

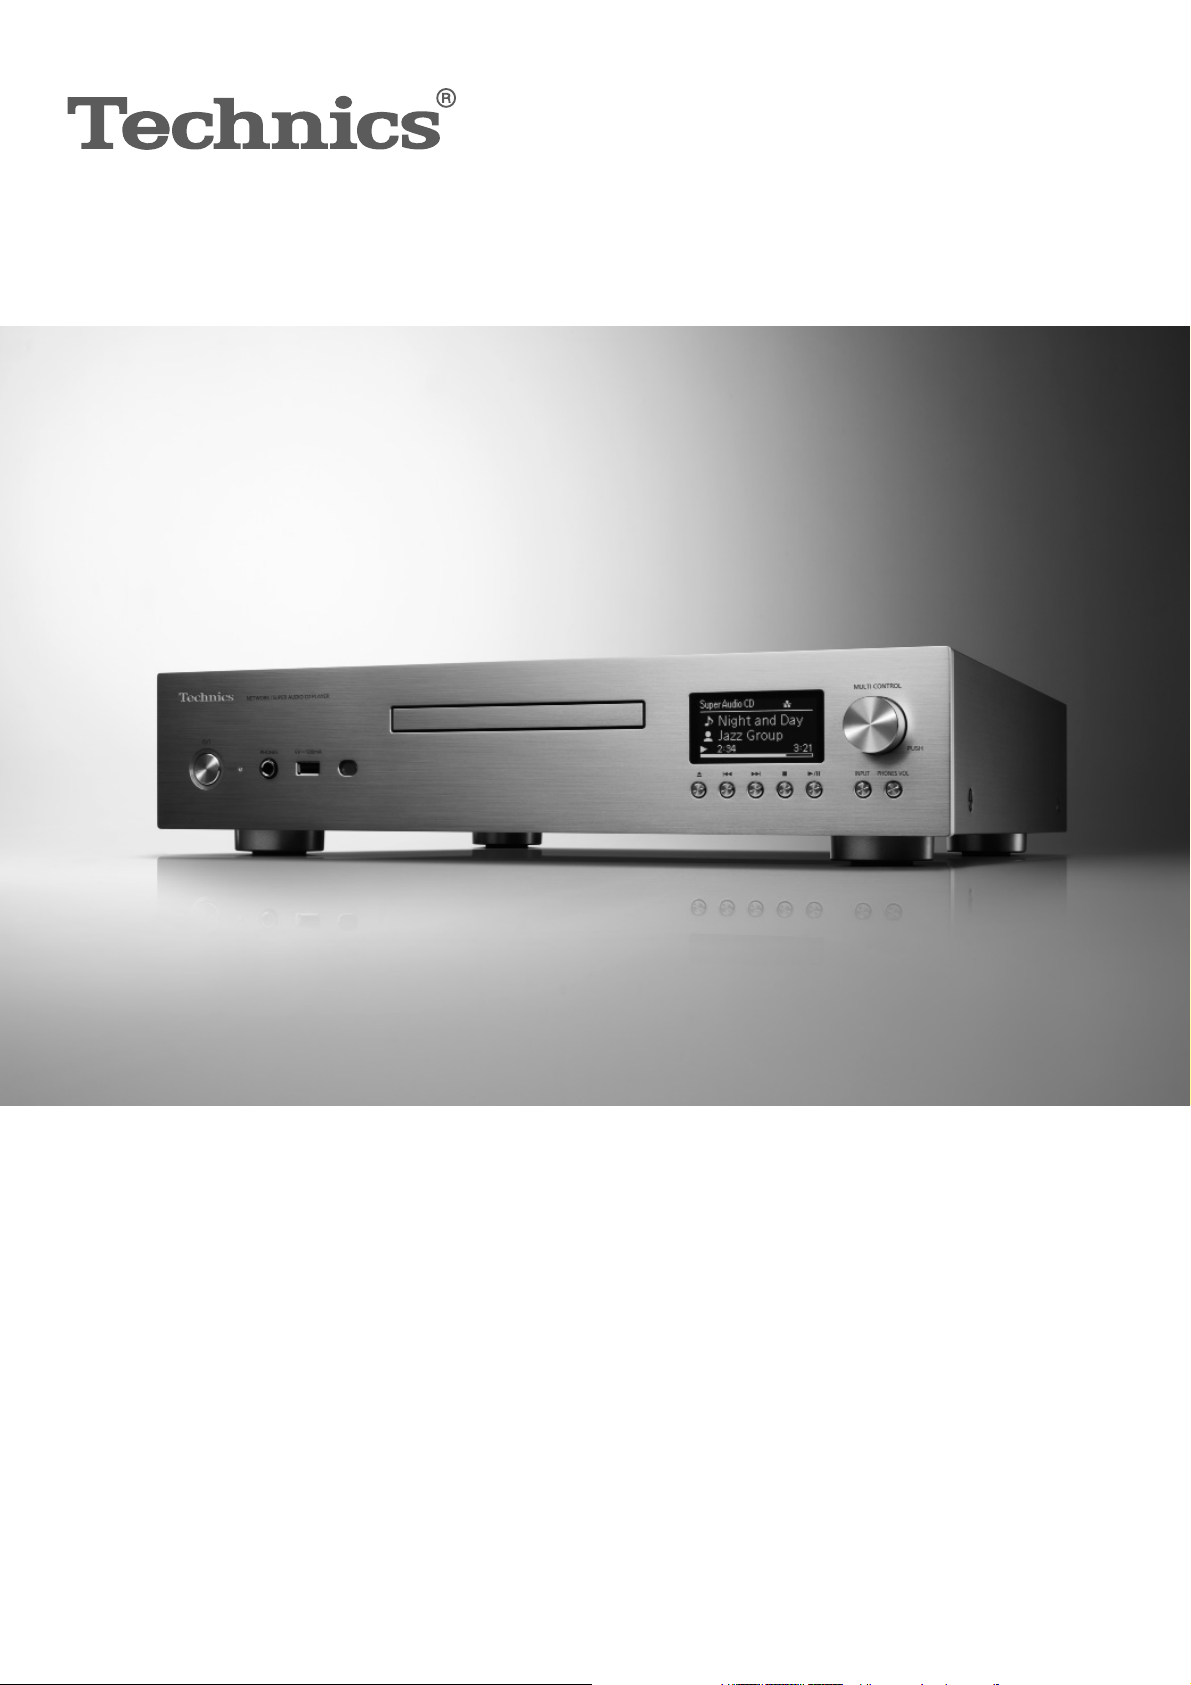
Basic Owner’s Manual
Network/Super Audio CD Player
SL-G700
Music is borderless and timeless, touching people’s
hearts across cultures and generations.
Each day the discovery of a truly emotive experience
from an unencountered sound awaits.
Let us take you on your journey to rediscover music.
02

Delivering the Ultimate Emotive Musical
Experience to All
At Technics we understand that the listening experience is not
purely about technology but the magical and emotional relationship
between people and music.
We want people to experience music as it was originally intended
and enable them to feel the emotional impact that enthuses and
delights them.
Through delivering this experience we want to support the
development and enjoyment of the world’s many musical cultures.
This is our philosophy.
With a combination of our love of music and the vast high-
end audio experience of the Technics team, we stand committed
to building a brand that provides the ultimate emotive musical
experience by music lovers, for music lovers.
Director
Michiko Ogawa
03
Thank you for purchasing this product.
Please read these instructions carefully before using this product, and save this manual for future use.
• About descriptions in these operating instructions
- Pages to be referred to are indicated as “ ○○”.
- The illustrations shown may differ from your unit.
• A more detailed operating instruction is available in “Operating Instructions” (PDF format).
To read it, download it from the website.
www.technics.com/support/
• You will need Adobe Reader to browse or print “Operating Instructions” (PDF format). You
can download and install a version of Adobe Reader that you can use with your OS from
the following website.
http://www.adobe.com/products/acrobat/readstep2.html
If you have any questions, visit:
U.S.A.: http://shop.panasonic.com/support
Canada: www.panasonic.ca/english/support
Register online at http://shop.panasonic.com/support (U.S. customers only)
04
(04)
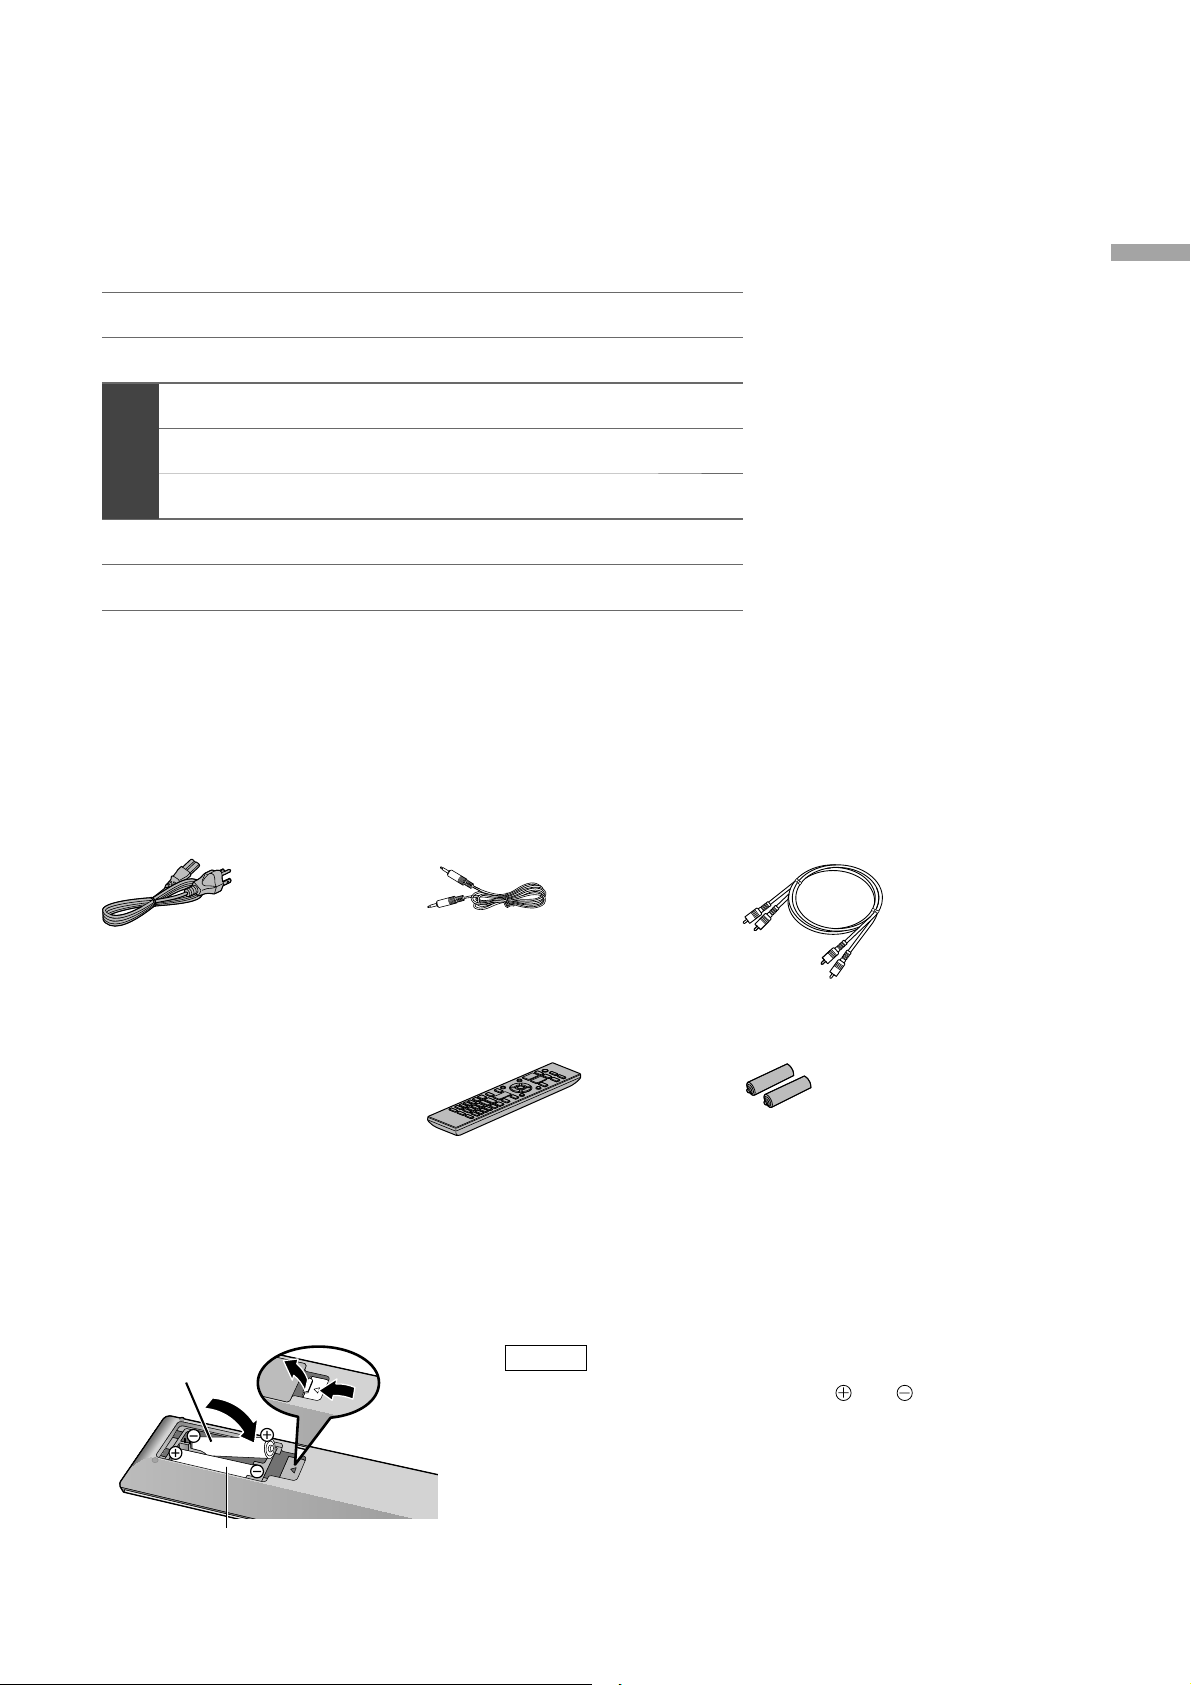
Table of contents
Safety precautions 06
Installation 08
Control reference guide 09
Connections 12
Network settings 13
Basic
Playback 17
Licenses 19
Specifications 20
Accessories
English
AC power supply cord (1)
K2CG3YY00209
• Product numbers provided in these operating instructions are correct as of March 2019.
• These may be subject to change.
• Do not use AC power supply cord with other equipment.
System connection cable (1)
K2KYYYY00233
Remote control (1)
N2QAYA000143
Analog audio cable (1)
K2KYYYY00257
Batteries for remote control (2)
■ Using the remote control
2
1
R03/LR03, AAA
(Alkaline or manganese batteries)
Note
• Insert the battery so the terminals (
the remote control.
• Point it at the remote control signal sensor on this unit. ( 09)
• Keep the batteries out of reach of children to prevent
swallowing.
and ) match those in
(05)
05
Safety precautions
Read these operating instructions carefully before using
the unit. Follow the safety instructions on the unit and
the applicable safety instructions listed below. Keep these
operating instructions handy for future reference.
1 Read these instructions.
2 Keep these instructions.
3 Heed all warnings.
4 Follow all instructions.
5 Do not use this apparatus near water.
6 Clean only with dry cloth.
7 Do not block any ventilation openings. Install in accordance
with the manufacturer’s instructions.
8 Do not install near any heat sources such as radiators, heat
registers, stoves, or other apparatus (including amplifiers)
that produce heat.
9 Do not defeat the safety purpose of the polarized or
grounding-type plug. A polarized plug has two blades with
one wider than the other. A grounding-type plug has two
blades and a third grounding prong. The wide blade or the
third prong are provided for your safety. If the provided
plug does not fit into your outlet, consult an electrician for
replacement of the obsolete outlet.
10 Protect the power cord from being walked on or pinched
particularly at plugs, convenience receptacles, and the
point where they exit from the apparatus.
11 Only use attachments/accessories specified by the
manufacturer.
12 Use only with the cart, stand,
tripod, bracket, or table specified
by the manufacturer, or sold with
the apparatus. When a cart is used,
use caution when moving the cart/
apparatus combination to avoid injury
from tip-over.
13 Unplug this apparatus during lightning storms or when
unused for long periods of time.
14 Refer all servicing to qualified service personnel. Servicing
is required when the apparatus has been damaged in any
way, such as power-supply cord or plug is damaged, liquid
has been spilled or objects have fallen into the apparatus,
the apparatus has been exposed to rain or moisture, does
not operate normally, or has been dropped.
Warning
Caution
Unit
• This unit utilizes a laser. Use of controls or adjustments or
performance of procedures other than those specified
herein may result in hazardous radiation exposure.
• Do not place sources of naked flames, such as lighted
candles, on this unit.
• This unit may receive radio interference caused by mobile
telephones during use. If such interference occurs, please
increase separation between this unit and the mobile
telephone.
Placement
• Place this unit on an even surface.
• To reduce the risk of fire, electric shock or product damage,
- Do not install or place this unit in a bookcase, built-in
cabinet or in another confined space. Ensure this unit is
well ventilated.
- Do not obstruct this unit’s ventilation openings with
newspapers, tablecloths, curtains, and similar items.
- Do not expose this unit to direct sunlight, high
temperatures, high humidity, and excessive vibration.
Battery
• Danger of explosion if battery is incorrectly replaced. Replace
only with the type recommended by the manufacturer.
• Mishandling of batteries can cause electrolyte leakage and
may cause a fire.
- Remove the battery if you do not intend to use the remote
control for a long period of time. Store in a cool, dark
place.
- Do not heat or expose to flame.
- Do not leave the battery(ies) in a car exposed to direct
sunlight for a long period of time with doors and windows
closed.
- Do not take apart or short circuit.
- Do not recharge alkaline or manganese batteries.
- Do not use batteries if the covering has been peeled off.
- Do not mix old and new batteries or different types at the
same time.
• When disposing of the batteries, please contact your local
authorities or dealer and ask for the correct method of
disposal.
Unit
• To reduce the risk of fire, electric shock or product damage,
- Do not expose this unit to rain, moisture, dripping or
splashing.
- Do not place objects filled with liquids, such as vases, on
this unit.
- Use only the recommended accessories.
- Do not remove covers.
- Do not repair this unit by yourself. Refer servicing to
qualified ser vice personnel.
- Do not let metal objects fall inside this unit.
- Do not place heavy items on this unit.
AC power supply cord
• The power plug is the disconnecting device.
Install this unit so that the power plug can be unplugged
from the socket outlet immediately.
• Ensure the earth pin on the power plug is securely connected
to prevent electrical shock.
- An apparatus with CLASS I construction shall be
connected to a power socket outlet with a protective
earthing connection.
06
(06)
CAUTION
RISK OF
ELECTRIC
CAUTION: TO REDUCE THE RISK OF ELECTRIC
Conforms to UL STD 62368-1.
Certified to CAN/CSA STD C22.2 No.62368-1.
THIS FOLLOWING APPLIES IN THE U.S.A. AND
CANADA.
This device complies with Part 15 of FCC Rules and
Innovation, Science and Economic Department
Canada's licence-exempt RSS(s). Operation is subject
to the following two conditions: (1) this device may
not harmful interference, and (2) this device must
accept any interference received, including
interference that may cause undesired operation.
FCC ID: ACJ-SL-G700
IC: 216A-SLG700
This equipment complies with FCC/ISED radiation
exposure limits set forth for an uncontrolled
environment and meets the FCC radio frequency (RF)
Exposure Guidelines and RSS-102 of the ISED radio
radio frequency (RF) Exposure rules. This equipment
should be installed and operated keeping the radiator
at least 20 cm (7
body.
SHOCK
DO NOT OPEN
SHOCK, DO NOT REMOVE SCREWS.
NO USER-SERVICEABLE PARTS
INSIDE.
REFER SERVICING TO QUALIFIED
SERVICE PERSONNEL.
The lightning flash with arrowhead
symbol, within an equilateral triangle, is
intended to alert the user to the presence
of uninsulated “dangerous voltage” within
the product’s enclosure that may be of
sufficient magnitude to constitute a risk of
electric shock to persons.
The exclamation point within an equilateral
triangle is intended to alert the user to
the presence of important operating and
maintenance (servicing) instructions in the
literature accompanying the appliance.
7
/8”) or more away from person’s
THE FOLLOWING APPLIES ONLY IN THE U.S.A.
FCC Note:
This equipment has been tested and found to comply
with the limits for a Class B digital device, pursuant to
Part 15 of the FCC Rules.
These limits are designed to provide reasonable
protection against harmful interference in a
residential installation. This equipment generates,
uses and can radiate radio frequency energy and,
if not installed and used in accordance with the
instructions, may cause harmful interference to radio
communications.
However, there is no guarantee that interference will
not occur in a particular installation. If this equipment
does cause harmful interference to radio or television
reception, which can be determined by turning the
equipment off and on, the user is encouraged to try
to correct the interference by one or more of the
following measures:
• Reorient or relocate the receiving antenna.
• Increase the separation between the equipment
and receiver.
• Connect the equipment into an outlet on a circuit
different from that to which the receiver is
connected.
• Consult the dealer or an experienced radio/TV
technician for help.
FCC Caution: To assure continued compliance,
follow the attached installation instructions and use
only shielded interface cables when connecting to
peripheral devices.
Any unauthorized changes or modifications to this
equipment would void the user’s authority to operate
this device.
THE FOLLOWING APPLIES ONLY IN CANADA.
CAN ICES-3(B)/NMB-3(B)
Information on Disposal in other
Countries outside the European Union
This symbol is only valid in the European
Union.
If you wish to discard this product,
please contact your local authorities or
dealer and ask for the correct method of
disposal.
English
For indoor use only
(07)
07

Installation
Installation
Turn off all the equipment before connection and
read the appropriate operating instructions. Be
sure to raise this unit when moving, and do not
drag this unit.
Unit care
Pull out the AC power supply cord from the
socket before maintenance. Clean this unit with a
soft cloth.
• When dirt is heavy, wring a wet cloth tightly to
wipe the dirt, and then wipe it with a soft cloth.
• Do not use solvents including benzine, thinner,
alcohol, kitchen detergent, chemical wiper, etc.
Doing so may cause the exterior case to be
deformed or the coating to come off.
Using “Technics Audio Center”
If you install the dedicated app “Technics
Audio Center” (free of charge) on your tablet/
smartphone, you can stream music files from the
device on your network to this unit and configure
the settings of sound quality, etc.
For details, visit:
www.technics.com/support/
To dispose of or transfer this unit
• Before disposing of or transferring this unit, be
sure to erase all the recorded information by
restoring the settings to factory default.
Press [NWP] or [CD].
Press [SETUP].
Press [ ], [ ] repeatedly to select
“Initialization” and then press [OK].
Press [ ], [ ] to select “Yes” and then press
[OK].
• A confirmation screen appears. Select “Yes”
in the following steps to restore all the
settings to defaults.
Press [ ], [ ] to select “Yes” and then press
[OK] again.
• Before you dispose of or transfer this unit
to a third party, be sure to log out of your
music streaming services accounts to prevent
unauthorised use of your accounts.
Firmware updates
Occasionally, Panasonic may release updated
firmware for this unit that may add or improve
the way a feature operates. These updates are
available free of charge.
• For the update information, refer to the
following website.
• www.technics.com/support/firmware/
08
(08)

This unit (front)
Control reference guide
English
01 [ ] Standby/on button
• Press to switch the unit from on to standby
mode or vice versa. In standby mode, the
unit is still consuming a small amount of
power.
02 Power indicator
• Blue: The unit is on.
• Red: The unit is in standby mode.
• Off: The unit is off.
03 Headphones jack
• Excessive sound pressure from earphones
and headphones can cause hearing loss.
• Listening at full volume for long periods
may damage the user’s ears.
04 USB-A terminal (USB Front)
(DC 5 V
• You can connect a USB device to the unit
and play back music stored on the USB
device. ( 18)
• You can connect the USB flash memory
with new firmware and update the
firmware for this unit.
For details, refer to the following website.
www.technics.com/support/firmware/
05 Remote control signal sensor
• Reception distance:
Within approx. 7 m directly in front
• Reception angle:
Approx. 30° left and right
500 mA)
06 Disc tray
( 17)
07 Display
• Input source, playback status, etc. are
displayed.
08 [
09 Playback operation buttons
10 Multi-control knob
11 Input selector button
12 Headphone volume button
] Open or close the disc tray
(e.g. “CD”)
Stop [ ]
[
Play/Pause
Skip [
Search
• Turn this knob clockwise or anticlockwise
to switch the input source and scroll
through items.
• To set an item, press the knob; to enter the
setup screen, press and hold it.
• Switch the input source.
• Headphone volume is displayed. (Volume
can be adjusted with the multi-control
knob while displaying.)
• -- dB (min), -99.0 dB to 0 dB (max)
]
• Press again to resume.
] [ ]
Press and hold [
[ ].
] or
(09)
09

Control reference guide (Continued)
This unit (rear)
01 Analog audio output terminals (ANALOG
OUT)
• You can connect the pre-amplifier which
has the unbalanced input terminals, etc.
with analog audio cable (supplied) to
output the analog audio signals.
• You can connect the pre-amplifier which
has the balanced input terminals, etc. with
XLR cable (not supplied).
02 Wireless LAN antenna
( 14)
03 Optical digital output terminal (OPT)
You can connect the digital audio output
device with optical digital audio cable (not
supplied) to this unit and play back music.
04 Coaxial digital output terminal (COAX)
05 Optical digital input terminal (OPT)
You can connect the digital audio output
device with optical digital audio cable (not
supplied) and play back music.
• The digital audio input terminal of this unit
can only detect the following linear PCM
signals. For details, refer to the operating
instructions of the connected device.
- Sampling frequency:
32/44.1/48/88.2/96 kHz
- Number of quantisation bits:
16/24 bit
06 Coaxial digital input terminal (COAX)
You can connect the digital audio output
device with coaxial digital cable (not
supplied) to this unit and play back music.
• The digital audio input terminals of this unit
can only detect the following linear PCM
signals. For details, refer to the operating
instructions of the connected device.
- Sampling frequency:
32/44.1/48/88.2/96/176.4/192 kHz
- Number of quantisation bits:
16/24 bit
07 Product identification marking
• The model number is indicated.
08 LAN terminal
( 13)
09 USB-A terminal (USB Rear)
(DC 5 V
You can connect a USB device to the unit
and play back music stored on the USB
device. ( 18)
10 System terminal (CONTROL)
11 AC IN terminal ( )
( 12)
1 A)
10
(10)
Remote control
1
05 [INFO]: View content information
*
06 [ ], [ ], [ ], [ ]/[OK]: Selection/OK
1
English
*
07 [RETURN]: Return to the previous
1
display
*
08 [DIRECT]: Turn on/off Direct mode
09 [RE-MASTER]: Turn on/off Re-master
• Press and hold [RE-MASTER] for approx.
2 seconds so that “MQA Decoding” is
displayed and the MQA decoding function
will be set to “On”. (Press and hold for
approx. 2 seconds again to set the function
to “Off”.)
1
10 [MENU]: Enter menu
11 [SETUP]: Enter setup menu
12 Adjust the volume
13 Mute the sound
*
1
*
2
*
2
*
14 Playback control buttons ( 17)
15 Numeric buttons, etc.
• To enter 2 digits or more
Example:
16: [
10] > [1] > [6]
124: [
10] > [ 10] > [1] > [2] > [4]
• [CLEAR]: Clear the entered value.
01 [NWP ]/[CD ]: Standby/on button
• Press to switch the unit from on to standby
mode or vice versa. In standby mode, the
unit is still consuming a small amount of
power.
The input source also switches for each
(switches to the last selected input source
when [NWP
]).
02 [NWP]/[CD]: Select the device to be
operated
• The playing layer switches by pressing [CD]
while playing Hybrid Super Audio CD.
• Press and hold [CD] to switch to “Pure Disc
Playback” mode. ( 17)
03 [>INPUT<]: Switch the input source
04 [DIMMER]: Adjust the brightness of the
2
power indicator, display, etc.
*
• Press repeatedly to switch the brightness.
1: Press [NWP]/[CD] first to operate this unit.
*
(The remote control works only for the
devices supporting system control function
when pressing [AMP].)
2: Also works for the devices supporting system
*
control function.
■ Buttons that work for Technics devices
supporting system control function
The remote control of this unit also works for
Technics devices supporting system control
function (Stereo Integrated Amplifier, etc.). For
information on the operations of the devices,
please also refer to their operating instructions.
] Standby/on button for the Stereo
[
01
Integrated Amplifier
Select the device to be operated
02
Select the input source
03
Measure the output signal of the amplifier
04
hen speakers are connected, and correct
w
its output
(11)
11
Basic
Connections
Connecting to an amplifier
XLR cable* (not supplied)
Analog audio
cable (supplied)
Pre-amplifier with
Pre-amplifier with
unbalanced input
terminals
balanced input
terminals
Connecting to a digital audio output
device
Optical digital
audio cable
(not supplied)
Digital audio output device
• For details, refer to the operating instructions of
the connected device.
Coaxial digital
cable
(not supplied)
Amplifier
(AV receiver, control amplifier, etc.)
: We recommend using cables with a length of
*
3 m or less.
• For details, refer to the operating instructions of
the connected device.
• Do not use any other analog audio cables
except the supplied one.
AC power supply cord connection
Connect only after all other connections are
completed.
AC power supply
cord (supplied)
To a household
AC outlet
• Use only the supplied AC power supply cord.
• Insert the plugs of the cables to be connected
all the way in.
• Do not bend cables at sharp angles.
• Wireless LAN (Wi-Fi
this unit is turned on. If you stop the Wi-Fi
setting, set “Wi-Fi” to “On” to enable the Wi-Fi
function after “Wi-Fi Setup” is displayed. Select
“On” to keep the Wi-Fi setting. ( 14)
®
) setting may start when
12
Note
• This unit consumes a small amount of AC power
( 20) even when the unit is in standby mode.
Remove the plug from the main electrical outlet
if you will not be using the unit for an extended
period of time. Place the unit so the plug can be
easily removed.
(12)

Network settings
You can stream online music services or music files from your smartphone/tablet to
this unit. To use these features, this system must join the same internet-connected
network as the compatible device.
This unit can be connected to a router using a LAN cable or built-in Wi-Fi®.
For a stable connection to the network, a wired LAN connection is recommended.
Basic
English
■ Preparation
If you install the “Google Home” app on your
smartphone/tablet, you can set up a connection
using the application.
• When using the Chromecast-enabled apps to
play music on this unit, set up a connection
using the “Google Home” app.
• Make sure that the Wi-Fi function and
Bluetooth
smartphones/tablet.
1 Install the “Google Home” app on
your smartphone/tablet.
• To download the “Google Home” app, visit:
https://www.google.com/cast/setup/
2 Connect your smartphone/tablet to
the same network as this unit before
setting.
Note
• If this unit is used exclusively for the playback
of CDs by disabling the network functions, etc.,
the network setting is not necessary. ( 18)
®
feature are activated on your
Wired LAN connection
LAN cable
(not supplied)
Broadband router, etc.
1 Disconnect the AC power supply cord.
2 Connect this unit to a broadband
router, etc. using a LAN cable.
3 Connect the AC power supply cord to
this unit. ( 12)
4 Press [NWP
unit on.
• When the connection is established, “ ” is
displayed.
5 Make sure to set up a connection
using “Google Home” app on your
smartphone/tablet.
]/[CD ] to turn this
(13)
13

Basic
Network settings (Continued)
Note
• While the AC power supply cord is
disconnected, the LAN cable must be
connected or disconnected.
• Use category 7 or above straight LAN cables
(STP) when connecting to peripheral devices.
• Inserting any cable other than a LAN cable in
the LAN port can damage the unit.
• After turning on this unit, it may take some time
until this unit is activated.
• After the network connection is set up,
“Updating” may be displayed and the firmware
for this unit may be updated.
- When the update has finished successfully,
“Success” is displayed and this unit restarts
automatically.
• Even when the Wi-Fi function is set to “On”, the
wired LAN function is activated while a LAN
cable being connected. (“
” is displayed.)
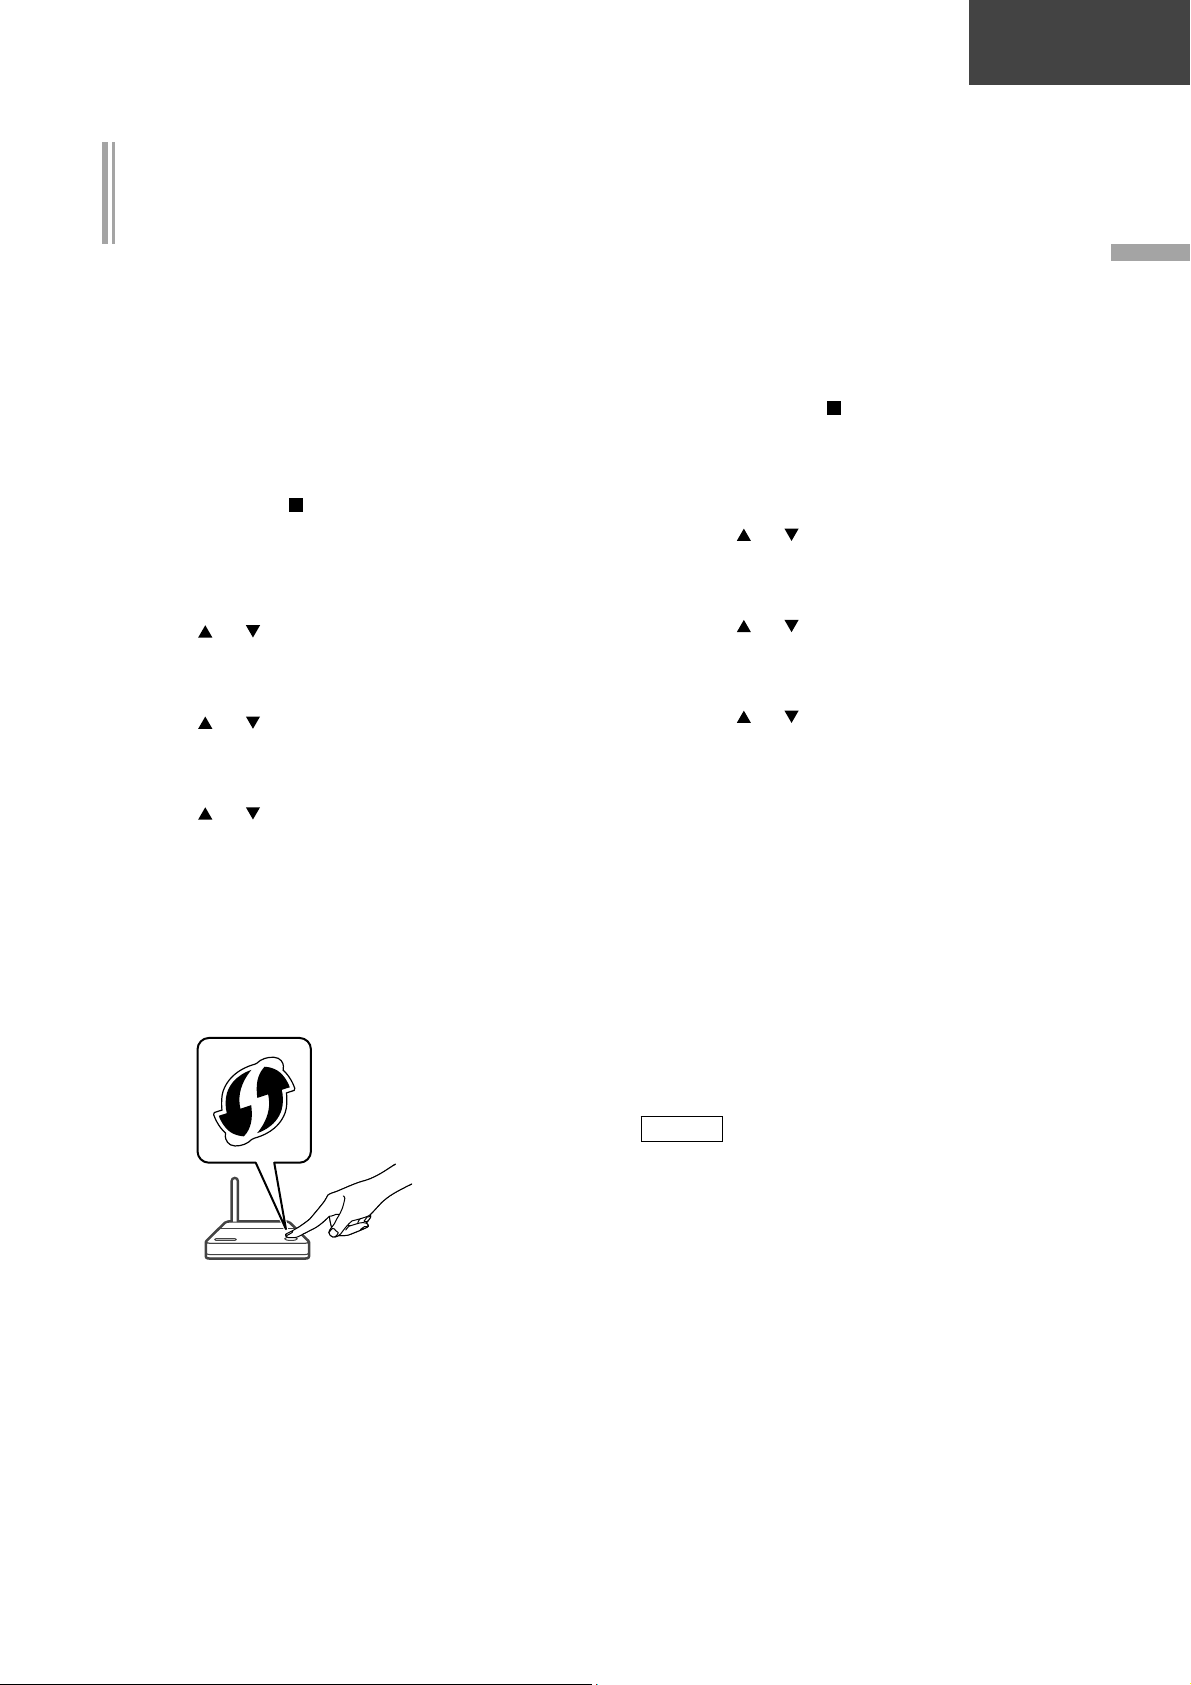
Wireless LAN connection
Preparation
■
Disconnect the AC power supply cord.
Disconnect the LAN cable.
Place this unit as close to the wireless router as
possible.
Point up the antenna on the rear of this unit as
shown in the figure.
Note
• Do not perform the following:
- Applying too much force to the antenna
- Carrying this unit by holding the antenna
• After turning on this unit, it may take some time
until this unit is activated.
• After the network connection is set up,
“Updating” may be displayed and the firmware
for this unit may be updated.
- When the update has finished successfully,
“Success” is displayed and this unit restarts
automatically.
• The setting will be cancelled after the set time
limit. In that case, try the setting again.
• “
” blinks while the network setting is not
complete, and blinking stops after the Wi-Fi
setting is complete.
• While “
from “Google Home” may be available. Start
the “Google Home” app and follow the onscreen instructions.
• To cancel this setting in the middle, press [
turn the unit to standby mode.
Network setting for the first time using
” is blinking, the network setting
] or
the “Google Home” app
1 Press [NWP
]/[CD ] to turn this
unit on.
• “Wi-Fi Setup” is displayed.
Connect the AC power supply cord to this unit.
( 12)
2 Press [ ], [ ] to select “On” and press
[OK] on the “Wi-Fi” screen.
(It enables the Wi-Fi function)
3 Start the “Google Home” app and
follow the on-screen instructions.
Note
• This unit will be displayed as “Technics-
SL-G700(“
” stands for characters unique to each
****
set.)
• You can check your network information (SSID,
MAC address and IP address) from the “Google
Home” app or “Technics Audio Center” app.
• Some items on the “Google Home” app are
irrelevant to this unit.
• To cancel this setting in the middle, press [
turn the unit to standby mode.
• When this unit is switched to standby mode and
turned on before the Wi-Fi setting is complete,
“Wi-Fi Setup” is displayed. Perform the Wi-Fi
setting or select “Off”.
• For other connection methods (15)
” if the device name is not set.
****
] or
14
(14)
Basic
Setting the network from the setup menu
(When not using the Chromecast-enabled
apps with this unit)
■ Using the WPS button
“WPS”
If your wireless router supports WPS, you can set
up a connection by pressing the WPS button.
• A compatible wireless router may have the WPS
identifier mark.
• Complete the settings within 2 minutes while
“WPS” is displayed.
• When “Wi-Fi Setup” is displayed when turning
on this unit, press [
setting and start the setting again.
1 Press [NWP] or [CD].
2 Press [SETUP].
3 Press [
], [ ] repeatedly to select
“Network” and then press [OK].
• When “Wi-Fi” screen is displayed, press [OK].
4 Press [ ], [ ] to select “On” and then
press [OK]. (The wireless LAN function
is enabled.)
5 Press [
], [ ] on the remote control
to select “WPS Push” and then press
[OK].
• “WPS” is displayed. Complete step 2 within 2
minutes.
6 After “WPS” is displayed, press the
WPS button on the wireless router.
Example:
] to cancel the network
■ Using the WPS PIN code
“WPS PIN”
If your wireless router supports WPS, you can set
up a connection by entering the WPS PIN code.
• For details on how to enter the PIN code, refer
to the operating instructions of the wireless
router.
• Complete the settings within 2 minutes while
“WPS PIN” and the PIN code are displayed.
• When “Wi-Fi Setup” is displayed when turning
on this unit, press [
setting and start the setting again.
1 Press [NWP] or [CD].
2 Press [SETUP].
3 Press [
], [ ] repeatedly to select
“Network” and then press [OK].
• When “Wi-Fi” screen is displayed, press [OK].
4 Press [ ], [ ] to select “On” and then
press [OK]. (The wireless LAN function
is enabled.)
5 Press [
], [ ] on the remote control to
select “WPS PIN” and then press [OK].
• The PIN code is displayed. Complete step 2
within 2 minutes.
6 Enter the PIN code into the wireless
router from PC, etc.
• “Linking” is displayed.
• When the connection is established,
“Success” is displayed.
- “Fail” may be displayed if the connection
was not complete. Try this method again
from the setup menu. If “Fail” is still
displayed, try other methods.
] to cancel the network
English
• “Linking” is displayed.
• When the connection is established,
“Success” is displayed.
- “Fail” may be displayed if the connection
was not complete. Try this method again
from the setup menu. If “Fail” is still
displayed, try other methods.
7 Press [OK] on the remote control to
exit the setting.
7 Press [OK] on the remote control to
exit the setting.
Note
• Depending on a router, other connected
devices may temporarily lose their connection.
• For details, refer to the operating instructions of
the wireless router.
(15)
15

Basic
Network settings (Continued)
Setting the network from the setup menu
(When using the Chromecast-enabled
apps with this unit)
■ Using the “Google Home” app
“Wi-Fi Setup”
When using the Chromecast-enabled apps to
play music on this unit, you need to set up a
network connection using “Google Home” app.
When the network has been set up with another
method, try the setting again with the following
procedure.
• When “Wi-Fi Setup” is displayed when turning
on this unit, press [
setting and start the setting again.
1 Press [NWP] or [CD].
2 Press [SETUP].
3 Press [
], [ ] repeatedly to select
“Network” and then press [OK].
• When “Wi-Fi” screen is displayed, press [OK].
4 Press [ ], [ ] to select “On” and then
press [OK]. (The wireless LAN function
is enabled.)
5 Press [
], [ ] on the remote control
to select “Wi-Fi Setup” and then press
[OK].
• “Setting” is displayed.
6 Start the app and follow the on-screen
instructions.
• When the connection is established,
“Success” is displayed.
- “Fail” may be displayed if the connection
was not complete. Try this method again
from the setup menu. If “Fail” is still
displayed, try other methods.
7 Press [OK] on the remote control to
exit the setting.
• This unit will be displayed as “Technics-
SL-G700(“
****
set.)
• You can check your network information
(SSID, MAC address and IP address) from
the “Google Home” app or “Technics Audio
Center” app.
• Some items on the “Google Home” app are
irrelevant to this unit.
• To cancel this setting in the middle, press [
or turn the unit to standby mode.
****
” stands for characters unique to each
] to cancel the network
” if the device name is not set.
Streaming music over the network
This unit is compatible with Chromecast-enabled
apps. For detailed information of Chromecastenabled apps, visit:
g.co/cast/apps
You can also stream music files from the device
on your network to this unit by using the free
app “Technics Audio Center”. Download and
install the app from the website below.
www.technics.com/support/
■ Preparation
• Complete the network settings. ( 13)
(Make sure that the network is connected to
the Internet.)
• Install the supported application on your device.
• Connect the device to the network currently
used at home.
1 Start the Chromecast-enabled app or
“Technics Audio Center” app on your
device (smartphone, tablet, etc.), and
select this unit as the output speaker.
2 Play back the music.
Not all music streaming services are available
in all countries/regions. Registration/
subscription may be required, or fees may
be charged to use music streaming services.
Services are subject to change or be
discontinued. For details, visit an individual
music streaming service’s website.
Important notice:
Before you dispose of or transfer this unit
to a third party, be sure to log out of your
music streaming services accounts to prevent
unauthorized use of your accounts.
]
16
(16)
Playback
DO DO NOT
DO DO NOT
Basic
Playing back CDs
1 Press [NWP ]/[CD ] to turn this
unit on.
2 Press [
] on the unit to open the disc
tray and insert a CD.
Place label up in the proper position in the
middle of the disc tray.
DO DO NOT
12 cm CD
DO DO NOT
8 cm CD
• Press [ ] again to close the disc tray.
3 Press [ ].
Note
• Be careful not to get your finger caught in the
disc tray when opening/closing it.
■ Repeat Playback
Press [CD].
Press [ ].
“1
”:
Only plays the selected track.
“
”:
All tracks are repeated.
■ Random playback
Press [CD].
Press [RND].
• Press again to cancel.
■ Programme playback
Press [CD].
Press [PGM] in the stop mode.
• “Program Mode” screen is displayed.
Press the numeric buttons to select tracks.
• Repeat this step to make further selections.
Press [ ] to start playback.
• Press [
programmed order.
• Press [CLEAR] in the stop mode to clear the
last track.
• Press [PGM] in the stop mode to cancel the
programme mode, and the programme
memory will be stored.
• Press [
to cancel the programme mode. (The
programme memory will be cleared.)
] or [ ] in the stop mode to check the
] in the stop mode and select “Yes”
Note
• The programme memory will be cleared in the
following conditions.
- When turning on/off this unit
- when replacing the CD
- when switching the layer
• The programme mode is cancelled when the
random playback is set.
■ Playing back Hybrid Super Audio CDs
Hybrid Super Audio CD discs include a
conventional CD layer along with the Super
Audio CD layer. You can select the CD layer or
Super Audio CD layer for playback by pressing
[CD] while playing back.
Note
• The layer cannot be selected on the disc except
Hybrid Super Audio CD discs.
■ Decoding MQA-CD
An MQA-CD needs to be decoded to deliver the
master quality audio. Switch the MQA decoding
function to “On” or “Off” in the following steps.
• The default setting is “Off”.
Press and hold [RE-MASTER] for approx.
2 seconds or longer.
• “MQA Decoding” is displayed and the MQA
decoding function is set to “On”. (Press and
hold for approx. 2 seconds again to set the
function to “Off”.)
Play back the MQA-CD.
■ Compatible CD
• A disc with the CD Logo.
• This unit can play back discs that conform to
the CD-DA format.
• The unit may not be able to play some discs due
to the condition of the recording.
• Before playback, finalise the disc on the device
it was recorded on.
■ CDs that cannot be used
• CDs with irregular shapes, such as heart shapes
(Use of such CDs may cause malfunction.)
■ CDs that are not guaranteed to operate
with this unit
• Discs with illegally copied data and those that
do not conform to industry standards
• DualDiscs (Discs that record data such as music
and images on both sides)
English
(17)
17
Basic
■
Disc formats supported by this unit
Playback (Continued)
Note
Super Audio CD (SACD)
Commercially available CDs
(CD- DA)
CD-R/CD-RW(CD-DA) Support
Support
(2-channel only)
Support
■ This unit’s lens
Use the lens cleaner (not supplied) to clean the
unit’s lens.
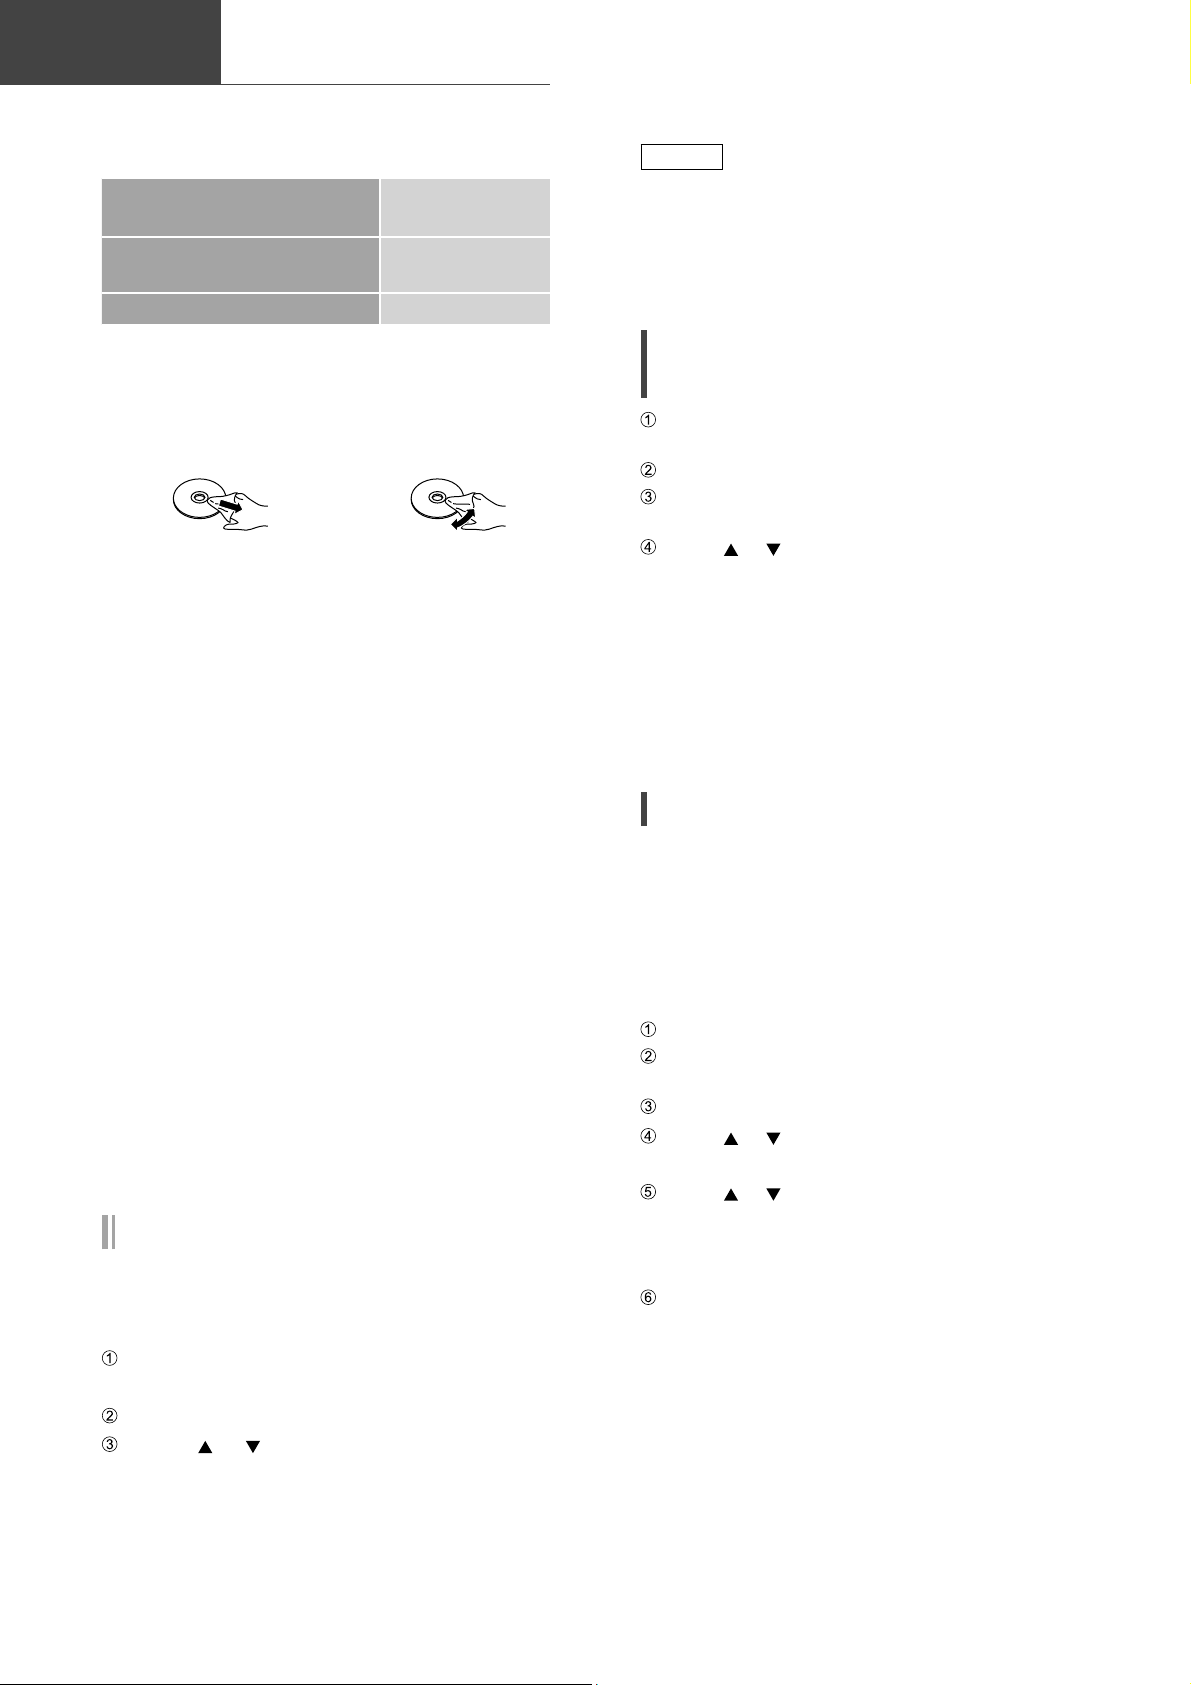
■ Clean discs
DO
Wipe with a damp cloth and then wipe dry with
a dry cloth.
DO NOT
■ Disc handling precautions
• Handle discs by the edges to avoid inadvertent
scratches or fingerprints on the disc.
• Do not attach labels or stickers to discs.
• Do not use disc cleaning sprays, benzine,
thinner, static electricity prevention liquids or
any other solvent.
• Do not use the following discs:
- Discs with exposed adhesive from removed
stickers or labels (rented discs, etc.).
- Discs that are badly warped or cracked.
- Irregularly shaped discs, such as heart shapes.
Incorrect display or play does not start.
• Make sure that the disc is compatible with this
unit.
• There is moisture on the lens. Wait for about an
hour and then try again.
• Unfinalised CD-R and CD-RW cannot be played
back.
Playback takes time to start.
• It may take some time for the disc to load if
there are a lot of tracks on it.
Pure Disc Playback
By disabling the network functions, etc. and this
unit operates exclusively for the playback of CDs
for the higher quality sound.
• Operating from “Technics Audio Center” app,
etc. are not available after setting.
• The programme playback cannot be set.
• Press again for 5 seconds or longer to cancel
and return to the normal mode.
Playing back music stored on the
USB device
Connect a USB device to the USB-A terminal
on the front of this unit. ( 09)
Press [NWP] or [CD].
Press [>INPUT<] repeatedly to select “USB
Front”.
Press [ ], [ ] to select an item and then press
[OK].
• Repeat this step to make further selections.
• Press [RETURN] to return to the previous
folder.
• Random/repeat playback can be set. ( 17)
• When using a USB HDD with this unit,
connect a USB HDD to the USB-A terminal on
the rear of this unit (USB Rear).
Using Bluetooth
You can listen to the sound from the Bluetooth®
audio device from this unit wirelessly.
■ Pairing a Bluetooth
Turn on the Bluetooth
place the device near this unit. (If a Bluetooth®
device is already connected, disconnect it.)
Press [NWP] or [CD].
Press [>INPUT<] repeatedly to select
“Bluetooth”.
Press [MENU].
Press [ ], [ ] repeatedly to select “Pairing”
and then press [OK].
Press [ ], [ ] to select “Yes” and then press
[OK].
• “Pairing” is displayed, and this unit waits for
registering.
Select “Technics-SL-G700Bluetooth® device’s menu.
®
®
device
®
feature of the device and
” from the
****
18
Press [CD] for 5 seconds or longer.
• A confirmation screen appears.
Press [OK].
Press [ ], [ ] to select “Yes” and then
press [OK].
(18)

The Wi-Fi CERTIFIED™ Logo is a certification
mark of Wi-Fi Alliance®.
The Wi-Fi Protected Setup™ Logo is a
certification mark of Wi-Fi Alliance
®
“Wi-Fi
” is a registered trademark of Wi-Fi
®
.
Alliance®.
“Wi-Fi Protected Setup™”, “ WPA™”, and
“WPA2™” are trademarks of Wi-Fi Alliance
®
.
Use of the Works with Apple badge means
that an accessory has been designed to work
specifically with the technology identified
in the badge and has been certified by
the developer to meet Apple performance
standards.
Apple and AirPlay are trademarks of Apple
Inc., registered in the U.S. and other countries.
Google, Google Home, Google Play, Android,
Chromecast built-in and other related marks
and logos are trademarks of Google Inc.
Windows is a trademark or a registered
trademark of Microsoft Corporation in the
United States and other countries.
Windows Media and the Windows logo
are trademarks or registered trademarks
of Microsoft Corporation in the United
States and/or other countries. This product
is protected by certain intellectual property
rights of Microsoft Corporation and third
parties. Use or distribution of such technology
outside of this product is prohibited without
a license from Microsoft or an authorized
Microsoft subsidiary and third parties.
Mac and OS X are trademarks of Apple Inc.,
registered in the U.S. and other countries.
Licenses
FLAC Decoder
Copyright (C) 2000, 2001, 2002, 2003, 2004,
2005, 2006, 2007, 2008, 2009 Josh Coalson
Redistribution and use in source and binary
forms, with or without modification, are
permitted provided that the following
conditions are met:
- Redistributions of source code must retain
the above copyright notice, this list of
conditions and the following disclaimer.
- Redistributions in binary form must
reproduce the above copyright notice, this
list of conditions and the following disclaimer
in the documentation and/or other materials
provided with the distribution.
- Neither the name of the Xiph.org Foundation
nor the names of its contributors may be
used to endorse or promote products derived
from this software without specific prior
written permission.
THIS SOFTWARE IS PROVIDED BY THE
COPYRIGHT HOLDERS AND CONTRIBUTORS
“AS IS” AND ANY EXPRESS OR IMPLIED
WARRANTIES, INCLUDING, BUT NOT
LIMITED TO, THE IMPLIED WARRANTIES OF
MERCHANTABILITY AND FITNESS FOR A
PARTICULAR PURPOSE ARE DISCLAIMED.
IN NO EVENT SHALL THE FOUNDATION
OR CONTRIBUTORS BE LIABLE FOR ANY
DIRECT, INDIRECT, INCIDENTAL, SPECIAL,
EXEMPLARY, OR CONSEQUENTIAL DAMAGES
(INCLUDING, BUT NOT LIMITED TO,
PROCUREMENT OF SUBSTITUTE GOODS OR
SERVICES; LOSS OF USE, DATA, OR PROFITS;
OR BUSINESS INTERRUPTION) HOWEVER
CAUSED AND ON ANY THEORY OF LIABILITY,
WHETHER IN CONTRACT, STRICT LIABILITY,
OR TORT (INCLUDING NEGLIGENCE OR
OTHERWISE) ARISING IN ANY WAY OUT
OF THE USE OF THIS SOFTWARE, EVEN IF
ADVISED OF THE POSSIBILITY OF SUCH
DAMAGE.
The Spotify Software is subject to third party
licenses found here: https://www.spotify.com/
connect/third-party-licenses.
English
The Bluetooth® word mark and logos are
registered trademarks owned by the Bluetooth
SIG, Inc. and any use of such marks by
Panasonic Corporation is under license. Other
trademarks and trade names are those of their
respective owners.
DSD is a trademark of Sony Corporation.
(19)
19

Specifications
■ GENERAL
Power supply AC 120 V, 60 Hz
Power
consumption
Power
consumption in
standby mode
(Network Standby
Off)
Power
consumption in
standby mode
(Network Standby
On)
Dimensions
(W×H×D)
Mass Approx. 7.8 kg
Operating
temperature range
Operating humidity
range
1: Wireless Network Standby (Wired LAN not
*
connected)
33 W
1
*
0.2 W
1
*
2.0 W
450 mm × 143 mm ×
280 mm
0 °C to +40 °C
(+32 °F to +104 °F)
35 % to 80 % RH
(no condensation)
■ DISC SECTION
Playable Disc
(8 cm or 12 cm)
Pickup
Wavelength 790 nm (CD)
Laser power CLASS 1
Format CD-DA, MP3, WMA
■ Bluetooth
Bluetooth® system
specification
Wireless
equipment
classification
Supported profiles A2DP, AVRCP
Supported codec AAC, SBC
Frequency band 2.4 GHz band FH-SS
Operating distance
2: Prospective communication distance
*
Measurement environment:
Temperature 25 °C (77 °F)/Height 1.0 m
(3.3 ft)
Measure in “Mode 1”
®
SECTION
CD, CD-R, CD-RW
Bluetooth® Ver.4.2
Class 2 (2.5 mW)
Approx. 10 m (33 ft) Line of
2
*
sight
■ TERMINALS SECTION
Headphones Jack Stereo, 3.5 mm (1/8”)
USB
Support Memory
Capacity
Maximum
number of
folders (albums)
Maximum
number of files
(songs)
File system FAT16, FAT32
USB port power DC OUT 5 V, 0.5 A (max)
Ethernet interface
Digital Input
Optical digital
input (Optical
terminal)
Format support LPCM
Analog output
BALANCED 3 pin XLR
UNBALANCED Pin jack
Digital output
Coaxial digital
output
Optical digital
output
System port
System control 3.5 mm (
REAR USB Type A
Connector
2 TB (max)
800
8000
LAN
(100BASE-TX/10BASE-T)
Pin jack
Pin jack
Optical terminal
1
/8”), Jack
■ FORMAT SECTION
USB-A
USB Standard
USB 2.0 high-speed
USB Mass Storage class
■ Wi-Fi SECTION
Standard IEEE802.11ac/a/b/g/n
2.4 GHz band (1 - 13 ch)/
Frequency band
Security
Encryption Type TKIP/AES
Authentication
type
WPS version Version 2.0
• The WLAN feature of this product shall
exclusively be used inside buildings.
5 GHz band (36, 40, 44,
48 ch)
WPA2™, Mixed mode
WPA2™/WPA™
PSK
WEP (64 bit/128 bit)
20
(20)

■ File format
This unit supports the following file formats.
• This unit does not support the playback of copy-protected music files.
• Playback of all files in formats supported by this unit is not guaranteed.
• Playback of a file in a format not supported by this unit may cause choppy audio or noise. In such cases,
check to see if this unit supports the file format.
• This unit does not support VBR (Variable Bit Rate) playback.
• Some of the connected devices or servers may be capable of converting files in formats not supported by
this unit and output them. For details, refer to the operating instructions for your devices or servers.
• File information (sampling frequency, etc.) shown by this unit and playback software may differ from each
other.
USB-A
File format Extension Sampling frequency
MP3 .mp3 32/44.1/48 kHz 16 to 320 kbps
AAC .m4a/.aac 32/44.1/48/88.2/96 kHz 16 to 320 kbps
WAV .wav
FLAC .flac
AIFF .aiff
ALAC .m4a
DSD .dff/.dsf 2.8/5.6/11.2 MHz
32/44.1/48/88.2/96/176.4/192/
352.8/384 kHz
32/44.1/48/88.2/96/176.4/192/
352.8/384 kHz
32/44.1/48/88.2/96/176.4/192/
352.8/384 kHz
32/44.1/48/88.2/96/176.4/192/
352.8/384 kHz
Number of quantisation bits
16/24 bit
16/24 bit
16/24 bit
16/24 bit
Bit rate/
English
LAN (DMR)
File format Extension Sampling frequency
MP3 .mp3 32/44.1/48 kHz 16 to 320 kbps
AAC .m4a/.aac 32/44.1/48/88.2/96 kHz 16 to 320 kbps
WAV .wav
FLAC .flac
AIFF .aiff
ALAC .m4a
DSD .dff/.dsf 2.8/5.6/11.2 MHz
: Whether or not each music file can be played back over your network is determined by the network server
*
even if the format of the file is listed above. For example, if you are using Windows Media Player 11, not
all music files on the PC are playable. You can play back only those added to the library of Windows Media
Player 11.
Note
• Specifications are subject to change without notice.
• Mass and dimensions are approximate.
*
Bit rate/
Number of quantisation bits
32/44.1/48/88.2/96/176.4/192/
352.8/384 kHz
32/44.1/48/88.2/96/176.4/192/
352.8/384 kHz
32/44.1/48/88.2/96/176.4/192/
352.8/384 kHz
32/44.1/48/88.2/96/176.4/192/
352.8/384 kHz
16/24 bit
16/24 bit
16/24 bit
16/24 bit
(21)
21

Panasonic Corporation of North America
Two Riverfront Plaza, Newark, NJ 07102-5490
http://www.panasonic.com
Panasonic Canada Inc.
5770 Ambler Drive,
Mississauga, Ontario,
L4W 2T3
www.panasonic.com
© Panasonic Corporation 2019
Printed in Malaysia
Imprimé en Malaisie
En Cf
TQBM0235
M0419TK0

IMPORTANTES MISES EN GARDE
Avant d’utiliser l’appareil, lire attentivement
les instructions qui suivent. Se conformer tout
particulièrement aux avertissements inscrits sur
l’appareil et aux consignes de sécurité indiquées
ci-dessous. Conserver le présent manuel pour
consultation ultérieure.
1 Lire attentivement ces instructions.
2 Conserver ces instructions.
3 Lire toutes les mises en garde.
4 Suivre toutes les instructions.
5 Ne pas utiliser cet appareil près d’une source d’eau.
6 Ne nettoyer qu’avec un chiffon sec.
7 Ne pas bloquer les évents d’aération. Installer
l’appareil selon les instructions du fabricant.
8 Ne pas installer l’appareil près d’un appareil de
chauffage tel qu’un radiateur, une cuisinière, un
registre de chaleur ou tout dispositif émettant de la
chaleur (y compris un amplificateur).
9 Pour des raisons de sécurité, ne pas modifier la
fiche polarisée ou celle de mise à la terre. Une fiche
polarisée est une fiche à deux lames, dont une plus
large. Une fiche de mise à la terre est une fiche à
deux lames avec une broche de masse. La lame plus
large ou la broche de masse procure une protection
accrue. Si ce genre de fiche ne peut être inséré
dans une prise de courant, communiquer avec un
électricien pour remplacer la prise.
10 S’assurer que le cordon est placé dans un endroit
où il ne risque pas d’être écrasé, piétiné ou coincé.
Faire particulièrement attention à ses extrémités de
branchement, y compris sa fiche.
11 N’utiliser que les accessoires ou périphériques
recommandés par le fabricant.
12 N’utiliser l’appareil qu’avec un chariot,
meuble, trépied, support ou table
recommandé par le fabricant ou vendu
avec l’appareil. Lors de l’utilisation d’un
chariot, le déplacer avec le plus grand
soin afin d’éviter tout dommage.
13 Débrancher cet appareil lors d’un orage ou en cas
de non-utilisation prolongée.
14 Confier l’appareil à un technicien qualifié pour
toute réparation : cordon d’alimentation ou fiche
endommagé, liquide renversé ou objet tombé
dans l’appareil, exposition à la pluie ou à une
humidité excessive, mauvais fonctionnement ou
échappement de l’appareil.
AVERTISSEMENT
- Ne laissez aucun objet en métal tomber à l’intérieur
de cet appareil.
- Ne posez pas d’objets lourds sur cet appareil.
Cordon d’alimentation c.a.
La fiche d’alimentation permet de déconnecter
l’appareil.
L’appareil doit être installé à proximité d’une prise
secteur facile d’accès.
Assurez-vous que la lame pour la mise à la terre
est insérée bien à fond afin de prévenir tout choc
électrique.
- Un appareil de classe 1 peut être branché dans une
prise secteur avec une protection pour mise à la
terre.
ATTENTION
Appareil
Cet appareil est doté d’un lecteur au laser. L’utilisation
de commandes ou le recours à des réglages autres
que ceux indiqués dans ce manuel peuvent présenter
des risques d’exposition à des radiations.
Ne placez aucune source de flamme nue, telles des
bougies allumées, sur l’appareil.
Il est possible que cette unité reçoive des
interférences provenant de téléphones cellulaires
pendant son utilisation. Si de telles interférences se
produisent, veuillez éloigner l’unité du téléphone
cellulaire.
Emplacement
Positionnez cet appareil sur une surface plane.
Pour réduire les risques d’incendie, de choc électrique
ou de dommages à l’appareil,
- N’installez pas cet appareil dans une bibliothèque,
une armoire ou tout autre espace confiné. Assurezvous que la ventilation de l’appareil est adéquate.
- N’obstruez pas les évents d’aération de l’appareil
avec des journaux, des nappes, des rideaux ou
d’autres objets similaires.
- N’exposez pas cet appareil aux rayons directs du
soleil, aux températures élevées, à une humidité
élevée et à des vibrations excessives.
Français
Appareil
Pour réduire les risques d’incendie, de choc électrique
ou de dommages à l’appareil,
- N’exposez pas cet appareil à la pluie, à l’humidité, à
l’égouttement ou aux éclaboussements.
- Ne placez sur l’appareil aucun objet rempli de
liquide, comme par exemple des vases.
- Utilisez exclusivement les accessoires
recommandés.
- Ne retirez pas les couvercles.
- Ne réparez pas cet appareil vous-même. Faites
effectuer la réparation par un personnel qualifié.
(27)
05

IMPORTANTES MISES EN GARDE
Pile
Il y a un danger d’explosion si la pile n’est pas
correctement remplacée. Remplacez uniquement par
le type recommandé par le fabricant.
Manipulez de façon incorrecte les piles peut causer
une fuite d’électrolyte ainsi qu’un incendie.
- Retirez la pile si vous n’avez pas l’intention d’utiliser
la télécommande pendant un long moment.
Rangez-la dans un endroit frais et sombre.
- Ne chauffez pas et n’exposez pas les piles à une
flamme.
- Ne laissez pas la (les) pile(s) dans un véhicule
exposé directement aux rayons du soleil pendant
un long moment avec fenêtres et portières
fermées.
- Ne démontez pas les piles et ne les court-circuitez
pas.
- Ne rechargez pas des piles alcalines ou au
manganèse.
- N’utilisez pas des piles dont le revêtement a été
enlevé.
- Ne mélangez pas les anciennes piles avec les piles
neuves ou différents types de piles.
Pour jeter les piles, veuillez contacter les autorités
locales ou votre revendeur afin de connaître la
procédure d’élimination à suivre.
AVIS
RISQUE DE CHOC
AVIS : AFIN DE PRÉVENIR LE RISQUE DE
ÉLECTRIQUE
NE PAS OUVRIR
CHOCS ÉLECTRIQUES, NE PAS
RETIRER LES VIS.
AUCUNE PIÈCE RÉPARABLE PAR
L’UTILISATEUR À L’INTÉRIEUR.
FAITES EFFECTUER LA RÉPARATION
PAR UN PERSONNEL QUALIFIÉ.
Le symbole de l’éclair dans un triangle
équilatéral indique la présence d’une
tension suffisamment élevée pour
engendrer un risque de chocs électriques.
Le point d’exclamation dans un triangle
équilatéral indique que le manuel
d’utilisation inclus avec l’appareil contient
d’importantes recommandations quant
au fonctionnement et à l’entretien de ce
dernier.
Conforme à la norme UL STD 62368-1.
onforme à la norme CAN/CSA STD C22.2
C
No.
62368-1.
CE QUI SUIT NE S’APPLICQUE QU’AUX ÉTATSUNIS ET AU CANADA.
Le présent appareil e
régles de la FC
Développement économique Canada applicables aux
appareils radio exempts de licence, L'exploitation est
autorisée aux deux conditions suivants : (1) l'appareil
ne doit pas produire de brouillage, et (2) l'appareil doit
accepter tout brouillage subi, même si le brouillage
est susceptible d'en compromettre le fonctionnement.
FCC ID : ACJ-SL IC : 216A-SLG700
Cet émetteur ne doit pas être placé à proximité d’une
autre antenne ou d’un autre émetteur, ni être utilisé
de pair avec de tels autres appareils.
Cet équipement est conforme aux limites
d’exposition aux rayonnements énoncées pour un
environnement non contrôlé et respecte les règles
les radioélectriques (RF) de la FCC lignes directrices
d'exposition et d'exposition aux fréquences
radioélectriques (RF) CNR-102 de l'ISDE Cet équipment
doit être installé et utilisé en gardant une distance de
20 cm (7
humain.
Pour usage intérieur seulment
E Q
C
CAN ICES-3(B)/NMB-3(B)
7
/8 po) ou plus entre le radiateur et le corps
UI SUIT NE S’APPLIQUE QU’AU CANADA.
Information sur la mise au rebut dans
les pays n’appartenant pas à l’Union
européenne
Ce symbole est uniquement valide dans
l’Union européenne.
Si vous désirez mettre ce produit au rebut,
contactez l’administration locale ou le
revendeur et informez-vous de la bonne
façon de procéder.
st conforme à la partie 15 des
C et aux CNR d'Innovation, Sciences et
G700
06
(28)
 Loading...