

Page 1
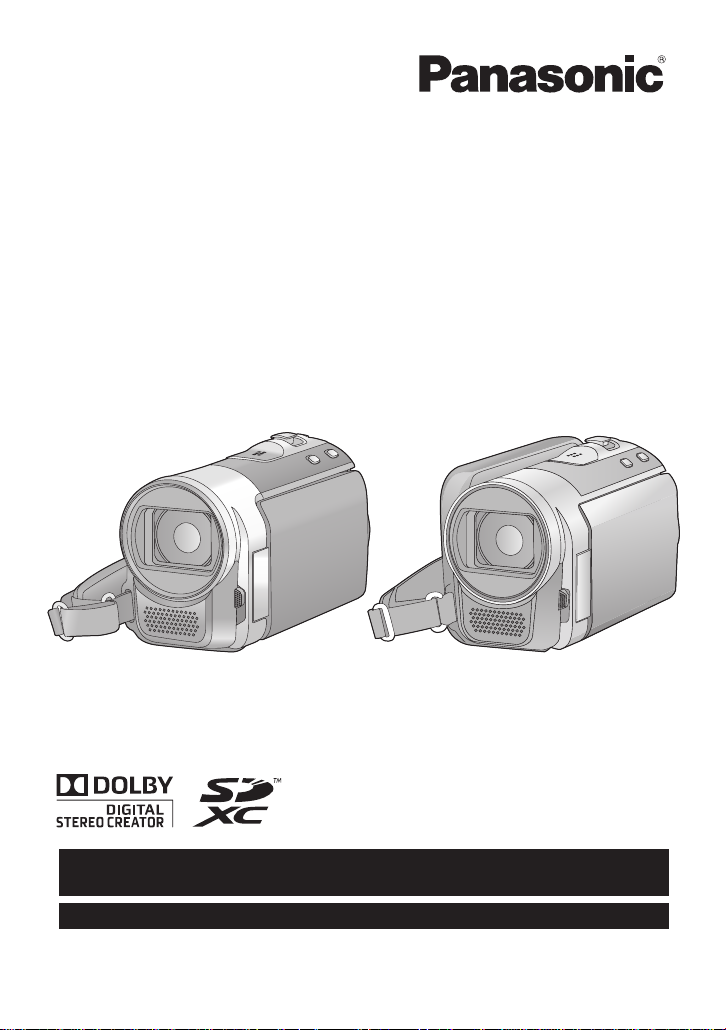
Operating Instructions
For USA and Puerto Rico assistance, please call: 1-800-211-PANA(7262) or,
contact us via the web at: http://www.panasonic.com/contactinfo
For Canadian assistance, please call: 1-800-561-5505 or visit us at www.panasonic.ca
SD Video Camera
Model No. SDR-S50P/PC
SD/HDD Video Camera
Model No. SDR-H85P/PC
SDR-T55P/PC
SDR-T50P/PC
Before connecting, operating or adjusting this product, please read the instructions completely.
Spanish Quick Use Guide is included.
Guía para rápida consulta en español está incluida.
VQT2L14
Page 2

Things You Should
Know
Thank you for choosing Panasonic!
You have purchased one of th e most
sophisticated and reliable products on
the market today. Used properly, we’re
sure it will bring you and your family
years of enjoyment. Pleas e take time to
fill in the information on the right.
The serial number is on the tag loca te d
on the back of your camera. Be sure to
retain this manual as your convenient
camera information source.
Date of Purchase
Dealer Purchased From
Dealer Address
Dealer Phone No.
Model No.
Serial No.
Safety Precautions
WARNING:
TO REDUCE THE RISK OF FIRE, ELECTRIC SHOCK OR PRODUCT DAMAGE,
≥ DO NOT EXPOSE THIS APPARATUS TO RAIN, MOISTURE, DRIPPING OR
SPLASHING AND THAT NO OBJECTS FILLED WITH LIQUIDS, SUCH AS VASES,
SHALL BE PLACED ON THE APPARATUS.
≥ USE ONLY THE RECOMMENDED ACCESSORIES.
≥ DO NOT REMOVE THE COVER (OR BACK); THERE ARE NO USER SERVICEABLE
PARTS INSIDE. REFER SERVICING TO QUALIFIED SERVICE PERSONNEL.
CAUTION!
DO NOT INSTALL OR PLACE THIS UNIT IN A BOOKCASE, BUILT-IN CABINET OR IN
ANOTHER CONFINED SPACE. ENSURE THE UNIT IS WELL VENTILATED. TO
PREVENT RISK OF ELECTRIC SHOCK OR FIRE HAZARD DUE TO OVERHEATING,
ENSURE THAT CURTAINS AND ANY OTHER MATERIALS DO NOT OBSTRUCT THE
VENTILATION VENTS.
2
VQT2L14
Page 3
THE FOLLOWING APPLIES ONLY IN THE U.S.A.
SDR-S50P SDR-T55P
SDR-T50P
SDR-H85P
FCC Note:
This equipment has been tested and found to comply with the limits for a Class B digital
device, pursuant to Part 15 of the FCC Rules. These limits are designed to provide
reasonable protection against harmful interference in a residential installation. This
equipment generates, uses, a nd can radia te radio fr equenc y energy and, if not inst alled and
used in accordance with the instructions, may cause harmful interference to radio
communications. However, there is no guarantee that interference will not occur in a
particular installa tion. If this equipment does cause harmful interf erence to radio or
television recept ion, whic h ca n be determin ed b y tur ning th e eq uipment off and on, the user
is encouraged to try to correct the interference by one or more of the following measures:
≥ Reorient or relocate the receiving antenna.
≥ Increase the separation between the equipment and receiver.
≥ Connect the equipment into an outlet on a circuit different from that to which the receiver
is connected.
≥ Consult the dealer or an experienced radio/TV technician for help.
FCC Caution: To assure continued complianc e, follow the attached installation
instructions and use only shielded interface cables with ferrite
core when connecting to computer or peripheral devices.
Any changes or modifications not expressly approved by the party responsible for
compliance could void the us er’s authority to operate this equ ipment.
Declaration of Conform ity
Trade Name: Panasonic
Model No.: SDR-S50P/SDR-T55P/SDR-T50P/SDR-H85P
Responsible party: Panasonic Corporation of North Amer ica
One Panasonic Way, Secaucus, NJ 07094
Support Contact: Panasonic Consumer Electronics Company
1-800-211-PANA (7262)
This device complies with Part 15 of the FCC Rules. Operation is subject to the following
two conditions: (1) This dev ice may not c ause harmf ul interfer ence, and (2) this device mus t
accept any interference received, including interference that may cause undesired
operation.
THE FOLLOWING APPLIES ONLY IN CANADA.
This Class B digital apparatus complies with Canadian ICES-003.
VQT2L14
3
Page 4
Battery pack (Lithium ion battery pack)
≥ Use the specified unit to recharge the battery pack.
≥ Do not use the battery pack with equipment other than the specified unit.
≥ Do not get dirt, sand, liquids, or ot her foreign matter on the termina ls.
≥ Do not touch the plug terminals (i and j) with metal objects.
≥ Do not disassemble, remodel, heat or throw into fire.
If any electrolyte should come int o con tac t wit h yo ur hands or cl othes, wash i t off th oroughly
with water.
If any electrolyte should come into contact with your eyes, never rub the eyes. Rinse eyes
thoroughly with water, and then consult a doctor.
Warning
Risk of fire, explosion and burns. Do not disassemble, heat above 60 oC (140 oF) or
incinerate.
AC adaptor
This AC adaptor operates on AC between 110 V and 240 V.
But
≥ In the U.S.A. and Canada, the AC adaptor must be connected to a 120 V AC power
supply only.
≥ When connecting to an AC supply out side of th e U.S .A. or Canada , use a plu g ada ptor to
suit the AC outlet configuration.
≥ When connecting to a supply of greater than AC 125V, ensure the cord you use is suited
to the voltage of the AC supply and the rated current of the AC adaptor.
≥ Contact an electrical parts dis tributor for assistance in selecting a suitable AC plug
adaptor or AC cord set.
The socket outlet shall be installed near the equipment and easily acc essible. The mains
plug of the power supply cord shall remain readily operable. To completely disconnect this
apparatus from the AC Mains, disconnect the power supply cord plug from AC receptacle.
Product Identificat ion Marking is located on the bottom of units.
U.S.A./CANADA CONSUMERS: ATTENTION:
A lithium ion/polymer battery that is recyclable powers the product
you have purchased. Please call 1-800-8-BATTERY for information
on how to recycle this battery.
<For USA-California only>
This product contains a CR Coin Cell Lithium Battery which contains Perchlorate Material –
special handling may apply.
See www.dtsc.ca.gov/haz ardouswaste/perchlorate
4
VQT2L14
.
Page 5

IMPORTANT SAFETY
INSTRUCTIONS
Read these operating instructions carefully before using th e unit. Follow the safety
instructions on the unit and the applicable safety instructions list ed below. Keep these
operating instructions handy for future reference.
1) Read these instructions.
2) Keep these inst ructions.
3) Heed all warnings.
4) Follow all instructions.
5) Do not use this apparatus near water.
6) Clean only with dry cloth.
7) Do not block any ventilat i on openings.
Install in accordance with the
manufacturer’s instructions.
8) Do not install near any heat sources
such as radiators, heat registers,
stoves, or other apparatus (including
amplifiers) that produce heat.
9) Do not defeat the safety purpose of the
polarized or grounding-type plug. A
polarized plug has two blades with one
wider than the other. A grounding-type
plug has two blades and a third
grounding prong. The wide blade or the
third prong are provided fo r your safety.
If the provided plug does not fit into your
outlet, consult an electrician for
replacement of the obsolete outlet.
11) Only use attachme nts/ a ccessories
specified by the manufacturer.
12) Use only with the
cart, stand, tripod,
bracket, or table
specified by the
manufacturer, or
sold with the
apparatus. When a
cart is used, use caution when moving
the cart/apparatus combination to avoid
injury from tip-over.
13) Unplug this apparatus during lightning
storms or when unused for long periods
of time.
14) Refer all servicing to qualified service
personnel. Servicing is required when
the apparatus has been damage d in any
way, s uc h as power-supply cord or plug
is damaged, liquid has been spilled or
objects have fallen into the apparatus,
the apparatus has been exp osed to rain
or moisture, does not operate normally,
or has been dropped.
10) Protect the power cord from being
walked on or pinched particularly at
plugs, convenience recept acles, and the
point where they exit fr om the
apparatus.
VQT2L14
5
Page 6
Precautions
WARNING
CAUTION
USE & LOCATION
device which could be damaged by
improper handling or storage.
≥ TO AVOID SHOCK HAZARD ... Your
camera and power supply shoul d not be
exposed to rain or moisture. Do not
connect the power supply or operate your
camera if it gets wet. Your camera has
been designed for outdoor use, howeve r it
is not designed to sust ain direct exposure
to water, rain, sleet, snow, sand, dust, or a
direct splashing fro m a pool or even a cup
of coffee. This action could permanently
damage the internal parts of your camera.
Do not attempt to disassemble this unit.
There are no user serviceable parts
inside. Unplug your camera from the
power supply before cleaning.
≥ AS WITH ANY SMALL OBJECT, SD
CARDS CAN BE SWALLOWED BY
YOUNG CHILDREN. DO NOT ALLOW
CHILDREN TO HANDLE THE SD CARD.
≥ DO NOT AIM YOUR CAMERA AT THE
SUN OR OTHER BRIGHT OBJECTS
≥ DO NOT EXPOSE YOUR CAMERA TO
EXTENDED HIGH TEMPERATURE ...
Such as, in direct sunlight, inside a closed
car, ne xt to a heater, etc... This action
could permanently damage the i nternal
parts of your camera.
≥ AVOID SUDDEN CHANGES IN
TEMPERATURE ... If the unit is suddenly
moved from a cold place to a warm place,
moisture may form on the SD card and
inside the unit.
≥ DO NOT LEAVE YOUR CAMERA OR
THE POWER SUPPLY TURNED ON
WHEN NOT IN USE.
≥ STORAGE OF YOUR CAMERA ... Store
and handle your camera in a manner that
will not subject it to unnecessary
movement (avoid shaking and striking).
Your camera contains a sensitiv e pick-up
CARE
≥ TO CLEAN YOUR CAMERA ... Do not
use strong or abrasive detergents when
cleaning your camera body.
≥ TO PROTECT THE LENS ... Do not touch
the surface of the lens with your hand.
Use a commercial camera lens solution
and lens paper when cleaning the lens.
Improper cleaning can scratch the lens
coating.
≥ TO PROTECT THE FINISH OF YOUR
CAMERA ... Before handling your
camera, make sure your hands and face
are free from any chemical prod ucts , su ch
as suntan lotion, as it may damage the
finish.
-If you see this symbolInformation on Disposal in other
Countries outside the European Union
This symbol is only valid
in the European Union.
If you wish to discard this
product, please contact your
local authorities or dealer
and ask for the correct
method of disposal.
6
VQT2L14
Page 7
∫ Indemnity about recorded
SDR-T55
SDR-T50
content
Panasonic does not accept any
responsibility for damages directly or
indirectly due to any type of problems that
result in loss of recording or edited content,
and does not guarantee any cont ent if
recording or editing does not work properly.
Likewise, the above also applies in a case
where any type of repair is made to the unit
(including any other non-built-in memory/
HDD related component).
∫ For the purposes of these
operating instructions
≥ SD Memory Card, SDHC Memory Card
and SDXC Memory Card are referred to
as the “SD card”.
≥ Functions that can be used for motion
picture recording/motion picture playback
are indica te d b y in th ese
operating instructions.
≥ Functions that can be used for still pictur e
recording/still picture playback are
indicated by in these operating
instructions.
≥ Pages for reference are indicated by an
arrow, for example: l 00
∫ Handling of built-in memory
[SDR-T55]/[SDR-T50]
This unit is equipped with the built-in 8 GB
memory. When using this component, pay
attention to the following points.
This unit is equipped with the built-in 4 GB
memory. When using this component, pay
attention to the following points.
Back up data periodically.
The built-in memory is temporary storag e. In
order to avoid erasing dat a due to static
electricity, electromagnetic wav es,
breakage, and fa ilures, b ack up the da ta t o a
PC or DVD disc. (l 79, 86)
≥ Access lamp [ACCESS] (l 16)
illuminates while the SD card or built-in
memory is being accessed (initial ization,
recording, playback, de leting etc.). Do not
perform the following ope rati ons whe n th e
lamp illuminates. It may damage the builtin memory or cause a malfunction in the
unit.
jTurn off the powe r ( r emove the battery)
jInsert and remove the USB cable
jExpose th e un i t to vibrations or sho c k
≥ About disposing of or giving a way this unit .
(l 111)
∫ Handling of HDD [SDR-H85]
This unit is equipped with the built-in 80 GB
HDD. While the HDD is capable of storing a
large amount of data, there are a few things
to look out for. When using this component,
pay attention to the following points.
Do not expose the HDD to vibrations and
shocks.
Due to the environment and handling
conditions, the HDD may be subject to
partial damages or may not be able to read,
record, and play back data. Do not expose
the unit to vibrations or shock, and do not
turn off the power during recording or
playback.
If the unit is used in a plac e with loud
sounds, such as a club or similar venue,
the recording may stop due to sound
vibrations. Recording data on an SD card
is recommended in these pl aces.
Back up data periodically.
The HDD is temporary storage. In order to
avoid erasing data due t o static electricity,
electromagnetic waves, breakage, and
failures, back up the data to a PC or DVD
disc. (l 79, 86)
If the HDD experiences any abnormality,
back up data immediately.
Failure in the HDD may produce continuous
noise or choppy sound during recording or
playing back. Continuous use will cause
further deterioration, and may eventually
disable the HDD. If these phenomena are
observed, copy the data on the HDD to a
PC, a DVD disc etc. immediately and
contact consumer support. (l 124, 125)
VQT2L14
7
Page 8

Once the HDD is out of order, data cannot
SDR-T55
SDR-T50
SDR-H85
SDR-S50
be restored.
Operation may stop in hot or cold
environments.
The unit is disabled in order to pr otect the
HDD.
Do not use the unit in low atmospheric
pressures.
The HDD may fail if it is used at altitudes of
3000 m (9800 feet) or higher above sea
level.
Transportation
When the unit is transported, turn off the
power and be careful not to shake, drop, or
cause impact to the unit .
Falling detection
[ ] is indicated on the screen when it
G
detects a falling state (a weightless state). If
the falling state is detected repeatedly, the
unit may stop the recording or playb ac k
operation in order to protect the HDD.
≥ HDD access lamp [ACCESS HDD] (l 18)
illuminates while the HDD is being
accessed (initialization, rec ording,
playback, deleting etc.). Do not perform
the following operations when the lamp
illuminates. It may damage the HDD or
cause a malfunction in the unit.
jTurn off the power (remove the battery)
jInsert and remove the USB cable
jExpose the unit to vibrations or shock
≥ About disposing of or giving awa y this unit.
(l 111)
IMPORTANT
∫ Carefully observe copyright
laws
Whatever you have r ecorde d and cre ated
can be used for your personal
entertainment only. Under copyright
laws, other materials cannot be used
without obtaining permission from the
holders of the copyrights.
These operating instructions are designed
for use with models ,
8
VQT2L14
SDR-S50
, and
different from the original.
≥ The illustrations used in these operat i ng
instructions show model ,
however, parts of the explanation refer to
different models.
≥ Depending on the model, some functions
are not availa bl e .
≥ Features may vary, so please read
carefully.
. Pictures may be slightly
∫ Cards that you can use with
this unit
SD Memory Card, SDHC Memory Card
and SDXC Memory Card
≥ 4 GB (or more) Memory Cards that do not
have the SDHC logo or 48 GB (or more)
Memory Cards that d o not have t he S DXC
logo are not based on SD Memory Card
Specifications.
≥ Refer to page 23 for more details on SD
cards.
∫ Licenses
≥ SDXC Logo is a trademark of SD-3C,
LLC.
≥ U.S. Patent Nos. 6,836,549; 6,381,747;
7,050,698; 6,516,13 2; and 5,583,936.
This product incorporates copyright
protection technology that is protected by
U.S. patents and other intellec t u al
property rights. Use of this copyright
protection technology must be authorized
by Macrovision, and is intended for home
and other limited viewing uses only unle ss
otherwise authorized by Macrovision.
Reverse engineering or disassembly is
prohibited.
≥ Manufactured under license from Dolby
Laboratories.
Dolby and the double-D symbol are
trademarks of Dolby Laboratories.
≥ Microsoft
Vista
trademarks of the Microsof t Corporat ion in
the United States and/or other countries.
≥ Microsoft product screen shot(s) reprinted
with permission from Microsoft
Corporation.
®
, Windows® and Windows
®
are either registered trad emarks or
Page 9

≥ IBM and PC/AT ar e re gis tered tr adema rks
of International Busine ss Machines
Corporation of the U.S.
®
≥ Intel
, Core™, Pentium® and Celeron® are
the registered trademarks or trademarks
of the Intel Corporation in the United
States and other countries.
≥ iMovie and Mac are trademarks of
Apple Inc., registered in the U.S. and
other countries.
≥ PowerPC is a trademark of International
Business Machines Corporation.
≥ YouTube and Picasa are trademarks of
Google, Inc.
≥ Other names of systems and pro ducts
mentioned in these instructions are
usually the registered trademarks or
trademarks of the manufacturers who
developed the system or product
concerned.
This product is licensed under the AVC
patent portfolio l icense for the personal and
non-commercial use of a consu mer to (i)
encode video in compliance with the AVC
Standard (“AVC V i deo”) and/or (ii) decode
AVC Vi deo that was encoded by a consumer
engaged in a personal and non-commercial
activity and/or was obtained from a video
provider licensed to provide AVC Video. No
license is granted or shall be implied for any
other use. Additional information may be
obtained from MPEG LA, LLC.
See http://www.mpegla.com
.
VQT2L14
9
Page 10

Contents
Accessories............................................12
Quick Guide....... ... .. ... ................. ... ... .. ....13
Preparation
Before using
[1] Parts identification and
handling .......................................16
Setup
[1] Power supply............. ... .............. 19
Inserting the battery ..................... 19
Charging the battery .................... 20
Charging and re co rd in g ti m e........ 21
[2] Recording to a card ................... 23
Cards that you can use with
this unit......................................... 23
Inserting/removing an SD card
[3] Turning the unit on/off ............... 25
Turning the power on and off
with the power button................... 25
Turning the power on and off
with the LCD monitor ................... 25
[4] Selecting a mode ....................... 26
[5] Using the menu screen ............. 27
Language selection...................... 28
Menu list....................................... 28
[6] Setting date and time................. 32
World time setting
(Displaying the time of the travel
destination) .................................. 33
[7] Adjusting LCD monitor.............. 34
LCD monitor adjustment .............. 34
Recording Yourself....................... 34
..... 24
Recording
Recording (Basic)
[1] Before recording........................ 35
Intelligent Auto Mode................... 36
Quick start.................................... 38
Quick power on............................ 38
[2] Recording motion pictures ....... 39
Selecting a media to record
[SDR-T55]/[SDR-T50]/
[SDR-H85] ................................... 40
Recording in long recording mode
Recording modes/approximate
recordable time ............................ 42
Audio recording modes................ 44
Shooting guide............................. 44
[3] Recording still pictures............. 45
Picture size ...... ............................ 46
Simultaneous recording
(recording still pictures while
recording motion pictures)........... 46
Number of recordable pictures
[4] Recording functions.................. 47
Enhanced optical zoom............... 47
Digital zoom function ..... ... ........... 47
Image stabilizer function.............. 48
[5] AF/AE tracking .... ... ... ................. 49
Recording (Advanced)
[1] Recording functions of
operation icons ...... .....................50
Operation icons............................ 50
[2] Recording functions of
menus ..........................................54
[3] Manual recording functions...... 58
White balance .......... ... ... .............. 59
Manual shutter speed/
iris adjustment.............................. 60
Recording with Manual focus....... 61
.... 41
..... 46
10
VQT2L14
Page 11

Playback
Playback
[1] Motion picture playback............ 62
Creating still picture from motion
picture .......................................... 64
Time frame index ................. ... ..... 65
Playing back motion pictures
by date ......................................... 65
Repeat playba ck ............... ........... 66
Resuming the previous
playback....................................... 66
[2] Still picture playback ................. 67
Playing back still pictur es
by date ......................................... 69
Changing th e pl a y b a c k s et t ing and
playing back the slide show ......... 69
Editing
[1] Deleting scenes/still pictures ... 70
Protecting scenes/still pictures..... 71
[2] Dividing a scene to partially
delete............................................72
[3] DPOF setting ................... ........... 73
[4]
Copying between SD card and
Built-in Memory/HDD .....................74
Copying [SDR-T55]/[SDR-T50]/
[SDR-H85].................................... 75
[5] Formatting .................................. 76
With a TV
[1] Watching Video/Pictures on
your TV. ... ... ..................................7 7
Backup
With other products
[1]
Connecting a DVD burner to
copy to/play back a disc ...............79
Preparing for copying/
playing back ................................. 79
Copying to discs........................... 81
Playing back the copied d i sc........ 83
Managing the copied disc ............ 84
[2] Dubbing images onto other
video devices ..............................85
With a PC
Before using
[1] What you can do with a PC....... 86
End User License Agreement...... 88
[2] Operating environment ............. 89
Setup
[1] Installation.................................. 92
[2] Connecting to a PC.................... 94
About the PC display................... 96
Using with a PC
[1] Starting VideoCam Suite 3.0..... 97
Reading the operating instructions
of the software applications ......... 97
Upload to YouTube...................... 98
[2] If using Mac ................................ 99
Others
Indications
[1] Indications................................ 100
[2] Messages.................................. 103
About recovery........... ................ 104
Helpful hints
[1] Functions that cannot be used
simultaneously..........................105
[2] Troubleshooting....................... 106
Cautions for use ..................................110
Specifications ......................................116
Optional accessories ................. .........120
Accessory Order Form
(For USA and Puerto Rico
Customers) ................................ 122
Limited Warranty
(ONLY FOR U.S.A. AND
PUERTO RICO).....................................123
Warranty
(For Canadian Cust o me rs ) .. ... ... ..........125
Index .....................................................126
Spanish Quick Use Guide/
Guía española para el uso rápido ......128
PreparationRecordingPlaybackBackupWith a PCOthers
11
VQT2L14
Page 12
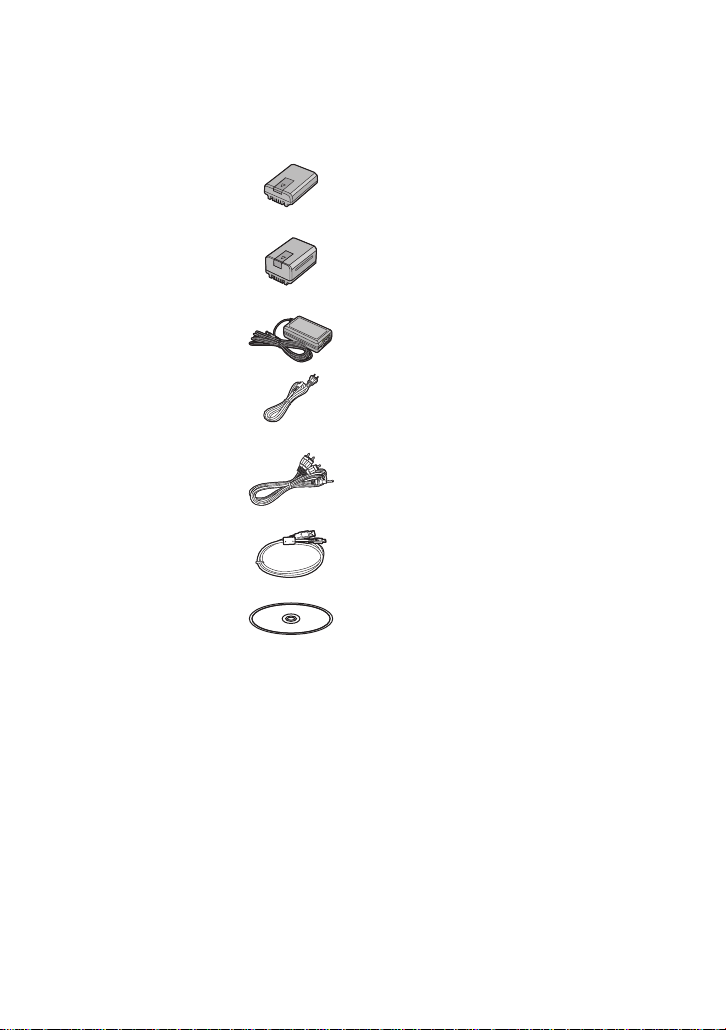
Accessories
Check the accessories before using this unit.
Product numbers correct as of December 2009. These may be subject to c hange.
Battery pack
VW-VBL090
(SDR-S50)
(SDR-T55/SDR-T50)
Battery pack
VW-VBK180
(SDR-H85)
AC adaptor
VSK0711
AC cable
K2CA2CA00025
AV cable
K2KYYYY00054
USB cable
K1HY04YY0032
CD-ROM
Software
12
VQT2L14
Page 13
Quick Guide
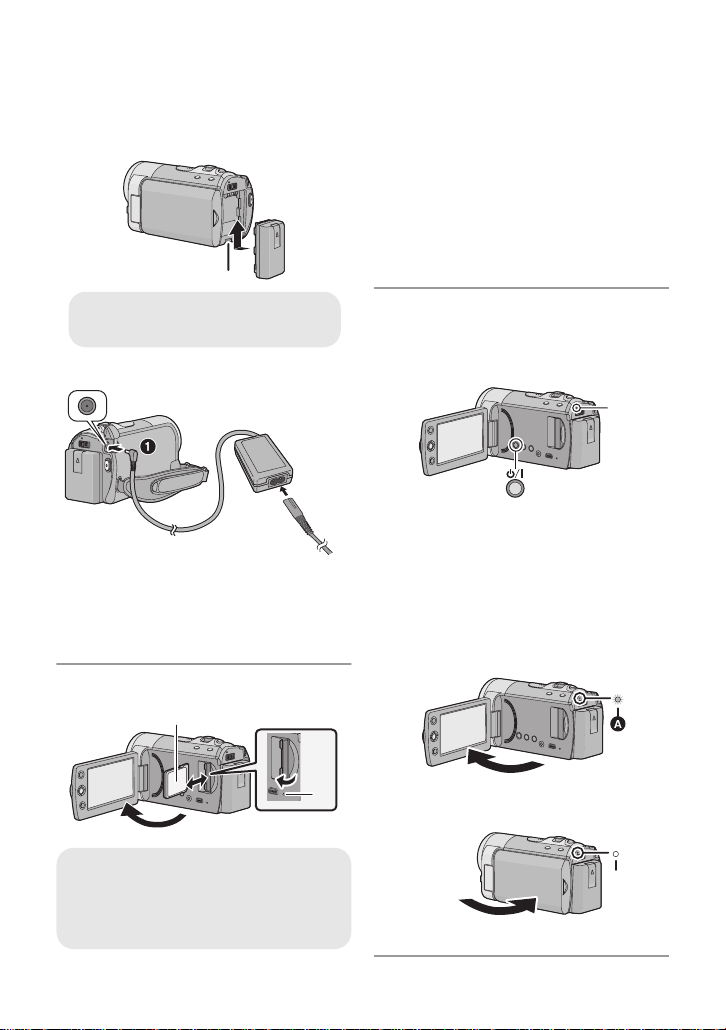
A Insert the battery until it clicks and
locks.
∫ Inserting the battery
Install the battery by inserting it in the
direction shown in the figure.
∫ Charging the battery
1) Open the LCD monitor.
2) Open the SD card cover and insert
(remove) the SD card into (from) the
card slot.
≥ Face the label side B in the direction
shown in the illustration and press it
straight in as far as it will go.
≥ Press the center of the SD card and then
pull it straight out.
3) Securely close the SD card cover.
∫ How to turn on the power
Turning the power on and off with the
power button
Press the power button to turn on the power.
1 Connect the AC adaptor to this unit’s
DC input terminal.
2 Connect the AC cable to the AC
adaptor, then the AC outlet.
≥ For the AC cable, plug in 2 and then 3.
∫ Inserting/removing an SD card
Access lamp [ACCESS] A
≥ When this unit is accessing the SD
card or built-in memory, the access
lamp lights up.
A The status indicator lights.
≥ To t urn of f the p ower, hold down the power
button until the status indicator goes off.
Turning the power on and off with the
LCD monitor
Power is turned on when the LCD monitor is
opened, and power is turned off when it is closed.
∫ To turn on the power
A The status indicator lights.
∫ To turn off the power
B The status indicator goes off.
13
VQT2L14
Page 14
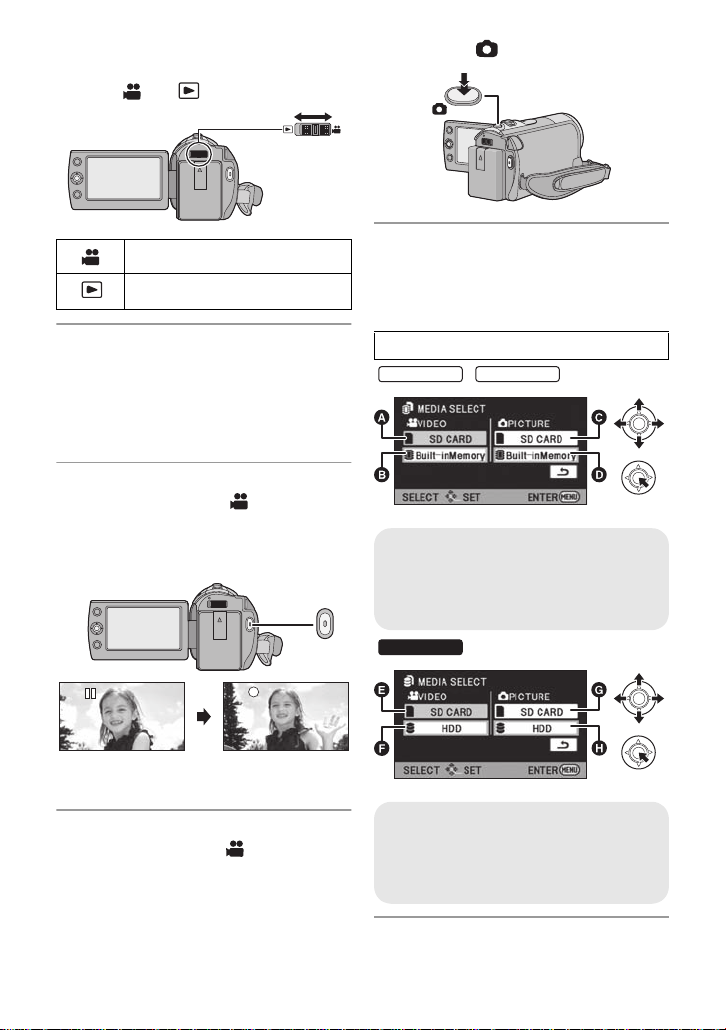
∫ Selecting a mode
SDR-T55
SDR-T50
SDR-H85
Operate the mode switch to change the
mode to or .
2) Press the button.
Recording mode (l 39, 45)
Playback mode (l 62, 67)
∫ Language selection
1) Press the MENU button, then select
[SETUP] # [LANGUAGE] and press th e
joystick.
2) Select [English] and the press the
joystick.
∫ Recording motion pictures
1) Change the mode to and open the
LCD monitor.
2) Press the recording start/stop button t o
start recording.
≥ When you begin recording, ; changes to
¥.
∫ Recording still pictures
1) Change the mode to and open the
LCD monitor.
∫ When selecting media to
record from the menu
[SDR-T55/SDR-T50/SDR-H85]
Select the menu. (l 27)
[MEDIA SELECT]
/
A VIDEO/SD CARD
B VIDEO/Built-inMemory
C PICTURE/SD CARD
D PICTURE/Built-inMemory
E VIDEO/SD CARD
F VIDEO/HDD
G PICTURE/SD CARD
H PICTURE/HDD
14
VQT2L14
Page 15
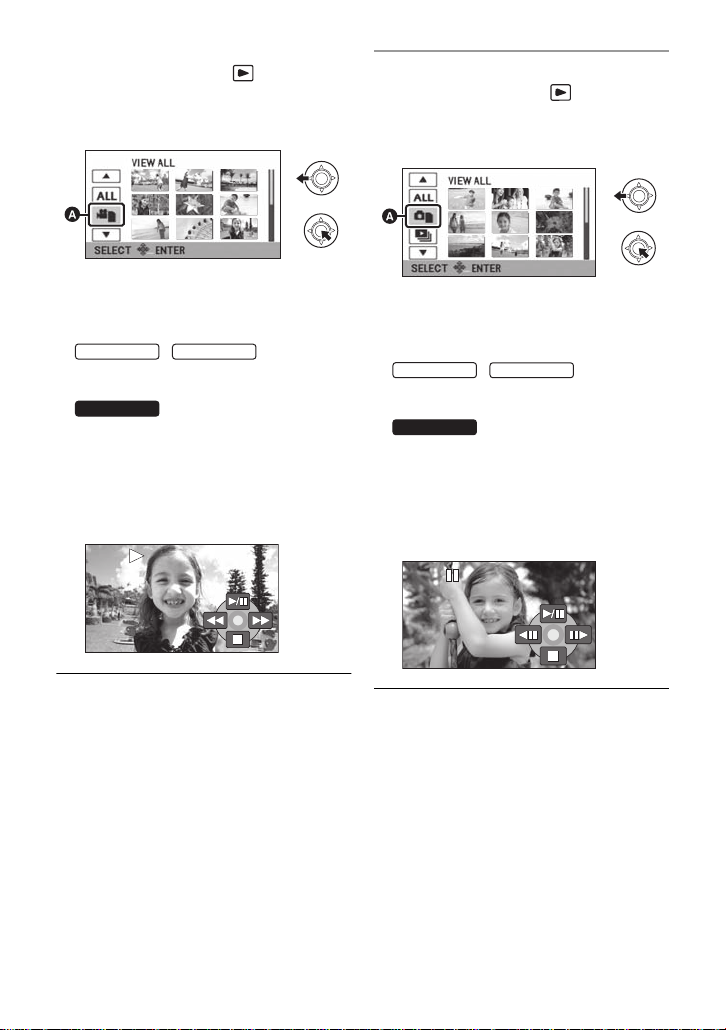
∫ Motion picture playback
SDR-T55
SDR-H85
0h00m00s0h00m00s0h00m00s
SDR-T55
SDR-T50
SDR-H85
1) Change the mode to .
2) Use the joystick to sele ct t he Play Mode
Select icon A, then press the center of
the joystick.
∫ Still picture playback
1) Change the mode to .
2) Use the joystick to s elec t the P lay Mode
Select icon A, then press the center of
the joystick.
3) Select the media you wish to play back,
then press the center of the joystick.
≥ Select [VIDEO/SD CARD] to play back the
SD card.
Select [VIDEO/Built-inMemory] to play
back the built-in memory.
Select [VIDEO/HDD] to play back the
HDD.
4) Select the scene t o be played back,
then press the joystick.
5) Select the playbac k operation with the
joystick.
1/;: Playback/Pause
6: Rewind playback
5: Fast forward playback
∫: Stops the playback and shows
/
SDR-T50
the thumbnails.
3) Select the media yo u wish to play back,
then press the center of th e joystick.
≥ Select [PICTURE/SD CARD] to play back
the SD card.
/
Select [PICTURE/ Bu i lt- i nMe m o r y] to play
back the built-in memory.
Select [PICTURE/HDD] to play back the
HDD.
4) Select the still picture to be played back,
then press the joystick.
5) Select the playback operation with the
joystick.
1/;: Slide show (playback of th e still
pictures in numerical order) start/
pause.
2;: Plays back the previous picture.
;1: Plays back the next picture.
∫: Stops the playback and shows
the thumbnails.
15
VQT2L14
Page 16
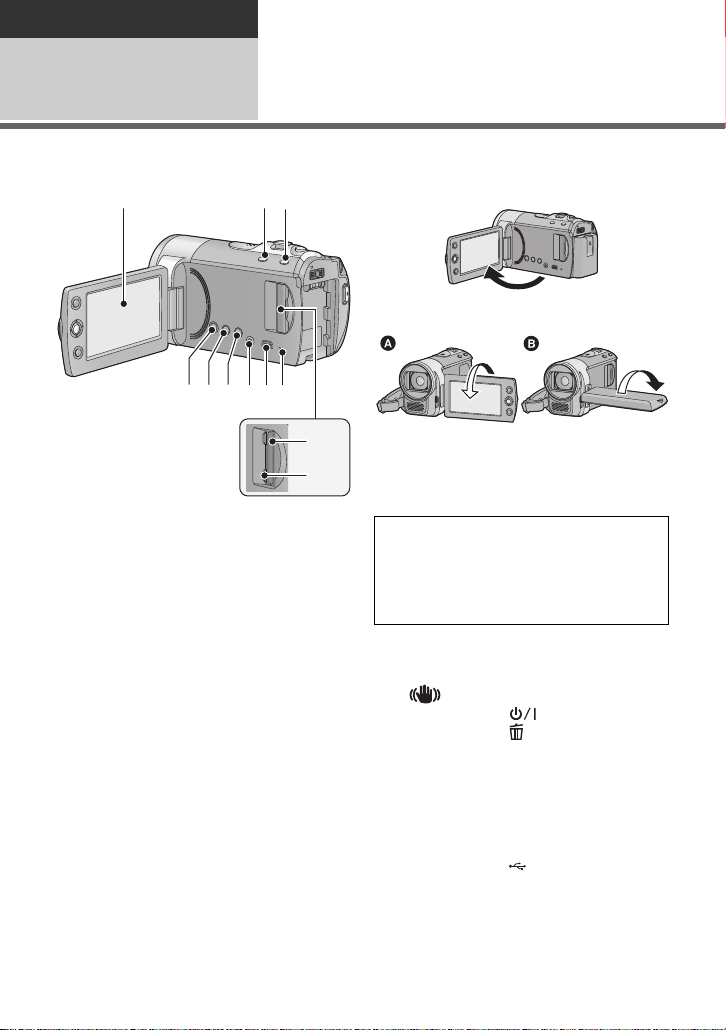
Preparation
1 23
456789
10
11
Before using
1
Parts identification and
handling
1 LCD monitor
≥ Pull the LCD monitor out in the directio n of
the arrow with your fingers.
≥ It can open up to 90o.
≥ It can rotate up to 180o A towards the lens
or 90o B towards the opposite direction.
≥ The brightness and color level of the LCD
monitor can be adjusted. (l 34)
Due to limitations in LCD production
technology , t here may be some ti ny bright
or dark spots on th e L CD monit or scr een.
However, t his is not a malfunction and
does not affect the recorded picture.
2 Intelligent auto/Manual button
[iA/MANUAL] (l 36)
3 Optical image stabilizer button
[ , O .I.S.] (l 48)
4 Power button [ ] (l 25)
5 Delete button [ ] (l 70)
6 Long recording button [LONG REC.]
(l 41)
7 Audio-video output terminal [A/V]
(l 77, 85)
≥ Use the AV cable (only the supplied
cable).
8 USB terminal [ ] (l 80, 94)
9 Access lamp [ACCESS] (l 24)
10 SD card slot (l 24)
11 SD card cover [SD CARD] (l 24)
16
VQT2L14
Page 17
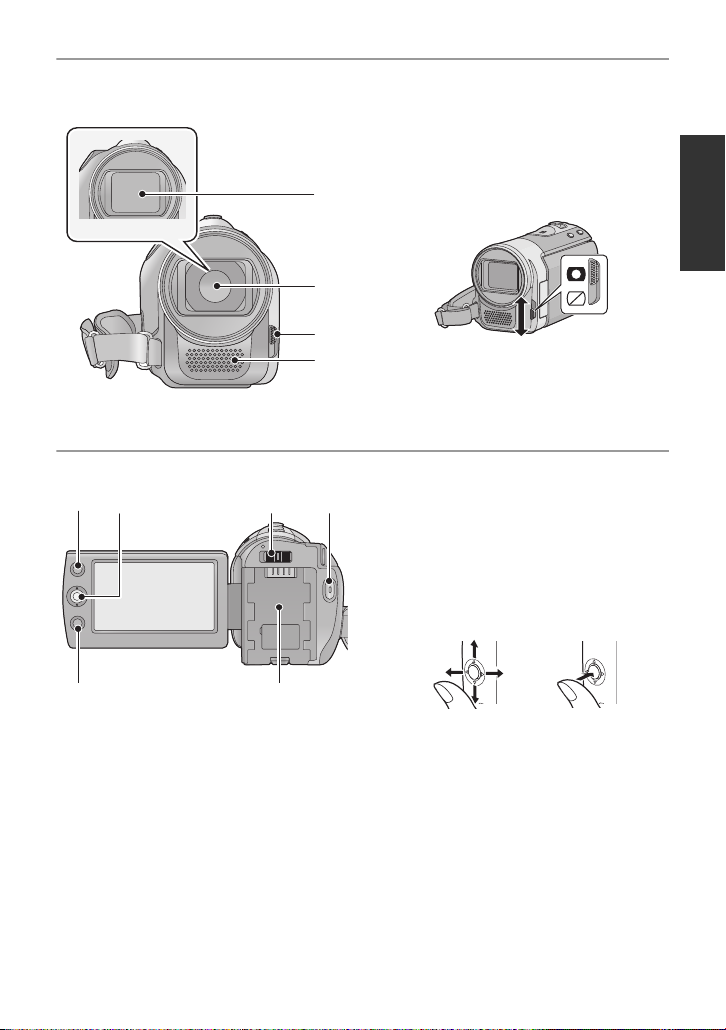
12 Lens cover
13
14
15
12
16 17 18 19
20
21
13 Lens
14 Open/close switch f or the lens cover
For the lens protection, be sure to close the
lens cover when not in use.
Slide open/close switch for the lens
cover.
15 Microphone (built-in, stereo)
16 AF/AE button [AF/AE] (l 49)
17 Joystick
Use the joystick to select the recording
functions and playback operations, and to
operate the menu screen.
Move the joystick up, down, left, or right
to select a setting or scene and then
press the joystick to set it.
1 Select by moving up, down, left or right.
2 Set by pressing the center.
≥ Menu screen operations (l 27)
≥ To select the recording functions (l 50)
≥ To adjust manually (l 58)
≥ Playback operations (l 62, 67)
18 Mode switch (l 26)
19 Recording start/stop button (l 39)
20 Menu button [MENU] (l 27)
21 Battery holder (l 19)
VQT2L14
17
Page 18
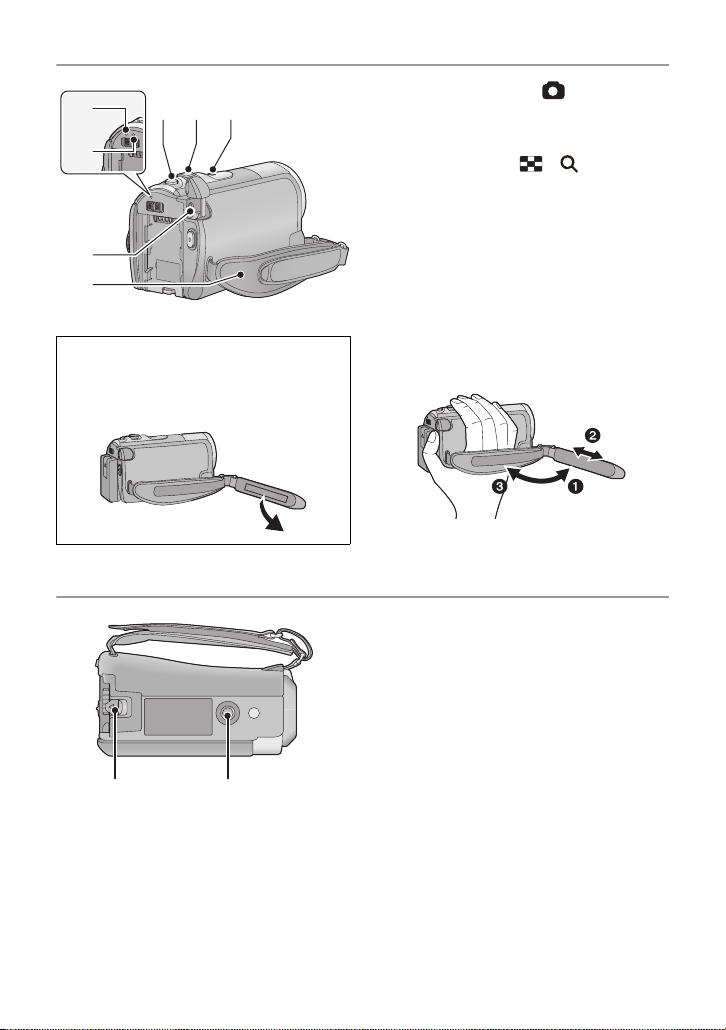
24
29 30
25
2322
26
27
28
(U.S.A. onl y ):
When this unit is purchased, a sens or tag
is attached to the grip belt. Remove the
tag before use.
22 Photoshot button [ ] (l 45)
23 When recording: Zoom lever [W/T]
(l 47)
When playing back: Thumbnail
display switch [ / ] (l 63)/
Vo lume lever [sVOLr] (l 64)
24 Speaker
25 Status indicator (l 25)
26 HDD access lamp [ACCESS HDD]
(SDR-H85) (l 8)
27 DC input terminal [DC IN] (l 20)
≥ Do not use any other AC adaptors except
the supplied one.
28 Grip belt
Adjust the belt length and the pad
position.
1 Flip the belt.
2 Adjust the length.
3 Replace the belt.
29 Battery release lever [BATTERY]
(l 19)
30 Tripod receptacle
18
VQT2L14
Page 19
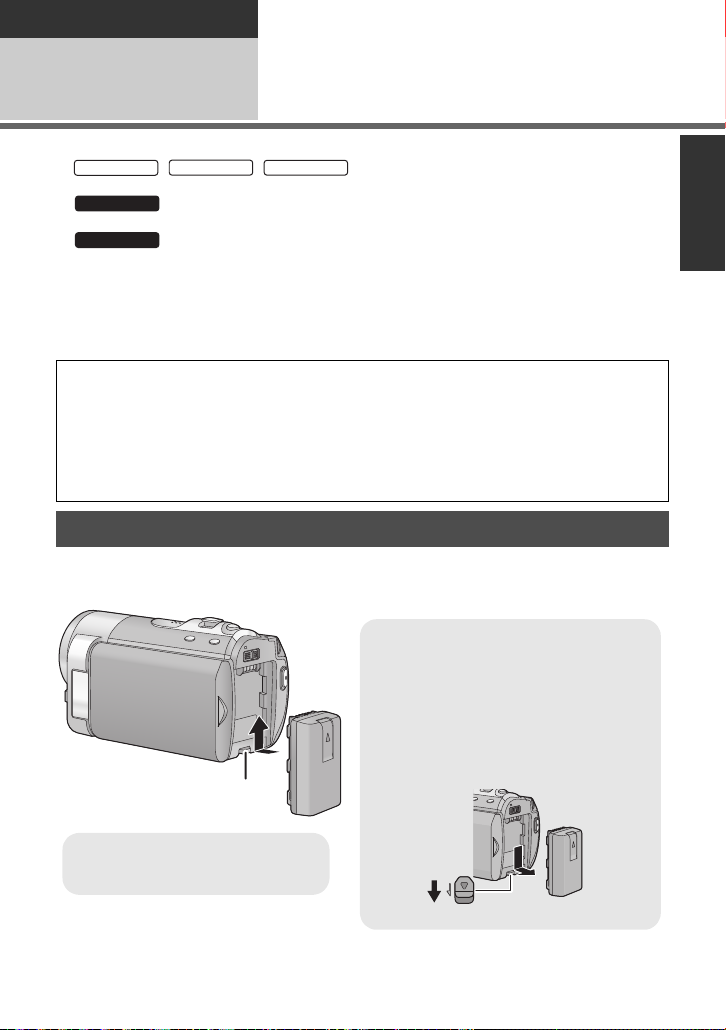
Preparation
SDR-S50
SDR-T55
SDR-T50
SDR-H85
SDR-H85
Removing the battery
Be sure to hold down the power button
until the status indicator goes off. Then
remove the battery while support i ng the
unit to prevent it from dropping.
Move the battery release lever in the
direction indicated by the arrow and
remove the battery when unlocked.
BATTERY
A Insert the battery until it clicks
and locks.
Setup
Power supply
1
∫ About batteries that you can use with this unit
The battery that can be used with this unit is VW-VBL090/VW-VBK180/VW-VBK360.
//
The battery that can be used with this unit is VW-VBK180/VW-VBK360.
≥
safely, and only dedicated batteries (VW-VBK180/VW-VBK360) support this function.
Only batteries which are genuine Panasonic products and batteries from other
companies certified by Panasonic can be used. (Only batteries which support this
function can be used) Note that Panasonic can only guarantee the quality, performance
or safety of genuine Panasonic batteries and not those made by other companies.
It has been found that counterfeit battery packs which look very similar to the genuine
product are made available to purchase in some markets. Some of these battery packs
are not adequately protected with internal protection to meet the requirements of
appropriate safety standards. There is a possibility that these battery packs may lead
to fire or explosion. Please be advised that we are not liable for any ac cident or failure
occurring as a result of use of a counterfeit battery pack. To ensure that safe products
are used we would recommend that a genuine Panasonic battery pack is used.
The unit has a function for judging whether the battery can be used
Inserting the battery
≥ Press the power button to turn off the power. (l 25)
Install the battery by inserting it in the direction shown in the figure.
19
VQT2L14
Page 20
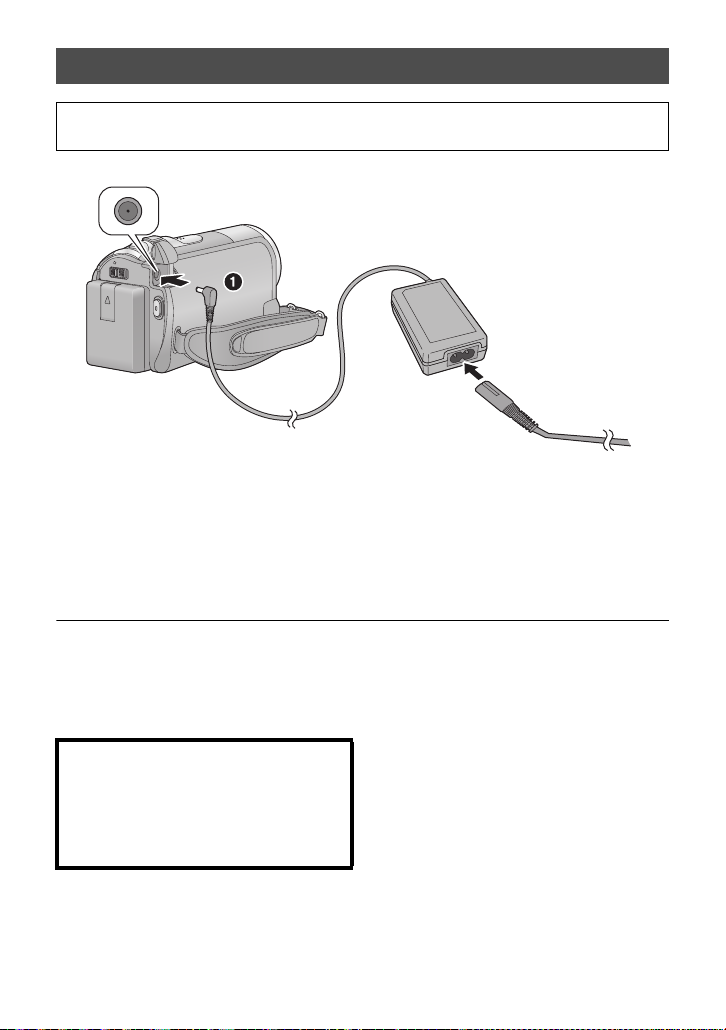
Charging the battery
When this unit is purchased, the battery is not charged. Charge the batter y b efo re
using this unit for the first time.
≥ The battery will not be charged if the power is turned on.
1 Connect the AC adaptor to this unit’s DC input terminal.
2 Connect the AC cable to the AC adaptor, then the AC outlet.
≥ For the AC cable, plug in 2 and then 3.
≥
The status indi cator will flas h red at an interval of 2 seconds, indicati ng that charging has begun.
∫ Connecting to the AC outlet
If you turn on this unit while charging the battery using the AC adapt or, you can use the
power supplied from the AC outlet to power the unit for use.
≥ Refer to page 113 when status indicator flashes either rapidly or slowly.
≥ We recommend using Panasonic batteries (l 12, 21, 120).
≥ If you use other batteries, we cannot guarantee the quality of this product.
≥ Do not heat or expose to flame.
≥ Do not leave the battery(ies) in an automobile ex posed to direct sunlight for a long period
of time with doors and windows closed.
CAUTION
Danger of explo sion if battery is i ncorrectly
replaced. Rep l ac e only with the same or
equivalent ty pe recommended by the
manufacturer. Dispose of used batteries
according to th e manu fac ture r’s in str uc tions .
20
VQT2L14
Page 21
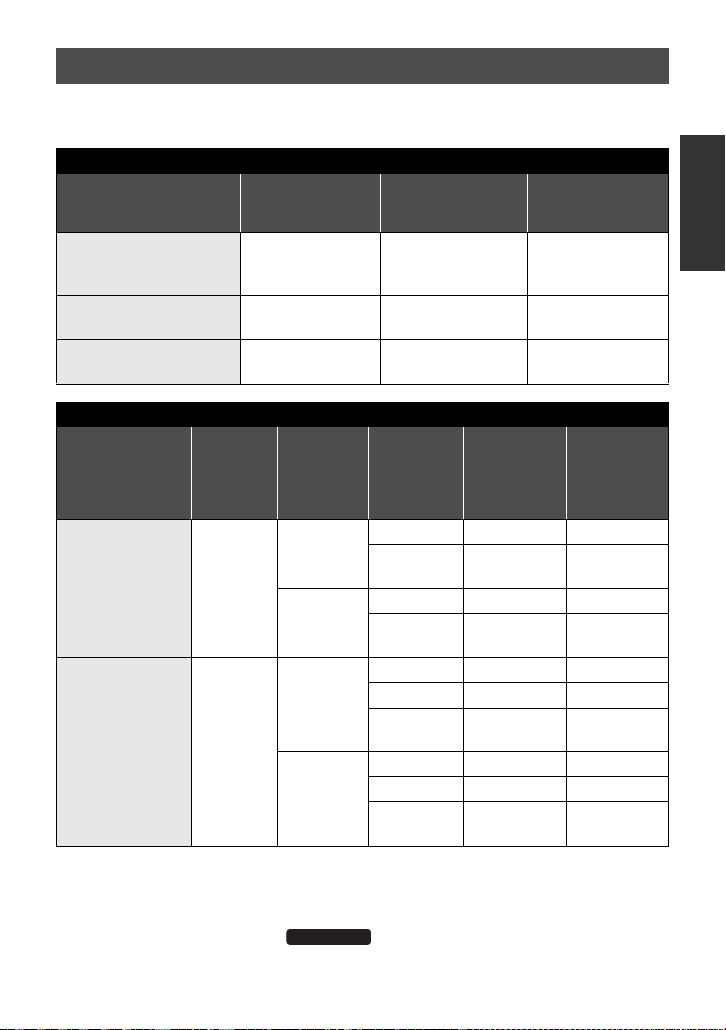
Charging and recording time
∫ Charging/Recording time
≥ Temperature: 25 oC (77 oF)/humidity: 60%
SDR-S50/SDR-T55/SDR-T50
Battery model number
[Voltage/Capacity
(minimum)]
Supplied battery/
VW-VBL090 (optional)
[3.6 V/895 mAh]
VW-VBK180 (optional)
[3.6 V/1790 mAh]
VW-VBK360 (optional)
[3.6 V/3580 mAh]
Battery model
number
[Voltage/
Capacity
(minimum)]
Supplied ba ttery/
VW-VBK180
(optional)
[3.6 V/1790 mAh]
VW-VBK360
(optional)
[3.6 V/3580 mAh]
≥ These times are approximations.
≥ The indicated charging time is f or when the batter y has been disc harged compl etely.
Charging time and recordable time vary depending on the usage conditions such as
high/low temperature.
≥ VW-VBL090 is not available for .
2h50min
4h50min
Charging
time
Charging time
2h20min 1h20min 40min
2h50min 2h55min 1h30min
4h50min 6h 3h10min
SDR-H85
Recording
destination
HDD
SD
HDD
SD
SDR-H85
Maximum
continuously
recordable time
Maximum
Recording
mode
XP 2h30min 1h15min
SP/LP/LXP/
LSP/LLP
XP/SP 2h35min 1h20min
LP/LXP/
LSP/LLP
XP 5h 2h40min
SP 5h5min 2h40min
LP/LXP/
LSP/LLP
XP 5h15min 2h45min
SP 5h20min 2h50min
LP/LXP/
LSP/LLP
continuously
recordable
time
2h30min 1h20min
2h40min 1h25min
5h10min 2h45min
5h25min 2h50min
Actual
recordable time
Actual
recordable
time
21
VQT2L14
Page 22

≥ The actual recordable time refers to the recorda ble t ime when repeat ed ly st art ing/s toppin g
SDR-H85
recording, turning the unit on/off, moving the zoom leve r etc .
≥ The batteries heat up after use or charging. This is not a malfunction.
Battery capacit y indica tion
≥ The display changes as the battery capacity reduces.
≥ The remaining battery capacity is displayed when using the Panasonic battery that you
≥ If the actual remaining time exceeds 9 hours 59 minutes, the indication will st ay green
≥ When using the AC adaptor or batteries made by other companies, the remaining
####
If there is less than 3 minutes remaining, then will become red. If the battery
discharges, then ( ) will flash.
can use for this unit. It may take time to display the remaining battery capacity. The
actual time can vary depending on your actual use.
and will not change until the remaining time fa lls below 9 hours 59 minutes.
battery capacity will not be shown.
22
VQT2L14
Page 23
Preparation
64
Setup
Recording to a card
2
The unit can record still pictures or motion pictures to an SD card, built -in memory, or HDD.
To record to an SD card, read the following.
This unit (an SDXC compatible device) is compatible with SD Memory Cards, SDHC
Memory Cards and SDXC Memory Cards. When using an SDHC memory card/SDXC
memory card with other equipment, ch eck the equipment is compatible with thes e
memory cards.
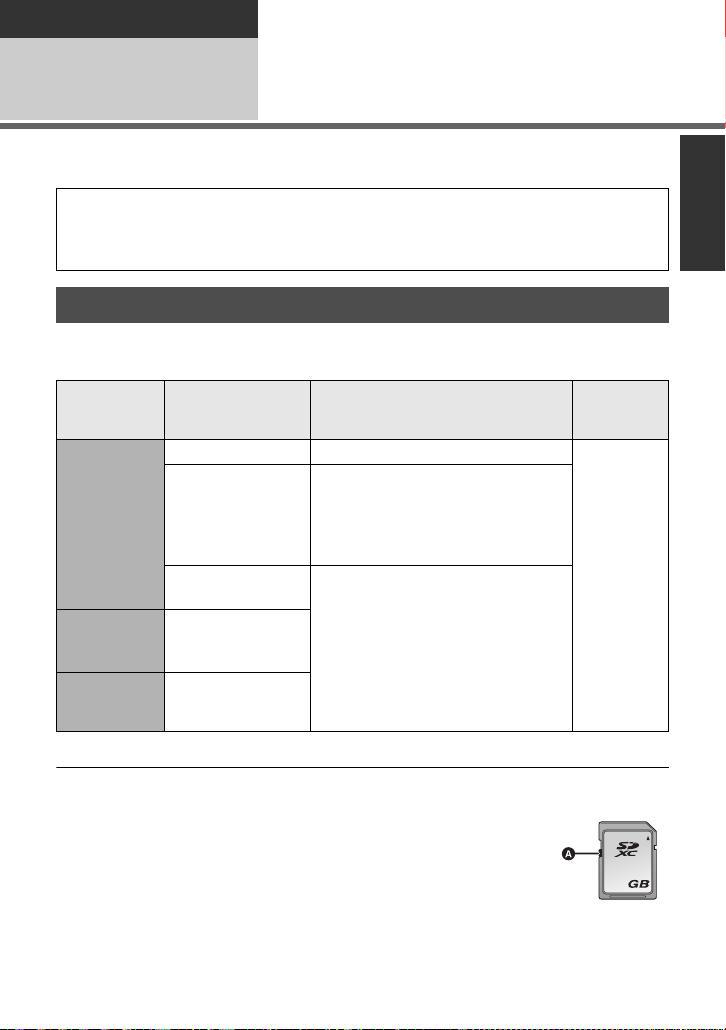
Cards that you can use with this unit
Use SD cards conforming to Class 2 or higher of the SD Speed Class Rating* for
motion picture record ing.
Still
Card type Capacity Motion picture recording
8 MB/16 MB Cannot be used.
Cannot be guaranteed in operation.
SD Memory
Card
SDHC
Memory
Card
SDXC
Memory
Card
* The SD Speed Class Rating is the speed standard for successive writes.
32 MB/64 MB/
128 MB/256 MB
512MB/1GB/
2GB
4GB/6GB/8GB/
12 GB/16 GB/
24 GB/32 GB
48 GB/64 GB
The recording may suddenly stop
during motion picture recording
depending on the SD card you use.
(l 107)
Can be used.
picture
recording
Can be
used.
≥ 4 GB or more Memory Cards that do not have the SDHC logo or 48 GB or more Memory
Cards that do not have the SDXC logo are not based on SD Memory Card Specifications.
≥ When the write-protect switch A on SD card is locked, no recording,
deletion or editing will be possible on th e card.
≥ Keep the Memory Card out of reach of children to prevent swallowing.
23
VQT2L14
Page 24
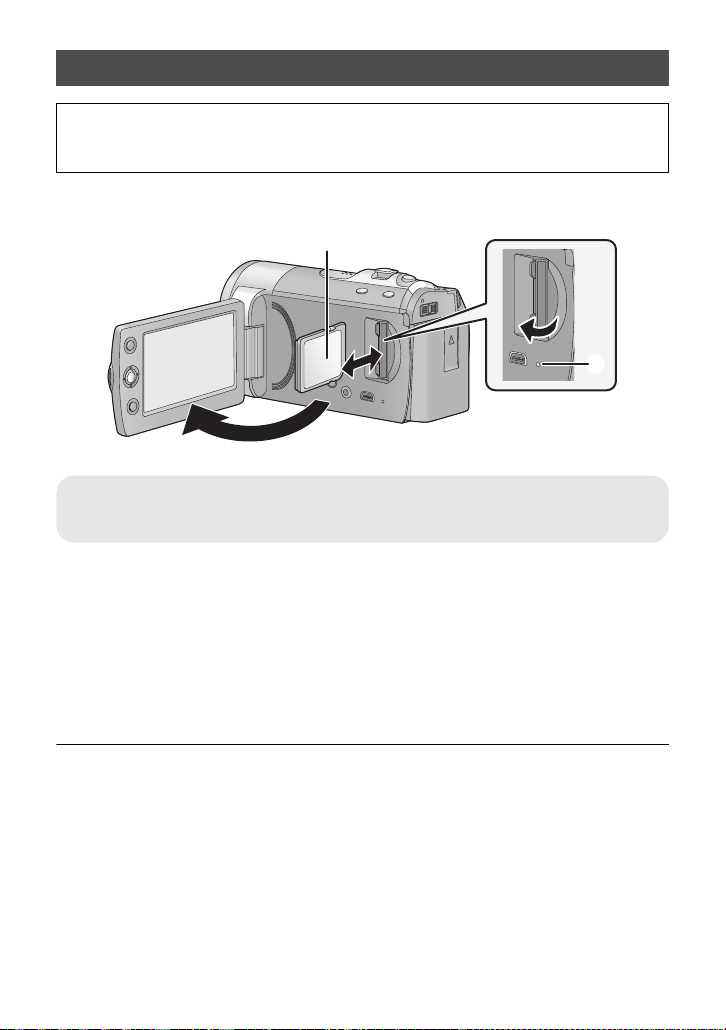
Inserting/removing an SD card
When using an SD card not from Pana sonic, or one previously used on other equipment,
for the first time on this unit, format the SD card. (l 76) When the SD card is formatte d, all
of the recorded data is deleted. Once the data i s deleted, it cannot be restor ed.
Caution:
Check that the access lamp has gone off.
Access lamp [ACCESS] A
≥ When this unit is accessing the SD card or built-in memory, the access lamp lights up.
1 Open the LCD monitor.
2 Open the SD card cover and insert (remove) the SD card into (from)
the card slot.
≥ Face the label side B in the direction shown in the illustr ati on and press it s traigh t in as f ar
as it will go.
≥ Press the center of the SD card and then pull it straight out.
3 Securely close the SD card cover.
≥ Do not touch the terminals on the back of the SD card.
≥ See page 113 for details on handling the SD card.
24
VQT2L14
Page 25
Preparation
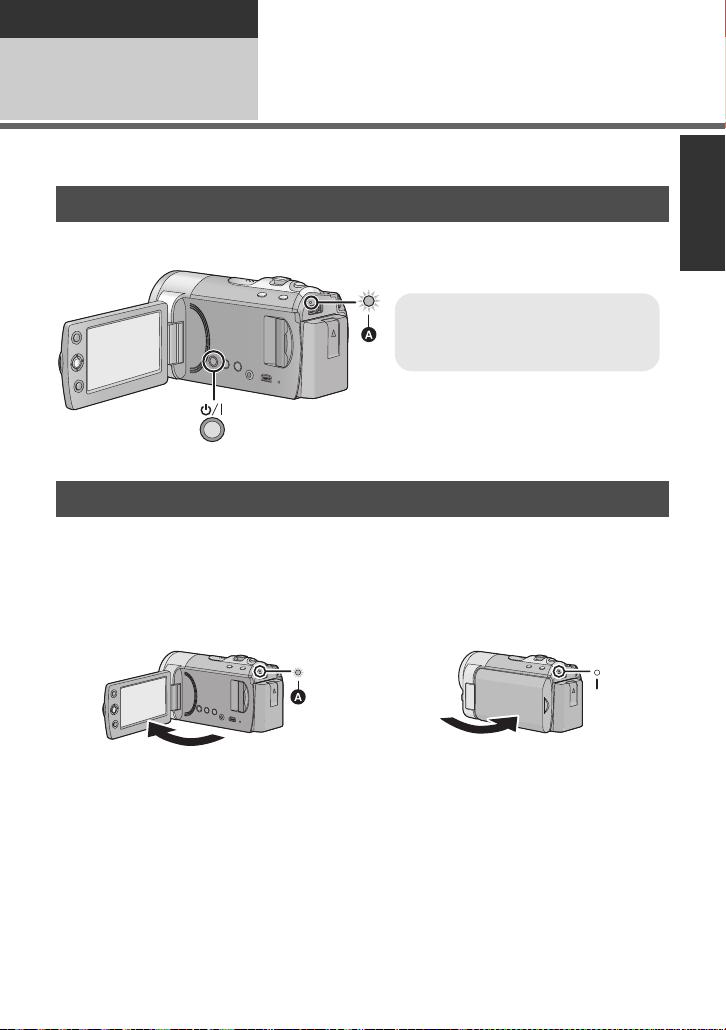
To turn off the power
Hold down the power but ton un til th e
status indicato r goes off.
Setup
Turning the unit on/off
3
Y ou ca n turn t he p ower on and of f us in g the powe r but ton or by open ing and c losing th e LCD
monitor.
Turning the power on and off with the power button
Press the power button to turn on the power.
A The status indicator lights.
Turning the power on and off with the LCD monitor
Power is turned on when the LCD monitor is opene d, and power is turned off when it is
closed.
During normal use, opening and closing of the LCD monitor can be conveniently used
to turn the power on/off.
∫ To turn on the power
∫ To turn off the power
A The status indicator lights.
≥ In the following cases, opening the LCD monitor does not turn on the power. Press the
power button to turn on the power.
jWhen the unit is purchased
jWhen you have turned off the power using the power button
≥ The power will not turn off while recording motion pictures even if the LCD monitor is
closed.
B The status indicator goes off.
VQT2L14
25
Page 26
Preparation
Setup
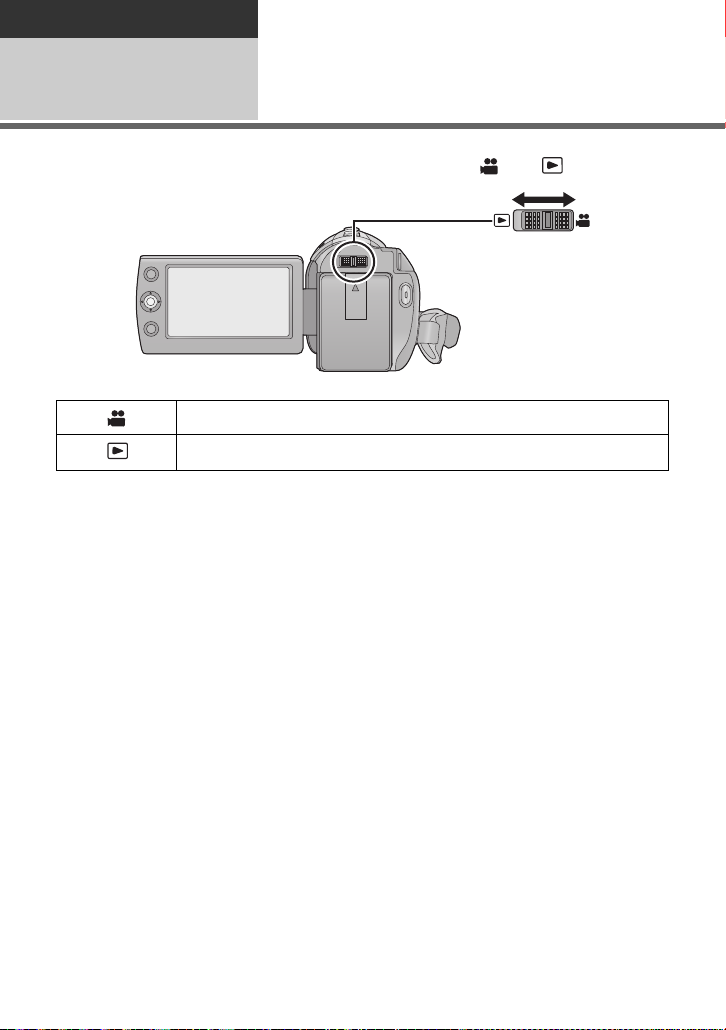
Selecting a mode
4
Change the mode to recording or pl ayback.
Operate the mode switch to change the mode to or .
Recording mode (l 39, 45)
Playback mode (l 62, 67)
26
VQT2L14
Page 27
Preparation
MENU
ENTER
Setup
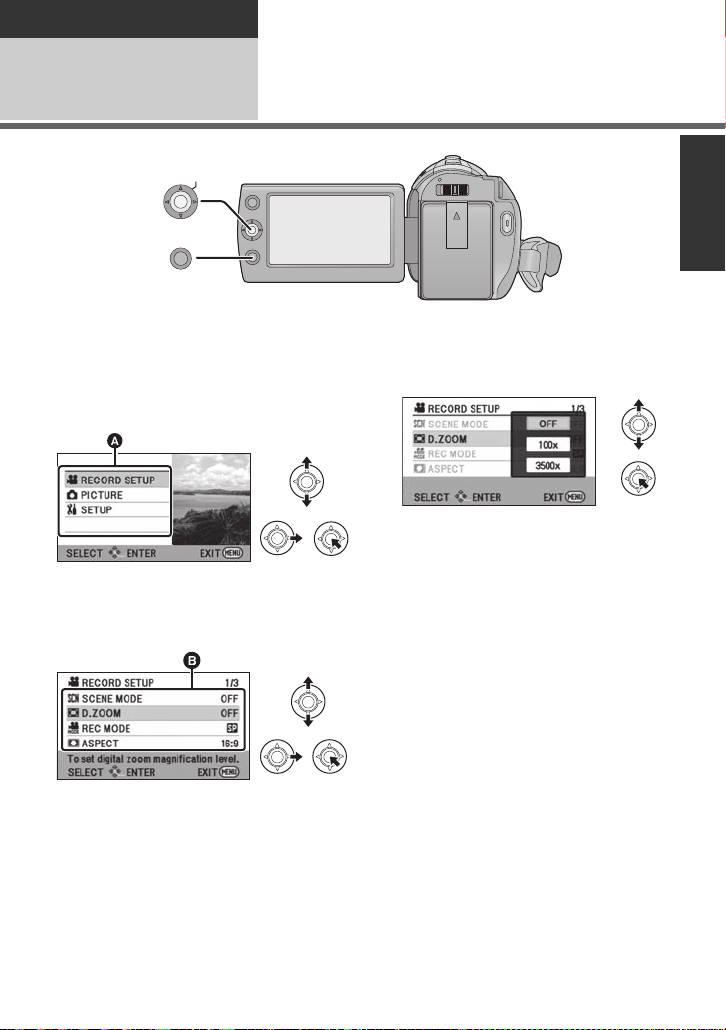
Using the menu screen
5
1 Press the MENU button.
2 Select the desired top menu A,
then move the joystick right or
press the joystick.
3 Select the submenu item B,
then move the joystick right or
press the joystick.
≥ Descriptions of submenus and current
settings on menus are displayed
scrolling at the bottom of the screen.
4 Select the desired setting, then
press the joystick to enter the
selection.
To get back to the previous screen
Move the joystick left.
To exit the menu screen
Press the MENU button.
27
VQT2L14
Page 28
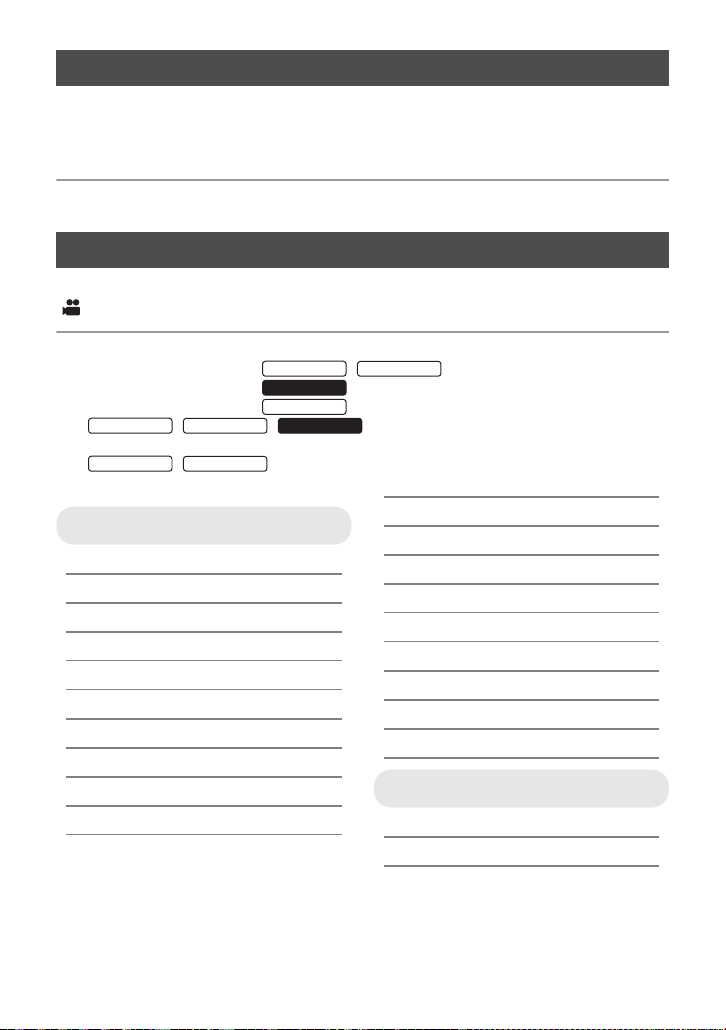
Language selection
SDR-T55
SDR-T50
SDR-H85
SDR-S50
SDR-T50
SDR-T55
SDR-T50
You can select the language on the screen display and the menu screen.
1 Press the MENU button, then select [SETUP] # [LANGUAGE] and
press the joystick.
2 Select [English] and press the joystick.
Menu list
Part of the menu will not be used depending on the used functions. (l 105)
Recording mode
*1 It is not displayed when the Intelligent auto mode is on.
*2 These menus are only for / .
*3 These menus are only for .
*4 These menus are only for .
*5 / / It will be displayed only when the [MEDIA
SDR-T55
SELECT] is set to [SD CARD].
*6 / It will be displayed only when the [MEDIA SELECT] is s et to
[Built-inMemory].
RECORD SETUP
[SCENE MODE] (l 54)
[D.ZOOM] (l 47)
[REC MODE] (l 42)
[RELAY REC]
[ASPECT] (l 55)
[FACE FRAMING] (l 55)
[GUIDE LINES] (l 52)
[WEB MODE] (l 51)
[FADE] (l 51)
[FADE C OLOR] (l 51)
[AUTO SLOW SHTR]
*6
*1
SDR-H85
(l 55)
(l 55)
[BACKLIGHT COMPENS.] (l 51)
[INTELLIGENT CONTRAST]*1(l 52)
[SOFT SKIN MODE]
[COLOR NIGHT REC]
[SHOOTING GUIDE] (l 44)
[WIND NOISE CANCELER]
[ZOOM MIC]
[WB ADJUST]
[MF ASSIST]
*1
*1
*1
*1
*1
*1
(l 53)
(l 53)
(l 56)
(l 56)
(l 56)
(l 61)
PICTURE
[SELF TIMER] (l 57)
[SHTR SOUND] (l 57)
28
VQT2L14
Page 29
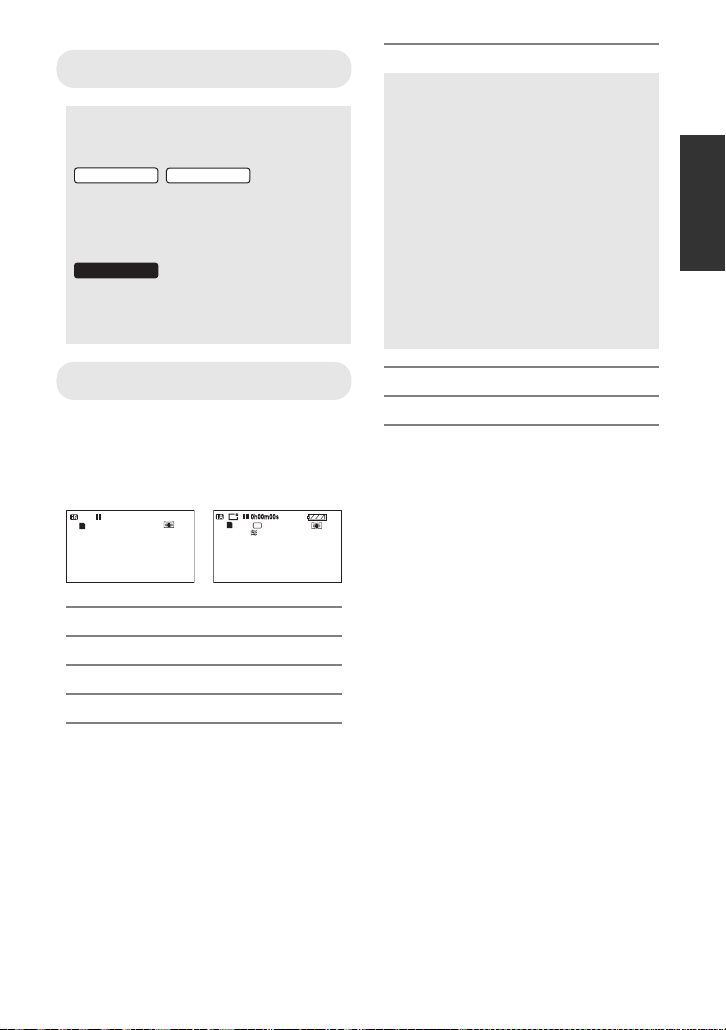
MEDIA SELECT
SDR-T55
SDR-T50
SDR-H85
NOV 15 2010
SP
NOV 15 2010
R 1h20m
A
*2*3
Recording media may be set
independently for both still pictures and
motion pictures.
/
When recording to the SD card, select
[SD CARD]. When re co rdi n g to the
built-in memory, select
[Built-inMemory]. (l 40, 62, 67)
When recording to the SD card, select
[SD CARD]. When re co rdi n g to the
HDD, select [HDD]. (l 40, 62, 67)
[ECONOMY]
[OFF]:
The power saving function is not
activated.
[5 MINUTES]:
When about 5 minutes have passed
without any operation, this unit
automatically turns off to s av e battery
life.
≥ The power save function will not
activate when:
jconnected to AC adaptor
jusing the USB cable for PC, DVD
burner etc.
jPRE-REC is used
SETUP
[DISPLAY]
The screen indications are selected as
shown in the illustration below.
[OFF] [ON]
[EXT. DISPLAY] (l 78)
[CLOCK SET] (l 32)
[SET WORLD TIME] (l 33)
[DATE/TIME] (l 32)
[DATE FORMAT] (l 32)
[QUICK POWER ON] (l 38)
[QUICK START] (l 38)
[AUDIO REC]
*5
(l 44)
VQT2L14
29
Page 30

[ALERT SOUND]
SDR-T50
SDR-H85
Starti ng and stopping of recording and
power on/off can be conf irmed with this
sound.
2 Beeps for 4 times
When an error occurs. Check the
sentence displayed on the scr een.
(l 103)
[POWER LCD] (l 34)
[LCD SET] (l 34)
[TV ASPECT ] (l 78)
[INITIAL SET]
Set to [YES] for changing the menu
settings back to the default condition.
(Settings for [MEDIA SELECT]
*2*3
,
[CLOCK SET] and [LANGUAGE] will
not be changed.)
*4
*2*3
(l 76)
(l 76)
[FORMA T MEDIA]
[FORMAT CARD]
[DEMO MODE]
This item is used to start the unit
demonstration.
(Only when the mode is at the
position)
SDR-S50
If [DEMO MODE] is switched to [ON]
when there is no SD card inserted, the
demonstration automatically starts.
SDR-T55
//
If [DEMO MODE] is switched to [ON]
when there is no SD card inserted and
while this unit is conn e c te d to the AC
adaptor, the demonstration
automatically starts.
If any operation takes place, the
demonstration is canceled. Howev er if
no operations take place for approx.
10 minutes, the demonstration
automatically starts again. To stop the
demonstration, set [DEMO MODE] to
[OFF] or insert an SD card.
[LANGUAGE] (l 28)
You can select the language on the
screen display and the menu screen.
30
VQT2L14
Page 31
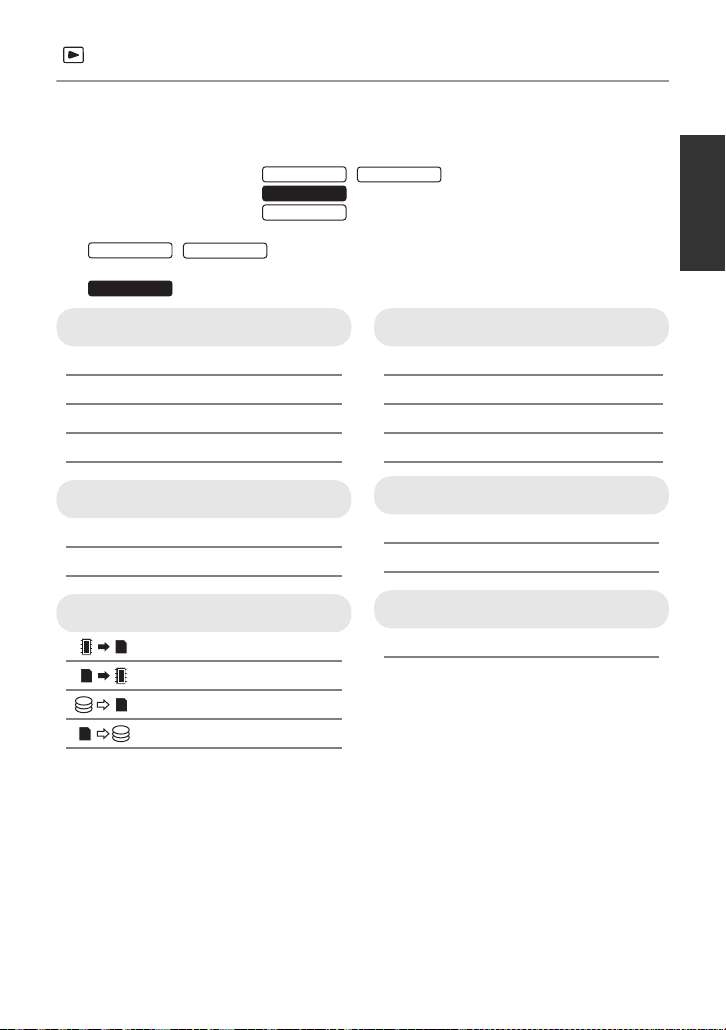
Playback mode
SDR-T55
SDR-T50
SDR-H85
SDR-S50
SDR-T55
SDR-T50
SDR-H85
*1 Only when the disc playback is sel ec ted whil e a DVD bu rner (optio nal) is c onnec ted, th is
does not appear.
*2 Only when the disc playback is sel ec ted whil e a DVD bu rner (optio nal) is c onnec ted, th is
appears.
*3 These menus are only for / .
*4 These menus are only for .
*5 These menus are only for .
*6 This appears only when the [PICTURE/SD CARD] is selected.
*7 / This appears only when the [VIDEO/Built-inMemory] is
selected.
*8 This appears only when the [VIDEO/HDD] is selected.
VIDEO SETUP
[REPEAT PLAY] (l 66)
[RESUME PLAY] (l 66)
*7*8
*1
*1
(l 71)
(l 72)
(l 75)
(l 75)
(l 75)
(l 75)
[SCENE PROTECT]
[GUIDE LINES] (l 52)
EDIT SCENE
[SPLIT&DELETE]
[DELETE] (l 70)
*1*3*4
COPY
*3
*3
*4
*4
DISC SETUP
*2
[FORMAT DISC] (l 84)
[AUTO PROTECT] (l 84)
[CANCEL PROTECT] (l 84)
[DISC STATUS] (l 84)
SETUP
*5
*3*4
(l 74)
(l 74)
[MEDIA STATUS]
[CARD STATUS]
PICT. SETUP
[DPOF SET]
≥ For any other menus that are not
described above, refer to menus with the
same names for the recording mode and
motion picture playback.
*6
(l 73)
31
VQT2L14
Page 32
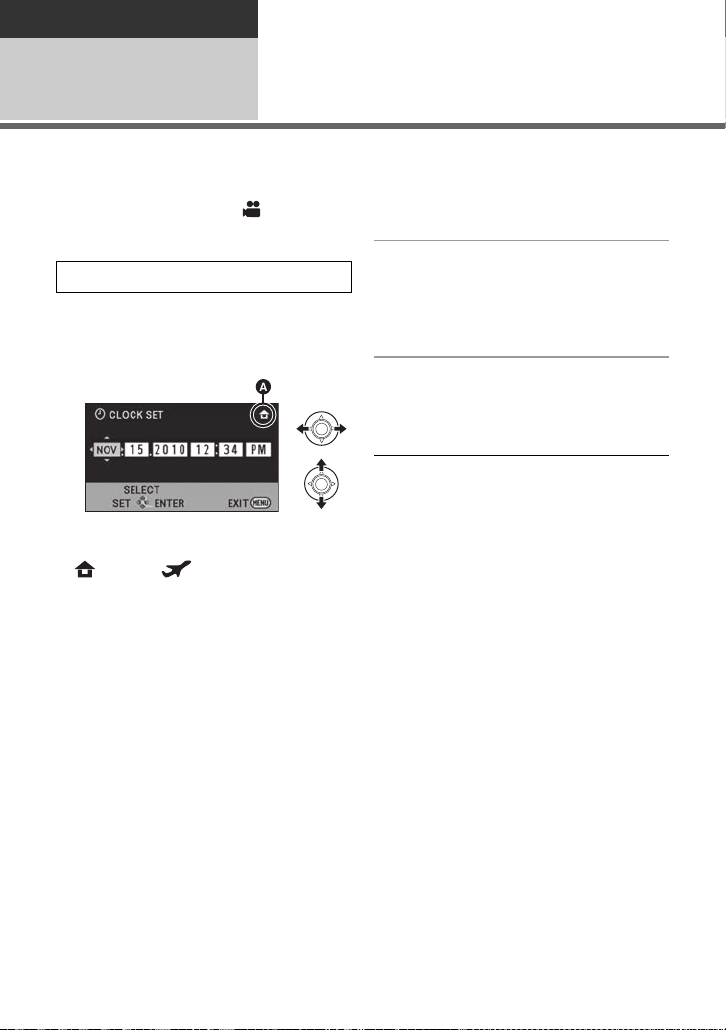
Preparation
Setup
Setting date and time
6
When the unit is turned on for the first time, a message ask i ng you to set the date and time
will appear.
Select [YES] and perform steps 2 to 3 below to set the date and time.
¬ Change the mode to .
1 Select the menu. (l 27)
[SETUP] # [CLOCK SET]
2 Select the date or time, then
adjust the desired value with
the joystick.
A Displaying the World time setting
(l 33):
[HOME]/ [DESTINATION]
≥ The year can be set between 2000 and
2039.
≥ The 12-hour system is used to display the
time.
3 Press the joystick to enter the
selection.
≥ The clock function starts at [00] seconds.
≥ A message may be displayed prompting
you to set the world time. (l 33)
≥ Press the MENU button to complete the
setting.
Changing the date and time display
mode
Select the menu. (l 27)
[SETUP] # [DATE/TIME] # [OFF]/[D/T]/
[DATE]
Changing the date format
Select the menu. (l 27)
[SETUP] # [DATE FORMAT] # [Y/M/D]/
[M/D/Y]/[D/M/Y]
≥ The date and time function is dr iven by a
built-in lithium battery.
≥ When this unit is purchased, the clock is
set. If the time display becomes [- -], the
built-in lithium battery needs to be
charged. To recharge the built-in lithium
battery, connect the AC adapt or or attach
the battery to this unit . Leave the unit as it
is for approx. 24hours and the battery will
maintain the date and time for approx.
6 months. (The battery is still being
recharged even if the power is off.)
32
VQT2L14
Page 33
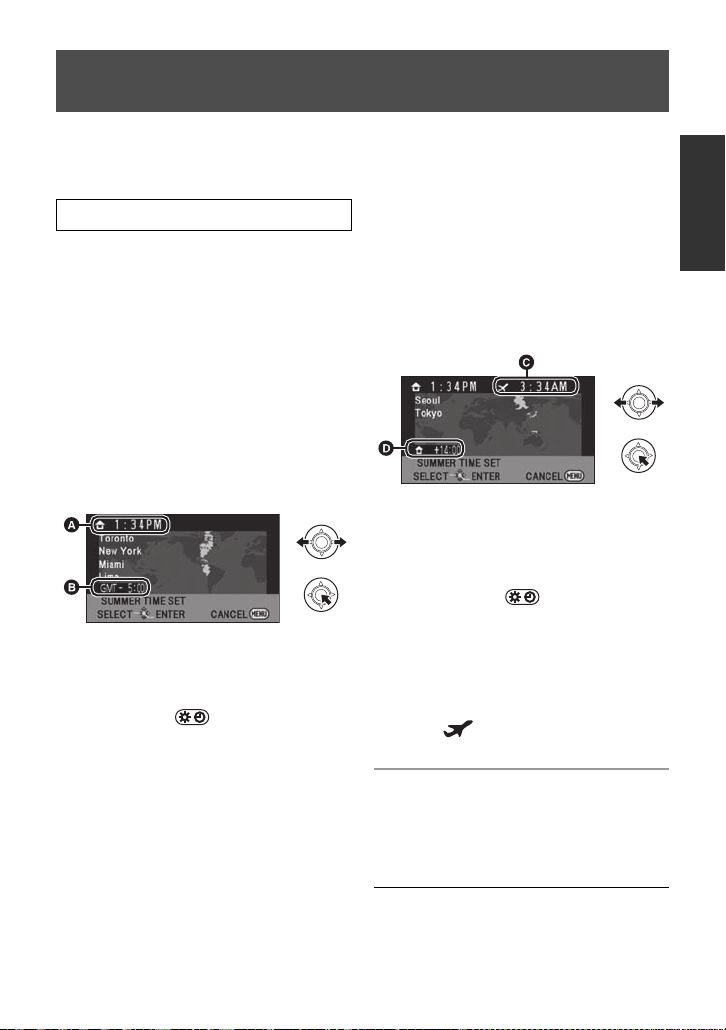
World time setting (Displaying the time of the travel
destination)
It is possible to display and record the time at the travel destination by selec ting your home
region and the travel destination.
1 Select the menu. (l 27)
[SETUP] # [SET WORLD TIME]
≥ If the clock is not set, adjust the clo ck to
the current time. (l 32)
≥ When the [HOME] (your home region) is
not set, the message appears. Press the
joystick to move to Step 3.
region successively. If the home region
has already been set once , execute the
menu operation for Step 1.
5 (Only when setting the region of your
travel destination)
Select your travel destination
and enter the selection with the
joystick.
2 (Only when setting your home region)
Select [HOME] and press the
joystick.
3 (Only when setting your home region)
Select your home region and
enter the selection with the
joystick.
A The current time
B The time difference from GMT
(Greenwich Mean Time)
≥
To set to daylight savings time, press the
joystick forward. appears and the
summer time setting is turned on; the time
difference from GMT is set forward by one hour.
Press the joystick forward again to return to
standard time.
4 (O nly when setting the region of your
travel destination)
Select [DESTINATION] and
press the joystick.
≥ When the home region is set for the first
time, the screen for sel ec ti ng ho m e /tr a ve l
destination appears af ter settin g the home
C The local time at the selected travel
destination
D
The time difference between the travel
destination and the home region
≥ To set to daylight savings time, press the
joystick forward. appears and the
summer time setting is turned on. The
clock and time difference from the home
region time are set forward by one hour.
Press the joystick forward again to return
to standard time.
≥ Close the setting by pressing the MENU
button. appears and the ti me of the
travel destination is indicated.
To return the display to the home
setting
Set the home region using Step 1 to 3, and
close the setting by pressing the MENU
button.
≥
If you cannot find your travel destination in
the area shown on the screen, set it by using
the time difference from your home region.
33
VQT2L14
Page 34
Preparation
-
1
A
+1
Setup
Adjusting LCD monitor
7
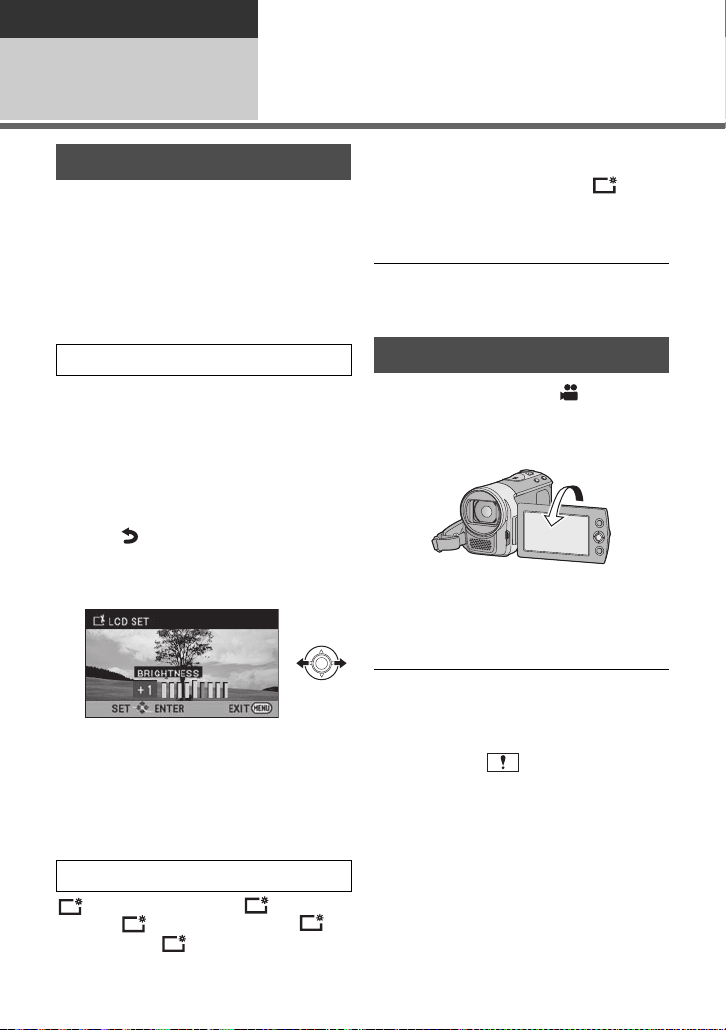
LCD monitor adjustment
≥ These settings will not affect the images
actually recorded.
∫ Adjusting the brightness and
color level of the LCD monitor
It adjusts brightnes s and color density on the
LCD monitor.
Select the menu. (l 27)
[SETUP] # [LCD SET]
1 Use the joystick to select the
item, then press the center of
the joystick.
[BRIGHTNESS]:
Brightness of the LCD monitor
[COLOR]:
Color level of the LCD monitor
≥ Select and press the center of the
joystick to return to the previous screen.
2 Make adjustments
≥ Close the setting by pressing the MENU
button.
∫ Power LCD
This makes it easier to view the LCD monitor
in bright places including outdoors.
Select the menu. (l 27)
* It is not displayed in the Manual Mode or
in the playback mode.
≥ If you use the AC adaptor, the
indication appears and the screen
becomes brig hter automatic a l ly wh e n th e
power is turned on.
≥ The recordable time using the battery will
become shorter when you use this unit
with the LCD monitor lit up.
Recording Yourself
¬ Change the mode to .
Rotate the LCD monitor towards
the lens side.
≥ The image is horizontally flipped as if you
see a mirror image. (However the image
recorded is the same as a normal
recording.)
≥ When the LC D m on i to r is ro tat ed to war d s
the lens side, t he icon will n ot be displaye d
even if you press the joystick.
≥ Only some indications will appear on the
screen. When appears, return the
direction of the LCD monitor to normal
position and check the warnin g/alarm
indication. (l 103)
[SETUP] # [POWER LCD]
: Makes even brighter / : Makes
+2
brighter / : No setting (normal) / :
Makes darker / : Auto
34
VQT2L14
0
+1
*
Page 35
Recording
Recording (Basic)
Before recording
1
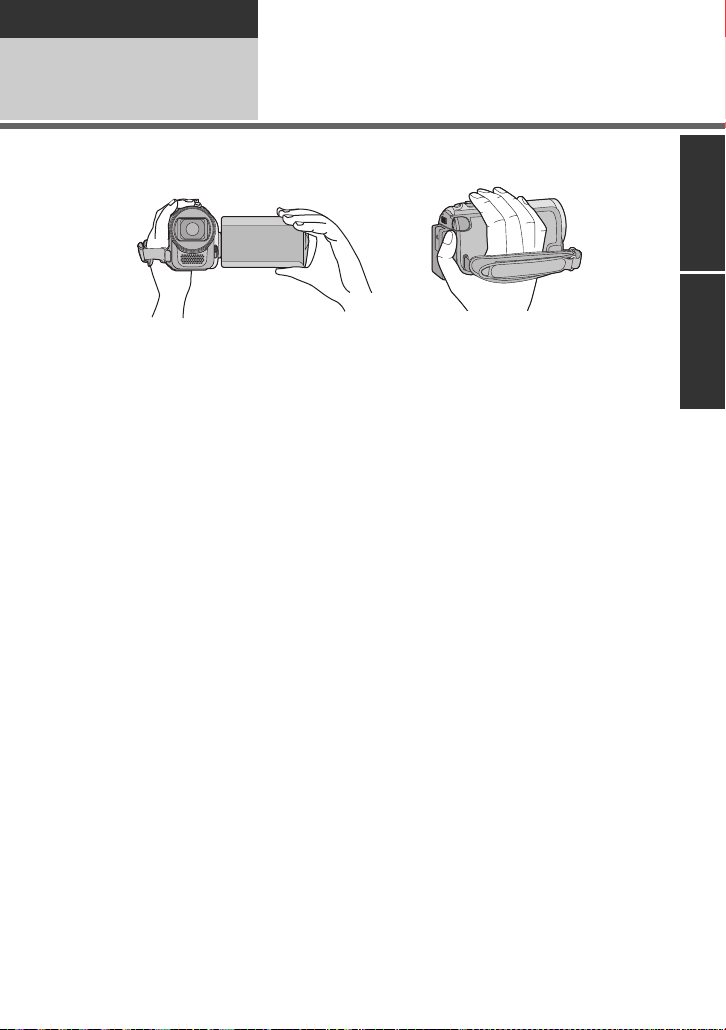
∫ Basic cam era positi oning
1 Hold the unit with both hands.
2 Put your hand through the grip belt.
≥ When recording, make sure your footing is stab le and there is no danger of colliding with
another person or objec t.
≥ When you are outdoors, record pictures with the sunlight behind you. If the subject is
backlit, it will become dark in the recording.
≥ Keep your arms near your body and separate your legs for better balance.
≥ Do not cover the microphones with your hand.
∫ Basic motion picture recording
≥ The unit should normally be held steady when recording.
≥ If you move the unit when recording, do so slowly, maintaining a constant speed.
≥ The zoom operation is use ful f or reco rding sub jec ts yo u ca nnot get cl ose to, bu t overu se o f
zoom in and zoom out can make the resulting motion picture less enjoyable to watch.
35
VQT2L14
Page 36
Intelligent Auto Mode
/MANUAL
Intelligent auto/Manual button
[iA/MANUAL]
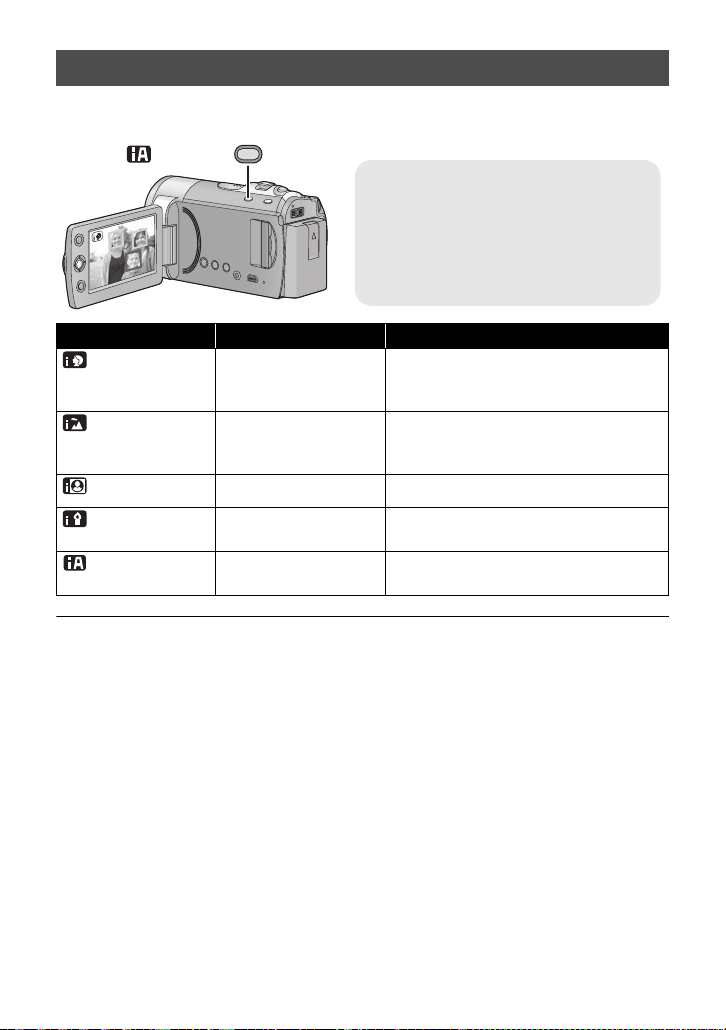
Press this button to change the mode to
Intelligent Auto Mode or Manual Mode.
≥ Please refer to page 58 about Manual
Mode.
The following modes based on shooting conditions are set just by pointing the unit to what
you want to record.
Mode Scene Effect
Portrait When the object is a
person
Scenery Recording outdoors The whole landscape will be recorded
Spotlight Under a spotlight Very bright object is recorded clearly.
Low light Dark room or twilight It can record very clearly even in a dark
Normal Other situations Contrast is adjusted automatically for
≥ Depending on the recording conditions, the unit may not enter the desired mode.
≥ In the Portrait mode, a subject that is bigger and close to center of the screen will be
surrounded by an orange frame. (l 55)
≥ Image stabilizer function (l 48) is set to Active mode/ON in all modes.
≥ Faces may not be detected depending on the recording conditions, such as when fac es
are of certain sizes or at certain angles or when digital zoom is used.
Faces are detected and focused
automatically, and the brightness is
adjusted so it is recorded clearly.
vividly without whiting out t he background
sky, which may be very bright.
room or twilight.
clear images.
36
VQT2L14
Page 37
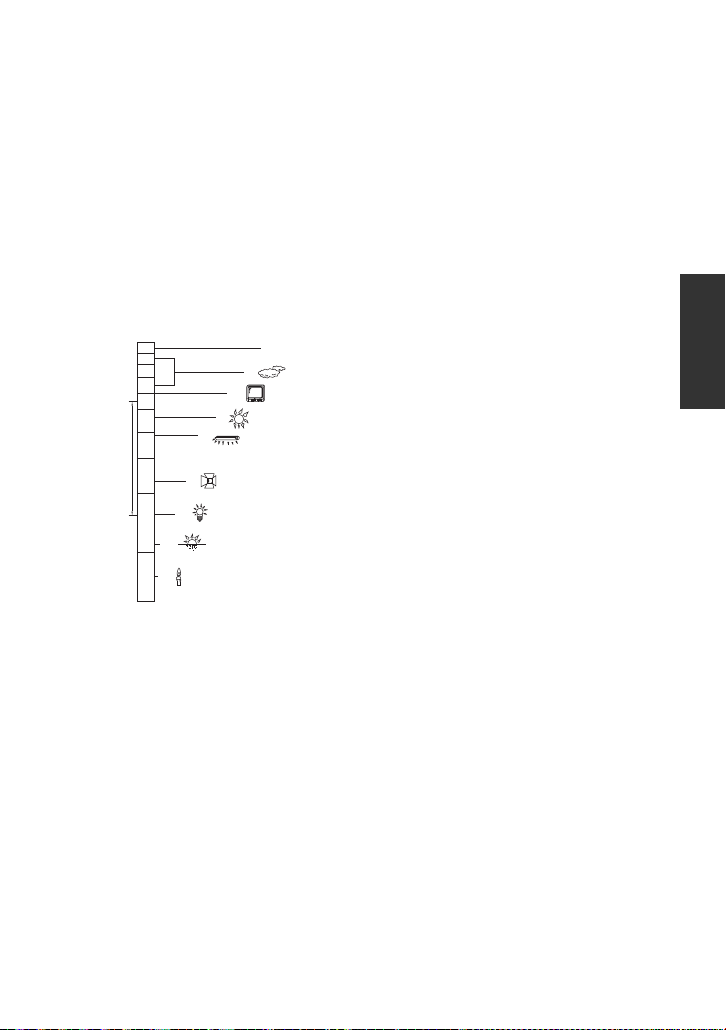
∫ About Intelligent Auto Mode
10 000K
9 000K
8 000K
7 000K
6 000K
5 000K
4 000K
3 000K
2 000K
1 000K
2)
1)
3)
4)
5)
6)
7)
8)
9)
10)
When the Intelligent Auto Mode is set to on,
the Auto white balance and Aut o focus
operate and automatically adjust the color
balance and focusing.
Depending on the brightness of t he subject
etc., the aperture and s hutter speed are
automatically adjusted for an optimum
brightness.
≥ Color balance and focus may not be
adjusted automatically depending on light
sources or scenes. If so, manually adjust
these settings. (l 59, 61)
Automatic white balance
The illustration above shows the ran ge over
which the Auto white balance functions.
1) The effective range of Automatic white
balance adjustment on this unit
2) Blue sky
3) Cloudy sky (rain)
4) TV screen
5) Sunlight
6) White fluorescent lamp
7) Halogen light bulb
8) Incandescent light bulb
9) Sunrise or sunset
10) Candlelight
If the automatic white balance is not
functioning normally, adjust th e white
balance manually. (l 56,59)
Auto focus
The unit focuses automatically.
≥ Auto focus does not wor k correctly i n the
following situations. Recor d pictures in the
Manual Focus Mode. (l 61)
jRecording distant and close-up objects
at the same time
jRecording a subject behind a dirty or
dusty window
jRecording a subject that is surrounded
by objects with glossy surfaces or by
highly reflective objects
For details on Scene mode , refer to page 54 .
For how to set Manual focus/white balance
manually, refer to page 58- 61.
37
VQT2L14
Page 38
Quick start
SDR-T55
SDR-T50
This unit will resume recording/pause mode
about 0.8 seconds after the LCD monitor is
reopened.
≥ Start time will not shorten if there is no SD
card inserted.
/
Start time will be shorten if the
[Built-inMemory] is select ed in th e [MEDIA
SELECT], even if there is no SD card
inserted.
SDR-H85
Start time will be shorten if the [HDD] is
selected in the [MEDIA SELECT], ev en if
there is no SD card inserted.
¬ Change the mode to .
1 Select the menu. (l 27)
[SETUP] # [QUICK START] # [ON]
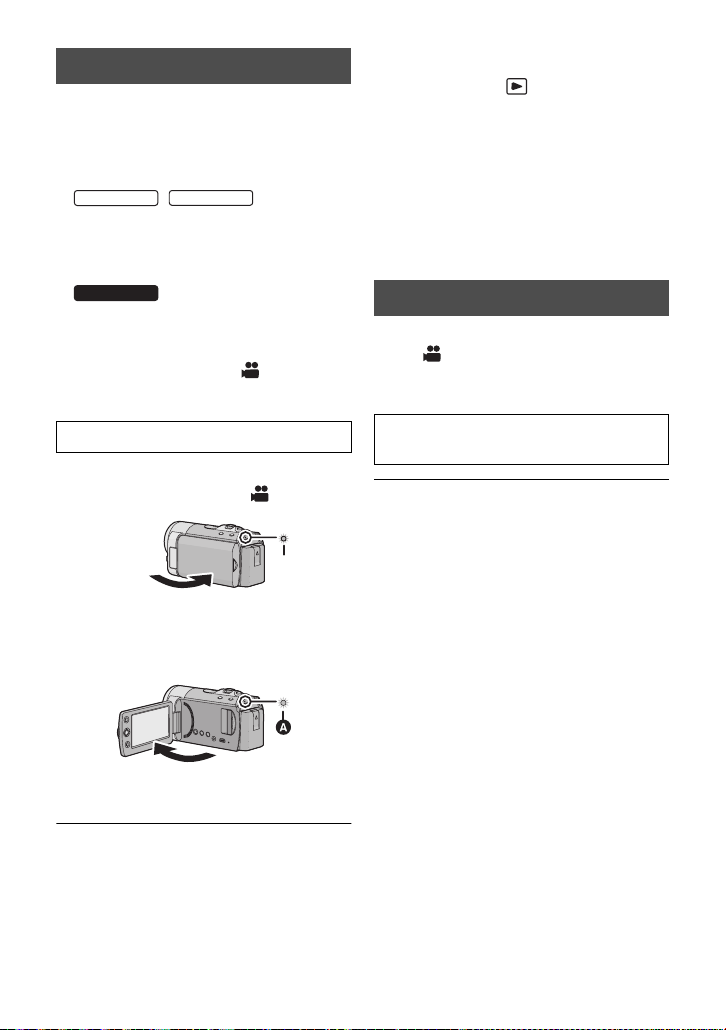
2 Close the LCD monitor while
the mode is set to .
The status indicator A flashes green an d the
unit goes into Quick start standby mode.
3 Open the LCD monitor.
≥ Quick start standby mode is canceled if
jabout 5 minutes have elapsed
jmode is set to
≥ It may take some time for A utomatic white
balance to adjust.
≥ In the Quick start mode, the zoom
magnification becomes 1k.
≥ If [ECONOMY] (l 29) is set to
[5 MINUTES] and th e un i t au to m a tica l l y
goes into Quick start st andby mode, clos e
the LCD monitor and then open it again.
≥ Turn the unit off using the power button.
Quick power on
When the power is turned on with the mode
set to , the unit will enter the reco r din g
pause mode after about 1.9 seconds.
Select the menu. (l 27)
[SETUP] # [QUICK POWER ON] #
[ON]
≥ In the Quick power on mode, the zoom
magnification becomes 1k.
The status indicator A li ght s red an d the unit
is put into recording pause.
≥ When in Quick start standby mode
about 70% of the power used in
Recording pause mode is being
consumed, so the recordi ng time will
be reduced.
38
VQT2L14
Page 39
Recording
0h00m00s0h00m00s0h00m00s
RR1h
2020
mR1h20m
0h00m00s0h00m00s0h00m00s
R 1h20mR 1h20mR 1h20m
SP
SDR-T55
SDR-T50
SDR-H85
Recording (Basic)
2
≥ Open the lens cover before turning the un it on. (l 17)
SP
Recording motion
pictures
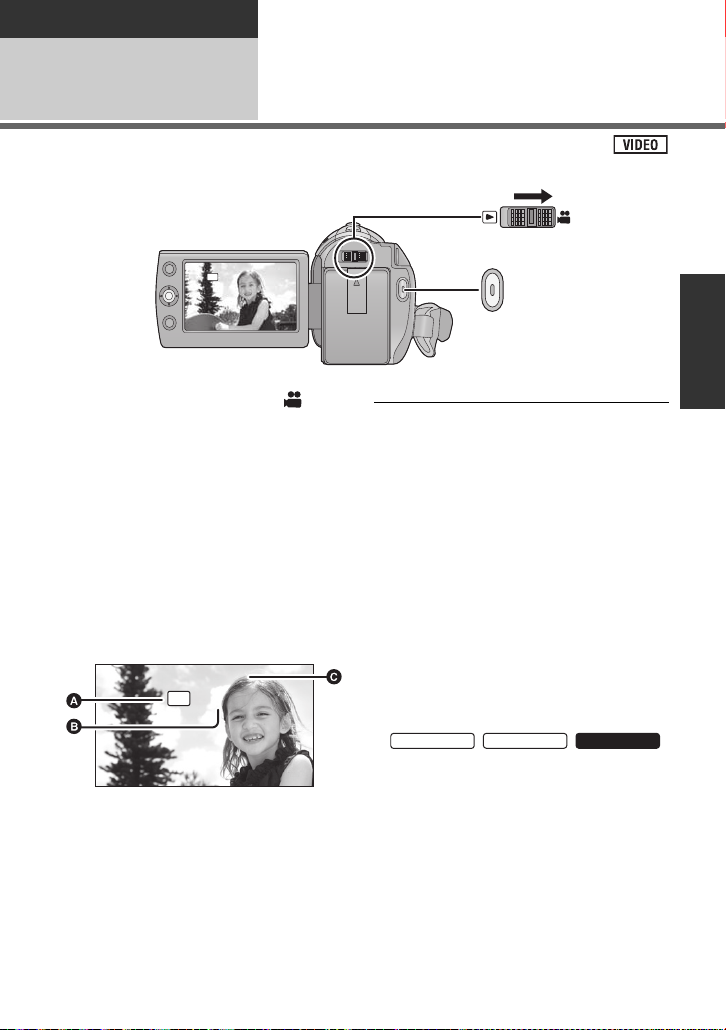
1 Change the mode to and
open the LCD monitor.
2 Press the recording start/stop
button to start recording.
≥
When you begin recording, ; changes to ¥.
≥
While recording is in progress, the recording
will not stop even if the LCD monitor is closed.
3
Press the recording start/stop
button again to pause recording.
∫
Screen indications in the
Motion Picture Recording Mode
A Recording mode
B Remaining time left for recording
(When the remaining time is less than
1 minute, [R 0h00m] flashes red.)
C Recording time elapsed
Each time the unit is put into recording
pause, the counter display will be reset
to “0h00m00s”.
≥ Still pictures can be recor ded while
recording the motion picture. (l 46)
≥ The images recorded between pressing
the recording start/s top button to start
recording and pressing it again t o pause
recording become one scene.
The scene is automatically divided when
the recorded data exceeds 1.9GB. (The
recording will continue.)
Normal recording mode:
SD CARD
Maximum number of recordable scenes: 9801
Maximum number of different dates: 99
(l65)
(In the case of SD cards it is the maximum
number of recordable scenes per card.)
Built-in Memory/HDD
//
Maximum number of recordable scenes:
98901
Maximum number of different dates:
999 (l 65)
Long recording mode:
Maximum number of recordable scenes:
89100
Maximum number of different dates:
99 (l 65)
When either of them reaches to the maximum
limit, additional scenes cannot be recorded.
VQT2L14
39
Page 40
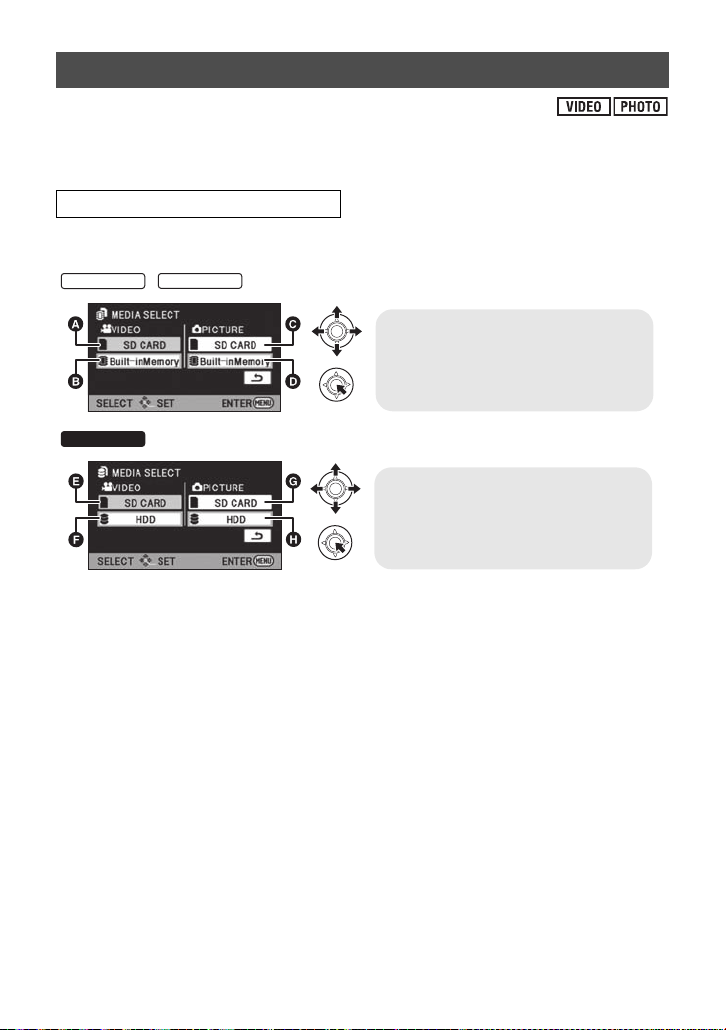
Selecting a media to record [SDR-T55]/[SDR-T50]/[SDR-H85]
SDR-T55
SDR-T50
A VIDEO/SD CARD
B VIDEO/Built-inMemory
C PICTURE/SD CARD
D PICTURE/Built-inMemory
SDR-H85
E VIDEO/SD CARD
F VIDEO/HDD
G PICTURE/SD CARD
H PICTURE/HDD
Media for recording both still pictures and motion pictures may be set on the SD Card, the
built-in memory or the HDD.
Select the menu. (l 27)
[MEDIA SELECT]
Select the media to record motion pictures or still pictures, then press
the center of the joystick.
/:
:
≥ Media set for still pictures and motion pictures will be outlined in a yellow frame.
≥ Press MENU button to end.
40
VQT2L14
Page 41
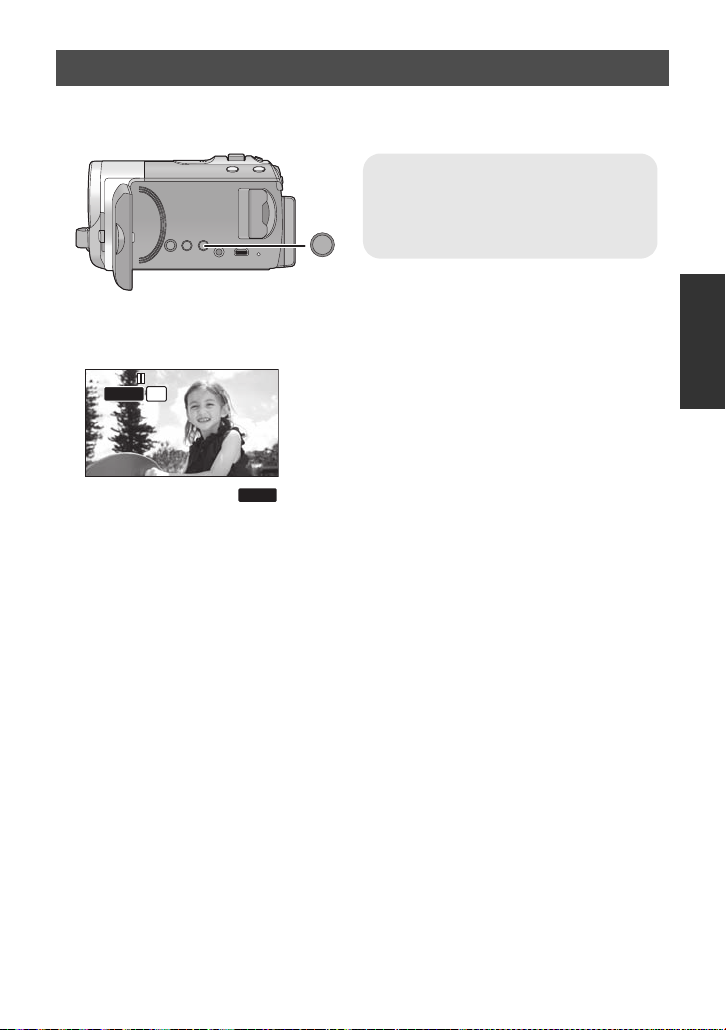
Recording in long recording mode
LONG
REC.
Long recording button
Pressing the button will switch
between Normal recording mode and
Long recording mode.
0h00m00s0h00m00s0h00m00s
LSP
LONG REC
LONG REC
Pressing the LONG REC. button allows for recording at the same image quality as Normal
recording mode for approximately twice as lon g.
1 Press and hold the LONG REC.
button.
≥ The Long recording icon appears.
2 Press the recording start/stop
button to start recording.
Normal recording mode:
Recording will take place in a mode s uitable
for playback in devices conforming to the
SD-Video standard .
Long recording mode:
Allows for recording at the same image
quality as Normal recording mode for
approximately twice as long. Enjoy playing
back your video on this camera.
41
VQT2L14
Page 42
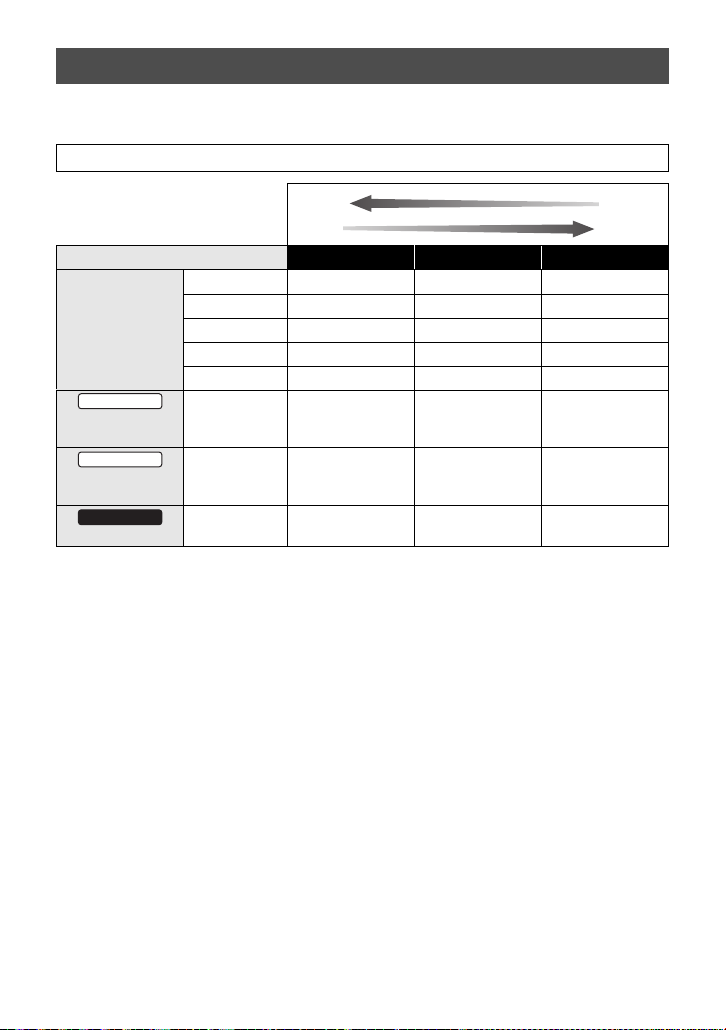
Recording modes/approximate recordable time
Switch the picture quality of the motion pictures to be record ed.
Select the menu. (l 27)
[RECORD SETUP] # [REC MODE] # desired setting
Normal recording mode
Recording mode XP SP LP
4GB 50 min 1h40min 3h20min
8GB 1h45min 3h30min 7h
SD card
SDR-T55
Built-in
memory
SDR-T50
Built-in
memory
SDR-H85
HDD
16 GB 3h30min 7h 14h
32 GB 7h30min 15h 30h
64 GB 15h 30h 60h30min
8GB 1h45min 3h30min 7h
4GB 50min 1h40min 3h20min
80 GB 18h30min 37h 74h30min
42
VQT2L14
Page 43
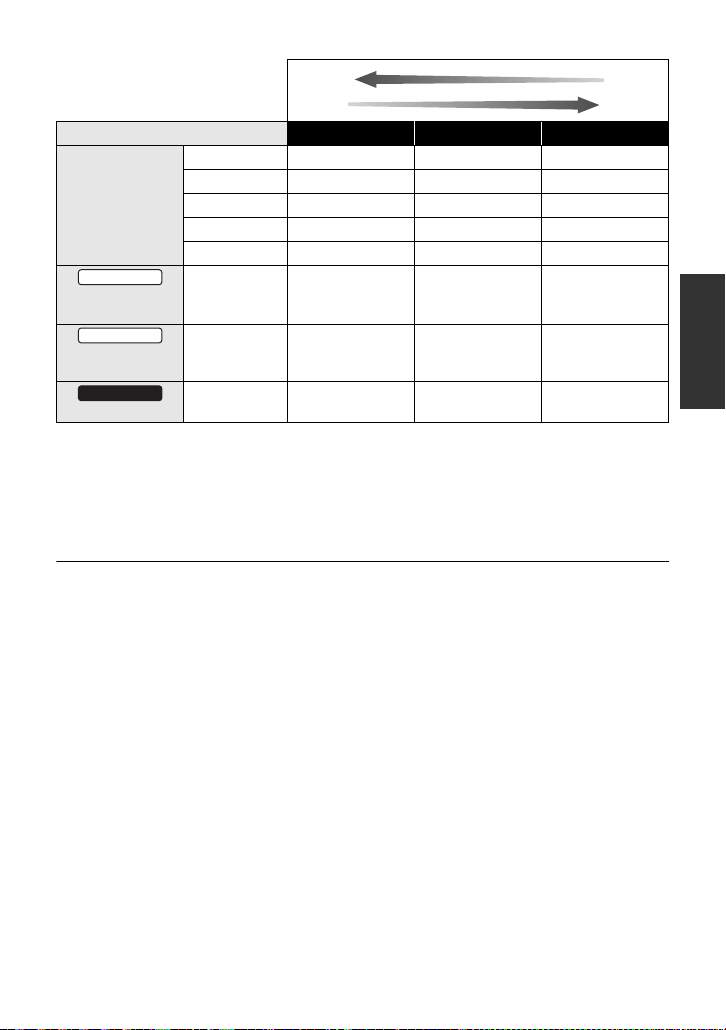
Long recording mode
SDR-T55
SDR-T50
SDR-H85
Recording mode LXP LSP LLP
4GB 1h40min 3h20min 6h40min
8GB 3h30min 7h 14h
SD card
16 GB 7h 14h 28h
32 GB 15 h 30 h 60 h
64 GB 30 h 60 h 121 h
Built-in
memory
Built-in
memory
HDD
A Favors image quality
B Favors recording time
≥ If a recording with a lot of movement is recorded, the record ing time is reduced.
≥ The recordable time may be reduced if recording of short scene is repeated.
≥ Use time in the row of 4 GB in above table as a guideline for the time that can be copied
onto one DVD disc (4.7 GB).
≥ Recordable time using the battery (l 21)
≥ When the unit is moved a lot or moved quickly, or when a fast-moving subject is recorded
(particularly when recording in LP/LLP mode), mosaic-type noise may appear at playback.
8GB 3h30min 7h 14h
4GB 1h40min 3h20min 6h40min
80 GB 37 h 74 h 149 h
43
VQT2L14
Page 44
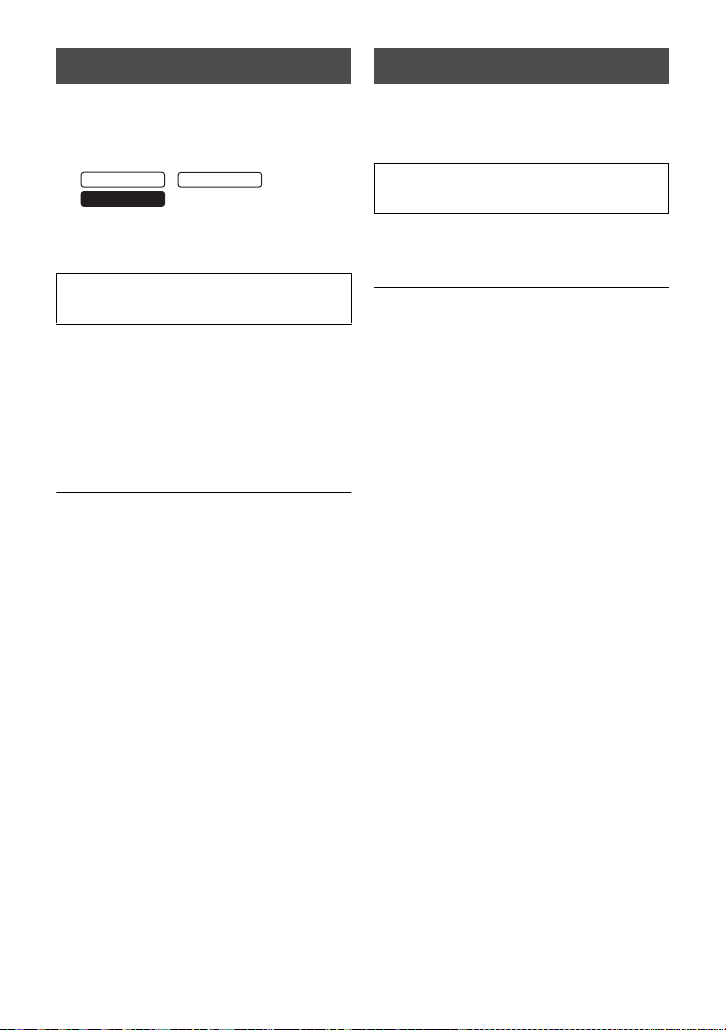
Audio recording modes
SDR-T55
SDR-T50
SDR-H85
Shooting guide
In Normal recording mode, you may switch
the audio recording method for motio n
picture recording on the SD Card.
¬ //
Select [SD CARD] in
[MEDIA SELECT].
Select the menu. (l 27)
[SETUP] # [AUDIO REC] # [DOLBY]
or [MPEG]
[DOLBY] (Dolby Digital):
This is a recording method suitable for
creating a DVD-Video disc us ing the DVD
burner. (l 79)
[MPEG] (MPEG-1 Audio Layer 2):
This is a recording method suitable for
playing back the SD card using a device
conforming to the SD-Video standard.
≥ This function’s default setting is [DOLB Y].
≥ This unit is not capable of converting the
audio recording method after recording
motion pictures.
By using the supplied sof tware (Vide oCam
Suite 3.0), audio can be recorded in
[DOLBY] mode on a DVD-Video disc and
in [MPEG] mode on an SD card.
Message is displayed when this uni t is
moved rap idl y.
Select the menu. (l 27)
[RECORD SETUP] # [SHOOTING
GUIDE] # [ON]
When “CAMER A PANNING IS TOO FAST.”
appears, move the unit slowly while
recording.
≥ Message will not appear while pa using the
recording. (Message will appear even if it
is pausing the record ing if [DEMO MODE]
is set to [ON].)
≥ In some recording conditions, messages
may not appear.
44
VQT2L14
Page 45
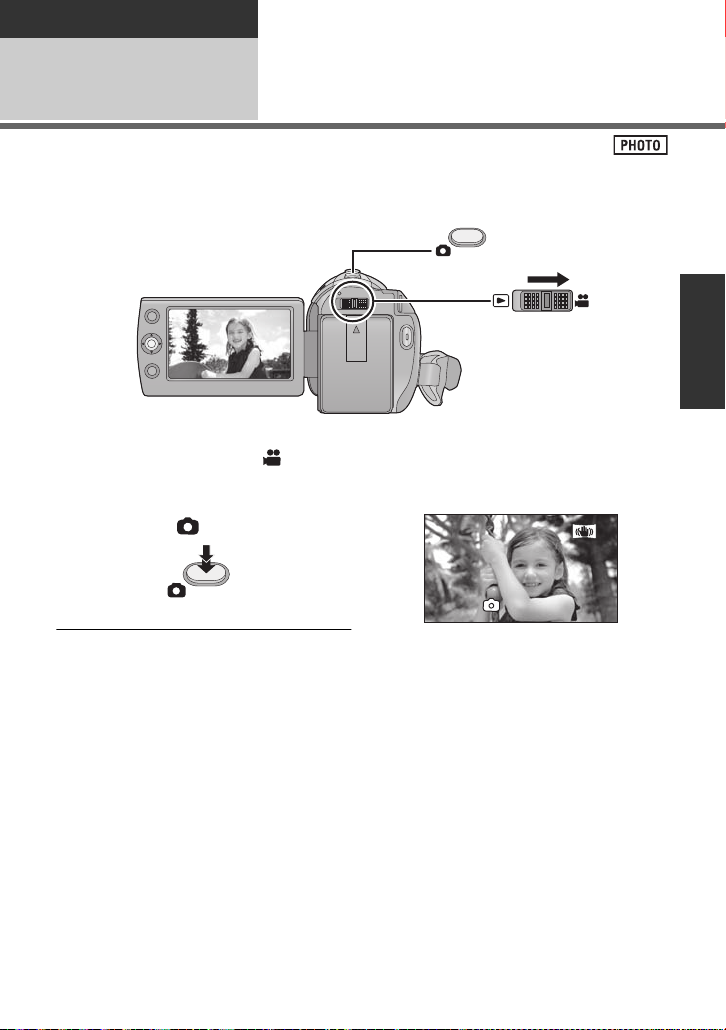
Recording
R3000R3000R3000
Recording (Basic)
Recording still pictures
3
≥ Open the lens cover before turning on the power. (l 17)
Still pictures can also be recorded while recording motion pictures.
≥ Refer to page 40 for methods for selecting recording media.
1 Change the mode to and
open the LCD monitor.
2 Press the button.
≥ Because of slower shutter speeds, it is
recommended that you use a tripod when
recording in low li ght.
∫ About the screen indica tions in
Still Picture Recording
R3000: Remaining number of still
pictures
(Flashes in red when [0]
appears.)
45
VQT2L14
Page 46
Picture size
SDR-T55
SDR-T50
SDR-H85
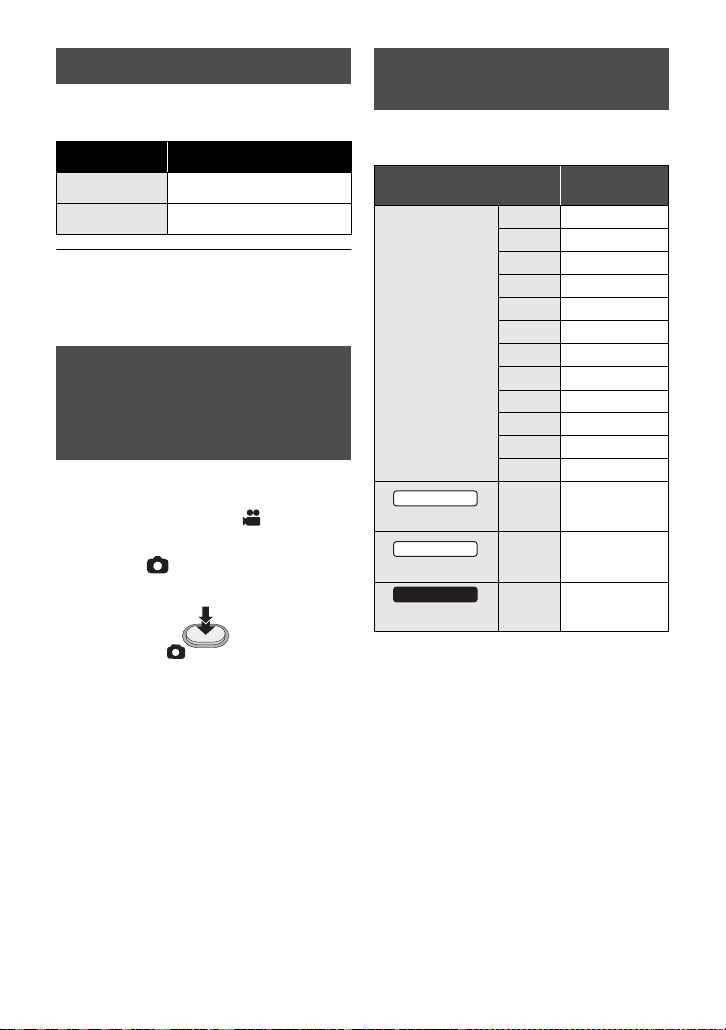
Records at the number of recording pix els
set under [ASPEC T] (l 55).
Aspect Number of pixels
4:3 640k480
16:9 640k360
≥ The edges of still pictures recorded on thi s
unit with a 16:9 aspect ratio may be cut at
printing. Check the printer or photo studio
before printing.
Simultaneous recording
(recording still pictures
while recording motion
pictures)
Y ou can record still pictures even while
recording motion pictures.
¬ Change the mode to .
While recording motion pictures,
press the button (press to the
bottom) to take the picture.
≥ While recording motion pictures or during
the PRE-REC operation, the following
arrangements are applied so that motion
picture recording takes pre ference over
still picture recording.
jImage quality is different from ordinary
still pictures.
jThe remaining usable capacity (number
of pictures that can be taken) indication
does not appear.
≥ For vivid still pictures, we recommend
pausing motion picture recording and
taking still pictures after releasing the
PRE-REC mode.
Number of recordable
pictures
≥ SD cards are only mentioned with their
main memory size.
Picture size
512 MB 3600
1GB 7400
2GB 15000
4GB 30000
6GB 45000
SD card
Built-in memory
Built-in memory
HDD
* Maximum number of recordable pictures
that can be displayed is 99999.
If the number of recordable pictures
exceeds 99999, the number will not
change when the picture is taken until the
number of recordable pictures gets less
than 99999.
8GB 60500
12 GB 92000
16 GB 99999
24 GB 99999
32 GB 99999
48 GB 99999
64 GB 99999
8GB 60500
4GB 30000
80 GB 99999
640k480
640k360
*
*
*
*
*
*
46
VQT2L14
Page 47
Recording
6
W
T
6
W
T
ヸヵ
ヷヰロ
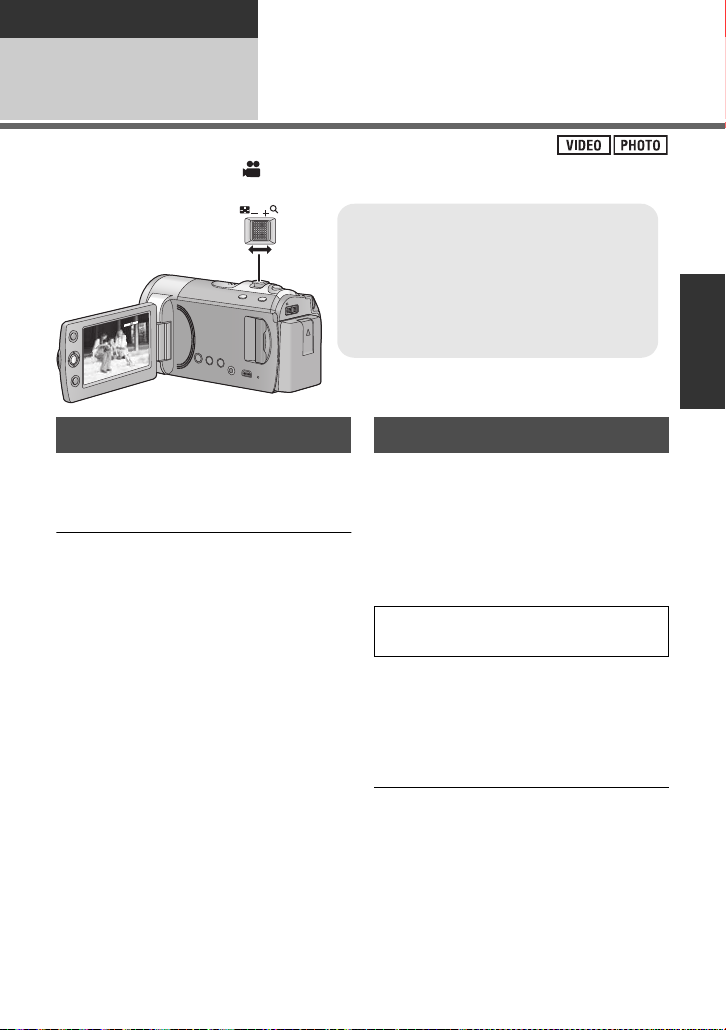
Zoom lever
T side:
Close-up recording (zoom in)
W side:
Wide-angle recording (zoom out)
≥ The zoom speed varies depending on the
range over whi c h th e z o om l eve r is moved.
Recording (Basic)
Recording functions
4
¬ Change the mode to .
Enhanced optical zoom Digital zoom function
It is possible to enhance the zoom
magnification up to 78k without degrading
the image quality when recording.
≥ If you take your finger off the zoom lever
during zoom operation, the operation
sound may be recorded. When returning
the zoom lever to the original position,
move it quietly.
≥ When distant subjects are brought closer,
they are focused at about 1.5 m (4.9 feet)
or more.
≥ When th e zo om m ag n i fi ca ti o n i s 1k, th i s
unit can focus on a subject approx. 2cm
(0.8z) away from the lens.
If the zoom magnification exceeds 78k ,
then the digital zoom function will be
activated. The maximum magnification
provided by the digital zoom can be
switched.
Select the menu. (l 27)
[RECORD SETUP] # [D.ZOOM] #
desired setting
[OFF]: Optical zoom only (Up to 78k)
[100k]: Up to 100k
[3500k]: Up to 3500k
≥ If [100k] or [3500k] is selected, the digital
zoom range is displayed in blue while
zooming.
≥ The larger the digital zoom magnification,
the more the image quality is degrade d.
47
VQT2L14
Page 48
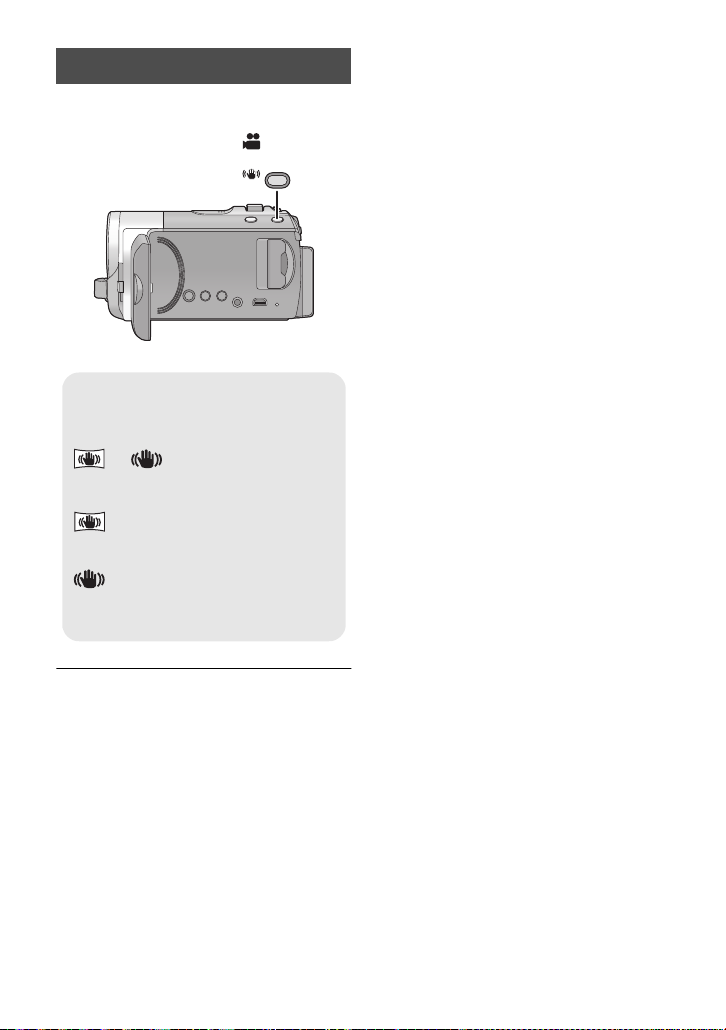
Image stabilizer function
ヰハリハヴハ
Optical image stabilizer button
Pressing the button changes the
optical image stabilizer setting.
# # OFF
≥ Set the Manual Mode before sett ing
the Image Stabilizer function to off.
: Active mode
This setting gives more stabilization and
is suitable for recording when walking.
: ON
This setting is suitable for recording in a
stable state such as scenery .
Optical Image stabilizer can stabilize th e
image without decreasing the image quality.
¬ Change the mode to .
≥ Stabilization may not be possible under
strong shaking.
≥ When a tripod is used, we recommend
that you turn the image stabilizer off.
48
VQT2L14
Page 49
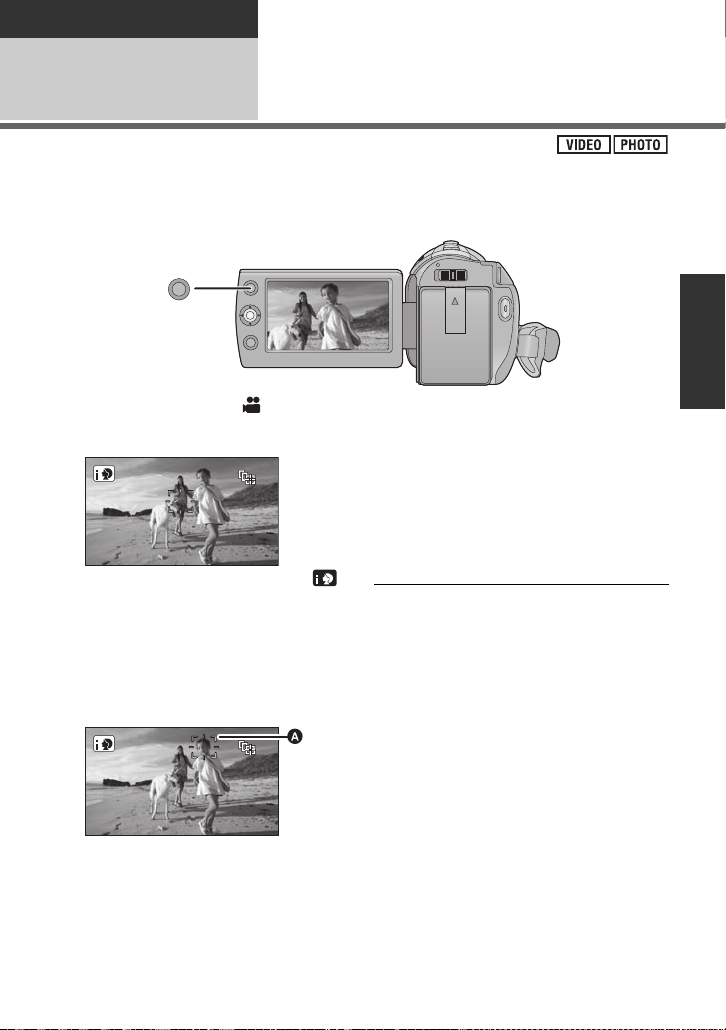
Recording
AF/AE
Recording (Basic)
AF/AE tracking
5
≥ Open the lens cover before turning the un it on. (l 17)
It is possible to set the focus and exposure to the locked t arget
The focus and exposure will keep following the s ubject automatically even if it moves.
(Dynamic tracking)
¬ Change the mode to .
1 Press the AF/AE button
≥ When Intelligent Auto Mode is set to
(Portrait), the pr i o rit i ze d fa ce fra me (i n
orange) will change to the target frame,
and the subject’s face will be tracked.
2
Align the subject with the target
frame and press the AF/AE
button to lock on to the target
A Target frame
≥ To chan ge the targ et, p ress the AF /AE
button and align the target frame with
the new subject and press the AF/AE
button once again.
3 Start recording.
≥ Pressing and holding the AF/AE
button releases the AF/AE tracking.
∫ About target frame
≥ In the event of failure to achiev e target
lock, the target frame will blink red and
then disappear. Realign the subject wi th
the target frame and repress the AF/AE
button to regain target lock.
≥ It may track different objects or may not
lock the target depe nding on the recor ding
conditions such as the following:
jWhen the object is too large or too small
jWhen color of the object is simil ar to the
background
jWhen the sc e ne is dark
≥ AF/AE tracking will be canceled in the
following cases.
jWhen the mode is changed
jWhen the power is turned off
jWhen the Scene mode is set
jWhen the unit is switched to Intelligent
Auto Mode/Manual Mode
jWhen the unit is switched to face-to-
face recording.
49
VQT2L14
Page 50
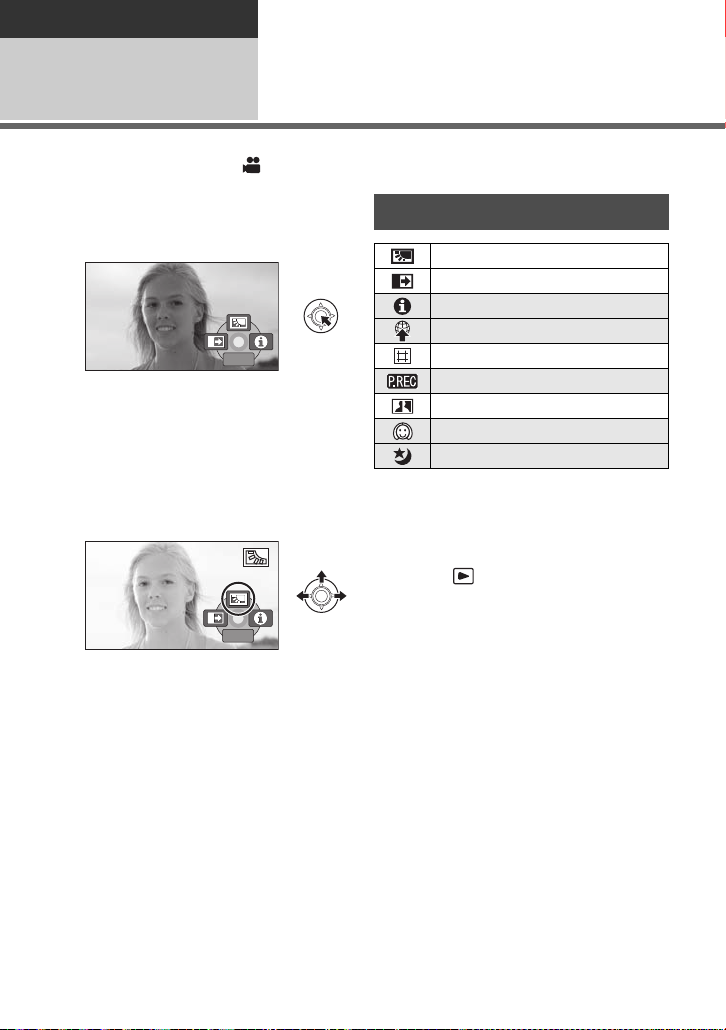
Recording
1/2
NEXT
1/2
NEXT
Recording (Advanced)
1
Select the operation icons to add different ef fects to the images to be recorded.
¬ Change the mode to .
Recording functions of
operation icons
1 Press the joystick, and icons
will be displayed on the
screen.
1/2
NEXT
1/2 NEXT
≥ The indication changes each time the
joystick is moved down.
≥ The indication disappears when th e center
of the joystick is pressed again.
2 (e. g. Backlight compensat ion)
Select an icon with the
joystick.
1/2
NEXT
1/2 NEXT
≥ To release, reselect the operation icon.
Operation icons
Backlight compensation
Fade
Help mode
Web mode
Guide line
PRE-REC
Intelligent contrast con trol
Soft skin mode
Color night rec
* Not displayed when the Intelligent Auto
Mode is on.
≥ The shaded operation icons are not
displayed while recording.
≥ If you turn off the power or change the
mode to , Color night rec and
Backlight compensation functions are
canceled and if you turn off the powe r, the
Fade function is canceled.
*
*
*
50
VQT2L14
Page 51
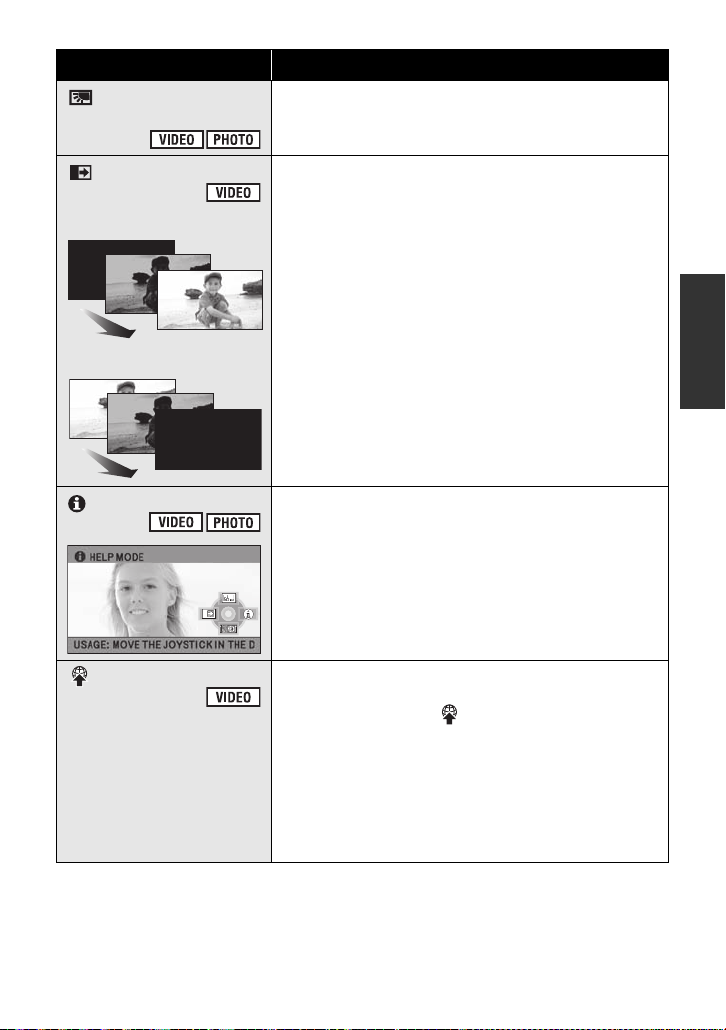
Function Effect
Backlight
compensation
This makes the image brighter to prevent darkening
of a backlit subject.
Fade
(Fade in)
(Fade out)
Help mode
WEB MODE
When you start recording, the image/audio gradually
appears. (F ade in)
When you pause recording, the image/audio
gradually disappears. (Fade out)
≥ The Fade setting is canceled when the reco rding
stops.
∫ To select the color for Fade in/out
Select the menu. (l 27)
[RECORD SETUP] # [FADE COLOR] # [WHITE] or
[BLACK]
Select the desired icon with the joystick to display an
explanation on the screen.
To exit the help mode
Press the MENU button.
You can record motion pictures of under 10 minutes,
suitable for uploading to YouTube.
≥ The web mode icon [ ] appears.
Press the recording start/stop button to start
recording.
≥ Countdown of remaining time will start from “9m59s”.
≥ Recording will pause automatically after 10 minutes
from start of the recording.
≥ Web mode is canceled if you turn the uni t off.
≥ To upload motion pictures to YouTube (l 98)
51
VQT2L14
Page 52
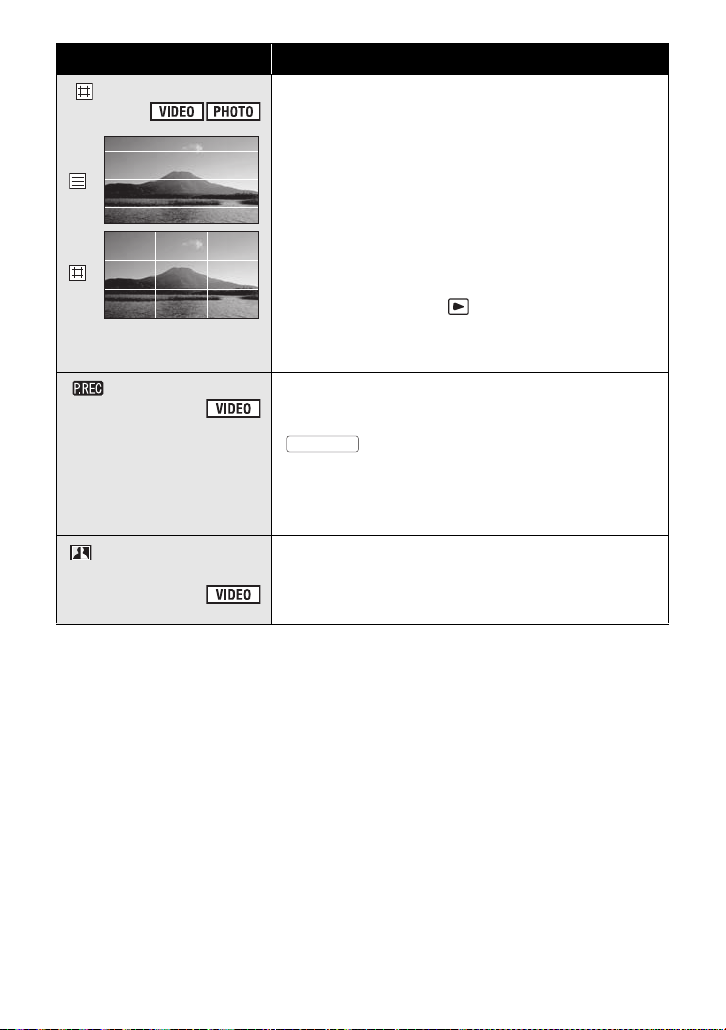
Function Effect
Guide line
PRE-REC
Intelligent contrast
control
You can chec k if th e image i s leve l whil e reco rding o r
playing back motion pictures and still pictures. The
function can also be used to estimate the balance of
the composition.
≥ The guide lines do not appear on the images actually
recorded.
∫ Selecting the type of Guide line
Select the menu. (l 27)
[RECORD SETUP] # [GUIDE LINES] # desired
setting
∫ Displaying Guide lines at playback
≥ Change the mode to .
[VIDEO SETUP] # [GUIDE LINES] # desired setting
≥ Set to [OFF] to cancel the guide l i ne.
This allows recording of the pictures and sound to
start approximately 3 seconds before the record in g
start/stop button is pressed.
PRE-REC
≥ Aim this unit at the subject and posi tio n it secur ely.
Press the recording start/stop button to start
recording.
≥ There is no beep sound.
This brightens parts that are in shadow and difficult
to see and suppresses white saturation in brig ht
parts at the same time. Both bright and dark parts
can be recorded clearly.
appears on the screen.
52
VQT2L14
Page 53
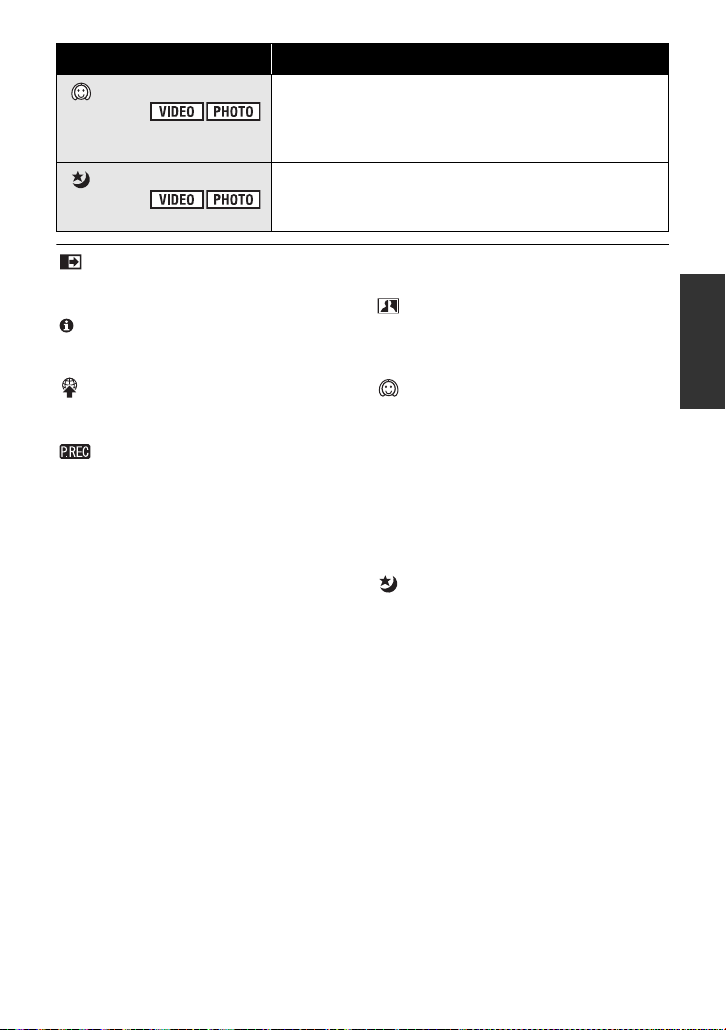
Function Effect
Soft skin mode
Color night rec
This makes skin colors appear softer for a more
attractive appearance.
This is more effective if you record a person closely
from the torso up.
This function allows yo u to record color images in
very low light situations. (Minimum required
illumination: approx. 2 lx)
Fade:
≥ The thumbnails of scenes recorded using
fade in become black (or white).
Help mode:
≥ Recording and function setting s cannot be
performed while in help mode.
WEB MODE:
≥ You cannot switch to web mode while
recording.
PRE-REC:
≥ PRE-REC is canceled in the following
cases.
jIf you change the mode.
jIf you press the MENU button.
jIf you turn the unit off.
jIf you start recording.
j3 hours have elapsed
≥ After setting PRE-REC, if recording starts
in less than 3 seconds, or while the PREREC indication flashes within about
3 seconds after initiating the quick start
operation, motion pictures taken
3 seconds before pressing the recording
start/stop but ton cannot be recorded.
≥ When in normal recording mode, the
thumbnail displays for recorded scenes
will be the initial images from recorded
scenes, while when in long recording
mode, the thumbna il di splays for rec orded
scenes will be images present when the
recording start/stop button was pressed.
≥ The date indication for scenes recorded
using the PRE-REC function will be the
date when the start /stop butto n is presse d.
Therefore, the date indication when
displaying thumbnails or during playback
may be different from the dat e when the
recording actually started.
Intelligent contrast control:
≥ If there are extremely dark or bright parts
or the brightness is insufficient, the effect
may not be clear.
Soft skin mode:
≥ If the background or anything else in the
scene has colors similar to the skin co lor,
they will also be smoothed.
≥ If the brightness is insufficient, the effect
may not be clear.
≥ If you record a person in the distan ce, the
face may not be recorded cle ar ly. In this
case, cancel Soft skin mode or zoom in o n
the face (close-up) to record.
Color night rec:
≥ Recorded scene is seen as if frames
were missed.
≥ If set in a bright place, the screen may
become washed out for a while.
≥ Bright dots that are usually invis i ble may
be seen, but this is not a malfunction.
≥ Using a tripod is recommended.
≥ In darker areas, Auto focus may focus a
bit slower. This is normal.
53
VQT2L14
Page 54
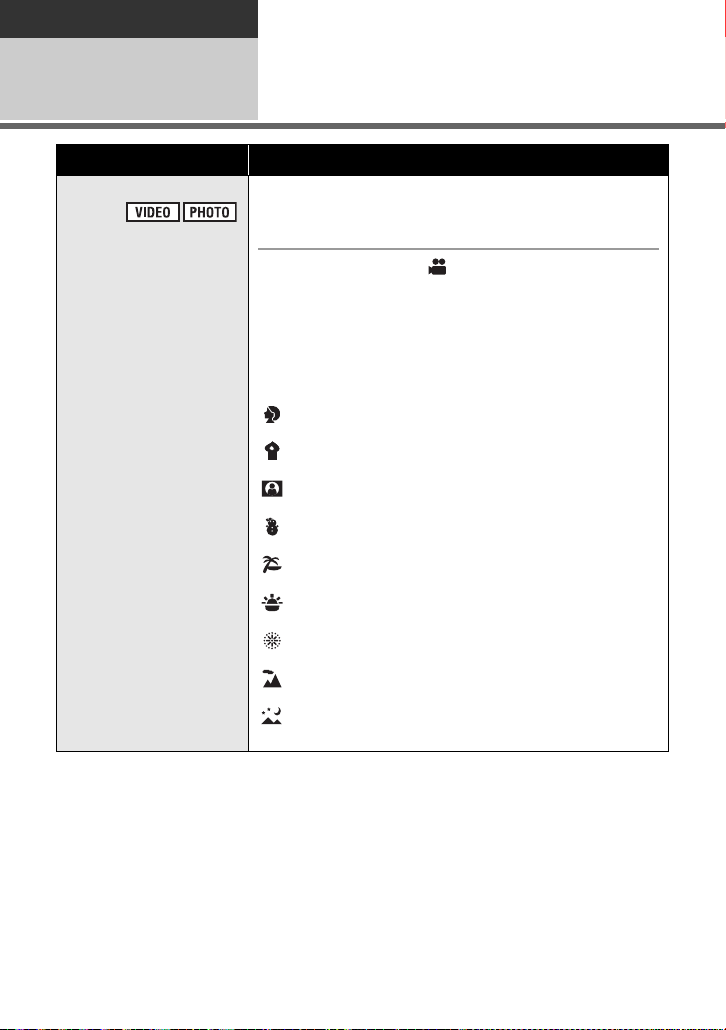
Recording
Recording
(Advanced)
Function Effect/Setting method
SCENE MODE
2
Recording functions of
menus
When you record images in different situations, this
mode automatically sets optimum shutter speeds and
apertures.
≥ Change the mode to .
Select the menu. (l 27)
[RECORD SETU P ] # [SCENE MODE] # desired setting
≥ Set [SCENE MODE] to [OFF] to cancel the function.
5Sports:
To make fast moving scenes less shaky with slow playback
and pause of playback
Portrait:
To make people stand out against the background
Low light:
For dark scenes, such as at dusk
Spotlight:
Improved quality when subject is brightly illuminated.
Snow:
Improved image quality when shooting in snowy locations.
Beach:
To make blue in the sea or sky vibrant
Sunset:
To make red in the sunrise or sunset vibrant
Fireworks:
To capture the fireworks in the night sky beautifully
Scenery:
For spatial scenery
Night scenery:
To capture the evening or night scenery beautiful l y.
54
VQT2L14
Page 55
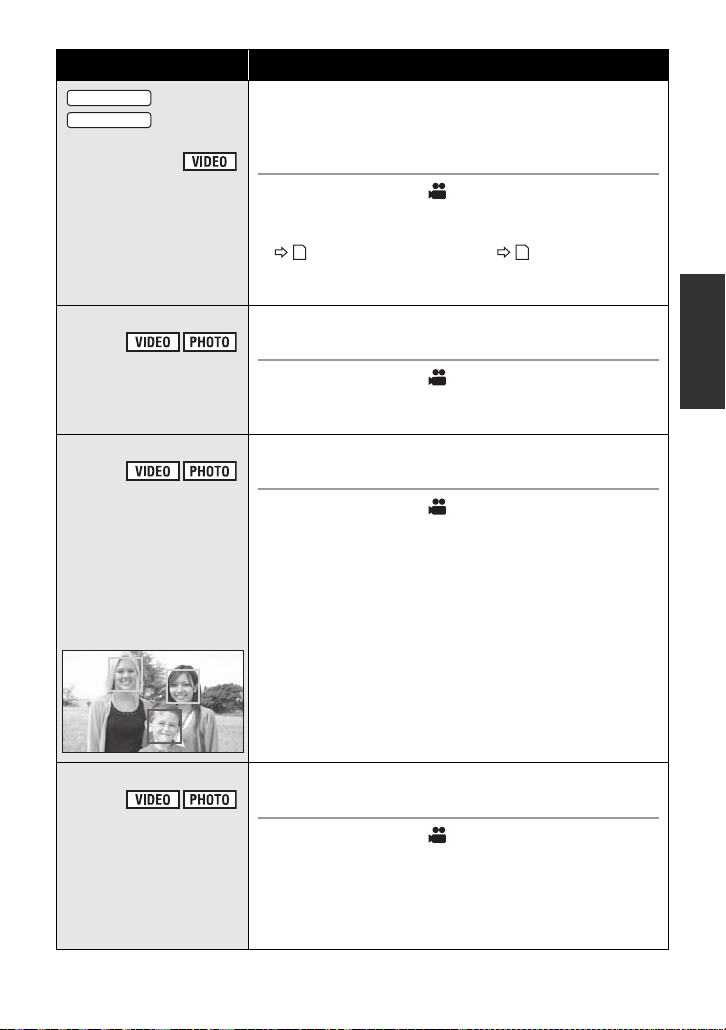
Function Effect/Setting method
SDR-T55
SDR-T50
RELAY REC
/
It is possible to continuously record motion picture to
an SD card when there is no space available in the builtin memory. (It allows you to record only to SD card from
built-in memory.)
≥ Change the mode to .
Select the menu. (l 27)
[RECORD SETU P ] # [RELAY REC] # [ON]
≥ is displayed on the screen. will disappear
when space in the built-in memory is gone and the
recording to the SD card starts.
ASPECT
This allows you to record images compatible with widescreen TVs (16:9) and regular TVs (4:3).
≥ Change the mode to .
Select the menu. (l 27)
[RECORD SETU P ] # [ASPECT] # [16:9] or [4:3]
FACE FRAMING
[OFF]:
Cancel the setting
[PRIMARY]:
Only the prioritized face
framing is displayed.
[ALL]:
All face detection
framings are displayed.
In the Intelligen t Auto Mo de , detected faces appear with
frames.
≥ Change the mode to .
Select the menu. (l 27)
[RECORD SETU P ] # [FACE FRAMING] # desired
setting
≥ Up to 5 frames are indicated. Larger faces and faces
nearer to the center of the screen take preference over
others.
∫ Prioritized face framing
Prioritized face framing is displayed in orange. Focus and
adjustment of brightness will be performed against the
prioritized face framing .
AUTO SLOW SHTR
You can record bright pictures even in dark places by
slowing the shutter speed.
≥ Change the mode to .
≥ Select the Manual Mode. (l 58)
Select the menu. (l 27)
[RECORD SETU P ] # [AUTO SLOW SHTR] # [ON]
≥ The shutter speed is set to 1/30 or more depen ding on the
surrounding brightness.
VQT2L14
55
Page 56
Function Effect/Setting method
WIND NOISE
CANCELER
This will reduce the wind noise coming into the built-in
microphones while maintaining the realism.
≥ Change the mode to .
≥ Select the Manual Mode. (l 58)
Select the menu. (l 27)
[RECORD SETU P ] # [WIND NOISE CANCELER] # [ON]
ZOOM MIC
The zoom microphone is linked to the zooming
operation so that far-away sounds with a tele-shot and
close-up sounds with a wide-angle shot are recorded
more clearly.
≥ Change the mode to .
≥ Select the Manual Mode. (l 58)
Select the menu. (l 27)
[RECORD SETU P ] # [ZOOM MIC] # [ON ]
WB ADJUST
You can fin ely ad ju st the whit e bal ance ( l 59) when you
cannot acquire the desire d hue b y setting the white
balance.
≥ Change the mode to .
≥ Select the Manual Mode. (l 58)
Select the menu. (l 27)
[RECORD SETU P ] # [WB ADJUST]
≥ The currently-set white balance icon will be displayed.
(l 59)
Adjust by moving the joystick l eft and right, then press
the MENU button or the center of the joystick to set.
R : Move when the hue is bluish.
B : Move when the hue is reddish.
56
VQT2L14
Page 57
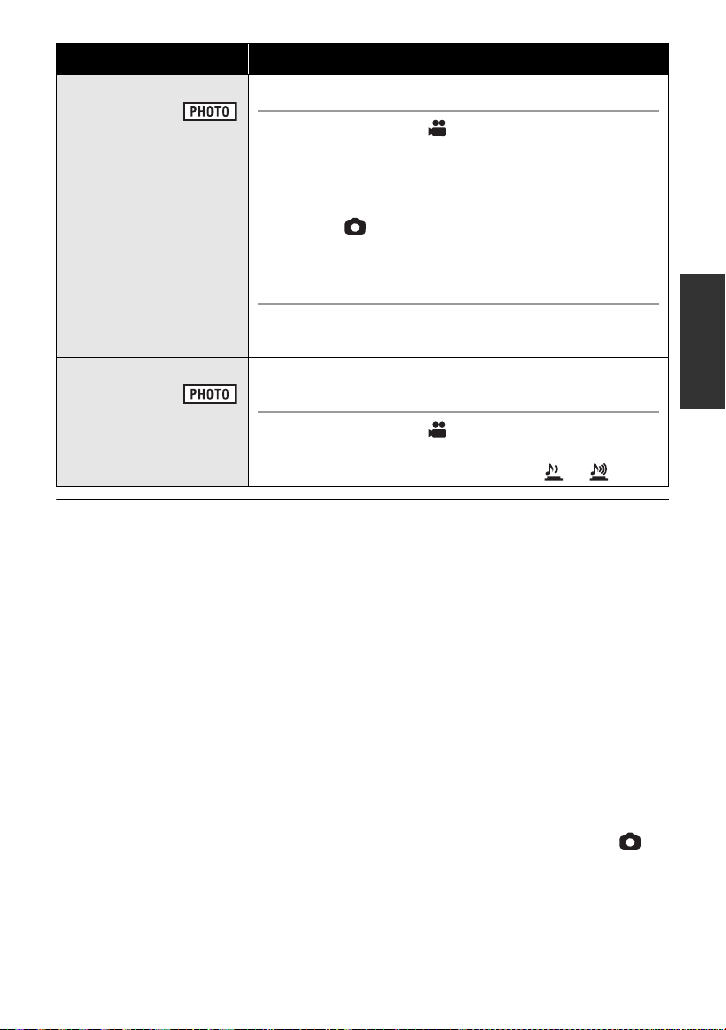
Function Effect/Setting method
SELF TIMER
This is for recording still pictures using the timer.
≥ Change the mode to .
Select the menu. (l 27)
[PICTURE] # [SELF TIMER] # desired setting
Ø10 (Records after 10 seconds)
Ø2 (Records after 2 seconds)
≥ When the button is pressed, a still picture is re corde d
after the Ø10 or Ø2 disp lay f lashe s f or the t ime which has
been set.
≥ After recording, the Self-timer is canc eled.
To stop the timer midway through
Press the MENU button.
SHTR SOUND
You can add a shutter sound when recording still
pictures.
≥ Change the mode to .
Select the menu. (l 27)
[PICTURE] # [SHTR SOUND] # [OFF]/[ ]/[ ]
SCENE MODE:
≥ (Low light/Sunset)
jThe shutter speed is 1/30 or more .
(Sunset/Fireworks/Scenery/Night Scenery)
≥
jImage may get blurry when a close
object is recorded.
≥ (Sports)
jDuring normal playback, the image
movement may not look smooth.
jColor and screen brightness may
change under indoor lighting.
jIf the brightness is insufficient, the
Sport s Mode does not function. The
5 display flashes.
≥ (Portrait)
jColor and screen brightness may
change under indoor lighting.
≥ (Fireworks)
jImage may get washed out when
recorded in bright surroundings.
≥ (Night scenery)
jUsing a tripod is recommended.
RELAY REC:
≥ In the Relay recording, still pictures are
also recorded onto the SD card.
AUTO SLOW SHTR:
≥ When the shutter speed becomes 1/30,
the screen may be seen as if frames are
missed and afterimages may appear.
If the scene is low in brightness or contrast,
≥
the subject may not be focused on.
WIND NOISE CANCELER:
≥ When the Intelligent Auto Mode is set to
WIND NOISE CANCELER
on, [
[ON], and the setting cannot be changed.
≥ The sound quality may be changed if this
function is activated i n strong winds.
SELF TIMER:
≥ The Self-timer standby mode is canceled
when you press the recording start/stop
button to start motion picture recording.
≥ Setting the Self-timer to Ø2 is a good way
to prevent image shake when the
button is pressed while using a tripod etc.
SHTR SOUND:
There will be no shutter noise when taking
≥
still pictures during motion picture recording.
] is set to
VQT2L14
57
Page 58
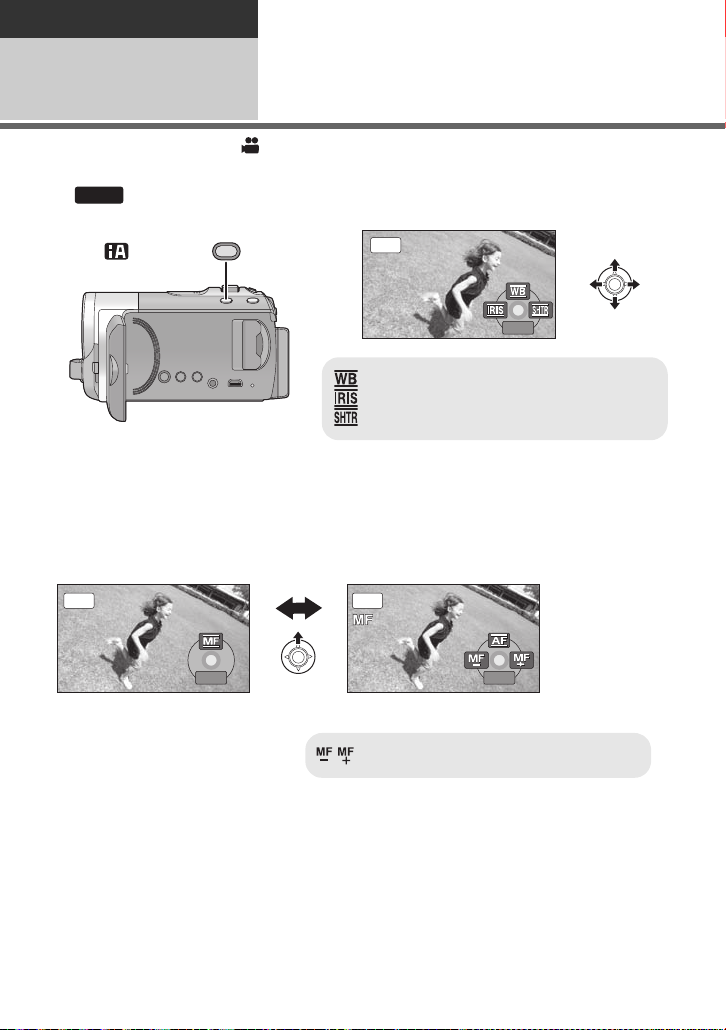
Recording
4/54/5 NEXTNEXT4/5 NEXT
MNL
White balance (l 59)
Aperture adjustment (l 60)
Shutter speed (l 60)
5/5
NEXT
5/5
NEXT
[MF] icon shown in the illustration appears.
Manual focus adjustment (l 61)
1 Manual Mode
2 Manual focus mode
Recording
(Advanced)
3
¬ Change the mode to .
Manual recording
functions
Press the iA/MANUAL button to switch to Manual Mode.
≥ appears on the screen.
MNL
/MANUAL
∫ To change to Manual Focus Mode
Switch the operation icon by pressing the joystick down while in the sc r een above.
Press the j oystick forward
≥ This will allow you to switch between Manual Mode and Manual Focus Mode.
MNL MNL
5/5
NEXT
5/5 NEXT
∫ To release the Manual Mode
≥ Press the iA/MANUAL button again.
58
VQT2L14
5/5
NEXT
5/5 NEXT
Page 59
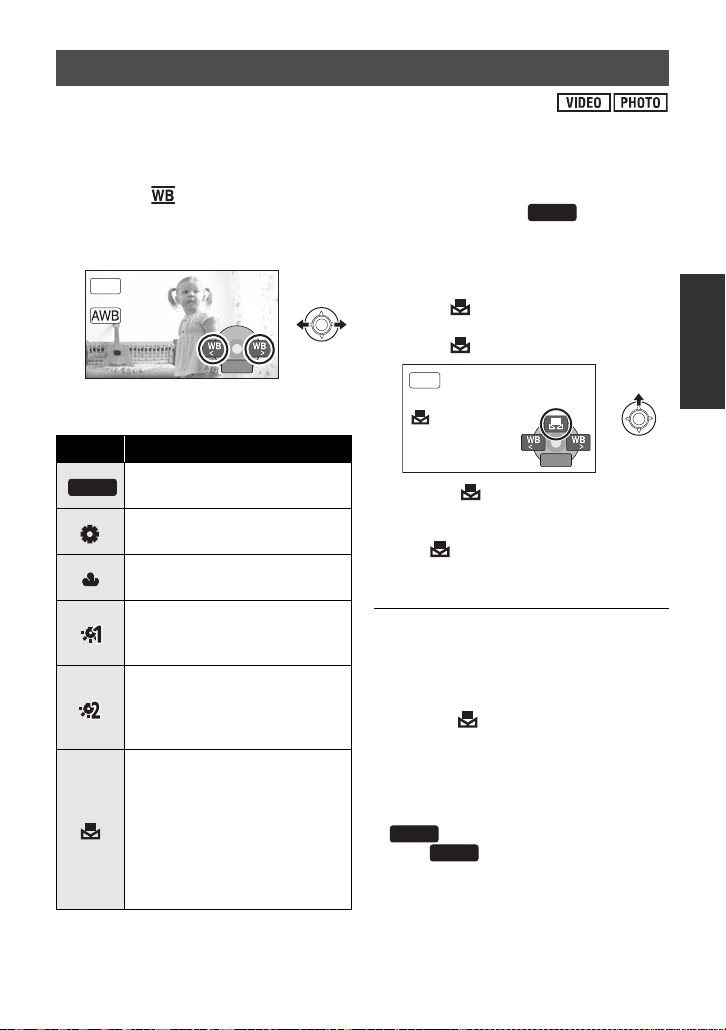
White balance
BACK
AWB
AWB
BACKBACKBACK
MNL
AWB
Automatic white bala nce f uncti on ma y not repro duce natur al c o lors d ependin g o n the s cenes
or lighting conditions. If so, you can adjust the white balance manually.
≥ Press the iA/MANUAL button to switch to Manual Mode (l 58)
1 Select [ ] with the joystick.
2 Select the white balance mode
with the joystick.
MNL
BACK
BACK
≥ Select the optimal mode by conf irmi ng the
color on the screen.
Icon Mode/Recording conditions
Auto white balance
adjustment
Sunny mode
Outdoors under a clear sky
Cloudy mode
Outdoors under cloudy sky
Indoor mode 1
Incandescent light, vid eo lig ht s
like in the studio, etc.
Indoor mode 2
Color fluorescent lamps,
sodium lamps in gymnasiums
etc.
Manual adjustment mode
≥ Mercury-vapor lamps,
sodium lamps, some
fluorescent lights
≥ Lights used for wedding
receptions at hotels, st age
spotlights in theaters
≥ Sunrise, sunset, etc.
≥ To return to automatic settings, either
switch to Auto Mode , or press the
iA/MANUAL button again.
∫ To set the white balanc e
manually
1) Select with the joystick, and fill the
screen with a white subject.
2) Select with the joystick.
≥ When the display stops flashing and
then lights const antly, the setting is
complete.
≥ If the display continues flashing, the
white balance cannot be set. In this case,
use other White balance modes.
≥ When the unit is turned on with the lens
cover closed, the automatic white balance
adjustment may not functi on properly.
Please turn the unit on after opening the
lens cover.
≥ When the display flashes, the manual
white balance previously adjusted is
stored. Whenever recording conditions
change, re-set the white balance.
≥ When setting both the w hite balance an d
the iris/gain, set th e whi t e ba l a nce first.
AWB
≥ is not displayed on the screen
when is being set.
59
VQT2L14
Page 60
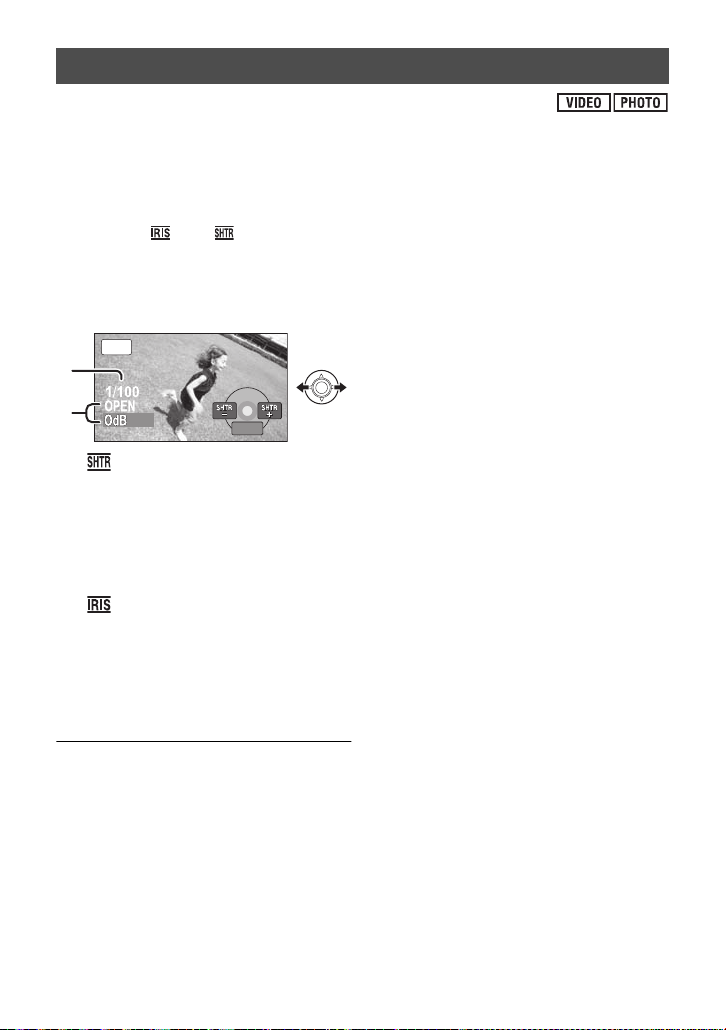
Manual shutter speed/iris adjustment
OPENOPEN
1/100100
BACKBACKBACK
MNL
Shutter Speed:
Adjust it when recording fast-moving subjects.
Iris:
Adjust it when the screen is to o bright or too dark.
≥ Press the iA/MANUAL button to switch to Manual Mode (l 58)
1 Select [ ] or [ ] with the
joystick.
2 Adjust the settings with the
joystick.
A Shutter speed:
1/60 to 1/8000
≥ If [AUTO SLOW SHTR] is set to [ON], the
shutter speed will be set between 1/30
and 1/8000.
≥ The shutter speed closer to 1/8000 is
faster.
B Iris/Gain value:
CLOSE # (F16 to F2.2) # OPEN # (0dB
to 18dB)
≥ When th e iris value is ad j u s te d to brighter
than [OPEN], it changes to the gain value.
≥ To return to automatic settings, press the
iA/MANUAL button.
screen brightness may change or a
horizontal line may appear on the screen.
In this case, record in Auto Mode or set
the shutter speed to 1/60 in areas where
the power supply frequenc y is 60 Hz, or
1/100 in areas of 50 Hz.
Manual iris/gain adjustment
≥ If the gain value is increased , the noise on
the screen increases.
≥ Depending on the zoom magnification,
there are iris values that are not dis play ed.
≥ When setting both the shutter speed and
the iris/gain value, set th e shutter speed
and then set the iris/gain val ue.
Manual shutter speed adjustme nt
≥ You may see a ban d of light around an
object that is shining very bright, or hig hly
reflective.
≥ During normal playback, image movement
may not look smooth.
≥ If you record an extremely bright object or
record under indoor lighting, colo r and
60
VQT2L14
Page 61
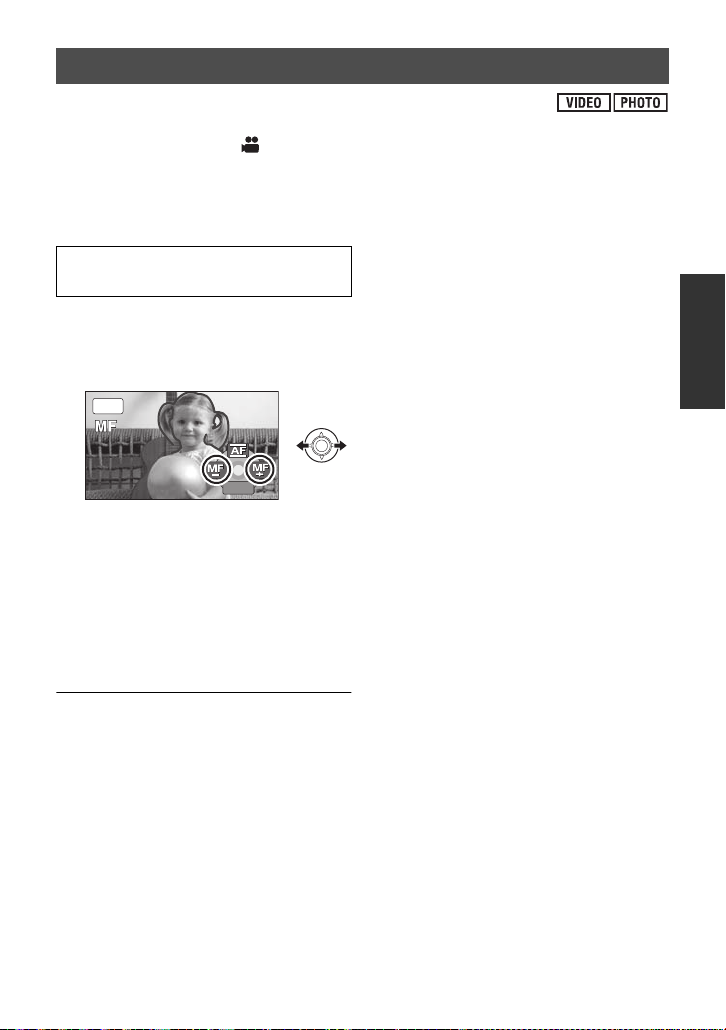
Recording with Manual focus
5/5
NEXT
If auto focusing is difficult due to the conditions, then us e Manual focus.
¬ Change the mode to .
≥ Press the iA/MANUAL button to switch to Manual Focus Mode (l 58)
1 (W hen MF assist function is used)
Select the menu. (l 27)
[RECORD SETUP] # [MF ASSIST] #
[ON]
2 Use the joystick to select [MF]
3 Bring the subject into focus
with the joystick.
MNL
5/5
NEXT
5/5 NEXT
The area in focus will be displayed in blue.
Display will return to normal approximately
2 seconds after the completion of the focus
adjustment operation.
≥ When [MF ASSIST] is set to [OFF], the
blue area is not displayed.
≥ To return to Auto focus, either switch to
[AF] as in step 2, or repress th e iA/
MANUAL butt on .
≥ The blue display does not appear in the
motion picture that is actually recorded.
61
VQT2L14
Page 62
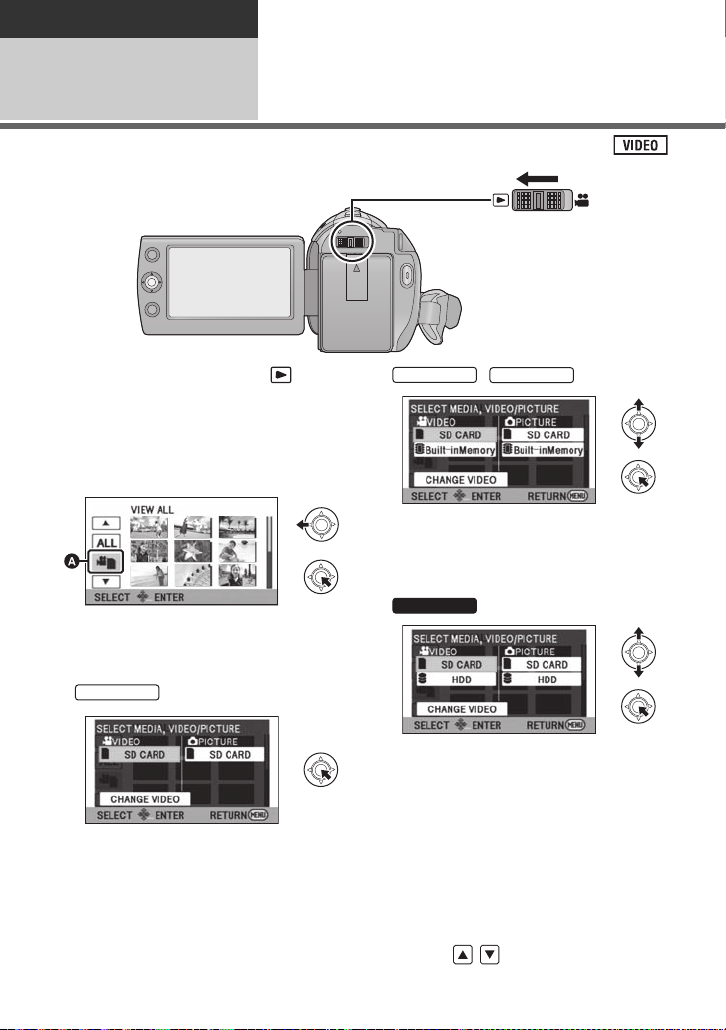
Playback
SDR-S50
SDR-T55
SDR-H85
Playback
Motion picture playback
1
1 Change the mode to .
2 Use the joystick to select the
Play Mode Select icon A, then
press the center of the
joystick.
/
SDR-T50
Select [VIDEO/Built-inMemory] to play
back the built-in memory.
Select [VIDEO/SDCARD] to play back the
SD card.
3 Select the media you wish to
play back, then press the
center of the joystick.
Select [VIDEO/SD CARD] to play back the
SD card.
62
VQT2L14
Select [VIDEO/HDD] to play back the
HDD.
Select [VIDEO/SDCARD] to play back the
SD card.
4 Select the scene to be played
back, then press the joystick.
≥ The operation icon will be displayed or
hidden each time the c en ter of the joys tic k
is pressed.
≥ Next (previous) page can be displayed by
selecting / .
Page 63
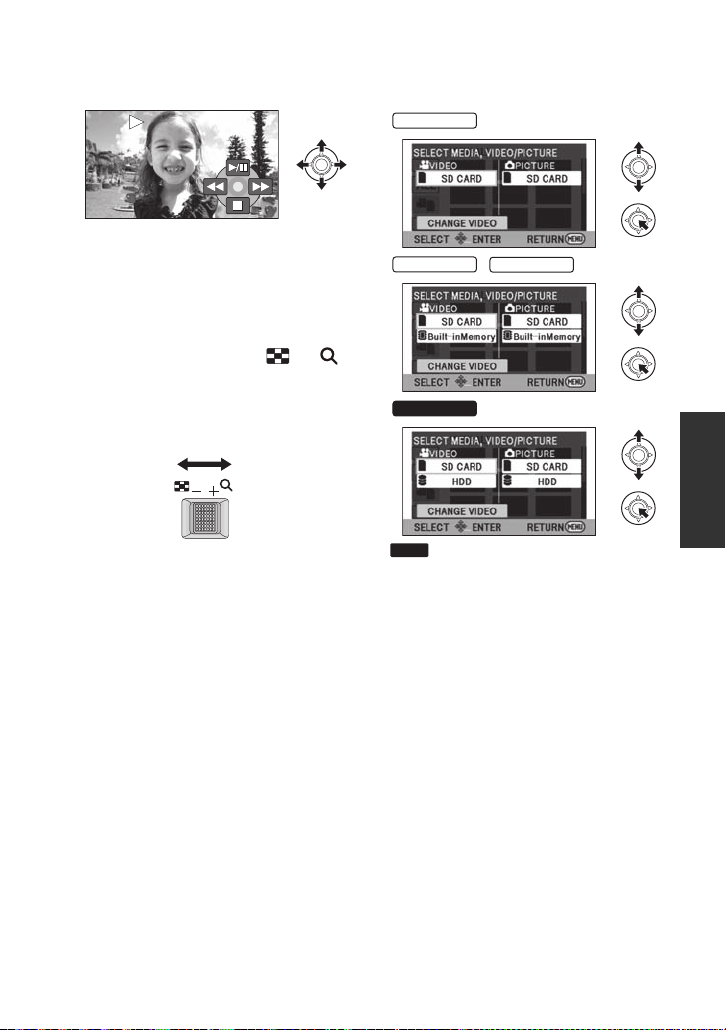
5 Select the playback operation
0h00m00s
ヸヵ
ヷヰロ
SDR-S50
SDR-T55
SDR-T50
SDR-H85
LONG REC
with the joystick.
0h00m00s
0h00m00s
1/;: Playback/Pause
6: Rewind playback
5: Fast forward playback
∫: Stops the playback and shows
the thumbnails.
∫ Change the thumbnail display
Pressing the zoom lever to the or
side as in step 4 will cause the thumbnail
display to change in the order sh own below.
20 scenes () 9 scenes () 1 scene
() Time frame index (l 65)
≥ 9 scenes display returns if the power is
turned off or the mode is c hanged.
∫ To play back scenes recorded
in long recording mode (l 41)
1) Select [CHANGE VIDEO]
/
≥ will be displayed.
≥ Re-selecting [CHANGE VIDEO] will cause
the display to return to the Normal
recording mode recording media selec tion
screen.
2) Select the media you wish to play back.
3) Select the scene t o be played back
63
VQT2L14
Page 64
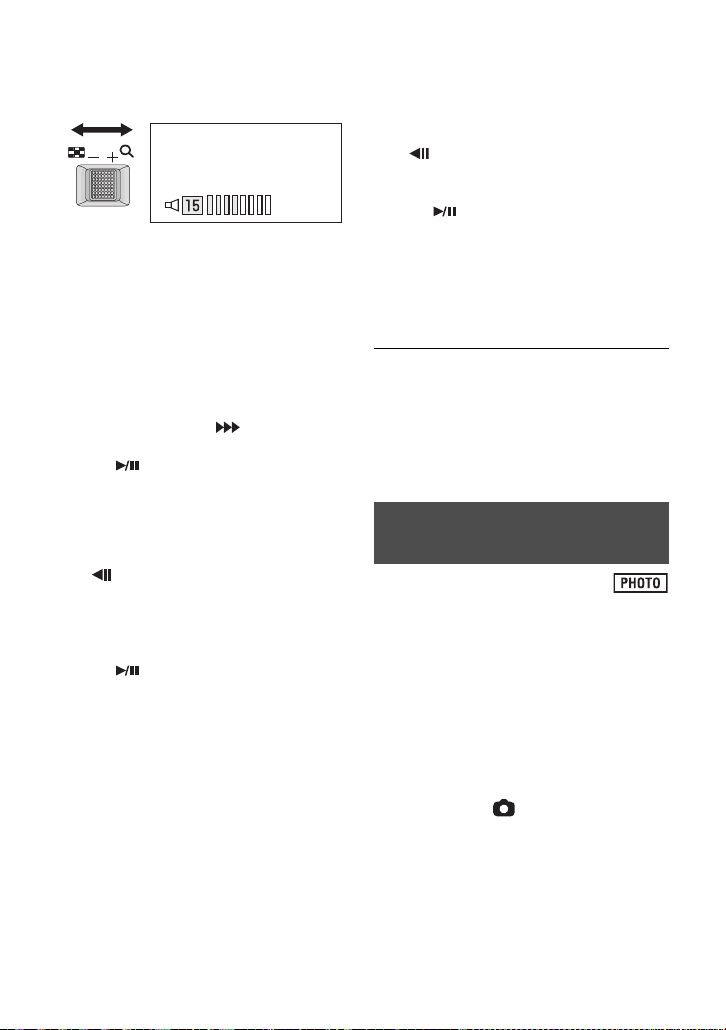
∫ Speaker volume adjustment
ヸヵ
ヷヰロ
Move the volume lever to adjust the speaker
volume during playback.
Towards “r”:
Increases the volume
Towards “s”:
Decreases the volume
∫ Fast forward/rewind playback
Move the joystick left or ri ght during
playback.
≥ Move the joystick again to increase the
speed. (The display on the screen
changes from 5 to .)
≥ Normal playback is restored when you
select .
∫ Slow-motion playback
1 Pause the playback.
2 Move and hold the joystick left or
right.
( is for reverse slow-motion
playback)
Press and hold the joystick to one s i de for
slow-motion playback.
≥ Normal playback is restored when you
select .
≥ When slow-motion pictures are played
back in reverse, they will be shown
continuously at approximately 2/3
speed of normal playback (inte rvals of
0.5 seconds).
≥ Slow playback of the motion picture
recorded in long recording mode will be
carried out at 0.5-second int ervals.
rd
the
∫ Frame-by-frame playback
The motion picture is advanced one frame at
a time.
1 Pause the playback.
2 Move the joystick left or right.
( is for reverse frame-by-frame
playback)
≥ Normal playback is restored when you
select .
≥ When the frames are advanced one at a
time in the reverse direction, they will be
shown in intervals of 0.5 second s.
≥ Frame-by-frame playback of the motion
picture recorded in long recording mode
will be carried out at 0.5-second intervals.
≥ Sound will be heard only during normal
playback.
≥ If pause play is continued for 5 minutes,
the screen returns to the thumbnails.
≥ The elapsed time for playback indication
will be reset to “0h00m00s” for each
scene.
Creating still picture from
motion picture
A single frame from the recorded motion
picture can be saved as a still picture.
Picture size of the still picture t o be recorded
is (640k360) or (640k480).
1 Pause at the scene you want to
save as a still picture during
playback.
≥ It is convenient to use slow-motion
playback and frame-by-frame playback.
2 Press the button.
≥ Date the motion picture was recorded will
be registered as date of the still picture.
≥ Still pictures will be saved with the aspect
ratio of the motion picture. (l 55)
≥ Quality will be different from the normal
still picture.
64
VQT2L14
Page 65
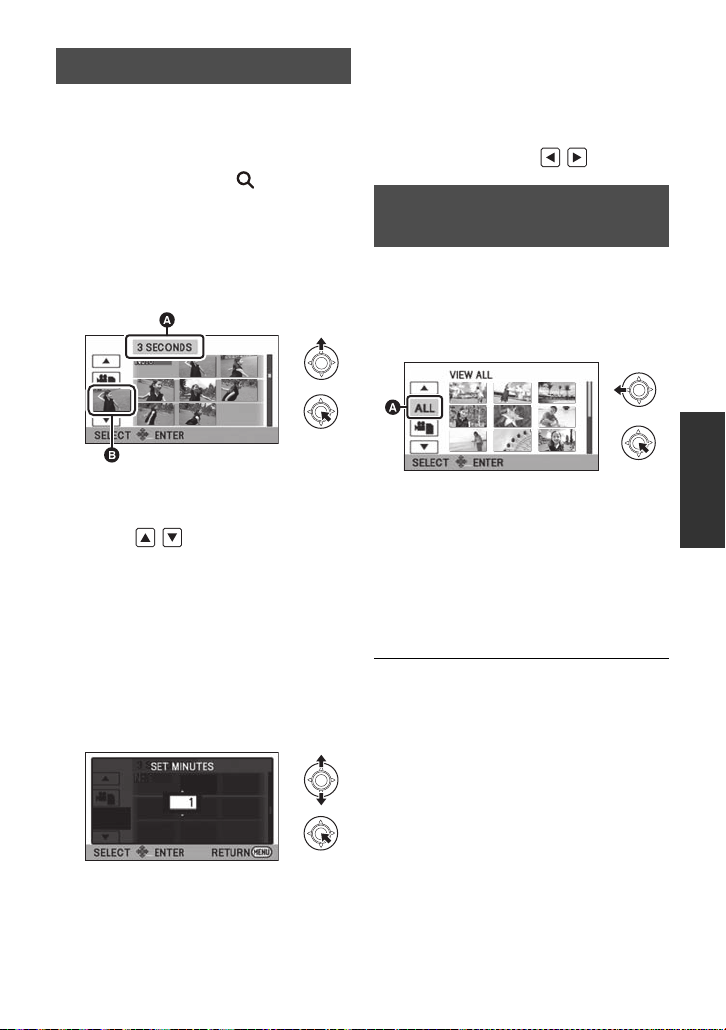
Time frame index
One-scene images will be displayed as
thumbnails under the set search conditions.
It is possible to play back the scene from any
desired point.
≥ Move the zoom lever to side and
change over the thumbn ail display to T i me
frame index. (l 63)
1 Use the joystick to select
search conditions, then press
the center of the joystick.
4 Choose the thumbnail from
which you wish to begin
playback, then press the
center of the joystick.
≥ Next (previous) thumbnail can be
displayed by selecting / .
Playing back motion
pictures by date
Scenes recorded on the same day c an be
played back in succession.
1 Select the date select icon and
press the joystick.
A Set time selection
B Scene selection
≥ Next (previous) scene can be display ed by
selecting / .
2 Choose the desired search
item in units of [3 SECONDS],
[6 SECONDS], [12 SECONDS]
or [MINUTES].
3 (O nly when [MINUTE S] has been
selected under step 2)
Set the time and then pre ss the
center of the joystick.
A Date select icon
2 Select the playback date, then
press the joystick.
The scenes rec or d e d on t h e da te s elected
are displayed as thumbnails.
3 Select the scene to be played
back, then press the joystick.
≥ Playing back of all the scenes returns if
the power is turned off or the mode is
changed.
≥ Even if scenes are recorded on the sa me
day, they are grouped separately in the
following cases.
jWhen the number of scenes exceed s 99
jWhen the world time setting is changed
VQT2L14
65
Page 66
Repeat playback
Playback of the firs t scene starts after
playback of the last scene finishes.
Select the menu. (l 27)
[VIDEO SETUP] # [REPEAT PLAY] #
[ON]
The indication appears on the fu ll
screen views.
≥ All the scenes are played back rep eatedl y.
(When playing back motion pictures by
date, all the scenes on the selec ted date
are played back repeatedly.)
Resuming the previous
playback
If playback of a scene wa s stopped halfway,
the playback can be resumed from where it
was stopped.
Select the menu. (l 27)
[VIDEO SETUP] # [RESUME PLAY ] #
[ON]
If playback of a motion picture is stopped,
appears on the thumbnail view of t he
stopped scene.
≥ The memorized resume position is cleared
if you turn off the power or change the
mode.
(The setting of [RESUME PLAY] do es not
change.)
66
VQT2L14
Page 67
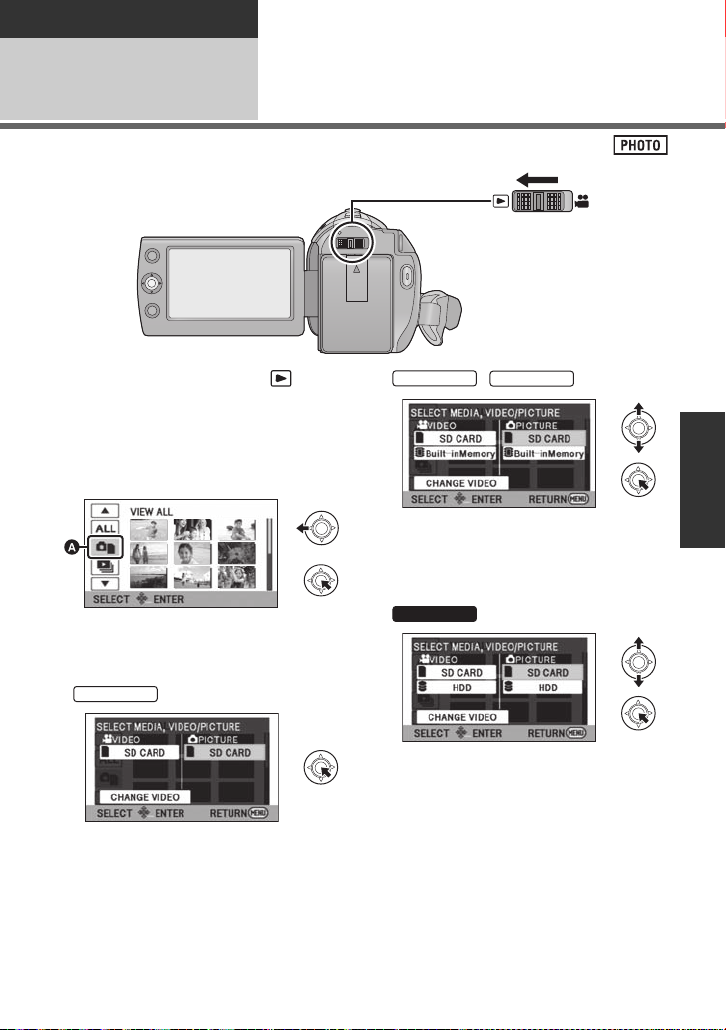
Playback
SDR-T55
SDR-T50
SDR-H85
Playback
Still picture playback
2
1 Change the mode to .
2 Use the joystick to select the
Play Mode Select icon A, then
press the center of the
joystick.
3 Select the media you wish to
play back, then press the
center of the joystick.
SDR-S50
Select [PICTURE/SD CARD] to play back
the SD card.
/
Select [PICTURE/ Bu i lt- i nMe m o r y] to play
back the built-in memory.
Select [PICTURE/SD CARD] to play back
the SD card.
Select [PICTURE/HDD] to play back the
HDD.
Select [PICTURE/SD CARD] to play back
the SD card.
4 Select the still picture to be
played back, then press the
joystick.
≥ The operation icon will be displayed or
hidden each time the c en ter of the joys tic k
is pressed.
67
VQT2L14
Page 68
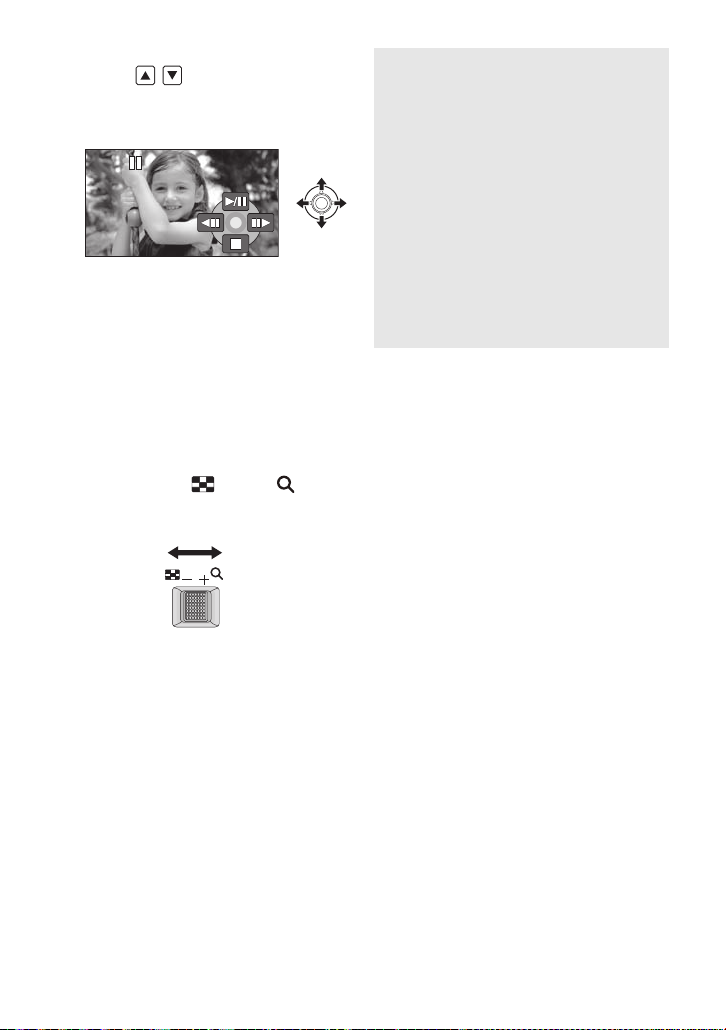
≥ Next (previous) page can be displayed by
ヸヵ
ヷヰロ
selecting / .
5 Select the playback operation
with the joystick.
1/;: Slide show (playback of the still
pictures in numerical order) start/
pause.
2;: Plays back the previous picture.
;1: Plays back the next picture.
∫: Stops the playback and shows
the thumbnails.
∫ Change the thumbnail display
During step 4, the thumbnail displa y
changes in the following order if the zoom
lever is operated to side or side.
20 still pictures ()
()
1 still picture
9 still pictures
Still picture comp a tibil ity
≥ This unit is compliant with the unified
standard DCF (Design rule for Camera
File system) established by JEITA
(Japan Electro nics and Information
Technology Industries Association).
≥ The file format of still pictures
supported by this unit is JPEG. (Not all
JPEG formatted files will be played
back.)
≥ This unit may degrade or not play back
still pictures recorded or created on
other products and other products may
degrade or not play back still pi ctures
recorded on this unit.
≥ 9 still pictures display returns if the power
is turned off or the mode is changed.
68
VQT2L14
Page 69
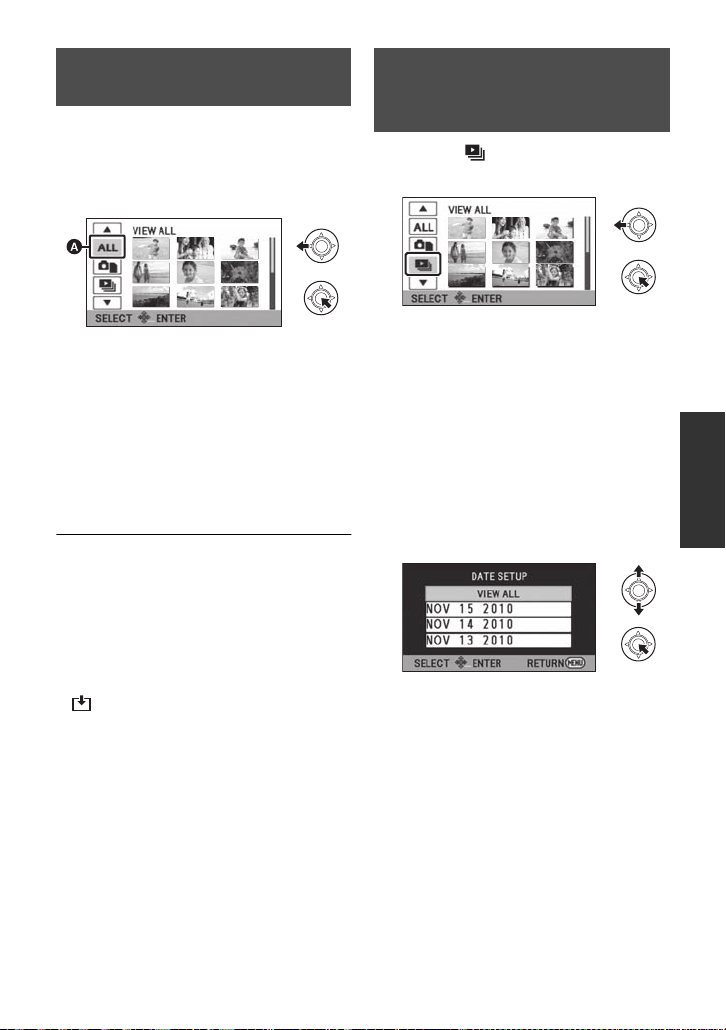
Playing back still pictures
by date
Still pictures recorded on the same day can
be played back in successio n.
1 Select the date select icon and
press the joystick.
Changing the playback
setting and playing back
the slide show
1 Select and press the
joystick.
A Date select icon
2 Select the playback date, then
press the joystick.
≥ The still pictures recorded on the date
selected are displayed as thumbnails .
3 Select the still picture to be
played back and press the
joystick.
≥ Playing back of all the still pictures retur ns
if the power is turned off or the mode is
changed.
≥ Even if still pictures are recorded on the
same day, they are grouped separ ately in
the following cases.
jWhen the nu m b er of still pictu re s
exceeds 999
≥ is displayed after the date in the list by
date for the still pictures created from the
motion picture. (l 64)
2 Select the desired item and
press the joystick.
[DA TE SETUP]:
Select the desired playbac k date.
[SLIDE INTERVAL]:
Select the playback time display interval.
(When [DATE SETUP] has been
selected)
Select the desired playback date,
then press the center o f the
joystick.
(When [SLIDE INTERVAL] has been
selected)
Select the playback interval, then
press the center of the joystick .
[SHORT]:
Approx. 1 second
[NORMAL]:
Approx. 5 seconds
[LONG]:
Approx. 15 seconds
3 Select [START], then press the
center of the joystick.
69
VQT2L14
Page 70
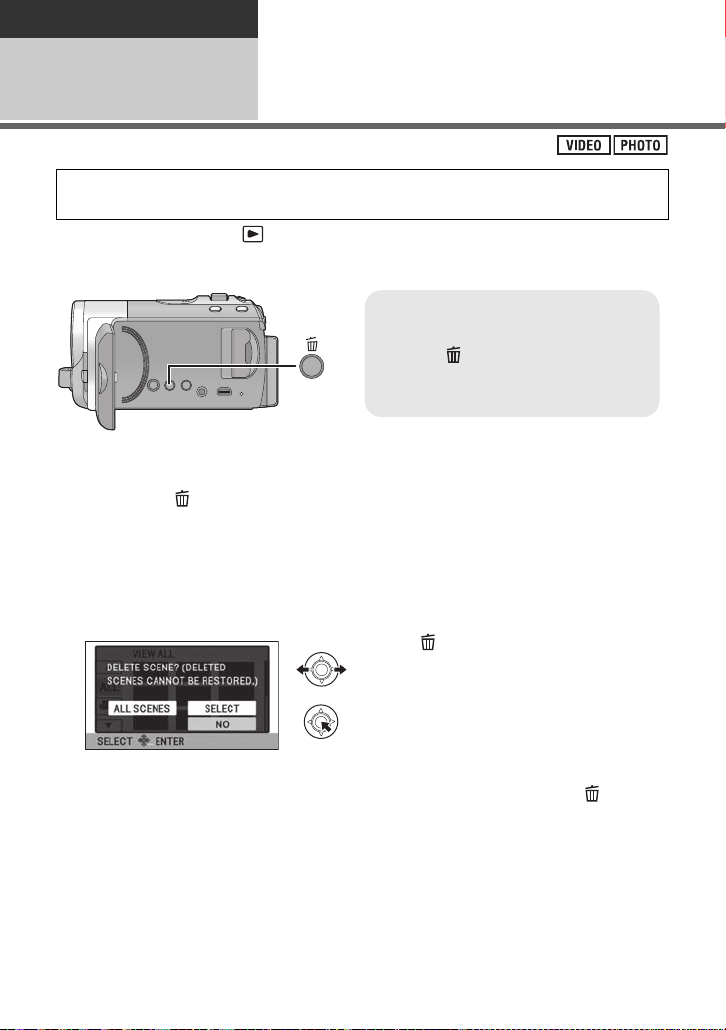
Playback
To delete by confirming images
being played back
Press the button while scenes or still
pictures to be deleted are being played
back.
Editing
1
Deleted scenes/still pictures cannot be restored, so perform appropriate
confirmation of the contents before proceeding with deletion.
¬ Change the mode to .
∫ Deleting multiple scenes/still pictures from the thumbnail display
Deleting scenes/still
pictures
1 Press the button while the
thumbnail view screen is
displayed.
2 Select [SELECT] or [ALL
SCENES] and press the
joystick.
3 (O nly when [SELECT ] is selected in
step 2)
Select the scene/still pic ture to
be deleted, then press the
joystick.
≥ A scene or still picture will be selected,
and will be displayed. Press the center
of the joystick again to deselect.
≥ Up to 99 scenes can be selected to be
deleted.
4 (O nly when [SELECT ] is selected in
≥ When [ALL SCENES] is selected, all the
scenes or still pictures on the selected
media will be deleted.
(In case of playing back scenes or still
pictures by date, all the scenes or still
pictures on the selected date will be
deleted.)
≥ Protected scenes/still pictures cannot be
deleted.
70
VQT2L14
step 2)
Select [Delete] and press the
joystick or press the button.
≥ To continuously delete other scenes/still
pictures, repeat step s 3-4
Page 71
When you stop deleting halfway
Press the MENU button while deleting .
≥ The scenes or still pictures that have
already been deleted when the de letion is
canceled cannot be restored.
To complete editing
Press the MENU button.
≥ You can also delete scenes by pressing
the MENU button, selecting [EDIT
SCENE] # [DELETE] # [ALL SCENES]
or [SELECT].
≥ You can also delete st il l pic tures by
pressing the MENU button, selecting
[PICT. SETUP] # [DELETE] # [ALL
SCENES] or [SELECT].
≥ Scenes/still pictures which cannot be
played back (the thumbna ils are display ed
as ) cannot be deleted.
≥ In case of [ALL SCENES], the deletion
may take time if there are many scen es or
still pictures.
≥ If you delete scenes recorded on other
products or still pictures conforming to
DCF standard with this unit, all the data
related to the scenes/still pictures may be
deleted.
≥ When still pictures recorded on an SD
card by other products are deleted, a still
picture (other than JPEG) that cannot be
played back on this unit may be erased.
Protecting scenes/still
pictures
Scenes/still pictures can be protected so
that they are not deleted by mis take.
(Even if you protect some s cenes/still
pictures, formatting t he media will delete
them.)
¬ Change the mode to .
1 Select the menu. (l 27)
[VIDEO SETUP] or [PICT. SETUP]#
[SCENE PROTECT]
2 Select the scene/still picture to
be protected and press the
joystick.
≥ will be displayed, and the selected
scene/still picture will be protected. Press
the joystick again to deselect.
≥ Press the MENU button to complete the
settings.
≥ When the disc playback is selected while
a DVD burner (optional) is connected,
scenes cannot be protected.
71
VQT2L14
Page 72
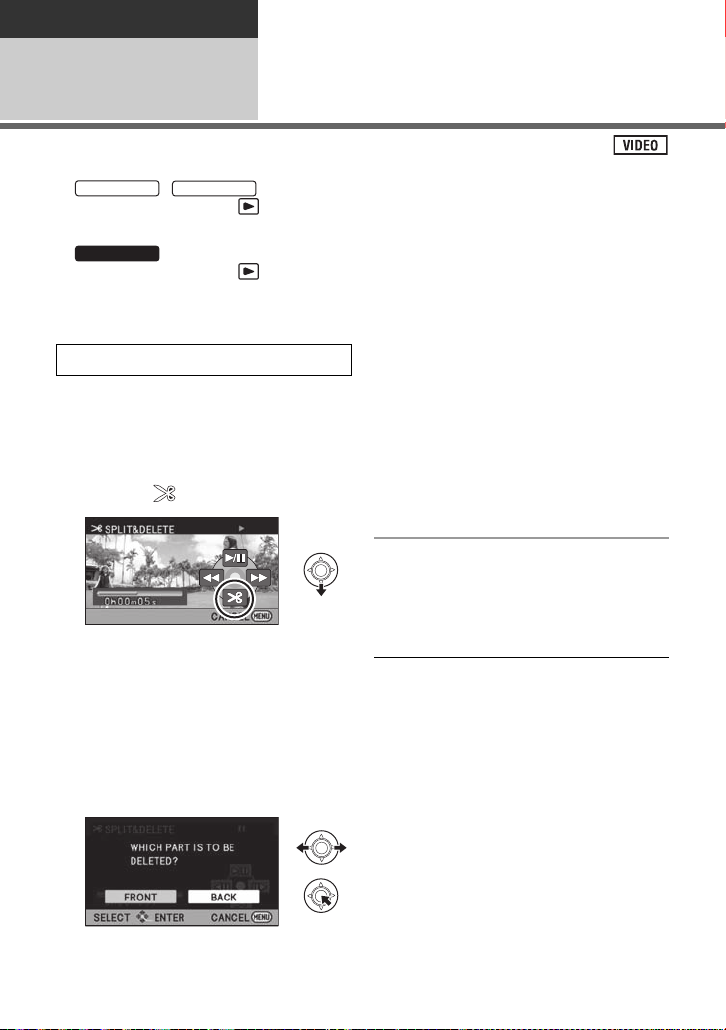
Playback
SDR-T55
SDR-T50
SDR-H85
Editing
2
Dividing a scene to
partially delete
This divides the recorded scenes in two and deletes the front half or back half.
¬ Change the mode to , and switch play mode selection to [VIDEO/
Built-inMemory] (l 62)
¬ Change the mode to , and switch play mode selection to [VIDEO/HDD]
(l 62)
1 Select the menu. (l 27)
[EDIT SCENE] # [SPLIT&DELETE]
2 Select the scene to be divided,
then press the joystick.
3 W hen you reach the point where you
want to divide the scene
Select [ ] with the joystick.
≥ Move the joystick left or right to fast
forward/rewind playback.
≥ Using slow-motion playback or frame-by-
frame playback makes it easy to search
for the point where you want to divi de the
scene. (l 64)
4 Select the half that you want to
delete and press the joystick.
/
5 Select [YES], then press the
joystick to play back the p art to
be deleted.
≥ When you stop the playback, the
confirmation message appears.
≥ When [NO] is selected, the confirmation
message appears.
Proceed to step 6.
6 Select [YES], then press the
joystick.
To continue dividing and deleting
other scenes
Repeat steps 2 to 6.
To complete editing
Press the MENU button.
≥ It is impossible to divide and delete
scenes with a short recording time. The
length of the remaining scenes mus t be
3 seconds or longer.
≥ It is impossible to set the dividing point at
the beginning or the end of the s cene.
≥ When a scene that was divided and
deleted using the SPLIT&DELETE
function is copied to a disc using the DVD
burner or the supplied software and
played back on another devic e, a
maximum of about 1second of the
deleted part may be played back.
≥ The actual division may slightly slip of f th e
previously designated dividing point.
72
VQT2L14
Page 73
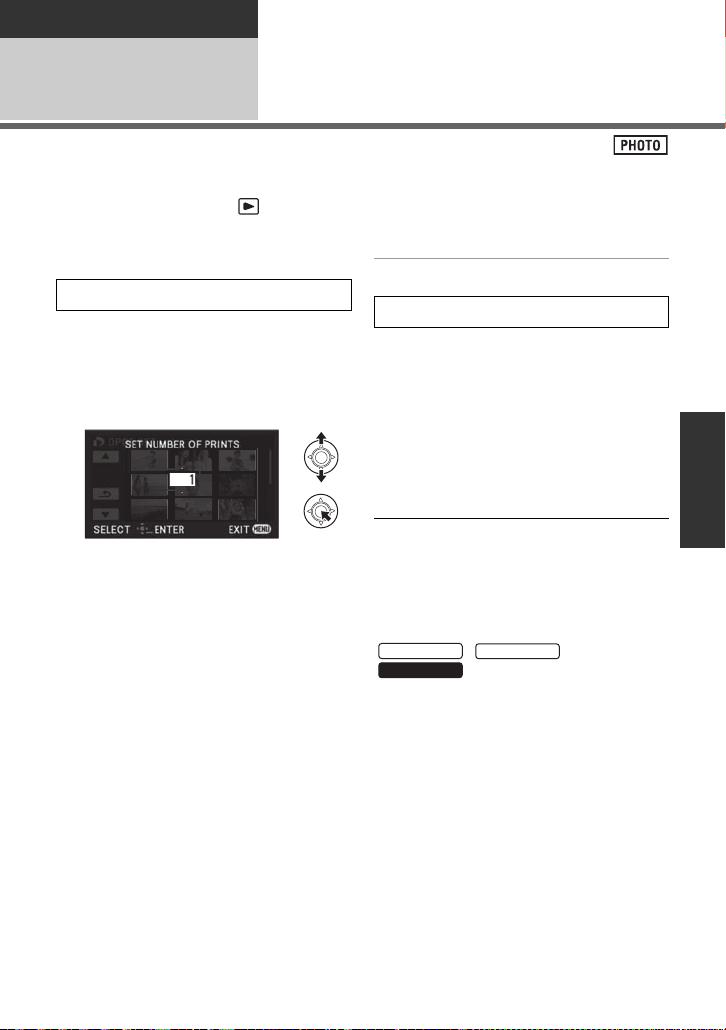
Playback
SDR-T55
SDR-T50
SDR-H85
Editing
DPOF setting
3
Y ou can write the data selecting still pictures to be printed and the number of prints (DPOF
data) onto the SD card.
¬ Change the mode to , and switch play mode selection to [PICTURE/
SD CARD] (l 67)
1 Select the menu. (l 27)
[PICT. SETUP] # [DPOF SET] # [SET]
2 Select the still picture to be
set, then press the joystick.
3 Select the number of prints,
then press the joystick.
≥ Up to 999 prints can be selected. (Pri nts
for set number can be printed with a
printer that supports DPOF.)
≥ To ca ncel the setting, set the number of
prints to [0].
≥ To continuously set other still pictures ,
repeat steps 2-3.
≥ Press the MENU button to complete the
settings.
To cancel all DPOF settings
[DPOF SET] # [CANCEL ALL]
∫ What is DP OF ?
DPOF (Digital Print Order Format) is a
format which allows the user of a digital
camera to define which capt ured images on
the SD card are to be printed, together with
information on the number of copies they
wish to print. (Please note: Not all
commercial printing services support this
feature at this ti m e. )
≥ DPOF setting is not possible during disc
playback while connected to a DVD
burner.
≥ You cannot add the recording date to
pictures to be printed with the DPOF
settings.
//
≥ Copy still pictures saved in the built-in
memory or HDD to an SD card before
setting DPOF.
73
VQT2L14
Page 74
Playback
SDR-T55
SDR-T50
SDR-T55
SDR-T50
SDR-H85
Editing
Copying between SD card and Built-in
Memory/HDD
4
Still pictures re co rded with this unit can be copied between an SD card insert ed in this unit
and a built-in memory/HDD.
≥ Motion pictures cannot be copied to SD card directly, can only be copied to PC.
∫ Confirming remaining capacity on the copy destination
The amount of space left on the SD card, the built-in memory and HDD can be checked.
≥ If the remaining capacity on a single SD card is not enough, you can copy to multiple SD
cards following the instructions on the screen.
¬ Change the mode to .
Select the menu. (l 27)
SDR-S50
[SETUP] # [CARD STATUS]
[SETUP] # [MEDIA STAT US]
//
≥ Current media information will be displayed.
≥ /
Press the center of the joy st i ck to switch display between SD card and built-in memory.
≥
Press the center of the joystick to switch display between SD card and HDD.
≥ Press the MENU button to end.
≥ The SD card, built-in memory or built-in HDD requires some space to store infor mation and
manage system files, so the actual usable space is slightly less than the indicated value.
The usable built-in memory/HDD space is generally calculated as 1GB=1,000,000,000
bytes. The capacitie s of this unit, PCs and softwar e are expressed as
1 G B=1,024k1,024k1,024=1,073,741,824 bytes. Therefore, the indicated value of the
capacity appears to be smaller .
SDR-H85
74
VQT2L14
Page 75
Copying [SDR-T55]/[SDR-T50]/[SDR-H85]
SDR-T55
SDR-H85
≥ If there is not much remaining capacity in the SD card, a confirmation message asking to
copy after deleting all dat a on th e SD card is displa ye d. Be aware th at deleted data cannot
be restored.
1 Change the mode to .
≥ Use a sufficiently charged batt ery or the
AC adaptor.
2 Select the menu. (l 27)
[COPY]
/
≥ Select to copy information from
the built-in memory to the SD card, or
select to copy information fro m
the SD card to the built-in memory, then
press the center of the joysti ck to confirm.
≥ Select to copy information from
the HDD to the SD card, or select
card to the HDD, then press the ce nter of
the joystick to confirm.
SDR-T50
to copy information fr om the S D
3 Follow the screen display, use
the joystick to select the
desired item then press the
center of the joystick.
≥ (When [SELECT SCENES] is selec ted)
Press the center of the joystick to select
the scene, after which will be
displayed. Press the center of the joystick
again to deselect.
≥ (When [SELECT DATE] is selected)
Press the center of the joystick to select
the date, which will be outlined in red.
Press the center of the joystick again to
deselect.
≥ Up to 99 still pictures or 99 dates can be
set in succession.
≥ If 2 or more SD cards are necessary to
copy, change the card following th e
instructions on the screen .
4 Press the MENU button after
the copying complete message
appears.
≥ The thumbnail view of the copy
destination is indicated.
When you stop copying halfway
Press the MENU button while copying.
If you will delete the still pictures after
copying is co mp l et e , b e sure to play
back the still pictures to check th at
they have been copied to correctly
before deleting.
≥ When the disc playback is selected while
a DVD burner (optional) is connected,
menus are not displayed.
≥ Depending on the following conditi ons, the
time it takes for copying may be longer.
jThe number of recorded scenes is
large.
jThe temperature of the unit is high.
≥ If some still pictures have already been
recorded to the copy destination, then the
same date may be assigned or images
may not display by date when the list by
date is selected.
≥ It may not be possible to copy some still
pictures recorded on other devices.
≥ Protection and DPOF settings will be
cleared on the copied still pictures when
copying still pictures with protection and
DPOF settings.
≥ The order in which the still pictures were
copied cannot be changed.
75
VQT2L14
Page 76
Playback
SDR-S50
SDR-T55
SDR-T50
SDR-H85
SDR-T55
SDR-T50
SDR-H85
Editing
Formatting
5
Please be aware that if a medium i s formatted, then all the data recorded on the
medium will be erased and cannot be restored. Back up important data on a PC, DVD
disc etc. (l 79, 86)
Select the menu. (l 27)
[SETUP] # [FORMAT CARD]
Select [YES], then press the joystick.
≥ After formatting is complete, press the MENU button to close the message screen.
//
[SETUP] # [FORMAT MEDIA]
1 Select [SD CARD], [Built-inMemory] or [HDD] and press the joystick.
2 Select [YES], then press the joystick.
≥ After formatting is complete, press the MENU button to close the message screen.
≥ Perform a physical formatting of the built-in memory/HDD when this unit is to be disposed/
transferred. (l 111)
≥ Do not turn this unit off or remove the SD card, while formatting. Do not expose t he unit to
vibrations or shock.
//
Use this un it to format media.
Formatting built-in memory or HDD is only available with this unit.
Do not format an SD card using any other equ ipment such as a PC. The card may
not be used on this unit.
76
VQT2L14
Page 77
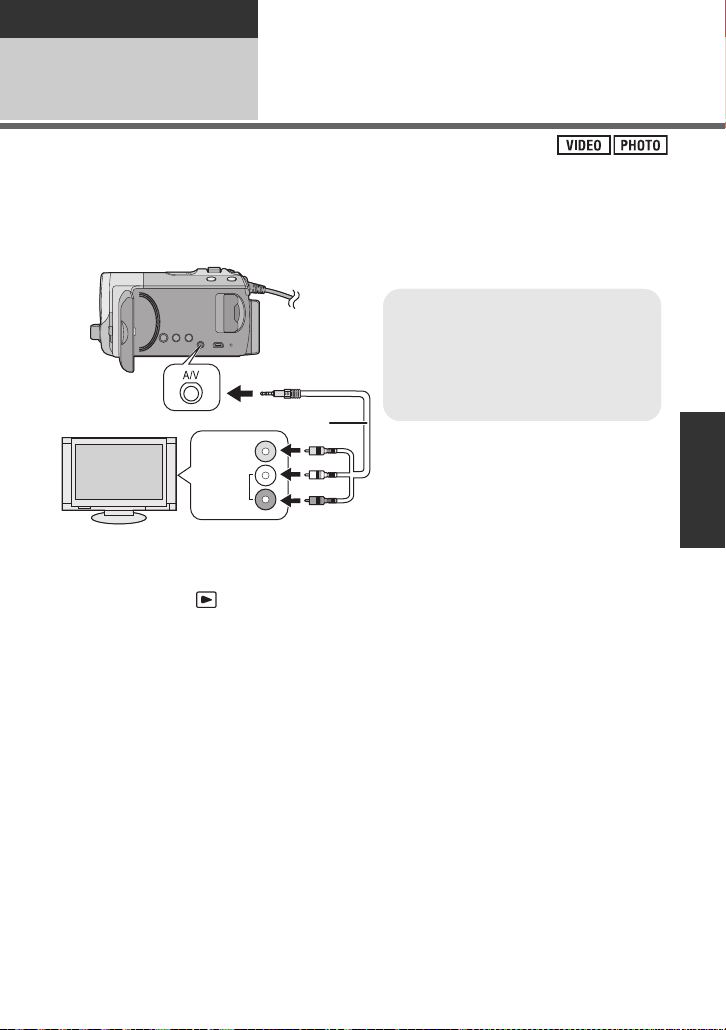
Playback
VIDEO IN
AUDIO IN
A AV cable (supplied)
≥ Insert the plugs as far as they will go.
≥ Do not use any other AV cables
except the supplied one.
≥ Select the video input on the TV that
this unit is connected to.
With a TV
1
The motion pictures and still pictures recorded by this unit can be played back on a TV.
≥ Use the AC adaptor to free you from worrying about the battery running down.
≥ If you have a TV with an SD card slot, the motion pictures and still pictures recorded on an
SD card may be played back on the TV. (Refer to the operating instructions of the TV for
details about TV compatibility.)
Watching Video/Pictures
on your TV
1 Connect this unit and a TV.
2 Turn on this unit, and change
the mode to .
3 Start playback on this unit.
∫ If the image or audio from this uni t
does not appear on the TV
≥ Check the connections.
≥ Check that the plugs are inserted as far as
they go.
≥ Check the TV’s input setting (input
switch). (For more info rmation, please
read the operating instructio ns for th e
TV.)
77
VQT2L14
Page 78
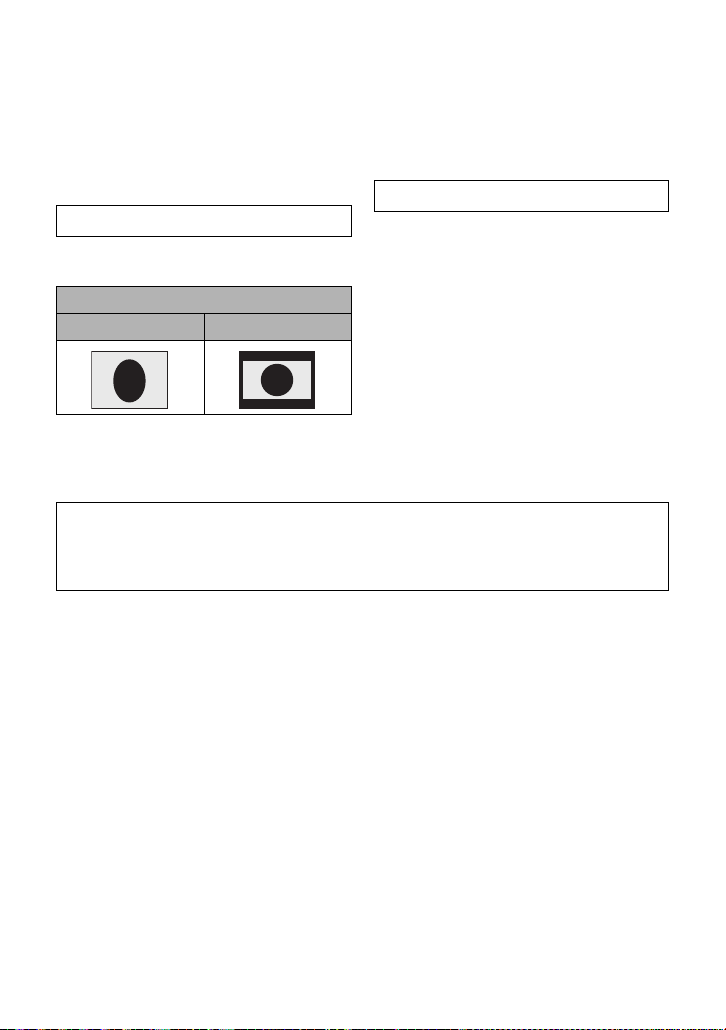
∫ To watch images on a regular
TV (4:3) or when both sides of
the images do not appear on
the screen
Change the menu setting to displa y t he
images correctly. (Check the TV setting.)
Select the menu. (l 27)
[SETUP] # [TV ASPECT] # [4:3]
Example of images with a 16:9 aspect
ratio on a regular TV (4:3)
[TV ASPECT] setting
[16:9] [4:3]
≥ If a wide-screen TV is connected, adjust
the aspect setting on the T V. (Refer to the
operating instructions of the TV for
details.)
Refer to the following support site for information about Panasonic TVs with an SD
card slot for playing back your pictures.
http://panasonic.net/
≥ For details on how to play back, please read the operating instructions for the TV.
∫ To display the on-screen
information on the TV
The information displayed on the screen
(operation icon and time code etc.) can be
displayed on the TV.
Select the menu. (l 27)
[SETUP] # [EXT. DISPLAY] # [ON]
≥ Select [OF F] to er ase the informatio n .
≥ The screen on this unit will not change.
78
VQT2L14
Page 79
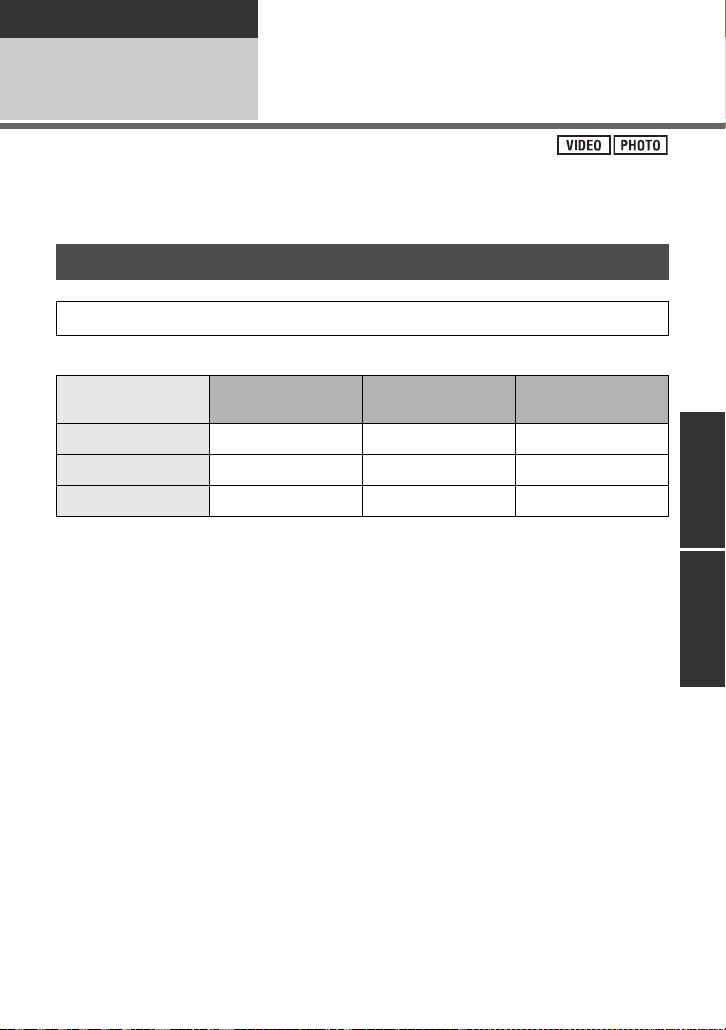
Backup
With other pr od ucts
1
Motion pictures or still pictures recorded with this unit can be copied to a DVD disc by
connecting a DVD burner (optional) t o this unit using a Mini AB USB Connection Cable
(supplied with DVD burner). The copie d DVD disc can also be played back.
≥ Please read the operating instructions of the DVD burner for how to use it.
Connecting a DVD burne r
to copy to/play back a disc
Preparing for copying/playing back
We recommend using Panasonic DVD burner VW-BN1/VW-BN2.
∫ About discs that can be used for copying
Disc type
1
Copy*
Additional copy*
3
Format*
*1 Use a new disc. You can additionally copy only to a DVD-RAM. When you copy to
DVD-RW, DVD-R, DVD-R DL, +RW, +R or +R DL the disc is automatically finalized to
allow playback on other devices an d additional copying will not be possible.
*2 Only DVD-RAM copied with the DVD burner or VideoCam Suite 3.0 can additionally
copy.
*3 Connect this unit and a DVD burne r b efore f or mat ting. If you f ormat a used dis c, you can
copy on that disc. Please be aware that if a disc is formatted, then all the data recorded
on the disc will be erased. (l 84)
*4 Only VW-BN2 can be used for +RW, +R and +R DL.
≥ We recommend using the discs that have been recommended in the operating instruc tions
of the DVD burner. Refer to the operating instructions of the DVD burner for details about
recommended discs, disc handl ing etc.
2
DVD-RAM DVD-RW/+RW
≤≤≤
≤ ——
≤≤—
DVD-R/DVD-R DL/
*4
+R
*4
/+R DL
*4
79
VQT2L14
Page 80
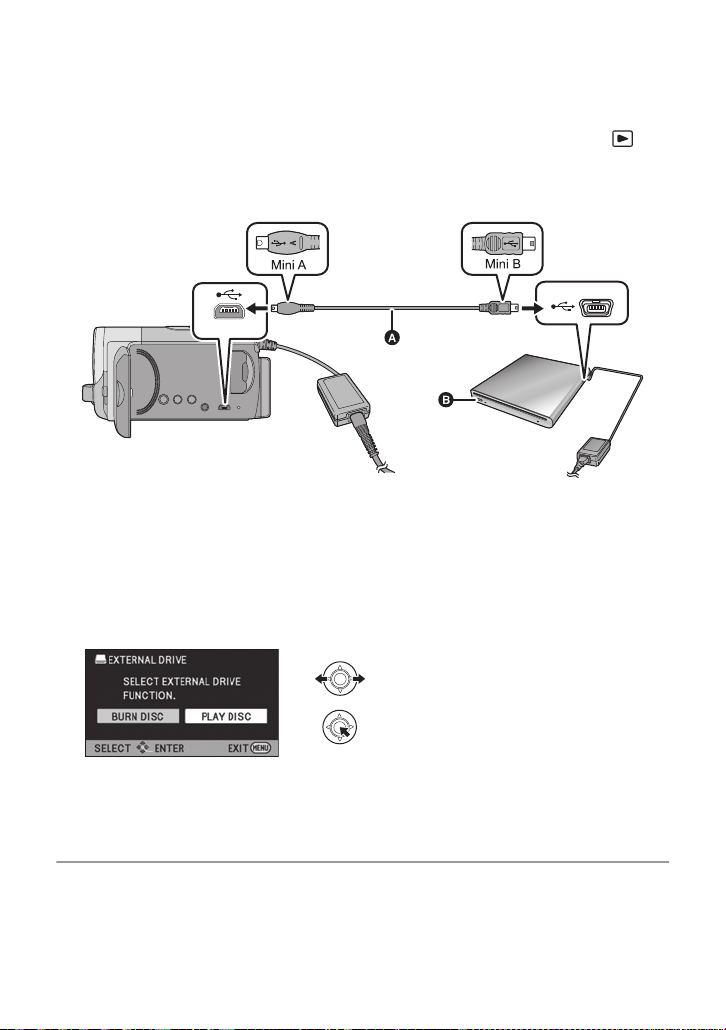
1 Connect the AC adaptor (supplied with DVD burner) to the DVD
burner.
≥ You cannot supply power to the DVD burner from this unit.
2 Connect this unit to the AC adaptor and change the mode to .
3 Connect this unit to the DVD burner with the Mini AB USB
Connection Cable (supplied with DVD burner).
A Mini AB USB Connection Cable (supplied with DVD burner)
B DVD burner (optional)
≥ Insert the plugs as far as they will go.
4 Insert the disc in the DVD burner.
≥ Insert the DVD disc with the recording label side up when using the DVD burner.
5 Select the desired item and press the joystick
[BURN DISC]:
Refer to page 81 for how to cop y di scs .
[PLAY DISC]:
Refer to page 83 for how to play ba ck the copied discs.
To terminat e the connection with the DVD burne r
Press the MENU button.
≥ Disconnect the Mini AB USB Connection Cable from this unit.
80
VQT2L14
Page 81
Copying to discs
≥ You cannot copy from multiple SD cards to 1 disc. (You can add itionally copy only to a
DVD-RAM.)
≥ Motion pictures and still pictures cannot both be copied to a single dis c.
≥ Scenes recorded in Normal recording mode and scenes recorded in long recording mode
cannot be copied to the sa me disc.
≥ Refer to page 82 for Approximate time for c opying to a disc.
1 Connect this unit to the DVD
burner to prepare for copying.
(l 79)
2 Follow the screen display, use
the joystick to select the
desired item then press the
center of the joystick.
≥ Select and press the center of the
joystick to return to the previous step.
≥ (
When [SELECT SCENES] is selected)
Press the center of the joystick to select
the scene, which will then be
displayed. Press the center of the joystick
again to deselect.
≥ (
When [SELECT DATE] is selected)
Press the center of the joystick to select
the date, which will be outlined in red.
Press the center of the joystick again to
deselect.
≥ Up to 99 scenes/99 dates can be sele cted
in succession.
3 Select [START], then press the
center of the joystick.
≥ When 2 or more discs are necessary for
copying, follow the on-screen instructions
to switch discs.
≥ You may need more discs than displayed
number of discs when you are copying
additionally to a used DVD-RAM.
≥ Eject the disc after copying is completed.
≥ When the copied disc is played back on
another device and the list of scenes is
displayed, they are ordered by date.
∫ When copying motion pictures recorded in long recording mode
The scenes recorded in long recording mode are copied after being con verted to normal
recording mode. When copying, the number of discs required for copying may also
increase, because the recording volume may increase, even for the same recording time,
due to the data volume increase caused by the conversion.
Before you delete the data on the media after copying is complete, be sure to play
back the discs to check that they have been copied to correctly. (l 83)
81
VQT2L14
Page 82
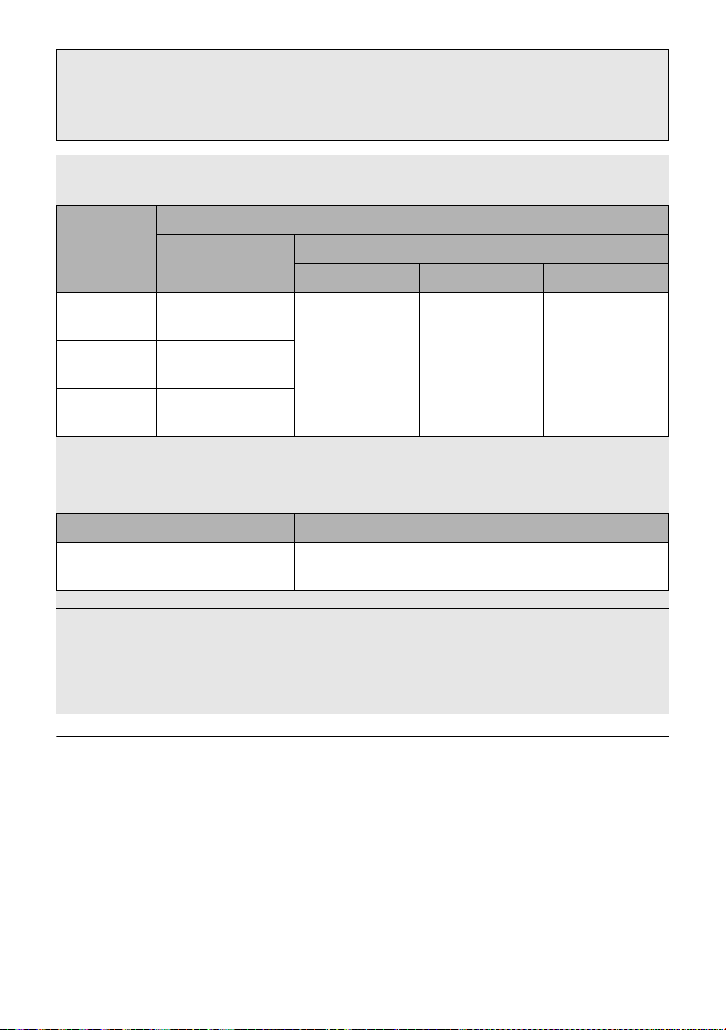
Important Notice
≥ When inserting a disc containing recorded motion/still pictures into other
devices, a message prompting you to format the disc may be displayed. Do not
format the disc, since deleted data cannot be restor ed later.
Approximate time for copying to a disc
To copy motion pictures to the full capacity of a di sc
Copy time
Disc type
Normal
recording mode
*
*
/
Approx. 40 min
to 90 min
Approx. 30 min
to 60 min
Approx. 15 min
to 60 min
Approx. 90 min
to 120 min
DVD-RAM
DVD-RW*/
+RW
DVD-R
*
+R
* Even if the data capac i ty to be copied is small, the time it takes for copying may be
about the same as the time shown in t he table.
To copy approx. 600MB still pictures
Disc type Copy time
DVD-RAM/DVD-RW/DVD-R/
+RW/+R
≥ Copy time of DVD-R DL/+R DL is approximately 2 to 3 times that of DVD-R/+R.
≥ Depending on the following conditions, the time it takes for copying may be longer than
the above times.
jWhen the number of recorded scenes is large
jWhen the temperature of the DVD burner has become high
Long recording mode
XP SP LP
Approx. 180 min
to 240 min
Approx. 360 min
to 480 min
Approx. 30 min to 40 min
≥ The disc that was copied to can be played back by connecting this unit and a DVD
burner. (l 83)
≥ Do not turn off this unit or the DVD burne r or disconnect the Mini AB USB Connection
Cable while copying. Also, do not shake this unit or the DVD burner.
≥ It is impossible to stop copying halfway.
≥ The order in which the scenes were copied cannot be changed.
≥ Data that has been recorded on another device may not be copied.
≥ Because copying is carried out in units of sce nes, unused disc space may arise when
copying to two or more discs.
≥ There is no guarantee that a disc created by connecting this unit and th e DV D burner will
play back on any playable device.
82
VQT2L14
Page 83
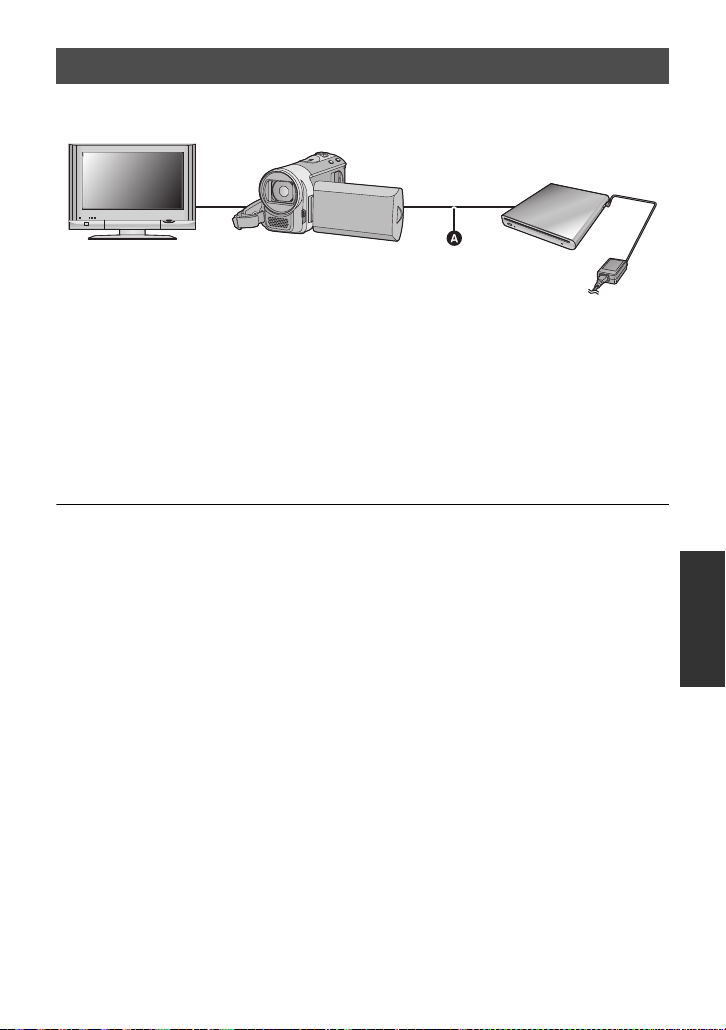
Playing back the copied disc
≥ Only discs that have been copied by connecting this unit to the DVD burner or
created with Vide oCam Suite 3.0 can be played back.
A Mini AB USB Connection Cable (supplied with DVD burner)
1 Connect this unit to the DVD burner to prepare for playback. (l 79)
≥ When playing back on a TV, connect this unit to the TV. (l 77)
2 Use the joystick to select a scene or a still picture, then press the
center of the joystick for playback.
≥ The playback operation is performed the same as when playing back motion pictures or
still pictures. (l 62, 67)
≥ It will return to step 5 on page 80 when [Return] is selected in the thumbnail screen.
≥ It is also possible to switch the media to play back by selecting the Play Mode Select icon.
It is possible to select [VIDEO/DISC] or [PICTURE/DISC] when the DVD burner is
connected.
83
VQT2L14
Page 84

Managing the copied disc
≥ Connect this unit to a DVD burner, use the joystick to select [PLAY DISC], then pres s
the center of the joystick. (l 79)
∫ Formatting discs
This is for initializing DVD-RAM and
DVD-RW/+RW discs.
Please be aware that if a disc is
formatte d, then all the data re co rded on
the disc will be erased. Ba ck up
important data on a PC etc.
Select the menu. (l 27)
[DISC SETUP] # [FORMAT DISC]
≥ After formatting is complete, press the
MENU button to c lose the message
screen.
≥ Connect this unit and the DVD burner to
format discs. Y ou may no longer be ab le to
use the discs if you format them on
another device such as a PC etc.
∫ Auto protect
You can protect (write protect) a DVD-RW
disc when copying still pictures.
1 Select the menu. (l 27)
[DISC SETUP] # [AUTO PROTECT] #
[ON]
≥ If a disc that you copied to is inserted in
another device without pro tecting it, a
message may be displayed prompti ng you
to format the disc. We recommend setting
[AUTO PROTECT] to [ON] in order to
prevent accidental deletion.
To release the disc protection
Select the menu. (l 27)
[DISC SETUP] # [CANCEL PROTECT]
≥ After successfully releasing [AUTO
PROTECT], press the MENU button to
close the message scree n.
∫ Displaying disc information
Information such as the type of rec or d e d
disc, the number of recorded scenes and
whether or not the disc is finalized is
displayed.
Select the menu. (l 27)
[DISC SETUP] # [DISC STATUS]
≥ Press the MENU button to exit the
information screen.
2 Copy to the disc. (l 81)
≥ After copying, the disc is write protec ted.
84
VQT2L14
Page 85
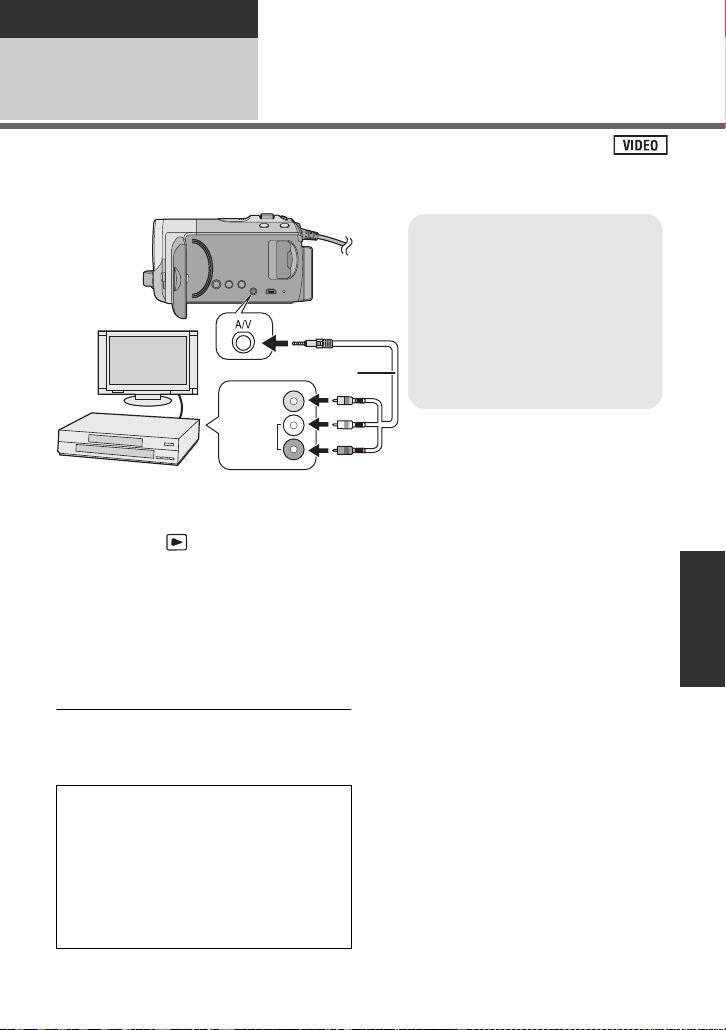
Backup
VIDEO IN
AUDIO IN
A AV cable (supplied)
≥ Insert the plugs as far as they will
go.
≥ Do not use any other AV cables
except the supplied one.
≥ Select the video input on the
video device and TV that this un it
and the video device are
connected to.
With other pr od ucts
2
Images played back on this unit can be dubbed onto a DVD recorder or video device.
≥ Use the AC adaptor to free you from worrying about the battery running down.
Dubbing images onto
other video devices
1 Connect this unit to a video
device and then change the
mode to .
2 Start playback on this unit.
3 Start recording on the
connected device.
≥ To stop recording (dubbing), stop playback
on this unit aft er s toppin g re cordin g on t he
recorder.
≥ If the date and time display and function
indication ar e no t w a nted, cancel th em
before dubbing. (l 32, 78)
If the dubbed images are played back on
a wide-screen TV, the images may be
stretched vertically.
In this case, refer to the operating
instructions for the device you are
connecting to or read the opera ting
instructions of the wide-screen TV and
set the aspect ratio to 16:9.
∫ Using SD card slot or USB
terminal of other video devices
If you have a DVD recorder with a n SD c ard
slot or a USB terminal, images recorded by
this unit can be copied (dubbed) onto the
hard disk or a DVD disc.
Refer to the operating inst ructions of your
DVD recorder for information abo ut whether
or not it supports copy ing (dubbing) from an
SD card or a USB terminal.
When using a USB terminal
Connect this unit to a DVD recor der with the
USB cable (supplied), then select [PC/
RECORDER] on the USB function selection
screen.
VQT2L14
85
Page 86
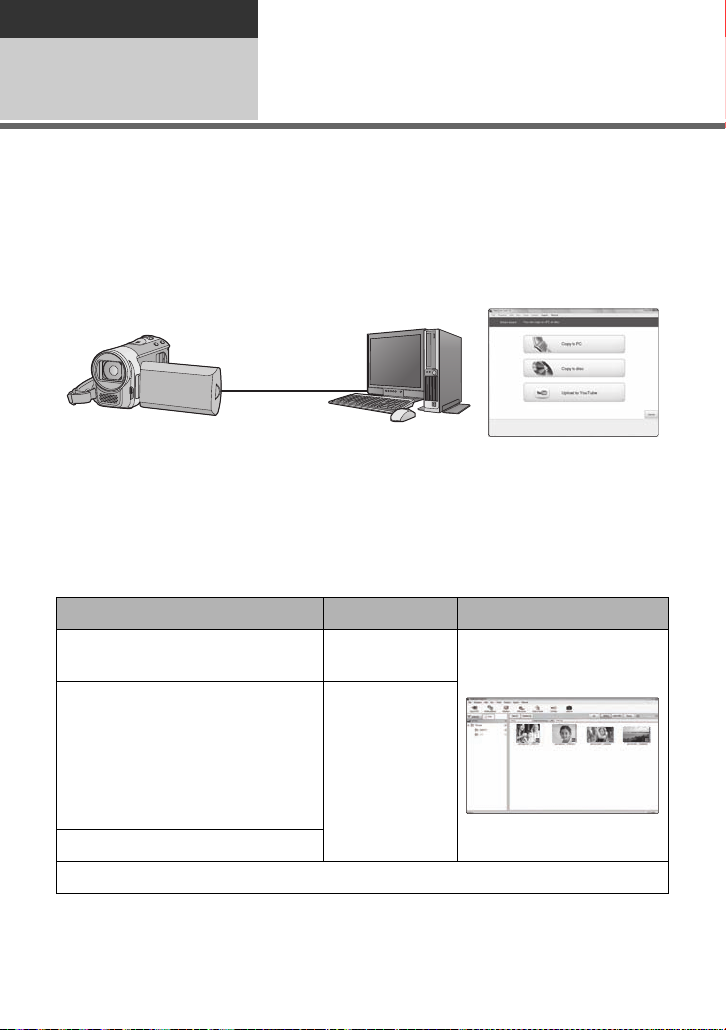
With a PC
Before using
1
VideoCam Suite 3.0
You can copy the motion/still picture data to the HDD of PCs or write to media like DVD discs
or SD cards using VideoCam Sui te 3.0, the software installed in the supplied CD-ROM.
Refer to the operating instruct ion s of V ideoCam Su ite 3.0 ( PDF file) for det ails on how to us e
it.
∫ Smart wizard
The Smart wizard screen is automatic ally displayed when you connect this unit to a PC with
VideoCam Suite 3.0 installed. (l 94)
Copy to PC:
Y ou can copy motion/still picture data to the HDD of PCs.
Copy to disc:
You can copy to disc in conventional standard picture quality (MPEG2 format).
Upload to YouTube:
You can easily upload motion pictures to YouTube. (l 98)
≥ Select the function you wish to use and follow the on-screen instructions for easy copying.
What you can do with a
PC
Available function Data type Software required
Copying data to a PC Motion picture
Editing:
Editing motion picture data copied
on an HDD of a PC
≥ Title, Transition, Delete partially,
Divide Scene
≥ Converting part of motion picture
into still picture
Playing back on a PC
Refer to page 99 if using a Mac.
86
VQT2L14
and still picture
Motion picture
CD-ROM (supplied):
VideoCam Suite 3.0
Page 87

≥ When Windows is used as the P C ope rati ng syst em, a me ssage prom ptin g t o form at
may display when a SDXC car d is read. (Pl ease be aw are that if a me dia is for matted,
then all the data recorded on the media will be erased.)
http://panasonic.net/avc/sdcard/information/SDXC.html
≥ VideoCam Suite 3.0 can handle images re corded wit h this unit or by us ing V ideoCam Su ite
3.0. Images created with other v i deo cameras, DVD recorders, softw are and commercial
DVD-Videos are not supported.
≥ We cannot guarantee proper operat ion of this unit if you use software other than that
supplied.
≥ Do not copy images recorded on this unit using any software other than the supplied
software.
87
VQT2L14
Page 88

End User License Agreement
Before opening the CD-ROM pa ckage, please read the foll owing.
You (“Licensee”) are gr anted a licen se for
the Software defined in t his End User
License Agreement (“Agreement”) on
condition that you agree to the terms and
conditions of this Agre ement. If Licensee
does not agree to the terms an d conditions
of this Agreement, promptly return the
Software to Panasonic Corp oration
(“Panasonic”), its distrib utors or dealers fro m
which you made the purchase.
Article 1 License
Licensee is granted the right to use the
software, including the information recorded
or described on the CD-ROM, instruction
manuals, and any other media provided to
Licensee (collectively “Sof tware”), but all
applicable rights to pat ents, copyrights,
trademarks and trade secrets in the
Software are not transferred to Licensee.
Article 2 Use by a Third Party
Licensee may not use, copy, modify, transf er
or allow any third party, whether free of
charge or not, to use, copy o r modify the
Software, except as expressly provided for
in this Agreement.
Article 3 Restrictions on Copying the
Software
Licensee may make a single copy of the
Software in whole or a par t solely for backup purpose.
Article 4 Com pu ter
Licensee may use the Software only on one
computer, and may not use it on more than
one computer.
permitted under law or regulation of the
country where Licensee res ides. Pa nasoni c,
or its distributors will not be responsible for
any defects in the Software or damage to
Licensee caused by Licens ee’s reverse
engineering, decompiling, or disassembly of
the Software.
Article 6 Indemnification
The Software is provided “AS-IS” without
warranty of any kind, either expressed or
implied, including, but not limited to,
warranties of non-infringement,
merchantability a nd/or fit ness for a p articular
purpose. Further, Panasonic does not
warrant that the operat ion of the Software
will be uninterrupted or error free. Pan asonic
or any of its distributors will not be liable for
any damage suffered by Licensee arising
from or in connection with Lic ensee’s use of
the Software.
Article 7 Export Control
Licensee agrees not t o export or re -expor t to
any country the Sof tware in any form witho ut
the appropriate export licenses under
regulations of the country where Li censee
resides, if necessary.
Article 8 Termination of License
The right granted t o Licensee hereunder will
be automatically terminated if Licens ee
contravenes any of the terms and conditions
of this Agreement. In this event, Licensee
must destro y th e So ftw are and relat ed
documentation toge ther with all the copies
thereof at Licensee’ s own expense.
Article 5 Reverse Engineering,
Decompiling or Disassembly
Licensee may not reverse engineer,
decompile, or disassemble the Software,
except to the extent either of them is
88
VQT2L14
Page 89

With a PC
Before using
Operating environment
2
≥ Even if the system requirements mention ed in these operating instructions are fulfilled,
some PCs cannot be used.
≥ A CD-ROM drive is necessary to install the supplied software applications. (A compatible
DVD writer drive and media are necessary for writing t o a DVD.)
≥ Operation is not guaranteed in the following cases.
jWhen 2 or more USB devices are connected to a PC, or when devices are connected
through USB hubs or by using extension cables.
jOperation on an upgraded OS.
jOperation on an OS other than the one pre-installed.
≥ Do not use any other USB cables except the supplied one. (Operation is not guaranteed
with any other USB cables.)
≥ This software is not compatible with Microsoft Windows 3.1, Windows 95, Windows 98,
Windows 98SE, Windows Me, Windows 2000 and Windows NT.
∫ Operating environment for VideoCam Suite 3.0
PC IBM PC/AT compatible PC
OS
CPU Intel Pentium 4 2.0 GHz or higher (including compatible CPU)
RAM 512 MB or more (1 GB or more recommended)
Display High Color (16 bit) or more (32 bit or more recommended)
Microsoft Windows XP Home Edition Service Pack 2/Ser vice Pack 3
Microsoft Windows XP Professional Service Pack 2/Service Pack 3
Microsoft Windows Vista Home Basic Service Pack 1/Service Pack 2
Microsoft Windows Vista Home Premium Service Pack 1/Service Pack 2
Microsoft Windows Vista Ultimate Service Pack 1/Servi ce Pack 2
Microsoft Windows Vista Business Service Pack 1/Service Pack 2
Microsoft Windows 7 Starter
Microsoft Windows 7 Home Basic
Microsoft Windows 7 Home Premium
Microsoft Windows 7 Professional
Microsoft Windows 7 Ultimate
≥ Intel Core 2 Duo 1.8 GHz or higher is recommended when a
playback function or MPEG2 output function is used.
Desktop resolution of 1024k768 pixels or more (1280k1024
pixels or more recommended)
Windows Vista/
Windows XP: DirectX 9.0c compatible video card
Compatible with DirectDraw overlay
PCI Express
Windows 7:
™
k16 compatible recommended
DirectX 10.0 compatible video card
89
VQT2L14
Page 90

Free hard disk
drive space
Sound DirectSound Support
Interface USB port [Hi-Speed USB (USB 2.0)]
Other
requirements
≥ Supplied CD-ROM is available for Windows only.
≥ Input is not supported in languages other than Englis h, German, French and Simplified
Chinese.
≥ Operation cannot be guaranteed on all DVD drive s.
≥ Operation is not guaranteed on Micro so ft Win dows V i st a E nte rpri se,
Windows XP Media Center Edition, TabletPC Edition and not comp atible with 64 bit
operation systems.
≥ This software is not compatible with a multi-boot env i ronment.
≥ This software is not compatible with a multi-monitor environment.
≥ If using Windows XP, an administrative account user only can use this software. If using
Windows Vista/
use this software. (An administrative account user should install and uninstall this
software.)
≥ DVD discs authored with this software are not guaranteed to play in all DVD players.
≥ Depending upon the environment of your PC, if it does not support Hi-Speed USB
(USB 2.0), for example, frame dropout may occur, the audio may be intermittent, or the
software may run slowly when you play back recorded images.
≥ If your PC does not satisfy the above system requirements, an error may occur when
writing data to disc.
Ultra DMA — 33 or more
450 MB or more (for installing the sof tware)
≥ When writing to a DVD/SD, more than double the amount of
free space as the disc being created is necessary.
Mouse or equivalent pointing device
SD card read/Writer
Internet connection
Windows 7
Windows 7,
administr at ive account an d sta nd a r d account user s on l y can
Enterprise,
90
VQT2L14
Page 91

∫ Operating environment for the card reader function (mass storage)
PC IBM PC/AT compatible PC
OS
CPU Windows Vista/Windows 7: 32-bit (k86) Intel Pentium III 1.0 GHz
RAM
Interface USB port
Other
requirements
≥ The USB equipment operates with the driver installed as standard in the OS .
Microsoft Windows XP Home Edition Service Pack 2/Ser vice Pack 3
Microsoft Windows XP Professional Service Pack 2/Service Pack 3
Microsoft Windows Vista Home Basic Service Pack 1/Service Pack 2
Microsoft Windows Vista Home Premium Service Pack 1/Service Pack 2
Microsoft Windows Vista Ultimate Service Pack 1/Servi ce Pack 2
Microsoft Windows Vista Business Service Pack 1/Service Pack 2
Microsoft Windows Vista Enterprise Service Pack 1/Service Pack 2
Microsoft Windows 7 Starter
Microsoft Windows 7 Home Basic
Microsoft Windows 7 Home Premium
Microsoft Windows 7 Profession al
Microsoft Windows 7 Ultimate
or higher processor
Windows XP: Intel Pentium
400 MHz or higher
Windows 7:
Windows Vista Home Basic: 512 MB or higher
Windows Vista Home Premium/Ultimate/Business/Enterprise:
1 GB or higher
Windows XP: 128 MB or more (256 MB or more recommended)
Mouse or equivalent pointing device
1 GB or higher
III 450 MHz or higher or Intel Celeron
91
VQT2L14
Page 92
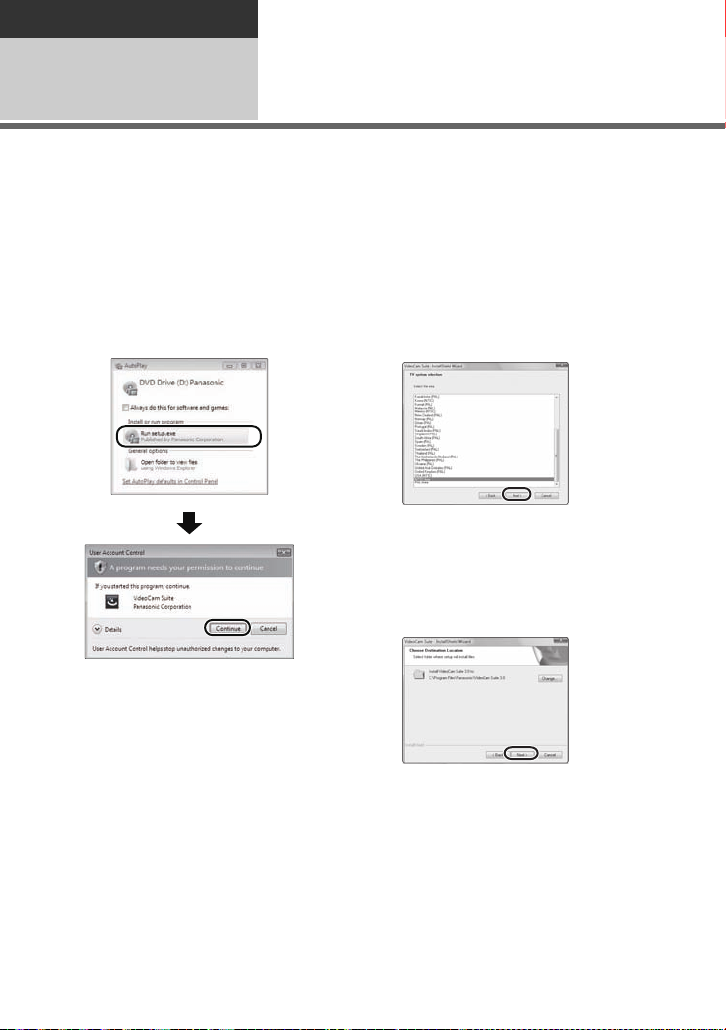
With a PC
Setup
Installation
1
When installing the software, log on to your computer as the Administrator or with a user
name with equivalent authorization. (If you do not have authorization to do this, consult your
manager.)
≥ Do not perform any other operations on your PC while the software is being installed.
For Windows Vista:
1 Insert the CD-ROM into the PC.
≥ Click [Run setup.exe] # [Co n tinue].
≥ If the installation screen does not appear
automatically, double-click th e CD-ROM
drive icon in [C omputer].
4 Select the country or region
where you li ve, then click
[Next].
≥ If the country or region cannot be
selected, select [NTSC Area].
≥ When the confirmation message appears,
click [Yes].
5 Select where the application is
to be installed, then click
[Next].
2 Click [Next].
3 Select [I accept the terms of
the license agreement], then
click [Next].
92
VQT2L14
6 Select [Yes] or [No] to create
shortcut.
≥ A message regarding the playback in the
environment used may be displayed
depending on the performance of the PC
used. Click [OK] after confirming.
Page 93
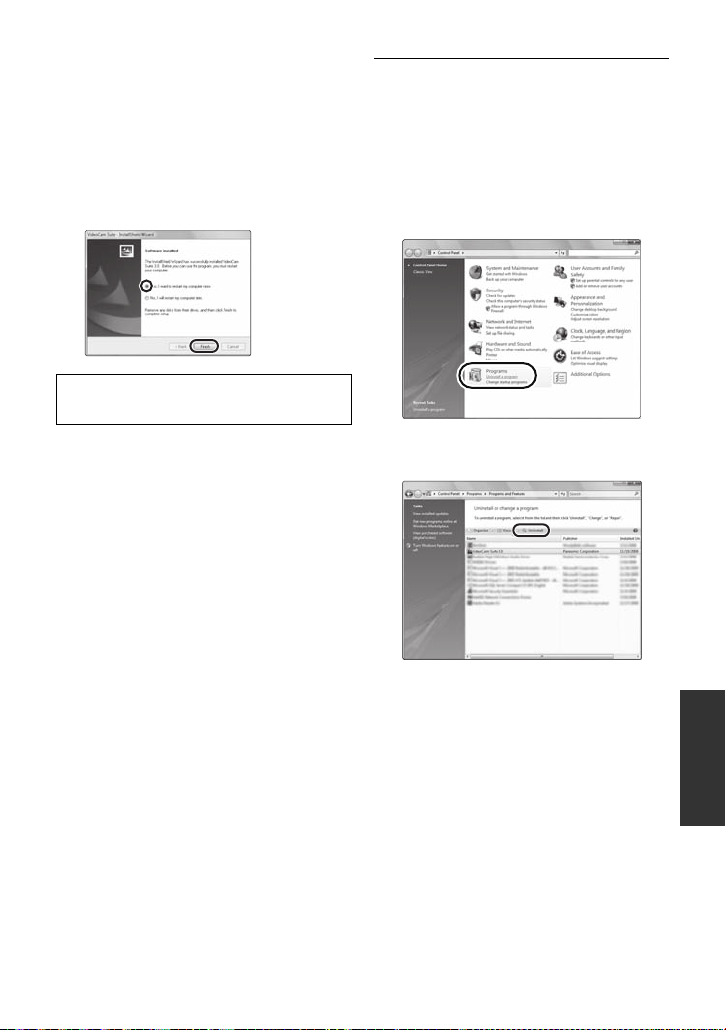
7 W hen installation is complete, some
notes will appear.
Check the contents , then close
the window.
8 Select [Yes, I want to restart my
computer now.], then click
[Finish].
The PC must be rebooted for the
application to work.
∫ Uninstalling Vide oCam Suite
3.0
Follow the steps below to uninstall any
software applications that you no longer
require.
1 Select [start] # [Control Panel]
# [Uninstall a program].
2 Select [VideoCam Suite 3.0],
then click [Uninstall].
≥ Proceed with the uninstallation by
following the on-screen instructions.
≥ After uninstalling the software, be sure to
reboot the PC.
VQT2L14
93
Page 94
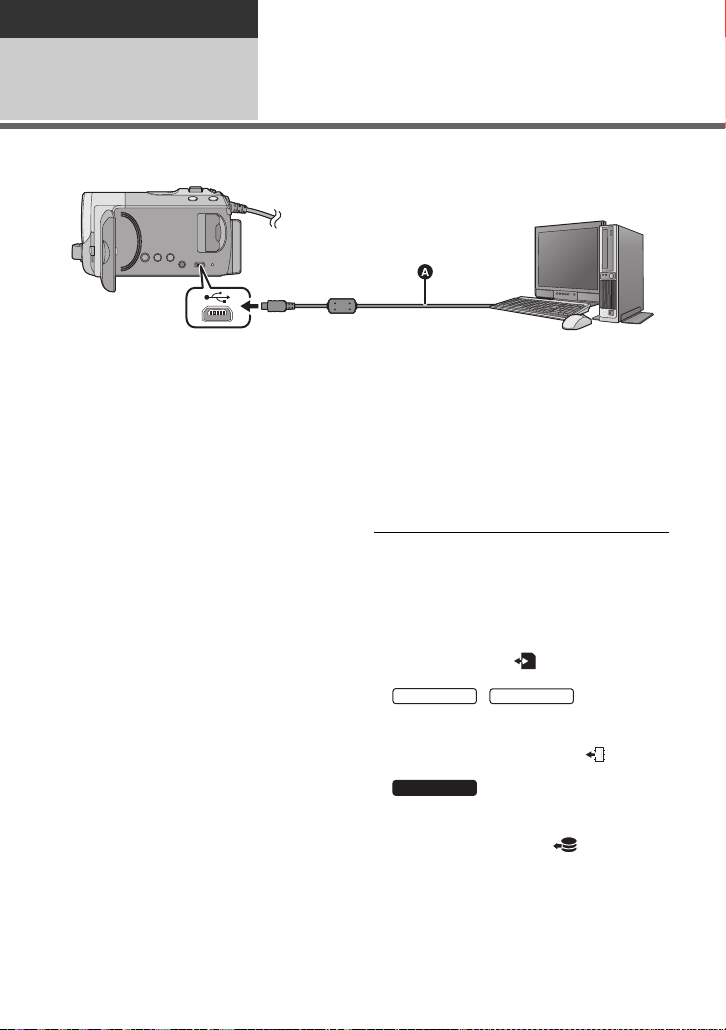
With a PC
SDR-T55
SDR-T50
SDR-H85
Setup
Connecting to a PC
2
≥ Connect this unit to the PC after the software applications are installed.
≥ Remove the supplied CD-ROM from your PC.
A USB cable (supplied)
1 Connect this unit to the AC
adaptor.
≥ It is possible to use the unit connected t o
the PC with the batteries only, but you will
not be able to write data in to the unit.
≥ Use the AC adapter to free you from
worrying about the battery running down.
2 Turn on the unit.
≥ This function is available in all modes.
≥ When using the battery, the LCD monitor
will be turned off after about 5 seconds.
Operating the joystick will cause the LCD
monitor to turn on again.
3 Connect this unit to a PC.
≥ Insert the USB connectors as far as they
will go.
≥ Do not use any other USB cables except
the supplied one. (Operation is not
guaranteed with any other USB c ables.)
≥ The Smart wizard screen is automatically
displayed when VideoCam Suit e 3.0 is
installed.
≥ This unit is automatically recognized as an
external drive of the PC. (l 96)
≥ A USB function selection screen will be
displayed if VideoCam Suite 3.0 has not
been installed. Use the joystick to select
[PC], then press the cent er of the
joystick.When you select an option other
than [PC], reconnect the USB cable.
94
VQT2L14
≥ When Windows is used as the PC
operating system, a message prompting
to format may display when a SDXC card
is read. (Please be a ware th at if a media i s
formatted, then all the data recorded on
the media will be erased.)
http://panasonic.net/avc/sdcard/
information/SDXC.html
≥ When the unit is connected to a PC, its
power cannot be turned off.
Disconnect the USB cable, before
turning this unit off.
≥ Do not disconnect the USB cable or the
AC adaptor while the a ccess la mp is o n or
card access icon ( ) appears on the
unit screen.
≥ /
Do not disconnect the USB cable or the
AC adaptor while the a ccess la mp is o n or
built-in memory access icon ( )
appears on the unit screen.
≥
Do not disconnect the USB cable or the
AC adaptor while the HDD access lamp is
on or HDD access icon ( ) appears on
the unit screen.
When performing reading/writing between a
≥
PC and an SD card, be aware that some SD
card slots built into PCs and some SD card
readers are not compatible with the SDHC
memory card or SDXC memory card.
Page 95

∫ To disconnect USB cable
SDR-S50
SDR-T55
SDR-T50
SDR-H85
safely
1 Double click the icon in task tray
displayed on the PC.
≥ Depending on your PC’s settings, this
icon may not be displayed.
2 Select [USB Mass Storage Device]
and click [Stop].
3
Verify [MATSHITA SDR-S50/SD USB
Device] is selected and click [OK].
Verify [MATSHITA SDR-T55/SD USB
Device] or [MATSHITA SDR-T55/MEM
USB Device] is selected and click
[OK].
Verify [MATSHITA SDR-T50/SD USB
Device] or [MATSHITA SDR-T5 0/MEM
USB Device] is selected and click
[OK].
Verify [MATSHITA SDR-H85/SD USB
Device] or [MATSHITA SDR-H85/HDD
USB Device] is selected and click
[OK].
Charging the battery using USB bus power
When using the battery, if you t urn off th e unit and co nnect it to a PC, Pan asonic Blu -ray dis c
recorder or Panasonic DVD recorder, the battery will charge.
≥ Insert the USB cable securely all the way. It will not operate properly if it is not inserted all
the way.
≥ Do not use any other USB cables except the supplied one. (Operation is not guaranteed
with any other USB cables.)
≥ Be sure to connect the unit directly to the PC, Blu-ray disc recorder or DVD recorder.
≥ During charging, the status indicator flashes. When charging is finished, the status
indicator turns off.
≥ Charging cannot be carried out if th e stat us indic ator flas hes quickl y for abou t 1 minute an d
then goes out, or if it does not illuminate at all. Use the AC adaptor to charge. (l 20)
≥ Charging will take 2-3 times longer than charging with the AC adaptor .
≥ Use the AC adaptor when charging the high capacity battery (VW-VBK360; optional).
≥ If the status indicator flashes at a particularly fast or slow rate, refer to page 113.
95
VQT2L14
Page 96
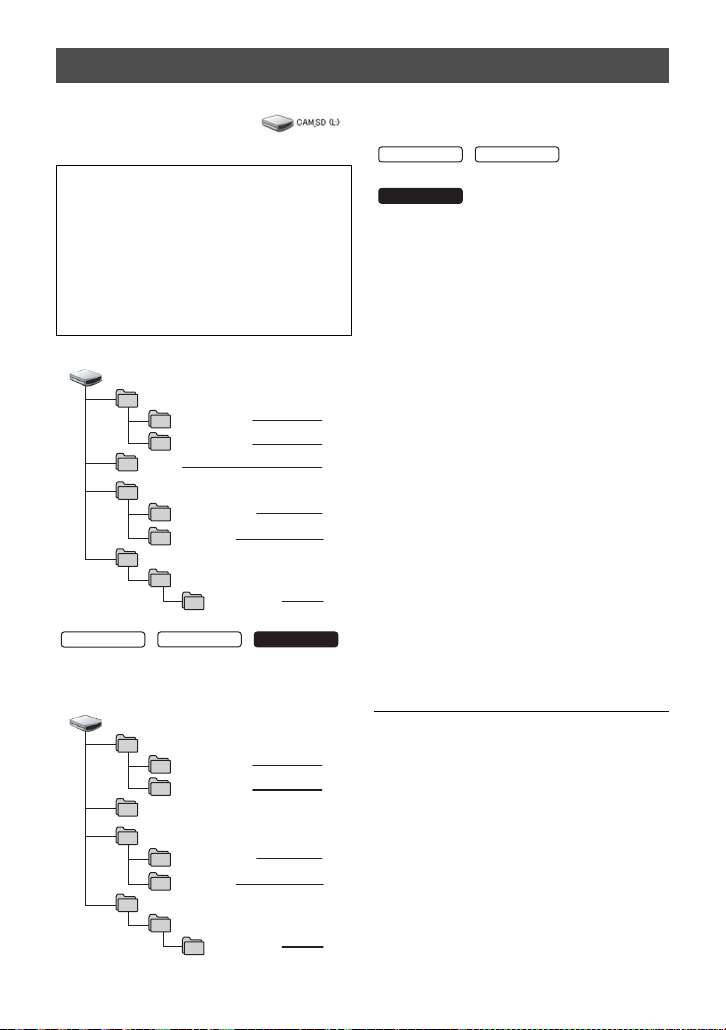
About the PC display
DCIM
PRIVATE
CAM_SD
100CDPFQ
MGR_INFO
PRG001
MISC
SD_VIDEO
100WCIHS
AVC_MP4
101CDPFS
SDR-T55
SDR-T50
CAM_MEM/CAM_HDD*
DCIM
PRIVATE
100CDPFQ
MGR_INFO
PRG001
MISC
SD_VIDEO
100WCIHS
AVC_MP4
101CDPFS
SDR-T55
SDR-T50
SDR-H85
When the unit is connected to a PC, it is recognized as an external dr ive.
≥ Removable disk (Example: ) is displayed in [Computer].
/
We recommend using VideoCam Suite
3.0 to copy or write back motion picture
data.
Using Windows Explorer or other programs on
the PC to copy, move or rename files and
folders recorded with this unit will result in them
being unusable with VideoCam Suite 3.0.
It is impossible to write data to the built-in
memory or HDD on the unit from a PC.
Example folder structure o f an SD card:
//
Example folder structure of built-in
memory or HDD:
SDR-H85
* [CAM_MEM] is displayed
* [CAM_HDD] is displayed.
The following data will be recorded.
1 Up to 999 still pictures in JPEG
format (S1000001.JPG etc.)
2 JPEG format still pictures created
from the motion picture
3 The DPOF setting files
4 SD-Video standard control data
5 SD-Video standard video data
(maximum of 99 files)
6 Long Recording video data
(S1000001.MP4 etc.)
∫ Copying your still pictures to
your PC
Card reader function (mass storage)
Still pictures recorded with this unit can be
copied to the PC with Explorer or other
programs.
1 Double click the folder that contains
the still pictures. ([ DCIM] #
[100CDPFQ] etc.)
2 Drag and drop the still pictures onto
the destination folder (on the PC’s
HDD).
96
VQT2L14
≥ Do not delete the SD card’s folde rs. Doing
so may make the SD card un usable in t his
unit.
≥ When data not supported by this unit has
been recorded on a PC, it will not be
recognized by this unit.
≥ Always use this unit to format SD cards.
Page 97
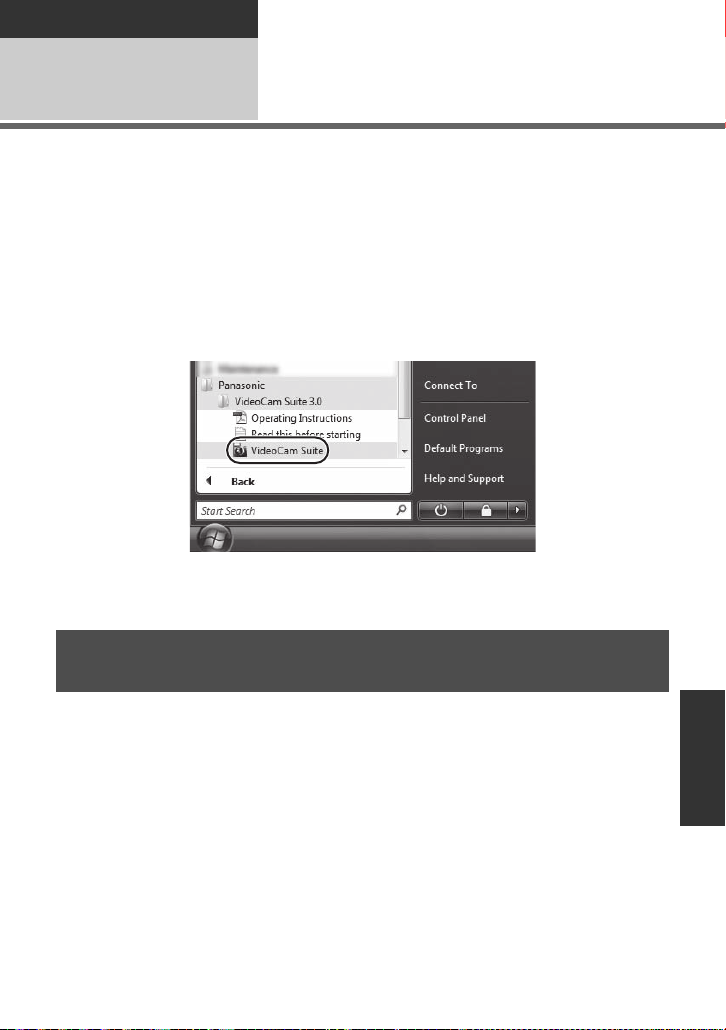
With a PC
Using with a PC
1
≥ When using VideoCam Suite 3.0 on WindowsXP, log on to your computer as
Administrator (or with a login name eq ually authorized). If you log on with a login name
other than Administrator, you cannot use the applications.
≥ When using VideoCam Suite 3.0 on Wi ndows V ista/ Windows 7, log on to your compute r as
Administrator (or with a login name eq ually authorized) or with the user name for a
standard user account . If you log on with a user name for a guest user account, the
software cannot be used.
(On the PC)
Select [start] # [All Programs (Programs)] # [Panasonic] #
[VideoCam Suite 3.0] # [VideoCam Suite].
≥ For details on how to use the software applications , read the PDF operat ing instruc ti ons of
the software.
Starting VideoCam Suite
3.0
Reading the operating instructions of the software
applications
≥ You will need Ad obe Acrobat Reader 5.0 or later or Adobe Reader 7.0 or later to read the
PDF operating instructions.
Select [start] # [All Programs (Programs)] # [Panasonic] #
[VideoCam Suite 3.0] # [Operating Instructions].
VQT2L14
97
Page 98
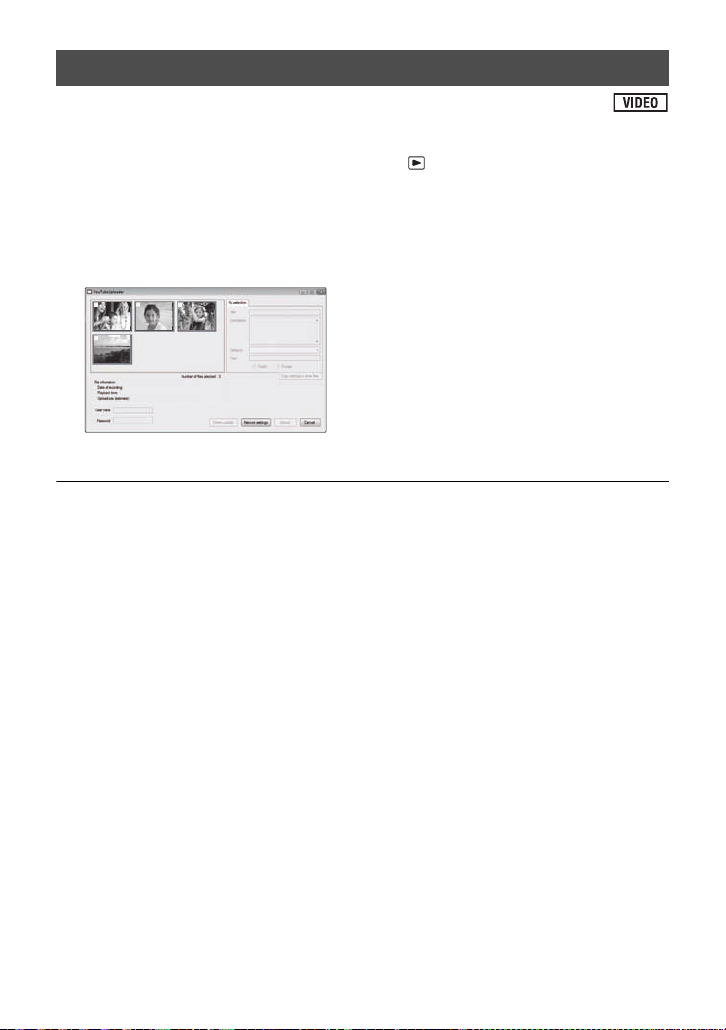
Upload to YouTube
You can easily upload motion pictures to YouTube with the VideoCam Su ite 3.0. You need to
record the motion picture t o upload in web mode. (l 51)
¬ Tur n on this unit, then change the mode to .
1 Connect this unit to a PC. (l 94)
≥ Smart Wizard screen will automatically be displayed.
2 Select [YouTube]
[YouTube Uploader] starts and the motion pictures recorded in web mode are dis played.
≥ Refer to the operating instructions of the s oftware (PDF file) for details on how to use it.
≥ In order to upload motion pictures to YouTube, a user account must first be obtained via
the YouTube sit e.
≥ After uploading is complete, a mes sage appea rs. If [OK] is clic ked, the USB function will b e
set to [PC/RECORDER]. Before turning this unit off, disconnect the USB cable (l 95).
≥ This service is available as of 1 December, 2009.
≥ Any operation about YouTube
guaranteed. The availab l e services and the displays are subject to change without notic e.
≥ Any copyrighted video cannot be uploaded without having the copyright or obtaining
permission from the copyright holder(s).
™
services and the specification changes are not
98
VQT2L14
Page 99
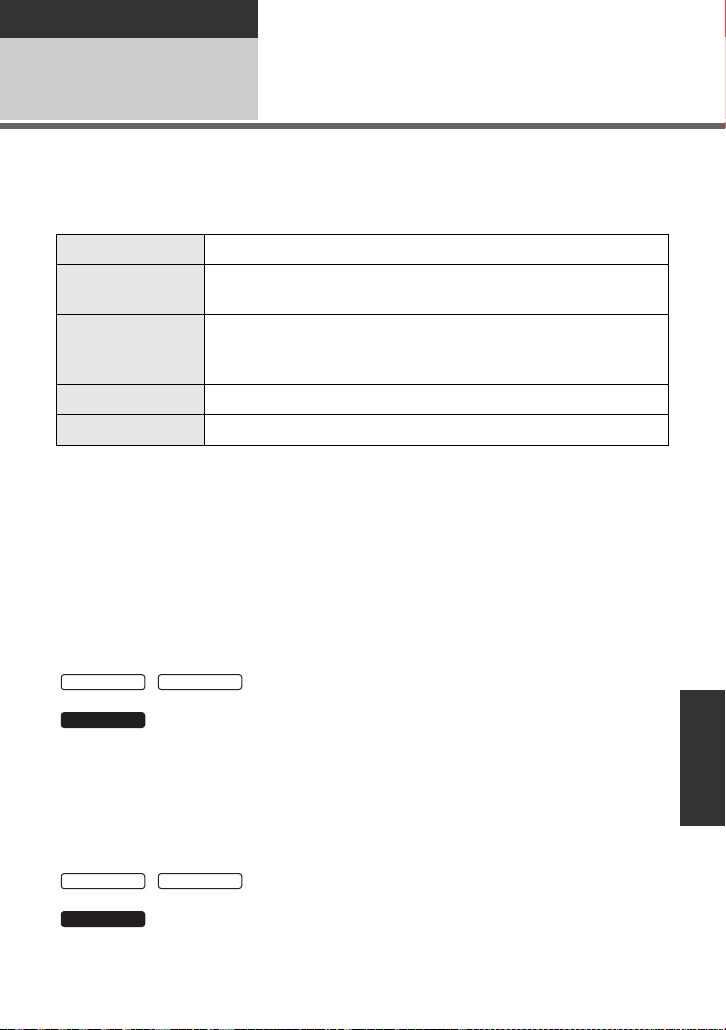
With a PC
SDR-T55
SDR-T50
SDR-H85
SDR-T55
SDR-H85
Using with a PC
If using Mac
2
≥ VideoCam Suite 3.0 is not available for Mac.
≥ SDXC memory cards cannot be used on Mac.
≥ iMovie’09 supported. For details about iMov ie’09, please contact AppleInc.
∫ Operating environment
PC Mac
OS Mac OS X 10.5.8
CPU Power Mac G5 Dual 2.0 GHz or higher
RAM 512 MB or more
Interface USB port
≥ Even if the system requirements mention ed in these operating instructions are fulfilled,
some PCs cannot be used.
≥ The USB equipment operates with the driver installed as standard in the OS .
≥ Supplied CD-ROM is available for Windows only.
∫ Copying still pictures on PC
1 Connect this unit to a PC via the supplied USB cable.
≥ The USB function selection screen will appear.
2 Use the joystick to select [PC], then press the center of the joystick.
3 Double-click [CAM_SD] displayed on the desktop.
/
[CAM_SD] and [CAM_MEM] are displayed on the desktop.
Mac OS X 10.6
iMac G5 1.9 GHz or higher
®
Intel
-based Mac
[CAM_SD] and [CAM_HDD] are displayed on the desktop.
≥ Files are stored in [100CDPFQ] or [101CDPFS] folder etc. in the [DCIM] folder.
4
Using a drag-and-drop operation, move the pictures you want to acquire
or the folder storing those pictures to any different folder on the PC.
∫ To disconnect USB cable safely
Drag [CAM_SD] disk icon to the [Trash], and then disconnect the USB cable.
≥ [CAM_SD] and [CAM_MEM] are displayed on the desktop.
≥ [CAM_SD] and [CAM_HDD] are displayed on the desktop.
SDR-T50
/
99
VQT2L14
Page 100
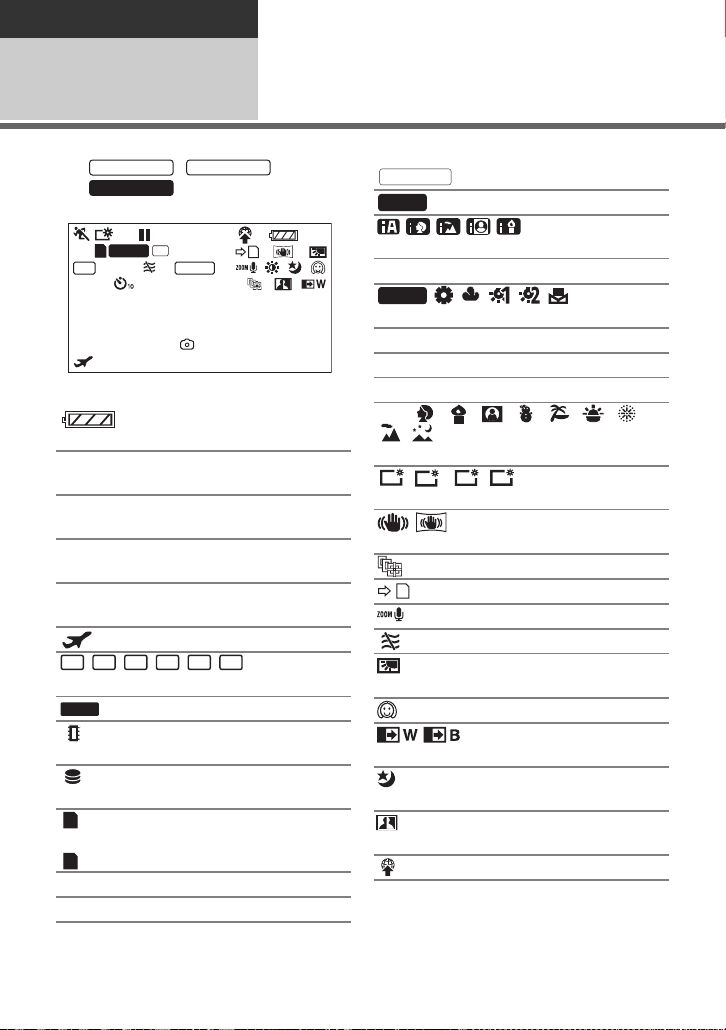
Others
SDR-T55
SDR-T50
SDR-H85
XPSPLP
LXP
LSP
LLP
+1
+2
-
1
A
Indications
Indications
1
∫ Recording indications
*1 / only
*2 only
A
MF
AWB
1/100
OPEN
0dB
NOV 15 201012:34PM
1h30m Remaining battery time
R 1h20m Remaining time for motion
0h00m00s Elapsed recording time
NOV 15 2010
12:34PM
/////
Motion picture recording mode (l 42)
LONG REC
(White)
(Green)
¥/; (Red) Recording
; (Green) Recording pause
0h00m00s
LSP
LONG REC
R 1h20m
PRE-REC
Remaining battery power
(l 22)
*2
(l 22)
picture recording (l 39)
(l 39)
Date indication (l 32)
Time indication (l 32)
World time setting (l 33)
Long recording mode (l 41)
Built-in memory recording
possible status
HDD recording possible
*2
status
Card recording possible
status
Recognizing the card
*1
PRE-REC
MNL
////
Intelligent Auto Mode (l 36)
MF Manual focus (l 61)
AWB
White balance (l 59)
1/100 Shutter speed (l 60)
OPEN/F2.2 Iris value (l 60)
0dB Gain value (l 60)
5////////
/
Scene mode (l 54)
// /
Power LCD (l 34)
/
Image stabilizer (l 48)
PRE-REC (l 52)
Manual Mode (l 58)
/////
AF/AE tracking (l 49)
RELAY REC (l 55)
Zoom microphone (l 56)
Wind noise canceler (l 56)
Backlight compensation
(l 51)
Soft skin mode (l 53)
/ Fade (White), Fade (Black)
(l 51)
Color night rec function
(l 53)
Intelligent contrast control
(l 52)
WEB MODE (l 51)
*1
100
VQT2L14
 Loading...