

Page 1
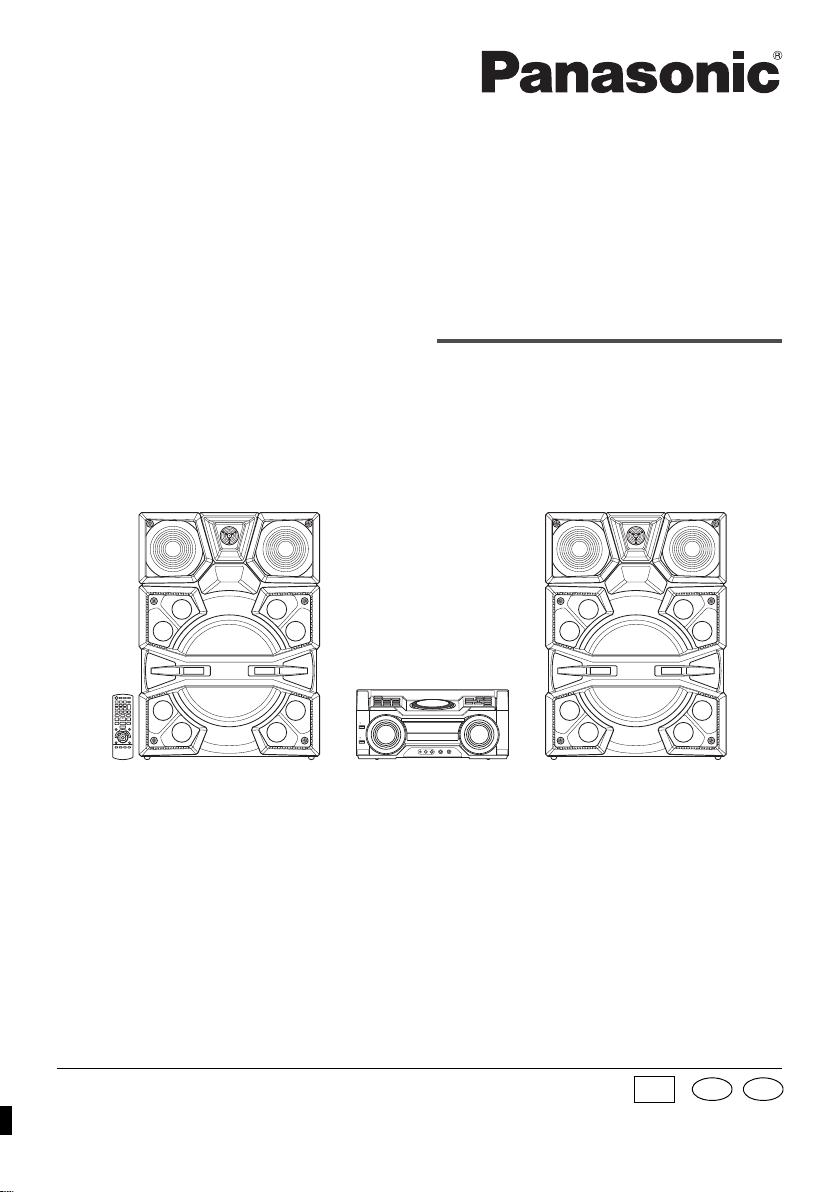
Operating Instructions
offset printing
使用说明书
CD Stereo System
CD 立体声组合音响
Model No. SC-MAX8000
SC-MAX6000
This illustration shows SC-MAX8000.
此插图为 SC-MAX8000。
Thank you for purchasing this product.
For optimum performance and safety, please read these instructions carefully.
Please keep this manual for future reference.
感谢您购买本产品。
为确保最佳性能和安全,请仔细阅读本说明书。
请保管本说明书以备今后参考。
Panasonic Corporation
Web Site: http://www.panasonic.com
© Panasonic Corporation 2015
GS
En Cn
RQT9979-Z
L0315CH0
Page 2
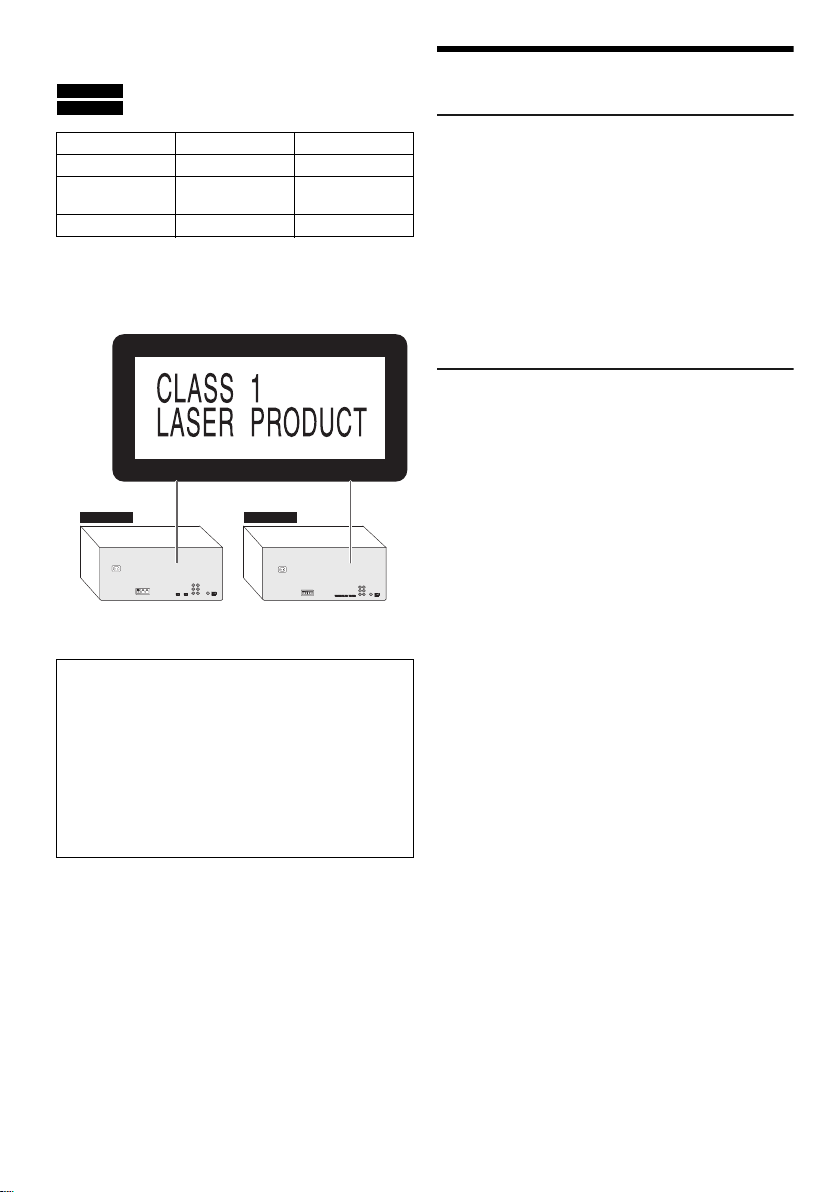
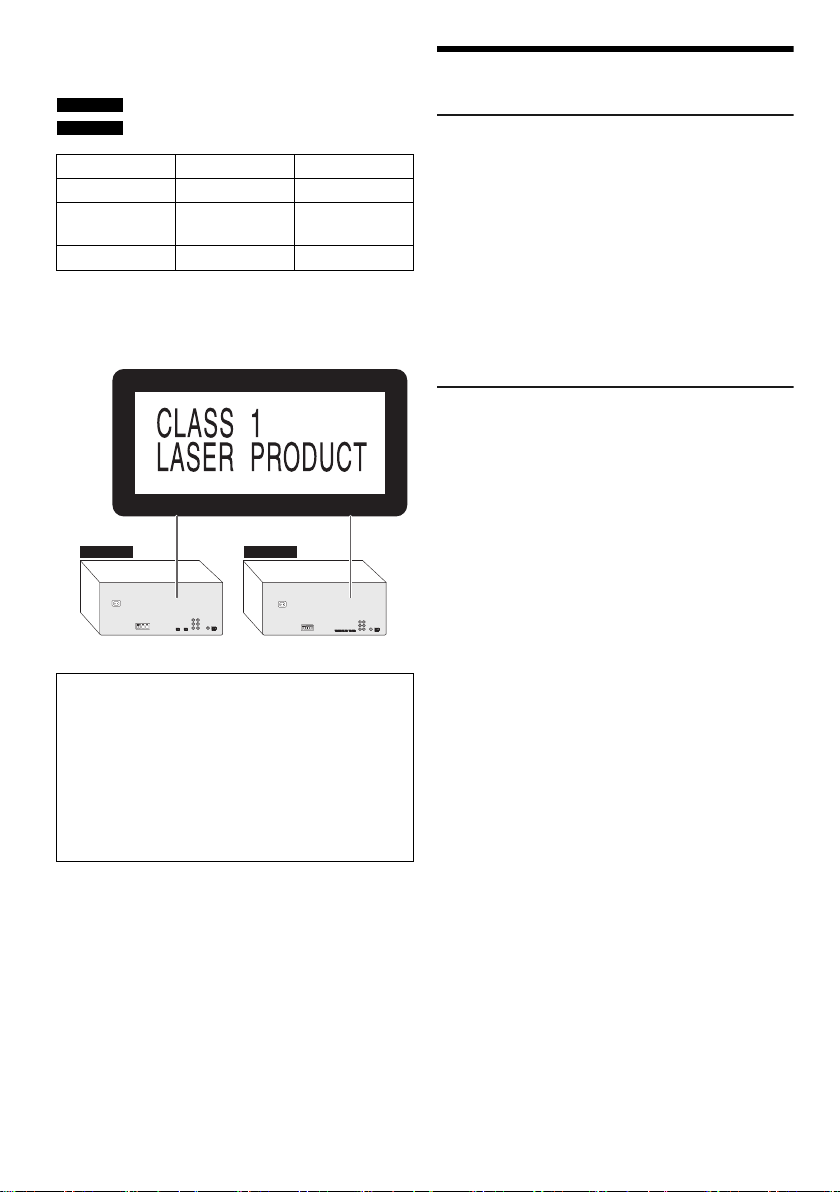
These operating instructions are applicable for models
SC-MAX8000 SC-MAX6000
offset printing
SC-MAX8000 and SC-MAX6000.
SC-MAX8000 :
SC-MAX6000 :
System SC-MAX8000 SC-MAX6000
Main unit SA-MAX8000 SA-MAX6000
Speakers SB-MAX8000 SB-MAF6000
Subwoofer – SB-MAW6000
Unless otherwise indicated, illustrations in these
operating instructions are of SC-MAX8000.
Your system and the illustrations can look differently.
Recording and playback of content on this or any other
devices may require permission from the owner of the
copyright or other such rights of that content.
Panasonic has no authority to and does not grant you
that permission and explicitly disclaims any right, ability
or intention to obtain such permission on your behalf. It
is your responsibility to ensure that your use of this or
any other devices complies with applicable copyright
legislation in your country. Please refer to that
legislation for more information on the relevant laws and
regulations involved or contact the owner of the rights
of the content you wish to record or playback.
RQT9979
2
2
Indicate features applicable to SC-MAX8000.
Indicate features applicable to SC-MAX6000.
SB-MAG6000
Safety precautions
WARNING!
Unit
• To reduce the risk of fire, electric shock or product
damage,
– Do not expose this unit to rain, moisture, dripping or
splashing.
– Do not place objects filled with liquids, such as
vases, on this unit.
– Use only the recommended accessories.
– Do not remove covers.
– Do not repair this unit by yourself. Refer servicing to
qualified service personnel.
– Do not let metal objects fall inside this unit.
CAUTION!
Unit
• To reduce the risk of fire, electric shock or product
damage,
– Do not install or place this unit in a bookcase, built-in
cabinet or in another confined space. Ensure this
unit is well ventilated.
– Do not obstruct this unit’s ventilation openings with
newspapers, tablecloths, curtains, and similar items.
– Do not place sources of naked flames, such as
lighted candles, on this unit.
• This unit is intended for use in tropical climates.
• This unit may receive radio interference caused by
mobile telephones during use. If such interference
occurs, please increase separation between this unit
and the mobile telephone.
• This unit utilizes a laser. Use of controls or adjustments
or performance of procedures other than those
specified herein may result in hazardous radiation
exposure.
• Set the unit up on an even surface away from direct
sunlight, high temperatures, high humidity, and
excessive vibration.
• The mains plug is the disconnecting device. Install this
unit so that the mains plug can be unplugged from the
socket outlet immediately.
Battery
• Danger of explosion if battery is incorrectly replaced.
Replace only with the type recommended by the
manufacturer.
• When disposing of the batteries, please contact your
local authorities or dealer and ask for the correct
method of disposal.
• Do not heat or expose to flame.
• Do not leave the battery(ies) in a car exposed to direct
sunlight for a long period of time with doors and
windows closed.
• Do not break open or short-circuit the battery.
• Do not charge the alkaline or manganese battery.
• Do not use the battery if the cover has peeled off.
• Remove the battery if you do not use the remote
control for a long period of time. Keep in a cool, dark
area.
Page 3
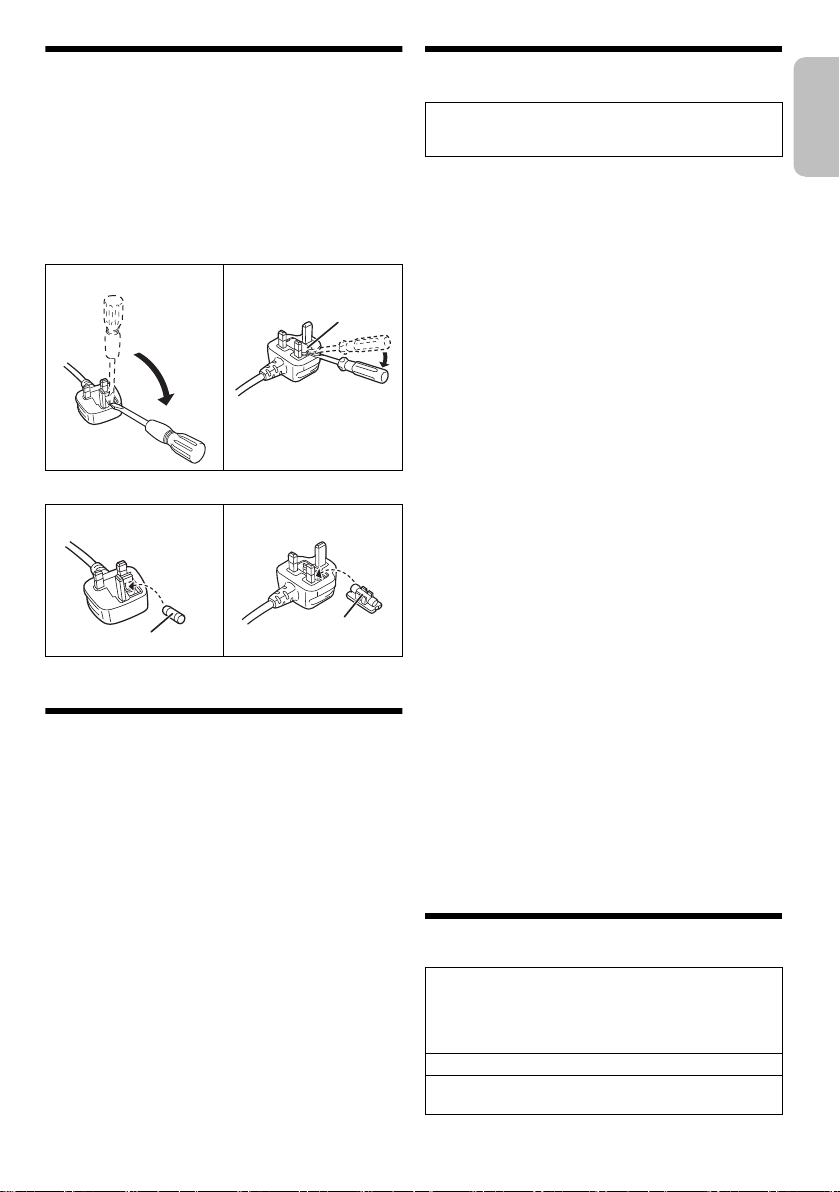
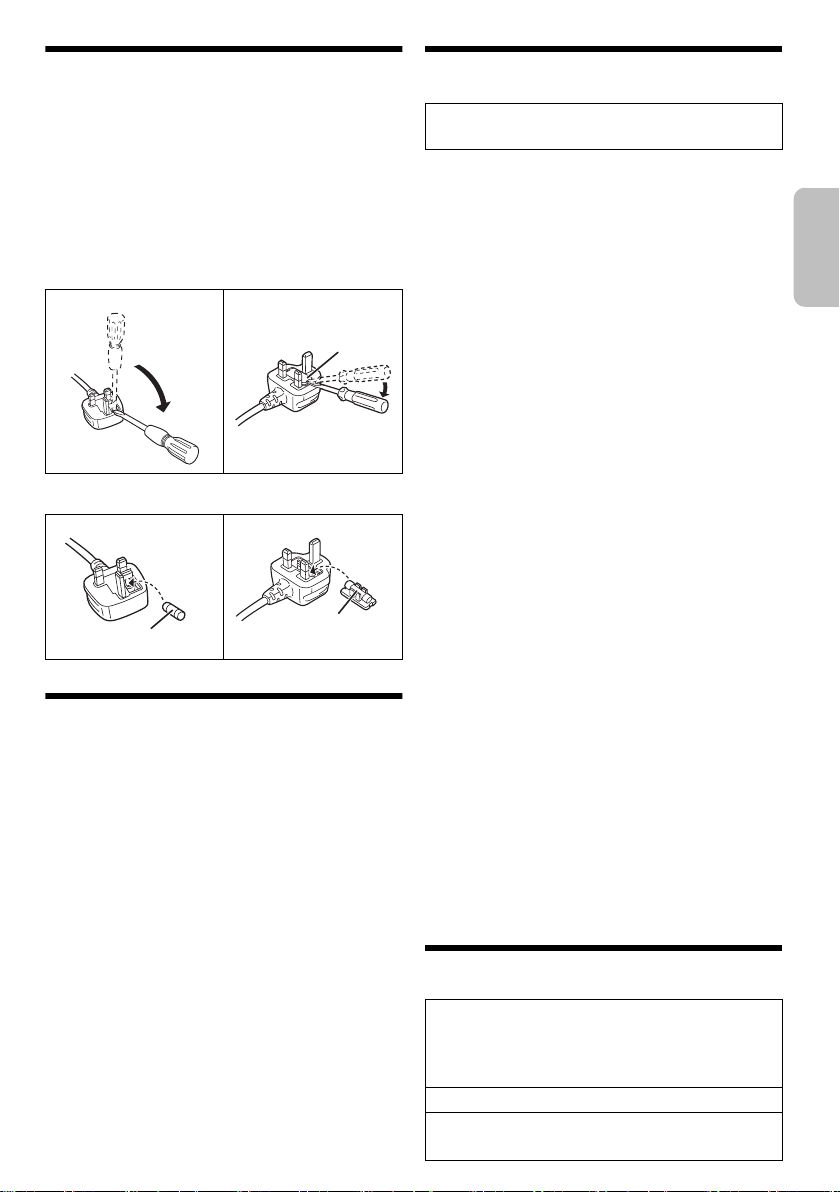
Note on AC mains lead
Fuse cover
Fuse (13 ampere)
Fuse (13 ampere)
ENGLISH
offset printing
(For the AC mains plug of three pins)
Before use
Remove the connector cover.
How to replace the fuse
The location of the fuse differ according to the type of AC
mains plug (figures A and B). Confirm the AC mains plug
fitted and follow the instructions below.
Illustrations may differ from actual AC mains plug.
1. Open the fuse cover with a screwdriver.
Figure A Figure B
2. Replace the fuse and close or attach the fuse cover.
Figure A Figure B
Table of contents
Safety precautions . . . . . . . . . . . . . . . . . . . . . . . . . . . . . . 2
Note on AC mains lead . . . . . . . . . . . . . . . . . . . . . . . . . . 3
About Bluetooth
Licenses. . . . . . . . . . . . . . . . . . . . . . . . . . . . . . . . . . . . . . 3
Supplied accessories . . . . . . . . . . . . . . . . . . . . . . . . . . . 4
Placement of speakers . . . . . . . . . . . . . . . . . . . . . . . . . . 4
Preparing the remote control. . . . . . . . . . . . . . . . . . . . . . 5
Overview of controls . . . . . . . . . . . . . . . . . . . . . . . . . . . . 6
Making the connections . . . . . . . . . . . . . . . . . . . . . . . . . 8
Preparing media . . . . . . . . . . . . . . . . . . . . . . . . . . . . . . . 9
Media playback . . . . . . . . . . . . . . . . . . . . . . . . . . . . . . . 10
Radio . . . . . . . . . . . . . . . . . . . . . . . . . . . . . . . . . . . . . . . 12
Recording . . . . . . . . . . . . . . . . . . . . . . . . . . . . . . . . . . . 13
Sound and illumination effects . . . . . . . . . . . . . . . . . . . 14
DJ functions. . . . . . . . . . . . . . . . . . . . . . . . . . . . . . . . . . 15
Karaoke . . . . . . . . . . . . . . . . . . . . . . . . . . . . . . . . . . . . . 16
Using a microphone . . . . . . . . . . . . . . . . . . . . . . . . . . . 16
Clock and timers . . . . . . . . . . . . . . . . . . . . . . . . . . . . . . 17
External equipment . . . . . . . . . . . . . . . . . . . . . . . . . . . . 18
Others . . . . . . . . . . . . . . . . . . . . . . . . . . . . . . . . . . . . . . 19
Maintenance . . . . . . . . . . . . . . . . . . . . . . . . . . . . . . . . . 19
Troubleshooting. . . . . . . . . . . . . . . . . . . . . . . . . . . . . . . 20
Specifications . . . . . . . . . . . . . . . . . . . . . . . . . . . . . . . . 22
®
. . . . . . . . . . . . . . . . . . . . . . . . . . . . . . . 3
About Bluetooth
Panasonic bears no responsibility for data and/or
information that can possibly be compromised during a
wireless transmission.
Frequency band
• This system uses the 2.4 GHz frequency band.
Certification
• This system conforms to the frequency restrictions and
has received certification based on frequency laws.
Thus, a wireless permit is not necessary.
• The actions below are punishable by law:
– Taking apart or modifying the main unit.
– Removing specification indications.
Restrictions of use
• Wireless transmission and/or usage with all Bluetooth
equipped devices is not guaranteed.
• All devices must conform to standards set by
Bluetooth SIG, Inc.
• Depending on the specifications and settings of a
device, it can fail to connect or some operations can be
different.
• This system supports Bluetooth
depending on the operating environment and/or
settings, this security is possibly not sufficient.
Transmit data wirelessly to this system with caution.
• This system cannot transmit data to a Bluetooth
device.
Range of use
• Use this device at a maximum range of 10 m.
• The range can decrease depending on the
environment, obstacles or interference.
Interference from other devices
• This system may not function properly and troubles
such as noise and sound jumps may arise due to radio
wave interference if this unit is located too close to
other Bluetooth
2.4 GHz band.
• This system may not function properly if radio waves
from a nearby broadcasting station, etc. is too strong.
Intended usage
• This system is for normal, general use only.
• Do not use this system near an equipment or in an
environment that is sensitive to radio frequency
interference (example: airports, hospitals, laboratories,
etc.).
®
devices or the devices that use the
®
®
security features. But
®
Licenses
®
The Bluetooth
trademarks owned by Bluetooth SIG, Inc. and any use
of such marks by Panasonic Corporation is under
license. Other trademarks and trade names are those of
their respective owners.
Google Play and Android are trademarks of Google Inc.
MPEG Layer-3 audio coding technology licensed from
Fraunhofer IIS and Thomson.
word mark and logos are registered
®
RQT9979
3
3
Page 4
Supplied accessories
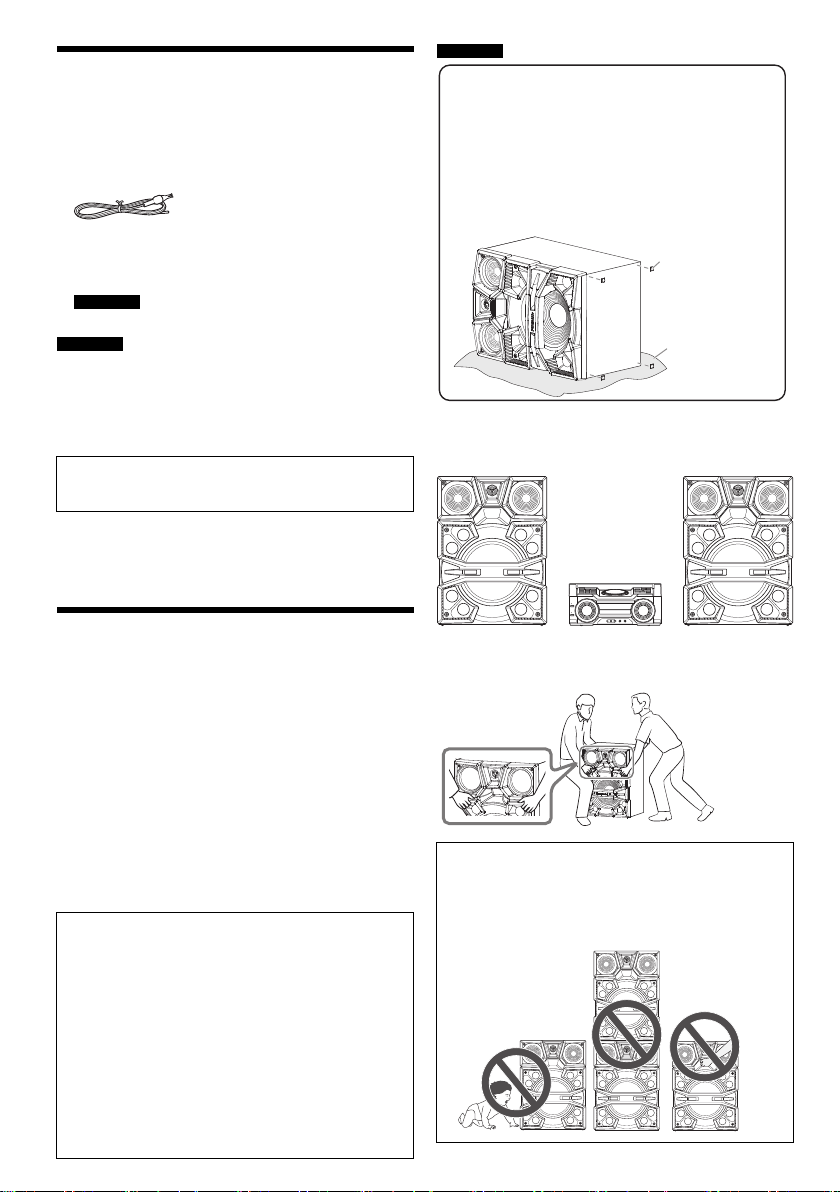
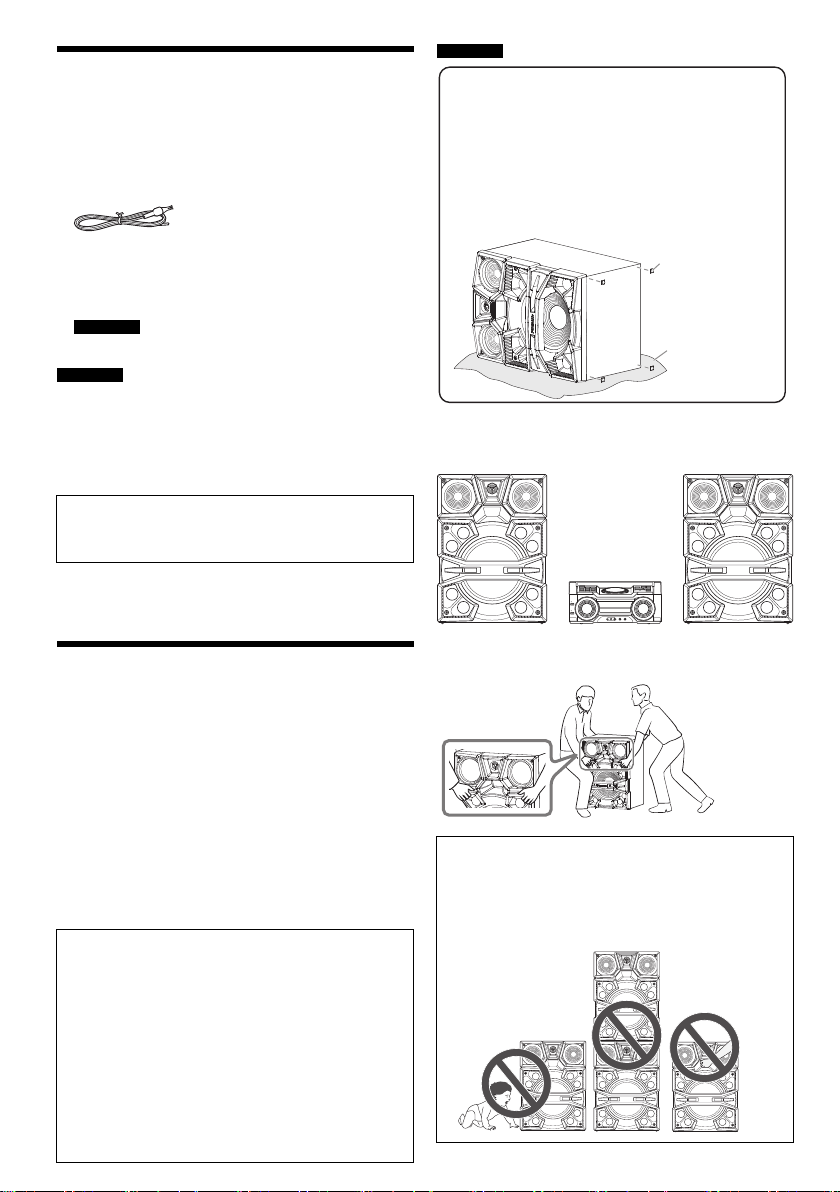
█ Attaching the speaker feet
For stability and to prevent damage to the floor,
attach the speaker feet to the bottom of the
speakers.
Preparation
Put a protection layer below the speakers to
prevent scratches.
Speaker feet
Protection layer
(not supplied)
offset printing
Check and identify the supplied accessories.
3 AC mains leads
1 AM loop antenna
1 FM indoor antenna
1 Remote control
(N2QAYB001022)
1 Remote control battery
SC-MAX8000
8 Speaker feet
SC-MAX6000
16 Speaker feet
16 Speaker stacking pins
2 Brackets
2 Screws
CAUTION!
Keep the speaker feet, brackets and screws out of
reach of children to prevent swallowing.
Note:
Use the AC mains lead that is suitable for your household
mains socket.
SC-MAX8000
The left and right speakers are the same.
Keep your speakers more than 10 cm from the main unit
for ventilation.
Placement of speakers
Use only the supplied speakers.
You can cause damage to the system and decrease the
sound quality if you use other speakers.
Note:
• Put the speakers on a flat safe surface.
• These speakers do not have magnetic shielding. Do not put
them near TVs, PCs or other equipment easily influenced
by magnetism.
• When you play at high levels for a long period, it can cause
damage to the speakers and decrease the life of the
speakers.
• Decrease the volume in these conditions to prevent
damage:
– When the sound is distorted.
– When you adjust the sound quality.
CAUTION!
• Use the speakers only with the recommended
system. If not, you can cause damage to the
amplifier and speakers and can cause a fire.
Consult an approved service personnel if damage
occurs or if there is a sudden apparent change in
performance.
• Do not modify the speaker or speaker wires as
this can cause damage to the system.
• Do the procedures included in these instructions
when you attach the speakers.
• Do not touch the speaker cone’s reverberating
surfaces:
RQT9979
– This may damage the speaker cone.
– The speaker cone may be hot.
4
4
Note:
More than one person is required to move, tilt or carry the
speakers.
CAUTION!
• Be careful when babies or children are near.
• Do not stack the speakers.
• Do not put a hand or foreign object into the port
holes as this can cause personal injury and
damage to the speaker.
Page 5
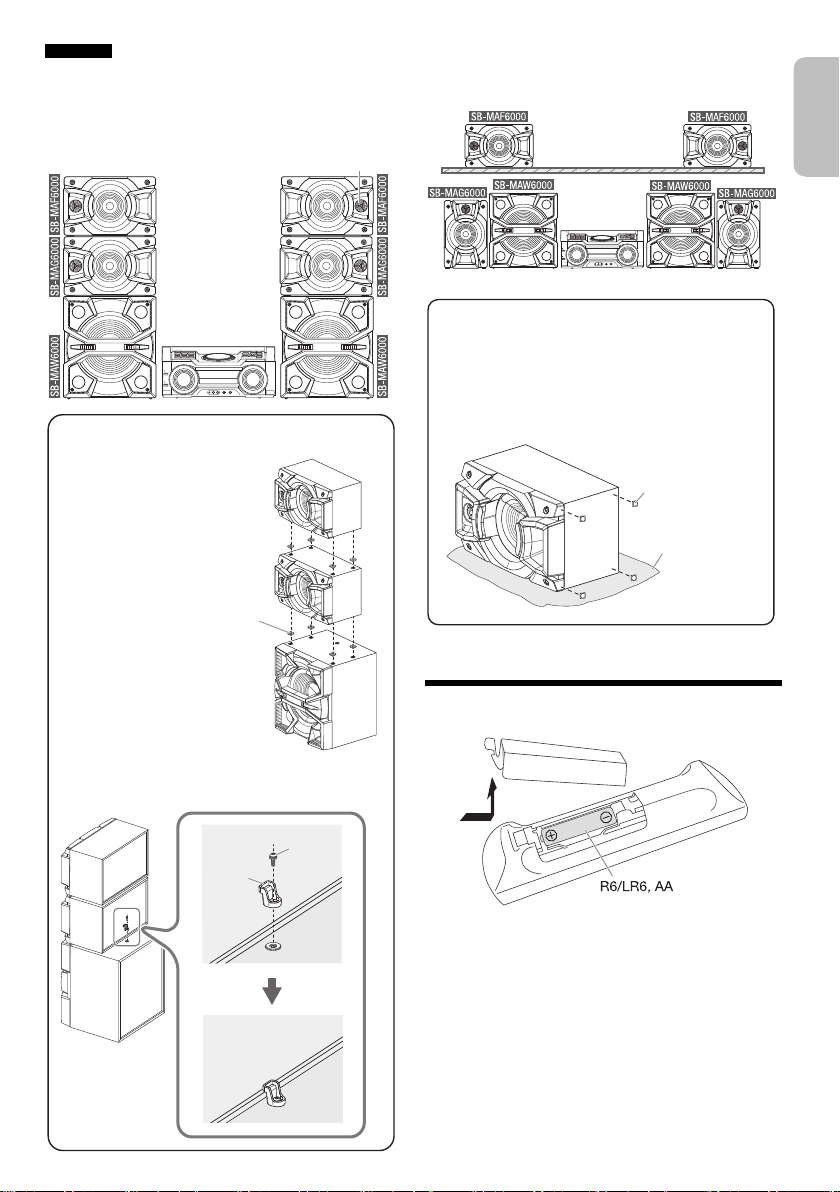
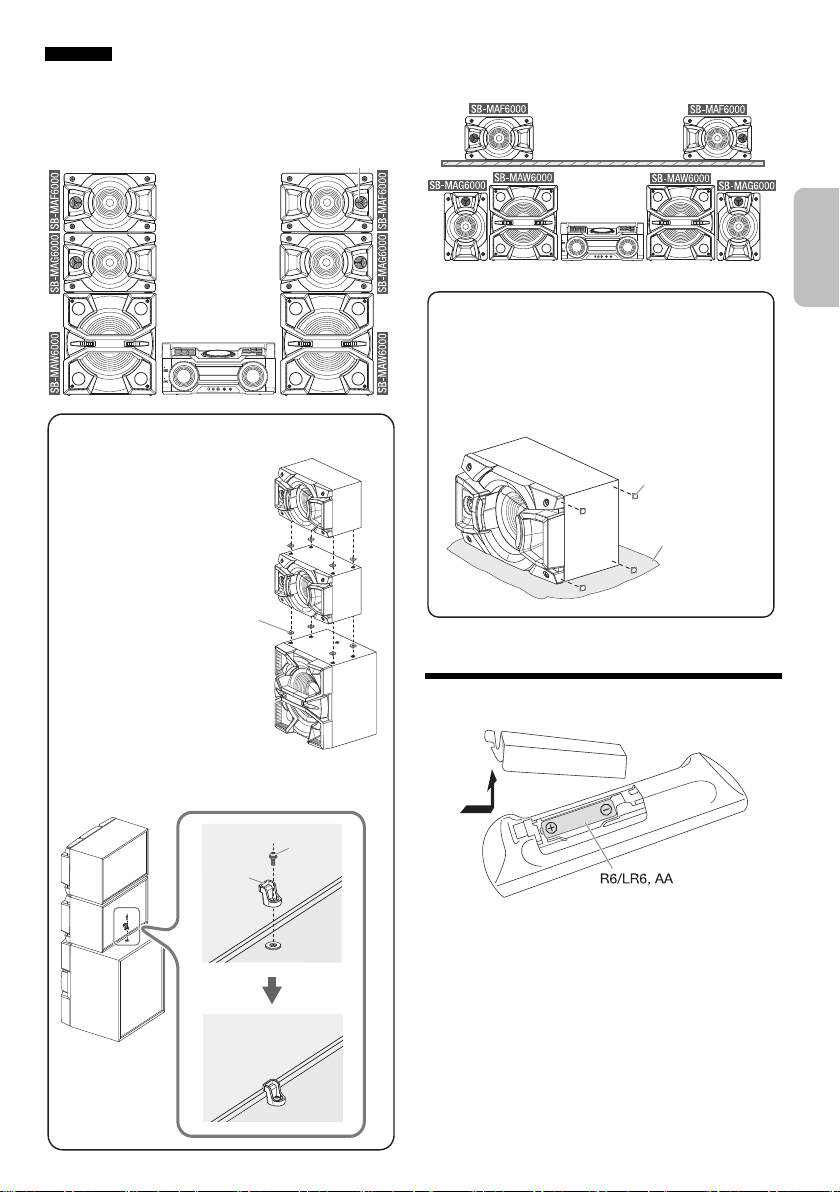
SC-MAX6000
Tweeter
█ Stacking the speakers
Stack the speakers with the
supplied speaker stacking pins.
Press down the stacking pins
and the speaker until it is
secured in position.
Stacking pin
Install the supplied bracket as shown below to
secure the speakers.
Screw
Bracket
Speaker feet
Protection layer
(not supplied)
█ Attaching the speaker feet
Before placing the speakers in a vertical position,
lay the speakers on top of a protection layer and
paste the supplied speaker feet to the bottom of the
speakers.
ENGLISH
offset printing
Put the speakers so that the tweeter is on the outside.
Keep your speakers more than 10 mm from the main unit
for ventilation.
Setup 1
Setup 2
You can put the speakers in a vertical position as well as
on a shelf.
Preparing the remote control
Use alkaline or manganese battery.
Install the battery so that the poles (+ and –) align with
those in the remote control.
RQT9979
5
5
Page 6
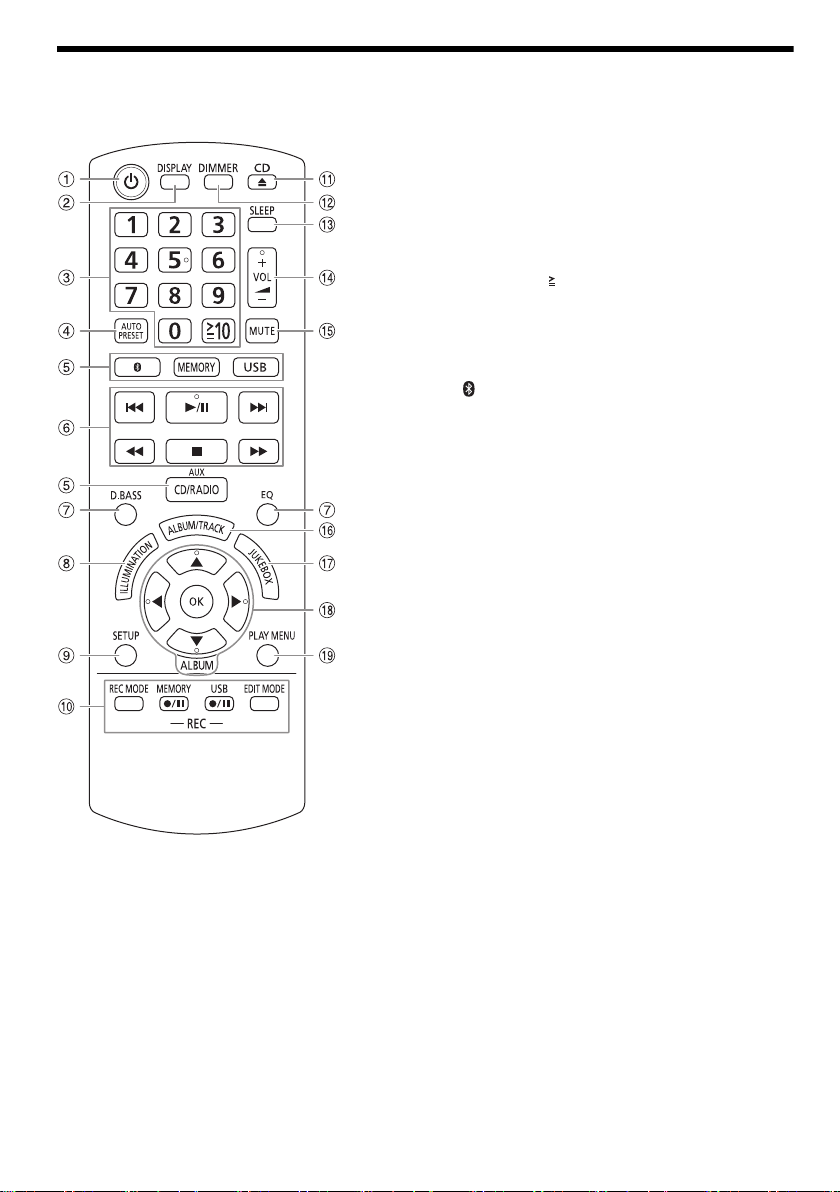
Overview of controls
offset printing
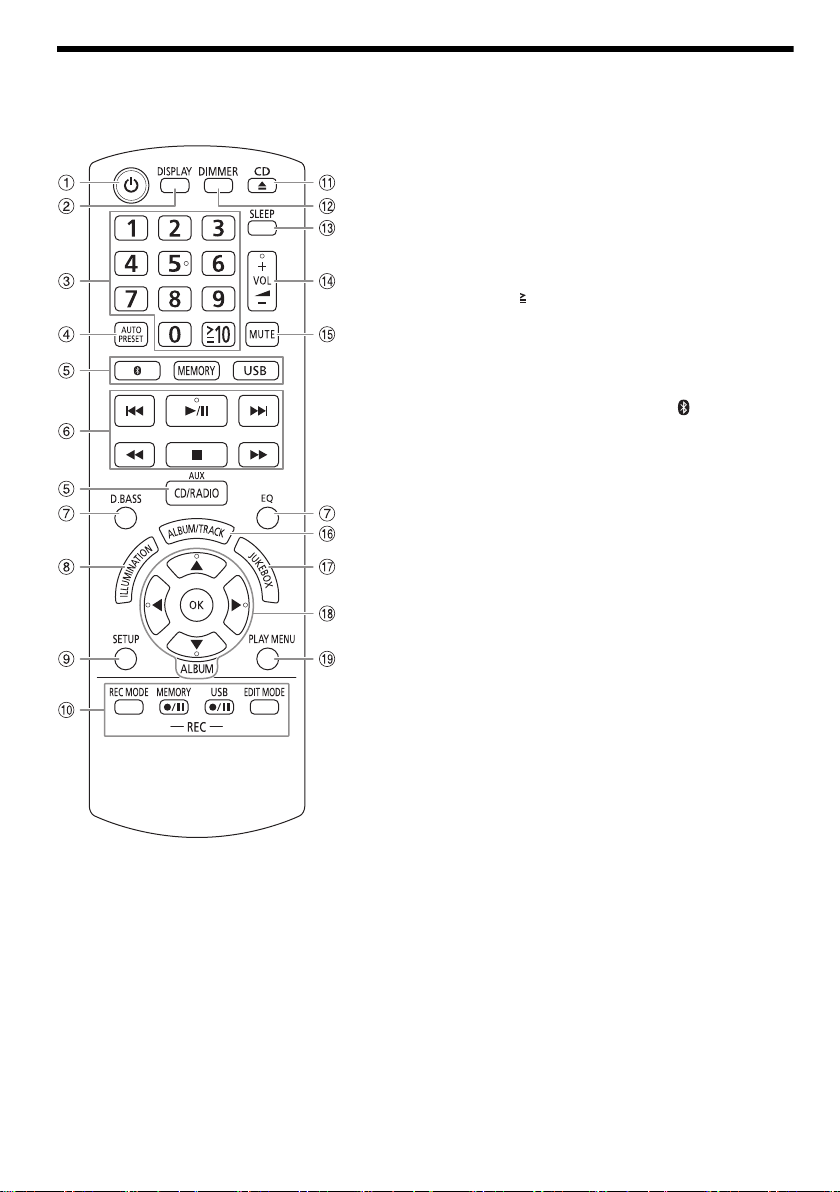
Do the procedures with the remote control. You can also use the buttons on the main unit if they are the same.
A Standby/on switch [`], [1]
Press to switch the unit from on to standby mode or
vice versa. In standby mode, the unit is still
consuming a small amount of power.
B View the content information
C Numeric buttons
To select a 2-digit number
Example: 16: [ 10]=[1]=[6]
D Auto preset the radio station
E Select the audio source
On the main unit:
To start Bluetooth
[ –PAIRING].
F Basic playback control
G Select the sound effects
H Select the illumination effects
I View the setup menu
J Recording operation control
K Open or close the disc tray
L Decrease the brightness of the display panel
To cancel, press the button again.
M Set the sleep timer
N Adjust the volume level
O Mute the sound
To cancel, press the button again.
“MUTE” is also cancelled when you adjust the volume
or when you switch off the system.
P Select MP3 album or track
Q Select DJ jukebox or Karaoke jukebox
R Select or confirm the option
S View the play menu
®
pairing, press and hold
RQT9979
6
6
Page 7
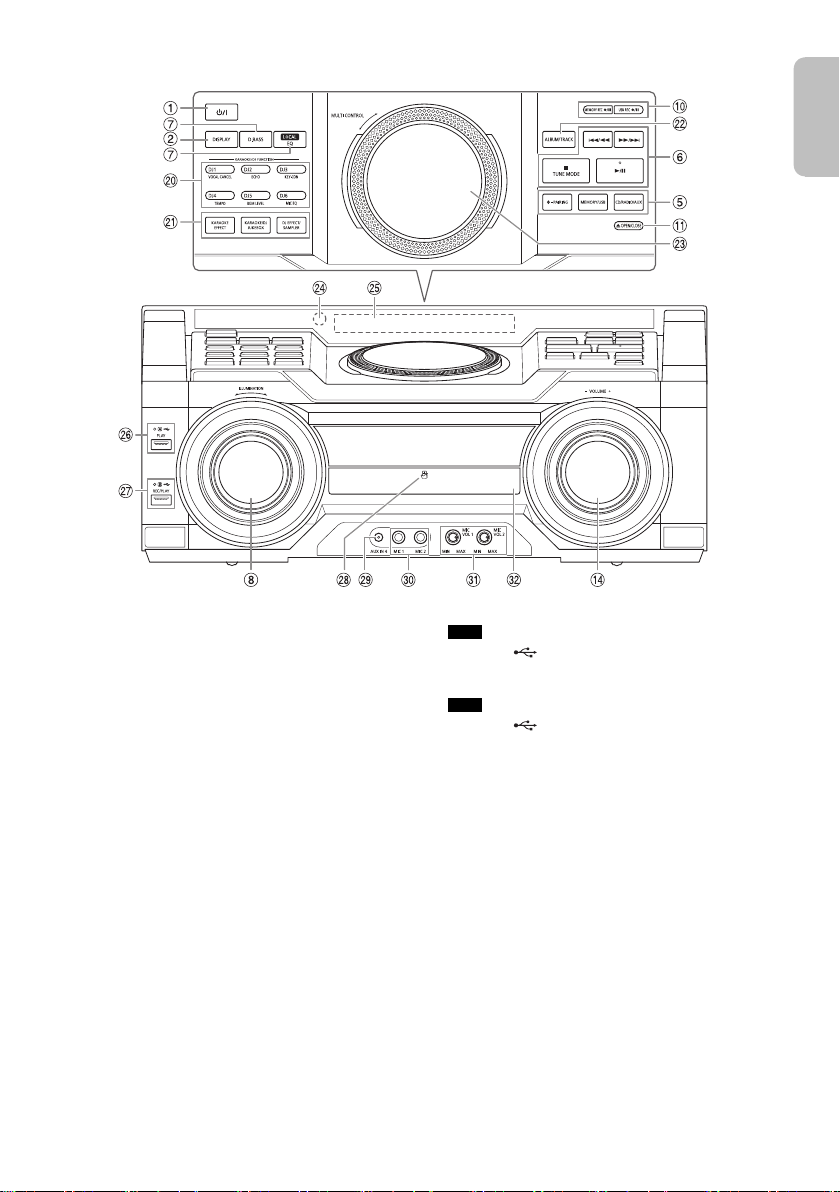
T Select the Karaoke effect
Top V ie w
Front View
ENGLISH
offset printing
DJ function direct buttons
Press [KARAOKE/DJ JUKEBOX] to switch on the
Karaoke function.
Press [KARAOKE/DJ JUKEBOX] or
[DJ EFFECT/SAMPLER] to switch on the DJ function.
Press [DJ1] to [DJ6] on the main unit to select the
desired function.
To cancel, press the selected [DJ1] to [DJ6] again.
U Switch on the Karaoke or DJ function
To cancel, press the button again.
V Select MP3 album or track
Press [ALBUM/TRACK] to select album or track.
Browse tracks or albums
Turn [MULTI CONTROL] to browse.
To start playback from the selection, press [4/9].
W Turntable for DJ and multi control
X Remote control sensor
Distance: Within approximately 7 m
Angle: Approximately 20° up and down,
30° left and right
Y Display panel
Z USB A
USB port ( )
USB status indicator
Play MP3 tracks.
a USB B
USB port ( )
USB status indicator
Play MP3 tracks.
Record sound or music tracks.
b NFC touch area
c AUX IN 4 jack
d Microphone jack
e Adjust the microphone volume level
f Disc tray
RQT9979
7
7
Page 8
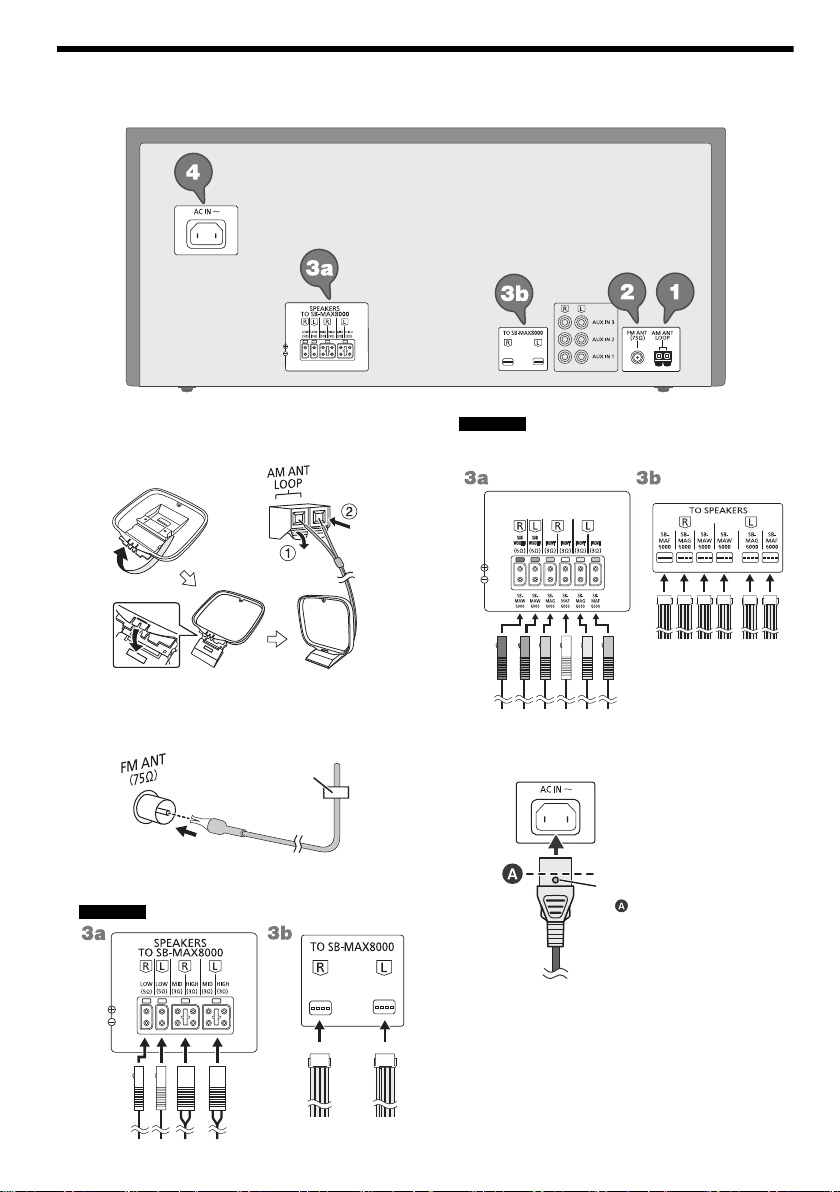
Making the connections
Adhesive tape
(not supplied)
TO SPEAKERS
To household
mains socket
Insert the AC mains lead up
to , a point just before the
round hole.
offset printing
Connect the AC mains lead only after all the other connections have been made.
1 Connect the AM loop antenna.
Stand the antenna up on its base until it clicks.
2 Connect the FM indoor antenna.
Put the antenna where reception is best.
3 Connect the speakers.
SC-MAX8000
SC-MAX6000
Connect the speaker cables to the terminals of the
same colour.
4 Connect the AC mains lead.
RQT9979
8
8
Do not use an AC mains lead from other equipment.
Conserving power
The system consumes a small amount of power even
when it is in standby mode. Disconnect the power
supply if you do not use the system.
Some settings will be lost after you disconnect the
system. You have to set them again.
Page 9
Preparing media
ENGLISH
offset printing
Disc
1 Press [CD x] (main unit: [x OPEN/CLOSE]) to
open the disc tray.
Put in a disc with the label facing up.
Press again to close the disc tray.
2 Press [CD/RADIO/AUX] to select “CD”.
USB
Preparation
Before you connect a USB device to the system, make
sure you do a backup of the data.
1 Decrease the volume and connect the USB device
to the USB port.
Hold the main unit when connecting or disconnecting
the USB device.
2 Press [USB] (main unit: [MEMORY/USB]) to select
“USB A” or “USB B”.
USB status indicator lights up in red when selected.
Note:
Do not use a USB extension cable. The system cannot
recognise USB device connected through a cable.
Bluetooth
You can connect and play an audio device wirelessly
through Bluetooth
Preparation
• Switch on the Bluetooth
the device near the system.
• Read the operating instructions of the device for
details.
█ Pairing a device
Preparation
If this system is connected to a Bluetooth
disconnect it (Z“Disconnecting a device”).
1 Press [ ].
If “PAIRING” is shown, continue with step 4.
2 Press [PLAY MENU] to select “PAIRING”.
3 Press [Y, U] to select “OK? YES” and then press
[OK].
“PAIRING” is shown.
To cancel, select “OK? NO”.
4 Select “SC-MAX8000” or “SC-MAX6000” from the
Bluetooth
If prompted for a passkey, input “0000”.
The device connects with this system automatically
after pairing is complete.
The name of the connected device is shown for a few
seconds.
®
®
.
®
feature of the device and put
®
menu of the device.
®
device,
Using the main unit
1 Press and hold [ –PAIRING] until “PAIRING” is
shown.
2 Select “SC-MAX8000” or “SC-MAX6000” from the
Bluetooth
Note:
You can pair up to 8 devices with this system. If a 9th device
is paired, the device that has not been used for the longest
time will be replaced.
®
menu of the device.
█ Connecting a device
Preparation
If this system is connected to a Bluetooth
disconnect it (Z“Disconnecting a device”).
®
device,
1 Press [ ].
“BLUETOOTH READY” is shown.
2 Select “SC-MAX8000” or “SC-MAX6000” from the
Bluetooth
The name of the connected device is shown for a few
seconds.
®
menu of the device.
3 Start playback on the device.
Note:
• A device must be paired to connect.
• This system can only connect to one device at a time.
• When “BLUETOOTH” is selected as the source, this
system will automatically try to connect to the last
connected device. (“LINKING” is shown during this
process.)
█ Disconnecting a device
1 Press [ ].
2 Press [PLAY MENU] to select “DISCONNECT?”.
3 Press [Y, U] to select “OK? YES” and then press
[OK].
“BLUETOOTH READY” is shown.
To cancel, select “OK? NO”.
Using the main unit
Press and hold [ –PAIRING] until “PAIRING” is
shown.
Note:
A device is disconnected when you:
• Select a different source.
• Move the device out of the maximum range.
• Disable the Bluetooth
• Switch off the system or the device.
®
transmission of the device.
RQT9979
9
9
Page 10
█ One-Touch Connection (NFC)
Bluetooth® device
(not supplied)
offset printing
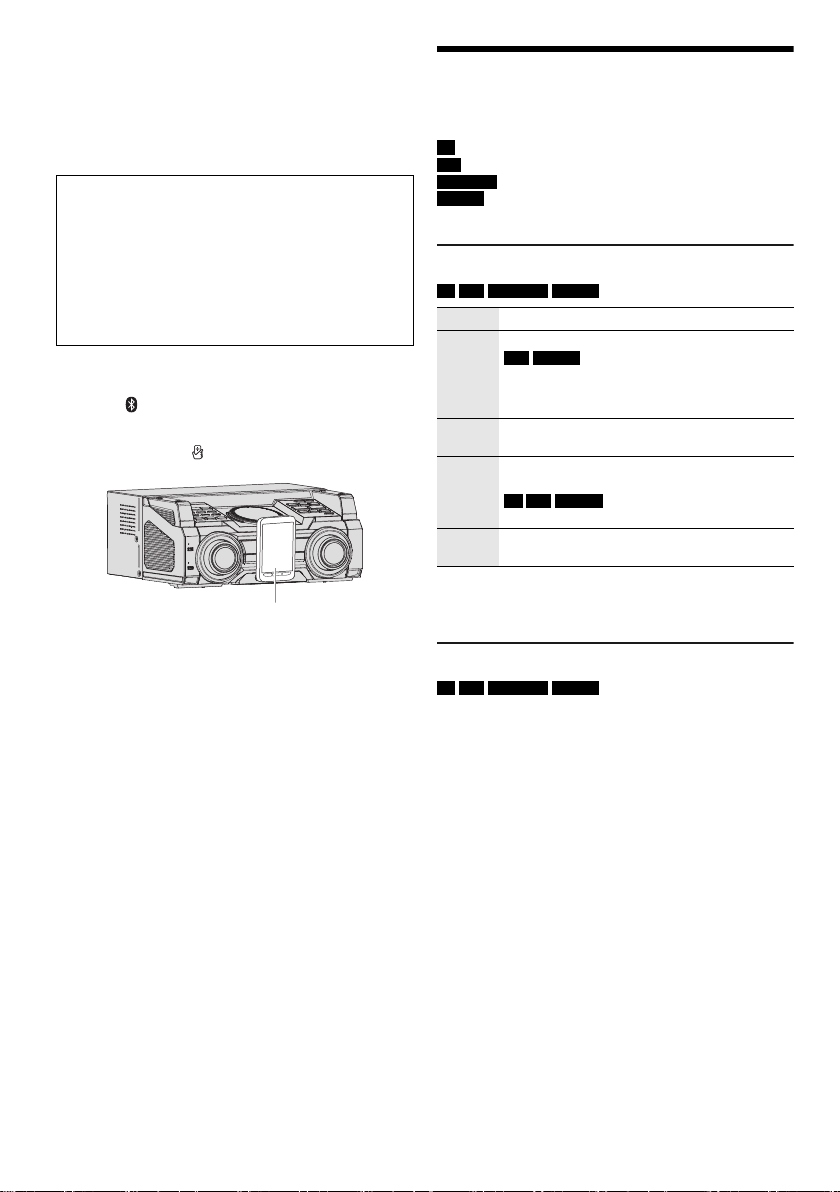
For NFC-compatible Bluetooth® devices (Android™
devices) only
Simply by touching an NFC (Near Field Communication)compatible Bluetooth
complete all preparations, from registering a Bluetooth
device to establishing a connection.
Android device version lower than 4.1 requires the
installation of the “Panasonic MAX Juke” app (free of
charge).
®
device on the system, you can
®
A Enter “Panasonic MAX Juke” in the search box of
Google Play™ to search and then select “Panasonic
MAX Juke”.
B Start the app.
– Follow the instructions to complete the settings.
– Make sure to use the latest version of the app.
Preparation
Switch on the NFC feature of the device.
1 Press [ ].
2 Touch and hold the device on the NFC touch area
of the main unit [ ].
Media playback
The following marks indicate the availability of the
feature.
CD :
USB :
BLUETOOTH :
MEMORY :
Basic playback
CD USB BLUETOOTH MEMORY
Play Press [4/9].
Stop Press [8].
Pause Press [4/9].
Skip Press [2] or [6] (main unit: [2/3] or
Search Press and hold [3] or [5] (main unit:
Note:
Depending on the Bluetooth
not work.
CD-R/RW in CD-DA format or with MP3 files.
USB device with MP3 files.
®
Bluetooth
2 GB internal memory (refer to “Recording” for
adding tracks to the internal memory).
USB MEMORY
The position is memorised.
“RESUME” is shown.
Press again to stop fully.
Press again to continue playback.
[5/6]) to skip track.
CD USB MEMORY
Press [R, T] to skip MP3 album.
[2/3] or [5/6]).
device.
®
device, some operations may
– Hold the device until it beeps, vibrates or displays a
pop-up window, and then move the device away
from the system.
– Once the registration and connection of the device
is complete, the name of the connected device is
shown on the system for a few seconds.
– When the connection is not established even if the
device has touched the NFC touch area, change its
touching position. The connection may improve if
you use the “Panasonic MAX Juke” app.
3 Start playback on the device.
Note:
• While connected, you can connect another device by
touching and holding it on the NFC touch area of the main
unit. The previous device will be disconnected
automatically.
• Depending on the device:
– The one-touch connection may not work.
– The position of the NFC touch area of the device may be
different.
– When the connection is established, playback may start
automatically.
RQT9979
10
10
Viewing available information
CD USB BLUETOOTH MEMORY
You can view the available information, such as MP3
album and track number, on the display panel.
Press [DISPLAY].
Note:
• Maximum characters that can be shown: Approximately 32
• This system supports ver. 1.0, 1.1 and 2.3 ID3 tags.
• Text data that the system does not support can show
differently.
Page 11
Play menu
ENGLISH
offset printing
CD USB MEMORY
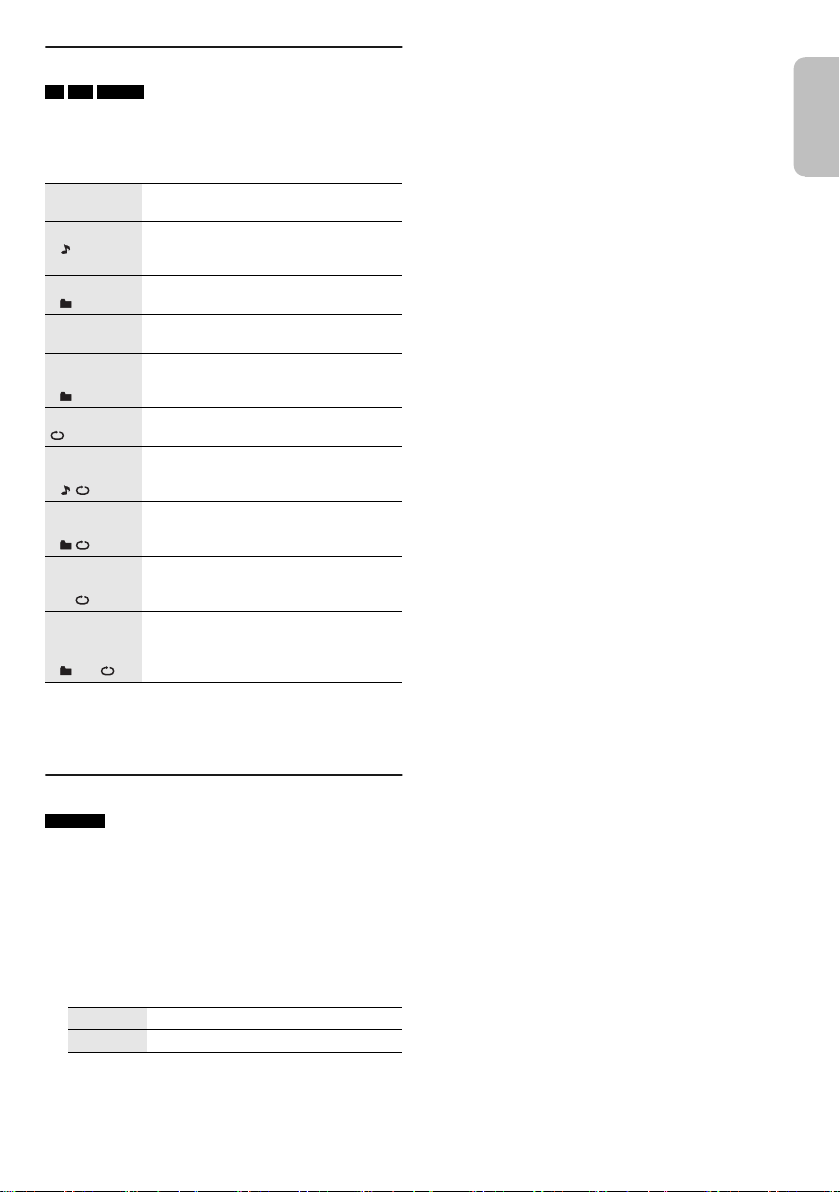
1 Press [PLAY MENU].
2 Press [Y, U] to select the setting and then press
[OK].
OFF
PLAYMODE
1-TRACK
1
1-ALBUM
1
RANDOM
RND
1-ALBUM
RANDOM
1 RND
ALL REPEAT Repeat all tracks.
1-TRACK
REPEAT
1
1-ALBUM
REPEAT
1
RANDOM
REPEAT
RND
1-ALBUM
RANDOM
REPEAT
1 RND
Note:
• During random playback, you cannot skip to tracks which
have been played.
• The setting is cancelled when you open the disc tray.
Cancel the setting.
Play one selected track.
Press the numeric buttons to select the
track.
Play one selected MP3 album.
Press [R, T] to select the MP3 album.
Play all tracks randomly.
Play all tracks in one selected MP3
album randomly.
Press [R, T] to select the MP3 album.
Repeat 1-TRACK.
Repeat 1-ALBUM.
Repeat random playback.
Repeat 1-ALBUM RANDOM.
█ Note on disc
• This system can play CD-R/RW with CD-DA or MP3
format content.
• Before playback, finalise the disc on the device it was
recorded on.
• Some CD-R/RW cannot be played because of the
condition of the recording.
█ Note on USB device
• This system does not guarantee connection with all
USB devices.
• This system supports USB 2.0 full speed.
• This system can support USB devices of up to 32 GB.
• Only FAT 12/16/32 file system is supported.
█ Note on MP3 file
• Files are defined as tracks and folders are defined as
albums.
• Tracks must have the extension “.mp3” or “.MP3”.
• Tracks will not necessarily be played in the order you
recorded them.
• Some files can fail to work because of the sector size.
MP3 file on disc
• This system can access up to:
– 255 albums (including root folder)
– 999 tracks
– 20 sessions
• Disc must conform to ISO9660 level 1 or 2 (except for
extended formats).
MP3 file on USB device
• This system can access up to:
– 800 albums (including root folder)
– 8000 tracks
– 999 tracks in one album
Link mode
BLUETOOTH
You can change the link mode to suit the connection
type.
Preparation
If this system is connected to a Bluetooth
disconnect it (Z“Disconnecting a device”).
1 Press [PLAY MENU] to select “LINK MODE”.
2 Press [Y, U] to select the mode and then press
[OK].
MODE 1 Emphasis on connectivity.
MODE 2 Emphasis on sound quality.
Note:
Select “MODE 1” if the sound is interrupted.
®
device,
11
11
RQT9979
Page 12
Radio
offset printing
Preparation
Press [CD/RADIO/AUX] to select “FM” or “AM”.
Manual tuning
Press [3] or [5] to tune in to the station.
To tune automatically, press and hold the button until the
frequency starts changing quickly.
“STEREO” is shown when a stereo broadcast is being
received.
Using the main unit
1 Press [TUNE MODE] to select “MANUAL”.
2 Press [2/3] or [5/6] to tune in to the
station.
Memory presetting
You can preset up to 30 FM and 15 AM stations.
█ Automatic presetting
1 Press [AUTO PRESET] to select “LOWEST” or
“CURRENT”.
LOWEST Tuning begins from the lowest
CURRENT Tuning begins from the current
2 Press [OK] to start presetting.
The tuner presets all the stations it can receive into
the channels in ascending order.
To cancel, press [8].
frequency.
frequency.
Improving the sound quality
When “FM” is selected
1 Press [PLAY MENU] to select “FM MODE”.
2 Press [Y, U] to select “MONO” and then press
[OK].
To cancel, select “STEREO”.
“MONO” is also cancelled when you change the
frequency.
To memorise the setting
Continue with step 2 of “Manual presetting”.
When “AM” is selected
1 Press [PLAY MENU] to select “BEATPROOF”.
2 Press [Y, U] to select the setting that provides the
best reception and then press [OK].
AM allocation setting
By main unit only
This system can also receive AM broadcasts allocated in
10 kHz steps.
1 Press [CD/RADIO/AUX] to select “FM” or “AM”.
2 Press and hold [CD/RADIO/AUX].
After a few seconds, the display panel shows the current
minimum radio frequency. Release the button when the
minimum frequency changes.
• To go back to the initial setting, do the above steps
again.
• Preset frequencies are erased after you change the
setting.
█ Manual presetting
1 Press [3] or [5] (main unit: [2/3] or
[5/6]) to tune in to the station.
2 Press [OK].
3 Press the numeric buttons to select a preset
number.
Do steps 1 through 3 again to preset more stations.
The new station replaces any station that occupies
the same preset number.
█ Selecting a preset station
Press the numeric buttons, [2] or [6] to select
the preset station.
Using the main unit
1 Press [TUNE MODE] to select “PRESET”.
2 Press [2/3] or [5/6] to select the preset
station.
RQT9979
12
12
Page 13
Recording
ENGLISH
offset printing
This system can record up to 800 folders (maximum 999
tracks in an album) or a total of 8000 tracks, depending
on the available storage capacity of the internal memory
or the USB device in
To check storage space
In the stop mode, press [DISPLAY].
• “UPDATE” is shown when the system is reading the
device.
• “NO DEVICE” is shown if there is no USB device
connected to
Note:
• All recordings are in “.mp3” format.
• You cannot do recording when you are using random
playback mode.
• The Karaoke or DJ function is switched off during
recording.
• Repeat playback mode is cancelled during recording.
• A new album is added each time you do a recording.
• The sequence of album may change after the recording.
• The recordings are kept in a folder named “REC_DATA” in
the USB device or the internal memory.
• USB status indicator blinks in red during USB recording.
Basic recording
1 Select the source you want to record.
CD-DA
Prepare the disc playback mode.
Record all
tracks
Record a
specified
track
Make sure the disc is stopped.
Radio
Tune in to the radio station.
External equipment
Connect and play the equipment
(Z“External equipment”).
2 Press [MEMORY REC 7/9] or [USB REC 7/9] to
start recording.
The name of the folder that keeps the recording is
shown.
Stop recording Press [8]. “WRITING” is shown.
Pause
recording
Note:
• Wait for a few seconds for the system to prepare the USB
device before you start recording.
• When the next track of the disc is being recorded, it will be
shown on the display.
USB B .
USB B .
Select “OFF PLAYMODE”
(Z“Play menu”).
Select “1-TRACK” (Z“Play menu”).
Press [MEMORY REC 7/9] or
[USB REC 7/9] during recording.
Press again to continue recording.
Note:
You can pause during recording from the
radio or AUX (except in “SYNCHRO”
mode). A track mark is added every time
you pause (Z“Adding track marks”).
█ High-speed recording
CD-DA disc recording speed:
CD, CD-R: Three times (3x) the normal speed.
CD-RW: Two times (2x) the normal speed.
1 Put in the disc you want to record.
2 Press [REC MODE] to select “NORMAL” or
“HI-SPEED” and then press [OK].
3 Press [USB REC 7/9] or [MEMORY REC 7/9] to
start recording.
Note:
• If you cannot record at high-speed because of the
condition of the disc, record at normal speed.
• The sound is muted during high-speed recording.
█ Adding track marks
When recording from radio or external equipment, you
can divide tracks using various modes.
Before recording
Press [REC MODE] to select the mode.
MANUAL Add a track mark manually.
SYNCHRO
(For AUX
source)
TIME MARK A track is automatically divided at
Note:
• During recording, if you press [OK] or pause recording
while using “TIME MARK” mode, the 5-minute counter is
reset.
• You cannot add track marks manually in “SYNCHRO”
mode.
Press [OK] during recording to add a
track mark.
Recording starts automatically when
the other equipment starts to play.
Recording pauses when it detects
silence for 3 seconds.
5-minute intervals.
13
13
RQT9979
Page 14
Recording MP3 tracks
offset printing
You can record MP3 tracks from:
•MP3 disc to
•
USB A to USB B or internal memory
•
USB B to internal memory or vice versa
USB B or internal memory
1 Prepare the source you want to record.
Record all
tracks
Record a
specified
album or track
Select “OFF PLAYMODE”
(Z“Play menu”).
Select “1-ALBUM” or “1-TRACK”
(Z“Play menu”).
2 Press [MEMORY REC 7/9] or [USB REC 7/9] to
start recording.
Stop recording Press [8].
Note:
• Some tracks can use a longer time to record.
• Some tracks cannot be recorded because of the condition
of the source.
• When recording from MP3 disc, the recorded file name is
different from the original file.
• When recording from USB A , the recorded file name is the
same as the original file (maximum 32 characters).
Recording stops at the last fully
recorded track in the album. For
example, if you stop recording during
the fourth track, only the first three
tracks are recorded.
“NO FILE RECORDED” is shown if no
track is recorded.
Deleting the recorded tracks
1 MEMORY
Press [MEMORY] (main unit: [MEMORY/USB]) to
select “MEMORY”.
USB B
Press [USB] (main unit: [MEMORY/USB]) to select
“USB B”.
2 Press [R, T] to select the album.
3 Press [2] or [6] to select the track.
4 Press [EDIT MODE] to select the mode.
TRACK DEL Delete a single track.
ALBUM DEL Delete one album (maximum 999
FORMAT Format the USB device.
ALL DEL Delete all albums in the internal
tracks).
memory.
5 Press [OK].
The selected item to be deleted is shown.
6 Press [OK].
“SURE? NO” is shown.
7 Press [Y, U] to select “SURE? YES” and then
press [OK].
“WRITING” is shown.
RQT9979
To cancel, select “SURE? NO”.
14
14
Sound and illumination effects
Sound effects
Preset EQ
1 Press [EQ] (main unit: [LOCAL EQ]) to select
“PRESET EQ”.
2 Press [R, T] to select the desired preset EQ
setting and then press [OK].
Or turn [MULTI CONTROL] to select the desired
preset EQ setting.
Manual EQ
1 Press [EQ] (main unit: [LOCAL EQ]) to select
“MANUAL EQ”.
2 Press [R, T] to select the sound effect.
Or turn [MULTI CONTROL] to select the sound effect.
3 Press [Y, U] to select the setting and then press
[OK].
Or press [2/3] or [5/6] to select the
setting.
BASS/MID/TREBLE –4 to +4
SURROUND “ON SURROUND” or
D.Bass
1 Press [D.BASS] to select “D.BASS LEVEL” or
“D.BASS BEAT”.
To cancel, select “OFF D.BASS”.
2 Press [R, T] to select the setting and then press
[OK].
Or turn [MULTI CONTROL] to select the setting.
Note:
D.BASS BEAT: This function emphasizes the attack level of
the drum beat and produces a punchy sound. Depending on
the track, the effect may be small.
Illumination effects
You can change the illumination effect on the system.
Press [ILLUMINATION] to select the desired effect.
PATTERN Illuminate with pattern in multiple colours.
COLOR Illuminate in one colour.
OFF Cancel the effect.
You can also press [R, T] to select the next or previous
effect.
Using the main unit
Turn [ILLUMINATION].
Note:
SC-MAX6000
To ensure the illumination effects are shown properly, make
sure to arrange the speakers accordingly as in “Placement of
speakers”.
“OFF SURROUND”
Page 15
DJ functions
ENGLISH
offset printing
You can use the DJ functions to add sound effect or
sample sound between songs.
Using the “Panasonic MAX Juke” app
You can download and install the free Android app
“Panasonic MAX Juke” on Google Play for additional
features, such as to request song playback from
multiple devices simultaneously.
Note:
The DJ function is switched off when you switch off the
system, change to another source or during recording.
DJ jukebox
USB MEMORY
Press [JUKEBOX] (main unit: [KARAOKE/DJ JUKEBOX])
to select “DJ JUKEBOX ON”.
To cancel, select “JUKEBOX OFF”.
Note:
The system switches to repeat mode automatically when you
switch on the DJ Jukebox.
█ Changing the repeat setting
1 Press [PLAY MENU].
2 Press [Y, U] to select the setting and then press
[OK].
Using the main unit
In the stop mode, turn [MULTI CONTROL] to select
the setting and then press [4/9].
RANDOM REPEAT
RND
ALL TITLE REPEAT Repeat all tracks.
RANDOM MIX REPEAT
RND
When “WAITING REQUEST” is shown, you can proceed
to the next step without using the “Panasonic MAX Juke”
app.
█ Changing the DJ jukebox effect
Press [DJ1] to [DJ6] on the main unit to select the
effect.
[DJ1]
[DJ2] to [DJ6]
To cancel, press the button again.
Note:
You cannot select the DJ jukebox effect when you are using
“RANDOM MIX REPEAT” mode.
Repeat random playback.
Repeat random playback.
Sample sound is added to the
intervals of all tracks.
Cross-fade
gradually becomes soft, and the next
track volume gradually becomes loud.
Sample sound mix
added to the intervals of all tracks.
: The current track volume
: Sample sound is
Using the “Panasonic MAX Juke” app
You can call up the tracks you want to play through the
app.
• When “MAKING LIST” is shown, you can call up a
part of tracks.
• When “WAITING REQUEST” is shown, you can call
up the tracks you want to play through the app.
DJ sampler
(Except for AUX source)
By main unit only
By turning [MULTI CONTROL], you can apply a scratch
sound or sample sound to the track you are playing.
1 Press [DJ EFFECT/SAMPLER] to select
“SAMPLER”.
2 Press [DJ1] to [DJ6] to select the desired sound.
3 Turn [MULTI CONTROL].
To cancel DJ sampler
Press [DJ EFFECT/SAMPLER] to select “OFF”.
Using the “Panasonic MAX Juke” app
You can change the sample sound on the app. (To
return all sample sounds to the factory preset, press
and hold [DJ EFFECT/SAMPLER] when the DJ sampler
is turned off.)
DJ effect
(Except for AUX source)
By main unit only
You can use the DJ effect function to add the sound
effects.
1 Press [DJ EFFECT/SAMPLER] to select “EFFECT”.
2 Press [DJ1] to [DJ6] to select the effect.
[DJ1] PHASER
Add space and dimension to the sound.
[DJ2] FILTER
Enhance or filter specific ranges of the
sound.
[DJ3] SOUND CHOPPER
Cut off the sound periodically.
[DJ4] ELECTRO ECHO
Add digital echo to the sound.
[DJ5] PITCH SHIFTER
Adjust the keys of the sound.
[DJ6] HARMONIZER
Add notes to the sound to create harmony.
3 Turn [MULTI CONTROL] to select the setting.
To cancel DJ effect
Press [DJ EFFECT/SAMPLER] to select “OFF”.
15
15
RQT9979
Page 16
Karaoke
offset printing
Preparation
Select the music source.
Note:
• The Karaoke function is switched off when you switch off
the system or start recording.
• When you switch on the Karaoke jukebox, the Karaoke
effect is switched on automatically.
Karaoke jukebox
Press [KARAOKE/DJ JUKEBOX]) on the main unit to
select “KARAOKE JUKEBOX ON”.
To cancel, select “JUKEBOX OFF”.
Note:
The system switches to repeat mode automatically when you
switch on the Karaoke jukebox.
█ Changing the repeat setting
1 Press [PLAY MENU].
2 Press [Y, U] to select the setting and then press
[OK].
Using the main unit
In the stop mode, turn [MULTI CONTROL] to select
the setting and then press [4/9].
RANDOM REPEAT
RND
ALL TITLE REPEAT Repeat all tracks.
RANDOM MIX REPEAT
RND
When “WAITING REQUEST” is shown, you can proceed
to the next step without using the “Panasonic MAX Juke”
app. (Z“DJ functions”)
Repeat random playback.
Repeat random playback.
Sample sound is added to the
intervals of all tracks.
Karaoke effect
By main unit only
You can use the Karaoke effect function to add the sound
effects.
1 Press [KARAOKE EFFECT].
2 Press [DJ1] to [DJ6] to select the effect.
[DJ1] VOCAL CANCEL
Switch on or switch off the voice guide
(depending on source).
[DJ2] ECHO
Add echo effect to the sound.
[DJ3] KEY-CON
Change the key of a song.
[DJ4] TEMPO
Change the speed of a song.
[DJ5] BGM LEVEL
Change the background music level.
[DJ6] MIC EQ
Select a MIC EQ level.
3 Turn [MULTI CONTROL] to select the setting.
To cancel Karaoke effect
Press [KARAOKE EFFECT].
Using a microphone
Preparation
Decrease the volume of the system to its minimum before
you connect or disconnect a microphone.
1 Connect a microphone (not supplied) to the
microphone jack.
Plug type: Ø 6.3 mm monaural
2 Turn [MIC VOL, MIN/MAX] on the main unit to
adjust the volume of the microphone.
If you want to sing with the background music.
3 Play the music source and adjust the volume of
the system.
Note:
• If a strange noise (howling) is emitted, move the
microphone away from the speakers, or decrease the
volume of the microphone.
• When you do not use the microphone, disconnect it from
the microphone jack, and decrease the volume of the
microphone level to “MIN”.
• This system cannot record from microphone.
RQT9979
16
16
Page 17
Clock and timers
NIM03ĺ120 MIN
ĺĺ60 MINĺ90 MINFF
O
ENGLISH
offset printing
Setting the clock
This is a 24-hour clock.
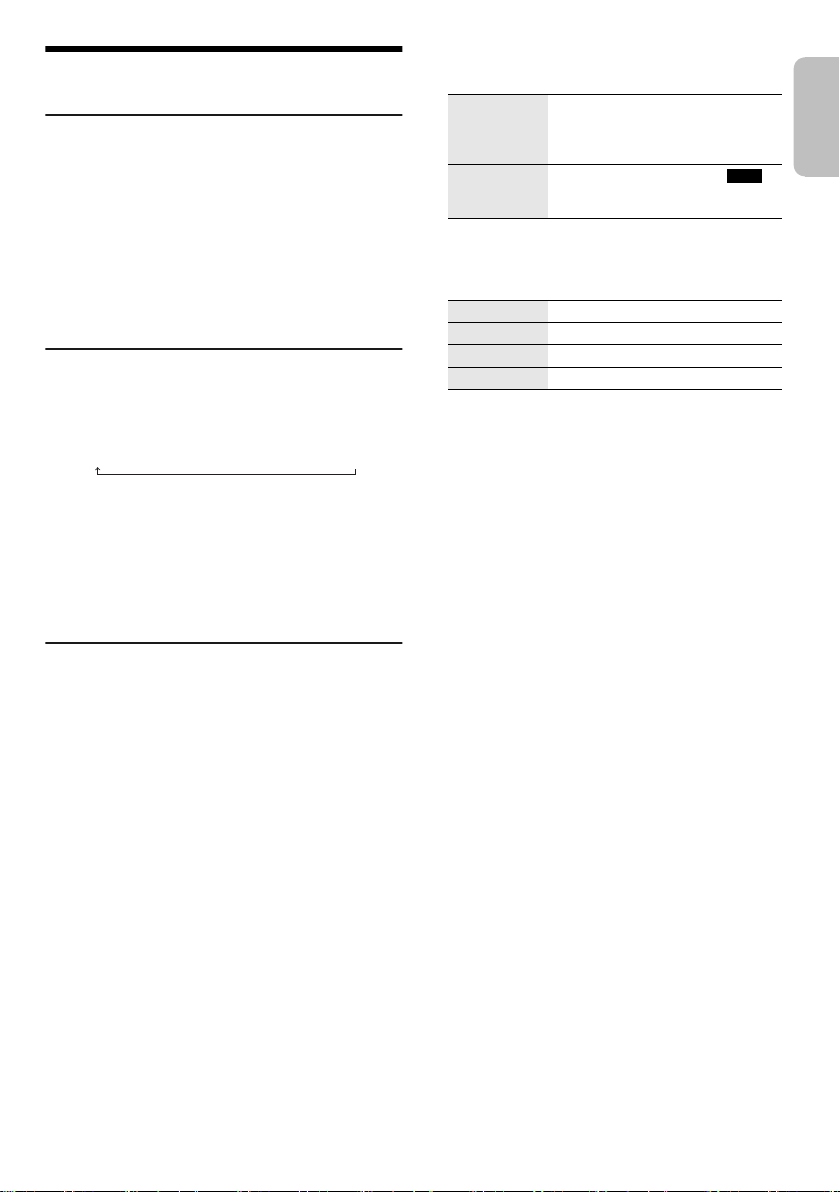
1 Press [SETUP] to select “CLOCK”.
2 Press [Y, U] to set the time and then press [OK].
To check the time
Press [SETUP] to select “CLOCK”.
In standby mode, press [DISPLAY].
Note:
Reset the clock regularly to maintain accuracy.
Sleep timer
The sleep timer switches off the system after the set time.
Press [SLEEP] to select the setting (in minutes).
To cancel, select “OFF”.
Note:
• The remaining time is always shown on the display. The
display changes temporarily when you perform other
operations.
• The play timer and sleep timer or the record timer and sleep
timer can be used together.
• The sleep timer always comes first. Be sure not to set an
overlap of timers.
Play timer and record timer
(Except for Bluetooth® and AUX source)
You can set the timer to come on at a certain time to:
• Wake you up (play timer).
• Record from the radio (record timer).
Play timer and record timer cannot be used together.
Preparation
Set the clock.
1 Press [SETUP] to select “TIMER ADJ”.
2 Press [Y, U] to select “#PLAY” or “#REC” and
then press [OK].
3 Press [Y, U] to set the start time and then press
[OK].
4 Do step 3 again to set the end time.
5 Press [Y, U] to select the source you want to play
or record and then press [OK].
6 For record timer, press [Y, U] to select “MEMORY”
or “USB B” to keep the recording and then press
[OK].
To start the timer
1 Prepare the source.
Play timer Prepare the source you want to
Record timer Connect the USB device to USB B
listen to (disc, USB, internal
memory or radio) and set the
volume.
(for USB recording) and tune in to
the radio station.
2 Press [SETUP] to select “TIMER SET”.
3 Press [Y, U] to select the setting and then press
[OK].
PLAY ON Start the play timer.
PLAY OFF Cancel the play timer.
REC ON Start the record timer.
REC OFF Cancel the record timer.
“#” is shown.
The system must be switched off for the timer to
operate.
To check the setting
1 Press [SETUP] to select “TIMER ADJ”.
2 Press [Y, U] to select “#PLAY” or “#REC” and
then press [OK].
In standby mode, press [DISPLAY] two times.
Note:
• The play timer starts at a low volume and increases
gradually to the preset level.
• The record timer starts 30 seconds before the set time with
the volume muted.
• The timer comes on at the set time every day if the timer is
on.
• If you switch off the system and then switch on again while
a timer is in operation, the timer will not stop at the end
time.
17
17
RQT9979
Page 18
External equipment
DVD player
(not supplied)
Audio cable (not supplied)
Rear panel of
this main unit
Audio cable
(not supplied)
Portable audio equipment
(not supplied)
offset printing
Preparation
• Disconnect the AC mains lead.
• Switch off all equipment and read the appropriate
operating instructions.
Note:
Components and cables are sold separately.
Using the auxiliary input
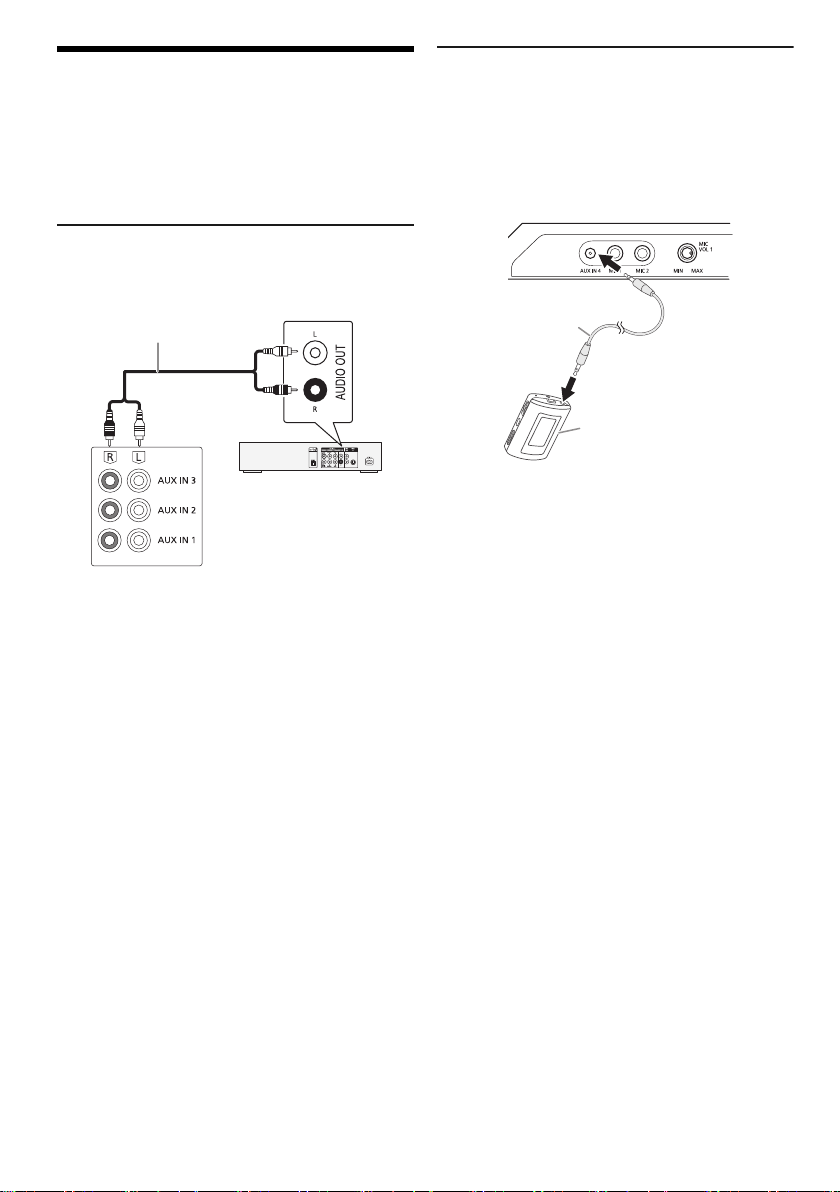
You can connect a VCR, DVD player etc. and listen to the
audio through this system.
1 Connect the external equipment.
2 Press [CD/RADIO/AUX] to select “AUX 1”,
“AUX 2” or “AUX 3”.
3 Play the external equipment.
Note:
• If you want to connect equipment other than those
described, refer to the audio dealer.
• Sound distortion can occur when you use an adaptor.
Connecting a portable audio equipment
You can play music from a portable audio equipment.
Preparation
• Switch off the equaliser (if any) of the portable audio
equipment to prevent sound distortion.
• Decrease the volume of the system and the portable
audio equipment before you connect or disconnect the
portable audio equipment.
1 Connect the portable audio equipment.
Plug type: Ø 3.5 mm stereo
2 Press [CD/RADIO/AUX] to select “AUX 4”.
3 Play the portable audio equipment.
To adjust the input level
1 Press [PLAY MENU] to select “INPUT LEVEL”.
2 Press [Y, U] to select “NORMAL” or “HIGH” and
then press [OK].
Note:
• You cannot adjust the input level during recording.
• Select “NORMAL” if the sound is distorted during “HIGH”
input level.
• Read the operating instructions of the portable audio
equipment for details.
RQT9979
18
18
Page 19

Others
ENGLISH
offset printing
Auto off
This system automatically switches off when you do not
use it for approximately 20 minutes.
1 Press [SETUP] to select “AUTO OFF”.
2 Press [Y, U] to select “ON” and then press [OK].
To cancel, select “OFF”.
Note:
This function does not work when you are in radio source or
when a Bluetooth
Bluetooth® standby
This function automatically switches on the system when
you establish a Bluetooth
device.
1 Press [SETUP] to select “BLUETOOTH STANDBY”.
2 Press [Y, U] to select “ON” and then press [OK].
To cancel, select “OFF”.
Note:
Some devices may take longer to respond. If you are
connected to a Bluetooth
system, wait for a minimum of 5 seconds before connecting
to this system from your Bluetooth
Software version
You can check the software version of the system.
1 Press [SETUP] to select “SW VER.” and then press
[OK].
The software version is shown.
2 Press [OK] again to exit.
®
device is connected.
®
connection from a paired
®
device before switching off the
®
device again.
Maintenance
To clean this system, wipe with a soft, dry cloth.
• Never use alcohol, paint thinner or benzine to clean this
system.
• Before using chemically treated cloth, read the
instructions that came with the cloth carefully.
19
19
RQT9979
Page 20

Troubleshooting
offset printing
Before requesting service, make the following checks. If
you are in doubt about some of the check points, or if the
solutions indicated do not solve the problem, consult
your dealer for instructions.
█ Common problems
The unit does not work.
• The safety device has been activated. Do the following:
1. Press [1] on the main unit to switch the unit to standby
mode. If the unit does not switch to standby mode,
– Press and hold the button for a minimum of 10
seconds. Or,
– Disconnect the AC mains lead and then connect it
again.
2. Press [1] again to switch on the unit. If the problem
persists, consult your dealer.
The display panel lights up and changes continuously in
standby mode.
• Press and hold [8] on the main unit to select “DEMO OFF”.
No operations can be done with the remote control.
• Examine that the battery is installed correctly.
Sound is distorted or no sound.
• Adjust the volume of the system.
• Switch off the system, determine and correct the cause,
and then switch on again. It can be caused by straining of
the speakers through excessive volume or power, and
when using the system in a hot environment.
A humming sound can be heard during playback.
• An AC mains lead or fluorescent light is near the cables.
Keep other appliances and cords away from the cables of
this system.
The sound level reduces.
• The protection circuit has been activated due to the
continuous use at high volume output. This is to protect the
system and maintain the sound quality.
█ Bluetooth
Pairing cannot be done.
• Check the Bluetooth
• The device is out of the 10 m communication range. Move
the device nearer to the system.
The device cannot be connected.
• The pairing of the device was unsuccessful. Do pairing
again.
• The pairing of the device has been replaced. Do pairing
again.
• This system might be connected to a different device.
Disconnect the other device and try pairing the device
again.
• The system may have a problem. Switch off the system and
then switch on again.
The device is connected but audio cannot be heard
through the system.
• For some built-in Bluetooth
audio output to “SC-MAX8000” or “SC-MAX6000”
manually. Read the operating instructions of the device for
details.
Sound from the device is interrupted.
• The device is out of the 10 m communication range. Move
the device nearer to the system.
• Remove any obstacle between the system and the device.
• Other devices that use the 2.4 GHz frequency band
(wireless router, microwaves, cordless phones, etc.) are
interfering. Move the device nearer to the system and
distance it from the other devices.
• Select “MODE 1” for stable communication.
The one-touch connection (NFC) is not working.
• Make sure the system and the NFC feature of the device
are switched on.
• Touch and hold the device on the NFC touch area of this
system again.
Playback image and sound are not synchronised.
• Restart the playback app of the device.
• Connect the device to the system with an audio cable (not
supplied).
®
®
device condition.
®
devices, you have to set the
█ Disc
Display not shown correctly.
Playback does not start.
• You have not put in the disc correctly. Put it in correctly.
• Disc is dirty. Clean the disc.
• Replace the disc if it is scratched, warped, or
non-standard.
• There is condensation. Let the system dry for 1 to 2 hours.
The total number of tracks displayed is incorrect.
The disc cannot be read.
Distorted sound is heard.
• You put in a disc that the system cannot play. Change to a
playable disc.
• You put in a disc that has not been finalised.
█ USB
The USB device or the contents in it cannot be read.
• The format of the USB device or the contents in it are not
compatible with the system.
• USB devices with storage capacity of more than 32 GB
cannot work in some conditions.
Slow operation of the USB device.
• Large content size or large memory USB device takes
RQT9979
longer time to read.
20
20
█ Radio
Sound is distorted.
• Use an optional FM outdoor antenna. The antenna should
be installed by a competent technician.
A beat sound is heard.
• Switch off the TV or move it away from the system.
• Move mobile telephones away from the system if the
interference is apparent.
• When in AM tuner mode, select the “BEATPROOF” setting
that provides the best reception.
A low hum is heard during AM broadcasts.
• Move the antenna away from other cables and cords.
█ Main unit displays
“ADJUST CLOCK”
• The clock is not set. Adjust the clock.
“ADJUST TIMER”
• The play timer and/or record timer is not set. Adjust the
play timer and/or record timer.
“ALB FULL”
• The number of albums has exceeded the supported limit.
Page 21

“AUTO OFF”
ENGLISH
offset printing
• The system has not been used for 20 minutes and will
switch off within a minute. To cancel, press any button.
“CAN’T REC”
“DEVICE FULL”
• You cannot do recording because the remaining recording
time of the USB device is less than the total time of the
music source. Change to a USB device which has enough
recording time and do the recording again.
“ERROR”
• An incorrect operation was done. Read the instructions and
try again.
“ERROR” (during recording)
• You cannot select other playback source (example: radio,
USB etc.) or press [2] or [6] during recording. Stop
the recording function.
• You cannot open the disc tray when recording from an AM
source.
“F61”
• Examine and correct the speaker cords connection.
• Disconnect the USB device. Switch off the system and then
switch on again.
“F70”
• Examine the Bluetooth
• Disconnect the Bluetooth
and then switch on again.
“F76”
• There is a problem with the power supply.
• Disconnect the AC mains lead and consult your dealer.
“F77”
• Disconnect the AC mains lead and consult your dealer.
“NO DEVICE”
• The USB device is not connected. Examine the connection.
• You cannot do recording or check available storage space
because there is no USB device connected to
“NO DISC”
• You have not put in a disc.
“NO PLAY”
“UNSUPPORT”
• Examine the content. You can only play supported format.
• The files in the USB device can be corrupted. Format the
USB device and try again.
• The system may have a problem. Switch off the system and
then switch on again.
“NO TRACK”
• There is no album or track in the USB device or the internal
memory.
“PLAYERROR”
• An unsupported MP3 file has been played. The system will
skip that track and play the next one.
“REC ERROR”
• You disconnected the USB device during recording.
Connect the USB device and do recording again.
• An error occurred during USB recording. Disconnect the
USB device and then connect it again.
“REMOTE 1”
“REMOTE 2”
• The remote control and the main unit are using different
codes. Change the code of the remote control.
– When “REMOTE 1” is shown, press and hold [OK] and
[1] for a minimum of 4 seconds.
– When “REMOTE 2” is shown, press and hold [OK] and
[2] for a minimum of 4 seconds.
®
connection.
®
device. Switch off the system
USB B .
“TEMP NG”
• The temperature protection circuit has been activated, and
the system will switch off. Let the unit cool down before
switching it on again.
• Check that the ventilation opening of the unit is not
obstructed.
• Ensure this unit is well ventilated.
“TRK FULL”
• The number of files has exceeded the supported limit.
“USB OVER CURRENT ERROR”
• The USB device is using too much power. Disconnect the
USB device, switch off the system and then switch on
again.
“VBR”
• The system cannot show the remaining play time for
variable bit rate (VBR) tracks.
Remote control code
When other Panasonic equipment responds to the
remote control of this system, change the remote control
code for this system.
Preparation
Press [CD/RADIO/AUX] to select “AUX 1”, “AUX 2”,
“AUX 3” or “AUX 4”.
█ To set the code to “REMOTE 2”
1 Press and hold [CD/RADIO/AUX] on the main unit
and [2] on the remote control until “REMOTE 2” is
shown.
2 Press and hold [OK] and [2] for a minimum of 4
seconds.
█ To set the code to “REMOTE 1”
1 Press and hold [CD/RADIO/AUX] on the main unit
and [1] on the remote control until “REMOTE 1” is
shown.
2 Press and hold [OK] and [1] for a minimum of 4
seconds.
System memory reset
Reset the memory when the following situations occur:
• There is no response when buttons are pressed.
• You want to clear and reset the memory contents.
1 Disconnect the AC mains lead.
2 While you press and hold [1] on the main unit,
connect the AC mains lead again.
Continue to press and hold the button until
“–––––––––” is shown.
3 Release [1].
All the settings are set back to the factory preset.
It is necessary to set the memory items again.
21
21
RQT9979
Page 22
Specifications
offset printing
█ Amplifier section
RMS output power stereo mode
SC-MAX8000
High Ch 500 W per channel (3 Ω), 1 kHz, 30% THD
Mid Ch 500 W per channel (3 Ω), 1 kHz, 30% THD
Low Ch 1000 W per channel (5 Ω), 100 Hz, 30% THD
Total RMS stereo mode power 4000 W
SC-MAX6000
Front Ch 350 W per channel (3 Ω), 1 kHz,
Front Ch 350 W per channel (3 Ω), 1 kHz,
Subwoofer Ch 725 W per channel (6 Ω), 100 Hz,
Total RMS stereo mode power 2850 W
30% THD
30% THD
30% THD
█ Disc section
Disc played (8 cm or 12 cm)
MPEG-1 Layer 3, MPEG-2 Layer 3
Pick up
Wavelength 790 nm (CD)
█ Bluetooth
Versio n Bluetooth® Ver. 2.1 + EDR
Class Class 2
Supported profiles
Operating frequency 2.4 GHz band FH-SS
Operation distance 10 m line of sight
®
section
CD, CD-R/RW (CD-DA, MP3 )
A2DP, AVRCP, SPP, OPP, FTP
█ Internal memory section
Memory
Memory size 2 GB
Media file format support MP3 (*.mp3)
Memory recording
Bit rate 128 kbps
Memory recording speed 1x, 3x max (CD only)
Recording file format MP3 (*.mp3)
█ Tuner section
Frequency modulation (FM)
Preset memory 30 stations
Frequency range
Antenna terminals 75 Ω (unbalanced)
Amplitude modulation (AM)
Preset memory 15 stations
Frequency range 522 kHz to 1629 kHz (9 kHz step)
87.50 MHz to 108.00 MHz (50 kHz step)
520 kHz to 1630 kHz (10 kHz step)
█ Speaker section
SB-MAX8000
Speaker unit(s)
Tweeter 6 cm cone type x 1
Woofer 16 cm cone type x 2
Super Woofer 38 cm cone type x 1
Impedance High 3 Ω / Mid 3 Ω / Low 5 Ω
Dimensions (W x H x D)
Including speaker feet 572 mm x 782 mm x 528 mm
Excluding speaker feet 572 mm x 774 mm x 528 mm
Mass 37 kg
SB-MAF6000 SB-MAG6000
Speaker unit(s)
Tweeter 6 cm cone type
Woofer 20 cm cone type
Impedance 3 Ω
Dimensions (W x H x D) 407 mm x 260 mm x 258 mm
Mass 5.5 kg
SB-MAW6000
Speaker unit(s)
Super Woofer 30 cm cone type
Impedance 6 Ω
Dimensions (W x H x D) 402 mm x 450 mm x 386 mm
Mass 13 kg
RQT9979
22
22
Page 23

█ Terminal section
ENGLISH
offset printing
USB port
USB standard USB 2.0 full speed
Media file format support MP3 (*.mp3)
USB device file system FAT12, FAT16, FAT32
USB recording
Bit rate 128 kbps
USB recording speed 1x, 3x (CD only)
Recording file format MP3 (*.mp3)
AUX IN 1, 2, 3
Audio input Pin jack
AUX IN 4
Terminal Stereo, 3.5 mm jack
Microphone
Terminal Mono, 6.3 mm jack (2 systems)
█ General
Power supply AC 220 V to 240 V, 50/60 Hz
Power consumption 340 W
Dimensions (W x H x D) 492 mm x 221 mm x 421 mm
Mass 7.1 kg
Operating temperature range 0°C to +40°C
Operating humidity range
Power consumption in standby mode (approximate)
Power consumption in standby mode (approximate)
(With “BLUETOOTH STANDBY” set to “ON”)
Note:
• Specifications are subject to change without notice.
Mass and dimensions are approximate.
• Total harmonic distortion is measured by the digital
spectrum analyser.
35% to 80% RH (no condensation)
0.4 W
0.5 W
23
23
RQT9979
Page 24
本使用说明书适用于型号 SC-MAX8000 和
SC-MAX8000 SC-MAX6000
offset printing
SC-MAX6000。
SC-MAX8000 :
SC-MAX6000 :
音响组合
主机
扬声器
重低频扬声器
表示功能适用于 SC-MAX8000。
表示功能适用于 SC-MAX6000。
SC-MAX8000
SA-MAX8000
SB-MAX8000 SB-MAF6000
– SB-MAW6000
除非另有说明,本使用说明书中的插图表示
SC-MAX8000。
您的系统可能与插图有所不同。
录制和播放本设备或其他设备中的内容可能需要
得到版权所有者的许可,或拥有此内容的其他相
关权力。Panasonic 无权提供且不会授予您版权所
有者的许可,Panasonic 明确否认具有任何代表您
获得此类许可的权利、能力或意图。您有责任确保
按照您所在国家适用的版权法规使用本设备或其
他任何设备。请参阅此法规,了解更多关于相关法
律法规的信息,或联系您希望录制或播放的内容
的版权所有者。
RQT9979
2
24
SC-MAX6000
SA-MAX6000
SB-MAG6000
安全注意事项
警告!
主机
• 为减低火灾、触电或产品损坏的危险,
– 不要将本机暴露在雨水、潮湿、滴水或溅水下。
– 不要将盛满液体的物体,例如花瓶等放置在本
机上。
– 只使用被推荐的附件。
– 勿拆开机壳。
– 切勿自行修理本机。任何有关维修的问题请咨
询合格人员。
– 切勿让金属物体掉落到本机内。
注意!
主机
• 为减低火灾、触电或产品损坏的危险,
– 为了确保良好的通风条件,切勿将本机安装或
置于书柜、内藏式机柜或其它密闭的空间里。
– 切勿让报纸、桌布、窗帘等物品堵塞住本机的通
风孔。
– 切勿将诸如点燃的蜡烛等明火火源置于本机
上。
• 本机供在热带气候地区使用。
• 本机在使用过程中,可能会受到行动电话的无线
电波干扰。如果干扰出现,增加本机和行动电话
之间的距离。
• 本机使用激光射线。控制器的使用、调整及操作
等如不遵照此处的说明进行,很可能会受到激光
辐射的危害。
• 本机应置于水平面上且应远离阳光直射、高温、
潮湿及过度振动之处。
• 电源插头是主要的断开设备。将本机安装在电源
插头容易接近之处以便能立即把电源插头断开。
电池
• 如果电池放置错误,有发生爆炸的危险。更换电
池时,只使用制造商建议的类型的电池。
• 当处理废旧电池时,请联络当地政府单位或经销
商以洽询正确的弃置方法。
• 切勿让电池遇热或触火。
• 切勿将电池长时间留在车门和车窗紧闭并有阳光
直射的车子内。
• 切勿将电池解体或使其短路。
• 切勿对碱或锰电池进行充电。
• 切勿使用覆层已脱落的电池。
• 如果长期不使用遥控器,请取出电池。储存于凉
快、阴暗之处。
Page 25
交流电源线注意事项
保险丝盖子
保险丝 (13 安培 )
保险丝 (13 安培 )
中文
offset printing
(限 3 针的交流电源插头)
使用前
拆除连接器的盖子。
如何更换保险丝
保险丝的位置根据交流电源插头类型而可能有所不
同( 图 A 和 B)。确认所安装的电源插头,并按照下
面的说明。
插图可能会和实际的交流电源插头不同。
1. 用螺丝刀打开保险丝的盖子。
图 A 图 B
2. 更换保险丝然后关闭或盖上保险丝的盖子。
图 A 图 B
目录
安全注意事项. . . . . . . . . . . . . . . . . . . . . . . . . . . . 2
交流电源线注意事项 . . . . . . . . . . . . . . . . . . . . . . 3
关于 Bluetooth
许可 . . . . . . . . . . . . . . . . . . . . . . . . . . . . . . . . . . . 3
提供附件 . . . . . . . . . . . . . . . . . . . . . . . . . . . . . . . 4
扬声器布置 . . . . . . . . . . . . . . . . . . . . . . . . . . . . . 4
准备遥控器 . . . . . . . . . . . . . . . . . . . . . . . . . . . . . 5
控制概要 . . . . . . . . . . . . . . . . . . . . . . . . . . . . . . . 6
连接 . . . . . . . . . . . . . . . . . . . . . . . . . . . . . . . . . . . 8
准备媒体 . . . . . . . . . . . . . . . . . . . . . . . . . . . . . . . 9
媒体播放 . . . . . . . . . . . . . . . . . . . . . . . . . . . . . . 10
收音机 . . . . . . . . . . . . . . . . . . . . . . . . . . . . . . . . 12
录制 . . . . . . . . . . . . . . . . . . . . . . . . . . . . . . . . . . 13
音响和光照效果 . . . . . . . . . . . . . . . . . . . . . . . . . 14
DJ 功能 . . . . . . . . . . . . . . . . . . . . . . . . . . . . . . . 15
卡拉 OK . . . . . . . . . . . . . . . . . . . . . . . . . . . . . . . 16
使用麦克风 . . . . . . . . . . . . . . . . . . . . . . . . . . . . 16
时钟和定时器. . . . . . . . . . . . . . . . . . . . . . . . . . . 17
其它设备 . . . . . . . . . . . . . . . . . . . . . . . . . . . . . . 18
其它 . . . . . . . . . . . . . . . . . . . . . . . . . . . . . . . . . . 19
保养 . . . . . . . . . . . . . . . . . . . . . . . . . . . . . . . . . . 19
故障排除指南. . . . . . . . . . . . . . . . . . . . . . . . . . . 20
技术规格 . . . . . . . . . . . . . . . . . . . . . . . . . . . . . . 22
®
. . . . . . . . . . . . . . . . . . . . . . . . . . 3
关于 Bluetooth
®
Panasonic 不对无线传输时可能发生的数据及 /
或资料的泄露负责任。
频段
• 本系统采用 2.4 GHz 频段。
认证
• 本系统符合频率限制,并获得以频率法规为基准
的认证。因此无需无线许可证。
• 下列行动受法律惩处 :
– 拆开或改装主机。
– 卸下规格指示。
使用限制
• 不保证无线传输及 / 或与所有配备 Bluetooth
®
设
备的使用。
• 所有设备必须符合 Bluetooth SIG, Inc. 设定的标
准。
• 视设备的规格和设置而定,连接可能失败或某些
操作可能不同。
• 本系统支援 Bluetooth
®
安全功能。但取决于操作
环境及 / 或设定,此保安措施也许不足。无线传输
数据至此系统时请当心。
• 本系统无法传输数据至 Bluetooth
®
设备。
使用范围
• 使用本设备的最远范围为 10 m。
• 范围会因环境、障碍或干扰而减短。
来自其它设备的干扰
• 如果设备的位置与其他 Bluetooth
®
设备或使用
2.4 GHz 频段的设备距离太近,由于无线电波干
扰,本系统可能无法正常操作,并出现噪音或声
音断断续续的问题。
• 如果附近广播电台的无线电波信号太强,本系统
可能无法正常操作。
预定用途
• 本系统只供常规、普通使用。
• 请勿在敏感无线电频率干扰的设备附近或环境中
使用本系统(例如 : 机场、医院、实验室等)。
许可
®
Bluetooth
Inc. 的注册商标,Panasonic Corporation 已获得
使用此类商标的许可。其它商标及商号均为其各
自持有者所有。
Google Play 和 Android 是 Google Inc. 的商标。
MPEG Layer-3 音频解码科技经 Fraunhofer IIS 和
Thomson 许可。
文字商标和标志均为 Bluetooth SIG,
RQT9979
3
25
Page 26
提供附件
█ 粘贴扬声器护垫
为确保平稳并避免损坏地板,将扬声器护垫粘
贴于扬声器的底部。
准备
将一个保护层置于扬声器的底部,以避免刮
伤。
扬声器护垫
保护层
(非附件)
offset printing
检查并确认所提供的附件。
3 条交流电源线
1 条 AM 环状天线
1 条 FM 室内天线
1 个遥控器
(N2QAYB001022)
1 个遥控器电池
SC-MAX8000
8 个扬声器护垫
SC-MAX6000
16 个扬声器护垫
16 个扬声器堆叠针
2 个支架
2 颗螺丝
注意 !
将扬声器护垫 , 支架和螺丝置于儿童无法触及之
处,以避免误吞。
备注 :
使用适合家用交流电源插座的交流电源线。
SC-MAX8000
左边与右边的扬声器是相同的。
将扬声器距主机至少
10 cm
放置以确保适当的通风。
扬声器布置
只使用所附的扬声器。
使用其它扬声器可能会损坏本系统,并降低其音质。
备注 :
• 将扬声器置于安全的平面上。
• 此扬声器无磁屏蔽功能,因此切勿将其置于电视机、
电脑或其它易受磁性影响的装置附近。
• 如果长时间以大音量播放,将损坏扬声器,并缩短其
使用寿命。
• 在下列情况下降低音量以避免损坏 :
– 当播放失真的声音。
– 当调整音质。
注意!
• 此扬声器只能与推荐的装置一起使用。否则可能
会损坏放大器和扬声器,并引起火灾。如果出现
损坏或感到性能上有明显的突变时,请向专业维
修人员咨询。
• 切勿更改扬声器或扬声器电线,因为这可能会损
坏本系统。
• 请按照本使用说明书内的步骤连接扬声器。
• 切勿触摸扬声器锥体混响表面 :
RQT9979
– 这可能损坏扬声器锥体。
4
– 扬声器锥体可能是热的。
26
备注 :
移动、倾斜或抬扬声器的动作需至少一个人以上来进行。
注意!
• 小心勿让婴儿或儿童接近。
• 切勿堆叠扬声器。
• 不要将手或异物放入端口,这样有可能造成人身
伤害和扬声器的损坏。
Page 27
SC-MAX6000
高频扬声器
█ 堆叠扬声器
使用随附的扬声器堆叠针堆
叠扬声器。按下堆叠针和扬
声器直至锁入位置。
堆叠针
如下所示来安装所提供的支架,以锁紧扬声
器。
螺丝
支架
█ 粘贴扬声器护垫
垂直堆放扬声器之前,先在扬声器顶部放置保
护层,然后将随附的扬声器护垫粘在扬声器底
部。
扬声器护垫
保护层
(非附件)
中文
offset printing
放置扬声器时,确认高频扬声器是在外侧。
将扬声器距主机至少
设置
1
10 mm
放置以确保适当的通风。
设置
2
您可以垂直堆放扬声器,或将其放在架子上。
准备遥控器
使用碱或锰性干电池。
插入电池时,确保对准其极性(+ 和 –)。
RQT9979
5
27
Page 28
控制概要
offset printing
使用遥控器来操作,如果按钮相同,您也可以使用主机上的按钮来操作。
A 待机 / 开机开关 [`], [1]
按此开关可将本机从开机切换到待机状态或相
反。在待机状态下,本机仍将消耗少量电力。
B 查看内容信息
C 数字键
欲选择一个 2 位数的数字
例 : 16: [ 10]=[1] =[6]
D 自动预设广播电台
E 选择音源
在主机上 :
欲开始 Bluetooth
F 基本播放操控
G 选择音效
H 选择光效
I 查看设置选单
J 录制操作控制
K 开启或关闭托盘
L 降低显示幕的亮度
欲取消,再按一次按钮。
M 设定睡眠定时器
N 调整音量水平
O 静音
欲取消,再按一次按钮。
如果调整音量或关闭本系统,“MUTE” 也将被取
消。
P 选择 MP3 唱片集或曲目
Q 选择 DJ jukebox 或卡拉 OK jukebox
R 选择或确认选项
S 查看播放选单
®
配对,按住 [–PAIRING]。
RQT9979
6
28
Page 29
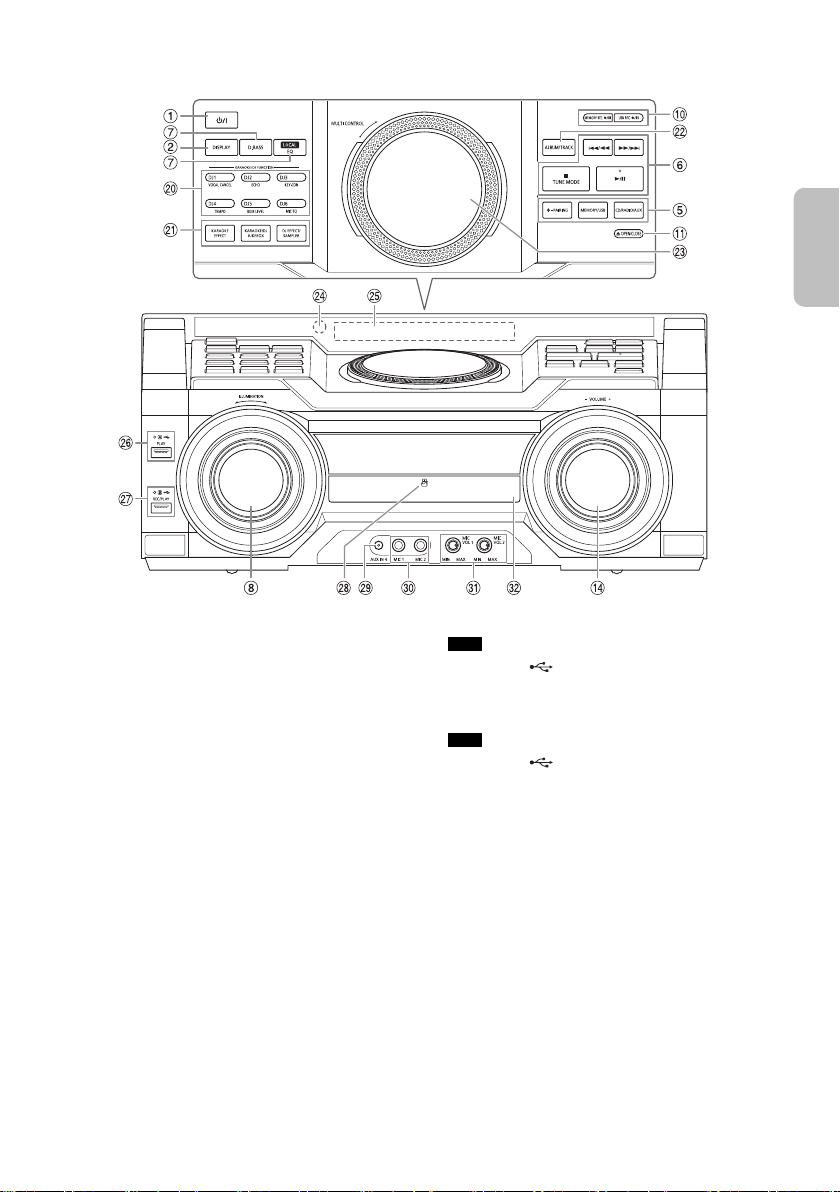
T 选择卡拉 OK 效果
前部
顶部
中文
offset printing
DJ 功能直接按钮
按 [KARAOKE/DJ JUKEBOX] 以开启卡拉 OK
功能。
按 [KARAOKE/DJ JUKEBOX] 或
[DJ EFFECT/SAMPLER] 以开启 DJ 功能。
按主机上的 [DJ1] 至 [DJ6] 以选择所要的功能。
欲取消,再按所选的 [DJ1] 至 [DJ6]。
U 开启卡拉 OK 或 DJ 功能
欲取消,再按一次按钮。
V 选择 MP3 唱片集或曲目
按 [ALBUM/TRACK] 以选择唱片集或曲目。
浏览曲目或唱片集
转动 [MULTI CONTROL] 浏览。
欲从选项开始播放,按 [4/9]。
W DJ 和多重控制转盘
X 遥控感应器
距离 : 约 7 m 内
角度 : 约 20° 上下,30° 左右
Y 显示幕
Z
USB A
USB 端口( )
USB 状态指示灯
播放 MP3 曲目。
a
USB B
USB 端口( )
USB 状态指示灯
播放 MP3 曲目。
录制声音或音乐曲目。
b NFC 触控区域
c AUX IN 4 插孔
d 麦克风插孔
e 调整麦克风音量水平
f 光碟托盘
RQT9979
7
29
Page 30
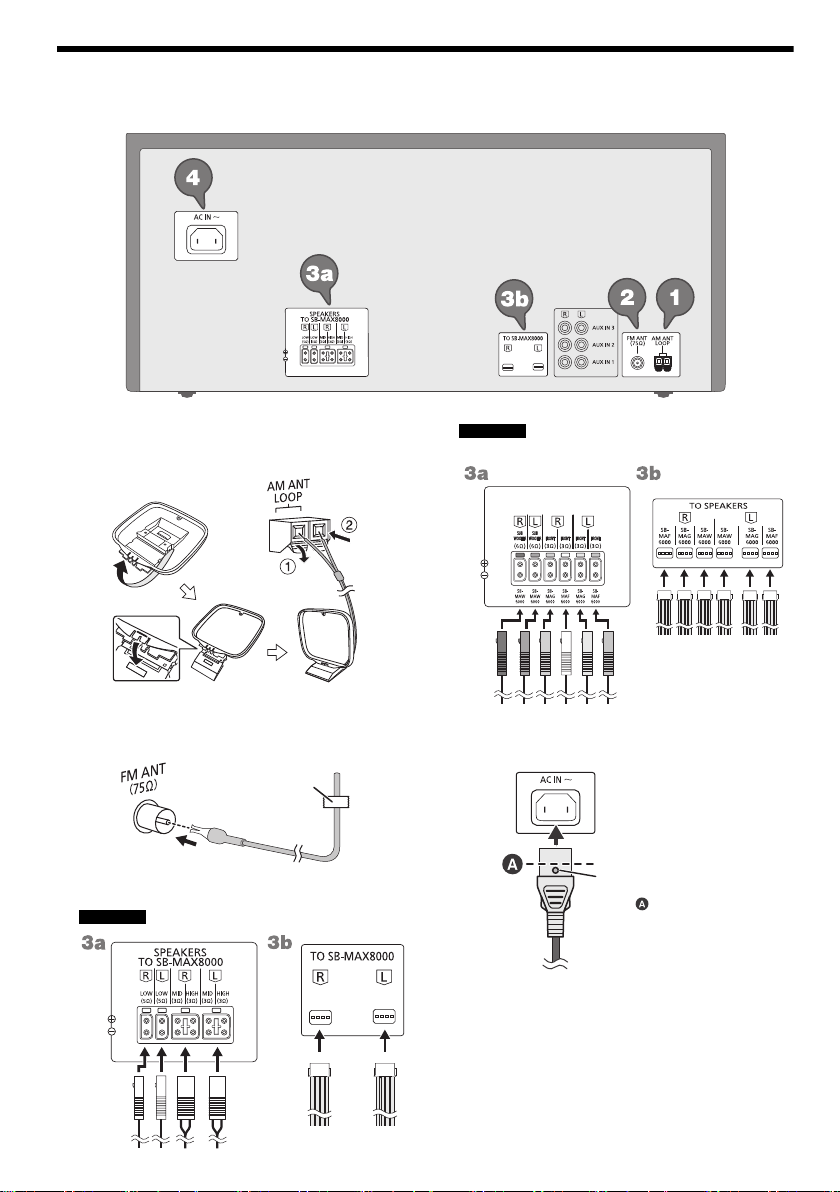
连接
胶布 (非附件)
TO SPEAKERS
至家用交流电源插座
将 AC 电源线插入
直到 ,即 圆 孔 之
前的位置。
offset printing
完成所有连接后再连接交流电源线。
1 连接 AM 环状天线。
将天线竖立于其基座上直到其卡入到位。
2 连接 FM 室内天线。
将天线粘贴于接收信号最好的位置。
3 连接扬声器。
SC-MAX8000
SC-MAX6000
将扬声器电线连接至相同颜色的端子。
4 连接交流电源线。
RQT9979
8
30
切勿使用其它设备的交流电源线。
省电
本系统在待机状态下仍消耗少量电力。如果不使
用本系统,请断开电源。
断开本系统后,某些设定将消失。您需重新设
定。
Page 31

准备媒体
中文
offset printing
光碟
1 按 [CD x](主机 : [x OPEN/CLOSE])以 开 启
托盘。
将标志朝上放入光碟。
再按一次按钮以关闭托盘。
2 按 [CD/RADIO/AUX] 以选择 “CD”。
USB
准备
连接 USB 设备前,务必将资料存档。
1 降低音量,并将 USB 设备连接至 USB 端口。
连接或断开 USB 设备时,请握住主机。
2 按 [USB](主机 : [MEMORY/USB])以 选 择
“USB A” 或 “USB B”。
所选的 USB 的 USB 状态指示灯亮起红灯。
备注 :
切勿使用 USB 延长线。本系统无法识别使用延长线连
接的 USB 设备。
Bluetooth
您可通过 Bluetooth® 无线式连接和播放音频设备。
准备
• 开启设备的 Bluetooth
统附近。
• 参阅有关设备的使用说明书。
®
®
功能,并将设备置于本系
█ 配对设备
准备
如果系统已连接着 Bluetooth
(Z“ 断开设备 ”)。
®
设备,断开设备
1 按 []。
如果 “PAIRING” 显示,执行步骤 4。
2 按 [PLAY MENU] 以选择 “PAIRING”。
3 按 [Y, U] 以选择 “OK? YES”,然 后 按 [OK]。
“PAIRING” 显示。
欲取消,选择 “OK? NO”。
4 从设备的 Bluetooth
“SC-MAX8000” 或 “SC-MAX6000”。
如果被要求输入密码,输入 “0000”。
配对完成后,设备自动与本系统连接。
所连接的设备名称显示几秒钟。
®
选单中选择
使用主机
1 按住 [–PAIRING] 直到 “PAIRING” 显示。
2 从设备的 Bluetooth
“SC-MAX8000” 或 “SC-MAX6000”。
备注 :
本系统可配对多达 8 个设备。如果配对第 9 个设备,未
使用时间最长的设备将被取代。
█ 连接设备
准备
如果系统已连接着 Bluetooth
(Z“ 断开设备 ”)。
®
选单中选择
®
设备,断开设备
1 按 []。
“BLUETOOTH READY” 显示。
2 从设备的 Bluetooth
“SC-MAX8000” 或 “SC-MAX6000”。
所连接的设备名称显示几秒钟。
®
选单中选择
3 开始播放设备。
备注 :
• 设备必须配对方可连接。
• 本系统只可在同一时间连接一个设备。
• 选择 “BLUETOOTH” 音源时,本系统会自动尝试连
接至最后所连接的设备。(在这个过程中,
“LINKING” 显示。)
█ 断开设备
1 按 []。
2 按 [PLAY MENU] 以选择 “DISCONNECT?”。
3 按 [Y, U] 以选择 “OK? YES”,然后按 [OK]。
“BLUETOOTH READY” 显示。
欲取消,选择 “OK? NO”。
使用主机
按住 [–PAIRING] 直到 “PAIRING” 显示。
备注 :
设备将在您进行下列事项时断开 :
• 选择不同的音源。
• 将设备移出最大范围。
• 中止设备的 Bluetooth
• 关闭本系统或设备。
®
传输。
RQT9979
9
31
Page 32
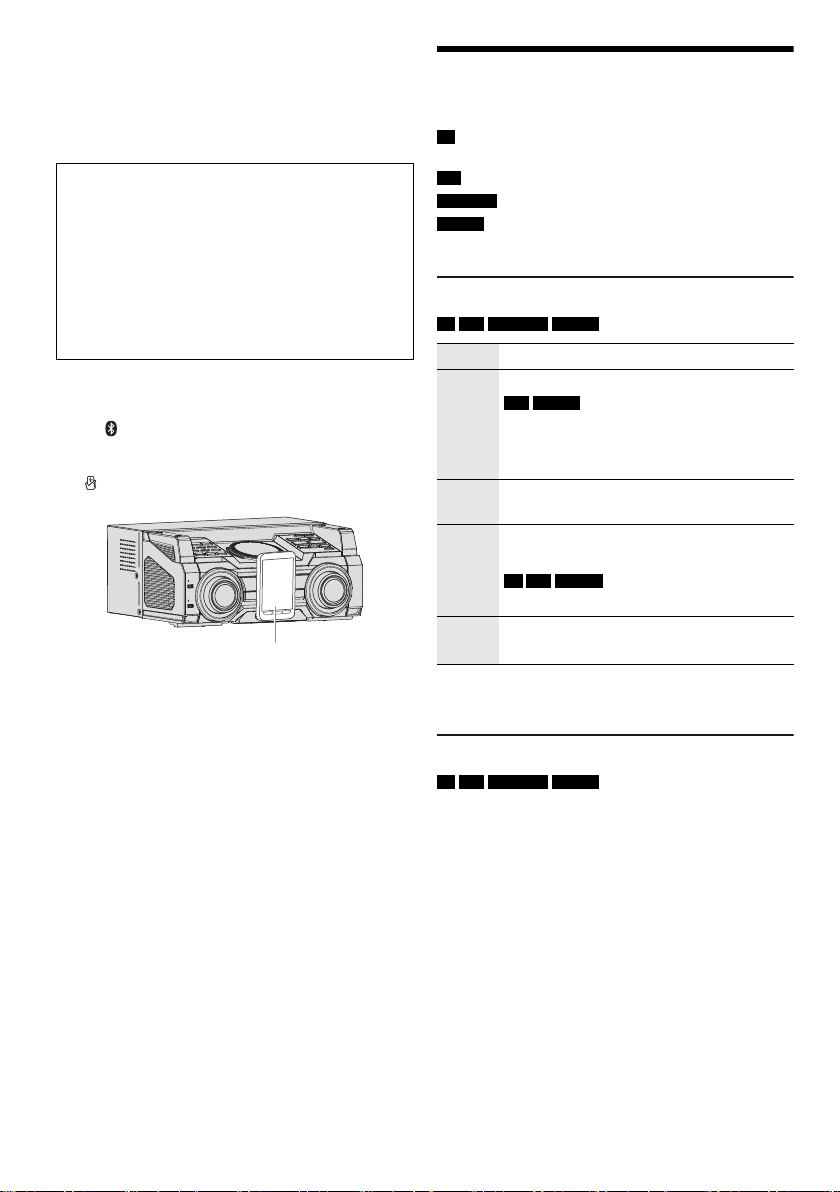
█ 一触式连接(NFC)
Bluetooth® 设备
(非附件)
offset printing
限
NFC
兼容的
Bluetooth®
设备(
Android™
设备)
只需让本系统简单接触 NFC(近场通信)兼容的
®
Bluetooth
设备,则可以完成从登记 Bluetooth®设
备到建立连接所有的准备工作。
4.1 以下版本的 Android 设备需要安装
“Panasonic MAX Juke” 软件(免费)。
A 在 Google Play™ 的搜索框中输入并搜索
“Panasonic MAX Juke”,然后选择
“Panasonic MAX Juke”。
B 启动应用程序。
– 按照说明以完成设定。
– 确保使用最新的应用程序版本。
准备
开启设备的 NFC 功能。
1 按 []。
2 将设备接触并按在主机的 NFC 触控区域上
[]。
– 持续按着设备直到其发出哔声、振动或显示快
显视窗,然后将设备远离本系统。
– 设备注册和连接完成后,已连接设备的名称将
显示于本系统上几秒钟。
– 当设备已经接触了 NFC 触控区域,但连接仍
未建立时,改变接触位置。如果您使用
“Panasonic MAX Juke” 应用程式,连接可能
改善。
3 开始播放设备。
备注 :
• 连接后,您可以将另一个设备接触并按在主机的
NFC 触控区域上以进行连接。先前的设备将被自动
断开。
• 取决于设备 :
– 一触式连接可能无法操作。
– 设备的 NFC 触控区域的位置可能不同。
– 当连接建立时,播放可能会自动开始。
媒体播放
下列标记表示功能的可用性。
CD :
USB :
BLUETOOTH :
MEMORY :
基本播放
CD USB BLUETOOTH MEMORY
播放 按 [4/9]。
停止 按 [8]。
暂停 按 [4/9]。
跳越 按 [2] 或 [6](主机 : [2/3] 或
搜寻 按住 [3] 或 [5](主机 : [2/3]
备注 :
取决于 Bluetooth
查看曲目信息
CD USB BLUETOOTH MEMORY
您可在显示幕上查看当前曲目的信息,如 MP3 唱
片集和曲目编号。
按 [DISPLAY]。
备注 :
• 可显示的最多字元数 : 约 32 个
• 本系统支援 1.0、1.1 和 2.3 ID3 版本的标记。
• 不支援的文字资料显示将有差异。
CD-DA 格式或存有 MP3 文件的
CD-R/RW。
存有 MP3 文件的 USB 设备。
Bluetooth
®
设备。
2 GB 内置记忆体(如需添加曲目至内置
记忆体,请参阅 “ 录制 ”)。
USB MEMORY
有关位置被记下。
“RESUME” 显示。
再按一次按钮以完全停止。
再按一次按钮以继续播放。
[5/6])以跳越曲目。
CD USB MEMORY
按 [R, T] 以跳越 MP3 唱片集。
或 [5/6])。
®
设备,某些操作可能无效。
RQT9979
10
32
Page 33
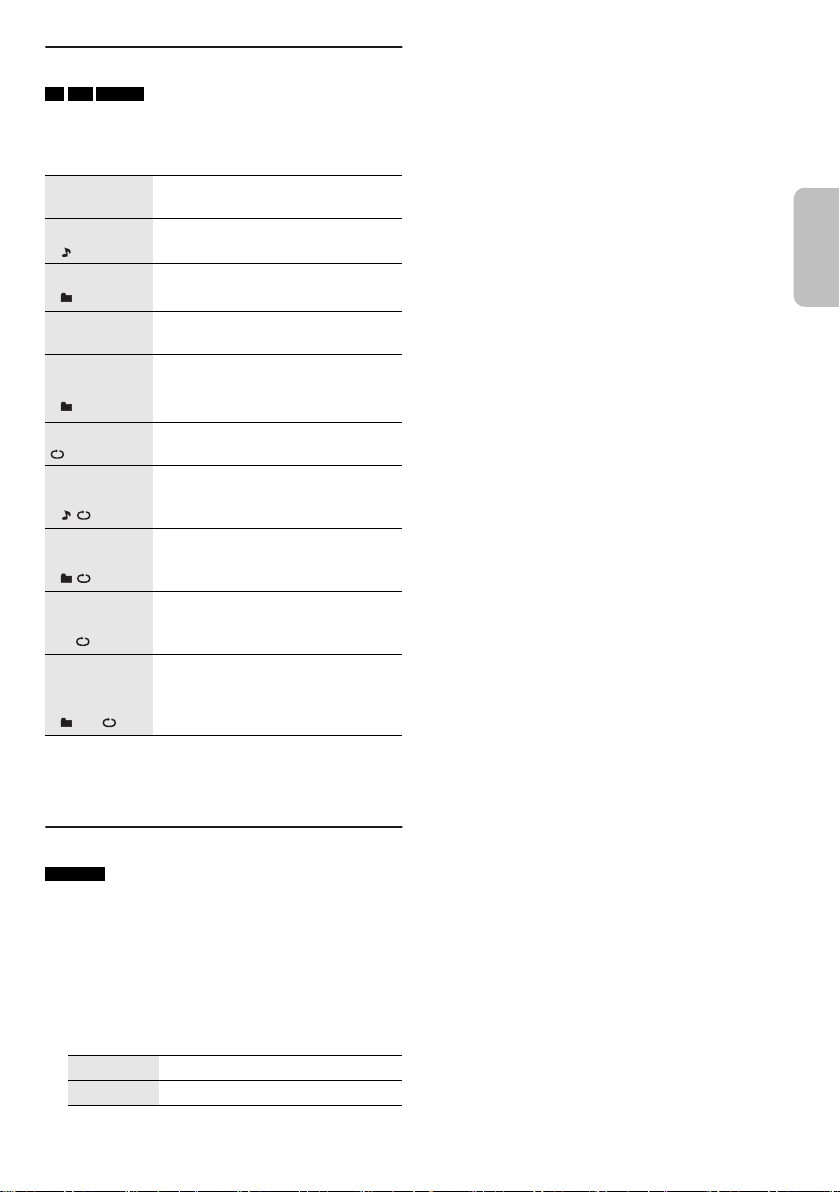
播放选单
中文
offset printing
CD USB MEMORY
1 按 [PLAY MENU]。
2 按 [Y, U] 以选择设定,然后按 [OK]。
OFF
PLAYMODE
1-TRACK
1
1-ALBUM
1
RANDOM
RND
1-ALBUM
RANDOM
1 RND
ALL REPEAT
1-TRACK
REPEAT
1
1-ALBUM
REPEAT
1
RANDOM
REPEAT
RND
1-ALBUM
RANDOM
REPEAT
1 RND
备注 :
• 随机播放时,您不能跳越至已播放过的曲目。
• 开启托盘后,设定将被取消。
取消设定。
播放一首所选的曲目。
按数字键以选择曲目。
播放一张所选的 MP3 唱片集。
按 [R, T] 以选择 MP3 唱片集。
随机播放所有曲目。
随机播放所选的 MP3 唱片集中的
所有曲目。
按 [R, T] 以选择 MP3 唱片集。
重复所有曲目。
重复 1-TRACK。
重复 1-ALBUM。
重复随机播放。
重复 1-ALBUM RANDOM。
█ 光碟备注
• 本系统可播放内容为 CD-DA 或 MP3 格式的
CD-R/RW。
• 播放前,在录制光碟的设备上对光碟进行封边。
• 取决于录音状态,某些 CD-R/RW 将无法播放。
█ USB 设备备注
• 本系统不保证与所有 USB 设备的连接。
• 本系统支援 USB 2.0 全速。
• 本系统支援储存容量多达 32 GB 的 USB 设备。
• 只支援 FAT 12/16/32 文件系统。
█ MP3 文件备注
• 文件被定义为曲目,文件夹被定义为唱片集。
• 曲目的文件副档名须为 : “.mp3” 或 “.MP3”。
• 曲目不一定会按照所录制的顺序播放。
• 取决于区段大小,某些文件将无法操作。
光碟中的 MP3 文件
• 本系统可读取多达 :
– 255 张唱片集(包括根文件夹)
– 999 首曲目
– 20 个片段
• 光碟必须符合 ISO9660 等级 1 或 2(扩展格式除
外)。
USB 设备中的 MP3 文件
• 本系统可读取多达 :
– 800 张唱片集(包括根文件夹)
– 8000 首曲目
– 999 首曲目于一张唱片集内
连接模式
BLUETOOTH
您可以更改连接模式以配合连接类型。
准备
如果系统已连接着 Bluetooth
®
设备,断开设备
(Z“ 断开设备 ”)。
1 按 [PLAY MENU] 以选择 “LINK MODE”。
2 按 [Y, U] 以选择模式,然后按 [OK]。
MODE 1
MODE 2
备注 :
如果声音断断续续,选择 “MODE 1”。
注重连接性。
注重音质。
11
33
RQT9979
Page 34

收音机
offset printing
准备
按 [CD/RADIO/AUX] 以选择 “FM” 或 “AM”。
手动调谐
按 [3] 或 [5] 以调谐至所要的电台。
欲自动调谐,按住按钮直到频率开始迅速改变。
当本系统接收立体广播时,“STEREO” 显示。
使用主机
1 按 [TUNE MODE] 以选择 “MANUAL”。
2 按 [2/3] 或 [5/6] 以调谐至所要的电
台。
改进音色品质
选择
“FM”
时
1 按 [PLAY MENU] 以选择 “FM MODE”。
2 按 [Y, U] 以选择 “MONO”,然 后 按 [OK]。
欲取消,选择 “STEREO”。
如果频率改变,“MONO” 也将被取消。
欲记下设定
执行 “ 手动预设 ” 的步骤 2。
选择
“AM”
时
1 按 [PLAY MENU] 以选择 “BEATPROOF”。
2 按 [Y, U] 以选择信号最好的选项,然后按
[OK]。
记忆预设
您可以预设多达 30 个 FM 电台和 15 个 AM 电台。
█ 自动预设
1 按 [AUTO PRESET] 以选择 “LOWEST” 或
“CURRENT”。
LOWEST
CURRENT
从最低频率开始调谐。
从当前频率开始调谐。
2 按 [OK] 以开始预设。
调谐器以顺序的方式,尽可能预设所有可以被接
收到的电台至频道内。
欲取消,按 [8]。
█ 手动预设
1 按 [3] 或 [5](主机 : [2/3] 或
[5/6])以调谐至所要的电台。
2 按 [OK]。
3 按数字键以选择一个预设频道。
重复步骤 1 至 3 以预设更多电台。
如果将另一个电台预设于一个已预设的频道上,
原来的预设电台将被删除。
█ 选择预设电台
按数字键、[2] 或 [6] 以选择预设电台。
使用主机
1 按 [TUNE MODE] 以选择 “PRESET”。
2 按 [2/3] 或 [5/6] 以选择预设电台。
AM 定位设定
只限主机
通过定位调整,您可使调谐器以 10 kHz 为频率间
隔接收 AM 广播。
1 按 [CD/RADIO/AUX] 以选择 “FM” 或 “AM”。
2 按住 [CD/RADIO/AUX]。
数秒钟后,显示幕将显示当前最小的频率。当最小
的频率改变时,放开按钮。
• 欲回复原来的设定,重复上述步骤。
• 设定改变后,预设频率将被删除。
RQT9979
12
34
Page 35
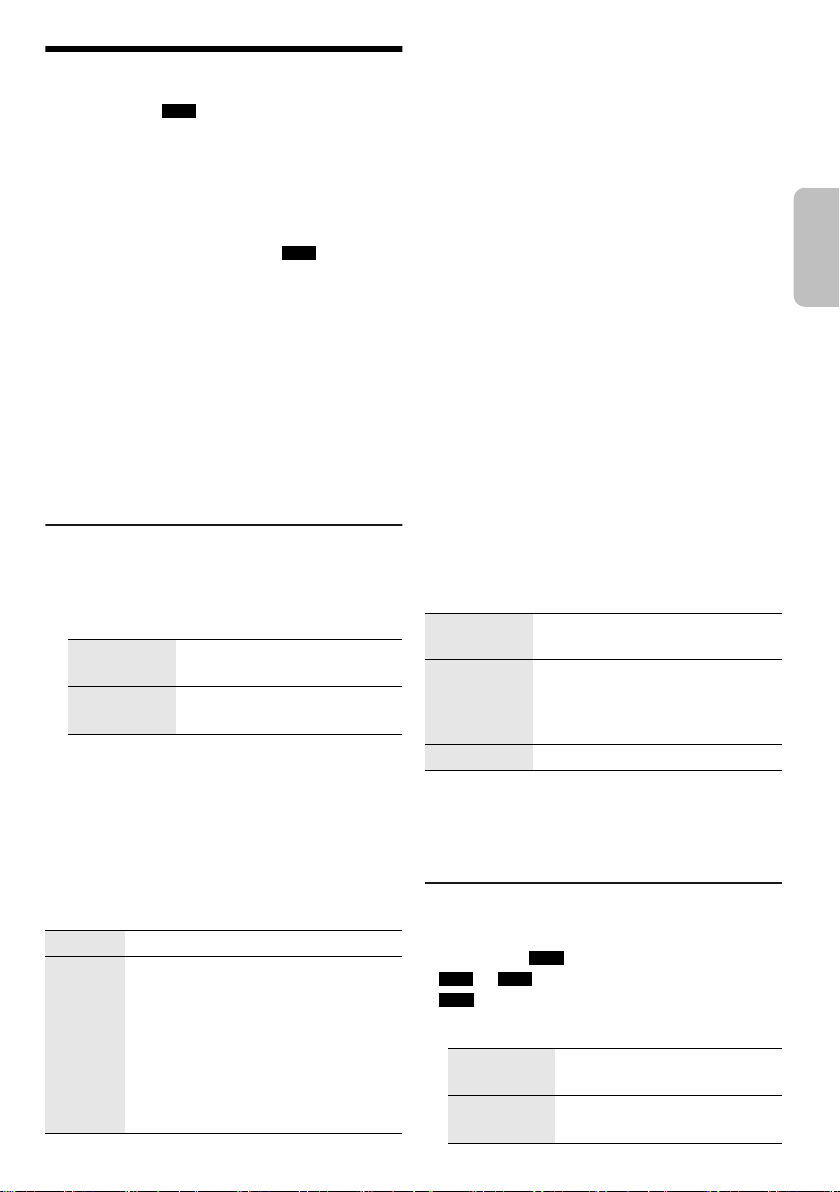
录制
中文
offset printing
视内置记忆体或 USB B 的 USB 设备的储存容量而
定,本系统可录制多达 800 个文件夹(一张唱片集
最多 999 首曲目)或 8000 首曲目。
欲检查储存容量
在停止模式中,按 [DISPLAY]。
• 系统读取设备时会显示 “UPDATE”。
• 如果没有任何 USB 设备连接至 USB B ,则会显示
“NO DEVICE”。
备注 :
• 所有录音为 “.mp3” 格式。
• 在随机播放模式中,您不能进行录制。
• 录制时 , 卡拉 OK 或 DJ 功能将关闭。
• 录制时,重复播放模式将关闭。
• 各录制将加入一张新的唱片集。
• 录制后,唱片集的顺序可能会改变。
• 所有录音将存入 USB 设备或内置记忆体中的
“REC_DATA” 文件夹。
• 录制时,USB 状态指示灯闪烁红灯。
基本录制
1 选择您想要录制的音源。
CD-DA
准备光碟播放模式。
录制所有曲目 选择 “OFF PLAYMODE”
(Z“ 播放选单 ”)。
录制一首
特定的曲目
确保光碟已停止。
收音机
调谐至广播电台。
其它设备
连接并播放其它设备(Z“ 其它设备 ”)。
选择 “1-TRACK”
(Z“ 播放选单 ”)。
2 按 [MEMORY REC 7/9] 或 [USB REC 7/9]
以开始录制。
所录制的内容将收纳至所显示的文件夹名内。
停止录制 按 [8]。“WRITING” 显示。
暂停录制 录制时,按 [MEMORY REC 7/9] 或
[USB REC 7/9]。
再按一次按钮以继续录制。
备注 :
录制收音机或 AUX 时,您可以暂停录制
(“SYNCHRO” 模式除外)。每次暂停录
制将添加一个曲目标记
(Z“ 添加曲目标记 ”)。
备注 :
• 录制前,等数秒钟以让本系统准备 USB 设备。
• 当本系统录制光碟中的下一首曲目时,其标题将显
示。
█ 高速录制
CD-DA 的光碟录制速度 :
CD、CD-R: 三倍(3x)正常速度。
CD-RW: 双倍(2x)正常速度。
1 放入您想要录制的光碟。
2 按 [REC MODE] 以选择 “NORMAL” 或
“HI-SPEED”,然后按 [OK]。
3 按 [USB REC 7/9] 或 [MEMORY REC 7/9]
以开始录制。
备注 :
• 如果因光碟状态而无法进行高速录制,以正常速度录
制。
• 进行高速录制时,本系统将消音。
█ 添加曲目标记
录制收音机或其它设备时,您可以使用各种模式划
分曲目。
录制前
按 [REC MODE] 以选择模式。
MANUAL
SYNCHRO
(限 AUX
音源)
TIME MARK
备注 :
• 在 “TIME MARK” 模式中,按 [OK] 或暂停录制将重
设 5 分钟的计数器。
• 在 “SYNCHRO” 模式中,您不能手动添加曲目标记。
手动添加曲目标记。
录制时,按 [OK] 以添加曲目标记。
当其它设备开始播放时,录制将自
动开始。
如果录制功能检测到至少 3 秒钟
的寂静,录制将暂停。
每隔 5 分钟,曲目将自动划分。
录制 MP3 曲目
您可以使用下列方式录制 MP3 曲目 :
• MP3 光碟至 USB B 或内置记忆体
• USB A 至 USB B 或内置记忆体
• USB B 至内置记忆体或相反
1 准备您想要录制的音源。
录制所有曲目 选择 “OFF PLAYMODE”
(Z“ 播放选单 ”)。
录制特定的唱
片集或曲目
选择 “1-ALBUM” 或
“1-TRACK”(Z“ 播放选单 ”)。
13
35
RQT9979
Page 36
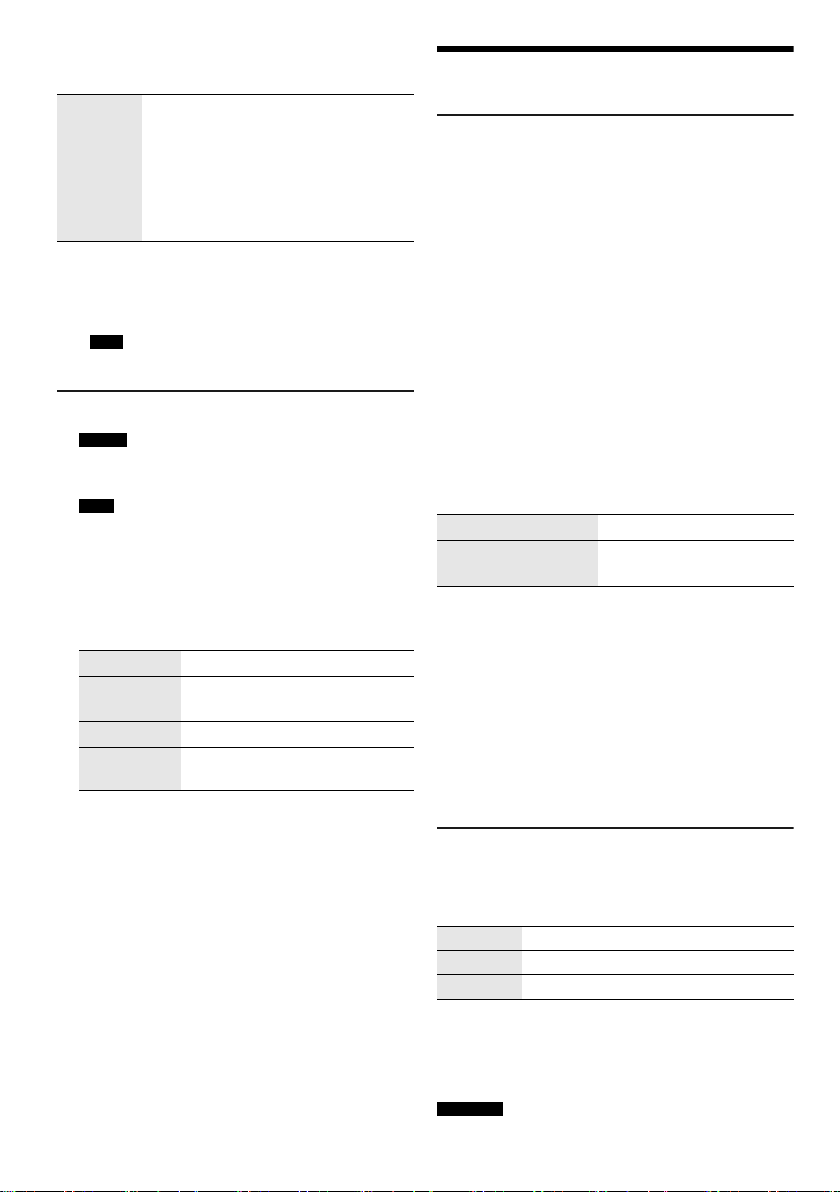
2 按 [MEMORY REC 7/9] 或 [USB REC 7/9]
offset printing
以开始录制。
停止录制 按 [8]。
录制将停止于上一首已完成录制的曲
目。例如,如果您在录制第四首曲目
中停止录制,本系统只储存首三首已
完成录制的曲目。
如果没有录制到任何曲目,会显示
“NO FILE RECORDED”。
备注 :
• 某些曲目需较长的时间录制。
• 视音源状态而定,某些曲目将无法录制。
• 录制 MP3 光碟时,录制文件名与原始文件名不同。
• 从 USB A 录制时,录制文件名与原始文件名(最多 32
个字符)相同。
删除录音
1 MEMORY
按 [MEMORY](主机 : [MEMORY/USB])以 选
择 “MEMORY”。
USB B
按 [USB](主机 : [MEMORY/USB])以选择
“USB B”。
2 按 [R, T] 以选择唱片集。
3 按 [2] 或 [6] 以选择曲目。
4 按 [EDIT MODE] 以选择模式。
TRACK DEL
ALBUM DEL
FORMAT
ALL DEL
删除一首曲目。
删除一张唱片集(最多 999 首曲
目)。
格式化 USB 设备。
删除内置记忆体中的所有唱片
集。
5 按 [OK]。
欲删除的选项显示。
6 按 [OK]。
“SURE? NO” 显示。
7 按 [Y, U] 以选择 “SURE? YES”,然 后 按 [OK]。
“WRITING” 显示。
欲取消,选择 “SURE? NO”。
RQT9979
14
36
音响和光照效果
音响效果
预设
EQ(Preset EQ
1 按 [EQ](主机 : [LOCAL EQ])以选择
“PRESET EQ”。
2 按 [R, T] 以选择所要的预设 EQ 设定,然后按
[OK]。
或转动 [MULTI CONTROL] 以选择所要的预设
EQ 设定。
手动
EQ
1 按 [EQ](主机 : [LOCAL EQ])以选择
“MANUAL EQ”。
2 按 [R, T] 以选择音效。
或转动 [MULTI CONTROL] 以选择音效。
3 按 [Y, U] 以选择设定,然后按 [OK]。
或按 [2/3] 或 [5/6] 以选择曲目。
BASS/MID/TREBLE
SURROUND
D.Bass
1 按 [D.BASS] 以选择 “D.BASS LEVEL” 或
“D.BASS BEAT”。
欲取消,选择 “OFF D.BASS”。
2 按 [R, T] 以选择设定,然后按 [OK]。
或转动 [MULTI CONTROL] 以选择设定。
备注 :
D.BASS BEAT: 此功能着重鼓声的敲击等级,制造强有
力的声音。取决于曲目,效果可能会较小。
光照效果
您可以更改本系统的光照效果。
按 [ILLUMINATION] 以选择所要的效果。
PATTERN
AUTO
OFF
您也可以按 [R, T] 以选择下一个或上一个效果。
使用主机
转动 [ILLUMINATION]。
备注 :
SC-MAX6000
要确保光照效果正确地显示,务必根据 “ 扬声器布置 ”
排列扬声器。
)
–4 至 +4
“ON SURROUND” 或
“OFF SURROUND”
以多种颜色的模式光照。
以单色光照。颜色将自动改变。
取消效果。
Page 37
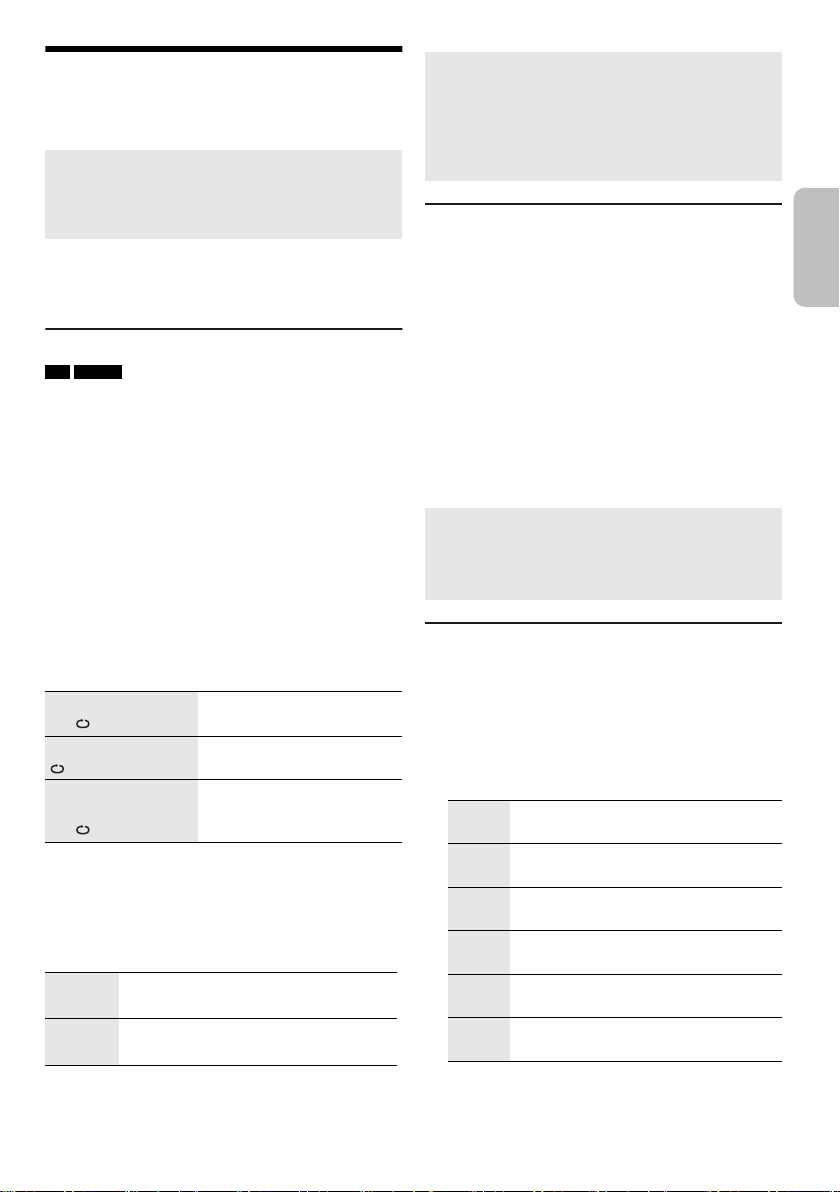
DJ 功能
中文
offset printing
您可以使用 DJ 功能在歌曲之间添加音效或示例声
音。
使用 “Panasonic MAX Juke” 应用程序
您可以在 Google Play 上下载和安装免费的
Android 应用程序 “Panasonic MAX Juke”,以 获
取更多功能,例如同时在多台设备上播放音乐。
备注 :
当您关闭本系统、切换至其他音源或在录制时,DJ 功
能将关闭。
DJ jukebox
USB MEMORY
按
[JUKEBOX](主机
以选择
“DJ JUKEBOX ON”
欲取消,选择 “JUKEBOX OFF”。
备注 :
当您开启 DJ Jukebox,本系统自动切换至重复模式。
: [KARAOKE/DJ JUKEBOX]
。
█ 更改重复设定
1 按 [PLAY MENU]。
2 按 [Y, U] 以选择设定,然后按 [OK]。
使用主机
在停止模式中,转动 [MULTI CONTROL] 以选择设
定,然后按 [4/9]。
RANDOM REPEAT
RND
ALL TITLE REPEAT
RANDOM MIX
REPEAT
RND
当 “WAITING REQUEST” 显示,您可以在没有使用
“Panasonic MAX Juke” 应用程序时进行下一步。
█ 更改 DJ jukebox 效果
按主机上的 [DJ1] 至 [DJ6] 以选择效果。
[DJ1]
[DJ2] 至
[DJ6]
欲取消,再按一次按钮。
备注 :
在 “RANDOM MIX REPEAT” 模式中,您不能选择
DJ jukebox 效果。
淡入淡出
一曲目的音量逐渐变大。
样本音混合
曲目的音程中。
重复随机播放。
重复所有曲目。
重复随机播放。将示例声音
添加到所有曲目的音程中。
: 当前曲目音量逐渐变小,下
: 将示例声音添加到所有
使用 “Panasonic MAX Juke” 应用程序
您可以使用此应用程序调用您想播放的曲目。
• 显示 “MAKING LIST” 时,您便可以调用部分曲
目。
• 显示 “WAITING REQUEST” 时,您可以使用此
应用程序调用您想播放的曲目。
DJ 取样机
(AUX 音源除外)
只限主机
通过旋转 [MULTI CONTROL],您可以将搓碟声或
示例声音应用到正在播放的曲目中。
1 按 [DJ EFFECT/SAMPLER] 以选择
“SAMPLER”。
)
2 按 [DJ1] 至 [DJ6] 以选择所要的音响。
3 转动 [MULTI CONTROL]。
欲取消 DJ 取样机
按 [DJ EFFECT/SAMPLER] 以选择 “OFF”。
使用 “Panasonic MAX Juke” 应用程序
您可以更改本应用程序上的示例声音。( 如需将所
有示例声音恢复为出厂预设,请在关闭 DJ 取样机
时按住 [DJ EFFECT/SAMPLER]。)
DJ 效果
(AUX 音源除外)
只限主机
您可以使用 DJ 效果功能以增强音效。
1
按
[DJ EFFECT/SAMPLER]
以选择
2 按 [DJ1] 至 [DJ6] 以选择效果。
[DJ1]
[DJ2]
[DJ3]
[DJ4]
[DJ5]
[DJ6]
PHASER
增加声音的空间和维度。
FILTER
增强或筛选特定的音素。
SOUND CHOPPER
规律性切断声音。
ELECTRO ECHO
加入数码回音。
PITCH SHIFTER
调整音调。
HARMONIZER
添加音符以制造和声效果。
3 转动 [MULTI CONTROL] 以选择设定。
欲取消
DJ
效果
按 [DJ EFFECT/SAMPLER] 以选择 “OFF”。
“EFFECT”
。
RQT9979
15
37
Page 38
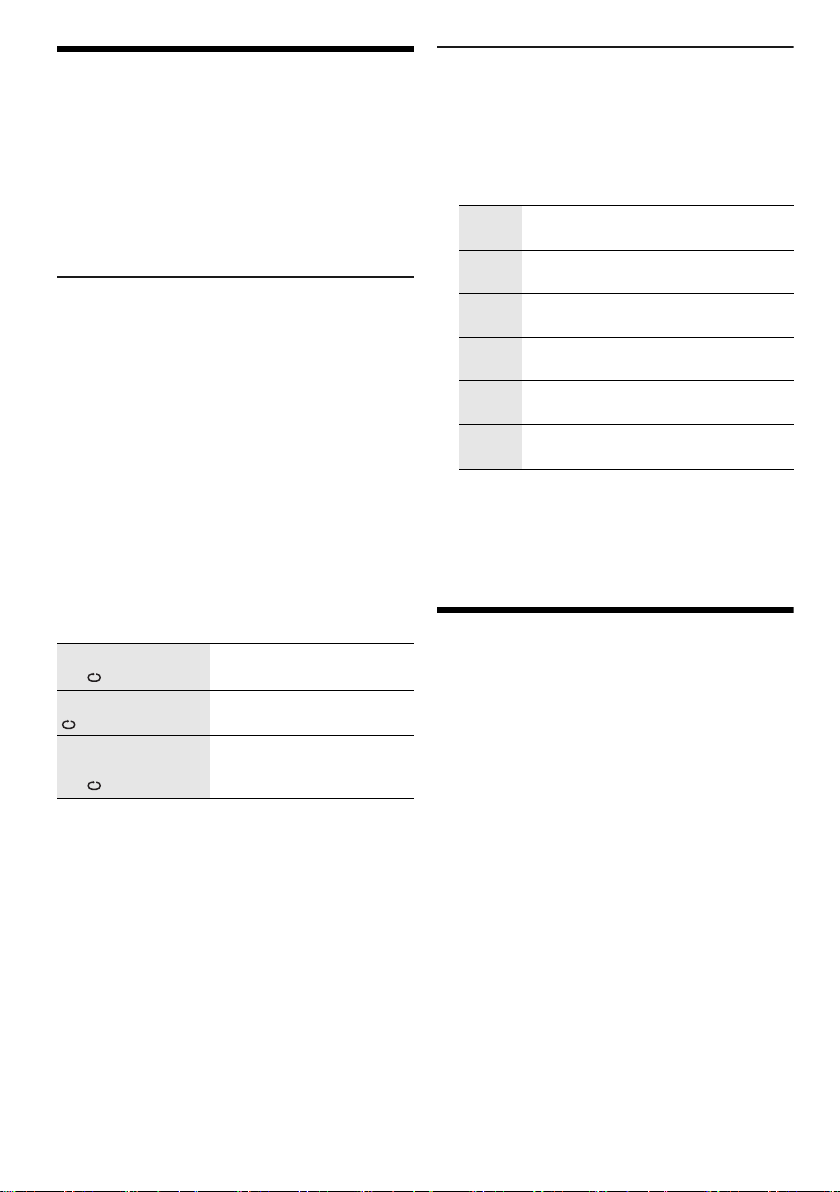
卡拉 OK
offset printing
准备
选择音源。
备注 :
• 当您关闭本系统或开始录制时,卡拉 OK 功能将关
闭。
• 当您开启卡拉 OK jukebox 时,卡拉 OK 效果将自动
开启。
卡拉 OK jukebox
按主机上的
“KARAOKE JUKEBOX ON”
欲取消,选择 “JUKEBOX OFF”。
备注 :
当您开启卡拉 OK jukebox,本系统自动切换至重复模
式。
█ 更改重复设定
1 按 [PLAY MENU]。
2 按 [Y, U] 以选择设定,然后按 [OK]。
使用主机
在停止模式中,转动 [MULTI CONTROL] 以选择设
定,然后按 [4/9]。
RANDOM REPEAT
RND
ALL TITLE REPEAT
RANDOM MIX
REPEAT
RND
当 “WAITING REQUEST” 显示,您可以在没有使用
“Panasonic MAX Juke” 应用程序时进行下一步
(Z“DJ 功能 ”)。
[KARAOKE/DJ JUKEBOX]
。
重复随机播放。
重复所有曲目。
重复随机播放。将示例声音
添加到所有曲目的音程中。
以选择
卡拉 OK 效果
只限主机
您可以使用卡拉 OK 效果功能以增强音效。
1 按 [KARAOKE EFFECT]。
2 按 [DJ1] 至 [DJ6] 以选择效果。
[DJ1]
[DJ2]
[DJ3]
[DJ4]
[DJ5]
[DJ6]
VOCAL CANCEL
开启或关闭语音提示(取决于音源)。
ECHO
加入回音效果。
KEY-CON
调节歌曲的音调。
TEMPO
调节歌曲的节奏。
BGM LEVEL
调节背景音乐电平。
MIC EQ
选择 MIC EQ 水平。
3 转动 [MULTI CONTROL] 以选择设定。
欲取消
Karaoke
按 [KARAOKE EFFECT]。
效果
使用麦克风
准备
连接或断开麦克风前,将系统音量降到最低。
1 将麦克风(非附件)连接至麦克风插孔。
插头类型 : Ø 6.3 mm 单声道
2 转动主机上的 [MIC VOL, MIN/MAX] 以调整麦
克风音量。
如果您想要跟着背景音乐一起唱。
3 播放音乐源,并调整系统音量。
备注 :
• 如果扬声器发出奇怪的噪音(啸叫),将麦克风远离
扬声器或降低麦克风音量。
• 如果不使用麦克风,请断开麦克风,并将其音量降到
“MIN”。
• 本系统不能通过麦克风进行录制。
RQT9979
16
38
Page 39
时钟和定时器
NIM03ĺ120 MIN
ĺĺ60 MIN
ĺ
90 MIN
FFO
中文
offset printing
设定时钟
此为 24 小时显示时钟。
1 按 [SETUP] 以选择 “CLOCK”。
2 按 [Y, U] 以设定时间,然后按 [OK]。
欲检查时间
按 [SETUP] 以选择 “CLOCK”。
在待机状态下,按 [DISPLAY]。
备注 :
经常调整时钟以保持其准确性。
睡眠定时器
睡眠定时器使本系统在预设时间自动关闭。
按 [SLEEP] 以选择所要的时间(分钟)。
欲取消,选择 “OFF”。
备注 :
• 屏幕会显示剩余的时间。当您执行其它操作时,显示
将暂时改变。
• 睡眠定时器可与播放定时器或录音定时器同时使用。
• 睡眠定时器总是优先启动。切勿使定时器设定重叠。
播放定时器和录音定时器
(Bluetooth®和 AUX 音源除外)
您可以设定定时器在特定的时间以 :
• 将您唤醒(播放定时器)。
• 录制收音机(录音定时器)。
播放定时器不能与录音定时器同时使用。
准备
设定时钟。
1 按 [SETUP] 以选择 “TIMER ADJ”。
2 按 [Y, U] 以选择 “#PLAY” 或 “#REC”,然 后
按 [OK]。
3 按 [Y, U] 以设定开始时间,然后按 [OK]。
4 重复步骤 3 以设定完成时间。
5 按 [Y, U] 以选择您想要播放或录制的音源,然
后按 [OK]。
6 只限录音定时器,按 [Y, U] 以选择 “MEMORY”
或 “USB B” 以储存录音,然后按 [OK]。
欲启动定时器
1 准备音源。
播放定时器 准备您想要收听的音乐源(光碟、
录音定时器 将 USB 设备连接至 USB B (限
USB、内置记忆体或广播电台)并
设定音量。
USB 录制)并调谐至所要的电台。
2 按 [SETUP] 以选择 “TIMER SET”。
3 按 [Y, U] 以选择设定,然后按 [OK]。
PLAY ON
PLAY OFF
REC ON
REC OFF
“#” 显示。
必须关闭本系统,定时器方能操作。
欲检查设定
启动播放定时器。
取消播放定时器。
启动录音定时器。
取消录音定时器。
1 按 [SETUP] 以选择 “TIMER ADJ”。
2 按 [Y, U] 以选择 “#PLAY” 或 “#REC”,然 后
按 [OK]。
在待机状态下,按 [DISPLAY] 两次。
备注 :
• 播放定时器将在预设时间启动,其音量将逐渐增加至
预设水平。
• 录音定时器将在预设时间前的 30 秒钟以消音的方式
启动。
• 定时器如果被设定,将在每日预设时间启动。
• 如果您在预设时间内关闭本系统,然后再次开机,定
时器将无法在完成时间时停止。
17
39
RQT9979
Page 40
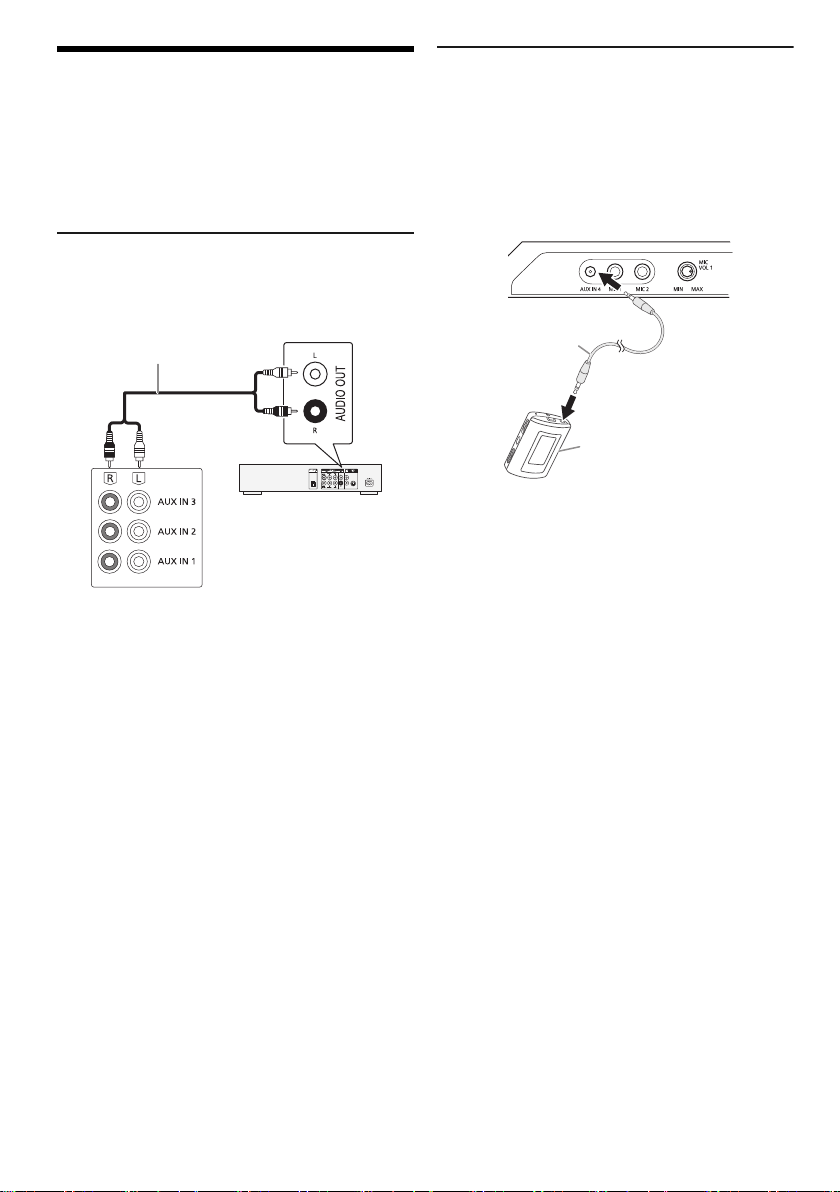
其它设备
本机的后部面板
DVD 播放机
(非附件)
音频电线(非附件)
音频电线
(非附件)
便携式音频设备
(非附件)
offset printing
准备
• 断开交流电源线。
• 关闭所有设备,并参阅有关使用说明书。
备注 :
设备和电线需另行添购。
使用 AUX 输入
您可以连接 VCR、DVD 播放机或其它设备,并通过
本系统享受音乐。
连接便携式音频设备
您可从便携式音频设备播放音乐。
准备
• 关闭便携式音频设备的音频平衡器功能(如果
有),以避免声音失真。
• 连接或断开便携式音频设备前,降低本系统和便
携式音频设备的音量。
1 连接便携式音频设备。
插头类型 : Ø 3.5 mm 立体声
2 按 [CD/RADIO/AUX] 以选择 “AUX 4”。
3 启动便携式音频设备。
1 连接其它设备。
2 按 [CD/RADIO/AUX] 以选择 “AUX 1”,
“AUX 2” 或 “AUX 3”。
3 启动其它设备。
备注 :
• 如果您想要连接此处没有描述的设备,请向当地经销
商咨询。
• 使用适配器可能会导致声音失真。
RQT9979
18
40
欲调整输入水平
1 按 [PLAY MENU] 以选择 “INPUT LEVEL”。
2 按 [Y, U] 以选择 “NORMAL” 或 “HIGH”,然 后
按 [OK]。
备注 :
• 在录制时,你不能调整输入水平。
• 如果 “HIGH”(高)输入水平导致声音失真,选择
“NORMAL”(正常)。
• 参阅有关便携式音频设备的使用说明书。
Page 41

其它
中文
offset printing
自动关闭
如果不使用本系统长达约 20 分钟,本系统将自动
关闭。
1 按 [SETUP] 以选择 “AUTO OFF”。
2 按 [Y, U] 以选择 “ON”,然后按 [OK]。
欲取消,选择 “OFF”。
备注 :
此功能在收音机模式中或连接着 Bluetooth
效。
Bluetooth® 待机
当您从已配对的设备建立 Bluetooth® 连接时,此功
能将自动开启本系统。
1 按 [SETUP] 以选择
“BLUETOOTH STANDBY”。
2 按 [Y, U] 以选择 “ON”,然后按 [OK]。
欲取消,选择 “OFF”。
备注 :
一些设备可能需要较长的反应时间。如果在关闭系统前
您已连接至 Bluetooth® 设备,您的 Bluetooth® 设备再
次连接至此系统之前需要至少等待 5 秒。
®
设备时无
保养
清洗本系统时,请使用柔软的干布。
• 切勿使用酒精、涂料稀释剂或挥发剂等清洗本系
统。
• 使用经化学浸处理的布前,请仔细阅读该布附带
的说明。
软件版本
您可以检查本系统的软件版本。
1 按 [SETUP] 以选择 “SW VER.”, 然后按
[OK]。
软件版本显示。
2 再按 [OK] 以退出。
19
41
RQT9979
Page 42

故障排除指南
offset printing
要求维修前,请确认下列各项。如果您无法按照下
述方式修理好本系统或出现某些此处未列出的问题
时,请向当地经销商咨询。
█ 常见问题
本机无法操作。
• 安全装置已启动。执行下列操作步骤 :
1. 按主机上的 [1] 以将本机切换到待机状态。如果
本机无法切换到待机状态,
– 按住按钮至少 10 秒钟。或,
– 断开交流电源,然后再次连接。
2. 再按 [1] 以开机。如果问题持续,向当地经销商咨
询。
显示幕在待机状态下亮起并持续改变。
• 按住主机上的 [8] 以选择 “DEMO OFF”。
遥控器无法操作。
• 检查电池是否正确插入。
声音失真或无声。
• 调整系统音量。
• 关闭本系统,检查并修正导因,然后再次开机。这可
能是由于扬声器受压于过大音量或功率,或在炎热环
境中使用本系统所导致。
播放时可听到嗡嗡声。
• 电线附近有交流电源线或萤光灯。将其它电器和电线
远离本系统的电线。
音量降低。
• 由于本系统持续使用大音量输出,电路保护机制已启
动以保护本系统,并保持其音质。
█ 光碟
显示有误。
无法开始播放。
• 您没正确放入光碟,请正确放入。
• 光碟肮脏,请擦拭干净。
• 如果光碟出现划痕、弯曲或非标准型,要予以更换。
• 结露形成,等 1 至 2 个小时到其蒸发。
显示不正确的曲目总数。
无法读取光碟。
声音失真。
• 您放入本系统无法播放的光碟,更换可播放的光碟。
• 您放入未定格的光碟。
█ USB
无法读取 USB 设备或其内容。
• USB 设备格式或其内容与本系统不兼容。
• 在某些情况下,储存容量超过 32 GB 的 USB 设备将
无法操作。
USB 设备操作缓慢。
• 大文件或高位存储 USB 设备需较长的时间读取。
█ Bluetooth
®
无法进行配对。
• 检查 Bluetooth
• 设备在 10 m 通信范围外。将设备移近系统。
®
设备状态。
无法连接设备。
• 设备的配对不成功。再次进行配对。
• 设备的配对已被取代。再次进行配对。
• 本系统可能已连接至不同的设备。断开其它设备,然
后再次配对设备。
• 本系统可能出现问题。关闭本系统,然后再次开机。
设备已连接但是无法通过系统听到音频。
• 对于某些内置 Bluetooth
®
设备,您需手动将音频输
出设定为 “SC-MAX8000” 或 “SC-MAX6000” 。参 阅
有关设备的使用说明书。
来自设备的声音断断续续。
• 设备在 10 m 通信范围外。将设备移近系统。
• 移开系统和设备之间的障碍物。
• 其他使用 2.4 GHz 频段的设备(无线路由器、微波、
无线电话等)可造成干扰。将设备移近本系统,并远
离其它设备。
• 选择 “MODE 1” 以获取稳定的通信。
一触式连接(NFC)无法操作。
• 确保本系统和设备的 NFC 功能已开启。
• 再次将设备接触并按在本系统的 NFC 触控区域上。
播放影像和声音不同步。
• 重新启动设备的播放应用程序。
• 使用音频电线(非附件)将设备连接至本系统。
█ 收音机
声音失真。
• 使用另购的 FM 室外天线。此天线应由合格的技术人
员进行安装。
听到拍声。
• 关闭电视机或将其远离本系统。
• 如果干扰明显,将手提电话远离本系统。
• 在 AM 调谐模式中,选择信号最好的 “BEATPROOF”
选项。
AM 广播时可听到低沉的嗡嗡声。
• 将天线与其它电线隔离。
RQT9979
20
42
Page 43

█ 主机显示
中文
offset printing
“ADJUST CLOCK”
• 时钟没有设定。调整时钟。
“ADJUST TIMER”
• 播放定时器及 / 或录音定时器没有设定。调整播放定
时器及 / 或录音定时器。
“ALB FULL”
• 唱片集数量超出允许的限制。
“AUTO OFF”
• 您未使用本系统长达 20 分钟,并将在 1 分钟内关
闭。欲取消,任意按下按钮。
“CAN’T REC”
“DEVICE FULL”
• 由于 USB 设备剩余的录制时间少于音乐源的播放时
间,录制无法进行。更换有足够录制时间的 USB 设
备,然后再次进行录制。
“ERROR”
• 操作不正确。阅读本使用说明书,然后再次操作。
“ERROR”(录制时)
• 您不能选择其它播放源(例 : 收音机、USB 等)或在
录制中按 [2] 或 [6]。停止录制。
• 录制 AM 音源时,您不能开启托盘。
“F61”
• 检查并更正扬声器电线连接。
• 断开 USB 设备。关闭本系统,然后再次开机。
“F70”
• 检查 Bluetooth
• 断开 Bluetooth
®
连接。
®
设备。关闭本系统,然后再次开机。
“F76”
• 电源出现问题。
• 断开交流电源,并向当地经销商咨询。
“F77”
• 断开交流电源,并向当地经销商咨询。
“NO DEVICE”
• USB 设备连接不良。检查连接。
• 您不能进行录制或检查可用的储存容量,因为没有将
任何 USB 设备连接至
USB B 。
“NO DISC”
• 您还没放入光碟。
“NO PLAY”
“UNSUPPORT”
• 检查内容。您只可播放受支援的文件格式。
• USB 设备中的文件可能已损坏。格式化 USB 设备,
然后再次操作。
• 本系统可能出现问题。关闭本系统,然后再次开机。
“NO TRACK”
• USB 设备或内置记忆体中没有唱片集或曲目。
“PLAYERROR”
• 您播放不受支援的 MP3 格式。本系统将跳越此曲
目,并播放下一首。
“REC ERROR”
• 您在录制时断开 USB 设备。连接 USB 设备,然后再
次录制。
• 进行 USB 录制时出错。断开 USB 设备,然后再次连
接。
“REMOTE 1”
“REMOTE 2”
• 遥控器和主机使用不同代码。更改遥控器代码。
– 当 “REMOTE 1” 显示时,按住 [OK] 和 [1] 至少
4 秒钟。
– 当 “REMOTE 2” 显示时,按住 [OK] 和 [2] 至少
4 秒钟。
“TEMP NG”
• 温度电路保护机制已启动。本系统将关闭。等主机冷
却后再开机。
• 检查通风孔是否受堵塞。
• 确保主机通风良好。
“TRK FULL”
• 文件数超出允许的限制。
“USB OVER CURRENT ERROR”
• USB 设备使用过多电源。断开 USB 设备并关闭本系
统,然后再次开机。
“VBR”
• 本系统无法显示 VBR 格式曲目剩余的播放时间。
遥控器代码
如果其它 Panasonic 设备对此遥控器产生反应,更
改本系统的遥控器代码。
准备
按 [CD/RADIO/AUX] 以选择 “AUX 1”, “AUX 2”,
“AUX 3” 或 “AUX 4”。
█ 欲切换到 “REMOTE 2”
1 按住主机上的 [CD/RADIO/AUX] 和遥控器上的
[2] 直到 “REMOTE 2” 显示。
2 按住 [OK] 和 [2] 至少 4 秒钟。
█ 欲切换到 “REMOTE 1”
1 按住主机上的 [CD/RADIO/AUX] 和遥控器上的
[1] 直到 “REMOTE 1” 显示。
2 按住 [OK] 和 [1] 至少 4 秒钟。
21
43
RQT9979
Page 44

系统记忆重设
offset printing
当发生下列情况时,重设记忆 :
• 按下按钮后没有反应。
• 您想要清除并重设记忆内容。
1 断开交流电源线。
2 按住主机上的 [1] 的同时,再次连接交流电源
线。
持续按住按钮直到 “–––––––––” 显示。
3 放开 [1]。
所有设定将回复厂家预设。
您需重设各项目。
技术规格
█ 扩音器部份
RMS 输出功率立体声
SC-MAX8000
高声道 每声道 500 W(3 Ω),1 kHz,
30% 全谐波失真
中声道 每声道 500 W(3 Ω),1 kHz,
30% 全谐波失真
低声道 每声道 1000 W(5 Ω),100 Hz,
30% 全谐波失真
RMS 立体模式总功率 4000 W
SC-MAX6000
前声道 每声道 350 W(3 Ω),1 kHz,
30% 全谐波失真
前声道 每声道 350 W(3 Ω),1 kHz,
30% 全谐波失真
低声道 每声道 725 W(6 Ω),100 Hz,
30% 全谐波失真
RMS 立体模式总功率 2850 W
█ 光碟部份
播放的光碟(8 cm 或 12 cm)
CD、CD-R/RW(CD-DA、MP3 )
MPEG-1 Layer 3、 MPEG-2 Layer 3
拾波器
波长 790 nm(CD)
RQT9979
22
44
█ Bluetooth
版本 Bluetooth® 版本 2.1 + EDR
等级 等级 2
支援应用格式 A2DP、 AVRCP、SPP、OPP、 FTP
操作频率 2.4 GHz 频段 FH-SS
操作距离 视线内 10 m
®
部份
█ 内置记忆体部份
记忆
记忆大小 2 GB
支援的音频文件格式 MP3(
记忆录制
比特率 128 kbps
记忆录制速度 1x、3x 最大(只限 CD)
录音文件格式 MP3(
*.mp3)
*.mp3)
Page 45
█ 调谐部份
中文
offset printing
调频(FM)
预设记忆 30 台
频率范围
87.50 MHz ~ 108.00 MHz(50 kHz 频率间隔)
天线端子 75 Ω(非平衡)
调幅(AM)
预设记忆 15 台
频率范围
522 kHz ~ 1629 kHz(9 kHz 频率间隔)
520 kHz ~ 1630 kHz(10 kHz 频率间隔)
█ 扬声器部份
SB-MAX8000
扬声器
高频扬声器 6 cm 锥型 x 1
低频扬声器 16 cm 锥型 x 2
超低频扬声器 38 cm 锥型 x 1
阻抗 高 3 Ω / 中 3 Ω / 低 5 Ω
尺寸(宽 x 高 x 深)
包括扬声器护垫 572 mm x 782 mm x 528 mm
不包括扬声器护垫
572 mm x 774 mm x 528 mm
重量 37 kg
SB-MAF6000 SB-MAG6000
扬声器
高频扬声器 6 cm 锥型
低频扬声器 20 cm 锥型
阻抗 3 Ω
尺寸(宽 x 高 x 深) 407 mm x 260 mm x 258 mm
重量 5.5 kg
SB-MAW6000
扬声器
超低频扬声器 30 cm 锥型
阻抗 6 Ω
尺寸(宽 x 高 x 深) 402 mm x 450 mm x 386 mm
重量 13 kg
█ 端子部份
USB 端口
USB 标准 USB 2.0 全速
支援的音频文件格式 MP3(
*.mp3)
USB 设备文件系统 FAT12、FAT16、FAT32
USB 录制
比特率 128 kbps
USB 录制速度 1x、3x(只限 CD)
录音文件格式 MP3(
*.mp3)
AUX IN 1, 2, 3
音频输入 管脚插孔
AUX IN 4
端子 立体声,3.5 mm 插孔
麦克风
端子 单声道,6.3 mm 插孔(2 系统)
█ 一般规格
电源 交流 220 V ~ 240 V, 50/60 Hz
耗电量 340 W
尺寸(宽 x 高 x 深) 492 mm x 221 mm x 421 mm
重量 7.1 kg
操作温度范围 0°C ~ +40°C
操作湿度范围
待机状态下的耗电量(大约) 0.4 W
待机状态下的耗电量(大约)
(“BLUETOOTH STANDBY” 的设定为 “ON”)
备注 :
• 规格若有变更,恕不另行通知。
重量和尺寸为近似值。
• 全谐波失真由数码波谐分析器测量。
35% ~ 80% 相对湿度(无形成水珠)
0.5 W
23
45
RQT9979
Page 46

ﺔﻠﻣﺎﻛ ﺔﻋﺮﺴﺑ USB 2.0 USB ﻲﺳﺎﻴﻗ
offset printing
(*.mp3) MP3 ﻂﺋﺎﺳﻮﻟﺍ ﻒﻠﻣ ﻖﻴﺴﻨﺗ ﻢﻋﺩ
FAT32 ،FAT16 ،FAT12 USB ﺯﺎﻬﺟ ﻒﻠﻣ ﻡﺎﻈﻧ
ﺔﻴﻧﺎﺜﻟﺍ ﻲﻓ ﺖﺑ ﻮﻠﻴﻛ 128 ﺖﺒﻟﺍ ﻝﺪﻌﻣ
(ﻂﻘﻓ CD) 3x ،1x USB ﻞﻴﺠﺴﺗ ﺔﻋﺮﺳ
(*.mp3) MP3 ﻂﺋﺎﺳﻮﻟﺍ ﻒﻠﻣ ﻖﻴﺴﻨﺗ ﻢﻋﺩ
AUX IN 1, 2, 3
ﺱﻮﺑﺩ ﺲﺒﻘﻣ ﺕﻮﺼﻟﺍ ﻞﺧﺩ
ﻢﻣ 3.5 ﺲﺒﻘﻣ ،ﻮﻳﺮﻴﺘﺳﺍ ﻑﺮﻄﻟﺍ
(ﺔﻤﻈﻧﺍ 2) ﻢﻣ 6.3 ﺲﺒﻘﻣ ،ﻮﻧﻮﻣ ﻑﺮﻄﻟﺍ
ﻲﺑﺮﻋ
ﺰﺗﺮﻫ 60/50 ،ﺖﻟﻮﻓ 240 ﻰﻟﺇ ﺖﻟﻮﻓ 220 ﺩﺩﺮﺘﻣ ﺭﺎﻴﺗ
ﻁﺍﻭ
340 ﺔﻴﺋﺎﺑﺮﻬﻜﻟﺍ ﺔﻗﺎﻄﻟﺍ ﻙﻼﻬﺘﺳﺍ
ﻢﻣ 421 x ﻢﻣ 221 x ﻢﻣ 492
ﻢﺠﻛ 7.1 ﺔﻠﺘﻜﻟﺍ
ﺔﻳﻮﺌﻣ ﺔﺟﺭﺩ
(
+40 ﻰﻟﺇ ﺔﻳﻮﺌﻣ ﺔﺟﺭﺩ 0 ﻞﻴﻐﺸﺘﻟﺍ ﺓﺭﺍﺮﺣ ﺔﺟﺭﺩ ﻕﺎﻄﻧ
ﺔﺑﻮﻃﺮﻠﻟ ﻒﻴﺜﻜﺗ ﻥﻭﺪﺑ
(
ﺎﹰﺒﻳﺮﻘﺗ) ﻞﻴﻐﺸﺘﻠﻟ ﺩﺍﺪﻌﺘﺳﻻﺍ ﻊﺿﻭ ﻲﻓ ﺔﻴﺋﺎﺑﺮﻬﻜﻟﺍ ﺔﻗﺎﻄﻟﺍ ﻙﻼﻬﺘﺳﺍ
)
RH 80%
ﻰﻟﺇ
ﻁﺍﻭ 0.4
(
ﺎﹰﺒﻳﺮﻘﺗ) ﻞﻴﻐﺸﺘﻠﻟ ﺩﺍﺪﻌﺘﺳﻻﺍ ﻊﺿﻭ ﻲﻓ ﺔﻴﺋﺎﺑﺮﻬﻜﻟﺍ ﺔﻗﺎﻄﻟﺍ ﻙﻼﻬﺘﺳﺍ
(“ON” ﻰﻠﻋ “BLUETOOTH STANBDY” ﻂﺒﺿ ﺀﺎﻨﺛﺃ)
ﻁﺍﻭ 0.5
ﺔﻴﺋﺎﺑﺮﻬﻜﻟﺍ ﺔﻗﺎﻄﻟﺍ ﺪﻳﻭﺰﺗ
(ﻖﻤﻌﻟﺍ x ﻉﺎﻔﺗﺭﻻﺍ x ﺽﺮﻌﻟﺍ) ﺩﺎﻌﺑﻷﺍ
35%
ﻞﻴﻐﺸﺘﻟﺍ ﺔﺑﻮﻃﺭ ﻕﺎﻄﻧ
.ﺔﻴﺒﻳﺮﻘﺗ ﺩﺎﻌﺑﻷﺍﻭ ﺔﻠﺘﻜﻟﺍ ﻡﺎﻗﺭﺃ ﺪﻌﺗ
USB ﺬﻔﻨﻣ
USB ﻞﻴﺠﺴﺗ
AUX IN 4
ﻥﻮﻓﻭﺮﻜﻴﻣ
:ﺔﻈﺣﻼﻣ
█ ﻑﺮﻄﻟﺍ ﻢﺴﻗ
ﺔﻄﺤﻣ 30 ﻖﺒﺴﻤﻟﺍ ﻂﺒﻀﻟﺍ ﺓﺮﻛﺍﺬﻠﻟ
(ﺰﺗﺮﻫ ﻮﻠﻴﻛ 50 ﻞﺣﺍﺮﻤﺑ) ﺰﺗﺮﻫ ﺎﺠﻴﻣ 108. 00 ﻰﻟﺇ ﺰﺗﺮﻫ ﺎﺠﻴﻣ 87.50
ﻥﺯﺍﻮﺘﻣ ﺮﻴﻏ) ﻡﻭﺃ 75 ﻲﺋﺍﻮﻬﻟﺍ ﻑﺍﺮﻃﺃ
(
15 ﻖﺒﺴﻤﻟﺍ ﻂﺒﻀﻟﺍ ﺓﺮﻛﺍﺬﻠﻟ
ﺔﻄﺤﻣ
(ﺰﺗﺮﻫ ﻮﻠﻴﻛ 9 ﻞﺣﺍﺮﻤﺑ) ﺰﺗﺮﻫ ﻮﻠﻴﻛ 1629 ﻰﻟﺇ ﺰﺗﺮﻫ ﻮﻠﻴﻛ 522
ﺰﺗﺮﻫ ﻮﻠﻴﻛ 10 ﻞﺣﺍﺮﻤﺑ) ﺰﺗﺮﻫ ﻮﻠﻴﻛ 163 0 ﻰﻟﺇ ﺰﺗﺮﻫ ﻮﻠﻴﻛ 520
(
1 x ﻲﻃﻭﺮﺨﻣ ﻉﻮﻧ ﻢﺳ 6 ﺮﺘﻳﻮﺗ
2 x ﻲﻃﻭﺮﺨﻣ ﻉﻮﻧ ﻢﺳ 16 ﺕﻮﺼﻟﺍ ﻢﺨﻀﻣ
█ ﺔﻣﺎﻋ ﺕﺎﻔﺻﺍﻮﻣ
1 x ﻲﻃﻭﺮﺨﻣ ﻉﻮﻧ ﻢﺳ 38 ﻖﺋﺎﻔﻟﺍ ﺕﻮﺼﻟﺍ ﻢﺨﻀﻣ
ﻡﻭﺃ
5 ﺾﻔﺨﻨﻣ / ﻡﻭﺃ 3 ﻂﺳﻮﺘﻣ / ﻡﻭﺃ 3 ﻊﻔﺗﺮﻣ ﺔﻗﻭﺎﻌﻤﻟﺍ
(ﻖﻤﻌﻟﺍ x ﻉﺎﻔﺗﺭﻻﺍ x ﺽﺮﻌﻟﺍ) ﺩﺎﻌﺑﻷﺍ
ﻢﻣ 528 x ﻢﻣ 782 x ﻢﻣ 572 ﺕﺎﻋﺎﻤﺴﻟﺍ ﻞﻣﺎﺣ ﺎﻨﻤﻀﺘﻣ
ﻢﻣ 528 x ﻢﻣ 774 x ﻢﻣ 572 ﺕﺎﻋﺎﻤﺴﻟﺍ ﻞﻣﺎﺣ ﻥﻭﺪﺑ
ﻢﺠﻛ
37 ﺔﻠﺘﻜﻟﺍ
ﻲﻃﻭﺮﺨﻣ ﻉﻮﻧ ﻢﺳ 6 ﺮﺘﻳﻮﺗ
ﻲﻃﻭﺮﺨﻣ ﻉﻮﻧ ﻢﺳ 20 ﺕﻮﺼﻟﺍ ﻢﺨﻀﻣ
ﻡﻭﺃ
3 ﺔﻗﻭﺎﻌﻤﻟﺍ
(ﻖﻤﻌﻟﺍ x ﻉﺎﻔﺗﺭﻻﺍ x ﺽﺮﻌﻟﺍ) ﺩﺎﻌﺑﻷﺍ
ﻢﻣ 258 x ﻢﻣ 260 x ﻢﻣ 407
ﻢﺠﻛ 5.5 ﺔﻠﺘﻜﻟﺍ
•.ﻖﺒﺴﻣ ﺭﺎﻌﺷﺇ ﻥﻭﺩ ﺮﻴﻴﻐﺘﻠﻟ ﺕﺎﻔﺻﺍﻮﻤﻟﺍ ﻊﻀﺨﺗ
ﻲﻃﻭﺮﺨﻣ ﻉﻮﻧ ﻢﺳ 30 ﻖﺋﺎﻔﻟﺍ ﺕﻮﺼﻟﺍ ﻢﺨﻀﻣ
•.ﻲﻤﻗﺮﻟﺍ ﻲﻔﻴﻄﻟﺍ ﻞﻠﺤﻤﻟﺍ ﻡﺍﺪﺨﺘﺳﺎﺑ ﻲﻠﻜﻟﺍ ﻲﻘﻓﺍﻮﺘﻟﺍ ﺶﻳﻮﺸﺘﻟﺍ ﺱﺎﻴﻗ ﻢﺗ
ﻡﻭﺃ
6 ﺔﻗﻭﺎﻌﻤﻟﺍ
(ﻖﻤﻌﻟﺍ x ﻉﺎﻔﺗﺭﻻﺍ x ﺽﺮﻌﻟﺍ) ﺩﺎﻌﺑﻷﺍ
ﻢﻣ 386 x ﻢﻣ 450 x ﻢﻣ 402
ﻢﺠﻛ 13 ﺔﻠﺘﻜﻟﺍ
(FM) ﺩﺩﺮﺘﻟﺍ ﻦﻴﻤﻀﺗ
(AM) ﺔﻌﺴﻟﺍ ﻦﻴﻤﻀﺗ
ﺔﻋﺎﻤﺴﻟﺍ (ﺕﺍﺪﺣﻭ) ﺓﺪﺣﻭ
SB-MAG6000 SB-MAF6000
ﺔﻋﺎﻤﺴﻟﺍ (ﺕﺍﺪﺣﻭ) ﺓﺪﺣﻭ
ﺔﻋﺎﻤﺴﻟﺍ (ﺕﺍﺪﺣﻭ) ﺓﺪﺣﻭ
█ ﻒﻟﺍﻮﻤﻟﺍ ﻢﺴﻗ
ﺩﺩﺮﺘﻟﺍ ﻕﺎﻄﻧ
ﺩﺩﺮﺘﻟﺍ ﻕﺎﻄﻧ
█ ﺕﺎﻋﺎﻤﺴﻟﺍ ﻢﺴﻗ
SB-MAX8000
SB-MAW6000
RQT9979
23
46
Page 47

ﺕﺎﻔﺻﺍﻮﻤﻟﺍ
offset printing
RMS ﺝﺮﺧ ﺔﻗﺎﻄﻟ ﻮﻳﺮﻴﺘﺳ ﻊﺿﻭ
،ﺰﺗﺮﻫ ﻮﻠﻴﻛ 1 ،(ﻡﻭﺃ 3) ﺓﺎﻨﻗ ﻞﻜﻟ ﻁﺍﻭ 500 ﻊﻔﺗﺮﻣ ﺓﺎﻨﻘﻟﺍ
30% ﺔﺒﺴﻨﺑ ﻲﻠﻛ ﻲﻘﻓﺍﻮﺗ ﺶﻳﻮﺸﺗ
،ﺰﺗﺮﻫ ﻮﻠﻴﻛ 1 ،(ﻡﻭﺃ 3) ﺓﺎﻨﻗ ﻞﻜﻟ ﻁﺍﻭ 500 ﻂﺳﻮﺘﻣ ﺓﺎﻨﻘﻟﺍ
30% ﺔﺒﺴﻨﺑ ﻲﻠﻛ ﻲﻘﻓﺍﻮﺗ ﺶﻳﻮﺸﺗ
،ﺰﺗﺮﻫ 100 ،(ﻡﻭﺃ 5) ﺓﺎﻨﻗ ﻞﻜﻟ ﻁﺍﻭ 1000 ﺾﻔﺨﻨﻣ ﺓﺎﻨﻘﻟﺍ
30% ﺔﺒﺴﻨﺑ ﻲﻠﻛ ﻲﻘﻓﺍﻮﺗ ﺶﻳﻮﺸﺗ
ﻁﺍﻭ 4000 RMS ﻮﻳﺮﻴﺘﺳ ﻊﺿﻭ ﺔﻗﺎﻃ ﻲﻟﺎﻤﺟﺇ
،ﺰﺗﺮﻫ ﻮﻠﻴﻛ 1 ،(ﻡﻭﺃ 3) ﺓﺎﻨﻗ ﻞﻜﻟ ﻁﺍﻭ 350 ﺔﻴﻣﺎﻣﻻﺍ ﺓﺎﻨﻘﻟﺍ
30% ﺔﺒﺴﻨﺑ ﻲﻠﻛ ﻲﻘﻓﺍﻮﺗ ﺶﻳﻮﺸﺗ
،ﺰﺗﺮﻫ ﻮﻠﻴﻛ 1 ،(ﻡﻭﺃ 3) ﺓﺎﻨﻗ ﻞﻜﻟ ﻁﺍﻭ 350 ﺔﻴﻣﺎﻣﻻﺍ ﺓﺎﻨﻘﻟﺍ
30% ﺔﺒﺴﻨﺑ ﻲﻠﻛ ﻲﻘﻓﺍﻮﺗ ﺶﻳﻮﺸﺗ
،ﺰﺗﺮﻫ 100 ،(ﻡﻭﺃ 6) ﺓﺎﻨﻗ ﻞﻜﻟ ﻁﺍﻭ 725 ﺾﻔﺨﻨﻣ ﺓﺎﻨﻘﻟﺍ
30% ﺔﺒﺴﻨﺑ ﻲﻠﻛ ﻲﻘﻓﺍﻮﺗ ﺶﻳﻮﺸﺗ
ﻁﺍﻭ 2850 RMS ﻮﻳﺮﻴﺘﺳ ﻊﺿﻭ ﺔﻗﺎﻃ ﻲﻟﺎﻤﺟﺇ
( MP3 ،CD-DA) CD-R/RW ،CD
(CD) ﺮﺘﻣ ﻮﻧﺎﻧ 790 ﺔﺟﻮﻤﻟﺍ ﻝﻮﻃ
EDR + 2.1 ﺭﺍﺪﺻﻹﺍ Bluetooth
(ﻦﺴﺤﻤﻟﺍ ﺕﺎﻧﺎﻴﺒﻟﺍ ﻞﻘﻧ ﻝﺪﻌﻣ)
2
ﺔﺌﻔﻟﺍ ﺔﺌﻔﻟﺍ
FTP ،OPP ،SPP ،AVRCP ،A2DP ﺔﻣﻮﻋﺪﻤﻟﺍ ﻒﻳﺮﻌﺘﻟﺍ ﺕﺎﻔﻠﻣ
FH-SS ﺰﺗﺮﻫ ﺎﺠﻴﺟ 2.4 ﺔﻋﺮﺴﺑ ﻕﺎﻄﻧ ﻞﻴﻐﺸﺘﻟﺍ ﺩﺩﺮﺗ
ﺭﺎﺘﻣﺃ
10 ﺮﻈﻨﻟﺍ ﻯﻮﺘﺴﻣ ﻂﺧ ﻎﻠﺒﻳ ﻞﻴﻐﺸﺘﻟﺍ ﺔﻓﺎﺴﻣ
(ﻢﺳ 12 ﻭﺃ ﻢﺳ 8) ﺎﻬﻠﻴﻐﺸﺗ ﻢﺗ ﻲﺘﻟﺍ ﺔﻧﺍﻮﻄﺳﻻﺍ
MPEG-2 Layer 3
®
SC-MAX8000
SC-MAX6000
،MPEG-1 Layer 3
ﺔﻄﻗﻼﻟﺍ ﺔﺳﺪﻌﻟﺍ
ﺭﺍﺪﺻﻹﺍ
ﺪﻌﺑ ﻦﻋ ﻢﻜﺤﺘﻟﺍ ﺓﺪﺣﻭ ﺓﺮﻔﺷ
█ ﺕﻮﺼﻟﺍ ﻢﺨﻀﻣ ﻢﺴﻗ
ﺪﻌﺑ ﻦﻋ ﻢﻜﺤﺘﻟﺍ ﺓﺪﺣﻮﻟ ﻯﺮﺧﻷﺍ
.ﺯﺎﻬﺠﻟﺍ ﺍﺬﻬﻟ ﺪﻌﺑ ﻦﻋ ﻢﻜﺤﺘﻟﺍ ﺓﺪﺣﻭ ﺓﺮﻔﺷ ﺮﻴﻴﻐﺘﺑ ﻢﻗ ،ﺯﺎﻬﺠﻟﺍ ﺍﺬﻬﺑ ﺔﺻﺎﺨﻟﺍ
ﻭﺃ “AUX 2” ﻭﺃ “AUX 1” ﺭﺎﻴﺘﺧﻻ [CD/RADIO/AUX] ﺭﺰﻟﺍ ﻂﻐﺿﺍ
ﻰﻠﻋ ﺩﻮﺟﻮﻤﻟﺍ [CD/RA DIO/AUX] ﺭﺰﻟﺍ ﻂﻐﺿ ﻊﺑﺎﺗﻭ ﻂﻐﺿﺍ
ﺪﻌﺑ ﻦﻋ ﻢﻜﺤﺘﻟﺍ ﺓﺪﺣﻭ ﻰﻠﻋ ﺩﻮﺟﻮﻤﻟﺍ [2] ﺭﺰﻟﺍﻭ ﺔﻴﺴﻴﺋﺮﻟﺍ ﺓﺪﺣﻮﻟﺍ
ﻰﻠﻋ ﺩﻮﺟﻮﻤﻟﺍ [CD/RA DIO/AUX] ﺭﺰﻟﺍ ﻂﻐﺿ ﻊﺑﺎﺗﻭ ﻂﻐﺿﺍ
ﺪﻌﺑ ﻦﻋ ﻢﻜﺤﺘﻟﺍ ﺓﺪﺣﻭ ﻰﻠﻋ ﺩﻮﺟﻮﻤﻟﺍ [1] ﺭﺰﻟﺍﻭ ﺔﻴﺴﻴﺋﺮﻟﺍ ﺓﺪﺣﻮﻟﺍ
█ ﺔﻧﺍﻮﻄﺳﻻﺍ ﻢﺴﻗ
:ﺔﻴﻟﺎﺘﻟﺍ ﻒﻗﺍﻮﻤﻟﺍ ﺙﻭﺪﺣ ﺔﻟﺎﺣ ﻲﻓ ﺓﺮﻛﺍﺬﻟﺍ ﻂﺒﺿ ﺪﻋﺃ
ﺩﺩﺮﺘﻤﻟﺍ ﺭﺎﻴﺘﻠﻟ ﺲﻴﺋﺮﻟﺍ ﺔﻴﺋﺎﺑﺮﻬﻜﻟﺍ ﺔﻗﺎﻄﻟﺍ ﻚﻠﺳ ﻞﺻ ،ﺔﻴﺴﻴﺋﺮﻟﺍ
█ Bluetooth® ﻢﺴﻗ
ﺓﺭﺎﺷﻹﺍ ﺮﻬﻈﺗ ﻰﺘﺣ ﺭﺰﻟﺍ ﻂﻐﺿ ﻊﺑﺎﺗﻭ ﻂﻐﻀﻟﺍ ﻲﻓ ﺮﻤﺘﺳﺍ
.ﻊﻨﺼﻤﻠﻟ ﻖﺒﺴﻤﻟﺍ ﻂﺒﻀﻟﺍ ﻰﻟﺇ ﻯﺮﺧﺃ ﺓﺮﻣ ﺕﺍﺩﺍﺪﻋﻹﺍ ﻊﻴﻤﺟ ﻂﺒﺿ ﻢﺘﻳ
Panasonic
.
“REMOTE 2” ﺓﺭﺎﺷﻹﺍ ﺽﺮﻋ ﻢﺘﻳ ﻰﺘﺣ
.“REMOTE 1” ﺓﺭﺎﺷﻹﺍ ﺽﺮﻋ ﻢﺘﻳ ﻰﺘﺣ
ﺓﺰﻬﺟﺃ ﺐﻴﺠﺘﺴﺗ ﺎﻣﺪﻨﻋ
.“AUX 4” ﻭﺃ “AUX 3”
ﻡﺎﻈﻨﻟﺍ ﺓﺮﻛﺍﺫ ﻂﺒﺿ ﺓﺩﺎﻋﺇ
.“– – – – – – – – –”
.ﻯﺮﺧﺃ ﺓﺮﻣ ﺓﺮﻛﺍﺬﻟﺍ ﺩﻮﻨﺑ ﻂﺒﺿ ﻱﺭﻭﺮﻀﻟﺍ ﻦﻣ
ﺮﻴﻀﺤﺘﻟﺍ
█ “REMOTE 2” ﻰﻠﻋ ﺓﺮﻔﺸﻟﺍ ﻂﺒﻀﻟ
1
2.ﻞﻗﻷﺍ ﻰﻠﻋ ﻥﺍﻮﺛ 4 ﺓﺪﻤﻟ [2] ﻭ [OK] ﺭﺰﻟﺍ ﻂﻐﺿ ﻊﺑﺎﺗﻭ ﻂﻐﺿﺍ
█ “REMOTE 1” ﻰﻠﻋ ﺓﺮﻔﺸﻟﺍ ﻂﺒﻀﻟ
1
2.ﻞﻗﻷﺍ ﻰﻠﻋ ﻥﺍﻮﺛ 4 ﺓﺪﻤﻟ [1] ﻭ [OK ] ﺭﺰﻟﺍ ﻂﻐﺿ ﻊﺑﺎﺗﻭ ﻂﻐﺿﺍ
•.ﺎﻬﻄﻐﺿ ﺪﻨﻋ ﺭﺍﺭﺯﻷﺍ ﺐﻴﺠﺘﺴﺗ ﻻ
•.ﺎﻬﻄﺒﺿ ﺓﺩﺎﻋﺇﻭ ﺓﺮﻛﺍﺬﻟﺍ ﺕﺎﻳﻮﺘﺤﻣ ﺢﺴﻣ ﺪﻳﺮﺗ ﺖﻧﺃ
1.ﺩﺩﺮﺘﻤﻟﺍ ﺭﺎﻴﺘﻠﻟ ﺲﻴﺋﺮﻟﺍ ﺔﻴﺋﺎﺑﺮﻬﻜﻟﺍ ﺔﻗﺎﻄﻟﺍ ﻚﻠﺳ ﻞﺼﻓﺍ
2 ﺓﺪﺣﻮﻟﺍ ﻰﻠﻋ ﺩﻮﺟﻮﻤﻟﺍ [1] ﻰﻠﻋ ﻂﻐﺿ ﺔﻌﺑﺎﺘﻣﻭ ﻂﻐﻀﻟﺍ ﺀﺎﻨﺛﺃ
.ﻯﺮﺧﺃ ﺓﺮﻣ
3.[1] ﺭﺰﻟﺍ ﺮﻳﺮﺤﺘﺑ ﻢﻗ
ﺖﻳﺎﺑ ﺎﺠﻴﺟ 2 ﺓﺮﻛﺍﺬﻟﺍ ﻢﺠﺣ
(*.mp3) MP3 ﻂﺋﺎﺳﻮﻟﺍ ﻒﻠﻣ ﻖﻴﺴﻨﺗ ﻢﻋﺩ
ﺔﻴﻧﺎﺜﻟﺍ ﻲﻓ ﺖﺑ ﻮﻠﻴﻛ
(ﻂﻘﻓ CD) ﺪﺤﻛ ﻰﺼﻗﺃ 3x ،1x ﺓﺮﻛﺍﺬﻟﺍ ﻞﻴﺠﺴﺗ ﺔﻋﺮﺳ
(*.mp3) MP3 ﻂﺋﺎﺳﻮﻟﺍ ﻒﻠﻣ ﻖﻴﺴﻨﺗ ﻢﻋﺩ
128 ﺖﺒﻟﺍ ﻝﺪﻌﻣ
ﺓﺮﻛﺍﺬﻟﺍ
ﺓﺮﻛﺍﺬﻟﺍ ﻞﻴﺠﺴﺘﻟﺍ
█ ﺔﻴﻠﺧﺍﺪﻟﺍ ﺓﺮﻛﺍﺬﻠﻟ ﻢﺴﻗ
RQT9979
22
47
Page 48

.ﻲﻟﺎﺘﻟﺍ ﺭﺎﺴﻤﻟﺍ ﻞﻴﻐﺸﺘﺑ ﻡﻮﻘﻳﻭ
offset printing
ﺠﺳﻭ USB ﺯﺎﻬﺟ ﻞﹼﺻﻭ .ﻞﻴﺠﺴﺘﻟﺍ ﺀﺎﻨﺛﺃ USB ﺯﺎﻬﺟ ﻞﺼﻔﺑ ﺖﻤﻗ ﺪﻘﻟ
ﻲﺑﺮﻋ
ﹼ
.ﻯﺮﺧﺃ ﺓﺮﻣ ﻞﹼﺠﺳ ﻢﺛ
USB
ﺯﺎﻬﺟ ﻞﺼﻓﺍ .
USB
ﺮﺒﻋ ﻞﻴﺠﺴﺘﻟﺍ ﺀﺎﻨﺛﺃ ﺄﻄﺧ ﺙﺪﺣ
.ﺪﻌﺑ ﻦﻋ ﻢﻜﺤﺘﻟﺍ ﺓﺪﺣﻭ ﺓﺮﻔﺷ ﺮﻴﻴﻐﺘﺑ
.ﻞﻗﻷﺍ ﻰﻠﻋ ﻥﺍﻮﺛ 4 ﺓﺪﻤﻟ [1]
ﻭ [OK] ﺭﺰﻟﺍ ﻂﻐﺿ ﻊﺑﺎﺗﻭ ﻂﻐﺿﺍ ،“REMOTE 2” ﺓﺭﺎﺷﻹﺍ ﺮﻬﻈﺗ ﺎﻣﺪﻨﻋ
.ﻞﻗﻷﺍ ﻰﻠﻋ ﻥﺍﻮﺛ 4 ﺓﺪﻤﻟ [2]
.ﻯﺮﺧﺍ ﺓﺮﻣ ﺎﻬﻠﻴﻐﺸﺗ ﻞﺒﻗ ﺩﺮﺒﺘﻟ ﺓﺪﺣﻮﻟﺍ
“USB OVER CURRENT ERROR”
.ﻯﺮﺧﺃ ﺓﺮﻣ ﻪﻠﻴﻐﺸﺗ ﺪﻋﺃ ﻢﺛ ،ﺯﺎﻬﺠﻟﺍ ﻞﻴﻐﺸﺗ ﻑﺎﻘﻳﺈﺑ
“NO DISC”
“NO PLAY”
“UNSUPPORT”
.ﻯﺮﺧﺃ ﺓﺮﻣ ﻝﻭﺎﺣﻭ
.ﻯﺮﺧﺃ ﺓﺮﻣ
“NO TRACK”
“PLAYERROR”
“REC ERROR”
.ﻯﺮﺧﺃ ﺓﺮﻣ
“REMOTE 1”
“REMOTE 2”
– ﻭ [OK] ﺭﺰﻟﺍ ﻂﻐﺿ ﻊﺑﺎﺗﻭ ﻂﻐﺿﺍ ،“REMOTE 1” ﺓﺭﺎﺷﻹﺍ ﺮﻬﻈﺗ ﺎﻣﺪﻨﻋ
–
“TEMP NG”
“TRK FULL”
“VBR”
.(VBR) ﺓﺮﻴﻐﺘﻤﻟﺍ
•.ﺔﻧﺍﻮﻄﺳﺍ ﻞﺧﺪﺗ ﻢﻟ ﻚﻧﺇ
•.ﻂﻘﻓ ﻡﻮﻋﺪﻤﻟﺍ ﻖﻴﺴﻨﺘﻟﺍ ﻞﻴﻐﺸﺗ ﻚﻨﻜﻤﻳ .ﻯﻮﺘﺤﻤﻟﺍ ﺺﺤﻓﺍ
• USB ﺯﺎﻬﺟ ﻖﻴﺴﻨﺘﺑ ﻢﻗ .ﺔﻔﻟﺎﺗ USB ﺯﺎﻬﺟ ﻲﻓ ﺕﺎﻔﻠﻤﻟﺍ ﻥﻮﻜﺗ ﻥﺃ ﻦﻜﻤﻳ
• ﻪﻠﻴﻐﺸﺗ ﺪﻋﺃﻭ ﺯﺎﻬﺠﻟﺍ ﻞﻴﻐﺸﺗ ﻒﻗﻭﺃ .ﺔﻠﻜﺸﻣ ﻦﻣ ﻲﻧﺎﻌﻳ ﻡﺎﻈﻨﻟﺍ ﻥﻮﻜﻳ ﺎﻤﺑﺭ
•.ﺔﻴﻠﺧﺍﺪﻟﺍ ﺓﺮﻛﺍﺬﻟﺍ ﻭﺃ USB ﺯﺎﻬﺟ ﻲﻓ ﺭﺎﺴﻤﻟﺍ ﻭﺃ ﻡﻮﺒﻟﻻﺍ ﻻ
“ADJUST CLOCK”
“ADJUST TIMER”
.ﺭﺯ ﻱﺃ ﻰﻠﻋ ﻂﻐﺿﺍ ،ﺀﺎﻐﻟﻺﻟ .ﺓﺪﺣﺍﻭ ﺔﻘﻴﻗﺩ ﻥﻮﻀﻏ
• ﺭﺎﺴﻤﻟﺍ ﻚﻟﺫ ﻡﺎﻈﻨﻟﺍ ﻰﻄﺨﺘﻳ ﻑﻮﺳ .ﻡﻮﻋﺪﻣ ﺮﻴﻏ MP3 ﻒﻠﻣ ﻞﻴﻐﺸﺘﺑ ﺖﻤﻗ
“DEVICE FULL”
ﻰﻠﻋ ﻱﻮﺘﺤﻳ USB ﺯﺎﻬﺟ ﻰﻟﺇ ﺮﻴﻴﻐﺘﻟﺎﺑ ﻢﻗ .ﻰﻘﻴﺳﻮﻤﻟﺍ ﺭﺪﺼﻣ ﺖﻗﻭ ﻲﻟﺎﻤﺟﺇ
• ﻞ
.ﻯﺮﺧﺃ ﺓﺮﻣ ﻞﻴﺠﺴﺘﻟﺍ ﺀﺍﺮﺟﺇﻭ ﻑﺎﻛ ﻞﻴﺠﺴﺗ ﺖﻗﻭ
•
• ﻢﻗ .ﺔﻔﻠﺘﺨﻣ ﺕﺍﺮﻔﺷ ﺔﻴﺴﻴﺋﺮﻟﺍ ﺓﺪﺣﻮﻟﺍﻭ ﺪﻌﺑ ﻦﻋ ﻢﻜﺤﺘﻟﺍ ﺓﺪﺣﻭ ﻡﺪﺨﺘﺴﺗ
(ﻞﻴﺠﺴﺘﻟﺍ ﺀﺎﻨﺛﺃ) “ERROR”
.ﻞﻴﺠﺴﺘﻟﺍ ﻑﺎﻘﻳﺈﺑ ﻢﻗ .ﻞﻴﺠﺴﺘﻟﺍ ﺀﺎﻨﺛﺃ [6] ﻭﺃ [2] ﺭﺰﻟﺍ ﻂﻐﺿ
• ﻙﺮﺗﺍ .ﻡﺎﻈﻨﻟﺍ ﻞﻴﻐﺸﺗ ﻒﻗﻮﺘﻳ ﻑﻮﺳﻭ ،ﺓﺭﺍﺮﺤﻟﺍ ﺔﺟﺭﺩ ﺔﻳﺎﻤﺣ ﺓﺮﺋﺍﺩ ﻞﻴﻐﺸﺗ ﻢﺗ
•.ﺔﻳﻮﻬﺘﻟﺍ ﺕﺎﺤﺘﻓ ﻕﻼﻏﺇ ﻡﺪﻋ ﻦﻣ ﺪﻛﺄﺗ
•.ﺓﺪﻴﺟ ﺓﺭﻮﺼﺑ ﺓﺪﺣﻮﻟﺍ ﻩﺬﻫ ﺔﻳﻮﻬﺗ ﻦﻣ ﺪﻛﺄﺗ
•.ﻡﻮﻋﺪﻤﻟﺍ ﺪﺤﻟﺍ ﺕﺎﻔﻠﻤﻟﺍ ﺩﺪﻋ ﺯﻭﺎﺠﺗ
• ﻢﻗﻭ USB ﺯﺎﻬﺟ ﻞﺼﻓﺍ .ﺔﻠﺋﺎﻫ ﺔﻴﺋﺎﺑﺮﻬﻛ ﺔﻗﺎﻃ USB ﺯﺎﻬﺟ ﻚﻠﻬﺘﺴﻳ
• ﺖﺒﻟﺍ ﻝﺪﻌﻣ ﺕﺍﺭﺎﺴﻤﻟ ﻲﻘﺒﺘﻤﻟﺍ ﻞﻴﻐﺸﺘﻟﺍ ﺖﻗﻭ ﺭﺎﻬﻇﺇ ﺯﺎﻬﺠﻟﺍ ﻊﻴﻄﺘﺴﻳ ﻻ
®
ﺯﺎﻬﺟ ﺔﻟﺎﺣ ﻦﻣ ﻖﻘﺤﺗ
. USB B ﺏ USB ﺯﺎﻬﺟ ﻞﻴﺻﻮﺗ ﻡﺪﻋ
.ﻞﻴﺠﺴﺘﻟﺍ ﻭﺃ/ﻭ
“ALB FULL”
“AUT O OFF”
“CANʼT REC”
“ERROR”
.AM ﺔﺟﻮﻣ
“F61”
“F70”
®
ﺯﺎﻬﺟ ﻞﺼﻓﺍ
“F76”
“F77”
“NO DE VICE”
█ ﺔﻴﺴﻴﺋﺮﻟﺍ ﺓﺪﺣﻮﻟﺍ ﺽﺮﻋ ﺕﺎﺷﺎﺷ
•.ﺔﻋﺎﺴﻟﺍ ﻂﺒﺿﺍ .ﻁﻮﺒﻀﻣ ﺮﻴﻏ ﺔﻋﺎﺴﻟﺍ
• ﻞﻴﻐﺸﺘﻟﺍ ﺖﻗﺆﻣ ﻂﺒﺿﺍ .ﻁﻮﺒﻀﻣ ﺮﻴﻏ ﻞﻴﺠﺴﺘﻟﺍ ﻭﺃ/ﻭ ﻞﻴﻐﺸﺘﻟﺍ ﺖﻗﺆﻣ
•.ﻡﻮﻋﺪﻤﻟﺍ ﺪﺤﻟﺍ ﺕﺎﻣﻮﺒﻟﻷﺍ ﺩﺪﻋ ﺯﻭﺎﺠﺗ
• ﻲﻓ ﻪﻠﻴﻐﺸﺗ ﻑﺎﻘﻳﺇ ﻢﺘﻴﺳﻭ ﺔﻘﻴﻗﺩ 20 ﺓﺪﻤﻟ ﻡﺎﻈﻨﻟﺍ ﻡﺍﺪﺨﺘﺳﺍ ﻢﺘﻳ ﻢﻟ
• ﻦﻣ ﻞﻗﺃ USB ﺯﺎﻬﺟ ﻲﻘﺒﺘﻤﻟﺍ ﻞﻴﺠﺴﺘﻟﺍ ﺖﻗﻭ ﻥﻷ ﻞﻴﺠﺴﺘﻟﺍ ﺀﺍﺮﺟﺇ ﻚﻨﻜﻤﻳ ﻻ
•.ﻯﺮﺧﺃ ﺓﺮﻣ ﻝﻭﺎﺣﻭ ﺕﺎﻤﻴﻠﻌﺘﻟﺍ ﺃﺮﻗﺍ .ﺔﺌﻃﺎﺧ ﺓﺭﻮﺼﺑ ﻞﻴﻐﺸﺘﻟﺍ ﻢﺗ
• ﻭﺃ (ﻚﻟﺫ ﺮﻴﻏﻭ USB ﻭ ﻮﻳﺩﺍﺭ :ﻝﺎﺜﻣ) ﺮﺧﺁ ﻞﻴﻐﺸﺗ ﺭﺪﺼﻣ ﺪﻳﺪﺤﺗ ﻚﻨﻜﻤﻳ ﻻ
• ﺭﺪﺼﻣ ﻦﻣ ﻞﻴﺠﺴﺘﻟﺍ ﺪﻨﻋ ﺎﻬﻗﻼﻏﺇ ﻭﺃ ﺔﻧﺍﻮﻄﺳﻻﺍ ﺔﻴﻨﻴﺻ ﺢﺘﻓ ﻚﻨﻜﻤﻳ ﻻ
•.ﺎﻬﺤﻴﺤﺼﺘﺑ ﻢﻗﻭ ﺕﺎﻋﺎﻤﺴﻟﺍ ﻙﻼﺳﺃ ﺕﻼﻴﺻﻮﺗ ﺺﺤﻓﺍ
•.ﻯﺮﺧﺃ ﺓﺮﻣ ﻪﻠﻴﻐﺸﺗ ﺪﻋﺃﻭ ﺯﺎﻬﺠﻟﺍ ﻞﻴﻐﺸﺗ ﻒﻗﻭﺃ .USB ﺯﺎﻬﺟ ﻞﺼﻓﺍ
•.Bluetooth
•.ﻯﺮﺧﺃ ﺓﺮﻣ ﻪﻠﻴﻐﺸﺗ ﺪﻋﺃﻭ ﺯﺎﻬﺠﻟﺍ ﻞﻴﻐﺸﺗ ﻒﻗﻭﺃ .Bluetooth
•.ﺔﻴﺋﺎﺑﺮﻬﻜﻟﺍ ﺔﻗﺎﻄﻟﺍ ﺪﻳﻭﺰﺗ ﻲﻓ ﺔﻠﻜﺸﻣ ﺪﺟﻮﻳ
•.ﻉﺯﻮﻤﻟﺍ ﺮﺸﺘﺳﺎﻓﻭ ﺩﺩﺮﺘﻤﻟﺍ ﺭﺎﻴﺘﻠﻟ ﺲﻴﺋﺮﻟﺍ ﺔﻴﺋﺎﺑﺮﻬﻜﻟﺍ ﺔﻗﺎﻄﻟﺍ ﻚﻠﺳ ﻞﺼﻓﺍ
•.ﻉﺯﻮﻤﻟﺍ ﺮﺸﺘﺳﺎﻓﻭ ﺩﺩﺮﺘﻤﻟﺍ ﺭﺎﻴﺘﻠﻟ ﺲﻴﺋﺮﻟﺍ ﺔﻴﺋﺎﺑﺮﻬﻜﻟﺍ ﺔﻗﺎﻄﻟﺍ ﻚﻠﺳ ﻞﺼﻓﺍ
•.ﺕﻼﻴﺻﻮﺘﻟﺍ ﺺﺤﻓﺍ .ﻞﺼﺘﻣ ﺮﻴﻏ USB ﺯﺎﻬﺟ
• ﺐﺒﺴﺑ ﺓﺮﻓﻮﺘﻤﻟﺍ ﻦﻳﺰﺨﺘﻟﺍ ﺔﺣﺎﺴﻣ ﻦﻣ ﻖﻘﺤﺘﻟﺍ ﻭﺃ ﻞﻴﺠﺴﺘﻟﺍ ﻚﻴﻠﻋ ﺭﺬﻌﺘﻳ
RQT9979
21
48
Page 49

.ﻪﻠﺧﺍﺩ ﺓﺩﻮﺟﻮﻤﻟﺍ ﺕﺎﻳﻮﺘﺤﻤﻟﺍ ﻭﺃ USB ﺯﺎﻬﺟ ﺓﺀﺍﺮﻗ ﻦﻜﻤﻳ ﻻ
offset printing
.ﻑﻭﺮﻈﻟﺍ ﺾﻌﺑ ﻲﻓ ﺖﻳﺎﺑ ﺎﺠﻴﺟ 32
.USB ﺯﺎﻬﺠﻟ ﺀﻲﻄﺑ ﻞﻴﻐﺸﺗ
ﺘﻗﻭ ﺓﺮﻴﺒﻜﻟﺍ ﺓﺮﻛﺍﺬﻟﺍ ﻭﺫ USB ﺯﺎﻬﺟ ﻭﺃ ﺮﻴﺒﻜﻟﺍ ﻯﻮﺘﺤﻤﻟﺍ ﻢﺠﺣ ﻕﺮﻐﺘﺴﻳ
ﹰ
®
.ﻡﺎﻈﻨﻟﺍ ﻦﻣ ﺏﺮﻘﻟﺎﺑ ﺯﺎﻬﺠﻟﺍ ﻞﻘﻧﺍ .ﺭﺎﺘﻣﺃ 10 ﻎﻠﺒﻳ ﻱﺬﻟﺍ ﻝﺎﺼﺗﻻﺍ ﻕﺎﻄﻧ ﺝﺭﺎﺧ ﺯﺎﻬﺠﻟﺍ
ﹰ
ﻼﺼﺘﻣ ﻡﺎﻈﻨﻟﺍ ﺍﺬﻫ ﻥﻮﻜﻳ ﺪﻗ
.ﻡﺎﻈﻨﻟﺍ ﻝﻼﺧ ﻦﻣ ﺕﻮﺼﻟﺍ ﻉﺎﻤﺳ ﻦﻜﻤﻳ ﻻ ﻦﻜﻟﻭ ﻞﺼﺘﻣ ﺯﺎﻬﺠﻟﺍ
®
ﺓﺰﻬﺟﺃ ﺾﻌﺒﻟ ﺔﺒﺴﻨﻟﺎﺑ
ﺃﺮﻗﺍ .ﺎﹰﻳﻭﺪﻳ “SC-MAX6000” ﻭﺃ “SC-MAX8000” ﻰﻠﻋ ﺕﻮﺼﻟﺍ
.ﻞﻴﺻﺎﻔﺘﻟﺍ ﻰﻠﻋ ﻉﻼﻃﻼﻟ ﺯﺎﻬﺟ ﻞﻴﻐﺸﺗ ﺕﺎﻤﻴﻠﻌﺗ
.ﻊﻄﻘﺘﻣ ﺯﺎﻬﺠﻟﺍ ﻦﻣ ﺭﺩﺎﺼﻟﺍ ﺕﻮﺼﻟﺍ
.ﻡﺎﻈﻨﻟﺍ ﻦﻣ ﺏﺮﻘﻟﺎﺑ ﺯﺎﻬﺠﻟﺍ ﻞﻘﻧﺍ .ﺭﺎﺘﻣﺃ 10 ﻎﻠﺒﻳ ﻱﺬﻟﺍ ﻝﺎﺼﺗﻻﺍ ﻕﺎﻄﻧ ﺝﺭﺎﺧ ﺯﺎﻬﺠﻟﺍ
ﻒﺗﺍﻮﻬﻟﺍﻭ ،ﻒﻳﻭﻭﺮﻜﻴﻤﻟﺍ ﺓﺰﻬﺟﺃﻭ ،ﻲﻜﻠﺳﻼﻟﺍ ﻪﺟﻮﻤﻟﺍ) ﺰﺗﺮﻫ ﺎﺠﻴﺟ 2.4
ﻦﻋ ﺍﹰﺪﻴﻌﺑﻭ ﻡﺎﻈﻨﻟﺍ ﻦﻣ ﺏﺮﻘﻟﺎﺑ ﺯﺎﻬﺠﻟﺍ ﻞﻘﻧﺍ .(ﻚﻟﺫ ﻰﻟﺇ ﺎﻣﻭ ،ﺔﻴﻜﻠﺳﻼﻟﺍ
.ﻞﻤﻌﺗ ﻻ (NFC) ﺓﺪﺣﺍﻭ ﺔﺴﻤﻠﺑ ﻝﺎﺼﺗﻻﺍ ﺓﺰﻴﻣ
.ﻞﻴﻐﺸﺘﻟﺍ ﺕﻮﺻﻭ ﺓﺭﻮﺻ ﺔﻨﻣﺍﺰﻣ ﻢﺘﺗ ﻻ
.ﻦﻜﻤﺘﻣ ﻲﻨﻓ ﺔﻄﺳﺍﻮﺑ ﻲﺋﺍﻮﻬﻟﺍ ﺖﻴﺒﺜﺗ ﺐﺠﻳ .ﺎﹰﻳﺭﺎﻴﺘﺧﺍ ﺎﹰﻴﺟﺭﺎﺧ ﺎﹰﻴﺋﺍﻮﻫ ﻡﺪﺨﺘﺳﺍ
.ﺔﻤﻐﻧ ﺕﻮﺻ ﻉﺎﻤﺳ ﻢﺘﻳ
.ﻦﻜﻤﻳ ﺎﻣ ﻞﻀﻓﺃ ﻝﺎﺒﻘﺘﺳﻻﺍ
.AM ﺔﺟﻮﻣ ﺚﺑ ﺕﺎﻴﻠﻤﻋ ﺀﺎﻨﺛﺃ ﺾﻔﺨﻨﻣ ﻦﻴﻨﻃ ﻉﺎﻤﺳ ﻢﺘﻳ
.ﺓﺀﺍﺮﻘﻟﺍ ﻲﻓ ﻝﻮﻃﺃ
®
.ﻥﺍﺮﻗﻹﺍ ﻡﺎﻤﺗﺇ ﺭﺬﻌﺘﻳ
ﺯﺎﻬﺟ ﺔﻟﺎﺣ ﻦﻣ ﻖﻘﺤﺗ
.ﺯﺎﻬﺠﻟﺍ ﻞﻴﺻﻮﺗ ﺭﺬﻌﺘﻳ
.ﻯﺮﺧﺃ ﺓﺮﻣ ﺯﺎﻬﺠﻟﺍ
.ﻯﺮﺧﺃ ﺓﺮﻣ
.ﻯﺮﺧﻷﺍ ﺓﺰﻬﺟﻷﺍ
.ﻯﺮﺧﺃ ﺓﺮﻣ
.ﻩﻮﺸﻣ ﺕﻮﺼﻟﺍ
█ USB
ﻚﺷ ﻙﺪﻨﻋ ﻥﺎﻛ ﺍﺫﺇ .ﺔﻴﻟﺎﺘﻟﺍ ﺕﺎﺻﻮﺤﻔﻟﺍ ﺀﺍﺮﺟﺈﺑ ﻢﻗ ،ﺔﻧﺎﻴﺼﻟﺍ ﺐﻠﻃ ﻞﺒﻗ
•.ﺯﺎﻬﺠﻟﺍ ﻊﻣ ﻪﻠﺧﺍﺩ ﺓﺩﻮﺟﻮﻤﻟﺍ ﺕﺎﻳﻮﺘﺤﻤﻟﺍ ﻭﺃ USB ﺯﺎﻬﺟ ﻖﻴﺴﻨﺗ ﻖﻓﺍﻮﺘﻳ ﻻ
ﻻ ﺎﻨﻫ ﺔﺤﺿﻮﻤﻟﺍ ﻝﻮﻠﺤﻟﺍ ﺖﻧﺎﻛ ﺍﺫﺇ ﻭﺃ ،ﺔﻴﻟﺎﺘﻟﺍ ﺺﺤﻔﻟﺍ ﻁﺎﻘﻧ ﺾﻌﺑ ﻝﻮﺣ
• ﻦﻣ ﺮﺜﻛﺃ ﻦﻳﺰﺨﺗ ﺔﻌﺳ ﻚﻠﺘﻤﺗ ﻲﺘﻟﺍ USB ﺓﺰﻬﺟﺃ ﻞﻤﻌﺗ ﻥﺃ ﻦﻜﻤﻳ ﻻ
• ﺎ
ﺎﻬﺣﻼﺻﺇﻭ ﺀﺎﻄﺧﻷﺍ ﻑﺎﺸﻜﺘﺳﺍ
.ﺕﺍﺩﺎﺷﺭﻹﺍ ﺔﻓﺮﻌﻤﻟ ﻉﺯﻮﻤﻟﺍ ﺮﺸﺘﺳﺎﻓ ،ﺔﻠﻜﺸﻤﻟﺍ ﻞﺤﺗ
.ﺓﺪﺣﻮﻟﺍ ﻩﺬﻫ ﻞﻤﻌﺗ ﻻ
█ Bluetooth
ﻊﺿﻭ ﻰﻟﺇ ﻞﻳﻮﺤﺗ ﻦﻜﻳ ﻢﻟ ﺓﺪﺣﻮﻟﺍ ﺍﺫﺇ .ﻞﻴﻐﺸﺘﻠﻟ ﺩﺍﺪﻌﺘﺳﻻﺍ ﻊﺿﻭ ﻰﻟﺇ
،ﻞﻴﻐﺸﺘﻠﻟ ﺩﺍﺪﻌﺘﺳﻻﺍ
•.Bluetooth
•
•.ﻯﺮﺧﺃ ﺓﺮﻣ ﻥﺍﺮﻗﻹﺍ ﺀﺍﺮﺟﺇ ﻝﻭﺎﺣ .ﺯﺎﻬﺠﻟﺍ ﻥﺍﺮﻗﺇ ﺔﻴﻠﻤﻋ ﺢﺠﻨﺗ ﻢﻟ
•.ﻯﺮﺧﺃ ﺓﺮﻣ ﻥﺍﺮﻗﻹﺍ ﺀﺍﺮﺟﺇ ﻝﻭﺎﺣ .ﺯﺎﻬﺠﻟﺍ ﻥﺍﺮﻗﺇ ﺔﻴﻠﻤﻋ ﻝﺍﺪﺒﺘﺳﺍ ﻢﺗ
• ﻥﺍﺮﻗﺇ ﻝﻭﺎﺣﻭ ﺮﺧﻵﺍ ﺯﺎﻬﺠﻟﺍ ﻞﺼﻓﺍ .ﺮﺧﺁ ﺯﺎﻬﺠﺑ
ﺩﺍﺪﻌﺘﺳﻻﺍ ﻊﺿﻭ ﻲﻓ ﺭﺍﺮﻤﺘﺳﺎﺑ ﺮﹼﻴﻐﺘﺗﻭ ﺽﺮﻌﻟﺍ ﺔﺷﺎﺷ ﺔﺣﻮﻟ ﺀﻲﻀﺗ
• ﻪﻠﻴﻐﺸﺗ ﺪﻋﺃﻭ ﺯﺎﻬﺠﻟﺍ ﻞﻴﻐﺸﺗ ﻒﻗﻭﺃ .ﺔﻠﻜﺸﻣ ﻦﻣ ﻲﻧﺎﻌﻳ ﻡﺎﻈﻨﻟﺍ ﻥﻮﻜﻳ ﺎﻤﺑﺭ
.ﻉﺯﻮﻤﻟﺍ ﺮﺸﺘﺳﺎﻓ ،ﺔﻠﻜﺸﻤﻟﺍ
.ﺪﻌﺑ ﻦﻋ ﻢﻜﺤﺘﻟﺍ ﺓﺪﺣﻭ ﺔﻄﺳﺍﻮﺑ ﻞﻴﻐﺸﺗ ﺕﺎﻴﻠﻤﻋ ﺔﻳﺃ ﺀﺍﺮﺟﺇ ﻦﻜﻤﻳ ﻻ
• ﺝﺮﺧ ﻂﺒﺿ ﻚﻴﻠﻋ ﺐﺠﻳ ،ﺔﺠﻣﺪﻤﻟﺍ Bluetooth
.ﺕﻮﺻ ﺪﺟﻮﻳ ﻻ ﻭﺃ ﺵﻮﺸﻣ ﺕﻮﺻ
•
•.ﺯﺎﻬﺠﻟﺍﻭ ﻡﺎﻈﻨﻟﺍ ﻦﻴﺑ ﻝﻮﺤﻳ ﻖﺋﺎﻋ ﻱﺃ ﺔﻟﺍﺯﺈﺑ ﻢﻗ
• ﺔﻋﺮﺴﺑ ﺩﺩﺮﺘﻟﺍ ﻕﺎﻄﻧ ﻡﺪﺨﺘﺴﺗ ﻲﺘﻟﺍ ﻯﺮﺧﻷﺍ ﺓﺰﻬﺟﻷﺍ ﻦﻣ ﻞﺧﺍﺪﺗ ﺪﺟﻮﻳ
ﻢﻗ ﻚﻟﺫ ﺪﻌﺑ ،ﺔﻠﻜﺸﻤﻟﺍ ﻞﺤﺑ ﻢﻗﻭ ﺐﺒﺴﻟﺍ ﺩﺪﺣ ،ﺯﺎﻬﺠﻟﺍ ﻞﻴﻐﺸﺗ ﻒﻗﻭﺃ
ﻝﻼﺧ ﻦﻣ ﺕﺎﻋﺎﻤﺴﻟﺍ ﺩﺎﻬﺟﺇ ﺐﺒﺴﻟﺍ ﻥﻮﻜﻳ ﻥﺃ ﻦﻜﻤﻳ .ﻯﺮﺧﺃ ﺓﺮﻣ ﺯﺎﻬﺠﻟﺍ ﻞﻴﻐﺸﺘﺑ
.ﺓﺭﺎﺣ ﺔﺌﻴﺑ ﻲﻓ ﺯﺎﻬﺠﻟﺍ ﻡﺍﺪﺨﺘﺳﺍ ﺪﻨﻋ ﻭﺃ ،ﺓﺪﺋﺍﺰﻟﺍ ﺔﻗﺎﻄﻟﺍ ﻭﺃ ﺕﻮﺼﻟﺍ ﻯﻮﺘﺴﻣ
.ﻞﻴﻐﺸﺘﻟﺍ ﺀﺎﻨﺛﺃ ﺔﻤﻬﻤﻫ ﺕﻮﺻ ﻉﺎﻤﺳ ﻦﻜﻤﻳ
.ﺯﺎﻬﺠﻟﺍ ﺍﺬﻫ ﺕﻼﺒﻛ ﻦﻋ ﻯﺮﺧﻷﺍ ﻙﻼﺳﻷﺍﻭ ﺓﺰﻬﺟﻷﺍ ﺪﻌﺑﺍ .ﺕﻼﺑﺎﻜﻟﺍ ﺭﺍﻮﺠﺑ
•.ﺮﻘﺘﺴﻣ ﻝﺎﺼﺗﺍ ﻰﻠﻋ ﻝﻮﺼﺤﻠﻟ “MODE 1” ﺩﺪﺣ
.ﺕﻮﺼﻟﺍ ﺓﺩﻮﺟ ﻰﻠﻋ ﻅﺎﻔﺤﻟﺍﻭ ﻡﺎﻈﻨﻟﺍ ﺔﻳﺎﻤﺤﻟ ﺀﺍﺮﺟﻹﺍ ﺍﺬﻫﻭ .ﻊﻔﺗﺮﻤﻟﺍ ﺕﻮﺼﻟﺍ
•.ﺯﺎﻬﺠﻟﺎﺑ NFC ﺓﺰﻴﻣﻭ ﻡﺎﻈﻨﻟﺍ ﻞﻴﻐﺸﺗ ﻦﻣ ﺪﻛﺄﺗ
• ﻡﺎﻈﻨﻟﺍ ﺍﺬﻬﺑ ﺔﺻﺎﺨﻟﺍ NFC ﺲﻤﻟ ﺔﻘﻄﻨﻣ ﺭﺍﺮﻤﺘﺳﻻﺍ ﻊﻣ ﺯﺎﻬﺠﻟﺎﺑ ﺲﻤﻟﺍ
•.ﺯﺎﻬﺠﻟﺍ ﻞﻴﻐﺸﺗ ﻖﻴﺒﻄﺗ ﻞﻴﻐﺸﺗ ﺪﻋﺃ
•.(ﻖﻓﺮﻣ ﺮﻴﻏ) ﺕﻮﺻ ﻞﺑﺎﻛ ﻡﺍﺪﺨﺘﺳﺎﺑ ﻡﺎﻈﻨﻟﺎﺑ ﺯﺎﻬﺠﻟﺍ ﻞﻴﺻﻮﺘﺑ ﻢﻗ
.ﺔﺤﻴﺤﺻ ﺓﺭﻮﺼﺑ ﺔﻧﺍﻮﻄﺳﻻﺍ ﻞﺧﺩﺍ .ﺔﺤﻴﺤﺻ ﺓﺭﻮﺼﺑ ﺔﻧﺍﻮﻄﺳﻻﺍ ﻊﻀﺗ ﻢﻟ ﻚﻧﺇ
.ﺢﻴﺤﺻ ﻞﻜﺸﺑ ﺽﺮﻌﻟﺍ ﺔﺷﺎﺷ ﺮﻬﻈﺗ ﻻ
.ﺕﻮﺼﻟﺍ ﻯﻮﺘﺴﻣ ﺽﺎﻔﺨﻧﺍ
█ ﻮﻳﺩﺍﺮﻟﺍ
•
•.ﺯﺎﻬﺠﻟﺍ ﻦﻋ ﻥﻮﻳﺰﻔﻠﺘﻟﺍ ﺪﻌﺑﺍ ﻭﺃ ﻥﻮﻳﺰﻔﻠﺘﻟﺍ ﻞﻴﻐﺸﺗ ﻒﻗﻭﺃ
•.ﺍﺮﻫﺎﻇ ﻞﺧﺍﺪﺘﻟﺍ ﻥﺎﻛ ﺍﺫﺇ ﻡﺎﻈﻨﻟﺍ ﻦﻋ ﺔﻳﻮﻠﺨﻟﺍ ﻒﺗﺍﻮﻬﻟﺍ ﺪﻌﺑﺍ
• ﻥﻮﻜﻳ ﺚﻴﺤﺑ “BEATPROOF” ﺩﺍﺪﻋﻹﺍ ﺩﺪﺣ ،AM ﻒﻟﺍﻮﻣ ﻊﺿﻭ ﻲﻓ
•.ﻯﺮﺧﻷﺍ ﻙﻼﺳﻷﺍﻭ ﺕﻼﺒﻜﻟﺍ ﻦﻋ ﻲﺋﺍﻮﻬﻟﺍ ﺪﻌﺑﺍ
.ﺢﻴﺤﺻ ﺮﻴﻏ ﺔﺿﻭﺮﻌﻤﻟﺍ ﺕﺍﺭﺎﺴﻤﻟﺍ ﺩﺪﻋ ﻲﻟﺎﻤﺟﺇ
.ﺔﻧﺍﻮﻄﺳﻻﺍ ﺓﺀﺍﺮﻗ ﻦﻜﻤﻳ ﻻ
.ﻩﻮﺸﻣ ﺕﻮﺻ ﻉﺎﻤﺳ ﻢﺘﻳ
.ﺎﻬﻠﻴﻐﺸﺗ ﻦﻜﻤﻳ ﺔﻧﺍﻮﻄﺳﺍ
– ،ﻭﺃ .ﻞﻗﻷﺍ ﻰﻠﻋ ﻥﺍﻮﺛ 10 ﺓﺪﻤﻟ ﺭﺰﻟﺍ ﻂﻐﺿ ﻊﺑﺎﺗﻭ ﻂﻐﺿﺍ
– ﻞﺼﺗﺍ ﻢﺛ ،ﺩﺩﺮﺘﻤﻟﺍ ﺭﺎﻴﺘﻠﻟ ﺲﻴﺋﺮﻟﺍ ﺔﻴﺋﺎﺑﺮﻬﻜﻟﺍ ﺔﻗﺎﻄﻟﺍ ﻚﻠﺳ ﻞﺼﻓﺍ
.ﻯﺮﺧﺃ ﺓﺮﻣ
.2 ﻞﺤﺗ ﻻ ﻝﻮﻠﺤﻟﺍ ﺖﻧﺎﻛ ﺍﺫﺇ .ﺓﺪﺣﻮﻟﺍ ﻞﻴﻐﺸﺘﻟ ﻯﺮﺧﺃ ﺓﺮﻣ [1] ﺭﺰﻟﺍ ﻂﻐﺿﺍ
.ﻞﻴﻐﺸﺘﻠﻟ
.“DEMO OFF”
.ﻞﻴﻐﺸﺘﻟﺍ ﺃﺪﺒﻳ ﻻ
█ ﺔﻌﺋﺎﺸﻟﺍ ﺕﻼﻜﺸﻤﻟﺍ
•:ﺕﺍﻮﻄﺨﻟﺍ ﻩﺬﻫ ﺀﺍﺮﺟﺈﺑ ﻢﻗ .ﺔﻣﻼﺴﻟﺍ ﺯﺎﻬﺟ ﻞﻴﻐﺸﺗ ﻢﺗ
.1 ﺓﺪﺣﻮﻟﺍ ﻞﻳﻮﺤﺘﻟ ﺔﻴﺴﻴﺋﺮﻟﺍ ﺓﺪﺣﻮﻟﺍ ﻰﻠﻋ ﺩﻮﺟﻮﻤﻟﺍ [1] ﺭﺰﻟﺍ ﻂﻐﺿﺍ
• ﺭﺎﻴﺘﺧﻻ ﺔﻴﺴﻴﺋﺮﻟﺍ ﺓﺪﺣﻮﻟﺍ ﻰﻠﻋ ﺩﻮﺟﻮﻤﻟﺍ [8] ﺭﺰﻟﺍ ﻂﻐﺿ ﻊﺑﺎﺗﻭ ﻂﻐﺿﺍ
•.ﺢﻴﺤﺻ ﻞﻜﺸﺑ ﺕﺎﻳﺭﺎﻄﺒﻟﺍ ﺐﻴﻛﺮﺗ ﻦﻣ ﺪﻛﺄﺗ
•.ﺯﺎﻬﺠﻟﺍ ﺕﻮﺻ ﻯﻮﺘﺴﻣ ﻂﺒﺿﺍ
•
• ﺖﻨﺴﻳﺭﻮﻠﻓ ﺀﻮﺿ ﻭﺃ ﺩﺩﺮﺘﻤﻟﺍ ﺭﺎﻴﺘﻠﻟ ﺲﻴﺋﺮﻟﺍ ﺔﻴﺋﺎﺑﺮﻬﻜﻟﺍ ﺔﻗﺎﻄﻟﺍ ﻚﻠﺳ ﺪﺟﻮﻳ
• ﻯﻮﺘﺴﻣ ﺝﺮﺨﻟ ﺮﻤﺘﺴﻤﻟﺍ ﻡﺍﺪﺨﺘﺳﻻﺍ ﺐﺒﺴﺑ ﺔﻳﺎﻤﺤﻟﺍ ﺓﺮﺋﺍﺩ ﻂﻴﺸﻨﺗ ﻢﺗ ﺪﻘﻟ
█ ﺔﻧﺍﻮﻄﺳﻻﺍ
•
•.ﺔﻧﺍﻮﻄﺳﻻﺍ ﻒﻴﻈﻨﺘﺑ ﻢﻗ .ﺔﺨﺴﺘﻣ ﺔﻧﺍﻮﻄﺳﻻﺍ
•.ﺔﻴﺳﺎﻴﻗ ﺮﻴﻏ ﻭﺃ ،ﺔﻴﻨﺤﻨﻣ ﻭﺃ ،ﺔﺷﻭﺪﺨﻣ ﺖﻧﺎﻛ ﺍﺫﺇ ﺔﻧﺍﻮﻄﺳﻻﺍ ﻝﺪﺒﺘﺳﺍ
•.ﻦﻴﺘﻋﺎﺳ ﻰﻟﺇ ﺔﻋﺎﺳ ﻦﻣ ﻒﺠﻳ ﺯﺎﻬﺠﻟﺍ ﻙﺮﺗﺍ .ﺔﺑﻮﻃﺮﻠﻟ ﻒﺛﺎﻜﺗ ﺪﺟﻮﻳ
• ﻰﻟﺇ ﺮﻴﻴﻐﺘﻟﺎﺑ ﻢﻗ .ﺎﻬﻠﻴﻐﺸﺗ ﻡﺎﻈﻨﻟﺍ ﻊﻴﻄﺘﺴﻳ ﻻ ﺔﻧﺍﻮﻄﺳﺍ ﺖﻠﺧﺩﺃ ﺪﻘﻟ
•.ﺎﻫﺅﺎﻬﻧﺇ ﻢﺘﻳ ﻢﻟ ﺔﻧﺍﻮﻄﺳﺍ ﺖﻠﺧﺩﺃ ﺪﻘﻟ
RQT9979
20
49
Page 50

ﺔﻧﺎﻴﺼﻟﺍ
offset printing
.ﺔﻓﺎﺟﻭ ﺔﻤﻋﺎﻧ ﺵﺎﻤﻗ ﺔﻌﻄﻘﺑ ﻪﺤﺴﻣﺍ ،ﺯﺎﻬﺠﻟﺍ ﺍﺬﻫ ﻒﻴﻈﻨﺘﻟ
ﹰ
ﻘﻠﻄﻣ ﻦﻳﺰﻨﺒﻟﺍ ﻭﺃ ﻥﺎﻫﺪﻟﺍ ﻒﻔﺨﻣ ﻭﺃ ﻝﻮﺤﻜﻟﺍ ﻡﺪﺨﺘﺴﺗ ﻻ
ﻴﺋﺎﻴﻤﻴﻛ ﺔﺠﻟﺎﻌﻣ ﺵﺎﻤﻗ ﺔﻌﻄﻗ ﻡﺍﺪﺨﺘﺳﺍ ﻞﺒﻗ
ﹰ
.ﺔﻳﺎﻨﻌﺑ ﺵﺎﻤﻘﻟﺍ ﺔﻌﻄﻗ ﻊﻣ ﺔﻘﻓﺮﻤﻟﺍ
.ﺯﺎﻬﺠﻟﺍ ﺍﺬﻫ
• ﻒﻴﻈﻨﺘﻟ ﺎ
ﺓﺪﻤﻟ ﻪﻣﺍﺪﺨﺘﺳﺍ ﻡﺪﻋ ﺔﻟﺎﺣ ﻲﻓ ﺎﹰﻴﺋﺎﻘﻠﺗ ﻡﺎﻈﻨﻟﺍ ﺍﺬﻫ ﻞﻴﻐﺸﺗ ﻑﺎﻘﻳﺇ ﻢﺘﻳ
• ﺕﺎﻤﻴﻠﻌﺘﻟﺍ ﺃﺮﻗﺍ ،ﺎ
ﺯﺎﻬﺟ ﻞﻴﺻﻮﺗ ﺪﻨﻋ ﻭﺃ ﻮﻳﺩﺍﺮﻟﺍ ﺭﺪﺼﻣ ﻲﻓ ﻥﻮﻜﺗ ﺎﻣﺪﻨﻋ ﺔﻔﻴﻇﻮﻟﺍ ﻩﺬﻫ ﻞﻤﻌﺗ ﻻ
ﻲﺋﺎﻘﻠﺘﻟﺍ ﻑﺎﻘﻳﻹﺍ
.“OFF” ﺩﺪﺣ ،ﺀﺎﻐﻟﻺﻟ
ﻯﺮﺧﺃ
.ﺎﹰﺒﻳﺮﻘﺗ ﺔﻘﻴﻗﺩ 20
1.“AUTO OFF ” ﺭﺎﻴﺘﺧﻻ [SETUP] ﺭﺰﻟﺍ ﻂﻐﺿﺍ
2.[OK] ﺭﺰﻟﺍ ﻂﻐﺿﺍ ﻢﺛ “ON” ﺭﺎﻴﺘﺧﻻ [Y ،U] ﺭﺰﻟﺍ ﻂﻐﺿﺍ
:ﺔﻈﺣﻼﻣ
.Bluetooth
®
ﻲﺑﺮﻋ
Bluetooth
ﻝﺎﺼﺗﺍ ﺀﺎﺸﻧﺈﺑ ﻡﺎﻴﻘﻟﺍ ﺪﻨﻋ ﺎﹰﻴﺋﺎﻘﻠﺗ ﻡﺎﻈﻨﻟﺍ ﻞﻴﻐﺸﺘﺑ ﺔﻔﻴﻇﻮﻟﺍ ﻩﺬﻫ ﻡﻮﻘﺗ
“
BLUETOOTH STANDBY
”
ﺭﺎﻴﺘﺧﻻ [
®
ﺩﺍﺪﻌﺘﺳﺍ ﻊﺿﻭ
.ﻥﺮﺘﻘﻣ ﺯﺎﻬﺟ ﻦﻣ Bluetooth
SETUP
] ﺭﺰﻟﺍ ﻂﻐﺿﺍ
1.
2.[OK] ﺭﺰﻟﺍ ﻂﻐﺿﺍ ﻢﺛ “ON” ﺭﺎﻴﺘﺧﻻ [Y ،U] ﺭﺰﻟﺍ ﻂﻐﺿﺍ
.“OFF” ﺩﺪﺣ ،ﺀﺎﻐﻟﻺﻟ
ﺯﺎﻬﺠﺑ ﹰﻼﺼﺘﻣ ﺖﻨﻛ ﺍﺫﺇ .ﺔﺑﺎﺠﺘﺳﻼﻟ ﻝﻮﻃﺃ ﺎﹰﺘﻗﻭ ﺓﺰﻬﺟﻷﺍ ﺾﻌﺑ ﻕﺮﻐﺘﺴﺗ ﺪﻗ
ﻞﺒﻗ ﻞﻗﻷﺍ ﻰﻠﻋ ﻥﺍﻮﺛ 5 ﺓﺪﻤﻟ ﺮﻈﺘﻧﺍ ،ﻡﺎﻈﻨﻟﺍ ﻞﻴﻐﺸﺗ ﻑﺎﻘﻳﺇ ﻞﺒﻗ Bluetooth
.Bluetooth® ﺯﺎﻬﺟ ﻦﻣ ﻡﺎﻈﻨﻟﺍ ﺍﺬﻬﺑ ﻯﺮﺧﺃ ﺓﺮﻣ ﻝﺎﺼﺗﻻﺍ
:ﺔﻈﺣﻼﻣ
ﺞﻣﺎﻧﺮﺒﻟﺍ ﺭﺍﺪﺻﺇ
.ﻡﺎﻈﻨﻟﺎﺑ ﺹﺎﺨﻟﺍ ﺞﻣﺎﻧﺮﺒﻟﺍ ﺭﺍﺪﺻﺇ ﻦﻣ ﻖﻘﺤﺘﻟﺍ ﻚﻨﻜﻤﻳ
1 ﺭﺰﻟﺍ ﻂﻐﺿﺍ ﻢﺛ “SW VER.” ﺭﺎﻴﺘﺧﻻ [SETUP] ﺭﺰﻟﺍ ﻂﻐﺿﺍ
.ﺞﻣﺎﻧﺮﺒﻟﺍ ﺭﺍﺪﺻﺇ ﺮﻬﻈﻳ
.[OK]
2.ﺀﺎﻬﻧﻺﻟ ﻯﺮﺧﺃ ﺓﺮﻣ [OK] ﺭﺰﻟﺍ ﻂﻐﺿﺍ
®
®
RQT9979
19
50
Page 51
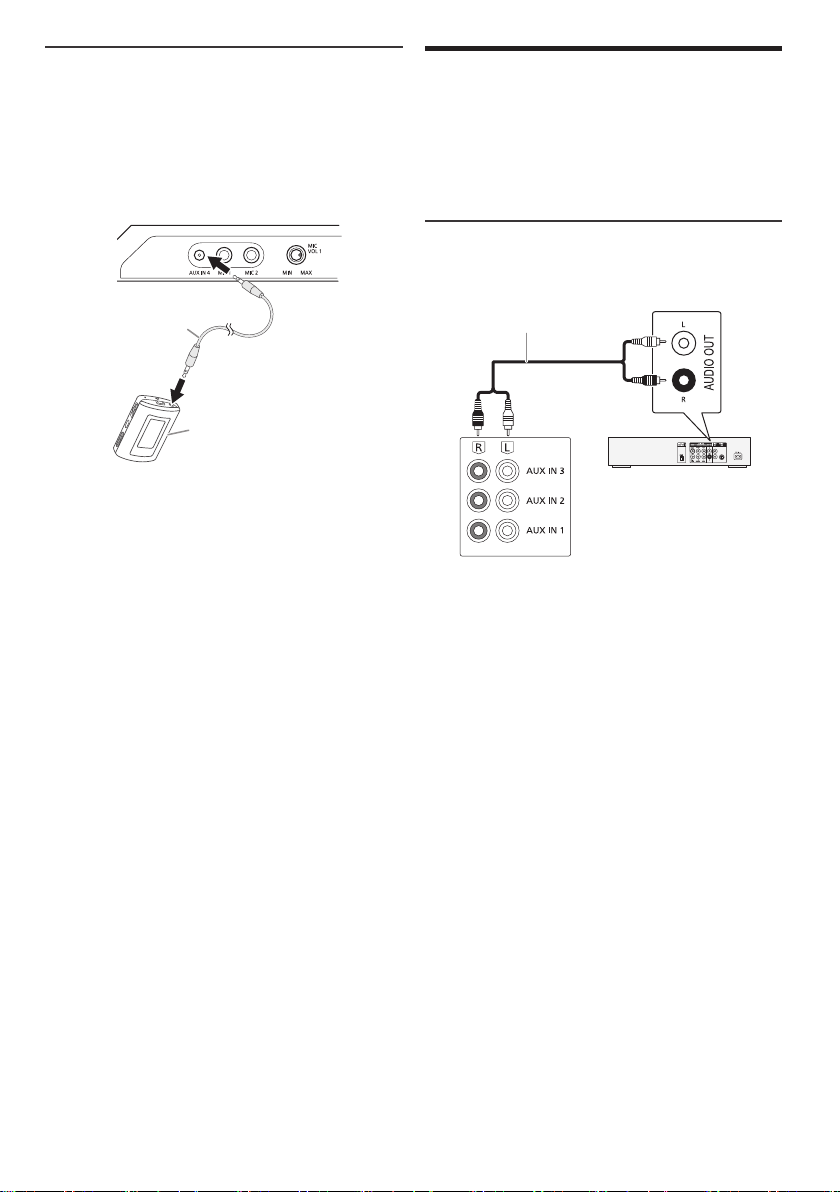
ﻝﻮﻤﺤﻤﻟﺍ ﺕﻮﺼﻟﺍ ﺯﺎﻬﺟ ﻞﺻ
offset printing
.ﻝﻮﻤﺤﻣ ﺕﻮﺻ ﺯﺎﻬﺟ ﻦﻣ ﻰﻘﻴﺳﻮﻤﻟﺍ ﻞﻴﻐﺸﺗ ﻚﻨﻜﻤﻳ
ﺩﻮﺟﻮﻣ ﻥﺎﻛ ﺍﺫﺇ) ﻝﺩﺎﻌﻤﻟﺍ ﻞﻴﻐﺸﺗ ﻑﺎﻘﻳﺈﺑ ﻢﻗ
ﹰ
.ﺕﻮﺼﻟﺍ ﻩﻮﺸﺗ ﻊﻨﻣ ﻞﺟﺃ ﻦﻣ
.ﻪﻠﺼﻓ ﻭﺃ ﻝﻮﻤﺤﻤﻟﺍ ﺕﻮﺼﻟﺍ ﺯﺎﻬﺟ
ﺮﻴﻀﺤﺘﻟﺍ
ﺔﻴﺟﺭﺎﺨﻟﺍ ﺓﺰﻬﺟﻷﺍ
• ﻝﻮﻤﺤﻤﻟﺍ ﺕﻮﺼﻟﺍ ﺯﺎﻬﺠﻟ (ﺍ
• ﻞﺻﻮﺗ ﻞﺒﻗ ﻝﻮﻤﺤﻤﻟﺍ ﺕﻮﺼﻟﺍ ﺯﺎﻬﺟﻭ ﺯﺎﻬﺠﻟﺍ ﺕﻮﺻ ﻯﻮﺘﺴﻣ ﺾﻔﺧﺍ
ﺕﻮﺼﻠﻟ ﻉﺎﻤﺘﺳﻻﺍﻭ ﻚﻟﺫ ﺮﻴﻏﻭ VCR ﻮﻳﺪﻴﻓﻭ DVD ﻞﹼﻐﺸﻣ ﻞﻴﺻﻮﺗ ﻚﻨﻜﻤﻳ
.ﻞﺼﻔﻨﻣ ﻞﻜﺸﺑ ﺕﻼﺒﻜﻟﺍﻭ ﺕﺎﻧﻮﻜﻤﻟﺍ ﻉﺎﺒﺗ
ﻲﻓﺎﺿﻹﺍ ﺯﺎﻬﺠﻠﻟ ﻞﺧﺩ ﻡﺍﺪﺨﺘﺳﺍ
.ﻡﺎﻈﻨﻟﺍ ﺍﺬﻫ ﻝﻼﺧ ﻦﻣ
ﺮﻴﻀﺤﺘﻟﺍ
•.ﺩﺩﺮﺘﻤﻟﺍ ﺭﺎﻴﺘﻠﻟ ﺲﻴﺋﺮﻟﺍ ﺔﻴﺋﺎﺑﺮﻬﻜﻟﺍ ﺔﻗﺎﻄﻟﺍ ﻚﻠﺳ ﻞﺼﻓﺍ
•.ﺔﻤﺋﻼﻤﻟﺍ ﻞﻴﻐﺸﺘﻟﺍ ﺕﺎﻤﻴﻠﻌﺗ ﺃﺮﻗﺍﻭ ﺓﺰﻬﺟﻷﺍ ﻊﻴﻤﺟ ﻞﻴﻐﺸﺗ ﻒﻗﻭﺃ
:ﺔﻈﺣﻼﻣ
(ﻖﻓﺮﻣ ﺮﻴﻏ) ﺕﻮﺼﻟﺍ ﻞﺒﻛ
(ﻖﻓﺮﻣ ﺮﻴﻏ) ﻝﻮﻤﺤﻤﻟﺍ ﺕﻮﺼﻟﺍ ﺯﺎﻬﺟ
ﺕﻮﺼﻟﺍ ﻮﻳﺮﻴﺘﺳ ﻢﻣ 3.5 Ø :ﺲﺑﺎﻘﻟﺍ ﻉﻮﻧ
ﻞﺧﺪﻟﺍ ﻯﻮﺘﺴﻣ ﻂﺒﻀﻟ
.[OK] ﺭﺰﻟﺍ ﻂﻐﺿﺍ ﻢﺛ (ﻊﻔﺗﺮﻣ)
:ﺔﻈﺣﻼﻣ
ﻫﻮﺸﻣ ﺕﻮﺼﻟﺍ ﻥﺎﻛ ﺍﺫﺇ (ﺔﻳﺩﺎﻌﻟﺍ) “NORMAL” ﺩﺪﺣ
ﹰ
.ﻞﻴﺻﺎﻔﺘﻟﺍ ﻰﻠﻋ ﻉﻼﻃﻼﻟ ﻝﻮﻤﺤﻤﻟﺍ ﺕﻮﺼﻟﺍ ﺯﺎﻬﺟ ﻞﻴﻐﺸﺗ ﺕﺎﻤﻴﻠﻌﺗ ﺃﺮﻗﺍ
.(ﻊﻔﺗﺮﻣ) “HIGH”
(ﻖﻓﺮﻣ ﺮﻴﻏ) ﺕﻮﺼﻟﺍ ﻞﺒﻛ
1.ﻝﻮﻤﺤﻤﻟﺍ ﺕﻮﺼﻟﺍ ﺯﺎﻬﺟ ﻞﺻ
(ﻖﻓﺮﻣ ﺮﻴﻏ) DVD ﻞ
ﹼ
ﻐﺸﻣ
2.“A UX 4” ﺭﺎﻴﺘﺧﻻ [CD/RA DIO/AUX] ﺭﺰﻟﺍ ﻂﻐﺿﺍ
3.ﻝﻮﻤﺤﻤﻟﺍ ﺕﻮﺼﻟﺍ ﺯﺎﻬﺟ ﻞﻴﻐﺸﺘﺑ ﻢﻗ
ﺔﻴﺴﻴﺋﺮﻟﺍ ﺓﺪﺣﻮﻠﻟ ﺔﻴﻔﻠﺨﻟﺍ ﺔﺣﻮﻠﻟﺍ
1.“INPUT LEVEL” ﺭﺎﻴﺘﺧﻻ [PLAY MENU] ﺭﺰﻟﺍ ﻂﻐﺿﺍ
2 “HIGH” ﻭﺃ (ﺔﻳﺩﺎﻌﻟﺍ) “NORMAL” ﺭﺎﻴﺘﺧﻻ [Y ،U] ﺭﺰﻟﺍ ﻂﻐﺿﺍ
.“AUX 3” ﻭﺃ “AU X 2”
1.ﻲﺟﺭﺎﺨﻟﺍ ﺯﺎﻬﺠﻟﺍ ﻞﺻ
2 ﻭﺃ “AUX 1” ﺭﺎﻴﺘﺧﻻ [CD/RADIO/AUX] ﺭﺰﻟﺍ ﻂﻐﺿﺍ
3.ﻲﺟﺭﺎﺨﻟﺍ ﺯﺎﻬﺠﻟﺍ ﻞﻴﻐﺸﺘﺑ ﻢﻗ
•.ﻞﻴﺠﺴﺘﻟﺍ ﺀﺎﻨﺛﺃ ﻝﺎﺧﺩﻹﺍ ﻯﻮﺘﺴﻣ ﻂﺒﺿ ﻚﻨﻜﻤﻳ ﻻ
• ﻞﺧﺩ ﻯﻮﺘﺴﻣ ﺀﺎﻨﺛﺃ ﺎ
•
:ﺔﻈﺣﻼﻣ
• ﺓﺰﻬﺟﻷﺍ ﻉﺯﻮﻣ ﻰﻟﺇ ﻊﺟﺭﺎﻓ ،ﺔﺤﺿﻮﻤﻟﺍ ﻚﻠﺗ ﺮﻴﻏ ﻯﺮﺧﺃ ﺓﺰﻬﺟﺃ ﻞﻴﺻﻮﺗ ﺕﺩﺭﺃ ﺍﺫﺇ
.ﻚﺑ ﺹﺎﺨﻟﺍ ﺔﻴﺗﻮﺼﻟﺍ
•.ﺊﻳﺎﻬﻣ ﻡﺪﺨﺘﺴﺗ ﺎﻣﺪﻨﻋ ﺕﻮﺼﻠﻟ ﻪﻳﻮﺸﺗ ﺙﺪﺤﻳ ﻥﺃ ﻦﻜﻤﻳ
RQT9979
18
51
Page 52
ﺪﻳﺮﺗ ﻱﺬﻟﺍ ﻰﻘﻴﺳﻮﻤﻟﺍ ﺭﺪﺼﻣ ﺮﻴﻀﺤﺘﺑ ﻢﻗ
offset printing
ﺓﺮﻛﺍﺬﻟﺍ ﻭﺃ USB ﻭﺃ ﺔﻧﺍﻮﻄﺳﻻﺍ) ﻲﻟﺇ ﻉﺎﻤﺘﺳﻻﺍ
.ﺕﻮﺼﻟﺍ ﻯﻮﺘﺴﻣ ﻂﺒﺿﺍﻭ (ﻮﻳﺩﺍﺮﻟﺍ ﻭﺃ ﺔﻴﻠﺧﺍﺪﻟﺍ
ﻰﻠﻋ ﻞﻴﺠﺴﺘﻠﻟ) USB B ـﺑ USB ﺯﺎﻬﺟ ﻞﺻ
.ﻮﻳﺩﺍﺮﻟﺍ ﺔﻄﺤﻣ ﻰﻠﻋ ﻪﻔﻴﻟﻮﺘﺑ ﻢﻗﻭ
.ﻞﻴﻐﺸﺘﻟﺍ ﺖﻗﺆﻣ ﻞﻴﻐﺸﺗ ﺃﺪﺑﺍ
.ﻞﻴﻐﺸﺘﻟﺍ ﺖﻗﺆﻣ ﺀﺎﻐﻟﺇ
.ﻞﻴﺠﺴﺘﻟﺍ ﺖﻗﺆﻣ ﻞﻴﻐﺸﺗ ﺃﺪﺑﺍ
ﻲﺑﺮﻋ
.ﻦﻴﺗﺮﻣ [DISPLAY] ﺭﺰﻟﺍ ﻂﻐﺿﺍ ،ﻞﻴﻐﺸﺘﻠﻟ ﺩﺍﺪﻌﺘﺳﻻﺍ ﻊﺿﻭ ﻲﻓ
.ﻞﻴﻐﺸﺘﻟﺍ ﺪﻴﻗ ﺖﻗﺆﻤﻟﺍ ﻥﺎﻛ ﺍﺫﺇ ﻡﻮﻳ ﻞﻛ ﻁﻮﺒﻀﻤﻟﺍ ﺖﻗﻮﻟﺍ ﻰﻠﻋ ﺖﻗﺆﻤﻟﺍ ﻞﻤﻌﻳ
.ﻞﻴﺠﺴﺘﻟﺍ ﺖﻗﺆﻣ ﺀﺎﻐﻟﺇ
.ﺖﻗﺆﻤﻟﺍ ﻞﻤﻌﻳ ﻰﺘﺣ ﻡﺎﻈﻨﻟﺍ ﻞﻴﻐﺸﺗ ﻑﺎﻘﻳﺇ ﺐﺠﻳ
.ﺎﹰﻘﺒﺴﻣ ﻁﻮﺒﻀﻤﻟﺍ ﻯﻮﺘﺴﻤﻟﺍ ﻰﻟﺇ ﻞﺼﻳ
.ﺀﺎﻬﻧﻹﺍ ﺖﻗﻭ ﺪﻨﻋ ﺖﻗﺆﻤﻟﺍ ﻒﻗﻮﺘﻳ ﻦﻠﻓ
ﻞﻴﻐﺸﺘﻟﺍ ﺖﻗﺆﻣ
ﻞﻴﺠﺴﺘﻟﺍ ﺖﻗﺆﻣ
(USB
PLAY OFF
.“#” ﺓﺭﺎﺷﻹﺍ ﺮﻬﻈﺗ
ﺖﻗﺆﻤﻟﺍ ﺀﺪﺒﻟ
PLAY ON
REC ON
REC OFF
ﺩﺍﺪﻋﻹﺍ ﺺﺤﻔﻟ
.[OK] ﺭﺰﻟﺍ
:ﺔﻈﺣﻼﻣ
.ﺕﻮﺼﻟﺍ
ﹼ
1.ﺕﻮﺼﻟﺍ ﺭﺪﺼﻣ ﺮﻴﻀﺤﺘﺑ ﻢﻗ
ﺕﺎﺘﻗﺆﻤﻟﺍﻭ ﺔﻋﺎﺴﻟﺍ
ﺔﻋﺎﺴﻟﺍ ﻂﺒﺿ
.ﺔﻋﺎﺳ 24 ﻖﻴﺴﻨﺘﺑ ﺔﻋﺎﺴﻟﺍ
1.“CLOCK” ﺭﺎﻴﺘﺧﻻ [SETUP] ﺭﺰﻟﺍ ﻂﻐﺿﺍ
2.[OK] ﺭﺰﻟﺍ ﻂﻐﺿﺍ ﻢﺛ ﺖﻗﻮﻟﺍ ﻂﺒﻀﻟ [Y ،U] ﺭﺰﻟﺍ ﻂﻐﺿﺍ
2.“TIMER SET” ﺭﺎﻴﺘﺧﻻ [SETUP] ﺭﺰﻟﺍ ﻂﻐﺿﺍ
3.[OK] ﺭﺰﻟﺍ ﻂﻐﺿﺍ ﻢﺛ ﺩﺍﺪﻋﻹﺍ ﺭﺎﻴﺘﺧﻻ [Y ،U] ﺭﺰﻟﺍ ﻂﻐﺿﺍ
.“CLOCK” ﺭﺎﻴﺘﺧﻻ [SETUP] ﺭﺰﻟﺍ ﻂﻐﺿﺍ
.[DISPLAY] ﺭﺰﻟﺍ ﻂﻐﺿﺍ ،ﻞﻴﻐﺸﺘﻠﻟ ﺩﺍﺪﻌﺘﺳﻻﺍ ﻊﺿﻭ ﻲﻓ
.ﺎﻬﺘﻗﺩ ﻰﻠﻋ ﺔﻈﻓﺎﺤﻤﻠﻟ ﻡﺎﻈﺘﻧﺎﺑ ﺔﻋﺎﺴﻟﺍ ﻂﺒﺿ ﺪﻋﺃ
ﺖﻗﻮﻟﺍ ﺺﺤﻔﻟ
:ﺔﻈﺣﻼﻣ
ﻡﻮﻨﻟﺍ ﺖﻗﺆﻣ
.ﻁﻮﺒﻀﻤﻟﺍ ﺖﻗﻮﻟﺍ ﺪﻌﺑ ﻡﺎﻈﻨﻟﺍ ﻞﻴﻐﺸﺗ ﻑﺎﻘﻳﺈﺑ ﻡﻮﻨﻟﺍ ﺖﻗﺆﻣ ﻡﻮﻘﻳ
(ﻖﺋﺎﻗﺪﻟﺍ ﻲﻓ) ﺩﺍﺪﻋﻹﺍ ﺭﺎﻴﺘﺧﻻ [SLEEP] ﺭﺰﻟﺍ ﻂﻐﺿﺍ
.
1.“TIMER ADJ” ﺭﺎﻴﺘﺧﻻ [SETUP] ﺭﺰﻟﺍ ﻂﻐﺿﺍ
2 ﻂﻐﺿﺍ ﻢﺛ “#REC” ﻭﺃ “#PLAY” ﺭﺎﻴﺘﺧﻻ [Y ،U] ﺭﺰﻟﺍ ﻂﻐﺿﺍ
ﻌﻣ ﻡﻮﻨﻟﺍﻭ ﻞﻴﺠﺴﺘﻟﺍ ﺖﻗﺆﻣ ﻭﺃ ﻡﻮﻨﻟﺍﻭ ﻞﻴﻐﺸﺘﻟﺍ ﺖﻗﺆﻣ ﻡﺍﺪﺨﺘﺳﺍ ﻦﻜﻤﻳ
ﹰ
• ﻰﺘﺣ ﺎﻴﺠﻳﺭﺪﺗ ﺩﺍﺩﺰﻳﻭ ﺾﻔﺨﻨﻣ ﺕﻮﺻ ﻯﻮﺘﺴﻣ ﻰﻠﻋ ﻞﻴﻐﺸﺘﻟﺍ ﺖﻗﺆﻣ ﺃﺪﺒﻳ
• ﻯﻮﺘﺴﻣ ﻢﺘﻛ ﻊﻣ ﺔﻴﻧﺎﺛ 30 ـﺑ ﻁﻮﺒﻀﻤﻟﺍ ﺖﻗﻮﻟﺍ ﻞﺒﻗ ﻞﻴﺠﺴﺘﻟﺍ ﺖﻗﺆﻣ ﺃﺪﺒﻳ
•
• ،ﺖﻗﺆﻤﻟﺍ ﻞﻴﻐﺸﺗ ﺀﺎﻨﺛﺃ ﻯﺮﺧﺃ ﺓﺮﻣ ﻪﻠﻴﻐﺸﺘﺑ ﺖﻤﻗﻭ ﺯﺎﻬﺠﻟﺍ ﻞﻴﻐﺸﺗ ﺖﻔﻗﻭﺃ ﺍﺫﺇ
:ﻞﺟﺃ ﻦﻣ ﺩﺪﺤﻣ ﺖﻗﻭ ﻲﻓ ﻞﻴﻐﺸﺘﻟﺍ ﺃﺪﺒﻴﻟ ﺖﻗﺆﻤﻟﺍ ﻂﺒﺿ ﻚﻨﻜﻤﻴﻳ
.ﺎﹰﻌﻣ ﻞﻴﺠﺴﺘﻟﺍ ﺖﻗﺆﻣﻭ ﻞﻴﻐﺸﺘﻟﺍ ﺖﻗﺆﻣ ﻡﺍﺪﺨﺘﺳﺍ ﻦﻜﻤﻳ ﻻ
ﻢﺛ ﻞﻴﺠﺴﺘﻟﺍ ﻰﻠﻋ ﻅﺎﻔﺤﻠﻟ “USB B” ﻭﺃ “MEMORY”
.ﻯﺮﺧﻷﺍ ﺕﺎﻴﻠﻤﻌﻟﺍ ﺀﺍﺮﺟﺇ ﺪﻨﻋ ﺔﺘﻗﺆﻣ
ﻞﻴﺠﺴﺘﻟﺍﻭ ﻞﻴﻐﺸﺘﻟﺍ ﺖﻗﺆﻣ
(AUX ﻭ Bluetooth
.[OK] ﺭﺰﻟﺍ ﻂﻐﺿﺍ ﻢﺛ ﻪﻠﻴﺠﺴﺗ
.“OFF” ﺩﺪﺣ ،ﺀﺎﻐﻟﻺﻟ
NIM03120 MIN 60 MIN90 MINFFO
:ﺔﻈﺣﻼﻣ
ﻤﺋﺍﺩ ﻡﻮﻨﻟﺍ ﺖﻗﺆﻣ ﻲﺗﺄﻳ
ﹰ
®
ﺭﺪﺼﻣ ﺀﺎﻨﺜﺘﺳﺎﺑ)
ﺮﻴﻀﺤﺘﻟﺍ
.ﺔﻋﺎﺴﻟﺍ ﻂﺒﺿﺍ
.[OK] ﺭﺰﻟﺍ
.[OK] ﺭﺰﻟﺍ ﻂﻐﺿﺍ
• ﺓﺭﻮﺼﺑ ﺔﺷﺎﺸﻟﺍ ﺮﻴﻐﺘﺗ .ﺔﺷﺎﺸﻟﺍ ﻰﻠﻋ ﻲﻘﺒﺘﻤﻟﺍ ﺖﻗﻮﻟﺍ ﺽﺮﻋ ﺎﻤﺋﺍﺩ ﻢﺘﻳ
•.ﺎ
•.ﺕﺎﺘﻗﺆﻤﻟﺍ ﻞﺧﺍﺪﺗ ﻂﺒﺿ ﻡﺪﻋ ﻦﻣ ﺪﻛﺄﺗ .ﻝﻭﻷﺍ ﻲﻓ ﺎ
•.(ﺖﻗﺆﻤﻟﺍ ﻞﻴﻐﺸﺗ) ﻡﻮﻨﻟﺍ ﻦﻣ ﻚﻇﺎﻘﻳﺇ
•.(ﻞﻴﺠﺴﺘﻟﺍ ﺖﻗﺆﻣ) ﻮﻳﺩﺍﺮﻟﺍ ﻦﻣ ﻞﻴﺠﺴﺘﻟﺍ
1.“TIMER ADJ” ﺭﺎﻴﺘﺧﻻ [SETUP] ﺭﺰﻟﺍ ﻂﻐﺿﺍ
2 ﻂﻐﺿﺍ ﻢﺛ “#REC” ﻭﺃ “#PLAY” ﺭﺎﻴﺘﺧﻻ [Y ،U] ﺭﺰﻟﺍ ﻂﻐﺿﺍ
3.[OK] ﺭﺰﻟﺍ ﻂﻐﺿﺍ ﻢﺛ ﺀﺪﺒﻟﺍ ﺖﻗﻭ ﻂﺒﻀﻟ [Y ،U] ﺭﺰﻟﺍ ﻂﻐﺿﺍ
4.ﺀﺎﻬﻧﻹﺍ ﺖﻗﻭ ﻂﺒﻀﻟ ﻯﺮﺧﺃ ﺓﺮﻣ 3 ﺓﻮﻄﺨﻟﺍ ﺬﻴﻔﻨﺘﺑ ﻢﻗ
5 ﻭﺃ ﻪﻠﻴﻐﺸﺗ ﺪﻳﺮﺗ ﻱﺬﻟﺍ ﺭﺪﺼﻤﻟﺍ ﺭﺎﻴﺘﺧﻻ [Y ،U] ﺭﺰﻟﺍ ﻂﻐﺿﺍ
6 ﺭﺎﻴﺘﺧﻻ [Y ،U] ﺭﺰﻟﺍ ﻂﻐﺿﺍ ،ﻞﻴﺠﺴﺘﻟﺍ ﺖﻗﺆﻤﻟ ﺔﺒﺴﻨﻟﺎﺑ
RQT9979
17
52
Page 53
(ﻲﻛﻮﻳﺭﺎﻛ) Karaoke ﺕﺍﺮﺛﺆﻣ
offset printing
ﻂﻘﻓ ﺔﻴﺴﻴﺋﺮﻟﺍ ﺓﺪﺣﻮﻟﺍ ﺐﺴﺣ
.ﺔﻴﺗﻮﺻ ﺕﺍﺮﻴﺛﺄﺗ ﺔﻓﺎﺿﻹ (ﻲﻛﻮﻳﺭﺎﻛ)
Karaoke
ﺮﺛﺆﻣ ﺔﻔﻴﻇﻭ ﻡﺍﺪﺨﺘﺳﺍ ﻚﻨﻜﻤﻳ
1.[KARAOKE EFFECT] ﺭﺰﻟﺍ ﻂﻐﺿﺍ
2.ﺮﺛﺆﻤﻟﺍ ﺭﺎﻴﺘﺧﻻ [DJ6] ﻰﻟﺇ [DJ1] ﺭﺰﻟﺍ ﻂﻐﺿﺍ
ﻲﺗﻮﺼﻟﺍ ﻞﻴﻟﺪﻟﺍ ﻞﻴﻐﺸﺗ ﻑﺎﻘﻳﺇ ﻭﺃ ﻞﻴﻐﺸﺗ
VOCAL CANCEL
.(ﺭﺪﺼﻤﻠﻟ ﺎﹰﻘﻓﻭ)
ECHO
.ﺕﻮﺼﻟﺍ ﻰﻟﺇ ﻯﺪﺻ ﺮﺛﺆﻣ ﺔﻓﺎﺿﺇ
KEY-CON
.ﺔﻴﻨﻏﻷﺍ ﺡﺎﺘﻔﻣ ﺮﻴﻴﻐﺗ
TEMPO
.ﺔﻴﻨﻏﻷﺍ ﻉﺎﻘﻳﺇ ﺔﻋﺮﺳ ﺮﻴﻴﻐﺗ
BGM LEVEL
.ﺔﻴﻔﻠﺨﻟﺍ ﻰﻘﻴﺳﻮﻤﻟﺍ ﻯﻮﺘﺴﻣ ﺮﻴﻴﻐﺗ
MIC EQ
.MIC EQ ﻯﻮﺘﺴﻣ ﺭﺎﻴﺘﺧﺍ
[DJ1]
[DJ2]
[DJ3]
[DJ4]
[DJ5]
[DJ6]
3.ﺩﺍﺪﻋﻹﺍ ﺭﺎﻴﺘﺧﻻ [MULTI CONTROL] ﺮﻳﻭﺪﺘﺑ ﻢﻗ
(
ﻲﻛﻮﻳﺭﺎﻛ)
Karaoke
ﺮﺛﺆﻣ ﺀﺎﻐﻟﻹ
.[KARAOKE EFFECT] ﺭﺰﻟﺍ ﻂﻐﺿﺍ
ﻥﻮﻓﻭﺮﻜﻴﻤﻟﺍ ﻡﺍﺪﺨﺘﺳﺍ
ﻥﻮﻓﻭﺮﻜﻴﻤﻟﺍ ﻞﺻﻮﺗ ﻞﺒﻗ ﻪﻟ ﻰﻧﺩﻷﺍ ﺪﺤﻟﺍ ﻰﻟﺇ ﺯﺎﻬﺠﻟﺍ ﺕﻮﺻ ﻯﻮﺘﺴﻣ ﺾﻔﺧﺍ
ﺕﻮﺼﻟﺍ ﻱﺩﺎﺣﺃ ﻢﻣ
6.3 Ø :ﺲﺑﺎﻘﻟﺍ ﻉﻮﻧ
.ﻥﻮﻓﻭﺮﻜﻴﻤﻟﺍ ﺕﻮﺻ ﻯﻮﺘﺴﻣ ﻂﺒﻀﻟ ﺔﻴﺴﻴﺋﺮﻟﺍ
.ﺔﻴﻔﻠﺨﻟﺍ ﻰﻘﻴﺳﻮﻤﻟﺍ ﺔﺒﺣﺎﺼﻤﺑ ﺀﺎﻨﻐﻟﺍ ﺕﺩﺭﺃ ﺍﺫﺇ
.ﻥﻮﻓﻭﺮﻜﻴﻤﻟﺍ ﺕﻮﺻ ﻯﻮﺘﺴﻣ ﺾﻔﺧﺍ
.“MIN” ﻰﻧﺩﻷﺍ ﺪﺤﻟﺍ ﻰﻟﺇ ﻥﻮﻓﻭﺮﻜﻴﻤﻟﺍ ﺕﻮﺻ ﻯﻮﺘﺴﻣ
ﺮﻴﻀﺤﺘﻟﺍ
.ﻪﻠﺼﻓ ﻭﺃ
ﻧﻮﻓﻭﺮﻜﻴﻣ ﻞﺻ
ﹰ
:ﺔﻈﺣﻼﻣ
1.ﻥﻮﻓﻭﺮﻜﻴﻤﻟﺍ ﺲﺒﻘﻤﺑ (ﻖﻓﺮﻣ ﺮﻴﻏ) ﺎ
2 ﺓﺪﺣﻮﻟﺍ ﻰﻠﻋ ﺩﻮﺟﻮﻤﻟﺍ [MIC VOL ،MIN/MAX] ﺮﻳﻭﺪﺘﺑ ﻢﻗ
3.ﻡﺎﻈﻨﻠﻟ ﺕﻮﺼﻟﺍ ﻯﻮﺘﺴﻣ ﻂﺒﺿﻭ ﻰﻘﻴﺳﻮﻤﻟﺍ ﺭﺪﺼﻣ ﻞﻴﻐﺸﺘﺑ ﻢﻗ
(ﻲﻛﻮﻳﺭﺎﻛ) Karaoke
.ﻰﻘﻴﺳﻮﻤﻟﺍ ﺭﺪﺼﻣ ﺭﺎﻴﺘﺧﺍ
.ﻞﻴﺠﺴﺘﻟﺍ ﺀﺪﺑ ﻭﺃ ﻡﺎﻈﻨﻟﺍ ﻞﻴﻐﺸﺗ
.ﺎﹰﻴﺋﺎﻘﻠﺗ (ﻲﻛﻮﻳﺭﺎﻛ) Karaoke ﺕﺍﺮﺛﺆﻣ
jukebox (ﻲﻛﻮﻳﺭﺎﻛ) Karaoke
ﺓﺪﺣﻮﻟﺍ ﻰﻠﻋ ﺩﻮﺟﻮﻤﻟﺍ [KARAOKE/DJ JUKEBOX] ﺭﺰﻟﺍ ﻂﻐﺿﺍ
ﺩﺍﺪﻋﻹﺍ ﺭﺎﻴﺘﺧﻻ [MULTI CONTROL] ﺮﻳﻭﺪﺘﺑ ﻢﻗ ،ﻑﺎﻘﻳﻹﺍ ﻊﺿﻭ ﻲﻓ
• ﻭﺃ ،ﺕﺎﻋﺎﻤﺴﻟﺍ ﻦﻋ ﻥﻮﻓﻭﺮﻜﻴﻤﻟﺍ ﺪﻌﺑﺍ ،(ﺮﻴﻔﺻ) ﺐﻳﺮﻏ ﺞﻴﺠﺿ ﺙﺎﻌﺒﻧﺍ ﺔﻟﺎﺣ ﻲﻓ
• ﺾﻔﺧﺍﻭ ،ﻥﻮﻓﻭﺮﻜﻴﻤﻟﺍ ﺲﺒﻘﻣ ﻦﻋ ﻪﻠﺼﻓﺍ ،ﻥﻮﻓﻭﺮﻜﻴﻤﻟﺍ ﻡﺍﺪﺨﺘﺳﺍ ﻡﺪﻋ ﺪﻨﻋ
•.ﻥﻮﻓﻭﺮﻜﻴﻤﻟﺍ ﻦﻣ ﻞﻴﺠﺴﺘﻟﺍ ﻡﺎﻈﻨﻟﺍ ﺍﺬﻬﻟ ﻦﻜﻤﻳ ﻻ
.“KARAOKE JUKEBOX ON” ﺭﺎﻴﺘﺧﻻ ﺔﻴﺴﻴﺋﺮﻟﺍ
.“JU K EB OX O FF ” ﺩﺪﺣ ،ﺀﺎﻐﻟﻺﻟ
Karaoke ﻞﻴﻐﺸﺘﺑ ﻚﻣﺎﻴﻗ ﺪﻨﻋ ﺎﹰﻴﺋﺎﻘﻠﺗ ﺭﺍﺮﻜﺘﻟﺍ ﻊﺿﻭ ﻰﻟﺇ ﻡﺎﻈﻨﻟﺍ ﻝﻮﺤﺘﻳ
.jukebox (ﻲﻛﻮﻳﺭﺎﻛ)
.[PLAY MEN U] ﺭﺰﻟﺍ ﻂﻐﺿﺍ
ﺔﻴﺴﻴﺋﺮﻟﺍ ﺓﺪﺣﻮﻟﺍ ﻡﺍﺪﺨﺘﺳﺍ
.[4/9] ﺭﺰﻟﺍ ﻂﻐﺿﺍ ﻢﺛ
.ﺭﺮﻜﺘﻤﻟﺍ ﻲﺋﺍﻮﺸﻌﻟﺍ ﻞﻴﻐﺸﺘﻟﺍ
.ﺕﺍﺭﺎﺴﻤﻟﺍ ﻞﻛ ﺭﺍﺮﻜﺗ
ﺔﻨﻴﻋ ﺔﻓﺎﺿﺇ ﻢﺘﺗ .ﺭﺮﻜﺘﻤﻟﺍ ﻲﺋﺍﻮﺸﻌﻟﺍ ﻞﻴﻐﺸﺘﻟﺍ
RANDOM MIX
.ﺕﺍﺭﺎﺴﻤﻟﺍ ﻊﻴﻤﺠﻟ ﺔﻴﻨﻣﺰﻟﺍ ﻞﺻﺍﻮﻔﻟﺍ ﻰﻟﺇ ﺕﻮﺻ
ﻰﻟﺇ ﺔﻌﺑﺎﺘﻤﻟﺍ ﻚﻨﻜﻤﻳ ،“WAITING REQUEST” ﺽﺮﻋ ﺪﻨﻋ
“Panasonic MAX Juke” ﻖﻴﺒﻄﺗ ﻡﺍﺪﺨﺘﺳﺍ ﻥﻭﺩ ﺔﻴﻟﺎﺘﻟﺍ ﺓﻮﻄﺨﻟﺍ
.(“DJ ﻒﺋﺎﻇﻭ”
ﺮﻴﻀﺤﺘﻟﺍ
:ﺔﻈﺣﻼﻣ
:ﺔﻈﺣﻼﻣ
1
2.[OK] ﺭﺰﻟﺍ ﻂﻐﺿﺍ ﻢﺛ ﺩﺍﺪﻋﻹﺍ ﺭﺎﻴﺘﺧﻻ [Y ،U] ﺭﺰﻟﺍ ﻂﻐﺿﺍ
RANDOM
REPEAT
RND
ALL TITLE
REPEAT
REPEAT
RND
m
• ﻑﺎﻘﻳﺈﺑ ﻡﻮﻘﺗ ﺎﻣﺪﻨﻋ (ﻲﻛﻮﻳﺭﺎﻛ) Karaoke ﺔﻔﻴﻇﻭ ﻞﻴﻐﺸﺗ ﻑﺎﻘﻳﺇ ﻢﺘﻳ
• ﻞﻴﻐﺸﺗ ﻢﺘﻳ ،jukebox (ﻲﻛﻮﻳﺭﺎﻛ) Karaoke ﻞﻴﻐﺸﺘﺑ ﻡﻮﻘﺗ ﺎﻣﺪﻨﻋ
█ ﺭﺍﺮﻜﺘﻟﺍ ﺩﺍﺪﻋﺇ ﺮﻴﻴﻐﺗ
)
RQT9979
16
53
Page 54
.ﻖﻴﺒﻄﺘﻟﺍ ﻝﻼﺧ ﻦﻣ ﺎﻬﻠﻴﻐﺸﺗ ﻲﻓ ﺐﻏﺮﺗ ﻲﺘﻟﺍ ﺕﺍﺭﺎﺴﻤﻟﺍ ﺀﺎﻋﺪﺘﺳﺍ ﻚﻨﻜﻤﻳ
offset printing
“Panasonic MAX Juke” ﻖﻴﺒﻄﺗ ﻡﺍﺪﺨﺘﺳﺍ
.ﺕﺍﺭﺎﺴﻤﻟﺍ ﻦﻣ ﺀﺰﺟ ﺀﺎﻋﺪﺘﺳﺍ ﻚﻨﻜﻤﻳ ،
ﺕﺍﺭﺎﺴﻤﻟﺍ ﺀﺎﻋﺪﺘﺳﺍ ﻚﻨﻜﻤﻳ ،
“MAKING LIST”
“WAITING REQUEST”
.ﻖﻴﺒﻄﺘﻟﺍ ﻝﻼﺧ ﻦﻣ ﺎﻬﻠﻴﻐﺸﺗ ﻲﻓ ﺐﻏﺮﺗ ﻲﺘﻟﺍ
DJ ﺕﺎﻨﻴﻋ ﺝﺍﺮﺨﺘﺳﺍ ﺓﺍﺩﺃ
ﻂﻘﻓ ﺔﻴﺴﻴﺋﺮﻟﺍ ﺓﺪﺣﻮﻟﺍ ﺐﺴﺣ
ﻭﺃ ﺵﺪﺧ ﺕﻮﺻ ﻖﻴﺒﻄﺗ ﻚﻨﻜﻤﻳ ،[MULTI CONTROL] ﻞﻳﻮﺤﺗ ﻝﻼﺧ ﻦﻣ
ﻲﺑﺮﻋ
.“OFF” ﺭﺎﻴﺘﺧﻻ [DJ EFFECT/SAMPLER] ﺭﺰﻟﺍ ﻂﻐﺿﺍ
“Panasonic MAX Juke” ﻖﻴﺒﻄﺗ ﻡﺍﺪﺨﺘﺳﺍ
ﺕﺎﻨﻴﻋ ﺔﻓﺎﻛ ﻉﺎﺟﺭﻹ) .ﻖﻴﺒﻄﺘﻟﺍ ﻦﻣ ﺕﻮﺼﻟﺍ ﺔﻨﻴﻋ ﺮﻴﻴﻐﺗ ﻚﻨﻜﻤﻳ
ﺭﺰﻟﺍ ﻰﻠﻋ ﺭﺍﺮﻤﺘﺳﻻﺍ ﻊﻣ ﻂﻐﺿﺍ ،ﻊﻨﺼﻤﻠﻟ ﻖﺒﺴﻤﻟﺍ ﻂﺒﻀﻟﺍ ﻰﻟﺇ ﺕﻮﺼﻟﺍ
DJ ﺕﺎﻨﻴﻋ ﺝﺍﺮﺨﺘﺳﺍ ﺓﺍﺩﺃ ﻥﻮﻜﺗ ﺎﻣﺪﻨﻋ [DJ EFFECT/SAMPLER]
.ﺔﻴﺗﻮﺻ ﺕﺍﺮﻴﺛﺄﺗ ﺔﻓﺎﺿﻹ DJ ﺮﺛﺆﻣ ﺔﻔﻴﻇﻭ ﻡﺍﺪﺨﺘﺳﺍ ﻚﻨﻜﻤﻳ
.ﺕﻮﺼﻟﺍ ﻰﻟﺇ ﺍﹰﺪﻌﺑﻭ ﺔﻓﺎﺴﻣ ﻒﺿﺃ
.ﺎﻬﺘﻴﻘﻨﺗ ﻭﺃ ﺕﻮﺼﻟﺍ ﺕﺎﻗﺎﻄﻧ ﻦﻴﺴﺤﺘﺑ ﻢﻗ
.ﻢﻏﺎﻨﺘﻟﺍ ﻖﻴﻘﺤﺘﻟ ﺕﻮﺼﻟﺍ ﻰﻟﺇ ﺕﺎﻈﺣﻼﻣ ﻒﺿﺃ
.“OFF” ﺭﺎﻴﺘﺧﻻ [DJ EFFECT/SAMPLER] ﺭﺰﻟﺍ ﻂﻐﺿﺍ
RQT9979
15
54
.ﻞﻴﻐﺸﺘﻟﺍ ﺪﻴﻗ ﺭﺎﺴﻤﻟﺍ ﻰﻠﻋ ﺕﻮﺻ ﺔﻨﻴﻋ
DJ
ﺕﺎﻨﻴﻋ ﺝﺍﺮﺨﺘﺳﺍ ﺓﺍﺩﺃ ﺀﺎﻐﻟﻹ
ﻂﻘﻓ ﺔﻴﺴﻴﺋﺮﻟﺍ ﺓﺪﺣﻮﻟﺍ ﺐﺴﺣ
PHASER
FILTER
SOUND CHOPPER
.ﻱﺭﻭﺩ ﻞﻜﺸﺑ ﺕﻮﺼﻟﺍ ﻊﻄﻘﺑ ﻢﻗ
ELECTRO ECHO
.ﺕﻮﺼﻟﺍ ﻰﻟﺇ ﺎﹰﻴﻤﻗﺭ ﻯﺪﺻ ﻒﺿﺃ
PITCH SHIFTER
.ﺕﻮﺼﻟﺍ ﺢﻴﺗﺎﻔﻣ ﻂﺒﻀﺑ ﻢﻗ
HARMONIZER
ﺮﻬﻈﺗ ﺎﻣﺪﻨﻋ
ﺮﻬﻈﺗ ﺎﻣﺪﻨﻋ
(AUX ﺭﺪﺼﻣ ﺀﺎﻨﺜﺘﺳﺎﺑ)
•
•
1 ﺭﺎﻴﺘﺧﻻ [DJ EFFECT/SAMPLER] ﺭﺰﻟﺍ ﻂﻐﺿﺍ
.“SAMPLER”
2.ﺏﻮﻠﻄﻤﻟﺍ ﺕﻮﺼﻟﺍ ﺭﺎﻴﺘﺧﻻ [DJ6] ﻰﻟﺇ [DJ1] ﺭﺰﻟﺍ ﻂﻐﺿﺍ
3.[MULTI CONTROL] ﺮﻳﻭﺪﺘﺑ ﻢﻗ
.ﻞﻴﻐﺸﺘﻟﺍ ﻑﺎﻘﻳﺇ ﺪﻴﻗ
(
DJ ﺕﺍﺮﺛﺆﻣ
(AUX ﺭﺪﺼﻣ ﺀﺎﻨﺜﺘﺳﺎﺑ)
1 ﺭﺎﻴﺘﺧﻻ [DJ EFFECT/SAMPLER] ﺭﺰﻟﺍ ﻂﻐﺿﺍ
.“EFFECT”
2.ﺮﺛﺆﻤﻟﺍ ﺭﺎﻴﺘﺧﻻ [DJ6] ﻰﻟﺇ [DJ1] ﺭﺰﻟﺍ ﻂﻐﺿﺍ
[DJ1]
[DJ2]
[DJ3]
[DJ4]
[DJ5]
[DJ6]
3.ﺩﺍﺪﻋﻹﺍ ﺭﺎﻴﺘﺧﻻ [MULTI CONTROL] ﺮﻳﻭﺪﺘﺑ ﻢﻗ
DJ
ﺮﺛﺆﻣ ﺀﺎﻐﻟﻹ
DJ ﻒﺋﺎﻇﻭ
.ﻲﻧﺎﻏﻷﺍ ﻦﻴﺑ ﺕﻮﺻ ﺔﻨﻴﻋ ﻭﺃ ﺕﻮﺻ ﺮﺛﺆﻣ ﺔﻓﺎﺿﻹ DJ ﻒﺋﺎﻇﻭ ﻡﺍﺪﺨﺘﺳﺍ ﻚﻨﻜﻤﻳ
ﻲﻧﺎﺠﻤﻟﺍ “Panasonic MAX Juke” ﻖﻴﺒﻄﺗ ﺖﻴﺒﺜﺗﻭ ﻞﻳﺰﻨﺗ ﻚﻨﻜﻤﻳ
Google Play ﻝﻼﺧ ﻦﻣ Android ﻡﺎﻈﻧ ﻰﻠﻋ ﻞﻤﻌﻟﺍ ﻢﻋﺪﻳ ﻱﺬﻟﺍ
ﹴﻥﺎﻏﺃ ﻞﻴﻐﺸﺗ ﺐﻠﻃ ﻝﺎﺜﻤﻟﺍ ﻞﻴﺒﺳ ﻰﻠﻋ ،ﺔﻴﻓﺎﺿﺇ ﺕﺍﺰﻴﻣ ﻰﻠﻋ ﻝﻮﺼﺤﻠﻟ
ﺮﻴﻴﻐﺘﻟﺍ ﻭﺃ ﻡﺎﻈﻨﻟﺍ ﻞﻴﻐﺸﺗ ﻑﺎﻘﻳﺈﺑ ﻡﻮﻘﺗ ﺎﻣﺪﻨﻋ DJ ﺔﻔﻴﻇﻭ ﻞﻴﻐﺸﺗ ﻑﺎﻘﻳﺇ ﻢﺘﻳ
.“
DJ JUKEBOX ON
.DJ jukebox ﻞﻴﻐﺸﺘﺑ ﻚﻣﺎﻴﻗ ﺪﻨﻋ ﺎﹰﻴﺋﺎﻘﻠﺗ ﺭﺍﺮﻜﺘﻟﺍ ﻊﺿﻭ ﻰﻟﺇ ﻡﺎﻈﻨﻟﺍ ﻝﻮﺤﺘﻳ
ﺩﺍﺪﻋﻹﺍ ﺭﺎﻴﺘﺧﻻ [MULTI CONTROL] ﺮﻳﻭﺪﺘﺑ ﻢﻗ ،ﻑﺎﻘﻳﻹﺍ ﻊﺿﻭ ﻲﻓ
ﺔﻨﻴﻋ ﺔﻓﺎﺿﺇ ﻢﺘﺗ .ﺭﺮﻜﺘﻤﻟﺍ ﻲﺋﺍﻮﺸﻌﻟﺍ ﻞﻴﻐﺸﺘﻟﺍ
.ﺕﺍﺭﺎﺴﻤﻟﺍ ﻊﻴﻤﺠﻟ ﺔﻴﻨﻣﺰﻟﺍ ﻞﺻﺍﻮﻔﻟﺍ ﻰﻟﺇ ﺕﻮﺻ
ﺓﻮﻄﺨﻟﺍ ﻰﻟﺇ ﺔﻌﺑﺎﺘﻤﻟﺍ ﻚﻨﻜﻤﻳ ،“WAITING REQUEST” ﺽﺮﻋ ﺪﻨﻋ
ﺔﻴﺴﻴﺋﺮﻟﺍ ﺓﺪﺣﻮﻟﺍ ﻰﻠﻋ ﺩﻮﺟﻮﻤﻟﺍ [DJ6] ﻰﻟﺇ [DJ1] ﺭﺰﻟﺍ ﻂﻐﺿﺍ
ﺭﺎﺴﻤﻟﺍ ﺕﻮﺻ ﺾﻔﺨﻨﻳ
.ﺎﹰﻴﺠﻳﺭﺪﺗ ﻲﻟﺎﺘﻟﺍ ﺭﺎﺴﻤﻟﺍ ﺕﻮﺻ ﻊﻔﺗﺮﻳﻭ ،ﺎﹰﻴﺠﻳﺭﺪﺗ ﻲﻟﺎﺤﻟﺍ
ﻰﻟﺇ ﺕﻮﺻ ﺔﻨﻴﻋ ﺔﻓﺎﺿﺇ ﻢﺘﺗ
“Panasonic MAX Juke” ﻖﻴﺒﻄﺗ ﻡﺍﺪﺨﺘﺳﺍ
.ﺪﺣﺍﻭ ﹴﺖﻗﻭ ﻲﻓ ﺓﺩﺪﻌﺘﻣ ﺓﺰﻬﺟﺃ ﻦﻣ
:ﺔﻈﺣﻼﻣ
.ﻞﻴﺠﺴﺘﻟﺍ ﺀﺎﻨﺛﺃ ﻭﺃ ﺮﺧﺁ ﺭﺪﺼﻣ ﻰﻟﺇ
DJ jukebox
MEMORY USB
:ﺔﻴﺴﻴﺋﺮﻟﺍ ﺓﺪﺣﻮﻟﺍ) [JUKEBOX] ﺭﺰﻟﺍ ﻂﻐﺿﺍ
” ﺭﺎﻴﺘﺧﻻ (
[KARAOKE/DJ JUKEBOX]
.“JU K EB OX O FF ” ﺩﺪﺣ ،ﺀﺎﻐﻟﻺﻟ
:ﺔﻈﺣﻼﻣ
.[PLAY MEN U] ﺭﺰﻟﺍ ﻂﻐﺿﺍ
1
2.[OK] ﺭﺰﻟﺍ ﻂﻐﺿﺍ ﻢﺛ ﺩﺍﺪﻋﻹﺍ ﺭﺎﻴﺘﺧﻻ [Y ،U] ﺭﺰﻟﺍ ﻂﻐﺿﺍ
ﺔﻴﺴﻴﺋﺮﻟﺍ ﺓﺪﺣﻮﻟﺍ ﻡﺍﺪﺨﺘﺳﺍ
.[4/9] ﺭﺰﻟﺍ ﻂﻐﺿﺍ ﻢﺛ
.ﺭﺮﻜﺘﻤﻟﺍ ﻲﺋﺍﻮﺸﻌﻟﺍ ﻞﻴﻐﺸﺘﻟﺍ
.ﺕﺍﺭﺎﺴﻤﻟﺍ ﻞﻛ ﺭﺍﺮﻜﺗ
.“Panasonic MAX Juke” ﻖﻴﺒﻄﺗ ﻡﺍﺪﺨﺘﺳﺍ ﻥﻭﺩ ﺔﻴﻟﺎﺘﻟﺍ
:ﻚﺑﺎﺸﺘﻤﻟﺍ ﻝﺅﺎﻀﺘﻟﺍ ﺮﺛﺆﻣ
:ﺕﻮﺼﻟﺍ ﺔﻨﻴﻋ ﺝﺰﻣ
.ﺕﺍﺭﺎﺴﻤﻟﺍ ﻊﻴﻤﺠﻟ ﺔﻴﻨﻣﺰﻟﺍ ﻞﺻﺍﻮﻔﻟﺍ
.ﺔﻴﻧﺎﺛ ﺓﺮﻣ ﺭﺰﻟﺍ ﻂﻐﺿﺍ ،ﺀﺎﻐﻟﻺﻟ
ﻊﺿﻭ ﻡﺍﺪﺨﺘﺳﺍ ﺪﻨﻋ DJ jukebox ﺮﺛﺆﻣ ﺭﺎﻴﺘﺧﺍ ﻚﻨﻜﻤﻳ ﻻ
.“RANDOM MIX REPEAT”
RANDOM
REPEAT
RND
ALL TITLE
REPEAT
RANDOM MIX
REPEAT
RND
.ﺮﺛﺆﻤﻟﺍ ﺭﺎﻴﺘﺧﻻ
[DJ1]
[DJ6] ﻰﻟﺇ [DJ2]
:ﺔﻈﺣﻼﻣ
█ ﺭﺍﺮﻜﺘﻟﺍ ﺩﺍﺪﻋﺇ ﺮﻴﻴﻐﺗ
█ DJ jukebox ﺮﺛﺆﻣ ﺮﻴﻴﻐﺗ
Page 55
ﺀﻮﻀﻟﺍﻭ ﺕﻮﺼﻟﺍ ﺕﺍﺮﺛﺆﻣ
offset printing
(Preset EQ)
ﹰ
ﻘﺒﺴﻣ ﻦﹼﻴﻌﻤﻟﺍ EQ ﺩﺍﺪﻋﺇ ﺭﺎﻴﺘﺧﻻ [R ،T] ﺭﺰﻟﺍ ﻂﻐﺿﺍ
ﻦﹼﻴﻌﻤﻟﺍ EQ ﺩﺍﺪﻋﺇ ﺭﺎﻴﺘﺧﻻ [MULTI CONTROL] ﻞﻳﻮﺤﺘﺑ ﻢﻗ ﻭﺃ
.ﺕﻮﺼﻟﺍ ﺮﺛﺆﻣ ﺭﺎﻴﺘﺧﻻ [MULTI CONTROL] ﻞﻳﻮﺤﺘﺑ ﻢﻗ ﻭﺃ
.ﺩﺍﺪﻋﻹﺍ ﺭﺎﻴﺘﺧﻻ [5/6] ﻭﺃ [2/3] ﺭﺰﻟﺍ ﻂﻐﺿﺍ ﻭﺃ
+4 ﻰﻟﺇ –4
ﻭﺃ “ON SURROUND”
“OFF SURROUND”
.“OFF D.BASS” ﺩﺪﺣ ،ﺀﺎﻐﻟﻺﻟ
.ﺩﺍﺪﻋﻹﺍ ﺭﺎﻴﺘﺧﻻ [MULTI CONTROL] ﻞﻳﻮﺤﺘﺑ ﻢﻗ ﻭﺃ
ﻝﻮﺒﻄﻟﺍ ﻉﺮﻘﻟ ﻡﻮﺠﻬﻟﺍ ﻯﻮﺘﺴﻣ ﻰﻠﻋ ﺔﻔﻴﻇﻮﻟﺍ ﻩﺬﻫ ﺪﻛﺆﺗ :D.BASS BEAT
.ﻖﺑﺎﺴﻟﺍ ﻭﺃ ﻲﻟﺎﺘﻟﺍ ﺮﻴﺛﺄﺘﻟﺍ ﺭﺎﻴﺘﺧﻻ [R ،T] ﺭﺰﻟﺍ ﻰﻠﻋ ﻂﻐﻀﻟﺍ ﺎﹰﻀﻳﺃ ﻚﻨﻜﻤﻳ
ﻚﻟﺫﻭ ،“ﺕﺎﻋﺎﻤﺴﻟﺍ ﻊﺿﻭ ﻥﺎﻜﻣ” ﻢﺴﻗ ﻲﻓ ﻮﻫ ﺎﻤﻛ ﺕﺎﻋﺎﻤﺴﻟﺍ ﺐﻴﺗﺮﺗ ﻦﻣ ﺪﻛﺄﺗ
.ﺍﹰﺮﻴﻐﺻ ﺮﺛﺆﻤﻟﺍ ﻥﻮﻜﻳ ﺪﻗ ،ﺭﺎﺴﻤﻠﻟ ﺎﹰﻘﻓﻭ .ﺎﹰﻳﻮﻗ ﺎﹰﺗﻮﺻ ﺞﺘﻨﺗﻭ
.ﻡﺎﻈﻨﻟﺍ ﺍﺬﻫ ﻰﻠﻋ ﺓﺀﺎﺿﻹﺍ ﺮﺛﺆﻣ ﺮﻴﻴﻐﺗ ﻚﻨﻜﻤﻳ
.ﺏﻮﻠﻄﻤﻟﺍ ﺮﺛﺆﻤﻟﺍ ﺭﺎﻴﺘﺧﻻ
.ﺓﺩﺪﻌﺘﻣ ﻥﺍﻮﻟﺄﺑ ﻂﻤﻨﻟﺍ ﻡﺍﺪﺨﺘﺳﺎﺑ ﺓﺀﺎﺿﻹﺍ
.ﺪﺣﺍﻭ ﻥﺍﻮﻟﺄﺑ ﻂﻤﻨﻟﺍ ﻡﺍﺪﺨﺘﺳﺎﺑ ﺓﺀﺎﺿﻹﺍ
.ﻢﺋﻼﻣ ﻞﻜﺸﺑ ﺓﺀﺎﺿﻹﺍ ﺕﺍﺮﺛﺆﻣ ﺭﻮﻬﻇ ﻥﺎﻤﻀﻟ
ﻖﺒﺴﻤﻟﺍ ﻂﺒﻀﻟﺍ ﻝﺩﺎﻌﻣ
.“PRES ET EQ”
.[OK] ﺭﺰﻟﺍ ﻂﻐﺿﺍ
(Manual EQ)
.“MANUAL EQ”
TREBLE/MID/BASS
.“D.BAS S BEAT”
[ILLUMINATION] ﺭﺰﻟﺍ ﻂﻐﺿﺍ
.ﺮﺛﺆﻤﻟﺍ ﺀﺎﻐﻟﺇ
ﺔﻴﺴﻴﺋﺮﻟﺍ ﺓﺪﺣﻮﻟﺍ ﻡﺍﺪﺨﺘﺳﺍ
.[ILLUMINATION] ﺮﻳﻭﺪﺘﺑ ﻢﻗ
ﺕﻮﺼﻟﺍ ﺕﺍﺮﺛﺆﻣ
1 ﺭﺎﻴﺘﺧﻻ ([LOCAL EQ] :ﺔﻴﺴﻴﺋﺮﻟﺍ ﺓﺪﺣﻮﻟﺍ) [EQ] ﺭﺰﻟﺍ ﻂﻐﺿﺍ
2 ﻢﺛ ﺎ
.ﺎﹰﻘﺒﺴﻣ
ﻱﻭﺪﻴﻟﺍ ﻝﺩﺎﻌﻣ
1 ﺭﺎﻴﺘﺧﻻ ([LOCAL EQ] :ﺔﻴﺴﻴﺋﺮﻟﺍ ﺓﺪﺣﻮﻟﺍ) [EQ] ﺭﺰﻟﺍ ﻂﻐﺿﺍ
2.ﺕﻮﺼﻟﺍ ﺮﺛﺆﻣ ﺭﺎﻴﺘﺧﻻ [R ،T] ﺭﺰﻟﺍ ﻂﻐﺿﺍ
3.[OK] ﺭﺰﻟﺍ ﻂﻐﺿﺍ ﻢﺛ ﺩﺍﺪﻋﻹﺍ ﺭﺎﻴﺘﺧﻻ [Y ،U] ﺭﺰﻟﺍ ﻂﻐﺿﺍ
SURROUND
D.Bass
1 ﻭﺃ “D.BASS LEVEL” ﺭﺎﻴﺘﺧﻻ [D.BASS] ﺭﺰﻟﺍ ﻂﻐﺿﺍ
2.[OK] ﺭﺰﻟﺍ ﻂﻐﺿﺍ ﻢﺛ ﺩﺍﺪﻋﻹﺍ ﺭﺎﻴﺘﺧﻻ [R ،T] ﺭﺰﻟﺍ ﻂﻐﺿﺍ
:ﺔﻈﺣﻼﻣ
ﺀﻮﻀﻟﺍ ﺕﺍﺮﺛﺆﻣ
PATT ERN
COLOR
OFF
:ﺔﻈﺣﻼﻣ
SC-MAX6000
MP3 ﺕﺍﺭﺎﺴﻣ ﻞﻴﺠﺴﺗ
:ﻦﻣ MP3 ﺕﺍﺭﺎﺴﻣ ﻞﻴﺠﺴﺗ ﻚﻨﻜﻤﻳ
“OFF PLAYMODE” ﺭﺎﻴﺘﺧﺍ
.(“ﻞﻴﻐﺸﺘﻟﺍ ﺔﻤﺋﺎﻗ”
“1-TRACK” ﻭﺃ “1-ALBUM” ﺭﺎﻴﺘﺧﺍ
ﻞﻣﺎﻜﻟﺎﺑ ﻞﹼﺠﺴﻣ ﺭﺎﺴﻣ ﺮﺧﺁ ﺪﻨﻋ ﻞﻴﺠﺴﺘﻟﺍ ﻒﻗﻮﺘﻳ
ﺭﺎﺴﻤﻟﺍ ﻝﻼﺧ ﻞﻴﺠﺴﺘﻟﺍ ﺖﻔﻗﻭﺃ ﺍﺫﺇ ،ﻼﺜﻣ .ﻡﻮﺒﻟﻻﺍ ﻲﻓ
.ﺕﺍﺭﺎﺴﻣ ﺔﺛﻼﺛ ﻝﻭﺃ ﻞﻴﺠﺴﺗ ﻂﻘﻓ ﻢﺘﻴﻓ ،ﻊﺑﺍﺮﻟﺍ
ﻥﺎﻛ ﺍﺫﺇ “NO FILE RECORDED” ﺓﺭﺎﺷﻹﺍ ﺮﻬﻈﺗ
ﺠﺴﻤﻟﺍ ﻒﻠﻤﻟﺍ ﻢﺳﺍ ﻒﻠﺘﺨﻳ ﺪﻗ ،MP3 ﺔﻧﺍﻮﻄﺳﺃ ﻦﻣ ﻞﻴﺠﺴﺘﻟﺍ ﺪﻨﻋ
ﹼ
.(“ﻞﻴﻐﺸﺘﻟﺍ ﺔﻤﺋﺎﻗ”
ﺠﺴﻤﻟﺍ ﻒﻠﻤﻟﺍ ﻢﺳﺍ ﻥﻮﻜﻳ ﻑﻮﺳ ، USB A ﻦﻣ ﻞﻴﺠﺴﺘﻟﺍ ﺪﻨﻋ
ﹼ
m
m
.[8] ﺭﺰﻟﺍ ﻂﻐﺿﺍ
.ﻞﺠﺴﻣ ﺮﻴﻏ ﺭﺎﺴﻤﻟﺍ
.(ﺪﺣ ﻰﺼﻗﺃ ﻑﻭﺮﺣ 32) ﻲﻠﺻﻷﺍ ﻒﻠﻤﻟﺍ ﻢﺳﺍ
ﻞﻛ ﻞﻴﺠﺴﺗ
)
ﺕﺍﺭﺎﺴﻤﻟﺍ
ﻭﺃ ﻡﻮﺒﻟﻻﺍ ﻞﻴﺠﺴﺗ
)
ﺩﺪﺤﻤﻟﺍ ﺭﺎﺴﻤﻟﺍ
.ﻞﻴﺠﺴﺘﻟﺍ ﺀﺪﺒﻟ
ﻞﻴﺠﺴﺘﻟﺍ ﻑﺎﻘﻳﺇ
ﺘﻗﻭ ﺕﺍﺭﺎﺴﻤﻟﺍ ﺾﻌﺑ ﻕﺮﻐﺘﺴﺗ
ﹰ
.ﻲﻠﺻﻷﺍ ﻒﻠﻤﻟﺍ
ﺔﻠﹼﺠﺴﻤﻟﺍ ﺕﺍﺭﺎﺴﻤﻟﺍ ﻑﺬﺣ
:ﺔﻴﺴﻴﺋﺮﻟﺍ ﺓﺪﺣﻮﻟﺍ) [MEMORY] ﺭﺰﻟﺍ ﻂﻐﺿﺍ
.“MEMORY” ﺭﺎﻴﺘﺧﻻ ([MEMORY/USB]
([MEMORY/USB] :ﺔﻴﺴﻴﺋﺮﻟﺍ ﺓﺪﺣﻮﻟﺍ) [USB] ﺭﺰﻟﺍ ﻂﻐﺿﺍ
.“USB B” ﺭﺎﻴﺘﺧﻻ
.ﺪﺣﺍﻭ ﺭﺎﺴﻣ ﻑﺬﺣﺍ
.(ﻰﺼﻗﺃ ﺪﺤﻛ ﺍﹰﺭﺎﺴﻣ 999) ﺍﹰﺪﺣﺍﻭ ﺎﹰﻣﻮﺒﻟﺍ ﻑﺬﺣﺍ
.USB ﺯﺎﻬﺟ ﻖﻴﺴﻨﺘﺑ ﻢﻗ
.ﺔﻴﻠﺧﺍﺪﻟﺍ ﺓﺮﻛﺍﺬﻟﺍ ﻲﻓ ﺕﺎﻣﻮﺒﻟﻷﺍ ﻞﻛ ﻑﺬﺣﺍ
.ﻪﻓﺬﺣ ﺩﺍﺮﻤﻟﺍ ﺭﺎﺘﺨﻤﻟﺍ ﺮﺼﻨﻌﻟﺍ ﺮﻬﻈﻳ
.“SURE? NO” ﺓﺭﺎﺷﻹﺍ ﺮﻬﻈﺗ
.“WRITING” ﺓﺭﺎﺷﻹﺍ ﺮﻬﻈﺗ
.“SURE? NO” ﺩﺪﺣ ،ﺀﺎﻐﻟﻺﻟ
USB B
TRACK DEL
ALBUM DEL
FORMAT
ALL DEL
.[OK]
1.ﻪﻠﻴﺠﺴﺗ ﺪﻳﺮﺗ ﻱﺬﻟﺍ ﺭﺪﺼﻤﻟﺍ ﺮﻴﻀﺤﺘﺑ ﻢﻗ
2 [USB REC 7/9] ﻭﺃ [MEMORY REC 7/9] ﺭﺰﻟﺍ ﻂﻐﺿﺍ
:ﺔﻈﺣﻼﻣ
1 MEMORY
2.ﻡﻮﺒﻟﻻﺍ ﺭﺎﻴﺘﺧﻻ [R ،T] ﺭﺰﻟﺍ ﻂﻐﺿﺍ
3.ﺏﻮﻠﻄﻤﻟﺍ ﺭﺎﺴﻤﻟﺍ ﺭﺎﻴﺘﺧﻻ [6] ﻭﺃ [2] ﺭﺰﻟﺍ ﻂﻐﺿﺍ
4.ﻊﺿﻮﻟﺍ ﺭﺎﻴﺘﺧﻻ [EDIT MODE] ﺭﺰﻟﺍ ﻂﻐﺿﺍ
5.[OK] ﺭﺰﻟﺍ ﻂﻐﺿﺍ
6.[OK] ﺭﺰﻟﺍ ﻂﻐﺿﺍ
7 ﺭﺰﻟﺍ ﻂﻐﺿﺍ ﻢﺛ “SURE? YES” ﺭﺎﻴﺘﺧﻻ [Y ،U] ﺭﺰﻟﺍ ﻂﻐﺿﺍ
•ﺔﻴﻠﺧﺍﺪﻟﺍ ﺓﺮﻛﺍﺬﻟﺍ ﻭﺃ USB B ﻰﻟﺇ MP3 ﺔﻧﺍﻮﻄﺳﻻﺍ
•ﺔﻴﻠﺧﺍﺪﻟﺍ ﺓﺮﻛﺍﺬﻟﺍ ﻭﺃ USB B ﻰﻟﺇ USB A
•ﺲﻜﻌﻟﺍ ﻭﺃ ،ﺔﻴﻠﺧﺍﺪﻟﺍ ﺓﺮﻛﺍﺬﻟﺍ ﻰﻟﺇ USB B
•.ﻞﻴﺠﺴﺘﻠﻟ ﻝﻮﻃﺃ ﺎ
•.ﺭﺪﺼﻤﻟﺍ ﺔﻟﺎﺣ ﺐﺒﺴﺑ ﺕﺍﺭﺎﺴﻤﻟﺍ ﺾﻌﺑ ﻞﻴﺠﺴﺗ ﻦﻜﻤﻳ ﻻ
• ﻦﻋ ﻞ
• ﻪﺴﻔﻧ ﻮﻫ ﻞ
RQT9979
14
55
Page 56
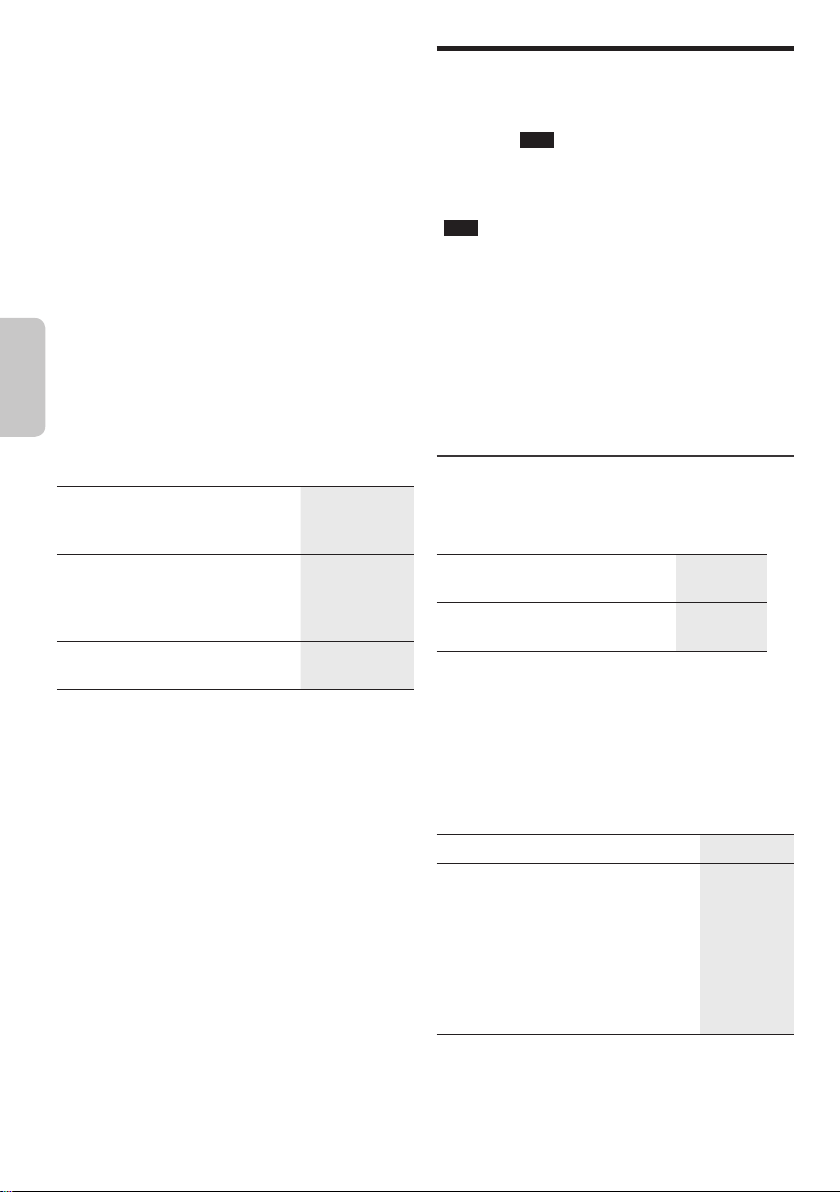
.ﺔﻳﺩﺎﻌﻟﺍ ﺔﻋﺮﺴﻟﺍ (3x) ﻑﺎﻌﺿﺃ ﺔﺛﻼﺛ :CD-R ،CD
offset printing
:CD-DA ﺹﺮﻗ ﻞﻴﺠﺴﺗ ﺔﻋﺮﺳ
.ﺔﻳﺩﺎﻌﻟﺍ ﺔﻋﺮﺴﻟﺍ (2x) ﻑﺎﻌﺿﺃ ﻥﺎﻨﺛﺍ :CD-RW
.
[OK] ﺭﺰﻟﺍ ﻂﻐﺿﺍ ﻢﺛ “HI-SPEED”
.ﺔﻳﺩﺎﻌﻟﺍ ﺔﻋﺮﺴﻟﺎﺑ ﻞﻴﺠﺴﺘﺑ
ﻲﺑﺮﻋ
ﺕﺍﺭﺎﺴﻤﻟﺍ ﻢﻴﺴﻘﺗ ﻚﻨﻜﻤﻳ ،ﻲﺟﺭﺎﺨﻟﺍ ﺯﺎﻬﺠﻟﺍ ﻭﺃ ﻮﻳﺩﺍﺮﻟﺍ ﻦﻣ ﻞﻴﺠﺴﺘﻟﺍ ﺪﻨﻋ
.ﻊﺿﻮﻟﺍ ﺭﺎﻴﺘﺧﻻ
[REC MODE] ﺭﺰﻟﺍ ﻂﻐﺿﺍ
.ﺎﹰﻳﻭﺪﻳ ﺭﺎﺴﻣ ﺔﻣﻼﻋ ﻒﺿﺃ
ﺔﻣﻼﻋ ﺔﻓﺎﺿﻹ ﻞﻴﺠﺴﺘﻟﺍ ﺀﺎﻨﺛﺃ [OK] ﺭﺰﻟﺍ ﻂﻐﺿﺍ
.ﺭﺎﺴﻣ
ﺓﺰﻬﺟﻷﺍ ﻞﻴﻐﺸﺗ ﺀﺪﺑ ﺪﻨﻋ ﺎﹰﻴﺋﺎﻘﻠﺗ ﻞﻴﺠﺴﺘﻟﺍ ﺃﺪﺒﻳ
.ﻯﺮﺧﻷﺍ
ﺎﹰﺘﻤﺻ ﻒﺸﺘﻜﻳ ﺎﻣﺪﻨﻋ ﺎﹰﺘﻗﺆﻣ ﻞﻴﺠﺴﺘﻟﺍ ﻒﻗﻮﺘﻳﻭ
.ﻥﺍﻮﺛ 3 ﺓﺪﻤﻟ
ﺔﻴﻨﻣﺯ ﺕﺍﺮﺘﻓ ﻰﻠﻋ ﺎﹰﻴﺋﺎﻘﻠﺗ ﺭﺎﺴﻣ ﻢﻴﺴﻘﺗ ﻢﺘﻳ
.ﻖﺋﺎﻗﺩ 5 ﻞﻛ
ﺘﻗﺆﻣ ﻞﻴﺠﺴﺘﻟﺍ ﻑﺎﻘﻳﺈﺑ ﺖﻤﻗ ﻭﺃ [OK] ﺭﺰﻟﺍ ﺖﻄﻐﺿ ﺍﺫﺇ ،ﻞﻴﺠﺴﺘﻟﺍ ﺀﺎﻨﺛﺃ
ﹰ
ﺩﺍﺪﻌﻟﺍ ﻂﺒﺿ ﺓﺩﺎﻋﺇ ﻢﺘﺗ ﻑﻮﺴﻓ ،“TIME MARK” ﻊﺿﻭ ﻡﺍﺪﺨﺘﺳﺍ ﺀﺎﻨﺛﺃ
ﻳﻭﺪﻳ ﺭﺎﺴﻤﻟﺍ ﺕﺎﻣﻼﻋ ﺔﻓﺎﺿﺇ ﻚﻨﻜﻤﻳ ﻻ
ﹰ
RQT9979
13
56
1.ﺎﻬﻠﻴﺠﺴﺗ ﺪﻳﺮﺗ ﻲﺘﻟﺍ ﺔﻧﺍﻮﻄﺳﻻﺍ ﻞﺧﺩﺃ
2 ﻭﺃ “NORMAL” ﺭﺎﻴﺘﺧﻻ [REC MODE] ﺭﺰﻟﺍ ﻂﻐﺿﺍ
3 [MEMORY REC 7/9] ﻭﺃ [USB REC 7/9] ﺭﺰﻟﺍ ﻂﻐﺿﺍ
.ﻞﻴﺠﺴﺘﻟﺍ ﺀﺪﺒﻟ
:ﺔﻈﺣﻼﻣ
.ﺔﻋﻮﻨﺘﻣ ﻉﺎﺿﻭﺃ ﻡﺍﺪﺨﺘﺳﺎﺑ
ﻞﻴﺠﺴﺘﻟﺍ ﻞﺒﻗ
MANUAL
SYNCHRO
ﺭﺪﺼﻤﻟ ﺔﺒﺴﻨﻟﺎﺑ)
(AUX
TIME MARK
:ﺔﻈﺣﻼﻣ
.ﻖﺋﺎﻗﺩ 5 ﻞﻛ
█ ﺔﻋﺮﺴﻟﺍ ﻲﻟﺎﻋ ﻞﻴﺠﺴﺘﻟﺍ
ﻮﻫ ﻰﺼﻗﻷﺍ ﺪﺤﻟﺍ) ﺪﻠﺠﻣ 800 ﻰﻟﺇ ﻞﺼﻳ ﺎﻣ ﻞﻴﺠﺴﺗ ﻡﺎﻈﻨﻟﺍ ﺍﺬﻬﻟ ﻦﻜﻤﻳ
ﻦﻳﺰﺨﺘﻟﺍ ﺔﻌﺴﻟ ﺎﹰﻘﻓﻭ ،ﺍﹰﺭﺎﺴﻣ 8000 ﻲﻟﺎﻤﺟﺇ ﻭﺃ (ﻡﻮﺒﻟﺃ ﻲﻓ ﺭﺎﺴﻣ 999
. USB B ﻲﻓ USB ﺯﺎﻬﺟ ﻭﺃ ﺔﻴﻠﺧﺍﺪﻟﺍ ﺓﺮﻛﺍﺬﻟﺍ ﻲﻓ ﺓﺮﻓﻮﺘﻤﻟﺍ
ﻦﻳﺰﺨﺘﻟﺍ ﺔﺣﺎﺴﻣ ﻦﻣ ﻖﻘﺤﺘﻠﻟ
.[DISPLAY] ﺭﺰﻟﺍ ﻂﻐﺿﺍ ،ﻑﺎﻘﻳﻹﺍ ﻊﺿﻭ ﻲﻓ
• ﻢﻘﻓ ،ﺔﻧﺍﻮﻄﺳﻻﺍ ﻑﻭﺮﻇ ﺐﺒﺴﺑ ﺔﻴﻟﺎﻋ ﺔﻋﺮﺴﺑ ﻞﻴﺠﺴﺘﻟﺍ ﻊﻄﺘﺴﺗ ﻢﻟ ﺍﺫﺇ
•.ﺔﻋﺮﺴﻟﺍ ﻲﻟﺎﻋ ﻞﻴﺠﺴﺘﻟﺍ ﺀﺎﻨﺛﺃ ﺕﻮﺼﻟﺍ ﻢﺘﻛ ﻢﺘﻳ
█ ﺭﺎﺴﻤﻟﺍ ﺕﺎﻣﻼﻋ ﺔﻓﺎﺿﺇ
ﻲﺳﺎﺳﻷﺍ ﻞﻴﺠﺴﺘﻟﺍ
.ﺕﺎﻧﺍﻮﻄﺳﻻﺍ ﻞﻴﻐﺸﺗ ﻊﺿﻭ ﺩﺍﺪﻋﺈﺑ ﻢﻗ
“OFF PLAYMODE” ﺭﺎﻴﺘﺧﺍ
.(“ﻞﻴﻐﺸﺘﻟﺍ ﺔﻤﺋﺎﻗ”
.(“ﻞﻴﻐﺸﺘﻟﺍ ﺔﻤﺋﺎﻗ”
• ﺎ
•.“SYNCHRO” ﻊﺿﻭ ﻲﻓ ﺎ
) “1-TRACK” ﺭﺎﻴﺘﺧﺍ ﺭﺎﺴﻣ ﻞﻴﺠﺴﺗ
m
.
(“ﺔﻴﺟﺭﺎﺨﻟﺍ ﺓﺰﻬﺟﻷﺍ”m) ﺯﺎﻬﺠﻟﺍ ﻞﻐﺷﻭ ﻞﺻﻭ
.ﻞﻴﺠﺴﺘﻟﺍ ﻆﻔﺤﻳ ﻱﺬﻟﺍ ﺪﻠﺠﻤﻟﺍ ﻢﺳﺍ ﺭﺎﻬﻇﺇ ﻢﺘﻳ
.“WRITING” ﺓﺭﺎﺷﻹﺍ ﺮﻬﻈﺗ .[8] ﺭﺰﻟﺍ ﻂﻐﺿﺍ ﻞﻴﺠﺴﺘﻟﺍ ﻑﺎﻘﻳﺇ
ﻭﺃ [MEMORY REC 7/9] ﺭﺰﻟﺍ ﻂﻐﺿﺍ
.ﻞﻴﺠﺴﺘﻟﺍ ﺀﺎﻨﺛﺃ [USB REC 7/9]
.ﻞﻴﺠﺴﺘﻟﺍ ﺔﻌﺑﺎﺘﻤﻟ ﻯﺮﺧﺃ ﺓﺮﻣ ﻂﻐﺿﺍ
ﻭﺃ ﻮﻳﺩﺍﺮﻟﺍ ﻦﻣ ﻞﻴﺠﺴﺘﻟﺍ ﺀﺎﻨﺛﺃ ﺖﻗﺆﻤﻟﺍ ﻑﺎﻘﻳﻹﺍ ﻚﻨﻜﻤﻳ
ﺔﻓﺎﺿﺇ ﻢﺘﺗ .(“
SYNCHRO
ﺖﻗﺆﻤﻟﺍ ﻑﺎﻘﻳﻹﺎﺑ ﺎﻬﻴﻓ ﻡﻮﻘﺗ ﺓﺮﻣ ﻞﻛ ﺭﺎﺴﻣ ﺔﻣﻼﻋ
” ﻊﺿﻭ ﻲﻓ ﺀﺎﻨﺜﺘﺳﺎﺑ)
.(“ﺭﺎﺴﻤﻟﺍ ﺕﺎﻣﻼﻋ ﺔﻓﺎﺿﺇ”
.ﻮﻳﺩﺍﺮﻟﺍ ﺔﻄﺤﻣ ﻰﻠﻋ ﻒﻴﻟﻮﺘﻟﺎﺑ ﻢﻗ
)
m
.ﺔﻧﺍﻮﻄﺳﻻﺍ ﻑﺎﻘﻳﺇ ﻦﻣ ﺪﻛﺄﺗ
ﺔﻴﺟﺭﺎﺨﻟﺍ ﺓﺰﻬﺟﻷﺍ
.ﻞﻴﺠﺴﺘﻟﺍ ﺀﺪﺒﻟ
:ﺔﻈﺣﻼﻣ
AUX
m
ﻞﻴﺠﺴﺘﻟﺍ
•.ﺯﺎﻬﺠﻟﺍ ﻡﺎﻈﻨﻟﺍ ﺃﺮﻘﻳ ﺎﻣﺪﻨﻋ “UPDATE” ﺮﻬﻈﺗ
•. USB B ﺏ USB ﺯﺎﻬﺟ ﻞﻴﺻﻮﺗ ﻡﺪﻋ ﺔﻟﺎﺣ ﻲﻓ “NO DEVICE” ﺮﻬﻈﺗ
:ﺔﻈﺣﻼﻣ
•.“.mp 3” ﻖﻴﺴﻨﺘﺑ ﺕﻼﻴﺠﺴﺘﻟﺍ ﻞﻛ ﻥﻮﻜﺗ
•.ﻲﺋﺍﻮﺸﻌﻟﺍ ﻞﻴﻐﺸﺘﻟﺍ ﻊﺿﻭ ﻡﺪﺨﺘﺴﺗ ﺎﻣﺪﻨﻋ ﻞﻴﺠﺴﺘﻟﺍ ﺀﺍﺮﺟﺇ ﻚﻨﻜﻤﻳ ﻻ
•.ﻞﻴﺠﺴﺘﻟﺍ ﺀﺎﻨﺛﺃ DJ ﻭﺃ (ﻲﻛﻮﻳﺭﺎﻛ) Karaoke ﺔﻔﻴﻇﻭ ﻞﻴﻐﺸﺗ ﻑﺎﻘﻳﺇ ﻢﺘﻳ
•.ﻞﻴﺠﺴﺘﻟﺍ ﺀﺎﻨﺛﺃ ﺭﺮﻜﺘﻤﻟﺍ ﻞﻴﻐﺸﺘﻟﺍ ﻊﺿﻭ ﻞﻴﻐﺸﺗ ﻑﺎﻘﻳﺇ ﻢﺘﻳ
•.ﻞﻴﺠﺴﺘﻟﺎﺑ ﺎﻬﻴﻓ ﻡﻮﻘﺗ ﺓﺮﻣ ﻞﻛ ﺪﻳﺪﺟ ﻡﻮﺒﻟﺃ ﺔﻓﺎﺿﺇ ﻢﺘﺗ
•.ﻞﻴﺠﺴﺘﻟﺍ ﺪﻌﺑ ﻡﻮﺒﻟﻷﺍ ﻞﺴﻠﺴﺗ ﺮﻴﻐﺘﻳ ﻥﺃ ﻦﻜﻤﻳ
• USB ﺯﺎﻬﺟ ﻲﻓ “REC_DATA” ﻰﻤﺴﻳ ﺪﻠﺠﻣ ﻲﻓ ﺕﻼﻴﺠﺴﺘﻟﺍ ﻆﻔﺣ ﻢﺘﻳ
.ﺔﻴﻠﺧﺍﺪﻟﺍ ﺓﺮﻛﺍﺬﻟﺍ ﻭﺃ
•.USB ﻰﻠﻋ ﻞﻴﺠﺴﺘﻟﺍ ﺀﺎﻨﺛﺃ ﺮﻤﺣﻷﺎﺑ USB ﺔﻟﺎﺣ ﺮﺷﺆﻣ ﺾﻣﻮﻳ
1.ﻪﻠﻴﺠﺴﺗ ﺪﻳﺮﺗ ﻱﺬﻟﺍ ﺭﺪﺼﻤﻟﺍ ﺭﺎﻴﺘﺧﺍ
CD-DA
ﻞﻛ ﻞﻴﺠﺴﺗ
ﺕﺍﺭﺎﺴﻤﻟﺍ
ﺩﺪﺤﻣ
ﻮﻳﺩﺍﺮﻟﺍ
2 [USB REC 7/9] ﻭﺃ [MEMORY REC 7/9] ﺭﺰﻟﺍ ﻂﻐﺿﺍ
ﺖﻗﺆﻤﻟﺍ ﻑﺎﻘﻳﻹﺍ
ﻞﻴﺠﺴﺘﻠﻟ
)
:ﺔﻈﺣﻼﻣ
•.ﻞﻴﺠﺴﺘﻟﺍ ﺀﺪﺑ ﻞﺒﻗ USB ﺯﺎﻬﺟ ﺩﺍﺪﻋﺈﺑ ﻡﺎﻈﻨﻟﺍ ﻡﻮﻘﻳ ﻰﺘﺣ ﻥﺍﻮﺛ ﺓﺪﻋ ﺮﻈﺘﻧﺍ
• ﺔﺷﺎﺷ ﻰﻠﻋ ﺮﻬﻈﻴﺳ ﻪﻧﺈﻓ ،ﺹﺮﻗ ﻦﻣ ﻲﻟﺎﺘﻟﺍ ﺭﺎﺴﻤﻟﺍ ﻞﻴﺠﺴﺗ ﻢﺘﻳ ﺎﻣﺪﻨﻋ
.ﺽﺮﻌﻟﺍ
Page 57

ﺕﻮﺼﻟﺍ ﺓﺩﻮﺟ ﻦﻴﺴﺤﺗ
offset printing
ﺓﺭﺎﺘﺨﻣ
“FM”
ﺔﺟﻮﻣ ﻥﻮﻜﺗ ﺎﻣﺪﻨﻋ
1.“FM MODE” ﺭﺎﻴﺘﺧﻻ [PLAY MENU] ﺭﺰﻟﺍ ﻂﻐﺿﺍ
.ﺩﺩﺮﺘﻟﺍ ﺮﻴﻴﻐﺗ ﺪﻨﻋ “MONO” ﺀﺎﻐﻟﺇ ﻚﻟﺬﻛ ﻢﺘﻳ
.“ﻱﻭﺪﻴﻟﺍ ﻖﺒﺴﻤﻟﺍ ﻂﺒﻀﻟﺍ” ﻢﺴﻘﻟﺎﺑ ﺔﺻﺎﺨﻟﺍ 2 ﺓﻮﻄﺨﻟﺍ ﻊﻣ ﻊﺑﺎﺗ
.“STEREO“ ﺩﺪﺣ ،ﺀﺎﻐﻟﻺﻟ
ﺩﺍﺪﻋﻹﺍ ﺮﻛﺬﺘﻟ
ﺓﺭﺎﺘﺨﻣ
“AM ”
ﺔﺟﻮﻣ ﻥﻮﻜﺗ ﺎﻣﺪﻨﻋ
.[OK] ﺭﺰﻟﺍ ﻂﻐﺿﺍ ﻢﺛ ﻦﻜﻤﻣ
AM ﺔﺟﻮﻣ ﺔﻄﺤﻣ ﺺﻴﺼﺨﺗ ﺩﺍﺪﻋﺇ
ﻂﻘﻓ ﺔﻴﺴﻴﺋﺮﻟﺍ ﺓﺪﺣﻮﻟﺍ ﺐﺴﺣ
ﺕﺍﻮﻄﺨﺑ AM ﺔﺟﻮﻣ ﺚﺑ ﺕﺎﻴﻠﻤﻋ ﻝﺎﺒﻘﺘﺳﺍ ﺎﹰﻀﻳﺃ ﻡﺎﻈﻨﻟﺍ ﺍﺬﻫ ﻊﻴﻄﺘﺴﻳ
ﻢﻗ .ﻲﻟﺎﺤﻟﺍ ﻮﻳﺩﺍﺮﻟﺍ ﺩﺩﺮﺗ ﻦﻣ ﻰﻧﺩﻷﺍ ﺪﺤﻟﺍ ﺔﺷﺎﺸﻟﺍ ﻦﹼﻴﺒﺗ ،ﻥﺍﻮﺛ ﺓﺪﻋ ﺪﻌﺑ
ﹰ
ﻘﺒﺴﻣ ﺔﻃﻮﺒﻀﻤﻟﺍ ﺕﺍﺩﺩﺮﺘﻟﺍ ﺢﺴﻣ ﻢﺘﻳ ﻑﻮﺳ ،ﺩﺍﺪﻋﻹﺍ ﺮﻴﻴﻐﺗ ﺪﻌﺑ
.ﺩﺩﺮﺘﻠﻟ ﻰﻧﺩﻷﺍ ﺪﺤﻟﺍ ﺮﹼﻴﻐﺘﻳ ﺎﻣﺪﻨﻋ ﺭﺰﻟﺍ ﺮﻳﺮﺤﺘﺑ
2.[OK] ﺭﺰﻟﺍ ﻂﻐﺿﺍ ﻢﺛ “MONO” ﺭﺎﻴﺘﺧﻻ [Y ،U] ﺭﺰﻟﺍ ﻂﻐﺿﺍ
1.“BEATPROOF” ﺭﺎﻴﺘﺧﻻ [PLAY MENU] ﺭﺰﻟﺍ ﻂﻐﺿﺍ
2 ﻝﺎﺒﻘﺘﺳﺍ ﻞﻀﻓﺃ ﺮﻓﻮﻳ ﻱﺬﻟﺍ ﺩﺍﺪﻋﻹﺍ ﺭﺎﻴﺘﺧﻻ [Y ،U] ﺭﺰﻟﺍ ﻂﻐﺿﺍ
.ﺰﺗﺮﻫ ﻮﻠﻴﻛ 10
1.“AM ” ﻭﺃ “FM” ﺭﺎﻴﺘﺧﻻ [CD/RA DIO/AUX] ﺭﺰﻟﺍ ﻂﻐﺿﺍ
2.[CD/RADIO/AUX ] ﺭﺰﻟﺍ ﻂﻐﺿ ﻊﺑﺎﺗﻭ ﻂﻐﺿﺍ
.“AM ” ﻭﺃ “FM” ﺭﺎﻴﺘﺧﻻ [CD/RADIO/AUX] ﺭﺰﻟﺍ ﻂﻐﺿﺍ
ﻱﻭﺪﻴﻟﺍ ﻒﻴﻟﻮﺘﻟﺍ
.ﺔﻋﺮﺴﺑ ﺮﻴﻴﻐﺘﻟﺍ ﻲﻓ ﺩﺩﺮﺘﻟﺍ ﺃﺪﺒﻳ ﻰﺘﺣ ﺭﺰﻟﺍ ﻂﻐﺿ ﻊﺑﺎﺗﻭ ﻂﻐﺿﺍ ،ﺎﹰﻴﺋﺎﻘﻠﺗ ﻒﻴﻟﻮﺘﻠﻟ
.ﺔﻄﺤﻤﻟﺍ ﻰﻠﻋ ﻒﻴﻟﻮﺘﻠﻟ [5] ﻭﺃ [3] ﺭﺰﻟﺍ ﻂﻐﺿﺍ
.ﻮﻳﺮﻴﺘﺳ ﻝﺎﺳﺭﺍ ﻝﺎﺒﻘﺘﺳﺍ ﺪﻨﻋ “STEREO” ﺓﺭﺎﺷﻻﺍ ﺽﺮﻋ ﻢﺘﻳ
ﺔﻴﺴﻴﺋﺮﻟﺍ ﺓﺪﺣﻮﻟﺍ ﻡﺍﺪﺨﺘﺳﺍ
ﺓﺮﻛﺍﺬﻠﻟ ﻖﺒﺴﻤﻟﺍ ﻂﺒﻀﻟﺍ
ﻭ FM ﺔﻄﺤﻣ 30 ﻰﻟﺇ ﻞﺼﻳ ﺎﻤﻟ ﻖﺒﺴﻤﻟﺍ ﻂﺒﻀﻟﺍ ﺀﺍﺮﺟﺇ ﻚﻨﻜﻤﻳ
ﻭﺃ “LOWEST” ﺭﺎﻴﺘﺧﻻ [AUTO PRESET] ﺭﺰﻟﺍ ﻂﻐﺿﺍ
•.ﻯﺮﺧﺃ ﺓﺮﻣ ﺔﻘﺑﺎﺴﻟﺍ ﺕﺍﻮﻄﺨﻟﺍ ﺬﻴﻔﻨﺘﺑ ﻢﻗ ،ﻲﻟﻭﻷﺍ ﺩﺍﺪﻋﻹﺍ ﻰﻟﺇ ﻉﻮﺟﺮﻠﻟ
•.ﺎ
ﻲﻓ ﻝﺎﺒﻘﺘﺳﺍ ﻦﻜﻤﻳ ﻪﻧﺃ ﺕﺎﻄﺤﻤﻟﺍ ﻊﻴﻤﺟ ﻒﻟﺍﻮﻤﻟﺍ ﻖﺒﺴﻤﻟﺍ ﻂﺒﻀﻟﺍ
.ﺩﺩﺮﺗ ﻞﻗﺃ ﻦﻣ ﻒﻴﻟﻮﺘﻟﺍ ﺃﺪﺒﻳ
.ﻲﻟﺎﺤﻟﺍ ﺩﺩﺮﺗ ﻦﻣ ﻒﻴﻟﻮﺘﻟﺍ ﺃﺪﺒﻳ
“CURRENT”
.
LOWEST
CURRENT
.ﻱﺪﻋﺎﺼﺗ ﺐﻴﺗﺮﺗ ﻲﻓ ﺕﺍﻮﻨﻘﻟﺍ
.[8] ﺭﺰﻟﺍ ﻂﻐﺿﺍ ،ﺀﺎﻐﻟﻺﻟ
ﻮﻳﺩﺍﺮﻟﺍ
ﺮﻴﻀﺤﺘﻟﺍ
1.“MANUAL” ﺭﺎﻴﺘﺧﻻ [TUNE MODE] ﺭﺰﻟﺍ ﻂﻐﺿﺍ
2 ﻰﻠﻋ ﻒﻴﻟﻮﺘﻠﻟ [5/6] ﻭﺃ [2/3] ﺭﺰﻟﺍ ﻂﻐﺿﺍ
.ﺔﻄﺤﻤﻟﺍ
.AM ﺔﻄﺤﻣ 15
█ ﻲﺋﺎﻘﻠﺘﻟﺍ ﻖﺒﺴﻤﻟﺍ ﻂﺒﻀﻟﺍ
1
2.ﻖﺒﺴﻤﻟﺍ ﻂﺒﻀﻟﺍ ﺀﺪﺒﻟ [OK] ﺭﺰﻟﺍ ﻂﻐﺿﺍ
[2/3] :ﺔﻴﺴﻴﺋﺮﻟﺍ ﺓﺪﺣﻮﻟﺍ) [5] ﻭﺃ [3] ﺭﺰﻟﺍ ﻂﻐﺿﺍ
.ﺔﻄﺤﻤﻟﺍ ﻰﻠﻋ ﻒﻴﻟﻮﺘﻠﻟ ([5/6] ﻭﺃ
1
2.[OK] ﺭﺰﻟﺍ ﻂﻐﺿﺍ
ﹰ
ﺮﺜﻛﺃ ﺕﺎﻄﺤﻣ ﻂﺒﻀﻟ ﻯﺮﺧﺃ ﺓﺮﻣ 3 ﻰﻟﺇ 1 ﻦﻣ ﺕﺍﻮﻄﺨﻟﺍ ﺬﻴﻔﻨﺘﺑ ﻢﻗ
ﻢﻗﺮﻟﺍ ﺲﻔﻧ ﻰﻠﻋ ﺓﺩﻮﺟﻮﻣ ﺔﻄﺤﻣ ﻱﺃ ﻞﺤﻣ ﺓﺪﻳﺪﺠﻟﺍ ﺔﻄﺤﻤﻟﺍ ﻞﺤﺗ
ﺔﻃﻮﺒﻀﻤﻟﺍ ﺔﻄﺤﻤﻟﺍ ﺭﺎﻴﺘﺧﻻ [6] ﻭﺃ [2] ﻭﺃ ﺩﺍﺪﻋﻷﺍ ﺭﺍﺭﺯﺃ ﻂﻐﺿﺍ
ﻘﺒﺴﻣ ﻁﻮﺒﻀﻣ ﻢﻗﺭ ﺭﺎﻴﺘﺧﻻ ﺩﺍﺪﻋﻷﺍ ﺭﺍﺭﺯﺃ ﻂﻐﺿﺍ
.ﻖﺒﺴﻣ ﻞﻜﺸﺑ
.ﺎﹰﻘﺒﺴﻣ ﻁﻮﺒﻀﻤﻟﺍ
ﺔﻴﺴﻴﺋﺮﻟﺍ ﺓﺪﺣﻮﻟﺍ ﻡﺍﺪﺨﺘﺳﺍ
3.ﺎ
.ﺎﹰﻘﺒﺴﻣ
1.“PRESET” ﺭﺎﻴﺘﺧﻻ [TUNE MODE] ﺭﺰﻟﺍ ﻂﻐﺿﺍ
2 ﺔﻄﺤﻤﻟﺍ ﺭﺎﻴﺘﺧﻻ [5/6] ﻭﺃ [2/3] ﺭﺰﻟﺍ ﻂﻐﺿﺍ
.ﺎﹰﻘﺒﺴﻣ ﺔﻃﻮﺒﻀﻤﻟﺍ
█ ﻱﻭﺪﻴﻟﺍ ﻖﺒﺴﻤﻟﺍ ﻂﺒﻀﻟﺍ
█ ﺎﹰﻘﺒﺴﻣ ﺔﻃﻮﺒﻀﻣ ﺔﻄﺤﻣ ﺭﺎﻴﺘﺧﺍ
RQT9979
12
57
Page 58
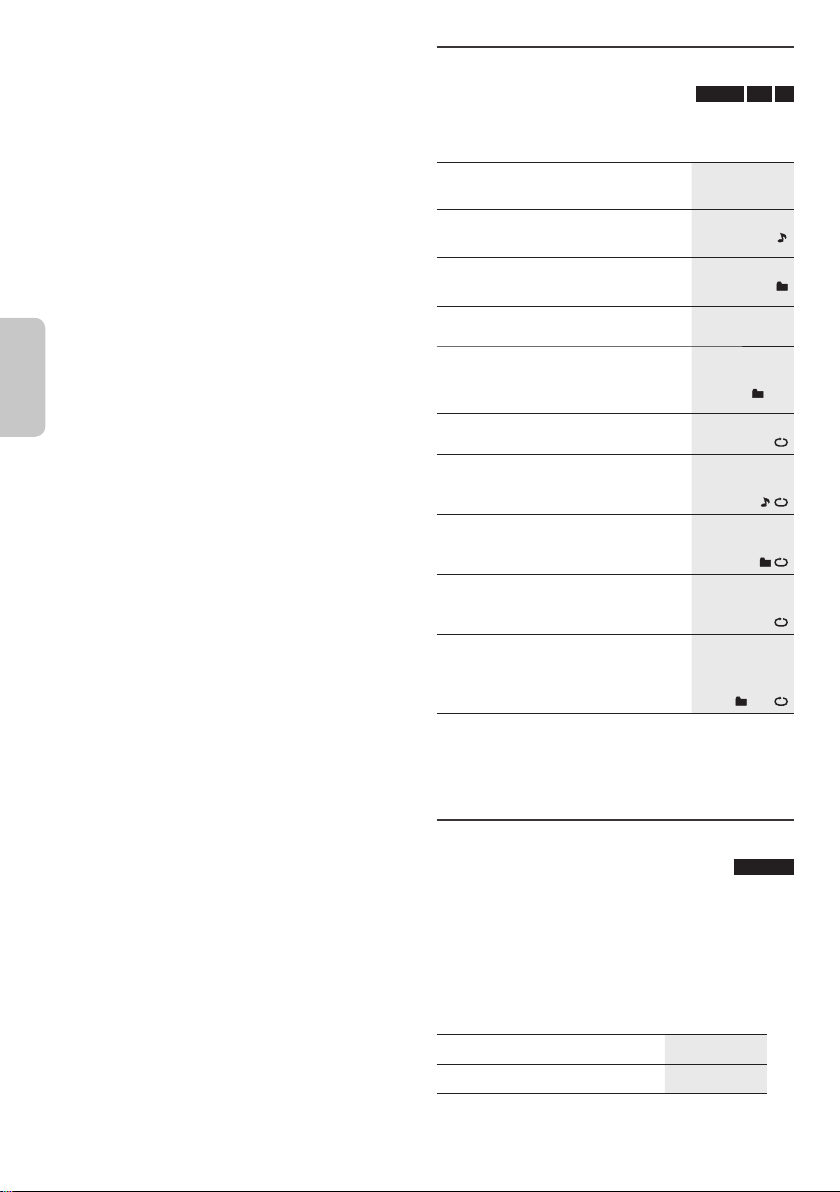
.ﻪﻴﻠﻋ ﻞﺠﺴﻤﻟﺍ ﺯﺎﻬﺠﻟﺍ ﻰﻠﻋ ﺹﺮﻘﻟﺍ ﺀﺎﻬﻧﺈﺑ ﻢﻗ ،ﺽﺮﻌﻟﺍ ﻞﺒﻗ
offset printing
.MP3 ﻭﺃ CD-DA
.FAT 12/16 /32 ﻡﺎﻈﻧ ﻢﻋﺩ ﻂﻘﻓ ﻢﺘﻳ
ﻲﺑﺮﻋ
ﺔﻧﺍﻮﻄﺳﻷﺍ ﻰﻠﻋ
ﻨﻤﻀﺘﻣ) ﺎﹰﻣﻮﺒﻟﺃ 255
ﹰ
ﺀﺎﻨﺜﺘﺳﺎﺑ) 2 ﻭﺃ 1 ﻯﻮﺘﺴﻤﻟﺍ ISO9660 ﻊﻣ ﺔﻧﺍﻮﻄﺳﻻﺍ ﻖﻓﺍﻮﺘﺗ ﻥﺃ ﺐﺠﻳ
.(ﺔﻌﺳﻮﻤﻟﺍ ﺕﺎﻘﻴﺴﻨﺘﻟﺍ
USB ﺯﺎﻬﺟ ﻰﻠﻋ MP3 ﻒﻠﻣ
ﻨﻤﻀﺘﻣ) ﺎﹰﻣﻮﺒﻟﺃ 800
ﹰ
ﺍﹰﺭﺎﺴﻣ 8000
ﺪﺣﺍﻭ ﻡﻮﺒﻟﺃ ﻲﻓ ﺍﹰﺭﺎﺴﻣ 999
.ﻞﻴﺠﺴﺘﻟﺍ
.ﺖﻳﺎﺑ ﺎﺠﻴﺟ 32
.ﺕﺎﻣﻮﺒﻟﺃ
MP3 ﻒﻠﻣ
ﺍﹰﺭﺎﺴﻣ 999
ﺓﺭﻭﺩ 20
█ ﺔﻧﺍﻮﻄﺳﻻﺍ ﻝﻮﺣ ﺔﻈﺣﻼﻣ
• ﻖﻴﺴﻨﺘﺑ CD-R/RW ﺕﺎﻧﺍﻮﻄﺳﺍ ﻞﻴﻐﺸﺗ ﺯﺎﻬﺠﻟﺍ ﺍﺬﻫ ﻊﻴﻄﺘﺴﻳ
•
• ﺔﻟﺎﺣ ﺐﺒﺴﺑ CD-R/RW ﺕﺎﻧﺍﻮﻄﺳﺍ ﺾﻌﺑ ﻞﻴﻐﺸﺗ ﻦﻜﻤﻳ ﻻ
.ﺩﺍﺪﻋﻹﺍ ﺀﺎﻐﻟﻹ
█ USB ﺯﺎﻬﺟ ﻝﻮﺣ ﺔﻈﺣﻼﻣ
•.USB ﺓﺰﻬﺟﺃ ﻊﻴﻤﺠﺑ ﻝﺎﺼﺗﻻﺍ ﻡﺎﻈﻨﻟﺍ ﺍﺬﻫ ﻦﻤﻀﻳ ﻻ
•.ﺔﻠﻣﺎﻛ ﺔﻋﺮﺴﺑ USB 2.0 ﻡﺎﻈﻨﻟﺍ ﺍﺬﻫ ﻢﻋﺪﻳ
• ﻰﻟﺇ ﺎﻬﺘﻌﺳ ﻞﺼﺗ ﻲﺘﻟﺍ USB ﺓﺰﻬﺟﺃ ﻢﻋﺩ ﻡﺎﻈﻨﻟﺍ ﺍﺬﻬﻟ ﻦﻜﻤﻳ
•
█ MP3 ﻒﻠﻣ ﻝﻮﺣ ﺔﻈﺣﻼﻣ
• ﺎﻬﻧﺃ ﻰﻠﻋ ﺔﻓﺮﻌﻤﻟﺍ ﺕﺍﺪﻠﺠﻤﻟﺍﻭ ﺕﺍﺭﺎﺴﻣ ﺎﻬﻧﺃ ﻰﻠﻋ ﺔﻓﺮﻌﻤﻟﺍ ﺕﺎﻔﻠﻤﻟﺍ
•.“.M P3” ﻭﺃ “.mp 3” ﻖﺤﻠﻤﻟﺍ ﻰﻠﻋ ﺕﺍﺭﺎﺴﻤﻟﺍ ﻱﻮﺘﺤﻳ ﻥﺃ ﺐﺠﻳ
•.ﻪﺑ ﻢﻬﺘﻠﺠﺳ ﻱﺬﻟﺍ ﺐﻴﺗﺮﺘﻟﺎﺑ ﺕﺍﺭﺎﺴﻤﻟﺍ ﻞﻴﻐﺸﺗ ﺓﺭﻭﺮﻀﻟﺎﺑ ﻢﺘﻳ ﻦﻟ
•.ﻉﺎﻄﻘﻟﺍ ﻢﺠﺣ ﺐﺒﺴﺑ ﺕﺎﻔﻠﻤﻟﺍ ﺾﻌﺑ ﻞﻤﻌﺗ ﻻ ﻥﺃ ﻦﻜﻤﻳ
•:ﻰﻟﺇ ﻞﺼﻳ ﺎﻣ ﻊﻣ ﻞﻣﺎﻌﺘﻟﺍ ﺯﺎﻬﺠﻟﺍ ﺍﺬﻫ ﻊﻴﻄﺘﺴﻳ
– (ﻲﺳﺎﺳﻷﺍ ﺪﻠﺠﻤﻟﺍ ﺎ
–
–
•
•:ﻰﻟﺇ ﻞﺼﻳ ﺎﻣ ﻊﻣ ﻞﻣﺎﻌﺘﻟﺍ ﺯﺎﻬﺠﻟﺍ ﺍﺬﻫ ﻊﻴﻄﺘﺴﻳ
– (ﻲﺳﺎﺳﻷﺍ ﺪﻠﺠﻤﻟﺍ ﺎ
–
–
.MP3 ﻡﻮﺒﻟﻻﺍ ﺭﺎﻴﺘﺧﻻ [R ،T] ﺭﺰﻟﺍ ﻂﻐﺿﺍ
.ﺔﻴﺋﺍﻮﺸﻋ ﺓﺭﻮﺼﺑ ﺕﺍﺭﺎﺴﻤﻟﺍ ﻞﻛ ﻞﻴﻐﺸﺘﺑ ﻢﻗ
ﻡﻮﺒﻟﺃ ﻲﻓ ﺓﺩﻮﺟﻮﻤﻟﺍ ﺕﺍﺭﺎﺴﻤﻟﺍ ﻊﻴﻤﺟ ﻞﻴﻐﺸﺘﻟ
.MP3 ﻡﻮﺒﻟﻻﺍ ﺭﺎﻴﺘﺧﻻ [R ،T] ﺭﺰﻟﺍ ﻂﻐﺿﺍ
.ﺩﺪﺤﻣ ﺪﺣﺍﻭ ﺭﺎﺴﻣ ﻞﻴﻐﺸﺘﻟ
.ﺭﺎﺴﻤﻟﺍ ﺭﺎﻴﺘﺧﻻ ﺩﺍﺪﻋﻷﺍ ﺭﺍﺭﺯﺃ ﻂﻐﺿﺍ
.ﺩﺪﺤﻣ ﺪﺣﺍﻭ MP3 ﻡﻮﺒﻟﺃ ﻞﻴﻐﺸﺘﻟ
.ﻲﺋﺍﻮﺸﻋ ﻞﻜﺸﺑ ﺩﺪﺤﻣ ﺪﺣﺍﻭ MP3
.ﺕﺍﺭﺎﺴﻤﻟﺍ ﻞﻛ ﺭﺍﺮﻜﺗ
.1-TRACK ﺭﺍﺮﻜﺗ
.1-ALBUM ﺭﺍﺮﻜﺗ
.ﺭﺮﻜﺘﻤﻟﺍ ﻲﺋﺍﻮﺸﻌﻟﺍ ﻞﻴﻐﺸﺘﻟﺍ
.1-ALBUM RA NDO M ﺭﺍﺮﻜﺗ
ﻞﻴﻐﺸﺘﻟﺍ ﺔﻤﺋﺎﻗ
MEMORY USB CD
1.[PLAY MENU] ﺭﺰﻟﺍ ﻂﻐﺿﺍ
2.[OK] ﺭﺰﻟﺍ ﻂﻐﺿﺍ ﻢﺛ ﺩﺍﺪﻋﻹﺍ ﺭﺎﻴﺘﺧﻻ [Y ،U] ﺭﺰﻟﺍ ﻂﻐﺿﺍ
OFF
PLAYMODE
1-TRACK
1
1-ALBUM
1
RANDOM
RND
1-ALBUM
RANDOM
1 RND
ALL REPEAT
1-TRACK
REPEAT
1
1-ALBUM
REPEAT
1
RANDOM
REPEAT
RND
1-ALBUM
RANDOM
REPEAT
1 RND
:ﺔﻈﺣﻼﻣ
• ﻢﺗ ﻲﺘﻟﺍ ﺕﺍﺭﺎﺴﻤﻟﺍ ﻰﻟﺇ ﻲﻄﺨﺘﻟﺍ ﻚﻨﻜﻤﻳ ﻻ ،ﻲﺋﺍﻮﺸﻌﻟﺍ ﻞﻴﻐﺸﺘﻟﺍ ﺀﺎﻨﺛﺃ
.ﺎﻬﻠﻴﻐﺸﺗ
•.ﻙﺮﺤﺘﻤﻟﺍ ﺏﺎﺒﻟﺍ ﺢﺘﻓ ﺪﻨﻋ ﺩﺍﺪﻋﻹﺍ ﺀﺎﻐﻟﺇ ﻢﺘﻳ
RQT9979
11
58
.ﻝﺎﺼﺗﻻﺍ ﻉﻮﻧ ﺐﺳﺎﻨﻴﻟ ﻁﺎﺒﺗﺭﻻﺍ ﻊﺿﻭ ﺮﻴﻴﻐﺗ ﻚﻨﻜﻤﻳ
ﻪﻠﺼﻓﺎﻓ ،
Bluetooth
®
ﺯﺎﻬﺠﺑ ﹰﻼﺼﺘﻣ ﻡﺎﻈﻨﻟﺍ ﺍﺬﻫ ﻥﺎﻛ ﺍﺫﺇ
.ﻝﺎﺼﺗﻻﺍ ﻰﻠﻋ ﺪﻴﻛﺄﺘﻟﺍ
.ﺕﻮﺼﻟﺍ ﺓﺩﻮﺟ ﻰﻠﻋ ﺪﻴﻛﺄﺘﻟﺍ
ﻁﺎﺒﺗﺭﻻﺍ ﻊﺿﻭ
BLUETOOTH
ﺮﻴﻀﺤﺘﻟﺍ
.(“ﺯﺎﻬﺟ ﻞﺼﻓ”
MODE 1
MODE 2
m
1.“LINK MODE” ﺭﺎﻴﺘﺧﻻ [PLAY MENU] ﺭﺰﻟﺍ ﻂﻐﺿﺍ
2.[OK] ﺭﺰﻟﺍ ﻂﻐﺿﺍ ﻢﺛ ﺩﺍﺪﻋﻹﺍ ﺭﺎﻴﺘﺧﻻ [Y ،U] ﺭﺰﻟﺍ ﻂﻐﺿﺍ
:ﺔﻈﺣﻼﻣ
)
•.ﻊﻄﻘﺘﻣ ﺯﺎﻬﺠﻟﺍ ﻦﻣ ﺭﺩﺎﺼﻟﺍ ﺕﻮﺼﻟﺍ ﻥﺎﻛ ﺍﺫﺇ “MODE 1” ﺩﺪﺣ
Page 59
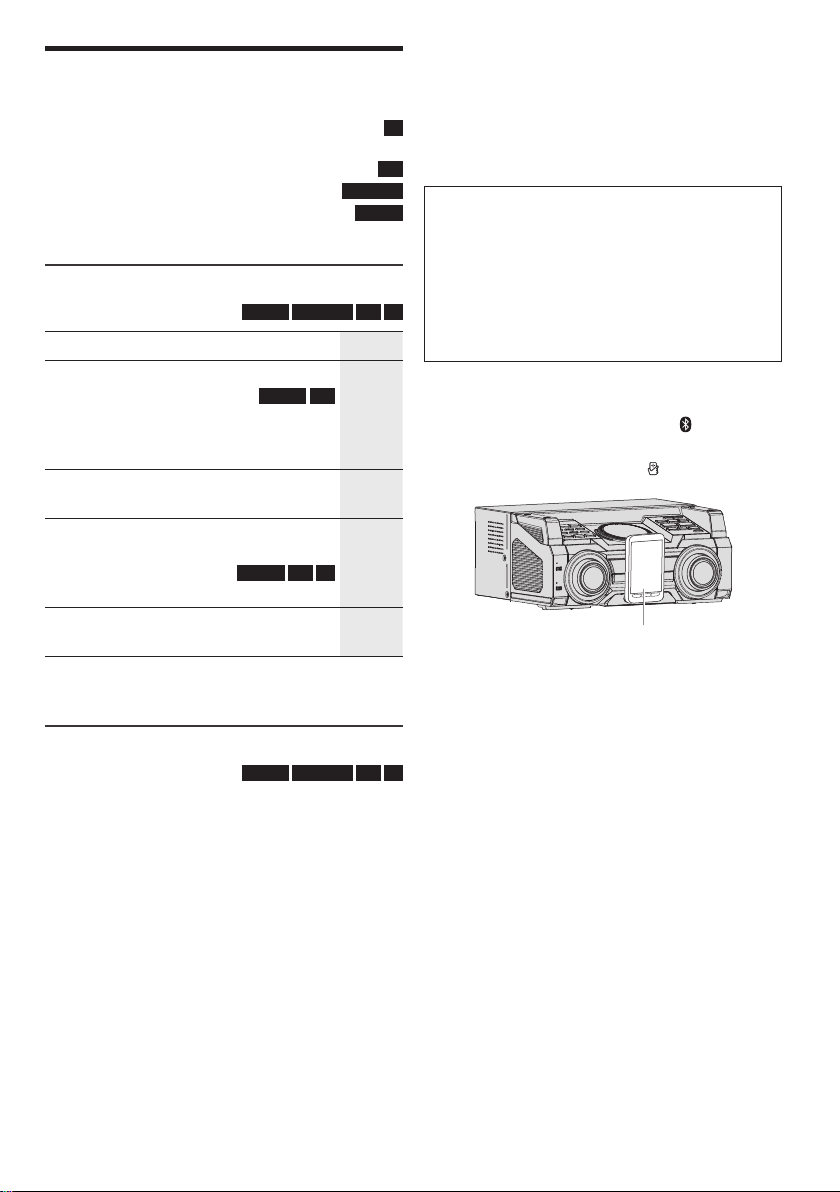
ﻂﺋﺎﺳﻮﻟﺍ ﻞﻴﻐﺸﺗ
offset printing
.ﺓﺰﻴﻤﻟﺍ ﺮﻓﻮﺗ ﻰﻟﺇ ﺔﻴﻟﺎﺘﻟﺍ ﺕﺎﻣﻼﻌﻟﺍ ﺮﻴﺸﺗ
ﻞﻤﺘﺸﺗ ﻲﺘﻟﺍ ﻭﺃ
“ﻞﻴﺠﺴﺘﻟﺍ” ﻰﻟﺇ ﻊﺟﺭﺍ) ﺖﻳﺎﺑ ﺎﺠﻴﺟ 2 ﺔﻌﺴﺑ ﺔﻴﻠﺧﺍﺩ ﺓﺮﻛﺍﺫ
،ﺭﺎﺴﻤﻟﺍ ﻢﻗﺭﻭ MP3 ﻡﻮﺒﻟﺃ ﻞﺜﻣ ،ﺓﺮﻓﻮﺘﻤﻟﺍ ﺕﺎﻣﻮﻠﻌﻤﻟﺍ ﺓﺪﻫﺎﺸﻣ ﻚﻨﻜﻤﻳ
CD-DA ﻖﻴﺴﻨﺘﺑ CD-R/RW ﺹﺍﺮﻗﺃ
.
MP3 ﺕﺎﻔﻠﻣ ﻰﻠﻋ ﻞﻤﺘﺸﻳ ﻱﺬﻟﺍ USB ﺯﺎﻬﺟ
MP3 ﺕﺎﻔﻠﻣ ﻰﻠﻋ
.
.
Bluetooth
®
ﺯﺎﻬﺟ
: BLUETOOTH
.(ﺔﻴﻠﺧﺍﺪﻟﺍ ﺓﺮﻛﺍﺬﻟﺍ ﻰﻟﺇ ﺕﺍﺭﺎﺴﻣ ﺔﻓﺎﺿﻹ
ﻲﺴﻴﺋﺮﻟﺍ ﻞﻴﻐﺸﺘﻟﺍ
MEMORY BLUETOOTH USB CD
.[4/9] ﺭﺰﻟﺍ ﻂﻐﺿﺍ ﻞﻴﻐﺸﺘﻟﺍ
.ﺓﺮﻛﺍﺬﻟﺍ ﻲﻓ ﻊﺿﻮﻤﻟﺍ ﻆﻔﺣ ﻢﺘﻳ
MEMORY USB
.“RESUME” ﺓﺭﺎﺷﻹﺍ ﺮﻬﻈﺗ
.ﺔﻠﻣﺎﻛ ﺓﺭﻮﺼﺑ ﻑﺎﻘﻳﻹ ﻯﺮﺧﺃ ﺓﺮﻣ ﻂﻐﺿﺍ
.[4/9] ﺭﺰﻟﺍ ﻂﻐﺿﺍ
.ﻞﻴﻐﺸﺘﻟﺍ ﺔﻌﺑﺎﺘﻤﻟ ﻯﺮﺧﺃ ﺓﺮﻣ ﻂﻐﺿﺍ
:ﺔﻴﺴﻴﺋﺮﻟﺍ ﺓﺪﺣﻮﻟﺍ) [6] ﻭﺃ [2] ﺭﺰﻟﺍ ﻂﻐﺿﺍ
.ﺭﺎﺴﻤﻟﺍ ﻲﻄﺨﺘﻟ ([5/6] ﻭﺃ [2/3]
.MP3 ﻡﻮﺒﻟﻻﺍ ﻲﻄﺨﺘﻟ [R ،T] ﺭﺰﻟﺍ ﻂﻐﺿﺍ
MEMORY USB CD
[5] ﻭﺃ [3] ﺭﺰﻟﺍ ﻂﻐﺿ ﻊﺑﺎﺗﻭ ﻂﻐﺿﺍ
.([5/6] ﻭﺃ [2/3] :ﺔﻴﺴﻴﺋﺮﻟﺍ ﺓﺪﺣﻮﻟﺍ)
.ﻞﻴﻐﺸﺘﻟﺍ ﺕﺎﻴﻠﻤﻋ ﺾﻌﺑ ﻞﻤﻌﺗ ﻻ ﺪﻗ ،Bluetooth® ﺯﺎﻬﺠﻟ ﺎﹰﻘﻓﻭ
ﺓﺮﻓﻮﺘﻤﻟﺍ ﺕﺎﻣﻮﻠﻌﻤﻟﺍ ﺓﺪﻫﺎﺸﻣ
MEMORY BLUETOOTH USB CD
.ﺽﺮﻌﻟﺍ ﺔﺷﺎﺷ ﻰﻠﻋ
[DISPLAY] ﺭﺰﻟﺍ ﻂﻐﺿﺍ
.
ﺒﻳﺮﻘﺗ :ﺎﻫﺭﺎﻬﻇﺇ ﻦﻜﻤﻳ ﻲﺘﻟﺍ ﻑﻭﺮﺤﻠﻟ ﻰﺼﻗﻷﺍ ﺪﺤﻟﺍ
ﹰ
: MEMORY
ﻑﺎﻘﻳﻺﻟ
ﻑﺎﻘﻳﻺﻟ
ﺖﻗﺆﻤﻟﺍ
ﻲﻄﺨﺘﻟ
ﺚﺤﺒﻠﻟ
:ﺔﻈﺣﻼﻣ
:ﺔﻈﺣﻼﻣ
ﺔﻘﻓﺍﻮﺘﻤﻟﺍ (Android™ ﺓﺰﻬﺟﻷﺍ) Bluetooth® ﺓﺰﻬﺟﻷ ﺔﺒﺴﻨﻟﺎﺑ
: CD
Bluetooth® ﺯﺎﻬﺟ ﻞﻴﺠﺴﺗ ﻦﻣ ﺍﹰﺀﺪﺑ ،ﺕﺍﺮﻴﻀﺤﺘﻟﺍ ﻊﻴﻤﺟ ﻝﺎﻤﻛﺇ ﻚﻨﻜﻤﻳ
Bluetooth® ﺯﺎﻬﺟ ﺲﻤﻟ ﻯﻮﺳ ﻚﻴﻠﻋ ﺎﻤﻓ ،ﻝﺎﺼﺗﺍ ﺀﺎﺸﻧﺇ ﻰﻟﺇ ﹰﻻﻮﺻﻭﻭ
: USB
.(ﺐﻳﺮﻘﻟﺍ ﻞﻘﺤﻟﺎﺑ ﻝﺎﺼﺗﻻﺍ) NFC ﺓﺰﻴﻣ ﻊﻣ ﻖﻓﺍﻮﺘﻣ
ﻖﻴﺒﻄﺗ ﺖﻴﺒﺜﺗ 4.1 ﻦﻣ ﻞﻗﺃ ﺭﺍﺪﺻﺈﺑ ﻞﻤﻌﺗ ﻲﺘﻟﺍ Android ﺓﺰﻬﺟﺃ ﺐﻠﻄﺘﺗ
.(ﺎﹰﻧﺎﺠﻣ) “Panasonic MAX Juke”
ﺩﺪﺣ ﻚﻟﺫ ﺪﻌﺑ ﻪﻨﻋ ﺚﺤﺒﻠﻟ Google Play™
.“Panasonic MAX Juke”
.ﺯﺎﻬﺠﻟﺎﺑ
.[ ] ﺔﻴﺴﻴﺋﺮﻟﺍ ﺓﺪﺣﻮﻟﺍ
(ﻖﻓﺮﻣ ﺮﻴﻏ) Bluetooth
.ﻡﺎﻈﻨﻟﺍ ﻦﻋ ﺍﺪﻴﻌﺑ ﺯﺎﻬﺠﻟﺍ ﻞﻘﻧ ﻚﻟﺫ ﺪﻌﺑ
ﺍﹰﺪﻴﻌﺑ ﺯﺎﻬﺠﻟﺍ ﻞﻘﻧﺍ .ﹴﻥﺍﻮﺛ ﻊﻀﺒﻟ ﻡﺎﻈﻨﻟﺍ ﺔﺷﺎﺷ ﻰﻠﻋ ﻞﺼﺘﻤﻟﺍ
ﻦﺴﺤﺗ ﺪﻗ ﻝﺎﺼﺗﻻﺍ .ﺲﻤﻠﻟﺍ ﻊﺿﻮﻣ ﺮﻴﻴﻐﺗ ،NFC ﺲﻤﻟ ﺔﻘﻄﻨﻤﻟ
.“Panasonic MAX Juke” ﻖﻴﺒﻄﺗ ﺖﻣﺪﺨﺘﺳﺍ ﺍﺫﺇ
ﺯﺎﻬﺠﻟﺍ ﻞﺼﻓ ﻢﺘﻴﺳ .ﺔﻴﺴﻴﺋﺮﻟﺍ ﺓﺪﺣﻮﻟﺍ ﻰﻠﻋ ﺩﻮﺟﻮﻤﻟﺍ NFC ﺲﻤﻟ ﺔﻘﻄﻨﻤﻟ
•32 ﺎ
•.2.3 ﻭ 1.1 ﻭ 1.0 ﺭﺍﺪﺻﻹﺍ ID3 ﺕﺎﻗﺎﻄﺑ ﺯﺎﻬﺠﻟﺍ ﺍﺬﻫ ﻢﻋﺪﻳ
•.ﻒﻠﺘﺨﻣ ﻞﻜﺸﺑ ﺎﻬﺿﺮﻋ ﻢﺘﻳ ﻥﺃ ﻦﻜﻤﻳ ﺯﺎﻬﺠﻟﺍ ﺎﻬﻤﻋﺪﻳ ﻻ ﻲﺘﻟﺍ ﺺﻨﻟﺍ ﺕﺎﻧﺎﻴﺑ
ﻴﺋﺎﻘﻠﺗ ﻞﻴﻐﺸﺘﻟﺍ ﺃﺪﺒﻳ ﺪﻗ ،ﻝﺎﺼﺗﺍ ﺀﺎﺸﻧﺇ ﺪﻨﻋ
ﹰ
ﻂﻘﻓ NFC ﻊﻣ
A ﺚﺤﺑ ﻊﺑﺮﻣ ﻲﻓ “Panasonic MAX Juke” ﻞﺧﺩﺃ
B.ﻖﻴﺒﻄﺗ ﻞﻴﻐﺸﺗ
– .ﺕﺍﺩﺍﺪﻋﻹﺍ ﺔﻴﻠﻤﻋ ﻝﺎﻤﻛﻹ ﺕﺎﻤﻴﻠﻌﺘﻟﺍ ﻊﺒﺗﺍ
– .ﻖﻴﺒﻄﺘﻟﺍ ﻦﻣ ﺭﺍﺪﺻﺇ ﺙﺪﺣﺃ ﻡﺍﺪﺨﺘﺳﺍ ﻦﻣ ﺪﻛﺄﺗ
ﺮﻴﻀﺤﺘﻟﺍ
NFC ﺓﺰﻴﻣ ﻞﻴﻐﺸﺘﺑ ﻢﻗ
1.[ ] ﺭﺰﻟﺍ ﻂﻐﺿﺍ
2 ﻰﻠﻋ ﺩﻮﺟﻮﻤﻟﺍ NFC ﺲﻤﻟ ﺔﻘﻄﻨﻣ ﺭﺍﺮﻤﺘﺳﻻﺍ ﻊﻣ ﺯﺎﻬﺠﻟﺎﺑ ﺲﻤﻟﺍ
®
ﺯﺎﻬﺟ
– ﺓﺪﻳﺪﺟ ﺔﺷﺎﺷ ﺭﺎﻬﻇﺇ ﻭﺃ ﺰﺘﻬﻳ ،ﺎﺗﻮﺻ ﺭﺪﺼﻳ ﻰﺘﺣ ﺯﺎﻬﺠﻟﺍ ﺭﺍﺮﻤﺘﺳﻻﺍ
– ﺯﺎﻬﺠﻟﺍ ﻢﺳﺍ ﺮﻬﻈﻳ ،ﺯﺎﻬﺟ ﻝﺎﺼﺗﺍﻭ ﻞﻴﺠﺴﺘﻟﺍ ﻝﺎﻤﺘﻛﺍ ﺩﺮﺠﻤﺑ
.ﻡﺎﻈﻨﻟﺍ ﻦﻋ
– ﺯﺎﻬﺠﻟﺍ ﺲﻤﻟ ﺔﻟﺎﺣ ﻲﻓ ﻰﺘﺣ ﻝﺎﺼﺗﻻﺍ ﺀﺎﺸﻧﺇ ﻡﺪﻋ ﺔﻟﺎﺣ ﻲﻓ
3.ﺯﺎﻬﺠﻟﺍ ﻞﻴﻐﺸﺗ ﺃﺪﺑﺍ
:ﺔﻈﺣﻼﻣ
.ﺎﹰﻴﺋﺎﻘﻠﺗ ﻖﺑﺎﺴﻟﺍ
ﹰ
ﻘﻓﻭ
– .ﺓﺪﺣﺍﻭ ﺔﺴﻤﻠﺑ ﻝﺎﺼﺗﻻﺍ ﺓﺰﻴﻣ ﻞﻤﻌﺗ ﻻ ﺪﻗ
– .ﻒﻠﺘﺨﺗ ﻥﺃ ﻦﻜﻤﻳ ﺯﺎﻬﺠﻟﺍ ﻦﻣ NFC ﺲﻤﻟ ﺔﻘﻄﻨﻣ ﻒﻗﻮﻣ ﻥﺇ
– .ﺎ
█ (NFC) ﺓﺪﺣﺍﻭ ﺔﺴﻤﻠﺑ ﻝﺎﺼﺗﻻﺍ
• ﺭﺍﺮﻤﺘﺳﻻﺍ ﻊﻣ ﻪﺴﻤﻟ ﻖﻳﺮﻃ ﻦﻋ ﺮﺧﺁ ﺯﺎﻬﺟ ﻞﻴﺻﻮﺗ ﻚﻨﻜﻤﻳ ،ﻝﺎﺼﺗﻻﺍ ﺀﺎﻨﺛﺃ
•:ﺯﺎﻬﺠﻠﻟ ﺎ
RQT9979
10
59
Page 60

ﺔﻴﺴﻴﺋﺮﻟﺍ ﺓﺪﺣﻮﻟﺍ ﻡﺍﺪﺨﺘﺳﺍ
offset printing
.ﺯﺎﻬﺠﻟﺎﺑ ﺔﺻﺎﺨﻟﺍ Bluetooth
ﺯﺎﻬﺟ ﻥﺍﺮﻗﺇ ﺔﻟﺎﺣ ﻲﻓ .ﻡﺎﻈﻨﻟﺍ ﺍﺬﻫ ﻊﻣ ﺓﺰﻬﺟﺃ 8 ﻰﻟﺇ ﻞﺼﻳ ﺎﻣ ﻥﺍﺮﻗﺇ ﻚﻨﻜﻤﻳ
.ﺔﻴﻨﻣﺯ ﺓﺮﺘﻓ ﻝﻮﻃﻷ ﻡﺪﺨﺘﺴﹸﻳ ﻢﻟ ﻱﺬﻟﺍ ﺯﺎﻬﺠﻟﺍ ﻝﺍﺪﺒﺘﺳﺍ ﻢﺘﻴﺳ ،ﻊﺳﺎﺗ
ﻪﻠﺼﻓﺎﻓ ،Bluetooth® ﺯﺎﻬﺠﺑ ﹰﻼﺼﺘﻣ ﻡﺎﻈﻨﻟﺍ ﺍﺬﻫ ﻥﺎﻛ ﺍﺫﺇ
.“BLUETOOTH READY” ﺓﺭﺎﺷﻹﺍ ﺮﻬﻈﺗ
ﻲﺑﺮﻋ
.ﺯﺎﻬﺠﻟﺎﺑ ﺔﺻﺎﺨﻟﺍ Bluetooth
.ﹴﻥﺍﻮﺛ ﻊﻀﺒﻟ ﻞﺼﺘﻤﻟﺍ ﺯﺎﻬﺠﻟﺍ ﻢﺳﺍ ﺮﻬﻈﻳ
(.ﺔﻴﻠﻤﻌﻟﺍ ﻩﺬﻫ ﻝﻼﺧ “LINKING” ﺽﺮﻋ ﻢﺘﻳ) .ﺎ
.
“PAIRING”
.“BLUETOOTH READY” ﺓﺭﺎﺷﻹﺍ ﺮﻬﻈﺗ
ﺮﻬﻈﺗ ﻰﺘﺣ
[ –PAIRING]
.“OK? NO” ﺩﺪﺣ ،ﺀﺎﻐﻟﻺﻟ
ﺔﻴﺴﻴﺋﺮﻟﺍ ﺓﺪﺣﻮﻟﺍ ﻡﺍﺪﺨﺘﺳﺍ
.“PAIRING”
2 ﺔﻤﺋﺎﻗ ﻦﻣ “SC-MAX6000” ﻭﺃ “SC-MAX8000” ﺩﺪﺣ
®
:ﺔﻈﺣﻼﻣ
ﺮﻴﻀﺤﺘﻟﺍ
.(“ﺯﺎﻬﺟ ﻞﺼﻓ”
m
1.[ ] ﺭﺰﻟﺍ ﻂﻐﺿﺍ
1 ﺮﻬﻈﺗ ﻰﺘﺣ [ –PAIRING] ﻰﻠﻋ ﺭﺍﺮﻤﺘﺳﻻﺍ ﻊﻣ ﻂﻐﺿﺍ
2 ﺔﻤﺋﺎﻗ ﻦﻣ “SC-MAX6000” ﻭﺃ “SC-MAX8000” ﺩﺪﺣ
®
3.ﺯﺎﻬﺠﻟﺍ ﻞﻴﻐﺸﺗ ﺃﺪﺑﺍ
:ﺔﻈﺣﻼﻣ
ﻴﺋﺎﻘﻠﺗ ﻞﺼﺘﻣ ﺯﺎﻬﺟ ﺮﺧﺂﺑ
ﹰ
.[ ] ﺭﺰﻟﺍ ﻂﻐﺿﺍ
1
2.“DISCONNECT?” ﺭﺎﻴﺘﺧﻻ [PLAY MENU] ﺭﺰﻟﺍ ﻂﻐﺿﺍ
3.[OK] ﺭﺰﻟﺍ ﻂﻐﺿﺍ ﻢﺛ “OK? YES” ﺭﺎﻴﺘﺧﻻ [Y ،U] ﺭﺰﻟﺍ ﻂﻐﺿﺍ
ﻰﻠﻋ ﺭﺍﺮﻤﺘﺳﻻﺍ ﻊﻣ ﻂﻐﺿﺍ
:ﺔﻈﺣﻼﻣ
:ﺪﻨﻋ ﺯﺎﻬﺠﻟﺍ ﻞﺼﻓ ﻢﺘﻳ
®
ﻝﺎﺳﺭﺇ ﻞﻴﻄﻌﺗ
ﻡﻼﻋﻹﺍ ﻞﺋﺎﺳﻭ ﺮﻴﻀﺤﺗ
[x OPEN/CLOSE]
█ ﺯﺎﻬﺟ ﻞﻴﺻﻮﺗ
.ﺕﺎﻧﺎﻴﺒﻠﻟ ﻲﻃﺎﻴﺘﺣﺍ ﺦﺴﻧ ﺀﺍﺮﺟﺇ ﻦﻣ ﺪﻛﺄﺗ ،ﺯﺎﻬﺠﻟﺎﺑ
)
.ﻪﻠﺼﻓ ﻭﺃ USB ﺯﺎﻬﺟ ﻞﻴﺻﻮﺗ ﺪﻨﻋ ﺔﻴﺴﻴﺋﺮﻟﺍ ﺓﺪﺣﻮﻟﺍ ﻚﺴﻣﺃ
USB ﺯﺎﻬﺟ ﻰﻠﻋ ﻡﺎﻈﻨﻟﺍ ﻑ
ﻞﺼﺘﻣ
•.ﻪﻠﻴﺻﻮﺘﻟ ﺯﺎﻬﺠﻟﺍ ﻥﺍﺮﻗﺇ ﺐﺠﻳ
•.ﺓﺮﻤﻟﺍ ﻲﻓ ﻂﻘﻓ ﺪﺣﺍﻭ ﺯﺎﻬﺠﺑ ﻝﺎﺼﺗﻻﺍ ﻡﺎﻈﻨﻟﺍ ﺍﺬﻬﻟ ﻦﻜﻤﻳ
• ﻝﺎﺼﺗﻻﺍ ﻡﺎﻈﻨﻟﺍ ﺍﺬﻫ ﻝﻭﺎﺤﻴﺳ ،ﺭﺪﺼﻤﻛ “BLUETOOTH” ﺪﻳﺪﺤﺗ ﺪﻨﻋ
.Bluetooth® ﻝﻼﺧ ﻦﻣ ﺎﹰﻴﻜﻠﺳﻻ ﻪﻠﻴﻐﺸﺗﻭ ﺕﻮﺻ ﺯﺎﻬﺟ ﻞﻴﺻﻮﺗ ﻚﻨﻜﻤﻳ
█ ﺯﺎﻬﺟ ﻞﺼﻓ
•.ﻒﻠﺘﺨﻣ ﺭﺪﺼﻣ ﺪﻳﺪﺤﺗ
•.ﻕﺎﻄﻨﻠﻟ ﻰﺼﻗﻷﺍ ﺪﺤﻟﺍ ﺝﺭﺎﺧ ﺯﺎﻬﺠﻟﺍ ﻞﻘﻧ
•.ﺯﺎﻬﺠﻟﺎﺑ Bluetooth
•.ﺯﺎﻬﺟ ﻭﺃ ﺯﺎﻬﺠﻟﺍ ﻞﻴﻐﺸﺗ ﻒﻗﻭﺃ
.ﻥﺍﺮﻗﻹﺍ ﺔﻴﻠﻤﻋ ﻝﺎﻤﺘﻛﺍ ﺪﻌﺑ ﺎﹰﻴﺋﺎﻘﻠﺗ ﻡﺎﻈﻨﻟﺍ ﺍﺬﻬﺑ ﺯﺎﻬﺠﻟﺍ ﻞﺼﺘﻳ
:ﺔﻴﺴﻴﺋﺮﻟﺍ ﺓﺪﺣﻮﻟﺍ) [CD x] ﺭﺰﻟﺍ ﻂﻐﺿﺍ
.ﻰﻠﻋﻸﻟ ﺎﹰﻬﺠﺘﻣ ﻖﺼﻠﻤﻟﺍ ﻥﻮﻜﻳ ﺚﻴﺤﺑ ﺔﻧﺍﻮﻄﺳﻻﺍ ﻊﺿ
.ﺔﻧﺍﻮﻄﺳﻻﺍ ﺔﻴﻨﻴﺻ ﻕﻼﻏﻹ ﻯﺮﺧﺃ ﺓﺮﻣ ﺭﺰﻟﺍ ﻂﻐﺿﺍ
.ﻩﺭﺎﻴﺘﺧﺍ ﺎﻣﺪﻨﻋ ﺮﻤﺣﻷﺍ ﻥﻮﻠﻟﺍ USB ﺔﻟﺎﺣ ﺮﺷﺆﻣ ﺀﻲﻀﻳ
ﻪﻠﺼﻓﺎﻓ ،Bluetooth® ﺯﺎﻬﺠﺑ ﹰﻼﺼﺘﻣ ﻡﺎﻈﻨﻟﺍ ﺍﺬﻫ ﻥﺎﻛ ﺍﺫﺇ
.4 ﺓﻮﻄﺨﻟﺍ ﻰﻟﺇ ﻊﺑﺎﺗ ،“PAIRING” ﺭﻮﻬﻇ ﺔﻟﺎﺣ ﻲﻓ
.“0000” ﻞﺧﺩﺄﻓ ،ﺭﻭﺮﻣ ﺡﺎﺘﻔﻣ ﺐﻠﹸﻃ ﻢﺗ ﺍﺫﺇ
.ﹴﻥﺍﻮﺛ ﻊﻀﺒﻟ ﻞﺼﺘﻤﻟﺍ ﺯﺎﻬﺠﻟﺍ ﻢﺳﺍ ﺮﻬﻈﻳ
.ﺔﻧﺍﻮﻄﺳﻻﺍ ﺔﻴﻨﻴﺻ ﺢﺘﻔﻟ
USB
.“USB B” ﻭﺃ “USB A” ﺭﺎﻴﺘﺧﻻ
ﺮﻌﺘﻳ ﻦﻟ .USB ﺔﻠﺻﻭ ﻞﺒﻛ ﻡﺪﺨﺘﺴﺗ ﻻ
ﹼ
®
.“PAIRING” ﺓﺭﺎﺷﻹﺍ ﺮﻬﻈﺗ
.“OK? NO” ﺩﺪﺣ ،ﺀﺎﻐﻟﻺﻟ
.ﺯﺎﻬﺠﻟﺎﺑ ﺔﺻﺎﺨﻟﺍ Bluetooth
ﺔﻧﺍﻮﻄﺳﻻﺍ
1 (
2.“CD” ﺭﺎﻴﺘﺧﻻ [CD/RADIO/AUX] ﺭﺰﻟﺍ ﻂﻐﺿﺍ
USB
ﺮﻴﻀﺤﺘﻟﺍ
ﺯﺎﻬﺟ ﻞﻴﺻﻮﺗ ﻞﺒﻗ
1.USB ﺬﻔﻨﻤﺑ USB ﺯﺎﻬﺟ ﻞﺻﻭ ﺕﻮﺼﻟﺍ ﻯﻮﺘﺴﻣ ﺾﻔﺧﺍ
2 ([MEMORY/USB] :ﺔﻴﺴﻴﺋﺮﻟﺍ ﺓﺪﺣﻮﻟﺍ) [USB] ﺭﺰﻟﺍ ﻂﻐﺿﺍ
:ﺔﻈﺣﻼﻣ
.ﻞﺒﻛ ﻝﻼﺧ ﻦﻣ
Bluetooth
ﺮﻴﻀﺤﺘﻟﺍ
ﺓﺰﻴﻣ ﻞﻴﻐﺸﺘﺑ ﻢﻗ
.ﻡﺎﻈﻨﻟﺍ
ﺮﻴﻀﺤﺘﻟﺍ
.(“ﺯﺎﻬﺟ ﻞﺼﻓ”
1.[ ] ﺭﺰﻟﺍ ﻂﻐﺿﺍ
2.“PAIRING” ﺭﺎﻴﺘﺧﻻ [PLAY MENU] ﺭﺰﻟﺍ ﻂﻐﺿﺍ
3.[OK] ﺭﺰﻟﺍ ﻂﻐﺿﺍ ﻢﺛ “OK? YES” ﺭﺎﻴﺘﺧﻻ [Y ،U] ﺭﺰﻟﺍ ﻂﻐﺿﺍ
4 ﺔﻤﺋﺎﻗ ﻦﻣ “SC-MAX6000” ﻭﺃ “SC-MAX8000” ﺩﺪﺣ
®
m
®
• ﻦﻣ ﺏﺮﻘﻟﺎﺑ ﺯﺎﻬﺠﻟﺍ ﻊﺿﻭ ﺯﺎﻬﺠﻟﺎﺑ Bluetooth
•.ﻞﻴﺻﺎﻔﺘﻟﺍ ﻰﻠﻋ ﻉﻼﻃﻼﻟ ﺯﺎﻬﺟ ﻞﻴﻐﺸﺗ ﺕﺎﻤﻴﻠﻌﺗ ﺃﺮﻗﺍ
█ ﺯﺎﻬﺟ ﻥﺍﺮﻗﺇ
)
RQT9979
9
60
Page 61
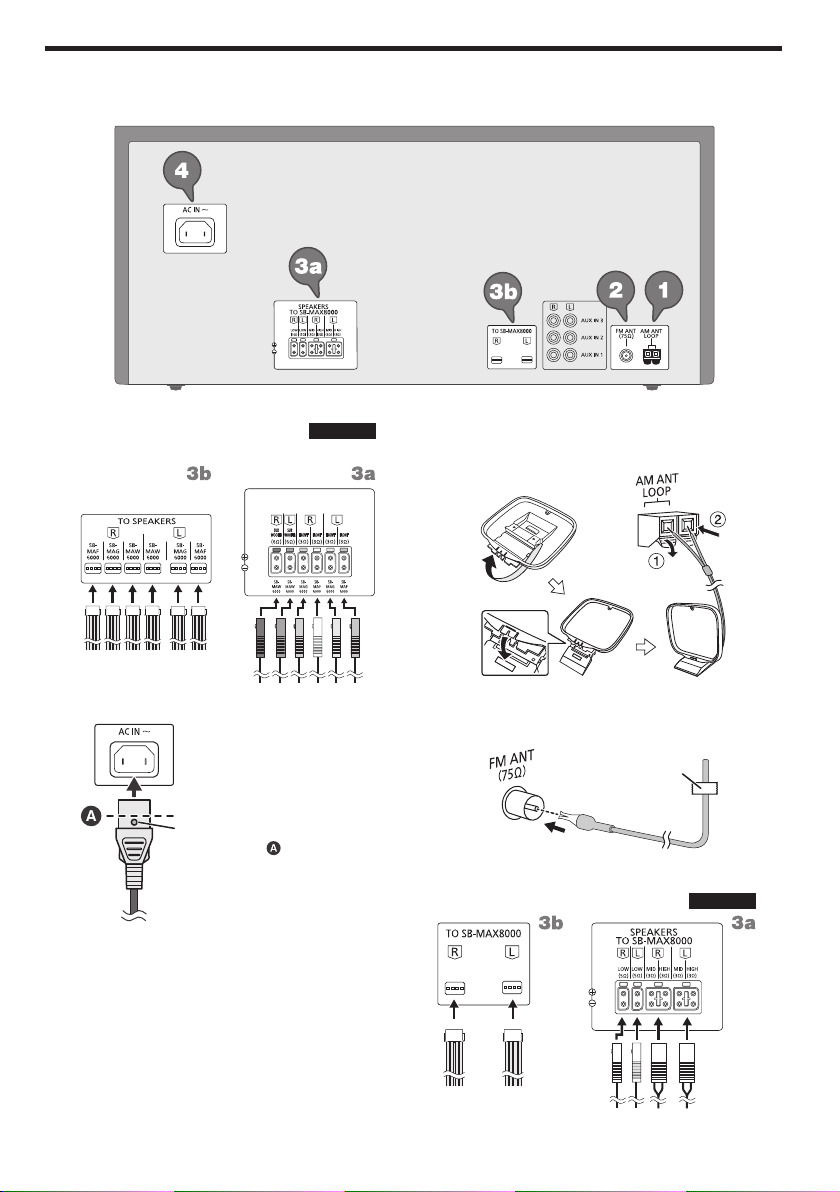
ﺕﻼﻴﺻﻮﺘﻟﺍ ﺀﺍﺮﺟﺇ
offset printing
.ﻯﺮﺧﻷﺍ ﺕﻼﻴﺻﻮﺘﻟﺍ ﻞﻛ ﺀﺍﺮﺟﺇ ﻦﻣ ﺀﺎﻬﺘﻧﻻﺍ ﺪﻌﺑ ﻂﻘﻓ ﺩﺩﺮﺘﻤﻟﺍ ﺭﺎﻴﺘﻠﻟ ﺲﻴﺋﺮﻟﺍ ﺔﻴﺋﺎﺑﺮﻬﻜﻟﺍ ﺔﻗﺎﻄﻟﺍ ﻚﻠﺳ ﻞﺻ
.ﻪﺑﺎﺸﺘﻤﻟﺍ ﻥﻮﻠﻟﺍ ﺕﺍﺫ ﻑﺍﺮﻃﻷﺎﺑ ﺕﺎﻋﺎﻤﺴﻟﺍ ﺕﻼﺑﺎﻛ ﻞﻴﺻﻮﺘﺑ ﻢﻗ
ﻲﺴﻴﺋﺮﻟﺍ ﺔﻴﺋﺎﺑﺮﻬﻜﻟﺍ ﺔﻗﺎﻄﻟﺍ ﻚﻠﺳ ﻞﺧﺩﺃ
ﺔﻄﻘﻧ ﻲﻫﻭ ، ﻰﺘﺣ ﺩﺩﺮﺘﻤﻟﺍ ﺭﺎﻴﺘﻠﻟ
.ﺓﺮﻳﺪﺘﺴﻤﻟﺍ ﺔﺤﺘﻔﻟﺍ ﻞﺒﻗ ﺪﺟﻮﺗ
ﻲﻟﺰﻨﻤﻟﺍ ﺲﻴﺋﺮﻟﺍ ﺔﻴﺋﺎﺑﺮﻬﻜﻟﺍ ﺔﻗﺎﻄﻟﺍ ﺲﺒﻘﻣ ﻰﻟﺇ
ﺓﺰﻬﺟﻷﺍ ﻦﻣ ﺩﺩﺮﺘﻤﻟﺍ ﺭﺎﻴﺘﻠﻟ ﺲﻴﺋﺭ ﺔﻴﺋﺎﺑﺮﻬﻛ ﺔﻗﺎﻃ ﻚﻠﺳ ﻡﺪﺨﺘﺴﺗ ﻻ
ﺔﻴﺋﺎﺑﺮﻬﻜﻟﺍ ﺔﻗﺎﻄﻟﺍ ﺮﻴﻓﻮﺗ
ﻊﺿﻭ ﻲﻓ ﻥﻮﻜﻳ ﺎﻣﺪﻨﻋ ﺔﻗﺎﻄﻟﺍ ﻦﻣ ﹰﻼﻴﺌﺿ ﺍﹰﺭﺍﺪﻘﻣ ﻡﺎﻈﻨﻟﺍ ﻚﻠﻬﺘﺴﻳ
ﻲﻓ ﺔﻴﺋﺎﺑﺮﻬﻜﻟﺍ ﺔﻗﺎﻄﻟﺍ ﺪﻳﻭﺰﺗ ﺭﺪﺼﻣ ﻞﺼﻓﺍ .ﻞﻴﻐﺸﺘﻠﻟ ﺩﺍﺪﻌﺘﺳﻻﺍ
.ﺯﺎﻬﺠﻟﺍ ﻡﺍﺪﺨﺘﺳﺍ ﻡﺪﻋ ﺔﻟﺎﺣ
ﻚﻴﻠﻋ ﺐﺠﻳ .ﺯﺎﻬﺠﻟﺍ ﻞﺼﻓ ﺪﻌﺑ ﺕﺍﺩﺍﺪﻋﻹﺍ ﺾﻌﺑ ﻥﺍﺪﻘﻓ ﻢﺘﻳ ﻑﻮﺳ
.ﻯﺮﺧﺃ ﺓﺮﻣ ﺎﻬﻄﺒﺿ ﺓﺩﺎﻋﺇ
SC-MAX6000
TO SPEAKERS
.ﻯﺮﺧﻷﺍ
.ﺎﹰﺗﻮﺻ ﺭﺪﺼﻳ ﻰﺘﺣ ﻪﺗﺪﻋﺎﻗ ﻰﻠﻋ ﻰﻠﻋﻼﻟ ﻲﺋﺍﻮﻬﻟﺍ ﻊﺿ
4.ﺩﺩﺮﺘﻤﻟﺍ ﺭﺎﻴﺘﻠﻟ ﺲﻴﺋﺮﻟﺍ ﺔﻴﺋﺎﺑﺮﻬﻜﻟﺍ ﺔﻗﺎﻄﻟﺍ ﻚﻠﺳ ﻞﺻ
.ﻝﺎﺒﻘﺘﺳﻼﻟ ﻥﺎﻜﻣ ﻞﻀﻓﺃ ﻲﻓ ﻲﺋﺍﻮﻬﻟﺍ ﻊﺿ
(ﻖﻓﺮﻣ ﺮﻴﻏ) ﻖﺻﻻ ﻂﻳﺮﺷ
2.FM ﺔﺟﻮﻤﻟ ﻲﻠﺧﺍﺪﻟﺍ ﻲﺋﺍﻮﻬﻟﺍ ﻞﺻ
3.ﺕﺎﻋﺎﻤﺴﻟﺍ ﻞﺻ
SC-MAX8000
RQT9979
8
61
1.AM ﺔﺟﻮﻤﻟ ﻱﺭﺎﻃﻹﺍ ﻲﺋﺍﻮﻬﻟﺍ ﻞﻴﺻﻮﺗ
Page 62
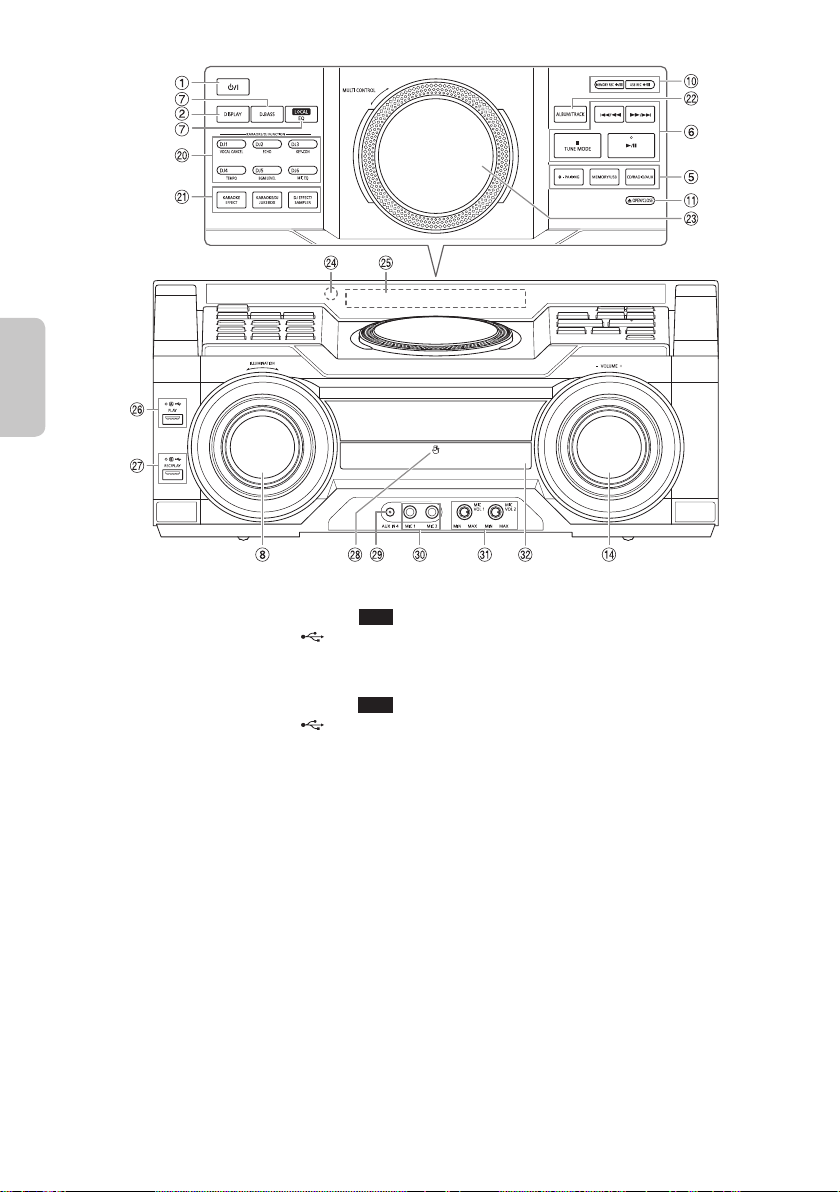
ﻲﺑﺮﻋ
offset printing
ﻱﻮﻠﻋ ﺮﻈﻨﻣ
ﻲﻣﺎﻣﺃ ﺮﻈﻨﻣ
.ﻰﻘﻴﺳﻮﻤﻟﺍ ﻭﺃ ﺕﻮﺼﻟﺍ ﺕﺍﺭﺎﺴﻣ ﻞﻴﺠﺴﺗ ﻢﻗ
RQT9979
7
62
( ) USB ﺬﻔﻨﻣ
USB A
USB ﺔﻟﺎﺣ ﺮﺷﺆﻣ
.MP3 ﺕﺍﺭﺎﺴﻣ ﻞﻴﻐﺸﺘﺑ ﻢﻗ
USB B
( ) USB ﺬﻔﻨﻣ
USB ﺔﻟﺎﺣ ﺮﺷﺆﻣ
.MP3 ﺕﺍﺭﺎﺴﻣ ﻞﻴﻐﺸﺘﺑ ﻢﻗ
NFC ﺲﻤﻟ ﺔﻘﻄﻨﻣ
AUX IN 4 ﺲﺑﺎﻘﻣ
Yﺽﺮﻌﻟﺍ ﺔﺣﻮﻟ
Z
ﺔﻔﻴﻇﻭ ﻞﻴﻐﺸﺘﻟ [KARAOKE/DJ JUKEBOX] ﺭﺰﻟﺍ ﻂﻐﺿﺍ
(ﻲﻛﻮﻳﺭﺎﻛ) Karaoke ﺕﺍﺮﺛﺆﻣ ﺭﺎﻴﺘﺧﺍ
DJ ﺔﻔﻴﻇﻮﻟ ﺓﺮﺷﺎﺒﻤﻟﺍ ﺭﺍﺭﺯﻷﺍ
ﻭﺃ [KARAOKE/DJ JUKEBOX] ﺭﺰﻟﺍ ﻂﻐﺿﺍ
.DJ ﺔﻔﻴﻇﻭ ﻞﻴﻐﺸﺘﻟ [DJ EFFECT/SAMPLER]
a
ﺔﻴﺴﻴﺋﺮﻟﺍ ﺓﺪﺣﻮﻟﺍ ﻰﻠﻋ ﺩﻮﺟﻮﻤﻟﺍ [DJ6] ﻰﻟﺇ [DJ1] ﺭﺰﻟﺍ ﻂﻐﺿﺍ
.ﺔﺑﻮﻠﻄﻤﻟﺍ ﺔﻔﻴﻇﻮﻟﺍ ﺭﺎﻴﺘﺧﻻ
.ﺔﻴﻧﺎﺛ ﺓﺮﻣ [DJ6] ﻰﻟﺇ [DJ1] ﺭﺎﺘﺨﻤﻟﺍ ﺭﺰﻟﺍ ﻂﻐﺿﺍ ،ﺀﺎﻐﻟﻺﻟ
DJ ﻭﺃ (ﻲﻛﻮﻳﺭﺎﻛ) Karaoke ﺔﻔﻴﻇﻭ ﻞﻴﻐﺸﺘﻟ
.ﺔﻴﻧﺎﺛ ﺓﺮﻣ ﺭﺰﻟﺍ ﻂﻐﺿﺍ ،ﺀﺎﻐﻟﻺﻟ
b
c
dﻥﻮﻓﻭﺮﻜﻴﻤﻟﺍ ﺲﺒﻘﻣ
eﻥﻮﻓﻭﺮﻜﻴﻤﻟﺍ ﺕﻮﺻ ﻯﻮﺘﺴﻣ ﻂﺒﺿ
fﺔﻧﺍﻮﻄﺳﻻﺍ ﺔﻴﻨﻴﺻ
.ﺭﺎﺴﻤﻟﺍ ﻭﺃ ﻡﻮﺒﻟﻷﺍ ﺭﺎﻴﺘﺧﻻ [ALBUM/TRACK] ﺭﺰﻟﺍ ﻂﻐﺿﺍ
ﺕﺎﻣﻮﺒﻟﺃ ﻭﺃ ﺕﺍﺭﺎﺴﻣ ﺽﺍﺮﻌﺘﺳﺍ
.ﺽﺍﺮﻌﺘﺳﻻ [MULTI CONTROL] ﺮﻳﻭﺪﺘﺑ ﻢﻗ
.[4/9] ﺭﺰﻟﺍ ﻂﻐﺿﺍ ،ﺓﺭﺎﺘﺨﻤﻟﺍ ﺮﺻﺎﻨﻌﻟﺍ ﻦﻣ ﻞﻴﻐﺸﺘﻟﺍ ﺀﺪﺒﻟ
ﺎﹰﺒﻳﺮﻘﺗ ﺭﺎﺘﻣﺃ
،ﻞﻔﺳﻷﻭ ﻰﻠﻋﻷ ﺔﻳﻮﺌﻣ ﺔﺟﺭﺩ 20 :ﺔﻳﻭﺍﺰﻟﺍ
ﺎﹰﺒﻳﺮﻘﺗ ﻦﻴﻤﻴﻠﻟﻭ ﺭﺎﺴﻴﻠﻟ ﺔﻳﻮﺌﻣ ﺔﺟﺭﺩ 30
.(ﻲﻛﻮﻳﺭﺎﻛ) Karaoke
MP3 ﻡﻮﺒﻟﺃ ﺭﺎﻴﺘﺧﺍ
DJ ـﻠﻟ ﺭﺍﻭﺪﻟﺍ ﺹﺮﻘﻟﺍ
7 ﻝﻼﺧ :ﺔﻓﺎﺴﻤﻟﺍ
T
U
Vﺭﺎﺴﻣ ﺭﺎﻴﺘﺧﺍ ﻭﺃ
Wﺩﺪﻌﺘﻤﻟﺍ ﻢﻜﺤﺘﻟﺍﻭ
Xﺪﻌﺑ ﻦﻋ ﻢﻜﺤﺘﻟﺍ ﺓﺪﺣﻭ ﺓﺭﺎﺷﺇ ﺲﺴﺤﺘﻣ
Page 63
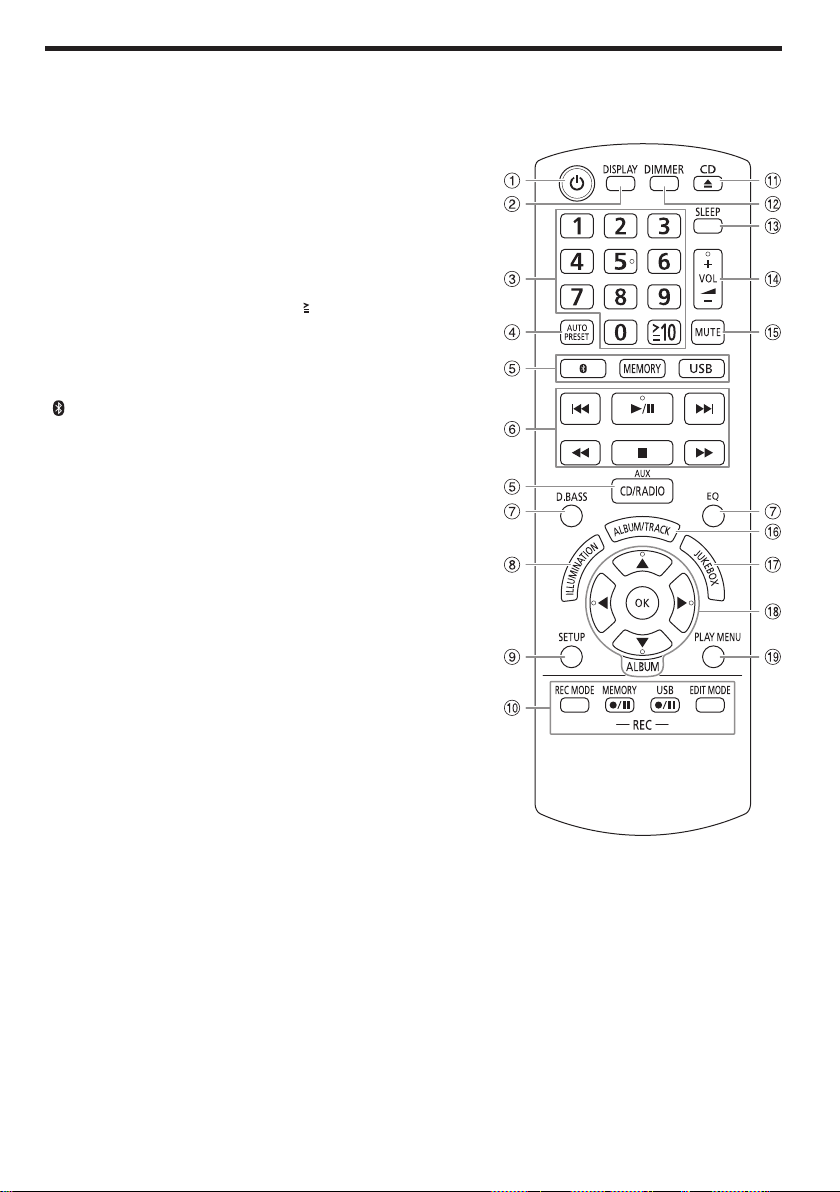
ﻢﻜﺤﺘﻟﺍ ﺭﺍﺭﺯﺃ ﻰﻠﻋ ﺔﻣﺎﻋ ﺓﺮﻈﻧ
offset printing
ﺲﻔﻧ ﺭﺍﺭﺯﻸﻟ ﻥﺎﻛ ﺍﺫﺇ ﺔﻴﺴﻴﺋﺮﻟﺍ ﺓﺪﺣﻮﻟﺍ ﻰﻠﻋ ﺓﺩﻮﺟﻮﻤﻟﺍ ﺭﺍﺭﺯﻷﺍ ﻡﺍﺪﺨﺘﺳﺍ ﺎﻀﻳﺃ ﻚﻨﻜﻤﻳ .ﺪﻌﺑ ﻦﻋ ﻢﻜﺤﺘﻟﺍ ﺓﺪﺣﻭ ﺔﻄﺳﺍﻮﺑ ﺕﺍﺀﺍﺮﺟﻹﺍ ﺬﻴﻔﻨﺘﺑ ﻢﻗ
ﻊﺿﻭ ﻰﻟﺇ ﻞﻴﻐﺸﺘﻟﺍ ﻊﺿﻭ ﻦﻣ ﺓﺪﺣﻮﻟﺍ ﻞﻳﻮﺤﺘﻟ ﺡﺎﺘﻔﻤﻟﺍ ﻂﻐﺿﺍ
،ﻞﻴﻐﺸﺘﻠﻟ ﺩﺍﺪﻌﺘﺳﻻﺍ ﻊﺿﻭ ﻲﻓ .ﺲﻜﻌﻟﺍ ﻭﺃ ﻞﻴﻐﺸﺘﻠﻟ ﺩﺍﺪﻌﺘﺳﻻﺍ
.ﺔﻴﺋﺎﺑﺮﻬﻜﻟﺍ ﺔﻗﺎﻄﻟﺍ ﻦﻣ ﺓﺮﻴﻐﺻ ﺔﻴﻤﻛ ﻚﻠﻬﺘﺴﺗ ﺓﺪﺣﻮﻟﺍ ﻰﻘﺒﺗ
ﻦﻴﻤﻗﺭ ﻦﻣ ﻥﻮﻜﻣ ﺩﺪﻋ ﺭﺎﻴﺘﺧﻻ
[6]+[1]+[ 10] :16 :ﻝﺎﺜﻣ
[ –
.
PAIRIN G
] ﺭﺰﻟﺍ ﻂﻐﺿ ﻊﺑﺎﺗﻭ ﻂﻐﺿﺍ ،Bluetooth
:ﺪﻌﺑ ﻦﻋ ﻢﻜﺤﺘﻟﺍ ﺓﺪﺣﻭ ﻰﻠﻋ ﺩﻮﺟﻮﻤﻟﺍ
®
.ﺔﻴﻧﺎﺛ ﺓﺮﻣ ﺭﺰﻟﺍ ﻂﻐﺿ ﻊﺑﺎﺗﻭ ﻂﻐﺿﺍ ،ﺀﺎﻐﻟﻺﻟ
.ﺔﻴﻧﺎﺛ ﺓﺮﻣ ﺭﺰﻟﺍ ﻂﻐﺿﺍ ،ﺀﺎﻐﻟﻺﻟ
ﻯﻮﺘﺴﻣ ﻝﹼﺪﻌﺗ ﺎﻣﺪﻨﻋ
“MUTE” ﺕﻮﺼﻟﺍ ﻢﺘﻛ ﺀﺎﻐﻟﺇ ﺎﻀﻳﺃ ﻢﺘﻳ
.ﺯﺎﻬﺠﻟﺍ ﻞﻴﻐﺸﺗ ﻒﻗﻮﺗ ﺎﻣﺪﻨﻋ ﻭﺃ ﺕﻮﺼﻟﺍ
MP3 ﻡﻮﺒﻟﺃ ﺭﺎﻴﺘﺧﺍ
jukebox (ﻲﻛﻮﻳﺭﺎﻛ) Karaoke ﻭﺃ DJ jukebox ﺭﺎﻴﺘﺧﺍ
ﻥﺍﺮﻗﺇ ﺀﺪﺒﻟ
A[1] ،[`] ﻞﻴﻐﺸﺘﻟﺍ/ﻞﻴﻐﺸﺘﻠﻟ ﺩﺍﺪﻌﺘﺳﻻﺍ ﺡﺎﺘﻔﻣ
Bﻯﻮﺘﺤﻤﻟﺍ ﺕﺎﻣﻮﻠﻌﻣ ﺓﺪﻫﺎﺸﻣ
Cﺩﺍﺪﻋﻷﺍ ﺭﺍﺭﺯﺃ
Dﻮﻳﺩﺍﺮﻟﺍ ﺔﻄﺤﻤﻟ ﻲﺋﺎﻘﻠﺘﻟﺍ ﻖﺒﺴﻤﻟﺍ ﻂﺒﻀﻟﺍ
Eﺕﻮﺼﻟﺍ ﺭﺪﺼﻣ ﺭﺎﻴﺘﺧﺍ
Fﻞﻴﻐﺸﺘﻟﺍ ﻲﻓ ﻲﺴﻴﺋﺮﻟﺍ ﻢﻜﺤﺘﻟﺍ
Gﺕﻮﺼﻟﺍ ﺕﺎﻴﻟﺎﻌﻓ ﺭﺎﻴﺘﺧﺍ
Hﺀﻮﻀﻟﺍ ﺕﺍﺮﺛﺆﻣ ﺭﺎﻴﺘﺧﺍ
Iﺩﺍﺪﻋﻹﺍ ﺔﻤﺋﺎﻗ ﺽﺮﻋ
Jﻞﻴﺠﺴﺘﻟﺍ ﻞﻴﻐﺸﺗ ﻲﻓ ﻢﻜﺤﺘﻟﺍ
Kﺎﻬﻗﻼﻏﺇ ﻭﺃ ﺔﻧﺍﻮﻄﺳﻻﺍ ﺔﻴﻨﻴﺻ ﺢﺘﻓ
Lﺽﺮﻌﻟﺍ ﺔﺣﻮﻟ ﺓﺀﺎﺿﺇ ﺓﺪﺷ ﻞﻴﻠﻘﺗ
Mﻡﻮﻨﻟﺍ ﺖﻗﺆﻣ ﻂﺒﺿ
Nﺕﻮﺼﻟﺍ ﻯﻮﺘﺴﻣ ﻂﺒﺿ
Oﺕﻮﺼﻟﺍ ﻢﺘﻛ
Pﺭﺎﺴﻣ ﺭﺎﻴﺘﺧﺍ ﻭﺃ
Q
Rﻩﺪﻴﻛﺄﺗ ﻭﺃ ﺭﺎﻴﺨﻟﺍ ﺪﻳﺪﺤﺗ
Sﻞﻴﻐﺸﺘﻟﺍ ﺔﻤﺋﺎﻗ ﺓﺪﻫﺎﺸﻣ
.ﺕﺎﻴﻤﺴﺘﻟﺍ
RQT9979
6
63
Page 64
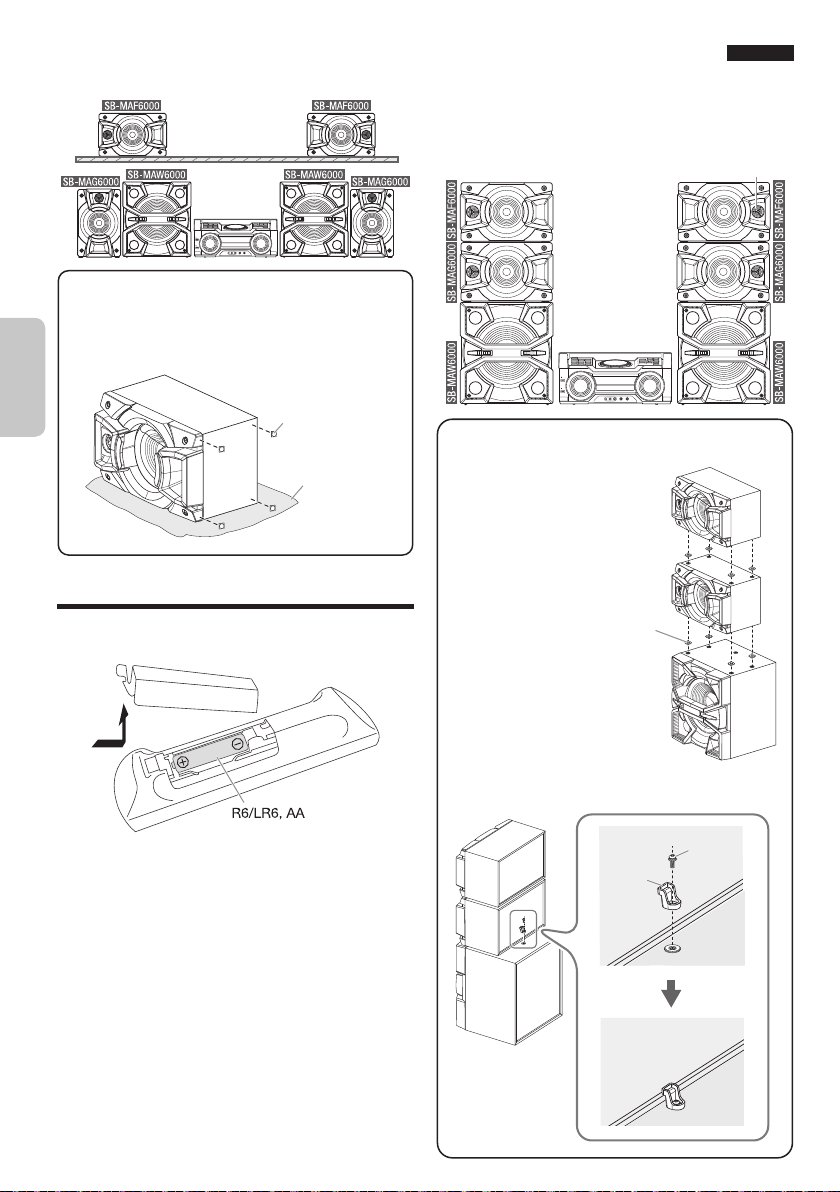
.ﻑﻮﻓﺮﻟﺍ ﺪﺣﺃ ﻰﻠﻋ ﻭﺃ ﻱﺩﻮﻤﻋ ﻊﺿﻭ ﻲﻓ ﺕﺎﻋﺎﻤﺴﻟﺍ ﻊﺿﻭ ﻚﻨﻜﻤﻳ
offset printing
ﺔﻳﺎﻤﺣ ﺔﻘﺒﻃ ﻰﻠﻋ ﺎﻬﻌﺿ ،ﻱﺩﻮﻤﻋ ﻊﺿﻭ ﻲﻓ ﺕﺎﻋﺎﻤﺴﻟﺍ ﻊﺿﻭ ﻞﺒﻗ
.ﺎﻬﻨﻣ ﻲﻠﻔﺴﻟﺍ ﺀﺰﺠﻟﺎﺑ ﺕﺎﻋﺎﻤﺴﻟﺍ ﻞﻣﺎﺣ ﻖﺼﻟﺍﻭ
ﻲﺑﺮﻋ
ﺕﺎﻋﺎﻤﺴﻟﺍ ﻞﻣﺎﺣ
ﺔﻳﺎﻤﺤﻟﺍ ﺔﻘﺒﻃ
(ﻖﻓﺮﻣ ﺮﻴﻏ)
2
ﺓﻮﻄﺨﻟﺍ
█ ﺕﺎﻋﺎﻤﺴﻟﺍ ﻞﻣﺎﺣ ﺐﻴﻛﺮﺗ
SC-MAX6000
.ﻲﺟﺭﺎﺨﻟﺍ ﺀﺰﺠﻟﺍ ﻰﻠﻋ ﺕﻮﺼﻟﺍ ﻢﺨﻀﻣ ﺔﻋﺎﻤﺳ ﻥﻮﻜﺗ ﺚﻴﺤﺑ ﺕﺎﻋﺎﻤﺴﻟﺍ ﻊﺿ
ﻦﻣ ﺔﻴﺴﻴﺋﺮﻟﺍ ﺓﺪﺣﻮﻟﺍ ﻦﻣ ﻢﻣ 10 ﻦﻣ ﺮﺜﻛﺃ ﺔﻓﺎﺴﻣ ﻰﻠﻋ ﺕﺎﻋﺎﻤﺴﻟﺍ ﻊﺿ
.ﺔﻳﻮﻬﺘﻟﺍ ﻞﺟﺍ
1
ﺓﻮﻄﺨﻟﺍ
ﺮﺘﻳﻮﺗ
█ ﺕﺎﻋﺎﻤﺴﻟﺍ ﺖﻴﺒﺜﺗ
ﺲﻴﺑﺎﺑﺩ ﻡﺍﺪﺨﺘﺳﺎﺑ ﺕﺎﻋﺎﻤﺴﻟﺍ ﺖﹼﺒﺛ
ﺲﻴﺑﺎﺑﺩ ﻰﻠﻋ ﻂﻐﺿﺍ .ﺔﻘﻓﺮﻤﻟﺍ ﺖﻴﺒﺜﺘﻟﺍ
ﺖﺒﺜﺗ ﻰﺘﺣ ﻞﻔﺳﻷ ﺔﻋﺎﻤﺴﻟﺍﻭ ﺖﻴﺒﺜﺘﻟﺍ
.ﺎﻬﻌﺿﻮﻣ ﻲﻓ ﻡﺎﻜﺣﺈﺑ
ﺪﻌﺑ ﻦﻋ ﻢﻜﺤﺘﻟﺍ ﺓﺪﺣﻭ ﺮﻴﻀﺤﺗ
.ﺰﻴﻨﻐﻨﻣ ﺕﺎﻳﺭﺎﻄﺑ ﻭﺃ ﺔﻳﻮﻠﻗ ﺕﺎﻳﺭﺎﻄﺑ ﻡﺪﺨﺘﺳﺍ
ﺏﺎﻄﻗﻷﺍ ﻊﻣ
RQT9979
5
64
(– ﻭ +) ﺏﺎﻄﻗﻷﺍ ﻖﺑﺎﻄﺘﺗ ﺚﻴﺤﺑ ﺕﺎﻳﺭﺎﻄﺒﻟﺍ ﺐﻴﻛﺮﺘﺑ ﻢﻗ
ﺖﻴﺒﺜﺘﻟﺍ ﺱﻮﺑﺩ
ﻦﻴﻣﺄﺘﻟ ﻩﺎﻧﺩﺃ ﺢﺿﻮﻣ ﻮﻫ ﺎﻤﻛ ﺔﻘﻓﺮﻤﻟﺍ ﺔﻔﻴﺘﻜﻟﺍ ﺐﻴﻛﺮﺘﺑ ﻢﻗ
.ﺕﺎﻋﺎﻤﺴﻟﺍ
ﻲﻏﺮﺑ
ﺔﻔﻴﺘﻛ
.ﺪﻌﺑ ﻦﻋ ﻢﻜﺤﺘﻟﺍ ﺓﺪﺣﻭ ﻰﻠﻋ ﺓﺩﻮﺟﻮﻤﻟﺍ
Page 65
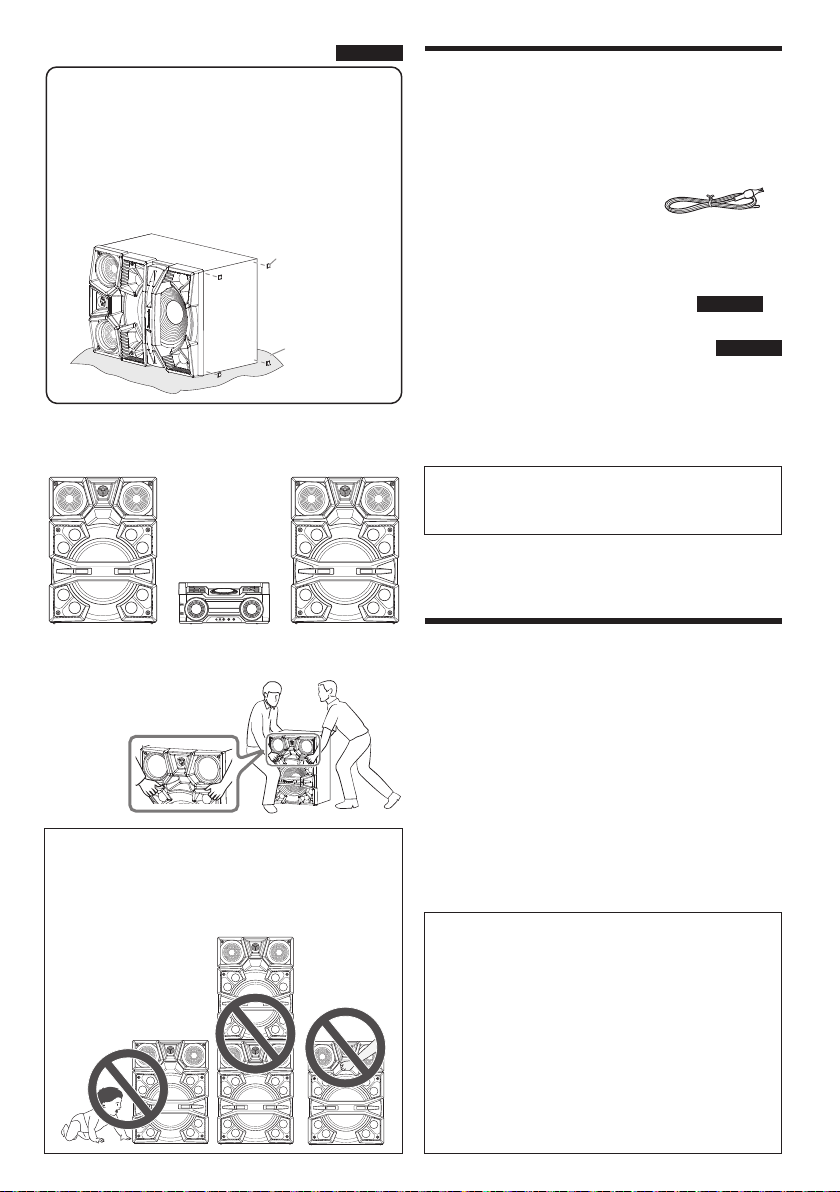
SC-MAX8000
offset printing
ﺕﺎﻋﺎﻤﺴﻟﺍ ﻞﻣﺎﺣ ﺐﻴﻛﺮﺘﺑ ﻢﻗ ،ﺔﻴﺿﺭﻷﺍ ﻒﻠﺗ ﻊﻨﻣﻭ ﺕﺎﺒﺜﻟﺍ ﻖﻴﻘﺤﺘﻟ
.ﺕﺎﻋﺎﻤﺴﻟﺍ ﻞﻔﺳﺃ
ﺮﻴﻀﺤﺘﻟﺍ
.ﺵﺪﺧ ﻱﺃ ﺙﻭﺪﺣ ﻊﻨﻤﻟ ﺕﺎﻋﺎﻤﺴﻟﺍ ﻞﻔﺳﺃ ﺔﻳﺎﻤﺤﻟﺍ ﺔﻘﺒﻃ ﻊﺿ
ﺓﺩﻭﺰﻤﻟﺍ ﺕﺎﻘﺤﻠﻤﻟﺍ
█ ﺕﺎﻋﺎﻤﺴﻟﺍ ﻞﻣﺎﺣ ﺐﻴﻛﺮﺗ
.ﺎﻫﺰﻴﻴﻤﺗﻭ ﺔﻘﻓﺮﻤﻟﺍ ﺕﺎﻘﺤﻠﻤﻟﺍ ﺺﺤﻓ ﻰﺟﺮﻳ
3
ﺩﺩﺮﺘﻤﻟﺍ ﺭﺎﻴﺘﻠﻟ ﻲﺴﻴﺋﺮﻟﺍ ﺔﻴﺋﺎﺑﺮﻬﻜﻟﺍ ﺔﻗﺎﻄﻟﺍ ﻚﻠﺳ
AM ﺔﺟﻮﻤﻟ ﻱﺭﺎﻃﺇ ﻲﺋﺍﻮﻫ 1
FM ﺔﺟﻮﻤﻟ ﻲﻠﺧﺍﺪﻟﺍ ﻲﺋﺍﻮﻬﻟﺍ 1
ﺕﺎﻋﺎﻤﺴﻟﺍ ﻞﻣﺎﺣ
ﺔﻳﺎﻤﺤﻟﺍ ﺔﻘﺒﻃ
(ﻖﻓﺮﻣ ﺮﻴﻏ)
.ﺔﻬﺑﺎﺸﺘﻣ ﻯﺮﺴﻴﻟﺍﻭ ﻰﻨﻤﻴﻟﺍ ﺕﺎﻋﺎﻤﺴﻟﺍ
ﻞﺟﺍ ﻦﻣ ﺔﻴﺴﻴﺋﺮﻟﺍ ﺓﺪﺣﻮﻟﺍ ﻢﺳ 10 ﻦﻣ ﺮﺜﻛﺃ ﺔﻓﺎﺴﻣ ﻰﻠﻋ ﺕﺎﻋﺎﻤﺴﻟﺍ ﻊﺿ
.ﺎﻬﻠﻤﺣ ﻭﺃ ﺎﻬﺘﻟﺎﻣﺇ ﻭﺃ ﺔﻋﺎﻤﺴﻟﺍ ﻚﻳﺮﺤﺘﻟ ﺪﺣﺍﻭ ﺺﺨﺷ ﻦﻣ ﺮﺜﻛﺃ ﺩﻮﺟﻭ ﻡﺰﻠﻳ
.ﺕﺎﻋﺎﻤﺴﻟﺎﺑ ﻒﻠﺗﻭ ﺔﻴﺼﺨﺷ ﺔﺑﺎﺻﺇ ﻰﻟﺇ ﻚﻟﺫ
.ﺔﻳﻮﻬﺘﻟﺍ
:ﺔﻈﺣﻼﻣ
!ﻪﻴﺒﻨﺗ
•.ﻝﺎﻔﻃﻷﺍ ﻭﺃ ﺭﺎﻐﺼﻟﺍ ﺏﺍﺮﺘﻗﺍ ﺪﻨﻋ ﺭﺬﺤﻟﺍ ﺥﻮﺗ
•.ﺕﺎﻋﺎﻤﺴﻟﺍ ﺲﻳﺪﻜﺗ ﺐﻨﺠﺗ
• ﻱﺩﺆﻳ ﺪﻗ ﺚﻴﺣ ﺬﻔﻨﻤﻟﺍ ﺕﺎﺤﺘﻓ ﻞﺧﺍﺩ ﺐﻳﺮﻏ ﻢﺴﺟ ﻭﺃ ﻚﻳﺪﻳ ﻊﻀﺗ ﻻ
(N2QAYB001022)
ﺕﺎﻋﺎﻤﺴﻟﺍ ﻞﻣﺎﺣ 8
SC-MAX6000
!ﻪﻴﺒﻨﺗ
ﻝﺎﻔﻃﻷﺍ ﻝﻭﺎﻨﺘﻣ ﻦﻋ ﺍﹰﺪﻴﻌﺑ ﻲﻏﺍﺮﺒﻟﺍﻭ ﻒﺋﺎﺘﻜﻟﺍﻭ ﺕﺎﻋﺎﻤﺴﻟﺍ ﻞﻣﺍﻮﺣ ﻞﻌﺟﺍ
.ﺎﻬﻋﻼﺘﺑﺍ ﺐﻨﺠﺘﻟ
:ﺔﻈﺣﻼﻣ
ﺲﺒﻘﻤﻟ ﺐﺳﺎﻨﻤﻟﺍ ﺩﺩﺮﺘﻤﻟﺍ ﺭﺎﻴﺘﻠﻟ ﻲﺴﻴﺋﺮﻟﺍ ﺔﻴﺋﺎﺑﺮﻬﻜﻟﺍ ﺔﻗﺎﻄﻟﺍ ﻚﻠﺳ ﻡﺪﺨﺘﺳﺍ
.ﻲﻟﺰﻨﻤﻟﺍ ﻲﺴﻴﺋﺮﻟﺍ ﺔﻴﺋﺎﺑﺮﻬﻜﻟﺍ ﺔﻗﺎﻄﻟﺍ
ﺕﺎﻋﺎﻤﺴﻟﺍ ﻊﺿﻭ ﻥﺎﻜﻣ
.ﺔﻘﻓﺮﻤﻟﺍ ﺕﺎﻋﺎﻤﺴﻟﺍ ﻂﻘﻓ ﻡﺪﺨﺘﺳﺍ
ﺖﻣﺪﺨﺘﺳﺍ ﺍﺫﺇ ﺕﻮﺼﻟﺍ ﺓﺩﻮﺟ ﻞﻴﻠﻘﺗﻭ ﺯﺎﻬﺠﻠﻟ ﺎﹰﻔﻠﺗ ﺐﺒﺴﺗ ﻥﺃ ﻦﻜﻤﻳ
.ﻯﺮﺧﺃ ﺕﺎﻋﺎﻤﺳ
:ﺔﻈﺣﻼﻣ
ﺮﺛﺄﺘﺗ ﻲﺘﻟﺍ ﻯﺮﺧﻷﺍ ﺓﺰﻬﺟﻷﺍ ﻭﺃ ﻲﺼﺨﺸﻟﺍ ﺮﺗﻮﻴﺒﻤﻜﻟﺍ ﺓﺰﻬﺟﺃ ﻭﺃ ﻥﻮﻳﺰﻔﻠﺘﻟﺍ ﺓﺰﻬﺟﺃ
.ﺔﻴﺴﻴﻄﻨﻐﻤﻟﺍ ﺔﻄﺳﺍﻮﺑ ﺔﻟﻮﻬﺴﺑ
.ﺕﺎﻋﺎﻤﺴﻟﺍ ﺓﺎﻴﺣ ﺓﺮﺘﻓ ﻞﻘﺗﻭ ﺕﺎﻋﺎﻤﺴﻟﺍ ﻲﻓ ﺎﹰﻔﻠﺗ ﻚﻟﺫ
!ﻪﻴﺒﻨﺗ
ﺙﺪﺤﻳ ﻥﺃ ﻦﻜﻤﻳﻭ ﺕﺎﻋﺎﻤﺴﻟﺍﻭ ﻢﺨﻀﻤﻠﻟ ﺎﹰﻔﻠﺗ ﺐﺒﺴﺗ ﻥﺃ ﻦﻜﻤﻳ
ﺭﺮﺿ ﺙﺪﺣ ﺍﺫﺇ ﺍﹰﺪﻤﺘﻌﻣﻭ ﺔﻧﺎﻴﺼﻟﺎﺑ ﺎﹰﺼﺘﺨﻣ ﺎﹰﻔﻇﻮﻣ ﺮﺸﺘﺳﺍ .ﻖﻳﺮﺣ
.ﺀﺍﺩﻷﺍ ﻲﻓ ﺔﺌﺟﺎﻔﻣ ﺓﺭﻮﺼﺑ ﺢﺿﺍﻭ ﺮﹼﻴﻐﺗ ﺙﺪﺣ ﺍﺫﺇ ﻭﺃ
.ﻡﺎﻈﻨﻟﺍ ﻒﻠﺗ ﻲﻓ ﻚﻟﺫ
.ﺕﺎﻋﺎﻤﺴﻟﺍ
ﺪﻌﺑ ﻦﻋ ﻢﻜﺤﺗ ﺓﺪﺣﻭ 1
ﺪﻌﺑ ﻦﻋ ﻢﻜﺤﺘﻟﺍ ﺓﺪﺣﻮﻟ ﺔﻳﺭﺎﻄﺑ 1
SC-MAX8000
ﺕﺎﻋﺎﻤﺴﻟﺍ ﻞﻣﺎﺣ 16
ﺕﺎﻋﺎﻤﺴﻟﺍ ﺖﻴﺒﺜﺗ ﺲﻴﺑﺎﺑﺩ 16
ﻒﺋﺎﺘﻛ 2
ﻲﻏﺍﺮﺑ 2
•.ﻦﻣﺁﻭ ﻮﺘﺴﻣ ﺢﻄﺳ ﻰﻠﻋ ﺕﺎﻋﺎﻤﺴﻟﺍ ﻊﺿ
• ﺭﺍﻮﺠﺑ ﺕﺎﻋﺎﻤﺴﻟﺍ ﻊﻀﺗ ﻻ .ﻲﺴﻴﻄﻨﻐﻣ ﺐﺠﺣ ﻰﻠﻋ ﺕﺎﻋﺎﻤﺴﻟﺍ ﻩﺬﻫ ﻱﻮﺘﺤﺗ ﻻ
• ﺐﺒﺴﻳ ﻥﺍ ﻦﻜﻤﻳ ،ﺔﻠﻳﻮﻃ ﺓﺪﻤﻟ ﺔﻴﻟﺎﻋ ﺕﺎﻳﻮﺘﺴﻣ ﻰﻠﻋ ﺯﺎﻬﺠﻟﺍ ﻞﻴﻐﺸﺗ ﺪﻨﻋ
•:ﺕﺎﻋﺎﻤﺴﻟﺍ ﻒﻠﺗ ﻊﻨﻤﻟ ﺔﻴﻟﺎﺘﻟﺍ ﺕﻻﺎﺤﻟﺍ ﻲﻓ ﺕﻮﺼﻟﺍ ﻯﻮﺘﺴﻣ ﺾﻔﺧﺍ
– .ﺕﻮﺼﻟﺍ ﻪﻳﻮﺸﺗ ﺪﻨﻋ
– .ﺕﻮﺼﻟﺍ ﺓﺩﻮﺟ ﻂﺒﺿ ﺪﻨﻋ
• ،ﻚﻟﺫ ﻑﻼﺨﺑ .ﻪﺑ ﻰﺻﻮﻤﻟﺍ ﻡﺎﻈﻨﻟﺍ ﻊﻣ ﻂﻘﻓ ﺕﺎﻋﺎﻤﺴﻟﺍ ﻡﺪﺨﺘﺳﺍ
• ﺐﺒﺴﺘﻳ ﺪﻗ ﺚﻴﺣ ﺔﻋﺎﻤﺴﻟﺍ ﻙﻼﺳﺃ ﻭﺃ ﺔﻋﺎﻤﺴﻟﺍ ﻞﻳﺪﻌﺘﺑ ﻢﻘﺗ ﻻ
• ﺐﻴﻛﺮﺗ ﺪﻨﻋ ﺕﺎﻤﻴﻠﻌﺘﻟﺍ ﻩﺬﻫ ﻲﻓ ﺓﺩﻮﺟﻮﻤﻟﺍ ﺕﺍﺀﺍﺮﺟﻹﺍ ﺬﻴﻔﻨﺘﺑ ﻢﻗ
•:ﺔﻋﺎﻤﺴﻟﺍ ﻁﻭﺮﺨﻤﻟ ﺔﻧﺎﻧﺮﻟﺍ ﺢﻄﺳﻷﺍ ﺲﻤﻠﺗ ﻻ
– .ﺔﻴﻃﻭﺮﺨﻤﻟﺍ ﺔﻋﺎﻤﺴﻟﺍ ﻒﻠﺘﻳ ﻥﺍ ﻦﻜﻤﻳ ﺍﺬﻫ
RQT9979
– .ﺔﻨﺧﺎﺳ ﺔﻴﻃﻭﺮﺨﻤﻟﺍ ﺔﻋﺎﻤﺴﻟﺍ ﻥﻮﻜﺗ ﻥﺍ ﻦﻜﻤﻳ
4
65
Page 66
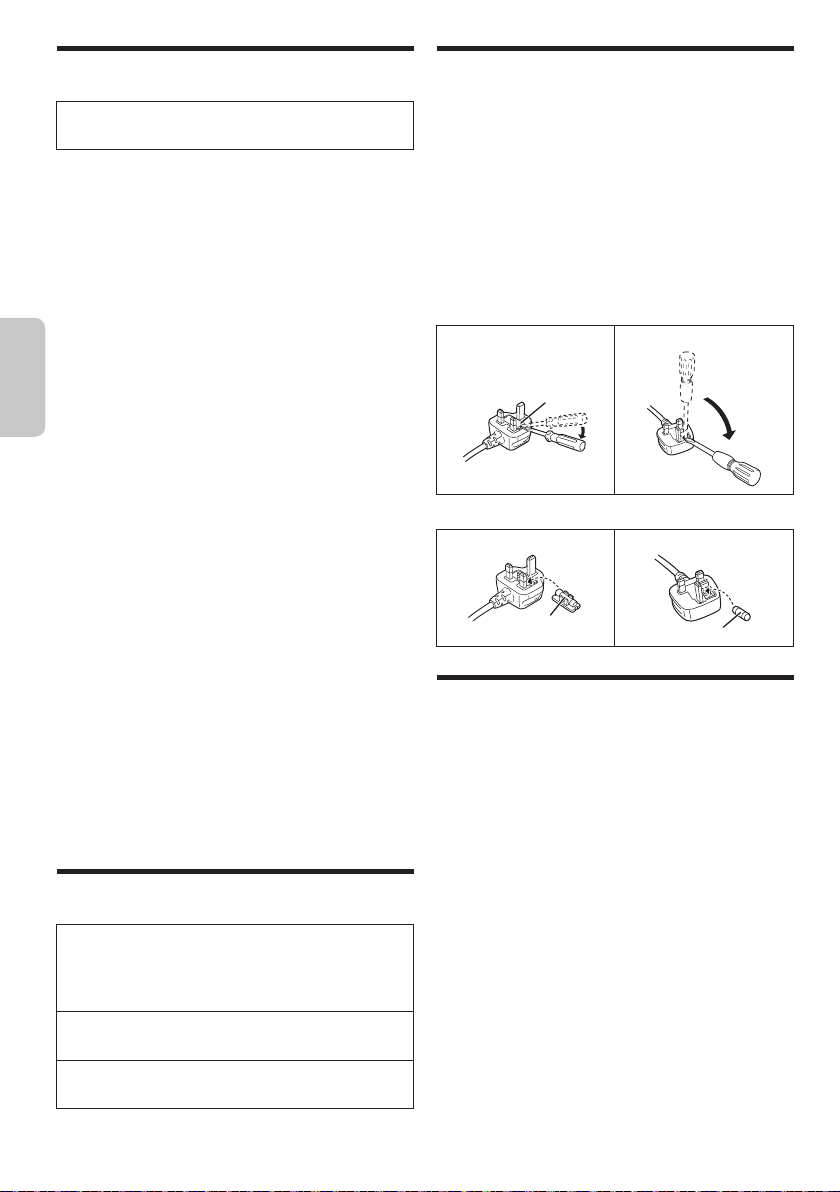
Bluetooth
offset printing
ﻲﺘﻟﺍ ﺕﺎﻣﻮﻠﻌﻤﻟﺍ ﻭﺃ/ﻭ ﺕﺎﻧﺎﻴﺒﻟﺍ ﻦﻋ ﺔﻴﻟﻭﺆﺴﻤﻟﺍ Panasonic ﻞﻤﺤﺘﺗ ﻻ
ﻲﺑﺮﻋ
ﻝﺎﺼﺗﻻﺍ ﻲﻓ ﻞﺸﻔﻳ ﺪﻗ ،ﺯﺎﻬﺠﻟﺎﺑ ﺔﺻﺎﺨﻟﺍ ﺕﺍﺩﺍﺪﻋﻹﺍ ﻭﺃ ﺕﺎﻔﺻﺍﻮﻤﻠﻟ ﺎﹰﻘﻓﻭ
ﺕﺎﻧﺎﻴﺒﻟﺍ ﻞﺳﺭﺃ .ﺎﹰﻴﻓﺎﻛ ﻥﺎﻣﻷﺍ ﺍﺬﻫ ﻥﻮﻜﻳ ﻻ ﺪﻗ ،ﺕﺍﺩﺍﺪﻋﻹﺍ ﻭﺃ/ﻭ ﻞﻴﻐﺸﺘﻟﺍ
ﻢﺗ ﺍﺫﺇ ﺔﻴﻜﻠﺳﻼﻟﺍ ﺕﺎﺟﻮﻤﻟﺍ ﻞﺧﺍﺪﺗ ﺐﺒﺴﺑ ﺕﻮﺼﻟﺍ ﺕﺎﻌﻄﻘﺗﻭ ﺶﻳﻮﺸﺘﻟﺍ
ﻯﺮﺧﻷﺍ Bluetooth® ﺓﺰﻬﺟﺃ ﻦﻣ ﺓﺪﻳﺪﺷ ﺔﺑﺮﻘﻣ ﻰﻠﻋ ﺓﺪﺣﻮﻟﺍ ﻩﺬﻫ ﻊﺿﻭ
ﺕﺎﻴﻔﺸﺘﺴﻤﻟﺍﻭ ﺕﺍﺭﺎﻄﻤﻟﺍ :ﻝﺎﺜﻤﻟﺍ ﻞﻴﺒﺳ ﻰﻠﻋ) ﺔﻴﻜﻠﺳﻼﻟﺍ ﺕﺍﺩﺩﺮﺘﻟﺍ
ﺔﻛﻮﻠﻤﻣ ﺔﻠﺠﺴﻣ ﺔﻳﺭﺎﺠﺗ ﺕﺎﻣﻼﻋ ﻲﻫ Bluetooth® ﺕﺍﺭﺎﻌﺷﻭ ﺔﻤﻠﻛ
ﺔﺴﺳﺆﻣ ﻞﺒﻗ ﻦﻣ ﺔﺼﺧﺮﻣ MPEG Layer-3 ﺕﻮﺼﻟﺍ ﺮﻴﻔﺸﺗ ﺔﻴﻨﻘﺗ
RQT9979
3
66
.ﺔﻴﻜﻠﺳﻼﻟﺍ ﻝﺎﺳﺭﻹﺍ ﺔﻴﻠﻤﻋ ﺀﺎﻨﺛﺃ ﺎﻬﻨﻋ ﻒﺸﻜﻟﺍ ﻢﺘﻳ ﺪﻗ
ﺩﺎﻨﺘﺳﺍ ﺔﻗﺩﺎﺼﻤﻟﺍ ﻰﻘﻠﺗ ﺪﻗﻭ ﺩﺩﺮﺘﻟﺍ ﺩﻮﻴﻗ ﻊﻣ ﻡﺎﻈﻨﻟﺍ ﺍﺬﻫ ﻖﻓﺍﻮﺘﻳ
ﹰ
.ﻲﻜﻠﺳﻻ ﺺﻴﺧﺮﺗ ﻰﻠﻋ ﻝﻮﺼﺤﻟﺍ ﻡﺰﻠﻳ ﻻ ،ﺍﺬﻟ .ﺩﺩﺮﺘﻟﺍ ﻦﻴﻧﺍﻮﻗ
.Bluetooth SIG, Inc.
.ﻞﻴﻐﺸﺘﻟﺍ ﺕﺎﻴﻠﻤﻋ ﺾﻌﺑ ﻒﻠﺘﺨﺗ ﺪﻗ ﻭﺃ
ﹰ
ﻘﻓﻭ ﻦﻜﻟﻭ .Bluetooth® ﻥﺎﻣﺃ ﺕﺍﺰﻴﻣ ﻡﺎﻈﻨﻟﺍ ﺍﺬﻫ ﻢﻋﺪﻳ
®
ﺯﺎﻬﺟ ﻰﻟﺇ ﺕﺎﻧﺎﻴﺒﻟﺍ ﻝﺎﺳﺭﺇ ﻡﺎﻈﻨﻟﺍ ﺍﺬﻫ ﻰﻠﻋ ﺭﺬﻌﺘﻳ
.ﺭﺬﺤﺑ ﻡﺎﻈﻨﻟﺍ ﺍﺬﻫ ﻰﻟﺇ ﺎﹰﻴﻜﻠﺳﻻ
ﻯﺮﺧﻷﺍ ﺓﺰﻬﺟﻷﺍ ﻦﻣ ﻞﺧﺍﺪﺘﻟﺍ
.ﺰﺗﺮﻫ ﺎﺠﻴﺟ 2.4 ﺔﻋﺮﺴﺑ ﺩﺩﺮﺘﻟﺍ ﻕﺎﻄﻧ ﻡﺪﺨﺘﺴﺗ ﻲﺘﻟﺍ ﺓﺰﻬﺟﻷﺍ ﻭﺃ
.ﺔﻳﺎﻐﻠﻟ ﺔﻳﻮﻗ ﻚﻟﺫ ﻰﻟﺇ ﺎﻣ ﻭﺃ ،ﺔﺒﻳﺮﻘﻟﺍ ﺚﺒﻟﺍ ﺔﻄﺤﻣ ﻦﻣ ﺓﺩﺭﺍﻮﻟﺍ
ﻦﻣ ﺕﺎﻣﻼﻌﻟﺍ ﻩﺬﻬﻟ ﻡﺍﺪﺨﺘﺳﺍ ﻱﺃﻭ Bluetooth SIG, Inc. ﺔﻛﺮﺸﻟ
ﺔﻴﻜﻠﻣ ﺩﻮﻌﺗﻭ .ﺺﻴﺧﺮﺗ ﺐﺟﻮﻤﺑ Panasonic Corporation ﻞﺒﻗ
.ﻦﻴﻴﻨﻌﻤﻟﺍ ﺎﻬﺑﺎﺤﺻﻷ ﻯﺮﺧﻷﺍ ﺔﻳﺭﺎﺠﺘﻟﺍ ﺀﺎﻤﺳﻷﺍﻭ ﺔﻳﺭﺎﺠﺘﻟﺍ ﺕﺎﻣﻼﻌﻟﺍ
ﺔﻛﺮﺸﻟ ﻦﻴﺘﻳﺭﺎﺠﺗ ﻦﻴﺘﻣﻼﻋ Android ﻭ Google Play ﺪﻌﹸﺗ
.Thomson ﻭ Fraunhofer IIS
®
ﻦﻋ ﺓﺬﺒﻧ
ﺩﺩﺮﺘﻟﺍ ﻕﺎﻄﻧ
ﺔﻗﺩﺎﺼﻤﻟﺍ
ﻡﺍﺪﺨﺘﺳﻻﺍ ﺩﻮﻴﻗ
.Bluetooth® ﺔﻴﻨﻘﺘﺑ
ﻡﺍﺪﺨﺘﺳﻻﺍ ﻕﺎﻄﻧ
ﹰ
ﻘﻓﻭ ﻕﺎﻄﻨﻟﺍ ﻞﻘﻳ ﺪﻗ
ﺩﻮﺼﻘﻤﻟﺍ ﻡﺍﺪﺨﺘﺳﻻﺍ
.(ﻚﻟﺫ ﻰﻟﺇ ﺎﻣﻭ ﻞﻣﺎﻌﻤﻟﺍﻭ
ﺺﻴﺧﺍﺮﺘﻟﺍ
.Google Inc.
ﺔﻴﺋﺎﺑﺮﻬﻜﻟﺍ ﺔﻗﺎﻄﻟﺍ ﻚﻠﺳ ﻝﻮﺣ ﺔﻈﺣﻼﻣ
ﺩﺩﺮﺘﻤﻟﺍ ﺭﺎﻴﺘﻠﻟ ﺲﻴﺋﺮﻟﺍ
(
ﺔﺛﻼﺜﻟﺍ ﻑﺍﺮﻃﻷﺍ ﻱﺫ ﺩﺩﺮﺘﻤﻟﺍ ﺭﺎﻴﺘﻠﻟ ﺲﻴﺋﺮﻟﺍ ﺔﻴﺋﺎﺑﺮﻬﻜﻟﺍ ﺔﻗﺎﻄﻟﺍ ﺲﺑﺎﻘﺑ ﺹﺎﺧ
•.ﺰﺗﺮﻫ ﺎﺠﻴﺟ 2.4 ﺔﻋﺮﺴﺑ ﺩﺩﺮﺘﻟﺍ ﻕﺎﻄﻧ ﻡﺎﻈﻨﻟﺍ ﺍﺬﻫ ﻡﺪﺨﺘﺴﻳ
ﺲﻴﺋﺮﻟﺍ ﺔﻴﺋﺎﺑﺮﻬﻜﻟﺍ ﺔﻗﺎﻄﻟﺍ ﺲﺑﺎﻗ ﻉﻮﻨﻟ ﺎﻘﺒﻃ ﺮﻬﺼﻤﻟﺍ ﻥﺎﻜﻣ ﻒﻠﺘﺨﻳ
ﺔﻴﺋﺎﺑﺮﻬﻜﻟﺍ ﺔﻗﺎﻄﻟﺍ ﺲﺑﺎﻗ ﻥﺃ ﻦﻣ ﺪﻛﺄﺗ .
• ﻰﻟﺇ ﺍ
ﺔﻴﺋﺎﺑﺮﻬﻜﻟﺍ ﺔﻗﺎﻄﻟﺍ ﺲﺑﺎﻗ ﻦﻋ ﺔﻴﺤﻴﺿﻮﺘﻟﺍ ﺕﺎﻣﻮﺳﺮﻟﺍ ﻒﻠﺘﺨﺗ ﻥﺃ ﻦﻜﻤﻳ
•:ﻥﻮﻧﺎﻘﻟﺍ ﺎﻬﻴﻠﻋ ﺐﻗﺎﻌﻳ ﻩﺎﻧﺩﺃ ﺓﺩﺭﺍﻮﻟﺍ ﺕﺍﺀﺍﺮﺟﻹﺍ
– .ﺎﻬﻠﻳﺪﻌﺗ ﻭﺃ ﺔﻴﺴﻴﺋﺮﻟﺍ ﺓﺪﺣﻮﻟﺍ ﻚﻴﻜﻔﺗ
– .ﺕﺎﻔﺻﺍﻮﻤﻟﺍ ﺕﺍﺮﺷﺆﻣ ﺔﻟﺍﺯﺇ
• ﺓﺩﻭﺰﻤﻟﺍ ﺓﺰﻬﺟﻷﺍ ﻊﻴﻤﺟ ﻊﻣ ﻡﺍﺪﺨﺘﺳﻻﺍ ﻭﺃ/ﻭ ﻲﻜﻠﺳﻼﻟﺍ ﻝﺎﺳﺭﻹﺍ ﻦﻤﻀ
ﻳ ﻻ
ﹸ
• ﺔﻛﺮﺷ ﺎﻬﺘﻌﺿﻭ ﻲﺘﻟﺍ ﺮﻴﻳﺎﻌﻤﻟﺍ ﻊﻣ ﺓﺰﻬﺟﻷﺍ ﻊﻴﻤﺟ ﻖﻓﺍﻮﺘﺗ ﻥﺃ ﺐﺠﻳ
•
• ﺔﺌﻴﺒﻟ ﺎ
•.Bluetooth
•.ﻰﺼﻗﺃ ﺪﺤﻛ ﺭﺎﺘﻣﺃ 10 ﻎﻠﺒﻳ ﻕﺎﻄﻧ ﻲﻓ ﺯﺎﻬﺠﻟﺍ ﺍﺬﻫ ﻡﺪﺨﺘﺳﺍ
•.ﻞﺧﺍﺪﺘﻟﺍ ﻭﺃ ﻖﺋﺍﻮﻌﻟﺍ ﻭﺃ ﺔﺌﻴﺒﻠﻟ ﺎ
• ﻞﺜﻣ ﺕﻼﻜﺸﻣ ﻢﺠﻨﺗ ﺪﻗﻭ ﻢﻴﻠﺳ ﻞﻜﺸﺑ ﻡﺎﻈﻨﻟﺍ ﺍﺬﻫ ﻞﻤﻌﻳ ﻻ ﺪﻗ
• ﺔﻴﻜﻠﺳﻼﻟﺍ ﺕﺎﺟﻮﻤﻟﺍ ﺖﻧﺎﻛ ﺍﺫﺇ ﻢﻴﻠﺳ ﻞﻜﺸﺑ ﻡﺎﻈﻨﻟﺍ ﺍﺬﻫ ﻞﻤﻌﻳ ﻻ ﺪﻗ
•.ﻂﻘﻓ ﻡﺎﻌﻟﺍﻭ ﻱﺩﺎﻌﻟﺍ ﻡﺍﺪﺨﺘﺳﻼﻟ ﺪﻌﻣ ﻡﺎﻈﻨﻟﺍ ﺍﺬﻫ
• ﻞﺧﺍﺪﺘﻟ ﺔﺳﺎﺴﺣ ﺔﺌﻴﺑ ﻲﻓ ﻭﺃ ﺯﺎﻬﺟ ﻦﻣ ﺏﺮﻘﻟﺎﺑ ﻡﺎﻈﻨﻟﺍ ﺍﺬﻫ ﻡﺪﺨﺘﺴﺗ ﻻ
(ﺮﻴﺒﻣﺃ 13) ﺮﻬﺼﻤﻟﺍ
2 . . . . . . . . . . . . . . . . . . . . . . . . . . . . . . . . . . . . . . . . . .ﺔﻣﻼﺴﻟﺍ ﺕﺎﻃﺎﻴﺘﺣﺇ
3 . . . . . . . .ﺩﺩﺮﺘﻤﻟﺍ ﺭﺎﻴﺘﻠﻟ ﺲﻴﺋﺮﻟﺍ ﺔﻴﺋﺎﺑﺮﻬﻜﻟﺍ ﺔﻗﺎﻄﻟﺍ ﻚﻠﺳ ﻝﻮﺣ ﺔﻈﺣﻼﻣ
3 . . . . . . . . . . . . . . . . . . . . . . . . . . . . . . . . . . . . . . .Bluetooth
3 . . . . . . . . . . . . . . . . . . . . . . . . . . . . . . . . . . . . . . . . . . . . . . . . . ﺺﻴﺧﺍﺮﺘﻟﺍ
4 . . . . . . . . . . . . . . . . . . . . . . . . . . . . . . . . . . . . . . . . . . .ﺓﺩﻭﺰﻤﻟﺍ ﺕﺎﻘﺤﻠﻤﻟﺍ
4 . . . . . . . . . . . . . . . . . . . . . . . . . . . . . . . . . . . . . . . ﺕﺎﻋﺎﻤﺴﻟﺍ ﻊﺿﻭ ﻥﺎﻜﻣ
5 . . . . . . . . . . . . . . . . . . . . . . . . . . . . . . . . ﺪﻌﺑ ﻦﻋ ﻢﻜﺤﺘﻟﺍ ﺓﺪﺣﻭ ﺮﻴﻀﺤﺗ
6 . . . . . . . . . . . . . . . . . . . . . . . . . . . . . . . . . .ﻢﻜﺤﺘﻟﺍ ﺭﺍﺭﺯﺃ ﻰﻠﻋ ﺔﻣﺎﻋ ﺓﺮﻈﻧ
8 . . . . . . . . . . . . . . . . . . . . . . . . . . . . . . . . . . . . . . . . . . . . ﺕﻼﻴﺻﻮﺘﻟﺍ ﺀﺍﺮﺟﺇ
9 . . . . . . . . . . . . . . . . . . . . . . . . . . . . . . . . . . . . . . . .ﻡﻼﻋﻹﺍ ﻞﺋﺎﺳﻭ ﺮﻴﻀﺤﺗ
10 . . . . . . . . . . . . . . . . . . . . . . . . . . . . . . . . . . . . . . . . . . ﻂﺋﺎﺳﻮﻟﺍ ﻞﻴﻐﺸﺗ
12 . . . . . . . . . . . . . . . . . . . . . . . . . . . . . . . . . . . . . . . . . . . . . . . . . . . .ﻮﻳﺩﺍﺮﻟﺍ
13 . . . . . . . . . . . . . . . . . . . . . . . . . . . . . . . . . . . . . . . . . . . . . . . . ﻞﻴﺠﺴﺘﻟﺍ
14 . . . . . . . . . . . . . . . . . . . . . . . . . . . . . . . . . . . . . .ﺀﻮﻀﻟﺍﻭ ﺕﻮﺼﻟﺍ ﺕﺍﺮﺛﺆﻣ
15 . . . . . . . . . . . . . . . . . . . . . . . . . . . . . . . . . . . . . . . . . . . . . . . DJ ﻒﺋﺎﻇﻭ
16 . . . . . . . . . . . . . . . . . . . . . . . . . . . . . . . . . . . . . . .(ﻲﻛﻮﻳﺭﺎﻛ) Karaoke
. . . . . . . . . . . . . . . . . . . . . . . . . . . . . . . . . . . . . . ﻥﻮﻓﻭﺮﻜﻴﻤﻟﺍ ﻡﺍﺪﺨﺘﺳﺍ
16
17 . . . . . . . . . . . . . . . . . . . . . . . . . . . . . . . . . . . . . . . . . ﹼ
18 . . . . . . . . . . . . . . . . . . . . . . . . . . . . . . . . . . . . . . . . . .ﺔﻴﺟﺭﺎﺨﻟﺍ ﺓﺰﻬﺟﻷﺍ
19 . . . . . . . . . . . . . . . . . . . . . . . . . . . . . . . . . . . . . . . . . . . . . . . . . . . . ﻯﺮﺧﺃ
19 . . . . . . . . . . . . . . . . . . . . . . . . . . . . . . . . . . . . . . . . . . . . . . . . . .ﺔﻧﺎﻴﺼﻟﺍ
20 . . . . . . . . . . . . . . . . . . . . . . . . . . . . . . . .ﺎﻬﺣﻼﺻﺇﻭ ﺀﺎﻄﺧﻷﺍ ﻑﺎﺸﻜﺘﺳﺍ
22 . . . . . . . . . . . . . . . . . . . . . . . . . . . . . . . . . . . . . . . . . . . . . . . ﺕﺎﻔﺻﺍﻮﻤﻟﺍ
.ﻩﺎﻧﺩﺃ ﺕﺎﻤﻴﻠﻌﺘﻟﺍ ﻊﺒﺗﺍﻭ ﻢﺋﻼﻣ ﺩﺩﺮﺘﻤﻟﺍ ﺭﺎﻴﺘﻠﻟ ﺲﻴﺋﺮﻟﺍ
.ﻲﻋﺍﺮﺑ ﻚﻔﻣ ﺔﻄﺳﺍﻮﺑ ﺮﻬﺼﻤﻟﺍ ﺀﺎﻄﻏ ﺢﺘﻓﺍ
B ﻞﻜﺷ A ﻞﻜﺷ
ﺮﻬﺼﻤﻟﺍ ﺀﺎﻄﻏ
.ﻪﺒﻴﻛﺮﺘﺑ ﻢﻗ ﻭﺃ ﺮﻬﺼﻤﻟﺍ ﺀﺎﻄﻏ ﻖﻠﻏﺃﻭ ﺮﻬﺼﻤﻟﺍ ﻝﺪﺒﺘﺳﺍ .2
B ﻞﻜﺷ A ﻞﻜﺷ
ﺮﻬﺼﻤﻟﺍ ﻝﺍﺪﺒﺘﺳﺍ ﺔﻴﻔﻴﻛ
(B ﻭ A ﻝﺎﻜﺷﻷﺍ) ﺩﺩﺮﺘﻤﻟﺍ ﺭﺎﻴﺘﻠﻟ
.ﻲﻠﻌﻔﻟﺍ ﺩﺩﺮﺘﻤﻟﺍ ﺭﺎﻴﺘﻠﻟ ﺲﻴﺋﺮﻟﺍ
(ﺮﻴﺒﻣﺃ 13) ﺮﻬﺼﻤﻟﺍ
ﺕﺎﻳﻮﺘﺤﻤﻟﺍ ﻝﻭﺪﺟ
ﻡﺍﺪﺨﺘﺳﻻﺍ ﻞﺒﻗ
.ﻞﹼﺻﻮﻤﻟﺍ ﺀﺎﻄﻏ ﻉﺰﻧﺍ
®
ﻦﻋ ﺓﺬﺒﻧ
ﺕﺎﺘﻗﺆﻤﻟﺍﻭ ﺔﻋﺎﺴﻟﺍ
)
.1
Page 67
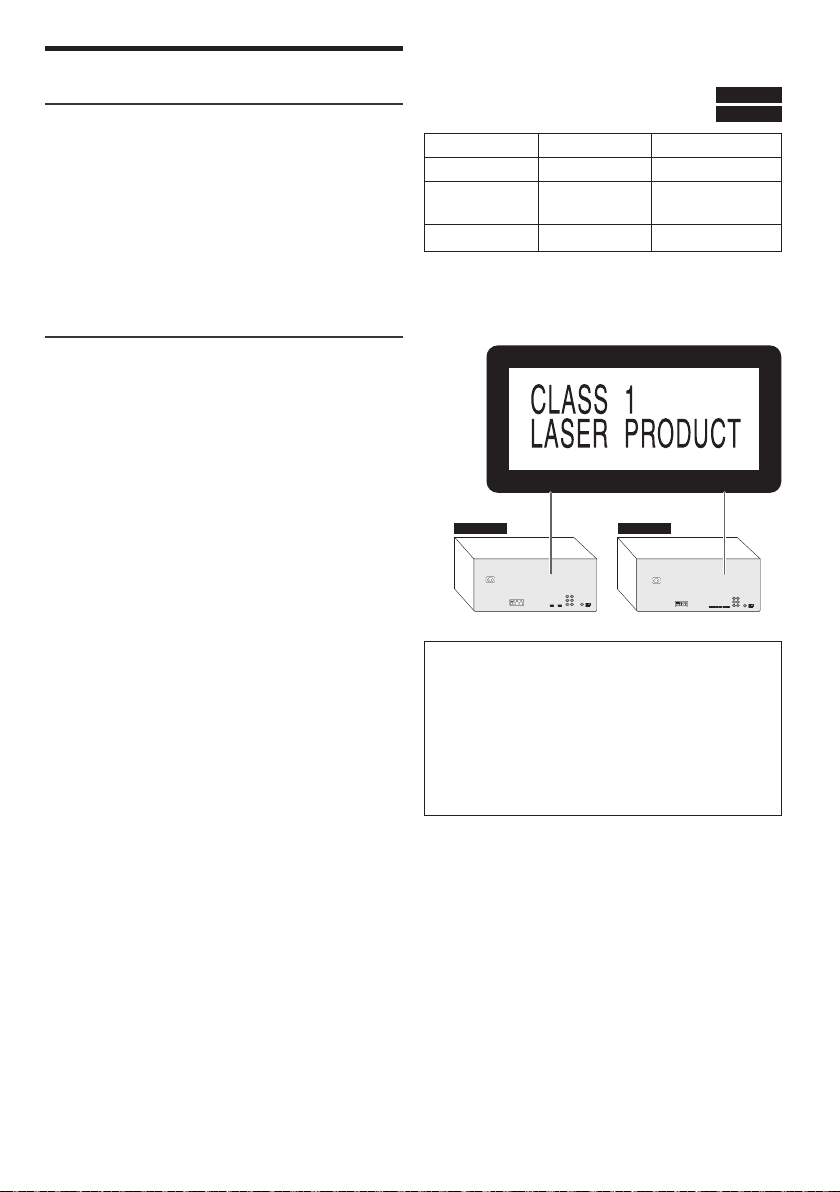
ﺔﻣﻼﺴﻟﺍ ﺕﺎﻃﺎﻴﺘﺣﺇ
offset printing
!ﺮﻳﺬﺤﺗ
ﺓﺪﺣﻮﻟﺍ
.ﺀﺎﻤﻟﺍ ﺔﺷﺮﺷﺭ ﻭﺃ ﺮﻴﻄﻘﺘﻟﺍ ﻭﺃ ﺔﺑﻮﻃﺮﻟﺍ ﻭﺃ ﺮﻄﻤﻠﻟ ﺓﺪﺣﻮﻟﺍ ﻩﺬﻫ ﺽﺮﻌﺗ ﻻ
.ﺓﺪﺣﻮﻟﺍ ﻩﺬﻫ ﻰﻠﻋ ،ﺕﺎﻳﺮﻫﺰﻤﻟﺍ ﻞﺜﻣ ،ﻞﺋﺍﻮﺴﻟﺎﺑ ﺓﺀﻮﻠﻤﻣ ﺀﺎﻴﺷﺃ ﻊﻀﺗ ﻻ
.ﺢﻴﻠﺼﺘﻟﺍﻭ ﺔﻧﺎﻴﺼﻟﺍ ﻞﺟﺍ ﻦﻣ ﻦﻴﻠﻫﺆﻤﻟﺍ ﺢﻴﻠﺼﺘﻟﺍﻭ
!ﻪﻴﺒﻨﺗ
ﺓﺪﺣﻮﻟﺍ
ﻭﺃ ﺔﻴﻠﺧﺍﺩ ﻦﺋﺍﺰﺧ ﻭﺃ ﺔﺒﺘﻜﻣ ﻲﻓ ﺎﻬﻌﺿﻭﻭ ﺓﺪﺣﻮﻟﺍ ﻩﺬﻫ ﺐﻴﻛﺮﺘﺑ ﻢﻘﺗ ﻻ
.ﺓﺪﻴﺟ ﺓﺭﻮﺼﺑ ﺓﺪﺣﻮﻟﺍ ﻩﺬﻫ ﺔﻳﻮﻬﺗ ﻦﻣ ﺪﻛﺄﺗ .ﺮﺧﺁ ﺭﻮﺼﺤﻣ ﻥﺎﻜﻣ ﻲﻓ
.ﻚﻟﺬﻟ ﺔﻬﺑﺎﺸﻤﻟﺍ ﺩﺍﻮﻤﻟﺍﻭ
.ﺓﺪﺣﻮﻟﺍ
ﹰ
ﻰﺟﺮﻳ ،ﻞﺧﺍﺪﺘﻟﺍ ﺍﺬﻫ ﻞﺜﻣ ﺙﻭﺪﺣ ﺔﻟﺎﺣ ﻲﻓ .ﻡﺍﺪﺨﺘﺳﻻﺍ ﺀﺎﻨﺛﺃ ﺔﻟﻮﻤﺤﻤﻟﺍ
.ﻝﻮﻤﺤﻤﻟﺍ ﻒﺗﺎﻬﻟﺍﻭ ﺓﺪﺣﻮﻟﺍ ﻩﺬﻫ ﻦﻴﺑ ﺔﻓﺎﺴﻤﻟﺍ ﺓﺩﺎﻳﺯ
ﺍﺬﻫ ﻲﻓ ﺓﺩﺪﺤﻤﻟﺍ ﻚﻠﺗ ﻑﻼﺨﺑ ﺕﺍﺀﺍﺮﺟﻹﺍ ﺬﻴﻔﻨﺗ ﻭﺃ ﺕﻼﻳﺪﻌﺘﻟﺍ ﻭﺃ ﻂﺑﺍﻮﻀﻟﺍ
.ﺪﺋﺍﺰﻟﺍ ﺯﺍﺰﺘﻫﻻﺍ ﻭﺃ ﺓﺪﻳﺪﺸﻟﺍ ﺔﺑﻮﻃﺮﻟﺍ ﻭﺃ ﺔﻌﻔﺗﺮﻤﻟﺍ ﺓﺭﺍﺮﺤﻟﺍ ﺕﺎﺟﺭﺩﻭ
ﺔﻴﺋﺎﺑﺮﻬﻜﻟﺍ ﺔﻗﺎﻄﻟﺍ ﻚﻠﺳ ﺲﺑﺎﻗ ﻞﻴﺻﻮﺗ ﺀﺎﻐﻟﺇ ﻦﻜﻤﻳ ﺚﻴﺤﺑ ﺓﺪﺣﻮﻟﺍ ﻩﺬﻫ
.ﺔﻌﹼﻨﺼﻤﻟﺍ ﺔﻛﺮﺸﻟﺍ ﻪﺑ ﻰﺻﻮﺗ ﻱﺬﻟﺍ ﻉﻮﻨﻟﺎﺑ ﺔﻳﺭﺎﻄﺒﻟﺍ ﻝﺪﺒﺘﺳﺍ .ﺢﻴﺤﺻ
.ﺎﻬﻨﻣ ﺺﻠﺨﺘﻠﻟ ﺔﺤﻴﺤﺼﻟﺍ ﺔﻘﻳﺮﻄﻟﺍ ﻦﻋ ﻝﺍﺆﺴﻟﺍﻭ ﻚﻳﺪﻟ ﻉﺯﻮﻤﻟﺍ
.ﺬﻓﺍﻮﻨﻟﺍﻭ ﺏﺍﻮﺑﻷﺍ ﻕﻼﻏﺇ ﻊﻣ ﺖﻗﻮﻟﺍ ﻦﻣ ﺔﻠﻳﻮﻃ ﺓﺪﻤﻟ ﺓﺮﺷﺎﺒﻤﻟﺍ
.ﺔﻤﻠﻈﻣﻭ ﺓﺩﺭﺎﺑ ﺔﻘﻄﻨﻣ ﻲﻓ ﺪﻌﺑ ﻦﻋ ﻢﻜﺤﺘﻟﺍ ﺓﺪﺣﻭ ﻦﻳﺰﺨﺘﺑ ﻢﻗ .ﺖﻗﻮﻟﺍ
ﻼﺧﺍﺪﺗ ﺓﺪﺣﻮﻟﺍ ﻩﺬﻫ ﻞﺒﻘﺘﺴﺗ ﻥﺃ ﻦﻜﻤﻳ
.ﻉﺎﻌﺷﻹﺍ ﻰﻟﺇ ﺮﻴﻄﺧ ﺽﺮﻌﺗ ﺐﻴﺘﻜﻟﺍ
ﺪﻴﻌﺑ ﹴﻮﺘﺴﻣ ﺢﻄﺳ ﻰﻠﻋ ﺓﺪﺣﻮﻟﺍ ﻩﺬﻫ ﻊﺿ
ﹰ
.ﺭﻮﻔﻟﺍ ﻰﻠﻋ ،ﺭﺎﻴﺘﻟﺍ ﺬﺧﺄﻣ ﺲﺒﻘﻣ ﻦﻣ ﺲﻴﺋﺮﻟﺍ
ﺔﻳﺭﺎﻄﺒﻟﺍ
ﻳ ،ﺕﺎﻳﺭﺎﻄﺒﻟﺍ ﻦﻣ ﺺﻠﺨﺘﻟﺍ ﺪﻨﻋ
ﹸ
ﺮﻌﺗ ﻭﺃ ﺔﻳﺭﺎﻄﺒﻟﺍ ﻦﹼﺨﺴﺗ ﻻ
ﹼ
ﺼﻘﺗ ﻭﺃ ﺮﺴﻜﺗ ﻻ
ﹼ
ﻭ SC-MAX8000 ﺕﻼﻳﺩﻮﻤﻠﻟ ﻖﻴﺒﻄﺘﻠﻟ ﺔﻠﺑﺎﻗ ﻩﺬﻫ ﻞﻴﻐﺸﺘﻟﺍ ﺕﺎﻤﻴﻠﻌﺗ
.
SC-MAX8000
.
SC-MAX6000
SC-MAX6000 SC-MAX8000
•،ﺞﺘﻨﻤﻟﺍ ﻒﻠﺗ ﻭﺃ ﺔﻴﺋﺎﺑﺮﻬﻜﻟﺍ ﺔﻣﺪﺼﻟﺍ ﻭﺃ ﻖﻳﺮﺤﻟﺍ ﺮﻄﺧ ﻞﻴﻠﻘﺘﻟ
–
–
– .ﺎﻬﺑ ﻰﺻﻮﻤﻟﺍ ﺕﺎﻘﺤﻠﻤﻟﺍ ﻂﻘﻓ ﻡﺪﺨﺘﺳﺍ
– .ﺔﻴﻄﻏﻷﺍ ﻉﺰﻨﺗ ﻻ
– ﺔﻧﺎﻴﺼﻟﺍ ﻲﻔﻇﻮﻣ ﻰﻟﺇ ﻊﺟﺭﺍ .ﻚﺴﻔﻨﺑ ﺓﺪﺣﻮﻟﺍ ﺡﻼﺻﺇ ﻝﻭﺎﺤﺗ ﻻ
– .ﺓﺪﺣﻮﻟﺍ ﻩﺬﻫ ﻞﺧﺍﺩ ﻝﻮﺧﺪﻟﺎﺑ ﺔﺒﻳﺮﻐﻟﺍ ﻡﺎﺴﺟﻸﻟ ﺢﻤﺴﺗ ﻻ
–
– ،ﺮﺋﺎﺘﺴﻟﺍﻭ ،ﺓﺪﺋﺎﻤﻟﺍ ﺔﻴﻄﻏﺃﻭ ،ﻒﺤﺼﻟﺎﺑ ﺓﺪﺣﻮﻟﺍ ﺔﻳﻮﻬﺗ ﺕﺎﺤﺘﻓ ﻖﻠﻐﺗ ﻻ
– ﻩﺬﻫ ﻰﻠﻋ ،ﺓﺀﺎﻀﻤﻟﺍ ﻉﻮﻤﺸﻟﺎﻛ ،ﻑﻮﺸﻜﻤﻟﺍ ﺐﻬﻠﻟﺍ ﺭﺩﺎﺼﻣ ﻊﻀﺗ ﻻ
SA-MAX6000 SA-MAX8000
SB-MAF6000
SB-MAG6000
SB-MAW6000 –
ﻞﻴﻐﺸﺘﻟﺍ ﺕﺎﻤﻴﻠﻌﺗ ﻲﻓ ﺔﻴﺤﻴﺿﻮﺘﻟﺍ ﺕﺎﻣﻮﺳﺮﻟﺍ ،ﻚﻟﺫ ﺲﻜﻋ ﻥﺎﻴﺑ ﻢﺗ ﺍﺫﺍ ﻻﺇ
.ﺔﻴﺤﻴﺿﻮﺘﻟﺍ ﻡﻮﺳﺮﻟﺍ ﻲﻓ ﺎﻤﻛ ﻞﻜﺸﻟﺍ ﺲﻔﻨﺑ ﺎﻣﺎﻤﺗ ﻙﺯﺎﻬﺟ ﺮﻬﻈﻳ ﻻ ﻥﺃ ﻦﻜﻤﻳ
•،ﺞﺘﻨﻤﻟﺍ ﻒﻠﺗ ﻭﺃ ﺔﻴﺋﺎﺑﺮﻬﻜﻟﺍ ﺔﻣﺪﺼﻟﺍ ﻭﺃ ﻖﻳﺮﺤﻟﺍ ﺮﻄﺧ ﻞﻴﻠﻘﺘﻟ
•.ﻱﺭﺍﺪﻤﻟﺍ ﺥﺎﻨﻤﻟﺍ ﺕﺍﺫ ﻖﻃﺎﻨﻤﻟﺍ ﻲﻓ ﻡﺍﺪﺨﺘﺳﻼﻟ ﺓﺪﻌﻣ ﺓﺪﺣﻮﻟﺍ ﻩﺬﻫ
• ﻒﺗﺍﻮﻬﻟﺍ ﺐﺒﺴﺑ ﻮﻳﺩﺍﺮﻟﺍ ﻦﻣ
• ﻡﺍﺪﺨﺘﺳﺍ ﻦﻋ ﺞﺘﻨﻳ ﻥﺃ ﻦﻜﻤﻳ .ﺭﺰﻴﻟ ﻉﺎﻌﺷ ﺓﺪﺣﻮﻟﺍ ﻩﺬﻫ ﻡﺪﺨﺘﺴﺗ
SC-MAX8000 SC-MAX6000
ﻞﻳﺩﻮﻤﻟﺍ ﻰﻠﻋ ﻖﻴﺒﻄﺘﻠﻟ ﺔﻠﺑﺎﻗ ﺕﺍﺰﻴﻣ ﻦﹼﻴﺒﺗ
ﻞﻳﺩﻮﻤﻟﺍ ﻰﻠﻋ ﻖﻴﺒﻄﺘﻠﻟ ﺔﻠﺑﺎﻗ ﺕﺍﺰﻴﻣ ﻦﹼﻴﺒﺗ
SB-MAX8000
ﺔﻴﻋﺮﻔﻟﺍ ﺮﻔﻳﻮﻟﺍ ﺔﻋﺎﻤﺳ
.
SC-MAX8000 ﻞﻳﺩﻮﻤﻠﻟ ﻲﻫ ﻩﺬﻫ
ﺐﻠﻄﺘﻳ ﺪﻗ ﺮﺧﺁ ﺯﺎﻬﺟ ﻱﺃ ﻭﺃ ﺯﺎﻬﺠﻟﺍ ﺍﺬﻫ ﻰﻠﻋ ﻯﻮﺘﺤﻣ ﻞﻴﻐﺸﺗﻭ ﻞﻴﺠﺴﺗ ﻥﺇ
• ﺮﺷﺎﺒﻤﻟﺍ ﺲﻤﺸﻟﺍ ﺀﻮﺿ ﻦﻋ ﺍ
ﺔﻘﻠﻌﺘﻤﻟﺍ ﻕﻮﻘﺤﻟﺍ ﻦﻣ ﺎﻫﺮﻴﻏ ﻭﺃ ﺮﺸﻨﻟﺍ ﻕﻮﻘﺣ ﻚﻟﺎﻣ ﻦﻣ ﻥﺫﺇ ﻰﻠﻋ ﻝﻮﺼﺤﻟﺍ
ﺍﺬﻫ ﻰﻠﻋ ﻝﻮﺼﺤﻠﻟ ﺕﺎﻴﺣﻼﺻ ﺔﻳﺃ ﻚﻴﻧﻮﺳﺎﻧﺎﺑ ﻚﻠﺘﻤﺗ ﻻ .ﻯﻮﺘﺤﻤﻟﺍ ﺍﺬﻬﺑ
ﻭﺃ ﻖﺣ ﻱﺃ ﻦﻋ ﺢﻳﺮﺻ ﻞﻜﺸﺑ ﺎﻬﺘﻴﻟﻮﺌﺴﻣ ﻲﻠﺨﺗﻭ ،ﻩﺎﻳﺇ ﻚﺤﻨﻣ ﻦﻋ ﻼﻀﻓ ،ﻥﺫﻹﺍ
• ﺐﻴﻛﺮﺘﺑ ﻢﻗ .ﻞﺼﺘﻤﻟﺍ ﺮﻴﻏ ﺯﺎﻬﺠﻟﺍ ﻮﻫ ﺲﻴﺋﺮﻟﺍ ﺔﻴﺋﺎﺑﺮﻬﻜﻟﺍ ﺔﻗﺎﻄﻟﺍ ﺲﺑﺎﻗ
ﻦﻣ ﺪﻛﺄﺘﻟﺍ ﻚﺘﻴﻟﻭﺆﺴﻣ ﻦﻣ .ﻚﻨﻋ ﺔﺑﺎﻴﻧ ﻥﺫﻹﺍ ﺍﺬﻫ ﻰﻠﻋ ﻝﻮﺼﺤﻠﻟ ﺔﻴﻧ ﻭﺃ ﺓﺭﺪﻗ
ﻕﻮﻘﺣ ﺕﺎﻌﻳﺮﺸﺗ ﻊﻣ ﻖﻓﺍﻮﺘﻣ ﺮﺧﺁ ﺯﺎﻬﺟ ﻱﺃ ﻭﺃ ﺯﺎﻬﺠﻟﺍ ﺍﺬﻬﻟ ﻚﻣﺍﺪﺨﺘﺳﺍ ﻥﺃ
ﻰﻠﻋ ﻝﻮﺼﺤﻠﻟ ﻊﻳﺮﺸﺘﻟﺍ ﺍﺬﻫ ﻰﻟﺇ ﻉﻮﺟﺮﻟﺍ ﻰﺟﺮﻳ .ﻙﺪﻠﺑ ﻲﻓ ﺔﻘﺒﻄﻤﻟﺍ ﺮﺸﻨﻟﺍ
ﻞﺼﺗﺍ ﻭﺃ ﺔﻴﻨﻌﻤﻟﺍ ﺔﻠﺼﻟﺍ ﺕﺍﺫ ﺢﺋﺍﻮﻠﻟﺍﻭ ﻦﻴﻧﺍﻮﻘﻟﺍ ﻝﻮﺣ ﺕﺎﻣﻮﻠﻌﻤﻟﺍ ﻦﻣ ﺪﻳﺰﻣ
• ﺮﻴﻏ ﻞﻜﺸﺑ ﺔﻳﺭﺎﻄﺒﻟﺍ ﻝﺍﺪﺒﺘﺳﺍ ﺔﻟﺎﺣ ﻲﻓ ﺭﺎﺠﻔﻧﺍ ﺙﻭﺪﺣ ﺓﺭﻮﻄﺧ ﻚﻟﺎﻨﻫ
• ﻭﺃ ﺔﻴﻠﺤﻤﻟﺍ ﺕﺎﻄﻠﺴﻟﺎﺑ ﻝﺎﺼﺗﻻﺍ ﻰﺟﺮ
•.ﺐﻬﻠﻟ ﺎﻬﺿ
• ﺲﻤﺸﻟﺍ ﺔﻌﺷﻷ ﺔﺿﺮﻌﻣ ﺓﺭﺎﻴﺳ ﻲﻓ (ﺕﺎﻳﺭﺎﻄﺒﻟﺍ) ﺔﻳﺭﺎﻄﺒﻟﺍ ﻙﺮﺘﺗ ﻻ
•.ﺔﻳﺭﺎﻄﺒﻟﺍ ﺓﺮﺋﺍﺩ ﺮ
•.ﺰﻴﻨﻐﻨﻤﻟﺍ ﺔﻳﺭﺎﻄﺑ ﻭﺃ ﺔﻳﻮﻠﻘﻟﺍ ﺔﻳﺭﺎﻄﺒﻟﺍ ﻦﺤﺸﺗ ﻻ
•.ﺩﻮﺟﻮﻣ ﺮﻴﻏ ﺀﺎﻄﻐﻟﺍ ﻥﺎﻛ ﺍﺫﺇ ﺔﻳﺭﺎﻄﺒﻟﺍ ﻡﺪﺨﺘﺴﺗ ﻻ
• ﻦﻣ ﺔﻠﻳﻮﻃ ﺓﺪﻤﻟ ﺪﻌﺑ ﻦﻋ ﻢﻜﺤﺘﻟﺍ ﺓﺪﺣﻭ ﻡﺪﺨﺘﺴﺗ ﻢﻟ ﺍﺫﺇ ﺔﻳﺭﺎﻄﺒﻟﺍ ﻉﺰﻧﺍ
.ﺎﻬﻠﻴﻐﺸﺗ ﻭﺃ ﺎﻬﻠﻴﺠﺴﺗ ﻲﻓ ﺐﻏﺮﺗ ﻲﺘﻟﺍ ﻯﻮﺘﺤﻤﻟﺍ ﻕﻮﻘﺣ ﻚﻟﺎﻤﺑ
.SC-MAX6000
: SC-MAX8000
: SC-MAX6000
ﻡﺎﻈﻨﻟﺍ
ﺔﻴﺴﻴﺋﺮﻟﺍ ﺓﺪﺣﻮﻟﺍ
ﺕﺎﻋﺎﻤﺴﻟﺍ
RQT9979
2
67
Page 68
ﻞﻴﻐﺸﺘﻟﺍ ﺕﺍﺩﺎﺷﺭﺇ
offset printing
CD ﻮﻳﺮﻴﺘﺳ ﻡﺎﻈﻧ
SC-MAX8000 ﻞﻳﺩﻮﳌﺍ ﻢﻗﺭ
SC-MAX6000
.SC-MAX8000 ﺮﻬﻈﻳ ﻲﺤﻴﺿﻮﺘﻟﺍ ﻞﻜﺸﻟﺍ ﺍﺬﻫ
Ar
GS
RQT9979-Z
L0315CH0
.ﺞﺘﻨﻤﻟﺍ ﺍﺬﻫ ﻚﺋﺍﺮﺸﻟ ﺍﺮﻜﺷ
.ﺍﺪﻴﺟ ﺕﺍﺩﺎﺷﺭﻹﺍ ﻊﻴﻤﺟ ﺓﺀﺍﺮﻗ ﻰﺟﺮﻳ ،ﻥﺎﻣﺃﻭ ﺀﺍﺩﺃ ﻞﻀﻓﺃ ﻰﻠﻋ ﻝﻮﺼﺤﻠﻟ
.ﺔﺟﺎﺤﻟﺍ ﺖﻗﻭ ﺎﻌﺟﺮﻣ ﻚﻟ ﻥﻮﻜﻴﻟ ﺐﻴﺘﻜﻟﺍ ﺍﺬﻬﺑ ﻅﺎﻔﺘﺣﻻﺍ ﻰﺟﺮﻳ
Panasonic Corporation
Web Site: http://www.panasonic.com
© Panasonic Corporation 2015
 Loading...