

Page 1
RQT6523-B
Note:
“EB” on the outer packaging indicates the United
Kingdom.
Before connecting, operating or adjusting this
product, please read these instructions completely.
Please keep this manual for future reference.
EB
DVD AUDIO System
Operating Instructions
Model No.
SC-HDA800
DIGITAL VIDEO
2 ALL
2
6
1
Region numbers are allocated to DVD
players and software according to where
they are sold.
¡The region number of this unit is “2”.
¡You can play DVDs marked with labels
containing “
2” or “ALL”.
See page 6 for details.
Region number supported by
this unit
(Example)
Page 2

2
RQT6523
Before use
Remote control (EUR7702200)..................................1 pc.
Remote control batteries.........................................2 pcs.
Antenna plug adapter (SJP9009)..............................1 pc.
Dear Customer
Thank you for purchasing this product.
For optimum performance and safety, please read these
instructions carefully.
These operating instructions are applicable to the following system.
Surround cable (REX0941)........................................1 pc.
Video connection cable (RJL1P019B15)..................1 pc.
Scart plug adapter (VFA0151-2)................................1 pc.
Metal wall mounts (RMQ1045) ................................6 pcs.
Screws (XTB3+12AFZ)...........................................12 pcs.
Speaker feet ............................................1 sheet (12 feet)
System
Integrated Amplifier
Stereo Tuner
DVD Audio/Video Player
Stereo Cassette Deck
Front speakers
Surround speakers
Center speaker
SC-HDA800
SE-HDA800
ST-HDA800
SL-HDA800
RS-HDA800
SB-HDA800
SB-PS800
Please check and identify the supplied
accessories.
AC mains lead (RJA0053-3X)....................................1 pc.
FM indoor antenna (RSA0007)..................................1 pc.
AM loop antenna set (RSA0035)...............................1 pc.
Supplied accessories
Use the numbers indicated in parentheses when asking for
replacement parts.
CLASS 1
LASER PRODUCT
RQLS0233
-
-
-
-
-
-
-
-
-
VISIBLE AND INVISIBLE LASER RADIATION WHEN OPEN.
AVOID DIRECT EXPOSURE TO BEAM.
DANGER
(FDA 21 CFR)
(IEC60825-1)
VISIBLE AND INVISIBLE LASER RADIATION WHEN OPEN.
AVOID EXPOSURE TO BEAM.
CAUTION
RAY ONNEMENT LASER VISIBLE ET INVISIBLE EN CAS D’OUVERTURE.
EXPOSITION DANGEREUSE AU F AISCEA U .
ATTENTION
SYNLIG OG USYNLIG LASERSTRÅLING VED ÅBNING.
UNDGÅ UDSÆTTELSE FOR STRÅLING.
ADVARSEL
AVATTAESSA OLET ALTTIINA NÄKYVÄÄ JA NÄKYMÄTÖN
LASERSÄTEILYLLE. ÄLÄ KATSO SÄTEESEEN.
VARO!
SYNLIG OCH OSYNLIG LASERSTRÅLNING NÄR DENNA DEL
ÄR ÖPPNAD. BETRAKTA EJ STRÅLEN.
VARNING
SYNLIG OG USYNLIG LASERSTRÅLING NÅR DEKSEL ÅPNES.
UNNGÅ EKSPONERING FOR STRÅLEN.
ADVARSEL
SICHTBARE UND UNSICHTBARE LASERSTRAHLUNG, WENN ABDECKUNG
GEÖFFNET. NICHT DEM STRAHL AUSSETZEN.
VORSICHT
-
(Side of product) (DVD Audio/Video player)
(Inside of product)
∗
Replacements (RFA0631A-K) sold in 1-sheet lots
(4 feet per sheet).
Speaker cords
¡Tagged red, black, blue, and white (REE1195)..............2 pcs.
¡Tagged blue and white (2 m) (REE1196).......................1 pc.
¡Tagged blue and white(7 m) (REE1196A) .....................2 pcs.
(2 m) (7 m)
www.panasonic.co.uk (for UK customers only)
¡Order accessory and consumable items for your product
with ease and confidence by telephoning our
Customer Care Centre Mon-Friday 9:00am-5:30pm.
(Excluding public holidays.)
¡Or go on line through our Internet Accessory ordering
application.
¡Most major credit and debit cards accepted.
¡All enquiries transactions and distribution facilities are
provided directly by Panasonic UK Ltd.
¡It couldn’t be simpler!
Customer Care Centre
For UK customers: 08705 357357
For Republic of Ireland customers: 01 289 8333
Technical Support
For UK customers: 0870 1 505610
This Technical Support Hot Line number is for Panasonic
PC software related products only.
For Republic of Ireland, please use the Customer Care
Centre number listed above for all enquiries.
For all other product related enquiries, please use the
Customer Care Centre numbers listed above.
Page 3

3
RQT6523
Before use
Table of contents
Before use
Caution for AC Mains Lead.....................................................3
Safety precautions
.....................................................................4
Disc information
.........................................................................4
The remote control
....................................................................6
Installation and connections
..................................................7
Front panel controls
................................................................12
Setting the time
........................................................................14
Television settings
..................................................................15
Disc operations
Playing DVDs and CDs ...........................................................16
Basic play
Skipping tracks and chapters ......................................................18
Slow motion.................................................................................18
Frame-by-frame viewing..............................................................18
Fast forward and rewind - Search ...............................................19
Starting play from a selected track or title ...................................19
Using menus to play....................................................................19
Switching time displays - Time mode..........................................19
Other modes of play
Specifying a group to play...........................................................20
Repeat play .................................................................................21
A-B repeat ...................................................................................21
Selecting still pictures - Page skip...............................................21
Random play ...............................................................................22
Playing all the groups in succession............................................22
Playing tracks in a selected order - Program play.......................23
Increasing your enjoyment of movies and music
Changing soundtracks.................................................................24
Changing subtitle language.........................................................24
Switching angles..........................................................................25
To enjoy even higher quality sound - AUDIO ONLY ...................25
Improving CD sound (RE-MASTER)...........................................25
Other features..............................................................................25
Graphic User Interface - GUI.................................................26
Radio operations
The radio: manual tuning ......................................................29
The radio: preset tuning
........................................................30
Cassette deck operations
Cassette tapes..........................................................................31
Timer operations
Using the timers.......................................................................38
Recording operations
Before recording......................................................................33
Recording the radio
.................................................................34
Recording discs
.......................................................................35
Other operations
Changing the sound quality .................................................36
Convenient functions
.............................................................37
Reference
Settings.......................................................................................41
Using other equipment
...........................................................46
Troubleshooting guide
...........................................................48
Maintenance
..............................................................................49
Language code list
..................................................................49
Glossary
.....................................................................................50
Technical specifications
........................................................51
Caution for AC Mains Lead
(For United Kingdom)
(“EB” area code model only)
For your safety, please read the following text carefully.
This appliance is supplied with a moulded three pin mains plug for
your safety and convenience.
A 5-ampere fuse is fitted in this plug.
Should the fuse need to be replaced please ensure that the
replacement fuse has a rating of 5-ampere and that it is approved
by ASTA or BSI to BS1362.
Check for the ASTA mark or the BSI mark on the body of the fuse.
If the plug contains a removable fuse cover you must ensure that it
is refitted when the fuse is replaced.
If you lose the fuse cover the plug must not be used until a
replacement cover is obtained.
A replacement fuse cover can be purchased from your local dealer.
CAUTION!
IF THE FITTED MOULDED PLUG IS UNSUITABLE FOR
THE SOCKET OUTLET IN YOUR HOME THEN THE
FUSE SHOULD BE REMOVED AND THE PLUG CUT
OFF AND DISPOSED OF SAFELY.
THERE IS A DANGER OF SEVERE ELECTRICAL
SHOCK IF THE CUT OFF PLUG IS INSERTED INTO
ANY 13-AMPERE SOCKET.
If a new plug is to be fitted please observe the wiring code as stated
below.
If in any doubt please consult a qualified electrician.
IMPORTANT
The wires in this mains lead are coloured in accordance with the
following code:
Blue: Neutral, Brown: Live.
As these colours may not correspond with the coloured markings
identifying the terminals in your plug, proceed as follows:
The wire which is coloured Blue must be connected to the terminal
which is marked with the letter N or coloured Black or Blue.
The wire which is coloured Brown must be connected to the
terminal which is marked with the letter L or coloured Brown or Red.
WARNING: DO NOT CONNECT EITHER WIRE TO THE
EARTH TERMINAL WHICH IS MARKED WITH THE
LETTER E, BY THE EARTH SYMBOL OR
COLOURED GREEN OR GREEN/YELLOW.
THIS PLUG IS NOT WATERPROOF–KEEP DRY.
Before use
Remove the connector cover.
How to replace the fuse
The location of the fuse differ according to the type of AC mains
plug (figures A and B). Confirm the AC mains plug fitted and follow
the instructions below.
Illustrations may differ from actual AC mains plug.
1. Open the fuse cover with a screwdriver.
2. Replace the fuse and close or attach the fuse cover.
Fuse cover
Figure A
Figure B
Fuse
(5 ampere)
Fuse
(5 ampere)
Figure A
Figure B
Page 4
DVD-
Audio
4
RQT6523
Before use
Safety precautions
Placement
Set the unit up on an even surface away from direct sunlight, high
temperatures, high humidity, and excessive vibration. These
conditions can damage the cabinet and other components, thereby
shortening the unit’s service life.
Place it at least 15 cm away from wall surfaces to avoid distortion
and unwanted acoustical effects.
Do not place heavy items on the unit.
Voltage
Do not use high voltage power sources. This can overload the
unit and cause a fire.
Do not use a DC power source. Check the source carefully when
setting the unit up on a ship or other place where DC is used.
AC mains lead protection
Ensure the AC mains lead is connected correctly and not
damaged. Poor connection and lead damage can cause fire or
electric shock. Do not pull, bend, or place heavy items on the lead.
Grasp the plug firmly when unplugging the lead. Pulling the AC
mains lead can cause electric shock.
Do not handle the plug with wet hands. This can cause electric
shock.
Foreign matter
Do not let metal objects fall inside the unit. This can cause
electric shock or malfunction.
Do not let liquids get into the unit. This can cause electric shock
or malfunction. If this occurs, immediately disconnect the unit from
the power supply and contact your dealer.
Do not spray insecticides onto or into the unit. They contain
flammable gases which can ignite if sprayed into the unit.
Service
Do not attempt to repair this unit by yourself. If sound is
interrupted, indicators fail to light, smoke appears, or any other
problem that is not covered in these operating instructions occurs,
disconnect the AC mains lead and contact your dealer or an
authorized service center. Electric shock or damage to the unit can
occur if the unit is repaired, disassembled or reconstructed by
unqualified persons.
Extend operating life by disconnecting the unit from the power
source if it is not to be used for a long time.
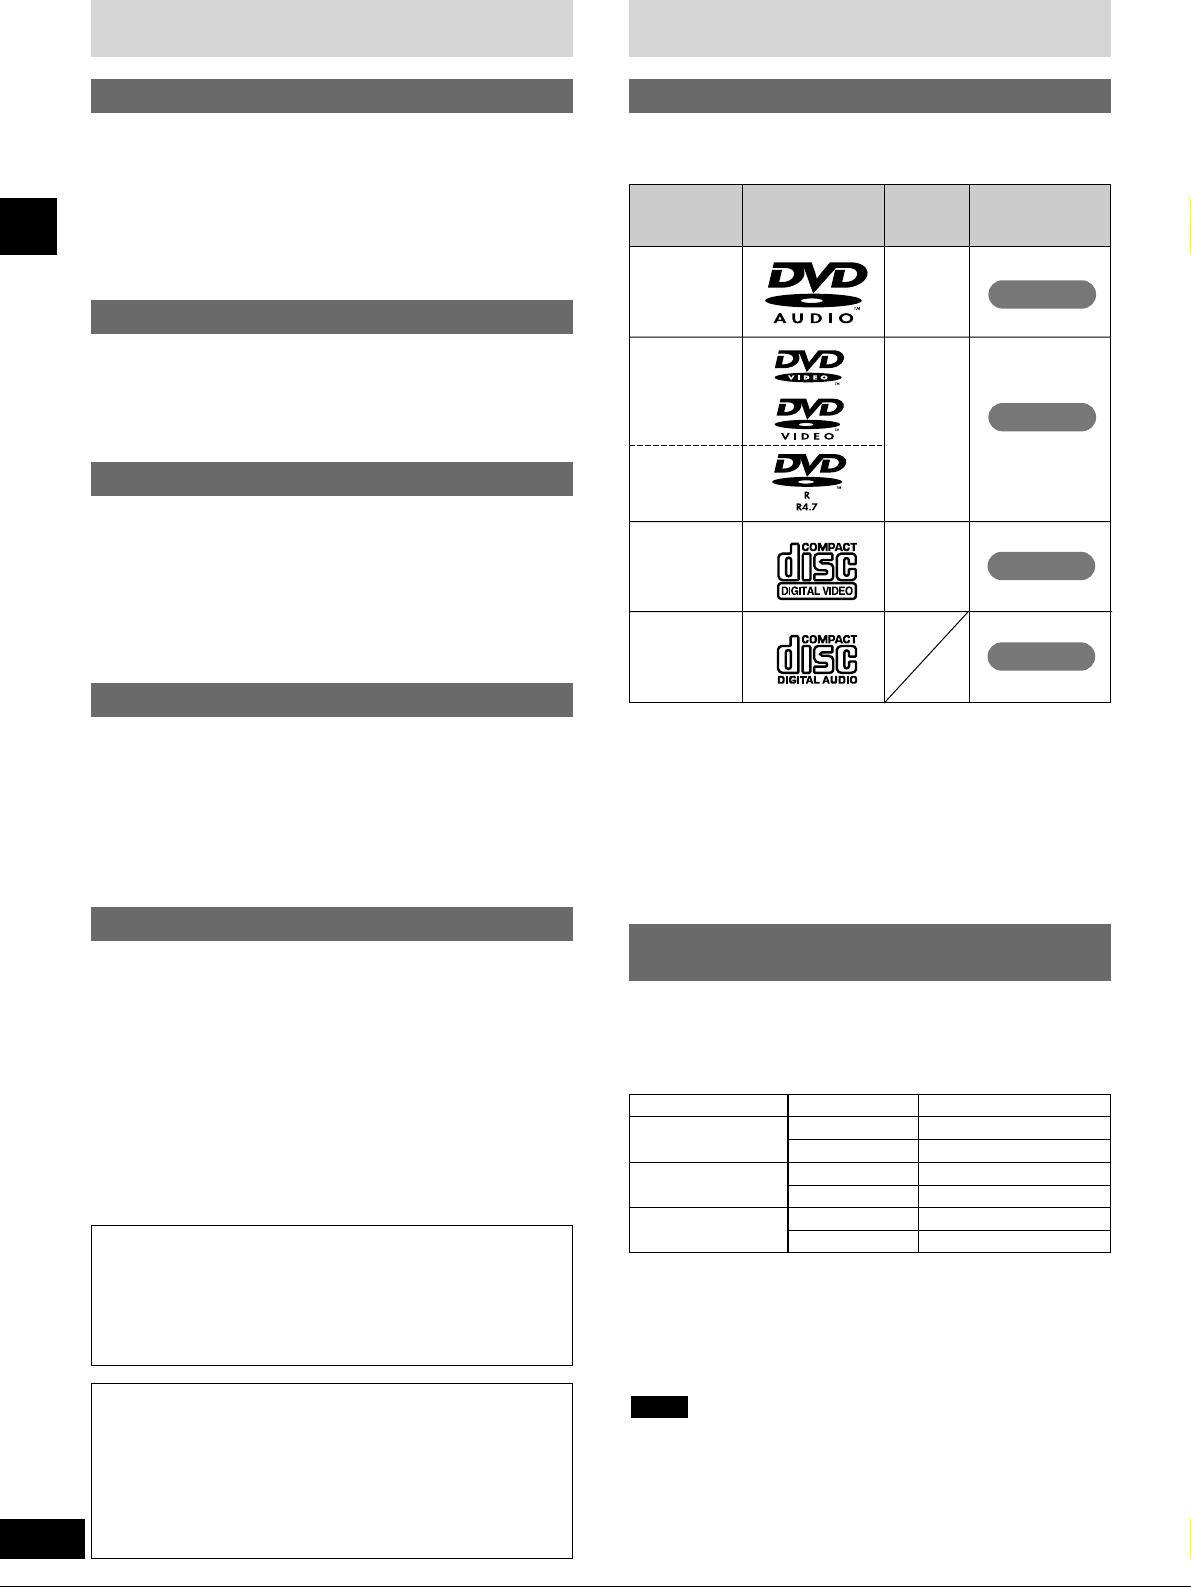
Use this chart when selecting discs. You can use both 8-cm and
12-cm discs. Do not use a disc adapter for 8-cm discs.
DVD-
Video
NTSC
+
PAL
Video CD
CD
NTSC
+
PAL
Discs that cannot be played
¡DVDs with an unsuitable region number.
¡DVD-ROM, DVD-RAM, CD-ROM, CDV, CD-G, +RW, DVD-RW,
CVD, SVCD, SACD, Divx Video Discs and Photo CD.
Disc information
VCD
CD
DVD-V
Disc type Logo
Video
system
NTSC
+
PAL
Indication used
in instructions
DVD-A
Disc selection and care
DVDs and Video CDs are recorded using either PAL or NTSC.
Refer to this table when selecting discs.
a Clear images are shown on the screen.
b No clear images shown on the screen.
1)
If you select “NTSC” in Video – NTSC Disc Output (a page 42),
the picture may be clearer.
2)
The factory setting for NTSC disc output is PAL 60, so no changes
to the initial settings are necessary. If your television is not
equipped to handle PAL 525/60 signals the picture will not be
shown correctly.
The bottom part of the picture may be cut off if the Video CD played
does not comply with standards.
Note
TV type Disc TV monitor
Multisystem TV
PAL
a
✓
a ✓
1)
NTSC
PAL
b ×
NTSC TV
NTSC
PAL
a
✓
PAL TV
NTSC
b ×
a
✓
2)
Type of disc for the type of
connected TV
WARNING:
TO REDUCE THE RISK OF FIRE, ELECTRIC SHOCK OR
PRODUCT DAMAGE, DO NOT EXPOSE THIS APPARATUS
TO RAIN, MOISTURE, DRIPPING OR SPLASHING AND
THAT NO OBJECTS FILLED WITH LIQUIDS, SUCH AS
VASES, SHALL BE PLACED ON THE APPARATUS.
CAUTION!
THIS PRODUCT UTILIZES A LASER.
USE OF CONTROLS OR ADJUSTMENTS OR
PERFORMANCE OF PROCEDURES OTHER THAN THOSE
SPECIFIED HEREIN MAY RESULT IN HAZARDOUS
RADIATION EXPOSURE.
DO NOT OPEN COVERS AND DO NOT REPAIR YOURSELF.
REFER SERVICING TO QUALIFIED PERSONNEL.
DVD-R
DVD-R discs
Panasonic DVD-R recorded and finalized on a Panasonic DVD
video recorder are played as DVD-Video on this unit.
It may not be possible to play these discs in all cases due to the
type of disc or condition of the recording.
Page 5
5
RQT6523
Before use
You can play discs with these symbols.
DVD audio formats
DVDs may be recorded monaurally or stereophonically instead of
with multiple channels. So, for example, audio recorded with Dolby
Surround, a stereo format found on DVDs and other media, will be
played only through the front speakers.
DVDs that can be played
This unit can play CD-DA (digital audio) and video CD format audio
CD-R and CD-RW that have been finalized upon completion of
recording.
It may not be able to play some CD-R or CD-RW due to the
condition of the recording.
Finalizing is a process that enables CD-R/CD-RW players to play
audio CD-R and CD-RW.
Disc information
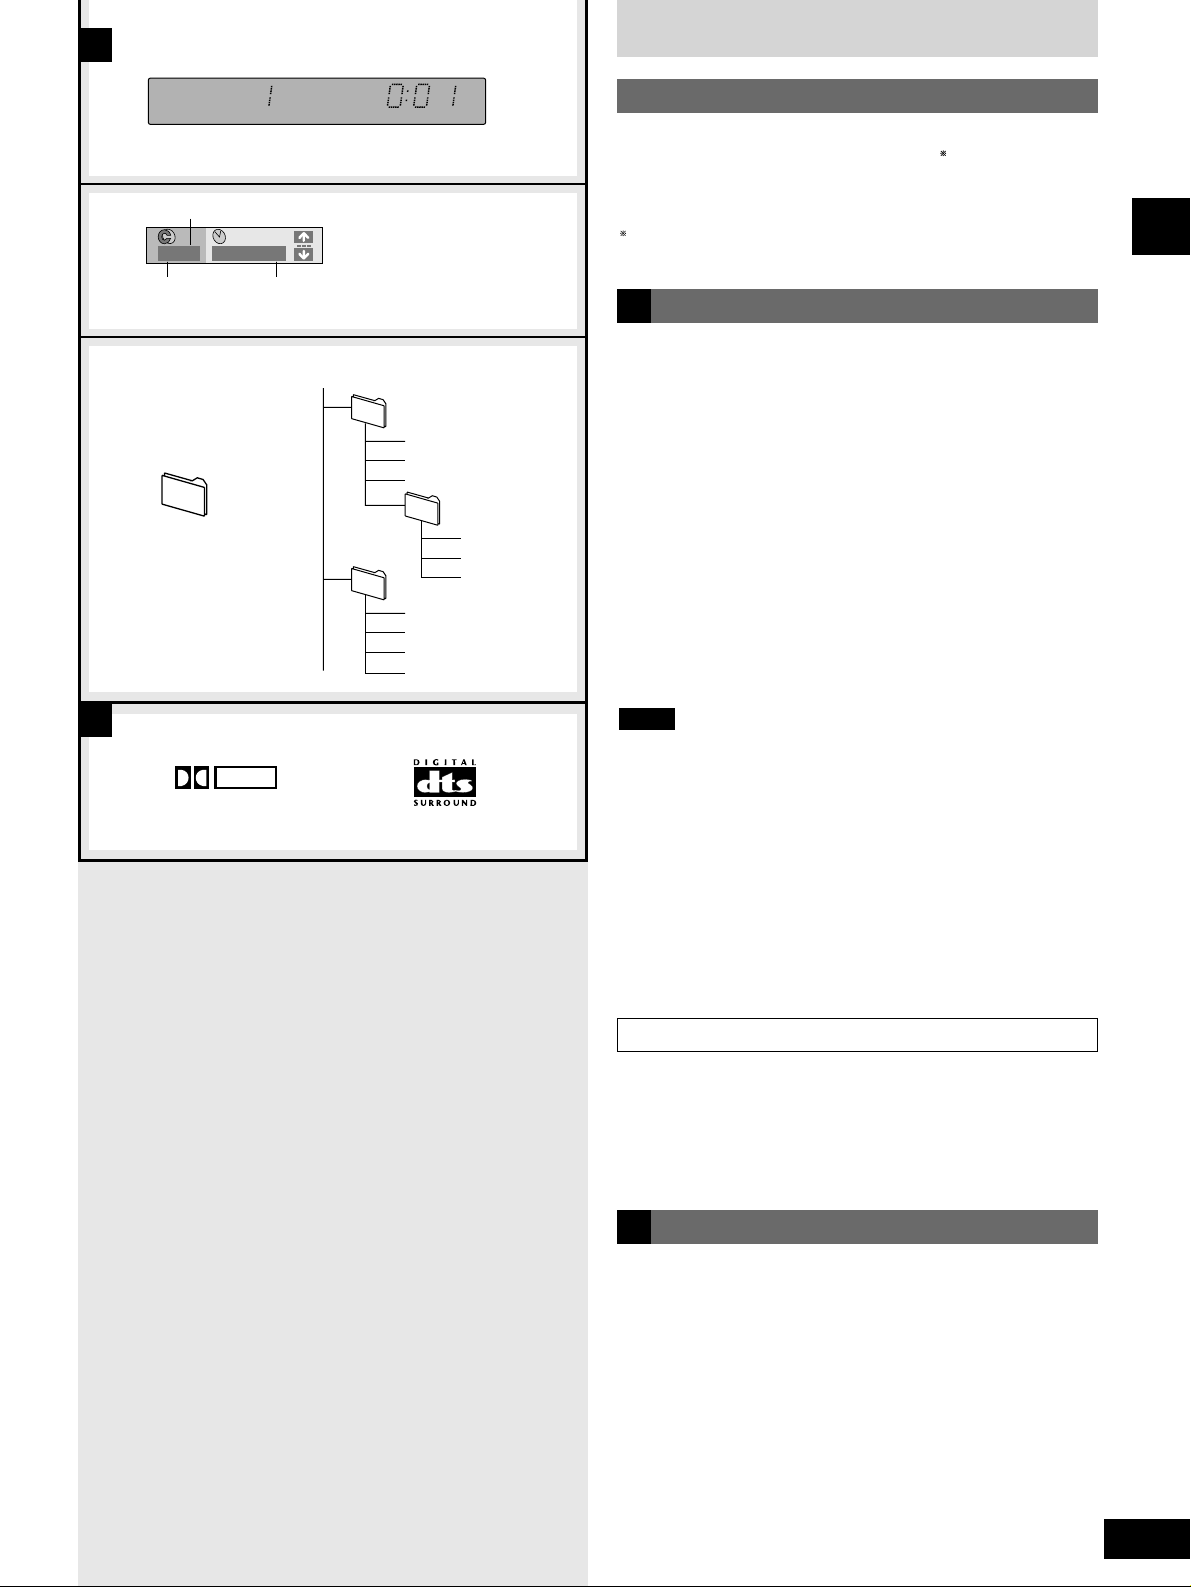
MP3 playback
A
You can use this unit to play MP3 format audio recorded for
personal use with a computer etc. onto CD-R or CD-RW. Play may
not be possible in some cases due to the condition of the recording.
Discs recorded using MP3 differ to CDs in the following ways.
¡Structure of the disc
MP3 files are treated as chapters and folders (albums) are
treated as titles.
¡Display during play a
¡On-Screen Menu Icons for disc information during play b
¡Starting play from a selected chapter
Press the numbered buttons and press [ENTER].
Example: Chapter 23: [2] / [3] / [ENTER]
(Pressing [≥10/-/--] is unnecessary.)
¡Repeat play
You can use chapter repeat or title repeat.
¡Program play, random play
You cannot use program play or random play.
¡If you play an MP3 track that includes still picture data, it will take
some time before the music itself starts playing and the elapsed
time will not be displayed during this time. Even after the track
starts, the correct play time will not be displayed.
¡The time information may not be displayed correctly.
¡If both MP3 and CD-DA data is recorded on the disc, only the
data type used for the first track is played.
¡This unit is compatible with multi-session but if there are a lot of
sessions it takes more time for play to start. Keep the number of
sessions to a minimum to avoid this.
¡This unit is not compatible with ID3 tags and packet-write format.
¡This unit is not compatible with files with a sampling rate of
32 kHz.
Note
0:011/ 59
A
a
b
Total number of chapters
Current chapter Elapsed play time (display only, cannot be
changed)
Playing CD-R and CD-RW
B
DOLBY
DIGITAL
When making MP3 discs to play on this unit
Discs must conform to ISO9660 level 1 or 2 (except for extended
formats). MP3 files must have the extension “.MP3” or “.mp3”.
Naming folders and files (Example) c
At the time of recording, prefix folder and file names with 3-digit
numbers in the order you want to play them (this may not work at
times).
B
001
003
004.mp3
005.mp3
006.mp3
root
002
007.mp3
008.mp3
009.mp3
010.mp3
011.mp3
012.mp3
013.mp3
c
Files in this example
are played in order from
004.mp3 to 013.mp3
004.mp3–013.mp3:
File (Chapter)
: Folder (Title)
Page 6
6
RQT6523
Before use
Disc information
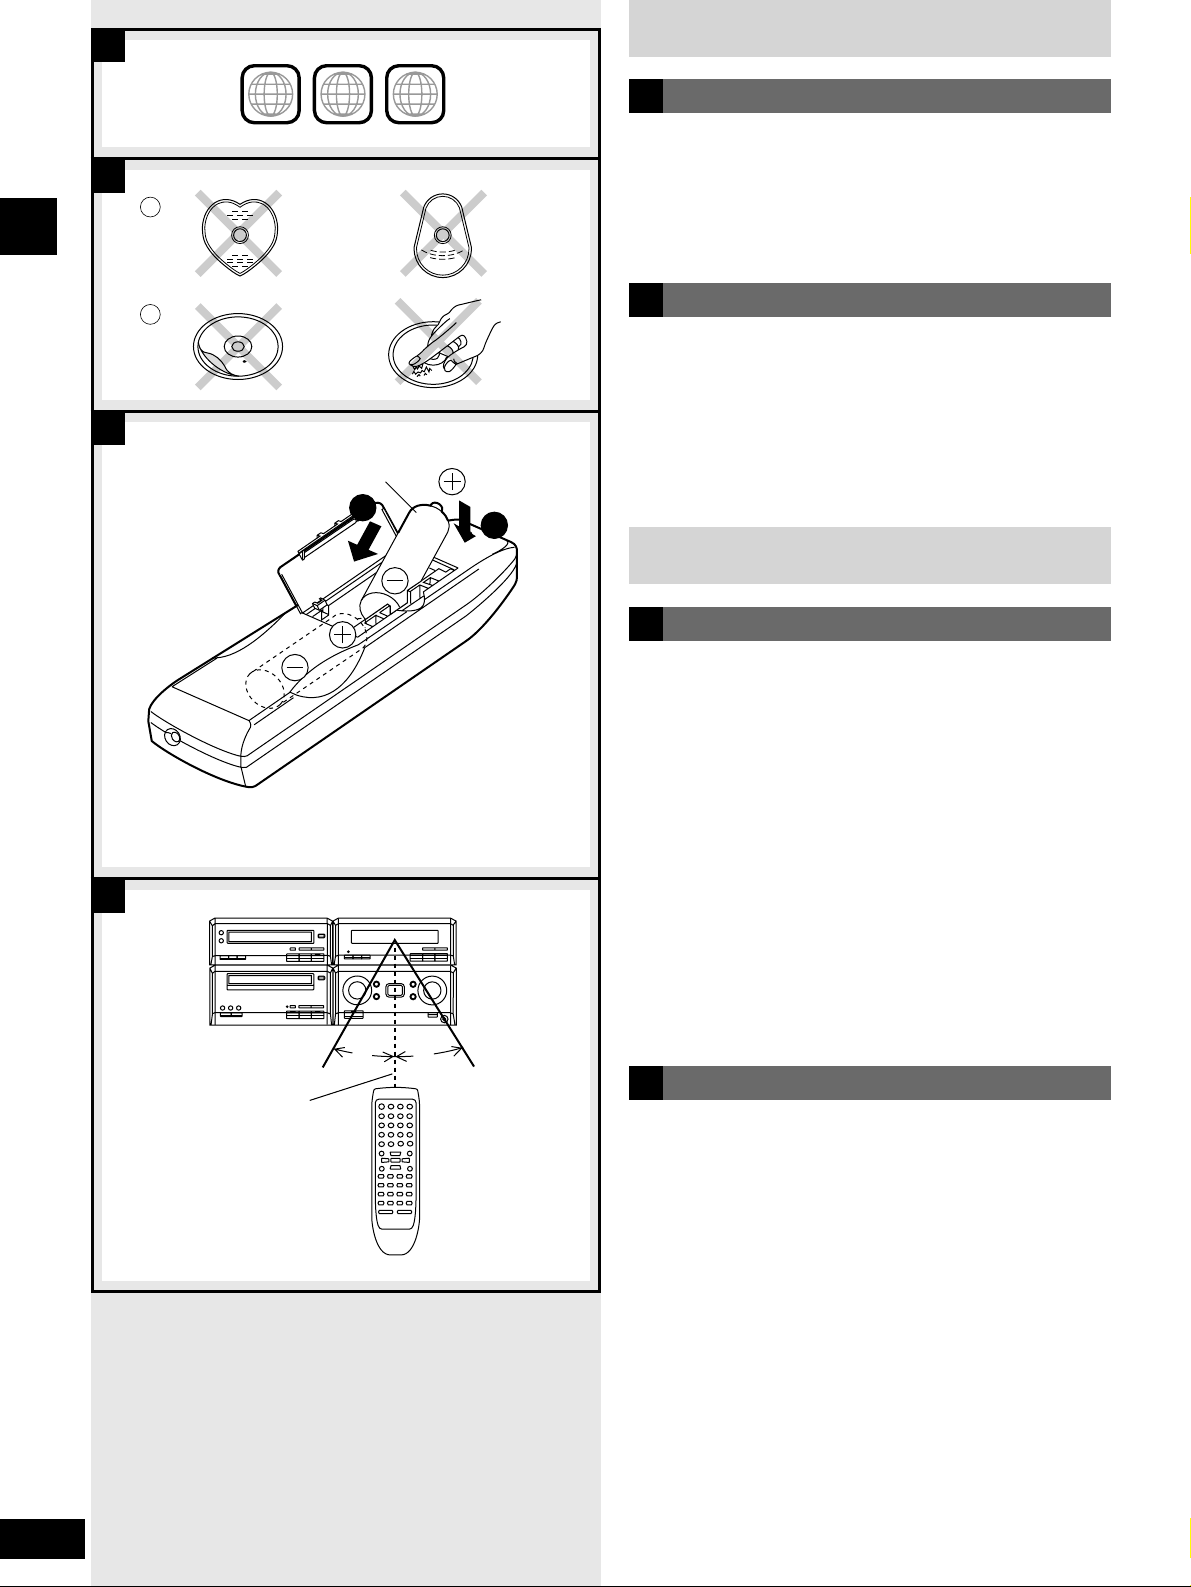
Batteries
Disc care
Insert so the poles (+ and –) match those in the remote control.
¡Do not use rechargeable type batteries.
Do not;
¡mix old and new batteries.
¡use different types at the same time.
¡heat or expose to flame.
¡take apart.
¡short circuit.
¡attempt to recharge alkaline or manganese batteries.
Mishandling of batteries can cause electrolyte leakage which can
damage items the fluid contacts and may cause a fire.
If electrolyte leaks from the batteries, consult your dealer.
Wash thoroughly with water if electrolyte comes in contact with any
part of your body.
Remove if the remote control is not going to be used for a long
period of time. Store in a cool, dark place.
Replace if the unit does not respond to the remote control even
when held close to the front panel.
C
B
Use
D
a
b
2 ALL
2
6
1
Aim at the sensor, avoiding obstacles, at a maximum range of
7 meters directly in front of the unit.
¡Keep the transmission window and the unit’s sensor free from
dust.
¡Operation can be affected by strong light sources, such as direct
sunlight, and the glass doors on cabinets.
Do not;
¡put heavy objects on the remote control.
¡take the remote control apart.
¡spill liquids onto the remote control.
B
A
30˚
30˚
7 m
R6 (AA, UM-3)
2
1
D
C
The remote control
Do not;
¡use irregularly shaped discs (a).
¡attach extra labels and stickers.
¡use discs with labels and stickers that are coming off or with
adhesive exuding from under labels and stickers (b).
¡attach scratch-proof covers or any other kind of accessory.
¡write anything on the disc.
¡clean discs with liquids (Wipe with a soft, dry cloth.).
Region numbers are allocated to DVD-Video and DVD players
according to where they are sold.
This unit can play DVD-Video labeled with or including the region
number allocated to “
2”, or “ALL”.
Confirm the region number for this unit before choosing discs.
The number for this unit is indicated on the rear panel.
Region numbers
A
(Example)
Page 7
7
RQT6523
Before use
Installation and connections
A
30˚
30˚
120˚
B
Side-by-side setup Stacking
TV (not included)
Front speaker (L)
Center speaker
Surround speaker (L)
Subwoofer (not included)
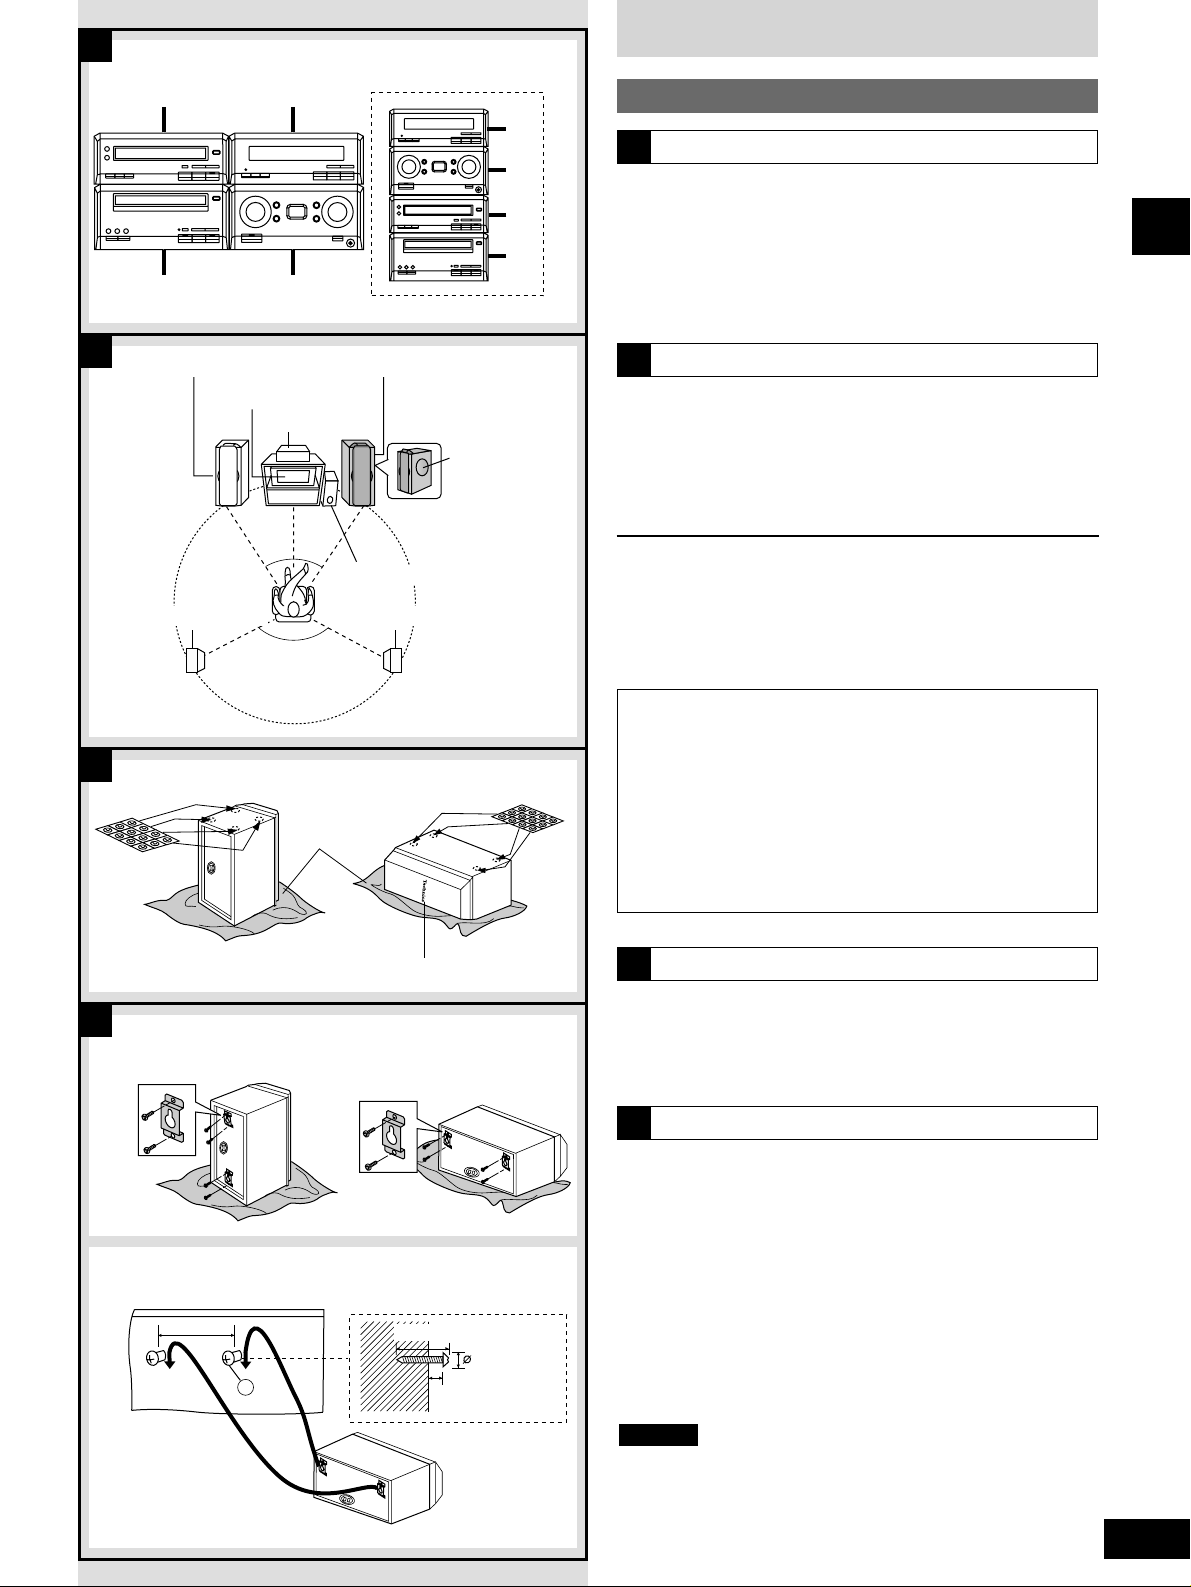
You can set up the components side-by-side or stacked. The
explanations show the side-by-side setup.
a
DVD Audio/Video Player
(SL-HDA800)
b
Stereo Cassette Deck
(RS-HDA800)
c
Stereo Tuner
(ST-HDA800)
d
Integrated Amplifier
(SE-HDA800)
The figure shows an example of when you have connected all the
speakers it is possible to connect to this system.
¡A subwoofer is not included, but the superwoofers provide
adequate bass reproduction.
For even more powerful bass reproduction, purchase an optional
active subwoofer.
Positioning your speakers
The optimum is to place all your speakers, except for the
subwoofer, an equal distance from the seating area. The angles in
the figure are approximate.
¡Position the center speaker directly above or below the television.
¡Put the subwoofer somewhere near the television.
Installation
A
Front speaker (R)
Surround speaker (R)
Audio components
B
Speakers and TV (not included)
1 Attach the wall mounts.
Use the included screws to attach to the back of the speaker.
Screw holes are already drilled.
2 Screw wood screws (a)
(not included) into a thick and hard
part of the wall.
The speakers can be mounted horizontally or vertically. Horizontal
mounting is used in the example.
The surface you attach the speakers to must be able to support
over 10 kg.
Do not attempt to attach these speakers to walls methods other
than those described in this manual.
Caution
Attaching the speakers to the wall
Attach the rubber feet to the speaker
Attach these rubber feet to the center and surround speakers to
prevent them from moving and falling over.
Attach four feet each to each speaker (center and surround), then
move the brand plate so it is horizontal.
a
a
b
b
c
c
d
d
C
7–9 mm
7.5–9.5 mm
30–35 mm
a
156 mm
D
Standing Lying down
To attach vertically To attach horizontally
Cloth
Brand plate
Superwoofers
facing out
C
1
2
D
Speaker magnetic shielding
If irregular coloring occurs on your television
These speakers are designed to be used close to a television,
but the picture may be affected with some televisions and setup combinations.
If this occur, turn the television off for about 30 minutes.
The television’s demagnetizing function should correct the
problem.
If it persists, move the speakers further away from the
television.
Page 8
Installation and connections
8
RQT6523
Before use
1
2
a
A
B1
B2
L
R
HF
HF LF
LF
R
SURROUND
CENTER
SURROUND
L
3
b
SUBWOOFER
White line
Press both ends and pull
out.
To unplug cable
Speaker
Amplifier
Gray
White
Gray
White
Red
Red
Blue
Black
Blue
Black
Surround speaker (R)
Surround speaker (L)
Center speaker
Subwoofer
(not included)
Gray
White
White
Blue
Gray
Blue
7 m
7 m
2 m
AmplifierSpeaker
Page 9

9
RQT6523
Before use
Connections
Note
Do not connect the AC mains lead until all other connections are
complete.
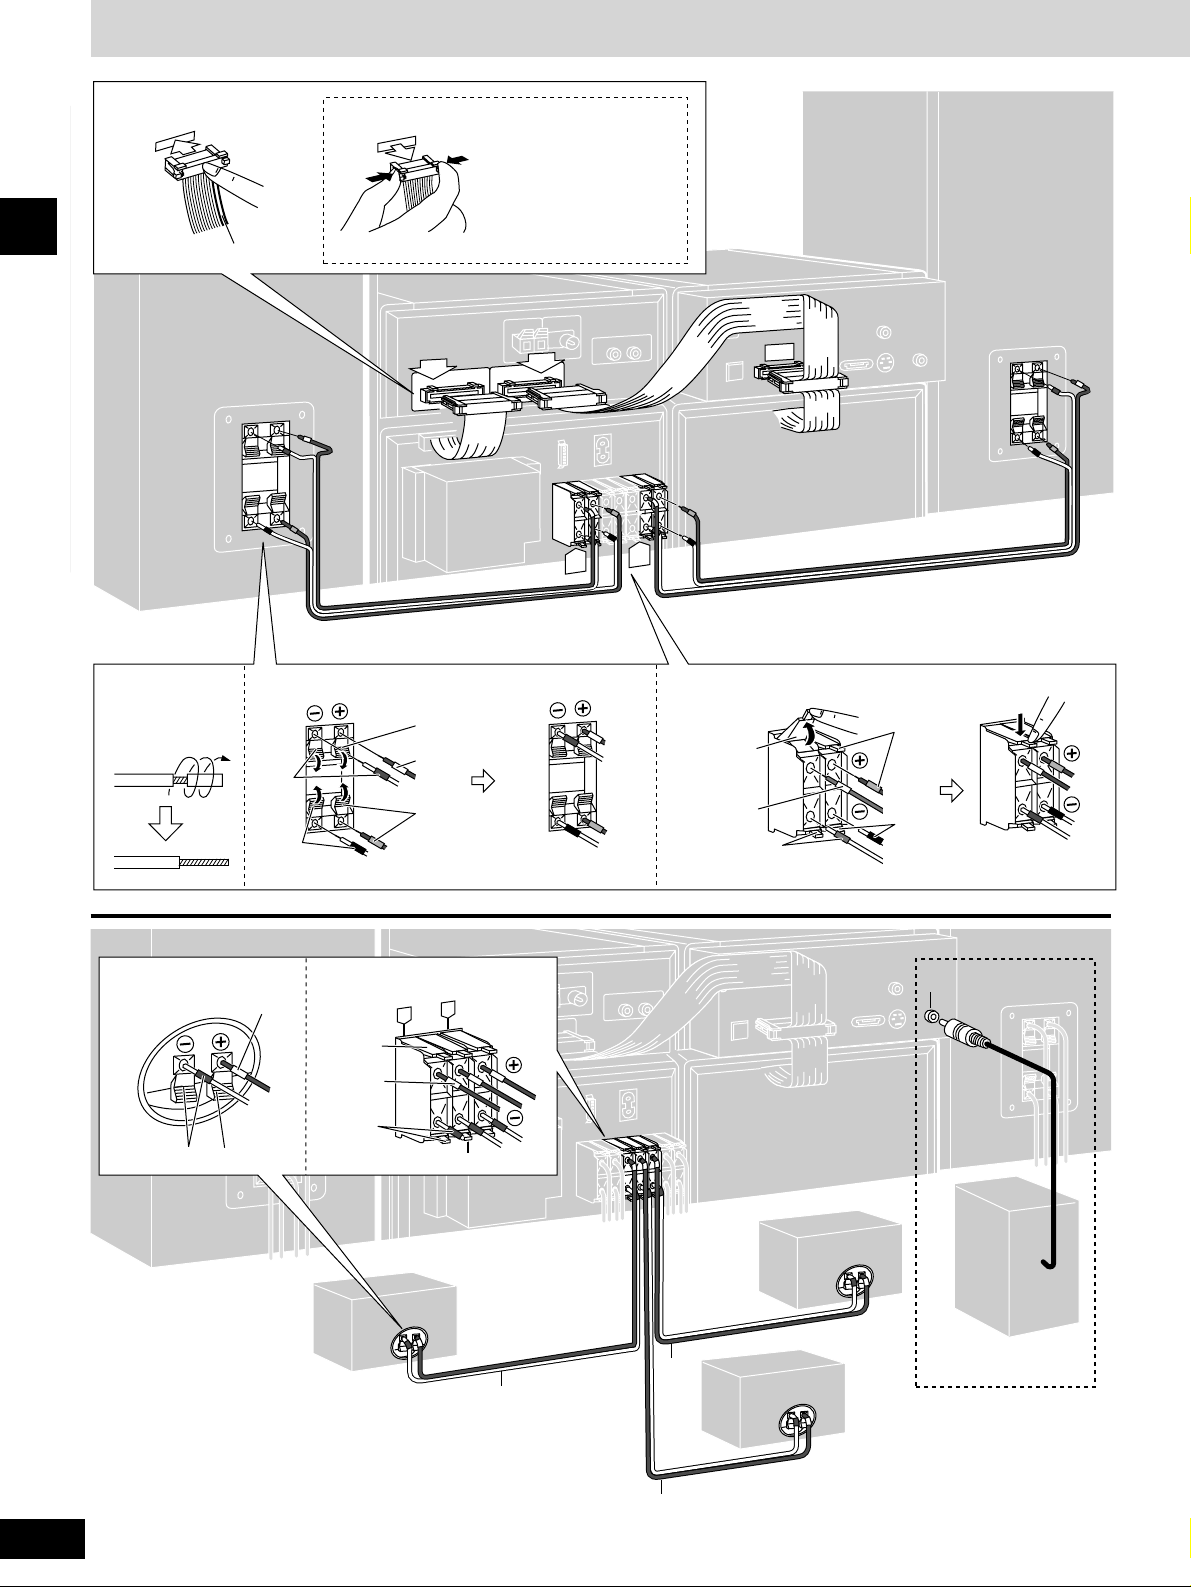
1 Flat cables.
Keep the cables as flat as possible against the back of the
unit.
2 Front speakers.
Connect with the speaker cables tagged with four colors.
To prepare the speaker cables, twist the vinyl tip and pull off
(a).
Connect so the color of the cable’s tag matches the terminal
(connect the cable tagged white to the gray terminal).
HF: High Frequency
LF : Low Frequency
¡To prevent damage to circuitry, never short-circuit positive
(+) and negative (–) speaker wires.
¡Connect only positive wires (tagged red and white) to
positive (+) terminals and negative wires (tagged black and
blue) to negative (–) terminals.
3 Center/surround speakers and
subwoofer.
Connect the center speaker with the 2-meter speaker cable
and the surround speakers with the 7-meter speaker cables.
The connection procedure is the same as for the front
speakers.
You will need a monaural connection cable to connect a
subwoofer (b).
Note
Caution
¡¡
Incorrect connection can damage the unit.
¡¡
Use the speakers only with the recommended system.
Failure to do so can damage the amplifier and speakers,
and can cause fire. Consult a qualified service person if
damage occurs or if a sudden change in performance is
apparent.
¡¡
Place the speakers on a stable surface such as the floor
or a sturdy shelf.
(Continued on next page)
Do not play distorted sounds over extended periods.
You can damage your speakers by playing sounds that include high
levels of noise. Reduce the volume in the following cases.
¡When turning the amplifier off.
¡When playing noise from FM broadcasts over extended periods.
Notes on speaker use
Page 10

FM ANT
75Ω
5
AC IN
7
A
a
4
VIDEO IN
S-VIDEO
OUT
VIDEO OUT
[AUDIO]
[VIDEO]
b
AM ANT
EXT LOOP
6
D1
D2
a
10
RQT6523
Before use
Installation and connections
Adhesive tape
YES
To household
mains socket
To unplug cable
Hold down the lever and
pull.
White line
Page 11
11
RQT6523
Before use
4 AM loop antenna.
To prepare antenna, twist the vinyl tip and pull off
(a)
.
Keep loose antenna cord away from other wires and cords.
5 FM antenna.
Fix the other end of the antenna where reception is best.
6 Surround cable.
BE SURE TO READ THE CAUTION FOR THE AC
MAINS LEAD ON PAGE 3 BEFORE PROCEEDING TO
STEP 7.
7 Connect the AC mains lead.
Inserting the lead’s connector
Part of the connector may jut out of the unit’s inlet even when
you have inserted it correctly.
This is normal and does not interfere with use.
For your reference
Information you enter into the unit’s memory, except for time,
remains intact for up to two weeks after the mains lead is
disconnected.
The included AC mains lead is for use with this unit only. Do not use
it with other equipment.
Note
Television (not included) connection
A
Connect to a television that has a video-input terminal.
S-VIDEO OUT terminal
If your television has an S-video input terminal, use an S-video
cable (not included) to connect to this unit. You can achieve better
quality video with this connection. Connecting the included video
cord is not necessary if you do so.
Connect your unit directly to your television (a).
Do not connect the unit through your video cassette recorder
when setting up your home entertainment system, because the
picture may not be played correctly due to the copy guard.
Use the RCAJ adaptor if your TV has 21-pin Scart terminal (b).
You do not have to connect anything to the AUDIO terminals.
Page 12
12
RQT6523
Before use
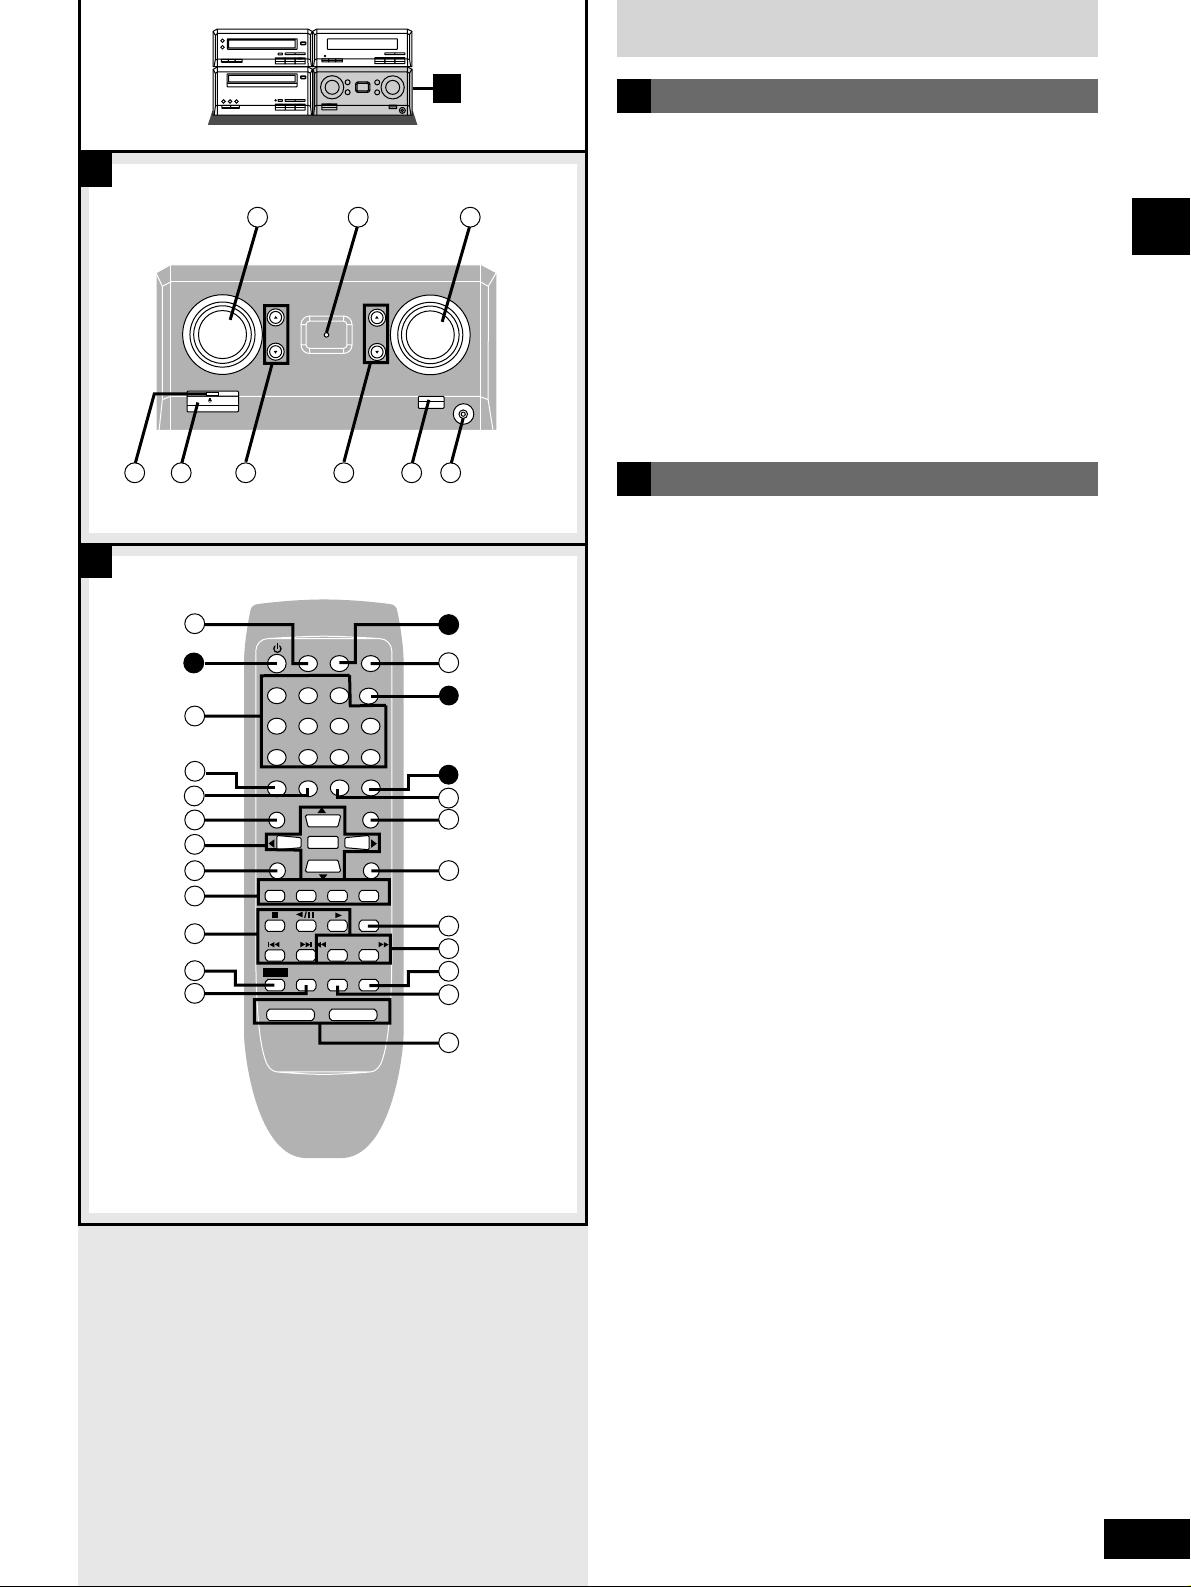
Front panel controls
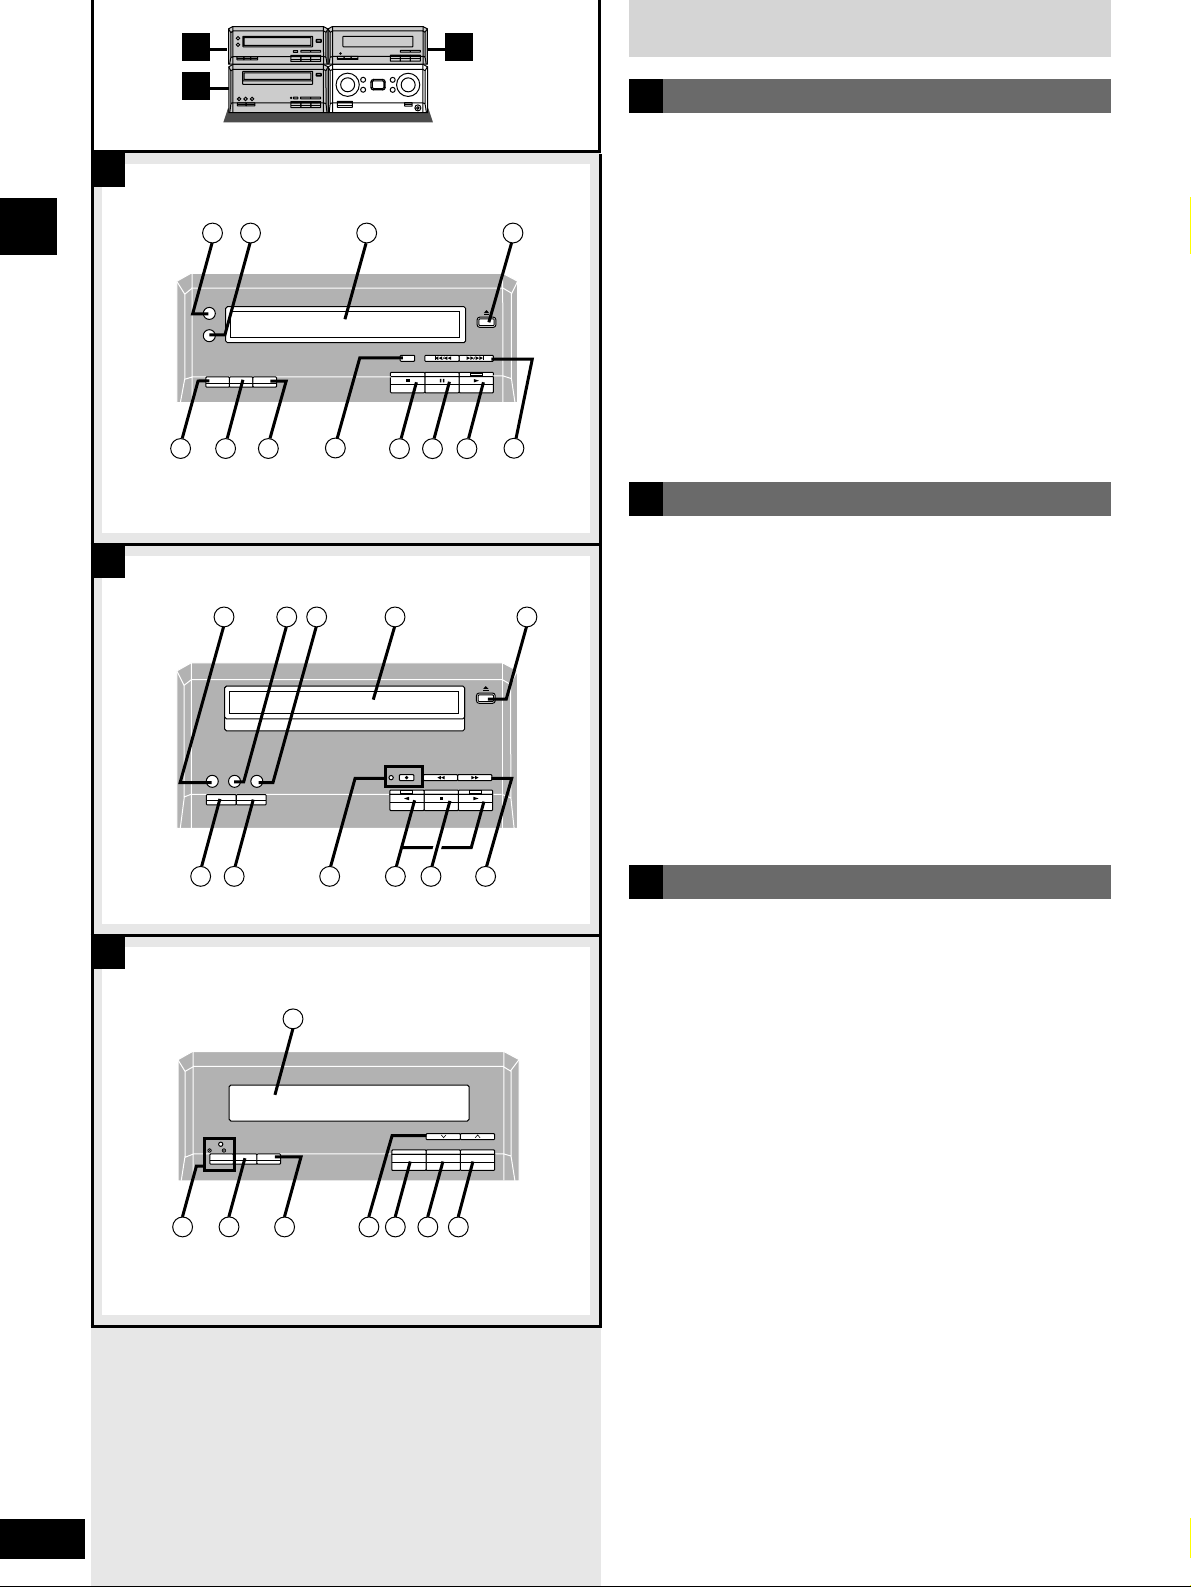
DVD Audio/Video Player
qq
Audio only button/indicator (AUDIO ONLY).........................25
ww
Re-master button/indicator (RE-MASTER)...........................25
ee
Disc tray
rr
Disc tray open/close button (; OPEN/CLOSE)....................16
tt
Time mode button (TIME MODE)...........................................19
yy
Repeat button (REPEAT)........................................................21
uu
CD edit button (EDIT) .............................................................35
ii
Group button (GROUP) ..........................................................20
oo
Stop button (g) .......................................................................16
!!00
Pause button (h).....................................................................16
!!11
Play button and indicator (q) ................................................16
The color of the indicator depends on the operation taking place.
If stopped: orange
If playing: green
When paused or the resume function is on: flashes
!!22
Skip/search buttons (u/t , y/i) .........................18, 19
A
Stereo Tuner
@@44
Display panel
The display also shows information for the cassette deck, DVD
player, and amplifier.
@@55
Play timer/record timer button and indicator
(zPLAY/zREC) .................................................................38, 39
@@66
Clock/timer button (CLOCK/TIMER)................................14, 38
@@77
Set button (SET)................................................................14, 38
@@88
Tuning/time adjust buttons
(TUNE/TIME ADJUST 2, 1)........................................14, 29, 38
@@99
Tuning mode button (TUNE MODE)......................................29
##00
RDS button (RDS)...................................................................29
##11
Band select button (FM/AM) ..................................................29
C
A
C
B
A
B
C
Stereo Cassette Deck
!!33
Dolby noise reduction button (DOLBY NR)..........................31
!!44
Reverse mode select button (REV MODE) ...........................31
!!55
Tape Program Sensor button (TPS SKIP) ............................32
!!66
Cassette holder
!!77
Cassette tray open/close button (; OPEN/CLOSE) ............31
!!88
Counter button (COUNTER)...................................................33
!!99
Counter reset button (RESET)...............................................31
@@00
Record pause button and indicator (* REC PAUSE)..........34
@@11
Playback buttons and indicators (w, q)...............................31
The color of the indicator depends on the operation taking place.
If stopped, fast forwarding or rewinding: orange
If playing or recording: green
While carrying out TPS or recording is on standby: flashes
@@22
Stop button (g) .......................................................................31
@@33
Fast forward/rewind buttons [t (TPS) y].......................32
B
1 2
AUDIO ONLY
RE-MASTER
REPEATTIME MODE
5 6 7
EDIT
3
GROUP
8
9 10 11
13 14 15 16 17
DOLBY NR REV MODE TPS SKIP
COUNTER RESET
REC PAUSE
4
OPEN/CLOSE
12
OPEN/CLOSE
(
)
TPS
25
PLAY/ REC
26
24
CLOCK/TIMER
SET
27 28
2221
TUNE/TIME ADJUST
29 30 31
232018 19
FM/AMRDSTUNE MODE
Page 13
13
RQT6523
Before use
Front panel controls
D
D
E
Integrated Amplifier
##22
Input selector (INPUT SELECTOR) .......................................46
##33
VGCA indicator (VGCA) .........................................................36
##44
Volume control (VOLUME).....................................................16
##5555
Standby indicator
When the unit is connected to the AC mains supply, this
indicator lights up in standby mode and goes out when the unit
is turned on.
##66
Standby/on switch (8) ..........................................................14
Press to switch the unit from on to standby mode or vice versa.
In standby mode, the unit is still consuming a small amount of
power.
##77
Bass buttons (BASS e, r).....................................................36
##88
Treble buttons (TREBLE e, r)..............................................36
##99
VGCA/Cinema bass button (-VGCA, –CINEMA BASS)........36
$$00
Headphone jack (PHONES)....................................................37
D
Remote control
Buttons q, i, @6 and #6 function the same as the controls on
the main unit.
$$11
Sleep timer button (SLEEP)...................................................40
$$22
Numbered buttons............................................................17, 19
$$33
Subtitle button (SUBTITLE) ...................................................24
$$44
Audio/Angle button (AUDIO, ANGLE).............................24, 25
$$55
Top menu button (TOP MENU)..............................................19
$$66
Cursor/Enter buttons (wreqENTER)........................15, 17
$$77
Display/Setup button (DISPLAY, SETUP).......................15, 26
$$88
Input select buttons
(DVD/CD, TAPE, EXT, TUNER).............................16, 29, 32, 46
$$99
Basic operating buttons
Function changes according to the source.
%%00
Shift button (SHIFT)................................................................15
%%11
Muting button (MUTING) ........................................................37
%%22
Cancel button (CANCEL) ................................................ 20, 23
%%33
Page button (PAGE) ...............................................................21
%%44
Menu button (MENU) ..............................................................19
%%55
Return button (RETURN)........................................................15
%%66
FM mode select button (AUTO/MONO).................................29
%%77
Slow/Search buttons (t SLOW/SEARCH y) ..................18
%%88
Play mode select button (PLAY MODE)................................22
%%99
Repeat/A-B repeat button (REPEAT, A-B REPEAT).............21
^^00
Volume/Balance buttons
(– VOLUME +, BALANCE L, BALANCE R)......................16, 37
E
INPUT
SELECTOR
/ I
32
VOLUME
-VGCA
– CINEMA BASS
34
UP
PHONES
33
BASS
TREBLE
DOWN
35 36
41
36
42
43
44
45
46
47
48
49
50
51
37
123
456
7890
SUB TITLE
TOP MENU
SETUP
DISPLAY
DVD/CD
SHIFT
BALANCE L –VOLUME+ BALANCE R
SKIP
SLEEP
AUDIO
ANGLE
ENTER
TAPE
MUTING
38
CLOCK/
TIMER
PAGE
EXT
SLOW/SEARCH
A-B REPEAT
REPEAT
CANCEL
GROUP
≥10/-/--
AUDIO ONLY
MENU
RETURN
TUNER
AUTO/MONO
PLAY MODE
39 40
26
52
8
1
53
54
55
56
57
58
59
60
Page 14
14
RQT6523
Before use
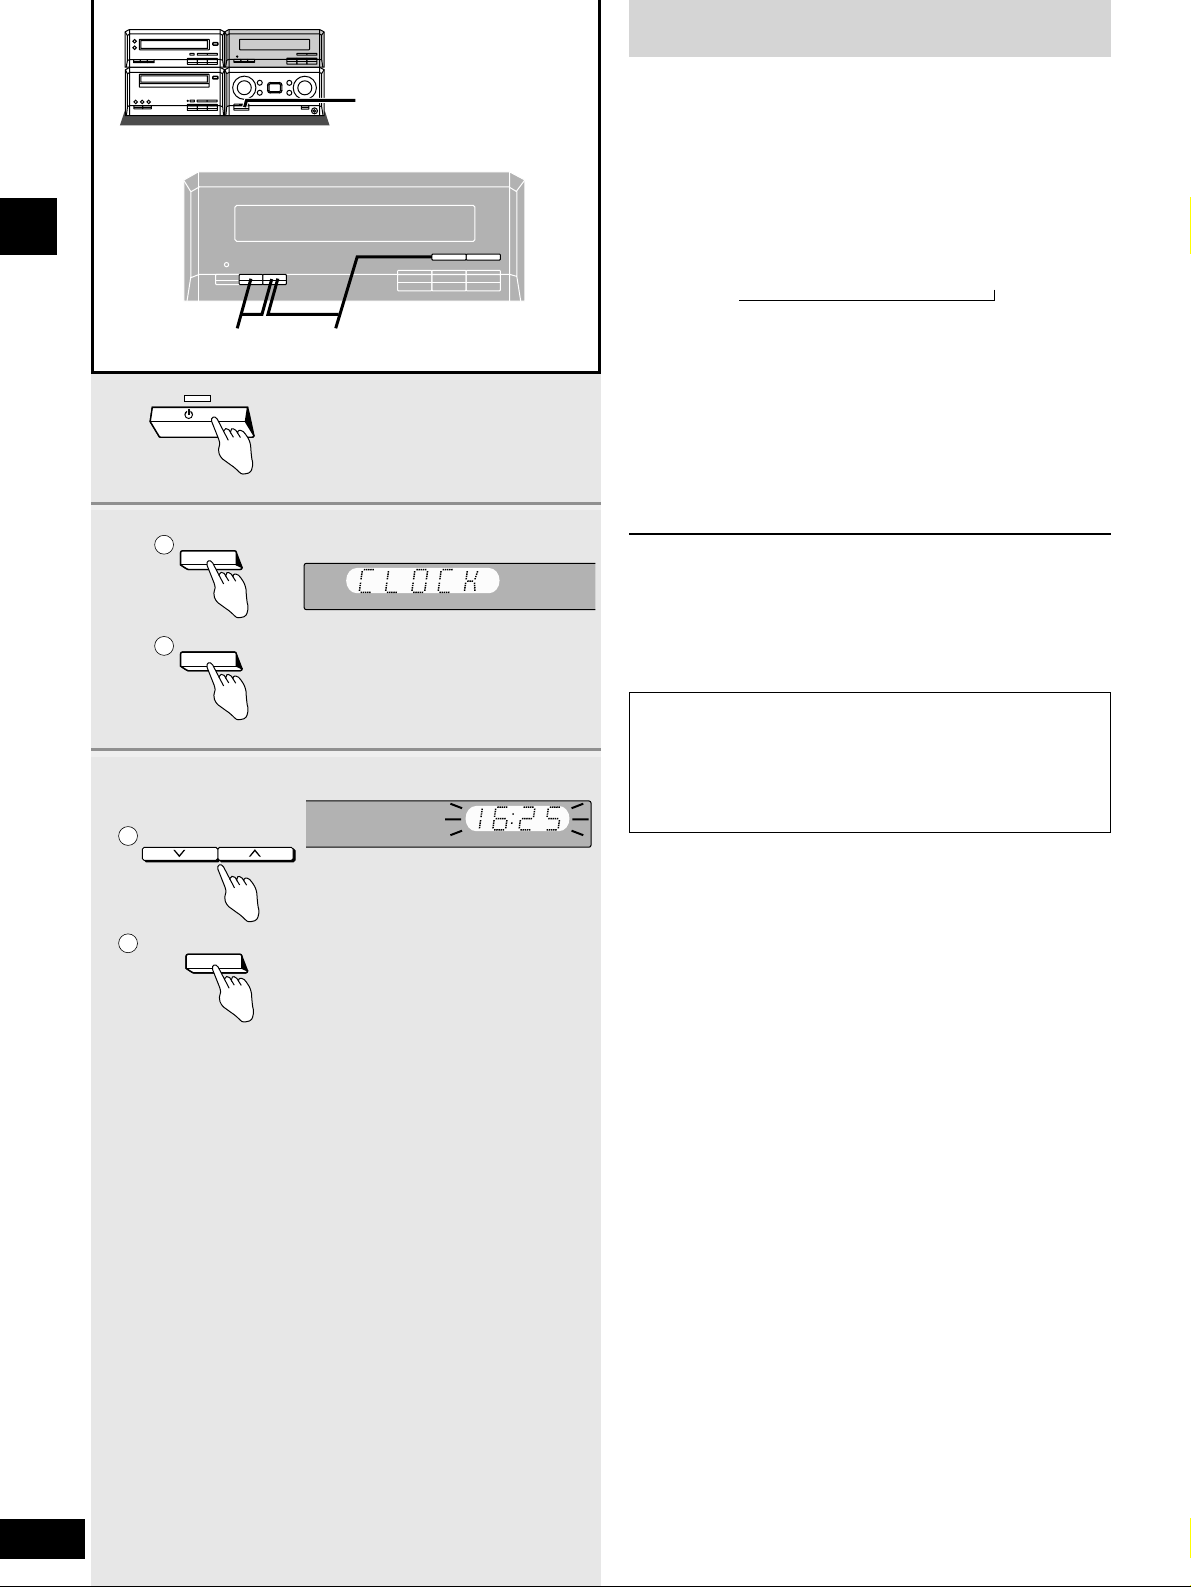
Setting the time
This is a 24-hour clock.
The example shows how to set the clock for 16:25 (4:25 pm).
1 Press [8] to turn the unit on.
2
qq
Press [CLOCK/TIMER] to display
“CLOCK”.
Each time you press the button:
CLOCK / z PLAY / z REC / Original display
ww
Within 7 seconds
Press [SET].
3
qq
Press [TUNE/TIME ADJUST
(2 or 1)] to set the time.
ww
Press [SET].
The time is set and the original display is restored.
Displaying the clock
Press [CLOCK/TIMER].
The clock is shown for about 5 seconds.
Reset the clock regularly.
,
1
1
/ I
2
CLOCK/TIMER
SET
1
2
3
TUNE/TIME ADJUST
SET
1
2
Conserving power
The unit consumes 0.8 W even when it is turned off with [8].
To save power when the unit is not to be used for a long time,
unplug it from the household mains socket.
Remember to reset the radio stations and any other memory
items before using the unit again.
23
Page 15
15
RQT6523
Before use
Television settings
SLEEP
CLOCK/
TIMER
PLAY MODE
A-B REPEAT
REPEAT
AUTO/MONO
DVD/CD
TAPE
EXT
TUNER
MUTING
BALANCE L –VOLUME+ BALANCE R
CANCEL
123
456
≥10/-/--
7890
SUB TITLE
AUDIO
ANGLE
MENU
TOP MENU
SETUP
DISPLAY
RETURN
ENTER
SKIP
SLOW/SEARCH
SHIFT
GROUP
PAGE AUDIO ONLY
1
2
5
3, 4
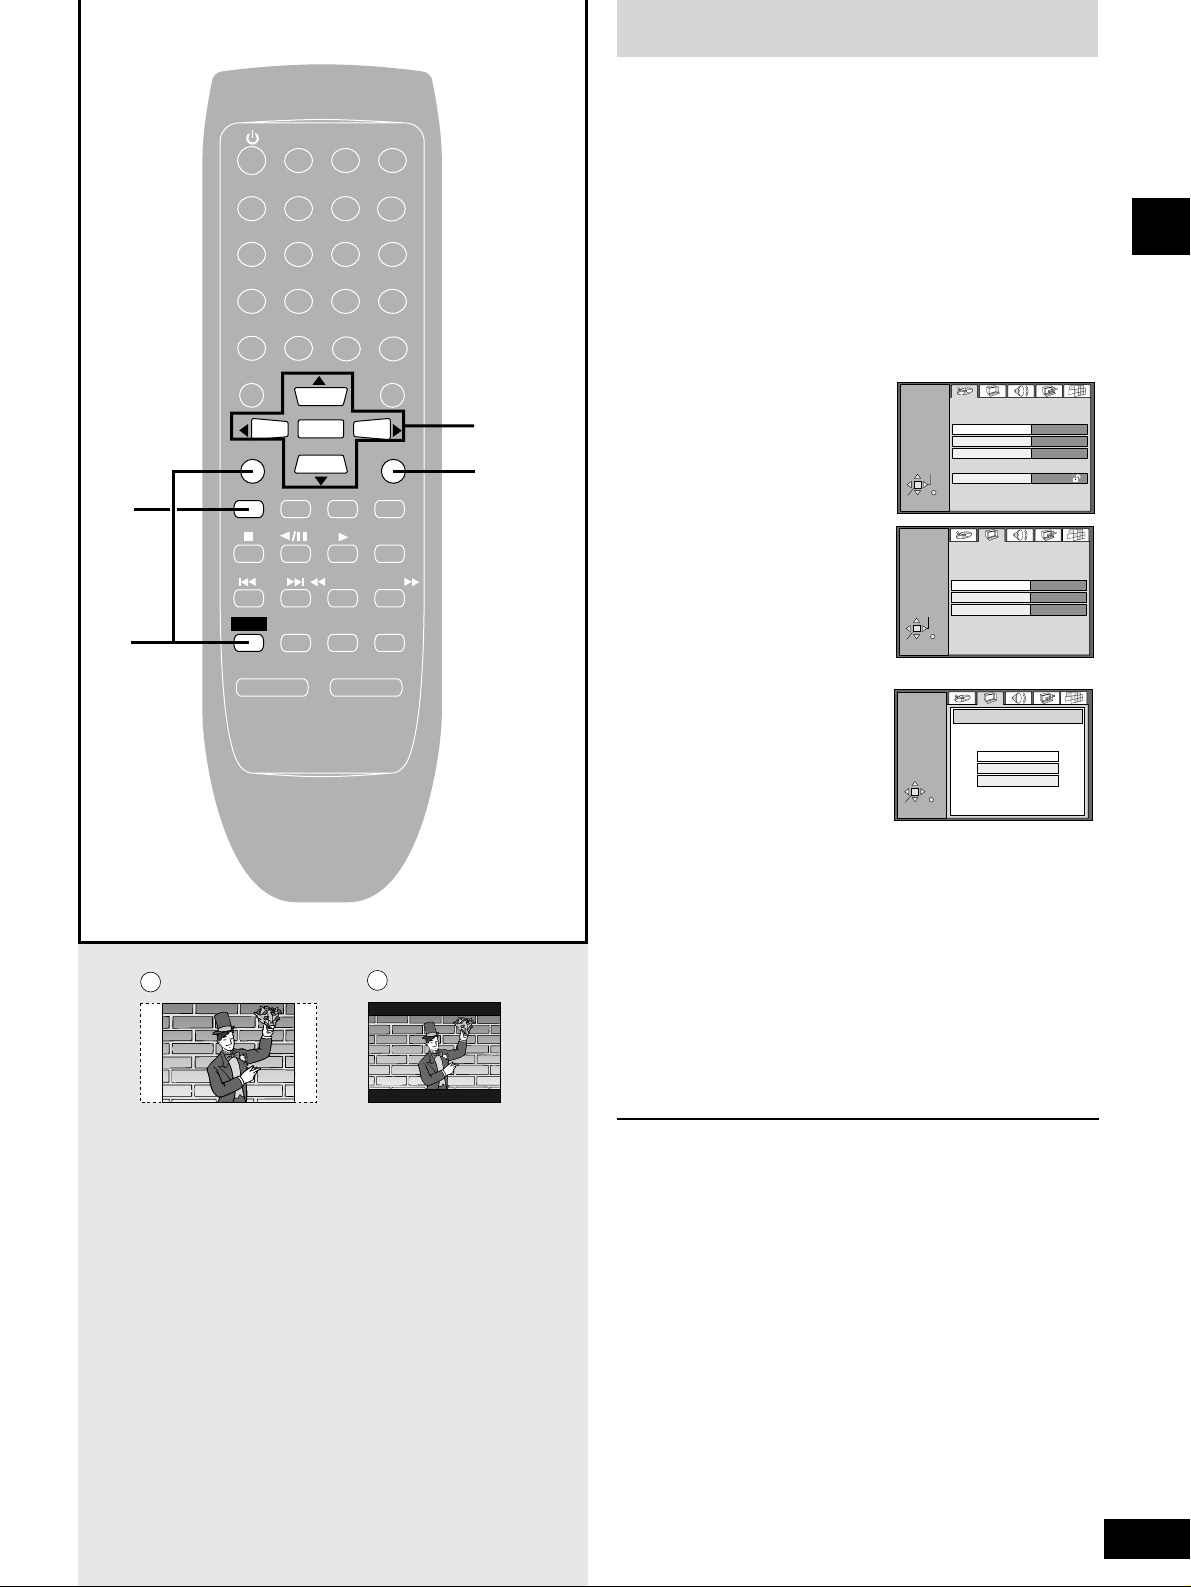
The menu language has been factory preset to English. You can
change the language by going to Display–Menu Language
(
a pages 41–42).
Set the screen size to suit your television. The initial setting is for a
regular television with an aspect ratio of 4:3.
Preparation
¡Turn the television on.
¡Switch the video input mode on the television to suit the type of
connection you have made (e.g., VIDEO 1).
1 Press [DVD/CD] to select “DVD” as
the source.
2 Press [SHIFT] +
[SETUP] to display
the settings screen
on the television.
3 Press the cursor
button (q
) to
select the Video
tab, and press
[ENTER].
4 Press the cursor
buttons (r
or e) to
highlight the
required size, and
press [ENTER].
4:3: regular television
If you select Pan & Scan, the video for widescreen televisions
is cut to fit a regular 4:3 screen (a).
If you choose Letterbox, the video for widescreen televisions
is shown in full on a regular 4:3 television. This causes black
bands to appear at the top and bottom of the screen (b).
16:9: widescreen television
5 Press [RETURN] to complete the
settings.
For your reference
¡DVDs are recorded in a variety of aspect ratios.
You can change the way software is shown on a regular
4:3 television with the above operation. If you have a widescreen
16:9 television, use the television's screen modes.
¡The picture size on some DVDs cannot be adjusted with this
setting.
SELECT
ENTER
RETURN
SETUP
Disc
Audio
Subtitle
Menus
Ratings
English
Automatic
English
Level 8
ENTER
RETURN
SETUP
Video
TV Aspect
4:3 Pan&Scan
Still Mode
Automatic
SELECT
NTSC Disc Output
PAL 60
ENTER
RETURN
SETUP
TV Aspect
4:3 Pan&Scan
4:3 Letterbox
16:9
SELECT
a
b
Page 16
16
RQT6523
Disc operations
Playing DVDs and CDs
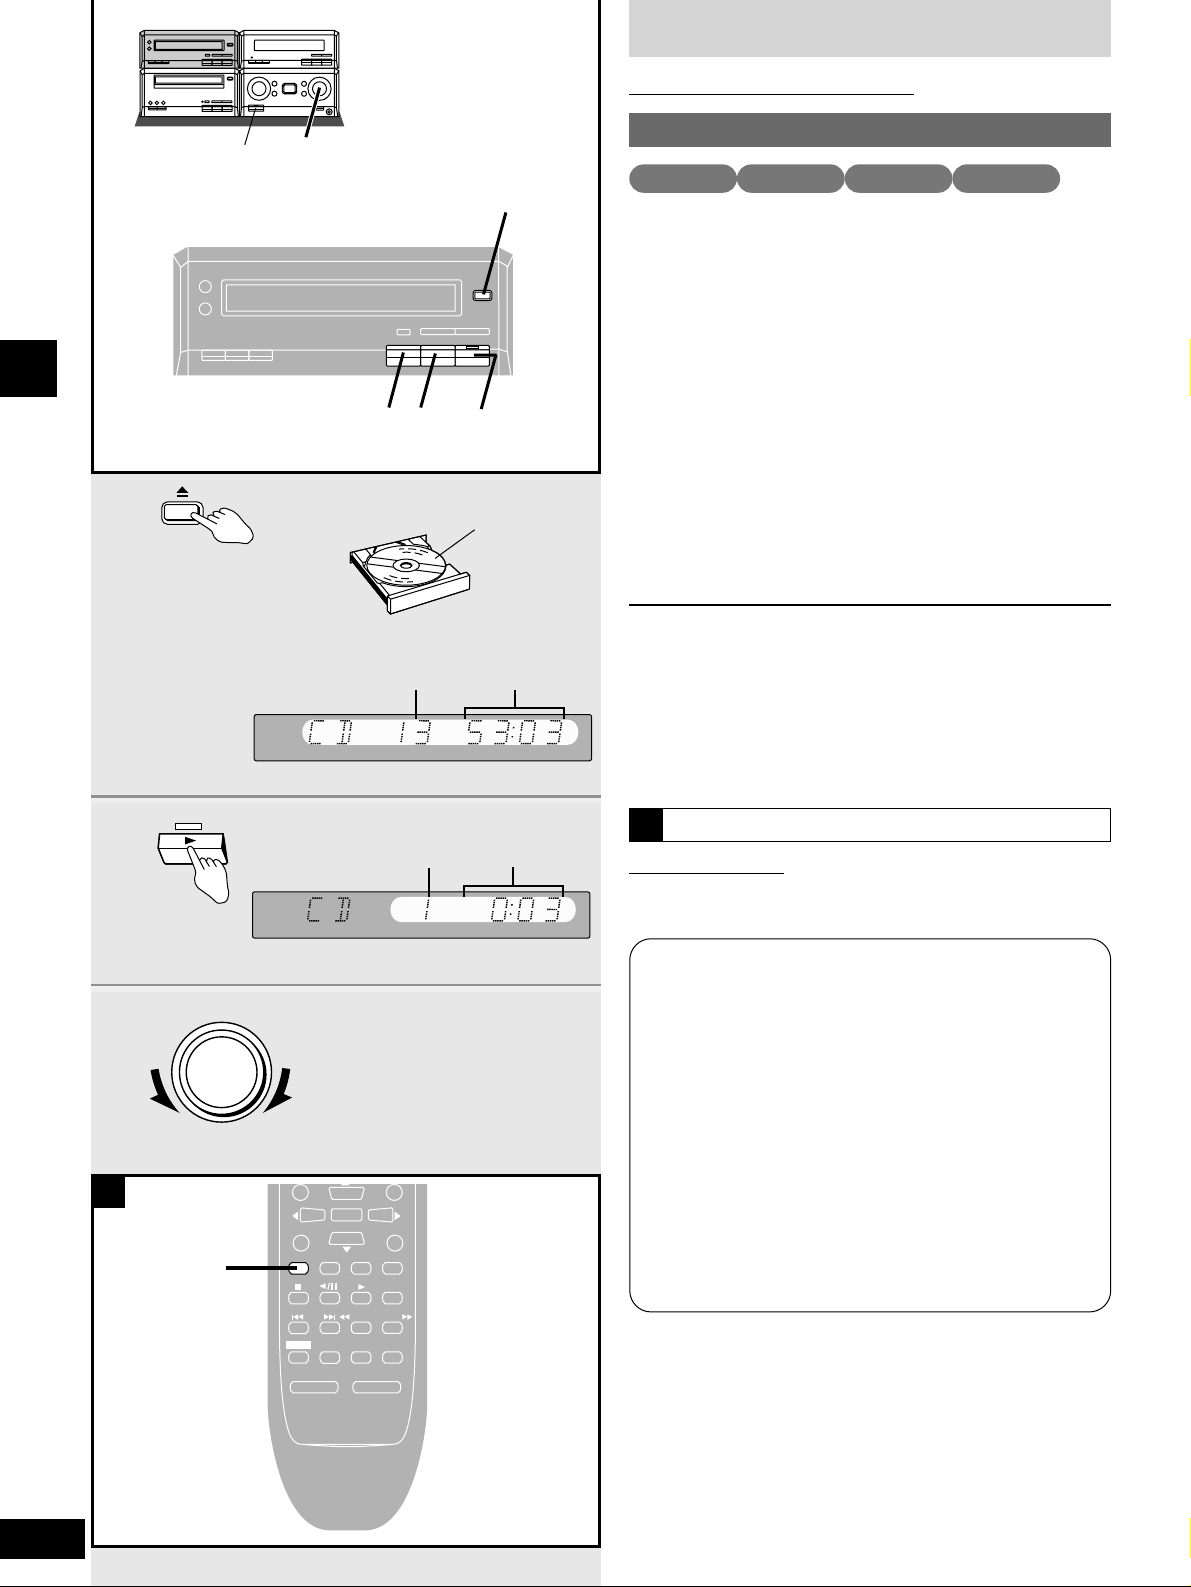
Normal play
Preparation
¡Turn the unit on.
¡When playing DVDs or video CDs, turn the television on and
switch its video input mode to suit the connections you have
made (e.g., VIDEO 1).
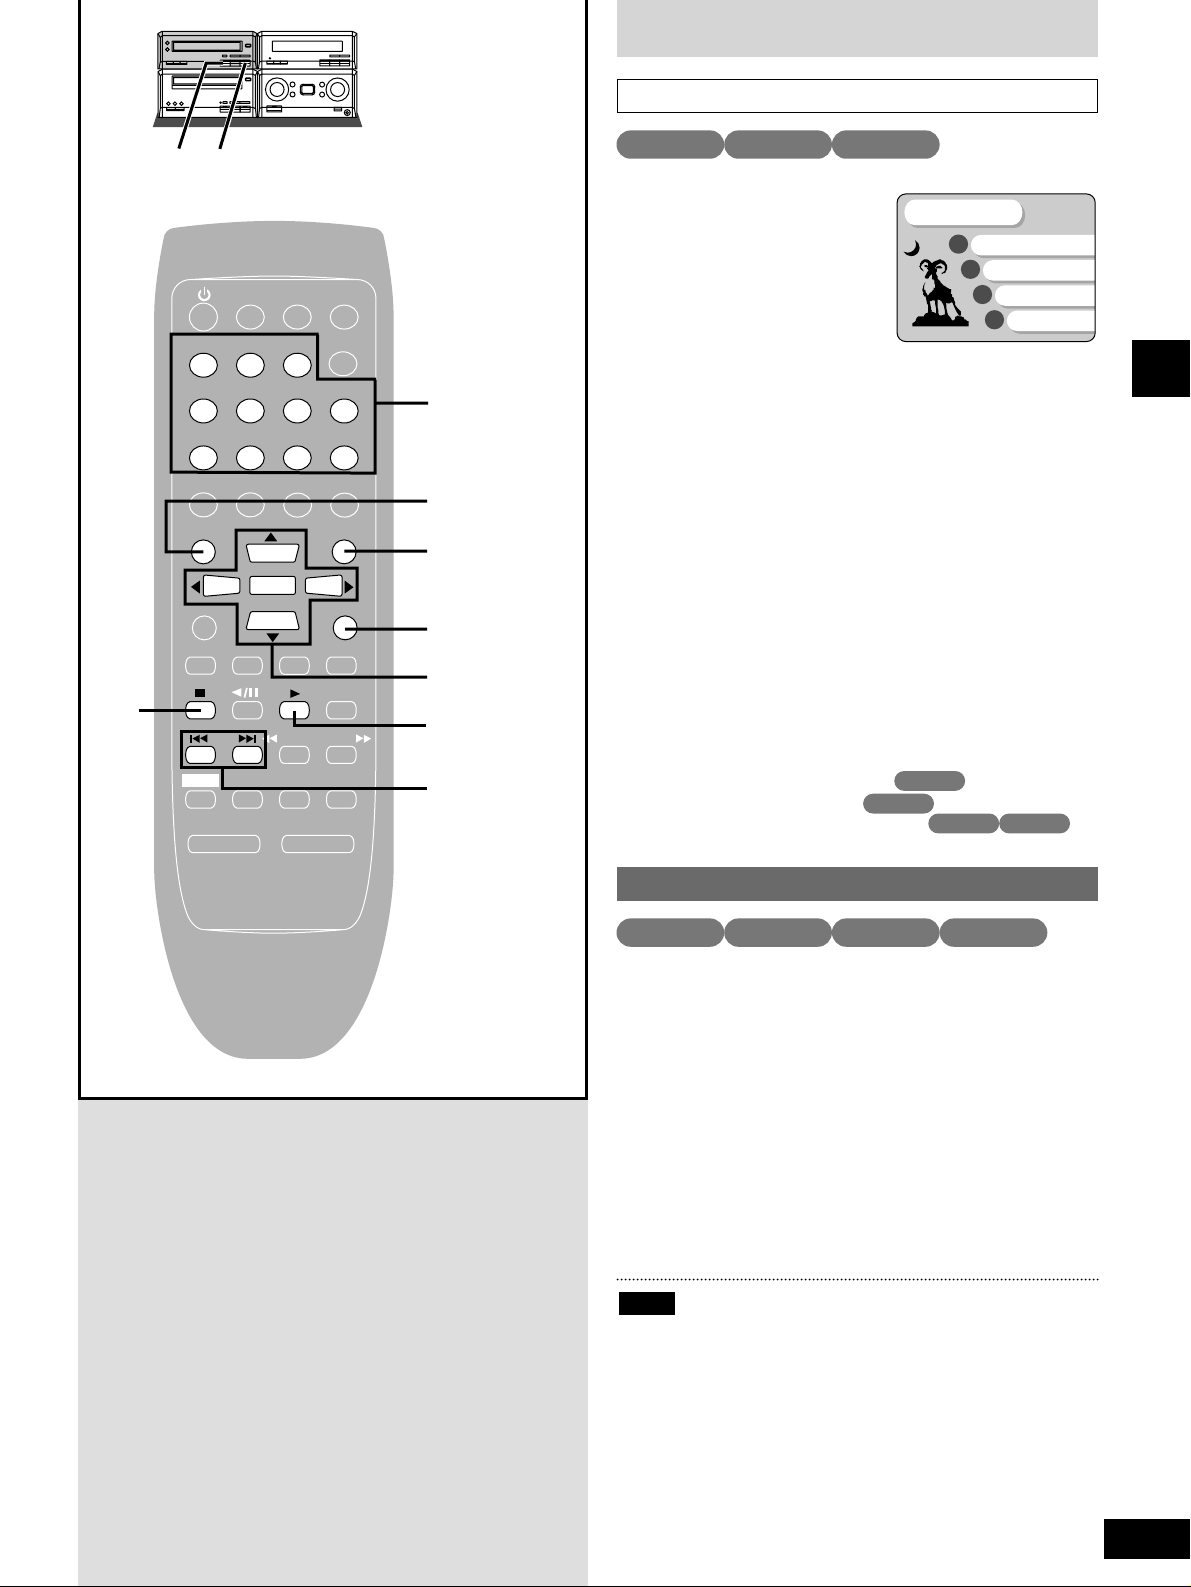
1 Press [; OPEN/CLOSE] to open the
tray.
Set the disc label up on the tray.
Press [; OPEN/CLOSE] to close the tray.
Most DVDs start automatically when you close the disc tray.
2 Press [q] to start play.
A menu will be shown with some discs (a page 17).
3 Adjust the volume.
To stop the disc
Press [g] (a page 17).
To pause play
Press [h] during play. Press [q] to resume play.
“NO DISC” is displayed
When the unit is in DVD mode but a disc isn’t in the player.
8
1
OPEN/CLOSE
2
3
VOLUME
DOWN
UP
Label must
face upward.
Playing DVD and Video CDs
The producer of the material can control how these discs are
played. This means that you may not be able to control play with
some of the operations described in these operating instructions.
Read the disc’s instructions carefully.
The symbol “5” appears on the television when you perform an
operation to indicate it is not allowed at that time.
Playing karaoke discs
After playing a track, you will normally be shown a menu. Some
discs allow you to play all the tracks in succession. Others will
play all the tracks in succession automatically.
DVD volume
Volume may be lower when playing DVDs than when playing
other discs.
If you turn the volume up, ensure you reduce the volume again
before playing other sources so that a sudden increase in output
does not occur.
Screens illustrated are examples.
VCD CD
One touch play
Remote control only
When a disc is loaded and the unit is off, press [DVD/CD].
The unit comes on and starts play with the volume fading in.
A
Total number
of tracks
Total playing
time
Track number
Elapsed play
time
A
DVD-A DVD-V
3
g
h
2
1
DVD/CD
ENTER
SETUP
DISPLAY
DVD/CD
SKIP
SHIFT
MUTING
BALANCE L –VOLUME+ BALANCE R
TAPE
RETURN
EXT
TUNER
AUTO/MONO
SLOW/SEARCH
A-B REPEAT
PLAY MODE
REPEAT
Page 17
Playing DVDs and CDs
17
RQT6523
Disc operations
If a menu screen is shown
A menu screen is shown on your
television shortly after starting some
DVDs and Video CDs. To continue
play you must make a selection.
(menu example)
Press the cursor buttons (werq) to
highlight an item.
Press [ENTER] to confirm your selection.
OR
Press the numbered button
corresponding to the menu item.
For items numbered 10 and over, press [≥10/-/--] then the two
digits.
e.g. 10: [≥10/-/--] / [1] / [0]
e.g. 25: [≥10/-/--] / [2] / [5]
Video CD menu items can only be selected with the numbered
buttons.
Other buttons used to operate menus
The operation of these buttons differs with the disc so read the
instructions that came with the disc for further details.
[u SKIP i]: Shows the next menu.
[RETURN]: Shows the previous menu.
[MENU]: Shows the menu screen.
[TOP MENU]: Shows the first menu screen.
When [g] is pressed.
The play indicator flashes to indicate that the resume function is
active.
Using the resume function to restart play
While the play indicator is flashing, press [q].
Play starts from where it was stopped.
If you are playing DVD-Video, you can activate the CHAPTER
REVIEW function while the message, “Press PLAY to Chapter
Review” is shown on your television. This message appears for a
few seconds before play is resumed.
Press [q] while this message is shown on your television and the
beginning portions of each chapter up to the current one are played.
Full play resumes from the point play was stopped at.
CHAPTER REVIEW is not possible with some DVD-Video.
¡Resume is canceled if you open the disc tray or change the play
mode (RANDOM a page 22, ALL GROUPa page 22 and
PROGRAM a page 23).
¡Resume does not work if the disc’s play time is not displayed.
¡The position is saved even if the unit is turned off.
Note
Resume function
1
Main Menu
Chapter
2
Options
3
Staff
4
Start
VCD CD
VCDDVD-A DVD-V
DVD-A DVD-V
VCD
DVD-V
DVD-V
DVD-A
q
g
SLEEP
123
456
7890
AUDIO
SUB TITLE
ANGLE
TOP MENU
ENTER
SETUP
DISPLAY
DVD/CD
TAPE
g
SKIP
SHIFT
MUTING
BALANCE L –VOLUME+ BALANCE R
CLOCK/
TIMER
CANCEL
GROUP
≥10/-/--
AUDIO ONLY
PAGE
MENU
RETURN
EXT
TUNER
AUTO/MONO
SLOW/SEARCH
A-B REPEAT
PLAY MODE
REPEAT
1–0, ≥10/-/--
TOP MENU
MENU
RETURN
e
ENTER
w
q
r
q
u SKIP i
Page 18
18
RQT6523
Disc operations
TIME MODE
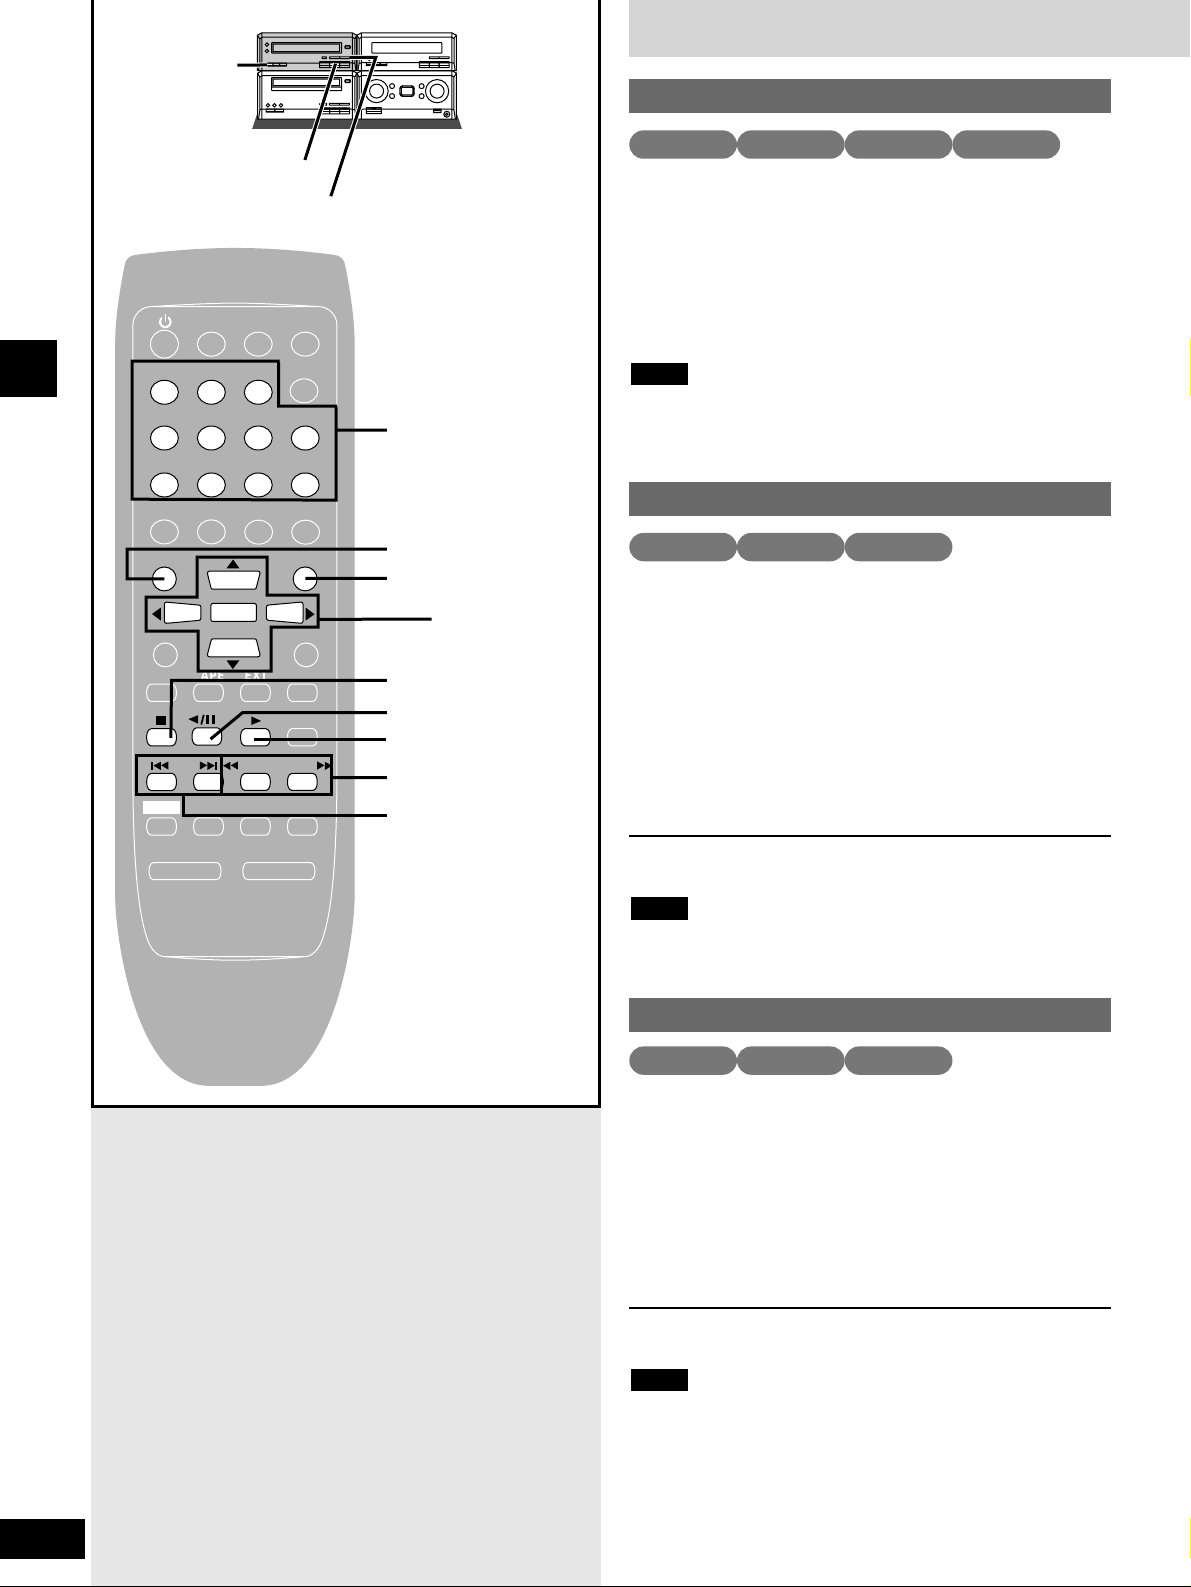
Press [u] (backward) or [i] (forward)
on the remote control.
OR
[u/t] or [y/i] on the main unit.
Each press increases the number of skips.
The first skip backwards takes you to the beginning of the current
track or chapter.
¡If pressed while a DVD or Video CD menu is on the screen, you
may return to the previous menu.
¡Skip will not work with some discs.
Note
Skipping tracks and chapters
VCD CD
While paused
Press [t] (backward) or [y] (forward)
on the remote control.
Each press increases the speed of the slow motion. There are five
speeds.
OR
Press and hold [u/t] or [y/i] on
the main unit.
The slow motion speed increases in five steps if the button is held
down.
To resume play
Press [q].
¡You cannot move backwards with video CD.
¡Only the motion picture parts of DVD-Audio are affected.
Note
Slow motion
VCDDVD-A DVD-V
DVD-A DVD-V
While paused
Press the cursor buttons (w or q).
w: Backward
q
: Forward
¡The frame changes each time you press a button.
¡The frames change in succession if you press and hold the
button.
¡The frames also advance if you press [h] on the main unit or
[w
/h] on the remote control.
To resume play
Press [q].
¡You cannot move backwards with video CD.
¡Only the motion picture parts of DVD-Audio are affected.
Note
Frame-by-frame viewing
VCDDVD-A DVD-V
Basic play
123
456
7890
SUB TITLE
TOP MENU
SETUP
DISPLAY
DVD/CD
SKIP
SHIFT
SLEEP
AUDIO
ANGLE
ENTER
TAPE
MUTING
h
u/t y/i
CLOCK/
TIMER
CANCEL
GROUP
≥10/-/--
PAGE
AUDIO ONLY
MENU
RETURN
EXT
TUNER
AUTO/MONO
SLOW/SEARCH
A-B REPEAT
PLAY MODE
REPEAT
1–0, ≥10/-/--
TOP MENU
MENU
e
ENTER q
w
r
g
w/h
q
t
SLOW/SEARCH
u SKIP i
y
BALANCE L –VOLUME+ BALANCE R
Page 19
19
RQT6523
Disc operations
During play
Press [t] (backward) or [y] (forward)
on the remote control.
Each press increases the speed of the search. There are five
speeds.
OR
Press and hold [u/t] or [y/i] on
the main unit.
The search speed increases in five steps if the button is held down.
Audio may be heard during fast-forward and rewind.
You can turn this audio off if you want to (DVD-Video and Video
CDs only, apages 41–42).
To resume play
Press [q].
If pressed while a DVD or Video CD menu is on the screen, you
may return to the previous menu.
Note
Fast forward and rewind - Search
VCD CD
While stopped or playing
Press the numbered
buttons.
To select a track or title numbered 10 and over, press [≥10/-/--] then
the two digits.
e.g. 10: [≥10/-/--] / [1] / [0]
e.g. 25: [≥10/-/--] / [2] / [5]
¡Cancel playback control on video CDs with this feature first.
¡When playing DVD-Audio and you want to start play from a track
in a different group , select the group first (apage 20).
Note
Canceling playback control allows you to play the disc all the way
through from the beginning.
1. Press [g].
“PBC” on the unit’s display goes out.
2. Press the numbered buttons to select the track where you want
to start play.
There are some video CDs with PBC where this will not work.
To restore playback control
1. Press [g] to stop play.
2. Press [MENU] on the remote control.
“PBC” appears on the unit’s display.
Starting play from a selected track or
title
Canceling the playback control (PBC) feature on
Video CDs
VCD CD
DVD-A DVD-V
DVD-A DVD-V
Menu content depends on the disc. These operating instructions
describe the basic steps.
While stopped or playing
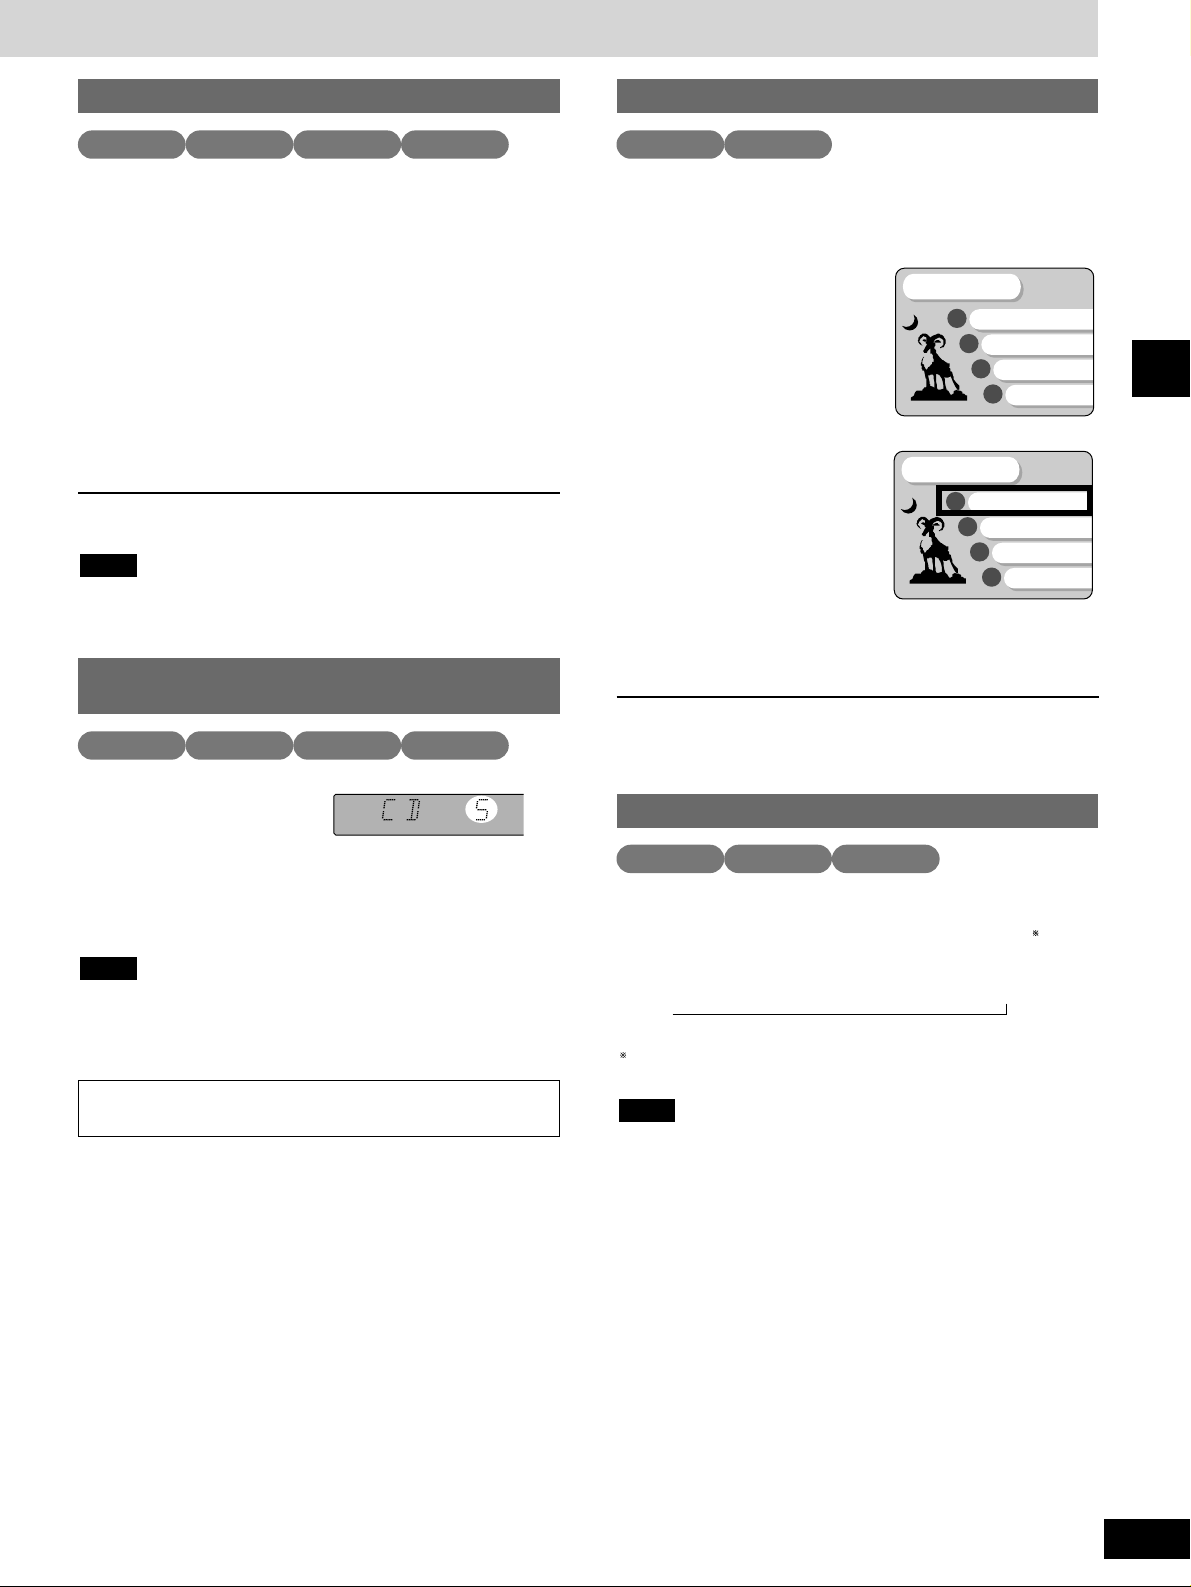
1 Press [TOP MENU]
or [MENU].
A menu screen is displayed.
(Press again to return to what
you were watching with some
discs.)
2 Select an item with
the cursor buttons
(werq
) and
press [ENTER] to
confirm the
selection.
You can select items with the numbered buttons with some
discs.
Repeat if another menu is shown.
DVDs can have several menus. The menu displayed by pressing
[TOP MENU] may be different to the menu displayed by pressing
[MENU].
Using menus to play
1
Main Menu
Chapter
2
Options
3
Staff
4
Start
1
Main Menu
Chapter
2
Options
3
Staff
4
Start
DVD-A DVD-V
Press [TIME MODE] on the main unit.
The display changes each time the button is pressed.
The displays shown depend on the condition of the player.
(example - During play)
Track elapsed time / Track remaining time / Disc/Group
remaining time
The disc remaining time, for example, is not shown during
random play, program play, and CD editing.
You can use this feature with Video CD if you cancel playback
control.
Note
,
Switching time displays - Time mode
VCD CDDVD-A
Page 20
Other modes of play
20
RQT6523
Disc operations
REPEAT GROUP
The tracks on DVD-Audio are divided into groups. How these
groups are played differs with the disc so read the instructions that
came with the disc for further details.
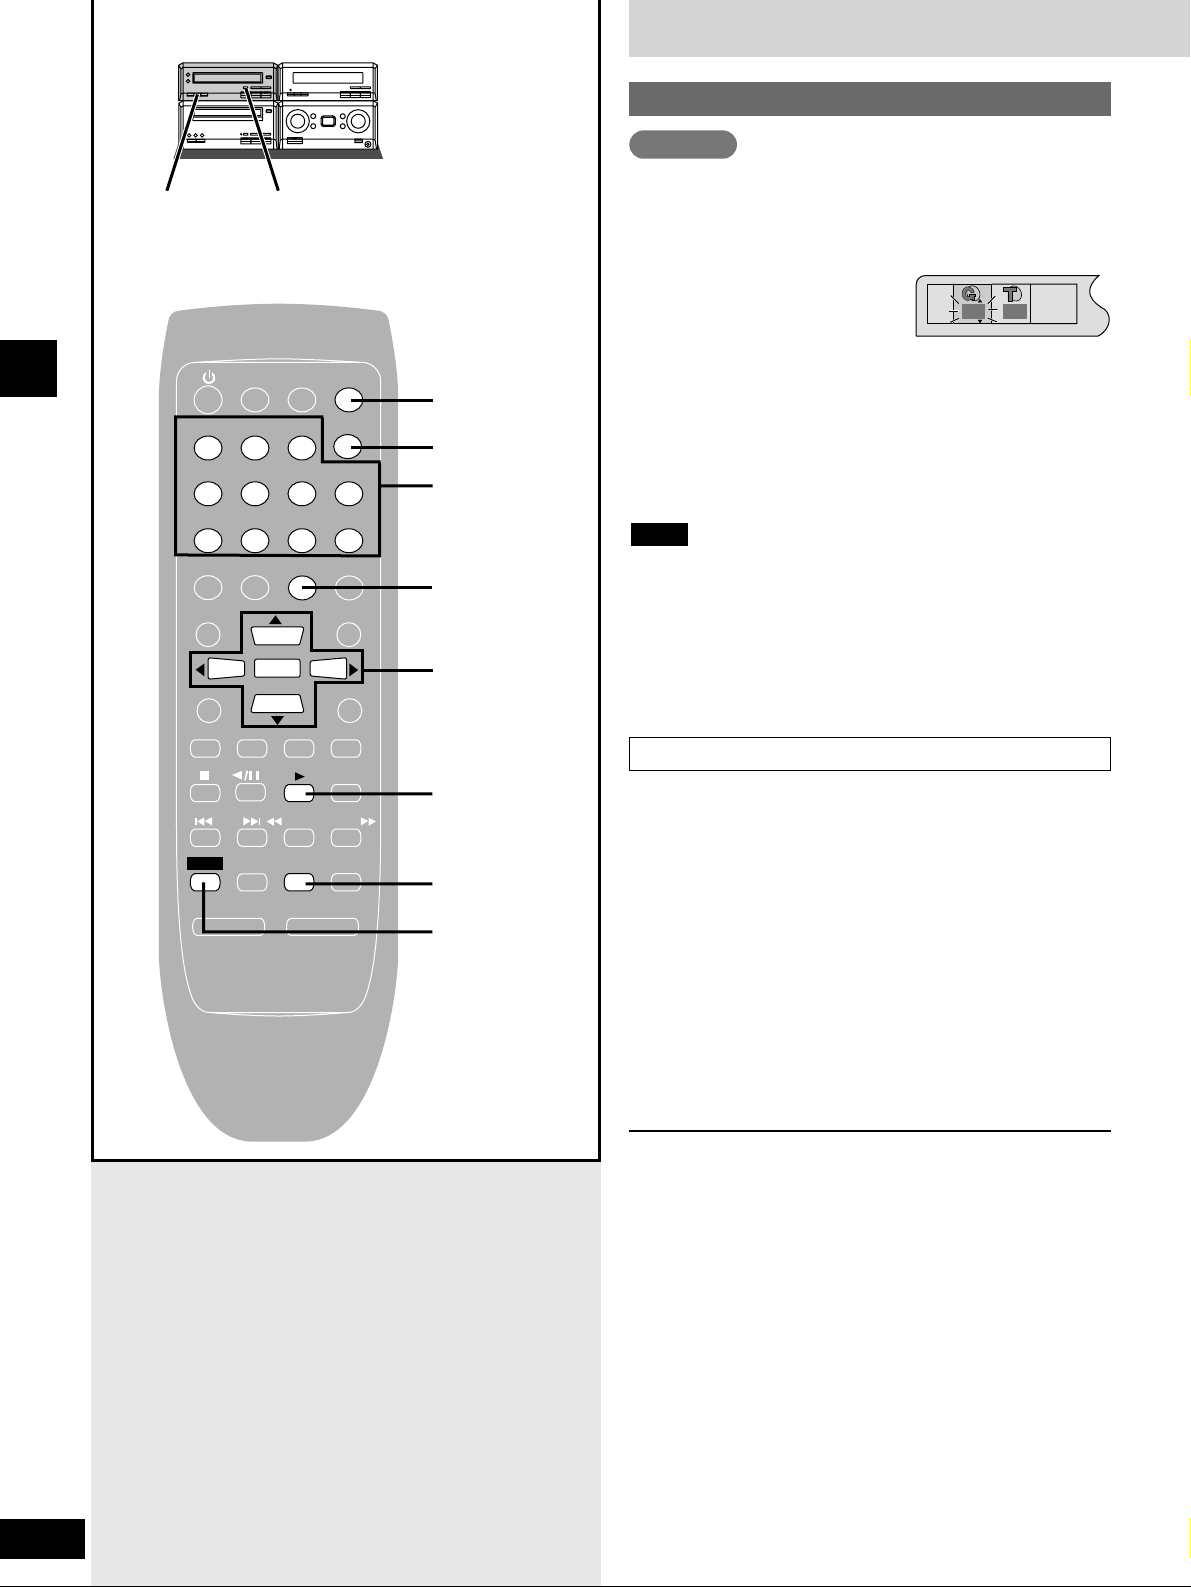
While stopped or playing
1 Press [GROUP].
2 Press the cursor
buttons (e
or r) to select the group
number and press [ENTER].
3 Press the cursor buttons (e or r) to
select the track number and press
[ENTER].
¡Selection may not be allowed in some situations (e.g., while a
menu is being displayed).
¡Press [q] when the required group is selected to start play of that
group.
Playing all the groups in succession (\\page 22).
Note
You can play the bonus groups contained on some DVD-Audio by
entering a password. Refer to the disc
’s jacket.
While stopped
1. Press [GROUP].
2. Press the cursor buttons (e or r) to select the
bonus group and press [ENTER].
3. Enter the 4-digit password with the numbered
buttons and press [ENTER].
4. Use the cursor buttons (e or r) to select a
track and press [ENTER].
For your reference
¡If you enter the wrong number, press [CANCEL] to erase it.
¡Some discs will show a menu screen for you to enter your
password. Follow the instructions on the screen.
Reenter the password after you:
¡Turn the unit off or select another source (unless the resume
function is active).
¡Open the disc tray.
Specifying a group to play
Playing bonus groups
DVD-A
DVD/CD
BALANCE L –VOLUME+ BALANCE R
CLOCK/
TIMER
SLEEP
123
456
7890
AUDIO
SUB TITLE
ANGLE
TOP MENU
ENTER
SETUP
DISPLAY
TAPE
SKIP
SHIFT
MUTING
CANCEL
GROUP
≥10/-/--
AUDIO ONLY
PAGE
MENU
RETURN
EXT
TUNER
AUTO/MONO
SLOW/SEARCH
A-B REPEAT
PLAY MODE
REPEAT
CANCEL
GROUP
1–0, ≥10/-/--
PAGE
e
w ENTER q
r
q
A-B REPEAT
REPEAT
SHIFT
1
1
Page 21
21
RQT6523
Disc operations
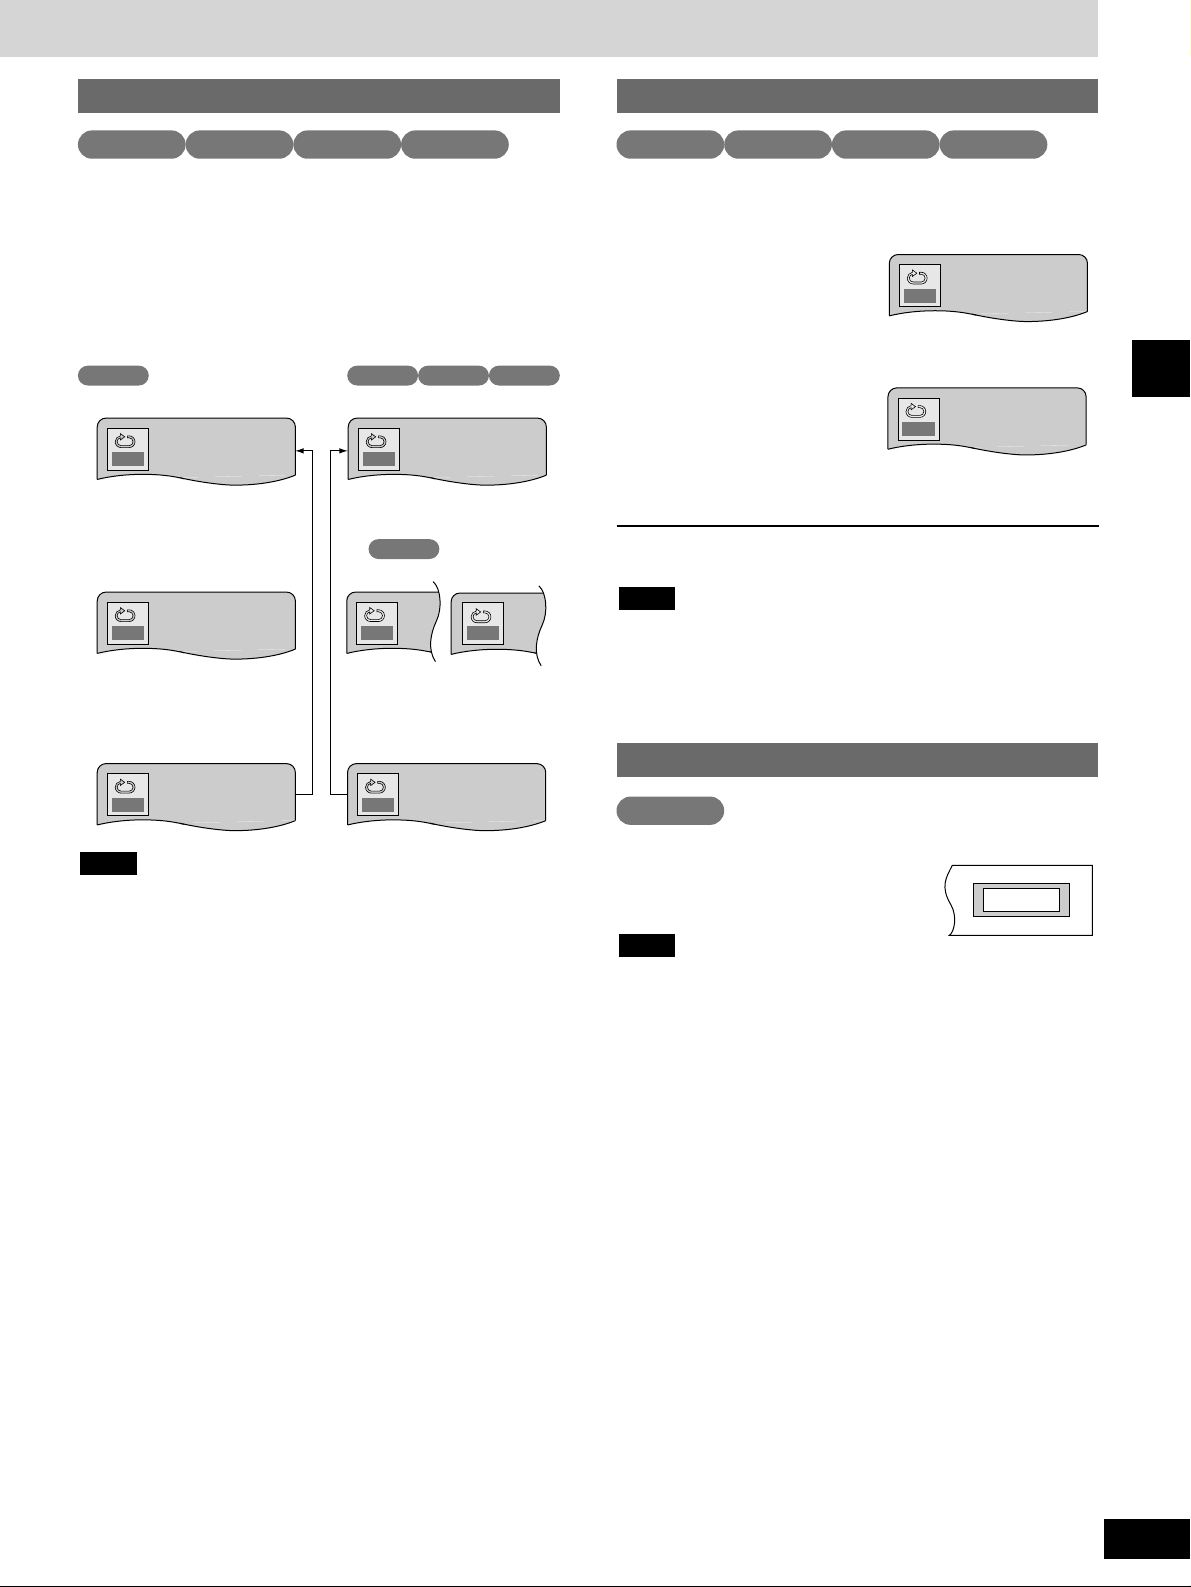
This feature repeats play between two points that you specify.
During play
1 Press [SHIFT] +
[A-B REPEAT] at
the starting point
(A).
2 Press [SHIFT] +
[A-B REPEAT] at
the finishing
point (B).
Play repeats continuously between these two points.
To cancel
Press [SHIFT] + [A-B REPEAT].
¡A-B repeat works only within a single track or title. The unit
automatically determines the end of a title or track as point B.
¡Subtitles may not appear between A and B.
¡This feature cannot be used if the play time for the DVD is not
displayed.
Note
A-B repeat
A
∗
AB
VCD CD
C
T
OFF
T
OFF
A
G
This feature allows you to repeat titles, tracks and chapters.
When playing DVD-Audio, the selected group play mode (normal or
all groups ) is repeated.
Press [REPEAT] during play to select the
required repeat play mode.
The mode changes each time you press the button.
The modes depend on the type of disc you are playing.
¡Chapter
¡Title
¡Off
¡Track
¡Off
Repeat play
VCD CD
¡There is no feature to repeat the whole disc for DVD-Video that
contain more than one title.
¡Repeat play does not work with some discs.
¡During All group, Program, or Random play modes, “A” is
displayed instead of “G” when playing DVD-Audio.
Note
VCD CDDVD-V
//
//
DVD-A DVD-V
DVD-A
DVD-A DVD-V
¡
All (all tracks or
programmed tracks)
¡
Group
(all tracks in the group)
During play
Press [PAGE].
The page changes each time you press
the button.
There are some cases where the disc does not allow you to select
pictures with this feature.
Note
Selecting still pictures - Page skip
DVD-A
PAGE1
DVD-A
Page 22
Other modes of play
22
RQT6523
Disc operations
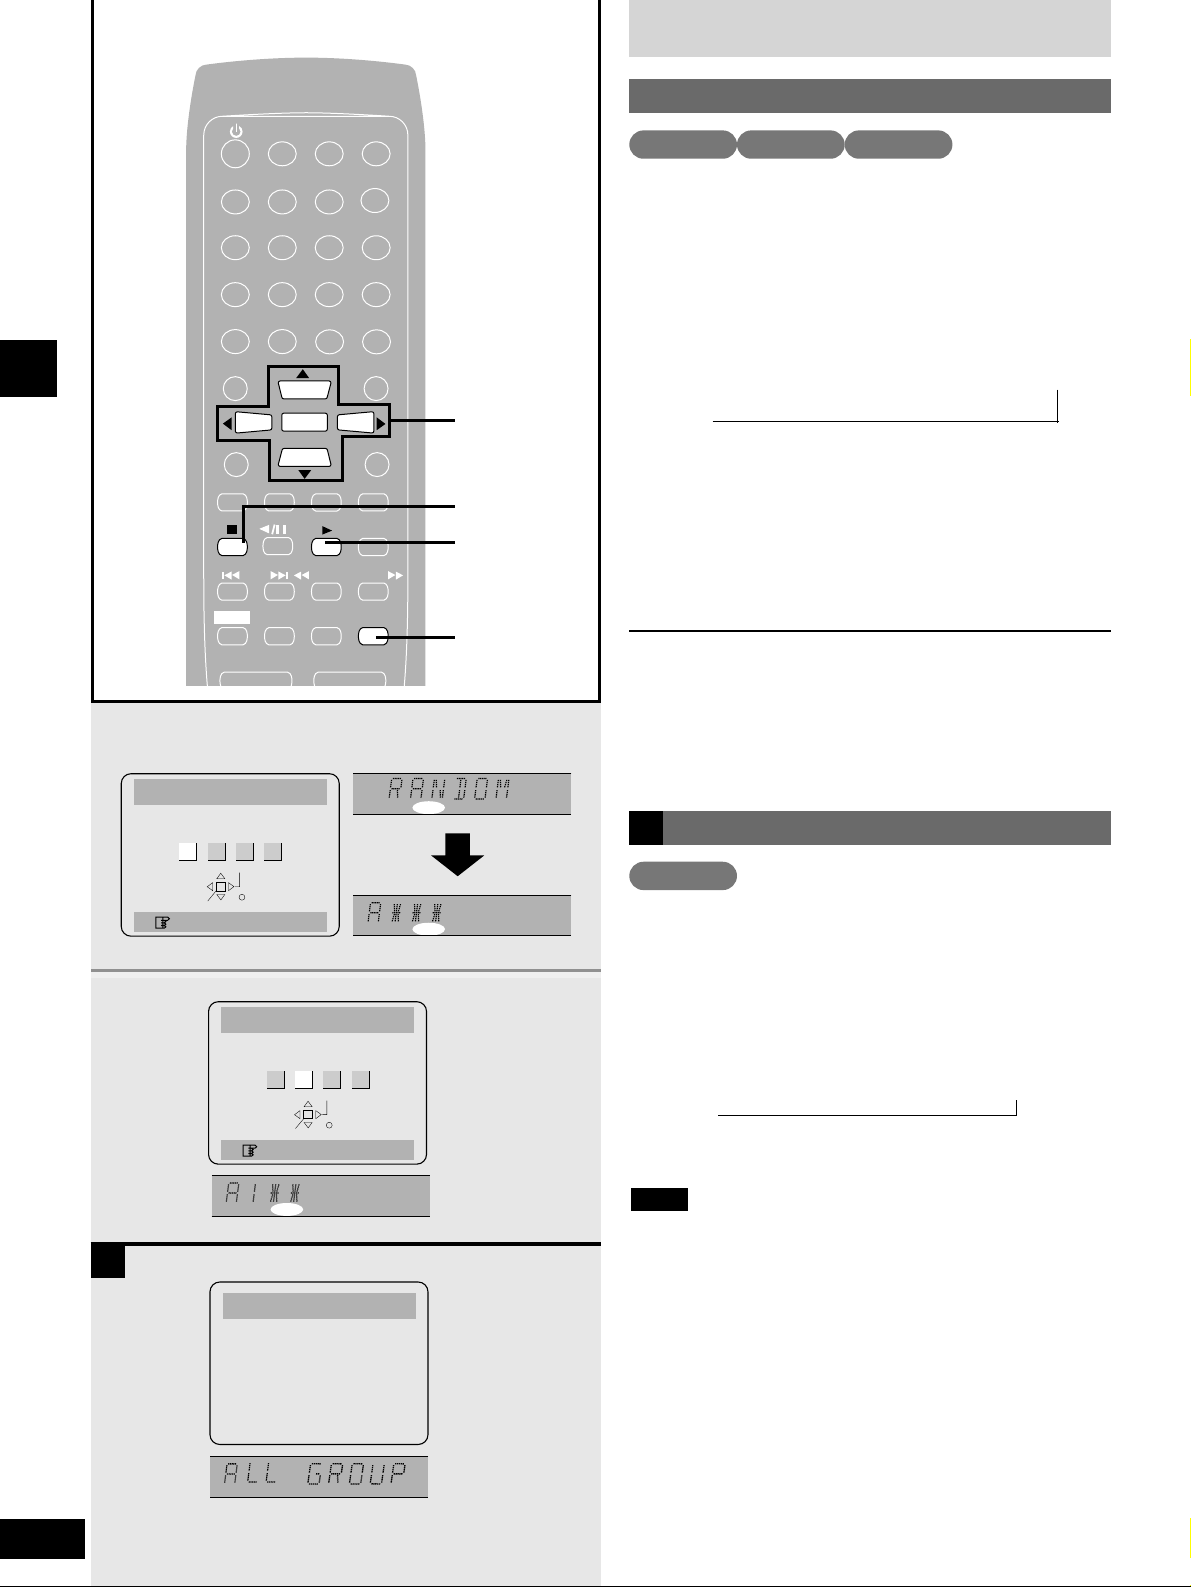
Play tracks in random order.
e.g.: DVD-Audio (three groups)
While stopped
1 Press [PLAY MODE] to display
“RANDOM”.
Each time you press the button:
ALL GROUP ../ PROGRAM / RANDOM / (cancel)
(DVD-Audio only)
2 While playing DVD-Audio
Press the cursor buttons (w, q) to
select a group and press [ENTER].
Press again to cancel.
You can select more than one group.
3 Press [q] to start random play.
When random play finishes
The disc stops and the random play screen is shown.
To exit random mode
Press [g] until “RND” disappears from the display.
,
Random play
VCD CDDVD-A
Use this operation if the disc does not give you the choice to play all
the groups.
While stopped
1 Press [PLAY MODE] to display
“ALL GROUP”.
Each time you press the button:
ALL GROUP / PROGRAM / RANDOM / (cancel)
2 Press [q] to start play.
ALL GROUP play is canceled if you select a menu during play.
Note
,
Playing all the groups in succession
DVD-A
A
SLEEP
CLOCK/
TIMER
PLAY MODE
A-B REPEAT
REPEAT
AUTO/MONO
DVD/CD
TAPE
EXT
TUNER
MUTING
BALANCE L –VOLUME+ BALANCE R
CANCEL
123
456
≥10/-/--
7890
SUB TITLE
AUDIO
ANGLE
MENU
TOP MENU
SETUP
DISPLAY
RETURN
ENTER
SKIP
SLOW/SEARCH
SHIFT
GROUP
PAGE
AUDIO ONLY
PLAY MODE
q
g
q
w
e
r
ENTER
1
2
A
Random Playback
Choose a group or groups.
All 1 2 3
SELECT
ENTER
RETURN
Press PLAY to start
Random Playback
Choose a group or groups.
All 1 2 3
Press PLAY to start
GRP
All Group Playback
Press PLAY to start
GRP ALL
RND
∗
ENTER
SELECT
GRP
RETURN
RND
RND
Page 23
Other modes of play
23
RQT6523
Disc operations
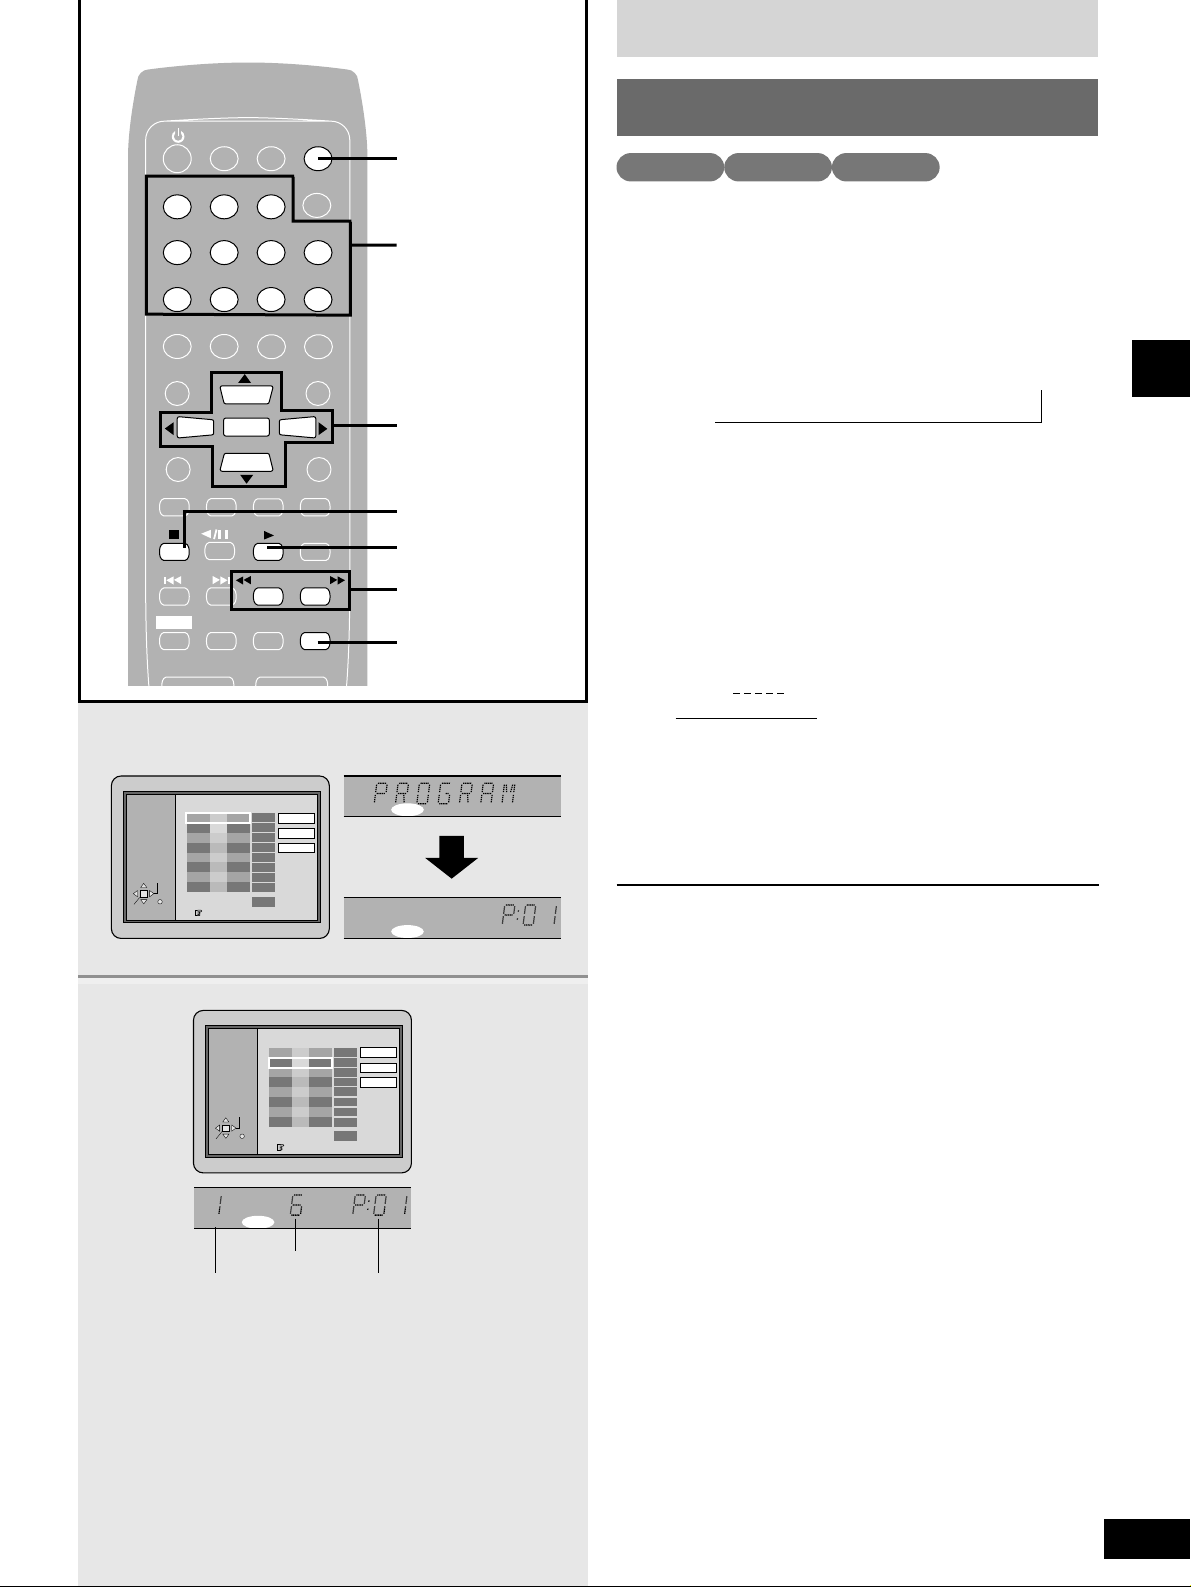
Select up to 24 tracks to play in the order you choose.
e.g.: DVD-Audio
While stopped
1 Press [PLAY MODE] to select
“PROGRAM”.
Each time you press the button:
ALL GROUP ../ PROGRAM / RANDOM / (cancel)
(DVD-Audio only)
2 Press [ENTER].
3 While programming DVD-Audio
Press the cursor buttons (e, r) to
select a group and press [ENTER].
4 Press the cursor buttons (e, r) to
select a track and press [ENTER].
Each time you press the button:
1 ,/ 2 ,/ALL
¡Repeat steps 2, 3 and 4 to program other tracks.
¡You can also select a group or track with the numbered
buttons.
¡All the tracks on a disc are selected when you select “ALL”
(all the tracks in the selected group with DVD-Audio).
5 Press [q] to start program play.
To return to the programming screen
During play, press [g] twice.
While stopped (“RESUME” is displayed), press [g] once.
To change the program
Move the cursor (e, r) to select the item you want to change.
If the program takes up more than one page, you can turn the
pages with [t] and [y].
¡To change the item repeat steps 2-4.
¡To clear the item, press [CANCEL] (or move the cursor (q, r) to
“Clear” and press [ENTER]).
To clear the whole program
1. Move the cursor (q, r) to “Clear all”.
2. Press [ENTER].
To exit program mode
Press [g] until “PGM” disappears from the display.
The program is cleared when you do this.
,
,
,
Playing tracks in a selected order Program play
VCD CDDVD-A
CLOCK/
1
3, 4
Track number
Program numberGroup number
TIMER
SLEEP
123
456
CANCEL
GROUP
≥10/-/--
7890
AUDIO ONLY
PAGE
AUDIO
SUB TITLE
ANGLE
TOP MENU
ENTER
SETUP
DISPLAY
DVD/CD
TAPE
SKIP
SHIFT
MUTING
BALANCE L –VOLUME+ BALANCE R
MENU
RETURN
EXT
TUNER
AUTO/MONO
SLOW/SEARCH
A-B REPEAT
PLAY MODE
REPEAT
CANCEL
1–0, ≥10/-/--
e
ENTER
w
q
r
g
q
t
SLOW/SEARCH
PLAY MODE
y
PLAY MODE
SELECT
ENTER
Choose a group and track, then press ENTER.
TGNoTime
1
Total time
RETURN
0:00
Press PLAY to start
Choose a group and track, then press ENTER.
PLAY MODE
SELECT
ENTER
RETURN
PGMGRP
Play
Clear
Clear all
TGNoTime
1 16
2
Total time
Press PLAY to start
2:51
2:51
Play
Clear
Clear all
PGM
PGMGRP
Page 24
Increasing your enjoyment of
movies and music
24
RQT6523
Disc operations
AUDIO ONLY
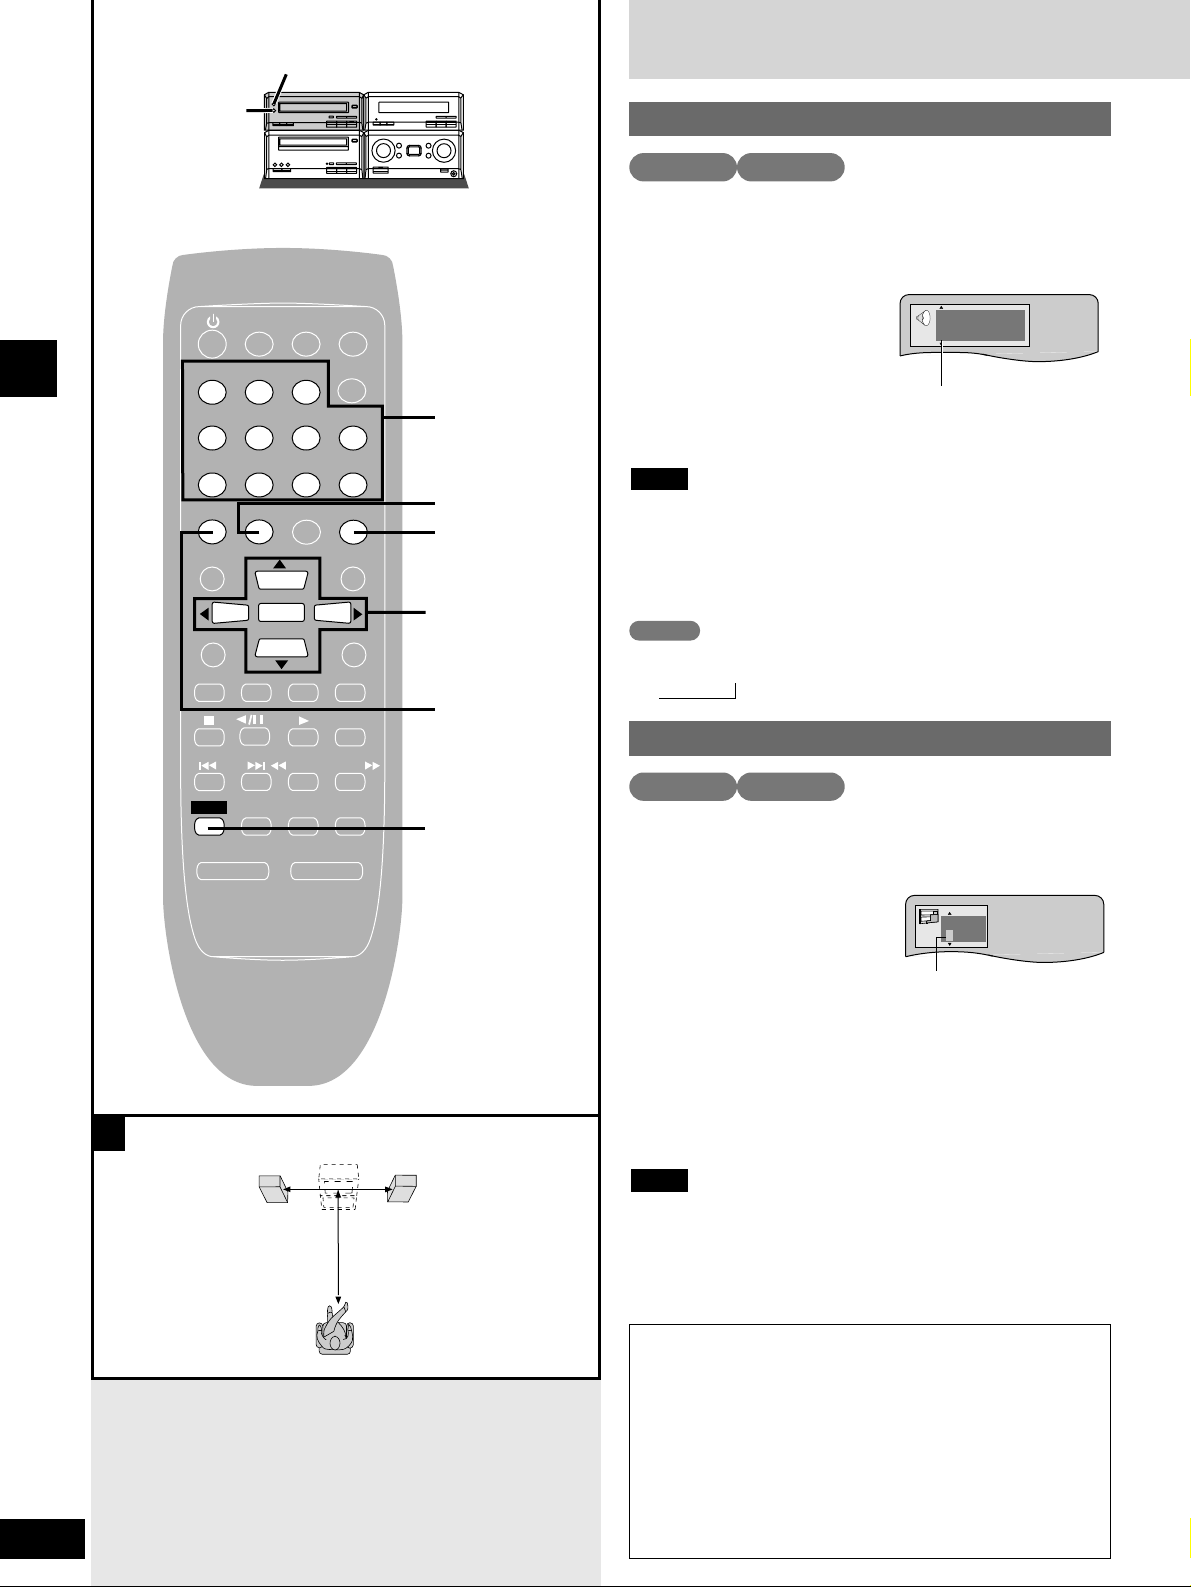
Some DVDs have more than one soundtrack recorded on them,
such as multiple languages or PCM, and you can change
soundtracks during play.
During play
Press [AUDIO] to
display the
soundtrack number.
The soundtrack number changes
each time you press the button.
You can also use the cursor buttons or numbered buttons while the
icon is displayed (about 5 seconds).
¡Even if a second soundtrack isn’t recorded on a DVD-Audio, two
soundtrack numbers will normally be shown when you press
[AUDIO]. The soundtrack currently playing is number 1.
¡You can also use this button and the cursor buttons to turn the
vocals on and off on karaoke discs. Read the disc’s instruction for
details.
Note
Soundtrack and subtitle language settings
¡You can make language settings before play with the Disc
settings menu (a pages 41–42). Whenever the unit is turned
on or the disc is replaced, the unit will specify the language
you set.
¡If the language you select is not on the disc, the disc will be
played in its primary language.
¡Despite any changes to the settings, some discs will specify
another language when play is started.
¡The default language is restored when the resume function is
canceled.
Some DVDs have more than one subtitle language recorded on
them, and you can change the language during play.
During play
Press [SUBTITLE] to
change the subtitle
number.
The subtitle number changes each time you press the button.
You can also use the cursor buttons or numbered buttons while the
icon is displayed (about 5 seconds).
“– –” is displayed if subtitles are not recorded on the disc.
To turn the subtitles on and off
After displaying the icon, move the cursor (q) and then move the
cursor (e
) or (r) to turn the subtitles on or off.
There may be a slight delay before subtitles are shown.
Note
Changing soundtracks
Changing subtitle language
% Digital
2 ENG 3/2.1 ch
Soundtrack number
OFF
1
ENG
Subtitle number
DVD-A DVD-V
DVD-A DVD-V
A
Listening
position
Audio changes as follows each time you press [AUDIO].
LR
/ L / R
,
VCD
RE-MASTER
BALANCE L –VOLUME+ BALANCE R
CLOCK/
TIMER
SLEEP
123
456
7890
AUDIO
SUB TITLE
ANGLE
TOP MENU
ENTER
SETUP
DISPLAY
DVD/CD
TAPE
SKIP
SHIFT
MUTING
CANCEL
GROUP
≥10/-/--
AUDIO ONLY
PAGE
MENU
RETURN
EXT
TUNER
AUTO/MONO
SLOW/SEARCH
A-B REPEAT
PLAY MODE
REPEAT
1–0, ≥10/-/--
AUDIO
ANGLE
AUDIO ONLY
e
w ENTER q
r
SUBTITLE
SHIFT
Page 25
25
RQT6523
Disc operations
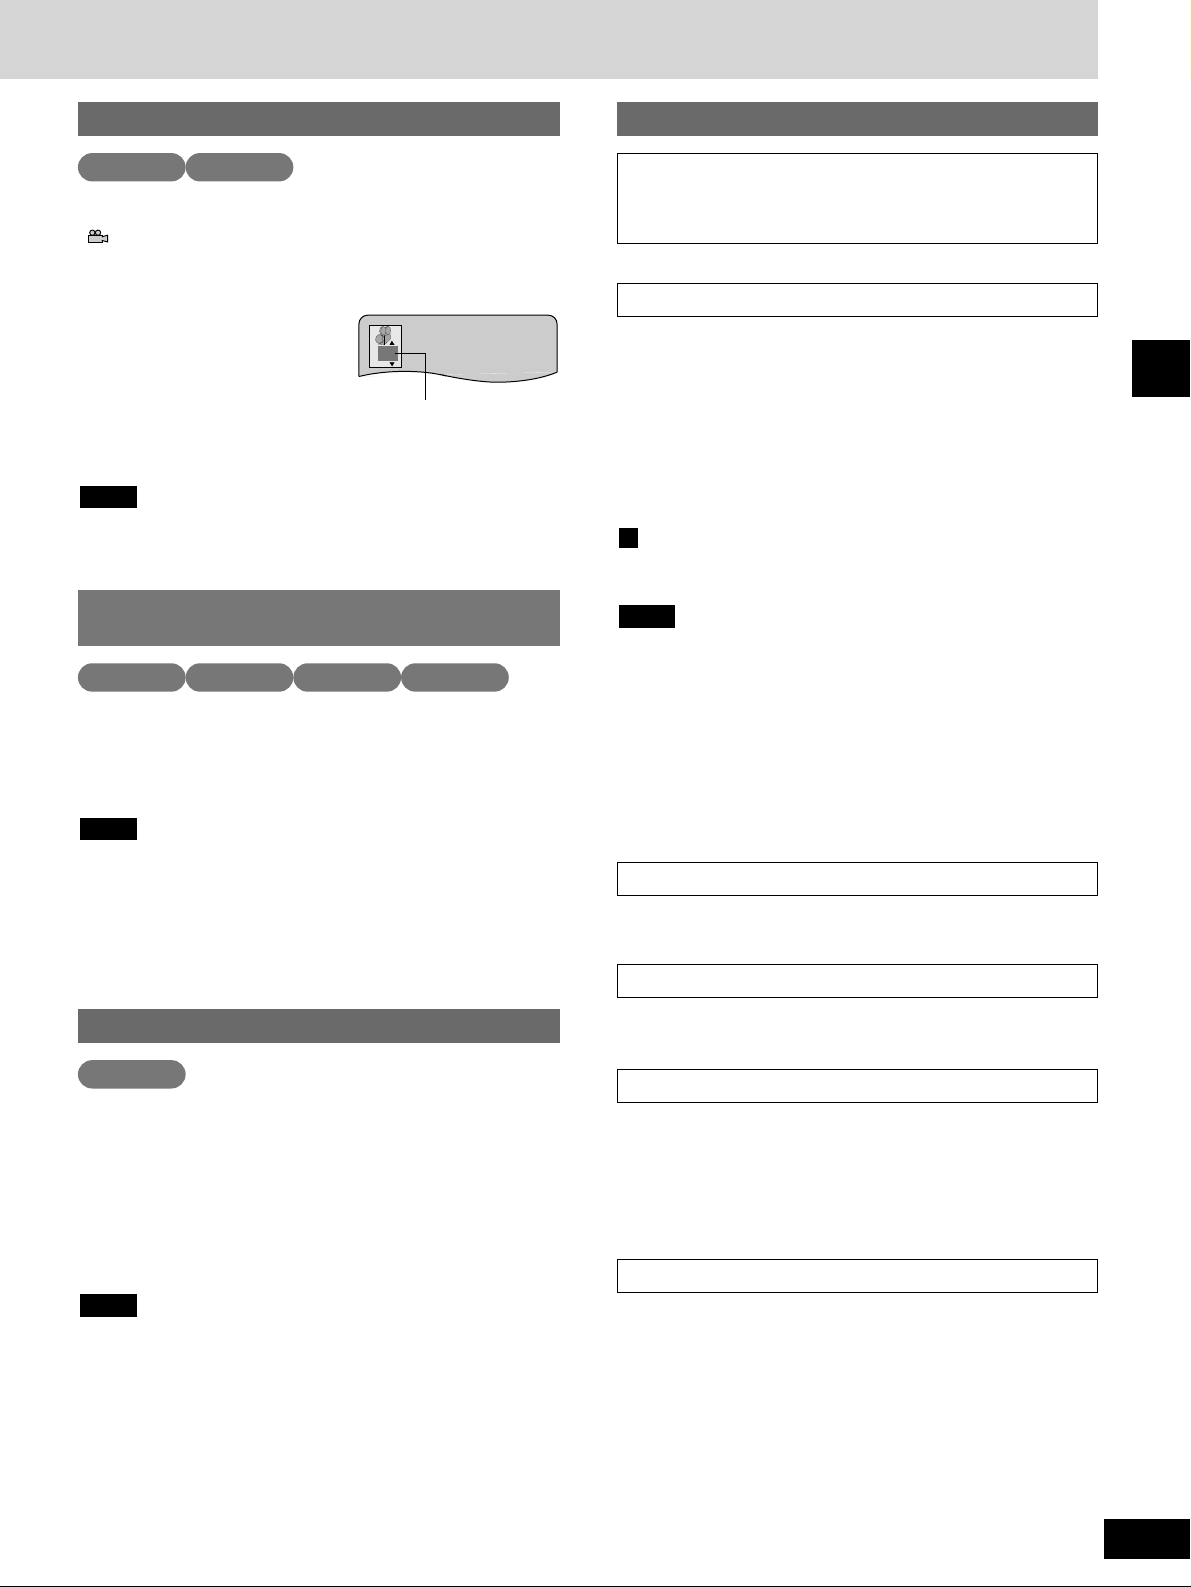
Some DVDs allow you to view the same scene from different
angles.
“” lights up on the unit’s display during scenes with multiple
angles recorded to indicate this feature is available.
While playing a scene with multiple angles
Press [SHIFT] +
[ANGLE] to change the
current angle number.
The angle number changes each time
you press the button.
You can also use the cursor buttons or numbered buttons while the
icon is displayed (about 5 seconds).
Some discs allow you to set angles before multi-angle scenes are
played. Read the instructions that come with the DVD.
Note
Switching angles
1
Angle number
DVD-A DVD-V
Apart from the features already introduced, there are
other features you can access with the graphic user
interface (
a pages 26 to 28).
Use this feature to enjoy a surround-like effect if you are using two
front speakers or headphones.
You can switch between speaker and headphone V.S.S. and
change the level with the GUI screens (a
pages 26 and 28)
.
Speaker V.S.S. (SP)
(Dolby Digital, DTS, MPEG, LPCM, 2 channel or over only)
Headphone V.S.S. (HP)
(Dolby Digital, MPEG, LPCM, 2 channel or over only)
To get the most from V.S.S.
Situate yourself in front of the television approximately 3 to 4 times
the distance between the left and right front speakers.
¡V.S.S. will not work, or will have less effect, with some discs.
¡Turn V.S.S. off when using more than just the two front speakers.
Sound will come only from the two front speakers if V.S.S. 1 or 2
is on.
¡Restore speaker mode when you are not using headphones or
else the sound from the speakers will sound strange.
¡Turn V.S.S. off if it causes distortion.
¡Ensure that you use the Speaker V.S.S. for speakers and
Headphone V.S.S. for headphones. Incorrect setting will result in
poor sound quality.
Note
A
Virtual Surround Sound (V.S.S.)
Find a part to play by entering the time (\ pages 26 and 27).
Time search
Marker
Marking parts to play again (\ pages 26 and 28).
Dialogue Enhancer
Increase center speaker volume to make dialogue clearer
(a pages 26 and 28).
This function is effective with Dolby Digital and DTS, 3 channels or
over, where the dialogue is recorded in the center channel.
Digital picture mode - Normal, Cinema, and User
You can change the picture to one suited for movie viewing with
Cinema mode or make your own adjustments (a pages 26 and 28).
Press [AUDIO ONLY].
The button lights.
The video signal is cut off.
AUDIO ONLY is canceled if the button is pressed again or the unit
is turned off. The light goes out.
¡Video signals are output while the disc is stopped and when
operations such as searching are performed. The television can
appear unusual while video signals are not being output.
¡Turn the television off for a better effect.
¡The television screen may be disrupted briefly when you turn
[AUDIO ONLY] on or off.
Note
To enjoy even higher quality sound AUDIO ONLY
DVD-A DVD-V VCD CD
Improving CD sound (RE-MASTER)
Press [RE-MASTER] on the main unit.
The button lights while RE-MASTER is on.
Each time you press the button:
RE-MASTER 1: Sharp acoustic imaging. Best suited for pop and
rock.
RE-MASTER 2: High clarity sound. Best suited for jazz.
RE-MASTER 3: Smooth and full sound. Best suited for classical
music.
RE-MASTER OFF: Original audio quality.
Sound may be disrupted if you change RE-MASTER while
recording.
Note
CD
Other features
Page 26
Graphic User Interface - GUI
26
RQT6523
Disc operations
CLOCK/
1
–100 +100
1:02:37
% Digital
2 ENG 3/2.1 ch
133
N
OFF
– – –
OFF
∗ ∗
– – –
∗ ∗ ∗ ∗ ∗
OFF
SETUP
DISPLAY
OFF
1
ENG
a
b
c
d
e
f
g
h
∗ ∗
∗ ∗ ∗ ∗ ∗
SP OFF
OFF
OFF
2
3
Example
Example: DVD-Video
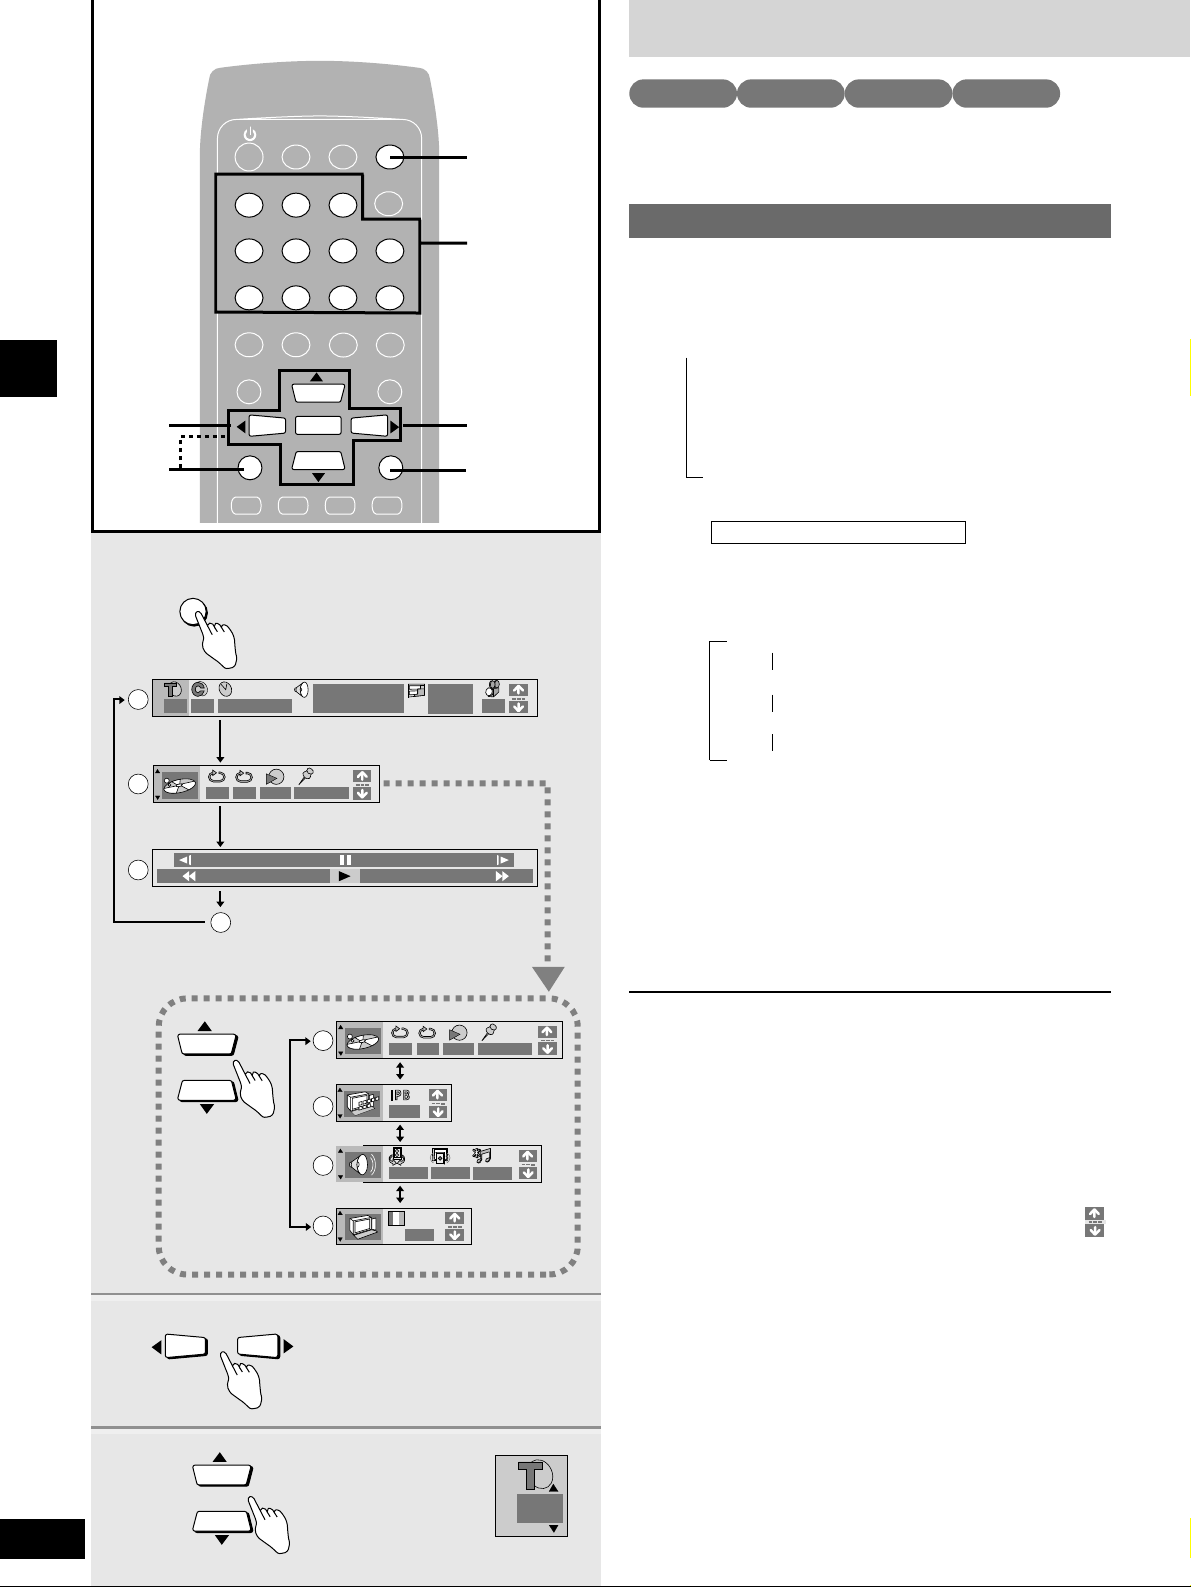
GUI are icons that appear on the screen that allow you to interact
with the player. The long thin GUI that show information about the
player and discs are called GUI screens.
During play or while stopped
1 Press [DISPLAY].
Each time you press the button:
/ Icons for disc information (a)
Icons for unit information (b)
Shuttle screen (c)
Original display (d)
¡The screens depend on the disc contents.
While the leftmost icon is highlighted
Press the cursor buttons (e or r) to select the
menu.
Each time you press the button:
Play menu (e)
Display menu (f)
Audio menu (g)
Video menu (h)
2 Press the cursor buttons (w or q) to
select the item.
3 Press the cursor buttons (e or r) to
select the setting.
Some items require different operations. Read the
explanations on the following pages.
For your reference
Some functions cannot be accessed from the stop mode (e.g.
changing the soundtrack language).
To clear the icons
Press [RETURN] until the menus disappear.
To change the position of the icons
You can lower the position of the icons on the screen if they are cut
off for some reason. There are 5 positions to choose from.
1. Press the cursor buttons (w
or q) to select the rightmost
icon.
2. Press the cursor buttons (e
or r) to move the icons.
Icons for unit information only
///
Basic GUI operation
VCD CDDVD-A DVD-V
TIMER
SLEEP
123
GROUP
CANCEL
CANCEL
2,3
1
456
7890
AUDIO
SUB TITLE
ANGLE
TOP MENU
ENTER
SETUP
DISPLAY
DVD/CD
TAPE
PAGE
EXT
≥10/-/--
AUDIO ONLY
MENU
RETURN
TUNER
1–0, ≥10/-/--
e
ENTER
w
r
RETURN
q
3
Page 27
ENG : English
FRA : French
DEU : German
ITA : Italian
ESP : Spanish
NLD : Dutch
SVE : Swedish
NOR : Norwegian
DAN : Danish
POR : Portuguese
RUS : Russian
JPN : Japanese
CHI : Chinese
KOR : Korean
MAL : Malay
VIE : Vietnamese
THA : Thai
✽ : Others
27
RQT6523
Disc operations
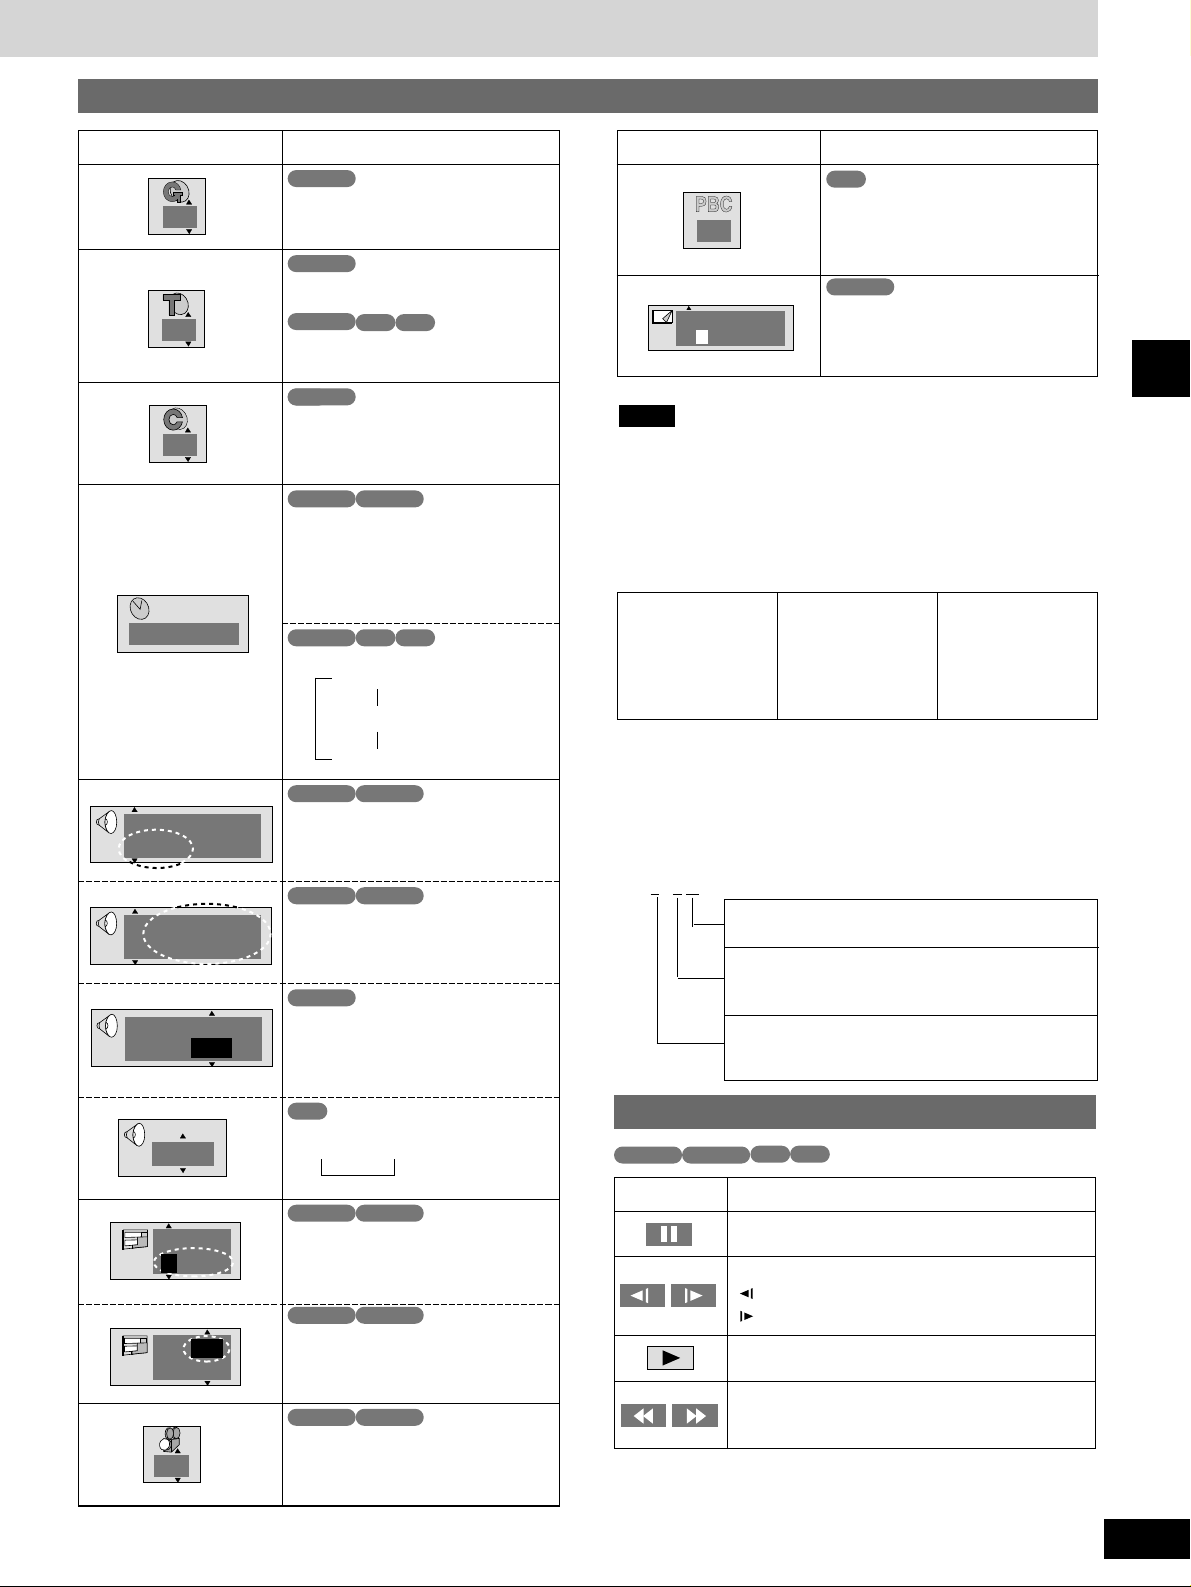
Icons for disc information
Å Soundtrack/Subtitle language
3
Icon Content
1
1:02:37
% Digital
2 ENG 3/2.1 ch
% Digital
2 ENG 3/2.1 ch
Vocal
1 ∗ ON
L R
OFF
1
ENG
OFF
1
ENG
3
VCD
CD
DVD
VCD
CD
Audio mode
LR — L — R
VCD
ı Signal type/data
LPCM/PPCM/% Digital/DTS/MPEG: Signal type
k (kHz): Sampling frequency
b (bit): Number of bits
ch (channel): Number of channels
Example:
3
/ 2 .1 ch
1: Center
2: Front left + Front right
3: Front left + Front right + Center
¡DVD time search can only be performed within a title.
¡You cannot do time search during random or program play.
¡Press [CANCEL] to cancel partway through.
¡You cannot change the time display when “PBC” is on the unit’s
display.
Note
Icon Content
ON
(with playback control only)
Menu play
Indicates whether menu play (PBC)
is on or off.
Cannot be changed here.
Still picture number
Selected picture is shown during
play.
VCD
2
DVD-A
DVD-V
DVD-V
DVD-A
DVD-A DVD-V
DVD-A
DVD-A DVD-V
DVD-A DVD-V
DVD-V
(karaoke disc only)
Karaoke vocal on/off
Solo: OFF or ON
Duet: OFF, V2, V1+V2 or V1
DVD-A DVD-V
DVD-A DVD-V
DVD-A DVD-V
Group number
[ENTER]
Title number
[ENTER]
Track number
[ENTER]
Chapter number
[ENTER]
Time search (select a position to
start play by specifying a time)
example; 1 hour, 2 minutes and
37 seconds
1 / 0 / 2 / 3 / 7 / [ENTER]
Changing the time display
Track elapsed time
Track remaining time
Disc/Group remaining time
Soundtrack language
(See Å at right for language
abbreviations.)
Audio signal type
(See ı at right for details.)
Subtitle language
(See Å at right for language
abbreviations.)
Subtitle on/off
Angle number
1: Subwoofer signal
(not displayed if there is no subwoofer signal)
0: No surround
1: Mono surround
2: Stereo surround (left/right)
Page
1
DVD-A
Shuttle screen
VCD
CD
Pause
Icon Content
Slow-motion play
: Backward (DVD only)
: Forward (DVD, Video CD only)
Play
Search
t: Backward
y: Forward
¡There are five speeds for both backward and forward slow-
motion and search.
¡The numbers on either side of the shuttle screen indicate the
maximum speeds of the search.
DVD-A DVD-V
Page 28
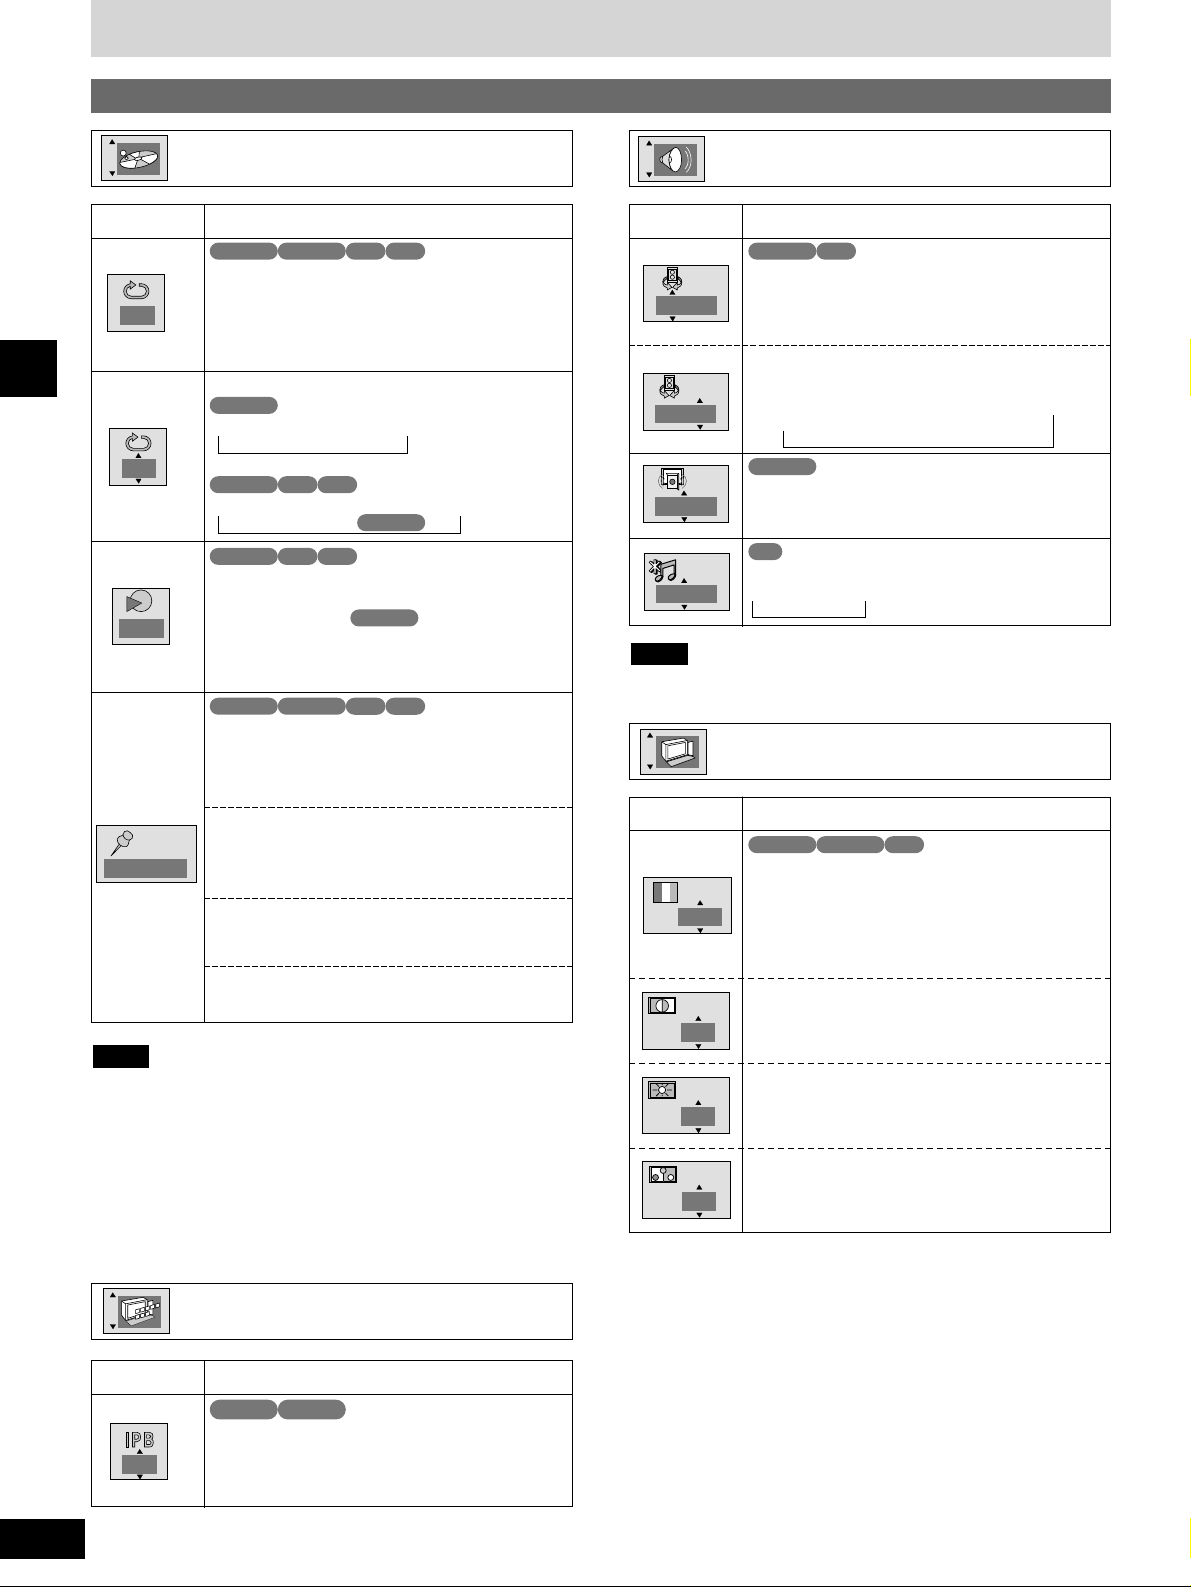
Repeat play (a page 21)
C (Chapter) — T (Title) — OFF
T (Track) — A (All)/G (Group) — OFF
Digital picture mode
N: Normal mode
C: Cinema mode
U: User mode
The following items are also displayed when you
select “U”.
Contrast (–7 to +7)
Increases the contrast between white and black
parts of the picture.
Brightness (0 to +15)
Brightens the picture.
Color (– 7 to +7)
Adjust the shade of the picture’s color.
SP OFF
OFF
Virtual Surround Sound (V.S.S.) (a page 25)
To select the V.S.S. mode
[e, r]
SP (speaker V.S.S.) — HP (headphone V.S.S.)
Dialogue Enhancer (a page 25)
ON — OFF
Marker
You can mark up to 5 positions to play again.
[ENTER]
(The unit is now ready to accept markers.)
To mark a position
[ENTER] (at the desired point)
To mark another position
[w
, q] / [ENTER]
To recall a marker
[w, q] / [ENTER]
To erase a marker
[w
, q] / [CANCEL]
Play mode display
---: Off
ALL: All group play
PGM: Program play
RND: Random play
Cannot be changed here.
Graphic User Interface - GUI
28
RQT6523
Disc operations
Icons for unit information
Play menu
Icon Content
OFF
A-B repeat (a page 21)
[ENTER] (start point) / [ENTER] (finish point)
To cancel
[ENTER]
VCD
CD
∗ ∗ ∗ ∗ ∗
VCD
CD
VCD
CD
– – –
VCD
CD
¡A-B repeat play (DVD), repeat play and marker do not work if the
disc’s elapsed play time is not shown on the unit’s FL display.
¡Markers can not be used with some DVDs or when “PBC”
(apage 19) is on.
¡Some subtitles or pictures may fail to appear around the marker
(DVD).
¡Markers are cleared when you turn off the unit or open the disc
tray.
¡Markers are cleared when you change the input mode.
Note
Sound may be disrupted if you change while recording.
Note
Audio menu
Icon Content
VCD
N
0
0
0
Video menu
Icon Content
DVD-V
DVD-A
DVD-A
DVD-A
DVD-A DVD-V
Display menu
Icon Content
IPB display (a page 50)
Display the picture type (I/P/B) in the still picture
mode.
ON — OFF
DVD-A DVD-V
DVD-V
DVD-A DVD-V
DVD-A DVD-V
SP 1
DVD-V
OFF
Re-Master (a page 25)
1 — 2 — 3 — OFF
CD
To select the V.S.S. level
[e, r]
SP1/HP1 ——— SP2/HP2 ———
SP OFF/HP OFF
(Natural effect)
(Emphasized effect)
DVD-A
VCD
∗ ∗
OFF
Page 29
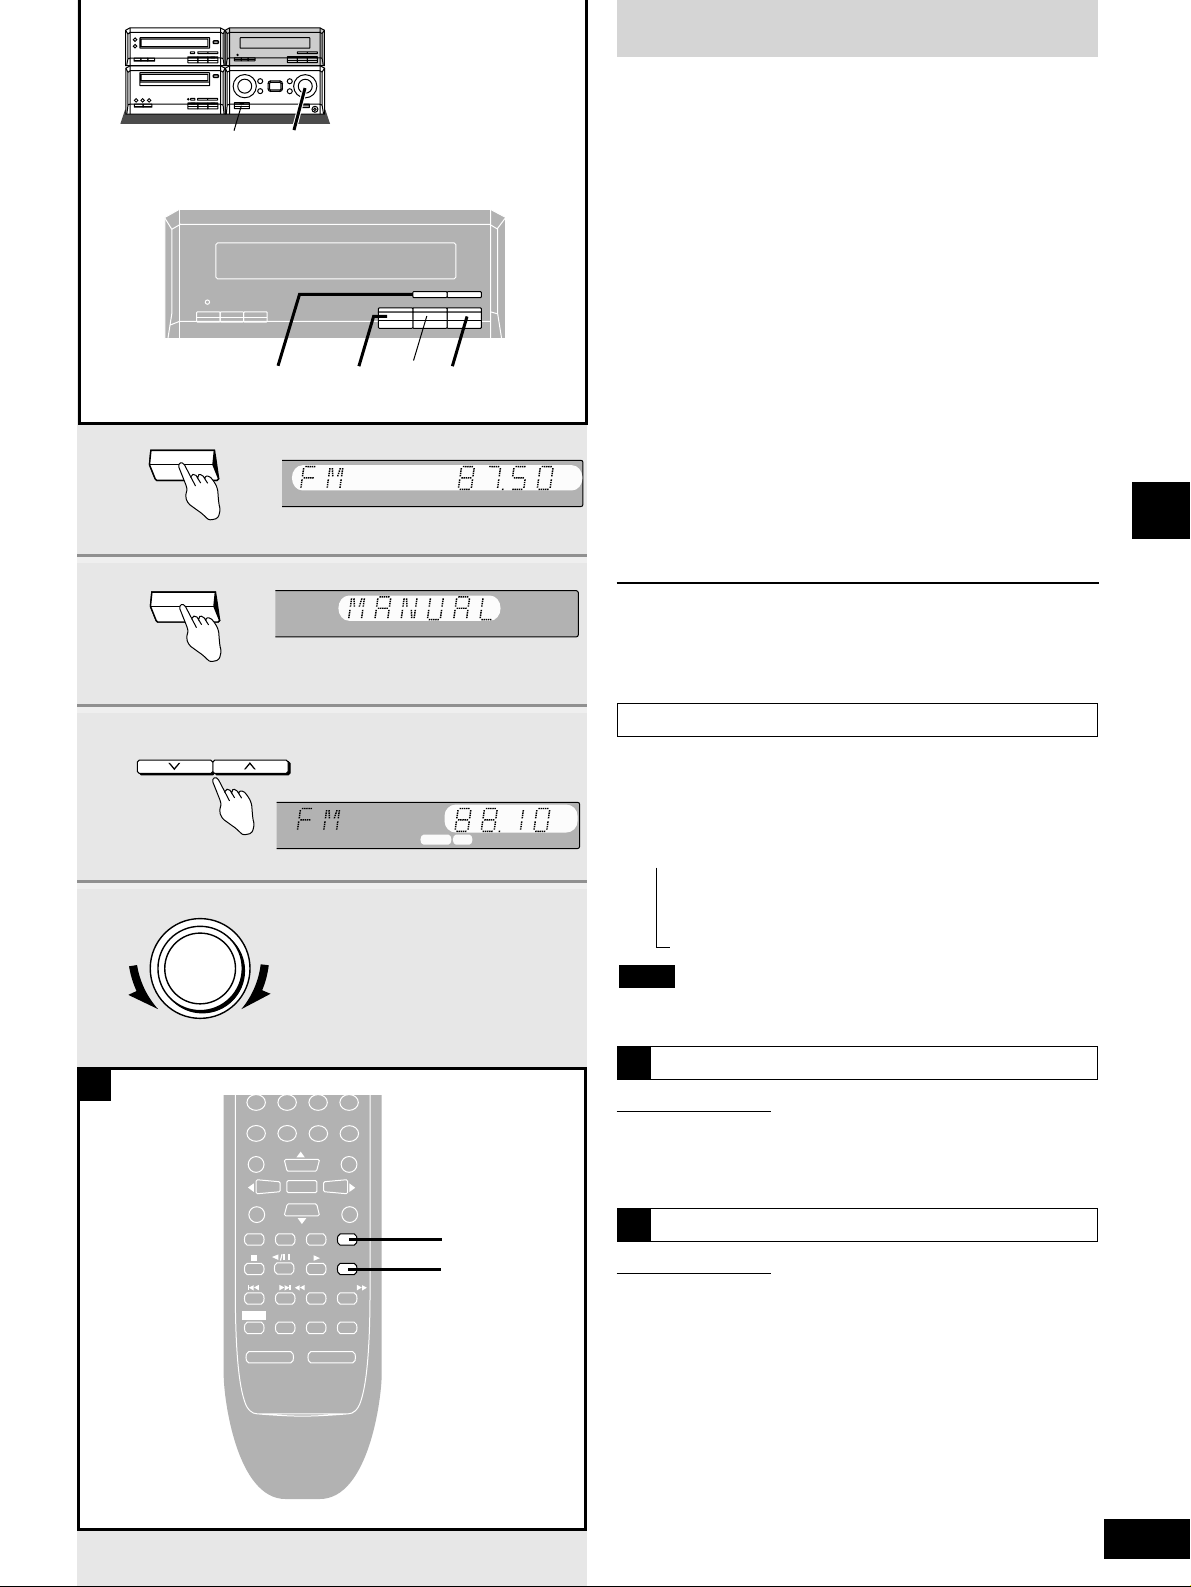
29
RQT6523
Radio operations
The radio: manual tuning
Radio stations can be tuned manually by selecting the station’s
frequency or they can be preset into channels to make it easy to
tune with the remote control (apage 30).
Preparation: Turn the unit on.
1 Press [FM/AM] to select the band.
Each time you press the button:
FM v AM
2 Press [TUNE MODE] to select
“MANUAL”.
Each time you press the button:
MANUAL v PRESET
3 Press [TUNE/TIME ADJUST (2 or 1)]
to select the frequency of the required
station.
“TUNED” is displayed when a radio station is tuned.
“ST” is displayed when a stereo FM broadcast is being
received.
4 Adjust the volume.
Auto tuning
Press and hold [TUNE/TIME ADJUST (2 or 1)] for a moment until
the frequency starts changing rapidly. The unit begins auto tuning,
stopping when it finds a station.
If noise is excessive in FM
Remote control only
Press [AUTO/MONO] to display “MONO”. This mode improves
sound quality if reception is weak for some reason but broadcasts
are heard in monaural.
Press [AUTO/MONO] again to cancel the mode. MONO is also
canceled if the frequency is changed.
Leave the tuner in AUTO for normal listening. Stereo and monaural
broadcasts are automatically played as they are received.
A
RDS broadcasting
This unit can display the text data transmitted by the radio data
system (RDS) available in some areas.
Changing the display
Press [RDS].
Each time you press the button:
/PS display (the name of the station)
PTY display (the type of program)
Frequency display
RDS displays may not be available if reception is poor.
Note
//
4
8
1
FM/AM
MHz
2
TUNE MODE
3
TUNE/TIME ADJUST
TUNED
ST
MHz
4
VOLUME
DOWN
UP
A
One touch play
Remote control only
When the unit is off, press [TUNER].
The unit comes on and starts playing the radio with the volume fading in.
Press [TUNER] again to select the band.
A
3
2
RDS
1
PAGE
AUDIO ONLY
AUDIO
SUB TITLE
ANGLE
TOP MENU
SETUP
DISPLAY
DVD/CD
TAPE
SKIP
SHIFT
MUTING
BALANCE L –VOLUME+ BALANCE R
ENTER
EXT
SLOW/SEARCH
A-B REPEAT
REPEAT
MENU
RETURN
TUNER
AUTO/MONO
PLAY MODE
TUNER
AUTO/MONO
Page 30
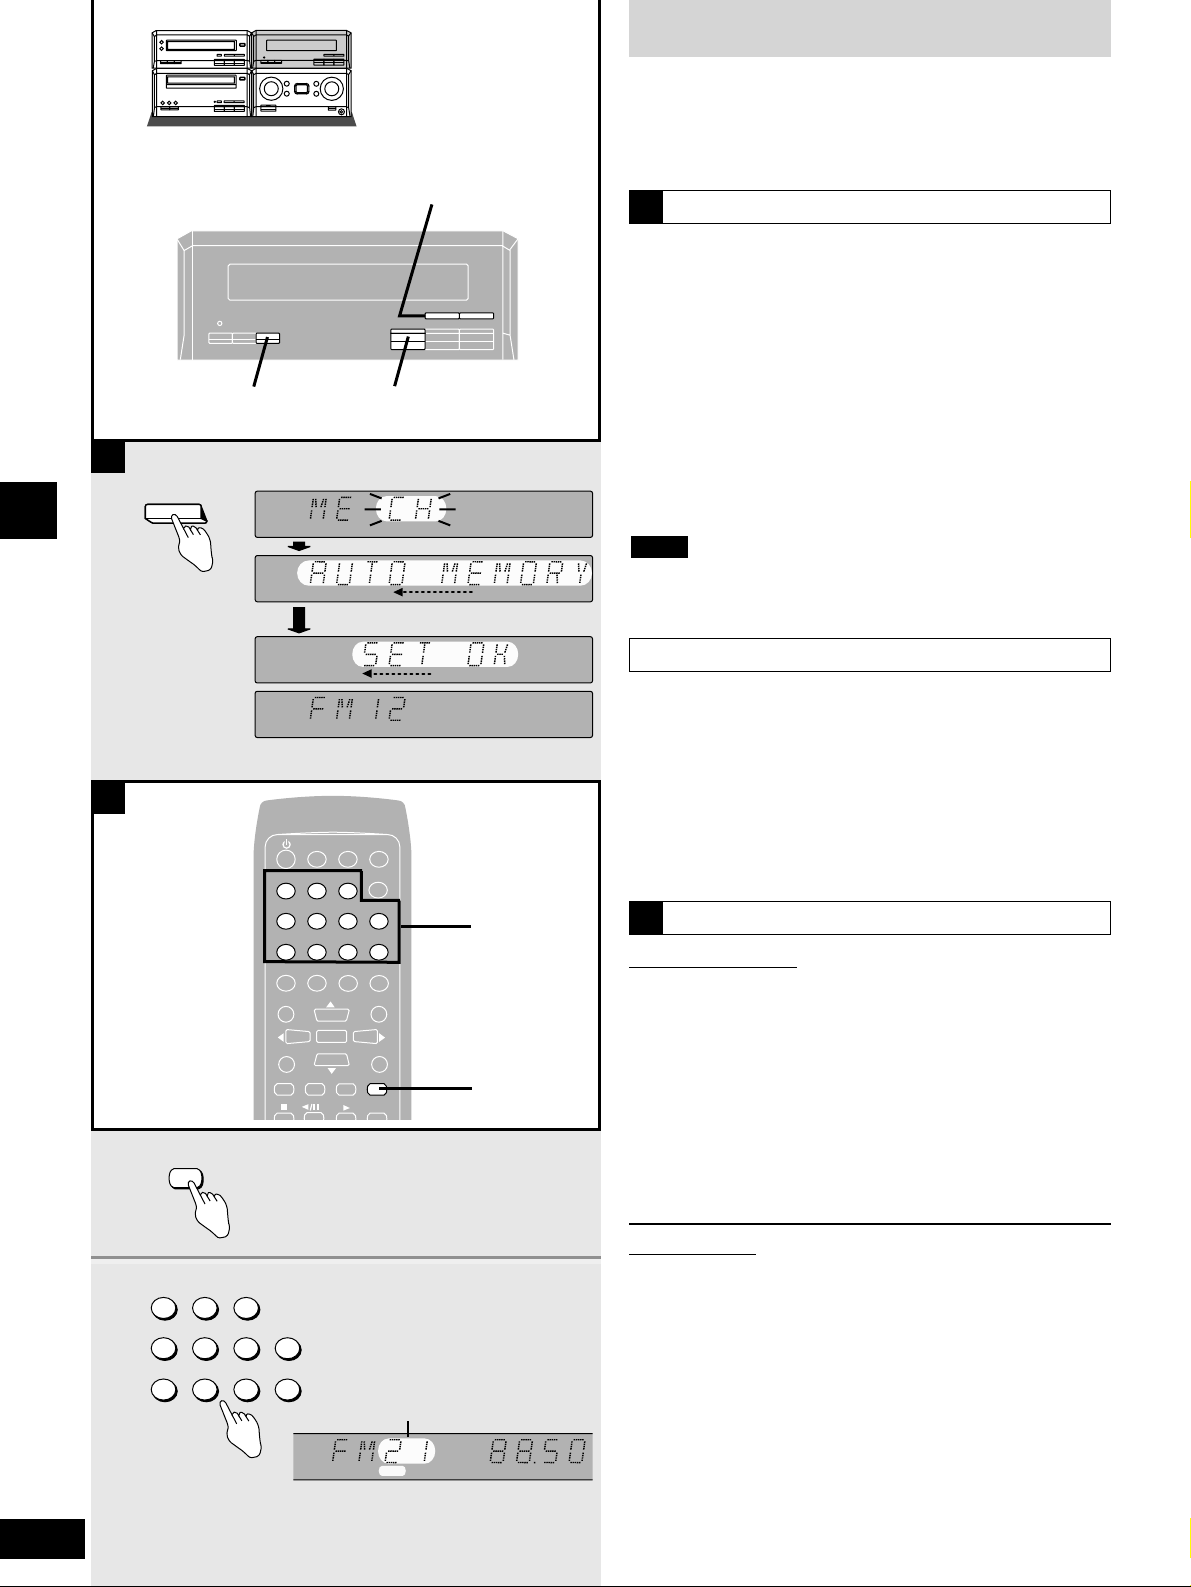
30
RQT6523
Radio operations
The radio: preset tuning
Automatic presetting
Do the following once each for FM and AM.
Preparation: Tune to the frequency presetting is to begin at
(apage 29).
Hold down [SET].
Release the button when “AUTO MEMORY” appears.
The tuner presets all the stations it can receive into the channels in
ascending order. FM stations are preset into channels 1 to 39, and
AM stations are preset into channels 21 to 39.
“SET OK” is shown when presetting is complete and the last station
to be preset is played.
“ERROR” is displayed if the tuner doesn’t receive any stations. Do
presetting manually if this happens (see below).
AM stations replace any FM channels that were preset in channels
21 to 39.
Note
A
Choose either automatic presetting, which presets all the stations
the tuner can receive, or manual presetting, which allows you to
select the stations to preset and the order they are to be preset in.
There are 39 channels available for presetting.
Manual presetting
Preset the stations one at a time.
qq
Tune to the required station.
ww
Press [SET].
ee
Press [TUNE/TIME ADJUST (2 or 1)] to select a channel.
rr
Press [SET].
The station occupying a channel is erased if another station is
preset in that channel.
Selecting channels
On the remote control
1 Press [TUNER].
The unit automatically comes on.
2 Press the numbered buttons to select
the channel.
For channels 1 to 9 press the corresponding number.
For channels 10 or over press [≥10/-/--], then the two digits.
e.g. To select channel 21: [≥10/-/--] / [2] / [1]
“PGM” lights when a preset station is selected.
On the main unit
1. Press [TUNE MODE] to select “PRESET”.
2. Press [TUNE/TIME ADJUST (2 or 1)] to select the channel.
B
A
SET
TUNED
ST
TUNED
ST
Preset channel
B
1
TUNER
2
123
456
≥10/-/--
7890
M
TUNE/TIME ADJUST 2, 1
SET
123
456
7890
SUB TITLE
TOP MENU
SETUP
DISPLAY
DVD/CD
TUNE MODE
CLOCK/
TIMER
SLEEP
GROUP
≥10/-/--
PAGE
AUDIO ONLY
AUDIO
ANGLE
ENTER
RETURN
EXT
TUNER
TAPE
AUTO/MONO
CANCEL
MENU
2
1
TUNED
STPGM
Page 31
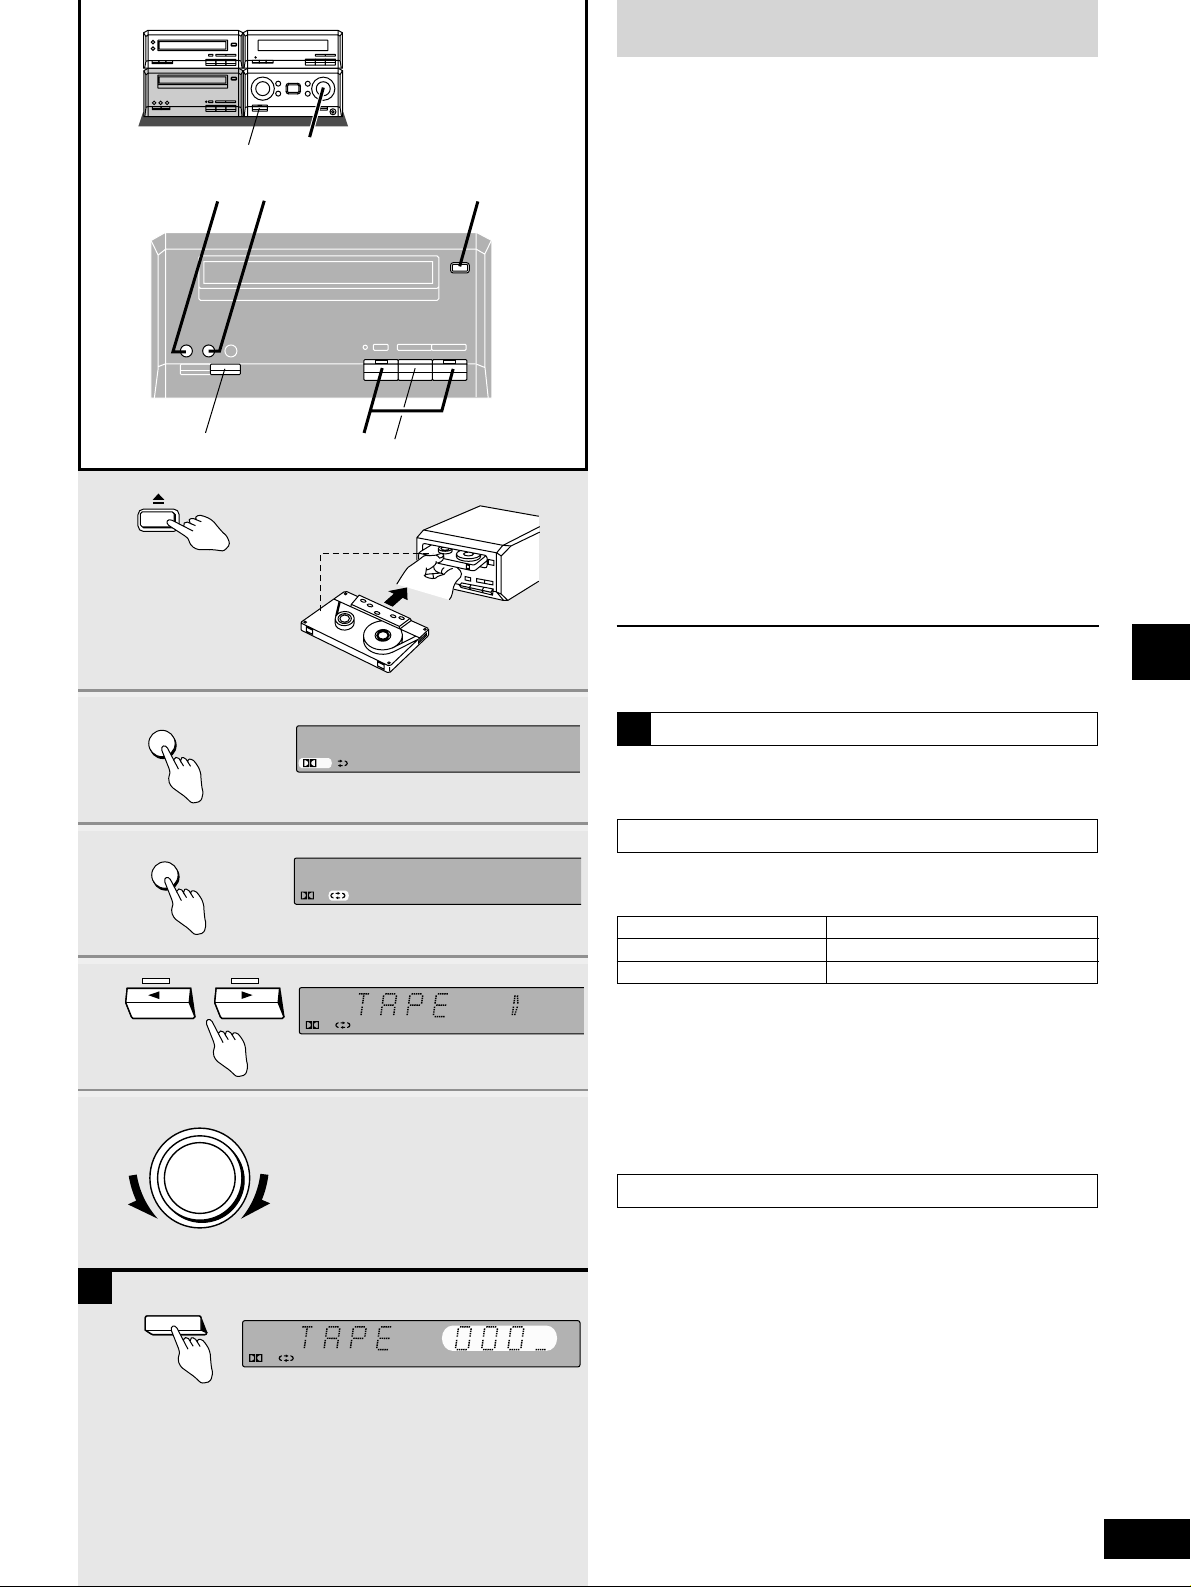
31
RQT6523
Cassette deck operations
Cassette tapes
Preparation: Turn the unit on.
1 Press [; OPEN/CLOSE], insert the
cassette with the tape facing in.
Make sure the cassette is fully inserted and press
[; OPEN/CLOSE] to close the deck.
2 Press [DOLBY NR] to select Dolby NR
on
(“% NR” appears) or off.
3 Press [REV MODE] to select the
reverse mode.
Every time the button is pressed:
! : One side is played.
/ : Both sides are played (forward / reverse).
$ : Both sides are played eight times each.
4 Press [w] or [q].
Play begins and the indicator changes to green.
q: to play the forward side (facing up).
w: to play the reverse side (facing down).
5 Adjust the volume.
To stop the tape
Press [g].
Cassette tape selection and care
The unit can correctly play the following types. It identifies the type
automatically.
Normal position/TYPE 1 ✔
High position/TYPE 2 ✔
Metal position/TYPE 4 ✔
¡Tapes exceeding 100 minutes are thin and can break or get
caught in the mechanism.
¡Tape slack can get caught up in the mechanism and should be
taken up before the tape is played.
¡Endless tapes can get caught up in the deck’s moving parts if
used incorrectly. Use tapes appropriate to this unit’s auto-reverse
mechanism.
Resetting the tape counter
Press [RESET].
A
5
8
2
1
OPEN/CLOSE
A
2
DOLBY NR
NR
3
REV MODE
NR
4
RESET
NR
NR
5
VOLUME
DOWN
UP
A
Dolby noise reduction
Dolby NR reduces “hissing” when playing tapes. It increases the
high frequency region when recording and then reduces it in
playback. Use the same system during playback and recording.
This unit has Dolby B NR which reduces noise to a third.
Prerecorded cassettes and equipment marked “%
” use Dolby B
NR.
RESET
31
g
4
Page 32
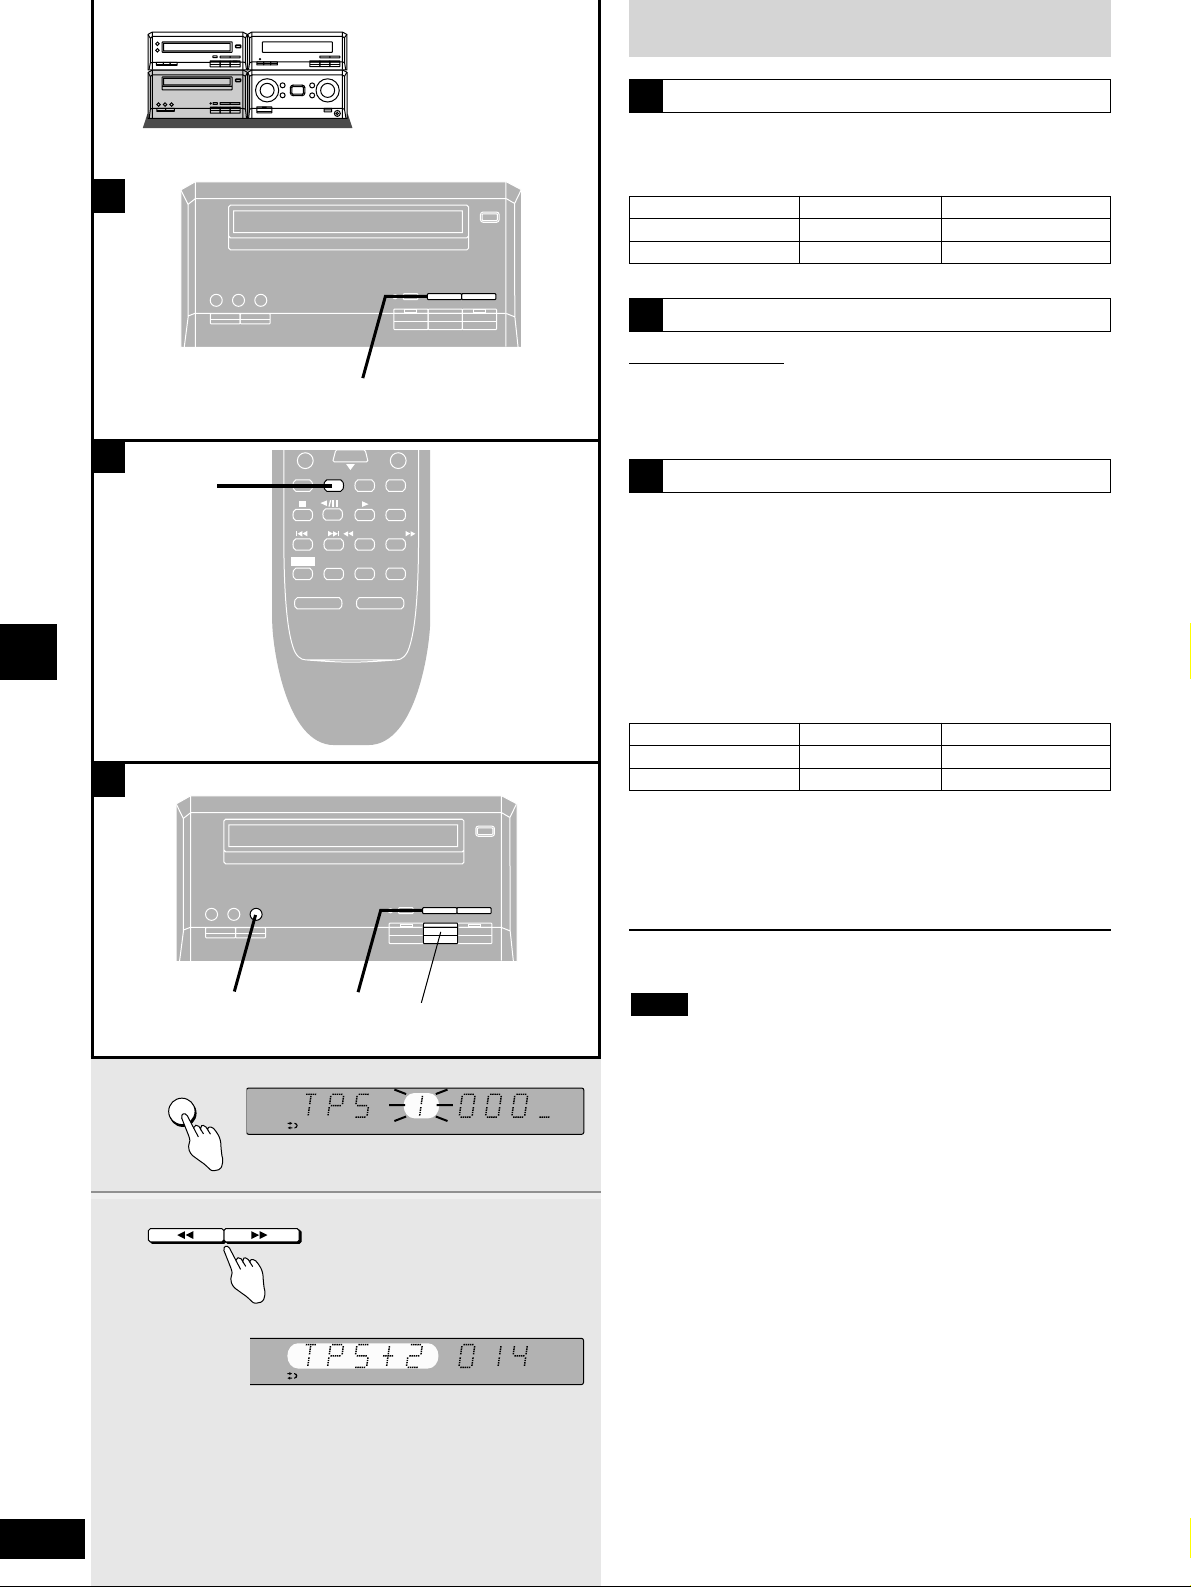
32
RQT6523
Cassette deck operations
Cassette tapes
Fast-forwarding and rewinding
Press [t (TPS)] or [(TPS) y] while the
tape is stopped.
A
Tape direction
q
w
Rewind
t
y
Fast-forward
y
t
Tape direction
q
w
Backward
t
y
Forward
y
t
One touch play
Remote control only
When a cassette is loaded and the unit is off, press [TAPE].
The unit comes on and starts play in the direction last selected with
the volume fading in.
B
Tape program sensor (TPS)
TPS finds the beginning of a track and starts play from there. You
can skip up to nine tracks.
1 Press [TPS SKIP] to select the
number of tracks you want to skip.
2 Press [t (TPS)] or [(TPS) y] to
select the direction.
C
A
PLAY MODE
A-B REPEAT
REPEAT
AUTO/MONO
DVD/CD
TAPE
EXT
TUNER
MUTING
BALANCE L –VOLUME+ BALANCE R
DISPLAY
RETURN
SKIP
SLOW/SEARCH
SHIFT
TAPE
2
1
g
B
C
1
TPS SKIP
2
(
TPS
)
Backward: The number of skips is displayed with a minus sign
Forward: The number of skips is displayed with a plus sign
Pressing [t (TPS)] or [(TPS) y] during play takes you to the
beginning of the current track or the next track, depending on tape
direction.
To cancel
Press [g].
¡Stop the tape before changing the TPS direction.
¡TPS may not operate correctly in the following situations:
If the interval between tracks is less than 4 seconds.
If there is noise between tracks.
If there are silent parts within tracks.
Note
t (TPS) y
Page 33
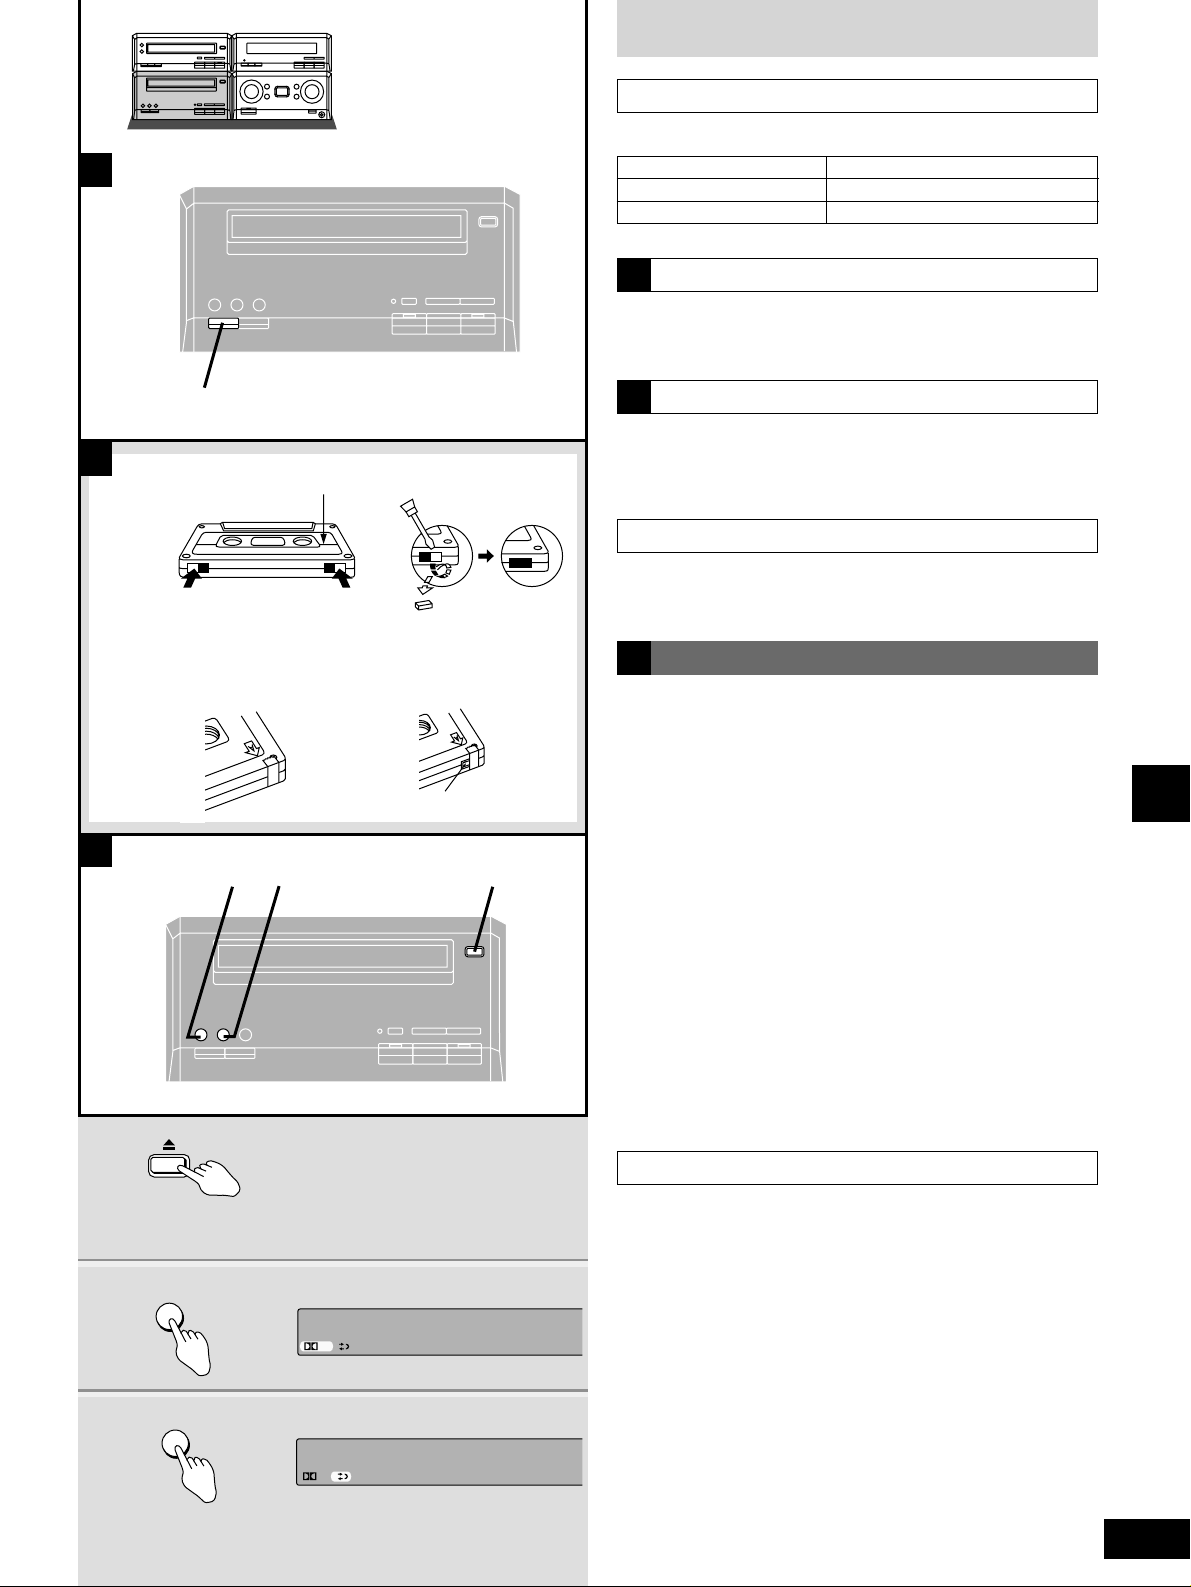
33
RQT6523
Recording operations
Before recording
Selection of tapes for recording
The unit automatically identifies the type of tape.
Normal position/TYPE 1 ✔
High position/ TYPE 2 ✔
Metal position/ TYPE 4 ✔
To display the tape counter while recording
Press [COUNTER].
The counter is displayed for about five seconds.
A
Erasure prevention
The illustration shows how to remove the tabs to prevent recording.
To record on the tape again, cover as shown, being careful not to
cover the high position discrimination hole.
B
Volume and sound quality
Recordings are unaffected by changes to volume and sound
quality.
Preparatory steps
Do these steps before each recording.
Wind up the leader tape so recording can begin immediately.
1 Press [; OPEN/CLOSE], insert the
cassette with the tape facing in.
Make sure the cassette is fully inserted and press
[; OPEN/CLOSE] to close the deck.
2 Press [DOLBY NR] to select Dolby NR
on
(“% NR” appears) or off.
(a“Dolby noise reduction” page 31)
3 Press [REV MODE] to select the
reverse mode.
Each time you press the button:
! : One side only records.
/ or $ : Both sides record (forward / reverse). “$”
automatically changes to “/” when [* REC
PAUSE] is pressed.
C
Erasing recordings
1. Turn [INPUT SELECTOR] to select “TAPE”.
2. Press [DOLBY NR] so that “% NR” goes off.
3. Select the reverse mode.
4. Press [* REC PAUSE].
5. Press [w] or [q].
B
1
2
OPEN/CLOSE
DOLBY NR
3
REV MODE
NR
NR
COUNTER
A
C
Side A
Tab for side “B” Tab for side “A”
Normal tape High-position tape
Detection hole
To re-record
2
31
Page 34
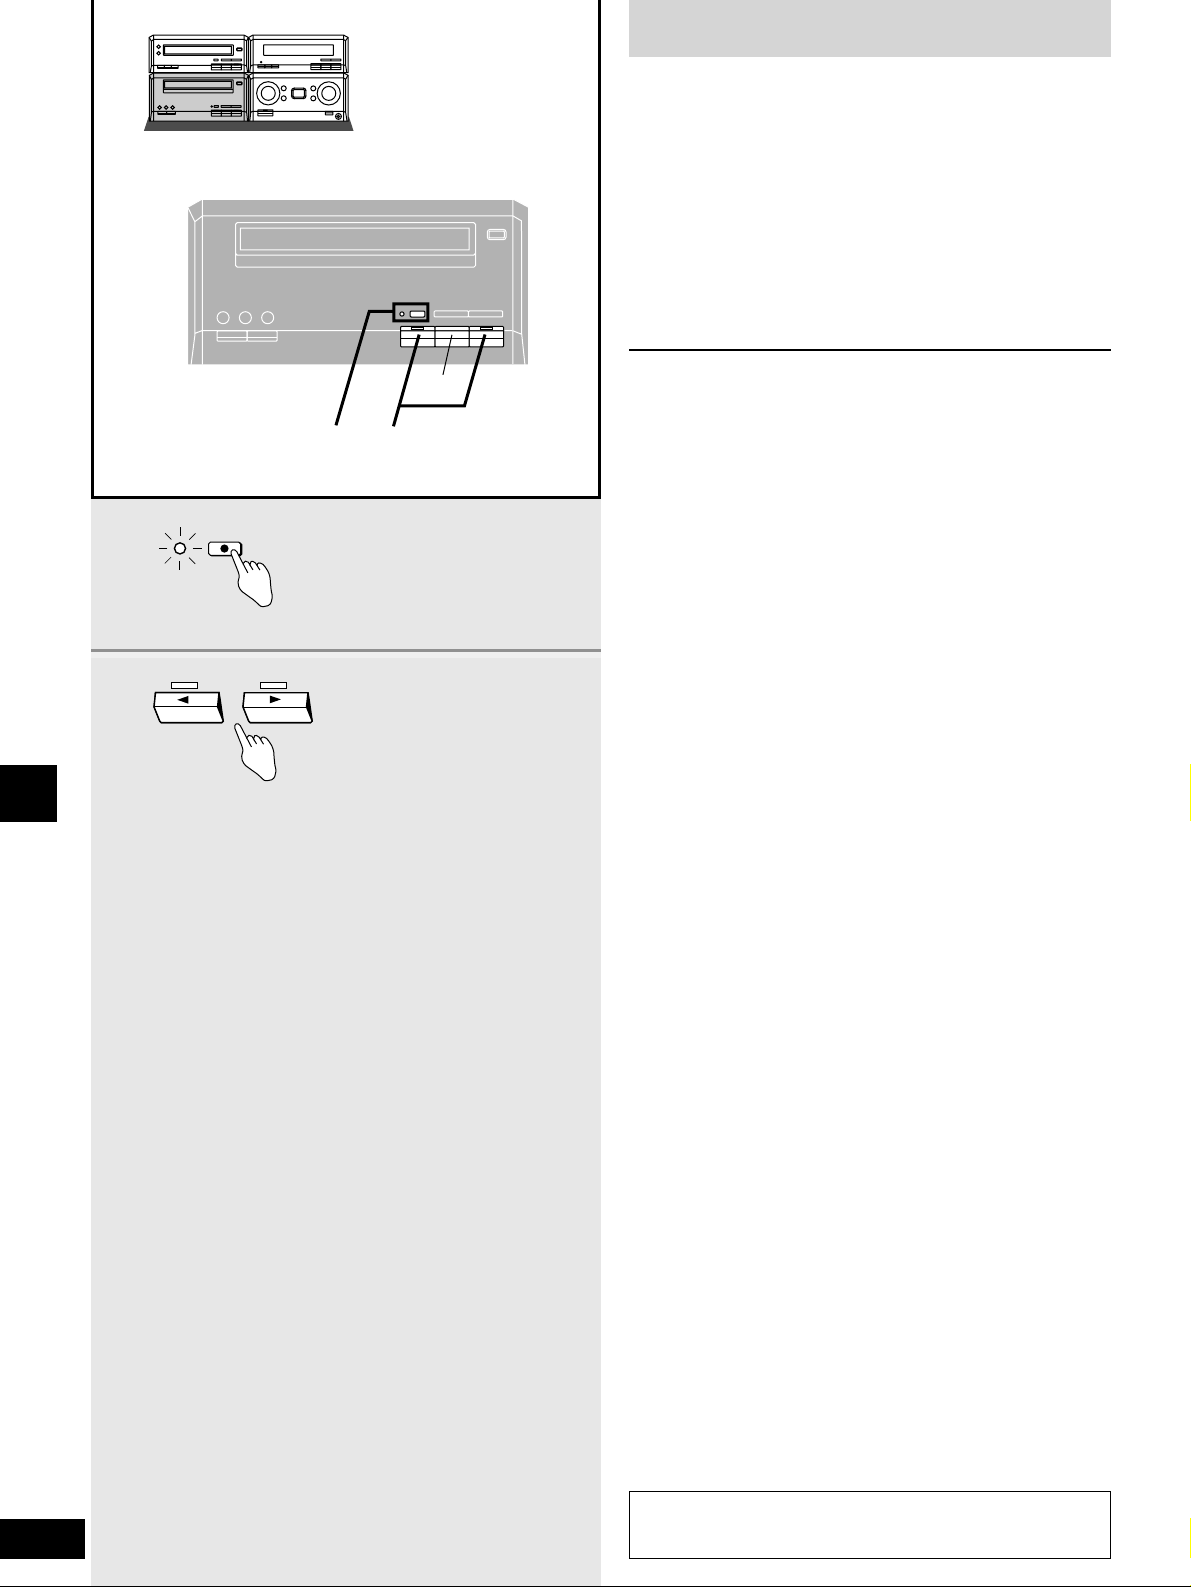
34
RQT6523
Recording operations
Recording the radio
Preparation: Do the preparatory steps (apage 33).
1 Tune to the required station.
(apage 29 or 30)
2 Press [* REC PAUSE].
The deck goes into the recording standby mode, [* REC
PAUSE] indicator lights and a play indicator starts flashing.
3 Press [w] or [q] to start recording.
q: to record on the forward side
w: to record on the reverse side
To stop recording
Press [g].
To temporarily stop recording
Press [* REC PAUSE].
The deck goes into recording standby mode.
Press the [w] or [q] button with the flashing indicator to resume
recording.
Your attention is drawn to the fact that recording pre-recorded
tapes or discs or other published or broadcast material may
infringe copyright laws.
2
3
REC PAUSE
2
3
g
Page 35
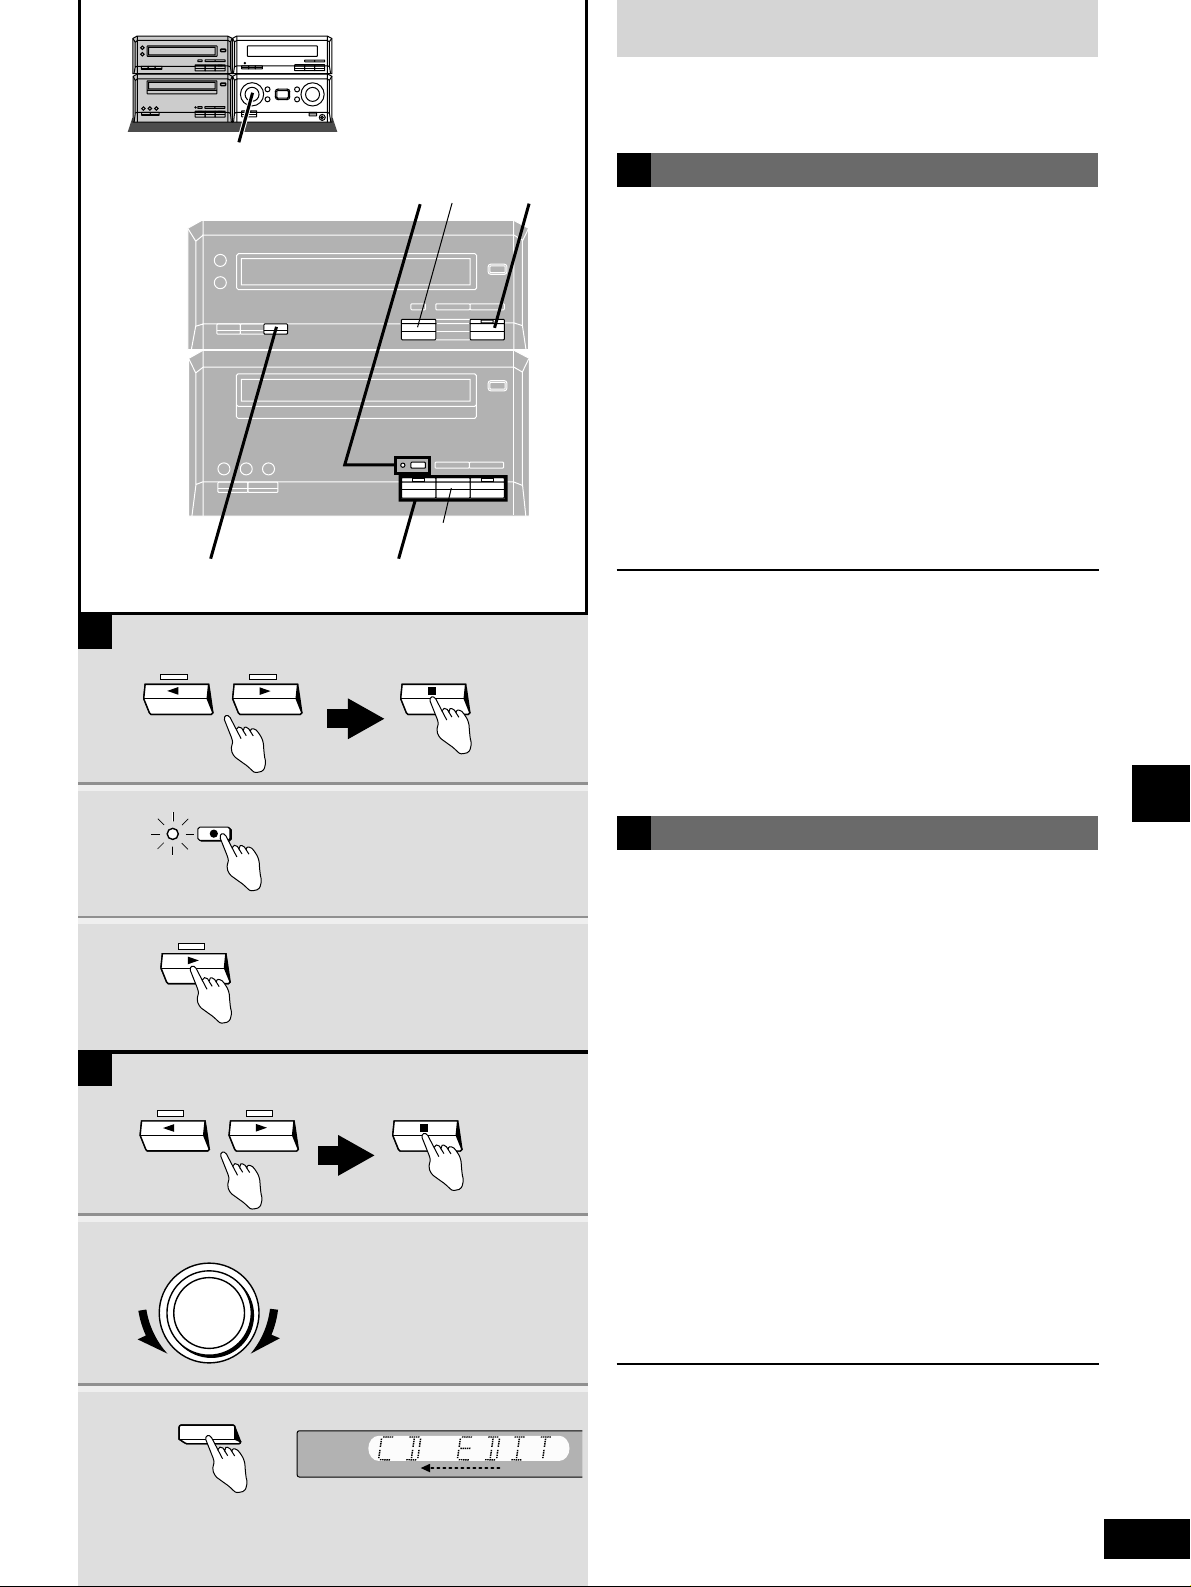
35
RQT6523
Recording operations
Recording discs
This function makes it easier for you to record from a CD.
11 Press [w] or [q] and then [g] to set
the tape direction.
q: to record on the forward side
w: to record on the reverse side
When you select “q”, set the reverse mode to “/”. Now, if a
track is cut off at the end of the forward side, it is re-recorded
on the reverse side.
¡At the end of the reverse side, recording stops and the
current track will be interrupted.
22 Turn [INPUT SELECTOR] to select
DVD mode.
Wait for the unit to finish reading the disc.
33 Press [EDIT].
Recording starts and “CD EDIT” scrolls across the display.
After recording finishes
The cassette deck automatically stops.
To stop editing
Press [g] on the deck or the DVD player.
“EDIT OUT” is displayed and both sections stop.
Editing programmed tracks
Program the tracks (asteps 1–4, page 23) before step 3.
CD editing
1
3
1
2
REC PAUSE
3
1
2
2
3
1
2
3
A
B
3
2
3
g
1, 1
g
2
11
3
1
2
22
INPUT
SELECTOR
3
1
2
33
EDIT
3
1
2
1
1 Press [w] or [q] then [g] to set the
tape direction.
q: to record on the forward side
w: to record on the reverse side
2 Press [* REC PAUSE].
The deck goes into the recording standby mode, [* REC
PAUSE] indicator lights and the play indicator starts flashing.
3 Press [q] on the DVD player.
Recording starts automatically.
Four seconds after the disc finishes, the deck goes into the
recording standby mode.
The deck may not go into recording standby mode if the disc shows
a menu after play.
To stop recording
EITHER
Press [g] on the DVD player.
The deck goes into the recording standby mode four seconds later.
OR
Press [g] on the deck.
Recording stops immediately but the disc continues to play.
To record programmed tracks
Program tracks before step 2 (asteps 1–4, page 23).
Preparation: Do the preparatory steps (apage 33).
Insert a disc (apage 16).
Normal recording
A
B
Page 36
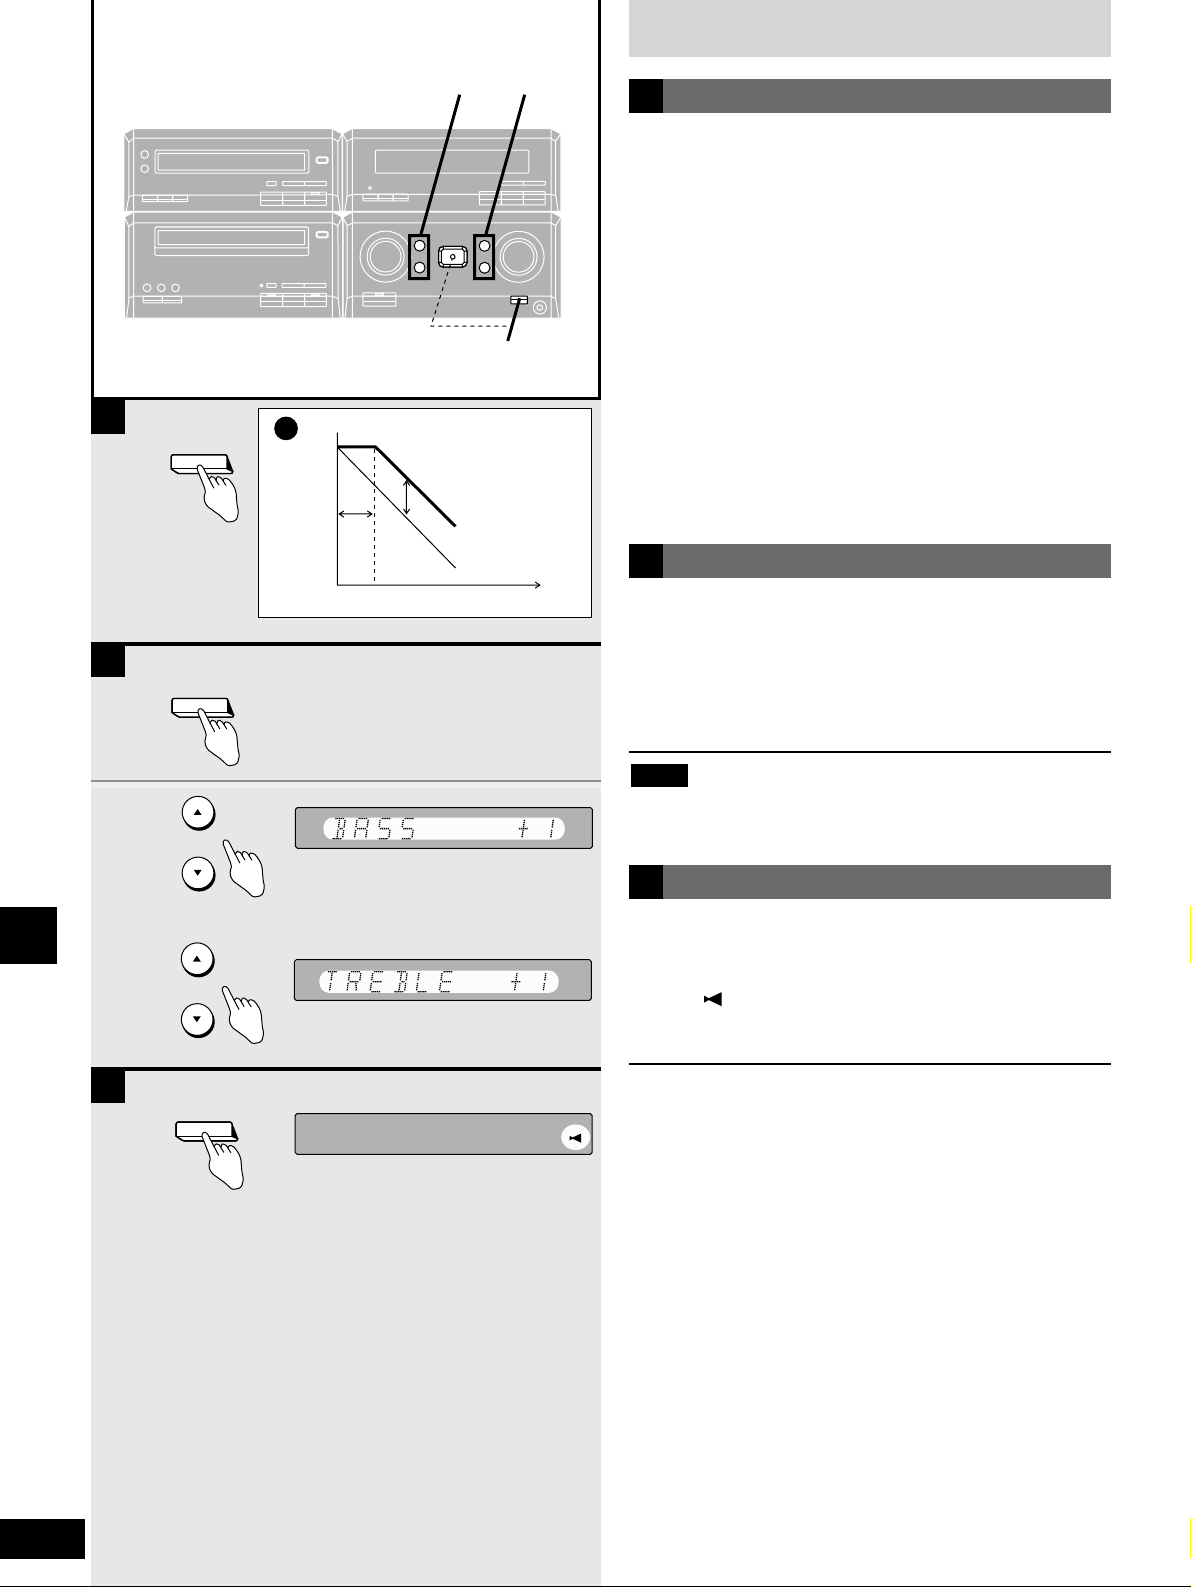
Changing the sound quality
36
RQT6523
Other operations
BASS TREBLE
-VGCA
–CINEMA BASS
1 Press [-VGCA –CINEMA BASS] to turn
the VGCA off.
2 Press [BASS (e or r)] (bass) or
[TREBLE (e
or r)] (treble).
You cannot adjust the tone while CINEMA BASS or the VGCA
is on.
Note
To adjust the tone quality
B
VGCA: Variable Gain Control Amplifier
You can achieve a clearer sound by using this feature.
Turning the VGCA on and off
Press [-VGCA –CINEMA BASS].
The indicator lights while the VGCA is on.
How this unit’s VGCA works
Generally, the ratio of noise to sound (S/N ratio) worsens as you
lower the volume. This unit’s VGCA, however, maintains the same
S/N ratio from the maximum volume level (0 dB) down to a certain
level, and as you continue to lower the volume, this difference is
maintained, allowing you to enjoy better S/N ratios at lower
volumes.
a Changes to the S/N ratio when the volume is lowered
(simplified)
a Gain variation range
b Difference between the S/N ratio when the feature is on and off
c Reduction in volume
The VGCA circuit
A
A
-VGCA
–CINEMA BASS
a
S/N
0 dB
ON
OFF
b
c
a
B
2
1
C
Maximizing the bass - CINEMA BASS
C
Optimize the tone for movie viewing.
Press and hold [-VGCA –CINEMA BASS]
until “” appears on the display.
The VGCA turns off if it was on.
To cancel
Press and hold [-VGCA –CINEMA BASS].
The feature is also canceled when you press [-VGCA –CINEMA
BASS] to turn the VGCA on.
-VGCA
–CINEMA BASS
BASS
TREBLE
-VGCA
–CINEMA BASS
Page 37
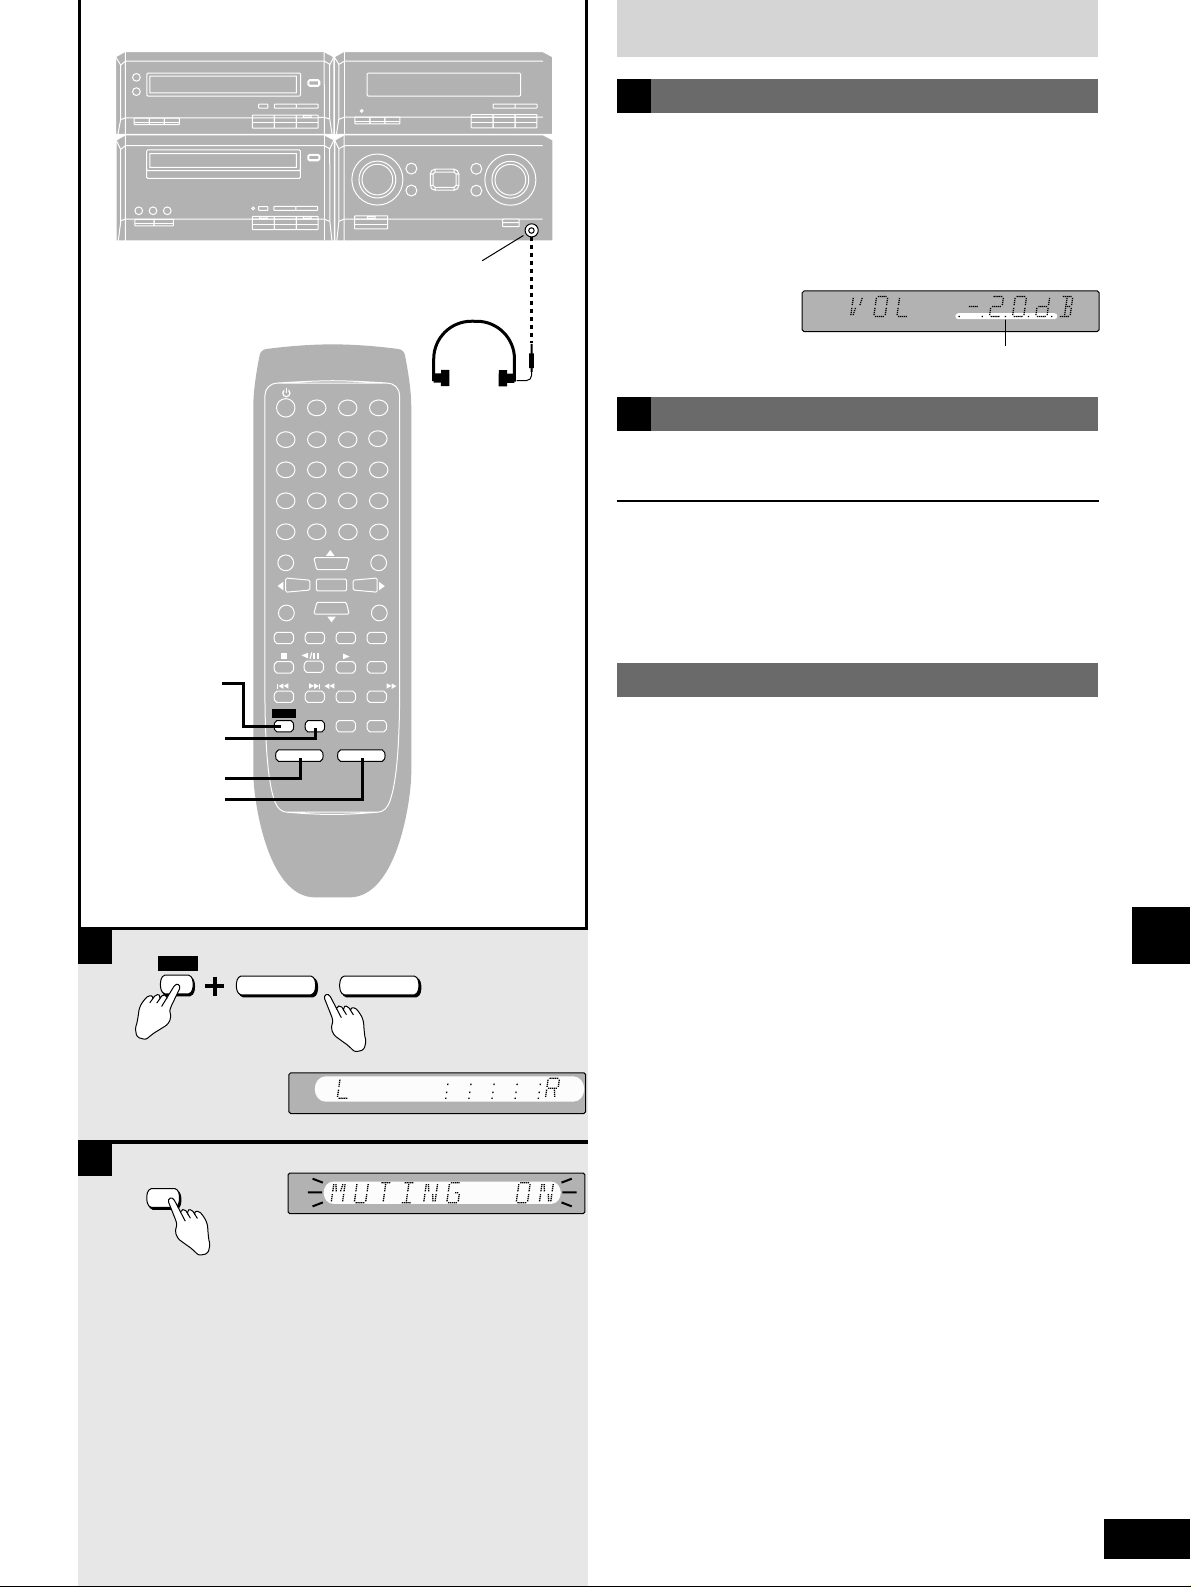
37
RQT6523
Other operations
Press [SHIFT] + [BALANCE (L) or (R)] to
adjust the sound balance.
For your reference
The following display appears when you adjust the volume to
indicate that you have adjusted the balance to the left or right.
To adjust left-right balance
Press [MUTING].
Volume is reduced to minimum.
To cancel
Press [MUTING] again. (“MUTING OFF” lights up.)
To cancel from the unit, turn [VOLUME] to minimum (- - dB), then
raise it to the required level.
When the unit is turned off, the muting operation will be
automatically canceled.
Muting the volume
Reduce the volume before connection.
Avoid listening for prolonged periods of time to prevent hearing
damage.
Plug type: 3.5 mm stereo.
Using headphones (not included)
PHONES
SLEEP
CLOCK/
TIMER
PLAY MODE
A-B REPEAT
REPEAT
AUTO/MONO
DVD/CD
TAPE
EXT
TUNER
MUTING
BALANCE L –VOLUME+ BALANCE R
CANCEL
123
456
≥10/-/--
7890
SUB TITLE
AUDIO
ANGLE
MENU
TOP MENU
SETUP
DISPLAY
RETURN
ENTER
SKIP
SLOW/SEARCH
SHIFT
GROUP
PAGE
AUDIO ONLY
SHIFT
MUTING
BALANCE L
BALANCE R
Convenient functions
BALANCE L BALANCE R
SHIFT
A
MUTING
B
B
A
Dot display
Page 38
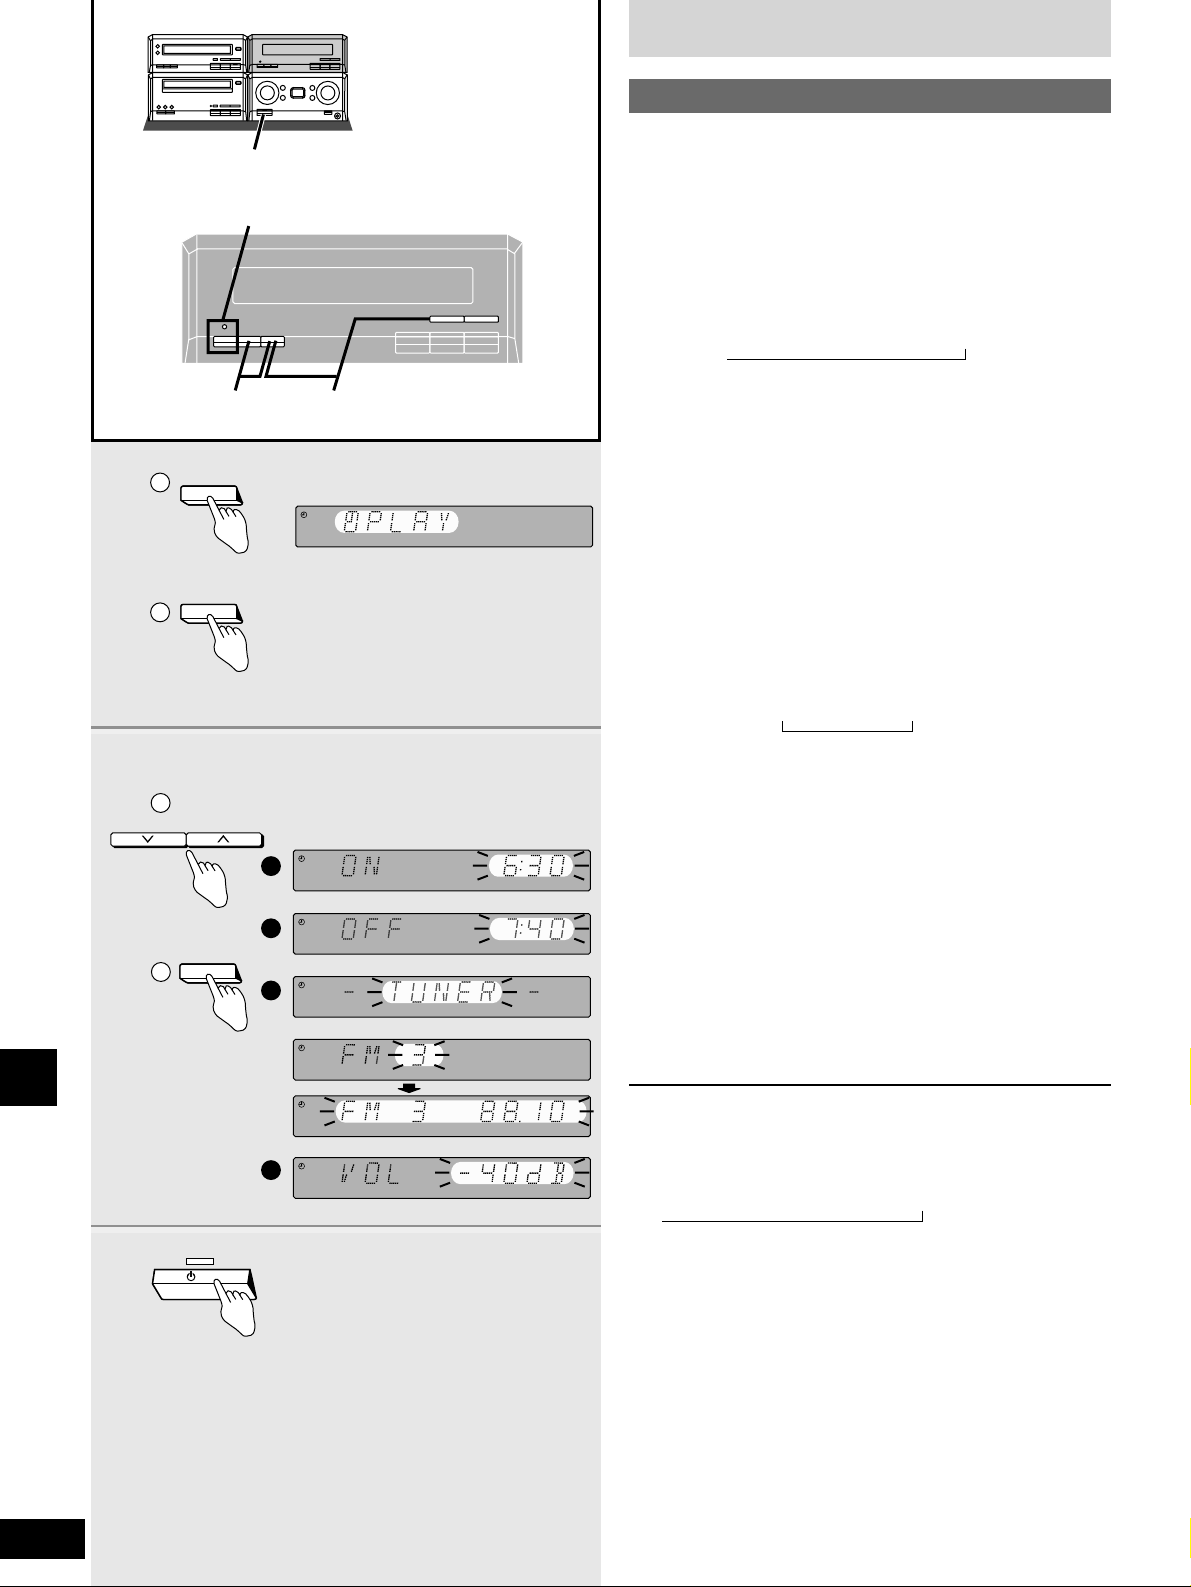
38
RQT6523
Timer operations
Using the timers
This timer starts play of the selected source at the selected time.
The example shows settings for preset radio channel 3 to play
between 6:30 and 7:40, at –40 dB.
Preparation: Turn the unit on, set the time (apage 14), preset
radio stations if you want the timer to start playing the
radio (apage 30).
1
qq
Press [CLOCK/TIMER] to select
“z PLAY”.
CLOCK / z PLAY / z REC / Original display
ww
Press [SET] within 10 seconds.
2
qq
Press [TUNE/TIME ADJUST (2 or 1)]
to select the condition required and
ww
press [SET].
Repeat steps q and w to complete items q to r.
q Select the start time.
w Select the finish time.
e Select the source.
TUNER – DVD – TAPE
If you select TUNER
Select a preset channel.
r Select the volume.
The timer is now on standby. The display shows each
condition again for 3 seconds each then restores the original
display.
Confirm the [zPLAY/z REC] indicator lights and that
“z PLAY” lights on the display.
3 Press [8] to turn the unit off.
The timer starts at the set time with the volume increasing
gradually to the set level.
To cancel the timer
Turn the unit on.
Press [zPLAY/zREC] so “z PLAY” goes out.
Each time you press the button:
z PLAY / z REC / z PLAY z REC / off (no display)
The timer function will be canceled, but the settings stay in the
memory.
,
,
The play timer
3
1
1
2
SET
CLOCK/TIMER
PLAY
2
1
2
TUNE/TIME ADJUST
SET
PLAY
PLAY
PLAY
PLAY
PLAY
1
2
3
4
PLAY
MHz
3
/ I
zPLAY/zREC
12
Page 39
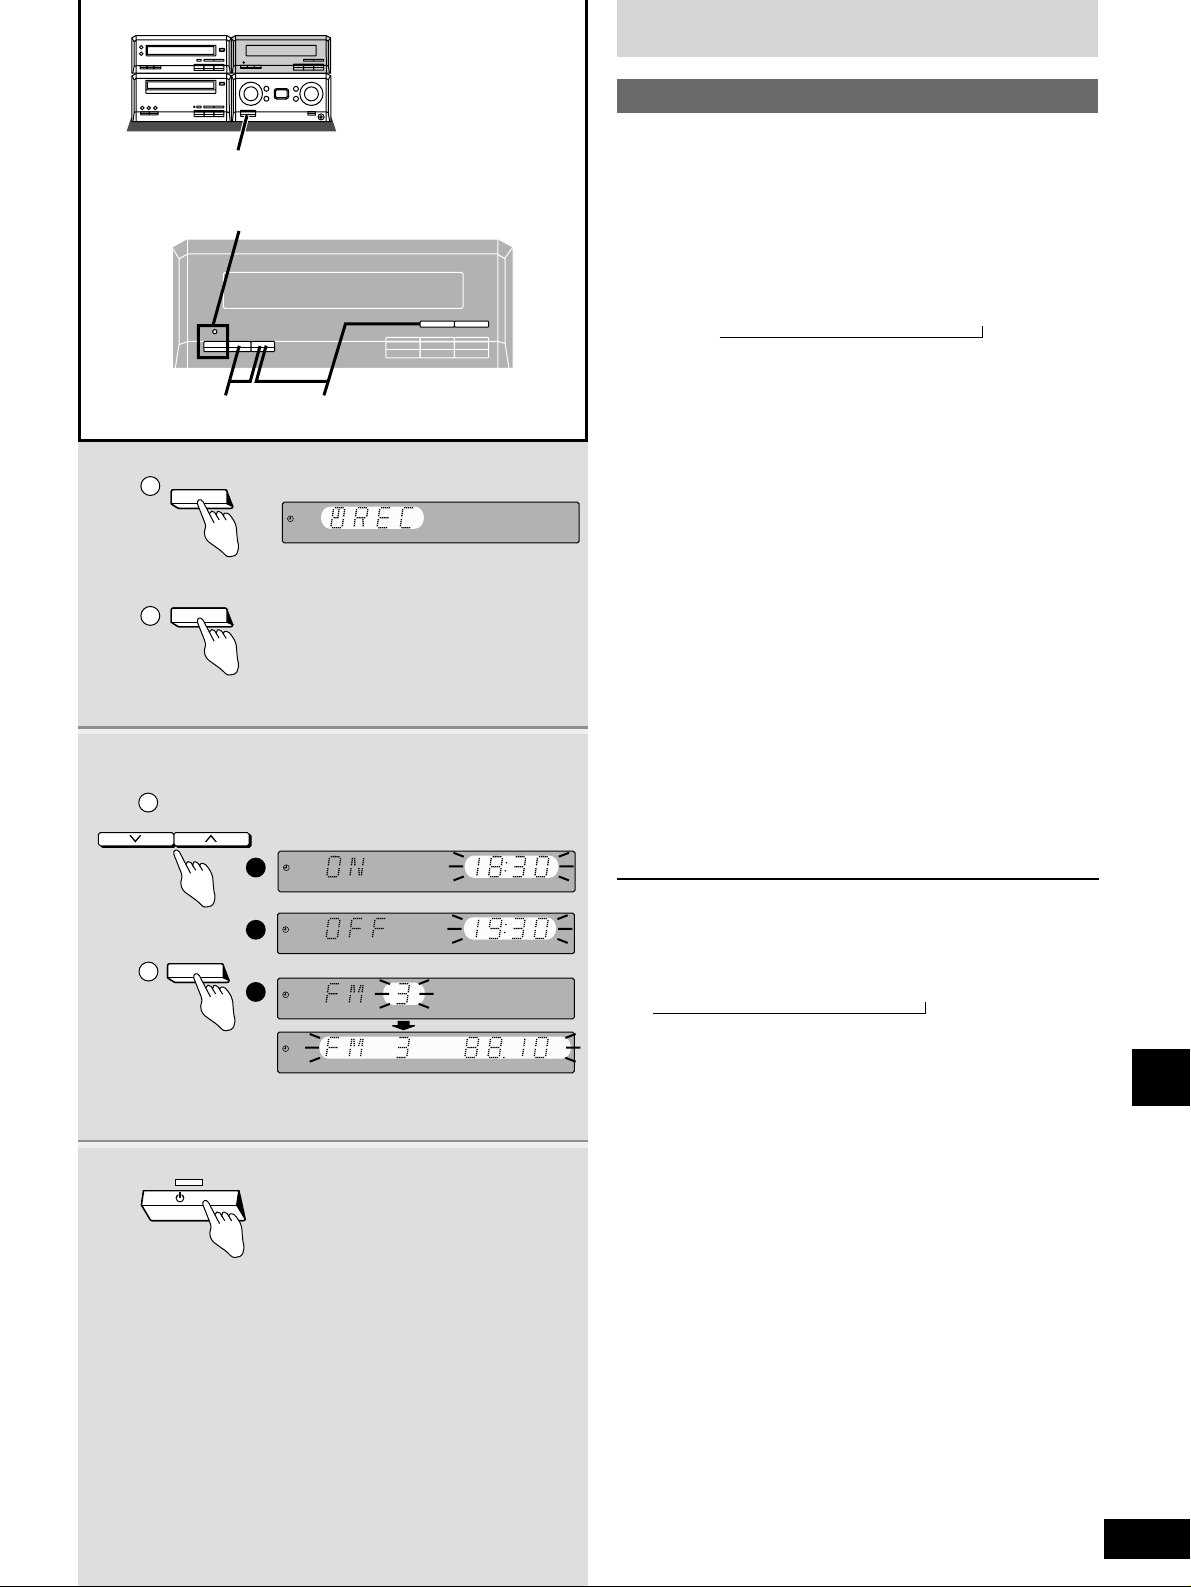
39
RQT6523
Timer operations
Using the timers
This timer records the radio at the set time.
The example shows settings for recording radio channel 3 from
18:30 to 19:30.
Preparation: Turn the unit on, set the time (apage 14), preset
radio stations (apage 30).
1
qq
Press [CLOCK/TIMER] to select
“z REC”.
CLOCK / z PLAY / z REC / Original display
ww
Press [SET] within 10 seconds.
2
qq
Press [TUNE/TIME ADJUST (2 or 1)]
to select the condition required and
ww
press [SET].
Repeat steps q and w to complete items q to e.
q Select the start time.
w Select the finish time.
e Select the preset channel.
The timer is now on standby. The display shows each
condition again for 3 seconds each then restores the original
display.
Confirm the [zPLAY/z REC] indicator lights and that
“z REC” lights on the display.
3 Press [8] to turn the unit off.
Recording starts 30 seconds before the set time with the
volume muted during the set time.
To cancel the timer
Turn the unit on.
Press [zPLAY/zREC] so “z REC” goes out.
Each time you press the button:
z PLAY / z REC / z PLAY z REC / off (no display)
The timer function will be canceled, but the settings stay in the
memory.
,
,
The record timer
3
zPLAY/zREC
1
1
2
SET
CLOCK/TIMER
REC
2
1
2
TUNE/TIME ADJUST
SET
1
2
3
REC
REC
REC
REC MHz
3
/ I
12
Page 40
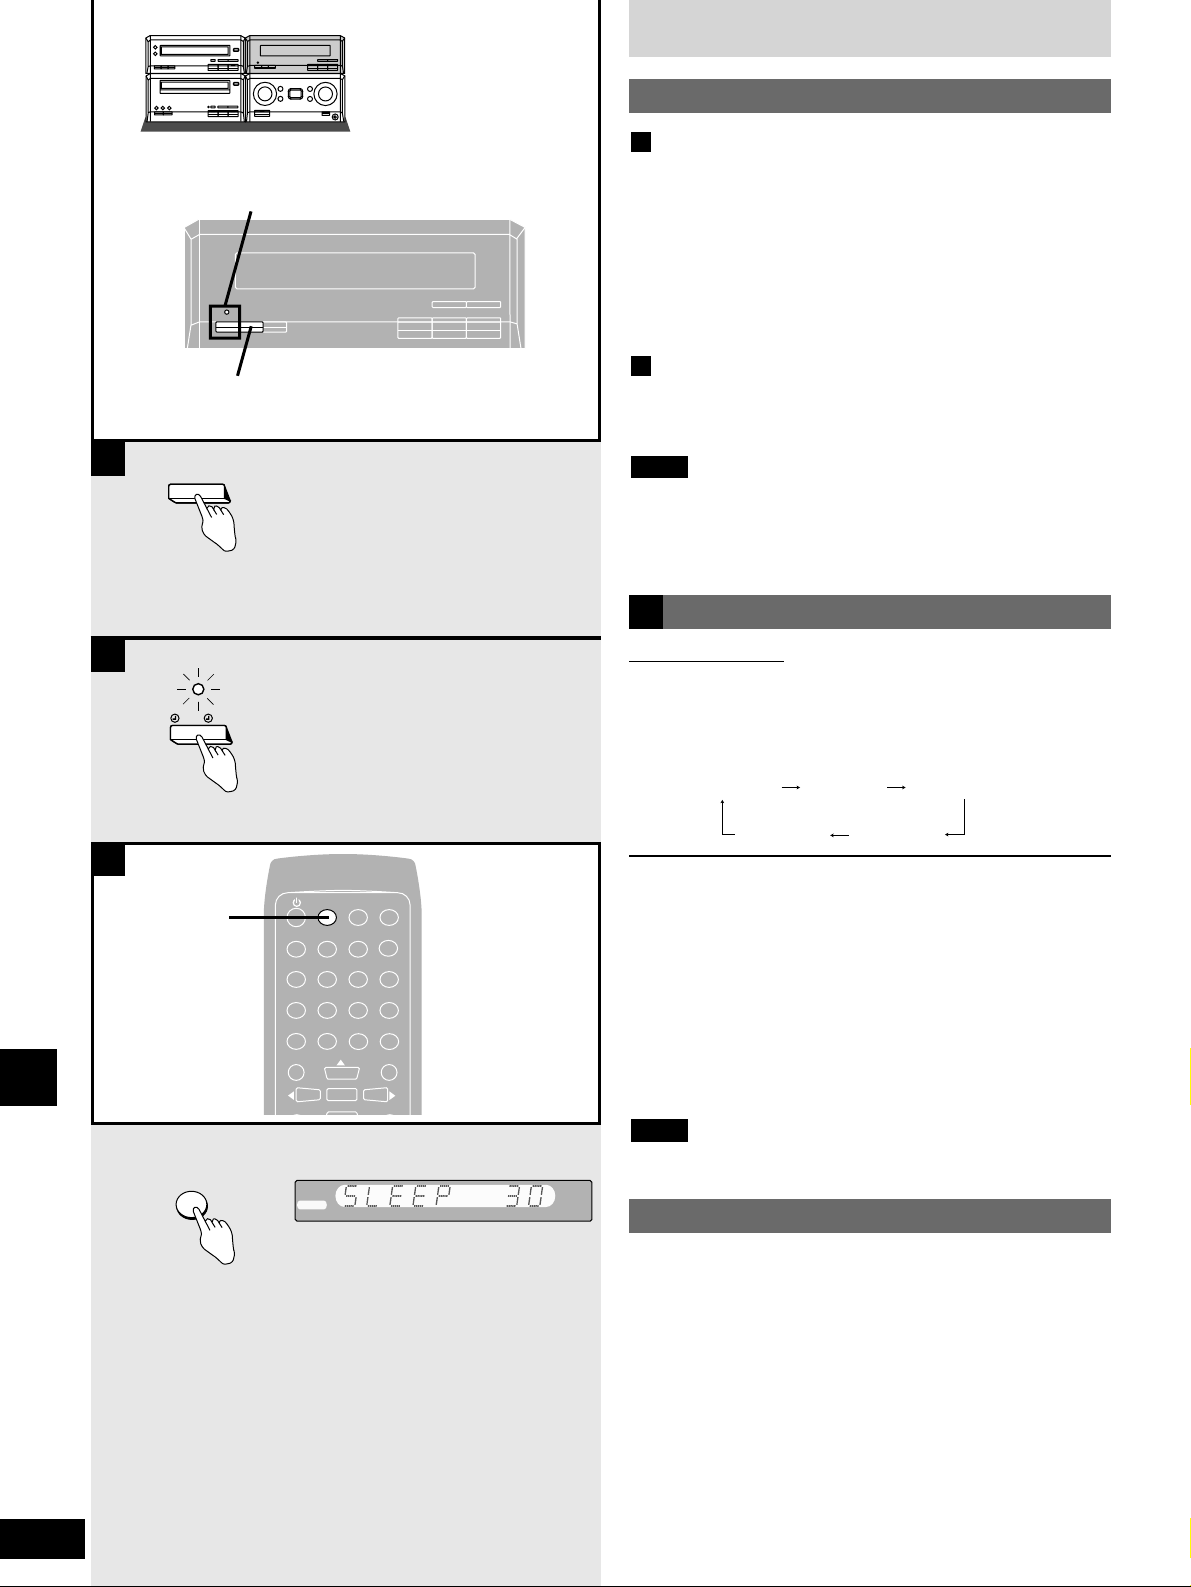
40
RQT6523
Timer operations
Using the timers
Checking the timers
Press [CLOCK/TIMER] to select “z PLAY” (or “z REC”).
The timer conditions are shown in the following order:
Start time / finish time / source / volume (“z PLAY” only)
The timers can be checked even if the unit is off.
Playing the unit after the timers are set
The unit can be used after the timers are set. Make sure the unit is
off before the set start time.
Turning the timers on and off
The timers come on at the set time if the [zPLAY/zREC] indicator
is on. Turn them on and off by pressing [zPLAY/z REC]
(a pages 38 and 39).
If the unit is turned off while a timer is functioning, the finish time
setting will not be activated.
You can change the finish time for a timer while it is functioning by
following the same steps for setting the timer.
Note
B
A
The play and record timers
Remote control only
This timer turns the unit off after a set time.
While playing a source
Press [SLEEP] to select the time (minutes).
Each time you press the button:
To cancel the sleep timer
Press [SLEEP] to select “SLEEP OFF”.
“SLEEP” goes out.
To confirm the remaining time
(While the timer is functioning)
Press [SLEEP].
The remaining time is shown for about five seconds.
To change the setting
Press [SLEEP] to display the remaining time, then press again to
select the required time.
The sleep timer is canceled if CD editing is started.
Note
SLEEP 30 SLEEP 60 SLEEP 90
SLEEP OFF SLEEP 120
The sleep timer
C
Any of the timers can be used together, but ensure the unit is off
before the start time for the record and play timers.
Using the timers together
A
CLOCK/TIMER
SLEEP
S
C
SLEEP
B
PLAY/ REC
zPLAY/zREC
CLOCK/TIMER
SLEEP
CLOCK/
TIMER
SLEEP
CANCEL
123
456
7890
SUB TITLE
TOP MENU
SETUP
PLAY
DI
AUDIO
ANGLE
ENTER
PAGE
GROUP
≥10/-/--
AUDIO ONLY
RETURN
MENU
Page 41
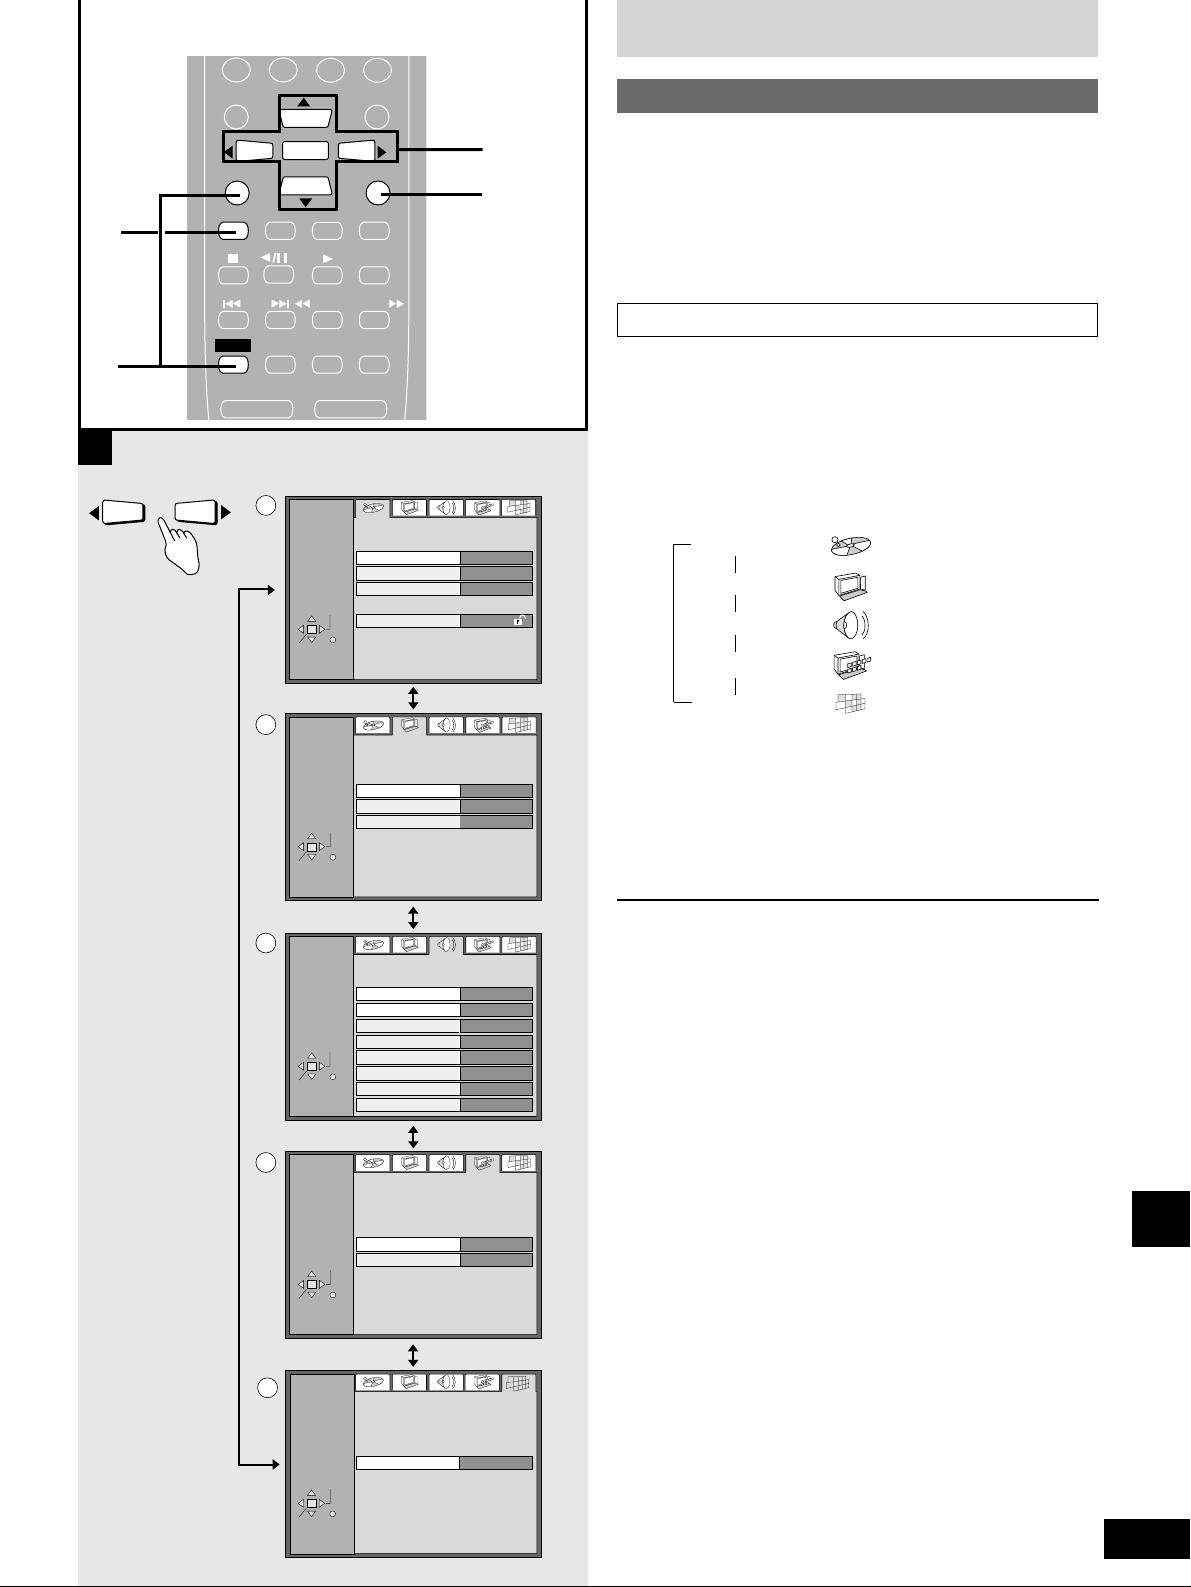
Settings
41
RQT6523
Reference
1 Press [DVD/CD].
2 Press [SHIFT] + [SETUP].
3 Press the cursor buttons (w or q) to
select the menu’s tab. (Å)
The screen changes to display the menu.
Disc menu (a)
Video menu (b)
Audio menu (c)
Display menu (d)
Others menu (e)
4 Press the cursor buttons (e or r) to
select the item and press [ENTER].
5 Press the cursor buttons (werq) to
select the option and press [ENTER].
To return to the previous screen
Press [RETURN].
To clear the setup screen
Press [RETURN] until the setup screen disappears.
Changing the settings
Basic operations
You can decide how to play discs before you start play. Refer to the
chart on the following pages and use the operations described
below to change the settings.
Preparation: Turn the television on and switch its input mode to
suit the type of connection you have made (eg.,
VIDEO 1).
Example
A
1
2
ANGLE
TOP MENU
ENTER
SETUP
DISPLAY
DVD/CD
TAPE
SKIP
SHIFT
MUTING
BALANCE L –VOLUME+ BALANCE R
MENU
RETURN
EXT
TUNER
AUTO/MONO
SLOW/SEARCH
A-B REPEAT
PLAY MODE
REPEAT
a
SETUP
Disc
Audio
Subtitle
Menus
ENTER
SELECT
RETURN
Ratings
3, 4, 5
RETURN
English
Automatic
English
Level 8
b
SETUP
ENTER
SELECT
RETURN
Video
TV Aspect
Still Mode
NTSC Disc Output
4:3 Pan&Scan
Automatic
PAL 60
c
SETUP
Audio
Speaker Setting
Digital Audio Output
PCM Down Conversion
SELECT
ENTER
d
SETUP
SELECT
Dolby Digital
DTS Digital Surround
RETURN
D.Range Compression
Audio during Search
Display
Menu Language
On-Screen Messages
MPEG
Multi-channel
On (RE-MASTER Off)
No
Bitstream
PCM
PCM
Off
On
English
On
ENTER
RETURN
e
SETUP
ENTER
SELECT
RETURN
Others
DVD-Video Mode
Off
Page 42
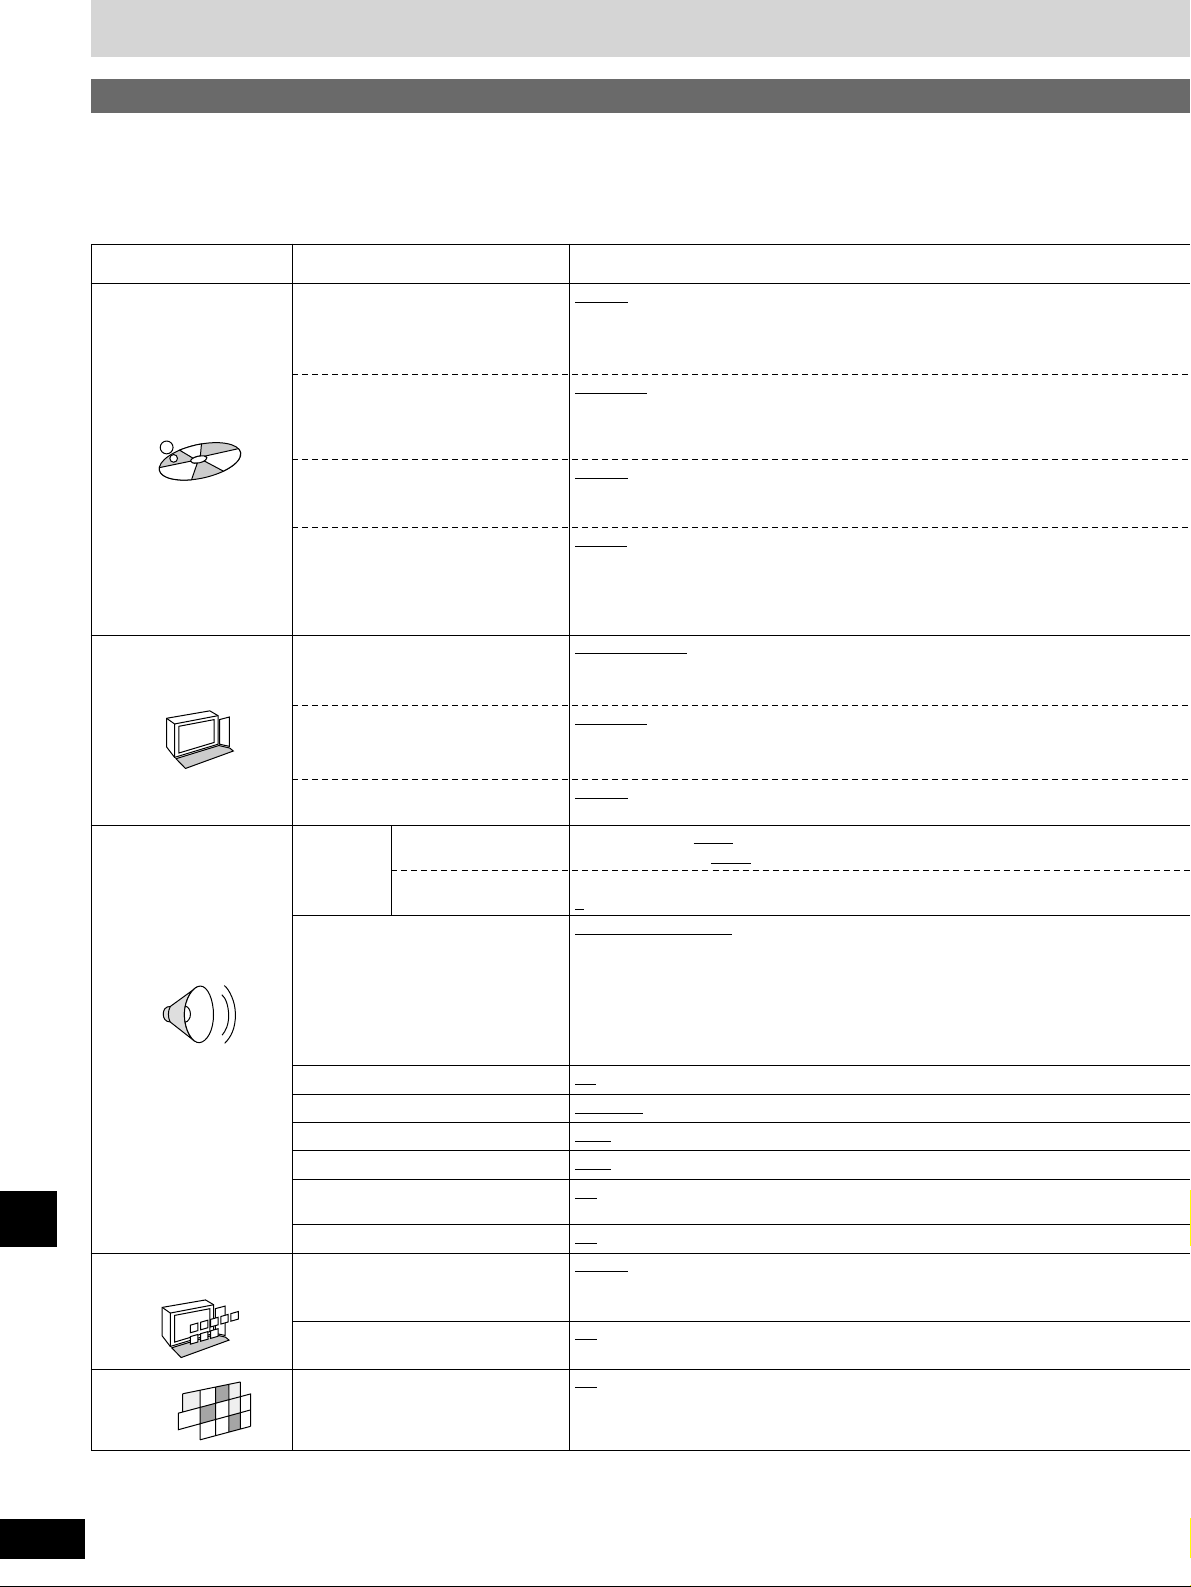
PCM Bitstream
On Off
Off On
Settings
42
RQT6523
Reference
Summary of settings
Disc
Video
Audio
Audio
Subtitle
Menus
Still Mode
English
Spanish
French Original
German Other
∗∗∗∗
(a page 49)
Italian
Automatic
Italian
English Spanish
French Other
∗∗∗∗
(a page 49)
German
English
Italian
French Spanish
German Other
∗∗∗∗
(a page 49)
Level 8 (all DVDs can be played) to Level 0 (play of all DVDs is prohibited)
You must also set a password if you change the rating to any level other
than “8”.
4:3 Pan & Scan
4:3 Letterbox
16:9
Items
Automatic
Field
Frame
NTSC Disc Output PAL 60
NTSC
Options
This chart shows the settings for this unit.
Underlined items are the factory settings.
The menu and on-screen message language has been factory preset to English. You can change the language by going to “Menu Language”
in Display and selecting the preferred language.
See page 41 for details on menu operation.
Speaker
Setting
Ratings
TV Aspect
Menu
Delay time Center speaker: 0 ms/1.3 ms/2.6 ms/3.9 ms/5.3 ms
Surround speaker: 0 ms/5.3 ms/10.6 ms/15.9 ms
Digital Audio Output On (RE-MASTER Off)
On (RE-MASTER On)
Off
Channel balance Center speaker/Surround speaker/Subwoofer:
0 to ± 6 dB
PCM Down Conversion No Yes
Dolby Digital
Bitstream
PCM
DTS Digital Surround
MPEG PCM
Bitstream
D. Range Compression
Audio during Search
Display
English Italiano
Français Español
Deutsch
Menu Language
On-screen Messages On
Off
Others
DVD-Video mode Off On
Page 43
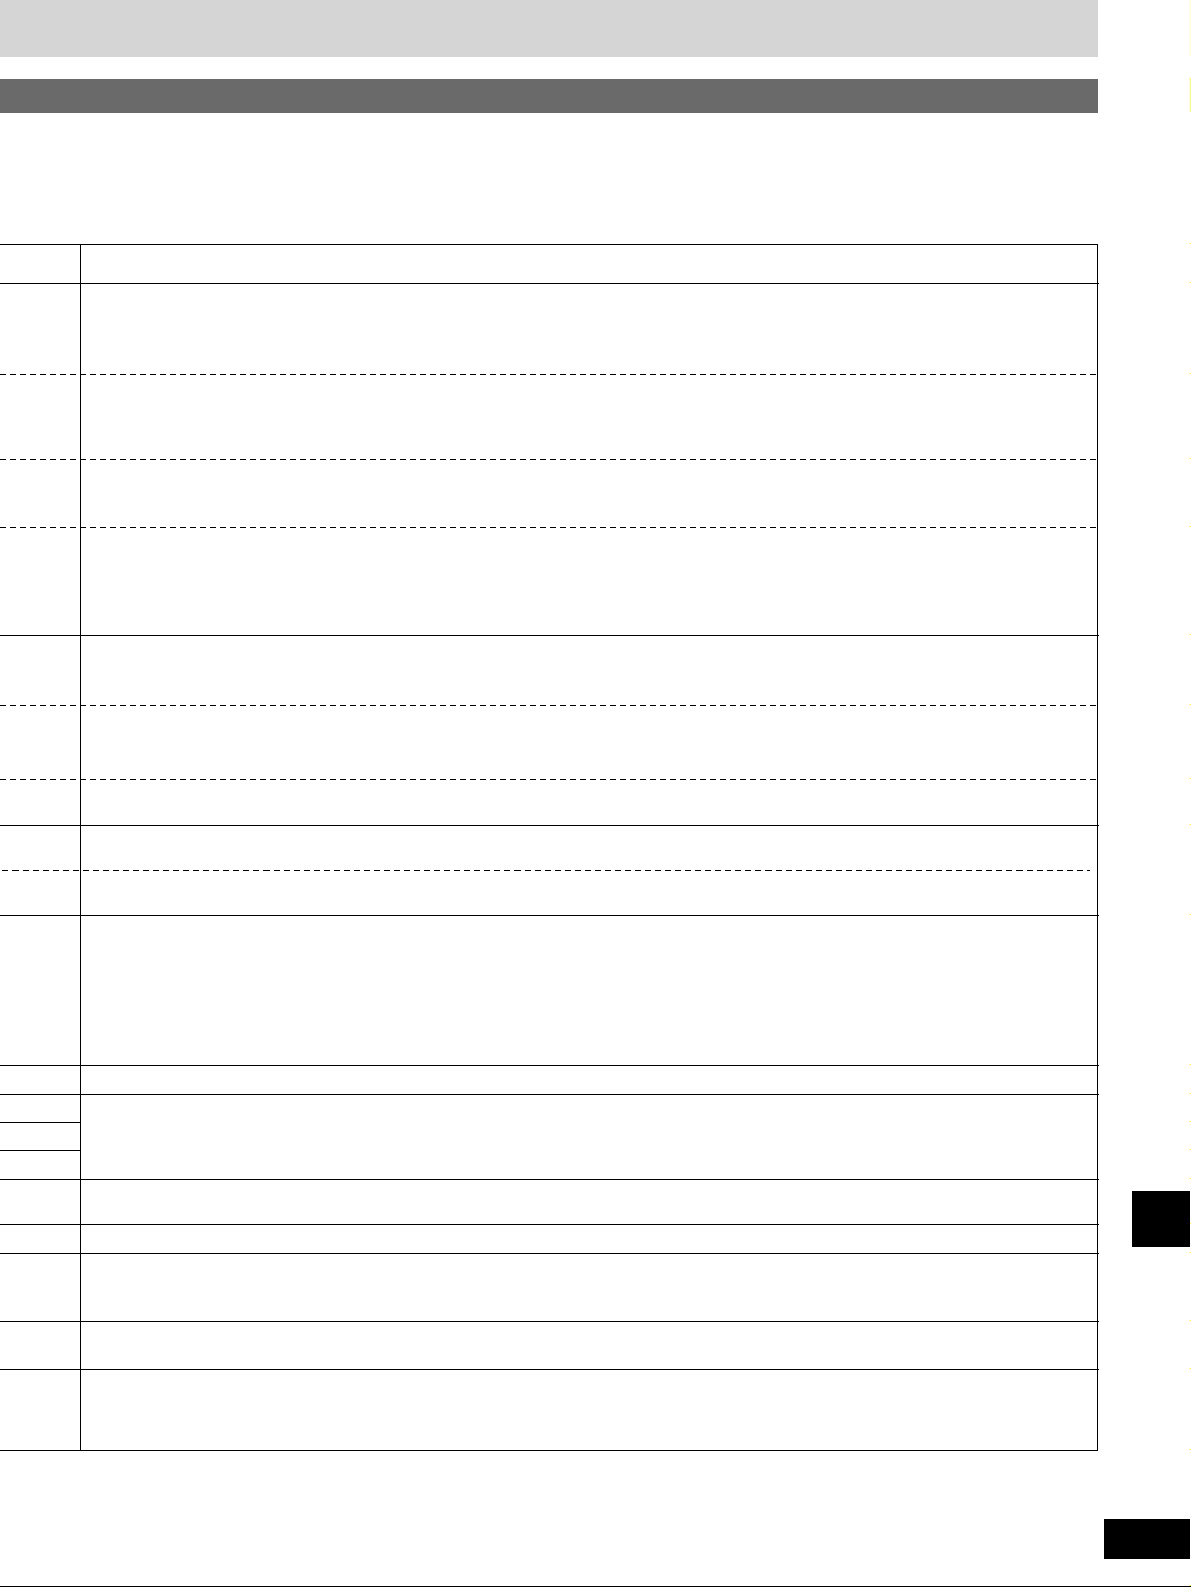
43
RQT6523
Reference
Setting details
Set a ratings level for playing DVD (a page 44). The DVDs must have ratings levels recorded on them for this feature to be effective.
Level 8: All DVD can be played.
Level 7 to level 1: Prohibits play of DVD with ratings recorded on them.
Level 0: Prohibits play of all DVD.
Select the soundtrack language. Some discs are designed to start in a certain language despite any changes you make here.
Select the subtitle language. Some discs are designed to start in a certain language despite any changes you make here.
Select the language for the title menu and other menus shown by the disc.
Select the language used for menus and messages the unit displays on the television (including these menus).
Choose whether to show the on-screen messages that appear on the television when you perform operations.
Set the delay time for your center and surround speakers (a page 45).
Select a picture type for when the picture is paused (a page 50).
Field: Field stills are shown which are less blurred.
Frame: Frame stills are shown which are sharper.
Select whether to have sound on or off during the first level of fast forward.
Select whether to have dynamic range compression on or off during play of Dolby Digital software. Dynamic range is the difference between
the loudest sound and the softest sound. By compressing this range, you can listen at low volume but still enjoy clear dialogue.
Select whether PAL 60 signals or NTSC signals will be output during playback of NTSC discs.
Changes to the settings remain intact after the unit is turned off.
Do the setting procedures again to restore to the original settings.
Use the test signal to adjust the volume balance of your speakers (a page 45).
Select whether to output digital signals or not, and whether digital signals are affected by the re-master settings.
On (RE-MASTER Off): Digital signals are output. The re-master settings (a page 25) do not affect this output.
On (RE-MASTER On): Digital signals are output. The re-master settings (a page 25) are effective. The equipment you connected will be
unable to output audio when the re-master circuit is functioning if it cannot handle digital signals with sampling
frequencies of 88.2 kHz or more.
Off: Digital signals are not output.
RE-MASTER is only effective on the audio signals from CDs.
Change to suit your television (a page 15).
Select how to output the audio signals on discs that do not have copyright protection (a page 47).
Select the types of digital signals to be output from the DIGITAL OPTICAL OUT terminal.
When recording to MDs and other digital equipment / PCM
When outputting to a decoder / Bitstream
Off : DVD-Audio discs are played as DVD-Audio discs.
On : DVD-Audio discs are played in a similar fashion to DVD-Video discs.
The setting reverts to “Off ” if the disc tray is opened or the unit is off.
Page 44
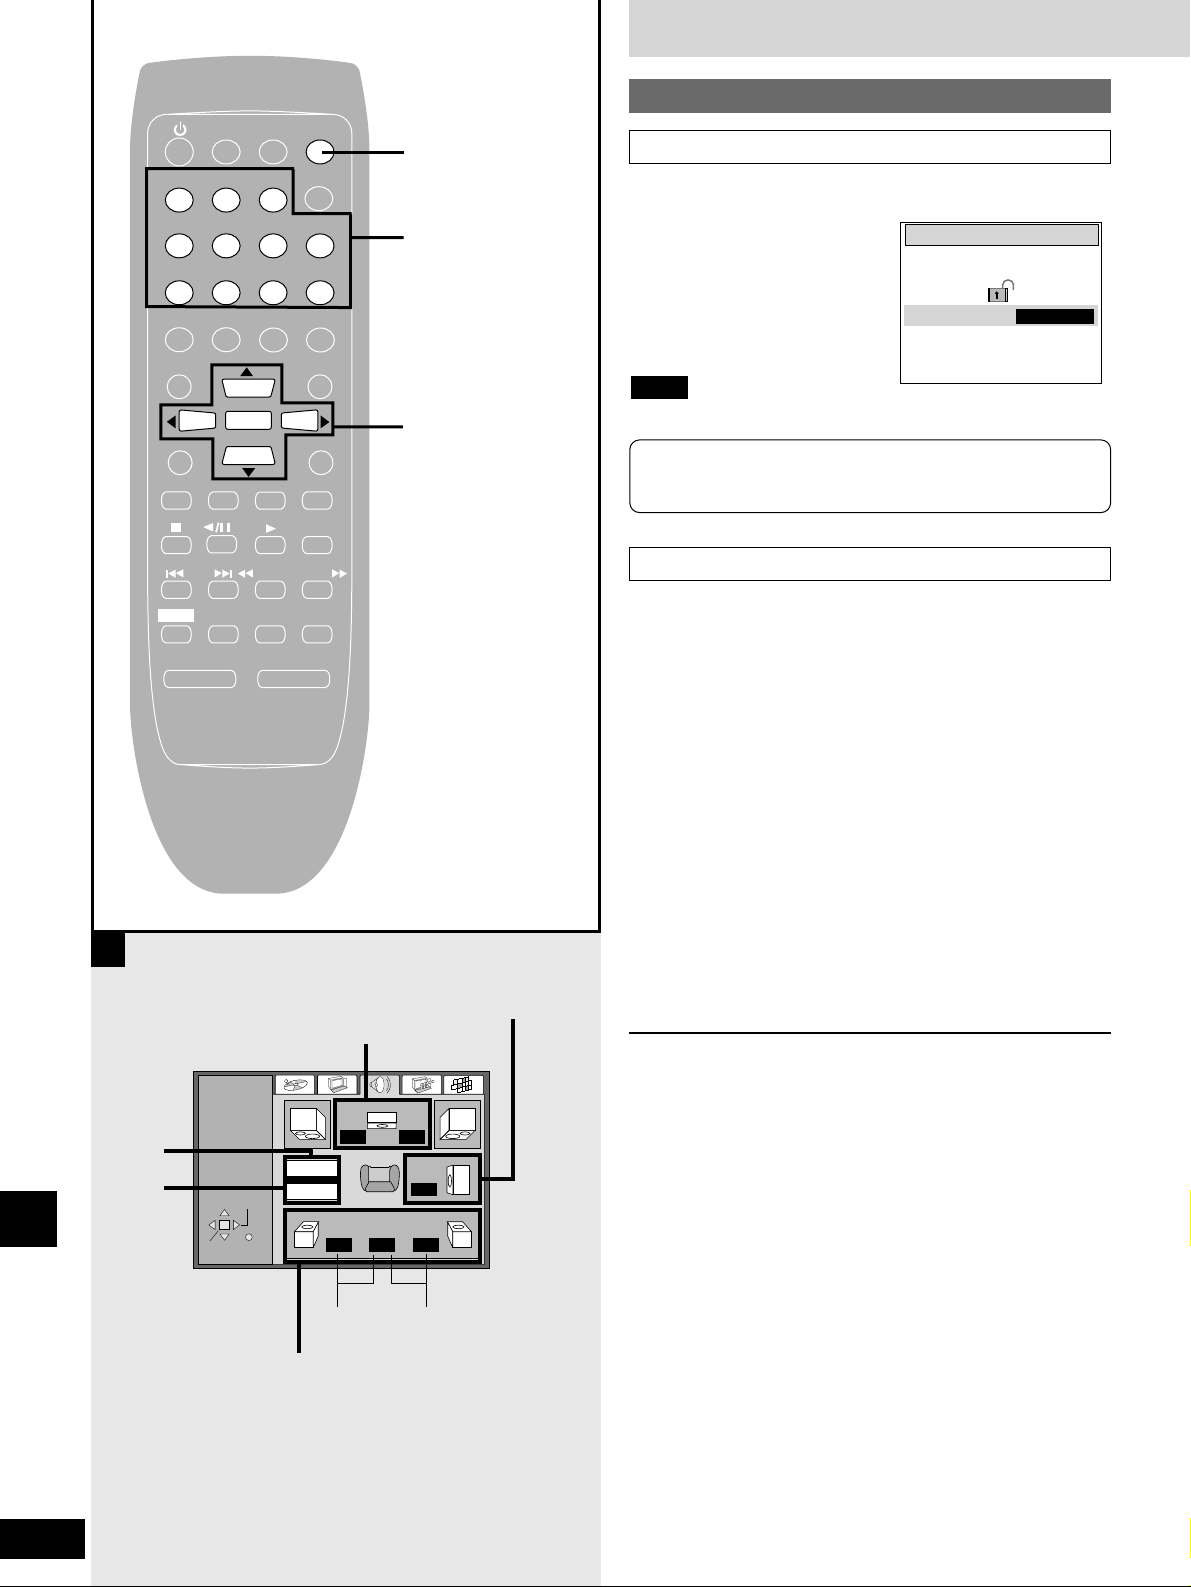
Settings
44
RQT6523
Reference
Exit
Test
signal
Center speaker
Subwoofer
Surround speakers
A
If you enter the wrong number while entering your password
Press [CANCEL].
Ratings
To set a ratings level
Go to “Ratings”, select a level between 7 and 0, press [ENTER].
1 Press the numbered
buttons on the remote
control to enter a
four-digit password.
2 Press [ENTER] twice.
Do not forget your password.
Note
To change the setting
After you have set the level to a level between 7 and 0, use the
following operation to change the setting.
1 Select “Ratings” and press [ENTER].
2 Enter your four-digit password with the
numbered buttons and press [ENTER].
3 Press the cursor buttons (e or r) to select
the item you want to change and press
[ENTER].
¡Unlock Player (the rating level returns to 8)
¡Change Password
¡Change Level
¡Temporary Unlock
Follow the instructions on the screen to make changes.
Ratings
Enter a 4-digit password,
then press ENTER.
Password
∗ ∗ ∗ ∗
SLEEP
CLOCK/
TIMER
PLAY MODE
A-B REPEAT
REPEAT
AUTO/MONO
DVD/CD
TAPE
EXT
TUNER
MUTING
BALANCE L –VOLUME+ BALANCE R
CANCEL
123
456
≥10/-/--
7890
SUB TITLE
AUDIO
ANGLE
MENU
TOP MENU
SETUP
DISPLAY
RETURN
ENTER
SKIP
SLOW/SEARCH
SHIFT
GROUP
PAGE
AUDIO ONLY
w
e
r
ENTER q
CANCEL
1–0, ≥10/-/--
Now, when you insert a DVD-Video that exceeds the ratings limit
you set, a message appears on the television.
Follow the on-screen instructions.
ENTER
SETUP
SELECT
RETURN
C
L
ms
O
Exit
Test
dBOms
LS
O
(LS)
dB
O
dB
O
dB
(RS)
O
R
SW
RS
Page 45
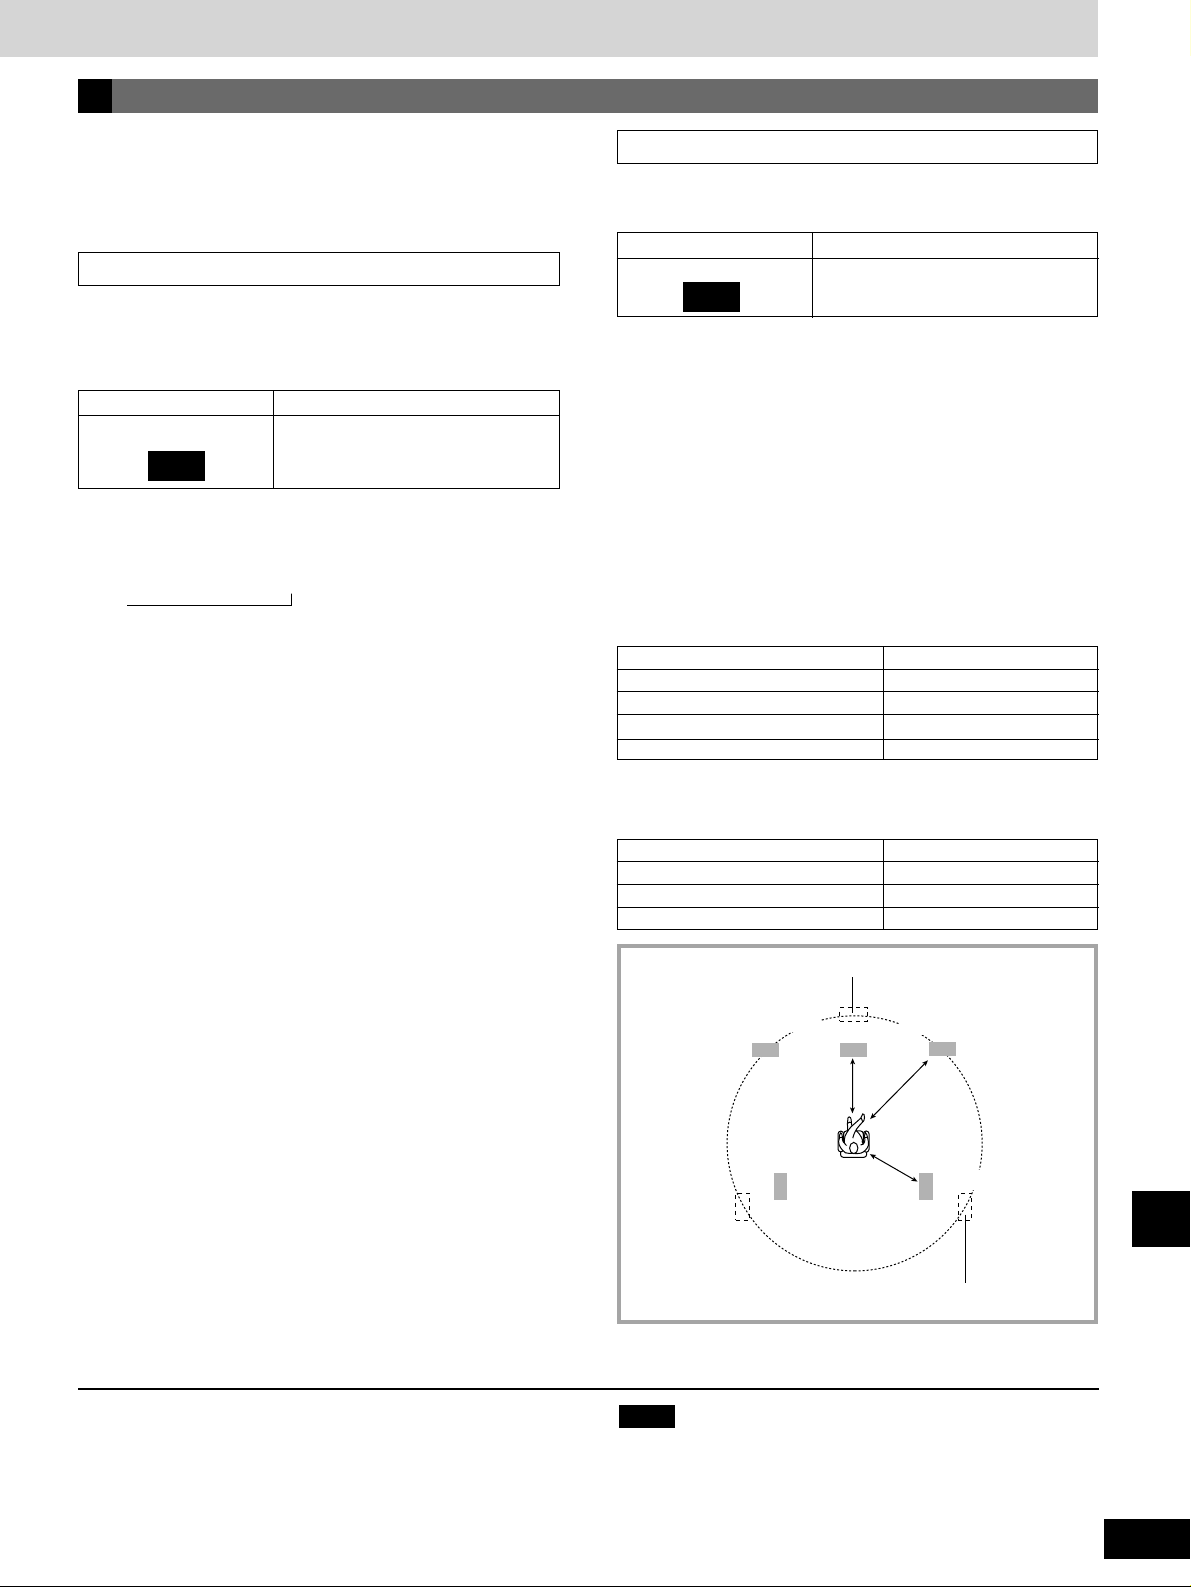
45
RQT6523
Reference
Speaker settings
Refer to “Changing the settings” (\ page 41).
You can enjoy multi-channel audio from DVDs without doing these
settings. Change them to improve the effect or when you connect a
subwoofer.
Channel balance
1 Press the cursor buttons (werq) to select
“Test” and press [ENTER].
A test signal is output in the following order:
L / C / R / RS / LS
2 Press the cursor buttons (e or r) to adjust
the level while the speaker is outputting the
signal.
3 Press [ENTER] to stop the test signal.
To adjust subwoofer output
After playing a source to determine the approximate level, stop play
and return to this screen to adjust the level to your taste.
,
A
Adjust the balance of the center and surround speakers using the
test signal so that they are the same apparent level as the front
speakers when you are sitting where you would normally enjoy a
source. First adjust the unit’s volume to the level normally used.
SpeakersIcon
O
dB
Center
Surround (LS) Surround (RS)
Subwoofer
Delay time
1 Press the cursor buttons (werq) to select
the delay time box you want to adjust and
press [ENTER].
2 Press the cursor buttons (e or r) to change
the setting.
(Refer to “Calculating delay time” below)
3 Press [ENTER].
Calculating delay time
Center speaker
If DF is less than or equal to DC, then set the delay time to 0 ms.
If DF is greater than DC, then set the delay time as follows.
Difference between DF and DS Delay time
200 cm 5.3 ms
400 cm 10.6 ms
600 cm 15.9 ms
Changing the delay time allows you to make up for differences in
distance between the speakers and the listening position.
SpeakersIcon
O
ms
Center
Surround (LS/RS)
Surround speakers
If DF is less than or equal to DS, then set the delay time to 0 ms.
If DF is greater than DS, then set the delay time as follows.
DF
DS
DC
Front speaker
Surround speaker
Ideal center speaker position
Ideal surround speaker position
When you have finished changing the settings
Press the cursor buttons to select “Exit” and press [ENTER].
Center speaker
When playing DVD-Audio, software settings may override any
settings you change here.
Note
Difference between DF and DC Delay time
50 cm 1.3 ms
100 cm 2.6 ms
150 cm 3.9 ms
200 cm 5.3 ms
Page 46
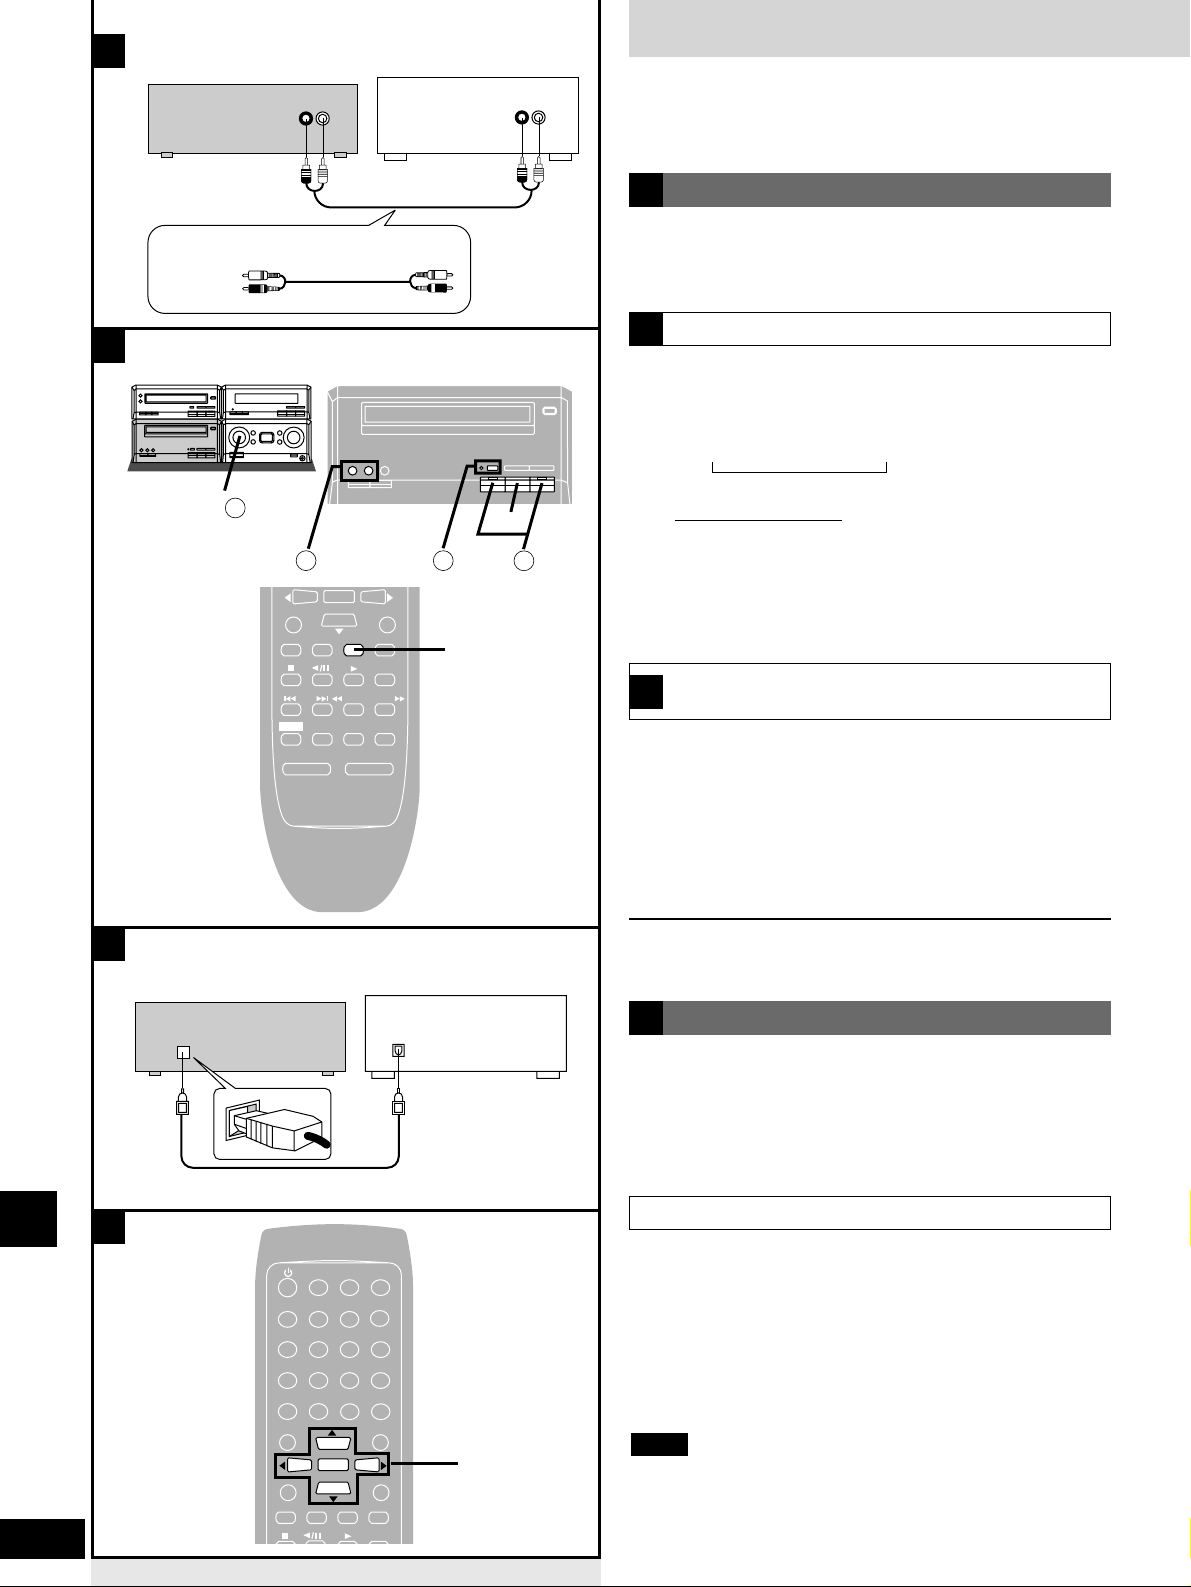
Using other equipment
46
RQT6523
Reference
1 Turn [INPUT SELECTOR] to select
EXT mode.
Each time you turn [INPUT SELECTOR]:
TUNER – DVD – TAPE – EXT
On the remote control
Press [EXT].
2 Operate the unit.
See the unit’s manual for details on operation and
connection.
Analogue connection
A
qq
Turn [INPUT SELECTOR] to select EXT mode.
ww
Select Dolby NR and reverse mode.
ee
Press [* REC PAUSE].
rr
Press [w] or [q] to start recording.
tt
Start the source to be recorded.
See the unit’s manual for details on operation and connection.
To stop recording
Press [g] on the deck.
A
EXT IN
AUDIO
OUTPUT
(L)(R)
(L)(R)
B
PLAY MODE
A-B REPEAT
REPEAT
AUTO/MONO
DVD/CD
TAPE
EXT
TUNER
MUTING
BALANCE L –VOLUME+ BALANCE R
1
SETUP
DISPLAY
RETURN
SKIP
SLOW/SEARCH
SHIFT
EXT
g
1
1
2 3
4
C
DIGITAL
OPTICAL
IN
DIGITAL
OPTICAL
OUT
D
SLEEP
CLOCK/
TIMER
AUTO/MONO
DVD/CD
TAPE
EXT
TUNER
CANCEL
123
456
≥10/-/--
7890
SUB TITLE
AUDIO
ANGLE
MENU
TOP MENU
SETUP
DISPLAY
RETURN
ENTER
GROUP
PAGE
AUDIO ONLY
q
w
e
r
ENTER
Playing an external source
B
¡Turn off the power to all units before making connections.
¡Refer to the manual of the other unit for details.
(Cables and equipment not included.)
Connect other equipment to the EXT IN terminals to output sound
through this unit’s speakers or to record onto the cassette deck.
You will need a phono equalizer if you connect a record player.
Recording an external source to this unit’s tape
deck
B
Digital connection
C
Use an optical fiber cable to connect other digital recording
equipment to DIGITAL OPTICAL OUT on the back of the DVD
player. This connection enables you to make digital recordings.
Connecting an optical fiber cable
The DIGITAL OPTICAL OUT terminal has a dust cover. The cover
opens when you plug in the cable.
Recording discs to other digital equipment
Change the Digital output settings before recording (\\page 47).
PCM Down Conversion: Yes
Dolby Digital: PCM
DTS Digital surround: PCM
MPEG: PCM
Digital Audio output: On (RE-MASTER Off)
Start recording on the external unit and start playing the disc
to be recorded.
¡Some discs cannot be recorded digitally.
¡When playing DVD-Audio and “D.MIX” is flashing on the display,
only the sound for the front speakers is recorded.
Note
Tuner
MD deck, record player, etc.
Stereo phono cable (not included)
White (L)
Red (R)
DVD player
Digital recording equipment
(e.g., MD deck)
Optical fiber cable (not included)
Page 47
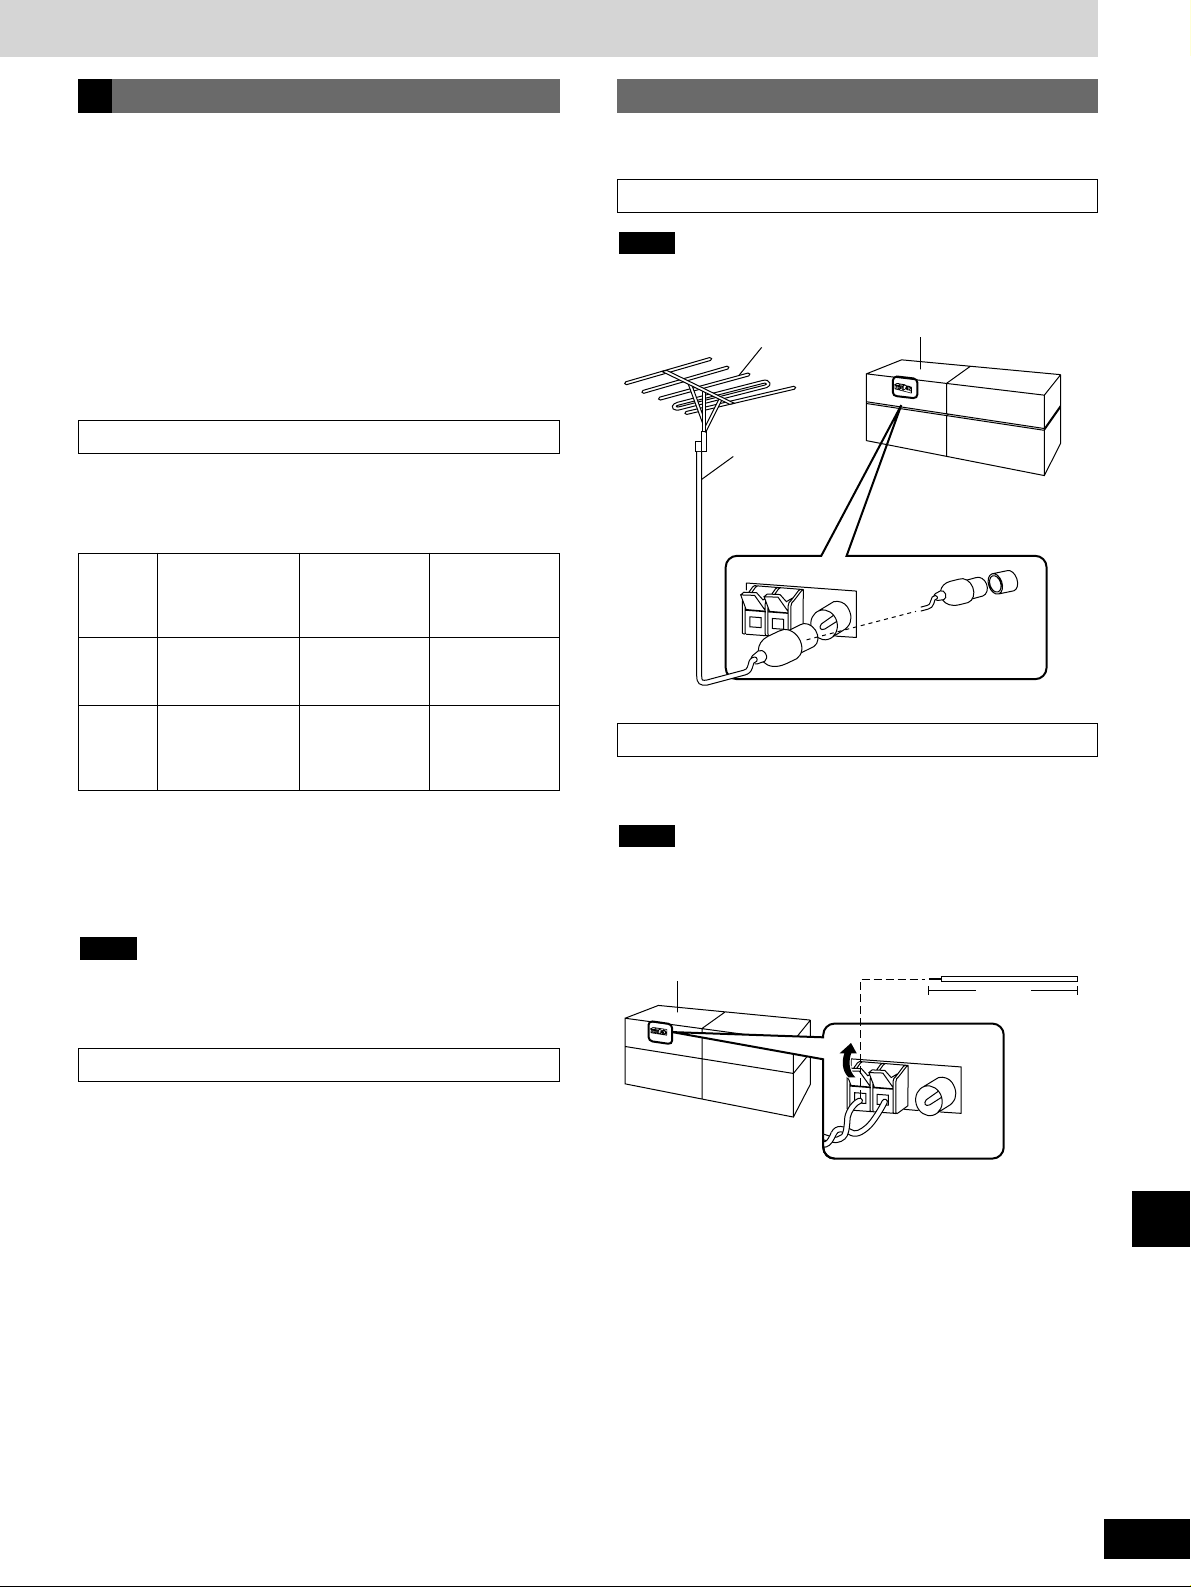
Setting
No
∗1
Yes Output as is
On
(RE-MASTER
On)
∗2
On
(RE-MASTER
Off)
∗3
Downsampled to
48 kHz or
44.1 kHz
NoYes
Equipment
(Able to handle
88.2 kHz or more)
Audio output
Digital Audio
Output setting
47
RQT6523
Reference
Digital output settings
D
Caution for the digital optical output terminal:
Ensure Dolby Digital, DTS and MPEG are set to “PCM” if you
connect this unit to a digital amplifier without a decoder. If the
signals are output as bitstream, “noise” will be output, which can
harm your ears and speakers.
Optional antenna connections
FM outdoor antenna
¡Disconnect the FM indoor antenna.
¡The antenna should be installed by a competent technician.
Note
Use outdoor antennas if radio reception is poor.
AM outdoor antenna
PCM Down Conversion
Run a piece of vinyl wire horizontally across a window or other
convenient location.
¡Leave the loop antenna connected.
¡Disconnect the antenna when the unit is not in use. Do not use
the antenna during an electrical storm.
Note
5-12 m
Tuner
AM outdoor antenna
FM outdoor antenna
Tuner
75 Ω coaxial
cable
(not included)
Use the antenna
plug adapter
(included)
Select how to output the high-quality audio signals (sampling
frequencies of 96 kHz and 88.2 kHz) on discs that do not have
copyright protection. Choose the settings to suit the equipment you
have connected.
∗1
The equipment cannot output signals of 88.2 kHz or more if the
setting is “No” and the equipment is unable to handle these signals.
∗2
This setting allows the re-master settings (\ page 43) to work on
the digital signals from CDs.
∗3
Choose this setting when you have connected equipment that
cannot handle signals of 88.2 kHz or more, as the equipment will
be unable to output audio when the re-master circuit is functioning.
Signals are down-sampled to either 48 kHz or 44.1 kHz despite the
above settings if they have a sampling frequency of 176.4 kHz or
more or are copyright protected.
Note
Dolby Digital, DTS Digital surround and MPEG
Bitstream (Factory preset for Dolby Digital)
Select if the equipment you connected can decode the signal.
PCM (Factory preset for DTS Digital surround and MPEG)
Select if the equipment you connected cannot decode the signal.
1 Go to the Audio menu.
(\ page 41–42)
2 Press the cursor buttons (e or r) to select
the item and press [ENTER].
3 Press the cursor buttons (e or r) to select
the option and press [ENTER].
Change these settings if you have connected this unit to another
piece of equipment through DIGITAL OPTICAL OUT.
Page 48
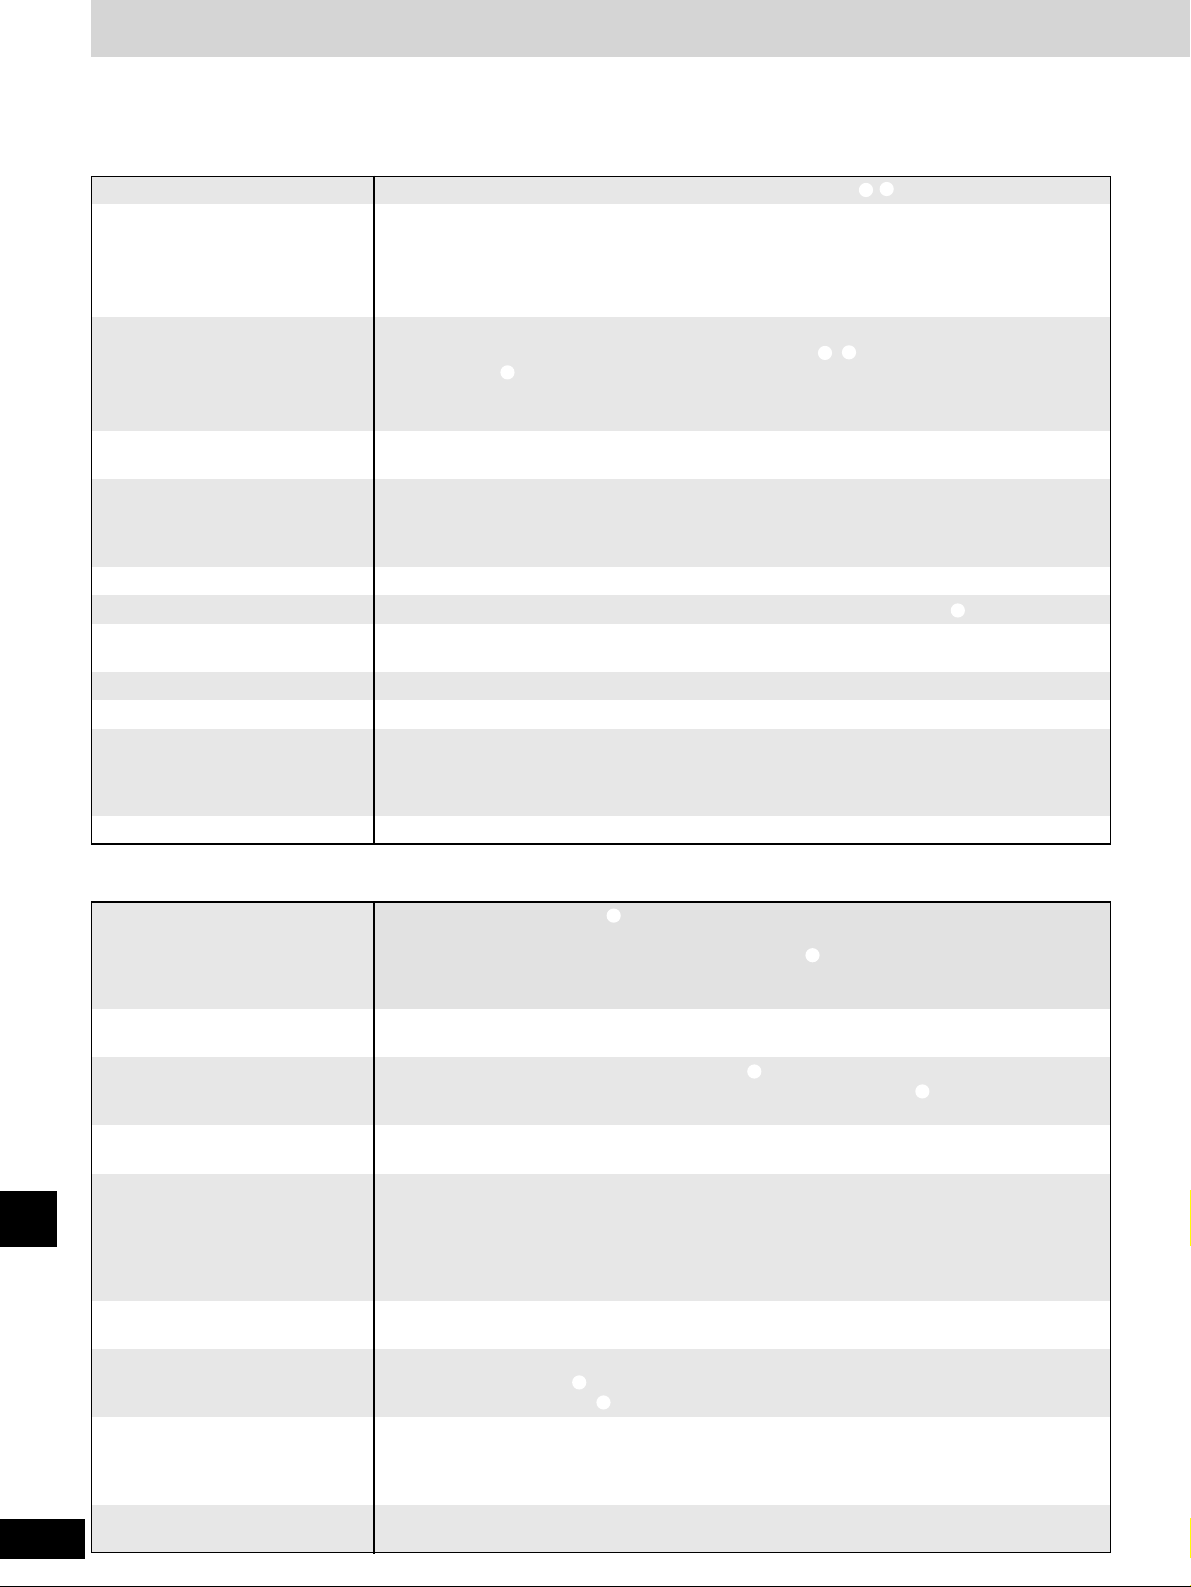
“F61” is displayed. There is a problem with the amplifier. Consult your dealer.
Troubleshooting guide
48
RQT6523
Reference
Before requesting service, make the below checks. If you can’t fix the system as described below, or if something not listed here occurs, refer to
the enclosed directory to locate an Authorized Service Center convenient to you or contact your dealer.
Reference pages are shown as black circled numbers.
i
Common problems
Cannot adjust the bass or treble.
No sound.
Sounds unfixed, reversed or
come from one speaker only.
Noise is heard.
“ERROR” is displayed.
“U70” is displayed.
No power.
The clock isn’t displayed.
The timers don’t work.
No sound or distorted sound.
Turn the volume up.
The speaker cords may be shorted. Turn the unit off, check and correct the connections and turn the
unit on. i
This unit cannot play DVD-Audio if the tracks are recorded using non-standard methods (”ERROR”
appears next to the group and track numbers).
Check the speaker connections. i
Separate the AC mains lead from the surround cable. The unit’s other cords should also be kept
away from AC mains leads, fluorescent lights and other appliances.
If possible in your area, turn the AC mains lead’s plug or connector over to reverse the lead’s
polarity. This can improve the sound quality.
Incorrect operation performed. Read the instructions and try again.
“
D.MIX”flashes on the unit’s
display.
This indicates that the multiple-channel DVD-Audio track being played cannot be down-mixed to
2 channels. With these tracks, you will not hear the sound intended for the center and surround
channels when listening through headphones or recording to cassettes. Read the disc's instructions
for details (there may also be a stereo version).
Connect the flat cables firmly. If “U70” remains on the display, contact the dealer.
The clock is displayed for about five seconds when you press [CLOCK/TIMER].
!4
The play and record timers do not work if the unit is on. #8 #9
Ensure the indicator for the timer is on before you turn the unit off.
The display is wrong or play
won’t start.
The DVD player
Disc is dirty. Wipe the disc clean.
“CHECK THE DISC” appears from
the television screen.
A problem has occurred. Turn the unit off then on again. Consult your dealer if the display isn’t
cleared.
“H” and a number is displayed.
NO PLAY
Check the settings and connections on the television. !5
Video signals are not output if the AUDIO ONLY feature is on. @5
No video or the size of the picture
is unusual.
Picture is disrupted.
Some discs prohibit certain operations.
Turn the unit off then on again.
The unit doesn’t respond when
buttons are pressed.
Play fails to start or stops soon
after starting.
You have forgotten your ratings
password.
Reset the unit to its original
factory settings.
Do the following to restore the unit to the condition it was in at the time of shipment. This clears the
ratings settings.
While pressing [g] on the DVD player, press and hold [≥10/-/--] on the remote control until the
message “Initialized” disappears from the television screen.
Depending on the type of television you have connected, the picture may be distorted if:
1) You switched the source from DVD to another source.
2) You turned AUDIO ONLY on or off.
3) You paused play or skipped tracks while AUDIO ONLY was on.
4)You pressed [q] to start play of a disc while another source was selected.
Ensure the AC mains lead and flat cables are connected correctly. i
!0
Check all connections.
Check the speaker settings and digital audio output settings. $5 $7
Turn V.S.S. off. @5
Due to the specifications on some types of televisions, both video and audio may be cut off when
you turn the AUDIO ONLY feature on.
You cannot adjust the tone while CINEMA BASS or VGCA is on. Turn them off. #6
You have inserted a disc that this unit cannot play. r
The DVD-Video exceeds the ratings level you have set. Unlock the player. $4
You can only play DVD if their region number is “2” ,“ALL” or multiple region number including “2” .y
This unit cannot play discs other than those specified.
Clean the disc if it is dirty. y
Ensure the label is facing up. !6
The disc may be upside down. !6
Wipe the disc.
Replace the disc if it is scratched, warped, or nonstandard. y
Condensation may have formed in the player due to a sudden change in temperature. Wait about an
hour for it to clear and try again.
Page 49
49
RQT6523
Reference
Listening to the radio
Noise is heard.
The stereo indicator flickers or
doesn’t light.
Sound is distorted.
A beat sound is heard. Turn the TV off or separate it from the unit.
A low hum is heard during AM
broadcasts.
Separate the antenna from other cables and leads.
The correct AM frequency can’t
be tuned in.
Change the frequency step. Hold [FM/AM] down for 10 seconds to change the step to 9 kHz.
The cassette deck
Poor quality sound.
Recording is not possible.
If the erasure prevention tabs have been removed, cover the holes with adhesive tape. #3
During CD editing
“NO TAPE” is displayed.
Load a cassette. #1
“CHANGE TAPE” is displayed.
The remote control
The remote control doesn’t work.
Check the batteries are inserted correctly. y
Replace the batteries if they are worn.
All components are required to service the system. If service is ever necessary, bring the entire system.
If the erasure prevention tabs have been removed, cover the holes with adhesive tape. #3
Use an outdoor antenna. $7
Clean the heads.
Check the Dolby NR setting. #1
Language code list
6565: Afar
6566: Abkhazian
6570: Afrikaans
6577: Ameharic
6582: Arabic
6583: Assamese
6588: Aymara
6590: Azerbaijani
6665: Bashkir
6669: Byelorussian
6671: Bulgarian
6672: Bihari
6678: Bengali; Bangla
6679: Tibetan
6682: Breton
6765: Catalan
6779: Corsican
6783: Czech
6789: Welsh
6865: Danish
6869: German
6890: Bhutani
6976: Greek
6978: English
6979: Esperanto
6983: Spanish
6984: Estonian
6985: Basque
7065: Persian
7073: Finnish
7074: Fiji
7079: Faroese
7082: French
7089: Frisian
7165: Irish
7168: Scots Gaelic
7176: Galician
7178: Guarani
7185: Gujarati
7265: Hausa
7273: Hindi
7282: Croatian
7285: Hungarian
7289: Armenian
7365: Interlingua
7378: Indonesian
7383: Icelandic
7384: Italian
7387: Hebrew
7465: Japanese
7473: Yiddish
7487: Javanese
7565: Georgian
7575: Kazakh
7576: Greenlandic
7577: Cambodian
7578: Kannada
7579: Korean
7583: Kashmiri
7585: Kurdish
7589: Kirghiz
7665: Latin
7678: Lingala
7679: Laotian
7684: Lithuanian
7686: Latvian, Lettish
7771: Malagasy
7773: Maori
7775: Macedonian
7776: Malayalam
7778: Mongolian
7779: Moldavian
7782: Marathi
7783: Malay
7784: Maltese
7789: Burmese
7865: Nauru
7869: Nepali
7876: Dutch
7879: Norwegian
7982: Oriya
8065: Punjabi
8076: Polish
8083: Pashto, Pushto
8084: Portuguese
8185: Quechua
8277: Rhaeto- Romance
8279: Romanian
8285: Russian
8365: Sanskrit
8368: Sindhi
8372: Serbo- Croatian
8373: Singhalese
8375: Slovak
8376: Slovenian
8377: Samoan
8378: Shona
8379: Somali
8381: Albanian
8382: Serbian
8385: Sundanese
8386: Swedish
8387: Swahili
8465: Tamil
8469: Telugu
8471: Tajik
8472: Thai
8473: Tigrinya
8475: Turkmen
8476: Tagalog
8479: Tonga
8482: Turkish
8484: Tatar
8487: Twi
8575: Ukrainian
8582: Urdu
8590: Uzbek
8673: Vietnamese
8679: Volapük
8779: Wolof
8872: Xhosa
8979: Yoruba
9072: Chinese
9085: Zulu
Maintenance
If the surfaces are dirty
To clean this unit, wipe with a soft, dry cloth.
¡Never use alcohol, paint thinner or benzine to clean this unit.
¡Before using chemically treated cloth, read the instructions that
came with the cloth carefully.
For a cleaner crisper sound
Clean the heads regularly to assure good quality playback and
recording. Use a cleaning tape (not included).
Page 50
50
RQT6523
Reference
Glossary
Frame
Frames are the still pictures that go together to make a moving
picture.
There are about thirty frames shown each second.
Field
One frame is made up of two fields.
A regular television shows these fields one after the other to create
frames.
Frame still and field still
A still is shown when you pause a moving picture.
A frame still is made up of two alternating fields, so the picture may
appear blurred, but overall quality is high.
A field still is not blurred, but it has only half the information of a
frame still so picture quality is lower.
I/P/B
MPEG 2, the video compression standard adopted for use with
DVD, codes frames using these three picture types.
I: Intra coded picture (I-picture)
This is the standard picture and is a complete picture in itself. This
means it has the best picture quality and is the best to use when
adjusting the picture.
P: Predictive coded picture (P-picture)
This picture is calculated based on past I and P-pictures.
B: Bidirectionally-predictive coded picture (B-picture)
This picture is calculated by comparing past and future I and Ppictures so it has the lowest volume of information.
Video
Decoder
A decoder restores the coded audio signals on DVDs to normal.
This is called decoding.
Dolby Digital
This is a method of coding digital signals developed by Dolby
Laboratories. The signals are highly compressed, enabling a large
amount of information to be recorded on one disc.
Digital Theater Systems (DTS) Digital Surround
This is a method of coding digital signals developed by Digital
Theater Systems. The signals are compressed at a low ratio to
maintain sound quality.
Sampling frequency
This is the number of samples of sound taken per second during
conversion to a digital signal. Sampling frequency is expressed in
kilohertz (kHz). A high sampling frequency results in a sound close
to the original when played back.
Linear PCM (pulse code modulation)
PCM is the usual digital method used for music CDs. DVDs have a
greater volume so they use linear PCM, which has a higher
sampling rate.
The compressed version of this is called Packed PCM (PPCM).
Bitstream
This is the digital form of multiple channel audio data (e.g.,
5.1 channel) before it is decoded into its various channels.
Digital audio
Track
This is the smallest division on DVD-Audio, CDs and Video CDs
and usually equates to a single song.
Chapter
This is the smallest division on DVD-Video and is roughly equivalent
to a track.
Group
The tracks on DVD-Audio are divided up into groups. The method of
grouping depends on the disc.
Title
This is the largest division on DVD-Video.
Playback control (PBC)
This method of controlling disc play is included on version 2.0 Video
CDs. You are able to interact with the disc through menus.
MP3
MP3 refers to the type of music file that is compressed using MPEG
1 audio layer 3.
A method of compressing audio, MPEG Audio Layer 3 (MP3) allows
audio to be reduced to up to one tenth its original size without
overtly hurting audio quality.
Other
This product incorporates copyright protection technology that is
protected by method claims of certain U.S. patents and other
intellectual property rights owned by Macrovision Corporation
and other rights owners. Use of this copyright protection
technology must be authorized by Macrovision Corporation, and
is intended for home and other limited viewing uses only unless
otherwise authorized by Macrovision Corporation. Reverse
engineering or disassembly is prohibited.
Manufactured under license from Dolby Laboratories.
“Dolby” and the double-D symbol are trademarks of Dolby
Laboratories.
Manufactured under license from Digital Theater Systems, Inc.
US Pat. No. 5,451,942, 5,956,674, 5,974,380, 5,978,762 and
other world-wide patents issued and pending. “DTS” and “DTS
Digital Surround” are registered trademarks of Digital Theater
Systems, Inc. c 1996, 2000 Digital Theater Systems, Inc. All
rights reserved.
THIS UNIT IS INTENDED FOR USE IN MODERATE
CLIMATES.
CAUTION!
¡DO NOT INSTALL, OR PLACE THIS UNIT, IN A
BOOKCASE, BUILT-IN CABINET OR IN ANOTHER
CONFINED SPACE. ENSURE THE UNIT IS WELL
VENTILATED. TO PREVENT RISK OF ELECTRIC SHOCK
OR FIRE HAZARD DUE TO OVERHEATING, ENSURE
THAT CURTAINS AND ANY OTHER MATERIALS DO NOT
OBSTRUCT THE VENTILATION VENTS.
¡DO NOT OBSTRUCT THE UNIT’S VENTILATION
OPENINGS WITH NEWSPAPERS, TABLECLOTHS,
CURTAINS, AND SIMILAR ITEMS.
¡DO NOT PLACE SOURCES OF NAKED FLAMES, SUCH
AS LIGHTED CANDLES, ON THE UNIT.
¡DISPOSE OF BATTERIES IN AN ENVIRONMENTALLY
FRIENDLY MANNER.
This product may receive radio interference caused by mobile
telephones during use. If such interference is apparent, please
increase separation between the product and the mobile
telephone.
Page 51
51
RQT6523
Reference
Technical specifications
Stereo Tuner
■ Pre-amplifier section
Input sensitivity/impedance
EXT IN 350 mV/15 kΩ
■ Tuner section
FM frequency range 87.50–108.00 MHz
(0.05 MHz step)
FM antenna terminal 75 Ω (unbalanced)
AM frequency range
522–1629 kHz (9 kHz step)
520–1630 kHz (10 kHz step)
■ Timer section
Clock Quartz lock type
Function Play timer: everyday
Rec timer: everyday
Sleep timer: 120 min, 30 min intervals
■ General
Dimensions (W × H × D)
210 × 76.3 × 251 mm
Mass 1.1 kg
Integrated Amplifier
■ Amplifier section
[Low frequency]
Power output
DIN 100 Hz, THD 1%, 4 Ω, both
channel driven 2 × 17 W
RMS 100 Hz, THD 10%, 4 Ω, both
channel driven 2 × 22 W
Load impedance 4 Ω
[High frequency]
Power output
DIN 1 kHz, THD 1%, 6 Ω, both
channel driven 2 × 15 W
RMS 1 kHz, THD 10%, 6 Ω, both
channel driven 2 × 20 W
Total harmonic distortion
Half power, 1 kHz, 6 Ω 0.07%
Load impedance 6 Ω
[Surround, Center]
Power output
DIN 1 kHz, THD 1%, 8 Ω 3 × 15 W
RMS 1 kHz, THD 10%, 8 Ω 3 × 22 W
Load impedance 8 Ω
■ S/N
DIN 500 mV input rated power 84 dB
■ Headphones
Jack type 3.5 mm STEREO
Load impedance 16–32 Ω
■ General
Power supply AC 230–240 V, 50 Hz
Power consumption 140 W
STANDBY condition 0.8 W
Dimensions (W × H × D)
210 × 104.8 × 309 mm
Mass 3.6 kg
DVD Audio/Video Player
■ Discs played
DVD-AUDIO
DVD-VIDEO
DVD-R (DVD-Video format discs)
VIDEO CD
CD (CD-DA)
CD-R/RW
(CD-DA, VIDEO CD, MP3, format discs)
■ Video
Signal system PAL(PAL 60/NTSC)
Output level (75 Ω)
Composite video 1 Vp-p
S-Video Y 1 Vp-p
S-Video C 0.3 Vp-p (PAL)
0.286 Vp-p (NTSC)
■ Digital output terminal Optical × 1
■ Pick up
Beam source Semiconductor laser
Wavelength 668 nm
■ General
Dimensions (W × H × D)
210 × 76.3 × 295 mm
Mass 1.5 kg
Stereo Cassette Deck
■ Audio section
Track system 4 track 2 channel STEREO
Frequency response (Dolby NR off)
TYPE 1 (NORMAL) 30 Hz–16 kHz (DIN)
TYPE 2 (HIGH) 30 Hz–16 kHz (DIN)
TYPE 4 (METAL) 30 Hz–16 kHz (DIN)
S/N (Signal level=max recording level,
TYPE 2)
NR off 56 dB (A weighted)
Dolby B NR 64 dB (A weighted)
■ Motor
Capstan drive DC servo motor
Reel table drive DC motor
Fast forward and rewind time (C-60)
Approx. 90 seconds
Wow and flutter 0.1% (WRMS)
■ General
Dimensions (W × H × D)
210 × 104.8 × 241 mm
Mass 1.6 kg
FRONT SPEAKER
Type 3 way, 3 speaker, bass-reflex system
Speaker(s)
Superwoofer: 14 cm cone type
Midrange 12 cm cone type
Tweeter: 2.5 cm semi-dome type
Impedance
HIGH 6 Ω
LOW 4 Ω
Input power
HIGH 30 W (Music), 15 W (DIN)
LOW 60 W (Music), 30 W (DIN)
Output sound pressure level
86 dB/W (1.0 m)
Cross over frequency 120 Hz
4.5 kHz
Frequency range 45 Hz–70 kHz (–16 dB)
50 Hz–50 kHz (–10 dB)
■ General
Dimensions (W × H × D)
160 × 348 × 297.5 mm
Mass 5.0 kg
HIGH stands for High Frequency.
LOW stands for Low Frequency.
CENTER /SURROUND SPEAKER
Type 2 way, 2 speaker, closed type
Speaker(s)
Woofer: 10 cm cone type
Tweeter: 6 cm ring shaped dome type
Impedance 8 Ω
Input power 30 W (Music)
15 W (DIN)
Output sound pressure level
84 dB/W (1.0 m)
Cross over frequency 6 kHz
Frequency range 70 Hz–50 kHz (–16 dB)
100 Hz–45 kHz (–10 dB)
■ General
Dimensions (W × H × D)
122 × 209 × 156 mm
Mass 1.6 kg
Notes:
1. Specifications are subject to change
without notice.
Mass and dimensions are approximate.
2. Total harmonic distortion is measured by
the digital spectrum analyzer.
Page 52

RQT6523-B
H0502BB0
Matsushita Electric Industrial Co., Ltd.
Web Site: http://www.panasonic.co.jp/global/
En
 Loading...