

Page 1
RQTX1083-2B
EB
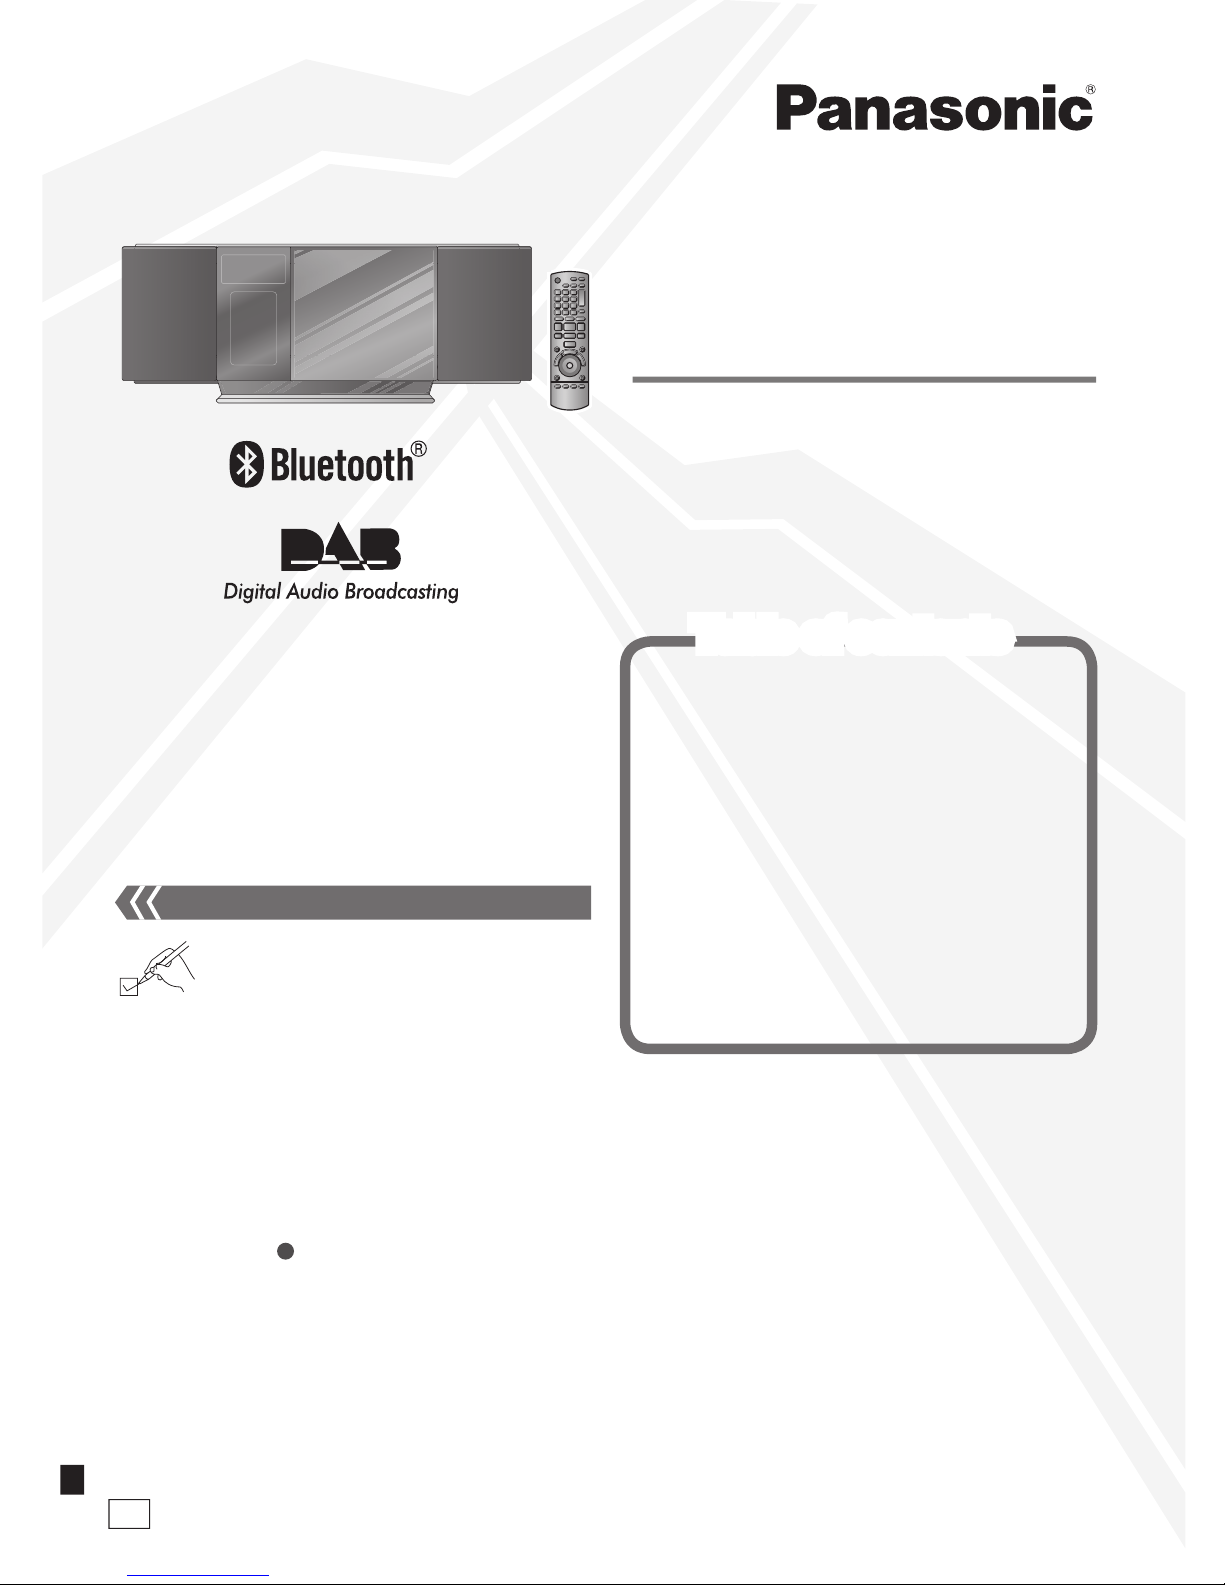
Operating Instructions
Compact Stereo System
Model No.
SC-HC40DB
Dear customer
Thank you for purchasing this product.
Before connecting, operating or adjusting this product, please
read the instructions completely. Please keep this manual for
future reference.
Operations in these instructions are described using remote
control, but you can do the operations with the main unit if the
controls are the same.
Your unit may not look exactly as illustrated.
The included AC mains lead is for use with this unit only. Do
not use it with other equipment.
Do not use an AC mains lead of other equipment.
•
•
Please check and identify the supplied
accessories.
Supplied accessories
Model number suffix “EB” denotes UK model.
Use numbers indicated in parentheses when asking for
replacement parts. (Product numbers correct as of February
2010. These may be subject to change.)
Supplied accessories Cover page
Caution for AC Mains Lead 2
Connections 4
Attaching the unit to a wall (Optional) 5
Control guide 8
Disc operations 9
Radio operations 11
DAB 12
Timer 15
Sound adjustment 15
External unit 16
Troubleshooting guide 21
Memory reset (Initialization) 22
Maintenance 22
Specifications 23
Safety precautions Back cover
Table of contents
1 AC mains lead
(K2CZ3YY00005)
1 DAB antenna
(N1EADY000001)
1 Remote control
(N2QAYB000525)
2 Batteries
Screw accessories (RFAX1020)
2 Fixing screws
(XYN3+J10FJ)
1 Safety holder
(RMKX1015)
Wall bracket accessories (RFAX1021)
1 Wall bracket
(RGQX1004)
Four-legged cushions
(RKAX0028-K)
B
Page 2
RQTX1083
2
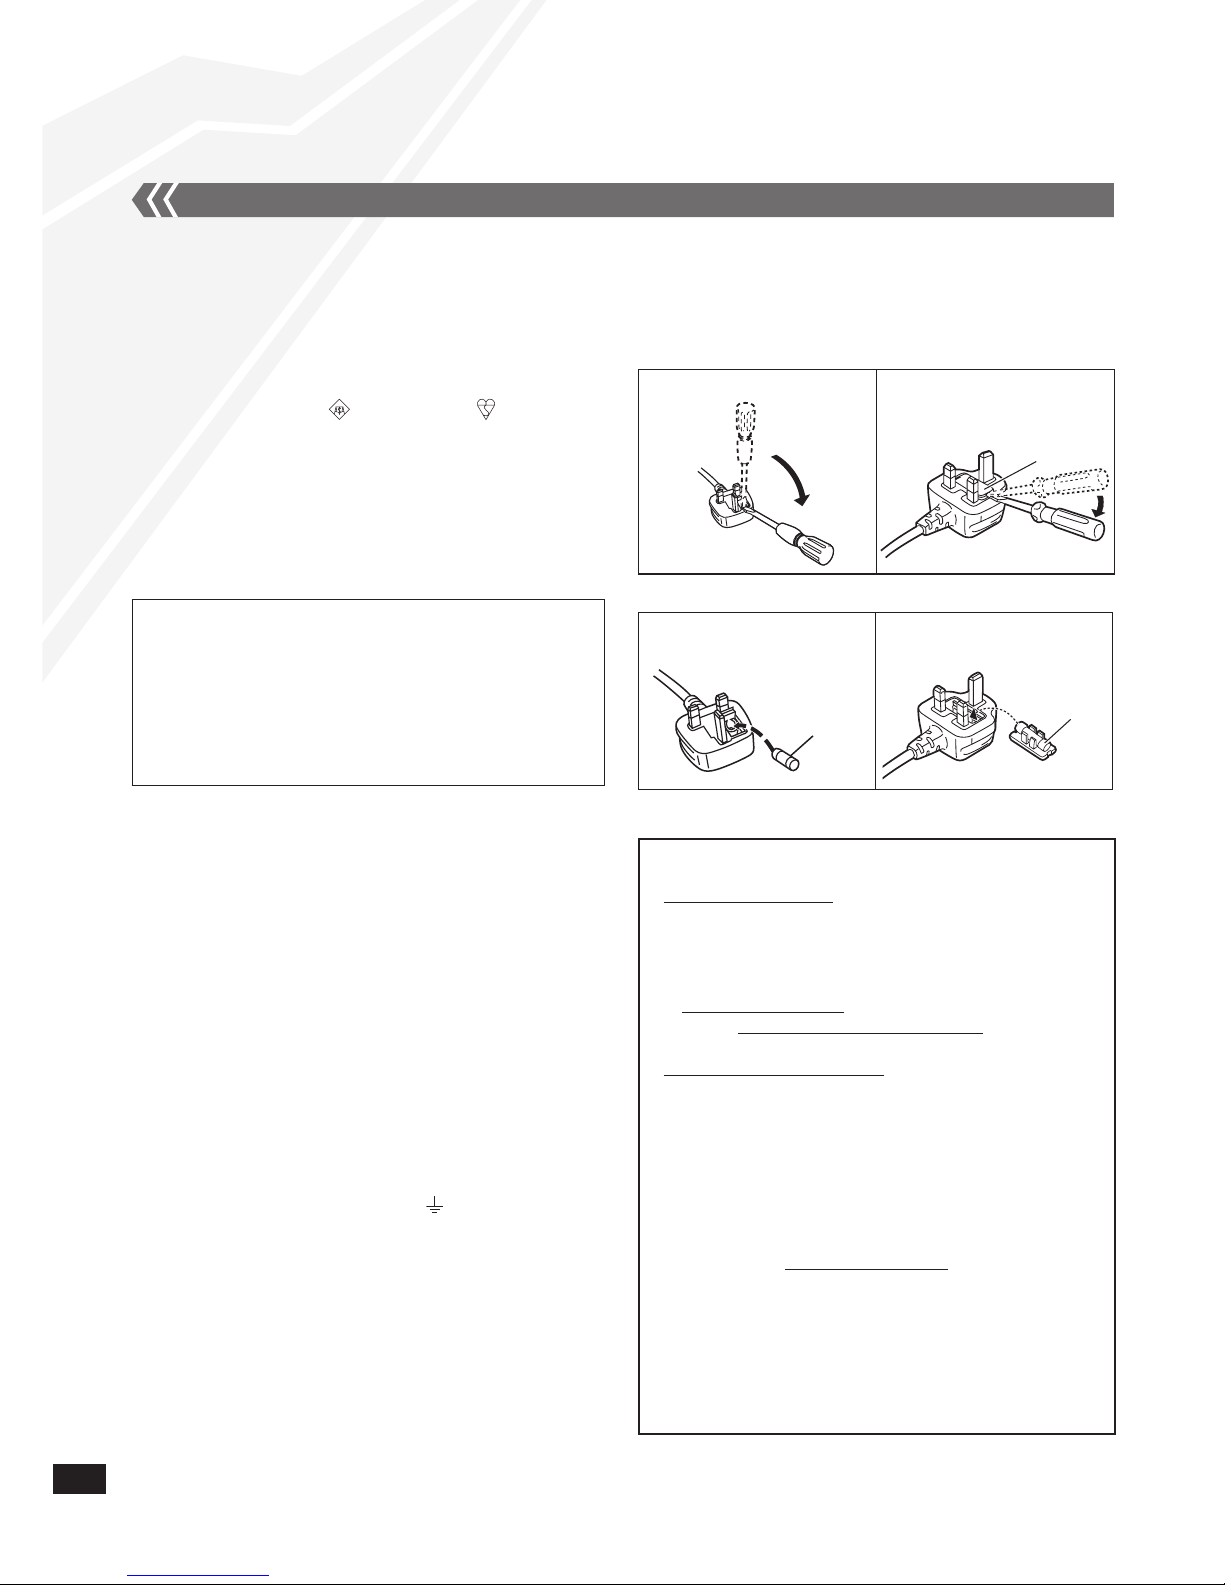
How to replace the fuse
The location of the fuse differ according to the type of AC mains
plug (figures A and B). Confirm the AC mains plug fitted and
follow the instructions below.
Illustrations may differ from actual AC mains plug.
1. Open the fuse cover with a screwdriver.
Figure A Figure B
2. Replace the fuse and close or attach the fuse cover.
Figure A Figure B
Fuse cover
Sales and Support Information
Customer Care Centre
For customers within the UK: 0844 844 3852
For customers within the Republic of Ireland:
01 289 8333
Visit our website for product information
www.panasonic.co.uk
E-mail: [email protected]
Direct Sales at Panasonic UK
For customers: 0844 844 3856
Order accessory and consumable items for your
product with ease and confidence by phoning our
Customer Care Centre
Monday–Thursday 9:00 a.m.–5:30 p.m.,
Friday 9:30 a.m.–5:30 p.m.
(Excluding public holidays)
Or go on line through our Internet Accessory ordering
application at www.pas-europe.com.
Most major credit and debit cards accepted.
All enquiries transactions and distribution facilities are
provided directly by Panasonic UK Ltd.
It couldn’t be simpler!
Also available through our Internet is direct shopping
for a wide range of finished products, take a browse on
our website for further details.
•
•
•
•
•
•
•
•
•
•
•
Fuse
(5 ampere)
Fuse
(5 ampere)
For your safety, please read the following text carefully.
This appliance is supplied with a moulded three pin mains plug
for your safety and convenience.
A 5-ampere fuse is fitted in this plug.
Should the fuse need to be replaced please ensure that
the replacement fuse has a rating of 5-ampere and that it is
approved by ASTA or BSI to BS1362.
Check for the ASTA mark or the BSI mark on the body
of the fuse.
If the plug contains a removable fuse cover you must ensure
that it is refitted when the fuse is replaced.
If you lose the fuse cover the plug must not be used until a
replacement cover is obtained.
A replacement fuse cover can be purchased from your local
dealer.
CAUTION!
IF THE FITTED MOULDED PLUG IS UNSUITABLE FOR
THE SOCKET OUTLET IN YOUR HOME THEN THE FUSE
SHOULD BE REMOVED AND THE PLUG CUT OFF AND
DISPOSED OF SAFELY.
THERE IS A DANGER OF SEVERE ELECTRICAL SHOCK
IF THE CUT OFF PLUG IS INSERTED INTO ANY
13-AMPERE SOCKET.
If a new plug is to be fitted please observe the wiring code as
stated below.
If in any doubt please consult a qualified electrician.
IMPORTANT
The wires in this mains lead are coloured in accordance with
the following code:
Blue: Neutral, Brown: Live.
As these colours may not correspond with the coloured
markings identifying the terminals in your plug, proceed as
follows:
The wire which is coloured Blue must be connected to the
terminal which is marked with the letter N or coloured Black or
Blue.
The wire which is coloured Brown must be connected to the
terminal which is marked with the letter L or coloured Brown or
Red.
WARNING: DO NOT CONNECT EITHER WIRE TO THE
EARTH TERMINAL WHICH IS MARKED WITH THE
LETTER E, BY THE EARTH SYMBOL OR COLOURED
GREEN OR GREEN/YELLOW.
THIS PLUG IS NOT WATERPROOF–KEEP DRY.
Before use
Remove the connector cover.
Caution for AC Mains Lead
Page 3
RQTX1083
3
CAUTION!
DO NOT INSTALL OR PLACE THIS UNIT IN A
BOOKCASE, BUILT-IN CABINET OR IN ANOTHER
CONFINED SPACE. ENSURE THE UNIT IS WELL
VENTILATED. TO PREVENT RISK OF ELECTRIC SHOCK
OR FIRE HAZARD DUE TO OVERHEATING, ENSURE
THAT CURTAINS AND ANY OTHER MATERIALS DO
NOT OBSTRUCT THE VENTILATION VENTS.
DO NOT OBSTRUCT THE UNIT’S VENTILATION
OPENINGS WITH NEWSPAPERS, TABLECLOTHS,
CURTAINS, AND SIMILAR ITEMS.
DO NOT PLACE SOURCES OF NAKED FLAMES, SUCH
AS LIGHTED CANDLES, ON THE UNIT.
DISPOSE OF BATTERIES IN AN ENVIRONMENTALLY
FRIENDLY MANNER.
•
•
•
•
WARNING:
TO REDUCE THE RISK OF FIRE, ELECTRIC SHOCK OR
PRODUCT DAMAGE,
* DO NOT EXPOSE THIS APPARATUS TO RAIN,
MOISTURE, DRIPPING OR SPLASHING AND THAT NO
OBJECTS FILLED WITH LIQUIDS, SUCH AS VASES,
SHALL BE PLACED ON THE APPARATUS.
* USE ONLY THE RECOMMENDED ACCESSORIES.
* DO NOT REMOVE THE COVER (OR BACK); THERE
ARE NO USER SERVICEABLE PARTS INSIDE. REFER
SERVICING TO QUALIFIED SERVICE PERSONNEL.
CAUTION!
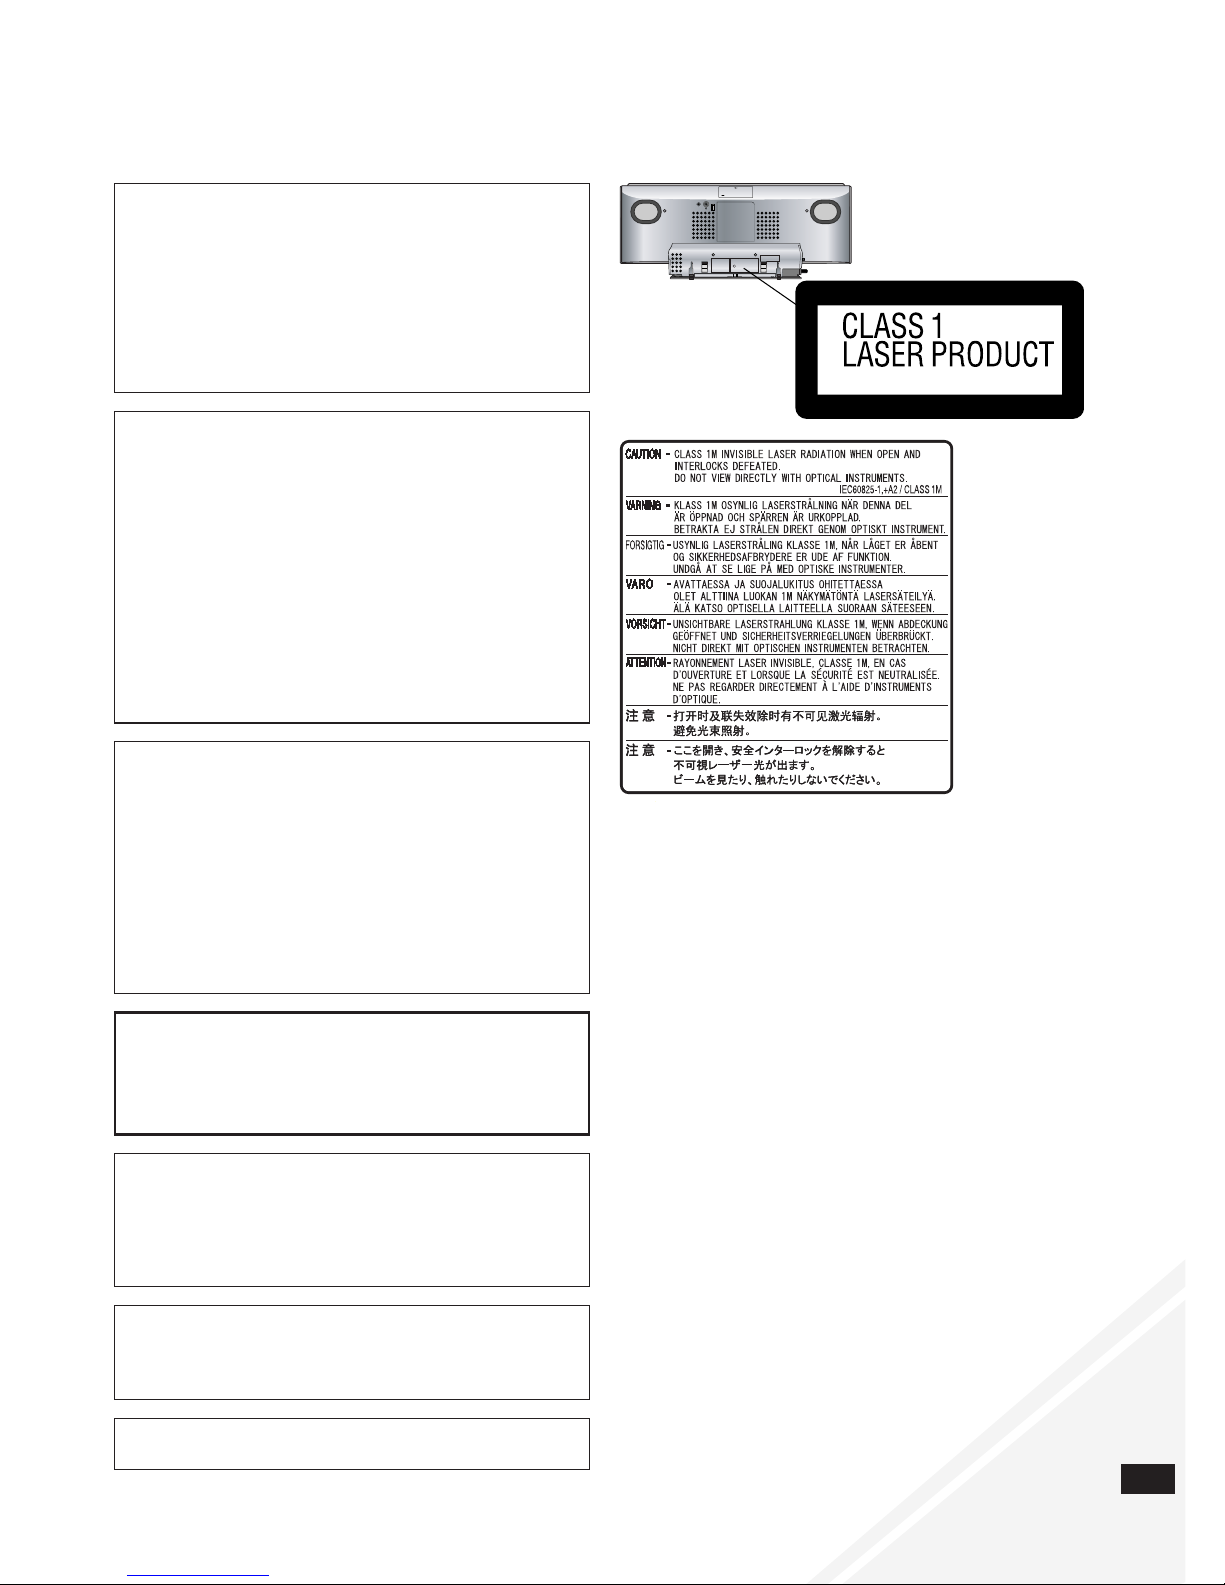
THIS PRODUCT UTILIZES A LASER.
USE OF CONTROLS OR ADJUSTMENTS OR
PERFORMANCE OF PROCEDURES OTHER THAN THOSE
SPECIFIED HEREIN MAY RESULT IN HAZARDOUS
RADIATION EXPOSURE.
DO NOT OPEN COVERS AND DO NOT REPAIR
YOURSELF. REFER SERVICING TO QUALIFIED
PERSONNEL.
The socket outlet shall be installed near the equipment and
easily accessible.
The mains plug of the power supply cord shall remain readily
operable.
To completely disconnect this apparatus from the AC Mains,
disconnect the power supply cord plug from AC receptacle.
CAUTION
Danger of explosion if battery is incorrectly replaced. Replace
only with the same or equivalent type recommended by the
manufacturer. Dispose of used batteries according to the
manufacturer’s instructions.
This product may receive radio interference caused by mobile
telephones during use. If such interference is apparent,
please increase separation between the product and the
mobile telephone.
THIS UNIT IS INTENDED FOR USE IN MODERATE
CLIMATES.
Inside of product
RQLS0418
AUX
RQT4389ZAA
Back of product
Page 4
RQTX1083
4
AUX
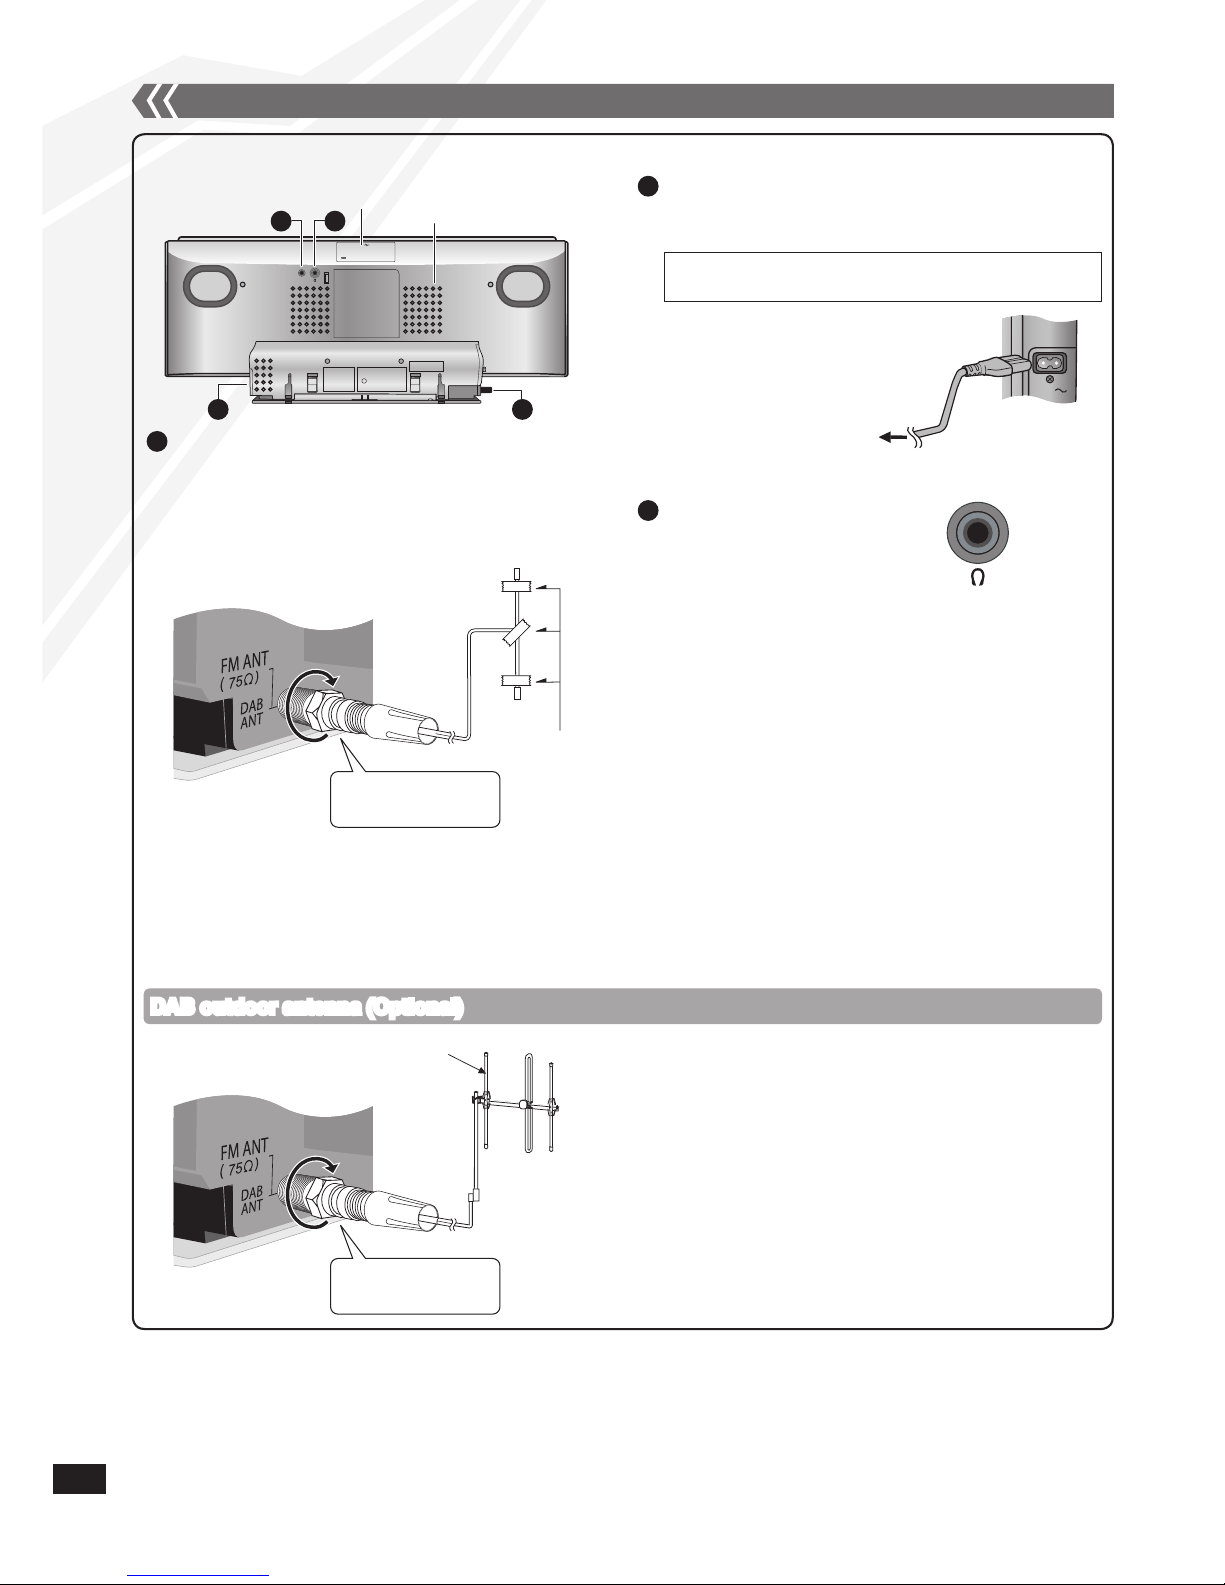
Connections
Back View
Exhaust holes
AUX (➡ page 17)
4 3
2 1
USB cover
Connect the AC mains lead after all other connections
are complete.
2
To household mains socket
AC IN
Avoid listening for prolonged periods of time to
prevent hearing damage.
Excessive sound pressure from earphones and
headphones can cause hearing loss.
Listening at full volume for long periods may damage
the user’s ears.
Be sure to use the supplied or recommended
headphones or earphones.
•
•
•
Reduce the volume level and
connect the headphones.
Plug type: 3.5 mm stereo
3
Headphones (not included)
Tape the antenna to a wall or column, in a position
with the least amount of interference.
Please refer to “Checking the DAB signal quality”
(➡ page 14).
•
•
g Notes on speakers
These speakers do not have magnetic shielding. Do not
place them near televisions, personal computers or other
devices easily influenced by magnetism.
The speaker nets cannot be removed.
•
•
DAB outdoor antenna (Optional)
DAB outdoor antenna (not included)
Be sure to fully
tighten the screw.
Use DAB outdoor antenna for better reception.
The antenna should only be installed by a competent
technician.
Never use the outdoor antenna during lightning storm.
Please refer to “DAB” (➡ page 12).
•
•
•
•
Connect the DAB antenna to receive
FM radio and DAB (Digital Audio
Broadcasting).
1
Adhesive tape
Be sure to fully
tighten the screw.
The cross bar of the T should be kept firmly
stretched. Find a good position with good reception.
READ THE CAUTION FOR THE AC MAINS LEAD ON
PAGE 2 BEFORE CONNECTION.
Connect the AC mains lead.
Page 5
RQTX1083
5
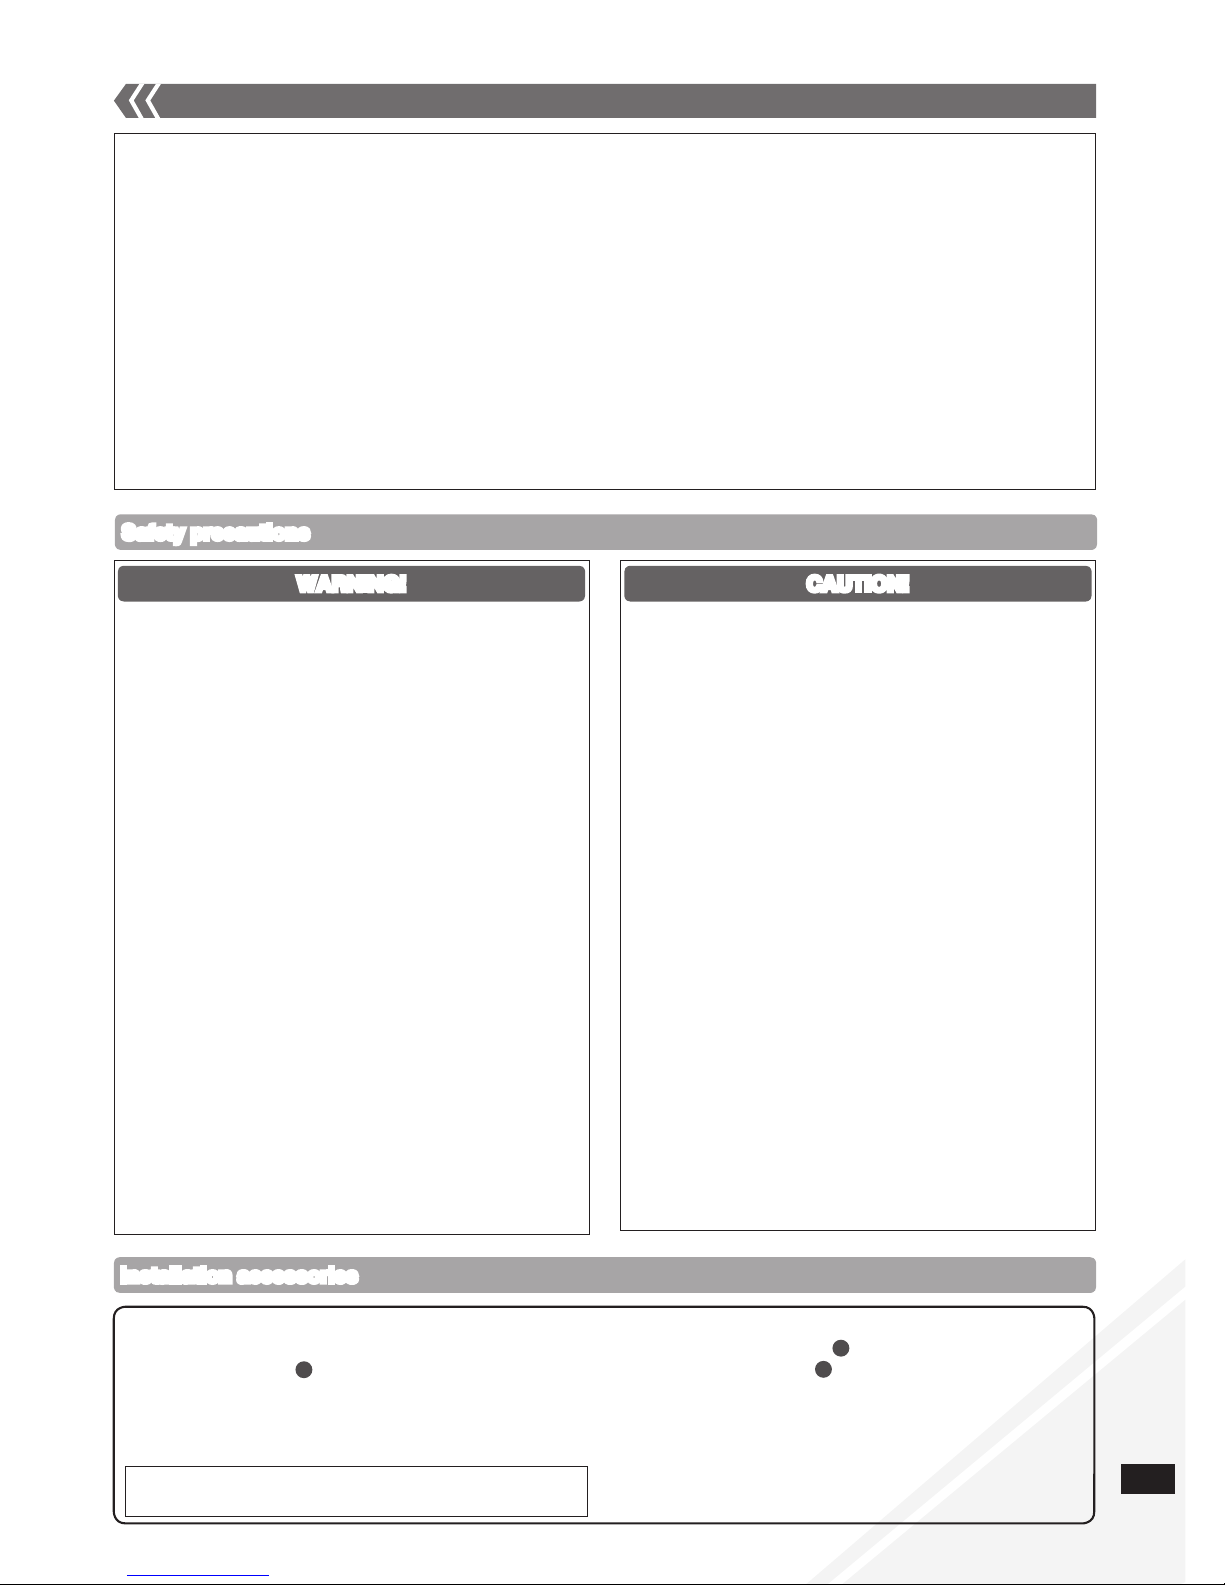
Attaching the unit to a wall (Optional)
Notes on installation
g Before installation, read the “Safety precautions” and “Wall mount instructions” for correct installation.
g For optimal performance and to prevent potential problems, do not install this unit:
at locations other than vertical walls.
near a sprinkler or a sensor.
near high-voltage lines or power sources.
near heating device.
at locations where the unit is subject to vibration or impact.
near sources of magnetism, heat, vapour, airborne grease, etc.
at locations where there may be water droplets (e.g. under an air conditioner).
g Do not install this unit under ceiling lights (e.g. spotlight, halogen light, etc.).
Failure to do so may bend the cabinet or lead to damage caused by high heat.
g Use a proper installation method that suits the structure and material of the wall.
g Use a soft blanket or cloth to prevent damage to the product or floor during installation.
g When tightening screws, make sure the screws are not loosely-tightened or overtightened.
g Secure a safe surrounding area and pay attention to safety during installation.
g Panasonic is not liable for incidental or consequential damages resulting from improper installation or operation.
•
•
•
•
•
•
•
Only a qualified building contractor shall install or
uninstall this unit.
Improper installation may cause the unit to fall, resulting in
injury.
To prevent injury, the unit must be securely attached to
the wall in accordance with the installation instructions.
Do not install the unit where it cannot support the load.
If the mounting parts are not strong enough, this may cause
the unit to fall, resulting in injury.
Do not use installation methods other than instructed.
This may cause the unit to fall and be damaged, resulting in
injury.
Do not install the unit at locations other than vertical
walls.
This may cause the unit to fall and be damaged, resulting in
injury.
Take the safety factor for mounting strength into account
(approx. 10 times the product weight).
Insufficient strength will cause the unit to fall, resulting in injury.
The wall on which the unit is to be attached to should be
capable of supporting 20 kg per screw.
Insufficient strength of the walls will cause the unit to fall in the
long run.
Do not disassemble or modify the wall-mounting hanger.
This will cause the unit to fall and be damaged, resulting in
injury.
Do not install this unit at humid or dusty locations, or
locations where airborne grease or steam may come into
contact with the unit, or under an air conditioner where
water may drip onto the unit.
This may have negative impact on the unit, resulting in fire or
electric shock.
Secure enough space of more than 30 cm above the
main unit and more than 10 cm on the left and right sides
respectively. Keep space between the wall and rear of the
unit clear of obstructions.
Blocking the exhaust holes on the main unit may result in fire.
Use the designated components for installation.
Otherwise, the main unit may fall and be damaged, resulting
in injury.
Prevent the mounting screws or power cord from coming
into contact with metal parts inside the wall during
installation.
Failure to do so may cause electric shock.
When removing the main unit, remove the wall mounting
screws as well.
Otherwise the wall mounting screws may hit a person and
lead to injury.
Install the unit at a height where the USB port and
operation buttons can be seen for safe operation.
Operating at improper position may cause the unit to fall and
be damaged, resulting in injury.
CAUTION!
Safety precautions
WARNING!
Installation accessories
g Included accessories
Screw accessories (RFAX1020)
2 Fixing screws (XYN3+J10FJ)
1 Safety holder (RMKX1015)
Wall bracket accessories (RFAX1021)
1 Wall bracket (RGQX1004)
Four-legged cushions (RKAX0028-K)
•
»
»
•
»
»
B
g Commercially available accessories (not included)
2 Wall mounting screws
1 Safety holder screw
Use screws with nominal diameter of 4 mm, which are suitable
to the material of the wall (e.g. wood, steel, concrete, etc.).
•
•
C
C
Keep all the intended accessories out of reach of
children to prevent swallowing.
Page 6
RQTX1083
6
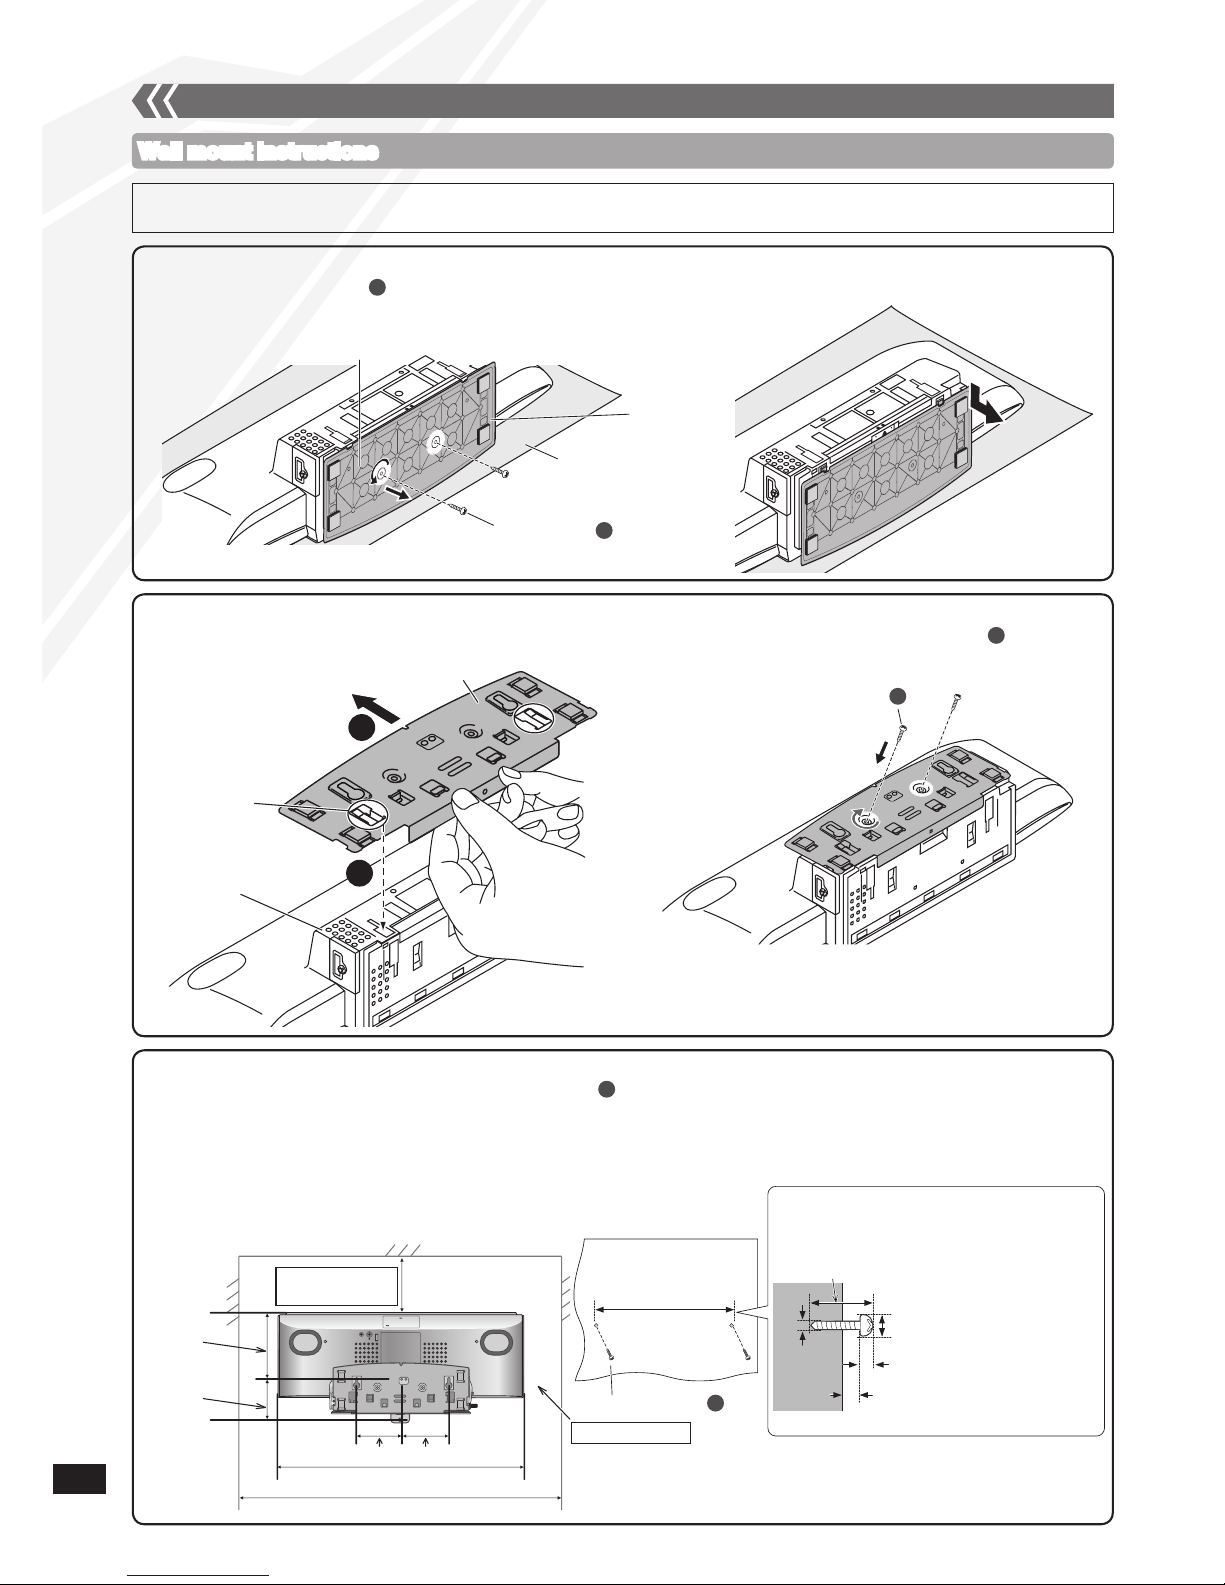
Wall mount instructions
• Before installation, turn the unit off and disconnect the AC mains lead plug from the AC receptacle.
• Tighten screws firmly to prevent slack in each step.
Attaching the unit to a wall (Optional) (continued)
2. Attach the wall bracket to the back of the unit.
1. Detach the stand from the unit.
3. Drive the mounting screws into the wall.
8 mm to 9.5 mm
2.2 mm to 2.8 mm
2.5 mm to 3.5 mm
4 mm
A length which supports the strength
of 20 kg or more must be kept for
each screw.
Wall
Mounting screw
C
163 mm
AUX
300 mm
Space required
Rear View
Space required
85.5 mm77.5 mm
500 mm
700 mm
74.8 mm
130 mm
Measure and mark the position of the mounting screw (2 pieces) and drive them into the wall.
Use figures below for screw positions and measurements.
Please install using both wall mounting screws.
Use a level ruler to ensure both screws are level.
Use a screw which is strong enough to support the weight of at least 20 kg.
•
•
•
•
C
Bottom of main unit
Stand
Soft blanket or cloth
Fixing screw
A
Slide the stand off the unit.
Unscrew the fixing screw (2 pieces) at the bottom of the unit.
Keep the removed screws in a safe place.
A
Fixing screw
B
2
1
Align both tabs on the wall bracket and the main unit,
then slide it in until it clicks into place.
Secure the wall bracket with fixing screw (2 pieces).
(Tightening torque: 1.2 Nm to 1.5 Nm)
B
Tab
Rear of main unit
Wall bracket (bottom view)
Page 7
RQTX1083
7
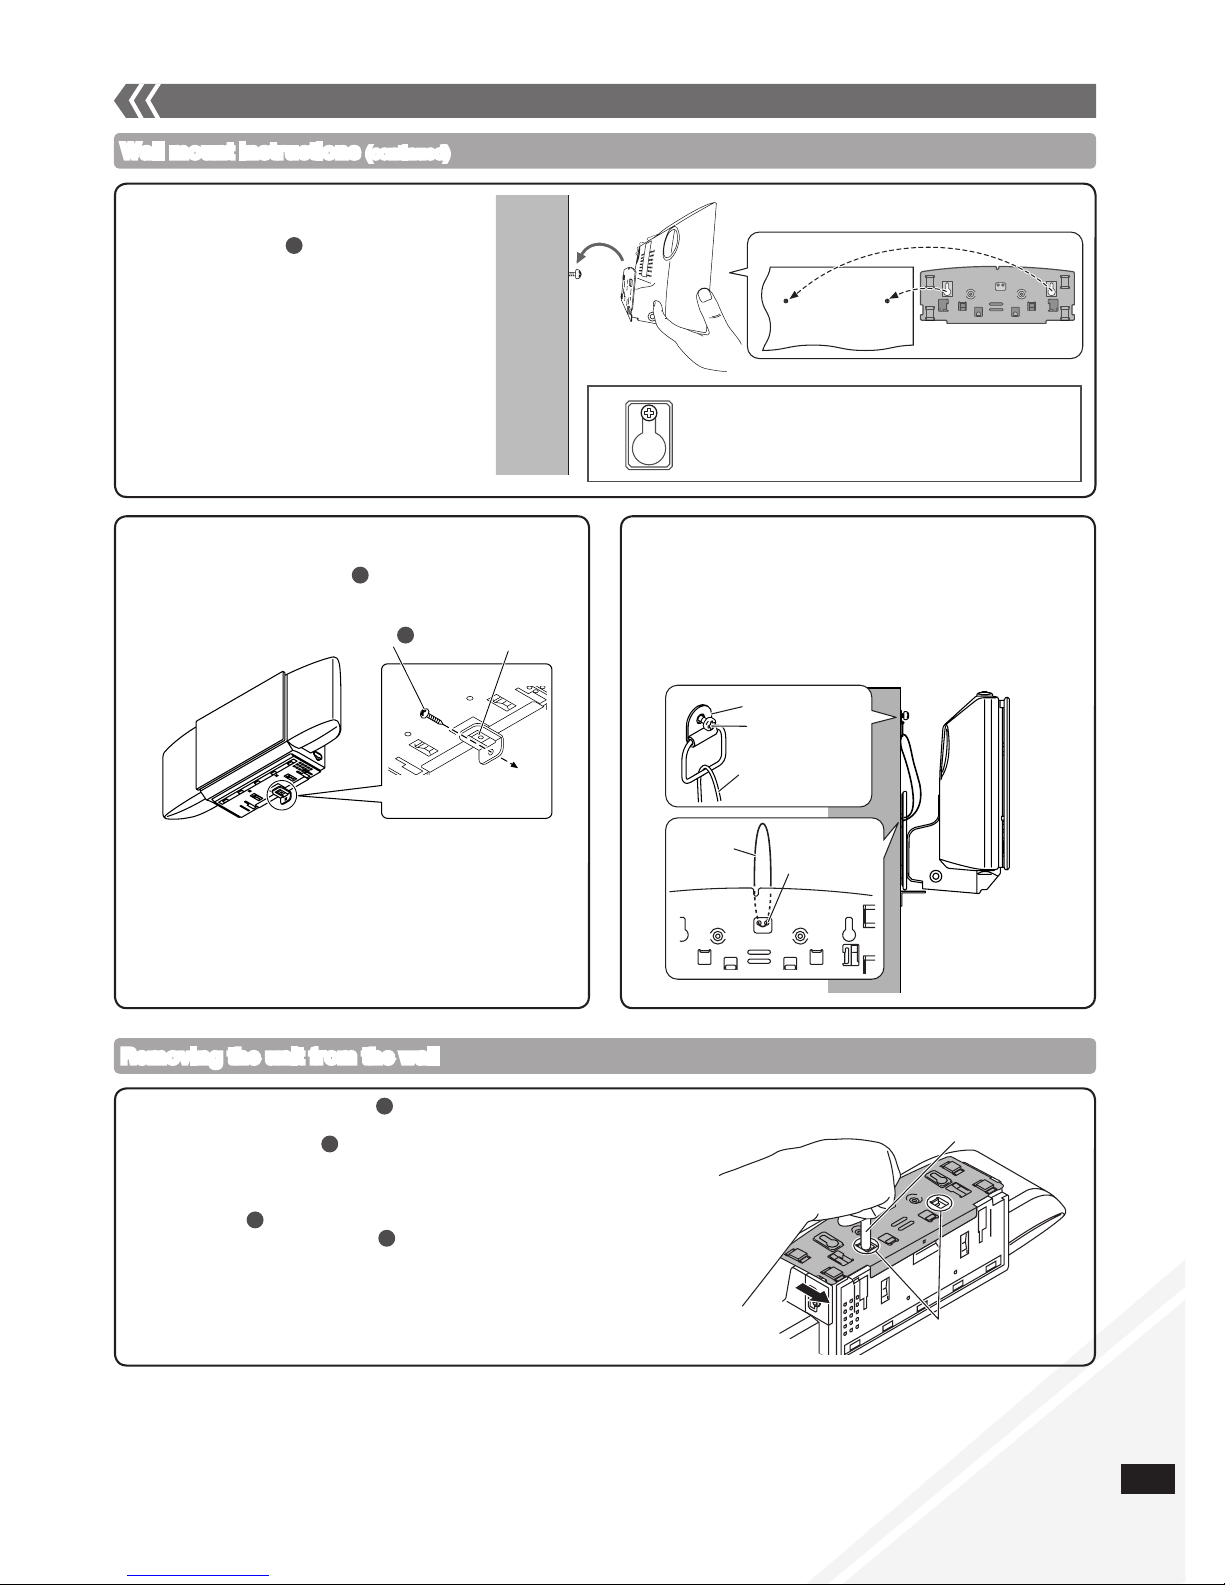
g Fall-preventive measure (Optional)
4. Hang the unit on the wall.
Removing the unit from the wall
Remove safety holder screw and the safety holder.
Unmount the unit from the wall.
Unscrew fixing screw (2 pieces).
Hold down both the catches and then slide the wall bracket off
the unit (➡ right).
Reattach the stand to the bottom of the unit and secure it with
fixing screw (2 pieces).
Remove the mounting screw (2 pieces) from the wall.
Remove the fall-preventive wire before step if you are using it.•
C
B
A
C
Pen or a blunt object
Catches
5. Install the safety holder.
Safety holder
Fixed to
the wall
Safety holder screw
C
Wire
Wire
Slot for wire
Wall mount instructions (continued)
Attaching the unit to a wall (Optional) (continued)
Slot both screws into this position firmly.
Wall
Wall bracket
Thread a wire (commercially available) through the
slot on the wall bracket before step 4 (➡ above).
Fix the wire to the wall with a screw (commercially
available) after step 5 (➡ left).
Fix the screw to the wire so that a slack of no more than
5 cm is kept in the upper centre part of the main unit.
•
Hook the unit securely onto the
mounting screws .
Connect the DAB antenna before hanging
the main unit on the wall (➡ page 4).
After hanging the unit, release your hand
carefully to confirm the unit sits securely on
the wall.
•
•
C
Fix the safety holder onto the wall bracket.
Drive safety holder screw to secure the safety
holder onto the wall.
C
Metal fitting
Screw
Page 8
RQTX1083
8
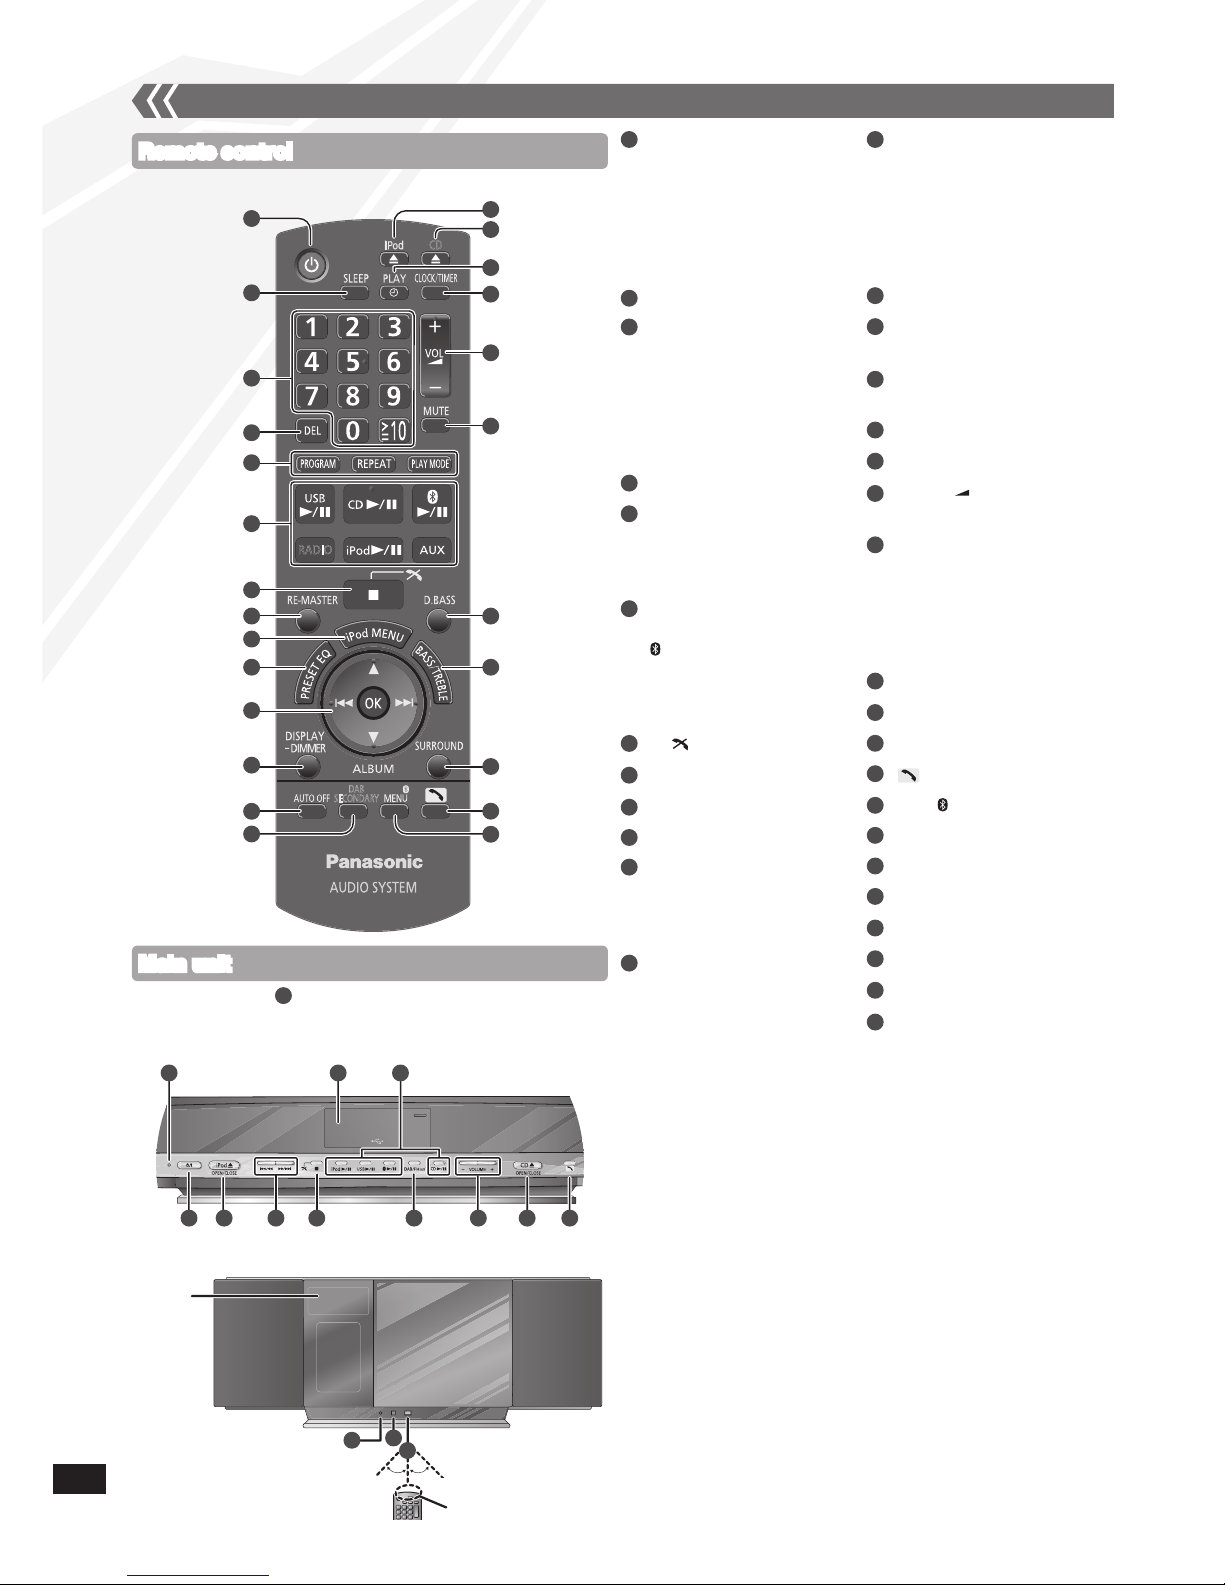
Standby/on switch [^], [8]
(9, 10, 15, 22)
Press to switch the unit from
on to standby mode or vice
versa. In standby mode, the
unit is still consuming a small
amount of power.
[SLEEP] (15)
Numeric buttons [1-9, 0, ≧ 10]
(10, 11, 13, 20)
To select a 2-digit number
e.g. 16: [≧ 10] [1] [6]
To select a 3-digit number
e.g. 226: [≧ 10] [≧ 10] [2]
[2] [6]
[DEL] (10)
[PROGRAM] (10, 11, 13)
[REPEAT] (10)
[PLAY MODE]
(10, 11, 13, 17, 19)
[USB q/h] (20)
[CD q/h] (10)
[ q/h] (18, 19)
[RADIO] (11, 13)
[iPod q/h] (16)
[AUX] (17)
[g, ] (10, 16 ,19, 20)
[RE-MASTER] (15)
[iPod MENU] (16)
[PRESET EQ] (15)
[e,r]
(10, 14, 15, 16, 19, 20)
[u], [i]
(10, 11, 13, 16, 19, 20)
[OK]
(10, 11, 14, 15, 16, 17, 19)
[DISPLAY, –DIMMER]
(10, 13, 19)
Press and hold to dim the
display panel. Press and
hold again to cancel.
[AUTO OFF]
This function allows you to
turn the unit off (except in
radio mode) after the unit is
left unused for about
30 minutes. Press twice to
turn it on.
[DAB SECONDARY] (13)
[;, iPod],
[iPod ;, OPEN/CLOSE] (16)
[;, CD],
[CD ;, OPEN/CLOSE] (9)
[z, PLAY] (15)
[CLOCK/TIMER] (15)
[+, VOL , –],
[– VOLUME +] (19)
[MUTE] (19)
Mutes the sound. Press again
to cancel. “MUTE” is also
cancelled when the volume is
adjusted or the unit is turned
off.
[D.BASS] (15)
[BASS/TREBLE] (15)
[SURROUND] (15)
[ ] (19)
[DAB/ MENU] (14, 19)
[u/t], [y/i]
[DAB/FM/AUX] (17)
USB port (20)
Standby indicator
Microphone (19)
Bluetooth indicator (18)
Remote control signal
sensor
Aim the remote control at the
sensor, avoiding obstacles,
at a maximum range of 7 m
directly in front of the unit.
Refer to the numbers in parentheses for page reference.•
Remote control
Main unit
Control guide
Buttons such as function the same as the remote control.
They can be used interchangeably.
•
1
CD
RADIO
DAB/
DAB
SECONDARY
16
17
18
19
20
23
24
25
22
21
1
2
3
4
5
6
8
9
10
11
12
13
15
14
7
Top View
1 167
29 6
26 27
28
15 19 24
8
9
10
6
7
16
15
17
18
19
21
23
25
26
27
28
29
30
20
22
24
14
2
1
3
4
5
11
12
13
31
32
Front View
Display
Approx. 30°
Transmission window
30
Approx. 30°
31
32
Page 9
RQTX1083
9
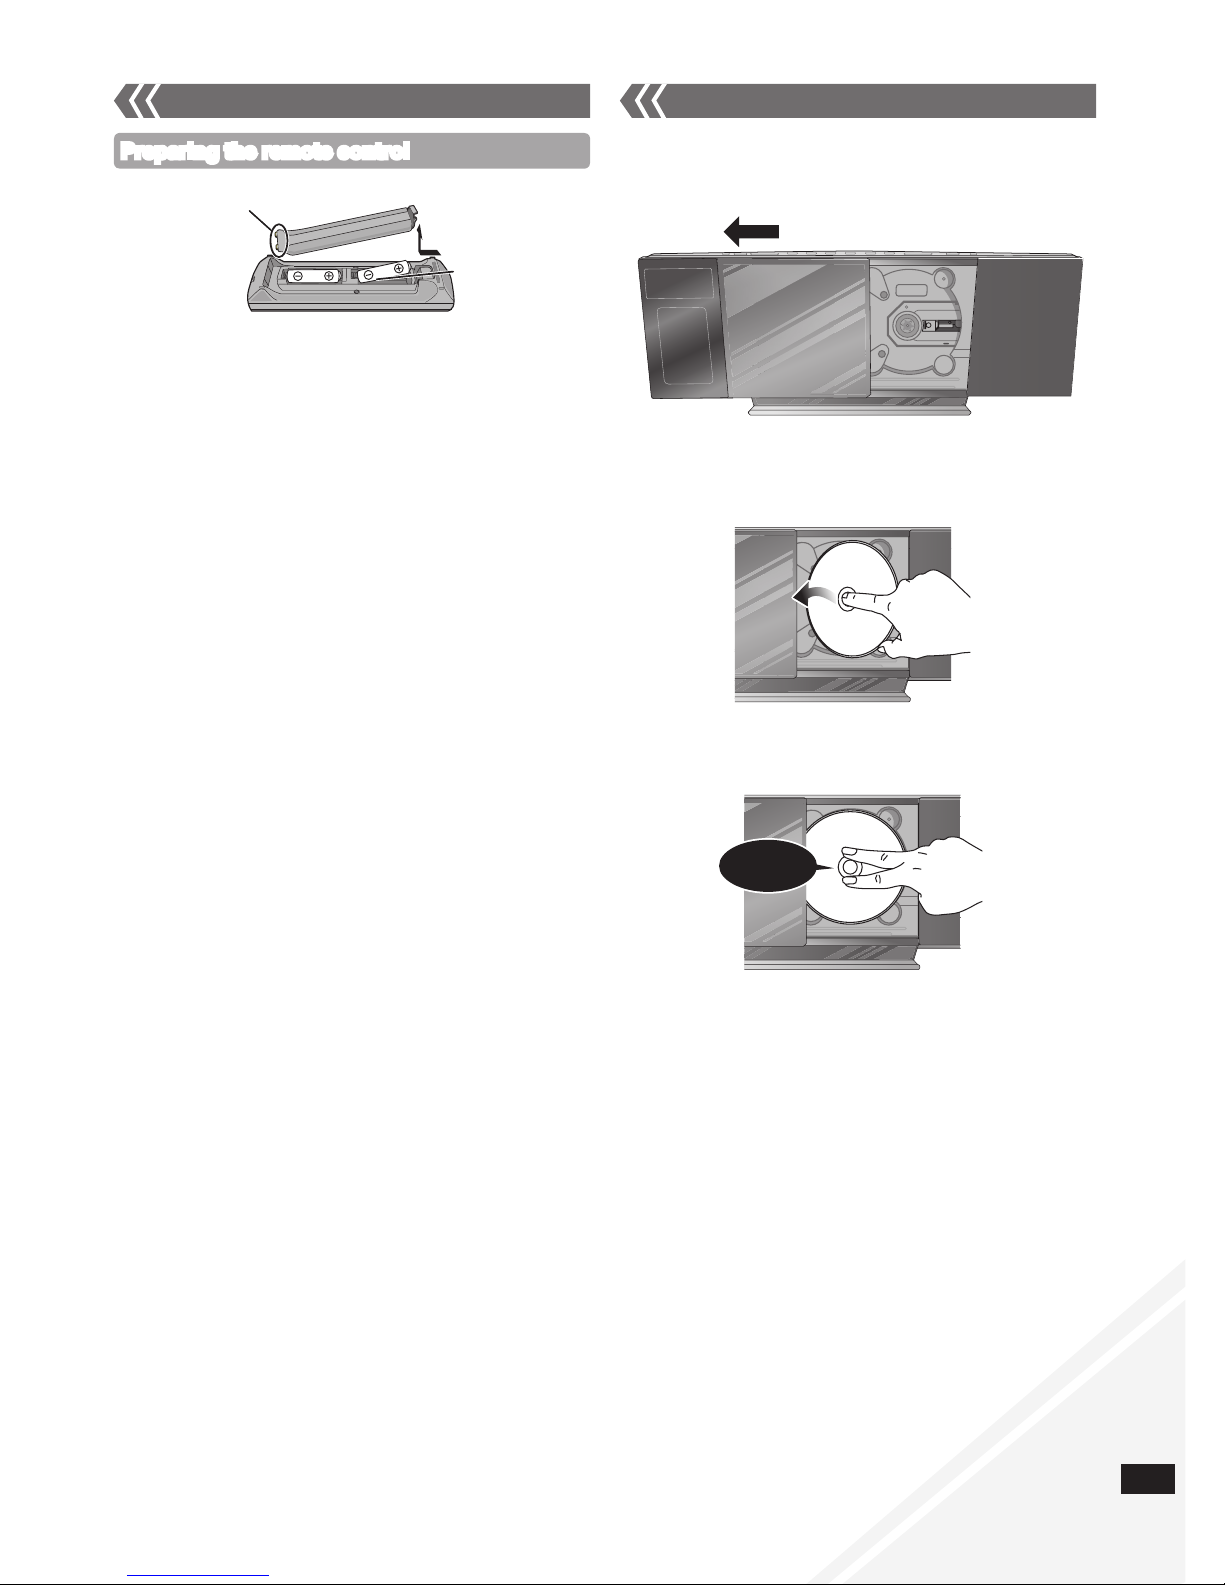
■ Batteries
Use a manganese dry battery or an alkaline dry battery.
Insert so the poles (+ and –) match those in the remote
control.
Remove if the remote control is not going to be used for a
long period of time.
Store in a cool and dark place.
Do not heat or expose to flame.
Do not leave the batteries in an automobile exposed to direct
sunlight for a long period of time with doors and windows
closed.
Mishandling of batteries in the remote control can cause
electrolyte leakage, which may cause a fire.
■ Do not:
mix old and new batteries.
use different types of batteries at the same time.
take apart or short-circuit the batteries.
attempt to recharge alkaline or manganese batteries.
use the batteries if the coverings have been peeled off.
•
•
•
•
•
•
•
•
•
•
•
•
R6/LR6, AA
Place this side in before the other side.
Preparing the remote control
Control guide (continued) Disc operations
g Inserting a disc
Press [^] to turn the unit on.
Press [;, CD] to open the sliding door.
With the label of the disc facing towards you, tilt the disc
into the disc tray under the sliding door.
Place the disc onto the spindle in the centre and then
push the disc down until it clicks into place.
g Removing a disc
Press [;, CD] to open the sliding door.
Hold the centre and the top right of the disc and pull the
top right of the disc to unlock it from the spindle.
Tilt the disc so as not to touch the sliding door and
remove the disc.
Damage may occur if the sliding door is forced closed.
Be careful of CD hitting the sliding door while being removed.
•
•
Press [;, CD] to close the sliding door.
Keep fingers away from the sliding door when it is closing to
avoid possible minor injuries.
Click!
Page 10
RQTX1083
10
Press [DISPLAY, –DIMMER] repeatedly during play or
pause to view the current track’s information.
Maximum number of displayable characters:
approximately 30
This unit supports ver. 1.0 and 1.1 ID3 tags. Text data that is
not supported will not be displayed.
•
•
Program play
Disc operations (continued)
Display function
Press [^] to turn the unit on.
Insert the disc to be played (➡ page 9).
Press [CD q/h] to start play.
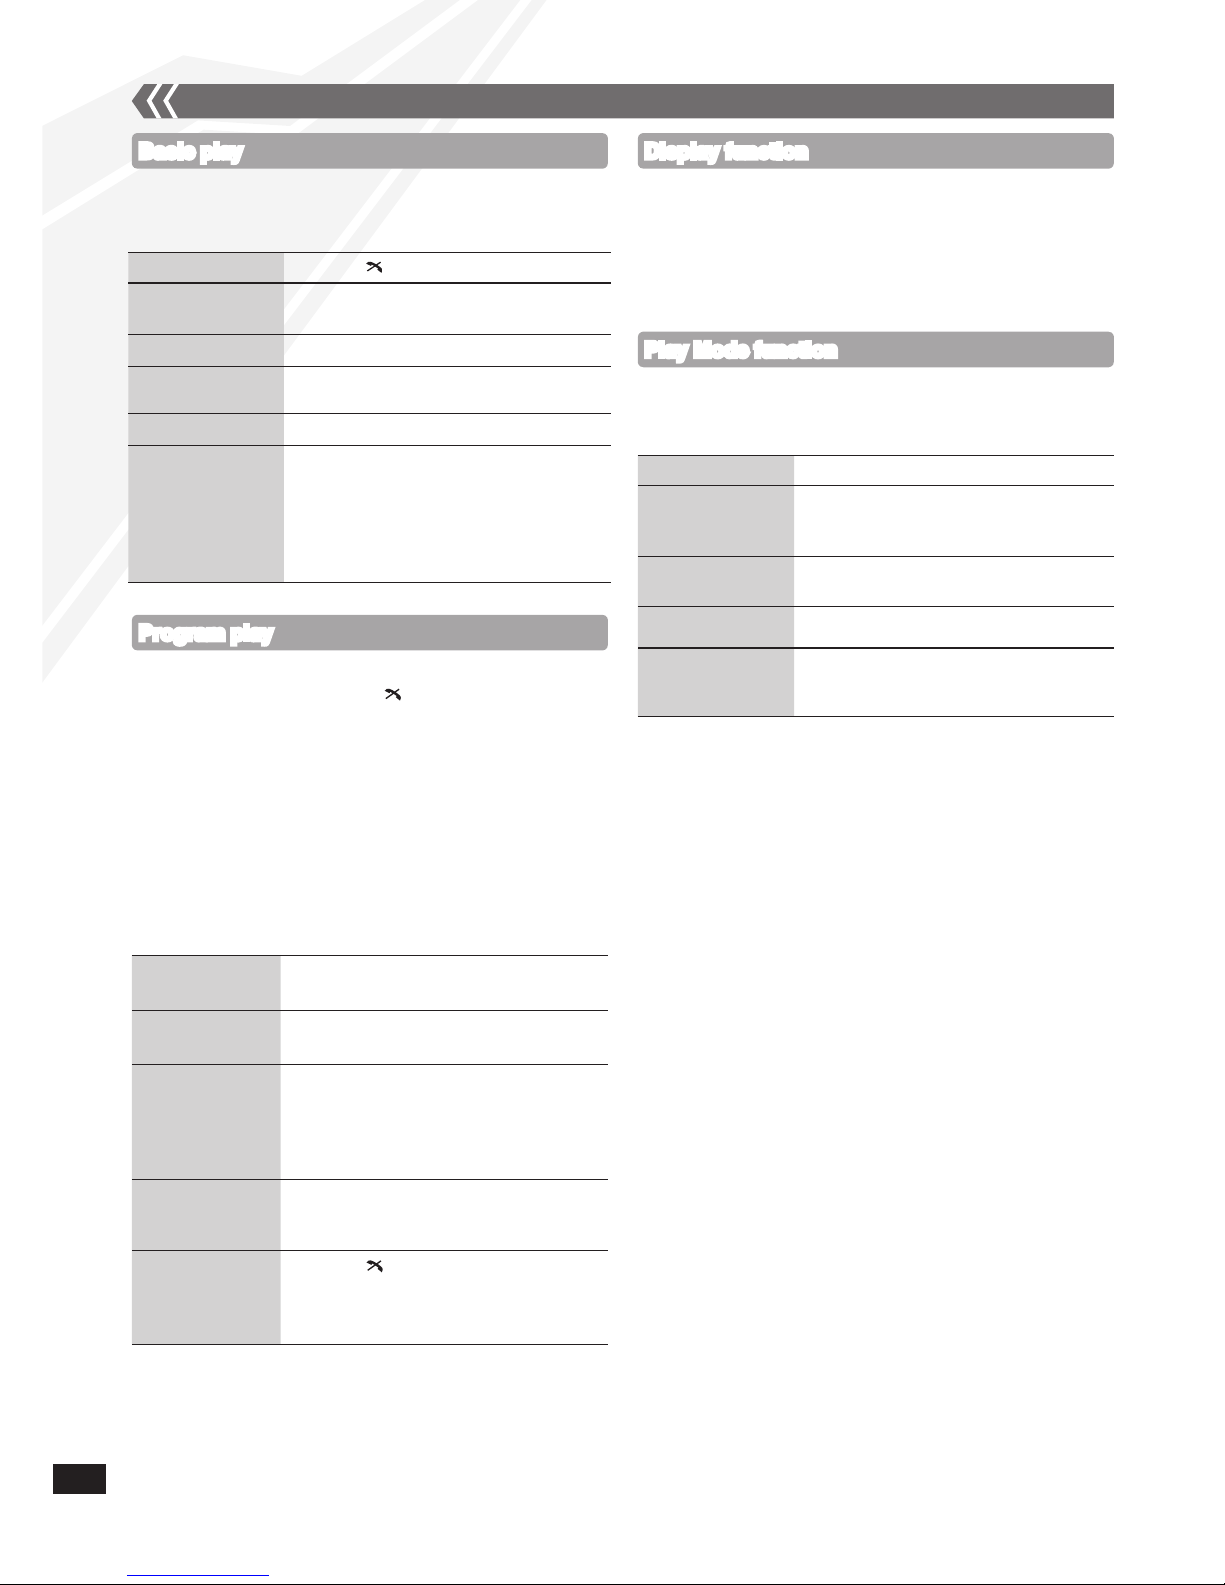
Basic play
Mode To play
1-TRACK
1TR
one selected track on the disc.
Press the numeric buttons to select the
track.
1-ALBUM
1ALBUM (MP3)
one selected album on the disc.
Press [e,r] to select the album.
RANDOM
RND
a disc randomly.
1-ALBUM
RANDOM
1ALBUM RND (MP3)
all tracks in one selected album
randomly.
Press [e,r] to select the album.
During random play, you cannot skip to the previous track.
The current play mode is cleared when you open the sliding
door.
To repeat program play or selected play mode, press
[REPEAT]. Press again to cancel.
•
•
•
Press [CD q/h].
Press [PLAY MODE] repeatedly to select the following
modes.
Play Mode function
Enables you to program up to 24 tracks.
Press [CD q/h] and then [g, ].
Press [PROGRAM].
CD: Press the numeric buttons to select the track.
To program more tracks, continue by pressing the
numeric buttons.
Press [OK] or [CD q/h] to start play.
MP3: Press [e,r] to select the album.
Press [i] once and then the numeric buttons to
select the track.
Press [OK].
To program more tracks, repeat step to .
Press [CD q/h] to start play.
Cancel program
mode
Press [PROGRAM] in the stop mode to
clear “PGM” indicator from the display.
Replay the
program
Press [PROGRAM] in the stop mode and
then [CD q/h].
Check program
contents
Press [u] or [i] when “PGM” is
displayed in the stop mode. To check
while programming, press [PROGRAM]
twice after “PGM” appears and then
press [u] or [i].
Delete last
programmed
track
Press [DEL] in the stop mode.
Clear all
programmed
tracks
Press [g, ] in the stop mode.
“CLR ALL” is displayed. Within
5 seconds, press the button again to
clear all tracks.
The program memory is cleared when you open the sliding
door.
•
Stop
Press [g, ].
Pause
Press [CD q/h]. Press again to resume
play.
Skip track
Press [u] or [i].
Search the current
track (CD)
Press and hold [u] or [i].
Skip album (MP3)
Press [e,r].
Direct access
play (Play starts
with the track you
select.)
CD: Press the numeric buttons to select
the track.
MP3: Press [e,r] to select the album.
Press [i] once and then the
numeric buttons to select the
track.
Page 11
RQTX1083
11
Notes on CD-R and CD-RW
This unit can play CD-R and CD-RW recorded with
CD-DA or MP3.
Use an audio recording disc for CD-DA and finalise* it
when you finish recording.
* A process performed after recording that enables CD-R
or CD-RW players to play audio CD-R and CD-RW.
The unit may not be able to play some discs due to the
condition of the recording.
Do not use irregularly shaped CDs.
Do not attach extra labels and stickers.
Do not use CDs with labels and stickers that are coming
off or with excessive adhesive under the labels and
stickers.
Do not attach scratch-proof covers or any other kind of
accessories.
Do not write anything on the CDs.
Do not clean CDs with liquids (Wipe with a soft and dried
cloth).
Creating MP3 files playable on this unit
Maximum number of tracks and albums: 999 tracks and
255 albums.
Compatible compression rate: Between 64 kbps and
320 kbps (stereo). 128 kbps (stereo) is recommended.
Disc formats: ISO9660 level 1 and level 2 (except for
extended formats).
The time for reading TOC depends on the number of the
tracks, folders or folder structures.
Limitations on MP3
This unit is compatible with multi-sessions and it takes
more time to start playing.
This unit cannot play files recorded using packet write.
If the disc includes both MP3 and normal audio data
(CD-DA), the unit plays the type recorded in the inner part
of the disc. If the disc includes both MP3 and other types
of audio data (e.g. WMA or WAV), the unit plays only the
MP3.
Depending on how you create the MP3 files, they may
not play in the order you numbered them or may not play
at all.
•
•
•
•
•
•
•
•
•
•
•
•
•
•
•
•
•
Radio operations
Press [RADIO] to select “FM”.
Press [PLAY MODE] to select “MANUAL”.
Press [u] or [i] to select the frequency of the
required station.
“ST” is displayed when a stereo FM broadcast is being
received.
To tune automatically
Repeat step and (➡ above).
Press and hold [u] or [i] until the frequency starts
changing rapidly.
To cancel auto tuning, press [u] or [i] once again.
Auto tuning may not function when there is excessive
interference.
g To improve FM sound quality
Press and hold [PLAY MODE] to display “MONO” indicator.
Press and hold again to cancel.
“MONO” is also cancelled if the frequency is changed.
Turn “MONO” off for normal listening.
•
•
•
•
Manual tuning
You can preset up to 30 FM channels.
Preparation: Press [RADIO] to select “FM”.
g Automatic presetting
Press [PLAY MODE] and then [OK] to switch between
“LOWEST” and “CURRENT” frequency.
Press and hold [PROGRAM] for at least 2 seconds to
start presetting.
g Manual presetting
Press [PLAY MODE] to select “MANUAL”.
Press [u] or [i] to tune to the required station.
Press [PROGRAM].
Press the numeric buttons to select a channel.
The station occupying a channel is erased if another station
is preset in that channel.
To preset more stations, repeat step to .
g Selecting a preset station
Press [PLAY MODE] to select “PRESET”.
Press [u] or [i] to select the channel.
Alternatively, press the numeric buttons to select the channel.•
Memory preset
Disc operations (continued)
Page 12
RQTX1083
12
DAB (Digital Audio Broadcasting) is a new form of radio that is
broadcast digitally. Unlike regular analogue broadcasting, digital
radio deteriorates less, and is thus able to provide quality sound
closer to that of a disc.
Bands
There are two types of DAB bands, “BAND III” (receivable in
this unit) and “L BAND” (not broadcast in the United Kingdom
and not receivable on this unit).
Frequencies
There are 38 frequencies on BAND III. Among these, 10 are
used in the United Kingdom (current as of January, 2010).
Ensemble, station and service
The number of stations that makes up one frequency differs
between DAB and analogue radio. Analogue stations broadcast
on different frequencies, even if it is the same company
doing the broadcasting. With DAB, however, it is possible to
broadcast a number of stations on the same frequency.
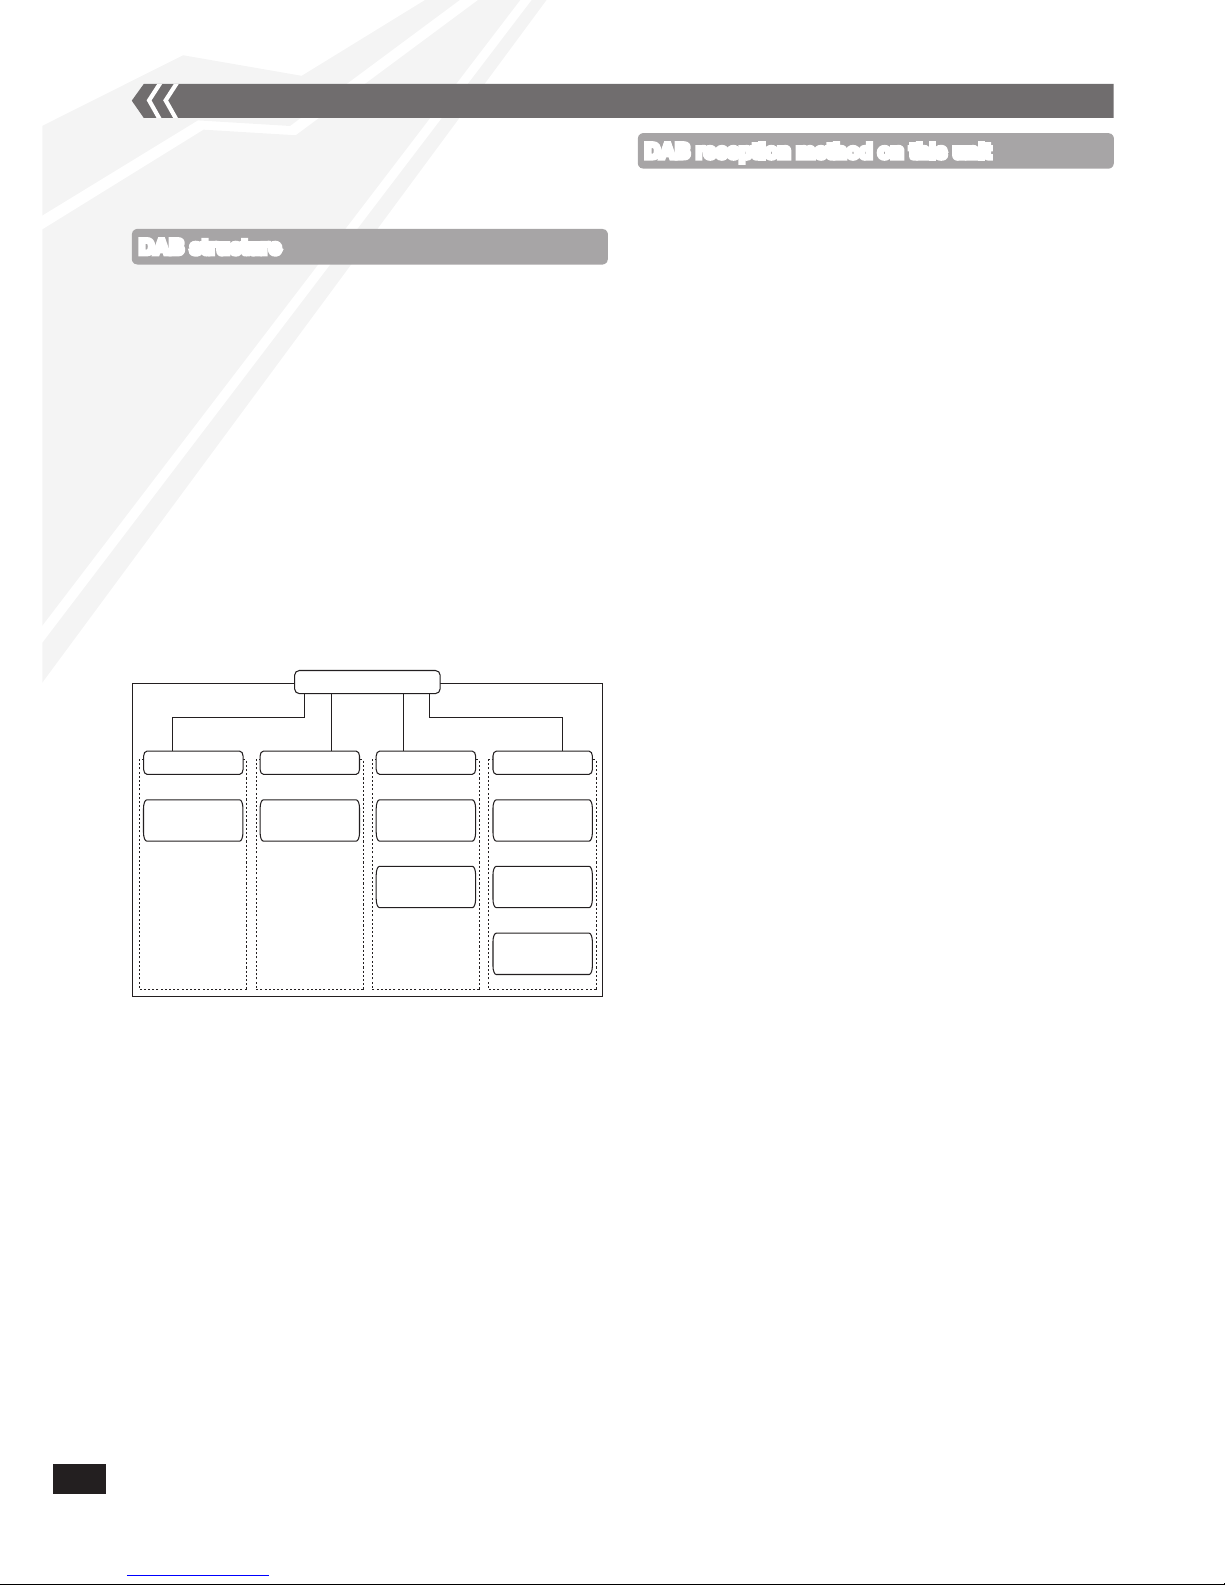
In DAB terminology, an ensemble represents a group of
stations on the same frequency.
As shown in the diagram, an ensemble consists of a group of
stations with primary services and secondary services. This
means, for example, that commentary on sports events from
different areas can all be broadcast at once.
ENSEMBLE
STATION 1
PRIMARY
SERVICE
PRIMARY
SERVICE
PRIMARY
SERVICE
SECONDARY
SERVICE
1
SECONDARY
SERVICE
2
SECONDARY
SERVICE
1
PRIMARY
SERVICE
STATION 2 STATION 3
STATION 4
Depending on the region, there is a difference between
broadcast frequency and stations broadcast along the same
frequency.
For this reason, a memory of receivable stations should first be
created and then selected from those memorised stations as
the reception method.
DAB Auto scan
This function searches for currently receivable stations and
inputs them into the unit memory.
When DAB is selected for the first time, this function starts
automatically.
Depending on some factors such as the broadcasting time
availability, the station may not broadcast even if it is stored
into the memory. If this occurs, “NO SERVICE” is displayed.
Station memory updating
When there is a station name change, or a new station begins
broadcasting, the unit memory is automatically updated when:
the previous station name is displayed by selecting
“STATION TUNE”.
the new station is displayed by selecting “STATION TUNE”
where another station has already broadcast on the same
frequency .
Deleting stations that are no longer broadcasting is not
automatic. If you want to delete a station, perform Auto scan
again and a new memory will be created.
When a new frequency begins broadcasting, stations on the
new frequency are not automatically added to the memory.
Perform Auto scan to add them to the memory. You may also
need to change the Auto scan range if the new frequency is
outside the factory-set Auto scan range (➡ page 14).
Station tune
You can select stations from the memory created (➡ page 13)
in alphanumeric order.
You can easily select your favourite stations by using presets
(➡ page 13).
•
•
•
DAB structure
DAB reception method on this unit
DAB
Page 13
RQTX1083
13
DAB (continued)
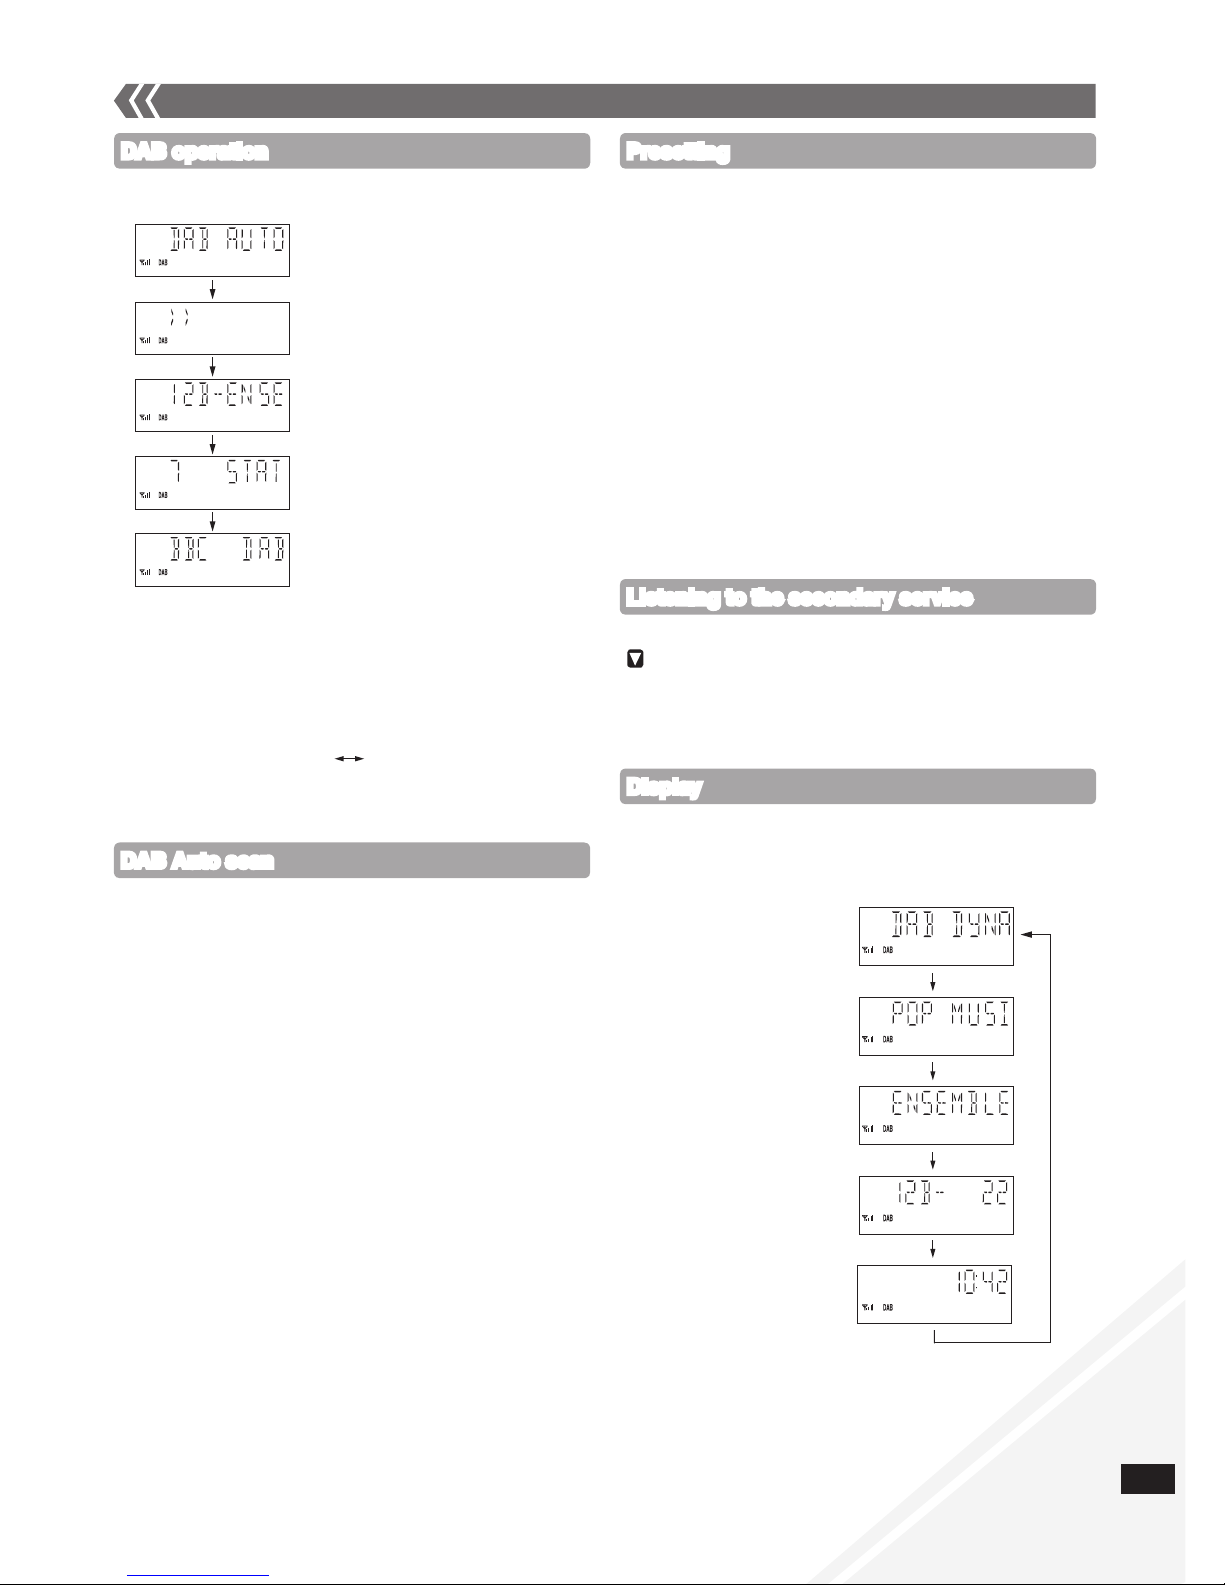
DAB operation
DAB Auto scan
Press and hold [PLAY MODE] until “DAB AUTO SCAN”
appears.
When a frequency is tuned using Auto scanning, the ensemble
corresponding to the frequency is displayed for approximately
2 seconds.
When updating memory with Auto scan, preset stations will
be erased. Preset them again (
➡ right).
Total stations received is displayed for approximately
2 seconds.
•
•
g Presetting channel
Press [u] or [i] to select the station.
Press [PROGRAM].
Press the numeric buttons to select the channel.
The station occupying a channel is erased if another station
is preset in that channel.
To preset more stations, press [PLAY MODE] to select
“STATION TUNE” and then repeat steps to .
Maximum channels presettable is 20.
You cannot preset stations when the station is not
broadcasting or when the secondary service is selected.
g Selecting a preset channel
Press [PLAY MODE] to select “PRESET TUNE”.
Press [u] or [i] to select the channel.
Alternatively, press the numeric buttons to select the channel.
•
•
•
Presetting
Press [DISPLAY, –DIMMER] to select the display.
The information scroll through the display.
Each time you press the button:
Listening to the secondary service
Display
Press [PLAY MODE] to select “STATION TUNE”.
Each time you press the button:
“STATION TUNE” “PRESET TUNE”
Press [u] or [i] to select a station.
The station name changes in alphanumeric order.
Press [RADIO] to select “DAB”.
The station first in alphanumeric
order is broadcast.
If you are selecting DAB for the
first time, “DAB AUTO SCAN”
is displayed, stations that
are currently receivable are
memorised.
When a frequency is tuned, the
ensemble corresponding to the
frequency is displayed.
“SCAN FAILED” appears if no stations are memorised. If
this occurs, adjust the antenna and try Auto scanning or
change the Auto scan frequency range (➡ page 14).
•
Dynamic label
(information about the
broadcast)
PTY display
(program type)
Ensemble label
(the name of the ensemble)
Frequency display
Time display
Press the [DAB SECONDARY] to select the secondary service.
“ ” is displayed if there is a secondary service broadcast.
The secondary services are selected each time the button
is pressed. The primary service is returned to after the last
secondary service.
Total number of receiving
stations is displayed.
Page 14
RQTX1083
14
DAB (continued)
To adjust the time information during DAB broadcasting and
automatic time adjustment.
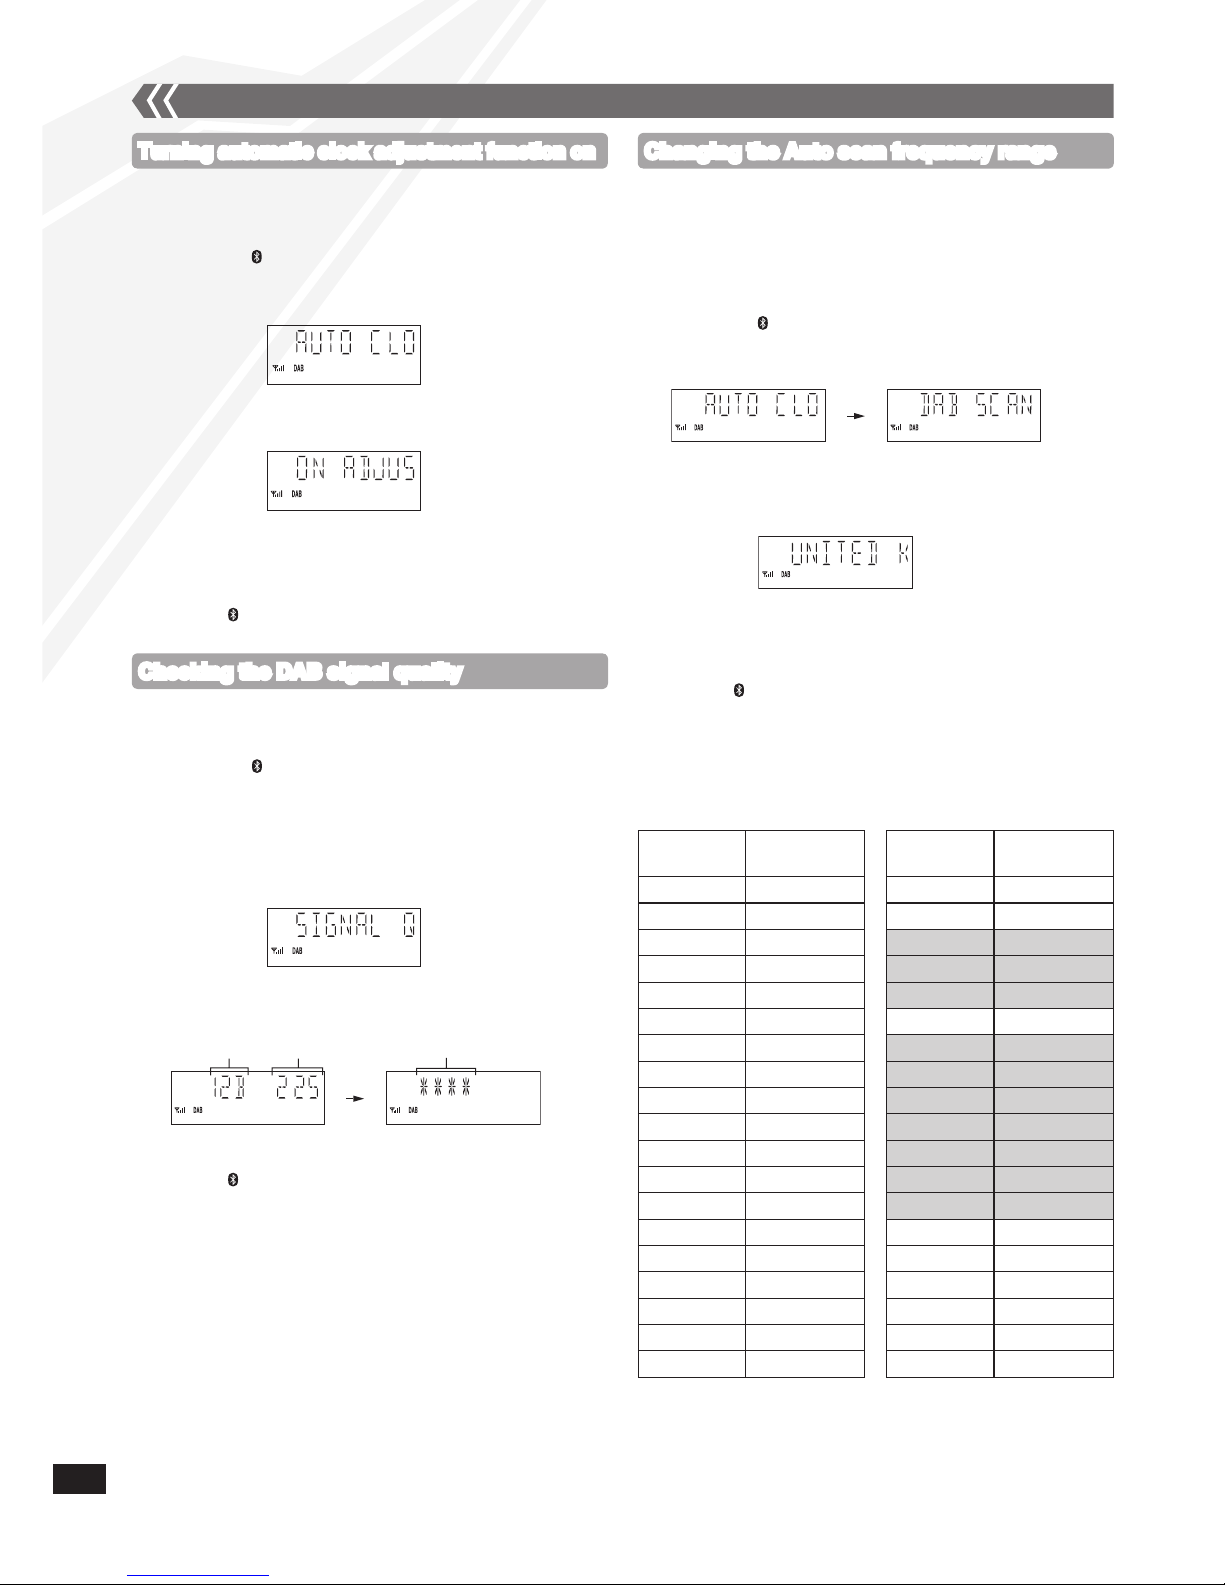
Press [DAB/ MENU] to enter menu mode.
Within 10 seconds, press [e,r] to select
“AUTO CLOCK ADJ.” and then press [OK].
Within 10 seconds, press [e,r] to select “ON ADJUST”
and then press [OK].
Select “OFF ADJUST” to turn the automatic clock
adjustment function off.
To exit
Press [DAB/ MENU] again.
•
To improve reception by adjusting the antenna while monitoring
signal quality on the display.
Press [DAB/ MENU] to enter menu mode.
“SCAN FAILED” appears if no stations are memorised. If this
occurs, adjust the antenna and try Auto scanning or change
the Auto scan frequency range (➡ right).
Within 10 seconds, press [e,r] to select
“SIGNAL QUALITY” and then press [OK].
Press [e,r] to select the frequency.
To exit
Press [DAB/ MENU] again.
In order to enjoy the new stations after adjusting the antenna,
perform Auto scanning and update the station memory.
•
Frequency
block
Frequency
Reception quality
0 (poor) - 8 (excellent)
Checking the DAB signal quality
Turning automatic clock adjustment function on
Only the frequencies currently used in the UK as of
January 2010 on BAND III are Auto scanned
(“United Kingdom”, factory setting).
Select “ALL BAND III” when you want to store stations on other
frequencies to memory.
Press [DAB/ MENU] to enter menu mode.
Within 10 seconds, press [e,r] to select
“DAB SCAN MODE” and then press [OK].
Within 10 seconds, press [e,r] to select
“UNITED KINGDOM” or “ALL BAND III” and then press
[OK].
Auto scan begins automatically after the change has
been made.
To exit
Press [DAB/ MENU] again.
The DAB preset channels are erased when the
“DAB SCAN MODE” is changed.
If the DAB play timer has been set, the timer switches to off.
•
•
•
Changing the Auto scan frequency range
ALL BAND III Frequency
Frequency
block
Frequency
(MHz)
Frequency
block
Frequency
(MHz)
5A 174.928 9D 208.064
5B 176.640 10A 209.936
5C 178.352 10B 211.648
5D 180.064 10C 213.360
6A 181.936 10D 215.072
6B 183.648 11A 216.928
6C 185.360 11B 218.640
6D 187.072 11C 220.352
7A 188.928 11D 222.064
7B 190.640 12A 223.936
7C 192.352 12B 225.648
7D 194.064 12C 227.360
8A 195.936 12D 229.072
8B 197.648 13A 230.784
8C 199.360 13B 232.496
8D 201.072 13C 234.208
9A 202.928 13D 235.776
9B 204.640 13E 237.488
9C 206.352 13F 239.200
Shaded areas are frequencies used currently as of
January 2010 in the “United Kingdom”.
Page 15
RQTX1083
15
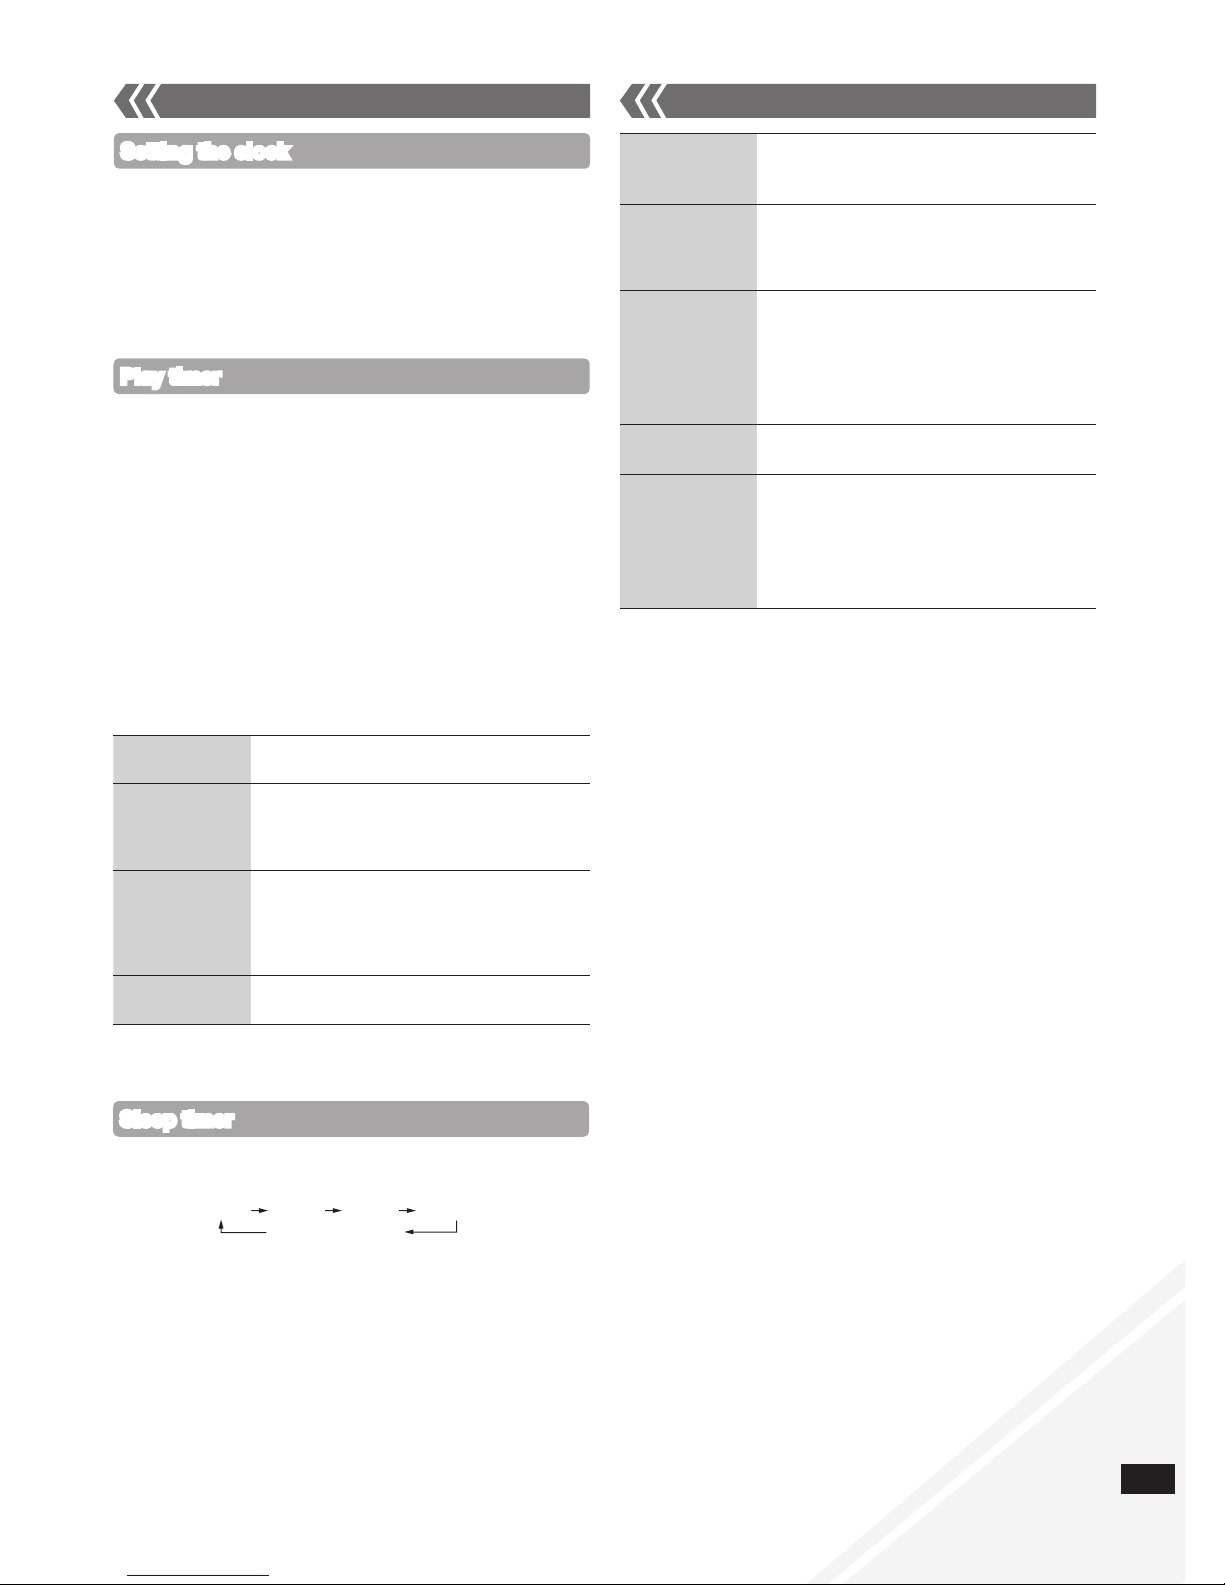
The sleep timer can turn the unit off after a set time.
Press [SLEEP] to turn the sleep function on or off.
Press [SLEEP] once to check the remaining time.
The play timer and sleep timer can be used together. The
sleep timer always has the priority. Be sure not to overlap the
timer settings.
When AUTO OFF is ON and the unit is left unused for about
30 minutes, the unit will shut down even if the play time or
sleep time has not expired.
•
•
You can set the timer to come on at a certain time to wake you
up.
This unit offers 3 optional play timers.
Preparation:
Turn the unit on and set the clock (➡ above).
Prepare the music source (disc, radio, iPod/iPhone,
Bluetooth, USB or AUX) and set the volume.
Press [CLOCK/TIMER] repeatedly to select play timer.
Within 5 seconds, press [e,r] to set the starting time.
Press [OK].
To set the finishing time, repeat step and .
To activate the timer
Press [z, PLAY] repeatedly to turn the selected play
timer on.
Press [^] to turn the unit off.
•
•
This is a 24-hour clock.
Press [CLOCK/TIMER] to select “CLOCK”.
Within 5 seconds, press [e,r] to set the time. (Press and
hold to change the time faster.)
Press [OK].
To display the clock, press [CLOCK/TIMER].
Reset the clock regularly to maintain accuracy.
•
•
Setting the clock
Play timer
Change the
settings
Repeat step to (➡ above).
Change the
source or
volume
Press [z, PLAY] twice to clear zPLAY
indicator from the display.
Make changes to the source or volume.
Perform step and (➡ above).
Check the
settings (When
the unit is on
or in standby
mode)
Press [CLOCK/TIMER] repeatedly to
select “zPLAY 1”, “zPLAY 2” or
“zPLAY 3”.
Cancel
Press [z, PLAY] twice to clear the timer
indicator from the display.
The timer will start at the preset time, with the volume
increasing gradually to the preset level.
•
Preset EQ Press [PRESET EQ] repeatedly to select
“HEAVY”, “SOFT”, “CLEAR”, “VOCAL” or
“FLAT”.
Bass or Treble
Press [BASS/TREBLE] repeatedly to
select “BASS” or “TREBLE”.
Press [e,r] to adjust the level
(-4 to +4).
Surround
Sound
Press [SURROUND] repeatedly during
play to select “ON SURROUND” or
“OFF SURROUND”.
If interference in FM stereo reception
increases, cancel the surround sound
effect.
D.Bass Press [D.BASS] repeatedly during play to
select “ON D.BASS” or “OFF D.BASS”.
Re-master Press [RE-MASTER] repeatedly during
play to select “ON RE-MASTER” or
“OFF RE-MASTER”.
Digital remaster is effective on MP3.
Analogue remaster is effective on
iPod/iPhone and AUX.
•
•
Sleep timer
30MIN 60MIN 90MIN 120MIN
OFF (Cancelled)
Timer Sound adjustment
Page 16
RQTX1083
16
External unit
Enjoying audio from iPod or iPhone
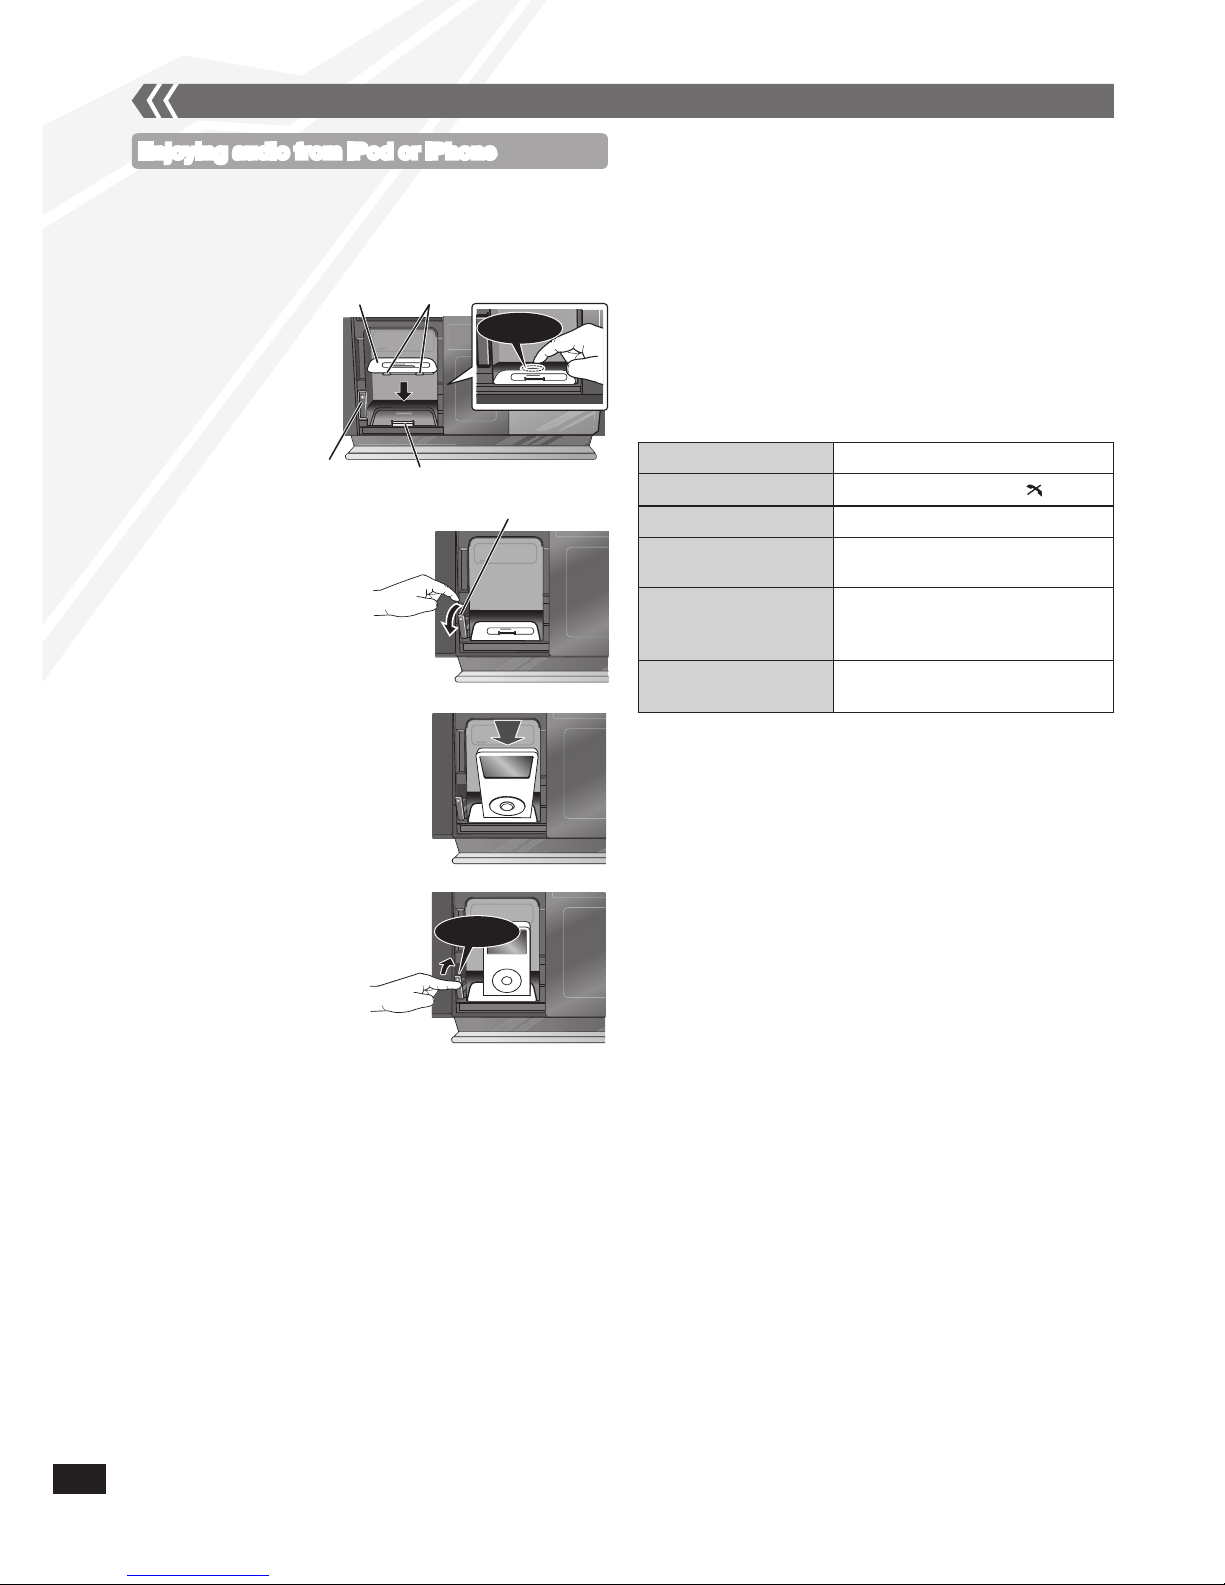
g Inserting an iPod/iPhone
Press [;, iPod] to open the sliding door.
Insert the suitable dock adapter (not included) for the
iPod/iPhone.
g Removing an iPod/iPhone
Press [;, iPod] to close the sliding door.
Repeat step and (➡ left).
To remove, simply pull the iPod/iPhone straight out to
disconnect it.
Repeat step and (➡ left).
If the iPod/iPhone dock is not tilted when connecting or
disconnecting the iPod/iPhone, it may cause damage to the
connector.
When inserting an iPod/iPhone into the unit, be sure to use
the dock adapter either supplied with the iPod/iPhone or
commercially available from Apple Inc.
Reduce the volume of the main unit to minimum before
connecting or disconnecting the iPod/iPhone.
•
•
•
Notes on iPhone:
All phone features can only be controlled by the iPhone’s
touch screen.
The unit does not display incoming calls or the phone status
(Connect iPhone to this unit via Bluetooth (➡ page 19) to
enjoy extended capabilities).
The ringtone of incoming call can be heard from the iPhone’s
speaker. When the unit is in iPod/iPhone mode, the ringtone
can also be heard from the unit’s speakers (Connect iPhone
to this unit via Bluetooth (➡ page 19) to enjoy extended
capabilities).
Connecting or disconnecting the iPhone from the unit will not
cancel a call.
There is no Apple Inc. specification that will guarantee the
iPhone responses above. iPhone responses may vary on
new iPhone models or iPhone new software updates.
•
•
•
•
•
Play
Press [iPod q/h].
Pause
Press [iPod q/h] or [g, ].
Skip track
Press [u] or [i].
Search the current
track
Press and hold [u] or [i].
Display iPod/iPhone
menu/return to previous
menu
Press [iPod MENU] in the play
mode.
(Remote control only)
Select contents from
iPod/iPhone menu
Press [e,r] and then [OK].
(Remote control only)
Connect the iPod/iPhone
(not included) firmly.
Be sure to remove the iPod/iPhone
from its case.
Push the docking switch
lever back until it clicks
into place.
Push!
Click!
Press [;] to unlock the
iPod/iPhone dock and
then pull the docking
switch lever to tilt the
iPod/iPhone dock.
Click!
Dock adapter
Lever
Connector
Clips
Insert the side of the
iPod/iPhone dock
adapter with the
clips facing towards
you first and then
push the opposite
side until it clicks into
place.
[;]
Page 17
RQTX1083
17
■ Charging the iPod/iPhone
When iPod/iPhone is being charged in standby mode,
“IPOD CHARGING” is shown on the main unit’s display.
Check iPod/iPhone to see if the battery is fully charged. If you
are not using iPod/iPhone for an extended period of time after
recharging has completed, disconnect it from the main unit as
the battery will be depleted naturally. (Once fully recharged,
additional recharging will not occur.)
•
•
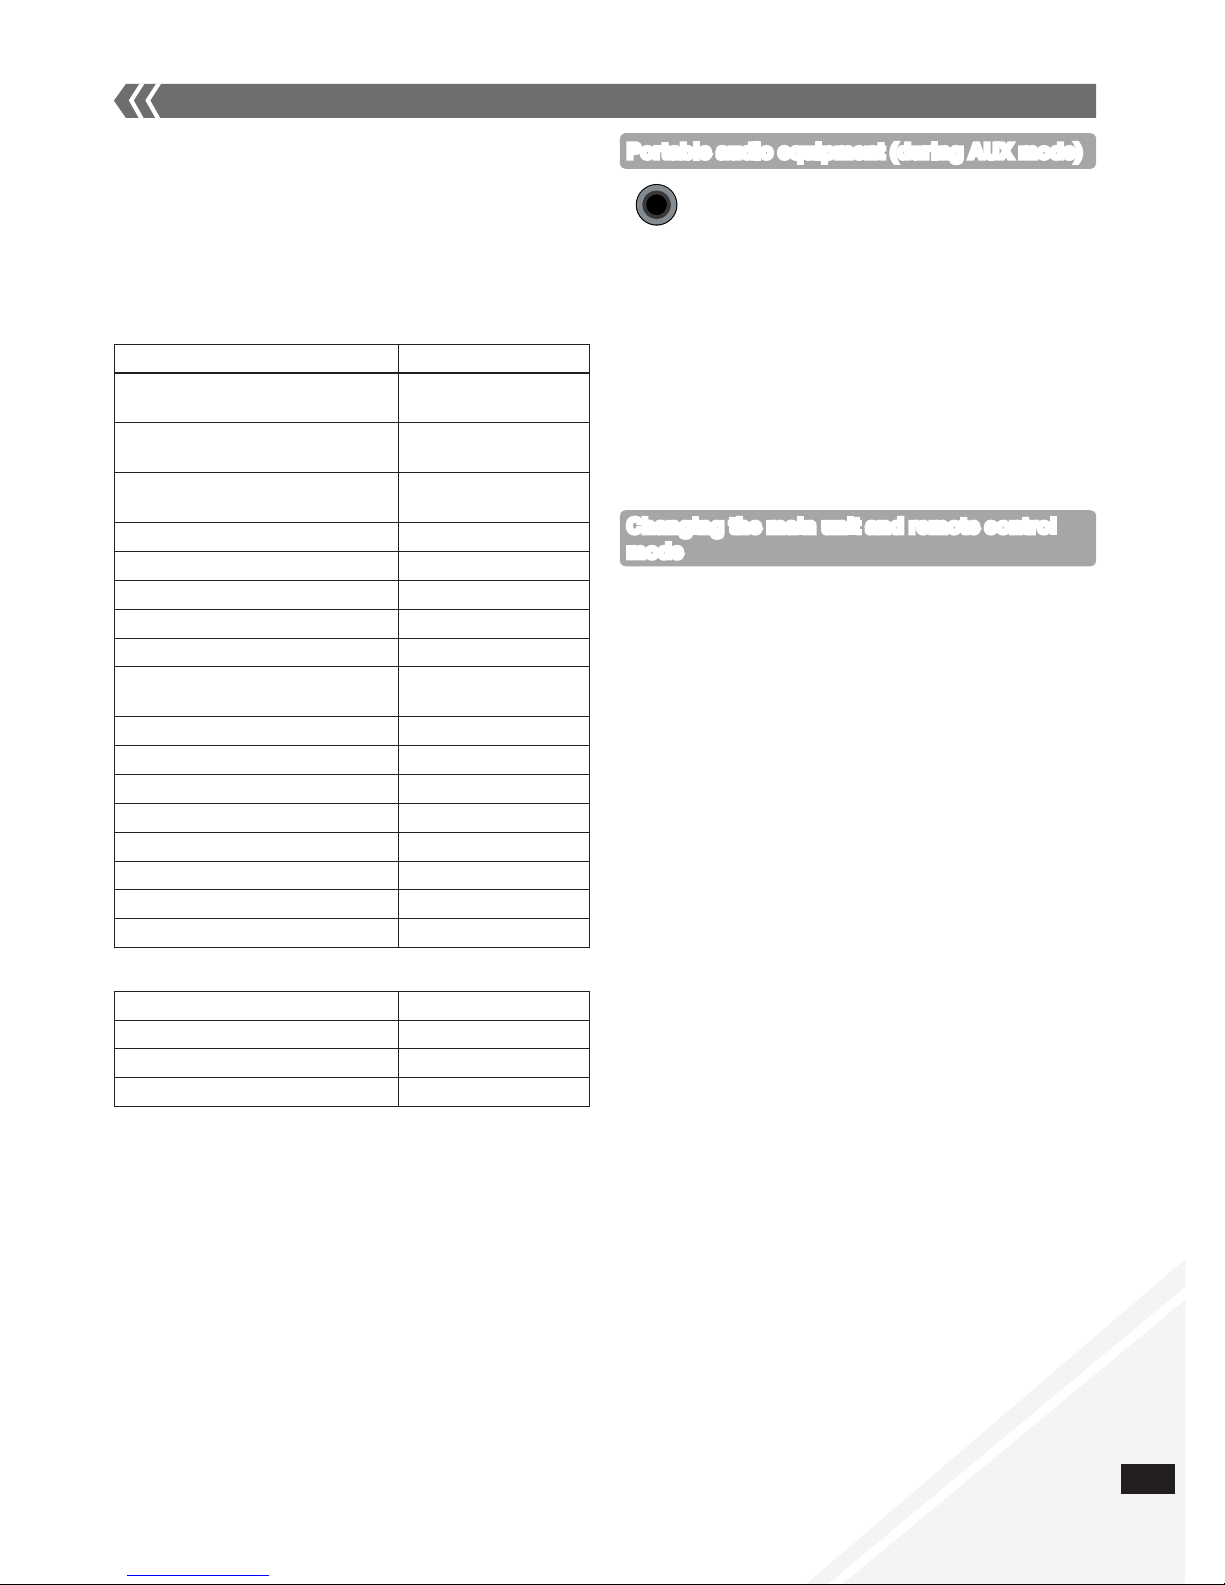
■ Compatible iPod
Name Memory size
iPod nano 5th generation
(video camera)
8 GB, 16 GB
iPod touch 2nd generation 8 GB, 16 GB, 32 GB,
64 GB
iPod classic 120 GB, 160 GB
(2009)
iPod nano 4th generation (video) 8 GB, 16 GB
iPod classic 160 GB (2007)
iPod touch 1st generation 8 GB, 16 GB, 32 GB
iPod nano 3rd generation (video) 4 GB, 8 GB
iPod classic 80 GB
iPod nano 2nd generation
(aluminum)
2 GB, 4 GB, 8 GB
iPod 5th generation (video) 60 GB, 80 GB
iPod 5th generation (video) 30 GB
iPod nano 1st generation 1 GB, 2 GB, 4 GB
iPod 4th generation (colour display) 40 GB, 60 GB
iPod 4th generation (colour display) 20 GB, 30 GB
iPod 4th generation 40 GB
iPod 4th generation 20 GB
iPod mini 4 GB, 6 GB
■ Compatible iPhone
Name Memory size
iPhone 3GS 16 GB, 32 GB
iPhone 3G 8 GB, 16 GB
iPhone 4 GB, 8 GB, 16 GB
Compatibility depends on the software version of the
iPod/iPhone.
•
External unit (continued)
The remote control and main unit are factory-set to
“REMOTE 1” mode.
If you find the remote control unintentionally also controls other
equipment, you can switch to operate in “REMOTE 2” mode.
To switch to “REMOTE 2” mode (by main unit only)
Press [DAB/FM/AUX] to select “AUX”.
Press and hold [DAB/FM/AUX] and then press [2] until
“REMOTE 2” is displayed.
Press and hold [OK] and [2] for at least 2 seconds.
To return to “REMOTE 1” mode
Repeat the steps above but replace [2] with [1].
(“REMOTE 1” will be displayed.)
Changing the main unit and remote control
mode
Plug the audio cord into the AUX jack.
Plug type: 3.5 mm stereo
Press [AUX] and start playback from the
portable audio source.
You can select the sound input level of the portable audio
equipment.
Press [PLAY MODE] repeatedly to select “HIGH” or
“NORMAL”.
Switch the equalizer off or turn the volume of the portable
equipment down to reduce the input signal. High level of
input signal will distort the sound.
For details, refer to the instruction manual of the other
equipment.
Cords and equipment are not included.
•
•
•
Portable audio equipment (during AUX mode)
AUX
Page 18
RQTX1083
18
About using Bluetooth
g Frequency band used
This unit uses the 2.4 GHz frequency band, however other devices
may use this frequency as well. To avoid interference with other
wireless devices, please follow the cautions listed below.
g Certification of this device
This unit conforms to frequency restrictions and has received
certification based on frequency laws, so a wireless permit is
not necessary. However, the following actions are punishable
by law:
Taking apart/modifying the unit.
Removing specification indications from the rear part of this
unit.
g Usage restrictions
Wireless transmission and/or usage with all Bluetooth
equipped devices is not guaranteed.
Compatible mobile phones capable of wireless transmission
include and comply to standards set by the Bluetooth SIG, Inc.
However, if the mobile phone is optimised to meet standard
specifications, some functions may work. Even so, depending
on the specifications and settings of the mobile phone, a
connection may not be established, nor are the methods of
operation, display, or operation guaranteed.
This unit supports Bluetooth security features, however
depending on the operating environment and/or settings, this
security may not be sufficient. Use caution when transmitting
data wirelessly.
Please be aware that Panasonic accepts no responsibility for
data and/or information that may be compromised during a
wireless transmission.
g Range of use
Use this device within an unobstructed 10 m range. The range
of usage or perimeter may be shortened depending on any
obstructions, devices causing interference, other people in the
room, or the construction of the building. Please note that the
range mentioned above is not guaranteed.
g Effects from other devices
It is possible that this unit may not operate correctly or you
may experience other effects of instability such as
“broken up” audio, etc. when other devices are placed
within close proximity. Therefore, in order to prevent signal
interference, we recommend separating this unit from the
following devices during use:
Microwave oven/Wireless LAN/Electronic devices/Audio &
Video devices/Office Assistant machines & devices/Digital
cordless telephones/Fax machines, etc.
If you live in close proximity to a broadcasting studio and the
signal is too strong, the unit may not operate correctly.
When using a notebook PC with a wireless LAN transmitter,
do not use this unit and the wireless LAN at the same time.
If you are still experiencing noise even outside of the
5 m range of a wireless LAN device, turn the power to the
wireless LAN device off.
•
•
•
•
•
•
•
•
•
•
What is Bluetooth?
Bluetooth technology allows you to make a wireless
connection with another electronic device.
Bluetooth operations
Preparation:
Pair the Bluetooth device with this unit to create an audio
connection.
Press [ q/h] to select Bluetooth.
When using it for the first time, it enters pairing mode
automatically.
While this unit is in pairing mode, access the Bluetooth
menu of the Bluetooth device and execute a Bluetooth
search to find this unit (SC-HC40).
Please refer to the Bluetooth device user manual for
further instruction on how to connect a Bluetooth device.
If prompted for the passkey, enter “0000” (For Bluetooth
devices which version are incompatible with 2.1+EDR).
If pairing is successful, the paired device’s name will be
displayed for 2 seconds. The Bluetooth indicator lights
up. The unit is now ready to be used with the Bluetooth
device.
Make sure the Bluetooth device supports A2DP (Advance
Audio Distribution Profile).
This unit supports the A2DP reception which is
copyright-protected by SCMS-T method.
A2DP enables you to stream stereo sound from an audio
source (mobile phone, PC or laptop) to this unit via Bluetooth.
Depending on the specification or setting of mobile phones,
connection may not be established, or operation and display
may vary.
You can register up to 6 devices into this unit. Disconnect
the current Bluetooth device and refer to “To register more
devices” (➡ page 19).
If you register more than the maximum device number, the
oldest device in connection history will be overwritten.
If a registered device is re-registered, it will be overwritten.
•
•
•
•
•
•
•
•
•
•
External unit (continued)
g Intended usage limitations
This unit is intended for normal, general use. This unit is not
developed or manufactured with the intention of use in
“high safety” or hazardous occupations. Do not use this unit in
these kinds of environments or occupations.
The following examples require extreme caution, and can
directly result in loss of life, or extreme bodily harm.
e.g.)
Nuclear Engineering, and control of a nuclear reaction/
automated control of aircraft/air traffic control management/
controlling movement of heavy freight systems/control
of life support or extension systems/control of weapons
systems and/or missile launch systems, etc.
Page 19
RQTX1083
19
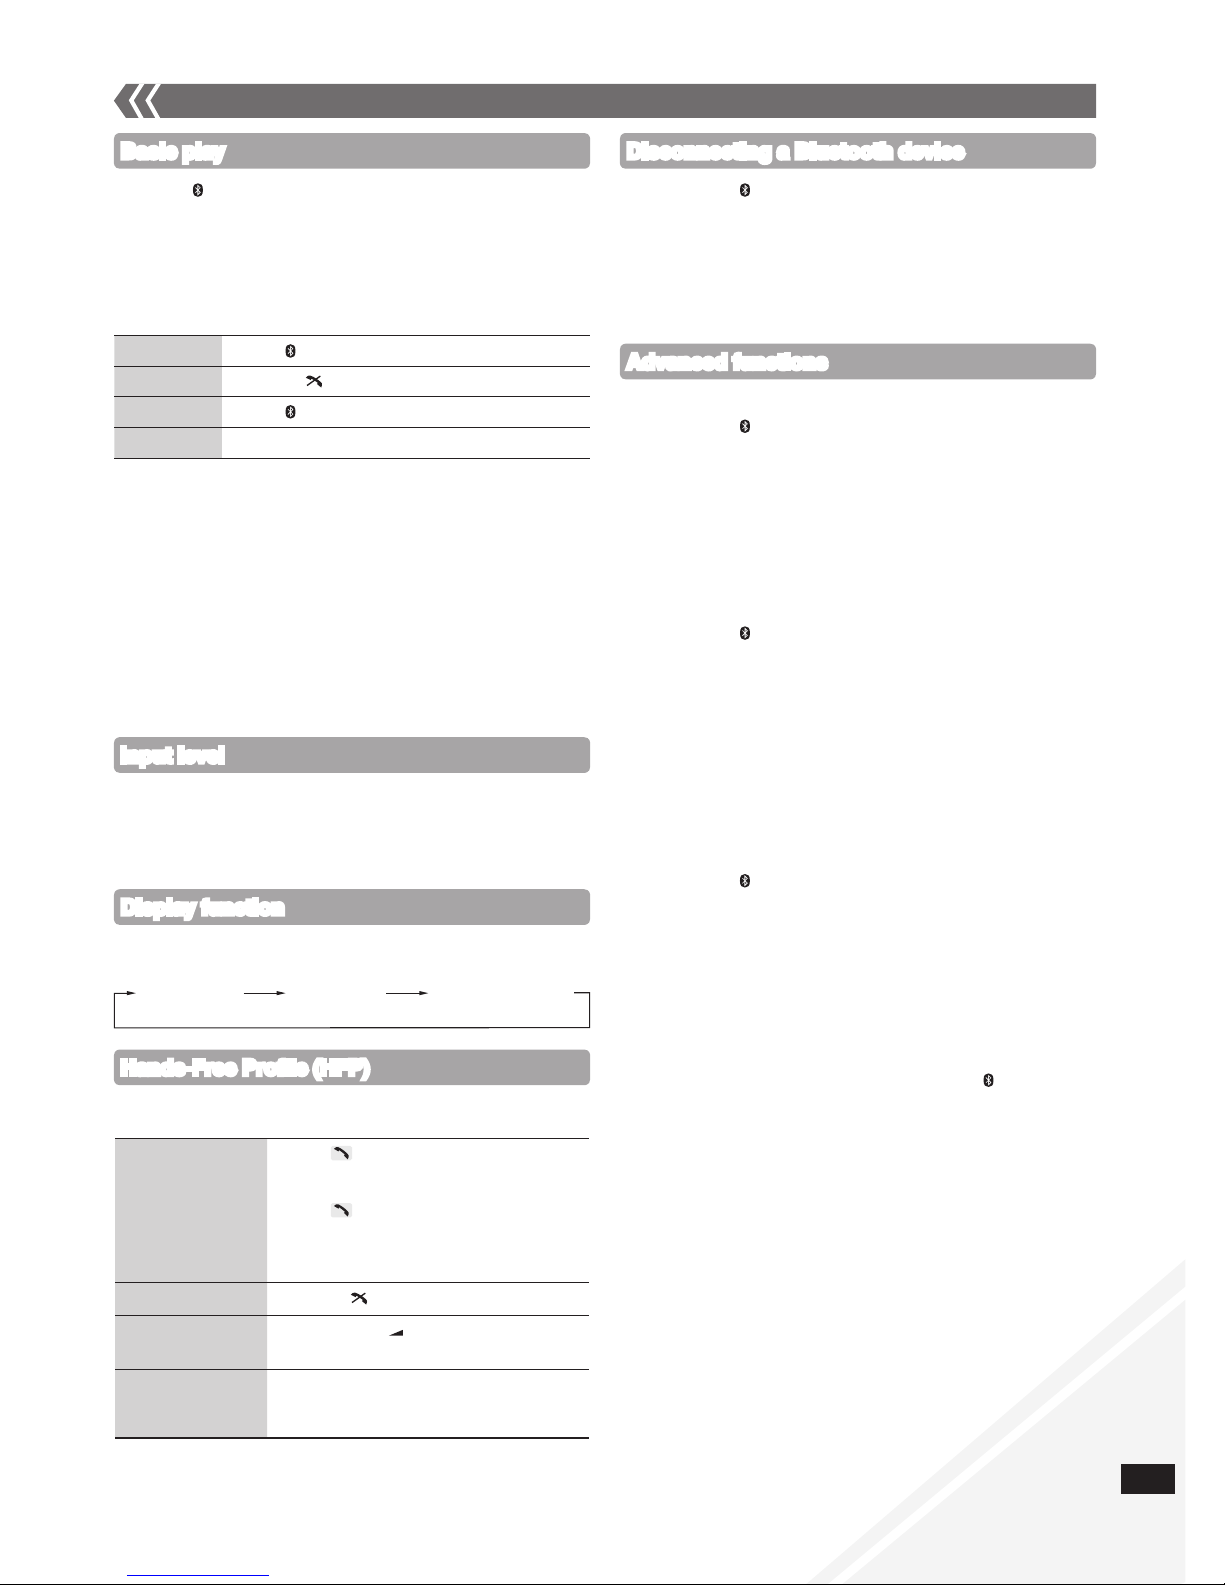
Basic play
Play
Press [ q/h] to start play.
Stop
Press [g, ].
Pause
Press [ q/h]. Press again to resume play.
Skip track
Press [u] or [i].
To utilise these functions, the Bluetooth device must support
AVRCP (Audio Video Remote Control Profile).
This unit cannot transmit data to a Bluetooth device.
When playing iPod/iPhone by Bluetooth with the main unit,
intermittent sound may be experienced if you leave the
iPod/iPhone Bluetooth menu screen active or when making
Bluetooth registration and connection. If this occurs, please
exit the iPod/iPhone Bluetooth menu screen.
When playing music by iPod/iPhone via Bluetooth connection
and the iPod/iPhone is connected into this unit iPod/iPhone
dock, the audio will not be re-produced in Bluetooth selector.
Switch the selector to iPod to continue enjoying the music.
•
•
•
•
External unit (continued)
Input level
You can select the sound input level of the Bluetooth device.
Press [PLAY MODE] repeatedly to select “LEVEL 0”,
“LEVEL +1” or “LEVEL +2”.
Select “LEVEL 0” if the sound is distorted.•
Display function
Press [DISPLAY, –DIMMER] repeatedly to view the
information of the current connected device.
Hands-Free Profile (HFP)
This unit works as a Bluetooth hands-free for your mobile phones.
You can answer or cancel an incoming call with the remote control.
To answer a call
(“IN CALL” blinks)
Press [ ]. “CALLING” starts blinking
on the display (Talk into the unit’s
microphone).
Press [ ] again to transfer the call to
the mobile phones (“TRANSFER” blinks.
You may now converse using the mobile
phone).
To cancel a call
Press [g, ].
To adjust volume Press [+, VOL , –] (Adjustable from
“TEL VOL 1” to “TEL VOL 10”).
To mute the
microphone
Press [MUTE]. Press again to cancel.
(During “MIC MUTE”, the caller is not
able to hear your voice).
This unit does not work with Headset Profile (HSP).
When the mobile phone is too close to the microphone of this
unit, noise may occur. Always keep the mobile phone away
from the microphone of this unit when making a call.
•
•
Advanced functions
g To register more devices
Press [DAB/ MENU].
Press [e,r] to select “NEW DEV” and then press [OK].
The unit enters pairing mode and “PAIRING” starts blinking
on the display.
While this unit is in pairing mode, access the Bluetooth
menu of the Bluetooth device and execute a Bluetooth
search to find this unit (SC-HC40).
If prompted for the passkey, enter “0000”.
g To select communication quality
Press [DAB/ MENU].
Press [e,r] to select “LINK MODE” and then press [OK].
Press [e,r] to select the following modes and then
press [OK].
“MODE 1”: Connection with emphasis on communication
stability
“MODE 2”: Connection with high bit rate for good audio
quality
(Communication might easily be disconnected in this
mode, select “MODE 1” if this occurs).
g To select Auto Link mode
Press [DAB/ MENU].
Press [e,r] to select “AUTO LINK” and then press [OK].
Press [e,r] to select the following modes and then
press [OK].
“ON”: Automatically linked even in other than Bluetooth
selector
“OFF”: Linked only in Bluetooth selector
These functions are unavailable if a device is connected.
Disconnect the Bluetooth devices to display these functions.
When “LINKING” is displayed, pressing [DAB/ MENU] is
invalid.
Auto Link works only if your device support A2DP.
•
•
•
•
•
•
•
•
Disconnecting a Bluetooth device
BLUETOOTH Connected
device name
Connected profiles
Press [DAB/ MENU] to display “DISCONNECT?” and
then press [OK].
A confirmation message is displayed.
Press [e,r] to select “YES” or “NO” and then press
[OK].
The connection can also be stopped when you disable
Bluetooth transmission on the connected Bluetooth device.
•
Press [ q/h] to select Bluetooth.
On the Bluetooth device, start playback of a music
source. If the device is connected, the music will be
heard on this unit.
(Please refer to the Bluetooth device user manual if required.)
You can also make the following controls with the
remote control.
Page 20
RQTX1083
20
External unit (continued)
Compatible devices
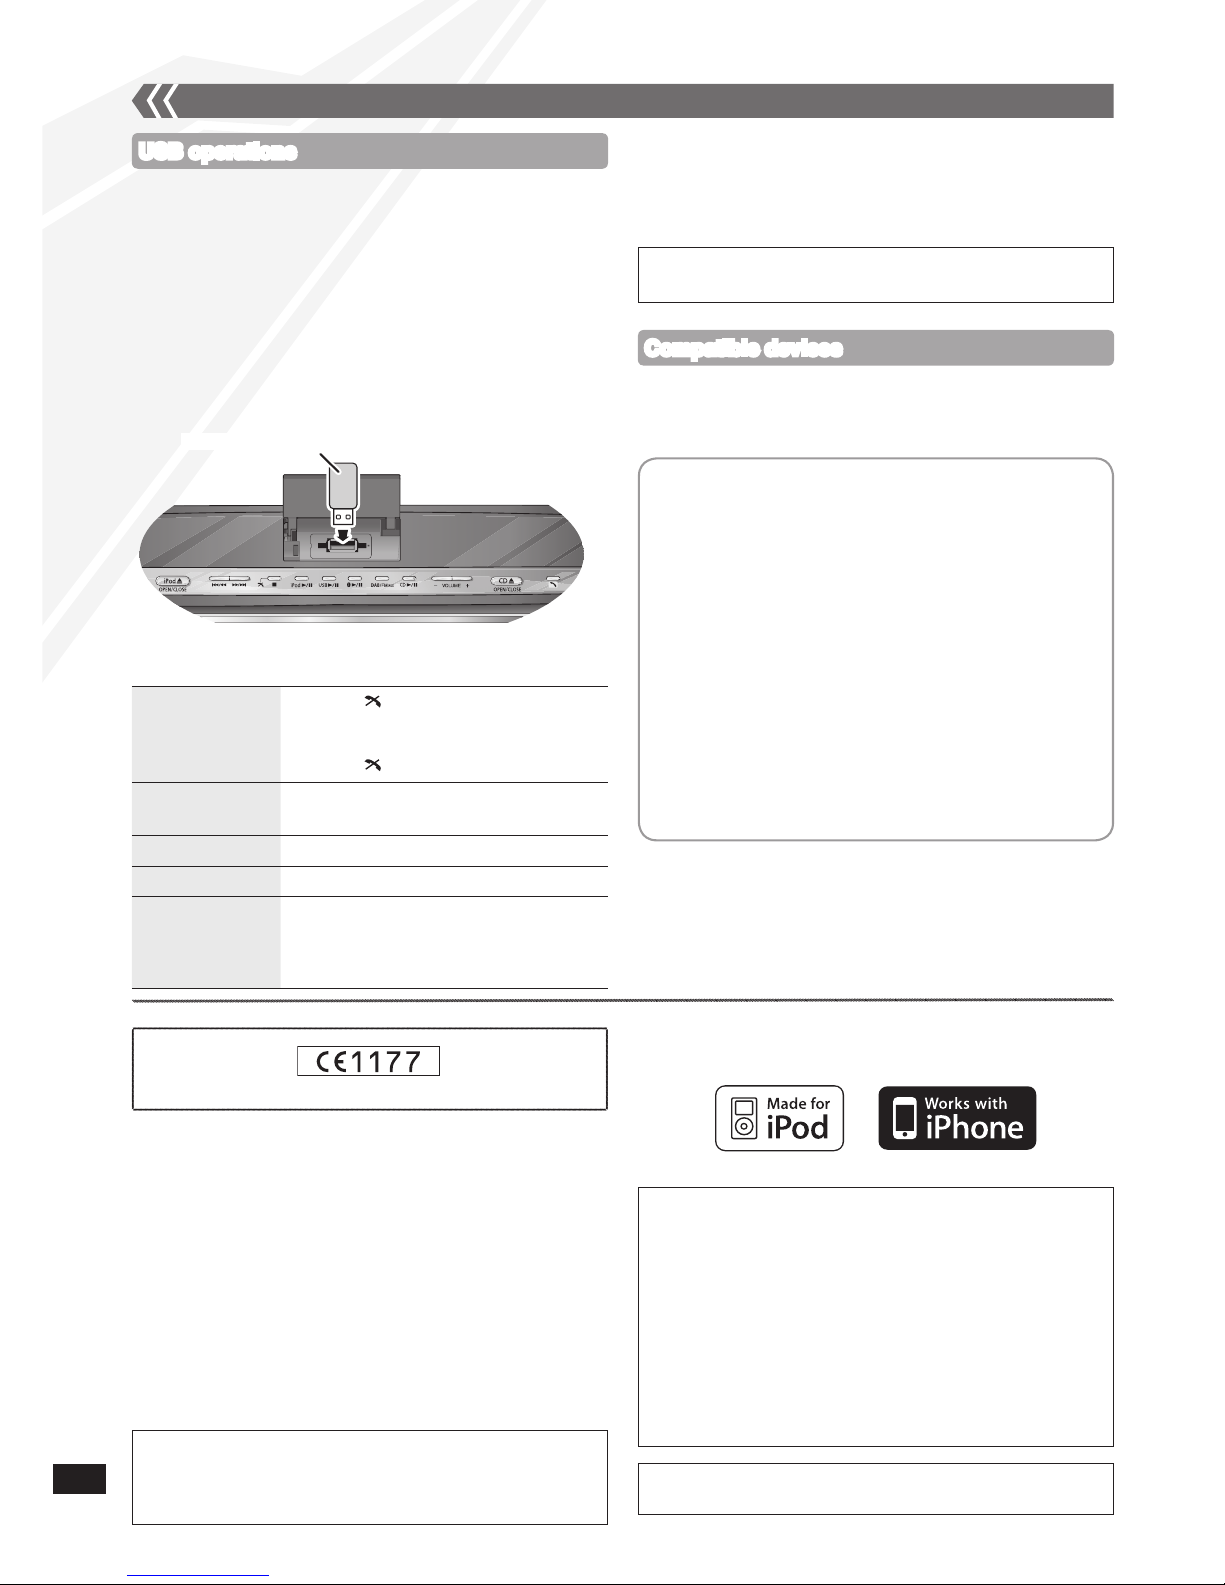
The USB connectivity enables you to connect and play MP3
tracks from USB mass storage class.
Preparation:
Before connecting any USB mass storage device to the unit,
ensure that the data stored therein has been backed up.
It is not recommended to use a USB extension cable. The
device connected via the cable will not be recognised by this
unit.
Open the USB cover.
Reduce the volume and connect the USB mass storage
device.
•
•
To remove the USB mass storage device, select a source
other than “USB”.
Removing the USB mass storage device with it selected as a
source can damage the data stored in the device.
•
Devices which are defined as USB mass storage class:
USB devices that support bulk only transfer
USB devices that support USB 2.0 full speed
•
•
For other operating functions, they are similar as those
described in “Disc operations” (➡ page 9, 10, 11).
Notes on USB
Supported format: Files with extension “.mp3” or “.MP3”
CBI (Control/Bulk/Interrupt) is not supported.
A device using NTFS file system is not supported [Only
FAT 12/16/32 (File Allocation Table 12/16/32) file system
is supported].
Depending on the sector size, some files may not work.
This unit can access up to 255 albums and 2500 tracks.
The maximum number of tracks in a folder is 999 tracks.
Only one memory card will be selected when connecting
a multiport USB card reader, typically the first memory
card inserted.
Disconnect the USB card reader from the unit when you
remove the memory card. Failure to do so may cause
malfunction to the device.
When you connect the digital audio player to the
USB port, it charges all the time when the unit is on.
•
•
•
•
•
•
•
•
•
USB operations
Stop
Press [g, ]. “RESUME” is displayed.
The position is memorised.
Press [USB q/h] to resume play.
Press [g, ] again to clear the position.
Pause
Press [USB q/h]. Press again to resume
play.
Skip track
Press [u] or [i].
Skip album
Press [e,r].
Direct access
play (Play starts
with the track you
select.)
Press [e,r] to select the album.
Press [i] once and then the numeric
buttons to select the track.
The Bluetooth word mark and logos are owned by the
Bluetooth SIG, Inc. and any use of such marks by Panasonic
Corporation is under license. Other trademarks and trade
names are those of their respective owners.
Declaration of Conformity (DoC)
Hereby, “Panasonic Corporation”, declares that this product
is in compliance with the essential requirements and other
relevant provisions of Directive 1999/5/EC.
Customers can download a copy of the original DoC to our
R&TTE products from our DoC server:
http://www.doc.panasonic.de
Contact to Authorised Representative: Panasonic Marketing
Europe GmbH, Panasonic Testing Centre, Winsbergring 15,
22525 Hamburg, Germany
This product is intended to be used in the following countries.
GB, IE
This product is intended for general consumer. (Category 3)
or
“Made for iPod” means that an electronic accessory has
been designed to connect specifically to iPod and has
been certified by the developer to meet Apple performance
standards.
“Works with iPhone” means that an electronic accessory has
been designed to connect specifically to iPhone and has
been certified by the developer to meet Apple performance
standards.
Apple is not responsible for the operation of this device or its
compliance with safety and regulatory standards.
iPod is a trademark of Apple Inc., registered in the U.S. and
other countries. iPhone is a trademark of Apple Inc.
MPEG Layer-3 audio decoding technology licensed from
Fraunhofer IIS and Thomson.
OPERATING AT 2400 MHz TO 2483.5 MHz
USB mass storage device (not included)
Press [USB q/h] to start play.
Page 21

RQTX1083
21
Troubleshooting guide
Before requesting service, make the following checks. If you are in doubt about some of the check points, or if the
remedies indicated in the chart do not solve the problem, consult your dealer for instructions.
g Common problems
Incorrect display or play will not start
You have not inserted the disc
properly. Insert it correctly.
The disc is scratched or dirty (Tracks
skipped).
There is moisture on the lens. Wait for
about an hour and then try again.
MP3 cannot be read
You may not be able to play MP3 if you
have copied a multi-session disc that
has no data between sessions.
When creating a multi-session disc, it
is necessary to close the session.
The amount of data on the disc is too
small. Set the amount of data to above
5 MB.
Noise is heard or no sound
While playing MP3, noise may occur if
the recording is poor.
Keep this unit away from mobile
phones if the interference is apparent.
Turn the volume up.
Switch the unit off, check and correct
the connection and then switch the
unit on. Causes include straining of the
speakers through excessive volume
or power and using the unit in a hot
environment.
Humming heard during play
An AC mains lead or fluorescent light is
near the cords. Keep other appliances
and cords away from this unit’s cables.
A beat sound or noise is heard while
receiving radio broadcast
Switch the television or other audio
player off or separate it from the unit.
Switch the portable audio player off if
connected to the AUX port.
The picture on the television near the
unit disappears or stripes appear on
the screen
The location and orientation of the
antenna are incorrect.
The television antenna wire is too close
to the unit. Separate the antenna wire
of the television from the unit.
No response when remote control
buttons are pressed
Check that the batteries are inserted
correctly (➡ page 9).
•
•
•
•
•
•
•
•
•
•
•
•
•
•
•
•
g Display
“--:--”
You plugged the AC mains lead in
for the first time or there was a power
failure recently. Set the time
(➡ page 15).
“ADJUST CLOCK”
Clock is not set. Adjust the clock
accordingly.
“ADJUST TIMER”
Play timer is not set. Adjust the play
timer accordingly.
“PGM FULL”
The number of programmed tracks is
limited to 24. No further tracks can be
programmed.
“NO PLAY”
A CD-ROM disc that is not in CD-DA
or MP3 format is inserted. It cannot be
played.
“ERROR”
Incorrect operation is performed. Read
the instructions and try again.
“F61” or “F76”
There is a power supply problem.
Consult the dealer.
Disconnect the USB device. Turn the
unit off and on again.
“AUTO OFF”
The unit has been left unused for about
29 minutes and will shut down in a
minute. Press any button to cancel it.
“ILLEGAL OPEN”
Sliding door is not in correct position.
Turn the unit off and on again.
“NODEVICE”
The iPod/iPhone device is not inserted
correctly. Read the instructions and try
again (➡ page 16).
The USB device is not inserted. Check
the connection.
“REMOTE 1”
The main unit is in “REMOTE 1” mode.
Switch the remote control to
“REMOTE 1” mode (➡ page 17).
“REMOTE 2”
The main unit is in “REMOTE 2” mode.
Switch the remote control to
“REMOTE 2” mode (➡ page 17).
•
•
•
•
•
•
•
•
•
•
•
•
•
•
g DAB
DAB reception is poor
Keep the antenna away from
computers, televisions, other cables
and cords.
Use an outdoor antenna (➡ page 4).
“DATA”
Data broadcast being received over the
DAB broadcast signal, cannot be used
on this unit.
“SCRAMBLED”
The broadcast station being received
cannot be accessed.
“NO SERVICE”
The station is currently not
broadcasting.
“NO SIGNAL”
This station cannot be received. Check
your antenna (➡ page 4).
“SCAN FAILED”
Stations are not receivable. Check your
antenna and try Auto scanning
(➡ page 4, 13, 14).
“STATION FULL”
DAB station memory is full. Use the
following method to clear station
memory.
Press [DAB/ MENU].
Press [e,r] to select
“STATION CLEAR”.
Press [OK]. “OK? Push OK” is
displayed.
Press [OK].
Station memory is erased and the unit
automatically begins Auto scanning.
•
•
•
•
•
•
•
•
Page 22
RQTX1083
22
Troubleshooting guide (continued)
g iPod/iPhone
iPod/iPhone does not turn on
Verify that the iPod/iPhone battery is
not depleted before connecting it to
the unit.
Before inserting the iPod/iPhone into
the dock, turn both the unit and the
iPod/iPhone off. Turn the power on and
select the appropriate source.
No sound is heard from the speakers
The iPod/iPhone is not inserted
correctly into the dock. Turn the
iPod/iPhone off and remove it from the
dock connector. Reinsert it and turn it
on again.
Make sure that the iPod/iPhone is
actually playing something.
Adjust the volume.
Distorted sound or the sound level is
too low
Make sure the equalizer function of the
iPod/iPhone is turned off.
iPod/iPhone cannot be controlled by
the remote control or main unit
Make sure the iPod/iPhone is inserted
properly into the dock.
Check the dock connection and make
sure that iPod/iPhone is selected as
the source of music (➡ page 16).
iPod/iPhone does not charge
Check all connections (➡ page 4, 16).
•
•
•
•
•
•
•
•
•
g Bluetooth
The name of the connected device is
shown as “
*
”
Character that cannot be displayed will
be replaced by “ * ”.
An unknown device name is detected
and displayed as “
*****
”.
Noise is heard or broken sound
The Bluetooth communication distance
has exceeded 10 m. Bring the device
closer to the unit.
There are obstructions between the
device and the unit. Remove or avoid
the obstacles.
Select “MODE 1” to improve
connection quality (➡ page 19).
Interference from mobile phones.
“F70”
Turn the unit off. Disconnect the AC
mains lead and consult your dealer.
•
•
•
•
•
•
•
g USB
No response when [USB q/ h] is
pressed
Disconnect the USB device and then
reconnect it. Alternatively, turn the unit
off and on again.
The USB drive or its contents cannot
be read
The USB drive format or its contents
is/are not compatible with the unit
(➡ page 20).
The USB host function of this product
may not work with some USB devices.
USB devices with storage capacity of
more than 8 GB may not work in some
instances.
Slow operation of the USB flash drive
Large file size or high memory USB
flash drive takes longer time to read.
“NO PLAY”
Check the content.
Only MP3 format files can be played.
If there are more than 255 albums or
folders (audio and non-audio), some
of the MP3 files in these albums may
not be read and played. Transfer
these music albums to another USB.
Alternatively, reformat the USB device
and save these music albums prior to
saving the other non-audio folders.
•
•
•
•
•
•
•
•
Maintenance
g Pull out the power plug from the outlet for maintenance
beforehand and then wipe it using a soft and dried cloth.
When dirt is heavy, wring the cloth moistened in water tightly
to wipe the dirt, and then wipe it with a dried cloth.
Do not use solvents such as benzine, thinner, alcohol and
detergent, which may deform the coating of the outer case.
When using a chemical cloth, follow the precautions.
•
•
•
g Care on the CD lens
Clean the lens regularly to prevent malfunctions. Use a
blower to remove dust and a cotton swab if it is extremely
dirty.
Do not use the lens cleaner of the CD type.
•
•
When the following situations occur, reset the memory:
There is no response when buttons are pressed.
You want to clear and reset the memory contents.
To reset memory
Disconnect the AC mains lead. (Wait for at least 3 minutes before proceeding to step 2.)
While pressing and holding down [8] on the main unit, reconnect the AC mains lead.
“--------” appears on the display.
Release [8].
All the settings are returned to the factory preset. You will need to reset the memory items.
•
•
Memory reset (Initialization)
Page 23
RQTX1083
23
g AMPLIFIER SECTION
RMS Output Power
Front Ch (both ch driven)
20 W per channel (6 Ω), 1 kHz, 10 % THD
Total RMS power 40 W
Phone jack
Terminal Stereo, 3.5 mm jack
Aux (Rear)
Terminal Stereo, 3.5 mm jack
g TUNER SECTION
Preset Memory FM 30 stations
Frequency Modulation (FM)
Frequency range 87.50 MHz to 108.00 MHz (50 kHz step)
Antenna terminals 75 Ω (unbalanced)
g DAB SECTION
DAB memories 20 channels
Frequency Band (Wavelength)
Band III (UK Only) 10B to 12D
(211.648 MHz to 229.072 MHz)
Band III (Europe) 5A to 13F
(174.928 MHz to 239.200 MHz)
Intermediate Frequency 2.048 MHz
Sensitivity *BER 4x10
-4
Max input power 0 dBm
Min requirement -98 dBm
DAB External Antenna
Terminal F - Connector (75 Ω)
g DISC SECTION
Disc played [8 cm or 12 cm]
(1) CD-Audio (CD-DA)
(2) CD-R/RW (CD-DA, MP3)
(3) MP3*
* MPEG-1 Layer 3, MPEG-2 Layer 3
Pick up
Wavelength 795 nm
Laser power CLASS 1
Audio Output (Disc)
Number of channels FL, FR, 2 channel
g SPEAKER SECTION
Type 1 way, 1 speaker system (Passive Radiator)
Speaker unit(s)
Full range 6.5 cm Cone type x 1 / channel
Passive Radiator 8 cm x 2 / channel
Impedance 6 Ω
g BLUETOOTH SECTION
Bluetooth system specification V2.1 + EDR
Wireless equipment classification Class 1 (2.5 mW)
Supported profiles A2DP, AVRCP, HFP
Frequency band 2402 MHz to 2480 MHz
(Adaptive Frequency Hopping)
Driving distance 10 m Line of Sight
(iPhone 3G, at height 1 m, in MODE 1)
g USB PORT SECTION
USB Standard USB 2.0 full speed
Media file format support MP3 (*.mp3)
USB device file system FAT 12/16/32
USB port power Max 500 mA
g GENERAL
Power supply AC 220 V to 240 V, 50 Hz
Power consumption 35 W
Dimensions (W x H x D) 500 mm x 201 mm x 102 mm
(D = 69 mm minimum)
Mass Approx. 3.0 kg
Operating temperature range 0 °C to +40 °C
Operating humidity range
35 % to 80 % RH (no condensation)
Power consumption in standby mode: 0.09 W (approx.)
Specifications are subject to change without notice.
Total harmonic distortion is measured by the digital spectrum
analyser.
•
•
Specifications
Page 24
RQTX1083-2B
H0310HU2050
EU
En
Panasonic Corporation
Web Site: http://panasonic.net
Pursuant to at the directive 2004/108/EC, article 9(2)
Panasonic Testing Centre
Panasonic Marketing Europe GmbH
Winsbergring 15, 22525 Hamburg, Germany
© Panasonic Corporation 2010
Placement
Set the unit up on an even surface away from direct
sunlight, high temperatures, high humidity, and excessive
vibration. These conditions can damage the cabinet and other
components, thereby shortening the unit’s service life.
Do not place heavy items on the unit.
Voltage
Do not use high voltage power sources. This can overload
the unit and cause a fire.
Do not use a DC power source. Check the source carefully
when setting the unit up on a ship or other place where DC
is used.
AC mains lead protection
Ensure the AC mains lead is connected correctly and not
damaged. Poor connection and lead damage can cause fire
or electric shock. Do not pull, bend, or place heavy items on
the lead.
Grasp the plug firmly when unplugging the lead. Pulling the
AC mains lead can cause electric shock.
Do not handle the plug with wet hands. This can cause
electric shock.
Foreign matter
Do not let metal objects fall inside the unit. This can cause
electric shock or malfunction.
Do not let liquids get into the unit. This can cause electric
shock or malfunction. If this occurs, immediately disconnect
the unit from the AC mains supply and contact your dealer.
Do not spray insecticides onto or into the unit. They contain
flammable gases which can ignite if sprayed into the unit.
Service
Do not attempt to repair this unit by yourself. If sound is
interrupted, indicators fail to light, smoke appears, or any
other problem that is not covered in these instructions occurs,
disconnect the AC mains lead and contact your dealer or
an authorized service centre. Electric shock or damage to
the unit can occur if the unit is repaired, disassembled or
reconstructed by unqualified persons.
Extend operating life by disconnecting the unit from the AC
mains if it is not to be used for a long time.
Safety precautions
Information for Users on Collection and Disposal
of Old Equipment and used Batteries
These symbols on the products, packaging,
and/or accompanying documents mean that
used electrical and electronic products and
batteries should not be mixed with general
household waste.
For proper treatment, recovery and recycling
of old products and used batteries, please
take them to applicable collection points, in
accordance with your national legislation and
the Directives 2002/96/EC and 2006/66/EC.
By disposing of these products and batteries
correctly, you will help to save valuable
resources and prevent any potential
negative effects on human health and the
environment which could otherwise arise
from inappropriate waste handling.
For more information about collection and
recycling of old products and batteries,
please contact your local municipality, your
waste disposal service or the point of sale
where you purchased the items.
Penalties may be applicable for incorrect
disposal of this waste, in accordance with
national legislation.
For business users in the European
Union
If you wish to discard electrical and
electronic equipment, please contact your
dealer or supplier for further information.
[Information on Disposal in other
Countries outside the European Union]
These symbols are only valid in the
European Union. If you wish to discard these
items, please contact your local authorities
or dealer and ask for the correct method of
disposal.
Note for the battery symbol (bottom two
symbol examples):
This symbol might be used in combination
with a chemical symbol. In this case it
complies with the requirement set by the
Directive for the chemical involved.
 Loading...