

Page 1
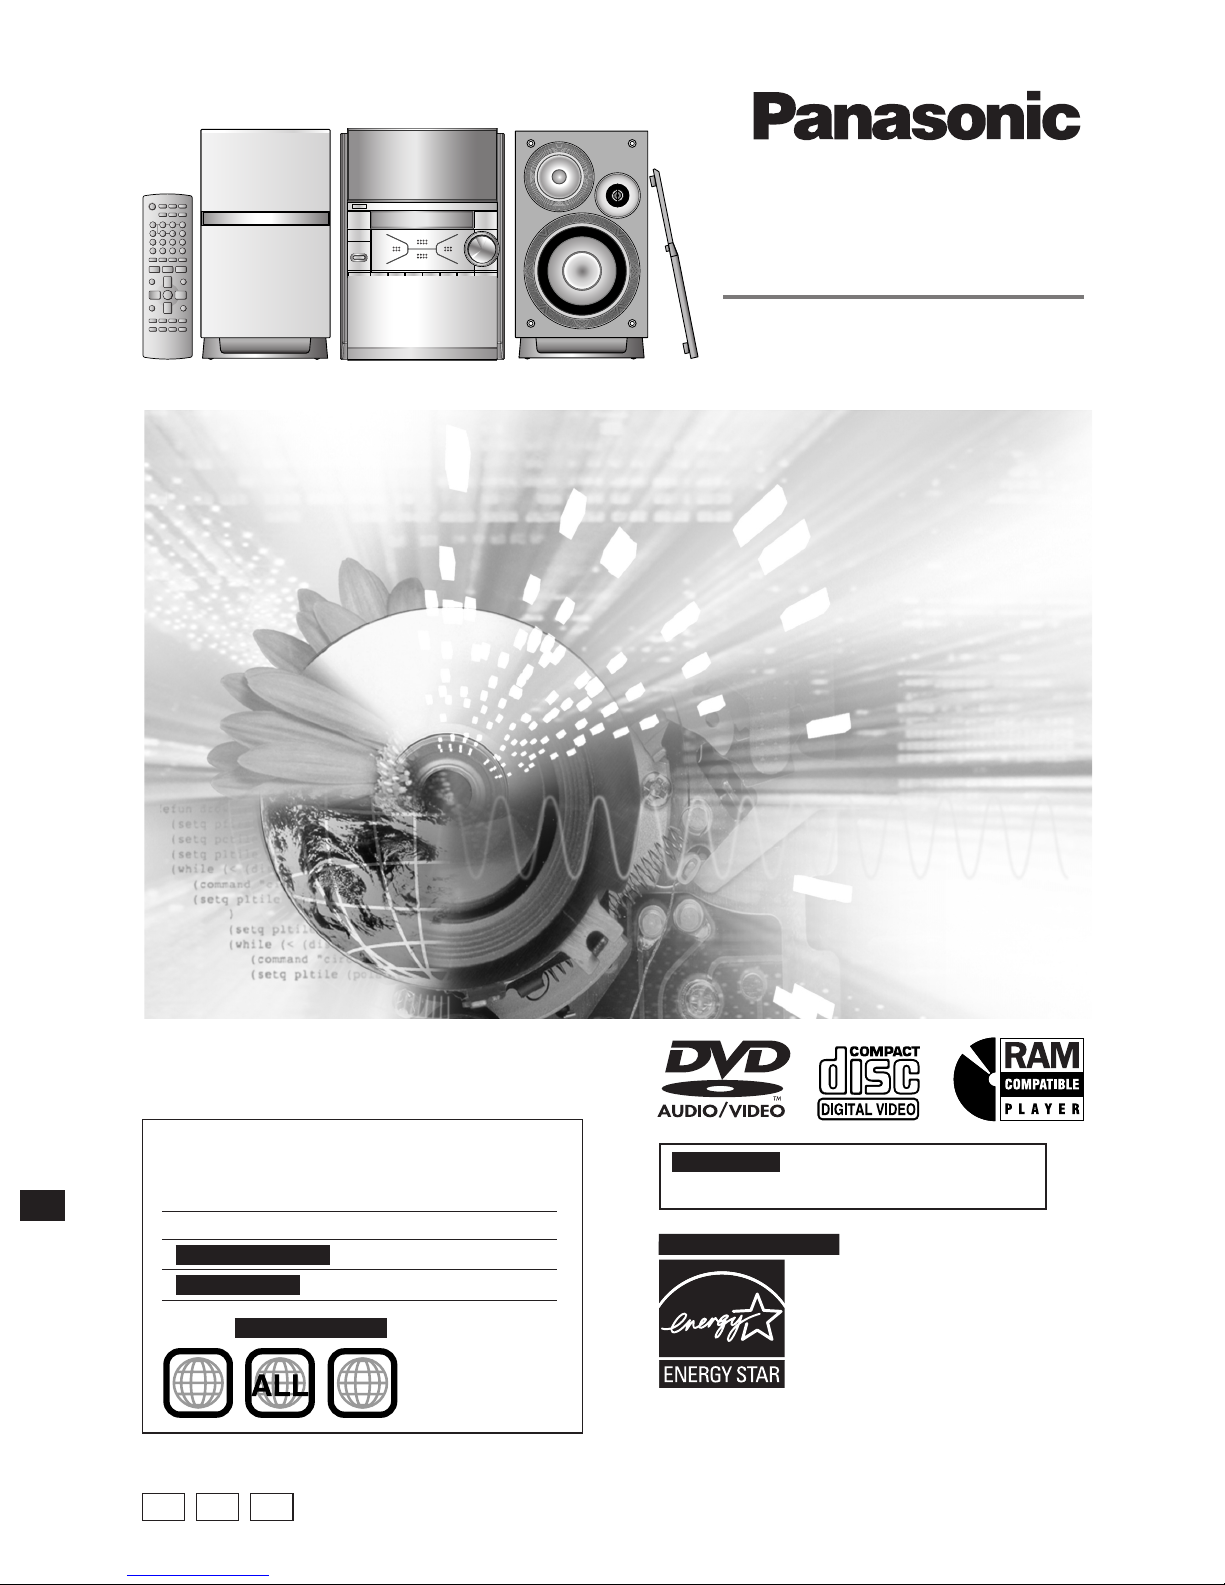
DVD Stereo System
Operating Instructions
Model No. SC-PM39D
Before connecting, operating or adjusting this product,
please read these instructions completely.
Please keep this manual for future reference.
Region number
The player plays DVD-Video marked with labels containing
the region number or “ALL”.
Region Number
For U.S.A. and Canada
For Latin America
Example:
For U.S.A. and Canada
1
1
2
4
P PLPC
For U.S.A. only
The warranty can be found on page 39.
1
4
F
As an ENERGY STAR® Partner\,
Panasonic has determined that this
product meets the ENERGY STAR
guidelines for energy efficiency.
\
For Canada only: The word “Participant” is used in place of
the word “Partner”.
®
ly
n
o
a
d
a
n
a
C
d
n
. a
.A
.S
U
r
o
RQT7509-1P
Page 2
Getting started
RQT7509
2
Dear customer
Thank you for purchasing this product.
For optimum performance and safety, please read these instructions
carefully.
Operations in these instructions are described mainly
for the remote control, but you can do the operations
on the main unit if the controls are the same.
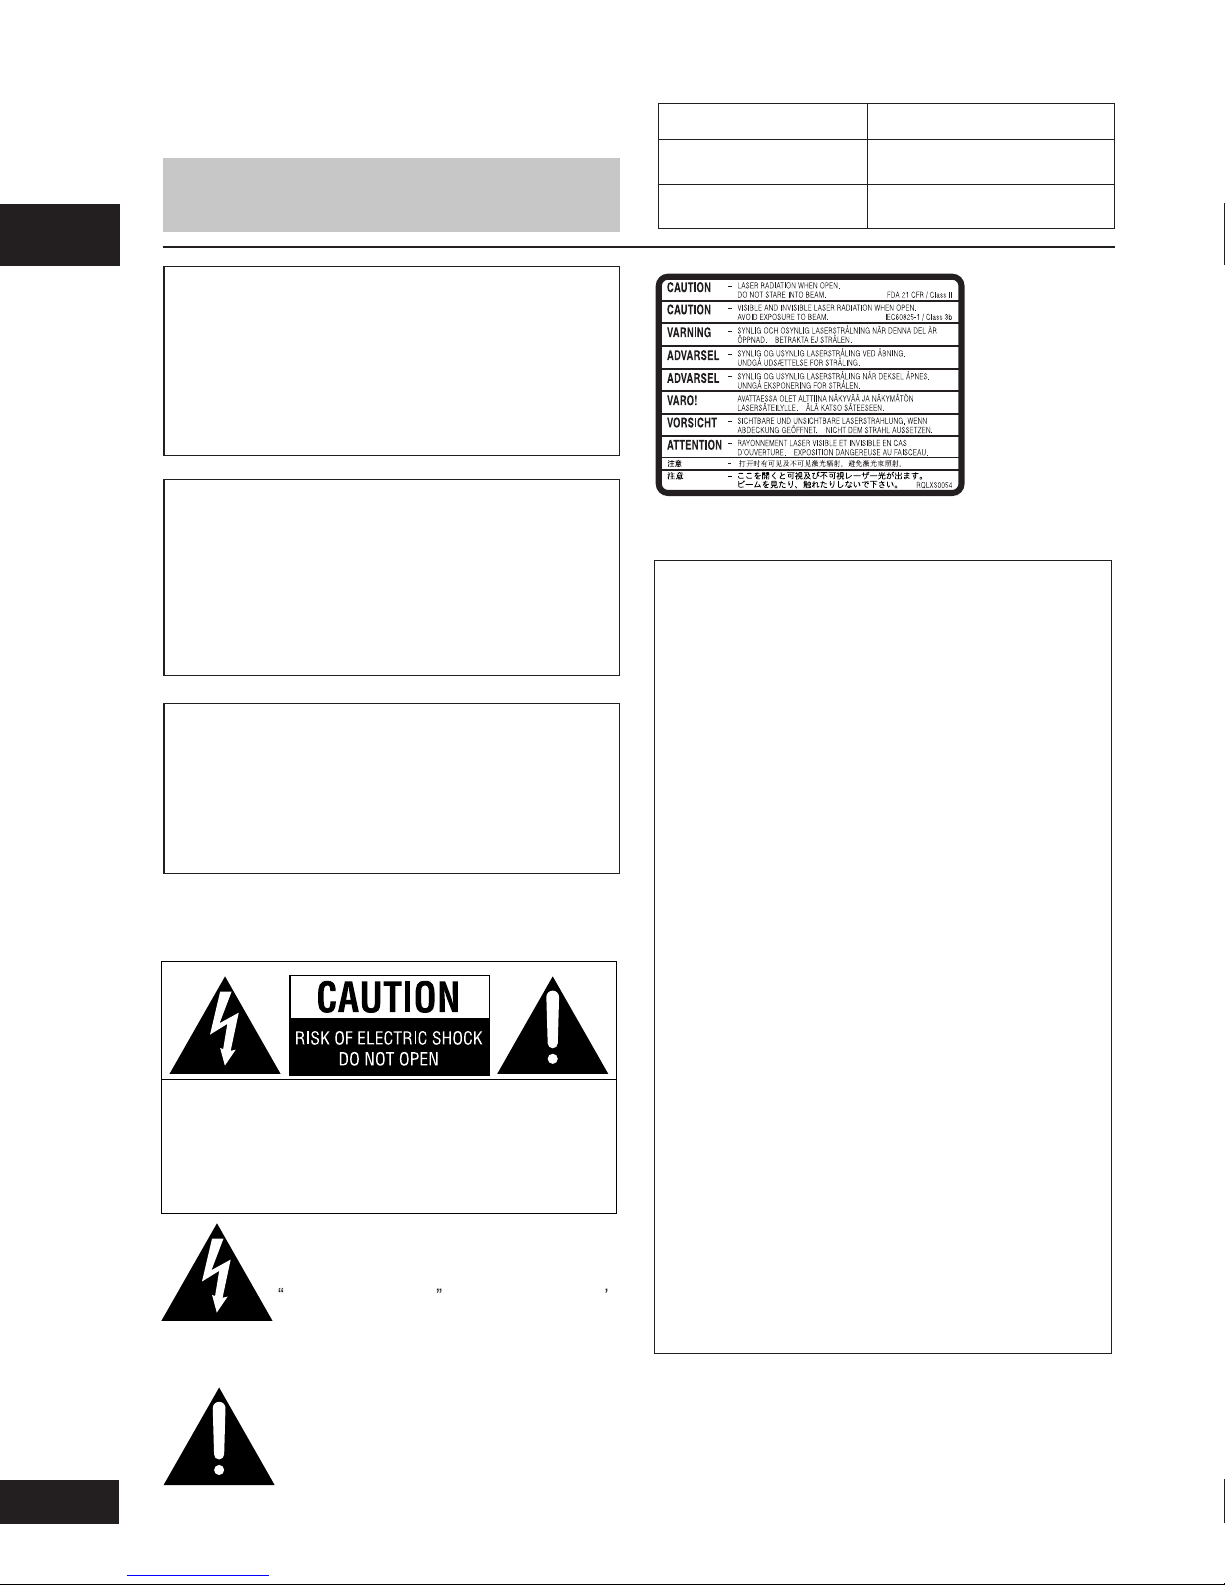
CAUTION!
THIS PRODUCT UTILIZES A LASER.
USE OF CONTROLS OR ADJUSTMENTS OR
PERFORMANCE OF PROCEDURES OTHER THAN
THOSE SPECIFIED HEREIN MAY RESULT IN
HAZARDOUS RADIATION EXPOSURE.
DO NOT OPEN COVERS AND DO NOT REPAIR
YOURSELF. REFER SERVICING TO QUALIFIED
PERSONNEL.
WARNING:
TO REDUCE THE RISK OF FIRE, ELECTRIC
SHOCK OR PRODUCT DAMAGE, DO NOT
EXPOSE THIS APPARATUS TO RAIN,
MOISTURE, DRIPPING OR SPLASHING AND
THAT NO OBJECTS FILLED WITH LIQUIDS,
SUCH AS VASES, SHALL BE PLACED ON
THE APPARATUS.
CAUTION!
DO NOT INSTALL OR PLACE THIS UNIT IN A BOOKCASE, BUILT-IN CABINET OR IN ANOTHER CONFINED
SPACE. ENSURE THE UNIT IS WELL VENTILATED.
TO PREVENT RISK OF ELECTRIC SHOCK OR FIRE
HAZARD DUE TO OVERHEATING, ENSURE THAT
CURTAINS AND ANY OTHER MATERIALS DO NOT
OBSTRUCT THE VENTILATION VENTS.
THE FOLLOWING APPLIES ONLY IN THE U.S.A. AND
CANADA
CAUTION: TO REDUCE THE RISK OF ELECTRIC
SHOCK, DO NOT REMOVE SCREWS.
NO USER-SERVICEABLE PARTS
INSIDE.
REFER SERVICING TO QUALIFIED
SERVICE PERSONNEL.
The lightning flash with arrowhead symbol,
within an equilateral triangle, is intended to
alert the user to the presence of uninsulated
dangerous voltage within the product s
enclosure that may be of sufficient
magnitude to constitute a risk of electric
shock to persons.
The exclamation point within an equilateral
triangle is intended to alert the user to the
presence of important operating and
maintenance (servicing) instructions in the
literature accompanying the appliance.
System SC-PM39D
Main unit SA-PM39D
Speakers SB-PM39
(Inside of product)
THE FOLLOWING APPLIES ONLY IN THE U.S.A.
CAUTION:
This equipment has been tested and found to comply
with the limits for a Class B digital device, pursuant to
Part 15 of the FCC Rules.
These limits are designed to provide reasonable
protection against harmful interference in a residential
installation. This equipment generates, uses and can
radiate radio frequency energy and, if not installed and
used in accordance with the instructions, may cause
harmful interference to radio communications.
However, there is no guarantee that interference will
not occur in a particular installation. If this equipment
does cause harmful interference to radio or television
reception, which can be determined by turning the
equipment off and on, the user is encouraged to try to
correct the interference by one or more of the following
measures:
• Reorient or relocate the receiving antenna.
• Increase the separation between the equipment and
receiver.
• Connect the equipment into an outlet on a circuit
different from that to which the receiver is connected.
• Consult the dealer or an experienced radio/TV
technician for help.
Any unauthorized changes or modifications to this
equipment would void the user’s authority to operate
this device.
This device complies with Part 15 of the FCC Rules.
Operation is subject to the following two conditions: (1)
This device may not cause harmful interference, and
(2) this device must accept any interference received,
including interference that may cause undesired
operation.
Page 3
Accessories
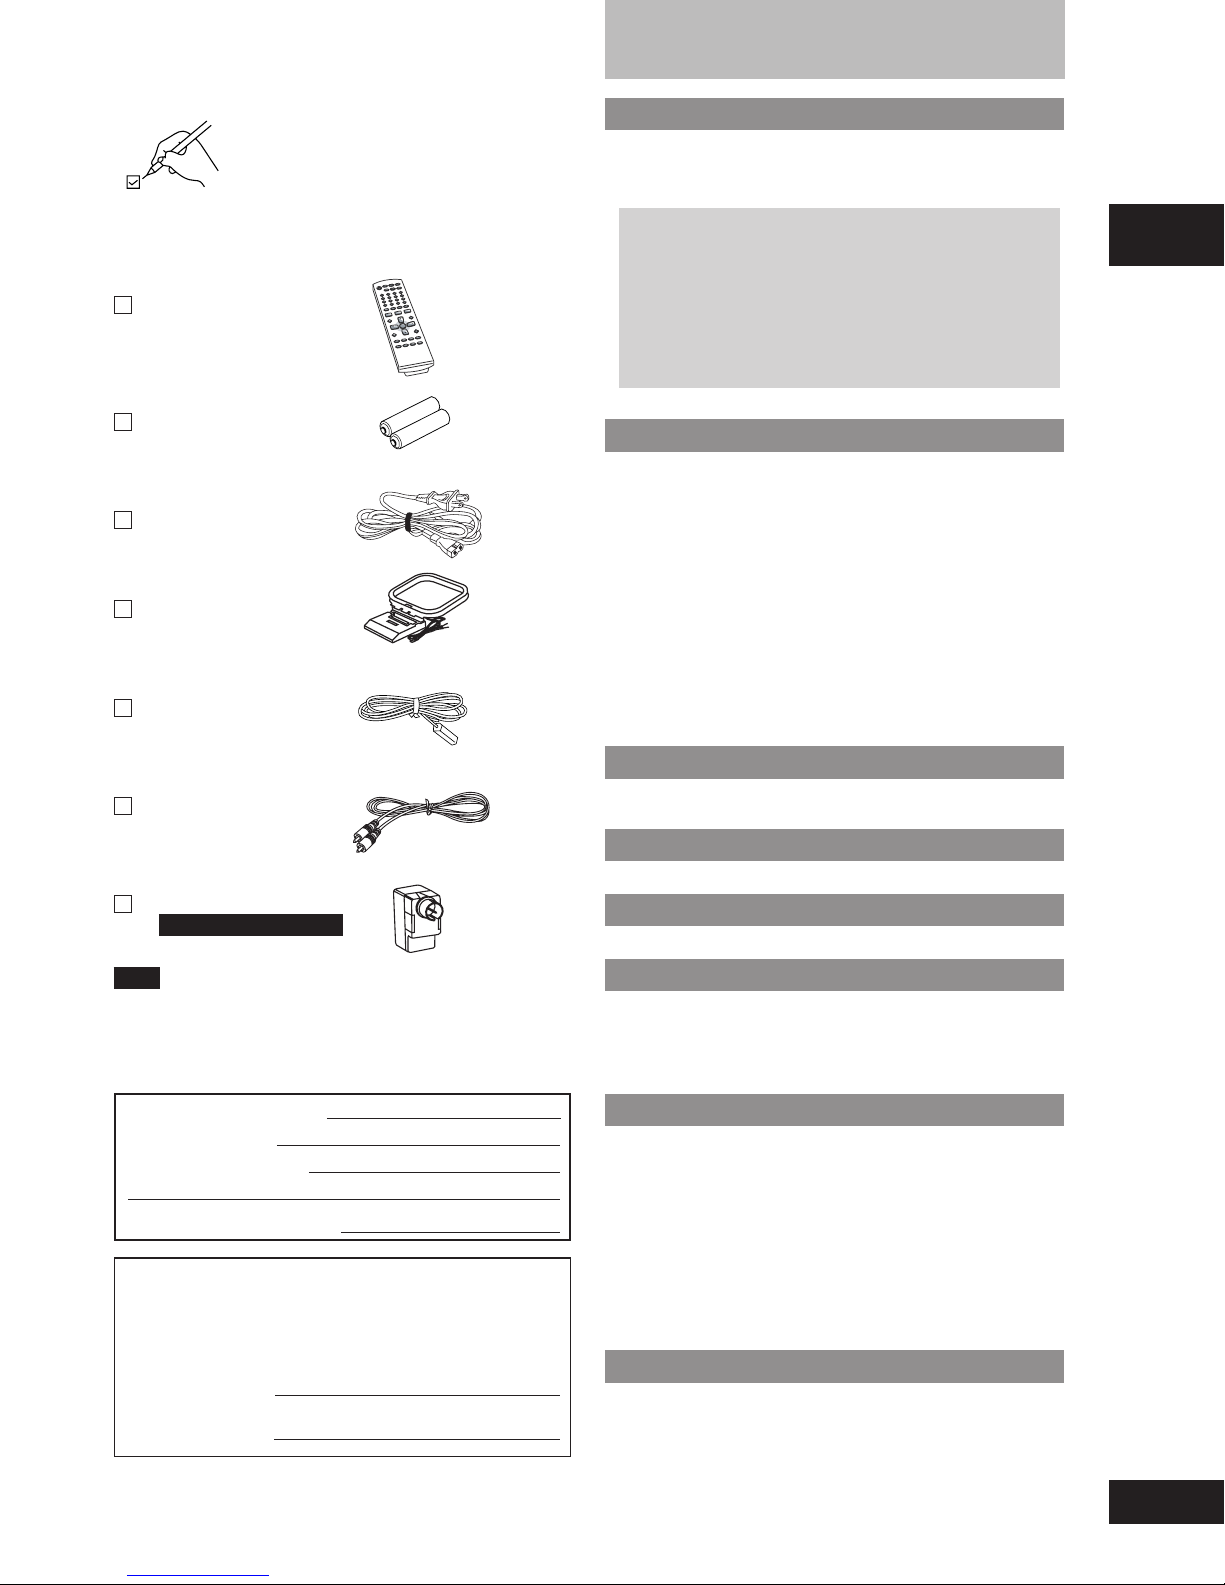
Please check and identify the supplied
accessories.
Use numbers indicated in parentheses when
asking for replacement parts.
In U.S.A. to order accessories, refer to “Accessory Purchases”
on page 39.
1 Remote control
(N2QAJB000098)
2 Batteries
for remote control
1 AC power supply cord
(K2CB2CB00006)
1 AM loop antenna
(N1DAAAA00001)
1 FM indoor antenna
(RSA0007-L)
Table of contents
Getting started
Accessories ............................................................................. 3
IMPORTANT SAFETY INSTRUCTIONS .................................. 4
Product Service ....................................................................... 4
Disc information ...................................................................... 5
Simple setup
STEP1
STEP2
STEP3
STEP4
STEP5
STEP6
STEP7
DEMO function ..................................................................... 9
Control reference guide ....................................................... 10
Disc operations
Discs — Basic play ............................................................... 12
Discs — Convenient functions ............................................ 14
Soundtracks / Subtitle .......................................................... 14
Position memory / Repeat play ............................................ 14
Random play ........................................................................ 15
Program play (up to 24 items) .............................................. 15
Discs — Using navigation menus ....................................... 16
Using the tree screen to find a group ................................... 16
Using a contents screen to find a track ................................ 16
Using the submenu .............................................................. 16
Playing HighMAT discs ......................................................... 17
Playing programs on DVD-RAM ........................................... 18
Using the play list on DVD-RAM .......................................... 18
Discs — Using On-screen menu ......................................... 19
To get disc information or to play from a specified item ....... 19
To see the playback position ................................................ 21
Positioning ........................................................... 6
Connecting the speakers .................................... 6
Television ............................................................. 7
Connecting the antennas and AC power
supply cord ........................................................ 8
The remote control .............................................. 8
QUICK SETUP ...................................................... 9
Setting the time ................................................... 9
Getting started
1 Video cable
(RJL1P016B15A)
1 Antenna plug
For U.S.A. and Canada only
(K2RC021B0001)
Note
The included AC power supply cord is for use with this unit only. Do
not use it with other equipment.
User memo:
DATE OF PURCHASE
DEALER NAME
DEALER ADDRESS
TELEPHONE NUMBER
The model number and serial number of this product can
be found on either the back or the bottom of the unit.
Please note them in the space provided below and keep
for future reference.
MODEL NUMBER
SC-PM39D
SERIAL NUMBER
Radio operations
The radio ................................................................................ 22
Manual tuning / Preset tuning .............................................. 22
Tape operations
Cassette tapes ....................................................................... 23
Recording operations
Recording .............................................................................. 24
Sound field and sound quality operations
Sound field and sound quality ............................................. 25
Advanced Surround ............................................................. 25
Multi Re-master — Enjoying more natural sound ................ 25
Changing sound field and quality ......................................... 25
To enjoy even higher quality sound—AUDIO ONLY ............ 25
Other functions
Convenient functions ........................................................... 26
Auto-off function / Dimming the display ................................ 26
Enjoying more powerful bass ............................................... 26
Muting the volume / Using headphones ............................... 26
The play/record timer ........................................................... 27
The sleep timer / Operating a television ............................... 28
Discs — Changing the player’s settings ............................ 29
Digital output ........................................................................ 31
Using other equipment ......................................................... 32
Home Theater — Enjoying more powerful sound ................ 32
Using an external unit .......................................................... 32
Optional antenna connections .............................................. 33
Reference
Troubleshooting guide ......................................................... 34
Maintenance .......................................................................... 36
When moving the unit .......................................................... 36
Glossary ................................................................................. 37
Tray/disc handling procedure .............................................. 37
Specifications ........................................................................ 38
Limited Warranty (ONLY FOR U.S.A.) .................................. 39
RQT7509
3
Page 4
IMPORTANT SAFETY INSTRUCTIONS
Read these operating instructions carefully before using the unit. Follow the safety instructions on the unit and the applicable
safety instructions listed below. Keep these operating instructions handy for future reference.
1) Read these instructions.
2) Keep these instructions.
3) Heed all warnings.
4) Follow all instructions.
5) Do not use this apparatus near water.
6) Clean only with dry cloth.
7) Do not block any ventilation openings. Install in
Getting started
accordance with the manufacturer’s instructions.
8) Do not install near any heat sources such as radiators,
heat registers, stoves, or other apparatus (including
amplifiers) that produce heat.
9) Do not defeat the safety purpose of the polarized or
grounding-type plug. A polarized plug has two blades
with one wider than the other. A grounding-type plug
has two blades and a third grounding prong. The wide
blade or the third prong are provided for your safety. If
the provided plug does not fit into your outlet, consult
an electrician for replacement of the obsolete outlet.
Product Service
10) Protect the power cord from being walked on or pinched
particularly at plugs, convenience receptacles, and the
point where they exit from the apparatus.
11) Only use attachments/accessories specified by the
manufacturer.
12) Use only with the cart, stand, tripod, bracket,
or table specified by the manufacturer, or
sold with the apparatus. When a cart is used,
use caution when moving the cart/apparatus
combination to avoid injury from tip-over.
13) Unplug this apparatus during lightning storms or when
unused for long periods of time.
14) Refer all servicing to qualified service personnel. Servicing
is required when the apparatus has been damaged in any
way, such as power-supply cord or plug is damaged, liquid
has been spilled or objects have fallen into the apparatus,
the apparatus has been exposed to rain or moisture, does
not operate normally, or has been dropped.
1. Damage requiring service —The unit should be serviced by qualified service personnel if:
(a) The AC power supply cord or AC adaptor has been damaged; or
(b) Objects or liquids have gotten into the unit; or
(c) The unit has been exposed to rain; or
(d) The unit does not operate normally or exhibits a marked change in performance; or
(e) The unit has been dropped or the cabinet damaged.
2. Servicing—Do not attempt to service the unit beyond that described in these operating instructions. Refer all other
servicing to authorized servicing personnel.
3. Replacement parts—When parts need replacing ensure the servicer uses parts specified by the manufacturer or parts
that have the same characteristics as the original parts. Unauthorized substitutes may result in fire, electric shock, or
other hazards.
4. Safety check—After repairs or service, ask the servicer to perform safety checks to confirm that the unit is in proper
working condition.
Product information
For product information or assistance with product operation:
In the U.S.A., refer to “Customer Services Directory” on page 39.
In Canada, contact the Panasonic Canada Inc. Customer Care Centre at 1-800-561-5505, or visit the website
(www.panasonic.ca), or an authorized Servicentre closest to you.
RQT7509
4
Page 5
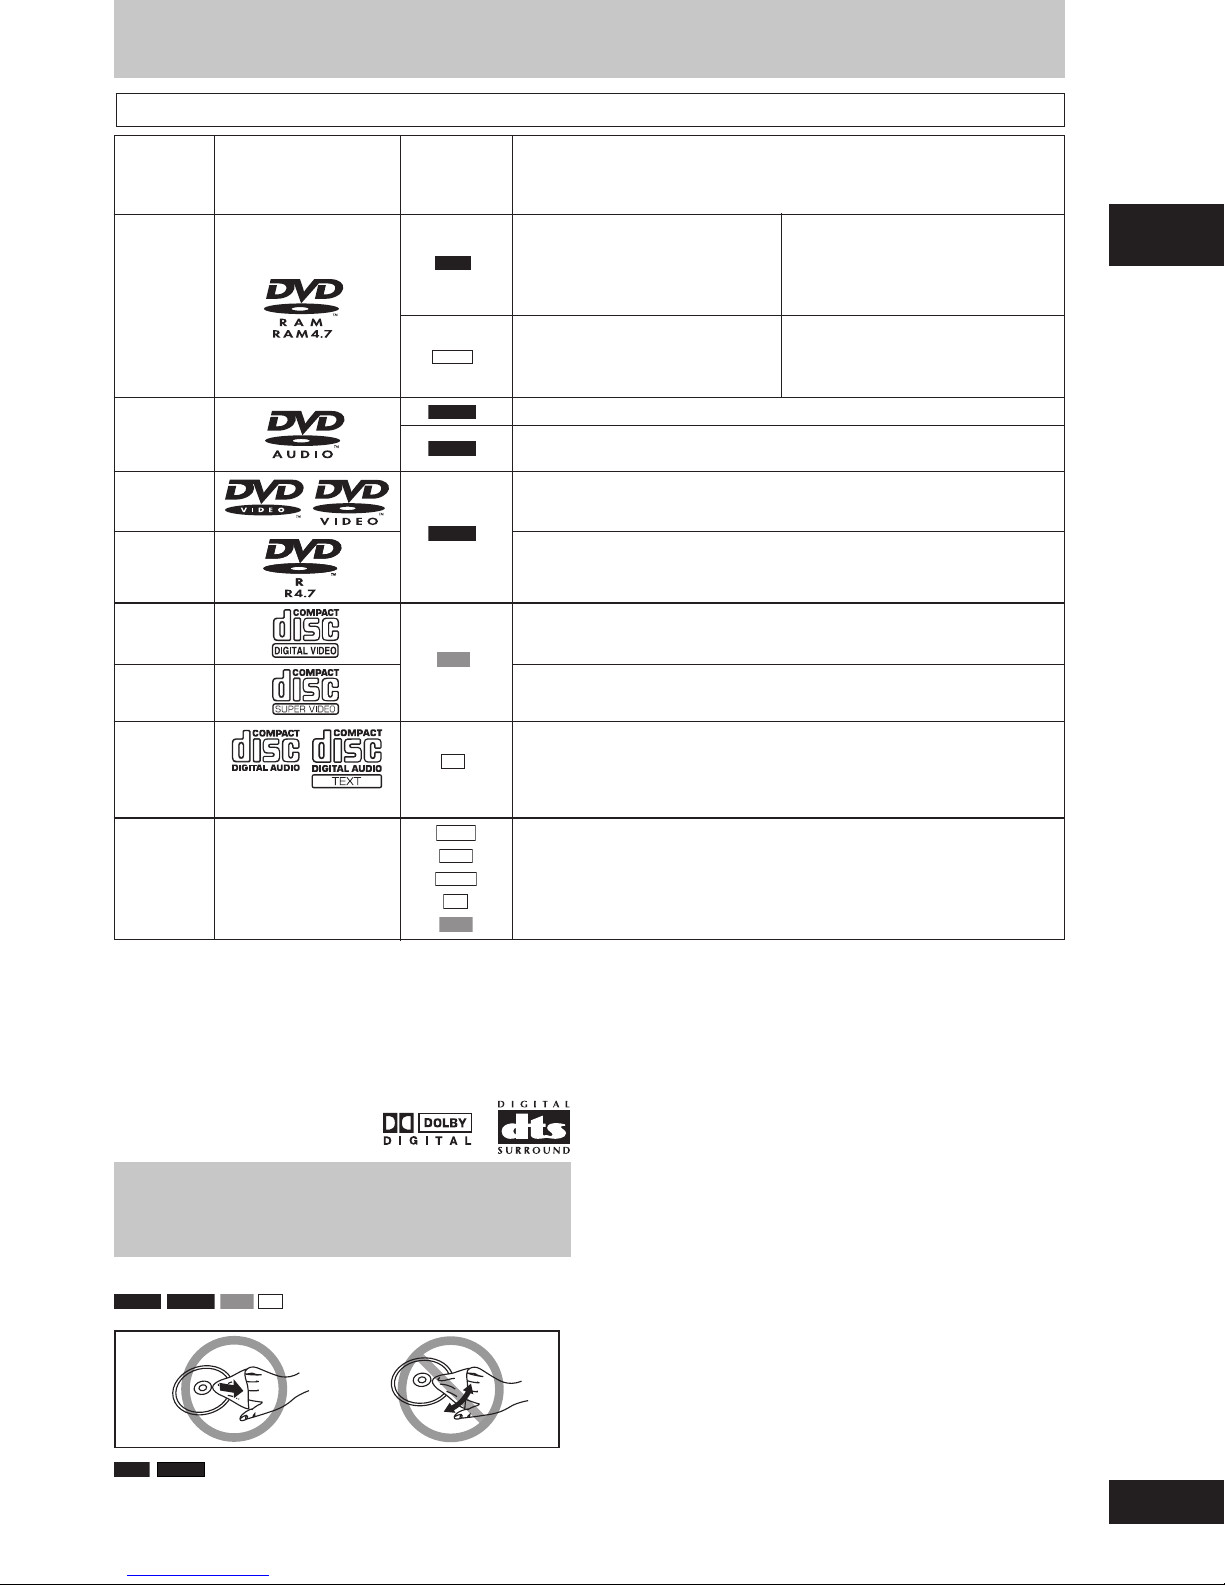
Disc information
Discs that can be played
Disc Logo in these Remarks
DVD-RAM
DVD-Audio
DVD-Video
DVD-R
Video CD
SVCD
Indication
operating
instructions
RAM
JPEG
DVD-A
DVD-V
DVD-V
VCD
Recorded using Version 1.1 of the
Video Recording Format (a unified
video recording standard).
Recorded using the DCF (Design rule
for Camera File system) standard.
—
Some DVD-Audio discs contain DVD-Video content.
To play DVD-Video content, select “Play as DVD-Video” in Other Menu (A page 21).
—
Panasonic DVD-R recorded and finalized
or DVD-Video camera are played as DVD-Video on this unit.
—
Conforming to IEC62107.
• Recorded with DVD-Video recorders,
DVD-Video cameras, personal
computers, etc.
• Remove discs from their cartridges
before use.
• Recorded with Panasonic DVD-Video
recorders.
• To play JPEG files, select “Play as Data
Disc” in Other Menu (A page 21).
\
on a Panasonic DVD-Video recorder
Getting started
This unit is compatible with HDCD, but does not support Peak Extend function
CD
CD
(A function which expands the dynamic range of high level signals).
HDCD-encoded CDs sound better because they are encoded with 20 bits,
compared with 16 bits for all other CDs.
• During HDCD play, “HDCD” appears on the unit’s display.
WMA
CD-R
CD-RW
\
A process that allows play on compatible equipment.
It may not be possible to play the above discs in all cases due to the type of disc or condition of the recording.
•
77
7 Discs that cannot be played
77
DVD-ROM, CD-ROM, CDV, CD-G, DVD+R, +RW, DVD-RW, SACD,
Divx Video Discs and Photo CD, DVD-RAM that cannot be removed
from its cartridge, 2.6-GB and 5.2-GB DVD-RAM, and “Chaoji VCD”
available on the market including CVD, DVCD and SVCD that do not
conform to IEC62107.
77
7 Audio format of DVDs
77
This unit automatically recognizes and
decodes discs with these symbols.
Playing DVDs and Video CDs
The producer of these discs can control how they are played so
you may not always be able to control play as described in these
operating instructions (for example if the play time is not displayed
or if a Video CD has menus). Read the disc’s instructions carefully.
77
7 To clean discs
77
DVD-A DVD-V VCD CD
Wipe with a damp cloth and then wipe dry.
—
MP3
JPEG
CD
VCD
• This unit can play CD-R/RW (audio recording disc) recorded with the formats
on the left. Close the session or finalize
\
the disc after recording.
• HighMAT discs
WMA, MP3 or JPEG files only.
To play without using the HighMAT function, select “Play as Data Disc” in Other
Menu (A page 21).
77
7 Disc handling precautions
77
Do not attach labels or stickers to discs (This may cause disc
•
warping, rendering it unusable).
Do not write on the label side with a ball-point pen or other hard
•
writing instrument.
Do not use record cleaning sprays, benzine, thinner, static electricity
•
prevention liquids or any other solvent.
Do not use scratch-proof protectors or covers.
•
Do not use the following discs:
•
– Discs with exposed adhesive from removed stickers or labels
(rented discs, etc).
– Discs that are badly warped or cracked.
– Irregularly shaped discs, such as heart shapes.
77
7 Playing PAL system DVD-Audio
77
This unit converts PAL to NTSC for play. The picture is compressed
to show it in its entirety, but this may cause it to be stretched vertically.
DVD-R
RAM
Clean with an optional DVD-RAM/PD disc cleaner (LF-K200DCA1,
•
where available).
Never use cloths or cleaners for CDs, etc.
•
RQT7509
5
Page 6
Simple setup
STEP
Simple setup
1
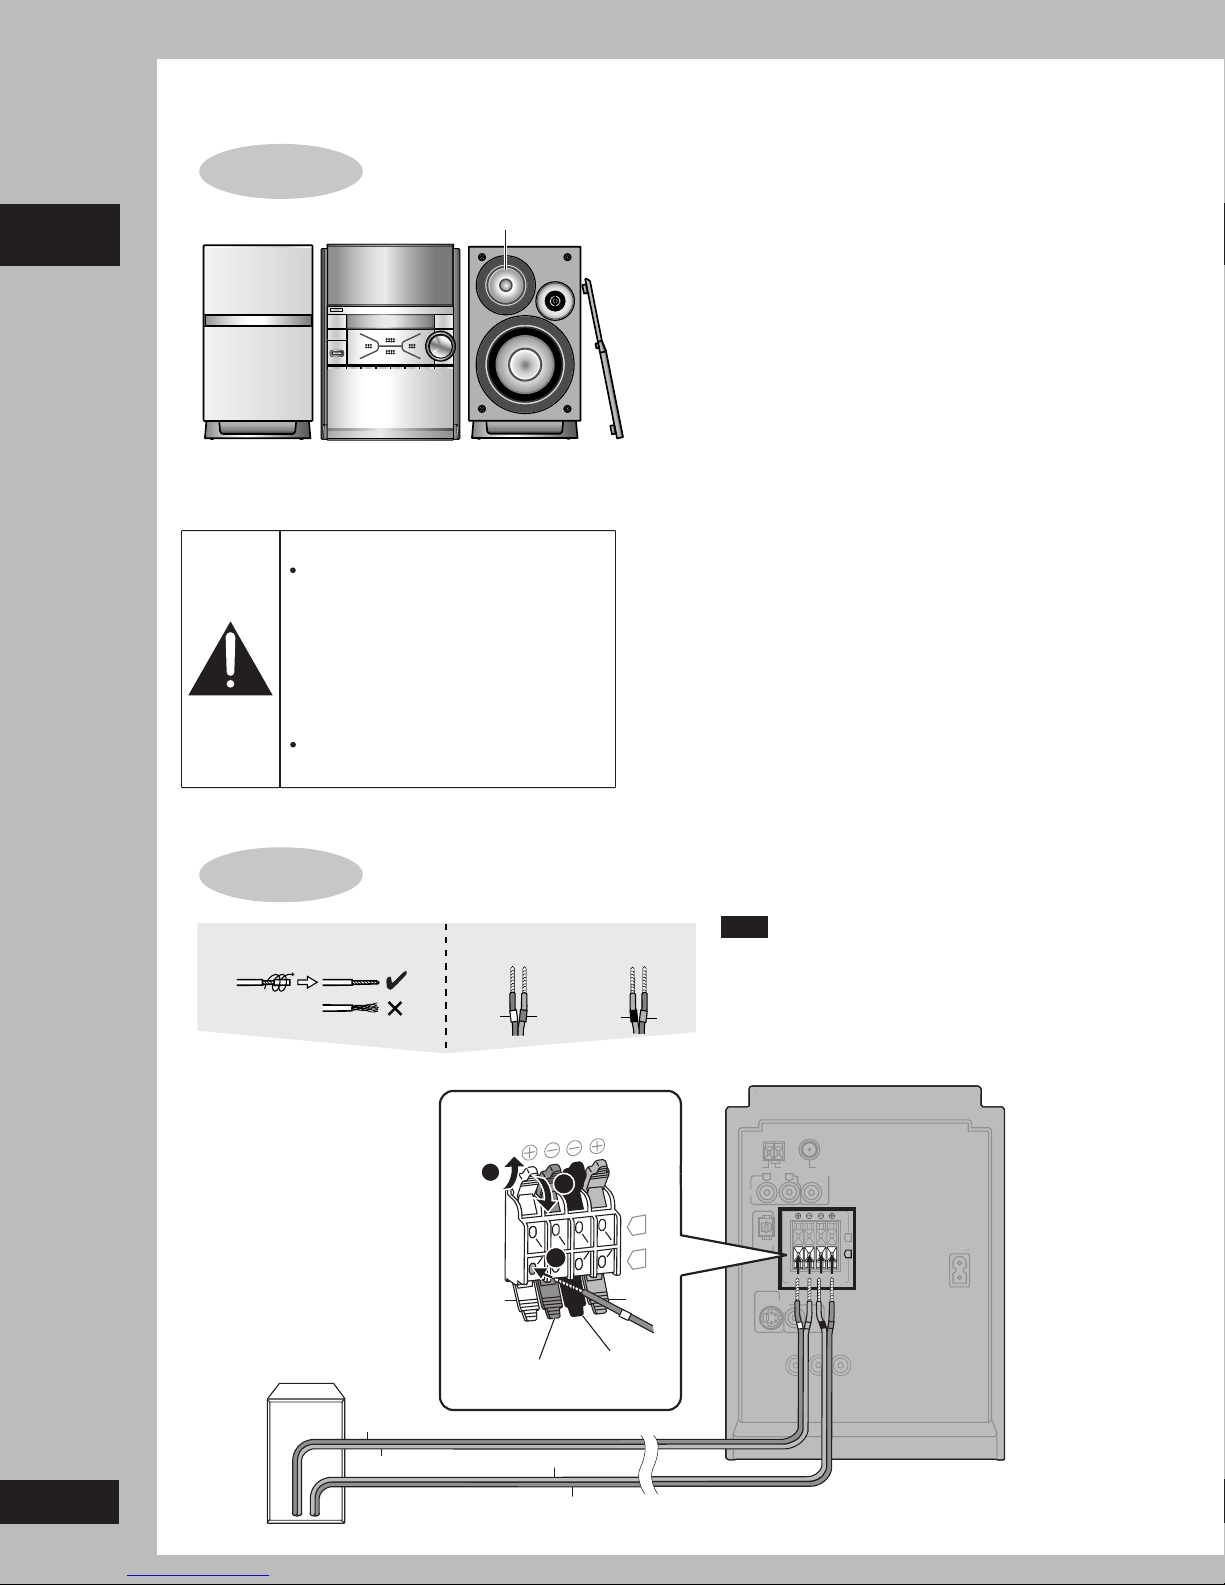
Positioning
Tweeter
Use only supplied speakers
•
Using other speakers can damage the unit and sound quality will be
negatively affected.
Set the speakers up on an even surface to prevent them from
•
falling. Take proper precautions to prevent the speakers from falling
if you cannot set them up on an even surface.
Positioning for best effect
How you set up your speakers can affect the bass and the sound
field. Note the following points.
Place speakers on flat secure bases.
•
Placing speakers too close to floors, walls, and corners can result in
•
excessive bass. Cover walls and windows with a thick curtain.
Keep your speakers at least 10 mm (13/32”) away from the system for
•
proper ventilation.
To avoid damage to the speakers, do not touch the speaker cones if
•
you have taken the nets off.
Speaker
(SB-PM39)
Place the speakers so that the tweeter is on the inside.
Main unit
(SA-PM39D)
Speaker
(SB-PM39)
Caution
Use the speakers only with the
recommended system. Failure to do
so may lead to damage to the
amplifier and/or the speakers, and
may result in the risk of fire. Consult
a qualified service person if damage
has occurred or if you experience a
sudden change in performance.
Do not attach these speakers to walls
or ceiling
STEP
Twist the vinyl tip and pull off.
2
s.
Connecting the speakers
Confirm the colors of the tags
on the ends of the cords.
White Blue RedBlack
Notes on speaker use
You can damage your speakers and shorten their useful life if you
•
play sound at high levels over extended periods.
Reduce the volume in the following cases to avoid damage.
•
–
When playing distorted sound.
–
When the speakers emit strange noise (howling) from a record
player, noise from FM broadcasts, or continuous signals from an
oscillator, test disc, or electronic instrument.
–
When adjusting the sound quality.
–
When turning the unit on or off.
If irregular coloring occurs on your television
These speakers are designed to be used close to a television, but
the picture may be affected with some televisions and set-up
combinations.
If this occurs, turn the television off for about 30 minutes.
The television’s demagnetizing function should correct the problem.
If it persists, move the speakers further away from the television.
Note
Never short-circuit positive (+) and negative (–) speaker
•
wires.
Be sure to connect only positive (copper) wires to
•
positive (+) terminals and negative (silver) wires to
negative (–) terminals.
Incorrect connection can damage the speakers.
Right speaker
Copper(White tag)
RQT7509
Silver(Blue tag)
6
Connect cords so tag colors
match the terminal colors.
1
3
L
2
White
HIGH(6Ω) LO
SPEAKERS(SB-PM39)
Connect the left (L) side in
the same way.
Blue
Silver(Black tag)
Copper(Red tag)
W(6
Ω
Black
R
Red
)
EXT LOOP
AUX
OPTICAL
OUT
S-VIDEO
OUT
FM ANT
AM ANT
SUBWOOFER
L
R
HIGH(6Ω
SPEAKERS
HAUT-PARLEURS
COMPONENT VIDEO OUT
PRPBY
)
VIDEO
OUT
75
Ω
OUT
LOW(6Ω
(SB-PM39)
L
R
)
AC IN
Page 7
STEP
3
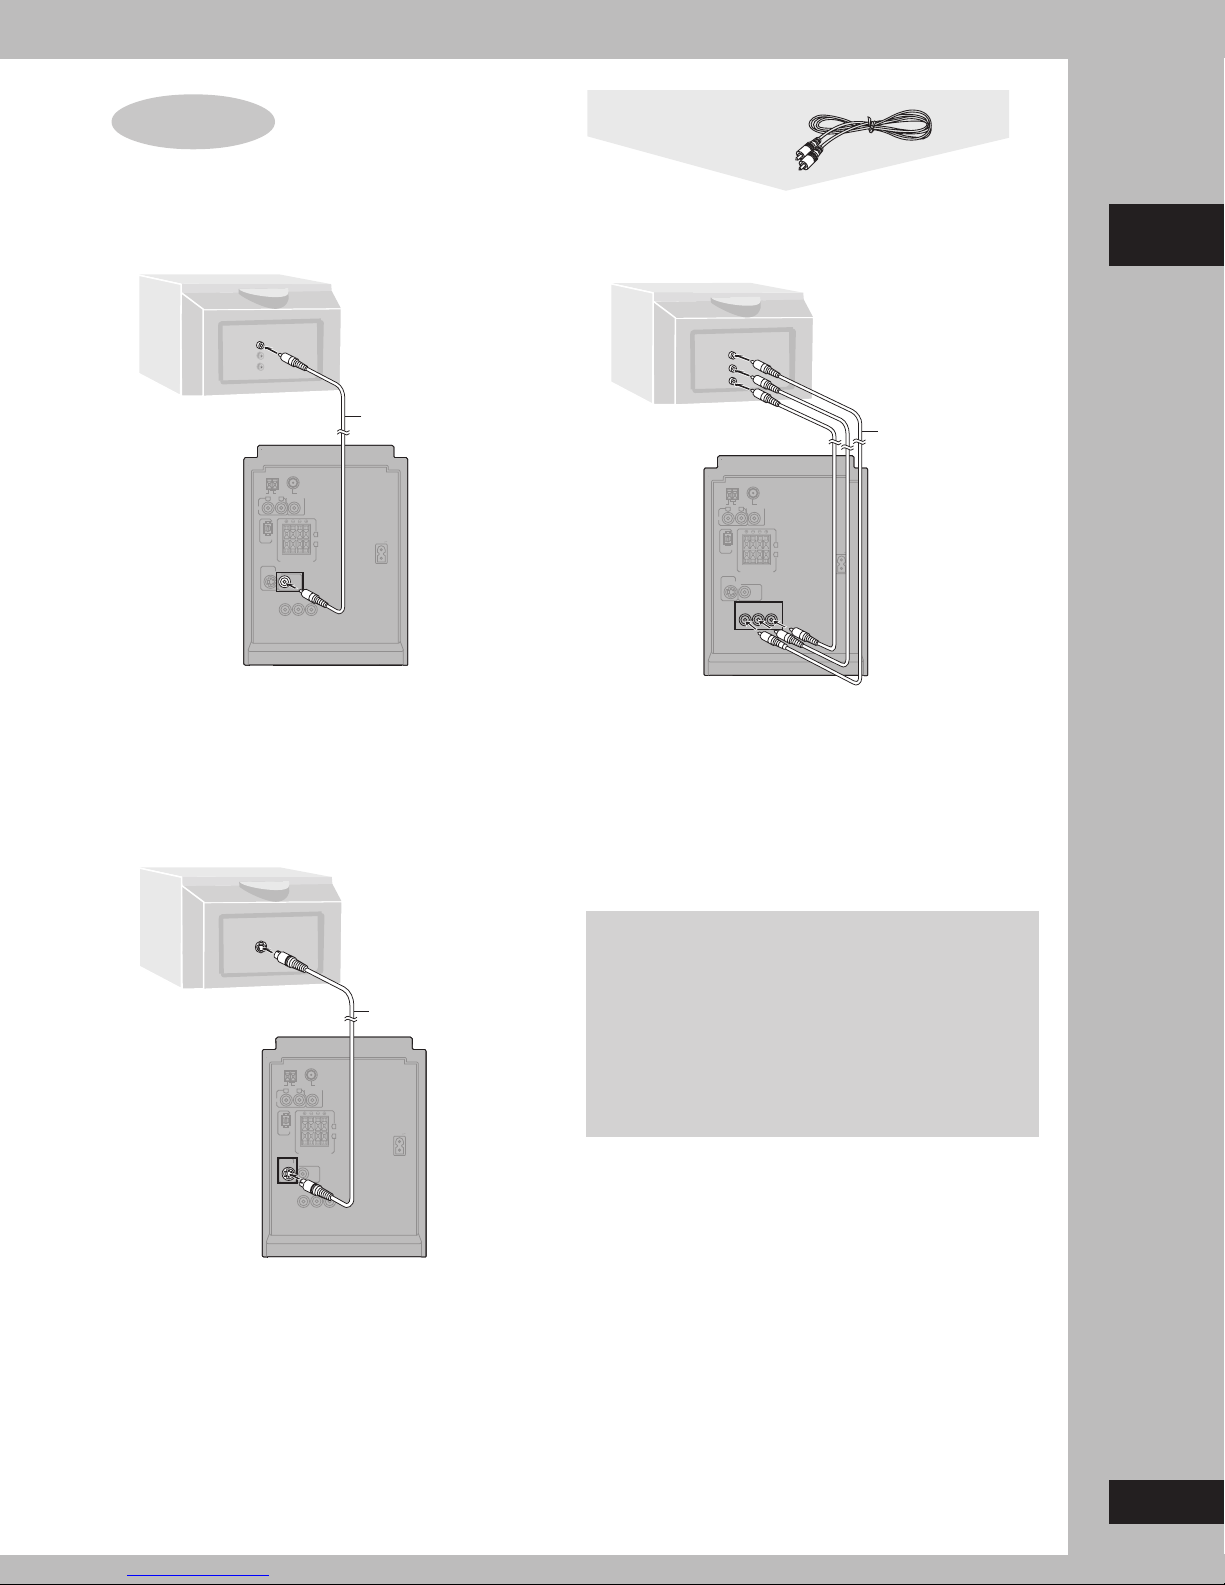
Television
Video cable
77
Connecting a television with a VIDEO IN terminal
7
77
VIDEO
IN
AU
AM ANT
EXT LOOP
R
X
OPTICAL
OUT
S-VIDEO
OUT
FM ANT
SUBWOOFER
L
HIGH(6Ω
SPEAKERS
HAUT-PARLEURS
VIDEO
COMPONENT VIDEO OUT
PRPBY
75
Ω
OUT
)
LOW(6Ω
)
(SB-PM39)
OUT
Television
(not included)
L
R
Video cable
(included)
AC IN
VIDEO OUT terminal
Do not connect the unit through a video cassette recorder,
because the picture may not be played correctly due to the copy
guard.
77
7 Connecting a television with an S-VIDEO IN terminal
77
O
E
ID
-V
S
IN
S-VIDEO cable
(not included)
AM ANT
FM ANT
EXT LOOP
75
Ω
SUBWOOFER
L
R
OUT
AUX
L
OPTICAL
OUT
S-VIDEO
OUT
HIGH(6Ω
)
LOW(6Ω
SPEAKERS
(SB-PM39)
HAUT-PARLEURS
VIDEO
OUT
COMPONENT VIDEO OUT
PRPBY
R
)
AC IN
77
7 Connecting a television with COMPONENT VIDEO IN
77
terminals
T
NEN
O
MP
O
C
O IN
E
VID
R
P
B
P
Y
Video cables
(not included)
FM ANT
AM ANT
EXT LOOP
75
Ω
SUBWOOFER
L
R
OUT
AUX
L
OPTICAL
OUT
S-VIDEO
OUT
HIGH(6Ω
)
LOW(6Ω
SPEAKERS
(SB-PM39)
HAUT-PARLEURS
VIDEO
OUT
COMPONENT VIDEO OUT
PRPBY
)
AC IN
R
COMPONENT VIDEO OUT terminals
These terminals can be used for either interlace or progressive
output and provide a purer picture than the S-VIDEO OUT terminal.
Connection using these terminals outputs the color difference
signals (P
B/PR) and luminance signal (Y) separately in order to
achieve high fidelity in reproducing colors. The description of the
component video input terminals depends on the television or
monitor (e.g. Y/P
B/PR,Y/B-Y/R-Y, Y/CB/CR). Connect to terminals of
the same color.
After making this connection, change the black level for a better
•
picture (A page 29, “Video” tab - Black Level Control).
To enjoy progressive video
1. Connect to the component video input terminals on a 480P
compatible television. (Video will not be displayed correctly if
connected to an incompatible television.)
2. In QUICK SETUP, set “Progressive Out” to “Enable”.
3. Change “Progressive” to “480P” (A page 20, Picture Menu—
Video Output Mode).
All televisions manufactured by Panasonic and that have 480P
•
input connectors are compatible. Consult the manufacturer if you
have another brand of television.
If the unit is connected to the television through VIDEO OUT or
•
S-VIDEO OUT, output will be interlace, irrespective of the settings.
Simple setup
S-VIDEO OUT terminal
The S-VIDEO terminal achieves a more vivid picture than the
VIDEO OUT terminal by separating the chrominance (C) and
luminance (Y) signals. (Actual results depend on the television.)
RQT7509
7
Page 8
STEP
Connect the AC power supply after all other connections are complete.
4
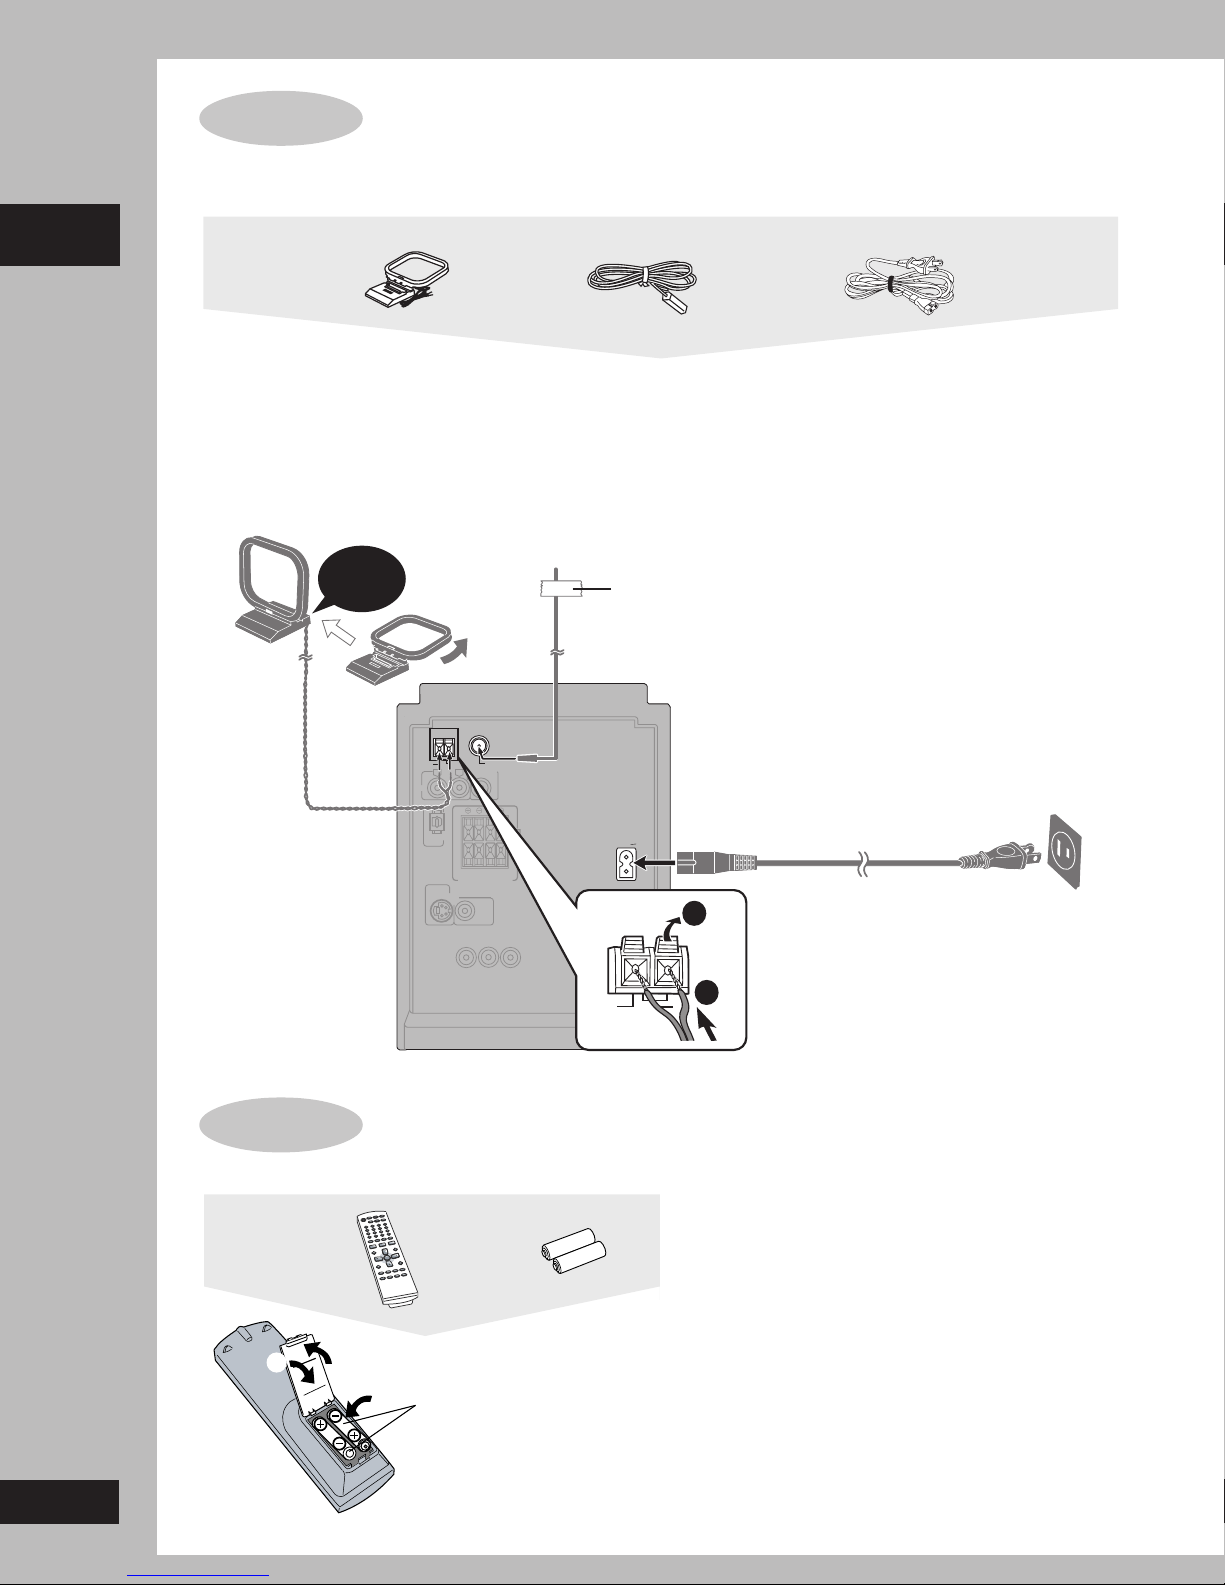
Connecting the antennas and AC power supply cord
Conserving power
Simple setup
The unit consumes power (approx. 0.5 W) even when it is turned off with [
time, unplug it from the household AC outlet. You will need to reset some memory items after plugging in the unit.
AM loop antenna FM indoor antenna
AM loop antenna
Stand the antenna up on its base.
Keep loose antenna cord away from
other wires and cords.
Click!
AM ANT
EXT LOOP
R
AUX
L
FM ANT
SUBWOOFER
AC power supply cord
f]. To save power when the unit is not to be used for a long
FM indoor antenna
Fix the other end of the antenna
where reception is best.
Adhesive tape
75
Ω
OUT
RQT7509
8
OPTICAL
OUT
HIGH(6Ω
)
LOW(6Ω
SPEAKERS
(SB-PM39)
HAUT-PARLEURS
S-VIDEO
OUT
VIDEO
OUT
COMPONENT VIDEO OUT
PRPBY
STEP
Remote control Batteries
3
5
The remote control
1
2
R6/LR6, AA, UM-3
Insert so the poles (+
•
and –) match those in the
remote control.
Do not use rechargeable
•
type batteries.
L
R
)
EXT
AC IN
AM ANT
1
2
LOOP
Do not:
mix old and new batteries.
•
use different types at the same time.
•
heat or expose to flame.
•
take apart or short circuit.
•
attempt to recharge alkaline or manganese batteries.
•
use batteries if the covering has been peeled off.
•
Mishandling of batteries can cause electrolyte leakage which can
damage items the fluid contacts and may cause a fire.
Remove if the remote control is not going to be used for a long
period of time. Store batteries in a cool, dark place.
77
7 Use
77
Aim at the sensor, avoiding obstacles, at a maximum range of
7 m (23 feet) directly in front of the unit.
AC power supply cord
To household AC outlet
(AC 120V, 60 Hz)
Page 9
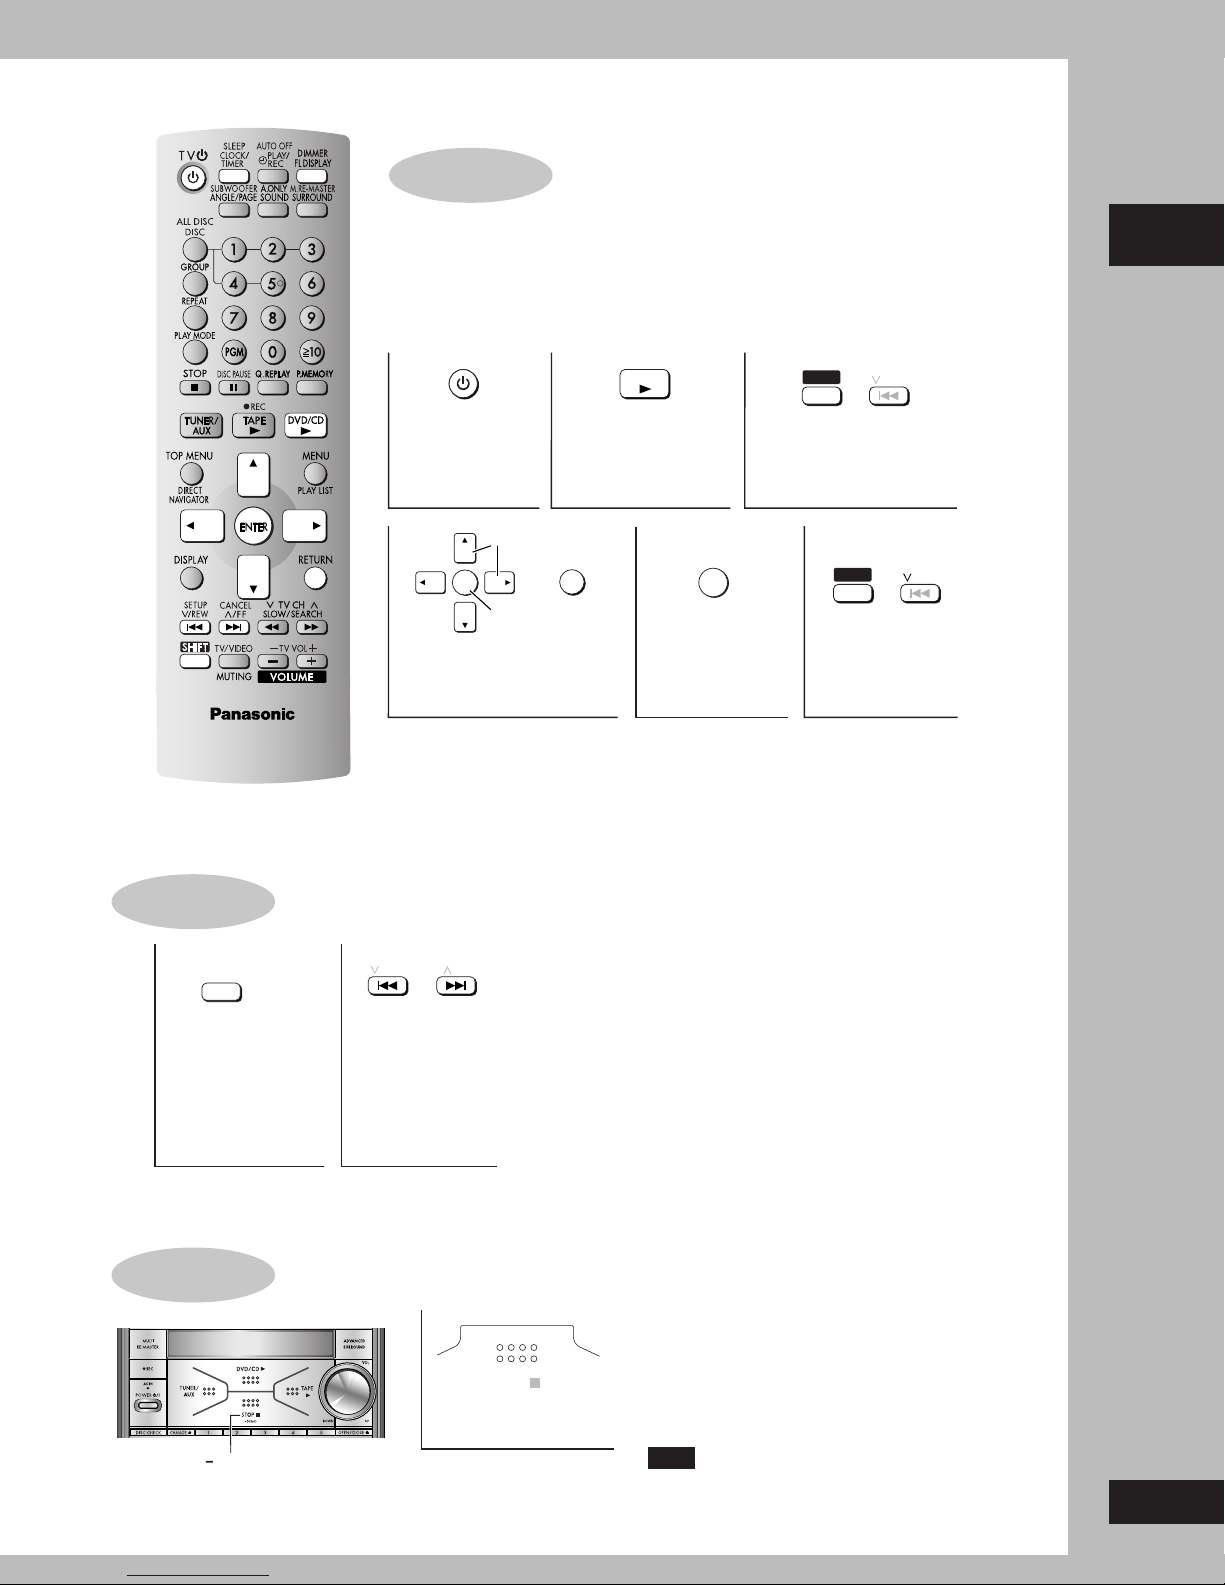
STEP
Turn on the television and select the appropriate video input on the television to suit
the connection for the unit.
6
QUICK SETUP
STEP
7
1
Power ON.
Select
ENTER
Confirm
4
Select the option from
the screen.
Setting the time
DVD / CD
2
Select “DVD/CD”.
RETURN
5
3
ENTER
Press to finish
QUICK SETUP.
SHIFT
Shows QUICK
SETUP screen.
SETUP
+
SHIFT
6
Press to exit.
/ REW
+
SETUP
/ REW
Simple setup
SLEEP
CLOCK/
TIMER
1
Select
“CLOCK”.
3
Press
[CLOCK/TIMER]
to finish setting
the time.
DEMO function
DEMO
SETUP
/ REW
or
2
Set the time
(press within 6
seconds or so).
CANCEL
/ FF
STOP
– DEMO
Press and hold.
This is a 12-hour clock.
The time is shown for about 5 seconds when you
•
select “CLOCK” again.
Pressing [FL DISPLAY] when the unit is on will also
display the time.
Reset the clock regularly to maintain accuracy.
•
When the unit is first plugged in, a demonstration of its
functions may be shown on the display.
If the demo setting is off, you can see a demonstration
by turning on the demo.
The display changes each time the button is held down.
Demonstration (demo on) @A NO DEMO (off)
You can reduce the power consumed in standby mode
by turning the demonstration off.
Note
You cannot turn the demo function on and off when
the unit is on.
RQT7509
9
Page 10
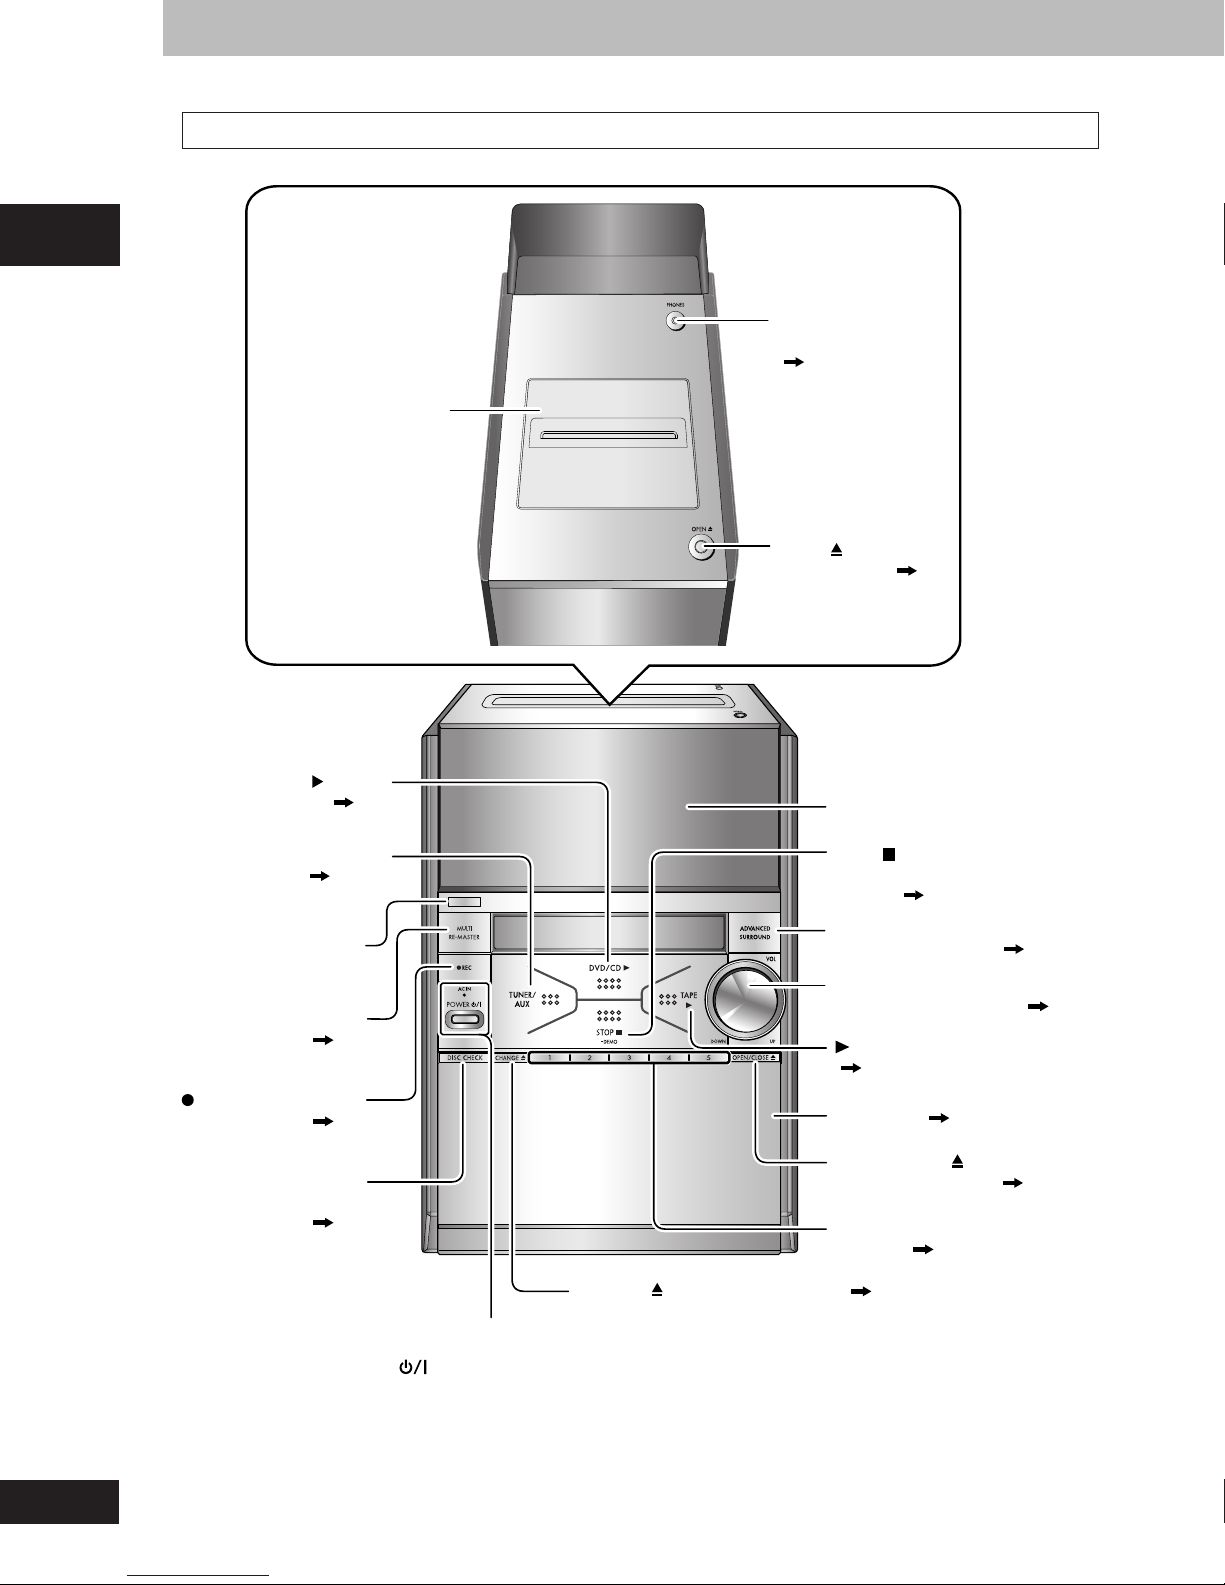
Control reference guide
Main unit
PHONES
(headphone jack)
(
26)
Getting started
DVD/CD button
TUNER/AUX button
Remote control
MULTI RE-MASTER
REC (record button)
( 12)
( 22, 32)
sensor
button ( 25)
( 24)
Cassette lid
OPEN (cassette
open button) ( 23)
FL Display
STOP
(stop, demonstation
button) ( 9, 12)
ADVANCED
SURROUND button ( 25)
VOL UP/DOWN
(volume control knob) ( 12, 25)
( 23)
Disc trays ( 12)
, –DEMO
TAPE
(tape play button)
DISC CHECK
(disc check button)
( 13)
AC IN (AC supply indicator)
This indicator lights when the unit is connected to the AC power supply.
POWER (standby/on switch)
Press to switch the unit from on to standby mode or vice versa.
In standby mode, the unit is still consuming a small amount of power.
RQT7509
10
OPEN/CLOSE (disc tray
open/close button) ( 12)
1– 5 (disc direct play
buttons) ( 13)
CHANGE (disc change button) ( 13)
Page 11
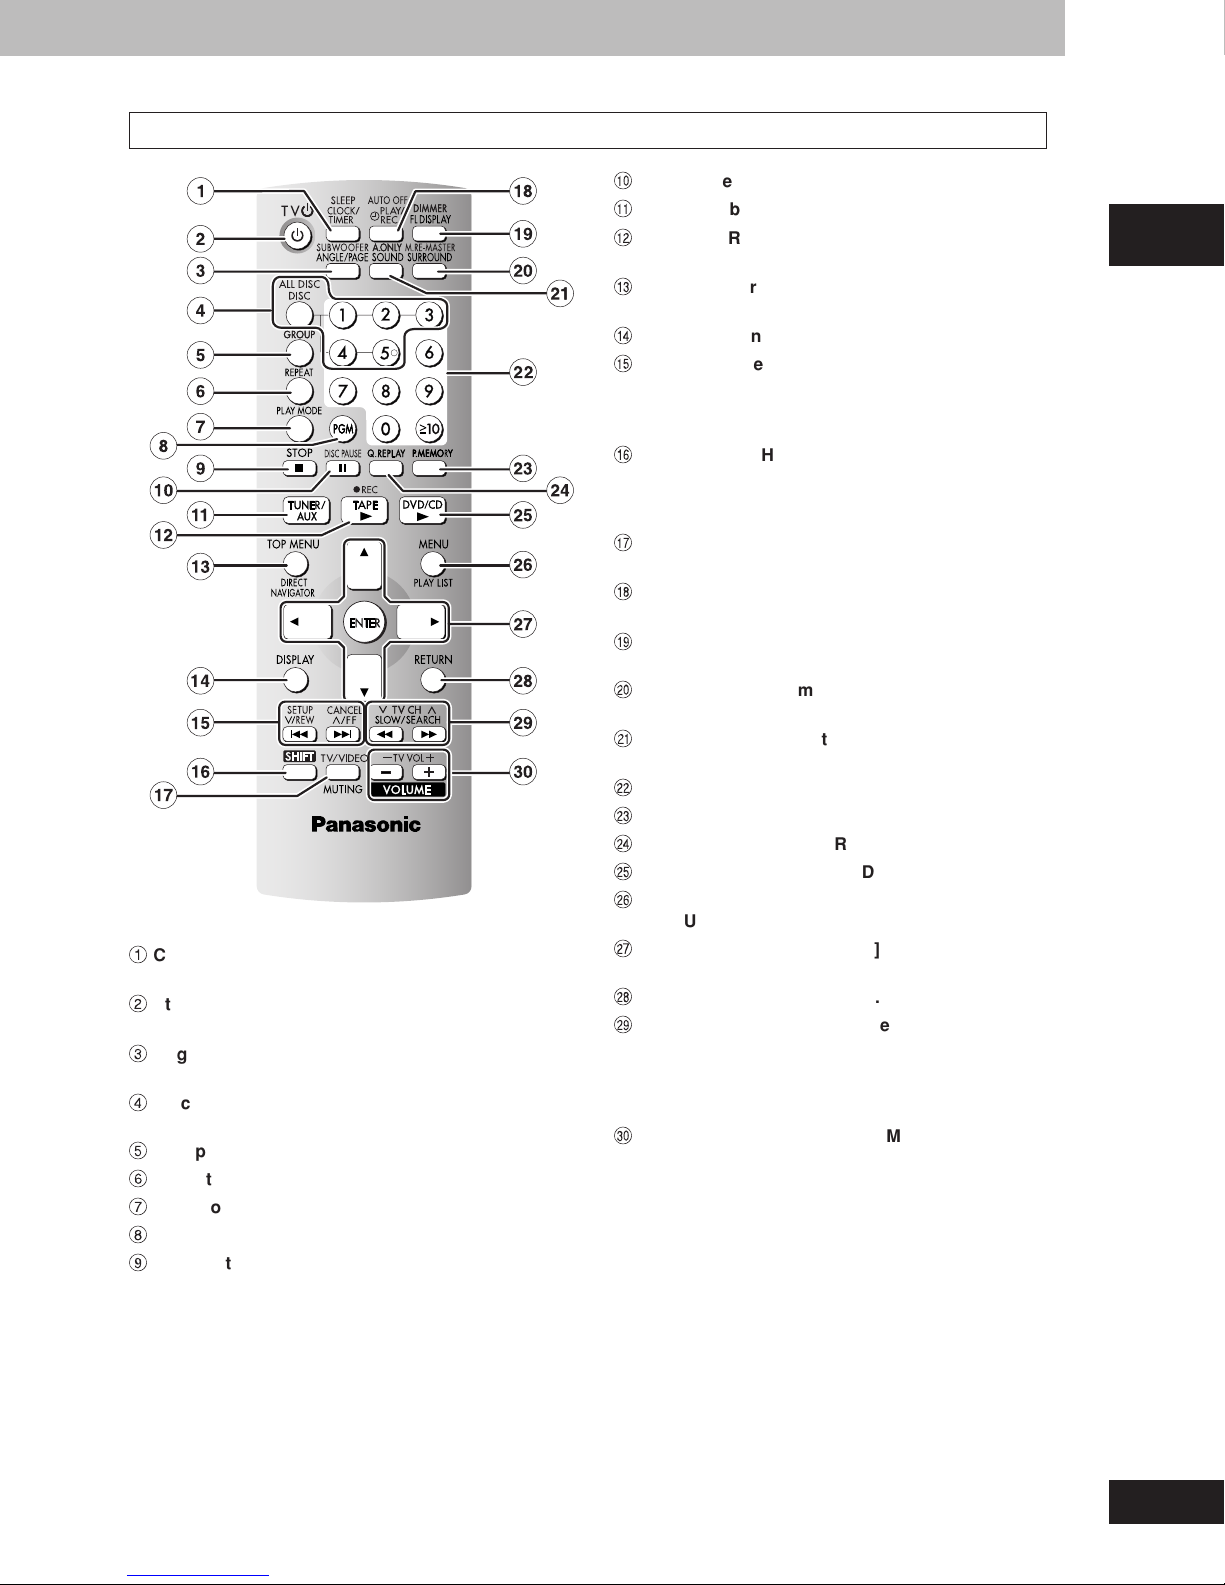
Remote control
1
Clock/timer, Sleep timer button
[CLOCK/TIMER, SLEEP] .............................. 9, 28
2
Standby/on, TV standby/on switch
ff
ff
[
f, TV
f] ......................................................... 9, 28
ff
ff
3
Angle/Page, Subwoofer button
[ANGLE/PAGE, SUBWOOFER] ........... 12, 15, 26
4
Disc select, All disc button [DISC, ALL DISC],
Disc buttons [1–5] ............................................ 13
5
Group button [GROUP] ....................................13
6
Repeat button [REPEAT] ................................. 14
7
Play mode select button [PLAY MODE] ...15, 22
8
Program button [PGM] ..................................... 15
9
Stop button [L STOP] ...................................... 12
Ä
Disc pause button [J DISC PAUSE] ............... 12
Å
Tuner/Aux button [TUNER/AUX] ............... 22, 32
Ç
Tape play, Record button
[- TAPE, [REC
É
Top menu, Direct navigator button
[TOP MENU, DIRECT NAVIGATOR] ... 13, 17, 18
Ñ
Display button [DISPLAY] ............. 14, 16, 17, 21
Ö
Disc skip, tape fast-forward/rewind, preset
channel select, time adjust, Setup, Cancel
buttons [g f,
CANCEL] ............................... 9, 12, 13, 15, 22, 23
Ü
Shift button [SHIFT]
To use functions labeled in orange:
While pressing [SHIFT], press the corresponding
button.
á
Muting, TV/VIDEO button
[MUTING, TV/VIDEO] .................................. 26, 28
à
Play timer/record timer, Auto off button
[
rPLAY/REC, AUTO OFF] ......................... 26, 27
â
FL display, Dimmer button
[FL DISPLAY, DIMMER] ................................ 9, 26
ä
Surround, Multi re-master button
[SURROUND, M.RE-MASTER] ......................... 25
ã
Sound, Audio only button
[SOUND, A.ONLY] ............................................. 25
å
Numbered buttons [0 – 9,
ç
Position memory button [P.MEMORY] ........... 14
é
Quick replay button [Q.REPLAY] .................... 15
è
DVD/CD play button [: DVD/CD] .................... 12
ê
Menu, Playlist button
[MENU, PLAY LIST] ............................. 13, 16–18
ë
Cursor buttons [8, 9, /, -], Enter button
[ENTER] ............................................................... 9
í
Return button [RETURN] ...................... 9, 13, 19
ì
Slow/search, tuning, character skip buttons
[(, )
These buttons also have the following functions.
[(, )]: TV channel select buttons
î
Volume buttons [ – , + , VOLUME] ............ 12, 25
These buttons also have the following functions.
[– , +]: TV volume buttons [TV VOL –, +] .......... 28
] ........................................ 23, 24
4 4
4/REW,
4 4
SLOW/SEARCH] ................ 12, 16, 22
[TV CH 4, 3] ................................. 28
3 3
3/FF, SETUP,
3 3
XX
X10] ....................... 13
XX
Getting started
RQT7509
11
Page 12
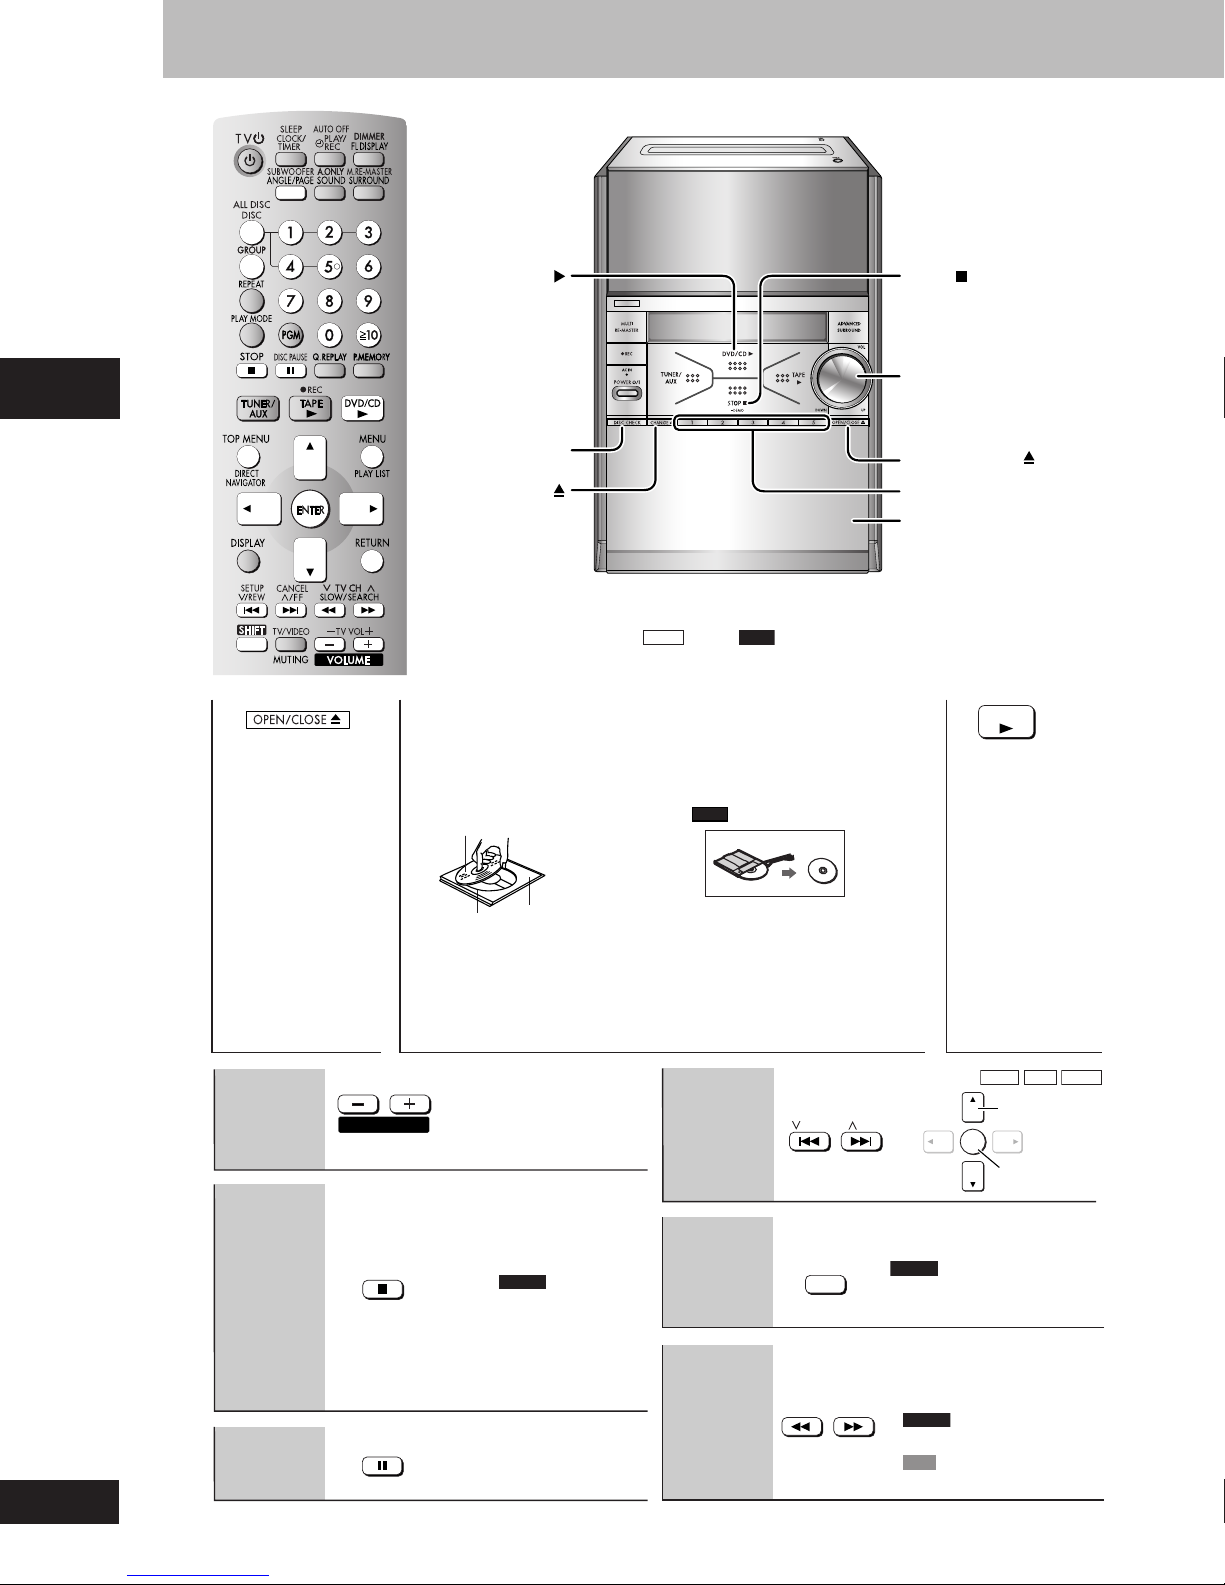
Discs — Basic play
Disc operations
1
Open the disc
tray.
•
3
Close the disc
tray.
The unit turns on
automatically and
a tray opens.
DVD/CD
STOP ,
–DEMO
VOL UP/DOWN
DISC
CHECK
CHANGE
OPEN/CLOSE
1– 5
Disc trays
If the disc contains both audio data (WMA and MP3) and JPEG, select “Audio” to
•
play WMA/MP3, “Picture” to play JPEG or “All” to play both audio and picture while the
menu is displayed (except
pressing [TOP MENU].
JPEG
files on
disc). You can also access the menu by
RAM
2
Place disc.
Label must face
upward.
1
Disc tray
Load double-sided discs
•
so the label for the side
you want to play is facing
up. (A page 37, Tray/disc
handling procedure)
Tray
number
RAM
Remove TYPE 2 and 4
•
discs from their cartridges
before use.
Read the instructions for the
disc carefully.
DVD / CD
4
Start play.
Volume
adjustment
VOLUME
STOP
Stop
RQT7509
Pause
DISC PAUSE
12
The stopped play position is
memorized when “RESUME” is
displayed.
Press [: DVD/CD] to
•
resume.
the previous chapters
(A page 14, Position
memory).
Press [L STOP] to clear the
•
position.
Press [: DVD/CD] to restart
•
play.
DVD-V
To review
Skip
Page skip
(during play
or pause)
Search
(during play)
Slow-motion
(during pause)
/ FF
/ REW
ANGLE / PAGE
SLOW / SEARCH
(Group skip
DVD-A
To select still pictures.
•
Up to 5 steps.
•
Press [: DVD/CD] to restart
•
play.
DVD-A
•
•
Motion picture parts
only.
Slow motion, forward
VCD
direction only.
ENTER
WMA
Select
Confirm
MP3 JPEG
)
Page 13
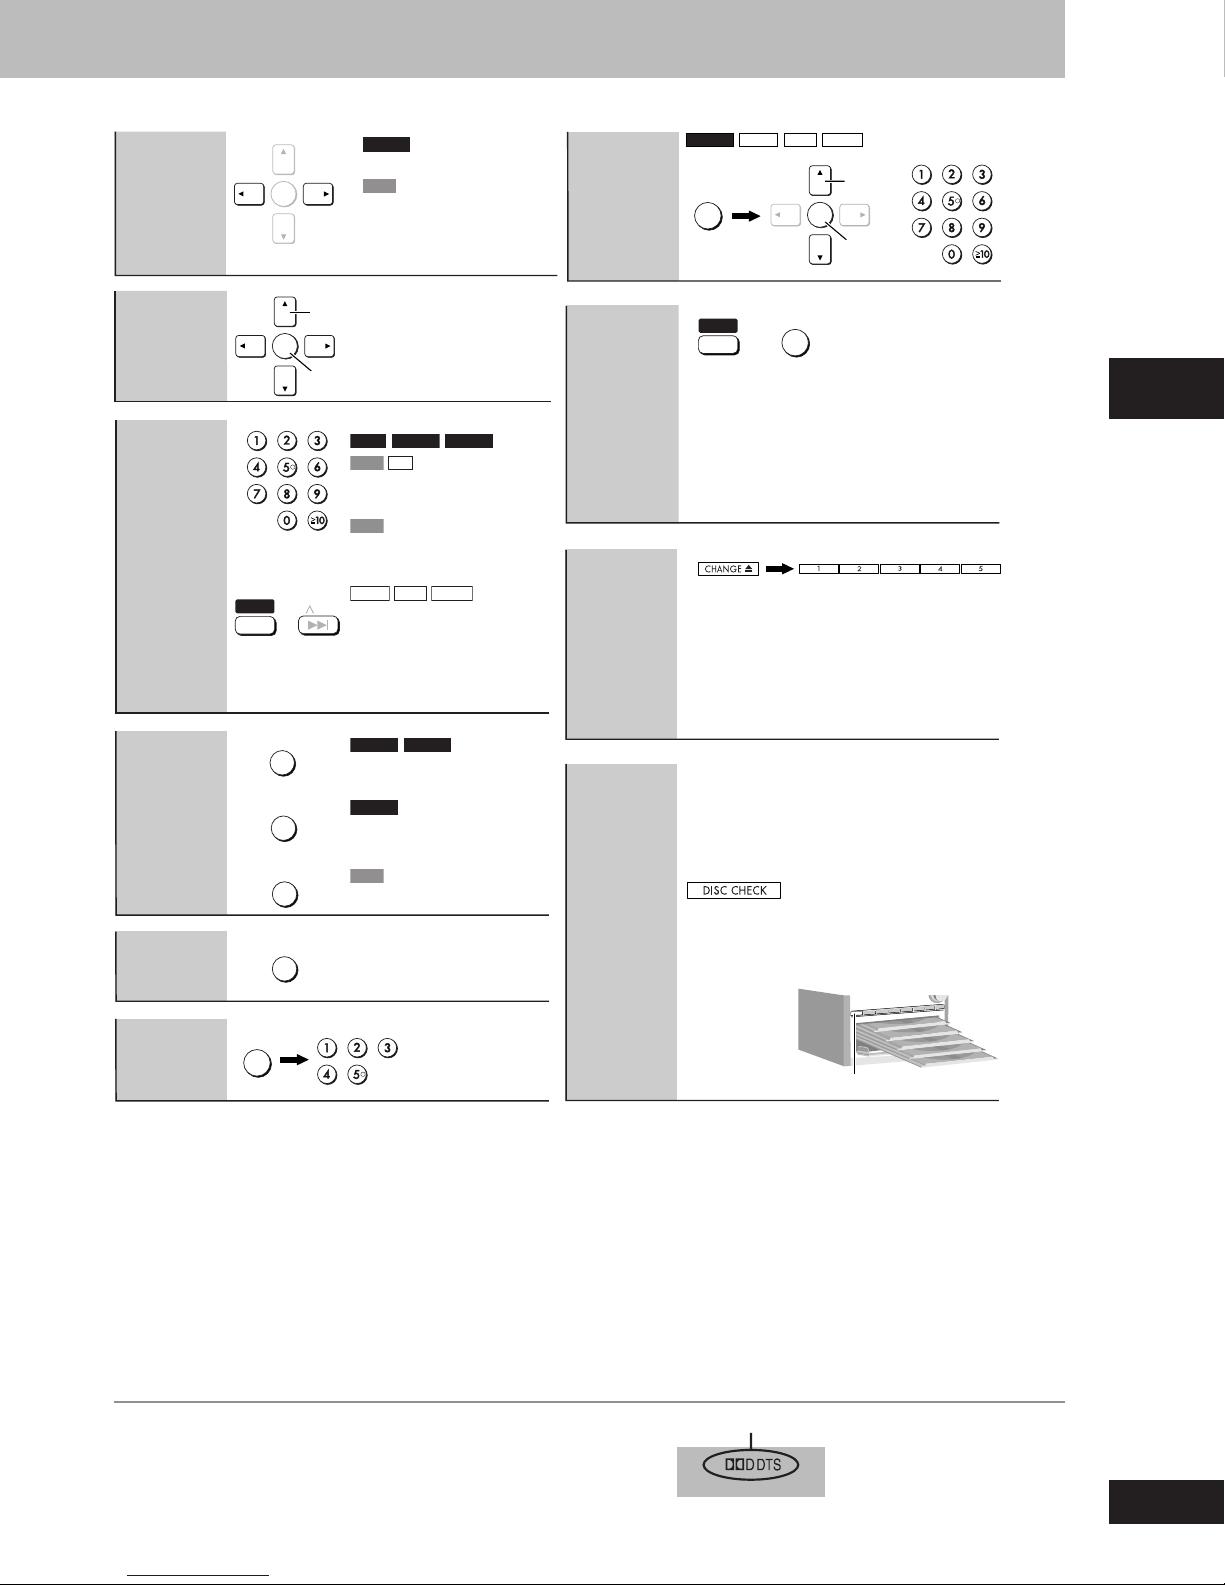
Frame-byframe
(during pause)
ENTER
DVD-A
•
•
•
Motion picture parts
only.
VCD
forward direction only.
Pressing [J DISC PAUSE]
also activates forward
direction.
Selecting
a group
DVD-A WMA MP3
GROUP
ENTER
JPEG
Select
Select
or
Confirm
On-screen
item select
Enter
number
Disc menu
Return to
previous
screen
SHIFT
TOP MENU
ENTER
+
MENU
RETURN
RETURN
Select
Confirm
RAM DVD-A DVD-V
VCD CD
Example: To select 12:
[X10] A [1] A [2]
with playback control
VCD
Press [L STOP] then press
•
the numbered buttons.
WMA
CANCEL
/ FF
MP3 JPEG
Example: To select 123:
[1] A [2] A [3] A [ENTER]
Press [SHIFT]+[CANCEL]
•
to cancel the number(s).
DVD-A DVD-V
Shows a disc top menu
DVD-V
Shows a disc menu
VCD
Shows a disc menu
All disc
playback
(during stop)
Changing a
disc in the
desired
tray
Checking
the disc
location
ALL DISC
SHIFT
DISC
+
ALL DISC ON ¡™ ALL DISC OFF
•
DVD discs and JPEG tracks are skipped.
•
HighMAT menus and video CD playback
•
control are disabled.
The mode cannot be changed during program
•
or random play.
Press again
to close the
tray.
You can also remove a disc while another is
•
playing (except in all-disc random, program
play or during recording).
This feature lets you check
•
whether a 12 cm disc is in a
tray.
If a disc is being played, the
•
corresponding tray will not
open.
Do not remove or insert discs
•
Press again
to close the
tray.
during a disc check.
Do not pull out the trays
•
during a disc check.
Disc operations
ALL DISC
Selecting
DISC
the disc
It may take some time for play to start but this is normal.
•
Multiple-channel signals are down-mixed to stereo (2-channel).
•
(A page 32, To enjoy multi-channel surround sound)
When playing VCDs with playback control (PBC)
•
Pressing buttons to perform skip, search or slow-motion may take you
to a menu screen.
DISC CHECK
Lights when a Dolby Digital or DTS disc is played.
•
RQT7509
13
Page 14
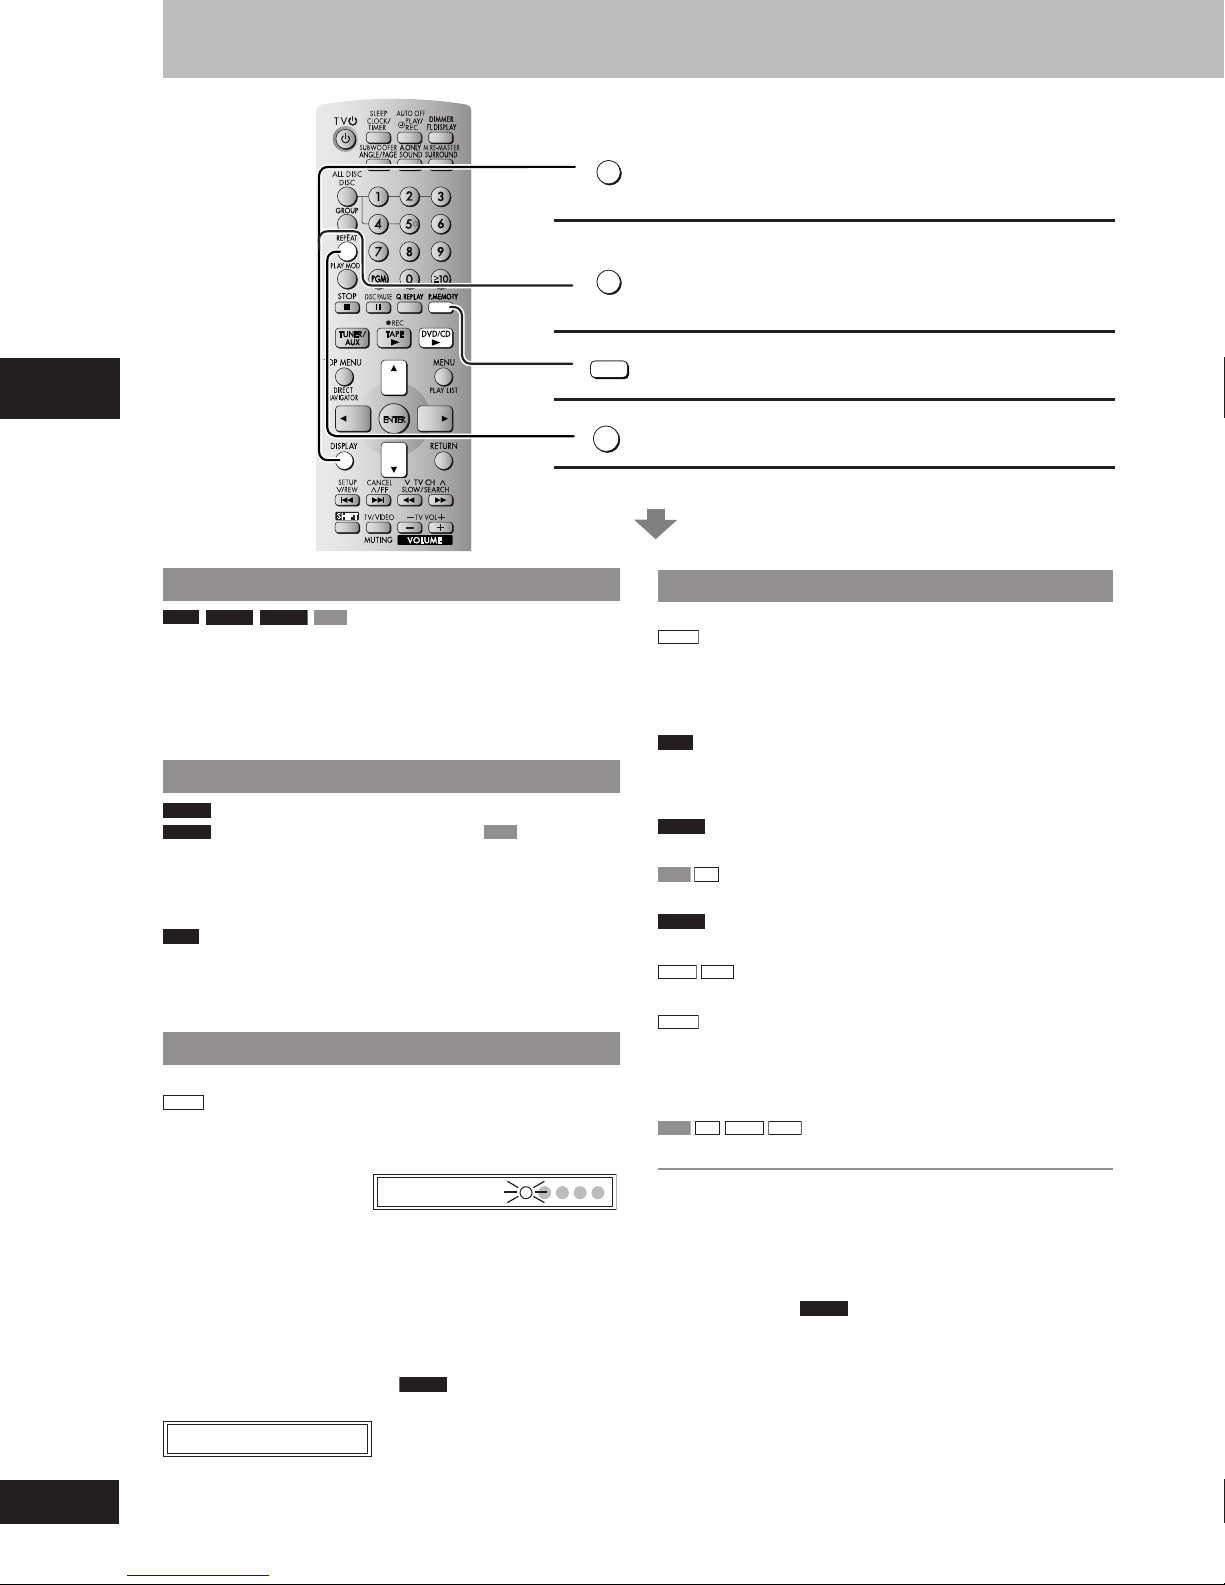
Discs — Convenient functions
Disc operations
RQT7509
14
DISPLAY
DISPLAY
P.MEMORY
REPEAT
See below for details.
Soundtracks
RAM
DVD-A
DVD-V
VCD
(Discs with multiple soundtracks)
During play
Press [DISPLAY] then [9, 8 ] to select “Audio”
(soundtrack).
(A page 19, Audio)
Subtitle
(Motion picture parts only)
DVD-A
(Discs with multiple subtitle languages)
DVD-V
(SVCD only)
VCD
During play
Press [DISPLAY] to select the subtitle language. (A page 19,
Subtitle)
RAM
You can only switch the subtitles on or off (A page 19, Subtitle).
To change the subtitle position and brightness (A page 21, Display
Menu)
Position memory
(Only when the elapsed play time can be displayed
: Works with all JPEG contents.)
JPEG
This position is memorized even after switching off the unit or changing the disc.
During play
Press [P.MEMORY].
Up to 5 discs.
•
When the sixth disc is memorized, the earliest position is replaced.
•
After changing the source or selecting another disc, re-selecting
•
Position memorized
the disc tray with the memorized position automatically starts
playback.
When the unit is switched on in “DVD/CD” mode or reinsert the disc
whose position you memorized, “RESUME” lights on the display.
Press [:DVD/CD] to start play from that position.
To review the previous chapters
Press [:DVD/CD] while the following message is on the display.
Press PLAY to preview chapters
Do not press [: DVD/CD] if you want to cancel review.
•
DVD-V
Soundtracks
Subtitle
Position memory
Memorizing the position to resume play
Repeat play
Repeat play
(Only when the elapsed play time can be displayed
: Works with all JPEG contents.)
JPEG
During play
Press [REPEAT] to select an item to be repeated.
For 1-disc play
RAM
PG REPEAT\1 → ALL REPEAT (Entire Disc)
→
REPEAT OFF
• During play list play
→
SCENE REPEAT
DVD-V
CHAPTER REPEAT → TITLE REPEAT
VCD
CD
TRACK REPEAT → ALL REPEAT (Entire disc)
DVD-A
TRACK REPEAT → GROUP REPEAT
WMA
MP3
CONTENT REPEAT → GROUP REPEAT
JPEG
PL REPEAT\2 → REPEAT OFF
\3
→
REPEAT OFF
→
REPEAT OFF
\3
→
REPEAT OFF
\3
→
REPEAT OFF
GROUP REPEAT\3 → REPEAT OFF
• You can also repeat play of content and group on HighMAT discs.
For All-disc play (A page 13)
VCD CD
To repeat only your favorite tracks, contents or chapters
Start program play {A page 15, Program play (up to 24 items)} and
press [REPEAT] to select the repeat mode.
\1
\2
\3
\4
WMA
MP3
ALL DISC RPT
\4
→
REPEAT OFF
Program repeat (A page 18, Playing the programs on DVD-RAM).
Playlist repeat (A page 18, Using the play list on DVD-RAM).
During all group (
“ALL REPEAT” is displayed.
), program and random play
DVD-A
All-disc repeat.
Page 15
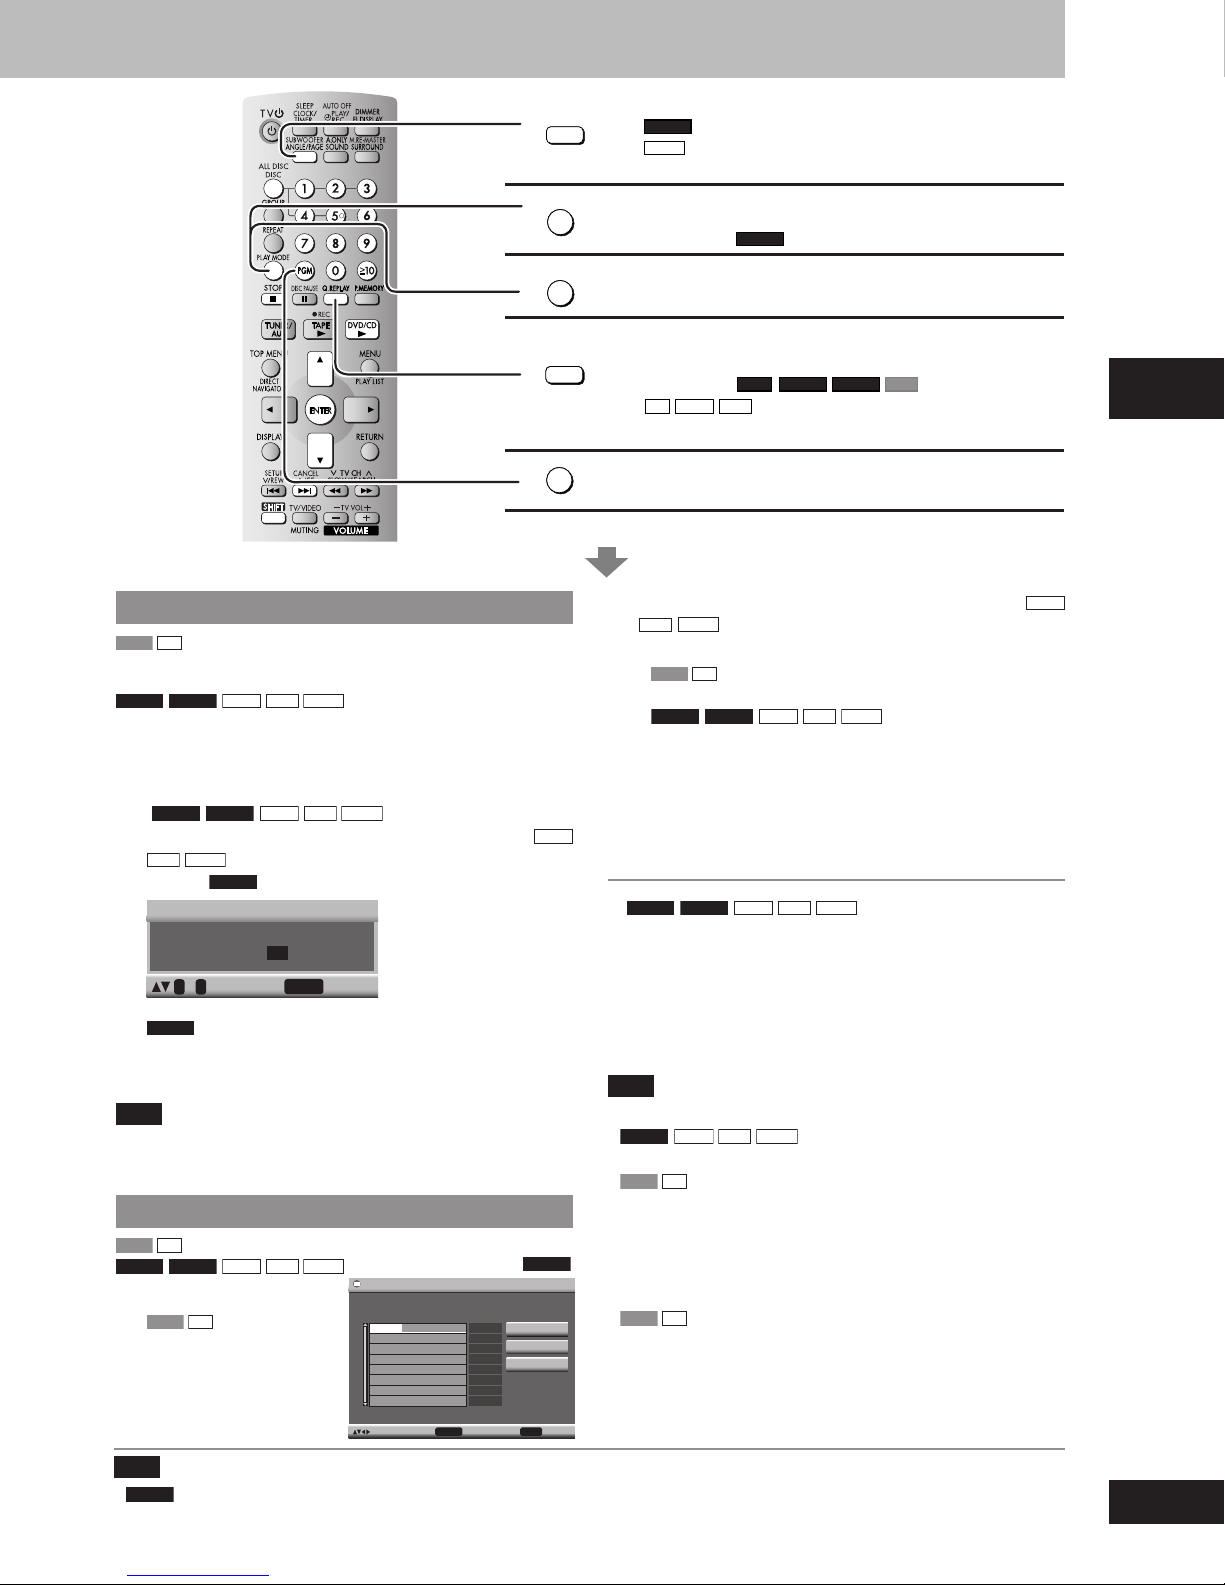
SUBWOOFER
ANGLE
/
PAGE
Angles
(with multiple angles) -- Angle select
DVD-V
JPEG
-- Still picture rotation
(During play)
PLAY MODE
PLAY MODE
All group play
Plays tracks in all the groups on a disc.
(During stop)
Random play
Quick replay
Q.REPLAY
PGMPGM
(Only when the elapsed play time can be displayed)
(During play)
CD WMA MP3
To skip back a few seconds.
Program play
See below for details.
Random play
VCD CD
1-disc random: All the items on a disc in random order.
All-disc random: All the items on all the discs in random order.
DVD-A DVD-V
1-disc random only: Selected items on a disc in random order.
During stop
(There is no on-screen display)
WMA
MP3 JPEG
1 Press [PLAY MODE] until the RANDOM screen
appears.
(
DVD-A DVD-V
2
WMA
MP3 JPEG
Press the numbered buttons to select a group
MP3 JPEG
Example
DVD-A
You can select more than one group or all groups.
•
To deselect a group, select the group again.
•
then press [ENTER]) or a title.
DVD-V
Random Playback
Choose a title.
Title 1
0 ~ 9 to select
PLAY to start
)
(
WMA
3 Press [: DVD/CD].
Note
During random play, empty trays are skipped and the playback
•
control function on Video CDs is cancelled.
During random play, this unit can access up to 999 audio or picture
•
contents and 400 groups.
Program play (up to 24 items)
VCD CD
DVD-A DVD-V
During stop
1
2 Press [PGM].
Note
•
•
•
(There is no on-screen display)
WMA
MP3 JPEG
VCD CD
Press [DISC] and then
disc button ([1] – [5]).
Program Play
No. Title
1
Example:
Choose a title and chapter.
Chapter Time
DVD-V
Play
Clear
Clear all
Press [L STOP].
“PGM” appears.
If you select bonus groups, you will have to enter a password.
DVD-A
Disable HighMAT disc play (A page 30, “Others” tab) to use random and program play.
Quick replay feature may not work while playing some parts of a disc or at all with some discs.
to select and press ENTER
PLAY to start
3 Press the numbered buttons to select the items (
JPEG
MP3
then press [ENTER]).
• Repeat this step to program other items.
•
VCD CD
the same disc.
DVD-A DVD-V
•
To select an item using the cursor buttons
Press [ENTER] and [
[ENTER] again to confirm the number.
All the items on the disc, title or group are selected when you
select “ALL”.
Step 1 is unnecessary when programming tracks on
4 Press [: DVD/CD] to play.
•
DVD-A DVD-V
To add to or change the program
Press [8, 9] to select an available item, then repeat step 3.
To clear the whole program
Select “Clear all” and press [ENTER].
To clear an item
Press [SHIFT]+[CANCEL], or select “Clear” and press [ENTER].
Press [ANGLE/PAGE] to skip 8 lines at a time.
•
Note
Clear the existing program before creating a new program.
•
•
•
•
WMA
DVD-V
Times are not displayed while programming.
VCD CD
Items the unit cannot find can be programmed but are cancelled
during play. This is also the case if you program the discs other
than Video CD and CD.
The program is cleared when you switch the unit to standby,
select another source, exit the program mode or move the disc
out of the play position.
VCD CD
The program is retained in memory.
MP3
DVD-A
DVD-A DVD-VRAM VCD
WMA
MP3 JPEG
88
8,
88
WMA
MP3 JPEG
JPEG
WMA
99
9] to select an item, then press
99
Disc operations
RQT7509
15
Page 16
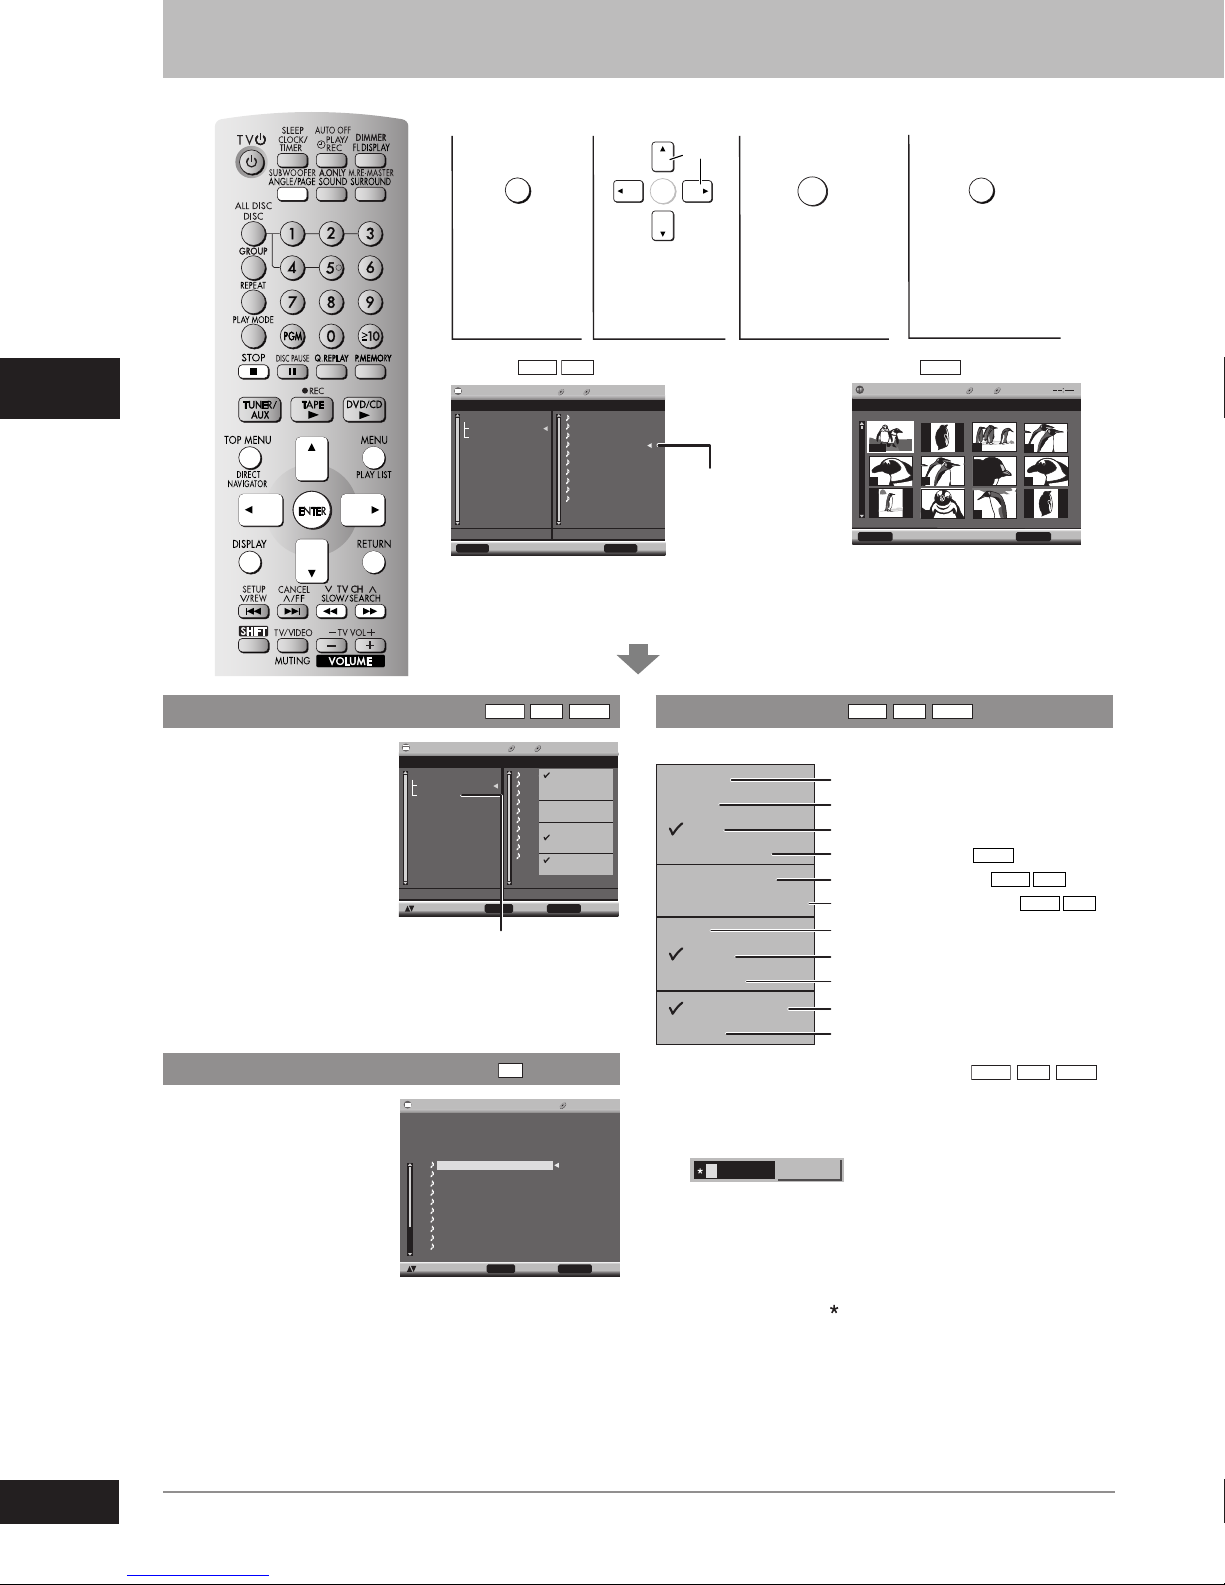
Discs — Using navigation menus
Thumbnail Menu 1 1 JPEG
2002_BUSSABA — NICOLE
DISPLAY to display the sub menu
RETURN to exit
G
G
C
C
1/12 2 3 4
6
758
10 11912
Disc operations
Using the tree screen to find a group
1 While the navigation
menu is displayed,
press [DISPLAY].
2 Press [
“Tree” and press
[ENTER].
3 Press [
88
8,
88
a group and press
[ENTER].
The navigation menu for
the group appears.
99
9] to select
99
99
9] to select
99
MENU
1
2
Shows
navigation
menu.
Example:
Navigation Menu 1 5 MP3 1:54
Lirkin Park — Meteora / Lirkin Park [Hybrid Theory] 09 — A Pla
Sep 15 2003
Lirkin Park — Meteora
The Ultimate
DISPLAY to display the sub menu
WMA
Group 001/002 Content 0005/0010
(Navigation menu) Example:
MP3
C
G
C
G
Breaking The Habit
Don’t Stay
Faint
Hit The Floor - Abyss
Lirkin Park [Hyorid Theor
Lirkin Park Cure For The
Lirkin Park — Meteora
Lirkin Park — Meteora
Lying From You
Somewhere I Belong
Search methods
WMA
MP3 JPEG
C
G
C
Navigation Menu 1 5 MP3 1:54
Lirkin Park — Meteora / Lirkin Park [Hybrid Theory] 09 — A Pla
Sep 15 2003
Lirkin Park — Meteora
The Beatles
Group 001/002 Content 0005/0010
Indicates this group includes
non compatible files
G
Breaking The Habit
Multi
Don’t Stay
List
Faint
Tree
Hit The Floor - Abyss
Next group
Lirkin Park [Hyorid Theor
Previous group
Lirkin Park Cure For The
All
Lirkin Park — Meteora
Lirkin Park — Meteora
Audio
Lying From You
Picture
Somewhere I Belong
Help display
Find
RETURN to returnto select and press ENTER
Select
ENTER
Select the
item.
ENTER
3
Press to
confirm.
4
Press to
exit.
JPEG
RETURN
(Thumbnails)
Track currently
playing
RETURN to exit
WMA
Using the submenu
MP3 JPEG
While the navigation menu is displayed, press [DISPLAY].
Multi
List
Tree
Thumbnail
Next group
Previous group
All
Audio
Picture
Help display
Find
Groups and contents
Contents only
Groups only
Thumbnail images
To go to next groups
JPEG
WMA
To go to previous groups
WMA/MP3 and JPEG files
WMA/MP3 files only
JPEG files only
To switch between guide messages
and the elapsed play time indicator
To search by content or group title
MP3
WMA
MP3
Using a contents screen to find a track
While the menu is displayed
88
Press [
99
8,
9] to move
88
99
through the tracks and
press [ENTER].
Press [ANGLE/PAGE] to
•
skip 10 lines at a time.
RQT7509
16
To return to the menu
Press [RETURN].
CD
(CD text only)
CD-Text 1/14 0:53
Disc Title : Celine Dion One Heart
Disc Artist : Celine Dion
Track Title : I Drove All Night (Album Version)
Track Artist :
1.
I Drove All Night (Album Version)
2.
Love Is All We Need (Album Version)
3. FAITH
(Album Version)
4.
In His Touch (Album Version)
5.
One Heart (Album Version)
6.
Stand By Your side (Album Version)
7.
NAKED (Album Version)
8.
Sorry For Love (Album Version)
9.
Have You Ever Been In Love (Album Version)
10. Reveal
(Album Version)
T
T
RETURN to exitto select and press ENTER
WMA
77
7 Searching by content or group title
77
MP3 JPEG
Place the cursor on the group title to search a group, or place the
cursor on the content title to search contents.
1 Select “Find” (A see above).
A
2 Press [
Repeat to enter other characters.
•
Lower case is also searched.
•
Press [(, )] to skip between A, E, I, O, and U.
•
Press [/] to erase a character.
•
Erase the asterisk ( ) to search only for the titles starting with
•
that word.
3 Press [
The search results screen appears.
4 Press [
press [ENTER].
Find
88
99
8,
9] to select a character and press [ENTER].
88
99
--
-] to select “Find” and press [ENTER].
--
88
99
8,
9] to select the content or group and
88
99
Page 17
Tips for making WMA/MP3, CD text and JPEG discs
Discs must conform to ISO9660 level 1 or 2 (except for extended
•
formats).
This unit is compatible with multi-session but if there are a lot of
•
sessions it takes more time for play to start. Keep the number of
sessions to a minimum to avoid this.
The order in which the tracks appear in the menus may differ from
•
the order shown on your computer.
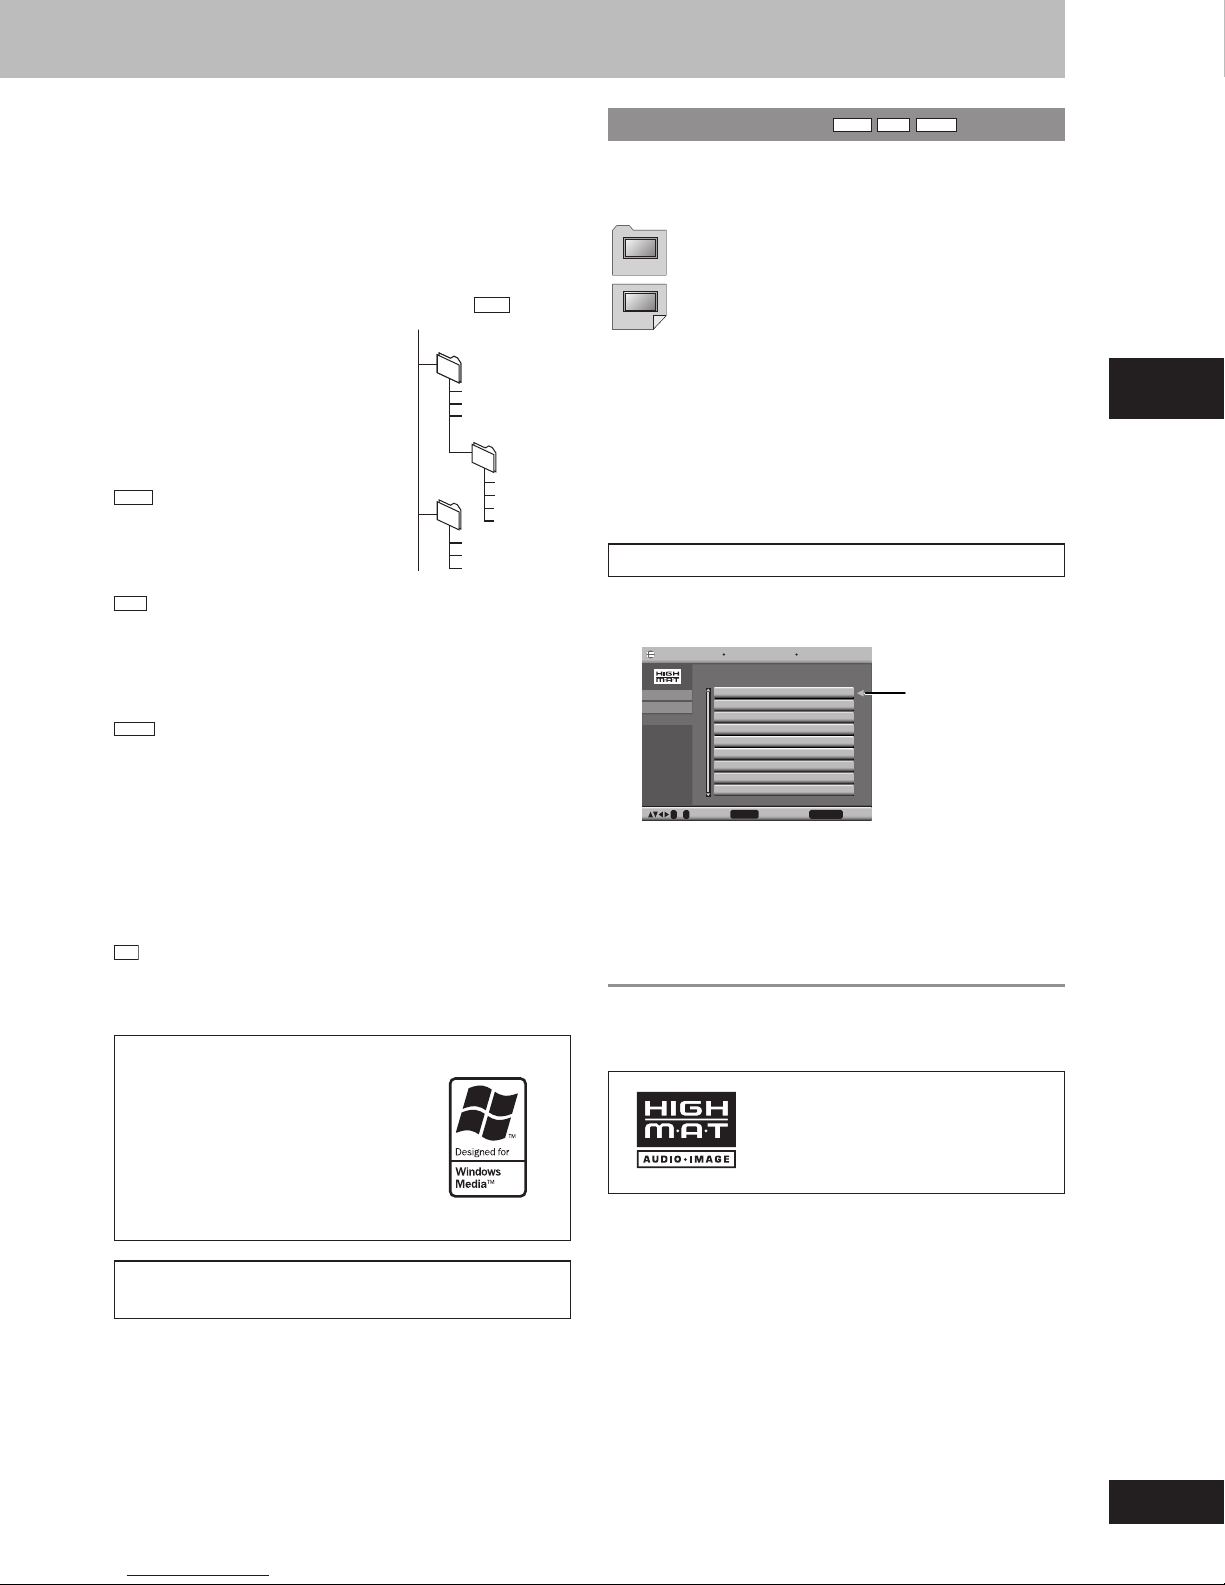
Playing HighMAT discs
A menu appears when you select the disc.
88
99
//
Press [
8,
88
When you press [ENTER]:
Menu: Takes you to the next menu which shows
--
9,
/,
-] to select then press [ENTER].
99
//
--
play lists or another menu.
WMA
MP3 JPEG
Naming folders and files
At the time of recording, prefix folder and
file names with 3-digit numbers in the order
you want to play them (this may not work
at times).
Files must have the extension:
“.WMA” or “.wma”
“.MP3” or “.mp3”
“.JPG”, “.jpg”, “.JPEG” or “.jpeg”
WMA
Noise may occur when playing WMA
•
files.
You cannot play WMA files that are copy
•
protected.
MP3
This unit is not compatible with ID3 tags.
•
If you play an MP3 track that includes still picture data, it will take
•
some time before the music itself starts playing and the elapsed
time will not be displayed during this time. Even after the track
starts, the correct play time will not be displayed.
JPEG
To view JPEG files on this unit:
•
— Take them on a digital camera that meets the DCF (Design rule for
Camera File System) standard. Some digital cameras have functions
that are not supported by the DCF standard like automatic picture
rotation which may render a picture unviewable.
— Do not alter the files in any way or save them under a different
name.
This unit cannot display moving pictures, Motion JPEG and other
•
such formats, still pictures other than JPEG (i.e. TIFF) or play
associated sound.
(CD text only)
CD
When making your own CD text discs
The unit plays the tracks in the order you record them so you do not
have to prefix the titles with numbers.
Windows Media, and the Windows logo
are trademarks, or registered trademarks
of Microsoft Corporation in the United
States and/or other countries.
WMA is a compression format developed
by Microsoft Corporation. It achieves the
same sound quality as MP3 with a file
size that is smaller than that of MP3.
Example:
root
001group
001
003group
MP3
001track.mp3
002track.mp3
003track.mp3
002group
001track.mp3
002track.mp3
003track.mp3
004track.mp3
001track.mp3
002track.mp3
003track.mp3
Play list: Play starts.
To display the screen
•
Press [TOP MENU].
To return to the menu above the current one
•
Press [RETURN].
To change the menu background
•
Press [DISPLAY].
The background changes to the one recorded on the disc.
To exit the screen
•
Press [L
STOP].
Selecting from the lists
1 During play
Press [MENU].
Playlist
PLAYLIST
GROUP
CONTENT
2 Press [
list, group and content lists.
3 Press [
[ENTER].
Press [ANGLE/PAGE] to skip 10 lines at a time.
•
To exit the list screen
•
Press [MENU].
All by Artist The Beatles
No. Content title
1 Love Me Do
2 From Me to You
3 She Loves You
4 I Want to Hold Your Hand
5 Can’t Buy Me Love
0 ~ 9 to select ENTER to play
//
/] then [
//
--
-] then [
--
HighMAT and the HighMAT logo are
either trademarks or registered
trademarks of Microsoft Corporation in
the United States and/or other countries.
Playing
RETURN to exit
88
99
8,
9] to switch between the play
88
99
88
99
8,
9] to select an item and press
88
99
Disc operations
MPEG Layer-3 audio decoding technology licensed from
Fraunhofer IIS and Thomson multimedia.
RQT7509
17
Page 18
Discs — Using navigation menus
1 11/ 1(WED) 12:05 Friends of a feather
2 1/ 1(MON) 1:05 Sunny day
3 2/ 2(TUE) 2:21 Penguins habitat
4 3/ 3(WED) 3:37 Irresistible
5 4/ 10(THU) 11:05 Hot cakes
No. Date On Title Contents
RETURN to exit
0 ~ 9 to select and press ENTER
DIRECT NAVIGATOR
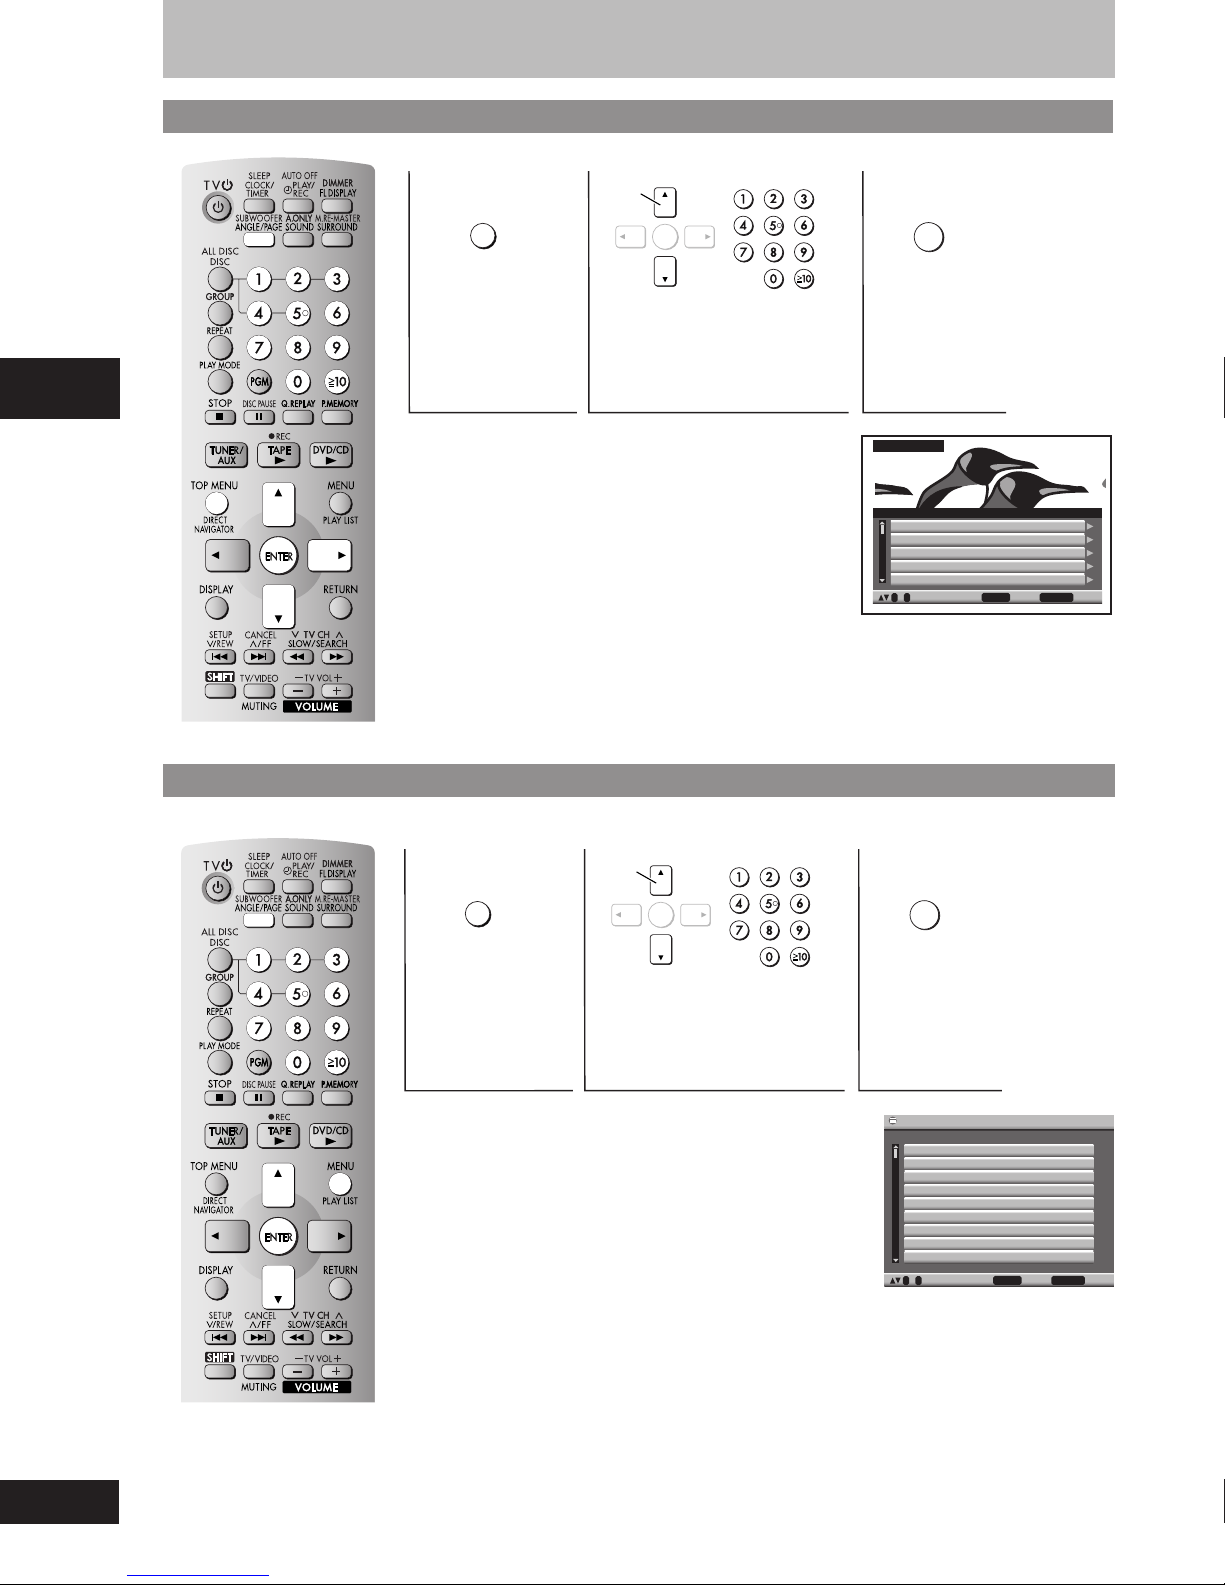
Playing programs on DVD-RAM
Disc operations
Select
ENTER
DIRECT
NAVIGATOR
1
Shows the
program list.
2
Select the item.
The selected program
plays in the background.
Titles appear only if you have entered them.
•
You cannot change program and disc titles.
•
Press [-] to show the contents of the program.
•
Press [ANGLE/PAGE] to skip 5 lines at a time.
•
Indication on the unit’s display.
PG: Program number
Select
ENTER
3
Press to
confirm.
Using the play list on DVD-RAM
1
Shows the
play list menu.
You can play a group of scenes and a play list created on
other equipment such as a DVD video recorder.
The play list can be selected only if the disc contains a play list.
•
Press [ANGLE/PAGE] to skip 10 lines at a time.
•
Indication on the unit’s display.
PL: Play list number
PLAY LIST
Select
ENTER
2
Select the item.
Select
ENTER
3
Press to
confirm.
Playlist
No. Date Length Title
1 11/ 1 0:00:01 I’m only a woman
2 1/ 1 0:01:20 Sunny day
3 2/ 2 1:10:04 Breathless
4 3/ 3 0:10:20 Irresistible
5 4/ 10 0:00:01 Hot cakes
0 ~ 9 to select and press ENTER
RETURN to exit
RQT7509
18
Page 19
Discs — Using On-screen menu
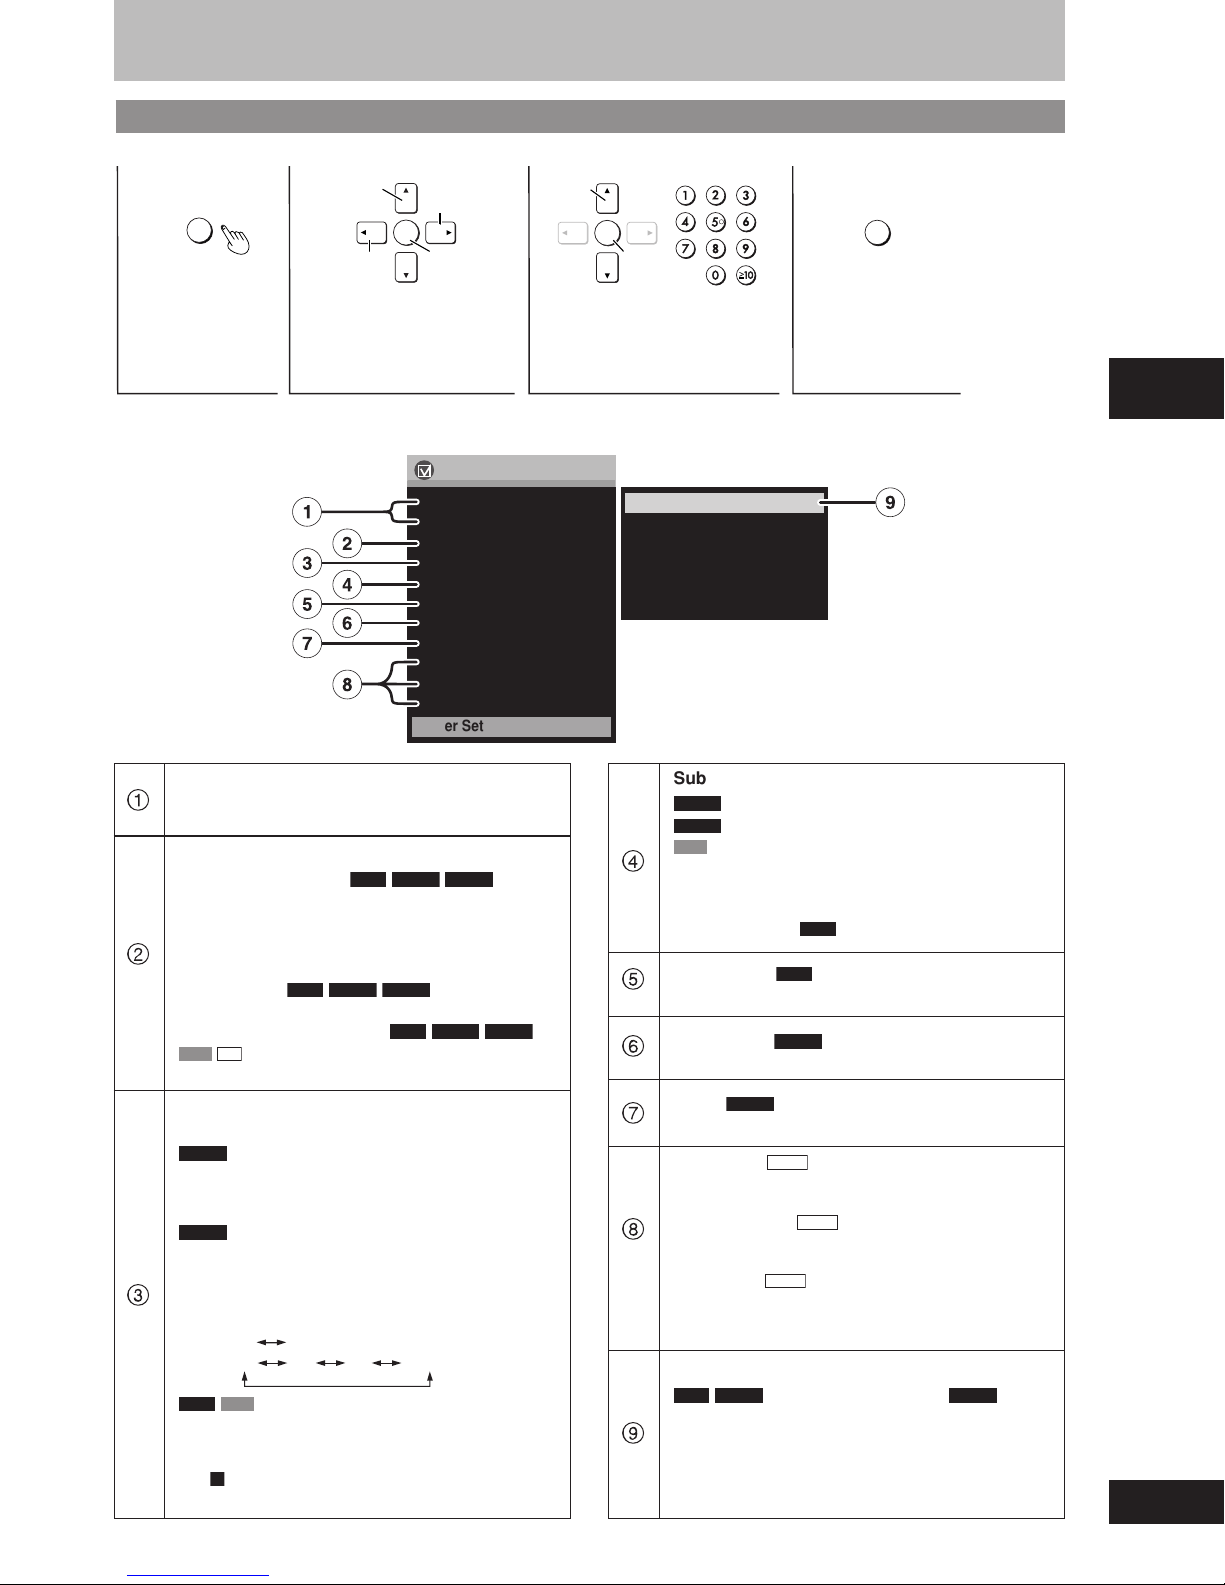
To get disc information or to play from a specified item
DISPLAY
1
Press once.
Select
Return to the
previous menu
2
Select the menu.
ENTER
Go to the
next menu
Confirm
Items shown differ depending on the type of software.
Example:
Menu
Title
Chapter 1/ 0
Time 0:00:00
Audio 1 English
Subtitle Off
Marker (VR)
Still Picture 3
Angle 1/1
Thumbnail
Rotate Picture
Slideshow Off
Other Settings
Select
ENTER
Confirm
3
Make the settings.
1/ 30
Play Speed
Play Menu
Picture Menu
Audio Menu
Display Menu
Other Menu
Select
RETURN
4
Press to exit.
Disc operations
Program, Group, Title, Track, Chapter,
Playlist, Content
1
To start from a specific item.
Time
Time Slip
To skip the time forward or backward.
1. Press [ENTER] twice to show Time Slip indicator.
2. Press [8, 9] to enter the time and press [ENTER].
2
•
Time Search
To start from a specific time.
Elapsed/Remaining Time
VCD CD
To change between elapsed or remaining time display.
(during play)
Press and hold [8, 9] to alter faster.
RAM DVD-A DVD-V
RAM DVD-A DVD-V
RAM DVD-A DVD-V
Audio
(Discs with multiple soundtracks)
DVD-A
Play restarts from the beginning of the soundtrack when
changing soundtracks that are accompanied by still
pictures.
(Karaoke discs)
DVD-V
You can also use this button to switch the vocals on and
off.
Read the disc’s instructions for details.
3
Karaoke vocals, on and off
Solo : On Off
Duet : Off
RAM VCD
You can also use this button to select “L”, “R” or “L R”.
Audio attributes
See
A page 21, Audio attributes.
A
V1 V2
V1+V2
Subtitle
(Motion picture parts only)
DVD-A
(Discs with multiple subtitle languages)
DVD-V
(SVCD only)
VCD
4
To clear or display the subtitles
Press [8, 9] to select “On” or “Off”.
Subtitle on or off
Marker (VR)
5
To recall a marker recorded on DVD-Video recorders.
Still Picture
6
To view still pictures.
DVD-V
Angle
7
To select the angle. (A page 15, Angles)
Thumbnail
To show thumbnail images.
Rotate Picture
8
(A page 15, Angles)
Slideshow
To turn the slideshow on or off.
To change the timing (0–30 seconds) of the slideshow.
RAM
RAM
DVD-A
(Discs with multiple angles)
JPEG
JPEG
JPEG
Other Settings—Play Speed
RAM DVD-A
To change play speed
9
– from x0.6 to x1.4 (in 0.1 unit steps)
After you change the speed:
•
– Digital output switches to PCM-2ch.
Sound is stereo as long as “Normal” is selected.
•
(Motion picture parts only)
(Continued on next page)
DVD-V
RQT7509
19
Page 20
Discs — Using On-screen menu
A
Example:
Menu
Title
Title
Chapter 1/ 0
Time 0:00:00
Audio 1 English
Subtitle Off
Marker (VR)
Still Picture 3
Angle 1/1
Thumbnail
Rotate Picture
Slideshow Off
Other Settings
1/ 30
Play Speed
Play Menu
Picture Menu
Audio Menu
Display Menu
Other Menu
Disc operations
RQT7509
20
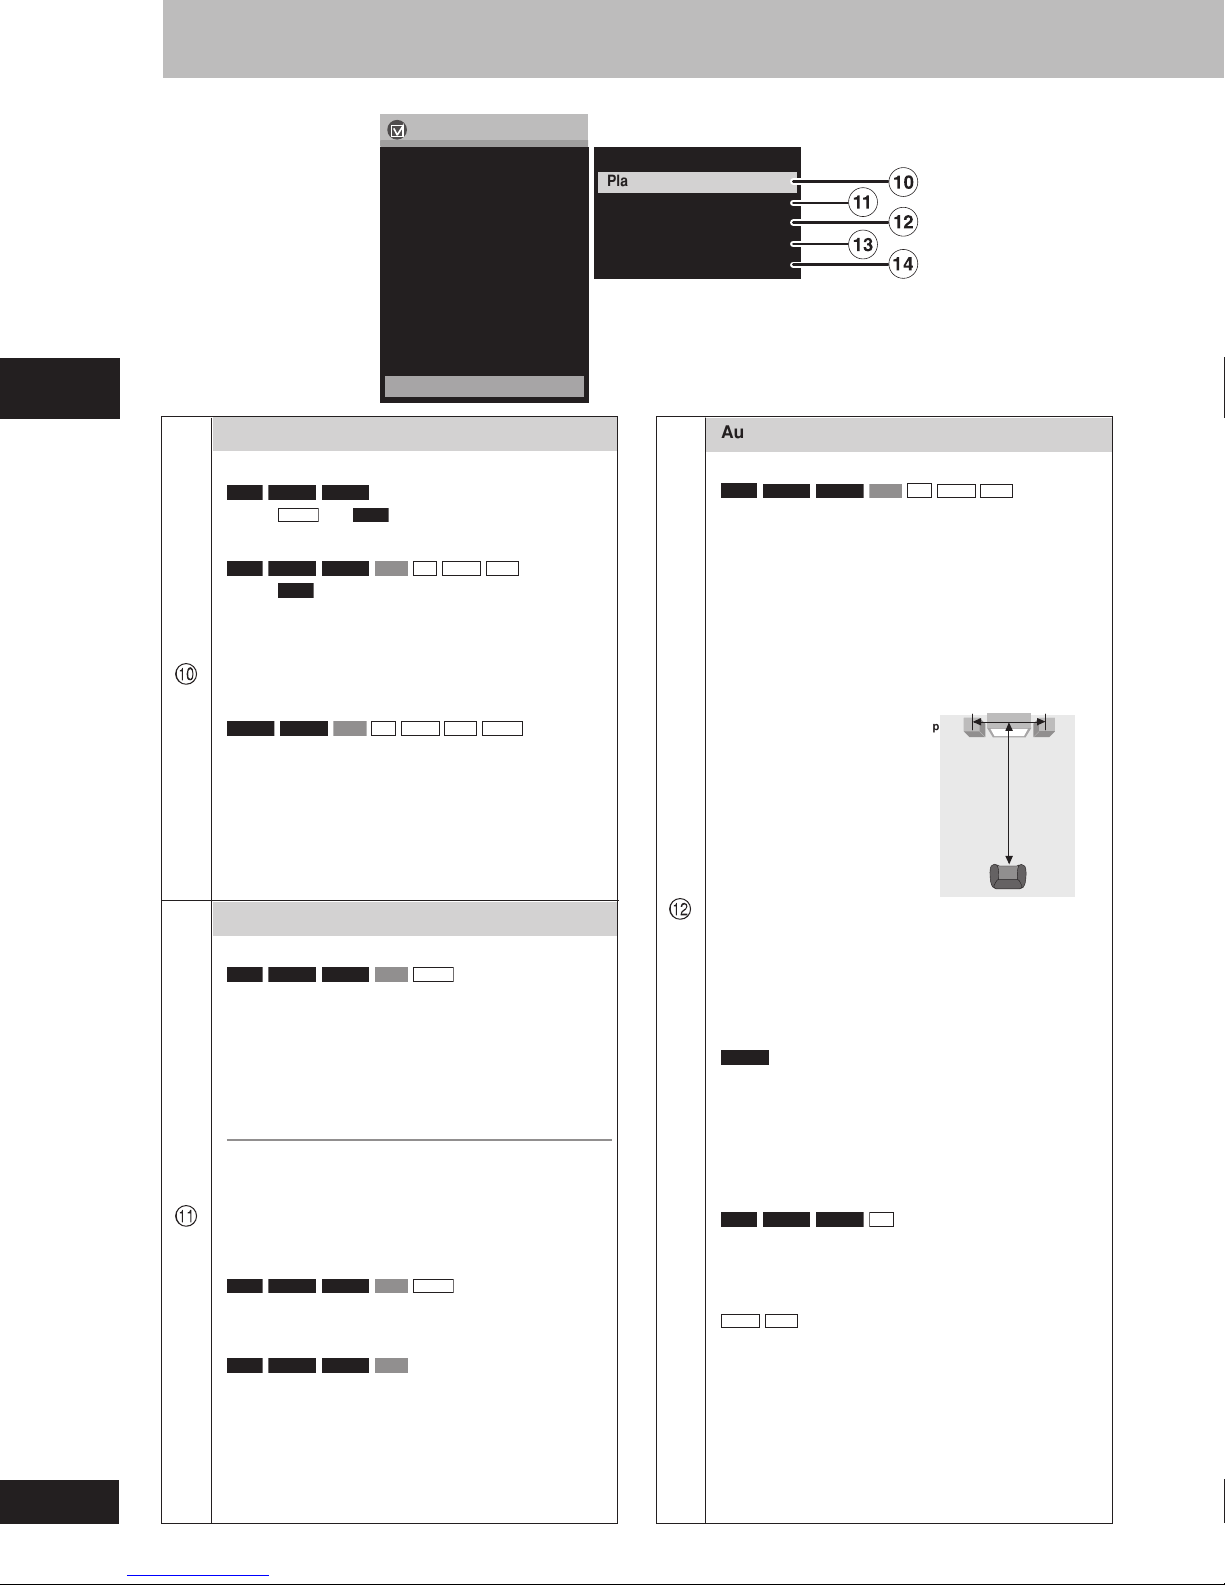
Play Menu
Repeat
RAM DVD-A DVD-V
Except
(A page 14, Repeat play)
JPEG
and
RAM
(still picture part).
A-B Repeat
RAM DVD-A DVD-V VCD CD
Except
Repeat a section between points A and B within an item.
[ENTER] (start point) A [ENTER] (finish point)
To cancel: [ENTER]
Ä
A-B repeat is cancelled when you press [Q.REPLAY].
•
(still picture part).
RAM
WMA
MP3
Marker
DVD-A DVD-V VCD CD
To mark a position to play again (Marker).
Press [-] to highlight the first asterisk and press
•
[ENTER] again to mark a position.
You can mark up to 5 positions.
To mark another position: [/, -] A [ENTER]
To recall a marker: [/, -] A [ENTER]
To erase a marker: [/, -] A [SHIFT]+[CANCEL]
This feature does not work during program and random
•
play.
WMA
MP3 JPEG
Picture Menu
Picture Mode
RAM DVD-A DVD-V VCD JPEG
Normal
Cinema1: Mellows images and enhances detail in dark
Cinema2: Sharpens images and enhances detail in dark
Animation
Dynamic
User (Press [ENTER] to select “Picture Adjustment”)
(A see below)
Picture Adjustment
Contrast Brightness Sharpness Color
Gamma (Adjusts the brightness of dark parts.)
Depth Enhancer
Å
Reduce the rough noise in the background to give a
•
greater feeling of depth.
scenes.
scenes.
Video Output Mode
RAM DVD-A DVD-V VCD JPEG
To switch between Progressive (480P) and Interlace
(480I) video.
Transfer Mode
RAM DVD-A DVD-V VCD
If you have chosen “480P” (A see above), select the
method of conversion for progressive output to suit the
type of material.
Auto1 (normal): For viewing film material
Auto2: For viewing film material (the same as Auto1,
Video: For video material
but able to convert 30-frame-per-second
progressive video)
Audio Menu
Advanced Surround
RAM DVD-A DVD-V VCD CD
(2 channels or more)
Enjoy a surround-like effect when using front speakers
or headphones. The effect broadens when playing discs
with surround effects and sound seems to come from
speakers on either side of you.
The level
•
Off (cancel – factory setting)
Natural
Enhanced
Optimum seating position
<When using the
television’s speakers>
Distance A = Television’s
width
Ç
This does not work or has less effect with some discs.
•
Turn off if it causes distortion.
•
Do not use in combination with surround effects on other
•
equipment.
(A page 25, Advanced Surround)
WMA
MP3
Speaker Speaker
3 to 4 times
distance A
Seating position
Dialogue Enhancer
DVD-V
(Dolby Digital, DTS, 3-channel or over, where the
dialogue is recorded in the center channel)
This makes the dialogue in movies easier to hear.
On ¡™ Off (Factory preset)
This does not work or has less effect with some discs.
•
Multi Re-master
RAM DVD-A DVD-V CD
For discs recorded with multi-channels LPCM at 44.1 kHz
or 48 kHz.
It adds higher frequency signal not recorded on the discs,
which gives a more natural sound effect.
WMA
MP3
For discs recorded at 44.1 kHz or 48 kHz.
This format reproduces the frequencies lost during
recording to give you a sound closer to the original effect.
(A page 25, Multi Re-master—Enjoying more natural sound)
Page 21
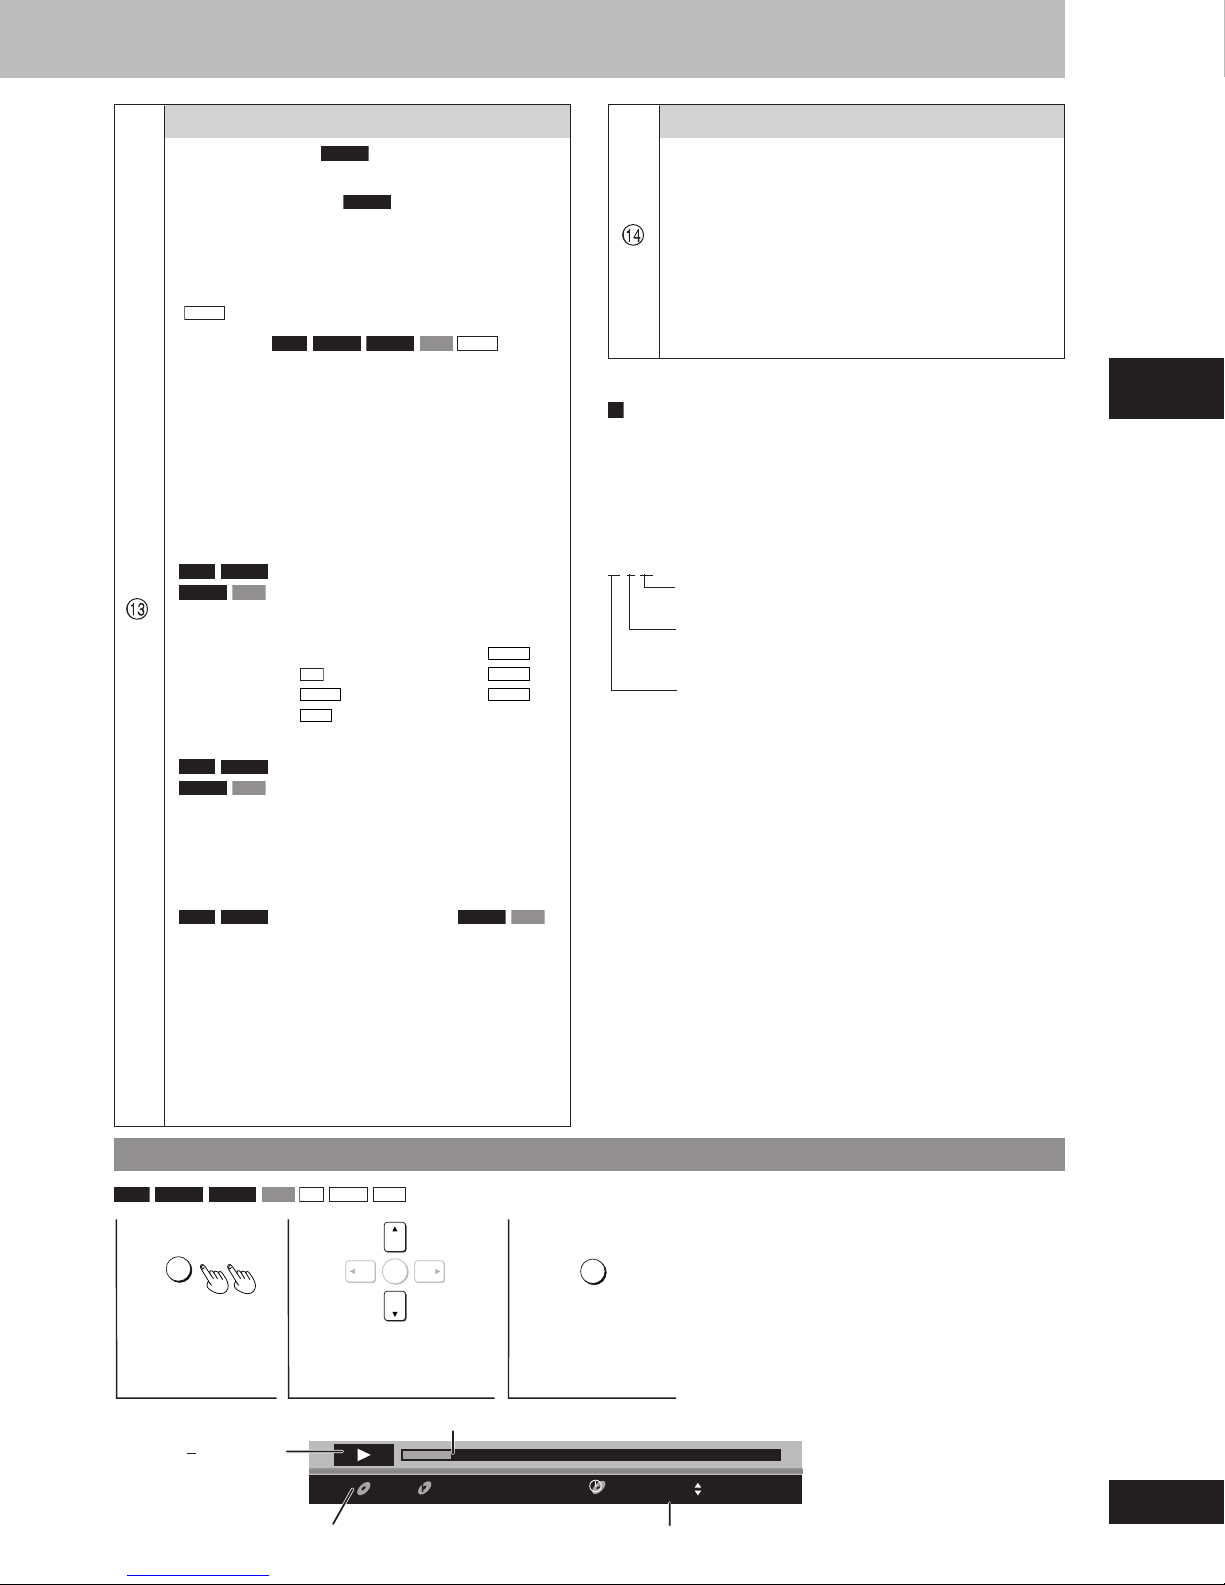
Display Menu
Subtitle Position
0 to –60 in 2 unit steps.
Subtitle Brightness
“Auto” to automatically adjust the brightness against
the background, or 0 to –7.
DVD-V
DVD-V
Information
On ¡™ Off
JPEG
(
: Off, Date, Details.)
4:3 Aspect
To select how to show images made for 4:3 aspect
screens on a 16:9 aspect television.
Normal: Laterally stretches images.
Auto: Expands 4:3 letterbox images to fill more of
Shrink: Images appear in the center of the screen.
Zoom: Expands all images to fill the screen.
If your television has a similar feature, use it instead for a
better effect.
RAM DVD-A DVD-V VCD JPEG
the screen. Other images appear in full in the
center of the screen.
Just Fit Zoom
RAM DVD-A
DVD-V VCD
Preset zoom ratios suitable for the following video
É
formats are available.
Auto American Vista
4:3 Standard
European Vista
16:9 Standard
(Motion picture parts only)
4:3
1.66:1
16:9
Cinemascope1
Cinemascope2
Manual Zoom
RAM
DVD-V VCD
Fine adjustments
Press [
– from x1.00 to x1.60 (in 0.01 units)
– from x1.60 to x2.00 (in 0.02 units)
(Motion picture parts only)
DVD-A
88
99
8,
9].
88
99
Bitrate Display
RAM DVD-A
When you select “On”:
During play: shows the bitrate (approximate values) of
During pause: shows the data volume of the frame and
(Moving picture parts only)
the video being played
type of picture (A page 37, Glossary—
I/P/B)
GUI See-through
To enable the on-screen menu to become translucent.
GUI Brightness (–3 to +3)
To adjust the brightness of the on-screen displays.
1.85:1
2.35:1
2.55:1
DVD-V VCD
Other Menu
Play as DVD-Video or Play as DVD-Audio
While stopped
Select “Play as DVD-Video” to play DVD-Video contents
•
of DVD-Audio.
Ñ
Play as DVD-VR, Play as HighMAT or Play as
Data Disc
While stopped
Select “Play as Data Disc” to play JPEG files on DVD-
•
RAM or to play HighMAT disc without using the HighMAT
function.
Audio attributes
A
LPCM/PPCM/0Digital/DTS: Signal type
kHz: Sampling frequency
bit: Number of bits
channel: Number of channels
Example:
3/2 .1ch
.1: Low frequency effect (not displayed if there is no
signal)
0: No surround
1: Mono surround
2: Stereo surround (left/right)
1: Center
2: Front left + Front right
3: Front left + Front right + Center
Disc operations
To see the playback position
RAM DVD-A DVD-V VCD CD
DISPLAY
1
Press twice.
Condition play, pause
or slow/search
Current playback item Elapsed play time
WMA
MP3
ENTER
2
Change the playback
time display.
Current position
G
C
11
RETURN
3
Press to exit.
RQT7509
T
T
00:01:02
21
Page 22
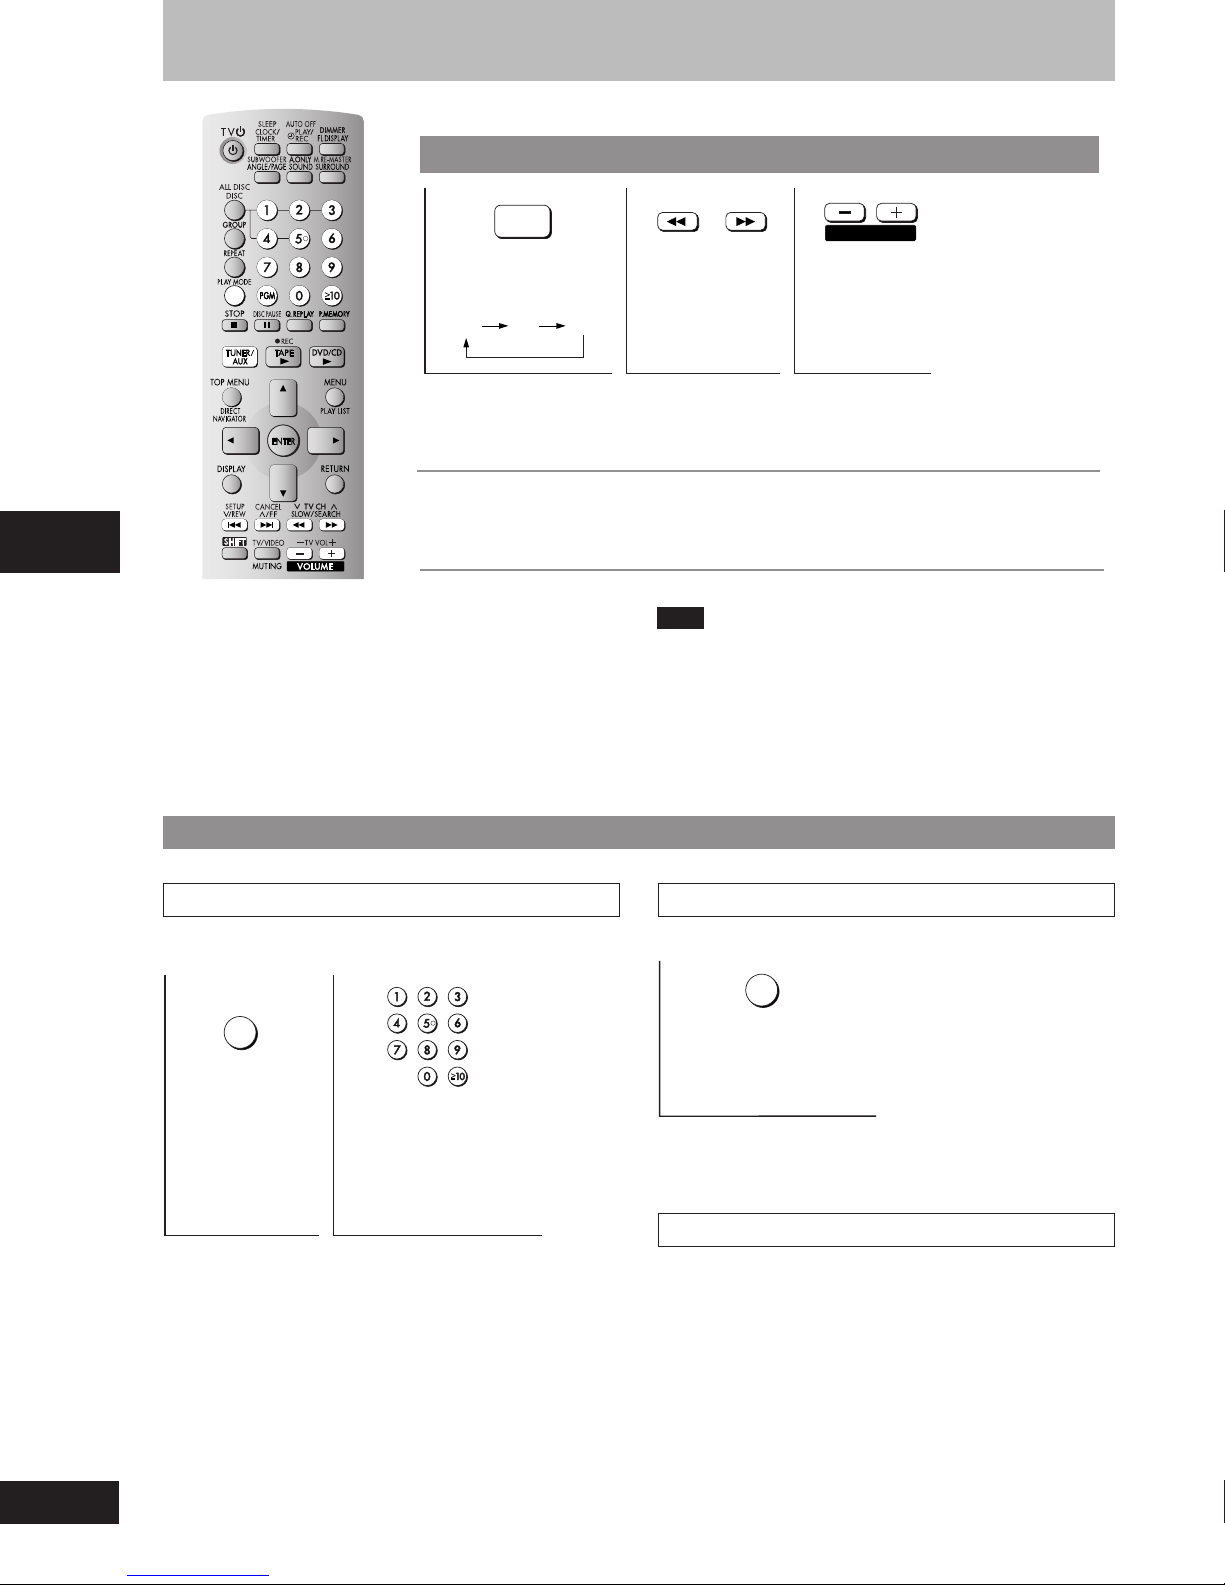
The radio
Manual tuning
TUNER /
1
Select “FM” or
“AM”.
FM AM
Press and hold [(] or [)] until the frequency starts scrolling to start automatic tuning.
•
Tuning stops when a station is found.
“ST” is displayed when a stereo FM broadcast is being received.
If noise is excessive in FM
1. Press [PLAY MODE] to display “MONO”.
2. Press [PLAY MODE] again to cancel the mode.
(The mode is also cancelled when you change the frequency)
77
7 FM frequency step (main unit only)
77
The step is factory-set to 0.2 MHz, but you can change it to receive
broadcasts allocated to 0.1 MHz steps.
1. Select “FM”.
2. Press and hold [TUNER/AUX].
After a few seconds the display changes to show the current
Radio operations
minimum frequency. Continue to hold the button down. The
minimum frequency changes and the step is changed.
To return to the original step, repeat the above steps.
AUX
AUX
or
2
Select the
frequency of
VOLUME
3
Adjust the
volume.
the desired
station.
Note
After changing the “allocation” setting, the frequencies you previously
preset in the memory will be cleared. Preset them again.
Preset tuning
Preset channels to make selection simpler. Up to 15 stations can each be set in the FM and AM bands.
Manual presetting
Tune to the desired station (A see above).
PGM
1
Press to
select.
(“PGM” will
appear.)
2
Press while the
station is flashing
to select the
channel.
Automatic presetting
Tune to the frequency where pre-setting is to begin (A see above).
PGM
Press and hold.
(release when “AUTO”
is displayed.)
The tuner presets all the stations it can receive into the channels in
ascending order.
When finished, the last station to be set is played.
Selecting channels
The station occupying a channel is erased if another station is preset
in that channel.
1. Press [TUNER/AUX] to select “FM” or “AM”.
2. Press the numbered buttons or [g 4 /REW] or [f 3 /FF] to
select the channel.
RQT7509
22
Page 23
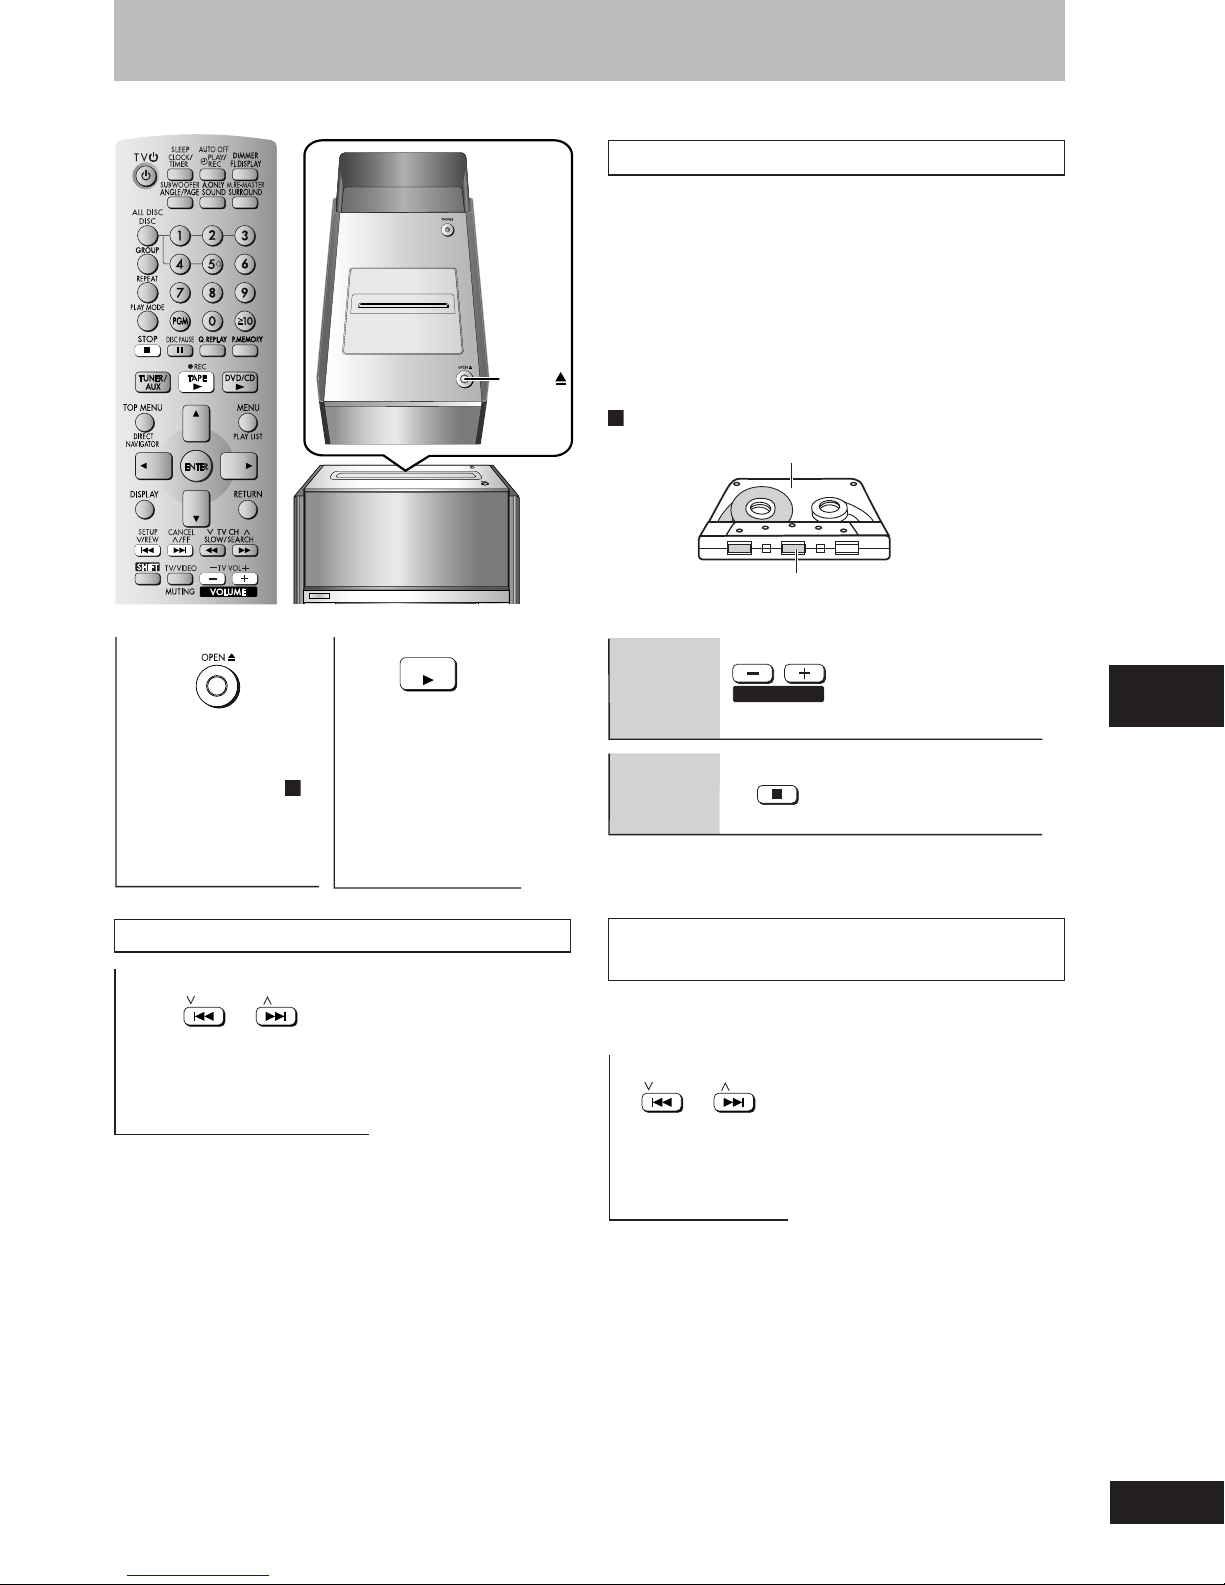
Cassette tapes
OPEN
Cassette tape selection and care
Use normal position tapes.
High position and metal position tapes can be played, but the unit is
not able to do full justice to the characteristics of these tapes.
• Tapes exceeding 100 minutes are thin and can break or get caught
in the mechanism.
• Tape slack can get caught up in the mechanism and should be
wound up before the tape is played.
• Endless tapes can get caught up in the deck’s moving parts if used
incorrectly.
Insert cassette
A
Side to be played back facing up.
Insert the cassette with the exposed tape facing you.
1
Press to open and
insert a cassette
(tape facing you, see
– make sure that the
cassette is fully inserted
and close the lid by
hand).
2
Start play.
To play the other
•
A
side of the tape,
turn the tape over
and restart play.
To fast-forward or rewind the tape
/ REW
or
CANCEL
/ FF
44
4/REW])
44
33
3 /FF])
33
SETUP
To fast-forward ([f
or rewind ([g
(during stop).
TAP E
Volume
adjustment
Stop
VOLUME
STOP
To stop playback.
•
To find the beginning of a program
(TPS: Tape Program Sensor)
TPS finds the beginning of a track and resumes play from there. Each
press increases the number of tracks skipped, up to a maximum of 9.
or
CANCEL
/ FF
SETUP
/ REW
TPS function
search
(during play).
The TPS function searches for silent parts of about 4 seconds in length
which are normally found between tunes. As a result, it may not function
properly in the following cases.
With short silent parts
•
When noise occurs between tunes
•
With silent parts found within tunes
•
Tape operations
RQT7509
23
Page 24
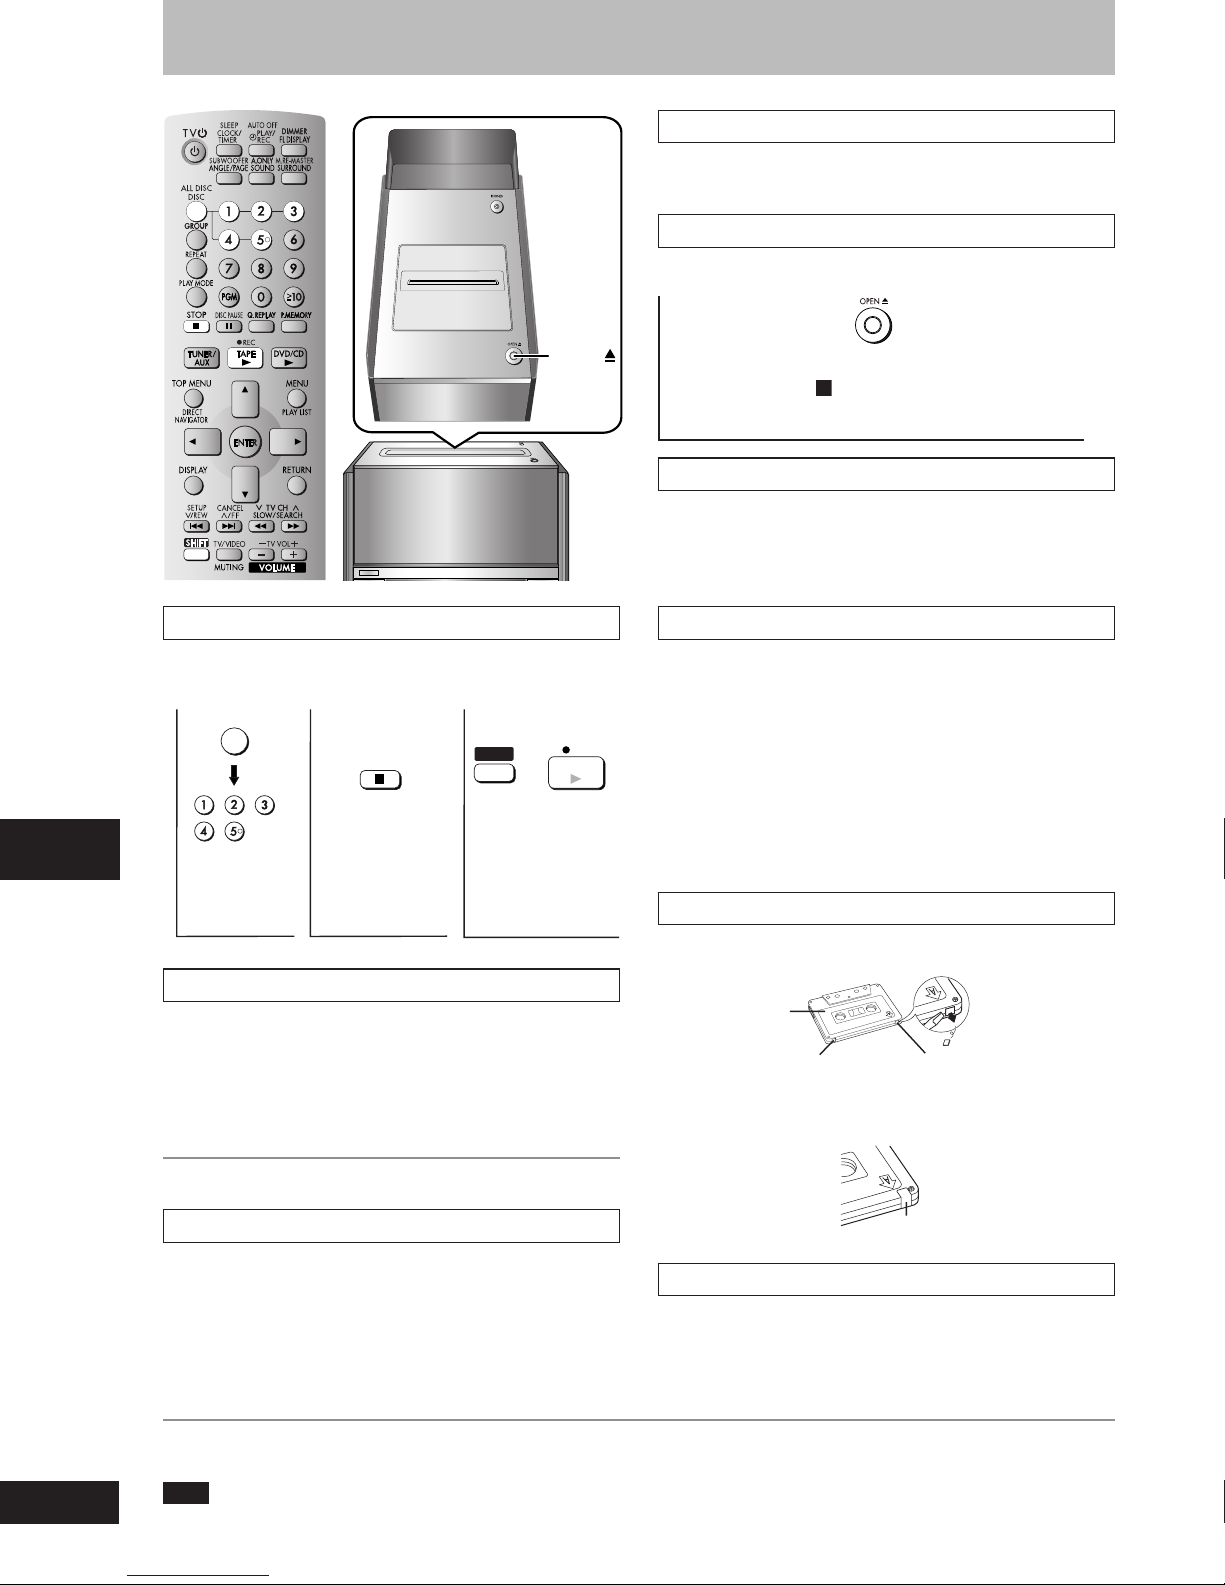
Recording
Types of tape which can be recorded correctly
Use normal position tapes.
High position and metal position tapes can be used, but the unit is not
able to record or erase them correctly.
Preparatory steps
Do these steps before each recording.
Wind up the leader tape so recording can begin immediately.
OPEN
Recording from disc(s)
Do the preparatory steps (A see above).
•
Insert the disc(s) you want to record (A page 12, Discs—Basic
•
play).
ALL DISC
DISC
STOP
1
Select the
disc.
When recording stops, disc play stops automatically.
•
2
Press to stop
playback.
SHIFT
3
Press to start
recording
(play starts).
REC
TAPE
+
Press to open and insert a cassette
Tape facing you (see A A page 23, Insert cassette) – make
sure that the cassette is fully inserted and close the lid by
hand.
Volume, surround effects, sound field and quality
Recording level is set automatically.
•
The volume, sound field and quality have no effect on recording.
•
They can be adjusted for playback.
Multi-channel sources are automatically down-mixed to 2 channels
•
during recording.
Recording from an external unit
Do the preparatory steps. (A see above)
•
(For connections A page 32, Using an external unit)
1 Do step 1 (A page 32, Using an external unit—To playback).
2 Press [SHIFT] + [aREC] (main unit: [aREC]) to start
recording.
3 Start playback from the external source.
(For details, refer to the external unit’s instruction manual.)
Erasure prevention
Use a screwdriver or similar object to break out the tab.
Recording specific disc(s) or tracks.
Do the preparatory steps (A see above).
•
1 Do steps 1 to 2 {A see above, Recording from disc(s)}.
To record programmed tracks
Recording operations
•
2 Press [SHIFT] + [aREC] (main unit: [aREC]) to start
recording.
If the tape finishes before the disc
The disc continues playing. Stop it by pressing [L STOP].
Recording from the radio
Do the preparatory steps (A see above).
•
1 Tune to the desired station (A page 22, The radio).
2 Press [SHIFT] + [aREC] (main unit: [aREC]) to start
recording.
When recording an AM broadcast, sound is momentarily interrupted
•
when you start and stop the recording.
To stop recording
RQT7509
24
Press [L STOP].
To record or erase the other side, turn the tape over.
•
Note
During recording, other buttons will not function except for [L STOP], [MUTING], [–, +, VOLUME], [J DISC PAUSE], [f] and [OPEN/CLOSE c]
buttons.
Do steps 1 to 3 {A page 15, Program play (up to 24 items)}.
Side A
Tab for side B
To record on the tape again, cover the hole with adhesive tape.
Tab for side A
Adhesive tape
Erase recordings
1. Press [- TAPE] and then [L STOP].
2. Press [SHIFT]+[aREC] (main unit: [aREC]).
Page 25
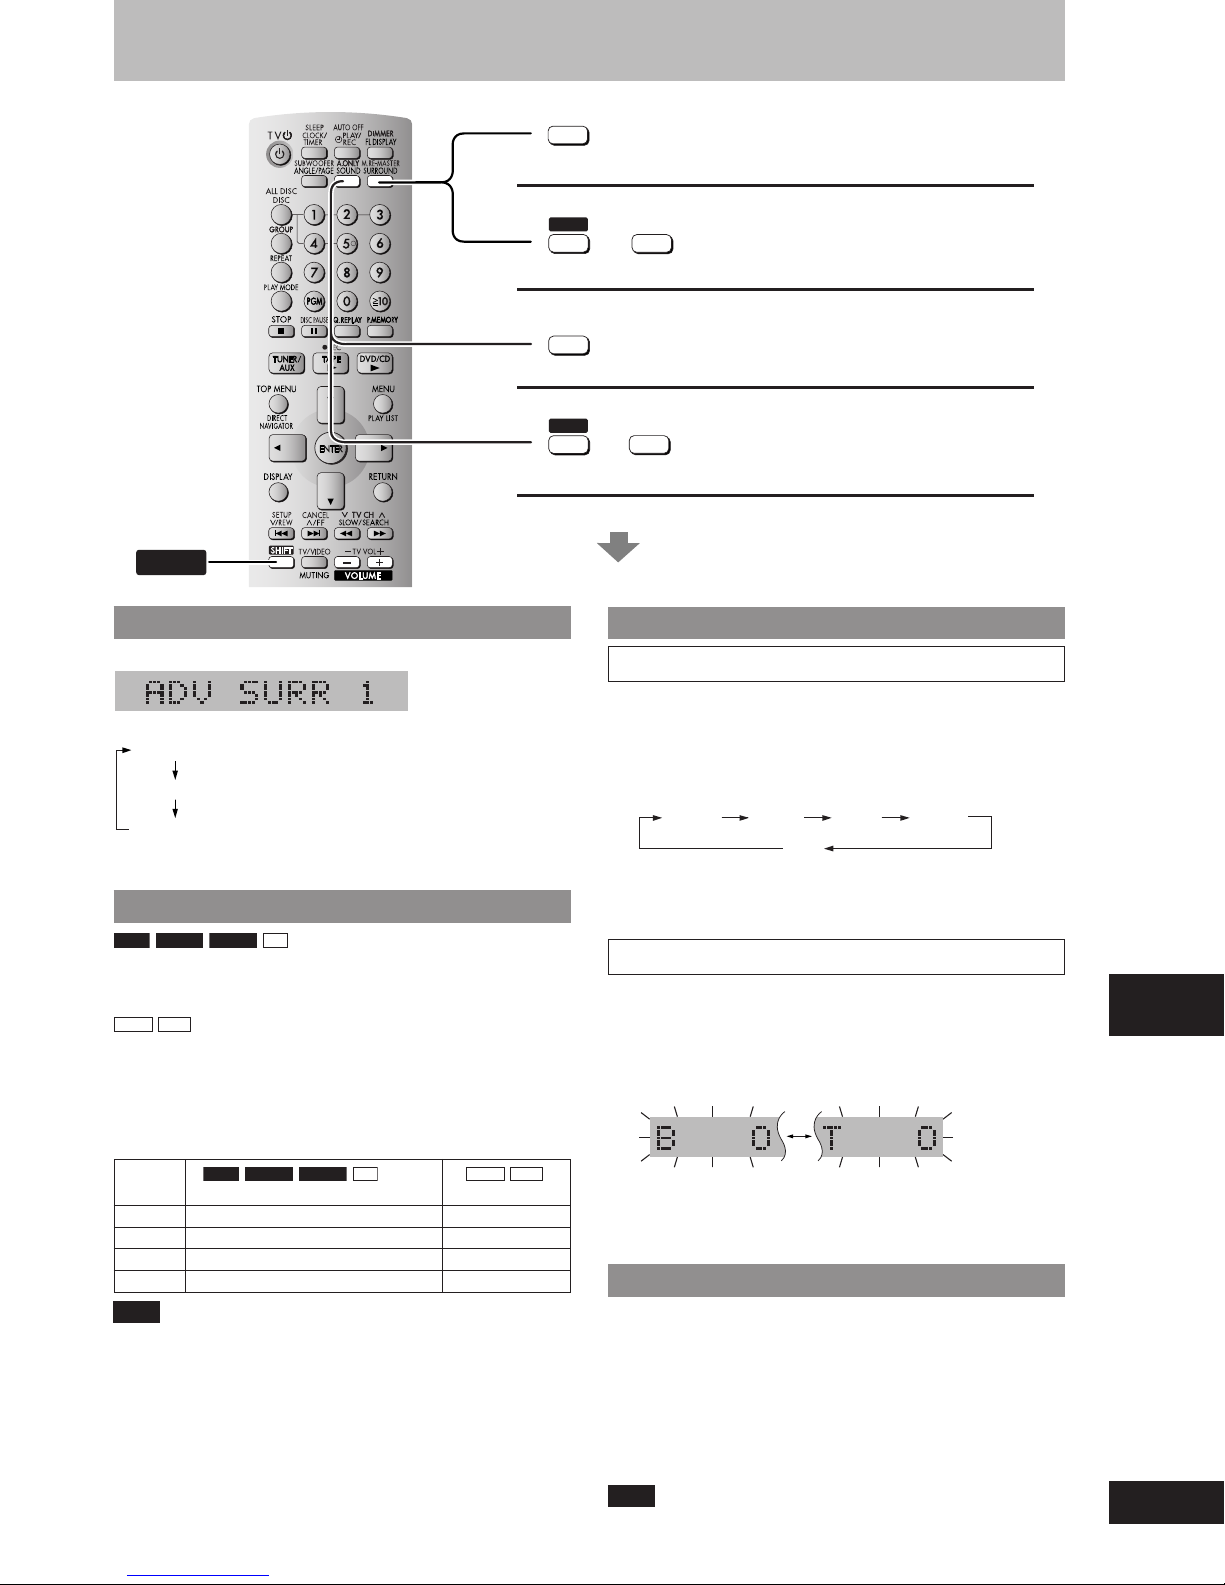
Sound field and sound quality
M.RE-MASTER
SURROUND
Advanced Surround
SHIFT
A.ONLY
SOUND
SHIFT
See below for details.
SHIFT
Advanced Surround
Press [SURROUND] (main unit: [ADVANCED SURROUND]).
Every time you press the button:
ADV SURR 1: Natural effect
ADV SURR 2: Enhanced effect
SURR OFF: Cancel (factory preset)
(A page 20, Audio Menu)
Multi Re-master — Enjoying more natural sound
RAM DVD-A DVD-V CD
Discs recorded with multi channels LPCM at 44.1 kHz or 48 kHz
This feature gives you a more natural sound by adding the higher
frequency signals not recorded on the disc.
WMA
MP3
Discs recorded at 44.1 kHz or 48 kHz
This feature reproduces the frequencies lost during recording to give
you a sound closer to the original.
During play
Every time you press [SHIFT]+[M.RE-MASTER]
(main unit: [MULTI RE-MASTER]):
Setting
1 High tempo (e.g., pops and rock) Light
2 Various tempos (e.g., jazz) Medium
3 Low tempo (e.g., classical) Strong
Off Off Off
Note
The actual output sampling frequency depends on the PCM Digital
Output setting (A page 31, PCM Digital Output) when using a digital
connection (A page 32, Home Theater — Enjoying more powerful
sound).
RAM DVD-A DVD-V CD
Type of music Effect level
WMA
MP3
M.RE-MASTER
SURROUND
+
Multi Re-master
(During play)
Changing sound field and quality
A.ONLY
SOUND
+
To enjoy even higher quality sound
Changing sound field and quality
Preset EQ
1 Press and hold [SOUND] to select “PRESET EQ”.
Every time you press and hold the button:
MANUAL EQ
↔
PRESET EQ
2 Press [SOUND] to select a setting.
Every time you press the button:
HEAVY CLEAR SOFT VOCAL
HEAVY: Adds punch to rock
CLEAR: Clarifies higher sounds
SOFT: For background music
VOCAL: Adds gloss to vocal
OFF
Manual EQ
1 Press and hold [SOUND] to select “MANUAL EQ”.
Every time you press and hold the button:
MANUAL EQ
↔
PRESET EQ
2 Press [SOUND] to select a setting.
Every time you press the button:
Bass Treble
3 Press [–, +, VOLUME] while either “B” (Bass) or
“T” (Treble) is flashing to change the level.
To enjoy even higher quality sound—AUDIO ONLY
You can enjoy higher quality audio by stopping the video output.
During play
Press [SHIFT] + [A.ONLY].
AUDIO ONLY is cancelled if you press [SHIFT]+[A.ONLY] again or
•
switch the unit to standby.
There is output to the screen only when:
•
–
the disc is stopped.
–
performing operations such as searching.
–
on screen display is displayed.
Note
The feature may not work depending on the discs’ recording.
quality operations
Sound field and sound
RQT7509
25
Page 26
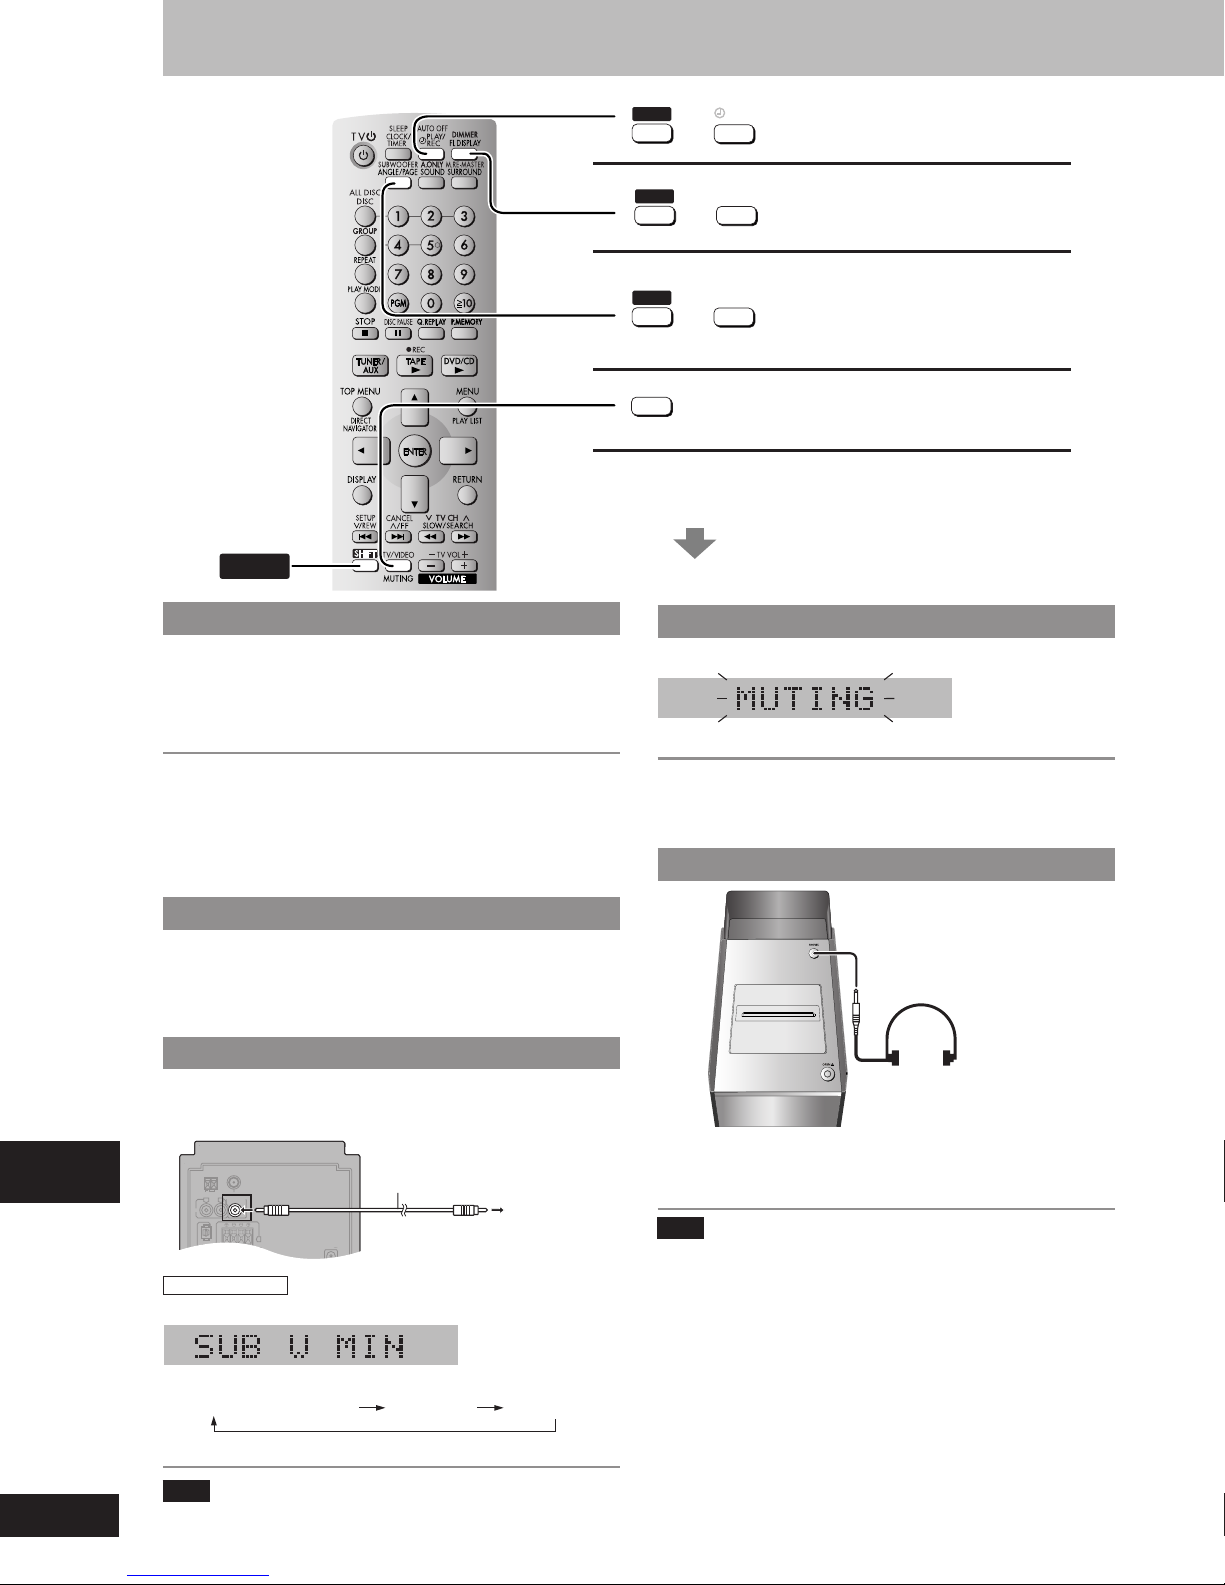
Convenient functions
SHIFT
+
AUTO OFF
PLAY/
REC
Auto-off function
See below for details.
SHIFT
Auto-off function
When disc or tape is selected as the source
To save power, the unit turns off if it is left unused for 10 minutes.
Press [SHIFT] + [AUTO OFF].
“A.OFF” is shown on the display.
This function does not work if the source is tuner or AUX.
To cancel
Press [SHIFT]+[AUTO OFF] again to clear “A.OFF” from the display.
For your reference
“A.OFF” disappears from the display but continues to function normally
if either tuner or AUX is selected as the source.
“A.OFF” remains displayed if disc or tape is selected as the source.
SHIFT
SHIFT
TV/VIDEO
DIMMER
FL DISPLAY
+
SUBWOOFER
ANGLE / PAGE
+
Dimmer function
Adjusting the bass
Muting function
MUTING
Muting the volume
Press [MUTING].
Volume is reduced to minimum.
To cancel
Press [MUTING] again or reduce the volume to minimum (--dB), then
raise it to the required level.
Muting is also cancelled when you switched the unit to standby.
Using headphones
Other functions
RQT7509
26
Dimming the display
Use this when you are going to sleep or any other time you would
prefer to dim the display panel.
Press [SHIFT] + [DIMMER].
To return to the original brightness, press [SHIFT]+[DIMMER] again.
Enjoying more powerful bass
• Connect an active subwoofer (not included). See below for
connection.
• Place the subwoofer as close as possible to the front center.
AC IN
Audio cable
(not included)
To the
subwoofer's
input terminal
FM ANT
AM ANT
EXT LOOP
Ω
75
SUBWOOFER
L
R
OUT
AU
X
OPTICAL
Adjusting the bass
L
OUT
R
HIGH(6Ω)LOW(6Ω
)
Press [SHIFT] + [SUBWOOFER].
Every time you press the buttons:
SUB W MIN (factory preset) SUB W MAXSUB W MID
Adjust the volume on the subwoofer to suit your preference.
Note
When using headphones, the subwoofer should be switched off.
PHONES
(not included)
Reduce the volume level and connect the headphones (not included).
Headphones plug type: 3.5 mm (
1
/8”) stereo.
Audio is automatically switched to stereo (2-channel).
Note
Avoid listening for prolonged periods of time to prevent hearing
damage.
Page 27
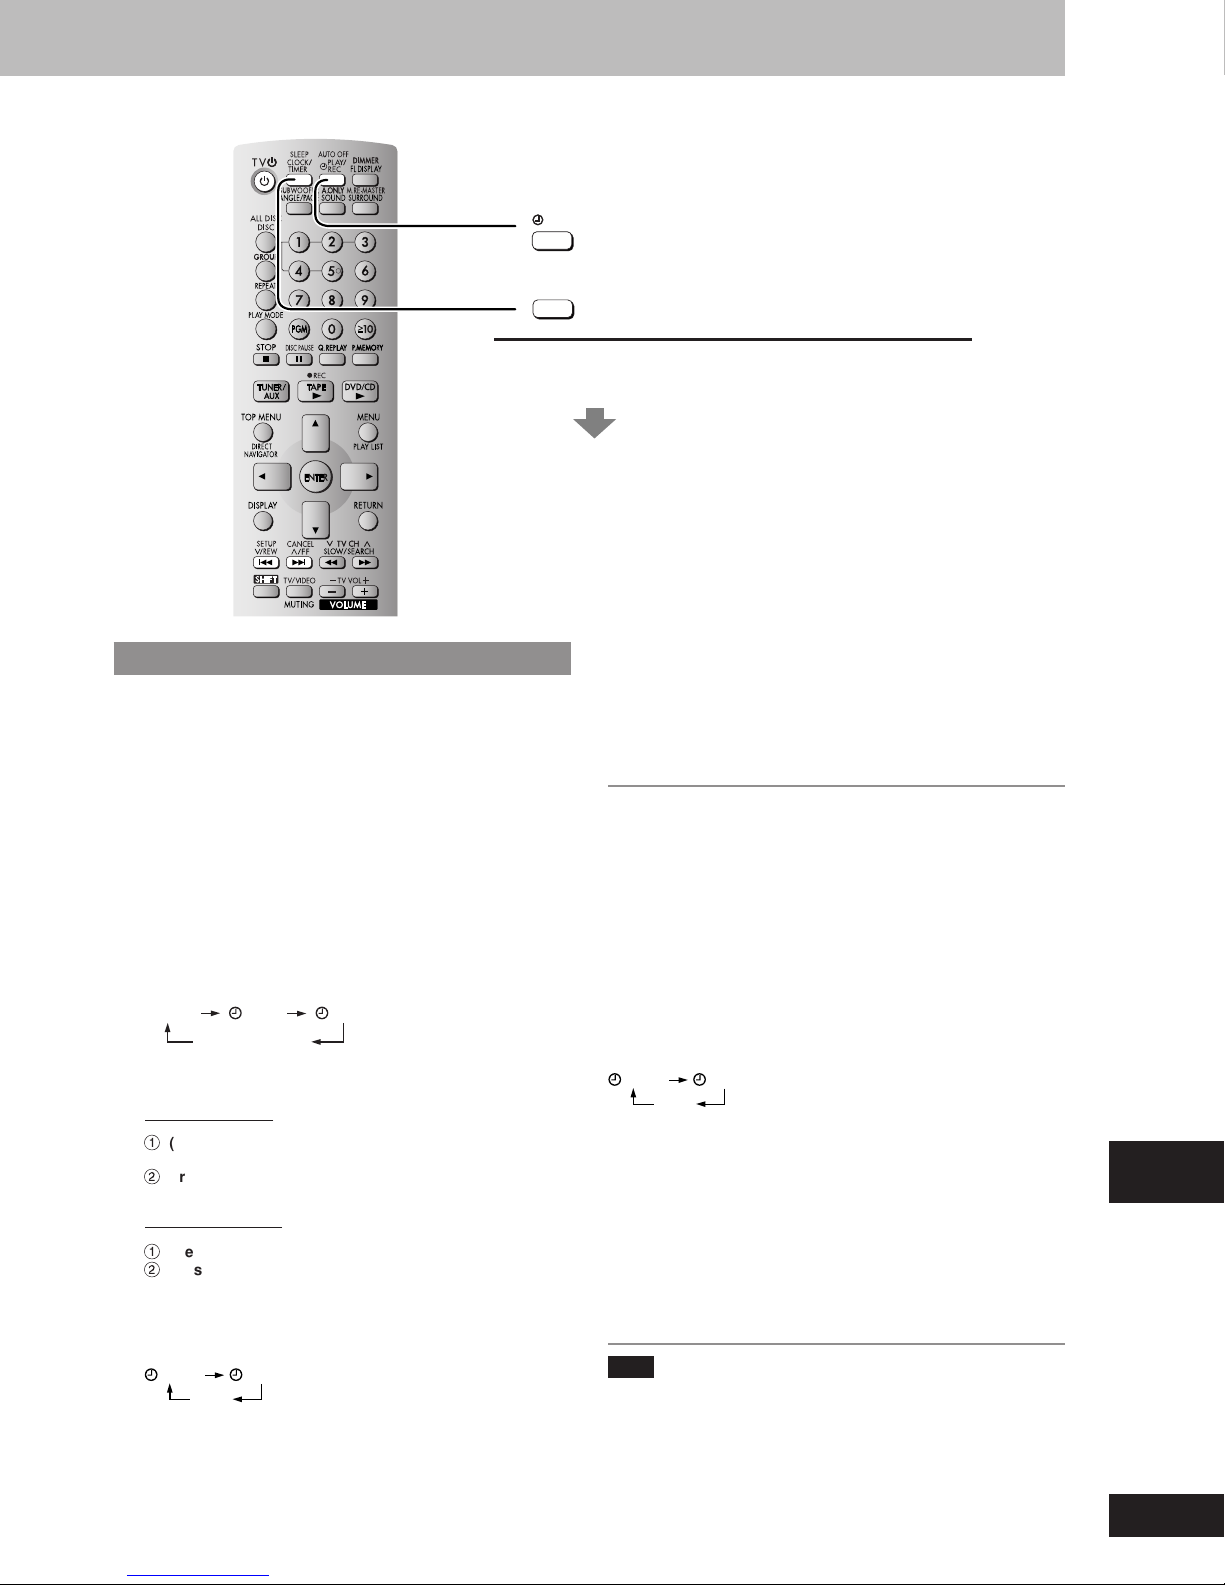
AUTO OFF
PLAY/
REC
SLEEP
CLOCK/
TIMER
See below for details.
The play/record timer
You can set the timer to come on at a certain time to wake you up
(play timer) or to record a radio station or from the aux source
(record timer).
The play and record timers cannot be used together.
Switch on the unit and set the clock (A page 9, Setting the
•
time).
For the play timer, prepare the desired music source (tape/disc/
•
radio/aux), and set the volume.
For the record timer, check the cassette’s erasure prevention
•
tabs (A page 24, Erasure prevention) and insert the tape
(A page 23, Cassette tapes). Tune to the radio station
(A page 22, The radio) or select the aux source (A page 32,
Using an external unit).
1 Press [CLOCK/TIMER] to select the timer function.
Every time you press the button:
CLOCK
Previous display
rPLAY: to set the play timer
rREC: to set the record timer
RECPLAY
2 ON time setting
1
(Within 6 seconds or so)
gg
g
gg
44
4/REW] or [
44
Press [
2
Press [CLOCK/TIMER].
ff
33
f
3 /FF] to set the start time.
ff
33
3 OFF time setting
gg
1
Press [
2
Press [CLOCK/TIMER].
The start and finish times are now set.
4 Press [
Every time you press the button:
rPLAY: to turn the play timer on
rREC: to turn the record timer on
(The indicator doesn’t appear if the start and finish times or the
clock have not been set.)
44
g
4/REW] or [
gg
44
rr
rPLAY/REC] to display the timer indicator.
rr
RECPLAY
(off)
ff
33
f
3/FF] to set the finish time.
ff
33
Play/record timer
5 Press [
To cancel the timer
Press [rPLAY/REC] to clear the timer indicator from the display.
(The timer comes on at the set time everyday if the timer is on.)
To change the settings (when the unit is on)
To change the play/record times
Do steps 1, 2, 3 and 5.
To change the source or volume
1. Press [rPLAY/REC] to clear the timer indicator from the display.
2. Make changes to the source or volume.
3. Do steps 4 to 5.
To change the timer
Press [rPLAY/REC] to select the desired timer.
Every time the button is pressed:
To check the settings
Press [CLOCK/TIMER] while the unit is on to select “rPLAY” or
“rREC”.
The settings are shown in the following order:
Play timer: start time → finish time → source → volume
Record timer: start time → finish time → source
To check the settings while the unit is off, press [CLOCK/TIMER]
twice.
If you use the unit after the timers are set
After using, check that the correct tape/disc are loaded before turning the unit off.
Note
If you turn the unit off and on again while a timer is functioning,
•
the finish time setting will not be activated.
If you selected AUX as the source, when the timer comes on, the
•
unit turns on and engages “AUX” as the source. If you want to
playback or record from a connected unit, set that unit’s timer to
the same time. (See the connected unit’s instruction manual.)
ff
f] to turn the unit off.
ff
The unit must be off for the timers to operate.
Play timer: Play will start in the set condition at the set
•
Record timer: The unit comes on 30 seconds before the set
•
(off)
time with volume increasing gradually to the
set level.
time with the volume muted.
RECPLAY
Other functions
RQT7509
27
Page 28
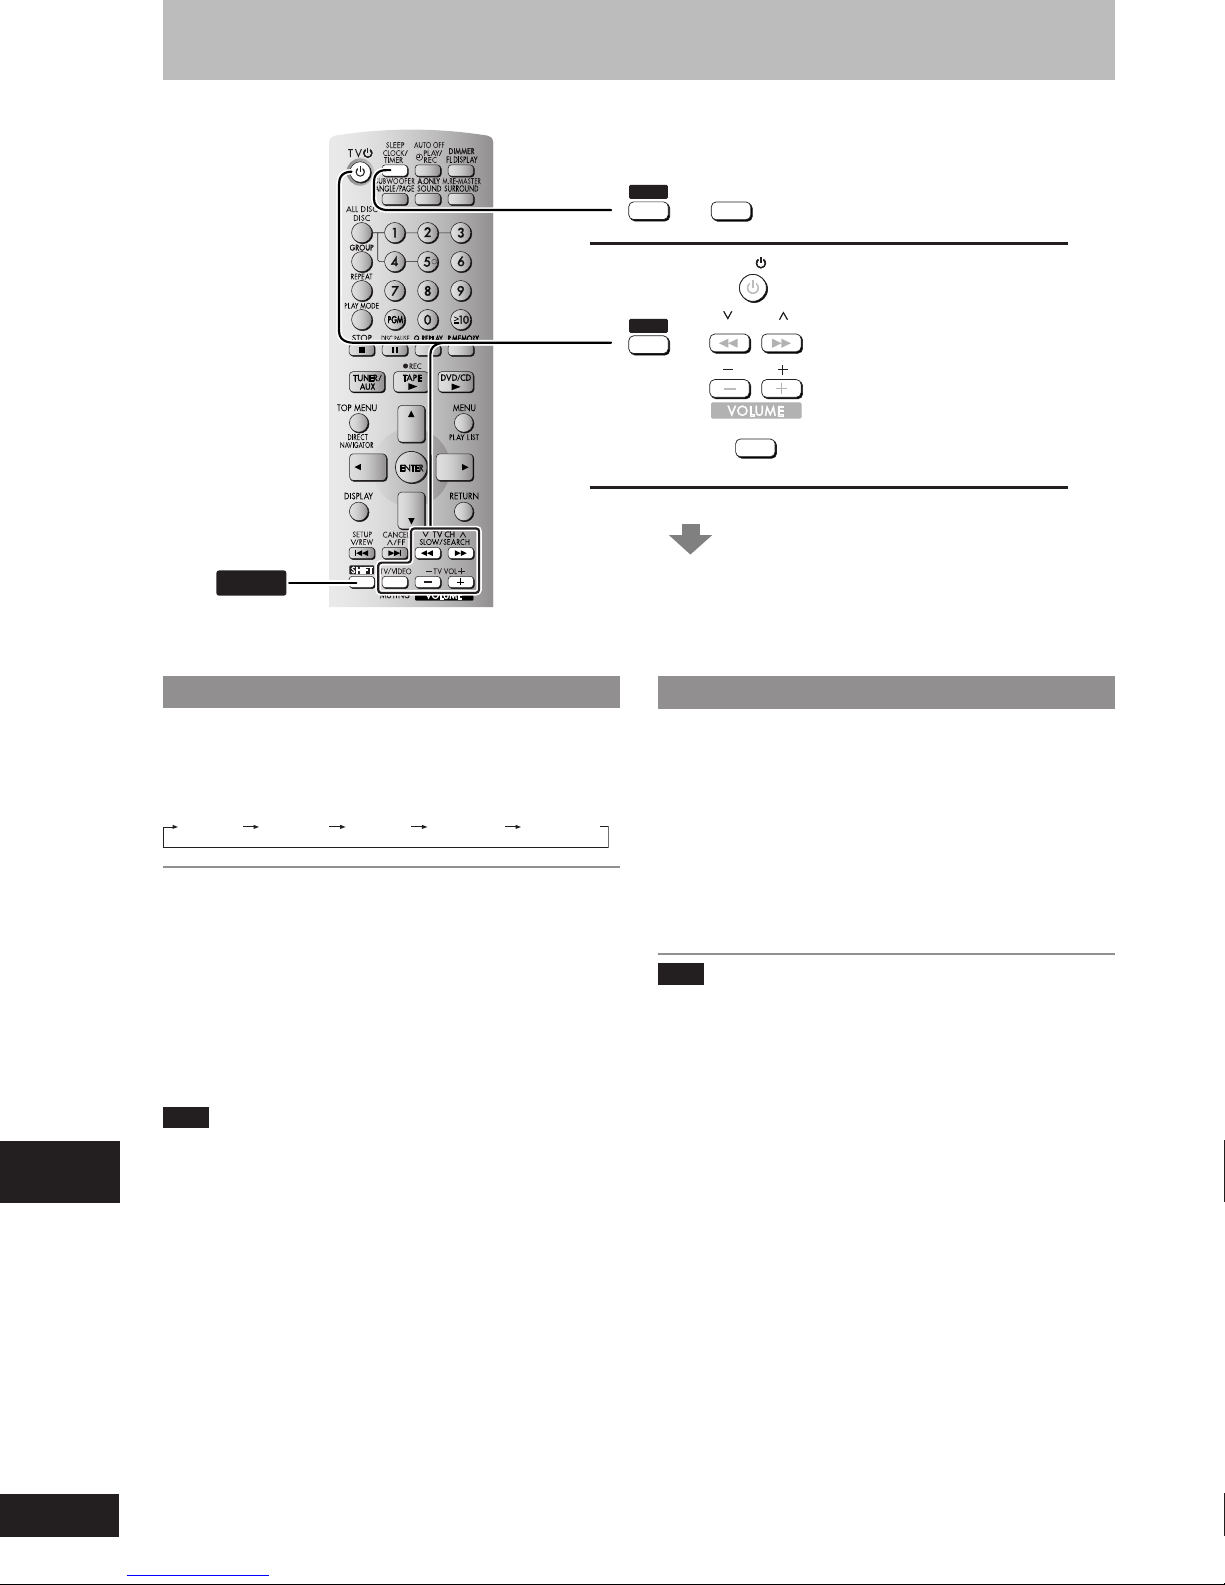
Convenient functions
SHIFT
SLEEP
CLOCK/
TIMER
+
TV
Sleep timer
SHIFT
The sleep timer
This timer turns the unit off after a set time.
While enjoying the desired source:
Press [SHIFT] + [SLEEP] to select the time (minutes).
Every time you press the button:
SLEEP 30
To cancel the sleep timer
Press [SHIFT]+[SLEEP] to select “SLEEP OFF”.
To confirm the remaining time
Press [SHIFT]+[SLEEP] once.
The remaining time is shown for about 5 seconds.
To change the setting
Press [SHIFT]+[SLEEP] to select the new setting.
SLEEP 60 SLEEP 90 SLEEP 120
SLEEP OFF
SHIFT
TV CH
SLOW / SEARCH
+
TV VOL
TV / VIDEO
MUTING
See below for details.
Operating a television
Face the remote control at the television for the following operations.
Turning the television on/off
Press [SHIFT] + [TV
Switching the television’s video input mode
Press [SHIFT] + [TV/VIDEO].
Changing channels
Press [SHIFT] + [
Adjusting the volume
Press [SHIFT] + [– TV VOL] or [SHIFT] + [TV VOL +].
Note
Some models cannot be operated by this remote control.
TV operation
ff
f].
ff
4 4
4 TV CH] or [SHIFT] + [TV CH
4 4
33
3].
33
You can use the sleep timer in combination with the play/record
timer.
Make sure the unit is off before the play/record timer’s start time.
Note
The sleep timer will be turned off when you start recording from a
disc.
Other functions
RQT7509
28
Page 29
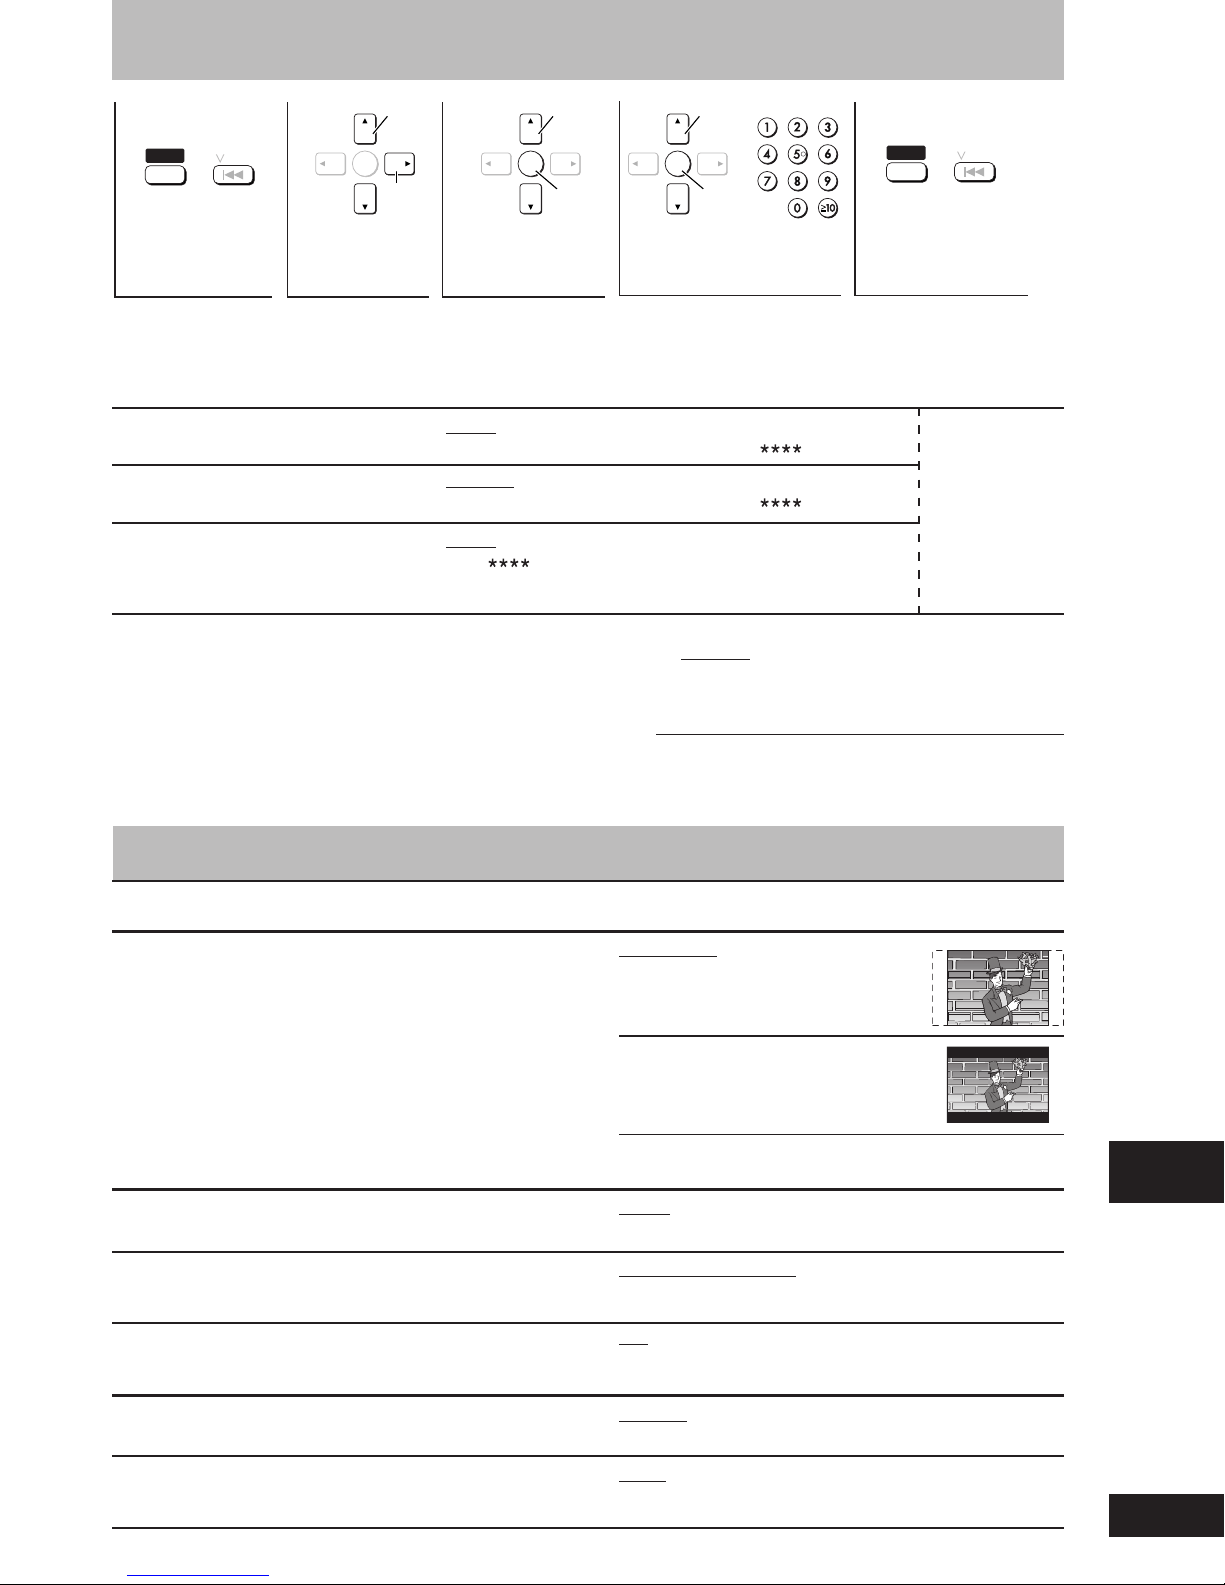
Discs — Changing the player’s settings
\1
\3
ENTER
\2
Select
Confirm
Select
ENTER
Confirm
4
Make the settings.
(Language options)
•
Other
•
English
•
Other
•
(Language options)
•
8 No Limit
•
\6
1 to 7
•
0 Lock All: To prevent play of discs without ratings
•
Unlock Player
•
Change Level
•
\2
\2
SHIFT
5
Press to exit.
Change Password
•
Temporary Unlock
•
Select
+
SETUP
/ REW
2
Select the
menu tab.
ENTER
Go
right
3
Select the item.
English
•
Original
•
Automatic
•
(Language options)
•
English
•
Other
•
Changing the menu language from QUICK SETUP also changes this
•
setting.
SHIFT
1
Shows SETUP
menu.
The settings remain intact even if you switch the unit to standby.
•
Underlined items are the factory preset.
•
77
7
77
“Disc” tab—To choose the language and set a rating level
Audio
Choose the audio language.
Subtitle
Choose the subtitle language.
Menus
Choose the language for disc menus.
Ratings Setting ratings (When level 8 is selected)
Set a ratings level to limit DVD-Video play. The password screen is shown
when you select levels 0 to 7.
To enter a password
1. Input a 4-digit password with the numeric buttons. levels.
If you enter a wrong number, press [SHIFT]+[CANCEL] to erase it.
•
Do not forget your password. Changing ratings (When level 0 – 7 is selected)
•
2. Press [ENTER].
The lock symbol appears closed to show the rating is locked.
•
3. Press [ENTER] to confirm the 4 digits.
If you insert a DVD-Video that exceeds the ratings limit you set, a message appears on the television.
Follow the on-screen instructions.
SETUP
/ REW
+
Language options
\4
French
•
Spanish
•
\5
French
•
Spanish
•
Portuguese
•
77
7
77
“Video” tab—To enable progressive output or to make settings to suit your television
TV Aspect
Choose the setting to suit your television and preference. Regular aspect television (4:3)
Changing the TV aspect from QUICK SETUP also changes The sides of the widescreen picture
•
this setting. are cut off so it fills the screen (unless
Progressive Out (Component)
Choose “Enable” to enable progressive output.
TV Type
Select to suit the type of television.
Time Delay
When connected with an AV amplifier and Plasma display, adjust if
you notice the audio is out of sync with the video.
Still Mode
Specify the type of picture shown when paused.
Black Level Control
Change the black level of the picture if you connected a television
through the COMPONENT VIDEO OUT terminals.
4:3 Pan&Scan:
•
prohibited by the disc).
4:3 Letterbox:
•
Regular aspect television (4:3)
Widescreen software is shown in
letterbox style on a 4:3 aspect
television.
16:9
•
Widescreen television (16:9)
Disable
•
Standard (Direct View TV)
•
CRT Projector
•
Projection TV
•
0ms
•
60ms
•
Automatic
•
Frame
•
Lighter: When connected through VIDEO OUT or S-VIDEO OUT.
•
Darker: When connected through COMPONENT VIDEO OUT.
•
Enable
•
LCD TV/Projector
•
Plasma TV
•
20ms
•
80ms
•
Field
•
40ms
•
100ms
•
Other functions
RQT7509
29
Page 30
Discs — Changing the player’s settings
77
7
77
“Audio” tab—To make settings to suit your digital connection and other audio settings
PCM Digital Output (A page 31, Digital output)
Digital Audio Output (A page 31, Digital output)
Dolby Digital (A page 31, Digital output)
DTS Digital Surround (A page 31, Digital output)
Dynamic Range Compression
(Dolby Digital only)
Audio during Search
Choose whether to have sound during search. (This feature does not work for some discs.)
77
7
77
“Display” tab—To choose the on-screen message language or to turn languages off
Menu Language
Choose the language for these menus and the on-screen messages.
On-Screen Messages
Choose whether to show on-screen messages or not.
Up to 48 kHz
•
On • Off
•
Bitstream
•
PCM
•
Off
•
On: Adjust for clarity even when the volume is low
•
through compressing the range of the lowest
sound level and the highest sound level.
Convenient for late night viewing.
On
•
\4
\5
English
•
English
•
On
•
Français
•
Français
•
Up to 96 kHz
•
PCM
•
Bitstream
•
Off
•
Español
•
Español
•
Off
•
Português
•
77
7
77
“Others” tab— To select either still picture data or audio data when playing discs including both data
HighMAT
Play HighMAT discs as HighMAT discs, or as regular
WMA/MP3/JPEG discs. JPEG discs.
QUICK SETUP
Answers questions to make basic settings.
Re-initialize Setting
This returns all values in the SETUP menus to the default settings. “Disc” tab) are set. Please enter the same password.
\1
The original language of each disc is selected.
\2
Input a code number with the numbered buttons
(A page 33, Language code list).
\3
If the language selected for “Audio” is not available,
subtitles of that language will automatically appear if it is recorded on them.
available on that disc.
Other functions
and other settings
Enable: Play HighMAT discs as HighMAT discs.
•
Disable: Play HighMAT discs as regular WMA/MP3/
•
Yes
•
Yes: The password screen is shown if “Ratings” (A page 29,
•
Turn the unit off and on again.
No
•
\4
For U.S.A. and Canada
\5
For Latin America
\6
Prohibits play of DVD-Video with corresponding ratings
No
•
RQT7509
30
Page 31
Digital output
RAM DVD-A
Change the settings when you have connected equipment through
this unit’s OPTICAL OUT terminal (A page 32, Home Theater—
Enjoying more powerful sound).
DVD-V
VCD CD
WMA
MP3
Manufactured under license from Dolby Laboratories.
“Dolby” and the double-D symbol are trademarks of Dolby
Laboratories.
“DTS” and “DTS Digital Surround” are registered trademarks of
Digital Theater Systems, Inc.
PCM Digital Output
Select the maximum sampling frequency of PCM digital output.
Check the digital input limitations of the equipment you connect.
Off: When not connected digitally
Up to 48 kHz (factory preset):
Up to 96 kHz: Signals over 96 kHz converted to 48 or 44.1 kHz
Note
Signals from copy-protected discs are converted to 48 or
•
44.1 kHz irrespective of the setting.
Some equipment cannot handle sampling frequencies of
•
88.2 kHz, even if it can handle 96 kHz. Read your equipment’s
operating instructions for details.
Signals over 48 kHz converted to 48 or 44.1 kHz
Dolby Digital and DTS Digital Surround
Bitstream (Factory preset for Dolby Digital):
Select if the equipment you connected can decode the signal.
PCM (Factory preset for DTS Digital Surround):
Select if the equipment you connected cannot decode the signal.
IMPORTANT
If the equipment you connected cannot decode the signal, the
setting must be changed to PCM. If not, signals the equipment
cannot process will be output by this unit, causing high levels
of noise which can damage your hearing and the speakers.
,HDCD®, High Definition Compatible Digital® and
TM
Pacific Microsonics
marks of Pacific Microsonics, Inc. in the United States and/or
other countries.
HDCD system manufactured under license from Pacific
Microsonics, Inc. This product is covered by one or more of the
following: In the USA: 5,479,168, 5,638,074, 5,640,161,
5,808,574, 5,838,274, 5,854,600, 5,864,311, 5,872,531, and in
Australia: 669114, with other patents pending.
Apparatus Claims of U.S. Patent Nos. 4,631,603, 4,577,216,
and 4,819,098, licensed for limited viewing uses only.
This product incorporates copyright protection technology that
is protected by method claims of certain U.S. patents and other
intellectual property rights owned by Macrovision Corporation
and other rights owners. Use of this copyright protection technology must be authorized by Macrovision Corporation, and is
intended for home and other limited viewing uses only unless
otherwise authorized by Macrovision Corporation. Reverse engineering or disassembly is prohibited.
are either registered trademarks or trade-
Other functions
RQT7509
31
Page 32
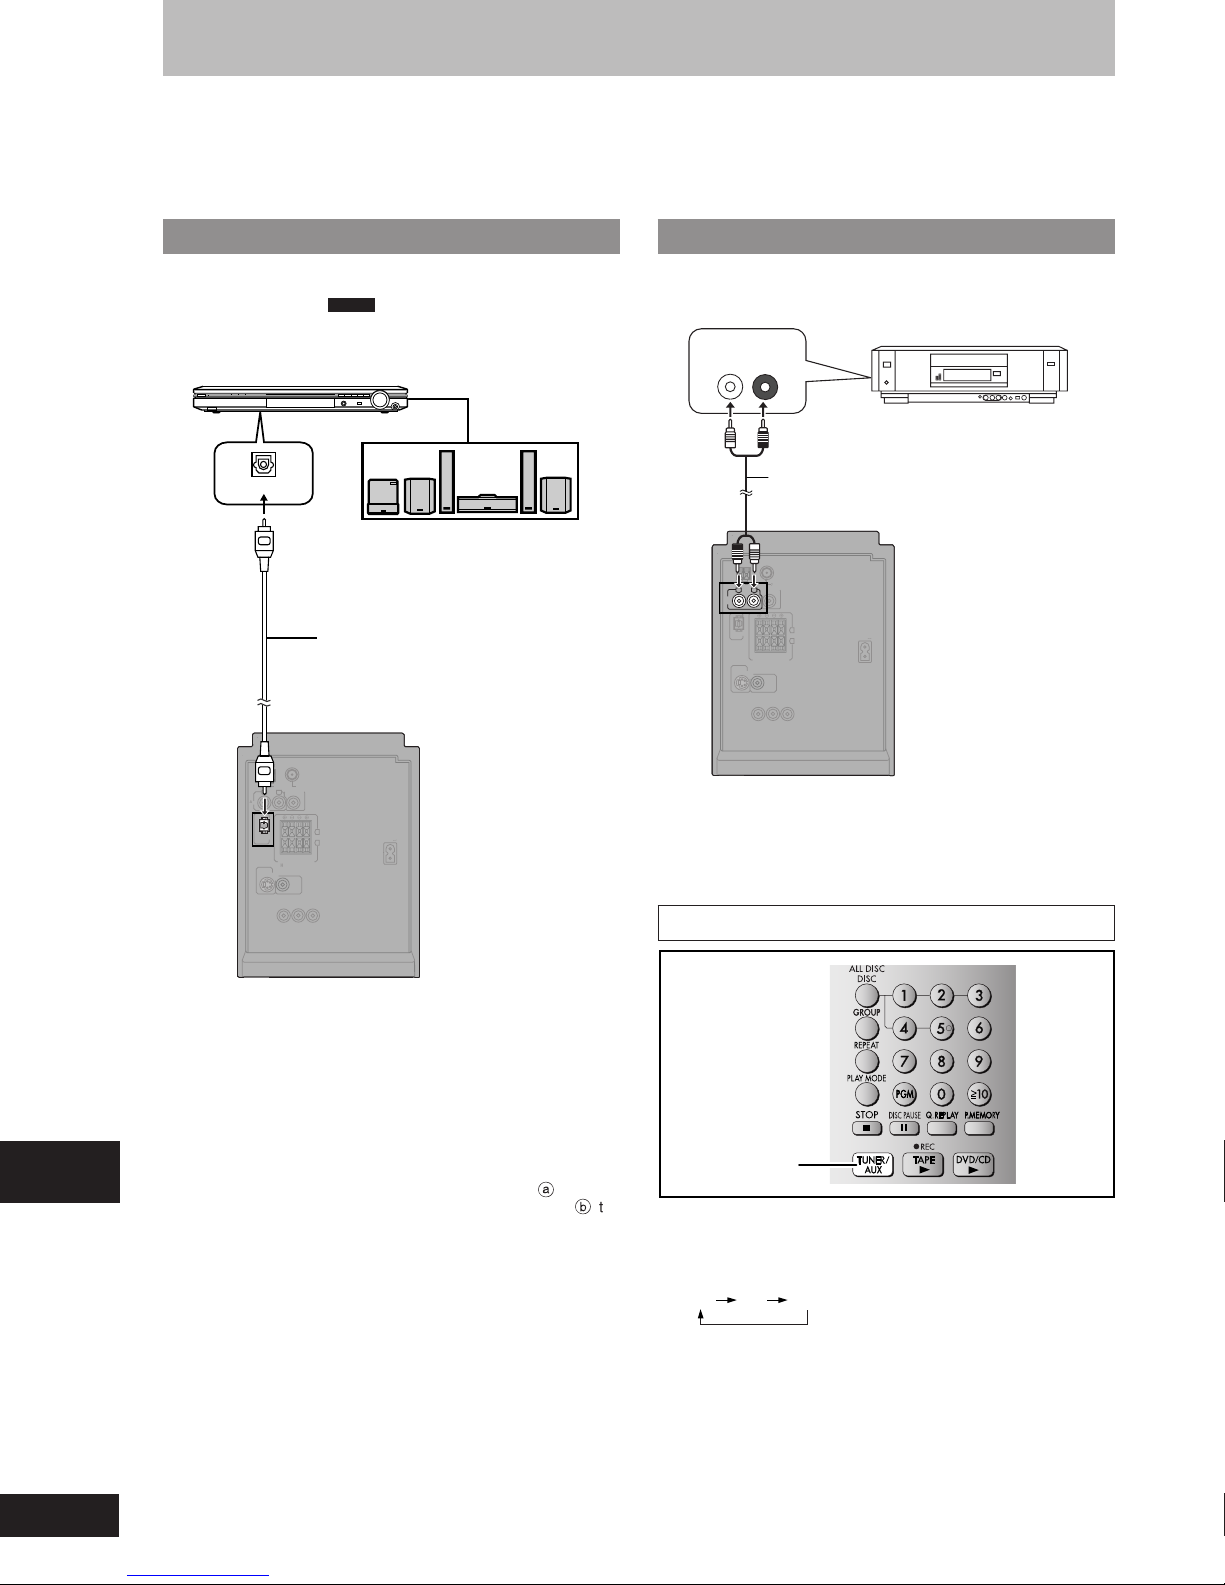
Using other equipment
Before connection
Disconnect the AC power supply cord.
•
Turn off all equipment and read the appropriate operating instructions.
•
The equipment connections described are examples only.
•
Peripheral equipment and optional cables sold separately unless otherwise indicated.
•
Home Theater — Enjoying more powerful sound
Enjoy the powerful movie theater and hall-like sound available with
multiple channel audio found on DVD-Video by connecting an
amplifier and speakers. (
will be only 2 channels.)
Amplifier (not included)
(DVD) IN
AM ANT
FM ANT
EXT LOOP
Ω
75
SUBWOOFER
L
R
OUT
AUX
OPTICAL
OUT
HIGH(6Ω
)
LOW(6Ω
)
SPEAKERS
(SB-PM39)
HAUT-PARLEURS
S-VIDEO
OUT
VIDEO
OUT
COMPONENT VIDEO OUT
PR PB Y
Even if using this connection, output
DVD-A
VOLUME
Speakers (example)
Connect three or more
speakers for surround
sound.
Optical digital audio cable
(not included)
Do not bend sharply when
connecting.
L
R
AC IN
Using an external unit
You can playback the sound from a video cassette recorder, tape
deck, laser disc player, etc., through this unit’s speakers.
Video cassette recorder
AUDIO OUT
L
R
(not included)
Audio cable
(not included)
AM ANT
FM ANT
EXT LOOP
Ω
75
SUBWOOFER
L
R
OUT
AU
X
HIGH(6Ω
)
LOW(6Ω
SPEAKERS
(SB-PM39)
HAUT-PARLEURS
VIDEO
OUT
COMPONENT VIDEO OUT
PRPBY
L
R
)
AC IN
OPTICAL
OUT
S-VIDEO
OUT
When connecting a record player
We recommend using a record player with a built-in phono equalizer.
If your player doesn’t have a built-in equalizer, connect it first to a
separate equalizer and then connect that to this unit.
To playback
To enjoy multi-channel surround sound
Connect an amplifier with a built-in decoder or a decoder-amplifier
combination.
Change the settings in “Digital output” (A page 31).
You can only use DTS Digital Surround decoders that are
•
compatible with DVD.
Recording Output
With DVD, the following conditions must be met: a the disc
•
doesn’t have protection preventing digital recording, and b the
recording equipment can handle signals wth a sampling frequency
of 48 kHz.
You cannot record WMA/MP3.
•
When recording DVDs, make the following settings.
– Advanced Surround: SURR OFF (A page 25)
– PCM Digital Output: Up to 48 kHz (A page 31, Digital output)
– Dolby Digital and DTS Digital Surround: PCM (A page 31, Digital
Other functions
RQT7509
output)
32
TUNER/AUX
1 Press [TUNER/AUX] to select “AUX”.
The unit comes on.
Every time you press the button:
FM AM AUX
2 Start playback from the external source.
(For details, refer to the external unit’s instruction manual.)
Page 33
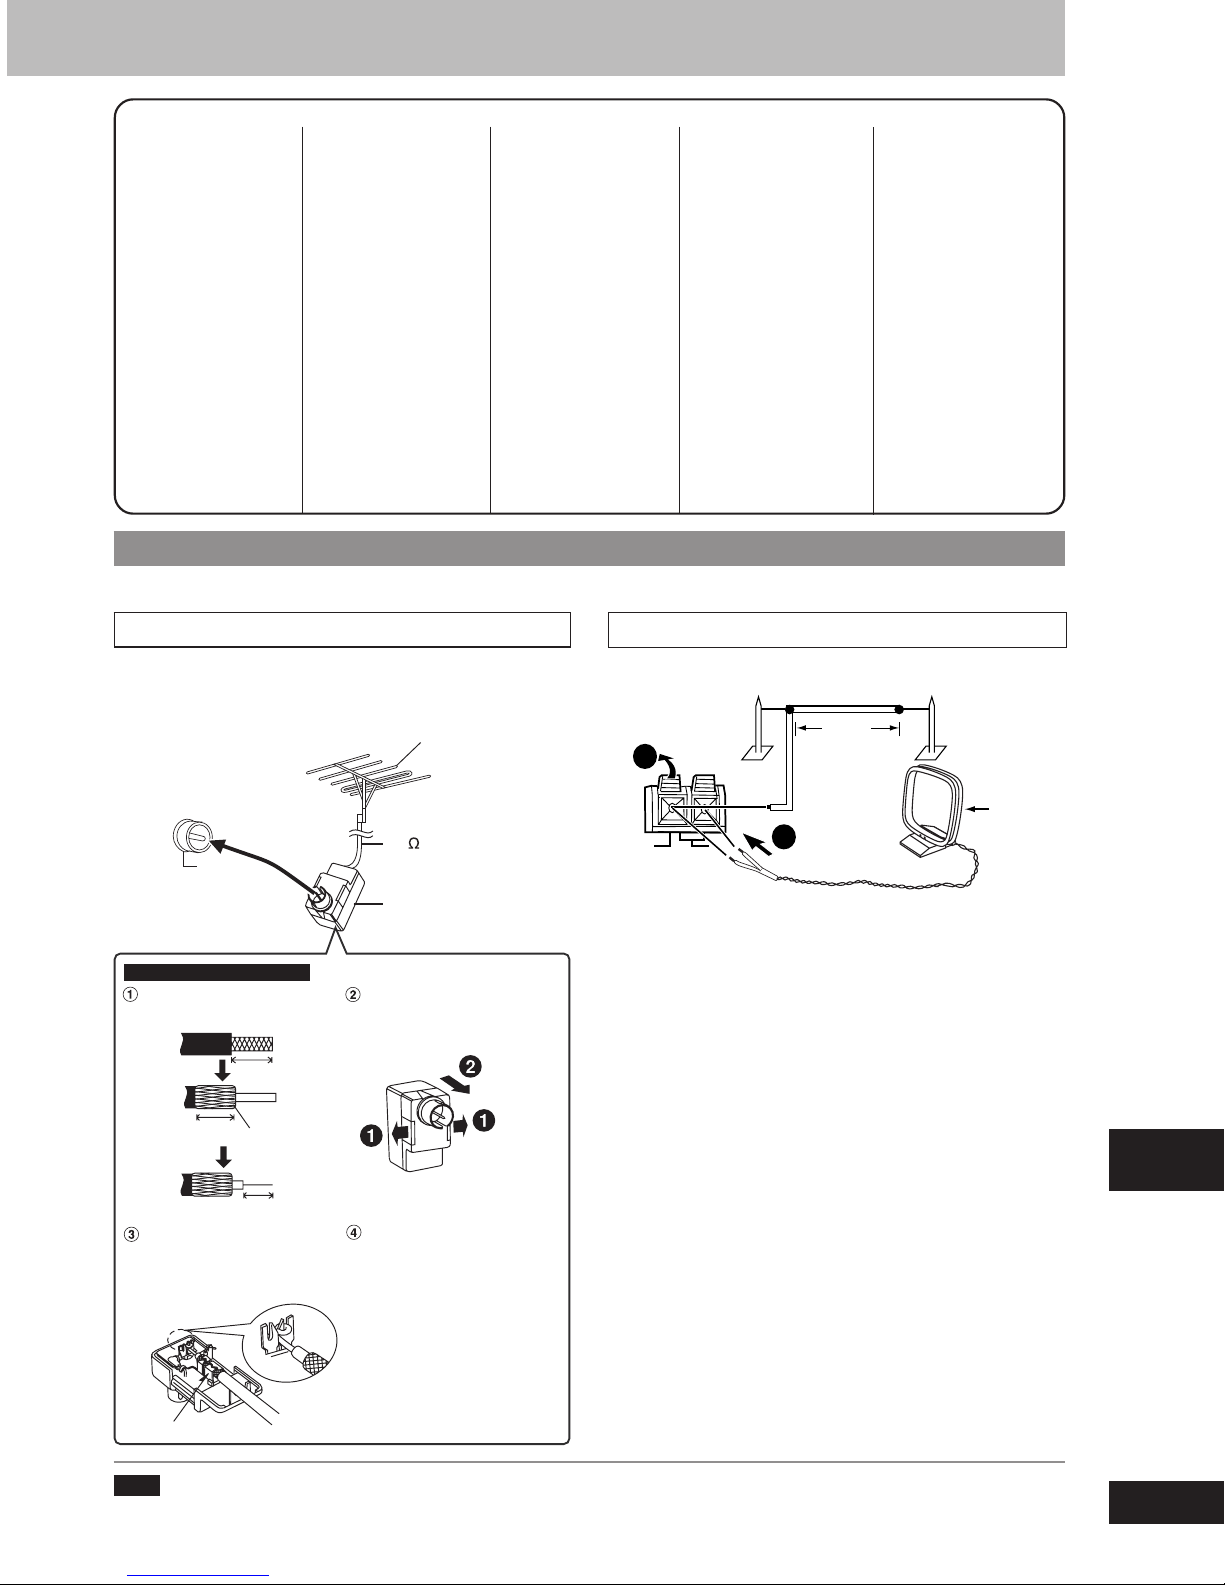
U
Language code list
Abkhazian: 6566
Afar: 6565
Afrikaans: 6570
Albanian: 8381
Ameharic: 6577
Arabic: 6582
Armenian: 7289
Assamese: 6583
Aymara: 6588
Azerbaijani: 6590
Bashkir: 6665
Basque: 6985
Bengali; Bangla: 6678
Bhutani: 6890
Bihari: 6672
Breton: 6682
Bulgarian: 6671
Burmese: 7789
Byelorussian: 6669
Cambodian: 7577
Catalan: 6765
Chinese: 9072
Corsican: 6779
Croatian: 7282
Czech: 6783
Danish: 6865
Dutch: 7876
English: 6978
Esperanto: 6979
Estonian: 6984
Faroese: 7079
Fiji: 7074
Finnish: 7073
French: 7082
Frisian: 7089
Galician: 7176
Georgian: 7565
German: 6869
Greek: 6976
Greenlandic: 7576
Guarani: 7178
Gujarati: 7185
Hausa: 7265
Hebrew: 7387
Hindi: 7273
Hungarian: 7285
Icelandic: 7383
Indonesian: 7378
Interlingua: 7365
Irish: 7165
Italian: 7384
Japanese: 7465
Javanese: 7487
Kannada: 7578
Kashmiri: 7583
Kazakh: 7575
Kirghiz: 7589
Korean: 7579
Kurdish: 7585
Laotian: 7679
Latin: 7665
Latvian, Lettish: 7686
Lingala: 7678
Lithuanian: 7684
Macedonian: 7775
Malagasy: 7771
Malay: 7783
Malayalam: 7776
Maltese: 7784
Maori: 7773
Marathi: 7782
Moldavian: 7779
Mongolian: 7778
Nauru: 7865
Nepali: 7869
Optional antenna connections
Use outdoor antenna if radio reception is poor.
FM outdoor antenna (Using a television antenna)
Disconnect the FM indoor antenna.
•
The antenna should be installed by a competent technician.
•
Rework your outdoor antenna’s 75 Ω coaxial cable as follows.
FM outdoor antenna
(not included)
Norwegian: 7879
Oriya: 7982
Pashto, Pushto: 8083
Persian: 7065
Polish: 8076
Portuguese: 8084
Punjabi: 8065
Quechua: 8185
Rhaeto-Romance: 8277
Romanian: 8279
Russian: 8285
Samoan: 8377
Sanskrit: 8365
Scots Gaelic: 7168
Serbian: 8382
Serbo-Croatian: 8372
Shona: 8378
Sindhi: 8368
Singhalese: 8373
Slovak: 8375
Slovenian: 8376
Somali: 8379
Spanish: 6983
Sundanese: 8385
Swahili: 8387
AM outdoor antenna
AM outdoor antenna (not included)
1
AM ANT
5 -12 m
Swedish: 8386
Tagalog: 8476
Tajik: 8471
Tamil: 8465
Tatar: 8484
Telugu: 8469
Thai: 8472
Tibetan: 6679
Tigrinya: 8473
Tonga: 8479
Turkish: 8482
Turkmen: 8475
Twi: 8487
Ukrainian: 8575
Urdu: 8582
Uzbek: 8590
Vietnamese: 8673
Volapük: 8679
Welsh: 6789
Wolof: 8779
Xhosa: 8872
Yiddish: 7473
Yoruba: 8979
Zulu: 9085
FM ANT
75
Ω
For U.S.A. and Canada only
Remove a piece of the
outer vinyl insulator.
10 mm (
13
10 mm (
/32”)
Peel bac
7 mm (
9
/32”)
Install the coaxial cable.
Clamp the cable conductor,
and wind it on so that it does
not contact anything else.
AM loop
75 coaxial
cable
(not included)
Antenna plug
(included)
EXT
Run a piece of vinyl wire horizontally across a window or other
•
LOOP
2
convenient location.
Leave the loop antenna connected.
•
antenna
(included)
Carefully pull the tabs apart
to remove the cover
13
/32”)
.
k
Attach the cover.
Other functions
Clamp with pliers
Note
Disconnect the outdoor antenna when the unit is not in use. Do not use the outdoor antenna during a lightning storm.
RQT7509
33
Page 34
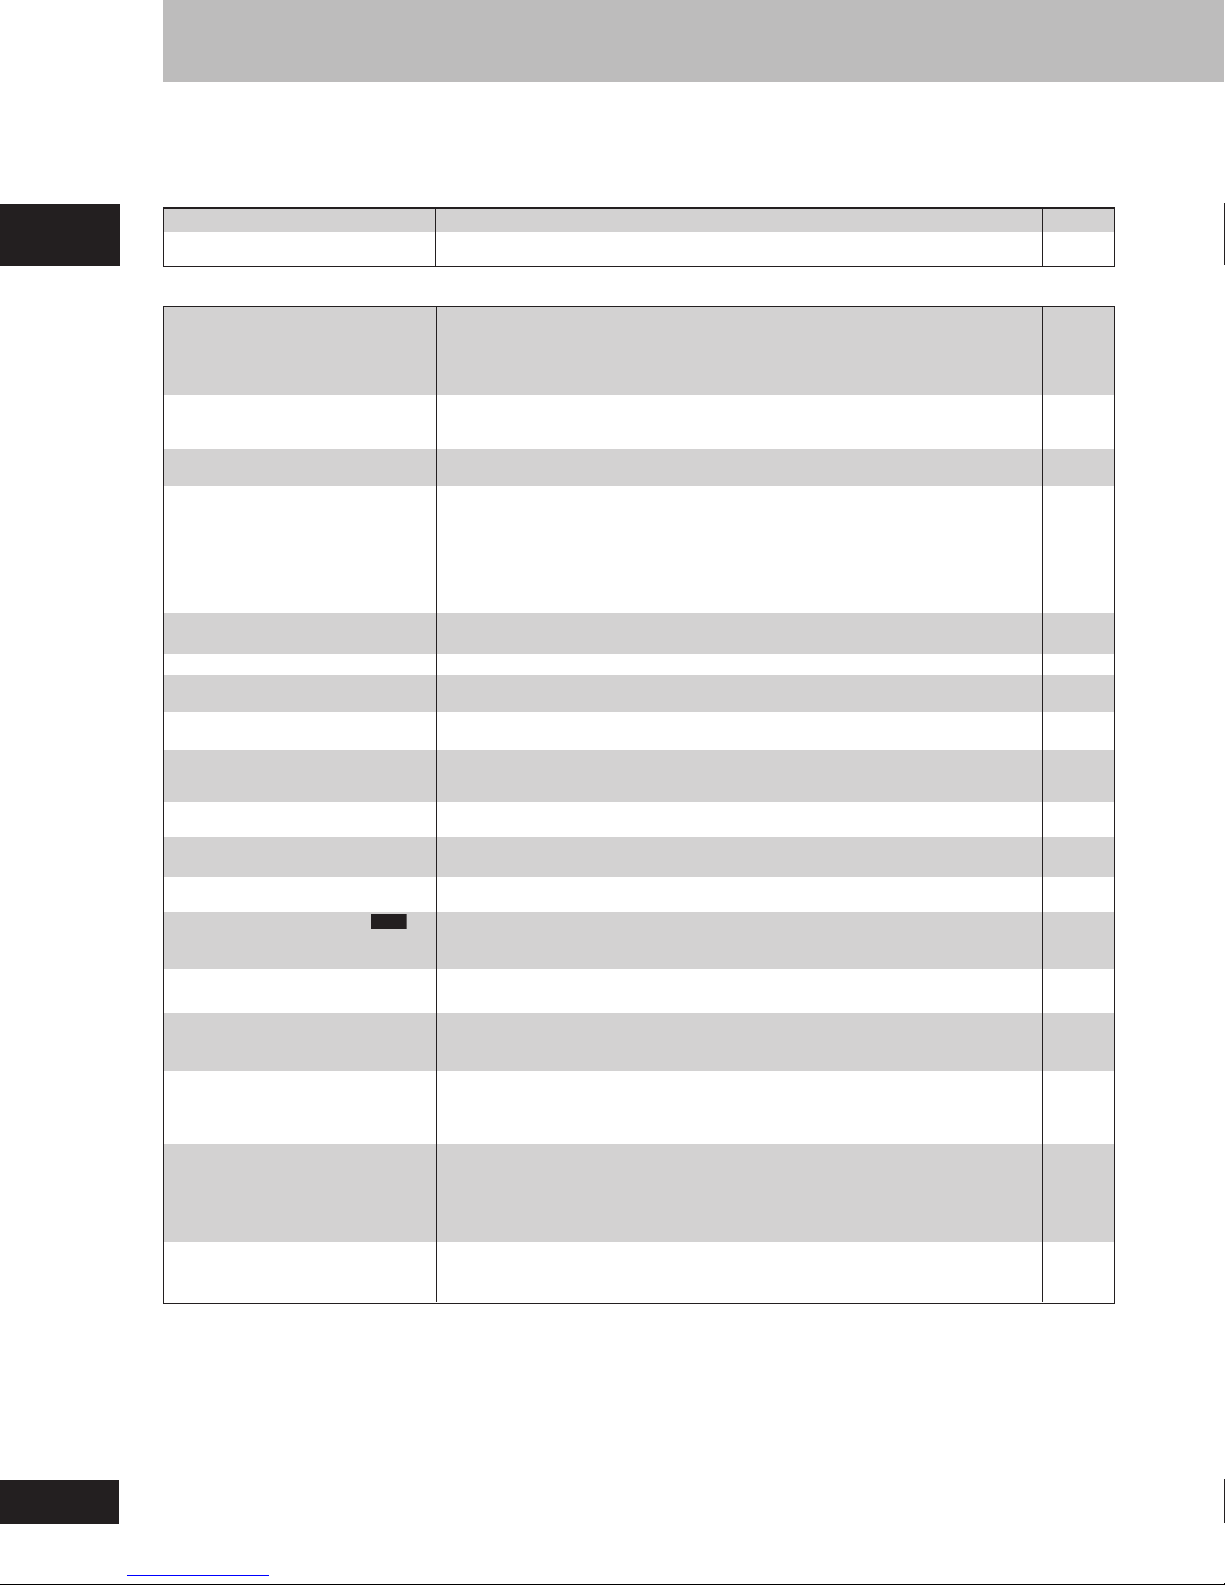
Troubleshooting guide
Before requesting service, make the following checks. If you are in doubt about some of the check points, or if the remedies indicated in the chart
do not solve the problem, refer to the “Customer Services Directory” on page 39 if you reside in the U.S.A., or refer to “Product information” on
page 4 if you reside in Canada.
Power
No power.
The unit is automatically switched
to the standby mode.
Operation
No response when any buttons
are pressed.
Reference
No operations can be performed
with the remote control.
Cannot switch on the television
with the remote control.
Play doesn’t start (or stops
immediately) when you press
[: DVD/CD].
Cannot select alternative
languages.
No menu play.
No subtitles.
The position of the subtitles is
incorrect.
Soundtrack and/or subtitle
language is not the one selected
with the SETUP menus.
Cannot change angle.
The SETUP menu cannot be
accessed.
Cannot add markers.
There are already markers.
Cannot select random or program
play.
Folders deeper than the eighth
layer on a data disc are not
displayed correctly.
You have forgotten your ratings
password.
Reset all the SETUP settings to
Factory Preset.
The unit doesn’t play the data type
(WMA/MP3 or JPEG) selected in
the “Audio” or “Picture” in the
Playback menu displayed on the
screen.
Cannot eject disc.
RAM
Page
Insert the AC power supply cord securely.
•
The unit was switched to standby by the sleep timer or auto-off function.
•
Some operations may be prohibited by the disc.
•
The unit may not be operating properly due to lightning, static electricity or some
•
other external factor. Turn the unit off and then back to ON.
Alternatively, press [f] to switch the unit to standby mode, disconnect the AC
mains lead, and then reconnect it.
Check that the batteries are installed correctly. 8
•
The batteries are depleted: replace them with new ones. 8
•
Point the remote control at the remote control sensor and operate.
•
Press [SHIFT]+[TV f] first to operate the television. 28
•
Condensation has formed: Wait 1 to 2 hours for it to evaporate.
•
This unit cannot play discs other than the ones listed in these operating instructions. 5, 17
•
You can only play DVD-Video if their region number is the same or includes the Cover
•
same region number as the unit or if DVD-Video is marked “ALL”. Confirm the region
number for the unit on the rear panel.
The disc may be dirty and may require cleaning. 5
•
Ensure that the disc is loaded with the label of the side to be played facing upwards. 12
•
Check that the DVD-RAM has something recorded on it.
•
This function is dependent on software availability.
•
Try selecting from the disc’s menu if one is available.
•
This function is dependent on software availability.
•
This function is dependent on software availability.
•
Subtitles are cleared from the television. Turn on the subtitles. 19
•
Change the position of the subtitles with “Subtitle Position” in the Display Menu. 21
•
This function is dependent on software availability.
•
This function is dependent on software availability. Even if a disc has a number
•
of angles recorded, these angles may be recorded for specific scenes only.
Select “DVD/CD” as the source.
•
Cancel all group, program and random play. 15
•
You cannot add markers while playing a play list or if the disc’s play time doesn’t
•
appear on the unit’s display.
The unit reads and displays the markers added with a DVD video recorder. You can –
•
clear them but they will reappear when you switch the unit to standby, change
the source, or open the disc tray.
You cannot select random or program play with some DVD-Video.
•
Folders deeper than the eighth layer are displayed as the eighth layer.
•
While stopped and “DVD/CD” is the source, press and hold [L STOP] on the unit
•
and [h10] on the remote control for about 3 seconds until “Initialized” disappears
from the television. Turn the unit off and on again.
All settings will return to the default values.
Reload the disc for the settings to take effect. Press [OPEN/CLOSE c] to open the
•
tray, then press [: DVD/CD] to start play.
The unit may not operate properly if the disc is damaged or dirty.
•
Press [f] and after the display disappears, wait a few seconds, then press [f]
again and eject the disc.
26, 28
8
–
–
–
–
–
–
13
–
–
–
–
–
–
–
–
–
–
–
RQT7509
34
Page 35
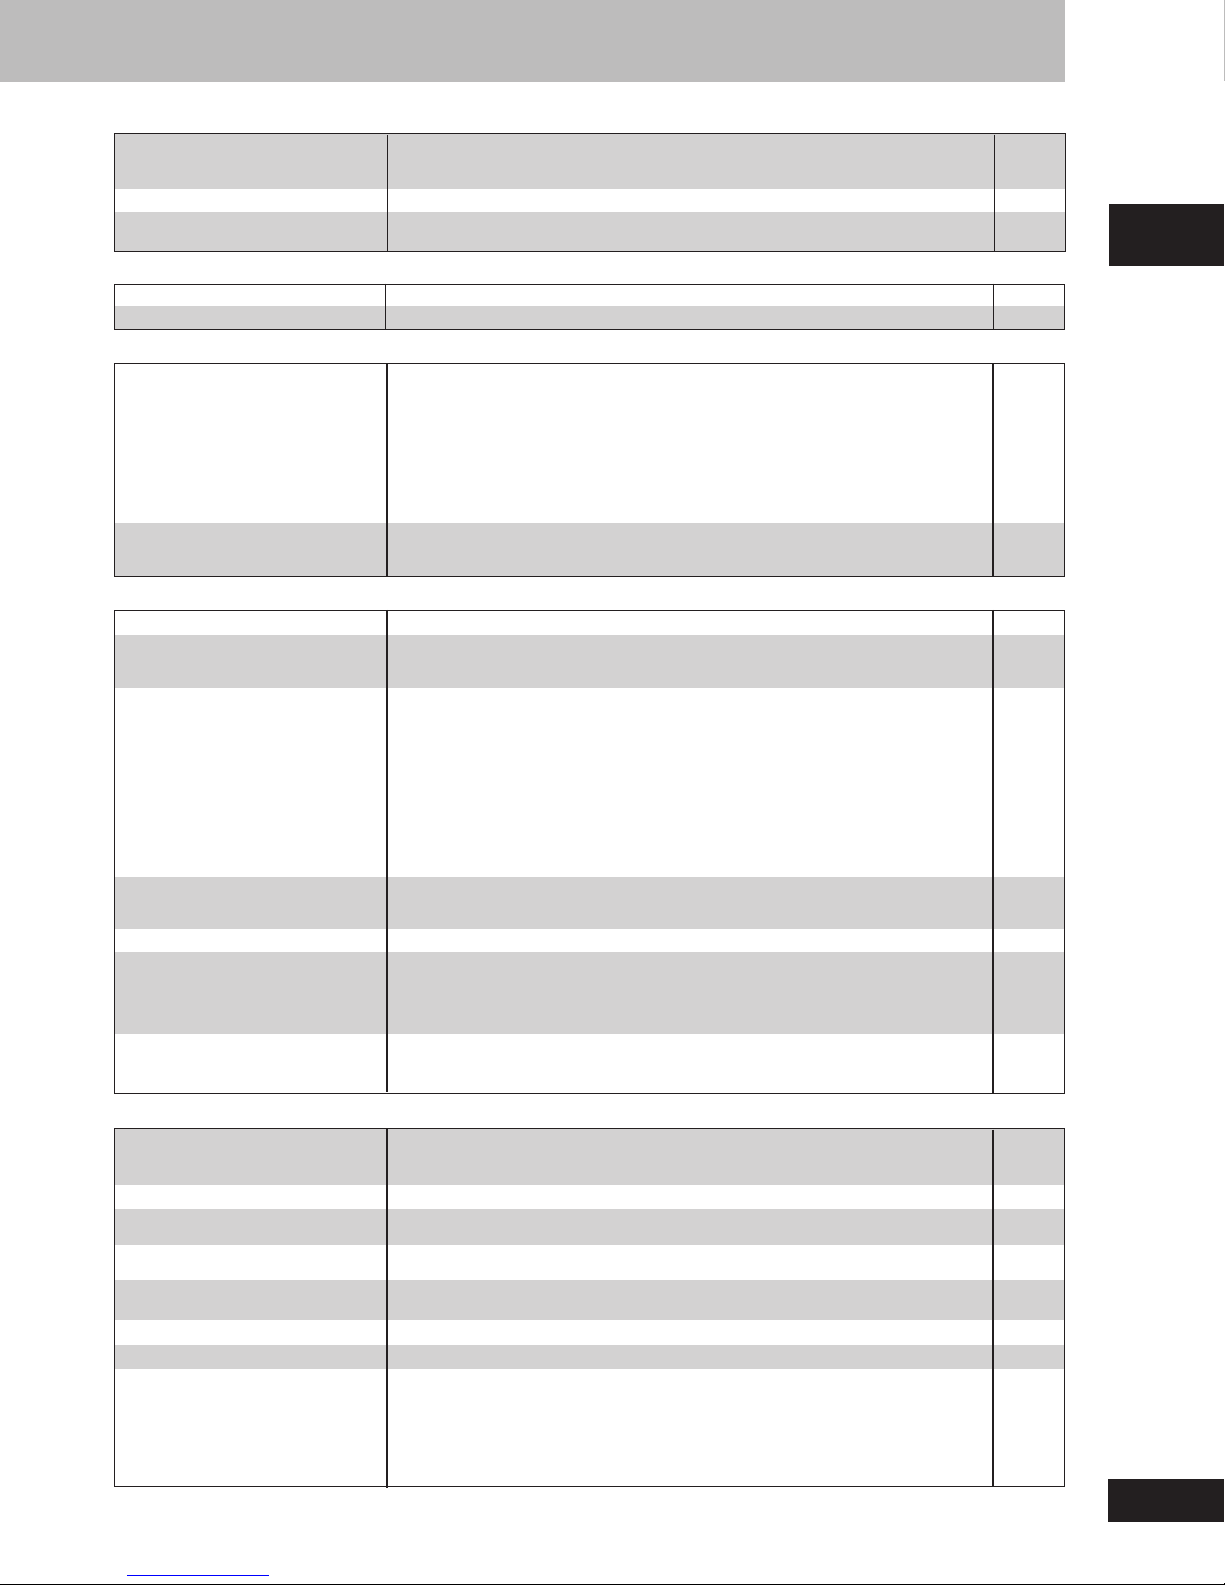
Listening to the radio
Noise is heard.
“ST” flickers or doesn’t light.
Sound is distorted.
A beat sound is heard.
A low hum is heard during AM
broadcasts.
Using the cassette deck
Poor quality sound.
Recording is not possible.
Sound
No sound.
Distorted sound.
Piercing noise comes from the
speakers.
Picture
Picture distorted.
No picture.
The picture shown on the television
is not normal.
(The sides of the picture are
cut off, the picture is stretched
horizontally, or black bands appear
at the top and bottom
of the screen.)
There is ghosting when
progressive output is on.
Picture quality is poor.
The picture on the television
disappears or stripes appear
on the screen.
Menus not displayed correctly.
Unit displays
Although the unit is in standby
mode, the display lights up and
changes continuously.
The display is dark.
“DVD NO PLAY”
“DVD NO DISC”
“F61”
“DVD U11”
“ERROR”
“DVD HMM”
MM stands for a number.
Adjust the position of the FM or AM antenna. –
•
Use an outdoor antenna. 33
•
Turn the television off or separate it from the unit. –
•
Separate the antenna from other cables and cords. –
•
Clean the heads. 36
•
If the erasure prevention tabs have been removed, cover the holes with adhesive tape.
•
Check the connections.
•
Turn the volume up.
•
Turn muting off.
•
Turn Advanced surround off if it causes distortion.
•
Switch off the unit, determine and correct the causes, then switch the unit on.
•
Causes include:
– Shorting (bare wires touching) of positive and negative speaker wires.
– Using speakers with an impedance lower than that rated for this unit.
– Straining of the speakers through excessive volume or power.
– Using the unit in a hot environment without proper ventilation.
If you have connected this unit to other equipment through the OPTICAL OUT
•
terminal, ensure you have selected the correct settings for “Dolby Digital” and “DTS
Digital Surround” in the SETUP menus’ “Audio” tab.
Some distortion is normal during SEARCH.
•
Check the connection.
•
Make sure the television is on.
•
Ensure the television’s video input setting (e.g., VIDEO 1) is correct.
•
Go to “Video” tab in the SETUP menus, and change “TV Aspect” to suit your television.
•
Use the television to change the aspect to the correct one.
•
If your television cannot change the aspect when input is progressive, try
changing 4:3 Aspect in Picture Menu.
Ensure that the unit is connected directly to the television, and is not connected
•
through a video cassette recorder.
Change the size with the zoom function.
•
Connect to the component video (480P) input terminals on a television compatible
•
with this unit’s copy guard system. You cannot view progressive video if your
television is not compatible.
The images on PAL system DVD-Audio are compressed for display. They may also
•
appear vertically stretched.
Change “Video Output Mode” to “480I” so “PROGRESSIVE” on the display goes
•
out. This problem is caused by the editing method or material used on DVD-Video,
but should be corrected if you use interlace output.
Check the settings in Picture Menu.
•
Mobile telephone chargers can cause some disturbance.
•
The location and orientation of the antenna are incorrect. If you are using an
•
indoor antenna, change to an outdoor antenna.
The television antenna wire is too close to the unit. Separate the antenna wire of
•
the television from the unit.
Change the zoom ratio to “x1.00”.
•
Set “Subtitle Position” in Display Menu to “0”.
•
Set “4:3 Aspect” in Display Menu to “Normal”.
•
Turn off the demo function.
•
If you set the clock, demo function will be turned off automatically.
•
Press [SHIFT]+[DIMMER] until the display returns to the original brightness.
•
You inserted a disc which the unit cannot play; insert one that can.
•
You inserted a blank DVD-RAM disc.
•
You haven’t inserted a disc; insert one.
•
You haven’t inserted the disc correctly; insert it correctly.
•
Check and correct the speaker cord connections.
•
If this does not fix the problem, there is a power supply problem. Consult the dealer.
Disc is dirty. Wipe it clean.
•
Incorrect operation performed. Read the instructions and try again.
•
Trouble may have occurred. The number following “H” depends on the status of the unit.
•
Reset procedure:
Press [f] to switch the unit to standby mode and then back to ON. Alternatively, press
[f] to switch the unit to standby mode, disconnect the AC mains lead, and then
reconnect it.
If the service numbers fail to clear, note the service number and contact a qualified
•
service person.
24
6
–
26
25
–
31
–
7
–
–
29
–
20
–
21
7
–
20
20
–
33
–
21
21
21
9
9
26
5
–
–
12, 37
6
5
–
–
–
Reference
RQT7509
35
Page 36
EST. 1924
Troubleshooting guide
Recording
Television displays
“Cannot display group xx, content xx.”
“The progressive out is set to
“Disable”.
No on-screen display.
The disc’s menu is displayed
in a different language.
Reference
Selecting fine audio equipment such as the unit you’ve just purchased is only the start of your musical enjoyment.
Now it’s time to consider how you can maximize the fun and excitement your equipment offers. This manufacturer
and the Electronic Industries Association’s Consumer Electronics Group want you to get the most out of your
equipment by playing it at a safe level. One that lets the sound come through loud and clear without annoying blaring
or distortion—and, most importantly, without affecting your sensitive hearing.
We recommend that you avoid prolonged exposure to excessive noise.
Sound can be deceiving. Over time your hearing “comfort level” adapts to higher volumes of sound. So what sounds
“normal” can actually be loud and harmful to your hearing.
Guard against this by setting your equipment at a safe level BEFORE your hearing adapts.
To establish a safe level:
• Start your volume control at a low setting.
• Slowly increase the sound until you can hear it comfortably and clearly, and without distortion.
You are trying to display incompatible contents.
•
Go to “Video” tab in the SETUP menus, and select “Enable” in “Progressive Out
•
(Component)”.
Go to “Display” tab in the SETUP menus, and select “On” for “On-Screen Messages”.
•
Go to “Disc” tab in the SETUP menus, and select the preferred language for “Menus”.
•
Listening caution
–
29
30
29
Once you have established a comfortable sound level:
• Set the dial and leave it there.
Taking a minute to do this now will help to prevent hearing damage or loss in the future. After all, we want you
listening for a lifetime.
Maintenance
To clean this unit, wipe with a soft, dry cloth.
Never use alcohol, paint thinner or benzine to clean this unit.
•
Before using chemically treated cloth, read the instructions that
•
came with the cloth carefully.
When moving the unit
1
Remove all discs.
2 Press [ /I POWER] on the main unit to turn it off.
3 Disconnect the AC mains lead.
For a cleaner, crisper sound (cassette deck)
Clean the heads regularly to assure good quality playback and recording. Use a cleaning tape (not included).
RQT7509
36
Page 37
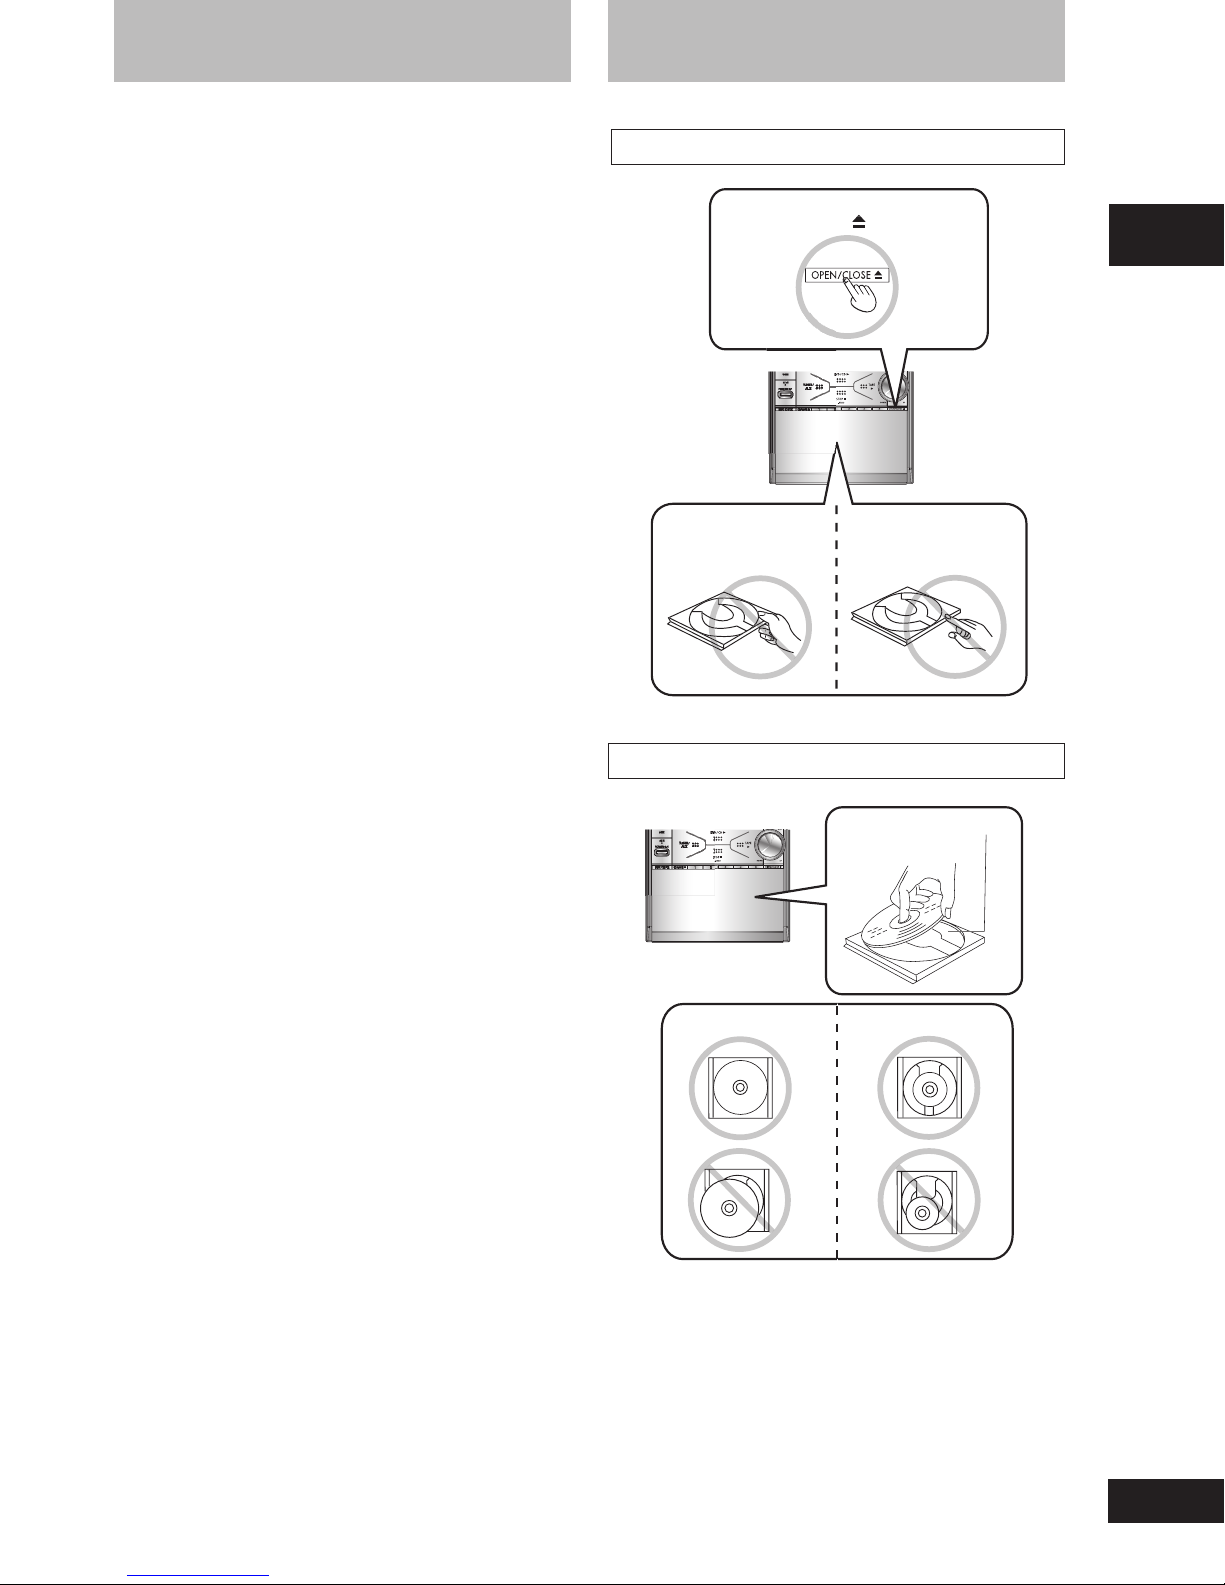
Glossary
[OPEN/CLOSE ] button only.
y.
y
.
Tray/disc handling procedure
Decoder
A decoder restores the coded audio signals on DVDs to normal. This
is called decoding.
Dolby Digital
This is a method of coding digital signals developed by Dolby
Laboratories. Apart from stereo (2-channel) audio, these signals can
also be multi-channel audio. A large amount of audio information can
be recorded on one disc using this method.
DTS (Digital Theater Systems)
This surround system is used in many movie theaters around the
world. There is good separation between the channels, so realistic
sound effects are possible.
Dynamic range
Dynamic range is the difference between the lowest level of sound
that can be heard above the noise of the equipment and the highest
level of sound before distortion occurs.
Film and video
DVD-Videos are recorded using either film or video. Usually, film is
recorded at 24 frames per second, the rate movies are filmed at,
while video is recorded at 30 frames per second.
Frame still and field still
Frames are the still pictures that go together to make a moving picture.
There are about 30 frames shown each second.
One frame is made up of two fields. A regular television shows these
fields one after the other to create frames.
A still is shown when you pause a moving picture. A frame still is
made up of two alternating fields, so the picture may appear blurred,
but overall quality is high.
A field still is not blurred, but it has only half the information of a frame
still so picture quality is lower.
Interlace and progressive output
NTSC, the video signal standard, has 480 interlaced (I) scan lines,
whereas progressive scanning uses twice the number of scan lines.
This is called 480P. The video signals output from this unit’s
COMPONENT VIDEO OUT terminals (Y, P
, PR) allow you to enjoy
B
higher quality pictures than if the signals were output from the VIDEO
OUT terminal or S-VIDEO OUT terminal.
I/P/B
MPEG 2, the video compression standard adapted for use with DVDVideo, codes frames using these 3 picture types.
I: Intra coded picture
This picture has the best quality and is the best to use when
adjusting the picture.
P: Predictive coded picture
This picture is calculated based on past I or P-pictures.
B: Bidirectionally-predictive coded picture
This picture is calculated by comparing past and future I and Ppictures so it has the lowest volume of information.
Not adhering to the following may cause problems.
Opening/closing a disc tray
Open/close the tray with
Do not pull the tra
Do not push the tra
with your hand
Inserting a disc correctly
Insert to fit in the tray
guide.
12 cm 8 cm
Reference
Linear PCM (pulse code modulation)
These are uncompressed digital signals, similar to those found on
CDs.
Playback control (PBC)
If a Video CD has playback control, you can select scenes and
information with menus.
XXX
X
XX
XX
X X
X
XXXX
X
X
X
X
X
X
X
X
X
XXX
XXX
X
X
X
X
XX
X
X
XXX
X
X
X
X
X
XXX
XXX
X
X
X
XX
X
X
XX
X
XXXX
X
X
X
X X
X
XX
X
X
X
X
X
X
X
X
X
X
X
X
X
X
X
X
X
X
X
X
X
X
X
X
X
X
X
X
X
X
X
X
X
X
X
X
X
X
X
X
X
X
X
X
X
X
X
X
X
X
X
X
X
X
X
X
X
X
X
X
X
X
X
X
X
X
X
X
X
X
X
X
X
X
X
X
Insert the disc correctly in the position indicated in the diagrams
•
X
XX
XXXX
XX
XX
X
X
X
X
X
X
X
X
X
X
X
X
X
X
X
X
X
X
X
X
X
X
X
X
X
X
X
X
X
X
X
X
X
X
X
X
X
X
X
X
X
X
X
X
X
X
X
X
X
X
X
X
X
X
X
above.
Place only one disc on a tray.
•
Insert the disc with the label side facing up.
•
RQT7509
37
Page 38

Specifications
RQT7509
AMPLIFIER SECTION
RMS Output Power Stereo mode (Both channel driven)
10% total harmonic distortion
kHz (Low channel) 35 W per channel (6
1
kHz (High channel) 35 W per channel (6
8
Total RMS Stereo mode power 140
FTC Output Power Stereo mode (Both channel driven)
10% total harmonic distortion
Hz – 3 kHz (Low channel) 30 W per channel (6
60
kHz – 16 kHz (High channel) 30 W per channel (6
3
Total FTC Stereo mode power 60 W per channel
Phone jack
Terminal Stereo, 3.5 mm (
Reference
FM TUNER SECTION
Frequency range 87.9 – 107.9 MHz (200 kHz step)
87.5 – 108.0
Sensitivity 2.5
S/N 26 dB 2.2
Antenna terminals 75
Preset stations 15
AM TUNER SECTION
Frequency range 520 – 1710 kHz (10 kHz steps)
Sensitivity
S/N 20 dB at 1000 kHz 560
Preset stations 15
CASSETTE DECK SECTION
Track system 4-track, 2-channel
Heads
Record/playback Solid permalloy head
Erasure Double gap ferrite head
Motor DC servo motor
Recording system AC bias 100 kHz
Tape speed 4.8 cm/s (1–7/8 ips)
Overall frequency response (+3, –6 dB) at DECK OUT
Normal (TYPE I) 35 Hz
S/N ratio 50 dB (A weighted)
Wow and flutter 0.18% (WRMS)
Fast forward and rewind time Approx. 120 seconds with
DISC SECTION
Disc played [8 cm (3”) or 12 cm (5”)]
(1) DVD-RAM (DVD-VR compatible, JPEG formatted disc)
(2) DVD-Audio
(3) DVD-Video
(4) DVD-R (DVD-Video compatible)
(5) CD-Audio (CD-DA)
(6) Video CD
(7) SVCD (Conforming to IEC62107)
(8) CD-R/CD-RW
(CD-DA, Video-CD, SVCD, MP3, WMA, JPEG formatted
disc)
(9) MP3/WMA
Compatible compression rate:
•
MP3: between 32 kbps and 320 kbps
WMA: between 48 kbps and 320 kbps
(10) JPEG
Exif Ver 2.1 JPEG Baseline files
•
Picture resolution:
•
(11) HighMAT Level 2 (Audio and Image)
\
The total combined maximum number of recognizable audio
and picture contents and groups: 4000 audio and picture
contents and 400 groups.
\
\
between 320x240 and 6144x4096 pixels
(Sub sampling is 4:2:2 or 4:2:0)
MHz (100 kHz step)
AC erase 100 kHz
C-60 cassette tape
1
/8”) jack
µV
(IHF)
Ω (unbalance)
µV/m
–
14 kHz
Video system NTSC
Composite video output
Output level 1
Ω)
Ω)
W
Terminal Pin jack (1 system)
S-VIDEO output
Y output level 1
C output level 0.286
Vp-p (75
Terminal S terminal (1 system)
Component video output (480P/480I)
Ω)
Ω)
Y output level 1
P
B output level 0.7
P
R output level 0.7
Terminal Pin jack (Y:green, P
Audio output
Number of channels 2
Digital audio output
Optical digital output Optical terminal
Pick up
µV
Wavelength
DVD 662 nm
CD 785 nm
Laser power
For U.S.A. CLASS IIa/CLASS I
For Canada and Latin America CLASS 2/CLASS 3a
SPEAKER SECTION
Type 3 way, 3 speaker system (Bass reflex)
Speaker units
Woofer 10 cm (4”) cone type
Tweeter 6 cm (2
3
/8”) ring shaped dome type
Super tweeter Piezo type
Impedance
High 6
Low 6
Input power (IEC) High 35 W (Max)
Output sound pressure level 80 dB/W (1.0 m)
Crossover frequency 2.6 kHz, 10 kHz
Frequency range 42 Hz–50 kHz (–16 dB)
52 Hz–45 kHz (–10 dB)
Dimensions (WxHxD) 145 x 250 x 274 mm
23
(5
/32” x 9 27/32” x 10 25/32”)
Mass 2.6 kg (5.7 lbs)
GENERAL
Power supply AC 120V, 60 Hz
Power consumption 130 W
Dimensions (WxHxD) 174.6 x 251 x 376 mm
Mass 5.7 kg (12.6 lbs)
Operating temperature range + 5°C to + 35°C (+41°F to +95°F)
Operating humidity range 5% to 90% RH (no condensation)
Power consumption in standby mode 0.5 W
Note
1. Specifications are subject to change without notice.
Mass and dimensions are approximate.
2. Total harmonic distortion is measured by digital spectrum
analyzer.
7
(6
/8” x 9 7/8” x 14 13/16”)
Vp-p (75
Ω)
Vp-p (75
Ω)
Ω) (NTSC)
Vp-p (75
Vp-p (75
Vp-p (75
Ω)
Ω)
Ω)
B: blue, PR:red)
(1 system)
Low 35 W (Max)
Ω
Ω
38
Page 39
Limited Warranty (ONLY FOR U.S.A.)
Panasonic Consumer Electronics Company,
Division of Matsushita Electric Corporation of America
One Panasonic Way Secaucus, New Jersey 07094
Panasonic Audio Products
Limited Warranty
Limited Warranty Coverage
If your product does not work properly because of a defect in materials or workmanship, Panasonic Consumer Electronics Company or Panasonic Sales Company (collectively referred to as “the warrantor”) will, for the length of the period
indicated on the chart below, which starts with the date of original purchase (“warranty period”), at its option either (a) repair your product with new or refurbished
parts, or (b) replace it with a new or a refurbished product. The decision to repair or
replace will be made by the warrantor.
Product or Part Name
Audio Products (except items listed
below)
All Audio Racks (cabinets)
Stand Alone Speakers, Subwoofer
Speakers
USB Reader-Writer, Personal
Computer Card Adapters
(in exchange for defective item)
Accessories: Headphones, Cartridges,
Microphones, Adapters
Rechargeable Batteries (in exchange
for defective item)
SD Memory Cards, Rechargeable
Battery Packs (in exchange for
defective item)
During the “Labor” warranty period there will be no charge for labor. During the
“Parts” warranty period, there will be no charge for parts. You must carry-in or mailin your product during the warranty period. If non-rechargeable batteries are
included, they are not warranted. This warranty only applies to products purchased
and serviced in the United States or Puerto Rico. This warranty is extended only to
the original purchaser of a new product which was not sold “as is”. A purchase
receipt or other proof of the original purchase date is required for warranty service.
Parts
One (1) year
Thirty (30) days
Three (3) years
One (1) year
Ninety (90) days
Ten (10) days
Ninety (90) days
Labor
One (1) year
Not Applicable
Three (3) years
Not Applicable
Ninety (90) days
Not Applicable
Not Applicable
Panasonic Sales Company, Division of Matsushita Electric
of Puerto Rico, Inc.
Ave. 65 de Infantería, Km. 9.5
San Gabriel Industrial Park, Carolina, Puerto Rico 00985
Carry-In or Mail-In Service
For Carry-In or Mail-In Service in the United States call 1-800-211-PANA (1-800211-7262) or visit Panasonic web site: http://www.panasonic.com
For assistance in Puerto Rico call Panasonic Sales Company (787)-750-4300 or
fax (787)-768-2910.
Limited Warranty Limits And Exclusions
This warranty ONLY COVERS failures due to defects in materials or workmanship,
and DOES NOT COVER normal wear and tear or cosmetic damage. The warranty
ALSO DOES NOT COVER damages which occurred in shipment, or failures which
are caused by products not supplied by the warrantor, or failures which result from
accidents, misuse, abuse, neglect, mishandling, misapplication, alteration, faulty
installation, set-up adjustments, misadjustment of consumer controls, improper
maintenance, power line surge, lightning damage, modification, or commercial use
(such as in a hotel, office, restaurant, or other business), rental use of the product,
service by anyone other than a Factory Servicenter or other Authorized Servicer,
or damage that is attributable to acts of God.
THERE ARE NO EXPRESS WARRANTIES EXCEPT AS LISTED UNDER
“LIMITED WARRANTY COVERAGE”. THE WARRANTOR IS NOT LIABLE
FOR INCIDENTAL OR CONSEQUENTIAL DAMAGES RESULTING FROM THE
USE OF THIS PRODUCT, OR ARISING OUT OF ANY BREACH OF THIS WARRANTY. (As examples, this excludes damages for lost time, travel to and from the
servicer, loss of media or images, data or other memory content. The items listed
are not exclusive, but are for illustration only.) ALL EXPRESS AND IMPLIED
WARRANTIES, INCLUDING THE WARRANTY OF MERCHANTABILITY, ARE
LIMITED TO THE PERIOD OF THE LIMITED WARRANTY.
Some states do not allow the exclusion or limitation of incidental or consequential
damages, or limitations on how long an implied warranty lasts, so the exclusions may
not apply to you.
This warranty gives you specific legal rights and you may also have other rights
which vary from state to state. If a problem with this product develops during or
after the warranty period, you may contact your dealer or Servicenter. If the problem is not handled to your satisfaction, then write to the warrantor’s Consumer
Affairs Department at the addresses listed for the warrantor.
PARTS AND SERVICE WHICH ARE NOT COVERED BY THIS LIMITED WARRANTY ARE YOUR RESPONSIBILITY.
Reference
Customer Services Directory
Obtain Product Information and Operating Assistance; locate your nearest Dealer or Servicenter; purchase Parts and
Accessories; or make Customer Service and Literature requests by visiting our Web Site at:
http://www.panasonic.com/support
or, contact us via the web at:
http://www.panasonic.com/contactinfo
You may also contact us directly at:
1-800-211-PANA (7262),
Monday-Friday 9 am-9 pm; Saturday-Sunday 10 am-7 pm, EST.
For hearing or speech impaired TTY users, TTY: 1-877-833-8855
Accessory Purchases
Purchase Parts, Accessories and Instruction Books online for all Panasonic Products by visiting our Web Site at:
http://www.pasc.panasonic.comm
or, send your request by E-mail to:
You may also contact us directly at:
1-800-332-5368 (Phone) 1-800-237-9080 (Fax Only) (Monday – Friday 9 am to 8 pm, EST.)
Panasonic Services Company
20421 84th Avenue South, Kent, WA 98032
(We Accept Visa, MasterCard, Discover Card, American Express, and Personal Checks)
For hearing or speech impaired TTY users, TTY: 1-866-605-1277
Service in Puerto Rico
Matsushita Electric of Puerto Rico, Inc. Panasonic Sales Company
Factory Servicenter:
Ave. 65 de Infantería, Km. 9.5, San Gabriel Industrial Park, Carolina, Puerto Rico 00985
Phone (787)750-4300, Fax (787)768-2910
RQT7509
39
Page 40

Panasonic Consumer Electronics
Company, Division of Matsushita
Electric Corporation of America
One Panasonic Way Secaucus,
New Jersey 07094
http://www.panasonic.com
© 2004 Matsushita Electric Industrial Co., Ltd.
Printed in Malaysia
Panasonic Sales Company,
Division of Matsushita Electric of
Puerto Rico, Inc. (“PSC”)
Ave. 65 de Infantería, Km. 9.5
San Gabriel Industrial Park, Carolina,
Puerto Rico 00985
Panasonic Canada Inc.
5770 Ambler Drive
Mississauga, Ontario
L4W 2T3
www.panasonic.ca
RQT7509-1P
En
L0204KE1034
 Loading...