

Panasonic SC-EN33, SA-EN35, SA-EN33, SB-EN35, SB-EN35A Operating Instructions Manual [en, no]
...Page 1
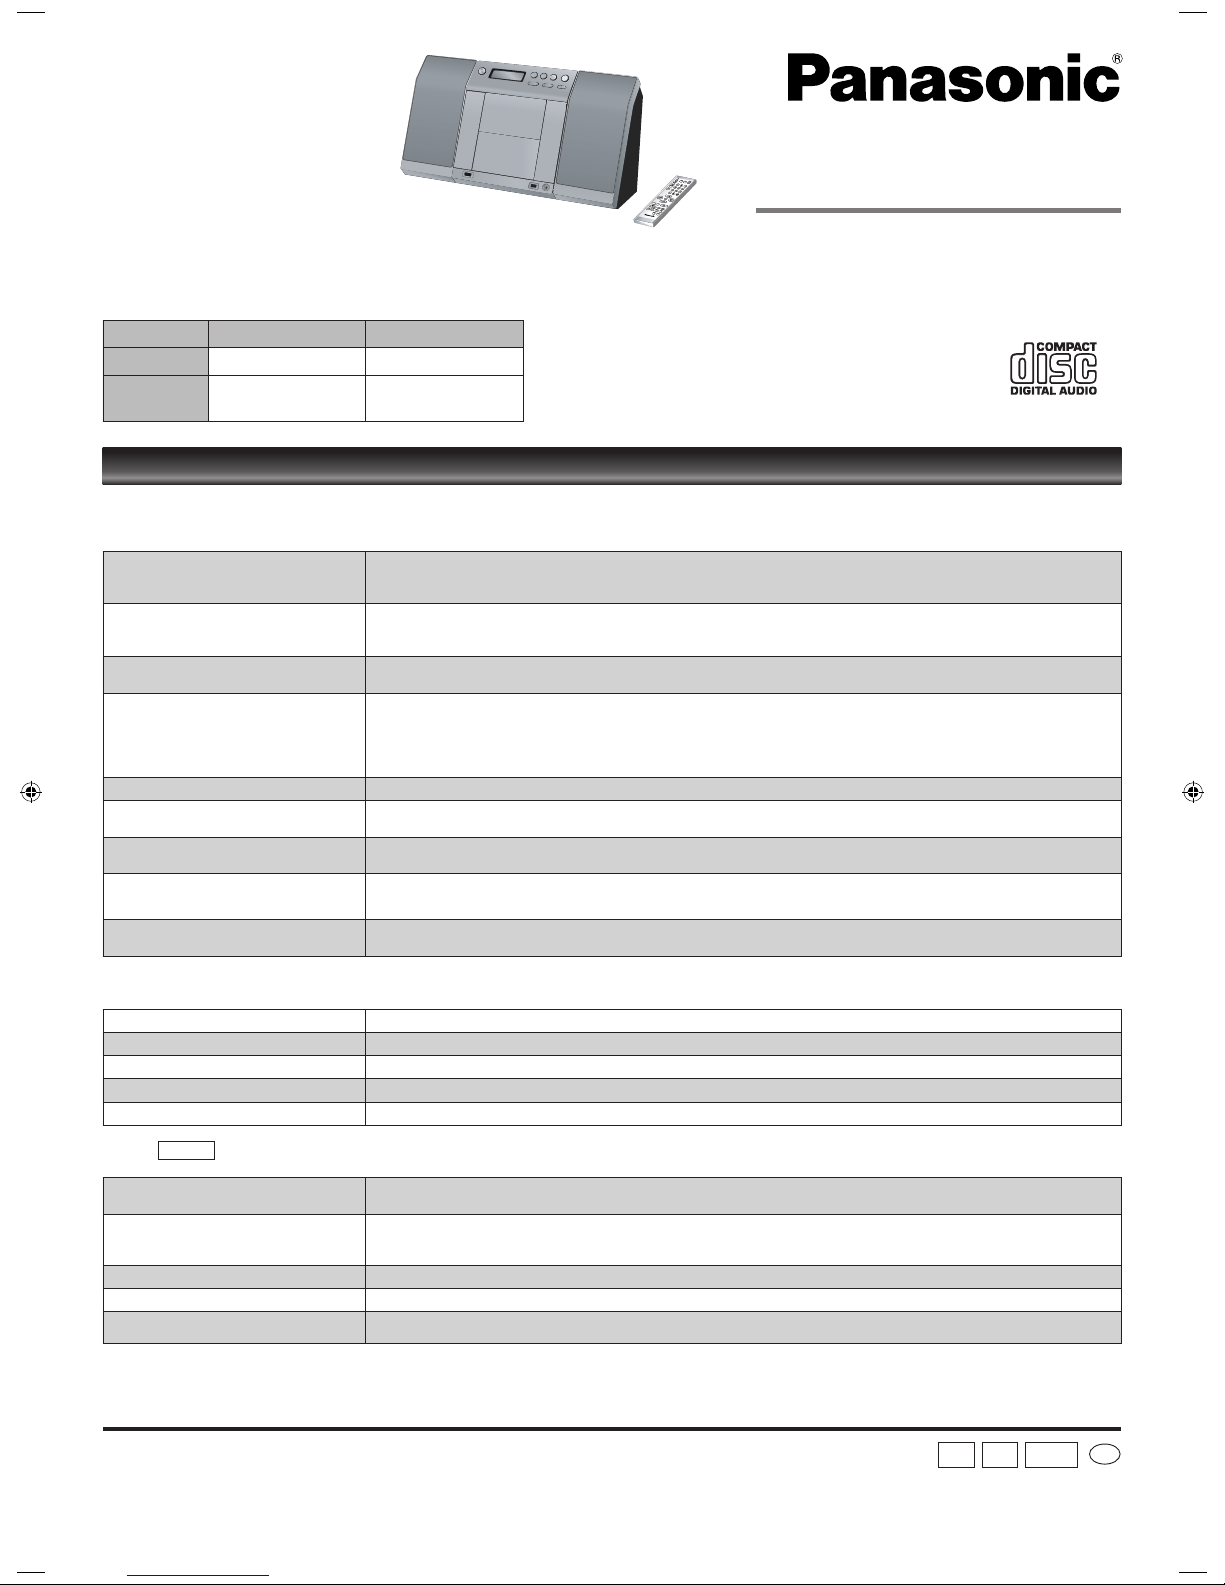
Operating Instructions
CD Stereo System
Model No. SC-EN35
SC-EN33
Dear customer
Thank you for purchasing this product.
Before connecting, operating or adjusting this product, please read the instructions completely.
Please keep this manual for future reference.
System SC-EN35 SC-EN33
Main unit SA-EN35 SA-EN33
Speakers
SB-EN35
SB-EN35A
SB-EN33
SB-EN33A
Matsushita Electric Industrial Co., Ltd.
Web Site: http://panasonic.net
RQTV0167-2B
H0107FL2047
En
E GN
SC-EN35 is used in the illustrations unless
otherwise mentioned.
These instructions are applicable to the following systems.
Before requesting service, make the following checks. If you are in doubt about any of the check points, or if the solutions indicated in the chart do not solve the
problem, consult your dealer for instructions.
No play.
The disc isn’t correctly set.
The disc is scratched or dirty. (Tracks skipped.)
There is moisture on the lens. Wait for about an hour and then try again.
•
•
•
MP3 cannot be read.
You may not be able to play MP3 if you have copied a multi-session disc that has no data between sessions.
When creating a multi session disc, it is necessary to close the session.
The amount of data on the disc is too small. Set the amount of data to greater than approximately 5 MB.
•
•
•
Sound is unfixed, reversed or comes
from one speaker only.
Check the speaker connections. (➡ page 3)•
No sound or there is a lot of noise.
Noise may occur when playing MP3 if recording quality is poor.
Keep this unit away from mobile telephones if the interference is apparent.
Turn the volume up.
Switch the unit off, determine and correct the cause, then switch the unit on. Causes include shorting of the positive and
negative speaker wires, straining of the speakers through excessive volume or power, and using the unit in a hot environment.
•
•
•
•
Humming heard during play. An AC mains lead or fluorescent light is near the cords. Keep other appliances and cords away from this unit’s cables.•
A beat sound or noise is heard while
receiving a radio broadcast.
Switch the TV or other audio player off or separate it from the unit.
Switch off the portable audio player connected to “MUSIC PORT”.
•
•
A low hum or noise is heard during AM
broadcasts.
Keep the antenna away from other cables and cords.
Keep the AM antenna away from the unit.
•
•
The picture on the television near the
set disappears or stripes appear on the
screen.
The location and orientation of the antenna are incorrect.
The television antenna wire is too close to the unit. Separate the antenna wire of the television from the unit.
•
•
Remote control doesn’t work.
Check that the batteries are inserted correctly. (➡ page 2)
Replace the batteries if they are worn.
•
•
Display
--:--
You plugged the AC mains lead in for the first time and there was a power failure recently. Set the time. (
➡ page 6)•
PGM FULL The number of programmed tracks is limited to 24. No further tracks can be programmed.•
NO PLAY A CD-ROM disc that is not CD-DA or MP3 format is inserted. It cannot be played.•
ERROR Incorrect operation performed. Read the instructions and try again.•
F76 There is a power supply problem. Consult the dealer.•
USB
No response when [USB q/h] button is
pressed.
Disconnect the USB device and then reconnect it back. Alternatively, turn the unit off and then back on.•
The USB drive or it’s contents cannot
be read.
The USB drive format or it’s contents is/are not compatible with the system (➡ page 5).
The USB host function of this product may not work with some USB devices.
USB devices with storage capacity of more than 8 gigabytes may not work in some instances.
•
•
•
Slow operation of the USB flash drive. Large file size or high memory USB flash drive takes longer time to read.•
“USB OVER CURRENT ERROR” The USB mass storage device rating exceeds 500mA. Disconnect the USB device. Turn the unit off and then back on.•
“NO PLAY”
Check the content.
Only MP3 format files can be played.
•
•
Troubleshooting guide
SC-EN35
GCS
Page 2
R
L
3
2
1
4
R6/LR6, AA
Aim at the sensor, avoiding obstacles, at a
maximum range of 7 m directly in front of
the unit.
Operation can be affected by strong light
sources, such as direct sunlight, and the
glass doors on cabinets.
•
•
Keep your speakers at least 10 mm away from the
system for proper ventilation.
These speakers do not have magnetic shielding. Do
not place them near televisions, personal computers
or other devices easily influenced by magnetism.
You cannot take the front net off the speakers.
•
•
•
Note
Left and right speakers are different.
Insert so the poles (+ and – ) match those
in the remote control.
Do not use rechargeable type batteries.
•
•
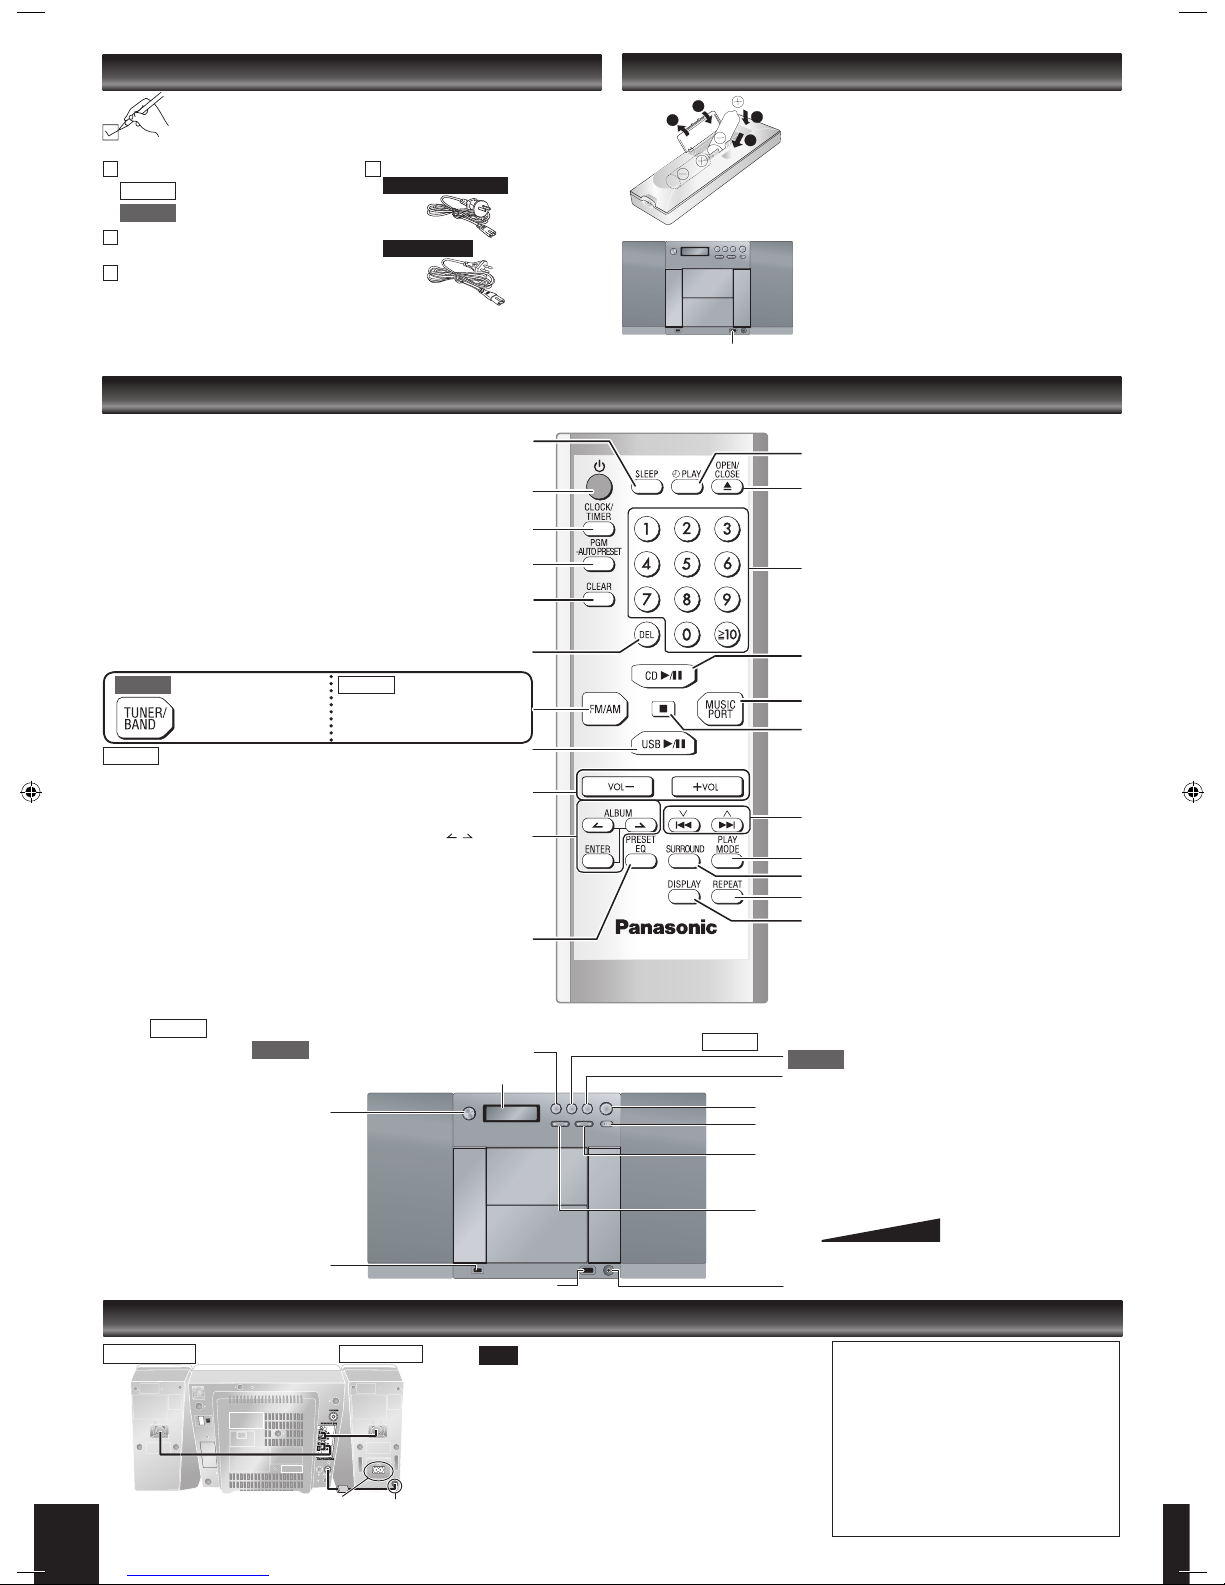
Standby/on switch [8]
Press to switch the unit from on to
standby mode or vice versa.
In standby mode, the unit is still
consuming a small amount of power.
[SLEEP]
SLEEP timer operation ON/OFF or SLEEP time setting
CD/MP3 Program, Tuner Preset (Manual) [PGM, -AUTO PRESET]
[Long press] Tuner Preset (Auto)
CD/MP3/USB: Delete all programs [CLEAR]
[PLAY MODE] Play mode button
[CD q/h] Selector switch to CD.
Direct CD Play/CD Pause
[TUNER/BAND]
Selector switch to Tuner
for FM and AM.
Turn the volume up/down [VOL-], [+VOL]
[z PLAY] Timer PLAY ON/OFF
Clock and Timer setting [CLOCK/TIMER]
[1-9, 0, ≧10] Numbered buttons
To select a 2-digit number
e.g. 16: [≧10] [1] [6]
To select a 3-digit number
e.g. 226: [≧10] [≧10] [2] [2] [6]
[MUSIC PORT] Selector switch to MUSIC PORT
[g] Stop button
[2/u, 1\i] CD: Skip/Search
MP3/USB: Track Skip
TUNER: Tune up/down, [Long press] Auto tuning
SA-EN35
[REPEAT] Repeat ON/OFF
[SURROUND] SURROUND mode ON/OFF
Delete last programmed track [DEL]
[DISPLAY]
CD: CD Display (Elapsed play time/Remaining play time)
MP3: MP3 Display (Elapsed time/Album name/Track name/
ID3 [Album]/ID3 [Track]/ID3 [Artist])
USB: USB Display (Elapsed time/Remaining time/Album
name/Track name/ID3 [Album]/ID3 [Track]/ID3 [Artist])
RDS: RDS Display (Station Name/Program Type/Frequency)
Preset EQ mode selector [PRESET EQ]
SA-EN35
Remote control signal sensor
■ Use
■ Batteries
The remote control
Control guide
Display
Standby/on switch
[^]
Remote control signal sensor
Placement of speakers
Caution
Use the speakers only with the
recommended system. Failure to do so
may lead to damage to the amplifier and/or
speakers, and may result in the risk of
fire. Consult a qualified service person if
damage has occurred or if you experience
a sudden change in performance.
Do not attach these speakers to walls or
ceilings.
•
•
Music port jack
[- VOLUME +] To adjust the volume
[2/u, 1\i] CD: Skip/Search
MP3/USB: Track Skip
TUNER: Tune up/down, [Long press] Auto tuning
[g] Stop button
[CD q/h] Selector switch to CD. Direct CD Play/CD Pause
[MUSIC PORT] Selector switch to MUSIC PORT
[; OPEN/CLOSE] Open and Close CD lid
FM/AM/MUSIC PORT select button [FM/AM/MUSIC P.]
FM/AM select button [TUNER/BAND]
2 3
SC-EN35
SC-EN33
[;, OPEN/CLOSE] Open and Close CD lid
SC-EN35
SC-EN33
Previous/Next Album [ , ALBUM]
Confirm track selection during MP3/USB Program Mode [ENTER]
0
(Minimum)
50
(Maximum)
Use the numbers indicated in parentheses when asking for replacement
parts.
Supplied accessories
(As of January 2007)
1 Remote control [➡ page 2]
1 FM/AM antenna [➡ page 3]
2 Batteries [➡ page 2]
1 AC mains lead [➡ page 3]
(N2QAYB000107)
(N2QAYB000108)
SC-EN35
SC-EN33
AC mains lead
Right Speaker
Left Speaker
DC in cord to connect to main set
For other areas
For Australia and N.Z.
Selector switch to Tuner for
FM and AM.
[FM/AM]
Selector switch to USB. Direct USB Play/USB Pause [USB
q/h]
SC-EN35
SC-EN33
USB port
The included AC mains lead is for use with this unit only. Do not use it with other
equipment.
Do not use an AC mains lead from other equipment.
•
•
[USB q/h] Selector switch to USB. Direct USB Play/USB Pause
SC-EN35
Page 3
3
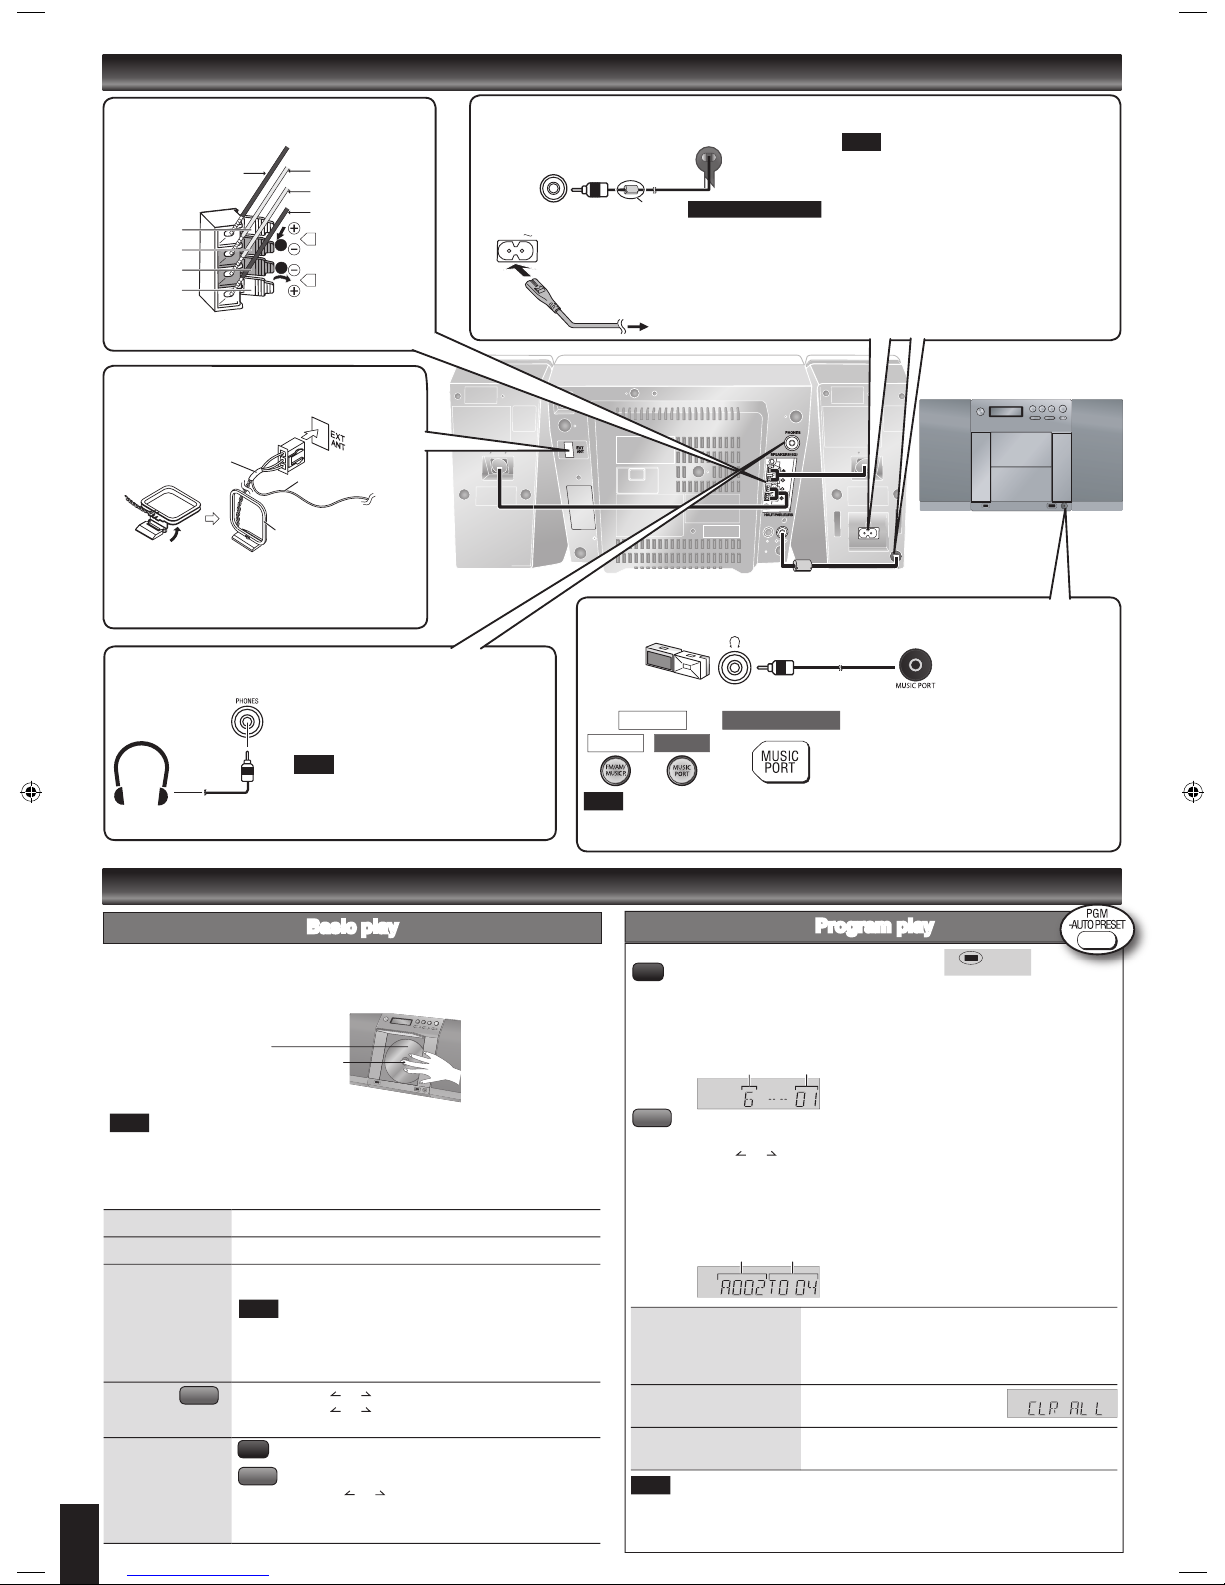
Press [8] to turn the unit on.
Press [; OPEN/CLOSE] to open the CD lid and then set the CD in place.
Press [; OPEN/CLOSE] again to close the lid.
Keep fingers away from the CD lid when it is closing to avoid possible minor injury.
Label must face outward.
Press until you hear it click into place.
Press [CD q/h] to start play.
Adjust the volume.
Be sure to press the [; OPEN/CLOSE] button to open and close the CD lid.
Damage may occur if the lid is forced closed.
During standby, if the CD is ready in the unit, the unit comes on and play begins.
(One touch play)
•
•
•
Basic play
Discs operations
Connections
R
L
SA-EN35
2. FM/AM antenna
Stand the antenna up on its base.
Taped part
FM antenna
AM antenna
3. AC mains lead
AC IN
To household mains socket
If the unit is left unplugged for longer than
approximately two weeks, all settings will
revert to the factory settings.
Remember to reset the radio stations and
any other memory items before using the unit
again.
Connect the AC mains lead after all other
connections are complete.
Note
Headphones
(not included)
Reduce the volume level and connect the
headphones.
Plug type: 3.5 mm stereo.
To prevent hearing damage, avoid listening
for prolonged periods of time .
Note
Portable audio equipment
(Cords and equipment not included)
Use
Adjust the volume and sound quality of this unit and the other equipment.
For details, refer to the instruction manual of the other equipment.
•
•
Portable audio player Plug type:
3.5 mm stereo
➡
Start Playback from the
Portable audio source.
Stop
Press [g].
Pause
Press [CD q/h]. Press again to resume play.
Skip/Search
Press [2/u] or [1/i] to skip/
Press and hold [2/u] or [1/i] to search.
You can search during play or while paused.
You cannot search through MP3 files.
You can only search within the current track during
program play, one track repeat, and random play.
•
•
•
Skip album Press [ALBUM or ] in the play mode.
Press [ALBUM or ] once and then the numbered buttons
in the stop mode.
Direct access play
(Play starts with the
track you select.)
Press the numbered buttons to select the desired track.
Press [ALBUM or ] to select the album.
Press [1/i] once and then press the numbered buttons
to
select the desired track.
Note
Note
1. Speakers
R
L
1
2
Copper (+)
Silver (-)
Silver (-)
Copper (+)
➡
Page 2 for the position of remote control and
main unit buttons.
The function allows you to program up to 24 tracks.
Press [PGM, -AUTO PRESET] while stopped.
Press the numbered buttons to select tracks. (Maximum 24 tracks)
Repeat this step to program other tracks.
Press [CD q/h] to start play.
Press [PGM, -AUTO PRESET] while stopped.
Press[ALBUM or ] to select your desired album.
Press [1/i] once and then press the numbered buttons to select tracks.
(Maximum 24 tracks)
Press [ENTER].
Repeat step 2 to 4 to program other tracks.
Press [CD q/h] to start play.
g Confirm a programmed
track
Press [2/u] or [1/i] when “PGM” is displayed
in the stop mode. To check while programming,
press [PGM, -AUTO PRESET] twice after “PGM”
appears, then press [2/u] or [1/i] .
g Delete all programs
Press [CLEAR] in the stop mode.
“CLR ALL” is displayed.
g Cancel program mode
Press [PGM, -AUTO PRESET] in the stop mode to
clear “PGM” indicator from the display.
Program contents are stored in the unit’s memory even after changing to a different
function or turning the unit off. All program contents are erased by pressing [CLEAR]
or by opening the CD lid.
Program play
Track number
Program number
Note
PGM
Album number Track number
MP3
CD
MP3
CD
MP3
Note
Connect the DC in cord from
left speaker to main set.
Connect the AC mains lead.
Red
Red
Black
Black
Unplug the antenna connector by holding the taped
part.
MAIN UNIT REMOTE CONTROL
SC-EN35 SC-EN33
Ferrite core ( )
For continental Europe
Page 4
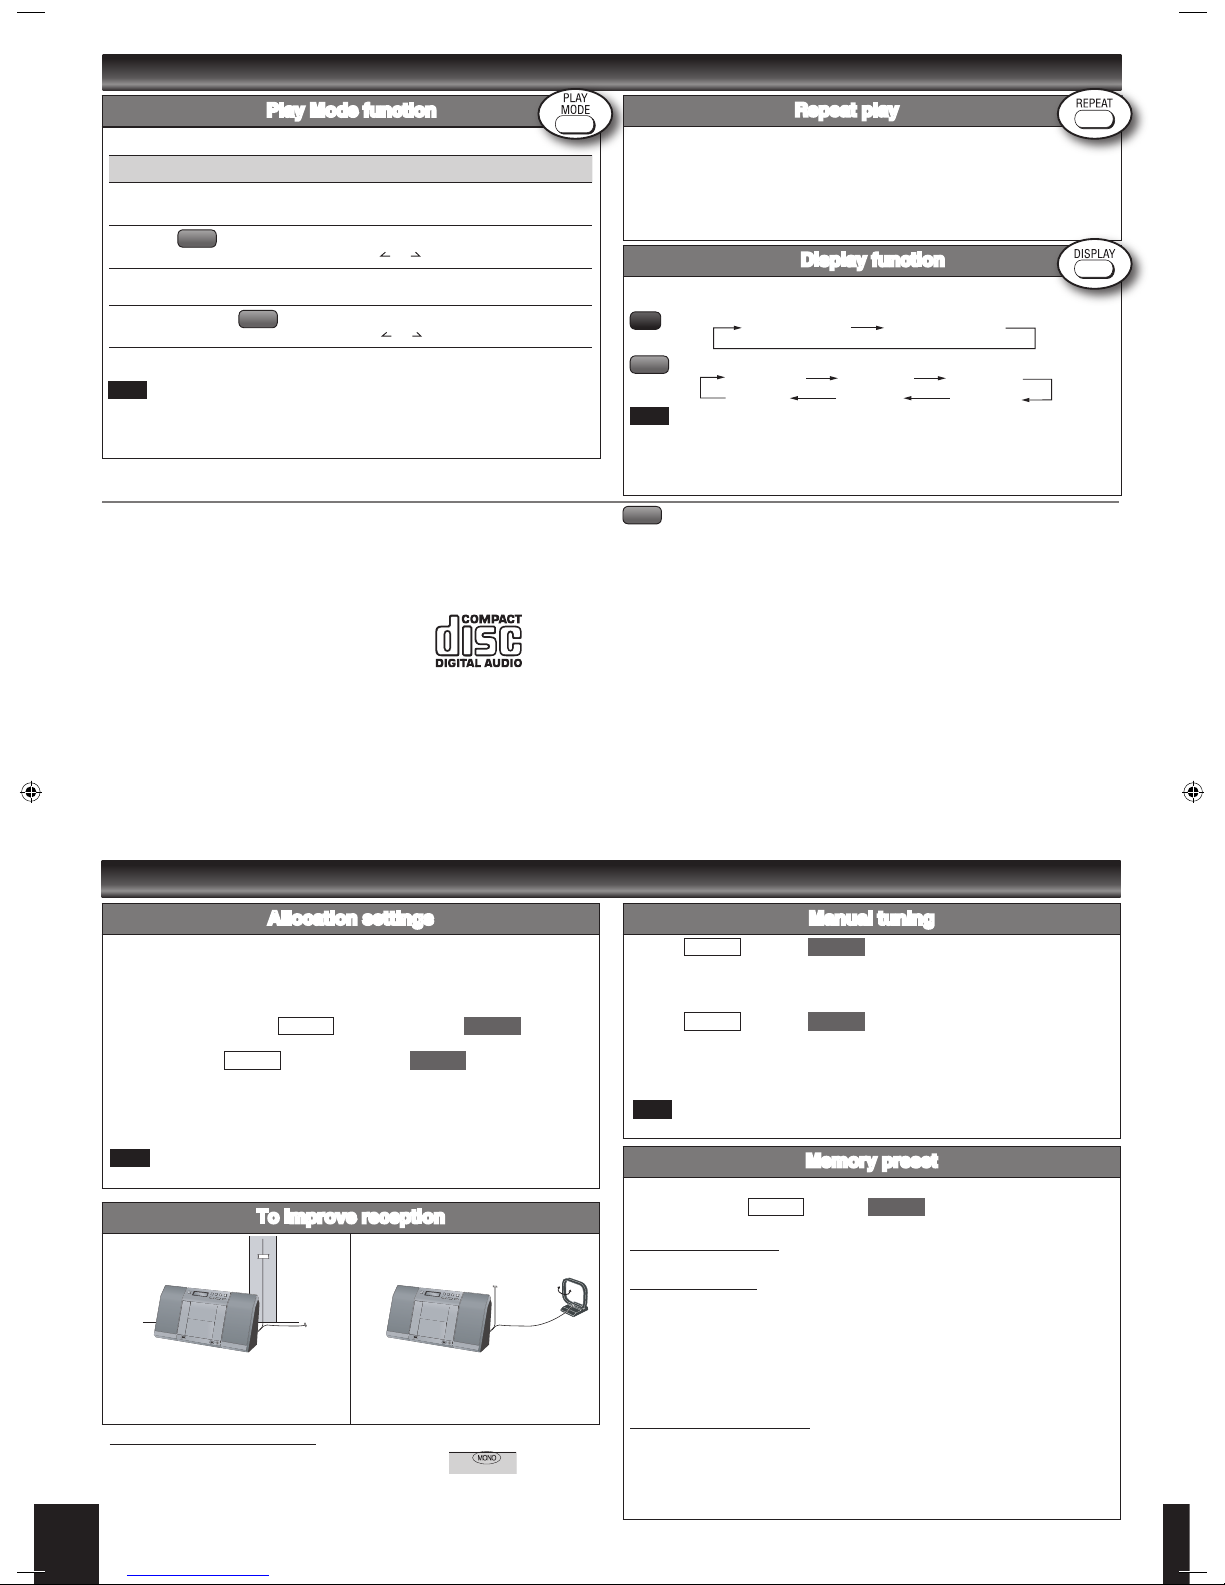
This function allows you to display the information of the current track.
Press [DISPLAY] repeatedly during play or pause.
Elapsed play time Remaining play time
Elapsed time Album name Track name
ID3 (Artist) ID3 (Track) ID3 (Album)
Maximum number of displayable characters: approximately 30
This unit supports ver. 1.0 & 1.1 ID3 tags. Text data that is not supported will not
be displayed.
ID3 is a tag embedded in MP3 tracks to provide information about the track.
•
•
•
Display function
The unit can play MP3, a method of compressing audio without overly hurting audio
quality.
When creating MP3 files to play on this unit
Maximum number of tracks and albums: 999 tracks and 256 albums.
Compatible compression rate: Between 64 kbps and 320 kbps (stereo).
128 kbps (stereo) is recommended.
Disc formats: ISO9660 level 1 and level 2 (except for extended formats).
The time for reading TOC depends on the number of the tracks, the folders or folder
structures.
Limitations on MP3
This unit is compatible with multi-session but if there are a lot of sessions it takes
more time for play to start. Keep the number of sessions to a minimum to avoid this.
This unit cannot play files recorded using packet write.
If the disc includes both MP3 and normal audio data (CD-DA), the unit plays the
type recorded in the inner part of the disc.
If the disc includes both MP3 and other types of audio data (e.g. WMA or WAV), the
unit plays only the MP3.
Depending on how you create MP3 files, they may not play in the order you
numbered them or may not play at all.
•
•
•
•
•
•
•
•
Memory preset
You can preset up to 20 FM channels and up to 12 AM channels.
Preparation: Press [FM/AM] / [TUNER/BAND] to select “FM”
or “AM”.
Automatic presetting
Press and hold [PGM, -AUTO PRESET] to start presetting.
Manual presetting
Press [PLAY MODE] to select “MANUAL”.
Press [2/u] or [1/i] to tune to the required station.
Press [PGM, -AUTO PRESET].
Press the numbered buttons to select a channel.
The station occupying a channel is erased if another station is preset in that
channel.
Repeat steps 2 to 4 to preset more stations.
Selecting a preset station
Press the numbered buttons to select the channel.
For channels 10 to 20 press [≧10], then the two digits.
OR
Press [PLAY MODE] to select “PRESET”.
Press [2/u] or [1/i] to select the channel.
Discs operations (continued)
Radio operations
➡
Page 2 for the position of remote control buttons.
4 5
Manual tuning
Press [FM/AM] / [TUNER/BAND] to select “FM” or “AM”.
Press [PLAY MODE] to select “MANUAL”.
Press [2/u] or [1/i] to select the frequency of the required station.
To tune automatically
Press [FM/AM] / [TUNER/BAND] to select “FM” or “AM”.
Press [PLAY MODE] to select “MANUAL”.
Press and hold [2/u] or [1/i] until the frequency starts changing rapidly.
Auto tuning stops when it finds a station.
To cancel auto tuning, press [2/u] or [1/i] once again.
Auto tuning may not function when there is excessive interference.
•
•
•
Note on CD-R and CD-RW
This unit can play CD-R and CD-RW recorded with CD-DA or MP3. Use an audio
recording disc for CD-DA and finalize* it when you finish recording.
The unit may not be able to play some discs due to the condition of the recording.
* A process performed after recording that enables CD-R/CD-RW players to play audio
CD-R and CD-RW.
Caution
Choose discs with this mark:
Do not:
use irregularly shaped CDs.
attach extra labels and stickers.
use CDs with labels and stickers that are coming off or with adhesive exuding from
under labels and stickers.
attach scratch-proof covers or any other kind of accessory.
write anything on the CD.
clean CDs with liquids (Wipe with a soft, dry cloth.).
•
•
•
•
•
•
Allocation settings
Each country allocates broadcast bands according to their particular system.
You can change the AM steps. The step is factory-set to 9 kHz, but you can change
it to receive broadcasts allocated 10 kHz steps.
Any FM/AM frequencies preset in channels will be changed by this procedure.
Preset them again.
Select the FM band with [FM/AM/MUSIC P.] / [TUNER/
BAND] on the unit.
Press and hold [FM/AM/MUSIC P.] / [TUNER/BAND] on
the unit.
After a few seconds the display changes to show the current minimum frequency.
Continue to hold the button down. The minimum frequency changes and the step
is changed.
To return to the original step, repeat the above steps.
The preset memory will be initialized when you change your frequency step.
To improve reception
FM
Receive the radio stations after
connecting the antenna. Then attach the
antenna cord to a wall or pillar where
there is good reception.
AM
Change the direction and location of the
antenna.
To improve FM sound quality
Press and hold [PLAY MODE] to display “MONO”.
To cancel
Press and hold [PLAY MODE] again until “MONO” disappears.
MONO is also canceled if the frequency is changed.
Turn off “MONO” for normal listening.
•
•
Press [PLAY MODE] to select the desired mode.
During random play, you cannot skip to previous track.•
Play Mode function
You can repeat program play or other selected play mode.
Press [REPEAT] before or during play.
“REPEAT ON” and “ & ” are displayed.
To cancel
Press [REPEAT] again.
“REPEAT OFF” is displayed and “ & ” is cleared.
Repeat play
Mode To play
1-TRACK
1TR
one selected track on the disc.
Press the numbered buttons to select the track.
1-ALBUM
1ALBUM
one selected album on the disc.
Press [ALBUM or ] to select the album.
RANDOM
RND
a disc randomly.
1-ALBUM RANDOM
1ALBUM RND
all tracks in one selected album randomly.
Press [ALBUM or ] to select the album.
MP3
MP3
CD
MP3
MP3
Note
Note
Note
SC-EN35
SC-EN33
SC-EN35 SC-EN33
SC-EN35 SC-EN33
SC-EN35 SC-EN33
SC-EN35 SC-EN33
Note
Page 5
5
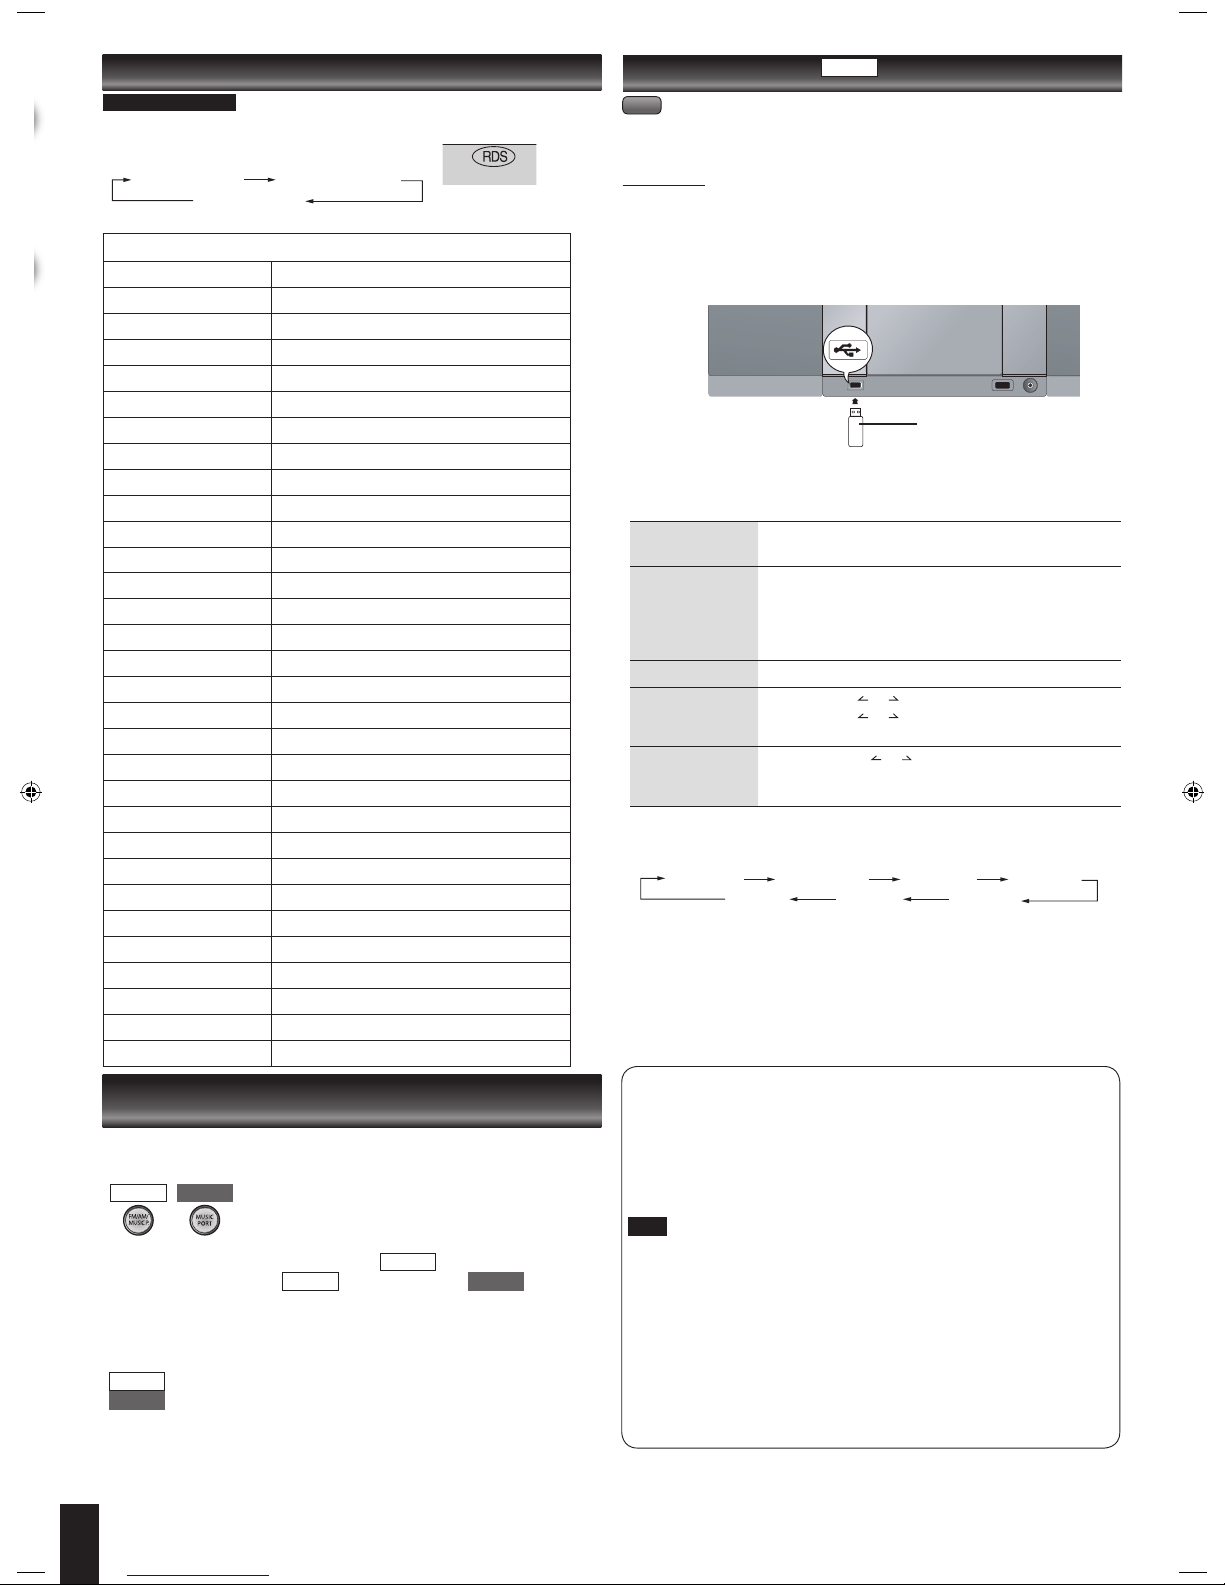
USB operations
The USB connectivity enables you to connect and play MP3 tracks from USB mass
storage class. Typically, USB memory devices (Bulk only transfer).
Preparation
Before connecting any USB mass storage device to the unit, ensure that the data
stored therein has been backed up.
It is not recommended to use a USB extension cable. The device connected via the
cable will not be recognised by this unit.
Reduce the volume and connect the USB mass storage device.
Press [USB q/h] to start play.
To pause play
Press [USB q/h].
Press again to resume play.
To stop play
Press [g].
“RESUME” is displayed. The position is memorized.
Press [USB q/h] to resume play.
OR
Press [g] again to clear the position.
To skip track
Press [2/u] or [1/i].
To skip album Press [ALBUM or ] in the play mode.
Press [ALBUM or ] once and then the numbered
buttons in the stop mode.
Direct access play
(Play starts with the
track you select.)
Press [ALBUM or ] to select the album.
Press [1/i] once and then press the numbered buttons
to
select the desired track.
g Display function
Press [DISPLAY] repeatedly during play or pause.
Elapsed time Remaining time Album name Track name
ID3 (Artist) ID3 (Track) ID3 (Album)
For other operating functions, they are similar as those described in “Discs Operations”
(➡ page 3 and 4).
To remove the USB mass storage device
Select a source other than “USB”.
Removing the USB mass storage device with it selected as a source can damage the
data stored in the device.
Program type displays
NEWS News
AFFAIRS Current affairs
INFO Information
SPORT Sport
EDUCATE Education
DRAMA Drama
CULTURE Culture
SCIENCE Science
VARIED Varied
POP M Pop music
ROCK M Rock music
M.O.R.M Middle of the road Music
LIGHT M Light classical
CLASSICS Serious classical
OTHER M Other music
WEATHER Weather information
FINANCE Finance
CHILDREN Children
SOCIAL A Social affairs
RELIGION Religion
PHONE IN Phone in
TRAVEL Travel
LEISURE Leisure
JAZZ Jazz music
COUNTRY Country music
NATIONAL National music
OLDIES Oldies
FOLK M Folk music
DOCUMENT Documentary
TEST Test broadcast
ALARM Emergency announcement
g Compatible device
Devices which are defined as USB mass storage class:
USB devices that support bulk only transfer.
USB devices that support USB 2.0 full speed.
g Supported Format
Files must have the extension “.mp3” or “.MP3”.
CBI (Control/Bulk/Interrupt) is not supported.
A device using NTFS file system is not supported [Only FAT 16/32 (File Allocation
Table 16/32) file system is supported].
Depending on the sector size, some files may not work.
This unit can access up to 255 albums and 2500 tracks.
The maximum number of tracks in a folder are 999 tracks.
Only one memory card will be selected when connecting a multiport USB card
reader. Typically the first memory card inse
rted.
Disconnect the USB card reader from the unit when you remove the memory
card. Failure to do so may cause malfunction to the device.
When you connect your digital audio player to the USB jack, it charges all the time
except in standby mode.
•
•
•
•
•
•
•
•
•
•
RDS broadcasts
Enable you to display the name of a broadcasting station or a program type.
“RDS” lights while RDS signals are being received.
Press [DISPLAY] to display.
Station Name (PS) Program Type (PTY)
Frequency display
RDS displays may not be available if reception is poor.
SC-EN35
For continental Europe
Note
➡
Page 2 for the position of
remote control buttons.
USB enabled device
(not included)
MP3
The remote control and main unit are factory-set to “REMOTE 1” mode.
If your remote control affects other equipment during operation, you can switch to
operate in “REMOTE 2” mode.
To switch to “REMOTE 2” mode
Press [FM/AM/MUSIC P.] to select “AM”. ( )
(While pressing and hold [FM/AM/MUSIC P.] / [MUSIC
PORT] on the main unit)
Press and hold [2] until “REMOTE 2” appears on the main unit display.
Press and hold [ENTER] and [2] for at least 2 seconds.
The main unit and remote control are now set to operate in “REMOTE 2” mode.
To return to “REMOTE 1” mode
Perform steps 1 to 3 but use [1] instead of [2] for steps 2 and 3.
Perform steps 2 and 3 above but use [1] instead of [2] for both steps.
(“REMOTE 1” appears on the main unit during step 2.)
The remote control cannot work with the main unit if their modes are different.
“REMOTE 1” or “REMOTE 2” appears on the main unit when you operate the remote
control.*
* If “REMOTE 1” appears (The main unit is in “REMOTE 1” mode.)
Press and hold [ENTER] and [1] on the remote control for at least 2 seconds.
If “REMOTE 2” appears (The main unit is in “REMOTE 2” mode.)
Press and hold [ENTER] and [2] on the remote control for at least 2 seconds.
SC-EN35 SC-EN33
SC-EN35 SC-EN33
Changing the main unit and remote control
mode
SC-EN35
SC-EN35
SC-EN33
Page 6
g AMPLIFIER SECTION
RMS OUTPUT POWER both channel driven
simultaneously
10 % total harmonic distortion (THD)
3 W per channel
2
W per channel
PMPO Output Power
90 W
60 W
Output impedance
HEADPHONE 16 Ω to 32 Ω
MUSIC PORT 14 kΩ
DC IN Jack
Terminal 14 V
Phone Jack
Terminal 3.5 mm stereo
Music Port Jack
Terminal 3.5 mm stereo
g TUNER SECTION
Frequency range
FM 87.50 MHz to 108.00 MHz (50 kHz)
AM 522 kHz to 1629 kHz (9 kHz)
520 kHz to 1630 kHz (10 kHz)
g CD SECTION
Disc played [8 cm or 12 cm]
(1) CD-Audio (CD-DA)
(2) CD-R/RW (CD-DA, MP3)
(3) MP3
Sampling frequency
CD 44.1 kHz
MP3 32 kHz, 44.1 kHz, 48 kHz
Bit rate
MP3 32 kbps to 384 kbps
Decoding 16/20/24 bit linear
Pick up
Wavelength 785 nm
Laser power CLASS 1
(For Norge)
Bølgelengde 785 nm
Laserstyrke Ingen farlig stråling sendes ut
(med sikkerhets-beskyttelse)
Audio Output (Disc)
Number of channels 2 channel
Frequency response 20 Hz to 20 kHz (+1, -2 dB)
Wow and flutter
Below measurement limit
Digital filter 8
D/A converter MASH (1 bit DAC)
g USB SECTION
Playable USB Storage Media
(1) HDD (with FAT 32 format and no partition)
(2) USB MP3 Player/Digital Audio Player
(3) USB Thumbdrives
Supported audio file format
MP3 Bit Rate
USB memory port
Maximum current 500 mA
Bit rate
MP3 32 kbps, 320 kbps
Audio Output (MP3)
Number of channels 2 channel
Frequency response (MP3) 20 Hz to 20 kHz
g SPEAKER SECTION
Type 1 Way, 1 Speaker system
Speaker Unit(s)
Full Range Speaker 8 cm cone type 6 Ω
Impedance 6 Ω
Input power 6 W (MAX)
Dimensions (W x H x D)
121 mm x 236 mm x 146 mm
g GENERAL
Power supply
AC 230 to 240 V, 50 Hz
AC 230 to 240 V, 50 Hz
AC 220 to 240 V, 50/60 Hz
Power consumption
32 W
16 W
Dimensions (W x H x D)
220 mm x 236 mm x 146 mm
Mass
With speakers
3.60 kg
3.33 kg
Without speakers
1.30 kg
1.26
kg
Operating temperature range +5 °C to +35 °C
Operating humidity range
5
% to 90 % RH (no condensation)
Power consumption in standby mode:2.0 W (approx.)
Notes:
Specifications are subject to change without notice.
Mass and dimensions are approximate.
Specifications
6 7
Sleep timer
The SLEEP timer can turn the unit off after a set time.
Press [SLEEP] to turn the SLEEP function ON/OFF.
Each time you press the button:
30 MIN 60 MIN 90 MIN 120 MIN
OFF (Canceled)
g To check the remaining time
Press [SLEEP] once
The play timer and sleep timer can be used together. The sleep timer always has
priority. Be sure not to overlap timer settings.
•
Sound quality
You can choose one of four types of sound quality.
Press [PRESET EQ] to select the sound quality.
Each time you press the button:
HEAVY CLEAR SOFT
(Adds punch to rock) (Clarifies higher sounds) (For background music)
EQ OFF (Canceled) VOCAL (Adds gloss to vocals)
•
Live Virtualizer
You can create a three-dimensional sound field when listening to stereo sound.
Press [SURROUND] to turn the Live Virtualizer ON/OFF.
The actual effect depends on the source played.
Play timer
You can set the timer to come on at a certain time to wake you up.
Preparation:
Turn the unit on and set the clock.
Prepare the music source you want to listen to; disc, radio, USB or music port
source, and set the volume.
Press [CLOCK/TIMER] repeatedly to select play timer.
CLOCK zPLAY Original display
Within 5 seconds, press [2/u] or [1/i] to set the starting time.
Press [CLOCK/TIMER] to confirm.
Repeat steps 2 and 3 to set the finishing time.
To activate the timer
Press [zPLAY] to turn on the timer.
Press [^] to turn off the unit.
To Action
Change the settings Repeat steps 1 to 4 and 6.
Change the source of volume
Press [zPLAY] to clear zPLAY indicator
from the display.
Make changes to the source or volume.
Perform steps 5 and 6.
Check the settings (when the
unit is on or in standby mode)
Press [CLOCK/TIMER] repeatedly to select
zPLAY.
Cancel
Press [zPLAY] to clear the timer
indicator from the display.
The timer will start at the preset time, with the volume increasing gradually to the
preset level.
The timer comes on at the set time every day if the timer is on.
The unit must be in the standby mode for the timer to function.
If you turn the unit off and on again while the timer is functioning, the finish time
setting will not be activated.
When MUSIC PORT or USB is selected as the source when the timer comes
on, the system turns on and engages MUSIC PORT or USB as the source. If
you wish to playback from the portable audio equipment, activate the equipment
’s play mode and increase the volume. (See the portable audio equipment’s
instruction manual.)
•
•
•
•
•
Timers and others
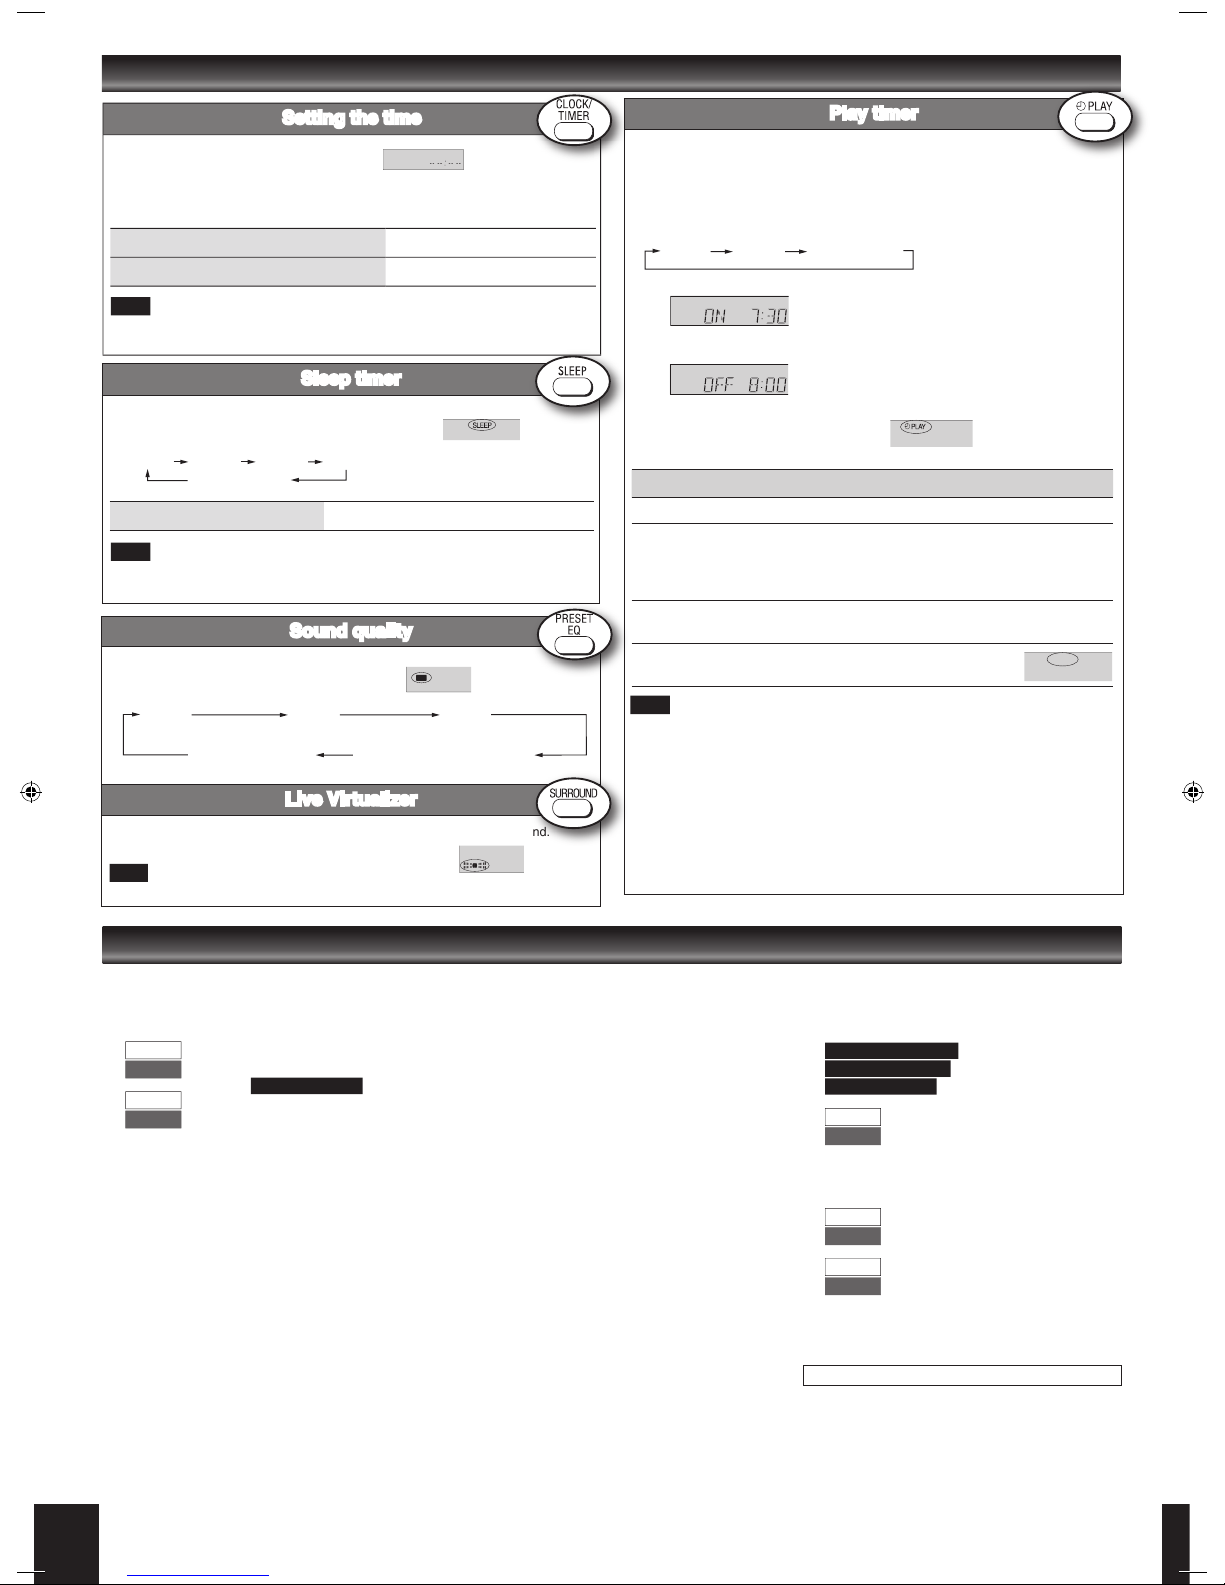
EQ
➡
Page 2 for the position of remote control buttons.
Note
Note
Note
For continental Europe
For Southeast Asia
For Australia and N.Z.
Setting the time
This is a 24-hour clock.
Press [CLOCK/TIMER] to set the clock.
Press [2/u] or [1/i] to select the time within 5 seconds.
(Press and hold to change the time faster.)
Press [CLOCK/TIMER] again.
g To display the clock when the unit is on
Press [CLOCK/TIMER]
g To check the time when the unit is off
Press [CLOCK/TIMER]
The clock is accurate to within ±60 seconds a month. Readjust if necessary.
Set again after disconnecting the AC mains lead or power failure.
Note
SC-EN35
SC-EN33
SC-EN35
SC-EN33
SC-EN35
SC-EN33
SC-EN35
SC-EN33
For Southeast Asia
SC-EN35
SC-EN33
Page 7
7
Placement
Set the unit up on an even surface away from direct sunlight, high
temperature, high humidity, and excessive vibration. These conditions can
damage the cabinet and other components, thereby shortening the unit’s
service life.
Do not place heavy items on the unit.
Voltage
Do not use high voltage power sources. This can overload the unit and
cause a fire.
Do not use a DC power source. Check the source carefully when setting
the unit up on a ship or other place where DC is used.
AC mains lead protection
Ensure the AC mains lead is connected correctly and not damaged. Poor
connection and lead damage can cause fire or electric shock. Do not pull,
bend, or place heavy items on the lead.
Grasp the plug firmly when unplugging the lead. Pulling the AC mains
lead can cause electric shock.
Do not handle the plug with wet hands. This can cause electric shock.
Foreign matter
Do not let metal objects fall inside the unit. This can cause electric shock
or malfunction.
Do not let liquids get into the unit. This can cause electric shock or
malfunction. If this occurs, immediately disconnect the unit from the power
supply and contact your dealer.
Do not spray insecticides onto or into the unit. They contain flammable
gases which can ignite if sprayed into the unit.
Service
Do not attempt to repair this unit by yourself. If sound is interrupted,
indicators fail to light, smoke appears, or any other problem that is not
covered in these instructions occurs, disconnect the AC power cord
and contact your dealer or an authorized service center. Electric shock
or damage to the unit can occur if the unit is repaired, disassembled or
reconstructed by unqualified persons.
Extend operating life by disconnecting the unit from the power source if it
is not to be used for a long time.
Safety precautions
WARNING:
TO REDUCE THE RISK OF FIRE, ELECTRIC SHOCK OR PRODUCT
DAMAGE,
DO NOT EXPOSE THIS APPARATUS TO RAIN, MOISTURE,
DRIPPING OR SPLASHING AND THAT NO OBJECTS FILLED
WITH LIQUIDS, SUCH AS VASES, SHALL BE PLACED ON THE
APPARATUS.
USE ONLY THE RECOMMENDED ACCESSORIES.
DO NOT REMOVE THE COVER (OR BACK); THERE ARE NO USER
SERVICEABLE PARTS INSIDE. REFER SERVICING TO QUALIFIED
SERVICE PERSONNEL.
•
•
•
CAUTION!
DO NOT INSTALL OR PLACE THIS UNIT IN A BOOKCASE, BUILTIN CABINET OR IN ANOTHER CONFINED SPACE. ENSURE THE
UNIT IS WELL VENTILATED. TO PREVENT RISK OF ELECTRIC
SHOCK OR FIRE HAZARD DUE TO OVERHEATING, ENSURE THAT
CURTAINS AND ANY OTHER MATERIALS DO NOT OBSTRUCT THE
VENTILATION VENTS.
DO NOT OBSTRUCT THE UNIT’S VENTILATION OPENINGS WITH
NEWSPAPERS, TABLECLOTHS, CURTAINS, AND SIMILAR ITEMS.
DO NOT PLACE SOURCES OF NAKED FLAMES, SUCH AS
LIGHTED CANDLES, ON THE UNIT.
DISPOSE OF BATTERIES IN AN ENVIRONMENTALLY FRIENDLY
MANNER.
•
•
•
•
CAUTION!
THIS PRODUCT UTILIZES A LASER.
USE OF CONTROLS OR ADJUSTMENTS OR PERFORMANCE OF
PROCEDURES OTHER THAN THOSE SPECIFIED HEREIN MAY
RESULT IN HAZARDOUS RADIATION EXPOSURE.
DO NOT OPEN COVERS AND DO NOT REPAIR YOURSELF. REFER
SERVICING TO QUALIFIED PERSONNEL.
The socket outlet shall be installed near the equipment and easily
accessible.
The mains plug of the power supply cord shall remain readily operable.
To completely disconnect this apparatus from the AC Mains, disconnect
the power supply cord plug from AC receptable.
This product may receive radio interference caused by mobile telephones
during use. If such interference is apparent, please increase separation
between the product and the mobile telephone.
R
L
-If you see this symbol-
Information on Disposal for Users of Waste Electrical & Electronic
Equipment (private households)
This symbol on the products and/or accompanying documents
means that used electrical and electronic products should not
be mixed with general household waste.
For proper treatment, recovery and recycling, please take
these products to designated collection points, where they will
be accepted on a free of charge basis. Alternatively, in some countries
you may be able to return your products to your local retailer upon the
purchase of an equivalent new product.
Disposing of this product correctly will help to save valuable resources
and prevent any potential negative effects on human health and the
environment which could otherwise arise from inappropriate waste
handling. Please contact your local authority for further details of your
nearest designated collection point.
Penalties may be applicable for incorrect disposal of this waste, in
accordance with national legislation.
For business users in the European Union
If you wish to discard electrical and electronic equipment, please contact
your dealer or supplier for further information.
Information on Disposal in other Countries outside the European
Union
This symbol is only valid in the European Union.
If you wish to discard this product, please contact your local authorities
or dealer and ask for the correct method of disposal.
LUOKAN 1 LASERLAITE
KLASS 1 LASER APPARAT
Inside of product
Tuotteen sisällä
Produktets innside
THIS UNIT IS INTENDED FOR USE IN TROPICAL CLIMATES.
For Southeast Asia
THIS UNIT IS INTENDED FOR USE IN MODERATE CLIMATES.
For other areas
Page 8
8
SUOMI NORSK
TÄMÄ LAITE ON TARKOITETTU KÄYTETTÄVÄKSI LEUDOSSA
ILMASTOSSA.
VAROITUS!
LAITTEEN KÄYTTÄMINEN MUULLA KUIN TÄSSÄ KÄYTTÖOHJEESSA
MAINITULLA TAVALLA SAATTAA ALTISTAA KÄYTTÄJÄN
TURVALLISUUSLUOKAN 1 YLITTÄVÄLLE NÄKYMÄTTÖMÄLLE
LASERSÄTEILYLLE.
VAROITUS!
ÄLÄ ASENNA TAI LAITA TÄTÄ LAITETTA KABINETTITYYPPISEEN
KIRJAKAAPPIIN TAI MUUHUN SULJETTUUN TILAAN, JOTTA
TUULETUS ONNISTUISI. VARMISTA, ETTÄ VERHO TAI MIKÄÄN
MUU MATERIAALI EI HUONONNA TUULETUSTA, JOTTA
VÄLTETTÄISIIN YLIKUUMENEMISESTA JOHTUVA SÄHKÖISKUTAI TULIPALOVAARA.
ÄLÄ PEITÄ LAITTEEN TUULETUSAUKKOJA SANOMALEHDELLÄ,
PÖYTÄLIINALLA, VERHOLLA TAI MUULLA VASTAAVALLA
ESINEELLÄ.
ÄLÄ ASETA PALAVAA KYNTTILÄÄ TAI MUUTA AVOTULEN
LÄHDETTÄ LAITTEEN PÄÄLLE.
HÄVITÄ PARISTOT LUONTOA VAHINGOITTAMATTOMALLA
TAVALLA.
•
•
•
•
VAROITUS:
VÄHENNÄ TULIPALON, SÄHKÖISKUN TAI LAITTEISTON
VAHINGOITTUMISEN VAARAA
TÄTÄ LAITETTA EI SAA ALTISTAA SATEELLE, KOSTEUDELLE,
ROISKEILLE TAI TIPPUVILLE NESTEILLE. LAITTEEN PÄÄLLE EI
SAA MYÖSKÄÄN ASETTAA MITÄÄN NESTEELLÄ TÄYTETTYÄ
ESINETTÄ, KUTEN MALJAKKOA.
KÄYTÄ VAIN SUOSITELTUJA LISÄVARUSTEITA.
ÄLÄ IRROTA KANTTA (TAI TAUSTAA). SISÄLLÄ EI OLE
KÄYTTÄJÄN HUOLLETTAVISSA OLEVIA OSIA. HUOLLON SAA
SUORITTAA VAIN AMMATTITAITOINEN HENKILÖKUNTA.
•
•
•
Pistorasia tulee asentaa laitteen lähelle helppopääsyiseen paikkaan.
Verkkojohdon pistokkeen on oltava aina helposti käytettävissä.
Tämä laite voidaan kytkeä kokonaan irti verkkovirrasta irrottamalla
verkkojohdon pistoke pistorasiasta.
ADVARSEL!
DETTE PRODUKTET ANVENDER EN LASER.
BETJENING AV KONTROLLER, JUSTERINGER ELLER ANDRE
INNGREP ENN DE SOM ER BESKREVET I DENNE BRUKSANVISNING,
KAN FØRE TIL FARLIG BESTRÅLING.
DEKSLER MÅ IKKE ÅPNES, OG FORSØK ALDRI Å
REPARERE APPARATET PÅ EGENHÅND. ALT SERVICE OG
REPARASJONSARBEID MÅ UTFØRES AV KVALIFISERT
PERSONELL.
ADVARSEL!
APPARATET MÅ IKKE PLASSERES I EN BOKHYLLE, ET
INNEBYGGET KABINETT ELLER ET ANNET LUKKET STED
HVOR VENTILASJONSFORHOLDENE ER UTILSTREKKELIGE.
SØRG FOR AT GARDINER ELLER LIGNENDE IKKE FORVERRER
VENTILASJONSFORHOLDENE, SÅ RISIKO FOR ELEKTRISK
SJOKK ELLER BRANN FORÅRSAKET AV OVERHETING UNNGÅS.
APPARATETS VENTILASJONSÅPNINGER MÅ IKKE DEKKES TIL
MED AVISER, BORDDUKER, GARDINER OG LIGNENDE.
PLASSER IKKE ÅPEN ILD, SLIK SOM LEVENDE LYS, OPPÅ
APPARATET.
BRUKTE BATTERIER MÅ KASSERES UTEN FARE FOR MILJØET.
•
•
•
•
ADVARSEL:
FØLG NEDENSTÅENDE INSTRUKSER FOR Å REDUSERE RISIKOEN
FOR BRANN, ELEKTRISK STØT OG SKADE PÅ PRODUKTET:
DETTE APPARATET MÅ IKKE UTSETTES FOR REGN, FUKTIGHET,
DRYPP ELLER SPRUT, OG INGEN VÆSKEFYLTE GJENSTANDER,
SOM F.EKS. VASER, MÅ PLASSERES PÅ APPARATET.
BRUK KUN ANBEFALT TILBEHØR.
IKKE FJERN DEKSELET (ELLER BAKSIDEN); APPARATET
INNEHOLDER INGEN DELER SOM KAN SKIFTES ELLER
REPARERES AV BRUKEREN. OVERLAT TIL KVALIFISERTE
SERVICETEKNIKERE Å UTFØRE SERVICE.
•
•
•
Strømuttaket må befinne seg i nærheten av utstyret og være lett
tilgjengelig.
Støpslet på strømkabelen må være klart til bruk.
Når dette apparatet skal kobles helt fra strømnettet (AC), må støpslet på
strømkabelen trekkes ut av stikkontakten.
DETTE APPARATET ER BEREGNET TIL BRUK UNDER MODERATE
KLIMAFORHOLD.
To clean this unit, wipe with a soft, dry cloth.
Never use alcohol, paint thinner or benzine to clean this unit.
Before using chemically treated cloth, read the instructions that came with the cloth
carefully.
•
•
Clean the lens regularly to prevent malfunctions. Use a blower to remove dust and a
cotton swab if it is extremely dirty.
Recommended product: Lens cleaner kit (part no. SZZP1038C).
Do not use the lens cleaner of the CD type.
•
•
Care of the CD lens
Maintenance
If the surfaces are dirty
 Loading...