

Panasonic PV-C1351W, PV-C1341, PV-C1331W, PV-C1321 Owner’s Manual
Combina_iom VCR
Op÷tat_ng _nstr_ction8
impodant SafeguardsandPrecautions
READAND RETNN ALL SAFETY AND
OPERATINGINSTRUCTIONS.HEED ALL
WARNINGSINTHE MANUALAND ON UNIT
INSTALLATION
POWER SoURC _=CANON
Operate only from power source i_icatad On und
or in this manual. If uncertain, have your Electdc
Utility Service Company or Video PrOduCtSDealer
redly your home power source,
2 POWER CORD PLUG
For safety, this unit has a polarized type plug (one
wide blade), or a three-wire grounding type plug.
Always hold the prug firmly and make sure your
hands are dry when plugging in or_unplegglng the
AC power cord. Regciady remove dust, dirt, etc_
on the plug.
POLARIZED PLUG CAUTION:
The plplugfits into outlet erie way. If it cannot be fully
inserte_ try reversing iL ff it still Willnot fit, have an
Otestr_¢ian mstctl the proper wall outlet. DO not
tamper with t0e plug,
GROUNDING PLUG CAUTION:
The plug requires a three-hole grounding o_Jtlet.
If necessary, have an electrician inststl the prober
outlet, D_ not tamper w_tothe plug.
3 POWER CORD
TOavoid unit malfunction, and to protect against
eleutdcel shOCk,fire er personal injury;
• Keep pow_wercord away from heatieg a]pp,liances
and walking traffio. DO not rest heavy objects on,
or tog such objects aver the power cord.
• DO nat tamper with lh_ cord in any way.
. An extension cord should have the same type
ptug (putadzed or grounding) and must be
secure!y COnnected,
• Overloaded wall oullets or extension cords is a
fire hazard.
-Frayed cords_da_ged_ plugs, and damaged or
era_ked wire insulation are haZardous and should
be replaced by a qpelgied electrician.
4 DO NOT BLOCK VENTILATION HOLES
Ventilation openings in the cabinet retease heat
generated dudng operation. If blocked, heat
build-up m_y result in a fire hazard or heat
damage to cassettes,
For your protection:
a. Never cover ventilation ststs while unit is ON,
or operate or_t white placed on a bed, sofa,
rug or other soft sue'see.
b. Avoid built.in nsta_tagoto such as a book case
or rack, unless prepedy ventilated,
5 AVOID EXTREMELY H_F LOCATIONS OR
SUDDEN TEMPERATURE CHANGES
Do nat place unit over or near a heater or
regLItator, in direct sunltghL eta, If unit is suddenly
moved from a cctd place to a warm place,
moisture may condense in unit _nd on the tape
causing damege,
6 TO AVOID PERSONAL INJURY
* Never place unit on supped or stand that is not
finn, level, and adequately strong.
The unit could fall causing sedous
injury to a child or adult and _.
damage tothe unit,
* Move an_ applianse and sett _
combinahon _th care.
Quick stops, excessive force, and _l_il-'
uneven surfaces may cause objects to overturn.
• Carefully fotlow all operating instructions.
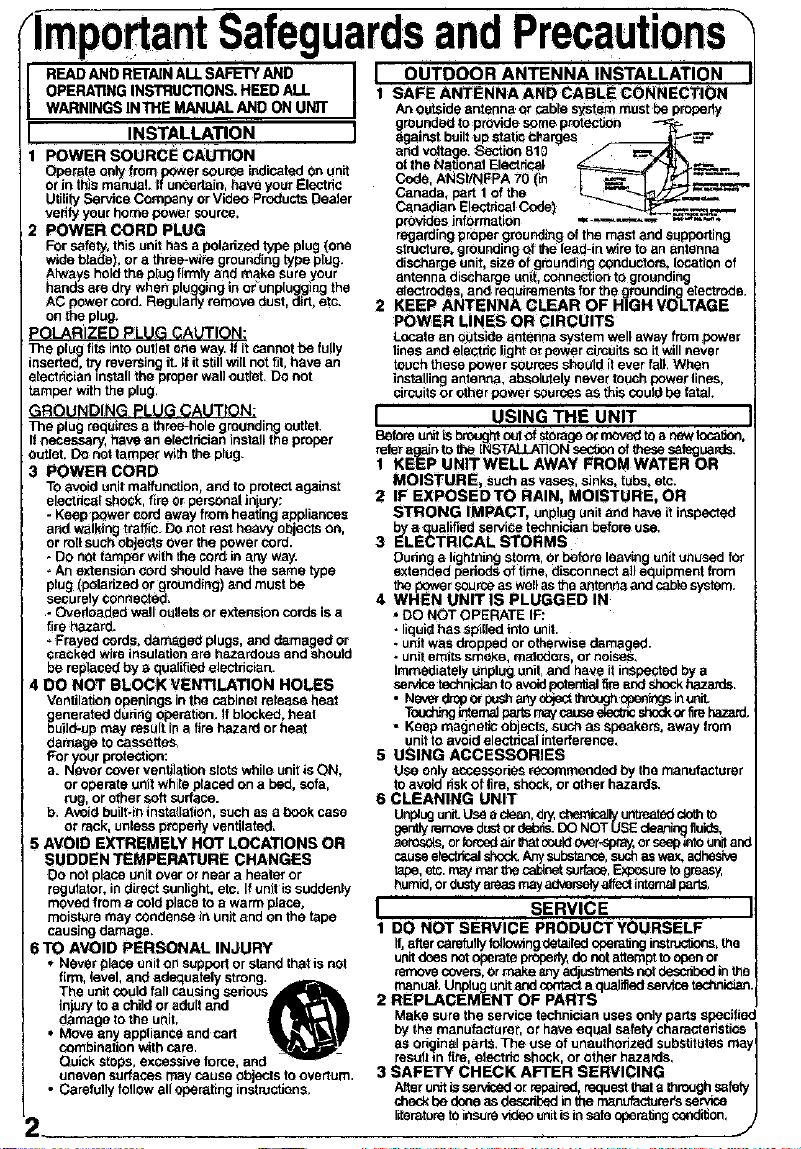
r OUTD-OOR ANTENNA INSTALLATION
1 SAFE ANTENNA AND CABLE CONNECTION
AnOutSide antenna or ¢abta s_em must be propedy
grounded to provide some protection
dgainst built up ctatic chargas ._U_g_,_.
and voltage. Section 810 _=======_-_J__'_ _
of the National Electnda_ ___._
Cede, ANSI/NFPA 70 (in I *_.-_ I¢'_1 _.._.
Canada, part 1 of toe ___
Canadian Electdcot Cede} ___-"_._
provides information _ _",. _-'_
regarding proper graund_ng Of the mast and supporting
structure, grounding Qfine lead-in wire to an antenna
diSCharge unit, size of gmuedin19 penduct ors, location of
antenna dis(toa_ge unit, connection ta grounding
otectrodes, and requtrements for the}_1roundiflg Otectrode.
2 KEEP ANTENNA CLEAR OF H|GH VOLTAGE
POWER LINES OR CIRCUITS
LOCate an outsida antenna system well aw_y from power
lines and eleottie light or power circpits so it will never
touch these power sources should if ever fall. When
instaUing antenna, absolutely never touch power lines,
circuits or other power Sources as this could be fatal.
I USING THE UNIT
Setem units outofstorage0imovedtaanowlocut_n,
rafe_,again to globe'hiE'SJ_/_f._ ON se_Jon of tease sefegLkards.
1 KEEP UlNITWELL AWAY FROM WATER OR
MOISTURE, such as vases, sinks, tUPe. etc.
2 IF EXPOSEDTO RAIN, MOISTURE, OR
STRONG IMPACT, unpieg unit and have itinspected
b a ual[fiedservieetechnicienbeforeuse.
3 _L_E_TRICAL STORMS
Dudeg a lightning storm , or before leaving unit unused for
extended pedods of time, disconnect etiequipment from
the gawer source as well as the orsonna and cabts system.
4 WHEN UNIT IS PLUGGED IN
* DO NOT OPERATE IF;
• liquid has spilled into unit.
• unit was dmpbed or otherwise damaged.
• unit emits smoke, mstodors, or noiseS.
Immediately unplug unit, and have it inspected by a
_rvice technictsnto avoidpotentialfire and Shock hazards.
Never ¢b_pOrpash any objectthraugh0tleflings in unit_
• Touchingintarn_pa_s may cause e_ sh_ _ firehaz_
Keep magnetic ob acts. such as speakerS, away from
unit to avoid electpeal interference.
5 USING ACCESSORIES
Use only accessories recommended by the manufacturer
to avoid r_skof fire, shock, or other hazards.
6 CLEANING UNIT
Unplug unit.Uas a ctsan, SW,chemicaliyuntreatedclothto
gentlyremove dustor debris.DO NOTUSE cteanin_ fluids,
aeras01s,or reinedair teat cou!dover_oray, or seep _ntounitand
causeetecbtcctshock. Anysubstance,suchas wax,adhesive
tapa, etc. may mar toe cai0inetsurface, Exposure to greasy,
humid, Or dusty areas may adv_mely affect internal parts,
[ SERVICE
I DO NOT SERVICE PRODUCTYOURSELF
If,after sero_ully fotiowingdetailed opera_ng ir_sfiu_6ons, toe
unitdoes not operate properly,do not attempt toopen or
remove covem, Ormake _ny adjustments not describedin the
manual. UnlYug unit=_d contact aqualified sewice tschni_an.
2 REPLACEMENT OF PARTS
Make sure the service technician uses 0nly parts specified
by the manufacturer, or have equal safety characteristics I
as original partS, The use of unautobezed substitutes may
result m flre electric shock or other hazards,
3 SAFETY CHECK AFTER SERVICING J
Afteru_ _ssen_._d or repa_red_request that a through _fcty J
check be done as described in the rsenu_ctumfs service
liten_tsre t0 nauru video unit ista safe ct0erating coati,on, )
Safety Precautions/Mesures de sdcurit
Warning : To prevent fire or shock hazard, do not expose this equipment to rain or moisture.
Caution : To prevent electric shock, match wide blade of plug to wide slot, fully Insert.
AverUssement : Afin de prdvenir tout risque d'incendie ou de chocs dlectriques, ne pas
exposer cet appareil _ la pluie ou _ une humiditd excessive.
Attention : Pour dviter les chocs dlectriques, introduire la lame la plus large de la fiche dans
la borne correspondante de la prise et pousser jusqu'au fond.
This video recorder, equipped with the HQ (High Quality) System, is compatible with
existing VHS equipment.
Only use those tapes with the _ mark. It is recommended that only cassette tapes that
have been tested and inspected for use in 2, 4, 6, and 8 hour VCR machines be used.
This television receiver provides display of television closed captioning in accordance with
§15.119 of the FCC rules.
FCC WARNING : Any unauthorized changes or modifications to this equipment
would void the user's authority to operate.
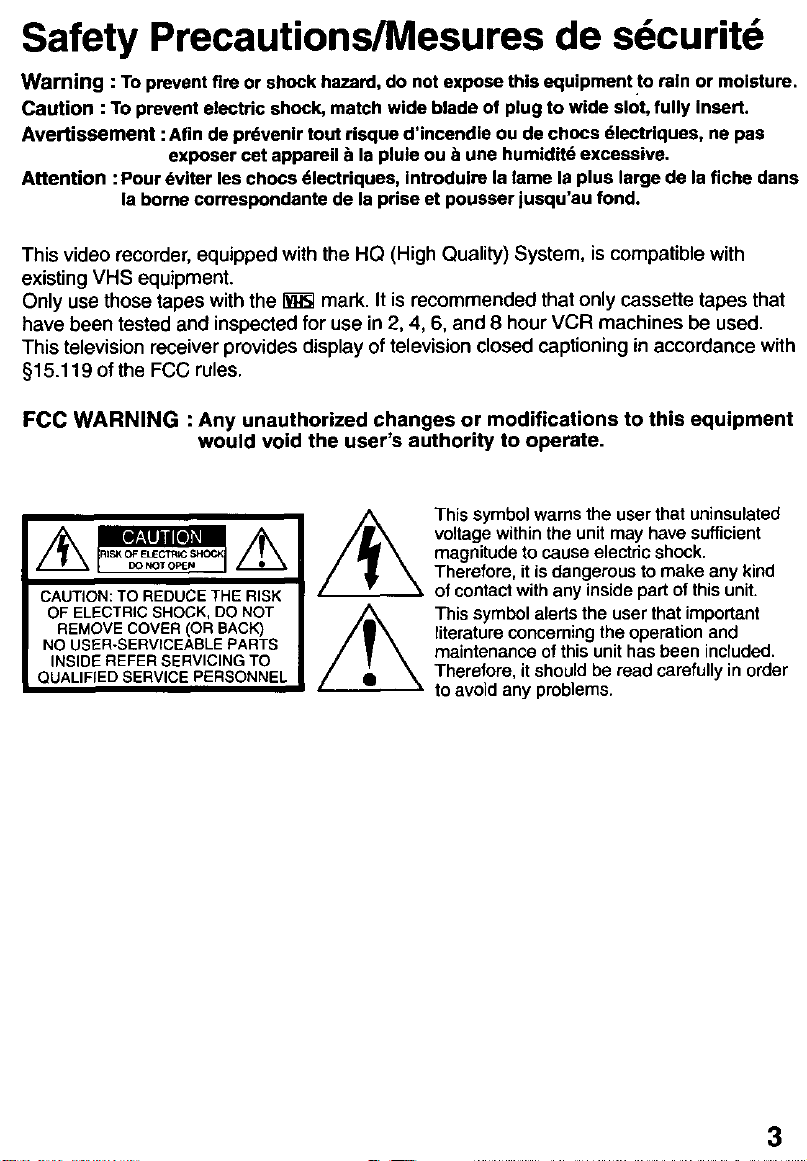
This symbol warns the user that uninsulated
voltage within the unit may have sufficient
magnitude to cause electric shock.
Therefore, it is dangerous to make any kind
CAUTION: TO REDUCE THE RISK
OF ELECTRIC SHOCK, DO NOT
REMOVE COVER (OR BACK)
NO USER-SERVICEABLE PARTS
INSIDE REFER SERVICING TO
QUALIFIED SERVICE PERSONNEL
of contact with any inside part of this unit.
This symbol alerts the user that important
literature conceming the operation and
maintenance of this unit has been included.
Therefore, it should be read carefully in order
to avoid any problems.
3
Congratulations
on your purchase of one of the most
sophisticated and reliable products on the market
today. Used properly, it will bring you and your
family years of enjoyment. Please fill in the
information below. The serial number is on the
tag located on the back of your unit.
Dealer Purchased From.
Dealer Address
Dealer Phone No
r Date of Purchase _'
Model NO
Serial No.
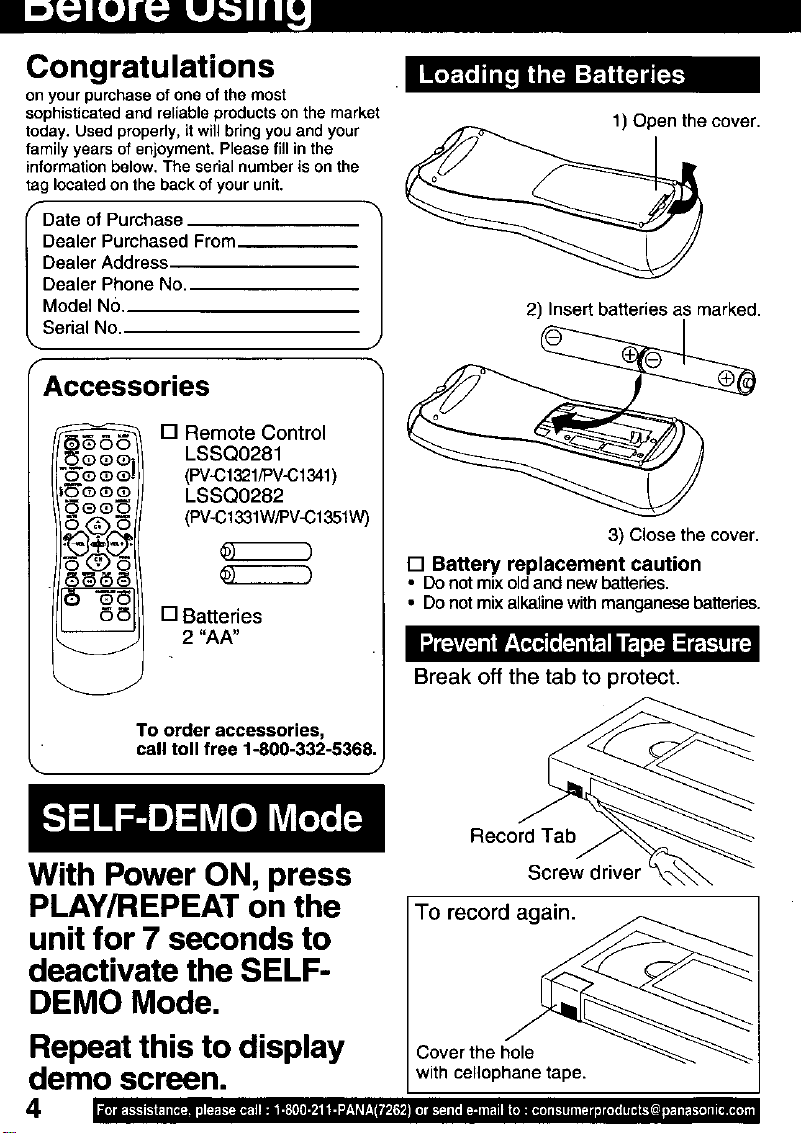
Accessories
[] Remote Control
_QQO
b-'QOQ!
_oee
LSSQ0281
(PV-C1321/PV-C1341)
LSSQ0282
(PV-C1331W/PV-C1351w)
[] Batteries
2 "AA"
1) Open the cover.
2) Insert batteries as marked.
3) Close the cover.
[] Battery replacement caution
• Do not mix old and new batteries.
• Do not mix alkaline with manganese batteries.
To order accessories,
call toll free 1-800-332-5368,
With Power ON, press
PLAY/REPEAT on the
unit for 7 seconds to
deactivate the SELF-
DEMO Mode,
Repeat this to display
demo screen.
4
Ilt!'L'_!lll_lllilf;lllli_lill',l_,llr,_llrlil,'t'llll'll_ltll, ll!lii_ll , , i iv , , iI'll[_] _liTi.t.-l,]ilYlllrlll
Break off the tab to protect.
J
Record Tab
Screw driver
TO record again.
]
Cover the hole
with cellophane tape.
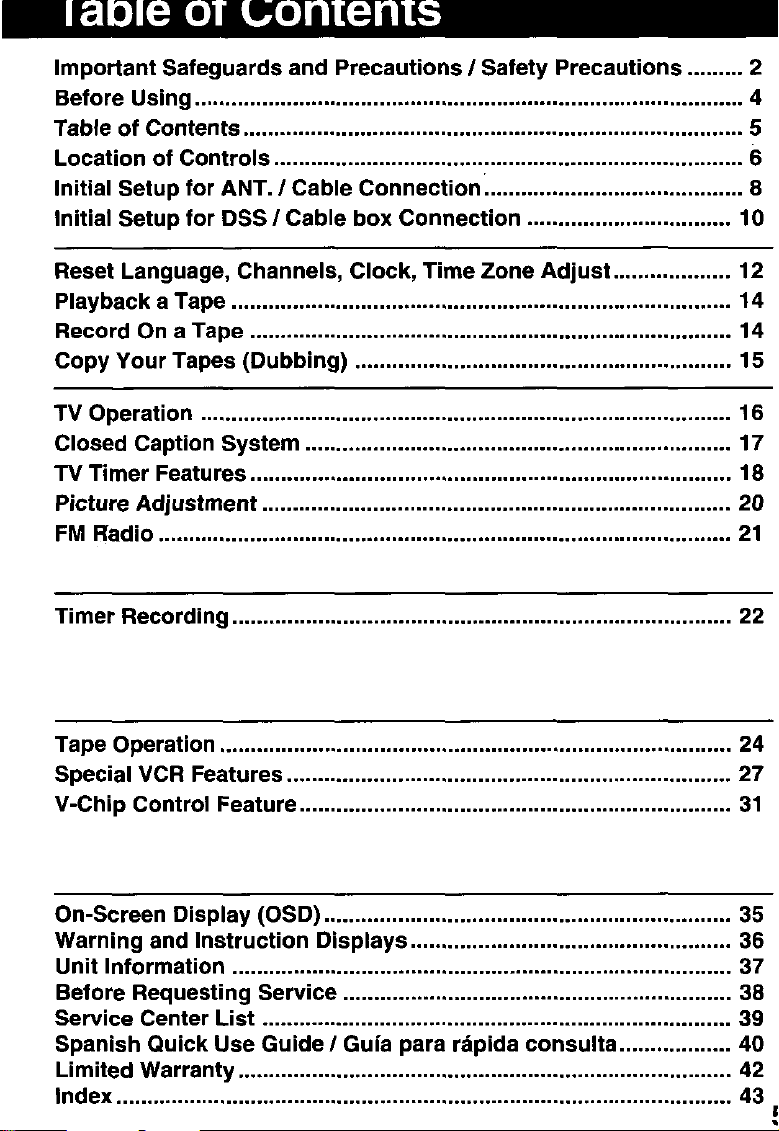
Important Safeguards and Precautions / Safety Precautions ......... 2
Before Using ......................................................................................... 4
Table of Contents ................................................................................. 5
Location of Controls ............................................................................ 6
Initial Setup for ANT. ! Cable Connection. ......................................... 8
Initial Setup for DSS l Cable box Connection ................................. 10
Reset Language, Channels, Clock, Time Zone Adjust ................... 12
Playback a Tape ................................................................................. 14
Record On a Tape .............................................................................. 14
Copy Your Tapes (Dubbing) ............................................................. 15
TV Operation ...................................................................................... 16
Closed Caption System ..................................................................... 17
TV Timer Features .............................................................................. 18
Picture Adjustment ............................................................................ 20
FM Radio ............................................................................................. 21
Timer Recording ................................................................................. 22
Tape Operation ................................................................................... 24
Special VCR Features ........................................................................ 27
V-Chip Control Feature ...................................................................... 31
On-Screen Display (OSD) .................................................................. 35
Warning and Instruction Displays .................................................... 36
Unit Information ................................................................................. 37
Before Requesting Service ............................................................... 38
Service Center List ............................................................................ 39
Spanish Quick Use Guide I Gu|a para rdpida consulta .................. 40
Limited Warranty ................................................................................ 42
Index .................................................................................................... 43
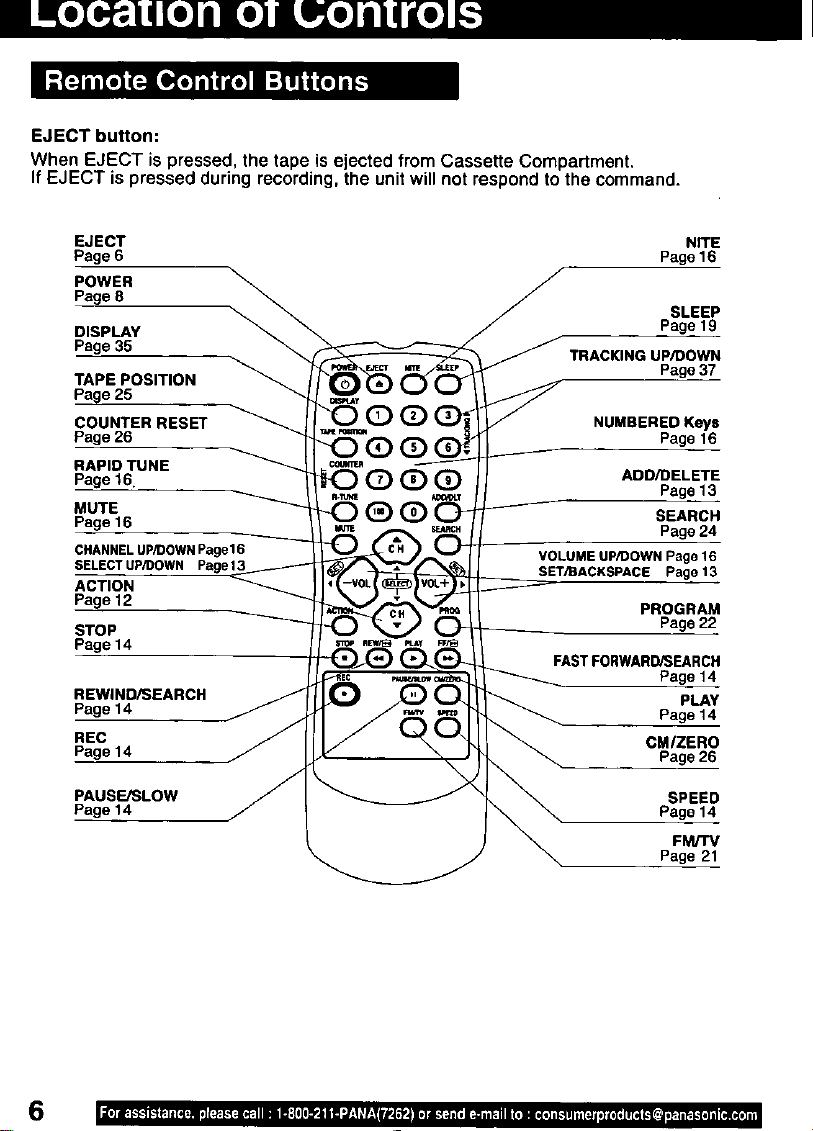
EJECT button:
When EJECT is pressed, the tape is ejected from Cassette Compartment,
If EJECT is pressed during recording, the unit will not respond to the command.
EJECT NITE
Page 6 Page 16
POWER
Page 8
Page 35 TRACKING UP/DOWN
TAPE POSITION
Page 25
COUNTER RESET NUMBERED Keys
Page 26 Page 16
RAPID TUNE
Page 16 D (_ ADD/DELETE
• Page 13
MUTE
Page 16 SEARCH
CHANNELUP/DOWNPage16
SELECTUP/DOWN Page
ACTION
Page 12
STOP
Page 14
REWIND/SEARCH pLAy
Page14 Page14
REC CM/ZERO
Page 14 Page 26
VOLUME UP/DOWN Page 16
SET/BACKSPACE Page 13
PROGRAM
FASTFORWARD/SEARCH
Page 14
SLEEPDISPLAY Page 19
Page
Page 24
Page 22
37
PAUSE/SLOW SPEED
Page 14 Page 14
6
FM/'FV
Page 21
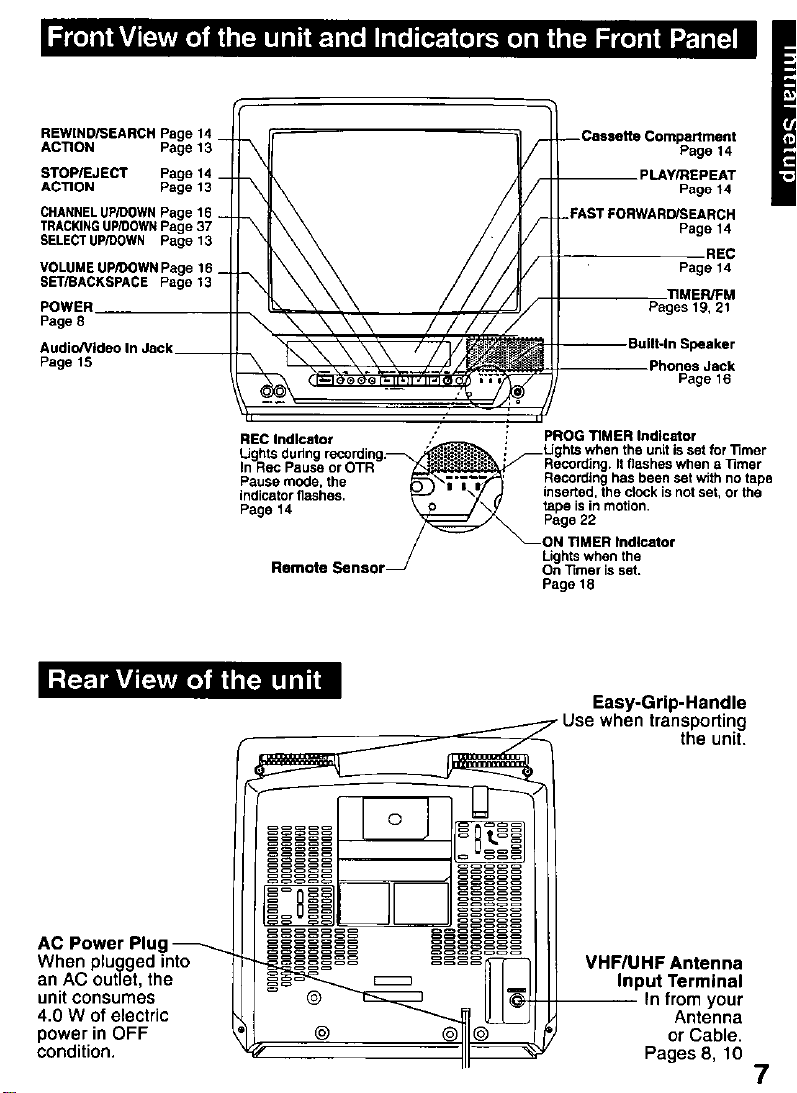
REWIND/SEARCH Page 14 _
ACTION Page 13
STOP/EJECT Page 14 _
ACTION Page 13
CHANNELUP/DOWNPage 16 _
TRACKINGUP/DOWNPage 37
SELECT UP/DOWN Page 13
VOLUME UP/SOWN Page 16 _
SET/BACKSPACE Page 13
POWER
Page 8
Audio/Vrdeo In Jack
Page 15
Cassette Compartment
PLAY_tEPEAT
Page 14
• Page 14
_ Page 14
FAST FORWAR_EARCH
I
/" ZJI/ II Pages19,21
( _ _*G G' G I _ II*ll ; I1=1_
I
REC Indicator ,' , PROG TIMER Indicator
Ughts during record ng _iF'• _ Lights when the unit is set for "Rmer
In Rec Pause or OTR "_Recording. It flashes when a ]]mer
nd ca or flashes inserted the clock is not set, or the
Pa e 14 ' tape is in motion•
g Page 22
Pause mode the _' Recording has been set with no tape
Remote Sensor On _mer is set.
// II B Page 16
_ _ --Built-In Speaker
• ,/!
ON TIMER Indicator
Lights when the
Page 18
.Phones Jack
Easy-Grip-Handle
when transporting
the unit.
AC Power Plat
When plugged into
an AC outlet, the
unit COnSUmes
4.0 W of electric
power in OFF
condition.
@
VHF/UHF Antenna
Input Terminal
In from your
Antenna
or Cable.
Pages 8, 10
7
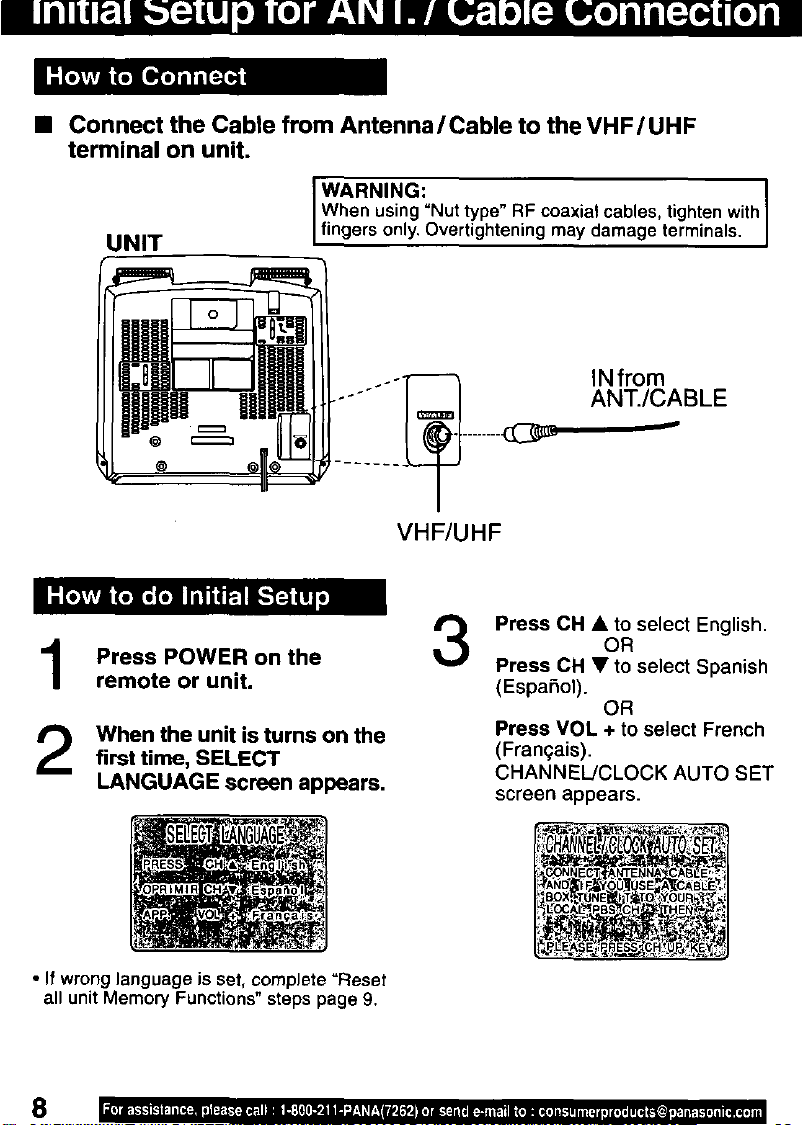
• Connect the Cable from Antenna/Cable to the VHF/UHF
terminal on unit.
WARNING: . I
When using "Nut type RF coaxial cables, tighten with
UNIT
f ngers only. Overtightening may damage term na s,
IN from
ANT./CABLE
VHF/UHF
Press POWER on the
1
remote or unit.
When the unit is turns on the
2
first time, SELECT
LANGUAGE screen appears.
• If wrong language is set, complete =Reset
all unit Memory Functions" steps page 9.
8
3
Press CH • to select English.
OR
Press CH • to select Spanish
(EspaSol).
OR
Press VOL + to select French
(Franqais).
CHANNEL/CLOCK AUTO SET
screen appears.
4
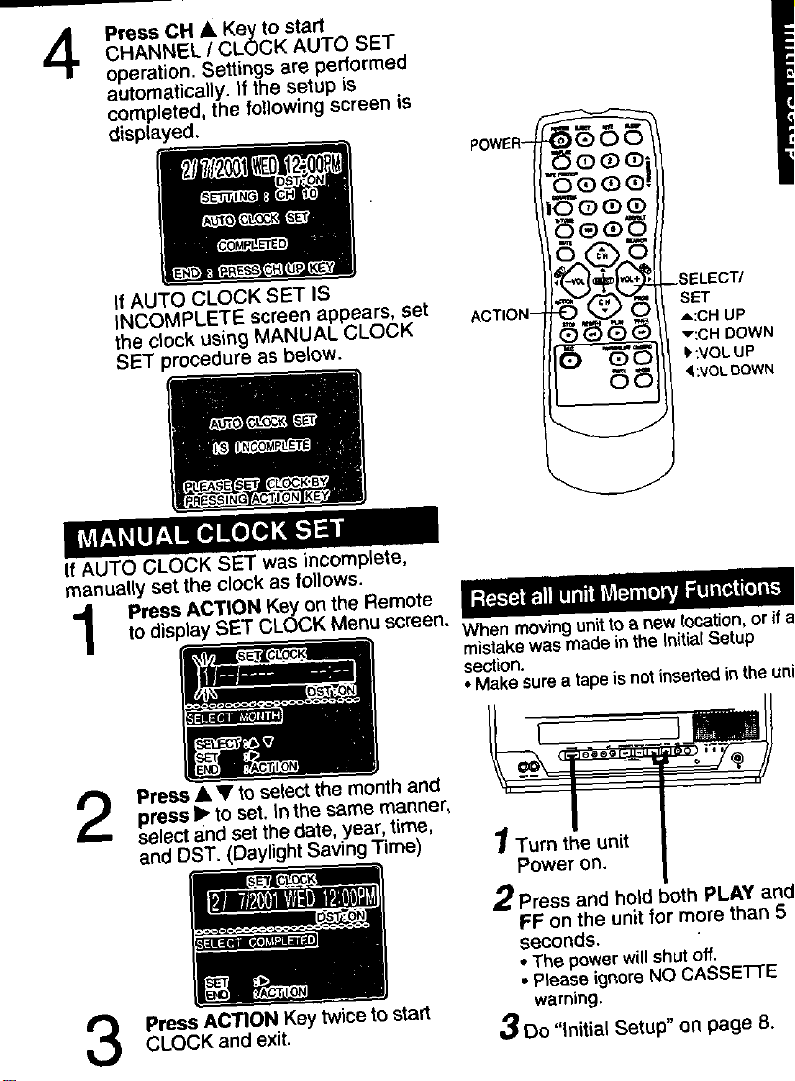
Press CH • Key to start
CHANNEL / CLOCK AUTO SET
operation. Settings are performed
automatically, tf the setup is
completed, the following screen is
displayed.
If AUTO CLOCK SET IS
iNCOMPLETE screen appears, set
the clock using MANUAL CLOCK
SET procedure as below.
If AUTO CLOCK SET was incomplete,
manually set the clock as follows.
to display SET CLOCK Menu screen.
Press ACTION Key on the Remote
press _" to set. In the same manner,
Press • • to selectthe month and
select and set the date, year, time,
and DST. (DaylightSaving Time)
Press ACTION Key twiceto start
3
CLOCK and exit.
SET
A:CH UP
v:CH DOWN
:VOL UP
4_VOLDOWN
When moving unit to a new location, or if
mistake was made in the Initiat.Setup
section,
• Make sure a tape is notinserted in the uni
Turn tf_e un(t
Power on.
2Press and hold both PLAY ant
FF on the unit for more than 5
seconds.
• The powerwillshutoff.
• PleaseignoreNO CASSET-FE
warning.
A
_,_Do "Initial Setup" on page 8.
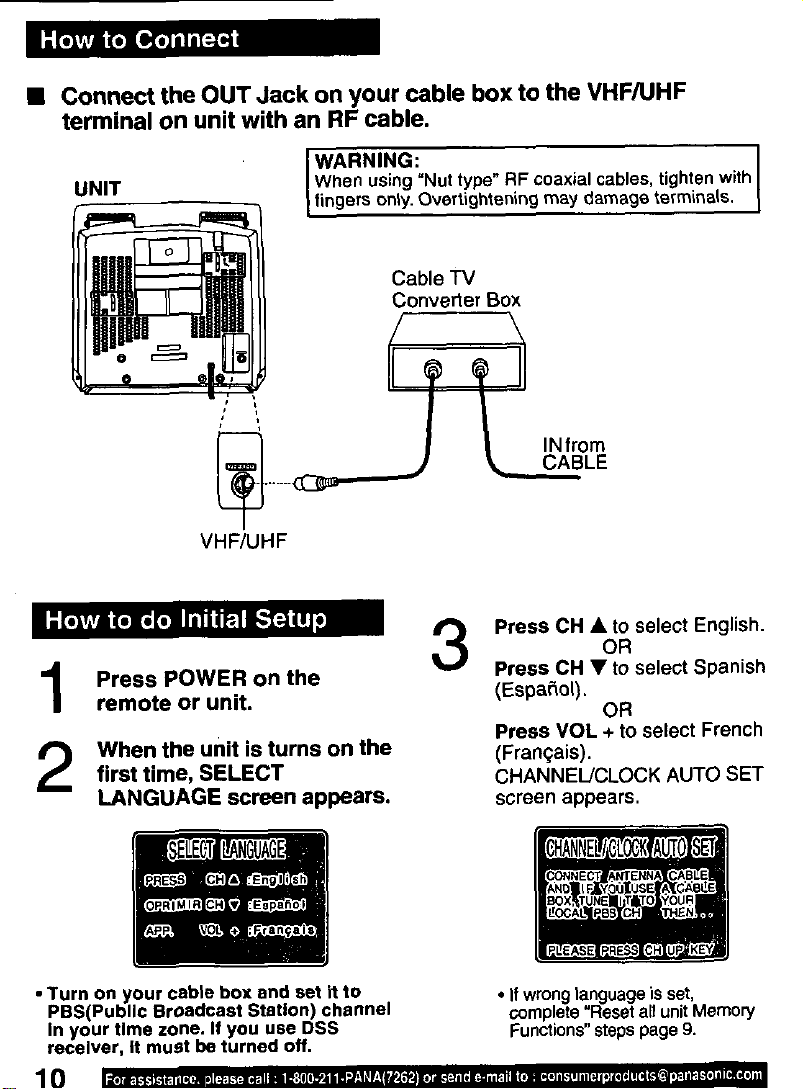
• Connect the OUT Jack on your cable box to the VHF/UHF
terminal on unit with an RF cable.
WARNING:
UNIT
VHF/UHF
When using "Nut type" RF coaxial cables, tighten with
fingers only. Overtightening may damage terminals.
Cable TV
Converter Box
Press POWER on the
1
remote or unit.
When the unit is turns on the
first time, SELECT
2
LANGUAGE screen appears.
• Turn on your cab|e box and set it to
PBS(PublIc Broadcast Station) channel
In your time zone. If you use DSS
receiver, it must be turned off.
10
3
Press CH • to select English.
OR
Press CH • to select Spanish
(Espa_ol).
OR
Press VOL + to select French
(Fran_ais).
CHANNEL/CLOCK AUTO SET
screen appears.
• If wrong language is set,
complete "Reset all unit Memory
Functions" steps page 9.
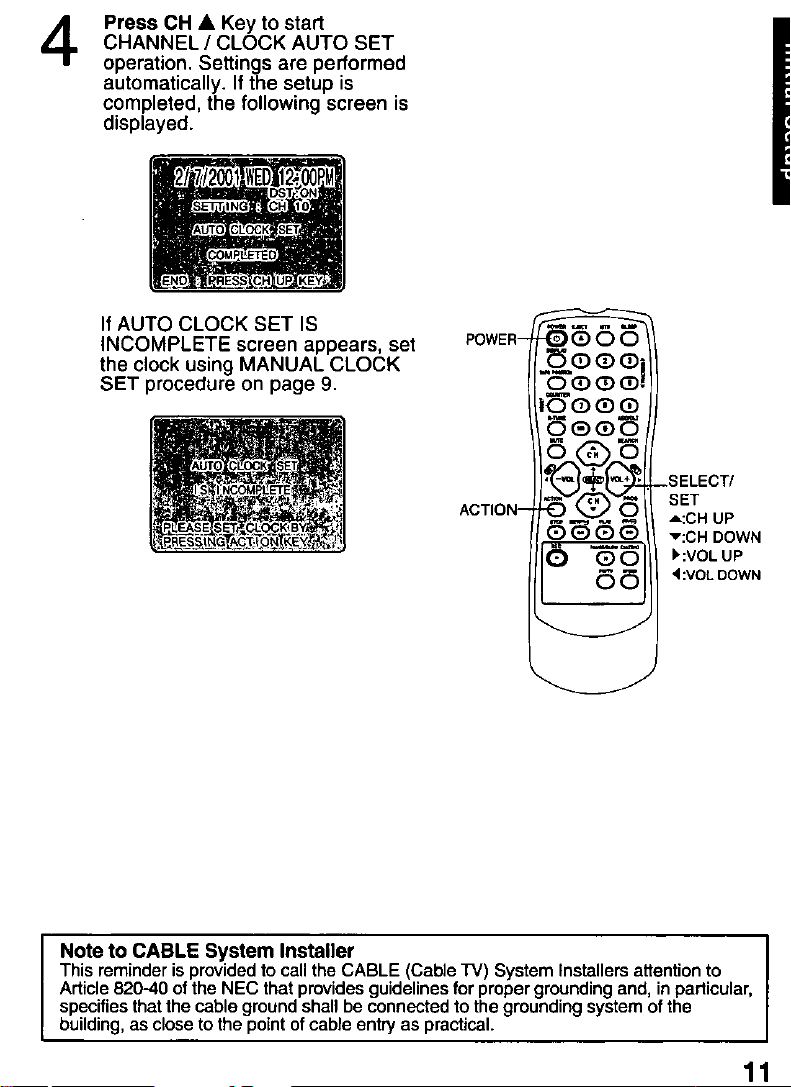
4
Press CH • Key to start
CHANNEL / CLOCK AUTO SET
operation. Settings are performed
automatically. If the setup is
completed, the following screen is
displayed.
If AUTO CLOCK SET IS
INCOMPLETE screen appears, set
the clock using MANUAL CLOCK
SET procedure on page 9.
POWER-
ACTION-
M
_o O(D (D
oo@
Lee
.SELECT/
SET
A:CH UP
v:CH DOWN
)':VOL UP
'4:VOLDOWN
Note to CABLE System Installer I
This reminder is provided to callthe CABLE (Cable TV) System Installers attention to
Article 820-40 of the NEC that provides guidelines for proper grounding and, in particular,
specifies that the cable ground shall be connected to the grounding system of the
building, as close tothe point ofcable entry as practical.
11
I
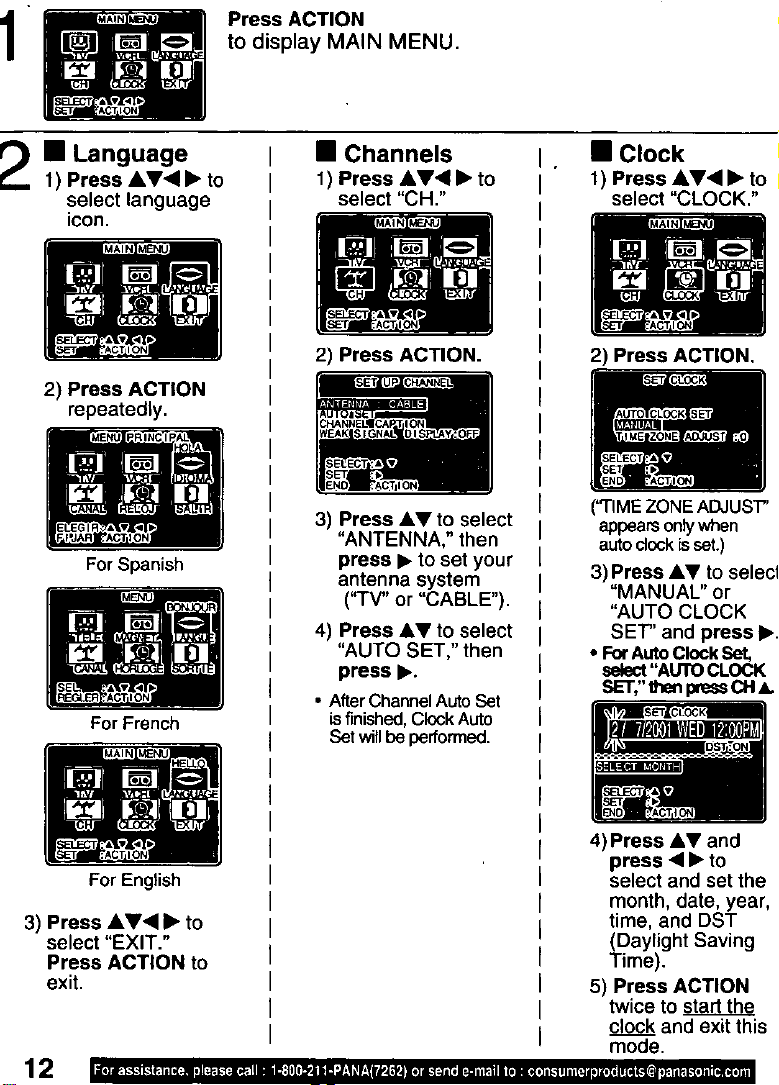
Press ACTION
to display MAIN MENU.
1 Language
1) Press &V4 • to
selectlanguage
2) Press ACTION
repeatedly.
ForSpanish
Nm
ForFrench
• Channels
1) Press AV'_ • to
select "CH."
q
2) Press ACTION.
3) Press AV to select
"ANTENNA," then
press • to set your
antenna system
("TV" or "CABLE").
4) Press AV to select
"AUTO SET," then
press •.
• After Channel AutoSet
is finished, Clock Auto
Set will be performed.
• Clock
1) Press A,Y<I • to
select "CLOCK,"
I
2) Press ACTION.
("TIMEZONEADJUST"
appearsonlywhen
autoclockisset.)
3) Press &V to select
"MANUAL" or
"AUTO CLOCK
SET" and press •.
• ForAutoClockSet,
select"AUTOCLOCK
SET/'thenpressCH_.
For English
3) Press AV'q • to
select "EXIT."
Press ACTION to
exit.
12
4) Press AV and
press • • to
select and set the
month, date, year,
time, and DST
(Daylight Saving
Time).
5) Press ACTION
twice to startthe
clock and exit this
mode.
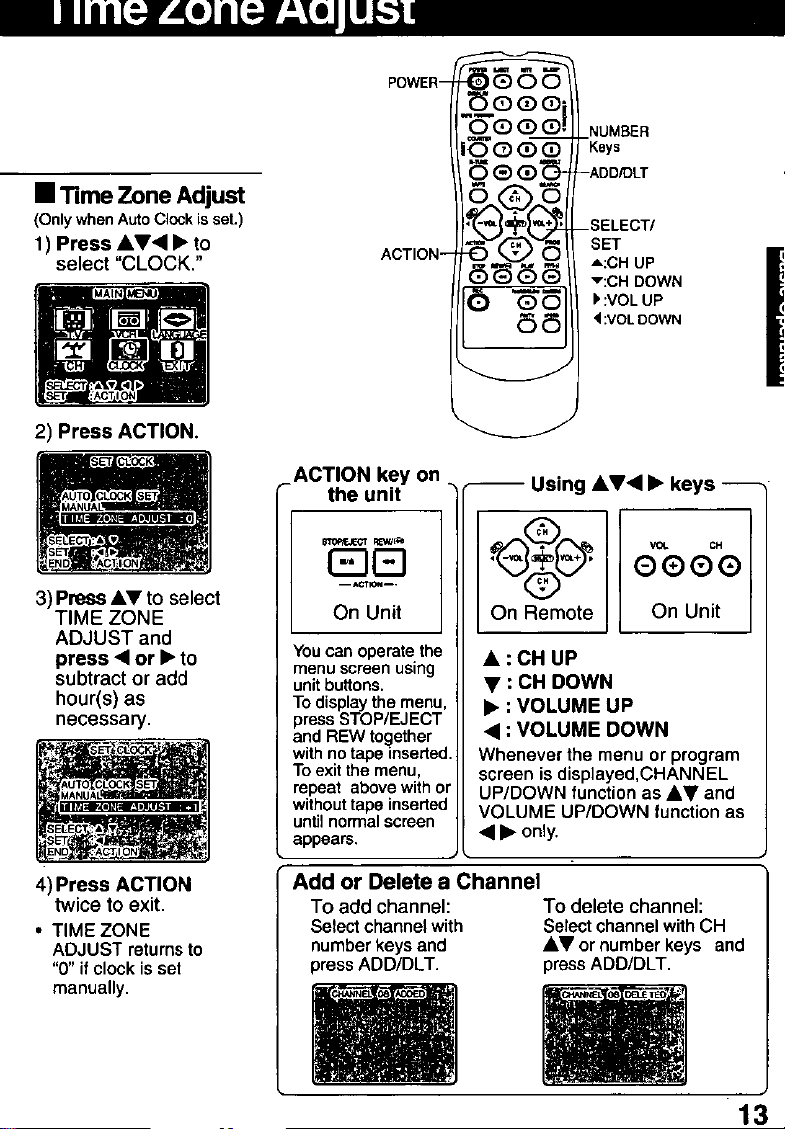
• "Hme Zone Adjust
(OnlywhenAutoClockisset.)
1) Press &V<I • to
select "CLOCK."
2) Press ACTION.
POWER-
ACTION-
_.ooQ
OQQ_
iOGO_
-- -Keys
NUMBER
-ADD/DLT
--SELECT/
SET
A:CH UP
v:CH DOWN
:VOL UP
:VOLDOWN
N
3) Press AV to select
TIME ZONE
ADJUST and
press • or • to
subtract or add
hour(s) as
necessary.
4) Press ACTION
twice to exit.
• TIME ZONE
ADJUST returns to
"0" if clock is set
manually.
ACTION key on
the unit
-- Using &V< • keys --
{3D
On Unit
Youcan operate the
menu screen using
unitbuttons.
Todisplaythe menu,
press STOP/EJECT
and REW to_ether
withnotape inserted.
Toexitthe menu,
repeat above withor
withouttape inserted
untilnormalscreen
appears,
Add or Delete a Channel
To add channel:
Select channel with
number keys and
press ADD/DLT.
On Remote
• : CH UP
• : CH DOWN
• : VOLUME UP
•41: VOLUME DOWN
Whenever the menu or program
screen is displayed,CHANNEL
UP/DOWN function as A• and
VOLUME UP/DOWN function as
• I_ only.
V_. CH
®Q®Q
On Unit
To delete channel:
Select channel with CH
• V or number keys and
press ADD/DLT.
13
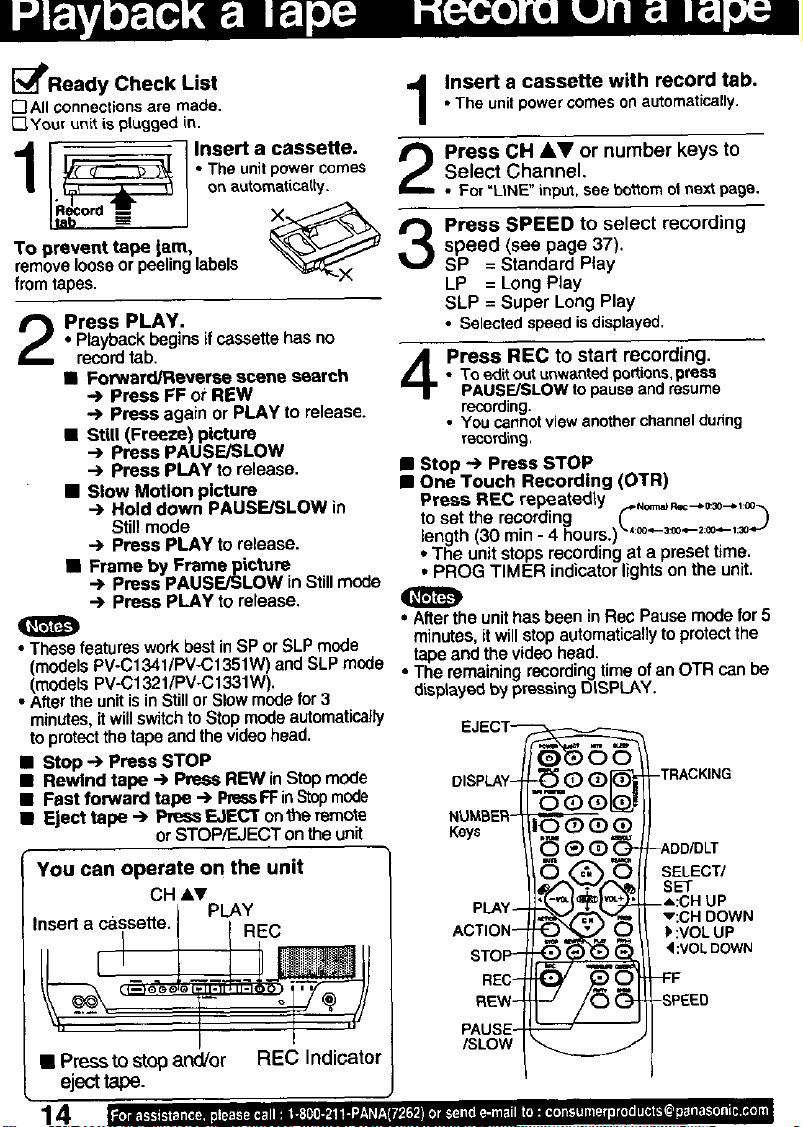
Insert a cassette with record tab.
17Allconnectionsare made,
[_Your unit ispluggedin.
"4 I _ I Insert a cassette.
_lPReady Check List
/ f I" Theunitpowercomes
I _ on automatically.
To prevent tape jam, _._--._
removeloose or peelinglabels
from tapes.
• Playbackbeginsifcassettehas no
Press PLAY.
recordtab,
• Forward/Reverse scene search
-,) Press FF or REW
-.) Press again or PLAY to release.
• Still (Freeze) picture
•-.) Press PAUSE/SLOW
Press PLAY to release.
• Slow Motion picture
•-,>Hold down PAUSE/SLOW in
Still mode
•..) Press PLAY to release.
• Frame by Frame picture
--) Press PAUSE/SLOW in Stillmode
•-,) Press PLAY to release,
• These features workbestin SP or SLPmode
(modelsPV.C1341/PV-C1351W) and SLP m(xie tapeandthe video head.
(modelsPV-C1321/PV-C1331W). The remaining recordingtime ofan OTR can be
• Afterthe unit isin Still or Slow modefor 3 displayed by pressing DtSPLAY.
minutes, it will switch to Stop mode automatically
to protect the tape and the video head.
• Stop -.) Press STOP
• Rewind tape "-) Press REW in Stopmode
• Fast forward tape ,-,) PressFF inStopmode
• Eject tape -'> Press EJECT onthe remote
I
orSTOP/EJECT onthe unit Keys
• The unitpowercomesoNautomatically.
Press CH &V or number keys to
Select Channel.
• For"LtNE"input,see botlom otnext page.
Press SPEED to select recording
speed (see page 37).
SP = Standard Play
LP = Long Play
SLP = Super Long Play
• Selected speed isdisplayed.
• To ed_outunwantedportions,press
Press REC to start recording.
PAUSE/SLOW topauseand resume
recording.
• Youcannot viewanotherchannelduring
recording,
• Stop ") Press STOP
• One Touch Recording (OTR)
Press REC repeatedly ,o,_-,=3o_,_o
toset the recording _,, _)
length (30 min - 4 hours.) ,:®.-3_o.-2:0o_-_:30
• The unitstops recording at a preset time.
• PROG TIMER indicator lightson the unit.
• Afterthe unit has been in Res Pausemode for 5
minutes, it willstopautomaticallytoprotectthe
You can operate on the unit
CH &v
Insert a caslsette. I PLAY
• Press to stop and/or REC Indicator
REC
i
ejecttape.
14
/SLOW
SELECT/
SET
v:CH DOWN
b:VOL UP
4:VOLDOWN
 Loading...