

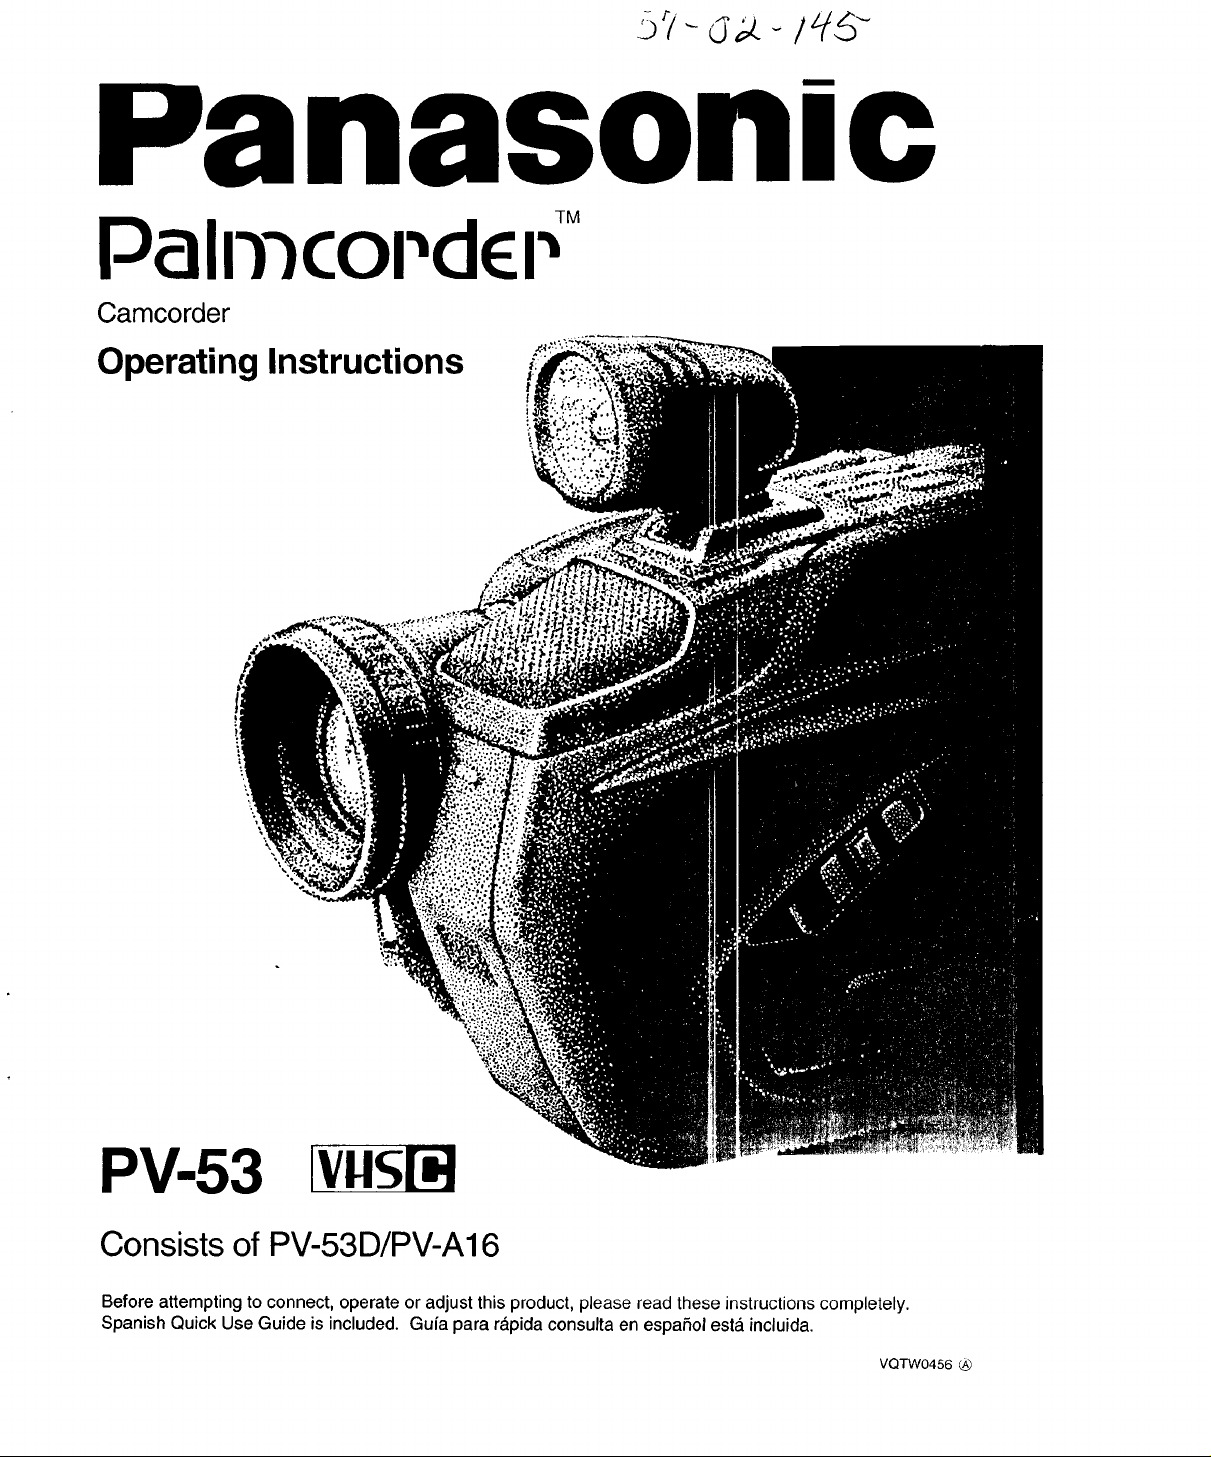
Panasonic PV-A16, PV-53D Owner’s Manual
nason/c
Palrnco dc
Camcorder
Operating Instructions
TM
PV-53 [v.sl_
Consists of PV-53D/PV-A16
Before attempting to connect, operate or adjust this product, please read these instructions completely.
Spanish Quick Use Guide is included. Gufa para rapida consulta en espa5ol esta_incluida.
VQTW0456
Thank you for choosing Panasonic!
You have purchased one of the most
sophisticated and reliable products on the market
today. Used properly, we're sure it will bring you
and your family years of enjoyment. Please take
time to fill in the information at right. The serial
number is on the tag located on the underside of
your Palmcorder. Be sure to retain this manual as
your convenient Palmcorder information source.
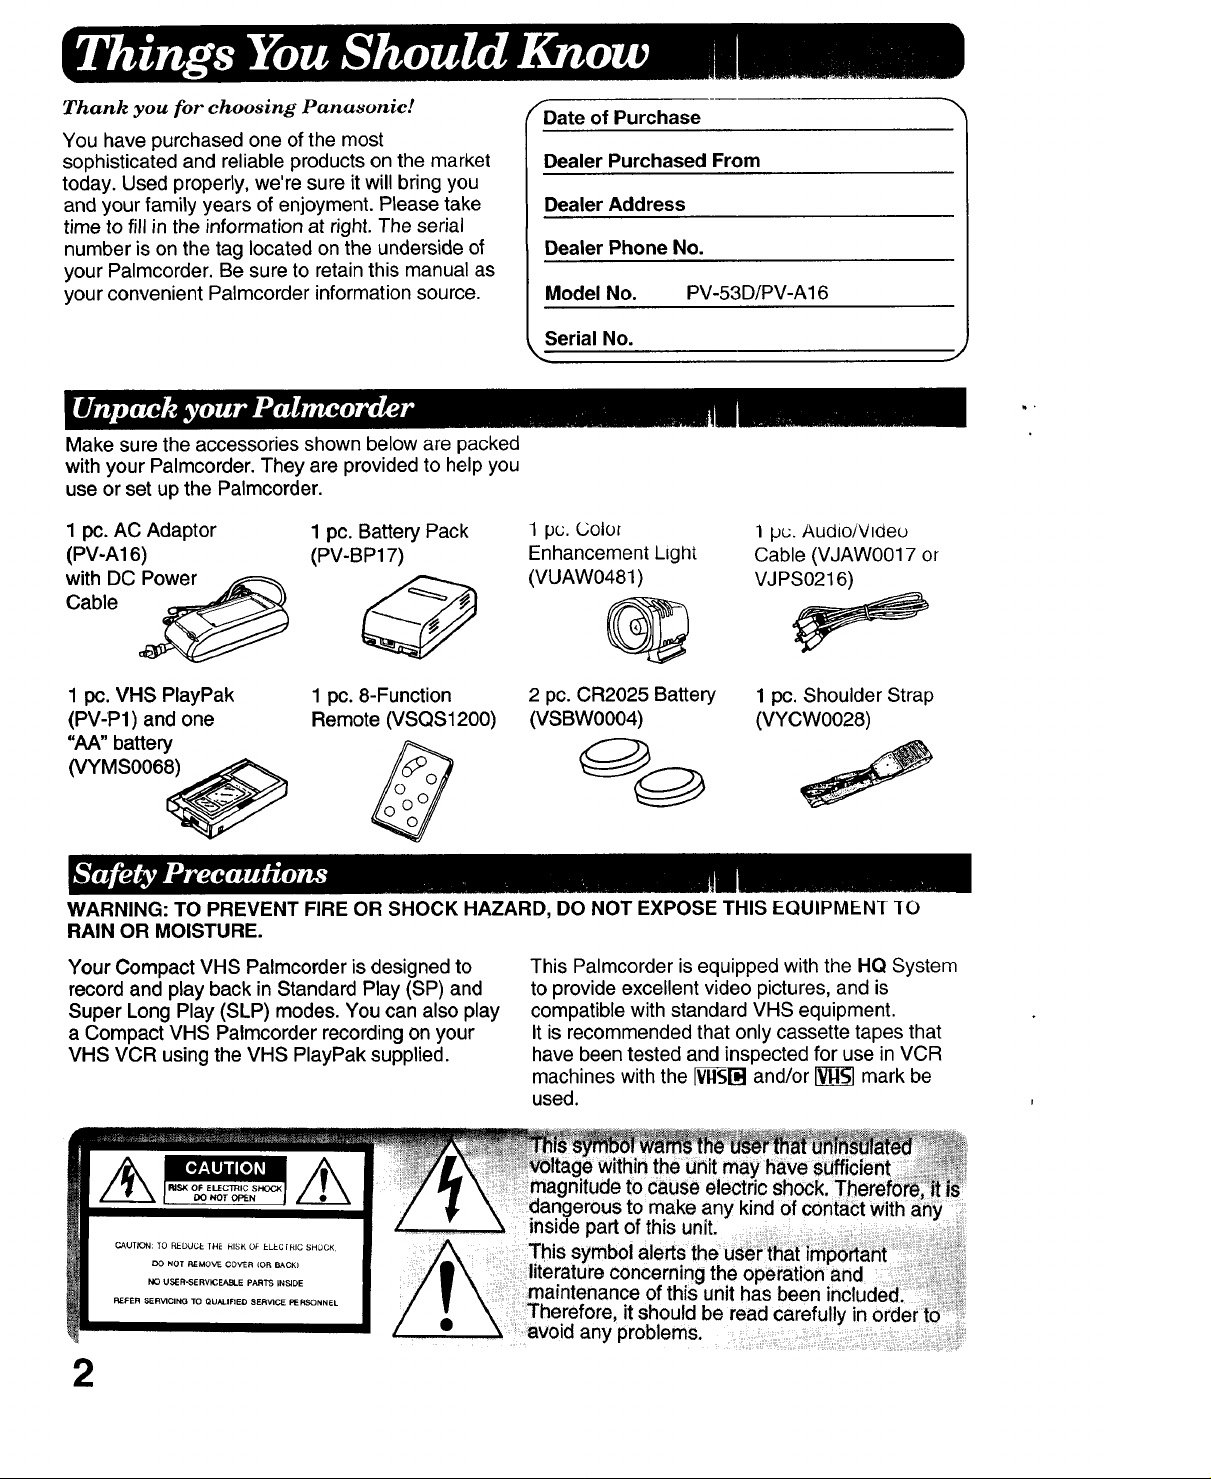
Make sure the accessories shown below are packed
with your Palmcorder. They are provided to help you
use or set up the Palmcorder.
_Date of Purchase
Dealer Purchased From
Dealer Address
Dealer Phone No.
Model No. PV-53D/PV-A16
Serial No.
1 pc. AC Adaptor
(PV-A16)
Cable
with DC _
1 pc. VHS PlayPak
(PV-P1) and one
"AA" battery
(VYMS006_
WARNING: TO PREVENT FIRE OR SHOCK HAZARD, DO NOT EXPOSE THIS EQUIPMEN[ IO
RAIN OR MOISTURE.
Your Compact VHS Palmcorder is designed to
record and play back in Standard Play (SP) and
Super Long Play (SLP) modes. You can also play
a Compact VHS Palmcorder recording on your
VHS VCR using the VHS PlayPak supplied.
1 pc. Battery Pack
(PV-BP17)
1 pc. 8-Function
Remote (VSQS1200)
1 pc. Colo_
Enhancement Light
(VUAW0481)
] p_;.Audio/Video
Cable (VJAW0017 or
VJPS0216)
Q
2 pc. CR2025 Battery
(VSBW0004)
This Palmcorder is equipped with the HQ System
to provide excellent video pictures, and is
compatible with standard VHS equipment.
It is recommended that only cassette tapes that
have been tested and inspected for use in VCR
machines with the V_l"d and/or _ mark be
used.
1 pc. Shoulder Strap
(VYCW0028)
2
itude to cause electric shock.
erous to make any kind of contact with
Therefore, it should be read carefully in order to
avoid any problems.

1.
Read Instructions -- All the safety and operating
instructions should be read before the unit is operated.
2.
Retain Instructions -- The safety and operating
instructions should be retained for future reference.
3.
Heed Warnings -- All warnings on the unit and in the
operating instructions should be adhered to.
4.
Follow Instructions -- All operating and maintenance
instructions should be followed.
5.
Cleaning -- Unplug this video unit from the wall outlet
before cleaning. Do not use liquid or aerosol cleaners.
Use a dry cloth for cleaning.
6.
Attachments -- Do not use attachments not
recommended by the video product manufacturer as they
may be hazardous.
7.
Water and Moisture -- Do not use this video unit near
water-- for example near a bath tub, wash bowl, kitchen
sink, or laundry tub, in a wet basement, or near a
swimming pool, and the like.
8,
Accessories -- Do not place this video unit on an
unstable cart, stand, tripod, bracket, or table. The video
unit may fall, causing serious injury to a child or adult,
and serious damage to the unit. Use only with a cart,
stand, tripod, bracket, or table recommended by the
manufacturer, or sold with the video unit. Any mounting
of the unit should follow the manufacturer's instructions
and should use a mounting
accessory recommended by the
manufacturer. An appliance and cart
combination should be moved with
care. Quick stops, excessive force,
and uneven surfaces may cause the
appliance and cart combination to
overturn.
11.
Grounding or Polarization -- This video unit may be
equipped with either a polarized 2-wire AC (Alternating
Current) line plug (a plug having one blade wider than
the other) or 3-wire grounding type plug, a plug having a
third (grounding) pin.
The 2-wire polarized plug will fit into the power outlet only
one way. This is a safety feature. If you are unable to
insert the plug fully into the outlet, try reversing the plug.
If the plug still fails to fit, contact your electrician to
replace your obsolete outlet. Do not defeat the safety
purpose of the polarized plug.
The 3-wire grounding type plug will fit into a grounding
type power outlet. This is a safety feature. If you are
unable to insert the plug into the outlet, contact your
electrician to replace your obsolete outlet. Do not defeat
the safety purpose of the grounding type plug.
12.
Power-Cord Protection -- Power-supply cords should be
routed so that they are not likely to be walked on or
pinched by items placed upon or against them, paying
particular attention to cords of plugs, convenience
receptacles, and the point where they exit from the unit.
13.
Outdoor Antenna Grounding -- If an outside antenna or
cable system is connected to the video unit, be sure the
antenna or cable system is grounded so as to provide
some protection against voltage surges and built-up
static charges. Part 1 of the Canadian Electrical Code, in
USA Section 810 of the National Electrical Code,
provides information with respect to proper grounding of
the mast and supporting structure, grounding of the lead-
in wire to an antenna discharge unit, size of grounding
conductors, location of antenna discharge unit,
connection to grounding electrodes, and requirements for
the grounding electrode.
Ventilation -- Slots and openings in the cabinet are
provided for ventilation and to ensure reliable operation
of the video unit and to protect it from overheating. These
openings must not be blocked or covered. Never place
the video unit on a bed, sofa, rug, or other similar
surface, or near or over a radiator or heat register. This
video unit should not be placed in a built-in installation
such as a bookcase or rack unless proper ventilation is
provided or the manufacturer's instructions have been
adhered to.
10. Power Sources -- This video unit should be operated
only from the type of power source indicated on the
marking label. If you are not sure of the type of power
supply to your home, consult your appliance dealer or
local power company. For video units intended to be
operated from battery power, or other sources, refer to
the operating instructions.
, ANTENNA
,_LEAD IN
WIRE
OROONO,#,,,
1/ _GROUNDING CONDUCTORS
J ,_/ (NEC SECTION 810-21)
_ _-- G ROUND CLAMPS
POWER SERVICE GROUNDING
NEC -- NATIONAL ELECTRICAL COD= (NEC ART 250, PART H)
ELECTRODE SYSTEM
3
14. Lightning -- For added protection of this video unit
receiver during a lightning storm, or when it is left
unattended and unused for long periods of time, unplug it
from the wall outlet and disconnect the antenna or cable
system. This will prevent damage to the video unit due to
lightning and power-line surges.
15. Power Lines-- An outside antenna system should not be
located in the vicinity of overhead power lines or other
electric light or power circuits, or where it can fall into
such power lines or circuits. When installing an outside
antenna system, extreme care should be taken to keep
from touching such power lines or circuits as contact with
them might be fatal.
16. Overloading -- Do not overload wall outlets and
extension cords as this can result in a risk of fire or
electric shock.
17. Objects and Liquids -- Never push objects of any kind
into this video unit through openings as they may touch
dangerous voltage points or short out parts that could
result in a fire or electric shock. Never spill liquid of any
kind onto the video unit.
18. Servicing -- Do not attempt to service this video unit
yourself as opening or removing covers may expose you
to dangerous voltage or other hazards. Refer all servicing
to qualified service personnel.
19. Damage Requiring Service -- Unplug this video unit from
the wall outlet and refer servicing to qualified service
personnel under the following conditions:
a. When the power-supply cord or plug is damaged.
b. If any liquid has been spilled onto, or objects have
fallen into the video unit.
c. If the video unit has been exposed to rain or water.
d. If the video unit does not operate normally by
following the operating instructions. Adjust only those
controls that are covered by the operating
instructions, as an improper adjustment of other
controls may result in damage and will often require
extensive work by a qualified technician to restore
the video unit to its normal operation.
e. If the video unit has been dropped or the cabinet has
been damaged.
f. When the video unit exhibits a distinct change in
performance- this indicates a need for service.
20.
Replacement Parts -- When replacement parts are
required, be sure the service technician has used
replacement parts specified by the manufacturer or have
the same characteristics as the original part.
Unauthorized substitutions may result in fire, electric
shock or other hazards.
21.
Safety Check-- Upon completion of any service or
repairs to this video unit, ask the service technician to
perform safety checks to determine that the video unit is
in safe operating order.
b
USE & LOCATION
• TO AVOID SHOCK HAZARD ... Your Camcorder and power supply should not be exposed to rain or moisture.
Do not connect the power supply or operate your Camcorder if it gets wet. Your Camcorder has been designed
for outdoor use, however it is not designed to sustain direct exposure to water, rain, sleet, snow, or a direct
splashing from a pool or even a cup of coffee. Do not attempt to disassemble this unit. There are no user
serviceable parts inside. Unplug your Camcorder from the power supply before cleaning.
• DO NOT AIM YOUR CAMCORDER AT THE SUN OR OTHER BRIGHT OBJECTS
• DO NOT EXPOSE YOUR CAMCORDER TO EXTENDED HIGH TEMPERATURE ... Such as, in direct
sunlight, inside a closed car, next to heater, etc... This action could permanently damage the internal parts of
your Camcorder.
• AVOID SUDDEN CHANGES IN TEMPERATURE ... Ifthe unit is suddenly moved from a cold place to a warm
place, moisture may form on the tape and inside the unit.
• DO NOT LEAVE YOUR CAMCORDER OR THE POWER SUPPLY TURNED ON WHEN NOT IN USE
• STORAGE OF YOUR CAMCORDER ... Store and handle your Camcorder in a manner that will not subject it to
unnecessary movement (avoid shaking and striking). Your Camcorder contains a sensitive pick-up device which
could be damaged by improper handling or storage.
CARE
• TO CLEAN YOUR CAMCORDER ... Do not use strong or abrasive detergents when cleaning your Camcorder
body.
• TO PROTECT THE LENS ... Do not touch the surface of the lens with your hand. Use a commercial camcorder
lens solution and lens paper when cleaning the lens. Improper cleaning can scratch the lens coating.
• TO PROTECT THE FINISH OF YOUR CAMCORDER ... Before handling your Camcorder, make sure your
hands and face are free from any chemical products such as suntan lotion as it may damage the finish.
4

Getting Started
Things You Should Know ........................................................................................................ 2
Important Safeguards and Precautions .............................................................................. 3
Palmcorder Accessory System ............................................................................................. 6
Attaching the shoulder strap .................................................................................................. 7
Cassette Information ................................................................................................................. 8
Supplying Power ......................................................................................................................... 9
Battery Care ................................................................................................................................ 10
Auto Lock Mode ........................................................................................................................ 12
Setting the Date/Time .............................................................................................................. 13
Electronic Viewfinder Indications ......................................................................... 15
Color Enhancement Light ..................................................................................... 16
Basic Operation
Camera Recording ................................................................................................ 17
8-Function Remote Control .................................................................................. 19
Playback your Recordings .................................................................................................... 20
Special Features
Tape Counter/Counter Memory/Lap Time Counter/Tape Remaining Functions ............................. 23
Variable Speed Power Zoom/High Speed Shutter ......................................................................... 24
Focusing ........................................................................................................................................ 25
White Balance/Backlight Button ..................................................................................................... 26
VHS Index Search System/Book Mark Search .............................................................................. 27
Digital Color Fade .......................................................................................................................... 28
Digital Zoom .................................................................................................................................. 29
Electronic Image Stabilization System (E.I.S.) ............................................................................... 30
Still/StrobeNVide ............................................................................................................................ 31
Copying your Tapes (dubbing) ............................................................................. 32
Dubbing over Recordings
Dubbing over Audio ....................................................................................................................... 34
Dubbing over Video ....................................................................................................................... 35
Dubbing over Audio/Video ............................................................................................................. 36
For Your Information
Notes on Operations ............................................................................................. 37
Spanish Quick Use Guide/Guia Para Uso Rdpido ............................................... 39
Index of Controls .......................................................................................................................41
Index .............................................................................................................................................. 45
Specifications ............................................................................................................................. 46
Before Requesting Service ....................................................................................................47
5
For more information and ordering instructions see the separate Selection Guide and Accessory Order
Form.
Power Supplies
AC Adaptor
(supplied, optional:
PV-A16)
Battery Pack
(supplied, optional:
PV-BP17)
To Transport
Car Battery Cord
(optional: PV-C16)
Battery Pack
(optional: PV-BP15)
Connection
Audio/Video Cable
(supplied:
VJAW0017 or
VJPS0216)
To Record and Playback
Compact Video Cassette
Tape (optional:
NV-TC20P,
NV-TC30P)
RF Adaptor
(optional: PV-RF15)
VHS PlayPak
(supplied, optional:
PV-P1)
To Enhance your Recording
System Carrying Case
(optional: PV-H18)
For Special Effects
Video Corrector
(optional: PV-CC50)
Shoulder Strap
(supplied: VYCW0028)
5W Color Enhancement
Light
(supplied: VUAW0481)
(optional: PV-L5)
®
Wide Angle Lens
(optional: PV-LW491Q)
Note:
Use only Panasonic PV-LW491Q wide conversion lens;
use of other wide conversion lenses may distort the
picture.
Filter Kit
(optional: PV-F49)
©
Telephoto Lens
(optional: PV-LT49)
To Copy your Tapes and for Dubbing Over the Audio and/or Fwleo
Audio/Video Cable Super Directional Synchro Edit Cord VCR (not supplied)
(supplied: Microphone (optional: PV-EC1)
VJAW0017 or (not supplied)
VJPS0216) (M3 connector)
6

1
Pinch the tabs together on either side of
the clasp and open the buckle.
2
Unhook the strap from the Buckle Catch.
3
Thread the strap ends through the Strap
Attachment Rings. Then re-hook them onto
the Buckle Catch.
4
Snap the clasp shut to lock the strap in
place.
Pull a loop of the strap loose from the
buckle, then pull the strap firmly through the
buckle to adjust the length.
7

Use tapes with the _[_ mark in this unit.
Tape Speed Selector Cassette type
Position T-20 T-30 T-40
SP (Standard Play) 20 Minutes 30 Minutes 40 Minutes
SLP (Super Long Play) One Hour One Hour Two Hours
30 Minutes
The Palmcorder may be ON or OFF when
you insert or remove a cassette.
1
Turn the Tape Wheel in the direction of the
arrow until there is no slack.
,.., EJECT
2
Slide the EJECT switch to open the door.
8
3
Hold the cassette vertically with the
window facing away from the Palmcorder
body.
4
Press the Door Close Area to close the
door.
Cassettes have a record tab to ensure that
recordings are not accidentally erased.
To prevent accidental erasure
Break off the tab with a screwdriver
(Some tapes have a slide type tab.)
To record again
Cover the hole with cellophane tape
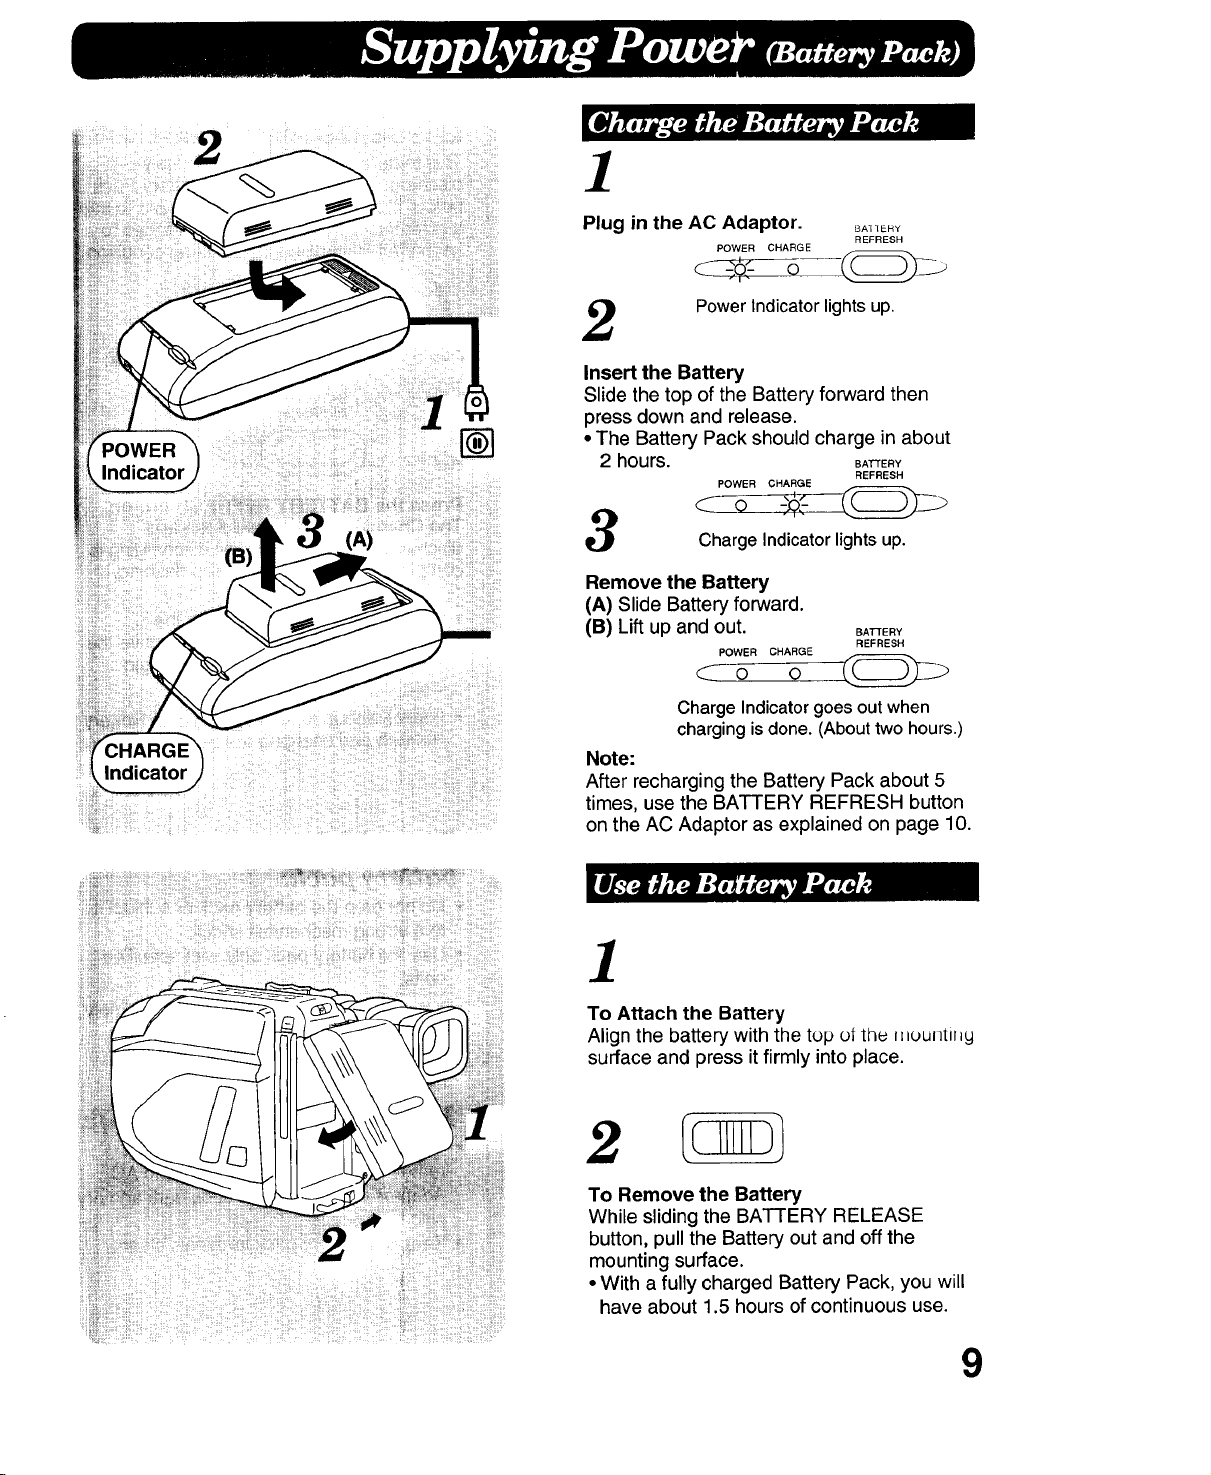
1
Indicator
Indicator
(A)
Plug in the AC Adaptor. _EH_
POWER CHARGE
REFRESH
o
2
Power Indicator lights up.
Insert the Battery
Slide the top of the Battery forward then
press down and release.
• The Battery Pack should charge in about
2 hours. BATTERY
POWER CHARGE
Charge Indicator lights up.
Remove the Battery
(A) Slide Battery forward.
(B)Liftup and out. BATTERY
POWER CHARGE
C o 0
Charge Indicator goes out when
charging is done. (About two hours.)
Note:
After recharging the Battery Pack about 5
times, use the BATTERY REFRESH button
on the AC Adaptor as explained on page 10.
REFRESH
REFRESH
]
To Attach the Battery
Align the battery with the top of the _=ountll_y
surface and press it firmly into place.
To Remove the Battery
While sliding the BATTERY RELEASE
button, pull the Battery out and off the
mounting surface.
• With a fully charged Battery Pack, you will
have about 1.5 hours of continuous use.
9
This feature allows you to completely
discharge the power from the Battery Pack
before recharging. It is recommended to use
this feature after about every 5 charges to
keep your Battery in top operating condition.
1
Place the Battery into the AC Adaptor.
BATTERY
REFRESH
2 J,czm
Press the BATTERY REFRESH button.
The Charging indicator will flash and
discharging will begin. When discharging is
complete, the indicator will stop flashing.
• Should you accidentally press the
BATTERY REFRESH button, remove the
Battery Pack then re-insert it to begin
charging.
• It takes about 10 hours when both Battery
Refresh and charging are performed.
Caution:
• Charge only with specified charger.
• The battery pack can be charged within a
temperature range of 32° F (0° C) and 104°
F (40° C).
• The battery pack may be warm after
charging or just after use. This is normal.
• To preserve the life of your battery, remove
the battery pack from the Palmcorder and the
AC Adaptor while not in use.
• Do not use an insufficiently charged or worn
out Battery Pack.
Safety precautions:
• Do not dispose of in fire. Keep the battery
away from fire.
• Do not directly connect (short circuit) the
positive (+) and negative (-) terminals.
• Never attempt to disassemble or reassemble
the battery pack.
10
To avoid damage to the
battery pack:
• Do not drop the battery pack or subject it
to a strong mechanical shock.
• Use the battery pack only with specified
units.
• If the battery pack is used in an extremely
high temperature, a safety device will
automatically prevent operation of the
battery pack.
Toobtain longer ba#ery life:
• While the battery pack is not in use
remove it from the Palmcorder and AC
Adaptor and store it in a cool, dark and dry
place.
• Keep the battery pack terminals clean.
]
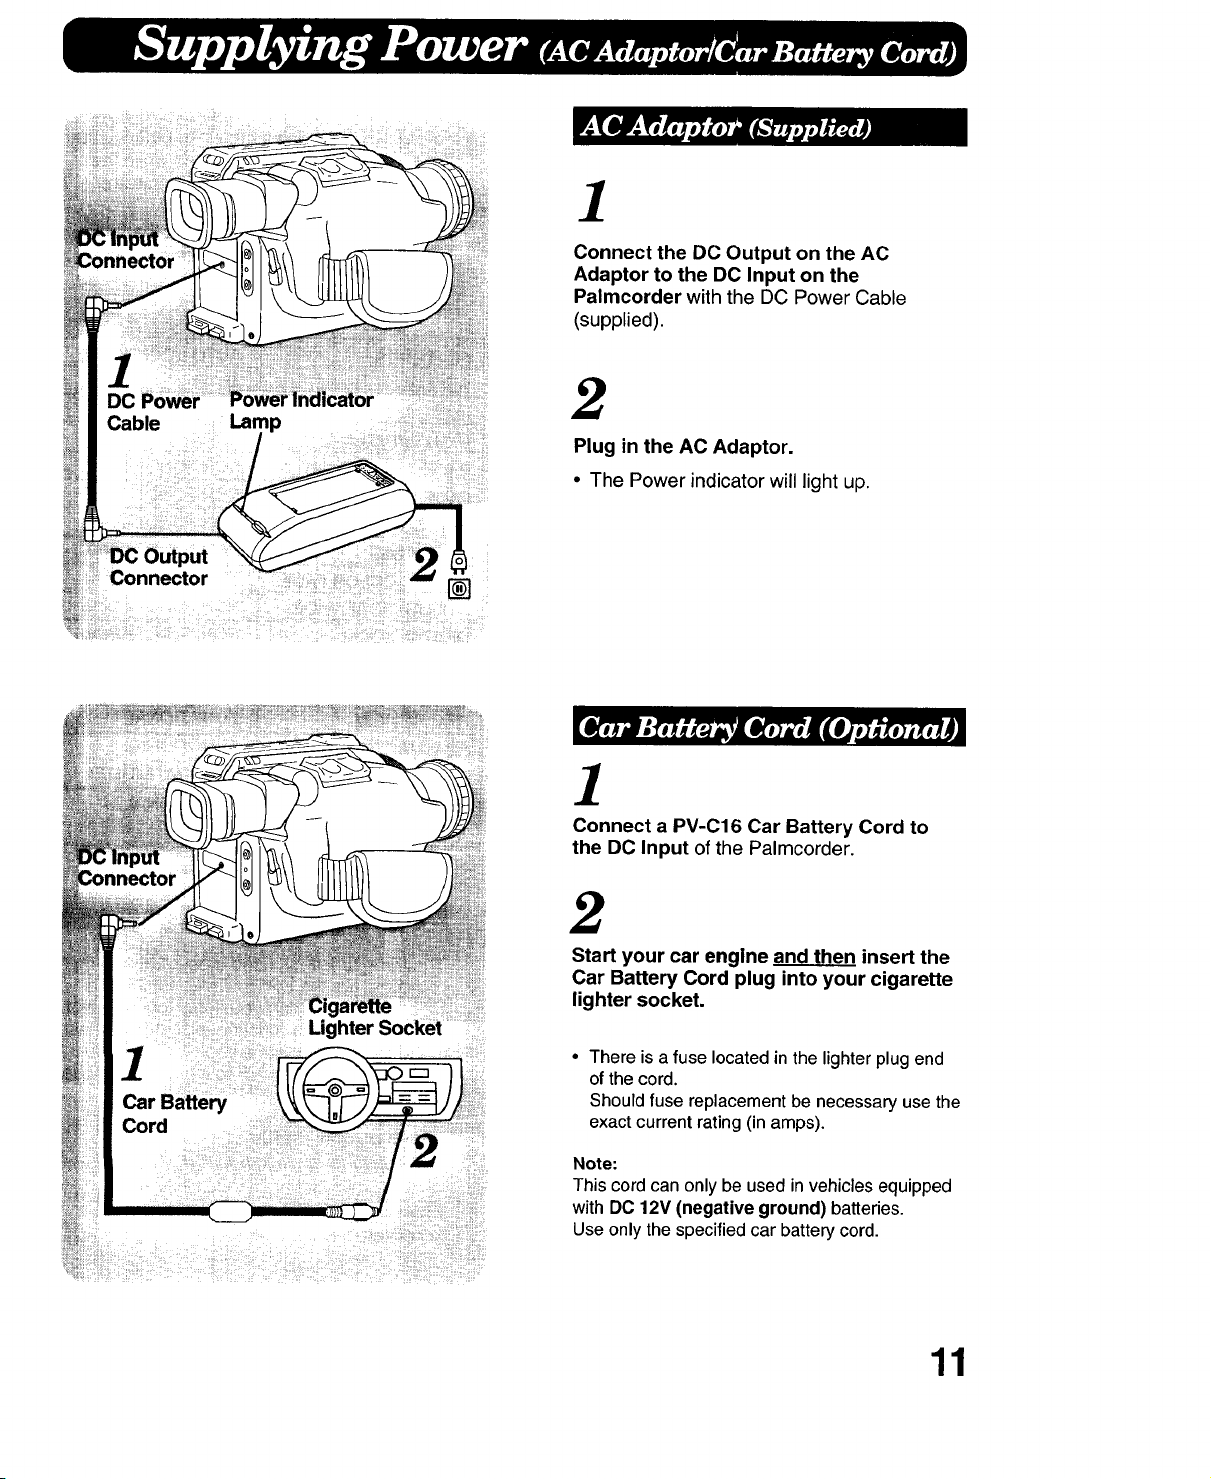
Connect the DC Output on the AC
Adaptor to the DC Input on the
Palmcorder with the DC Power Cable
(supplied).
DC
2
Plug in the AC Adaptor.
• The Power indicator will light up.
]
Connect a PV-C16 Car Battery Cord to
the DO Input of the Palmcorder.
2
Start your car engine and then insert the
Car Battery Cord plug into your cigarette
lighter socket.
hter Socket
• There is a fuse located in the lighter plug end
of the cord.
Should fuse replacement be necessary use the
exact current rating (in amps).
Note:
This cord can only be used in vehicles equipped
with DO 12V (negative ground) batteries.
Use only the specified car battery cord.
11

i_iiii_i!_ i __/ _,il¸ !_! i_ii__i_ii!_ii¸_!i_:i_i
When the AUTO LOCK switch is set to the
AUTO LOCK position, the white balance and
focus are automatically adjusted while the
more advanced features listed below are
locked.
Auto Lock is especially helpful for the first
time Palmcorder user and ensures "point
and shoot" operation under most conditions.
AUTO LOCK --_
NORMAL
FEATURES
FOCUS
AUTO WHITE BALANCE
HIGH SPEED SHUTTER
BACKLIGHT (LOCK)
FADE
EDIT SEARCH
CLOCK SET
DIGITAL COLOR FADE
STILL/STROBE/WIDE
DIGITAL ZOOM
BOOK MARK SEARCH
DATE/TIME
REC REVIEW
FEATURE PREVIEW
ELECTRONIC IMAGE
STABILIZATION SYSTEM
AUTO LOCK MODE
AUTO
AUTO
AUTO
NON FUNCTIONAL
NON FUNCTIONAL
NON FUNCTIONAL
NON FUNCTIONAL
NON FUNCTIONAL
NON FUNCTIONAL
NON 'FUNCTIONAL
NON FUNCTIONAL
FUNCTIONAL
FUNCTIONAL
FUNCTIONAL
(only DATE/TIME)
FUNCTIONAL
TIME
LIGHT
12
The three functions used most often during
recording are the DATE/TIME, FADE and
BACK LIGHT. When you softly touch one of
these buttons, the function indicator will flash
in the EVF. This means you won't have to
look down from the EVF to locate a particular
button.
Touch buttons softly
to display the function preview.
Push buttons
to operate the function.
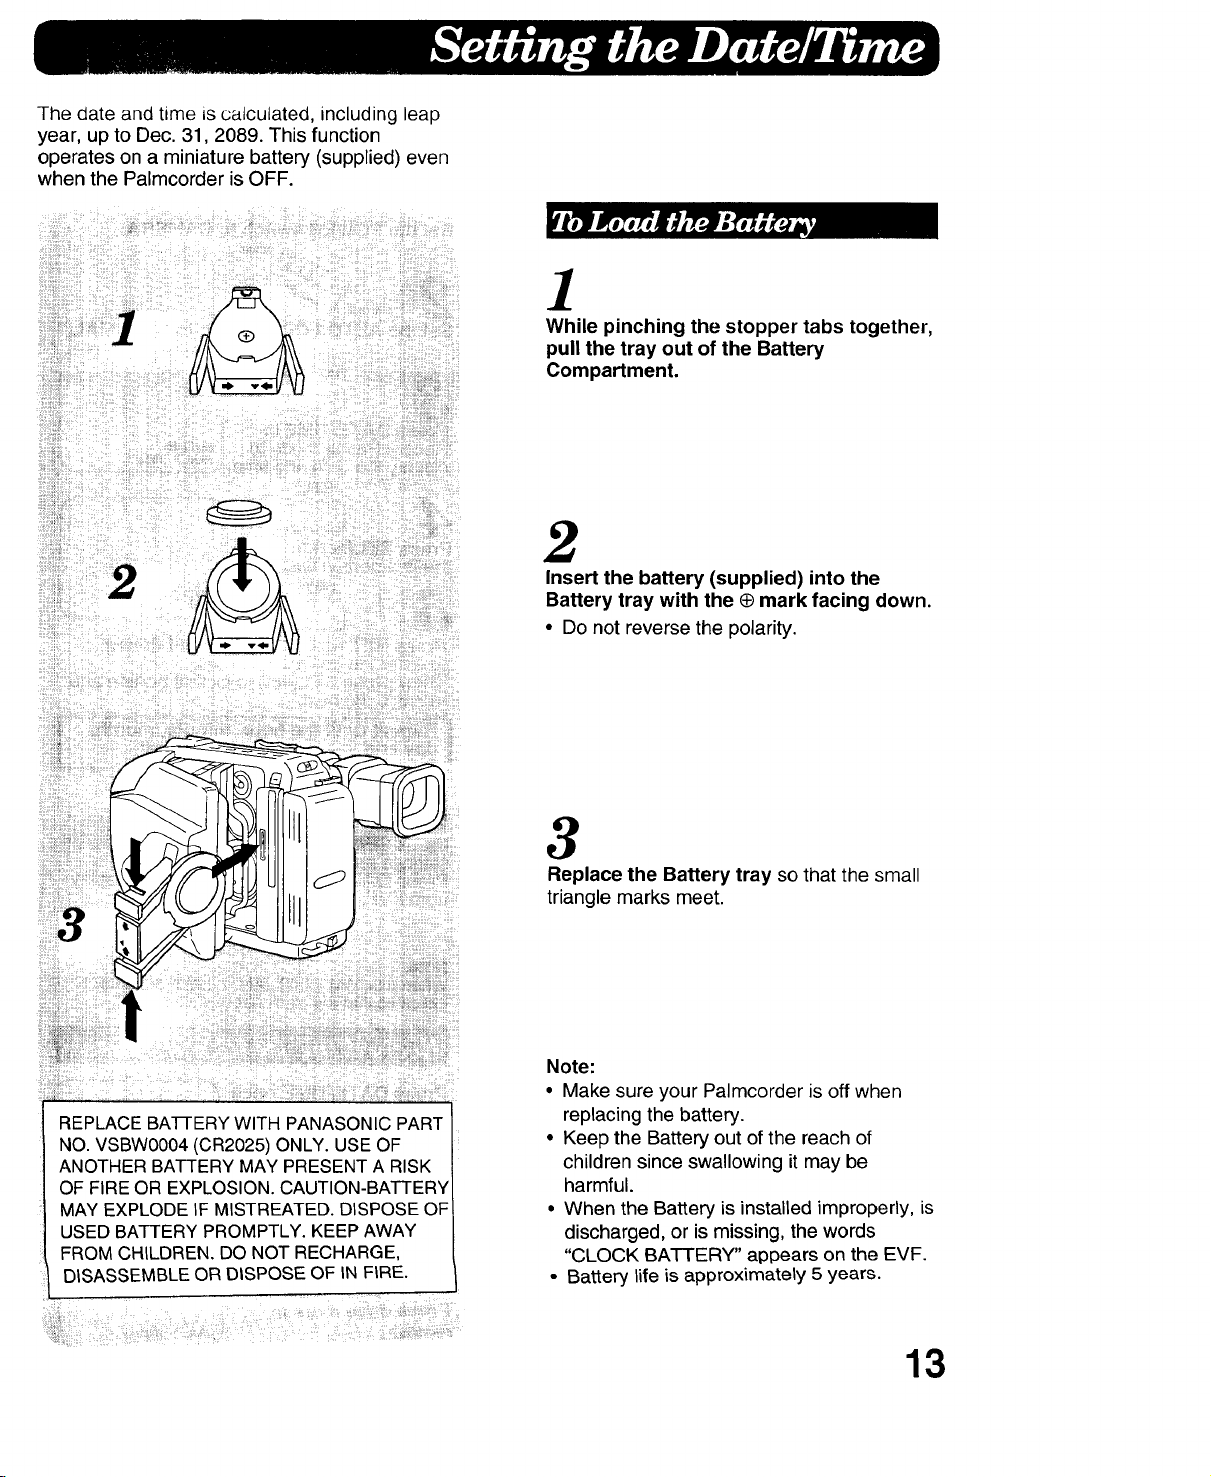
Thedateandtimeiscalculated,includingleap
year,uptoDec.31,2089.Thisfunction
operatesonaminiaturebattery(supplied)even
whenthePalmcorderisOFF.
1
While pinching the stopper tabs together,
pull the tray out of the Battery
Compartment.
2
Insert the battery (supplied) into the
Battery tray with the @mark facing down.
• Do not reverse the polarity.
.... Replace the Battery tray so that the small
REPLACE BA-I-FERY WITH PANASONIC PART
NO. VSBW0004 (CR2025) ONLY. USE OF
ANOTHER BATTERYMAY PRESENT A RISK
OF FIRE OR EXPLOSION.CAUTION-BATTERY
MAY EXPLODE IF MISTREATED.DISPOSE OF
USED BATTERY PROMPTLY. KEEP AWAY
FROM CHILDREN. DO NOT RECHARGE,
DISASSEMBLE OR DISPOSE OF IN FIRE.
triangle marks meet.
Note:
• Make sure your Palmcorder is off when
replacing the battery.
• Keep the Battery out of the reach of
children since swallowing it may be
harmful.
• When the Battery is installed improperly, is
discharged, or is missing, the words
"CLOCK BATTERY" appears on the EVF.
• Battery life is approximately 5 years.
13
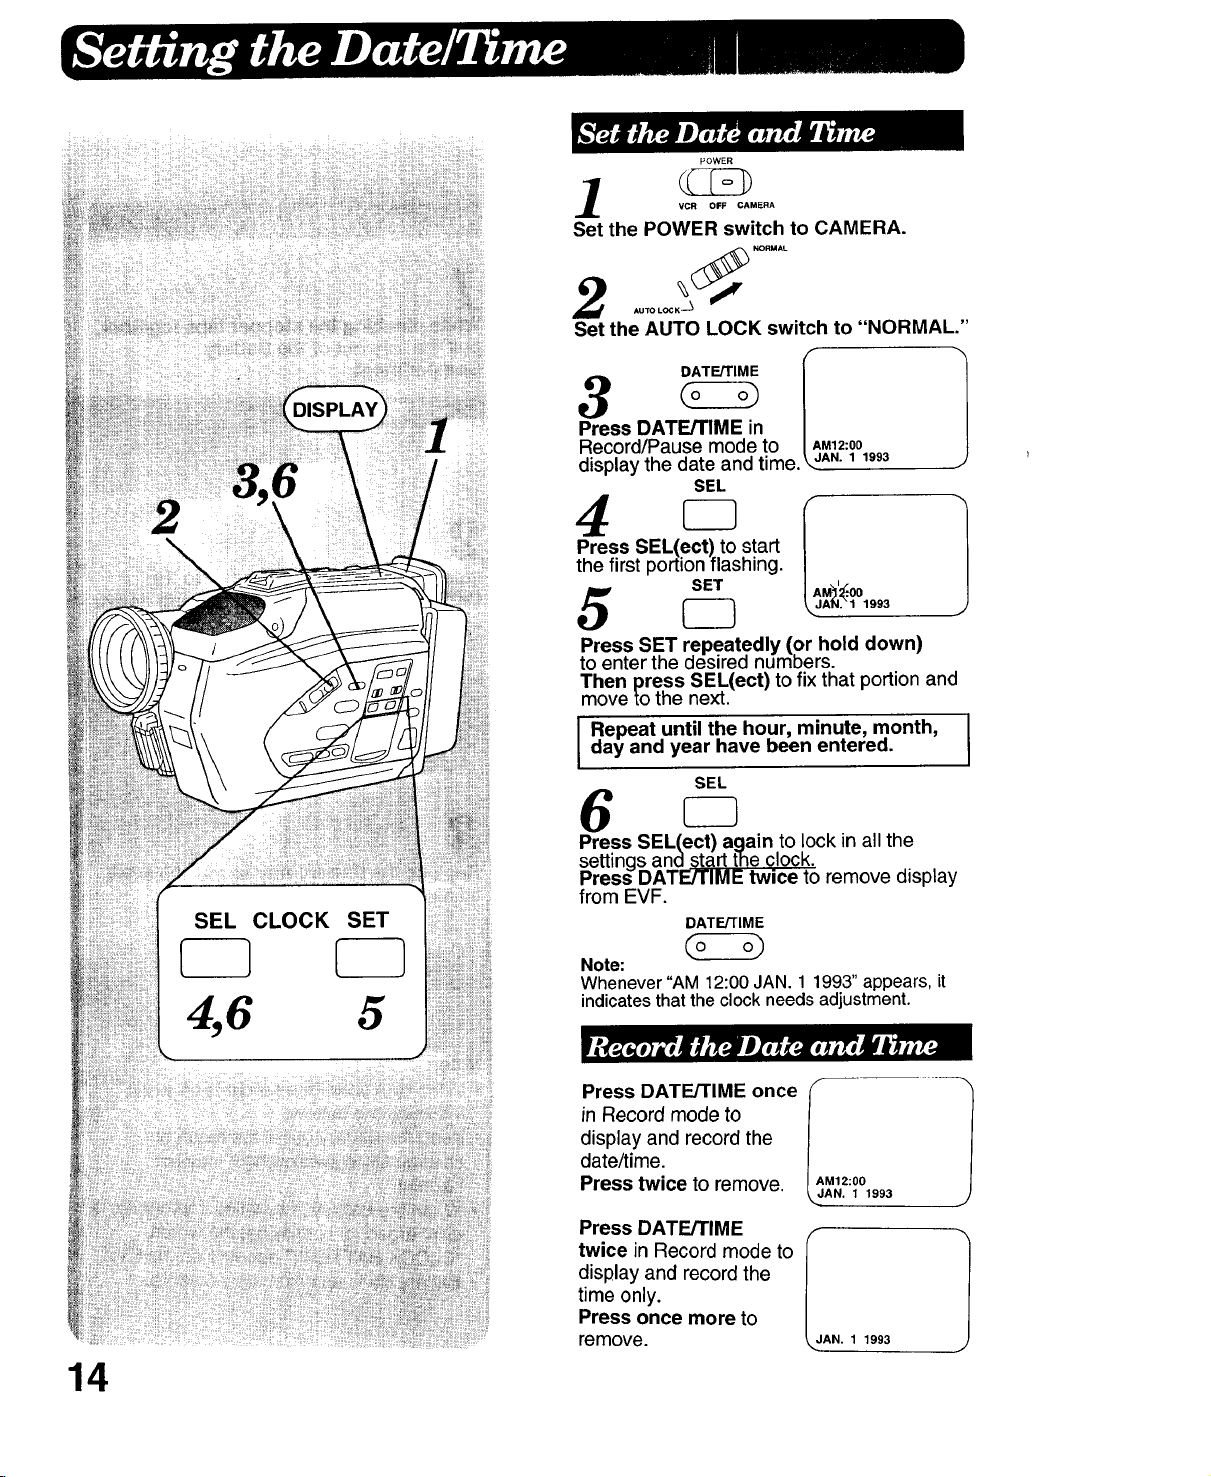
2
&6
POWER
VCR OFF CAMERA
Set the POWER switch to CAMERA.
AUTO LOCK -_
Set the AUTO LOCK switch to "NORMAL."
Press DATE/TIME in /
Record/Pause mode to I AM12:00
displaythe date and time.\ aA" 1 1993
the first portion flashing.
P_ressSEL(ect) to start IA
5 _ \aA..11993
Press SET repeatedly (or hold down)
to enter the desired numbers.
Then press SEL(ect) to fix that portion and
move to the next.
SEL
SET M_I'_..00
SEL CLOCK
4,6
SET
5
I Repeat until the hour, minute, month,
day and year have been entered. I
SEL
6
Press SEL(ect) again to lock in all the
settings and start the clock.
Press DATE/TIME twice to remove display
from EVF.
DATE/TIME
Note:
Whenever"AM12:00JAN. 1 1993"appears,it
indicatesthattheclockneedsadjustment.
in Record mode to
display and record the
date/time.
'ress'AT'"°ncel
Press twice to remove. _AN. 11993
Press DATE/TIME
disp ay and record the
time only.
twice in Record mode to Ij 1
Press once more to
remove. AN. 1 1993
AM12:00
I
14
 Loading...