

Page 1
Panasonic
OmniMovle [_
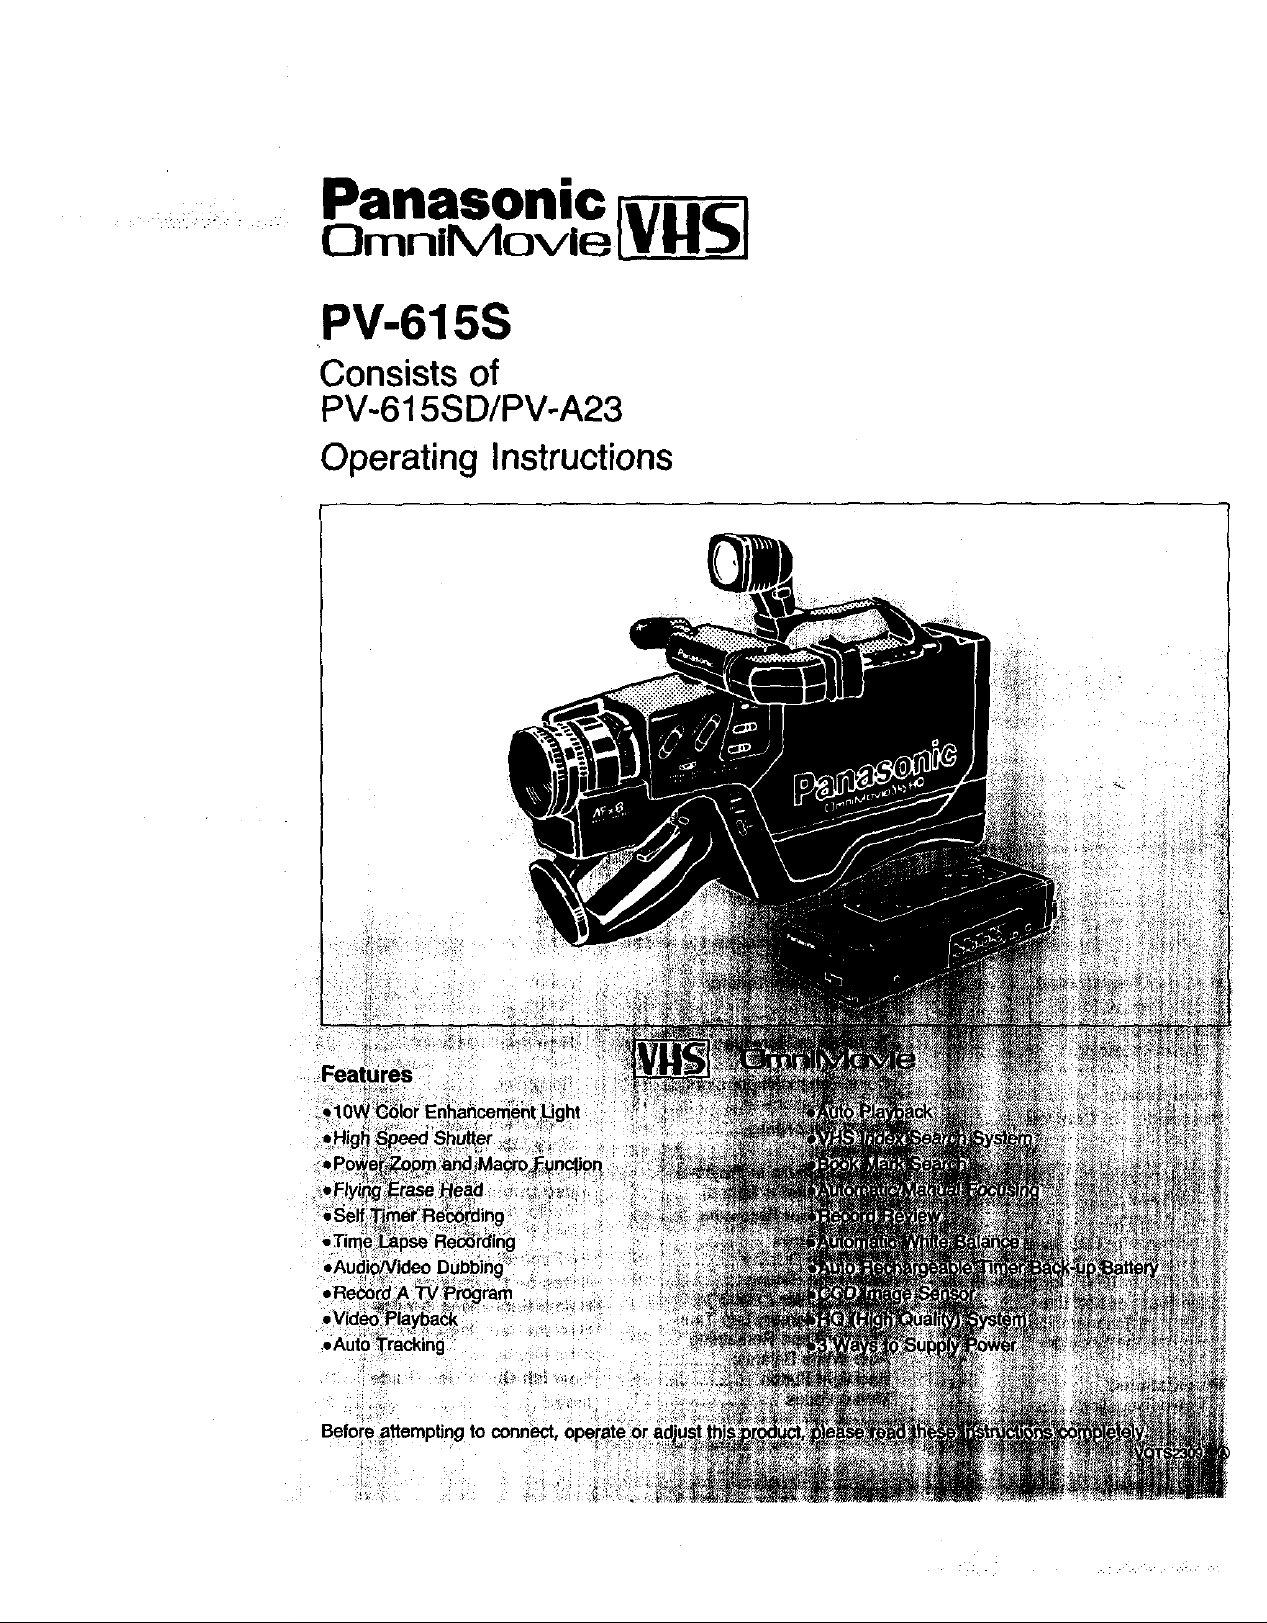
PV-615S
Consists of
PV-615S D/PV-A23
Operating Instructions
Beforeattempting
Page 2
Warranty Registration
The serial number of these products may be found
on the bottom of the Movie and on the surface of
the AC Adaptor. No other has the same serial
number as yours. You should record the number
and other vital information here and retain this book
as a permanent record of your purchase to aid
identification in case of theft.
Safety Precautions
WARNING: TO PREVENT FIRE OR SHOCK
HAZARD, DO NOT EXPOSE THIS EQUIPMENT
TO RAIN OR MOISTURE.
Your Movie is designed to record and play back
in Standard Play (SP) mode only. Your Movie will
not perform normal playback for programs pre-
recorded in Long Play (LP) or Super Long Play
(SLP) mode.
CAUTION: TO RIED_CE THE RISK OF ELEC 1_11CSHOCK
DO NOT REMOVE COVER (OR BACK)
NO USEA-SER_ICEABLE pART_ INSIOE
Date of Purchase
Dealer Purchased From
Dealer Address
Dealer Phone No.
Model No. PV-615SD/PV-A23
Serial No.
CAUTION: TO PREVENT FIRE OR SHOCK
HAZARD AND ANNOYING INTERFERENCE, USE
THE RECOMMENDED ACCESSORIES ONLY.
This Movie is equipped with the HQ System to
provide excellent video pictures, and is
compatible with standard VHS equipment.
Only use those tapes with the _ mark. It is
recommended that only cassette tapes that have
been tested and inspected for use in 2, 4, 6 and
8 hour VCR machines be used.
This symbol warns the user that uninsulated voltage
within the unit may have sufficient magnitude to cause
electric shock. Therefore, it is dangerous to make any
kind of contact with any inside part of this unit.
This symbol alerfs the user that important literature
concerning the operation and maintenance of this unit
has been included. Therefore, it should be read
carefully in order to avoid any problems.
Table of Contents
Warranty Registration ............. 2
Safety Precautions .................. 2
Basic Steps .............................. 3
Basic Recording .................... 3
ToWatchRaybackintheEVF ..... 3
Movie System .......................... 4
Description of Controls .......... 5
Front View ............................. 5
Rear View .............................. 6
Underside .............................. 6
Top View ................................ 7
AC Adaptor ............................ 8
Adjustmentsfor EasyHandling ..... 9
How to Adjust the Electronic
Viewfinder (EVF) for use with
the Right or Left Eye ............. 9
Vision Adjustment Ring ......... 9
To Use the Shoulder
Strap .................................... 10
Preparations .......................... 11
Power Supplies .................... 11
2
How to Charge Battery
Pack ..................................... 12
A Word About Cassettes ..... 13
To Insert or Remove a
Cassette ............................... 13
Color Enhancement Light .... 14
EVF Indications ................... 15
Camera Recording ................ 16
Playback ................................. 17
Special Effects in Playback
Mode (Sound is Muted) ....... 17
To Monitor Your Recording ...... 18
Useful Features ..................... 19
Date/Time Display ............... 19
Date/Time Setting ................ 19
Tape Counter ("0000")/
Counter Memory/Lap Time
Counter/Tape Remaining .... 20
Auto White Balance ............. 21
Backlight Button ................... 21
Macro Focus ........................ 21
Zoom .................................... 22
Focus ................................... 22
Fade In/Out .......................... 23
High Speed Shutter ............. 23
Self Timer/Time Lapse
Recording ............................ 24
VHS Index Search System .... 25
Book Mark Search ............... 25
Easy Editing ......................... 25
To Record a TV Program ..... 26
Video Dubbing ....................... 27
AudioNideo Dubbing ........... 28
Audio Dubbing ...................... 29
Re-Recording ......................... 30
Notes on Operations ............. 32
Before Requesting Service ..... 34
System Carrying Case .......... 35
Specifications ........................ 36
Spanish Quick Use Guide ,,., 37
Index ....................................... 39
Page 3
Basic Steps
- Basic Recording ,o_
6
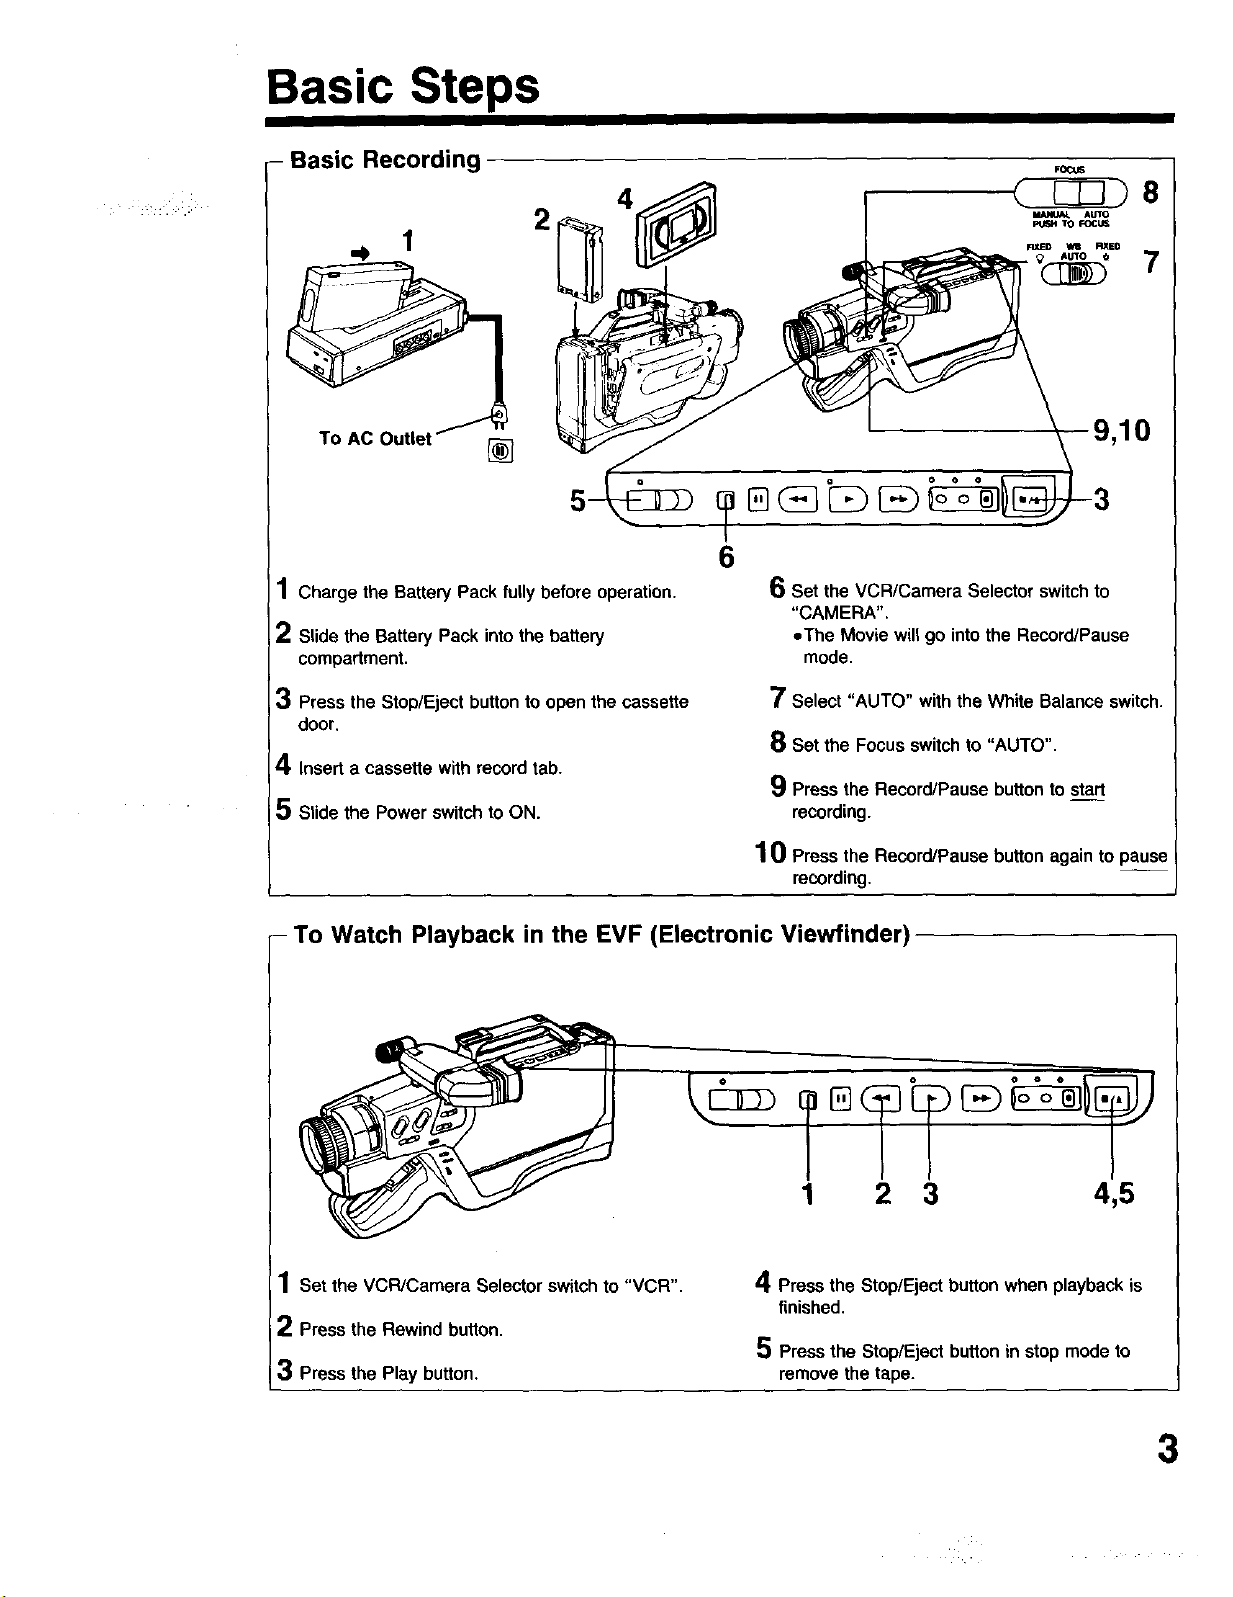
1Charge the Battery Pack fully before operation.
2 Slide the Battery Pack into the battery
compartment.
6 Set the VCR/Camera Selector switch to
"CAMERA",
eThe Movie will go into the Record/Pause
mode.
3 Press the Stop/Eject button to open the cassette
door,
4 Insert a cassette with record tab.
5 Slide the Power switch to ON.
- To Watch Playback in the EVF (Electronic Viewfinder)
7 Select "AUTO" with the White Balance switch.
8 Set the Focus switch to "AUTO".
9 Press the Record/Pause button to start
recording.
1 0 Press the Record/Pause button again to pause
recording,
1 2 3 4,5
1Set the VCPJCamera Selector switch to "VCR".
2 Press the Rewind button.
3 Press the Play button.
4Press the Stop/Eject button when playback is
finished.
5 Press the Stop/Eject button in stop mode to
remove the tape.
3
Page 4
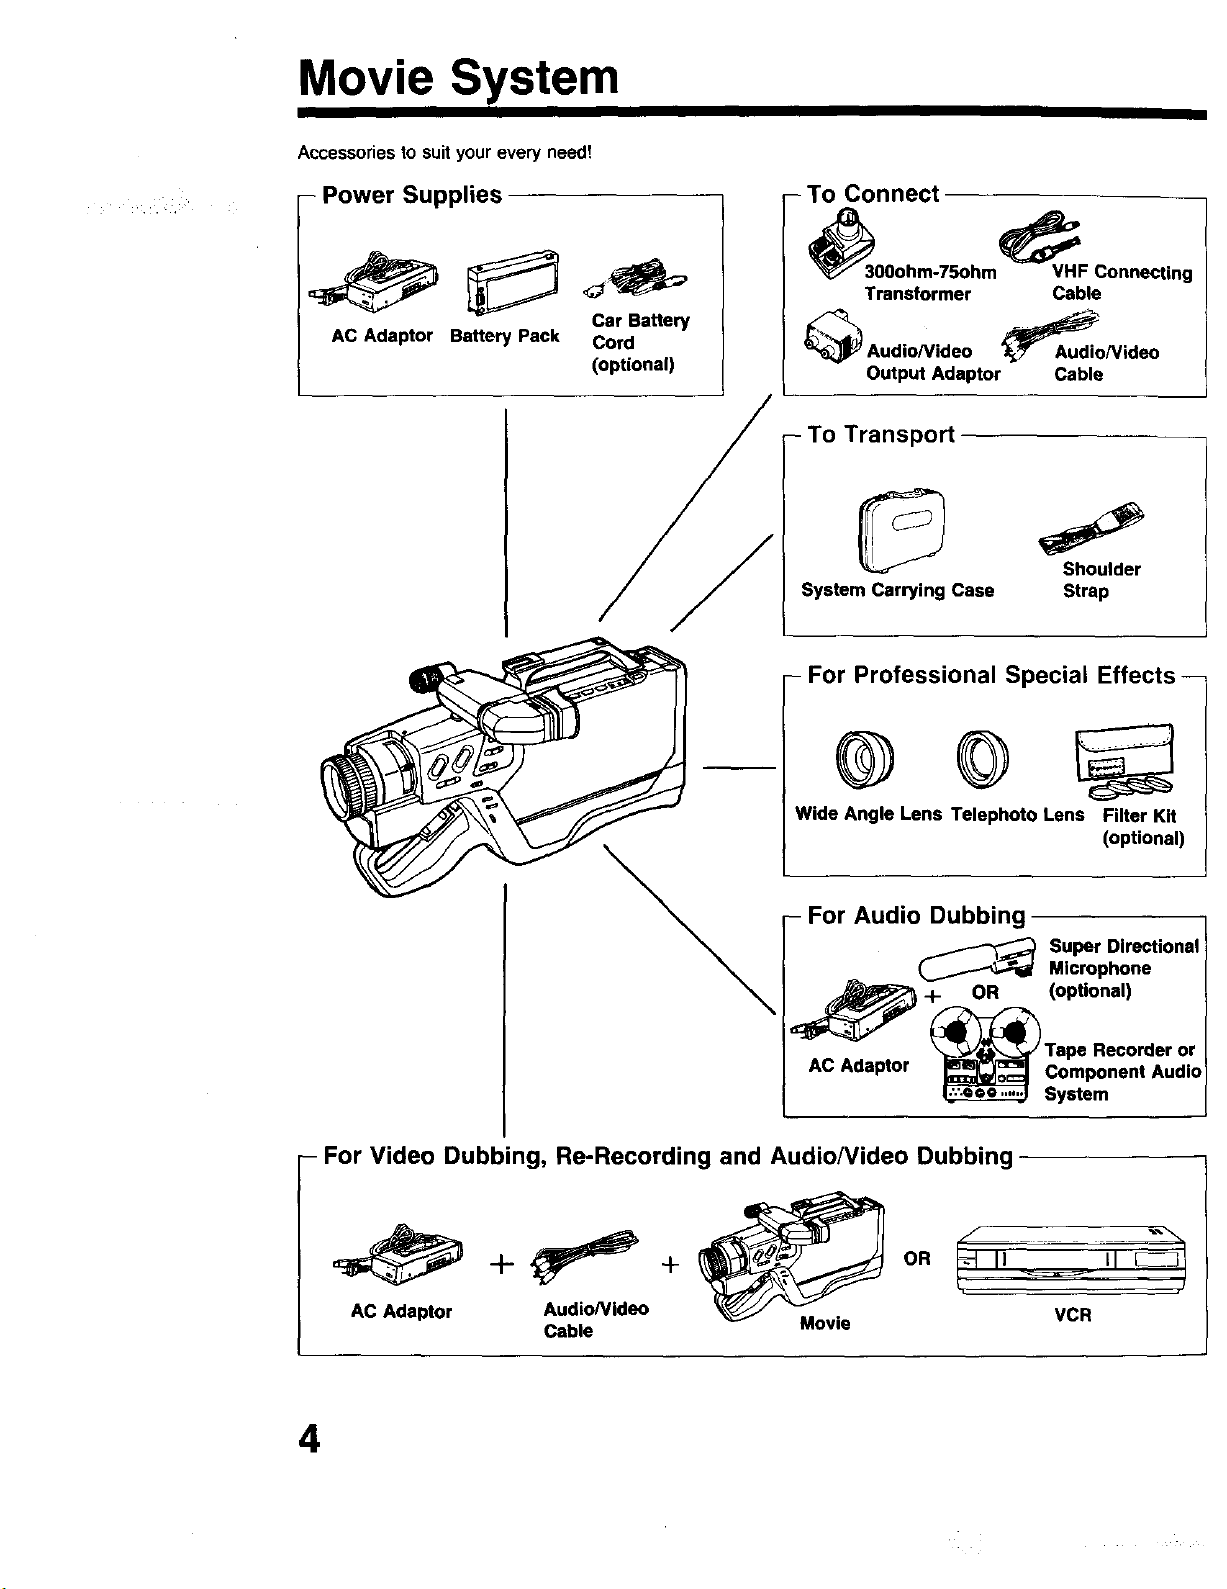
Movie System
Accessories to suit your every need!
<x, ¸ , •
- Power Supplies
AC Adaptor Battery Pack Cord
Car Battery
(optional)
- To Connect
_300ohm-75ohm VHF Connecting
Transformer Cable
Output Adaptor Cable
Transpo_
System Carrying Case Strap
- For Professional Special Effects --
Wide Angle Lens Telephoto Lens Filter Kit
Audio Dubbing
_ uper Directional
OR (optional)
AC Adaptor Component Audio
-- For Video Dubbing, Re-Recording and Audio/Video Dubbing
oR
AC Adaptor Audio/Video
Cable Movie
(optional)
Microphone
System
VCR
4
Page 5
• . ..._
Description of Controls
Front View
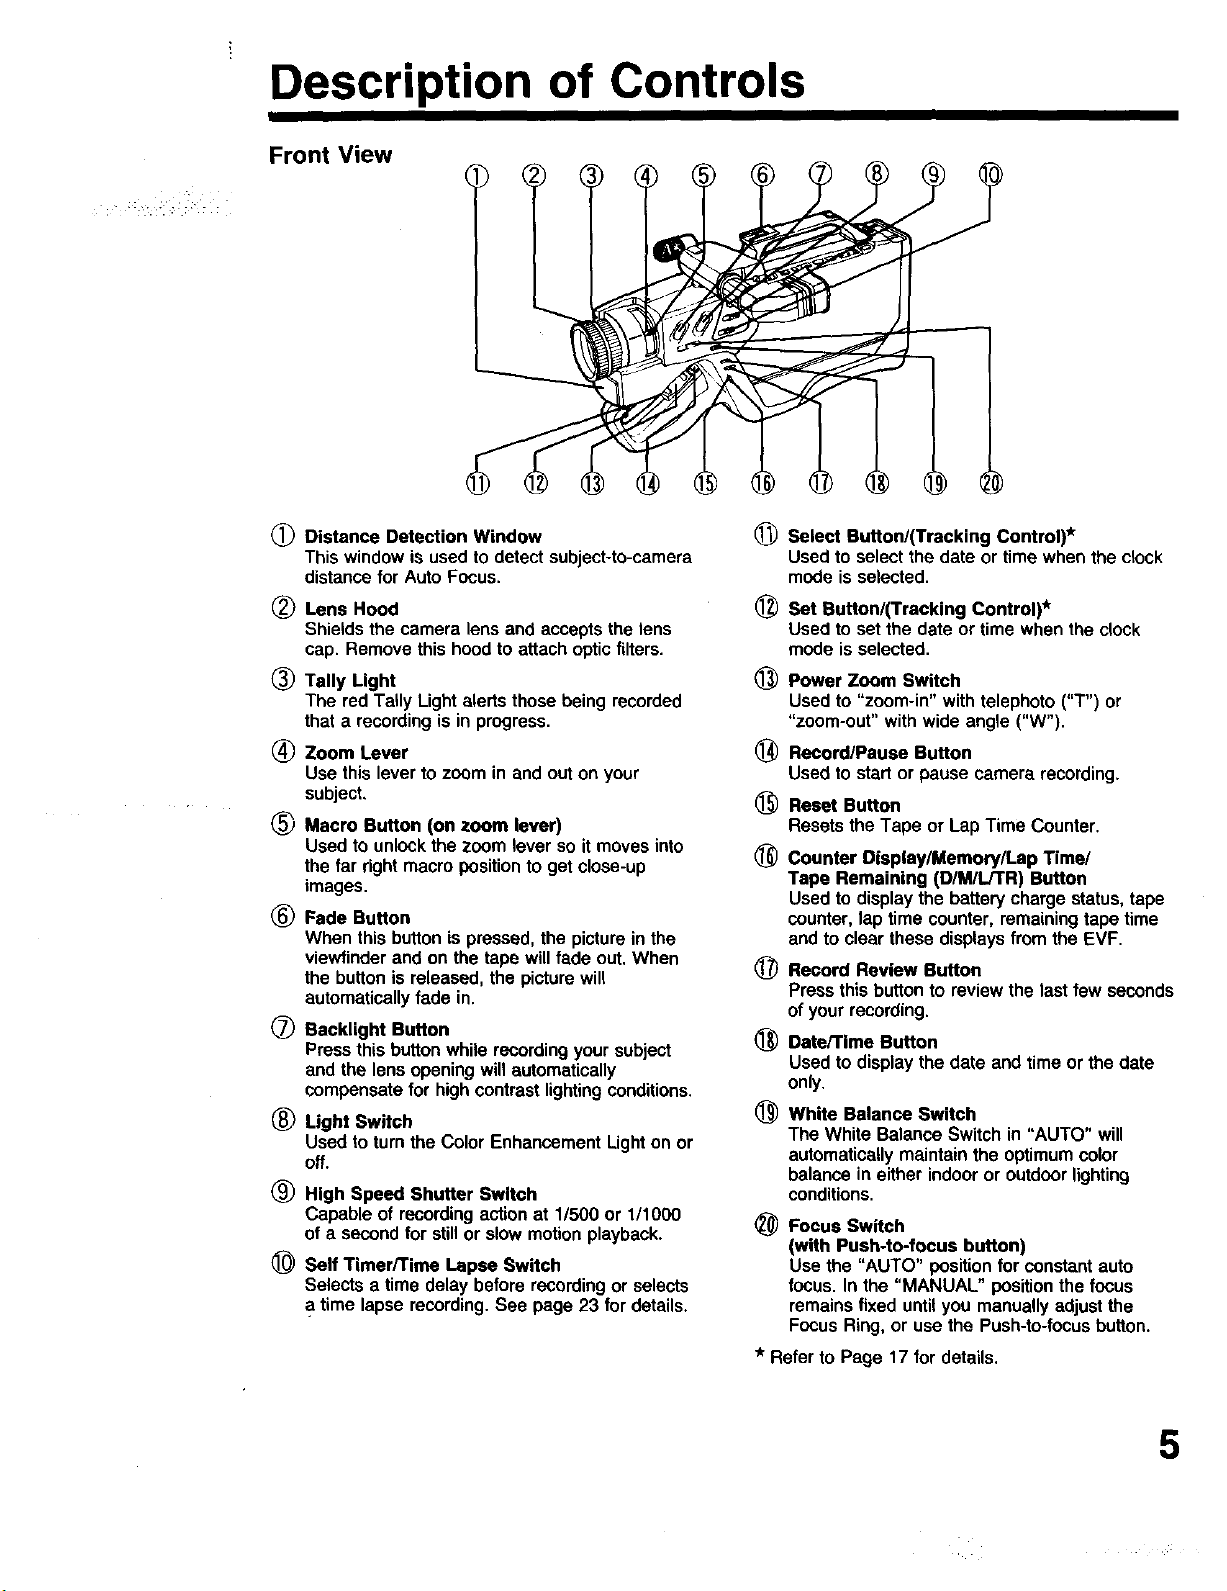
(_) Distance Detection Window
This window is used to detect subject-to-camera
distance for Auto Focus.
(_) Lens Hood
Shields the camera lens and accepts the lens
cap. Remove this hood to attach optic filters.
_) Tally Light
The red Tally Light alerts those being recorded
that a recording is in progress.
(_ Zoom Lever
Use this lever to zoom in and out on your
subject.
(_ Macro Button (on zoom lever)
Used to unlock the zoom lever so it moves into
the far right macro position to get close-up
images.
(_) Fade Button
When this button is pressed, the picture in the
viewfinder and on the tape will fade out. When
the button is released, the picture will
automatically fade in.
(_ Racklight Button
Press this button while recording your subject
and the lens opening will automatically
compensate for high contrast lighting conditions.
(_) Light Switch
Used to turn the Color Enhancement Light on or
off.
(_ High Speed Shutter Switch
Capable of recording action at 1/500 or 1/1000
of a second for stillor slow motion playback.
_) Self Timer/Time Lapse Switch
Selects a time delay before recording or selects
time lapse recording. See page 23 for details.
(_) Select Button/(Tracking Control)*
Used to select the date or time when the clock
mode is selected.
_) Set Rutton/(Tracking Control)*
Used to set the date or time when the clock
mode is selected.
@
Power Zoom Switch
Used to "zoom-in" with telephoto ("T') or
"zoom-out" with wide angle ("W').
@
Record/Pause Button
Usedto startor pausecamera recording.
®
Reset Button
Resets the Tape or Lap Time Counter.
®
Counter Display/Memory/Lap Time/
Tape Remaining (D/M/L/TR) Button
Used to display the battery charge status, tape
counter, lap time counter, remaining tape time
and to clear these displays from the EVF.
(_ Record Review Button
Press this button to review the last few seconds
of your recording.
_) Dete/Time Button
Used to display the date and time or the date
only,
(_ White Balance Switch
The White Balance Switch in "AUTO" will
automatically maintain the optimum color
balance in either indoor or outdoor lighting
conditions.
_) Focus Switch
(with Push-to-focus button)
Use the "AUTO" position for constant auto
focus. In the "MANUAL" position the focus
remains fixed until you manually adjust the
Focus Ring, or use the Push-to-focus button.
* Refer to Page 17 for details.
5
Page 6
Description of Controls (continued)
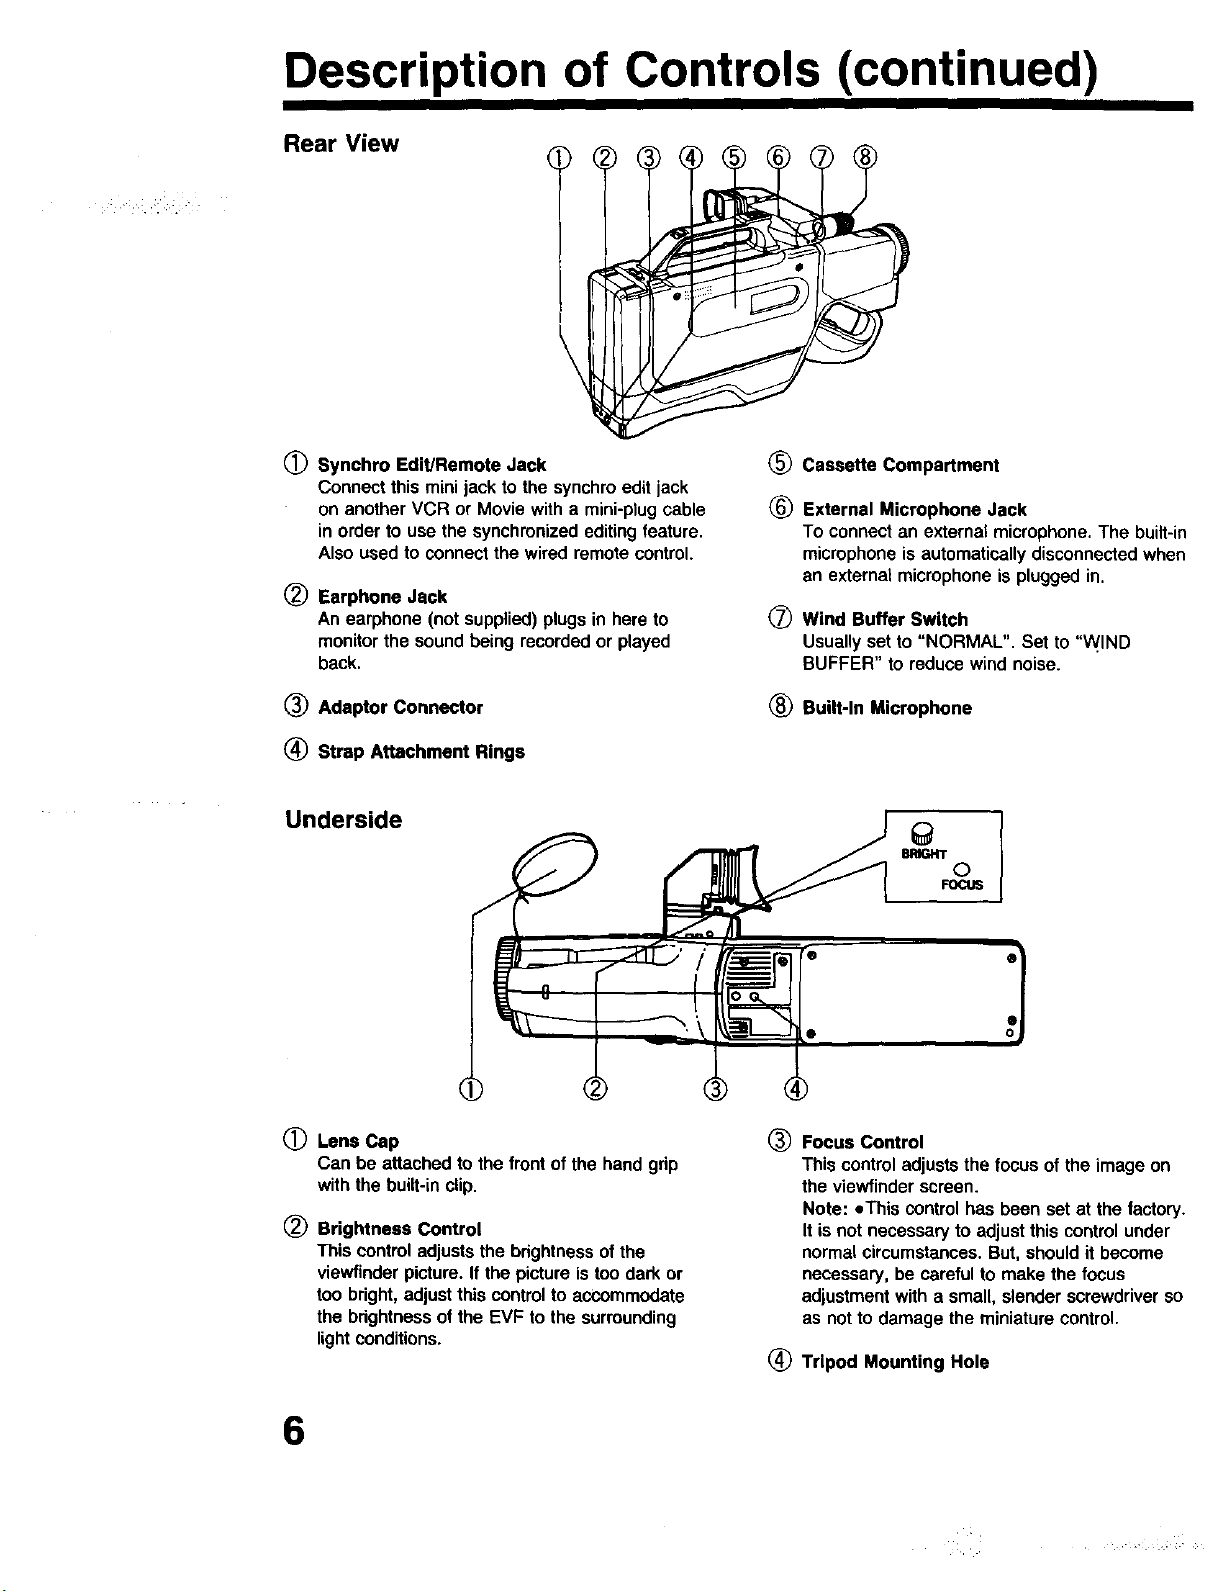
Rear View
O
Synchro Edit/Remote Jack _)
Connect this mini jack to the synchro edit jack
on another VCR or Movie with a mini-plug cable (_
in order to use the synchronized editing feature.
Also used to connect the wired remote control.
®
Earphone Jack
An earphone (not supplied) plugs in here to
monitorthe sound being recorded or played
back.
Cassette Compartment
External Microphone Jack
To connectan externalmicrophone.The built-in
microphoneis automaticallydisconnectedwhen
an externalmicrophone ispluggedin.
Q
Wind Buffer Switch
Usually set to "NORMAL". Set to "WIND
BUFFER" to reduce wind noise.
(_ Adaptor Connector (_ Built-In Microphone
(_ Strap Attachment Rings
Underside
BRIGHT
©
FOCUS
0
Lens Cap
Can be attachedto the frontof the handgdp
withthe built-in clip.
®
Brightness Control
This control adjusts the brightness of the
viewfinder picture. If the picture is too dark or
too bright, adjust this control to accommodate
the brightness of the EVF to the surrounding
light conditions.
® Focus Control
This control adjusts the focus of the image on
the viewfinder screen.
Note: eThis control has been set at the factory.
It is not necessary to adjust this control under
normal circumstances. But, should it become
necessary, be careful to make the focus
adjustment with a small, slender screwdriver so
as not to damage the miniature control.
(_ Tripod Mounting Hole
6
Page 7
Description of Controls (continued)
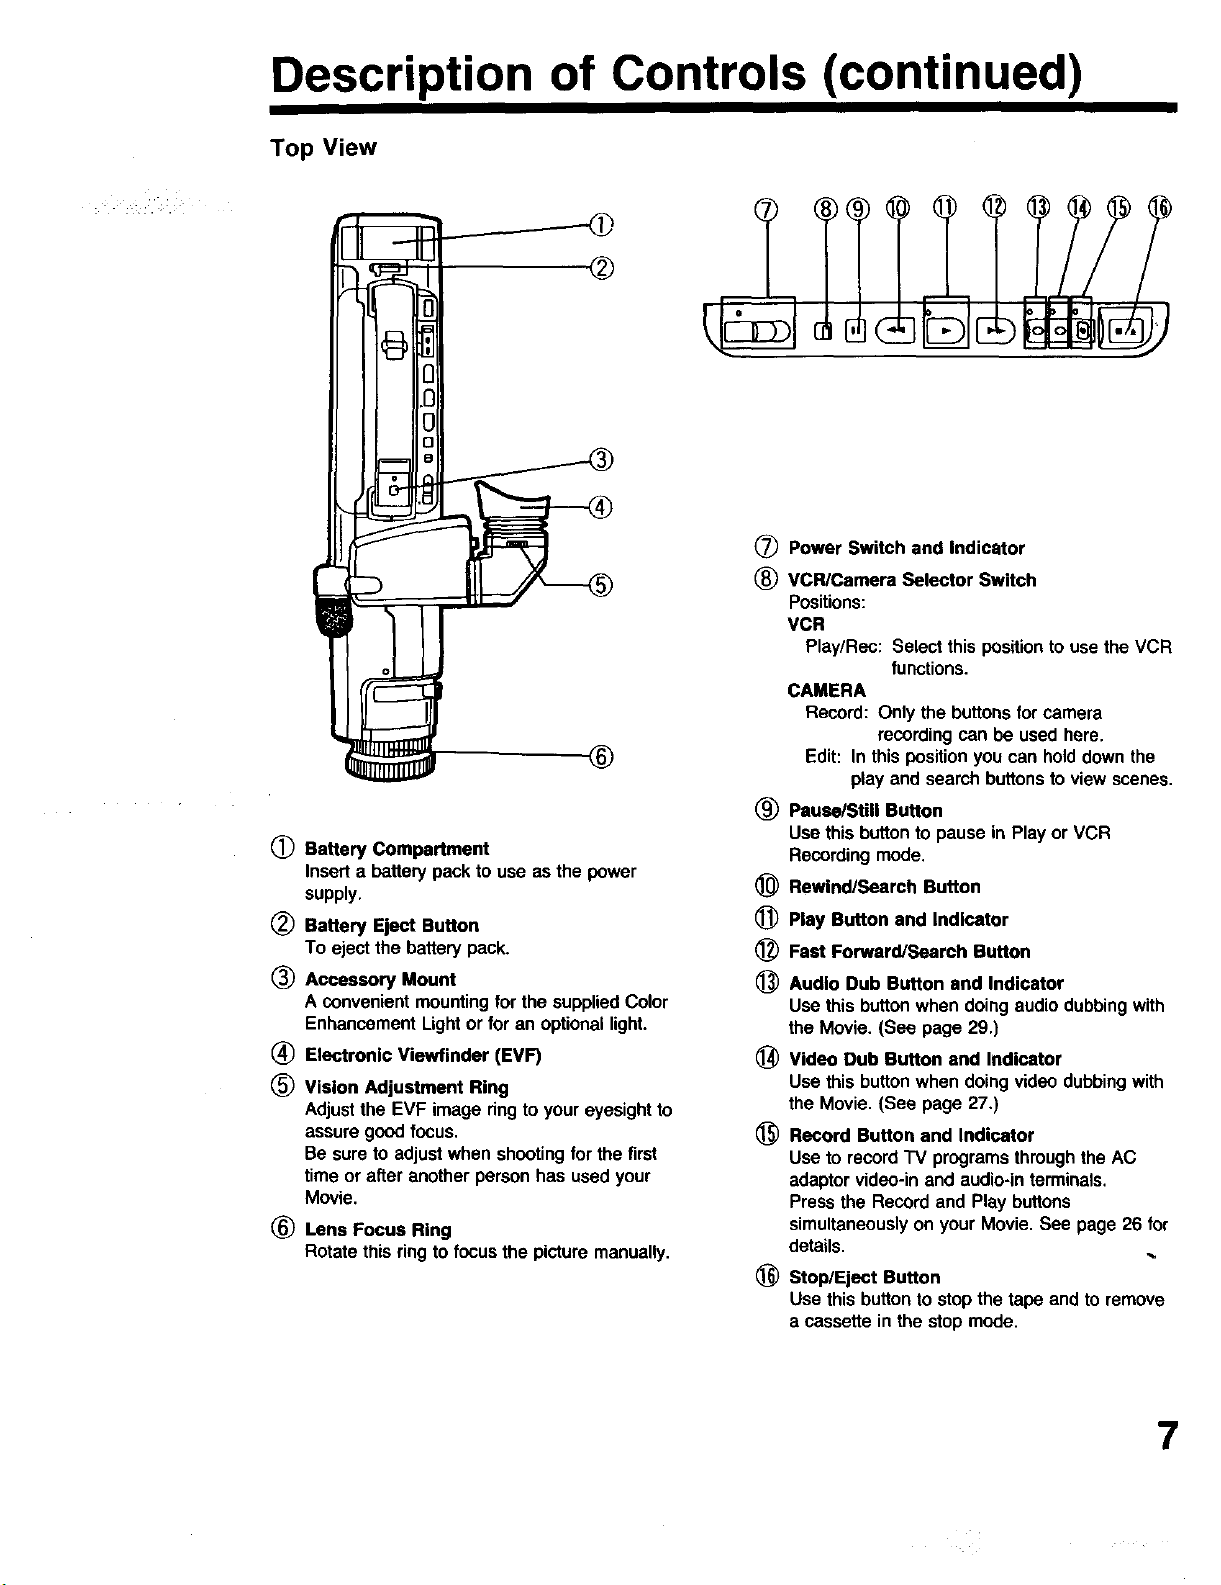
Top View
®
(_) Power Switch and Indicator
® VCR/Camera Selector Switch
Positions:
VCR
Play/Rec: Select this position to use the VCR
functions.
CAMERA
Record: Only the buttons for camera
recording can be used here.
®
(_ Battery Compartment
Insert a battery pack to use as the power
supply.
(_) Battery Eject Button (_)
To eject the battery pack.
_) Accessory Mount (_)
A convenient mounting for the supplied Color
Enhancement Ught or for an optional light.
(_ Electronic Viewfinder (EVF) _)
® Vision Adjustment Ring
Adjust the EVF image ring to your eyesight to
assure good focus. (_)
Be sure to adjust when shooting for the first
time or after another person has used your
Movie.
® Lens Focus Ring
Rotate this ring to focus the picture manually.
Edit: In this position you can hold down the
play and search buttons to view scenes,
® PauselStill Button
Use this button to pause in Play or VCR
Recording mode,
Rewind/Search Button
Play Button and Indicator
Fast Forward/Search Button
Audio Dub Button and Indicator
Use this button when doing audio dubbing with
the Movie. (See page 29.)
Video Dub Button and Indicator
Use this button when doing video dubbing with
the Movie, (See page 27,)
Record Button and Indicator
Use to record TV programs through the AC
adaptor video-in and audio-in terminals.
Press the Record and Play buttons
simultaneously on your Movie. See page 26 for
details.
_) Stop/Eject Button
Use this button to stop the tape and to remove
a cassette in the stop mode.
7
Page 8

Description of Controls (continued)
AC Adaptor
(_ Input Signal Selector
INPUT SIGNAL
SELECTORSET TO LINE
VCR/CAMERA POSITION
IN VCR
POSITION
TO RECORD:
VIDEO
IMAGE
AUDIO
SOUND
IN CAMERA
POSITION
TO RECORD
®
Power Indicator Lamp
This indicator lights up when the AC power plug
of the AC adaptor is connected to an AC outlet.
®
Charging Indicator Lamp
VIDEO-IN NOT
CONNECTION RECORDED
AUDIO-IN CAMERA
CONNECTION MICROPHONE
FOR BOTH INPUT SIGNAL
SELECTOR POSITIONS
Camera lena image and
Camera Microphone Audio
SETTOCAMERA
POSITION
Ughts whilethe BatteryPack is charging.
Aftercharging,thislightwillgo off.
(_) Battery Charging Compartment
For charging a Battery Pack.
(_) Video Output Connector
For connection to a video input connector on a
"IV Monitor or VCR.
_) Audio Output Connector
For connection to an audio input connector on a
TV Monitor, VCR or an audio tape recorder.
(_ Video Input Connector
For connection from a video output connector
on another VCR, or TV, to record a TV
program,
(_ Audio Input Connector
For connection from an audio output connector
on another VCR, TV, or other audio source,
® RF Converter Switch
Set to channel 3 or 4, whichever is not used for
TV broadcasting inyour area, or provides the
best picture during playback. Set to OFF to view
TV channels if the Movie is left ON.
(_) VHF Antenna Input Terminal
Connect the VHF antenna or cable TV cable to
this terminal.
(_) VHF Antenna Output Terminal
Connect this terminal to the VHF antenna
terminal on the TV using the supplied VHF
connecting cable.
i CAUTION:
perating at a voltage setting of 110/120/220/240V
may require the use of a different AC plug,
lease contact either a local or foreign electrical
rts distributor for assistance in selecting an
8
®
Adaptor Cable
(_) AC Power Cord
alternate AC plug. We recommend using the
accessory power plug adaptor (VJSS0070) in an
area which has special AC outlets.
Page 9
Adjustments for Easy Handling
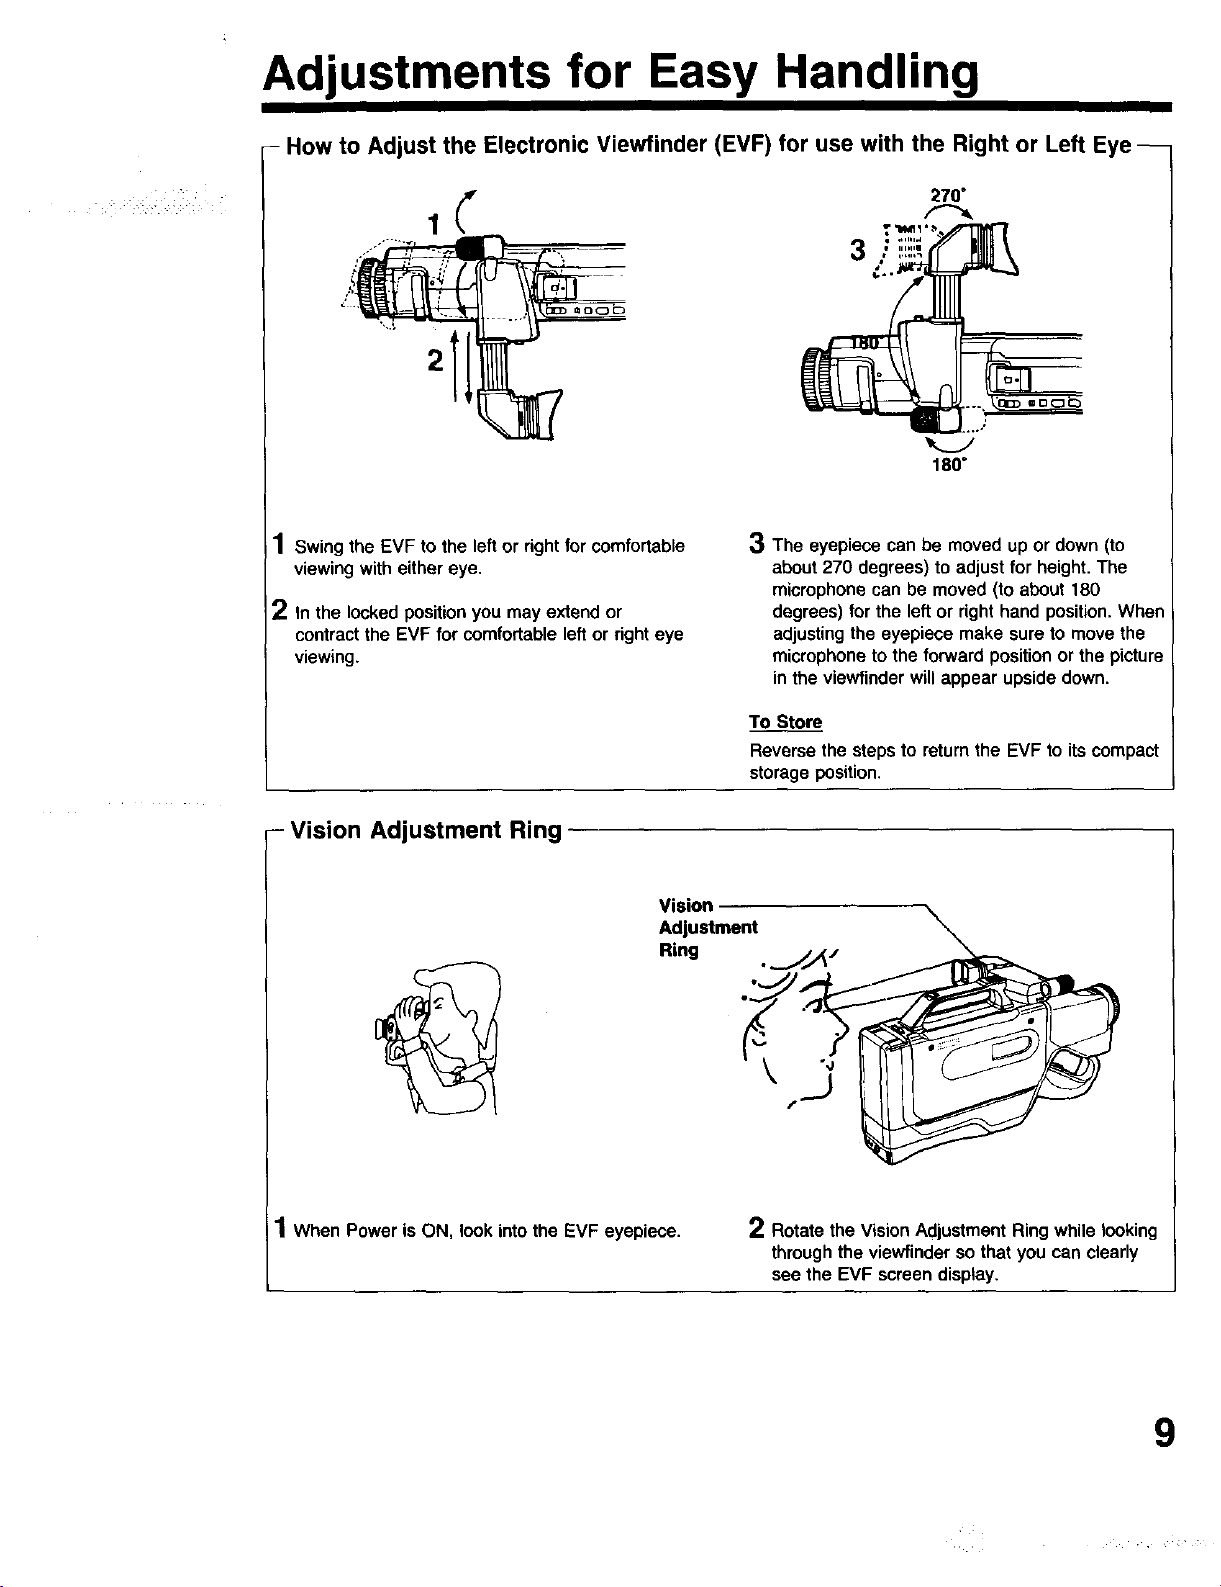
- How to Adjust the Electronic Viewfinder (EVF) for use with the Right or Left Eye --
2
180"
1
Swing the EVF to the left or rightforcomfortable
viewingwitheithereye,
2
In the locked position you may extend or
contract the EVF for comfortable left or right eye
viewing.
- Vision Adjustment Ring
3 The eyepiece can be moved up or down (to
about 270 degrees) to adjust for height. The
microphone can be moved (to about 180
degrees) for the left or right hand position. When
adjusting the eyepiece make sure to move the
microphone to the forward position or the picture
in the viewfinder will appear upside down.
To StoJ
Reverse the steps to return the EVF to its compact
storage position.
Vision
Adjustment
Ring . j,_/
1When Power is ON, look into the EVF eyepiece. 2 Rotate the Vision Adjustment Ring while looking
through the viewfinder so that you can clearly
see the EVF screen display,
9
Page 10
"_ :_:_i _ .:_i _ _
Adjustments for Easy Handling (continued)
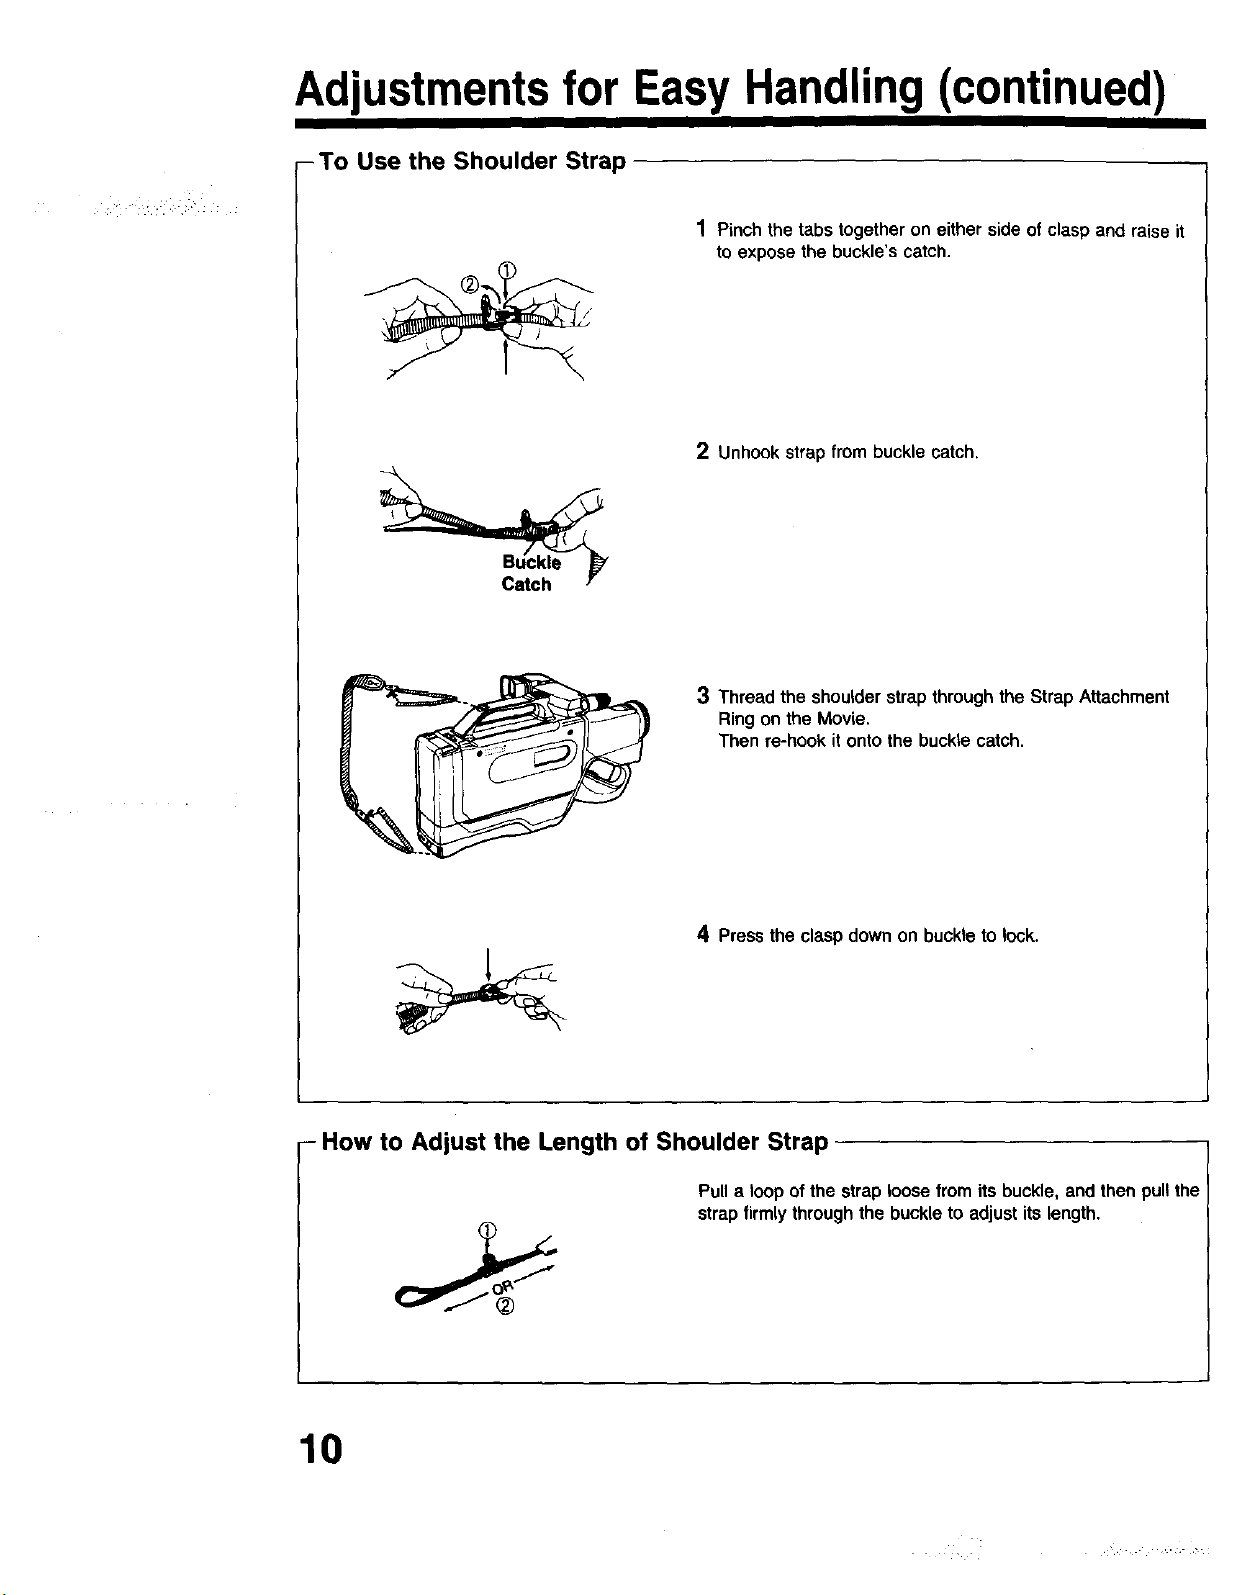
-To Use the Shoulder Strap
1 Pinch the tabs together on either side of clasp and raise it
to expose the buckle's catch.
2 Unhook strap from buckle catch.
3 Thread the shoulder strap through the Strap Attachment
Ring on the Movie.
Then re-hook it onto the buckle catch.
4 Pressthe claspdown on buckle to lock.
- How to Adjust the Length of Shoulder Strap
Pull a loop of the strap loose from its buckle, and then pull the
strap firmly through the buckle to adjust its length.
10
Page 11
Preparations
Power Supplies
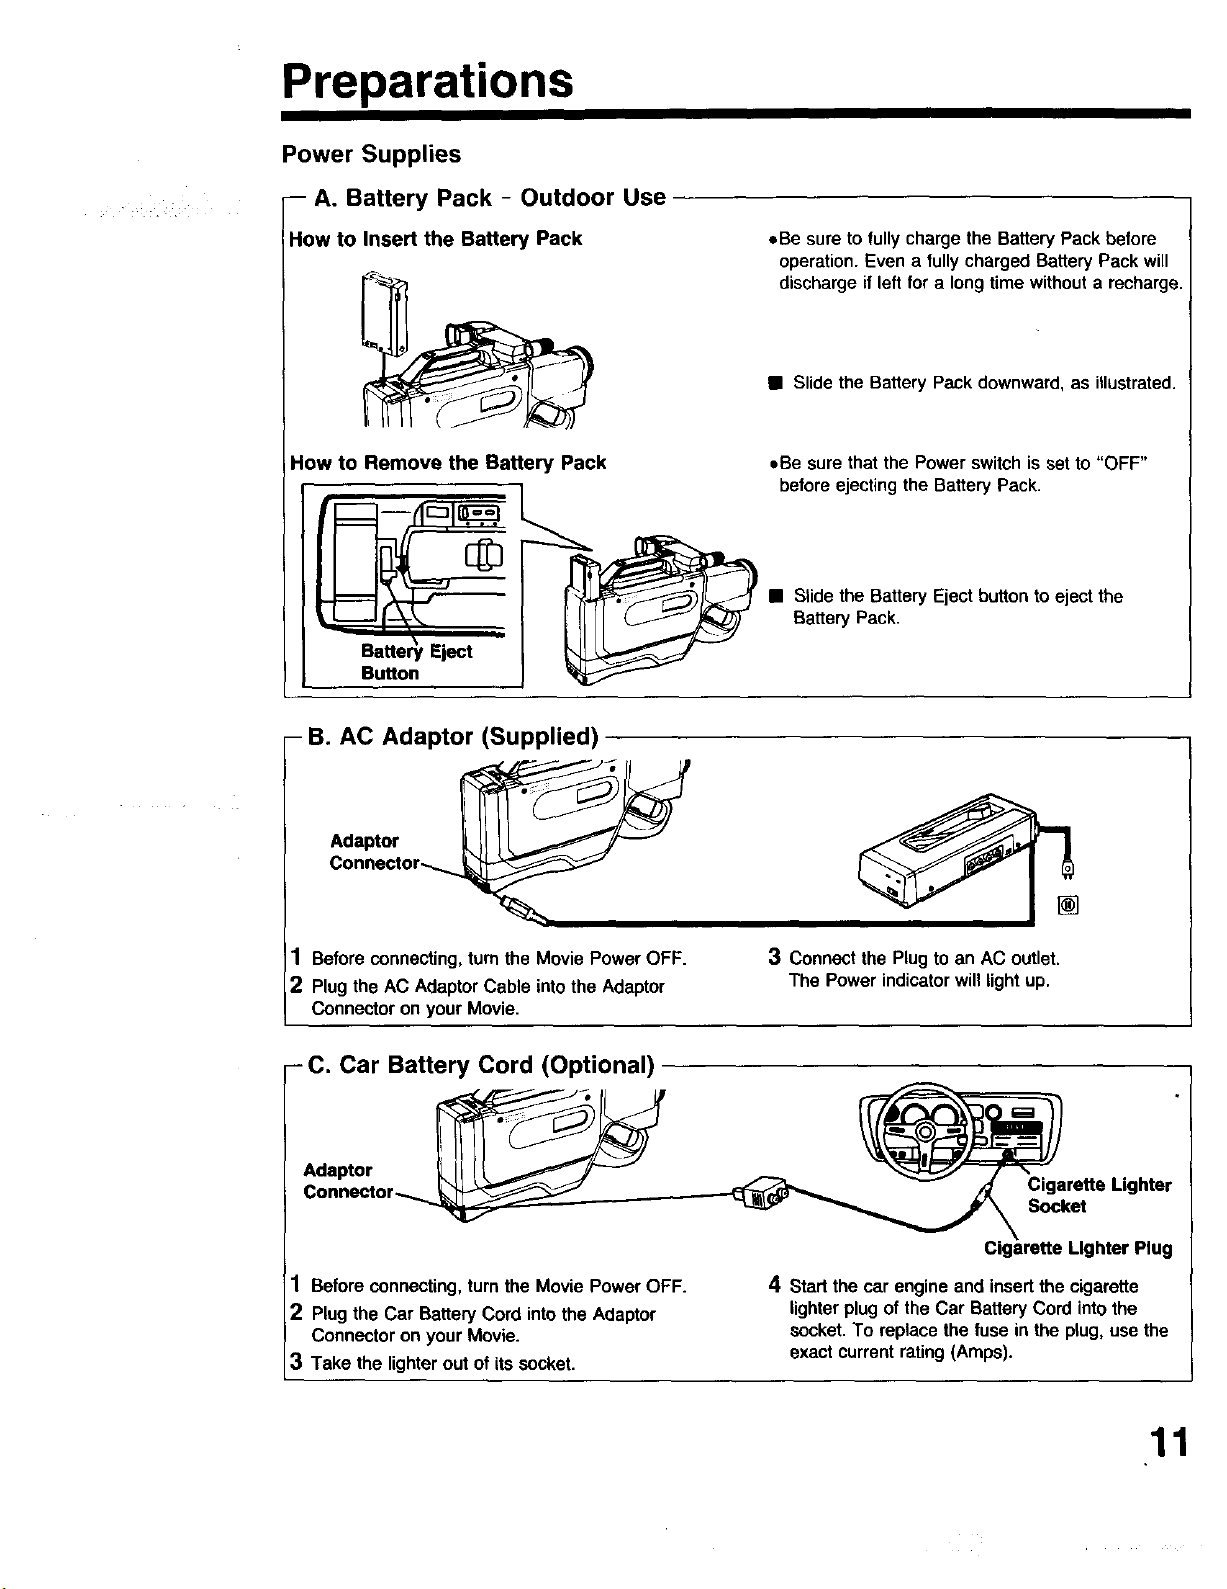
-- A. Battery Pack - Outdoor Use
How to Insert the Battery Pack
How to Remove the Battery Pack
- B. AC Adaptor (Supplied)
,*Be sure to fully charge the Battery Pack before
operation. Even a tully charged Battery Pack will
discharge if left for a long time without a recharge.
• Slide the Battery Peck downward, as illustrated.
oBe sure that the Power switchis set to "OFF"
beforeejecting the Battery Pack.
• Slide the Battery Eject button to eject the
Battery Pack.
Adaptor
Connector,_
1 Before connecting, turn the Movie Power OFF.
2 Plug the AC Adaptor Cable into the Adaptor
Connector on your Movie.
-C, Car Battery Cord (Optional)
Adaptor
1 Before connecting, turn the Movie Power OFF.
2 Plug the Car Battery Cord into the Adaptor
Connector on your Movie.
3 Take the lighter out of its socket.
3 Connect the Plug to an AC outlet.
The Power indicator will light up.
Cigarette Lighter
Socket
Plug
4 Start the car engine and insert the cigarette
lighter plug of the Car Battery Cord into the
socket. To replace the fuse in the plug, use the
exact current rating (Amps).
11
Page 12
Preparations (continued)
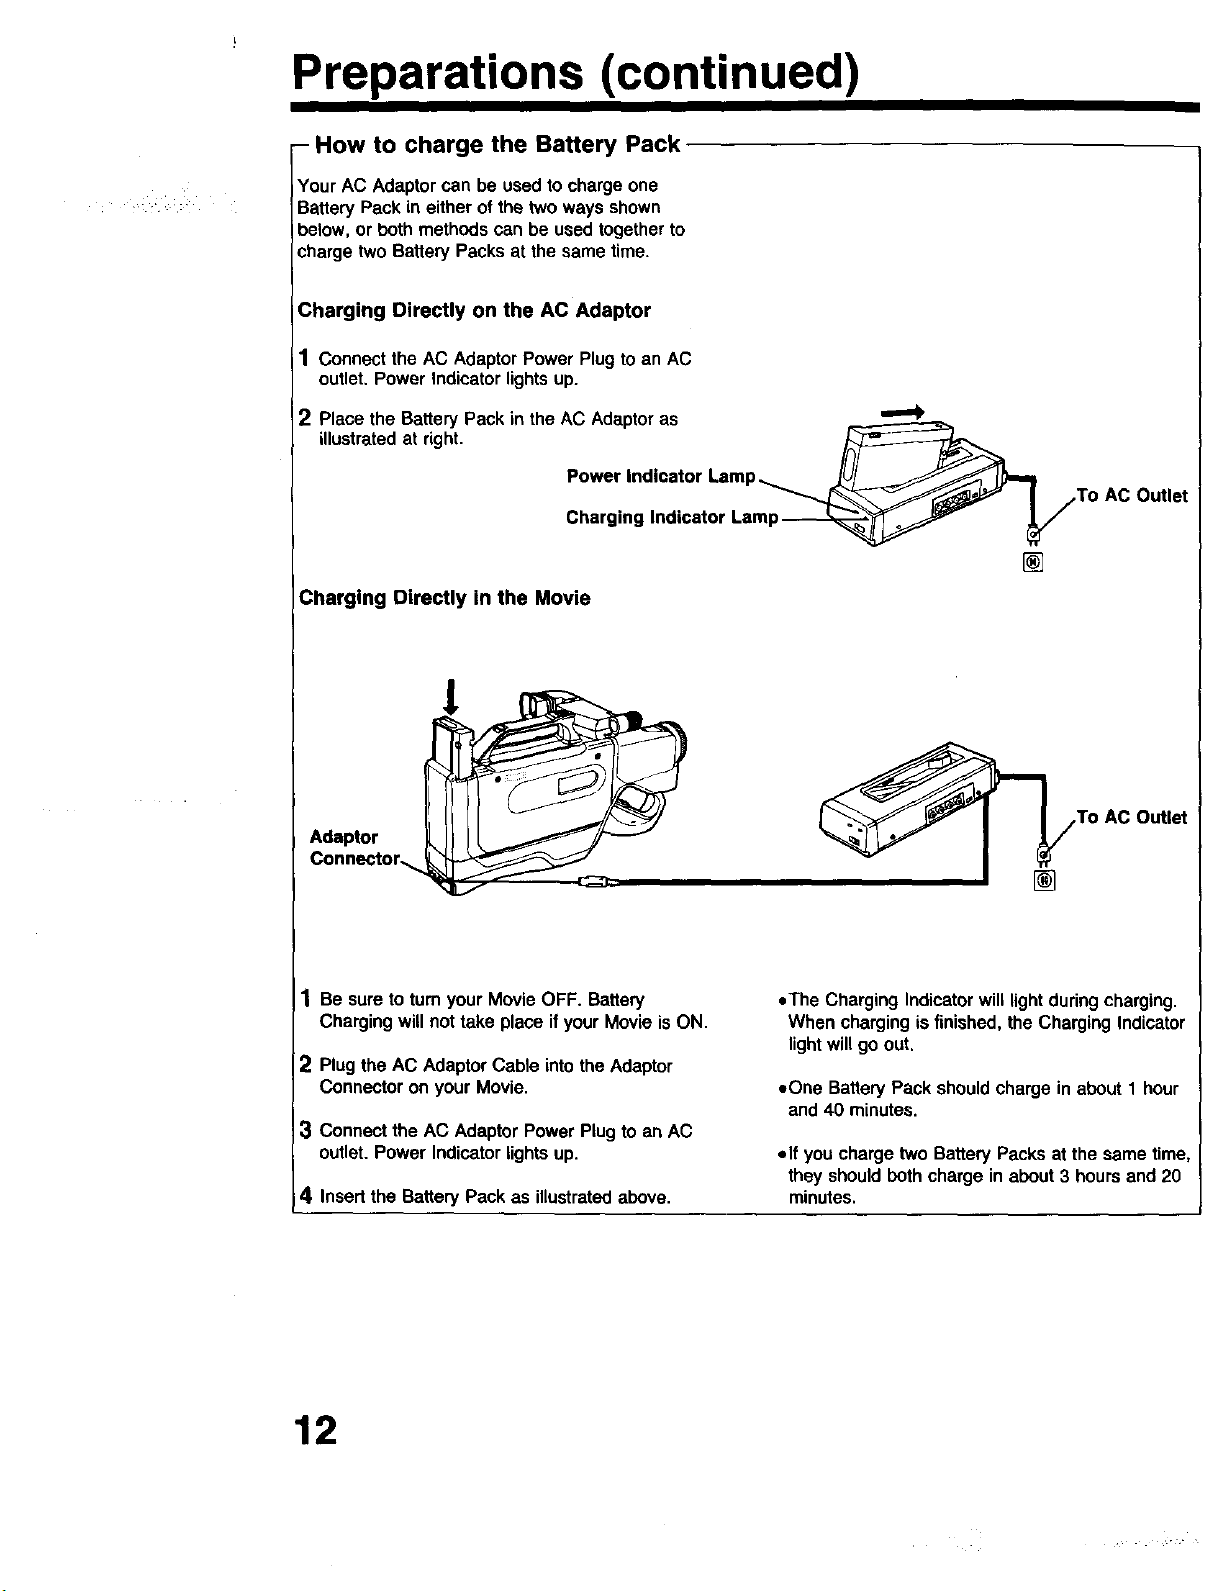
- How to charge the Battery Pack
Your AC Adaptor can be used to charge one
Battery Pack in either of the two ways shown
below, or both methods can be used together to
charge two Battery Packs at the same time.
Charging Directly on the AC Adaptor
1 Connectthe AC AdaptorPower Plug to an AC
outlet,Power Indicator lights up.
2 Place the Battery Pack in the AC Adaptor as '_
illustrated at right. Power Indicator Lamp._ __'__Uj__)_, I
Charging Indicator Lamp_
Charging Directly in the Movie
I/.To AC Outlet
[]
Adaptor
Connector.s.
1 Be sureto tum yourMovieOFF. Battery
Chargingwillnot take place ifyour Movie is ON.
2 Plug the AC Adaptor Cable into the Adaptor
Connector on your Movie.
:3 Connect the AC AdaptorPowerPlugto an AC
outlet.Power Indicatorlightsup.
i4 Insertthe BatteryPack as illustrated above.
To AC Outlet
• The Charging Indicator will light during charging.
When charging is finished, the Charging Indicator
light will go out.
• One Battery Pack should charge in about 1 hour
and 40 minutes.
elf you charge two Battery Packs at the same time,
they should both charge in about 3 hours and 20
minutes.
12
Page 13

Preparations (continued)
- A Word about Cassettes
A. Types of Video Cassette
Tape Speed
SP
(Standard Play)
Use tapes with the _ mark in this unit.
Maximum Record/Playback
Time
T160 T120 T60
2 Hours 2 Hours 1 Hour
40 Minutes
-To Insert or Remove a Cassette
The Movie may be ON or OFF when you ins(_rtor
remove a cassette.
B. Erase Protection
Cassettes have a record tab to ensure that
recordings are not accidentally erased.
**To prevent accidental erasure
Break off the tab with a screwdriver
oTo record again
Coverthe hole withcellophanetape
NOTE: elf the EVF is positioned for left eye use,
be sure it is fullyextended before ejecting
or loading a tape.
button
Press the Stop/Eject button to open the door.
Video Cassettescan onlybe
insertedwiththewindowside
ofcassettefacingthe
cassettedoor,and thearrow
pointingdown.Do not
attemptto inserta cassette
whichis upsidedownor
backwards,
13
Page 14

Preparations (continued)
- 10W Color Enhancement Light (Supplied)
Using the Color Enhancement Light, you can
provide additional light to brighten the natural colors
in a scene.
1 Mount the Light on the Accessory Mount on the
Movie.
Be sure to mount the Color Enhancement Light
until it locks into place.
LIGHT SWITCH
LOCK RELEASE BUTTON
\
Replacement of the Lamp Bulb
2 Using the Light switch on your Movie, turn the
Light ON.
CAUTION:
This Light becomes hot during operation.
To release
To remove the Color Enhancement Lightfrom the
Movie, hold down the Lock Release button and
slide off the Color Enhancement Light.
1 Turn the screw on the underside of the reflector
casing counterclockwise to loosen it.
2 Turn the reflector casing counterclockwise only
as far as shown in the diagram and pull it
completely off the bulb housing.
3 Pull the old bulb off the base and replace it.
4 Reposition the reflector casing on the bulb
housing as in step 2, and turn it clockwise to
reattaeh. Replace and tighten the screw.
Danger:
oWhen replacing the bulb use only lamp bulbs
(PART NO. VLLW0002) Supplied by Panasonic to
reduce the risk of fire.
Use a cloth or tissue when handling the bulb as
finger oils will decrease the bulb life. To prevent
possible burn hazard disconnect Movie Light Unit
and allow lamp to cool before replacing.
eDo not connect any light other than the standard
light included. Use of a different light, modification
to the light connector or light jack may cause
severe battery drain and fire hazard.
14
Note:
tlf using the Enhancement Light for an extended
pedod of time, take note of the surrounding
temperature, As a safety feature, if the
surrounding temperature exceeds 104°F (40"C),
the light will temporarily go out, It will resume
normal operation when the temperature drops, Be
sure to provide ventilation when using the light in
a hot environment,
oUsing the Enhancement Light when the Movie is
powered by a car battery may shorten bulb life,
Page 15

Preparations (continued)
Electronic Viewfinder (EVF) Indications
These indications will not be recorded on the tape.
- Operating Mode Indications
tThese indications will appear
VCFI mode,
_Recording in progress
/_Camera Recording
• These indications will appear in the VCR mode.
,, I
.. _ _Fast Forward
v-o_80u' / _ __Rewind
,,,-,u,--:_-.._-"--..._Video Dub mode
l °o,e
in the Camera and
- Battery Remaining Indication
E--- F
E -F E .... F
-E- F-
-E F-
- Tape Warning Indication
- Dew Indication
- H m
J
,F
- BATTERY -
# / I \_"
-,Whenthe BatteryPack is fully charged,
"E .... F" appears.
oAs the batterycharge is consumed,the indicator
changes:"E - - - F", "E - - F",
"E- F".
e"E - F" willflash for severalminutesand
then "E F" and "BAI-rERY" willflash for
severalsecondspriorto automaticpowershutoff.
Whenthishappens,a batter/recharge is
necessary.
• If the record tab is missing, this indicator will flash
and recording will not start.
• If excessive moisture condenses in the unit, it will
not operate. This indicator will flash for several
seconds and the Movie will automatically turn
OFF. In this case, wait until the indicator no
longer flashes when your Movie is turned on
again.
15
Page 16

Camera Recording
2
Connect the earphone (not
supplied) to the earphone jack
for monitoring the sound track
as it is being recorded or
played back.
Follow these simple steps to become familiar with
the operation of your Movie.
EVF
WhenyourMovieis
turnedon, the image
fromthe lens
appears.
REC
Indicator
Preparations:
.,Your Movie is connected to a power source
(Battery Pack, AC Adaptor, or Car Battery Cord).
oThe Power is ON.
eA cassette with a record tab is inseded.
- Operation
1 set the VCR/CAMERA SelectorSwitchtothe
"CAMERA" position.
This is the camerarecordonlyposition.
Edit Search:
Besidesrecording,you can view or seamh
scenesbyholdingdownthe Play, FP/Searchor
Rewind/Searchbutton.
2
Set the White Balanceswitchto "AUTO" for
normalindooror outdoorlighting.
"INDOOR"or "OUTDOOR" are for specialcolor
conditions (page 21).
| Set the Focus Switch to "AUTO":
When powered ON and in the Camera mode,
the Auto Focus system will function
continuously.
-Automatic Easy Edit Standby-
If you Stop recording, but plan to resume within 24
hours, you can leave the cassette in the Movie.
Simply shut the Movie off at the Movie's Power
switch after your recording is completed. This
allows the Easy Edit feature to make a smooth
transition between one scene and the next. After
24 hours, the tape will retract into the cassette,
making automatic editing impossible. For manual
editing, see page 25 under "EASY EDITING".
4
Pressthe Record/Pausebuttonto start
recording.
The REC Indicatorwillappear andthe Tally
Lightwillflashwhilerecordingis inprogress.
Indexmarkswillbe placed onthe tape
automatically(page25).
5
Pressthe Record/Pausebuttonagainto pause.
In Record/Pause,pressthe Ejectbuttonifyou
needto removethecassette.
After5 minutes, pause modewillautomatically
go intostandbymode,to conservebattery
power.
Slidethe PowerswitchON to returntothe
Record/Pausemode.
- Record Review
Press the Record Review button in the
Record/Pause mode.
When you press the Record Review button in the
Record/Pause mode, the last few seconds of your
recording will play back on the viewfinder or
monitor screen for review. Then you can start your
recording from the Record/Pause mode in
synchronization with the last segment recorded.
16
Page 17

Playback
You can play back your Movie recordings
immediately on the viewfinder by following the steps
given below. You may also play back your Movie
recordings directly to a monitor or "IV.
- Operation
1 Set the VCR/Camera Selector Switch to the
"VCR" position.
2 Press the Rewind button to rewind the tape to
the desired location.
1 2 3 4
Preparations:
oYour Movie is connected to a power source
(Battery Pack, AC Adaptor, or Car Battery Cord).
oThe Power is ON.
eA cassette is inserted.
3 Press the Play button to view the recorded
picture.
4 Press the Stop button when playback is finished
- Auto Tracking
With Auto Tracking there is usually no need for
manual adjustments to minimize noise in playback
for most tapes. Auto Tracking continuously
analyzes the signal to adjust for optimum picture
quality for each recording.
However, with some recordings you may get a
better result using Manual Tracking.
Tracking Control
rees the Set or Select button which is usually
ed for the Date/rime setting, Manual Tracking
justment is intended for use during playback to
nimize noise in the picture,
I-- Auto Playback
IWhen the Movie is in the VCR mode and a tape
Iwithout a record safety tab is inserted, the Movie
[will b_:Jinto play automatically.
- Special Effects in Playback Mode (Sound is Muted)
To Rapidly Locate A Particular Segment
• Press the Search button.
A rapid forward or reverse picture search will
continue,
Press the Search button or Play button to resume
normal speed,
Search Speed
StandardPlay(SP) Searchis abo_ 3 times normal
speed.
To View A Still Picture
• Pressthe Pause/Stillbutton.
A freeze framepicturefrom the currentplayback
appears.
• Press the button once more,
This releases the still and playback continues,
17
Page 18

To Monitor Your Recording
Your Movie may be connected to a TV to play back
tapes or to monitor what you are recording, Follow
the illustration below for hook-up,
-When Your TV Does Not Have Video In & Audio In Terminals
Using the AC Adaptor
300 ohm-75 ohm transformer
(supplied) or F
RF Converter_
VHF VHF Connecting Cable
Antenna (supplied)
UHF
Antenna
.."
Switch
_---_ Adaptor Connector
-When Your TV has Video In & Audio In Terminals
- Using the Battery Pack
To Audio In
AudioNideo
Cable (supplied)
- Using the Car Battery Cord
Video
Audio/Video
Adaptor (supplied)
Battery Pack I
(supplied)
Audio Out
Q..==_=_._ TO Audio In • . )
the AC Adaptor. Audio/Video Cable
To watch TV
1 Turn your Movie OFF.
2 Turn TV ON and select a
channel.
VideoOut
[]
Out
Cigarette Lighter Socket
To Video In
AudioNideo Cable
(supplied)
Audio
Car Battery Cord
(optional)
- To Monitor
Connect the AC Adaptor to an AC Outlet. 2 Turn your Movie and the "IV ON.
eWhen you use the supplied Audio/Video Output elf your TV has no Video in or Audio In
Adaptor instead of the AC Adaptor, be sure to terminals, select CH 3 or 4 on TV to match the
connect your Movie to a Battery Pack. RF Converter Switch on the AC Adaptor, when
using the VHF Connecting Cable (see top
diagram above).
18
Page 19

Useful Features
- Date/Time Display and Setting
Your Movie is equipped with an automatic date
function which operates by a built-in lithium battery.
It calculates the date and time, including leap year,
up to Dec. 31,2086 even when the Movie is off.
Before setting the date and time it is necessary to
charge the lithium battery for 48 hours.
To Display the Date and Time
To do this simply insert the Battery Pack or attach
the AC Adaptor. This will automatically charge the
battery. Through normal use the battery wilt stay
charged. If after initial charging the Movie is not
used, the automatic date function will continue for
about a year.
Turn your Movie ON and look into the EVF.
Pressing the Date/Time button will provide the
following displays in order.
Press
DATE/ .....
I I-
TIME "" ' ""
Button
DIM/LITR
Date/Time Setting
Date/Time
Sutton
r--i o
SEL SET
CLOCK
1 Press the Date/Time button in Record/Pauss
mode or Stop mode.
"AM 12:00 JAN. 1 1990" appears.
Whenever "AM 12:00 JAN. 1 1990" appears, it
indicates that the clock needs adjustment.
2 Press the Select button.
The first portion of the Date and Time display will
flash.
Press
DATE/
TIME
Button
The selectedDate andTime mode willbe saved
when the poweris turned OFF.
- To Set the Clock
(_ PRESS THE _) PRESS THE SET SUl-rON
SELECT Bu'rrON
HOUR: AM12-_AM1 AM11_PM12
[PM11 ............ PM1 _-_
MINUTE:
MONTH:
0_ _01"-_02 ..... 58 -_59 _-_
JAN'_FEBt ...... NOV._DEC._
DAY:
YEAR:
1990_1991 ........................ 2086
L1989.-1988.--1987
3
Press the Set button until the desired number(s)
appear in the space you selected. Then press
the Select button to fix that portion of the date
and time.
4 Pressthe Select button again.
This locksin all the settingsyou havemade.
Note:
elf the Set button is held down, the numbers will
advance rapidly.
p.s [
DATE!
TIME
Button
PRESS THE
SELECT SUTTON
AFTER SEt'rING
19
Page 20

Useful Features (continued)
-Tape Counter ("O000")/Counter Memory/Lap Time Counter ("0:00:00")/
Tape Remaining ("0:00") (always accompanies the Battery indication)
The following displays for each Tape and Time
Counter function can be selected to track your
current position, or find a desired tape location.
Press the D/M/L/TR button repeatedly to get the
desired display.
Tape Counter: Displays a reading for any position
41,
NO OVERLAY
on the tape.
Pressthe Reset buttonto reset
displayto "0000".
D/M/L/TR BUTTON
Firet press
TAPECOUNTER
D/M/L/TR BUTTON
I _ond press
COUNTERMEMORY
I Third pressD/MilJTR BUTTON
LAPTIMECOUNTER
D/M/L/TR BUTTON
t ou_h press
TAPE REM_JNING
MemoryCounter:Whenthe Memoryfunctionis
selectedthe Moviewillstop
duringRewind,FastForward,
VideoDubbing,AudioDubbing
and NV Dubbingwheneverit
reachesthe pointwherethetape
counterwas previouslyset to
"0000".
LapTime Counter: The elapsedtimeduringa
recordingis displayedby the
LapTime Counter.
Pressthe Resetbutton to reset
displayto0:00:00.
Tape Remaining:Thisdisplayshowsthe time
remainingonthetape in 1
minutesegments,during
playbackorrecording.
20
Fifth press
D/M/L/TR BUTTON
Page 21

Useful Features (continued)
MACRO BUTTON
ZOOM LEVER \
LENS FOCUS RING-_
-Auto White Balance
_ ACKLIGHT BUTTON
!
WHITE BALANCE SWITCH
FOCUS SWITCH
With the White Balance switch, select "AUTO" for
continuous color balance in both indoor and
outdoor lighting situations. Under the following
conditions set the White Balance Switch to "o:." or
"_" as recommended, for better color reproduction
in your recordings.
OUTDOOR ":_:": When recording an outdoor
scene from indoors, or recording
an outdoor scene using an amber
filter.
INDOOR "_": When recording an indoor scene
from outside, or recording an indoor
scene using a blue filter.
White Balance is affected by Color Temperature.
See the chart on page 33.
- Backlight Button
- Macro Focus (for close-up)
This button may be used to adjust the light level on
a recording subject that is darker than the
surrounding scene.
You will find this backlight adjustment useful for
recording a subject in a shadowed area or in front
of strong backHght.
Press the Backlight button while recording a high
contrast scene, then release it when the lighting
condition changes.
Focusing on objects as close as 1 inch from the
lens in "Macro" lets you fill your screen with
enlarged details of the miniature wodd.
1 Set the Focus switch to "MANUAL",
2 Turn the Zoom Ring Lever to the extreme right
position.
3 Press the Macro (green) button on the Zoom
Ring Lever and use the Zoom Ring Lever for
Macro Focusing.
oWhen using the Macro function, it may be helpful
to steady your Movie by mounting it on a tripod.
21
Page 22

Useful Features (continued)
I I
- Zoom
Your Movie has a power zoom tens that gently
changes the viewing angle. Zooming is possible by
lightlypressing the "T" or "W" side of the Power
Zoom switch. You can also manually zoom with the
zoom ring which has a handy lever for steady
turning.
Set the Focus Switch to "AUTO" for normal use,
and the lens will be automatically focused on the
subject in the center of the EVF, even during a
zoom.
- Focus
A. Auto Focus
FOOd6
M_IU_IU. AUTO
pUSH TO FI_,_
,,_OR
Zoom In
B. Manual Focus (by hand)
F_
MANUAL AUTO
1
AimyourMovieat thesceneto be recorded.
2
Press and hold the "T" side of the Power Zoom
switch until the lens zooms to the maximum
close-up setting.
3 Rotate the Lens Focus Ring for the sharpest
picture at this setting.
(It may be necessary to back away from the
subject to focus the image properly.)
Underthe following sceneconditions,manual
focusing is recommended.
=Scene with both close and distant objects in view.
=Scene with enhanced perspective.
=Scene with dominant non-reflective object, such
as a black curtain.
Set the Focus switch to "MANUAL", and then
adjust the focus with the Lens Focus Ring.
4 Pressthe "W" sideofthe PowerZoom switch.
The picture shouldstayin focus over theentire
zoomrange.
Re-focusingmay be requiredwhenyourMovieis
aimed at a newscene.
*When you want to adjustthe focus quickly in the
"MANUAL" position,you canactivatethe Auto
Focus.Leavethe Focusswitchin "MANUAL",
andthen pressand holdthe Focus switch.
The pictureautomaticallyadjustsforfocus as long
as you continuepressing.
=Focusing on small objects. The Auto Focus
system needs a reflecting area of a certain
minimum size in order to operate. Objects more
than 10 feet away should have a reflecting
surface of approximately 4 inches in diameter.
=Distant objects. The Auto Focus system may not
always focus clearly on objects that are over 40
feet away.
22
Page 23

Useful Features (continued)
g
HIGH SPEED SHUTTER
SWITCH
_SELF TIMER/TIME LAPSE
FADE BuI"rON_
-Fade In/Out - Video Only; Audio Is Not Affected By Fade Control
FADE IN
FADE OUT
__ SWITCH
Use the Fade button to activate the fade feature•
The picture will fade out when the Fade button is
held down. When the button is released, the picture
will fade in, eliminating sudden scene changes.
Fade in: Before starting a recording segment, hold
down the Fade button until the picture
fades out. Then press the Record/Pause
button to start the recording, as you
release the Fade button. The new scene
will fade in.
Fade Out: To fade out at the end of a recording
segment, hold down the Fade button.
When the picture has faded out, press
the Record/Pause button to pause the
recording.
-High Speed Shuffer
Select The 1/500th Shutter
1/5_
Select The l!1000th Shutter
1/1000 l
This switch may be used to record a clear, sharp
image of high speed motion for fine point replay in
still or slow mode, when watching the tape on
Panasonic TECH 3 or TECH 4 VCR (3 or 4 head
VCR). There are 2 Shutter speeds available.
Slide the switch to the right once to activate the
High Speed Shutter during recording. This mode
should be used for subjects moving fast enough to
cause blurs.
Slide this switch to the right once more to select the
1/1000 shutter speed.
This mode should be used for extremely fast
motions, like a golf swing.
Note:
eThe High Speed Shutter indicator flashes when
the light level is inadequate, More light should be
provided to achieve better picture quality and
color. See page 32 for more information,
23
Page 24

Useful Features (continued)
- Self Timer/Time Lapse Recording
The Self Timer/Time Lapse switch slides to the
right to select one of three recording overlays.
Pressing the Record/Pause button activates the
selected mode. When recording stops, the Movie
will return to the Record/Pause mode.
Self Timer Recording
• Select "Self- 10S"
In the Record/Pause mode slide Self
Timer/Time Lapse Switch once
t
|(LF.I|I 1
Slide twice
4,
Indicates that a 10 second recording will begin 10
seconds after you press the Record/Pause button.
Press the Record/Pause button again to cancel
the recording in progress.
• Select "Self-End"
Indicates that a continuous recording to the end of
the tape will begin 10 seconds after you press the
Record/Pause button. Press the Record/Pause
button again to cancel the recording in progress.
Time Lapse Recording
=Select "T.LAPSE"
Press the Record/Pause button.
Your Movie will start to record at once. A one
second frame of the scene will be recorded each
minute. As shown in the diagram below, your
recording will have continuous Time Lapse
images of the scene. Press the Record/Pause
button again to cancel the recording in progress.
I T LAPSE 1
Slide four times
I
Note:
This camera is not designed for industrial use of
the Time Lapse Feature. Please keep the following
_oints in mind.
=Avoid using the unit solely for Time Lapse
recording. A ten hour duration of Time Lapse
recording will record 10 minutes of the Time
Lapse specia! effect.
After this period, the unit will automatically turn
itself off.
I
24
59 SECOND PAUSE (approx.)
• The battery pack is not designed for continuous
Time Lapse use. For extended periods of time
lapse recording it is recommended that an
alternate power source be used.
=The Self Timer/Time Lapse switch has no effect if
pressed during normal recording.
Page 25

Useful Features (continued)
-VHS Index Search System
An index mark is automatically ptaced on the tape
. I s
--IIIOEK--
Book Mark Search
_;'.'&_
at the beginning of each recording (the Index
indicator will flash), but not where a recording
resumes after the Movie has been put into pause.
You can enjoy automatic review and playback of
indexed tapes using VCR models which feature the
VHS Index Search System.
You can return directly to the blank portion of the
tape (a tape, once recorded, is not considered
"blank" even it it has been erased) just where the
recording you have done so far ends. In camera
mode, just press both the Rew and FF buttons
together at the same time, wherever you are on the
tape. ]-he Movie wit1advance or rewind and then
stop at the point where recording can be continued.
Press the Play button should you desire to
discontinue this function.
Note:
eWhen you initiate an edit search, you are in effect,
placing a marker at that point. No matter where
on the tape you initiate the edit search, if you then
use the book mark search, the Movie will locate
and stop at the approximate point that the edit
search was initiated.
- Easy Editing
RECORO/PAUSE BuTroN
1 Set the VCR/Camera Selector switch to the
"VCR" position.
Rewind the tape for a short distance (about 5
digits on the Tape Counter) by pressing the
Rewind button. Then press the Play button and
view the picture on the Viewfinder.
2 At the location where you wish to continue
recording, press the Pause/Stilt button.
To obtain proper continuity when taping from the
Stop mode, or after charging the Battery Pack.
RECORD BUTTON
PLAY BUTTON l
l !,oT':,:::u"C:.°o o"
VCPJCAMEIRA SELECTOR SWITCH
3A.
For Camera recording:
Set the VCPJCamera Selector switch to the
"CAMERA" position; your Movie will go into
the Record/Pauss mode. Then press the
Record/Pause button to continue recording.
B.
For VCR recording (of rv programs, etc.).
Press the Record button and the Play button
together. Press the Pause/Stitl button again to
begin recording.
25
Page 26

To Record A TV Program
Your Movie enables you to record a TV program
through the AC Adaptor from a tuner source unit.
Connect the AC Adaptor with the AudioWideo Cable
to one of these tuner sources: 1) a TV which has
Video Out and Audio Out Terminals, 2) the optional
Tuner Adaptor, 3) another VCR.
- Operation
I Set the VCR/Camera Selector Switch to the
"VCR" position.
). Turn the source unit on; select the channel to be
recorded.
The selected channel will appear on the TV and
in the EVF of your Movie.
Connections
-- SOURCE UNIT -- step 2, above
UHFNHF Antenna
or Cable
UHF) in
Preparations:
=Connect your Movie to the AC Adaptor.
=Turn the Power ON.
elnsert a cassette with a Record Tab.
=Slide the Input Signal Selector on the AC Adaptor
to "LINE".
3Press the Record button and Play button
together on your Movie.
During recording, be sure the source unit power
is on.
4 Press the Stop button.
This ends the recording session. Use the Pause/
Still button to pause recording.
"Video Out
To VHF (or UHF) In OR
Video Out
TUNER ADAPTOR
(optional)
OR
To VHF (or UHF) In
Video Out
Audio Out
Adaptor Connector
\
input Signal Seieotor
Set to LINE
Video ln
AudioNideo Cable
(supplied)
26
Page 27

Video Dubbing
Your Movie uses advanced Flying Erase Head
technology to produce exceptionally clean edits.
With your Movie you can replace existing video
segments with new ones (the original audio
segments will remain). Use two Movies, or use a
VCR for the source and your Movie for the editing
unit, as described below.
• Set up and connect the Movie (or VCR) as
illustrated on the next page.
(Be sure to connect the AC Power PLug of the AC
Adaptor to an AC outlet).
Set the VCR/Camera Selector Switch to the
i_ Operation
"VCR" position on the Editing Movie.
2 Press the Play button on the Editing Movie to
locate the starting point for dubbing. Press the
Pause/Still button where you want dubbing to
begin. To use the Memory-Stop feature for
Editing, see step 5.
3 Press the Video Dub button on the Editing Movie
only. This puts the Movie in the Video Dub
Pause mode.
4 If Neither Unit Has a Synchro Edit Jack
Release the Pause buttons on both units
simultaneously. This may require some practice
beforehand.
Preparations:
•Press Power ON on both units.
At the Source VCR (or Movie):
• Insert the master cassette to be played. Put the
source VCR (or Movie) in Play/Pause mode at the
desired starting point.
At the Editing Movie:
+Insert a cassette (with tab) to be recorded. Set the
AC Adaptor Input Signal Selector to "LINE".
• Turn the TV ON, and select CH 3 or 4, to monitor
the dubbing, if desired.
4 Using the Synchro Edit Feature
On the Editing Unit, press Pause to begin video
dubbing (both units begin operation). Press
Pause on the Editing Unit at the end of the
recorded sequence (both units go into Pause).
For the use of the Synchm Edit Feature refer to
page 30.
5 Press the Stop button on both units to stop
Video Dubbing.
* Memory-Stop Editing:
Use the Display/Memory/Lap Time/Tape
Remaining button to automatically stop Editing
with the following preparations.
(a) In step 2 on the Editing unit tape, locate
the end of portion to be edited, then press
the Memory Button and reset the tape
counter to 00O0.
(b) Rewind to the editing start point, and
continue steps 2-4.
(c) The Editing Movie tape will stop when it
reaches "O000".
1 4 2 3 5
27
Page 28

Video Dubbing (continued)
Connection
Synchro
Edit Jack
Video Out
SOURCE: VCR or Movie
(This connection is for
units with Synchro Edit
Jacks,)
-- Audio/Video Dubbing
You can use the Audio/Video Dubbing feature to
copy a tape using the Flying Erase Head
technology to produce exceptionally clean edits at
the end of the recording on a tape. Be sure to
connect the Audio out terminal on source unit to the
Audio In terminal on editing unit as illustrated
below.
EDITING: Movie or VCR
TV Set
for
g
Cable (supplied)
• Follow steps 1 and 2 on page 27.
• Press the Audio Dub button and Video Dub
button together on the Editing Movie only, This
puts the Movie in the Audio/Video Dub Pause
mode. Then follow steps 4 and 5 to start and
stop the Audio/Video Dubbing.
Connection
Synchro
Video Out
SOURCE: VCR or Movie
(This connection is for
units with Synchro Edit
Jacks.)
NOTE: Tapes to be dubbed must be
prereoorded in SP modefor AudioNideo
Dubbing.
EDITING: Movie or VCR
TV Set
i (Used for
monitoring)
Connecting
Cable(supplied)
Audio In
28
Page 29

Audio Dubbing
Your own soundtrack may be substituted onto a
tape which is recorded in SP mode using a
microphone, tape recorder, or your own component
audio system.
=Set up and connect the Movie and the other audio
equipment as illustrated.
(Be sure to connect the AC Power Plug of the AC
Adaptor to an AC Outlet.)
-- Operation
1 Set the VCR/Camera Selector Switch to the
"VCR" position.
The Movie automatically goes into the stop
mode.
2 Press the Play button on the Editing Movie.
Press the Pause/Still button where you want
dubbing to begin.
3 Press the Audio Dub button to put the Movie in
the Audio Dub Pause mode. The sound can be
heard through the TV if it is connected to the
Movie.
=Prepare the audio source to start playback at
the desired point.
Preparations:
=Turn ON the Movie.
At the Editing Movie:
elnsert a cassette (with tab) to.be recorded.
=Set the AC Adaptor Input Signal Selector to the
desired position:
Select
CAMERA: The sound from the microphone will
be recorded.
LINE: The sound from whatever is connected to
the AC Adaptor, through the Audio Input
Connector will be recorded.
=Turn the TV ON, and select CH 3 or 4.
4 Start playback at the audio source, and press the
Pause/Still button on the Movie at the same time,
to start Audio Dubbing.
=Press the Stop button to stop Audio Dubbing.
* Memory-Stop Editing:
Referto page27 for Memory-StopEditing.
AUDIO DUB BUTTON
PLAY BUTTON I
I[
ConneXion
External Microphonq
Jack
I
or Adaptor
t
I
I
NOTE:
oA rolling white pattern may appear if you have
made a Display/Memory/Lap Time/Tape
Remaining button selection without a video input to
the unit. (See page 32.)
STOP BUTTON
REWIND/SEARCH BuI"rON
PAUSE/STILL BUTTON
VCR/CAMERA SELECTOR SWITCH
VHF Connecting Cable
Input (supplled)_
(Used for
monitoring)
Audio In
eWhen a microphone is used for dubbing, do not
place it near the speaker of your TV while dubbing
is being done. A howling noise (feedback) may
occur.
29
Page 30

Re-Recording (Video/Audio Dubbing)
With only the Pause button on the editing unit, you
can control two Movies or a Movie and one table-
type VCR when you use their Synchro Edit jacks to
copy a tape. The Synchre Edit feature starts and
stops both the seurce and editing units together with
the press of one button.
=Set up and connect the units as illustrated. (Be
sure to connect the AC adaptor to an AC Outlet.)
If Both Units have Synchro Edit Jacks
-- Operation
On the Source Unit
I Insert the master tape into the unit.
Press Play to review the tape.
Press Pause/Still where you want to start the
playback of the master recording to copy it. The
source unit is now in Play/Pause.
On the Editing Unit
3 Insert the blank tape (or one you want to record
over) into the unit.
4 Press Play to review the tape.
Press Pause/Still where you want recording to
begin to make the copy of the master tape. The
editing unit is now in Play/Pause.
5 Press the Play and Rec buttons together.
The unit is now in Record/Pause.
Preparations:
=Turn ON both units.
=Set the AC Adaptor Input Signal Selector on the
Editing Movie to "LINE".
(Or set the editing VCR's Input Signal Selector to
"LINE".)
=Set the VCR/Camera Selector switch on the Movie
to the "VCR" position.
To Synchro Edit
The Synchro Edit feature simultaneously releases
the Pause mode on both units, so playback and
recording begin at the same time.
6 On the editing unit, press Pause to begin the re-
recording (both units begin operation).
7 Press Pause at the end of the recorded
sequence (the source unit goes into Play/Pause).
8 Press the Stop button on both units to stop
dubbing after completion.
Connection
Source: VCR or Movie Editing: Movie or VCR
Synchro Edit Cord (optional)
(This connection is for
Synchro
Edit Jack
unltswlth SynchroEdit
Jacks.)
Synchro
EdWRemote
Jack
Adaptor
Connector
Video Out Audio Out
Input Signal Selector
Set to LINE
.3able(supplied)
TV Set
(Used for
monitodng)
VHF
Cable (supplied)
Audio In
Video In
3O
Page 31

Re-Recording (continued)
If Either Unit Does Not Have A Synchro Edit Jack
Preparations:
*Set up and connect the units as illustrated
(Be sure to connect the AC Adaptor to an AC
Outlet).
- Operation
1 Insert a pre-recorded tape.
2 Insert a blank tape, or one you want to record
over.
Connection
*Turn ON bothunits.
=Set the editing VCR's Input Signal Selector to
"LINE".
(Or set the AC Adaptor Input Signal Selector on
the Editing Movie to "LINE".)
*Set the VCR/Camera Selector switch on the Movie
to the "VCR" position.
3 Press the Play button on the source unit
The Record and Play buttons on the editing unit
all at the same time.
*To finish dubbing, press the Stop button on
both units.
AND
Source: Movie or VCR
Video Out Audio Out
TV Set
(Used for
monitoring)
Connector
Editing: VCR or Movie
Cable
(supplied)
Audio in
VHF Connecting
Cable (supplied)
TO Monitor the Re-Recording Process on Your TV
urn TV ON and select its VCR channel (either =Set the VCR/TV Selector on the editing VCR to
H3 or CH4), "VCR",
_iUr_CAUTION:
nauthodzed exchanging and/or copying of
pyrighted recordings may be copydght
dngement.
31
• • H • •
Page 32

Notes on Operations
Battery Pack (P.11)
• Store the Battery Pack in a cool, dry, dark place.
• Do not drop it or subject it to strong jolts.
oAIways charge the Battery Pack soon after full use.
Discharging for a long time may make its life
shorter and recharging impossible.
aBe careful not to put the Battery Pack near fire
because this may cause a short-circuit.
• Batteries should never be disposed of in fire.
ode not use any other chargers than specified.
• Do not use the Battery Pack for appliances other
than specified.
ode not use it below 32°F (0°C) or above 104"F
(4O°C).
ode not use an insufficiently charged or worn out
Battery Pack.
Car Battery Cord (P.11)
eE_esure to start the car engine before inserting the
cigarette lighter plug of the Car Battery Cord into
the cigarette lighter socket; otherwise, the cigarette
lighter plug fuse may burn out when you start the
engine.
eThe car engineshould be runningwhileyour
Movie is in operation. Make sure your car is in an
open, welt ventilated area.
• Disconnect the cigarette lighter plug when your
Movie is not being used.
Charging the Battery Pack (P.12)
eThe usefuloperationtimeofthe Battery will
gradually decreaseafter repeateduse and
recharging. The Batteryis nolongerserviceableif
the operationtime is too shorteven after a
sufficient charge.
*To preservethe lifeof yourBattery, please be sure
to removethe Battery Pack from the Movie for
storage after every use, storingit fully recharged,
When recharging,shouldthe chargingindicatoron
the AC Adaptorgo outin a short time andthe
Battery cannot be fullycharged,pleaseleavethe
Battery on theAC Adaptorforapprox.24 hours
even after the charging indicator goes off.Use this
batteryin the Movie,then repeatthisprocedure
one more time.This procedureshould restorethe
Battery to normal operation.
Special Effects Playback (P.17)
eDuring search playback, horizontal noise bars will
appear and there will be no audio.
eTo protect the tape and Video Heads, your Movie's
operating modes will automatically revert as
follows:
STILL -_STOP after 5 minutes.
STOP _ POWER OFF after 5 minutes
when using a Battery Pack.
eWben the tape reaches its end during playback, or
fast forward, the tape will rewind automatically.
Tape Remaining (P.20)
• The lap time counter only functions in the REC
mode.
.The remaining tape indicator "0:00" will continue
flashing during the last 5 minutes as a final
warning that the tape is about to end.
• The remaining tape time is being calculated when
the indicator "-:--" flashes (up to 30 seconds) in
the EVF.
High Speed Shutter (P.23)
• For proper color reproduction it is recommended
that you use this feature outdoors. For indoor High
Speed Shutter recording, the supplied COLOR
ENHANCEMENT LIGHT, or additional halogen or
tungsten light should be provided. Fluorescent light
will degrade the picture quality.
oFer effective operation, this feature requires ample
light. More light is required for the fastest shutter
speed.
oThe Auto Focus system may not operate properly
under insufficient light when you are using the
High Speed Shutter.
To Record a TV Program (P.26)
.To pause recording, press the PAUSE/STILL
Button. Press the PAUSE/STILL Button again to
return to recording within 8 minutes. After 5
minutes, Pause mode will automatically go into
Stop mode.
• When you place the VCR/CAMERA Selector
Switch to the "VCR" position, a roiling white
pattern may appear if the Tape Counter, Time
Counter and Battery Display have not been
cleared while in VCR mode with the AC Adaptor in
"LINE" and the VIDEO IN Terminal disconnected.
Re-Recording (P.30)
• Sourcetapes recordedon other VCRs must be
pre-recorded inSP modefor Movieplayback.
• For technicalreasons,dubbinga tape may reduce
itsquality.
CCD Warning
When your Movie is aimed at a scene which
contains an excessively bright object such as the
sun or other bright lighting, a vertical bar may
appear in the picture. This is a characteristic of the
CCD pick-up device and is normal when using your
Movie. Try to avoid aiming the camera directly at
extremely bright objects.
CATV System Installer
This reminder is provided to call the CATV system
installer's attention to Article 820-22 of the NEC in
USA (and to the Canadian Electrical code in
Canada) that provides guidelines for proper
grounding and, in particular, specifies that the cable
ground shall be connected to the grounding system
of the building, as close to the point of cable entry
as practical
32
Page 33

Notes on Operations (continued)
-Rough Values of Brightness
Your Movie has been designed for normal scene
illumination of 150 footcandles (1500 lux). However,
the Movie may be used at F1.2, if illumination is
MOVIE SEI-rlNGS NATURAL LIGHT CONDITIONS
(Amber Filter
Range)
- -"OUTDOOR"
tFair weather, blue sky
• Slightly cloudy sky
• Cloudy or rainy sky
• Sunlight in clear weather at midday
• Average sunlight in clear weather
more than 0.2 footcandles (2 lux). The table below
shows the approximate values of brLghtness for
reference.
KELVIN ARTIFICIAL LIGHT SOURCE COLOR
COLO_ TINT
TE_ERAIURE MIXTURE
10,000 •Color television Bluish
8,000
7,000
6,500
6,000
5,500
5,000
• Fluorescent lamp (Daylight)
• Camera flash bulb
• Blue tamp for photography
"AUTO"
- -"INDOOR"
• Sunlight 2 hours after sunrise
and before sunset
• Sunlight40 min.after sunrise
and beforesunset
• Sunlight 30 min. after sunrise
(Blue Fitter
Range)
and before sunset
• Sunlight 20 min. after sunrise
and before sunset
-Special Effects Photography
You can fit the Movie Lens Hood with any
compensator, or "special effects"photographic lens
or filter, that is 49 mm in diameter.
Wide Angle Lens (Supplied)
Expandsthe Movie'sfieldof viewto permitwide
panoramaswithoutpanning.
Telephoto Lens (Supplied)
Increasesthe Movie'smagnification throughout its
zoomrange.
4,500
4,000
3,500
3,200
2,800
Refer to the Accessory section on the back cover
for an illustration of the accessories below.
To Remove the Lens Hood:
Facing the Lens, turn the Lens Hood
counterclockwise to its limit. Cover the Lens Hood
with the palm of your hand, and lightly press and
squeeze the Lena Hood Ring, supplying equal
pressure around the ring. Turn the Ring
counterclockwise a little more, to loosen and
remove it.
• Fluorescent lamp (White)
• Normal flash bulb
• Fluorescent lamp (Off-white)
=Tungsten lamp for photography
• Halogen lamp
• Iodine lamp
,=Tungsten lamp
* Acetylene lamp
eKerosene lamp
•Candlelight2,000
Whitish
Yellowish
Reddish
Filter Kit
Helps you create professional special effects with
star, clear, neutral density and poladzing filters.
This equipment has been tested and found to or television reception which can be determined by
comply with the limits for a Class B computing turning the equipment on and off, use the
device in accordance with the specifications set equipment in another location and/or utilize an
forth in Bubpart J of Part 15 of the FCC Rules. If electrical outlet different from that used by the
this equipment does cause nterferense to rad o receiver,
33
Page 34

Before Requesting Service
If you have a problem with your Movie, it may be a
minor one that you can correct yourself. Use the
chart below in case your problem is listed, and then
follow the recommendations.
Troubles
No power...
Video cassette can't be inserted ...
Video cassette can't be removed ...
No operation starts when operation
buttons are pressed ...
Recording does not operate ...
Auto Focus does not operate ...
The sound from microphone can't be
monitored ...
Camera picture is too dark ...
No playback picture, or the playback
picture is noisy or contains streaks ...
Dudng playback, the picture indicates
motion or blurred action ...
If the top ofyourplaybackpicturewaves
backand forth excessively...
Corrections
-,Make sure the Power Source is connected. (P.11)
=Make sure the POWER Switch is ON. (P.16)
=Check the Dew Indicator. (P.15)
=Make sure the battery is fully charged. (P.12)
=Make sure all necessary cables are connected correctly and firmly.
(P.18)
eMake sure the Lens Cap is OFF. (P.6)
eMake sure the Power Source is connected. (P.11)
elnsert the cassette with the window side facing out and the record
tab facing up. (P.13)
eMake sure the Power Source {s connected. (P.11)
-,Check the Dew Indicator. (P.15)
=Make sure the record tab is still intact. (P.13)
=Check the Battery Indicator. (P.15)
-,Check the Dew Indicator. (P.15)
=Make sure the Focus Switch is set to "AUTO". (P.22)
=Make sure the unit is ON, with the VCR/CAMERA Selector Switch
set to "CAMERA". (P.16)
=Make sure the unit is set to REC or Record/Pause mode.
,=Make sure the High Speed Shutter Switch is OFF. (P.23)
=Press the Tracking Control Button. (P.17)
=Portions of the still picture where the normal speed motion was
particularly rapid may produce this effect. This is normal.
=Because the playback signal is not as stable as an off the air TV
signal, the top of your TV screen may be bent or unstable when the
tape is played back. This symptom is more noticeable when a pre-
recorded tape, recorded on another VCR, is played back. To solve
this problem, locate the horizontal hold control on your TV, Turn it
slowly to correct the wavy picture. If your "IV does not have the
horizontal hold control or adjusting the control does not help, some
modifications may have to be made to the TV set. Technically this
is called "Horizontal AFC time constant change." If such a problem
is noticed, please contact your local "IV service center. (Some
nominal service charges are required.)
-- Cleaning Care for Video Heads
(a) Video Head Cleaning:
Your Movie will not normally
require head cleaning;
however, it is possible that the
heads may become clogged
when playing an old or
damaged tape. If the image
on your screen resembles the
Clogged Video Head photograph on the left, while
playing back a tape, the
heads may require cleaning.
Refer servicing to qualified service personnel,
34
(b) Cleaning the Heads: It is recommended that
head cleaning be performed by a qualified service
technician, Please contact your nearest Panasonic
Service Center. An alternate solution is to obtain a
head cleaning cassette. There are many types of
cleaning cassettes, so be sure to follow the
cleaning instructions carefully. Excessive use of the
cleaning cassette could shorten head life. Use this
cassette only when a head clogging symp_
OCcurs.
Page 35

System Carrying Case
For organizing, carrying and storing the Movie
system and optional accessories.
-System Carrying Case
To Open the Case
Accessory Storage Suggestion
Handling Precautions
Tab
Be sure that the triangle in the center of the case is
facing up; press raised tabs to open.
Raise lid.
AudioNideo Output Adaptor,
Shoulder Strap for Movie,
Cord etc...
Tab
oThis case will not withstand strong impact, nor
protect your Movie from strong vibrations or
shocks.
,,This case hasbeen designed for comfortable
carriageandeasy access;sitting,stepping or
placing heavy objects on the case maycause
permanent damage to its structure or contents,
35
Page 36

Specifications
Power Source:
Power Consumption:
Video Signal:
Video Recording System:
Audio Track:
Pick-Up System:
Pick-Up Device:
Lens:
Viewfinder:
Minimum Illumination Required:
External Microphone Input Level:
Operating Temperature:
Operating Humidity:
Weight:
Dimensions:
Weight and dimensions shown are approximate.
Designs and specifications are subject to change without notice.
VHS Movie: DC 12V
AC Adaptor: 110/1201220/240V AC, 50/60 Hz
VHS Movie: 12V DC ttW (Max. 21W)
AC Adaptor: 42 W
EIA Standard (525 lines, 60 fields) NTSC color signal
4 rotary heads, helical scanning system
1 track
Sequential color difference field reverse system
One integral color filter, Charge Coupled Device (CCD)
6:1 zoom lens, fl.2 with auto iris control
Focal length: 8.5mm - 68mm
Power zoom and macro functions
Lens filter diameter: 49mm
2/3 inch Electronic Viewfinder
2 Lux (F1.2) 0.2 footcandles
--70dB, 4.7K ohms unbalanced, M3 connector
32"F_ 104"F (0"C_40°C)
10o./o_75%
VHS Movie: 4.4 Ibs.
AC Adaptor: 1.5 Ibs.
VHS Movie: 3" (W) X 8-3/16" (H) X !5-1/2" (D)
76 (W) X 208 (H) X 394 (D) mm
AC Adaptor: 3" (W) X 1-11/16" (H) X 8-5/16" (D)
76 (W) X 43 (H) X 210 (D) mm
36
Page 37

Index
AC Adaptor ................................ 8
AC Power Cord ......................... 8
Accessory Mount ....................... 7
Accessories (Optional/
Supplied) ............... Back Cover
Adaptor Cable ........................... 8
Adaptor Connector .................... 6
Audio Dubbing ..................... 4, 29
Audio Dubbing Button ............... 7
Audio Dubbing Indicator ............ 7
Audio Input Connector .............. 8
Audio Output Connector ........... 8
Audio/Video
Cable ............ 4, 18, 26, 28, 30
Audio/Videe Dubbing .............. 28
Audio/Video Output
Adaptor ............................ 4, 18
Auto Focus .............................. 22
Auto White Balance ................ 21
Automatic Easy Edit
Standby ................................ 16
Backlight Button ........................ 5
Basic Steps ............................... 3
Battery Charging
Compartment ......................... 8
Battery Compartment ................ 7
Battery Eject Button .................. 7
Battery Pack ...................... 11, 12
Battery Remaining
Indication ............................. 15
Brightness Control ..................... 6
Built-In Microphone ................... 6
Camera Recording .................. 16
Car Battery Cord ..................... 32
Cassette Compartment ............. 6
Charging Battery ............... 12, 32
Charging Indicator Lamp ..... 8, 12
Cleaning Care for Video
Heads .................................. 34
Color Enhancement Light ....... 14
Counter D/M/L/TR Button ... 5, 20
Date/rime Button ................ 5, 19
Dew Indication ......................... 15
Distance Detection Window ...... 5
Earphone Jack .................... 6, 16
Erase Protection ...................... 13
EVF (Electronic
Viewfinder) ....................... 7, 16
EVF Indications ....................... 15
External Microphone Jack ......... 6
Fast Forward/Search Button ..... 7
Fade Button ......................... 5, 23
Fade In/Out ............................. 23
Filter Kit ............................... 4, 33
Focus Control ............................ 6
Focus Switch ............................. 5
High Speed Shutter ................. 23
High Speed Shutter
Indicator ............................... 23
High Speed Shutter
Switch .............................. 5, 23
Index Indicator ......................... 25
Indoor "_" .............................. 21
Input Signal Selector ................. 8
Lap Time Counter ................... 20
Lens Cap ................................... 6
Lens Focus Ring ....................... 7
Lens Hood ........................... 5, 33
Macro Button
(On Zoom Lever) ................... 5
Macro Focus ........................... 21
Manual Focus .......................... 22
Memory Counter ..................... 20
Monitor .................................... 18
Outdoor "-.'51:'........................... 21
Pause/Still Button ...................... 7
Play Button ................................ 7
Play Indicator ............................ 7
Playback .................................. 17
Power Indicator ......................... 7
Power Indicator Lamp ......... 8, 12
Power Supply .......................... 11
Power Switch ............................ 7
Power Zoom Switch .................. 5
Rec Indicator ........................... 16
Record Button ........................... 7
Record Indicator ........................ 7
Record/Pause Button ................ 5
Record Review ........................ 16
Record Review Button .............. 5
Re-Recording .................... 30, 31
Reset Button ............................. 5
Rewind/Search Button .............. 7
RF Converter Switch ................. 8
Safety Precautions .................... 2
Search Speed ......................... 17
Select Button ............................. 5
Self Timer/rime
Lapse Switch ................... 5, 24
Set Button ................................. 5
Shoulder Strap ........................ 10
Specifications .......................... 36
Still Picture .............................. 17
Still Picture .............................. 17
Stop/Eject Button ...................... 7
Strap Attachment Rings ............ 6
Super Directional
Michrophone ..... 4, Back Cover
Synchro Edit Cord ............. 28, 30
Synchro Edit/
Remote Jack .............. 6, 28, 30
Synchro Edit Jack ............. 28, 30
System Carrying Case ............ 35
Tab .......................................... 13
Tally light ................................... 5
Tape Counter .......................... 20
Tape Remaining ...................... 20
Tape Warning .......................... 15
Telephoto Lens ................... 4, 33
Tracking Control .................. 5, 17
Tripod Mounting Hole ................ 6
Troubles .................................. 34
Tuner Adaptor ......................... 26
Values of Brightness ............... 33
VCR/Camera Selector Switch ... 7
VHF Antenna Input Terminal .... 8
VHF Antenna Output
Terminal ................................. 8
VHF Connecting
Cable ...... 4, 18, 28, 29, 30, 31
VHS Index Search System ..... 25
Video Cassettes (tapes) .......... 13
Video Dubbing ......................... 27
Video Dubbing Button ............... 7
Video Dubbing Indicator ............ 7
Video Input Connector .............. 8
Video Output Connector ........... 8
Vision Adjustment Ring ............. 7
WB (White Balance) Switch ...... 5
Wide Angle lens .................. 4, 33
Wind Buffer Switch .................... 6
Zoom In/Out ............................ 22
Zoom Lever ............................... 5
39
Page 38

Accessories
Accessories packed with,
t pc. AC Adaptor
(PV-A23)
1 pc. Audio/Video Cable
(VJPS0216 or
VJPS0337)
1 pc. System Carrying
Case (VYCS0761)
1 pc. Battery Pack
(PV-BP50)
,our Movie
1 pC. Shoulder Strap
(VYCS0786)
1 pc. 300ohm-75ohm
Transformer
(VSQS049_
1 pc. AudioNideo
Output Adaptor
(VSQS0507)
Wide Angle Lens
(PV-LW49)
Optional Accessories
1/2" Video Cassette
_NV-T160"_
NV-T120)
Tape
_NV-T60 ]
Tuner Adaptor
AC Adaptor
PV-A23)
Synchro Edit Cord
(PV-_
Car Battery Cord
(PV-C20M)
Video Corrector
Wide Angle Lens
(PV-LW49)
Q
Telephoto Lens
(PV-LT49)
©
1 pc. Color
Enhancement Light
(VUAW0415)
=1 pc. VHF Connecting
Cable (VSQS0217)
Telephoto Lens
(PV-LT49)
Panasonic+
Panasonlc Company Panasonic Sales Company,
Division of Mofsushb Elecblc Division of Matlushlta Electrk;
Cofl=_tatlon of America of Puerto Rico, Inc.
One Par_so_c Way, Secaucus, San Gabriel Industrial Park
New Jersey 07094 65th It=rant r)' Ava_ue KM 9,5
CarolirJa, Puedo Rico 00630
Battery Pack (PV-BP50)
Super Directional
Microphone(PV-MK40)
Filter Kit (PV-F49)
SystemCarryingCase
(PV-H60M)_
Printed in Japan
VQTS2309 _)
 Loading...