

Panasonic PV-4820 Owner’s Manual
To GET STARTED
I I
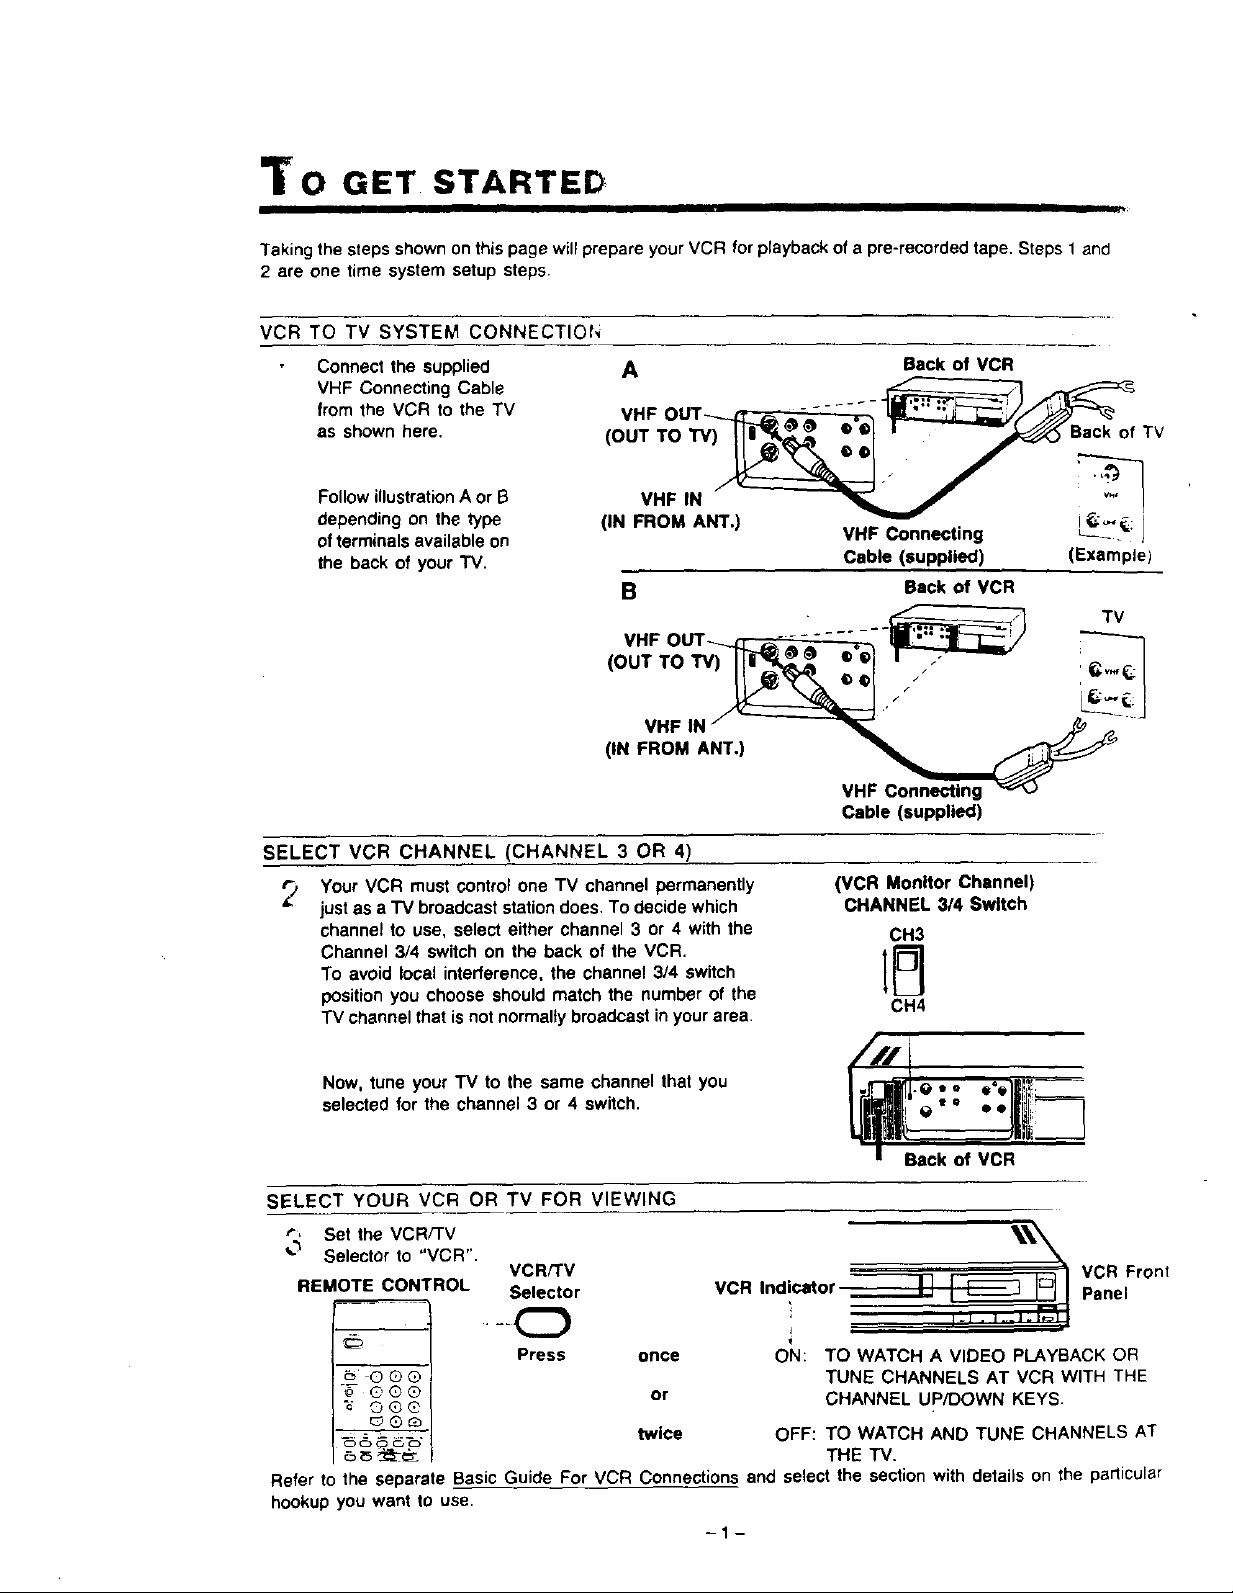
Taking the steps shown on this page will prepare your VCR for playback of a pre-recorded tape. Steps 1 and
2 are one time system setup steps.
VCR TO TV SYSTEM CONNECTIOI-,
Connect the supplied
VHF Connecting Cable
from the VCR to the TV
as shown here.
Follow illustrationA or B
depending on the type
of terminals available on
the back of your "IV.
A Back of VCR
VHF OUT_ ,, _'@ ..... ."-__'_ _
(OUTTOW)_li_ _ _ ° _1r_'-'_s.ck ofTV
(IN FROM ANT.) VHF Connecting _2_'; I
B Back of VCR
VHF OUT .... - ..... . II1-.- .;liar-- /
(OUTTO,V) ._,l I
(1.
SELECT VCR CHANNEL (CHANNEL 3 OR 4)
_., Your VCR must cOntrol one TV channel permanently
just as a "IV broadcast station does. To decide which
channel to use, select either channel 3 or 4 with the
Channel 3/4 switch on the back of the VCR.
To avoid local interference, the channel 3/4 switch
position you choose should match the number of the
TV channel that is not normally broadcast in your area.
._-'----------_7_._=:-=:-=:-=:-=:-=_
• • , .,.'_
Cable (supplied) (Example)
._-.______.q_- TV
1,."
VHF Connecting
Cable (supplied)
(VCR Monitor Channel)
CHANNEL 3/4 Switch
CH3
CH4
Now, tune your TV to the same channel that you
selected for the channel 3 or 4 switch.
l-e.. a"l!!i!_---
e "° • olliili_-_7
SELECT YOUR VCR OR TV FOR VIEWING
r, Set the VCR/TV
_'_ Selector to "VCR".
REMOTE CONTROL Selector
VCR/TV
VCR Indicator _ Panel
___ _ VCR Front
• -kO
Press once
"_- @®®
"_ OG@
OC_O C,_
Refer to the separate Basic Guide For VCR Connections and select the section with details on the particular
hookup you want to use.
or
twice
-1-
ON: TO WATCH A VIDEO PLAYBACK OR
TUNE CHANNELS AT VCR WITH THE
CHANNEL UP/DOWN KEYS.
OFF: TO WATCH AND TUNE CHANNELS AT
THE TV.
ABLE OF CONTENTS
PV-4820
INTRODUCTIOr,
We are pleased to introduce to you one of the most
sophisticated viewing and entertainment products
available today.
This manual is arranged to get you started easily so
you can begin to enjoy the wodd of video as soon
as possible. On the facing page you will find the
basic steps described for setting up your VCR to
view tapes on your TV and to record. Keep this
manual handy to serve as a quick guide to the video
features on your new VCR.
FEATURES
• HQ (High Quality) System
• Digital Quartz Tuning with Auto Set Feature
• On Screen Display Programming
• Multi Function Display
• Recorded Time Counter (Real Time)
• Special Effects Playback
Fast Search
Double Speed Playback
Field-Still
Field Frame Advance
Double Fine Slow
• One Touch Recording
• Unattended (Timer) Recording
• Auto Operation Functions
• Wireless Remote Control
TABLE OF CONTENTS
TO GET STARTED ....................... 1
TABLE OF CONTENTS ................... 2
DESCRIPTION OF CONTROLS ............. 3
CLOCK ADJUSTMENT .................... 8
TO PLAYBACK .......................... 9
TO RECORD ............................ 1!
CHANNEL MEMORY ...................... 13
ONE TOUCH RECORDING ................ 15
TIMER RECORDING ...................... 17
HELPFUL HINTS ......................... 20
BEFORE REQUESTING SERVICE .......... 23
SPECIFICATIONS ........................ 24
WARRANTY ............................. 25
ACCESSORIES ................... Back Cover
- I
t
: • : . D2 NC'_ EXoOSE THIS EOUIPMEf:T TC, Rt..!t i '
This video recorder, equipped with the HO System, is compatible with existing VHS equipment.
Only use those tapes wlth the _ mark. It Is recommended that only cassette tapes that have been
tested and inspected for use In 2, 4, 6, and 8 hour VCR machines be used.
This symbol warns the user that uninsulated voltage
withinthe unit may have sufficient magnitude to cause
electric shock. Therefore, it isdangerous to make any
kind of contact with any inside part of this unit.
C,_UTI_,"dTO '_¢EoUCF T,'_ _S_: _,= ELE_"A,C S,',OC,_
This symbol alerts the user that important literature
concerning the operation 8nd maintenance ofthis unit
has been included. Therefore, it should be read
carefully in order to avoid any problems.
-2-
DESCRIPTION OF CONTROLS
I
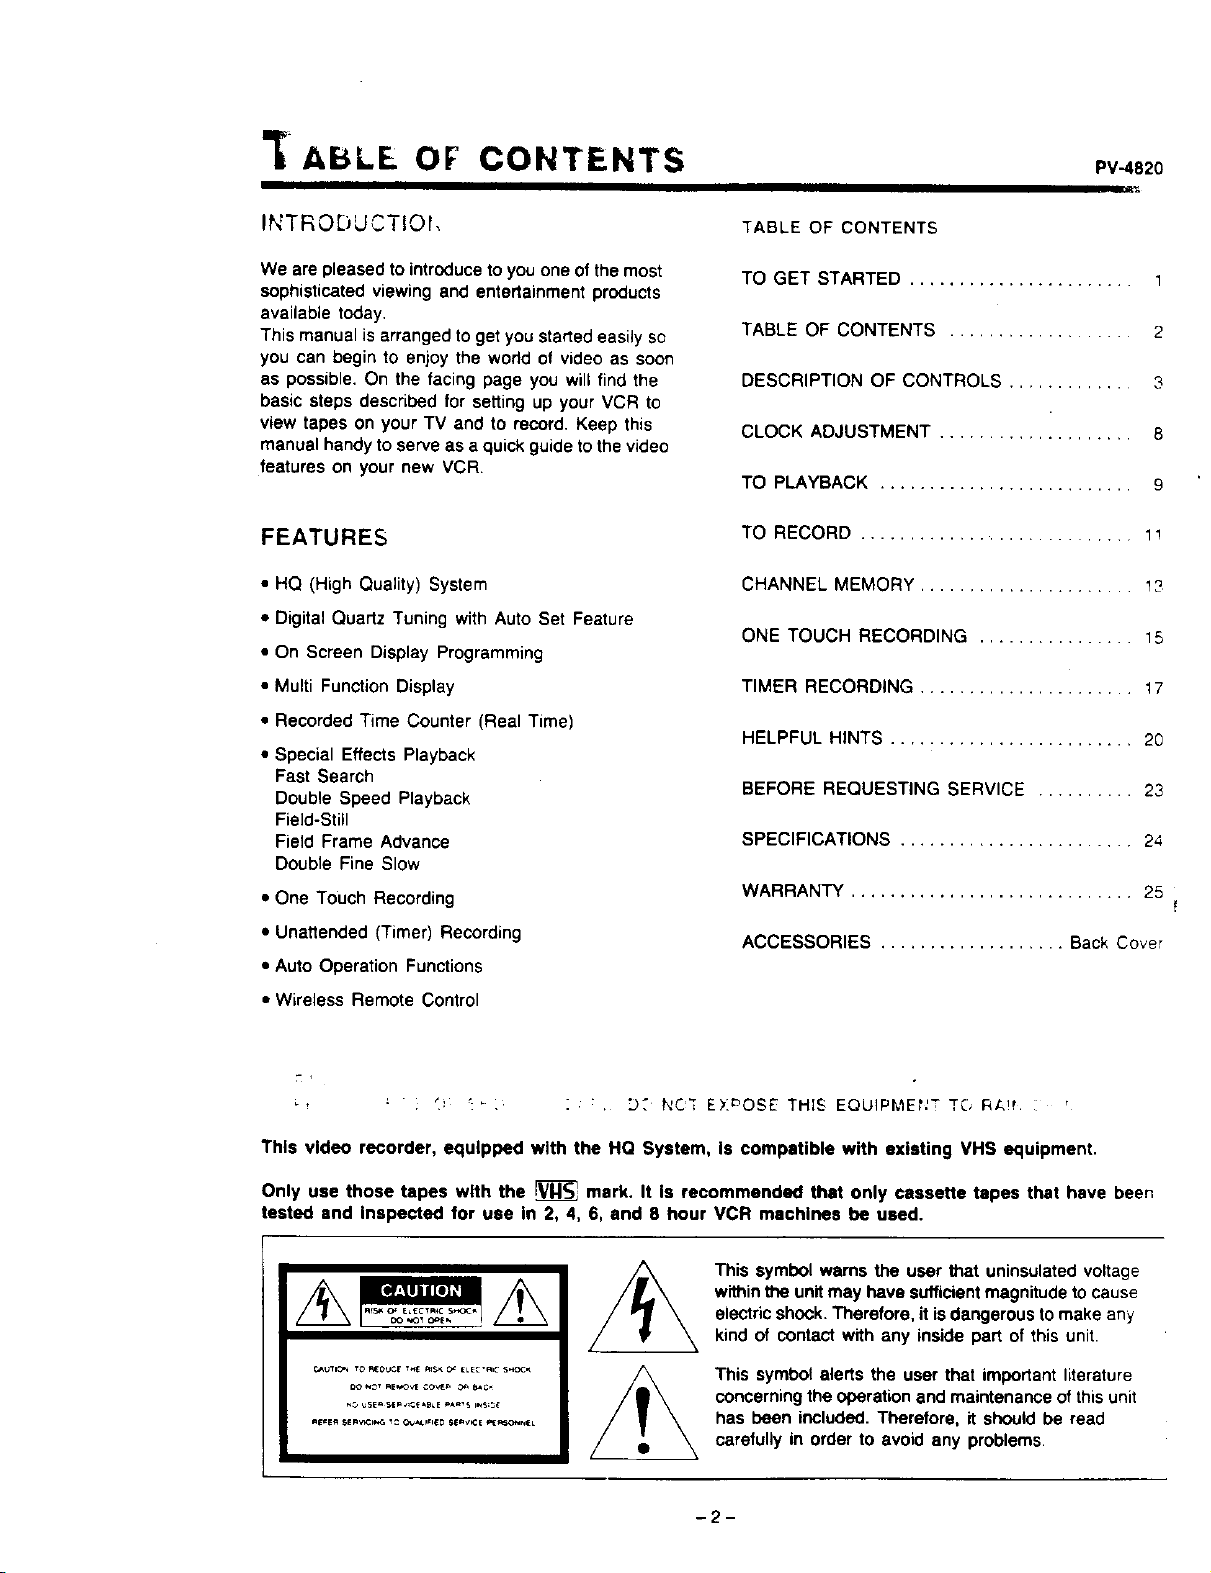
. (See pages 5 and 6 for explanation of controls.)
MULTI FUNCTION DISPLAY \
CASSETTE
COMPARTMENT
VCR/TV SELECTOR
BUTTON
REWIND/SEARCH 4_- BUTTON
|','_I; l-._I!;_"}--t ;1_,',_t]11:l[_l_ ="I f :{!; I_
Various VCR function controls are conveniently available with your Wireless Remote Control.
POWER BUTTON \
VCR/rV SELECTOR BUTTON--
CHANNEL MEMORY BUTTON--, •',
ADD/DELETE BUTTON
\
\
CHANNEL CALL BUTTON --_
TIME CALL BUTTON -_\
COUNTER CALL BuI-rON-
RESET Bu'r'FON
MEMORY BUTTON
STOP BUTTON
REWIND/SEARCH ,t_
SLOW-MOTION BUTTONS
TRACKING CONTROL
(UP/DOWN)
f
J
\
\
\
_-'--NUMERIC KEYS (0, 1, 2, 3, 4, 5.
/
_--CHANNEL UP/DOWN KEYS
F CLEAR BUTTON
_ PROG/CLOCK BUTTON
/_--ONE TOUCH RECORD
_ (O.T.R,) BUTTON
/_-- PLAY/STILL BUTTON
.' r--WIRELESS REMOTE
SENSOR
UP/DOWN KEYS
FAST FORWARD/
SEARCH _; BUTTON
STOP BUTTON
6, 7, 8, and 9)
STANDBY BUTTON
PLAY BUTTON
RECORD BUTTON
PAUSE/STILL BUTTON
DOUBLE SPEED (X2) PLAY
BUTTON
FAST FORWARD/SEARCH
TAPE-SPEED SELECTOR BU'I-rON
(SP/LPiSLP)
UTTON
BUTTON
See page 7 for Battery Replacement Caution.
l__o_
PV-4820
TIMER INDICATOR--
/
CASSETTE-IN ,
INDICATOR .\ \ , / CATV INDICATOR
VCR/TV INDICATOR
=VCR"
lSu.o To
!We Th Fr _ SLP/_--_F, I
RECORD INDICATOR_ _ . "',
CLOCK DISPLAY SPEED INDICATOR
AUDIO INPUT
CONNECTOR
AUDIO OUTPUT / ADJUSTMENT
CONNECTOR CONTROL
.f \
"SP" "LP" "SLP"
,/ VERTICAL LOCK
VIDEO INPUT
CONNECTOR
VIDEO OUTPUT
CONNECTOR
CHANNEL 3/4 SWITCH-
AC POWER CORD
UHF ANTENNA
OUTPUT TERMINALS
(OUT TO TV SET)
UHF ANTENNA
INPUT TERMINALS
(IN FROM ANTENNA)
VHF ANTENNA
OUTPUT TERMINAL
(OUT TO TV SET)
VHF ANTENNA
INPUT TERMINAL
(IN FROM ANTENNA)
-4-

DESCRIPTION OF CONTROLS (CONTINUED)
FROf'T
• POWER BUTTON
- TO turn the VCR on and off.
- To set the VCR for unattended recordings after
timer settings have been completed
• VCR/TV SELECTOR BU'II'ON
VCR position: To view playback or to monitor video
recordings. "VCR" appears on the
Multi Function Display.
TV position: To watch TV or to view one program
while recording a different program.
When this is set to TV, there is no
indication on the Multi Function
Display.
• REWIND/SEARCH BUT'TON
To rewind tapes. Also, during playback press this
button to view the picture in rapid reverse.
• PLAY/STILL BUTTON
To play back a tape. In SP or SLP playback, press
this button once more to view a still picture.
• FAST FORWARD/SEARCH Bu'rroN
To rapidly advance the tape. Also, during playback
press this button to do rapid forward visual search.
WIRELESS REMOTE CONTROL
• VCRfTV SELECTOR BUTTON
Same as the VCR/TV SELECTOR Button on the
VCR.
• CHANNEL MEMORY BUTTON
This button is normally OFF. For CHANNEL
MEMORY programming, hold this button down and
press NUMERIC Key "1" to use the AUTO SET
feature.
• ADD/DELETE BUTTON
Used to add or delete a selected CHANNEL.
• CHANNEL CALL BUTTON
When pressing this button, the number of the
channel tuned will be displayed on the TV screen
momentarily.
• TIME CALL BUTTON
Press the TIME CALL Button to display or clear the
date and time from the TV screen.
• COUNTER CALL BUTTON
Press this button to display or clear the time counter
and tape speed display.
• RESET BUTTON
Sets the Time Counter to "0:00.001'
WIRELESS REMOTE CONTROL
• MEMORY BUTTON
When this button is set to ON, the tape will rewind
or fast forward to the "0:00.00" point then stop
automatically.
• REWIND/SEARCH BUTTON
Same as the REWIND/SEARCH Button on the
VCR.
• SLOW-MOTION BUTTONS
Press the SLOW Button while watching a tape to
put action into slow motion for tapes recorded in
SP and SLP speeds. DOWN and UP Buttons let
you adjust slow motion speed from about 1/10 to
about 1/60 of normal speed.
• CLEAR BUTTON
Press this button to clear the settings for the
displayed program contents.
While setting the clock or a program, each press
of this button starts the digit tothe left flashing for
correction.
• PROG/CLOCK BUTTON
Press this button to display the MENU screen to
select either clock adjustment or the Timer
programming mode.
• STANDBY BUI"FON
Used along with O.T.R. Button, to set a delayed
(Standby) O.T.R..
• ONE TOUCH RECORD (O,T.R.) BUTTON
Select the channel and press the ONE TOUCH
RECORD Button to start recording immediately for
30 minutes to 4 hours of recording, or until tape
ends. In any case power shut off is automatic
• PAUSE/STILL BUI_ON
To temporarily stop'the tape during recording or to
view a still picture during playback.
• DOUBLE SPEED (X2) PLAY BUTTON
Press this button during playback of the tapes
recorded in SP and SLP mode forrapid tape search
at twice the normal speed,
• FAST FORWARD/SEARCH BUTTON
Same as the FAST FORWARD/SEARCH Button
on the VCR
• FRAME ADVANCE BUTTON
While viewing an SP or SLP still picture, press this
button to advance the picture one frame at a time,
or hold it down for a slow-motion picture.
• TAPE SPEED SELECTOR (SP/LPiSLP) BUTTON
Set this selector for the desired recording speed
-5-
PV,.4820
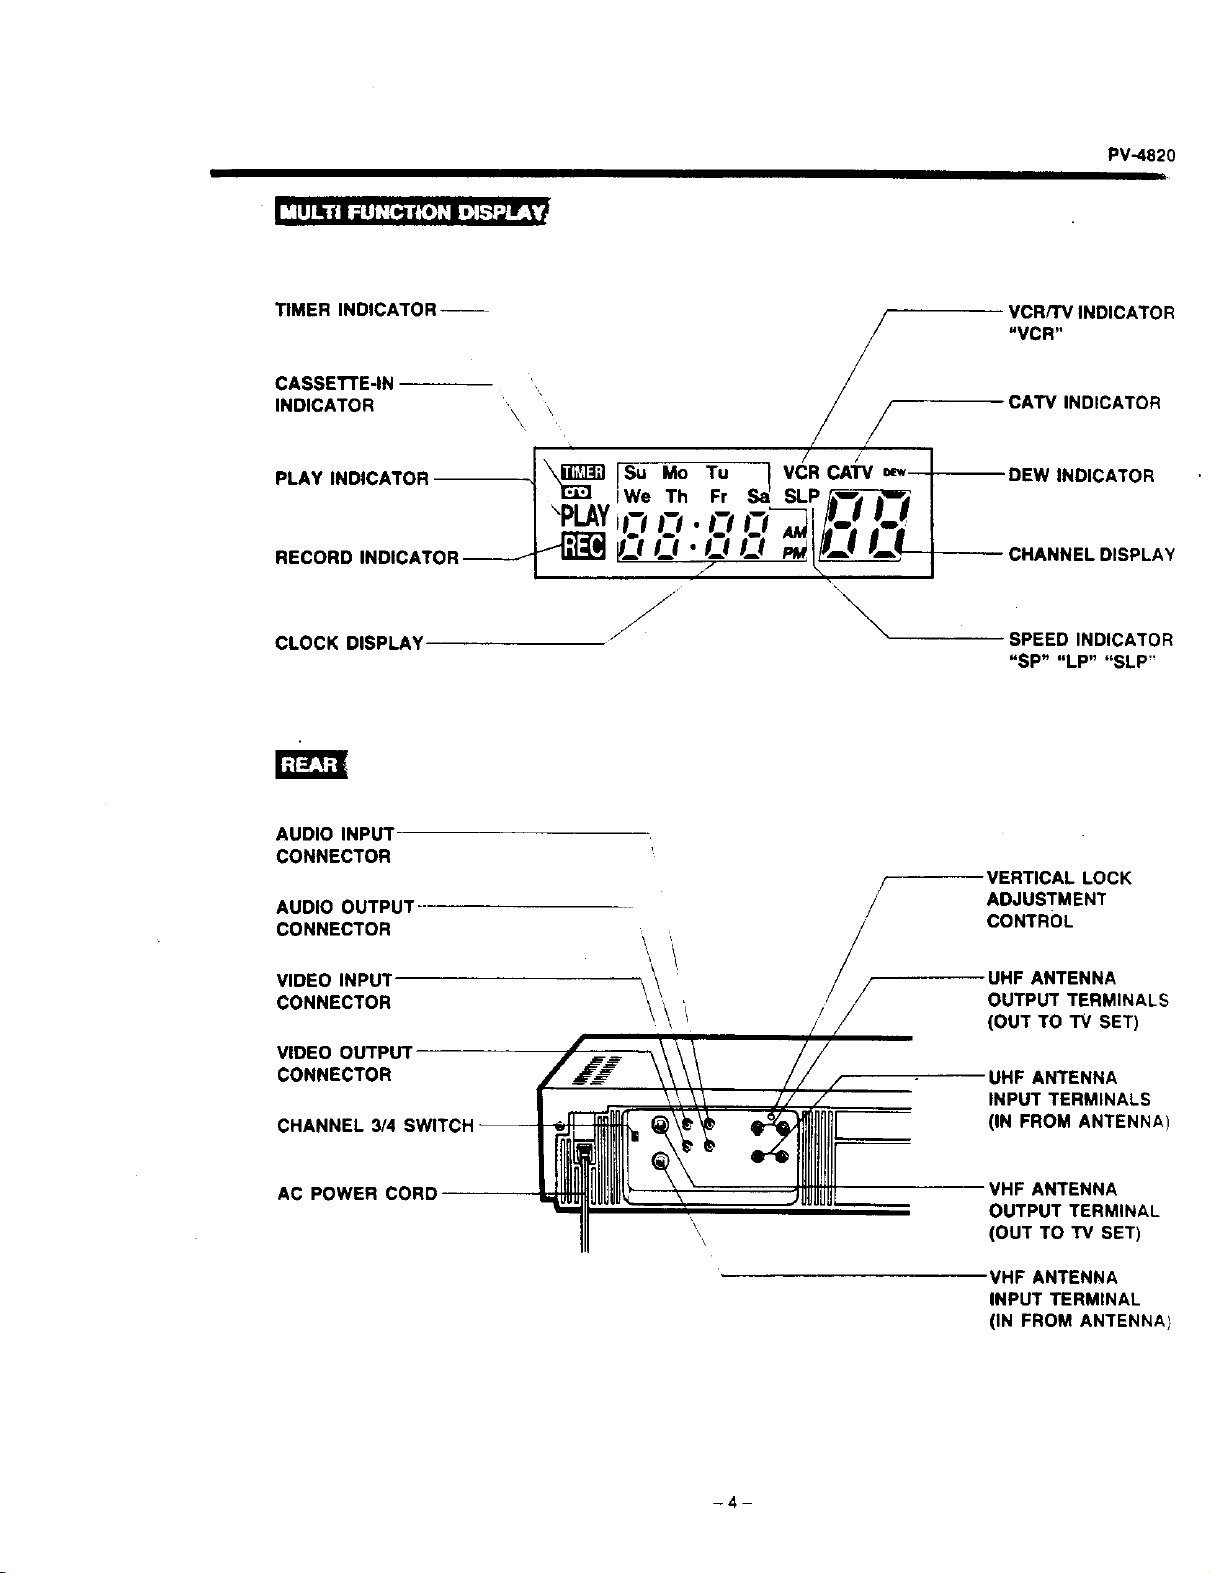
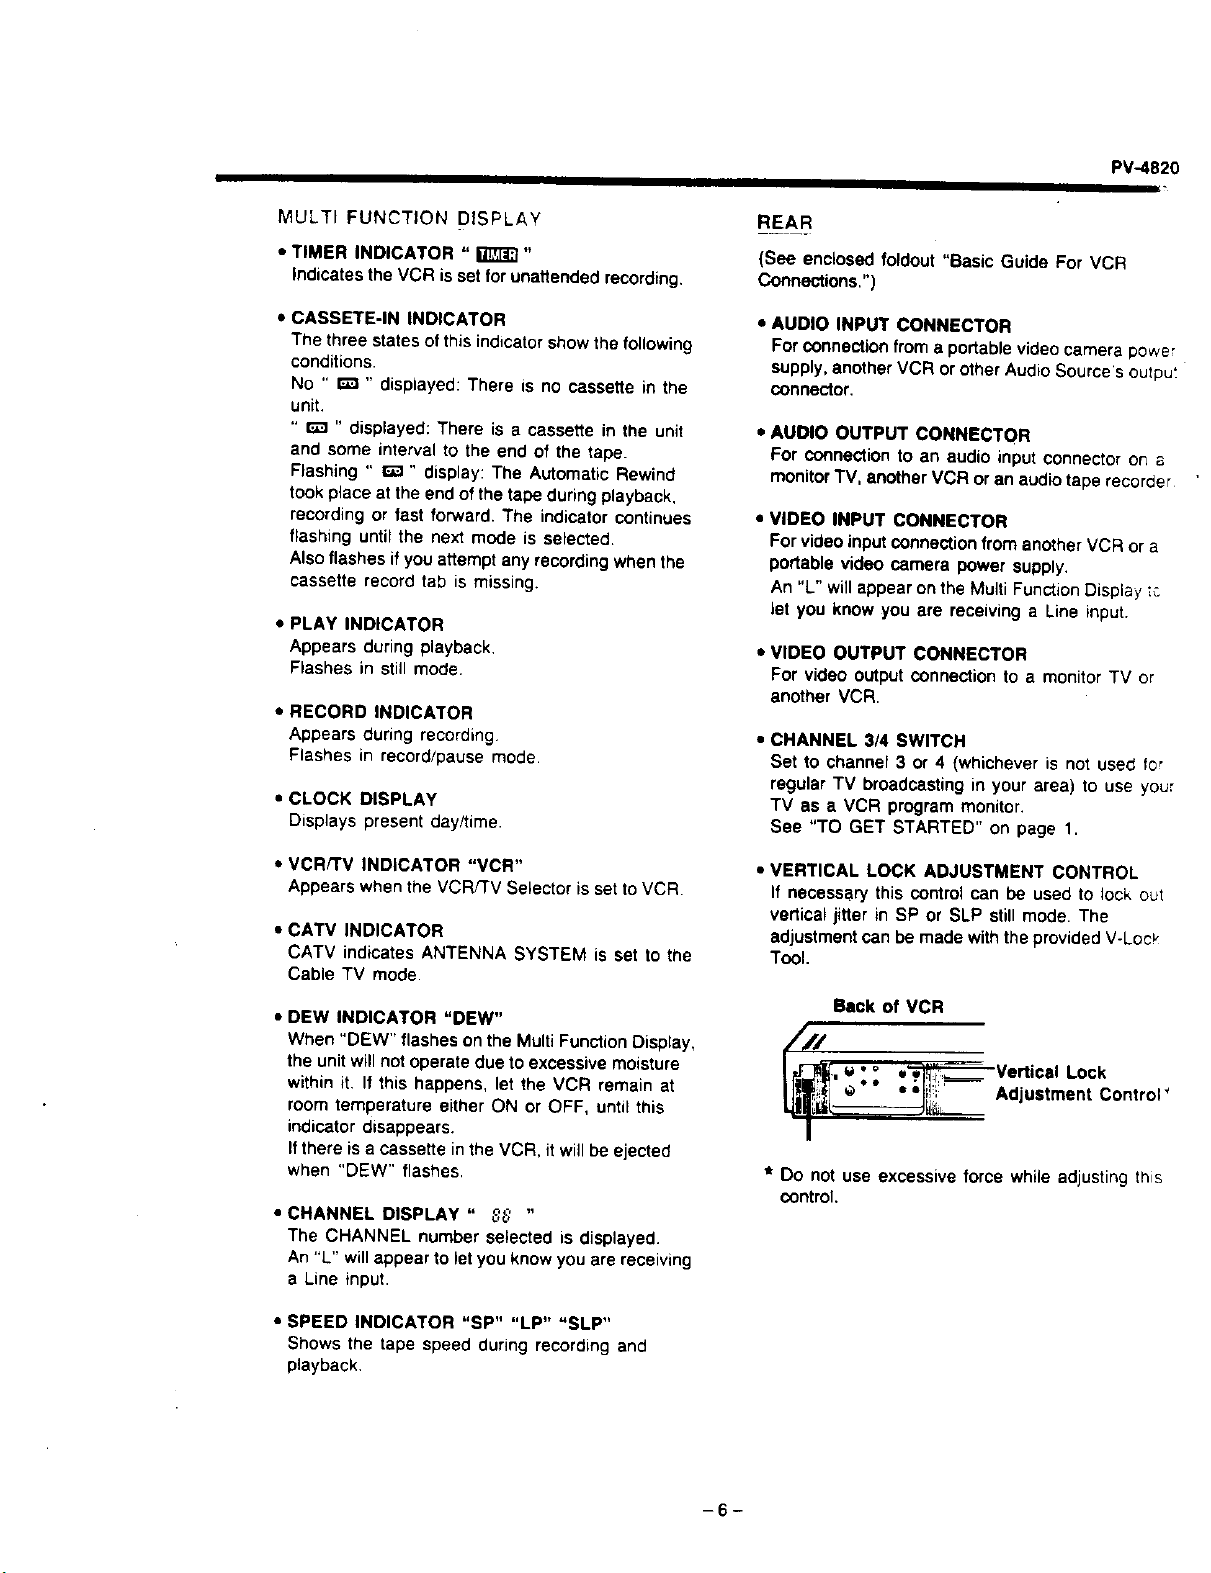
MULTIFUNCTIONDISPLAY
• TIMER INDICATOR " _"
Indicates the VCR is set for unattended recording.
• CASSETE-IN INDICATOR
The three states ofthis indicator show the following
conditions,
No " r'_ ,' displayed: There is no cassette in the
unit.
" _ " displayed: There is a cassette in the unit
and some interval to the end of the tape.
Flashing " E_ " display: The Automatic Rewind
took place at the end of the tape during playback,
recording or fast forward. The indicator continues
flashing until the next mode is selected.
Also flashes if you attempt any recording when the
cassette record tab is missing.
• PLAY INDICATOR
Appears during playback,
Flashes in still mode.
• RECORD INDICATOR
Appears during recording.
Flashes in record/pause mode
• CLOCK DISPLAY
Displays present day/time.
• VCR/TV INDICATOR "VCR"
Appears when the VCR/TV Selector is set to VCR.
• CATV INDICATOR
CATV indicates ANTENNA SYSTEM is set to the
Cable TV mode.
• DEW INDICATOR "DEW"
When "DEW" flashes on the Multi Function Display,
the unit will not operate due to excessive moisture
within it. If this happens, let the VCR remain at
room temperature either ON or OFF, until this
indicator disappears.
Ifthere is a cassette in the VCR, it will be ejected
when "DEW" flashes,
• CHANNEL DISPLAY " _ "
The CHANNEL number selected is displayed.
An "L" willappear to let you know you are receiving
a Line input.
REAR
(See enclosed foldout "Basic Guide For VCR
Connections,")
• AUDIO INPUT CONNECTOR
For connection from a portable video camera power
supply, another VCR or other Audio Source's outpu_
connector.
• AUDIO OUTPUT CONNECTOR
For COnnectionto an audio input connector on a
monitorTV, another VCR or an audio tape recorder
• VIDEO INPUT CONNECTOR
For video input connection from another VCR or a
portable video camera power supply.
An "L" will appear on the Multi Function Display, _:.
let you know you are receiving a Line input.
• VIDEO OUTPUT CONNECTOR
For video output connection to a monitor TV or
another VCR,
• CHANNEL 3/4 SWITCH
Set to channel 3 or 4 (whichever is not used for
regular TV broadcasting in your area) to use your
TV as a VCR program monitor.
See "TO GET STARTED" on page 1,
• VERTICAL LOCK ADJUSTMENT CONTROL
If necessary this control can be used to lock out
vertical jitter in SP or SLP still mode. The
adjustment can be made with the provided V-Loc_"
Tool.
Back of VCR
___-_ _'° •w Vert
, _ ical Lock
_J_,_:__._i_.___ '*" . ;b;!!;m Adjustment Control _
I
* Do not use excessive force while adjusting this
control.
• SPEED INDICATOR "SP" "LP" "SLP"
Shows the tape speed during recording and
playback,
-6-
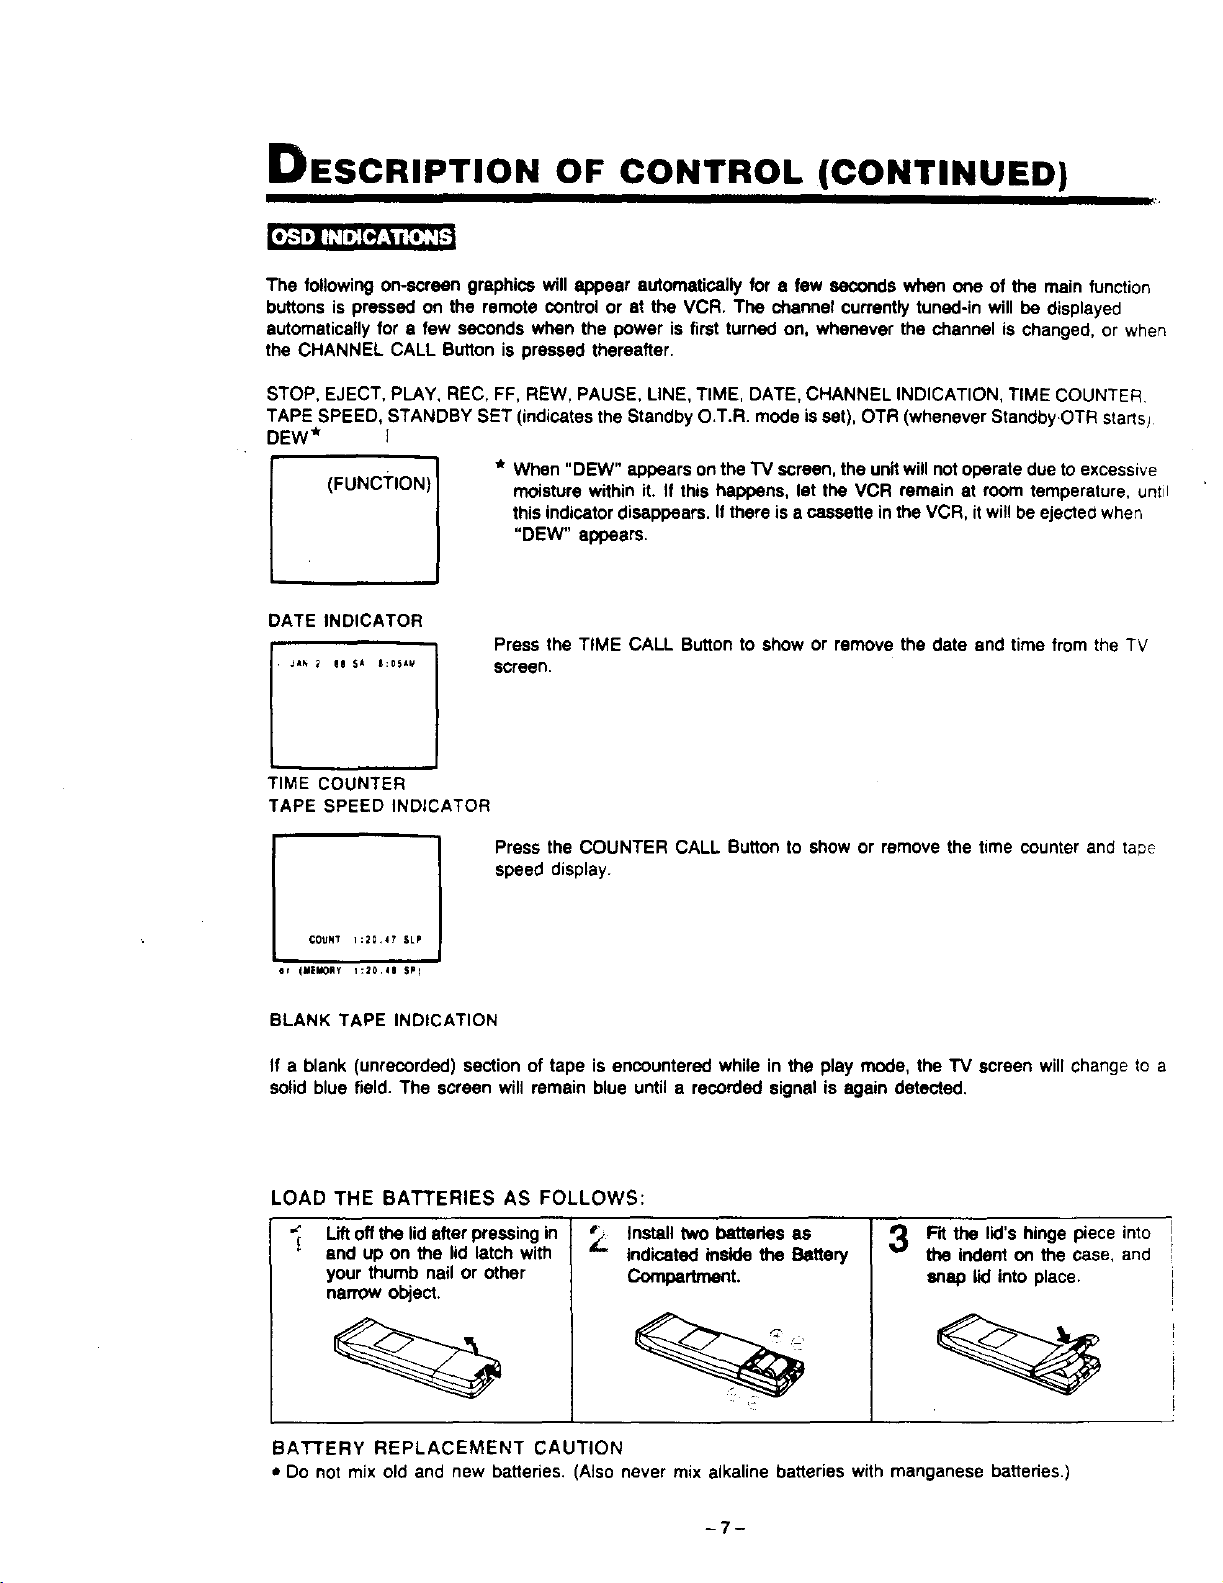
DESCRIPTION OF CONTROL (CONTINUED)
The following on-screen graphics will appear automatically for a few seconds when one of the main function
buttons is pressed on the remote control or at the VCR. The channel currently tuned-in will be displayed
automatically for a few seconds when the power is first turned on, whenever the channel is changed, or when
the CHANNEL CALL Button is pressed thereafter.
STOP, EJECT, PLAY, REC, FF, REW, PAUSE, LINE, TIME, DATE, CHANNEL INDICATION, TIME COUNTER
TAPE SPEED, STANDBY SET (indicates the Standby O.T.R. mode is set), OTR (whenever StandbyOTR starts)
DEW* I
* When "DEW" appears on the "IV screen, the unit will not operate due to excessive
moisture within it. If this happens, let the VCR remain at room temperature, untit
this indicator disappears. If there is a cassette inthe VCR, it will be ejected when
(FuNcT=oN)1
"DEW" appears.
Press the TIME CALL Button to show or remove the date end time from the TV
screen.
TIME COUNTER
TAPE SPEED INDICATOR
Press the COUNTER CALL Button to show or remove the time counter and tape
speed display.
1
COUNT 1:20,47 SLP
et _MEMORy 1:_0,45 $PI
BLANK TAPE INDICATION
If a blank (unrecorded) section of tape is encountered while in the play mode, the TV screen will change to a
solid blue field. The screen will remain blue until a recorded signal is again detected.
LOAD THE BATTERIES AS FOLLOWS:
Liftoff the lid after pressing in
end up on the lid latch with
your thumb nail or other
narrow object
/
Install two batteries as
indicated inside the Battery
Compertnent.
Fit the lid's hinge piece into
the indent on the case, and
snap lid into place.
BATTERY REPLACEMENT CAUTION
• Do not mix old and new batteries. (Also never mix alkaline batteries with manganese batteries.)
-7-
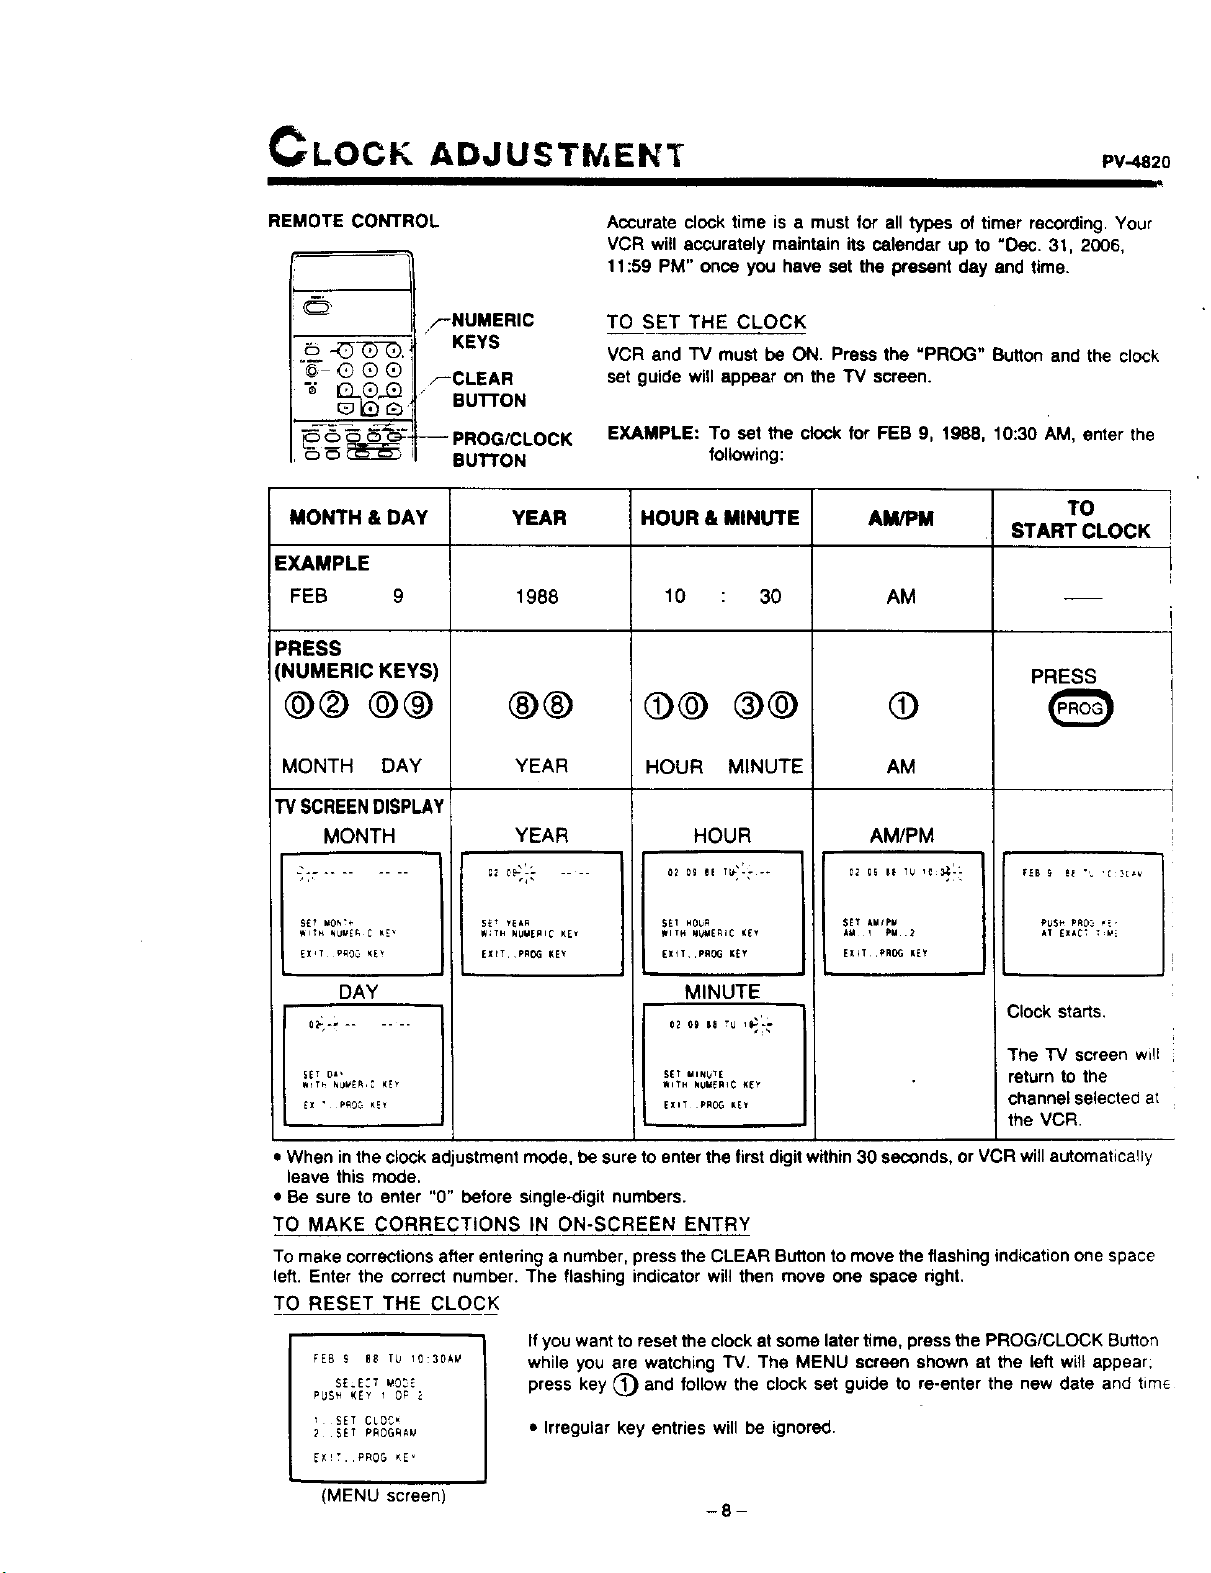
CLOCK ADJUSTW, EN'f PV- 2o
REMOTE CONTROL
F'NUMERIC
__, KEYS
"_" G Q Q ,--CLEAR
k_ [2_ Bu'n'ON
_ _ _-c_. -- PROG/CLOCK
_ _ _ BUTTON
MONTH & DAY
EXAMPLE
FEB 9
PRESS
(NUMERIC KEYS
@@ ®®
MONTH DAY
Accurate clock time is a must for all types of timer recording. Your
VCR witl accurately maintain its calendar up to "Dec. 31, 2006,
t 1:59 PM" once you have sot the present day and time.
TO SET THE CLOCK
VCR and TV must be ON. Press the "PROG" Button and the clock
set guide wifl appear on the TV screen.
EXAMPLE: To sot the clock for FEB 9, 1988, 10:30 AM, enter the
following:
YEAR HOUR & MINUTE AM/PM TO
START CLOCK
1988
®®
YEAR
10 : 30
@@ ®@
HOUR MINUTE
AM
PRESS
@
AM
TV SCREEN DISPLAY
MONTH
gET _!*,
WITH _UVE_ C _E _
DAY
YEAR HOUR AM/PM
5E_ yEAR
W;TH NUMERIC KEI
EXITPRO¢I KEY
$EI NOU_
WITH NUr_l_iC _[Y
EXlL .PROG K_Y
MINUTE
SET AMIp_
A_ 1 PM.2
EX_T,PR_ KEY
RU$_ PR03 _E,
AT EXAC_ _VE
Clock starts,
The "IV screen will
SET 0_'
_X • pRO5 K!_
S_T MINUTE
_ITH NUMERIC KEY
EXIT pROG KE_
return to the
channel selected at
the VCR.
• When inthe clock adjustment mode, be sure to enter the first digitwithin 30 seconds, or VCR will automatically
leave this mode.
• Be sure to enter "0" before single.digit numbers.
TO MAKE CORRECTIONS IN ON-SCREEN ENTRY
To make corrections after entering a number, press the CLEAR Butlon to move the flashing indication one space
left. Enter the correct number. The flashing indicator will then move one space right.
TO RESET THE CLOCK
FEB S 88 T_ 10:30k_
SE_E:T _O_E
PUS_ KEY 1 OP
SET CLOC_
2 SET PROGfiAU
EX_T. PROG _E _
Ifyou want to reset the clock at some later time, press the PROG/CLOCK Bu_lon
while you are watching TV. The MENU screen shown at the left will appear;
press key _) and follow the clock set guide to re-enter the new date and tim_
• Irregular key entries will be ignored.
(MENU screen)
-8-
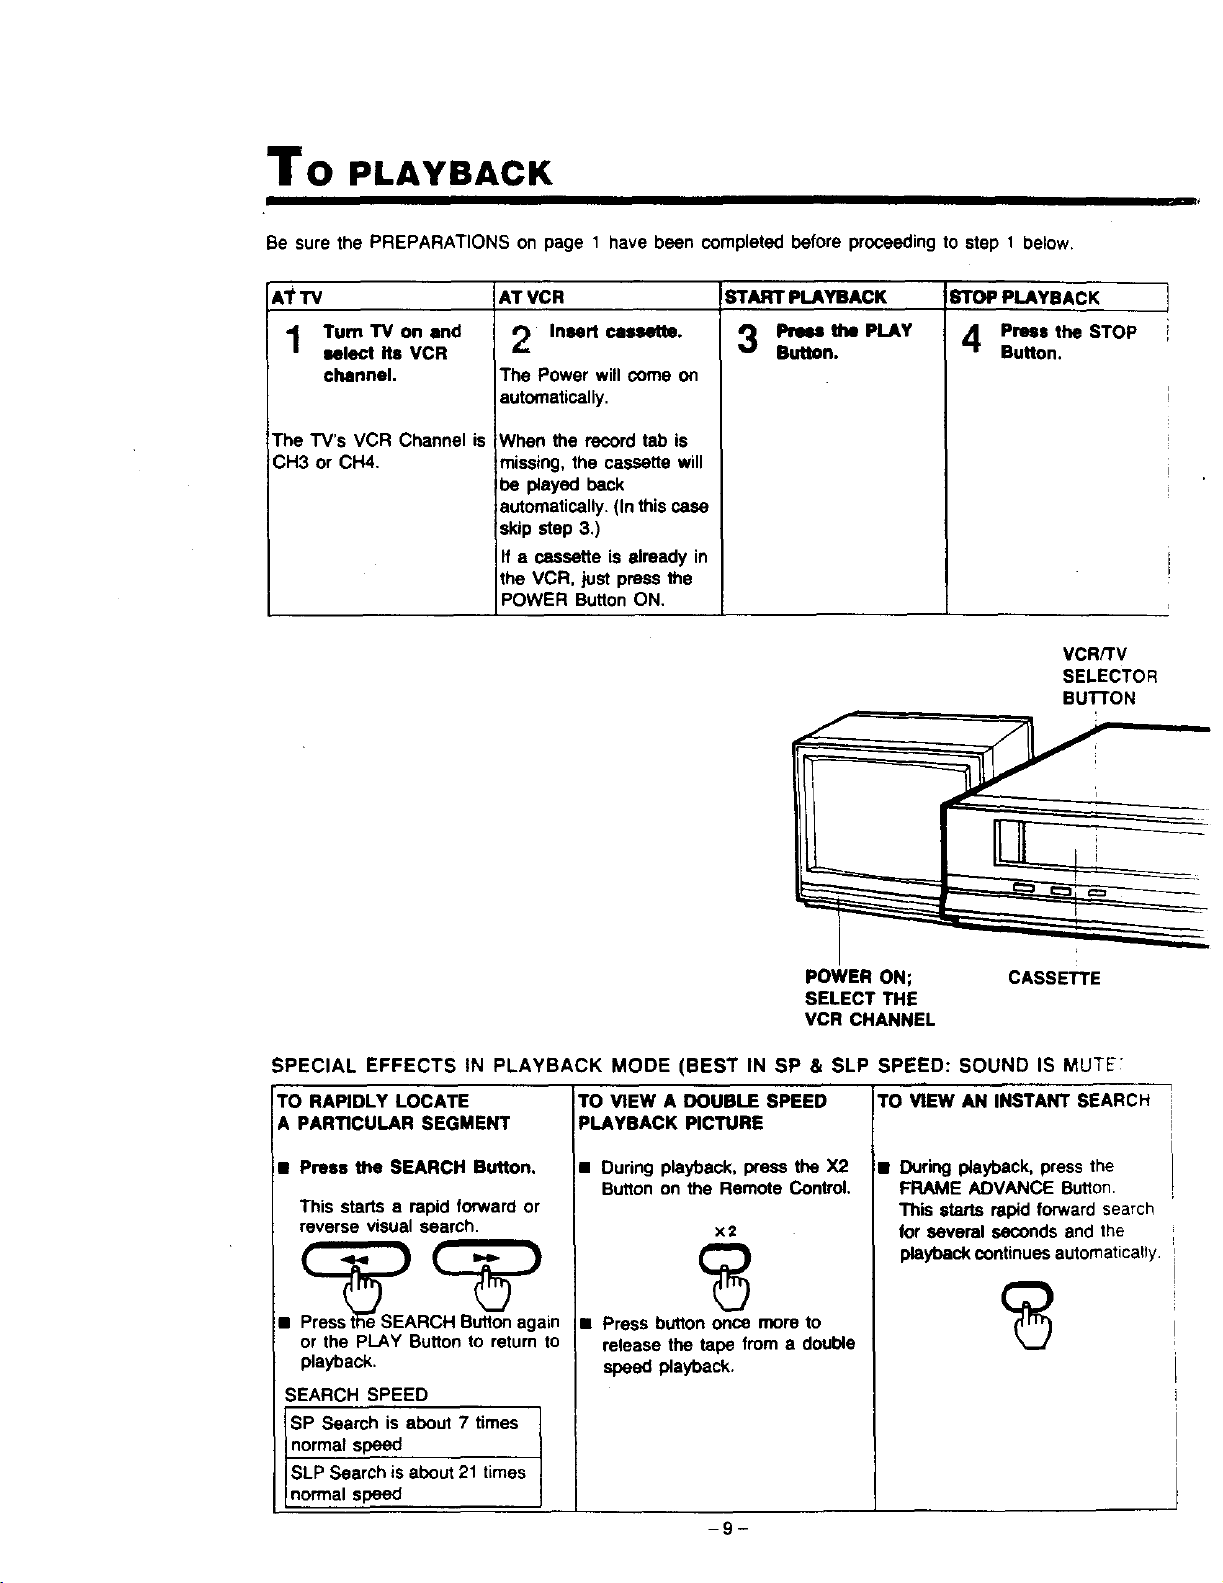
To PLAYBACK
Be sure the PREPARATIONS on page 1 have been completed before proceeding to step 1 below.
ATTV
Turn"IV on end
select its VCR
channel.
The TV's VCR Channel is
CH3 or CH4.
AT VCR
Insert cassette.
The Power will come on
automatically.
When the record tab is
missing, the cassette will
_e played back
automatically. (In this case
skip step 3.)
If a cassette is already in
the VCR, just press the
POWER Button ON.
START PLAYBACK STOP PLAYBACK
3 'LAY
Press the STOP
Button.
VCR/TV
SELECTOR
BuI"rON
POWER ON;
SELECT THE
VCR CHANNEL
SPECIAL EFFECTS IN PLAYBACK MODE (BEST IN SP & SLP SPEED: SOUND IS MUTE';
TO RAPIDLY LOCATE
A PARTICULAR SEGMENT
• Prees theSEARCH Button.
This starts a rapid forward or
reverse visual search.
•
Pr_t_e SEARCH Button again
or the PLAY Button to return to
playback.
SEARCH SPEED
SP Search is about 7 times
normal speed
SLP Search is about 21 times
normal speed
TO VIEWADOUBLESPEED
PLAYBACK PICTURE
• During playback, press the X2
Button on the Remote Control.
x2
• Press button once more to
release the tape from a double
speed playback.
-9-
TO VIEW AN INSTANT SEARCH
• During playback, press the
FRAME ADVANCE Button.
This starts rapid forward search
for several seconds and the
playback continues automatically.
CASSETTE
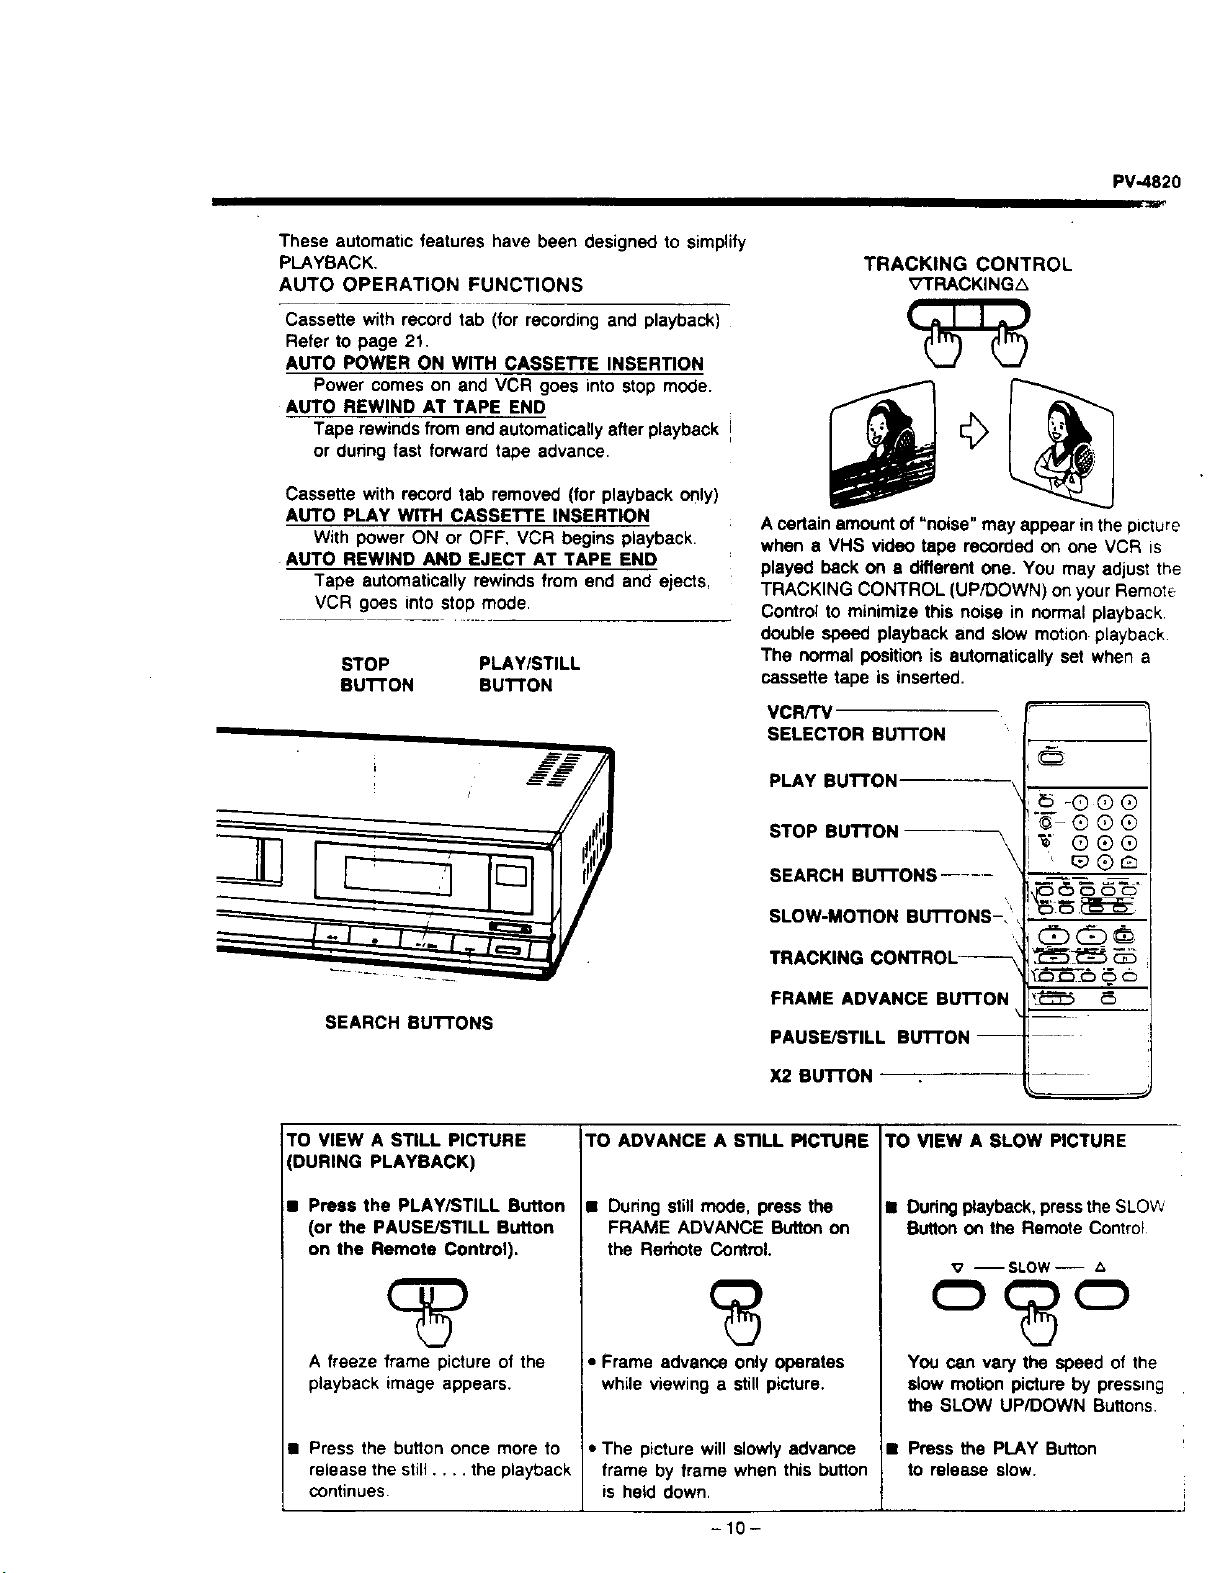
These automatic features have been designed to simplify
PLAYBACK.
AUTO OPERATION FUNCTIONS
Cassette with record tab (for recording and playback)
Refer to page 21.
AUTO POWER ON WITH CASSETTE INSERTION
Power comes on and VCR goes into stop mode.
AUTO REWIND AT TAPE END
Tape rewinds from end automatically after playback !
or dunng fast forward tape advance.
Cassette with record tab removed (for playback only)
AUTO PLAY WITH CASSETTE INSERTION
With power ON or OFF, VCR begins playback.
AUTO REWIND AND EJECT AT TAPE END
Tape automatically rewinds from end and ejects,
VCR goes into stop mode.
STOP PLAY/STILL
BUTTON BUTTON
' /E
PV-.4820
TRACKING CONTROL
_;7TRACKINGL_
A certain amount of "noise" may appear in the picture
when 8 VHS video tape recorded on one VCR =s
played back on • different one. You may adjust the
TRACKING CONTROL (UP/DOWN) on your Remote
Control to minimize this noise in normal playback
double speed playback and slow motion playback.
The normal position is automatically set when a
cassette tape is inserted.
VCR/TV
SELECTOR BUTTON
@
PLAY BUTTON
-® ®®
STOP BUTTON \
SEARCH BUTTONS .....
"5--® ®®
\
SEARCH BUTTONS
TO VIEW A STILL PICTURE
(DURING PLAYBACK)
1• Press the PLAY/STILL Button
(or the PAUSE/STILL Button
on the Remote Control).
A freeze frame picture of the
playback image appears.
Press the bu_on once more to
release the still .... the playback
continues
SLOW-MOTION BuI"rONS-I',
TRACKING CONTROL_
FRAME ADVANCE BUTTON
PAUSE/STILL BLrl-rON--
X2 BUTTON
TO ADVANCE A STILL PICTURE
• During still mode, press the
FRAME ADVANCE Button on
the Rerhote Control.
• Frame advance only operates
while viewing a still picture.
• The picture will slowly advance
frame by frame when this button
is held down.
®
TO VIEW A SLOW PICTURE
• Dudng playback, pressthe SLOW
Sutton on the Remote Control
v --SLOW--
You can vary the speed of the
slow motion picture by pressing
the SLOW UP/DOWN Buttons.
• Press the PLAY Button
to release slow.
-10-
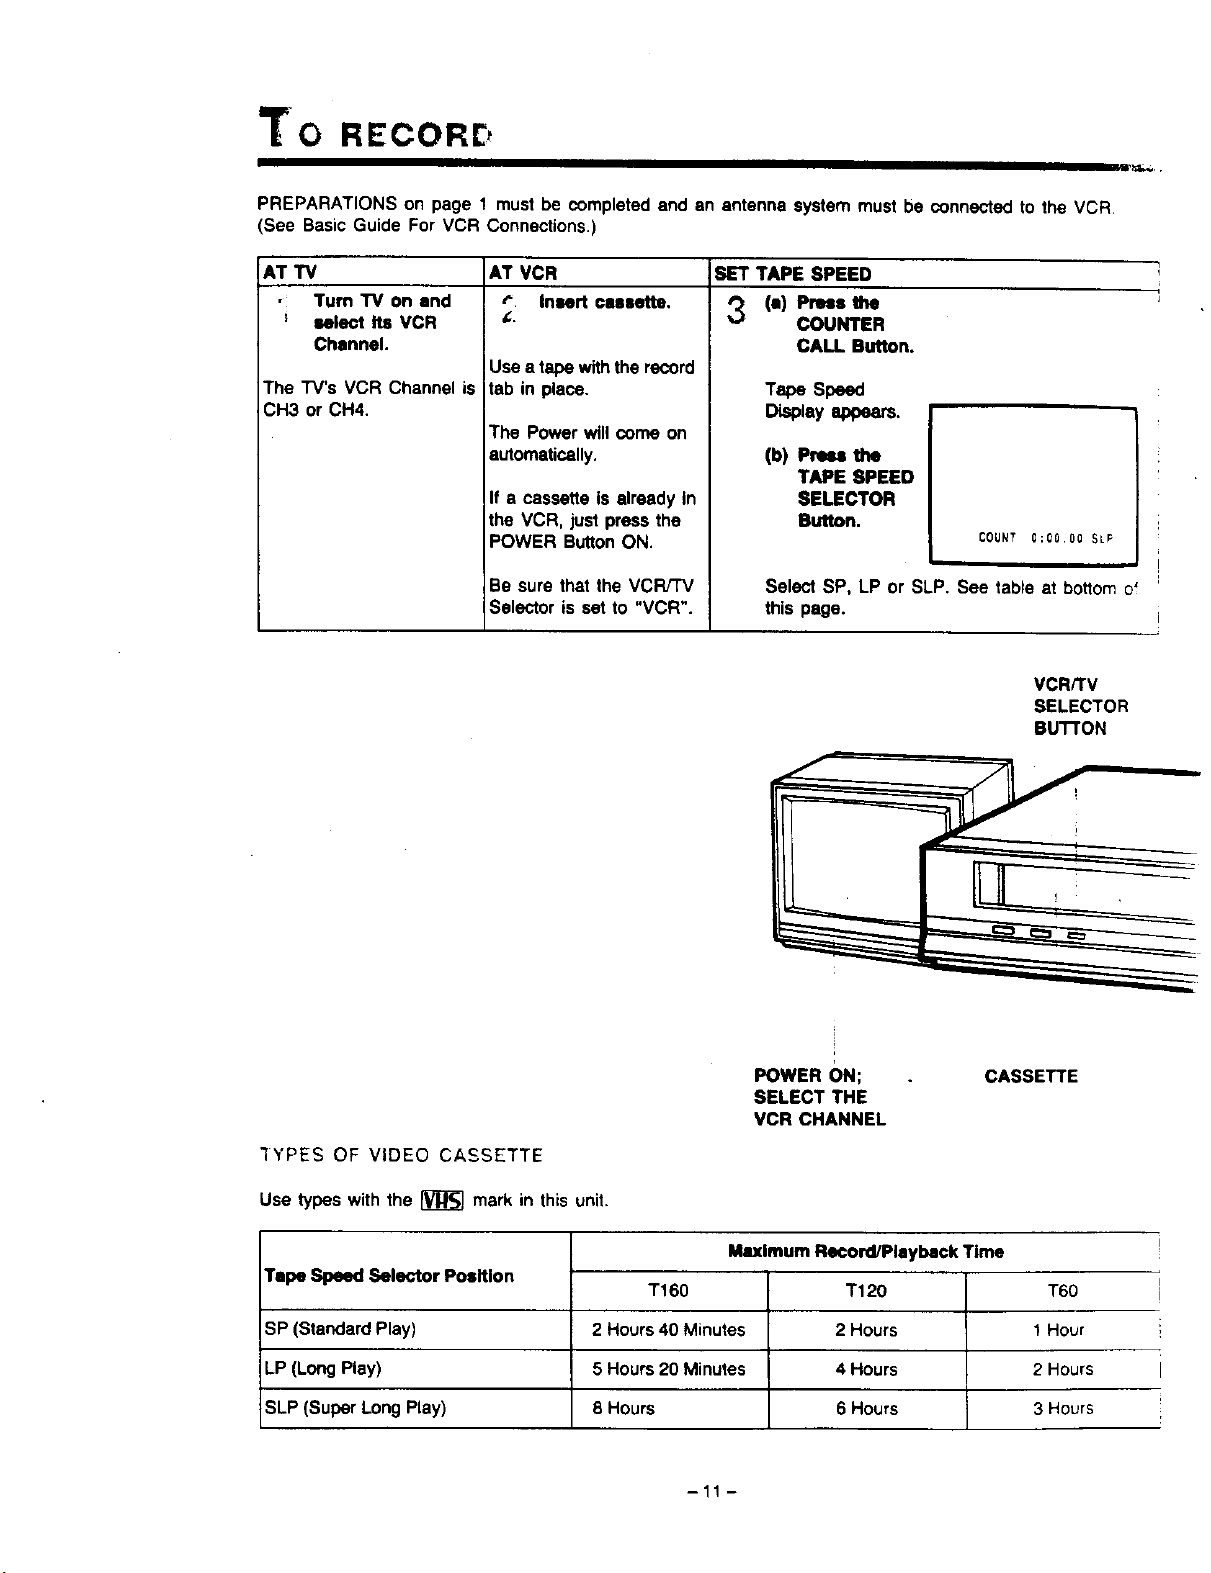
"to RECORE,
PREPARATIONS on page 1 must be completed and an antenna system must be connected to the VCR,
(See Basic Guide For VCR Connections.)
AT TV
• Turn "IV on end
; select Its VCR
Channel.
The "r'V'sVCR Channel is
CH3 or CH4.
AT VCR
r" Insert cassette.
Use a tape with the record
tab in place.
The Power will come on
automatically.
If a cassette is alreadyIn
the VCR, just pressthe
POWER ButtonON.
Be sure that the VCFVTV
Selector is set to "VCR".
SET TAPE SPEED
'_ (a) Plus the
COUNTER
CALL. Button.
TapeSpeed
(b) Pr._ the
TAPE SPEED
SELECTOR
Button.
COUNT 0:00.00 SLP
Select SP, LP or SLP. See table at boHomof
this page.
VCRKV
SELECTOR
BU'I-rON
3YPES OF VIDEO CASSETTE
Use _peswiththe_r_]ma_inthisunit.
Tape Speed Selector Position
SP (Standard Play)
LP (Long Play)
SLP (Super Long Play)
POWER ON;
SELECT THE
VCR CHANNEL
Maximum Rseord/Playback Time
T160 T120 T60
2 Hours 40 Minutes 2 Hours 1 Hour
5 Hours 20 Minutes 4 Hours 2 Hours
8 Hours 6 Hours 3 Hours
-11 -
CASSETTE
 Loading...