

Page 1
P6 ~ P9
Connections
P10 ~ P1S
Getting Started
I
a.
P17~ P23
Sasic Operation
to
to
>
P24 - P33
More You Can Do
o
"O
O
O
CD
DC
CD
1j r*
rt «1
ifi
D)C
C O
BJ o
P34 - Back Cover
Other information
3>
1 ""
c
3
s
Q
5
CX
c
ql
E
a
^ i »
^11
-a £ ^
>» a Cj
ci *3
u
o
■O
>
to
03
o
CD
O S
14J
Q
c
.c
c
O
p
15
11
•“ JC
11
I ^
C- o
c d
= 3
li
C g
rt ?
i I
W X
5d
O
Page 2
Things You Should Know
Congratulations
on your purchase of one of the most sophisticated and
reliable products on the market today. Used properly,
we’re sure it will bring you and your family years of
enjoyment. Please take time to fill in the information at
right. The serial number is on the tag located on the
back of your VCR. You’ll want to keep this manual
handy as your convenient VCR information source.
ÍDate of Purchase.
Dealer Purchased From
Dealer Address
Dealer Phone No..
Model No________
Serial No
________
________
PV-4664
Safety Precautions
Warning: To prevent fire or shock hazard, do not expose this equipment to rain or moisture.
This video recorder, equipped with the HQ (High Quality) System, is compatible with existing
VHS equipment.
Qnly use those tapes with the IVHSI mark. It is recommended that only cassette tapes that have
been tested and inspected for use in 2, 4, 6, and 8 hour VCR machines be used.
FCC Warning: Any unauthorized changes or modifications to this equipment would void the user's authority to operate.
CAUTION
A
CAUTION: TO REDUCE THE RISK OF ELECTRIC SHOCK,
DO NOT REMOVE COVER (OR BACK)
NO USER-SERVICEABLE PARTS INSIDE
REFER SERVICING TO QUALIFIED SERVICE PERSONNEL
A
This symbol warns the user that uninsulated voltage within
the unit may have sufficient magnitude to cause electric
shock. Therefore, it is dangerous to make any kind of
contact with any inside part of this unit.
This symbol alerts the user that important literature
concerning the operation and maintenance of this unit has
been included. Therefore, it should be read carefully in order
to avoid any problems.
Table of Contents
Important Safeguards and Precautions..................................................................................................3
Unpacking Your VCR and Features.......................................................................................................4
VCR and Cassette Information (Record Tab, Tape Speeds, Tape Cleaning, Specifications)................ 5
Basic Connection (Antenna and VCR, VCR and TV)........................................................................ 6, 7
Additional Connections (CATV, AudioA/ideo)....................................................................................8, 9
One Time VCR Setup
(On-screen Language, Cable Box/ DSS Receiver Setup, Channel Memory, Auto Clock Set)
On Screen Displays (OSD) (Function, Channel, Menu, VCR Status & Clock, Warning, Instruction)... 16
Playback a Tape (Main operation. Special Effects, Quality Picture Features).................................... 17
Record On a Tape (Main Operation, One Touch Record, Channel Selection)
Tape Operation (Repeat Play, Zero Search, Shuttle Search, Auto Function, Commercial Advance)
Timer Recording (Main Operation, Cancel-Clear or Replace, Program Contents)
Timer Recording Using VCR Buttons................................................................................................... 26
Copying Your Tapes (Dubbing) (Connection, Main Operation, Monitoring, Select Input Mode)
MTS Broadcast/ VHS Hi-Fi Stereo System (Stereo/SAP/Mono Broadcast, Select Audio Mode, Spatializer)... 28, 29
VCR Plus-i- Set Up (VCR Plus+ Channel Set Up)
VCR Plus+ Programming (Main Operation, Make Corrections).......................................................... 31
Special VCR Features (VCR Lock, Warning Beeper)
Multi-Brand Control Feature.................................................................................................................33
..............................................................................
..........................................................................
...................................
.......................
........
24, 25
..........
10-^15
18
.........
19 ~ 23
27
30
32
Before Requesting Service (Self-check items).....................................................................................34
Spanish Quick Use Guide/Guia para rápida consulta
Index of Controls (Remote Control, VCR)...................................................................39, Back Cover
................................................................
35 38
2
Page 3
Important Safeguards and Precautions
I INTRODUCTION
Careful attention has been given to this Video product to assure
a quality standard devoted to your safety and enjoyment. This
quality standard together with your personal responsibility for
the safety of yourself and others, will contribute to your
enjoyment. This Video product uses electrical energy and
requires proper handling at all times.
I CAUTION
READ AND RETAIN THE SAFETY AND OPERATING INSTRUCTIONS
To make full use of the safeguards incorporated in this unit, read
and follow this basic guide, adopted in part from Underwriter's
Laboratories Standard 1409, Second Edition, before operating
this Video product.
FOLLOVtfTHE INSTRUCTIONS AND BE SURE TO HEED ALL
WARNINGS on unit and in the manual, for easy maintenance,
proper and trouble free operation of this Video product.
INSTALLATION
1.
OPERATE FROM A POWER SOURCE INDICATED on this
Video product, or in this Manual. Your Electric Utility Service
A
Company or Video Products Dealer will be happy to verify
the power source in your home.
THE GROUNDED OR POLARIZED PLUG IS A SAFETY FEATURE
2.
This Video product may be equipped with either a polarized
2-wire AC line plug or a 3- wire grounding type plug. The two
A
wire polarized plug (having one blade wider than the other)
will fit into the power outlet only one way. If it is a three wire
grounding type plug (having a third pin), it will fit into a
grounding type outlet.
DO NOT DEFEAT THE SAFETY PURPOSE OF THE GROUNDED
OR POLARIZED PLUG by tampering with it. If the plug does
not fit fully into the socket, try reversing it. If you should still
be unable to fully insert the plug into the socket, you may
find that a proper outlet is needed to meet today's Electrical
Standards. An electrician wilt replace your outlet safely.
3.
POWER SUPPLY CORDS SHOULD BE PROTECTED and
routed so that they are not likely to have anything rest on
them, roll over them, or be subject to walking traffic or
A
abuse: particularly at plug-ins, convenience receptacles, or
cord exit points from the unit. Where an extension is
needed, use a grounded or polarized cord.
HAZARDOUS FRAYED CORDS OR DAMAGED PLUGS
SHOULD BE REPLACED BY A QUALIFIED SERVICE
TECHNICIAN.
OVERLOADED WALL OUTLETS AND EXTENSION
CORDS PRESENT DANGEROUS RISKS OF FIRE OR
ELECTRICAL SHOCK.
4.
AVOID BLOCKING VENTILATION HOLES
Your video unit has ventilation openings in its cabinet to
A
release heat generated dunng operation. Blocking these
opening can cause heat build-up inside the unit, causing
failure that may result in a fire hazard or heat damage to
cassettes. For protection:
a. Never cover the bottom ventilation slots or the unit with
soft material, or operate the unit placed on a bed, sofa,
rug, or soft accessory.
b. Avoid built-in installations, such as a bookcase or rack,
unless proper ventilation is provided.
5.
AVOID EXTREMELY HOT LOCATIONS OR SUDDEN
CHANGES IN TEMPERATURE such as placing the unit
near or over a radiator, in direct sunlight, closed vehicles, or
A
transporting it suddenly between areas
of extreme temperature variation.
If the unit is suddenly moved from a cold
place to a warm place, moisture may
form on the tape and inside the unit.
6.
TO AVOID INJURY TO A CHILD. ADULT;
OR COSTLY DAMAGE:
A
a. Do not place unsecured equipment on a sloping surface
or any heavy object or unit.
(Use the unit in a horizontal position and do not place
anything heavy on H.)
b. Support for the unit should be adequately firm, level, and
strong. Replace any unstable cart, table or support. An
appliance and cart combination should be moved with
care. Quick stops, excessive force, and uneven surfaces
may cause the appliance and cart combination to overturn.
c. Carefully follow all operaWng instructions and use the
manufacturer’s recommended accessories when
operating this unit or connecting it to any other equipment.
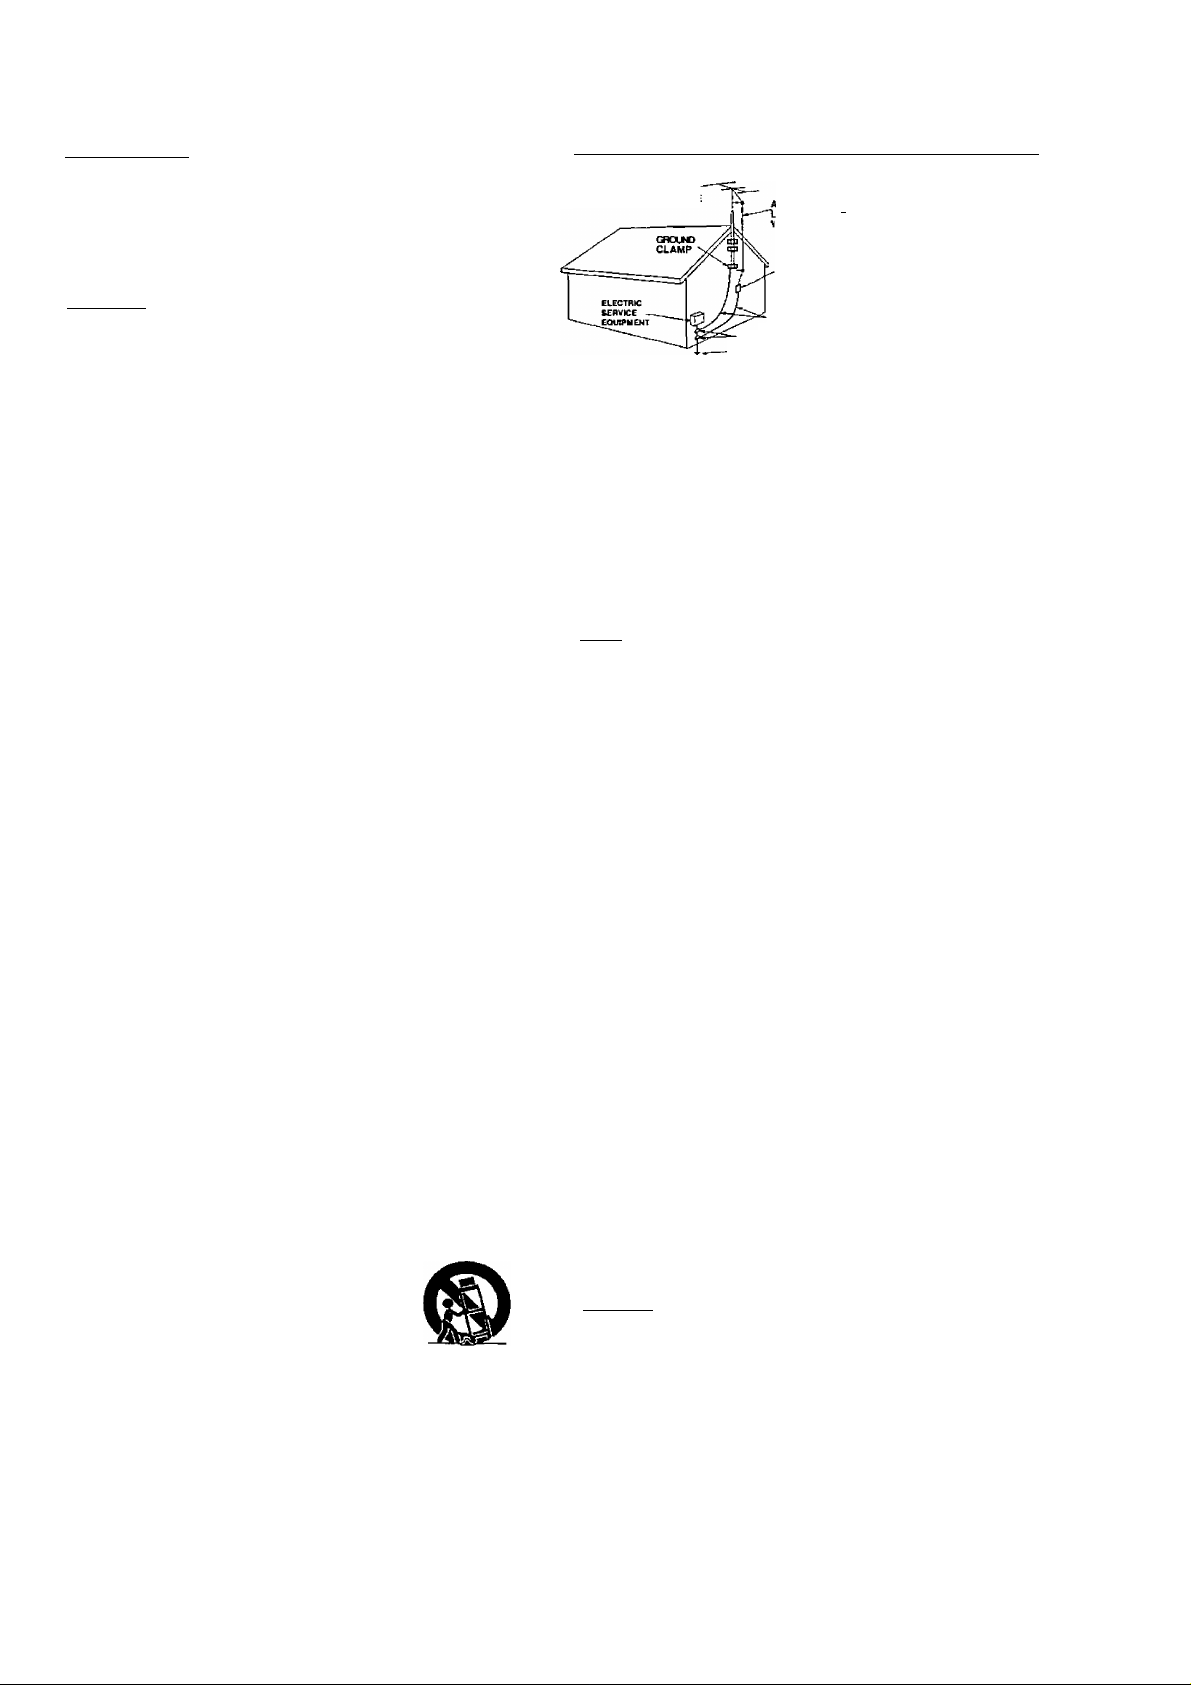
lOUTSIDE ANTENNA, EQUIPMENT, AND POWERLINE EXPOSURE
1.
NEC - NATIONAL
ELECTRICAL CODE
GROUND CLAMPS surges. Part 1 of the Canadian
-POWER SERVICE Electrlcal Code, in USA
tuPcTRooi srsTEM Sectlon 810 of the National
(NECART»«.PANTH, Electrical Code, ANSl/NFPA
70, provides information with respect to proper grounding of the
mast and supporting structure, grounding of the lead-in wire to an
antenna discharge unit, size of grounding conductors, location of
antenna discharge unit, connection to grounding electrodes and
requirements for the grounding electrode.
ELIMINATE ANTENNA PROXIMITY TO HIGH VOLTAGE POWER
2.
SOURCES. OR CHANCE OF ACCIDENTAL CONTACT BY INSTALLER
An outside antenna system should be located where it will never be
A
reached by power lines, electric light or power circuits and where it
will never contact these power sources if it falls. Installer should use
extreme care to avoid possible fatal contact by touching power lines,
circuits or other power sources when installing an outside antenna.
ENNA /Ч\
1 IM ■ г ■
mi system is connected to the
antenna equipment, be sure the
DISCHARGE UNIT aotenna or cable systerh is
(NEc»ECT»«»i*.20) g,.Qypjjg(j gQ 35 iQ provide
CONDUCTORS sorns protection against built
(NEC sEcnoN *10-11) Up statlc chargcs and voltage
INSURE SAFE ANTENNA
AND CABLE CONNECTIONS
If an outside antenna or cable
I USE
AFTER STORING OR WHEN MOVING THE UNIT, REFER TO THE
INSTALLATION SECTION OF THE SAFEGUARDS.
1. DO NOT USE THIS VIDEO UNIT NEAR WATER; around bathtubs,
sinks, laundry, wet basement, swimming pool or any water source.
A
USE ACCESSORIES RECOMMENDED ONLY BY THE
2.
MANUFACTURER to avoid risk of fire, shock or other hazards.
A
UNPLUG ALL EQUIPMENT EXPOSED TO RAIN. MOISTURE. OR
3.
STRONG IMPACT AND GET A QUALIFIED INSPECTION
A
If your unit has been exposed to rain, water, excessive moisture, or
subjected to strong impact, unplug it and have it inspected by a
service technician before use.
4. UNPLUG UNUSED UNIT, AND ALL EQUIPMENT DURING A STORM
A During a lightning storm, when indoors or outdoors, or before
leaving unit unused for extended periods of time, disconnect all
equipment from power source, antenna and cable system.
5. UNPLUG ALL EQUIPMENT BEFORE CLEANING. After unit has
A been unplugged use a dry, clean, chemically untreated cloth. Use
no cleaning fluids, aerosols, or forced air that could over-spray, or
soak into the unit, and cause electrical shock. Any substance such
as wax, adhesive tape, etc. may affect the cabinet surface.
Exposure to greasy, humid, or dusty areas may affect internal parts.
6.
WHEN PLUGGED-IN: KEEP WATER AWAY; NO FINGERS
* INSIDE NOR ANY OBJECTS INSIDE; AND NO MAGNETS OR
^ ELECTRICAL INTERFERENCE NEARBY.
a. Never operate the unit if liquid has been spilled into it.
Immediately unplug the unit, and have it inspected by a service
technician. Fire and shock hazards can result from electrical
shorts caused by liquid contact inside,
b. Caution the children about dropping or pushing objects into the
unit. Some parts inside carry hazardous voltages and contact can
cause electric shock. Objects dropped in electrical equipment can
cause fire hazards.
c. Separate the unit from any interference causing appliances.
Placing the unit directly above or below your TV set may cause
electrical interference. Keep all magnets away from electronic
equipment.
[SERVICE
DO NOT ATTEMPT TO SERVICE THIS PRODUCT YOURSELF. If
this Video product does not operate as described, wheh the detailed
A
Operating Instructions are followed, do not attempt to open or
remove covers, or make any adjustments not described in the
manual. Attempting to service this unit yourself may expose you to
dangerous voltage or other hazards. Refer all servicing to qualified
service personnel.
2.
CHECK ON REPLACEMENT PARTS REQUIRED. Be sure the
service technician has used replacement parts specified by the
A
manufacturer or having the same characteristics as the original
part. Unauthorized substitutes may result in fire, electric shock or
other hazards.
3.
HAVE TECHNICIAN PERFORM SAFETY CHECK described in
the manufacture’s service literature, after any service or repairs, to
A
determine that the Video unit is in safe operating order.
Page 4
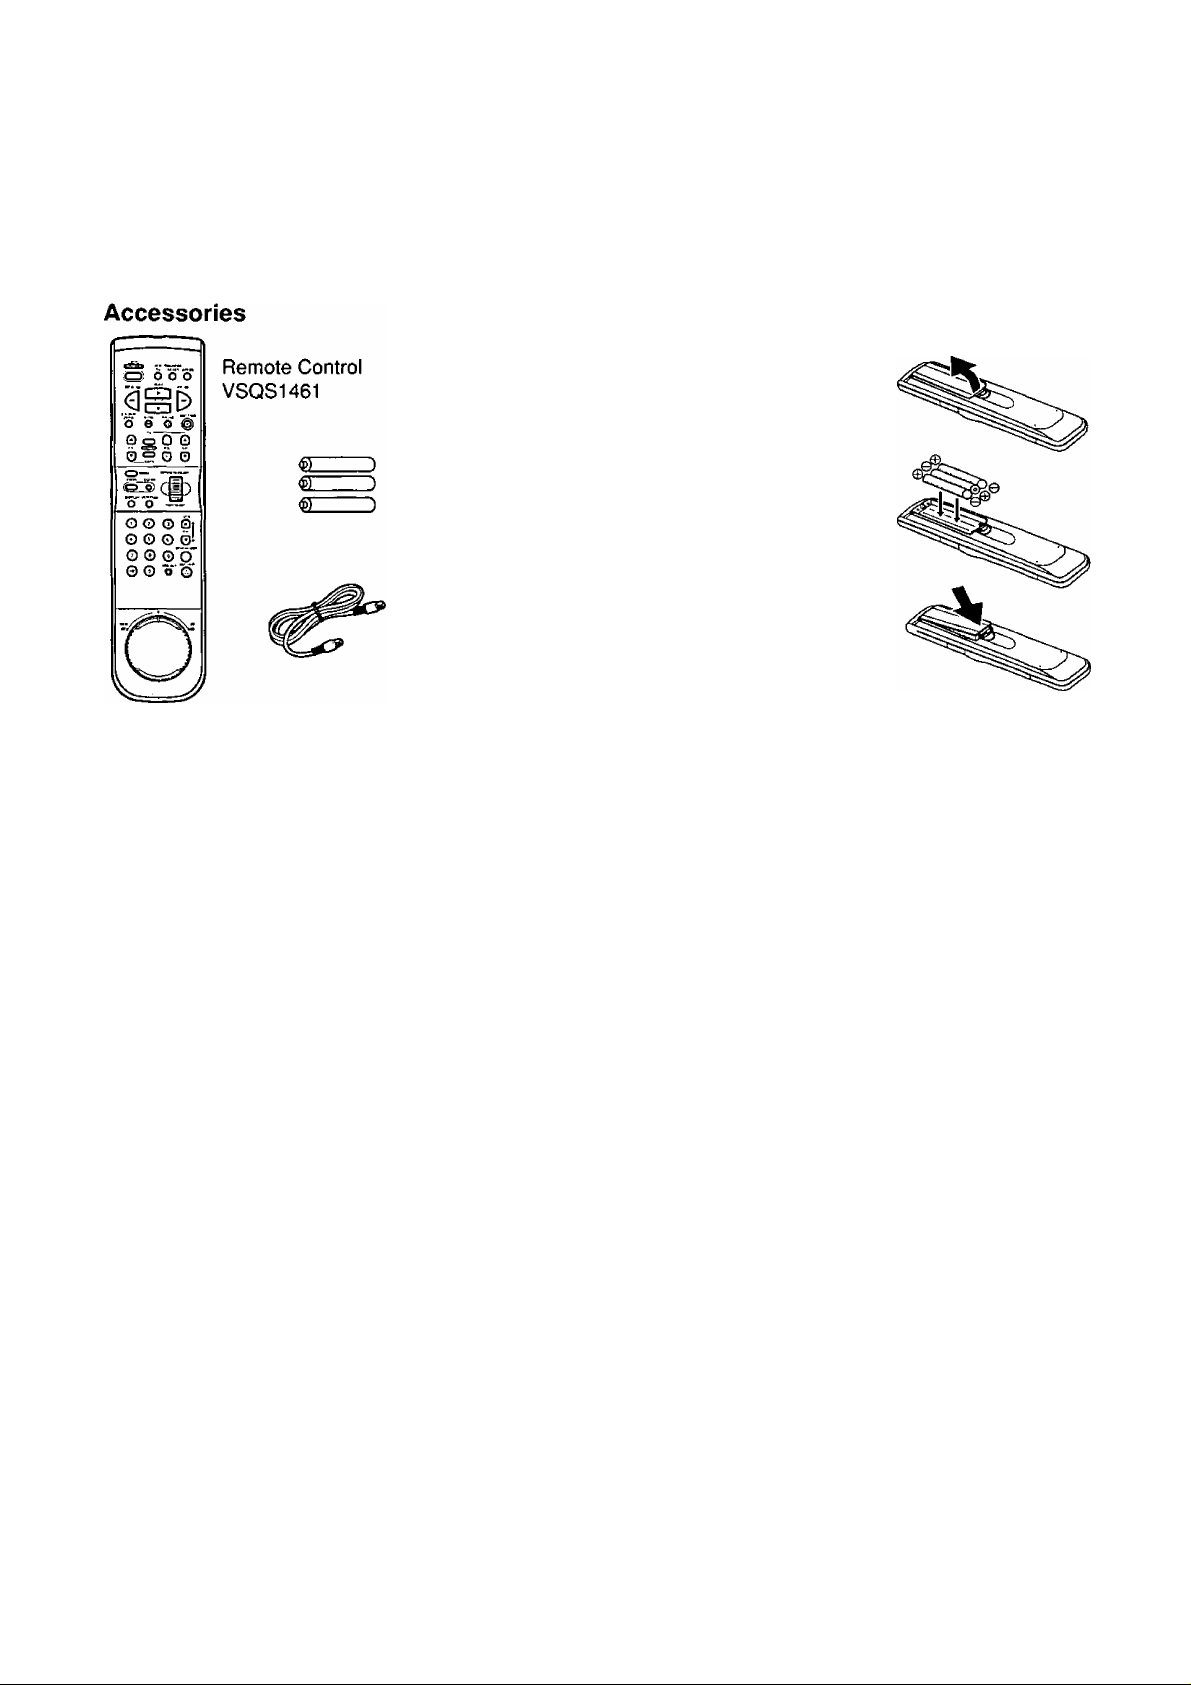
Unpacking Your VCR and Features
Unpacking Your VCR
The accessories shown below are provided to help
you use or set up your VCR.
Optional accessories are also listed.
Load the batteries in the Remote Control
Lift off the lid after
pressing in and up on
the latch with your thumb
nail or other narrow object.
3 “AAA”
Batteries
Install three batteries
as indicated inside the
Battery Compartment.
RF Coaxial
Cable
VJAS0183
Optional Accessories
• 1/2” Video Cassette Tape
Fit the lid's hinge piece
into the indent on the
case, and snap lid into place.
Battery replacement caution
• Do not mix old and new batteries.
(Also, never mix alkaline with manganese batteries.
Product Features
All Channel Auto Set/ 181-CH TV/CATV Tuner......................................................................................12
Advanced Noise Reduction.....................................................................................................................17
Auto Clock Set............................................................................................................................12, 13, 14
Auto Daylight Saving Time........................................................................................................................5
Auto Operation Functions (Auto Playback, Rewind, Tape Eject, Power off)
Auto Repeat Function...............................................................................................................................19
Cable Box Channel Control.....................................................................................................................11
Color Noise Reduction............................................................................................................................ 17
Commercial Advance.................................................................................................................21,22, 23
Digital Auto Picture..................................................................................................................................17
DynAmorphous™ Metal Head................................................................................................................. 17
Easy-to-Read English/Spanish/French On Screen Displays
........................................
Front-mounted A/V In Terminals.............................................................................................................27
MTS Broadcast System (Multi-channel Television Sound-Stereo, SAP, Mono).................................... 28
Multi Brand TV/Cable Box Remote Control.............................................................................................33
One Month, 8 Program Timer Recording..........................................................................................24, 25
One Touch Recording (OTR)...................................................................................................................18
Program Director Remote Control......................................................................................................24, 25
Quick Play Mechanism............................................................................................................................34
Shuttle Search.........................................................................................................................................20
Spatializer............................................................................................................................................... 29
Special Effects Playback......................................................................................................................... 17
Special VCR Features (VCR Lock, Warning Beeper).............................................................................32
VCR Plus-t- Recording.......................................................................................................................30, 31
VHS Hi-Fi Stereo System........................................................................................................................29
Zero Search............................................................................................................................................ 19
..........................................
12, 13, 14, 24, 25
20
4
Page 5
VCR and Cassette Information
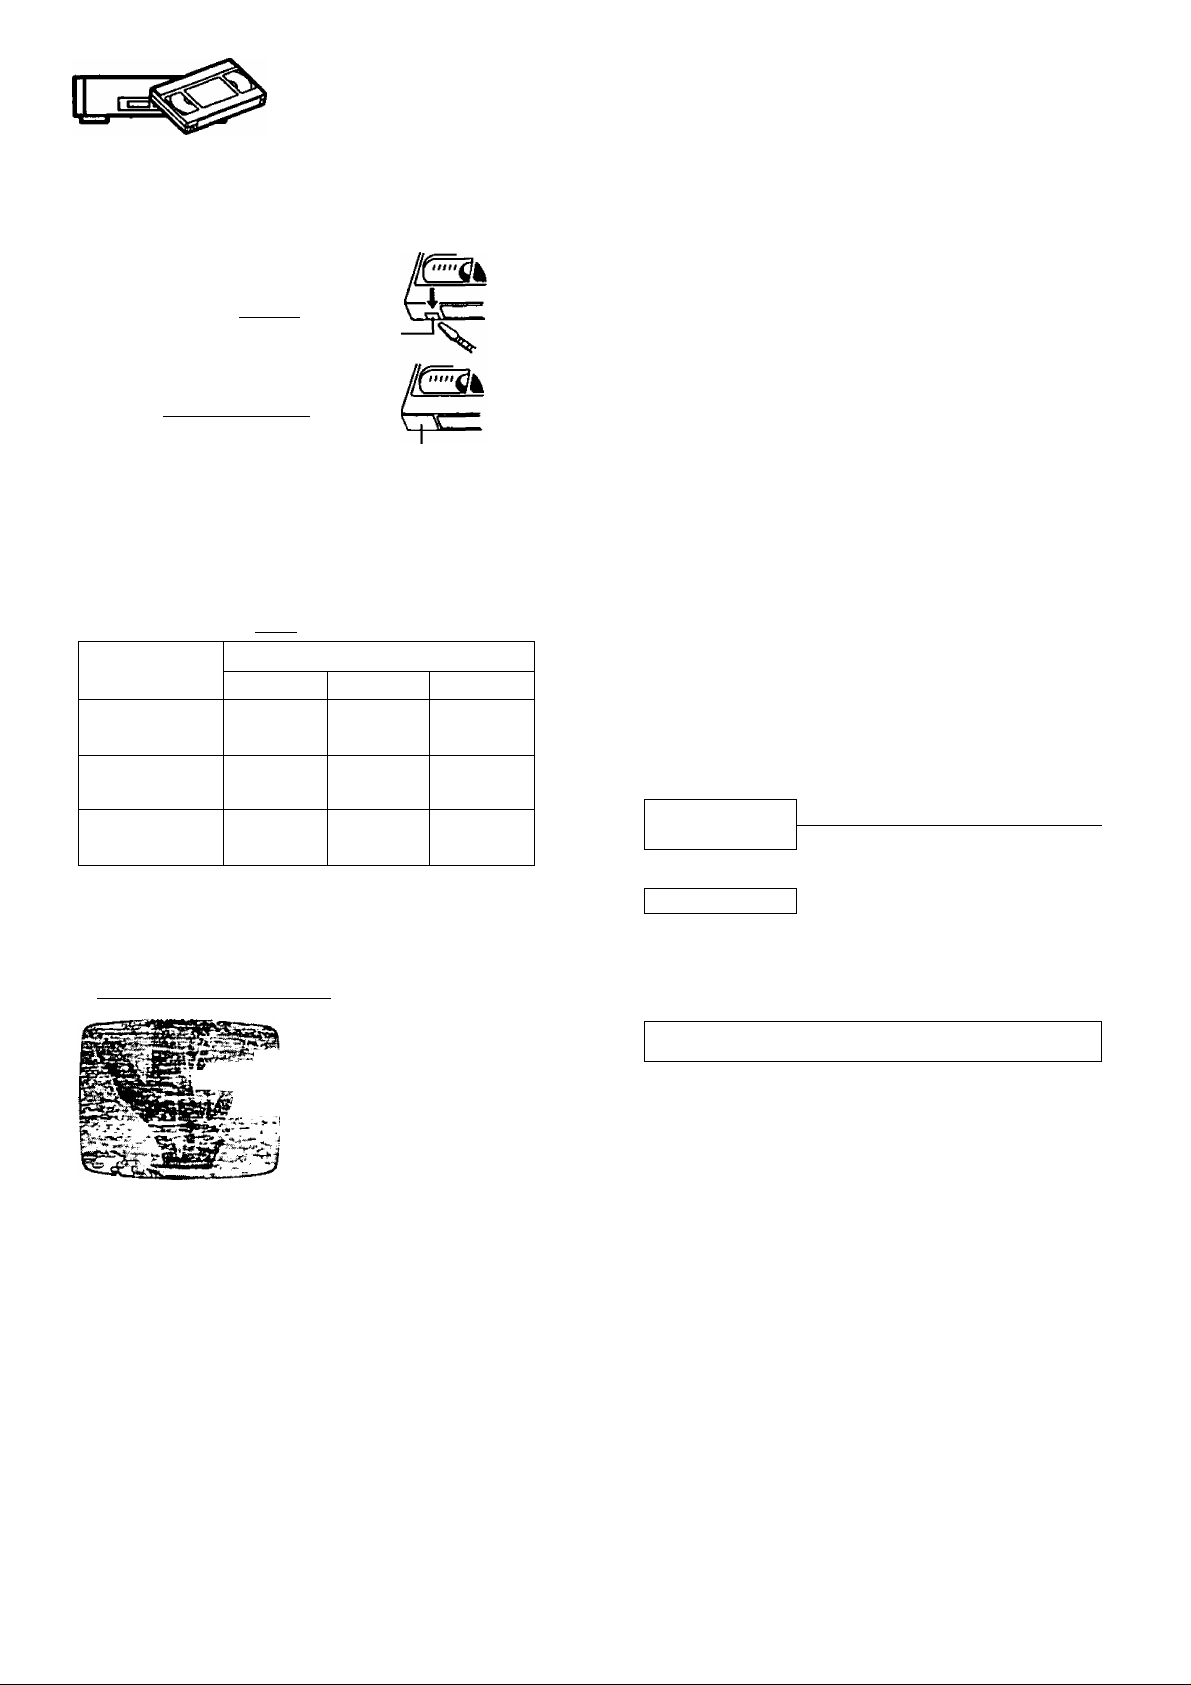
Erase Protection (Record Tab)
Cassettes have a record tab to ensure that
recordings are not accidentally erased.
To prevent accidental
erasure, break off the tab
with a screwdriver^ CH
To record again, cover the
hole with cellophane tape.
Maximum Record/Playback Time
Only use tapes with thelVHSimark in this unit.
Tape Speed
Position
SP
(Standard Play)
LP
(Long Play)
SLP
(Super Long Play)
Type of Video Cassette
T60
1 Hour
2 Hours
3 Hours
T120
2 Hours
4 Hours
6 Hours
T160
2 Hours
40 Minutes
5 Hours
20 Minutes
8 Hours
Reset all VCR Memory Functions
This operation is convenient when moving the VCR to a new
location, or if a mistake was made in the One Time VCR
Setup section. Make sure a tape is not inserted in the VCR.
1) Turn VCR Power on.
2) Press and hold both Play and Rewind buttons on the
VCR for more than 5 seconds.
• The power will shut off.
3) Perform the One Time VCR Setup section on page 12.
D.S.T (Daylight Saving Time)
Spring:
First Sunday in April (DAYLIGHT SAVING TIME:AUTO)
Automatically adds one hour and adjusts the clock.
NORMAL TIME
DAYLIGHT
SAVING TIME
Autumn:
Last Sunday in October (DAYLIGHT SAVING TIME:
AUTO) Automatically turns back one hour and adjusts
the clock.
DAYLIGHT
SAVING TIME
V.OO a.m. 2:00 a.m.
3:00 a.m. 4:00 a.m.
1:00 a.m. 2:00 a.m.
Cleaning Care for Video Heads
__
i-'a
A'
.
m or
Clogged Video
Head Picture
Clogged Video Heads
While your VCR will not normally require head cleaning,
however the heads may become clogged when playing
an old or damaged tape. If the image on your screen
resembles the illustration on the left or the screen
becomes solid blue when playing back a pre-recorded
signal on the tape, the heads probably require cleaning.
Cleaning the Heads
It is recommended that head cleaning be performed by
a qualified service technician. Please contact your
nearest Panasonic Service Center. An alternate
solution is to obtain a head cleaning cassette. Be sure
to follow the cleaning instructions carefully. Excessive
use of a cleaning cassette could shorten head life.
Use this cassette only when symptoms occur.
Blue Back
(During playback of
pre-recorded tape)
Blue Back
Screen
NORMAL TIME
*
----------------------
1:00 a.m. 2:00 a.m.
Product Specifications
Power Source:
Power Consumption:
Video Signal:
Video Recording System:
Audio Track:
Tuner:
Broadcast Channels:
CATV Channels:
Operating Temperature
Operating Humidity:
Weight:
Dimensions:
Note:
Designs and specifications are subject to change
without notice.
120V AC, 60 Hz
Approx. 23watts (Power on)
Approx. 7watts (Power off)
EIA Standard NTSC color
4 rotary heads helical
scanning system
1 track (Normal)
2 channels (Hi-Fi Audio Sound)
VHF 2-13, UHF M-eo
Midband A through I (14-22)
Superband J through W
(23-36)
Hyperband AA-EEE (37-64)
Lowband A-5"A-1 (95-99)
Special CATV channel 5A (01)
Ultraband 65-94, 100-125
4rF-104°F (5'^C-40“C)
10%-75%
8.6 lbs. (3.9 Kg)
14-15/16" (W)X 3-1/2" (H)X
11-1/4" (D)
380 (W) X 89 (H) X 285 (D) mm
►
Page 6
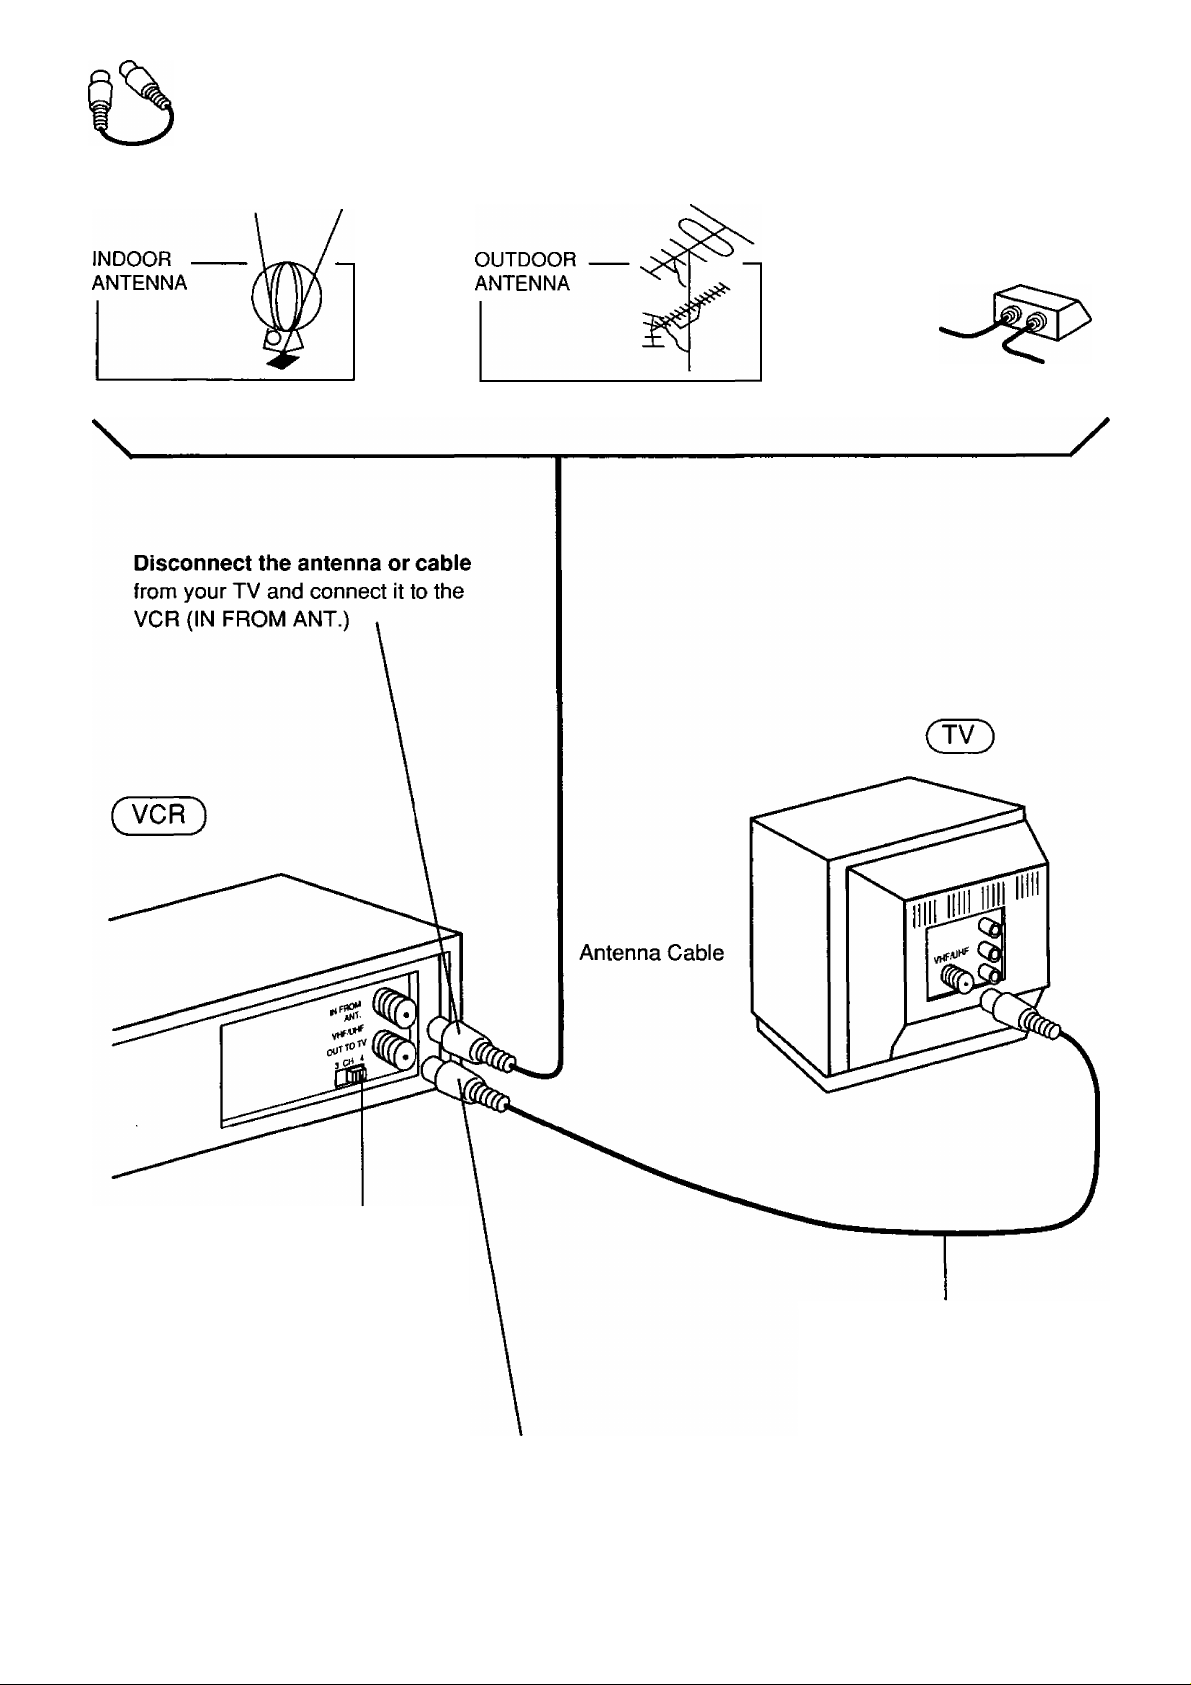
Basic Connection
Cable TV
or
or
Set the Output Channel
of your VCR
to channel 3 or 4 (whichever is not being
transmitted on by a Local TV broadcast).
Connect the VCR to your TV
with the RF Coaxial Cable (OUT TO TV).
RF Coaxial Cable
(VCR-TV Connection Cable) (supplied)
Page 7
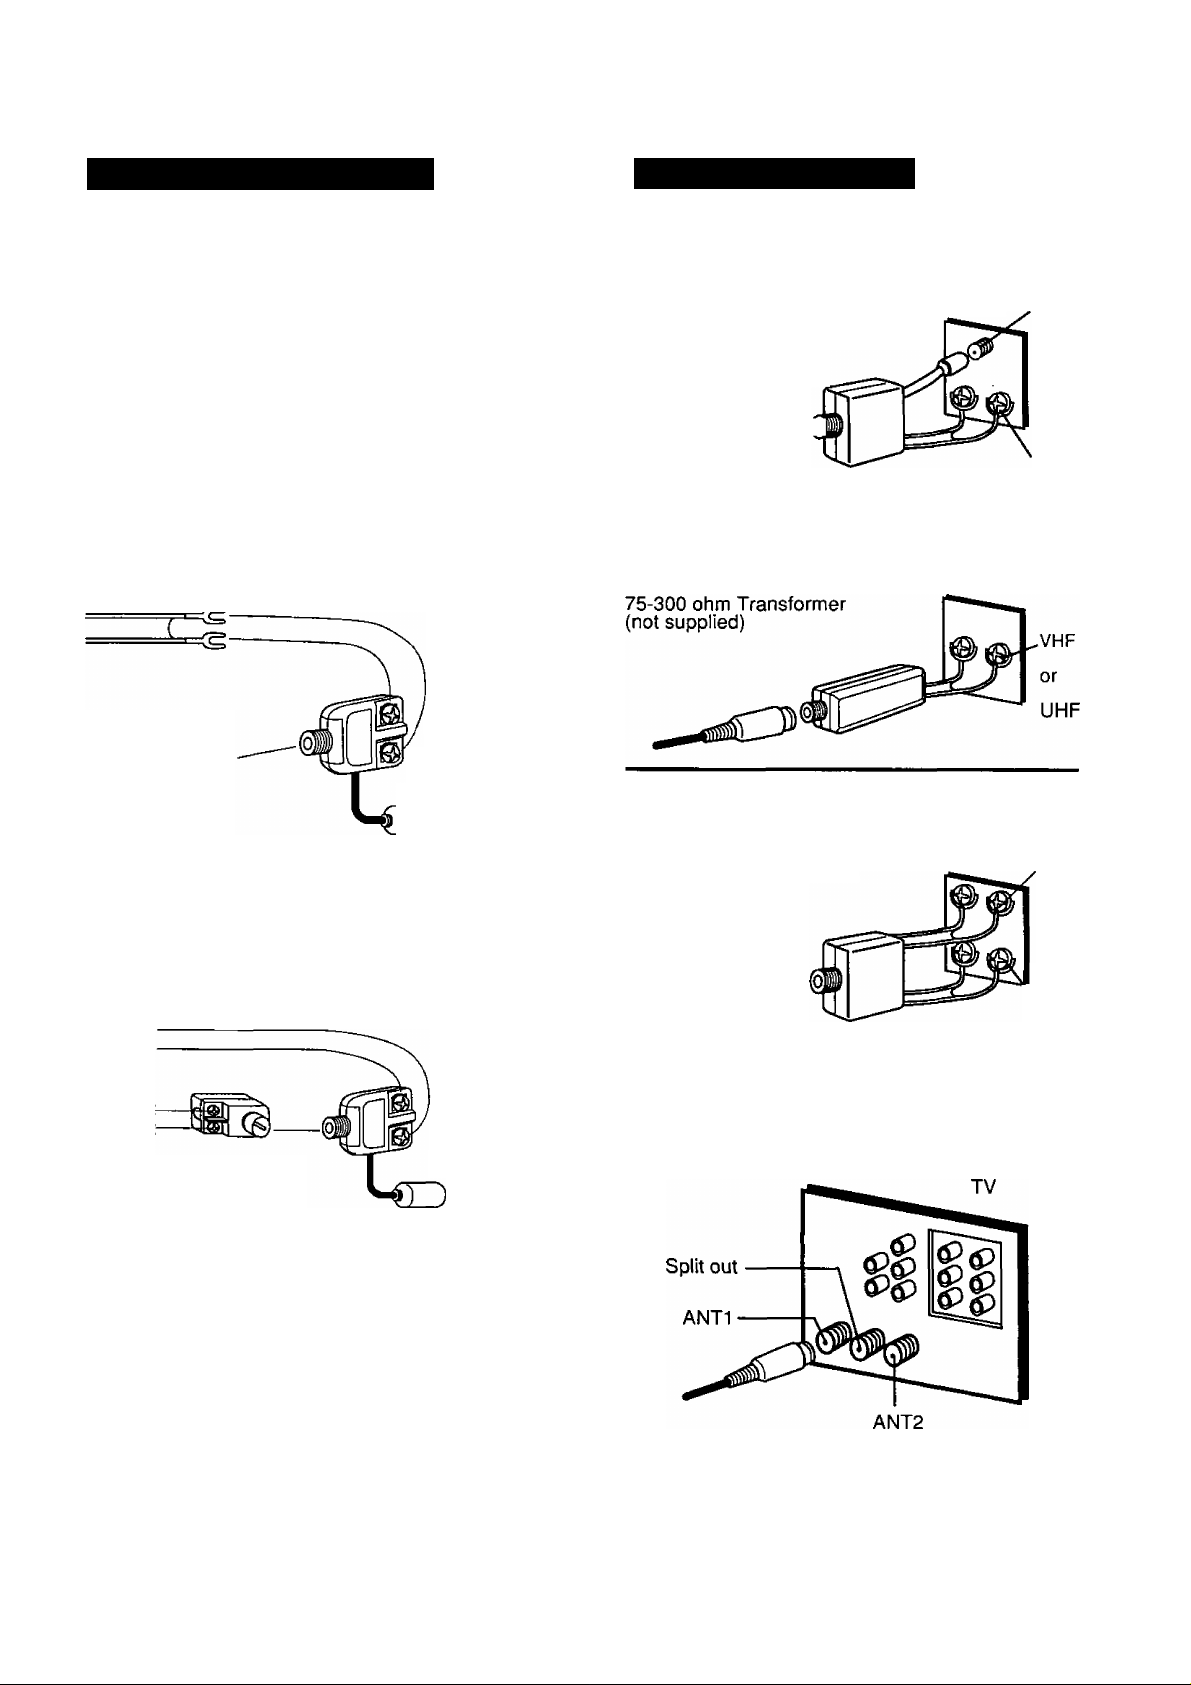
Between Antenna and VCR
Between VCR and TV
Case 1: Twin Lead Cable Only
To VCR Terminal
(Flat) Twin Lead 300
Ohm Cable
300-75 ohm Transformer
(not supplied)
Case 2: Twin Lead & Coaxial Cables
UHF/VHF
Band Mixer
(not supplied)
Case 1: Screw & Plug Type Terminal
UHF/VHF Band Separator
(not supplied)
RF Coaxial Cable
Case 2: Screw Type Terminal
Case 3: Double Screw Type Terminal
VHF
UHF
TV
(Round) 75 Ohm
coaxial Cable
D
To VCR Terminal
Case 3: Two Twin Lead Cables
300-75 ohm Transformer
(not supplied)
To VCR Terminal
• If your TV has both post and screw-type VHF
terminals, using the post connection is
recommended to minimize signal loss-
UHF/VHF
Band Mixer
(not supplied)
UHF/VHF Band Separator
(not supplied)
Case 4: Complex TV Terminal
TERMINALS ON BACK OF TV SET
TV
VHF
^UHF
Connect to one of the ANT terminals and select
the same antenna number on the TV.
Page 8
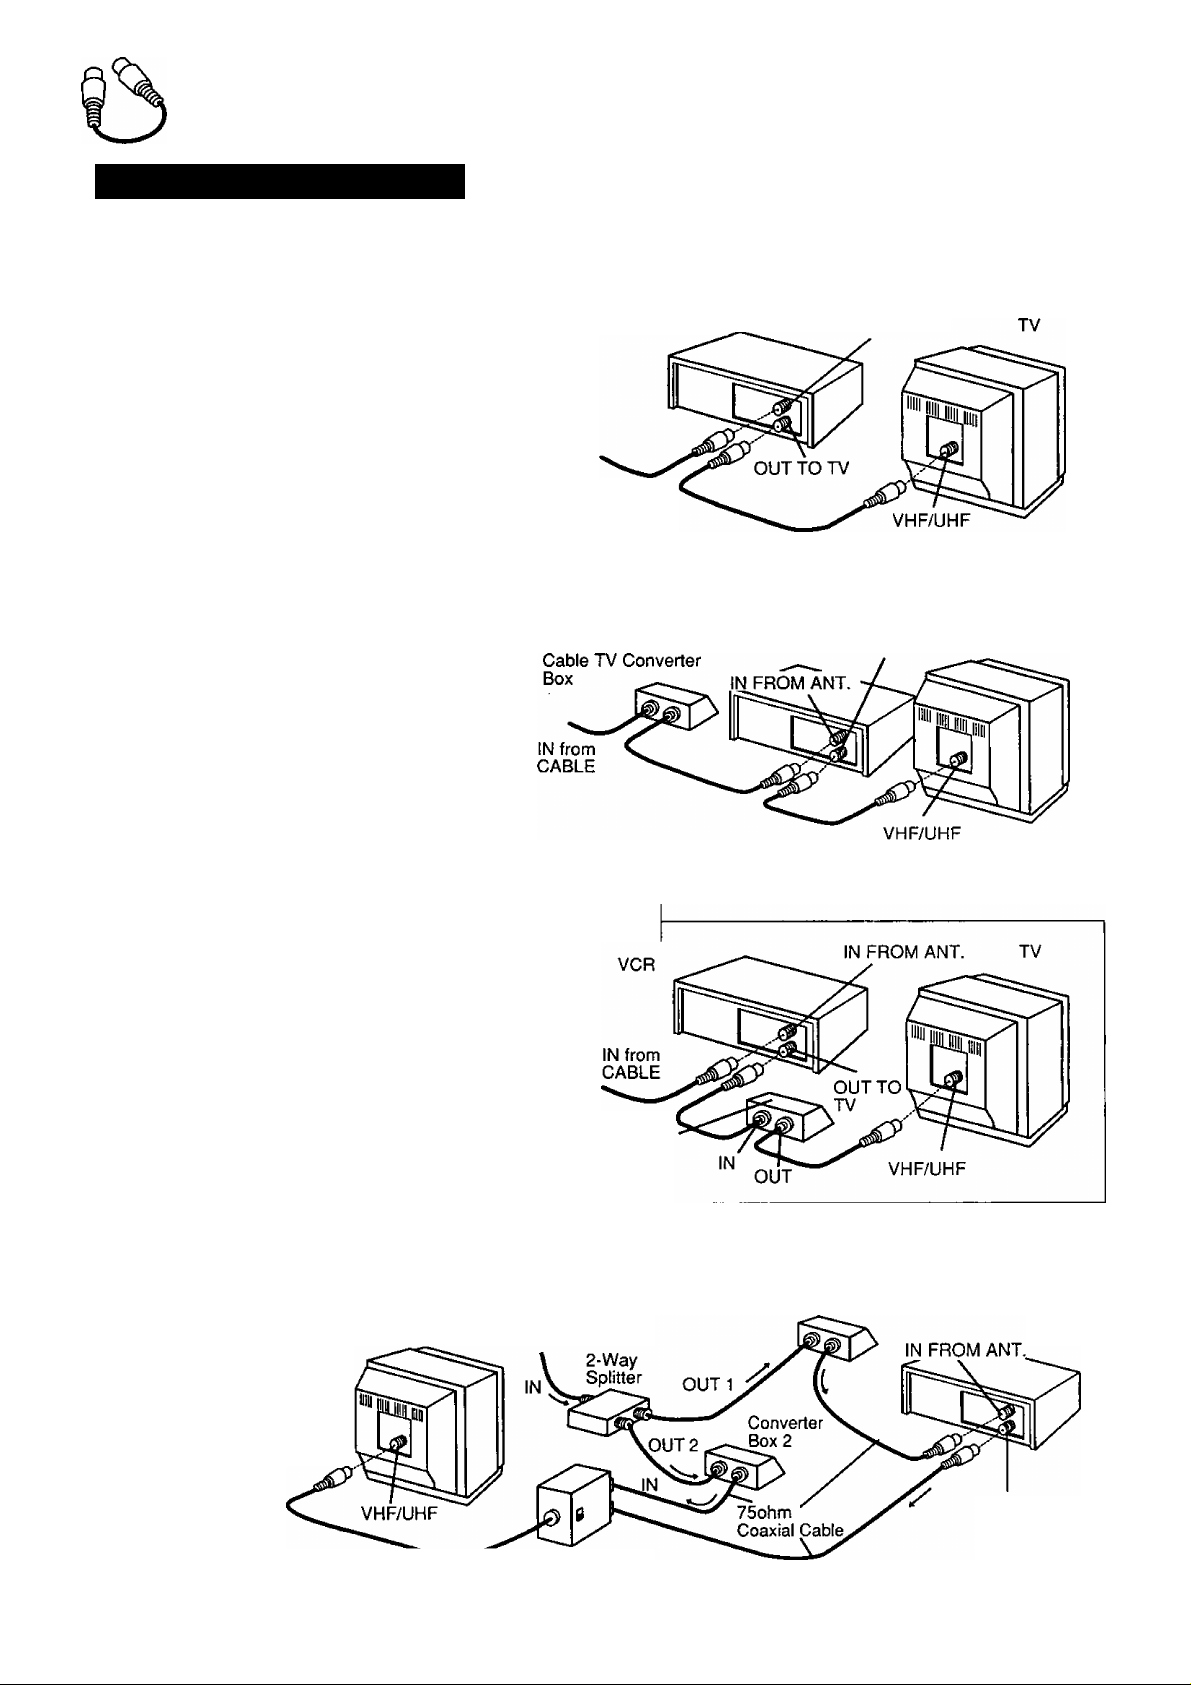
Additional Connections
CATV(Cable) Connections
All connections on this page are made with 75 Ohm coaxial cables.
I- Without a Converter/Descrambler Box
You can:
1) Use your VCR Remote Control to select channels.
2) Program one or more unscrambled channels for
unattended recording.
VCR
IN FROM ANT.
NOTE: You cannot record or view scrambled
channels with this connection.
IN from
CABLE
r With a (CABLE to VCR) Converter/Descrambler Box
You can:
1) Record and view any channel including
scrambled channels: channel selection
must be made at the Cable TV Converter
Box.
2) Program one channel for unattended
recording.
With a (VCR to TV) Converter/Descrambier Box
You can:
1) Use your VCR Remote Control to select channels.
2) Program unattended recordings of more than
one unscrambled channel.
VCR
OUT TO TV
TV
NOTE: You cannot record scrambled channels with
this connection.
With Two Converter/Descrambier Boxes
If you want to record and view
a combination of scrambled
and unscrambled channels,
you will need additional
equipment.
This connection requires
two converter boxes,
an A/B switch, and
a 2-way splitter
as shown here.
OUT
8
IN from
CABLE
Cable TV
Converter
Box
Converter Box 1
VCR
OUT TO TV
A/B Switch
Page 9
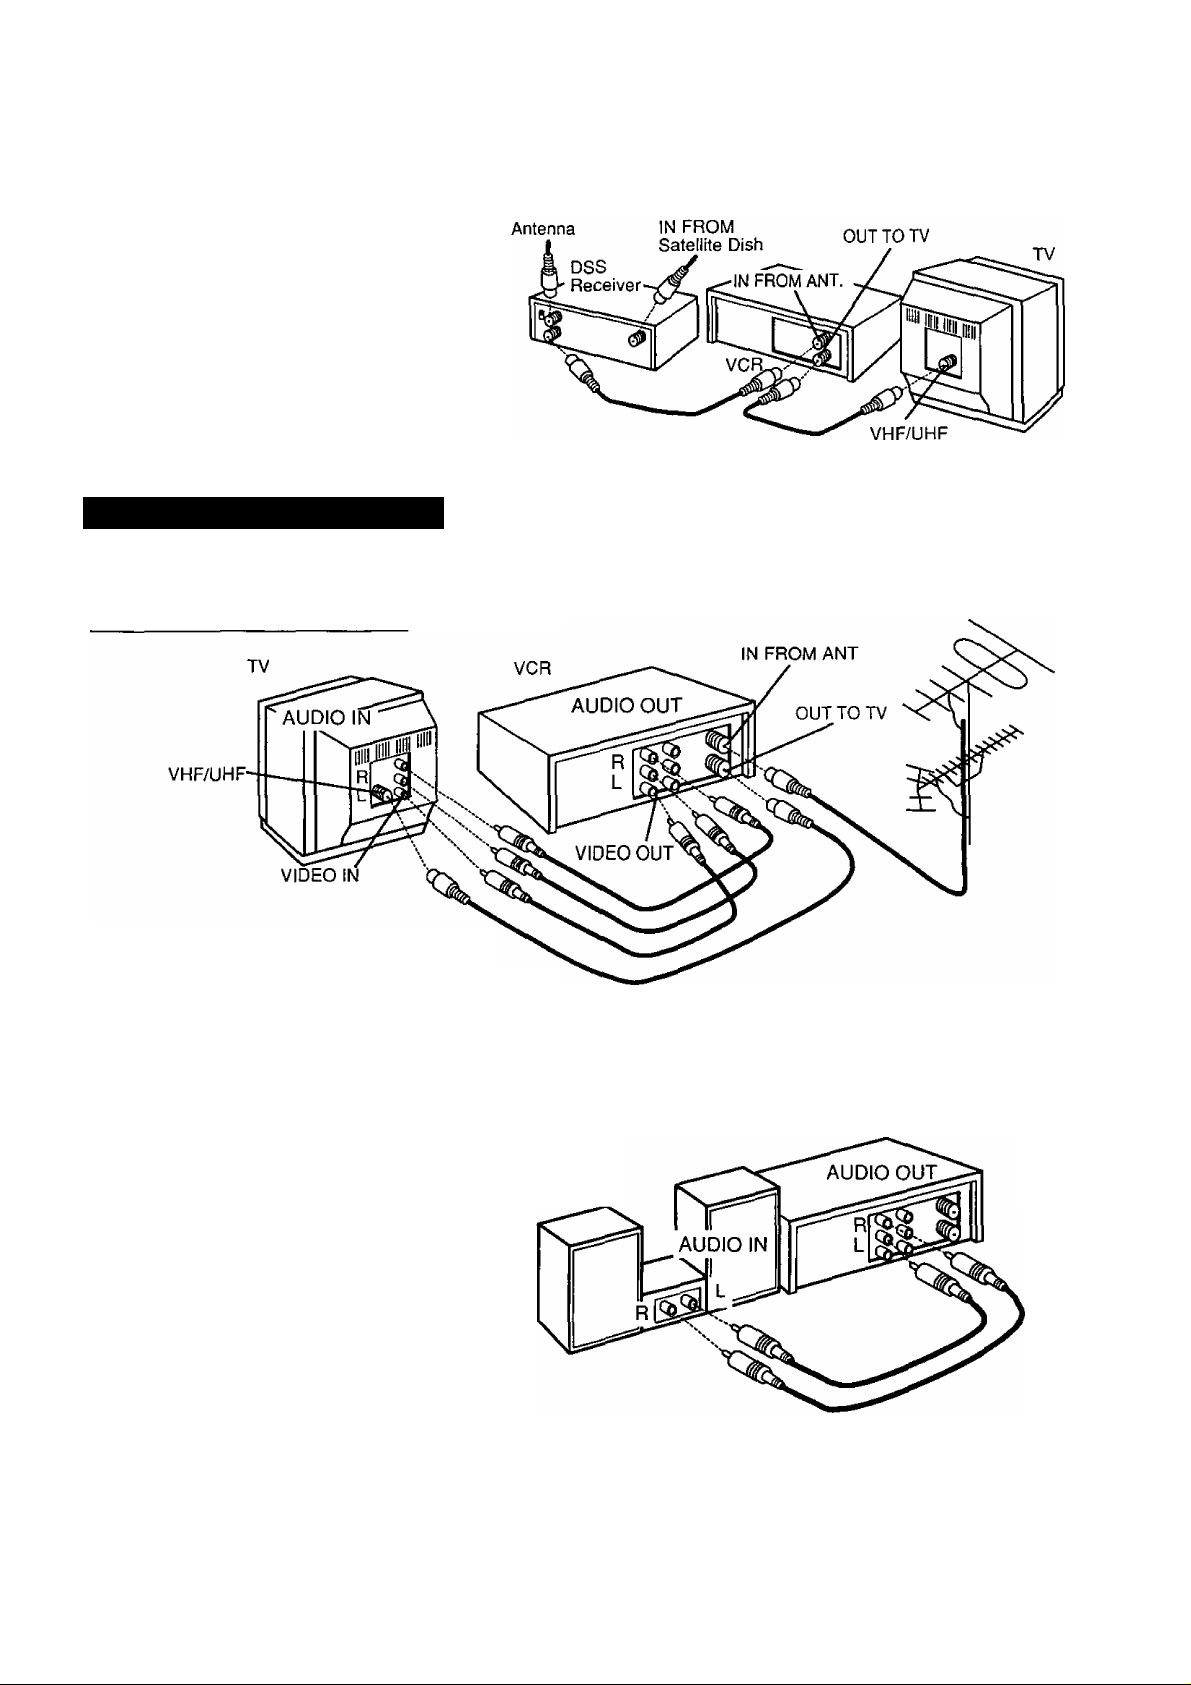
r With a DSS Receiver
You can:
Record and view any channel including
1)
scrambled channels; channel selection
must be made at the DSS Receiver.
Program one channel for unattended
2)
recording.
NOTE: The DSS receiver must be turned
off to view programs from a cable
box or antenna. See the DSS
manual for details.
IN FROM
CABLE or
Audio/Video Connections
If your TV has AUDIO IN and VIDEO IN terminals, you can connect your VCR to them to receive a higher quality
picture and sound. The antenna-VCR and VCR-TV connection is as shown.
AudioA/ideo Connections
1 Connect the VIDEO OUT terminal on the
VCR to the VIDEO IN terminal of your TV.
2 Connect the “L" and “R" AUDIO OUT terminals on
the VCR to the "L” and “R" AUDIO IN terminals of your TV.
3 Set the VIDEO/TV selector of your TV (Monitor/Receiver) to “VIDEO."
NOTE: To use your TV as a VCR monitor, set the VIDEO/TV selector on the TV (Monitor/Receiver) to “VIDEO.”
Stereo Ampiifier Connections
When you connect your VCR to a
Stereo Component System, you can
view the picture from the VCR while
enjoying stereo from your audio
system.
Connect the “L” and “R" AUDIO OUT
terminals on the VCR to the “L" and “R”
AUDIO IN terminals of your stereo.
**DSS® is a registered trademark of DIRECTV, INC., a unit of GM Hughed Electronics.
Note to CATV system installer:
This reminder is provided to call the CATV system installer's attention to Article 820-40 of the NEC in USA (and to the
Canadian Electrical code in Canada) that provides guidelines for proper grounding and, in particular, specifies that the cable
ground shall be connected to the grounding system of the building, as close to the point of cable entry as practical.
**
Stereo Amplifier
VCR
Page 10

One Time VCR Setup
The setup on pages 12 through 14 is vital for proper VCR operation.
Please read the instructions carefully and in the order presented.
NOTE: These first two pages contain reference material needed for setup on pages 12-14. Please look
over the information before you begin setup procedure.
Setup Overview
You will be performing the following tasks:
• Setting the language you want on-screen displays to appear in {English, Spanish, French).
• Telling the VCR what kind of equipment you are using to receive channels and how it is connected.
• Entering pertinent cable box or DSS receiver information if used.
• Entering a local PBS channel so that the VCR can receive auto clock set data. (Not available in all areas.
• Placing channels in memory and setting the clock.
Please Note Which Connection Method You are Using.
Make sure all equipment is hooked up as described on pages 6-9.
The diagrams below illustrate some of the basic connection types. Confirm which method you used for
later reference .
Connection Method 1
A.<CABLE BOX ->VCR ->TV>
Back of
VCR
(^our
VKXO
Cable Box
RF Coaxial Cabla
B.<ANT/CABLE BOX ->DSS BOX ->VCR ->TV>
{supplied)
Connection Method 2
C.<VCR
From Antenna
or Cable
D.<VCR ->CABLE BOX ->TV>
From Antenna
->TV>
or Cable
ONE TIME SETUP IMPORTANT NOTES:
• For detailed DSS receiver connection instruction, please see your DSS operating manual.
• The DSS receiver must be turned off to view programs from the cable box or antenna.
• If you use a DSS receiver, it must be turned off for auto clock set.
• If your cable box is not remote controllable, it must be tuned to your PBS channel.
• If you use Audio/Video Jack connection between the VCR and cable box or DSS receiver, you must aiso
connect the RF coaxial cable in order to use the auto clock set and channel auto set features.
10
Page 11

Cable Box/ DSS Receiver Code Number List
If your cable box or DSS receiver is remote controllable, refer to this list during setup on page 13.
Cable Box
Brand
_____
Archer
...........................................................
Cableview
Citizen...........................................30, 42, 44, 52, 63, 88
Curtis
Diamond.................................................1,29, 44, 88, 91
Drake
Eagle
Eastern.............................................................................28
GC Brand......................................30. 42, 44, 52. 63, 88
Gemini.........................................................................4, 85
General Electric................................................................57
General Instruments
Hamlin...........................................................14, 15, 28, 41
Jerrold
Macom, Hitachi.........................................................31, 79
Magnavox.................................................................25, 26
Movietime............................................................32, 38, 40
Movietime
NSC.....................................................................32, 38, 40
Oak...........................................................................11. 46
Panasonic
Philips
Pioneer..................................................................5, 06, 78
Pulser
RCA..........................................................................16, 17
Realistic................................................................44, 51,88
Regal........................................................................14, 41
.....................................
.................................................
.................................................................
.....................................
....................
.................
..................................................
...........................................
1,2, 3, 4, 34. 55, 83. 85, 91,93, 95
1,2, 3, 4, 34. 55, 83, 85, 91,93, 95
.....................................
................................................................
30, 42, 44, 52, 63. 88
13, 20, 22, 26. 40, 58, 62
29, 32, 39, 42, 44, 88
Code Numbers
29, 44, 88, 91
8, 9, 56, 61,87, 90
37, 67, 71
16,17
13, 20, 23, 24, 96
30, 42, 44. 52, 63, 88
Brand
Regency...........................................................................28
Rembran.......................................29, 32, 39, 42, 44, 88
Salora
.......................................................................
Samsung
Scientific Atlantic
Sheritech..........................................................................27
SL Marx
Sprucer.....................................................................16, 17
Stargate
Stargate
Sylvania...........................................................................19
Telecaption...............................................................77, 92
Tekntka............................................................................74
Teleview...............................................32, 40, 42, 78, 94
Texscan....................................................................18, 19
Tocom
Toshiba............................................................................36
Uniden Satellite........................................................65, 69
Unika............................................................1,29,44, 88,91
Universal.......................................42, 43, 44, 52, 63, 88
Viewstar.................................13, 20, 22, 26, 40, 58, 62
Vid Tech..........................................................................64
Vidter...............................................................................64
Videoway
Zenith.....................................................................7, 23, 50
.............................................
...............................
...............................................
...............................................
........................................
......................................
...............................................................
30, 42, 44, 52, 63, 88
1, 33, 34, 42, 48, 49, 91
DSS (Digital Satellite System Receiver)
Sony................................................................................98
RCA.................................................................................99
Panasonic......................................................................100
Code Numbers
32, 40, 42, 78, 94
8, 9, 56, 61,87, 90
32, 40, 42, 78, 94
32, 40, 42, 78, 94
68, 72
7, 23, 50
Note: During setup you will be instructed to enter your brand code number. As some brands have
multiple codes, it may be necessary to try different codes to attain the proper results.
These codes are for Cable box or DSS Box setup for Auto Clock and VCR Plus+ recording only.
For TV/Cable Box Universal Remote Control operation, please see page 33.
Positioning Your Cable Box or DSS Receiver
If your cable box or DSS receiver is remote controllable, place it on or near the VCR as shown
in the example below. The VCR transmits an infrared signal from two locations. Be sure not to
cover the transmitter windows.
11
Page 12
One Time VCR Setup
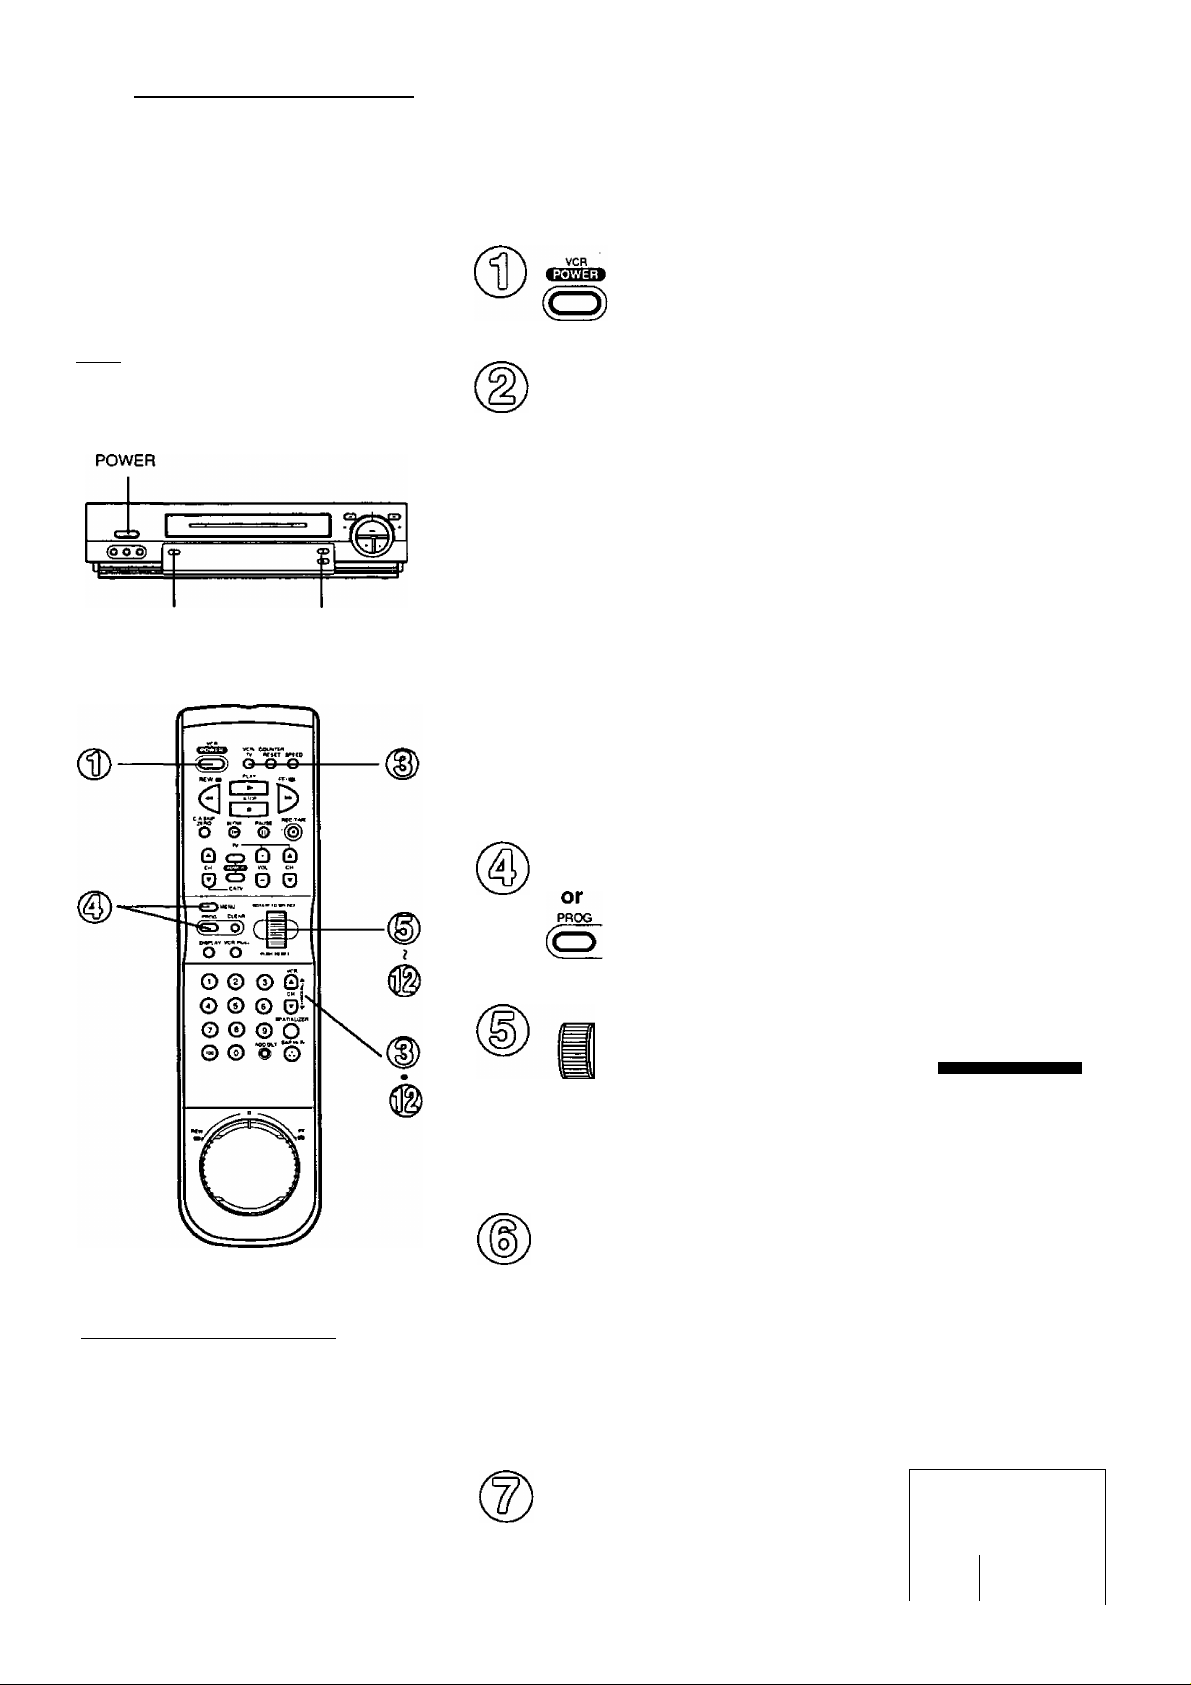
When the VCR power is first turned
on, the language select screen
automatically appears.
Follow along in the manual as you are
guided through the setup procedure
on the screen.
I \Xcheck list before you begin.
Q All TV and VCR connections are made.
(See pages 6-9.)
VCRn’V
CHANNEL
Up/Down
On-Screen Language, Cable box/ DSS receiver Setup, Channel Memory, and Auto Clock
Turn the TV and VCR
power on.
Tune your TV to the VCR channel {the same channel you
set on the back of the VCR, CH3 or CH4). (See page 6.)
VCR
Q
CH
CH
0
VCR/
TV
Push VCR CH ▲ for
English on-screen
displays.
or
Push VCR CH T for
Spanish on-screen
displays.
or
Push VCR/TV for
French on-screen
displays.
SELECT LANGÜAGE
PUSH VCR CH a: ENGLISH
PULSE VCRCH T; ESPAÑOL
APP. VCR/TV : FRANÇAIS
If you set the wrong
language,
see the “Reset all VCR
Memory Functions”
section on page 5.
• You can also set by
using the same
buttons on the VCR.
Using the Select/Set Wheel
There are basically two types of Wheel operation.
• Selecting items from an on-screen display.
• Entering information, such as setting the clock.
OPERATION
Rotate
©
(up or down)
ROTATE TO SELECT
Push
(like a button)
ROTATE TO SELECT
C
to make selection to enter selection
12
IMENU
This screen appears
a few seconds later.
Push MENU for YES or
ARE YOU USING A CABLE
BOX OR DSS RECEIVER?
PUSH MENU KEY
PUSH PROG. KEY
PROG for NO.
If YES, continue with next step.
If NO, go to Alternate
Instructions on page 14.
Rotate and push the
WHEEL to select your
equipment connection
method. (Refer to page 10.)
If “CABLE/DSS BOX- VCR- TV,"
go to step 6.
If not, go to Alternate
Instructions on page 14.
Rotate and push the
WHEEL to set your Cable
box or DSS receiver
output channel, (the channel
you tune the TV to in order to
watch cable or DSS stations).
If both a cable box and DSS receiver is used, set the
output channel of the DSS receiver.
If you are using Audio/Video jack connections, set
VIDEO OUT as the output channel.
Rotate and push the
WHEEL to select YES
or NO.
If YES continue with next step.
If NO, go to Alternate
Instructions on page 14.
- CABLE/DSS BOX SET UP SELECT YOUR CABLE BOX OR
DSS RECEIVER SET UP,
ABLE/OSS BOX-VCR-TV
VCR-CABLE/DSS BOX-TV
SELECT
SET
END
- CABLE/DSS BOX SET UP -
ENTER CABLE BOX OR DSS
RECEIVER OUTPUT CHANNEL
SELECT
SET
END
- CABLE/DSS BOX SET UP -
DOES YOUR CABLE BOX OR
DSS RECEIVER HAVE
WIRELESS
SELECT :
SET PUSH WHEEL
END PUSH MENU KEY
ROTATE WHEEL
PUSH WHEEL
PUSH MENU KEY
ED
ROTATE WHEEL
PUSH WHEEL
PUSH MENU KEY
REMOTE CONTROL?
NO
.ROTATE WHEEL
Continued on the next page.
: YES
; NO
Page 13

Rotate and push the WHEEL
to set the Cable box or DSS
receiver code number that
matches your brand from
the list on page 11.
• This determines whether the
VCR will control your cable box
or DSS receiver.
If you use a cable box, tune it to
channel 02.
If you use a DSS receiver, tune
it to any channel other than 200.
Push WHEEL to continue.
Rotate and push the WHEEL
to select YES or NO.
If you use a cable box and
selected YES, go to step 11.
If you use a DSS receiver and
selected YES, go to the Alternate
Instructions on page 14.
If NO, the screen in step 8 will
reappear. Try entering a
different code assigned to your
brand and/ or repositioning the
equipment (see page 11).
If the answer is still NO, cable
box or DSS receiver control is
not available. Push MENU and
go to the Alternate Instructions
on page 14.
Rotate and push the WHEEL
to select and set the local
PBS channel number you
receive on your cable box.
• If you live near a different time
zone, enter the channel in your
time zone.
Confirm that your cable box is
on and that your DSS Box is off.
Push WHEEL to Start
CHANNEL AUTO SET and
AUTO CLOCK SET.
The following displays appear in sequence:
“CH AUTO SET PROCEEDING”
“CH AUTO SET COMPLETED"
“AUTO CLOCK SET PROCEEDING”
VCR
This display appears when
auto clock set is completed.
(3
CH
Confirm that the time is
correct and push CH ▲
to exit.
- CABLE/OSS BOX SET UP CHOOSE A CODE NUMBER FOR
CABLE BOX/DSS RECEIVER
FROM THE LIST IN OWNER'S
MANUAL AND ENTER NUMBER.
SELECT
SET
END
- CABLE/DSS BOX SET UP -
PLEASE TUNE YOUR CABLE
BOX TO CH02.
- CABLE/DSS BOX SET UP
IS YOUR CABLE BOX
RECEIVING CH 09 ?
.............
PLEASE ENTER YOUR LOCAL
PBS CHANNEL ON CABLE BOX
SELECT
SET
END
12/25/1996 WED 12:
m
ROTATE WHEEL
PUSH WHEEL
PUSH MENU KEY
If Cable Box
If DSS Receiver
PLEASE TUNE YOUR DSS
RECEIVER TO CH 270.
PROCEED :
END
IS YOUR DSS RECEIVER
RECEIVING CH 200?
SELECT
SET
END
END : PUSH CH UP KEY
PUSH WHEEL
PUSH MENU KEY
If Cable Box
If DSS Receiver
NO
ROTATE WHEEL
PUSH WHEEL
PUSH MENU KEY
SET CLOCK
SETTING : CH02
AUTO CLOCK SET
..................
ROTATE WHEEL
PUSH WHEEL
PUSH MENU KEY
DST:ON
COMPLETED
If the Auto Clock Set displayed time is incorrect
If you use a cable box and
receive more than one PBS
station, try auto clock set again.
Follow the Set or Reset Auto
Clock Set steps and when the
instructions call for you to enter
a PBS station, make sure to
enter the one you have not
tried yet.
If AUTO CLOCK SET INCOMPLETE appears
The screen below will appear
on-screen if auto clock set
data is not available in your
area.
AUTO CLOCK SET
IS INCOMPLETE
PUSH MENU TO SET CLOCK
Push MENU to display
the manual clock set
screen. (See the
“Manual Clock Set”
section on page 14.)
Note;
If you use a cable box and
receive more than one PBS
station, you may exit the
manual clock set screen and
try auto clock set again.
Follow the Set or Reset Auto
Clock Set steps and when the
instructions call for you to enter
a PBS station, make sure to
enter the one you have not
tried yet.
Auto clock set will be performed
when the VCR is turned off for
the first time each day. If you
use a cable box and you want
auto clock set to be performed,
the cable box must be left on at
the time the VCR power is
turned off.
13
Page 14

One Time VCR Setup
Alternative Instructions
Complete the following steps if, during one time
setup, any of the following applies:
A You selected NO in step 4 on page 12 (you do not
use a cable box or DSS receiver).
B You selected connection method 2 (VCR-CABLE
DSS BOX- TV) in step 5 on page 12.
C You selected NO in step 7 on page 12 (your cable
box or DSS receiver is not remote controllable).
D You use a DSS receiver and selected YES in step
10 on page 13.
E Cable Box or DSS receiver can not be controlled
in step 10 on page 13.
WHEEL
Turn on the cable box and set
фй
the local PBS channel.
If you live near a different time
zone, make sure to set the
channel in your time zone.
If you use a DSS receiver, it
must be turned off.
VCR
Q
CH о
This screen appears to confirm that
auto clock set Is completed.
VCR
Push CH ▲ to start
CHANNEL AUTO
СЭ
SET and AUTO
CLOCK SET.
The following displays will appear in sequence.
“CH AUTO SET PROCEEDING”
“CH AUTO SET COMPLETED"
"AUTO CLOCK SET PROCEEDING”
Confirm that the
time is correct and
Q
CH
push CH A to exit
this screen.
If this screen appears,
auto clock set is not
available in your area.
Please set the clock
manually as described
at right.
CHANNEL/CIOCK AUTO SET
CONNECT ANTENNA CABLE
ANO IF YOU USE A CABLE
BOX.TUNE IT TO YOUR
LOCAL PBS CH THEN, . .
PLEASE PUSH CH UP KEY
12/25/1996 WED 12:OOPH
SETTING : CH02
AUTO CLOCK SET
END : PUSH CH UP KEY
AUTO CLOCK SET
IS INCOMPLETE
PUSH MENU TO SET CLOCK
DST: ON
COMPLETED
If the displayed auto clock set time and
D.ST, are not correct
If you live dose to two different time zones, the VCR may
recognize the wrong PBS station as the setting channel. If this
happens, please complete the following steps.
1 Make a note of the SETTING: CH number on screen and
push CH A to exit.
2 Delete the setting channel form channel memory. (See the
Add or Delete a Channel section on page 15.)
3 Push MENU button to display the menu.
4 Use the Wheel to select “SET CLOCK" and then to select
“AUTO SET."
• If you use a cable box and have multiple PBS stations, tune
the cable box to a different PBS station and try auto clock
set again using the menu.
Manual Clock Set
(In case Auto Clock Set could not
be performed)
1 Push MENU to
display the set
clock screen.
2 Rotate and push
the Wheel to select
and enter the month,
date, year, time and
D.S.T. (Daylight
Saving Time).
* “DST:ON" automatically adjusts for
daylight saving time. (See page 5.)
To Make Corrections,
push the Wheel or CLEAR button
repeatedly to move back or forward to
the desired item.
3 Push MENU twice to
start the clock and
exit this mode.
SET CLOCK
/I
BY ROTATING WHEEL
TO END PUSH MENU KEY
lì
2/1996 FRI 1:;
TO CORRECT
PUSH WHEEL OR CLEAR KEY
TO START PUSH MENU KEY
:PUSH WHEEL-*
ADD/
DELETE
14
Page 15

To Change On Screen Display Language
1
Push MENU to display the menu.
Rotate the Wheel to select the
language selection item.
(English: LANGUAGE, Spanish:
IDIOMA, French; LANGUE)
............ MENU
SET UP VCR
SET CLOCK
SET UP CHANNEL
SET UP INDEX Plust
SELECT
SET
END
3 Push the Wheel to change the language.
• Each Push will change the language in the order shown.
j—►English- ►Spanish ► French—|
4 Push MENU to exit this mode.
..................
ENGLISHIDIOMA/LANGUE
ROTATE WHEEL
PUSH WHEEL
PUSH MENU KEY
To Add or Delete a Channel
Select a channel using the
1
NUMBERED keys.
Push ADD/DLT to add or
delete the channel.
• To select a deleted channel,
use the NUMBERED keys
on the remote control. Deleted channels will flash
in the Multi Function Display when selected.
CHANNEL 08 DELETED
ADDED
To Set or Reset the Clock
In case the clock is wrong, or a power failure occurred.
..............
MENU
SET UP VCR
SET UP CHANNEL
1 Push MENU to display the menu.
SET UP INDEX P)us+
ID ЮМА/ LANGUE; ENGL I SH
..........SET CLCCK
AUTO SET
2 Rotate and push the Wheel to:
(A) Select SET CLOCK
(B) Select MANUAL SET
SELECT
SET
END
ROTATE WHEEL
PUSH WHEEL
PUSH MENU KEY
(C) Set the date, time, and
D.S.T. (Daylight Saving
Time).
3 Push MENU twice to start the
clock and exit this mode.
-M/-- SET CLOCK
твшШштт
/l^ DSTiON
BY ROTATING WHEEL
«-PUSH CLEAR: iPUSH WHEEL-»
TO START PUSH MENU KEY
To Set or Reset Auto Clock Set
Complete the following steps if:
• Auto clock set displayed time was incorrect.
• Auto clock set was not available at the time one
time setup was done, but is available now.
• The PBS channel over which dock data is sent
was changed by the broadcast company.
..................
...............
............................
When Using the 100 key
When selecting CATV channels 100 to 125 with the
NUMBERED keys, first push the 100 key and then
enter the remaining two digits.
For example, to select channel 125:
Push NUMBERED keys 100, then 2, then 5.
To Replace Channels in Memory
Example, if you have cable installed, etc.
1 Push MENU to display the menu.
2 Rotate and push the Wheel to
select SET UP CHANNEL from
menu, and then push to set
your antenna system (TV or
CATV).
3 Rotate and push the Wheel to
select AUTO SET.
* To exit this mode, push MENU
twice.
Follow the one time setup
instructions on page 12-14.
• Whenever channels are replaced in memory, auto
clock set is also reprogrammed.
.............
MENU
SET UP VCR
SET CLOCK
SET UP CHANNEL
SET UP INDEX Ptus+
ID I ОМА/ LANGUE: ENGL I SH
SELECT
SET
END
■ANTENNA SYSTEM^^S^H
1 CABLE/OSS BOX SET UP
1 VCR PIUS+ CH SET UP
--- SET
AUTO SET
SELECT :
SET
END :
ROTATE WHEEL
PUSH WHEEL
PUSH MENU KEY
UP CHANNEL --- 1
ROTATE WHEEL !
PUSH WHEEL 1
PUSH MENU KEY 1
^ Push MENU to display the menu.
..........
2 Rotate and push the Wheel to
select SET CLOCK and then
select AUTO SET.
3 Follow the one time setup
instructions on page 12*“14.
SET CLOCK ..............
fjiw.grsi
MANUAL SET
SELECT
SET
END
ROTATE WHEEL
PUSH WHEEL
PUSH MENU KEY
To setup the VCR in case a cable box or DSS receiver was installed or replaced
..............
MENU
1 Push MENU to display the menu.
2 Rotate and push the Wheel to
select SET UP CHANNEL from
menu.
3 Rotate and push the Wheel to
select CABLE/DSS BOX SET UP.
• To exit this mode, push MENU
twice.
4 Rotate and push the Wheel to
select YES and continue with
steps 5-10 on pages 12 and 13.
SET UP VCR
SET CLCXDK
SET UP CHANNEL
SET Up INDEX Plus+
ID I ОМА/ LANGUE: ENGL I SH
SELECT
SET
END
SELECT
SET
END
- CABLE/DSS BOX SET UP ARE YOUUSING A CABLE
BOX OR DSS RECEIVER?
ROTATE WHEEL
PUSH WHEEL
PUSH MENU KEY
--- SET UP CHANNEL --ANTENNA SYSTEM : CATV
AUTO SET
VCR P1US+ CH SET UP
ROTATE WHEEL
PUSH liVHEEL
PUSH MENU KEY
NO
SELECT
: ROTATE WHEEL
SET
: PUSH WHEEL
END
: PUSH MENU KEY
This VCR will accurately maintain its calendar up to Dec. 31,2014.11:59PM.
Normal TV or Cable channels are automatically selected and placed in memory depending on how your VCR is hooked up.
By pushing the Wheel or CLEAR button repeatedly, you can skip forward or backward over correct entries and go
directly to a specific item.
15
Page 16

П Screen Displays (OSD)
Channel & Function Display
Whenever the channel is
changed, the Channel
number will appear for a
few seconds on-screen.
(Some station names may
also appear.)
When a function button is
pushed (PLAY, FF, etc.)
the VCR mode will be
displayed.
Menu Screen
1 Push MENU to display
the menu.
2 Rotate and push the wheel
to make your selection
(see page 12).
To get the most from each feature, it is
recommended that you read the Operation
Manual before attempting any operation.
08
..................
SELECT
SET
END
MENU ...................
SET UP VCR
ID10MA/ LAMGUE: ENGLISH
: ROTATE WHEEL
: PUSH WHEEL
: PUSH MENU KEY
WNET
Warning and Instruction Displays
These displays will alert you to a missed operation or
provide further instructions.
If no active channels are
found for CHANNEL
MEMORY...
If you attempt to set or
review a Timer Recording
and the Clock is not set...
If a Timer Program was not
completed before exiting
the Program mode...
NO CH FOUND
PLEASE CHECK ANTENNA
CABLE CONNECTION THEN
PUSH VCR CH UP KEY AGAIN
PLEASE SET CLOCK
BEFORE PROGRAMMING
PROGRAM IS INCOMPLETE
>
^^
VCR Status & Clock Display
Push DISPLAY to display and remove the
overlay shown below.
Function Status Time
RecTime -
Remaining
(OTR mode only
see page 18.)
Receivable
Broadcast Types
(See page 28.)
REC 12:00AM СНОВ
0 : 25 0:00:00
STEREO <- ! SUP
SAP
MONO
Counter
Channel &
Call Letter
\
Tape Speed
Blank Tape and will be Blue Screen
If a blank section of tape is encountered in the Play
mode or the channel you select has no broadcast,
the TV screen will change to a solid blue field.
The screen will remain blue until a recorded signal
is again detected or an active channel is selected.
After a Timer Program
has been set...
If you push REC on the
remote control or REC
and PLAY on the VCR,
and a cassette is inserted
with no record tab...
If you push PLAY, FF, REW,
or REC on the remote control
or if you push REC and
PLAY, PLAY, FF, REW, or
REC on the VCR without a
cassette inserted...
If you push POWER or
STOP during a Timer
Recording...
(visible in VCR mode only)
TURN VCR OFF
FOR TIMER RECORDING
CHECK CASSETTE
RECORD TAB
;
NO CASSETTE
PLEASE INSERT A CASSETTE
TO CANCEL TIMER REC
PUSH POWER THEN STOP KEY
16
Page 17

Playback a Tape
Check list before you begin
O All connections are made.
(See pages 6~9.)
□ TV and VCR are plugged in.
□ TV is turned on and set to the VCR
channel (CH 3 or 4).
Push PLAY to start playback.
• Playback begins automatically if
cassette has no record tab.
(VCR or Remote Control)
FF/O
or
D)
(VCR or Remote Control)
Push STOP to Stop playback.
(VCR or Remote Control)
Push STOP/EJECT to eject the cassette.
• This button only on VCR.
Insert a cassette.
• VCR power corines on automatically.
This indicator lights in the
Multi Function Display.
S I /
-VCR -
Push REW or FF to
quickly locate a scene.
• SP mode tapes have a search speed of
9 times and SLP mode tapes 27 times
the normal speed.
• Some noise bars will appear during search.
SLOW
O © © 0Í
O © © 0^
o © ©'o'
© © '^"'©
Caution:
Please inspect your cassette tape for
any loose or peeling labels as it may
become jammed in your unit.
PAUSE
.TRACKING/
V-LOCK
Special Effects During Playback
These features work best in SP or SLP mode. The sound will be muted.
(After the VCR is in the Still or Slow mode for 3 minutes, it will go into the Stop
mode automatically to protect the tape and video head.)
Slow Motion Playback
Push SLOW to start and PLAY or SLOW to release the Slow mode.
Still (Freeze) Frame Picture
Push PAUSE to freeze and release the picture.
• To reduce picture noise:
Place the VCR in Slow motion mode. Use TRACKING A/T to clear up
the picture, then push PAUSE.
Frame bv Frame Advance
While in Still mode, hold down SLOW to advance the still picture one
frame at a time. Push PAUSE to release.
Feature for a Quality picture
Digital Auto Picture
This feature automatically controls the video output signal for less noise
depending on the tape condition.
Digital Auto Tracking
This feature continuously analyzes the signal and adjusts for
optimum picture quality.
Manual Tracking Control
Use during Playback and Slow Motion mode to reduce picture noise.
Push VCR CH (TRACKING) A/T buttons until the picture clears up.
To return to Auto Tracking mode, push VCR POWER off and then on again.
V-Lock Control
In Still mode, the VCR CH (TRACKING) A/T buttons operate as a
V-Lock control to reduce jitter. Push A/T until the picture is stabilized.
DynAmorohousT^ Metal Head/
CNR (Color Noise Reduction)/ ANR (Advanced Noise Reduction)
DynAmorphous™ Metal Head increases playback and record picture
quality. Color Noise Reduction reduces the color noise. Advanced
Noise Reduction reduces the luminance noise.
17
Page 18

Record On a Tape
Check list before you begin.
All connections are made.
{See pages 6~9.)
□ VCR is Plugged in.
□ TV is turned on and set to the VCR
channel (CH3 or CH4).
Insert a cassette with record
VCR power comes on automatically.
Push VCR CH A/T or
NUMBERED keys to
select a channel.
• Or, push CHANNEL A/W
on the VCR.
• To record from an outside
source, push VCR CH A/V
to select “LINE1" or “L1NE2”
{see page 27).
SPEED
Push SPEED to change
current recording speed.
• SP = Standard Play, LP = Long
Play, SLP = Super Long Play.
Push REC/TIME
to start recording.
* Or, push PLAY and
REC/TIME on VCR.
Watching Another TV Program
1 Push VCR/TV while recording is in progress
to turn off the VCR indicator in the Multi
Function Display.
2 Use the TV channel controls to select a
program. The VCR will continue to record
your program while you watch any channel
you choose.
* Switch back and forth between the recording
and viewing channel with the VCR/TV selector.
One Touch Timer Recording (OTR)
The VCR starts recording and turns itself off
at a preset time.
Continue to push REC/TIME to set />NomialRec
the recording length. Each push will
change the stop time as shown.
• “TIMER" lights in the Multi Function Display.
C
4.-00^3.-00^2.iO-*-1;30
Push STOP to
stop recording.
• Or, push STOP on the VCR.
Selecting Channels at the VCR
1 Turn TV on.
V /
-VCR\
If indicator doesn't light, push VCR/TV to turn it on.
Multi Function
Display
2 Use VCR CH A/T buttons to select channels
for viewing or recording.
• To resume TV control channel selection, push VCR/
TV to turn VCR indicator off, or simply turn VCR off.
►0:30-^1i0
D
18
Holding down the VCR CH A/T buttons will increase the channel search speed.
Push PAUSE to pause a recording in progress. (After the VCR has been in Pause mode for 5 minutes, it will stop
automatically to protect the tape and video head.)
The recording time remaining appears if the DISPLAY button is pushed during OTR mode (See page 16).
Page 19

A ^ ^ \ Tape Operation
Your VCR is equipped with several time
saving features as well as convenient
automatic functions which make tape
operation easier than ever.
® (1)
Repeat Play
You can set your VCR up to play a recording over and over.
Push MENU to
display the menu.
Imenu
Rotate and push the
WHEEL to select SET
SI
The VCR plays to the end of a tape, or until a blank portion of 30
seconds or more is reached. (Erased portions of tape are not
considered blank.) The tape is then automatically rewound and
played again and again until Repeat Play is cancelled. All function
buttons (REW, FF, etc.) are operational during Repeat Play.
UP VCR.
Rotate the WHEEL to
select “REPEAT PLAY”,
then push to select “ON”
or OFF”.
MENU
SET CLOCK
SET UP CHANNEL
ID lOMAy UNGUE; ENGL ISH
SELECT
SET
END
SELECT
SET
END
ROTATE ViHEEL
PUSH WHEEL
PUSH MENU KEY
-- SET UP VCR
REPEAT PLAY
BEEPER : ON
INPUT SELECT : TUNER
SET audio mode
SET UP COMMERCIAL AOV.
.............
: ON
ROTATE WHEEL
PUSH WHEEL
PUSH MENU KEY
.
Push MENU twice to
leave this screen.
Zero Search
You can reset the Time Counter to zero and then return to that point.
Push DISPLAY to
Disi^Y display the Time
O Counter overlay.
COUNTER
RESET
Push COUNTER RESET
to reset the Time Counter.
• This may be done at as many
places as you wish on the tape.
STOP 12:00AM CH08
STOP 12:00AM CHOe
0:00:30
SLP
0:00:00
SLP
C/A SKIP
ZERO
O
Push C/A SKIP ZERO
in Stop mode.
• The VCR will go into FF or REW mode and stop at the
last point the Time Counter was set to 0:00:00.
19
Page 20

/(<1. V >\ Tape Operation(continued)
Shuttle Variable Speed Search
The SHUTTLE Ring allows you to smoothly control the tape speed during
special effects playback in both forward or reverse.
Turn SHUTTLE Ring on the VCR or
remote while in Play or Still mode to
place the VCR in Shuttle mode and
Start a forward or reverse search.
• The Shuttle indicator lights.
• The more you turn the Ring, the faster the search
speed will be.
vtrv coiMTtA
^ IV WIAT t^to
Q) o o o
<5 © O @
0 0
<B-% rg
o‘"cr
O © © Oj
© © 0 0'
© ® © Q
© © ©" ©
(3)
Push a function button such as: PLAY, STOP, etc.
on the VCR or remote to release the Shuttle mode.
• The VCR performs the function of the button pushed.
• The Shuttle indicator goes out.
When the SHUTTLE Ring is turned more than half way
in Stop mode, normal Fast Forward or Rewind will begin.
Some noise bars are normal during Shuttle operation.
After 3 minutes in Still or Slow, the VCR will go into Stop
mode.
When the SHUTTLE Ring is released, the VCR goes into
Still mode.
Auto Operation Functions
Auto Playback
When a tape is inserted, the power comes on (Auto). If the record
tab* is removed, playback begins (Auto).
Auto Rewind
After a tape reaches its end during playback, fast forward or manual
record, the VCR will rewind and go into Stop mode.
20
Playback Auto Eject
After a tape without a record tab* is played to its end, the VCR will
rewind and then eject the tape.
Memory Rewind Off
When the POWER button is pushed during rewind, the VCR will turn
off after rewind is complete.
Eject Cassette
A cassette may be ejected with power on or off.
* For record tab information, see page 5.
Page 21

COMMERCIAL ADVANCE
TM
COMMERCIAL ADVANCE™ detects and marks the beginning and end points of commercials on your tape for
recordings over 15 minutes in length. When the COMMERCIAL ADVANCE™ marked tape is played back, the VCR
automatically advances through the commercial segments at high speed. You can also set this feature to Manual
so as to have more control over the advance process.
The effectiveness of this system can vary due to differences in the way television stations broadcast.
See page 23 for answers to the most commonly asked questions about this feature.
Check list before you begin
□ All connections have been made and
the One Time Setup is completed.
□ Your TV and VCR are plugged in and
turned on.
D TV is tuned to the VCR channel (CH 3
or 4).
COMMERCIAL ADVANCE™ Marking
When the COMMERCIAL ADVANCE RECORD setting is ON, the
VCR automatically rewinds the tape after a recording has been made
and marks the beginning and end of any detected commercial blocks.
After marking is done, the tape is returned to the end of the
recording. Commercials are not erased from the tape.
Push MENU to display
the menu screen.
Imenu
Rotate and push the
WHEEL to select and
set SET UP VCR from
the menu screen.
Rotate and push the
WHEEL to select SET
UP COMMERCIAL ADV.
Push the WHEEL to
select C/A RECORD
ON or OFF.
SELECT
SET
END
---------REPEAT PLAY : OFF
BEEPER : ON
INPUT SELECT ; TUNER
SET AUDIO MODE
SELECT
SET
END
MENU
SET CLOCK
SET UP CHANNEL
IDIOMA/LANGUEiENGLISH
ROTATE WHEEL
PUSH WHEEL
PUSH MENU KEY
SETUPVCR
SET UP COMMERCIAL ADV.
C/A PLAYBACK
.................
ROTATE WHEEL
PUSH WHEEL
PUSH MENU KEY
ON
AUTO
.
The selection made in step
4 remains set unless there
is a power outage in which
case the original factory
setting will be restored.
• If the time interval between scheduled
timer recordings is insufficient for
marking, the VCR will wait until ail
recordings are finished before marking
them.
• The VCR can store up to 8 programs
or 40 commercial blocks in memory at
one time. As marking is performed,
memory storage space is replenished.
However, if storage capacity is
exceeded, the remaining commercials
will not be marked.
COMMERCIAL ADVANCE™ is a
trademark of Arthur D. Little Enterprises.
A Jerry Iggulden invention licensed by
Arthur D. Little Enterprises.
ON Timer recordings, VCR Pius+ recordings, and One Touch
Recordings are marked automatically.
The screen at right appears when
STOP is pushed during a normal
recording. Select one of the following:
Push the 1 NUMBERED key to mark
the recording now. The screen below
right will appear.
Push the 2 NUMBERED key, to mark
the recording later, after the power
has been turned off.
• If the tape is rewound and another
recording started before the power
is turnea off, the commercials may
not be marked correctly.
Push CLEAR to cancel the marking
of this recording.
OFF
m
The VCR will not mark commercials.
Off should be selected when you are
editing or dubbing a tape, or when you
simply do not wish to use this feature.
Push MENU three times
Imenu
to return to the normal
screen.
SELECT
SET
END
THE VCR IS WAITING TO
MARK COMMERCIALS IN THE
PROGRAM YOU RECORDED.
MARKING
NOW : PUSH 1 KEY
LATER : PUSH 2 KEY
CANCEL : PUSH CLEAR KEY
NOW MARKING COMMERCIALS
CANCEL ; PUSH CLEAR KEY
ROTATE WHEEL
PUSH WHEEL
PUSH MENU KEY
21
Page 22

/( <i ^ )\ Tape Qperation(continued)
COMMERCIAL
I^^Check list before you begin
All connections have been made and
the One Time Setup is completed.
Your TV and VCR are plugged in and
□
turned on.
TV is tuned to the VCR channel (CH 3
□
or 4).
PLAY
ADVANCE™
COMMERCIAL ADVANCE™ Playback
When playing back recordings which have been marked using the
COMMERCIAL ADVANCE™ feature, you can either set the VCR to
automatically advance through marked commercial blocks, or set it so
that commercials are only skipped on your command.
Push MENU to display
lUEMU
(D
the menu screen.
Rotate and push the
WHEEL to select and
set SET UP VCR from
the menu screen.
Rotate and push the
WHEEL to select and
set SET UP
COMMERCIAL ADV.
SELECT
SET
END
............
REPEAT PLAY : OFF
BEEPER ; ON
INPUT SELECT : TUNER
SET AUDIO MODE
SET UP COMMERCIAL ADV.
SELECT : ROTATE WHEEL
SET r PUSH WHEEL
END ; PUSH MENU KEY
macron
SET CLOCK
SET
UP CHANNEL
1D1OMA/LANGUE;ENGL 1SH
: ROTATE WHEEL
; PUSH WHEEL
; PUSH MENU KEY
SET UP VCR..............
Rotate the WHEEL to
select C/A PLAYBACK
and push to set AUTO
SET UP COMMERCIAL ADV.
C/A RECORD
C/A PLAYBACK
orMANU(al).
SELECT
SET
END
ROTATE WHEEL
PUSH WHEEL
PUSH MENU KEY
AUTO automatically advance through
marked commercial blocks recorded on the tape
and then resume playback.
MANUiaH advance through commercials only
' ' when the C/A SKIP ZERO button is pushed.
Playback will resume when the end mark of a
commercial block is found, or a new recording or
blank portion is detected, or after eight minutes.
Push MENU three times to
IMENU
return to the normal screen.
ON
AUTO
22
The selection made in step 4 remains set unless there is a power outage in which case the original
factory setting will be restored.
A commercial may not be skipped if playback is started in the middle of a commercial, only a single
isolated commercial is shown, or an individual commercial is longer than one minute. Push FAST
FORWARD/ SEARCH to quickly advance through the commercial.
Part of a recorded program may be skipped over if the program portion between commercials is less
than one minute, or there are frequent dark and quiet scenes. Rewind the tape to the beginning of the
skipped portion and push PLAY.
Page 23

The most commonly asked questions about COMMERCIAL ADVANCE™ are answered below.
Question
How fast does the VCR advance through
commercials?
Are commercials advanced through only when 1
playback a recording?
Are commercials still recorded on the tape in
case 1 choose to view them sometime?
Does COMMERCIAL ADVANCE™ work in all
recording speeds?
Does the VCR advance through commercials each
time 1 playback tapes which were recorded using
COMMERCIAL ADVANCE™ ?
After marking commercials, does the VCR stop at
the end of the tape, or rewind to the beginning?
Answer
The VCR advances through a 3-minute commercial
block in about 8 to 12 seconds if the tape speed is SLP.
In SP, it takes about 25 to 35 seconds.
Yes. The commercials are not marked until after the
recording is finished.
Yes. By setting the C/A PLAYBACK to MANU(al),
see page 22, you can view or advance through
commercials as desired.
Yes. COMMERCIAL ADVANCE™ works in SP, LP.
and SLP.
Yes. As long as C/A PLAYBACK is set to AUTO, see
page 22, the VCR should advance through
commercials each time the tape is played back.
The tape stops at the end of the recording so that any
additional timer recordings can be performed.
Can 1 play my COMMERCIAL ADVANCE™
recordings in non-COMMERClAL ADVANCE™
VCRs?
Does the marking process interfere with other
programmed recordings?
What happens if 1 cancel the marking in progress
so 1 can use the VCR?
What if part of my program is advanced through
along with the commercials?
Yes. COMMERCIAL ADVANCE™ marked recordings
will play in non-COMMERCIAL ADVANCE™ VCRs,
but commercials will not be advanced through.
No. If the interval between 2 or more timer programs
is not sufficient to mark the recording, marking will be
done after all recordings are complete and the power
goes off.
Marking will be resumed when the VCR’s power is
turned off as long as the tape has not been ejected.
Rewind the tape to where the program should have
started, and push PLAY to view the program.
Additional Notes:
• Because of the various ways in which commercials are broadcast, the VCR may not be able to recognize all
commercials.
* If a timer recording is scheduled for the middle of the night, please be aware that the VCR will make some
noise as it rewinds and fast fonwards the tape while marking commercials.
COMMERCIAL ADVANCE™ is a trademark of Arthur D. Little Enterprises.
A Jerry Iggulden invention licensed by Arthur D. Little Enterprises.
23
Page 24

Timer Recording
Your VCR can be set up to do a recording
while you are away or otherwise occupied
Up to 8 programs can be placed in
memory. You can choose to record one
time, daily, or weekly.
[S^heck list before you begin.
n All connections are made.
(See pages 6-9.)
□ TV and VCR are plugged in and turned on.
□ VCR/TV selector is set to “VCR."
n Clock is set to correct time.
□ Record tab in place. (See page 5.)
PROG
Push PROG to display
the program screen.
• If a program is already in
memory, use the Wheel to
select an unused program
number.
Rotate and push the
WHEEL to select and
set the DATE.
Daily and Weekly Timer Recording
If you want the program to be recorded daily
(Mon thru Fri), enter DAILY in place of the
DATE in step 2. If you want the recording to
be on a weekly basis, enter WEEKLY MON,
TUE, etc..
Rotate and push the
WHEEL to select
and set remaining
items at right.
START STOP CH
Ì'ÌÌBXtV SLP
ELECT START DATE
BY ROTATING WHEEL
TO END PUSH PROG KEY
WEEKLYiSAT,-«— 7 -»S-S— 31
WEEKLYiSlN!--MY—6“
:PUSH WHEEL-*
Today's Date
Wheel'seiEpti'on Order
Remaining Items
to be set:
• START time
• STOP time
• CH(annel) number,
or LINE for outside
source recording.
• Speed (SP. LP, SLP).
Important notes when using a DSS receiver.
• When recording programs via a
DSS receiver the DSS receiver
must be left on.
• When recording programs via an
antenna or cable, the DSS
receiver must be turned off.
24
To Make Corrections
Repeatedly push the Wheel to move forward, or the CLEAR
button to move back to the desired item.
Push the WHEEL when program is completed.
“PROGRAM COMPLETED" will appear on-screen.
If “PROGRAM IS INCOMPLETE" appears on-screen,
check all entries and make necessary corrections.
If you enter a channel number
of 100-125, the screen at right
PROG
PROG
VCR
appears a few seconds later.
Rotate and push the
WHEEL to select “DSS”
or “CABLE”.
Push PROG to end
the program.
• If you want to enter more
programs, select a blank
program number with Wheel
and repeat steps 2 and 3.
Push PROG to exit
this mode.
Push VCR POWER
off to set the timer.
• When recording programs via a
cable box, make sure the cable
box is left on. If the cable box
cannot be controlled with the
VCR, you must manually select
the desired channel.
IS IT CABLE CHANNEL
OR DSS RECEIVER CHANNEL?
CABLE
: ROTATE WHEEL
SELECT
: PUSH WHEEL
SET
P DT STRAT STOP CH SPD
2
------------
3
----------
4
---------SELECT
CANCEL
END
ENTER
-8 :R01
PUSH V
PUSH
PUSH
-EEH3Ì1-
Mullt Function Display
FATE WHEEL
iHEEL
:leah key
ROG KEY
Page 25

Multi Function
Display
Cancel a Timer Recording: (Recording is in progress)
1 Push the VCR POWER button to release the VCR from
timer mode.
2 Push the STOP button within 10 seconds of pushing the
VCR Power button to cancel the recording.
The TIMER indicator goes out in the Multi Function Display.
Replace Program Contents: (Recording is not in progress)
STOP
■WHEEL
1 Push the PROG button to display
all currently set programs.
2 Rotate and push the Wheel to select
and enter the desired timer recording.
(See page 24.)
3 Rotate and push the Wheel to select
and enter replacement information.
4 Push the PROG button to exit
this mode and return to the
normal TV screen.
Review or Clear Program Contents: Recording is not in progress
1 Push the PROG button to display
all currently set programs.
2 Rotate the Wheel to select the
desired program number.
P DT STRAT STOP CH SPD
3
To
8:OOP S:OOPl£¡£l!j 5P
4 SU 9;OOP 10:OOP L SLP
SELECT 1-8;ROTATE WHEEL
ENTER
PUSH WHEEL
CANCEL
PUSH CLEAR KEY
END
PUSH PROG KEY
DATE I> START STOP CH
8SAT10:00P12:00P125
ELECT START DATE
BY ROTATING WHEEL
«-PUSH CLEAR ; PUSH WHEEL-»
TO END PUSH PROG KEY
P DT STHAT STOP CH SPD
2 8 10;OOP12:OOP 125 SLP
3 10 6:OOP fliOOPEEl SP
4 SU 9:OOPlO;OOP L SLP
SELECT 1-8;R0TATE WHEEL
ENTER
PUSH WHEEL
CANCEL
PUSH CLEAR KEY
END
PUSH PROG KEY
3 Push the CLEAR button to clear
the program.
4 Push the PROG button to exit
this mode and return to the
normal TV screen.
If a DSS channel is selected, the channel will appear as blue numbers on white background.
If the cassette record tab is missing at the time the VCR power is turned OFF, the tape ejects and
the TIMER indicator flashes in the Multi Function Display.
If the start times of two programs overlap, the lower numbered program will have priority,
if the start time for a timer recording comes up during a normal recording or One Touch Recording (page 18).
the timer recording will not be performed.
P DT STRAT STOP CH SPD
□
----------------------
2 8 lO:OOPl2:OOP125 SLP
3 10 8:00P 9:00PES] SP
4 SU 9;OOP10:OOP L SLP
SELECT 1-8;aOTATE WHEEL
ENTER ;PUSH WHEEL
END :PUSH PROG KEY
:--------------------
25
Page 26

Timer Recording Using VCR Buttons
A tinner recording can be set up using the
buttons on the VCR. If necessary, the clock
can also be set.
POWER
Hold down
START STOP CH
REC/TIME.
9
and
Push FF to
ELECT START DATE
BY SELECT A/T KEY
NEXT. PUSH SET KEY OR
TO END PUSH PROG KEY
enter the
program mode.
• If the clock is not set, pushing these
buttons will display the SET CLOCK
screen. In this case, proceed with
steps 2 and 3 to set the clock and then
steps 2-6 to set a timer recording.
• Once the VCR is in the Program mode, the PLAY, REC, FF,
and REW buttons on the VCR operate only as specified above
___
; Push REW or PLAY to
SET CLOCK -
/|N
ELECT MONTH
BY SELECT A/T KEY
NEXT, PUSH SET KEY OR
TO END PUSH PHOG KEY
.............
OST;ON
^3 Qj.' I make your selection.
(for down) (for up)
Push FF to set
and move on to
the next item.
Push SET (FF) repeatedly to
move to a particular item for
setting or correction.
Items to be Set:
• recording DATE
• START time
• STOP time
• CH(annel), or LINE
•SPEED (SP, LP,SLP)
SLP
^SELECTA PROGRAM SET
Important notes when using a DSS receiver.
• When recording programs via a
DSS receiver the DSS receiver
must be left on.
• When recording programs via an
antenna or cable, the DSS receiver
must be turned off.
When the program is completed...
Push REC/TIME
[77 and Q)
(at the same time)
To set the next program,
repeat steps 2, 3, and 4 before continuing with step 5.
and FF to display
program contents.
Push REC/TIME and
§) F7 and Q)
(at the same time)
FF to exit this mode.
■ Push POWER off
Oy a
..........
to set the timer.
Multi Function Display
It is not possible to clear a timer program using the VCR
buttons. Please use the Remote Control.
When recording programs via a cable box, make sure the
cable box is left on. If the cable box cannot be controlled
with the VCR, you must manually select the desired
channel.
-¡EHia-
^ I ^
26
Page 27

Connections you’ll need to make. (Choose front or rear connection.)
Playing (Source) VCR Recording (Editing) VCR TV for Monitoring
Insert a pre-recorded
tape into the Playing
^r~<J кп\
(Source) VCR.
Insert a blank tape
with record tab into the
Recording (Editing) VCR.
Select Input “LINE” on the
Recording (Editing) VCR.
(See “Selecting the
Input Mode” at right.)
Push PLAY on Playing VCR.
Push PAUSE at the point you
want to start copying.
Push REC and PLAY at the
same time on Recording VCR.
Push PAUSE immediately.
To Monitor the Re-Recording
1 Turn the TV on and select its VCR channel
(CH3 or CH4) on the Recording VCR.
2 Set the VCR/TV selector on the Recording
VCR to the “VCR” position.
Selecting the Input Mode
1 Push MENU to display the
menu.
2 Rotate and push the Wheel
to select SET UP VCR.
Rotate the Wheel to select
“INPUT SELECT”, and then
push to choose TUNER or
LINE (LINE1 or LINE2).
• LINE1; For rear audio/video
connection.
LINE2: For front audio/video
connection.
• You can also select “LINE1" or “LINE2” using the
VCR CH A/'T buttons.
The numbers will change in the order shown.
..................
SELECT
SET
END
SELECT : ROTATE WHEEL
SET ; PUSH WHEEL
END ; PUSH MENU KEY
MENU ...................
ÎET Cu
SET UP CHANNEL
IDIОМА/LANGUE: ENGL ISH
ROTATE WHEEL
PUSH WHEEL
PUSH MENU KEY
-- SET UP VCR
REPEAT PLAY
BEEPER
SET AUDIO MODE
SET UP COMMERCIAL ADV.
ON
ON
LINEI
Push PAUSE on both
VCRs (at the same time),
to_begin copying.
Edit Out Unwanted Parts
of the original recording by using the PAUSE button
(on the Recording unit) while copying is in progress.
Push STOP on both
VCRs to stop copying.
When LINE is selected, “L1” or L2” is displayed in
the Multi Function Display for about 4 seconds.
Caution:
Unauthorized exchanging and/or copying of copyrighted
recordings may be copyright infringement.
27
Page 28

0||0| MTS Broadcast/ VHS Hi-Fi Stereo System
Check list before you begin
af<
n The VCR is connected to a stereo TV, or a mono TV and stereo amp or receiver with speakers.
□ The VCR and other components are plugged in and turned on.
When recording, you may monitor in
stereo, by connecting the VCR to
either a stereo TV, or a mono sound
TV with stereo amp and speakers.
o o o
o e © ®
0
0
^ 0
0
DISPLAY-
O © © Si
O © © 1^
© © © o
© © WQ
\^j
Receivable Broadcast Types
The following are possible broadcast types with their accompanying on-screen
displays. The signal(s) not being received is enclosed in parenthesis. The
currently selected audio mode is indicated with an arrow. To change the audio
mode for listening to, or recording these broadcasts, follow the steps on page 29.
DISPUY
MTS Stereo and SAP broadcast
Multi-channel Television Sound Stereo
{main language) and Second Audio Program
{second language) broadcasts are being
received simultaneously. Select the STEREO
or SAP audio mode as desired.
MTS Stereo broadcast
Multi-channel Television Sound Stereo
broadcast is being received.
SAP broadcast
Second Audio Program {second language)
broadcast is being received. Select SAP
audio mode for the second language.
Push DISPLAY to display the broadcast
signal currently being received on-screen.
STOP 12;OOAM WNET
STEREO <- SLP
SAP
MONO
STOP
STEREO <-
(SAP)
MONO
STOP
(STEREO)
SAP <MONO
0:00:00
12: 00AM WNET
0:00:00
12:00AM WNET
0:00:00
SLP
SLP
Equipped with dbx^ -TV Noise Reduction
for true MTS reproduction, dbx® -TV
Noise Reduction is required for good
stereo separation and audio fidelity,
dbx*^ is a registered trademark, and is
licensed by dbx Technology Licensing.
28
MONO broadcast
Normal monaural sound broadcast is
being received.
• If a stereo broadcast is weak and the display
flickers, you may want to select the MONO
audio mode for better results.
When recording, the currently selected broadcast sound is always recorded
on the left and right Hi-Fi tracks as well as the normal monaural track. This
means your tapes can be played back on Hi-Fi as well as non-Hi-Fi VCRs.
(STEREO)
(SAP)
MONO <-
12:00AM WNET
0:00:00
SLP
Page 29

With the proper audio mode
setting, your VCR can:
1) record and playback an MTS stereo
broadcast (main language) in stereo Hi-Fi.
2) record and playback a monaural
broadcast (main language) or Second
Audio Program (second language) on
the Hi-Fi tracks for better quality
monaural sound.
3) playback non Hi-Fi tapes in monaural.
Selecting the Audio Mode for Recording
Select the type of broadcast and sound track you wish to record.
SAPrHi-R
О
Push SAP/Hi-Fi repeatedly
(each press within 5
seconds) to select the
desired audio mode
(STEREO/SAP/MONO).
• Please refer to “Receivable
Broadcast Types” section on
previous page.
The currently selected
audio mode is indicated
with an arrow.
Do a recording.
See the “Record On a Tape" section on page 18.
Selecting the Audio Mode for Playback
Select the type of sound track you desire for playback.
you oesire tor playback.
When purchasing or
renting prerecorded tapes,
remember that only those
recorded in Hi-Fi stereo will
play back with true stereo
sound. Standard stereo
tapes will play back with
monaural sound.
In order to listen to Hi-Fi stereo playback,
the VCR AUDIO (UR) jacks must be
connected to a stereo TV or stereo amp
and speakers. (See previous page.)
When adjusting the tracking during
playback, the Hi-Fi audio sound may revert
to normal audio sound. This is normal.
There may be a difference in audio level
between Hi-Fi and normal audio playback.
SAP/Hi-F
o
Push SAP/Hi-Fi repeatedly
{each press within 5
seconds) to select the
HIFI <r
NORMAL
desired audio mode
(HIFI/NORMAL).
• Please select HIFI to listen to
your stereo recordings with
stereo sound or MONO for
monaural sound.
The currently selected
audio mode is indicated
with an arrow.
Playback the tape.
See the “Playback a Tape” section on page 17.
Spatializer Feature
This feature allows you to enhance the stereo sound so that it seems to
completely surround you.
Note; Your VCR needs to be hooked up to a stereo TV or stereo amp/receiver
with speakers (see page 28). For playback, tapes must be recorded in Hi-Fi
stereo. For TV viewing, programs must be broadcast in stereo.
SPATIALIZER
О
Portions of this product manufactured under a licence from Desper Products,
Inc. SPATIALIZER, and the circle-in-square device are trademarks owned by
Desper Products, Inc.
Push SPATIALIZER
repeatedly to choose
the desired setting.
• Each push will change the
display in the order shown.
To Select Audio Mode From Menu
1 Push MENU to display the menu.
2 Rotate and push Wheel to select
SET UP VCR from menu.
3 Rotate and push the Wheel to select SET AUDIO MODE.
4 Push the Wheel to set the desired audio for
listening or recording.
• For recording, set to “STEREO”, "SAP", or “MONO”.
• For playback, set PLAY AUDIO to “Hi-Fi”, or “MONO”.
5 Push MENU three times to exit this mode.
SPATIALIZER HIGH
SPATIALIZER LOW
SPATIALIZER OFF
i
.............
SET UP VCR
REPEAT PLAY : ON
BEEPER : ON
INPUT SELECT • TUNER
SET AUDIO MODE
SET UP COMMERCIAL ADV.
SELECT
SET
END
-------
SET AUDIO MODE -----------
PLAY
AUDIO : HIF1
SELECT
: ROTATE WHEEL
SET
: PUSH WHEEL
END
; PUSH MENU KEY
..............
ROTATE WHEEL
PUSH WHEEL
PUSH MENU KEY
; STEREO
29
Page 30

VCR Plus+ Set Up
This setup is for VCR Plus+ and tinner
programming only.
VCR Plus+ programming allows you to set most items of a timer recording by simply entering a special code found in TV GUIDE
magazine as well as the TV listings in selected newspapers. In order for the VCR to read this special code, some set up is required.
A Guide {VCR Plus+) channel number is assigned to each local broadcast and cable station. Because this number sometimes
differs from the channel your TV receives the station on, it is necessary to program the VCR with local channel information.
VCR Plus-H Channel Set Up
(Connection Method 2 on page 10)
Push MENU
to display the
menu.
Rotate and push
the WHEEL to
select SET UP
CHANNEL.
-----------------
SELECT
SET
END
MENU
.....................
SET UP VCR
SET CLOCK
SET UP CHANNEL
101OUA/LANGUE;ENGL ISH
ROTATE WHEEL
PUSH WHEEL
PUSH MENU KEY
NOTE: Complete the steps on this page if you are using
Connection Method 2 on page 10 for VCR hookup.
Prepare a list like the example below.
This list will help you smoothly enter the information
needed in step 4 at right.
You will need the following to complete the list:
■ A line up of normal and/or cable stations you
receive along with the channel numbers your TV
receives them on. A cable channel line-up chart is
supplied by your cable company.
■ A list of Guide (VCR Plus-i-) channel numbers
assigned to the stations you receive. This list is
available in TV Guide and the TV listings found in
selected newspapers.
\ Make a chart with 3 columns like the example
below. In the left column, fill in the name or call
letters of the stations you receive.
2 In the middle column, fill in each station's
assigned Guide (VCR Plus+) number found in TV
Guide, newspapers, etc.
3 In the right column, fill in the channel number that
your TV receives the station on from your channel
line-up.
EXAMPLE ONLY
Broadcast or Cable
Station Name
HBO
Nickelodeon
CBS
FOX
Assigned
Guide
(VCR Plus+)
channel no.
33
38
04
11
Channel no.
your TV
receives the
station on
15
20
04
(D
Rotate and push
the VVHEELto
select VCR Plus-iCH SETUP.
--- SET UP CHANNEL --ANTENNA SYSTEM
AUTO SET
SELECT
SET
END
ROTATE WHEEL
PUSH WHEEL
PUSH MENU KEY
CATV
JiP
IMPORTANT NOTE:
For this step, use the list you prepared. You may leave lines
blank if, you don’t receive that station, or the GUIDE CH
number and the CATV (or TV) CH numbers are the same.
Push WHEEL
to move the
shaded area on
the right side.
VCR PIUS+ CH SET UP
GUIDE CH CATV CH
-» ED
02
SELECT :
>
_____
SET :
END :
ROTATE WHEEL
PUSH WHEEL
PUSH MENU KEY
--
Then, rotate the Wheel
to change CATV or TV CH number.
Next, push the Wheel
to enter CATV or TV CH number.
Now, rotate the Wheel to continue.
Repeat this operation until the list is complete.
To Make Corrections
Rotate and push the Wheel to select the incorrect CATV or TV
CH number. Then, push CLEAR to delete the numbers.
Now, use the Wheel to re-enter the channel.
Push MENU twice to
I MENU exit the VCR P1us-h
CH SET UP mode.
Make your entries within 60 seconds or the VCR will
leave this mode.
Once local channels have been programmed, they will
stay in memory, even in the case of a power failure.
VCR PIus-pC? and PlusCode are trademarks of Gemstar
Development Corporation. The VCR Plus+ and INDEX Plus+
systems are manufactured under license from Gemstar
Development Corporation and Index Systems Inc.
J
Page 31

VCR Plus+ Programming
Check list before you begin.
The clock is set.
One Time VCR Setup is complete.
(See pages 10''14.)
□ VCR Plus+ Set Up is complete. (See page 30.)
SPEED
VCR Ptus+
Push VCR Plus+
to display the VCR
VCR Ptust
ENTER,VCR PLUSCODE
Plus+ screen.
TO END PUSH VCR Plus+
Push the Numbered Keys to
enter the PlusCode number.
• Refer to your local TV listings.
VCR PKJS+
ENTER VCR PLUSCODE
123456
TO CORRECT PUSH CLEAR
TO ENTER PUSH VCR Plus+
To make corrections
Push the CLEAR button repeatedly to delete the PlusCode number.
Then, enter the correct number.
Push VCR Plus+
VCR Plus+
O
Push 1, 2 or 3 Key to
select the program type.
to lock in your
program.
VCR PIUS+
1 ONETIME
2 DAILY (MON-FRI)
3 WEEKLY
TO SELECT PUSH 1,2 OR 3
TO END PUSH VCR Ptus+
Use normal Timer Recording steps if:
• the PlusCode for a program is not listed.
• you anticipate the program, such as a sporting
event, to run over the scheduled stop time.
See page 25 to:
• Cancel a timer recording in progress
• Replace program contents
• Review or Clear program contents once set
Important notes when using
a DSS receiver.
• When recording programs via a DSS receiver
the DSS receiver must be left on.
• When recording programs via an antenna or
cable, the DSS receiver must be turned off.
To change the recording speed:
DATE START STOP
Push the SPEED button for SP, LP or SLP.
To cancel program contents:
Push the CLEAR button.
If you use Connection Method 1 on page 10, the channel
shown in the on-screen display in this step will always be
the cable box output channel number.
TO CHANGE RECORD SPEED
PUSH SPEED KEY
TO CANCEL PUSH CLEAR
TO END PUSH VCR Plus+
Push VCR Plus+
VCR Plus+
O
When recording programs via a cable
box, make sure the cable box is left on.
If the cable box can not be controlled
with the VCR, you must manually select
the desired channel.
to complete the
program.
Push VCR
FOR TIMER RECORDING
LEAVE CABLE BOX POWER ON
This display may differ
depending on your
cable box hook-up.
Multi Function Display
POWER off to
set the timer.
CH
t2:00P 125
TURN VCR OFF
AND
For a list of publications that carry the PlusCode numbers in your area, call 1 - 800 - 258 - 4827.
You can obtain unlisted PlusCode numbers by calling 1 - 900 - 454 - 7587. Call costs approximately $.95 per minute.
VCR PlusCodes can not be used to program the VCR to record DSS channels.
Avoid overlapping program times.
An on-screen display will indicate if an invalid PlusCode number has been entered.
An on-screen display will indicate when all timer programs are full.
31
Page 32

ij_r^^ ji Special VCR Features
ЭГ,
Check list before you begin.
All connections are made.
(See pages 6"-9.)
□ VCR is Plugged in.
□ TV is turned on and set to the VCR
channel (CH3 or CH4).
VCR Lock Feature
When activated, this feature prohibits all operations except for timer
recording, and tape eject. This is useful to prevent misoperation and
protect your VCR from curious children.
Hold down STOP/EJECT on
the VCR for 7 seconds
during Stop, or Power OFF
mode.
To Cancel the VCR Lock feature,
Hold down STOP/EJECT on
the VCR for 7 seconds again
during Stop, or Power OFF
mode.
VCR Lock mode is cancelled automatically
after 24 hours when the clock is set.
VCR LOCK OFF
Warning Beeper Feature
When you select BEEPER ON as described below, a short warning will sound
each time an invalid entry or operation is made and a timer program is set.
Push MENU to display
imm the menu.
Rotate and push the
WHEEL to select “SET
UP VCR”.
Rotate the WHEEL
to select “BEEPER”,
then push to select
“ON” or “OFF”.
Push MENU twice to exit
this screen.
IMENU
.
................ MENU
SET CLOCK
SET UP CHANNEL
ID10МА/LANGUE:ENGL ISH
SELECT
SET
END
.............SET UP VCR
REPEAT PLAY : ON
OHa : ON
INPUT SELECT : TUNER
SET AUDIO MODE
SET UP COMMERCIAL ADV.
SELECT
SET
END
.........................
ROTATE WHEEL
PUSH WHEEL
PUSH MENU KEY
-------------
ROTATE WHEEL
PUSH WHEEL
PUSH MENU KEY
32
Page 33

Multi-Brand Control Feature
The Remote Control may be set up to control
some of the functions on your TV or Cable Box.
TV Brand Code Numbers
........
Panasonic
Quasar
RCA
GE...........................................................
Zenith
Magnavox
Sylvania
Sharp
Sony........................................................
Toshiba
Sanyo......................................................
Fisher......................................................
JVC..........................................................
Hitachi.....................................................
Mitsubishi................................................
Samsung................................................
Gold Star.................................................
...............................................
....................................................
........................................................
......................................................
...............................................
..................................................
......................................................
...................................................
Cable Box Brand Code Numbers
Archer
........................
Cable view
Citizen
Curtis
Diamond
Drake
Eagle
Eastern......................
GC Brand...................
Gemini
General Electric.........
General Instruments
................
Hamlin
Hitachi
Jerrold .... 01,02, 03, 04, 34, 55, 83, 85, 91.93, 95
Macom
Magnavox..................
Matsushita
Movietime
Movietime
NSC
Oak
Panasonic
Philips
Pioneer
Puiser
RCA...........................
Realistic
Regal
Regency
Rembrandt
Samsung
Scientific Atlanta
Sheritech
SL Marx
Sprucer
Stargate
Stargate
Sylvania
Telecaption
Teleview.....................
Texscan
Tocom........................
Toshiba......................
Unika
Universal....................
Viewstar
Videoway
Zenith
.................
........................
.........................
....................
........................
.........................
.......................
01,02, 03, 04, 34, 55, 83, 85, 91,93, 95
.......................
.......................
......................
.................
..................
..................
...........................
............................
.................
........................
......................
........................
.....................
.........................
...................
.................
...................
...................
.....................
......................
.....................
.....................
.....................
................
....................
.........................
....................
...................
........................
.................
...4, 30, 42,44, 52, 63, 85, 88
...4 , 30, 42,44, 52, 63. 85. 88
............08, 09,56, 61,87, 90
..................
............................................37
.13, 20,22, 26,40, 58, 62, 98
...........................................
...4, 30. 42, 44, 52, 63. 85, 88
.....................................
............................................57
..................
.....................................
.....................................
.....................................
.....................................
...............................32, 38. 40
.............
...............................32, 38, 40
............................................46
.....................................
...................
................................
...4, 30, 42, 44, 52. 63,85, 88
.....................................
.....................................
.....................................
............................................28
.............
...................
........
.............
.............................................27
...................
.....................................
...................
...4, 30, 42,44, 52, 63, 85. 88
............................................19
.....................................
...................
......................................
......
.............................................36
...................
.............
.13, 20, 22, 26, 40, 58, 62,98
................................
................................07,23,50
01,29,44,88,91
01,29,44,88,91
14, 15, 28, 41,97
29, 32,39, 42,44, 88
13, 20, 23, 24, 96
29, 32, 39, 42, 44, 88
32, 40,42, 78, 94
08,09,56, 61.87, 90
32, 40, 42, 78, 94
32.40. 42,78,94
32,40, 42,78,94
01,33. 34, 42,48, 49, 91
01,29,44,88,91
42, 43,44, 52. 63, 88
01,02
.........01,02
...............
...............
...............
...............
...............
.........06,07
...............
...............
...............
...............
...............
...............
...............
...............
...15, 16, 17
04, 85
31,79
31,79
25. 26
16. 17
16,17
05, 06, 78
16. 17
44, 88
14, 41
16, 17
77. 92
18, 19
07, 23, 50
03
03
04
05
05
08
09
10
10
11
12
13
14
28
Find your TV or Cable Box Brand
Code Numbers.
See left chart for TV or Cable Box Brand Code Numbers.
Hold down TV POWER
or CATV POWER.
CATV
and
Use the NUMBERED keys
to enter code number.
Enter your TV or Cable Box brand code number.
Due to changes in infra-red commands used by some
manufacturers, some TV or Cable Box brands are listed more
than once. If your TV or Cable Box does not respond in step
3 with the first code, please try entering the next code.
Try each of the following
d)
functions.
• Some TV and Cable Box brands require you to turn
on the power manually.
(TV) (Cable Box)
POWER ON/OFF POWER ON/OFF
CHANNEL UP/DOWN CHANNEL UP/DOWN
VOLUME UP/DOWN
• Depending on your TV or Cable Box model, not all
functions listed may be controlled by this remote.
Please repeat the TV/ Cable Box Set Up procedure
when you replace the remote's batteries.
The remote control is designed to control the brands
listed. However, it will not operate all TVs or Cable
Boxes made by these manufacturers. If you get no
results, your particular product brand cannot be
controlled by this remote.
33
Page 34

Before^eguestingSei^^
• Check the following points once again if you are having some trouble with your VCR.
Power
No power...
Recording & Playback
TV program can’t be recorded...
Timer recording can't be performed...
There is no playback picture, or the playback picture
is noisy or contains streaks..
During special effects playback, the picture may
contain some vertical jitter when using a TV which
has an Automatic Vertical Hold Control...
Correction
• Check that the Power Plug is completely inserted to an AC outlet.
• Check that the POWER button is set to on.
Correction
• Check the connections between the VCR, the external antenna,
and your TV.
• Check that the band selected matches your antenna or cable TV
system. (P.15)
• Make sure that the record tab on the back of the cassette is still
intact. (P.5)
• Set the recording start/stop times correctly. (P.24)
• Make sure that the POWER button is set to off. (P.24)
• Timer recording may not be performed or continued if a power
interruption of more than 1 minute occurs before, or during.
Timer Recording, even if power resumes thereafter.
• Select the same channel on your TV as that of the Channel 3/4
switch located on the rear panel of the VCR. (P.6)
• Set the VCR/TV selector to “VCR". (P.17)
• Check that channel 3 or 4 of the TV is properly adjusted.
• Adjust the TRACKING control slowly in either direction. (P.17)
• Set the TV’s Vertical Hold Control to “MANUAL" and then adjust it.
If the top of your playback picture waves back and
forth excessively...
VCR can’t be controlled...
Remote Control
VCR can’t be remote controlled... • Aim the Remote Control directly at the remote sensor on the
Miscellaneous
You can’t view programs normally on TV...
Video cassette can’t be inserted...
Video cassette can’t be removed...
Video cassette ejects when the REC and PLAY
buttons are pushed or when the POWER button is
pushed off to set the Timer...
• Because the VCR playback signal is not as stable as an off-the-air
TV signal, the top of your TV screen may be bent or unstable
during playback. To solve this problem, slowly turn the horizontal
hold control on your TV to correct the wavy picture. If your TV
does not have a horizontal hold control or adjusting the control
does not help, please contact your local TV service center.
• Make sure that VCR LOCK is set to off. (P. 32)
Correction
VCR. (Refer to Back Cover.)
• Avoid all obstacles which may interfere with the signal path.
• Inspect or replace the batteries (P.4).
• Make sure that VCR LOCK is set to off. (P. 32)
• Exposing theVCR remote sensor to direct fluorescent or outdoor
light may cause signal interference.
Correction
• Set the VCR/TV selector to “TV”. (P.18)
• Insert the cassette with the window side up and the record tab
facing you.
• Check that the power plug is completely connected to an AC outlet.
- Make sure the record tab on the back of the cassette is still intact.
(P.5)
In the stop mode, the motor (CYLINDER) continues
to rotate...
VCR can’t be controlled...
34
• To enable the quick play mechanism, the cylinder will rotate for
about 5 minutes.
• The quick play mechanism reduces response time from stop to
PLAY mode from PLAY to REWIND search mode.
• Make sure that VCR LOCK is set to off. (P. 32)
Page 35

Sganish^2íiÍ£!LÍÍ2L£lüáÉ¿£iiíá£áEáJÍáfiÍáá^
Fijación del Idioma de la pantalla, fijaciones para la conexión con la caja de TV por
cable y receptor DSS, memorizar los canales y fijación automática de la hora.
Encienda el televisor y la
videograbadora.
El televisor debe estar fijado al mismo canal
que ha seleccionado en la parte trasera de
la videograbadora (canal 3 o 4).
Oprimir VCR CH
Apara elegir el
idioma de la
pantalla en inglés.
SELECT ЦЩА6Е
PUSH VCR CH a:
PULSE VCR CH ▼;
APP. VCR/TV
ENGLISH
ESPAÑOL
FRANÇAIS
Oprimir VCR CH
▼ para elegir el
idioma de la
pantalla en español.
Oprimir VCR/TV para
elegir el idioma de la
pantalla en francés.
Esta pantalla aparecerá
en unos segundos.-^
Oprimir MENU
ESTA USANDO UNA CAJA
DE TV POTI CABLE 0 UN
RECEPTOR DSS?
PULSE MENU :
PULSE PROG. : NO
SI
para elegir “SI” o
PROG para "NO.”
• Si ha elegido “SI”, continue al paso
siguiente. Si ha elegido NO, siga las
instruciones alternativas de la página 36.
Girar y oprimir
la rueda para
elegir SI o NO.
• Si ha elegido “Si",
continue ai paso siguiente. Si ha elegido
NO, siga las instruciones alternativas de
la página 36,
Girar y Oprimir la
rueda para fijar
el número de
código de la caja
de TV por cable ^
o receptor DSS que coincide con
su marca desde la lista de la
página 11.
• Este determinará si la videograbadora
controlará la caja de TV por cable o el
receptor DSS.
Si ud. usa una caja de
TV por cable, sintonice
al canal 2. Si usa un
receptor DSS,
sintonice a cualquier
canal fuera de 200.
Oprimir la rueda
para continuar.
-FIJAR TV POR CABLE/OSSTIENE UN CONTROL REMOTO
SU CAJA DE TV POR CABLE
O SU RECTOR DSS?
NO
ELEGIR
F I JAR
TERMINAR
-FIJAR TV POR CABLE/DSSELEGIR E 1HTROOUCIR UN
CODIGO DE NUMERO LISTADO
EN SU MANUAL DE INSTRUC,
ELEGIR :GIRE LA RUEDA
FI JAR : PULSE LA RUEDA
TERMINAR :PULSE MENU
-FIJAR TV POR CA3LE/DSS-
POR FAVOR SINTONICE SU
CAJA DE TV POR CABLE AL
CANAL 02.
GIRE LA RUEDA
PULSE LA RUEDA
PULSE MENU
Caja de TV
Receptor DSS
-FIJAR TV POR CABLE/DSSРОП FAVOR SINTONICE SU
RECEPTOR DSS AL CANAL270
PROCEDER ; PULSE LA RUEDA
TERMINAR -.PULSE MENU
Girar y oprimir la
RUEDA para
elegir la conexión
de su equipo.
Si es “CABLE/DSS-VCR-TV", continué pase
al paso 8. Si ha elegido NO, siga las
instruciones alternativas de la página 36.
Girar y oprimir la
RUEDA para
fijar el canal de
-FIJAR TV POR CABLE/DSSELEGIR LA CONEXION DE SU
CAJA DE TV POR CABLE O
VCR-CABLE/DSS-TV
ELEGIR
FIJAR
TERM I MAR
-FIJAR TV POR CABLE/DSSINTRODUCIR EL CANAL DE
SALIDA DE SU CAJA DE TV
POR CABLEA RECEPTO« DSS
GIRE LA RUEDA
PULSE LA RUEDA
PULSE MENU
salida de la caja
de TV por cable
o el receptor
ELEGIR :G1RE LA RUEDA
F I JAR ; PULSE LA RUEDA
TERMINAR ; PULSE MENU
DSS (el canal sintonizado en el
televisor para ver la emisión de
la caja de TV por cable o
receptor DSS).
• Si está usando los dos, fije el canal de
salida del receptor DSS.
• Si ud. está usando los termínales de
audio/video, elija y fije a “SALIDA DE
VIDEO" para el canal de salida.
Girar y oprimir
la rueda para
elegir SI o NO.
Caja de TV
-FIJAR TV POR CABLE/DSSE5TA RECE IВI ENDO SU CAJA
DE TV PC« CABLE EL
CANAL 09 ?
m
NO
Receptor DSS
ESTA RECIBIENDO SU
RECEPTOR
ELEGIR :GIRE LA RUEDA
FIJAR
TERMINAR
DSS EL CA. 200?
Ш
N0
: PULSE LA RUEDA
: PULSE MENU
Si ud. usa una caja de TV por cable y ha
elegido S), siga al paso 11.
Si ud. usa un receptor DSS y ha elegido SI,
sipa las instrucciones alternativas de ia
pagina 36.
Si ha elegido NO, aparecerá de nuevo la
pantalla del paso 8. Intente fijar un código
direrente para su marca y/o cambie la
conexión de su equipo.
Si su respuesta es todavía NO, el control de
la caja de TV por cable o el receptor DSS no
es disponible. Oprimir MENU y pase a las
instrucciones alternativas de la página 36.
35
Page 36

Spanish Quick Use Guide/Guia para rápida consulta
Girar y oprimir
la rueda para
elegir y fijar el
canal PBS de su
local que está
recibiendo en su
--------
FIJAR RELOJ
FIJAR EL CANAL PBS DE TV
POR CABLE DÉ SU LOCAL
ELEGIR :GIRE LA RUEDA
PROCEDER ; PULSE LA RUEDA
TERMINAR iPULSE MENU
----------
caja de TV por cable.
• Si ud. vive cerca de una zona con
diferente hora, fije el cana! de su zona.
Verifique que su caja de TV por cable esté
encendido y su receptor DSS esté
apagado.
Oprimir la RUEDA para iniciar la
fijacieon automeatica de los canales.
Las siguientes informaciones aparecerán seguidamente:
“AUTOPROGRAMACION EN PROCESO”
“AUTOPROGRAMACION COMPLETO"
“FIJACION AUTOMATICA DEL RELOJ EN PROCESO"
Esta pantalla aparece
cuando la fijación
automática del reloj
es incompleto.
Comprobar si la
hora está fijada
correctamente y
12/25/1996 MIE 12*
HORA VERAN I EGA:ACT
CANAL fijado : CA 10
F IJAC ION AUTOMATI CA
TERMINAR : PULSE CH UP
luego oprimir CH A
para terminar la fijación.
Instrucciones alternativas
Complete los siguientes pasos si ha efectuado una
de las siguientes explicaciones durante su fijación.
A Ud. ha elegido NO en ei paso 4 de la página
35 (ud. no está usando una caja de TV por
cable o un receptor DSS).
B Ud. ha elegido la segunda conexión (VCR-
CABLE/DSS-TV) en el paso 5 de la página 35.
C Ud. ha elegido NO en el paso 7 de la página
35 (su caja de TV por cable o receptor DSS
no tiene un control remoto).
D Ud. está usando un receptor DSS y ha elegido
SI en el paso 10 de la página 35.
E No se puede controlar la caja de TV por cable
o receptor DSS en el paso 10 de la página 35.
Encienda la caja de TV
por cable y fije la caja
Ф
de TV por cable al canal
PBS de su zona.
• Si ud. vive cerca de una
zona con diferente hora,
asegúrese de fijar el canal
de su zona.
* Si ud. usa un receptor DSS,
éste debe estar apagado.
FIJACION AUTO. (CA/RELOJ)
CONECTE EL CABLE DE LA
ANTENA Y S I ESTA USANDO
UNA CAJA DE TV POR CABLE
SINTONICE AL CANAL PBS
DÉ SU LXAL LUEGO...
POR FAVOR OPRIMIR CH UP
Si la hora fijada automáticamente es incorrecto
Si ud. usa una caja de TV por cable y recibe emisiones de
más de un canal PBS, ud. debe salir desde la pantalla de la
fijación del reloj manual e intente fijar automáticamente
otravez.
Siga los pasos de la fijación o anulación de la hora y cuando
las instrucciones de la pantalla requiere la fijación del canal
PBS, fije un canal que no ha intentado anteriormente.
Si aparece en la pantalla FIJACION DEL RELOJ INCOMPLETO ^^
La pantalla a la derecha
aparecerá si no es dísploníble
en zona la fijación automática
de la hora.
Oprimir MENU para ver
FUACION AUTOMATICA
DEL RELOJ
INCOMPLETO
PULSE LA RUEDA
PARA FUAR EL RELOJ
la pantalla de la fijación
manual del reloj. (Consulte la “Fijación
Manual del reloj" en la página 37).
Notas:
Si ud. usa una caja de TV por cable y recibe emisiones de
más de un canal PBS, ud. debe salir desde la pantalla de
la fijación del reloj manual e intente fijar automáticamente
otravez.
Siga los pasos de la fijación o anulación de la hora y
cuando las instrucciones de la pantalla requiere la fijación
del canal PBS, fije un canal que no ha intentado
anteriormente.
Oprimir CH A para iniciar la
fijacieon automeatica de los
canales.
Las siguientes informaciones aparecerán seguidamente:
“AUTOPROGRAMACION EN PROCESO”
“AUTOPROGRAMACION COMPLETO"
“FIJACION AUTOMATICA DEL RELOJ EN PROCESO”
Esta pantalla aparece para informarle que la
fijación automática de la hora es incompleto.
VCR
Qi
Comprobar si la
hora está filada
correctamente v
luego oprimir CH
A para terminar
la fijación.
12/25/1996 MIE 12:OOPM
HORA VERANIEGA:ACT
CANAL FIJADO : CA 10
F I JAC I ON AUTOMAT I CA
COMPLETO
TERMINAR : PULSE CH UP
Sí aparece esta pantalla, la
fijación automática no es
díisponible en su zona.
Por favor fije la hora
manualmente como
describe al siguiente.
FIJACION AUTOMATICA
DEL RELOJ
INCOMPLETO
PULSE LA RUEDA
PARA FUAR EL RELOJ
La fijación automática de la hora se efectuará cada día al
apagar la videograbadora por primera vez. Si ud. usa una
caja de TV por cable y desea efectuar la fijación
automática de la hora, la caja de TV por cable debe
permanecer encendido cuando la videograbadora se
apaga.
36
Page 37

Si la hora y la hora veraniega es incorrecta, por favor siga los siguientes pasos:
Raras veces, en caso de que ud. vive cerca de dos
zonas con hora diferente, el aparato puede elegir un
canal PBS con diferente hora de su zona. En este
caso, haga ios siguientes pasos:
1 Tome nota del canal que está fijado en la pantalla y
salga desde este modo oprimiendo el botón CH A.
2 Anule este canal desde los canales memorizados en
la combinación de VCR/TV.
3 Oprima el botón MENU para que aparezca la pantalla
del MENU.
4 Use la rueda para elegir “FIJAR RELOJ" y luego para
elegir “AUTO MATICO."
• Si ud. esta usando una caja de TV por cable y tiene
muchos canales PBS, sintonizo la caja de TV por
cable a un canal PBS diferente e intente la fijación
automática otravez.
Fijación manual del reloj
Oprimir MENU para que aparezca
la pantalla de la fijación del reloj.
Girar y oprimir la RUEDA para
elegir y fijar el mes, la fecha,
el año, la hora y ‘la hora veraniega.
Para hacer correcciones
Oprimir la rueda o el botón CLEAR
repetidamente para retroceder o
avanzar hasta el paso que desea
corregir.
Oprimir MENU dos veces para
iniciar a funcionar el reloj y salir
desde este modo.
-hí--FIJAR RELOJ
M-h —
1^
----------
2/ 2/1S9S VI
PARA CAMBIAR
PULSE LA RUEDA O CLEAR
PARA INICIAR PULSE MENU
FUAft RELOJ
verano : ACT
-------------
-----------
Operaciones básicas para la
reproducción
i
Oprimir PLAY para comenzar
a reproducir,
> Si la cinta no tiene la lengüeta
{Videograbadora o Control Remoto)
(Videograbadora o Control Remoto)
Oprimir STOP para parar la
reproducción.
(Videograbadora o Control Remoto)
Introducir una cinta
• La videograbadora se
enciende automáticamente.
Esta indicación aparece en
la pantalla multifuncíonal.
para evitar borrado la
videograbadora comienza a
reproducir automáticamente.
Oprimir REW o FF para
localizar rápidamente
una escena.
La velocidad de búsqueda en el modo
SP es a 9 veces más rápida que la
velocidad normal y en el mode SLP
es a 27 veces más rápida.
Durante la búsqueda aparece alguna
barras de ruido.
[ Fijación o cambio de la hora
En caso de que el reloj está incorrecto o ha ocurrido un
corte eléctrico.
1 Oprimir MENU para que
aparezca la pantalla del menú.
2 Girar y oprimir la RUEDA para
elegir la pantalla de la fijación
del reloj y luego fijar la hora y la
fecha,
3 Oprimir MENU dos veces para
iniciar a funcionar el reloj y salir
desde este modo.
SELECT
SET
END
MENU
PREPARAR VCR
[ЭШЛПЯЭ]
FIJAR CANAL
LANGUE/ LANGUAGE: ESPAÑOL
ROTATE WHEEL
PUSH WHEEL
PUSH MENU KEY
X-l-r-FUAR RELOJ
щщшшштш
-------------------------
VERANO : ACT
RUEDA
Oprimir STOP/EJECT para
expulsar la cinta.
• Este botón se encuentra solamente
en la videograbadora.
37
Page 38

Spanish Quick Use Guide/Guia para rápida consulta
Operaciones básicas para la
grabación
Introducir una cinta
con la lengüeta.
La videograbadora se
enciende automáticamente.
■
Oprimir VCR
CH A/T para
elegir el canal.
U oprimir CH A/T en la
videograbadora.
Para grabar desde una fuente
externa, oprimir VCR CH A/V
para elegir "LINEAI" ou “LINEA2
SPEED
O
oprimir
SPEED para
cambiar la
velocidad de
la cinta.
SP = Reproducción estándar,
LP = Larga duración,
SLP = Superlarga duración.
Oprimir REC/TIME con el control
remoto para empezar a grabar.
• U oprimir PLAY y REC/TIME en la
videograbadora
------------------------PARADA CA 02
SLP
Programación fácil para la
grabación con temporizador
Oprimir PROG para
1
Si ya existe una programación,
elija usando la rueda un
número sin programación.
Grabación diaria y semanal
Si ud. desea programar una grabación
diaria (lunes a viernes), elija DIARIO
en vez de la fecha en el paso 2. Si
desea una grabación semanal, elija
SEMANAL LUN, MAR, etc.
que aparezca la
pantalla de la
programación.
Girar y oprimir la RUEDA para elegir
y fijar la fecha.
Fecha de hoy
•SEMANAMSAB)«
БЕМАщ. Orden de selección
(Lu^ con la rueda
-SEMANAUDOM)-DIARIA -
►8-9—31
1(bvA/IN)CIO PARACA CA
: PULSE LA RUEDA-*
Girar y oprimir la RUEDA para elegir y
fijar las fijaciones que sobran.
Fijaciones:
• Hora de inicio • Hora de parada
• Canal o LINEA para una fuente externa .
• Velecidad de la cinta (SP, LP, SLP).
FECHA^ INICIO PARADA CA
MOij N SFP
BlMbi
GIRANDO LA RUEDA
: PULSE LA RUEDA-»
PARA TERMINAR PULSE PROG
SLP
UKVOO LA KUtUA
CiRAnÍx) la RuáoÁ
Grabación de un toque (OTR)
La videograbadora termina la grabación a
una hora programada.
Oprima sucesivamente REC/TIME para fijar
el tiempo de la grabación.
Cada presión cambiará la hora de parada
como demuestra al siguiente.
nGrabadón normal-►0:30-►! flO-v
C
4í0‘*—3:00-^2íM-*—1:30-^-^
• La indicación TIMER aparece en la pantalla
multifunciona!.
Oprimir STOP para
parar la grabación.
• U oprimir STOP en la
videograbadora.
Si mantiene oprimiendo el botón de VCR CH A/T
aumentará la velocidad del cambio del canal.
Oprimir PAUSE para hacer una pausa en la
grabación en progreso.
Para hacer correcciones
Oprimir la rueda sucesivamente para avanzar u oprimir
CLEAR para retroceder hasta el paso que desea corregir.
í
Oprimir PROG
para terminar la
programación.
Si desea hacer más
programaciones, elija un número
de programa en blanco con la
rueda y repita los paso 2 y 3.
-------------------------------------------------
2
----------
;— —
4
----------
:— —
ELEGIR 1-S:GI
ENTRAR :PUL
ANULAR :PUL
TERMINAR :PUL
Oprimir PROG para
salir desde este modo.
Oprimir POWER y
apaque el aparato
multifuncional
para la grabación con
temporizador.
Si la fuente de la grabación es una
caja de TV por cable, asegúrese de
que la caja de TV por cable esté
encendido y esté sintonizado al canal
que desea grabar.
-ПТШЛ-
RE LA RUEDA
SE LA RUEDA
SE CLEAR
SE PROG
Pantalla
38
Page 39

Index of Controls
Multi Function Display
VCR Indicator
Appears when the VCR/TV
selector is set to VCR.
Power Indicator
This indicator lights
when power is turned on.
Ciock/Status/Channei Display
Displays the current time.
Briefly displays VCR status when function button is pressed.
Also, briefly displays the channel number selected, “LI" or “L2"
when channel button is pressed or select a line input.
Rear View of the VCR
Hi-Fi indicator
When Hi-Fi audio is monitored or
played back, this indicator appears.
Timer indicator
This indicator lights when the VCR
is set for a Timer Recording, or if a
length is set for normal recording.
It flashes when a Timer Recording
has been set, but a tape has not
been inserted into the VCR.
AC Power Plug
Audio Input Connector (L/R)
See pages 10, 27.
39
Page 40

Index of Controls
Remote Control Button
VCRyJV
See pages 12, 18, 27.
PLAY
See pages 17, 22, 27.
COMMERCIAL ADVANCE/
ZERO SEARCH
See pages 19, 22.
CATV CHANNEL UP/DOWN
See page 33.
MENU
See pages 12-16,19.21,22,27,29.30,32
COUNTER RESET
See page 19.
See pages 18, 31.
FAST FORWARD/SEARCH
See pages 17, 18, 25, 27.
See pages 17, 18, 27.
TV CHANNEL UP/DOWN
TV VOLUME UP/DOWN
---------------------
SPEED
See page 17, 22.
STOP
RECORD/TIME
See pages 18, 27.
PAUSE
See page 33.
See page 33.
CATV POWER
See page 33.
DISPLAY
See pages 16, 18, 19, 28.
NUMBERED KEYS
See pages 15,18, 21,31, 33.
ADD/DELETE
See page 15.
SHUTTLE Ring
See page 20.
Front View of the VCR
VCR/TV Selector Cassette Compartment
See pages 12, 18, 27. See pages 17, 18, 27.
POWER
See pages
12, 24-26, 31.
VIDEO Input
Connector
See page 27.
AUDIO Input
Connector(ÜR)
See page 27.
Multi Function Display
See pages 17,18,
24-27, 31,39.
REMOTE CHANNEL UP/DOWN
SENSOR See pages 12-14, 17.
REWIND/SEARCH
See pages 17, 26.
18, 27.
SELECT/SET WHEEL
pages 12-16, 19, 21,22,
^4,25,27,29,30,32.
-------------------------------
pages14,15, 21,24, 25, 30, 31.
VCR CHANNEL UP/DOWN
(TRACKING UP/DOWN)
See pages 12-14,17,18, 27.
SPATIALIZER
See page 29.
SAP/Hi-Fi
See page 29.
SHUTTLE Indicator
See page 20.
See pages 17, 22, 26.
SHUTTLE Ring
PLAY
See pages 17, 18,
22, 26, 27.
See page 20.
CLEAR
FAST FORWARD/
SEARCH
STOP/EJECT
See pages
17.18, 25, 27, 32.
RECORDrriME
See pages
18,26, 27.
Matsushita Consumer Electronics
Company, Division of Matsushita
Electric Corporation of America
One Panasonic Way Secaucus,
New Jersey 07094
Printed in Japan
VQTS3212 (A)
Panasonic Sales Company,
Division of Matsushita Electric of
Puerto Rico, Inc. (“PSC")
Ave. 65 de Infanteria. Km. 9.5
San Gabriel Industrial Park, Carolina,
Puerto Rico 00985
 Loading...