

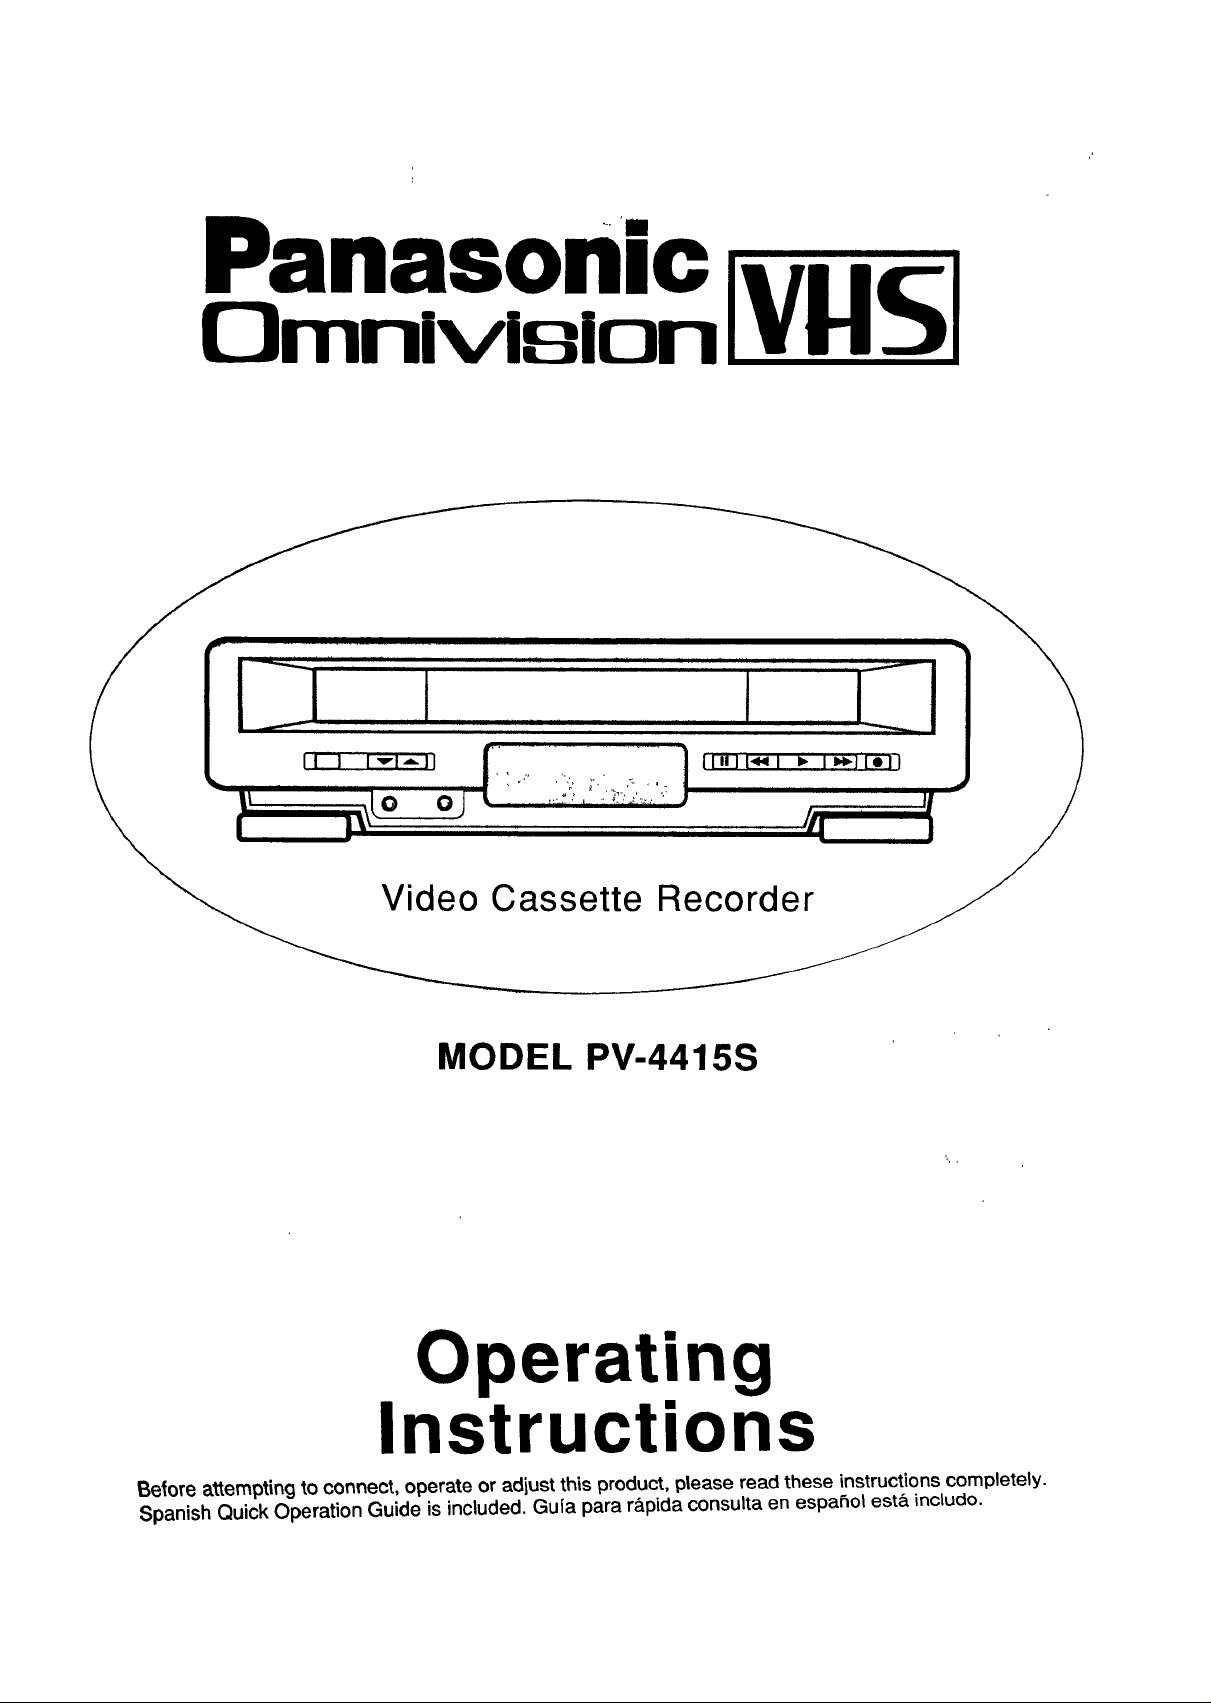
Panasonic PV-4415S Owner’s Manual
Panason'ic
Omnlvision
MODEL PV-4415S
Operating
Instructions
Belore attempting to connect, operate or adjust this product, please read these instructions completely.
Spanish Quick Operation Guide is included. Guia para r&pidaconsulta en espaSot est&inctudo.
f'_ _ j[ 1 1__=
t.ongrarutartons onyour purchase of
one of the most sophisticated and reliable products on
the market today. Used properly, we're sure it will bring
you and your family years of enjoyment. Please take
time to fill in the information at right. The serial number
is on the tag located on the back of your VCR. You°,
want to keep this manual handy as your convenient
VCR information source.
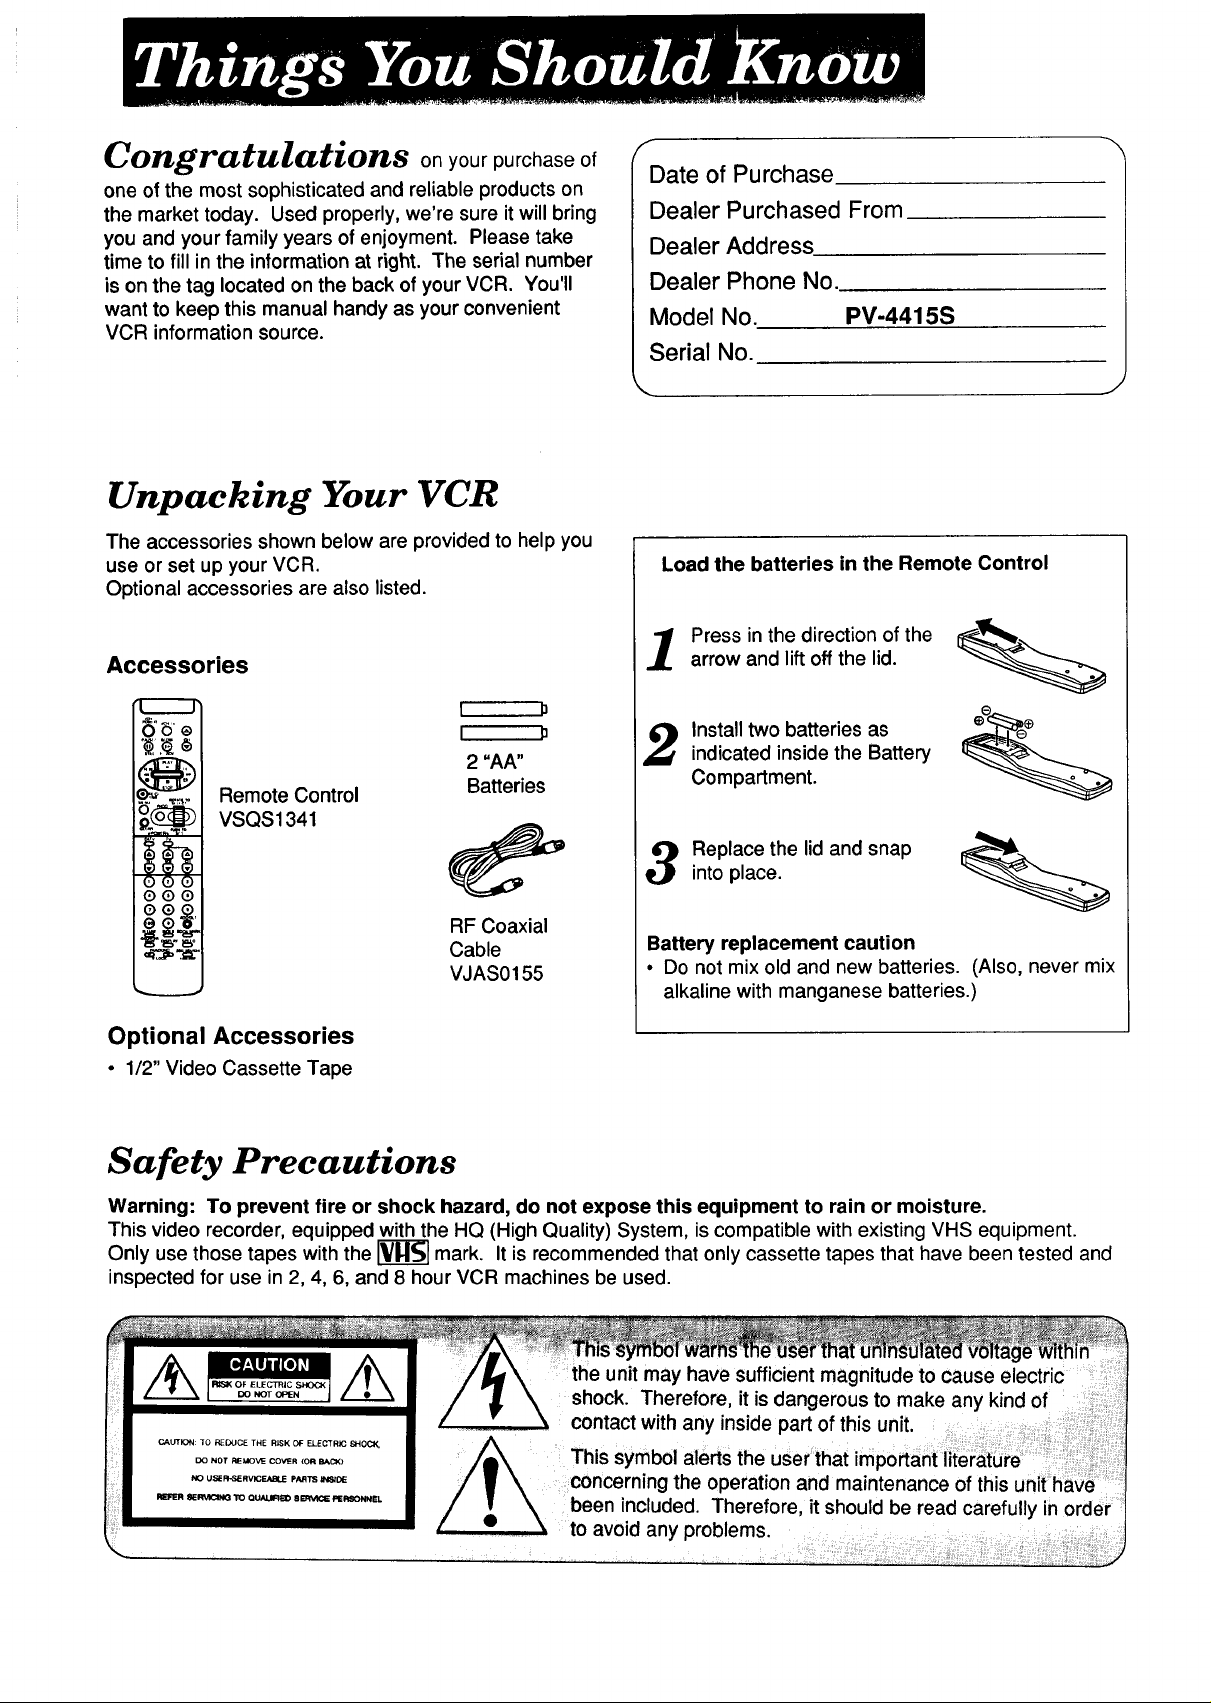
Unpacking Your VCR
The accessories shown below are provided to help you
use or set up your VCR.
Optional accessories are also listed.
Accessories
I P
I p
2 "AA"
Remote Control
VSQS1341
Batteries
f
Date of Purchase
Dealer Purchased From
Dealer Address
Dealer Phone No.
Model No. PV-4415S
Serial No.
\
Load the batteries in the Remote Control
Press in the direction of the
arrow and lift off the lid.
Install two batteries as
indicated inside the Battery
Compartment.
Replace the lid and snap
into place.
:QQ®I
IOQ_I
G "6"
RF Coaxial
Cable
VJAS0155
Battery replacement caution
• Do not mix old and new batteries. (Also, never mix
alkaline with manganese batteries.)
Optional Accessories
• 1/2" Video Cassette Tape
Safety Precautions
Warning: To prevent fire or shock hazard, do not expose this equipment to rain or moisture.
This video recorder, equipped with the HQ (High Quality) System, is compatible with existing VHS equipment.
Only use those tapes with the _r_ mark. It is recommended that only cassette tapes that have been tested and
inspected for use in 2, 4, 6, and 8 hour VCR machines be used.
the unit may have sufficient magnitude to cause
shock. Therefore, it is dangerous to make any kind of
concerning the operation and maintenance of this unit have
been included. Therefore, it should be read carefully in order
to avoid any problems.
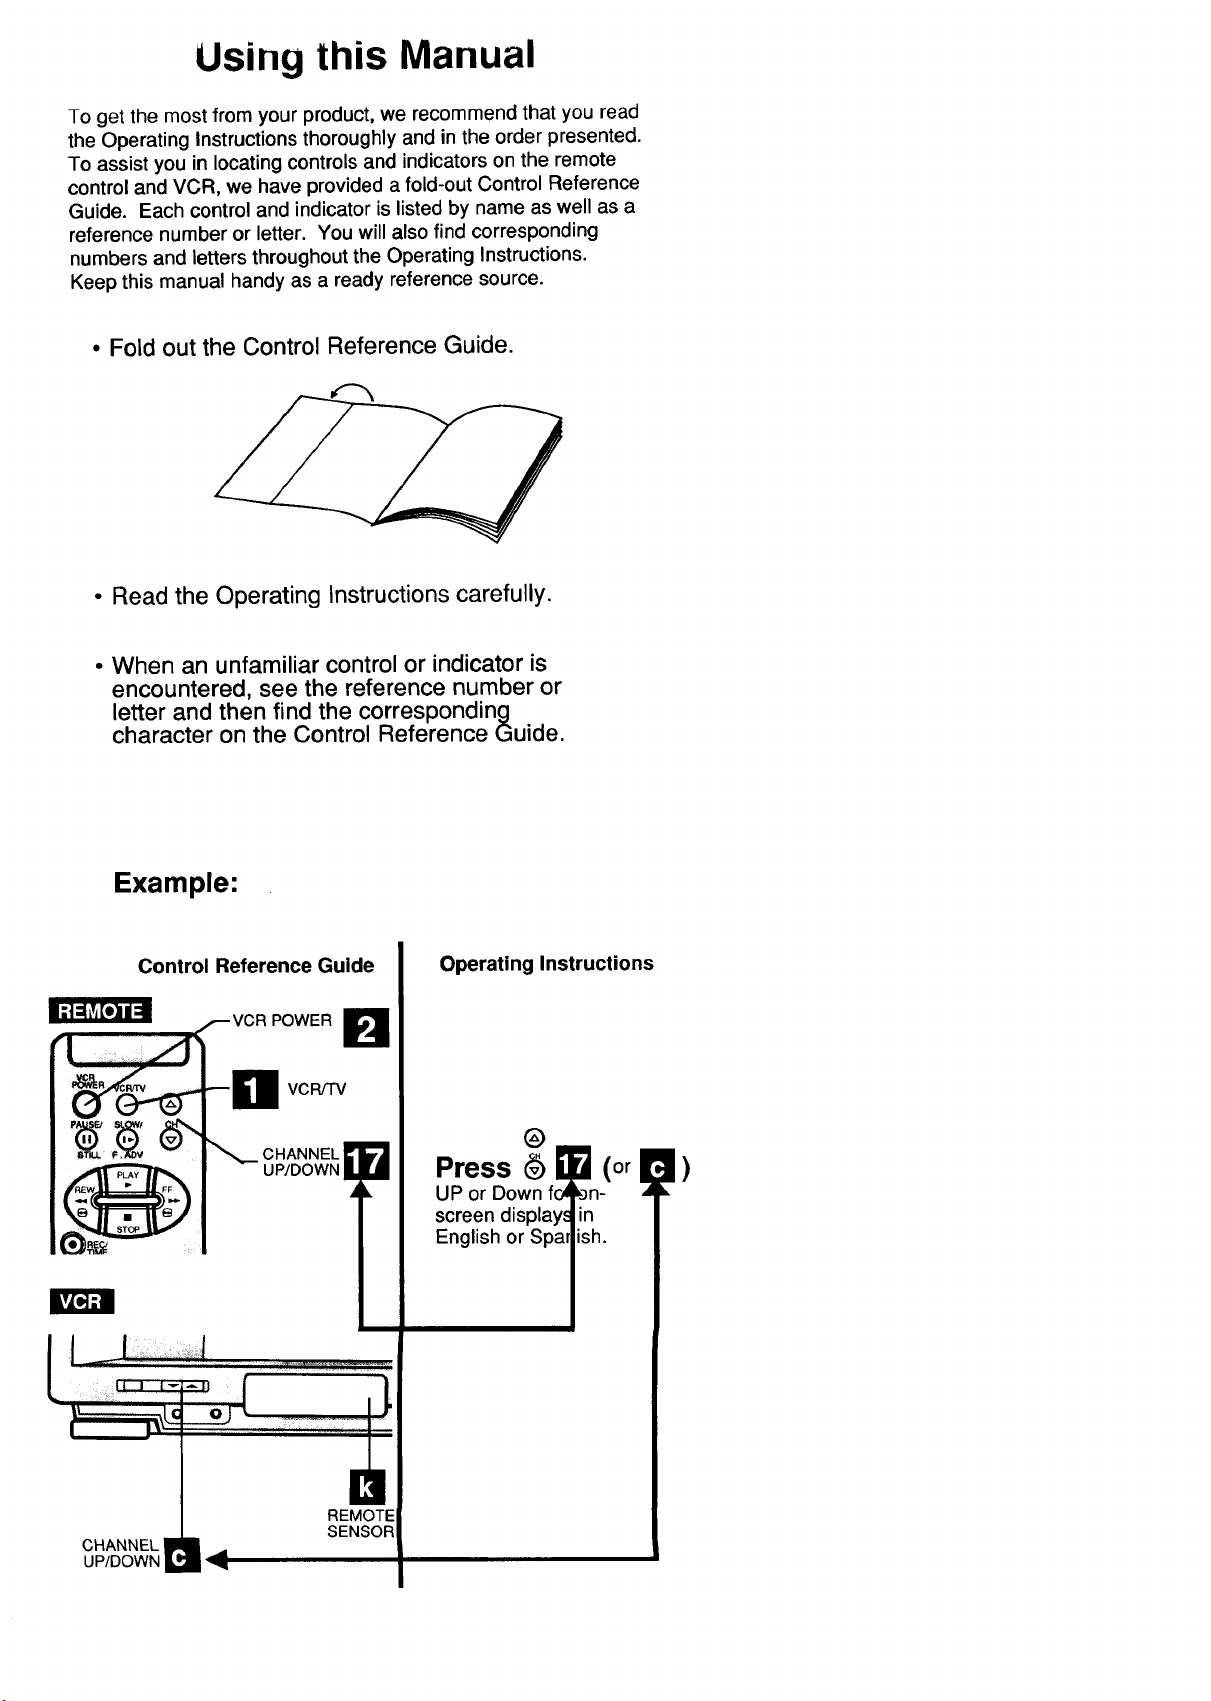
Using this Manual
To get the most from your product, we recommend that you read
the Operating Instructions thoroughly and in the order presented.
To assist you in locating controls and indicators on the remote
control and VCR, we have provided a fold-out Control Reference
Guide. Each control and indicator is listed by name as well as a
reference number or letter. You will also find corresponding
numbers and letters throughout the Operating Instructions.
Keep this manual handy as a ready reference source.
• Fold out the Control Reference Guide.
• Read the Operating Instructions carefully.
• When an unfamiliar control or indicator is
encountered, see the reference number or
letter and then find the corresponding
character on the Control Reference Guide.
Example:
Control Reference Guide
VCR/TV
Operating Instructions
@
Press (or !
UP or Down _-
screen dis
|)
h.
CHANNEL _1_UP/DOWN
REMOTE
SENSOR
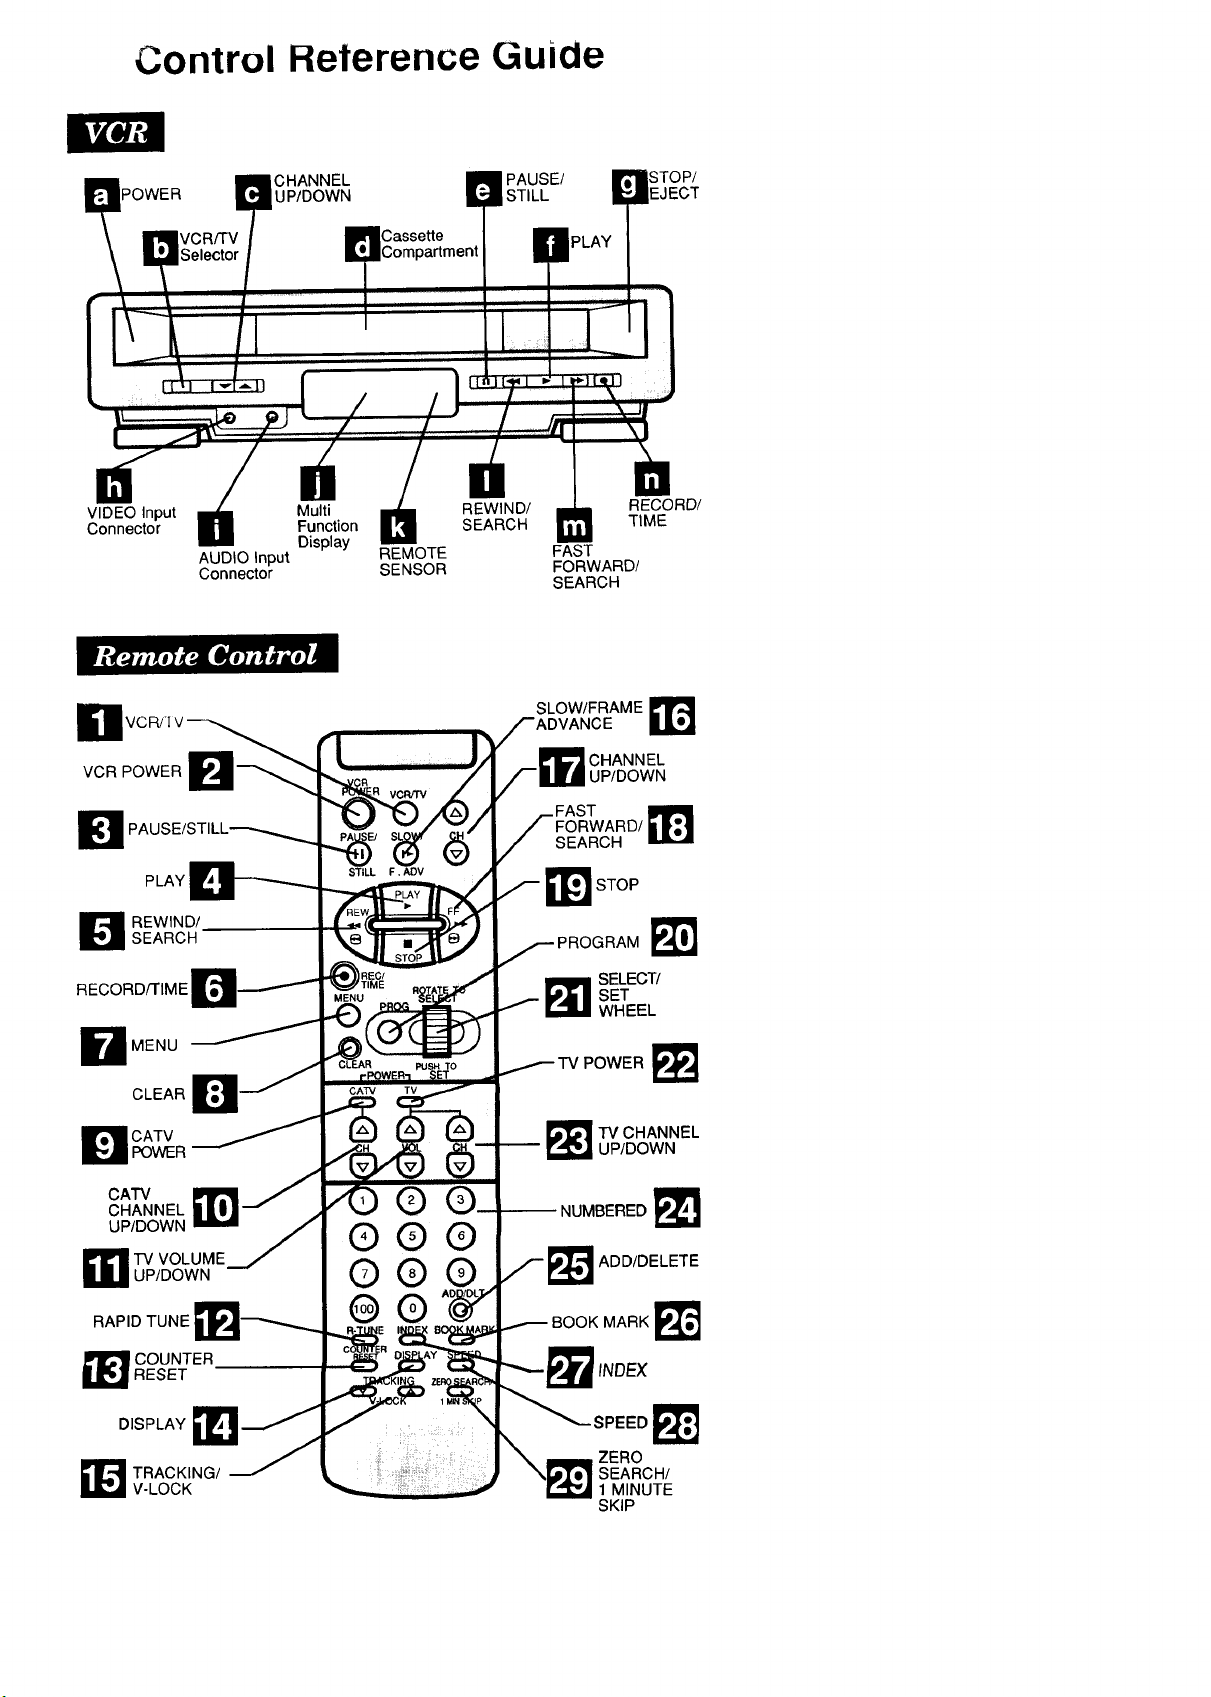
Control Reterence Guide
POWER UP/DOWN STILL
VIDEO Input Multi REWIND/
Connector Function SEARCH
AUDIO Input REMOTE
Connector SENSOR
CHANNEL PAUSE/
Casse_e
Display
El
STOP/
EJECT
i i =ii_
RECORD/
TIME
FAST
FORWARD/
SEARCH
SLOW/FRAME _r_
VCR POWER
PLAY
D EWIND/SEARCH
RECORD/rIME
D MENU
CLEAR
D CATVPOWER
CATV
CHANNEL
UP/DOWN
TV VOLUME
UP/DOWN
RAPID TUNE
O
O0
©
CHANNEL
UP/DOWN
_1 STOP
PROGRAM
SET
_11 ELECT/
WHEEL
POWER E_ _
!_TV CHANNEL
UP/DOWN
-- NUMBERED
ADD/DELETE
BOOK MARK
1 OUNTERRESET
DISPLAY
_[L_ RACKING/
V-LOCK
INDEX
SPEED
rZERO
:SEARCH/
1 MINUTE
SKIP
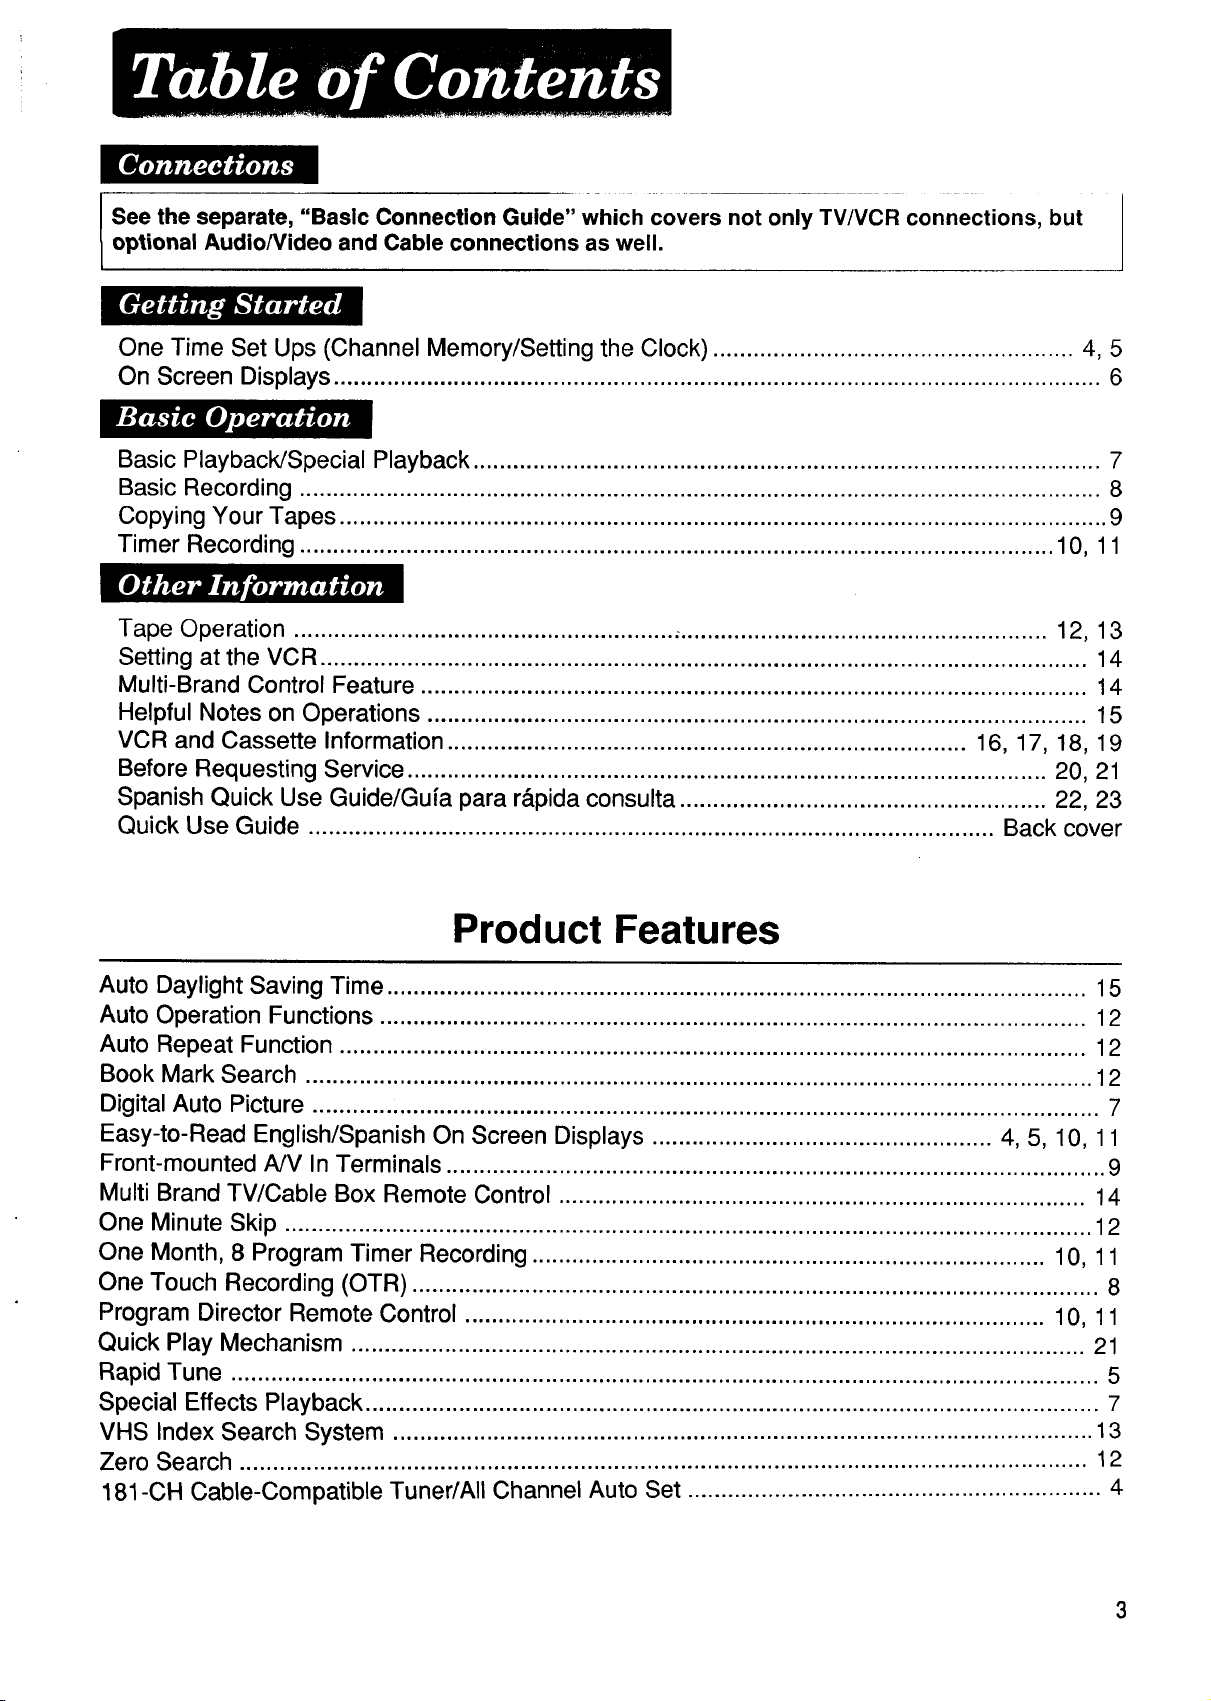
See the separate, "Basic Connection Guide" which covers not only TV/VCR connections, but
optional Audio/Video and Cable connections as well.
One Time Set Ups (Channel Memory/Setting the Clock) ...................................................... 4, 5
On Screen Displays ................................................................................................................... 6
Basic Playback/Special Playback .............................................................................................. 7
Basic Recording ........................................................................................................................ 8
Copying Your Tapes ................................................................................................................... 9
Timer Recording ................................................................................................................. 10, 11
Tape Operation ......................................................... ,....................................................... 12, 13
Setting at the VCR ................................................................................................................... 14
Multi-Brand Control Feature .................................................................................................... 14
Helpful Notes on Operations ................................................................................................... 15
VCR and Cassette Information .............................................................................. 16, 17, 18, 19
Before Requesting Service ................................................................................................ 20, 21
Spanish Quick Use Guide/Gufa para r&pida consulta ....................................................... 22, 23
Quick Use Guide ....................................................................................................... Back cover
Product Features
Auto Daylight Saving Time ......................................................................................................... 15
Auto Operation Functions .......................................................................................................... 12
Auto Repeat Function ................................................................................................................ 12
Book Mark Search ...................................................................................................................... 12
Digital Auto Picture ...................................................................................................................... 7
Easy-to-Read English/Spanish On Screen Displays ................................................... 4, 5, 10, 11
Front-mounted A/V In Terminals ................................................................................................... 9
Multi Brand TV/Cable Box Remote Control ............................................................................... 14
One Minute Skip ......................................................................................................................... 12
One Month, 8 Program Timer Recording ............................................................................. 10, 11
One Touch Recording (OTR) ....................................................................................................... 8
Program Director Remote Control ....................................................................................... 10, 11
Quick Play Mechanism .............................................................................................................. 21
Rapid Tune .................................................................................................................................. 5
Special Effects Playback .............................................................................................................. 7
VHS Index Search System ......................................................................................................... 13
Zero Search ............................................................................................................................... 12
181-CH Cable-Compatible Tuner/All Channel Auto Set .............................................................. 4
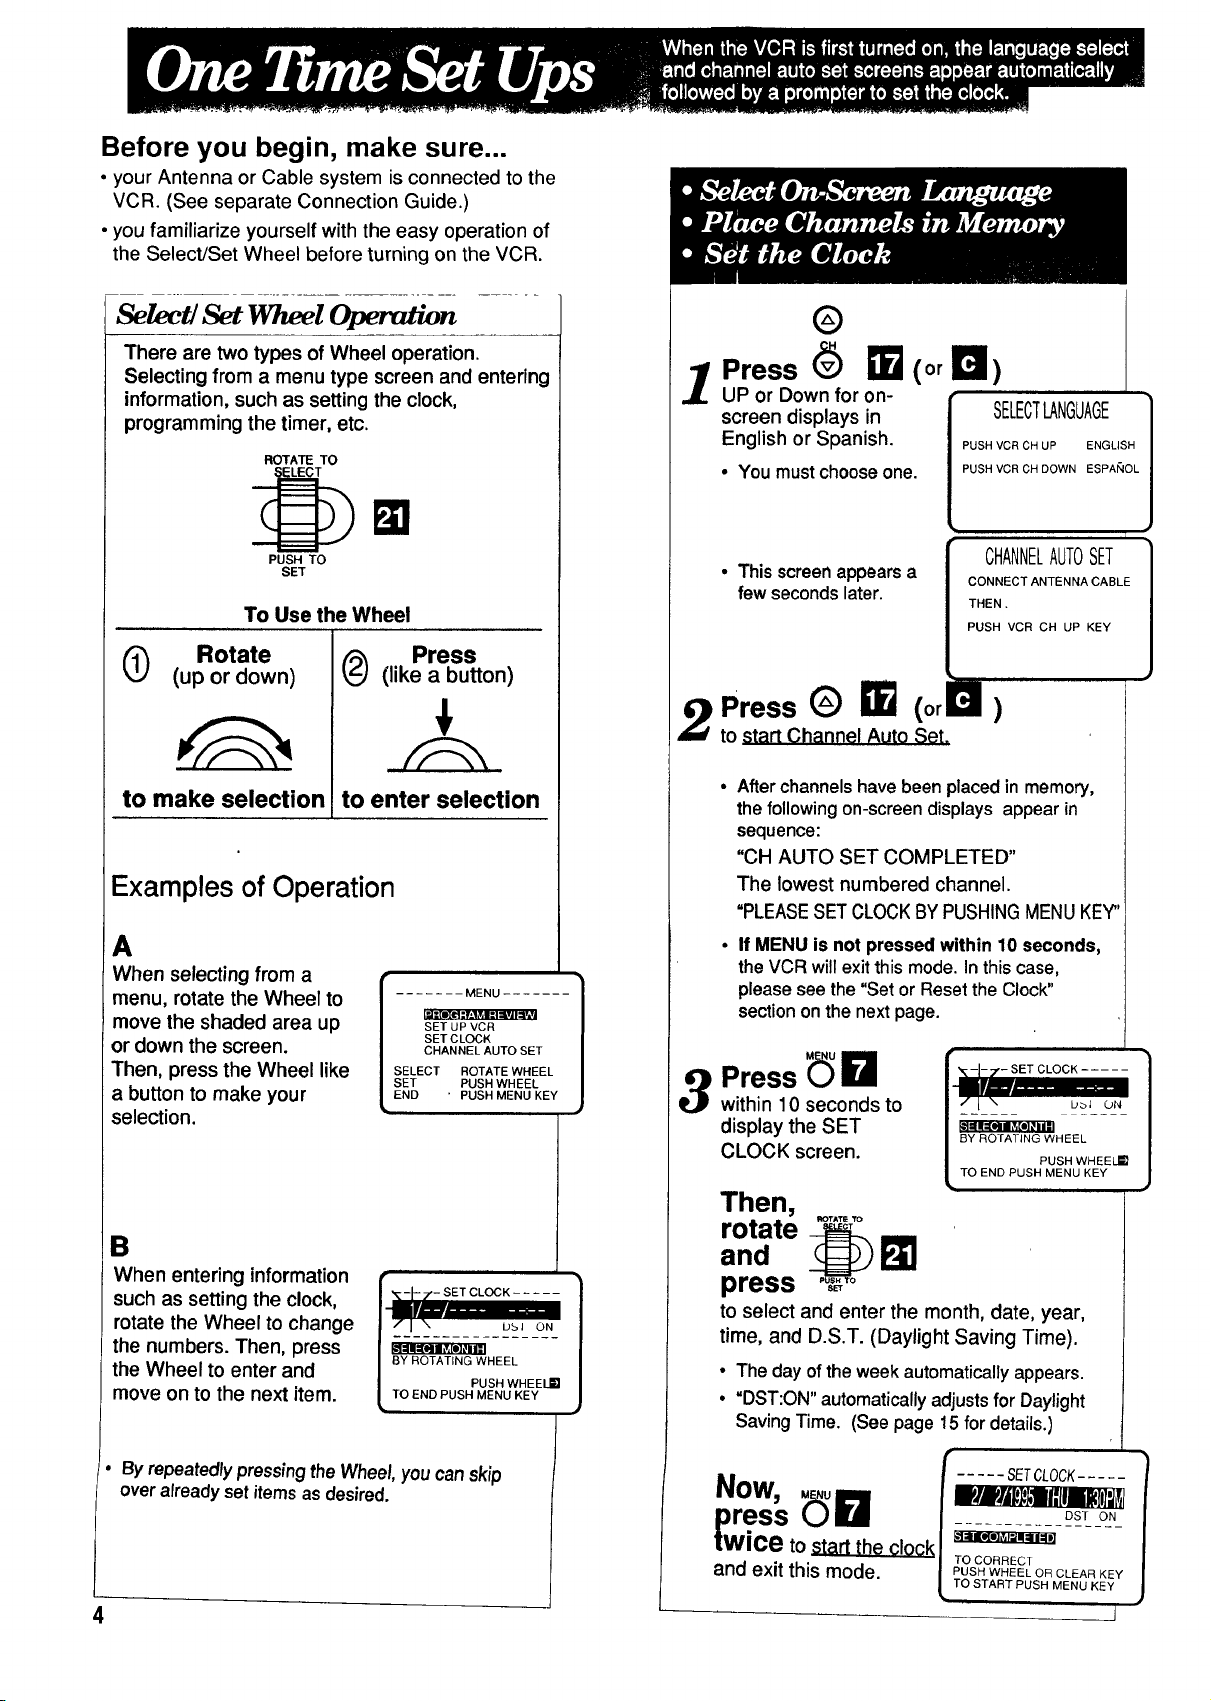
Before you begin, make sure...
• your Antenna or Cable system is connected to the
VCR. (See separate Connection Guide.)
• you familiarize yourself with the easy operation of
the Select/Set Wheel before turning on the VCR.
Se/ect/Set Wheel _n
There are two types of Wheel operation.
Selecting from a menu type screen and entering
information, such as setting the clock,
programming the timer, etc.
ROTATE TO
PUSH TO
SET
To Use the Wheel
Rotate
0 (up ordown)
to make selection
to enter selection
Press
(like a button)
Examples of Operation
A
When selecting from a
menu, rotate the Wheel to
move the shaded area up
or down the screen.
Then, press the Wheel like
a button to make your
selection.
B
When entering information
such as setting the clock,
rotate the Wheel to change
the numbers. Then, press
the Wheel to enter and
move on to the next item.
....... MENU .......
Iti[i[l_.l]: y;1_I -_I=ivJI",v!
SET UP VCR
SET C LOCK
CHANNEL AUTO SET
SELECT ROTATE WHEEL
SET PUSH WHEEL
END ' PUSH MENU KEY
I..__ _,,- SET CLOCK
/ k'lal=[lll_[l]0na;I
BY ROTATING WHEEL
/ PUSH WHEEI_
L TO END PUSH MENU KEY
®
1 Press (_ _(orB)
UP or Down for on-
screen displays in
English or Spanish.
• You mustchoose one.
• This screenappearsa
few seconds later.
2Press G 11_ (orb)
to start Channel Auto Set.
Afterchannels have been placed in memory,
the following on-screen displays appear in
sequence:
"CH AUTO SET COMPLETED"
The lowest numbered channel.
"PLEASESETCLOCKBY PUSHINGMENUKEY"
If MENU is not pressed within 10 seconds,
the VCR will exitthis mode.In this case,
pleaseseethe "Set orResetthe Clock"
sectiononthe nextpage.
3 Press _ I_1
within 10 seconds to
display the SET
CLOCK screen.
Then,
rotate ....
and ,__
press
to select and enter the month, date, year,
time, and D.S.T. (Daylight Saving Time).
• The day of the week automatically appears.
• "DST:ON" automatically adjusts for Daylight
Saving Time. (See page 15 for details.)
PUSH VCR CH UP ENGLISH
PUSH VCR CH DOWN ESPANOL
CHANNELAUTOSET
CONNECTANTENNACABLE
THEN.
PUSH VCR CH UP KEY
_;.__._.SET CLOCK .....
BY ROTATING WHEEL
TO END PusHF_uWK_ ELj_
SELECTLANGUAGE}
i
b_i ON
• Byrepeatedly pressingtheWheel,youcanskip
overalreadyset itemsas desired.
Now, _,,=
press uu
l[wlce to start the clock
and exit this mode.
..... SETCLOCK.....
|ll!Jlt_,ll{llikll_l_t
DST ON
TO CORRECT
PUSH WHEEL OR CLEAR KEY
TO START PUSH MENU KEY
4 I
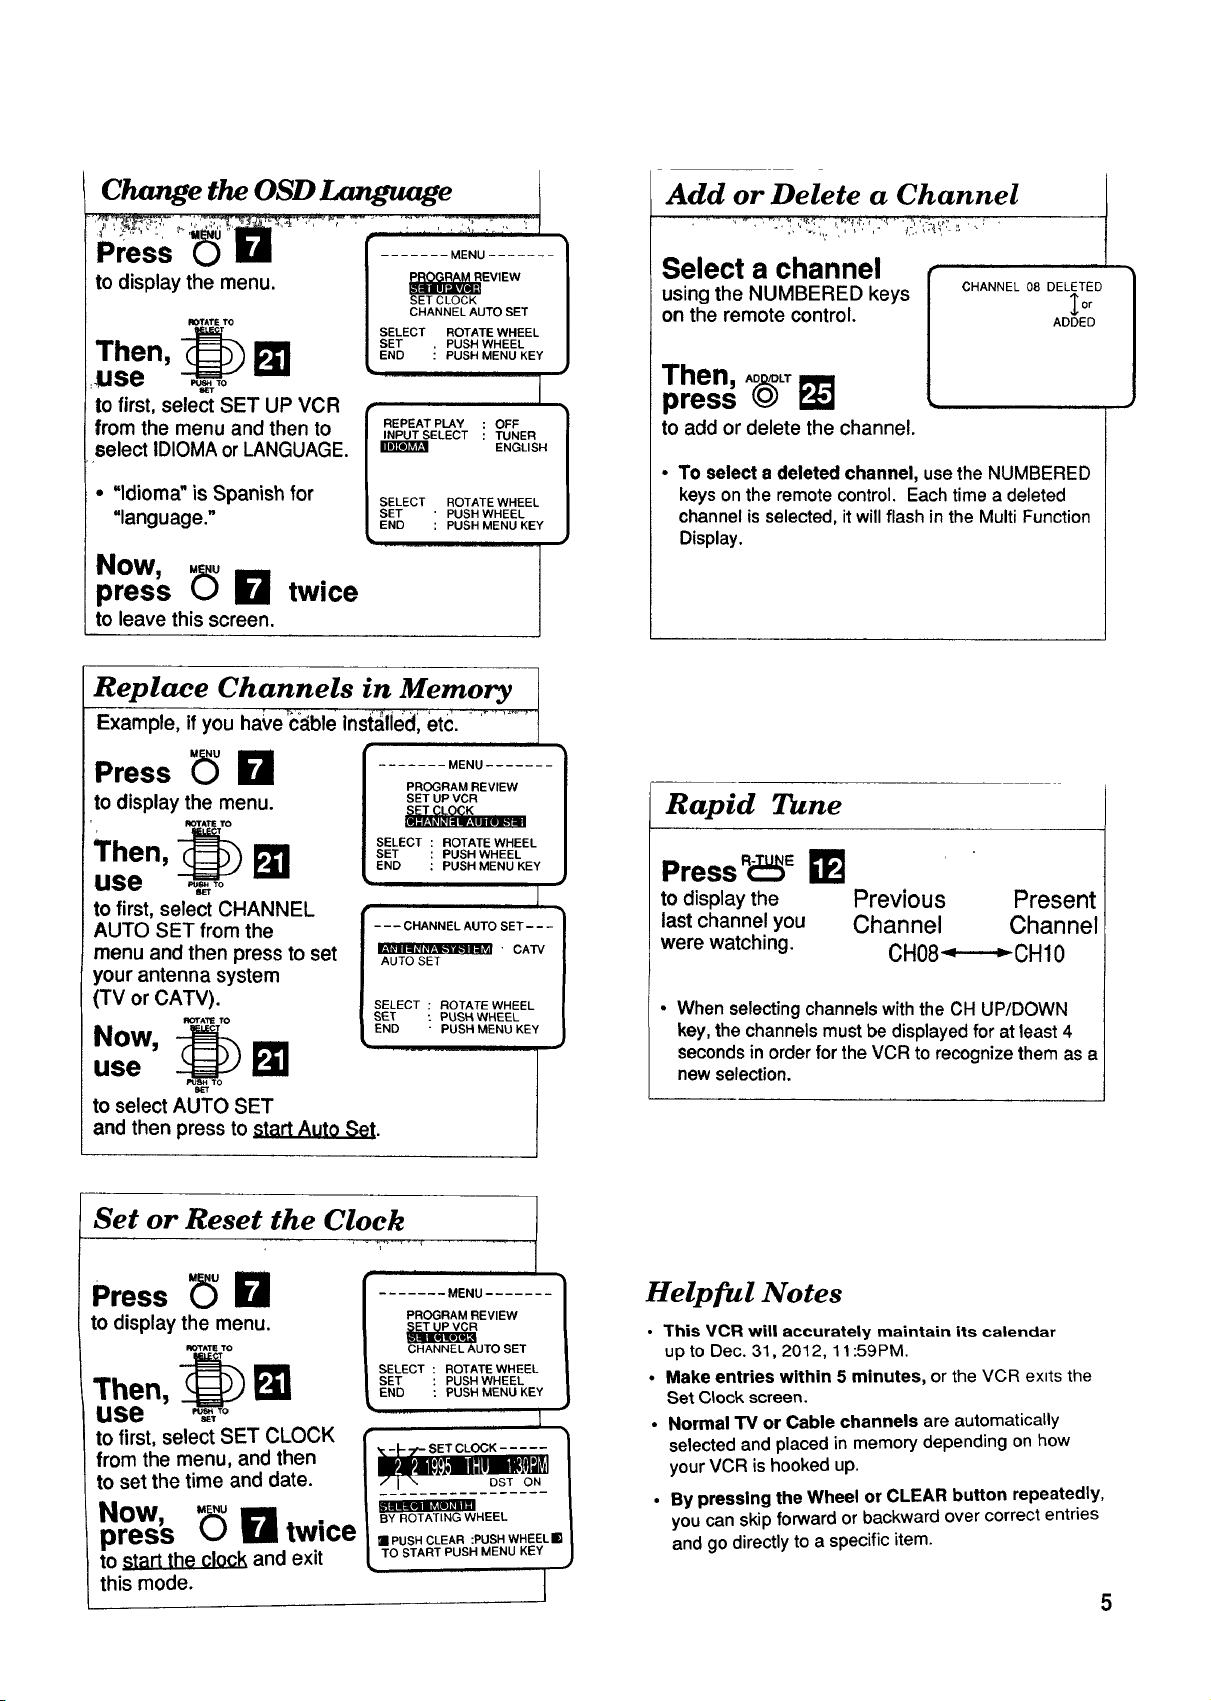
Change the OSD Language
Add or Delete a Channel
Press
to display the menu.
to first, select SET UP VCR
from the menu and then to
select IDIOMA or LANGUAGE.
• "ldioma" is Spanish for
"language."
....... MENU .......
SETCLOCK
CHANNEL AUTO SET
SELECT ROTA_ WHEEL
SET . PUSH WHEEL
END : PUSH MENU KEY
INPUT SELECT : _NER
SELECT ROTATE WHEEL
SET ' PUSH WHEEL
END : PUSH MENU KEY
EViEWJ
ENGLISH
Now,
press _ I_1 twice
to leave this screen.
Replace Channels in Memory I
Example, if you ha_,e:c_ble inst_lied, etc. - ...........
Press _ 0
to display the menu.
Then, _
use
to first, select CHANNEL
AUTO SET from the
menu and then press to set
your antenna system
(TV or CATV).
use I_
NOW,
to select AUTO SET
and then press to _{EL_.Lt.0_._,_.
ROTATETO
ROTATE TO
PROGRAM REVIEW
SET UP VCR
SELECT ROTATE WHEEL
....... MENU ....... 1
SET PUSH WHEEL
END PUSH MENU KEY
AUTO SET
SELECT : ROTATE WHEEL
[ 1
SET : PUSH WHEEL
END " PUSH MENU KEY
............. t
Select a channel
using the NUMBERED keys
on the remote control.
Then, A_L_
press
to add or delete the channel.
• To select a deleted channel, use the NUMBERED
keysonthe remote control. Eachtime a deleted
channelisselected,itwillflash inthe MultiFunction
Display.
CHANNEL 08 DELETED
_o_
ADDED
t
Rapid Tune
Press R_E _]
1
to display the Previous Present
last channel you Channel Channel
were watching. CH08_CH10
• When selecting channels with the CH UP/DOWN
key, the channels must be displayed for at least 4
seconds in order for the VCR to recognize them as a
new selection.
Set or Reset the Clock
Press _ I_1
to display the menu.
Then, _
use _.,To
tO first, select SET CLOCK I"_,-I---?'-SETCLOCK..... /
to set the time and date.
from the menu, and then / __!o_,Nl__ /
NOW, / _Y ROTATING WHEEL /
press _ 0 twice 1=_OS.OLEA":.OS.W.EEL,,
to _tart the clock and exit _ TOSTARTPUSHMENUKEY
this mode. J
| PROGRAM REVIEW
/ OHAN.E AUTOSET
/ SELEOT"OTATEW"EEL
[.......M0.u.......1
,SET USHW.EEL
LENDPUS. E.O E
1
Helpful Notes
This VCR will accurately maintain its calendar
up to Dec. 31,2012, 11:59PM.
Make entries within 5 minutes, or the VCR exits the
Set C_ock screen.
Normal TM or Cable channels are automatically
selected and placed in memory depending on how
your VCR is hooked up.
By pressing the Wheel or CLEAR button repeatedly,
you can skip forward or backward over correct entries
and go directly to a specific item.
5
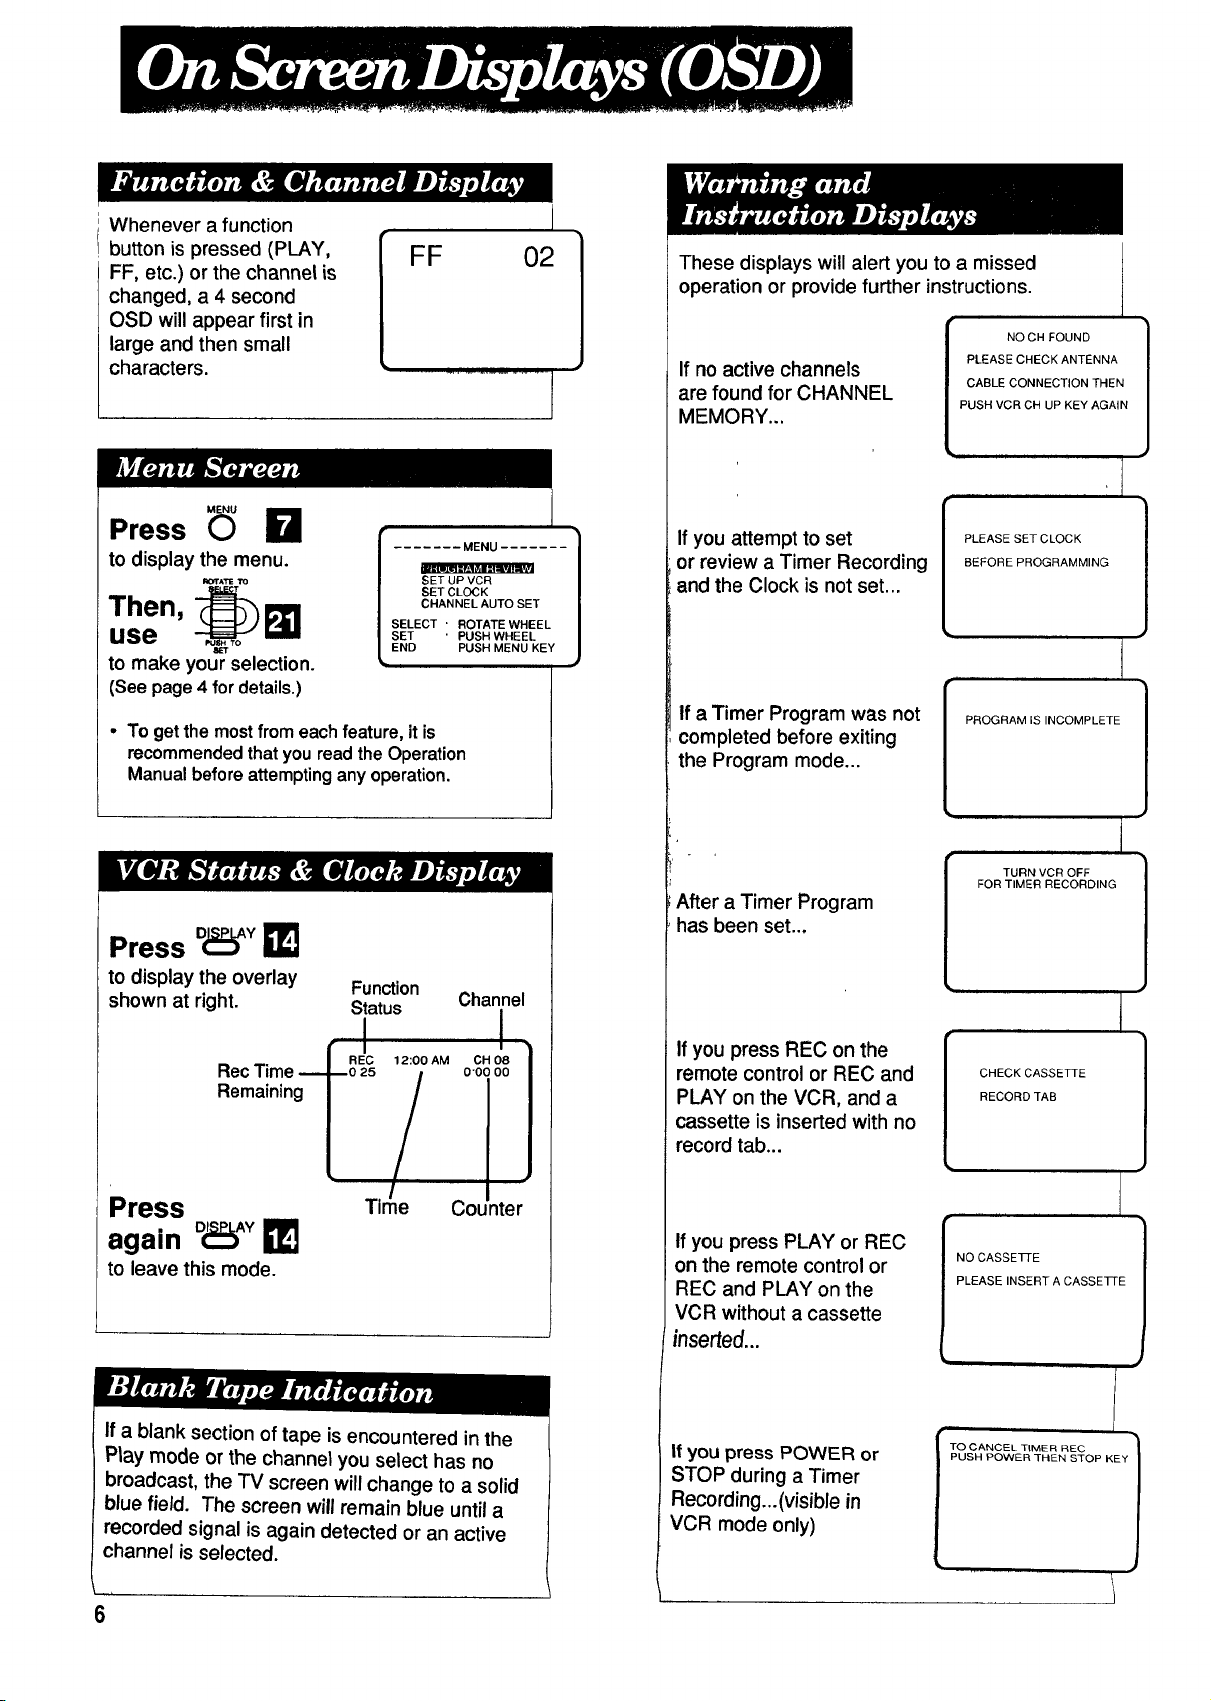
Whenever a function
button is pressed (PLAY,
FF, etc.) or the channel is
changed, a 4 second
OSD will appear first in
large and then small
characters.
FF 02
I
These displays will alert you to a missed
operation or provide further instructions.
If no active channels
are found for CHANNEL
MEMORY...
PLEASE CHECK ANTENNA
CABLE CONNECTION THEN
PUSH VCR CN UP KEY AGAIN
{OHOUN}
t
,I
Press _ r_l
to display the menu.
I_OT^TETTO
Then, ._o1_ 1
use
to make your selection.
(See page4 fordetails.)
• To getthe mostfrom each feature, it is
recommendedthat youread theOperation
Manualbeforeattemptinganyoperation.
Press D(_Y
to display the overlay Function
shown at right. Status
....... MENU ....... l
SELECT ' ROTATE WHEEL
SET ' PUSH WHEEL
END PUSH MENU KEY
12:00 AM OH 08
• _ LJ .
SETUP VCR
SET CLOCK
CHANNEL AUTO SET
Channel
I
0"00 O0
1
If you attempt to set
or review a Timer Recording
and the Clock is not set...
if a Timer Program was not
completed before exiting
the Program mode...
After a Timer Program
has been set...
If you press REC on the
remote control or REC and
PLAY on the VCR, and a
cassette is inserted with no
record tab...
PLEASE SET CLOCK
BEFORE PROGRAMMING
PROGRAM IS INCOMPLETE
TURN VCR OFF
FOR TIMER RECORDING
I
CHECK CASSETTE
RECORD TAB
Press _e Counter
again o_,Y
to leave this mode.
If a blank section of tape is encountered in the
Play mode or the channel you select has no
broadcast, the TV screen will change to a solid
blue field. The screen will remain blue until a
recorded signal is again detected or an active
channel is selected.
6
If you press PLAY or REC
on the remote control or
REC and PLAY on the
VCR without a cassette
inserted...
If you press POWER or
STOP during a Timer
Recording...(visible in
VCR mode only)
NO CASSE]q-E
PLEASE INSERT A CASSETTE
J
EOPEY1
 Loading...