

Page 1

TV / DVD Combination
Operating Instructions
Getting Started TV Operation
Models No.
• Initial Setup and Connection Procedures are on page 18.
PV-20DF64-K/PV-27DF64-K
Disc Operation
MULTI FORMAT PLAYBACK
Information
*Ability to play back may depend on recording
conditions.
As an ENERGY STAR® Partner, Panasonic has determined that
this product or product model meets the
guidelines for energy efficiency.
Please read these instructions carefully before attempting to connect,
operate, or adjust this product. Please save this manual.
This operating instruction book is designed for use with models PV-20DF64- K and PV-27DF6 4-K.
Illustrations in this manual show the PV-27DF64-K. Fea tures may vary, so please read care ful ly.
For assistance, please call : 1-800-561-5505 or visit us at www.panasonic.ca
ENERGY STAR
®
LSQT0810 A
Page 2

Before Using
Congratulations
On your purchase of one of the most
sophisticated and reliable products on the
market today. Used properly, it will bring you
and your family years of enjoyment. Please
fill in the information below. The serial
number is on the tag located on the back of
your unit.
Date of Purchase _______________
Dealer Purchased From __________
Dealer Address_________________
Dealer Phone No._______________
Model No. ____________________
Serial No. _____________________
Accessories
Please check and identify the supplied
accessories.
Use numbers indicated in parentheses
when asking for replacement parts.
Safety Precaution
Be sure to read the following cautions
carefully.
WARNING
■ PV-27DF64-K only
Always grasp
bottom and front
of unit as shown
for proper
balance.
To avoid injury to
hands, always
hold unit by area
shown with arrow
when resting it
on a flat surface.
2
1 Remote Control (EUR7724010)
The unit may tip or fall if not situated on a
stable surface, if pushed, or during an
earthquake. Use a strong rope or chain
(not included) to fasten the unit firmly to
a strong wall support.
2 Batteries “AA”
Page 3
Table of Contents
Getting
Started
TV
Operation
Disc
Operation
Before Using..................................................................................2
Safety Precautions .......................................................................4
IMPORTANT SAFEGUARDS AND PRECAUTIONS ....................6
Information (Unit)..........................................................................8
Information (Disc) .........................................................................9
Location of Controls................................................................... 11
Connections ................................................................................14
Initial Setup -Ready to Play- ......................................................18
Tuning TV.....................................................................................19
TV Operation ...............................................................................22
MTS Broadcast / TV Stereo System..........................................24
TV Timer Features.......................................................................25
Closed Caption System..............................................................26
Video / Audio Menu.....................................................................28
Weak Signal Display Feature.....................................................30
V-Chip Control Features ............................................................31
Display Feature ...........................................................................37
Basic Disc Operation..................................................................38
Disc Operation -In PLAY mode- ................................................40
DVD-RAM Operation...................................................................44
Disc Operation -Using Information Screen- ............................46
Special Disc Operation ..............................................................50
Settings for DVD Operation .......................................................54
Getting StartedGetting Started TV Operation
Disc Operation
Information
Information
Warning and Instruction Displays ............................................59
Before Requesting Service........................................................60
Limited Warranty/Servicentre List ...........................................62
Glossary.......................................................................................64
Specifications .............................................................................65
Index .............................................................................................66
3
Page 4

Safety Precautions
WARNING
TO PREVENT FIRE OR SHOCK HAZARD, DO NOT EXPOSE THIS
EQUIPMENT TO RAIN OR MOIS TURE.
CAUTION
TO PREVENT ELECTRIC SHOCK, MATCH WIDE BLADE OF PLUG TO
WIDE SLOT IN WALL SOCKET. FULLY INSERT.
4
Page 5
CAUTION:
UNIT IS A CLASS I LASER PRODUCT.
HOWEVER THIS UNIT USES A VISIBLE LASER BEAM WHICH COULD CAUSE
HAZ ARDOUS RADIATION EXPOSURE IF DIRECTED. BE SURE TO OPERATE THE
UNIT CORRECTLY AS INSTRUCTED.
WHEN THIS UNIT IS PLUGGED TO THE WALL OUTLET, DO NOT PLACE YOUR EYES
CLOSE TO THE OPENING OF THE DISC TRAY AND OTHER OPENINGS TO LOOK
INTO THE INSIDE OF THIS UNIT.
USE OF CONTROLS OR ADJUSTMENTS OR PERFORMANCE OF PROCEDURES
OTHER THAN THOSE SPECIFIED HEREIN MAY RESULT IN HAZARDOUS RADIATION
EXPOSURE.
DO NOT OPEN COVERS AND DO NOT ATTEMPT TO REPAIR THE UNIT YOURSELF.
REFER SERVICING TO QUALIFIED PERSONNEL.
CAUTION:
LASER RADIATION WHEN OPEN. DO
NOT STARE INTO BEAM.
(Inside of product)
This symbol warns the user that uninsulated
CAUTION
RISK OF ELECTRIC SHOCK
DO NOT OPEN
CAUTION: TO REDUCE THE RISK
OF ELECTRIC SHOCK, DO NOT
REMOVE COVER (OR BACK)
NO USER-SERVICEABLE PARTS
INSIDE REFER SERVICING TO
QUALIFIED SERVICE PERSONNEL
voltage within the unit may have sufficient
magnitude to cause electric shock.
Therefore, it is dangerous to make any kind
of contact with any inside part of this unit.
This symbol alerts the user that important
literature concerning the operation and
main te nance of this unit has been included.
Therefore, it should be read carefully in order
to avoid any problems.
Getting Started
Apparatus Claims of U.S. Patent Nos. 4,631,603, 4,577,216, 4,819,098, and 4,907,093,
licensed for limited viewing uses only.
This product incorporates copyright protection technology that is protected by method
claims of certain U.S. Patents and other intellectual property rights owned by Macrovision
Corporation and other rights owners. Use of this copyright protection technology must be
authorized by Macrovision Corporation, and is intended for home and other limited viewing
uses only unless otherwise authorized by Macrovision Cor po ra tion. Reverse engineering
or dis as sem bly is prohibited.
This television receiver provides display of television closed captioning.
5
Page 6
IMPORTANT SAFEGUARDS AND PRE CAU TIONS
WARNING
TO REDUCE THE RISK OF ELECTRIC SHOCK, FIRE, INJURY TO
PERSONS OR DAMAGE TO THIS PRODUCT, READ AND RETAIN ALL
SAFETY AND OPERATING INSTRUCTIONS. HEED ALL WARNINGS IN
THE MANUAL AND ON THE PRODUCT.
INSTALLATION
1 POWER SOURCE CAUTION
Operate only from power source indicated on
unit or in this manual. If uncertain, have your
Electric Utility Service Company or Video
Products Dealer verify your home power
source.
2 POWER CORD PLUG
For safety, this unit has a polarized type plug
(one wide blade), or a three-wire grounding
type plug. Always hold the plug firmly and
make sure your hands are dry when plugging
in or unplugging the AC power cord. Regularly
remove dust, dirt, etc. on the plug.
POLARIZED PLUG CAUTION:
The plug fits into outlet only one way. If it
cannot be fully inserted, try reversing it. If it still
will not fit, have an electrician install the proper
wall outlet. Do not tamper with the plug.
GROUNDING PLUG CAUTION:
The plug requires a three-hole grounding
outlet. If necessar y, have an electrician install
the proper outlet. Do not tamper with the plug.
3 POWER CORD
To avoid unit malfunction, and to protect
against electrical shock, fire or personal injury:
- Keep power cord away from heating
appliances and walking traffic. Do not rest
heavy objects on, or roll such objects over the
power cord.
- Do not tamper with the cord in any way.
- An extension cord should have the same type
plug (polarized or grounding) and must be
securely connected.
- Overloaded wall outlets or extension cords
are fire hazards.
- Frayed cords, damaged plugs, and damaged
or cracked wire insulation are hazardous and
should be replaced by a qualified electrician.
4 DO NOT BLOCK VENTILATION
HOLES
Ventilation openings in the cabinet release heat
generated during operation. If blocked, heat
build-up may result in a fire hazard or heat
damage to discs.
For your protection:
a. Never cover ventilation slots while unit is
ON, or operate unit while placed on a bed,
sofa, rug, or other soft surface.
b. Avoid built-in installation, such as a book
case or rack, unless properly ventilated.
5 AVOID EXTREMELY HOT LOCATIONS
OR SUDDEN TEMPERATURE
CHANGES
Do not place unit over or near a heater or
radiator, in direct sunlight, inside closed
ve hi cles, in high temperature locations [over
95 °F (35 °C)], or in over 75 % humidity. If unit
is suddenly moved from a cold place to a warm
one, moisture may con dense in unit and on the
disc causing dam age. Never sub ject unit to
vibration, im pact, or place it so that the sur face
is tilted as in ter nal parts may be se ri ous ly
dam aged.
6 TO AVOID PERSONAL INJURY
• Never place unit on support or stand that is
not firm, level, and adequately strong. The
unit could fall causing serious injur y to a child
or adult and damage to the unit.
• Move any appliance and cart
combination with care. Quick
stops, excessive force, and
uneven surfaces may cause
objects to overturn.
• Carefully follow all operating
instructions.
6
Page 7

GROUND
CLAMP
ELECTRIC
SERVICE
EQUIPMENT
ANTENNA
LEAD IN
WIRE
ANTENNA
DISCHARGE UNIT
(NEC SECTION 810-20)
GROUNDING CONDUCTORS
(NEC SECTION 810-21)
GROUND CLAMPS
POWER SERVICE GROUNDING
ELECTRODE SYSTEM
(NEC ART 250, PART H)
NEC
- NATIONAL ELECTRICAL CODE
USING THE UNIT
Before unit is brought out of storage or
moved to a new location, refer again to the
INSTALLATION section of these safe guards.
1 KEEP UNIT WELL AWAY FROM
WATER OR MOISTURE,
such as vases, sinks, tubs, etc.
2 IF EXPOSED TO RAIN, MOISTURE,
OR STRONG IMPACT,
unplug unit and have it inspected by a qualified
service technician before use.
OUTDOOR ANTENNA INSTALLATION
1 SAFE ANTENNA AND CABLE
CONNECTION
An outside antenna or cable system must be
properly grounded to provide some protection
against built up static charges and voltage. Part
1 of the Canadian Electrical Code, in U.S.A.
Section 810 of the National Electrical Code.
ANSI/NFPA 70 provides information regarding
proper grounding of the mast and supporting
structure, grounding of the lead-in wire to an
antenna discharge unit, size of grounding
conductors, location of antenna discharge unit,
con nec tion to grounding electrodes, and
requirements for the grounding electrode.
Getting Started
3 ELECTRICAL STORMS
During a lightning storm, or before leaving unit
unused for extended periods of time,
disconnect all equipment from the power
source as well as the antenna and cable
system.
4 WHEN UNIT IS PLUGGED IN
• DO NOT OPERATE IF:
- liquid has spilled into unit.
- unit was dropped or otherwise damaged.
- unit emits smoke, odours, or noises.
Immediately unplug unit, and have it
inspected by a service technician to avoid
potential fire and shock hazards.
• Never drop or push any object through
openings in unit. Touching internal parts may
cause electric shock or fire hazard. Do not
put any foreign object on the tray.
• Keep magnetic objects, such as speakers,
away from unit to avoid electrical interference.
5 USING ACCESSORIES
Use only accessories recommended by the
manufacturer to avoid risk of fire, shock, or
other hazards.
6 CLEANING UNIT
Unplug unit. Use a clean, dry, chemically
untreated cloth to gently remove dust or debris.
DO NOT USE cleaning fluids, aerosols, or
forced air that could over-spray, or seep into
unit and cause electrical shock. Any substance,
such as wax, adhesive tape, etc. may mar the
cabinet sur face. Exposure to greasy, humid, or
dusty areas may adversely af fect internal parts.
2 KEEP ANTENNA CLEAR OF HIGH
VOLTAGE POWER LINES OR
CIRCUITS
Locate an outside antenna system well away
from power lines and electric light or power
circuits so it will never touch these power
sources should it
ever fall. When
installing antenna,
absolutely never
touch power lines,
circuits or other
power sources as
this could be fatal.
SERVICE
1 DO NOT SERVICE PRODUCT
YOURSELF
If, after carefully following detailed operating
in struc tions, the unit does not operate properly,
do not attempt to open or remove covers, or
make any adjustments not described in the
manual. Unplug unit and contact a qualified
service tech ni cian.
2 REPLACEMENT OF PARTS
Make sure the ser vice technician uses only
parts specified by the manufacturer, or have
equal safety char ac ter is tics as original parts.
The use of unauthorized substitutes may result
in fire, electric shock, or other hazards.
3 SAFETY CHECK AFTER SERVICING
After unit is serviced or repaired, request that a
thorough safety check be done as described in
the manufacturer’s service literature to ensure
video unit is in safe operating condition.
7
Page 8
Information (Unit)
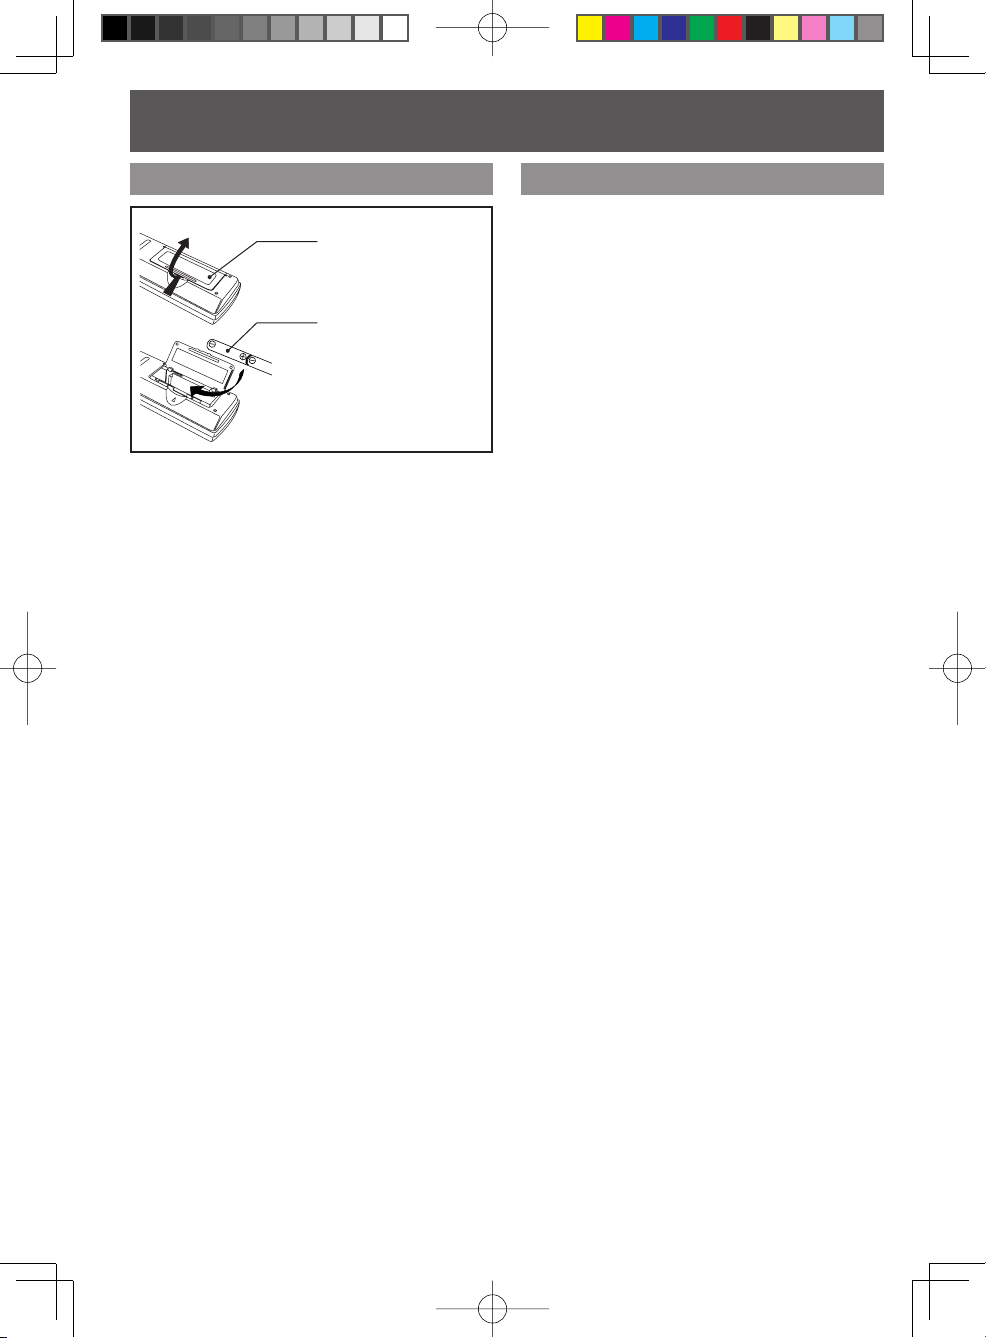
Loading the Batteries
1 Open the
cover.
2 Insert
batteries as
marked.
3 Close the
cover.
• Insert so the poles (+ and - ) match those in the
remote control.
• Do not use rechargeable type batteries.
Do not:
• Mix old and new batteries.
• Use different types at the same time.
• Heat or expose to flame.
• Take apart or short circuit.
• Attempt to recharge alkaline or manganese
batteries.
• Use batteries if the covering has been peeled
off.
Mishandling of batteries can cause
electrolyte leakage which can damage items
the fluid contacts and may cause a fire.
Remove if the remote control is not going to
be used for a long period of time. Store in a
cool, dark place.
DST (Daylight Saving Time)
Unit auto adjusts clock for DST (Daylight
Saving Time.)
■ Spring (First Sunday in April)
DST: ON ➞ Sets clock ahead one hour.
■ Autumn (Last Sunday in October)
DST: ON ➞ Turns clock back one hour.
• If your area does not observe Daylight Saving
Time, select DST : OFF (see “Manual Clock
Setting” on page 20).
8
Page 9
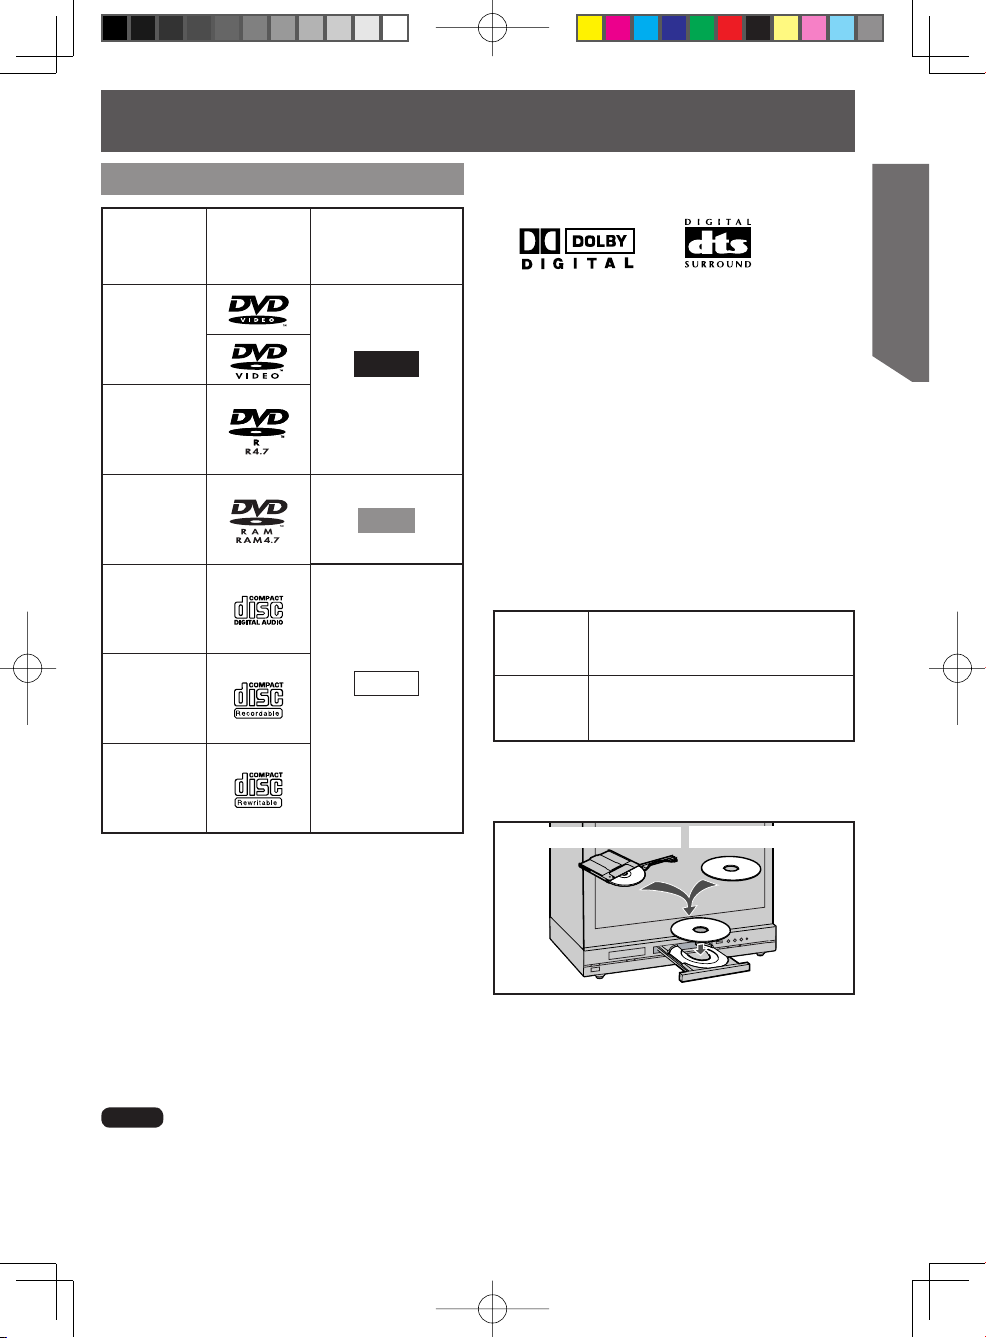
Information (Disc)
Discs that can be played
Disc type Disc Logo
DVD-Video
DVD- R*
DVD- RAM
CD
CD-R
CD-RW
Do not use irregularly shaped discs (e.g.
heart-shaped), as these can damage the
unit.
*1 DVD-Video formatted discs [finalized].
2
*
1
*2
Discs recorded using Version 1.1 of the Video
Recording Format.
Indication in
these operating
instructions
DVD-V
(DVD-Video)
DVD-RAM
CD
(CD-DA)
DVDs that can be played
You can play discs with these symbols.
Playing DVDs
The producer of these discs can control how
they are played so you may not always be
able to control play as described in these
operating instructions. Read the disc’s
instructions carefully.
DVD-R discs
Panasonic DVD-R recorded and finalized*
on a Panasonic DVD video recorder are
played as DVD-Video on this unit.
DVD-RAM discs
DVD-RAM discs must meet the following
conditions for this unit to be able to play
them.
• Non-cartridge discs
Type
Capacity
• Remove TYPE 2 and 4 discs from their
cartridges before use, then return them when
you are finished. Read the instructions for the
disc carefully.
• Discs that can be removed from
their car tridges (T YPE 2 and 4)
• 12 cm (5″) 9.4 GB (double-sided)
and 4.7 GB (single-sided)
• 8 cm (3″) 2.8 GB (double-sided)
TYPE 2 or 4 disc
Non-cartridge disc
Getting Started
Discs that cannot be played
DVD with Region No. other than “1” or “ALL”,
DVD from PAL system, DVD-ROM, DVD+R,
DVD-AUDIO, DVD-RW, DVD+RW,
CD-ROM, CDV, CVD, CD-G, CD-TEXT,
SACD, Photo-CD,
Note
• It may not be possible to play CD-R, CD-RW,
DVD-R and DVD-RAM in all cases due to the
type of disc or condition of the recording.
Video CD.
• Some parts of the disc, for example where one
program ends and another begins, may not play
smoothly.
CD-R and CD-RW discs
This unit can play CD-R and CD-RW if they
are formatted as CD-DA (digital audio) and
finalized*.
*A process that allows play on compatible
equipment.
9
Page 10

ALL
2
4
1
Disc Handling
Handling
precautions
• Sticking a label on the
disc may impair DVD-R
playback.
• Do not attach sticker to
disc. (Do not use discs
with exposed adhesive
from tape or left over
peeled-off stickers.)
• Only hold disc by edges
as shown below.
Fin ger prints, dirt and
scratches can cause
skipping and distortion.
• Do not write on label
side of disc.
• Never use record
cleaning sprays,
benzine, thinner, static
electricity prevention
liquids, or any other
solvent.
• Do not try to close disc
tray when disc is not
properly placed.
Disc tray
Disc
To clean disc surface
With a soft, damp (water only) cloth, gently
wipe from the centre hole to the outer edge
as shown below. (Wiping in a circular pattern
will scratch the surface.)
• DVD-RAM, DVD- R :
Clean only with the DVD-RAM disc cleaner
available. Never use cloths or cleaners for CDs,
etc.
Region Management Information
This unit is designed and man u fac tured to
respond to the Region Management
Information that is recorded on a DVD disc. If
the Region number described on the DVD
disc does not cor re spond to the Region
number of this unit, this unit cannot play this
disc.
For U.S.A. and Canada
• The region number of this player is “1”.
• The player will play DVD-Video marked with
labels bearing “1” or “ALL”.
Example:
1
If disc is brought from a cold to a warm
environment, moisture may form on the
disc
Wipe away moisture with a soft, dry, lint-free
cloth before using disc. (See above.)
Improper disc storage
Discs can be damaged if stored or left in
these environment:
• Exposed to direct sunlight.
• Areas that are humid or dusty.
• Near heat (i.e. heater, radiator, etc.).
10
Page 11

Location of Controls
Remote Control Buttons
1
2
3
4
5
6
7
8
9
10
11
12
13
14
15
16
17
OPEN / CLOSE Opens or closes the disc tray.
1
POWER Turns the unit on or off.
2
DISPLAY
3
RAPID TUNE
4
MUTE Mutes the sound instantly.
5
INPUT Changes input source.
6
ACTION Displays Main Menu.
7
SELECT ▲▼◄ ►
8
CHANNEL
9
UP/DOWN
SKIP-
10
Displays the TV status and
clock. In DVD mode, displays
disc and unit information.
Displays the last channel you
were watching.
Controls navigation around
on-screen menu.
Selects a channel.
Skips back one chapter or track.
Goes to previous menu screen.
18
19
20
21
22
23
24
25
26
27
28
29
30
31
STOP Stops playback.
11
STILL
12
SEARCH /
13
SLOW-
AUDIO Selects the desired audio mode.
14
ANGLE
15
TIMER
16
RETURN Returns to DV D menu screen.
17
DVD Set to DVD mode.
18
TV Sets to TV mode.
19
NUMBER Keys Selects a channel directly.
20
ADD/DELETE/
21
CLEAR
MENU / PLAY
22
LIST
SET Sets selected menu.
23
VOLUME
24
UP/DOWN
PLAY Begins playback.
25
SKIP+
26
TITLE / D.NAVI
27
SEARCH /
28
SLOW+
SURROUND / VSS
29
SUB TITLE
30
ZOOM
31
Pauses picture in Playback
mode and frame advance
picture in Still mode.
Activates reverse rapid scene
search in Play mode.
Increases reverse slow motion
speed in still mode. (Up to 5
levels)
Selects the desired angle in
DVD mode.
Set ON TIM ER or SLEEP
TIMER.
Adds or deletes a channel.
Cancels an item on the screen.
Displays DVD menu. Displays
Play List. (DVD-R AM)
Adjusts volume.
Skips one chapter or track.
Goes to nex t menu screen.
Selects the desired title by
number on some DVDs.
Displays Direct Navigator.
(DVD-RAM).
Activates forward rapid scene
search in Play mode.
Increases forward slow motion
speed in still mode. (Up to 5
levels)
Creates a deeper, 3-D sound
effect.
Selects a different subtitle
language.
Enlarges specific portions of
DVD picture.
Getting Started
11
Page 12
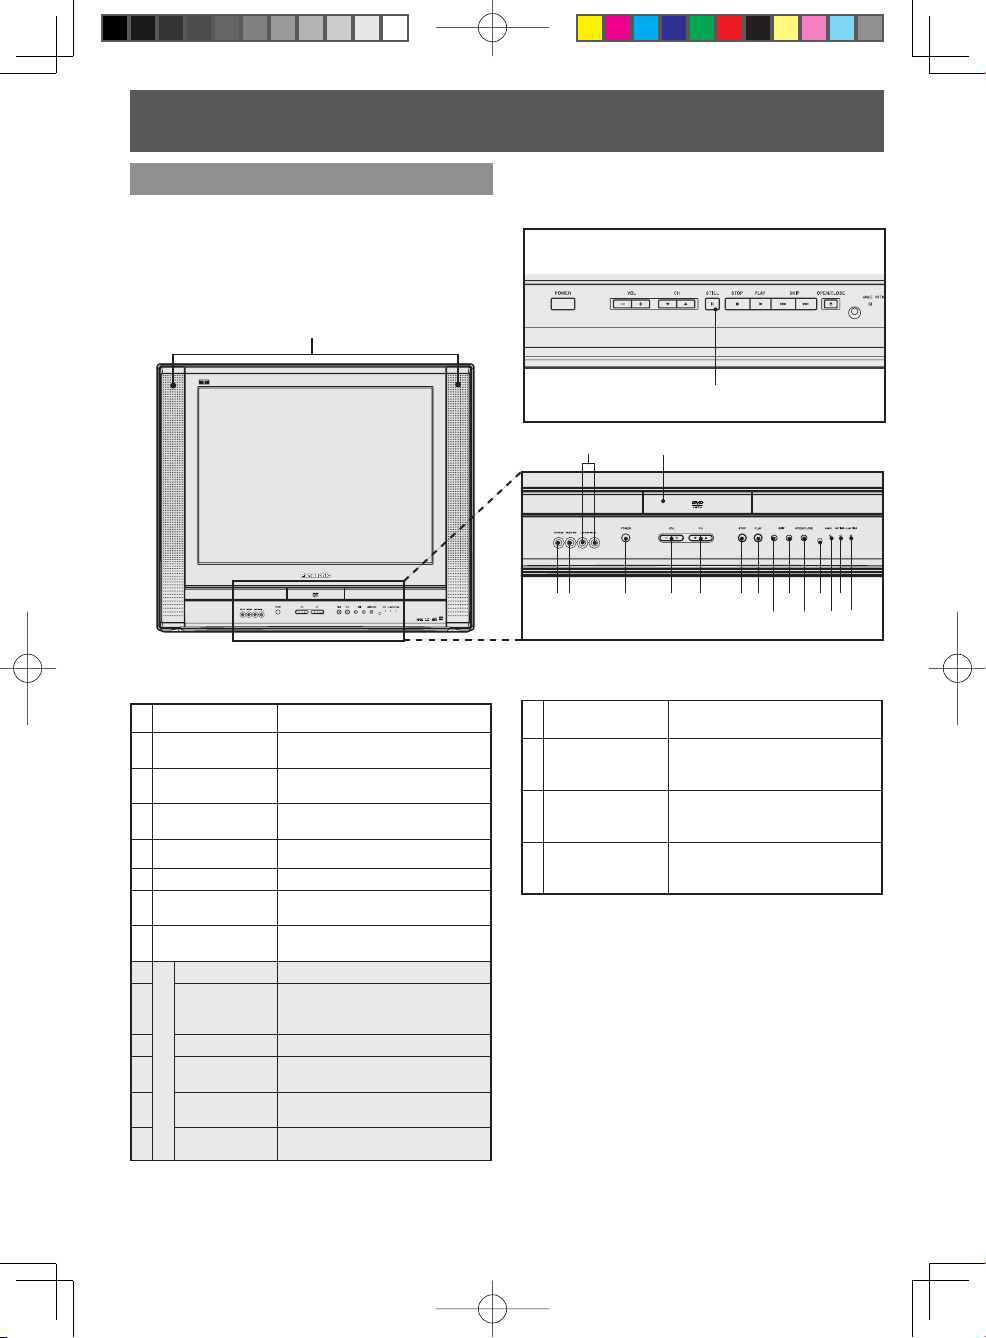
Unit Buttons
Front View
<Model PV-27DF64-K unit shown>
1
Built In Speakers Equipped with 2 front speakers.
1
Phones Jack
2
Video Input
3
Connector 2
Audio Input
4
Connector 2
Disc Tray Place compatible discs here.
5
POWER Turns the unit on or of f.
6
VOLUME
7
UP/DOWN
CHANNEL
8
UP/DOWN
STOP Stops playback.
9
STILL
DVD Operation
(PV-20DF64-K
9'
only)
PLAY Begins playback.
10
SKIP-
11
SKIP+
12
OPEN/CLOSE Opens or closes the disc tray.
13
Connect an ear phone or
headphones.
Connect from other component.
(LINE 2)
Connect from other component.
(LINE 2)
Adjusts volume.
Selects a channel.
Still picture in Playback mode
and frame advance picture in
Still mode.
Skips back one chapter or track.
Goes to previous menu screen.
Skips one chapter or track. Goes
to next menu screen.
<Model PV-20DF64-K unit shown>
9'
45
23 6
Remote Sensor
14
ANGLE Indicator
15
(RED)
ON TIMER
Indicator
16
(ORANGE)
SLEEP TIMER
Indicator
17
(GREEN)
78 9101112
Receives infrared signal from
remote control.
Lights up when a scene
recorded at multiple angles is
detected. (DVD only)
Lights when the On Timer is set.
Lights when the Sleep-Timer is
set.
14 16
13 15 17
12
Page 13
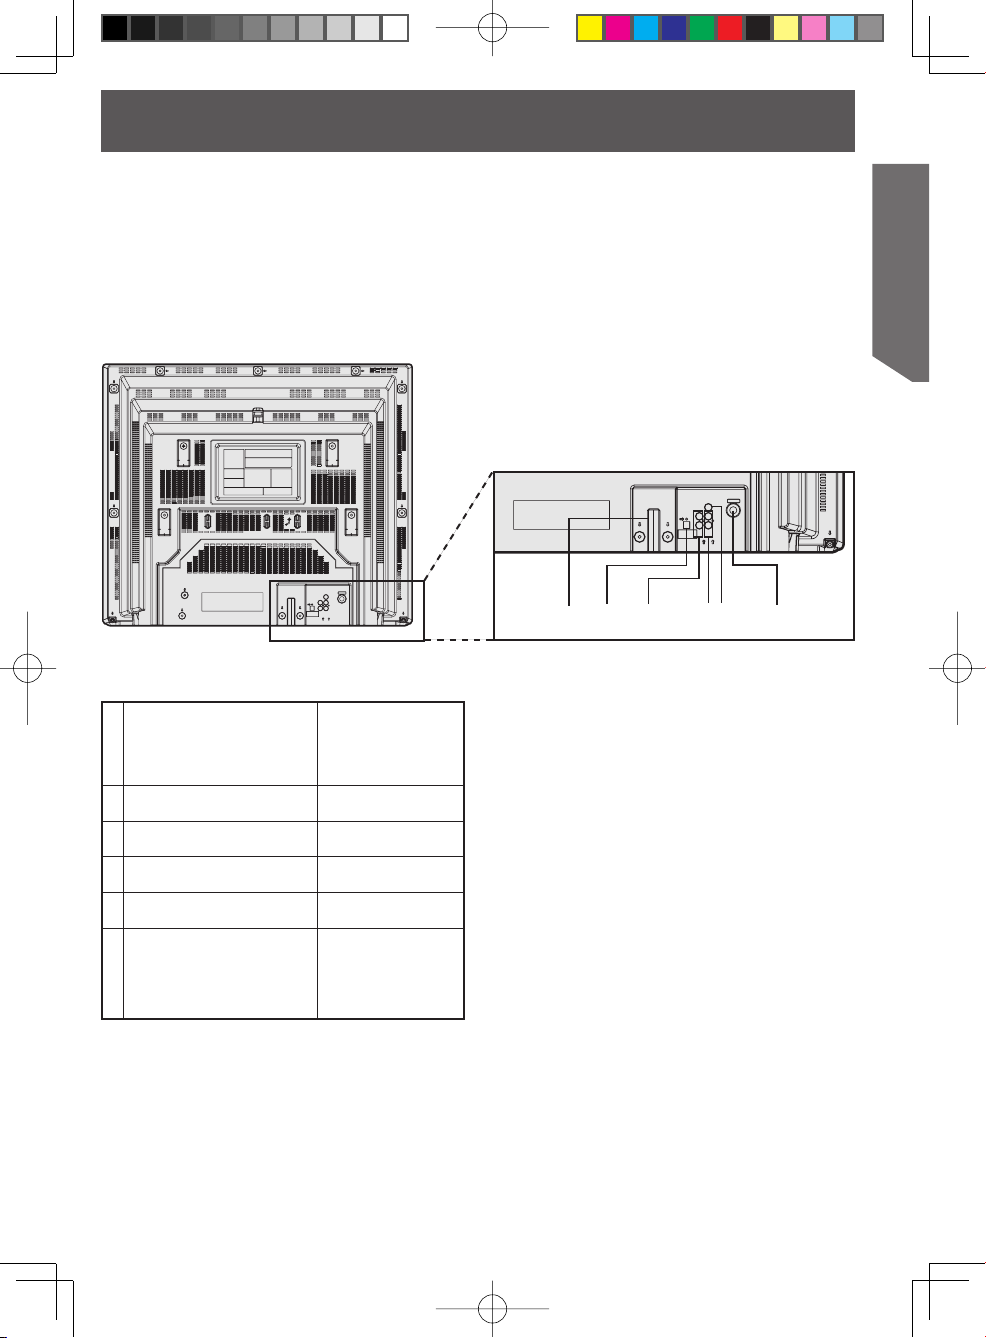
Rear View
<Model PV-27DF64-K unit shown>
When plugged into an
1 AC Power Plug
Optical digital audio output
2
connector
Audio Output Connector
3
(L/R)
4 Audio Input Connector 1
5 Video Input Connector 1
AC outlet, this unit
consumes 1.5 W of
electr ic power in OFF
condition.
Outputs audio signal.
(Digital)
Outputs audio signal.
(Analog)
Connect from other
component. (LINE 1)
Connect from other
component. (LINE 1)
Getting Started
12 3 45 6
VHF/UHF Antenna
6
Input Terminal
Input terminal for an
antenna or cable box
signal.
13
Page 14
Connections
Notes on con nec tions
• Turn off the power supply for all com po nents before making any connections.
• If the cables necessary for connecting a component to the system are not included with the
component or available as an option, you may need to fashion a cable to suit the component
concerned.
• Read the instruction manual for each system component care ful ly before connecting it.
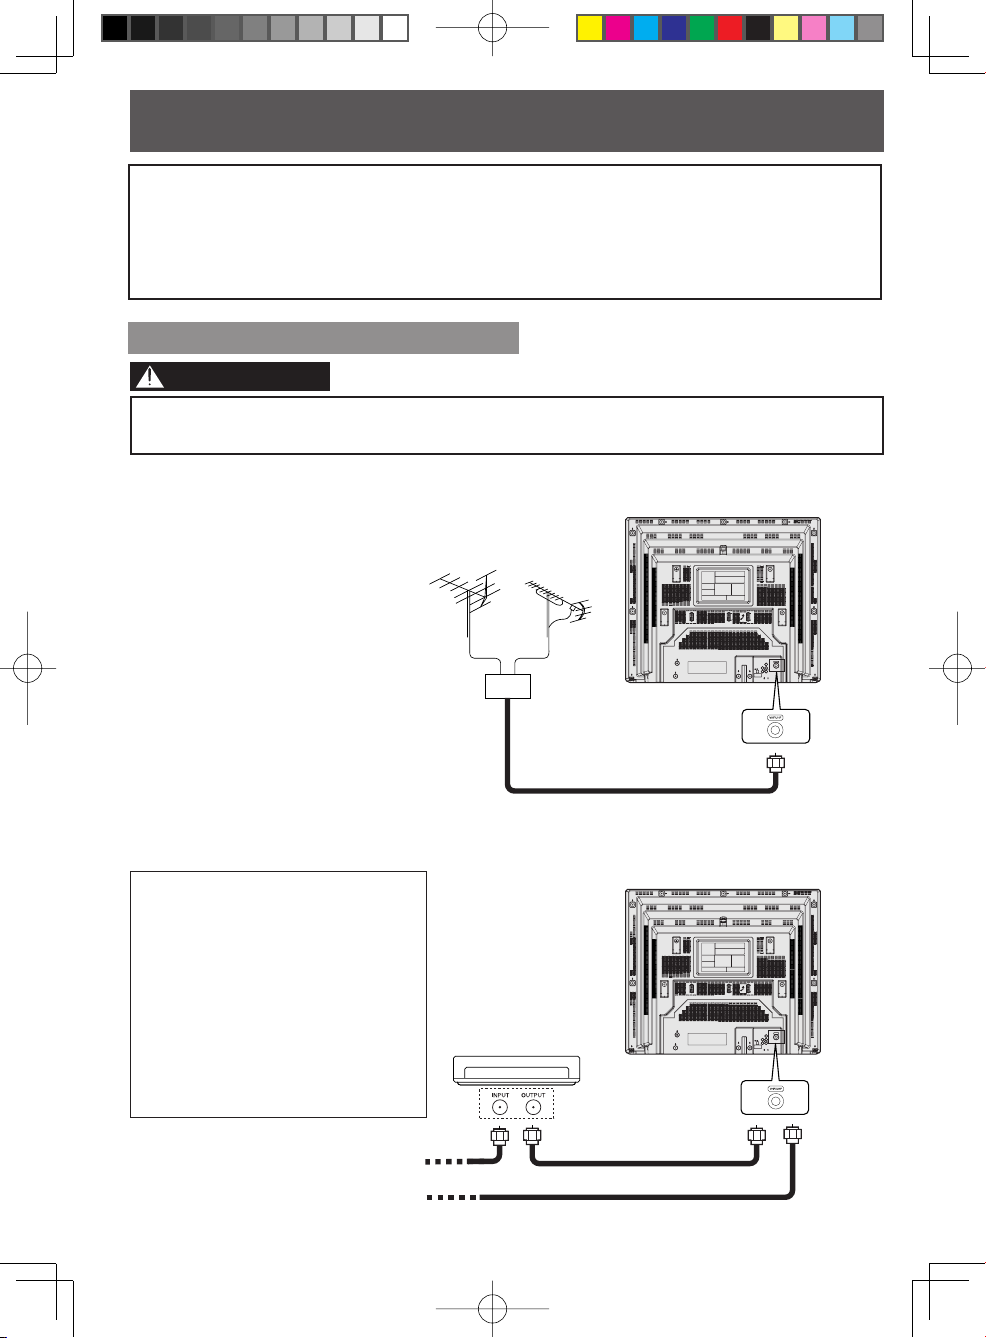
Connecting the RF in Terminal
CAUTION
Overtightening “Nut type” RF coaxial cables may damage jacks.
Finger tighten only.
Antenna Connection
Connect the cable from Antenna to the VHF/UHF terminal on the unit.
VHF
Antenna
Mixer
UHF
Antenna
Cable Connection
Connect the cable supplied by your local cable company to VHF/UHF terminal on the unit.
Note to CABLE system installer:
This re mind er is pro vid ed to call
the CABLE (Cable TV) System
Installer’s at ten tion to Article
820- 40 of the NEC that pro vides
guide lines for proper grounding
and, in par tic u lar, specifies that
the cable ground shall be
con nect ed to the ground ing
system of the build ing, as close to
the point of cable entry as
practical.
In from CABLE
Cable Box
Or
14
Page 15
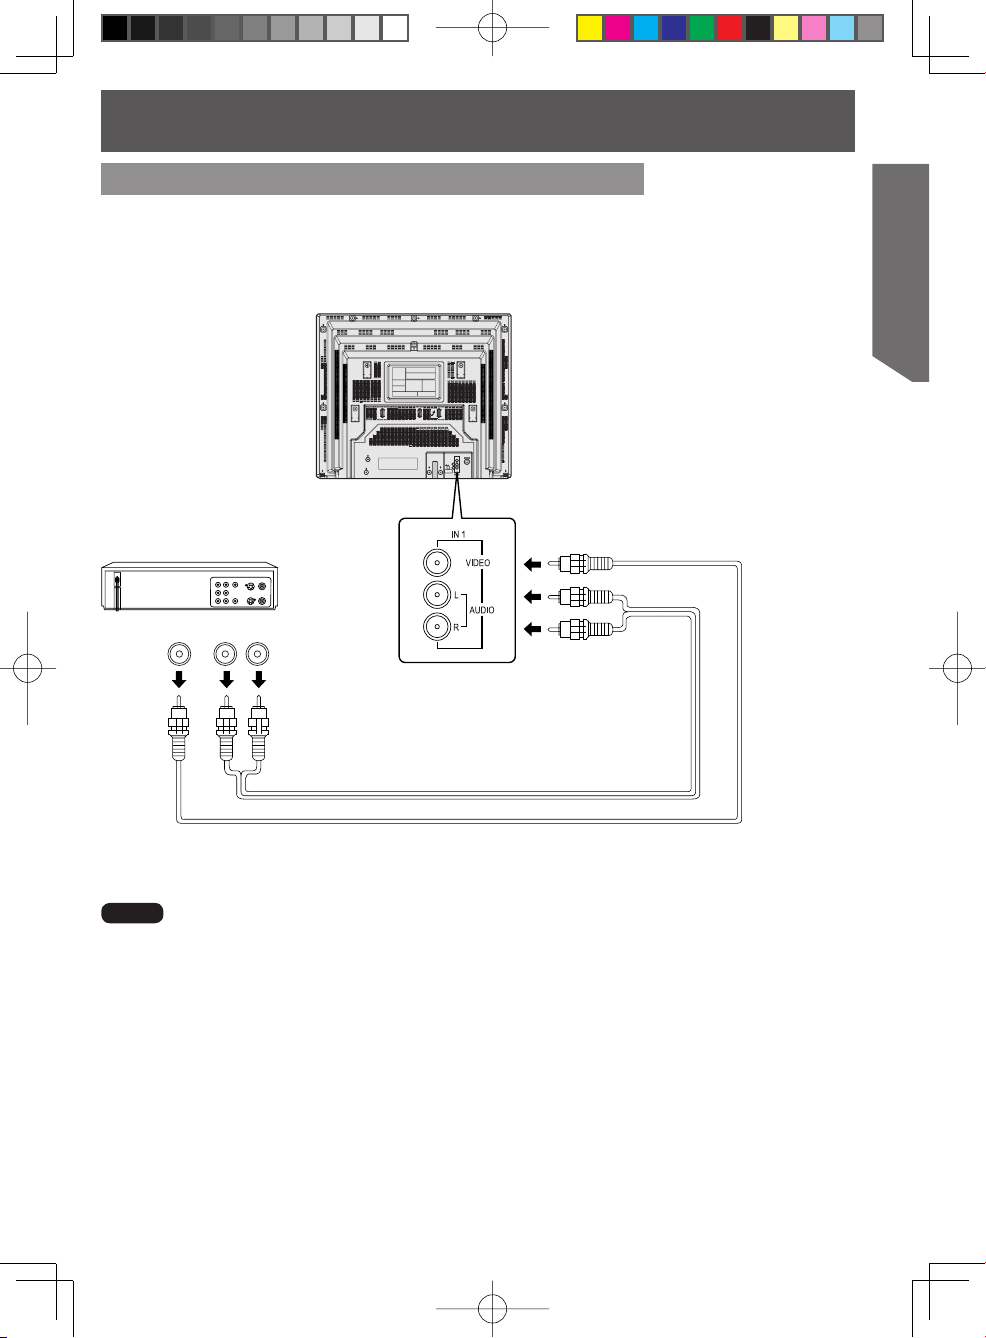
Connecting the “1, 2” AV Input Terminals
Connects VCRs and other peripheral equipment
AV Input terminal 1 is used
Getting Started
Video
OUT
Audio
OUT
RL
Notes
• Similar connections are available at the “1, 2” AV input terminals.
• AV Input terminal 2 is located on the front of the unit.
15
Page 16
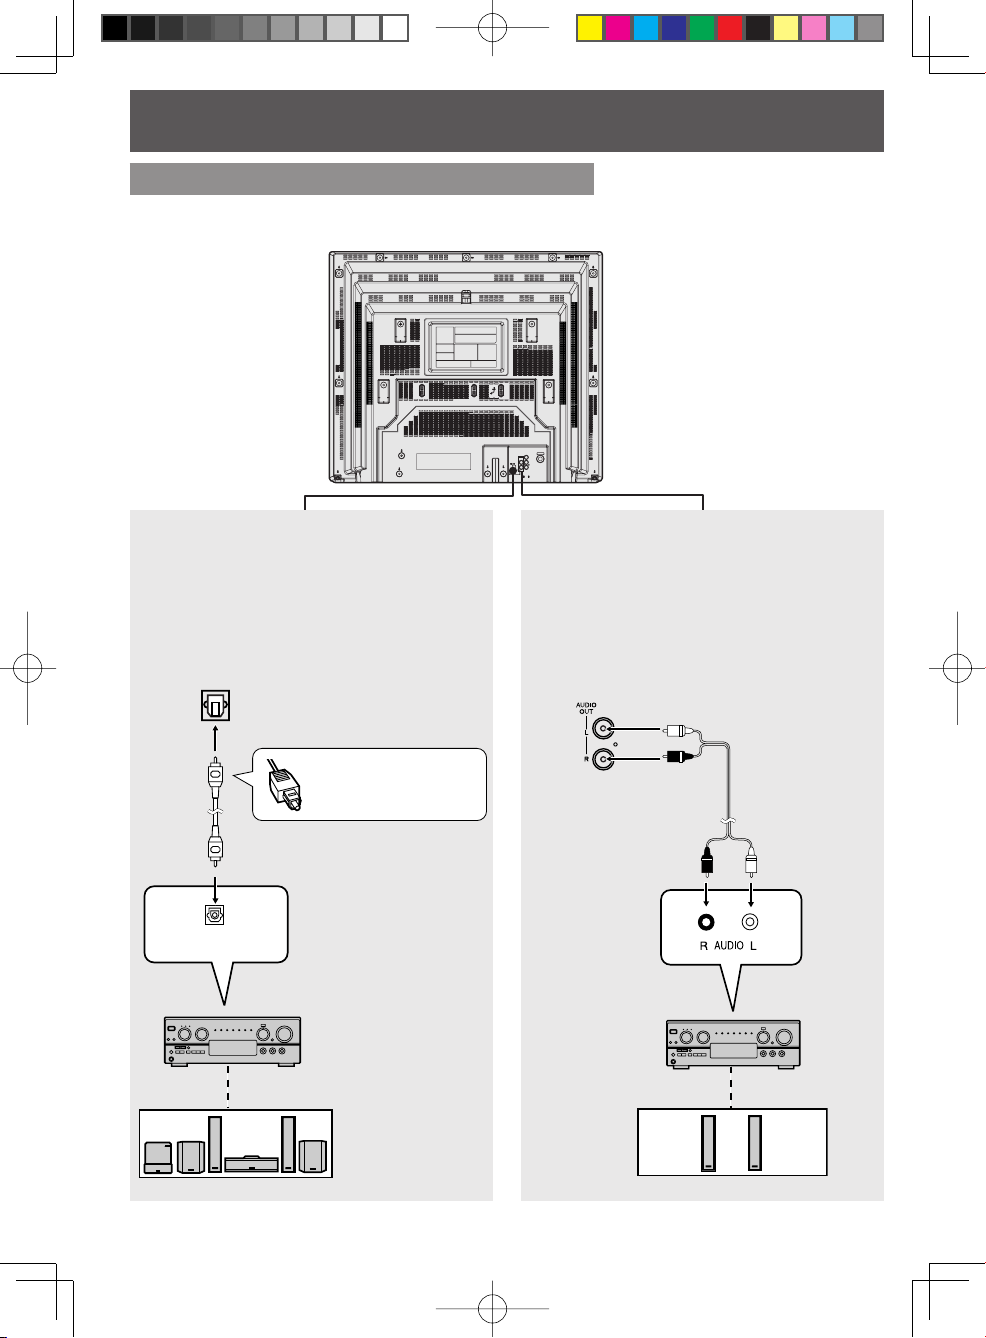
Connecting the Audio Output Terminal
Enjoy the powerful movie theatre and hall-like sound available with multiple channel audio
found on DVDs by connecting an amplifier and speakers. There are two types of connection,
digital and analog.
Analog connection Digital connection
Connect an amplifier with Dolby Digital or
DTS decoders to enjoy surround sound.
Connect an amplifier to enjoy high-quality
stereo sound with sampling frequencies of
96 kHz.
16
OPTICAL
Firmly connect
the cable to the
connector.
Amplifier with built in
Dolby Digital or DTS
decoders.
Speakers (example)
Please see
amplifier manual
for speaker
requirements.
Amplifier
Speakers (example)
Page 17
Check List
Turn down the volume, then turn this unit, as
well as other equipment to be connected, off
before pro ceed ing with connection.
Do not block ventilation holes of any equipment
and arrange it so that air can circulate freely.
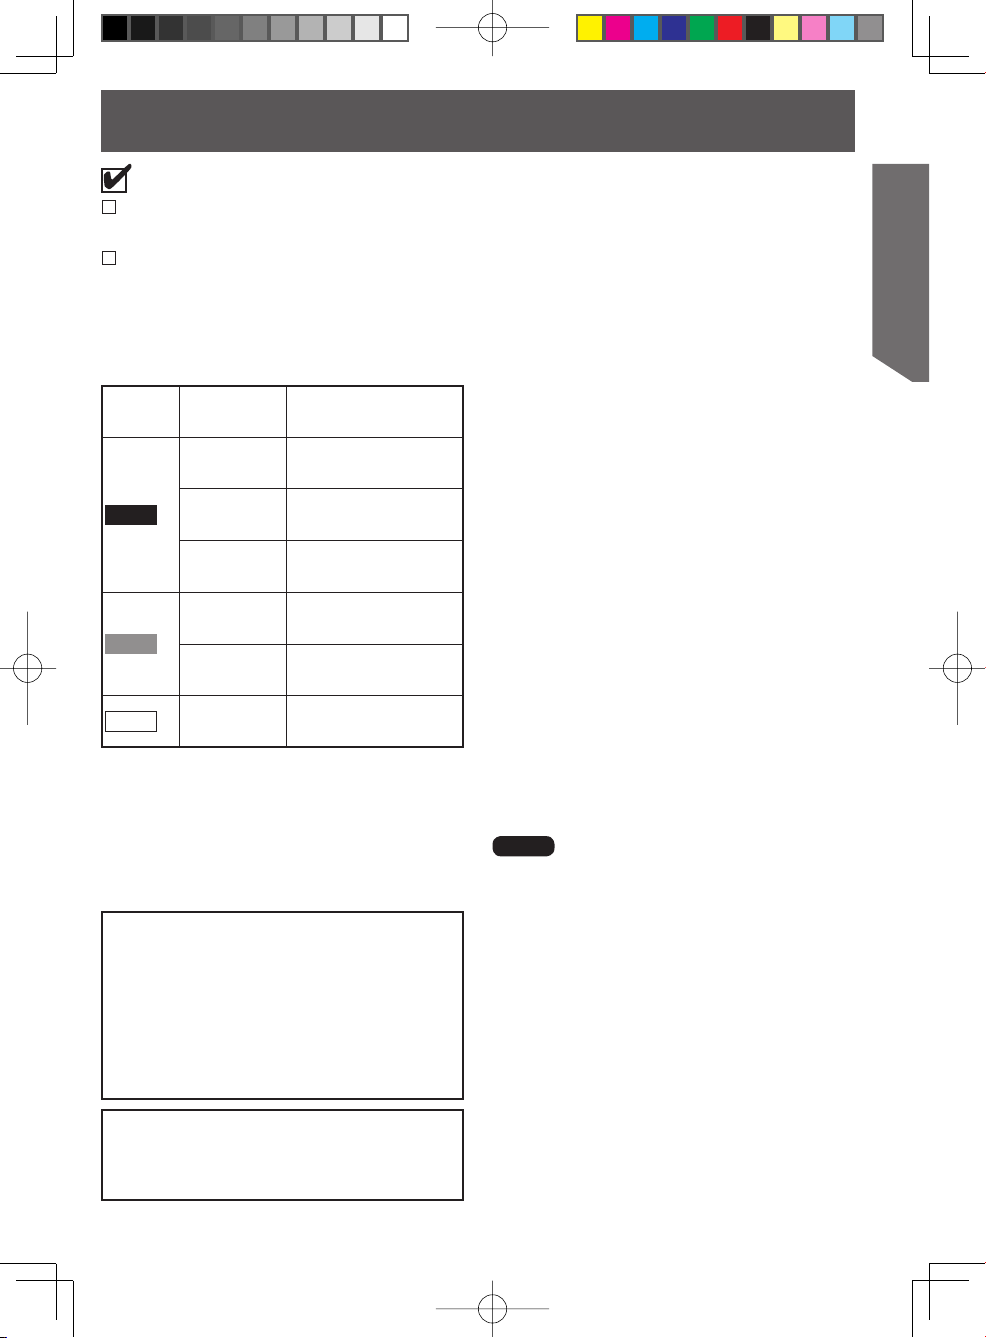
Enjoying digital audio output from the
digital audio output con nec tor
Notes on audio output from the optical
digital audio output con nec tor
CD
Sound
recording
format
Dolby Digital
Linear PCM
(48/96 kHz
16/20/24 bi t)
dts
Dolby Digital
Linear PCM
(48 kHz
16 bit)
Linear PCM
Disc
DVD-V
DVD- RAM
*1 The type of audio output from the connector can
be selected by adjusting the Settings for DVD
Operation. (See pages 56-57.)
*2 When "LPCM" is set to OFF in the DVD Main
Menu, only 48 kHz sampling/16 bit is output.
When set to ON, sampling of sound quality
greater than 48 kHz/16 bit is reduced to
48 kHz/16 bit. (See pages 56-57.)
Manufactured under license from Digital
Theatre Systems, Inc. US Pat. No’s.
5,451,942, 5,956,674, 5,974,380,
5,978,762, 6,487,535 and other U.S. and
world-wide patents issued and pending.
“DTS” and “DTS 2.0 + Digital Out” are
trademarks of Digital Theatre Systems,
Inc. Copyright 1996, 2003 Digital Theatre
Systems, Inc. All Rights Reserved.
Optical digital audio
output from connector
Dolby Digital bitstream
(1-5.1 ch) or PCM (48 kHz
sampling/16 bit only)*
Linear PCM (2ch)
(48 kHz sampling/16 bit
2
only)*
Bitstream or PCM (4 8 kHz
sampling/16 bit only)*
Dolby Digital bitstream
(1-5.1 ch) or PCM (48 kHz
sampling/16 bit only)*
Linear PCM (2ch)
Linear PCM
(44.1 kHz sampling)
1
1
1
For your reference:
• Dolby Digital is a digital sound compression
technique developed by the Dolby Laboratories
Licensing Corporation. Supporting 5.1-channel
surround sound, as well as stereo (2-channel)
sound, this technique enables a large quantity of
sound data to be ef ficiently recorded on a disc.
• Linear PCM is a signal recording format used in
CDs. While CDs are recorded in 44.1 kHz/16 bit,
DVDs are recorded in 48 kHz/16 bit up to
96 kHz/24 bit.
• If you have a Dolby Pro Logic Surround decoder,
you will obtain the full benefit of Pro Logic from
the same DVD movies that provide full 5.1
channel Dolby Digital soundtracks, as well as
from titles with the Dolby Surround mark. For
information on Panasonic Dolby Pro Logic
Surround Sound Decoders please contact your
local dealer.
IMPORTANT NOTE:
Caution for optical digital audio output
connector:
• When connecting an amplifier (with an optical
digital input connector) which does not contain
the Dolby Digital or dts decoder, be sure to
select “PCM” at “Dolby Digital” and “PCM” at “dts”
in the Settings for DVD Operation “Selecting
AUDIO OUTPUT” (see pages 56-57). Other wise,
any attempt to play DVDs may cause such a high
level of noise that it may be harmful to your ears
and damage your speakers.
• Be sure to refer to pages 56-57 regarding output
settings of Dolby Digital, dts, and PCM.
• CDs can be played as usual.
Note
• Some dts decoders which do not support
DVD-dts Interface may not work properly with
the unit.
Getting Started
Manufactured under license from Dolby
Laboratories. “Dolby,” “Pro Logic,” and the
double-D symbol are trademarks of Dolby
Laboratories.
17
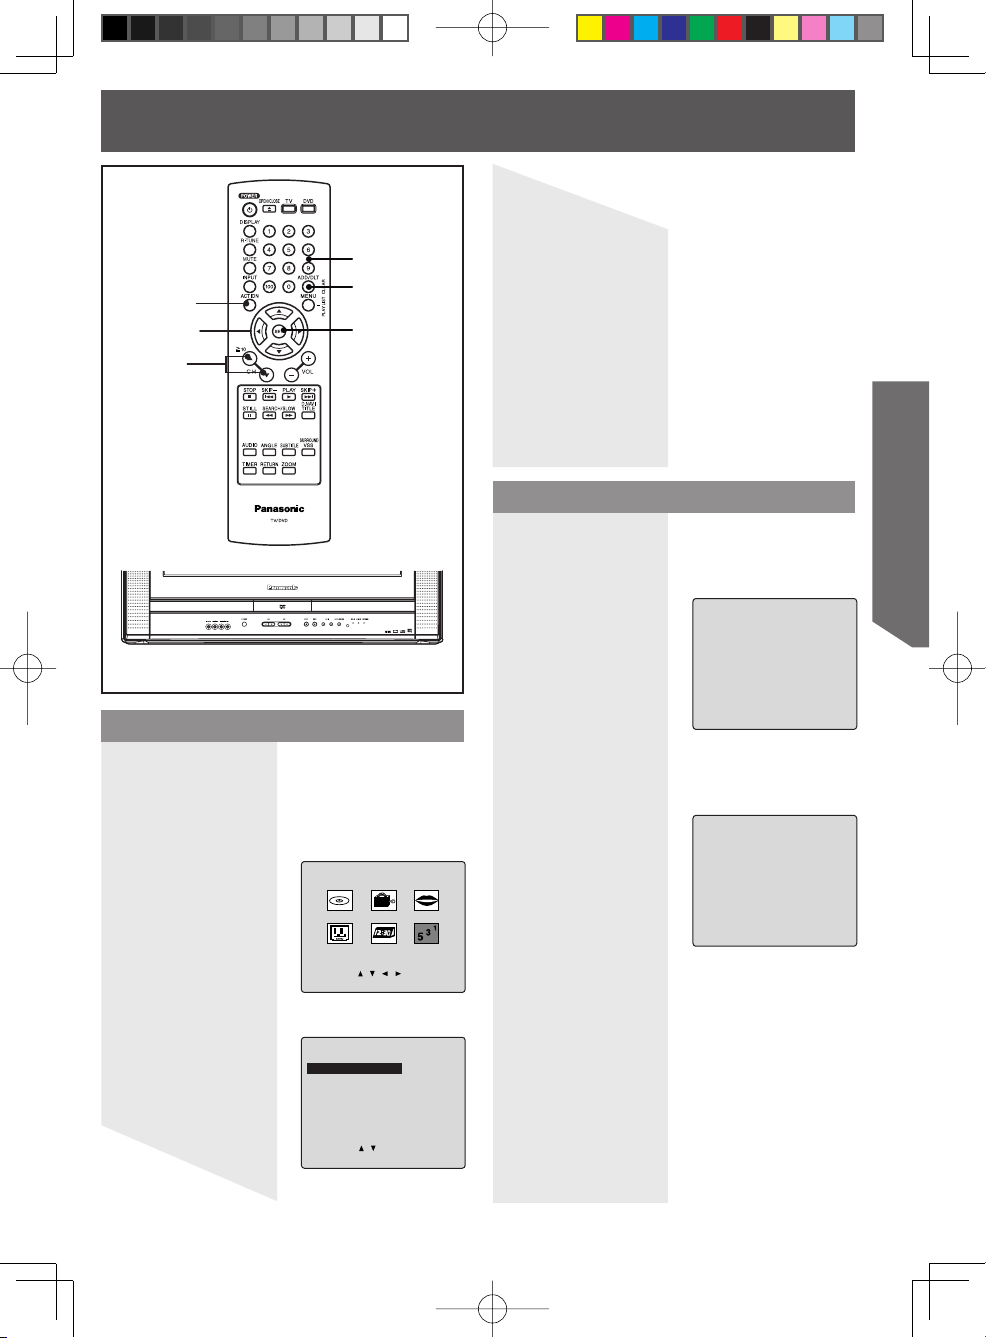
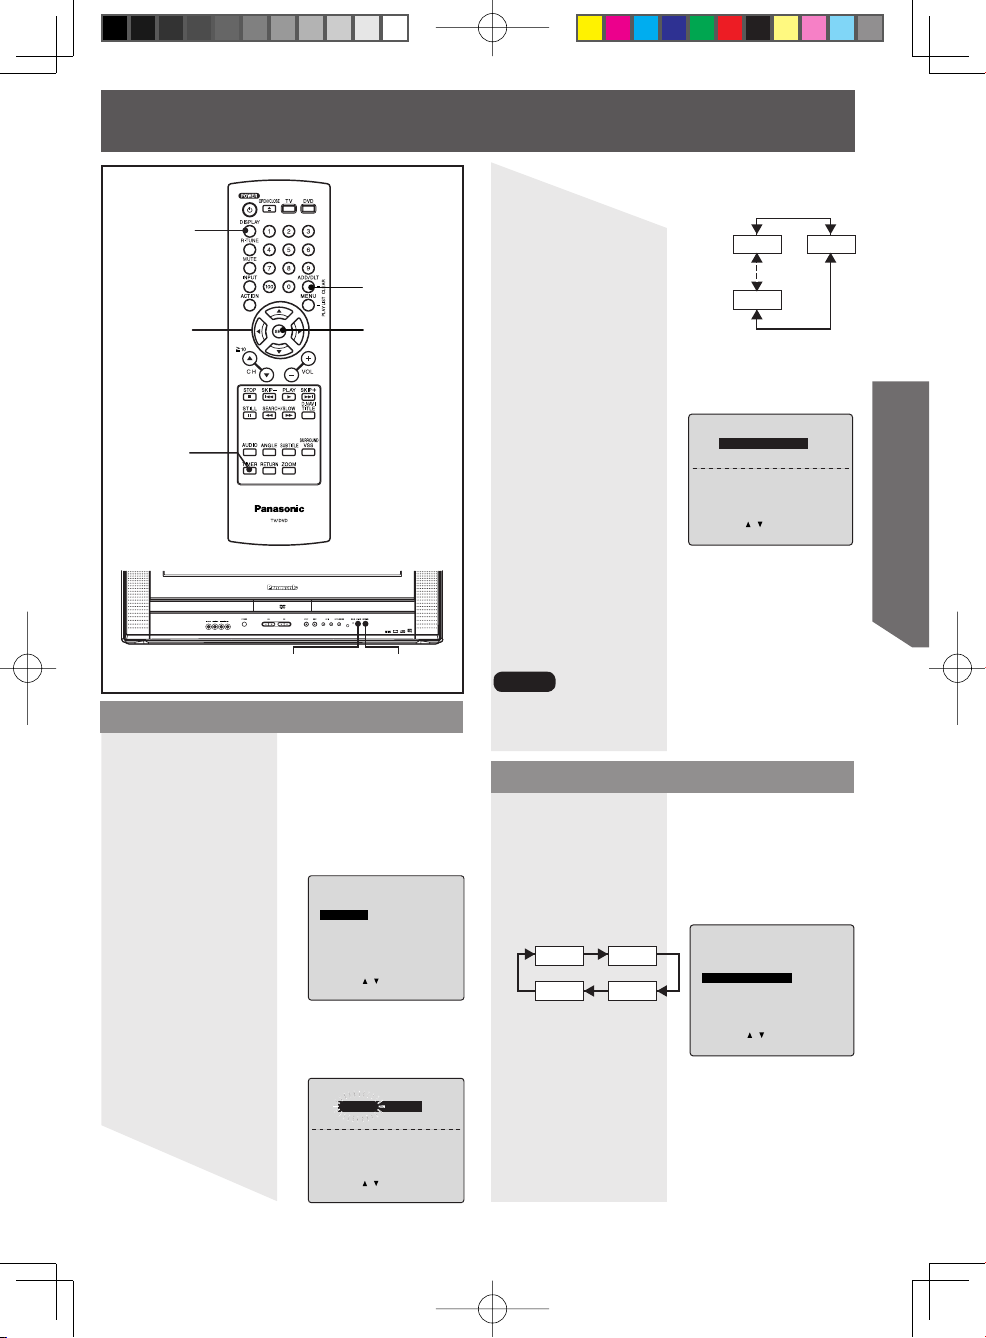
Page 18
AUTO CLOCK SET
PROCEEDING
CANCEL:STOP
10/25/2004 MON 11:45AM
DST:ON
SETTING : CH 10
AUTO CLOCK SET
COMPLETED
AUTO CLOCK SET
IS INCOMPLETE
PLEASE SET CLOCK BY
PRESSING ACTION KEY
SET CLOCK
10/25/2004 MON 11:45AM
DST:ON
SELECT: SET:SET
START :ACTION
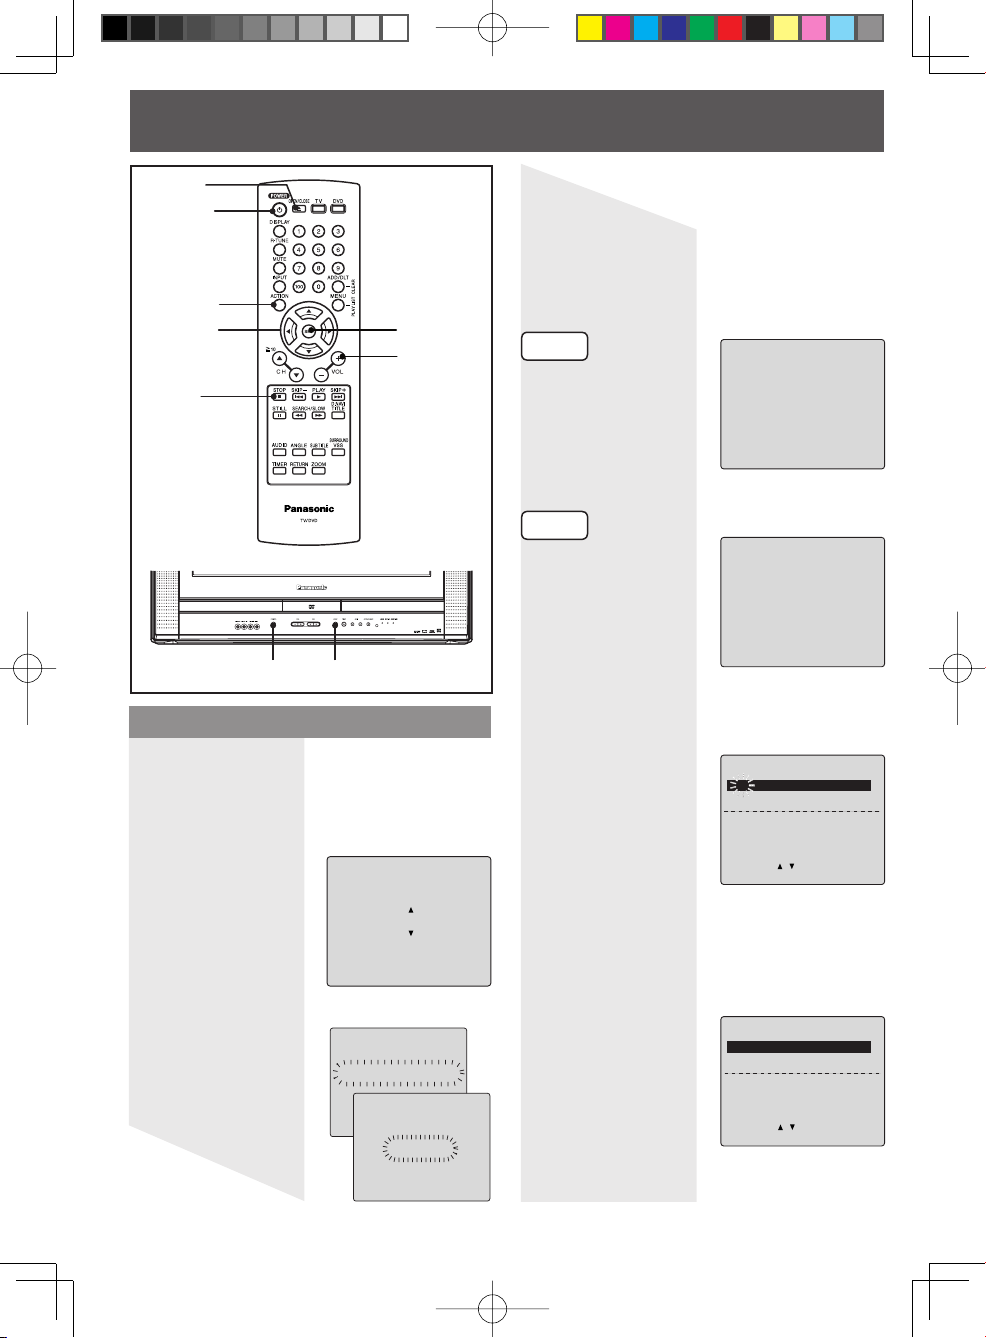
Initial Setup -Ready to Play-
Initial Setup (Ready to Play)
Please make all cable or antenna
connections before powering on.
Plug the unit power cord into an AC wall
outlet.
1 Press POWER on the remote or unit.
2 Press ▲, ▼, or
3 Auto channel and clock set starts.
18
EJECT
POWER
ACTION
SELECT
▲▼◄ ►
STOP
POWER
VOL+ to select
language.
• If you use a cable
box, turn it on and
set it to the Public
Broadcasting
Service (PBS)
channel in your
time zone. If you
use a DSS
receiver, it must be
turned off.
SET
VOL+
STOP
SELECT LANGUAGE
PRESS CH :English
APPUYER CH :Français
OPRIMIR VOL+ :Español
CH AUTO SET PROCEEDING
• Function buttons are void during Initial Setup.
• If Auto Clock Set takes more than 30 minutes,
press STOP and perform settings manually. (See
pages 19-21.)
Case 1
Settings are made
automatically. When
complete, this screen
appears.
Case 2
If setup is incomplete,
the following screen
appears. Check
connection of
Antenna/Cable to the
RF in Terminal, then
try manually to set the
clock as follows.
a. Press ACTION on the Remote to
display SET CLOCK Menu screen.
SET CLOCK
1/ 1/2004 THU 12:00AM
SELECT: SET:SET
START :ACTION
DST:ON
b. Press ▲▼ to select the month and
press SET to set. In the same
manner, select and set the date, year,
time, and DST (Daylight Saving Time).
• Press ◄ repeatedly to move the cursor. Press
▲▼ to make a correction.
c. Press ACTION twice to start CLOCK
and exit.
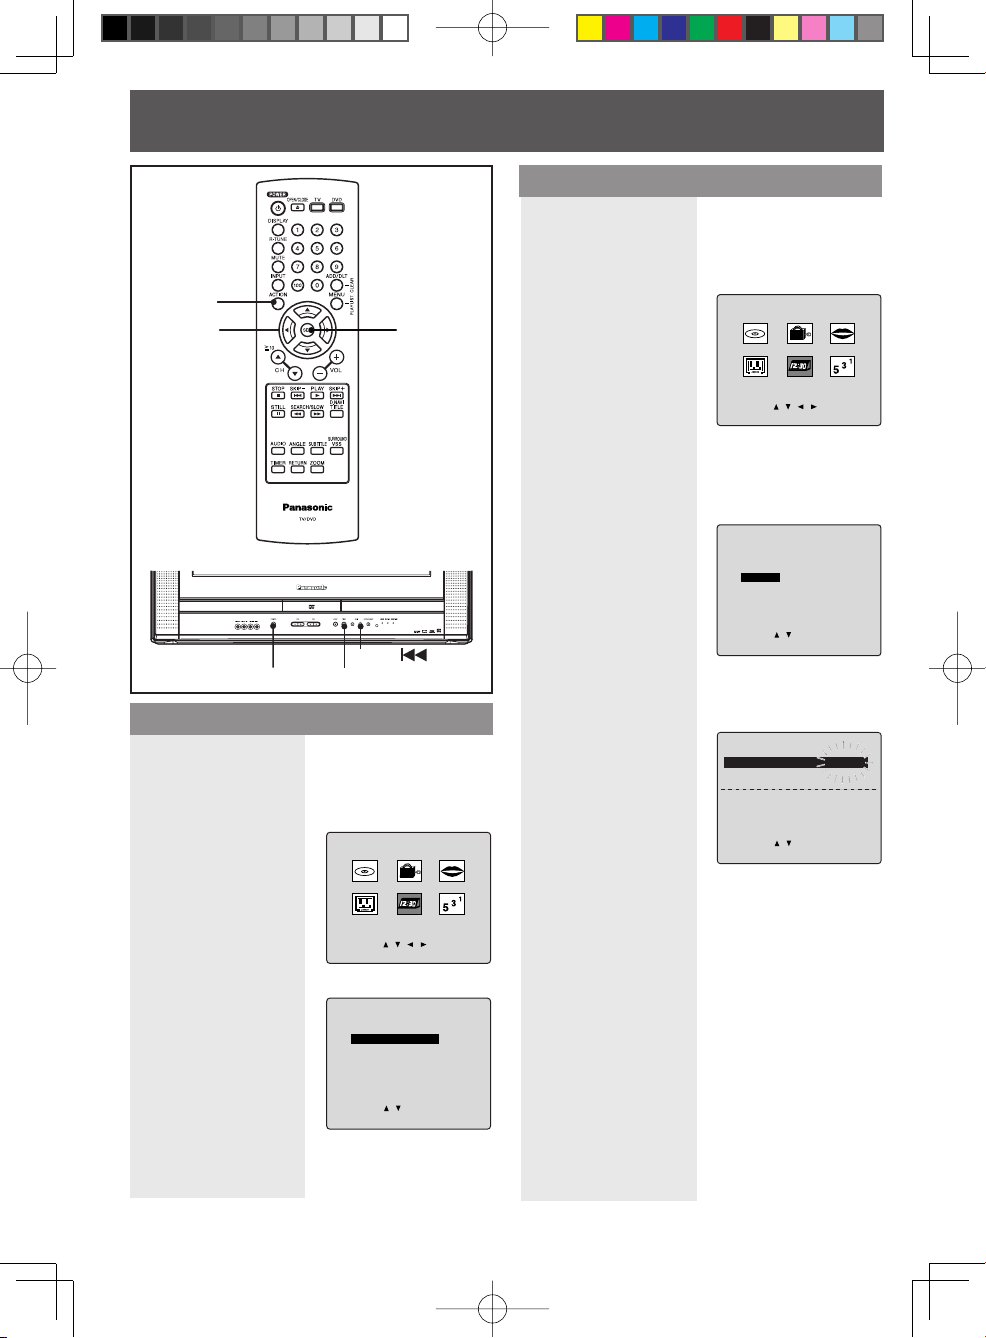
Page 19
Tuning T V
ACTION
SELECT
▲▼◄ ►
CH▲▼
NUMBER
keys
ADD/DLT
SET
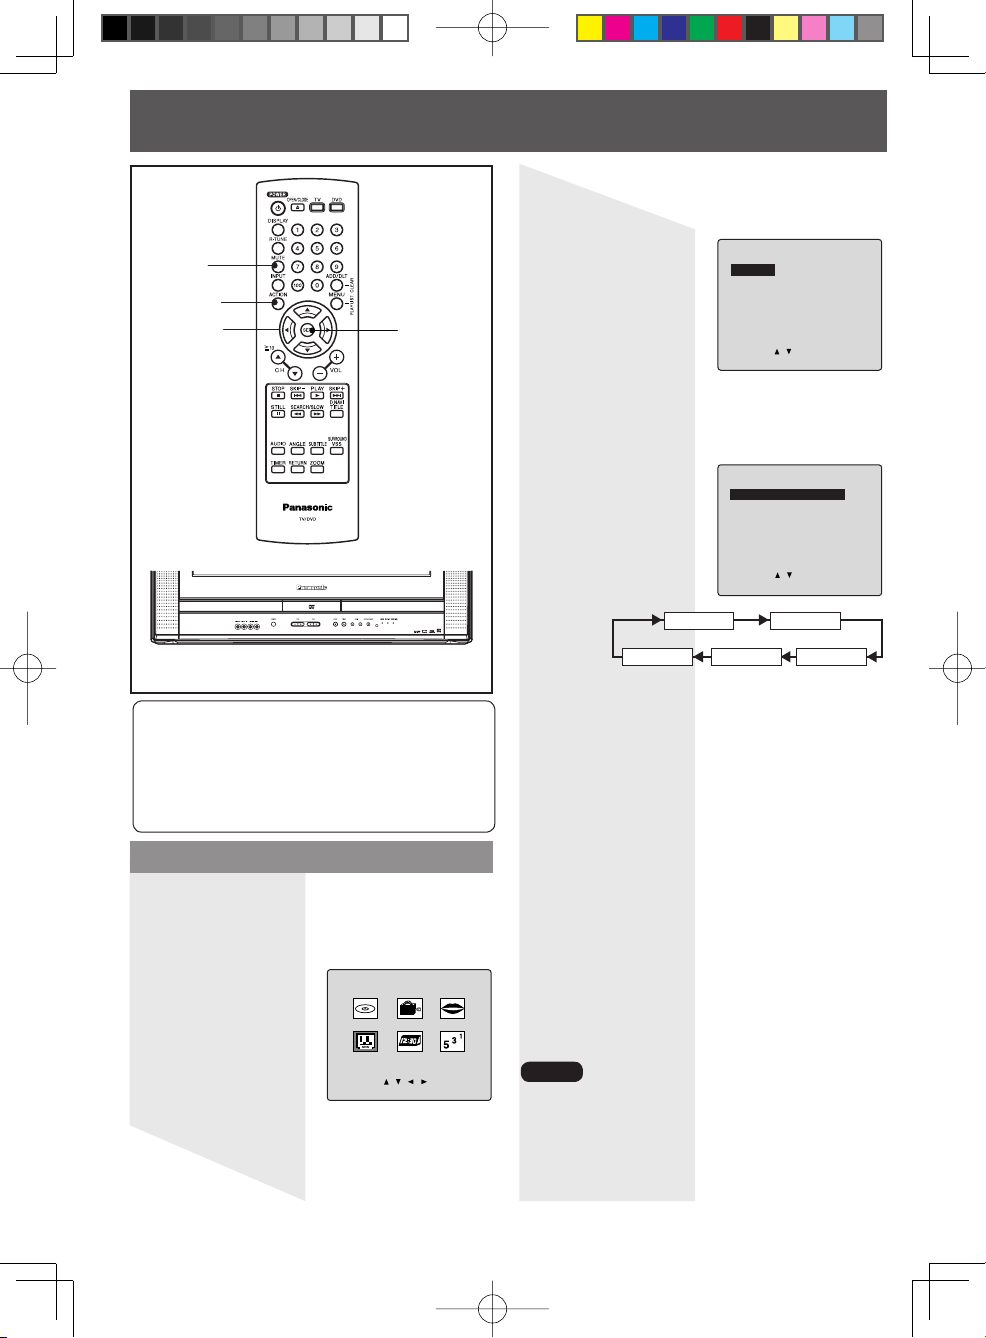
4 Press ▲▼ to select “ANTENNA,” then
press SET to set your antenna
system (“TV” or “CABLE”).
5 Press ▲▼ to select “AUTO SET,”
then press SET.
• After Channel Auto Set is finished, Clock Auto
Set will be per formed. (If clock is set manually,
Clock Auto Set will not be per formed.)
TV Operation
Add or Delete a Chan nel
To add channel:
Select channel with NUMBER keys and
press ADD/DLT.
CHANNEL 08 ADDED
Automatic Channel Setting
1 Press ACTION to display MAIN
MENU.
2 Press ▲▼◄ ► to select “CH.”
MAIN MENU
DVD LOCK LANGUAGE
TV CLOCK CH
SELECT: SET:SET
END :ACTION
3 Press SET.
SET UP CHANNEL
ANTENNA : CABLE
AUTO SET
WEAK SIGNAL DISPLAY:OFF
SELECT: SET:SET
END :ACTION
To d e lete channel:
Select channel with CH ▲▼ or NUMBER
keys and press ADD/DLT.
CHANNEL 08 DELETED
19
Page 20
SET CLOCK
10/25/2004 MON 11:45AM
DST:ON
SELECT: SET:SET
END :ACTION
SET CLOCK
AUTO CLOCK SET
MANUAL
TIME ZONE ADJUST : 0
SELECT: SET:SET
END :ACTION
MAIN MENU
DVD LOCK LANGUAGE
TV CLOCK CH
SELECT: SET:SET
END :ACTION
ACTION
SELECT
▲▼◄ ►
SET
SKIP-
POWER
PLAY
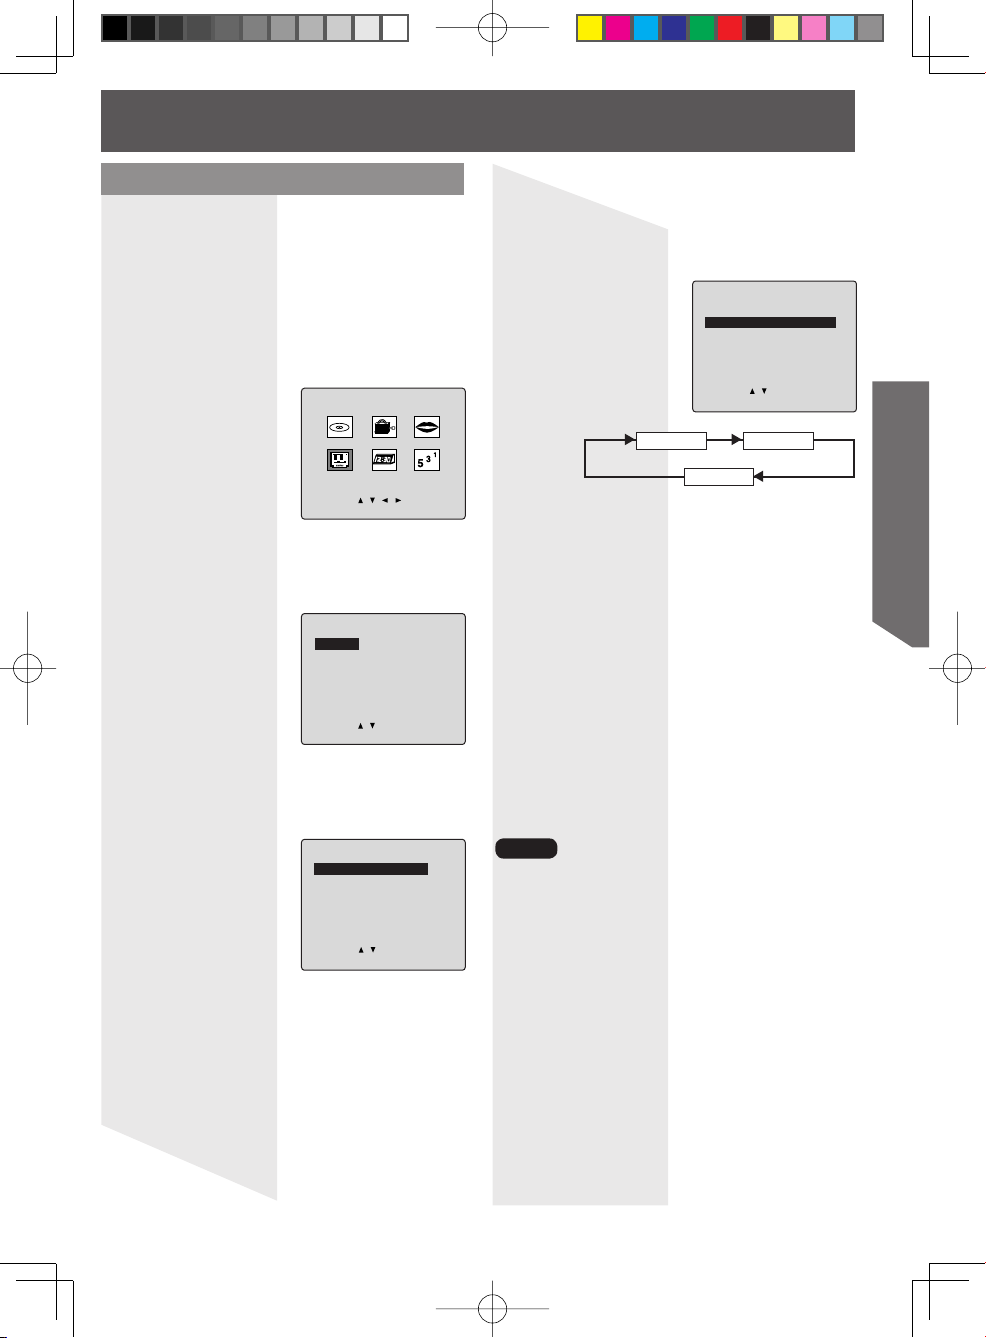
Automatic Clock Setting
1 Press ACTION to display MAIN
MENU.
Manual Clock Setting
1 Press ACTION to display MAIN
MENU.
2 Press ▲▼◄ ► to select “CLOCK.”
3 Press SET.
(“TIME ZONE ADJUST” appears only when
auto clock is set.)
4 Press ▲▼ to select “MANUAL,” then
press SET.
2 Press ▲▼◄ ► to select “CLOCK.”
3 Press SET.
4 Press ▲▼ to select “AUTO CLOCK
20
SET,” then press SET.
MAIN MENU
DVD LOCK LANGUAGE
TV CLOCK CH
SELECT: SET:SET
END :ACTION
SET CLOCK
AUTO CLOCK SET
MANUAL
SELECT: SET:SET
END :ACTION
5 Press ▲▼ and press SET to select
and set the month, date, year, time,
and DST (Daylight Saving Time).
To Make Corrections, repeatedly
press ◄ to move to error, then
correct.
6 Press ACTION twice to start the
clock and exit this mode.
Page 21

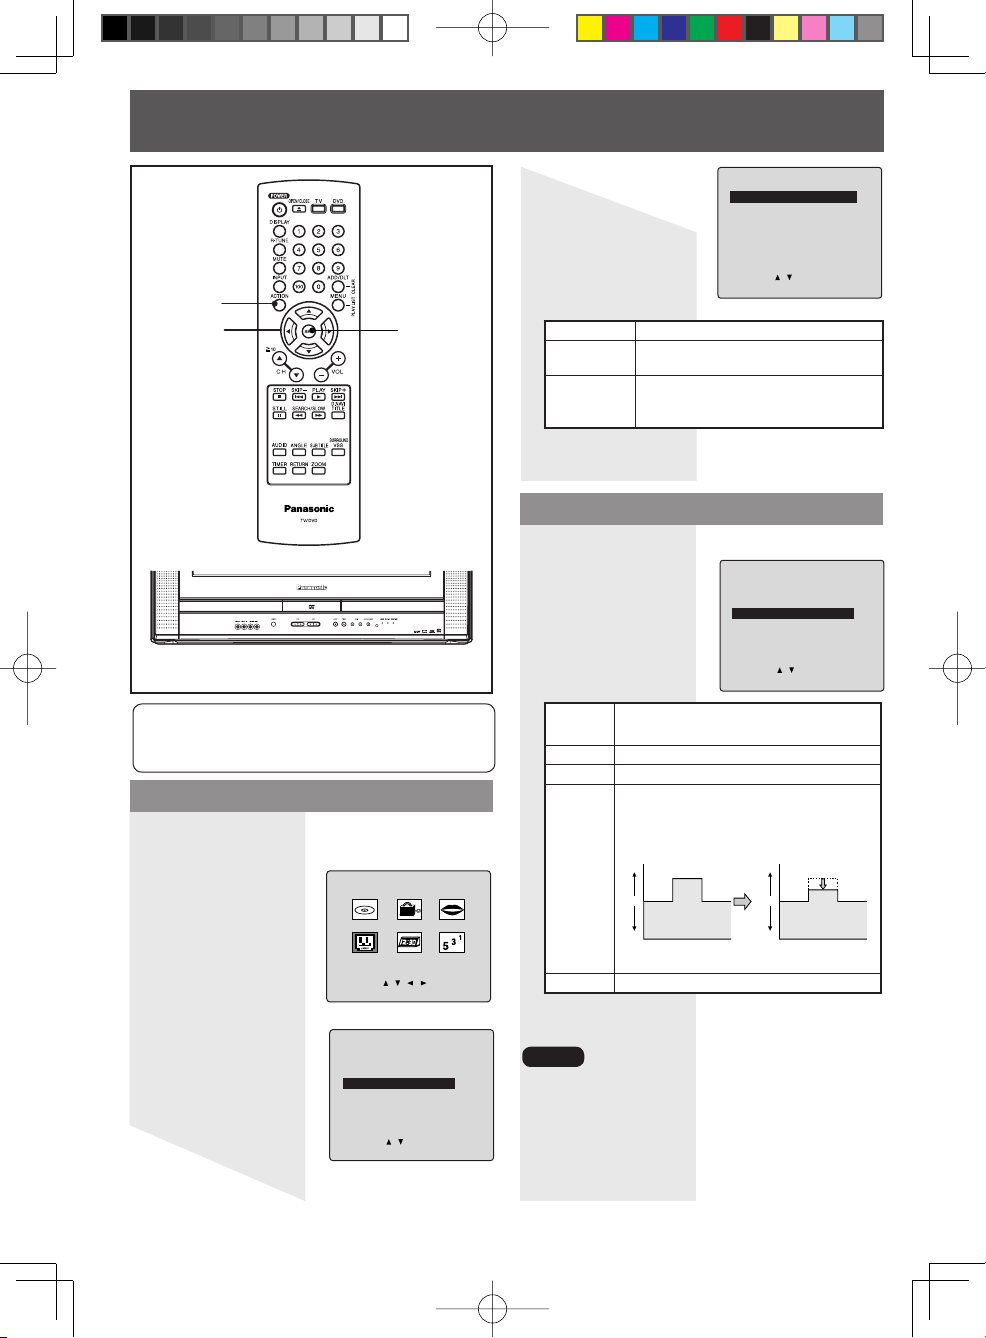
Time Zone Adjust
MENU
DVD BLOCAGE LANGUE
TELE HORLOGE CANAL
SEL.: REGLER:SET
FIN :ACTION
MENU PRINCIPAL
DVD BLOQUEO IDIOMA
TV RELOJ CANAL
ELEGIR: FIJAR:SET
TERMINAR:ACTION
MAIN MENU
DVD LOCK LANGUAGE
TV CLOCK CH
SELECT: SET:SET
END :ACTION
(Only when Auto Clock is set.)
1 Press ▲▼◄ ► to select “CLOCK.”
MAIN MENU
DVD LOCK LANGUAGE
TV CLOCK CH
SELECT: SET:SET
END :ACTION
3 Press SET repeatedly.
English Spanish
French
For Engl ish
2 Press SET.
3 Press ▲▼ to select “TIME ZONE
ADJUST” and press SET to subtract
or add hour(s) as necessary.
4 Press ACTION twice to exit.
Note
• “TIME ZONE ADJUST” returns to “0” if clock is
set manually.
Change Language Setting
1 Press ACTION to display MAIN
MENU.
2 Press ▲▼◄ ► to select “LANGUAGE.”
AUTO CLOCK SET
MANUAL
TIME ZONE ADJUST : 0
SELECT: SET:SET
END :ACTION
AUTO CLOCK SET
MANUAL
TIME ZONE ADJUST :+1
SELECT: SET:SET
END :ACTION
0
DVD LOCK LANGUAGE
SELECT: SET:SET
END :ACTION
SET CLOCK
SET CLOCK
+1
MAIN MENU
TV CLOCK CH
For Spanish
TV Operation
For Fr ench
-1
4 Press ACTION to exit.
Reset all unit Memory Func tions
Returns to factory setting. Use if relocating
unit, or if Initial Setup needs to be redone.
1 Turn the unit Power on.
2 Press and hold both PLAY and
SKIP-
on the unit for more than 5
seconds.
• The power will shut off.
3 Perform “Initial Setup” on page 18.
21
Page 22

TV Operation
MAIN MENU
DVD LOCK LANGUAGE
TV CLOCK CH
SELECT: SET:SET
END :ACTION
SET UP TV
CAPTION
INPUT SELECT :TUNER
SET UP VIDEO/AUDIO
DVD VOL ADJUST :+2
SELECT: SET:SET
END :ACTION
TV
RAPID
TUNE
MUTE
INPUT
ACTION
SELECT
▲▼◄ ►
CH▲▼
AV Input Terminal 2
NUMBER
keys
100 key
SET
VOL+/-
SURROUND
If a remote control button does not work
when pressed, press the TV button on the
remote and try the button again.
Method 2:
Press INPUT. The display will change as
follows.
LINE1
LINE2
TUNER
Method 3:
1 Press ACTION for MAIN MENU.
2 Press ▲▼◄ ► to select “TV”, then
press SET for SET UP TV screen.
3 Press ▲▼ to select “INPUT SELECT,”
and then press SET to select
“TUNER”, “LINE 1”, or “LINE 2.”
Selecting Input Mode
Method 1:
Press CH ▲▼. The display will change as
follows.
Notes
• The diagram at right
is an example.
• T V CH 2 and CABLE
CH 1 represent the
lowest channels in
memory, while TV
CH 69 and CABLE
CH 125 represent the
highest channels in
memory.
22
(TV)
CH2
(CABLE)
CH1
(TV)
CH69
(CABLE)
CH125
LINE2
LINE1
4 Press ACTION twice to exit this
mode.
LINE 1:
Signal of source connected to AV Input
terminal 1 is displayed. (
Rear of the unit.)
LINE 2:
Signal of source connected to AV Input
terminal 2 is displayed.
TUNER:
Signal of source connected to VHF/UHF
terminal is displayed.
Using the CH/VOL Button
Select desired channel:
Press CH ▲▼ or NUMBER keys.
Adjust desired volume level:
Press VOL + or VOL -.
Page 23
Using the Number and 100 keys
When selecting CABLE channels 100 to 125
with the NUMBER keys, first press the 100
key, and then enter the remaining two digits.
Example 1:
To select channel 125, first press the 100
key, then 2, then 5.
Example 2:
To select channel 12, first press the 1 key,
then 2.
Example 3:
To select channel 2, first press the 0 key,
then 2.
Rapid Tune
Press R-TUNE to display the last channel
you were watching.
Audio Mute
Press MUTE to instantly mute the sound.
Press again to restore the previous sound
level.
TV Operation
Surround Sound System
You can hear a deeper, 3-D sound effect
using just the unit’s two front speakers.
Press SURROUND.
•”SURROUND ON” is displayed.
To Cancel, press SURROUND.
Notes
• Surround sound effect is not available for normal
(mono) broadcasts.
• The surround effect (TV mode only) is not output
to Audio Output L /R Connector.
23
Page 24
12:00AM CH 08
STEREO
SAP
MONO
12:00AM CH 08
STEREO
SAP
MONO
12:00AM CH 08
STEREO
SAP
MONO
12:00AM CH 08
STEREO
SAP
MONO
12:00AM CH 08
STEREO
SAP
MONO
12:00AM CH 08
STEREO
SAP
MONO
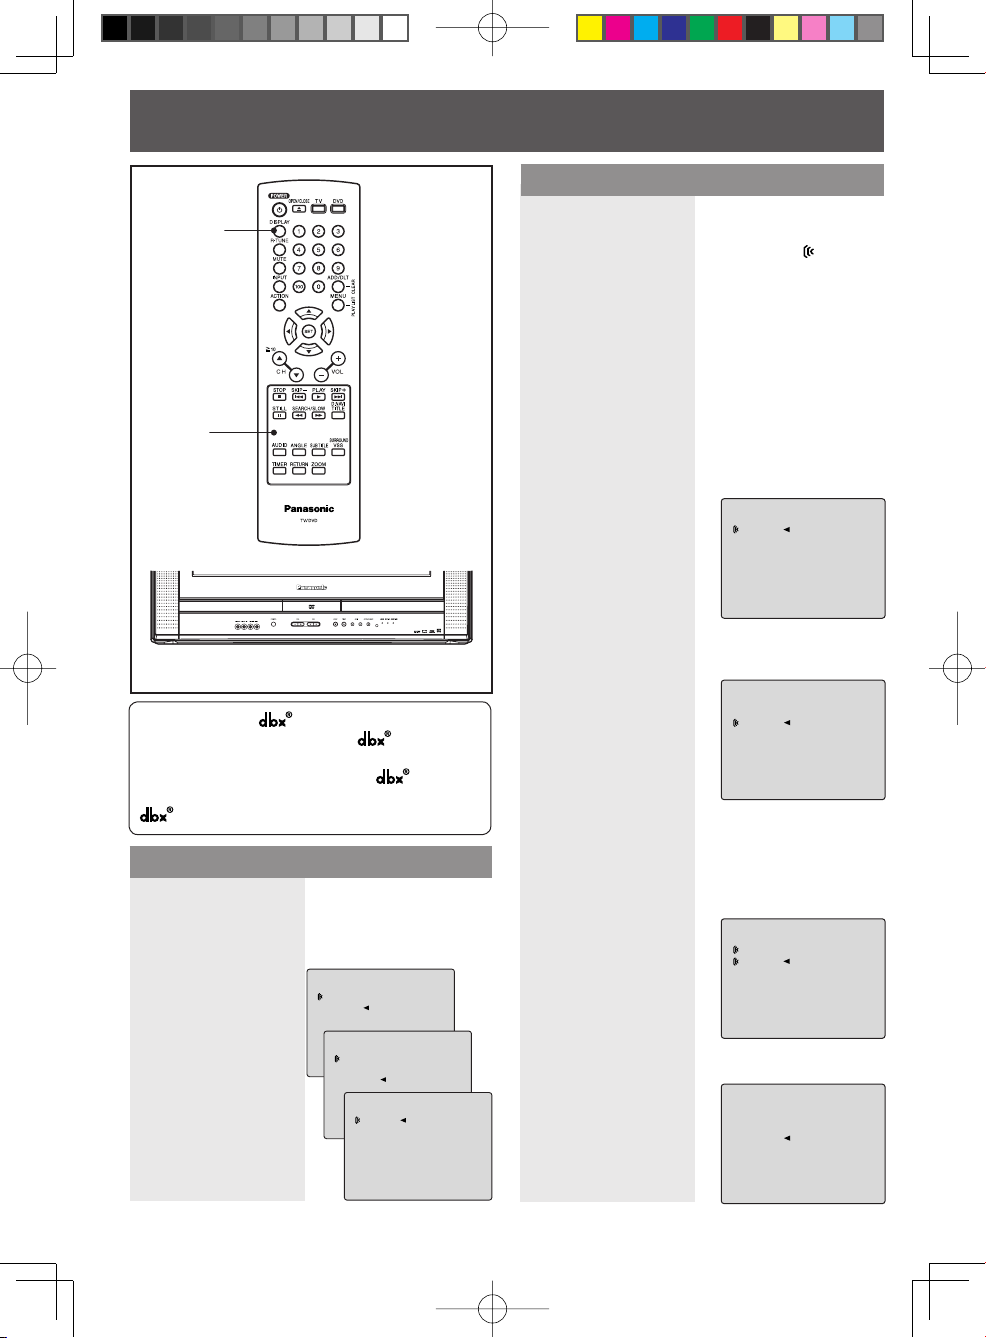
MTS Broadcast / TV Stereo System
Receivable Broadcast Types
DISPLAY
AUDIO
The following are possible audio broadcast
types and on-screen displays. The signal
being received is indicated with a “
while the selected audio mode is indicated
with an arrow. To change the audio mode for
these broadcasts, see the “Audio Mode for
TV Viewing” section.
Press DISPLAY to display the broadcast
signal being received.
MTS Stereo broadcast:
Multi-channel Television Sound Stereo
broadcast. Select STEREO audio mode.
• If stereo broadcast is weak and the display
flickers, select MONO audio mode for possible
improvement.
SAP broadcast:
Secondary Audio Program (sub language).
Select SAP audio mode for the sub
language.
” mark
Press AUDIO to select the desired audio
mode as described above. (Arrow shows
selection.)
• Each press of
• “SAP” is selected
24
Equipped with -TV Noise Reduction
for true MTS reproduction.
-TV Noise
Reduction is required for good stereo
separation and audio fidelity.
is a
registered trademark, and is licensed by
Techn o l o g y L ic e nsing.
Audio Mode for TV Viewing
AUDIO will change
the audio mode as
shown below.
with first press of
AUDIO.
< Example >
12:00AM CH 08
STEREO
SAP
MONO
MTS Stereo and SAP broadcast:
Multi-channel Television Sound Stereo (main
language) and Secondary Audio Program
(sub language) broadcasts are being
received simultaneously. Select the STEREO
or SAP audio mode.
MONO broadcast:
Normal monaural sound broadcast.
Page 25
ON TIMER
10:00AM CH 05
CANCEL:ADD/DLT
SELECT: SET:SET
END :TIMER
SET TIMER
ON TIMER
SLEEP TIMER: 0
SELECT: SET:SET
END :TIMER
TV Timer Features
DISPLAY
ADD/DLT
SELECT
▲▼◄ ►
TIMER
ON-TIMER
Indicator
SET
SLEEP TIMER
Indicator
ON-TIMER
This unit can be set to automatically power on
in one of 2 modes (TV or Disc.)
1 Press TIMER to display SET TIMER
screen.
2 Press ▲▼ to select “ON TIMER.”
3 Press SET to display ON TIMER
screen.
4 Press ▲▼ to select desired settings.
5 Press SET to set the ON-TIMER time
and ON-TIMER mode.
SET TIMER
ON TIMER
SLEEP TIMER: 0
SELECT: SET:SET
END :TIMER
ON TIMER
10:--AM CH --
SELECT: SET:SET
END :TIMER
• Make sure a disc
is inserted if Disc
(DVD/CD) mode is
selected.
Lowest
channel
Highest
channel
ON-TIMER mode
selection order
CH01
CH125
Disc
To Make Corrections, use ▲▼ and ◄ ►
to move back and correct.
6 Press TIMER to
set ON TIMER.
• “ON TIMER SET”
is displayed.
• ON-TIMER
Indicator lights up
on the unit.
To Cancel ON-TIMER,
Repeat steps 1-3. Then, press ADD/DLT to
clear the time in steps 4-5. Now, press
TIMER to end. “ON TIMER END” briefly
appears on-screen.
Note
• If no button on the remote or unit is pressed
within 60 minutes after unit turns itself on, it will
turn itself back off.
Sleep Timer
This unit can be set for auto power off.
1 Press TIMER to display SET TIMER
screen.
2 Press ▲▼ to select “SLEEP TIMER.”
3 Press SET repeatedly to select the
desired time.
30 60
0 90
To cancel, press SET repeatedly until 0
appears.
4 Press TIMER to return to the normal
screen.
• Pressing DISPLAY with sleep timer set
displays remaining time.
• SLEEP TIMER Indicator lights up on the unit.
TV Operation
25
Page 26
SET UP TV
CAPTION
INPUT SELECT :TUNER
SET UP VIDEO/AUDIO
DVD VOL ADJUST :+2
SELECT: SET:SET
END :ACTION
Closed Caption System
CAPTION
CAPTION MODE : OFF
CC ON MUTE : CAP C1
SELECT: SET:SET
END :ACTION
MUTE
ACTION
SELECT
▲▼◄ ►
Closed Caption is ...
This multi-use system not only allows the
hearing impaired to enjoy selected
programs, but also allows one to watch
programs with the volume muted.
Closed Caption Mode Feature
1 Press ACTION to display MAIN
MENU.
2 Press ▲▼◄ ► to select “TV.”
SET
MAIN MENU
DVD LOCK LANGUAGE
4 Press ▲▼ to select “CAPTION”.
5 Press SET to display CAPTION
screen.
6 Press ▲▼ to select “CAPTION
MODE.”
7 Press SET repeatedly to select mode.
OFF CA P C1
TEXT C2 CAP C2 TEXT C1
Caption Mode: CAP C1 or C2
A narration of selected TV programs is
displayed.
Check TV program listings for CC (Closed
Caption) broadcasts.
Caption Mode: TEXT C1 or C2
Most of the screen will be blocked out.
When the TV station broadcasts
information, such as program listings, it
will appear in this space.
Caption Mode: OFF
Closed Caption/Text narration will not be
displayed.
8 Press ACTION three times to return
to the normal screen.
3 Press SET to display SET UP TV
26
screen.
TV CLOCK CH
SELECT: SET:SET
END :ACTION
Note
• The closed caption or text signal may be
broadcast over C1, C2, or both. Also, text
contents can vary so you may wish to try
different settings.
Page 27
MAIN MENU
DVD LOCK LANGUAGE
TV CLOCK CH
SELECT: SET:SET
END :ACTION
SET UP TV
CAPTION
INPUT SELECT :TUNER
SET UP VIDEO/AUDIO
DVD VOL ADJUST :+2
SELECT: SET:SET
END :ACTION
CAPTION
CAPTION MODE : OFF
CC ON MUTE : CAP C1
SELECT: SET:SET
END :ACTION
CAPTION
CAPTION MODE : OFF
CC ON MUTE : CAP C1
SELECT: SET:SET
END :ACTION
Caption On Mute Feature
Closed Caption narration, if available, is
displayed when MUTE button is pressed for
silence.
1 Press ACTION to display MAIN
MENU.
2 Press ▲▼◄ ► to select “TV.”
3 Press SET to display SET UP TV
screen.
8 Press ▲▼ to select “CC ON MUTE.”
9 Press SET repeatedly to select
desired mode.
• The caption may be broadcast over CAP C1
or C2.
4 Press ▲▼ to select “CAPTION”.
5 Press SET to display CAPTION
screen.
6 Press ▲▼ to select “CAPTION
MODE.”
7 Press SET repeatedly to select “OFF.”
NO CA P C1
CAP C2
CC ON MUTE: CAP C1 or C2
A narration of selected TV programs is
displayed when MUTE button is pressed
for silence.
CC ON MUTE: NO
A narration will not be displayed when
MUTE button is pressed for silence.
10 Press ACTION three times to return
to the normal screen.
11 Press MUTE to mute the sound and
display closed captioning.
• To cancel, press MUTE again.
Note
• When a disc supporting closed captions is used,
the subtitle and the closed caption may overlap.
In this case, turn the subtitle or caption mode off.
(See page 42.)
TV Operation
27
Page 28
SET UP VIDEO/AUDIO
VIDEO MENU :NORMAL
VIDEO ADJUST
AUDIO MENU :MUSIC
AUDIO ADJUST
SELECT: SET:SET
END :ACTION
SET UP VIDEO/AUDIO
VIDEO MENU :NORMAL
VIDEO ADJUST
AUDIO MENU :MUSIC
AUDIO ADJUST
SELECT: SET:SET
END :ACTION
Video / Audio Menu
ACTION
SELECT
▲▼◄ ►
SET
6 Press ▲▼ to
select “VIDEO
MENU.”
7 Press SET
repeatedly to
select desired
mode.
NORMAL Factory setting.
MOVIE
NIGHT
Picture is adjusted for a movie-like
feel.
Colour and picture intensity are
adjusted to be easier on the eyes for
night viewing.
8 Press ACTION three times to end
setup.
Audio Menu
1 Do steps 1 - 5 at left.
2 Press ▲▼ to
select “AUDIO
MENU.”
3 Press SET to
select desired
mode.
28
This feature allows easy setting of picture
and sound suitable for each program
source.
Video Menu
1 Press ACTION to display MAIN
MENU.
2 Press ▲▼◄ ► to
select “TV.”
3 Press SET to
display SET UP
TV screen.
4 Press ▲▼ to
select “SET UP
VIDEO/AUDIO.”
5 Press SET to
display.
MAIN MENU
DVD LOCK LANGUAGE
TV CLOCK CH
SELECT: SET:SET
END :ACTION
SET UP TV
CAPTION
INPUT SELECT :TUNER
SET UP VIDEO/AUDIO
DVD VOL ADJUST :+2
SELECT: SET:SET
END :ACTION
MUSIC
SPEECH Sound suited to dialogue.
NORMAL
AUTO
MOVIE Sound suited to movies.
Sound suited to music.
(Factory setting)
[Audio AGC (Auto Gain Control)] The
sound level is automatic ally adjusted to
suit the program source.
Volume level
High
TV TV
Standard
Low
AUDIO MENU : NORMAL
CD
Volume level
High
TV TV
Standard
Low
<Audio AGC Example>
AUDIO MENU : AUTO
CD
4 Press ACTION three times to end
setup.
Notes
• The effects of this feature on the signal are not
output to the Audio/Video Output Connector.
• When AUDIO MENU mode is “AUTO,” the
AUDIO ADJUST setting will be “STANDARD.”
• AUDIO MENU settings remain in memory.
• VIDEO MENU settings do not remain in memory.
Page 29
MAIN MENU
DVD LOCK LANGUAGE
TV CLOCK CH
SELECT: SET:SET
END :ACTION
SET UP TV
CAPTION
INPUT SELECT :TUNER
SET UP VIDEO/AUDIO
DVD VOL ADJUST :+2
SELECT: SET:SET
END :ACTION
SET UP TV
CAPTION
INPUT SELECT :TUNER
SET UP VIDEO/AUDIO
DVD VOL ADJUST :+2
SELECT: SET:SET
END :ACTION
SET UP VIDEO/AUDIO
VIDEO MENU :NORMAL
VIDEO ADJUST
AUDIO MENU :MUSIC
AUDIO ADJUST
SELECT: SET:SET
END :ACTION
AUDIO ADJUST
BASS
TREBLE
BALANCE
STANDARD
SELECT: ADJUST:
END :ACTION
Video Adjustment Audio Adjustment
Press ACTION to display MAIN MENU.
Press ACTION to display MAIN MENU.
1 Press ▲▼◄ ► to
MAIN MENU
select “TV.”
2 Press SET to
display SET UP
TV screen.
DVD LOCK LANGUAGE
TV CLOCK CH
SELECT: SET:SET
END :ACTION
3 Press ▲▼ to
select “SET UP
VIDEO/AUDIO.”
4 Press SET to
display.
5 Press ▲▼ to
select “VIDEO
ADJUST.”
SET UP VIDEO/AUDIO
VIDEO MENU :NORMAL
VIDEO ADJUST
AUDIO MENU :MUSIC
AUDIO ADJUST
6 Press SET to
display.
7 Press ▲▼ to
select an item.
8 Press ◄► to
adjust.
COLOR Control Adjust colour intensity.
TINT Control Adjust for natural flesh tones.
BRIGHTNESS
Control
PICTURE Control
SHARPNESS
Control
SELECT: SET:SET
END :ACTION
VIDEO ADJUST
COLOR
TINT
BRIGHTNESS
PICTURE
SHARPNESS
STANDARD
SELECT: ADJUST:
END :ACTION
Adjust picture brightness.
Adjust picture intensity by
adjusting both contrast and
colour level in the proper
balance.
Increases or decreases the
level of detail in the image.
To Reset VIDEO Controls.
Press ▲▼ and SET to select and set
“STANDARD.” All controls return to their
factory settings.
1 Press ▲▼◄ ► to
select “TV.”
2 Press SET to
display SET UP
TV screen.
3 Press ▲▼ to
select “SET UP
VIDEO/AUDIO.”
4 Press SET to
display.
5 Press ▲▼ to
select “AUDIO
ADJUST.”
6 Press SET to
display.
7 Press ▲▼ to
select an item.
8 Press ◄► to
adjust.
BASS Control
TREBLE Control
BALANCE Cont rol
• The levels set here do not affect other audio
equipment when connected to the Audio
Output L/R Connector.
To adjust the intensity of low
frequency sound.
To adjust the intensity of high
frequency sound.
Controls the difference in
audio level between the left
and right speaker.
To Reset AUDIO Controls.
Press ▲▼ and SET to select and set
“STANDARD.” All controls return to their
factory settings.
TV Operation
9 Press ACTION four times to end
setup.
9 Press ACTION four times to end
setup.
29
Page 30

MAIN MENU
DVD LOCK LANGUAGE
TV CLOCK CH
SELECT: SET:SET
END :ACTION
SET UP CHANNEL
ANTENNA : CABLE
AUTO SET
WEAK SIGNAL DISPLAY:OFF
SELECT: SET:SET
END :ACTION
Weak Signal Display Feature
When “ON” is selected, the picture is
displayed even when a broadcast signal is
weak or non-existent.
1 Press ACTION to display MAIN
MENU.
ACTION
SELECT
▲▼◄ ►
SET
2 Press ▲▼◄ ► to select “CH.”
3 Press SET to display SET UP
CHANNEL screen.
4 Press ▲▼ to select “WEAK SIGNAL
DISPLAY.”
5 Press SET to set “ON” or “OFF.”
ON:
Picture is displayed regardless of signal
condition, and may not always be clearly
visible.
OFF:
Screen turns solid blue when signal is
absent or weak.
Note
• If unit is connected to equipment which has
blue back feature, selecting “ON” will have
no effect on the other equipment.
30
6 Press ACTION twice to return to the
normal screen.
Page 31

V-Chip Control Features
MAIN MENU
DVD LOCK LANGUAGE
TV CLOCK CH
SELECT: SET:SET
END :ACTION
LOCK
CONFIRM 4-DIGIT CODE
****
****
RECOGNIZED
CHANGE CODE:ADD/DLT
CONTINUE:SET
END :ACTION
ACTION
SELECT
▲▼◄ ►
V-Chip Control Feature is...
This unit has a built-in V-Chip Control
which allows you to block unwanted TV
usage based on US MOVIES, US TV
PROGRAMS Ratings, Canadian English
Language Ratings and Canadian French
Language Ratings.
Enter Secret Code
A 4-digit code must be entered to view a
blocked program or change rating settings.
1 Press ACTION to display MAIN
MENU.
2 Press ▲▼◄ ► to select “LOCK.”
3 Press SET to display LOCK screen.
NUMBER
keys
ADD/DLT
(CLEAR)
SET
4 Press NUMBER keys to enter your
secret code.
• Take care that you are not observed entering
the secret code.
LOCK
ENTER 4-DIGIT CODE
**--
ENTER :0-9
END :ACTION
5 Enter same code again for
confirmation.
■ To Make Corrections
a. Press ◄ repeatedly to move the
cursor.
b. Press NUMBER keys to make the
correction.
6 Press SET to display Ratings menu
(see pages 32-36). Or press ACTION
twice to exit.
Notes
• Some rental movies do not include V-Chip data.
• Do not forget your secret code.
• Once ratings are set, restricted tapes or
programs cannot be accessed unless the secret
code is entered.
• Step 5 not necessary when changing rating.
Changing your secret code
You will need your current code.
1
While this OSD (on screen display) is
displayed, press ADD/DLT (CLEAR) to
clear current code.
2 Enter new secret code.
LOCK
ENTER 4-DIGIT CODE
****
RECOGNIZED
CHANGE CODE:ADD/DLT
CONTINUE:SET
END :ACTION
TV Operation
31
Page 32

LOCK
US MOVIES :OFF
CHANGE SETTINGS
US TV PROGRAMS :OFF
CHANGE SETTINGS
NEXT PAGE
SELECT: SET:SET
END :ACTION
LOCK
US MOVIES :OFF
CHANGE SETTINGS
US TV PROGRAMS :OFF
CHANGE SETTINGS
NEXT PAGE
SELECT: SET:SET
END :ACTION
VIEW NR PROGRAMS? : YES
G UNLOCKED
PG
PG-13
R
NC-17
X
CONTAINS NO RATING
SELECT: SET:SET
END :ACTION
VIEW NR PROGRAMS? : YES
G UNLOCKED
PG
PG-13
R
NC-17
X
GENERAL AUDIENCE
SELECT: SET:SET
END :ACTION
NUMBER
keys
ACTION
SELECT
▲▼◄ ►
SET
If LOCK menu is not displayed, perform
“Enter Secret Code” steps on page 31.
3 Press ▲▼ to
select “CHANGE
SETTINGS.”
4 Press SET to
display screen.
5 Press ▲▼ to select “VIEW NR
PROGRAMS?.”
6 Press SET to set “YES” or “NO.”
NR (Not Rated) PROGRAMS:
Some movies, such as old movies or
foreign movies have no ratings.
7 Press ▲▼ to select and SET to set
ratings to be blocked.
1 Press ▲▼ to select “US MOVIES.”
2 Press SET to set “ON” or “OFF.”
32
US MOVIES Ratings
• “NEX T PAGE” displays CANADIAN V-Chip
settings menu. Please refer to pages 34-35
for more details on Canadian tapes or
broadcasts.
ON:
V-Chip Control is activated.
OFF:
V-Chip Control is deactivated.
GENER AL AUD IENCE:
G
All ages admitted.
PARENTAL GUIDANCE:
PG
Some material may not be suitable for
children.
PARENTS CAUTIONED:
PG-13
Some material may be inappropriate for
children under 13.
RESTRICTED:
R
Children under 17 must be acc ompanied
by a parent or adult.
OVER AGE 17 ONLY:
NC-17
No one 17 and under admitted.
XADULTS ONLY:
8 Press ACTION to redisplay LOCK
menu and continue with US TV
PROGRAMS Ratings (page 33). Or,
press ACTION three times to exit.
Page 33

LOCK
US MOVIES :OFF
CHANGE SETTINGS
US TV PROGRAMS :OFF
CHANGE SETTINGS
NEXT PAGE
SELECT: SET:SET
END :ACTION
VIEW NR PROGRAMS? : YES
TV-Y UNLOCKED
TV-Y7 FV
TV-G
TV-PG V S L D
TV-14 V S L D
TV-MA V S L
CONTAINS NO RATING
SELECT: SET:SET
END :ACTION
US TV PROGRAMS Ratings
1 Press ▲▼ to select “US TV
PROGRAMS.”
• “NEX T PAGE” displays CANADIAN V-Chip
setting menu. Please refer to pages 34-35 for
more details on Canadian tapes or
broadcasts.
2 Press SET to set “ON” or “OFF.”
ON:
V-Chip Control is activated.
OFF:
V-Chip Control is deactivated.
3 Press ▲▼ to select “CHANGE
SETTINGS.”
4 Press SET to display screen.
LOCK
US MOVIES :OFF
CHANGE SETTINGS
US TV PROGRAMS :OFF
CHANGE SETTINGS
NEXT PAGE
SELECT: SET:SET
END :ACTION
5 Press ▲▼ to select “VIEW NR
PROGRAMS?.”
6 Press SET to set “YES” or “NO.”
7 Press ▲▼ to select and SET to set
ratings to be blocked.
• You may select from standard TV ratings
(chart 1), or customize to a specific content
rating (chart 2).
• Ratings highlighted in green will be blocked.
Ratings in white letters will not be blocked.
VIEW NR PROGRAMS? : YES
TV-Y UNLOCKED
TV-Y7 FV
TV-G
TV-PG V S L D
TV-14 V S L D
TV-MA V S L
FOR ALL CHILDREN
SELECT: SET:SET
END :ACTION
Chart 1
FOR ALL CHILDREN:
TV-Y
Content specifically geared to young
viewers ages 2-6.
FOR AGE 7 AND OLDER:
May contain mild physical or comedic
TV-Y7
violenc e which may frighten children under
7.
GENER AL AUD IENCE:
TV-G
Contains little or no violence, strong
language, or sexual dialogue or situations.
PARENTAL GUIDANCE:
May contain infrequent coar se language,
TV-PG
limited violence, some suggestive sexual
dialogue and situations.
PARENTS CAUTIONED:
May contain sophisticated themes, sexual
TV-14
situations, strong language, and more
intense violence.
MATURE AUDIENCE:
May contain mature themes, profane
TV-MA
language, graphic violence, and sexual
situations.
Chart 2
FV Fantasy Violence
VViolence
SSexual Situations
LAdult Language
D Sexually Suggestive Dialogue
TV Operation
NR (Not Rated) PROGRAMS:
Some TV shows, such as news, sports,
weather, bulletins, emergency information
have no ratings.
8 Press ACTION three times to exit this
mode.
33
Page 34

NUMBER
LOCK
CANADIAN ENGLISH :OFF
CHANGE SETTINGS
CANADIAN FRENCH :OFF
CHANGE SETTINGS
PREVIOUS PAGE
SELECT: SET:SET
END :ACTION
VIEW E PROGRAMS? : YES
C UNLOCKED
C8+
G
PG
14+
18+
EXEMPT
SELECT: SET:SET
END :ACTION
VIEW E PROGRAMS? : YES
C UNLOCKED
C8+
G
PG
14+
18+
FOR CHILDREN
SELECT: SET:SET
END :ACTION
keys
ACTION
SELECT
▲▼◄ ►
SET
If LOCK menu is not displayed, perform
“Enter Secret Code” steps on page 31.
5 Press ▲▼ to
select “CHANGE
SETTINGS.”
6 Press SET to
display screen.
7 Press ▲▼ to
select “VIEW E
PROGRAMS?.”
8 Press SET to set
“YES” or “NO.”
E (Exempt) PROGR AMS:
Some TV shows, such as news, sports,
weather, bulletins, and emergency
information have no ratings.
9 Press ▲▼ to select and SET to set
ratings to be blocked.
1 Press ▲▼ to
2 Press SET to
3 Press ▲▼ to
4 Press SET to set
34
Canadian English Language Ratings
LOCK
select “NEXT
PAGE.”
display screen.
select
“CANADIAN
ENGLISH.”
“ON” or “OFF.”
ON:
V-Chip Control is activated.
OFF:
V-Chip Control is deactivated.
US MOVIES :OFF
CHANGE SETTINGS
US TV PROGRAMS :OFF
CHANGE SETTINGS
NEXT PAGE
SELECT: SET:SET
END :ACTION
LOCK
CANADIAN ENGLISH :OFF
CHANGE SETTINGS
CANADIAN FRENCH :OFF
CHANGE SETTINGS
PREVIOUS PAGE
SELECT: SET:SET
END :ACTION
CChildren
C8+ Children 8 years and older
GGeneral Audience
PG Parental Guidance
14+ Viewer s 14 years and older
18+ Adult Progr amming
10 Press ACTION to redisplay LOCK
menu and continue with Canadian
French Language Ratings (next
page). Or, press ACTION three times
to exit.
Page 35

Canadian French Language Ratings
LOCK
CANADIAN ENGLISH :OFF
CHANGE SETTINGS
CANADIAN FRENCH :OFF
CHANGE SETTINGS
PREVIOUS PAGE
SELECT: SET:SET
END :ACTION
LOCK
CANADIAN ENGLISH :OFF
CHANGE SETTINGS
CANADIAN FRENCH :OFF
CHANGE SETTINGS
PREVIOUS PAGE
SELECT: SET:SET
END :ACTION
VIEW E PROGRAMS? : YES
G UNLOCKED
8 ANS+
13 ANS+
16 ANS+
18 ANS+
EXEMPT
SELECT: SET:SET
END :ACTION
VIEW E PROGRAMS? : YES
G UNLOCKED
8 ANS+
13 ANS+
16 ANS+
18 ANS+
GENERAL AUDIENCE
SELECT: SET:SET
END :ACTION
1 Press ▲▼ to select “NEXT PAGE.”
2 Press SET to display screen.
LOCK
US MOVIES :OFF
CHANGE SETTINGS
US TV PROGRAMS :OFF
CHANGE SETTINGS
NEXT PAGE
7 Press ▲▼ to select “VIEW E
PROGRAMS?.”
8 Press SET to set “YES” or “NO.”
SELECT: SET:SET
END :ACTION
3 Press ▲▼ to select “CANADIAN
FRENCH.”
4 Press SET to set “ON” or “OFF.”
ON:
V-Chip Control is activated.
OFF:
V-Chip Control is deactivated.
5 Press ▲▼ to select “CHANGE
SETTINGS.”
6 Press SET to display screen.
E (Exempt) PROGR AMS:
Some TV shows, such as news, sports,
weather, bulletins, and emergency
information have no ratings.
9 Repeatedly press ▲▼ to select and
SET to set ratings to be blocked.
G General Audience
8 ANS +
13 ANS +
16 ANS +
18 ANS + Pro gramming restricted to adults
Not recommended for young
children
Programming m ay not be suitable
for children under the age of 13
Programming i s not suitable for
children under the age of 16
TV Operation
10 Press ACTION three times to exit this
mode.
35
Page 36

LOCK
CANADIAN ENGLISH :OFF
CHANGE SETTINGS
CANADIAN FRENCH :OFF
CHANGE SETTINGS
PREVIOUS PAGE
SELECT: SET:SET
END :ACTION
CH08
PROGRAM RATING EXCEEDED
RATING:PG-13
ACCESS CODE *---
ENTER :0-9
CH 08
PROGRAM RATING EXCEEDED
RATING:PG-13
ACCESS CODE ----
ENTER :0-9
To View a Blocked Program/Movie
CH 08
PROGRAM RATING EXCEEDED
RATING:13ANS+
ACCESS CODE ----
ENTER :0-9
LOCK
US MOVIES :OFF
CHANGE SETTINGS
US TV PROGRAMS :OFF
CHANGE SETTINGS
NEXT PAGE
SELECT: SET:SET
END :ACTION
LOCK
ENTER 4-DIGIT CODE
**--
ENTER :0-9
END :ACTION
NUMBER
keys
SELECT
▲▼◄ ►
SET
Blocking Message
<When V-Chip Control is activated>
If a program or movie exceeds the ratings
you have set, a message will appear on a
black background and sound is muted.
■ Temporarily Deactivate V-Chip
Control
Press NUMBER keys to enter your secret
code in the Blocking Message screen.
• V- Chip Control is reactivated when power is
turned off or power failure occurs.
<Example: US Rating>
■ Deactivate V-Chip Control
1
Enter your secret code. (See page 31.)
2 Then, set US MOVIES and/or US TV
PROGRAMS and/or CANADIAN
ENGLISH LANGUAGE and/or
CANADIAN FRENCH LANGUAGE to
“OFF” using ▲▼ and SET. (Ratings
set on pages 31-35 are retained and
will be in effect when V-Chip Control
is activated again.)
36
<US Rating>
<US Rating>
<Canadian French Rating>
<Canadian Rating>
Page 37

Display Feature
08
TV Status & Clock Display
Press DISPLAY
to display or remove the overlay.
3
12:00PM CH 08
1
2
STEREO
SAP
MONO
RATING:PG-13
1 Receivable Broadcast Types
(See page 24.)
2 Rating level
3 Current Time
4 Channel
Auto Shut Off
No broadcast signal in TV mode (Only when
Weak Signal Display is set to OFF. (see page
30)).
Power turns off.
4
Note
• This feature is cancelled if any button is pressed
during above conditions.
Blue Screen Display
When the selected channel has no broadcast
signal with the Weak Signal Display Feature
set to “OFF” (see page 30), the screen will
turn solid blue.
TV Operation
Channel Display
When you change channels, channel number
will be displayed.
37
Page 38

CLOSE
READING
1 MAIN STORY
2 SUBTITLE
3 AUDIO SOUNDTRACK
4 INFORMATION
LOVE STORY
Basic Disc Operation
OPEN /
CLOSE
POWER
SELECT
▲▼◄ ►
10
SKIP-
STOP
STILL
SEARCH /
SLOW-
POWER STOP PLAY OPEN /
Insert
disc
DVD
NUMBER
keys
MENU
SET
PLAY
SKIP+
TITLE
SEARCH /
SLOW+
RETURN
CLOSE
If a remote control button does not work
when pressed, press the DVD button on
the remote and try the button again.
Play Disc
1 Press POWER on the remote or unit.
2 Press DVD to set remote to DVD
mode.
3 Press OPEN/CLOSE.
• If a disc is already inserted, go to step 5.
(Depending on the disc, playback may start
automatically.)
4 Place disc into disc tray.
• Hold disc by its edges only (page 10) with
printed side up and use guides to place into
tray. Use
1
3″(8 cm) or 2 5″ (12 cm) disc.
5 Press PLAY to start play. Disc tray
closes automatically.
• You may also close the tray by pressing
OPEN/CLOSE.
• Data reading time differs with each disc.
If an interactive DVD is used and a
Main MENU of DVD appears, go to
step 6.
<Example>
While Main MENU is displayed, Press
|
SKIP+
or previous
or SKIP- | to go to next
Main MENU of DVD
screen.
• SKIP function not available with all discs.
Please refer to disc jacket for operation
information.
6 Press ▲▼◄ ► to select title and
press SET to start play. Or, pressing
NUMBER keys starts play
automatically.
• The number of available titles varies with
each disc.
To return to Main MENU of DVD
(play stops):
Press TITLE, MENU, or RETURN.
7 Press STOP to stop playing.
8 Press OPEN/CLOSE to eject the disc.
Auto-Power Off function
38
DVD-V CD
1
2
Power turns off after unit is in stop mode with
wallpaper displayed for about 5 minutes.
DVD- RAM
Page 39

• When appears on the screen while a button is being pressed, it means that the corresponding
operation is prohibited by the unit or the disc.
Using the NUMBER keys
DVD-V CD
When a NUMBER key is used in disc mode, it
performs a different operation from TV mode.
Example 1:
To select 12, first press the
then 2.
Example 2:
To select 2, press the 2 key.
DVD- RAM
10 key, then 1,
Forward/Reverse Rapid Scene Search
DVD-V CD
1 Press SEARCH /SLOW+ or
SEARCH
• Search speed, slow at first, increases with each
additional press of the button up to 5 levels.
2 Press PLAY to release.
DVD- RAM
/SLOW- during play.
Forward/Reverse Chapter/Track Skip
DVD-V CD
1 Press SKIP+
play.
DVD and CD
• Pressing SKIP-| once midway through a
chapter/track returns to start of that
chapter/track. Each additional press skips
back one chapter/track.
Chapter/Track Chapter/Track Chapter/Track
Reverse Skip
DVD- RAM
• Pressing SKIP-|
program/play list returns to start of that
program/play list. Each additional press skips
back one program/play list.
Current playback position
Program/Play List Program/Play List Program/Play List
Reverse Skip
2 Each press skips a chapter (DVD),
track (CD) or Program/Play List/
Marker (DVD-RAM).
• Pressing SKIP within 3 seconds of a track/
chapter/program/play list start point skips
to the previous start point.
DVD- RAM
|
or SKIP- | during
Current playback position
Forward Skip
once midway through a
Forward Skip
Marker
Still (Pause) Picture
DVD-V CD
1 Press STILL during play.
• DVD:
The unit will enter Still picture mode.
• CD:
The unit will enter Pause mode.
2 Press PLAY to release.
DVD- RAM
Frame by Frame Picture
DVD-V
DVD- RAM
1 Press STILL in Still mode.
• Each press advances picture one frame.
• Hold down for consecutive frame advance.
2 Press PLAY to release.
Note
• Whether pictures are advanced by “FR AME” or
“FIELD” is selected automatically (see page 57).
Slow Motion Picture
DVD-V
DVD- RAM
1 Press SEARCH
SEARCH
• Slow motion speed, slow at first, is increased
with each additional press of the button up to
5 levels.
/SLOW+ or
/SLOW- in Still mode.
2 Press PLAY to release.
RESUME Function
DVD-V CD
The unit memorizes the point where STOP is
pressed (STOP ► display on screen).
Press PLAY to resume play from this point.
Pressing STOP again in DVD mode or
opening the tray cancels RESUME. However,
RESUME is not cancelled when power is
turned off and on.
Notes
• RESUME works only with discs for which
elapsed play time is displayed during play.
• When a DVD-RAM still picture is played back,
the counter will not be displayed, however,
RESUME will function.
DVD- RAM
Disc Operation
39
Page 40

TITLE MENU
4EPILOGUE
2 A PAINFUL
SEPARATION
3MEETING
AGAIN
1 PROLOGUE
TITLE MENU
4EPILOGUE
2 A PAINFUL
SEPARATION
3MEETING
AGAIN
1 PROLOGUE
CHAPTER 1
CHAPTER 2
CHAPTER 3
CHAPTER 4
3MEETING
AGAIN
Disc Operation -In PLAY mode-
3 Press SET or PLAY to access.
• Step 3 not necessary when using NUMBER
keys.
Note
• Repeat steps 2-3 if there is more than one menu.
SELECT
▲▼◄ ►
NUMBER
keys
MENU
SET
PLAY
TITLE
AUDIO
Main Menu of DVD
DVD-V
DVDs may offer a special menu. This menu
may include guides to unique contents,
audio/subtitle languages, etc. Although
contents and operation may vary, the
following steps show basic steps for using
menus.
1 Press MENU in Play mode to display
main menu of DVD.
2 Press ▲▼◄ ► or NUMBER keys to
select an item.
<Example>
LOVE STORY
Title Menu of DVD
DVD-V
Some DVDs have more than one title, e.g.
movies. If the disc offers a title menu, you
can select the desired title number.
(Operation may vary according to the disc.)
1 Press TITLE in Play mode to display
title screen.
<Example>
2 Press ▲▼◄ ► or NUMBER keys to
select a title.
3 Press SET or PLAY to access.
• Step 3 not necessary when using NUMBER
keys.
<Example>
40
1 MAIN STORY
2 SUBTITLE
3 AUDIO SOUNDTRACK
4 INFORMATION
Page 41

• When appears on the screen while a button is being pressed, it means that the corresponding
HOLA
AUDIO:3ESP
Dolby Digital 3/2.1ch
SELECT:AUDIO
AUDIO:2 ENG VOCAL ON
SELECT:AUDIO/
Dolby Digital 3/2.1ch
AUDIO:1 LR
SELECT:AUDIO/
operation is prohibited by the unit or the disc.
Audio Soundtrack Language
DVD-V
You can change the audio soundtrack
language, selected at Settings for DVD
Operation, to a different language if
available. (See page 54.)
(This operation works only with discs on
which multiple audio soundtrack languages
are recorded.)
1 Press AUDIO in Play mode to display
the audio selection on-screen.
• Display disappears after 5 seconds.
Infor mation on the audio
stream cur rently being
played back is displayed.
(See page 56.)
AUDIO:1ENG
Dolby Digital 3/2.1ch
HELLO
SELECT:AUDIO
LPCM
Dolby
Digital
dts 1 ch - 5.1 ch dts disc
96 kHz
or
48 kHz
1 ch - 5.1 ch Dolby Digital disc
16 bit
Linear PCM disc20 bit
24 bit
Audio soundtrack
language being played
back.
ENG English
FRA Frenc h
DEU German
ITA Italian
ESP Spanish
NLD Dutch
SVE Swedish
NOR Norwegian
DAN Danish
POR Portuguese
RUS Russian
JPN Japanese
CHI Chinese
KOR Korean
MAL Malay
VIE Vietnamese
THA Thai
* Other
Notes
• If, after several presses of the AUDIO button, the
language does not change, language selection is
not offered on the disc.
• When disc is removed, language rever ts to initial
setting. If this language is not recorded on the
disc, the language recorded will be heard.
Vocal selection for Karaoke discs
Disc Operation
2 Press AUDIO, ▲▼, or NUMBER keys
Note
• With DVD-RAM, Audio Soundtrack
Language cannot be set. Audio stream and
Audio mode (LR/L/R) settings can be made.
Audio stream operation method is the same
as for Audio Soundtrack Language. Press ►
to move the cursor to Audio mode, then
press AUDIO or ▲▼ to select LR/ L/ R.
to select desired language.
DVD-V
1 Press AUDIO in Play mode to display
the audio screen.
2 Press ◄► to
select “VOCAL.”
3 Press AUDIO or ▲
▼ to set.
DVD Karaoke (1 vocal)
VOCA L ON VOCAL OFF
DVD Karaoke (2 vocals)
VOCA L V1 VOCAL V2
VOCAL OFF VOCAL V1 + V2
41
Page 42

HELLO
SUBTITLE:1ENG
SELECT:SUBTITLE
HELLO
HELLO
SUBTITLE:3ESP
SELECT:SUBTITLE
HOLA
DISPLAY
2 Press SUB TITLE, ▲▼, or NUMBER
keys to select desired language.
Note
• With DVD-RAM, the subtitle can only be set
to ON/OFF. The subtitle language cannot be
selected.
SELECT
▲▼◄ ►
SET
SUB TITLE
ZOOM
Subtitle Language
DVD-V
You can select a different subtitle language (if
offered) than the one set at Settings for DVD
Operation. (See page 54.)
1 Press SUB TITLE in Play mode to
DVD- RAM
display the subtitle selection
on-screen.
• Display disappears after 5 seconds.
• When no subtitles are offered, “-” will be
displayed instead of the language number.
Number of subtitle
language being played
back.
ENG English
FRA Frenc h
DEU German
ITA Italian
ESP Spanish
NLD Dutch
SVE Swedish
NOR Norwegian
DAN Danish
POR Portuguese
RUS Russian
JPN Japanese
CHI Chinese
KOR Korean
MAL Malay
VIE Vietnamese
THA Thai
* Other
Notes
• When closed captioning is used along with
subtitles, they may overlap. If so, turn one function
off. (See pages 26-27.)
• If, after several presses of the button, the
language does not change, language selection is
not offered on the disc.
• Subtitles may not change to the selected
language immediately.
• When disc is removed, subtitles revert to initial
setting language. If the initial language is not
recorded on the disc, the disc’s priority language
will appear.
42
Page 43

• When appears on the screen while a button is being pressed, it means that the corresponding
PROGRAM:1 DVD-VR
01:12:34
SELECT:
SET :SET NEXT:DISPLAY
PLAY
REPEAT:PROGRAM
SELECT:
SET :SET END:DISPLAY
ZOOM 1
ZOOM 2
ZOOM 2
ZOOM 2
ZOOM 2
ZOOM 2
ZOOM 2
operation is prohibited by the unit or the disc.
Information Display
DVD-V
When DISPLAY is pressed, On-Screen
Displays show disc information and unit
information.
Press DISPLAY in Play or Stop mode to
display “On-Screen Display.”
• Each press of DISPLAY changes the on-screen
display as follows. (Please refer to pages 46-49.)
DVD- RAM
CD
Selected disc information
<Example of DVD>
TITLE :2 DVD
CHAPTER: 11 01:12:34
<Example of CD>
TRACK :2 CD
SELECT:
<Example of DVD-RAM>
SET :SET NEXT:DISPLAY
SET :SET NEXT:DISPLAY
00:01:23
Note
• DISPLAY button does not function while main
menu of DVD, title menu of DVD, Direct
Navigator, or Play List is displayed.
Picture Zoom
DVD-V
DVD- RAM
You can enlarge specific portions of a picture
and select the zoom ratio using the ZOOM
button on the remote during DVD playback.
1 Press ZOOM repeatedly to change
display as follows.
• You can enlarge the centre portion of the
image to one of 2 magnifications.
X1.0
(ORIGINAL)
2 Use the ▲ , ▼, ◄ and ► buttons to
move the position up, down, left and
right.
1st
press
X1.5
(ZOOM1)
3rd press
X2.0
(ZOOM2)
2nd
press
Disc Operation
<Example of DVD>
Selected unit information
PLAY
REPEAT:CHAPTER
<Example of CD >
PLAY
REPEAT:DISC
RANDOM PLAY
SELECT:
SET :SET END :DISPLAY
<Example of DVD-RAM>
SET :SET END :DISPLAY
Normal Screen
Notes
• The subtitle cannot be enlarged nor can its
position be changed.
• During picture zoom, “ZOOM1” or “ZOOM2”
appears on-screen for 5 seconds.
• Zooming, on some discs, may result in poor
picture quality, or may not operate at all.
43
Page 44

DVD-RAM Operation
OPEN /
POWER
CLOSE
DVD
NUMBER
keys
PLAYLIST
SELECT
▲▼◄ ►
10
SET
PLAY
STOP
D.NAVI
You can enjoy playing your personally
recorded/edited DVD-RAM discs on
this unit.
Note
• This unit was designed for playback only.
DVD-RAM recording is not possible.
Play a DVD-RAM
DVD- RAM
1 Press POWER on the remote or unit.
2 Press DVD to set remote to DVD
mode.
3 Press OPEN/CLOSE.
4 Place disc into disc tray.
5 Press PLAY to start play. Disc tray
closes automatically.
• Play begins from the first program title
recorded on the DVD-RAM.
6 Press PLAYLIST or D.NAVI to display
Play List or Direct Navigator menu
for easy title or scene selection.
Example: Play List menu
Play List No.
Recorded time
length
Page No.
Play List Page1/5
No. Date Length Title
2002/12/24
1
5:15:41AM
2002/12/25
2
4:31:49AM
2002/12/25
3
8:24:25AM
2002/12/25
4
12:45:00AM
SELECT:
SET :SET END:MENU
Recording time
and date
00:01:00
00:03:12
00:15:01
00:03:00
Movie Picture
Playback
Still Picture
Playback
Hybrid Playback
Partial Playback
Titles
Example: Direct Navigator menu
2002/12/24
5:15:41AM
2002/12/25
4:31:49AM
2002/12/25
8:24:25AM
2002/12/25
12:45:00AM
Recorded time
length
Drama
01:00:00
Pana NEWS
00:30:00
Tigers vs. Giants
01:30:25
Dinosaur
02:00:50
Titles
Page No.
Page1/4
Program No.
Direct Navigator
No. Date Length Title
1
2
3
4
SELECT:
SET :SET END:TITLE
Recording time
and date
7 Press STOP to stop playing.
8 Press OPEN/CLOSE to eject the disc.
Notes
• Titles of Direct Navigator and Play List cannot be
changed using this unit.
• With Direct Navigator, up to 99 programs can be
displayed. With Play List, up to 99 titles (999
scenes) can be displayed.
• While DVD MAIN MENU is displayed, Play List
and Direct Navigator display will not appear even
if PLAYLIST or D.NAVI is pressed.
44
Page 45

Direct Navigator
Page1/4
No. Date Length Title
SELECT:
SET :SET END:TITLE
1
2
3
4
01:00:00
00:30:00
01:30:25
02:00:50
Drama
Pana NEWS
Tigers vs. Giants
Dinosaur
2002/12/24
5:15:41AM
2002/12/25
4:31:49AM
2002/12/25
8:24:25AM
2002/12/25
12:45:00AM
• When appears on the screen while a button is being pressed, it means that the corresponding
Direct Navigator Page1/4
No. Date Length Title
SELECT:
SET :SET END:TITLE
1
2
3
4
01:00:00
00:30:00
01:30:25
02:00:50
Drama
Pana NEWS
Tigers vs. Giants
Dinosaur
2002/12/24
5:15:41AM
2002/12/25
4:31:49AM
2002/12/25
8:24:25AM
2002/12/25
12:45:00AM
operation is prohibited by the unit or the disc.
Play List
Direct Navigator
DVD- RAM DVD- RAM
If the DVD-RAM features a Play List, your
preselected list of favourite scenes is
displayed for easy access. (Operation can
vary according to how you edited the
If the DVD-RAM features Direct Navigator, a
list of recorded titles is displayed. Simply
select a title number and start playback.
(Operation can vary with disc used.)
DVD-R AM.)
1 Press PLAYLIST in Play/Stop mode
to display the Play List menu.
Play List Page1/5
No. Date Length Title
2002/12/24
1
5:15:41AM
2002/12/25
2
4:31:49AM
2002/12/25
3
8:24:25AM
2002/12/25
4
12:45:00AM
SELECT:
SET :SET END:MENU
00:01:00
00:03:12
00:15:01
00:03:00
Movie Picture
Playback
Still Picture
Playback
Hybrid Playback
Partial Playback
2 Press ◄► to select a page and press
▲▼ or the NUMBER keys to select a
title (Play List No.).
Play List Page1/5
No. Date Length Title
2002/12/24
1
5:15:41AM
2002/12/25
2
4:31:49AM
2002/12/25
3
8:24:25AM
2002/12/25
4
12:45:00AM
SELECT:
SET :SET END:MENU
00:01:00
00:03:12
00:15:01
00:03:00
Movie Picture
Playback
Still Picture
Playback
Hybrid Playback
Partial Playback
1 Press D.NAVI in Play/Stop mode to
display the Direct Navigator menu.
2 Press ◄► to select a page and press
▲▼ or the NUMBER keys to select a
title (Program No.).
Disc Operation
3 Press SET or PLAY to start playing.
• Pressing SET or PLAY is not necessary
when using NUMBER keys.
Using NUMBER keys starts play
automatically.
• The number of available titles varies with
each disc.
Example 1:
To select No. 12, first press the
then 1, then 2.
Example 2:
To select No. 2, press 2.
4 Press PLAYLIST to clear Play List
menu.
10 key,
3 Press SET or PLAY to start playing.
• Pressing SET or PLAY is not necessary when
using NUMBER keys.
Using NUMBER keys starts play
automatically.
• The number of available titles varies with
each disc.
Example 1:
To select No. 12, first press the
10 key,
then 1, then 2.
Example 2:
To select No. 2, press 2.
4 Press D.NAVI to clear Direct
navigator menu.
45
Page 46

Disc Operation -Using Information Screen-
TITLE :2 DVD
CHAPTER: 11 01:12:34
SELECT:
SET :SET NEXT:DISPLAY
PLAY
REPEAT:CHAPTER
SELECT:
SET :SET END :DISPLAY
TITLE : 2 DVD
CHAPTER: 11 01:12:34
ENTER :0-9
SET :SET NEXT:DISPLAY
TITLE : 2 DVD
CHAPTER: 11 --:--:01
ENTER :0-9
SET :SET NEXT:DISPLAY
a.TITLE:
Go directly to a preset title number.
DISPLAY
NUMBER
keys
SELECT
▲▼◄ ►
SET
Disc information screen 1
DVD-V
1 Press DISPLAY
in Play or Stop
mode to display
“On-Screen
Display.”
2 Press ▲▼◄ ► to
select an item.
3 Press SET to enter selected item.
Cursor moves to the right. Change
the item by pressing ▲▼ or the
NUMBER keys, and press SET.
ac
b
b.Chapter:
Go directly to a preset chapter number.
• This function does not work with some discs.
c.Disc currently being played:
The type of disc currently inserted is
displayed.
d.Elapsed playing time:
Go to a different scene by entering an
elapsed playing time, then SET.
• This function does not work with some discs.
• If SET is pressed while making entries, unit
returns to the condition before entries were
made.
Example:
12 : 34 : 56 1 → 2 → 3 → 4 → 5 → 6
00 : 20 : 00 2 → 0 → 0 → 0 → SET
Unit information screen 1
DVD-V
1 Press DISPLAY twice in Play or Stop
mode to display “On-Screen
Display.”
2 Press SET to enter. Cursor moves to
the right. Change the item by
pressing ▲▼ and press SET.
a.OPERATING
d
MODE:
The current
operation is
displayed.
b.REPEAT MODE:
REPEAT MODE
can be selected
Example:
CURRENT PLAYBACK POSITION
a
b
46
TITLE
chapter chapter chapter
REPEAT:CHAPTER
REPEAT:TITLE
REPEAT:OFF
Page 47

• When appears on the screen while a button is being pressed, it means that the
TRACK :2 CD
00:01:23
SET :SET NEXT:DISPLAY
PLAY
REPEAT:DISC
RANDOM PLAY
SELECT:
SET :SET END :DISPLAY
corresponding operation is prohibited by the unit or the disc.
Disc information screen 2
CD
1 Press DISPLAY in Play or Stop mode
to display “On-Screen Display.”
2 Press SET to enter selected item.
Cursor moves to the right. Change
the item by pressing ▲▼ or the
NUMBER keys, and press SET.
ab
TRACK : 2 CD
ENTER :0-9
SET :SET NEXT:DISPLAY
a.TRACK:
Go directly to a preset track number.
b.Disc currently being played:
The type of disc currently inserted is
displayed.
00:01:23
c
Unit information screen 2
CD
1 Press DISPLAY twice in Play or Stop
mode to display “On-Screen
Display.”
2 Press SET to enter. Cursor moves to
the right. Change the item by
pressing ▲▼, and press SET.
a
b
c
a.OPERATING MODE:
The current operation is displayed.
b.REPEAT MODE:
REPEAT MODE can be selected.
Example:
CURRENT PLAYBACK POSITION
track track track
REPEAT:TRACK
REPEAT:DISC
REPEAT:OFF
Disc Operation
c.Elapsed playing time:
When disc information screen 2 is
displayed, it is not possible to enter an
elapsed playing time.
c.Play mode:
When Play mode is set (see pages 50 -51),
the mode name is displayed.
47
Page 48

DISPLAY
PLAY LIST: 1 DVD-VR
01:12:34
SELECT:
SET :SET NEXT:DISPLAY
PROGRAM: 1 DVD-VR
01:12:34
SELECT:
SET :SET NEXT:DISPLAY
PROGRAM: 1 DVD-VR
01:12:34
SELECT:
SET :SET NEXT:DISPLAY
PROGRAM: 1 DVD-VR
01:12:34
ENTER :0-9
SET :SET NEXT:DISPLAY
PROGRAM: 1 DVD-VR
--:--:01
ENTER :0-9
SET :SET NEXT:DISPLAY
Example:
Direct Navigation (PROGRAM)
ab
NUMBER
keys
c
SELECT
▲▼◄ ►
SET
Disc information screen 3
DVD- RAM
1 Press DISPLAY in Play or Stop mode
to display “On-Screen Display.”
2 Press ◄► to select an item.
3 Press SET to enter selected item.
Cursor moves to the right. Change
the item by pressing ▲▼ or the
NUMBER keys, and press SET.
Example:
PLAY LIST
ab
c
a.Direct Navigation (PROGRAM) or
PLAY LIST No.:
Go directly to a preset title number.
b.Disc currently being played:
The type of disc currently inserted is
displayed.
c.Elapsed playing time:
Go to a different scene by entering an
elapsed playing time, then SET.
• This function does not work with some discs.
• If SET is pressed while making entries, unit
returns to the condition before entries were
made.
Example:
12 : 34 : 56 1 → 2 → 3 → 4 → 5 → 6
00 : 20 : 00 2 → 0 → 0 → 0 → SET
48
Page 49

PLAY
REPEAT:PROGRAM
SELECT:
SET :SET END:DISPLAY
• When appears on the screen while a button is being pressed, it means that the corresponding
operation is prohibited by the unit or the disc.
Unit information screen 3
DVD- RAM
1 Press DISPLAY twice in Play or Stop
mode to display “On-Screen
Display.”
2 Press SET to enter. Cursor moves to
the right. Change the item by
pressing ▲▼ and press SET.
a
b
a.OPERATING MODE:
The current operation is displayed.
b.REPEAT MODE:
REPEAT MODE can be selected.
Example:
REPEAT:PROGRAM
REPEAT:DISC
REPEAT:OFF
Example:
REPEAT:PLAY LIST
REPEAT:
REPEAT:OFF
Direct Navigation
(PROGRAM)
CURRENT PLAYBACK POSITION
PLAY LIST
CURRENT PLAYBACK POSITION
ALL PLAY LIST
Disc Operation
PROGRAM PROGRAM PROGR AM
PLAY LIST PLAY LIST PLAY LIST
49
Page 50

MAIN MENU
DVD LOCK LANGUAGE
TV CLOCK CH
SELECT: SET:SET
END :ACTION
DVD MAIN MENU
DISC LANGUAGES
AUDIO OUTPUT
STILL MODE :AUTO
TV MODE :4:3 Pan&Scan
PLAY MODE
SELECT :
SET :SET
END :ACTION
PLAY MODE
PROGRAM PLAY
RANDOM PLAY
SELECT :
SET :SET
END :ACTION
PROGRAM PLAY
DISC PROGRAM
1 61116 5 8
2 7 12 17 15 6
3 8 13 18 1 13
4 9 14 19 3 2
5101520 2
CLEAR LAST
CLEAR ALL START
SELECT :
SET :SET
END :ACTION
PROGRAM PLAY
DISC PROGRAM
1 61116 5 8
2 7 12 17 15 6
3 8 13 18 1 13
4 9 14 19 3 2
5101520 2
CLEAR LAST
CLEAR ALL START
SELECT :
SET :SET
END :ACTION
Special Disc Operation
NUMBER
keys
CLEAR
ACTION
SELECT
▲▼◄ ►
SET
6 Press ▲▼ to select “PROGRAM
PLAY.”
7 Press SET to display screen.
8 Press ▲▼◄ ► to select a track
number.
(Track numbers on disc are displayed.)
9 Press SET to set.
• Repeat steps 8-9 to select another track.
• The selected track is added on the right side.
You can program specific tracks and order of
play.
1 Press ACTION in Stop mode to
2 Press ▲▼◄ ► to select “DVD.”
3 Press SET to display DVD MAIN
4 Press ▲▼ to
5 Press SET to
50
Program Play
CD
display MAIN MENU.
MENU.
select “PLAY
MODE.”
display PLAY
MODE screen.
10 Pr ess ▲▼◄ ► to select “START.”
11 Press SET to start play of programs
in the sequence selected.
To cancel, press STOP during play, then
press CLEAR.
Notes
• Up to 15 tracks can be programmed.
• “◄” or “►” (depending on disc) indicates
additional PROGRAM PLAY screen. Press ▲▼
◄► for next or previous screen.
• To clear the last program one by one, Press ▲▼
◄► to move to “CLEAR LAST” and press SET.
(Pressing CLEAR also clears last program.)
• To clear all programs, Press ▲▼◄ ► to move to
“CLEAR ALL” and press SET. (Programs are
also cleared when the power is turned off or the
disc is removed.)
Page 51

• When appears on the screen while a button is being pressed, it means that the corresponding
MAIN MENU
DVD LOCK LANGUAGE
TV CLOCK CH
SELECT: SET:SET
END :ACTION
TRACK :2 CD
00:01:23
SET :SET NEXT:DISPLAY
DVD MAIN MENU
DISC LANGUAGES
AUDIO OUTPUT
STILL MODE :AUTO
TV MODE :4:3 Pan&Scan
PLAY MODE
SELECT :
SET :SET
END :ACTION
PLAY
REPEAT:DISC
PROGRAM PLAY
SELECT:
SET :SET END:DISPLAY
PLAY MODE
PROGRAM PLAY
RANDOM PLAY
SELECT :
SET :SET
END :ACTION
PLAY
REPEAT:OFF
PROGRAM PLAY
SET :SET END:DISPLAY
operation is prohibited by the unit or the disc.
Program Repeat Play Random Play
CD CD
1 Do steps 1-11 on page 50.
2 Press DISPLAY to display Disc
Information screen.
(Disc Information Screen)
Tracks are played in random order.
1 Press ACTION in Stop mode to
display MAIN MENU.
2 Press ▲▼◄ ► to select “DVD.”
3 Press SET to display DVD MAIN
MENU.
3 Press DISPLAY again to display Unit
Information screen.
4 Press SET to enter Select mode.
Cursor moves to “OFF.”
(Unit Information Screen)
5 Press ▲▼ to select “DISC.”
(Unit Information Screen)
6 Press SET to set mode. Cursor
moves to “REPEAT.” To cancel,
select “REPEAT OFF” in step 5, then
press SET.
4 Press ▲▼ to select “PLAY MODE.”
5 Press SET to display PLAY MODE
screen.
Disc Operation
6 Press ▲▼ to select “RANDOM
PLAY.”
7 Press SET to begin random play.
To cancel, press STOP during play, then
press CLEAR.
51
Page 52

MAIN MENU
DVD LOCK LANGUAGE
TV CLOCK CH
SELECT: SET:SET
END :ACTION
SET UP TV
CAPTION
INPUT SELECT :TUNER
SET UP VIDEO/AUDIO
DVD VOL ADJUST :+2
SELECT: SET:SET
END :ACTION
ACTION
SELECT
▲▼◄ ►
ANGLE
SET
VSS
ANGLE Indicator
DVD Volume Adjust
DVD-V
Some DVDs are recorded at lower than
average volume levels. For these DVDs, this
unit can be set so that the average volume is
increased automatically.
1 Press ACTION to display MAIN
MENU.
2 Press ▲▼◄ ► to select “TV.”
3 Press SET to display SET UP TV
screen.
4 Press ▲▼ to select “DVD VOL
ADJUST.”
5 Press SET to set the level (0, +1, or
+2).
52
6 Press ACTION twice to return to the
normal screen.
Note
• DVD Volume Adjust works only when sound is in
Dolby Digital.
Page 53

VSS2
• When appears on the screen while a button is being pressed, it means that the corresponding
ANGLE:1
SELECT :ANGLE
ANGLE:2
SELECT :ANGLE
operation is prohibited by the unit or the disc.
V.S.S. (Virtual Surround Sound)
DVD-V CD
Enjoy a surround-like effect if you are using
two front speakers only. The effect is
broadened and sound seems to come from
virtual speakers on either side if the disc has
surround signals recorded on it.
Press VSS in Disc mode.
• The Surround sound effects can be changed by
pressing VSS repeatedly as shown in the figure
below.
DVD- RAM
VSS OFF
Default
VSS1
Multiple Angle Viewing
DVD-V
DVDs may contain scenes shot from multiple
camera angles allowing the same scene to
be viewed from different angles. You can
view these angles, if available, using the
ANGLE button.
1 Press ANGLE in Play mode to display
the angle selection on-screen.
2 Press ANGLE repeatedly to select
the desired angle.
• Display disappears after 5 seconds.
Number of angle being
played back.
Disc Operation
VSS3
Notes
• Turn off the surround ef fects on the other
equipment.
• V.S.S. will not work, or will have less effect, with
some discs.
• Turn V.S.S. off if it causes distortion.
Notes
• This function not available with DVD-RAM.
• ANGLE Indicator lights up on the unit when a
scene recorded from different angles is detected.
• The angle number can be set beforehand so that
the angle is switched whenever ANGLE Indicator
lights up.
53
Page 54

MAIN MENU
DVD LOCK LANGUAGE
TV CLOCK CH
SELECT: SET:SET
END :ACTION
DISC LANGUAGES
AUDIO :English
SUBTITLE :AUTO
MENUS :English
SELECT :
SET :SET
END :ACTION
Settings for DVD Operation
6 Press ▲▼ to
select an item.
7 Press SET
repeatedly for
desired language.
AUDIO
To select the audio soundtrack language.
(Factory preset: English)
English/Spanish/French/Japanese
Original: Original disc language
Other :Other language selection
SUBTITLE
To select the subtitle language.
(Factory preset: AUTO)
AUTO: Same language selected for
“AUDIO”
• If language set for “AUDIO” is used in
playback, subtitles will not appear.
• If another language is used during playback,
the subtitles will appear in the language
selected at “AUDIO” setup.
English/Spanish/French/Japanese
Other
ACTION
SELECT
▲▼◄ ►
Disc Languages
NUMBER
keys
SET
:Other language selection
*1
*1
54
DVD-V
To select and set the language of the audio
soundtrack, subtitles, or title/DVD menus for
all discs to be played.
1 Press ACTION in
Stop mode to
display MAIN
MENU.
2 Press ▲▼◄ ► to
select “DVD.”
3 Press SET to
display DVD
MAIN MENU.
4 Press ▲▼ to
DVD MAIN MENU
DISC LANGUAGES
AUDIO OUTPUT
STILL MODE :AUTO
TV MODE :4:3 Pan&Scan
select “DISC
LANGUAGES.”
5 Press SET to
SELECT :
SET :SET
END :ACTION
display DISC
LANGUAGES
screen.
MENUS
To select the language used in title menus
or DVD menus. (Factory preset: English)
English/Spanish/French/Japanese
Other
*1
If the selected language is not offered, the
original disc language is selected.
To enter OTHER code number,
Press NUMBER keys (Please refer to
next page).
To make corrections, press ◄
repeatedly to delete language code
number, and correct.
• Once initial settings are done, they remain
in memory (even after the power is off)
until changed. This means the unit will
always operate under the same conditions
(especially DVDs) each time.
8 Press ACTION twice to exit this
mode.
:Other language selection
*1
Page 55

• When appears on the screen while a button is being pressed, it means that the corresponding
operation is prohibited by the unit or the disc.
Language Code List
Language Code
Abkhazian 6566
Afar 6565
Afrikaans 6570
Albanian 8381
Ameharic 6577
Arabic 6582
Armenian 7289
Assamese 6583
Aymara 6588
Azerbaijani 6590
Bashkir 6665
Basque 6985
Bengali;Bangla 6678
Bhutani 6890
Bihari 6672
Breton 6682
Bulgarian 6671
Burmese 7789
Byelorussian 6669
Cambodian 7577
Catalan 6765
Chinese 9072
Corsican 6779
Croatian 7282
Czech 6783
Danish 6865
Dutch 7876
English 6978
Esperanto 6979
Estonian 6984
Faroese 7079
Fiji 7074
Finnish 7073
Frenc h 7082
Frisian 7089
Galician 7176
Georgian 7565
German 6869
Greek 6976
Greenlandic 7576
Guarani 7178
Gujarati 7185
Language Code
Hausa 7265
Hebrew 7387
Hindi 7273
Hungarian 7285
Icelandic 7383
Indonesian 7378
Interlingua 7365
Irish 7165
Italian 7384
Japanese 7465
Javanese 74 87
Kannada 7578
Kashmiri 7583
Kazakh 7575
Kirghiz 7589
Korean 7579
Kurdish 7585
Laothian 7679
Latin 7665
Latvian, Lettish 7686
Lingala 7678
Lithuanian 7684
Macedonian 7775
Malagasy 7771
Malay 7783
Malayalam 7776
Maltese 7784
Maori 7773
Marathi 7782
Moldavian 7779
Mongolian 7778
Nauru 7865
Nepali 7869
Norwegian 7879
Oriya 7982
Panjabi 8065
Pashto, Pushto 8083
Persian 7065
Polish 8076
Portuguese 8084
Quechua 8185
Rhaeto-Romance 8277
Language Code
Romanian 8279
Russian 8285
Samoan 8377
Sanskrit 8365
Scots Gaelic 7168
Serbian 8382
Serbo-Croatian 8372
Shona 8378
Sindhi 8368
Singhalese 8373
Slovak 8375
Slovenian 8376
Somali 8379
Spanish 6983
Sundanese 8385
Swahili 8387
Swedish 8386
Tag alo g 8476
Taj ik 8471
Tam il 8465
Tat ar 8484
Tel ugu 8469
Thai 8472
Tibetan 6679
Tigrinya 8473
Ton ga 8479
Tur kish 8482
Tur kmen 8475
Twi 8487
Ukrainian 8575
Urdu 8582
Uzbek 8590
Vietnamese 8673
Volapük 8679
Welsh 6789
Wolof 8779
Xhosa 8872
Yiddish 747 3
Yor uba 8979
Zulu 9085
Disc Operation
55
Page 56

MAIN MENU
DVD LOCK LANGUAGE
TV CLOCK CH
SELECT: SET:SET
END :ACTION
DVD MAIN MENU
DISC LANGUAGES
AUDIO OUTPUT
STILL MODE :AUTO
TV MODE :4:3 Pan&Scan
SELECT :
SET :SET
END :ACTION
AUDIO OUTPUT
LPCM(DVD) :OFF
Dolby Digital :Bitstream
dts :Bitstream
DRC :OFF
SELECT :
SET :SET
END :ACTION
ACTION
SELECT
▲▼◄ ►
SET
Selecting AUDIO OUTPUT
DVD-V
Select the digital output to be output from the
optical digital audio output connector of the
unit.
1 Press ACTION in Stop mode to
display MAIN MENU.
2 Press ▲▼◄ ► to select “DVD.”
3 Press SET to display DVD MAIN
MENU.
4 Press ▲▼ to select “AUDIO
OUTPUT.”
5 Press SET to display AUDIO OUTPUT
screen.
6 Press ▲▼ to select an item.
7 Press SET repeatedly for desired
output.
LPCM (DVD)
OFF:
Linear PCM of less than 48 kHz/16 bit is
output. When playing DVDs recorded in
linear PCM of over 48 kHz/20 bit, no
digital audio is output. (Factory preset)
PCM:
When playing DVDs recorded in linear
PCM of 48 kHz/20 bit/24 bit or more,
digital audio converted to 44.1 kHz/16 bit
or 48 kHz/16 bit is output.
(Digital output of PCM audio is restricted
to 48 kHz/16 bit or below for copyright
protection.)
Dolby Digital
Bitstream:
Dolby Digital bitstream (1ch-5.1ch) is
output. (Factory preset)
PCM:
When you have connected an amplifier
that doesn’t have a built-in Dolby Digital
decoder.
56
dts selections
Bitstream:
dts bitstream is output. (Factory preset)
PCM:
When you have connected an amplifier
that doesn’t have a built-in dts decoder.
Page 57

• When appears on the screen while a button is being pressed, it means that the
DVD MAIN MENU
DISC LANGUAGES
AUDIO OUTPUT
STILL MODE :AUTO
TV MODE :4:3 Pan&Scan
SELECT :
SET :SET
END :ACTION
corresponding operation is prohibited by the unit or the disc.
DRC (Dynamic Range
OFF:
Normal audio range is selected. (Factory
preset)
ON:
For dynamic sound even at low volume.
This is useful for late-night listening.
[Dolby Digital DVDs only].
Typ e o f
amplifier to
be
connected
No amplifier
is connected
AV amplif ier
without
Dolby
Digital/dts
decoder
AV amplif ier
including
Dolby Digital
decoder
AV amplif ier
including
Dolby
Digital/dts
decoder
*1 When connecting an amplifier (with an
*2 When a dts decoder is connected, please
*3 When a Dolby Digital decoder is connected,
Note
• Make settings according to amplifier
8 Press ACTION to redisplay DVD
MAIN MENU and go to step 4 to set
up another item. Or, press ACTION
three times to exit.
Compression)
Recommended sett ing
LPCM
(DVD)
PCM PCM*
PCM Bitstream*
PCM Bitstream*
optical digital input connector) which does
not contain the Dolby Digital or dts decoder,
be sure to select “PCM.” If “Bitstream” is
selected, starting DVD play may cause
such a high level of noise as to be harmful
to your ears and damage the speakers.
select “Bitstream” in “dts.” If “PCM” is
selected, there will be stereo sound.
please select “Bitstream” in “Dolby Digital.”
If “PCM ” is selected, there will be stereo
sound.
connected to optical audio output as shown
in above table.
Dolby
Digital
1
dts
PCM*
3
PCM
3
Bitstream*
1
Selecting STILL MODE
DVD-V
Set to reduce jitter in a displayed still picture
or a motion picture.
1 Press ACTION in Stop mode to
display MAIN MENU.
2 Press ▲▼◄ ► to select “DVD.”
3 Press SET to display DVD MAIN
MENU.
MAIN MENU
DVD LOCK LANGUAGE
TV CLOCK CH
SELECT: SET:SET
END :ACTION
4 Press ▲▼ to select “STILL MODE.”
5 Press SET repeatedly for mode.
2
AUTO:
“FIELD” (Field still) or “FRAME” (Frame
still) is automatically selected during the
still mode. (Factory preset)
Field:
“FIELD” (Field still) is always selected.
This setting will reduce jitter when
compared with “AUTO” on some discs.
Frame:
“FRAME” (Frame still) is always selected.
Some texts and fine patterns will be seen
clearly when compared with “AUTO” on
some discs.
6 Press ACTION twice to exit this
mode.
Disc Operation
57
Page 58

MAIN MENU
DVD LOCK LANGUAGE
TV CLOCK CH
SELECT: SET:SET
END :ACTION
DVD MAIN MENU
DISC LANGUAGES
AUDIO OUTPUT
STILL MODE :AUTO
TV MODE :4:3 Pan&Scan
SELECT :
SET :SET
END :ACTION
ACTION
SELECT
▲▼◄ ►
SET
Selecting TV MODE
DVD-V
Set the screen display style for widescreen
video material playback.
1 Press ACTION in Stop mode to
display MAIN MENU.
4 Press ▲▼ to select “TV MODE.”
5 Press SET repeatedly for mode.
4:3 Pan & Scan:
Widescreen video data is played in Pan &
Scan style (left and right of screen is
trimmed.)
• Video data not formatted in Pan & Scan will
play in letterbox style.
(Factory preset)
4:3 Letterbox:
Widescreen video data is played in
Letterbox style (top and bottom of screen
display a black margin).
2 Press ▲▼◄ ► to select “DVD.”
3 Press SET to display DVD MAIN
58
MENU.
6 Press ACTION twice to exit this
mode.
Page 59

Warning and Instruction Displays
These displays will alert you to a missed operation or provide further instructions.
OSD CAUTION Page
PLEASE SET CLOCK BY
PRESSING ACTION KEY
PLEASE CHECK THE DISC,
AND FOR STAINS OR SCRATCHES
ON DISC
THIS DISC MAY NOT BE PLAYED
IN YOUR REGION
THIS TYPE OF DISC CANNOT BE
PLAYED. PLEASE INSERT A
DIFFERENT DISC
If you attempt to set or review a Timer
Recording or set the On-Timer and the Clock
is not set...
If you press PLAY, or the unit reads data from
a stained or scratched disc in DVD mode.
Also, if the type of disc is other than DVD or
CD...
Playback of a disc with different region number
was attempted. Only discs marked region “1,”
“ALL,” or those that include “1” are playable on
this unit.
An unusable disc is inserted in the unit, or the
disc is not inserted with label side up.
20
10
10
9
Information
59
Page 60

Before Requesting Service
Check the following points once again if you are having trouble with your unit.
PROBLEM CORRECTION Page
Power Monitor Remote Control
Completely insert Power Plug into an AC outlet.
No power…
Set POWER button to ON. 11-12
13
Power turns itself off...
No picture or sound...
Poor picture with
normal sound...
Poor sound with normal
picture...
Poor TV reception...
No colour or poor
colour...
Ghost (multiple)
images...
TV programs cannot
be watched...
Unit cannot be
controlled...
ACTION, PL AY,
SELECT, SET
POWER, etc. buttons
cannot be selected...
Auto power-off (shut off) occurs af ter about 5 min. in DVD mode
with no operation, or if there is no broadcast signal in TV or
Playback mode. Turn the power back on.
Make sure your antenna system (TV or CABLE) is correctly set. 14
Completely insert Power Plug into an AC outlet. 13
Set POWER button to ON. 11-12
Adjust BRIGHTNESS, SHARPNESS, and PICTURE controls in
the SET UP Video Adjustment.
Adjust VOLUME control.
Adjust SHARPNESS and PICTURE controls in the SET UP Video
Adjustment.
Adjust TINT and COLOR controls in the SET UP Video
Adjustment.
Install a directional antenna.
Make sure the selected channel is in unit’s memory.
Aim Remote directly at the remote sensor on the unit. Avoid any
object blocking signal path.
Inspect the remote batteries. 8
Exposing unit remote sensor to direct fluorescent or outdoor light
may cause signal interference.
Press TV for TV mode.
Press DVD for DVD mode. 12
Check remote batteries. 8
37-38
28-29
22
28-29
28-29
14
19
12
12
12
60
Page 61

PROBLEM CORRECTION Page
DVD/CD
Play fails to start even
when PLAY is
pressed...
Picture is distor ted
during rapid advance
or rapid reverse...
This unit cannot play discs other than DVDs and CDs.
The disc may be dirty and require cleaning. 10
The picture will be somewhat distorted at times: this is normal.
9
No Forward/Reverse
search play...
Audio soundtrack
and/or subtitle
language is not the one
selected at the initial
settings...
No subtitles...
Alternative audio
soundtrack
(or subtitle) language
cannot be selected...
Angle cannot be
changed...
Some discs may have sections which prohibit Forward/Reverse
search.
The audio soundtrack and/or subtitle language selected at DVD
initial settings must exist on the disc.
Subtitles appear only when available on disc.
Select “ON” at the “Subtitle language” section to display subtitles. 42
Alternative language cannot be selected with discs which do not
contain more than one language.
For some discs, alternative language cannot be selected with the
AUDIO or SUB TITLE button. Try selecting it from the DVD menu
if available.
This function is dependent on software availability. Even if disc
has multiple angles, they may be recorded for specific scenes
only (ANGLE Indicator on unit lights up).
39
41- 42
42
41
41
53
Information
61
Page 62

Limited Warranty/Servicentre List
5770 Ambler Drive, Mississauga, Ontario L4W 2T3
Panasonic Canada Inc.
PANASONIC PRODUCT – LIMITED WARRANTY
Panasonic Canada Inc. warrants this product to be free from defects in materials and workmanship and
agrees to remedy any such defect for a period as stated below from the date of original purchase.
COMBINATION VHS VCR TV / VCR DVD TV / DVD TV:
21″ and under
Carry-in Service
Only
22″ and over In-home Service One (1) year, parts (including Picture Tube) and labour
In-home service will be carried out only in locations accessible by roads and within 50 km of an authorized
Panasonic service facility.
LIMITATIONS AND EXCLUSIONS
This warranty does not apply to products purchased outside Canada or to any product which has been
improperly installed, subjected to usage for which the product was not designed, misused or abused,
damaged during shipping, or which has been altered or repaired in any way that affects the reliability or
detracts from the performance, nor does it cover any product which is used commercially. Dry cell batteries
are also excluded from coverage under this warranty.
This warranty is extended to the original end user purchaser only. A purchase receipt or other proof of date of
original purchase is required before warranty service is performed.
THIS EXPRESS, LIMITED WARRANTY IS IN LIEU OF ALL OTHER WARRANTIES, EXPRESS OR
IMPLIED, EXCLUDING ANY IMPLIED WARRANTIES OF MERCHANTABILITY OR FITNESS FOR A
PARTICULAR PURPOSE.
IN NO EVENT WILL PANASONIC CANADA INC. BE LIABLE FOR ANY SPECIAL, INDIRECT OR
CONSEQUENTIAL DAMAGES.
In certain instances, some jurisdictions do not allow the exclusion or limitation of incidental or consequential
damages, or the exclusion of implied warranties, so the above limitations and exclusions may not be
applicable.
WARRANTY SERVICE
For product operation and information assistance, please contact your Dealer or our Customer Care
Centre at: Telephone #: (905) 624-5505 Fax #: (905) 238-2360 Web: www.panasonic.ca
For product repairs, please contact one of the following:
• Your Dealer who will inform you of an authorized Servicentre nearest you.
• Our Customer Care Centre at (905) 624-5505 or www.panasonic.ca
• A Panasonic Factor y Servicentre listed below:
One (1) year, parts (including Picture Tube) and labour
Richmond, British Columbia Calgary, Alberta Mississauga, Ontario Lachine, Québec
Panasonic Canada Inc.
12111 Riverside Way
Richmond, BC V6W 1K8
Tel: (604) 278-4211
Fax: (604) 278-5627
Carefully pack and send postage prepaid, adequately insured and preferably in the original carton.
Include details of the defect claimed, and proof of date of original purchase.
Panasonic Canada Inc.
6835-8th St. N. E.
Calgary, AB T2E 7H7
Tel: (403) 295-3955
Fax: (403) 274-5493
IF YOU SHIP THE PRODUCT TO A SERVICENTRE
Panasonic Canada Inc.
5770 Ambler Dr.
Mississauga, ON L4W 2T3
Tel: (905) 624-8447
Fax: (905) 238-2418
Panasonic Canada Inc.
3075, rue Louis A. Amos
Lachine, QC H8T 1C4
Tel: (514) 633-8684
Fax: (514) 633-8020
62
Page 63

NOTE
Information
63
Page 64

Glossary
Angle
Some DVD discs feature scenes simultaneously shot
from dif ferent angles. The A NGLE button can be used to
view the sc ene from different angles. (ANGLE Indicator
lights up on the unit when a scene recorded from
different angles is detected.)
Bitstream
This is the digital form of multi-channel audio data (e.g.,
5.1 channel) before it is decoded into its various
channels.
Chapter Number
Titles are subdivided into numbered sections. You can
quickly search for a favourite sc ene using these numbers.
Decoder
A decoder restores the coded audio signals on DVDs to
normal. This is called decoding.
Dolby Digital
This is a method of coding digital signals developed by
Dolby Laboratories. Apart from stereo (2- channel) audio,
these signals can also be multichannel audio. A large
amount of audio information can be recorded on one disc
using this method.
Dolby Pro Logic
A surround system where a 4-channel audio track is
recorded as 2 channels and then is restored to 4
channels for play. The surround channel is monaural and
can reproduce up to 7 kHz.
DTS (Digital Theatre Systems)
This surround system is used in many movie theatres
around the world. There is good separation between the
channels, so realistic sound ef fects are possible.
Dynamic range
Dynamic range is the difference between the lowest level
of sound that can be heard above the noise of the
equipment and the highest level of sound before
distortion occurs.
DVD
A high-density optical disc on which high- qualit y pictures
and sound have been digitally recorded. DVD
incorporates new video compression technology (MPEG
II) and high-density recording technology which allow
entire movies to be rec orded with incredible playback
quality.
Film and video
DVD-Videos are recorded using either film or video.
Usually, film is recorded at 24 frames per second, the
rate movies are filmed at, while video is recorded at 30
frames per second.
Frame still and field still
Frames are the still pictures that go together to make a
moving picture. There are about 3 0 frames shown each
second. One frame is made up of two fields. A regular
television shows these fields one after the other to create
frames.
A still is shown when you pause a moving picture. A
frame still is made up of t wo alternating fields, so the
picture may appear blurred, but overall quality is high. A
field still is not blurred, but it has only half the information
of a frame still so picture qualit y is lower.
Linear PCM (pulse code modulation)
These are uncompressed digital signals, similar to those
found on CDs.
Regional Code
This is a copyright protection measure unique to
DVD-Video. There are 6 regional codes worldwide. In
order to play a disc encoded with a regional code, the
DVD player must be equipped with the same code.
Sampling bit number
This is the resolution shown in number of bits to
determine how faithfully the sampled analog frequency
was expressed at the time the signal is converted from
analog to digital.
Sampling Frequency
This is the number of times sampling is performed in (1)
second shown in Hz units at the time the signal is
converted from analog to digital using the PCM method.
The greater the number, the higher the sound quality.
Subtitles
Written dialogue which appears at the bottom of the
screen.
Time Number
The elapsed play time from the start of a disc or title. Use
to quickly find scenes. (M ay not work with some discs.)
Title Number
For DVD discs with two or more titles, the title is
numbered as title 1, title 2, etc.
Tra ck Num ber
Numbers assigned to tracks on CDs to allow specific
tracks to be quickly located.
V.S .S . F ea tur e
Virtual surround sound playback is possible even with
only 2 speakers. For example, using this unit’s built-in
speakers, the 2 speaker s of a connected stereo, etc., you
can enjoy a surround sound effect. If the disc was
recorded in Dolby Digital 5.1 ch, with just the two front
L/R speakers, you will feel as if you are hearing sound
from nonexistent speakers on both sides of you. This
effect also works with Dolby Digital 2- channel discs.
64
Page 65

Specifications
Display
Picture Tube
Tun er
Broad cast Channels VH F 2 ~ 13, UHF 14 ~ 69
CA BLE Channels
General
Power Source 120 V AC, 6 0 Hz
Power
Consumption
Tel ev i si on S ys tem EIA Standard NTSC colour
Speak er
Op er at ing Temperature 5 °C ~ 35 °C (41 °F ~ 95 °F)
Op er at ing Humidity 10 % ~ 75 %
Weight
Di men sions
(W x H x D)
Power On
Power Of f Approx. 1.5 W
Discs played
DVD disc ( DVD-Video, DVD-R)
DVD- RAM
Compact disc (CD- DA, CD -R,
CD-RW)
Digital audio output
Optical digital output Optical connector
Pickup
Wavelength
20 inch, measured diagonally pure flat Picture Tube (PV-20DF6 4- K)
27 inch, measured diagonally pure flat Picture Tube (PV-27DF64 -K)
Midband A through I (14 ~ 22)
Superband J through W (23 ~ 36)
Hyperband AA ~ EEE (37 ~ 64)
Lowband A -5 ~ A-1 (95 ~ 99)
Special CABLE channel 5A (01)
Ultraband 65 ~ 94, 10 0 ~ 125
Approx. 113 W (PV-20DF64-K)
Approx. 146 W (PV-27DF64-K)
2 pieces 3 W ( PV-20DF64 -K)
2 pieces 5 W ( PV-27DF64- K)
28 kg (61.7 lbs.) (PV-20DF64-K)
48 kg (105.8 lbs.) (PV-27DF64-K)
604 mm (23-3/4″) x 523 mm (20- 5/8″) x 503 mm (19-3 /4″ ) (PV-20 DF64-K )
760 mm (29-7/8″) x 645 mm (25 -3 /8″) x 511 mm (20-1/8″) (PV-27DF64 -K)
12 cm (5″ ) single-sided, single-layer
12 cm (5″ ) single-sided, double-layer
12 cm (5″ ) double-sided, double-layer
(one layer per side)
8 cm (3″ ) single-sided, single-layer
8 cm (3″ ) single-sided, double-layer
8 cm (3″ ) double-sided, double-layer
(one layer per side)
5″ (12 cm) 9.4 GB (double-sided) and 4.7 GB (single-sided)
3″ (8 cm) 2.8 GB (double-sided)
5″ (12 cm) disc
3″ (8 cm) disc
655 nm (DVD)
790 nm (CD)
Laser power: CLASS II
Information
Note
• Designs and spec i fi ca tions are sub ject to change without no tice.
65
Page 66

Index
A
Accessories.................................................2
ACTION button.......................................... 11
AC Power Plug .......................................... 13
ADD/ DELETE/CLEAR button................... 11
Add or Delete a Channel ........................... 19
ANGLE button ........................................... 11
ANGLE Indicator ....................................... 12
Audio Adjustment ......................................29
AUDIO button ............................................ 11
Audio Input Connector 1 ...........................13
Audio Input Connector 2 ...........................12
Audio Menu ...............................................28
Audio Mode for TV Viewing ...................... 24
Audio Mute ................................................23
Audio Output Connector (L/R) .................. 13
Audio Soundtrack Language..................... 41
Auto-Power Off function............................ 38
Automatic Channel Setting ....................... 19
Automatic Clock Setting ............................ 20
Auto Shut Off............................................. 37
B
Before Requesting Service .......................60
Blocking Message ..................................... 36
Blue Screen Display .................................. 37
C
Canadian English Language Ratings ........ 34
Canadian French Language Ratings ........35
Caption On Mute Feature.......................... 27
Change Language Setting ........................21
Changing your secret code ....................... 31
Channel Display ........................................ 37
CHANNEL UP/DOWN button ................... 11
Closed Caption Mode Feature .................. 26
Connecting the “1, 2” AV Input Terminals . 15
Connecting the Audio Output Terminal..... 16
Connecting the RF in Terminal .................14
D
Direct Navigator ........................................ 45
Discs that can be played ............................. 9
Disc Handling ............................................10
Disc Languages ........................................ 54
Disc Operation
Disc Tray ...................................................12
DISPLAY button ........................................ 11
DST (Daylight Saving Time)........................ 8
DVD button................................................ 11
DVD Volume Adjust................................... 52
E
Enter Secret Code..................................... 31
-Using Information Screen-
..46
F
Forward/Reverse Chapter/Track Skip ......39
Forward/Reverse Rapid Scene Search ....39
Frame by Frame Picture............................ 39
I
Important Safeguards and Precautions ...... 6
Information Display ...................................43
Initial Setup (Ready to Play)...................... 18
INPUT button ............................................ 11
L
Language Code List .................................. 55
Loading the Batteries .................................. 8
Location of Controls .................................. 11
M
Main Menu of DVD ....................................40
Manual Clock Setting ................................ 20
MENU/ PLAY LIST button.......................... 11
Multiple Angle Viewing..............................53
MUTE button ............................................. 11
N
NUMBER Keys.......................................... 11
O
ON-TIMER................................................. 25
ON TIMER Indicator.................................. 12
OPEN / CLOSE ......................................... 11
Optical digital audio output connector....... 13
P
Phones Jack.............................................. 12
Picture Zoom .............................................43
Play a DVD-RAM ......................................44
PLAY button .............................................. 11
Play Disc ...................................................38
Play List.....................................................45
POWER button.......................................... 11
Program Play............................................. 50
Program Repeat Play ................................ 51
R
Random Play............................................. 51
Rapid Tune................................................ 23
RAPID TUNE button ................................. 11
Receivable Broadcast Types ....................24
Region Management Information.............. 10
Remote Control Buttons............................ 11
Remote Sensor ......................................... 12
Reset all unit Memory Functions............... 21
RESUME Function ....................................39
RETURN ................................................... 11
66
Page 67

S
Safety Precaution........................................ 2
Safety Precautions ...................................... 4
SEARCH /SLOW+ ................................... 11
SEARCH /SLOW- .................................... 11
Selecting AUDIO OUTPUT .......................56
Selecting Input Mode ................................22
Selecting STILL MODE ............................. 57
Selecting TV MODE.................................. 58
SELECT ▲▼◄ ► button............................ 11
SET button ................................................ 11
SKIP+ ........................................................ 11
SKIP- ......................................................... 11
Sleep Timer ...............................................25
SLEEP TIMER Indicator............................ 12
Slow Motion Picture ..................................39
STILL......................................................... 11
Still (Pause) Picture...................................39
STOP button.............................................. 11
Subtitle Language .....................................42
SUB TITLE button ..................................... 11
SURROUND/VSS button.......................... 11
Surround Sound System ........................... 23
T
Table of Contents ........................................3
TIMER ....................................................... 11
Time Zone Adjust ......................................21
TITLE/D.NAVI button ................................ 11
Title Menu of DVD .....................................40
To clean disc surface ................................ 10
To View a Blocked Program/ Movie ........... 36
TV.............................................................. 11
TV Status & Clock Display ........................ 37
U
Unit Buttons............................................... 12
Using the CH/VOL Button.........................22
Using the Number and 100 keys ............... 23
Using the NUMBER keys [Disc]................ 39
US MOVIES Ratings .................................32
US TV PROGRAMS Ratings ....................33
V
V.S.S. (Virtual Surround Sound) ............... 53
VHF/UHF Antenna Input Terminal ............ 13
Video Adjustment ......................................29
Video Input Connector 1 ...........................13
Video Input Connector 2 ...........................12
Video Menu ...............................................28
Vocal selection for Karaoke discs ............. 41
VOLUME UP/DOWN button ..................... 11
W
Warning and Instruction Displays .............59
Z
ZOOM button ............................................ 11
Information
67
Page 68

Panasonic Canada Inc.
5770 Ambler Drive,
Mississauga, Ontario L4W 2T3
(905) 624-5010
www.panasonic.ca
Montréal: 3075 Louis A. Amos, Lachine, Québec H8T 1C4 (514) 633- 868 4
Toro n t o : 5770 Ambler Drive, Mississauga, Ontario L4W 2T3 (905) 624- 8447
Calgary: 6835 - 8th Street N.E., Calgary, Alberta T2E 7H7 (403) 295-395 5
Vancouver: 12111 Riverside Way, Richmond, BC V6W 1K8 (604) 278- 4211
Printed in Indonesia
LSQT0810 A
S0304-1034
K
Page 69

Combiné télé/DVD
Manuel d’utilisation
Préparatifs Fonctionnement du téléviseur Fonctionnement du disque Information
Modèles
• Les instructions concernant le réglage initial et les raccordements se trouvent à la page 18.
PV-20DF64-K/PV-27DF64-K
Lecture multiformat
* La capacité de lecture est relative
aux conditions d’enregistrement.
À titre de participant au programme ENERGY STAR®,
Panasonic assure que cet appareil, ou ce modèle, satisfait aux
normes d’efficacité énergétique du programme.
Nous vous recommandons de lire attentivement ces instructions avant de brancher,
d’utiliser ou de régler l’appareil et de les conserver pour référence ultérieure.
Ce manuel d’utilisation se rapporte aux modèles PV-20DF64-K et PV-27DF64-K. Les
illustrations figurant dans ce manuel s’appliquent au PV-27DF64-K. Les
caractéristiques sont susceptibles de varier. Veuillez lire attentivement.
Pour de l’aide, composez le 1-800-561-5505 ou visitez notre site Internet à www.panasonic.ca
LSQT0810 A
Page 70

Avant l’utilisation
Félicitations
Vous avez arrêté votre choix sur l’un des
produits les plus perfectionnés et les plus
fiables sur le marché. Utilisé correctement, il
ne manquera pas de procurer à vous et à
votre famille des années de plaisir. Veuillez
prendre le temps de remplir l’encadré
ci-dessous. Le numéro de série est inscrit
sur l’étiquette apposée sur le panneau
arrière de l’appareil.
Date d’achat ___________________
Détaillant _____________________
Adresse du détaillant ____________
N° de téléphone du détaillant ______
N° de modèle _________________
N° de série ____________________
Accessoires
Identifier et vérifier les accessoires
fournis. Lors de la commande de pièces
de rechange, utiliser les numéros
indiqués entre parenthèses.
Mesures de sécurité
Veuillez lire attentivement les mesures de
sécurité suivantes.
AVERTISSEMENT
PV-27DF64-K seulement
Lors de la
manipulation de
l’appareil, toujours
le tenir de la
manière indiquée à
l’illustration.
Afin d’éviter toute
blessure aux mains
lorsque l’appareil
est déposé sur une
surface plane,
toujours le tenir par
la partie indiquée
par la flèche.
2
1 télécommande (EUR7724010)
L’appareil peut basculer s’il est placé sur une
surface instable, pendant des tremblements
de terre ou si quelqu’un s’appuie dessus.
Utiliser une corde robuste ou une chaîne
(non fournie) pour attacher l’appareil
fermement à un support robuste comme un
mur ou une colonne.
2 piles “AA”
Page 71

Table des matières
Préparatifs
Fonctionnement du
téléviseur
Fonctionnement
du disque
Avant l’utilisation ..........................................................................2
Mesures de sécurité .....................................................................4
IMPORTANTES MESURES DE SÉCURITÉ ..................................6
Informations (Appareil) ................................................................8
Informations (Disque) ..................................................................9
Emplacement des commandes .................................................11
Raccor dements ........................................................................... 14
Réglage initial -Prêt pour la lecture- ........................................18
Réglage des canaux ...................................................................19
Visionnement ..............................................................................22
Réception d’émissions multivoie/réception stéréo ................24
Minuterie du téléviseur ...............................................................25
Affichage des sous-titres ..........................................................26
Réglage vidéo/audio ...................................................................28
Avis de signal faible ...................................................................30
Discrétion parentale ...................................................................31
Affichage ......................................................................................37
Utilisation de base du disque ....................................................38
Utilisation du disque -Mode lecture- ........................................40
Opération avec disque DVD-RAM .............................................44
Utilisation du disque -Écran d’informations- ..........................46
Caractéristiques spéciales ........................................................50
Réglages initiaux du DVD ..........................................................54
Préparatifs
Préparatifs Fonctionnement du téléviseur Fonctionnement du disque Information
Information
Avertissements et directives .....................................................59
Guide de dépannage ..................................................................60
Garantie/Liste des centres de service .....................................62
Glossa ire ......................................................................................6 4
Spécifications .............................................................................65
Index .............................................................................................6 6
3
Page 72

Mesures de sécurité
AVERTISSEMENT
AFIN DE PRÉVENIR TOUT RISQUE D’INCENDIE OU DE CHOCS
ÉLECTRIQUES, NE PAS EXPOSER CET APPAREIL À LA PLUIE OU À
UNE HUMIDITÉ EXCESSIVE.
ATTENTION
POUR ÉVITER LES CHOCS ÉLECTRIQUES, INTRODUIRE LA LAME LA
PLUS LARGE DE LA FICHE DANS LA BORNE CORRESPONDANTE DE
LA PRISE ET POUSSER JUSQU’AU FOND.
4
Page 73

ATTENTION:
CET APPAREIL EST UN PRODUIT LASER DE CLASSE I. TOUTEFOIS, CET APPAREIL
UTILISE UN FAISCEAU LASER VISIBLE, LEQUEL PEUT CAUSER DES RADIATIONS
DANGEREUSES. SE CONFORMER AUX INSTRUCTIONS DU PRÉSENT MANUEL.
LORSQUE CET APPAREIL EST BRANCHÉ SUR LE SECTEUR, NE PAS APPROCHER
LES YEUX DE L’OUVERTURE DU PLATEAU DU DISQUE NI DES AUTRES
OUVERTURES POUR REGARDER À L’INTÉRIEUR DE L’APPAREIL. L’UTILISATION DE
COMMANDES OU LE RECOURS À DES RÉGLAGES AUTRES QUE CEUX INDIQUÉS
DANS CE MANUEL PEUVENT PRÉSENTER DES RISQUES D’EXPOSITION À DES
RADIATIONS. NE PAS OUVRIR LE BOîTIER. TOUTE RÉPARATION DOIT ÊTRE FAITE
PAR UN PERSONNEL QUALIFIÉ ET NON PAR L’USAGER.
ATTENTION:
RAYONNEMENT LASER EN CAS
D’OUVERTURE.
NE PAS REGARDER DANS LE
FAISCEAU.
(Intérieur du produit)
Le symbole de l’éclair dans un triangle
équilatéral indique la présence d’une tension
suffisamment élevée pour engendrer un
risque de chocs électriques. Il est dangereux
de toucher à une pièce interne de l’appareil.
Le point d’exclamation dans un triangle
équilatéral indique que le manuel d’utilisation
inclus avec l’appareil contient d’importantes
recommandations quant au fonctionnement
et à l’entretien de ce dernier. Il faut donc le
lire attentivement.
Préparatifs
Cet appareil est breveté aux États-Unis sous les références 4,631,603, 4,577,216,
4,819,098 et 4,907,093. Licence accordée pour utilisation privée seulement.
Ce produit intègre une technologie protégée par copyright, qui dépend de certains brevets
américains ou d’autres droits de propritété intellectuelle, possédés par Macrovision
Corporation et les autres ayants droit. L’utilisation de cette technologie protégée doit être
autorisée par Macrovision Corporation, et doit se faire, sauf exception officielle fournie par
Macrovision Corporation, dans le cadre domestique ou privé d’un visionnement. Le
démontage de l’appareil et la décompilation sont interdites.
Cet appareil permet I’affichage des sous-titres.
5
Page 74

IMPORTANTES MESURES DE SÉCURITÉ
AVERTISSEMENT
AFIN DE PRÉVENIR TOUT RISQUE DE CHOCS ÉLECTRIQUES,
D’INCENDIE, DE BLESSURES AINSI QUE TOUT DOMMAGE À L’APPAREIL,
LIRE ET CONSERVER LES MESURES DE SÉCURITÉ ET LE MANUEL
D’UTILISATION. TENIR COMPTE ÉGALEMENT DE TOUTES LES MISES EN
GARDE INDIQUÉES DANS LE MANUEL ET INSCRITES SUR L’APPAREIL.
Installation
1 Mise en garde – Alimentation
N’alimenter l’appareil que sur le type de
courant indiqué dans ce manuel ou sur
l’appareil. Dans le doute, consulter un détaillant
ou la compagnie d’électricité.
2 Fiche polarisée ou avec retour à la
terre
Par mesure de sécurité, cet appareil est muni
soit d’une fiche polarisée (branches de largeur
différente) ou d’une fiche à trois branches.
Tenir la prise fermement et ne pas brancher ou
débrancher les mains mouillées. Nettoyer la
prise régulièrement.
Mise en garde – Fiche polarisée:
Cette fiche ne peut être insérée dans une prise
que dans un sens. Si elle ne peut être
entièrement insérée, essayer l’autre sens. Si
elle ne peut être insérée dans aucun des deux
sens, consulter un électricien pour faire
modifier l’installation électrique. Ne pas
contourner cette mesure de sécurité en
modifiant la fiche.
Fiche avec retour à la terre:
Cette fiche ne peut être insérée que dans une
prise avec retour à la terre (prise à trois trous).
Si cela s’avérait nécessaire, consulter un
électricien pour installer une prise adéquate.
Ne pas contourner cette mesure de sécurité en
modifiant la fiche.
3 Cordon d’alimentation
Afin d’assurer le bon fonctionnement de
l’appareil et d’éviter tout risque de chocs
électriques, d’incendie ou de blessure:
• Placer le cordon dans un endroit loin des appareils
de chauffage et dans un endroit où il ne risque pas
d’être écrasé ou étiré. Ne pas placer d’objet lourd
sur le cordon.
• Ne pas essayer d’altérer le cordon.
• Si une rallonge devenait nécessaire, s’assurer
qu’elle comporte une fiche polarisée ou une fiche
avec retour à la terre et que le raccordement
puisse se faire de manière sécuritaire.
• Les prises murales surchargées et les rallonges
peuvent être cause d’incendie ou de chocs
électriques.
• Toute prise, fiche ou cordon endommagés doivent
être remplacés par un électricien qualifié.
4 Ne pas bloquer les évents d’aération
Les évents d’aération du boîtier assurent
l’évacuation de la chaleur produite par le
fonctionnement de l’appareil. Le blocage des
évents peut entraîner une surchauffe et un
risque d’incendie ou de dommage aux disques.
Pour plus de protection:
a. Ne jamais placer cet appareil sur un lit,
divan ou tapis, ni recouvrir les évents
pendant l’utilisation de l’appareil.
b. Éviter d’encastrer l’appareil dans une
étagère ou une unité murale à moins
d’assurer une ventilation adéquate.
5 Éviter les pièces surchauffées ou les
changements soudains de
température
Ne jamais installer l’appareil sur un radiateur
ou une bouche de chaleur, ni l’exposer aux
rayons directs du soleil. Si l’appareil est soumis
à une hausse soudaine de température
ambiante, il peut y avoir formation d’humidité à
l’intérieur, ce qui est susceptible
d’endommager l’appareil.
6 Afin de prévenir tout accident
• N’utiliser que des supports fermes et de
niveau.
• Déplacer avec précaution toute table roulante
portant un appareil. Afin de ne pas renverser
l’appareil et la table roulante, éviter les arrêts
et les déplacements brusques ainsi que les
surfaces inégales.
• Pour un bon fonctionnement de l’appareil,
suivre attentivement les recommandations du
manuel d’utilisation.
6
Page 75

Utilisation de l’appareil
Après rangement ou lors du déplacement de
l’appareil, consulter la section Installation de
ces mesures de sécurité.
1 Éloigner l’appareil de toute source
d’humidité et le protéger de l’eau.
2 Si l’appareil a été exposé à la pluie,
l’humidité ou a subi un choc violent,
le débrancher et le faire vérifier par
un technicien qualifié avant de
l’utiliser.
3 En cas d’orage
Pendant un orage ou si l’appareil n’est pas
utilisé pendant une période prolongée,
débrancher tout équipement des prises de
courant ainsi que l’antenne ou le câble.
4 Avec l’appareil branché
• NE PAS UTILISER L’APPAREIL SI:
- un liquide a été répandu à l’intérieur
- l’appareil a été laissé tombé ou endommagé
- l’appareil émet des bruits, des odeurs ou de
la fumée. Afin d’éviter tout risque d’incendie
ou de chocs électriques, débrancher
immédiatement l’appareil et le faire vérifier
par un technicien qualifié.
• Ne jamais insérer ou laisser tomber des
objets à l’intérieur de l’appareil. Certaines
pièces internes sont porteuses de hautes
tensions et peuvent donc causer des chocs
électriques ou provoquer des incendies.
• Afin d’éviter tout risque d’interférences,
éloigner l’appareil de tout champ magnétique
(tels haut-parleurs).
5 Utilisation des accessoires
N’utiliser que les accessoires recommandés
par le manufacturier afin d’éviter tout risque
d’incendie, de chocs électriques ou autre
danger.
6 Nettoyage de l’appareil
Débrancher l’appareil. Utiliser un chiffon doux,
sec et propre pour nettoyer l’appareil. NE PAS
utiliser de produits nettoyants, de vaporisateurs
ou toute autre méthode qui pourrait entraîner la
pénétration de liquides à l’intérieur de l’appareil
causant ainsi des risques de chocs électriques.
Toute substance comme la cire ou du ruban
adhésif risque d’endommager le fini du boîtier.
Les éléments internes peuvent être
endommagés par un environnement graisseux,
humide ou poussiéreux.
Installation d’une antenne extérieure
1 Raccordement sécuritaire à une
antenne ou à la câblodistribution
Si l’appareil doit être raccordé à une antenne
extérieure ou à la câblodistribution, s’assurer
que l’antenne ou le câble soit raccordé à la
terre afin de protéger l’appareil contre les
surtensions et des décharges d’électricité
statique. La partie 1 du Code canadien de
l’électricité contient les informations
concernant la mise à la terre des mâts
d’antenne et de leurs structures, celle du fil de
descente à un parafoudre, le calibre des
conducteurs de mise à la terre, l’emplacement
du parafoudre, le raccordement et les
exigences requises pour les électrodes de
terre.
2 Éloigner l’antenne des lignes et des
circuits à haute tension
Installer toute antenne extérieure à l’abri des
lignes à haute tension, circuit d’éclairage ou
lignes d’alimentation au cas où elle viendrait à
tomber. Lors de cette installation, tout contact
avec les lignes et
circuits à haute
tension, ou toute
source
d’alimentation
électrique, pourrait
être fatal.
Entretien
1 Ne pas tenter de réparer l’appareil
soi-même
Si, après avoir suivi attentivement les
instructions du manuel, l’appareil ne fonctionne
pas adéquatement, ne pas ouvrir ses
couvercles ni essayer de faire des réglages qui
ne sont pas décrits dans le manuel.
Débrancher l’appareil et contacter un
technicien qualifié.
2 Remplacement de pièces
S’assurer que le technicien n’utilise que des
pièces recommandées par le manufacturier ou
ayant des caractéristiques identiques. Toute
autre substitution peut provoquer un risque
d’incendie ou de chocs électriques.
3 Demander au technicien d’effectuer
des vérifications de sécurité
Après tout entretien ou service, demander au
technicien d’effectuer des vérifications de
sécurité comme mentionné dans le manuel de
service du fabricant afin de confirmer le
fonctionnement normal de l’appareil.
Préparatifs
7
Page 76

Informations (Appareil)
Insertion des piles
1 Ouvrir le
couvercle.
2 Insérer les
piles en
respectant la
polarité.
3 Refermer le
couvercle.
• S’assurer de respecter la polarité (+ et -)
indiquée sur la télécommande.
• Ne pas utiliser de piles rechargeables.
Ne pas:
• Utiliser ensemble des piles neuves et usées.
• Utiliser ensemble des piles de types différents.
• Exposer les piles à la chaleur ou à la flamme.
• Démonter ou court-circuiter les piles.
• Tenter de recharger des piles alcalines ou au
manganèse.
• Utiliser des piles dont la gaine a été enlevée ou
est endommagée.
Un traitement inapproprié des piles peut entraîner
une fuite de l’électrolyte susceptible
d’endommager les objets avec lesquels elle
entrerait en contact et de provoquer un incendie.
Retirer les piles de la télécommande si celle-ci ne
doit pas être utilisée pendant une longue période.
Ranger les piles dans un endroit sombre et frais.
Heure avancée (heure d’été)
Ce combiné permet le réglage automatique
de l’horloge à l’heure avancée.
Au printemps (Premier dimanche
d’avril)
HR ETE : OUI →
l’horloge est avancée d’une heure.
À l’automne (Dernier dimanche
d’octobre)
HR ETE : OUI →
• Si l’heure avancée n’est pas en vigueur dans
votre région, sélectionner HR ETE : NON (voir la
section “Réglage manuel de l’horloge” à la
page 20).
l’horloge recule d’une heure.
8
Page 77

Informations (Disque)
Disques compatibles
Typ e de
disque
DVD-Vidéo
DVD-R*
DVD-RAM
CD
CD-R
CD-RW
Ne pas utiliser de disques aux formes
irrégulières (en forme de cœur, par exemple);
ils pourraient en effet endommager le lecteur.
*1 Disques DVD-Vidéo formatés [finalisés]
2
Disques enregistrés avec la version 1.1 de
*
Video Recording Format
Logo
1
*2
Identification
dans ce manuel
DVD-V
(DVD-Vidéo)
DVD-RAM
CD
(CD-DA)
Disques DVD compatibles
Les disques portant les étiquettes suivantes
pourront être lus.
Lecture des DVD
Le producteur de ces disques peut contrôler
la manière dont ils doivent être lus. Aussi se
pourrait-il que le pilotage de la lecture ne se
fasse pas exactement tel que décrit dans le
présent manuel. Lire attentivement la notice
d’utilisation du disque.
Disques DVD-R
Les disques DVD-R Panasonic enregistrés
et finalisés* sur un enregistreur DVD
Panasonic sont lus comme DVD-Vidéo sur
cet appareil.
Disques DVD-RAM
Les disques DVD-RAM doivent remplir les
conditions suivantes pour que cet appareil
puisse en faire la lecture.
• Disques sans cartouche
Typ e
Capacité
• Sortir les disques de TYPE 2 et 4 de leur
cartouche avant de les utiliser; les retourner
dans leur cartouche après la lecture. Lire
attentivement les instructions qui accompagnent
le disque.
• Disques qui peuvent être retirés
de leur cartouche (TYPE 2 et 4)
• 12 cm (5 po), 9,4 Go (double face)
et 4,7 Go (simple face)
• 8 cm (3 po), 2,8 Go (double face)
Disque (TYPE 2 et 4)
Disque sans cartouche
Préparatifs
Disques non compatibles
DVD avec n° de région autre que “1” ou
“ALL”, DVD au format PAL, DVD-ROM,
DVD+R, DVD-AUDIO, DVD-RW, DVD+RW,
CD-ROM, CDV, CVD, CD-G, CD texte,
SACD, CD photo, CD-Vidéo.
Nota
• Il est possible que cet appareil ne puisse lire
certains disques CD-R, CD-RW, DVD-R et
DVD-RAM en raison du type d’encodage utilisé
à l’enregistrement.
• Il se peut que la lecture de certains passages du
disque ne se fasse pas adéquatement, par
exemple là où un programme se termine et où
un autre commence.
Disques CD-R et CD-RW
L’appareil peut prendre en charge les
disques CD-R/RW s’ils sont en format
CD-DA (audio numérique) et finalisés*.
* La finalisation est un processus qui permet
la lecture de ces disques sur un appareil
compatible.
9
Page 78

Maniement des disques et entretien
Précautions de
maniement
• Ne pas apposer
d’étiquettes sur le
disque car ceci pourrait
nuire à la lecture
DVD-R.
• Ne pas apposer de
collants sur les
disques. (Ne pas
utiliser de disques sur
lesquels des bandes
adhésives ou des
étiquettes se décollent.)
• Tenir le disque par les
bords de façon à ne
pas laisser de marques
de doigt sur la surface.
Les marques de doigt,
la saleté et les rayures
peuvent provoquer des
sauts de lecture et de
la distorsion.
• Ne pas écrire sur le
côté portant l’étiquette.
• Ne pas utiliser de
vaporisateurs de
nettoyage pour
disques, benzène,
diluant, liquide
antistatique ni aucun
autre solvant.
• Ne pas essayer de
refermer le plateau du
disque si le disque n’est
pas installé
correctement.
Plateau du
disque
Disque
Information sur la gestion des régions
Cet appareil est conçu et fabriqué de façon à
répondre à l’information de gestion de région
enregistrée sur les disques DVD. Si le
numéro de région du DVD ne correspond
pas au numéro de région de cet appareil, le
disque ne pourra pas être lu sur l’appareil.
Aux États-Unis et au Canada
• Le numéro de région de cet appareil est “1”.
• Cet appareil prend en charge les disques
DVD-Vidéo sur lesquels est apposée une
étiquette marquée “1” ou “ALL” (Tous).
Exemple:
Si la surface du disque est sale
L’essuyer délicatement avec un chiffon doux
et humide (eau seulement). Pour essuyer les
disques, toujours déplacer le chiffon de
l’orifice central vers le bord extérieur. (Si les
disques sont essuyés suivant un mouvement
circulaire, cela risque de provoquer des
rayures circulaires qui engendreront des
parasites.)
• DVD-RAM, DVD-R :
Nettoyer uniquement avec le nettoyeur pour
disque DVD-RAM facultatif. Ne jamais utiliser de
tissus, nettoyeurs pour CD, etc.
10
Si le disque est amené d’un
environnement froid à une pièce chaude,
de l’humidité risque de se former sur le
disque
Essuyer l’humidité avec un chiffon doux, sec
et sans peluche avant d’utiliser le disque.
(Voir ci-dessus.)
Afin de prévenir les risques de
dommages, ne pas ranger ou laisser les
disques dans un endroit
• exposé aux rayons solaires directs ;
• humide ou poussiéreux ;
• près d’une source de chaleur.
Page 79

Emplacement des commandes
Télécommande
1
2
3
4
5
6
7
8
9
10
11
12
13
14
15
16
17
Ouverture /
1
Fermeture
2 Interrupteur
3 Affichage
Syntonisation
4
rapide
Réglage
5
silencieux
6 Entrée Change la source du signal
7 Action Affichage du menu principal.
8 Sélection ▲▼ ◄ ►
Le plateau du disque ouvre ou
ferme selon le cas.
Mise en/hors marche de
l’appareil.
Affichage de l’état du téléviseur
et de l’heure du jour. En mode
DVD, affichage d’informations
sur le disque et l’appareil.
Affichage du dernier canal
syntonisé.
Coupure instantanée du son.
entrant.
Pour naviguer dans le menu
affiché à l’écran.
18
19
20
21
22
23
24
25
26
27
28
29
30
31
Changement de
9
canal
10 Saut- Ι◄◄
11 Arrêt Arrête la lecture.
12 Arrêt sur image
Recherche ◄◄ /
13
ralenti-
14 Audio
15 Angle
16 Minuterie
17 Retour Retour au menu DVD.
18 DVD Pour passer au mode DVD.
19 Tél é Pour passer au mode télé.
Touc hes
20
numériques
Ajout ou
21
effacement
Menu / Liste de
22
lecture
23 Réglage
Commande de
24
volume
25 Lecture Amorce la lecture.
Saut+ ►►Ι
26
Titre / Navigateur
27
direct
Recherche ►► /
28
ralenti+
Ambiophonique /
29
VSS
30 Sous-titres
32 Zoom
Sélection d’un canal.
Saut arrière d’un chapitre ou
d’une plage. Retour au menu
précédent.
Pause à la lecture et défilement
image par image en mode arrêt
sur image.
Repérage arrière rapide de
séquence en mode lecture.
Augmentation de la vitesse du
ralenti arrière en mode arrêt sur
image (jusqu’à 5 paliers).
Pour la sélection du mode audio
désiré.
Pour la sélection de l’angle de
vision désiré en mode DVD.
Réglage de la minuterie sous
tension ou de la
minuterie-sommeil.
Syntonisation directe d’un
canal.
Ajout ou effacement d’un canal.
Pour annuler une rubrique à
l’écran.
Affichage du menu du disque
DVD. Affichage de la liste de
lecture (DVD-R AM).
Permet d’effectuer les réglages
dans le menu séléctionné.
Réglage du volume.
Saut de chapitre ou de plage.
Passage à l’écran suivant.
Permet la sélection du titre au
moyen de son numéro sur
certains DVD. Affichage du
navigateur direct (DVD-R AM).
Repérage avant rapide de
séquence en mode lecture.
Augmentation de la vitesse du
ralenti avant en mode arrêt sur
image (jusqu’à 5 paliers).
Un effet ambiophonique
tridimensionnel plus profond est
possible.
Sélection d’une langue de
sous-titres.
Pour agrandir des sections
spécifiques d’une image d’un
DVD.
Préparatifs
11
Page 80

Commandes du combiné
Panneau avant de l’appareil
<Le modèle PV-27DF64-K est illustré>
1
<Le modèle PV-20DF64-K est illustré>
9'
45
Haut-parleur
1
incorporé
Prise de casque
2
d’écoute
Borne d’entrée
3
vidéo 2
Bornes d’entrée
4
audio 2
Plateau du
5
disque
Interrupteur
6
Commande de
7
volume
Changement de
8
canal
Arrêt Arrête la lecture.
9
Fonctions du lecteur DVD
Arrêt sur
image
9'
(PV-20DF64-K
seulement)
Lecture Amorce la lecture.
10
Saut Ι◄◄
11
Saut ►►Ι
12
Ouverture /
13
Fermeture
2 haut-parleurs avant
Pour brancher des écouteurs ou
un casque d’écoute.
Pour le raccordement à un autre
appareil. (LINE 2)
Pour le raccordement à un autre
appareil. (LINE 2)
Poser les disques compatibles
ici.
Mise en/hors marche de
l’appareil.
Réglage du volume.
Sélection d’un canal.
Pause à la lecture et défilement
image par image en mode arrêt
sur image.
Saut arrière d’un chapitre ou
d’une plage. Retour au menu
précédent.
Saut de chapitre ou de plage.
Passage à l’écran suivant.
Le plateau du disque ouvre ou
ferme selon le cas.
23 6
Capteur de
signal de la
14
télécommande
Indicateur
15
d’angle (rouge)
Indicateur de
mise sous
16
tension (orange)
Indicateur de
minuterie-sommeil
17
(vert)
78 9101112
14 16
13 15 17
Reçoit le signal infrarouge de la
télécommande.
S’allume lorsqu’une scène
enregistrée sous plusieurs
angles de prise de vue est
détectée (DVD seulement).
S’allume lorsque la minuterie de
mise sous tension est en
fonction.
S’allume lorsque la
minuterie-sommeil est en
fonction.
12
Page 81

Panneau arrière
<Le modèle PV-27DF64-K est illustré>
Une fois l’appareil
branché sur le
1 Prise d’alimentation c.a.
Prise de sortie audio
2
optique numérique
3 Prise de sortie audio (G/D)
4 Bornes d’entrée audio 1
5 Borne d’entrée vidéo 1
6 Prise d’antenne VHF/UHF
secteur, sa
consommation
d’énergie sera de
1,5 W (avec le contact
coupé).
Achemine le signal de
sortie audio
(numérique).
Achemine le signal de
sortie audio
(analogique).
Pour le raccordement
à un autre appareil.
(LINE 1)
Pour le raccordement
à un autre appareil.
(LINE 1)
Borne d’entrée pour
une antenne ou un
signal d’un
câblosélecteur.
Préparatifs
12 3 45 6
13
Page 82

Raccordements
Nota concernant les raccordements
• Couper l’alimentation sur tous les appareils avant d’effectuer les raccordements.
• Si les câbles nécessaires au raccordement d’un appareil auxiliaire ne sont pas fournis avec l’appareil
ou sont vendus séparément, il peut être nécessaire de fabriquer ou d’acheter le câble approprié.
• Lire attentivement le manuel d’utilisation de chaque appareil auxiliaire avant de procéder aux
raccordements.
Raccordement à la borne d’entrée RF
ATTENTION
Si les câbles RF coaxiaux utilisés sont de type à écrou, ne serrer les
écrous qu’à la main. Les serrer trop pourrait endommager les bornes.
Raccordement de l’antenne
Raccorder le câble de l’antenne à la borne VHF/UHF du combiné.
Antenne
VHF
Mélangeur
Antenne
UHF
Raccordement du câble
Raccorder le câble fourni par le câblodistributeur à la borne VHF/UHF du combiné.
Note à l’intention de
l’installateur du câble:
Ne pas oublier de rappeler au
technicien installant le câble que
le Code canadien de l’électricité
contient des directives quant à la
mise à la terre de l’installation; il
précise en outre que le câble doit
être relié à la mise à la terre de
l’immeuble aussi près du point
d’entrée du câble que possible.
Fil de câblodistribution
Câblosélecteur
Ou
14
Page 83

Raccordement aux bornes d’entrée audio/vidéo 1 et 2
Ces prises acceptent les magnétoscopes et autres périphériques.
Utilisation de la borne d’entrée audio/vidéo 1
Préparatifs
Nota
• Il est possible de faire des raccordements semblables au moyen des bornes d’entrée audio/vidéo 1 et
2.
• La borne d’entrée audio/vidéo 2 est située sur le panneau avant de l’appareil.
15
Page 84

Raccordement à la borne de sortie audio
Profiter d’un environnement sonore caractéristique d’une salle de cinéma ou de concert en
reproduisant la piste sonore multicanal des DVD à l’aide d’un amplificateur et d’enceintes
acoustiques. Deux types de raccordement sont possibles : analogique et numérique.
Raccordement analogique Raccordement numérique
Raccorder l’appareil à un décodeur Dolby
Digital ou dts pour obtenir un rendu
ambiophonique.
Brancher
fermement le câble
au connecteur.
Raccorder l’appareil à un amplificateur
pour obtenir un rendu stéréophonique de
haute qualité à une fréquence
d’échantillonnage de 96 kHz.
16
Amplificateur avec
décodeurs Dolby Digital
et dts intégrés.
Enceintes (exemple)
Consulter le
manuel
d’utilisation de
l’amplificateur
pour les
spécifications des
enceintes.
Amplificateur
Enceintes (exemple)
Page 85

Liste des préparatifs
Baisser le volume, puis mettre tous les
appareils hors circuit avant d’effectuer les
raccordements.
Ne pas obstruer les orifices de ventilation des
appareils et les disposer de façon que l’air
circule librement.
Sonorité numérique avec connecteur de
sortie audio numérique
À propos de la sortie audio du
connecteur de sortie audio numérique
optique
Disque
DVD-V
Format
d’enregistrement
du son
Dolby Digital
PCM linéaire
(48/ 96 kHz
16/20/24 bits)
dts
Dolby Digital
DVD-RAM
PCM linéaire
(48 kHz 16 bit)
CD
PCM linéaire
*1 Le type de sortie audio du connecteur pourra
être sélectionné dans les réglages initiaux du
DVD. (Voir pages 56-57.)
*2 Lorsque “LPCM” est désactivé dans le menu
DVD, seul l’échantillonnage à 48 kHz/16 bits
est acheminé. Lorsque ce réglage est activé,
l’échantillonnage à une cadence supérieure à
48 kHz/16 bits sera réduit à 48 kHz/16 bits. (Voir
pages 56-57.)
Fabriqué sous licence de Digital Theater
Systems Inc. Brevets 5,451,942, 5,956,674,
5,974,380, 5,978,762, 6,487,535 ainsi que
d’autres brevets en instance aux États-Unis et
dans d’autres pays. “DTS” et “DTS 2.0 + Digital
Out” sont des marques de commerce de Digital
Theater Systems Inc. ©1996, 2003 Digital
Theater Systems Inc. Tous droits réservés.
Sortie audio numérique optique
par le connecteur
Train de bits Dolby Digital
(1-5.1 canaux) ou PCM
(échantillonnage de
48 kHz/16 bits uniquement)*
PCM linéaire (2 canaux)
(échantillonnage de
48 kHz/16 bits)*
Train de bits ou PCM
(échantillonnage de
48 kHz/16 bits uniquement)*
Train de bits Dolby Digital
(1-5.1 canaux) ou PCM
(échantillonnage de
48 kHz/16 bits uniquement)*
PCM linéaire (2 canaux)
PCM linéaire
(échantillonnage de
44,1 kHz)
2
Pour référence:
• Le Dolby Digital est une technique de
compression du son numérique mise au point
par Dolby Laboratories Licensing Corporation.
Cette technique, qui supporte un son
ambiophonique à 5.1 canaux ainsi qu’un son
stéréo à 2 canaux, permet d’enregistrer
efficacement une grande quantité de données
sonores sur un disque.
• Le PCM linéaire est un format d’enregistrement
du signal utilisé pour les CD. Alors que les CD
sont enregistrés à 44,1 kHz/16 bits, les DVD
sont enregistrés entre 48 kHz/16 bits et
96 kHz/24 bits.
• Le raccordement d’un récepteur avec décodeur
ambiophonique Dolby Pro Logic permet de
profiter des mêmes effets Pro Logic tirés des
films DVD avec pistes sonores pour 5.1 canaux
Dolby Digital ainsi que des titres identifiés avec
la marque Dolby Surround. Pour plus de
1
renseignements sur les récepteurs avec
décodeur ambiophoniques Dolby Pro Logic
Panasonic, contacter votre détaillant.
IMPORTANT:
1
Précautions pour le connecteur de sortie
audio numérique optique:
• Lors du raccordement d’un amplificateur (avec
un connecteur d’entrée numérique optique) non
1
équipé d’un décodeur Dolby Digital ou d’un
décodeur dts, s’assurer de bien sélectionner
“PCM” sous “Dolby Digital” et “PCM” sous “dts”
du réglage initial “SORTIE AUDIO” de la section
DVD. (Voir pages 56-57.) Autrement, toute
tentative de lecture d’un DVD pourrait entraîner
un niveau de bruit si élevé qu’il risque d’affecter
l’ouïe et d’endommager les enceintes.
• S’assurer de consulter les pages 56 et 57 pour
de plus amples renseignements sur le réglage
du signal de sortie de Dolby Digital, dts et PCM.
• Les CD se lisent normalement.
Nota
• Certains décodeurs dts qui ne prennent pas en
charge l’interface DVD-dts pourraient ne pas
fonctionner correctement avec cet appareil.
Préparatifs
Fabriqué sous licence de Dolby Laboratories.
“Dolby”, “Pro Logic” et le symbole double D
sont des marques de commerce de Dolby
Laboratories.
17
Page 86

Réglage initial -Prêt pour la lecture-
Éjection
Interrupteur
Action
Sélection
▲▼◄ ►
Réglage
Commande
de volume +
Arrêt
Interrupteur
Arrêt
Réglage initial (Prêt pour la lecture)
S’assurer d’effectuer tous les raccordements
avant de mettre l’appareil sous tension.
Brancher le cordon d’alimentation dans une prise.
1 Appuyer sur POWER sur la
télécommande ou l’appareil.
2 Appuyer sur ▲,
▼ ou VOL+ pour
sélectionner la
langue.
3 Le réglage automatique des canaux
et de l’horloge s’amorce.
• Lors de l’utilisation
d’un
câblosélecteur, le
mettre en contact
et syntoniser le
canal PBS. Si un
récepteur DSS est
utilisé, il doit être
mis hors contact.
SELECT LANGUAGE
PRESS CH :English
APPUYER CH :Français
OPRIMIR VOL+ :Español
REGLAGE AUTOMATIQUE
EN COURS
REGLAGE AUTOMATIQUE
DE L’HORLOGE EN COURS
ANNULER:STOP
• Les touches de fonction sont inopérantes lors du
réglage initial.
• Si le réglage automatique de l’horloge prend plus de
30 minutes, appuyer sur STOP et effectuer les
réglages manuellement. (Voir pages 19-21.)
Cas 1
Les réglages sont
effectués
automatiquement. Les
réglages terminés, l’écran
10/25/2004 LUN 11:45AM
HR ETE:OUI
REGLAGE : CA 10
REGLAGE AUTOMATIQUE DE
L’HORLOGE COMPLETE
ci-contre s’affiche.
Cas 2
Si le réglage est
incomplet, l’écran
ci-contre s’affiche. Vérifier
le raccordement de
l’antenne/câble à la borne
d’entrée RF, puis régler
REGLAGE AUTOMATIQUE DE
L’HORLOGE INCOMPLET
REGLER L’HORLOGE
EN APPUYANT SUR ACTION
manuellement l’horloge de
la manière suivante.
a. Appuyer sur ACTION sur la
télécommande pour faire afficher le
menu REGLAGE HORLOGE.
REGLAGE HORLOGE
1/ 1/2004 JEU 12:00AM
HR ETE:OUI
SEL. : REGLER:SET
MARCHE:ACTION
b. Appuyer sur ▲▼ pour sélectionner
le mois et appuyer sur SET pour
régler. Régler la date, l’année, l’heure
et l’heure avancée (HR ETE) de la
même façon.
• Appuyer à répétition sur ◄ pour déplacer le
curseur. Appuyer sur ▲▼ pour effectuer une
correction.
REGLAGE HORLOGE
10/25/2004 LUN 11:45AM
HR ETE:OUI
SEL. : REGLER:SET
MARCHE:ACTION
c. Appuyer deux fois sur ACTION pour
mettre l’horloge en marche et quitter.
18
Page 87

Réglage des canaux
Tou ch es
numériques
Action
Sélection
▲▼◄ ►
Changement
de canal ▲▼
Ajout /
effacement
Réglage
4 Appuyer sur ▲▼ pour sélectionner
“ANTENNE”, puis appuyer sur SET
pour sélectionner “TELE” ou
“CABLE”.
5 Appuyer sur ▲▼ pour sélectionner
“REGLAGE AUTO”, puis appuyer sur
SET.
• Une fois le réglage automatique des canaux
terminé, le réglage automatique de l’horloge
s’amorce. (Si l’horloge a été réglé
manuellement, le réglage automatique de
l’horloge n’est pas fait automatiquement.)
Ajout ou effacement d’un canal
Pour ajouter un canal:
Sélectionner le canal au moyen des touches
numériques, puis appuyer sur ADD/DLT.
CANAL 08 AJOUTE
Fonctionnement du téléviseur
Réglage automatique des canaux
1 Appuyer sur ACTION pour afficher
l’écran MENU.
2 Appuyer sur ▲▼ ◄ ► pour
sélectionner “CANAL”.
3 Appuyer sur SET.
MENU
DVD BLOCAGE LANGUE
TELE HORLOGE CANAL
SEL.: REGLER:SET
FIN :ACTION
REGLAGE CANAL
ANTENNE : CABLE
REGLAGE AUTO
AVIS SIGNAL FAIBLE:NON
SEL. : REGLER:SET
FIN :ACTION
Pour supprimer un canal:
Sélectionner le canal au moyen des touches
CH ▲▼ ou des touches numériques, puis
appuyer sur ADD/DLT.
CANAL 08 EFFACE
19
Page 88

Action
Sélection
Réglage
▲▼◄ ►
Interrupteur
Saut- Ι◄◄
Lecture
Réglage automatique de l’horloge
1 Appuyer sur ACTION pour afficher
l’écran MENU.
2 Appuyer sur ▲▼ ◄ ► pour
sélectionner “HORLOGE”.
MENU
Réglage manuel de l’horloge
1 Appuyer sur ACTION pour afficher
l’écran MENU.
2 Appuyer sur ▲▼ ◄ ► pour
sélectionner “HORLOGE”.
MENU
DVD BLOCAGE LANGUE
TELE HORLOGE CANAL
SEL.: REGLER:SET
FIN :ACTION
3 Appuyer sur SET.
(“FUSEAU HORAIRE” ne s’affiche qu’une
fois l’horloge réglée.)
REGLAGE HORLOGE
REGLAGE AUTOMATIQUE
MANUEL
FUSEAU HORAIRE : 0
SEL. : REGLER:SET
FIN :ACTION
4 Appuyer sur ▲▼ pour sélectionner
“MANUEL”, puis appuyer sur SET.
REGLAGE HORLOGE
10/25/2004 LUN 11:45AM
HR ETE:OUI
SEL. : REGLER:SET
FIN :ACTION
DVD BLOCAGE LANGUE
TELE HORLOGE CANAL
SEL.: REGLER:SET
FIN :ACTION
3 Appuyer sur SET.
REGLAGE HORLOGE
REGLAGE AUTOMATIQUE
MANUEL
SEL. : REGLER:SET
FIN :ACTION
4 Appuyer sur ▲▼ pour sélectionner
“REGLAGE AUTOMATIQUE”, puis
appuyer sur SET.
20
5 Appuyer sur ▲▼ et sur SET pour
sélectionner et régler le mois, la
date, l’année, l’heure et l’heure
avancée (HR ETE).
Pour faire des corrections, appuyer
à repétition sur ◄ pour sélectionner
la rubrique désirée puis faire les
corrections.
6 Appuyer à deux reprises sur ACTION
pour mettre l’horloge en marche et
quitter ce mode.
Page 89

Fuseau horaire
(Seulement lorsque le réglage de l’horloge a
été fait automatiquement.)
1 Appuyer sur
▲▼◄ ► pour
sélectionner
“HORLOGE”.
2 Appuyer sur
SET.
3 Appuyer sur ▲▼
pour
sélectionner
“FUSEAU
HORAIRE”, puis
appuyer sur SET
pour faire
reculer ou
avancer
I’horloge.
MENU
DVD BLOCAGE LANGUE
TELE HORLOGE CANAL
SEL.: REGLER:SET
FIN :ACTION
REGLAGE HORLOGE
REGLAGE AUTOMATIQUE
MANUEL
FUSEAU HORAIRE : 0
SEL. : REGLER:SET
FIN :ACTION
REGLAGE HORLOGE
REGLAGE AUTOMATIQUE
MANUEL
FUSEAU HORAIRE :+1
SEL. : REGLER:SET
FIN :ACTION
0
+1
-1
3 Appuyer à répétition sur SET.
Anglais Espagnol
Français
Anglais
MAIN MENU
DVD LOCK LANGUAGE
TV CLOCK CH
SELECT: SET:SET
END :ACTION
Espagnol
MENU PRINCIPAL
DVD BLOQUEO IDIOMA
TV RELOJ CANAL
ELEGIR: FIJAR:SET
TERMINAR:ACTION
Français
MENU
DVD BLOCAGE LANGUE
TELE HORLOGE CANAL
SEL.: REGLER:SET
FIN :ACTION
4 Appuyer sur ACTION pour quitter.
Fonctionnement du téléviseur
4 Appuyer à deux reprises sur ACTION
pour quitter.
Nota
• Le FUSEAU HORAIRE est remis à “0” si
l’horloge est réglée manuellement.
Réglage de la langue
1 Appuyer sur ACTION pour afficher
l’écran MENU.
2 Appuyer sur ▲▼ ◄ ► pour
sélectionner “LANGUE”.
MENU
DVD BLOCAGE LANGUE
TELE HORLOGE CANAL
SEL.: REGLER:SET
FIN :ACTION
Réinitialisation de toutes
les fonctions en mémoire
Retourne aux réglages d’usine. Utiliser cette
fonction lors du déplacement de l’appareil à
un autre endroit ou en cas d’erreur lors du
réglage initial.
1 Établir le contact sur l’appareil.
2 Maintenir simultanément enfoncées
les touches PLAY et SKIP- Ι◄◄ de
l’appareil pendant plus de 5
secondes.
• Le contact est coupé.
3 Pour réinitialiser les fonctions en
mémoire, suivre les instructions
décrites à la page 18.
21
Page 90

Visionnement
Syntonisation
rapide
Réglage
silencieux
Entrée
Action
Sélection
▲▼◄ ►
Changement
de canal ▲▼
Bornes d’entrée audio/vidéo 2
Télé
Tou ch es
numériques
Tou c he 10 0
Réglage
Commande de
volume + / -
Ambiophonique
Si une touche de la télécommande ne
fonctionne pas, appuyer sur la touche télé
de la télécommande et essayer à
nouveau.
Sélection du mode d’entrée
Méthode 1:
Appuyer sur CH ▲▼. L’affichage change
dans I’ordre suivant.
Nota
• L’illustration ci-contre
n’est donnée qu’à titre
d’exemple.
• (TÉLÉ) CA2 et
(CÂBLE) CA1
indiquent les canaux
en mémoire les plus
bas et (TÉLÉ) CA69
et (CÂBLE) CA125
indiquent les canaux
en mémoire les plus
hauts.
(TÉLÉ)
CA2
(CÂBLE)
CA1
(TÉLÉ)
CA69
(CÂBLE)
CA125
LIGNE2
LIGNE1
Méthode 2:
Appuyer sur la touche INPUT. L’affichage
change de la manière suivante.
LIGNE1
LIGNE2
BLC ACCORD
Méthode 3:
1 Appuyer sur ACTION pour afficher le
menu.
2 Appuyer sur ▲▼ ◄ ► pour
sélectionner “TELE”, puis appuyer
sur SET pour afficher le menu
“REGLAGE TELEVISEUR”.
MENU
DVD BLOCAGE LANGUE
TELE HORLOGE CANAL
SEL.: REGLER:SET
FIN :ACTION
3 Appuyer sur ▲▼ pour sélectionner
“SELECT SOURCE”, puis appuyer
sur SET pour sélectionner “BLC
ACCORD”, “LIGNE1” ou “LIGNE2”.
REGLAGE TELEVISEUR
SOUS-TITRES
SELECT SOURCE:BLC ACCORD
REGLAGE VIDEO/AUDIO
REGLAGE VOL. DVD:+2
SEL. : REGLER:SET
FIN :ACTION
4 Appuyer à deux reprises sur ACTION
pour quitter ce mode.
LIGNE 1:
Le signal de la source raccordée aux bornes
d’entrée audio/vidéo 1 s’affiche. (Panneau
arrière de l’appareil)
LIGNE 2:
Le signal de la source raccordée aux bornes
d’entrée audio/vidéo 2 s’affiche.
BLC ACCORD:
Le signal de la source raccordée à la borne
VHF/UHF s’affiche.
Réglage de canal/volume
Sélectionner le canal désiré:
Appuyer sur CH▲▼ ou utiliser les touches
numériques.
Modifier le niveau du volume:
Appuyer sur VOL+ ou VOL-.
22
Page 91

Utilisation des touches
numériques et de la touche 100
Pour sélectionner les canaux 100 à 125 au
moyen des touches numériques, appuyer
d’abord sur la touche 100, puis entrer les
deux autres chiffres.
Exemple 1:
Pour sélectionner le canal 125, appuyer
dans l’ordre sur les touches 100, 2 et 5.
Exemple 2:
Pour sélectionner le canal 12, appuyer dans
l’ordre sur les touches 1 et 2.
Exemple 3:
Pour sélectionner le canal 2, appuyer dans
l’ordre sur les touches 0 et 2.
Syntonisation rapide
Appuyer sur la touche R-TUNE pour
syntoniser le dernier canal sélectionné.
Réglage silencieux
Appuyer sur MUTE pour couper
instantanément le son. Appuyer de nouveau
pour rétablir le son à son volume d’origine.
Fonctionnement du téléviseur
Système ambiophonique
Un effet ambiophonique tridimensionnel plus
profond est possible en n’utilisant que les
deux haut-parleurs avant de l’appareil.
Appuyer sur la touche SURROUND.
• “AMBIO. OUI” apparaît à l’écran.
Pour annuler, appuyer de nouveau sur la
touche SURROUND.
Nota
• L’effet ambiophonique n’est pas disponible avec
les émissions émises en mono.
• L’effet ambiophonique (mode télé seulement)
n’est pas acheminé au connecteur de sortie
audio G/D.
23
Page 92

Réception d’émissions multivoie/réception stéréo
Modes de réception possibles
Affichage
Audio
Cet appareil est équipé d’un réducteur de bruit
-TV pour une reproduction multivoie fidèle. Ce
réducteur
est nécessaire en vue d’assurer une
bonne séparation stéréo et une haute fidélité du
rendu sonore.
fabriqué sous licence de
est une marque déposée, et
Techn o l o g y Licensing.
Sélection du mode audio de la réception télé
Appuyer sur la touche AUDIO pour
sélectionner le mode audio désiré. (La flèche
indique la sélection.)
• Chaque pression sur
la touche AUDIO
change l’affichage
de la manière
illustrée ci-dessous.
• Le mode “2 VOIE”
est sélectionné suite
à une première
pression sur AUDIO.
< Exemple >
12:00AM CA 08
STEREO
2 VOIE
MONO
12:00AM CA 08
STEREO
2 VOIE
MONO
12:00AM CA 08
STEREO
2 VOIE
MONO
La liste ci-dessous comporte les différents modes
audio possibles d’émissions télévisées avec leur
affichage. Le signal reçu est identifié par le
symbole “
est indiqué par une flèche. Pour modifier le mode
”, tandis que le mode audio sélectionné
audio de ces émissions, consulter la section
“Sélection du mode audio de la réception télé”.
Appuyer sur DISPLAY pour faire afficher
le signal reçu.
Émission multivoie stéréo:
Transmission multivoie de signaux audio en
télévision. Sélectionner le mode audio “STEREO”.
• Si le signal stéréophonique est faible et que
l’affichage tremble, il est recommandé de sélectionner
le mode MONO pour obtenir une meilleure réception.
12:00AM CA 08
STEREO
2 VOIE
MONO
2 VOIE (Voie audio secondaire):
Émission comportant une deuxième voie audio
enregistrée dans une autre langue. Sélectionner
“2 VOIE” pour la réception dans la seconde langue.
12:00AM CA 08
STEREO
2 VOIE
MONO
Émission multivoie stéréo et deux voies son:
Une transmission multivoie (langue principale)
avec voie audio secondaire (seconde langue)
peut être captée. Sélectionner “STEREO” ou
“2 VOIE”.
12:00AM CA 08
STEREO
2 VOIE
MONO
Mono:
Émission diffusée en mode monaural standard.
12:00AM CA 08
STEREO
2 VOIE
MONO
24
Page 93

Minuterie du téléviseur
Affichage
Ajout /
effacement
Sélection
▲▼◄ ►
Minuterie
Indicateur de minuterie
de mise sous tension
Réglage
Indicateur de
minuterie-sommeil
Minuterie de mise sous tension
Il est possible de programmer la mise en
contact automatique en 2 modes (téléviseur
ou disque).
1 Appuyer sur TIMER pour faire afficher
l’écran REGLER LA MINUTERIE.
2 Appuyer sur ▲▼
pour sélectionner
“MINUTERIE MISE
S/TENSION”.
3 Appuyer sur SET
pour afficher l’écran
MINUTERIE MISE
S/TENSION.
4 Appuyer sur ▲▼
pour sélectionner le
réglage désiré.
5 Appuyer sur SET
pour régler l’heure
de la mise sous
tension ou pour
sélectionner une
option de réglage.
REGLER LA MINUTERIE
MINUTERIE MISE S/TENSION
MINUTERIE-SOMMEIL: 0
SEL. : REGLER:SET
FIN :TIMER
MINUTERIE MISE S/TENSION
10:--AM CA --
SEL. : REGLER:SET
FIN :TIMER
• Si le mode Disque
(DVD/CD) a été
sélectionné,
s’assurer qu’un
disque est en place.
Ordre des sélections du
mode de mise sous tension
Canal le
plus bas
Canal le
plus haut
CA01
CA125
Disque
Pour procéder à des corrections, utiliser les touches
▲▼ et ◄ ► pour passer au réglage à corriger.
6 Appuyer sur TIMER
pour compléter le
réglage de la minuterie
MINUTERIE MISE S/TENSION
10:00AM CA 05
de mise sous tension.
• Le message “MINUTERIE DE
MISE SOUS TENSION
REGLEE” est affiché.
• L’indicateur de minuterie
s’allume sur le panneau avant.
ANNULER:ADD/DLT
SEL. : REGLER:SET
FIN :TIMER
Pour annuler, répéter les étapes 1-3. Appuyer ensuite
sur ADD/DLT pour annuler l’heure (voir les étapes
4 et 5). Appuyer maintenant sur TIMER pour quitter.
“MINUTERIE DE MISE SOUS TENSION ANNULEE”
apparaît pendant quelques secondes.
Nota
•
Si aucune touche de la télécommande ou de
I’appareil n’est appuyée 60 minutes après la mise
en contact, le contact est automatiquement coupé.
Minuterie-sommeil
Il est possible de programmer la mise hors
contact différée de l’appareil.
1 Appuyer sur TIMER pour faire afficher
l’écran REGLER LA MINUTERIE.
2 Appuyer sur ▲▼ pour sélectionner la
minuterie-sommeil.
3 Appuyer sur SET à répétition pour
sélectionner l’heure désirée.
30 60
0 90
Pour annuler, appuyer
sur SET à répétition
jusqu’à ce que
l’indication 0 s’affiche.
4
Appuyer sur TIMER pour revenir à l’écran normal.
• Appuyer sur DISPLAY après avoir fait la
programmation. La minuterie-sommeil appelle
l’affichage de la durée restante.
• L’indicateur de la minuterie-sommeil s’allume sur
le panneau avant.
REGLER LA MINUTERIE
MINUTERIE MISE S/TENSION
MINUTERIE-SOMMEIL: 0
SEL. : REGLER:SET
FIN :TIMER
Fonctionnement du téléviseur
25
Page 94

Affichage des sous-titres
4 Appuyer sur ▲▼ pour sélectionner
“SOUS-TITRES”.
5 Appuyer sur SET pour afficher
l’écran SOUS-TITRES.
Réglage
silencieux
Action
Sélection
▲▼◄ ►
Réglage
6 Appuyer sur ▲▼ pour sélectionner
“MODE S/TITRES”.
7 Appuyer sur SET à plusieurs
reprises pour sélectionner le mode.
REGLAGE TELEVISEUR
SOUS-TITRES
SELECT SOURCE:BLC ACCORD
REGLAGE VIDEO/AUDIO
REGLAGE VOL. DVD:+2
SEL. : REGLER:SET
FIN :ACTION
SOUS-TITRES
MODE S/TITRES : NON
S/TITRES-SOURDINE:S/T C1
SEL. : REGLER:SET
FIN :ACTION
NON S/T C1
TEXTE C2 S/T C2 TEXTE C1
Sous-titres
Ce système permet non seulement aux
malentendants de suivre certains
programmes, mais aussi la lecture
d’informations diffusées par les stations de
télévision.
Mode affichage des sous-titres
1 Appuyer sur ACTION pour afficher
l’écran MENU.
2 Appuyer sur ▲▼ ◄ ► pour
sélectionner “TELE”.
MENU
DVD BLOCAGE LANGUE
TELE HORLOGE CANAL
SEL.: REGLER:SET
FIN :ACTION
3 Appuyer sur SET pour afficher
l’écran REGLAGE TELEVISEUR.
26
Mode sous-titres: S/T C1 ou C2
Tout programme télévisé codé pour
malentendants est reçu avec affichage
de sous-titres. Vérifier le guide télé pour
la liste de telles émissions.
Mode sous-titres: TEXTE C1 ou C2
Le bas de l’écran est réservé pour
l’affichage de textes télédiffusés par
certaines stations, tels que liste de
programmes télé, informations diverses,
etc.
Mode sous-titres: NON
Aucun sous-titre n’est affiché même si
une émission codée pour malentendants
est diffusée.
8 Appuyer à trois reprises sur ACTION
pour revenir à l’écran normal.
Nota
• Le signal de sous-titrage ou de texte peut être
diffusé en mode C1 ou C2, ou les deux à la fois.
De plus, les informations textuelles peuvent
varier ; aussi est-il recommandé de faire l’essai
des différents modes d’affichage.
Page 95

Affichage des sous-titres avec
réglage silencieux
Sur réception d’une émission avec
sous-titrage, une pression de la touche
MUTE appelle l’affichage des sous-titres.
1 Appuyer sur ACTION pour afficher
l’écran MENU.
8 Appuyer sur ▲▼ pour sélectionner
“S/TITRES-SOURDINE”.
9
Appuyer sur SET à plusieurs reprises
pour sélectionner le mode désiré.
• Le signal de sous-titrage peut être diffusé en
mode S/T C1 ou S/T C2.
SOUS-TITRES
MODE S/TITRES : NON
S/TITRES-SOURDINE:S/T C1
2 Appuyer sur ▲▼ ◄ ► pour
sélectionner “TELE”.
3 Appuyer sur SET pour afficher
l’écran REGLAGE TELEVISEUR.
MENU
DVD BLOCAGE LANGUE
TELE HORLOGE CANAL
SEL.: REGLER:SET
FIN :ACTION
4 Appuyer sur ▲▼ pour sélectionner
“SOUS-TITRES”.
5 Appuyer sur SET pour afficher
l’écran SOUS-TITRES.
REGLAGE TELEVISEUR
SOUS-TITRES
SELECT SOURCE:BLC ACCORD
REGLAGE VIDEO/AUDIO
REGLAGE VOL. DVD:+2
SEL. : REGLER:SET
FIN :ACTION
6 Appuyer sur ▲▼ pour sélectionner
“MODE S/TITRES”.
7 Appuyer sur SET à plusieurs
reprises pour sélectionner “NON”.
SOUS-TITRES
MODE S/TITRES : NON
S/TITRES-SOURDINE:S/T C1
SEL. : REGLER:SET
FIN :ACTION
NON S/T C1
S/T C2
Affichage des sous-titres avec
réglage silencieux: S/T C1 ou S/T C2
Tout programme télévisé codé pour
malentendants est reçu avec affichage
de sous-titres lorsque le réglage
silencieux est activé.
Affichage des sous-titres avec
réglage silencieux: NON
Aucun sous-titre n’est affiché lorsque le
réglage silencieux est activé.
10 Appuyer à trois reprises sur ACTION
pour revenir à l’écran normal.
11 Appuyer sur MUTE pour couper le
son et afficher les sous-titres.
• Pour annuler, appuyer à nouveau sur MUTE.
Nota
• Lorsqu’un disque avec sous-titres codés est
utilisé, il est possible que les sous-titres du disque
et les sous-titres codés se chevauchent. Dans un
tel cas, désactiver les sous-titres ou le mode
sourdine avec sous-titres (voir à la page 42).
Fonctionnement du téléviseur
SEL. : REGLER:SET
FIN :ACTION
27
Page 96

Réglage vidéo/audio
Action
Sélection
▲▼◄ ►
Réglage
Cette fonction permet de régler l’image
et la piste sonore selon chacune des
sources de programme.
Menu vidéo
1 Appuyer sur ACTION pour afficher
l’écran MENU.
2 Appuyer sur
▲▼◄ ► pour
sélectionner
“TELE”.
3 Appuyer sur SET
pour afficher
l’écran REGLAGE
TELEVISEUR.
4 Appuyer sur ▲▼
pour sélectionner
“REGLAGE
VIDEO/AUDIO”.
5 Appuyer sur SET
pour afficher
l’écran REGLAGE
VIDEO/AUDIO.
MENU
DVD BLOCAGE LANGUE
TELE HORLOGE CANAL
SEL.: REGLER:SET
FIN :ACTION
REGLAGE TELEVISEUR
SOUS-TITRES
SELECT SOURCE:BLC ACCORD
REGLAGE VIDEO/AUDIO
REGLAGE VOL. DVD:+2
SEL. : REGLER:SET
FIN :ACTION
6
Appuyer sur ▲▼
pour sélectionner
“MENU VIDEO”.
7
Appuyer sur SET à
plusieurs reprises
pour sélectionner
le mode.
NORMAL Réglage en usine.
FILM Image ajustée pour les films.
NUIT
La couleur et l’intensité des images sont
ajustées de façon à être plus visibles la
nuit.
REGLAGE VIDEO/AUDIO
MENU VIDEO:NORMAL
REGLAGE IMAGE
MENU AUDIO:MUSIQUE
REGLAGE SON
SEL. : REGLER:SET
FIN :ACTION
8 Appuyer à trois reprises sur ACTION
pour revenir à l’écran normal.
Menu audio
1 Suivre les étapes 1 à 5 ci-contre.
2 Appuyer sur ▲▼
pour sélectionner
“MENU AUDIO”.
3 Appuyer sur SET
pour sélectionner
le mode.
MUSIQUE
DIALOGUE
NORMAL
AUTO
FILM Piste sonore adaptée pour les films.
Piste sonore adaptée pour la musique.
Réglage en usine.
Piste sonore adaptée pour les dialogues.
[Commande automatique du gain]
Le niveau du volume est réglé
automatiquement en fonction de la
source du programme.
Niveau du volume
Élevé
Télé Télé
Standard
Bas
Menu audio à NORMAL
4 Appuyer à trois reprises sur ACTION
pour revenir à l’écran normal.
Nota
• Les effets de cette fonction ne sont pas
acheminés au connecteur de sortie audio/vidéo.
• Lorsque le mode du MENU AUDIO est “AUTO”,
le réglage audio sera “STANDARD”.
• Les réglages du MENU AUDIO restent en
mémoire.
• Les réglages du MENU VIDEO ne restent pas
en mémoire.
REGLAGE VIDEO/AUDIO
MENU VIDEO:NORMAL
REGLAGE IMAGE
MENU AUDIO:MUSIQUE
REGLAGE SON
SEL. : REGLER:SET
FIN :ACTION
Niveau du volume
CD
Ex.: Commande automatique du gain audio
Élevé
Standard
Bas
CD
Télé Télé
Menu audio à AUTO
28
Page 97

Réglage vidéo Réglage audio
Appuyer sur ACTION pour afficher
l’écran MENU.
1 Appuyer sur ▲▼◄ ►
MENU
pour sélectionner
“TELE”.
2 Appuyer sur SET
pour afficher
l’écran REGLAGE
TELEVISEUR.
3 Appuyer sur ▲▼
pour sélectionner
“REGLAGE VIDEO/
AUDIO”.
4 Appuyer sur SET
pour afficher l’écran
REGLAGE VIDEO/
DVD BLOCAGE LANGUE
TELE HORLOGE CANAL
SEL.: REGLER:SET
FIN :ACTION
REGLAGE TELEVISEUR
SOUS-TITRES
SELECT SOURCE:BLC ACCORD
REGLAGE VIDEO/AUDIO
REGLAGE VOL. DVD:+2
SEL. : REGLER:SET
FIN :ACTION
AUDIO.
5 Appuyer sur ▲▼
pour sélectionner
“REGLAGE IMAGE”.
6 Appuyer sur SET
pour afficher l’écran
REGLAGE VIDEO.
7 Appuyer sur ▲▼
pour sélectionner
une rubrique.
8 Appuyer sur ◄►
pour effectuer le
réglage.
Contrôle de la
couleur
Contrôle des
nuances
Contrôle de la
brillance
Contrôle du
contraste
Contrôle de la
netteté
REGLAGE VIDEO/AUDIO
MENU VIDEO:NORMAL
REGLAGE IMAGE
MENU AUDIO:MUSIQUE
REGLAGE SON
SEL. : REGLER:SET
FIN :ACTION
REGLAGE VIDEO
COULEUR
NUANCES
BRILLANCE
CONTRASTE
NETTETE
STANDARD
SEL. : NIVEAU:
FIN :ACTION
Pour régler l’intensité des
couleurs.
Pour obtenir une carnation
plus naturelle.
Pour régler la brillance de
l’image.
Pour régler l’intensité de
l’image en équilibrant le
contraste et les couleurs.
Pour augmenter ou réduire le
niveau des détails de l’image.
Réinitialisation des réglages vidéo
Appuyer sur ▲▼ et SET pour sélectionner
et régler “STANDARD” de manière à
rétablir tous les réglages implicites.
9 Appuyer à quatre reprises sur
ACTION pour revenir à l’écran
normal.
Appuyer sur ACTION pour afficher
l’écran MENU.
1 Appuyer sur ▲▼◄ ►
pour sélectionner
“TELE”.
2 Appuyer sur SET
pour afficher l’écran
REGLAGE
TELEVISEUR.
3 Appuyer sur ▲▼
pour sélectionner
“REGLAGE VIDEO/
AUDIO”.
4 Appuyer sur SET
pour afficher l’écran
REGLAGE VIDEO/
AUDIO.
5 Appuyer sur ▲▼
pour sélectionner
“REGLAGE SON”.
6 Appuyer sur SET
pour afficher l’écran
REGLAGE AUDIO.
7 Appuyer sur ▲▼
pour sélectionner
une rubrique.
8 Appuyer sur ◄►
pour effectuer le
réglage.
Contrôle des
GRAVES
Contrôle des
AIGUS
Contrôle de
l’équilibre
• Les niveaux réglés ne sont pas répercutés
sur d’autres appareils audio qui sont
branchés au connecteur de sortie audio L/R
(gauche/droite).
Réinitialisation des réglages audio
Appuyer sur ▲▼ et SET pour sélectionner
et régler “STANDARD” de manière à
rétablir tous les réglages implicites.
9 Appuyer à quatre reprises sur
ACTION pour revenir à l’écran
normal.
MENU
DVD BLOCAGE LANGUE
TELE HORLOGE CANAL
SEL.: REGLER:SET
FIN :ACTION
REGLAGE TELEVISEUR
SOUS-TITRES
SELECT SOURCE:BLC ACCORD
REGLAGE VIDEO/AUDIO
REGLAGE VOL. DVD:+2
SEL. : REGLER:SET
FIN :ACTION
REGLAGE VIDEO/AUDIO
MENU VIDEO:NORMAL
REGLAGE IMAGE
MENU AUDIO:MUSIQUE
REGLAGE SON
SEL. : REGLER:SET
FIN :ACTION
REGLAGE AUDIO
GRAVES
AIGUS
EQUILIBRE
STANDARD
SEL. : NIVEAU:
FIN :ACTION
Pour régler l’intensité des
sons à basse fréquence.
Pour régler l’intensité des
sons à haute fréquence.
Pour régler le niveau sonore
entre les enceintes gauche et
droite.
Fonctionnement du téléviseur
29
Page 98

Avis de signal faible
Lorsque “OUI” est sélectionné, une image
est affichée même si le signal capté est
faible ou qu’aucun signal n’est émis sur le
canal syntonisé.
Action
Sélection
▲▼◄ ►
Réglage
1 Appuyer sur ACTION pour afficher
l’écran MENU.
2 Appuyer sur ▲▼ ◄ ► pour
sélectionner “CANAL”.
3 Appuyer sur SET pour afficher
l’écran REGLAGE CANAL.
MENU
DVD BLOCAGE LANGUE
TELE HORLOGE CANAL
SEL.: REGLER:SET
FIN :ACTION
4 Appuyer sur ▲▼ pour sélectionner
“AVIS SIGNAL FAIBLE”.
5 Appuyer sur SET pour régler “OUI”
ou “NON”.
REGLAGE CANAL
ANTENNE : CABLE
REGLAGE AUTO
AVIS SIGNAL FAIBLE:NON
SEL. : REGLER:SET
FIN :ACTION
OUI:
L’image est affichée indépendamment de
la qualité du signal (l’image peut même
être à peine visible).
NON:
En l’absence de signal ou en présence
d’un signal faible, l’écran est
complètement bleu.
Nota
• Si le magnétoscope est branché à un
équipement muni d’une fonction d’écran
bleu, la sélection de l’option “OUI” n’aura
aucun effet sur ce dernier.
30
6 Appuyer à deux reprises sur ACTION
pour revenir à l’écran normal.
Page 99

Discrétion parentale
Tou ch es
numériques
Ajout /
Action
Sélection
▲▼◄ ►
effacement
(An nuler)
Réglage
Fonction de discrétion parentale (puce
antiviolence)
Le combiné est équipé d’une fonction de
discrétion parentale qui permet de bloquer
la réception d’émissions et de films de
classifications américaines, canadiennes
ou québécoises.
Entrer le mot de passe
Un code à 4 chiffres doit être entré pour
permettre le visionnement d’une émission
“bloquée” ou pour changer le réglage de la
classification.
1 Appuyer sur ACTION pour afficher
l’écran MENU.
2 Appuyer sur
▲▼◄ ► pour
sélectionner
“BLOCAGE”.
3 Appuyer sur
SET pour
afficher l’écran
BLOCAGE.
MENU
DVD BLOCAGE LANGUE
TELE HORLOGE CANAL
SEL.: REGLER:SET
FIN :ACTION
4 Appuyer sur les
touches
numériques pour
entrer le mot de
passe.
• Prendre soin que le
code secret ne soit
connu de personne
d’autre.
5 Répéter la saisie
du code pour fins
de confirmation.
BLOCAGE
ENTRER UN CODE
A 4 CHIFFRES
**--
ENTRER:0-9
FIN :ACTION
BLOCAGE
CONFIRMER LE CODE ENTRE
****
****
ACCEPTE
CHANGER CODE:ADD/DLT
CONTINUER:SET
FIN :ACTION
Pour apporter des corrections
a.
Appuyer à répétition sur ◄ pour
déplacer le curseur.
b.
Appuyer sur les touches numériques
pour faire les corrections.
6 Appuyer sur SET pour afficher le
menu BLOCAGE (voir pages 32-36).
Ou appuyer à deux reprises sur
ACTION pour quitter.
Nota
• Certains films de location peuvent ne pas avoir
de données encodées pour puce antiviolence.
• NE PAS oublier le code secret.
• Une fois les classifications entrées, les bandes
vidéo et les programmes faisant l’objet d’une
restriction ne pourront être visionnés que si le
code secret est entré.
• L’étape 5 n’est pas nécessaire lors du
changement des classifications.
Modification du mot de passe
Il sera nécessaire d’entrer le code courant.
1 Pendant
l’affichage de
l’écran ci-contre,
appuyer sur ADD/
DLT (CLEAR) pour
annuler le code
courant.
2 Entrer le nouveau code secret.
BLOCAGE
ENTRER UN CODE
A 4 CHIFFRES
****
ACCEPTE
CHANGER CODE:ADD/DLT
CONTINUER:SET
FIN :ACTION
Fonctionnement du téléviseur
31
Page 100

Action
Sélection
▲▼◄ ►
Tou ch es
numériques
Réglage
3 Appuyer sur ▲▼
pour sélectionner
“MODIFIER
REGLAGE”.
4 Appuyer sur SET
pour appeler
l’affichage.
5 Appuyer sur ▲▼
pour sélectionner
“SANS VISA –
REGARDER?”.
6 Appuyer sur SET
pour régler “OUI”
ou “NON”.
BLOCAGE
FILMS USA :NON
MODIFIER REGLAGE
EMISSIONS TELE USA:NON
MODIFIER REGLAGE
PAGE SUIVANTE
SEL. : REGLER:SET
FIN :ACTION
SANS VISA-REGARDER?: OUI
G DEBLOQUE
PG
PG-13
R
NC-17
X
AUCUN VISA EMIS
SEL. : REGLER:SET
FIN :ACTION
Programmes sans cote (visa):
Certains films, tels que de vieux longs
métrages ou des films étrangers, peuvent
ne pas avoir de cote.
Si le menu BLOCAGE n’est pas affiché, se
reporter à la section “Entrer le mot de
passe” à la page 31.
Classifications des films américains
1 Appuyer sur ▲▼ pour sélectionner
“FILMS USA”.
•
“PAGE SUIVANTE” affiche le menu des
classifications canadiennes. Se reporter aux
pages 34 et 35 pour plus de renseignements
sur les bandes ou les émissions canadiennes.
2 Appuyer sur
SET pour régler
“OUI” ou
“NON”.
OUI:
La fonction de discrétion parentale est
activée.
NON:
La fonction de discrétion parentale est
désactivée.
BLOCAGE
FILMS USA :NON
MODIFIER REGLAGE
EMISSIONS TELE USA:NON
MODIFIER REGLAGE
PAGE SUIVANTE
SEL. : REGLER:SET
FIN :ACTION
7 Appuyer sur ▲▼
pour sélectionner
et appuyer sur
SET pour régler
“BLOQUE” ou
“DEBLOQUE”.
AUDITOIRE GÉNÉRAL:
G
Convient à tous les auditoires.
SUPERVISION PARENTS:
PG
Certaines scènes pourraient ne pas
convenir à un jeune auditoire.
JUGEMENT PARENTS:
PG-13
Certaines scènes pourraient ne pas
convenir à des enfants de moins de 13 ans.
17 ANS +:
R
Les enfants de moins de 17 ans doivent être
accompagnés d’un adulte.
+DE 17 ANS SEULEMENT
NC-17
Interdit aux enfants de moins de 17 ans.
XAUDITOIRE ADULTE
SANS VISA-REGARDER?: OUI
G DEBLOQUE
PG
PG-13
R
NC-17
X
AUDITOIRE GENERAL
SEL. : REGLER:SET
FIN :ACTION
8 Appuyer sur ACTION pour faire
afficher à nouveau le menu de
BLOCAGE et poursuivre le réglage
selon les instructions données à la
page 33 ou appuyer à trois reprises
sur ACTION pour quitter.
32
 Loading...