


ImageCreator 1.5
(PT-P1SD series)
TQBJ0190
Home page : http://panasonic.co.jp/pavc/global/projector/
ImageCreator 1.5 is application software that is supplied for the user of the
video projector “PT-P1SD series” via the following home page.
ImageCreator 1.5 allows the user to :
• Convert Microsoft PowerPoint files into JPEG files that comply with the DCF
(Design rule for Camera File system) standard (see page 12).
• Convert JPEG files into JPEG files that comply with the DCF standard.
• Sort JPEG files.
• Write JPEG files into an SD memory card.
Note for the user who has used ImageCreator 1.0A :
• Use ImageCreator 1.5 for PT-P1SD series.
• Use ImageCreator 1.0A for PT-L735NT series, PT-L780NT series or
PT-L730NT series.

2
Contents
System requirements .............................................................. 3
Installation and Startup........................................................... 4
Installation................................................................................................... 4
Startup ......................................................................................................... 4
Functions on the Operational Windows................................ 5
Main window ............................................................................................... 5
Convert & Save window ............................................................................. 6
Using ImageCreator 1.5 .......................................................... 7
Setting a drive name and a destination folder number........................... 7
Capturing presentation files created with
Microsoft PowerPoint 97/2000/2002.......................................................... 7
Capturing JPEG files .................................................................................. 8
Capturing files by drag-and-drop manner................................................ 8
Sorting images............................................................................................ 9
Deleting images .......................................................................................... 9
Adjusting the quality of the images to write into an SD memory card .. 10
Writing the captured images into an SD memory card ......................... 11
DCF Standard......................................................................... 12
Folder (directory) name............................................................................ 12
File name ................................................................................................... 12
File format ................................................................................................. 12
Example of folder structure ..................................................................... 13
Uninstall ................................................................................. 14
Note :
• Unauthorized use or reproduction of part or all of this software and
manuals is strictly prohibited.
• Panasonic cannot be held liable for any effects resulting from the use of
this software and manuals.
• Panasonic reserves the right to revise this software specifications and
manual contents without notice.

3
System requirements
The computer must meet the following requirements in order to use this software.
OS : Windows 98SE (Second Edition) /Me (Millennium Edition)
/2000 Professional/XP Home Edition/XP Professional
CPU : Pentium III or faster or compatible processor
RAM : 128 MB or more (256 MB or more for Windows 2000/XP)
Empty hard disk capacity : 60 MB or more
Necessary software : Microsoft PowerPoint 97, 2000 or 2002 must be installd.
Note :
Note that operation is not guaranteed when used with system environments other
than the above or on homemade computers.
Operation is not guaranteed for all computers
that meet the above conditions.
• Windows and Microsoft PowerPoint are trademarks or registered trademarks of U.S.
Microsoft Corporation in the U.S. and other countries.
• Other company names, product names or other names noted in this manual are
trademarks or registered trademarks of the respective companies. Note that ® and
TM marks are not indicated in the text of this manual.

4
Installation
Installation and Startup
Startup
Select [Start] [(All) Programs] [Panasonic]
[ImageCreator ver. 1.5] [ImageCreator 1.5].
To exit the program :
Click [EXIT] or [ ] on the main window.
Notes :
• Shut down all software currently active on Windows. Otherwise, installation may
not be possible.
• Administrator authority is required for installation with Windows 2000/XP.
Access the Panasonic home page
(http://panasonic.co.jp/pavc/global/projector/) and click [Software].
1
Follow the instructions on the page to download and decompress
the software.
2
Double-click [setup.exe] in the decompressed folder.
The installer starts up.
Follow the instructions on the screen to install the software.
3
5
Functions on the Operational Windows
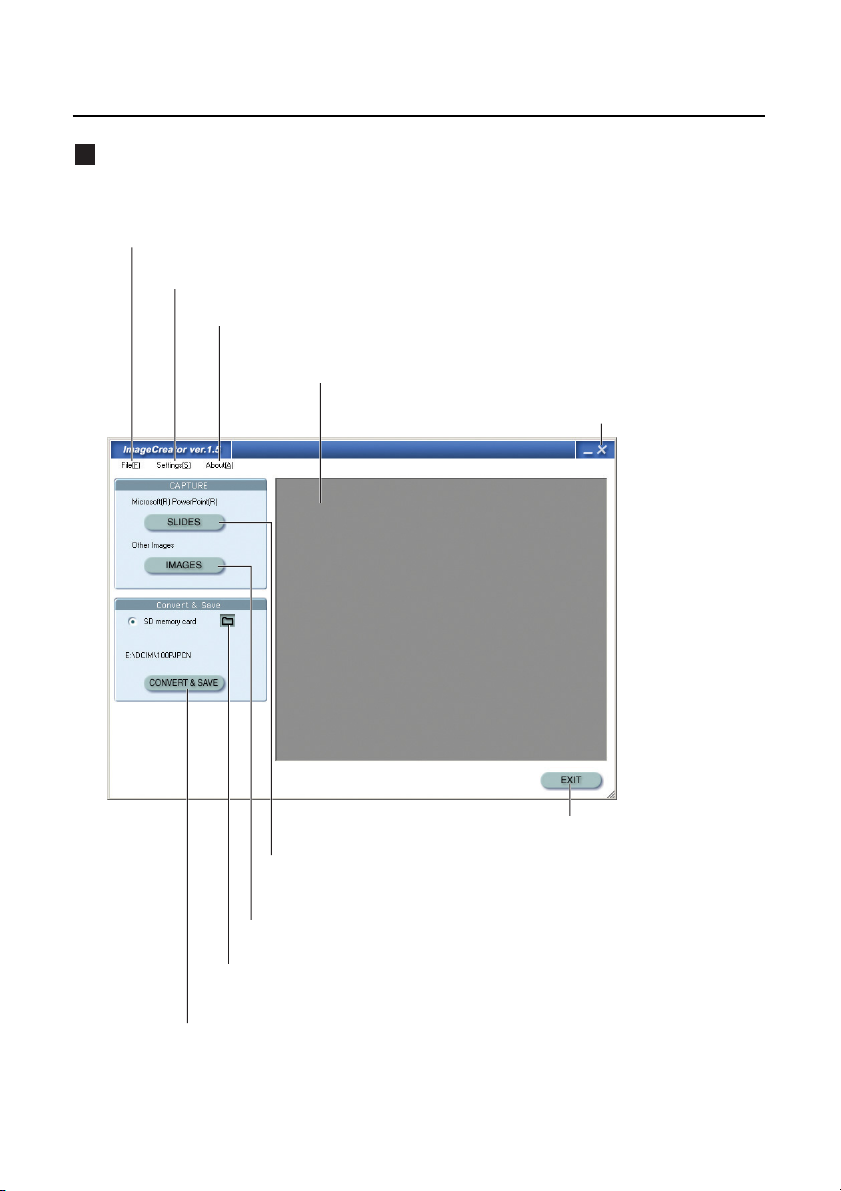
Main window
[Import slides], [Import file], [Convert and save] and [Close] are available in this
menu.
The JPEG quality can be adjusted.
The version of this software can be checked.
The images captured into this software are displayed in reduced size.
They can be sorted or deleted by right clicking with the mouse.
Clicking here captures presentation files created with
Microsoft PowerPoint.
Clicking here captures JPEG files.
Clicking here displays the window to make format conversion (JPEG
conversion) and size conversion of the captured files and to save them.
Clicking here displays the window to set a destination drive name
and a folder number.
Clicking here exits the software.
Clicking here exits the software.

6
Functions on the Operational Windows
(continued)
Convert & Save window
Click [CONVERT & SAVE] on the main window to display this window.
This is the compression format of the files to be saved.
Clicking here switches
the display of the
captured image files.
The selected
image file is
displayed.
Clicking here saves the
selected image file in the
specified compression format
and screen size into an SD
memory card. The name of the
saved file will be generated
automatically (see page 12).
Clicking here saves all the captured image files in the specified
compression format and screen size into an SD memory card. The
name of the saved file will be generated automatically (see page 12).
This is the screen size of the files to be saved.
Clicking here stops conversion
and save and closes the window.
(If clicking while converting or
saving is in progress, the
remaining process will be stopped
and the window will be closed.)
Clicking here stops conversion
and save and closes the window.
(If clicking while converting or
saving is in progress, the
remaining process will be stopped
and the window will be closed.)

7
Using ImageCreator 1.5
Capturing presentation files created with Microsoft PowerPoint 97/2000/2002
Note :
• To use this software, Microsoft PowerPoint 97, 2000 or 2002 must be installed
on the computer.
• Only presentation files saved in PPT format (with a .ppt extension) can be
captured. A file saved in other format (for example, a file with a .pps extension)
must be opened with Microsoft PowerPoint and saved in PPT format.
Click [SLIDES] on the main window.
The following window appears.
1
Select a desired presentation file and click [Open].
When completing the capture, the thumbnail is created.
2
Setting a drive name and a destination folder number
Click [ ] on the main window and set a drive name and a destination
folder number.

8
Note :
The following images cannot be captured even if they are in JPEG format.
• Images with 10,000 dots or more vertically or horizontally
• JPEG images in CMYK (Cyan, Magenta, Yellow and Black)
• Images compressed in JPEG2000
Using ImageCreator 1.5 (continued)
Capturing JPEG files
Capturing files by drag-and-drop manner
Select a desired file and drag and drop it into the shortcut icon or the
window of ImageCreator 1.5.
When performing it into the shortcut icon, ImageCreator 1.5 starts automatically and
captures the file.
Click [IMAGES] on the main window.
The following window appears.
1
Select a desired image file and click [Open] or [Load All].
When completing the capture, the thumbnail is created.
[Open] :
Captures one each of files.
[Load All] :
Captures all the image files in the currently open folder.
2

9
Using ImageCreator 1.5 (continued)
Sorting images
Drag and drop a desired image onto a desired location on the
thumbnail window.
A vertical bold line appears on the location to be dropped between images.
Deleting images
Note :
Alternatively, the following steps may be taken.
(1) Right-click on a desired image to display the submenu and select [Sort...].
(2) Move the image on the [Shuffle image files] window.
Note :
Even when the captured images are deleted, the original images will not be
deleted.
Select images for deletion on the thumbnail window.
While pressing the [CTRL] key, repeat clicking :
Two or more images can be selected.
While pressing the [SHIFT] key, click :
All the images between two images can be selected.
1
Right-click on the selected images to display the submenu and
select [Delete slide].
If selecting [Delete All], all the captured images will be deleted.
2
Click [OK] when the confirmation window appears.
The images will be deleted from the thumbnail window.
3

10
Using ImageCreator 1.5 (continued)
Adjusting the quality of the images to write into an SD memory card
Note :
The JPEG format is suitable for natural pictures such as photographs. For
Presentation files created with Microsoft PowerPoint and illustrations created with
graphic software, there may be significant loss of picture quality even if adjusting
to a higher quality.
Click [Preferences…] on the [Settings] menu of the main window.
The following window appears.
1
Adjust the image quality with the slide bar and click [OK].
If adjusting to a higher quality, the file size becomes larger and if adjusting to a
lower quality, the file size becomes smaller. The size of the lowest quality file is
aproximately one fifth of that of the highest quality file.
2

11
Using ImageCreator 1.5 (continued)
Note :
• When converting image formats using this software, folder and file names that
comply with the DCF standard will be automatically assigned. (Folder names
consist of three numerals followed by “PJPCN” and file names consist of
“JPCN” followed by four numerals.)
• To stop the process while converting or writing files, click [CANCEL/EXIT].
• All the captured images are converted so that the aspect ratio will be 4:3.
Images with other aspect ratio than 4:3 will not be reproduced in correct image.
• Some files created with Microsoft PowerPoint 97 may cause an error during
their converting process. If this occurs, converting the files with a computer in
which Microsoft PowerPoint 2000 has been installed can solve the problem.
• If image files are pasted in combined Microsoft PowerPoint 97 and Windows
98, normal conversion is not available.
Writing the captured images into an SD memory card
Click [CURRENT Image] or [ALL Images].
The file format is converted automatically into DCF format (see the next page).
[CURRENT Image] :
Writes one each of the files
[ALL Images] :
Writes all the captured JPEG files.
2
Click [CONVERT & SAVE] on the main window.
The [Convert & Save] window appears.
1

12
DCF Standard
For data recorded by digital cameras, folder and file names that comply with the DCF
standard will be automatically assigned. The DCF standard has the following
requirements. Files or folders that do not comply with these requirements cannot be
recognized by the projector. If changing the folder and file names on computers, the
projector may not recognize them correctly.
Folder (directory) name
•Folders are created as sub-folders of the DCIM folder on the SD memory card.
• Data located in folders other than the DCIM folder is not recognized.
• Folder names consist of three numerals (folder number) followed by five
alphanumeric characters. (Example: 100ABCDE)
• Numbers between 100 and 999 can be used for the three numerals and the
alphanumeric characters can be taken from the following set of 37 characters:
0123456789ABCDEFGHIJKLMNOPQRSTUVWXYZ_ (No distinction is made
between upper-case and lower-case alphabetic characters. Double-byte characters
cannot be used.)
• Multiple folders using the same three-digit combination (folder number) cannot be
recognised correctly.
• Folder sub-hierarchies are not supported.
File name
• File names consist of four alphanumeric characters followed by four numerals (file
number), followed by “.JPG” (extension). (Example: ABCD0001.JPG)
• The alphanumeric characters can be taken from the following set of 37 characters:
0123456789ABCDEFGHIJKLMNOPQRSTUVWXYZ_ and numbers between 0001
and 9999 can be used for the four numerals (No distinction is made between uppercase and lower-case alphabetic characters. Double-byte characters cannot be used.)
• Multiple files using the same four-digit combination (file number) cannot be
recognized correctly.
File format
•Only Exif2.2-compliant JPEG images are supported.

13
DCF Standard (continued)
Example of folder structure
DCIM 100_PANA
Folder names that do
not comply with the
DCF standard are not
recognized.
: Folder XXXXXXXX.JPG : Name of file
MATSUSHITA
102PJPCN
IMAG0001.JPG
IMAG0002.JPG
TARO0001.JPG
This file cannot be
recognized as there is
another file which has
the same file number.
JPCN0001.JPG
JPCN0002.JPG

Uninstall
Matsushita Electric Industrial Co., Ltd.
Web Site: http://www.panasonic.co.jp/global/
C 2005 Matsushita Electric Industrial Co., Ltd. All Rights Reserved.
M1205-0
Select [Start] [(All) Programs] [Panasonic]
[ImageCreator ver. 1.5] [Remove ImageCreator 1.5].
1
Follow the instructions on the screen to uninstall the software.
2
 Loading...