

Panasonic PT-LC50U User Manual
LCD PROJECTOR
Operating Instructions
Model No. PT-LC50U
Please read these instructions completely before operating
this LCD Projector.

Dear Panasonic Customer:
This instruction manual provides all the necessary operating
information that you might require. We hope it will help you to
get the most performance out of your new product, that you will
be pleased with your Panasonic LCD Projector.
For your own protection and prolonged operation of your LCD
Projector, please be sure to read the “Important Safeguards”
carefully, before use.
Things You Should Know
Caution:
This equipment has been tested and found to comply with the
limits for a Class B digital device, pursuant to Part 15 of the FCC
Rules. These limits are designed to provide reasonable
protection against harmful interference in a residential
installation. This equipment generates, uses, and can radiate
radio frequency energy and, if not installed and used in
accordance with the instructions, may cause harmful
interference to radio communications. However, there is no
guarantee that interference will not occur in a particular
installation. If this equipment does cause harmful interference to
radio or television reception, which can be determined by turning
the equipment off and on, the user is encouraged to try to
correct the interference by one or more of the following
measures:
– Reorient or relocate the receiving antenna.
– Increase the separation between the equipment and
receiver.
– Connect the equipment into an outlet on a circuit different
from that to which the receiver is connected.
– Consult the dealer or an experienced radio/TV technician
for help.
Previous
screen
Continued on the next page...
2
Things You Should Know
Declaration of Conformity
Model Number: PT-LC50U
Trade Name:
Responsible party: Matsushita Electric Corporation of America.
Address: One Panasonic Way Secaucus New Jersey 07094
Telephone number: 1-800-528-8601
This device complies with Part 15 of the FCC Rules, Operation is
subject to the following two conditions: (1) This device may not cause
harmful interference, and (2) this device must accept any interference
received, including interference that may cause undesired operation.
FCC Warning:
To assure continued FCC compliance, use only the provided grounded
power supply cord and prevent undesirable interference, use only the
provided shielded VGA cable with 2 ferrite cores while connecting LCD
to computer and all other connecting cables should be shielded. Any
changes or modifications not expressly approved by the party
responsible for compliance could void the user’s authority to operate
this equipment.
Warning: (E.U. only)
To assure continued CE Mark compliance, use only the provided
earthed power supply cord and prevent undesirable interference, use
only the provided shielded VGA cable with 2 ferrite cores while
connecting LCD to computer and all other connecting cables should be
shielded.
Any changes or modifications not expressly approved by the party
responsible for compliance could void the user‘s authority to operate
this equipment.
© 2000 Matsushita Electric Industrial Co., Ltd
All product/brand names are trademarks or registered trademarks of the
respective holders.
Previous
screen
3

Important Safeguards
CAUTION: Please read all of these instructions
before you operate your LCD Projector.
Save these instructions for future
reference.
Electrical energy can perform many useful functions.
This LCD Projector has been engineered and
manufactured to meet applicable safety standards. But
IMPROPER USE CAN RESULT IN POTENTIAL
ELECTRICAL SHOCK OR FIRE HAZARDS. In order not
to defeat the safeguards incorporated into this LCD
Projector, observe the following basic rules for its
installation, use and servicing.
1 Unplug the LCD Projector from the wall outlet before
cleaning.
2 Do not use liquid cleaners or aerosol cleaners. Use a
soft dry cloth to clean the LCD Projector unit. If the
unit is very dirty, wet a cloth with neutral detergent,
squeeze it tight, wipe the unit with it, and finish by
wiping with a dry cloth. Do not use a chemical duster
or polisher-cleaner because it can adversely affect
the unit and peel the paint coat.
3 Do not use attachments not recommended by
Panasonic, as they may cause hazards.
Previous
screen
Continued on the next page...
4

Important Safeguards
4 Do not use the LCD Projector near water; for example,
near a bathtub, washbowl, kitchen sink, laundry tub, in
a wet basement, near a swimming pool, etc. Never spill
liquid into the LCD Projector.
5 Do not place the LCD Projector on an
unstable cart, stand, or table. The LCD
Projector may fall, which may cause
serious injury to a child or an adult,
and/or serious damage to the unit. Use
only with a cart or stand recommended
by its manufacturer, as being suitable for use with the
LCD Projector.
6 The LCD Projector equipment and cart combinations
should be moved with care. Quick stops, excessive
force, and uneven surfaces may cause the equipment
and cart combination to overturn.
7 Slots and openings in the cabinet back and bottom are
provided for ventilation. To ensure reliable operation of
the LCD Projector and to protect it from overheating,
these openings must not be blocked or covered. These
openings should never be covered with cloth or other
material. The bottom opening should not be blocked by
placing the LCD Projector on a bed, sofa, rug, or other
similar surface. The LCD Projector should not be
placed near or over a radiator or heating vent. The
LCD Projector should not be placed in a built-in
installation such as a bookcase unless proper
ventilation is provided.
Previous
screen
Continued on the next page...
5

Important Safeguards
8 The LCD Projector should be operated only from the
type of power source indicated on the back of the LCD
Projector or in the specifications. If you are not sure of
the type of power supplied to your home, consult your
LCD Projector dealer or local power company.
9 Do not allow anything to rest on the power cord. Do
not place the LCD Projector where the cord will be
walked on.
10 Follow all warnings and instructions marked on the
LCD Projector.
11 As a safety feature, the LCD Projector is equipped with
a 3-prong grounded plug. The 3-prong grounded plug
will fit only into a grounding type power outlet. If the
plug does not fit, use an adaptor that is properly
grounded or have an electrician install a grounded
type outlet. Do not attempt to modify this AC plug.
12 For added protection of the LCD Projector during a
lightning storm, or when it is left unattended or not in
use for long periods of time, unplug it from the wall
outlet and disconnect any cable systems. This will
prevent damage to the projector due to lightning and
power-line surges.
13 Do not overload wall outlets and extension cords with
too many products, because this can result in fire or
electric shock.
Previous
screen
Continued on the next page...
6

Important Safeguards
14 Never push objects of any kind into the LCD Projector
through cabinet slots as they may touch dangerous
voltage points or short out parts, which could result in
a fire or electric shock.
15 Do not attempt to service the LCD Projector yourself.
Opening or removing covers may expose you to
dangerous voltage or other hazards. Refer all servicing
to qualified service personnel.
16 Unplug the LCD Projector equipment from the wall
outlet and refer servicing to qualified service
personnel under the following conditions:
A.When the power cord or plug is damaged or frayed.
B.If liquid has been spilled into the LCD Projector.
C.If the LCD Projector has been exposed to rain or
water.
D.If the LCD Projector does not operate normally when
you follow the operating instructions. Adjust only
those controls that are covered by the operating
instructions; improper adjustment of other controls
may cause damage and will often require extensive
work by a qualified technician to restore the LCD
Projector to normal operation.
E.If the LCD Projector has been dropped or the
cabinet has been damaged.
F. When the LCD Projector exhibits a distinct change in
performance – this indicates a need for service.
Previous
screen
Continued on the next page...
7

Important Safeguards
17 Upon completion of any service or repairs to the LCD
Projector, ask the service technician to perform a
routine safety check to determine that the LCD
Projector is in safe operating condition.
18 When replacement parts are required, be sure the
service technician has used replacement parts
specified by the manufacturer that have the same
characteristics as the original parts. Unauthorized
substitutions may result in fire, electric shock, or other
hazards.
19 Air filter should be cleaned every 100 lamp on hours.
The LCD Projector may become too hot if filter is not
cleaned when required.
20 If lens becomes dirty, or smudged, clean with a clean,
dampened cloth. Never touch the lens with your
fingers.
21 Do not look directly into the aperture and lens while
operating as this may result in damage to your eyes.
Previous
screen
8

LCD Projector Features
1 Compact & Lightweight
This LCD Projector is lightweight and compact
allowing you to give presentations at any location.
2 Built-in Simple Stand
The Built-in Simple Stand makes it possible to match
the projection angle with the basic use environment of
your office with one-touch ease.
3 Attachable/Removable Swivel Stand
Flexible settings are possible because the projected
image height and left/right tilt can be adjusted freely.
4 One-touch Auto Setup
One-touch image adjustments of RGB input can be
made. The unit detects the condition (up/down) of the
simple stand and automatically corrects keystone
distortion.
5 Compatible with most Personal Computers
The RGB input accepts signals from VGA, SVGA,
XGA, SXGA, and Macintosh compatible computers
with no additional hardware.
6 Supports Component Video (YPBPR) Input
This unit supports progressive DVD and HDTV (480 i/
480 p/625 i/720 p/1 080 i) when components are
connected.
Previous
screen
Continued on the next page...
9

LCD Projector Features
7 Accommodates all International Broadcast Video
Signal Formats
The LCD Projector accepts NTSC/PAL/SECAM/PAL-M/
PAL-N/NTSC4.43 video signal formats.
8 Digital Zoom and Freeze Feature
With remote control operation, you can display a
enlarged portion of the screen up to 5 times. You can
also display a freeze frame (paused) screen.
9 On-board Card Type Wireless Remote Control
Keys necessary for basic operation have been simply
arranged on this compact remote control which can be
stored neatly in the unit.
10 On Screen Display
In addition to English, you can select German, French,
Spanish, Italian, Japanese, and Chinese.
11 Automatic Universal Power Supply
This unit has an operating voltage range of
AC 100 V - 240 V.
12 CD-ROM Manual
Because this is an electronic manual, by simply
clicking on the link given for each item of information,
you can go directly to the related page for instructions.
Previous
screen
Continued on the next page...
10

LCD Projector Features
13 Image Quality Select Feature, R/G/B Level Adjust
Feature
With the Image Quality mode switch (Dynamic/
Natural) you can also fine-adjust the white balance of
the projected image.
14 Full Function Remote Control Unit for LCD
Projector (optional)
A full function remote control unit for LCD Projector.
with built-in wireless mouse and laser pointer is
available.
15 Frontal Air Vent Design
Vented air will not blow on persons located to the side
or in rear of the projector and light leakage will not be
a problem with the Frontal Air Vent design.
Equipped with a variety of convenient functions
A variety of functions such as the following have been
provided.
•A blue screen is projected (at start-up only) when no signal
is being input.
•Freeze functions for video and audio signals can be toggled
on and off.
•The input signal display function can be toggled on and off.
•16:9 (wide) screen projection is provided.
•Two projection modes (directions) to choose from.
Previous
screen
11

Contents of LCD Projector Box
Please confirm that the following items are packed in the LCD
Projector box.
They are provided to help you use or set up your LCD Projector.
(1) LCD Projector
(2) Wireless Remote Control Unit (LSSQ0275)
(3) CR2025 Lithium Battery (Included with the remote control unit)
(4) 9.8 ft UL/CSA Power Cord (LSJA0308)
(5) VGA Cable (LSJA0239)
(6) Video Cable (LSJA0074)
(7) Audio Cable (LSJA0240)
(8) Lens Cap (Included with the projector)
(9) Carrying Bag (LSFC0015)
(10) Swivel Stand (LSYC0162)
(11) CD ROM (Operating Instructions)
(12) Quick Reference Manual
(13) Warranty Card
(14) Service Center List
Previous
screen
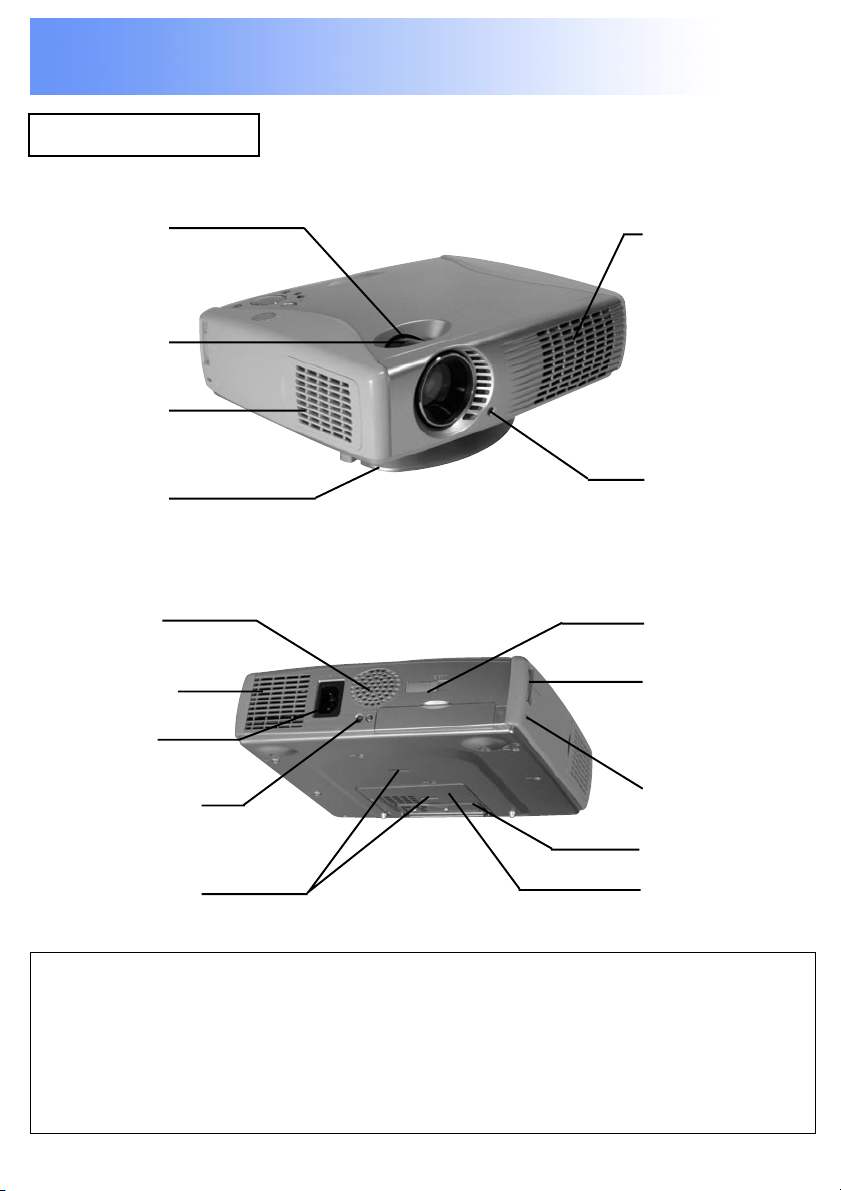
12
Product Information
LCD Projector
Labels on the unit are omitted.
■ Top, right and front
Zoom Ring
Focus Ring
Air Filter
Swivel Stand
(Supplied)
■ Back and bottom
Speaker
Air Inlet Port
AC Socket
(In case Swivel stand is installed.)
Air Outlet Port
Remote
Control
Sensor
Remote
Control unit
EJECT Knob
Remote
Control unit
Holder
Remote
Security Lock
Control Sensor
Simple Stand
Hole for
Swivel Stand
Installation
MicroSaver and Kensington are registered trademarks of Kensington Technology
Group. All product names mentioned in this document are trademarks or registered
trademarks of their respective owners.
© 1998 Kensington Technology Group.
Kensington Technology Group
2885 Campus Drive
San Mateo, CA 94403, U.S.A
Previous
screen
Phone: (650)572-2700
Fax: (650)572-9675
Lamp
Cover
13
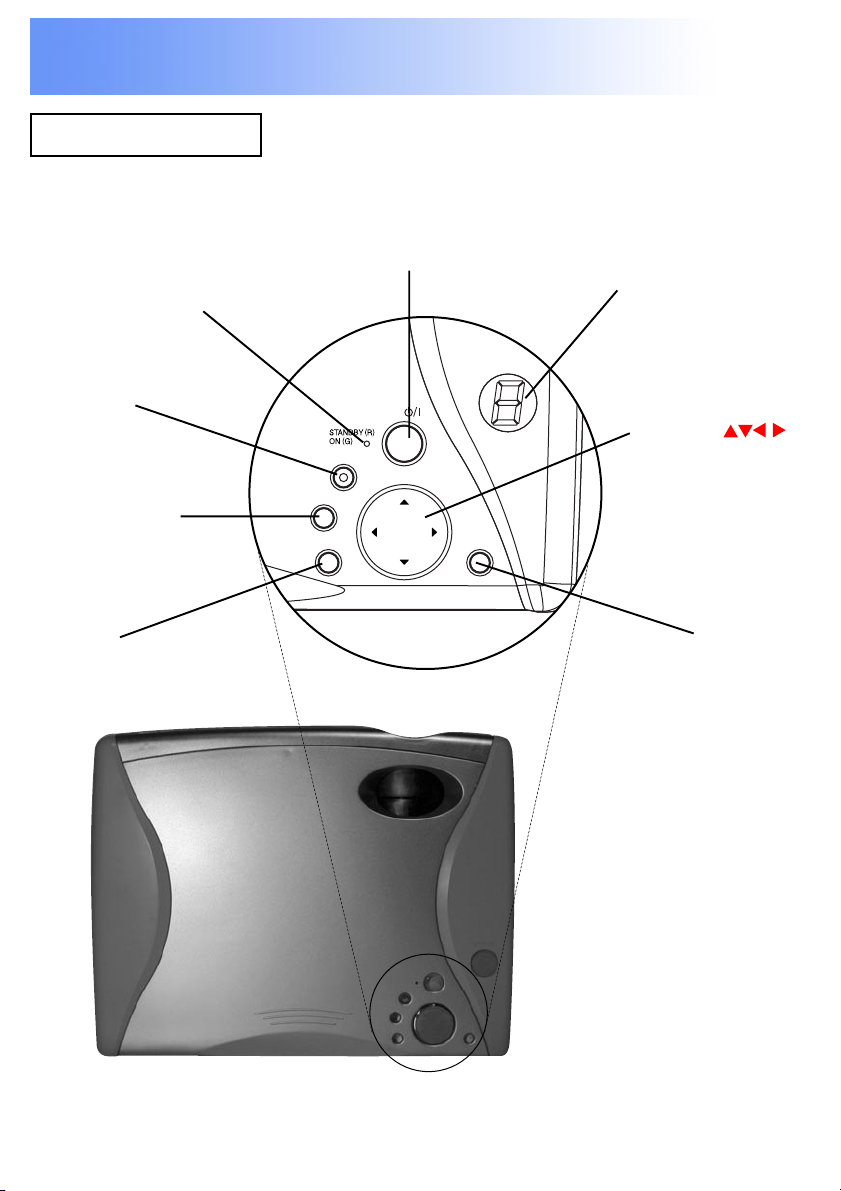
Product Information
INPUT
KEYSTONE
MENU
ENTER
STATUS
POWER
LCD Projector
■ Control panel
STANDBY(RED)
ON(GREEN)
INPUT
Button
KEYSTONE
Button
MENU
Button
POWER ButtonPOWER Indicator
STATUS Code
Indicator
Adjust
Buttons
(Also used for
Volume -/+)
ENTER
Button
Previous
screen
14
Product Information
LCD Projector
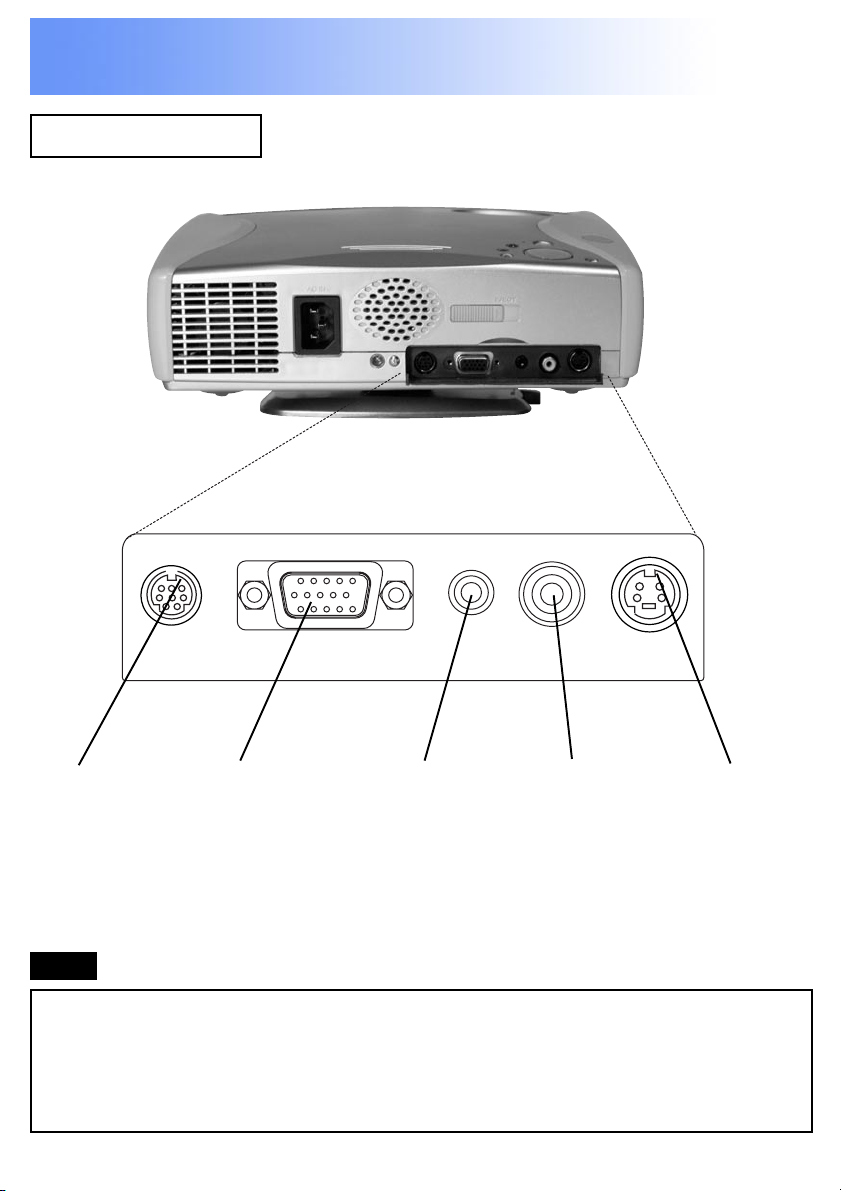
■ Connector panel
RS232C RGB/YPBPR IN AUDIO IN VIDEO IN
SERIAL
Connector
RGB/YPBPR
Input
Connector
Audio
Input
Connector
Video
Input
Connector
S-VIDEO IN
S-Video
Input
Connector
Note
The serial connector which is on the terminal board of the
projector conforms to the RS-232C interface specification, so that
the projector can be controlled by a personal computer which is
connected to this connector.
Previous
screen
15
Product Information
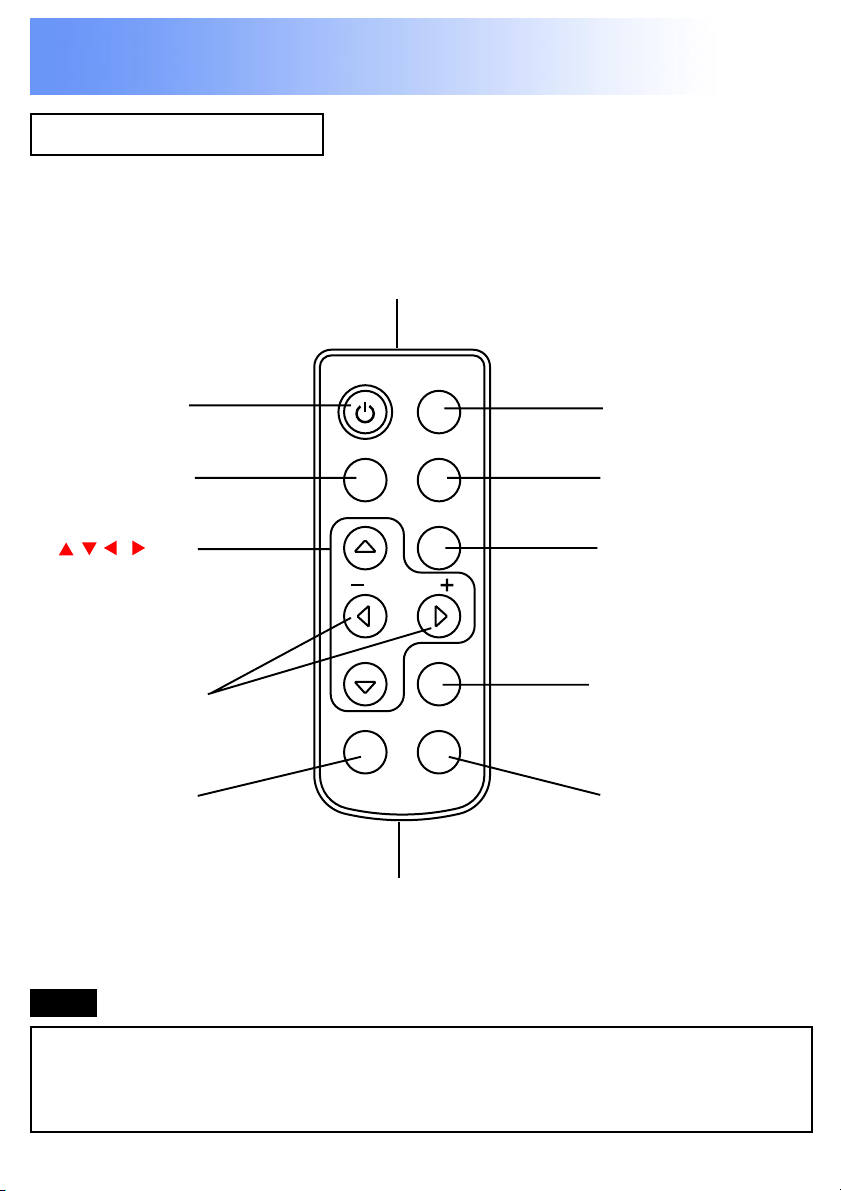
Remote Control unit
Transmitter
POWER
Button
SHUTTER
Button
, , ,
Buttons
VOLUME
-/+ Buttons
FREEZE
Button
POWER
SHUTTER
FREEZE D.ZOOM
INPUT
AUTO SETUP
MENU
VOLUME
ENTER
Battery Holder
INPUT
Button
AUTO SETUP
Button
MENU
Button
ENTER
Button
D.ZOOM
Button
Note
When you purchase the optional full functional remote control unit
(ET-RMLC50), you can enjoy the wireless mouse and laser pointer
features.
Previous
screen
16
Before using the Remote Control Unit
Remote Control comes with battery inside. Please remove white
protective film before use.
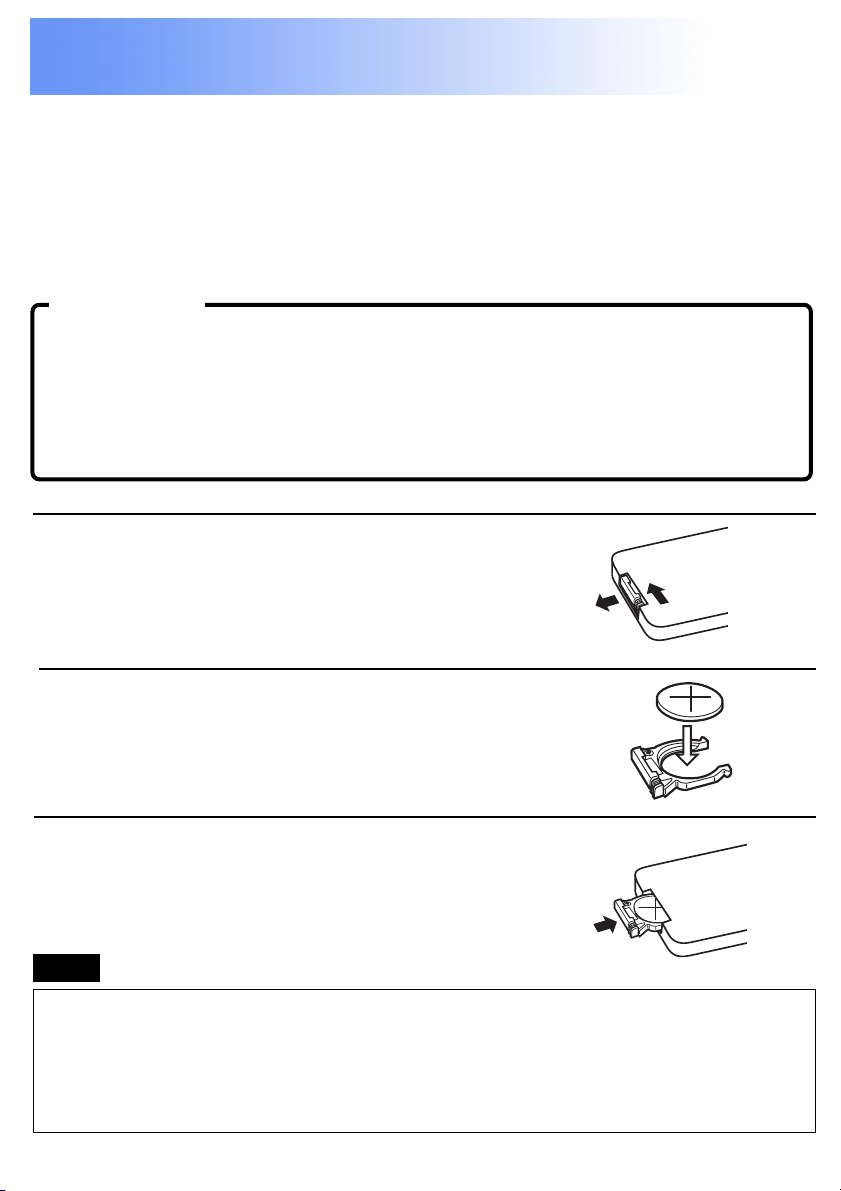
■ Replacing the battery
Insert the new lithium battery making sure the polar ities (+)
and (-) are correct.
WARNING:
Replace battery with CR2025 only. Use of another battery may
present a risk of fire or explosion.
Caution: Battery may explode if mistreated. Dispose of used
battery promptly. Keep away from children. Do not recharge,
disassemble or dispose of in fire.
1 While pushing the batter y holder
tab to the left, pull out the battery
holder.
Pull out
Push the tab
2 Inser t the batter y into the batter y
holder so that the + side is facing
upward.
3 Inser t the batter y holder.
Note
• Do not drop the remote control unit.
• Keep the remote control unit away from liquids.
• Remove the battery if not using the remote control unit for
long periods.
Previous
screen
17
Before using the Remote Control Unit
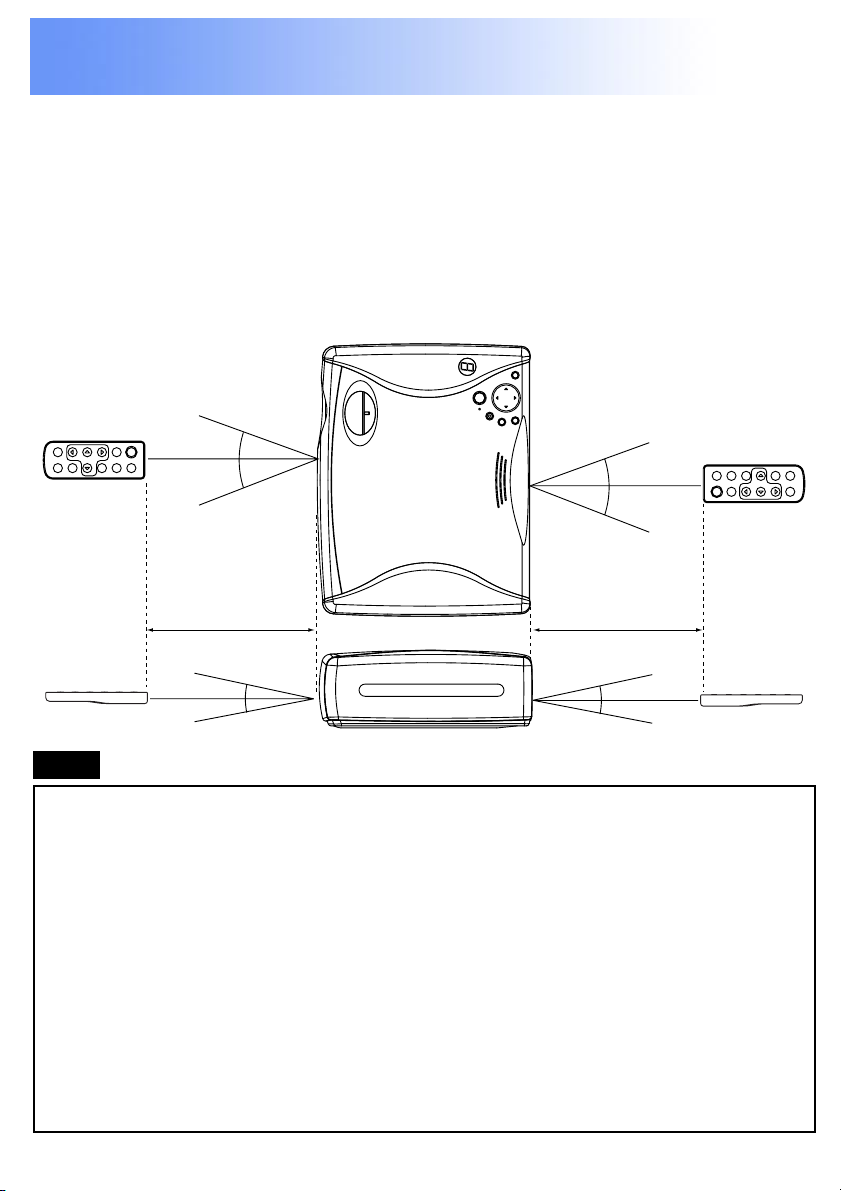
■ Operating range
If the remote control unit is held so that it is facing directly in front of
the front or rear remote control signal receptors, the operating range
is within approximately 7 m (23 ft) from the surfaces of the
receptors. Furthermore, the remote control unit can be operated
from an angle of ±30 º to the left or right and ±15 º above or below
the receptors. (In this case, the operating range is shortened.)
30°
30°
30°
30°
approximately
7 m (23 ft)
15°
15°
approximately
7 m (23 ft)
15°
15°
Note
• If there are any obstacles in between the remote control unit and
the receptors, the remote control unit may not operate correctly.
• If strong light is allowed to shine onto the remote control signal
receptor, or if there are any obstacles between the remote
control signal receptor and the remote control unit, correct
remote control operation may not be possible.
• If facing the remote control unit toward the screen to operate the
projector, the operating range of the remote control unit will be
limited by the amount of light reflection loss caused by the
characteristics of the screen used.
Previous
screen
18
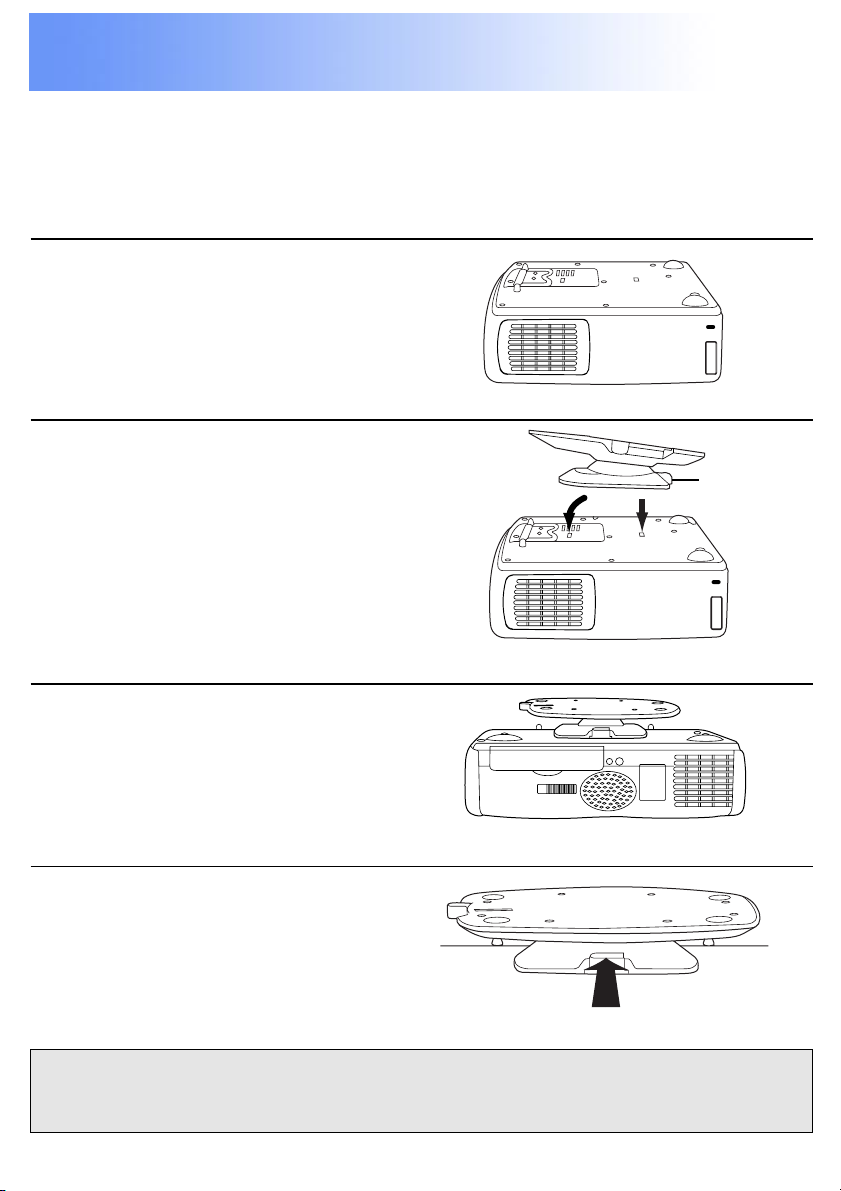
Attaching and Removing the Swivel Stand
1)
2)
A swivel stand can be attached to or removed from the LCD
Projector. When attached, you can fine-adjust the projection angle.
To attach or remove the swivel stand, follow the steps below.
•Attachment
1 Place the unit upside down.
Place the unit on a flat,
stable surface covered with
a soft cloth, etc.
2 1) First, insert the swivel base
into the front openings of the
projector.
2) Then, while pressing the
PUSH Button, insert into the
rear openings.
PUSH
Button
•Removal
1 Place the unit upside down.
Place the unit on a flat,
stable surface covered with
a soft cloth, etc.
2 While pressing the PUSH
Button, remove the Swivel
stand.
Caution:
Never pick the unit up by the swivel stand.
Previous
screen
PUSH Button
19
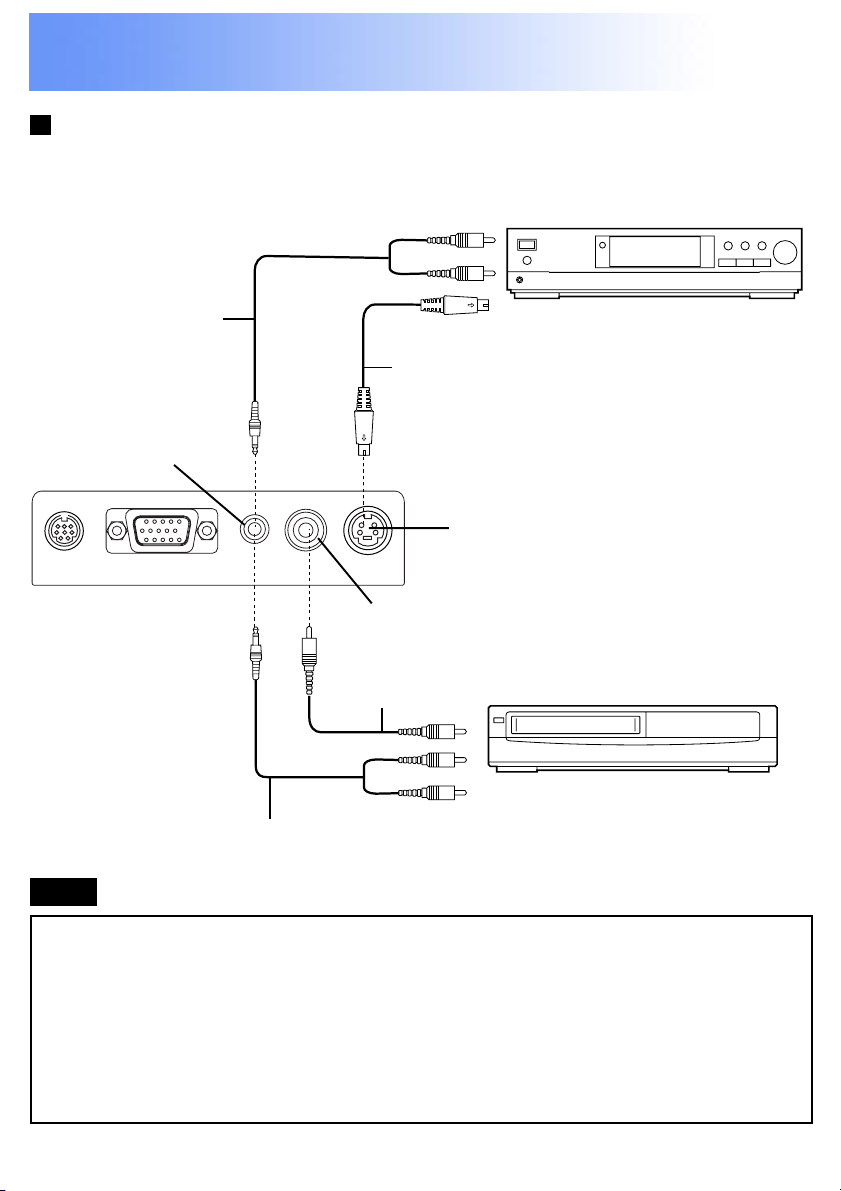
System Configuration Example
Example of connection to audio-visual equipment
DVD Player
Audio Cable
S-Video Cable
(not included)
AUDIO IN
S-VIDEO IN
VIDEO IN
Video Cable
Audio Cable
VCR
Note
• Only one audio system circuit is available for the AUDIO IN jack,
so if you wish to change the audio input source, you will need to
remove and insert the appropriate plugs.
• If the video signal source is connected using a cable with a
BNC junction plug, use the BNC-RCA Adaptor (not included) to
convert the pin jack.
Previous
screen
20
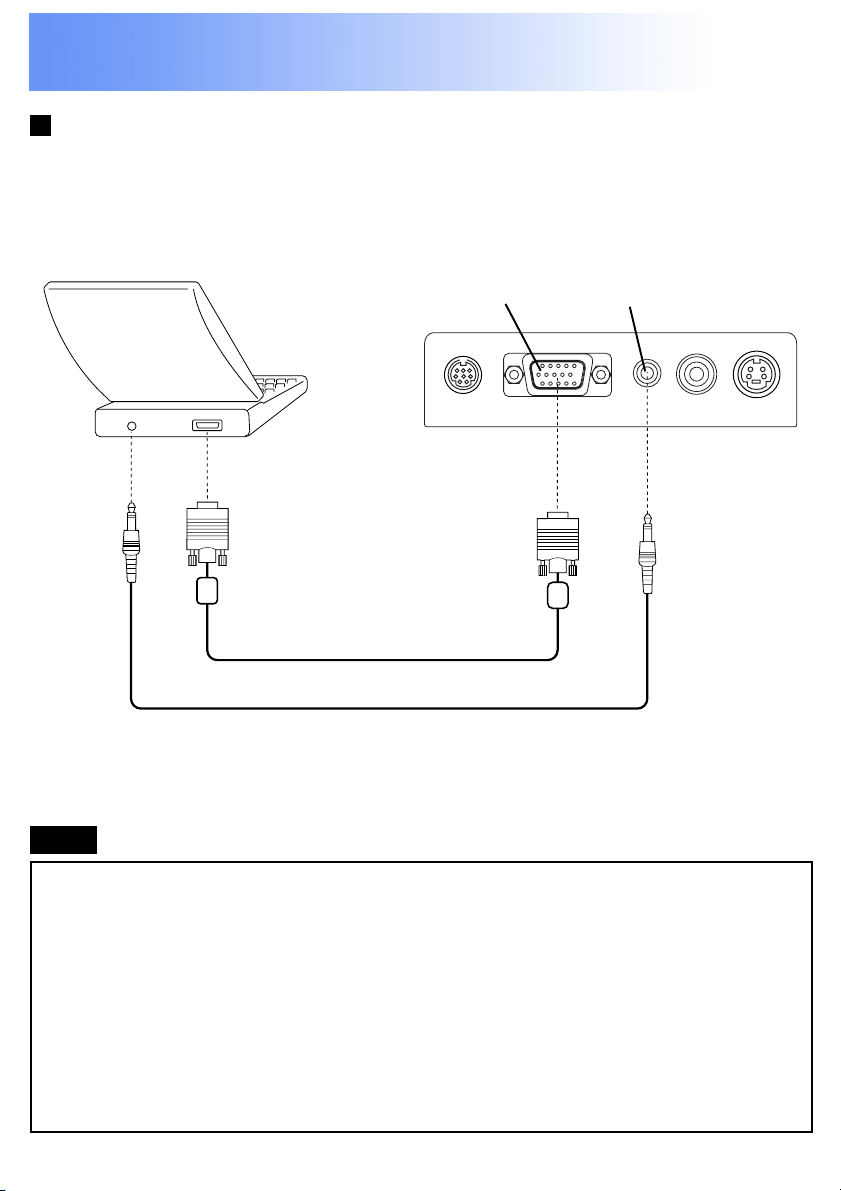
System Configuration Example
Example of connection to a Personal Computer
Personal Computer
RGB/YPBPR IN
AUDIO IN
VGA Cable
PC Audio Cable (not included)
Note
• When using the PC Plug & Play feature, first, attach the AC cord
to the LCD Projector and turn the projector power on. Then, turn
the PC power on.
• When LCD Projector power is turned off, shut down the
personal computer as well.
• Refer to the “Signals that can be Input” for types of RGB signals
which can be input to the projector by connecting a personal
computer.
Previous
screen
21
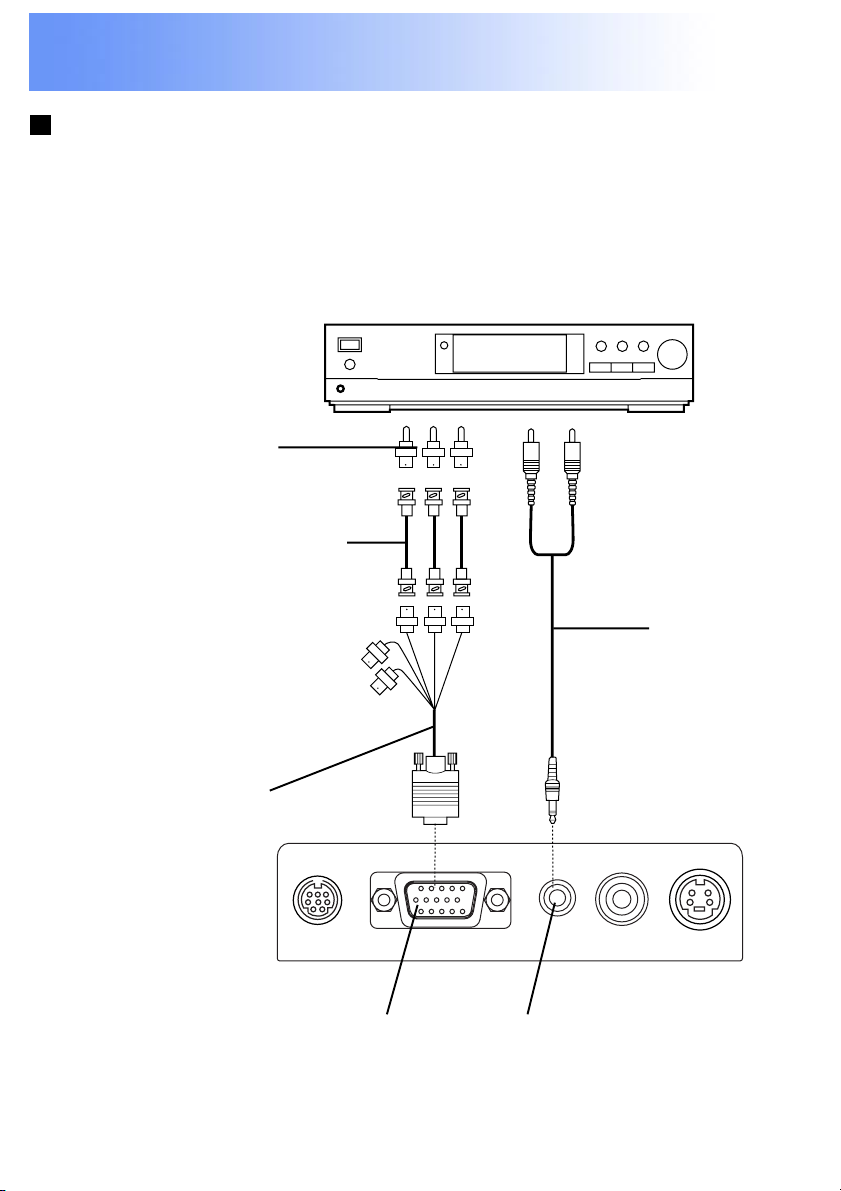
System Configuration Example
Connecting D-sub15-BNC5 (female) Adaptor Cable
The Component signal (YPBPR signal) can be input and projected
with this LCD Projector. Please read the operating instructions
regarding the output side of the component when connecting.
DVD Player
BNC-RCA Adaptor
(not included)
BNC Cable (not included)
Red
(Connect to PR Input Signal)
Blue
(Connect to PB Input Signal)
Green
(Connect to Y Input Signal)
Audio Cable
D-sub15-BNC5
(female) Adaptor
Cable (sold
separately)
Previous
screen
RGB/YPBPR IN AUDIO IN
Continued on the next page...
22
 Loading...