

Panasonic PT-LB20NTU Instruction Manual

Network Function Edition
(PT-LB20NTU / PT-LB30NTU)

Using Wireless Manager ME 2.0
...14
Startup................................................14
Description of the connection select
window...............................................14
Description of the launcher and menu
.....15
Screen styles that allow the projection
modes to be used.............................17
Live mode ..........................................17
Quitting live mode ............................17
Multi live mode ..................................18
Standard style (4-screen multi live mode)
..19
4-screen index style ........................19
16-screen index style ......................21
One shot mode..................................21
Moving picture transmission ...........22
Displaying the moving picture
transmission window ........................22
Moving picture transmission window
...22
Multiple Source Projection Mode ....23
Pointer mode .....................................24
Quitting pointer mode.......................24
Options...............................................24
Version information ..........................24
Picture quality selection ...................24
Live mode settings ...........................25
Shortcut key settings........................25
Launcher size and automatic setting
of destinations ..................................26
Operations when password
entry is required for connection......27
Adding and deleting connections
......27
Adding a connection.........................27
Deleting a connection.......................27
2
Contents (Network Function Edition)
Notes on Using
Wireless Connection...............4
Channels that can be used ................5
Examples of Network
Function Usage .......................6
Software Installation ...............8
System requirements..........................8
Wireless Manager ME (Mobile Edition) 2.0
.....9
DirectX 9.0c Driver ............................10
Simple Wireless Connection
(Using the Initial Settings) ....11
Projector operations.........................11
Computer operations........................12
Canceling the connection with
the projector ......................................13
Displaying the Network Menu
........28

3
Using WebBrowser ...............38
Projector settings..............................38
Computer settings ............................38
When a proxy server is already
being used........................................39
Enabling JavaScript .........................39
Starting up WebBrowser ..................40
Top window ......................................40
Projector control window.................41
Basic control window........................41
Option control window......................41
Monitor information window ............42
Password changing window............42
Network setting window
.......................43
Setting the infrastructure mode ........43
Making the above settings effective
....44
Software Uninstall .................45
Wireless Manager ME 2.0 .................45
Terminology ...........................46
Frequently Asked Questions
....48
Trademarks ................
Back cover
Other Applications
(
Changing the Initial Settings
).....29
Changing the network number ........29
Projector operations .........................29
Computer operations........................29
Changing the projector name ..........30
Wireless connection with password....
31
Projector operations .........................31
Computer operations........................31
User connections (not using simple
connections)......................................32
Projector operations
(Network number settings) ...............32
Computer operations
(Wireless settings)............................32
TCP/IP settings..................................33
Wireless settings...............................35
Verifying settings..............................36
Returning to the Initial
Settings ..................................37
Projector operations.........................37
Computer operations........................37
Contents (Network Function Edition) (cont.)
Please note the following.
• Panasonic cannot be held liable for any direct or indirect damages resulting from
the use or malfunction of this projector.
• Panasonic cannot be held liable for damages arising from data corruption or loss
as a result of using this projector.

4
Wireless connection function of the projector uses radio waves in the 2.4 GHz band.
A radio station license is not required, but be sure to read and fully understand the
following items before use.
■ Do not use near other wireless equipment.
The following equipment may use radio waves in the same band as the projector.
When the projector is used near these devices, radio wave interference may make
communication impossible, or the communication speed may become slower.
• Microwave ovens, etc.
• Industrial, chemical and medical equipment, etc.
• In-plant radio stations for identifying moving objects such as those used in factory
manufacturing lines, etc.
• Designated low-power radio stations
■ If at all possible, avoid the use of cellular phones, TV sets or
radios near the projector.
Cellular phones, TV sets, radios and similar devices use different radio bands from
the projector, so there is no effect on wireless communication or the transmission
and reception of these devices. However, radio waves from the projector may
produce audio or video noise.
■ Wireless communication radio waves cannot penetrate steel
reinforcements, metal, concrete, etc.
Communication is possible through walls and floors made from materials such as
wood and glass (except glass containing wire mesh), but not through walls and
floors made from steel reinforcements, metal, concrete, etc.
Notes on Using Wireless Connection

5
■ Channels that can be used
The channels (frequency range) that can be used differ according to the country or
region. Refer to the table below.
Notes on Using Wireless Connection (cont.)
England, Germany,
France, Spain
Italy, Belgium,
Austria, Sweden,
Norway, Denmark,
Switzerland, Holland,
Finland, Portugal,
Greece, Thailand,
South Korea
United States
Taiwan
2,412 MHz 2,472 MHz
2,412 MHz 2,464 MHz
DGT
ETSI 300.328
SIRIM
Country or region
Japan ARIB STD-T66
FCC part 15
1 - 13
1 - 11
Malaysia
IDASingapore
C-Tick
Australia,
New Zealand
Standard Channels used
Frequency band
(Center frequency)

6
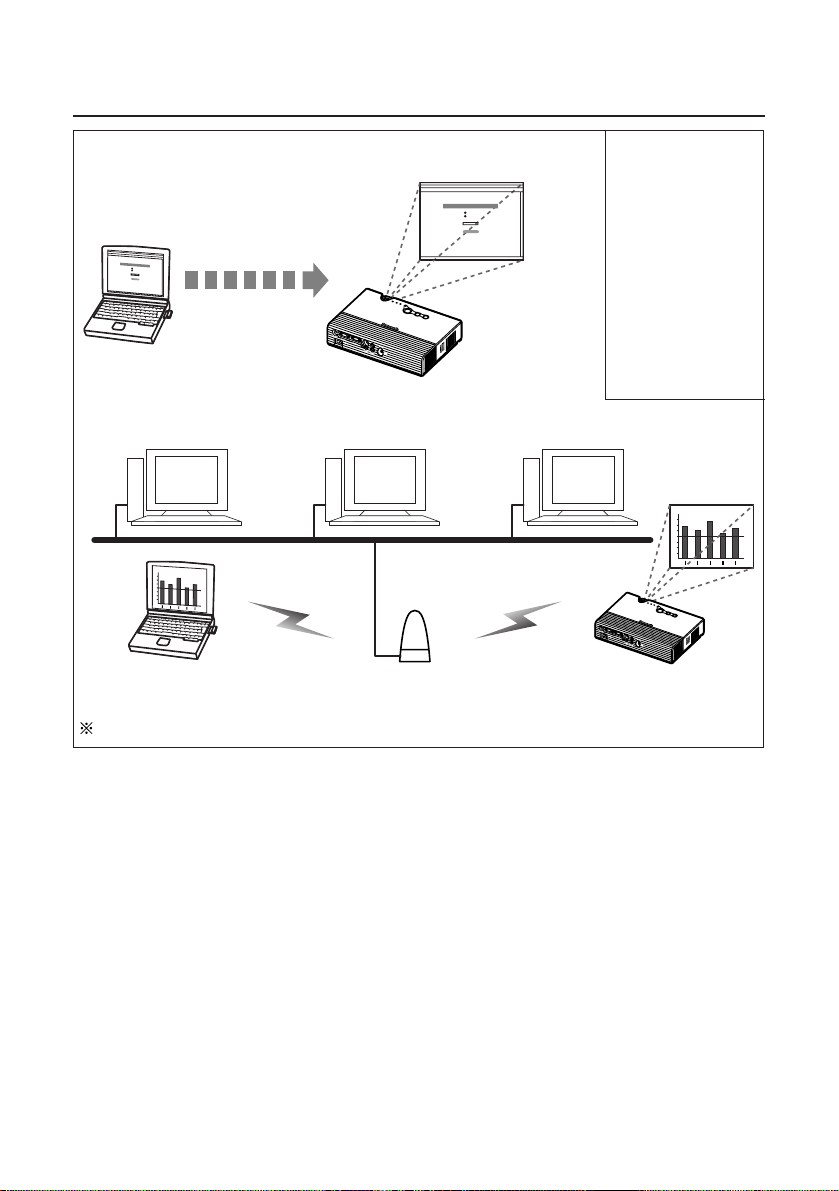
Examples of Network Function Usage
Computer equipped
with wireless LAN
Transmission
Installation
Wireless Manager ME 2.0
(DirectX 9.0c Driver)
Projector
Live mode
Computer equipped
with wireless LAN
PC1 PC2 PC3 PC4
12
34
56
78
9
10 11 12
13 14 15 16
Standard style
(4-screen multi live mode)
Projector
1
12
3
4
2
34
Computer equipped
with wireless LAN
PC1 PC2 PC16
16-screen index style
Projector
Computer equipped
with wireless LAN
PC1 PC2 PC3 PC4
4-screen index style
Projector
1234
…
1
12
12
16
3
4
Software
Installation
(See page 8)
Simple Wireless
Connection
(See page 11)
Using Wireless
Manager ME 2.0
(See page 14)
Projecting a computer image by wireless operation
Transmission to multiple projectors
Projector Projector
Computer equipped
with wireless LAN
Projector
The projectors illustrated
as examples are
PT-LB20NTU.
7
Examples of Network Function Usage (cont.)
Controlling the projector by WebBrowser
Simple Wireless
Connection
(See page 11)
Using
WebBrowser
(See page 38)
The projectors illustrated as examples are PT-LB20NTU.
Control
by WebBrowser
Computer equipped
with wireless LAN
Use in infrastructure mode
Computer equipped
with wireless LAN
Access Point (AP) Projector
Projector
LAN

8
Software Installation
The computer must meet the following requirements in order to use the supplied
software.
OS: Windows 98SE (Second Edition) /Me (Millennium Edition) /2000
Professional/XP Home Edition/XP Professional
CPU: Pentium III or faster or compatible processor (800 MHz or faster is
recommended when using live mode and 1 GHz or faster is
recommended when playing movies.)
RAM: 128 MB or more (256 MB or more for Windows 2000/XP).
Empty hard disk capacity:
60 MB or more
Hardware conditions:
CD-ROM drive (for software installation and viewing the user’s manual)
An 802.11 b/g built-in wireless LAN system or an 802.11 b/g wireless
LAN card must be installed and running properly.
However, some 802.11 b/g wireless LAN may not allow connection to
802.11 g projectors.
Web browser: Internet Explorer 6.0 or newer
Netscape Communicator 7.0 or newer
DirectX: Environment required for running Ver.8.1b or newer
System requirements
Operation is not guaranteed for all computers that
meet the above conditions.
Note:
Note that operation is not guaranteed when used with system environments other
than the above or on homemade computers.
9
Software Installation (cont.)
Wireless Manager ME (Mobile Edition) 2.0
Wireless Manager ME 2.0:
This software is used to send screen images from a computer to the projector via a
wireless LAN.
Notes:
• Shut down all software currently active on Windows. Otherwise, installation may
not be possible.
• Administrator authority is required for installation with Windows 2000/XP.
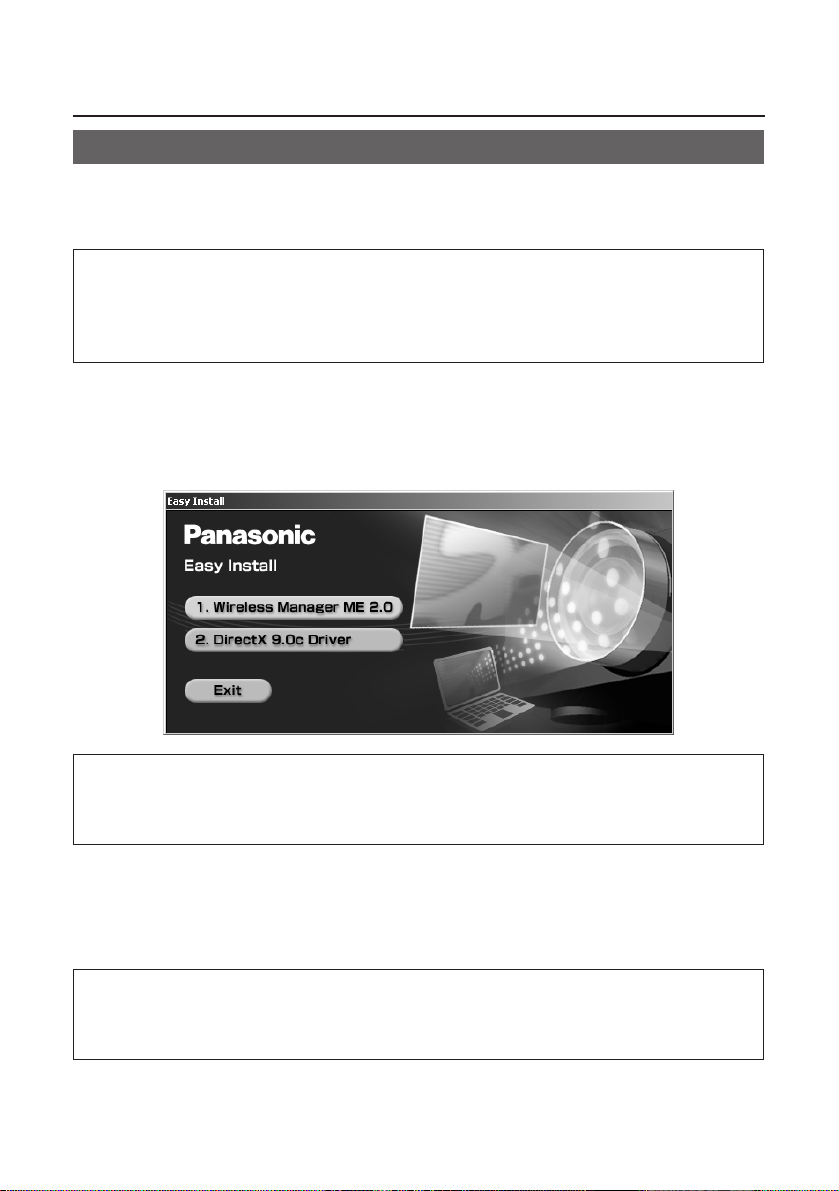
Set the supplied CD-ROM in the CD-ROM drive.
The installer starts up automatically and the following screen appears.
1
Note:
If the installer does not start up automatically, double-click [EasyInstall]
→
[Easy_Inst.exe] in the CD-ROM.
Note:
If Wireless Manager ME 1.0 has been installed, uninstall it by following the
instructions on the screen.
Click [Wireless Manager ME 2.0].
Follow the instructions on the screen and install the software.
2
10
Software Installation (cont.)
DirectX 9.0c Driver
To transfer moving picture using the projector, your computer must have DirectX driver
Ver.8.1b or newer. This CD-ROM has the latest version of DirectX. However, it cannot
be installed in a machine which runs Windows 98SE or Windows Me.
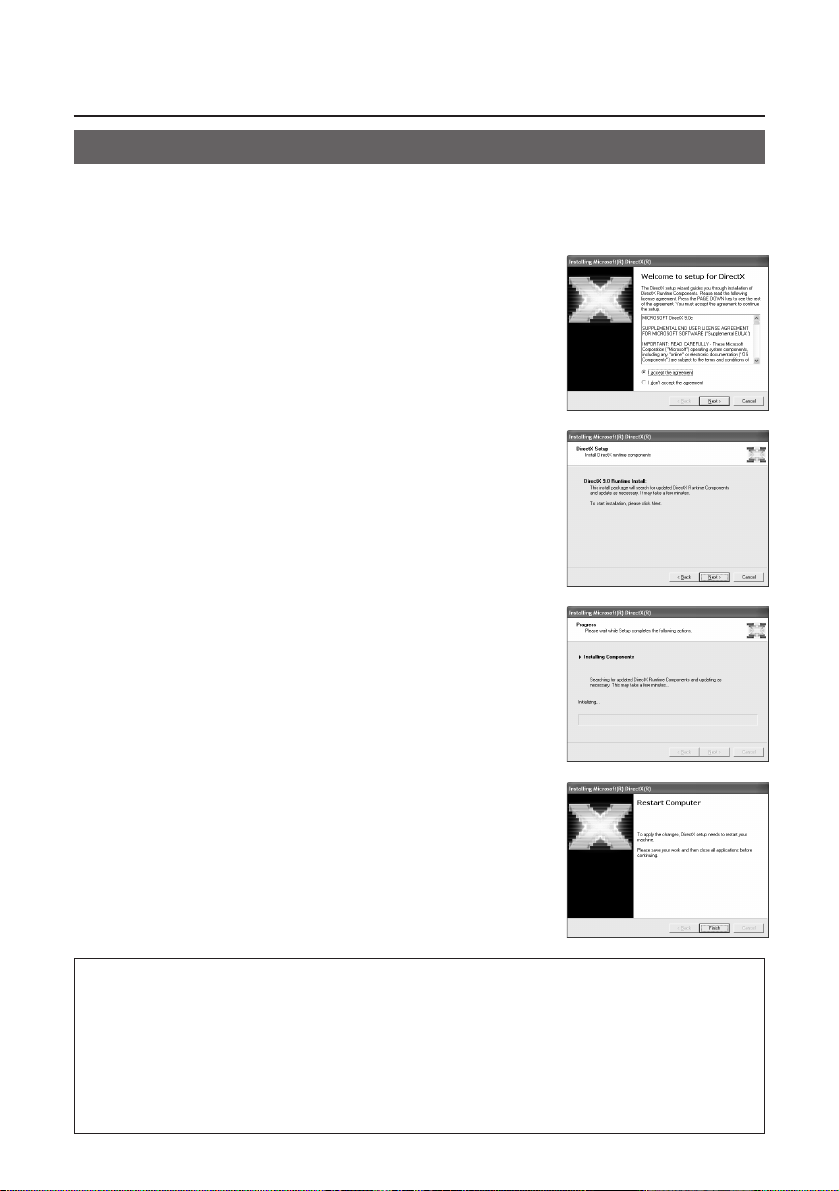
Click [DirectX 9.0c Driver] in step
1 on page 9.
The License Agreement for DirectX appears.
1
Place a check in the [I accept the
agreement] checkbox and click
[Next].
The DirectX Runtime component install window
appears.
2
Click [Next].
• The DirectX component install progress bar
appears.
• Do not perform any other operations until
installation is complete.
3
Click [Finish] when the window on
the right appears.
4
Notes:
• Once installed, the DirectX 9.0c Runtime cannot be uninstalled.
• In rare cases, installing DirectX 9.0c may prevent your computer from starting up
properly. Before installing, be sure to verify with the customer support office of the
manufacturer that the video card of your computer is compatible with DirectX 9.0c.
• No guarantees are made for the operation of Wireless Manager ME 2.0 with a
version newer than DirectX driver Ver. 9.0c.

11
Simple Wireless Connection (Using the Initial Settings)
When making a wireless connection between the projector and the computer using the
default settings, if the projector is in the ON condition, and the computer has built-in
wireless LAN or has a wireless card installed (with the driver installed and running
properly), the necessary settings will be made automatically when Wireless Manager
ME 2.0 is started.
However, note that Wireless Manager ME 2.0 must be installed.
For details on changing the initial settings and using the changed settings, refer to
pages 29 to 36.
Notes:
• Operation is not guaranteed for all wireless cards and built-in wireless LAN
adapters.
• Refer to the following URL for the types of wireless cards that can be used.
http://panasonic.co.jp/pavc/global/projector/
• Other network adapters may not be usable under simple connections.
• Connections to other networks connected through the wireless card are broken
during simple connections.
• Administrator authority is required for installation of simple connections in
Windows 2000/XP. (Refer to page 53 for the procedure if you do not have the
authority of the administrator and to page 48 for the restrictions applying in such a
case.)
Projector operations
Turn on the projector.
Note:
When using a computer which is not equipped with an built-in wireless LAN, install
the wireless card driver beforehand. For details on how to install the driver, refer to
the instructions accompanying the wireless card.
12
Computer operations
Turn on the computer.
1
Select [Start] →[Programs] →[Panasonic Wireless
Display] →[Wireless Manager mobile edition 2.0].
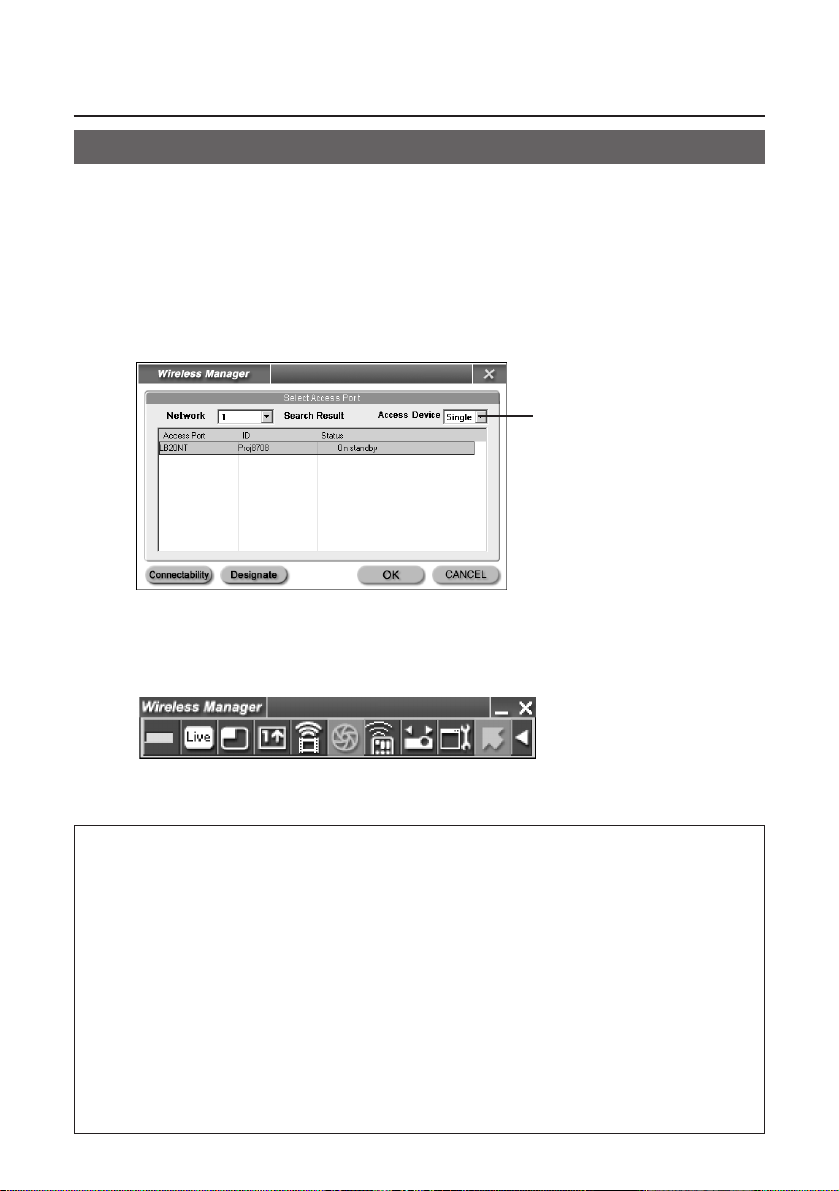
Wireless Manager ME 2.0 starts up, and the connection select window shown
below appears.
2
Select the connection and click [OK].
The launcher shown below appears and the connection with the projector is
established.
3
Simple Wireless Connection (Using the Initial Settings) (cont.)
Notes:
• The initial network number for both the projector and the computer is “1”.
These numbers must match for the connection.
Also, WEP is enabled when network number is anything but “1”, so when security
is a concern, use a different number than “1”.
Image and audio data are encrypted using AES in all networks, so essential data
are protected.
• Depending on the computer and wireless card used, automatic setup may not be
possible. If this is the case, the [Network] setting on the screen in step 2 above will
be switched to [USER] automatically. For details of the connection procedure, first
close Wireless Manager ME 2.0, and then refer to page 32.
• When anti-virus software and utilities for network cards are installed, these may
prevent connection of the projector. (See pages 51 to 53)
For multiple transmissions,
refer to page 23.
13
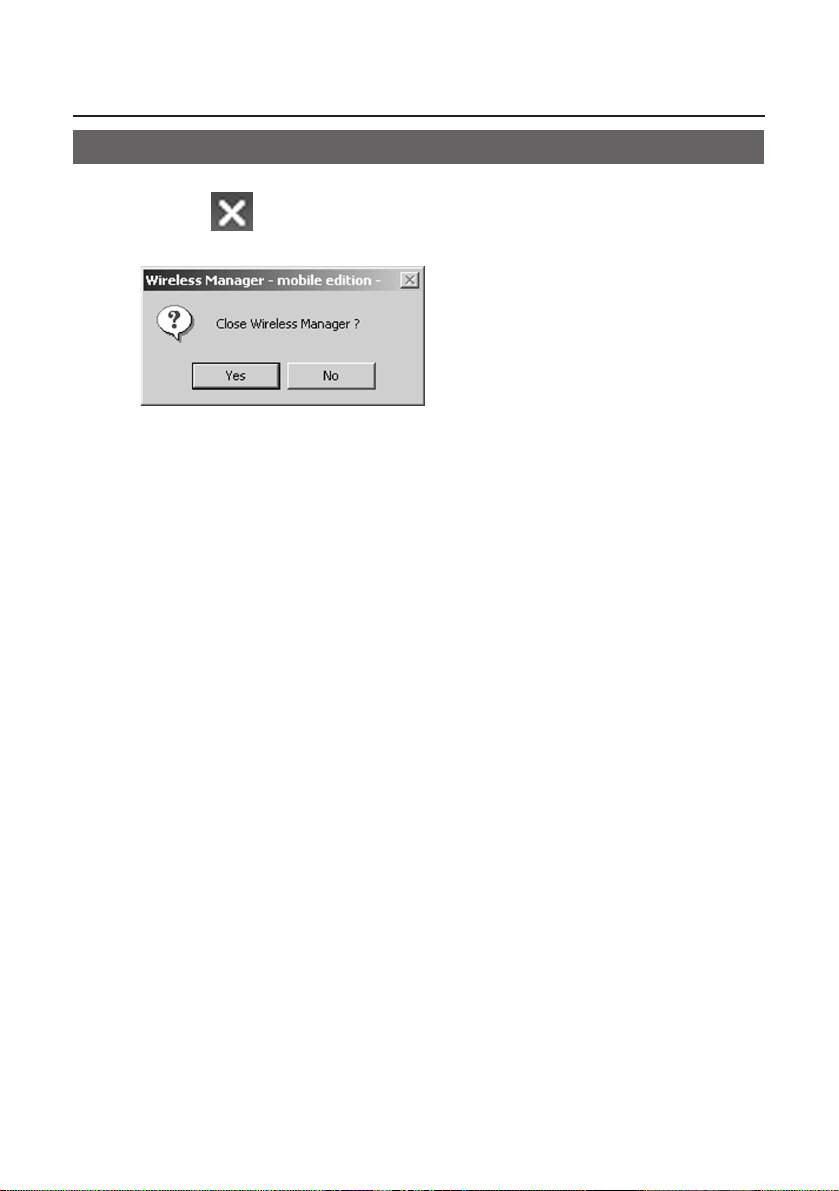
Canceling the connection with the projector
Click [ ] on the launcher.
The following window appears.
1
Click [Yes].
The computer returns to the original network settings when the connection is
ended.
However, note that some time may be needed to return to the original network
settings.
2
Simple Wireless Connection (Using the Initial Settings) (cont.)
14
Using Wireless Manager ME 2.0
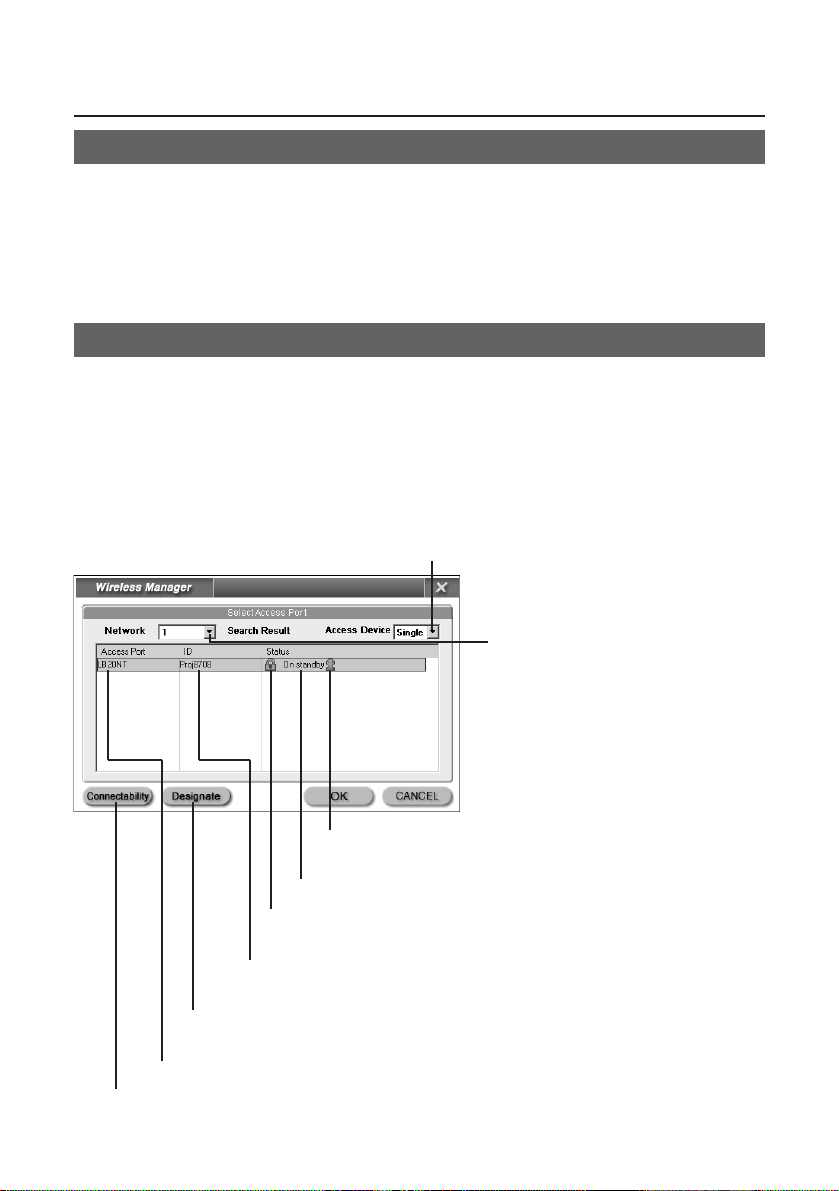
Description of the connection select window
When the network number to be
connected differs, select the
network number to be connected.
The network settings change
according to this selection.
This network number is stored in
the computer, so connection is
performed with the current
number the next time Wireless
Manager ME 2.0 is started up.
This indicates the number of people connected to this
projector.
This indicates the status of this projector.
This appears when password entry is needed for connection.
(See page 27)
Projector name (See page 30)
When there are two or more projectors with the same name, each
projector is automatically assigned its own ID for identification purposes.
The equipment to be connected can be designated when [Network]
is set to [USER].
Click this to display the projector name at the upper left of the projection screen for
the projector in question.
When only one projector is connected, select [Single] and the
projector from the list of destination.
When multiple projectors are connected, select [Multi-] and
select multiple projectors.
When the [Make an automatic connection] checkbox in [Automatic connection setting]
has been checked in Options (see page 26) and a connection with the projector
registered as a destination for automatic connection is possible, connection with the
projector will be performed automatically, and the connection select window will not be
displayed.
Startup
Select [Start] →[Programs] →[Panasonic Wireless Display]
→
[Wireless Manager mobile edition 2.0].
15
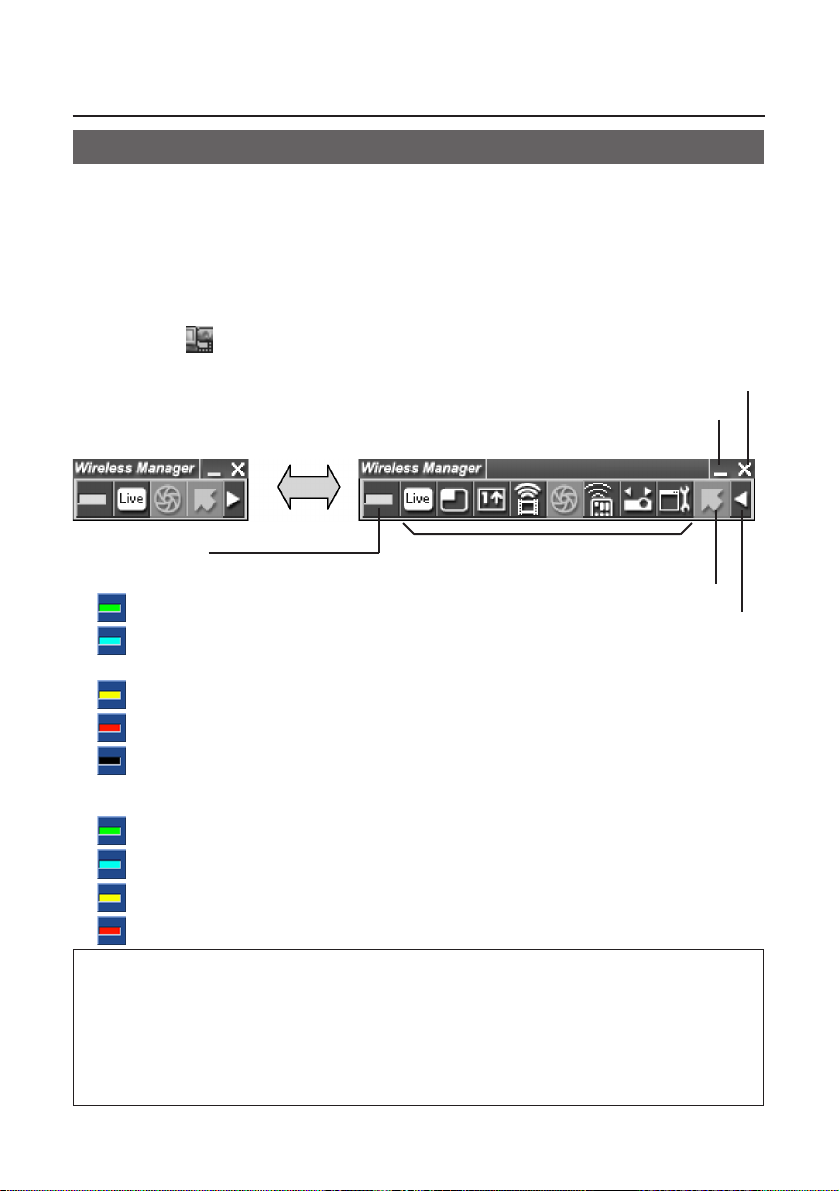
Description of the launcher and menu
(Green, lighted):
Transmission possible
(Blue, blinking):
Own computer currently transmitting
(
in the live mode or moving picture transmission mode
)
(Yellow, lighted):
Other user currently transmitting
(Red, lighted): Communication impossible
(Black, lighted): When the projector has not been selected
Status indication
When connected to one projector
(Green, lighted):
All transmission possible
(Blue, blinking): Currently transmitting
(Yellow, blinking):
Communication impossible for more than one unit
(Red, lighted): All communication impossible
When connected to multiple projectors
• The launcher always appears on the computer screen, and can be used to perform
various operations.
Two types of launchers are available in the Launcher Display Mode, the simple launcher
and the full launcher. Ordinarily, the full launcher is displayed. The Launcher Display
Mode can be toggled by clicking on the button on the right side of the launcher window.
Two window sizes are allowed, the standard and an expanded version. This is
controlled in [Launcher size setting] in Options (see page 26).
• Right-click [ ] on the task tray to display the menu when the menu has been
placed on the task tray by the launcher.
Using Wireless Manager ME 2.0 (cont.)
Cancel connection
Place in task tray
Simple launcher Full launcher
Pointer mode on/off
See next page
Toggling Launcher
Display Mode
(Continued on next page)
Notes:
• With Windows 2000 or Windows XP, the launcher appears only on the computer
screen and is not projected by the projector.
• With Windows 98SE or Windows Me, you can place the launcher on the task tray
and use it as a menu from the task tray when you do not wish to display the
launcher on the projector’s projection screen.
16
Using Wireless Manager ME 2.0 (cont.)
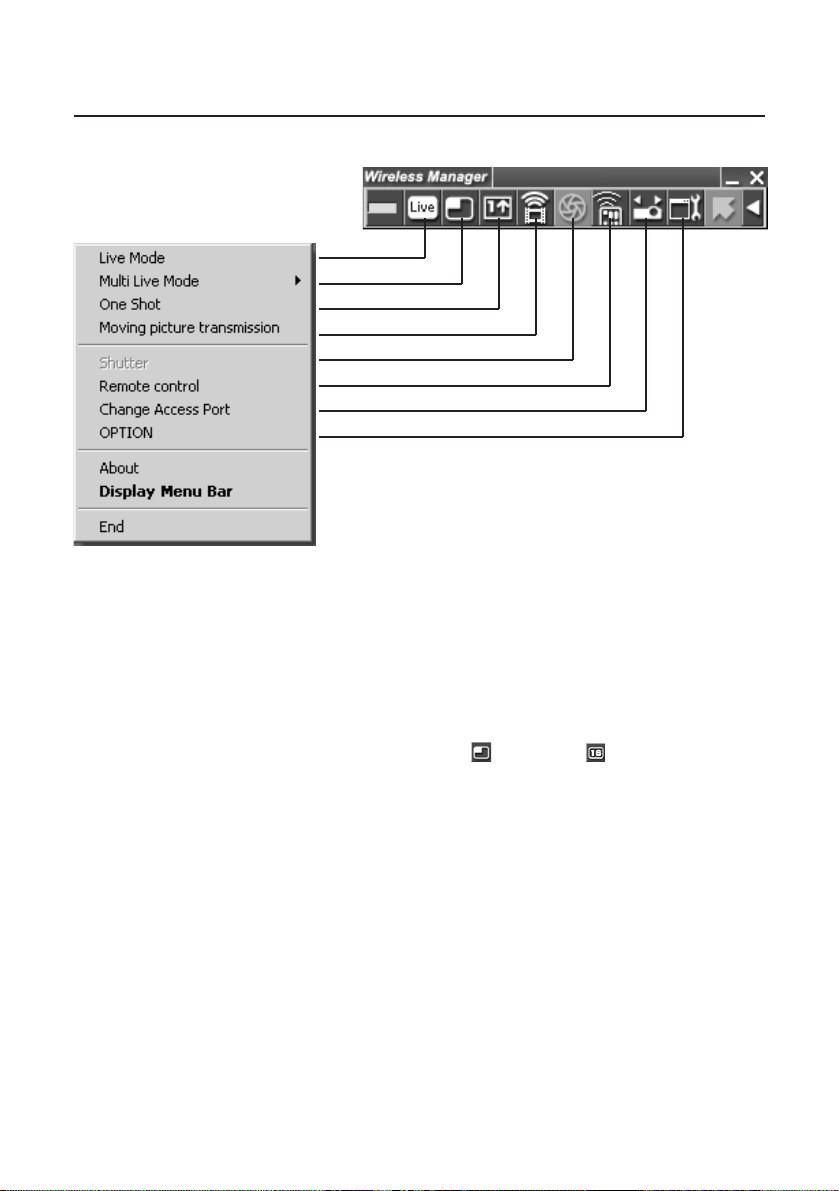
Full launcher
Menu
Live Mode: Displays the computer screen over the entire projection screen.
(See page 17)
Multi Live Mode: Offers a choice of three styles: the standard style (for displaying
the images on one of the four windows into which the screen
has been divided), the 4-screen index style (for displaying 4
indexed images), and the 16-screen index style (for displaying
the images on one of the 16 windows into which the screen has
been divided).
In 16-screen index style mode, [ ] changes to [ ]. (See pages 18 to 21)
One Shot: Transmits a snapshot of the current computer screen to the
projector one time. (See page 21)
Moving picture transmission:
Displays the movie select window. (See page 22)
However, this menu item does not function with Windows 98SE
or Windows Me. When transferring to or closing moving picture
transmission, the computer screen blanks for a moment, but
this is not an indication of any malfunction.
Shutter: Blanks the screen for a moment. (This menu item functions only
in the live mode.)
Remote control: Starts up WebBrowser. (See pages 40 to 44)
Change Access Port
: Displays the connection select window. (See page 14)
OPTION: Displays the option setting window. (See pages 24 to 26)
About: Displays the Wireless Manager ME 2.0 version information.
Display Menu Bar: Displays the launcher.
17
Using Wireless Manager ME 2.0 (cont.)
Check the status indication on the launcher to make
sure that transmission is possible (check that the
green lamp is lighted).
1
Click [ ] on the launcher.
The current computer screen is transmitted to the selected projector. In the live
mode the projector is occupied by a single computer, so operations from other
computers are not possible.
2
■ Quitting live mode
Click [ ] on the launcher.
Live mode
Notes:
• For presentations in live mode, the [ ] buttons on the remote control will
function in the same way as the computer’s Page Up and Page Down keys. This
means that if you run a computer application that supports the [ ]buttons, the
presentation screen can be changed using the remote control.
• Movie play is slowed if [High Definition] is selected in the Options.
• Some portions of images are not projected under some applications (MS Office
Assistant, IME Bar, and others).
Note:
Whether to keep the last image in the projector or clear it after quitting live mode
can be set as an option. (See page 25)
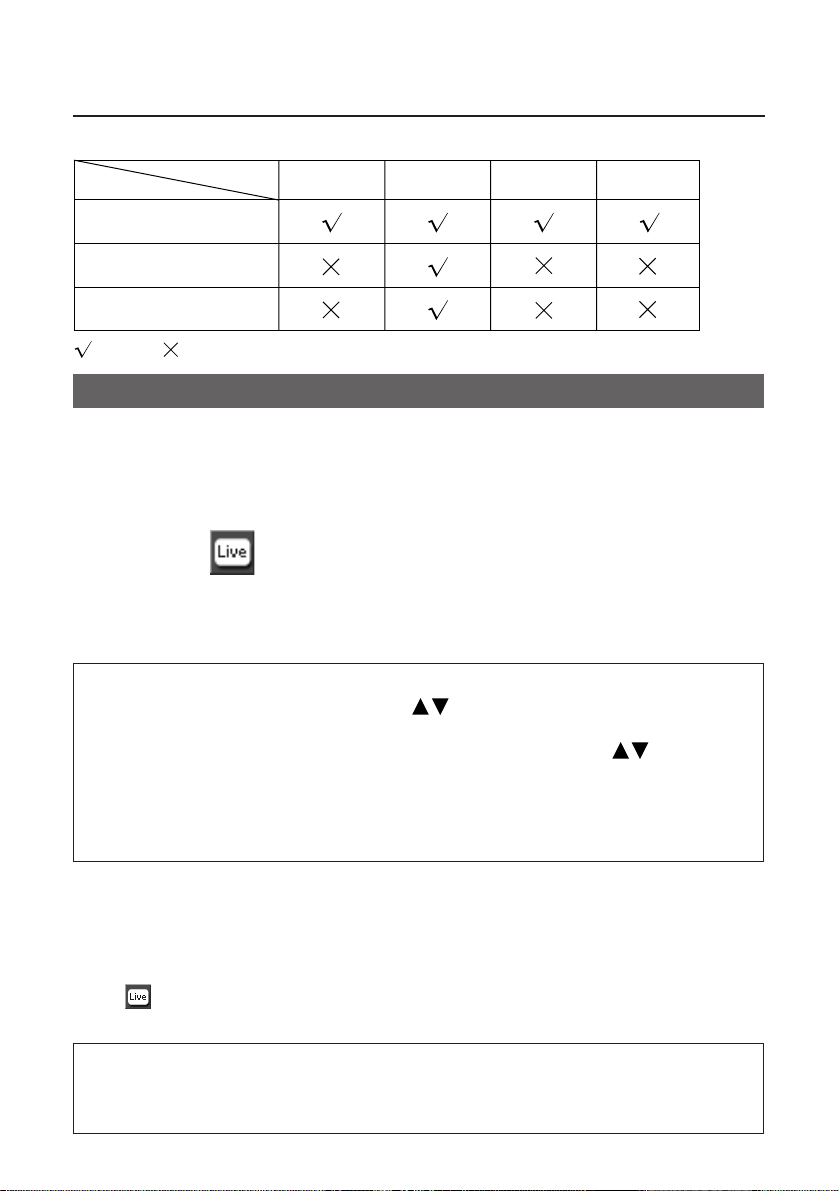
■ Screen styles that allow the projection modes to be used
= Yes = No
Computer side
Projector side
Standard style
4-screen index style
16-screen index style
Live mode
Multi
Live mode
One shot
mode
Moving picture
transmission
18
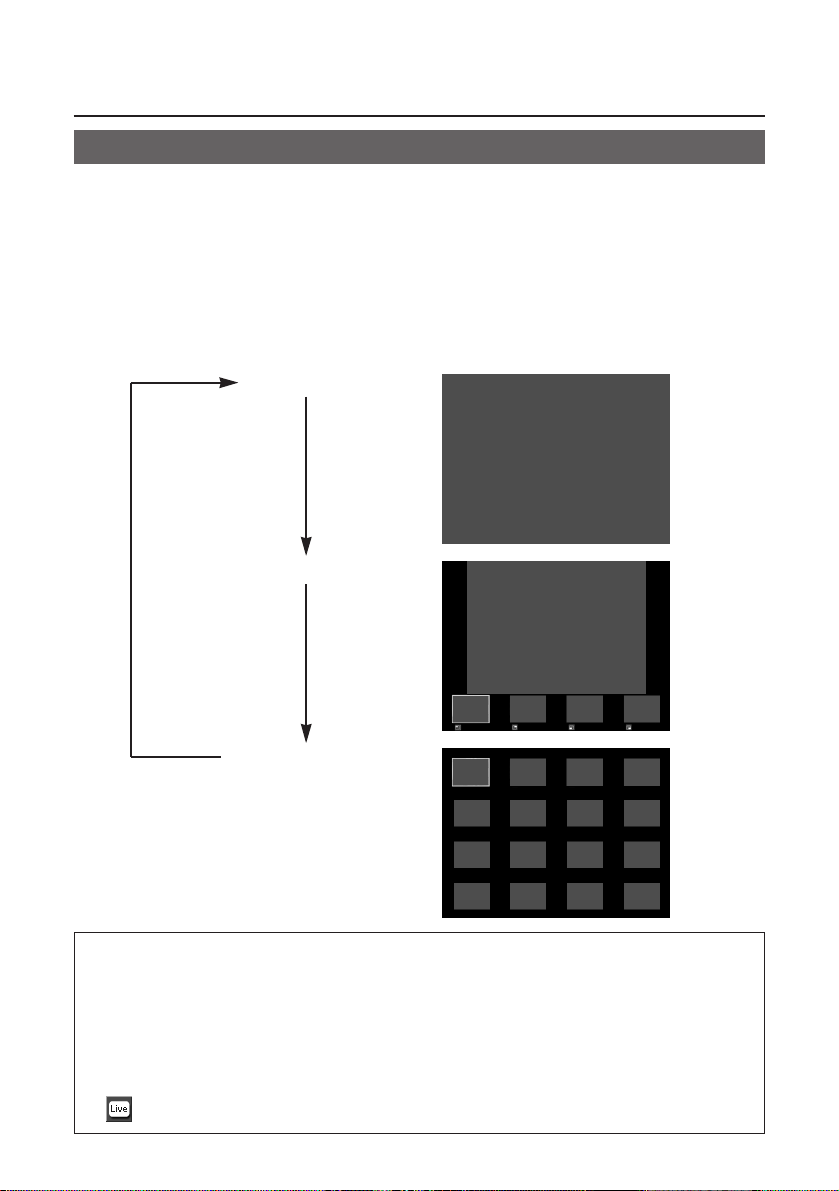
Using Wireless Manager ME 2.0 (cont.)
Multi live mode
Multi live mode allows simultaneous projection of the contents of the monitors of 4
computers (Standard style, 4-screen index style) and of 16 computers (16-screen
index style) onto a single screen.
Switching from one style to another
Either press the [INDEX WINDOW] button on the remote control or select [INDEX
WINDOW] on the projector's main menu (See page 28) and press the [ENTER] button.
4-screen index style
16-screen index style
Notes:
• The default setting is the standard style.
• When the projector starts up, it resumes in the current style the last time the
projector was turned off.
• When the style setting is switched, the connection to the computer is broken, so
this must be re-established.
• When transferring to the live mode, first select the standard style, and then click
[ ] on the computer.
Standard style
 Loading...