

Panasonic PT-L759XU, PT-L759VU User Manual
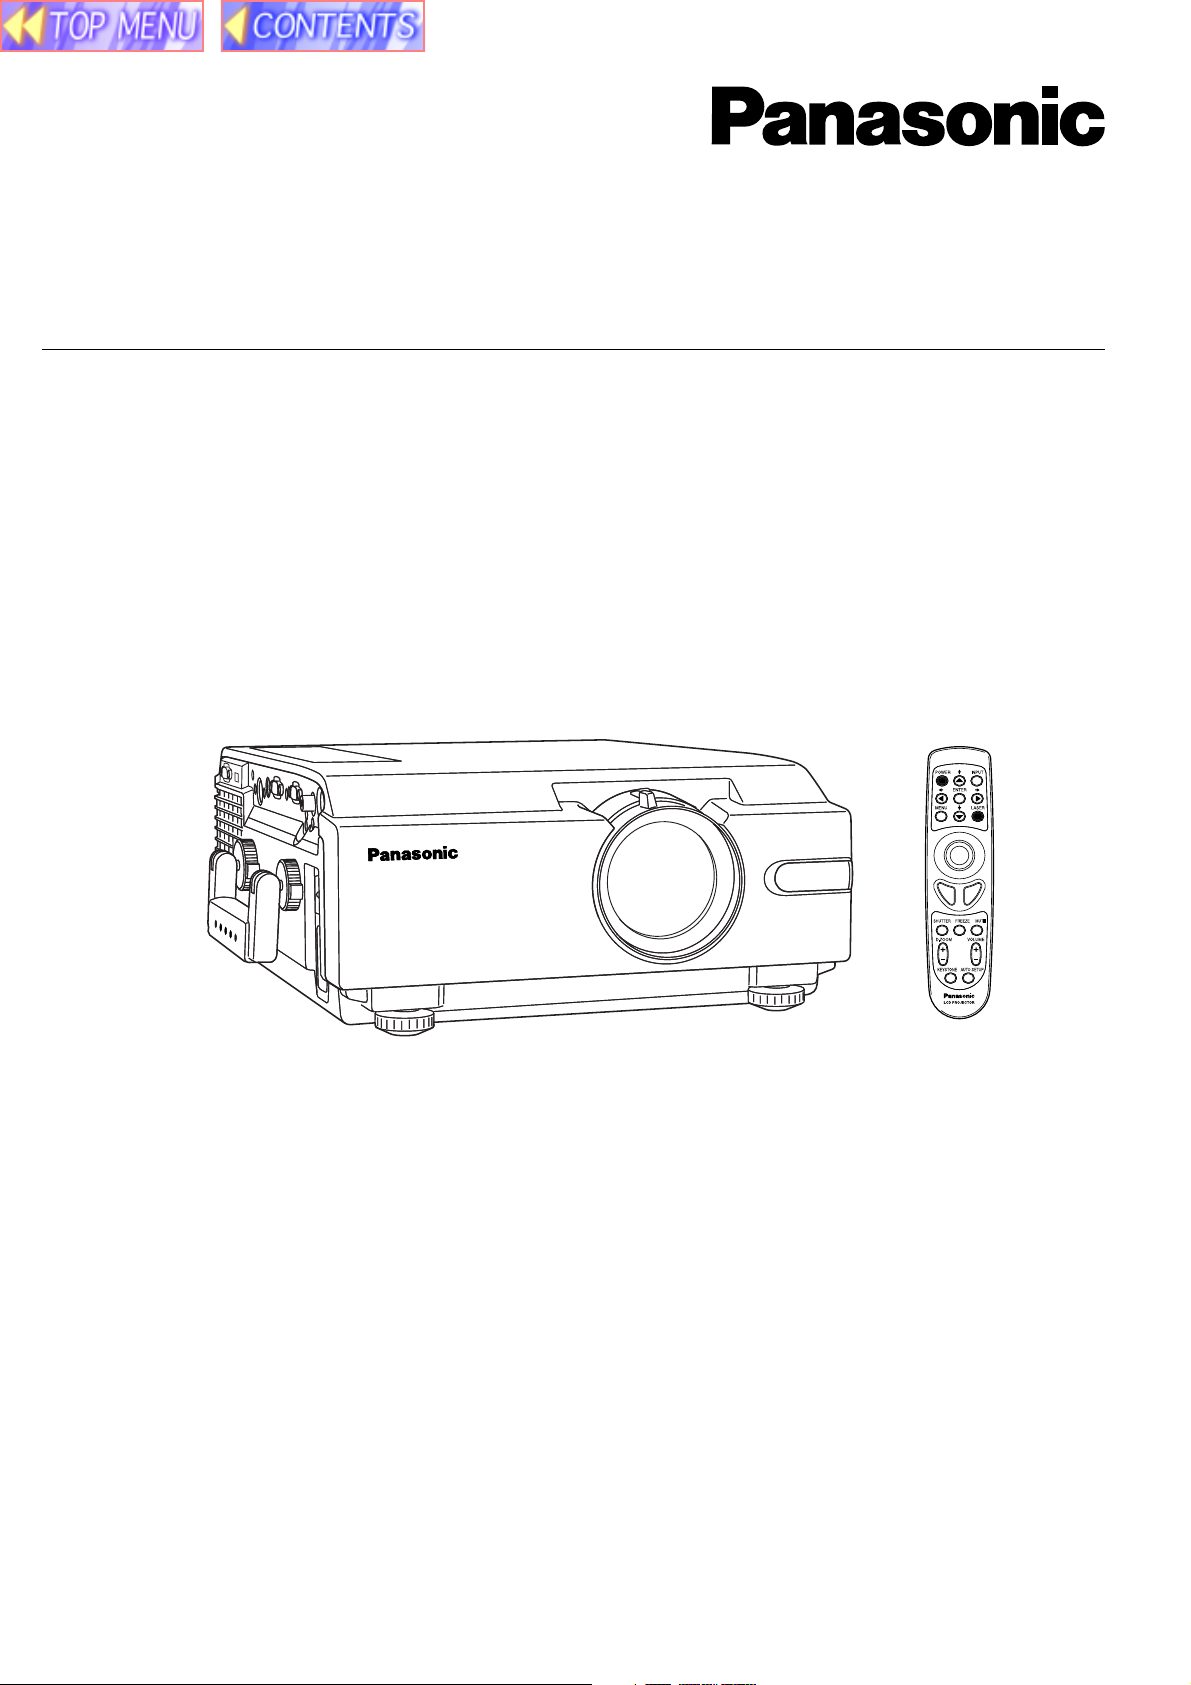
LCD PROJECTOR
Operating Instructions
Model No. PT-L759VU /
PT-L759XU
Please read these instructions completely before operating this LCD Projector.
This operating instruction book is designed for use with models PT-L759VU and PT-L759XU.
Illustrations in this manual show the PT-L759XU. Features may vary, so please read carefully.

Dear Panasonic Customer:
This instruction manual provides all the necessary operating information that you might require. We hope it will help you
to get the most performance out of your new product, that you will be pleased with your Panasonic LCD Projector.
For your own protection and prolonged operation of your LCD Projector, please be sure to read the “Important
Safeguards” carefully, before use.
Things You Should Know
Caution:
This equipment has been tested and found to comply with the limits for a Class B digital device, pursuant to Part 15
of the FCC Rules. These limits are designed to provide reasonable protection against harmful interference in a
residential installation. This equipment generates, uses, and can radiate radio frequency energy and, if not installed
and used in accordance with the instructions, may cause harmful interference to radio communications. However,
there is no guarantee that interference will not occur in a particular installation. If this equipment does cause harmful
interference to radio or television reception, which can be determined by turning the equipment off and on, the user is
encouraged to try to correct the interference by one or more of the following measures:
– Reorient or relocate the receiving antenna.
– Increase the separation between the equipment and receiver.
– Connect the equipment into an outlet on a circuit different from that to which the receiver is connected.
– Consult the dealer or an experienced radio/TV technician for help.
Declaration of Conformity
Model Number: PT-L759VU / PT-L759XU
Trade Name:
Responsible party: Matsushita Electric Corporation of America.
Address: One Panasonic Way Secaucus New Jersey 07094
Telephone number: 1-800-528-8601
This device complies with Part 15 of the FCC Rules, Operation is subject to the following two conditions: (1) This
device may not cause harmful interference, and (2) this device must accept any interference received, including
interference that may cause undesired operation.
FCC Warning:
To assure continued FCC compliance, use only the provided grounded power supply cord and prevent undesirable
interference, use only the provided shielded VGA cable with 2 ferrite cores while connecting LCD to computer and all
other connecting cables should be shielded. Any changes or modifications not expressly approved by the party
responsible for compliance could void the user’s authority to operate this equipment.
Warning: (E.U. only)
To assure continued CE Mark compliance, use only the provided earthed power supply cord and prevent undesirable
interference, use only the provided shielded VGA cable with 2 ferrite cores while connecting LCD to computer and all
other connecting cables should be shielded.
Any changes or modifications not expressly approved by the party responsible for compliance could void the user‘s
authority to operate this equipment.
2

Table of Contents
Dear Panasonic Customer ........................................................................................................ 2
Getting
Started
Basic
Operation
Important Safeguards ............................................................................................................... 4
LCD Projector Features ............................................................................................................ 6
Contents of LCD Projector Box ................................................................................................. 7
Product Information ................................................................................................................... 8
Before using the Remote Control Unit .................................................................................... 10
Standard Setting-up Positions ................................................................................................. 12
Screen Requirements ............................................................................................................. 13
Turning the power on and off................................................................................................... 14
Adjusting the LCD Projector Projection Angle......................................................................... 15
Adjusting the Lens................................................................................................................... 16
Changing the input signal........................................................................................................ 17
Basic LCD Projector Operation ............................................................................................... 18
Menu operation guide ............................................................................................................. 19
Setting-up Positions and Changing the Projection Mode ........................................................ 22
Setting the Screen Type .......................................................................................................... 23
Digital Variable Compression .................................................................................................. 24
Keystone Correction function .................................................................................................. 25
Signals that can be Input......................................................................................................... 26
Selecting the Image Quality .................................................................................................... 29
Adjusting the Picture to the Desired Setting............................................................................ 30
Adjusting the White Balance ................................................................................................... 31
Using the Auto Setup Feature ................................................................................................. 32
Adjusting the Image Position, Dot Clock and Phase ............................................................... 33
Useful
Functions
Other
Information
Using Other Useful Functions ................................................................................................. 34
Projecting the DTV Format Signal........................................................................................... 39
Changing the RGB2 IN/RGB1 OUT Terminal ......................................................................... 40
System Configuration Example ............................................................................................... 41
Video/Personal Computer Cables & Adaptors ........................................................................ 44
Using the SERIAL connector (RS-232C) ................................................................................ 46
Wireless mouse and keyboard ................................................................................................ 48
Removing and Attaching the Carrying Handle ........................................................................ 49
Status Code Display Indications ............................................................................................. 50
Cleaning the Air Filter.............................................................................................................. 51
Lamp Replacement ................................................................................................................. 52
Specifications .......................................................................................................................... 55
Before Requesting Service ..................................................................................................... 57
Cher Client: ............................................................................................................................. 58
Notes importantes concernant la sécurité ............................................................................... 59
Utilisation de l’indicateur laser sur la télécommande .............................................................. 61
Remplacement de la lampe .................................................................................................... 61
Lieber Panasonic-Kunde, ........................................................................................................ 63
Wichtige Sicherheitshinweise.................................................................................................. 64
Benutzung des Laserzeigers der Fernbedienung ................................................................... 66
Lampenaustausch ................................................................................................................... 66
3

Important Safeguards
CAUTION: Please read all of these instructions before you operate your LCD
Projector. Save these instructions for future reference.
Electrical energy can perform many useful functions. This LCD Projector has been engineered and manufactured to
meet applicable safety standards. But IMPROPER USE CAN RESULT IN POTENTIAL ELECTRICAL SHOCK OR FIRE
HAZARDS. In order not to defeat the safeguards incorporated into this LCD Projector, observe the following basic rules
for its installation, use and servicing.
1 Unplug the LCD Projector from the wall outlet before cleaning.
2 Do not use liquid cleaners or aerosol cleaners. Use a soft dry cloth to clean the LCD Projector
unit. If the unit is very dirty, wet a cloth with neutral detergent, squeeze it tight, wipe the unit with
it, and finish by wiping with a dry cloth. Do not use a chemical duster or polisher-cleaner
because it can adversely affect the unit and peel the paint coat.
3 Do not use attachments not recommended by Panasonic, as they may cause hazards.
4 Do not use the LCD Projector near water; for example, near a bathtub, washbowl, kitchen sink,
laundry tub, in a wet basement, near a swimming pool, etc. Never spill liquid into the LCD
Projector.
5 Do not place the LCD Projector on an unstable cart, stand, or table. The LCD Projector may fall,
which may cause serious injury to a child or an adult, and/or serious damage to the unit. Use
only with a cart or stand recommended by its manufacturer, as being suitable for use with the
LCD Projector.
6 Ceiling, wall or shelf mounting for installation should use a mounting kit approved
by the manufacturer for use with the LCD Projector and should follow the
manufacturer’s instructions.
7 The LCD Projector equipment and cart combinations should be moved with care. Quick stops,
excessive force, and uneven surfaces may cause the equipment and cart combination to
overturn.
8 Slots and openings in the cabinet are provided for ventilation. To ensure reliable operation of the
LCD Projector and to protect it from overheating, these openings must not be blocked or
covered. These openings should never be covered with cloth or other material. The bottom
opening should not be blocked by placing the LCD Projector on a bed, sofa, rug, or other similar
surface. The LCD Projector should not be placed near or over a radiator or heating vent. The
LCD Projector should not be placed in a built-in installation such as a bookcase unless proper
ventilation is provided.
9 The LCD Projector should be operated only from the type of power source indicated on the LCD
Projector or in the specifications. If you are not sure of the type of power supplied to your home,
consult your LCD Projector dealer or local power company.
10
Do not allow anything to rest on the power cord. Do not place the LCD Projector where the cord will
be walked on.
11 Follow all warnings and instructions marked on the LCD Projector.
4

Important Safeguards
12 As a safety feature, the LCD Projector is equipped with a 3-prong grounded plug. The 3-prong
grounded plug will fit only into a grounding type power outlet. If the plug does not fit, use an
adaptor that is properly grounded or have an electrician install a grounded type outlet. Do not
attempt to modify this AC plug.
13 For added protection of the LCD Projector during a lightning storm, or when it is left unattended
or not in use for long periods of time, unplug it from the wall outlet and disconnect any cable
systems. This will prevent damage to the projector due to lightning and power-line surges.
14 Do not overload wall outlets and extension cords with too many products, because this can
result in fire or electric shock.
15 Never push objects of any kind into the LCD Projector through cabinet slots as they may touch
dangerous voltage points or short out parts, which could result in a fire or electric shock.
16 Do not attempt to service the LCD Projector yourself. Opening or removing covers may expose
you to dangerous voltage or other hazards. Refer all servicing to qualified service personnel.
17 Unplug the LCD Projector equipment from the wall outlet and refer servicing to qualified service
personnel under the following conditions:
A. When the power cord or plug is damaged or frayed.
B. If liquid has been spilled into the LCD Projector.
C. If the LCD Projector has been exposed to rain or water.
D. If the LCD Projector does not operate normally when you follow the operating instructions.
Adjust only those controls that are covered by the operating instructions; improper adjustment
of other controls may cause damage and will often require extensive work by a qualified
technician to restore the LCD Projector to normal operation.
E. If the LCD Projector has been dropped or the cabinet has been damaged.
F. When the LCD Projector exhibits a distinct change in performance – this indicates a need for
service.
18 Upon completion of any service or repairs to the LCD Projector, ask the service technician to
perform a routine safety check to determine that the LCD Projector is in safe operating
condition.
19 When replacement parts are required, be sure the service technician has used replacement
parts specified by the manufacturer that have the same characteristics as the original parts.
Unauthorized substitutions may result in fire, electric shock, or other hazards.
20 Air filter should be cleaned every 100 hours of lamp use.
The LCD Projector may become too hot if filter is not cleaned when required.
21 If lens becomes dirty, or smudged, clean with a clean, dampened cloth. Never touch the lens
with your fingers.
22 Do not look directly into the aperture and lens while operating as this may result in damage to
your eyes.
23 Do not look into the red Laser Pointer transmitter, or aim the Laser beam at a person. Shining
the Laser beam into the eyes could result in eye damage.
5

LCD Projector Features
1 High Brightness and Resolution
786 432 (1 024 X 768) pixels X 3 panels format, 3 100 lumen (ANSI) [PT-L759XU] / 2 400
lumen (ANSI) [PT-L759VU] offers clear images even when ambient light level is high.
2 Compact and Lightweight
Completely portable, you can give attractive presentations at any location by connecting the
PT-L759XU/PT-L759VU to a computer or video equipment.
3 0.508 m (20 inch) to 7.620 m (300 inch) Screen Capability
Project a screen size of 0.508 m (20 inch) to 7.620 m (300 inch) from a distance of 0.85 m (2.79
feet) to 13.45 m (44.13 feet) (Manual focus.) (See page 12.)
4 Compatible with Most Personal Computers
The RGB input accepts signals from VGA, SVGA, XGA, SXGA (Compression),
UXGA (Compression), and MAC compatible computers with no additional hardware. Other
compatible computers require a separate cable.
5 RGB Input/Output Terminals
RGB2 IN / RGB1 OUT terminal can output the incoming signal of RGB1 by selection, when
using another monitor.
6 Equipped with next-generation interface DVI-D input terminal [PT-L759XU only]
The video signal from the PC is input to the LCD Projector as a digital signal, you can enjoy
superior picture quality.
7 Accommodates 6 different video signal standards
The LCD Projector accepts the input signal of all major video formats, including PAL, SECAM,
NTSC, PAL-M, PAL-N, NTSC4.43, and the higher quality S-Video signals. And, input of DTV
Format Signal, such as the Component (YPBPR) signal from a DVD is also possible with this
Projector. And, the Projector can also display even higher quality Component signals generated
by HDTV equipment.
8 On Screen Display
The LCD Projector’s language is set to English at the factory. In addition, you can select
Spanish, French, German, Italian, and Japanese. Information screens and menus make setting
up and operating the LCD Projector extremely easy.
9 IR Remote Control
Front and rear sensors allow you to control the LCD Projector from almost anywhere in the
room.
10 Laser Pointer on the Remote Control
When the Laser beam is aimed at the screen, the Pointer is displayed on the screen.
11 Wireless mouse and the , , and keys on a keyboard
This function lets you use the remote control to control a personal computer in place of the
personal computer’s mouse and keyboard , , , . (USB cable connection requires that
your computer be equipped with a USB port as standard and preinstalled with
Windows 98/Me, Windows 2000.) (See page 48.)
12 Stereo Audio Output
For external audio equipment connection. Audio follows video source.
6

LCD Projector Features
13 Automatic Universal Power Supply
This unit has an operating voltage range of AC 100 V - 240 V.
14 Digital Zoom function
Pressing the D.ZOOM button allows you to magnify the image up to 5 times.
15 Dimensional Noise Reduction [PT-L759XU only]
The video signal noise is reduced, so you can enjoy a beautifully sharp picture.
16 Digital variable compression
Images can be projected with the distance to the screen increased by up to about 1.6 times.
17 Keystone correction function
You can perform keystone correction using the menu screen or the remote control. (Up to 40
degrees up and down.)
18 Wide conversion lens
Using the optional Wide conversion lens (ET-LEC059), the throw distance can be shorten by 0.8
times.
Equipped with a variety of convenient functions
A variety of functions such as the following have been provided.
• A blue screen is projected (at startup only) when no signal is being input.
• Mute or freeze functions for video and audio signals can be toggled on and off.
• The input signal display function can be toggled on and off.
• 16:9 (wide) screen projection is provided.
Contents of LCD Projector Box
Please confirm that the following items are packed in the LCD Projector box.
They are provided to help you use or set up your LCD Projector.
(1) LCD Projector
(2) Remote Control unit (LRQ90044)
(3) 2 “AA” Batteries
(4) Lens Cap*
(5) Carrying Handle*
(10) MAC Mouse Cable (LSJA0214)
(11) USB Cable (LSJA0305)
(12) VGA MAC Adaptor (LSJA0307)
(13) Audio Cable (LSJA0240)
(14) Video Cable (LSJA0074)
(6) 9.8 ft UL/CSA Power Cord (VJAS0308)
(7) VGA Cable (LSJA0239)
(8) DVI Cable (K1HA24DA0003)
[PT-L759XU only]
(9) PS/2 Mouse Cable (LSJA0212)
*:Included with the projector
(15) CD ROM (Operating Instructions)
(16) Warranty Card
(17) Service Center List
7
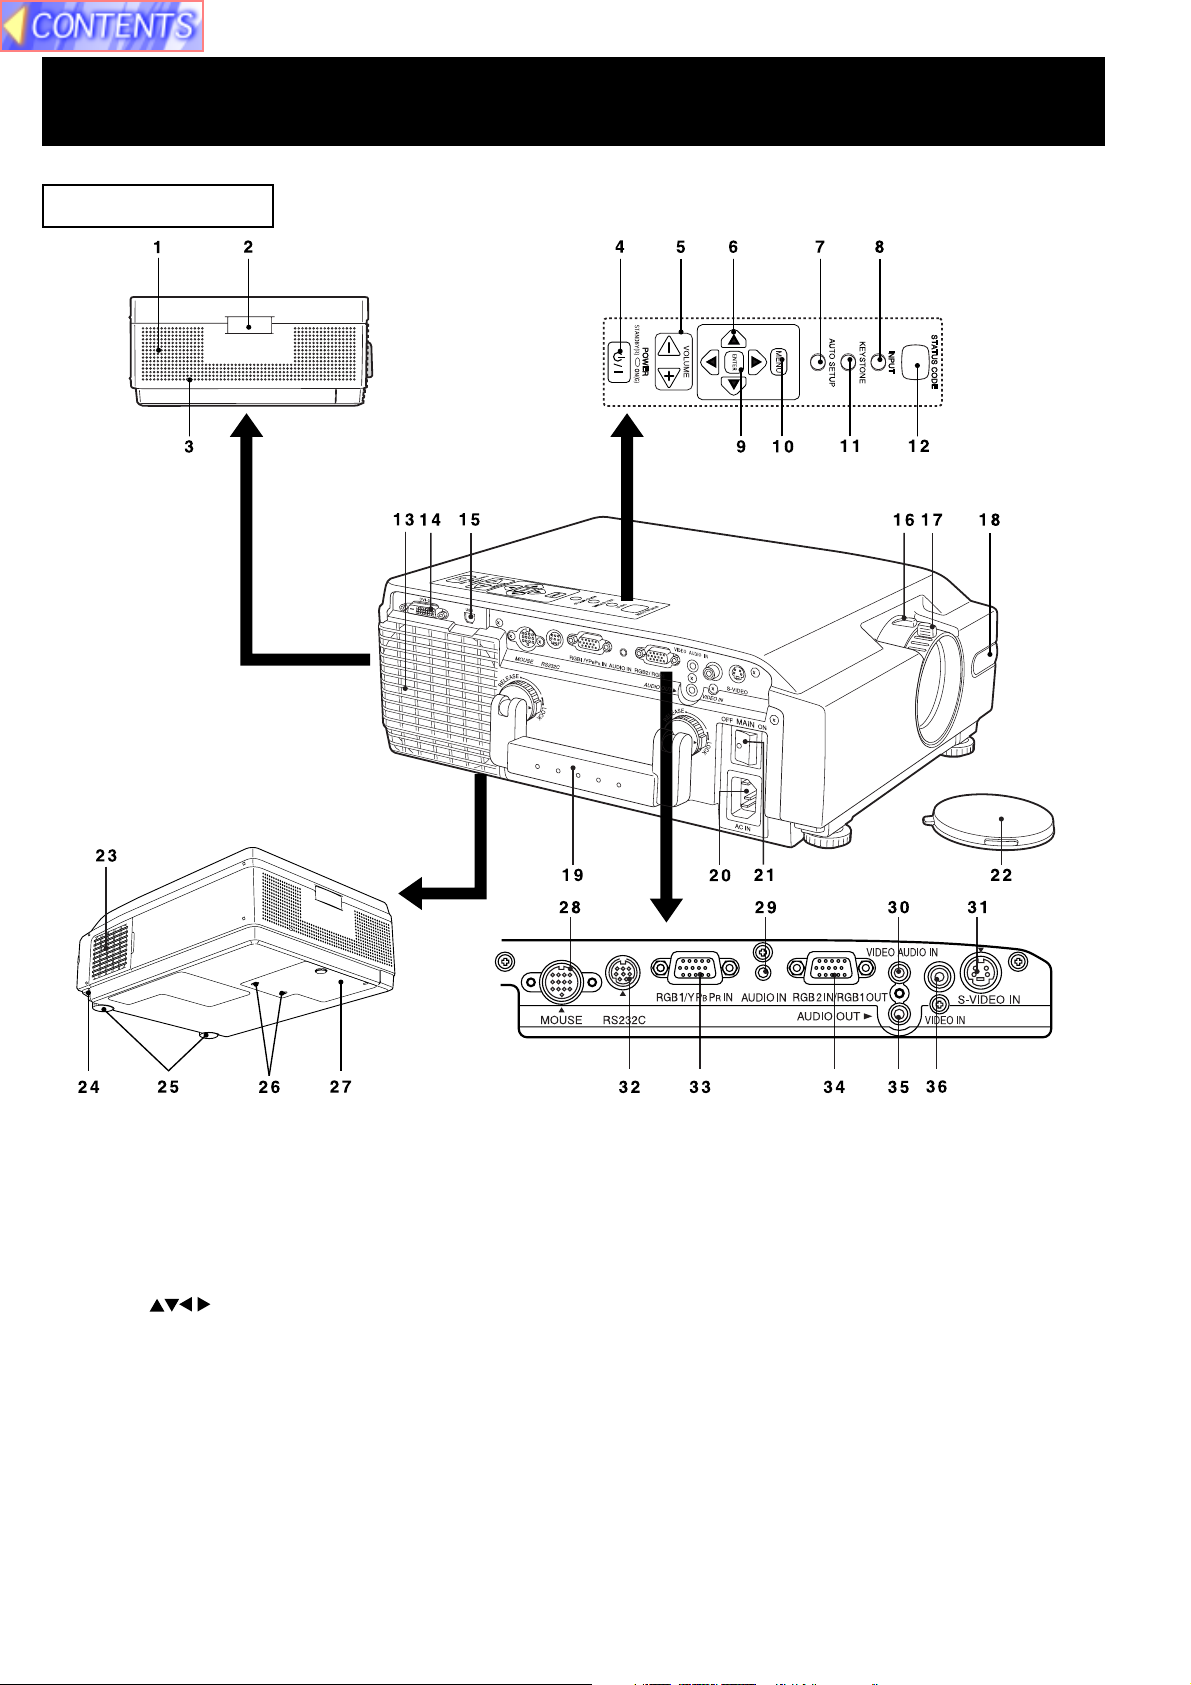
Product Information
LCD Projector
1 Speaker
2 Remote Control Sensor ........................ See page 11.
3 Security Lock
4 POWER Button/
POWER Indicator STANDBY(R) ON(G) See page 14.
5 VOLUME+/- Buttons ............................. See page 18.
6 Adjust Buttons .................. See pages 19, 22.
7 AUTO SETUP Button ............................ See page 32.
8 INPUT Button......................................... See page 17.
9 ENTER Button ....................................... See page 19.
10 MENU Button ......................................... See page 19.
11 KEYSTONE Button ................................ See page 25.
12 STATUS CODE ...................................... See page 50.
13 Air Outlet Port
14 DVI-D Input Connector
[PT-L759XU only] .................................. See page 42.
15 USB Connector ..................................... See page 48.
16 Zoom Ring ............................................. See page 16.
17 FOCUS Ring .......................................... See page 16.
18 Remote Control Sensor ........................ See page 11.
19 Carrying Handle ..................................See page 49.
20 AC Socket (100 V - 240 V)................... See page 14.
21 Main Power Switch ............................. See page 14.
22 Lens Cap
23 Air Filter ...............................................See page 51.
24 Adjuster Button ...................................See page 15.
25 Adjustable Legs ..................................See page 15.
26 Lamp Cover Screws.................... See pages 53, 54.
27 Lamp Cover ................................. See pages 53, 54.
28 MOUSE Connector ..............................See page 48.
29 RGB Audio Input Connector ......See pages 42, 43.
30 Video Audio Input Connector ...........See page 41.
31 S-Video Input Connector ....................See page 41.
32 RS232C Connector ............................. See page 46.
33 RGB1/YPBPR Input Connector ... See pages 42, 43.
34 RGB2 Input Connector /
RGB1 Output Connector ............ See pages 42, 43.
35 Audio Output Connector .............See pages 41-43.
36 Video Input Connector .......................See page 41.
8
Product Information
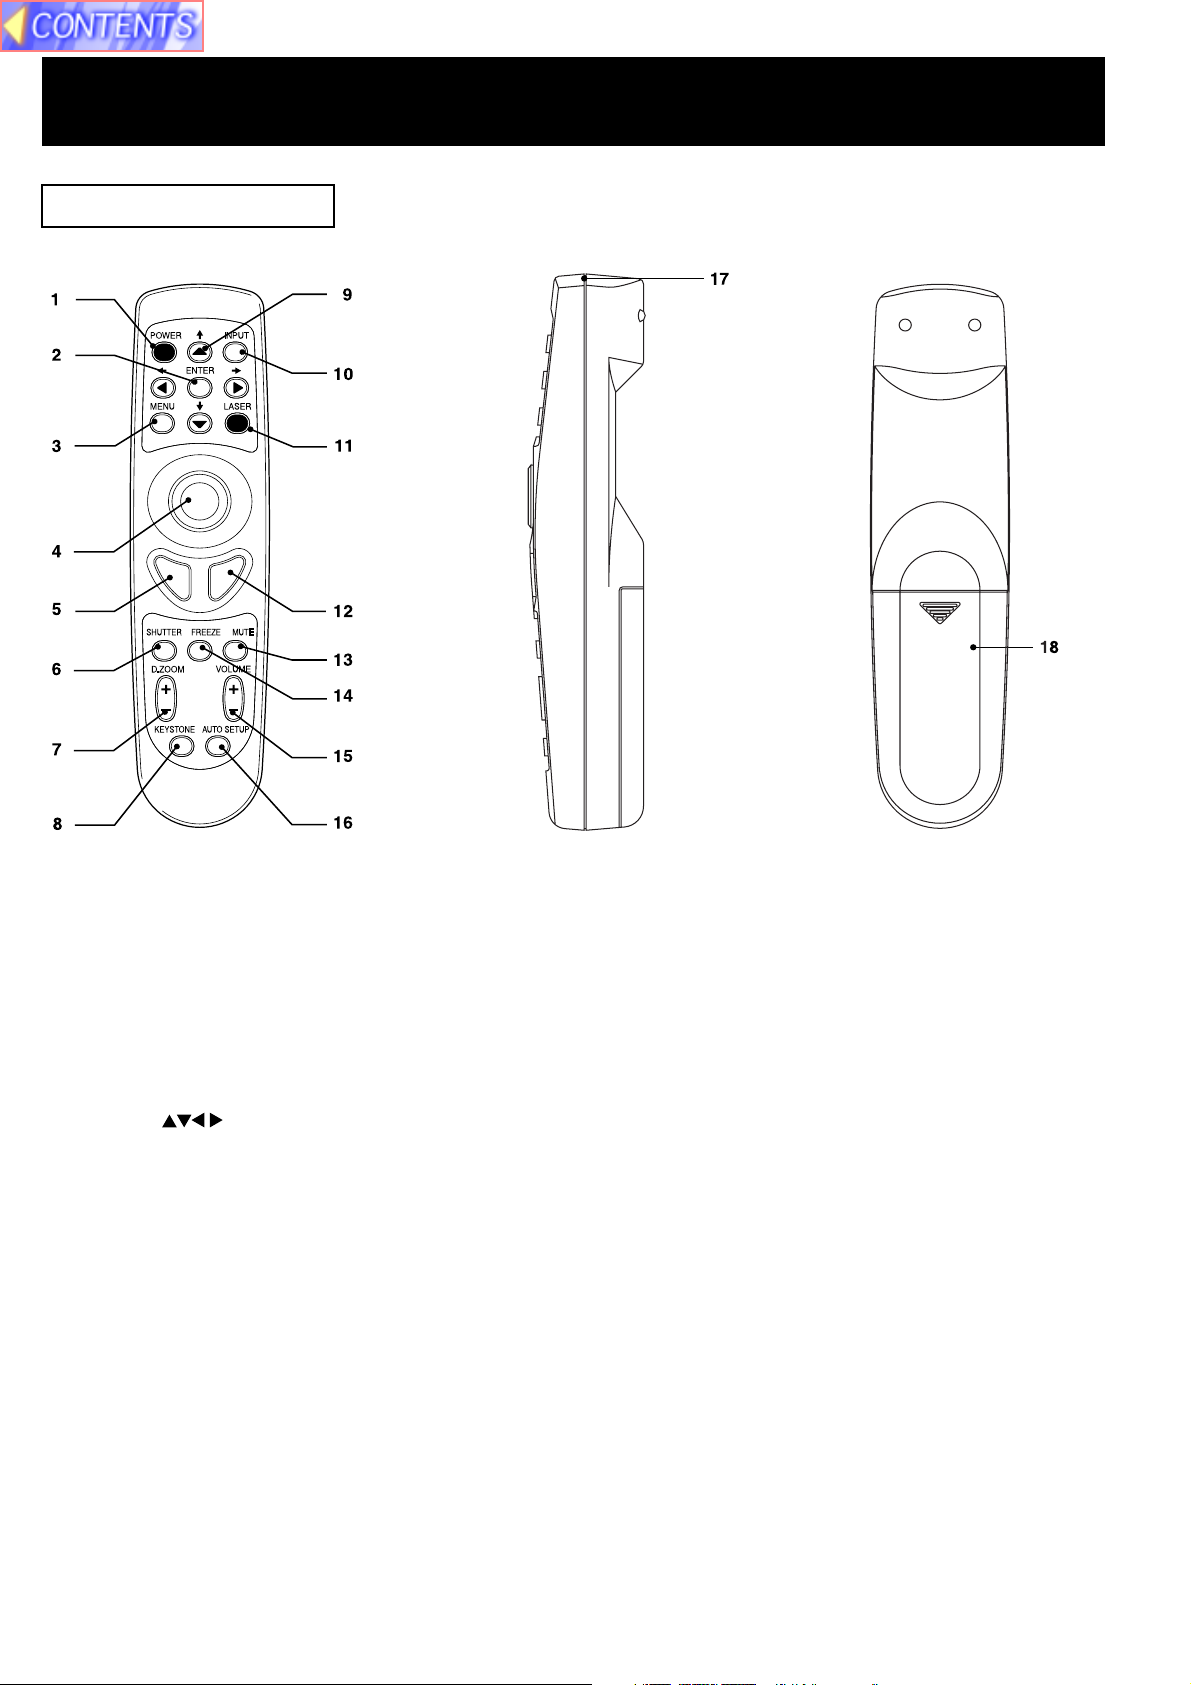
Remote Control Unit
[ Front ] [ Back ]
[ Side ]
1 POWER Button ............................................................................................................................... See page 14.
2 ENTER Button ................................................................................................................................ See page 19.
3 MENU Button .................................................................................................................................. See page 19.
4 Mouse Button ................................................................................................................................. See page 48.
5 Click 1 Button ................................................................................................................................. See page 48.
6 SHUTTER Button ........................................................................................................................... See page 18.
7 D.ZOOM +/-Buttons ....................................................................................................................... See page 38.
8 KEYSTONE Button......................................................................................................................... See page 25.
9 Adjust Buttons ............................................................................................................See pages 19, 22.
10 INPUT Button.................................................................................................................................. See page 17.
11 LASER Button ................................................................................................................................ See page 10.
12 Click 2 Button ................................................................................................................................. See page 48.
13 MUTE Button .................................................................................................................................. See page 18.
14 FREEZE Button .............................................................................................................................. See page 18.
15 VOLUME +/- Buttons ..................................................................................................................... See page 18.
16 AUTO SETUP Button ..................................................................................................................... See page 32.
17 Transmitter ..................................................................................................................................... See page 11.
18 Battery Compartment .................................................................................................................... See page 10.
9
Before using the Remote Control Unit
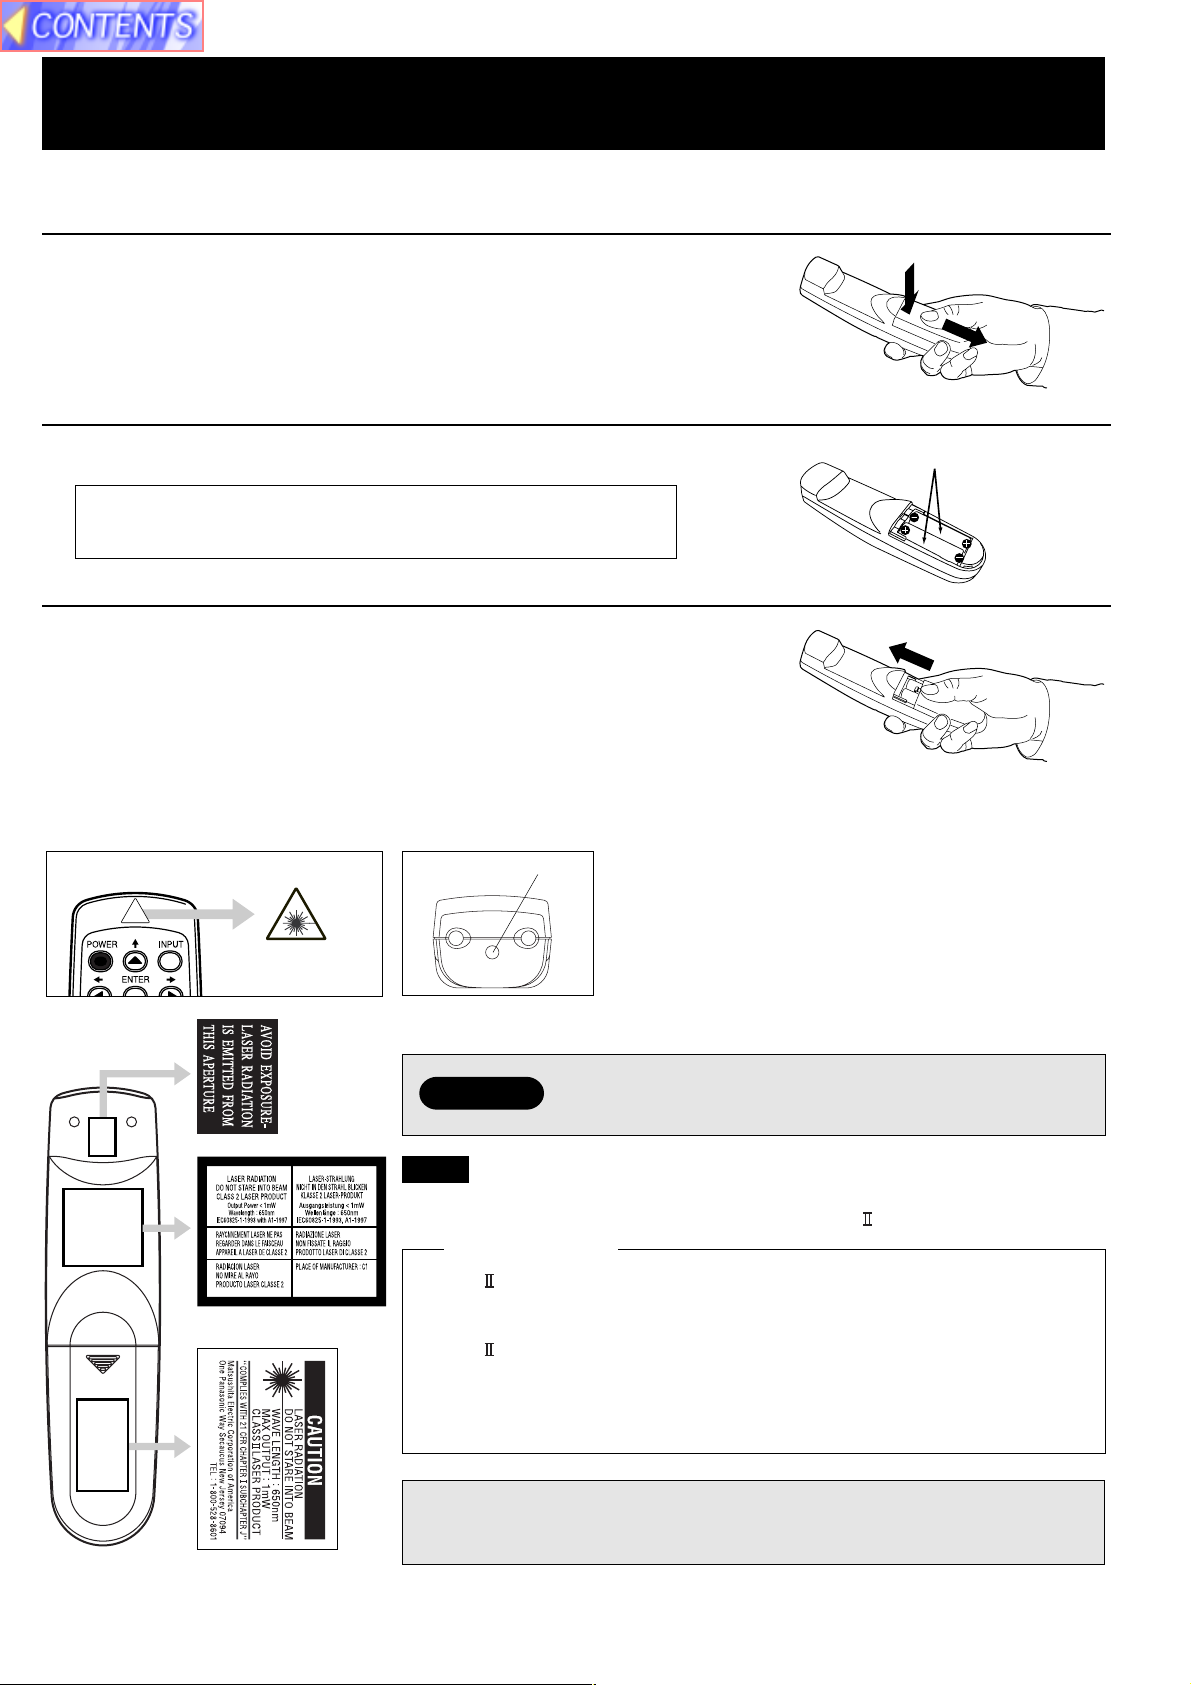
■ Load the 2 “AA” batteries in the Remote Control Unit
1 Slide the lid in the direction of the arrow.
2 Install 2 “AA” batteries as indicated inside the Battery Compartment.
Battery replacement caution
• Do not mix old and new batteries.
Also never mix alkaline with manganese batteries.
3 Replace the lid and snap into place.
■ Using the Laser Pointer on the Remote Control Unit
When the Laser beam is aimed at the screen, the Pointer is displayed on the screen.
Laser transmitter
Press LASER on the remote control to activate Laser.
2 “AA” Batteries (included)
Warning
DO NOT look into the Laser transmitter, or aim the
Laser beam at a person. Shining the Laser beam into
the eyes could result in eye damage.
Note
• This product has the following laser radiation specifications:
Wavelength - 650 nm, Max. Output - 1 mW, Class (Class 2.)
For U.S.A. only
• Class laser products are normally required to be equipped with an
indicator indicating that the laser beam is being emitted. On this product,
the red beam emitted from the laser point functions as this indicator.
• Class laser products are normally required to be equipped with an
emergency stop device such as a shutter to stop the laser immediately. On
this product, instead of such a device, the laser does not stay on unless
the laser button is held in continuously.
CAUTION: Use of controls or adjustments or performance of procedures
other than those specified herein may result in hazardous radiation
exposure.
10
Before using the Remote Control Unit
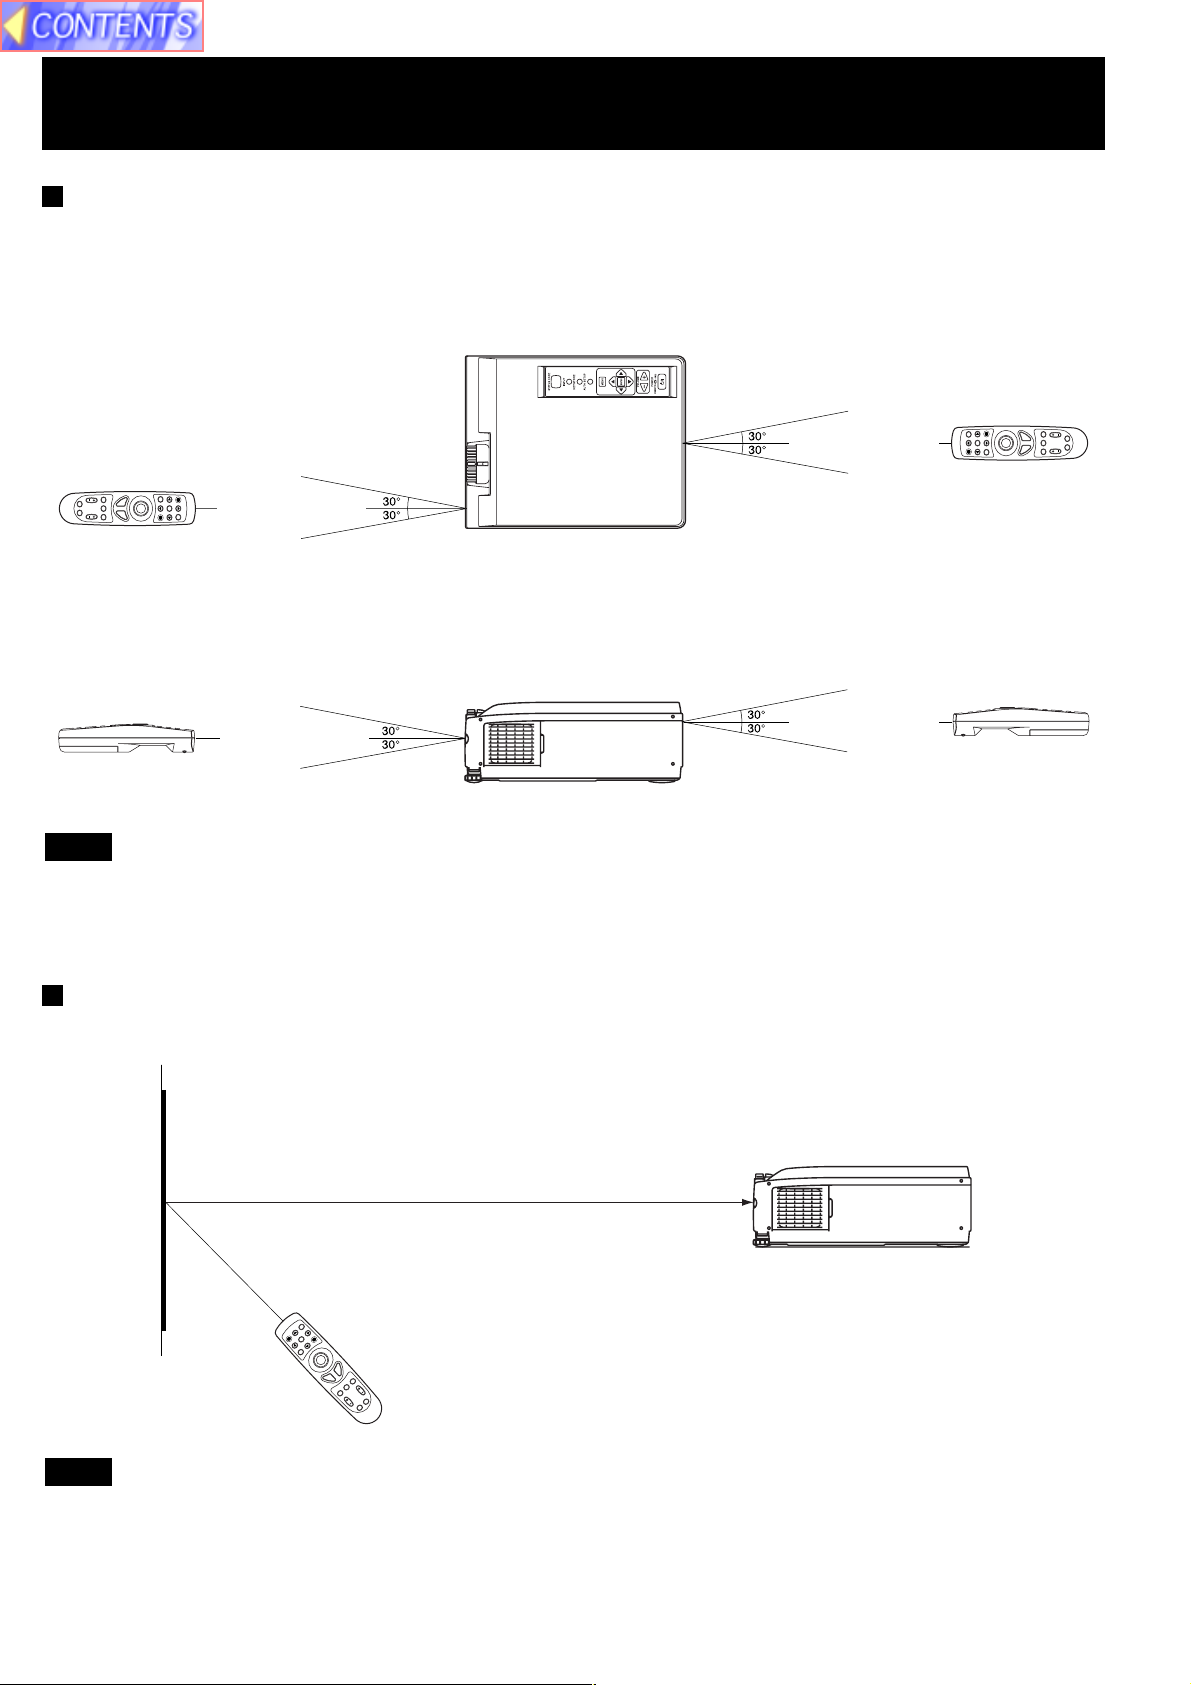
Operating range of the remote control unit
Point the remote control unit toward the remote control signal receptor on the front or the rear of the Projector to operate
the Projector. Refer to the illustration below for the operating range of the remote control unit.
<Top view>
Remote Control Unit Projector Remote Control Unit
(approximately 7 m)
(approximately 7 m)
(When operating from in front)
(When operating from behind)
<Side view>
Remote Control Unit Projector Remote Control Unit
(approximately 7 m)
(When operating from in front)
(approximately 7 m)
(When operating from behind)
Note
• The operating distance is within 7 meters (approximately 23.0 feet) from directly in front of the front or rear remote
control signal receptors.
• If strong light is allowed to shine onto the remote control signal receptor, or if there are any obstacles between the
remote control signal receptor and the remote control unit, correct remote control operation may not be possible.
If facing the remote control unit toward the screen
The Projector can also be operated by pointing the remote control unit toward the screen as shown in the illustration
below.
Screen
Projector
Remote Control Unit
Note
If facing the remote control unit toward the screen to operate the projector, the operating range of the remote control unit
will be limited by the amount of light reflection loss caused by the characteristics of the screen used.
11
Standard Setting-up Positions
The screen should be positioned so that it is not directly touched by sunlight or room light as this will wash out the colors
of the picture making it hard to see. When possible, close all blinds, curtains, etc. and dim the lights. Also, the LCD
Projector should be at a 90° angle to the screen for the best picture results. To determine the distance for the desired
size, please refer to the LCD Projector/Screen Relationship Chart below.
(By using the digital variable compression feature, you can increase the throw distance. See page 24.)
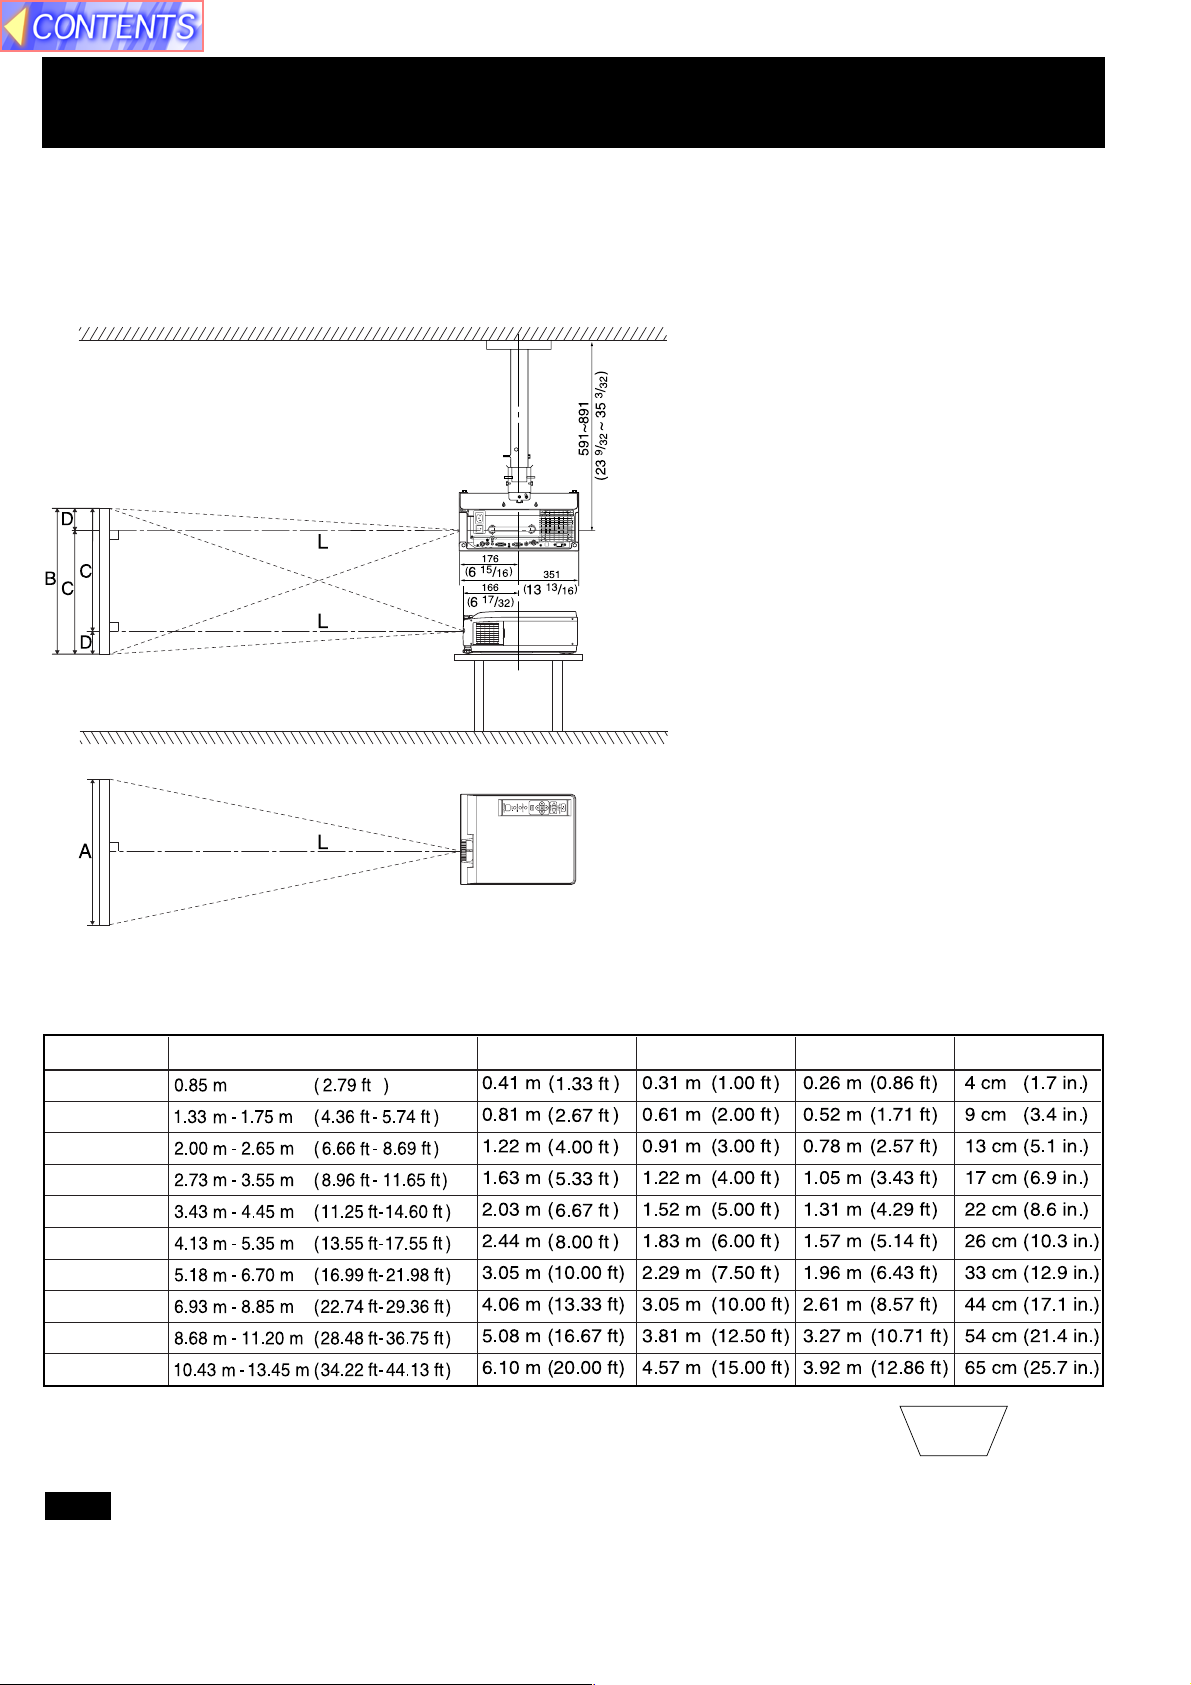
When installed using the
ET-PK057 ceiling mount
bracket (sold separately).
Unit : mm (inch)
• Your LCD Projector is
equipped with an
image reverse feature.
(See page 22.)
LCD Projector /Screen Relative Position Chart
The picture can be adjusted to the desired size within the range of the zoom lens.
(This chart is based on a reduction ratio of 1 time.) The values in the table are reference values.
Screen size
20 inches
40 inches
60 inches
80 inches
100 inches
120 inches
150 inches
200 inches
250 inches
300 inches
• If the LCD Projector and the screen are not properly placed, the picture will be distorted
producing a keystoned image as shown at right.
Throw distance (L) Measure (A) Measure (B)
Measure (C) Measure (D)
Keystoned Image
Note
• Using the Optional Wide Conversion lens (ET-LEC059), you can shorten the above throw distances by 0.8 times.
12
Screen Requirements
This Projector is used to project the image onto flat screens. However, the brightness and viewable range will vary
depending on which type of screen is used.
When selecting a screen, check the characteristics of the screen to ensure that it is suitable for the intended place of
use.
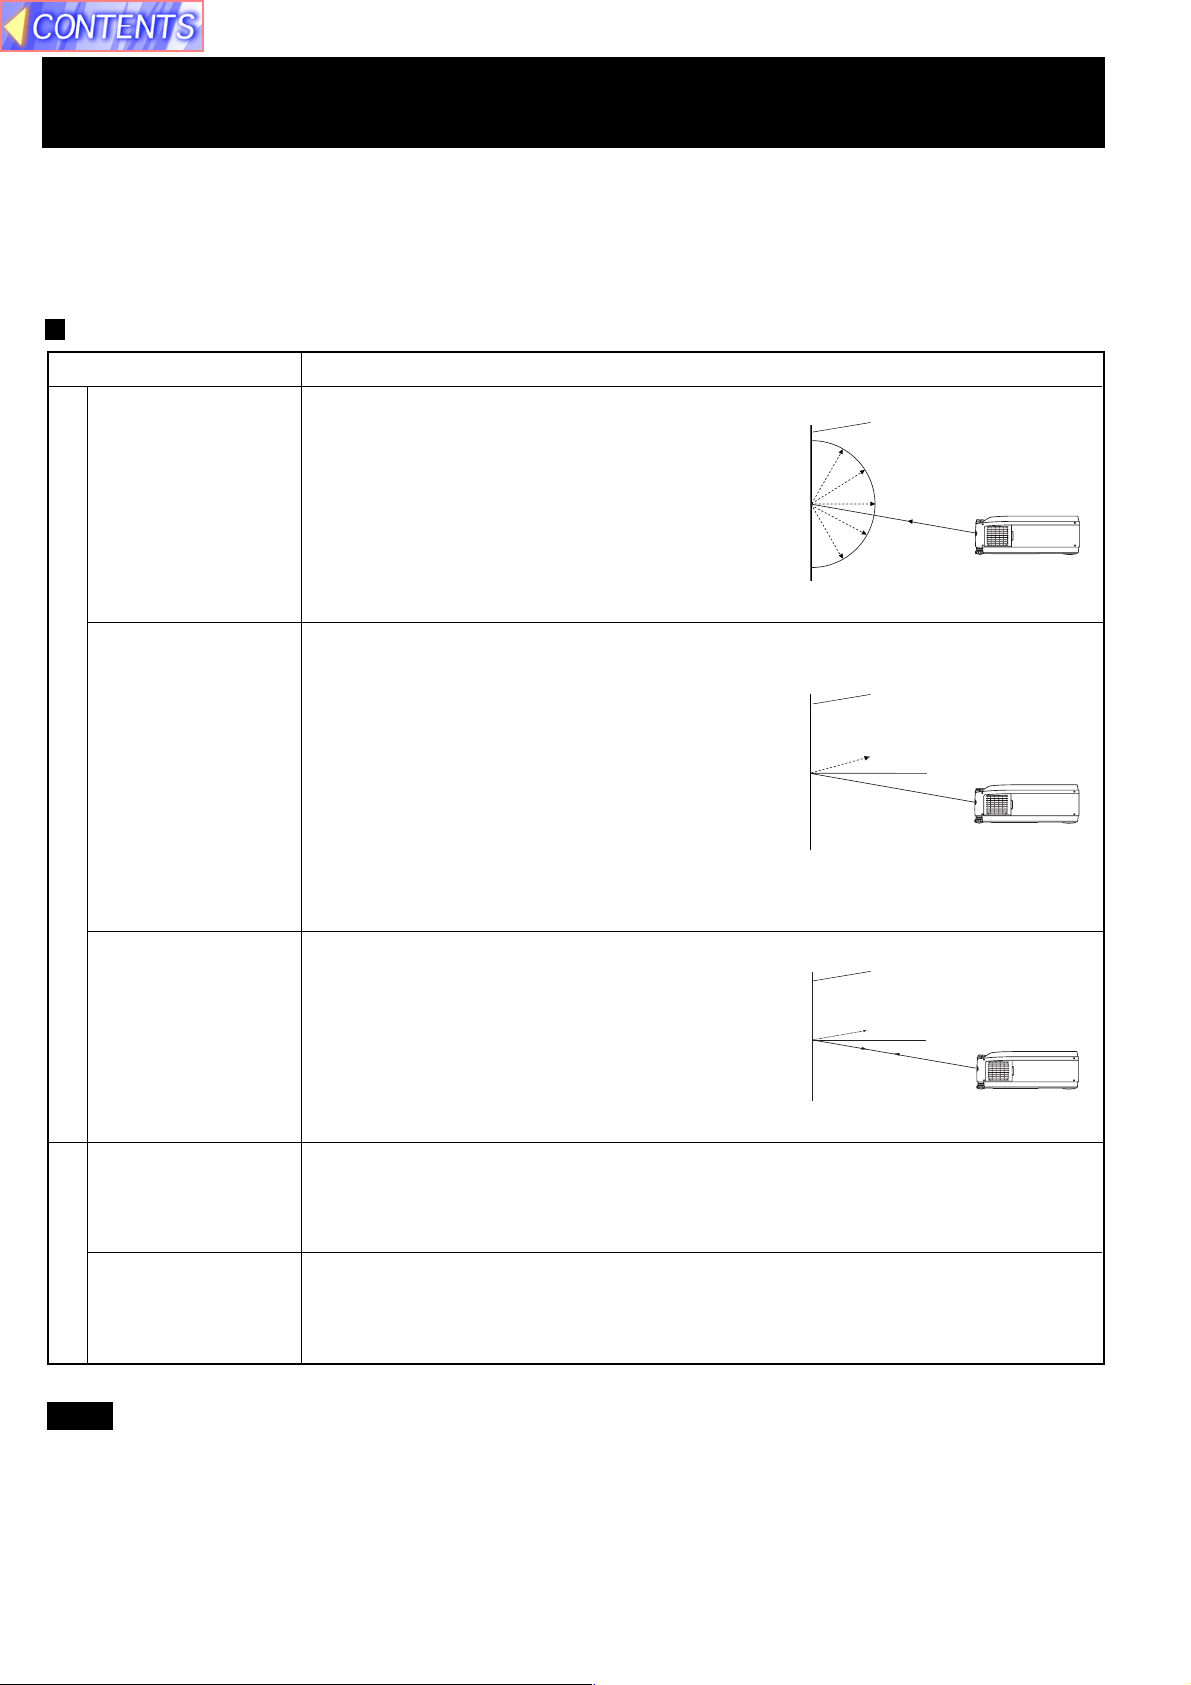
Screen characteristics (reference)
Screen type
White screen
Silver screen
Reflective screens
Screen characteristics
This type of screen can be seen from anywhere,
so there are no limits on the viewing position.
However, the surrounding walls should be
darkened as in a movie theatre, otherwise a
clear picture cannot be obtained.
This type of screen gives a picture which is 2-4
times brighter than a white screen. A variety of
types are available from different manufacturers,
and each type has different brightness
characteristics. Some also have restrictions on
the possible range of viewing positions.
* Care should be taken with screens that have
a high gain, as these types of screen can
cause color distortion at the left and right
edges.
* This type of screen is recommended when the
Projector is suspended from the ceiling.
White screen
Silver screen
Maximum brightness
Beaded screen
Flexible
translucent screen
Rigid-type
translucent screen
Translucent screens
This type of screen is similar to the silver
screen, except that no color distortion occurs
at the left and right edges. Moreover, most of
the light is reflected at the same angle as the
angle of incidence.
* This type of screen is recommended when
the Projector is placed on the floor.
This type of screen is made of PVC (polyvinyl chloride).
It has the same characteristics as silver screens, but sometimes it can have hot
spots.
This type of screen is made of acrylic plastic.
It is extremely durable and has excellent optical characteristics. It performs in the
same way as silver screens.
Beaded screen
Brightness decline
Maximum
brightness
Note
• A Polarized screen can not be use for this LCD Projector, because its polarizing effect will add to the polarization
already designed into the Projector (to increase its efficiency). The resulting image will not appear in its true
color.
13

Turning the power on and off
If the MAIN POWER switch on the LCD Projector is turned off while the cooling fan is still operating, the operating life of
the projector lamp will be shortened. Be sure to follow the procedures given below when turning the LCD Projector
power supply on and off.
POWER Button/
POWER Indicator
STANDBY(R) ON(G) MAIN POWER Switch
(LCD Projector)
• Turning on the power
MAIN
1
2
(LCD Projector)
OFF ON
or
(Remote Control
Unit)
Press the
MAIN POWER
switch
Press the
POWER button
Press the MAIN POWER switch on the LCD Projector to ON.
The power indicator will illuminate red and the Projector will switch
to standby mode.
Press POWER button on the LCD Projector or remote control.
The power indicator will illuminate solid green and a picture will be
projected onto the screen.
Note
The LCD Projector cannot be turned on for 60 seconds after
turning it off.
(Remote Control Unit)
POWER Button
• Turning off the power
1
Press the
POWER button
or
(LCD Projector)
(Remote Control
Unit)
2 Wait for the cooling fan to stop.
3
Press the
MAIN POWER
switch
Press POWER button on the LCD Projector or remote control.
“Please press POWER button again to power off.” is displayed on
the screen, and then press POWER button again.
The power indicator will illuminate flashing red and the Projector
will switch to standby mode.
Wait for a while (approximately 2 minutes) until the power indicator
will illuminate solid red.
Press the MAIN POWER switch on the LCD Projector to OFF.
The power indicator will switch off and the power supply will be
turned off.
Note
• Insert Power Cord into LCD Projector AC socket and connect to properly grounded wall outlet.
• If the power is turned off using the POWER button, the cooling fan will continue to operate while the inside of the
Projector is still at a high temperature. Do not turn the MAIN POWER switch to the OFF position, disconnect the power
cord plug from the wall socket or shut off the mains power supply until the cooling fan stops operating.
• If the MAIN POWER switch has not been turned off, the Projector will still draw approximately 20 W of power, even
when the POWER button has been turned off and the fan has stopped.
• To prevent the Lamp, when the power is turned off, the Lamp lights for just a moment as the cooling fan stops.
14
Adjusting the LCD Projector Projection Angle
Adjusting the LCD Projection angle of the LCD Projector. When the projector is in the horizontal position, keystone
correction is unnecessary and a correct image can be viewed.
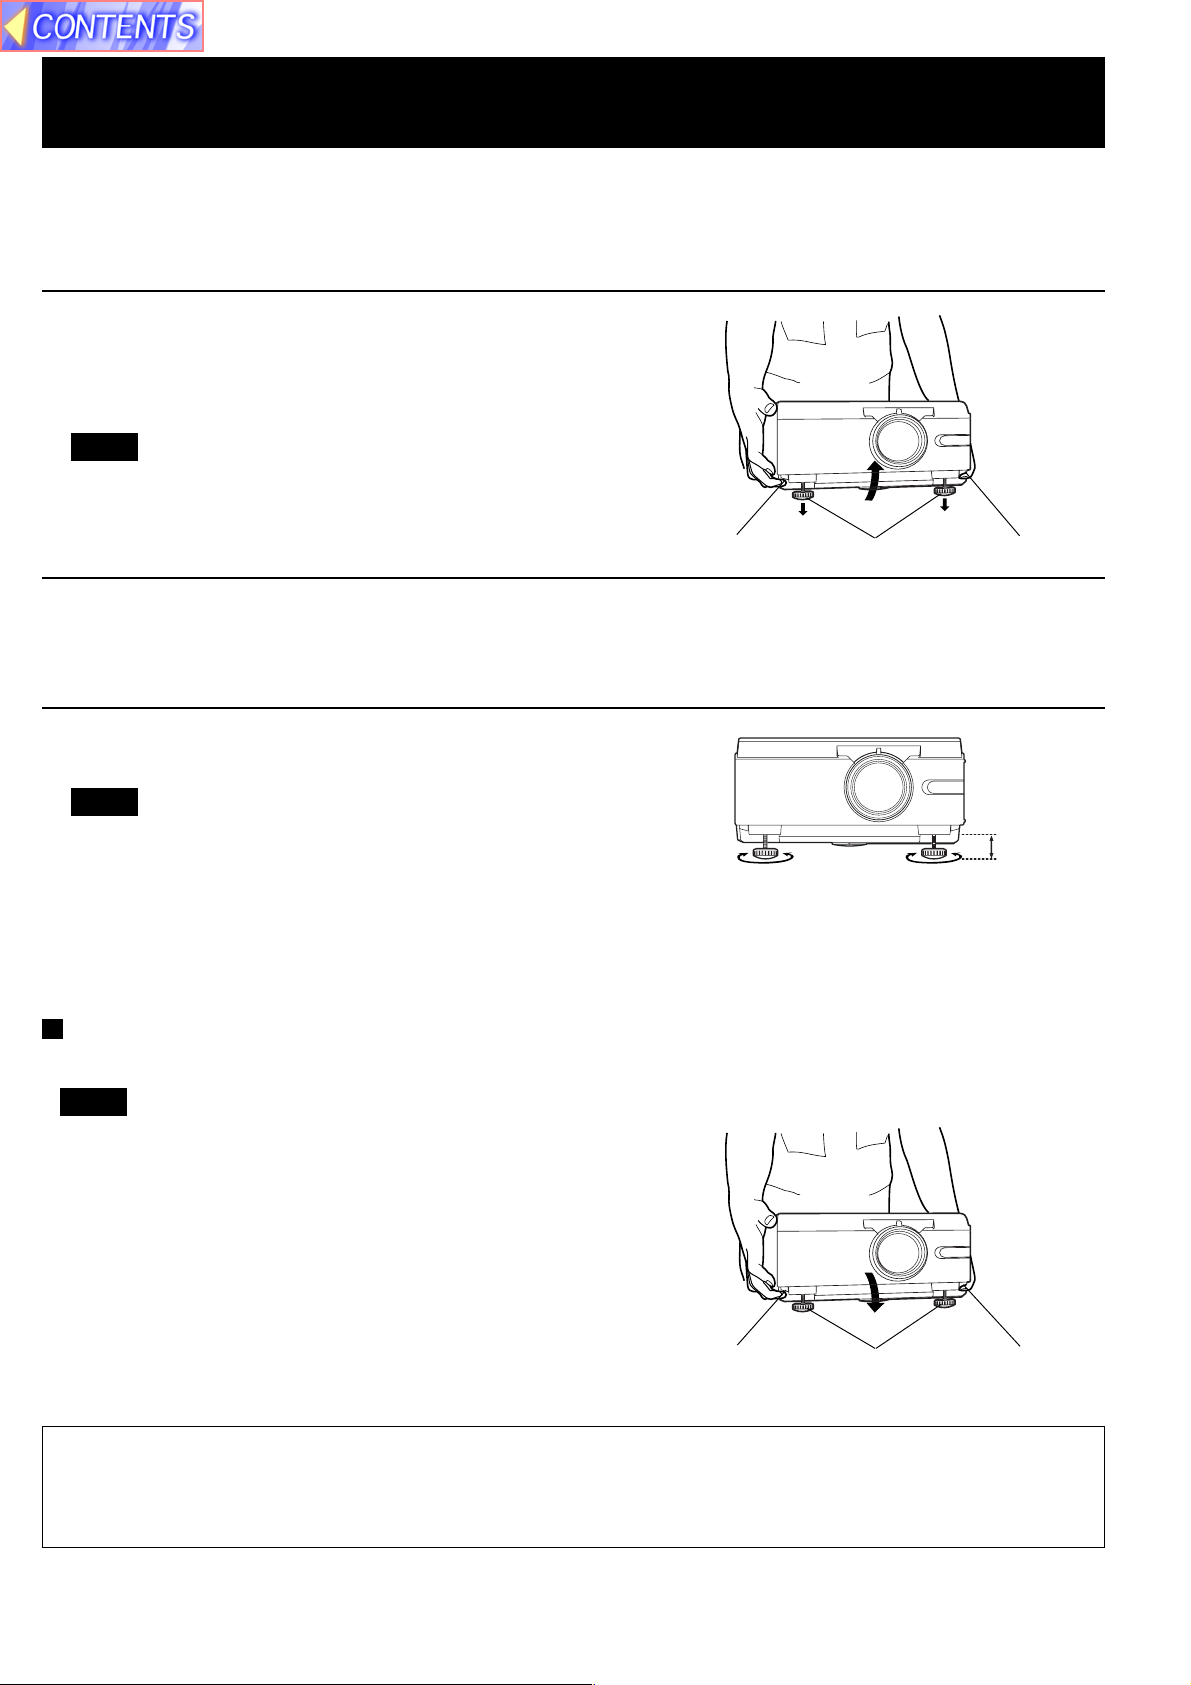
• Adjustment procedure
1 Lift the front of the LCD Projector to the desired angle. While
holding it in place, press the 2 adjuster buttons located under
the right and left sides of the projector. When the buttons are
pressed, the left and right adjustable legs will drop down until
they reach the setting-up surface.
Note
• Do not release the buttons until both legs have reached the
setting-up surface.
Adjuster button Adjustable legs
Adjuster button
2 Release the adjuster buttons. (The adjustable legs will lock as
soon as the buttons are released.)
3 Turn the adjustable legs by hand in either direction to make
fine adjustments.
Note
• The legs can be extended by up to 52 mm. If you try to
extend them any further than this, they will merely spin
freely.
Retracting the adjustable legs
After lifting the front of the Projector slightly, press and hold the adjuster buttons and then gently lower the Projector.
Note
• Be sure to support the Projector firmly while pressing the
adjuster buttons. If the adjuster buttons are pressed
without supporting the Projector, the adjustable legs will
suddenly unlock and the Projector will fall down, which
could catch your fingers and damage the Projector.
52 mm
Adjuster button Adjustable legs Adjuster button
Caution: When you set up the LCD Projector
• Do not place it in humid or dusty places, or places where the air is sooty or full of cigarette smoke. If the lens, mirror,
or other optical components become dirty, the picture will blur or darken, making viewing difficult.
• Do not expose to extreme heat or cold. Operating temperature: 0 °C – 40 °C (32 °F – 104 °F)
15

Adjusting the Lens
If the LCD Projector is not set up so that it is horizontal, it will not be possible to obtain a distortion-free picture. Turn the
adjusters in either direction to make fine adjustments to the level of the Projector so that the Projector is perfectly
horizontal.
ZOOM Ring
FOCUS Ring
• Adjustment procedure
1 Turn the ZOOM Ring to adjust the size of the picture.
• When facing the rear of the projector, turn the ring to the right for a larger
picture, or to the left for a smaller picture.
2 Turn the FOCUS Ring to adjust the focus of the picture.
• Turn the ring to the right or left until the picture is at the optimum focus.
3 Turn the ZOOM Ring again to adjust the size of the picture.
• When you turn the FOCUS Ring, the size of the picture changes.
16
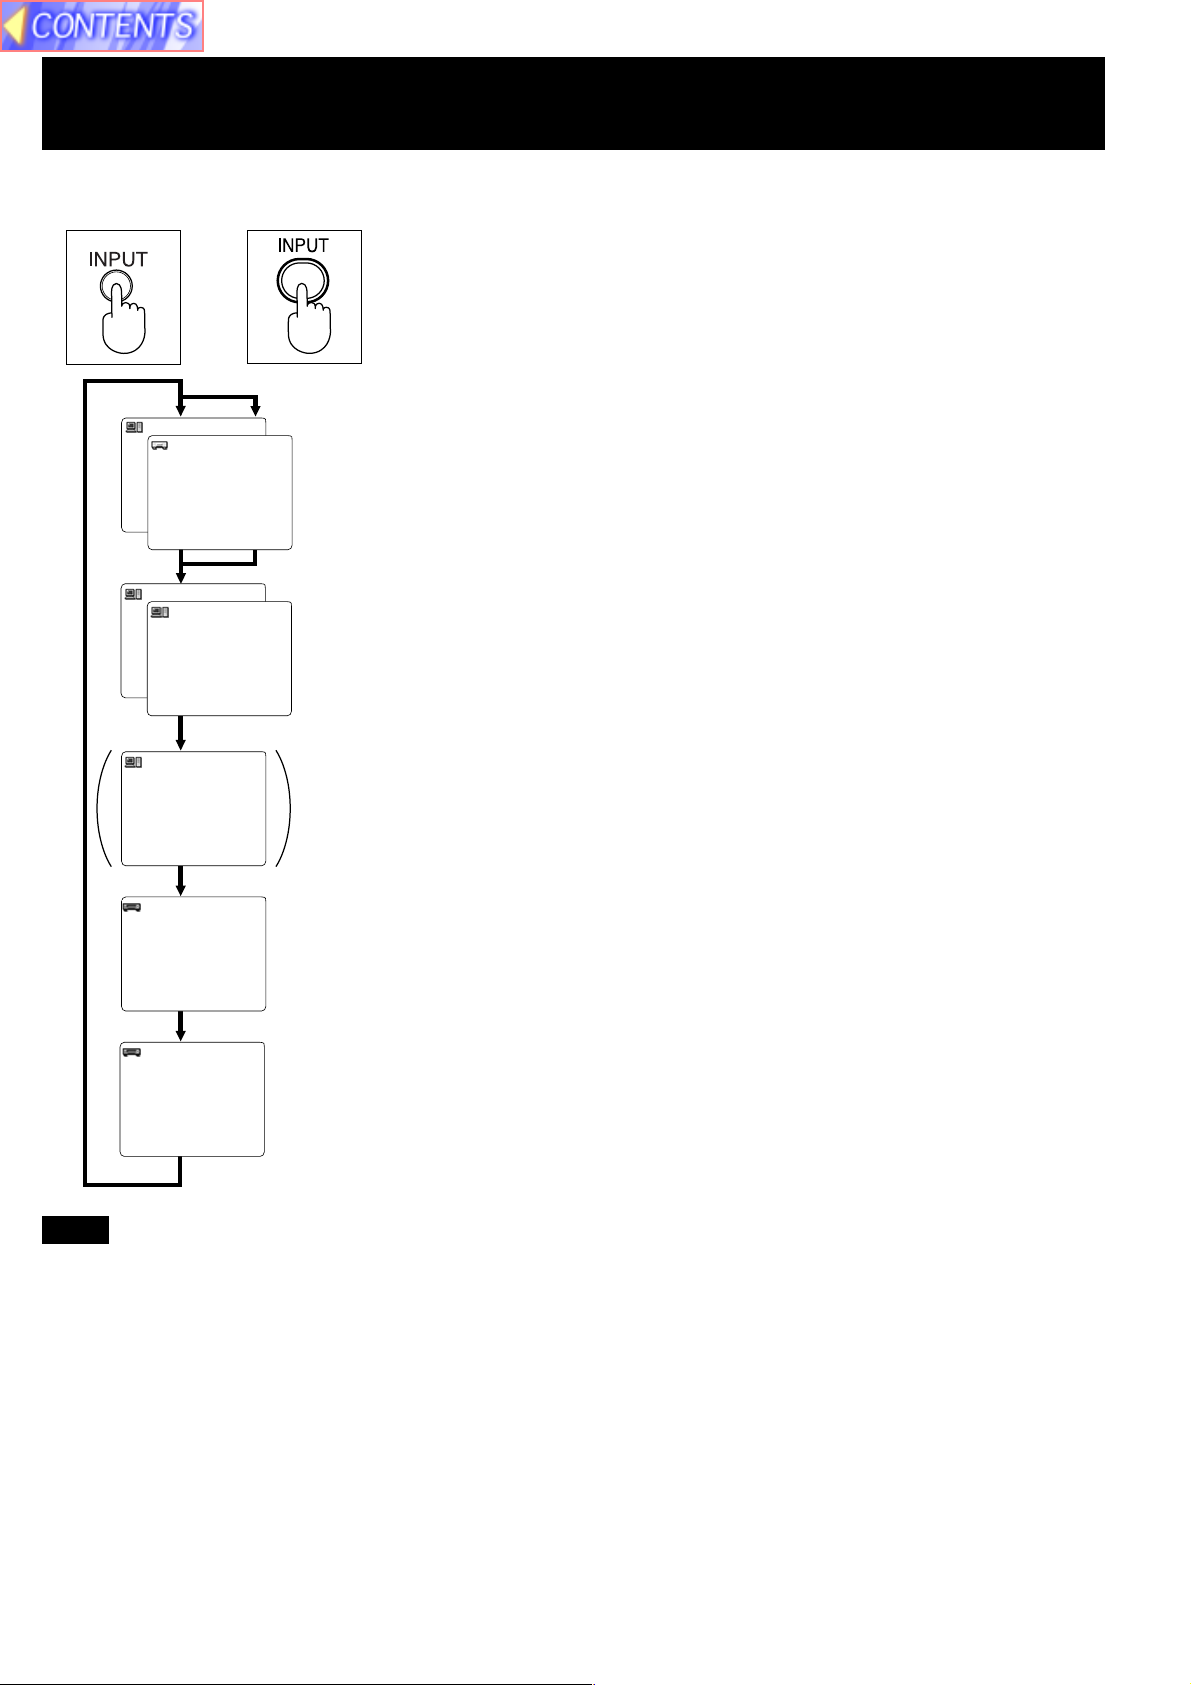
Changing the input signal
(LCD Projector) (Remote Control
Unit)
Press the INPUT button
The input source for picture signals and the corresponding audio signals can
or
1BGR
PY
P
R
B
be changed by pressing the INPUT buttons on the Projector operating panel
or on the remote control.
The signal from the source which is connected to the RGB1/YPBPR
connector is projected.
This terminal accepts input of RGB input signals from a personal computer
and DTV Format signals (RGB, YPBPR) from a DVD or a digital broadcast.
No monitor or Projector can automatically decide whether a Component
signal is the RGB-type or the YPBPR-type. So, you will have to select either
RGB or YPBPR manually.
2BGR
TUO1BGR 2BGR
The signal from the source which is connected to the RGB 2 IN/ RGB 1 OUT
terminal is projected.
This terminal accepts an RGB signal from a PC in addition to a DTV format
signal (RGB) from a digital broadcast, DVD, etc. And, by setting the terminal
to OUT, the signal input to the RGB1/YPBPR connector can be output. At that
time, the projected screen will go to blue back. (See page 40.)
D-IVD
[PT-L759XU
only]
OEDIV
OEDIV-S
The signal input to the DVI-D (Digital Visual Interface)input terminal is
projected. The video signal from the PC is input to the LCD Projector as a
digital signal, you can enjoy superior picture quality. [PT-L759XU only]
The signal from the source which is connected to the VIDEO IN connector is
projected.
The signal from the source which is connected to the S-VIDEO IN connector
is projected.
Note
• To turn off the input signal on-screen display, please see “Turning off the input signal display” on page 34.
• There is only one audio system circuit provided for the VIDEO AUDIO IN terminals for S-VIDEO and VIDEO signals.
Because of this, if using both S-VIDEO signals and VIDEO signals, it will be necessary to change over the connectors.
• There is only one audio system circuit provided for the AUDIO IN terminals for RGB1/YPBPR, RGB2,
DVI-D [PT-L759XU only] signals. Because of this, if using both RGB1/YPBPR,RGB2 signals and DVI-D signals, it will
be necessary to change over the connectors.
• The LCD Projector is shipped from the factory with the S-VIDEO/VIDEO signal selection function set to “AUTO.” If the
correct picture is not projected when VIDEO signal is input and it is necessary to change the input to match the input
signal, refer to “S-VIDEO/VIDEO Signal Format Selection” on page 28.
• Please refer to page 39 to change the setting if you change the signal input to the RGB1/YPBPR connector.
• When RGB signal is input, please input the registered signals found on page 26.
• Please refer to page 40 to change the setting if you change the signal select to the RGB2 IN/RGB1 OUT connector.
• When projecting via the DVI-D input, first connect the LCD Projector to your PC using the DVI cable, and then turn the
PC on.
17
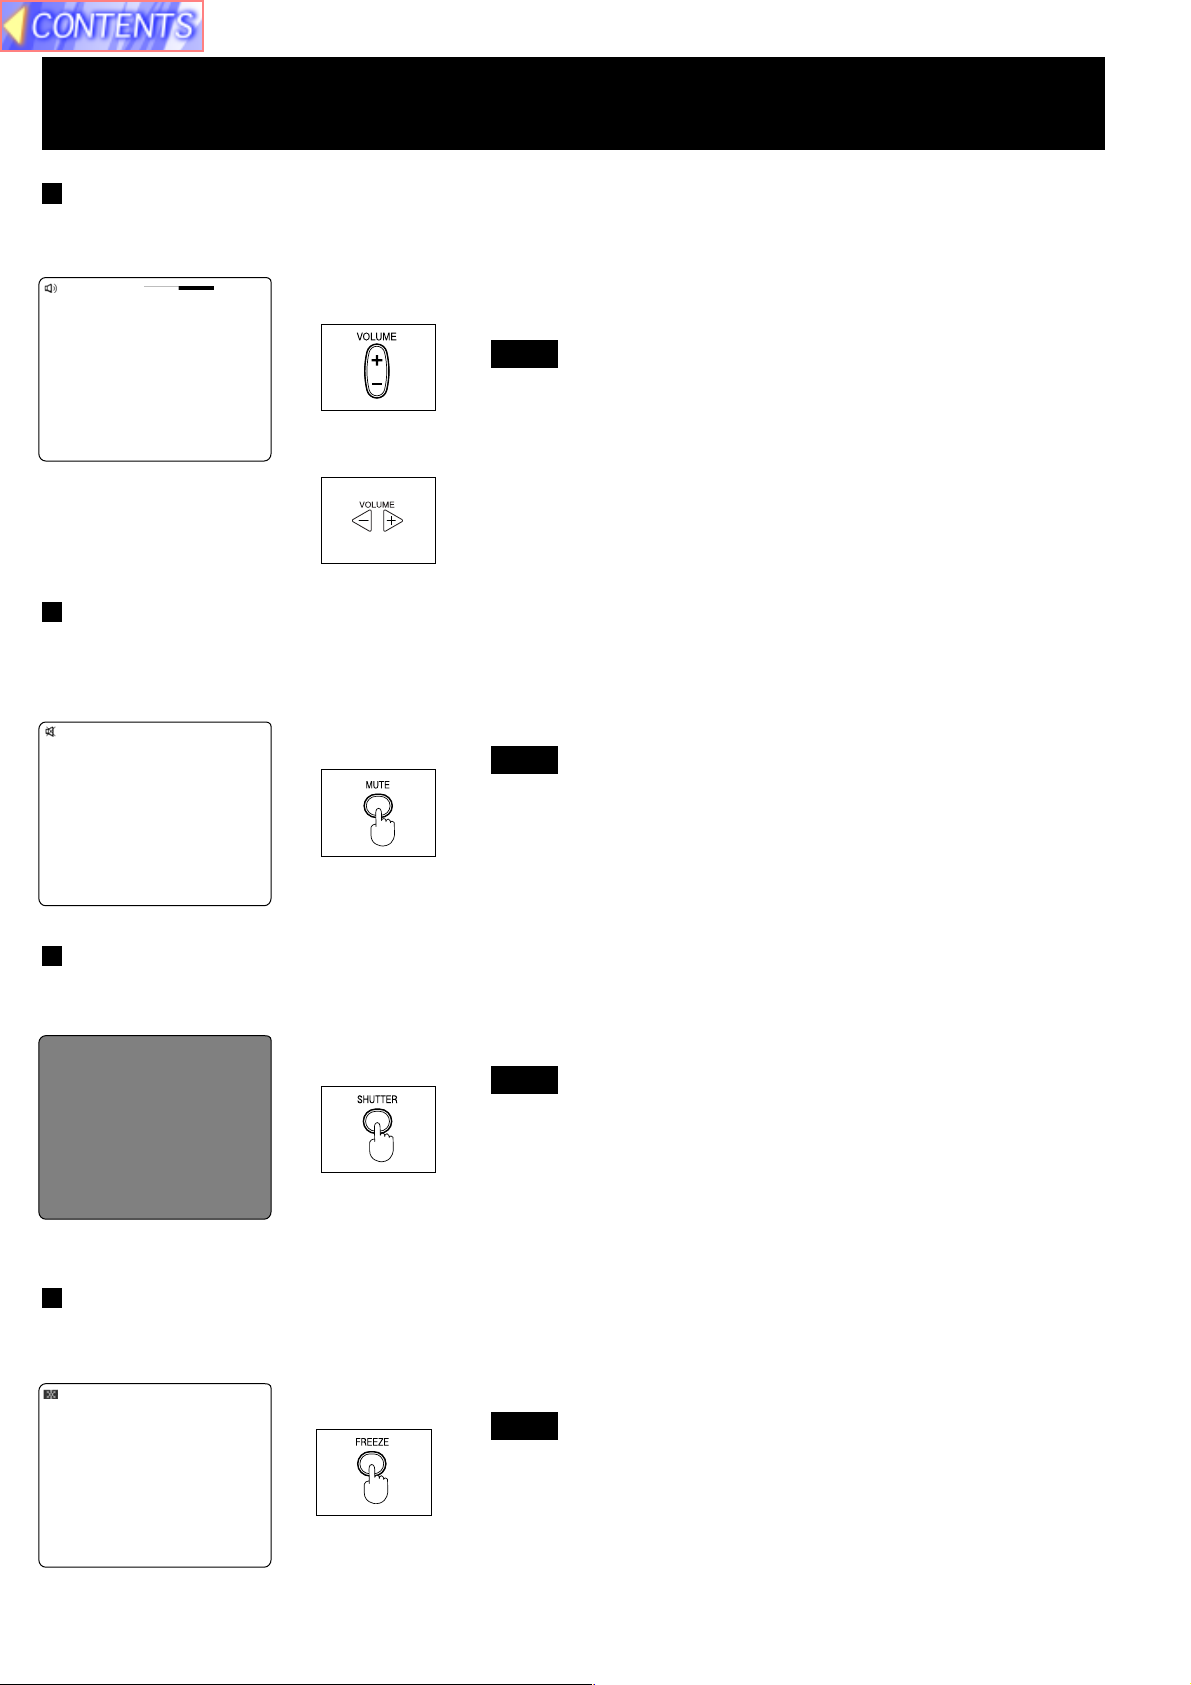
Basic LCD Projector Operation
Adjusting the Volume
The volume can be adjusted using the VOLUME +/- buttons on the LCD Projector or remote control.
emuloV
42+
(Remote Control
Unit)
• Press VOLUME + button to turn the volume high.
• Press VOLUME - button to turn the volume low.
Note
• The “Volume” will remain displayed on the screen for approximately
5 seconds.
or
(LCD Projector)
Turning off the sound
If the MUTE button on the remote control is pressed, “Mute” will be displayed on the screen as shown in the illustration
below and the sound will be muted. If the MUTE button is pressed again, the normal sound volume will be restored.
etuM
(Remote Control
Unit)
Note
• If the Power supply is turned off or either of the VOLUME +/buttons is pressed, the mute setting will be cancelled.
Turning off the Picture and Sound at the same time
When SHUTTER button is pressed on the remote control the picture and sound turns off and the screen goes black,
Press SHUTTER button again to resume picture and sound.
(Remote Control
Unit)
Note
• When the screen goes black, the picture will not be shown on
the screen. However, the picture continues to be sent from the
Personal Computer or video source.
Black screen
Freezing the picture
Projection can be switched between a frozen (still) picture and a moving picture each time when the FREEZE button on
the remote control is pressed. Press FREEZE button again to resume motion.
ezeerF
(Remote Control
Unit)
Note
• The sound is muted while the picture frozen.
18
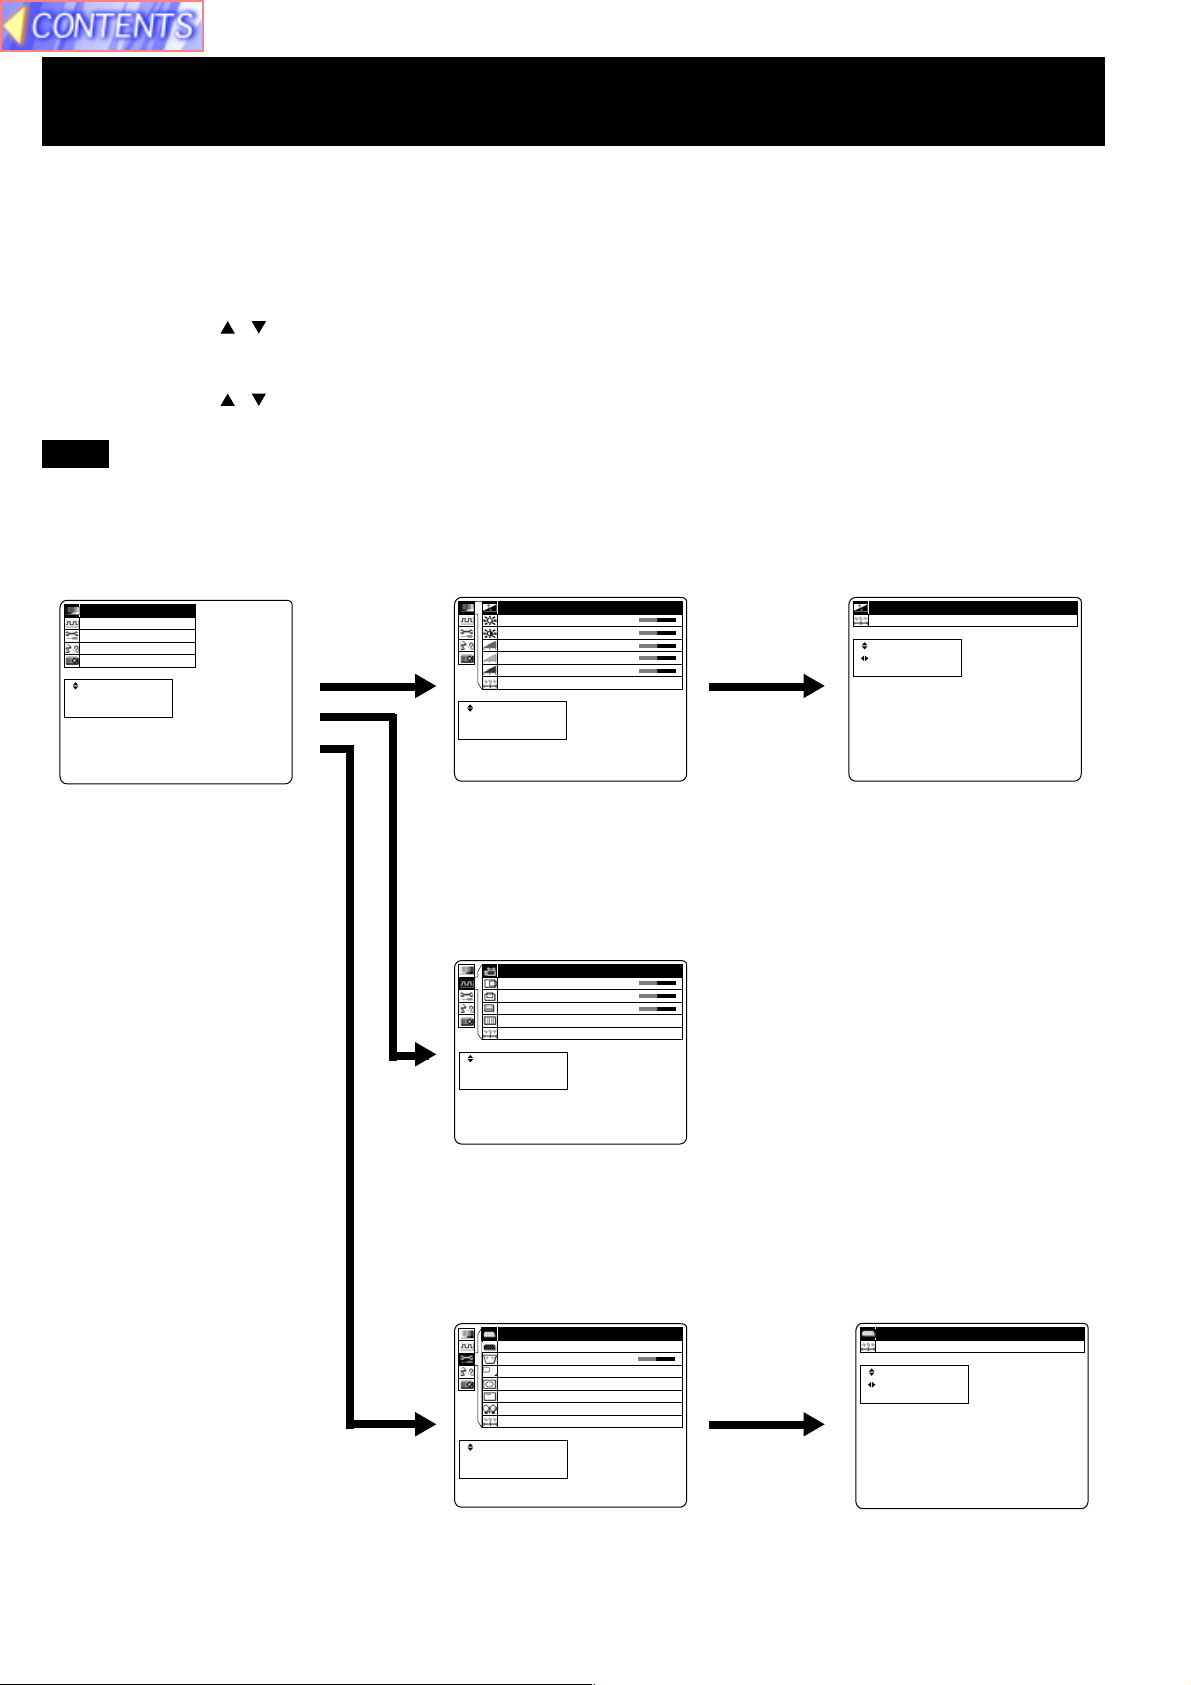
Menu operation guide
This section explains how to reach the desired selection or setting screens from the MENU screen. Refer to the page
indicated for further details on each screen item.
1 Press the MENU button.
(The Main MENU screen will be displayed.)
2 Use the arrow ( , ) buttons to select an item, and then press the ENTER button.
(The Second MENU screen will be displayed.)
3 Use the arrow ( , ) buttons to select an item, and then press the ENTER button.
(The Adjustment MENU screen will be displayed.)
Note
• Press MENU to remove the setup screen and menu.
<Main MENU> <Second MENU> <Adjustment MENU>
Picture
cimany
D
ytilsa
u
Q
e
g
a
m
P
n
y
S
n
u
F
n
a
L
f
n
I
E
T
N
E
U
N
E
M
a
z
i
n
o
r
h
c
n
o
i
t
c
e
g
a
u
g
n
o
i
t
a
m
r
o
t
c
e
l
e
S
:
R
r
e
t
n
E
:
e
p
a
c
s
E
:
n o i t
e
r
u
t
c
i
I
B
C
R
G
B
R
R
E
T
N
E
U
N
E
M
s
e
n
t
h
g
i
r
t
s
a
r
t
n
o
l
e
v
e
L
l
e
v
e
L
l
e
v
e
L
t
e
s
e
t
c
e
l
e
S
:
r
e
t
n
E
:
e
p
a
c
s
E
:
0
1
+
0
1
+
0
1
+
0
1
+
0
1
+
teseR
t
c
e
l
e
S
:
U
N
E
M
t
s
u
j
d
A
:
e
p
a
c
s
E
:
cimanyD ytilauQ egamI
When RGB signal is being
projected.
Used to picture adjustments.
Synchronization
A
P
H
P
V
t
o
D
a
h
P
s
e
R
S
:
R
E
:
E
T
N
E
E
:
U
N
E
M
n
o
i
t
i
s
o
n
o
i
t
i
s
o
k
c
o
l
C
e
s
t
e
t
c
e
l
e
r
e
t
n
e
p
a
c
s
p
u
t
e
S
o
t
u
0
1
+
0
1
+
0
1
+
01
Used to adjust the horizontal and vertical position of the picture and to
adjust other properties such as the size.
Function
P
Y
/
1
B
G
R
P
R
B
U
O
1
B
G
R
/
N
I
2
B
G
R
n
o
t
s
y
e
K
t
c
e
j
o
r
P
s
e
r
p
m
o
C
e
r
c
S
n
O
a
L
o
t
u
A
t
e
s
e
R
c
e
l
e
S
:
R
T
N
E
N
E
M
r
e
t
n
E
:
E
p
a
c
s
E
:
U
e
e
d
o
M
n
o
i
n
o
i
s
l
p
s
i
D
n
e
f
f
O
p
m
t
e
1
B
G
R
T
U
O
T
0
1
+
1
6
.
0
x
N
O
y
a
S
E
Y
E
M
PY/1BGR
P
R
B
teseR
c
e
l
e
S
:
s
u
j
d
A
:
p
a
c
s
E
:
U
N
t
t
e
1B
GR
Used to adjust and change the settings of the various functions
available on the projector.
19
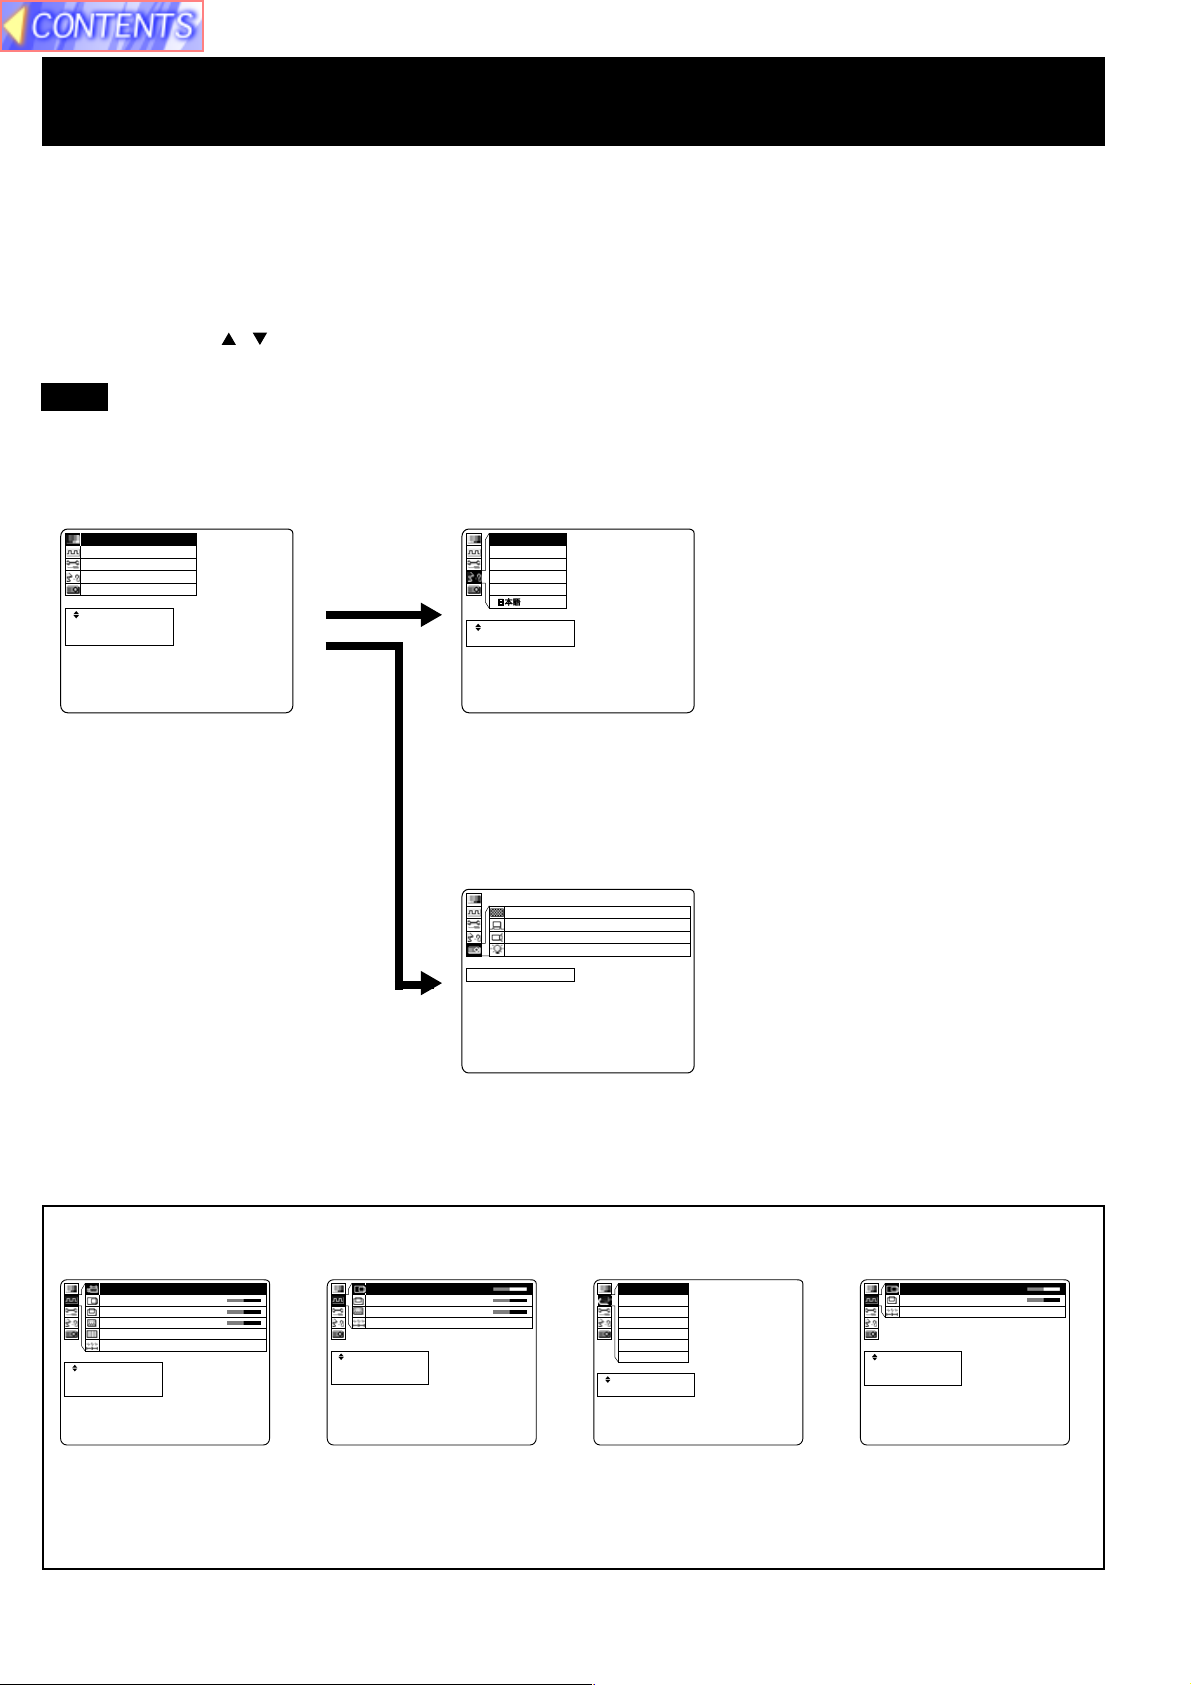
Menu operation guide
This section explains how to reach the desired selection or setting screens from the MENU screen. Refer to the page
indicated for further details on each screen item.
1 Press the MENU button.
(The Main MENU screen will be displayed.)
2 Use the arrow ( , ) buttons to select an item, and then press the ENTER button.
(The Second MENU screen will be displayed.)
Note
• Press MENU to remove the setup screen and menu.
<Main MENU> <Second MENU>
Language
n o i t
e
r
u
t
c
i
P
n
y
S
n
u
F
n
a
L
f
n
I
E
T
N
E
U
N
E
M
a
z
i
n
o
r
h
c
n
o
i
t
c
e
g
a
u
g
n
o
i
t
a
m
r
o
t
c
e
l
e
S
:
R
r
e
t
n
E
:
e
p
a
c
s
E
:
l
g
n
E
t
u
e
D
n
a
r
F
a
p
s
E
l
a
t
I
M
h
s
i
h
c
s
s
i
a
ç
l
o
ñ
o
n
a
i
tecpealcesSE:: U N E
When RGB signal is being
Used to switch the on-screen display language.
projected.
Information
N
r
F
H
r
F
V
p
m
a
L
y
c
n
e
u
q
e
y
c
n
e
u
q
e
e
m
i
t
n
u
R
epacsE:UNEM
z
H
K
9
.
z
H
5
8
h
0
1
8
6
7
x
482601
s
t
o
D
f
o
.
o
Use to display information about the input signal, lamp run time, etc.
The displayed items on the screen differ according to the input signal.
p
u
t
e
S
o
t
u
A
H
V
o
D
h
P
e
R
:
R
:
E
T
N
E
:
U
N
E
M
n
o
i
t
i
s
o
P
n
o
i
t
i
s
o
P
k
c
o
l
C
t
e
s
a
t
e
s
t
c
e
l
e
S
r
e
t
n
E
e
p
a
c
s
E
0
1
+
0
1
+
0
1
+
01
H
V
D
R
R
E
T
N
E
U
N
E
M
nno
i
t
i
s
o
P
o
i
t
i
s
o
P
k
c
o
l
C
t
o
t
e
s
e
t
c
e
l
e
S
:
r
e
t
n
E
:
e
p
a
c
s
E
:
0
1
+
0
1
+
0
1
+
M
O
T
U
A
C
S
T
N
3
4
.
4
C
S
T
N
L
A
P
M
-
L
A
P
N
-
L
A
P
M
A
C
E
S
tecpealcesSE:: U N E
H
V
R
R
E
T
N
E
U
N
E
M
n
ooiittiis
o
P
n
s
o
P
t
e
s
e
t
c
e
l
e
S
:
r
e
t
n
E
:
e
p
a
c
s
E
:
0
1
+
0
1
+
0
1
+
When RGB signal is being
projected.
When YPBPR signal is being
projected.
When Video/S-Video signal
is being projected.
When DVI-D signal is
being projected. [PTL759XU only]
20
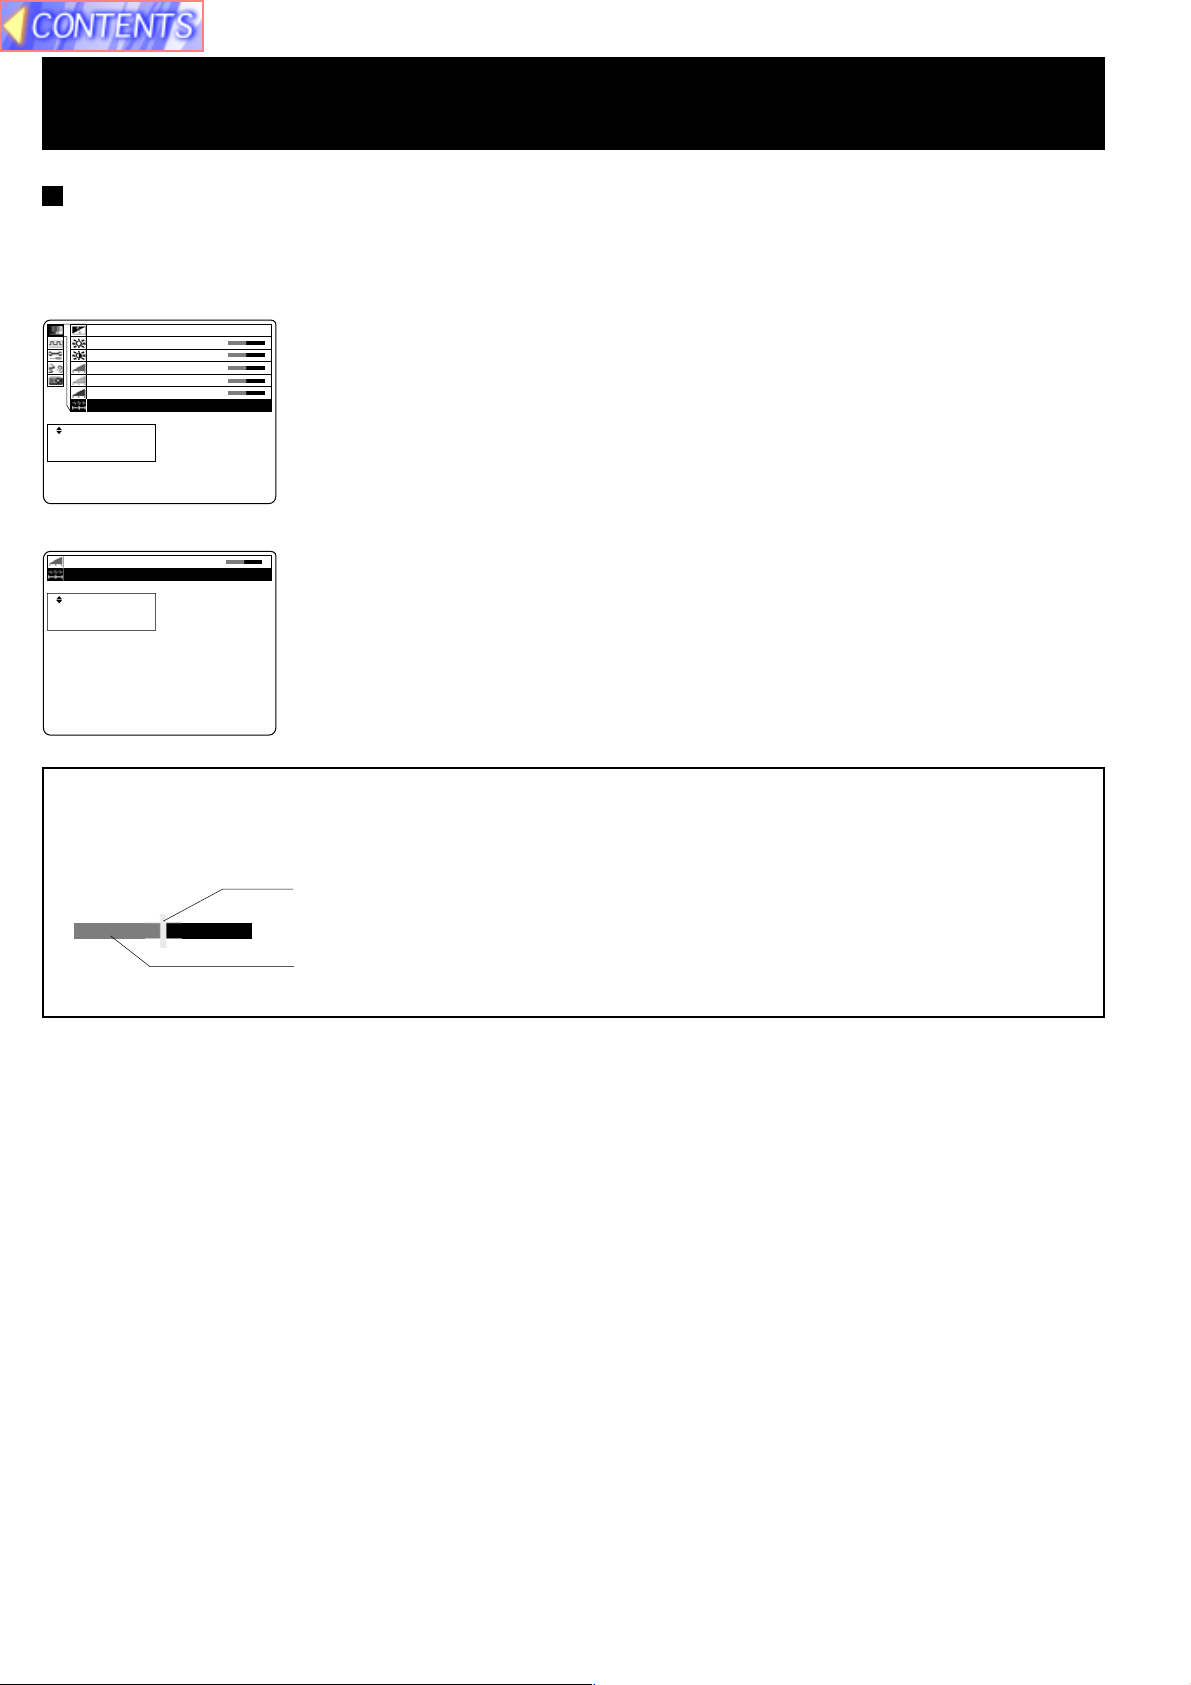
Menu operation guide
Returning adjustment values to the factory default settings (standard values)
If “Reset” is selected while the “Second MENU” or an “Adjustment MENU” is displayed, the setting can be
returned to the factory default setting.
• During a second menu screen is displayed, chose the “Reset” and then press the ENTER button.
All items displayed in the second menu return to the
cimany
D
ytilsa
u
Q
e
g
a
m
I
B
C
R
G
B
R
R
E
T
N
E
U
N
E
M
s
e
n
t
h
g
i
r
t
s
a
r
t
n
o
l
e
v
e
L
l
e
v
e
L
l
e
v
e
L
t
e
s
e
t
c
e
l
e
S
:
r
e
t
n
E
:
e
p
a
c
s
E
:
• During an individual adjustment screen is displayed, chose the “Reset” and then press the ENTER button.
leveLR
teseR
t
c
e
l
e
S
:
R
E
T
N
E
U
N
E
M
r
e
t
n
E
:
e
p
a
c
s
E
:
0
1
+
0
1
+
0
1
+
0
1
+
0
1
+
01+
factory settings.
Only items selected in the second menu return to the
factory settings.
Bar Scale display
The bar scale mark indicates the factory standard value. The mark is only displayed when a factory standard value
was assigned.
This bar shows the factory standard value.
This bar shows the current value adjustment.
21
 Loading...