

Panasonic PT-L702SDE, PT-L701SDE User Manual
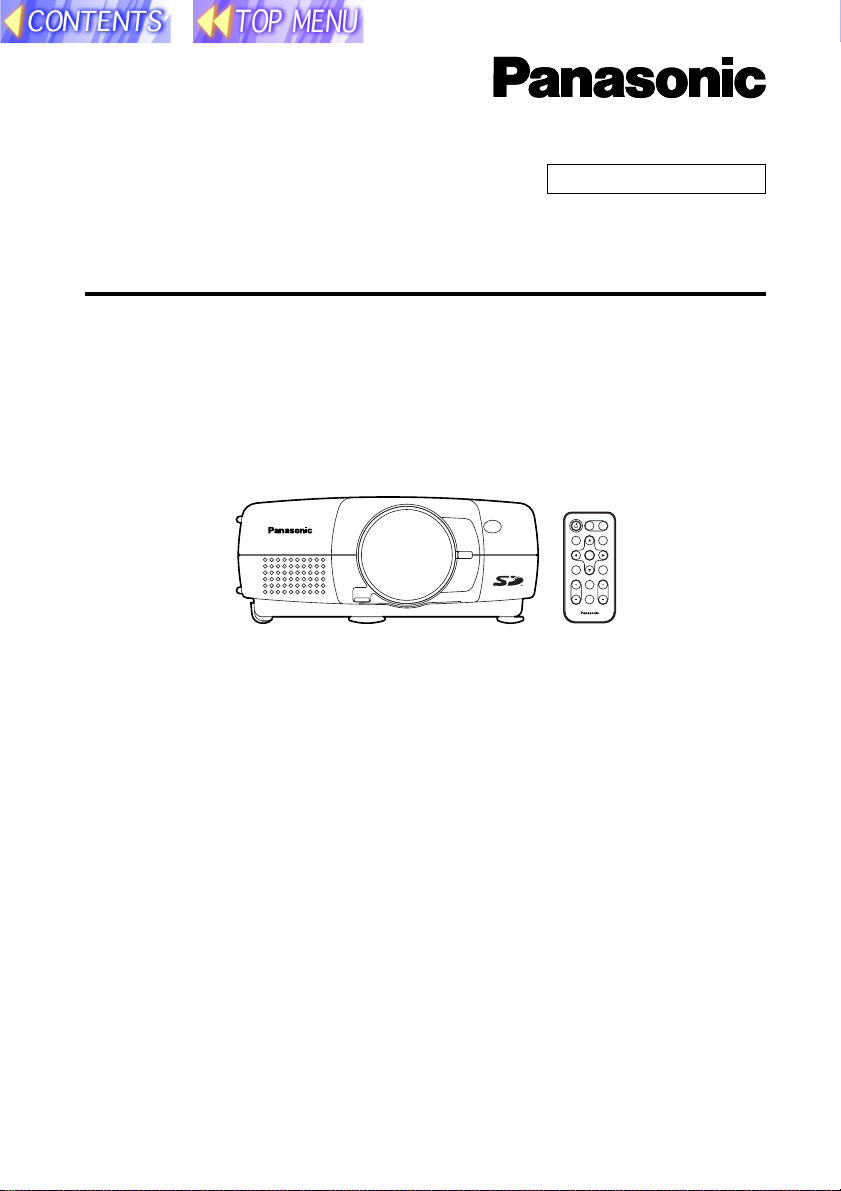
SD memory card compatible
LCD Projector Commercial Use
Operating Instructions
(SD Memory Card Functions)
Model No. PT-L702SDE
PT-L701SDE
POWER
INPUT
VIDEO
RGB
AUTO
MENU
SETUP
ENTER
FREEZE
SHUTTER
STD
VOLUME D.ZOOM
INDEX
WINDOW
PROJECTOR
B This LCD projector is designed to be compatible with the SD memory
card.
These operating instructions explain how to use the SD memory card and
how to play back images which have been recorded on the card. Please
refer to the separate PT-L702E or PT-L701E Operating Instructions for
details on how to use the LCD projector.
B Before using the SD memory card, be sure to read all documentation,
including the "Read this first" booklet, these Operating Instructions and
the Operating Instructions for the PT-L702E or PT-L701E LCD projector
and also the Warranty card provided.
TQBH9001-3
GBR
1

Contents
Dear Panasonic Customer: ................ 3
Safety Precautions ............................. 3
Notes on using the PC card adapter ... 4
Check accessories ............................. 5
Names of each part (SD memory card
slot) ................................................ 5
What is the SD memory card? ........... 6
Examples of using
the SD memory card ...................... 6
Notes on handling the SD memory
card ................................................ 7
Notes on handling ................................ 7
Notes on storage .................................. 7
Protecting valuable data ...................... 7
Making backups of the data in the SD
memory card .................................. 8
Write-protect switch ............................. 8
Notes on using the projector ............. 8
Explanation of terms .......................... 9
Inserting and removing the SD
memory card ............................... 10
Inserting the SD memory card ........... 10
Removing the SD memory card ......... 10
On-screen menus ............................. 11
List of menu screens .......................... 11
Capturing projected images onto the
SD memory card ......................... 12
Enabling the FREEZE button for making
capture recordings ....................... 12
Capturing images ............................... 13
Using the SD memory card in a
Windows PC ................................ 14
Inserting the SD memory card ........... 14
Removing the SD memory card ......... 15
Using the SD memory card in a
Macintosh .................................... 16
Inserting the SD memory card ........... 16
Saving JPEG files onto the SD memory
card .............................................. 17
Removing the SD memory card ......... 18
DCF standard .................................... 19
Limits on directory names .................. 19
File names ......................................... 19
File format .......................................... 19
Using JPEG Convertor ..................... 20
What JPEG Convertor can do ........... 20
Starting JPEG Convertor ................... 20
Main screen functions ........................ 21
Importing presentation files created
using Microsoft PowerPoint .......... 22
Importing JPEG, BMP and TIFF files
created using other applications .. 23
Importing files using drag-and-drop ... 23
Checking, sorting and
deleting images ............................ 24
Conversion settings for saving
images .......................................... 25
Saving imported images onto the SD
memory card ................................ 26
Saving to other folders ....................... 27
Playing back images using
the projector ................................ 28
Selecting the folder (directory) ........... 28
Playing back images .......................... 29
Setting the playback method.............. 29
Moving and deleting images .............. 30
Keystone correction in CARD mode .. 30
Troubleshooting................................ 31
Before asking for service ................. 31
Specifications ................................... 32
Trademark Information ..................... 34
2

Dear Panasonic Customer:
These instructions provide all the necessary operating information that
you may require. We hope it will help you get the best performance from your
new product, and that you will be pleased with your Panasonic LCD
projector.
Safety Precautions
WARNING
Keep the SD memory card out of the reach of infants.
B If the memory card is swallowed, death by suffocation may result. If you
believe that the memory card may have been swallowed, seek medical
advice immediately
Caution
Do not insert the SD memory card into devices which are not
compatible with the SD memory card (for example, devices which only
use multimedia cards).
B If this is not observed, it may not be possible to remove the SD memory
card, and damage to the card or to the device may result.
Do not remove the SD memory card from the projector while the card is
being accessed for reading or writing (while the SD memory card
access indicator inside the card slot cover at the rear of the projector is
flashing).
B If this is not observed, the data on the card may become corrupted or
erased.
Do not insert any foreign objects into the card slot at the rear of the
projector.
B Inserting foreign objects may damage the projector. If the SD memory
card is inserted while some foreign object is inside the card slot, it may
damage the card and the projector.
3

Notes on using the PC card adapter
Caution
Do not remove the accessory PC card adapter or the SD memory card
while the computer is accessing the SD memory card for reading or
writing.
B If this is not observed, the data on the card may become corrupted or
erased.
Do not install the accessory PC card adapter to any device other than a
PC card slot.
B If this is not observed, damage to the device may result. Before installing
the accessory PC card adapter, check that the card slot on the device
being used is a PC card (PCMCIA) Type II or Type III card slot.
Do not insert any foreign objects into the card slot of the accessory PC
card adapter.
B Inserting foreign objects may damage the device. If the SD memory card
is inserted while some foreign object is inside the card slot, it may damage
the card and the device.
4
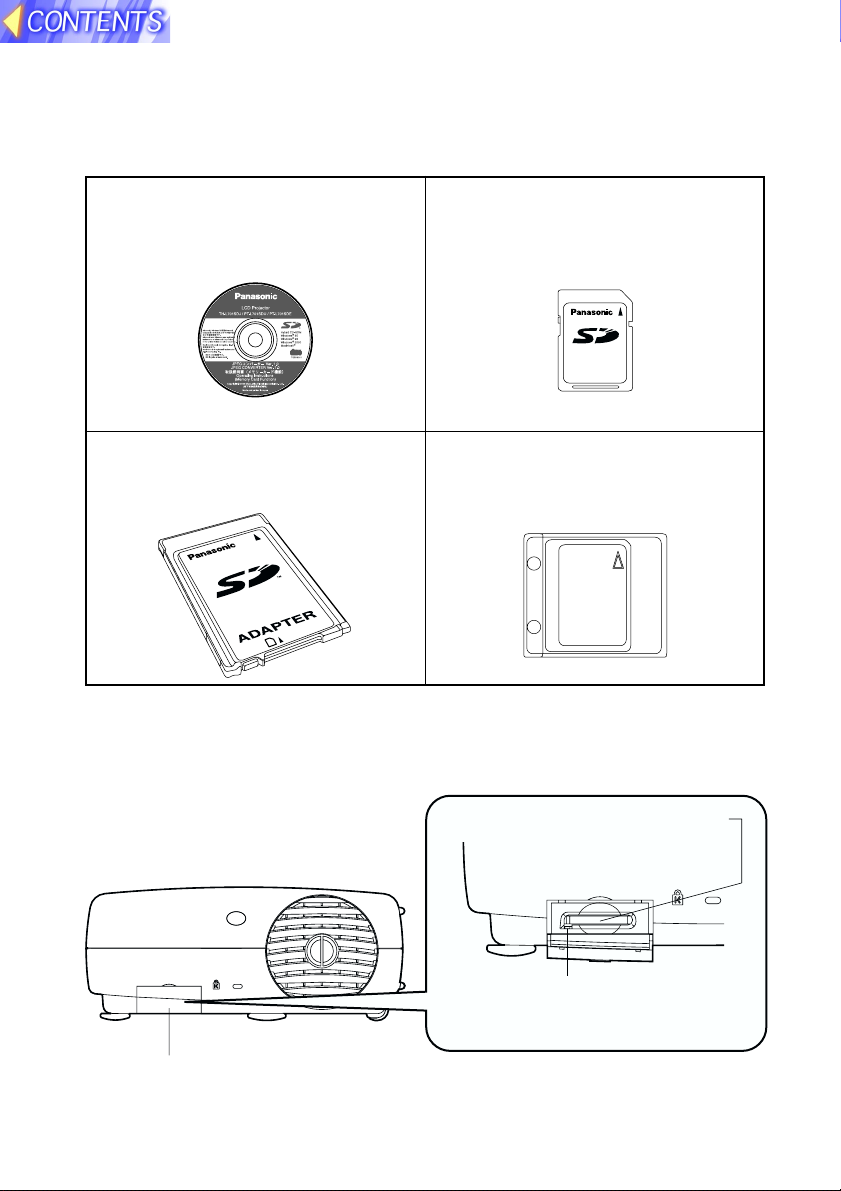
Check accessories
The following accessories are included, in addition to the accessories which
are listed in the separate Operating Instructions for the PT-L702E or PTL701E LCD projector.
CD-ROM ... 1 pc. (JPEG Convertor,
Operating Instructions)
SD memory card (16 MB) ... 1 pc.
16
MB
PC card adapter for SD memory
card ... 1 pc.
D
R
A
C
Protective case for SD memory
card ... 1 pc.
Names of each part (SD memory card slot)
SD memory card slot
Rear of projector
SD CARD
Card slot cover
Covers the SD memory card slot.
Access indicator
Flashes when the SD memory card is
being accessed for reading and writing.
Insert the SD memory
card in here.
5

What is the SD memory card?
The SD memory card is a semiconductor memory which at 24 mm x 32 mm x 2.1 mm is
about the size of a postage stamp. It is a next-generation recording medium which can
be used instead of conventional storage devices such as MDs (mini discs), CDs
(compact discs) and cassette tapes. In addition, it allows data to be repeatedly recorded, played and erased. The SD memory card can be used to store computer image
files, video images (still pictures) and presentations created using Microsoft PowerPoint
which have been converted into JPEG images using the accessory JPEG Convertor
software, letting you make "PC-free" presentations using just the LCD projector.
Examples of using the SD memory card
Capturing images using the projector
Tuner
Computer
The freeze function can be used to capture the
moving pictures as still pictures.
Video signal
Projector
Image file
SD memory card
Saving images directly using a computer
Computer
RecordingPlayback
PC card adapter
Exporting data
D
R
A
C
SD memory card
The accessory JPEG Convertor software can be used
to convert image files in other formats (PowerPoint,
TIFF, BMP) into JPEG files which can then be saved
onto the SD memory card. (Windows only)
Projecting JPEG images PC-free (using just the
projector)
Insert
16
MB
Projector
SD memory card
Images can also be sorted and deleted.
Projection
Projected
image
Screen
Refer to "Capturing projected
images onto the
SD memory card"
on page 12.
16
MB
Refer to "Using
the SD memory
card in a Windows
PC" on page 14
and "Using the SD
memory card in a
Macintosh" on
page 16.
Refer to "Playing
back images using
the projector" on
page 28.
6

Notes on handling the SD memory card
Be sure to read the following before
using the accessory SD memory
card.
Front
Notes on handling
Be sure to observe the following.
B Do not disassemble or modify
the card.
B Do not subject the card to
strong shocks, and do not twist
it, bend it, drop it, step on it or
immerse it in liquids.
B Do not rub the card with cloth or plastic, or bring it close to objects which
may generate static charges or magnetic fields.
B Do not touch the metal terminals with hands or metal objects, attach
stickers to them, or allow them to become contaminated in any way.
B Do not remove the attached label from the card.
B Do not attach any other labels or stickers to the card.
16
MB
Write-protect switch
Rear
LOCK
Notes on storage
After removing the SD memory card from the projector or other device,
always insert it into its protective case.
B Do no leave the card inside hot vehicles or in other places with high
temperatures such as places exposed to direct sunlight.
B Do not leave the card in places which are exposed to substances such as
corrosive gases.
Protecting valuable data
B Do not turn off the projector power supply or remove the SD memory card
from the projector while the card is being accessed for reading or writing
(while the SD memory card access indicator inside the card slot cover at
the rear of the projector is flashing). Failure to observe this may result in
loss of data.
B Always make a backup of the data which is stored in the SD memory card.
Accidental mistakes in using the card may sometimes result in the loss of
valuable data.
7

Making backups of the data in the SD memory card
B Double-click on the drive icon (refer to page
15) for the SD memory card in My Computer
(or on the Desktop if you are using a
Macintosh), and then drag the DCIM directory
to the Desktop (while clicking the Option button
if you are using a Macintosh). This will create a
backup copy on your computer of all data in
the DCIM directory.
Write-protect switch
B If the write-protect switch on the SD memory card is moved to the LOCK
position, it will not be possible to capture images using a projector or to
use any file editing functions such as deleting or moving image files. (An
error message will be displayed if you try to use any of these functions.)
B If the SD memory card is inserted into a computer using the PC card
adapter while the write-protect switch is at the LOCK position, a blue
warning screen will be displayed when the computer attempts to access
the card. If this happens, press any key on the computer's keyboard to
clear the error display. Check that the write-protect switch is not at the
LOCK position when using the SD memory card in a computer.
Notes on using the projector
Be sure to observe the following.
B Do not drop the projector or subject it to strong shocks.
B Keep the projector dry at all times.
B Do not use excessive force when opening and closing the card slot cover.
B Do not use the card if it is cracked or bent.
B Do not use the projector in humid environments such as bathrooms, or in
dusty environment such as warehouses.
Please make sure that you understand the following before using the
SD memory card.
B Panasonic shall not be liable for any damage or losses suffered by the
user, either directly or through claims from a third party, arising from or
in connection with the use of or problems with the projector or the SD
memory card.
B Panasonic shall not be liable for any damage or losses suffered by the
user arising from loss of data stored on the SD memory card.
8

Explanation of terms
Following are definitions for some of the terms used throughout these Operating Instructions.
PowerPoint
Application software for creating presentations which is included as part of
Microsoft Office. 95, 97 and 2000 versions are available, but the JPEG
Convertor software which is bundled with
the projector is only compatible with the
97 and 2000 versions.
JPEG
Abbreviation for Joint Photographic
Experts Group. JPEG is the name of an
international organisation which was
jointly established by the ISO and the
ITU-TS (formerly the CCIT), but the term
is normally used to refer to the specifications for the still picture compression
algorithm which was formulated by the
JPEG. This algorithm allows still images
such as photographs, single frames of
moving images and scanned images to
be compressed to up to 1/100th of their
original sizes. However, images which are
compressed in this way cannot be fully
restored to their original quality (some
deterioration in quality occurs), so that
compression rates of 1/5 to 1/30 are
normally used. Because of differences in
colour separation, two format sub-types
are used: RGB (red, green and blue) and
CMYK (cyan, magenta, yellow, black).
The projector and the JPEG Convertor
software do not support the CMYK subtype of JPEG file.
BMP
Abbreviation for BitMaP. This is the
standard image format for the bitmapped
files (image files consisting of a collection
of dots) which are handled by Windows.
Colour levels of monochrome, 16 colours,
256 colours and 16.7 million colours are
supported.
RLE
Abbreviation for Run Length Encoding. It
can be used to achieve high rates of
compression for image files which contain
large areas of a single colour. RLE can be
used with monochrome, 16-colour and
256-colour BMP image files. (JPEG
Convertor does not support files compressed using RLE.)
TIFF
Abbreviation for Tagged-Image File
Format. This type of file is used to
exchange documents between computers. Colour levels of monochrome, 256
colours and 16.7 million colours are
supported. TIFF files in 16.7 million colour
format can include transparent colour.
LZW
Abbreviation for Lempel-Ziv-Welch. LZW
is a compression method used for TIFF
files, and is named thus because it was
developed by three people named
Lempel, Ziv and Welch. It compresses the
files by converting patterns within the
images into short codes. There is no
deterioration in image quality resulting
from compression, but high rates of
compression which are comparable to
JPEG files cannot be expected to be
obtained. (JPEG Convertor does not
support files compressed using LZW.)
DCF
Abbreviation for Design rule for Camera
File system. DCF is a standard which was
established by the Japan Electronic
Industry Development Association
(JEIDA) with the aim of realising a
common image file format, directory
name format and file name format for the
images used with digital still cameras. It is
based on recommendations such as Exif
Version 2.1.
Exif 2.1
Abbreviation for Exchangeable Image File
Format. This is an image file format which
was established by the Japan Electronic
Industry Development Association
(JEIDA). It defines the common information format and range of application for
images used with digital still cameras,
centring around TIFF and JPEG-format
images. Version 2.1 is the latest version of
the Exif standard.
9
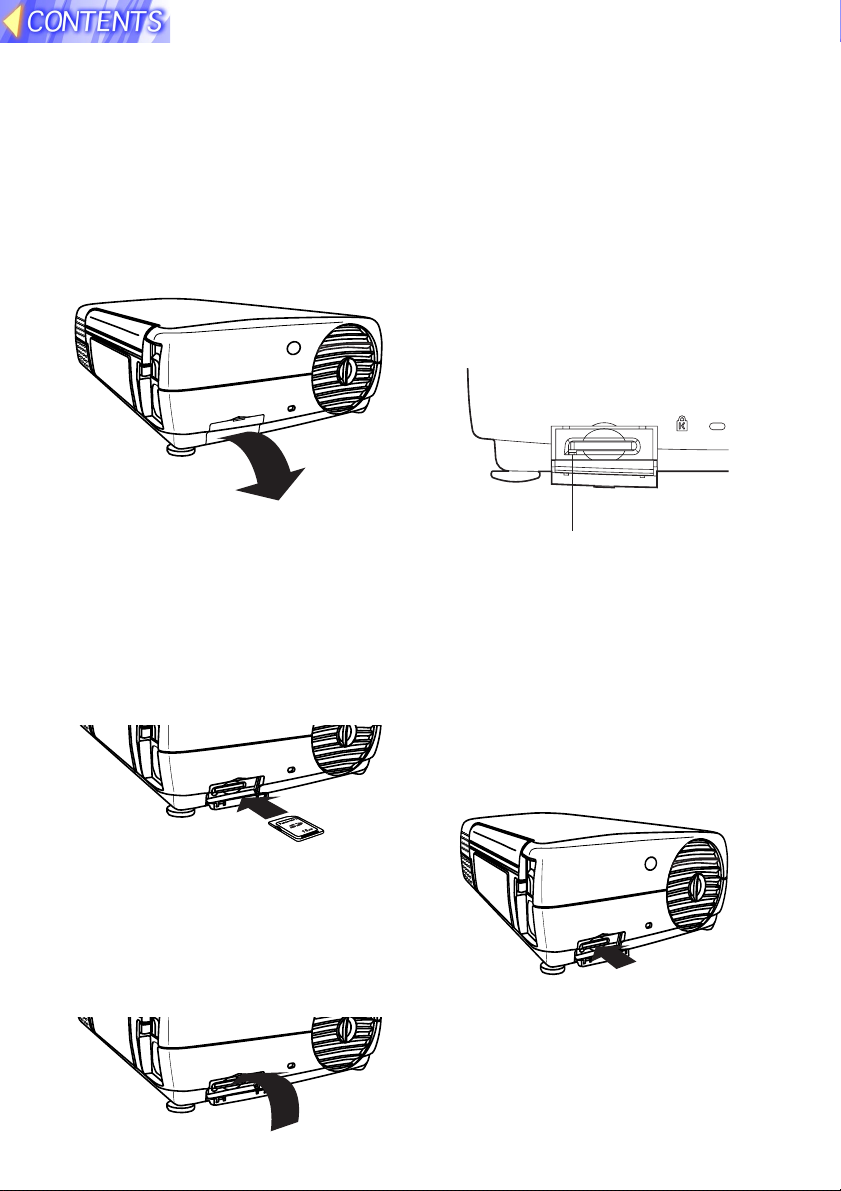
Inserting and removing the SD memory card
Inserting the SD memory card
Make sure that the SD memory card
is the right way up when inserting it.
##
# Open the card slot cover.
##
SD CARD
$$
$ Insert the SD memory card as
$$
shown below.
Insert the SD memory card so
that the side with the label is
facing upwards and the end with
the cut-away corner is towards
the front. Push the card in until it
locks into place.
Removing the SD memory card
##
# Open the card slot cover.
##
$$
$ Check that the access indicator
$$
at the lower left of the slot is
not flashing (the SD memory
card is not being accessed for
reading or writing).
Note:
B Before removing the SD memory
card, make sure that the access
indicator is not flashing. If the
card is removed while the access
indicator is flashing, it may result
in loss of data on the card.
%%
% Push the centre of the SD
%%
memory card to unlock it, and
then remove the card.
Access indicator
Note:
B If you try to force the SD memory
card into the slot the wrong way, it
may damage the card and the slot.
%%
% Close the card slot cover.
%%
&&
& Close the card slot cover.
&&
10
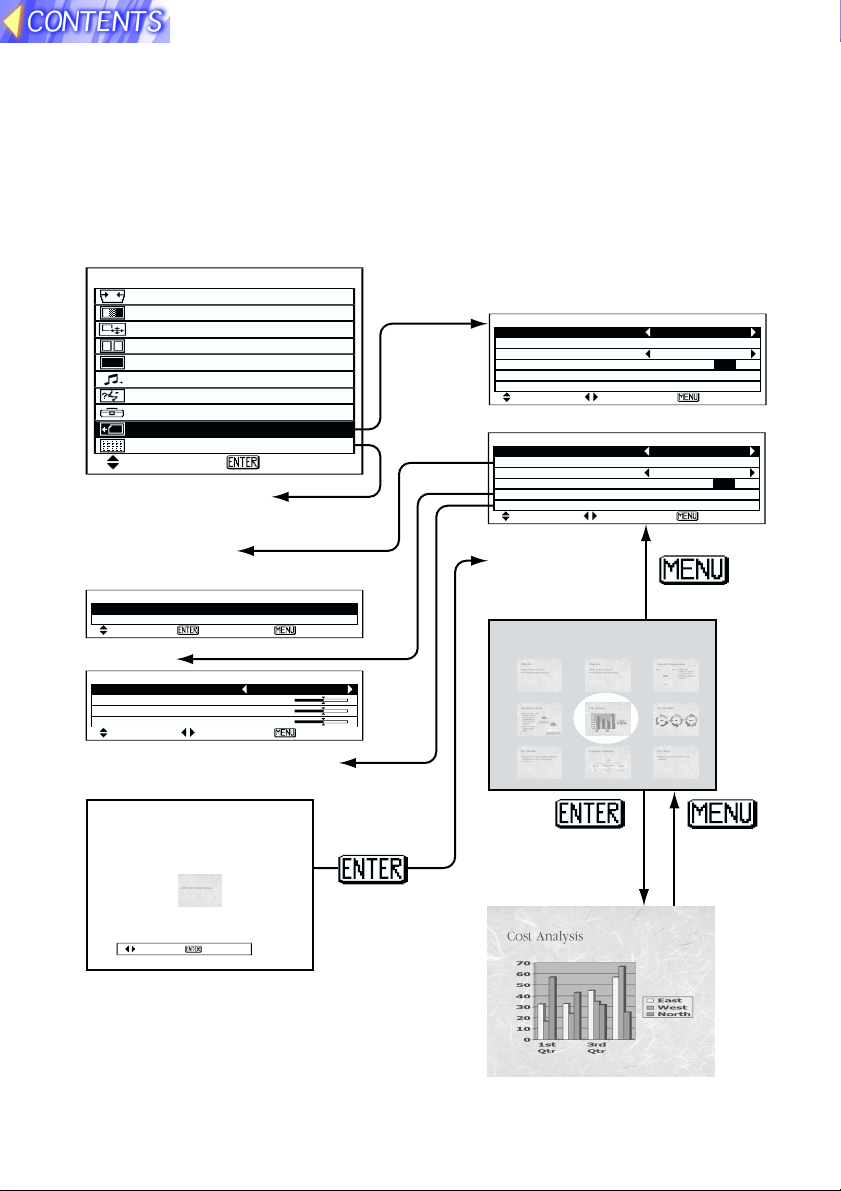
On-screen menus
List of menu screens
The projector allows various settings to be adjusted and changed using onscreen menu operations. The overall structure of the projector menus is
shown below.
MAIN MENU SD CARD menu
MENU
KEYSTONE
PICTURE
POSITION
INDEX WINDOW
SHUTTER
AUDIO
LANGUAGE
OPTION
SD CARD
CAPTURE
SELCT ENTER
CAPTURE function
(Page 13)
FILE EDIT menu
(Page 30)
FILE EDIT
MOVE
DELETE
SELCT ENTER ESC
PICTURE
PICTURE
PICTURE MODE NATURAL
COLOR 32
BRIGHT 32
CONTRAST 32
SELCT ADJ ESC
Directory selection screen
(Page 28)
(Pages 12, 29 and 30)
VIDEO or RGB mode
SD CARD
CAPTURE MENU
AUTO PLAY 60SEC
AUTO LOOP OFF ON
SELCT ADJ ESC
CARD mode
SD CARD
CAPTURE MENU
FILE EDIT
AUTO PLAY 60SEC
AUTO LOOP OFF ON
PICTURE
DIR SELECT
SELCT ADJ ESC
Image selection
screen
(Page 28)
100-0005
[5/17]
REST 2.1MB
DIR 100[1/7]
REST 2.1MB
SELCT ENTER
Note:
B Refer to the separate PT-L702E or PT-
L701E Operating Instructions for details
on the MAIN MENU items other than "SD
CARD" and "CAPTURE" and for details
on the items in the PICTURE menu.
Image playback
screen
(Page 29)
11
 Loading...