

Page 1
Installation
Instructions
POH-1000/POH-1500
Indoor / Outdoor Extruded Housing
®
Before attempting to connect or operate this product,
please read these instructions completely.
Page 2

TABLE OF CONTENTS
• CAUTION
1. PRECAUTIONS ON INSTALLATION
2. DESCRIPTION
3. INSTALLATION
3-1 Camera Installation
3-2 Housing Mount
3-3 System Connection
4. SPECIFICATIONS
5. OUTLINE DRAWING
- 2 -
Page 3

Caution
This unit must be properly mounted to a supporting structure capable of sustaining the
weight of the bracket and camera assembly. Accordingly
1. The installation should be made by a qualified installer.
2. The installation should be in compliance with local codes.
3. Care should be exercised to select suitable hardware to install the unit, taking
into account both the composition of the mounting surface and the weight the
hardware will be required to sustain.
4. The maximum camera weight, including lens, should not exceed 7 pounds.
5.Use with 24VAC Class 2 transformer only.
Be sure to periodically examine the unit and the supporting structure to make the
integrity of the installation is intact.
Failure to comply with the foregoing could result in the unit coming loose from the
support structure and failing, with resultant damages or injury to anyone struck by the
falling unit.
- 3 -
Page 4

1. PRECAUTIONS ON INSTALLATION
• Installation should be in accordance with all applicable local and National
Electric codes. Only approved materials should be utilized.
• This unit must be properly and securely mounted to a supporting structure
that is capable of sustaining the weight of the housing and camera along
with the lens.
• Read instructions completely before installation and operation.
2. DESCRIPTION
• This product has been designed and engineered for a Panasonic camera for
indoor/outdoor applications.
- POH-1000 is a 11" long housing designed for 1/3" CCD camera
with all Panasonic fixed focal lens.
- POH-1500 is a 16" long housing designed for 1/2" & 1/3" CCD camera
with Panasonic zoom lens.
• This housing contains a hinged extrusion for easy access to the camera
and lens.
2-1 Models & Options
POH-1000 11" Indoor/Outdoor extruded aluminum housing for
1/3" Panasonic CCD Camera with all Panasonic fixed focal
length lens.
POH-1000HB POH-1000 with factory installed 24 VAC heater and blower.
POH-1500 16" Indoor / outdoor extruded aluminum housing for 1/2" and
1/3" Panasonic CCD camera with Panasonic zoom lens.
POH-1500HB POH-1500 with factory installed 24VAC heater and blower.
PSS-10 Sunshield for POH-1000/POH-100HB.
PSS-15 Sunshield for POH-1500/POH-1500HB.
PHK-10 24 VAC heater kit for POH-1000/POH-1500.
PBK-10 24 VAC blower kit for POH-1000/POH-1500.
2-2 Recommended Mounts
WV-831 Light duty mount with adjustable swivel head.
Supports up to 20lbs.
P9000HW Medium duty wall mount with manual adjustable swivel
head. Supports up to 83 lbs.
P9000HP Medium duty pole mount with manual adjustable swivel
head. Supports up to 83 lbs.
P9000HC Medium duty corner mount with manual adjustable swivel
head. Supports up to 83 lbs.
- 4 -
Page 5
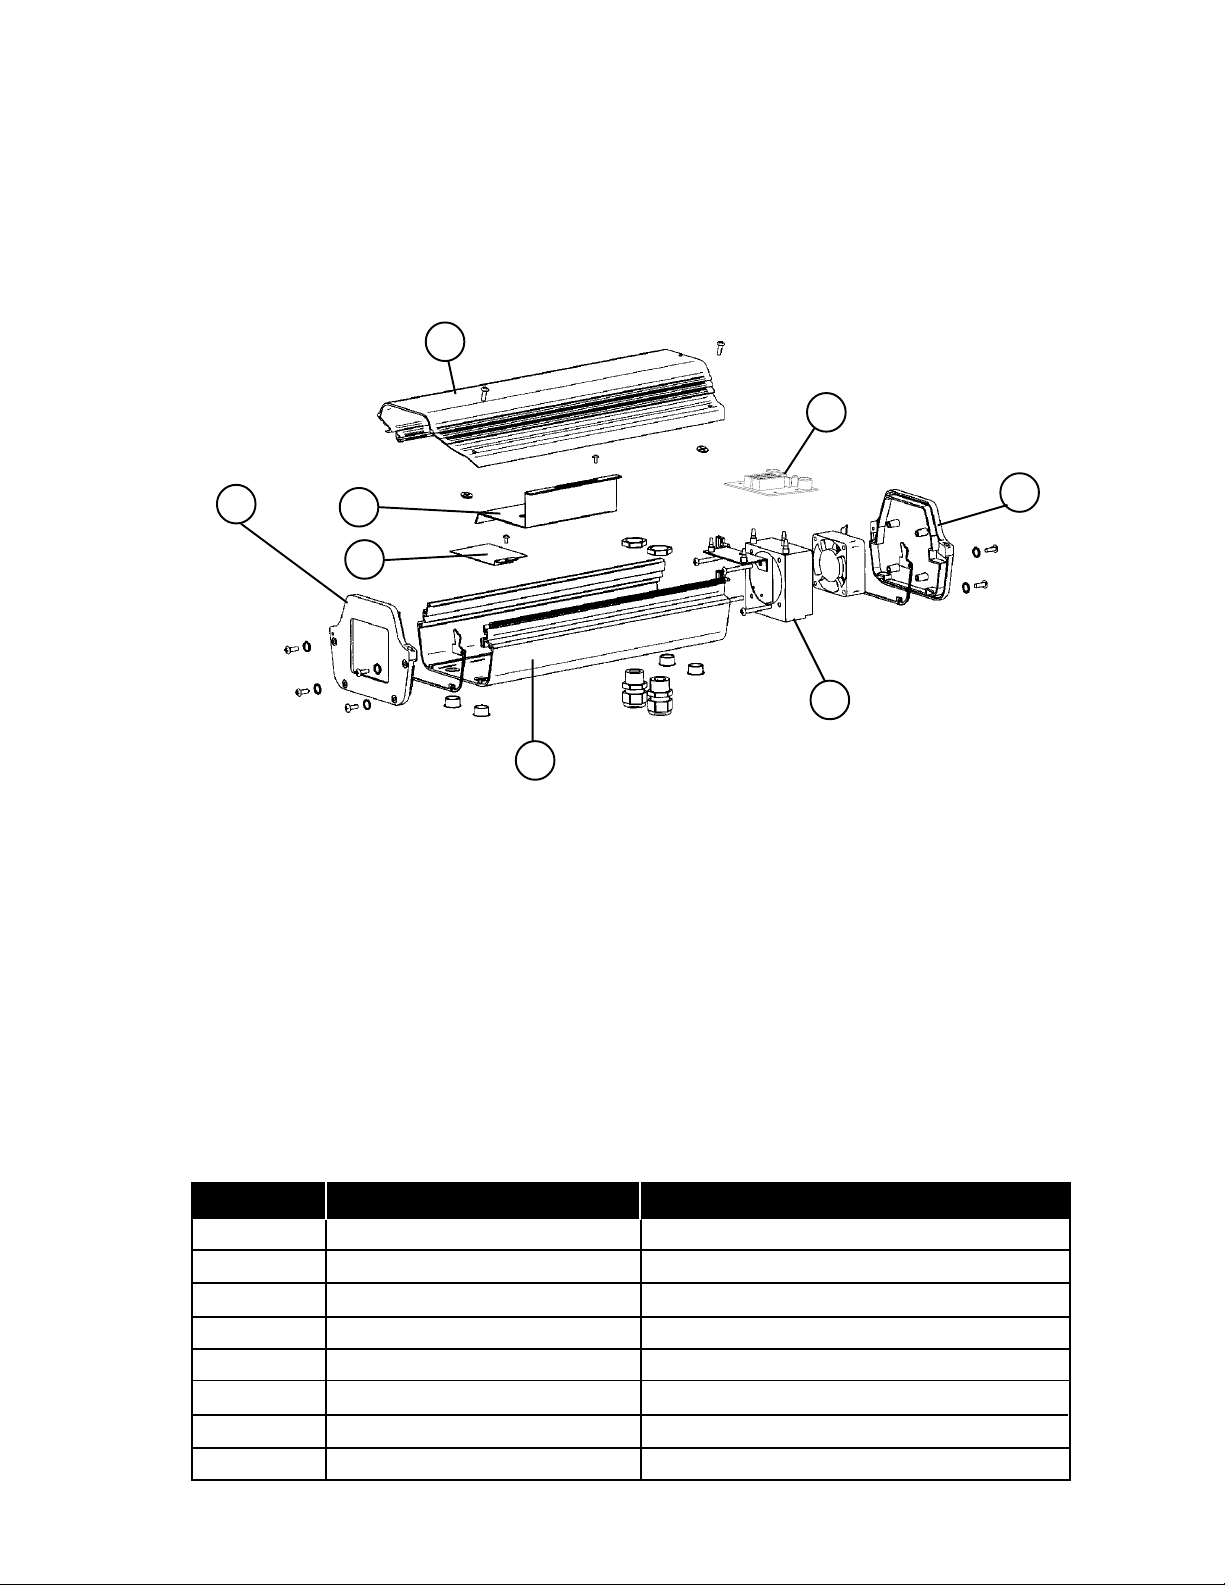
EXPLODED VIEW
3
6
1
5
2
8
7
4
PART DESCRIPTION POH-1000 / POH-1500
1 Front Cap/Window/Gasket 30-VL955
2 Rear Cap/Gasket 30-VL956
3 Top Aluminum Extrusion 30-VL1111
4 Bottom Aluminum Extrusion 30-VL1112
5 Camera Sled 30-VL960
6 Power Board 76-POH15PCB24
7 Blower Assembly B24POH
8 Heater Assembly H24POH
PARTS LIST
- 5 -
Page 6

3. Installation
3.1 Camera Installation
A. To open housing cover:
• Loosen (2) screws on the cover of housing with a phillips head screwdriver.
B. Removing camera mounting sled:
• Loosen camera mount sled screw 1 turn with phillips head screwdriver. Slide
sled to the rear and lift to remove.
Camera Mounting Sled
- 6 -
Page 7

C. To Install CCD Camera:
w
• Mounting CCD camera to camera mounting sled by using the flat
washer and 1/4"-20 x 1/2" bolt.
There are two possible position as shown.
Positions as shown.
Camera mounting Sled
Panasonic
Flat washer x 2
1/4" - 20 x 1/2" bolt x 2
(standard accessory)
D. To install CCD Camera:
• Before installing camera in the housing you must first connect the video out
BNC connector and the power hook-up to camera.
• Tighten the bracket mounting screw to secure the camera assembly on the
housing as shown.
Panasonic
sled scre
NOTE: THE BNC CABLE FOR THE VIDEO
OUTPUT AND THE POWER CABLE ARE ONLY
SUPPLIED WITH THE HB MODEL. THE HB MODEL
COMES WITH THE HEATER KIT (PHK-10) AND
THE BLOWER KIT (PBK-10)
• Seat camera
- 7 -
mount sled leg
into channel.
channel
camera sled
Page 8

3-2 Housing Mount
A. To mount housing according to the chosen bracket or pan/tilt unit.
• Use this hole with WV-831.
NOTE: Seal unused mounting
hole to keep out moisture.
a. WV-831
18mm
• Use these holes with WV-7260D
and P9000 series mount with
plane, spring washer and the
screw provided.
12mm
Long one for
WV-7260D
WARNING: Improper choice of
screw could cause camera damage.
Short one for
P9000 series
b. P9000 HP/HC/HW
c. WV-7260D
- 8 -
Page 9

3.3 System Connection
• From the table below select the appropriate section for system connection. Your
selection will depend upon the type of housing and whether you are using a pan/tilt
unit or a fixed mount.
Model Fix Mount Pan/Tilt
POH1000 Section A Section C
POH1500 Section A Section C
POH1000HB Section B Section D
POH1500HB Section B Section D
Important: Don't connect power input until the completion of all wiring.
Section A: Connecting without powerboard.
(POH1000, 1500 with fix mount)
• Cable entry to the housing as shown.
Note: If using 3/8" or 1/2" conduit, install with proper fittings.
• Cable connect to the camera as shown.
camera
Panasonic
Video
Out
Gen Lock
Panasonic
GND.
24VAC
COM.
Grommet
Cable entry (or Conduit)
Video Out
Note: There are 2 cable entrance holes
on the housings. Sealing off the
unused grommet to keep out
moisture.
- 9 -
Page 10

SECTION B: Connecting with powerboard.
(POH100HB, 1500HB with fix mount)
• Cable entry to the housing as shown.
Panasonic
Grommet
Cable entry (or Conduit)
NOTE: If using 3/8" or 1/2"
conduit install with
proper fittings.
• Connect cable to the powerboard as shown.
To Connect Terminal
Note: There are 2 cable entrance holes
on the housings. Sealing off the
unused grommet to keep out
moisture.
CABLE LENGTH CHART (for power)
AWG SIZE 3 WIRE
#24 ft 33
m10
#22 ft 53
m16
#20 ft 84
m25
#18 ft 130
m39
Heater (2)
Heater(1)
Blower (-) Black
Blower (+) Red
Lens Zoom
Lens Focus
Lens Iris
Lens Common
Not Used
BNC to Camera
The cables from the heater,
the blower, and the zoom lens.
V1
GND
V2
GND
(V1) 24VAC
(V2) 24VAC
Lens Zoom
Lens Focus
Lens Iris
Lens DC Common
Video
Video Shield
Note: The maximum cable length is based on
11 watts power consumption in camera.
Connect to class 2 power supply only.
- 10 -
Page 11

Section C: Connecting with Pan/Tilt (without powerboard)
(POH1000, 1500 with pan/Tilt (WV-7260D)
Cable cut as shown.
AC24V Power
• Camera power - cut pan/tilt cable (CN4) No. 1, 5, 8, then connect to
camera.
Pin Number for CN4
front
Green 8 7 6 5 Black (24VAC)
(Gnd) 4 3 2 1 Red (24VAC)
Zoom lens
• Zoom lens - cut pan/tilt cable (CN3) No. 7, 8, 9, 10. Then connect to
zoom lens connector as shown below (this connector is included with
the zoom lens).
• Cover any unused wires with electical tape.
Female Zoom lens connector Pan Pan/tilt
Grey Blue
Violet White
Pin Number
3 2
4 1
Rear
Pin 1 DC com Pin 7 10 9 8 7 6
Pin 2 Iris Pin 8 5 4 3 2 1
Pin 3 Focus Pin 9
Pin 4 Zoom Pin 10
CN3
CN3
Pin number for CN3
(Front)
Cable Entry
• Cable entry to the housing as shown.
Panasonic
- 11 -
Grommet
Cable entry (or Conduit)
NOTE: If using 3/8" or 1/2" conduit
install with proper fittings.
Page 12

B. Connect cable wires to camera as shown.
Panasonic
Zoom Lens
Note: There are 2 cable entrance holes
on the housings. Sealing off the
unused grommet to keep out
moisture.
GND.
24VAC
COM.
Video Out
Section D: Connection with pan/tilt (with power board)
(POH1000HB, 1500HB with pan/Tilt (WV-7260D)
Cable cut as shown.
AC24V Power
• Camera power - cut pan/tilt cable (CN4) No. 1, 5, 8, then connect to
power board.
The Power Board Pin Number for CN4
(front)
Green 8 7 6 5 Black (24VAC)
(Gnd) 4 3 2 1 Red (24VAC)
- 12 -
Page 13

Zoom lens
• Zoom lens - cut pan/tilt cable (CN3) No. 7, 8, 9, 10. Then connect to
zoom lens connector as shown below (this connector is included with
the zoom lens).
• Cover any unused wires with electical tape.
Female Zoom lens connector Pan Pan/tilt
Pin Number
3 2
4 1
Rear
Pin 1 DC com Pin 7 10 9 8 7 6
Pin 2 Iris Pin 8 5 4 3 2 1
CN3
Pin 3 Focus Pin 9
Pin 4 Zoom Pin 10
Cable Entry
• Cable entry to the housing as shown.
Panasonic
Cable Connect
• Cable connect to the powerboard as shown.
Gray
Violet
Blue
White
pin number for CN3
(front)
Grommet
Cable entry (or Conduit)
NOTE: If using 3/8" or 1/2" conduit
install with proper fittings.
To Connect Terminal
Note: There are 2 cable entrance holes
on the housings. Sealing off the
unused grommet to keep out
moisture.
CABLE LENGTH CHART (for power)
AWG SIZE 3 WIRE
#24 ft 33
m10
#22 ft 53
m16
#20 ft 84
m25
#18 ft 130
m39
Note: The maximum cable length is based on
11 watts power consumption in camera.
Connect to class 2 power supply only.
- 13 -
Heater (2)
Heater(1)
Blower (-) Black
Blower (+) Red
Lens Zoom
Lens Focus
Lens Iris
Lens Common
Not Used
BNC to Camera
The cables from the heater,
the blower, and the zoom lens.
V1
GND
V2
GND
(V1) 24VAC
(V2) 24VAC
Lens Zoom
Lens Focus
Lens Iris
Lens DC Common
Video
Video Shield
Page 14

4. SPECIFICATIONS
A. POH-1000/1000HB
• Dimensions: 5.625" (W) x 4.375" (H) x 11.00" (L)
• Weight:
a. POH-1000 2.8 lbs.
b. POH-1000HB 3.35 lbs. .
• Power Source 24 V AC, 60Hz
• Standard accessories (supplied)
POH-1000, 1000HB -Camera mounting bolt/plain washer.......2pcs.
B. POH-1500/1500HB
• Dimensions: 5.625" (W) x 4.375" (H) x 16.00" (D)
-Housing mounting bolt/ plain washer and
spring washer (for wv-7260D)......................2pcs.
-Housing mount bolt/plain washer and spring
washer (for P9000H series)...........................2pcs.
-Cable strain relief with locknuts................2pcs.
• Weight:
a. POH-1500 3.3 lbs.
b. POH-1500HB 3.85 lbs.
• Power Source 24 V AC, 60 Hz
• Standard accessories (supplied)
POH-1500/1500HB -Camera mounting bolt/plain washer.......2pcs.
-Housing mounting long bolt/ plain washer and
spring washer (for wv-7260D pan/tilt)........2pcs.
-Housing mount short bolt/plain washer and
spring washer (for P9000H series)...............2pcs.
-Cable strain relief with locknuts................2pcs.
C. PBK-10 Blower kit
• Dimensions: 3.00" (W) x 3.00" (H) x 1.50" (D)
• Weight: .45 lbs.
• Power Source 24 V DC, 1.4 Watts
• Standard accessories (supplied) -PCB power board with blower housing and PCB
bracket........................................................1pc.
-Mounting screws/plain and
washers...............................................4pcs.
-PCB standoffs...............................................4pcs.
-Wire Management Clips...................2pcs.
- 14 -
Page 15

D. PHK-10 Heater
• Dimensions: 2.00" (W) x 2.25" (L)
• Weight: 1 lbs.
• Power Source 24V AC, 25 Watts
• Standard accessories (supplied) -PCB power board with mounting bracket....1pc.
E. PSS-10 Sunshield for POH-1000/1000HB
• Dimensions: 5.80" (W) x 2.15" (H) x ?13.25" (L)
• Weight: 1.1 lbs.
F. PSS-15 Sunshield for POH-1500/1500HB
• Dimensions: 5.80" (W) x 2.15" (H) x 18.25" (L)
• Weight: 1.5 lbs.
-Mounting screws/plain and
washers.........................................................4 ea.
-PCB stand-offs...............................................4 ea.
-Wire management clips...............................2 ea.
-1/4" Screw for heater bracket mount......... 1 ea.
5. Outline Drawing
4.375"
Panasonic
POH1000=11.00"/POH1500=16.00"
5.625"
- 15 -
Page 16

All specifications subject to change without notice. Information furnished to Videolarm is believed to accurate and reliable. However, no responsibility or liability is assumed
by Videolarm for its use, nor for any infringement of patents or other rights of hired parties which may result from its use. No license is granted by implication or otherwise
under any patent or other rights of Videolarm.
Copyright 1994 by Videolarm Inc. All rights reserved
Printed in U.S.A. 3020/0197
- 16 -
 Loading...