

Panasonic PanaVoice Guide

Contents
CHAPTER.1
Introduction
......................................... 1
About the voice messaging system
CHAPTER-2
Planning the
ldentifying the system
Deciding how to
application.. ....................
manager..
answer calls.. ...............
Tailoring the automated attendant to
your customer’s site
.........................
Completing the System Setup
Worksheet
System Setup Worksheet
CHAPTER-3
........................................ 16
......................
Installing the voice messaging
system ...........................................
P:eparing to install the voice
messaging system
Telephone system requirements
Preparing the telephone system
Installing the telephone system
Testing the single-line
Connecting the voice messaging
system to the telephone system
............................ 20
ports .................
......
........... 6
19
.......... 22
.......... 26
...........
28
31
..... .33
CHAPTER-4
Setting up
.2
Accessing the technician’s
conversation
the application..
....................................
Initializing the system
5
Identifying the telephone system..
Choosing how to handle calls
8
Creating voice mailboxes
Identifying the operator’s extension
12
and the Operator mailbox
Using the voice messaging system’s
...................................... 50
17
fax support
Setting
system options..
Special dialing characters
Setting the voice messaging system
to perform regular maintenance..
Protecting the voice messaging
system’s data
................................... 56
Changing the technician’s password..
Learning call
Checking system
progress tones ................
information
Testing the voice messaging system
Enhancing the voice messaging
system’s
CHAPTER-5
performance ......................
Training the system manager
Training the system
...............
........................... 38
...... .40
.............. 42
.....................
............... 48
.......................
....................
.... 54
............... 70
... .72
............
manager
............... 80
35
36
44
52
53
. .58
60
76
79
CONTENTS
. . .
1 i 1
CONTENTS
_-
.
:.
:
CHAPTER-6
Remote Maintenance
Remote Maintenance overview..
........................ 83
..........
84
Connecting to the voice messaging
system by using Direct Connect
.....
.85
Connecting to the voice messaging
system with a modem
......................
86
Installing the Remote Maintenance
software on the support
computer .........................................
Disabling the mouse ............................
88
89
Getting started on the support
computer ........................................
90
Setting up the support computer’s
phone book .....................................
92
Conducting a Remote Maintenance
session .............................................
94
Suspending and resuming a Remote
Maintenance session.. ...................... 96
Ending a connection
............................
97
Backing up and restoring the voice
messaging system ............................
Transferring files
.................................
Managing files ....................................
98
102
106
Restarting the voice messaging
system remotely .............................
108
Tracking Remote Maintenance
sessions with the billing log ........... 1 IO
CHAPTER.7
Troubleshooting with the console . . . 115
Console overview . . . . . . . . . . . . . . . . . . . . . . . . . . . . . . . 116
System manager’s screen . . . . . . . . . . . . . . . . . . . 120
Technician’s screen . . . . . . . . . . . . . . . . . . . . . . . . . . . . . 122
CHAPTER*8
Creating system reports..
Creating system reports..
Viewing
Usage reports
Call log
Subscriber report
APPENDIX
earlier reports
....................................
...............................................
...............................
l
A
................
...................
.......................
125
126
128
130
132
136
Changing system options . . . . . . . . . . . . . . . . 137
System Options Worksheet . . . . . . . . . . . . . . . .
Call Progress Options Worksheet . . . . . . 154
System options by option number . . . . . 160
APPENDIX. B
138
Troubleshooting system options . . . . . 171
Quick Diagnostic Guide . . . . . . . . . . . . . . . . . . . . .
APPENDIX
TED Utility
Using the TED Utility
TED commands
APPENDIX. D
l
C
. . . . . . . . . . . . . . . . . . . . . . . . . . . . . . . . . . . . . . .
. . . . . . ..*.................
. . . . . . . . . . . . . . . . . . . . . . . . . . . . . . . . . .
172
179
180
182
Using the voice messaging
system’s LED patterns for
troubleshooting
Normal operation
Startup sequence
Glossary
Index
. . . . . . . . . . . . . . . . . . . . . . . . . . . . . . . . . . . . . . . . . . .
. . . . . . . . . . . . . . . . . . . . . . . . . . . . . . . . . . . . . . . . . . . . . . .
. . . . . . . . . . . . . . . . . . . . . . . . . . .
. . . . . . . . . . . . . . . . . . . . . . . . . . . . . .
. . . . . . . . . . . . . . . . . . . . . . . . . . . . . . .
185
186
187
195
203
iv PANAVOICE S-SERIES TECHNICIAN’S GUIDE
Introduction
About the voice
messaging system . . . . . . . . . . . . . . . . . . . . .
2
INTRODUCTION 1
j
li
i’
:
About the voice messaging system
Installation is quick and easy
Using the Technician’s Guide
.?
;.
-..
. . -
;
.7%-b
:
hx&lling the voice messaging system is
quick and
easy.
Your customer does much
of the system setup and customization, so
you handle fewer details during installation.
The voice messaging system is simple to
use, so minimal training is required. People
introduce themselves to the-system as they
use it.
Understanding your customer’s
telephone system
You must be familiar with the basics of the
telephone system that you are connecting
to the voice messaging system, including
how to program the available features. For
information, refer to page 28.
This
Technician’s Guide
provides information essential to planning the system setup
before you access the technicians conversation. The guide is organized in a series of
easy-to-follow chapters:
0
“Planning the application’
0
“Installing the voice messaging system”
0
“Setting up the application’
l
“Training the system manager’
.
2
PANAVOICE S-SERIES TECHNICIAN’S GUIDE
ABOUT THE.VOICE MESSAGING SYSTEM
The System Setup Worksheet contained
in the next chapter helps you obtain and
organize all of the information you need
before you begin the actual setup.
The system manager at your customer’s site
can perform most maintenance to the voice
messaging system. If a problem occurs,
however, this guide also includes the
following troubleshooting information:
l
Remote Maintenance
l
Troubleshooting with the console
l
Creating system reports
INTRODUCTION
3
Planning
application
the
Identifying the system
Deciding
Tailoring the automated attendant to your
customer’s site
Completing the System Setup Worksheet . . . . . . . 16
System
how to answer calls . . . . . . . . . . . . . . . . . . . . . . . . . . . . . . .
Setup Worksheet
manager
. . . . . . . . . . . . . . . . . . . . . . . . . . . . . . . . . . . . . . . . . . . . . . . .
. . . . . . . . . . . . . . . . . . . . . . . . . . . . . . . . . . .
. . . . . . . . . . . . . . . . . . . . . . . . . . 6
8
12
17
PLANNING THE APPLICATION
5
‘. g
-.,’
‘1
:’
’
Identifying the system manager
The system manager is your liaison with
the company and makes basic installation
decisions. Identifying a system manager
and giving that person the information
necessary to make these decisions helps
you complete the installation quickly and
easily.
If the system manager has not already been
selected, you need to recruit a person to
take on the responsibilities.
Initial duties
Help make decisions about how to set
up the voice messaging system
Configure and customize the system
Provide minimal training to the operator
and subscribers
Answer coworkers’ questions as they
open their mailboxes
Answer basic questions about the voice
messaging system
See
also
Training the system manager . . . . . . . . . . . . . . . . . . . . 79
6
PANAVOICE S-SERIES TECHNICIAN’S GUIDE

IDENTIFYING THE SYSTEM MANAGER
Ongoing duties
l
Verify that the voice messaging system is
running normally
. Record holiday greetings; set holiday
operation
l
Add, delete, and reassign mailboxes
l
Set up and maintain the menu keys
l
Set up and maintain message groups
The System Manager’s Guide
Being system manager is easy and takes
very little time. Most of the system manager’s time is spent during the start-up
process immediately after installation.
Complete, step-by-step instructions for
all system manager duties are given in
the System Manager’s Guide.
Encourage the system manager to read
Chapter
2,
“Planning your system’ in the System
1,
“System overview” and Chapter
Manager’s Guide before you begin the
installation.
If the system manager reads this material,
he or she can better help you make installation decisions.
PLANNING THE APPLICATION 7
Deciding how to answer calls
Before you connect the voice messaging
system to the telephone system, you need
to answer two questions:
Will the operator answer all calls, with
the voice messaging system being used
for voice mail only, or will ‘the system
help answer calls and transfer them to
internal extensions?
If the system will help answer calls (the
automated attendant feature), will it
answer all calls or only overflow calls?
Deciding whether to use call transfer
Some customers want the operator to .handle all incoming calls, using the voice
messaging system primarily for its voice
mail features. For these sites, you turn off
the voice messaging system’s call transfer
feature. The voice messaging system then
acts as a voice mail “post office,” collecting
and delivering voice mail messages but not
transferring calls to other extensions.
Some customers want the voice messaging
system to help the operator answer incoming calls and transfer calls to extensions.
For these customers, you and the system
manager need to determine how to set up
the automated attendant.
.
_ :
. .
?
.,
<-.
See also
Tailoring the automated attendant to
your customer’s site
Choosing how to handle
. . . . . . . . . . . . . . . . . . . . . . . . . . . . . . .
calls . . . . . . . . . . . . . . . . . . . . 42
If your customer wants the operator to
handle all incoming calls, read “Using the
voice messaging system for voice mail
only.” If your customer chooses to have the
voice messaging system answer some or all
calls, read “Using the voice messaging systems automated attendant,” later in this
chapter.
When you initialize the voice messaging
system, you indicate the customer’s choices
about call transfer by selecting an application method. For details, see “Choosing
how to handle calls.”
12
8 PANAVOICE S-SERIES TECHNICIAN’S GUIDE
DECIDING HOW TO ANSWER CALLS
Using the voice messaging system for
voice mail only
Your customer may want the voice messaging system set up as an extension of the
telephone system, with no external lines
answered by the voice messaging system.
Internal callers can check messages and
leave messages by dialing ihe voice mail
extension. Outside callers can reach voice
mail during business hours.
l
The operator can transfer the call to
voice mail manually
l
If the telephone system supports call
forwarding, callers can be transferred
to voice mail automatically when an
extension is busy or not answered.
Voice mail can also be available after business hours. If the telephone system has a
“night ring” feature, you can program it to
route incoming calIs to the voice messaging
systems extension.
Later in the installation process, the system
conversation asks you to pick an applica-
tion method. To turn off call transfer,
choose “Application Method 3: Voice
Mail On&.”
Note
When call transfer is turned off, your
customer cannot use the fax detection or
menu key features.
PLANNING THE APPLICATION
9
DECIDING HOW TO ANSWER CALLS
:
. .
Using the voice messaging system’s
automated attendant
Your customer may want the voice messaging system to help the operator answer and
transfer calls and to transfer callers to voice
mail during nonbusiness hours. This is the
automated attendant feature.
What is the automated,attendant?
As an automated attendant, the voice
messaging system answers, greets, and
routes incoming calls. Callers hear an
opening greeting that gives them
instructions and options.
The automated attendant lets an external caller with a touchtone telephone
reach a person directly by dialing an
extension number. Callers who do not
know the correct extension number can
use the system’s directory assistance
feature.
The voice messaging system listens for
touchtones while playing the opening.
greeting. Ifthe caller dials avalid extension, the voice messaging system
transfers the call, ringing that extension.
A valid extension is one with a corre-
sponding voice mailbox.
During business hours, callers who
need personal assistance can dial 0 at
any time to reach the operator. The
voice messaging system even handles
callers who are not using a touchtone
telephone-for callers who do not
respond during the opening greeting,
the voice messaging system then transfers to the operator automatically.
Calls can route to voice mail
If the extension is busy or unanswered,
the voice messaging system places the
caller in the extension’s voice mailbox.
The caller hears a personal greeting
from the subscriber (“Hi, this is Chris.
I’m away from my phone right now...“).
After the personal greeting plays, the
caller can leave a message.
.i
10 PANAVOICE S-SERIES TECHNICIAN’S GUIDE
DECIDING HOW TO ANSWER CALLS
Automatic fax routing
If the voice messaging system hears a fax
tone when it answers, it transfers the call
to a fax machine connected to a specified fax extension. Callers can also dial
the fax machine extension and then
manually send a fax. Your customer does
not need a separate fax telephone num-
ber or a dedicated external line. ..
Menu key shortcuts
The voice messaging system menu key
feature lets the system manager create
simple menus that callers can choose
from during the opening greeting. With
a single touchtone, callers can transfer
to a specified extension (“For sales,
press 1.“) or hear a recorded message
(“For product information, press 2.“).
lIenu keys are explained in detail in the
System Manager’s Guide, Chapter 5,
“Maintaining your system.”
You and the system manager must decide
how to distribute the incoming call load
between the automated attendant and the
operator. The next topic, “Tailoring the
automated attendant to your customer’s
site,” helps you make this decision.
The automated attendant does not
replace an operator, of course, but it
does streamline the routine.
-
PLANNING THE APPLICATION 1 1
Tailorina
the automated attendant
custom&% site
to your
In programming the telephone system
software and connecting the voice messaging system, you controT three variables that
determine when the automated attendant
answers an outside line:
Which external lines the voice messag-
l
ing system answers
How the external lines are~grouped
l
How many external lines the voice
l
messaging system wiLl handle at once
This flexibility lets you tailor the automated
attendant operation to best suit your customer’s needs.
Which external lines the voice
messaging system will answer
The voice messaging system can answer
the organization’s lead telephone number (primary attendant), a secondary
number (secondary attendant), or a line
that is dedicated to the voice messaging
system (private attendant).
12
PANAVOICE S-SERIES TECHNICIAN’S GUIDE
TAILORING THE AUTOMATED All-ENDANT TO YOUR CUSTOMER’S SITE
How external lines are grouped
You can divide the external lines into
two groups, and connect the voice
messaging system to just one group.
This isolates the voice messaging system
from general calls and makes it available
only to subscribers, callers who dial it
directly, and callers transferred by the
operator. In this case, the voice messaging system functions as a private attendant.
How many external lines the voice
messaging system handles at once
As part of programming the telephone
system, you determine how many external lines connect to the voice messaging
system. You can allocate one line, several
lines, or all available external lines.
PLANNING THE APPLICATION f
3
TAILORING THE AUTOMATED Al-t-ENDANT TO YOUR CUSTOMER’S SITE
se..
When you consider what external lines to
connect to the voice messaging
system,
keep these factors in mind:
Average and peak telephone traffic
Note
Iftoo many ports are answering calls,
subscribers may experience delays when
checking voice mail.
If peak traflic ties up all of the voice
messaging system ports with incoming
calls, subscribers cannot call in to leave
and receive messages. I -
The number of external lines available
If the number of external lines is limited,
your customer must decide which has
priority on incoming calls: the operator,
the automated attendant, or voice mail
operations.
*-
-\.
,i
The number of the voice messaging
system ports available
A four-port system can handle more
lines than a two-port system.
The speed of the telephone system
in making transfers.
Telephone systems that allow the voice
messaging system to release a call on
transfer can handle higher automated
attendant traffic than those that must
wait for a ring or an answer.
14
PANAVOICE S-SERIES TECHNICIAN’S GUIDE
TAILORING THE AUTOMATED ATTENDANT TO YOUR CUSTOMER’S SITE
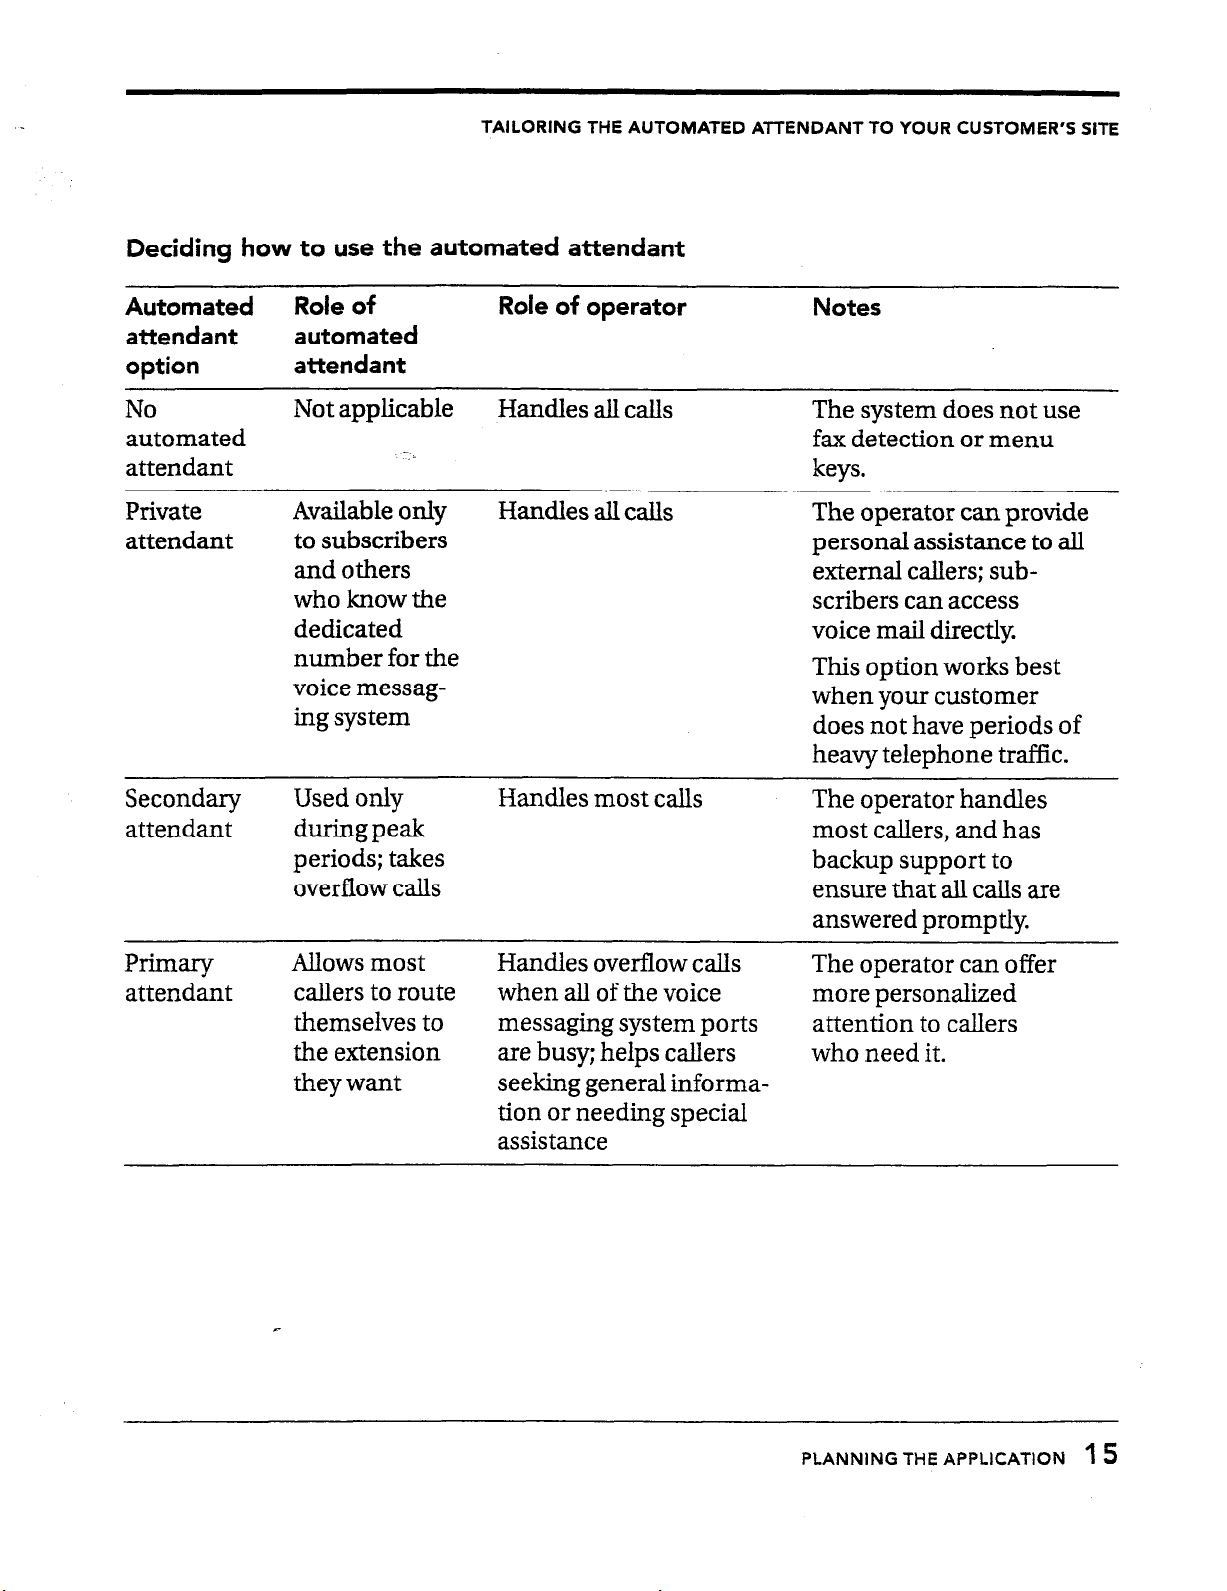
Deciding how to use the automated attendant
Automated
attendant
option
No
automated
Role of Role of operator
automated
attendant
Not applicable
Handles all calls
Notes
The system does not use
fax detection or menu
attendant keys.
Private
attendant
Available only
to subscribers
and others
who know the
dedicated
number for the
voice messag-
ing sys tern
Handles all calls
The operator can provide
personal assistance to all
external callers; subscribers can access
voice mail directly
This option works best
when your customer
does not have periods of
heavy telephone traffic.
Secondary
attendant
Used only
duringpeak
periods; takes
overflow calls
Handles most calls
The operator handles
most callers, and has
backup support to
ensure that all calls are
answered promptly.
Primary
attendant
Allows most
callers to route
themselves to
the extension
theywant
Handles overflow calls
The operator can offer
when all of the voice more personalized
messaging system ports attention to callers
are busy; helps callers who need it.
seeking general information or needing special
assistance
PLANNING THE APPLlCATlON 1 5
Completing the System Setup Worksheet
There are several additional factors that you
and your customer must consider in planning the system setup. Each of the setup
tasks is explained in Chapter 4, “Setting up
the application.” That chapter explains the
decisions your customer must make about
the site. As you and the system manager
decide how to set up the voice messaging
system, note the decisions on the System
Setup Worksheet.
You must complete the System Setup
Worksheet before accessing the technicians
conversation for two reasons:
* The conversation asks you for codes that
you must determine ahead of time.
l
The worksheet provides a record of the
choices you have made, in case you
need to reinitialize the system.
When you complete the System Setup
Worksheet, program the telephone system,
and then set up the voice messaging system
through the technician’s telephone conver-
sation. The technician’s conversation guides
you
through all of the setup tasks with
simple questions and instructions. The
System Setup Worksheet reflects the structure of the technicians conversation.
2
See also
Accessing the technician’s
conversation
16 PANAVOICE S-SERIES TECHNICIAN’S GUIDE
. . . . . . . . . . . . . . . . . . ..*.......*.............. 36
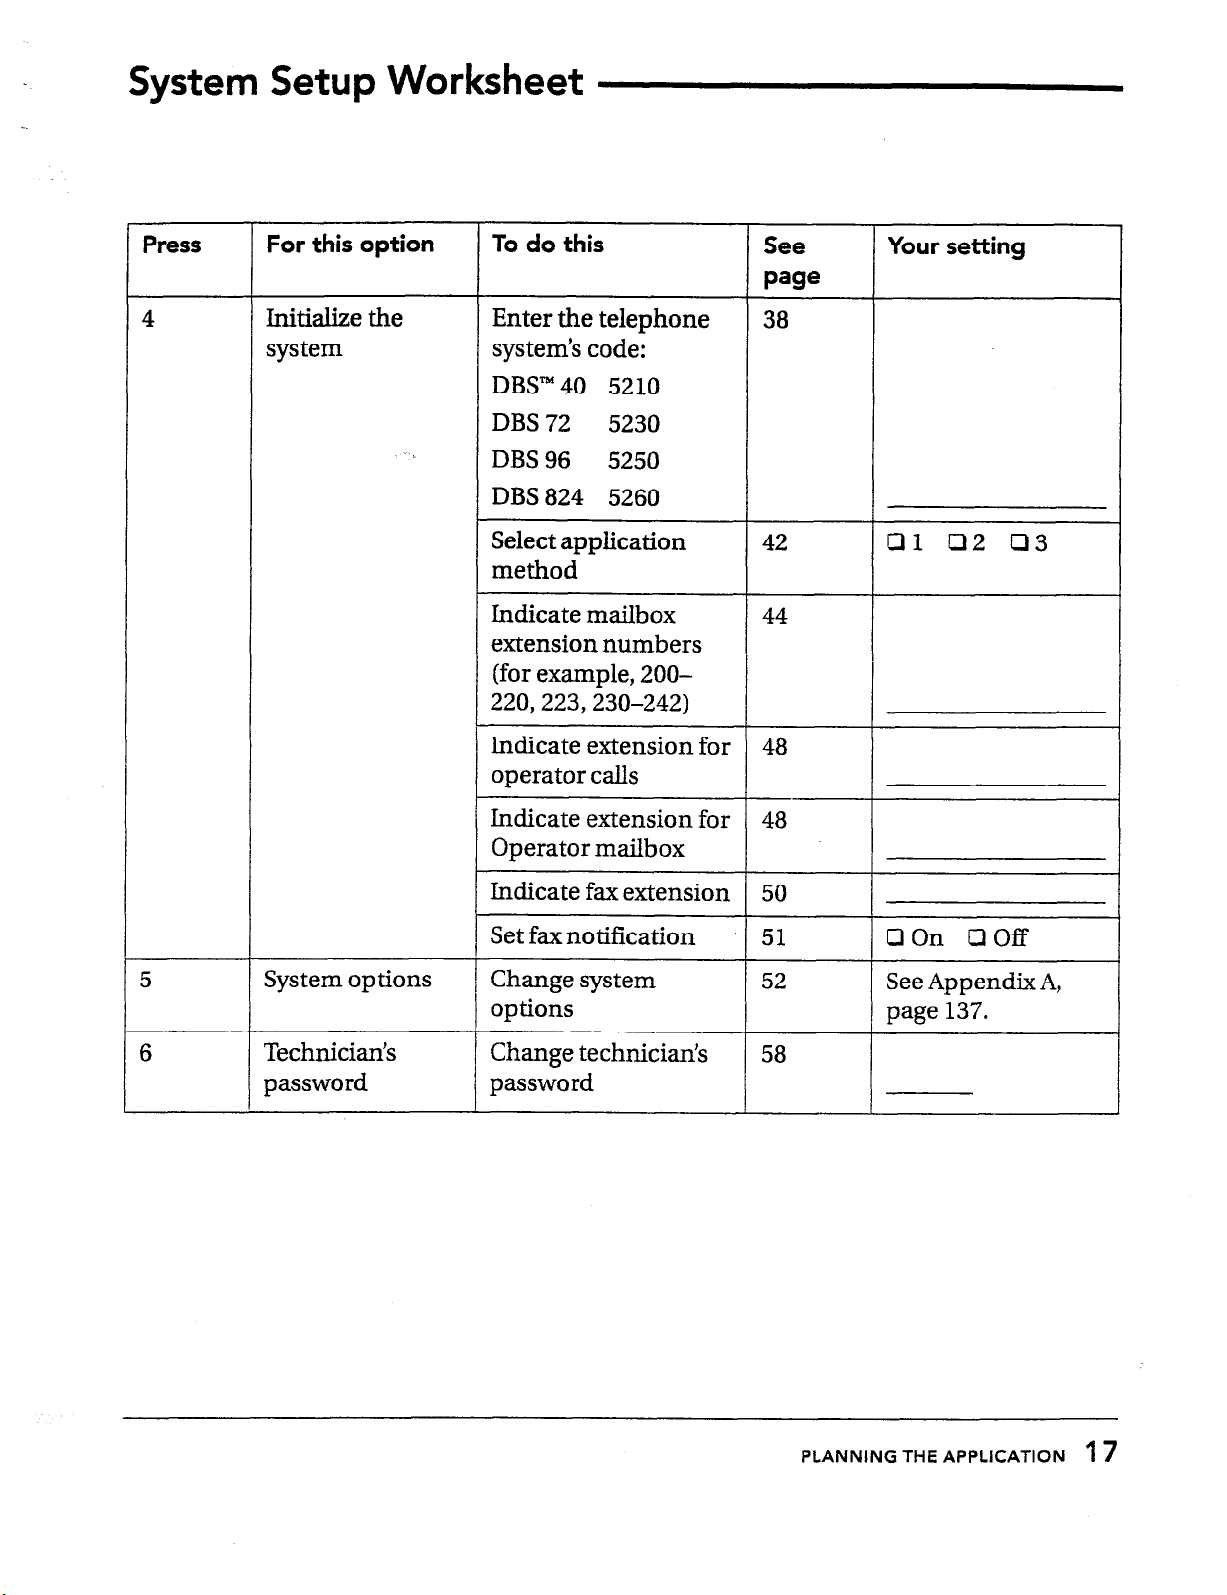
System Setup Worksheet
Press
4
For this option
Initialize the
sys
tern
To do this
Enter the telephone
system’s code:
DBS” 40 5210
DBS 72 5230
DBS 96 5250
DBS 824 5260
Select application
method
Indicate mailbox
extension numbers
(for example, 200220,223,230-242)
Indicate extension for
operator calls
Indicate extension for
Operator mailbox
See
Page
38
44
::
48
Your setting
01 02 03
I
5
6
System options
Technician’s
password
-
Indicate fax extension
Set fax notification
Change system
options
r
-r
Change technician’s
password
L
50
51
PLANNING THE APPLICATION 1
I
1 OOn LlOff
7
Installing the
voice messaging
system
Preparing to install the voice messaging
system . . . . . . . . . . . . . . . . . . . . . . . . . . . . . . . . . . . . . . . . . . . . . . . . . . . . . . . . . . . . .
20
Telephone system
Preparing the telephone system . . . . . . . . . . . . . . . . . . . . . . . .
Installing
Testing the single-line
Connecting the voice messaging system
to the telephone
the
requirements . . . . . . . . . . . . . . . . . . . . . . . .
telephone
system . . . . . . . . . . . . . . . . . . . . . . . . .
ports . . . . . . . . . . . . . . . . . . . . . . . . . . . . . . .
system . . . . . . . . . . . . . . . . . . . . . . . . . . . . . . .
22
26
28
31
33
INSTALLING THE VOICE MESSAGING SYSTEM 1
9
Preparing to install
the
voice messaging system -
Installing and setting up the voice messaging
system
are simple tasks because
there
are no components to install or configure.
You simply connect the unit
tomer’s telephone system, plug it in to an
electrical outlet, and install the batteries.
Choosing a suitable location
The most efficient location for the voice
messaging system meets the following
conditions:
The voice messaging system must be
near the main unit of your customer’s
telephone system because the voice
messaging system is wired directly to it.
A short and neat wiring run is easiest
to set up and maintain.
The voice messaging system is hung on
a wall so that the connectors are on the
right side and the LEDs are clearly
visible on the left.
to your cus-
Warning!
Stacking anything on top of the
voice messaging system may damage it and
voids the warranty. It is strongly recom-
mended that you hang the voice messaging
system on a wall.
Avoid areas that are:
l
Unusually cold (below 50”F/ 1O“C). , -
l
Unusually hot (above
l
Highly humid (above 80% relative
humidity).
l
Exposed to direct sunlight.
l
Subject to heavy vibrations.
l
Poorly ventilated. (The heat generated
by the voice messaging system and
other equipment can quickly raise the
temperature of an enclosed space well
above the voice messaging system’s
operating limits.)
90°F/28”C).
.
There is ample clearance between the
voice messaging system and any other
equipment so that you can easily reach
the connectors.
The voice messaging system is relatively
undisturbed but accessible. Although
the voice messaging system itself does
not require any maintenance, there may
be situations when you connect to it for
backing up the system, viewing the
system screens, or creating system
reports.
20
PANAVOICE S-SERIES TECHNICIAN’S GUIDE
PREPARING TO INSTALL THE VOICE MESSAGING SYSTEM
The voice messaging system’s power
SUPPlY
The voice messaging system requires
electrical power that is free from voltage
drops, surges, and related problems. For
this reason, avoid connecting the voice
messaging system to an outlet on a circuit
shared by equipment wiih large motors-
especially motors that stop and start
frequently. Circuits shared by refrigerators,
heating and cooling equipment, or large
photocopiers frequently interfere with the
normal operation of telephone and computer systems. Always use a surge protector
to connect the voice messaging system to
the electrical circuit.
The voice messaging system has eight AA
batteries to protect its database during a
power outage. The voice messaging system
automatically monitors battery voltage and
sends a message to the system manager
and Operator mailbox when batteries
must be changed.
Warning!
age the
Power fluctuations can dam-
voice messaging system. If your site
is subject to power fluctuations, we recommend that you connect the voice messaging
system to a dedicated circuit or a UPS
(uninterruptible power suppiy).
Notes
l
Both the voice messaging system and
the modem use transformers to connect
to electric power. Because of these
transformers’ size, we recommend that
you connect them to a power strip.
l
The voice messaging system’s batteries
do not keep the voice messaging system
running, but they do prevent the loss of
valuable database information during a
power outage.
INSTALLING THE VOICE MESSAGING SYSTEM
21
Telephone system requirements
::f?
.-
Preparing your customer’s telephone
system to support the voice messaging
system is straightforward. To complete this
step, you must know how to program the
telephone to work with voice mail. For
information, refer to page 28.
After ensuring that the customers tele-
phone system meets the voice messaging
system’s requirements, follow. the instructions in “Preparing the telephone system’
and “Testing the single-line ports” later in
this chapter, before connecting the voice
messaging system to the telephone system.
General telephone system
requirements
The telephone system must be equipped
with an SLT-Adapter. Each voice messaging
system port connects and operates as a
single-line telephone. A two-port system
needs two, single-line telephone connections, and a four-port system needs four
connections on the telephone system.
The single-line connection points on the
telephone system are also called ports. In
other words, a voice messaging system port
connects to a single-line telephone port on
the telephone system.
“I .
22
PANAVOICE S-SERIES TECHNICIAN’S GUIDE
TELEPHONE SYSTEM REQUIREMENTS
To work with the voice messaging system,
each single-line telephone port must meet
two requirements:
90
l
Volt AC ringing, the industry standard. The single-line port must generate
this ring signal for the voice messaging
system to recognize and answer an
“incoming” call.
DTMF (touchtone) signals must be
l
passed to the voice messaging system
ports through the single-line port. In
addition, the telephone system must be
able to receive and interpret the DTMF
signals that the voice messaging system
transmits.
Your customer’s telephone system provides
single-line support through the SLT-
Adapter, a small box or cabinet that may be
located near the telephone system cabinet.
The module connects to and converts one
or more electronic key telephone connections to single-line port service. The
module’s single lines terminate in standard
modular jacks. The voice messaging system
ports connect to the telephone system
through leads connected to these singleline jacks.
External modules usually include AC
ringing and DTMF signaling support.
INSTALLING THE VOICE MESSAGING SYSTEM
23
TELEPHONE SYSTEM REQUIREMENTS
,.-.
,..
Special telephone system capabilities
The voice messaging system offers several
voice mail features that take advantage of
special capabilities found on some telephone systems. The voice messaging
system’s feature and the corresponding
telephone system capabilities are described
as follows.
Message notification
The voice messaging system can notify ti
subscriber of new messages. It does this
in one of the following ways:
l
_
Activating a message waiting lamp at
the extension telephone
0
Activating a special dial tone at the
extension telephone
Calling the extension telephone at
30minute intervals to deliver
messages
Announcing that messages are
waiting when the subscriber calls the
system
24 PANAVOICE S-SERIES TECHNICIAN’S GUIDE
Call
forward to personal greeting
When call forwarding is supported,
the telephone system automatically
forwards calls to the voice messaging
system when an extension is busy or
unanswered. When the telephone
system forwards a call to the voice
messaging system, it sends a follow-
along ID. This ID identifies the extension
the call was forwarded from. When the
voice messaging system answers the
forwarded call, it hears the follow-along
ID information, and knows to transfer
the call directly to the extension’s voice
mailbox.
a
TELEPHONE SYSTEM REQUIREMENTS
Easy message access
This feature lets a subscriber check
messages by pressing a single button
on the telephone. To do this, the voice
messaging system takes advantage of
programmable speed dialing offered by
some telephone systems. The speed dial
key at each extension must be programmed to dial the voice messaging
system, wait
for an answer, then send
the appropriate DTNE signals to identify the correct mailbox and retrieve
messages.
INSTALLING THE VOICE MESSAGING SYSTEM
25
Preparing the telephone system
To prepare the telephone system for the
voice messaging system, follow these six
steps. Depending on the telephone system
you are connecting to, you may need to
perform additional stens.
Install the hardware.
Cl
Install the SLT-Adapter (refer to Section
300
of the DBS manual) on the telephone system to make it fully compatible with the voice messaging system.
Program the telephone system.
cl
Program the telephone system software
to work with the voice messaging system.
Refer to your telephone system documentation for more information.
Cl Connect a fax machine for the voice
messaging system s&ice.
To use the voice messaging system fax
support features, connect a fax machine
to a telephone system extension, not an
incoming trunk line. The fax extension
you use cannot have a voice mailbox.
If your customer has more than one
fax machine and the telephone system
supports hunt groups, create a hunt
group for fax service and connect the
fax machines accordingly The voice
messaging system transfers fax calls to
the pilot extension number for the hunt
group.
,’
ml
1.
Program individual extensions.
Ll
On some telephone systems, you must
enable call forwarding and easy message
access at each extension.
PANAVOICE S-SERIES TECHNICIAN’S GUIDE
25
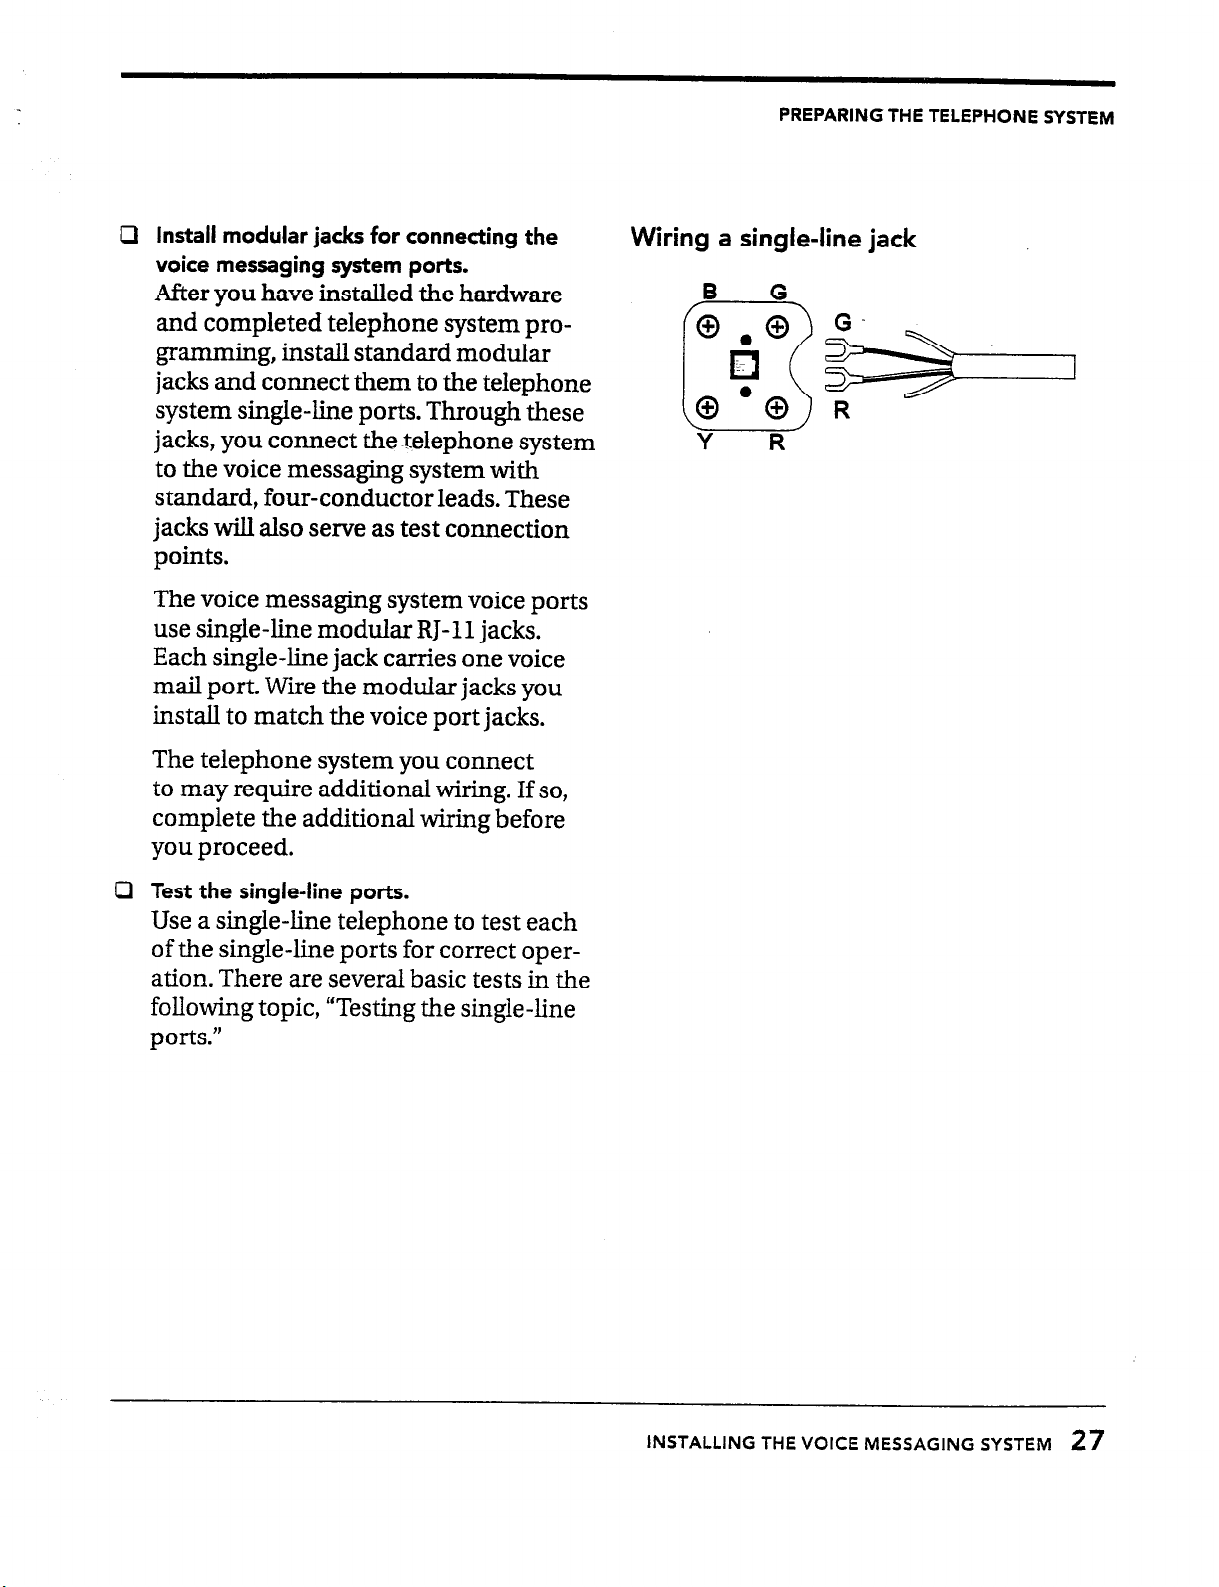
Install modular jacks for connecting the
a
voice messaging system ports.
After you have installed the hardware
and completed telephone system programming, install standard modular
jacks and connect them to the telephone
system single-line ports. Through these
jacks, you connect the telephone system
to the voice messaging system with
standard, four-conductor leads. These
jacks will also serve as test connection
points.
The voice messaging system voice ports
use single-line modular RJ-11 jacks.
Each single-line jack carries one voice
mail port. Wire the modular jacks you
install to match the voice port jacks.
PREPARING THE TELEPHONE SYSTEM
Wiring a single-line jack
,B G-
Y R
The telephone system you connect
to may require additional wiring. If so,
complete the additional wiring before
you proceed.
Test the single-line ports.
a
Use a single-line telephone to test each
of the single-line ports for correct oper-
ation. There are several basic tests in the
following topic, “Testing the single-line
DOrtS.”
INSTALLING THE VOICE MESSAGING SYSTEM
27

Installing the telephone system
..
..:;‘
..__
.?
::
.:
: I
The following items are necessary to
connect to the voice messaging system.
For
the DBS 40,72, or 96
Cl CPC-All Software (9.01 or later)
c3 SLT-Adapter
For the DBS 824
Cl CPC-S or M software (3.03 or later)
Cl SLT-Adap ter
Preparatory programming requirements
The telephone system requires ‘the following programming before connecting to the
voice messaging system:
Definition of hardware
cl
Program the telephone system to
identify the SLT-Adapter.
Hunt group ring assignments
0
Program the hunt group assignments
for all extension numbers that ring the
voice messaging system. When programming, assign a “Hunt Group Pilot
Number or Group Hunting Code” for the
voice messaging system. This code is the
extension number that rings the voice
messaging system.
Program call overflow
cl
Program the options for busy voice port
conditions. Incoming calls may be
forwarded to an attendant or operator
when the voice ports are busy.
_ _.._ r. _
PANAVOICE S-SERIES TECHNICIAN’S GUIDE
28
INSTALLING THE TELEPHgNE SYSTEM
Special programming requirements
The following procedures are the minimum
required programming to ensure the proper
ftmctioning of the telephone system with
the voice messaging system.
Caution
When setting other telephone
system options, be sure. to avoid conflicts
with the settings in these procedures.
Conflicting options may affect the proper
functioning of the voice messaging system.
To assign a terminal type to each voice port
Enter programming mode.
Press
FF3.
Dial the first voice port extension
number (for the DBS
40,72,
or 96, range:
9-72; for the DBS 824, range: 3-24) The
display shows “EXT Xxx PROGRAM.”
Press 2#. The display shows “EXT Xxx
002: XX” (the telephone type).
Do one of the following:
To enable the disconnect signal on each voice
Port
1 Press FF3.
2 Dial the voice port extension numbers
(for the DBS 40,72,96, range: 9-72; for
the DBS 824, range: 3-24). The display
shows “EXT XXX PROGRAM.”
3 Do one of the following:
l
For the DBS 40,72, or 96, press 46#.
The display shows “EXT XXX 046: 0
(AEC DISCONNECT) .”
l
For the DBS 824, press 45#. The
display shows “EXT Xxx 045: 0 (SLT
DISCONNECT) .”
4 Press 1 to enable sending the disconnect
signal to the voice messaging system
when the caller hangs up.
5
Press
HOLD to go
to the next voice port
extension number.
6 Repeat steps 4 and 5 for each voice port
extension number.
l
For the DBS
40,72
or 96, press 15 (for
third-party voice mail through OPX;
this type includes the SIT-Adapter).
l
For the DBS 824, press
15
(for third-
party voice mail through the SLT-
Adapter) .
Press HOLD to go to the next voice port
6
extension number.
Repeat steps 5 and 6 for each voice port
7
to be programmed.
INSTALLING
THE VOICE MESSAGING SYSTEM
29
 Loading...