

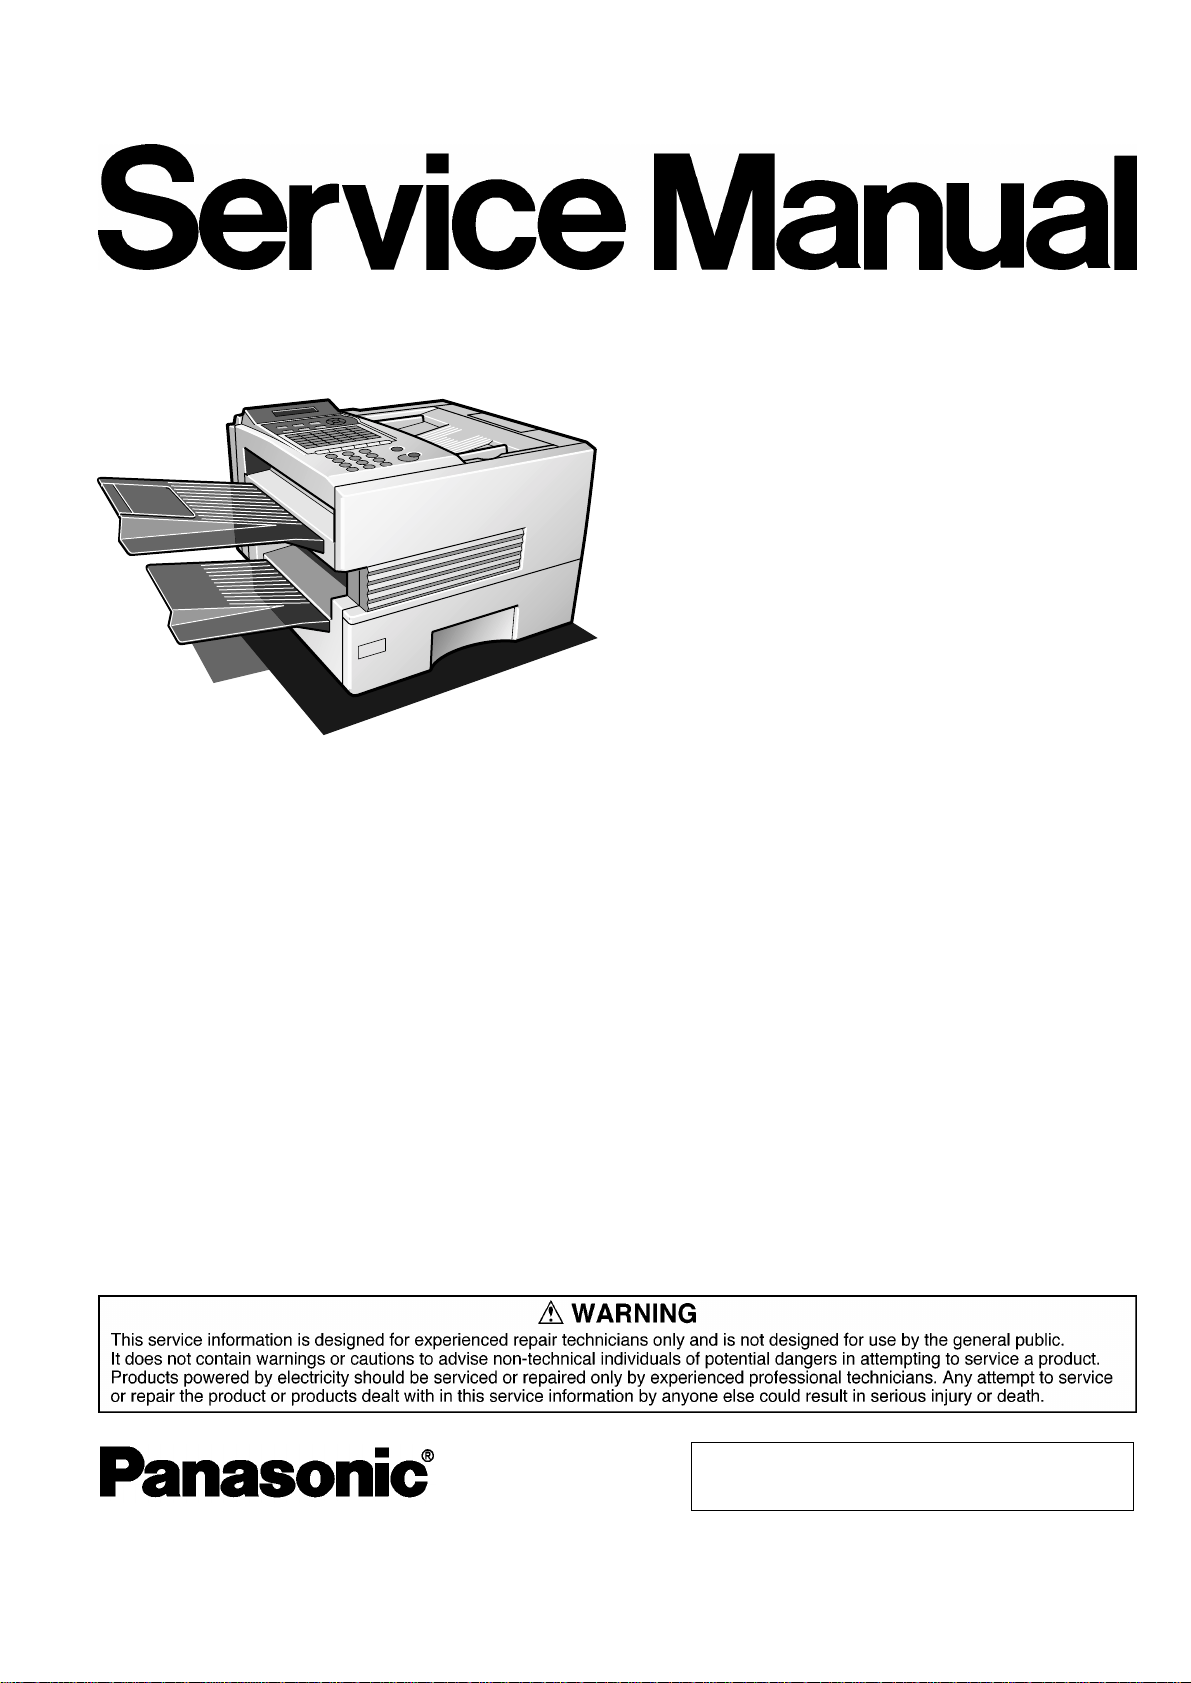
Panasonic Panafax UF-885, Panafax UF-895 Service Manual
Order Number : MGCS981201C1
UF-885 / 895
H13
Facsimile
© 1999 Matsushita Graphic Communication Systems, Inc.
All rights reserved. Unauthorized copying and distribution is
a violation of law.

Table of C ontents
1 General Description................................5
1.1 Overview...................................................5
1.2 General Features and Functions..............5
1.3 General Specifications..............................7
1.4 Scanner Specifications .............................9
1.5 Printer Specifications..............................10
1.6 Power......................................................11
1.7 Environment............................................11
1.8 Construction............................................11
1.9 Function Table........................................15
2 Disassembly Instruction........................18
2.1 General Disassembly Flowchart.............18
2.2 Power Cord (1108),
Telephone Line Cable (1107),
Document Return Tray (138 and 139),
Recording Paper Tray (1106),
Paper Cassette (1018)............................19
2.3 Sub Rear Cover (114),
Rear Cover (108),
Left Side Cover (107),
Front Cover (105),
Speaker (133).........................................20
2.4 Paper Guide Cover (110),
Transmit Guide (117),
SNS Assembly (121) ..............................22
2.5 Low Voltage
Power Supply Unit (502),
FCB PC Board (522),
LCU PC Board (519),
LPC PC Board (555),
Control Panel Unit,
PNL PC Board (214)...............................24
2.6 Transmitter Chassis (301),
Scanner Assembly (340),
LED Array Assembly (333),
Verification Stamp Assembly..................28
2.7 ADF Roller (323),
Pre-Feed Roller (325),
Eject Roller (330),
Feed Roller (328),
Transmission Gear Assembly,
Transmit Motor (346) ..............................30
2.8 Toner Sensor (639),
Timing Sensor (610),
Bias Transfer Roller (630) ......................33
2.9 Fuser Unit (431),
Fuser Lamp (408),
Thermistor Assembly (405),
Paper Exit Sensor (610) .........................35
2.10 Fuser Roller (414),
Pressure Roller (409),
Eject Roller (422)....................................37
2.11 Fan Duct (520),
Printer Motor (650),
Motor Bracket (641) ............................... 39
2.12 Laser Unit (429),
Feed Roller (618),
Paper Feed Roller (746),
Clutch Gear Assembly (660),
Paper Feed Solenoid (744),
Fan Unit (622) ........................................ 41
2.13 ILS PC Board (621),
No Paper Actuator (609),
Catch Magnet (730) ............................... 43
2.14 High Voltage
Power Supply (HVPS) (506) .................. 44
2.15 Screw Identification Template................45
3 Maintenance, Adjustments and
Check Points........................................46
3.1 Required Tools ...................................... 46
3.2 Periodic Maintenance Points..................46
3.3 Periodic Maintenance Check List...........47
3.4 Updating the Firmware........................... 48
3.5 ADF Pressure.........................................49
3.6 Printer Unit Test .....................................50
3.7 General Circuit Diagram.........................51
3.8 FCB PCB................................................54
3.9 LPC PCB................................................ 76
3.10 LCU PCB................................................85
3.11 SRU PCB (Optional) ..............................88
3.12 Low Voltage
Power Supply PCB (POW ).....................90
3.13 High Voltage
Power Supply PCB (HVPS) ...................92
3.14 CST2 PCB (Option)................................94
3.15 CST3 PCB (Option)................................98
4 Troubleshooting..................................102
4.1 Initial Troubleshooting Flowchart .........102
4.2 Improper LCD Display..........................103
4.3 Information Codes (INFO. CODES) .....104
4.4 Printed Copy Quality Problems............117
4.5 Document Feeder (ADF)...................... 133
4.6 Communications ..................................136
4.7 Information Code Table........................142
4.8 Diagnostic Codes.................................146
3

Table of C ontents
5 Service Modes....................................152
5.1 Service Mode Table..............................152
5.2 Service Mode 1
(Function Parameter Setting)................153
5.3 Service Mode 3
(Printout of Lists,
Reports and Test Results) ............... ....158
5.4 Service Mode 4
(Modem Test) .......................................172
5.5 Service Mode 5
(Diagnostic)...........................................177
5.6 Service Mode 6
(RAM Initialization)................................179
5.7 Service Mode 7
(LBP Service Mode)..............................180
5.8 Service Mode 8
(Check & Call).......................................181
5.9 Service Mode 9
(System Maintenance)..........................186
6 System Description.............................191
6.1 Mechanical Operation...........................191
6.2 Electrical Circuit Explanation................200
9 Options and Supplies .........................262
9.1 Options and Supplies ...........................262
9.2 Installing Optional
Feeder Unit (UE-409057)..................... 264
9.3 Installing Optional
Feeder Unit (UE-409056)..................... 266
9.4 Installing Handset Kit (UE-403160)......268
9.5 Installing Parallel Port
Interface Kit (UE-403159) ....................269
9.6 Installing PDL
Printer Driver Kit (UE-403162) ............. 271
9.7 Installing G3 Communication
Port Kit (UE-407019)............................ 273
7 Exploded View & Parts List.................225
7.1 Cover Assembly....................................225
7.2 Control Panel Unit.................................227
7.3 Transmitter Assembly...........................229
7.4 Fuser Unit.............................................231
7.5 Electrical Parts......................................233
7.6 Paper Transportation............................235
7.7 250 Feeder Unit....................................238
7.8 250 Paper Cassette..............................240
7.9 500 Feeder Unit....................................242
7.10 500 Paper Cassette..............................244
7.11 Packing.................................................246
8 Installation...........................................248
8.1 Function Key.........................................248
8.2 Main Unit and Accessories...................249
8.3 Installing the Accessories ..................... 250
8.4 Installing the Toner Cartridge ...............251
8.5 Loading the Recording Paper...............253
8.6 Connecting the Telephone
Line Cable and Power Cord..................255
8.7 Customizing Your Machine...................257
4

Chapter 1
General Description

Panasonic UF-885 / 895
1 General Description
1.1 Overview
This section covers the features and specifications of the plain paper facsimile transceiver "Panasonic UF-885/895". This fax
machine can transmit and rec eive on the Publ ic Switched Telephone Network (PSTN) in modes conf orming to ITU-T / CCITT Group
3 recommendations.
1.2 General Features and Functions
1. Laser Printing
Clear picture quality is obtained by employing a Laser p rinting method on plain paper. The machine can print onto A4, Letter
or Legal size paper.
2. Quick Scan
Quick Scan speeds the fax proce ss by scan ning a nd stori ng doc umen ts i nto me mory a t a rate of appro xi matel y 1 se cond* p er
page. This means that you no longer have to wait around until a transmission is completed before retrieving your originals.
(* UF-885 : 2.8 seconds, based on ITU-T Image No.1 Test Chart at Standard Resolution. The Scanning speed applies only
to the feeding process from the leading to the lagging edge of a single page test chart. The time it takes to store the
document into memory is not applied for this definition)
3. Easy Maintenance
This laser printing mechanism only requires changing the toner cartridge, housing the drum, developer and toner.
Unlike other machines with removable EPROM (Erasable Programmable ROM), this machine is equipped with an F-ROM
(Flash ROM). F-ROM offers the flexibility of quick and easy firmware updates, creation of a master firmware card, backup
and restore of firmware and machine parameters.
4. Batch Transmission
The UF-885/895 permits accumulation of different documents for the same destination(s) to be transmitted in a single phone
call.
5. Panasonic Super Smoothing
The machine incorpo rates a new sophisti ca ted im age pro ces s ing tec hnology to enhance p rint quality of ordinary rec eiv ed fax
images by smoothing the curved edges of the character.
6. B4 size Scanning
B4 size is the maximum document width that can be scanned and transmitted.
7. Automatic Document Feeder
An Automatic Document Feeder feeds originals from the document tray automatically, starting with the bottom page.
Capacity: 50 documents of average thickness and of the same size.
8. Speedy Transmission
The use of JBIG Coding with ECM achieves faster transmissions. Short Protocol reduces hand-shake time by shortening
Phase B and D.
9. Error Correction Mode (ECM)
An Error Correction M ode, which confor ms to ITU-T/CCITT Recomm endatio ns, all ows erro r-free d ata trans mission . ECM with
MMR or JBIG Coding also conforms to ITU-T/CCITT Recommendations.
10. Automatic Dialing Function
Up to 200 stations can be easily dialed by One-Touch Dialing or Abbreviated Dialing Function. Any other stations can be
dialed directly from the keypad by entering the full telephone number (UF-895: up to 70 stations, UF-885: up to 32 stations).
11. Memory Transmission
The contents of a document can be stored into the document memory first, then transmitted from memory. Operator
attendance until transmission ends is not necessary.
12. Multi-station T rans m iss io n
Using the document memory, the document can be transmitted to multiple destinations.
5

General Description
13. Multi-file Transmission
It is possible to store multiple documents, each of which could be transmitted to different destinati ons, into the document
memory. Then the unit will transmit them sequentially (max. number of files: 30 files [UF-885], 70 files [UF-895]).
14. Deferred Communication
The built-in 24-hour timers allow the operator to set deferred transmissions or deferred polling. Using the document memory,
documents can also be transmitted to multiple stations.
15. Substitute Reception
The contents of a documen t will be receiv ed into the docum ent memory if the re cording p aper or toner runs out, or a recording
paper jam occurs d uring recep tion. The s tored docu ments c an be printe d after repl acing the recording p aper or toner cartri dge
or correcting a paper jam.
16. Multiple Operation
Multiple Access operations can store documents and their destina tion s even during reception or mem ory tran sm is si on. I t can
also receive during document storage.
17. Halftone (Photo)
For transmission or copying, this function ensures high quality reproduction of gray-shaded or photographic documents. This
machine uses 64 levels of error diffusion to create halftones with Quality mode.
18. Copy Function
The Copy function al lows the mach in e to be used a s a co pier. Using the document memory, up to 99 copies can be made of a
single original.
19. 100 Transaction Journal
The 100 Transaction Journal provides transaction information - number of pages transmitted or received, start date and time,
communication res ult s , identification, etc. It is automatically prin ted af ter ev ery 10 0 transactions, or i t c an be printed manually
at anytime.
20. Latest Individual Transmission Journal
The latest Individual Transmission Journal provides information on the last transmission - number of pages transmitted, start
date and time, communication results, identification, etc. It can be printed manually at anytime after communications.
21. Communication Journal
A communication journal is a result report of a communication which can be printed automatically after communication is
completed. Printout conditions can be selected for each communication to 1) not print, 2) always print, or 3) print when
communication has failed.
22. Multi-purpose LCD Display
The 20 x 2 Alphanumeric LCD displ ay shows the operation mo de, date and tim e, remote ID numbe r , and p ages tran smitted or
received. In case of an error, the LCD display shows an information code and error message indicating the exact cause of
trouble.
23. Verification Stamp
The Verification Stamp is automatically stamped on the original document when the document is transmitted or stored in
memory successfully. The "X" mark appears at the bottom of each page.
24. Password Transmission
A password transmitted from the other party is checked to prevent the transmission of documents to an unauthorized station.
25. Password Reception
A password transmitted from the other party is checked to prevent the reception of documents by an unauthorized station.
The reception of junk mail, etc., is preventable.
26. Access Code
The Access Code can be registered into the machine to prevent operation by an unauthorized user.
27. S elective Reception
To prevent unwanted faxes from being received, the machine compares the ID Number of the transmitting machine with the
telephone number stored in the built-in automatic telephone dialer.
6

Panasonic UF-885 / 895
28. Receive to Memory
Users can set the unit to store incoming documents into its available memory. Later, using a 4-digit password, stored
documents can be pri nte d w hen the u se r is pre se nt. This function helps ens ure that imp ort ant documents are no t read or lo st
while they are sitting unattended in the fax tray.
29. Relay Transmission Request
By setting the machine as an initial sending station, the unit is capable of setting up a relay request to a central hub machine
with a network password. Documents can then be automatically transmitted to the end receiving stations. This model is
designed to operate as an initial sending station.
30. Confidential Transmission and Polling
The documents can be transmitted to a predetermined destination with a 4-digit confidential code utilizing the Confidential
Mailbox function. Stored messages in the Confidential Mailbox can be polled by the receiver at the destination terminal.
31. Confidential Mailbox (Proprietary)
When the received message is stored into the memory with a 4-digit confidential code, the message can be printed on
recording paper or polled by a remote station. A maximum of 20 mailboxes* can be used. A remote confirmation report such
as Confidential Memory Report and/or Confidential XMT Report is not transmitted to the source station and/or the remote
station after Confidential Mailbox reception or polling transmission. (*UF-885: 10 mailboxes)
32. Remote Diagnostic Function
The remote Diagnostic Function can be used to diagnose the unit remotely over the PSTN or equivalent. A new host system
is required for high speed remote diagnostics to be available.
33. Check and Call Function
This feature enables the Authorized Servicing Dealers to manage and improve the Fax machine maintenance to their
customers by alertin g th em of e quipment problems. It a ls o can be used as a Supply S ale s Tool by alerting the Dealer that the
unit is running Low on Toner. The function overview is as follows:
a. The machine’s printer error information is stored in the Printer Report.
b. The printer report can be manually printed when required.
c. When printer errors occur, the unit can automatically transmit the Service Alert Report to the pre-registered t elephone
number.
d. When the unit detects Low Toner, it can automatically transmit the Maintenance Alert Report to the pre-registered
telephone number.
e. When the unit detects Low Toner, it can au tomati cally prin t out the Toner Order Form with pre-regi stered o rder info rmation .
34. Multiple LOGO
This operation allows the user to select one of the 25 preset LOGOs before a Transmission. The selected LOGO is printed on
the Header of each page sent, Cover Sheet, COMM. Journal and Individual Journal.
35. Department Code
This operation requires the user to input a pr eset 4-digi t Departm ent Code before tran smis sion. The Departmen t Name of the
selected Department Cod e is printed on the Header of each page sent, Cover She et, COMM . Jour nal and Ind iv idu al Jo urn al.
When the Department Code is set, the Transaction Journal will be sorted by the Department Code number when it is printed.
If you wish to prevent unauthorized persons from setting, changing or erasing Department Code settings, you should set the
Access Code to restrict these settings.
36. File Transmission
This feature allows your machine to store the document(s) into a special File in memory. This special File can be reused for
transmission to a single or multiple locations when desired. This File will remain in memory until it is manually deleted.
1.3 General Specifications
1. Communication Facility
Public Switched Telephone Network (PSTN)
2. Line Coupling
Direct Coupling
7

3. Input Level
-5 to -43 dbm
4. Output Level
0 to -15 dbm
5. Control Procedure
ITU-T/CCITT Rec. T.30
MGCS Proprietary short protocol
6. Modem Speed
V34 : 33600 - 2400 bps @2400 step (QAM with TCM)
V.17 : 14400, 12000, TC9600, TC7200 bps (QAM with TCM)
V.33 : 14400, 12000 bps (QAM with TCM)
V.29 : 9600, 7200 bps (QAM)
V.27ter : 4800, 2400 bps (PhM)
7. Coding Scheme
MH (Modified Huffman), MR (Modified Read), MMR (Modified Modified Read)
JBIG (Joint Bi-level Experts Group)
General Description
8. Communication Resolution
<Transmission>
Standard : 203 dpi x 98 lpi (8 pels/mm x 3.85 lines/mm)
Fine : 203 dpi x 196 lpi (8 pels/mm x 7.70 lines/mm)
S-Fine : 203 dpi x 391 lpi (8 pels/mm x 15.4 lines/mm)
<Reception>
Standard : 203 dpi x 98 lpi (8 pels/mm x 3.85 lines/mm)
Fine : 203 dpi x 196 lpi (8 pels/mm x 7.70 lines/mm)
S-Fine : 203 dpi x 391 lpi (8 pels/mm x 15.4 lines/mm)
9. Halftone (Photo)
64 Levels, Error Diffusion
10. Error Correction Mode
ITU-T/CCITT Rec. T.30 ECM
11. Image Memory Capacity
(Flash Memory)
406 dpi x 391 lpi (16 pels/mm x 15.4 lines/mm)
406 dpi x 391 lpi (16 pels/mm x 15.4 lines/mm)
Standard (Base) : 60 pages (UF-885)
120 pages (UF-895)
Option (Additional) : 140 pages (1 MB byte : UE-410045)
220 pages (2 MB byte : UE-410046)
380 pages (4 MB byte : UE-410047)
700 pages (8 MB byte : UE-410048)
(using ITU-T Image No.1 in Standard Resolution)
12. Transmission Speed
3 Seconds using ITU-T Image No. 1 in Standard Resolution, memory to memory communication.
8

Panasonic UF-885 / 895
13. Automatic Dialing
Dialing Signal : 10 PPS/20 PPS/DTMF
Dialing Method
One-Touc h Dialing
Abbreviated Dialing
Manual Number Dialing
(Direct Dialing)
Programmable Dialing : Up to 8 programmable keys
Combination Dialing : Combination of One-Touc h, Abbreviated and Manual Number
Multi-Station Dialing : Multi-Station Transmission/Polling
Registration Memory Capacity in One-Touch and Abbreviated Dialing
Number of Stations : Up to 200 stations
Telephone number of
each station : Up to 36 digits (Including pauses and spaces)
Station name for each
station : Up to 15 characters
Redialing
Automatic
Manual
:
:
Up to 40 keys (including 8 programmable keys)
:
Up to 160 stations
:
Up to 70 stations (UF-895), Up to 32 stations (UF-885)
(Up to 36 digits including pauses)
Dialing
[Up to 232 stations (UF-885), Up to 270 stations (UF-895)]
Deferred Multi-Station Transmission//Polling
[Up to 232 stations (UF-885), Up to 270 stations (UF-895)]
:
Up to 15 times with 0 to 15 minute intervals
:
By pressing the Redial button (last number dialed)
14. Print Reduction Ratio
A4 / Letter : 70 to 100% in 1% steps
Legal : 85 to 100% in 1% steps (according to the received document length)
15. Clock Backup Battery
This unit uses a Lithium battery to save the clock and calendar.
The service life is approximately 1 year during power faiure.
CAUTION
!
denotes hazards that could result in minor injury or damage to the machine.
• THIS PRODUCT CONTAINS A L ITHIUM BATTERY. DANGER OF EXPLOSION IF BATTERY IS INCORRECTLY
REPLACED.
REPLACE ONLY WITH THE SAME OR EQUIVALENT TYPE. DISPOSE OF USED BATTERIES ACCORDING TO
THE INSTRUCTIONS OF YOUR LOCAL SOLID WASTE OFFICIALS.
1.4 Scanner Specifications
1. Docume nt Dimensions
Width : Minimum 5.83 in (148 mm)
Maximum 11.0 in (280 mm)
Length : Minimum 5.04 in (128 mm)
Maximum 14.0 in (356 mm)
Note
With operator’s assistance, a maximum of 78.7 in (2000 mm) length document can be sent (one page at a time) through the
ADF.
2. Automatic Document Feeder
The Automatic Document Feeder feeds the originals from the document tray automatically, starting with the bottom page.
Paper thickness : Single-page : 0.0024 to 0.0060 in (0.06 to 0.15 mm)
: Multi-page : 0.0024 to 0.0048 in (0.06 to 0.12 mm)
Capacity : 20 documents (Legal Size - 20 lb)
: 50 documents (Letter / A4 Size - 20 lb)
9
3. Scanning Method
Horizontal : Sheet Feeding with CCD type image sensor
Vertical : Stepper Motor feeding
4. Effective Scanning Width : 9.9 in (252 mm)
5. Scanning Resolution
Standard : 203 dpi x 98 lpi (8 pels/mm x 3.85 lines/mm)
Fine : 203 dpi x 196 lpi (8 pels/mm x 7.7 lines/mm)
S-Fine : 203 dpi x 391 lpi (8 pels/mm x 15.4 lines/mm)
406 dpi x 391 lpi (16 pels/mm x 15.4 lines/mm) (Interpolated)
6. Contrast Selection
3 steps (Normal / Lighter / Darker)
1.5 Printer Specifications
1. Recording Paper Size (W x L)
General Description
Letter : 8.5 x 11 in (216 x 279 mm)
Legal : 8.5 x 14 in (216 x 356 mm)
A4 : 8.3 x 11.7 in (210 x 297 mm)
2. Recommended Recording Paper Weight
16 to 24 lb (60 to 90 g/m
2
)
3. Paper Capacity with standard cassette
2
500 sheets (20lb / 75g/m
)
4. Printing Resolution
406.4 X 391.16 dpi (Fax or Copy)
600 X 600 dpi (Printer)
5. Non Printable Margin
The shaded areas represent the unprintable area on the recording paper.
0.16 in
(4 mm)
0.16 in
(4 mm)
0.16 in
(4 mm)
0.16 in
(4 mm)
6. Printing Speed
10 ppm (6 seconds/page)
7. Fuser Warm Up Time
Within 70 seconds after turning the power on. [Room Temperature: 68 to 95°F (20 to 35°C)]
[Power Voltage: Minimum 115 V]
10

Panasonic UF-885 / 895
1.6 Power
1. Po wer Requirement
99~138 VAC, 47~63Hz, Single Phase
2. Power Consumption
Max : Approx. 470 W
Reception : Approx. 460 W
Copy : Approx. 470 W
Transmission : Approx. 23 W
Standby (Sleep Mode: On) : Approx. 1.2 W/H
Standby (Energy-Saver Mode: On) : Approx. 10 W/H
Standby (Energy-Saver Mode: Off) : Approx. 85 W/H
[Room temperature: 77°F (25°C)]
1.7 Environment
1. Operating Environment
Temperature : 50 to 95°F (10 to 35°C)
Relative Humidity : 15 to 70% RH
Tilt : The unit must be kept on an even, level surface.
2. Storage Environment (Carton Box Condition)
Temperature : -4 to 104°F (-20 to 40°C)
Relative Humidity : 5 to 85% RH
Note
The machine should be stored upright.
3. Transportation Environment (Max. 480 hours, Carton Box Condition)
Temperature : -4 to 122°F (-20 to 50°C)
Relative Humidity : 15 to 85% RH
1.8 Construction
Dimensions (W x D x H) 17.3 x 17.7 x 12.2 in (440 x 450 x 310 mm)
Weight (excluding paper) Approximately 35.2 lb (16 Kg)
11

1.8.1 External View
General Description
12
Panasonic UF-885 / 895
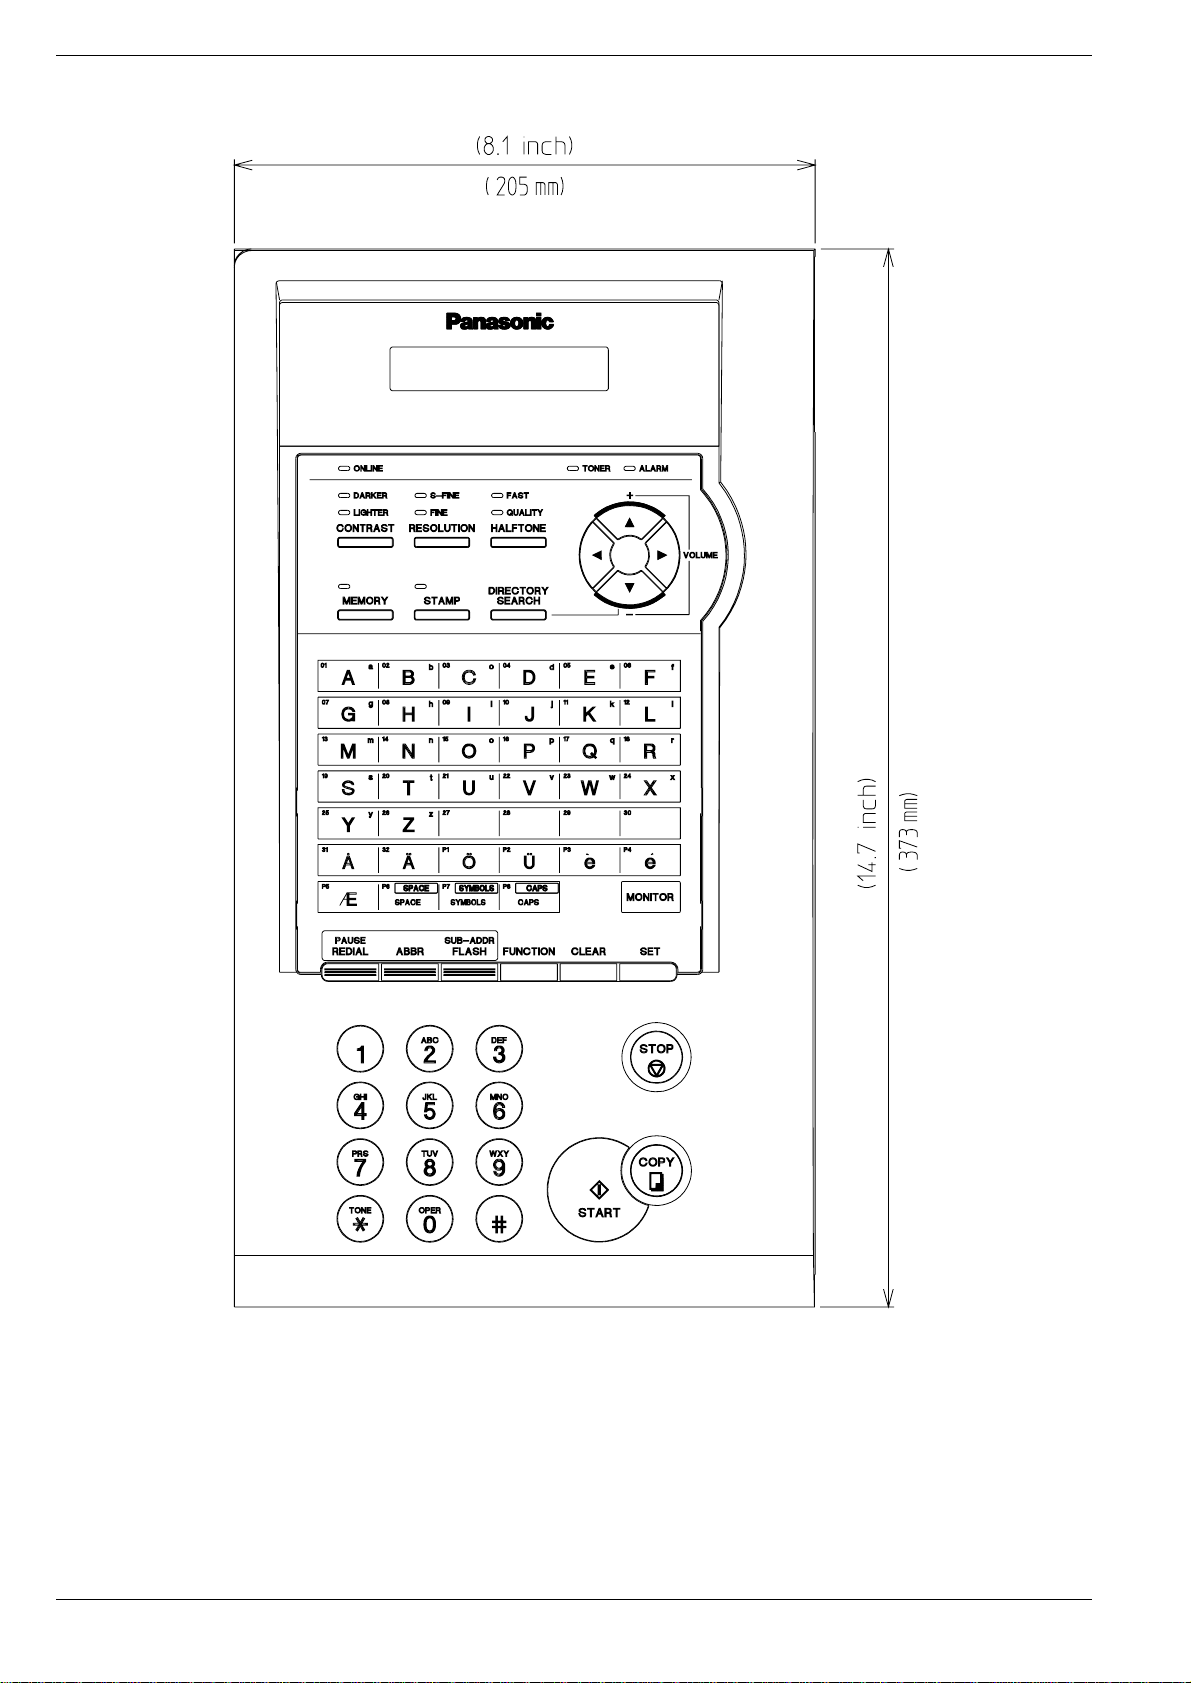
1.8.2 Control Panel (UF-885)
13

1.8.3 Control Panel (UF-895)
General Description
14
Panasonic UF-885 / 895
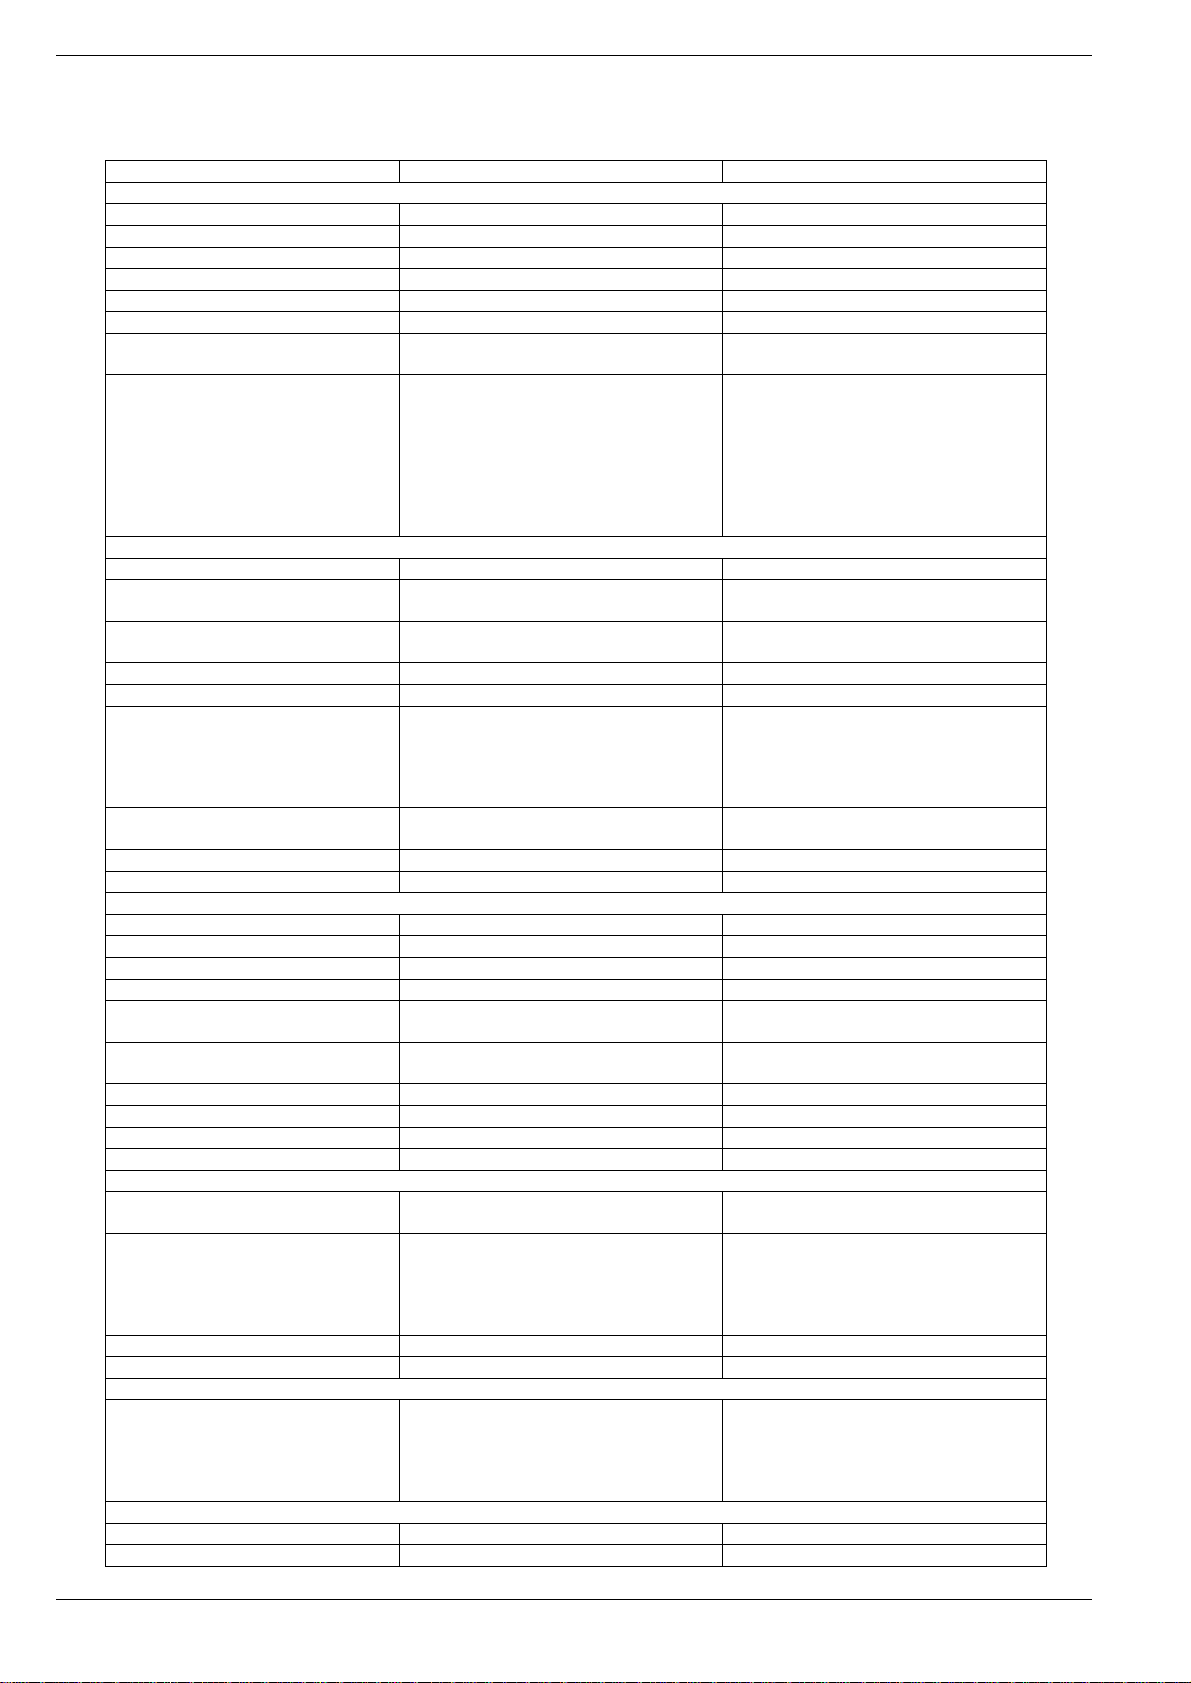
1.9 Function Table
Items UF-885 UF-895
MAIN SPECIFICATION
Compatibility G3
Modem Speed (kbps) 33.6 - 2.4
Coding Scheme MH/MR/MMR/JBIG
ECM (Conforms to ITU-T/CCITT) Yes (MMR/JBIG)
MWS No
Short Protocol Yes (B, D)
Transmission Speed
(ITU-T Image No.1)
Communication Resolution (dpi x lpi)
(Conforms to ITU-T/CCITT)
SCANNER MECHANISM
ADF Capacity 50 Sheets
Max. Document Size 11.03 x 78.74 in
Min. Document Size 5.83 x 5.04 in
Effective Scanning Width 8.92 in (252 mm)
Scanning Device CCD (B4)
Scanning Resolution (dpi x lpi) 203 x 98 (8 pels x 3.85 lines/mm)
Scanning Speed
(A4 size document, standard resolution)
Reduction XMT Yes (B4 →A4/Letter)
Collation Stack Yes
PRINTER MECHANISM
Recording Method Laser Printing
Recording Paper Size A4/Letter/Legal
Recording Paper Capacity 500 sheets (Cassette)
Optional Recording Paper Cassette Yes (250, 500 or 250 + 500 sheets)
Effective Printing Width Letter : 8.19 in (208 mm)
Recording Resolution 406 x 391 dpi (Fax or Copy)
Recording Speed 10 ppm (6 sec / page)
Heater Timer (Inc. Fan Timer) Yes
Collation Stack Yes (Memory)
Cassette Size Detector Yes
DOCUMENT MEMORY
Document Memory Capacity
(Flash Memory)
Optional Document Memory
(Flash Memory)
Document Memory Backup Yes (Permanent)
Optional Document Memory Backup No (not required)
PRINTER PAGE MEMORY
Optional Page Memory
(D-RAM Memory)
2 MB
4 MB
8 MB
COPY QUALITY
ABC Yes ←
Contrast Selection Yes (3 levels) [New Type] ←
3 seconds
Tx 203 x 98
203 x 196
203 x 391
406 x 391
Rx 203 x 98
203 x 196
203 x 391
406 x 391
(280 x 2000 mm)
(148 x 128 mm)
203 x 196 (8 pels x 7.7 lines/mm)
203 x 391 (8 pels x 15.4 lines/mm)
406 x 391 (16 pels x 15.4 lines/mm)
(Interpolated)
Approx. 2.8 seconds Approx. 1 second
A4 : 7.95 in (202 mm)
600 x 600 dpi (Printer)
60 pages (1 MB) 120 pages (2 MB)
Yes
1 MB : 140 pages
2 MB : 220 pages
4 MB : 380 pages
8 MB : 700 pages
Yes
Yes
Yes
Yes
←
←
←
←
←
←
←
←
←
←
←
←
←
←
←
←
←
←
←
←
←
←
←
←
←
←
Yes
1 MB : 200 pages
2 MB : 280 pages
4 MB : 440 pages
8 MB : 760 pages
←
←
←
←
←
←
15

General Description
Items UF-885 UF-895
Halftone (Photo) 64 levels Error Diffusion,
Fast and Quality Mode
Super Fine (dpi x lpi) 203 x 391
406 x 391
Smoothing Yes (Copy and Fax)
No (PC Printing)
MULTIPLE OPERATIONS
Multiple Operation Yes
Direct XMT Reserve Yes
Memory XMT Reserve Yes
DIALING FEATURES
One-Touch Keys 32
One-Touch/Program Keys 8
Auto dialing locations 200
One-Touch Auto Dialing 40
Abbr. Auto Dialing 160
Max. digits on AD 36
Max. ID characters on AD 15
Alternative Abbr. Dialing No
Full Number Dialing 32 stations 70 stations
Redialing Yes
Combination Dialing Yes (On Monitor Dialing Mode only)
Directory Search Dialing Yes
Line Monitor Speaker Yes
Pulse/Tone change Yes
Flash Key Yes
TRANSMISSION FEATURES
Memory Transmission Yes
Multi-Station Transmission Yes (232 stations) Yes (270 stations)
Multifile Transmission Yes (30 files) Yes (70 files)
Deferred Transmission Yes (30 timers) Yes (70 timers)
Deferred Multi-Station T r ansmission Yes (30 timers, 232 stations) Yes (70 timers, 270 stations)
Priority Transmission Yes (ADF TX Reserve)
Batch Transmission Yes (Up to 4 files)
Cover Sheet Yes
RECEPTION FEATURES
Substitute Memory Reception Yes
Auto Reduction to A4 / Letter Yes (70-100%)
Auto Reduction to Legal Yes (85-100%)
Overlapping Print Yes
Fax/Tel Auto Switch No
TAM Interface No
Parallel TAM hookup No
Receive to Memory Yes
Remote Reception No
Distinctive Ring Detector Yes
POLLING FEATURES
Polling Yes
Turnaround Polling No
Multi-Station Polling Yes (232 Stations) Yes (270 Stations)
Continuous Polling Tx Yes (Station mode)
Continuous Polling Rx Yes
Deferred Polling Yes (30 timers) Yes (70 timers)
Deferred Multi-Station Polling Yes (30 timers, 232 stations) Y es (70 timers, 270 stations)
Direct Polling TX Yes (Select the function by parameter 03
”Continuous Polling”.)
Memory Polling TX Yes (1 file)
Preset Polling Password Yes
Temporary Polling Password Yes
COPY FUNCTIONS
Single Copy Yes
Multiple Copy Yes (99 copies) ←
Copy Enlargement No ←
Copy Reduction Yes (Zoom Ratio: 70 - 100%) ←
Copy Resolution 406 x 391 lpi ←
CERTAINTY
Verification Stamp Yes ←
←
←
←
←
←
←
←
←
←
←
←
←
←
←
←
←
←
←
←
←
←
←
←
←
←
←
←
←
←
←
←
←
←
←
←
←
←
←
←
←
←
←
←
16

Panasonic UF-885 / 895
Items UF-885 UF-895
Header / Total Page Print Yes
Comm. Journal Yes (w / Image)
Transaction Journal Yes (100)
Last Individual XMT Journal Yes
View Mode Yes
LIST PRINTOUTS
One-Touch List Yes
Abbr. No. List Yes
Program List Yes
Directory Search List Yes
Fax Parameter List Yes
File List Yes
Character Code List No
Directory Sheet Yes
Callback Message No
IDENTIFICATIONS
Logo/TTI 25 characters
Multiple Logo Yes (25)
Character ID 16 characters
Numeric ID 20 digits
SPECIAL COMM.
Password XMT/RCV (Closed Network) Yes
Selective Reception (TSI check) Yes
Relay XMT Request Yes
Relay XMT Center No
Confidential XMT/Polling Yes
Confidential Comm. Center No
Mailbox XMT/Polling Yes
Mailbox Center Yes (10 boxes) Yes (20 boxes)
OMR-XMT No
Sub-Address XMT Yes (T. Routing)
Sub-Address RCV No
File Transmission Yes
OTHERS
Access Code Yes
Pin Code Access (PBX Access Code) Yes
Department Code Yes (24)
Panel Display 20 x 2 Alphanumeric LCD
Logo Input Method Character Keys
Remote Diagnostic Function Yes
Internal Demo No
2-W Leased Line No
AI Redial Yes (Up to 4 files)
Auto Multi-copy No
Auto-Forwarding Yes
Check & Call Function Yes
OPTIONS
G3 Communication Port No Yes
Scanner Interface Yes
Printer Interface (PDL) Yes (PCL6)
Printer Interface Yes (300/600 dpi)
Encryption Interface No
V24 Interface No
PC Interface No
CONSTRUCTION
Telephone Handset Yes (Optional)
Dimensions (W x D x H) 17.3 x 17.7 x 12.2 in
(440 x 450 x 310 mm)
Weight 35.2 lb (16 Kg)
←
←
←
←
←
←
←
←
←
←
←
←
←
←
←
←
←
←
←
←
←
←
←
←
←
←
←
←
←
←
←
←
←
←
←
←
←
←
←
←
←
←
←
←
←
←
←
←
←
←
17
18
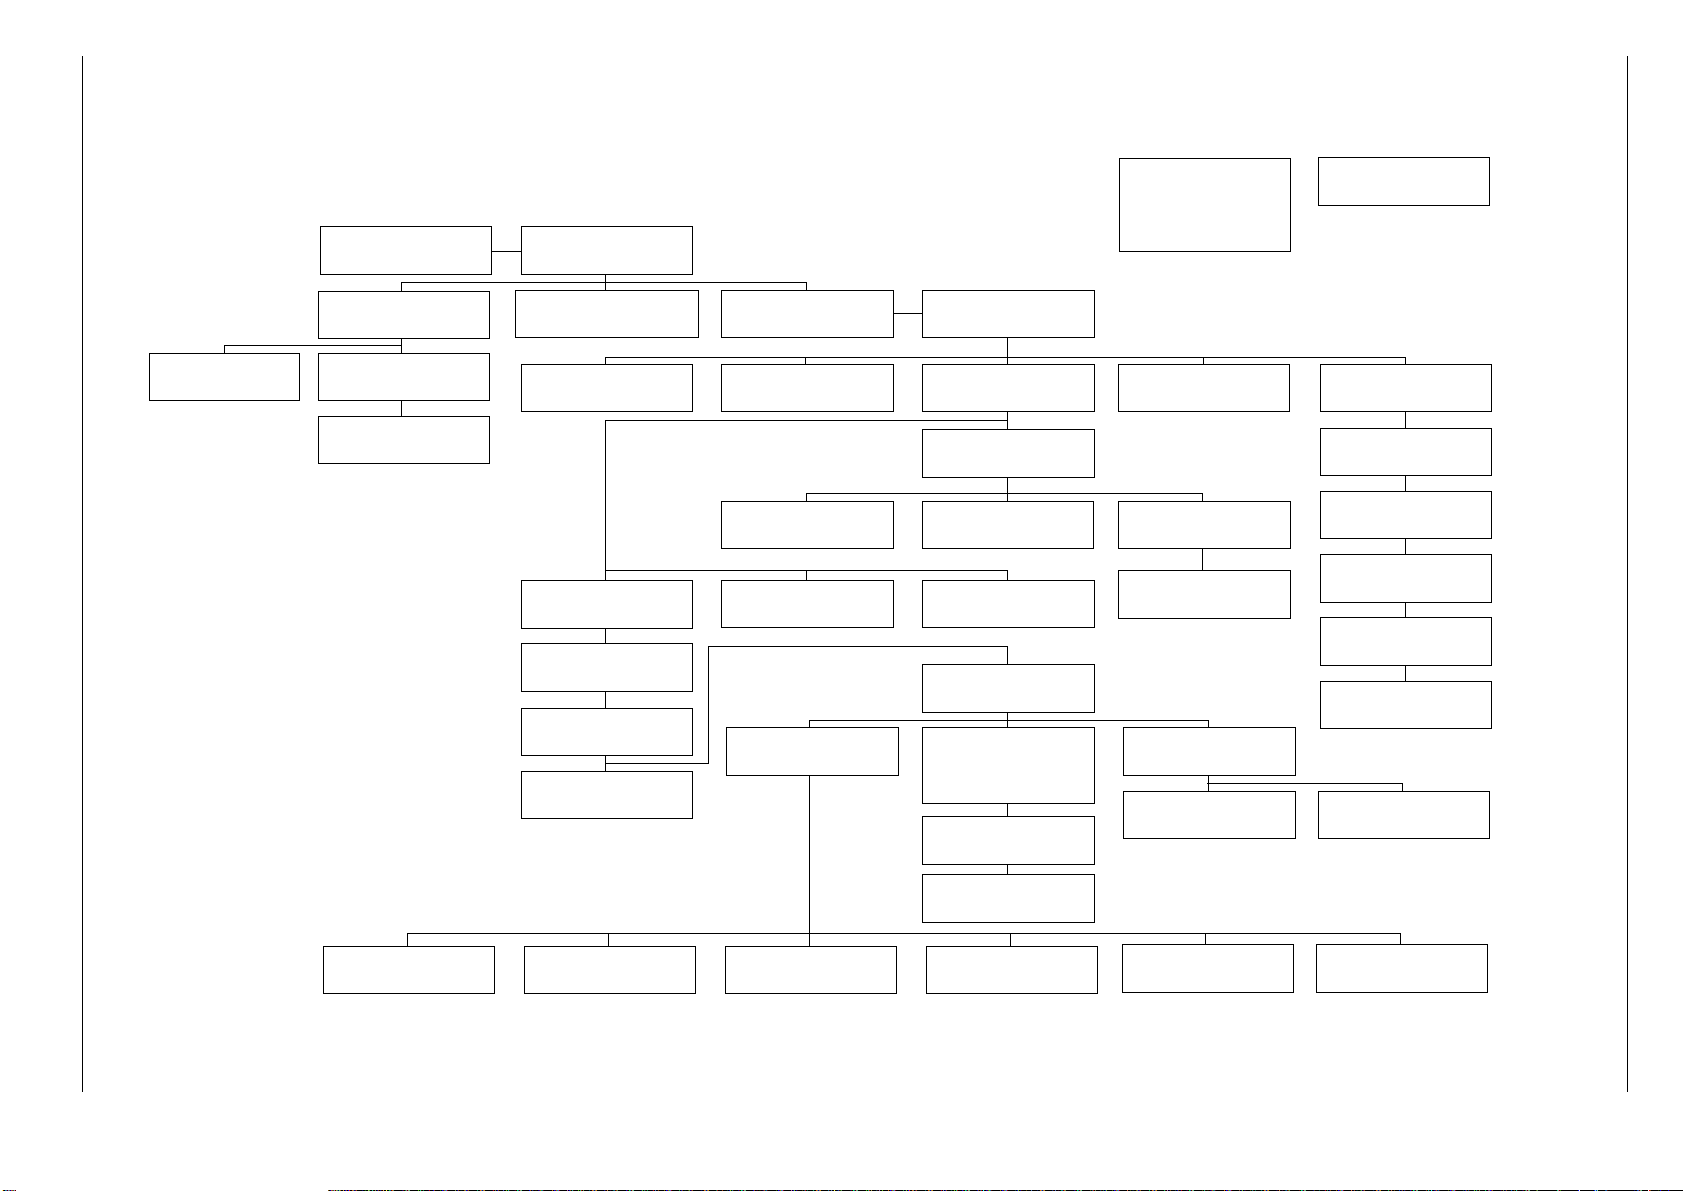
2 Disassembly Instruction
2.1 General Disassembly Flowchart
Panasonic UF-885 / 895
No Paper Actuator
(609)
2.13
Control
Panel Unit
Toner Sensor
(639)
2.8
Timing Sensor
(610)
2.8
Bias Transfer Roller
(630)
2.8
Printer Cover
(122)
2.3
Pre-Feed Cover (223)
Separation Rubber (229)
2.3
ILS PC Board
(621)
2.13
FCB PC Board
(522)
2.5
LPC PC Board
(555)
2.5
Control Panel Unit
2.5
PNL PC Board
(214)
2.5
Sub Rear Cover
(114)
2.3
Catch Magnet
(730)
2.13
Speaker
(133)
2.3
Low Voltage PSU
(502)
2.5
Paper Cassette
Fuser Unit
(XXX)
(431)
X.X
2.9
Open Control
Open Printer Cover
Rear Cover
Rear Cover
Panel Unit
(XXX)
(108)
(XXX)
X.X
2.3
X.X
Left Side Cover
(107)
2.3
Front Cover
(105)
2.3
High Voltage PSU
(506)
2.14
LCU PC Board
(519)
2.5
Transmitter Chassis
(301)
2.6
ADF Roller 1 (323)
Pre-Feed Roller (325)
Eject Roller (330)
Feed Roller (328)
2.7
Transmission Gear
Assembly
2.7
Transmit Motor
(346)
2.7
Document Return Tray
(138 & 139)
Recording Paper Tray
(1106)
2.2
Printer Motor
(650)
2.11
Paper Guide Cover
(110)
2.4
Transmit Guide
(117)
2.4
Scanner Assembly
(340)
2.6
LED Array Assembly
(333)
2.6
Paper Cassette
(1018)
2.2
Laser Unit
(429)
2.12
Feed Roller
(618)
2.12
Paper Feed Roller
(746)
2.12
Clutch Gear Assembly
(660)
2.12
Paper Feed Solenoid
(744)
2.12
Fan Unit
(622)
2.12
Verification Stamp
Assembly
2.6
Fuser Lamp
(408)
2.9
Thermistor Assembly
(405)
2.9
Paper Exit Sensor
(610)
2.9
Fuser Roller
(414)
2.10
Pressure Roller
(409)
2.10
Eject Roller
(422)
2.10
Disassembly
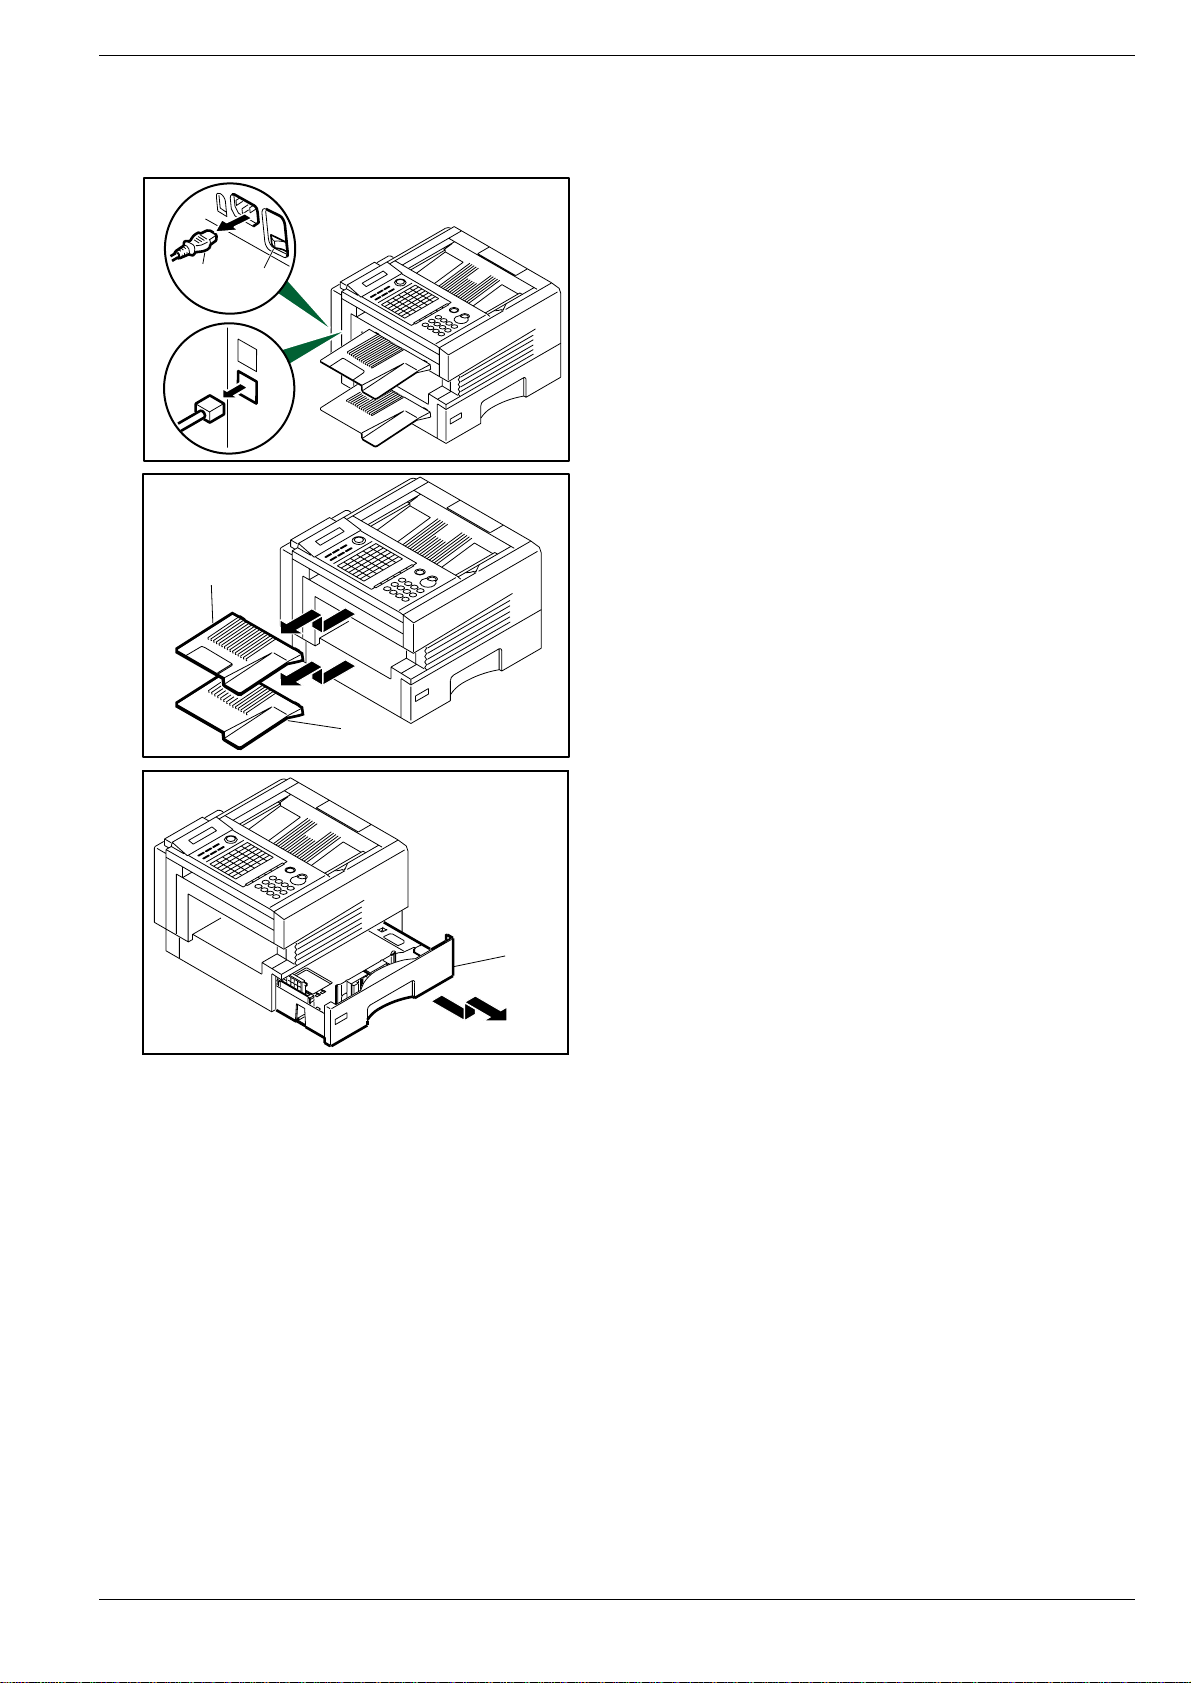
2.2 Power Cord (1108), Telephone Line Cable (1107), Document Return Tray
(138 and 139), Recording Paper Tray (1106), Paper Cassette (1018)
(1) Turn the Power Switch "OFF".
(2) Disconnect the Power Cord (1108).
(3) Disconnect the Telephone Line Cable (1107).
(2)
(1)
(3)
(4) Remove the Document Return Tray (138 and 139).
(5) Remove the Recording Paper Tray (1106).
(4)
(5)
(6) Remove the Paper Cassette (1018).
(6)
19
Panasonic UF-885 / 895
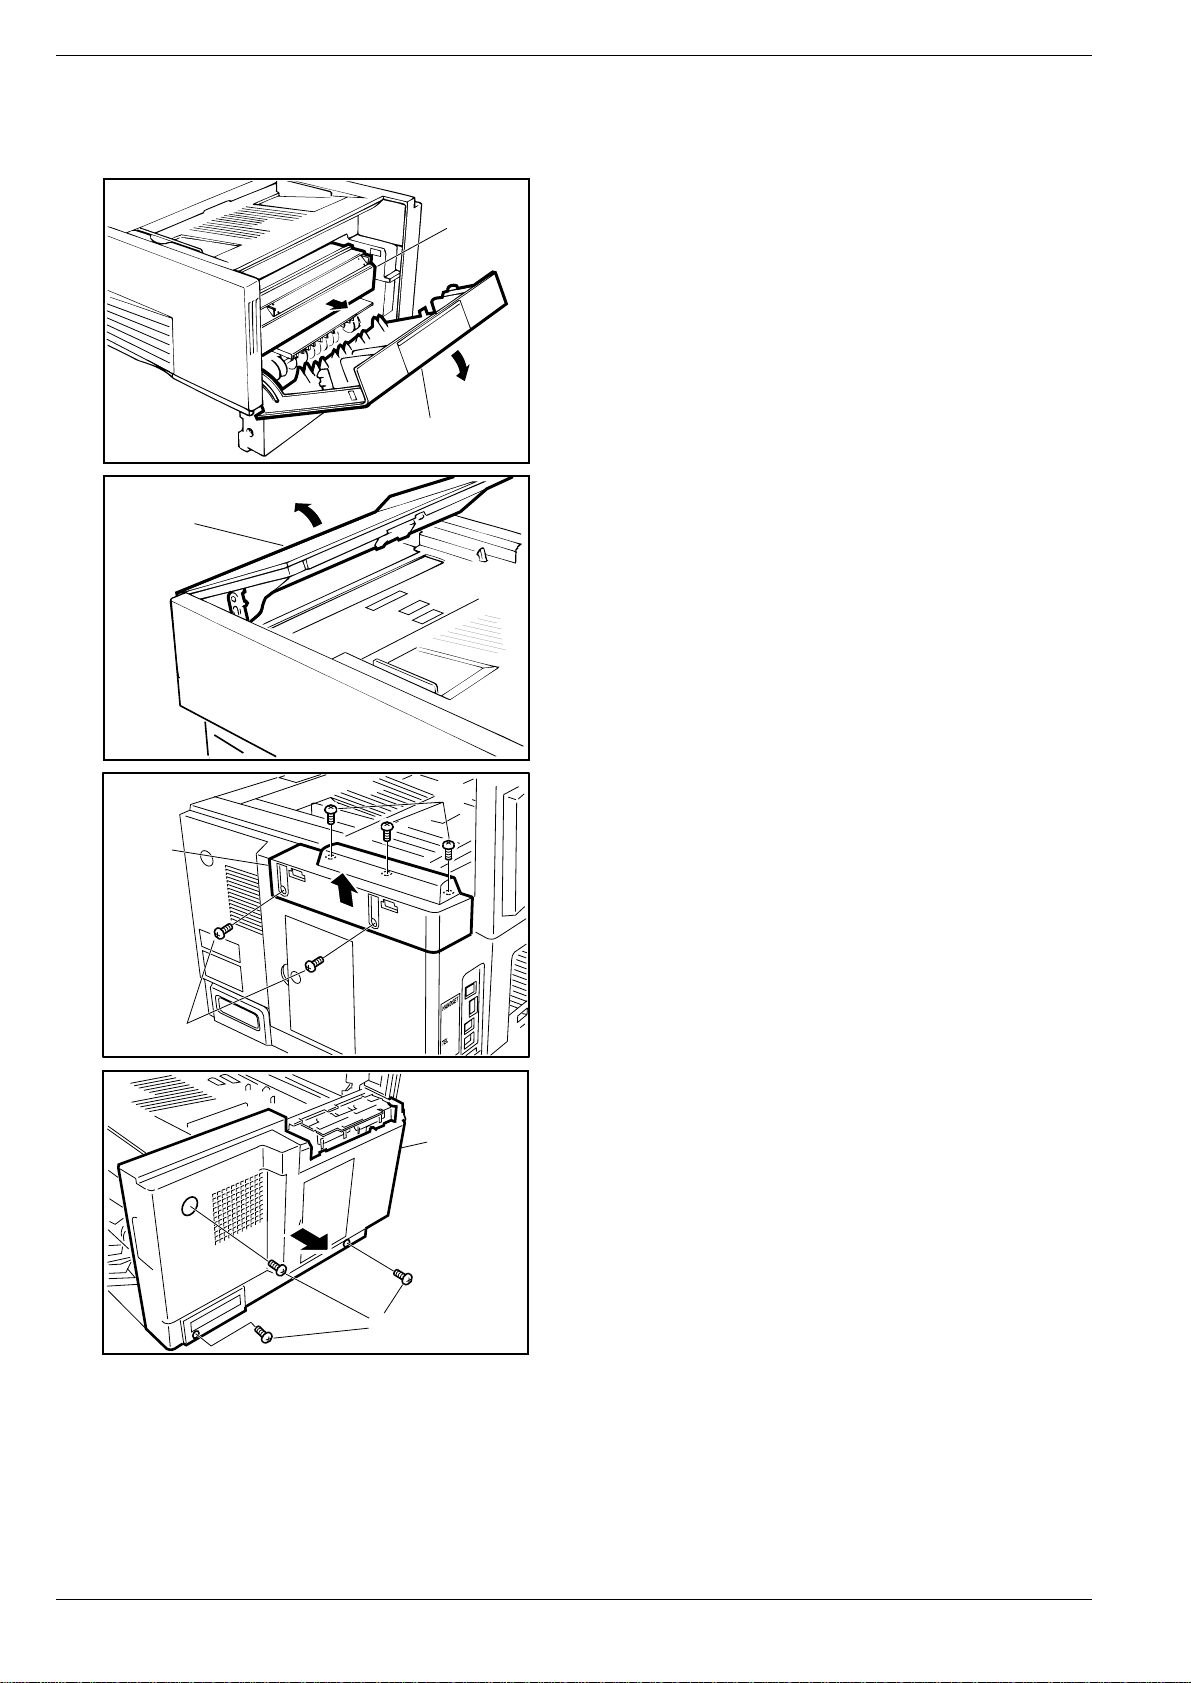
2.3 Sub Rear Cover (114), Rear Cover (108), Left Side Cover (107),
Front Cover (105), Speaker (133)
(1) Open the Printer Cover (122).
(2)
(1)
(3)
(2) Remove the Toner Cartridge.
(3) Open the Control Panel Unit.
(5)
(4)
(6)
(4)(4)
(7)
(4)
(4) 5 Screws (B1).
(5) Remove the Memory Card Cover (115) and the Sub Rear
Cover (114).
(6) 3 Screws (B1).
(7) Remove the Rear Cover (108).
20

(10)
(10)(10)
Disassembly
(8) Close the Control Panel Unit.
(9) 3 Screws (B1).
(10) Hold in the center and release the Latch Hook.
(1 1 ) Remove the Left Side Cover (107).
(11)
(9)
(12) Open the Control Panel Unit.
(13) 2 Screws (B1).
(14) Release the hook and remove the Front Cover (105).
(13)
(16)
(14)
(15)
(17)
(16)
(15) Disconnect Connector on the Speaker Harness.
(16) 2 Screws (B1), 1 Screw (1Y).
(17) Remove the Speaker Assembly (133).
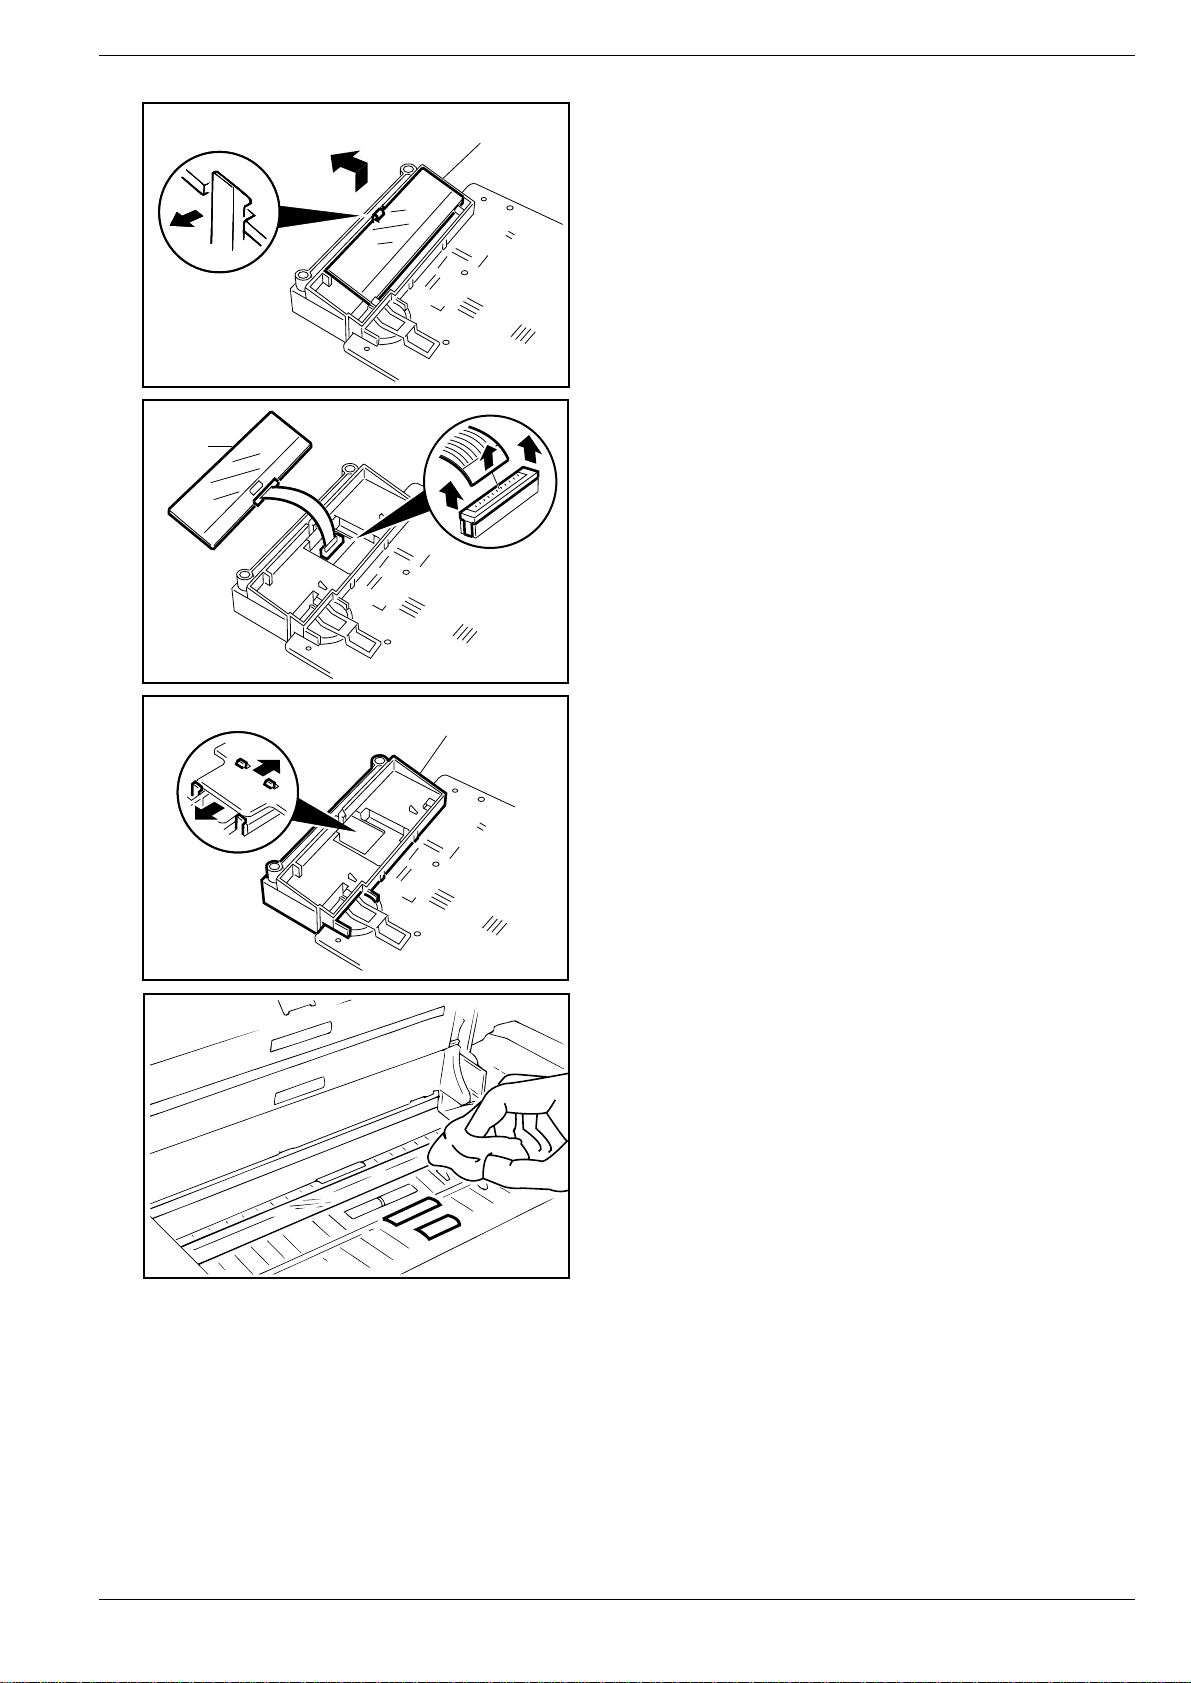
Cleaning Separation Rubber (229)
(1) Open the Control Panel Unit.
(2) Remove the Pre-Feed Cover (223).
(3) Remove the Separation Rubber (229).
(4) Clean the Sep a ration Rubber (229) with a soft cloth, soaked
with isopropyl alcohol.
(2)
(3)
21
Panasonic UF-885 / 895
2.4 Paper Guide Cover (110), Transmit Guide (117), SNS Assembly (121)
(1) Remove the Front Cover (105) and the Rear Cover (108)
(2)
(3)
(Refer to 2.3).
(2) 2 Screws (19).
(3) Remove the Paper Guide Cover (110).
(6)
(4)
(4) 5 Screws (19).
(4)
(5) Release two Latch Hooks.
(6) Remove the Transmit Guide (117).
(5)
22
(7) Remove the SNS Assembly Harness from the clamp.
(8) Disconnect Connector CN7 on the FCB PC Board.
(7)
(8)

Disassembly
(9)
(11)
(9) 1 Screw (19).
(10) Release two Latch Hooks.
(1 1 ) Remove the SNS Assembly (121).
(10)
23
Panasonic UF-885 / 895
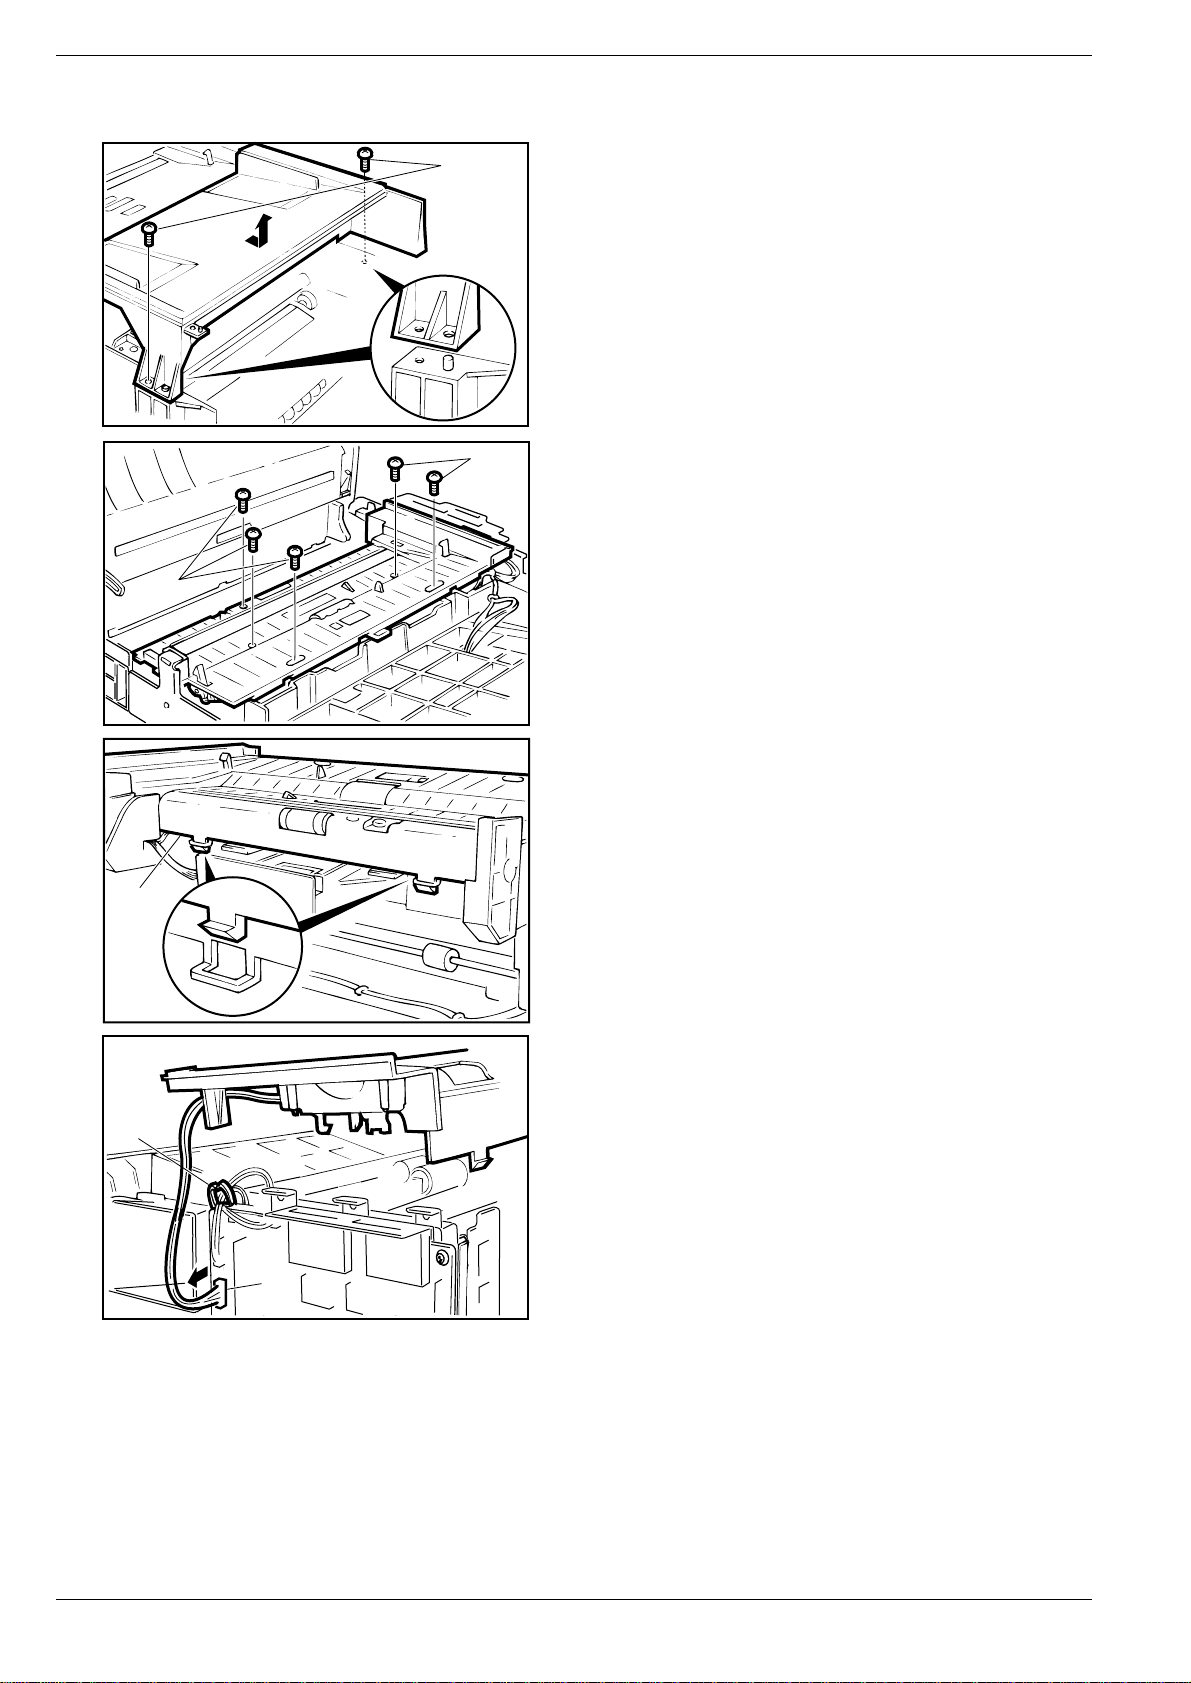
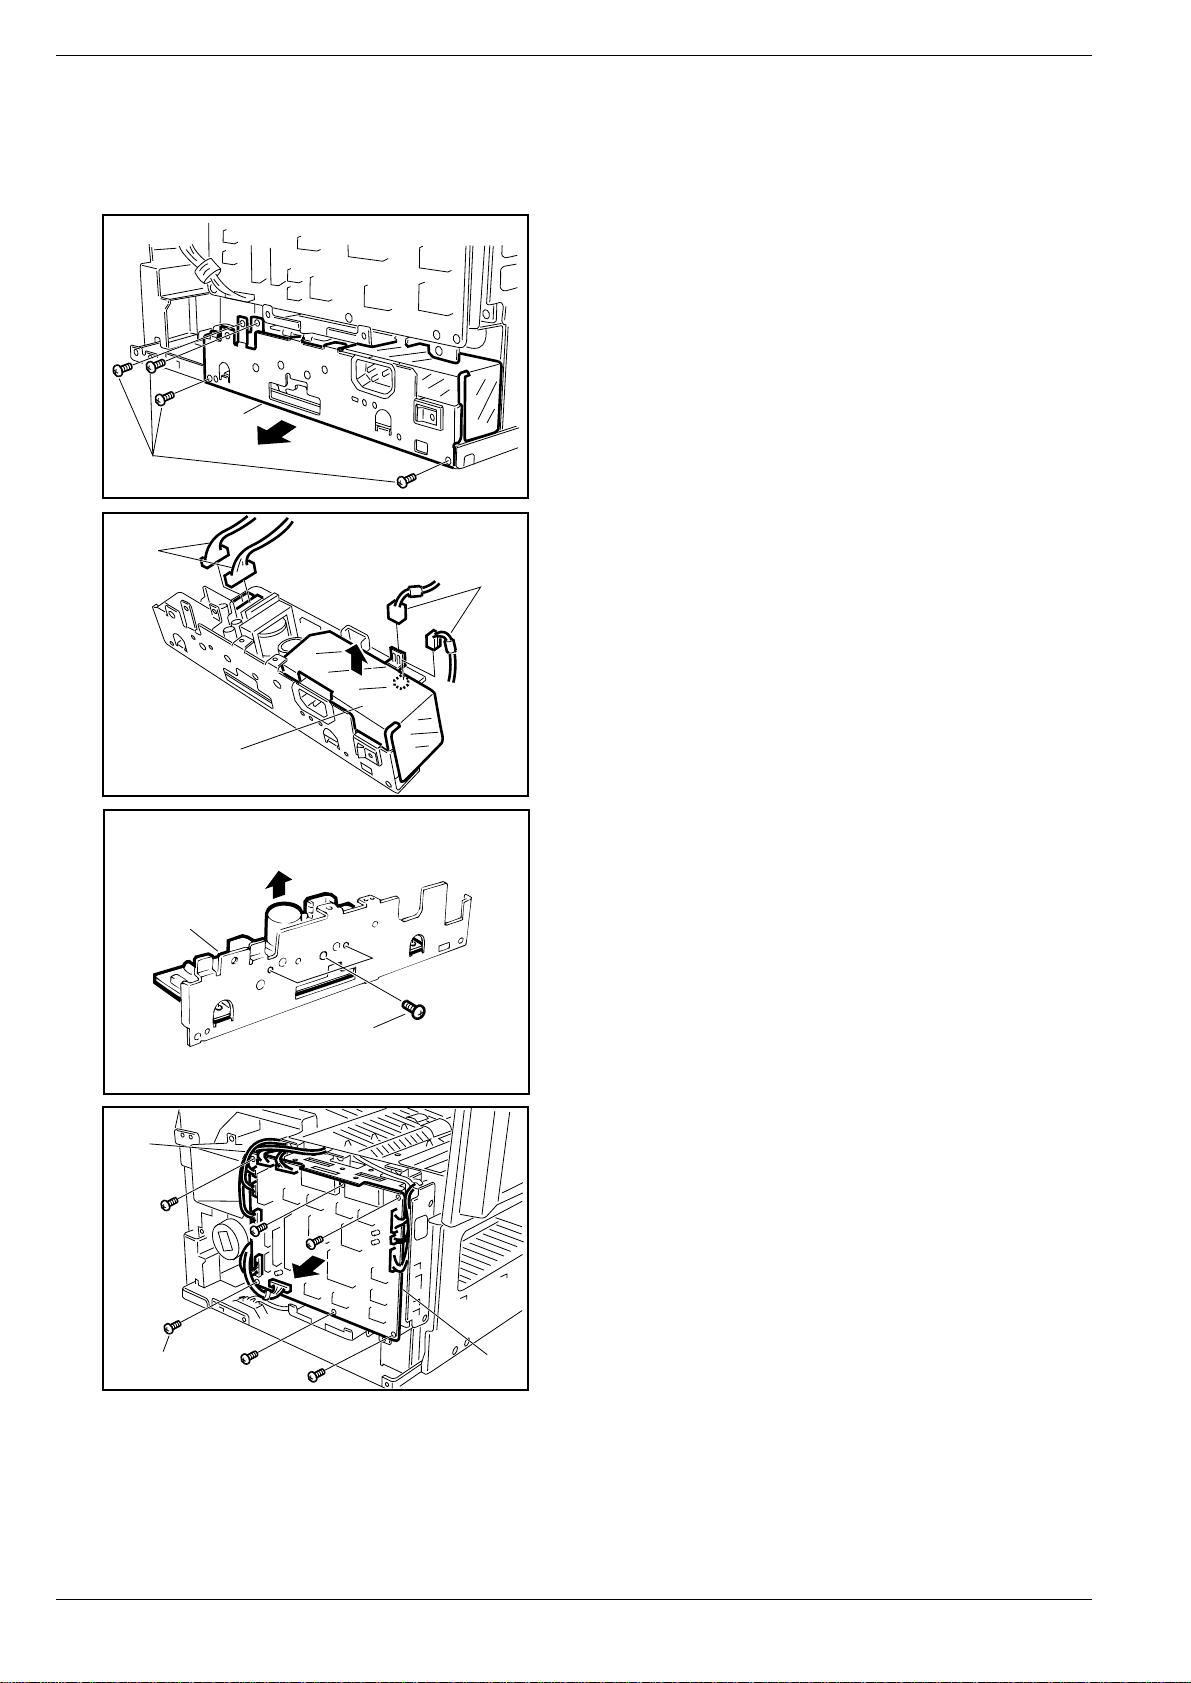
2.5 Low Voltage Power Supply Unit (502), FCB PC Board (522),
LCU PC Board (519), LPC PC Board (555), Control Panel Unit, PNL PC
Board (214)
(1) Remove the Left Side Cover (107) and the Rear Cover
(108) (Refer to 2.3).
(2) 4 Screws (19).
(3) Pull out the Low Voltage Power Supply Assembly.
(3)
(2)
(4) Disconnect 4 Connectors on the Low Voltage Power
(4)
(4)
Supply Assembly.
(5) Remove the Mylar Shield (508).
(8)
(5)
(6) 3 Screws (19).
(7) Remove the Low Voltage Power Supply Unit (502).
(7)
(6)
(8) Disconnect all Connectors on the FCB PC Board.
(9) 6 Screws (C8).
(10) Remove the FCB PC Board (522).
24
(9)x6
(10)

(13)
(16)
(11)
(12)
(15)x2
Disassembly
(11) Close the Control Panel Unit.
(12) 2 Screws (19).
(13) Remove the LCU Bracket (512).
(14) Disconnect Connector CN25 on the LCU PC Board.
(15) 2 Screws (C8).
(16) Remove the LCU PC Board (519).
(18)
(17)
(14)
(17)
(21)
(17) 3 Screws (19).
(18) Remove the FCB Bracket (523).
(19) Disconnect all Connectors on the LPC PC Board.
(20) 3 Screws (C8).
(21) Remove the LPC PC Board (555).
(19)
(20)
25

Panasonic UF-885 / 895
(26)
(28)
(25)
(24)
(22)
(22) 1 Screw (19) and remove the Ground Strap (540).
(23) Disconnect Connector CN11 on the FCB PC Board.
(24) Remove the Harness from the clamp.
(25) Remove the Control Panel Unit.
(23)
(26) Remove the Battery Holder (1114) Assembly.
(27) Release 4 Latch Hooks.
(28) Remove the Control Panel Chassis (216).
(27)
(32)
(29)
(31)
(30)x15
(29) Disconnect Connector CN41 on the PNL PC Board.
(30) 15 Screws (7B).
(31) Release two Latch Hooks.
(32) Remove the PNL PC Board (214).
26
(33)
(36)
(34)
Disassembly
(33) Release Latch Hook.
(34) Carefully lift the LCD Unit (215).
(35) Disconnect Connector CN42 on the PNL PC Board.
(36) Remove the LCD Unit (215).
(35)
(37)
(38)
(37) Release 4 Latch Hooks on the back of the LCD Holder.
(38) Remove the LCD Holder (232).
Cleaning ADF Roller (323), Pre-Feed Roller (325), Feed
Roller (328), Eject Roller (330) and the Scanner Glass (341)
(1) Open the Control Panel Unit.
(2) Clean the ADF Roller (323), Pre-Feed Roller (325),
Feed Roller (328), Eject Roller (33 0) and th e Sc anner Gl ass
(341) with a soft cloth, soaked with isopropyl alcohol.
27
Panasonic UF-885 / 895
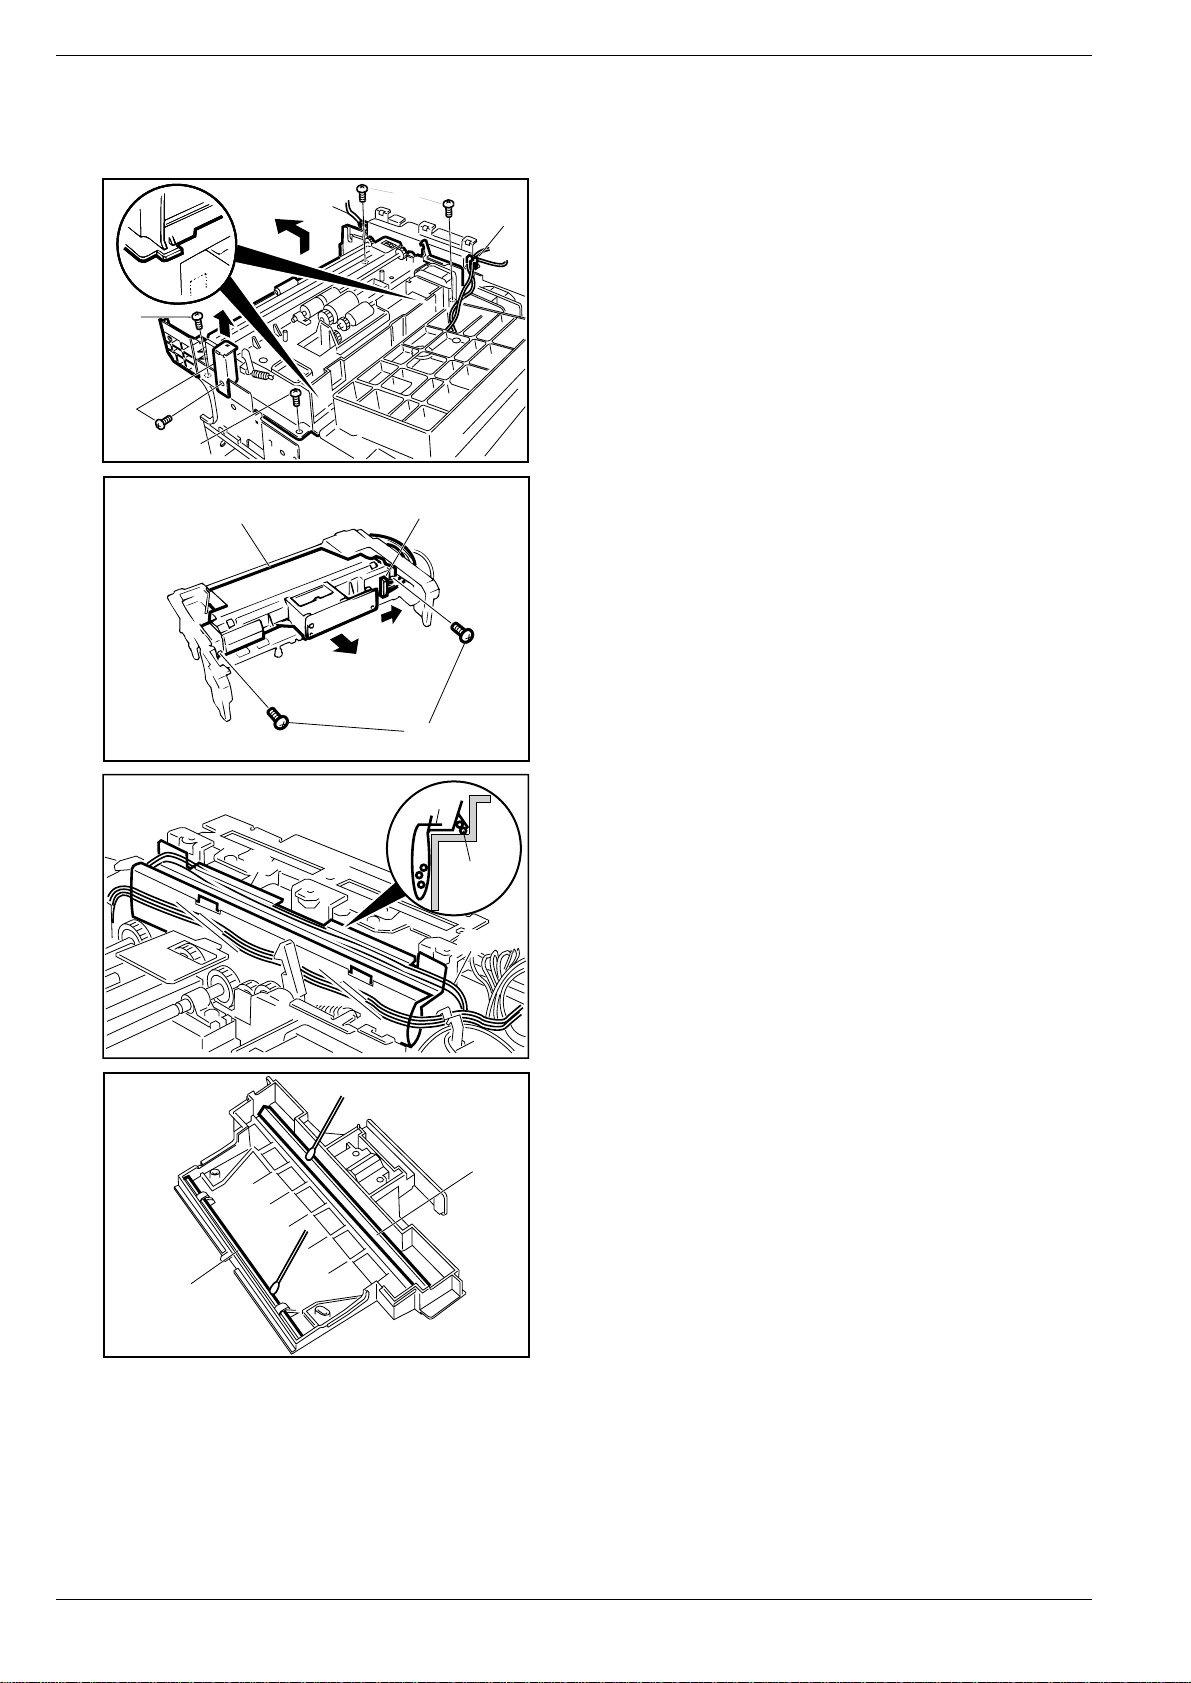
2.6 Transmitter Chassis (301), Scanner Assembly (340),
LED Array Assembly (333), Verification Stamp Assembly
(5)
(4)
(5)
(9)
(6)
(2)
(5)
(7)
(8)
(2)
(1) Remove the Front Cover (105), Rear Cover (108) (Refer
to 2.3) and the Control Panel Unit (Refer to 2.5).
(2) Remove all the harnesses from the clamps.
(3) Disconnect Connector CN8 on the FCB PC Board.
(4) 1 Screw and remove the Front Bracket 2 (136).
(5) 4 Screws (19).
(6) Remove the Transmitter Chassis (301) Assembly.
(7) Disconnect Connector CN30 on the CCD PC Board.
(8) 2 Screws (19).
(9) Remove the Scanner Assembly (340).
Mirror 2
(2)
(2)
Mirror 1
(1)
(1)
Note: When reinstalling the CCD Harness,
1. Se parate the CCD Harness (545) from the other
harnesses.
2. Place the other harnesses into the Harness Prote ctor Film
(556).
Cleaning Mirror 1 (337), Mirror 2 (338)
Clean the Mirror 1 (337) and Mirror 2 (338) with a soft cloth,
soaked wit h isoproyl alcohol.
28
(11)
(10)x6
Disassembly
(10) 6 Screws (19).
(1 1 ) Remove the LED Array Bracket 1 (332) and LED Array
Bracket 2 (351).
(12) 8 Screws (9H).
(13) Remove two LED Array Assemblies (333).
Note:
UF-885 has only one LED Array Assembly.
(15)
(12)
(14)
(13)
(14) 1 Screw (19).
(15) Remove the Stamp Holder (334) and Stamp Solenoid
(335).
29
Panasonic UF-885 / 895
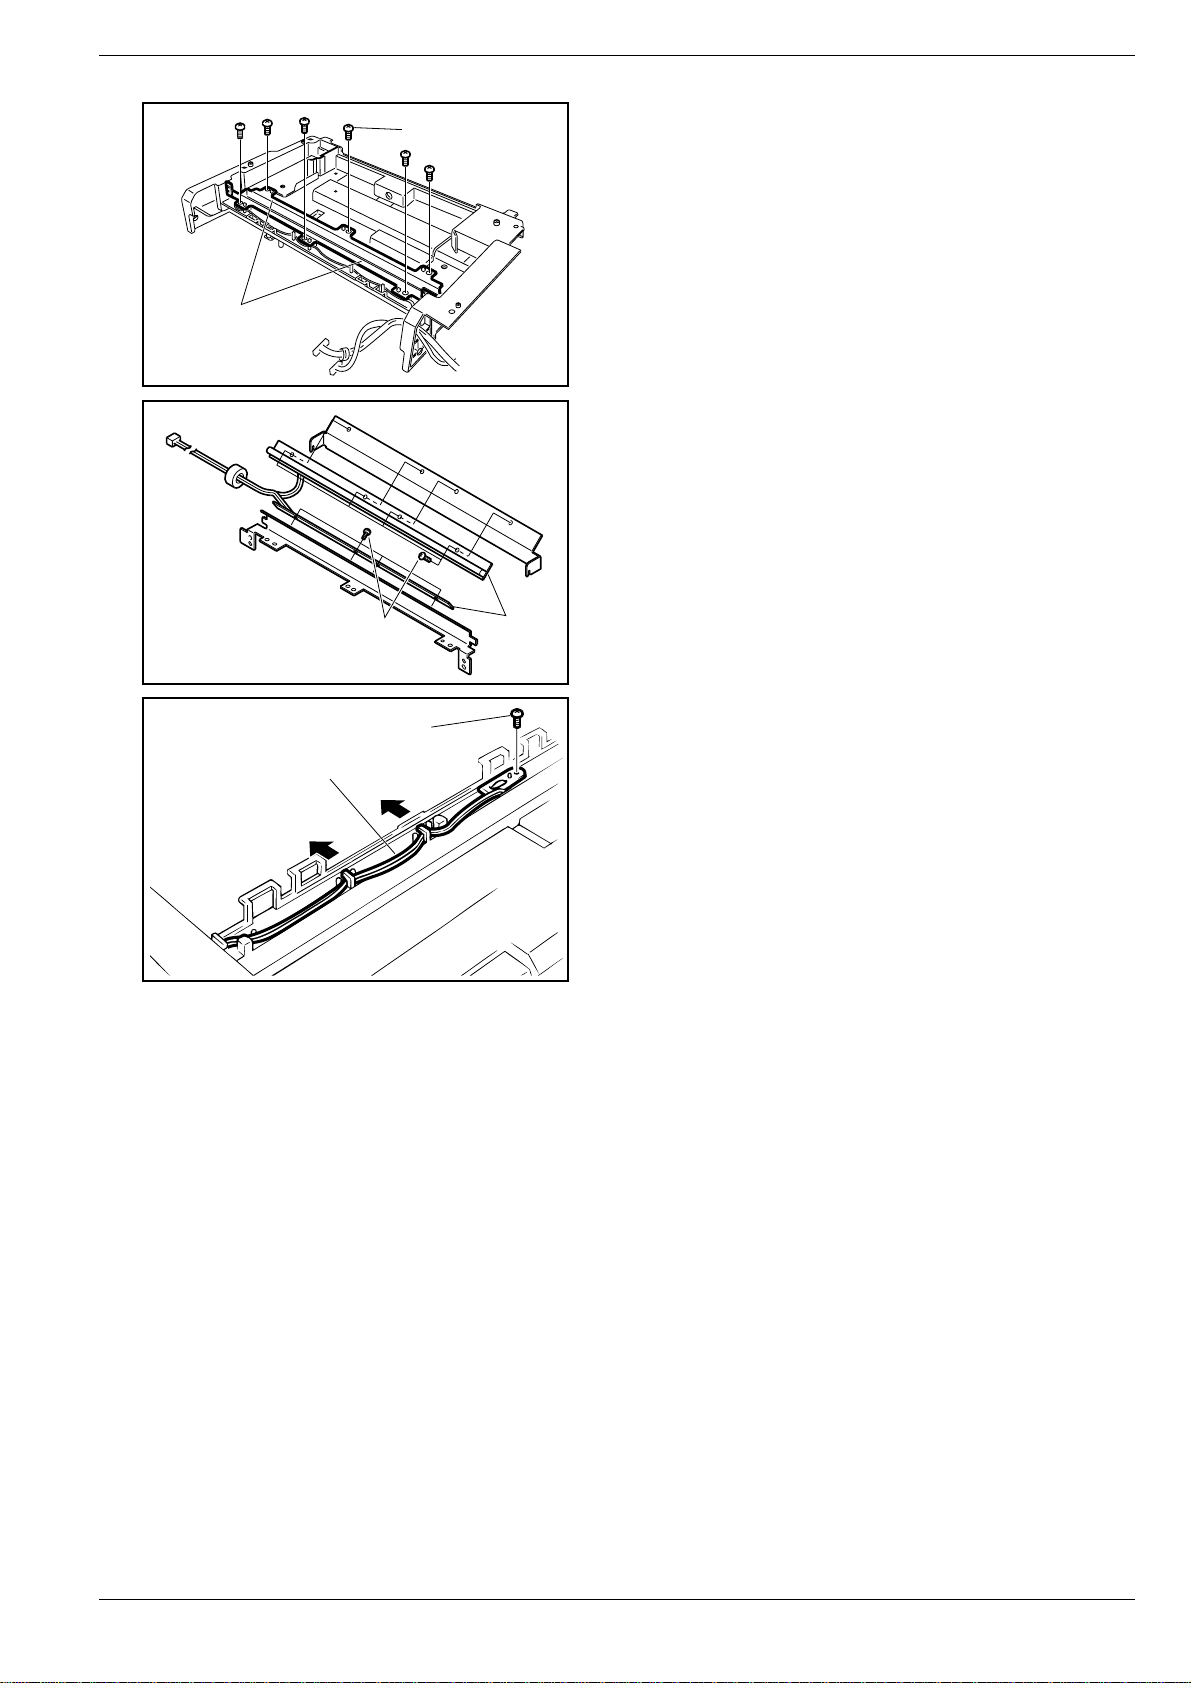
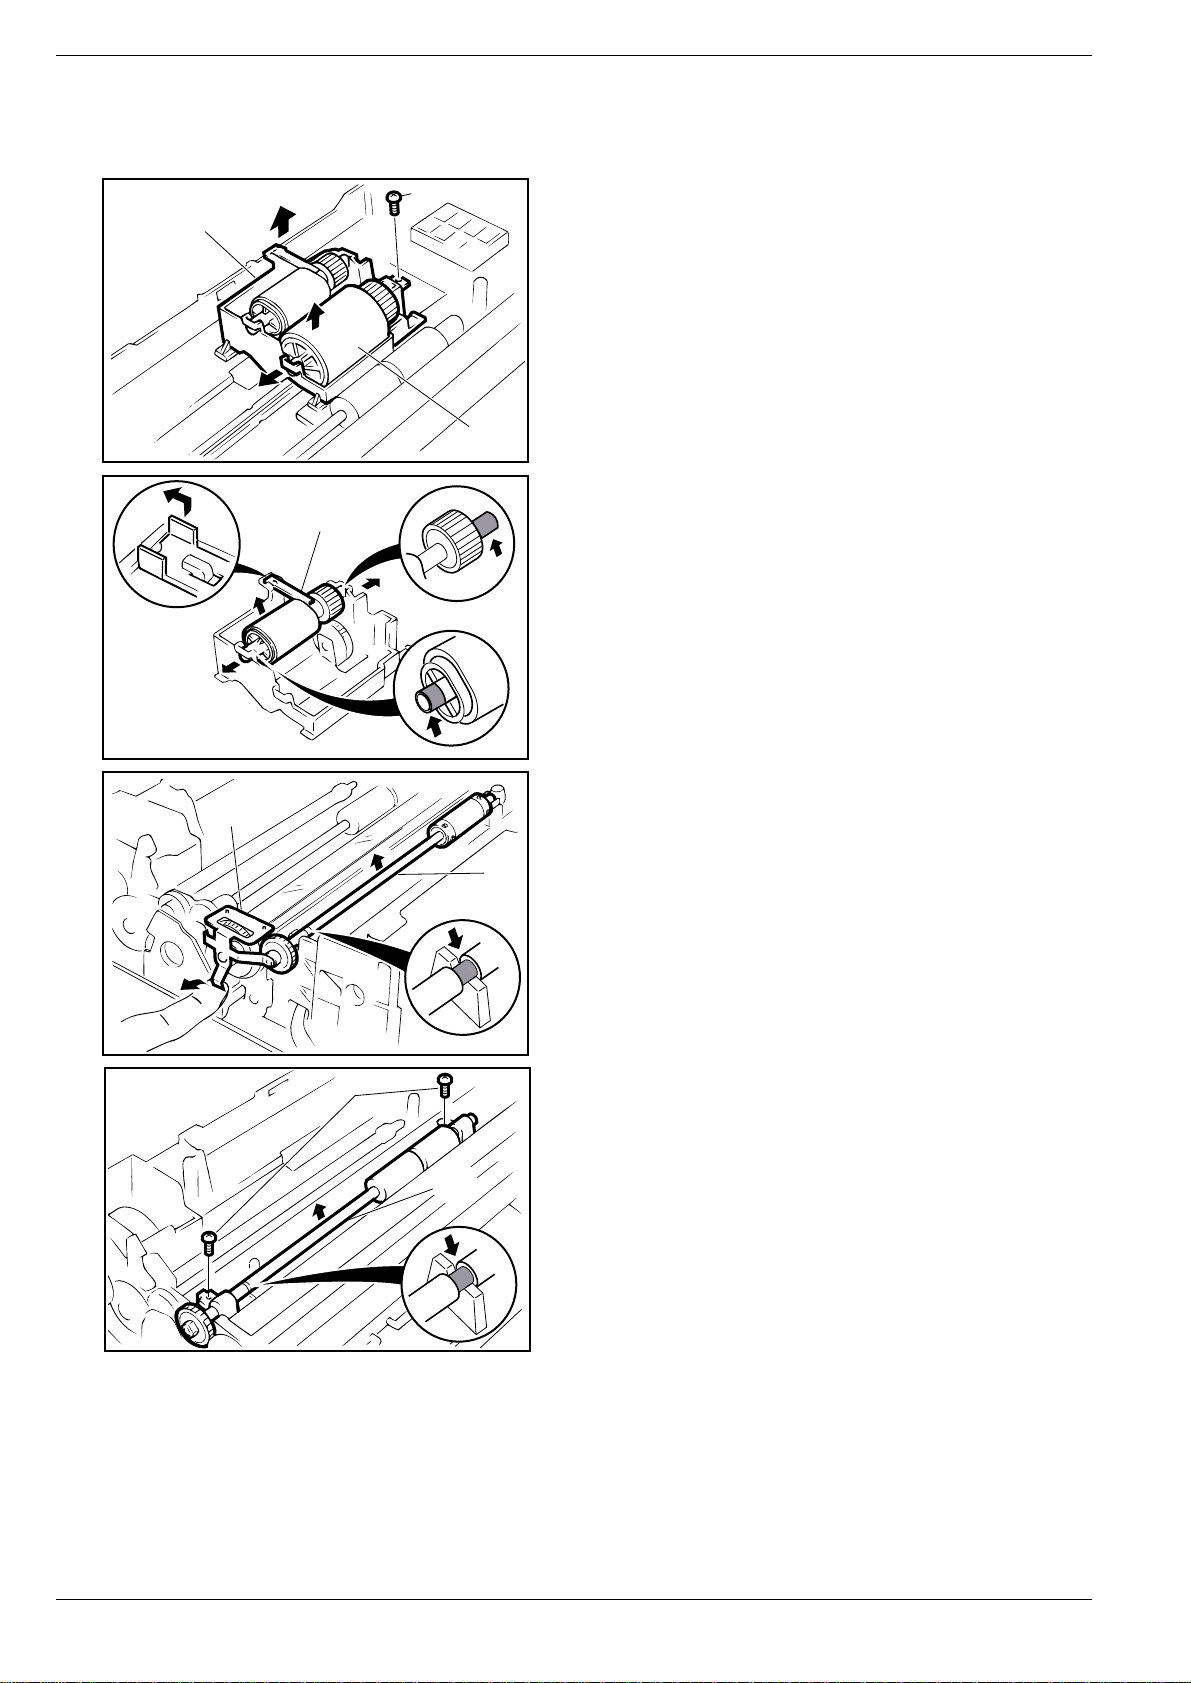
2.7 ADF Roller (323), Pre-Feed Roller (325), Eject Roller (330), Feed Roller
(328), Transmission Gear Assembly, Transmit Motor (346)
(5)
(3)
(6)
(2)
(1) Remove the Front Cover (105), Rear Cover (108) (Refer
to 2.3), Control Panel Unit (Refer to 2.5) and the
Transmitter Chassis (301) Assembly (Refer to 2.6).
(2) 1 Screw (19).
(3) Remove the ADF Bracket (317) Assembly.
(4) Remove the ADF Roller (323).
(4)
(5) Remove the Pressure Spring Plate (324).
(6) Remove the Pre-Feed Roller (325).
Note:
Apply Molykote EM-502L Grease to the Pre-Feed Roller
(325).
(7)
(9)
(10)
(10)(10)
(7) Remove the Ground Spring Plate A (316).
(8) Remove the document Eject Roller (330).
Note:
Apply Molykote EM-502L Grease to the Eject Roller (330).
(8)
(9) 2 Screws (19).
(10) Remove the Feed Roller (328).
Note:
Apply Molykote EM-502L Grease to the Feed Roller (328).
30
 Loading...