

Panasonic Omnivision VHS PV-M2768-K, Omnivision PV-M2768 Operating Instructions Manual
Thank you for choosing
Panasonic
Omn_vis_on_
Combination VCR
MODEL PV-M2768
Easy Taping.
Operating
Instructions
Pleaseread theseinstructionscarefullybeforeattempting toconnect,
operateor adjustthisproduct.Pleasesavethismanual.
SpanishQuickUseGuideisincluded.
Gufapara rdpidaconsultaenespafiolestdincluida.
VQTS3441 (A)
Things You Should Know
Congratulations
on your purchase of one ofthe most sophisticated and reliable products
on the market today. Used propedy, itwillbdng you and your family
years of enjoyment. Please fillinthe informationat dght.The sedal
number ison the tag located on the back of your CombinationVCR.
Safety Precautions
Date of Purchase
Dealer PurchasedFrom
DealerAddress
Dealer PhoneNo,
Model No. PV-M2768
SerialNo.
Warning: To prevent fire or shock hazard, do not expose this equipment to rain or moisture.
This video recorder, equipped with the HQ ( High Quality) System, is compatible with existing VHS equipment.
Only use those tapes with the MR mark. It is recommended that only cassette tapes that have been tested and
inspected for use in 2, 4, 6, and 8 hour VCR machines be used.
This television receiver provides display of television closed captioning in Jccordance with §15.119 of the FCC rules.
This symbolwarns the user that uninsulatedvoltagewithinthe unit |
//__/_ I may have sufficientmagnitudetocause electric shock.Therefore, itisJ
___l I dangeroustomake any kind of contact with any insidepart of this.unit. I
This symbolalertsthe user that importantliteratureconcerningthe |
operationand maintenance of this unit has been irlcluded. |
Therefore, it shouldbe read carefully in order to avoid any problems. J
J
Table of Contents
Things You Should Know ................................................................................................................ 2
Important Safeguards ;endPrecautions .......................................................................................... 3
Unpacking Your Combination VCR • Product Features .................................................................. 4
Antenna or Cable Connections (OutdoorAntenna,Cable Box,Scrambled/UnscrambledChannels) ................. 5
Location of Controls (l_emoteControl,CombinationVCR) .................................................................... 6, 7
One Time Setup (On-ScreenLanguage,ChannelMemory,AutoClockSet) ............................................... 8, 9
On-Screen Displays (OSD) (Function,Channel,Menu,VCR Status/Clock,Waming, Instruction).................... 10
TV Operation (MainOperation,Usingthe 100 key,RapidTune,AudioMute,Phones,SELF-DEMOMode)........... 11
Audio/Picture Adjustment (Bass,Treble, Color,Tint,Brightness,Picture,Sharpness,Reset) ......................... 12
TV Timer Features (AlarmTimer,Sleep Timer) .................................... •....... -.................................... ;..13
Closed Caption System (MainOperation,CaptionOn Mute)................................................. •................. 14
FM Radio ................................................................................................................... _.................. 15
I;_.k-t _A[e) t,] [ej0[;)_',l_(o)01
Playback a Tape (Main Operation, Special Effects, Quality Picture Features) ................................................ 16
Record On a Tape (Main Operation, One Touch Record, Input Select) ....................................................... 17
IltVJlo) dr,lB'(0l I lqkB.ll eBB|ie]
Timer Recording (Main Operation, Cancel, ClearorReplace ProgramContents) ..................................... 18, 19
Copying Your Tapes (Dubbing) (Connection,MainOperation).............................................................. 19
Special VCR Features (VCRLock,WarningBeeper,SpeakerON/OFF System).......................................... 20
Tape Operation (RepeatPlay, One MinuteSkip,Zero Search,AutoFunctions)............................................. 21
MTS Broadcast NHS Hi-Fi Stereo System (Sterso/SAP/MonoBroadcast,SelectAudioMode,Spatializer).. 22, 23
VCR Plus+ Setup ................................................................................................................... 24, 25
VCR Plus+ Programming .............................................................................................................. 26
Cable Box Universal Remote Control Operation (MainOperation,Cable BoxBrandCede Ust) ............... 27
[|]11 (;,)III _ (o) III IP, IIi {o) I I
Unit and Cassette Information ...................................................................................................... 28
Before Requesting Service (Self-checkItems) .................................................................................. 29
Service Center List........................................................................................................................ 30
Warranty ..................................................................................... . ................................................. 31
Spanish Quick Use Guide/Guru pare rdpida consulta ............................................................ 32-35
2
Important Safeguards and Precautions
FOR YOUR SAFETY, READ AND RETAIN ALL
SAFETY AND OPERATING INSTRUCTIONS.
HEED ALL WARNINGS IN THE MANUAL AND
ON THE UNIT
I INSTALLATION [
1 POWER SOURCE CAUTION
Operate only from a power source indicated on the
unit or in this manual.
If necessary, have your Electdc Utility Service
Company or Video Products Dealer verify the power
source in your home.
2 POLARIZED OR GROUNDING PLUG
As a safety feature, this Video product comes with
either a polarized power cord plug (one blade is
wider than the other), or a three-wire grounding type
plug.
POLARIZED PLUG CAUTION:
This plug will only fit into an outlet one way. If you
cannot fully insert the plug, try reversing it. If it still will
not fit, have an electrician install the proper wall outlet.
Do not defeat the safety feature by tampering with the
plug.
GROUNDING PLUG CAUTION:
This plug will only fit into a three-hole grounding outlet.
If necessary, have an electrician install the proper
outlet. Do not defeat the safety feature by tampering
with the plug•
3 POWER CORD
Make sure power cords are muted so that they are
not likely to have anything rest on them, roll over
them, or be in the way of walking traffic.
If an extension cord is used, make sure it also has
either a polarized or grounded plug and that the
cords can be securely connected.
Frayed cords, damaged plugs, and damaged or
cracked wire insulation are hazardous and should be
replaced by a qualified service technician.
Ovedoaded outlets and extension cords are fire
hazards and should be avoided.
4 DO NOT BLOCK VENTILATION HOLES
Vantilation openings in the cabinet release heat
generated dudng operation. If they are blocked, heat
build-up inside the unit can cause failures that may
result in a fire hazard or heat damage to cassettes.
For protection follow these rules:
a. Never cover ventilation slots or the unit while in
use, or operate the unit when placed on a bed,
sofa, rug, or other soft surface.
b• Avoid built-in installation, such as a book case or
rack, unless proper ventilation is provided.
5 AVOID EXTREMELY HOT LOCATIONS OR
SUDDEN TEMPERATURE CHANGES
Do not place the unit over or near any kind of heater
or regulator, in direct sunlight, inside a dosed
vehicle, etc.. Do not move the unit suddenly between
areas of extreme temperature variation. If the unit is
suddenly moved from a cold place to a warm place,
moisture may condense in the unit and on the tape.
6 TO AVOID PERSONAL INJURY
• Do not place unsecured equipment on a sloping
surface.
• Do not place this unit on any support that is not
firm, level and adequately strong. The unit could fall
causing serious injury to child or
adult and damage to the unit.
• An appliance and cart combination
should be moved with care. Quick
stops, excessive force, and
uneven surfaces may cause the
appliance and cart combination to
ovedum.
• Carefully follow all operating
instructions and use the manufacturer's
recommended accessories when operating this unit
or connecting it to any other equipment.
I OUTDOOR ANTENNA INSTALLATION I
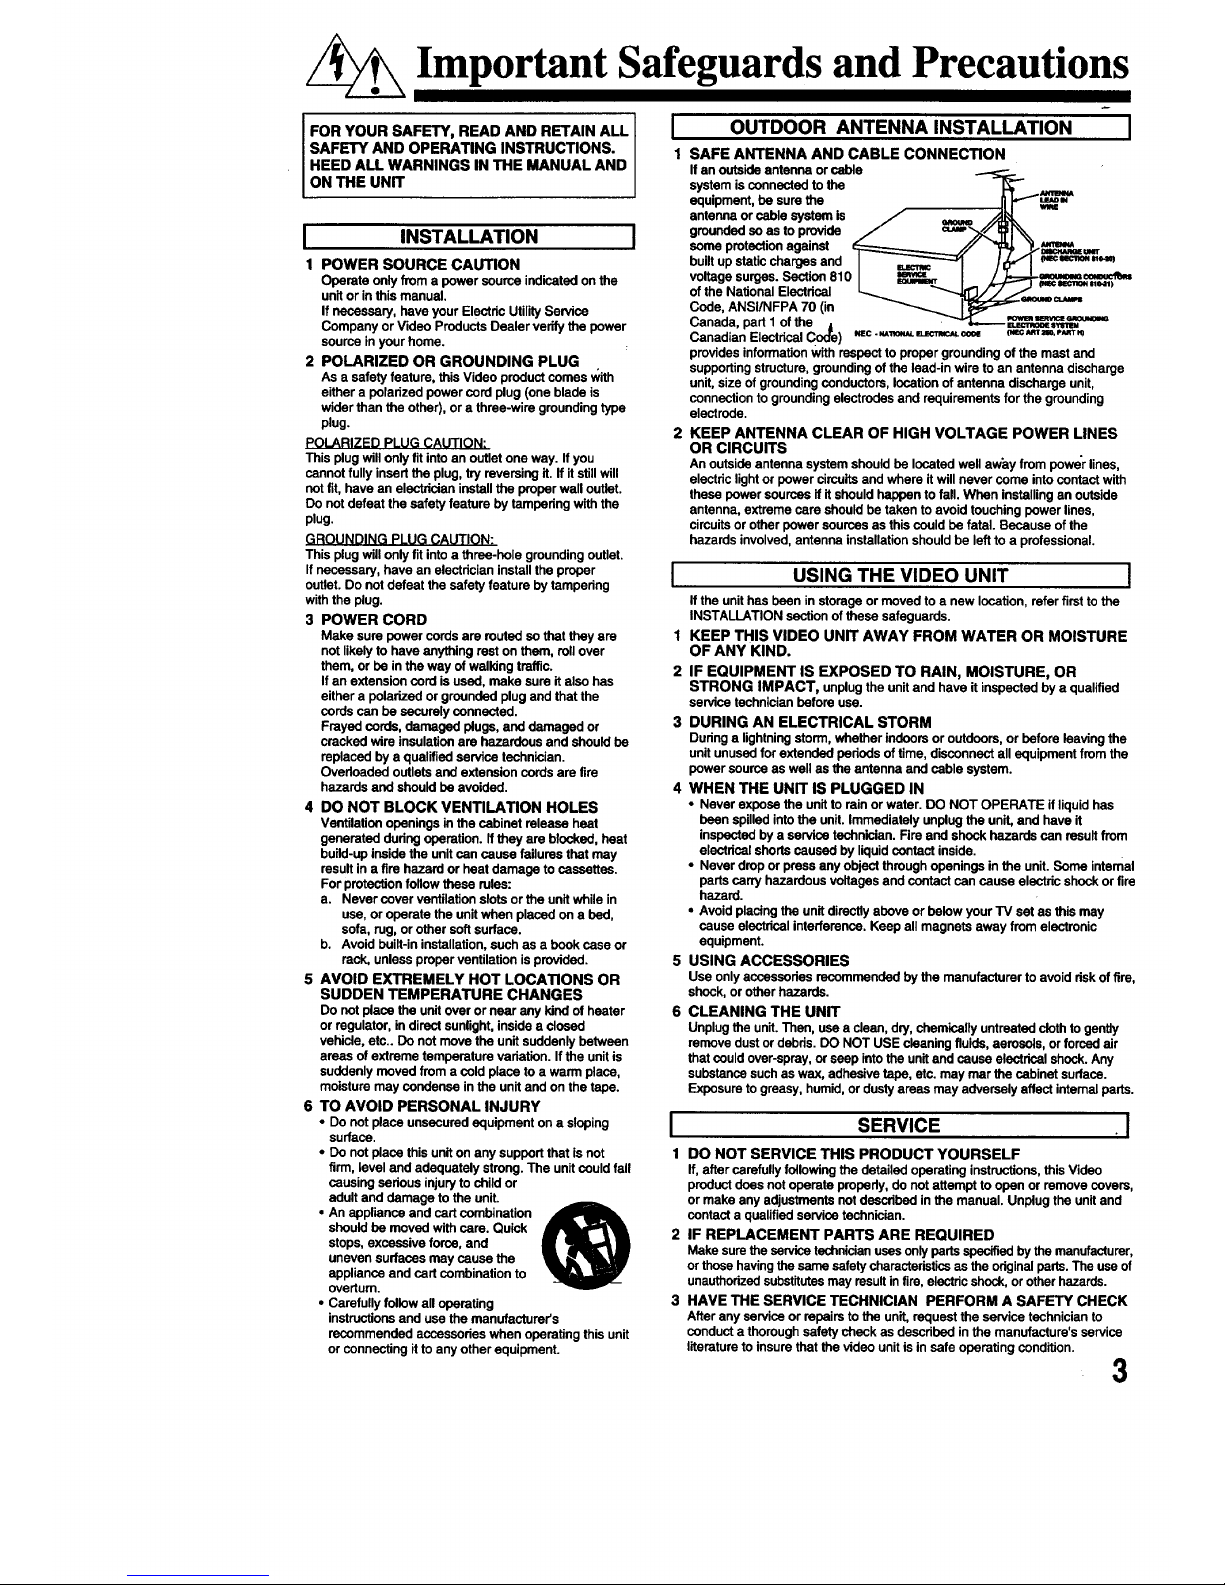
1 SAFE ANTENNA AND CABLE CONNECTION
If an outside antenna or cable _ •
system is connected to the
equipment, be sure the
antenna or cable systam, is _
grounded so as to provide
some protection against _------_J'/ _ _=_=,=r
bullt up static charges and I _ ]l_,,f] _=_aoN=,._
voltage surges Section 810 I _ [ Z..,_=,._=_ee_=_
• " . _ )
of the National Electncal _ _'L'----._i/"7"_/"J
Code, ANSI/NFPA 70 (in _ [_:_==_.._=u=_
Canada, pad I of the | __aaoug_
Canadian Electrical Code) _c .,=,_.,u_,_co_ _c*_ra=,,_rr_
provides information with respect to proper grounding of the mast and
suppoding structure, grounding of the lead-in wire to an antenna discharge
unit, size of grounding conductors, location of antenna discharge unit,
connection to grounding electrodes and requirements for the grounding
electrode.
2 KEEP ANTENNA CLEAR OF HIGH VOLTAGE POWER LINES
OR CIRCUITS
An outside antenna system should be located well away from power lines,
electric light or power circuits and where it will never some into contact with
these power sources ifit should happen to fall• When installing an outside
antenna, extreme care should be taken to avoid touching power lines,
circuits or other power sources as this could be fatal. Because of the
hazards involved, antenna installation should be left to a professional.
I USING THE VIDEO UNIT I
If the unit has been in storage or moved to a new location, refer first to the
INSTALLATION section of these safeguards.
1 KEEP THIS VIDEO UNIT AWAY FROM WATER OR MOISTURE
OF ANY KIND.
2 IF EQUIPMENT IS EXPOSED TO RAIN, MOISTURE, OR
STRONG IMPACT, unplug the unitand have it inspected by a qualified
service technician before use.
3 DURING AN ELECTRICAL STORM
During a lightning storm, whether indoors or outdoors, or before leaving the
unit unused for extended periods of time, disconnect all equipment from the
power source as well as the antenna and cable system.
4 WHEN THE UNIT IS PLUGGED IN
• Never expose the unit to rain or water. DO NOT OPERATE if liquid has
been spilled into the unit. Immediately unplug the unit, and have it
inspected by a service technician. Fire and shock hazards can result from
electrical shorts caused by liquid contact inside.
• Never drop or press any object through openings in the unit. Soma intemal
pads carry hazardous voltages and contact can cause electric shock or fire
hazard.
• Avoid placing the unit directly above or below your TV set as this may
cause electrical interference. Keep all magnets away from electronic
equipment.
5 USING ACCESSORIES
Use only accessodas recommended by the manufacturer to avoid risk of fire,
shock, or other hazards.
6 CLEANING THE UNIT
Unplug the unit. Than, use a clean, dry, chemically untreated cloth to gently
remove dust or debds. DO NOT USE cleaning fluids, aerosols, or forced air
that could over-spray, or seep into the unit and cause electrical shock. Any
substance such as wax, adhesive tape, etc. may mar the cabinet sudace.
Exposure to greasy, humid, or dusty areas may adversely affect internal parts.
I SERVICE [
1 DO NOT SERVICE THIS PRODUCT YOURSELF
If, after carefully following the detailed operating instructions, this Video
product does not operate properly, do not attempt to open or remove covers,
or make any adjustments not described in the manual. Unplug the unit and
contact a qualified service technician.
2 IF REPLACEMENT PARTS ARE REQUIRED
Make sure the service technician uses only parts specified by the manufacturer,
or those having the same safety characteristics as the original parts. The use of
unauthorized substitutes may result in fire, electric shock, or other hazards.
3 HAVE THE SERVICE TECHNICIAN PERFORM A SAFETY CHECK
After any service or repairs to the unit, request the service technician to
conduct a thorough safety check as described in the manufacture's service
literature to insure that the video unit is in safe operating condition.
3
UnpackingYourCombinationVCRoProductFeatures
Unpacking Your
Combination VCR
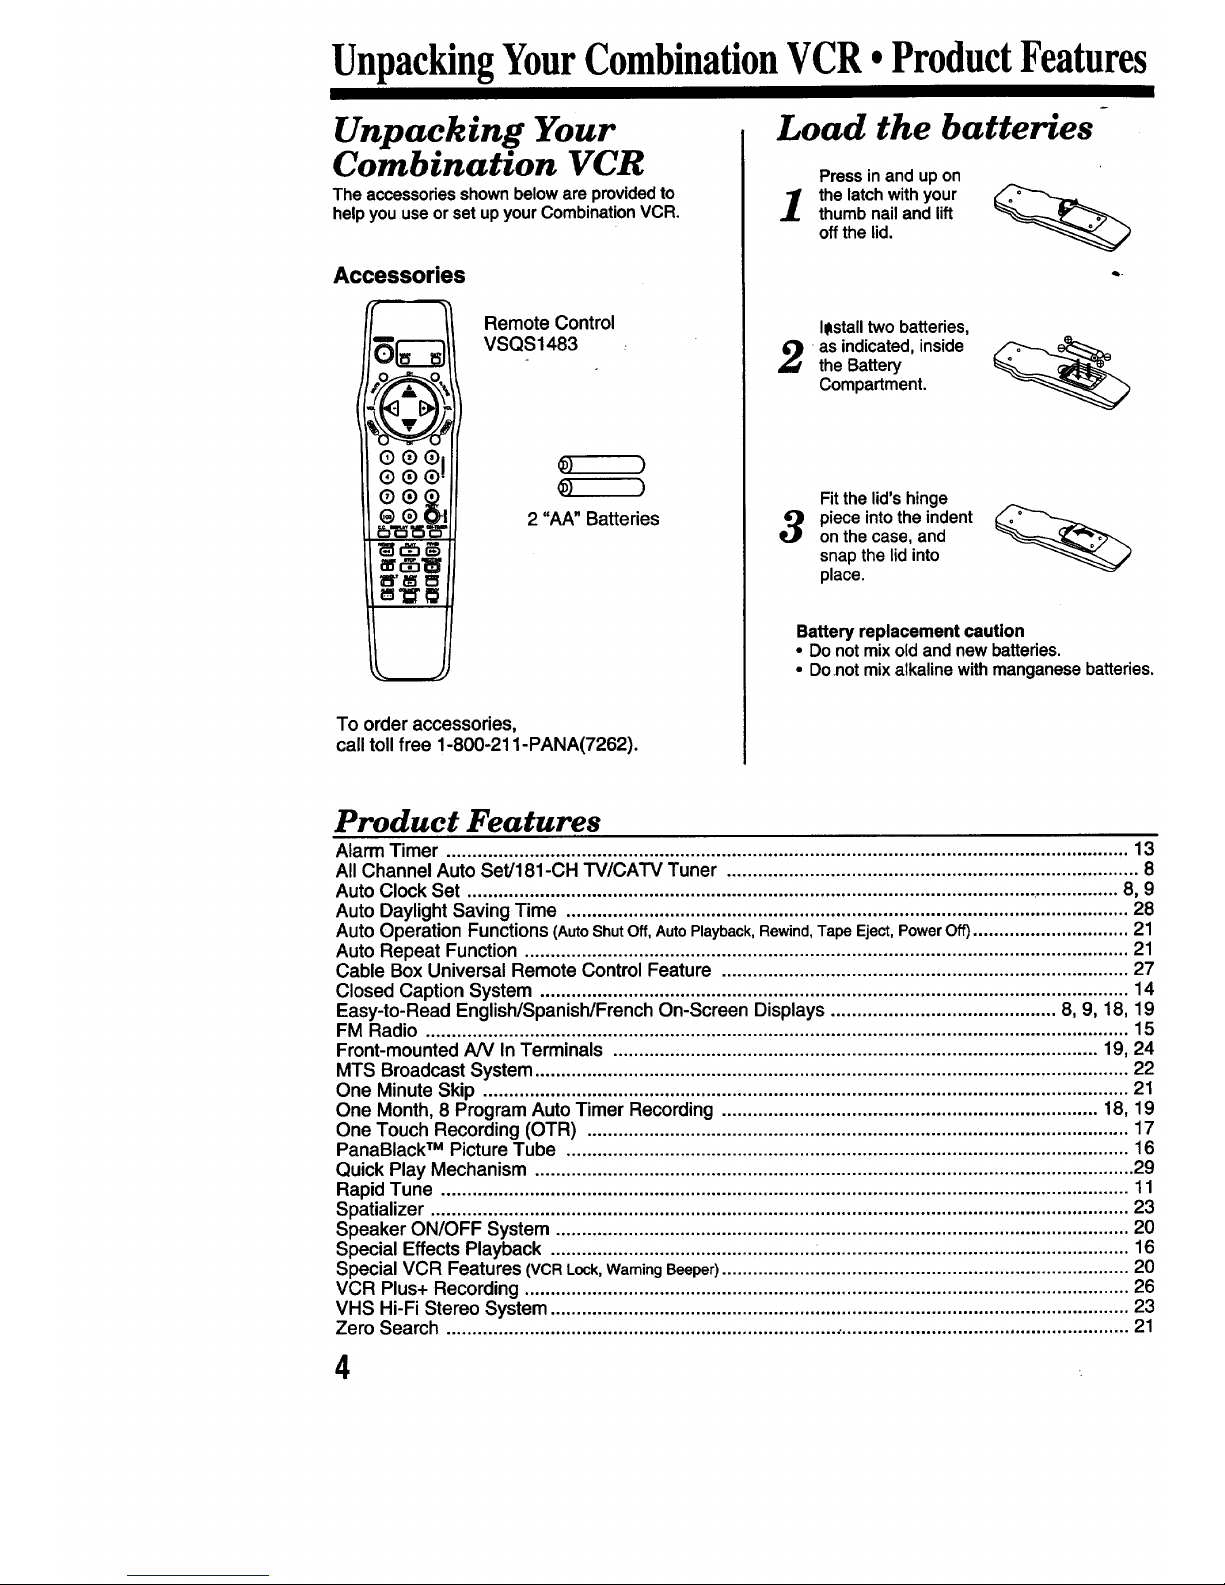
The accessoriesshownbeloware providedto
helpyou useor set upyourCombinationVCR.
Accessories
141-1 I*lHI
QQQI
QQ®;
®®
@Q
Remote Control
VSQS1483
2 "AA" Batteries
To order accessories,
call toll free 1-800-211-PANA(7262).
Load the batteries
Pressinand upon
thelatchwithyour
thumbnailand lift
offthe lid.
I_stalltwobatteries,
as indicated,inside
theBattery
Compartment.
Fitthelid'shinge
pieceintotheindent
onthecase,and
snapthe lidinto
place.
Battery replacement caution
• Do not mix old and new batteries
• Do not mix alkaline with manganese batteries
Product Features
Alarm Timer ................................................................................................................................... 13
All Channel Auto Set/181-CH TV/CATV Tuner ............................................................................... 8
Auto Clock Set .............................................................................................................................. 8, 9
Auto Daylight Saving Time ............................................................................................................ 28
Auto Operation Functions (AutoShutOff,AutoPlayback,Rewind,TapeEject,PowerOff).............................. 21
Auto Repeat Function .................................................................................................................... 21
Cable Box Universal Remote Control Feature .............................................................................. 27
Closed Caption System ................................................................................................................. 14
Easy-to-Read English/Spanish/French On-Screen Displays ........................................... 8, 9, 18, 19
FM Radio ....................................................................................................................................... 15
Front-mounted A/V In Terminals ............................................................................................. 19, 24
MTS Broadcast System .................................................................................................................. 22
One Minute Skip ............................................................................................................................ 21
One Month, 8 Program Auto Timer Recording ........................................................................ 18, 19
One Touch Recording (OTR) ........................................................................................................ 17
PanaBlackTMPicture Tube ............................................................................................................ 16
Quick Play Mechanism ................................................................................................................... 29
Rapid Tune .................................................................................................................................... 11
Spatializer ...................................................................................................................................... 23
Speaker ON/OFF System .............................................................................................................. 20
Special Effects Playback ................................................... :........................................................... 16
Special VCR Features (VCR Lock, Waming Beeper) .............................................................................. 20
VCR Plus+ Recording .................................................................................................................... 26
VHS Hi-Fi Stereo System ............................................................................................................... 23
Zero Search ................................................................................................................................... 21
Antenna or Cable Connections
]trtttrtrn [oIrIlltt li
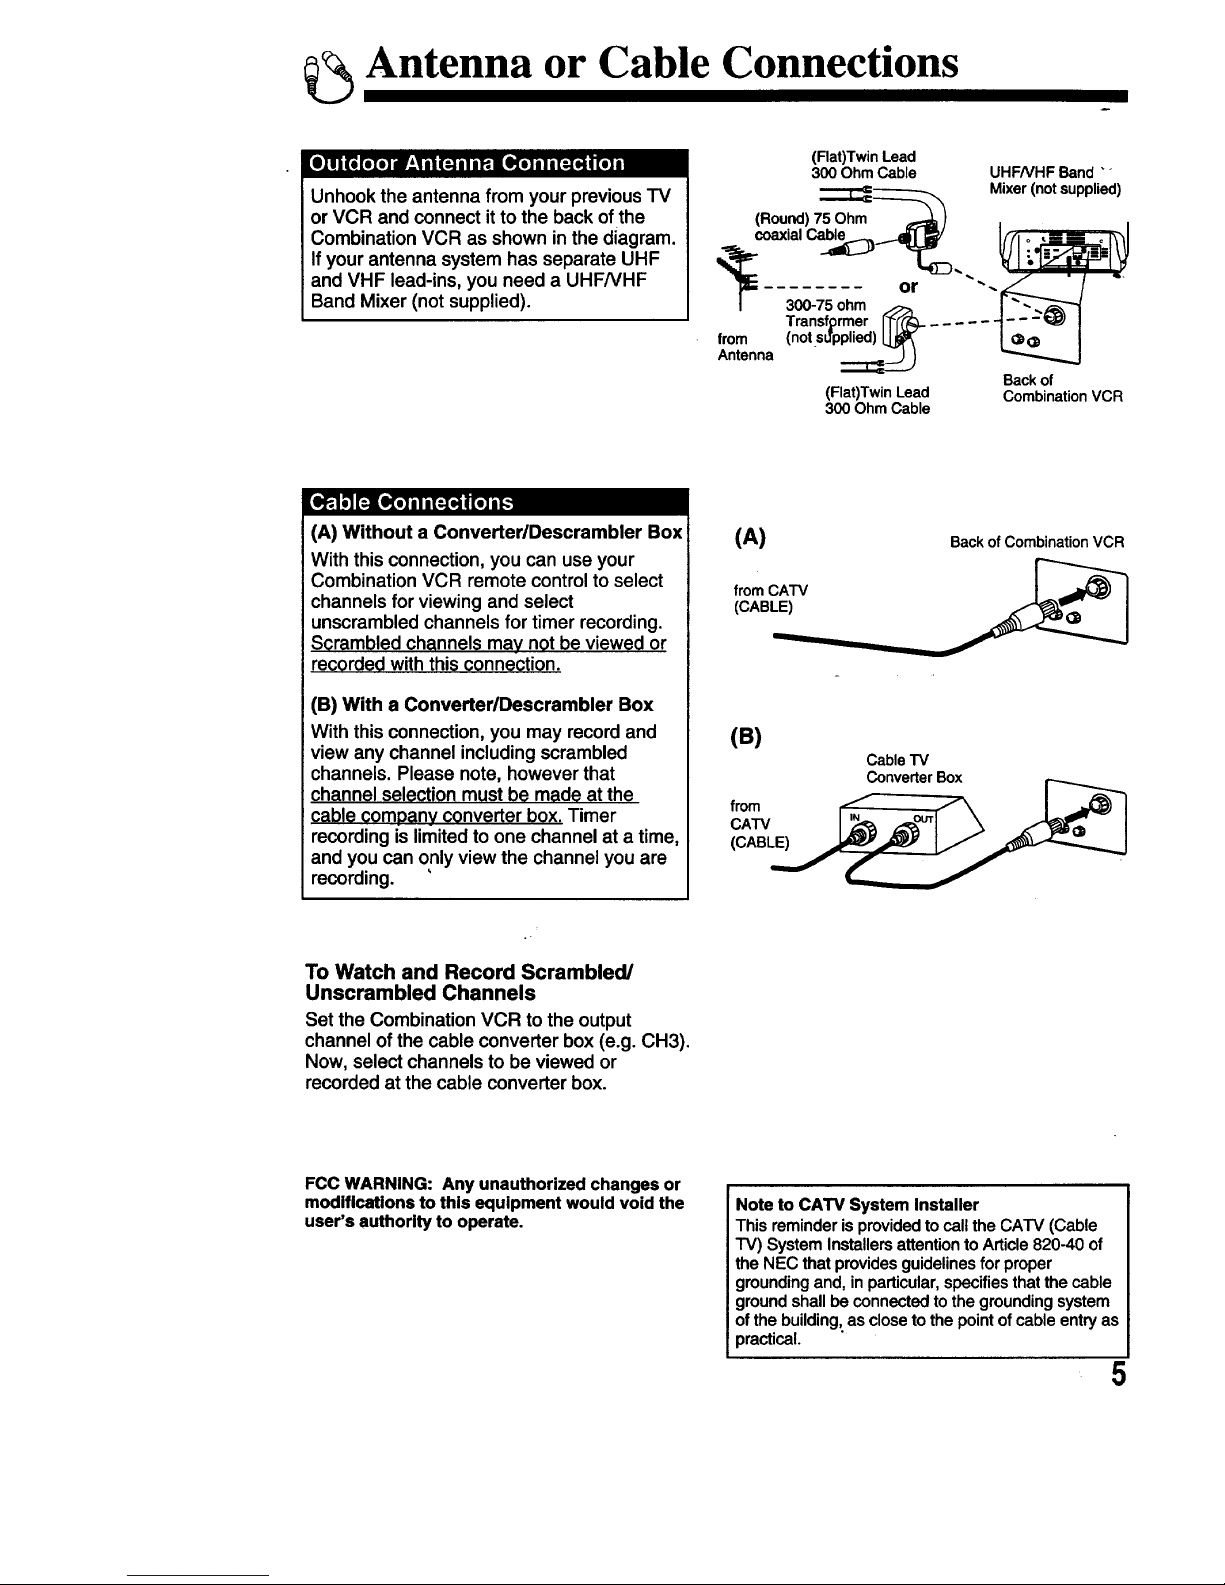
Unhook the antenna from your previous TV
or VCR and connect it to the back of the
Combination VCR as shown in the diagram.
Ifyour antenna system has separate UHF
and VHF lead-ins, you need a UHFNHF
Band Mixer (not supplied).
(Flat)Twin Lead
300 Ohm Cable UHFNHF Band ""
_-----_ Mixer(not supplied)
(Round) 75 Ohm _-_")
p= ........ or "-
/ 300-75 ohm _ "_....
Transfprmer ['_-i"(_i_;;_..........
from (notsd'ppUed)LJJ_ dD
Antenna " ::::::::Z___
Back of
(Flat)Twin Lead Combination VCR
300 Ohm Cable
(A) Without a Converter/Descrambler Box
With this connection, you can use your
Combination VCR remote control to select
channels for viewing and select
unscrambled channels for timer recording.
Scrambled channels may not be viewed or
recorded with this connection.
(B) With a ConverterlDescrambler Box
With this connection, you may record and
view any channel including scrambled
channels. Please note, however that
channel selection must be made at the
cable company converter box. Timer
recording is limited to one channel at a time,
and you can only view the channel you are
recording.
(A) Back of Combination VCR
from CATV
(CABL.I_m_d___J
(B)
Cable TV
ConverterBox
from f _ I J_ I
CA V I
To Watch and Record Scrambled/
Unscrambled Channels
Set the Combination VCR to the output
channel of the cable converter box (e.g. CH3).
Now, select channels to be viewed or
recorded at the cable converter box.
FCC WARNING: Any unauthorized changes or
modifications to this equlpment would void the
user's authorlty to operate.
Note to CATV System Installer
Thisreminderisprovidedto callthe CATV (Cable
TV) SystemInstallersattentiontoArticle820-40of
theNECthatprovidesguidelinesfor proper
groundingand,inparticular,specifiesthatthecable
groundshallbe connectedtothe groundingsystem
ofthe building;ascloseto the pointofcableentryas
practical.
5

Location of Controls
MAIN
See page 27.
POWER
See pages 8, 11, 27.
MUTE
See pages 11, 14.
CHANNEL
SELECT UP/DOWN
See pages 8-15, 17-21, 23-26.
MENU
See pages 8-10, 12, 14, 17, 20,
.u..o,.°,° ooj,
See pages 9, 11, 15, 17, 26, 2
tlo ®®)tJ,'
10, 15, 21, 22.
Seepages 13, __ _ _
CLOSED CAPTION
See page 14.
REWIND/SEARCH _ m
See page 16.
PLAY
See page 16.
PAUSE
See pages 16, 17.
ADD/DELETE
See 13, 15, 19, 25, 26.
AUDIO
See pages 15, 22, 23.
COUNTER RESET
See page 21.
"'CAW
See page 27.
RAPID TUNE
See page 11.
VOLUME UP/DOWN
SET/BACKSPACE
See pages 8-14, 17-21, 23-26.
PROGRAM
See pages 18, 19, 26.
TRACKING UP/DOWN
See page 16.
SLEEP.
See page 13.
FM/TVENTER
Seepages 15, 27.
ON-TIMER
See page 13.
FAST FORWARD/SEARCH
See page 16.
STOP
Seepages16,17,19.
RECORD/TIME
See page 17.
SPEED
See pages 17, 26.
ZERO/1 MINUTE SKIP
See page 21.
SLOW
See page 16.
Audio Output Connector (L/R)
For connection to the audio input
connector of a stereo TV,
another (Combination) VCR or
an audio stereo amp.
AC Power Plug
When plugged into an AC
outlet, the Combination VCR
consumes 7 W of electric
power in OFF condition.
VHF/UHF Antenna
Input Terminal
In from your
Antenna or Cable.
See page 5.
6
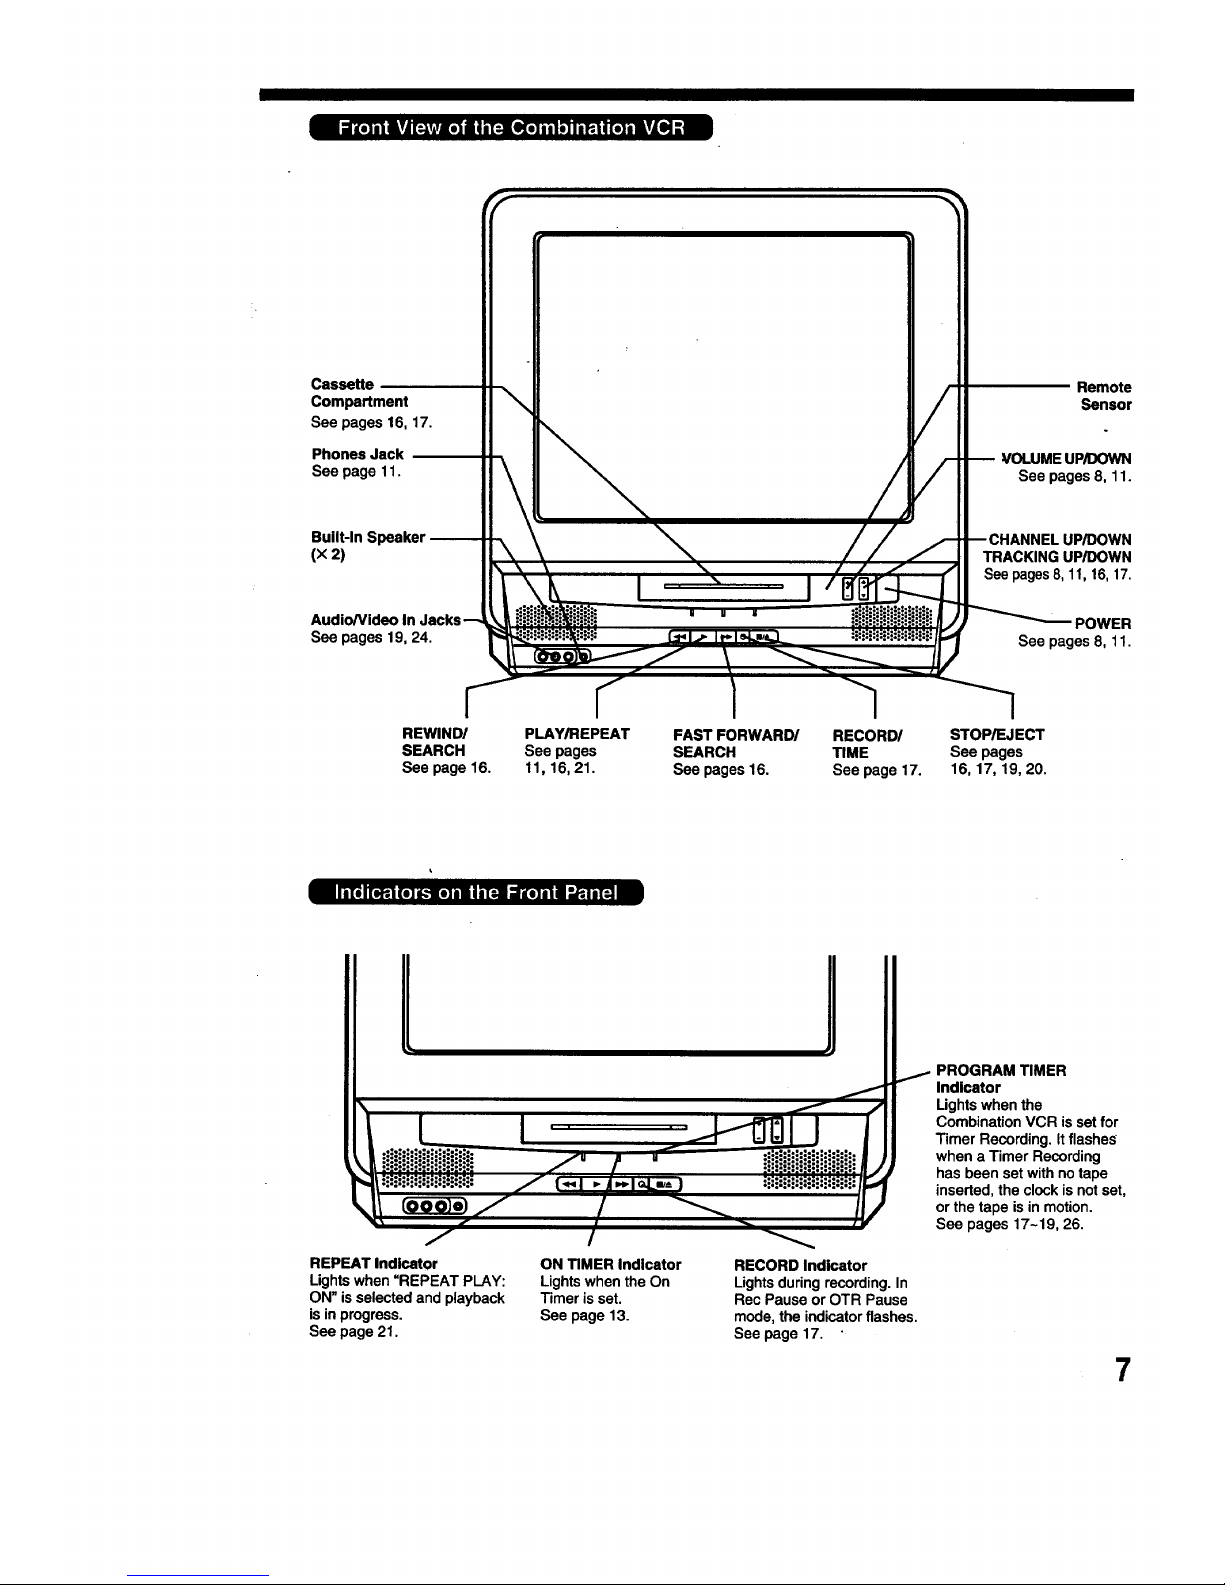
Cassette
Compartment
See pages 16, 17.
Phones Jack
See page 11.
Built-In
(X 2)
Audio/Video
See pages 19, 24.
Remote
Sensor
VOLUME UP/DOWN
See pages 8, 11.
UP/DOWN
TRACKING UP/DOWN
See pages 8, 11, 16,17.
POWER
See pages8, 11.
REWIND/ PLAY/REPEAT FAST FORWARD/ RECORD/ STOP/EJECT
SEARCH See pages SEARCH TIME See pages
See page 16. 11, 16, 21. See pages 16. See page 17. 16, 17, 19, 20.
I I_.i [_-i (el kle] im I i[=ll ;ii[e] |11 I_..ii[=_ I
PROGRAM TIMER
Indicator
Lights when the
Combination VCR is set for
Timer Recording. It flashes"
when a Timer Recording
has been set with no tape
inserted, the clock is not set,
or the tape is in motion.
See pages 17-19, 26.
REPEAT Indicator
Lights when =REPEAT PLAY:
ON" isselected and playback
is in progress.
See page 21.
ON TIMER Indicator
Lights when the On
Timer is set.
See page 13.
RECORD Indicator
Lights during recording. In
Rec Pause or OTR Pause
mode, the indicator flashes.
See page 17.
7
One Time Setup
*Important:
IftheremotecontrolPOWER, CH &v, MENU,
PROG,ON-TIMER,R-TUNE,FM/TVand
ADD/DLTbuttondoesnotworkwhenpressed,
pressthe MAINbuttononthe remotecontrol
andtrythebuttonagain.
When the Combination VCR is turned on for
the first time, it automatically enters the setup
mode. Setup includes the following:
• Choose the language for on-screen menus
and messages.
• Tell the Combination VCR how your
equipment is hooked up (page 5) so the
Combination VCR can correctly place
channels into memory.
• Get the CombinationVCR re_;dyfor clock set.
I_llPcheck list before you begin.
[] Your Combination VCR is connected to an
Antenna or Cable system (see page 5).
IIIIII
/ /
2 2.3.4 1
ToSetLanguage,Channels,andClock
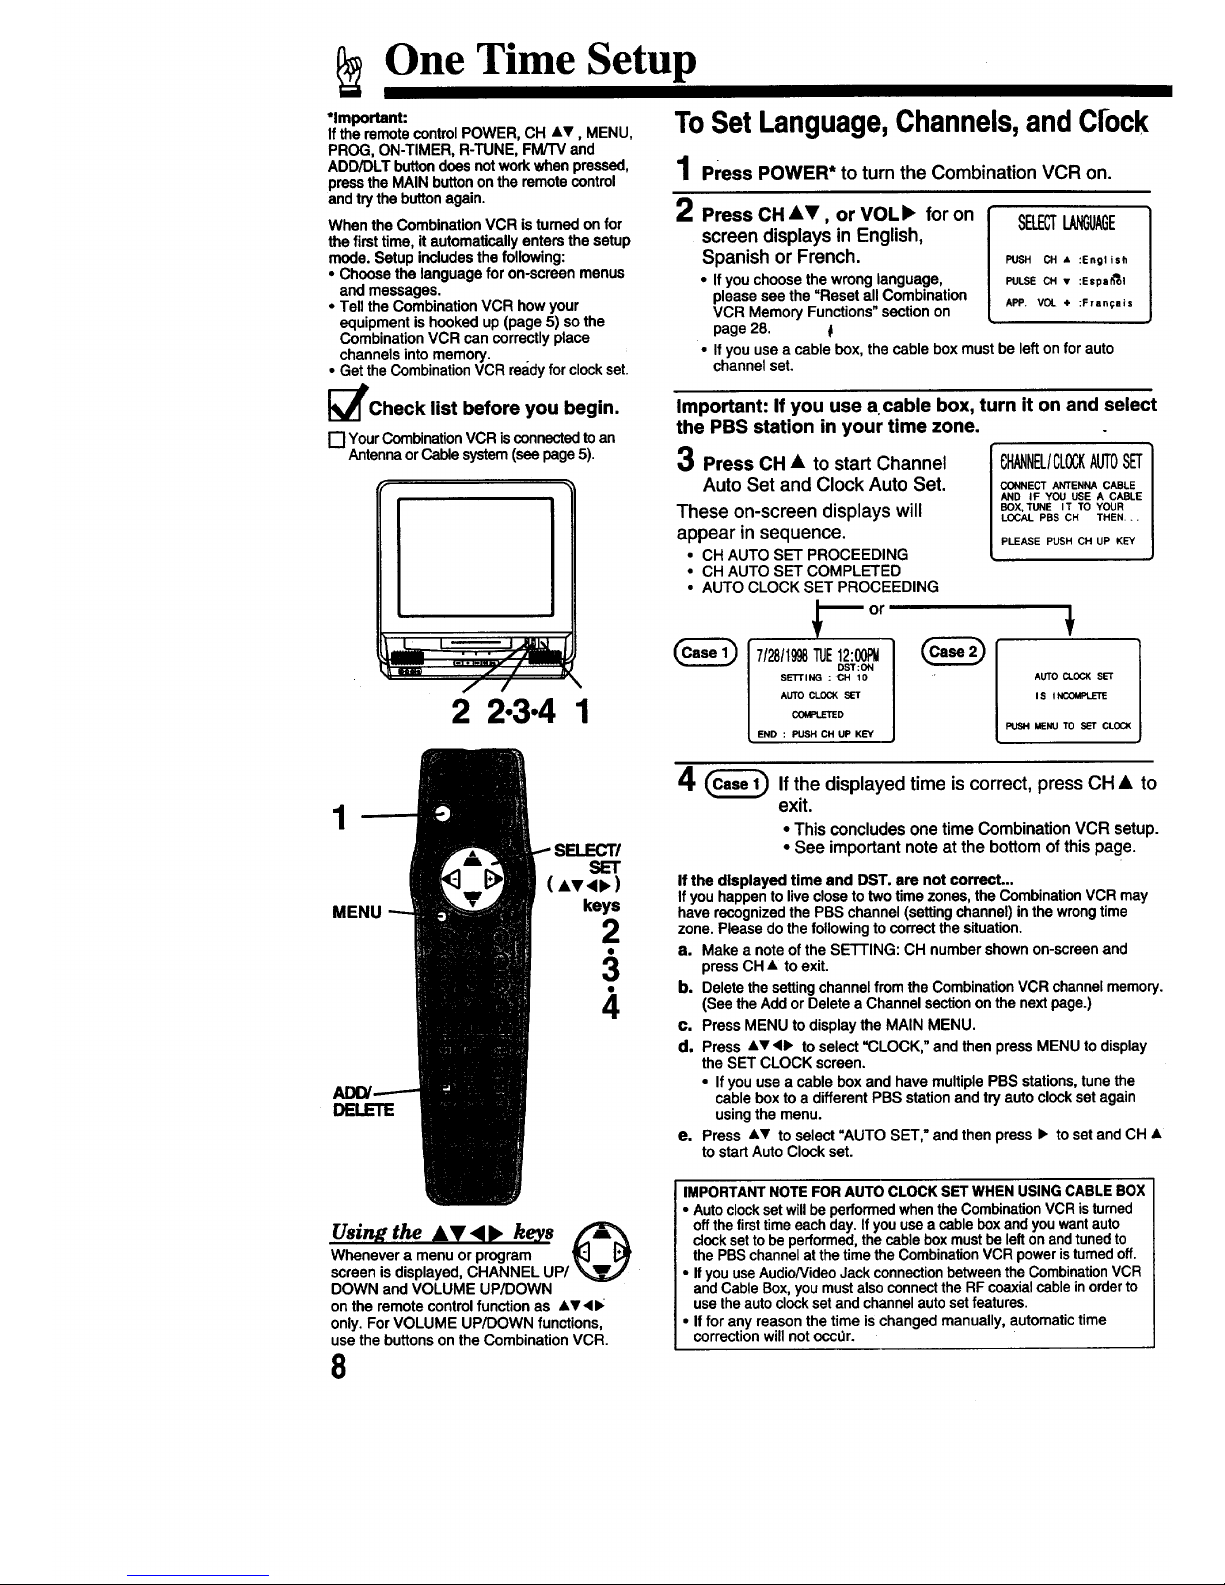
1 Press POWER* to turn the Combination VCR on.
2 Press CH •_', or VOLI_ for on
screen displays in English,
Spanish or French.
• If you choose the wrong language,
please see the =Reset all Combination
VCR Memory Functions" section on
page 28. f
• If you use a cable box, the cable box must be left on for auto
channel set.
SELECTLANGUAGE
PUSH CH • :English
PULSE CH • :Espal_l
APP. VOL ÷ :FranC:Ills
Important: If you use a.cable box, turn it on and select
the PBS station in your time zone.
3 Press CH • to start Channel
Auto Set and Clock Auto Set.
These on-screen displays will
appear in sequence.
• CH AUTO SET PROCEEDING
• CH AUTO SET COMPLETED
• AUTO CLOCK SET PROCEEDING
CHANNEL/CL(X;KAUTOSET
CONNECT ANTENNA CABLE
AND IF YOU USE A CABLE
BOX, TUNE IT TO YOUR
LOCAL PBS CH THEN...
PLEASE PUSH CH UP KEY
or
7/28/1998TUE12:00PM
DST:ON
SE'I-rlNG : CH 10
AUTO CLOCK SET
COMPLETED
END : PUSH CH UP KEY
AUTO CLOCK SET
IS I NCO_PLETE
PUSH MENU TO s_=r CLOCK
1
MENU
DELETE
SELECTI
SET
(Avo.)
keys
.2
3.
4
'_4 _ If the displayed time is correct, press CH • to
exit.
• ThisconcludesonetimeCombinationVCRsetup.
• See importantnoteatthe bottomofthispage.
If the displayed time and DST, are not correct..,
If you happen to live close to two time zones, the Combination VCR may
have recognized the PBS channel (setting channel) in the wrong time
zone. Please do the following to correct the situation.
a. Make a note of the SETTING: CH number shown on-screen and
press CH • to exit.
b. Delete the setting channel from the Combination VCR channel memory.
(See the Add or Delete a Channel section on the next page.)
c. Press MENU to display the MAIN MENU.
d, Press •T<I_ to select =CLOCK," and then press MENU to display
the SET CLOCK screen.
• If you use a cable box and have multiple PBS stations, tune the
cable box to a different PBS station and try auto clock set again
using the menu.
e. Press &T to select =AUTO SET," and then press I_ to set and CH •
to start Auto Clock set.
Using the bV • • keys
Whenever a menu or program _1 I_
screen is displayed, CHANNEL UP/_,_
DOWN and VOLUME UP/DOWN
on the remote control function as ,&V<IIV
only. For VOLUME UP/DOWN functions,
use the buttons on the Combination VCR.
8
IMPORTANT NOTE FOR AUTO CLOCK SET WHEN USING CABLE BOX
• Auto clockset willbe performed when the Combination VCR is tumed
off the first time each day. If you use a cable box and you want auto
clock set to be performed, the cable box must be left on and tuned to
the PBS channel at the time the Combination VCR power is turned off.
• If you use Audio/Video Jack connection between the CombinationVCR
and Cable Box, you must also connect the RF coaxial cable in order to
use the auto clock set and channel auto set features.
• If for any reason the time is changed manually, automatic time
correction will not occtJr.

_lf AUTO CLOCK SET IS INCOMPLETE
appears, please set the clock manually.
a. PressMENU todisplaythe SE'4"-
CLOCKscreen.
b. Press Av toselectand • to
enterthemonth,date,year, time,
and DST. (DaylightSavingTime).
To Make Corrections,
press<• repeatedlytomovethe
cursortotheincorrectentryand
makethe correction.
c. PressMENUtwicetostartthe
clockandexitthe MAIN MENU.
I DST:ON
SELECT:& • KEY
| SET :1_ KEY
[ IE_ID :MB_I KIEY
• "DST:ON"automaticall
adjustsfor daylight
savingtime.(Seepage28.)
MENU
SELECT/
SET
(.v<k)
keys
keys
To Change the OSD Language
1 Press MENU to display the MAIN MENU.
2 Press &V<• to select the language selection
icon.
3 Press MENU repeatedly to change the language as
shown.
Li
MAIN MENU
SE3_EC'F:& v <1_ KEY
SET :f/B_J KEY
=l <Spanish>
MENU PRINCIPAL
ELEGIR:& • < I_
FIJAR :MB#J
<French>
_ :MENU
4 Press A,V<• toselect=EXIT,"andthen press
MENUto exittheMAIN MENU.
To Replace Channels in Memory
Incase,you havecable installed,etc.
1 Press MENU to display the MAIN MENU.
2 Press AV<• to select =CH,"
and then press MENU to
display the SET UP CHANNEL
screen.
3 Press A'I' repeatedly to select
=ANTENNA," and then press
• to select your antenna
system ("TV" or "CAW").
4 Press AV to select =AUTO
SET," and then press
• to start.
• To exittheSET UP CHANNEL
screen,pressMENUtwice.
SET :MENU KEY
--- SET UP _---
AUTO SET
CABLE BOX SET UP
VCR Plus+ CH SET UP
SELECT:& • KEY
SET :1_
END :MENU KEY
ADD/
DELETE
To Set or Reset the Clock
Incase theclockiswrong,ora powerfailureoccurred.
1 Press MENU to
display the MAIN ..... SETCLOCK......
MENU. AUTOSET
2 Press A_'<• to
select =CLOCK." sa_c-r:,• KEY
Then, press MENU sET :_
END :MENU KEY
to display the SET
CLOCK screen. [._
3 Press A_' to select
=MANUAL SET," and I__----°_r--_-.
then • to display
the SET CLOCK I sEu_r:. • _z_
/SET :_KEY
screen, t "" :_u _E_'
laamm mdUl
4 Please dostepsb
andc at thetopof thispage.
To Add or Delete a Channel
1 Select a channel I c.a.a, oe_o_o I
using the I . I
NUMBERED keysl I 08 /
to add orCHAV I I
to delete. I I
2 Press ADD/DLT I_ I
to add or delete /
the channel. L
• To selecta channelonce it'sdeleted,usethe
NUMBERED keys.
9
On-Screen Displays (OSD)
*Important:
Ifthe remotecontrolPOWER,CH &v, MENU, PROG,
ON-TIMER, R-TUNE, FM/TVand ADD/DLTbuttondoes
notworkwhen pressed,pressthe.MAINbuttononthe
remotecontrol and trythe buttonagain.
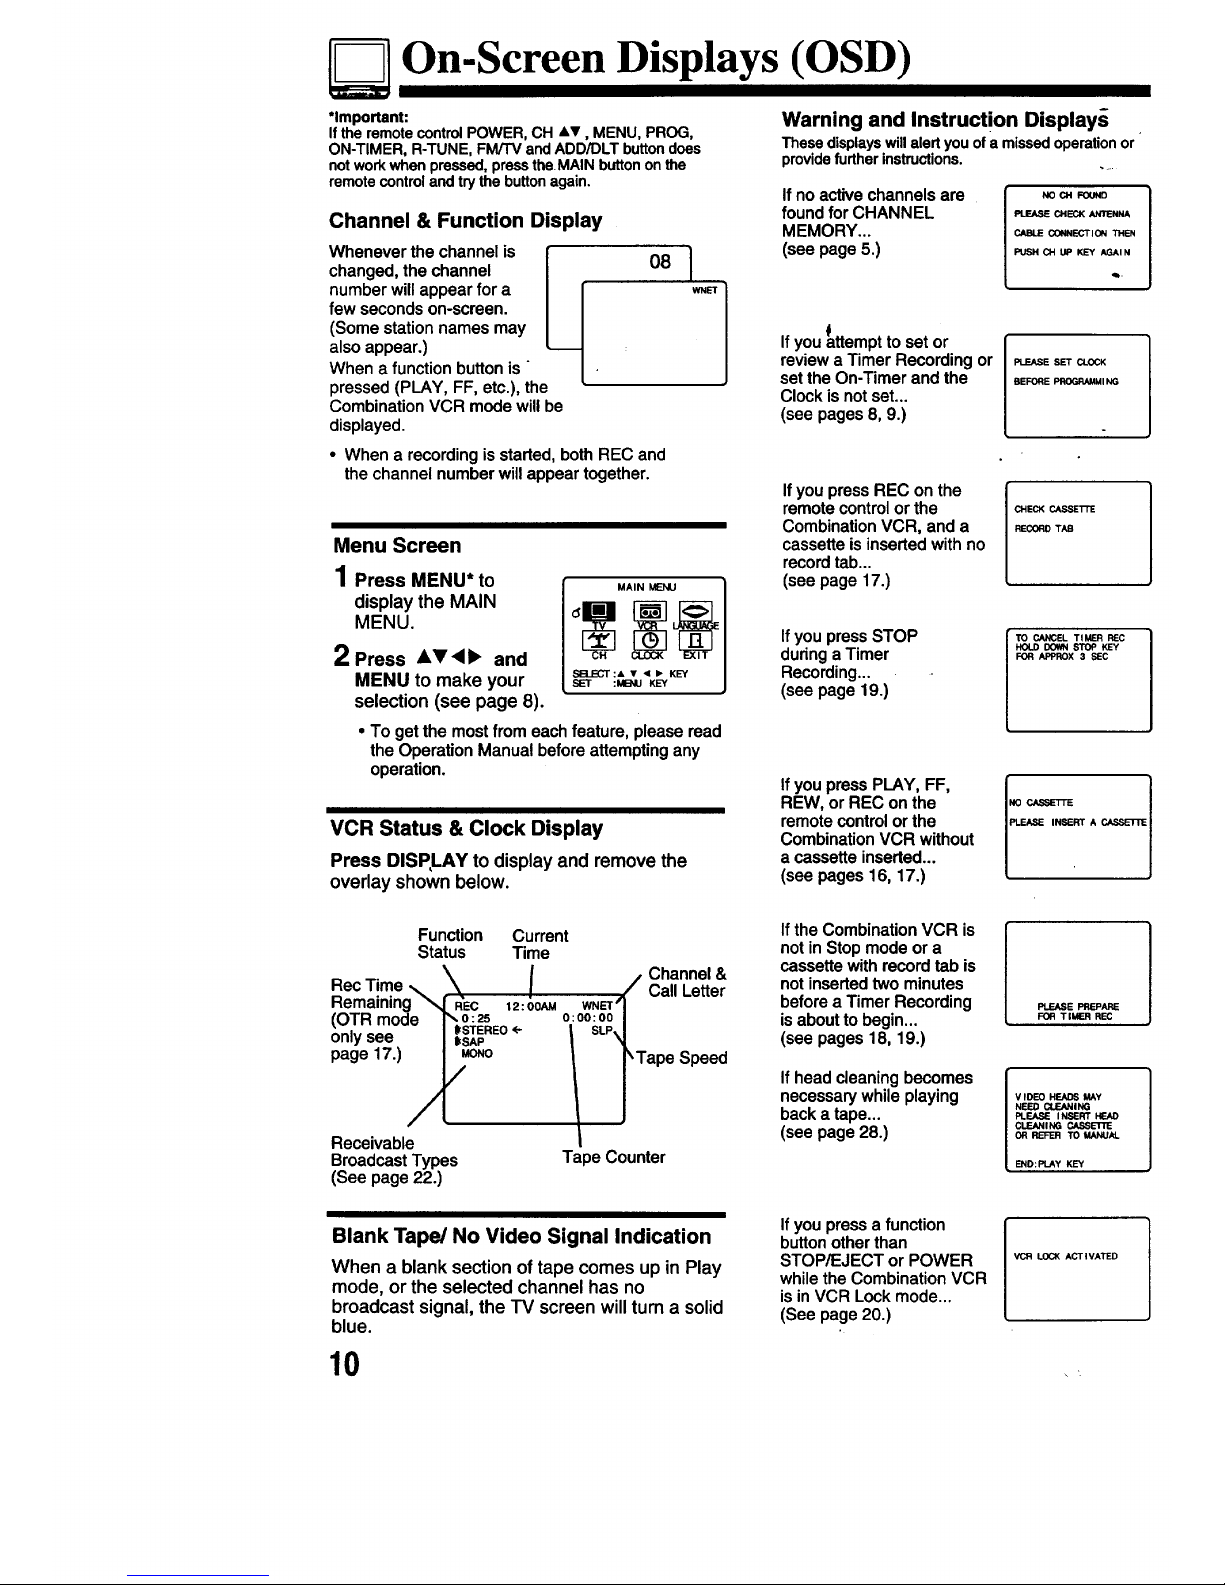
Channel & Function Display
Whenever the channel is [
changed, the channel I
number will appear for a I l
few seconds on-screen. I I
(Some station names may I I
also appear.) _-_
When a function button is " | •
pressed (PLAY, FF, etc.), the •
Combination VCR mode will be
displayed.
Warning and Instruction Display.s
Thesedisplayswillalertyouof amissedoperationor
provide furtherinstructions. ...
Ifnoactivechannelsare
found for CHANNEL
MEMORY...
(seepage5.)
NO CH FOUND
PLEASE CHECK ANTENNA
CABLE (X_Nff_'_TION 'THEN
PUSH Q.4 UP KEY AGAi N
,4b.
6
Ifyouattempttosetor
reviewa Timer Recordingor
set the On-Timerandthe
Clockisnotset...
(see pages8, 9.)
PLEASE SET CLOCK
BEFORE PROGRNAMI NG
• When a recordingis started,bothREC and
the channelnumberwillappeartogether.
Menu Screen
1 Press MENU* to
display the MAIN
MENU,
2Press A_' 4• and
MENU to make your
selection (see page 8).
_H MAIN MENU
d
SELECT :& T < I_ KEY
SET :MI_ILI KEY
IfyoupressREC on the
remotecontrolorthe
CombinationVCR, and a
cassetteisinsertedwithno
recordtab...
(see page17.)
If you press STOP
during a Timer
Recording...
(see page 19.)
CHECK CASSETrE
RECORD TAB
TO CANCEL TIMER REC
HOLD IX)_ STOP KEY
FOR APPROX 3 SEC
• To get the mostfromeachfeature,pleaseread
theOperationManualbeforeattemptingany
operation.
VCR Status & Clock Display
Press DISPLAY to display and remove the
overlay shown below.
IfyoupressPLAY,FF,
REW,or REC onthe
remotecontrolorthe
CombinationVCR without
a cassetteinserted...
(see pages16, 17.)
Function Current
Status Time
g'_RE / Channel&
RemaininReCTime c I_:OOAMWNET/_ Call Letter
(OTR mode r_,o_2[=,,L o:oo:oo/
only see I ;SA_ .... SLP_
page 17.) | MONO rape Speed
J
Receivable
Broadcast Types Ta )e Counter
(See page 22.)
IftheCombinationVCR is
notinStopmodeor a
cassette withrecordtab is
notinsertedtwominutes
beforeaTimerRecording
isabouttobegin...
(seepages 18, 19.)
Ifheadcleaningbecomes
necessarywhile playing
backa tape...
(seepage28.)
PLEASE PREPARE
FOR TIMER REC
V IDIEO HEADS MAY
NEED CLEANING
PLEASE INSERT HEAl)
CLEANING CASSETTE
0R REFER TO MANU/d.
END:PLAY KEY
Blank Tape/No Video Signal Indication
When a blank section of tape comes up in Play
mode, or the selected channel has no
broadcast signal, the TV screen will turn a solid
blue.
Ifyoupressa function
button otherthan
STOP/EJECT or POWER
whilethe CombinationVCR
isin VCR Lockmode...
(See page20.)
VCFI LOCK ACTIVATED
10 _-
 Loading...