

Panasonic Omnivision PV-M2089, Omnivision PV-M2079 Operating Instructions Manual
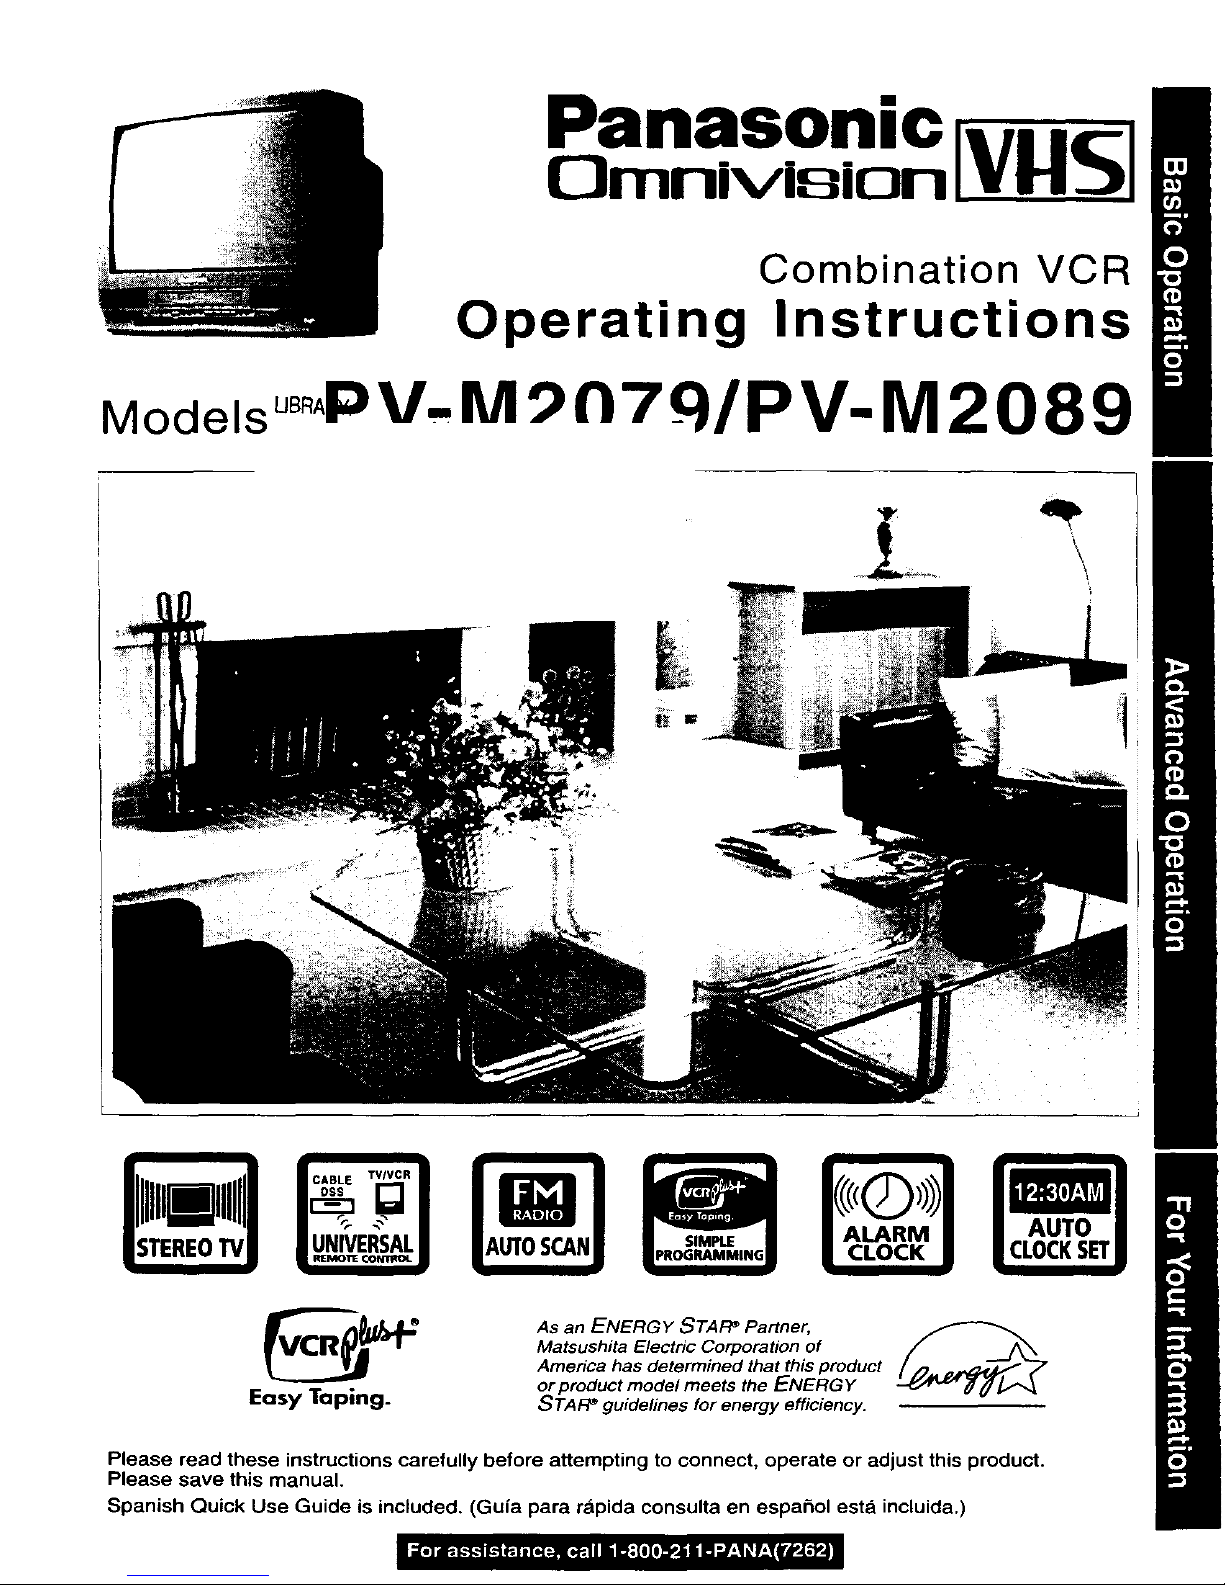
Panasonic
13rnnivisiQn V _J
Combination VCR
Operating Instructions
Models uBR4;:) V.IU! _n7_q/pV-M 2089
Easy Taping.
As an ENERGY STAI:P Partner,
Matsushita Electric Corporation of
America has determined that this product
or product model meets the ENERGY
STAFP guidelines for energy efficiency.
Please read these instructions carefully before attempting to connect, operate or adjust this product.
Please save this manual.
Spanish Quick Use Guide is included, (Guia para r&pida consulta en espahol esta incluida.)
Important Safeguards and Precautions
I READ AND RETAIN ALL SAFETY AND
OPERATING INSTRUCTIONS. HEED ALL
WARNINGS IN MANUAL AND ON UNIT
[ INSTALLATION
I POWER SOURCE CAUTION
Operate only from powersourceindicated on unit
or in this manual. If uncertain,have an Electrlc
UtilityService Companyor Video Preducts Dealer
verify your home power source.
2 POWER CORD PLUG
For safety, this unit comes with a polarized
type plug (one wide blade), or a three-wire
grounding type plug.
8QL_kaJZED_P_LU_
The plug fits into outlet one way. If it cannot be
fully inserted, try mverelng it. If it still wilt not fit,
have an aleotr_ian install the proper wall outlet.
Do not tamper with the plug,
_JUI2_G._.U.G_G.SU_TIQ_
The plug requires a three-hole grounding outlet.
If necessary, have an etecthcian install the
proper outlet, Do not tamper with the plug.
3 POWER CORD
Make sure power cords am muted SOthey
are not likely to have anything rest on
them,roll over them. or be in the wey of
walking traffic. An extension cord should have
the same type plug (polarized or grounding)
and must be securely connected. Overloading
wall outlets or extension con_ may cause fire
hazard. Frayed cards, damaged ptugs, and
dentaged or cracked wire insulation ere
hazardous end should be replaced by •
qualified electrician,
4 DO NOT BLOCK VENTILATION HOLES
Ventilation openings in the cabinet release
heat generated duflhg operation. If btocked,
heat buitd-up may result in a tire hazard or
heat damage to cassettes,
For your protection:
a. Never cover ventilation slots while unit is
ON, Oroperate unit while placed on a bed.
sofa.rug;orotherseftsurface.
b, Avoid bulit,in installation, such ass book
case or rack, unless property ventilated.
5 AVOID EXTREMELY HOT LOCATIONS OR
SUDDEN TEMPERATURE CHANGES
Do not place unit over or near a heater or
regulator, in direct sunlight, etc. If unit is
suddenly moved from a cold place to a warm
place, moisture may condensa in unit end on
the tape causing damage.
S TO AVOID PERSONAL iNJURY
• Never place unit on support or stand that is
not firm, level, and adequately strong. The
unit could fall causing sadous injury to a
child or adult and damage to the unit,
• Move any appliance and cart
combination with care.
Quick stops, excessive force.
and uneven surfaces mey
cause objects to overture.
• Carefully follow all operating instruotfons.
[ OUTDOOR ANTENNA INSTALLATION 1
I SAFE ANTENNA AND CABLE CONNECTION
An outside antenna or cabte sysfam must be "-"3 :.--
properly grour_ed to provide some protection ......._=,_
against built up static charges and votlag_ / *'_
Section 810 of the National El_Ctrical _/- _
Code, ANSVNFPA 70 (in Canada. / _'_'_
pan 1 of the Canadian Electhcal _--------------_----------------._/ " _=,_u_
code) provides information I !.___'_1 / r j _.:==_,_
regarding proper grounding of the I _ J / "r'_.,_'_
mast and supporting stmctura, _ _, j _ '
grounding of the lead-in wire to an _ __ --"-_
antenna disctlarge unit. size of _ _=_w_=_t_
grounding conductors, location of _© ._r,=_==_-_ r_=_
antenna discharge unit.
connection to grounding electrodes, and requirements for the grounding electrode.
2 KEEP ANTENNA CLEAR OF HIGH VOLTAGE POWER LINES OR CIRCUITS
Locate an Outside antenna system well away from pOWer lines and electric light or
bower circuits so it willnever touch these bower sources should it ever fall. When
installing antenna, absolutely never touch power lines, drcuits or other bower
sources as this could be fatal.
I USING THE VIDEO UNIT I
Before unit is brought out of storage or moved to e new location, refer again to the
INSTALLATION section of these safeguards.
1 KEEP UNIT WELL AWAY FROM WATER OR MOISTURE, such as a k_chen sink,
be,th tLto,pool, and so on,
2 IF EXPOSED TO RAIN, MOISTURE, OR STRONG IMPACT, unplug unit end have
it inspected by a qualified service technician before use,
3 ELECTRICAl. STORMS
. Duflng e llghthingstorm;or before leaving unit unussd for extended periods ct time,
d_ allequipmentfrem the power source as wslSas ine antsnna and cab_ system.
4 WHEN UNIT iS PLUGGED IN
• Never axpose to rain or water. DO NOT OPERATE if _quid has been spitlad into
unit. Immediately unplug unit, and have if inspected by a service technician. Fire
and shOCkhazarde Can result _ electrical shorts caused by liquid contact thslde.
• Never drop or push any object through openings in unit. Some internal parts carry
hazardous voltages and contact can calve aleotric shock or fire hazard.
• Avoid placing unit directly on top or underneath s TV as this may cause efaotdoal
interference. Keep all magnets away from electronic equipment.
5 USING ACCESSORIES
Use only accessories recommended by the manufacturer to avoid risk of fire,
shock, or other hazards.
6 CLEANING UNIT
Unplug unit. use • clean, dry, chemically untreated cloth to gantiy remove dust or
dabris. DO NOT USE cleaning fluids, aerosols, Orforced air that could over._=pray,
or seep into unit and cause electrk_l shoP_. Any substance, such as wax, edheldve
tape, etc. may mar the cabinet surface. Exposure to greasy, humid, or dusty areas
may aslvorsaly a_ftectinterest parts,
[ SERVICE (
I DO NOT SERVICE PRODUCT YOURSELF
if. after carefully following detailed operating instructions, the unit does not Operate
properly, do not attempt to open or remove covers, or make any adjustmants not
described in the manual, Unplug unit and contact a qualified service technician.
2 REPLACEMENT OF PARTS
Make sure the service technicien uses only parts specified by tha manufacturer, or
have equal safety characteristics as original parts. The usa of unauthorized
substitutes may result in tire. alectdc shock, or other hazards,
3 SAFETY CHECK AFTER SERVICING
After unit is servicedor repaired, request that a thorough satety check be done as described
in the manufacturer's service literatureto insure video unllisin safe operatingconcrdio_.
Safety Precautions
Warning: TO prevent fire or shock hazard, do not expose thfa equipment to rain or moisture.
This video recorder, equipped with the HQ ( High Quality) System. is compatible with existing VHS equipment.
Only use those tapes with the _ mark. It is recommended that only cassette tapes that have been tested and inspected for use in 2, 4, 6,
and 8 hour VCR machines be used.
This television receiver provides diSplay of television closed captioning in accordanca with §15.119 of the FCC rules.
FCC WARNING: Any unauthorized changes or modifications to this equipment would void the user's authority tO operate.
This symbol warns the user that uninsulated voltage within the unit may have
sufflolant magnitude to cause electric shock. Therefore. it is dangerous to make any
kind bf contact with any inside part of this unit.
This symbol alerts the user that important literature conceming the operation and
maintenance of this unit has been included.
Tharafore, it should be read carefully in order to avoid any problemS.
2
Table of Contents
Use
Now!
Important Safeguards and Precautions ................................ 2
Before Using ............................................................................ 4
• Accessories ................................ 4 • Loading the Batteries .................. 4
• Record/Playback Time .............. 4 • Prevent Accidental Tape Erasure ..4
Connections (Outdoor Antenna Connections, DeS/Cable Box Connections) .......... 5
One Time Setup (Language,Channel, Clock) .................................... 6, 7
mv Operation (NITE mode, Using the 100 key, Rapid Tune, Audio Mute, Phones, SELF-DEMO mode)....8
MTS Broadcast/TV Stereo System .............................................. 9
• Stereo/SAP/Mono Operation ....9 ° Select Audio mode for TV Viewing ....9
Playback a Tape (SlowMotion, Still Picture, Frame by Frame, Features for Quality) ..10
Record On a Tape .................................................................. 11
• One Touch Recording ............ 11 • Selecting Input Mode ................ 11
Enjoy
More!
Timer Recording .............................................................. 12, 13
• Timer Recording Using • Review, Replace or Clear
Combination VCR Buttons ...... 12 Program Contents ...................... 13
Timer Programming using VCR Plus+ System .......... 14 ~ 17
=VCR Plus+ System Setup ..15,16 * VCR Plus+ System Programming ..17
TV Timer Features (ON-TIMER with Alarm, SLEEP TIMER, INSTANT ALARM) ..18 7 1 9
Closed Caption System .................................................. 20, 21
• Closed Caption Mode Feature ..20 • Caption on Mute Feature .......... 21
FM Radio .......................................................................... 227 23
Tape Operation .............................................................. 24 ~ 27
• Tape Position Display .............. 24 •Auto Operation Functions .......... 25
• Zero Search ............................ 24 • One Minute Skip ........................ 25
• Repeat Play ............................ 25 ° VHS Index Search System ..26, 27
Special MCR Features .................................................. 28 ~ 32
• Channel Caption ................ 28, 29 ° Weak Signal Display ON/OFF ..32
• Time Stamp ...................... 30, 31 • VCR Lock .................................. 32
Copying Your Tapes (Dubbing) ............................................ 33
V-Chip Control Feature .................................................. 34 ~ 37
• Enter or Change Secret Code ..34 ° Setup TV PARENTAL Ratings ..36
• Setup MOTION PICT. Ratings ..35 • Blocking Message ...................... 37
Cable Box Universal Remote Control ............................ 38, 39
• Remote Warning ON/OFF ...... 39 • DSS and Cable Box Code List ..39
Picture Adjustment ................................................................ 40
Audio Features <For Model PV-M2089 only> ......................................................41
Other
Information!
Reset Language, Clock, Channel .......................................... 42
On-Screen Display (OSD) ...................................................... 43
• VCR Status & Clock Display....43 • Warning and Instruction
• Channel & Function Display ....43 Displays .................................... 43
Unit Information ...................................................................... 44
• Reset all Combination VCR - Head Cleaning .......................... 44
Memory Functions .................. 44 • Specifications ............................ 44
• DST (Daylight Saving Time) ....44
Before Requesting Service .................................................... 45
Service Center List ................................................................ 46
Spanish (Espahol) Quick Use Guide ............................ 47 ~ 49
Location of Controls ........................................................ 50, 51
Warranty .................................................................. Back Cover
3
Congratulations
on your purchase of one of the most sophisticated and
reliable products on the market today. Used properly, it will
bring you and your family years of enjoyment. Please fill in
the information bellow. The serial number is on the tag
located on the back of your Combination VCR.
Date of Purchase
Dealer Purchased From
Dealer Address
Dealer Phone No.
Model No.
Serial No.
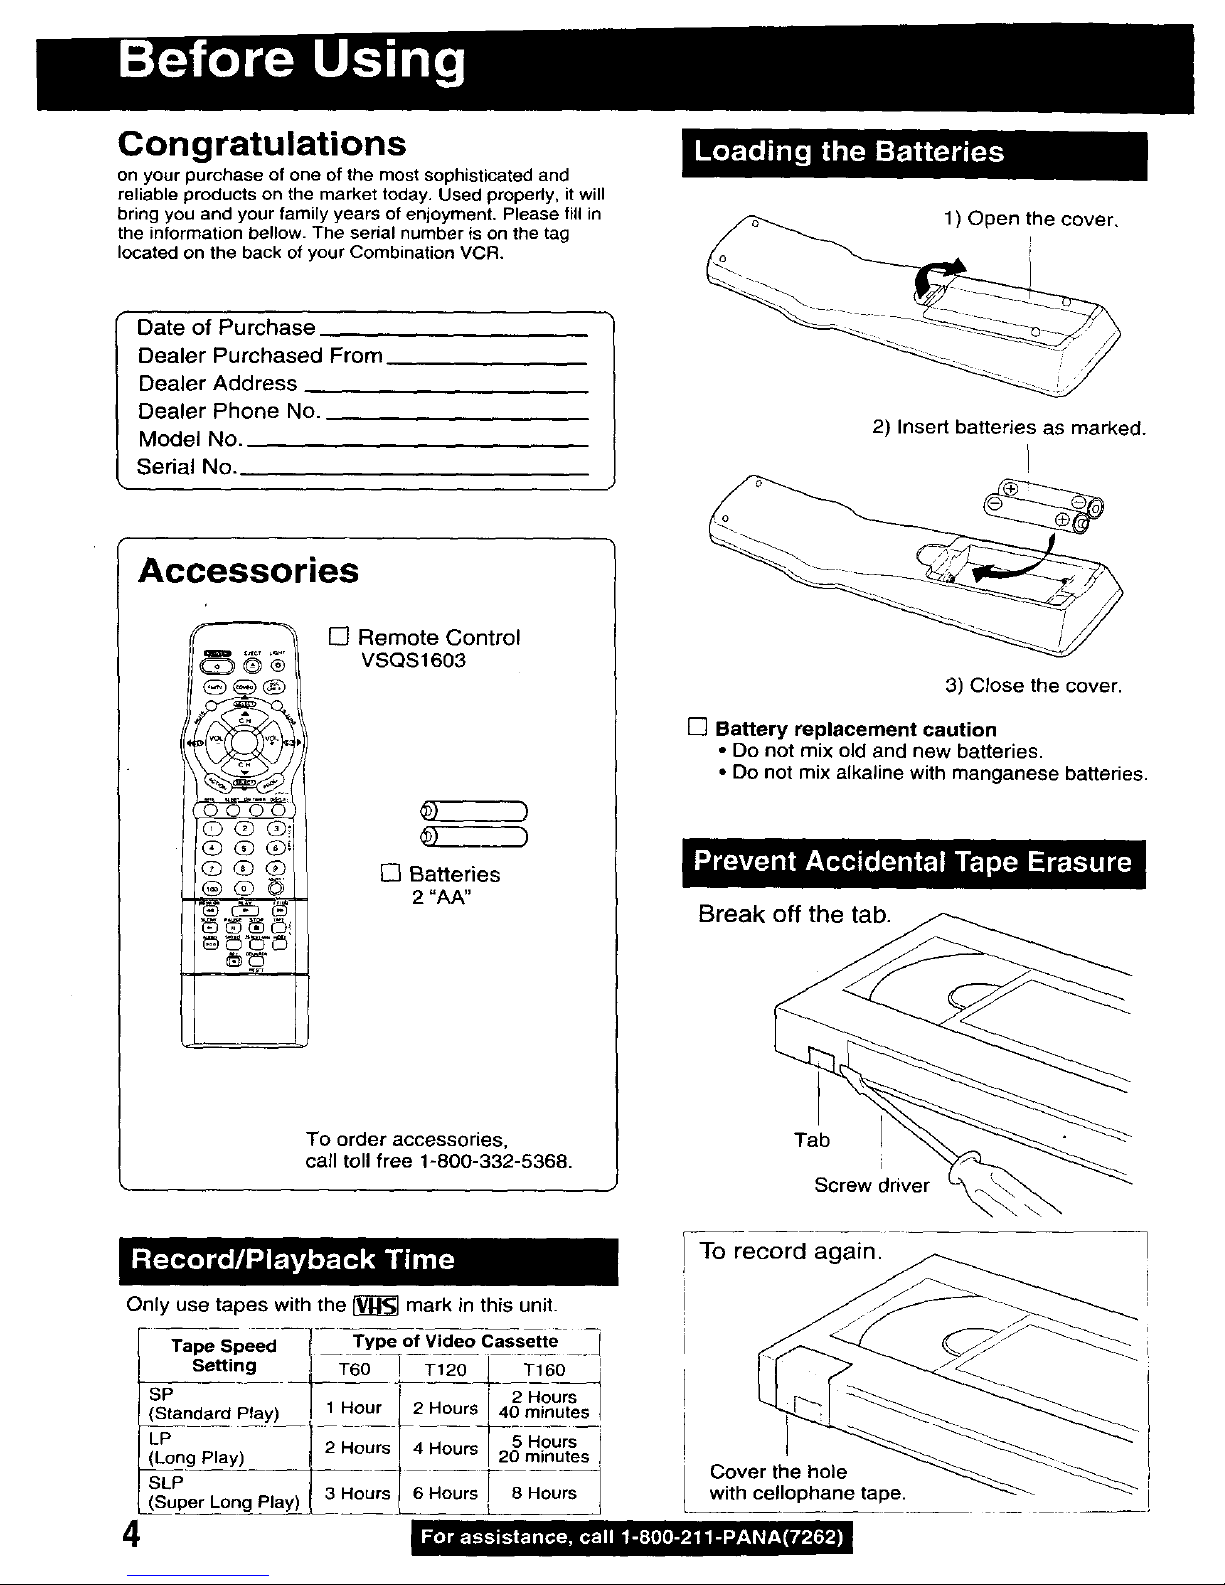
Accessories
Q®®
GQ<_
[] Remote Control
VSQS 16O3
[] Batteries
2 "AA"
To order accessories,
call toll free 1-800-332-5368.
Only use tapes with the _ mark in this unit.
1) Open the cover.
2) Insert batteries as marked.
3) Close the cover.
[] Battery replacement caution
• Do not mix old and new batteries.
• Do not mix alkaline with manganese batteries.
Break off the tab.
Tab
Screw driver
4
Tape Speed
Setting
SP
{Standard Play)
LP
(Long Play)
SLP
(Super Long Play)
Type of Video Cassette
-
F
2 Hours
1 Hour 2 Hours I
40 minutes
2 Hours 4 Hours 5 Hours
20 minutes
3 Hours 6 Hours J 8 Hours
J
To record again.
Cover the hole "_'_.'_
with cellophane tape.
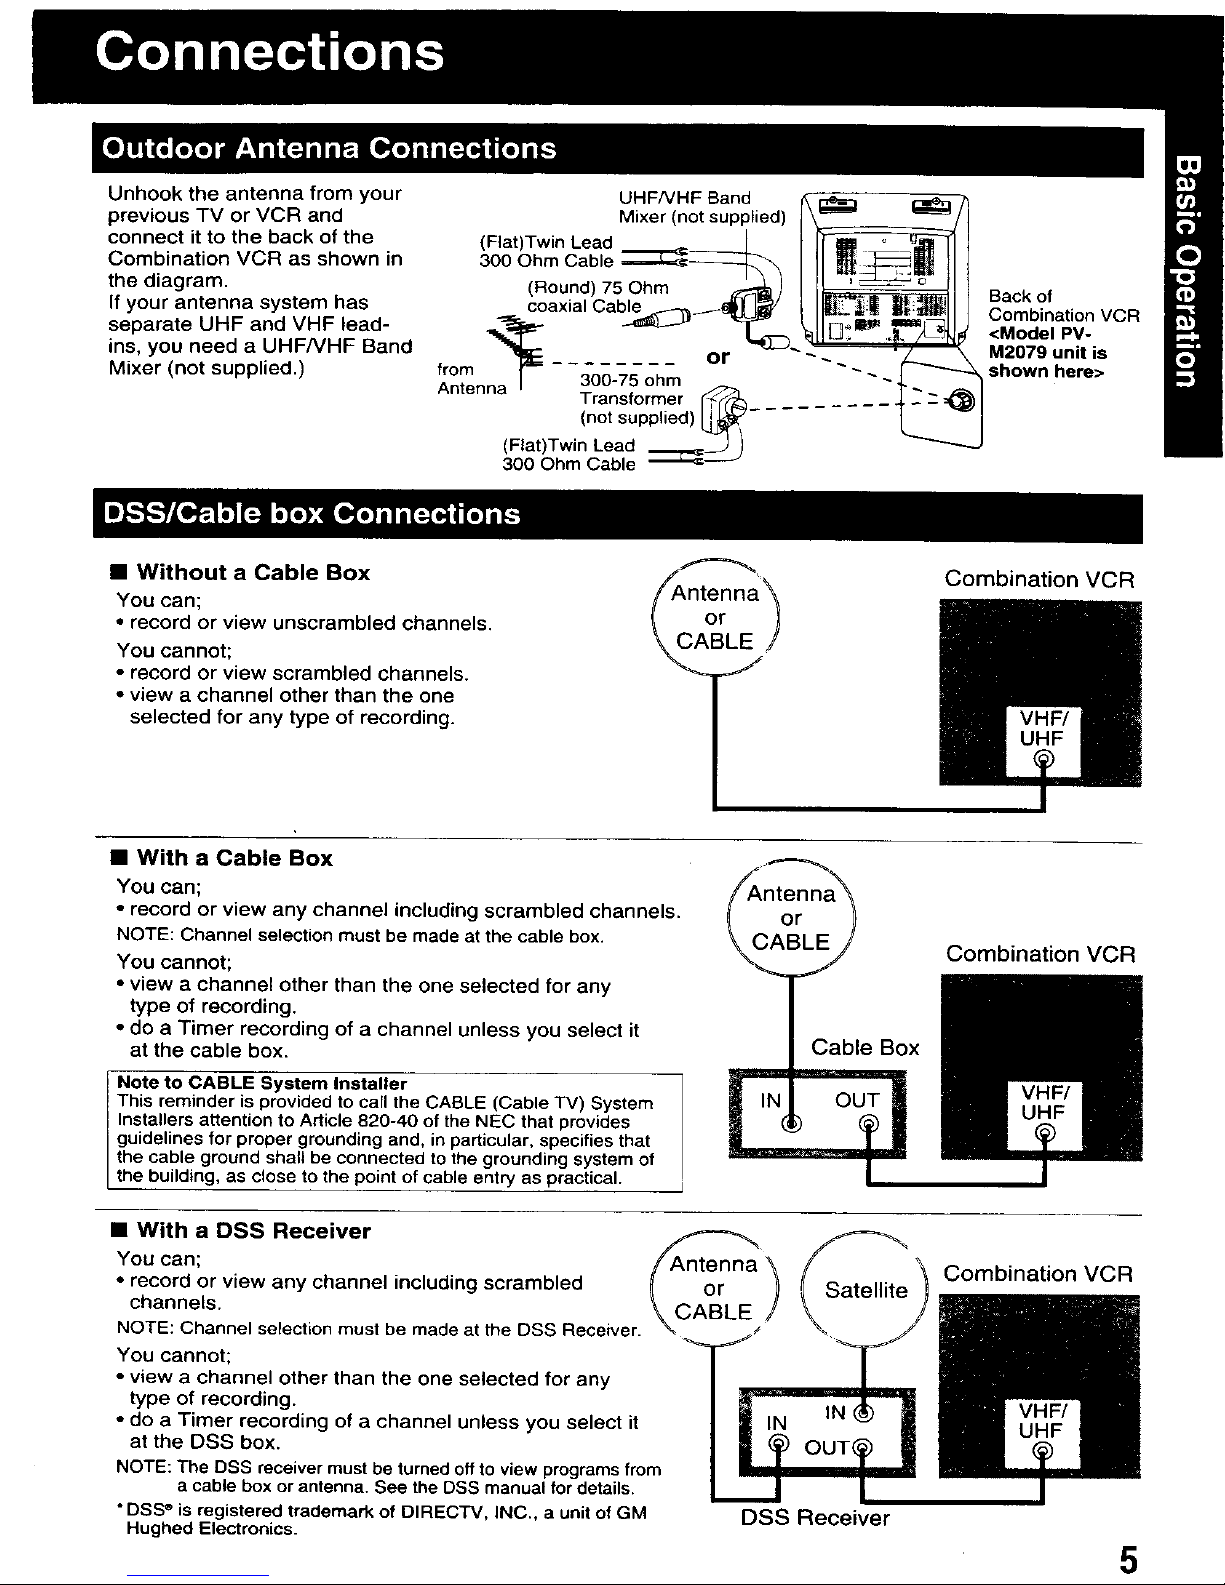
Unhook the antenna from your
previous TV or VCR and
connect it to the back of the
Combination VCR as shown in
the diagram.
If your antenna system has
separate UHF and VHF lead-
ins, you need a UHFNHF Band
Mixer (not supplied.)
Back of
Combination VCR
<Model PV-
M2079 unit is
shown here>
• Without a Cable Box
You can;
• record or view unscrambled channels.
You cannot;
• record or view scrambled channels.
• view a channel other than the one
selected for any type of recording.
Combination VCR
• With a Cable Box
You can;
• record or view any channel including scrambled channels.
NOTE: Channel selectionmust be madeat the cable box.
You cannot;
• view a channel other than the one selected for any
type of recording.
• do a Timer recording of a channel unless you select it
at the cable box.
Note to CABLE System Installer
This reminder is provided to call the CABLE (Cable TV) System
Installers attention to Article 820-40 of the NEC that provides
guidelines for proper grounding and, in particular, specifies that
the cable ground shall be connected to the grounding system of
the building, as e ose to the point of cable entry as practical.
• With a DSS Receiver
You can;
• record or view any channel including scrambled
channels.
NOTE: Channel selection must be made at the DSS Receiver.
/
You cannot;
• view a channel other than the one selected for any
type of recording.
• do a Timer recording of a channel unless you select it
at the DSS box.
NOTE: The DSS receiver must be turned off to view programs from
a cable box or antenna. See the DSS manual for details.
• DSS ®is registered trademark of DIRECTV, INC., a unit of GM
Hughed Electronics.
DSS Receiver
Combination VCR
Combination VCR
5

When the Combination VCR is turned on the Process of Setup
first time, setup mode is entered automatically.
I Q
2
3
Press POWER* on the
Combination VCR.
SELECTLANGUAGE
J
PUSH OH • :English /
J
OPR{MfR CH • :E_p_oI
APP. VOL * :Franq@is
I Select the language.
<_ _- for English
_-for Spanish
(Espa_ol)for French
(Frangais)
• If wrong language is set, do
"Reset all Combination VCR
Memory Functions" steps page 44.
• If you use a cable box, the cable
box must be left on.
Start Channel Auto Set
CHANNEL/CLOCKAUTOSET r and Clock Auto Set.
CONNECT ANTENNA CABLE
AND IF YOU USE A CABLE
BOX, TUNE IT TO YOUR Press CH •.
LOCAL PBS CH THEN
PLEASE PUSH OH UP K_Y
I
J
OH AUTO SET PROCEEDING
- 1POWER
VOLUME
UP '
_ CHANNEL
IT'. UP/DOWN
3
AUTO CLOCK SET
PROCEED I NG
Setup completed)
7/28/1999WED12:00PM
OST:ON
SETTING : CM 10
AUTO CLOCK SET
COMPLETED
END : PUSH CH UP KEY
Press CH • to exit.
• If your area observes
daylight saving time, but
you would like to turn the
DST feature off, do the
Reset Clock steps on
page 42 and set DST:OFF.
• If your area observes daylight saving time
and DST is set to ON, but the time is
incorrect; do the Time Zone Adjust steps
on the next page.
(Case
(Setup incomplete)
i See Case 2
next page.
AUTO CLOCK SET
FS INCOMPLETE
PUSH ACT ION TO SET CLOCK
)
IMPORTANT NOTE FOR AUTO CLOCK SET
• Auto clock set is performed the first time when Combination VCR i$ turned off each day. if used, a cable box must be left
on and tuned to the PBS channel at the time Combination VCR power is turned off if you want auto clock set to be done.
• If used, a DSS receiver, it must be turned off for auto clock set.
• If Cable Box or C)SS receiver is connected to Combination VCR via Audio/Video Jacks, an RF coaxial cable must also
be connected for auto clock set and channel auto set features.
• If for any reason the time is changed manually, automatic time correction will not occur.
6
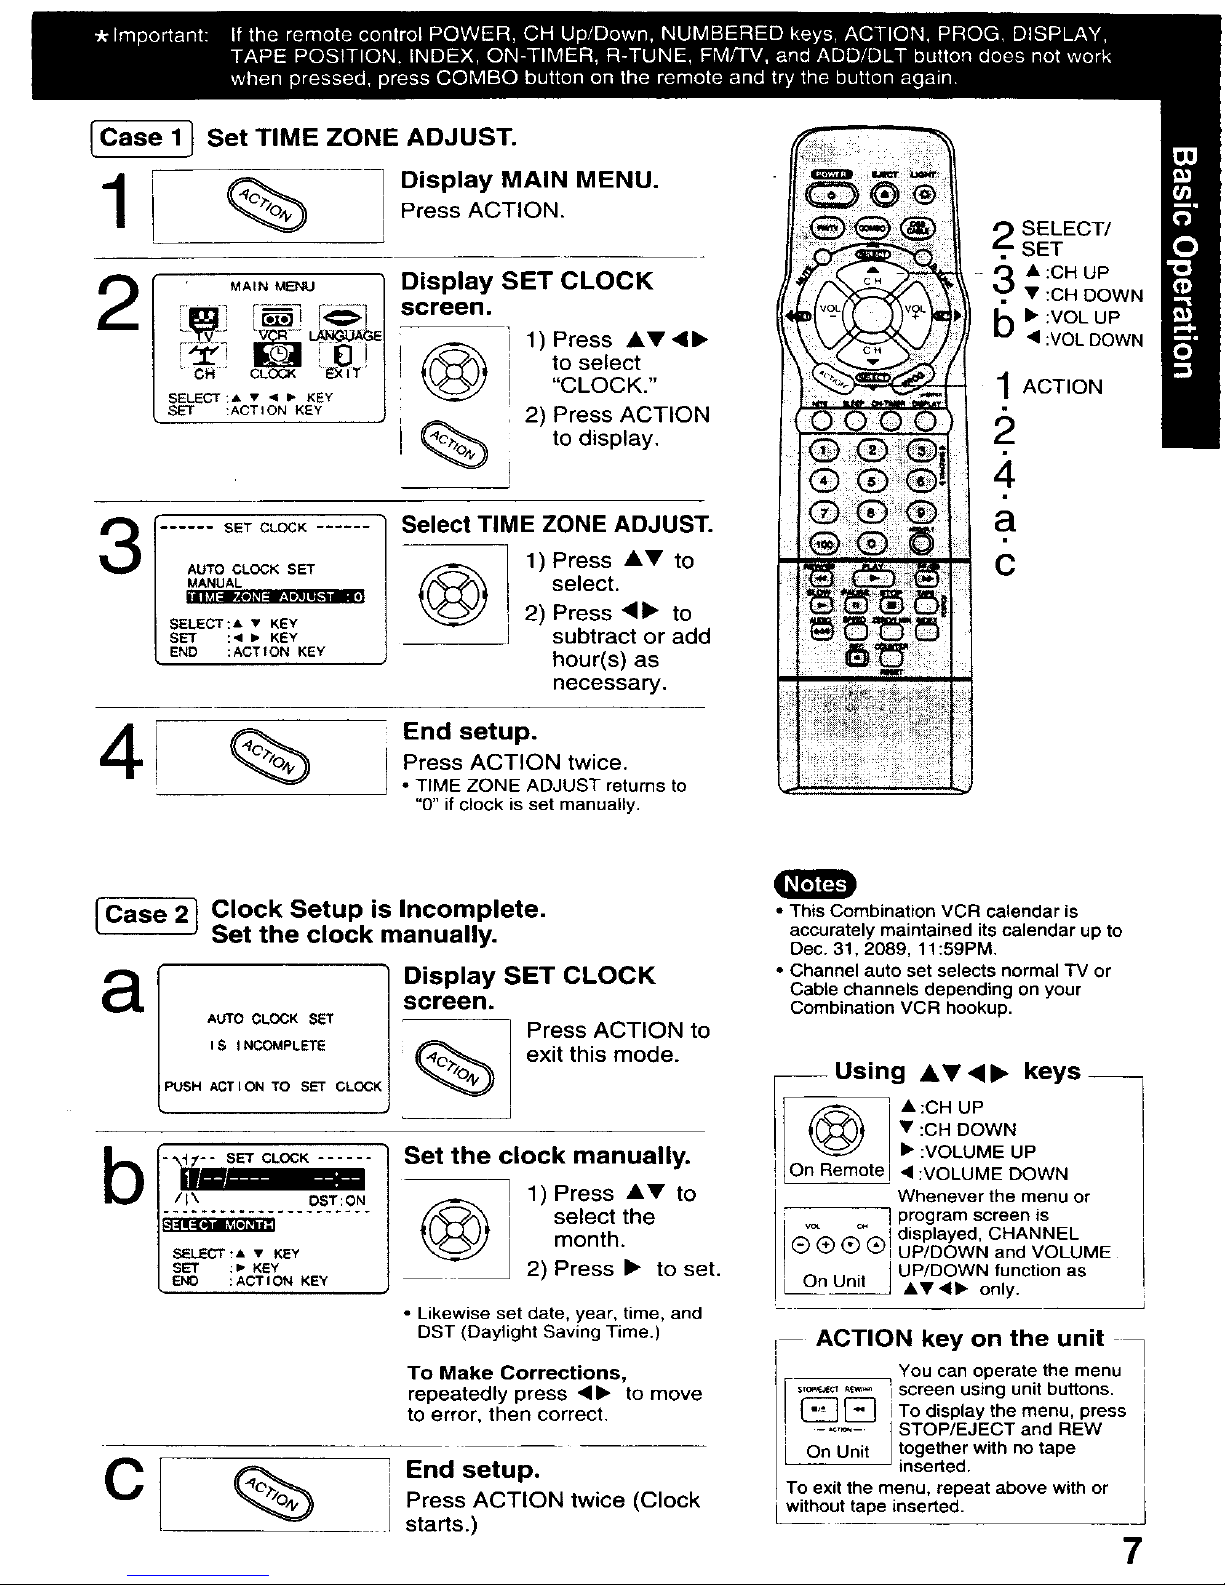
Case1
1
Set TIME ZONE ADJUST.
Display MAIN MENU.
Press ACTION.
MAIN MENU
C_ " CLOCK "_<[T'
SELECT:A • < I- KEY
tACT I ON KEY
AUTO CLOCK SET
MANUAL
Display SET CLOCK
screen.
] 1)Press AV<•
I [f_"_ j to select ,,
: I clocK.
i _. i 2) Press ACTION
j (_._% to display.
Select TIME ZONE ADJUST.
1 1)Press AV to
{(%-_, L select.
____ ! 2) Press'• to
subtract or add
hour(s) as
necessary.
SELECT:A • KEY
SET :< IJ KEY
END :ACTION KEY
41 % se,u,
Press ACTION twice.
I * TIME ZONE ADJUST returns to
"0" if clock is set manually.
SELECT/
SET
- _ • :CH UP
• :CH DOWN
b• :VOL UP
4 :VOL DOWN
1ACTION
[_S_ Clock Setup is Incomplete.
Set the clock manually.
a
AUTO CLOCK SET
I S I NCOMPLETE
PUSH ACTION TO SET CLOCK
i
Display SET CLOCK
screen.
Press ACTION to
exit this mode.
b - -__ Set the clock manually.
I_ oST:ON @ 1) Press A" tOselectmonth.the
SELECTt& • KEY
sET :,- K_¥ 2) Press • to set.
END : ACT ION KEY
• Likewise set date, year, time, and
DST (Daylight Saving Time.)
To Make Corrections,
repeatedly press <1_ to move
tO error, then correct,
C
End setup.
Press ACTION twice (Clock
starts.)
• This Combination VCR calendar is
accurately maintained itscalendar up to
Dec. 31, 2089, 11:59PM,
• Channel auto set selects normal TV or
Cable channels depending on your
Combination VCR hookup.
--Using AV<, keys__
• :CH UP
• :CH DOWN
• :VOLUME UP
On Remote •:VOLUME DOWN
Whenever the menu or
] program screen is
w _" _displayed, CHANNEL
I(_) (_) (_) (_! UP/DOWN and VOLUME
• UP/DOWN function as
L OnUnt •Y•• only.
ACTION key on the unit
• You can operate the menu
{_ [] i screen using unit buttons.
I To display the menu, press
! ...... ] STOP/EJECT and nEW
On Unit Jtogether with no tape
inserted.
To exit the menu, repeat above with or
without tape inserted.
7
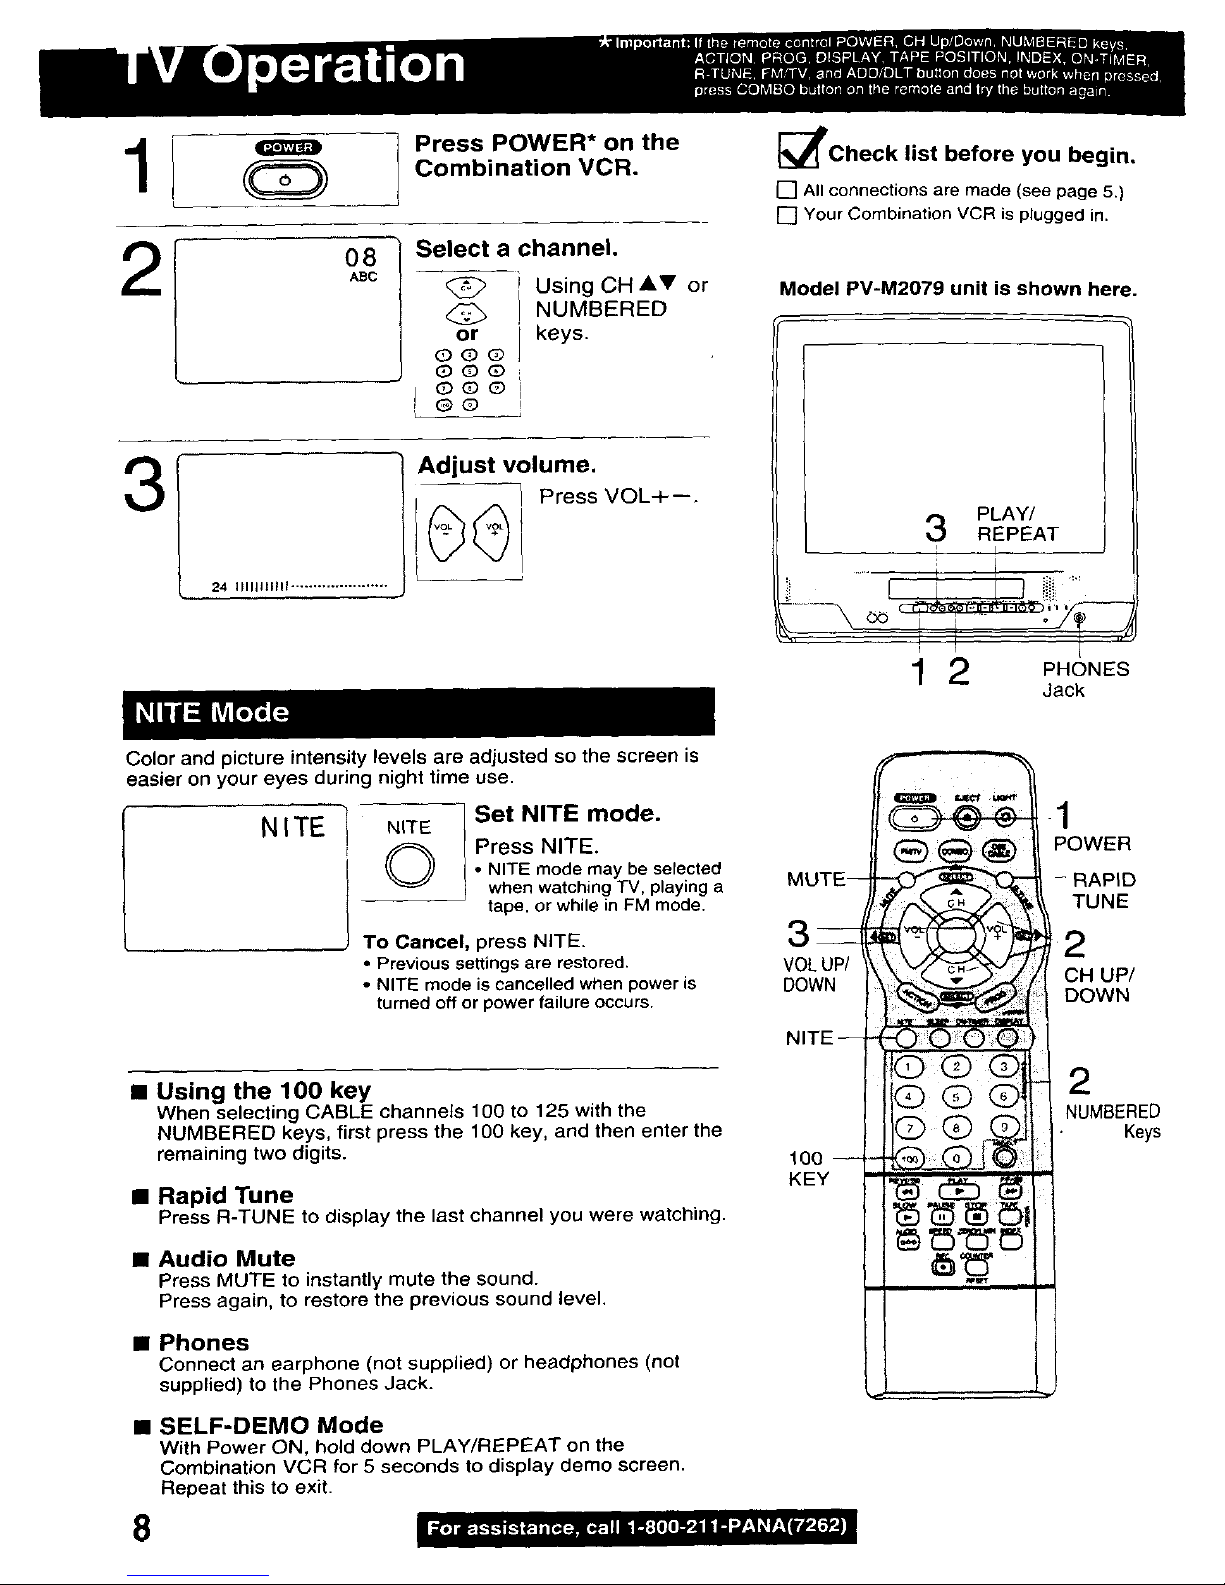
3
Press POWER* on the
Combination VCR.
08
ABC
Select a channel,
Using CH AV or
, NUMBERED
or J keys.
OQ@
QOQ
j o®ol
e_l
24 IIIIII11111 ......................
Adjust volume.
Press VOL+--.
_P'Check list before you begin,
[] All connectionsare made (see page 5.)
[] Your Combination VCR is plugged in.
Model PV-M2079 unit is shown here.
PLAY/
3 REPEAT
I I
I
i i -
1 2 PHONES
Jack
Color and picture intensity levels are adjusted so the screen is
easier on your eyes during night time use.
NITE
NITE
,©
Set NITE mode.
Press NITE.
• NITE mode may be selected
when watching TV, playing a
tape, or while in FM mode.
To Cancel, press NITE.
• Previous settings are restored.
• NITE mode is cancelled when power is
turned off or power failure occurs.
• Using the 100 key
When selecting CABLE channels 100 to 125 with the
NUMBERED keys, first press the 100 key, and then enter the
remaining two digits.
• Rapid Tune
Press R-TUNE to display the last channel you were watching.
• Audio Mute
Press MUTE to instantly mute the sound.
Press again, to restore the previous sound level.
• Phones
Connect an earphone (not supplied) or headphones (not
supplied) to the Phones Jack.
• SELF-DEMO Mode
With Power ON, hold down PLAY/REPEAT on the
Combination VCR for 5 seconds to display derno screen.
Repeat this to exit.
8
MUTE--
3_
VOL UP/
DOWN
NITE --
100 --
KEY
1
POWER
- RAPID
TUNE
CH UP/
DOWN
2
NUMBERED
Keys
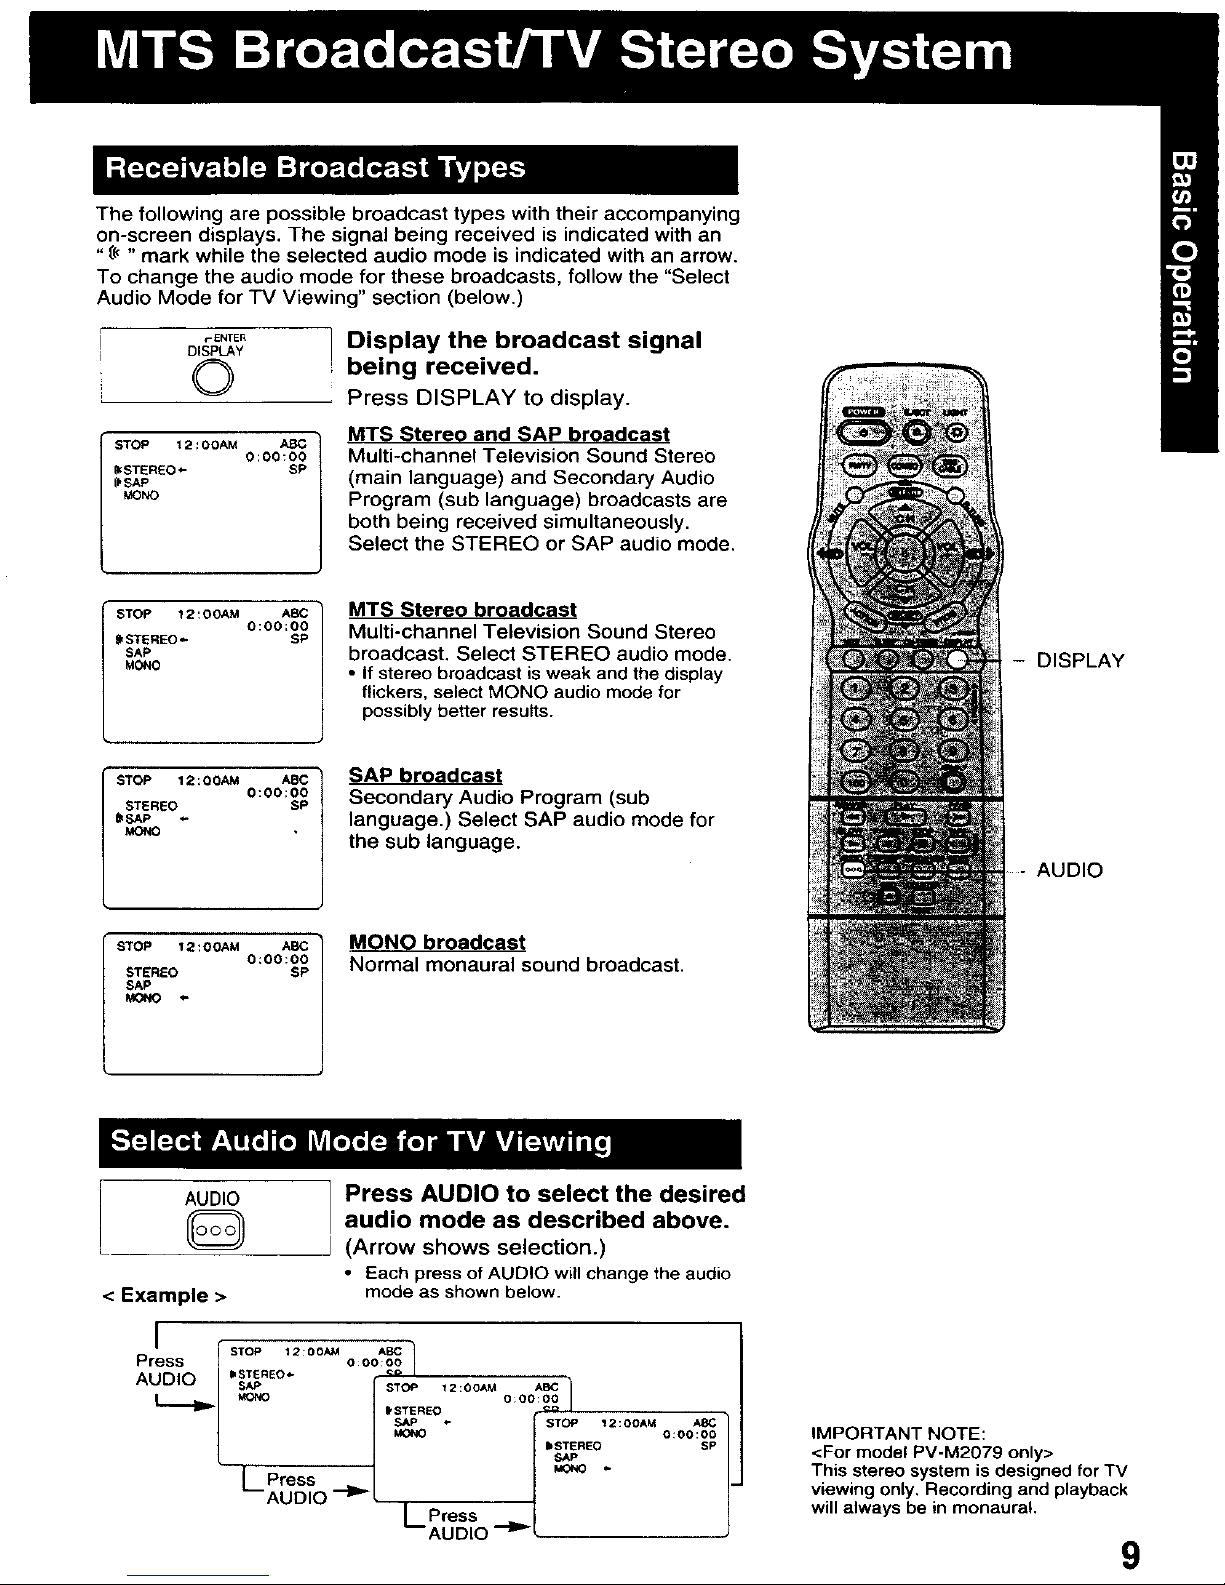
Thefollowingarepossiblebroadcasttypeswiththeiraccompanying
on-screendisplays.Thesignalbeingreceivedisindicatedwithan
"(_ "mark while the selected audio mode is indicated with an arrow.
To change the audio mode for these broadcasts, follow the "Select
Audio Mode for TV Viewing" section (below.)
©
STOP 12:00AM ABC
0:00:00
_STEREO_ SP
_SAP
_NO
STOP 12:00AM ABC )
0:00;00
/
_STEREO_ SP
SAP
MONO
J
STOP 12:OOAM ABC
0:00:00
_EREO SP
_SAP
STOP 12:OOAM ABC
0;00:O0
STEREO SP
SAP
AUDIO
@
< Example >
Display the broadcast signal
being received.
Press DISPLAY to display.
MTS Stereo end SAP broadcast
Multi-channel Television Sound Stereo
(main language) and Secondary Audio
Program (sub language) broadcasts are
both being received simultaneously.
Select the STEREO or SAP audio mode.
MTS Stereo broadcast
Multi-channel Television Sound Stereo
broadcast. Select STEREO audio mode.
• If stereo broadcastis weak and the display
flickers, selectMONO audio modefor
possiblybetter results.
SAP broadcast
Secondary Audio Program (sub
language.) Select SAP audio mode for
the sub language.
- DISPLAY
AUDIO
MONO broadcast
Normal monaural sound broadcast.
Press AUDIO to select the desired
audio mode as described above.
(Arrow shows selection.)
• Each press of AUDIO will change the audio
mode as shown below.
_ STEREO_ _;_ l
[ STOP 12:00AM AI_
MONO / O:OO:OO ]
t STEREO o_
L Press
AUDIO -_'L |
l Press |
'--AUDIO --l_L
IMPORTANT NOTE:
<For model PV-M2079 only>
This stereo system is designed for TV
viewing only, Recording and playback
will always be in monaural,
9
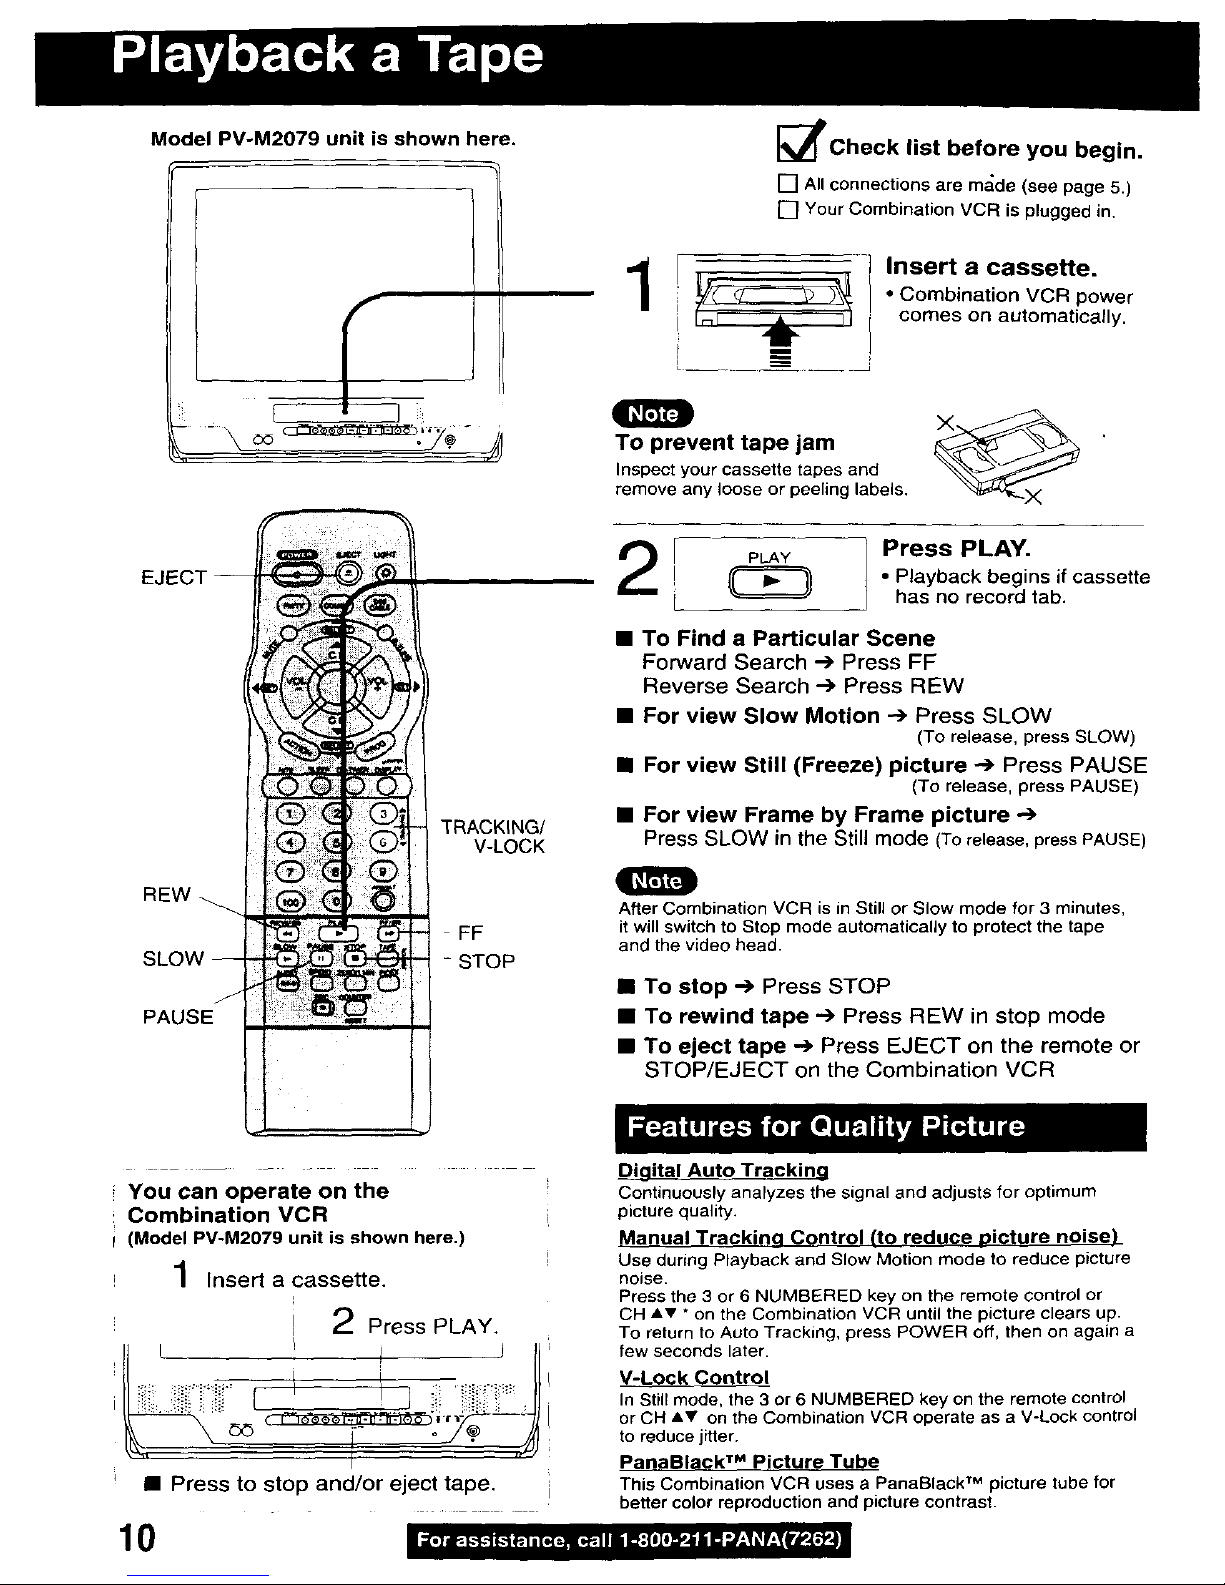
Model PV-M2079 unit is shown here.
Q
nEW
SLOW
PAUSE
TRACKING/
V-LOCK
FF
- STOP
[_Check list before you begin.
[] All connections are m_;de (see page 5,)
[] Your Combination VCR is plugged in.
Insert a cassette.
• Combination VCR power
comes on automatically.
To prevent tape jam __
Inspect your cassette tapes and
remove any loose or peeling labels.
Press PLAY.
• Playback begins if cassette
has no record tab.
• To Find a Particular Scene
Forward Search .--) Press FF
Reverse Search -) Press nEW
• For view Slow Motion -_ Press SLOW
(To release, press SLOW)
• For view Still (Freeze) picture -.-) Press PAUSE
(To release, press PAUSE)
• For view Frame by Frame picture
Press SLOW in the Still mode (Torelease, press PAUSE)
After Combination VCR is in Still or Slow mode for 3 minutes,
it will switch to Stop mode automatically to protect the tape
and the video head.
• To stop _ Press STOP
• To rewind tape --) Press nEW in stop mode
• To eject tape -) Press EJECT on the remote or
STOP/EJECT on the Combination VCR
You can operate on the
Combination VCR
(Model PV-M2079 unit is shown here.)
Insert a cassette.
i
2 Press PLAY,
H L ! j J tl
• Press to stop and/or eject tape, i
10
Digital Auto Trackina
Continuously analyzes the signal and adjusts for optimum
picture quality.
Manual Trackina Control (tO reduce picture noise)
Use during Playback and Slow Motion mode to reduce picture
noise.
Press the 3 or 6 NUMBERED key on the remote control or
CHAv * on the Combination VCR until the picture clears up.
To return to Auto Tracking, press POWER off, then on again a
few seconds later.
V-Lock Control
In Still mode, the 3 or 6 NUMBERED key on the remote control
or OH &V on the Combination VCR operate as a V-Lock control
to reduce jitter.
PanaBlack TM Picture Tube
This Combination VCR uses a PanaBlack TM picture tube for
better color reproduction and picture contrast.
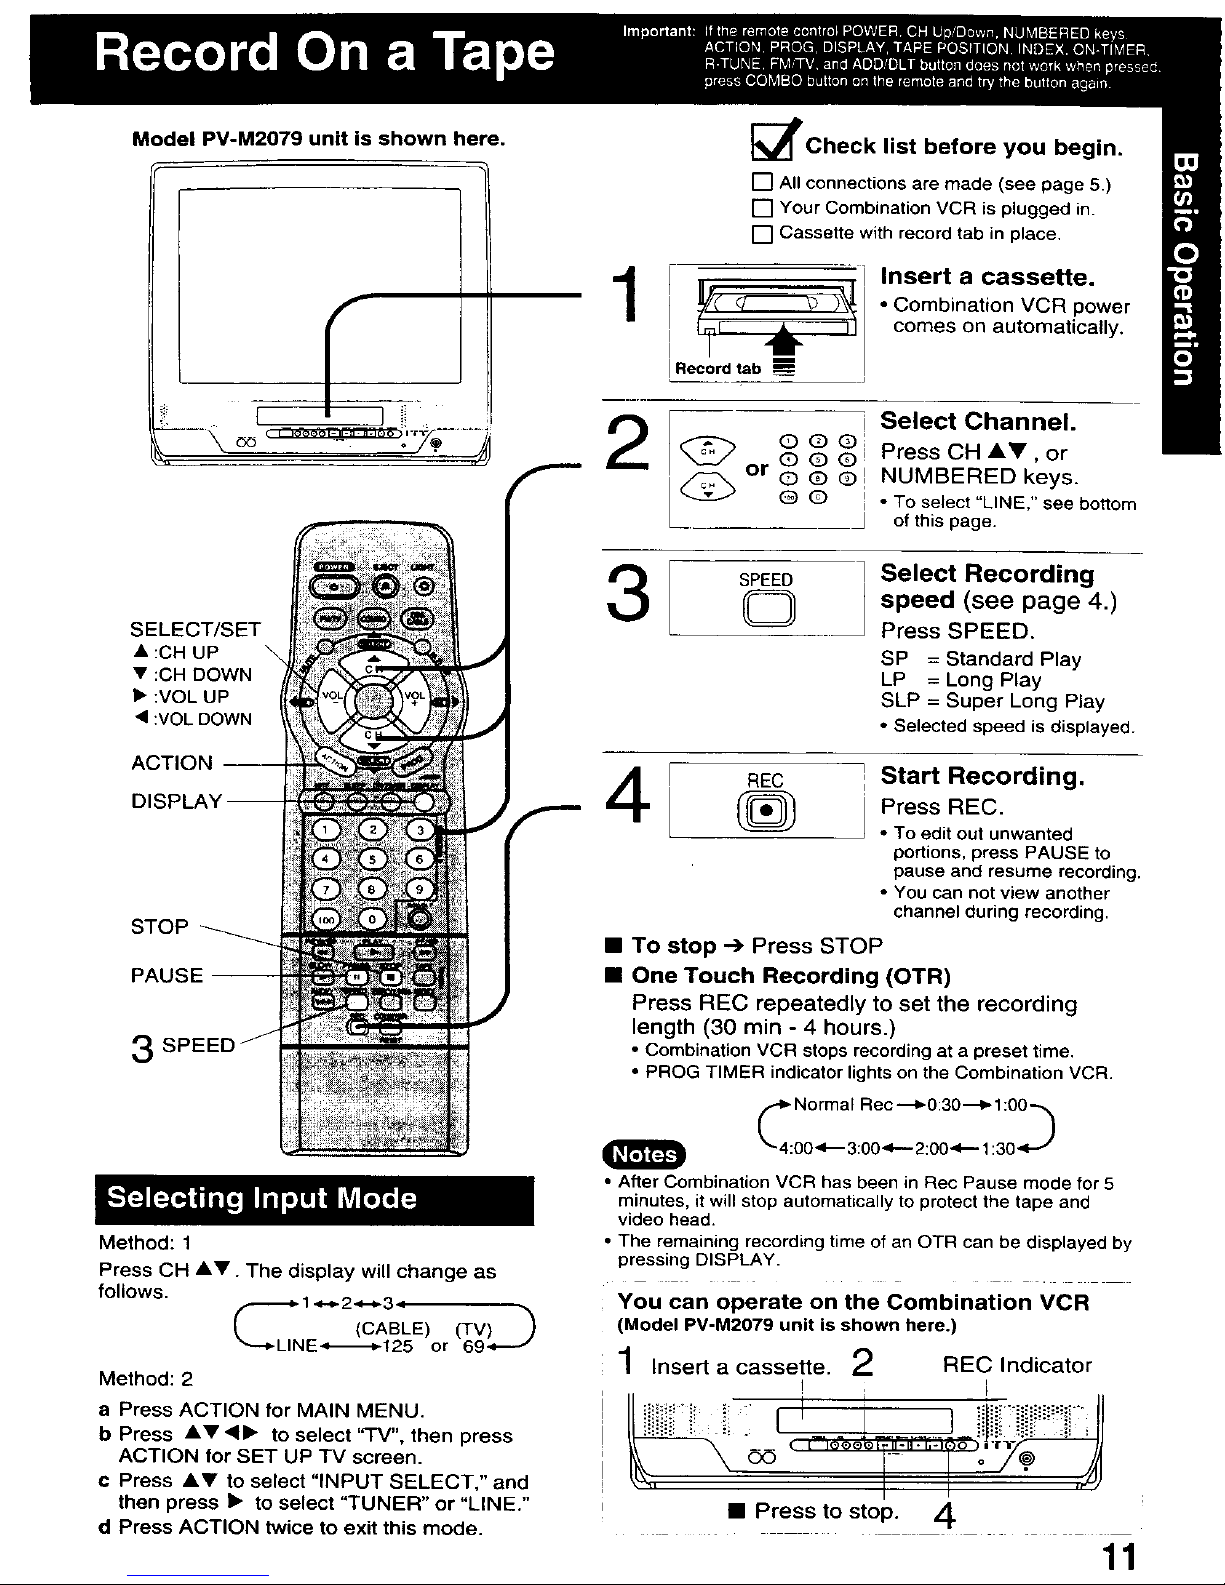
Model PV-M2079 unit is shown here.
i
SELECT/SET
• :CH UP
• :CH DOWN
• :VOL UP
• :VOL DOWN
ACTION ----
STOP
PAUSE --
Method: 1
Press CH AV. The display will change as
follows.
1•_"2"_-_3 !
,CABLE
LINE-_._-t 25 or
Method: 2
a Press ACTION for MAIN MENU.
b Press AV ,_1_ to select "TV", then press
ACTION for SET UP TV screen.
¢ Press AV to select "INPUT SELECT," and
then press I_ to select "TUNER" or "LINE."
d Press ACTION twice to exit this mode.
_lPCheck list before you begin.
[] All connections are made (see page 5.)
[] Your Combination VCR is plugged in.
[] Cassette with record tab in place.
2
3
Insert a cassette.
• Combination VCR power
comes on automatically.
Select Channel.
Press CH A,_', or
NUMBERED keys.
• To select "LINE," see bottom
of this page.
Select Recording
speed (see page 4.)
Press SPEED.
SP = Standard Play
LP = Long Play
SLP = Super Long Play
• Selected speed is displayed.
4
Start Recording.
Press REC.
• To edit out unwanted
portions, press PAUSE to
pause and resume recording.
• You can not view another
channel during recording.
• To stop --> Press STOP
• One Touch Recording (OTR)
Press REC repeatedly to set the recording
length (30 min - 4 hours.)
• Combination VCR stops recording at a preset time,
• PROG TIMER indicator lights on the Combination VCR.
• After Combination VCR has been in Rec Pause mode for 5
minutes, it will stop automatically to protect the tape and
video head.
• The remaining recording time of an OTR can be displayed by
pressing DISPLAY.
You can operate on the Combination VCR
(Model PV-M2079 unit is shown here.)
1 Insert a cassette. 2 RED Indicator
i i
- o /._ ,_
• Press to stop. 4
11
You can set up to 8 programs to be recorded while you are away.
Display SET PROGRAM.
Press PROG*.
2
..... SET PROGRAM
SELECT:A • KEY
SET : _" KEY
: PP_X3 KEy
Select TIMER PROGRAM.
.1) Press •V
_ [ to select.
i 2) Press • to
display.
• If a program is already in memory,
press A_,, and • to select an
unused program number.
3
;ATEGORY:N/A SLP
SELECT:A • KEY
SET :_ KEY
END :PROG/ACTION KEY
E_ _8-9 ........ 31--1 -- 2...---
/
Today's -- 7 SELECTA 1 • Selection Order DAILY
Date L_WEEKLY.... WEEKLY WEEKLY.__J
-- (SAT) "" (MON) (SUN)
Set the recording DATE.
1) Press •V to
select.
2) Press • or •
; to set.
• 1-31 = One time
• DALLY = MON~FRI
• WEEKLY SUN-SAT
= Same time once a
week
Repeat step 3 to set:
• start time, stop time
• Channel (or LINE for outside source)
• Category [N/A (not applicable), SPORTS,
MOVIE, COMEDY, MUSIC, DRAMA]
• Speed (SP, LP, SLP)
4
TOOAY ASC
ICATEGORY : MOV IE SP
#ISH TO MAKE NOTES :& KEY
S_T :< l- KEY
END : PRO/ACT ION KEY
Make the notes.
• If not wanted, go to step 5,
1)Press •to
begin.
2) Press •V to
select.
3) Press • or •
to set.
• Characters will change in the following order. 4) Press PROG
(or ACTION)
I---_A-- B--C ...... Z-- BLANK-- -- --&*--I
,9 ....... 2--1--0--/--! ÷- to end.
Continued on the next page.
Rt' "J!
• If "PLEASE PREPARE FOR TIMER REC" appears and/or the
PROGRAM TIMER indicator flashes, check that a cassette with
record tab is loaded and the Combination VCR is in Stop mode.
• If the start times of two programs overlap, the lower numbered
program will have priority.
• If the start time for a Timer Recording comes up during a normal
recording or One Touch Recording (page t 1), the Timer Recording
will not be performed.
• If there is a power interruption of more than one minute, the
recording may not be performed or continue.
• If "INCOMPLETE" appears after all items have been set, check all
entries and make necessary corrections.
12
_llPCheck list before you begin.
[] All connections are made (see page 5.)
[] Your Combination VCR is plugged in.
[] The clock is set to correct time.
[] The tape is long enough.
[] The record tab is in place.
O 1.1¢ 't
G3 ®®
SELECTI
. SET ,
3 • :CH UP
• :CH DOWN
41_ :VOL UP
• :VOL DOWN
1 PROG
6
Timer Recording Using
-Combination VCR Buttons--
You can set the Timer Recording using
ACTION key on the Combination VCR.
(See page 7.)
VO L CH 5TOP/E*_CT REW/_ 1
"J Press STOP/EJECT and REW
together without a tape to display
MAIN MENU.
Press AV,I_ to select "VCR"
and STOP/EJECT and REW
together to display SET UP VCR
screen.
Press _I,V to select"TIMER
PROGRAM" and I_ to display the
TIMER PROGRAM screen.
4], Repeat steps 3-6.
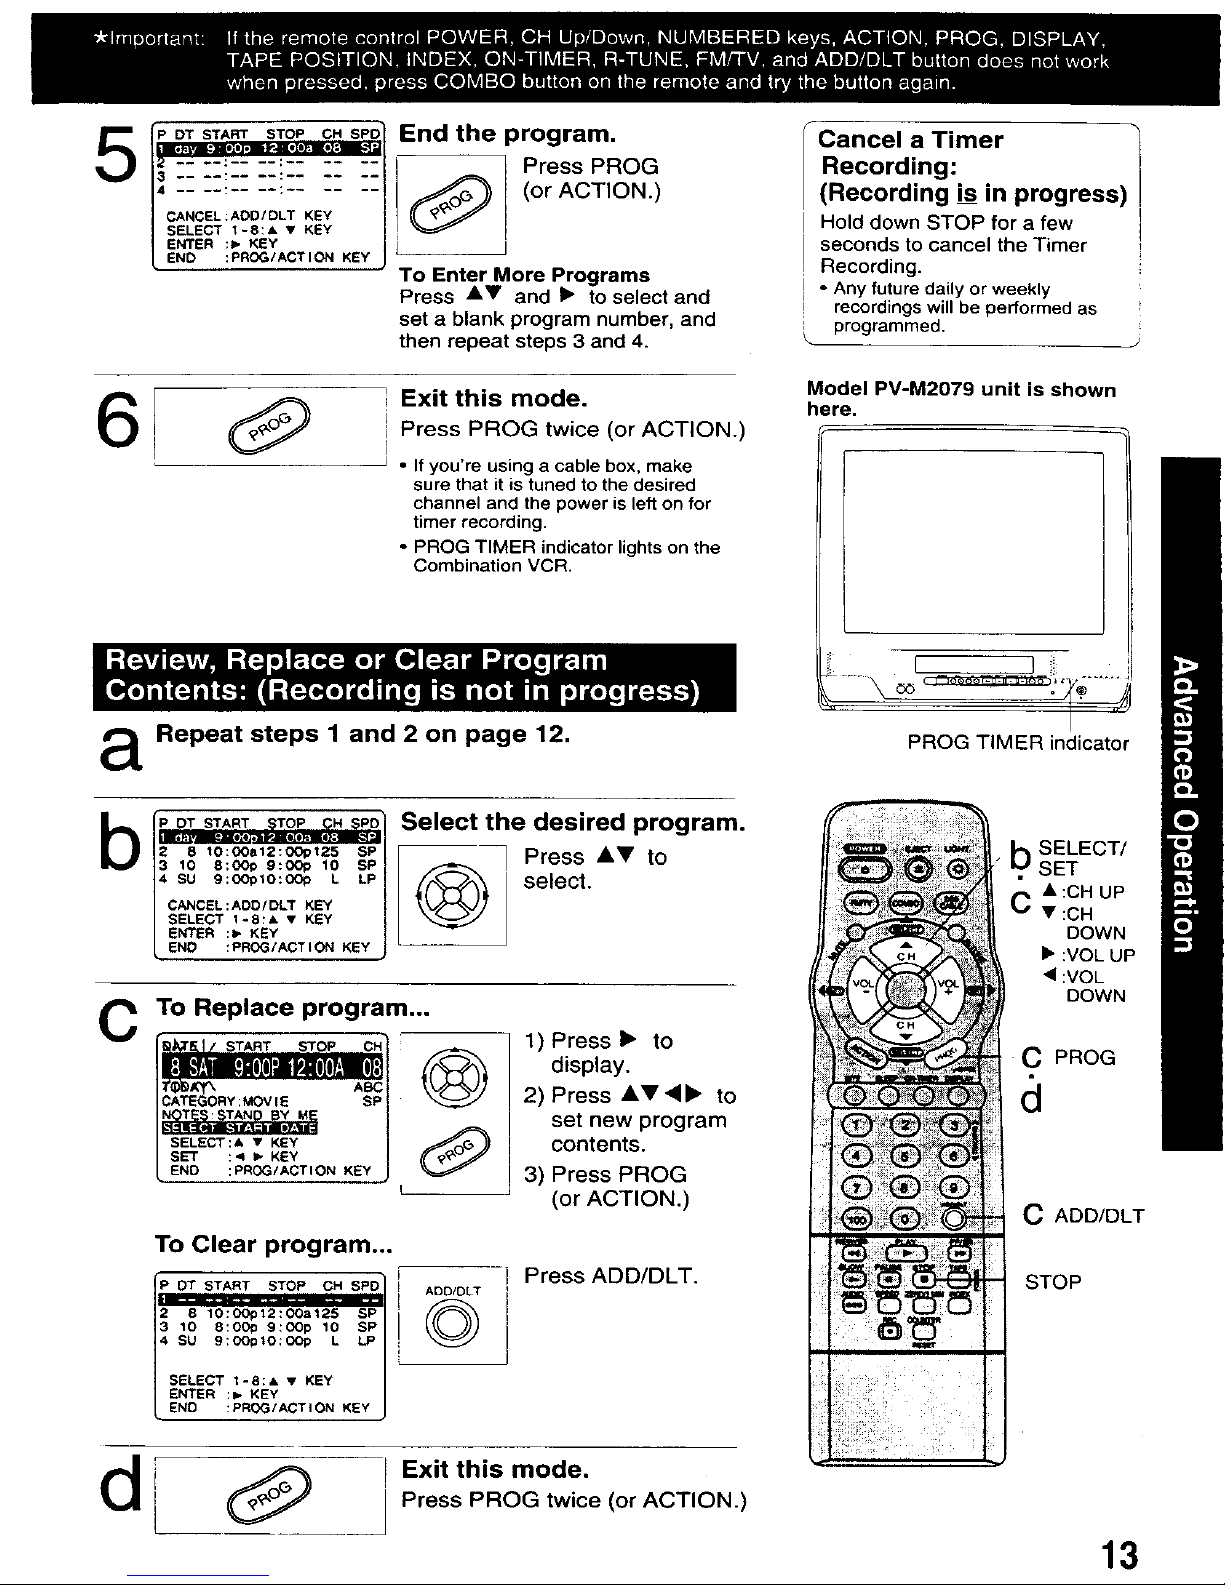
_-'-!-_:--!---_-!i!
END :PROG/ACT I ON KEY
End the program.
Press PROG
(_ (or ACTION.)
To Enter More Programs
Press A_' and I_ to select and
set a blank program number, and
then repeat steps 3 and 4.
6
i Exit this mode.
i Press PROG twice (or ACTION.)
I
• If you're using a cable box, make
sure that it is tuned to the desired
channel and the power is left on for
timer recording.
• PROG TIMER indicator lights on the
Combination VCR.
a Repeat steps 1 and 2 on page 12.
Cancel a Timer
Recording:
(Recording is in progress)
Hold down STOP for a few
seconds to cancel the Timer
Recording.
• Any futuredaily or weekly
recordingswillbe performed as
programmed.
J
Model PV-M2079 unit is shown
here.
I L !i
/
PROG TIMER indicator
b
C
2 8 lO:O0812:OOpt25 SP
3 10 8:0Ot> 9:00p 10 SP
4 SU 9:00_10:00_ L LP
CANCEL:ADD/DLT KEY
SELECT 1-8:& • KEY
ENTER :_ KEY
END :PROG/ACTION KEY
Select the desired program.
Press i,Y to
select.
To Replace program...
CATEGORY ;MOV IE SP
SELECT:& • KEY
SET :< I_ KEY
END :PROG/ACTION KEY
©
To Clear program...
2 8 10:0Op12:OOa125 SP
3 10 8:00o 9:0Op 10 SP
4 SU 9_00_t0_0op L LiP
SELECT 1-E_& • KEY
_NTER _ KEY
_ _ROG_C_O_ _¥
ADD/DLT
©
1) Press • to
display.
2) Press &V,<• to
set new program
contents.
3) Press PROG
(or ACTION.)
Press ADD/DLT.
b SELECT/
SET
• :CH UP
C • :CH
DOWN
• :VOL UP
• :VOL
DOWN
C PROG
C ADD/DLT
STOP
! Exit this mode.
I Press PROG twice (or ACTION.)
13
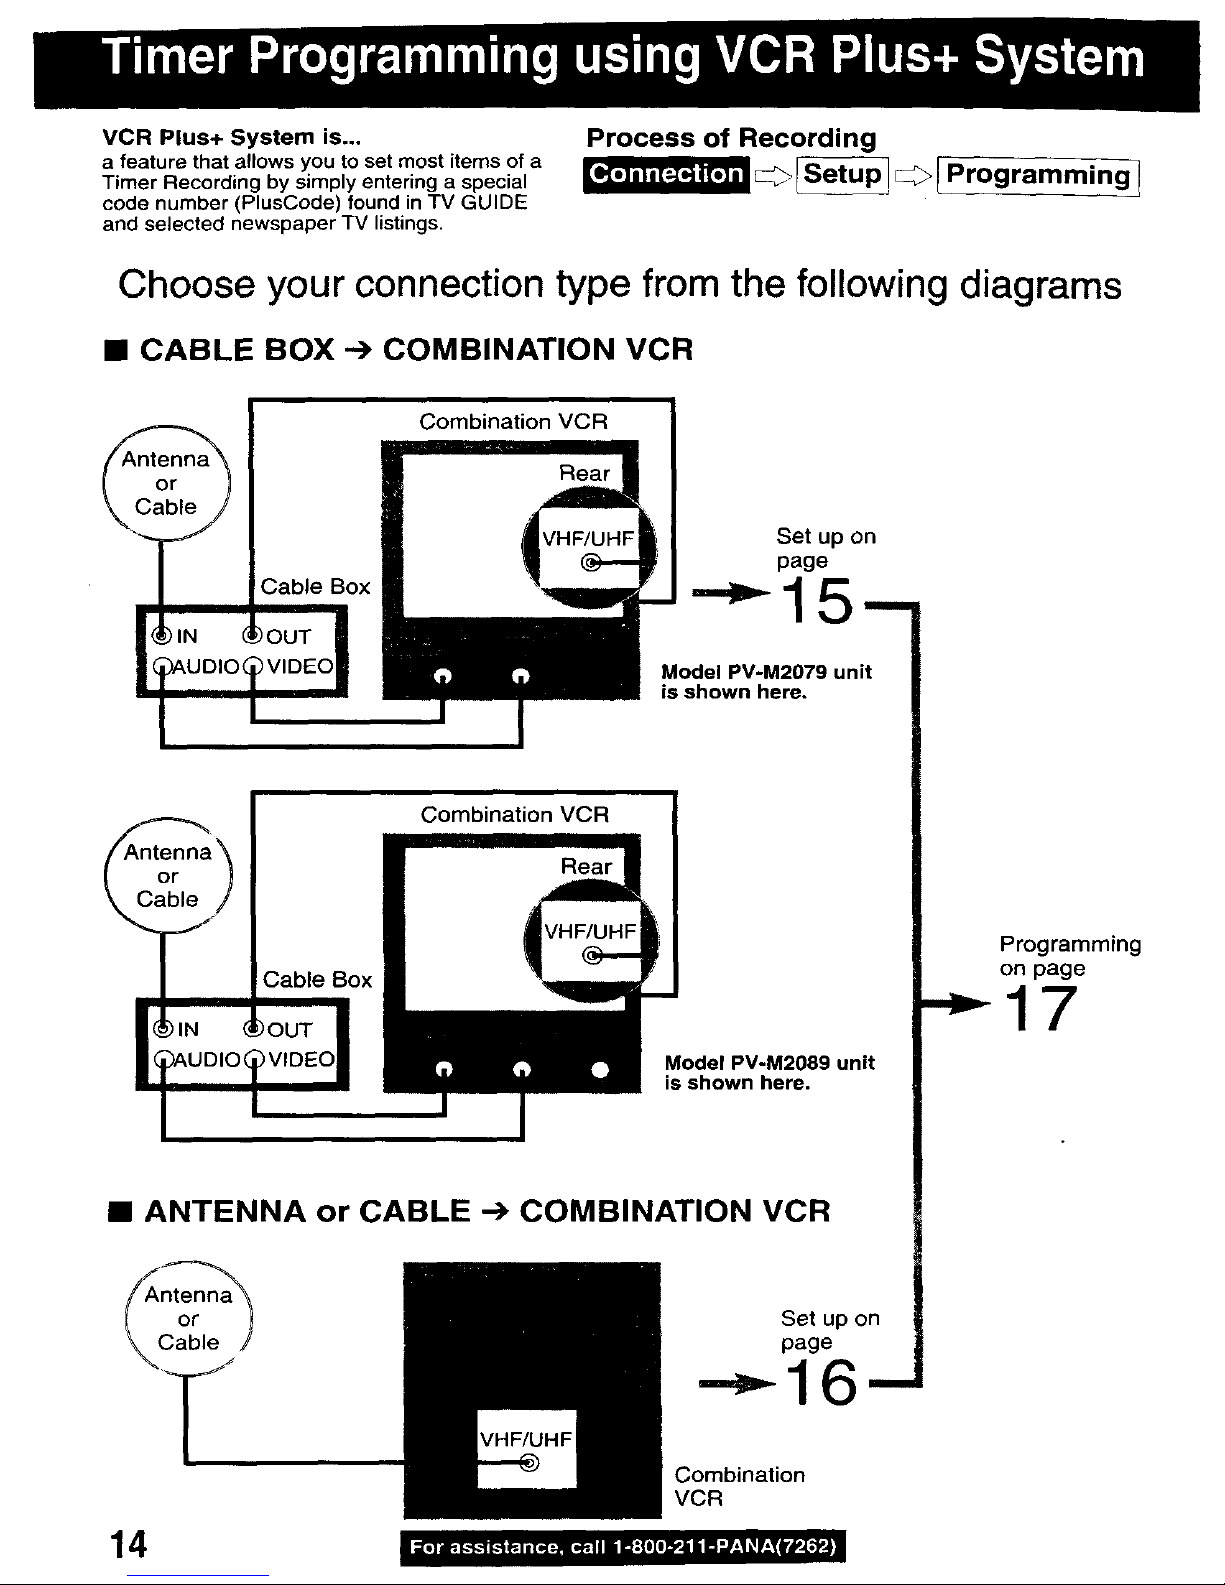
VCR Plus+ System is...
a feature that allows you to set most items of a
Timer Recording by simply entering a special
code number (PlusCode) found in TV GUIDE
and selected newspaper TV listings.
Process of Recording
SetuP1E:3> l Programming I
Choose your connection type from the following diagrams
• CABLE BOX --) COMBINATION VCR
Set up on
page
Model PV-M2079 unit
is shown here.
Model PV-M2089 unit
is shown here.
• ANTENNA or CABLE -_ COMBINATION VCR
Set up on
page
Programming
on page
" 17
14
Combination
VCR
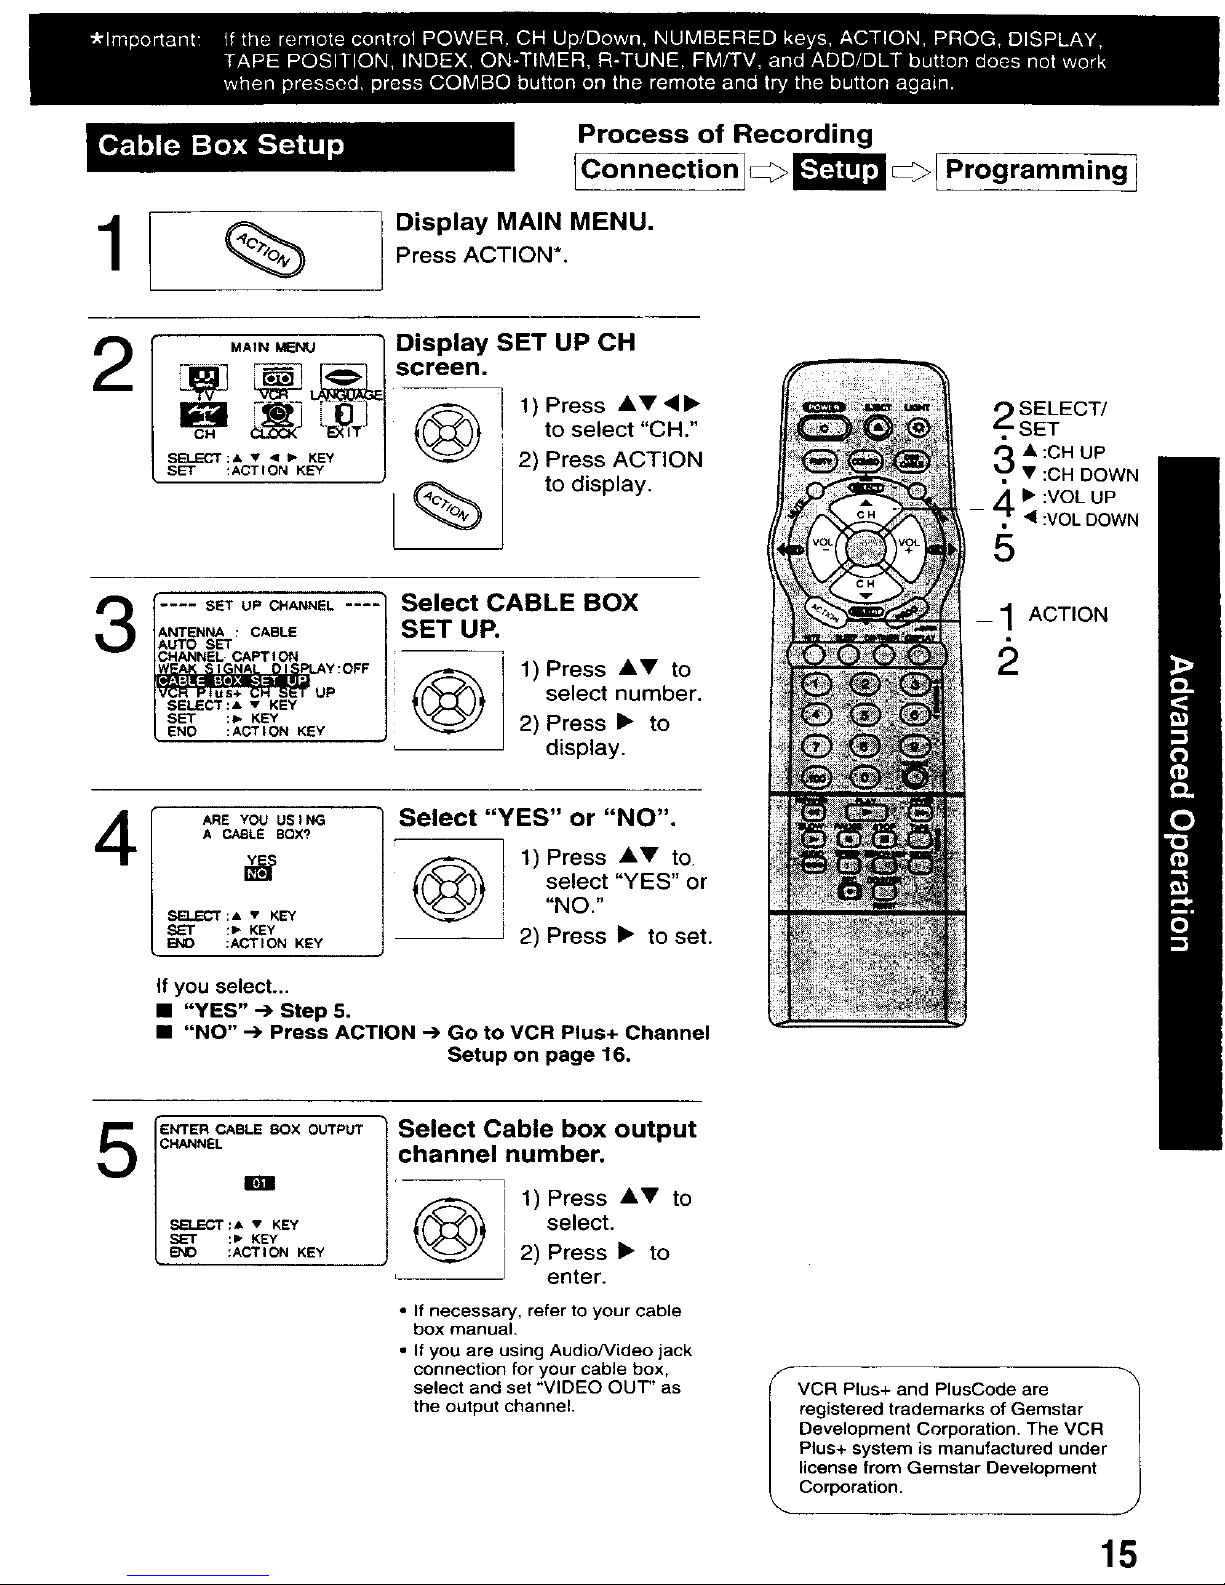
Process of Recording
IConnection
Display MAIN MENU.
Press ACTION*.
_! Programming i
1) Press Jl,_l' 4•
to select "CH."
2) Press ACTION
to display.
3
.... SET UP CHANNEL ....
ANTENNA : CABLE
AUTOSET
CHANNEL CAPT I ON
SELECt:& • KEY
SET ;=. KEY
ENO :ACTION KEY
Select CABLE BOX
SET UP.
1) Press Jl,V to
select number.
2) Press • to
display.
4
ARE YOU US IHO
A CABLE BOX?
SELECT:& • KEY
:_ KEY
B*_IO :ACTION KEY
Select "YES" or "NO".
©
1) Press AV to.
select "YES" or
"NO."
2) Press • to set.
If you select...
• "YES" -->Step 5.
• "NO" -> Press ACTION -->Go to VCR Plus+ Channel
Setup on page 16.
SELECT/
SET
3 A :CH UP
• :CH DOWN
4_ :VOL UP
• :VOL DOWN
5
1ACTION
5
ENTER CABLE BOX OUTPUT
CHANNEL
SELECT:A • KEY
:P" KEY
:ACTION KEY
Select Cable box output
channel number.
(_ 1) Press AV to
i select.
I 2) Press • to
I enter.
• If necessary, refer to your cable
box manual.
• If you are using Audio/Video jack
connection for your cable box,
select and set "VIDEO OUT" as
the output channel.
f VCR Plus+ and PlusCode are
registered trademarks of Gemstar
Development Corporation. The VCR
Plus+ system is manufactured under
license from Gemstar Development
%-. Corporation.
15
 Loading...