

Panasonic Omnivision PV-9455S Operating Instructions Manual
Video Cassette Recorder
Panasonic
OmnlvisIonl Vl-II_l
Operating Instructions
MODEL PV-9455S
Please read these instructionscarefullybefore
attemptingto connect,operate oradjustthis
product.Pleasesave thismanual.
SpanishQuick Use Guide isincluded,(Guia
para rdpida consultaen espaSol estd incluida.)
Quick Use Guide is on the back cover,
As an ENERGY STAR® Partner,
Matsushita Electric Corporationof f _
America has determined that this product
orproduct model meets the ENERGY
STAR®guidelines forenergy efficiency_
impor.tantSafec
FoX_0u.-S_. ReADAND
RETAIN All. SAFL_rY AND OPERATING
INSTRUCTIONS. HEED ALL WARNINGS
INT.EMA.UALANDO.T.EDN_
INSTALLATION
E CAUTION •
uards and Precautions
[ OUTDOOR ANTENNA INSTALLATION J
1 SAFE ANTENNA AND CABLE CONNECTION
_fa_outsideantsnmzc(_ _
iso_r_ed totheequ_t,
besureIheantennaorcablesystem
Isgroundedsoasto_roVdes_e
protec_ t b_t upsta_c
ElectricalCode,ANSI/NFPA70
2
pr0duct_OU n_topomf_properly,donotaltempttoop(morremovecovenk
orm_J_,.ny._lua.m_w._ de_.ribedInthernan_.
UnplugtheUnitandcontectaqualifiedservicetechnlckm.
2 IF REPLACEMENT PARTS ARE REQUIRED
Makes,rethe m,,tce_ ,._4 cnlypa_ spedfledbyIhemnufactur_,
Ine_uctionsanduse orthoseha'Angthesame_ty _dstJ_ astheori_kla]par_l_e useo(
unauthorlzedsub_tutesmayresult_ fire,electdcshock,oro_erhazard&
opemE_gthisunitorconnectingittoanyotherequipmenL 3 HAVETHESERVICETECHNICIAN PERFORM A SAFETY CHECK
Afterany eecvk_orre_dreto theunit,req_ mesen_e t_hnk:_anto
ccxldu_athoroughsafetychecku des_nbedInthernanufacture'sservice
literatureto_,_urethatthevkfeouhitIs insafeopemUng€o,,xt_on.
Safe_ Precautions
Warning: "[b _nt flreor shock hazard, do not expose this equipment to rain or moisture.
"l_;symbolwamstlleuserthatuni_ub_edvotla_)withintheul_mayhave_magnitudetocause
_ slecfficshocK.Therefore,t is &_ngeroustomakeanyIdndofcsatastwithar_ insl_ _ _ _ _ ,.
|_'-&_'_'_"_| /_, "i_1$symbolalerts_ userthat important literature concemlr_gthe operationand maintenance of
I.,__ I ! "/,! _'__thl,_ unithas been i_cluded."131erofote,it shouldbe read ¢memlly In orderto avoid any problems;
2
Tableof Contents
Use
Now!
Important Safeguards and Precautions .......................................2
Accessories ............................................................................................. 4
Loading the Batteries ........................................................................... 4
Basic Connections (Antenna,VCR,TV) ............................................. 4, 5
One Time VCR Setup (Language,Channel,Clock)............................. 6, 7
Playback a Tape (slowMotion,StillPicture,FramebyFrame).................... 8
Record On a Tape ..................................................................................9
• One Touch Recording............... 9
Advanced Connections (Cable/DSS,AudioNideo)...................... 10, 11
Timer Recording ...........................................................................12, 13
• Timer Recording • Review, Replaceor Clear
UsingVCR Buttons................. 12 ProgramContents................... 13
Multi-Brand Control Feature ....................................................14, 15
Tape Operation ...........................................................................16 ~ 18
• VHS IndexSearchSystem....16, 17 • Zero Search ............................ 18
• AutoOperation Functions....... 17 • One MinuteSkip...................... 18
• Repeat Play............................. 18
Copying Your Tapes (Dubbing).......................................................... 19
MTS Broadcast/VHS Hi-Fi Stereo System ........................20, 21
• Stereo/SAP/MonoBroadcast....20 • Select Audio Mode .................. 21
Special VCR Features .............................................................. 22 ~ 27
• ChannelCaption ............... 22, 23 • Auto Shut-Off .......................... 26
• Time Stamp....................... 24, 25 • Weak Signal DisplayON/OFF..27
• ShuttleVariableSpeedSearch...26 • VCR Lock ................................ 27
Reset Language, Channel, Clock ................................... 28, 29
VCR & Cassette Information ........................................... 30, 31
• ResetallVCRMemoryFunctions..30 • Head Cleaning......................... 31
• DST (DaylightSavingTime)........30 • Cleaning theVCR ...................31
• PreventAccidentalTapeErasure.30 • Specifications.......................... 31
• Record/PlaybackTime ............ 30 • Featuresfor Quality................ 31
On Screen Displays (OSD) .................................................... 32
• Function& Channel Display....32 - Warningand
• VCR Status & Clock Display... 32 InstructionDisplays.................32
Before Requesting Service ................................................... 33
Warranty ........................................................................... 34, 35
Spanish (Espa_ol) Quick Use Guide ............................. 36, 37
Location of Controls ........................................................ 38, 39
Quick Use Guide (Playback,Recording)...................... Back Cover
3
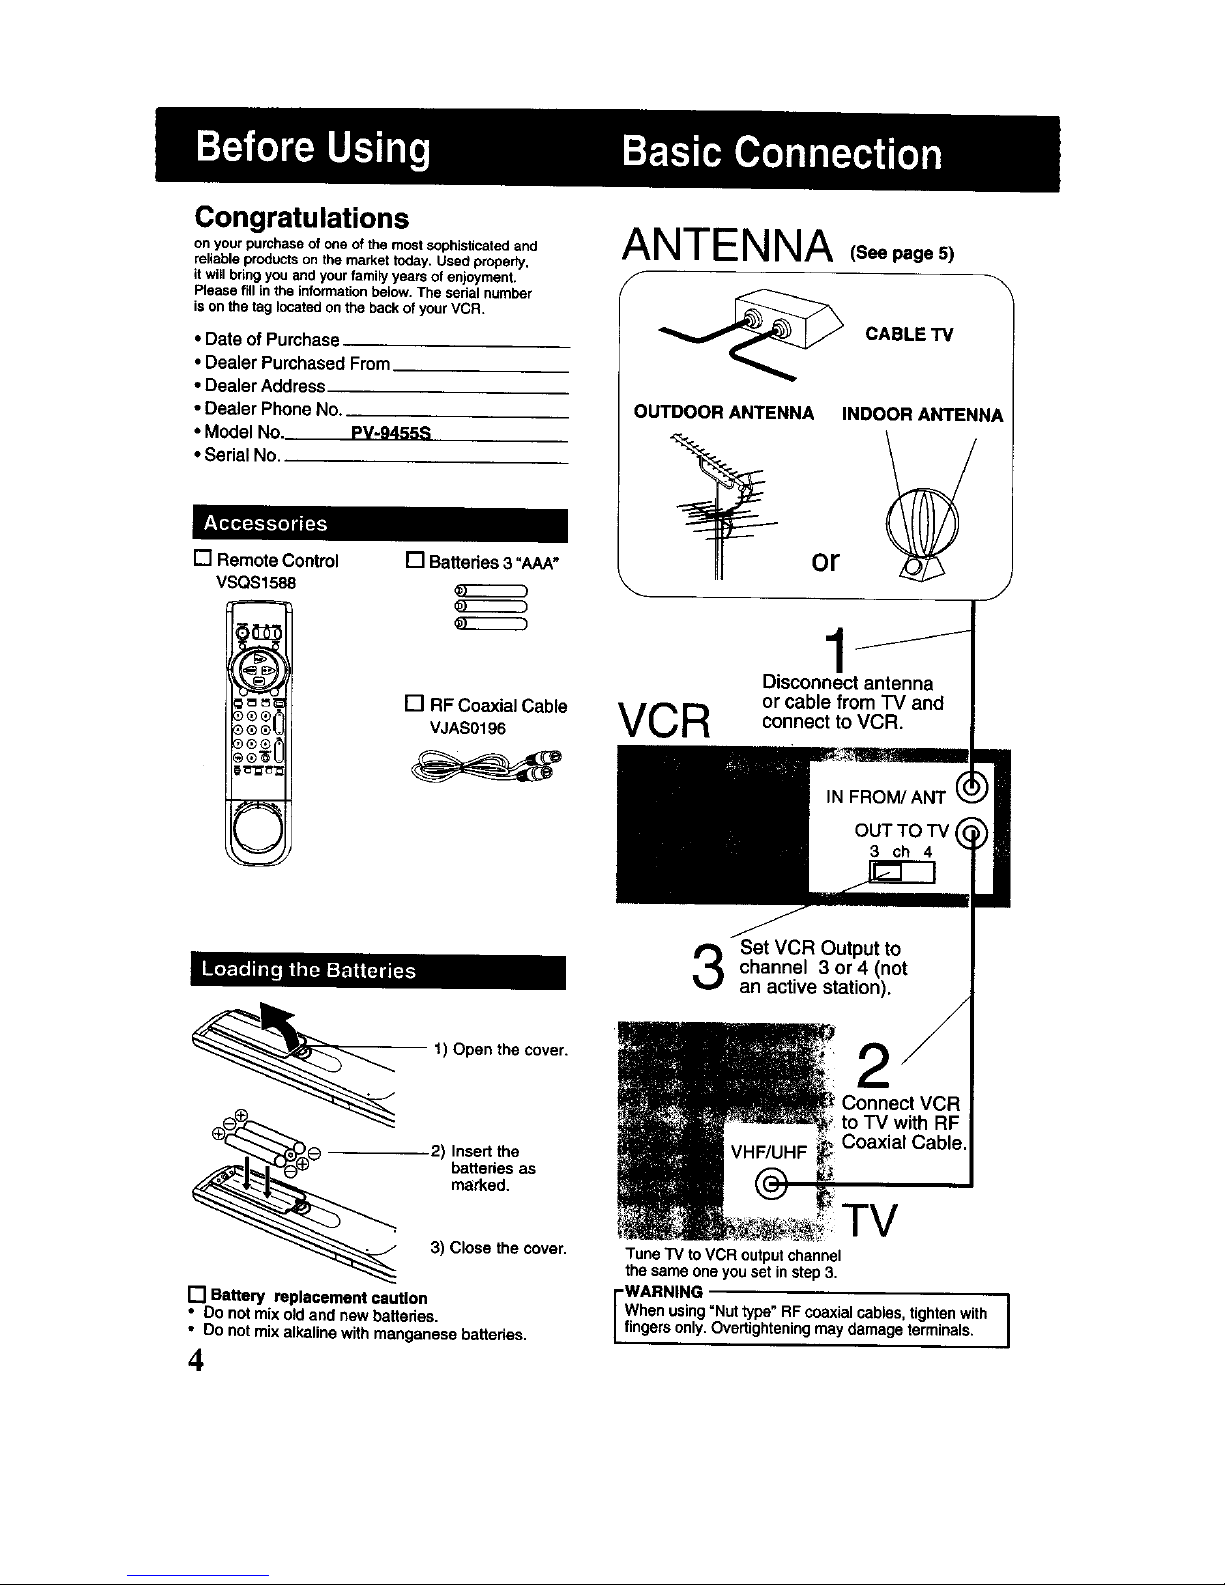
Congratulations
on your purchaseof one of the most sophisticatedand
reliable products on the market today. Used properly,
itwillbring you and yourfamily years of enjoyment.
Please fill in the informationbelow. The serial number
ison the tag located on the back of your VCR.
• Date ofPurchase
• Dealer PurchasedFrom
• Dealer Address
• Dealer PhoneNo.
• Model No PV-9455S
•SerialNo,
[] Remote Control
VSQS1588
_,PJN
[]BaHedes3"AAA"
[] RF Coaxial Cable
VJAS0196
ANTENNA s..ege,
f
CABLE TV
OUTDOOR ANTENNA
or
INDOOR ANTENNA
J
VCR
Disconnect antenna
or cable from TV and
connect to VCR.
1) Open the cover.
2) Insert the
batteries as
marked.
Set VCR Output to
channel 3 or 4 (not
an active station).
2
3) Close the cover.
[] Battery replacement caution
• Do not mix oldand new batteries.
• Do not mix alkaline withmanganese batteries.
4
TuneTV to VCR outputchannel
thesameone yousetinstep3.
WARNING I
Whenusing=Nuttype"RF coaxialcables,tightenwith
fingersonly.Overtighteningmaydamage terminals.
1
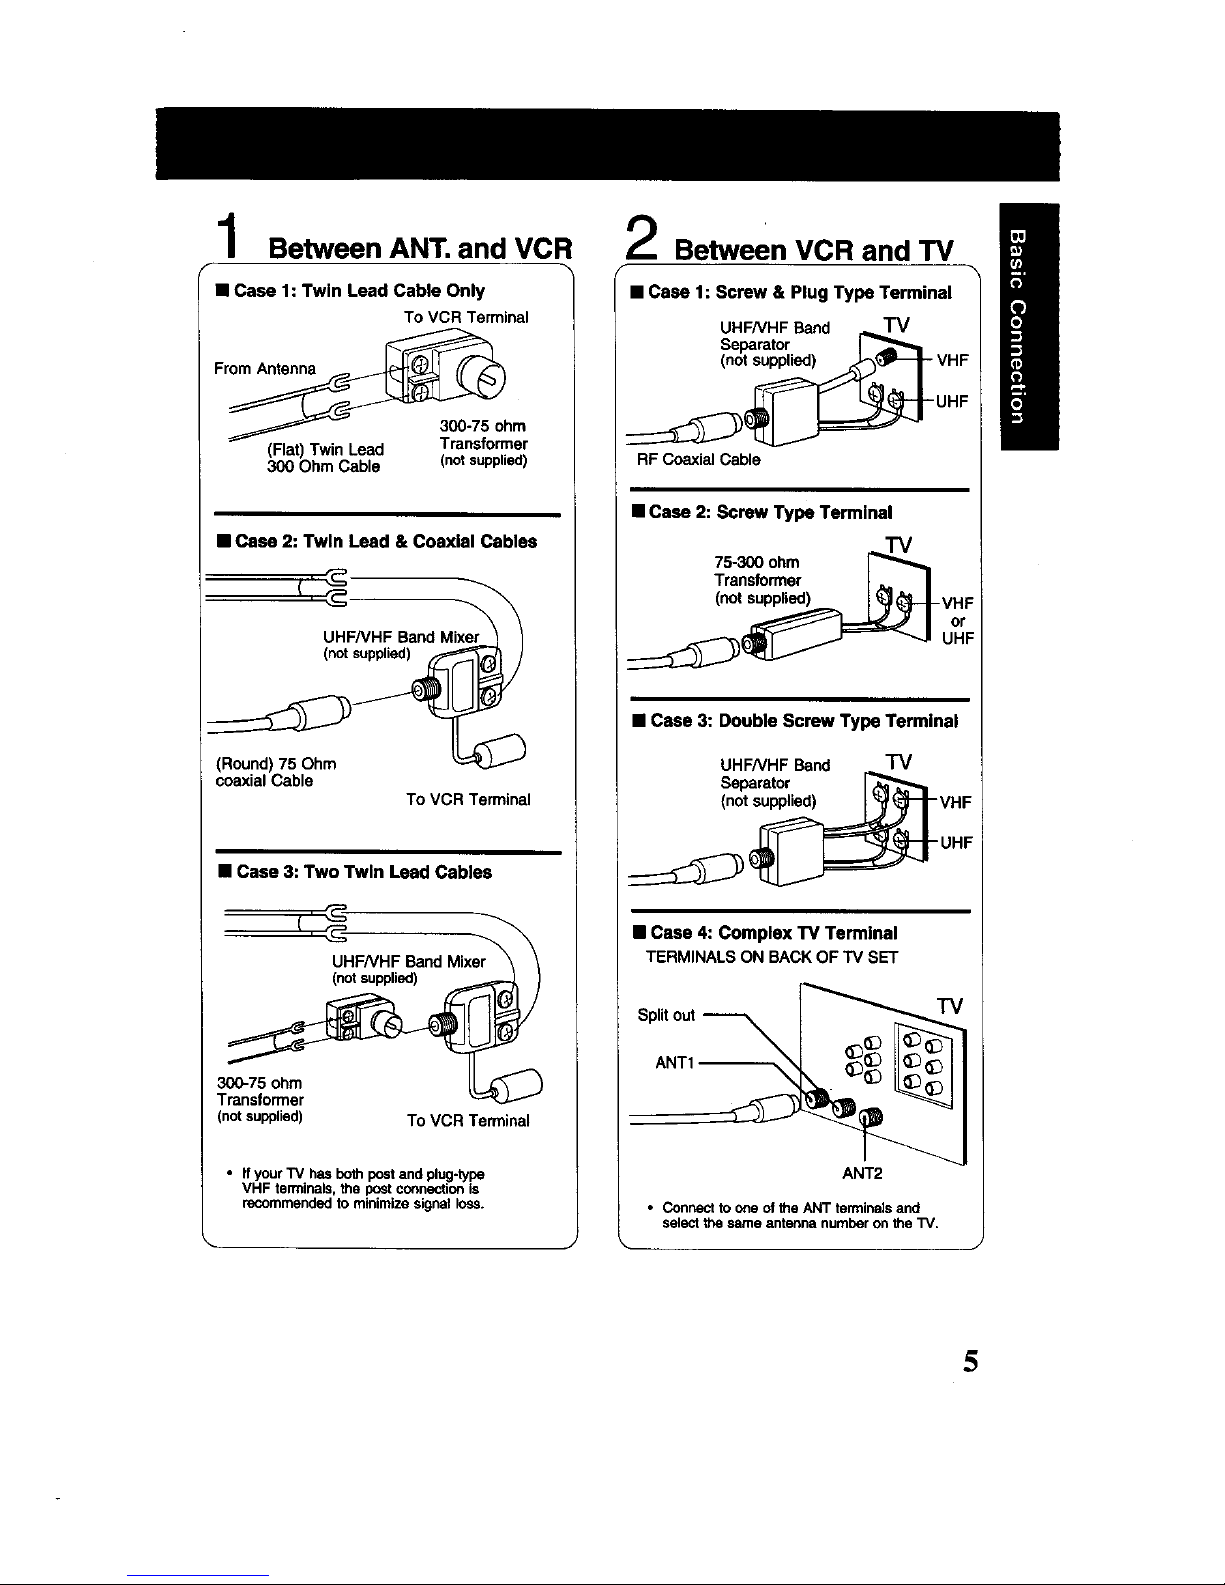
Between ANT, and VCR
• Case 1: Twin Lead Cable Only
To VCR Terminal
From Antenna _
3C0-75 ohm
(Flat) Twin Lead Transformer
300 Ohm Cable (notsupplied)
• Case 2: Twin Lead & Coaxial Cables
(notsuppli_
coaxial Cable
To VCR Terminal
• Case 3: Two Twin Lead Cables
UHFNHF Band Mixer
(notsupplied)
300-75 ohm
Transformer
(notsupplied)
To VCR Terminal
• If your TV has both post and plug*typp
VHF terminals, the po_t connectionis
recommendedto minimize signal loss.
Between VCR and TV
f
• Case 1: Screw & Plug Type Terminal
UHFNHF Band _ TV
Separator
RF Coaxial Cable
• Case 2: Screw Type Terminal
75-300 ohm
Transformer
(not supplied)
• Case 3: Double Screw Type Terminal
UHFNHF Band TM
Separator
(not s_VHF
• Case 4: Complex "rv Terminal
TERMINALS ON BACK OF TV SET
Split out _--_ _
ANT2
• Connect to one ofthe ANT terminals and
select the same antenna number on the "iV.
5
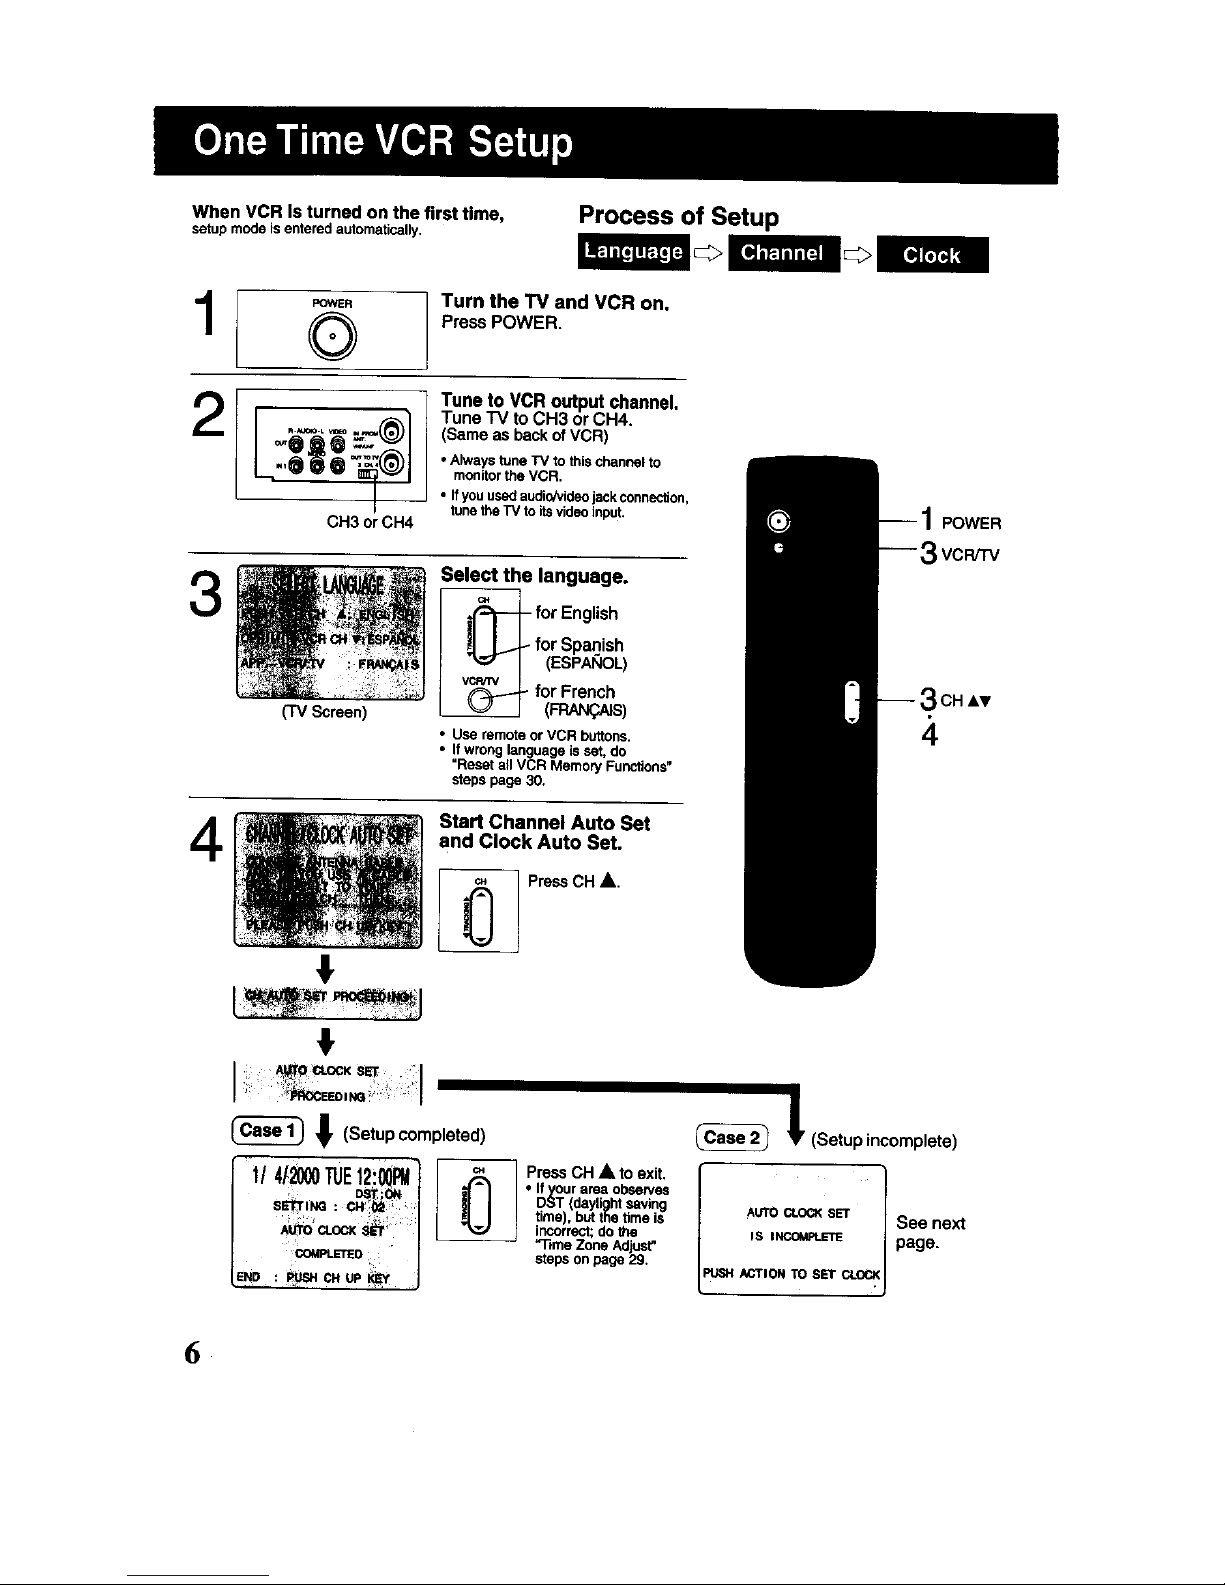
When VCR Is turned on the first time,
setupmodeisenteredautomatically,
Process of Setup
1
3
4
POWER
Q
Turn the TV and VCR on,
PressPOWER.
CH3 or CH4
(TV Screen)
Tune to VCR output channel.
Tune "IV to CH3 orCH4.
(Sameas backofVCR)
• Always tune TV to this channel to
monitorthe VCR.
• Ifyou usedaudi_videojack connection,
tunethe TV to itsvk_eo_nput.
Select the language.
v__ for English
tor Spanish
(ESPANOL)
for French
(_S)
• Use remote or VCR buttons.
• Ifwrong language is set, do
"Reset a_[VCR Memory Fu_-_ons"
steps page 30.
Start Channel Auto Set
and Clock Auto Set.
_ PressCH A.
POWER
VCR/TV
_ (Setupcompleted)
1/4f2000TUE12:_l I_ PressCH&toexlt.
:ON • If ur area observes
I _ [ incorrect; dothe
1, ,j , , t,me,.0=ths, o,s
COMPLETED _ _l-_meZone Adjust"
END : _ €HUP _ J steps on page 29.
! (Setup incomplete)
AUTOCLOO¢SET
See next
,s iNCOMPLETE page.
ACTIONTO SET _,.OCK
,
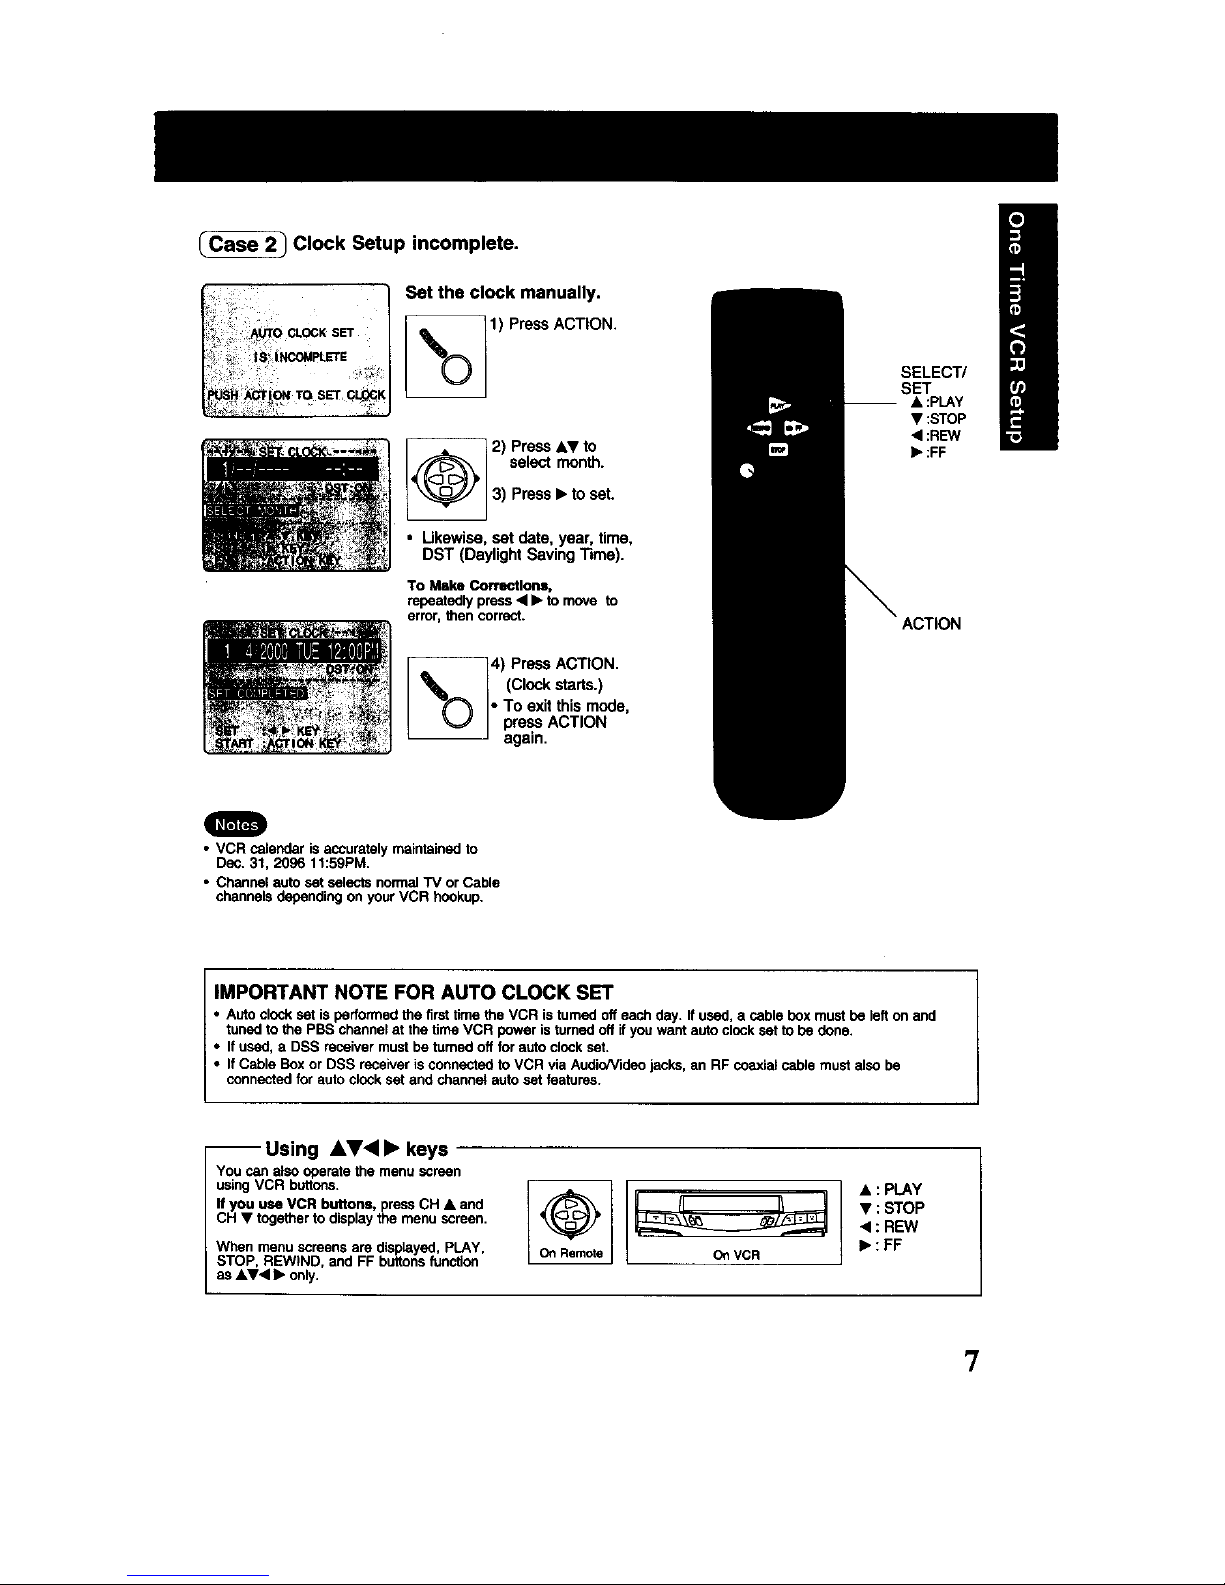
Clock Setup incomplete.
Set the clock manually.
I,_UTO CLOCKSET 1) Press ACTION.
L_2) Press AV to
select month.
3) Press• to set.
• Likewise,set date, year, time,
DST (Daylight SavingTime).
To Make Corrections,
repeatedlypress • • to move to
error, then correct.
4) Press ACTION.
_O (ClOCkstarts.)
• To exitthis mode,
press ACTION
again.
SELECT/
SET
-- • :PLAY
• :STOP
• :REW
• :FF
R
• VCR calendar isaccurately maintained to
Dec. 31, 2096 11:59PM.
• Channel auto set selects normal TV or Cable
channels depending on your VCR hookup.
IMPORTANT NOTE FOR AUTO CLOCK SET
• Auto clock set is performedthe first time the VCR is turned offeach day. If used, a cable box must be left on and
tuned to the PBS channel at the time VCR power is turned off if you want auto clock set to be done.
• If used, a DSS receiver must be tomed off for auto clockset.
• If Cable Boxor DSS receiver is connected to VCR via AudioNideo jacks, an RF coaxial cable mustalso be
connected for auto clockset and channal autoset features.
-- Using A_',< • keys
You can also operate the menuscreen
usingVCR buttons.
If you use VCR buttons, pressCH • and
CH • together to displaythe menu screen.
When menu screens are displayed, PLAY,
STOP, REWIND, and FF buttonsfunction
as AV• • only.
• : PLAY
• :STOP
•:REW
onVCR • : FF
7
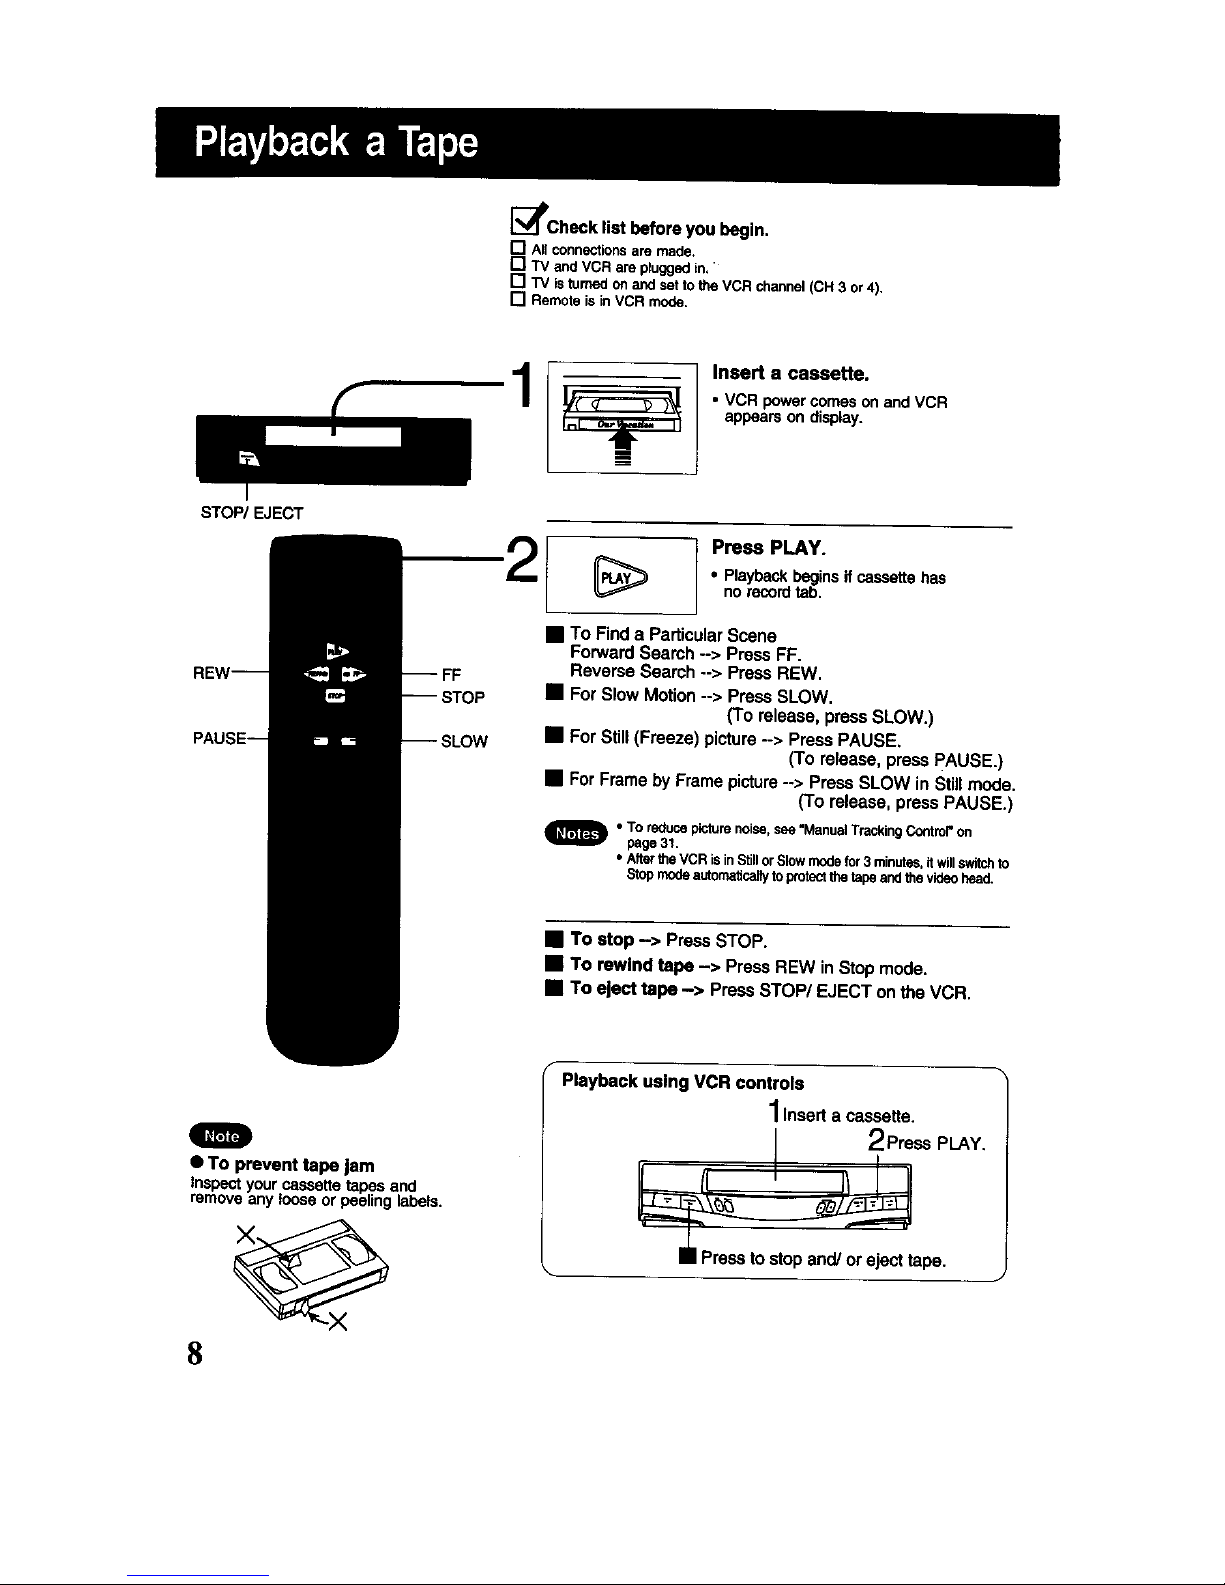
[_l_check list before you begin.
[] All connectionsare made.
[] "IV and VCR am pluggedin,
[] "IV is turned on ar,d set to the VCR channel (CH 3 or 4).
[] Remote Is in VCR mode.
STO_ EJECT
|
Insert a cassette.
• VCRpowercomesonandVCR
appearsondisplay.
Prose PLAY.
• Playbackbeginsifcassettehas
norecordtab.
• To Find a ParticularScene
ForwardSearch --> Press FF.
Reverse Search--> PressREW.
• For Slow Motion--> PressSLOW.
(To release, pressSLOW.)
• ForStill(Freeze) picture--> PressPAUSE,
(To release,pressPAUSE.)
• ForFramebyFramepicture--> PressSLOW inStillmode.
(To release, pressPAUSE.)
_)e To reduce picturenoise,see"ManualTrackingContmi"on
pege31.
• AltertheVCR isinStillorSlowmodefor3 minutes,itwillswitchto
Stopmodeautomaticallyto protsctthetapeand thevideohead.
• To stop -> PressSTOP.
• To rewind tape -> Press REW inStop mode.
• To eject tape -> Press STOP/EJECT on the VCR.
n
• To prevent tape jam
inspectyourcassettetapesand
removeanylooseorpeelinglabels.
8
Playback using VCR controls
1Inserta cassette.
J 2 PressPLAY.
• Press tostopand/or eject tape.
*Important:
Ifthe remote controlPOWER,ACTION,
PROG,CH _J_', INDEX,NUMBERED
keys,INPUT, ADD/DLT,orDISPLAY
buttondoesnotworkwhenpressed,press
theVCR buttononthe remoteandtrythe
buttonagain.
REC/'I'IME
Afterthe VCR hasbeen in Pause mode
for5 minutes,it will stopautomatically
to protectthe tape and the video head.
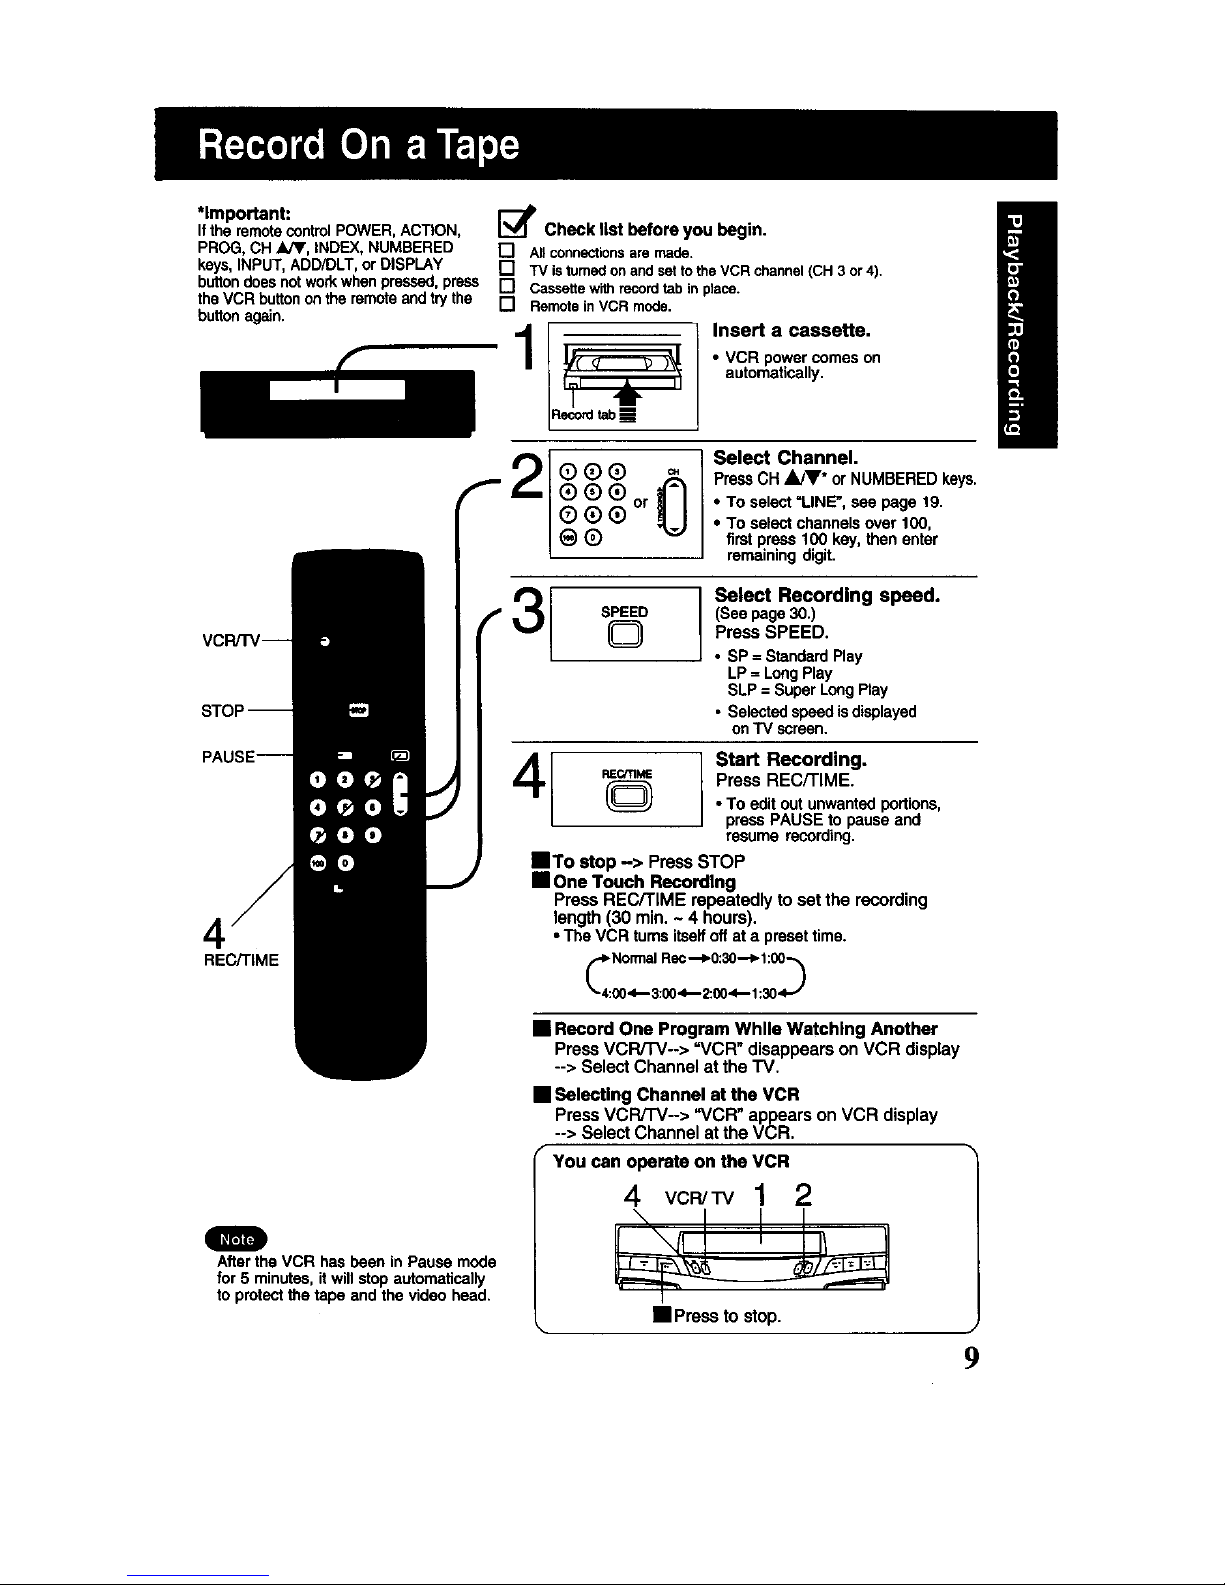
I_IP Check list before you begin.
17 All connectionsare made.
[] TV istumod on and set to the VCR channel (CH 3 or 4),
[] Cassette with record tab in place+
[] Remote inVCR mode,
l[ ]nsecasee
• VCR powercomes on
automatically.
2°++6
®®®or
Q®®
Select Channel.
PressCH JidV* or NUMBERED keys.
• To select=LINE', see page 19.
• To select channels over t00,
firstpr.ess100 key, then enter
remaining digit.
SPEED
©
Select Recording speed.
(Seepage30.)
PressSPEED.
• SP = StandardPlay
LP = LongPlay
SLP = SuperLong Play
• Selectedspeedis displayed
onTV screen.
(_ Start Recording.
RECmM_ Press REC/TIME.
• To edit out unwantedportions,
press PAUSE to pause and
resume recording.
ITo stop -> Press STOP
• One Touch Recording
Press REC/TIME repeatedly to set the recording
length (30 min. ~ 4 hours).
• The VCR tums itselfoff at a presettime.
• Record One Program While Watchlng Another
PressVCR/TV--> "VCR" disappears onVCR display
--> SelectChannel at theTV.
• Selecting Channel at the VCR
PressVCR/TV--> "VCR" appearson VCR display
--> Select Channelat the VCR.
You can operate on the VCR
4 VC TV 1 2
• Pressto stop.
9

Make sure to tune TV to VCR output channel the same one you
CATV Connection set on back of VCR: CH3 or CH4.
Allconnectionson these pagesaremadewith 75Ohm coaxialcables.
• With a Cable Box (Cable Box,_VCR)
I N _'l
M or , CABLE BOX VCR
CATV /
"IV
OUT TO TV
• With a Cable Box (VCR,_ Cable Box)
," ANT '_
i or i VCR
I CA'IV ,'
\
CABLE BOX
TV
• With Two Cable Boxes
VCR
i i CABLE
or = 2-Way Splitter BOX
' CATV '
• /
NB
TV
DSS Connection
I N \,
i or i
i CATV l
• - *DSS_ is a registeredtrademarkof DIRECTV,
t INC., a unitof GM Hughed Electronics.
,SATELLITE,
DSB
RECEIVER VCR
OUTTO TV I
TV
10
mwmmll
• record or view any
(includingscrambled)
channel.
• use VCR Remote
Controlto select
channels using Multi-
brand controlfeature.
• view channel
other than the one
selected for any
type of recording,
• do a Timer
recordingof a
channel unless you
select it at the
cable box,
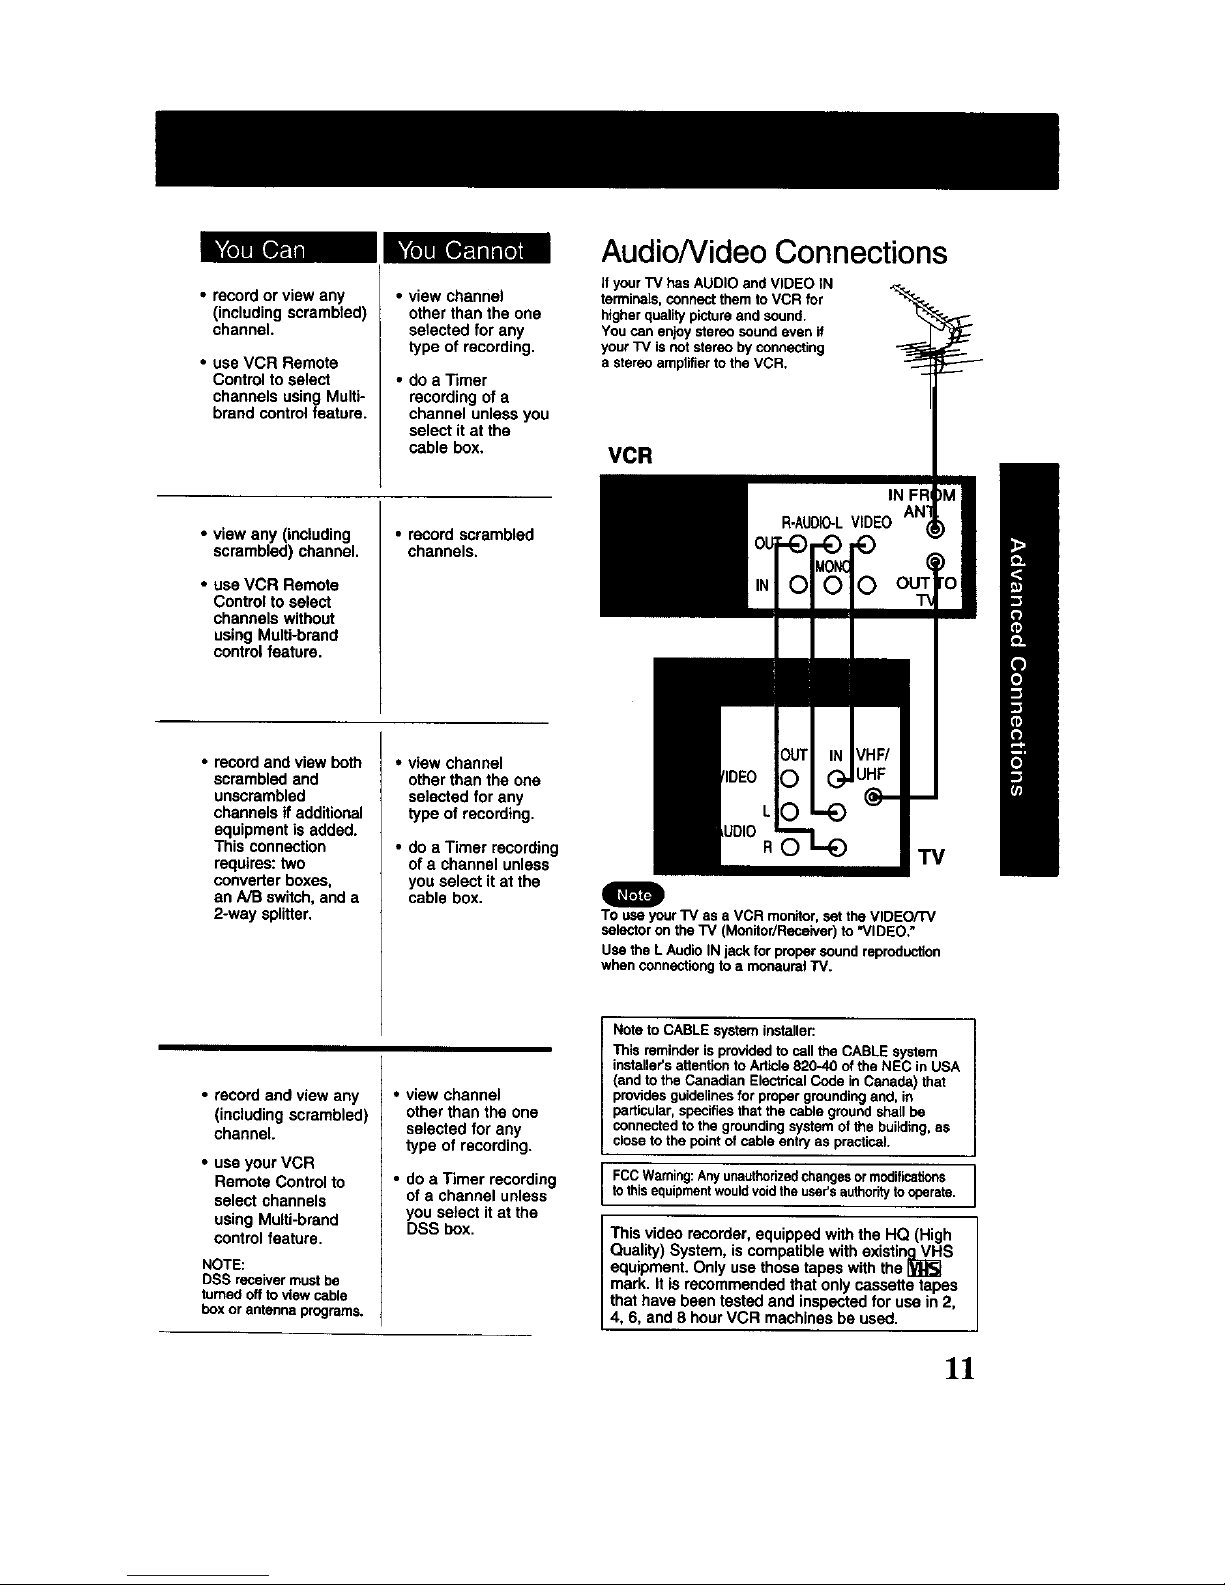
Audio/Video Connections
LIyourTVhasAUDIOandVIDEOIN
terminals,connectthemtoVCRfor
higherqualitypictureandsound.
Youcanenjoystereosoundevenif
yourTVIsnotstereobyconnecting
astereoamplifierto theVCR.
VCR
I
• view any (including
scrambled) channel.
• use VCR Remote
Control to select
channels without
using Multi-brand
controlfeature.
• record scrambled
channels.
• recordand viewboth
scrambledand
unscrambled
channels if additional
equipmentis added.
This connection
requires:two
converterboxes,
an A/B switch,and a
2-way splitter.
• view channel
other than the one
selected for any
type of recording,
• do aTimer recording
of a channel unless
you select it at the
cable box.
• record and view any
(including scrambled)
channel.
• use your VCR
Remote Control to
select channels
using Multi-brand
controlfeature.
NOTE:
DSS receivermustbe
turnedoffto view cable
box or antenna programs.
• view channel
other than the one
selected for any
type of recording.
• do a Timer recording
of a channel unless
you select itat the
DSS box.
-rv
To use your TV as a VCR monitor, set _he V_DEO/TV
selectoron the "IV (Monitor/Receiver) to 'VIDEO."
Use the L Audio IN jack for proper sound reproduction
when connectiongtoa monaural TV.
Note to CABLE system installer:
This reminder is providedto call the CABLE system
installer'sattentionto Adicle 820-40 of the NEC in USA
(andto the Canadian ElectricalCode in Canada) that
providesguidelinesfor proper groundingand, in
particular,specifiesthat the cable ground shall be
connected to the groondthgsystem ot the building,as
closeto the pointof cable entry as practical.
FCCWarning:Anyunauthorizedchangesormodifications
I tothis equipmentwouldvoidthe user's authoritytooperate.
This video recorder, equipped with the HQ (High
Quality) System, is compatible with existing._.S
equipment. Only use those tapes with the
mark. It is recommended that only cassette tapes
that have been tested and inspected for use in 2,
4, 6, end 8 hour VCR machines be used.
1]
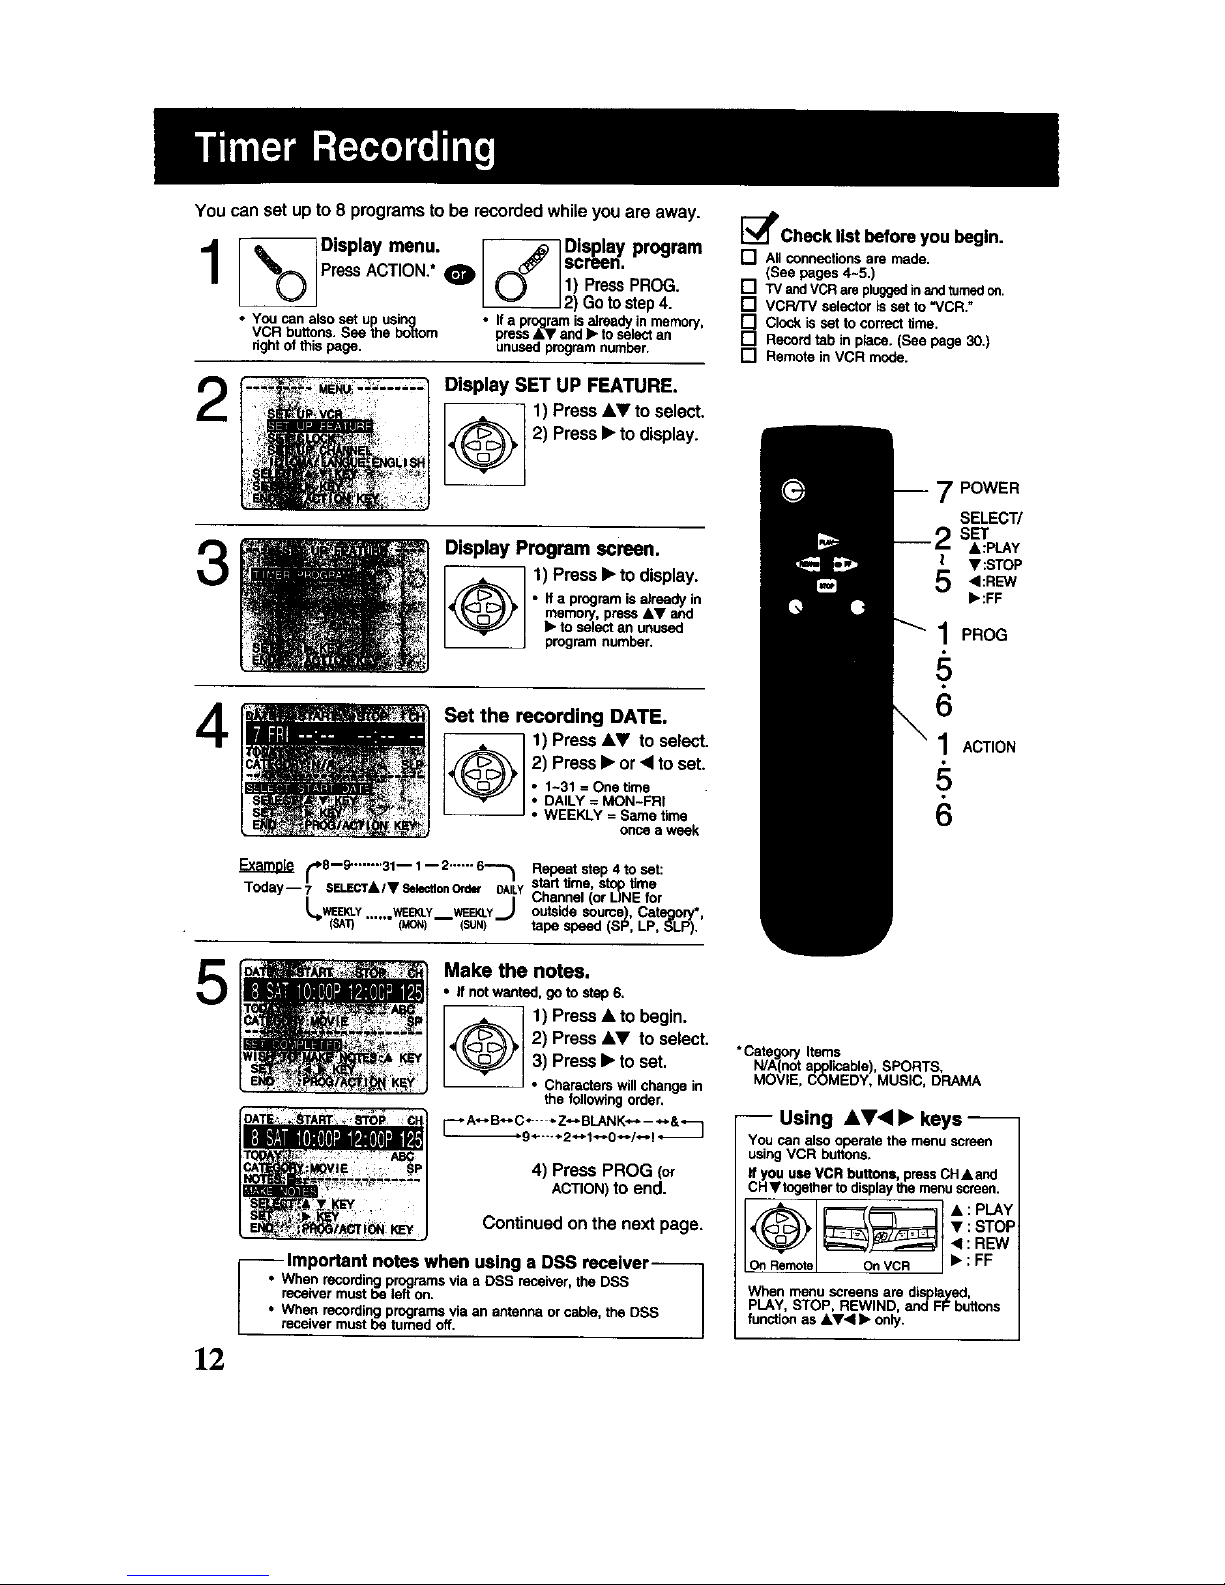
You canset upto 8 programstobe recordedwhiteyouare away.
1
2
3
4
Display menu. I_ Display program
, screen.
I _ IPressACTION. O I _=_ I1) PressPROG.
_2) Gotostep4.
• Youcan also set u usi • Ifa programisalreedy in memory,
VCR buttons. See _he i_ongttom pressA_I, and • to selectan
rightof this page. unused program number.
Display SET UP FEATURE.
1) Press&V toselect.
2) Press• to display.
Display Program screen.
I) Press• to display.
• Ifa programis already in
memory, pmsc &V and
• to select an unused
program number,
Set the recording DATE.
_l 1) Press &,V to select.
[ 2) Press • or • to set.
'I• 1-31 = One time
I • DAILY = MON-FRI
J
• WEEKLY = Same time
once a week
[_Check list before you begin.
[] All connectionsare made.
(See pages 4-5,)
[] TV ssd VCR are pluggedinandturnedon,
[] VCR/TV selector is set to "VDR."
[] Clock is set to correct lime.
[] Record tab in p_ace.(See page 30,)
[] Remote inVCR mode.
7POWER
SELECT/
SET
&:PLAY
• :STOP
<I:REW
• :FF
1 PROG
6
1ACTION
6
('_8--9"-...-"31-- 1-- 2"-'" 6--_ Repeat step 4 to cat:
Today--7 $ELECM,/VSek_onOrder ONLYstarttime, stoptlme
!_--WEE_.V W_L'_ WSt_.'_..,)t Channel (or LINE foroutskk5 source), Cste_ory•,
SA'_ .... (MON)m SUN) tape speed (SP, LP, SLP).
5
12
Make the notes.
• If not wlntod, go to step 6.
1) Prese & to begin.
2) Press &V to select.
3) Press• to set.
• Characterswill change in
the followingorder,
A_. e4..Co--- _Z*_ BLANK_-=- _.*&
4) Press PROG (or
ACTION)to end.
Continued on the nextpage.
important notes when using a DSS receiver
I .When recordingprograms via a DSS receiver,the DSS /
receivermustbe lefton.
I " _°_/heerecordingPrngrams via an antenna orcable, the DSS J
I receiver must be turned off. [
•Category [toms
N/A not applk;able),SPORTS.
MOV E, COMEDY, MUS C, DRAMA
-- Using AV< I> keys --
You can alsooperate the menu screen
usingVCR buttons.
If you use VCR buttons, pressCHAand
CH•together to displaythe menu screen.
• : STOP
<:REW
Onvc_ • : FF
When menu screens area_OLyd'la ed,
PLAY, STOP, REWIND, andFF buttons
function as &•4 • only.
 Loading...