

Panasonic Omnivision PV-8455S Operating Instructions Manual
Thank you for choosing
Panasonic
Omnlvlsion _.-
Video Cassette Recorder
MODEL PV-8455S
Operating
_ nstructions
2
guidelines for energy efficiency.
Please readthese instructions carefullybeforeattemptingto
connect,operateor adjustthisproduct.Please savethismanual.
"Spanish Quick Use Guide is included. (Gufa para r&pidaconsulta en esp_fiol estd includo.)
\
Quick Use Guide is on the back cover.
VQTS3474 (B)
Thin s You Should Know
Congratulations
onyourpurchaseof oneofthemostsophisticatedand
reliableproductson the markettoday.Used propedy,it
willbringyouandyourfamily yearsofenjoyment.
Pleasefillinthe informationat right.The serial number
ison the taglocatedon the backofyourVCR.
FDate of Purchase
Dealer Purchased From
Dealer Address
Dealer Phone No.
Model No. PV-R4_._R
Serial No ........
Safety Precautions
Warning: To prevent fireor shock hazard, do not expose this equipment to rain or moisture.
Thisvideorecorder,equippedwiththe HQ(HighQuality)System,is compatiblewithexistingVHS equipment.
Onlyusethosetapeswiththe _ mark.It is recommendedthatonlycassettetapesthathavebeen tested
andinspectedforuse in2, 4, 6, and8 hourVCR machinesbeused.
I FCCWaming:Anyunauthorizedchangesormodificationstothisequipmentwouldvoidtheuser'sauthoritytooperate.
Thissymbolwamsthe userthat uninsulatedvoltagewithintheunitmay
havesufficientmagnitudetocause electricshock.Therefore,itis dangerous
tomake anykindofcontactwithanyinsidepartofthisunit.
This symbol alerts the user that important literature concerning the operation
and maintenance of this unit has been included. Therefore_ itshould be read
care.fiJIlyin order to avoid any problems.
I
Table of Contents
Important Safeguards and Precautions ............................................................................................. 3
Unpacking Your VCR • Product Features ......................................................................................... 4
VCR and Cassette Information (Record Tab, Tape Speeds, Head Cleaning, DST., Specifications) ................... 5
Basic Connection (Antenna and VCR, VCR and TV) .............................................................................. 6, 7
Other Connections (CABLE, Audio/Video) ........................................................................................... 8, 9
Lt_J_]];lm,119111t_
Location of Controls (Remote Control, VCR) ................................................................................... 10, 11
One Time VCR .Setup (On-Screen Language,Channel Memory,AutoClockSet) .................................. 12 ~ 14
On-Screen Displays (OSD) (Function,Channel,Menu, VCR Status& Clock,Warning) ................................. 15
Playback a Tape (Main Operation, Special Effects, Quality Picture Features) ................................................. 16
Record On a Tape (Main Operation, One Touch Record, Channel Selection) ................................................ 17
Timer Recording (Main Operation, Cancel, Clear or Replace Program Contents) ...................................... 18, 19
h_ I_ [O111'I'lI_
Tape Operation (RepeatPlay,Zero Search,One MinuteSkip_ShuttleSearch,AutoFunctions,Ind;x Search) .... 20 ~ 23
Special VCR Features (ChannelCaption,TimeStamp,Blue BackON/OFF, VCR Lock,WarningBeeper) .. 24 ~ 26
Copying Your Tapes (Dubbing) (Connection, MainOperation,Monitoring,Select InputMode)....................... 27
MTS Broadcast/VHS Hi-Fi Stereo System (Stereo/SAP/MonoBroadcast,SelectAudioMode) ............ 28, 29
OCR Plus+ Setup (CableBoxSetup, VCR Plus+ChannelSetup) ....................................................... 30 ~ 32
VCR Plus+ Programming (MainOperation, Make Correction)........... ....................................................... 33
Multi-Brand Control Feature ................................................... _............................................ ,,.... 34, 35
[I]]JfltlllIITi_itffil
-Before Requesting Service (Self-checkitems)...................................................................................... 36"
Warranty ............................................................. ,.............................................................................. 37
Spanish Quick Use Guide .......................................................................................................... 38, 39
Quick Use Guide ................................................................................................................. Back Cover
2
ImportantSafeguardsandPrecautions
FOR YOUR SAFETY, READ AND
RETAIN ALL SAFETY AND OPERATING
INSTRUCTIONS. HEED ALL WARNINGS
IN THE MANUAL AND ON THE UNIT
I INSTALLATION I
1 POWER SOURCE CAUTION
Operate only from a power source indicated on the
unit or in this manual. Ifnecessary, have your Electric
Utility Service Company or Video Products Dealer vedly
the power source in your home.
• 2 POLARIZED OR GROUNDING PLUG
As a safety feature, this Video product comes with either
a polarized power cord plug (one blade is wider than the
other), or a three-wire grounding type plug.
pOLARIZED PLUG CAUTION:
This plug will only fit into an outlet one way. Ifyou cannot
fully insert the plug, try reversing it. If it still will not fit, have
an electrician install the proper wall outlet. Do not defeat the
• safety feature by tampering with the plug.
GROUNDING PLUG CAUTION:
This plug will only fit into a three-hole grounding ouUet. If
necessary, have an electrician installthe proper outlet. Do
not defeat the safety feature by tampering with the plug.
POWER CORD
Make sure power cords are routed so that they 6re not
likely to have anything rest on them, roll over them, or be
in the way of walking traffic.
If an extension cord is used, make sure it also has either
a polarized or grounded plug and that the cords can be
securely connected.
Frayed cords, damaged plugs, and damaged or cracked
wire insulation are hazardous and should be replaced by
a qualified service technician.
Overloaded outlets and extension cords are fire hazards
and should be avoided.
4 DO NOT BLOCK VENTILATION HOLES
Ventilation openings in the cabinet release heat
generated during operation. If they are blocked, heat
build-up inside the unit can cause failures that may result
in a fire hazard or heat damage to cassettes.
For protection, follow these rules:
a. Never cover ventilation slots or the unit while in use,
or operate the unit when placed on a bed, sofa, rug,
or other soft surface.
b. Avoid built-in installation, such as a book case or
rack, unless proper ventilation is provided.
AVOID EXTREMELY HOT LOCATIONS OR SUDDEN
TEMPERATURE CHANGES
Do not place the unit over or near any kind of heater or
regulator, in direct sunlight, inside a closed vehicle, etc..
Do not move the unit suddenly between areas of
extreme temperature variation. Ifthe unit is suddenly
moved from a cold place to a warm place, moisture
may condense in the unit and on the tape.
6 TO AVOID PERSONAL INJURY
• Do not place unsecured equipment ona sloping
surface. -- -
• Do not place this unit on any support
that is not firm, level, and adequately
strm_g. The unit could fall causing
serious injury to a child or adult and
damage to the unit.
• An appliance and cart combination
should be moved with care.
Quick stops, excessive force, and
uneven surfaces may cause the
appliance and cart combination to overtum.
• Carefully fellow all operating instructions and use
the manufacturer's recommended acoessodes
when operating this unit or connecting it to any
other-equipment.
I OUTDOOR ANTENNA INSTALLATION I
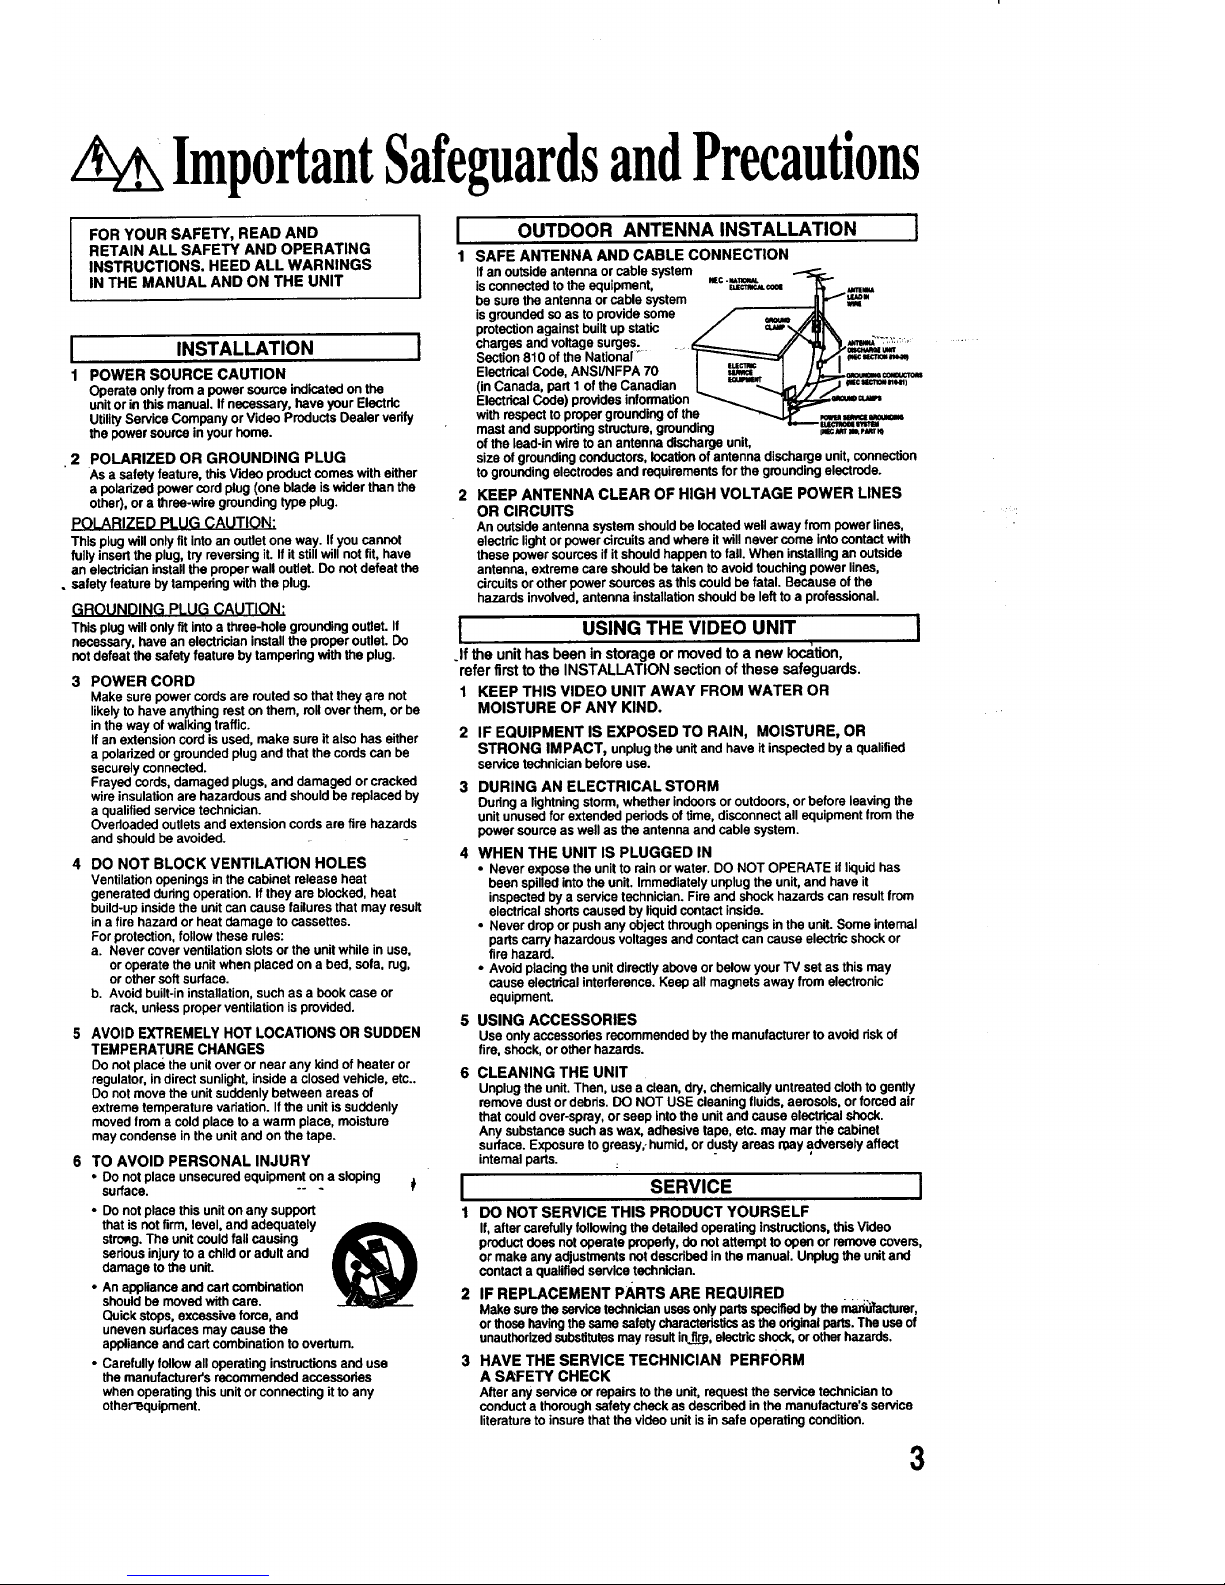
1 SAFE ANTENNA AND CABLE CONNECTION
If an ou_ide antenna or cable system _"'_-_c.,,_
is connected tothe equipment, ====_=0=
be sure the antenna or cable system
is grounded so as to provide some =o=,=
protection against built up static --_:;:
charges and voltage surges .....
(in Canada, part I of the Canadian
Electrical Code) provides information
with respect to proper grounding of the
mast and supporting structure, grounding ,,=,_m,=v_
of the lead-in wire to an antenna discharge unit,
size of grounding conductors, location of antenna discharge unit, connection
to grounding electrodes and requirements for the grounding electrode.
2 KEEP ANTENNA CLEAR OF HIGH VOLTAGE POWER LINES
OR CIRCUITS
An outside antenna system should be located well away from power lines,
electdc light or power circuits and where it will never come into contact with
these power sources if it should happen to fall. When installing an outside
antenna, extreme care should be taken to avoid touching power lines,
circuits or other power sources as this could be fatal. Because of the
hazards involved, antenna installation should be left to a professional.
I USING THE VIDEO UNIT
=
.If the unit has been in storage or moved to a new location,
refer first to the INSTALLATION section of these safeguards.
1 KEEP THIS VIDEO UNIT AWAY FROM WATER OR
MOISTURE OF ANY KIND.
2 IF EQUIPMENT IS EXPOSED TO RAIN, MOISTURE, OR
STRONG IMPACT, unplug the unit and have it inspected by a qualified
service technician before use.
3 DURING AN ELECTRICAL STORM
During a lightning storm, whether indoors or outdoors, or before leaving the
unit unused for extended periods of time, disconnect all equipment from the
power source as well as the antenna and cable system.
4 WHEN THE UNIT IS PLUGGED IN
• Never expose the unit to rein or water. DO NOT OPERATE if liquid has
been spilled into the unit. Immediately unplug the unit, and have it
inspected by a service technician. Fire and shock hazards can result from
electrical shorts caused by liquid contact inside.
• Never drop or push any object through openings in the unit. Some internal
parts carry hazardous voltages and contact can cause electric shock or
fire hazard.
* Avoid placing the unit directly above or below your TV set as this may
cause electrical interference. Keep all magnets away from electronic
equipment.
5 USING ACCESSORIES
Use only accessories recommended by the manufacturer to avoid risk of
fire, shock, or other hazards.
6 CLEANING THE UNIT
Unplug the unit. Then, use a clean, dry, chemically untreated cloth to gently
remove dust or debris. DO NOT USE cleaning fluids, aerosols, or forced air
that could over-spray, or seep into the unit and cause elect ".ncalshock.
Any substance such as wax, adhesive tape, etc. may mar the cabinet
surface. Exposure to greasy,- humid, or dusty areas may adversely affect
intemal parts.
I SERVICE I
1 DO NOT SERVICETHIS PRODUCT YOURSELF
If, after carefully following the detailed operating instructions, this Video
product does not operate properly, do not attempt to open or remove covers,
or make any adjustments not described in the manual. Unplug the unit and
contact a qualified service technician.
2 IF REPLACEMENT PARTS ARE REQUIRED
Make sure the sawica technician uses only parts specified by the ma_acturer,
or those having the same safety characteristics as the originalparts. The usa of
unauthorized substitutes may resulttrine, elac_ic shock, or other hazards.
3 HAVE THE SERVICE TECHNICIAN PERFORM
A SAFETY CHECK
After any service or repairs to the unit, request the service technician to
conduct a thorough safety check as described in the manufactura's service
literature to insure that the video unit is in safe operating condition.
3
Unpckin Your VCR • Product Features
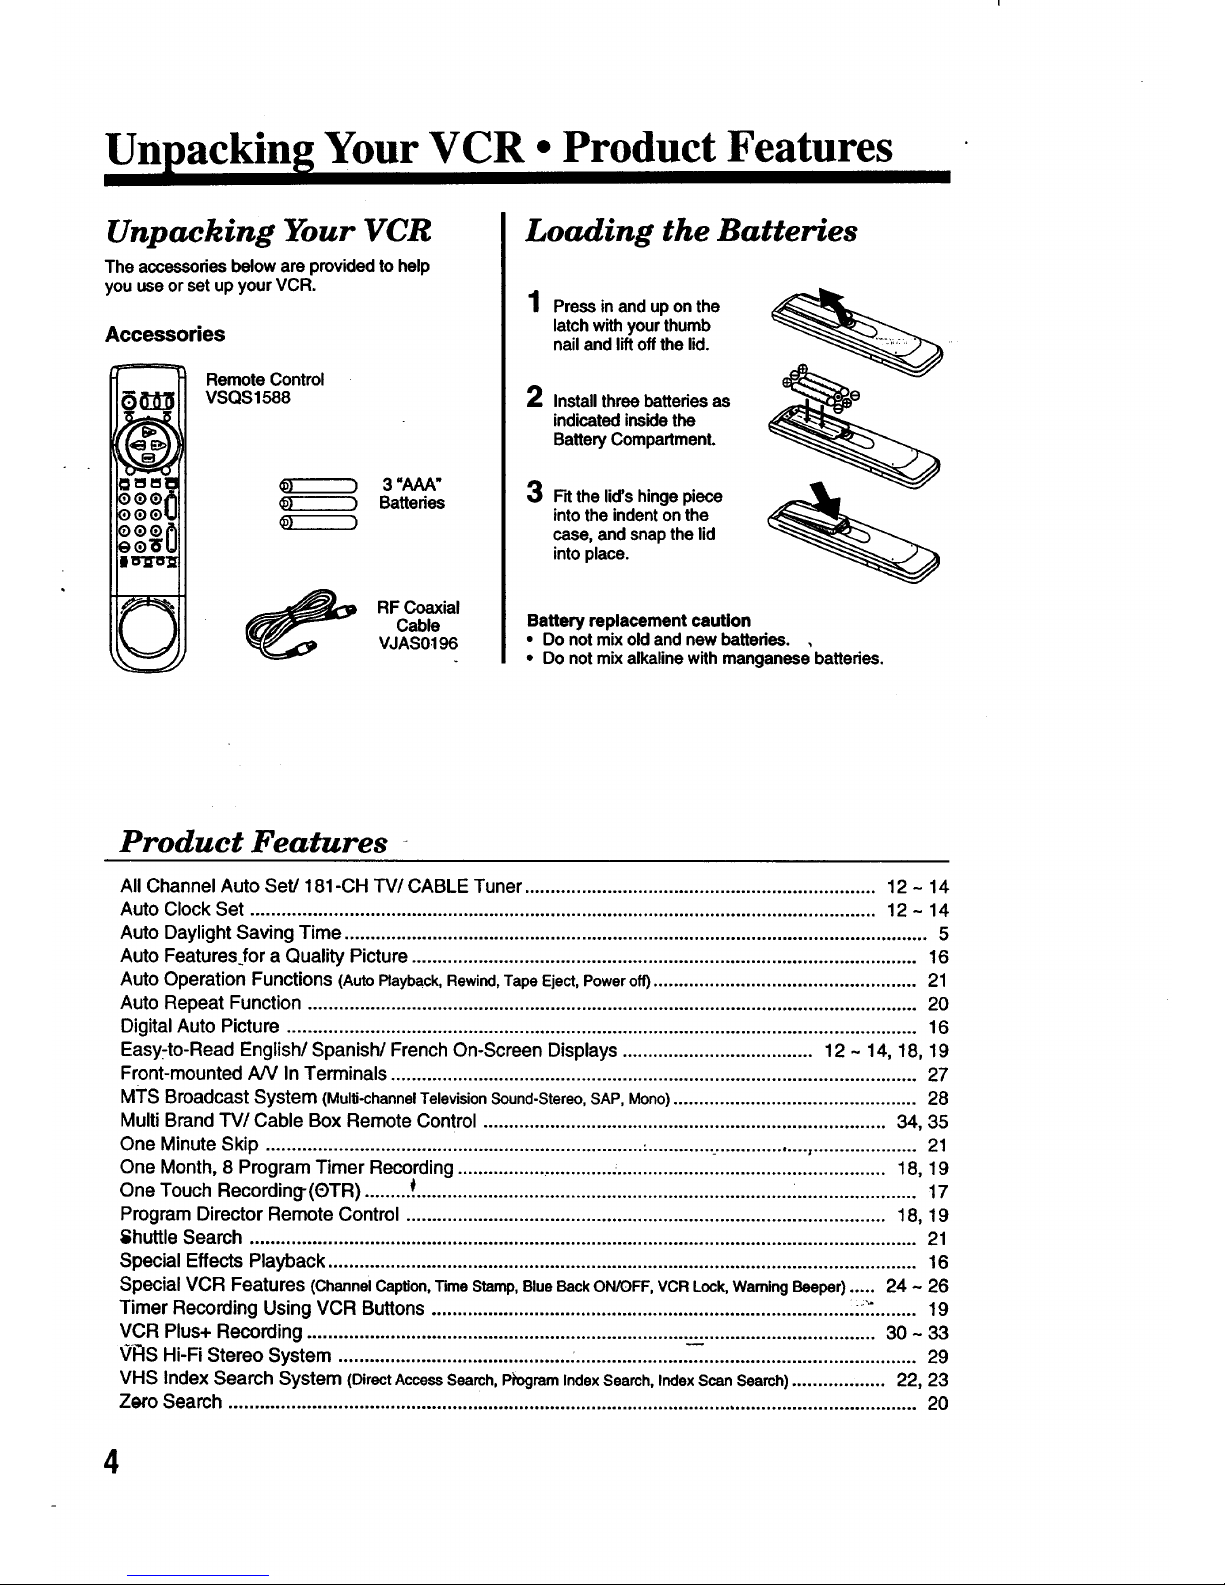
Unpacking Your VCR
The accessoriesbeloware providedto help
youuseorsetup yourVCR.
Accessories
m,
Oq
D_
_)_
9_
:0
RemoteControl
VSQS1588
3 =AAA"
Batteries
RF Coaxial
Cable
VJAS0t 96
Loading the Batteries
1Press in and up on the
latch with your thumb
nail and liftoff the lid.
2 Install three batteries as
indicated inside the
Battery Compartment.
3
Fntthe lid's hinge piece
into the indent on the
case, and snap the lid
into place.
Battery replacement caution
: Do not mix old and new battedes. ,
Do not mix alkaline with manganese battedes.
Product Features
All Channel Auto Set/181-CH TV/CABLE Tuner .................................................................... 12 - 14
Auto Clock Set ......................................................................................................................... 12 ~ 14
Auto Daylight Saving Time ................................................................................................................. 5
Auto Features for a Quality Picture .................................................................................................. 16
Auto Operation Functions (AutoPlayback, Rewind, Tape Eject, Power off) ................................................... 21
Auto Repeat Function ...................................................................................................................... 20
Digital Auto Picture .......................................................................................................................... 16
Easy-to-Read English/Spanish/French On-Screen Displays ..................................... 12 ~ 14, 18, 19
Front-mounted A/V In Terminals ...................................................................................................... 27
MTS Broadcast System (Multi-channel Television Sound-Stereo, SAP, Mono) ............................................... 28
Multi Brand TV/Cable Box Remote Control .............................................................................. 34, 35
One Minute Skip ......................................................................... :............ :.................. ,.................... 21
One Month, 8 Program Timer Recording .............................. :.................................................... 18, 19
One Touch Recording-(eTR) ......... _.......................................................................... i....................... 17
Program Director Remote Control ............................................................................................. 18, 19
Shuttle Search ................................................................................................................................. 21
Special Effects Playback .................................................................................................................. 16
Special VCR Features (Channel Caption, Time Stamp, Blue Back ON/OFF, VCR Lock, Warning Beeper) ..... 24 - 26
Timer Recording UsingVCR Buttons : :_" 19
VCR Plus+ Recording ............................................................................ __:.................................. 30 ~ 33
VFIS Hi-Fi Stereo System ' 29
VHS Index Search System (Direct Access Search, Ph:)grarn Index Search, Index Scan Search) .................. 22, 23
Zero Search ..................................................................................................................................... 20
4
VCR and Cassette Information
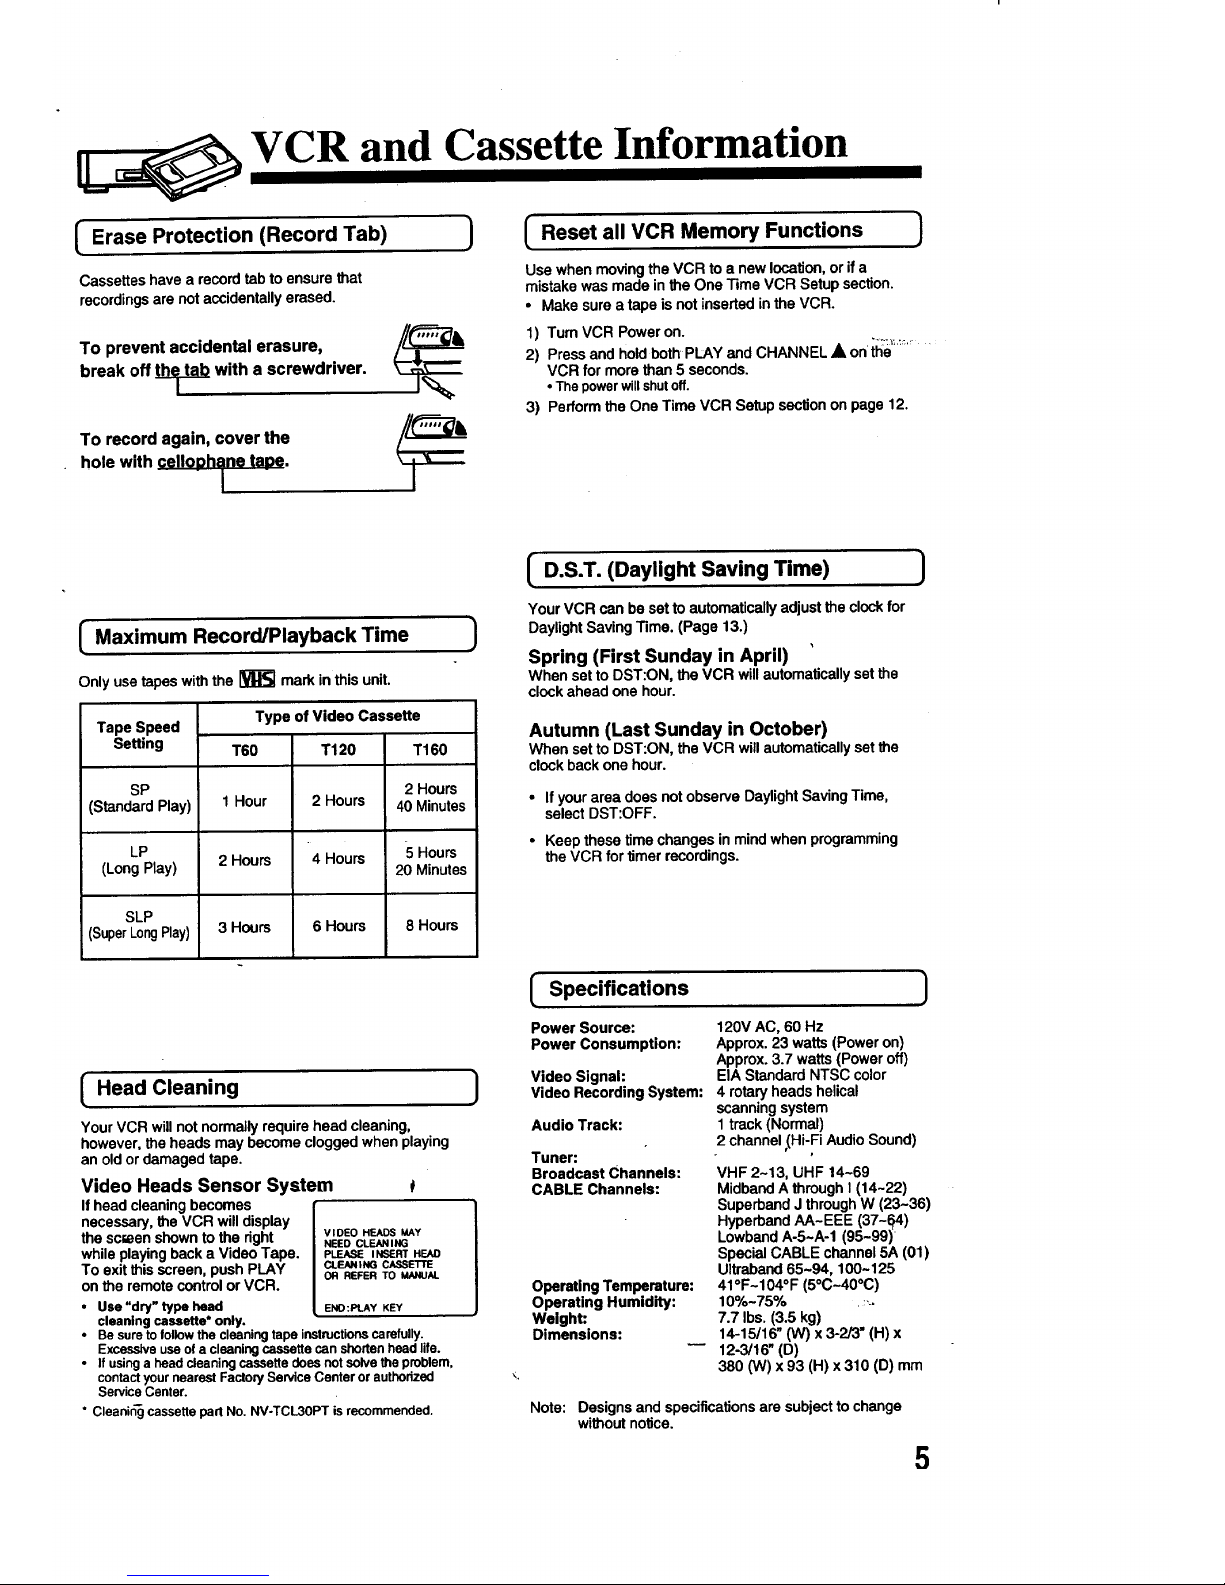
[ Erase Protection (Record Tab) ) [ Reset all VCRMemoryFunctions ]
Use when moving the VCR to a new location, or if a
Cassettes have a record tab to ensure that mistake was made in the One Time VCR Setup section.
recordings are not accidentally erased. • Make sure a tape is not inserted in the VCR.
To prevent accidental erasure,
break off the_ah with a screwdriver.
To record again, cover the
hole with celloDhane taDe.
/
1) Turn VCR Poweron.
2) Press and hold both PLAY and CHANNEL • on ih_e_........
VCR for more than 5 seconds.
• The power will shutoff.
3) Perform the One Time VCR Setup section on page 12.
Maximum Record/Playback Time )
Only use tapes with the _ mark in this unit.
Type of Video Cassette
Tape Speed
Setting T60 T120 T160
SP 2 Hours
(Standard Play) 1 Hour 2 Hours 40 Minutes
LP 5 Hours
(Long Play) 2 Hours 4 Hours 20 Minutes
SLP
(Super LongPlay) 3 Hours 6 Hours 8 Hours
Head Cleaning
Your VCR will not normally require head cleaning,
however, the heads may become clogged when playing
an old or damaged tape.
Video Heads Sensor System
If head cleaning becomes
necessary, the VCR willdisplay
the screen shown to the right VIDEOHEADSMAY
NEED CLEANING
while playing back a Video Tape. PLEASEmsEm HEAD
TOexit this screen, push PLAY CLEANINGCASSETTE
OR REFER TO MANUAL
on the remote control or VCR.
• Use"dry" type head END:Pt.AYKEY
cleanlng cassette* only.
• Besureto followthe cleaningtapeinstructionscarefully.
Excessiveuseo! a cleaningcassettecanshortenheadlife.
• Ifusinga head cleaningcassette doesnot solvethe problem,
contactyournearestFactor/Service Centeror authorized
ServiceCenter.
• Cleanin'gcassettepart No. NV-TCL3OPTisrecommended.
J
I D.S.T. (Daylight Saving Time)
Your VCR can be set to automatically adjust the clock for
Daylight Saving Time. (Page 13.)
Spring (First Sunday in April)
When set to DST:ON, the VCR will automatically set the
clock ahead one hour.
Autumn (Last Sunday in October)
When set to DST:ON, the VCR will automatically set the
clock back one hour.
• If your areadoesnotobserveDaylightSavingTime,
selectDST:OFF.
• Keep these time changes in mind when programming
the VCR for timer recordings.
J
l Specifications
J
Power Source:
Power Consumption:
Video Signal:
Video Recording System:
Audio Track:
Tuner:
Broadcast Channels:
CABLE Channels:
Operating Temperature:
Operating Humidity:
Welght:
Dimenslons:
120V AC, 60 Hz
Approx. 23 watts (Power on)
Approx. 3.7 watts (Power off)
EIA Standard NTSC color
4 rotary heads helical
scanning system
1 track (Normal)
2channel ,(Hi-Fi Audio Sound)
VHF 2-13, UHF 14-69
Midband A through I (14-22)
Superband J through W (23-36)
Hyperband AA-EEE (37-¢:t4)
Lowband A-5~A-1 (95-99)
Special CABLE channel 5A (01)
Ultraband 65-94, 100-125
41OF-104°F (5°C-40°C)
10%-75% .....
7.7 Ibs. (3.5 kg)
14-15/16" ON) x 3-2/3" (H) x
12-3/16" (D)
380 (W) x 93 (H) x 310 (D) mm
Note: Designsandspecificationsare subjecttochange
withoutnotice.
5
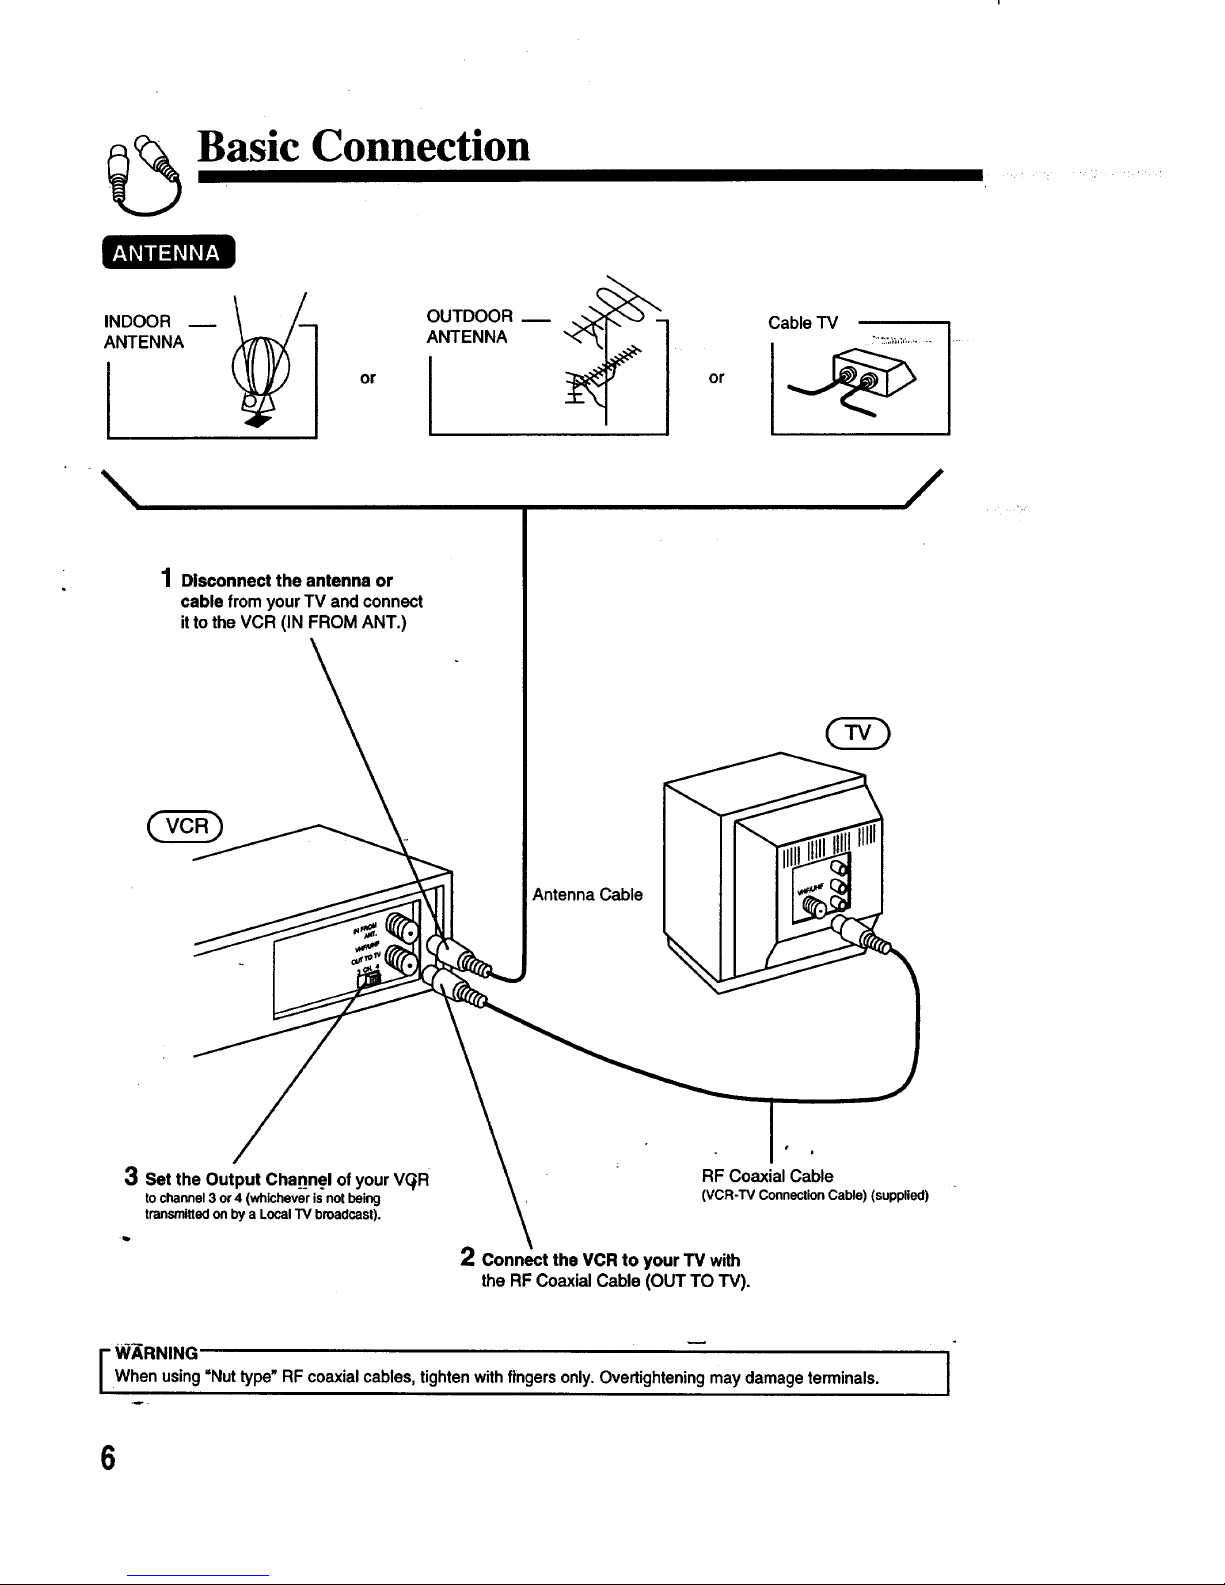
Basic Connection
INDOOR
ANTENNA
\
or or
/
1Disconnect the antenna or
cable from your TV and connect
itto the VCR (IN FROM ANT.)
Antenna Cable
3 Set the Output Channel of your V(_R
to channel 3 or 4 (whichever is not being
transmitted on by a Local TV broadcast).
RF Coaxial Cable
(VCR-TV Connection Cable) (supplied)
2 Connect the VCRto yourTV with
theRF CoaxialCable (OUT TO TV).
I _RNING -- I
When using=Nuttype" RF coaxial cables, tighten with fingers only. OverUghteningmay damage terminals.
6
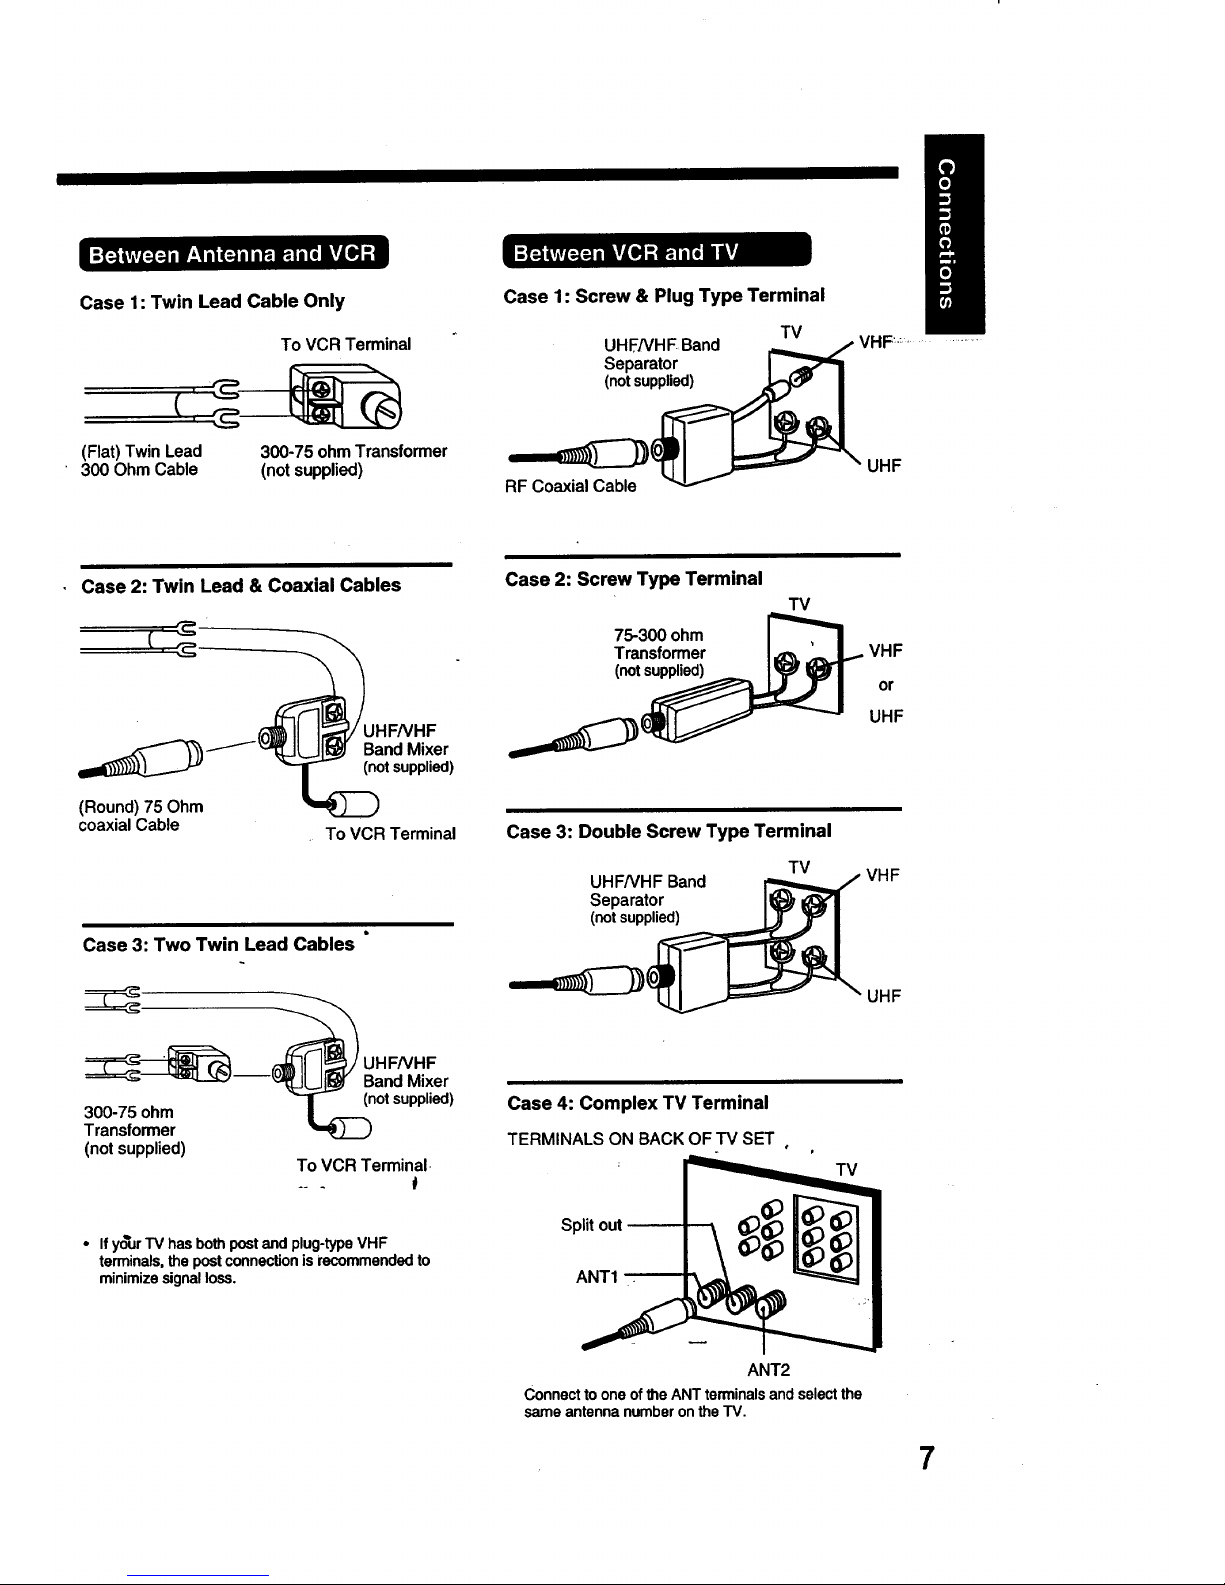
Case 1: Twin Lead Cable Only
(Flat) Twin Lead
300 Ohm Cable
To VCR Terminal
300-75 ohm Transformer
(not supplied)
Case 1: Screw & Plug Type Terminal
TV
UHF/VHF Band _ / VHF ...............
Separator I
__UHF(n°t supplied)
Case 2: Twin Lead & Coaxial Cables
_1_ JHF/VHF
_'_ / _...1__ Band Mixer
q t_ (n°t supplied)
(Round) 75 Ohm
coaxial Cable . To VCR Terminal
Case 3: Two Twin Lead Cables
Case 2: Screw Type Terminal
75-300 ohm
Transformer
(notsupplied)
TV
Case 3: Double Screw Type Terminal
TV
UHF/VHF Band
Separator
(notsupplied)
VHF
or
UHF
VHF
__ UHFNHF
====_-_ _="L-_'J--v'_JU_ Band Mixer
• _ (notsupplied)
300-75 onm
Transformer
(not supplied)
To VCR Terminal.
• If y_ur TV has both post and plug-type VHF
terminals, the post connection is recommended to
minimize signal loss.
Case 4: Complex TV Terminal
TERMINALS ON BACK OF TV SET
p
Split out
ANT1 --
UHF
TV
ANT2
Connect to one of the ANT terminals and select the
same antenna number on the TV.
7
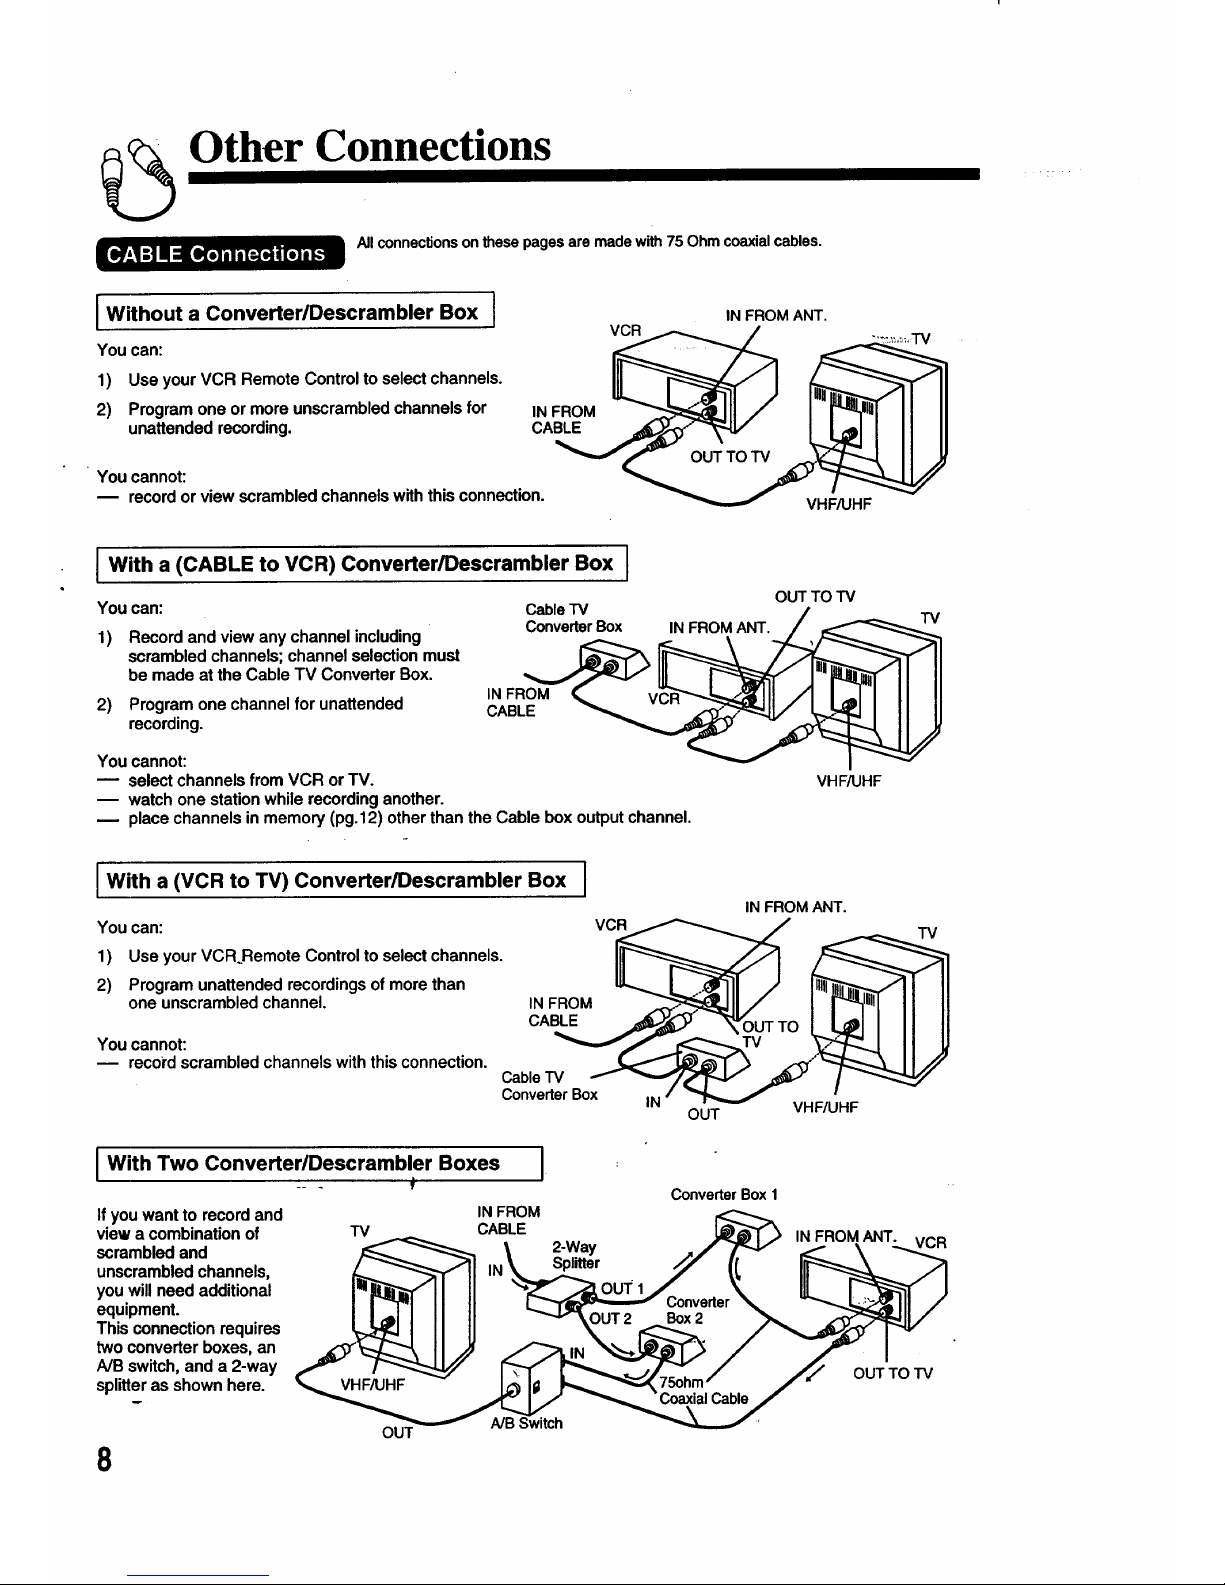
Other Connections
Allconnectionsonthesepagesare made with75 Ohmcoaxialcables.
I Without a Converter/Descrambler Box I
You can:
1) Use your VCR Remote Control to select channels.
2) Program one ormore unscrambled channels for
unattended recording.
IN FROM
CABLE
You cannot:
m record or view scrambled channels with this connection.
VCR
IN FROM ANT.
VHF_HF
l With a (CABLE to VCR) Converter/Descrambler Box I
Youcan:
1) Recordand viewanychannelincluding
scrambledchannels;channelselectionmust
bemade at the CableTV ConverterBox.
2) Programonechannelfor unattended
recording.
CableTV
ConverterBox
IN FROM
CABLE
IN FROM ANT.
You cannot:
select channels from VCR or TV.
m watch one station while recording another.
place channels in memory (pg.12) other than the Cable box output channel.
OUT TO TV
VHF_HF
TV
I With a (VCR to TV) ConvertedDescrambler Box
You can:
1) Use your VCR_Remote Control to select channels.
2) Program unattended recordings of more than
one unscrambled channel.
You cannot:
reco_'dscrambled channels with this connection.
IN FROM
CABLE
Cable"I"V
Converter Box
l With Two Converter/Descrambler Boxes I
If you want to record and
view a combination of
scrambled and
unscrambled channels,
you will need additional
equipment.
This connection requires
two converter boxes, an
A/B switch, and a 2-way
splitter as shown here.
8
TV
OUT
IN FROM
CABLE
NB Switch
2-Way
Splitter
VCR
IN
IN FROM ANT.
OUT VHF/UHF
ConverterBox1
IN FROM ANT.
TV
VCR
OUT TO TV
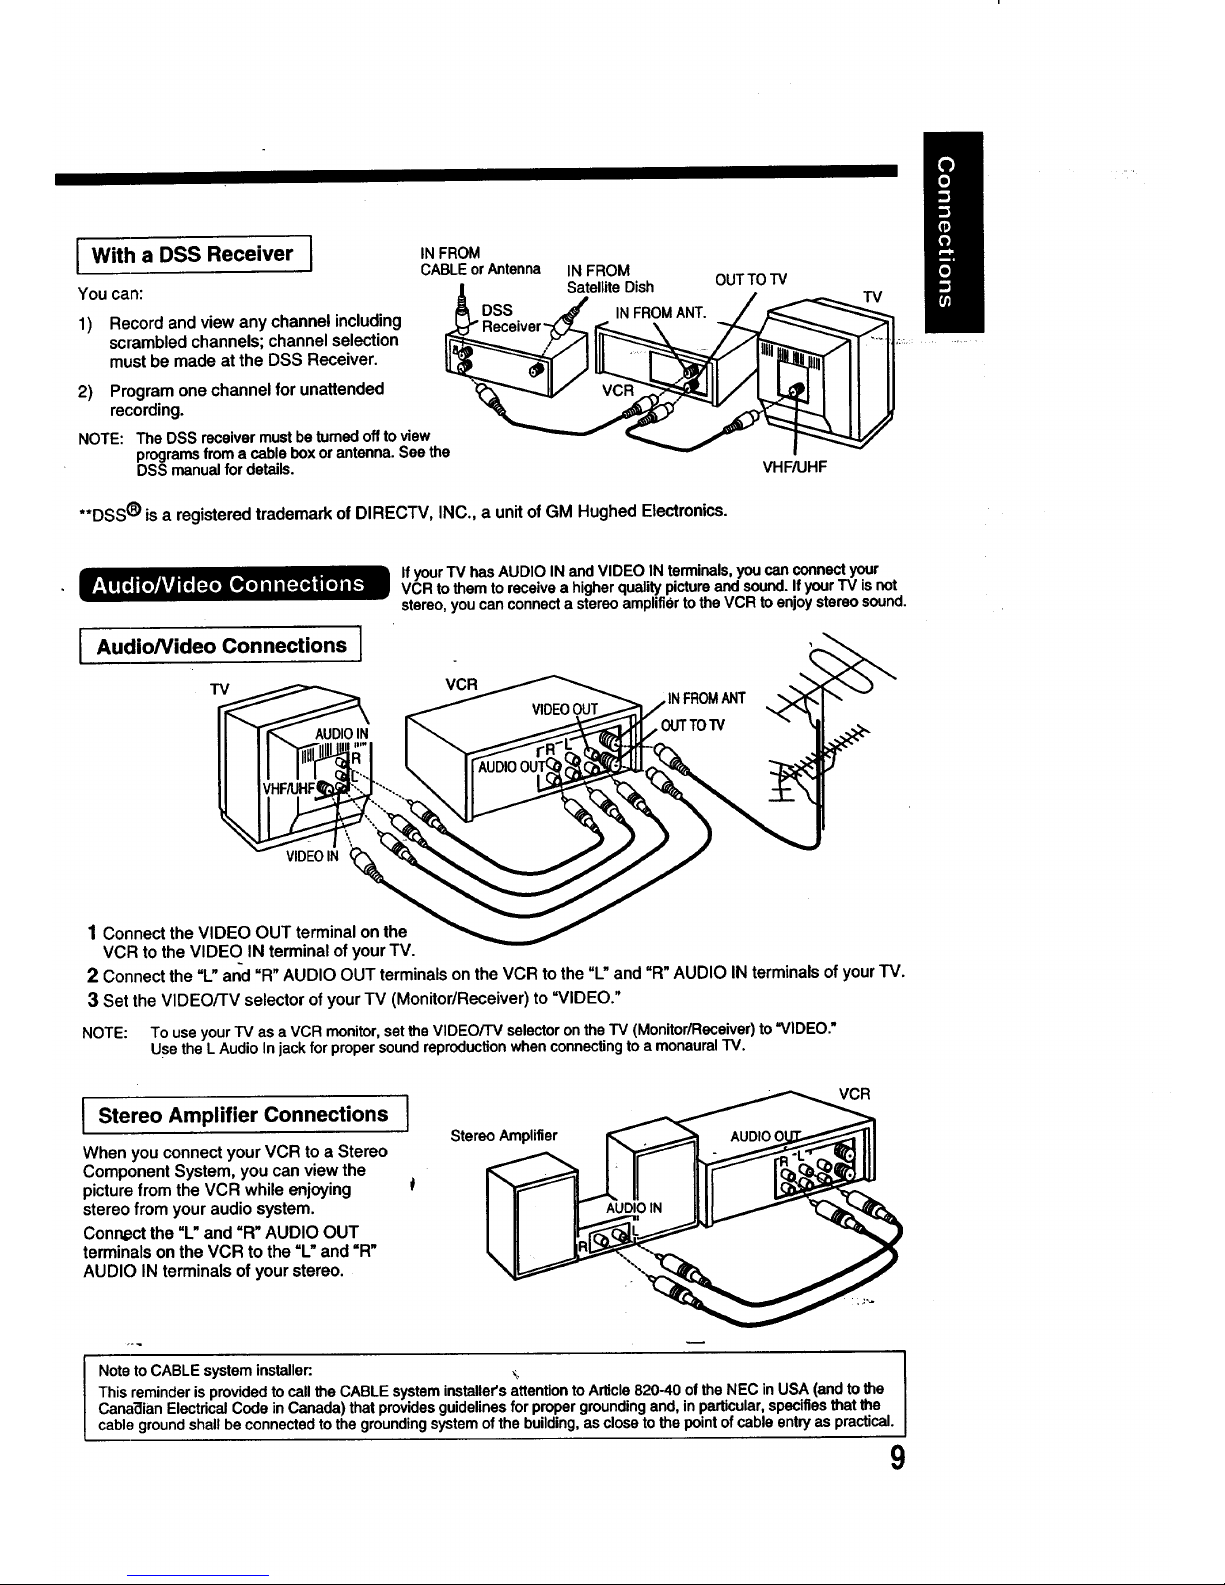
I With a DSS Receiver I
You can:
1) Record and view any channel including
scrambled channels; channel selection
must be made at the DSS Receiver.
IN FROM
CABLE or Antenna
DSS
2) Program one channel for unattended
recording.
NOTE: The DSS receiver must be turned off to view
programs from a cable box or antenna. See the
DSS manual for details.
IN FROM
Satellite Dish
IN FROM ANT.
**DSS® is a registered trademark of DIRECTV, INC., a unit of GM Hughed Electronics.
OUT TO TV
VHF_HF
TV
If your TV has AUDIO IN and VIDEO IN terminals, you can connect your
VCR to them to receive a higher quality picture and sound. If your TV isnot
stereo, you can connect a stereo amplifier to the VCR toenjoy stereo sound.
I
Audio/Video Connections I . (_
AUDIOIN OUTTO1V --
II F
1 Connect the VIDEO OUT terminal on the
VCR to the VIDEO IN terminal of your TV.
2 Connect the =L"and "R" AUDIO OUT terminals on the VCR to the "L" and =R" AUDIO IN terminals of your TV.
3 Set the VIDEO/TV selector of your TV (Monitor/Receiver) to "VIDEO."
NOTE: To useyour "IVas aVCR monitor,set the VIDEO/'rv selectoron the TV (Monitor/Receiver)to =VIDEO."
UsetheL AudioInjackfor propersoundreproductionwhenconnectingto amonauralTV.
I Stereo Amplifier Connections
When you connect your VCR to a Stereo
Component System, you can view the
picture from the VCR while enjoying
stereo from your audio system.
Conr_ct the "L" and "R" AUDIO OUT
terminals on the VCR to the "L" and "R"
AUDIO IN terminals of your stereo.
Stereo Amplifier
VCR
Noteto CABLEsysteminstaller:. _
Thisreminderis providedto callthe CABLEsysteminstaller'sattentiontoArticle820-40of the NEC inUSA (andto the
CanadianElectricalCodeinCanada) that providesguidelinesfor propergroundingand, inparticular,specifiesthatthe
cablegroundshallbeconnectedtothe groundingsystemof the building,as closetothe pointofcableentryaspractical.
9
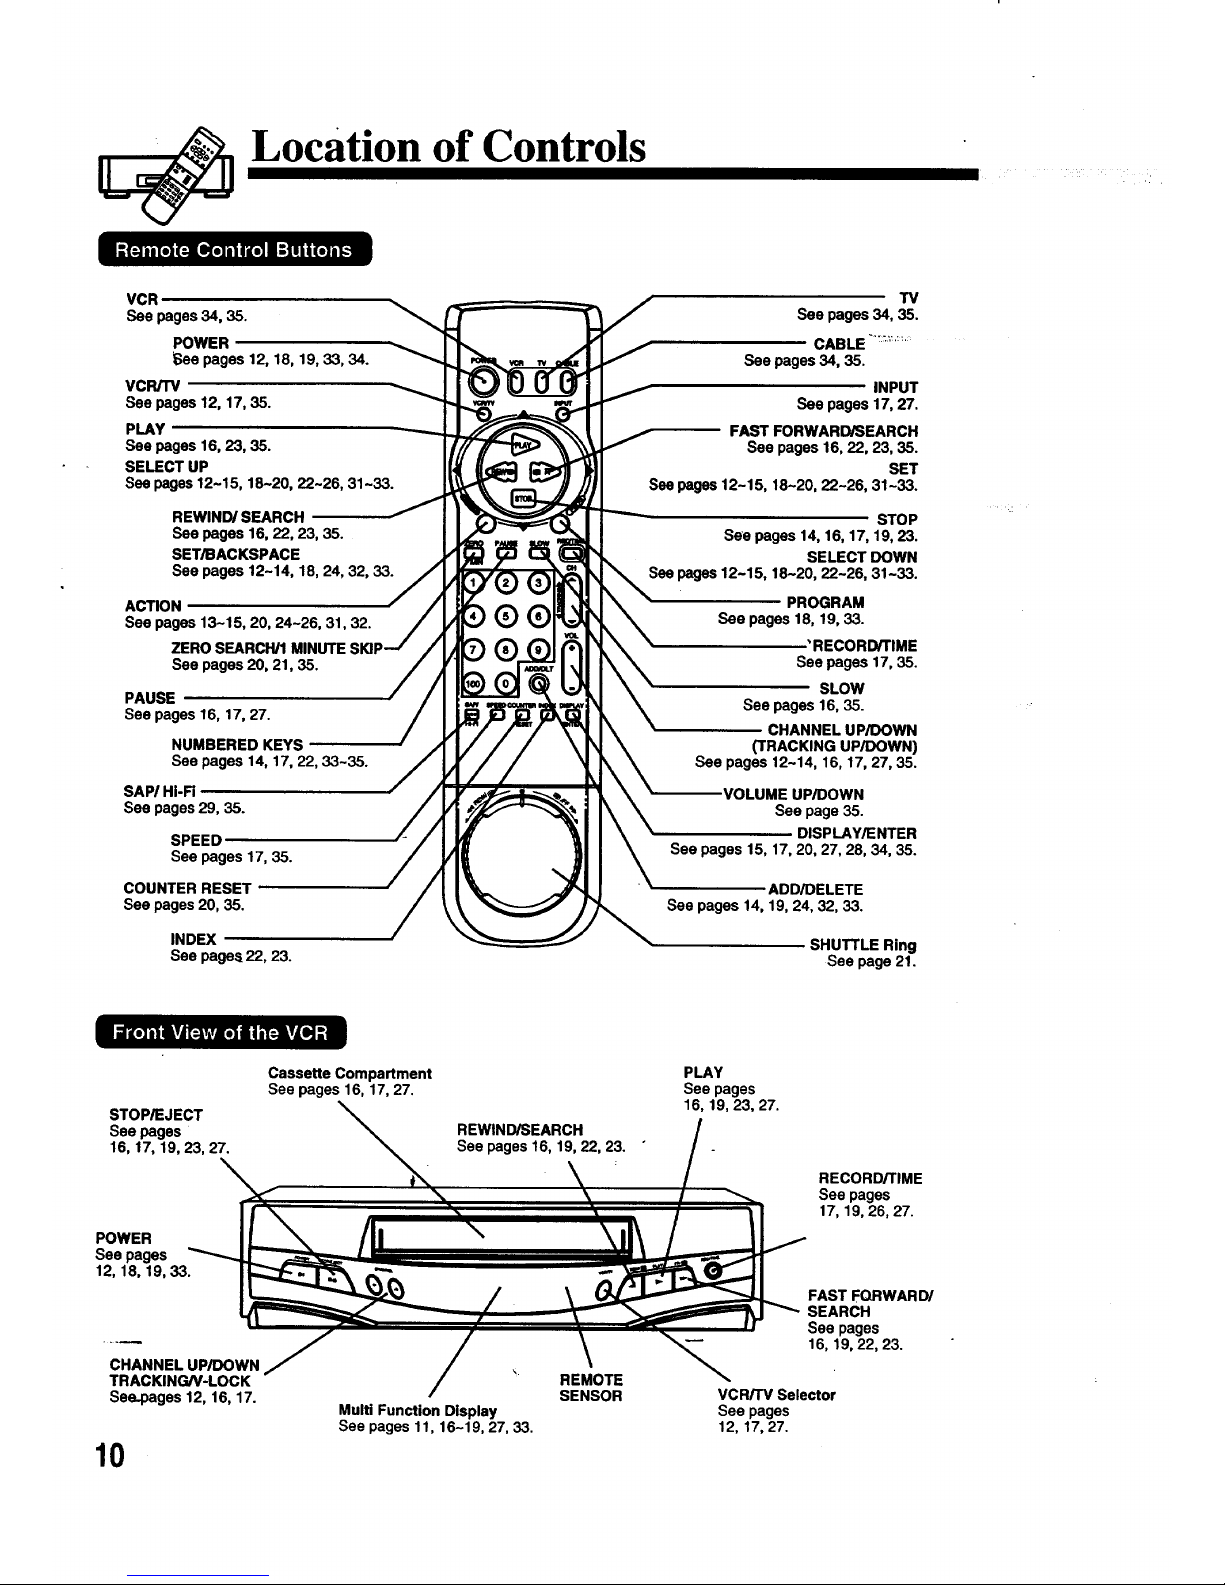
Location of Controls
•. L
VCR
See pages 34, 35.
POWER
_ee pages 12, 18, 19, 33, 34.
VCR/TV
See pages 12, 17, 35.
PLAY
See pages 16, 23, 35.
SELECT UP
See pages 12-15, 18-20, 22-26, 31-33.
REWIND/SEARCH
See pages 16, 22, 23, 35.
SET/BACKSPACE
See pages 12-14, 18, 24, 32, 33.
ACTION
See pages 13-15, 20, 24-26, 31,32.
ZERO SEARCH/1 MINUTE I
See pages 20, 21, 35.
PAUSE
See pages 16, 17, 27.
NUMBERED KEYS
Seepages14,17,22,33-35.
SAP/Hi-Fi
See pages29, 35.
SPEED
Seepages17,35.
COUNTER RESET
Seepages20,35.
INDEX
Seepages22,23.
®®
/
TV
See pages 34, 35.
CABLE ...........
See pages 34, 35.
INPUT
See pages 17, 27.
FAST FORWARD/SEARCH
See pages 16, 22, 23, 35.
SET
See pages 12-15, 18-20, 22-26, 31-33.
STOP
Seepages14,16,17,19,23.
SELECT DOWN
12-15,18-20,22-26,31-33.
PROGRAM
See pages 18, 19, 33.
_' RECORD/rIME
See pages 17, 35.
SLOW
See pages 16, 35.
CHANNEL UP/DOWN
(TRACKING UP/DOWN)
See pages 12-14, 16, 17, 27, 35.
VOLUME UP/DOWN
See page 35.
DISPLAY/ENTER
15, 17, 20, 27, 28, 34, 35.
ADD/DELETE
See pages 14, 19, 24, 32, 33.
SHUTTLE Ring
See page 21.
STOP/EJECT
See pages
16, 17, 19, 23, 27.
POWER
See pages
12,18,19,33.
CHANNEL UP/DOWN
TRACKING/V-LOCK
See.pages 12, 16, 17.
10
Cassette Compartment
See pages 16, 17, 27.
REWIND/SEARCH
See pages 16, 19, 22, 23.
Multi Function Display
See pages 11, 16-19, 27, 33.
REMOTE
SENSOR
PLAY
See pages
16,19,23,27.
RECORD/rIME
See pages
17,19,26,27.
FAST FORWAR D/
SEARCH
See pages
16, 19, 22, 23.
VCR/rVSelector
See pages
12,17,27.
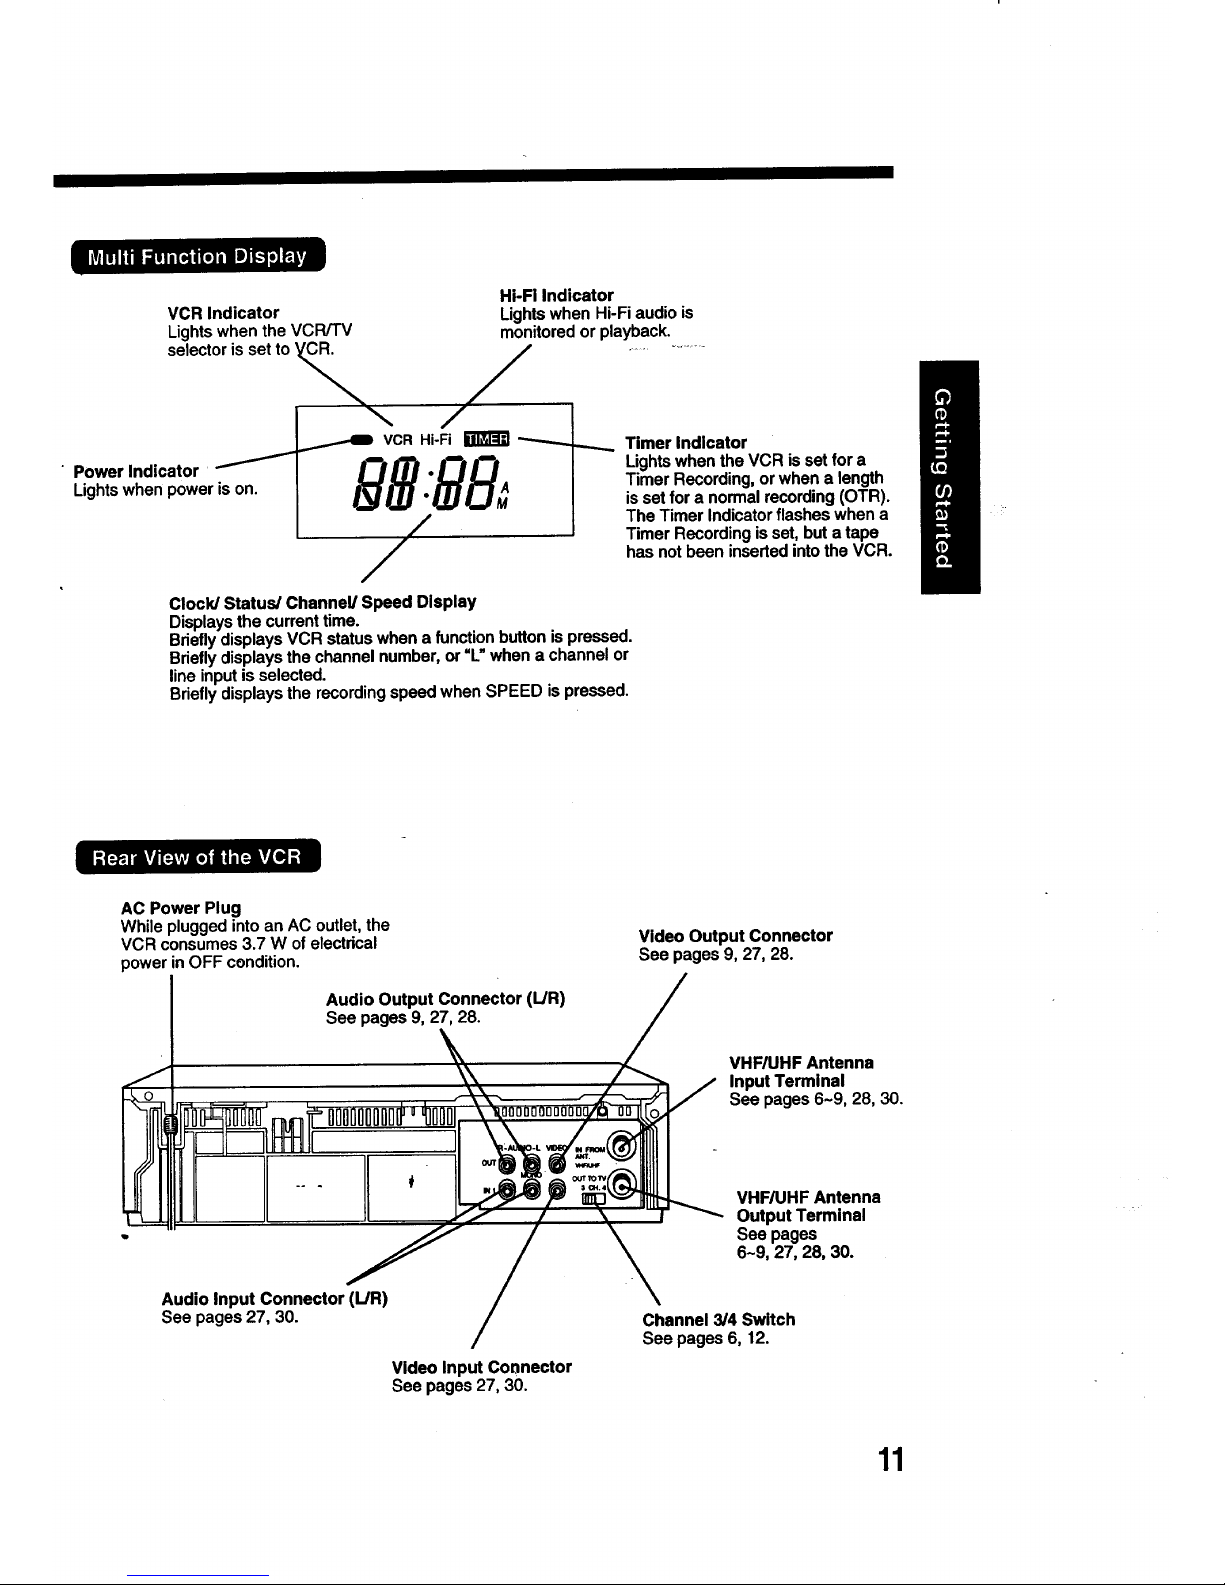
VCR Indicator
Lights when the VCR/TV
selector is set to _ /
- Power indicator , --___)VCj_HI'F__I_ _
Lights when p°wer is °n" I __Z_OrMA /
Hi-FI Indicator
Lights when Hi-Fi audio is
monitored or playback.
Timer Indicator
Lights when the VCR is set for a
Timer Recording, or when a length
is set for a normal recording (OTR).
The Timer Indicator flashes when a
Timer Recording is set, but a tape
has not been inserted intothe VCR.
Clocld Status/Channel/Speed Display
Displays the current time.
Briefly displays VCR status when a function button is pressed.
Briefly displays the channel number, or =L"when a channel or
line input is selected.
Briefly displays the recording speed when SPEED is pressed.
AC Power Plug
While plugged into an AC outlet, the
VCR consumes 3.7 W of electrical
power in OFF condition.
Video Output Connector
See pages 9, 27, 28.
See pages9, 27, 28.
VHF/UHF Antenna
Input Terminal
See pages 6~9, 28, 30.
Audio Input Connector (L/R)
See pages 27, 30.
Video Input Connector
See pages 27, 30.
VHF/UHF Antenna
Output Terminal
See pages
6-9, 27, 28, 30.
\
Channel 3/4 Switch
See pages 6, 12.
11
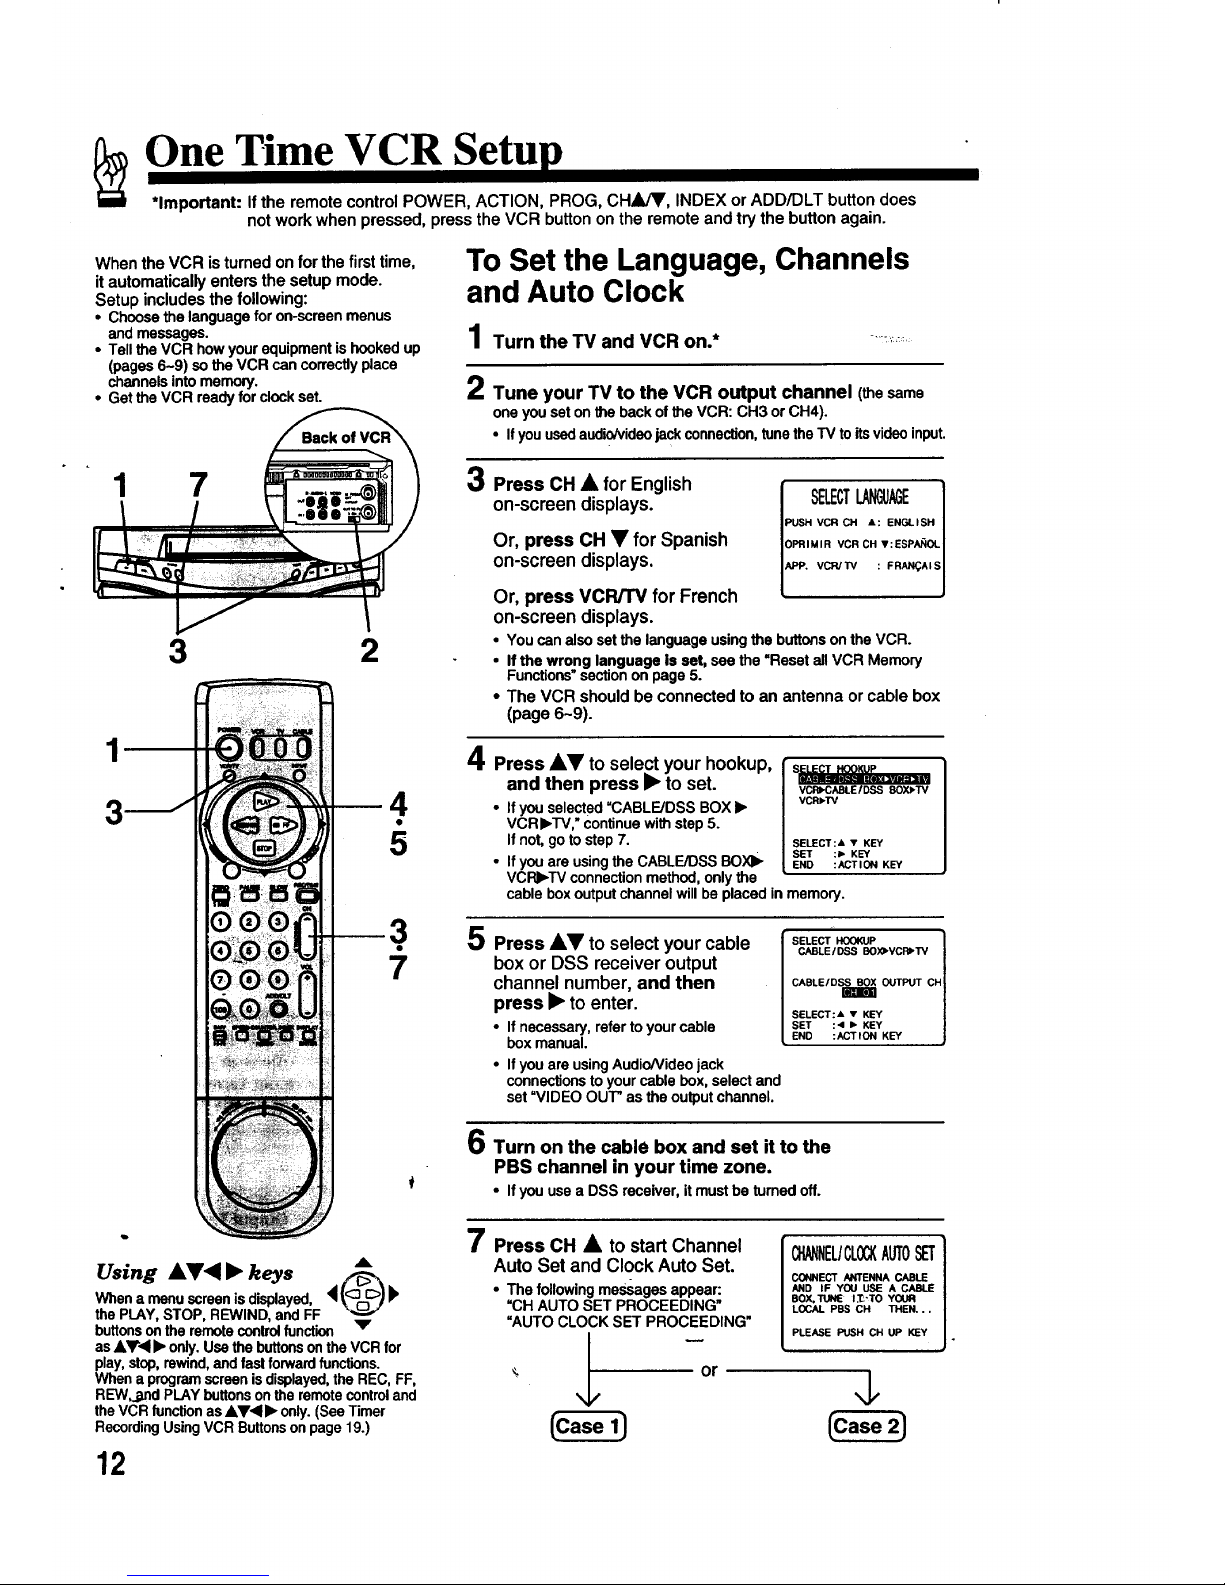
One Time VCR
*Important: If the remote control POWER, ACTION, PROG, CHA/V, INDEX or ADD/DLT button does
not work when pressed, press the VCR button on the remote and try the button again.
When the VCR isturned on forthe firsttime,
it automatically enters the setup mode.
Setup includes the following:
• Choosethelanguagefor on-screenmenus
andmessages.
• Tellthe VCR howyourequipmentis hookedup
(pages6-9) so theVCR cancorrectlyplace
channelsintomemory.
• Getthe VCR readyfor clockset.
1 7
3 2
r,
5
7'J_
Using AV_ • keys A
When a menu screen isdisplayed, _ (<_[_>)
the PLAY, STOP, REWIND, and FF
buttonson the remote control function v'
as J,T'_ I_ only. Use the buttonson the VCR for
play, stop, rewind, and fast forwardfunctions.
When a program screen is displayed,the REC, FF,
REWd_nd PLAY buttonson the remote control and
the VCR function as _i,V<l_ only. (See Timer
RecordingUsing VCR Buttonson page 19.)
To Set the Language, Channels
and Auto Clock
1Turn the TV and VCR on.*
-..._,...
2 Tune your TV to the VCR output channel (thesame
one you set on the back of the VCR: CH3 or CH4).
• If you used audio/videojack connection, tune the TV to its video input.
3 Press CH • for English
on-screen displays.
Or, press CH • for Spanish
on-screen displays.
Or, press VCR/TV for French
on-screen displays.
SELECTLANGUAGEI
PUSH VCR CH &: ENGLISH J
OPRIMIR VCR CH *:ESP*_XI
APP. VCR/TV : FRAN_AISI
J
• Youcanalsosetthe languageusingthebuttonson the VCR.
• Ifthe wrong language is set, seethe =ResetallVCR Memory
Functions"sectionon page5.
• The VCR should be connected to an antenna or cable box
(page 6~9).
4 Press •• to sele=ctyour hookup,
and then press • to set.
• If you selected "CABLE/DSS BOX I_
VCRb,TV," Continue with step 5.
If not, go to step 7.
• If you are using the CABLE/DSS BOX_
VCRI_TV connection method, only the
cable box output channel will be placed in memory.
si ti tlm==
VCRI_ABLE/DSS BOX_TV
VCRI_TV
SELECT:& • KEY
SET :lb KEY
END :ACTION KEY
5 Press A• to select your cable
box or DSS receiver output
channel number, and then
press • to enter.
• If necessary, refer to your cable
box manual.
• If you are using Audio/Video jack
connections to your cable box, select and
set "VIDEO OUT' as the output channel.
SELECT HOOKUP ]
CABLE/ DSS BO:O'VCRI'TV
CABLE/DSS BOX OUTPUT CH
SELECT:& • KEY
SET :4 Ib KEY
END :ACTION KEY
tO Turn on the cable box and set it to the
PBS channel in your time zone.
• If you use a DSS receiver, it must be tumed off.
7 Press CH • to start Channel
Auto Set and Clock Auto Set.
• The following messages appear:
=CH AUTO SET PROCEEDING"
"AUTO CLOCK SET PROCEEDING"
_, or
CHANNEL/CLOQ(AUTOSET]
CONNECT ANTENNA CABLE
AND IF YOU USE A CABLE
BOX.'nJNE I_'TO YOUR
LOCAL PBS CH THEN...
PLEASE PUSH CH UP KEY .
d,
12
 Loading...