

Panasonic NV-DS11EN, NV-DS11ENA, NV-DS11ENC User Manual
Digital
Video
Camera
Operating Instructions
155ffl32wg
Mini
bTPAL
Before use, please read these instructions completely.
Recording with Special
Wipe Mode
.........................................................
Effects (Digital Effects)
...........
72
78
Standard Accessories
Controls and Compon
The
3 Types of Power Suppiies
i
Supplying Power from an AC Mains Socket
i
Suppiying Power from the Cigarette Lighter
i
Supplying Power w
i
Charging Lamp [CHARGE]
Handling the Lens Cap
Adjusting the Grip Belt
Atiaching the Shoulder
Recording
(Backiight
Recording Yourself (Recording with
the LCD Monitor Facing
Eiilarging Your Subject or Widening
the Recording Angle (Zooming
Using the Movie
(Photoshot)
Recording in
Recoro ng
(Suoer .mage Srao. izerl
the Movie
i
Searching for a Scene That You Want to
Play Back
Piaying Back in Slow Motion
(Slow Motion Playback)
Playing Back Still Pictures and Advancing Them
öne-by One
(Still PlaybacklStill Advance Playback)
Plavino Back on a TV
After Use
Viewing Recorded Scenes During Recording
Searching for the End of the Recorded Part
Searching for the Beginning of Recorded Scenes
Backlit Scenes
Compensation)
...........................
the Cnema Mode (Cinema Mode)
M
ln M. nimisea Camera Sna~e
ist
the
Camera (Playback)
Adjusting the Sound Volume
...................
.
......................
Pause (Camera Search)
Cassene (Blank Search)
on a
Marked with Index Signal (Index Search)
..............................................
Strap
Camera as a Digital Still Camera
~ecorded Scenes on
..........................
...................................
........................
...................
..
...................................
........................................
Fonvard)
.................................
............................
InIOut)
.....................
...
...........................
................................
............................
...
....................................
..........................
....
....................
....
..
.........................................
.........................
.......................
..
.................
........
.........
...
.......
.............
...........
..
...... 58
16
16
18
18
28
28
30
32
32
34
36
38
40
42
44
44
46
48
50
52
54
56
60
66
........
..
.......
..........
..........
....
..........
...........
84
88
90
94
96
98
110
110
112
116
118
122
124
128
130
144
152
154
158
160
162
168
Adjusting the White Balance Manually
Focuslng on the Subject
(Manual Focus) 86
Adjusting the
Adjusting the Iris (F Number) Manually
Playing Back with Special Effects
(Playback Digital Effects) 92
i
Wipe Function and Mix Function
Enlarging the Playback Picture (Playback Zoom)
Adding New Sound on a Recorded Casseiie
(Audio Dubbing)
Remote Controller 102
Controller
i
Replacing the Batteries
i
Using the Remote Controller
Copying
(Dubbing) l14
Using with Digital Video Equipment (Recording)
Copylng with the Help of an Editing Controller
Using the Movie Camera with a Video Printer
Using the Automatic
(Autoprint)
Using the Movie Camera with a Computer
Using the Menu Screen
Menu Functions
Adjusting the LCD MonitorIFinder
Cautions for
i
i
i
i
i
i
Glossary 160
i
i
i
w
Shutter Speed Manually
..........................
onto an S-VHS (or VHS) Cassetie
................................................................
...................
Use
Video Head Clogging and Remedy
Optimum Use of the Baiiety
Precautions for Storage 156
LCD MonitorIFinderlLens Hood 158
Repeat Playback
Listening to the Playback Sound via
Headphone 158
..........................................................
D. gita Voeo System
FOC
..
White Balance Adjustment 166
Colour Temperature
Manually
.....................................
....................
...................................
Printing Functlon
.......................................
..
..........................
...........................
......................
.........................
.........................
........................
.........................
..............................
..
...................
..............
.............................
...........
................
...
.......................
...................
..............................
...................................
........................
....
.........
................................
...
68
Standard Accessories
g%%A&%(+
.z=,z=---:z
,z=-==.*
X,
2.
K;%OE&?(+
.~*,$'*za:*:
;-
--
i
:;b+,
.-
NV-DS1 IEN
NV-DS11 ENA
NV-DS11 ENC
16)
.s.*z.mc=-
,-
.-,AL
-
.,.~~
i6,18)
.=:z;;g7\.zz
1
~-
z
g>*:
,,=::~
. .~
,
:<,.
-,
:IT;==?
T::
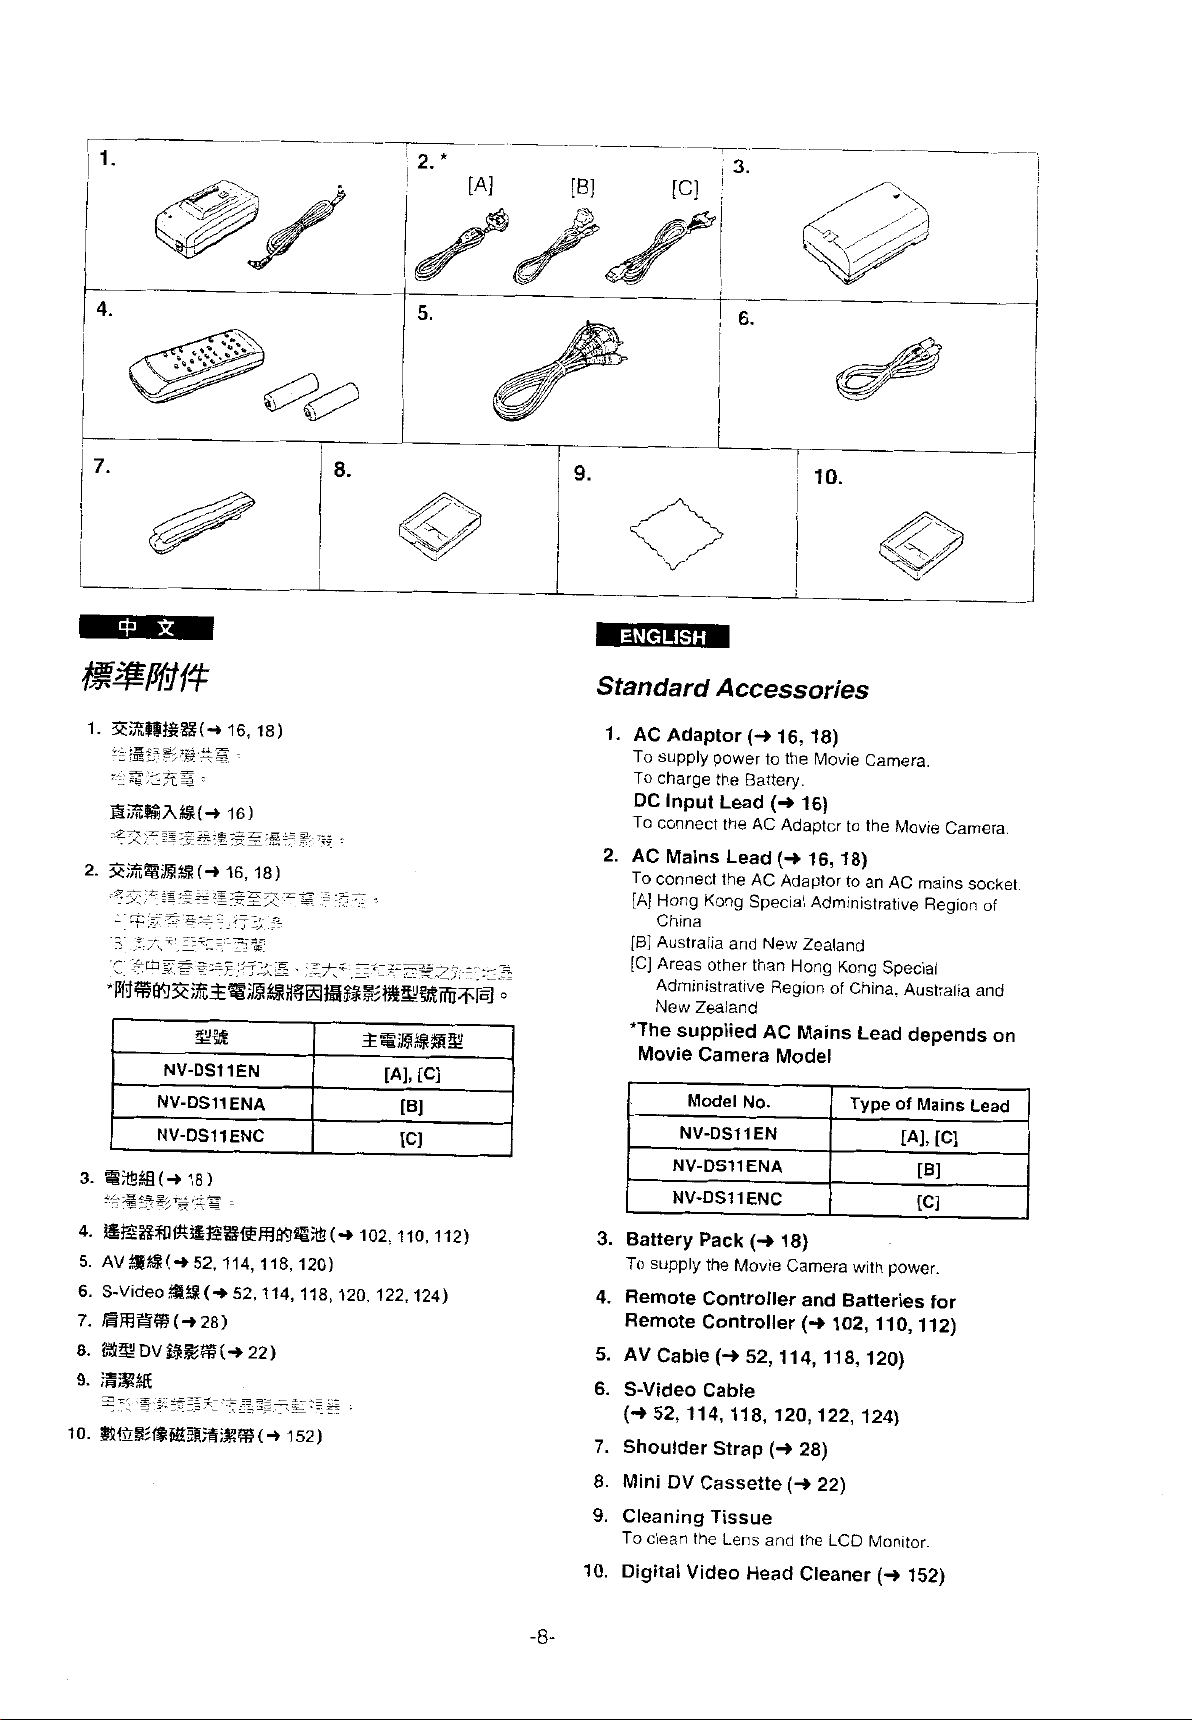
1. AC Adaptor
To supply power to the Movie Camera.
To charge the Battery.
DC Input Lead
.'--
-
...
.>
=.=-
<
='
7
-.
.
..~
'
.
>-
~
TO connect the AC Adaptor to the Movie Camera
2. AC Mains Lead
To connect the AC Adaptor to an
[A] Hong Kong Special Administrative Region of
China
[Bl
Australia and New Zealand
[C] Areas other than
Administrative Region of China Australia and
New Zealand
(+
16,18)
(+
16)
(+
16,18)
AC
mains socket
-
Hong Kong Special
'The supplied AC Mains Lead depends on
Movie
3.
Battery Pack
TO supply the Movie Carnera with power.
Camera Model
Model
No.
NV-DS11EN
NV-DS11ENA
NV-DS11 ENC
(+
18)
4. Remote Controller and Batteries for
(+
Remote Controller
102, 110,112)
(+
5. AV Cable
52, 114, 118, 120)
6. S-Video Cable
(+
52,114,118,120,122,124)
7.
Shoulder Strap
8. Mini DV Cassette
9.
Cleaning Tissue
To clean the Lens and the
(+
(+
28)
22)
LCD
10. Digital Video Head Cleaner
monitor^
(+
152)
O
EoS$?B
BiiFfjIEilRSEfii [44](+ 44.46)
@S?ESB
@
WRB[I1](+50)
e$Ti$lBiW.B](+ 82.84)
O
iE038?%3 [SEARCH
,REi
O
%lLB[FADE](+ 66)
@ltfii[i](+ 44)
0
B?%B
RZB
O
#%BEME8
(+
30,68, 82,84,86.88, 90)
@
ZEi%R[MENU](+ 130)
O
SrtiaEiE
(-i
40. 42.
0
1%%%(+44)
@
@%S%(+
0)
HE#XE#(+ 26)
@
;~xJ%Bn<-i
~=*=*,~:
_-,
x-
@
VCR(Ea)#%lCamera(HB)%EB(Nla)
(+30, 44)
@
PX?flfklifii[BATTERY EJECTJ(+ 18)
@
f%EM%l
a
BB%RFEl%I
@
iitEZ3F9iZ3
Q)
fa#fl,SE(+
!
-
[@l(+
I
RkESZiB
[BLC]
(+
[bJ(+44)
[PROGRAMME AE]
[PUSH]
44.
50, 58, 76, 86, 88, 90, 130, 140. 144)
18)
p
=-L=--
=
~
--~
.~
...-;5ea:z
-
,
LE
T$ltB(+
28)
SEARCH](+ 56)
32)
+
l(+
56)
[&b
J
(+
46)
32)
150)
~;~.~,',>'S::~~
-
.,.:~,~.y,\z~2g~
30)
#SRE~fifi
11
[OFFIONJ
LOCK](+ 22)
~T~~-C~zGz-
:
(+
'/
,?T:27i
26.30.54)
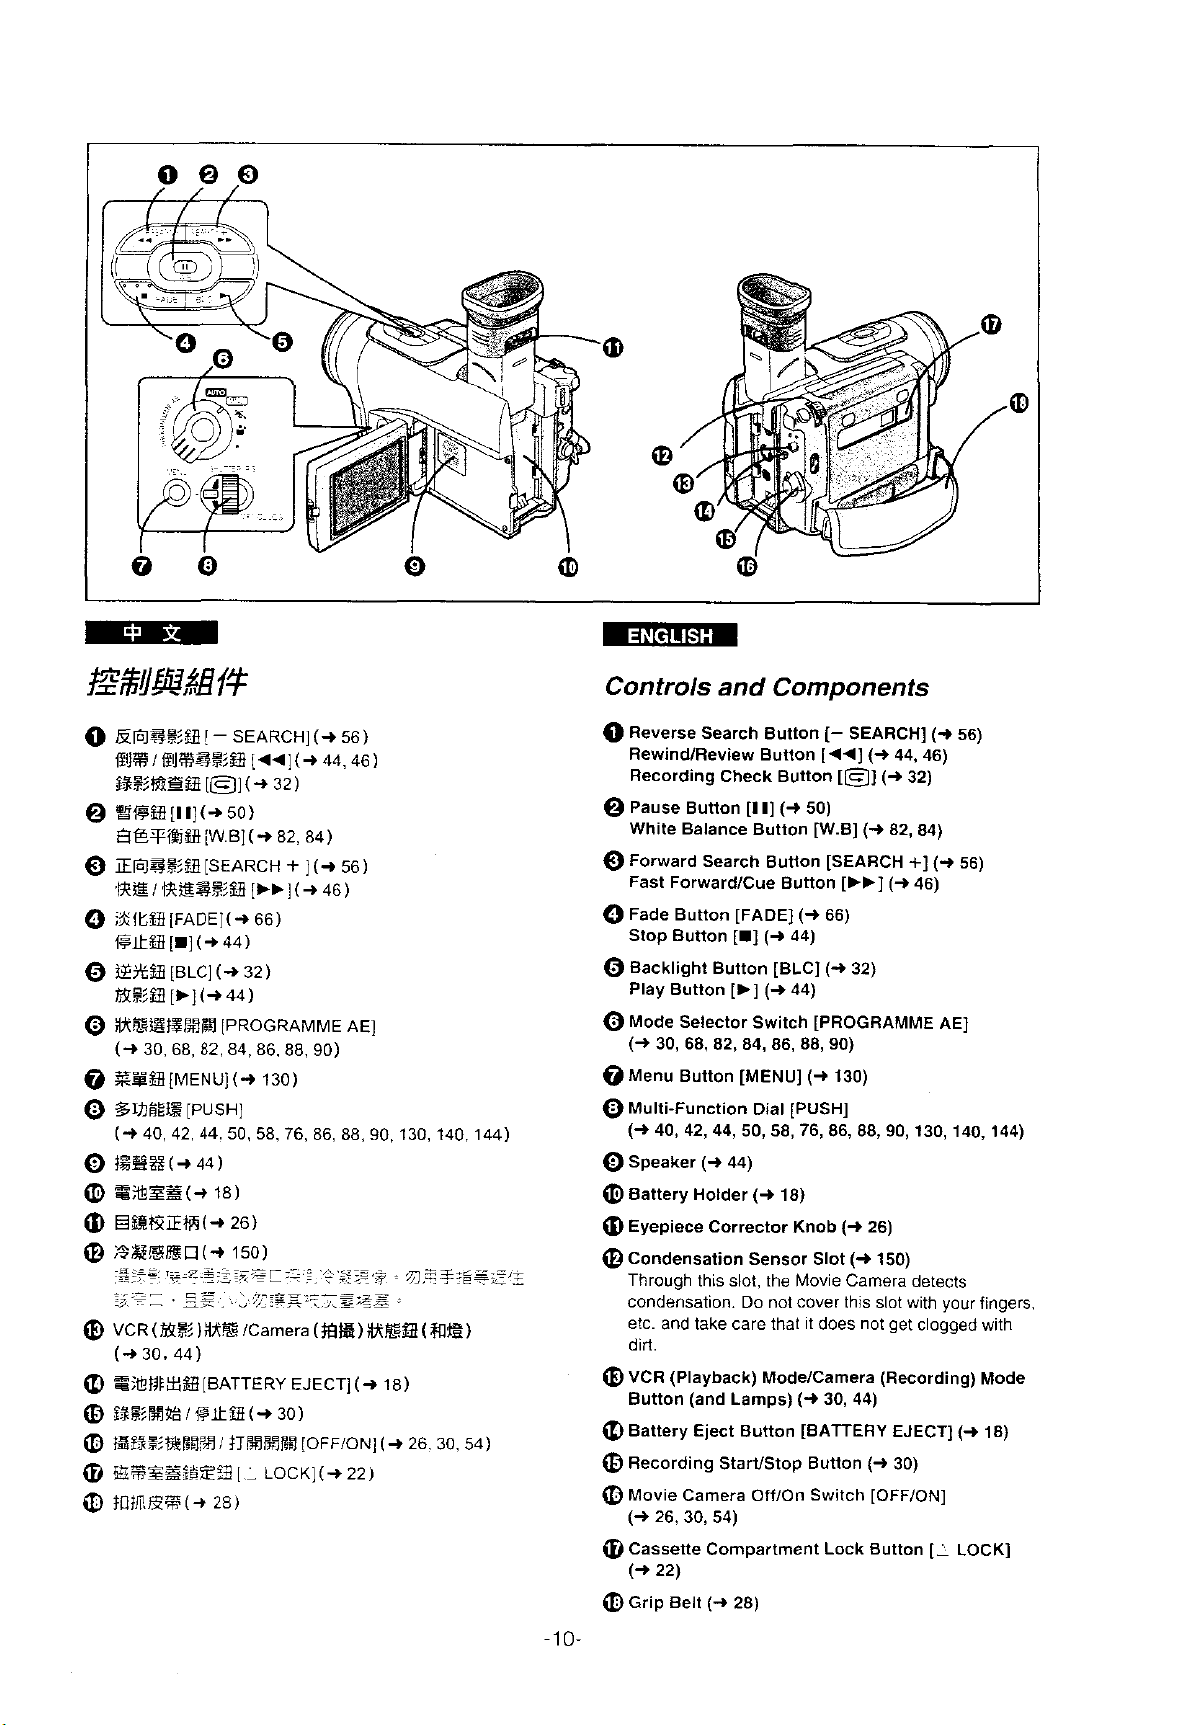
Controls and Components
O
Reverse Search ButtOn
RewindIReview Button [44]
Recording Check Button
[I
(+
(-8
I]
[m]
(+
[b]
(+
44)
(-i
Lamps)
28)
Pause Button
White Balance Button
O
Forward Search Button [SEARCH
ForwardICue Button
Fast
O
Fade Button [FADE]
Stop Button
O
Backlight Button [BLC]
Play Button
O
Mode Selector Switch [PROGRAMME AE]
(+
30, 68, 82, 84, 86, 88, 90)
@Menu Button [MENU]
O
Multi-Function Dial [PUSH]
(+
40, 42,44, 50, 58,
O
Speaker
@
Battery Holder
@
Eyepiece Corrector Knob
@
Condensation Sensor Slot
Through this slot. the Movie
condensation. Do not cover this slot with your fingers.
etc. and
diit.
@
VCR (Playback) Modelcamera (Recording) Mode
Button (and
@
Battery Eject Button [BATTERY EJECT]
fD
Recording Stariistop Button
@Movie Camera OfflOn Switch [OFFION]
(+
@
Cassette Compartment Lock Button
(+
Q)
Grip Belt
lake care that it does not get clogged with
26,30, 54)
22)
[-
SEARCH]
(+
44, 46)
[B]
(+
32)
(-P
50)
[W.B]
(-i
82, 84)
+]
[b,]
(+
46)
(+
66)
44)
(+
32)
44)
(+
130)
76,
86, 88, 90, 130, 140, 144)
18)
(+
26)
(+
150)
Camera detects
(+
30, 44)
(+
30)
(+
(+
[I
56)
56)
(+
LOCK]
18)
@
%!!&K4
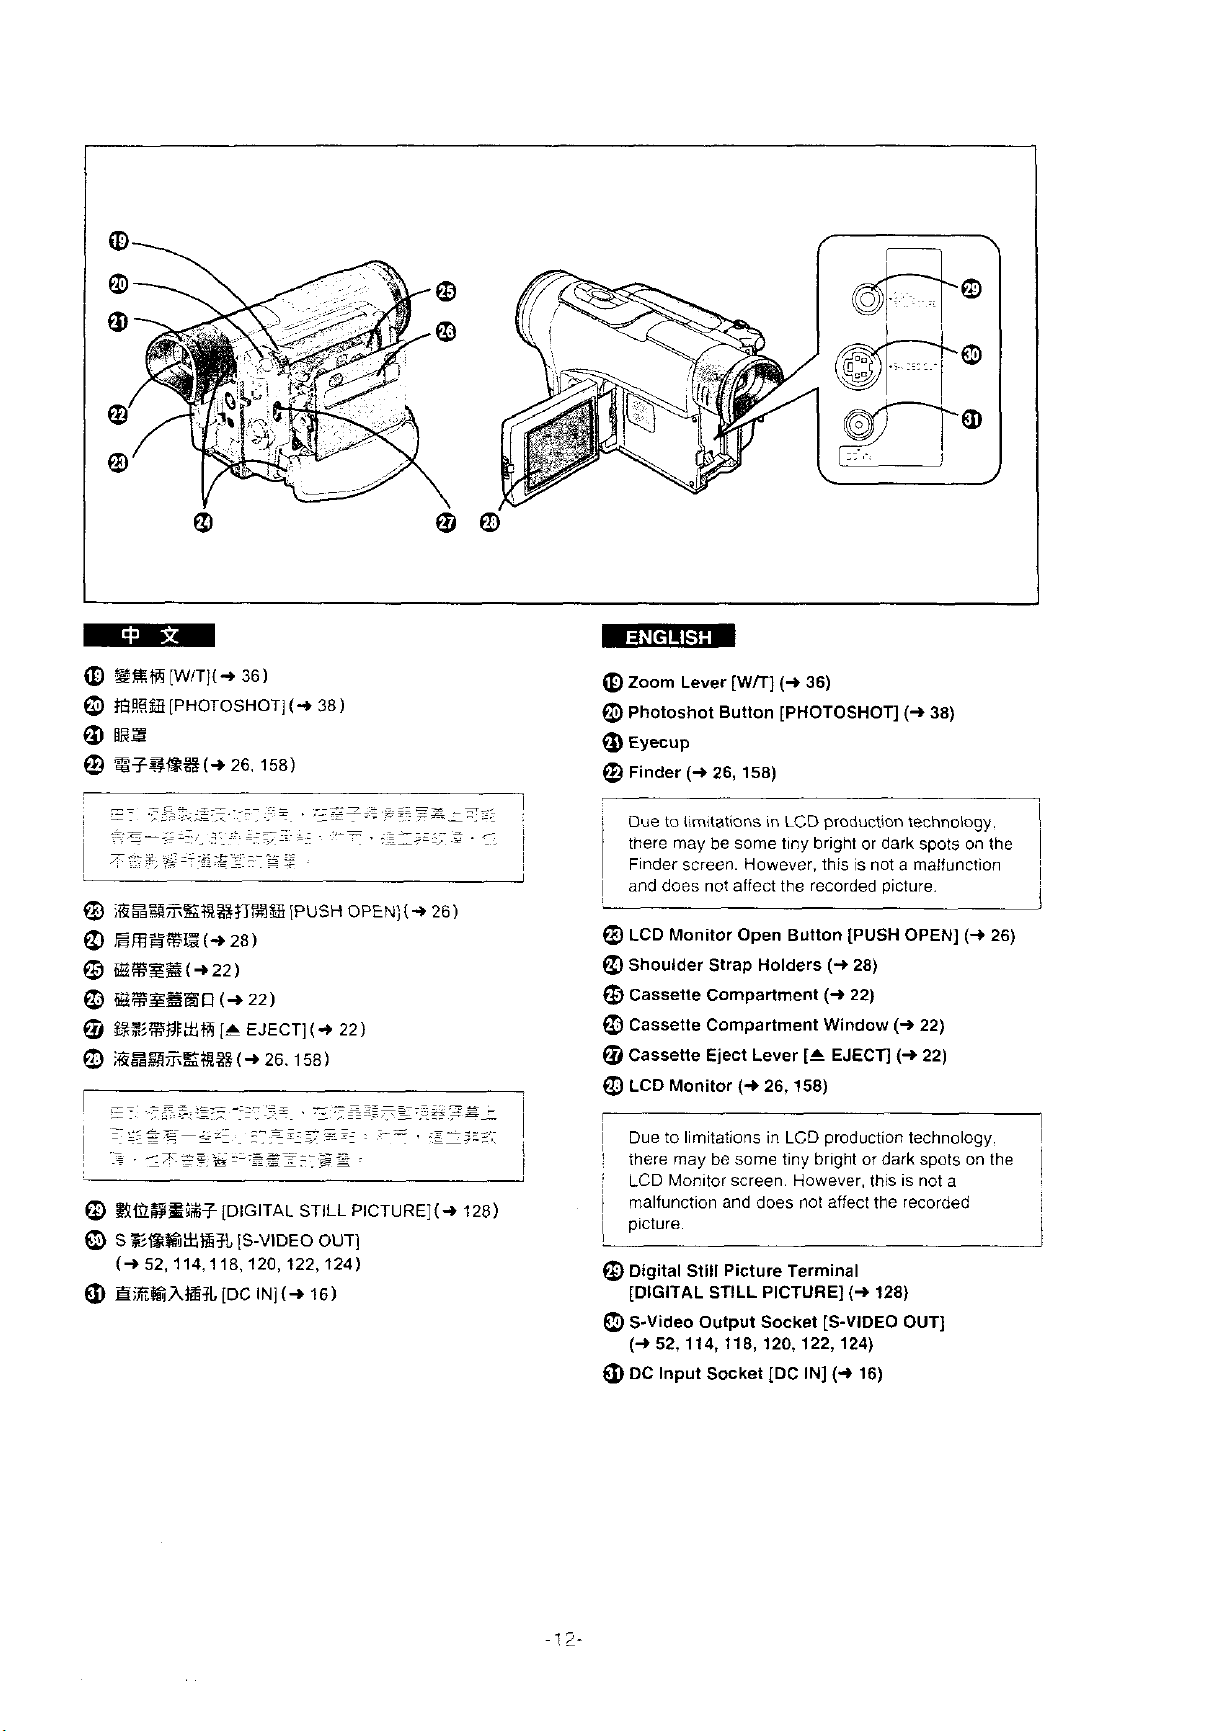
[WlTl(+
@
#E%
[PHOTOSHOT]
0
naz
@
%381<g#(+
@
l@ER%%#l%$?f%%
a
ERE%lZ(+
@
aEzs(+22)
@
BEZsBn
@
&%%flWm
0
iEER%%#l?#(+
(+
[r
36)
(+
38)
26. 158)
[PUSH OPEN)(+
28)
22)
EJECT](+ 22)
26.158)
26)
mEfEm
@
Zoom Lever
@
Photoshot Button [PHOTOSHOT]
0
Eyecup
@
Finder
i
Due to iirnitations in
there rnay be sorne tiny briyht or dark spots on the
Finder screen. However. this is not a rnalluncfion
1
and does not affect the recorded picture.
@
LCD Monitor Open Button [PUSH OPEN]
Q
Shoulder Strap Holders
@
Cassette Compartment
@
Cassette Compartment Window
@
Cassette Eject Lever
a
LCD Monitor
(+
26, 158)
[Wm
(+
26,158)
(+
36)
LCD
production technoloyy.
(+
28)
(+
22)
(+
[I
EJECT]
(+
(+
38)
22)
22)
(+
26)
I
i
'
!
l
@
RMSSf%3
O
S
$>1<g%XfaiR
(+52.114,118,120,122,124)
Q)
H~,%GA%3L
[DIGITAL STILL PICTURE](+ 128)
[S-VIDEO OUT]
[DC IN](+ 16)
l
1
Due to limitations in
I
there rnay be sorne tiny briyht or dark spots on the
j
LCD Monitor screen. However. this is not a
rnalfunction and does not affect the recorded
j
i
picture.
@Digital Still Picture Terminal
[DIGITAL STILL
O
S-Video Output Socket [S-VIDEO OUT]
(+
52,114,118,120,122,124)
Q)
DC Input Socket [DC IN]
LCD
production technology.
PICTURE]
(+
(+
128)
16)
l
l
l
l
@
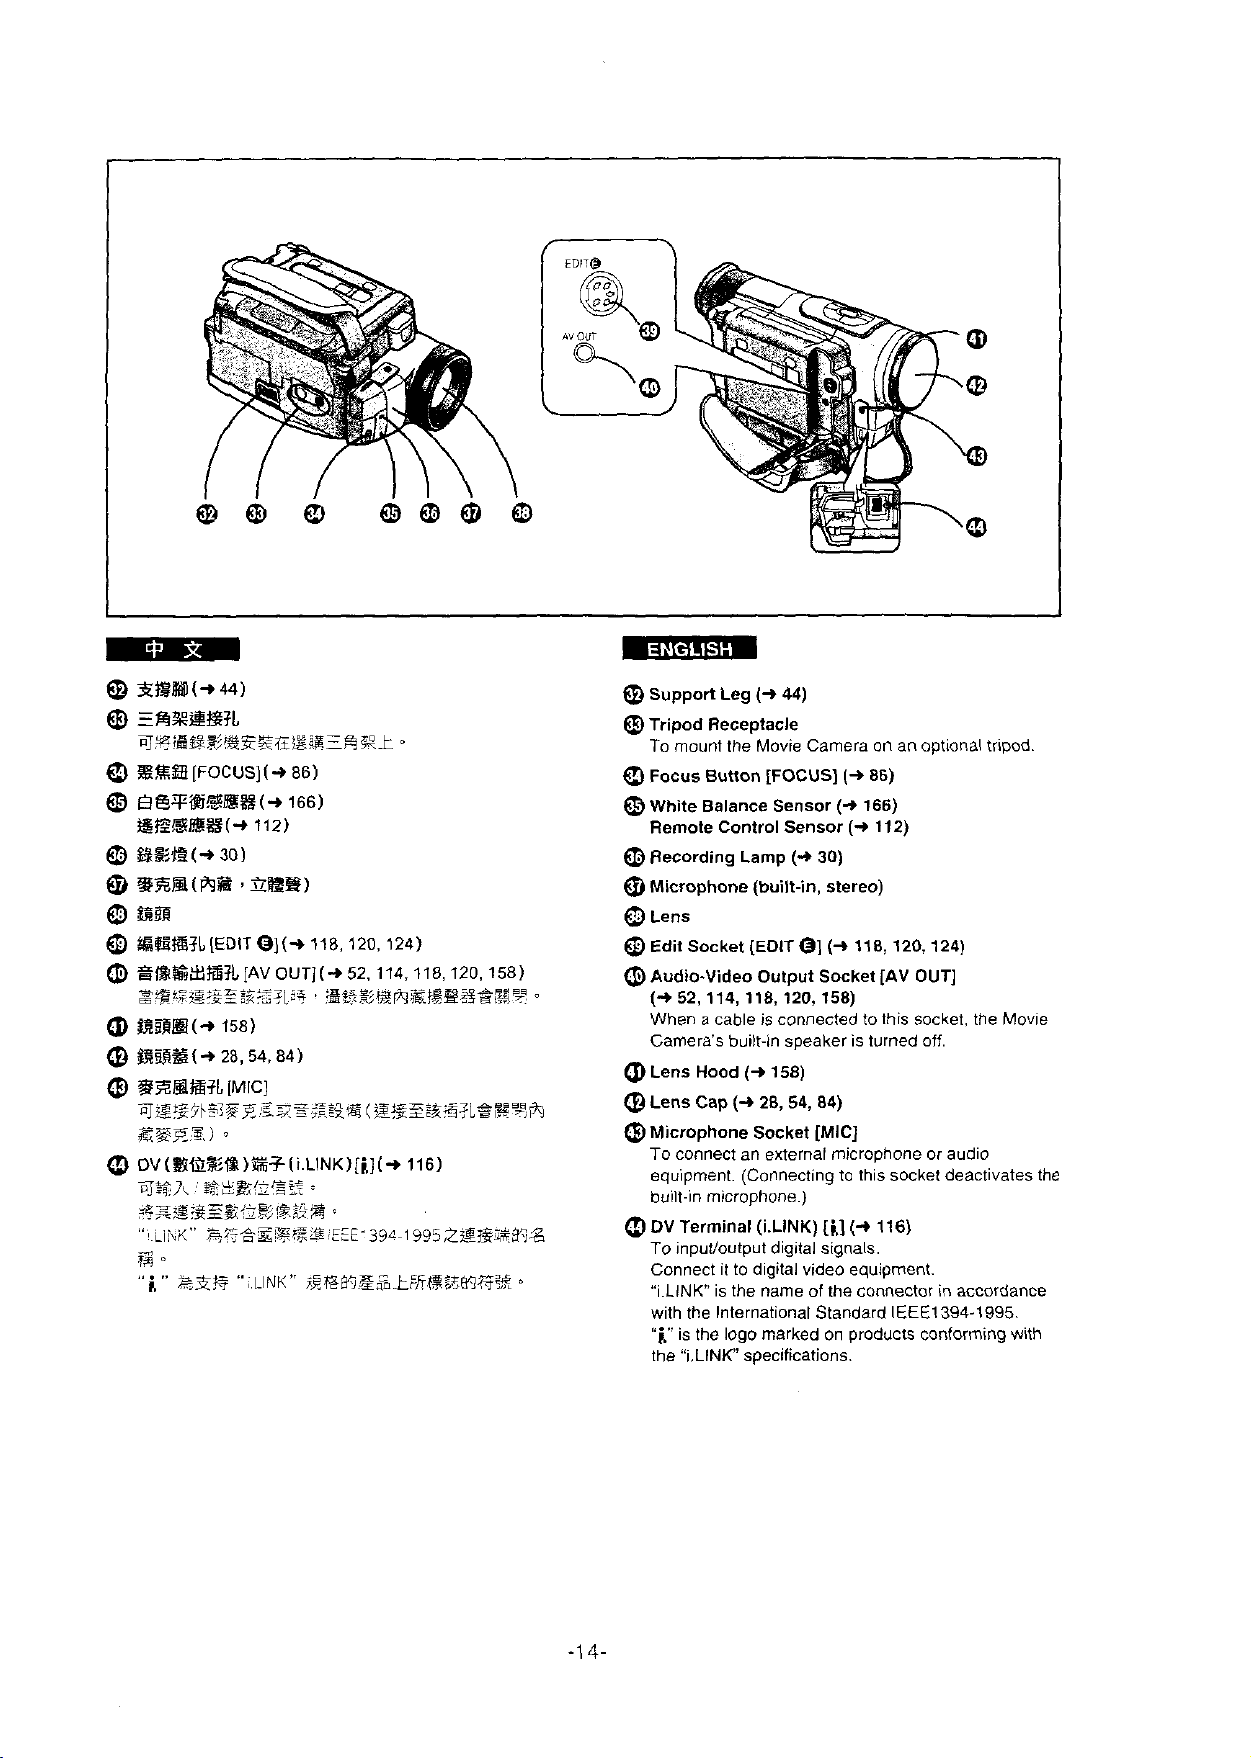
3m3(+44)
@
Ew%slstL
q,q:a$@~BEgg&gg$z~Rk
0
0
u,
0
(D
a
@
0
[FOCUS](+ 86)
B$T@&@%(+
&ES@%(-t
%%B(+
e5m
30)
(m%
166)
112)
i&B)
BB
SFaBrS3L[EDIT e](+ 118,120,124)
~~~X~R[AVOUT](+52.114,118,120,158)
e-qizg;gz$g:z?L?+
EBB(+ 158)
%3R%3(+28,54,84)
%ZEJE+L
[MICI
,
:*$*:~@,A,$g~~g*;g,%~
q~igg~~z~g!~.~~,~;;~~~
E@E,Z.)
O
Dv(%Mk(ra)%+(i.LlN~)[i.]L+
qsh
gZg:$Igfi&f&&&
''8
$Lg!GEn
iihi<"
~~~:~@i,~Z.EtE.39@~19?j2~&;~3'j%
c
0
o
(g~zzgg~L~~=+-a
116)
s
"i''
23%
'',
LINK"
%E@H.E%kifiE$5NR%
RmmB
@Support Leg
@Tripod Receptacle
To mount the Movie
Q
Focus Button [FOCUS]
a
White Balance Sensor
Remote Control Sensor
0
Recording Lamp
@
Microphone (built-in, stereo)
0
Lens
Edit Socket (EDIT01
(D
"
Audio-video Output Socket [AV
(+
52,114,118,120,158)
When
Camera's built-in speaker is turned off.
Lens Hood
@
Lens Cap
@
Microphone Socket [MIC]
To connect an
equipment. (Connecting to this
built-in microphone.)
O
DV Terminal (i.LINK)
To inpuWoutput digitai signals.
Connect it to digital video
"YLINK is the name
with the International Standard
,,
.
,.
.
I,
IS
"i.LINK specifications.
the
(+
44)
Camera on an optional tripod.
(+
86)
(+
166)
(+
112)
(+
30)
(+
118,
120,124)
OUT]
a
cable is connected to this socket. the Movie
(+
158)
(+
28,54,84)
external microphone or audio
socket deactivates the
[i]
(-t
116)
equipment.
of
the connector in accordance
IEEE1394-1995.
the logo rnarked on products conforming with
i
EBS;XZ%EtES
1
%&%%A&mBBEtgZBBZtWftk81;1
[DC
IN]
%?L
2
d%B3%?A%%mZ-IWCB @BEZiEW
#Z%k@
3
;r-:P=.)$j~@~=---=
if2,llli~~ll~
4
i3x~EsiE%mz-G@~zzR~;R%
@o
@
:
@
:
L.
.
z<*,=
AB%B~~ECER~?EWR~~~R
ifi
[DC
OUT]
%?L
o
588
*2;lbb@tZ%
q~~,gz~;?~:~~
:~~,,~.~z::,=~&:
.-.
--.
ESiES%&
-
:%.F~E,,
,
z,g3555+3\~3%
o
o
v
F&%H
O:,,V?.g
o
%i
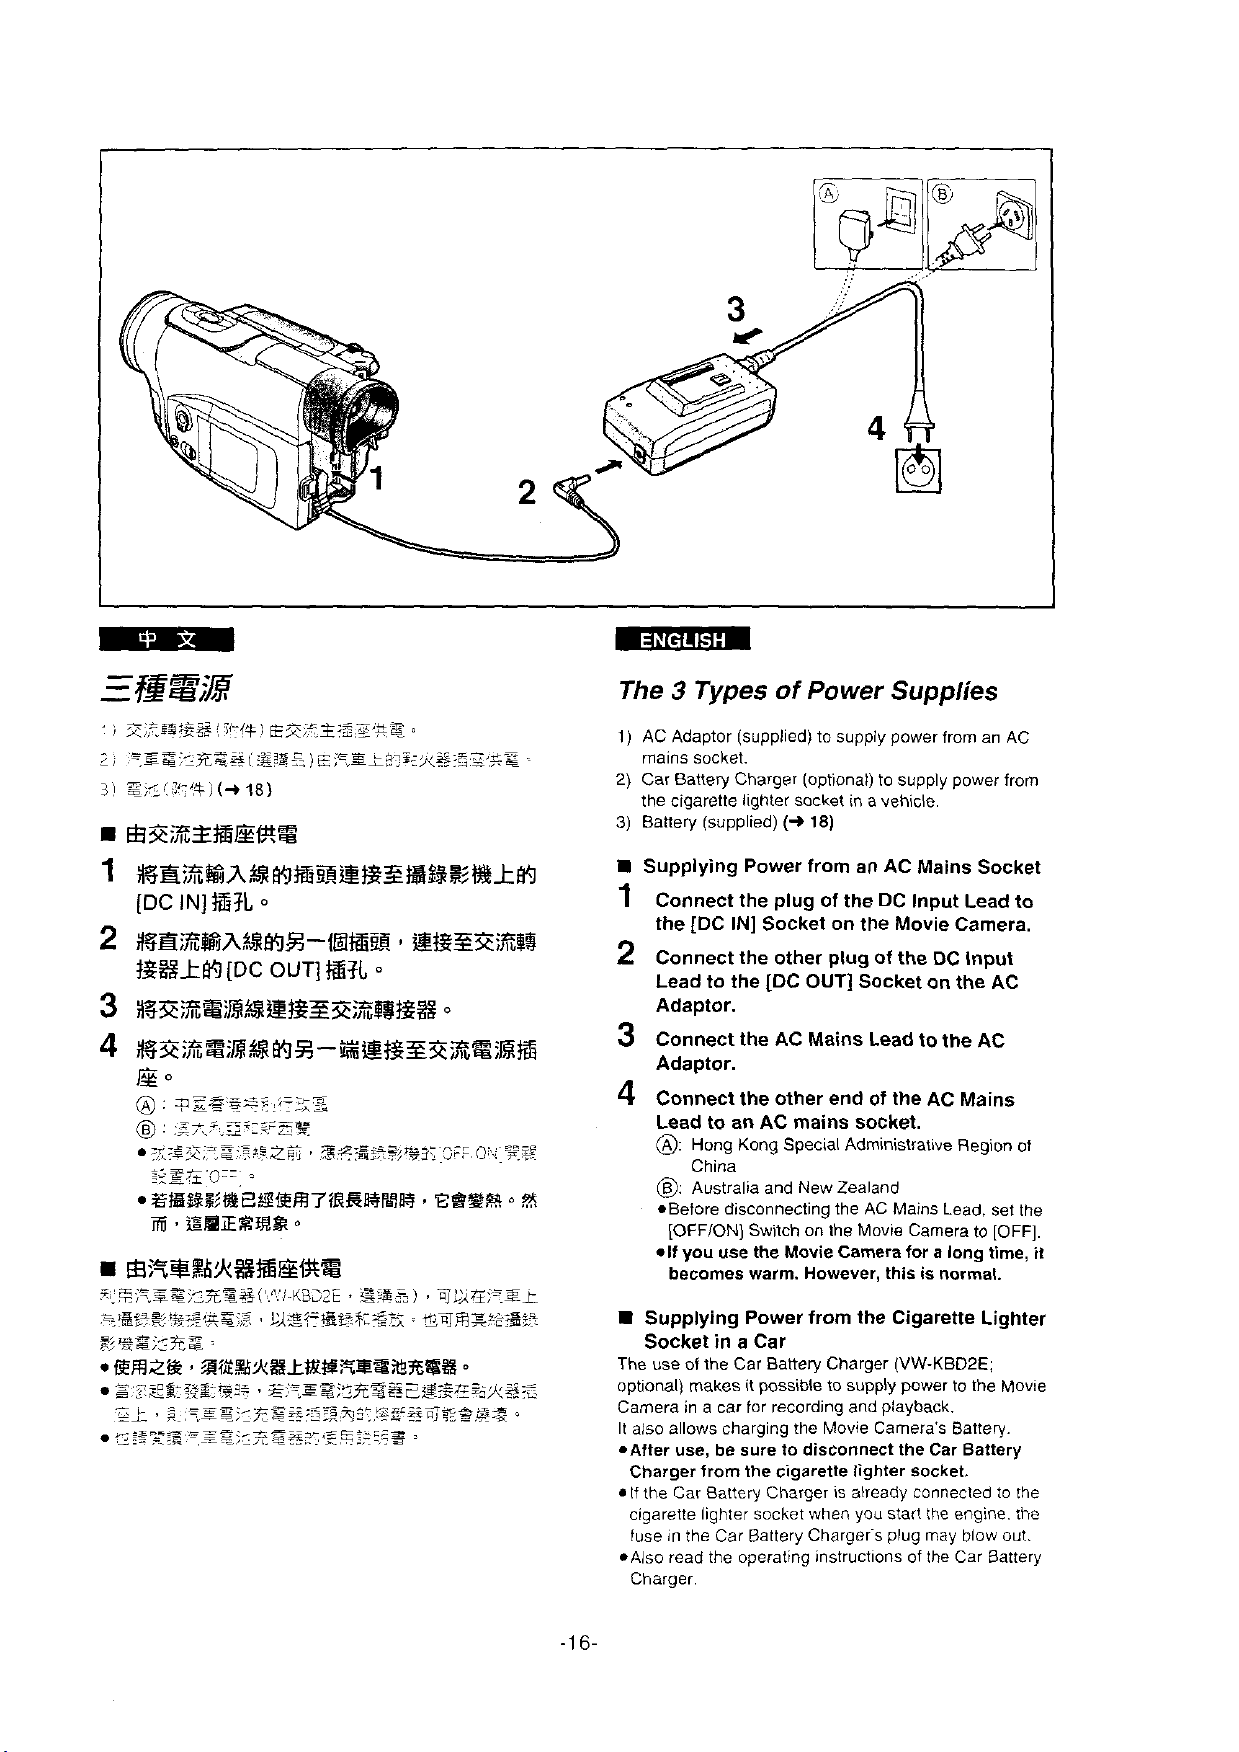
The 3 Types
1)
AC Adaptor (supplied) to supply power from an AC
mains
socket.
2)
Car Battery Charger (optionat) to supply power from
the ciqarette lighter
3)
Batiery (supplied)
Supplying Power from an AC Mains Socket
~~
~
1
Connect the plug of the DC Input Lead to
the [DC IN]
2
Connect the other plug of the DC Input
Lead to the [DC
Adaptor.
3
Connect the AC Mains Lead
Adaptor.
4
Connect the other end of the AC Mains
Lead to an AC mains socket.
B:
Hong Kong Special Administrative Region of
China
0:
Australia and New Zealand
*Before disconnecting the AC Mains Lead. set the
[OFFION]
.if
you use the Movie Camera for a long time,
becomes warm. However, this is normal.
of
Power
socket
(+
18)
.
Socket on the Movie Camera.
OUT]
Switch on the Movie Camera to
Supplies
in
a vehicle.
Socket on the AC
to
the AC
IOFFI.
.
.
il
the
Supplying Power from
Socket
The use of the Car Battety Charger (VW-KBDZE;
optional) makes it possible to supply power
Camera in a car for recording and playback.
It aiso allows charging the Movie Camera's Battery.
.After use, be sure to disconnect the Car Battery
Charger from the cigarette lighter
If the Car Battery Charger is aiready connected to the
cigarette lighter socket when you star! the engine. the
fuse
*Also read the operating instructions of the Car Battery
Charger.
in
a Car
in
the Car Battery Chargers plug may blow out.
Cigaretie Lighter
to
the Movie
socket.
i
RSfZ%B
~.~.
. .
-
.
.L.
~-
~
.-
~
-
~~
~
~.
[CHARGE]
-,
L
I
-
~
-
-~
.~ .-
.~
. ~ ..
~
.
~
~
~
.
~
~
~-
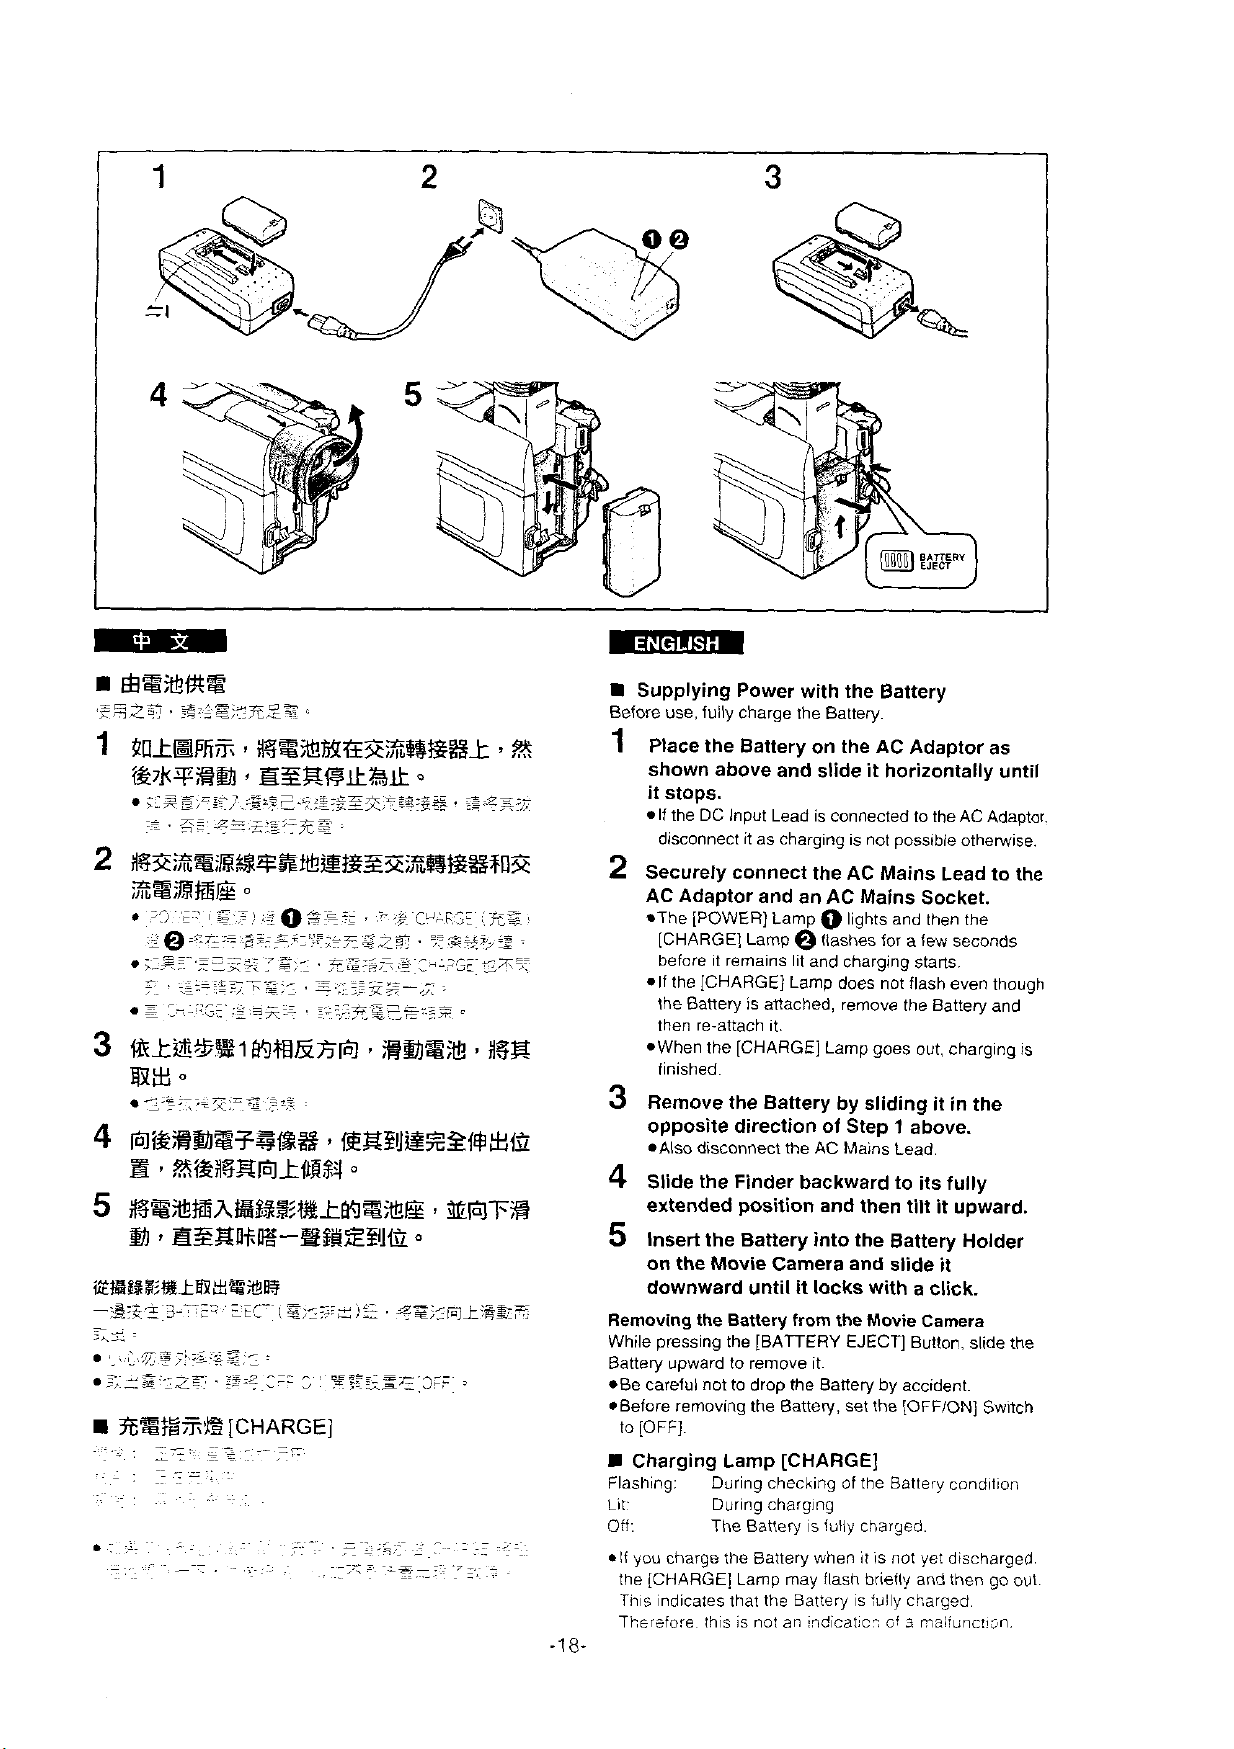
Supplying Power with the Battery
Before use. fully charge the Battery.
1
Place the Battery on the AC Adaptor as
shown above and slide it horizontally until
it stops.
If the DC Input Lead is connected to the AC Adaptor.
disconnect it as charging is not possible
2
Securely connect the AC Mains Lead to the
AC Adaptor and an AC Mains
othewise.
Socket.
*The [POWER] Lamp O lights and then the
[CHARGE] Lamp
@
flashes for a few seconds
before it remains lit and charging starts.
*If the [CHARGE] Lamp does not flash even though
Banery is atiached, remove the Battery and
the
re-attach it.
then
*When the [CHARGE] Lamp goes out, charging
is
finished.
3
Rernove the Battery by sliding it in the
opposite direction of Step
1
above.
*Also disconnect the AC Mains Lead.
4
Slide the Finder backward to its fully
extended position and then tilt it upward.
5
lnsert the Battery into the Battery Holder
on the Movie Carnera and slide it
downward until
Removing the Battery from the Movie Camera
While pressing the [BATTERY EJECT] Button, slide the
Battery upward to remove it.
*Be careful not to drop the Battery
Before removing the Battery, set the
to
=r
.
[OFF].
H
Charging Lamp [CHARGE]
Flashing: During checking of the Battery condiiion
Lit. During charging
Off: The
*If you charge the Battery when 11 is not yet discharged.
ine [CHARGE] Lamp may
Tns
ndicates thai the Battery is fuly charged.
Therzfore thrs is
it
locks with a click.
by
accident.
[OFFION]
Battery is fuliy charged.
flash briefly and then go out.
not
an !ndicatic?
of
3
Switch
r;alfunc!!sn.
48-
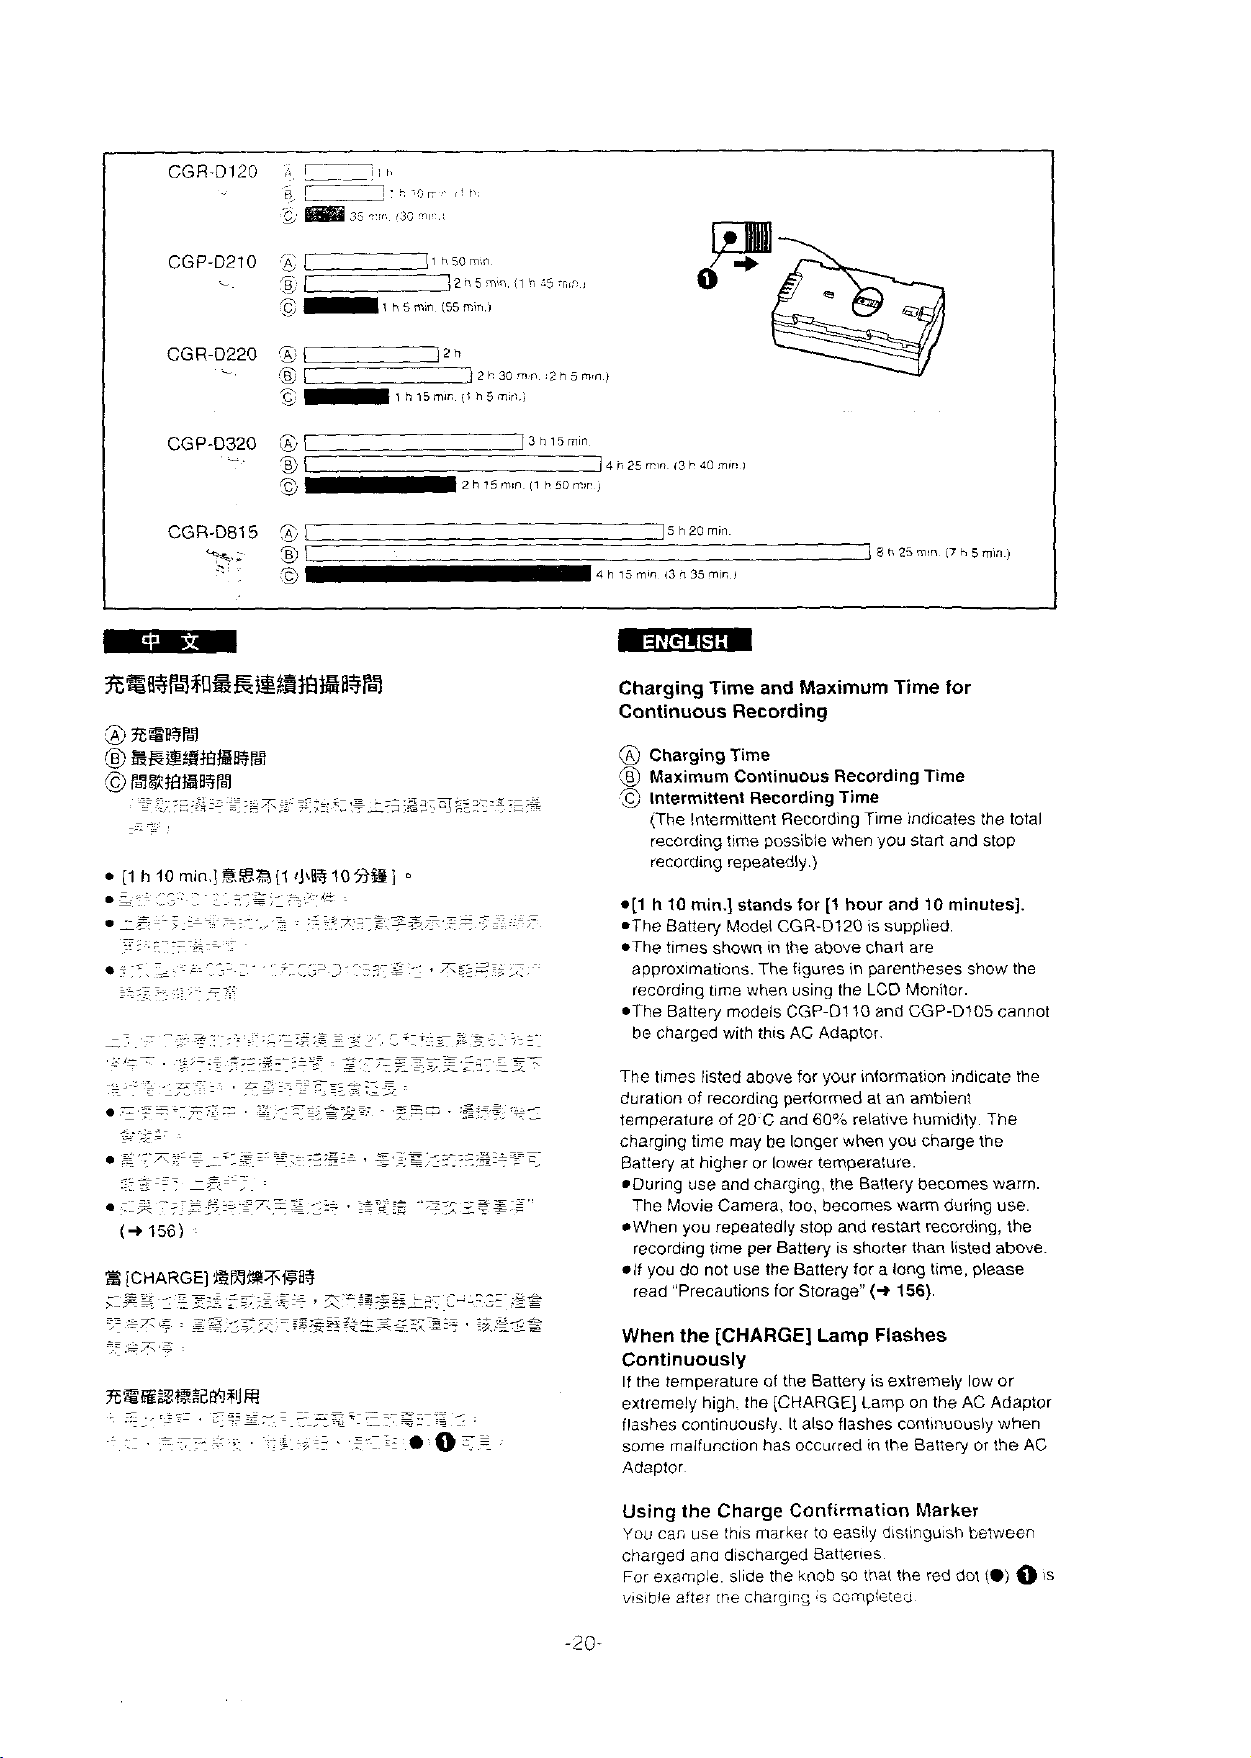
CGR-D120
i!
a
c
L-:,
L
EiEB
8
i
/l
I.~<!~~..
35
78,
T.r,
,jf,,
.t
CGP-D210
,
CGR-D220
-
CGP-D320
-.
CGR-D815
+k.;
2:
T-Jl
3;
7,znjrnin
s'
jjPl2h
'g
1
g,
71
3
E*i
.
-
1
81
Q
1 h
5
min
h15mii
h5Om;n
(55
min
[l
h5m~i
2h
i1 h
i
21'30mn
15min
:5:ri:::
121i5m,n)
3
h
15
m"
II
h5cmiri
/i
n
25
rrm
4
h
15
min
Charging
1s
i3
i3
b
40
min
I
h
20
ri
35
min
mr
i
Time
and Maximum
]
8
O
25
m:n
Time
i7
for
h
5
min
)
Continuous Recording
@
Charging Time
Maximum Continuous Recording Time
a
Intermittent Recording Time
(The Intermittent Recording Time indicates the total
recording time possibie when you stan and stop
recording repeatedly.)
3
[CHARGE]
--
s
~g
,.,-s.
--
.
~
~
..~
~
Z
,~_
.-
--
-
-,\,e
..
.-
-~
2
,A
,
-
r
..>.L~~
'
=.z
@E3%!;FWB?
z
*~:=
.,
.=
.-~-
,.~
~..
.z
.,er
~
~
-z=---:
*[l h 10
min.] stands for
[l
hour and
10
minutes].
.The Batten/ Model CGR-D120 is supplied.
*The times shown in the above chan are
approximations. The figures in parentheses show the
recording time when using the LCD Monitor.
*The Battery models CGP-D1 10 and CGP-D105 cannot
be charged with this AC Adaptor.
The
limes listed above for your information indicate the
duration of recording periormed at an
temperature of
charging time may be
Battery at
20
C
and
6040
longer when you charge the
higher or lower temperature.
ambient
relative humidity. The
*During use andcharging, the Battery becomes warm.
The Movie
Camera, too. becomes warm during use.
*When you repeatedly stop and restait recording, the
recording time per Battery is
shotter than listed above.
.if you do not use the Battery for a long time, please
.-s
--
----
~-
=,z*
-
:-
---
=.,a
>z-
-'-y
<ru-Z7z~
L
--
--
-.*
'
:x'-*
s-e
E
,
,\
A
read "Precautions
When
the
for Storage"
(+
156).
[CHARGE] Lamp Flashes
Continuously
If the temperature of the Battery is extremely low or
extremely high. the [CHARGE] Lamp on the AC Adaptor
ilashes continuously. It also flashes continuously when
some maifunction has occurred in the Battery or the
AC
Adaptor
Using the Charge
You
car, use this marker to easlly distinguish between
Conftrrnation Marker
charged ana discharged Batteries
example side the knob so rna( the red dot
For
visible aftei
1T.e
chargirn,
*s
cc'npicted
(0)
O
is
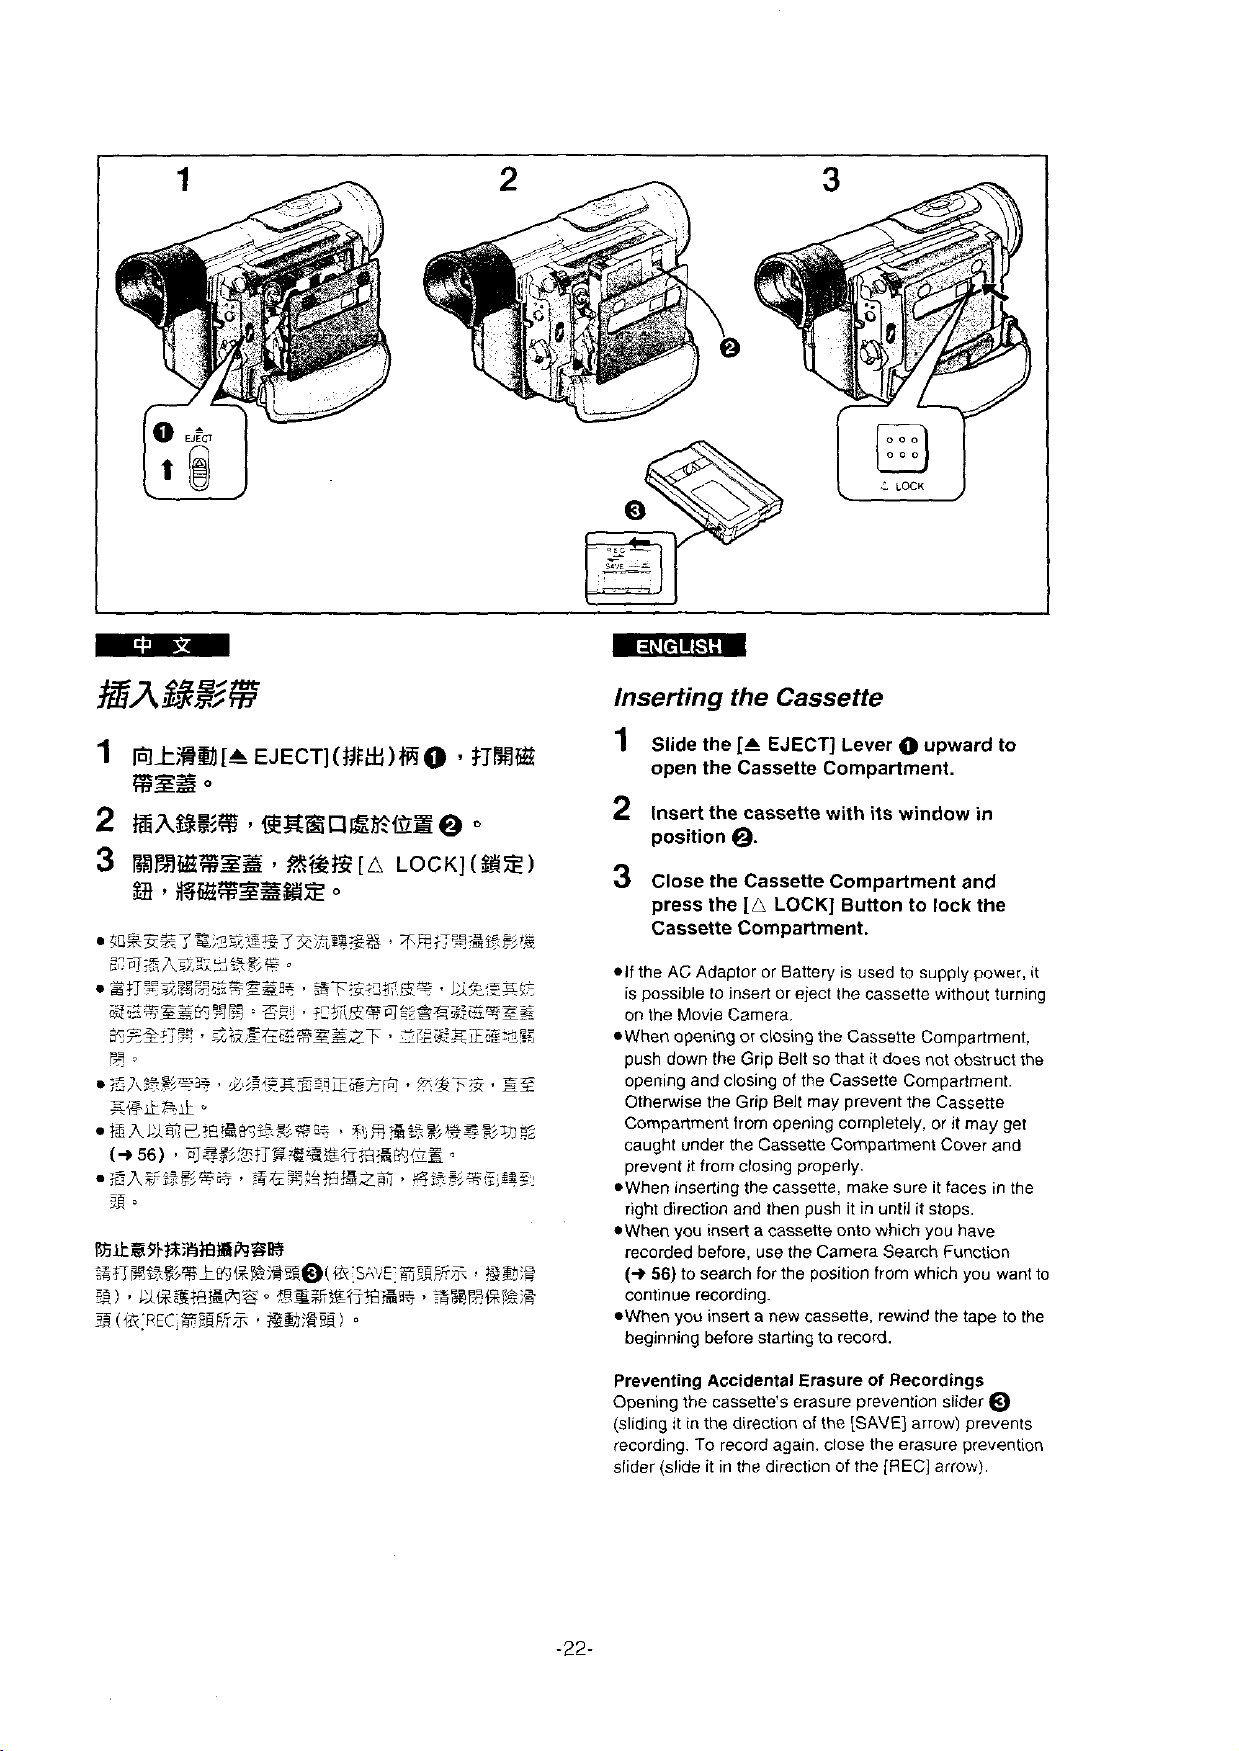
Inserting the Cassette
1
Siide the
open
2
lnseri the cassette with
position
3
Ciose the Cassette Compariment and
press the
Cassette
*If
the AC Adaptor or Battery is used to supply power,
is possible to insert or eject the cassette without turning
on the Movie Camera.
*When opening or closing the Cassette Compartment,
push down the Grip
opening and closing of the Cassette Compartment.
Otherwise the Grip Belt rnay
Compartment from opening completely, or it may get
caught under the Cassette Cornpartment Cover and
prevent
*When inserting the cassette, make sure it taces in the
right direction and then push it in until it stops.
eWhen you insert a cassene onto which you have
recorded before, use the
(+
56)
continue recording.
*When you insert a new cassene, rewind the tape to the
beginning before
[C
EJECT]
the Cassette Compartment.
Lever upward to
its
window
in
Q.
[A
LOCK] Button to lock the
Compartment.
Belt so that it does not obstruct the
prevent the Cassene
it
from closing properly.
Camera Search Function
to search for the position from which you want to
starting to record.
it
Preventing Accidental
Opcn
ng
tic cassettc's erasdre
is d.ny
fecording. To record again. close the erasure prevention
slider
:t
in tne a rectton of Ini. ISAVEJ
(slide it in the direction of the
Erasure of Recordings
preveni
on
air:
[REGI
srfdPr
n
pre,ents
afrow).
Q
LP
Mode
!ZFfiM2Ki#BBSbqBB (OTHER FUNCTIONS]
+Ki[REC
s~~~~](#Bl$l@E)R%Kfiieft%
o
(+
F%@
130)
The desired recording speed can be selected with
[REC SPEED] on the
Menu.
(+
130)
If you select the
time is
picture quality. However. the
contain rnosaic-like patterns and certain iunctions may
1.5
times as long
Recording in the LP mode
restricted.
*In the following cases. rnosaic-like patterns may appear
!n the playback picture. or the picture rnay not be played
back correctly:
When a cassette recorded in the LP Mode on this
Movie Carnera is played back on other digital video
equiprnent.
When a cassette recorded in the LP Mode on other
digital video equipment is played back on this Movie
Carnera.
When a cassette recorded in the LP Mode on this
Movie Carnera is played back on digital video
equiprnent not
In the
Siow Motion or Still Advance Playback Mode.
(+
48,50)
When using the Carnera Search Function.
*As the recording track width in the LP Mode is srnaller
than the head width. recording
already recorded casseite (audiodubbing)
oossible.
[OTHER
LP
Mode, the possible recording
featuring the LP Mode.
FUNCTIONS] Sub-
as
in
the SP Mode.
does not deteriorate the
playback picture may
new
sound onto an
(+
(-P
56)
98)
is not
be
IS.
IO.?W.>
12:30:45
15.10.1999
lis
[OFFION]
RBBSSB
-.--~=
-
-
[ON]
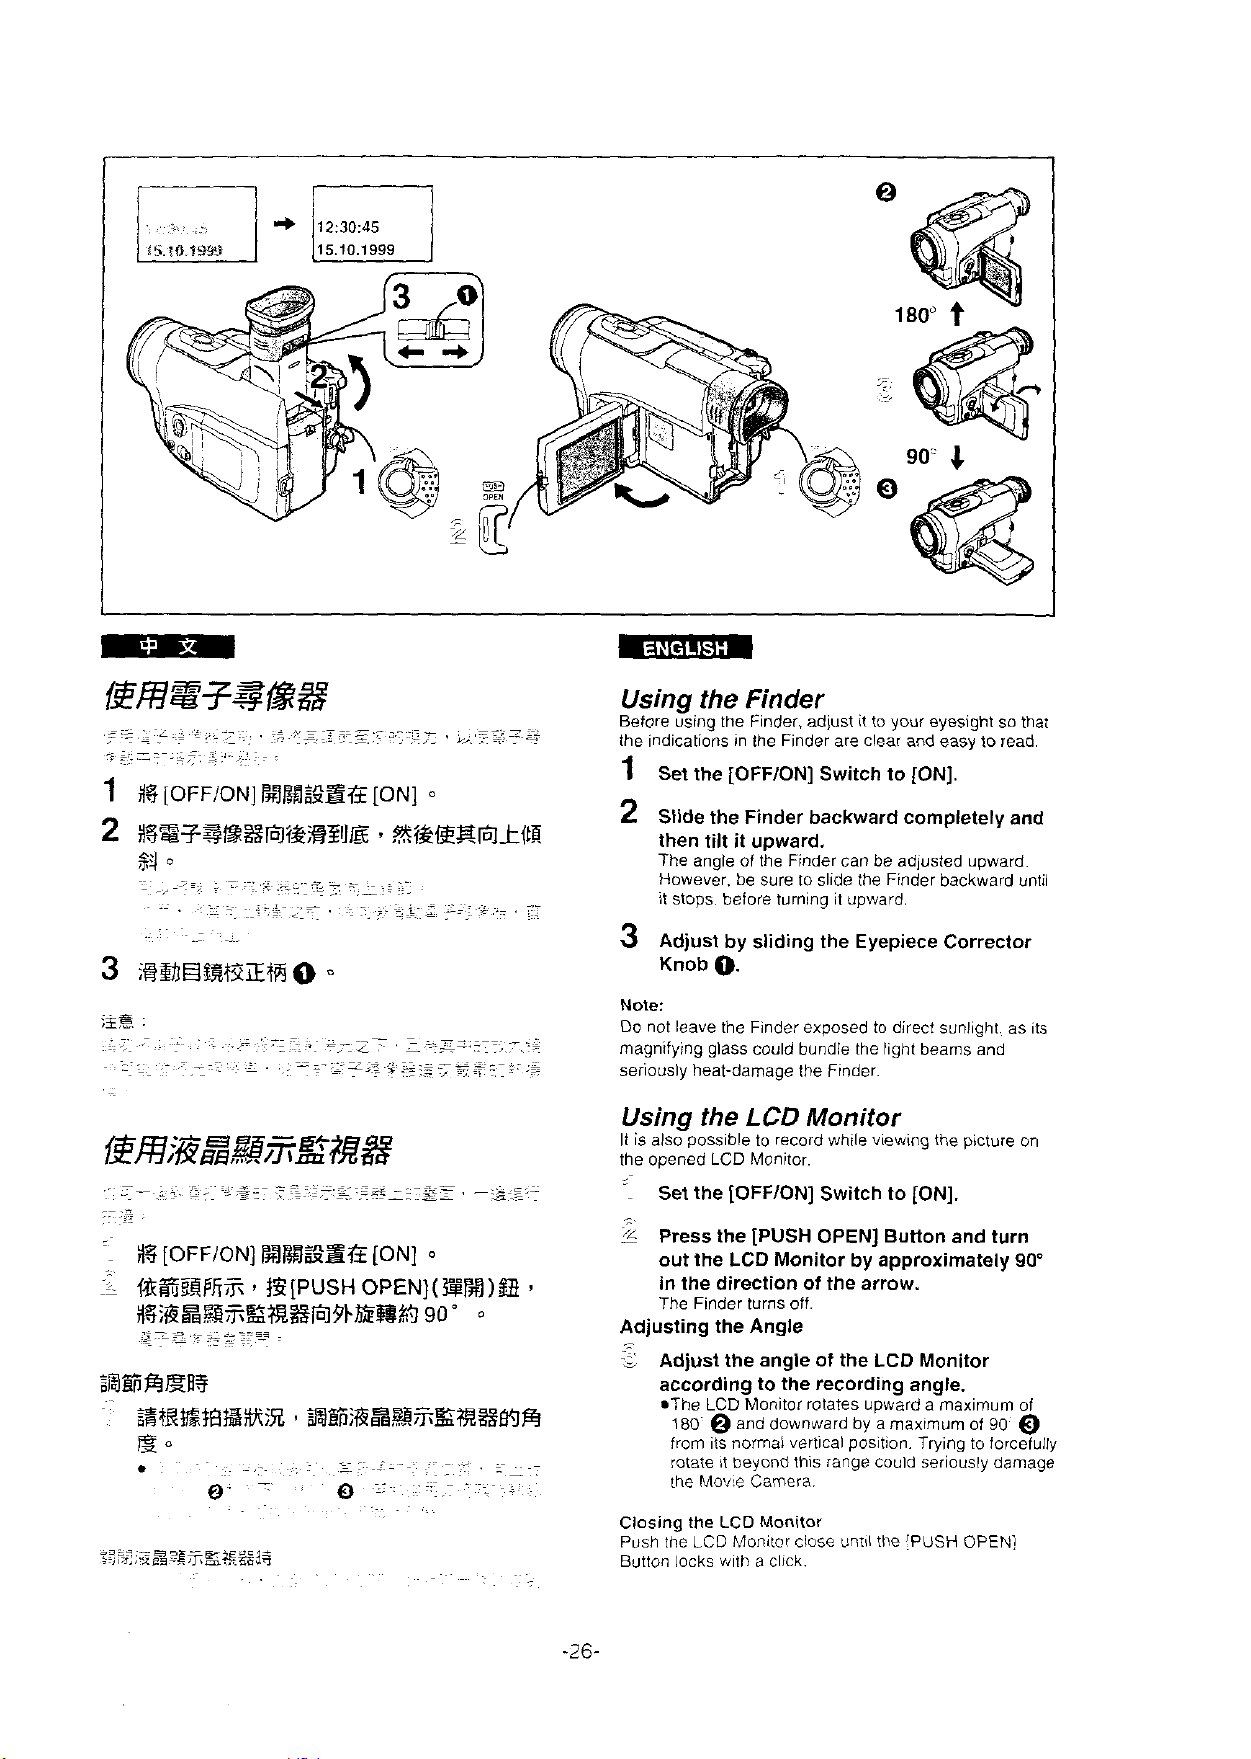
Using
Before using the Finder. adjust it to your eyesight so that
the indications
1
2
the
Finder
in
the Finder are clear and easy to read.
Set the [OFFION] Switch to [ON].
Slide the Finder backward completely and
then tilt it upward.
The angle of the Finder can be adjusted upward
However be sure to
it stops before turning
3
Adjust by sliding the Eyepiece Corrector
Knob
O.
Note:
DO not leave the Finder exposed to direct sunlight. as its
magnifying glass could bundle the light beams and
seriously heat-damage
Using
It is also possible to record while viewing the picture on
the opened
.
-.F~ci-
a.=
~~
>
2
-_i
=
.
0
the
LCD
LCD
Monitor.
Set the [OFFION] Switch to [ON].
Press the [PUSH OPEN] Button and turn
out the
LCD
slide the Finder backward unlll
il
upward
the Flnder.
Monitor
Monitor bv a~proximately
.
..
90'
in the direction of the arrow.
The Finder turns off.
Adjusting the Angle
.-
Adjust the angle of the
S
LCD
Monitor
according to the recording angle.
*The
LCD
180
from its normal vertical position. Trying to forcefully
rotate it beyond this range could seriously darnage
the
blonitor rotates upward a maximum of
O
and downward by a maximum of
Mowe
Camera.
90
@
Closing
Push the
Butlon locks with a click
the
LCD Monitor
LCD
klonitor chose
uniil
the
IPUSH
OPEN]
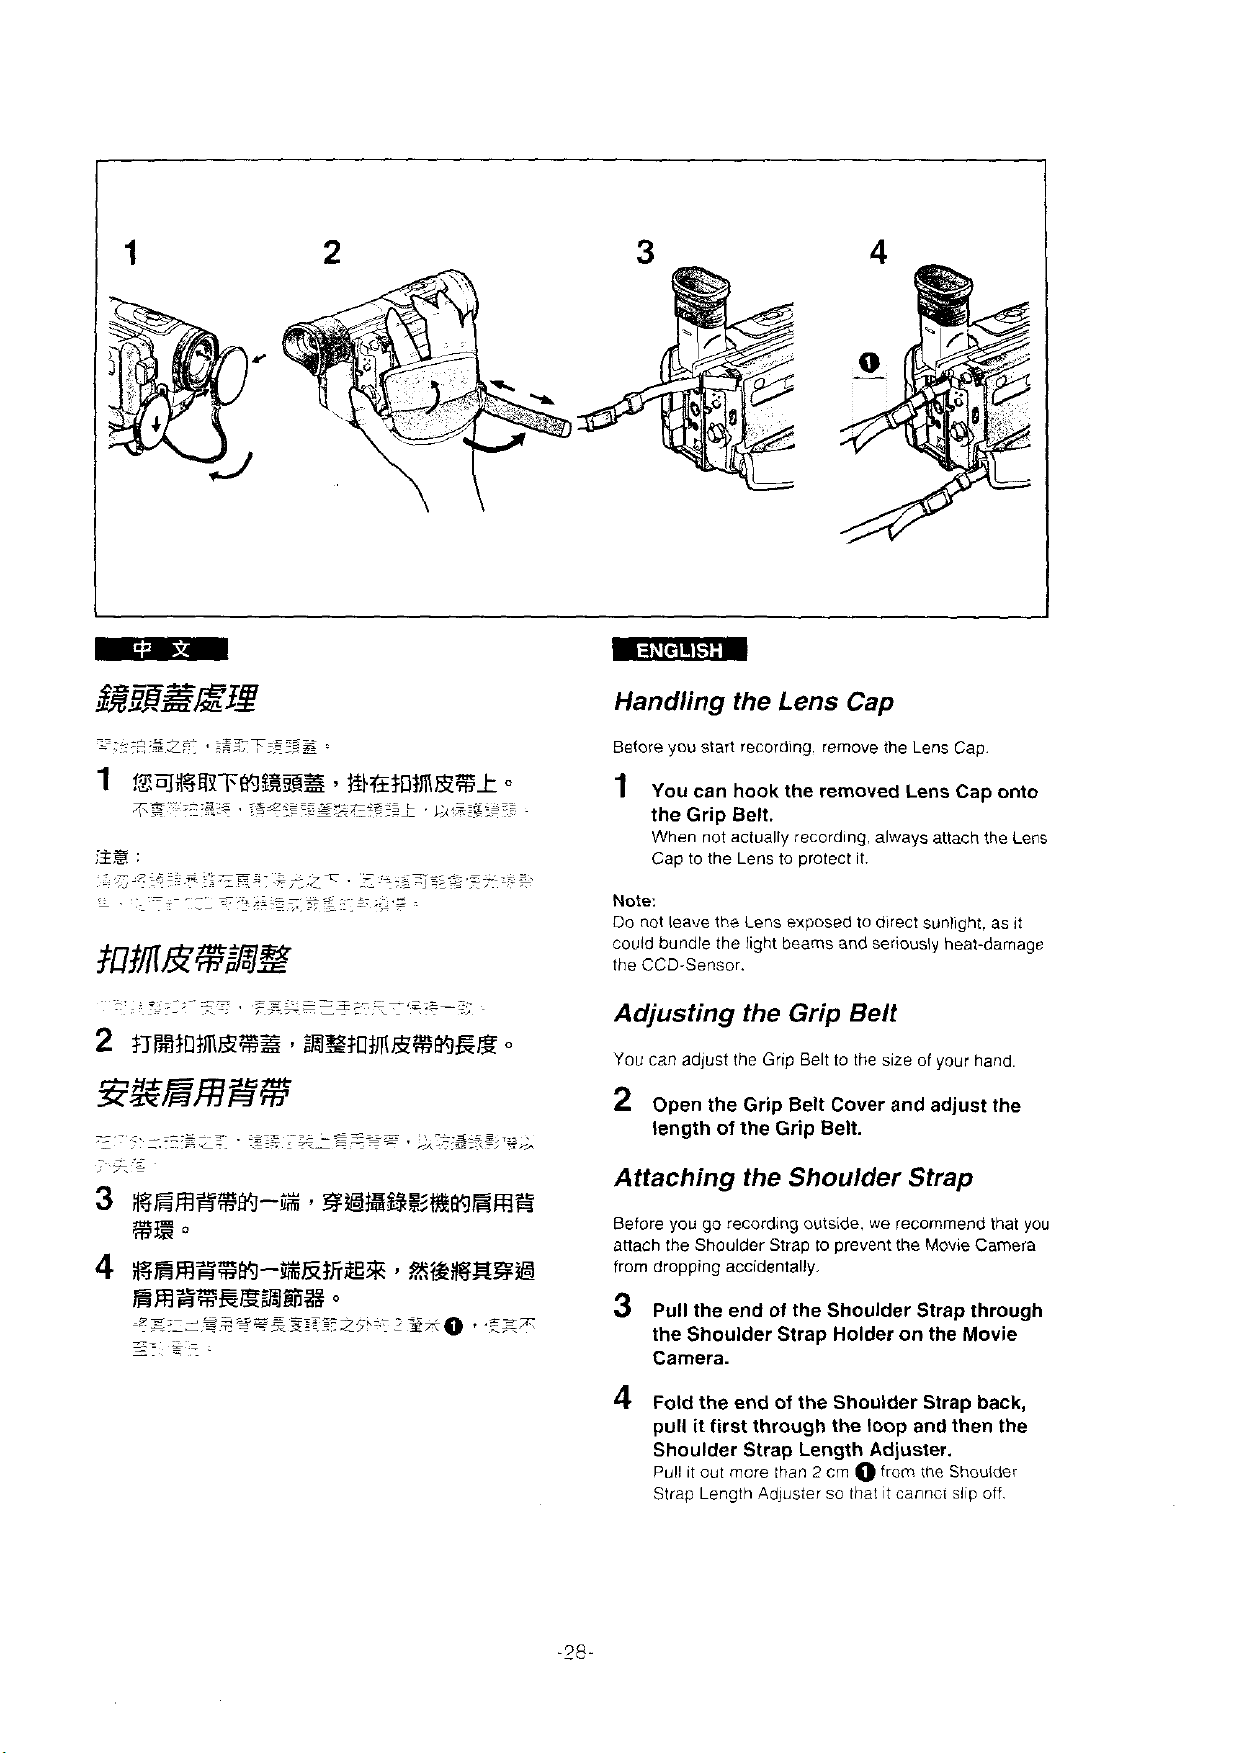
Handling the Lens
Before you start recording. rernove the Lens Cap
1
You can hook the removed Lens Cap onto
the Grip Belt.
When not actually recording. always attach the Lens
Cap to the Lens to protect it.
Note:
Do not leave the Lens exposed to direct sunlight, as $t
could bundle the light beams and seriously heat-damage
the CCD-Sensor.
Cap
Adjusting the Grip Belt
You
can
adjust the Grip Belt to the size of your hand
2
Open the Grip Belt Cover and adjust the
length of the Grip Belt.
Attaching the Shoulder Strap
Before you go recording outside. we recornmend that
anach the Shoulder Strap to prevent
from dropping accidentally.
Pull the end of the Shoulder Strap through
3
the Shoulder
Camera.
4
Fold the end of the Shoulder Strap back,
pull
it
first through the loop and then the
Shoulder
Pull it out rnore :han 2 cm O from the Shoulder
Strap Length Adjuster so that t cannci slp off
Strap Holder on the Movie
Strap Length Adjuster.
the
Movie Camera
you
%&e
~?)\%~;*EE?&~s~;L!JTo:~5+
S~esa*
?L:%%2$/l+k5
~;g~e&e&)$pgj
,
@~SSi~%;+?l3?S
:
iRB%.B$ri;BSI&#
%:BeIpBWB
%B
:
(+
1
i%
[OFFION]
c:,'.~E?A~
4
si7rnER:
ii%
[OFFION]
86)
:
:e*=:~
O
E3"ll-s'
s
Gaqo?$g~;$jI%r_.Eq~
GLcis;EF
:
I%I%~E~
Q
H~~SR
3
,
;s+@gfiiqg
(+
82,84)
[ON]
[OFF]
,qg?JRS&g>+*
C
BE%$cegT
fia:%+
s
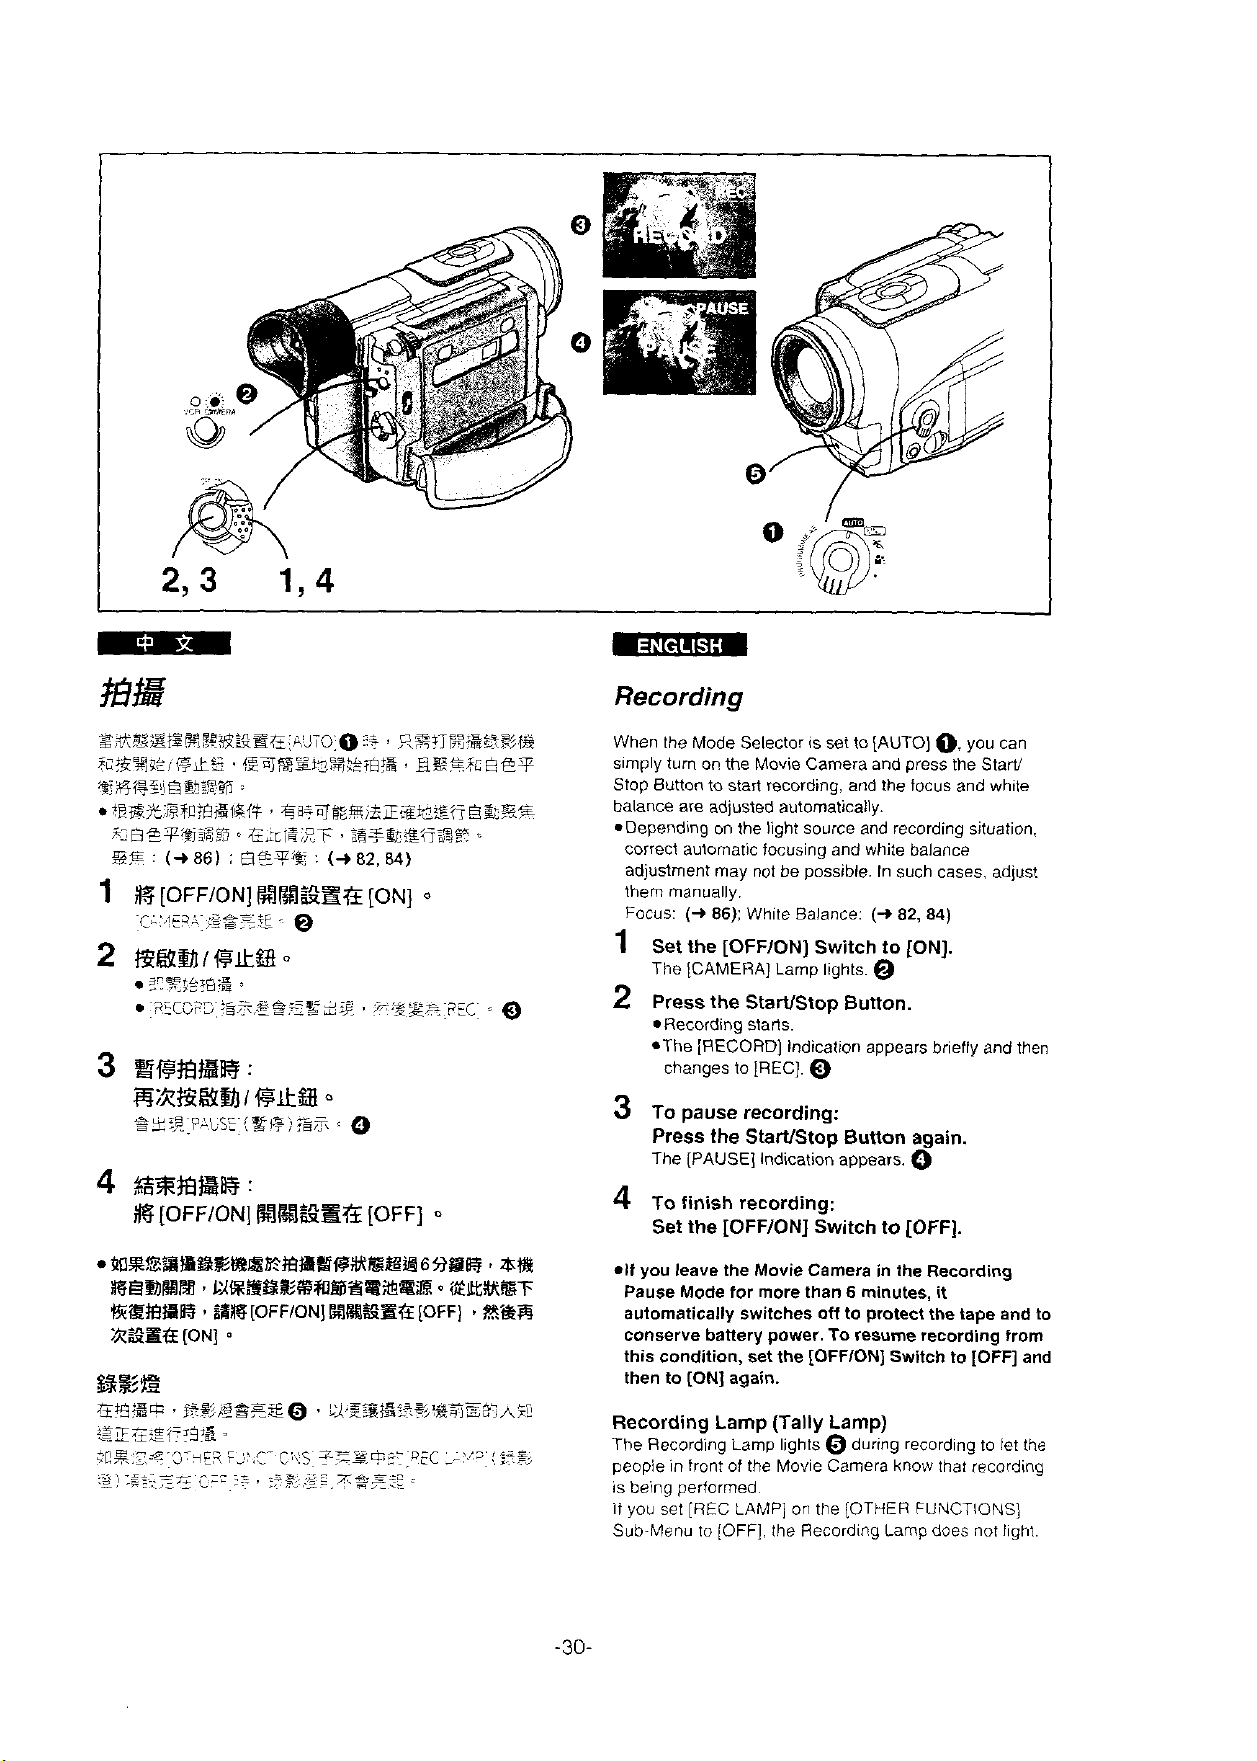
Recording
When the Mode Selector is set to [AUTO]
Simply turn on the Movie Carnera and press the Start/
Stop Button to start recording. and the focus and white
balance are adjusted automatically.
*Depending on the light source and recording situation.
correct autornatic focusing and white balance
adjustment may not be possible. In such cases, adjust
thern manually.
Focus:
1
2
3
4
(+
86):
White Balance:
Set
the
[OFFION]
The [CAMERA] Larnp lights.
Press
the
StarVStop Button.
*Recording stafis.
*The [RECORD] Indication appears briefly and then
changes to [REC].
To
pause
Press
The [PAUS€] Indication appears.
To finish recording:
Set
the
the
[OFFION]
recording:
StaNStop
O
(+
Switch
Button
Switch
82,
to
to
[OFF].
0.
84)
[ON].
again.
O
you can
2O%%SBB%REBBB%bXESB6f3SR
St#.
RBBMM~URSB%R@~SR%ER~@EX%T
146EBb98rf
;Rsltf
[ON]
:SR
o
[OFFION]
B;lMSf;r?Z
[OFF]
v
%@F3
*If
you leave the Movie Camera in the Recording
Pause Mode for more
automatically switches off to protect the tape and to
conserve battery power.
this condition, set the
then to
Recording Lamp (Tally
The Recording Lamp Iights during recording to let the
people in front of the Movie Camera know that recording
is
if
Sub Menu to [OFF] the Recording Lamp doec not light
[ON]
again.
being perforrned
you set
[REC
LAMP] on the
than 6 minutes,
To
resume recording from
[OFFION]
Lamp)
[OTHER
it
Switch to
FUNCTIONS]
[OFF]
and
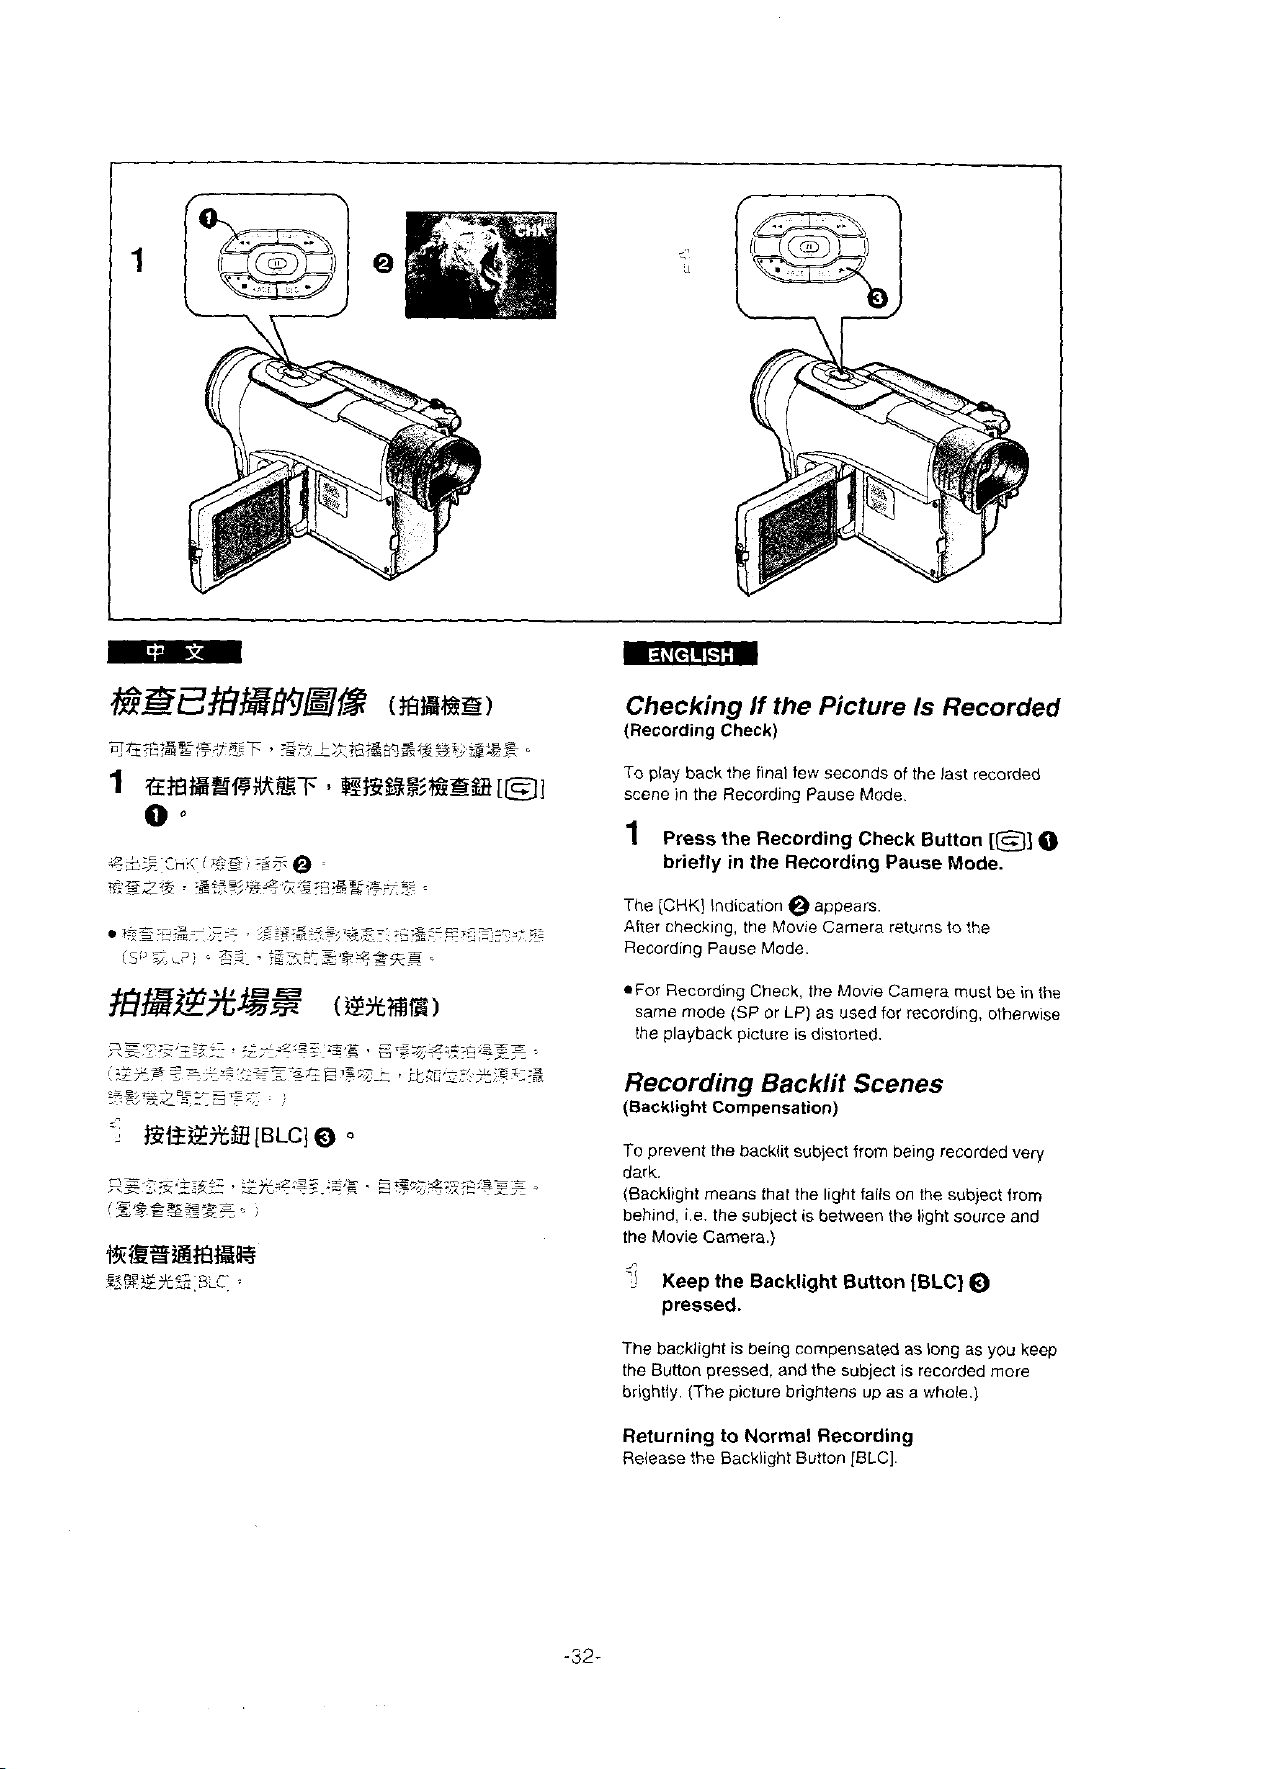
Checking
(Recording
To play back the final few seconds of the last recorded
scene in the Recording Pause Mode.
1
Press the Recording Check Button
briefly in the Recording Pause Mode.
The [CHK] Indication @ appears.
Alter checking, the Movie Camera returns to the
Recording Pause Mode.
*For Recording Check. the Movie Carnera must be in the
same mode
the playback picture is distorted
If
the Picture Is Recorded
Check)
(CP
or
LP)
as used for recording. otherwise
[B]
Recording Backlit Scenes
(Backlight Compensation)
To prevent the backlit subject from being recorded very
dark.
(Backlight means that the light falls on the subject from
behind. i.e. the subject is between the light source and
the Movie Carnera.)
$
Keep the Backlight Button [BLC]
pressed.
O
The backlight is being compensated as long as you keep
the Button
brightly. (The picture
Returning to Normal Recording
Release the Backlight Button [BLC].
pressed. and the subject is recorded rnore
brightens up as a whole.)
m3?~@BIzEE%smm3~%m%I
~.
~~
~
.~~
-
~.
.
.
~~
~~
.--.
;.
.
,
--
~~,
~
.- .
.-
~-,.,,.,:~
.
~~
~.
>, z <~
--
.
-
~~
__:.
.
,
-=
?~*<%~;:;~~=:;
.
-.
*==z
e
el,
,
-
-
.
-
.~
..,.
-0
.^_
~
-
-e;..z
.=
=~
L
-,-
,-
:I-1K1,
.
.-c-
-
-
-
T.-
. - ..
-
-
-~
.*
.
,,
~
-- i -
..
__
-_..=-._L-
--
,
--.s
:
~-
:
. , ...
~
~=T.
~
-
,-
..
~~
::~-
c=
-
=.
-
-
~ ~
,
;z
~..
=.Z
,~
.-=
E?*
,
.**~:.+.-::
-
~
-
'--..IA-
=
~-
:3L
-
-:
-
-.
\~.<;z=
z
-
.-
-
c
,..
z
z,s:-./
_a
,Z-
.-
.:
._a=
i-
,
..zs-:i--
~-
=s
-.
-
~s
~
-
-
--
:;::s
~~
&.~.-.
:=.z
.
..
ZY7~<
:.~
~.~
-
.
-
,
-:-
5{--z.13iTr.=
~=.~
;;S.=
+_
__
.~
<i..~.i__
&-,E
.-so
r-
.--,
(+72)
=
-e,-~
,.
.-x
Z.?.
,
=z;,,
,
,:
,
~<,s,
~
J:
-
.$.
--s.-*-<
>.,T.:
?,~
~--~.,s*<
.--e-
.
~...
,<
--
-.
.
3
.;
.~~<-E~s~Z.,??,
*<
:>
~
.
p.7&,=-
,?2TF
-s;
s,.
.
z
>.
-
.
..~-
.=.
..7*72-z-
-
~=
,~..:..,~!?~~SLz:
,
--
,=*T
,
.
-
=z
<^_
-
=
-'<-..z-
;=x-
:
\
.
,?-S.<=+z-.=
-F-
p
,-.
2.3
,.:,,=
~s:2:z.~.
*
z
2,.
.;.a*
,
:
.se
,-,-
-.
-
*=L*.=:i=:
.
,
\=A,?s:,7
-Q
.,.=
s
:s:
=---
,
.
-,:z
--- ,
:
-:-s-
<ss;
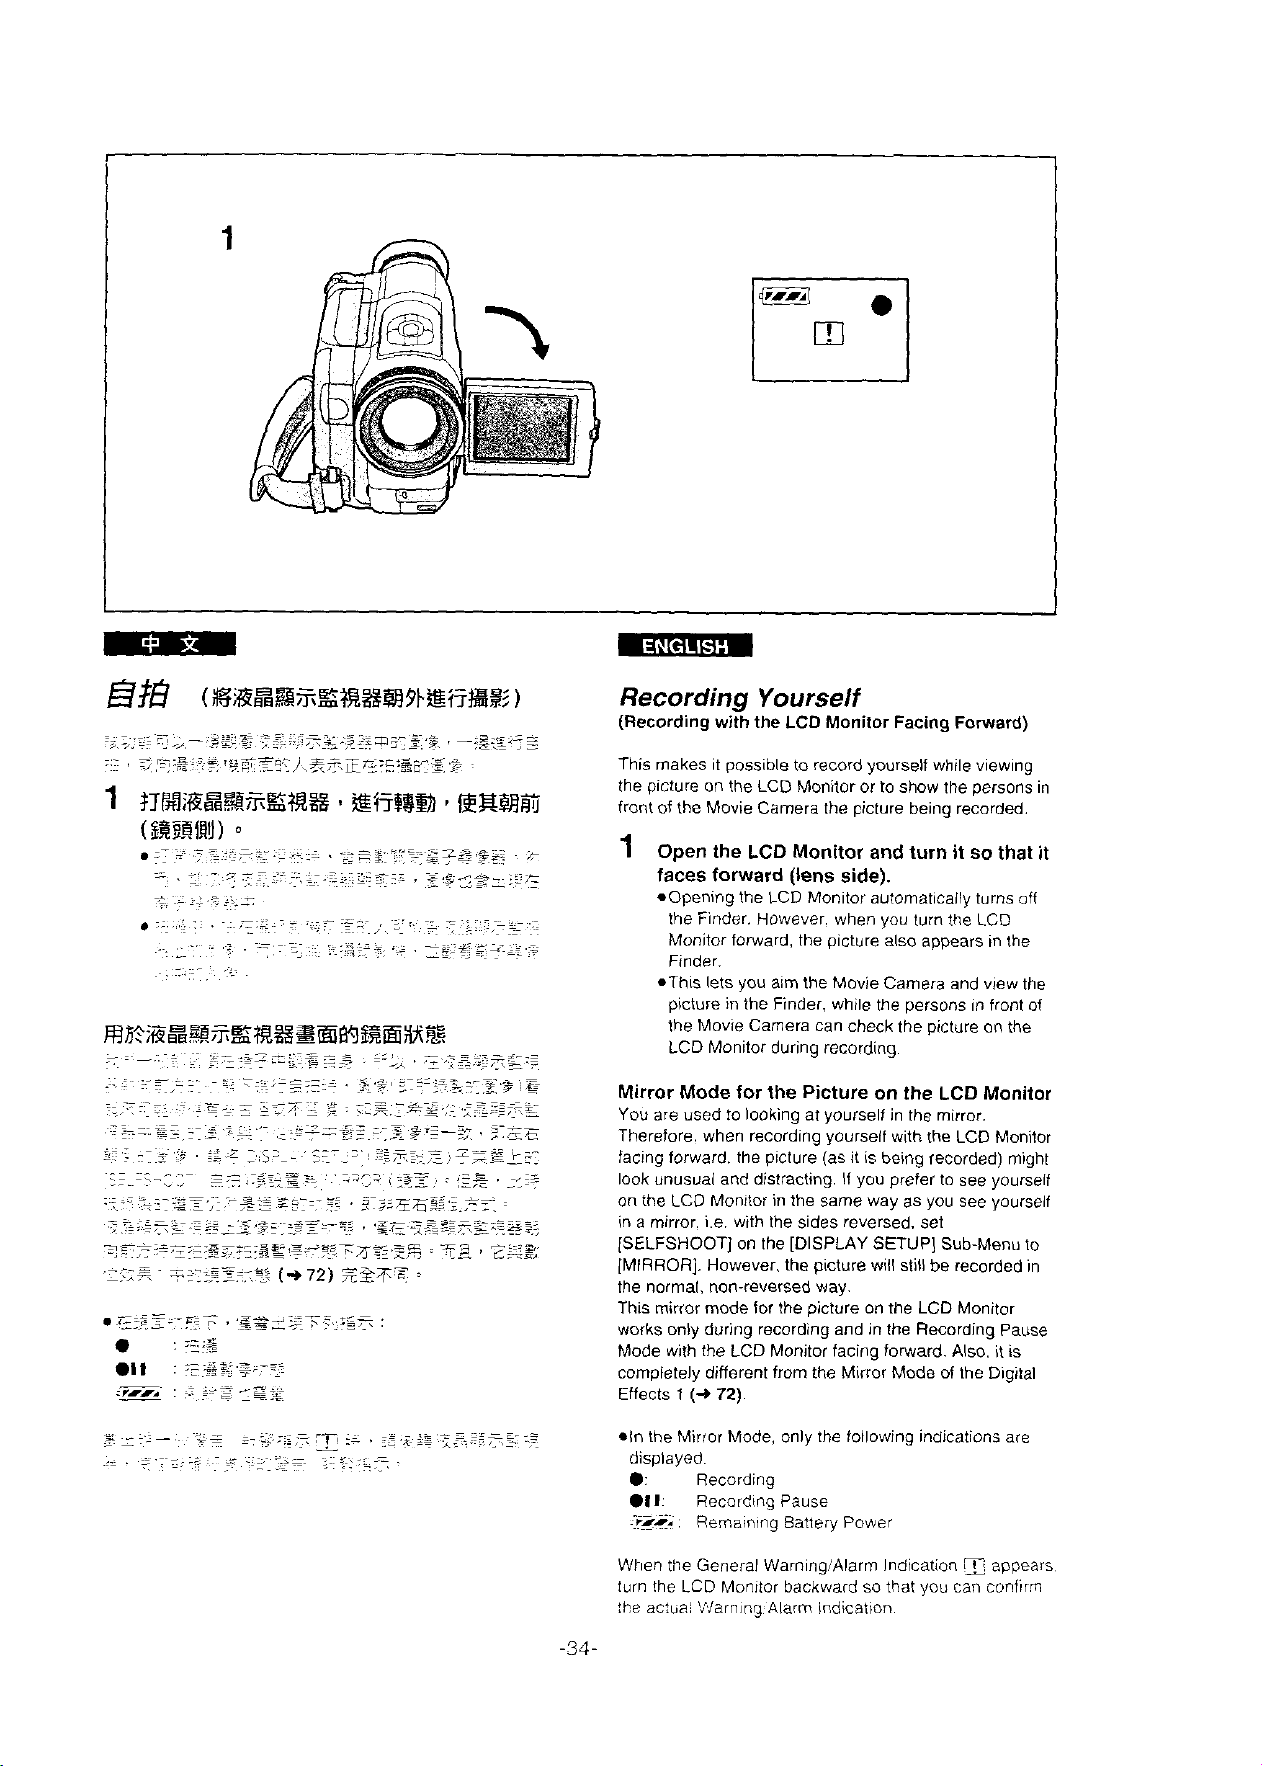
Recording
(Recording with
Yourself
the
LCD
Monitor
Facing Forward)
This makes it possible to record yourself while viewing
the picture on the LCD Monitor or to show the persons in
front of the Movie
1
Open the
Camera the picture being recorded.
LCD
Monitor
and
turn it so that
faces forward (lens side).
.Opening the LCD Monitor automaticaily turns off
Finder. However. when you turn the LCD
the
Monitor forward, the picture
Finder.
*This lets you alm the Movie Camera and view the
picture in the
the Movie
LCD Monitor
Finder. while the persons in front of
Carnera can check the picture on the
during recording.
Mirror Mode for the Picture on the
You are used to looking at yourself in the mirror.
Therefore. when recording yourself with
facing forward. the picture (as it is being recorded)
look unusuai and distracting. If you prefer to see younelf
on the LCD Monitor in the same way as you see yourself
mirror. ie. with the sides reversed. set
in a
[SELFSHOOT] on the [DISPLAY
[MIRROR]. However. the picture will still be recorded in
the normal, non-reversed way.
mirror mode for the picture on the LCD Monitor
This
only during recording and in the Recording Pause
works
Mode with the LCD Monitor facing forward.
compietely different from the
Effects
1
(+
72).
also appears ,n the
LCD
Monitor
the
LCD Monitor
might
SETUP] Sub-Menu to
Also. it is
Mirror Mode of the Digital
it
*In the Mirror Mode, only the following indications are
displayed.
e:
el1
3.
When the General
turn the
Recording
iiecardtng Pause
-.~
Remaining Battery Power
Warning)Alarm Indication 9 appears
LCD
Monitor backward so that you can cuniirm
the actuai Warning Alarm indication
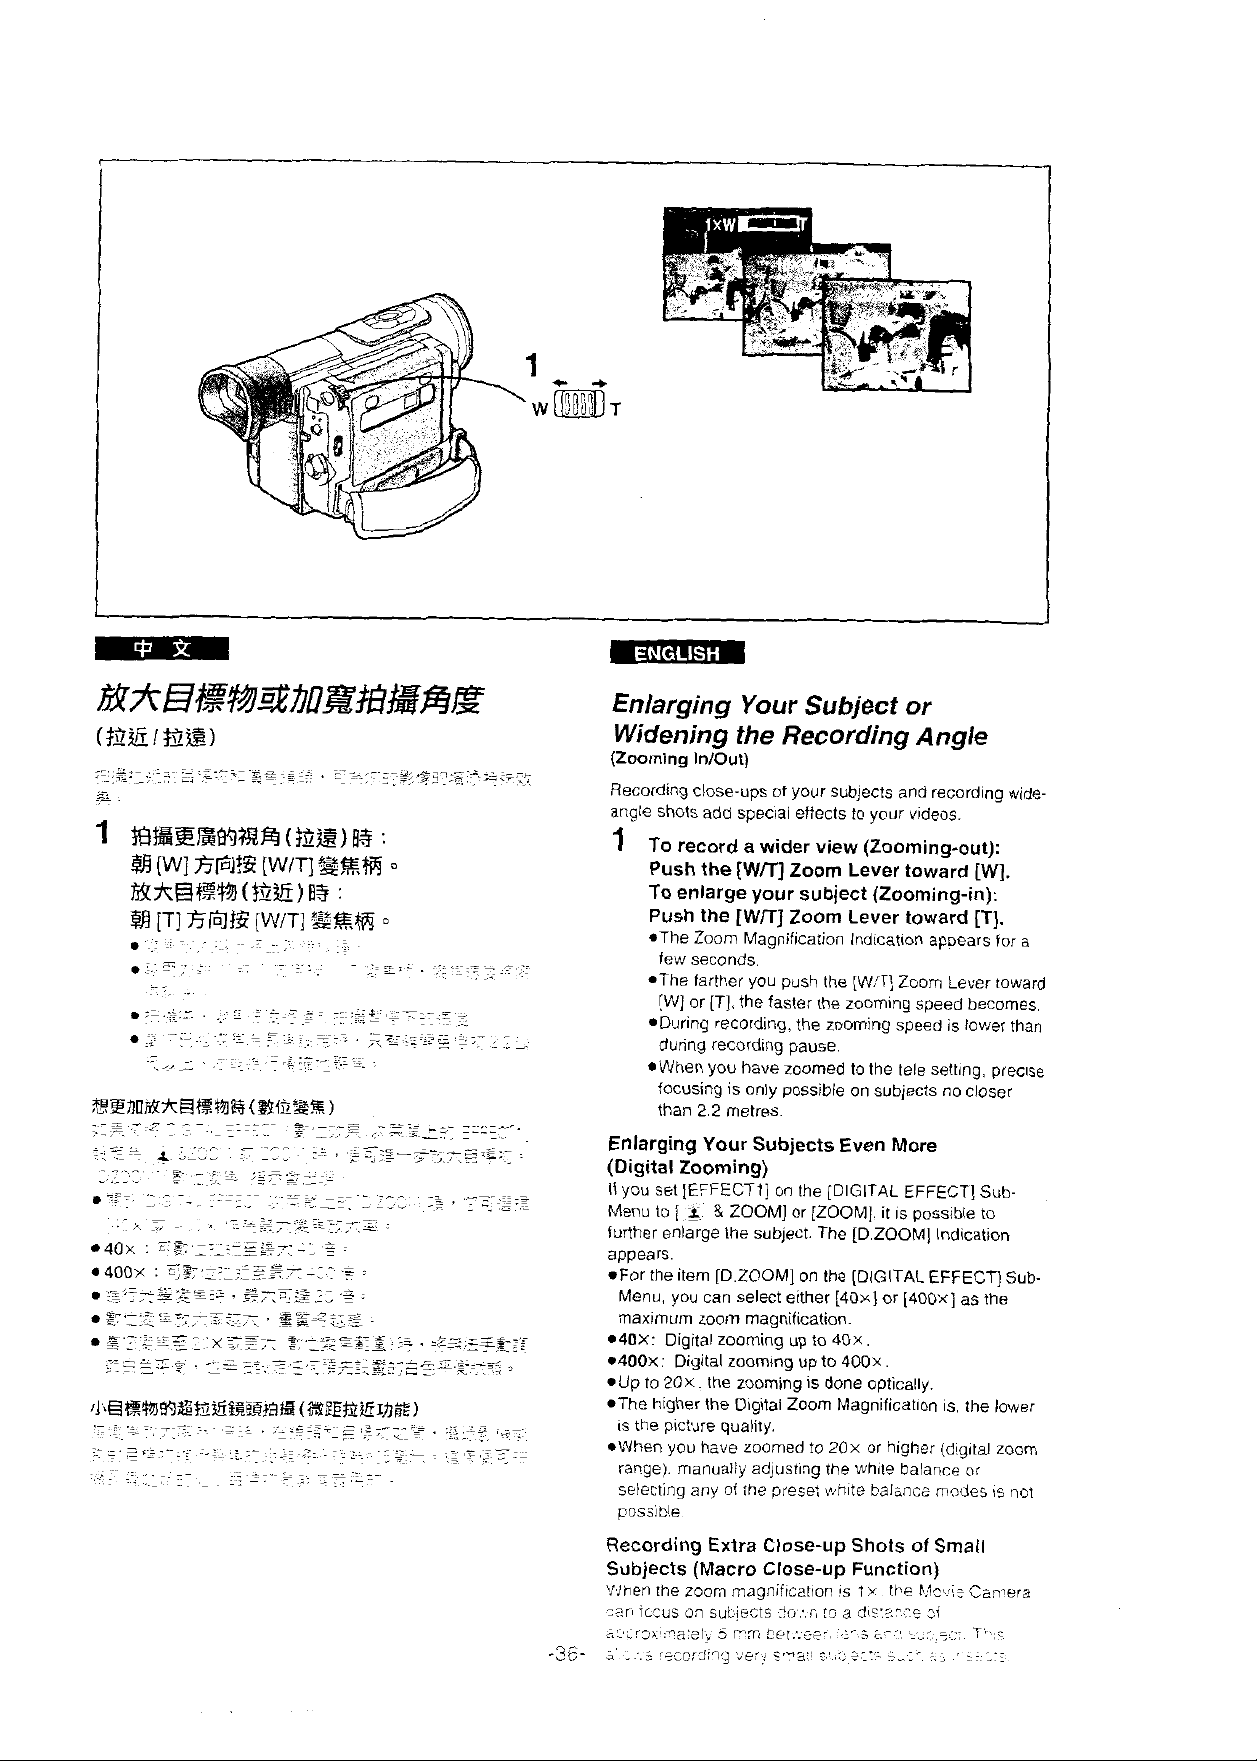
Enlarging Your Subject or
Widening the Recording Angle
(Zooming InIOut)
Recording close-ups of your subjects and recording wide-
angle Shots add special effects to vour videos.
1
To record a wider view (Zooming-out):
Push the
To enlarge your
Push the
*The Zoom Magnificalion lndication appears for
few seconds.
*The farther you push the [W,'Tj Zoom Lever toward
[W] or
*During recording, the zooming speed is lower than
durina recordin~ Dause.
*When you have zoomed to the tele setting, precise
focusing is
than 2.2
Enlarging Your Subjects Even More
(Digital Zooming)
If you set [EFFECTI] on the [DIGITAL EFFECT]
Menu to
furlher enlarge the subject. The [DZOOM] Indication
appears.
*For the item [DZOOMI on the [DIGITAL EFFECT] Sub-
040X:
0400x:
*Up to 2Ox the zooming is done optically.
*The higher the Digital Zoom Magnification is. the lower
*When you have zoomed to 20x or higher (d!gifal zoom
[
Menu. you can select either [40x] or [400x] as the
maximum
Digital zooming
Digital zooming up to 400x
picture quality.
is the
range). rnanuail); adjusting the White balance
seiecting any of the preset nhte baläncr modes is not
poss!ble
[WK]
Zoom Lever toward [W].
subject (Zooming-in):
[Wn] Zoom Lever toward [T].
[T]. the faster the zooming speed becomes
",
only possible on subjects no closer
metres.
;
&
ZOOM] or [ZOOM!. it is possible to
room rnagnilication.
up
to 40%
or
a
Sub-
Recording Extra Close-up Shots of
Subjects (Macro Close-up Function)
'!,)hen ihe zoom magniiicatior !s
3zr
-?c^-
iCws on subects
.
,
i
.,.;,*:o
io:.n
!a
ly
a
dis:;-?,:e
tt;€
Small
hlev!:
ii
Cernera
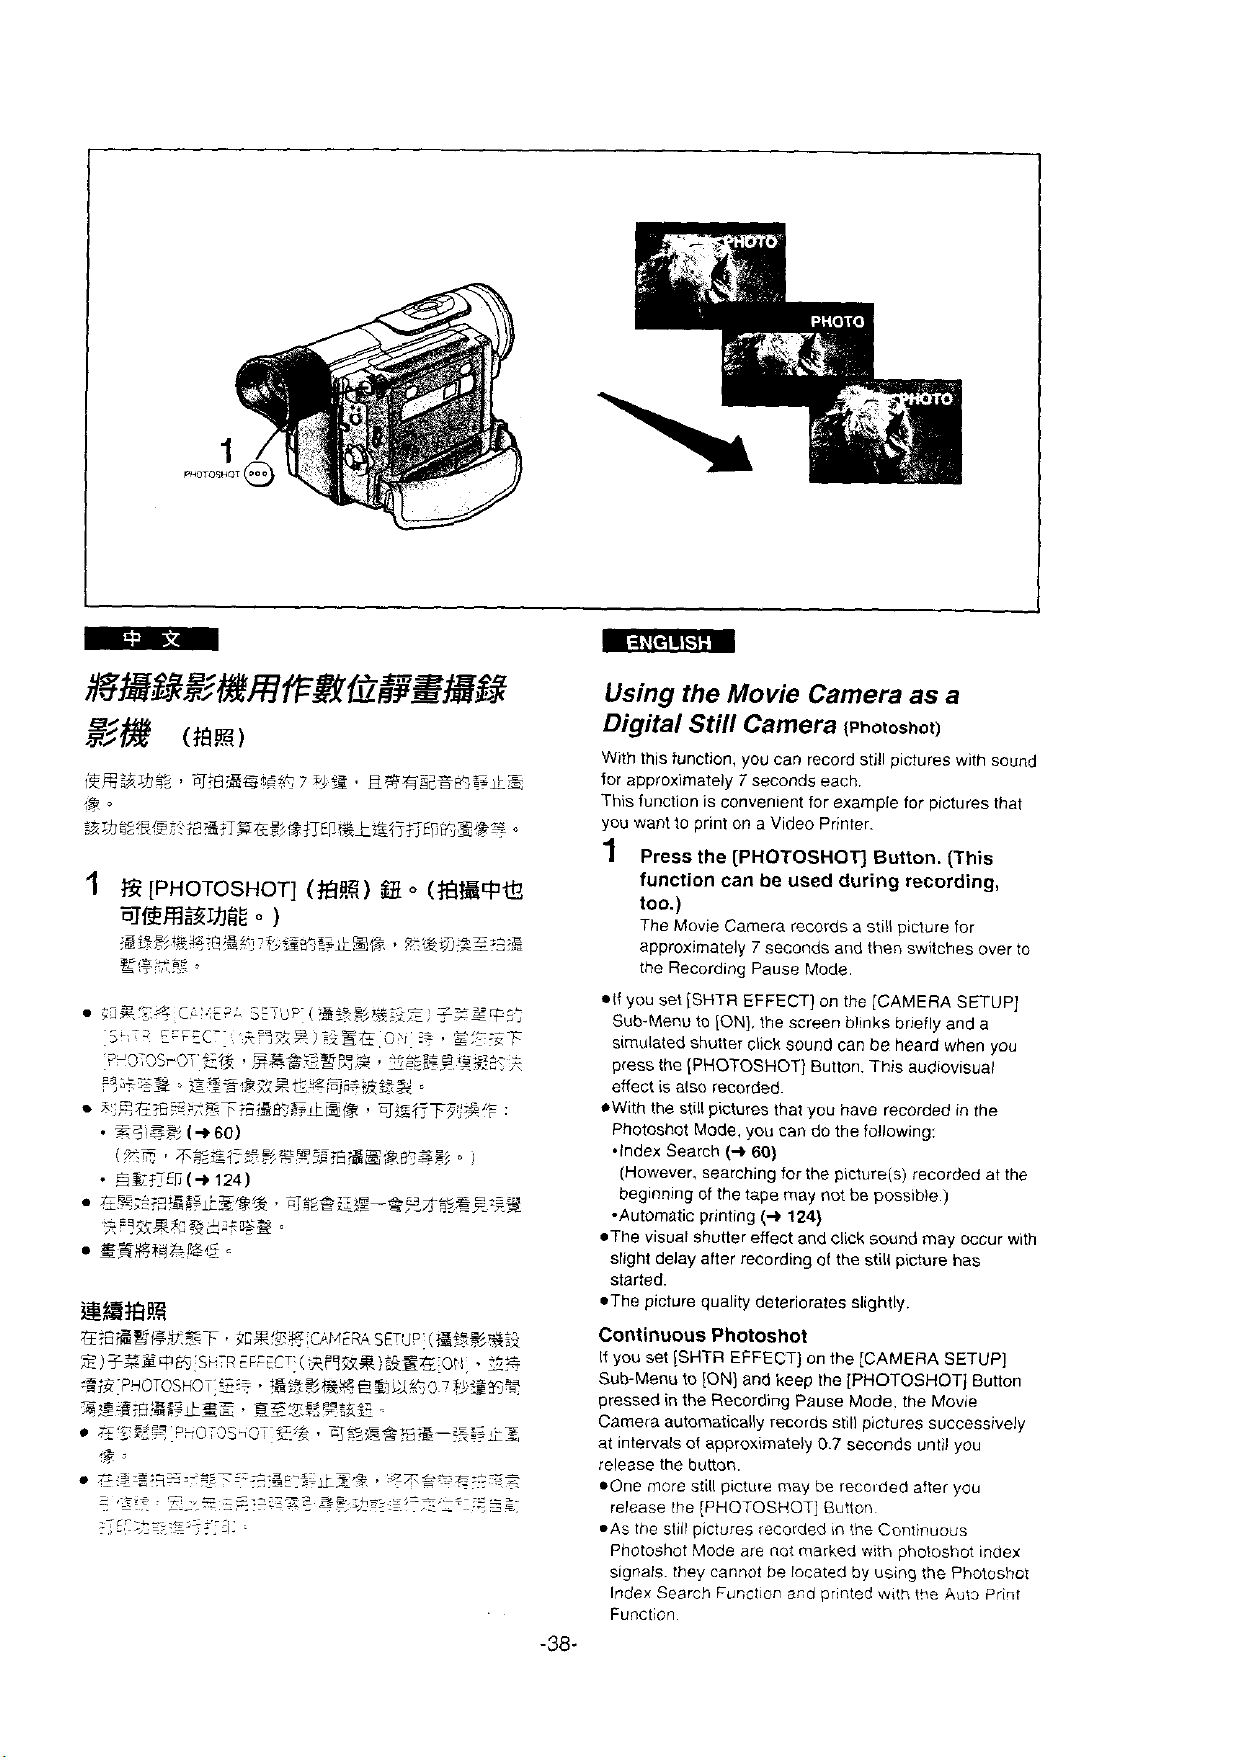
Using the Movie
Digital Still
With this function, you can record still pictures with sound
for approximately
This function is
you want to print on a Video Printer.
1
Press the [PHOTOSHOT] Button. (This
function can
Camera
7
convenient for example for pictures that
Camera
(P~o~os~o~)
seconds each.
be
used during recording,
as a
too.)
The Movie Carnera records a still picture for
7
approximately
the Recording Pause Mode.
*If
you set [SHTR EFFECT] on the [CAMERA SETUP]
Sub-Menu to [ON]. the screen blinks briefly and a
sirnulated
press the (PHOTOSHOT] Button. This audiovisual
effect is
*With the still pictures that you have recorded in the
Photoshot Mode, you can do the
.Index Search
(However. searching for the picture(s) recorded at the
beginning of the tape rnay not be possible.)
-Automatic printing
*The visual shutter effect and click sound may occur with
slight delay alter recording
sfaried.
-The picture quality deteriorates slightly.
shutter click sound can be heard when you
also recorded.
seconds and then switches over to
following:
(+
60)
(+
124)
of
the still picture has
Continuous Photoshot
If
you set [SHTR EFFECT] on the [CAMERA SETUP]
Sub-Menu to [ON] and keep the [PHOTOSHOTJ Bunon
pressed in the Recording Pause Mode. the Movie
Camera autornatically records still pictures successively
at intervals of approximately
release the button.
*One more still picture rnay be recuided after you
release the (PHOTOSHOT] Button
.AS the sliil pictures recorded
Photoshot Mode are not
signals. they cannof be
Index
Search Function and printed with the
Function
0.7
seconds until you
in
the Conlinuous
marked with photoshot index
located by using the Photoshot
-38-
Auts
Pri~t
2
@B[PUSH]E
(B&%%g;E')
.z%=
'
.;c:
.
.\
-
4
E
[PUSH]
-.
'-"2:"'"."'=
.-
,
-
>-=.~..,7
5
E?
[MENU]
af
Sg3KfgU3
9.
..
,
L
z,
y,,
,
-l
.<>
i.:
22-s,:
-
,3=:
r
E%
%?%Z[PUSH]E
--
,
E%
HEXZg
.:Bi's
.
[ON]
-
,S,-
.
$3
,=,
a sa>^
[CAMERA SETUP]
=-s=:
.
-x?
.
o
. .
Z!
s
;
_
O
-z>-
)y=.=
...=
o
0
>T,
.,.-,
&..,L
.=
i
=
s
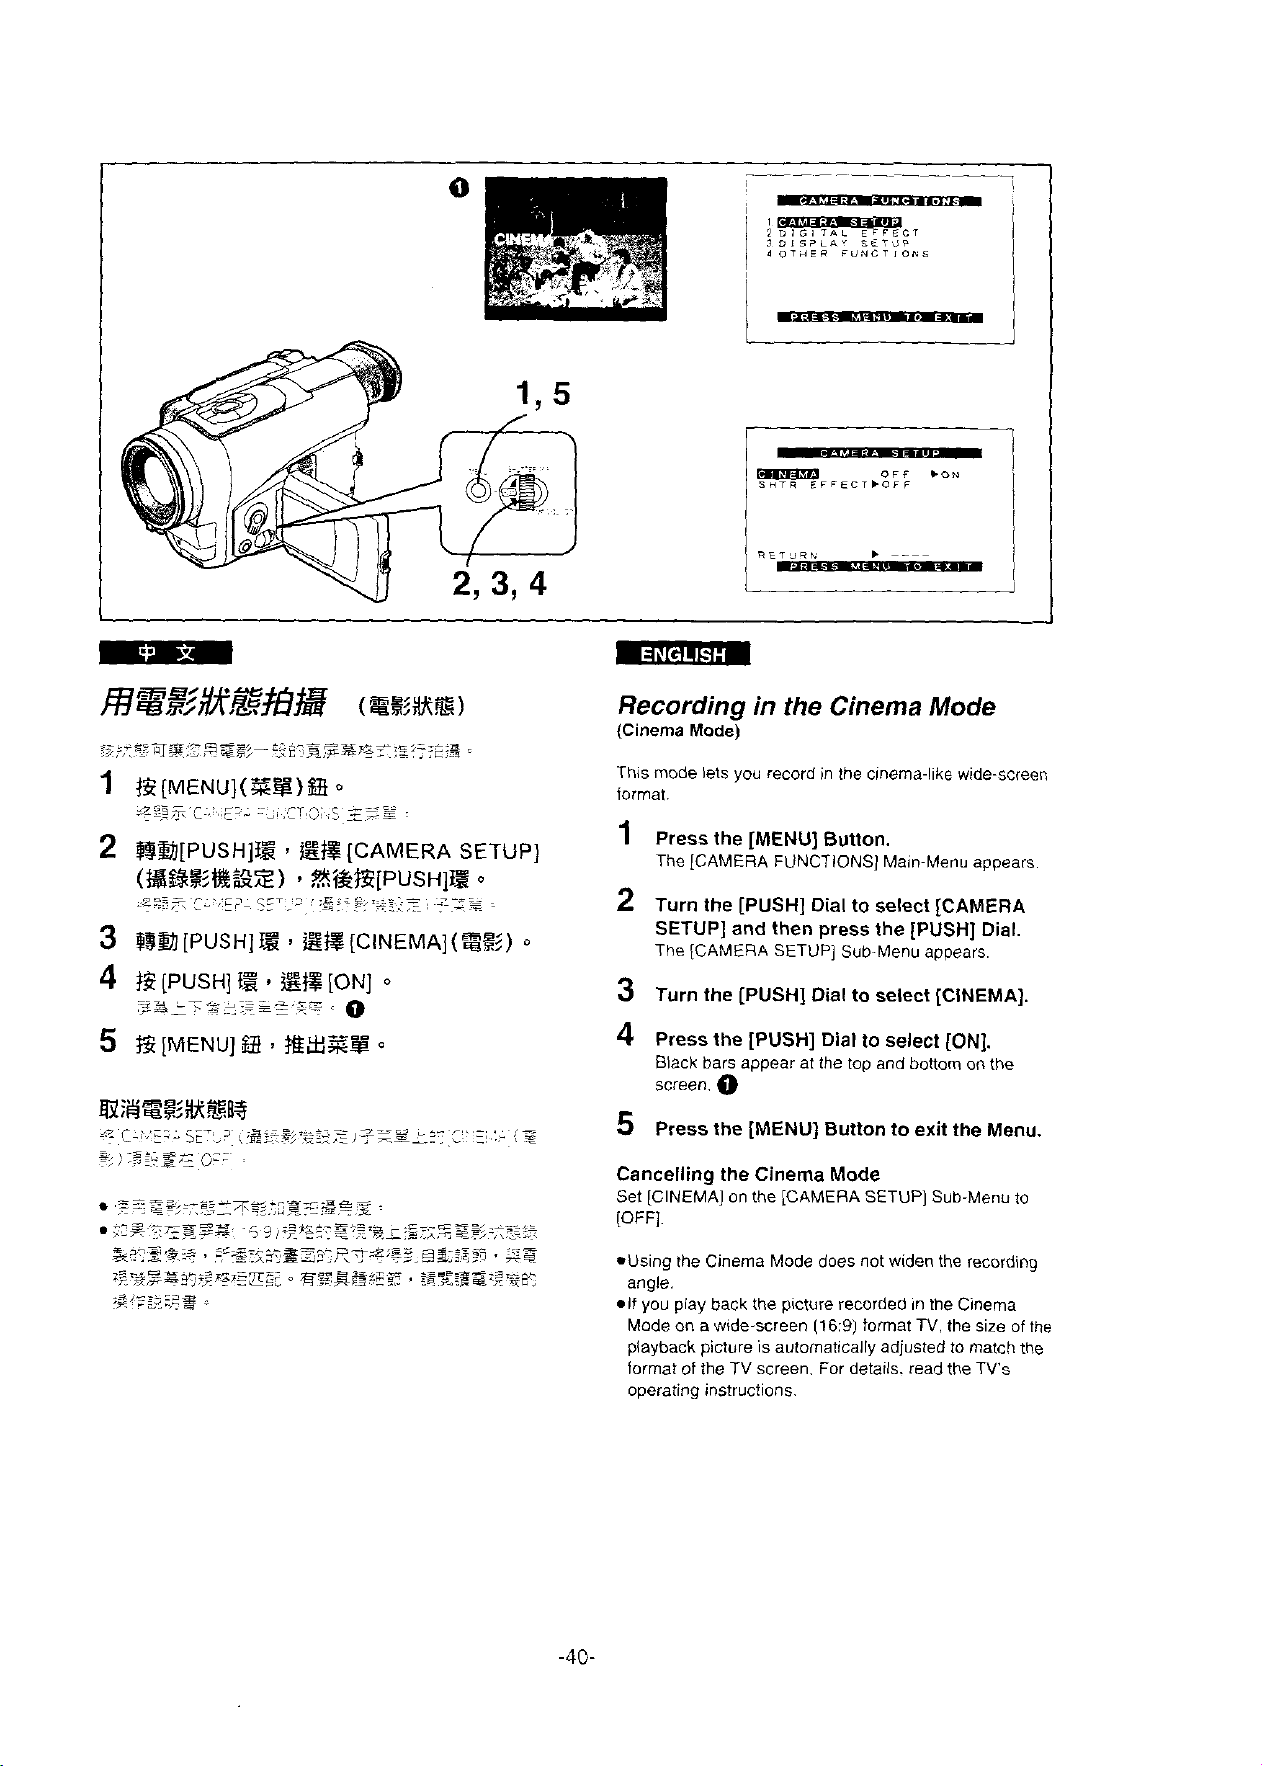
Recording in
(Cinema
This mode lets you record in the cinema-like wide-screen
format.
1
2
3
Mode)
Press the [MENU] Button.
The [CAMERA FUNCTIONS] Main-Menu appears.
Turn the [PUSH] Dial to select [CAMERA
SETUP] and Zhen press the [PUSH] Dial.
The [CAMERA SETUP] Sub-Menu appears.
Turn the [PUSH] Dial to select [CINEMA].
4 Press the [PUSH] Diat to celect
Black bars appear at the top and bottom on the
screen.
0
the
Cinema Mode
[ON].
5 Press the [MENU] Button to exit the Menu.
Cancelling the Cinema Mode
Set [CINEMA] on the [CAMERA SETUP] Sub-Menu to
(OFF].
*Using the Cinema Mode does not widen the recording
angle.
*If
you play back the picture recorded in the Cinema
Mode on a
playback picture is automatically
format of the
operating instructions.
w~de-screen
TV
(16:9)
tolmat
TV.
the size of the
adjusted to match the
screen. For details. read the TV's
OFF
LOOM
STROBE
TIAGE9
LFFECTPLOFF
M19ilOil
.'LLIOOM
WIPt
GAI
MOS*
M,?
NUD
I
C
:%,F..
,.
i..
.
7,
,
'*?>lr*
.--=--'L
T.-;.,
2
@B[PUSH]tS
($%.IG%Z)
~
. . .
..
--
~~
~
~
,
..
,
3
?&a
[PUSH]
1)
o
.-.+.m:z
,<z,-
~-
%%%$Z
. - -.
...~C
-
.
-...L
,
>.
S,-.
s
gg
-
,
-
:
-.-;
~.,%:a?~a
-
-
,
[DIGITAL
[PUSH]
3
F.
I,
EE
[EFFECTI]
---c..=->&
E
\
.
%i~
.?-*~>,"<*<y,y
~--
EFFECT]
o
(g'%
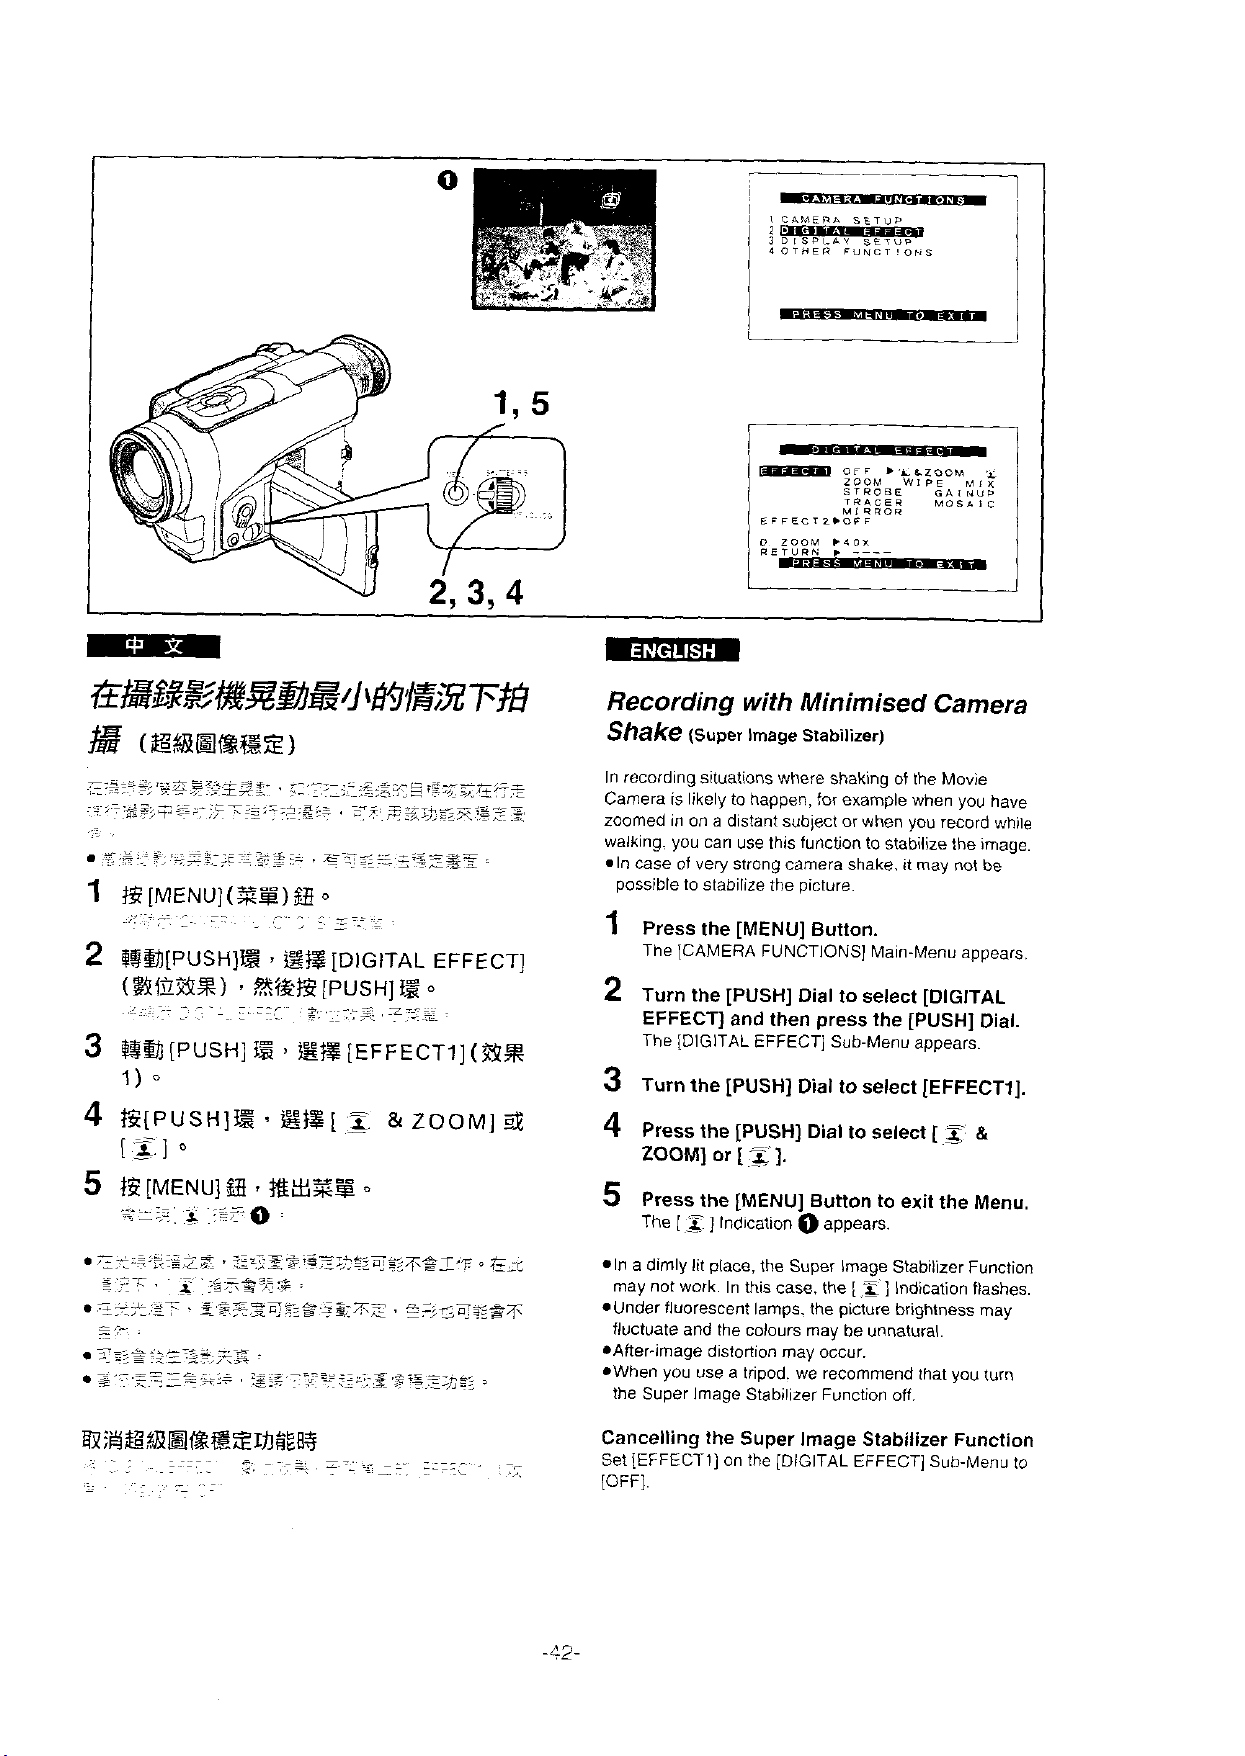
Recording
Shake
In recording situations where shaking of the Movie
Camera is likely to happen, for example when you have
zoorned in on a
walking. you can use this function to stabilize the image.
In case of very strong carnera shake. it
possible to stabilize the picture.
1
Press the [MENU] Button.
The [CAMERA FUNCTIONS] Main-Menu appears.
2 Turn the [PUSH]
EFFECT] and then press the [PUSH]
The [DIGITAL EFFECT] Sub-Menu appears.
3
Turn the [PUSH] Dial to select [EFFECTI].
4
Press
ZOOM] or
5
Press the [MENU] Button to exit the Menu.
The
[
*In a dimly lit place, the Super Image Stabilizer Function
rnay not work. In this
-Under fluorescent lamps. the picture brightness
fluctuate and the colours rnay be unnatural.
*After-image distortion rnay occur.
*When you use a tripod. we recommend that you turn
the Super Image Stabilizer Function off.
with Minimised
(Super
Image Siabillzer)
distant subject or when you record while
Dial
to select [DIGITAL
the
[PUSH] Dial to select
[
z
1.
_g
]
lndication O appears
case. the
[ 3 ]
Camera
rnay
[
Indication flashes.
not be
5
Dial.
&
rnay
Cancelling the Super Image Stabilizer Function
Set [EFFECTI] on the [DIGITAL EFFECT] Sub-Menu to
IOFF].
GB~93'MkBzml7tm@m
(&!E)
?x*--+~=
,,g.,:~2$~
1
@[VCRICAMERA](&?@&@/
f33
3
t5?hlrz!5
4
wkhlrB3aa
n-=RDRE€
-8--*-
;z.:
2
~>
-
-4
E.
-
-
--.
.
z
-c
,=,\
..
-.
-
...
,>.
..
:...--.Lz~
.
..~ ~ .
.=,~=-.==.-z
-
.-
.a
-a
d
,-
=-
.
.,-
-
,*~:
.
.-
.
-
.~
..=~~
-
.+
,
.
..
-p
E[VCRl'
[b]
[m]
.
~-
~=,?~==
-=---
.
v
~.:
p
=-
-
,
i
.~,,*
$3
:
$3
,
,,
:=
.
-=
.
,.
-
~.
~
,.
-..
O
%E
R%RBS
.;-,
~,
?:;.z.
-
-
-
.
=,
.-
--
-
~?-7Tz
-~
-
;s=;g..z
~..
.
o
.'F
:F.
-->-:a,
.
=__
I
.
z;e'
.
.
g~g,~:~~:;gE;y~~:+
@m3i%mBi?EzBE%32
~.2;*~~~.7s~%
--
--
-
~
-i
-.
.,
~-
-.
-z..-
8
z
--
. ,~*
,
-
<,
:I=--
x:*+:
*S
!+z
-
,
=~~;~~?$:~g
#.
0
,A
@B%&)
;e*@
-
-
.
.=
.
,~~~~~.~g
,.-
-=
>
r.
-
+:-z..===
--s=s
;
:
:
-
&.-~
.
-.g
.
-
'F.
.
-
--
-
-
.
z
~
,7.s-:Tz
..
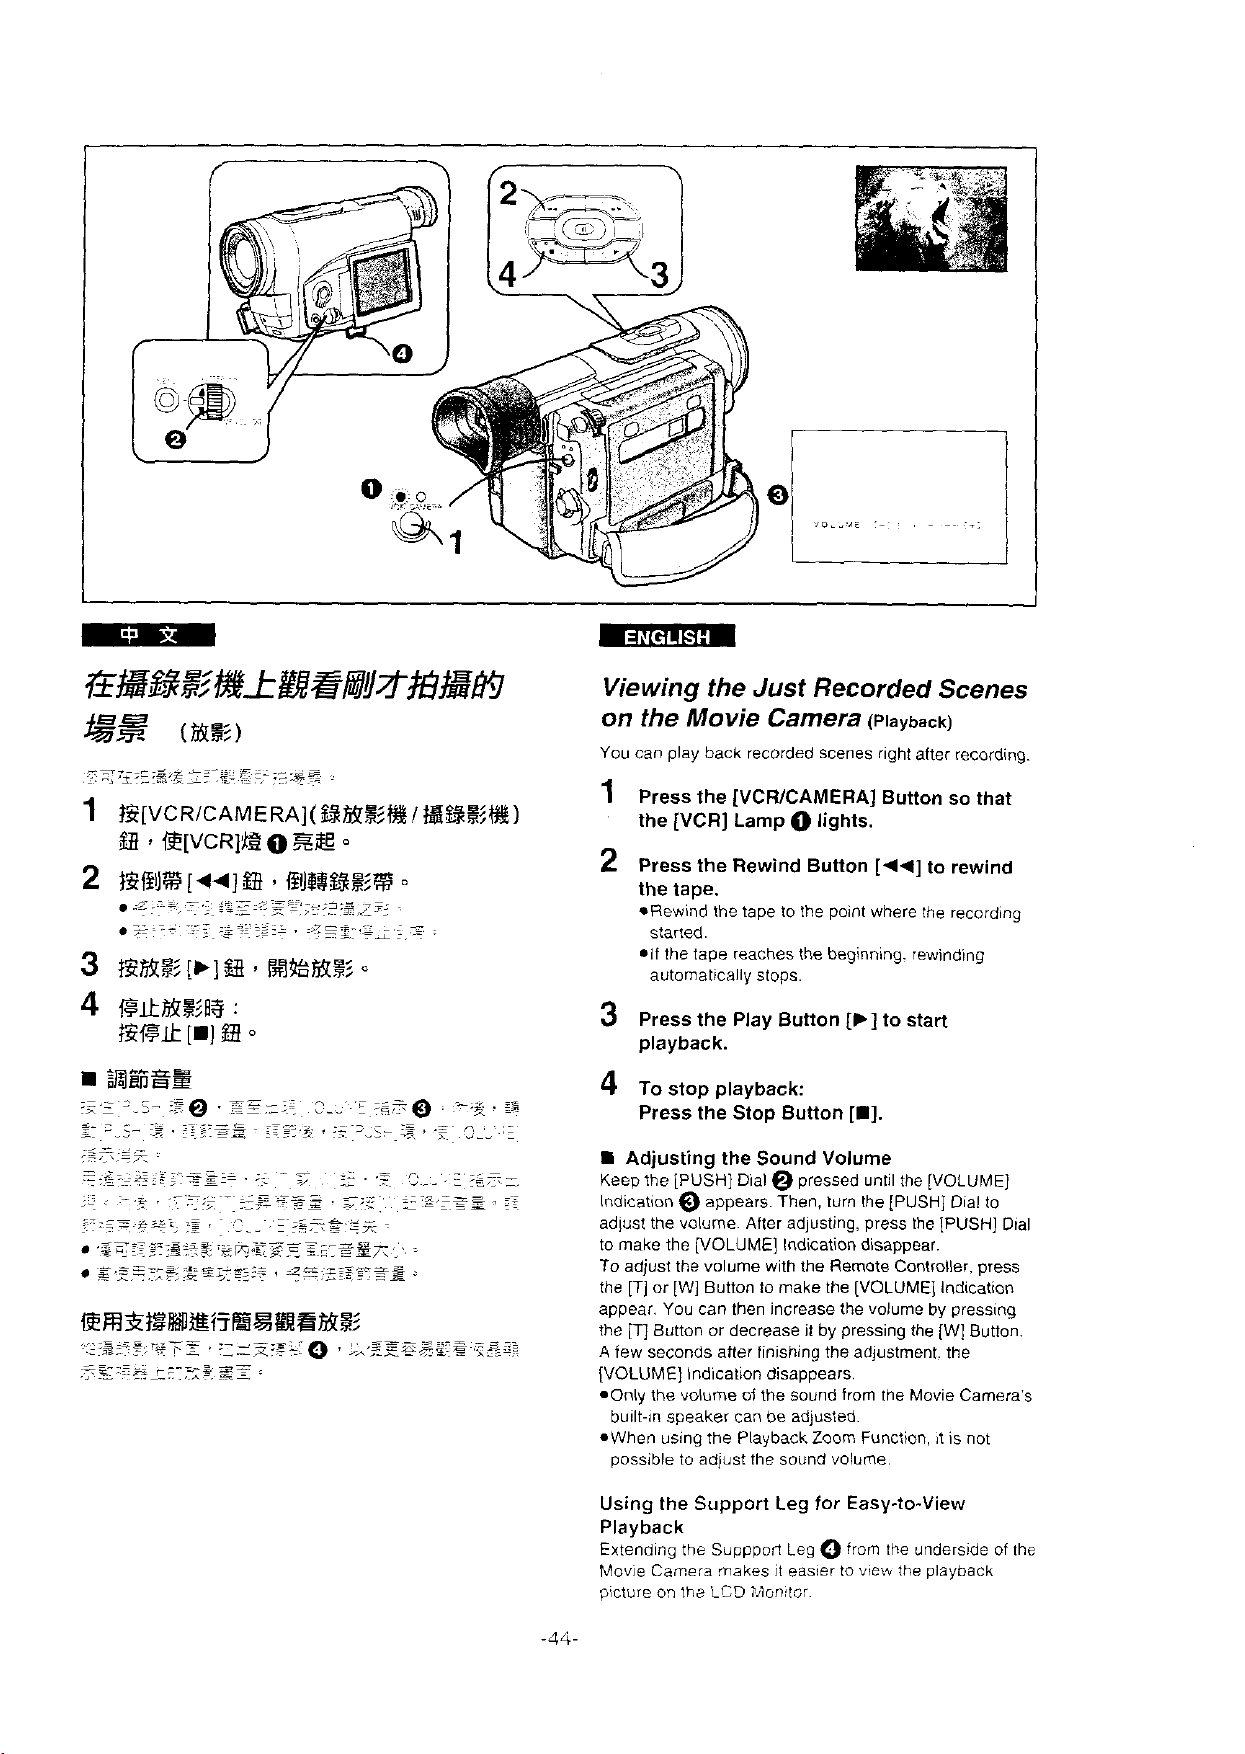
Viewing the Just
on the Movie
You can play back recorded Scenes right
1
Press the [VCRICAMERA] Button so that
the [VCR] Lamp
2
Press the Rewind Button [q*] to rewind
Recorded
Camera
O
lights.
Scenes
(Playback)
after recording.
the tape.
eRewind the tape to the Point where the recording
started
*if the tape reaches the beginning rewinding
automatically stops
3
Press the Play Button
[t]
to start
playback.
4
:g
To stop playback:
Press the Stop Button
[m].
Adjusting the Sound Volume
x.
:~:
~~
;~
Keep the [PUSH] Dial
Indication
adlust the volurne. After adjusting, press the [PUSH] Dial
to make the [VOLUME] Indication disappear.
To
the [T] or [W] Button to make the [VOLUME] Indication
appear. You can then increase the volume by pressing
the
iew seconds after finishing the adjustment. the
A
[VOLUME] Indication disappears.
-Only the volume
built-in speaker can be adjusted.
OWhen using the Playback Zoom Function.
possibie to adjust the sound volurne.
@
appears. Then. turn the [PUSH] Dial to
adjust the volume with the Remate Controller. press
[q
Button or decrease it by pressing the [W] Button.
pressed until the [VOLUME]
oi
the sound from the Movie Camera's
it
is not
Using the Support Leg for Easy-to-View
Playback
Extending the Cuppport Leg O from the underside of the
Movie
Camera makes it easier to
picture on
the LCD
?,lonitsr.
viei*
the playback
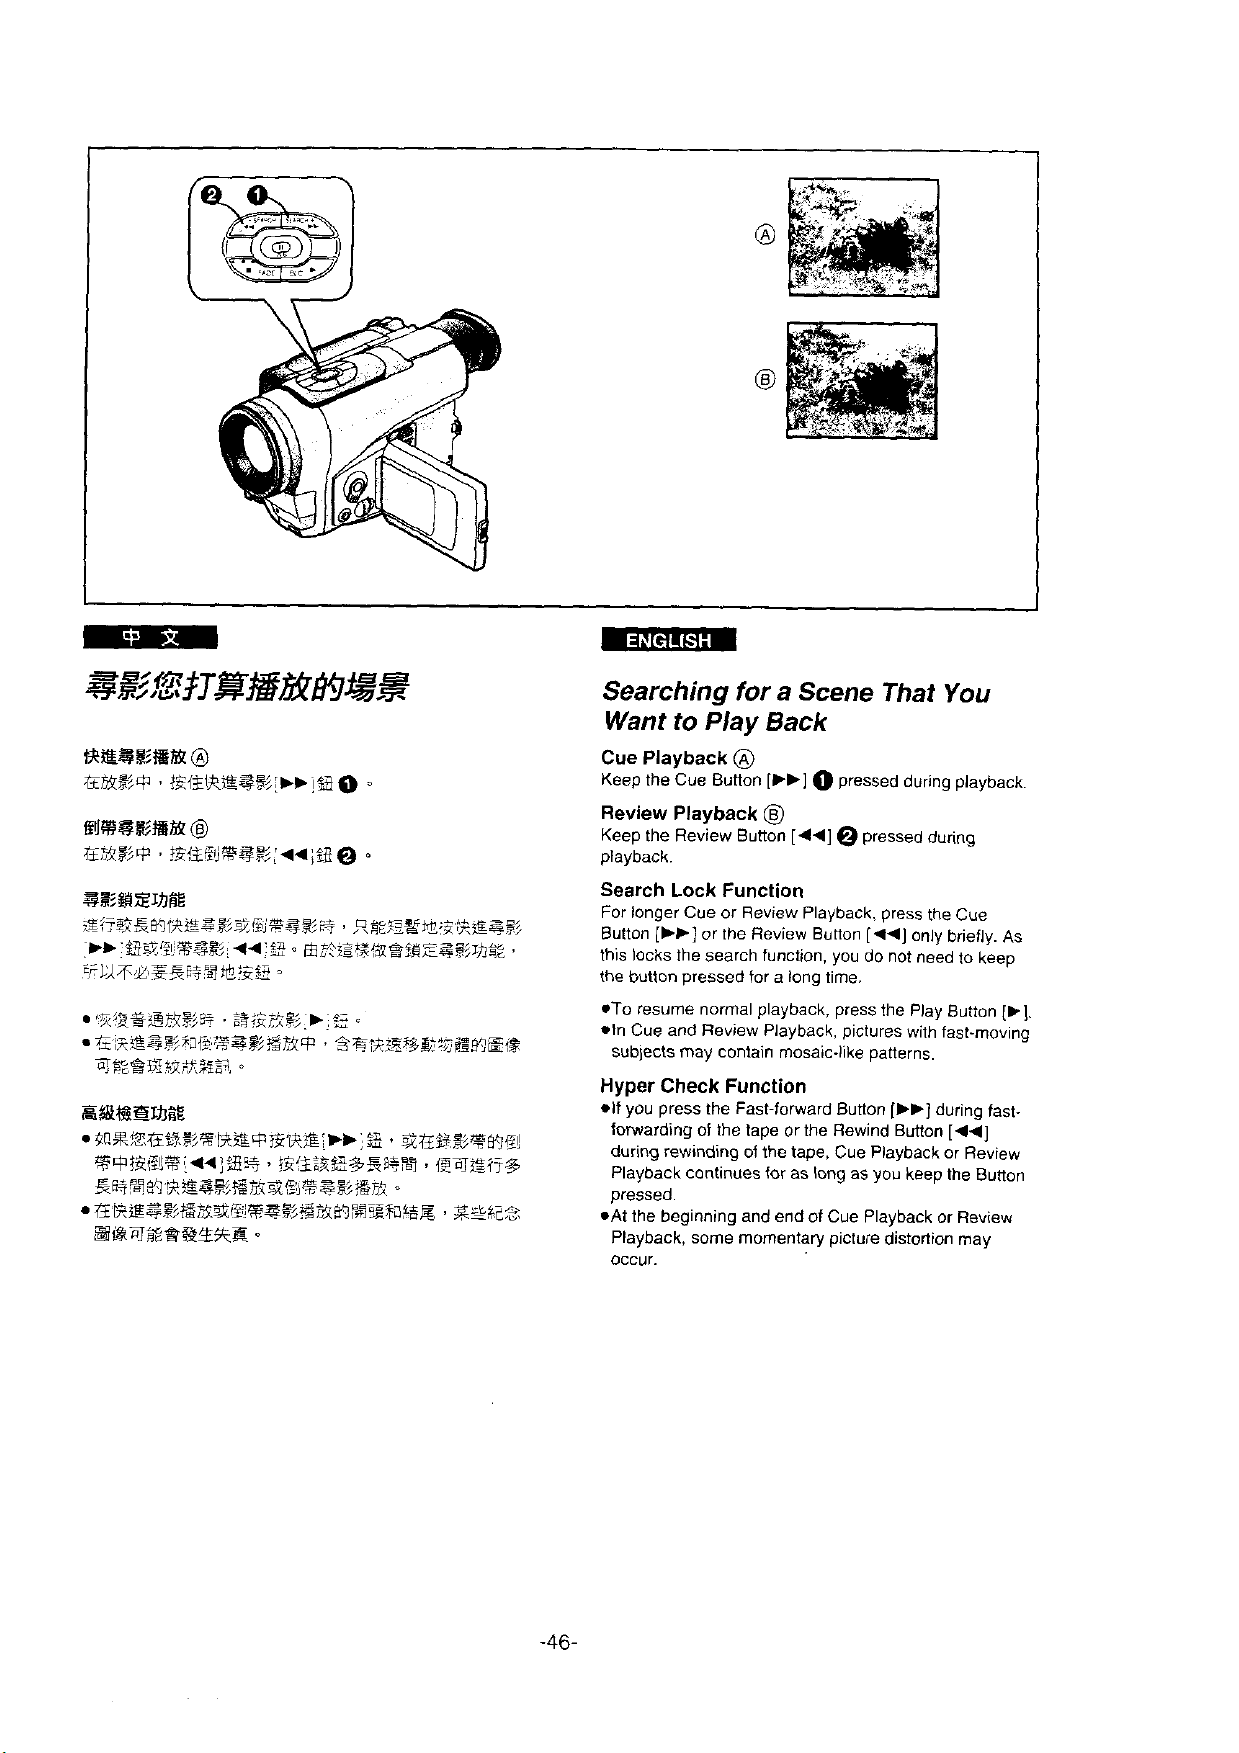
Searching
Want
to
Play
for
a
Scene
Back
That
You
Cue Playback
Keep the Cue Button
Review Playback
Keeo the Review Button
Search Lock Function
For longer Cue or Review Playback, press the Cue
Button
[tt]
this locks the
the button
*To resume normal playback, press the Play Button
*In Cue and Review Playback. pictures with fast-moving
subjects may contain mosaic-like patterns.
Hyper Check Function
*If you press the Fast-forward Button
forwarding of the tape or the Rewind Button
during rewinding of the tape, Cue Playback or Review
Playback continues for as
pressed.
*At
the beginning and end of Cue Playback or Review
Playback,
occur.
@
[b,]
O
Pressed during playback.
63
1441
@
pressed during
or the Review Bunon
search function. you do not need to keep
pressed for a long time.
some momentary picture distortion may
(441
only briefly. As
(FP]
during fast-
1441
long as you keep the Bunon
[t].
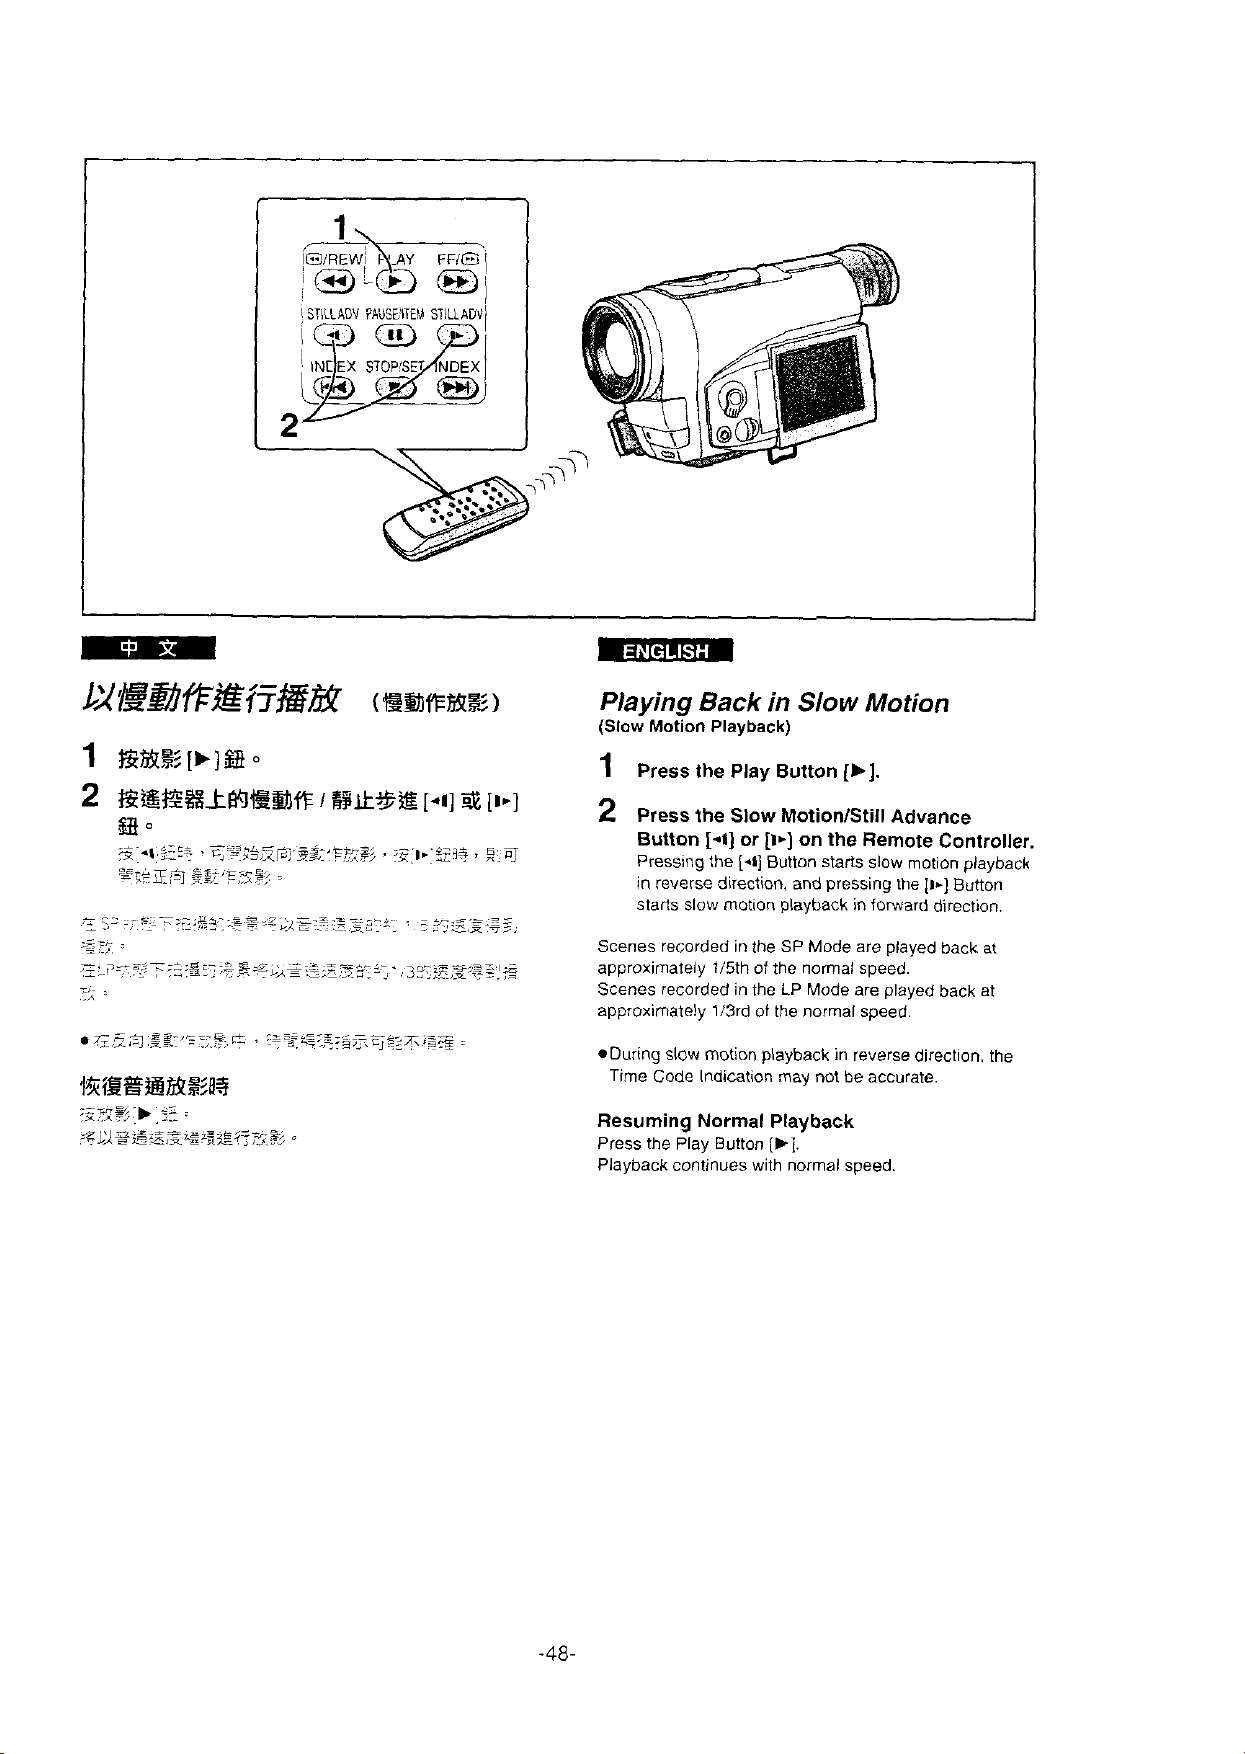
Playing
(Slow Motion Playback)
1
Press the Play Button
2
Press the Slow MotionlStill Advance
Button
Pressing the
in
starts
Back
in
Slow
Motion
[b].
[-i]
or
[I*]
on the Remote Controller.
[.l]
Button Starts slow motion playback
reverse direction, and pressing the
slow motion playback in forward direction.
[I.]
Button
Scenes recorded in the SP Mode are played back
approximateiy 115th of the normal speed.
Scenes recorded in the LP Mode are played back at
approximately
*During slow motion playback in reverse direction. the
Time Code Indication may not be accurate.
Resurning Normal Playback
Press the Play Button
Playback continues with normal speed.
li3rd of the normal speed.
[t].
at
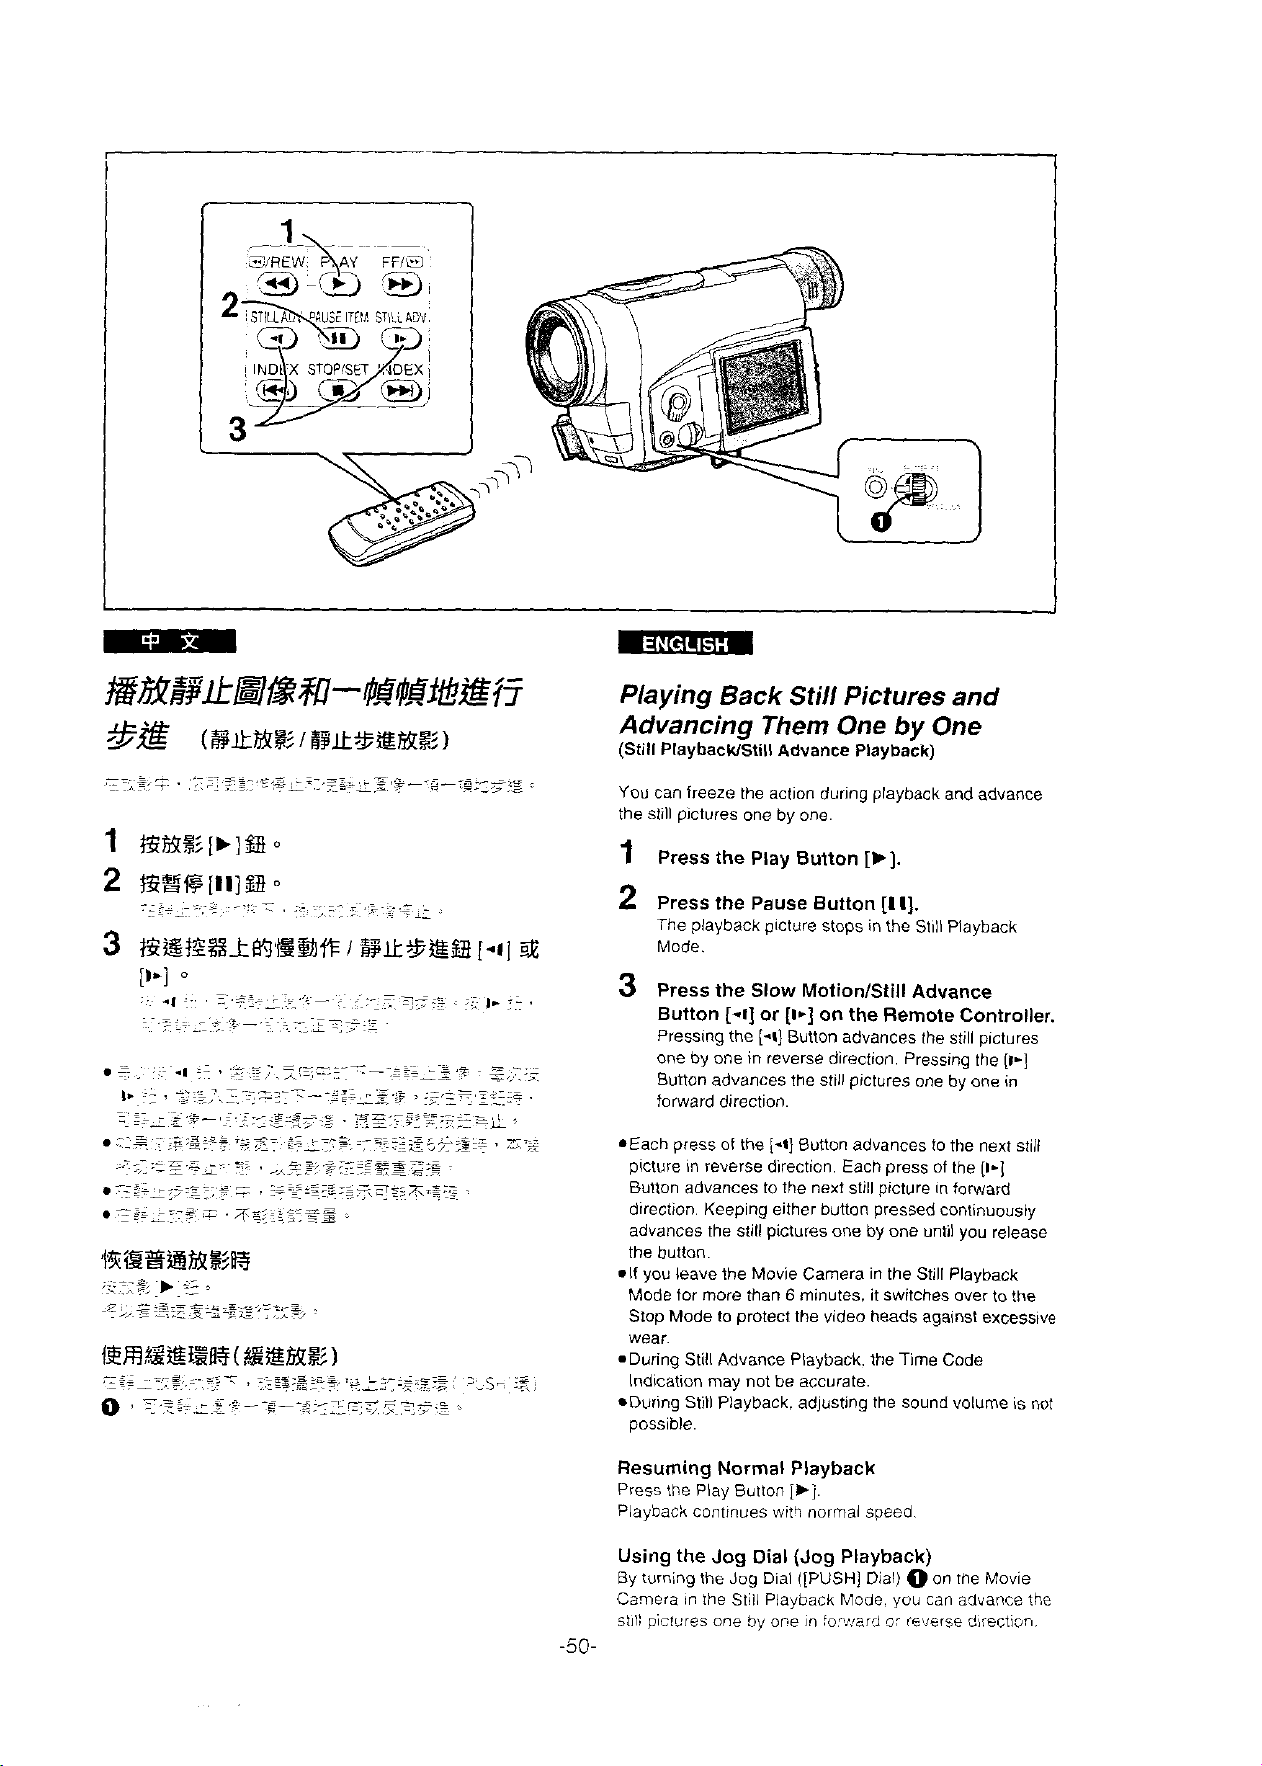
Playing
Advancing Them
(Still PlaybacWStill
You can freeze the action during playback and advance
the still pictures one by one.
1
Press the Play Button
2
Press the Pauce Button
The playback picture stops in the Still Playback
Mode.
3
Press the Slow MotionIStill Advance
Button
Pressing the
one by one in
Bution advances the still pictures one by one in
forward direction.
Back
Still Pictures and
One
Advance
[-i]
or
[i*]
(-1)
Button advances the still pictures
reverse direction. Pressing the
Playback)
[b].
[Il].
on the Remote Controller.
by
One
(1-1
SEach press of the
picture in
Button advances to the next still picture in forward
direction Keeping either
advances the still pictures one by one
the button.
*If you leave the Movie Camera in the Still Playback
Mode for more than
Stop Mode to protect the video heads against excessive
wear.
.During Still Advance Playback. the Time Code
Indication
*During Still Playback. adjusting the sound volume is not
possible.
reverse direction. Each press of the
may not be accurate.
[-t]
Button advances to the next still
button pressed continuously
until you release
6
minutes. it switches over to the
Resuming Normal Playback
Press
the
Play Button
Playback continues witi normai speed
[,j
Using the Jog Dial (Jog Playback)
Bv turning the Jog Dial ([PUSH] Dial) O on the Movie
Carnera in
stil! vis!ures one
the
Still Playback Mode.
by
or.e in !or,.,erO
you
a:
reverse d~rection.
-50-
(1-1
can advance the
fs%%&t%{?&g?
,%7:~ii.,:;s.I~-.i
.;.,r,
,,=A-
..
.
-,
.
.
~,,
1
8@%z&k@J
%%@J%~~$~8%%~WR
-
-~
.:
c.
..
2
.t.z7
-
*
,
-..~
--L.-.
.
~.
.-
-
.
~$s%%wz~~ER#~%!$
.-.3.-=~~
....
..=..
-.--.L..
L?.
.-
--
~
..
,
<%.-~.:==
-
=
~~
E'=ig.
;
,
,5C;-z;g:7=
-
[AV
OUT]
:ezg~$7+2@$~z~TG
~.
-.
.T;q:z:*s
-
.
. - .
.~:
z
<.
xz~*
~,,
.~:~-
~,.>z.::~:7:*-~
--
___._,,:,--,L
,
d>2
~-
-
-
,
%3Zz:,$,F!
,
--,&-:s=73.
-
-.
.
. .
T-,
::-,~=.;~?;=::
L
.
-.
.
~
~<
$:,*:z.-
;
L
5
Q
\'
.
.
%R
--.m
>-"'.
e
-.
=2,7.2
..~
~,
F:&.
:=.z;=
.
...~~a-7,c~---
:
LB;,sa-*.E-
-
--..-:C*,?
o
-a-w7E,
...-
0
,
-sX----L.~*.
_.t
,
c
-.
:-i
~-
:
s,.*.-.=
@$gz@
,.
E
.-,
. .-
::
E
i
Ei
..-=~%:
-z7<<
,.
*'%;~%~
~
-==-..
ii:x
--
.+
,Y-
-.
,-
c
%d
..
-
=
z
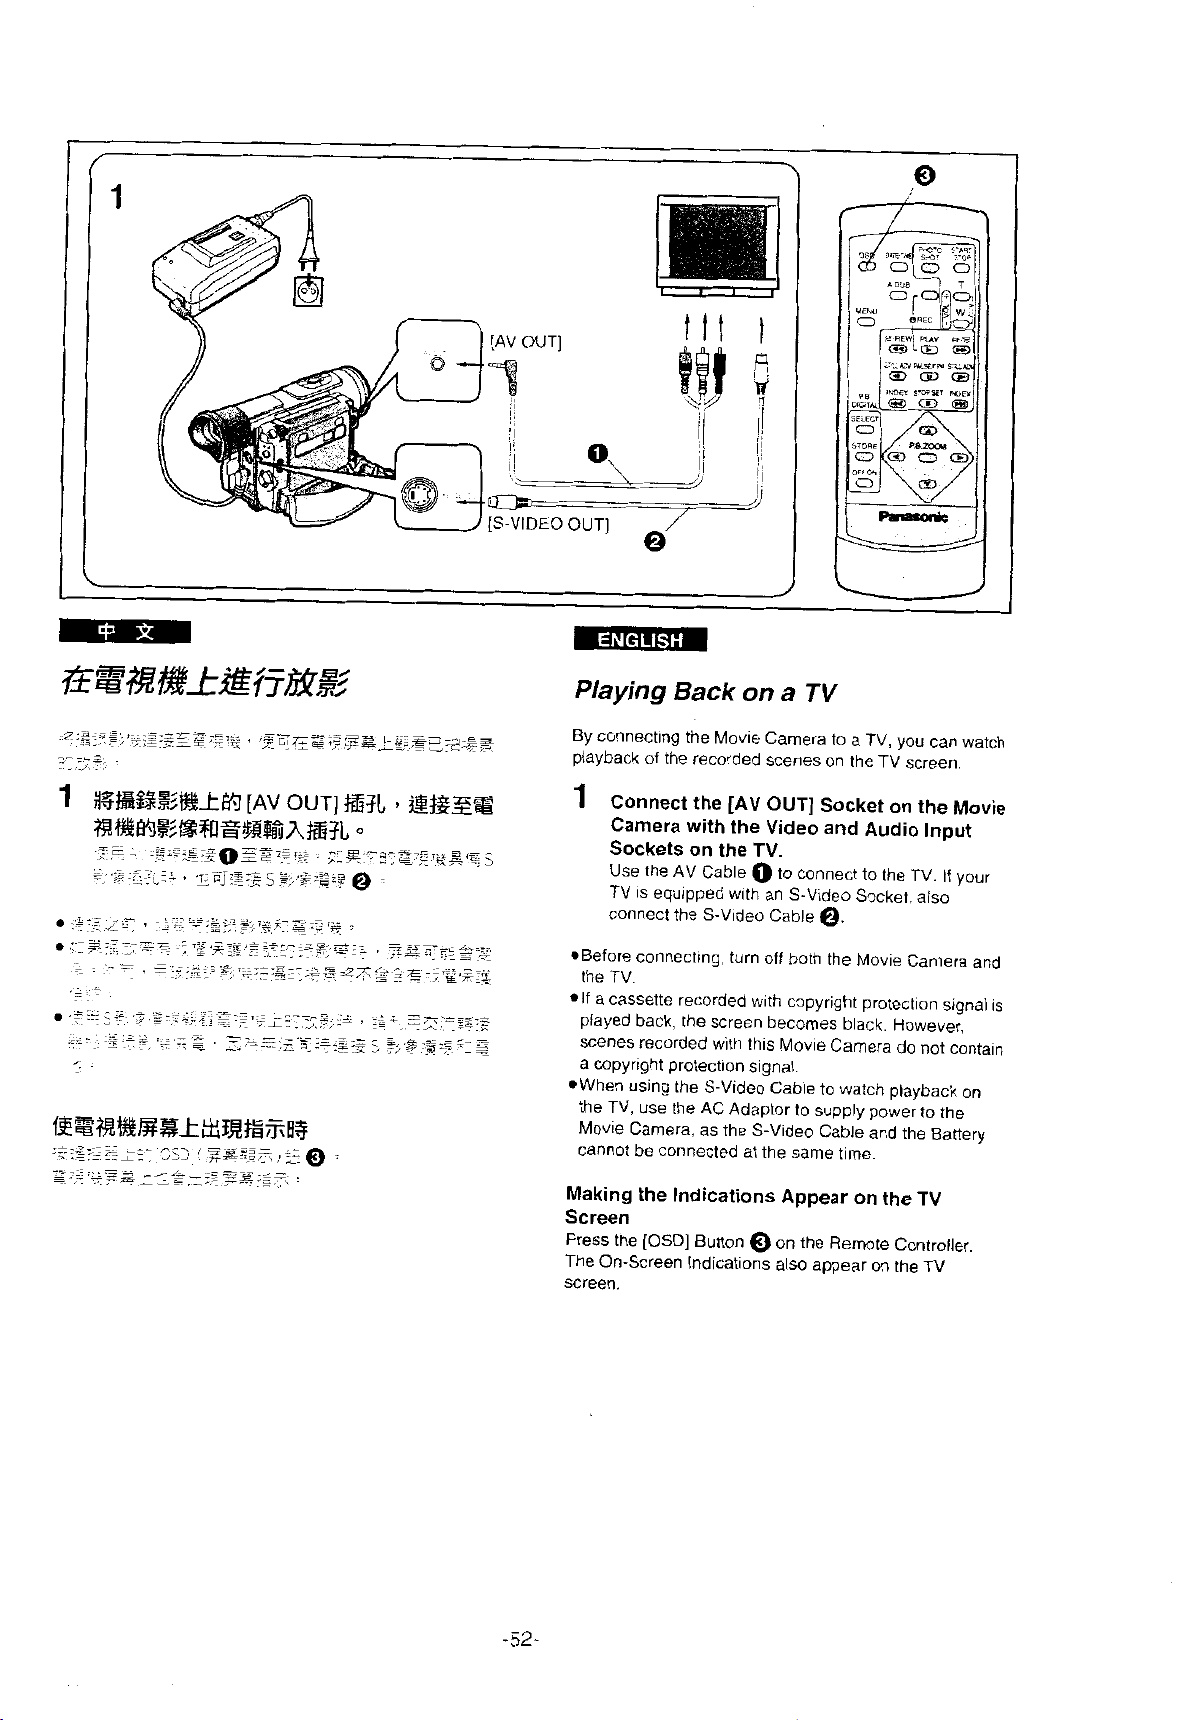
Playing Back on
BY connecting the Movie Camera to a TV, you
playback of the recorded scenes on the
1
COnnect the [AV OUT] Socket on the Movie
Camera with the Video and
Sockets on the TV.
Use the AV Cable O to connect to the
a
TV
Aiidin
~
~~
.
TV
.--.-
can
screen,
Inniit
..
,
V".
TV.
~f
watch
your
TV 1s equipped with an S-Video Socket.
COrIneCt the S-Video Cable
*Before ConnecfIng. turn off both the Movie
e.
camera
the TV.
*If
a CaSSette recorded with copyright protection signal
played back. the screen becomes black. However,
scenes recorded with this Movie Camera do not contain
a copyright protection signal.
*When using the S-Video Cable to watch playback
on
the TV, use the AC Adaptor to supply power to the
Movie Camera, as the S-Video Cable and the Banery
cannot be connected at the same time.
Making the Indications Appear on the
TV
Screen
Press the [OSDI Bunon O on the Remote Controller.
The On-Screen Indications
screen.
also appear on the
TV
and
is
mlmm
1
rn~~S2E
2
E
[OFFION]
3
aaM%Bis8azKBa%o
4
@8%%y@!13~i?$#%Bo
o
(+
22)
f%JE%%EG
3SSSS
.,?et&
r;
:sg!lfqqfi~,%:,$&@
:B
~
[OFF]
(+
zgjyig:~~.
o
18)
L;I$,E~E
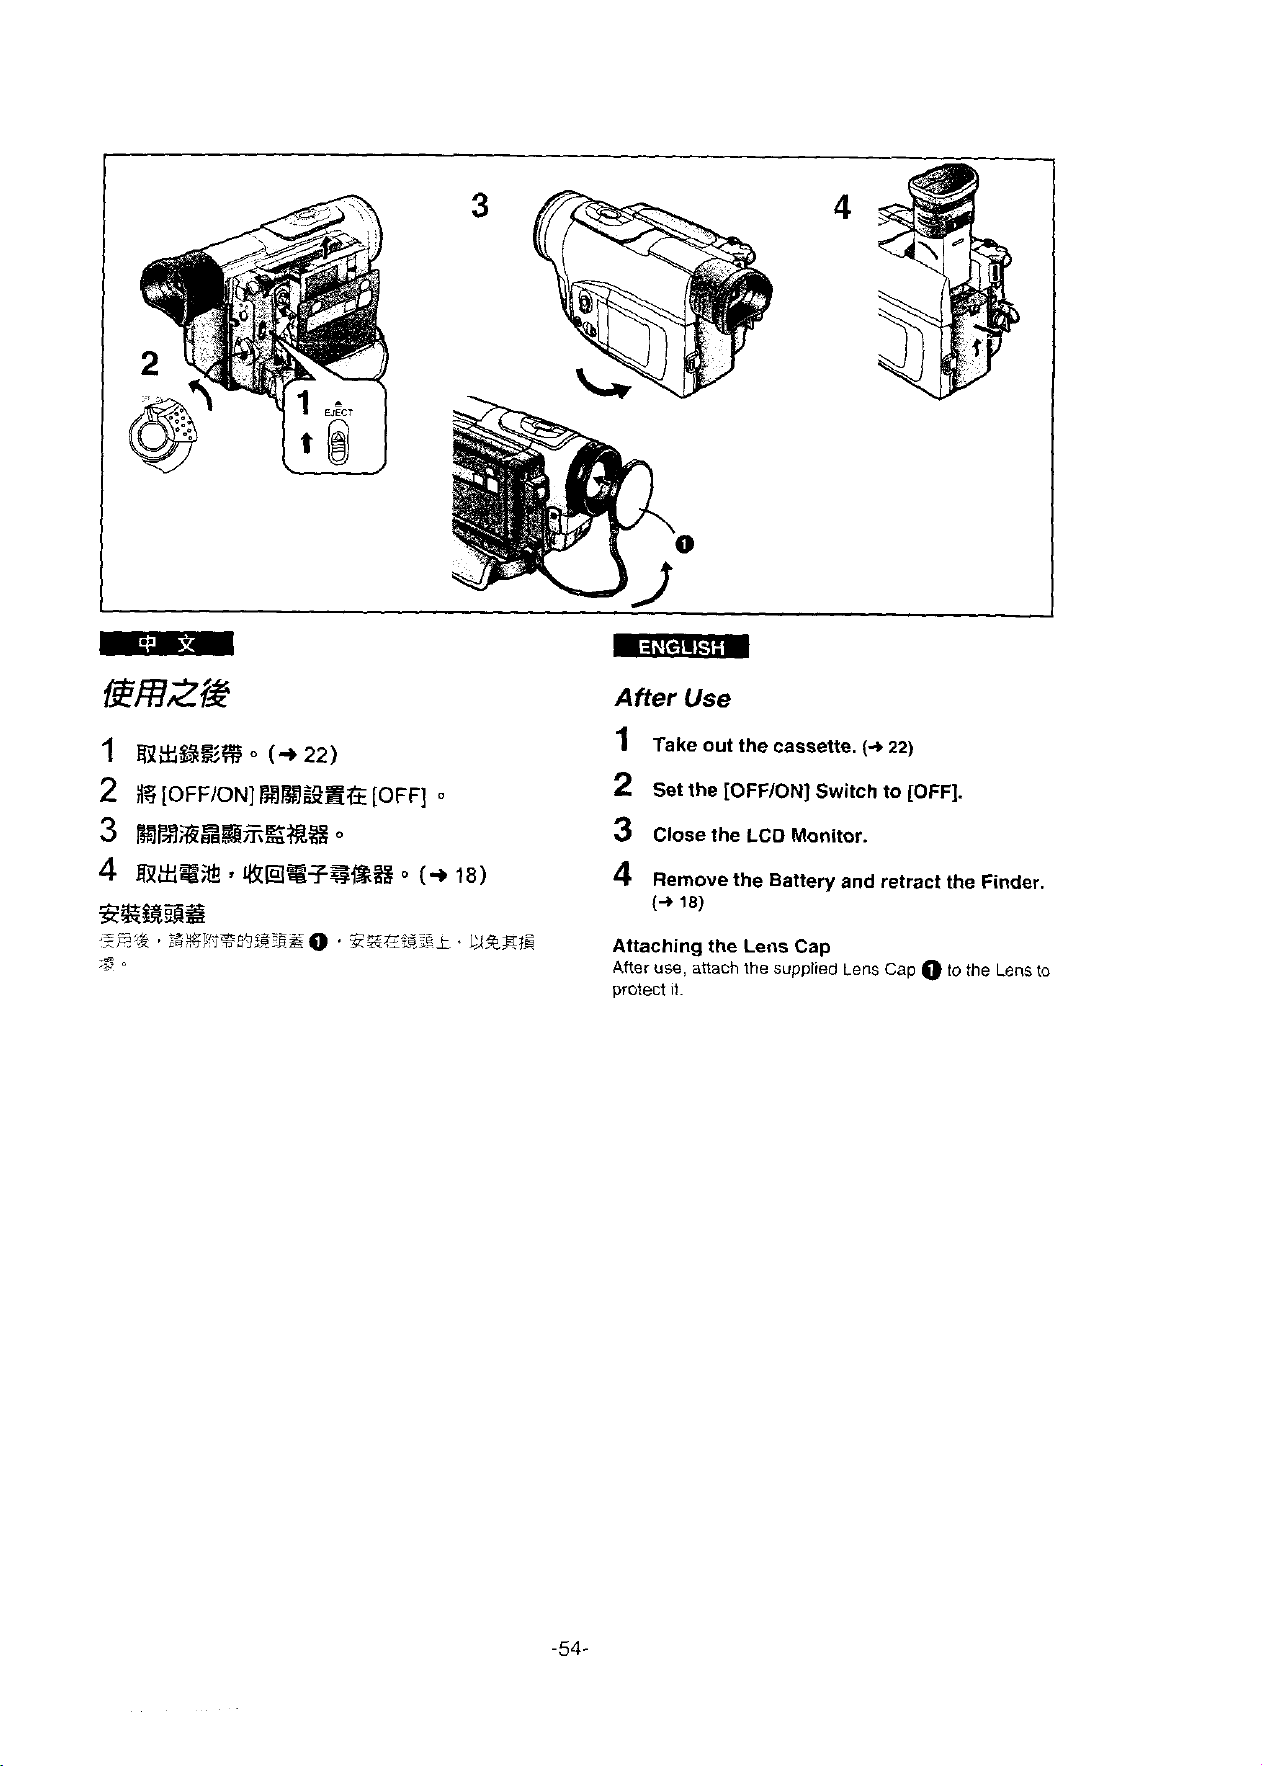
After
1
2
3
4
Attaching the
After
protect it.
Use
Take out the cassette.
Set the [OFFION] Switch to [OFF].
Close the
Rernove the Battery and retract the Finder.
(-r
18)
use, attach
LCD
Lens
the
supplied
Monitor.
Cap
(-r
22)
Lens Cap
O
to
the
Lens
to
G#Bs@@HEt?&3B.e
(B%Z@ZZ
.*:Elss
-
-
~
BG%w7*=*s5-
+~,.
A
,:,z
1
,=eF/;
rnL>..38%,*>!.,
,
-
sm.2.z+.m--E
.
,s~,=,G:Ez,r=.zqg
EliEmgZB[-SEARCH]%EO3&B
[SEARCHII
,;z
C;:IiL
:
.:z
jE.2C.-
'h
d..
1
=a*,*..
fik*
-?:,
%,=z.~--<4,?+Tc--
=.:-
1
?!@PA&
i=,
L
~..
i{
.
*z.-
,:-z=
3
qg,?@BS3$-*%
.,...
<.:,~,~z;3~~~-*Sj3,,g
2
--*s.
D,?.
E;z,-;+zf's
0
,=,.A&*.
;
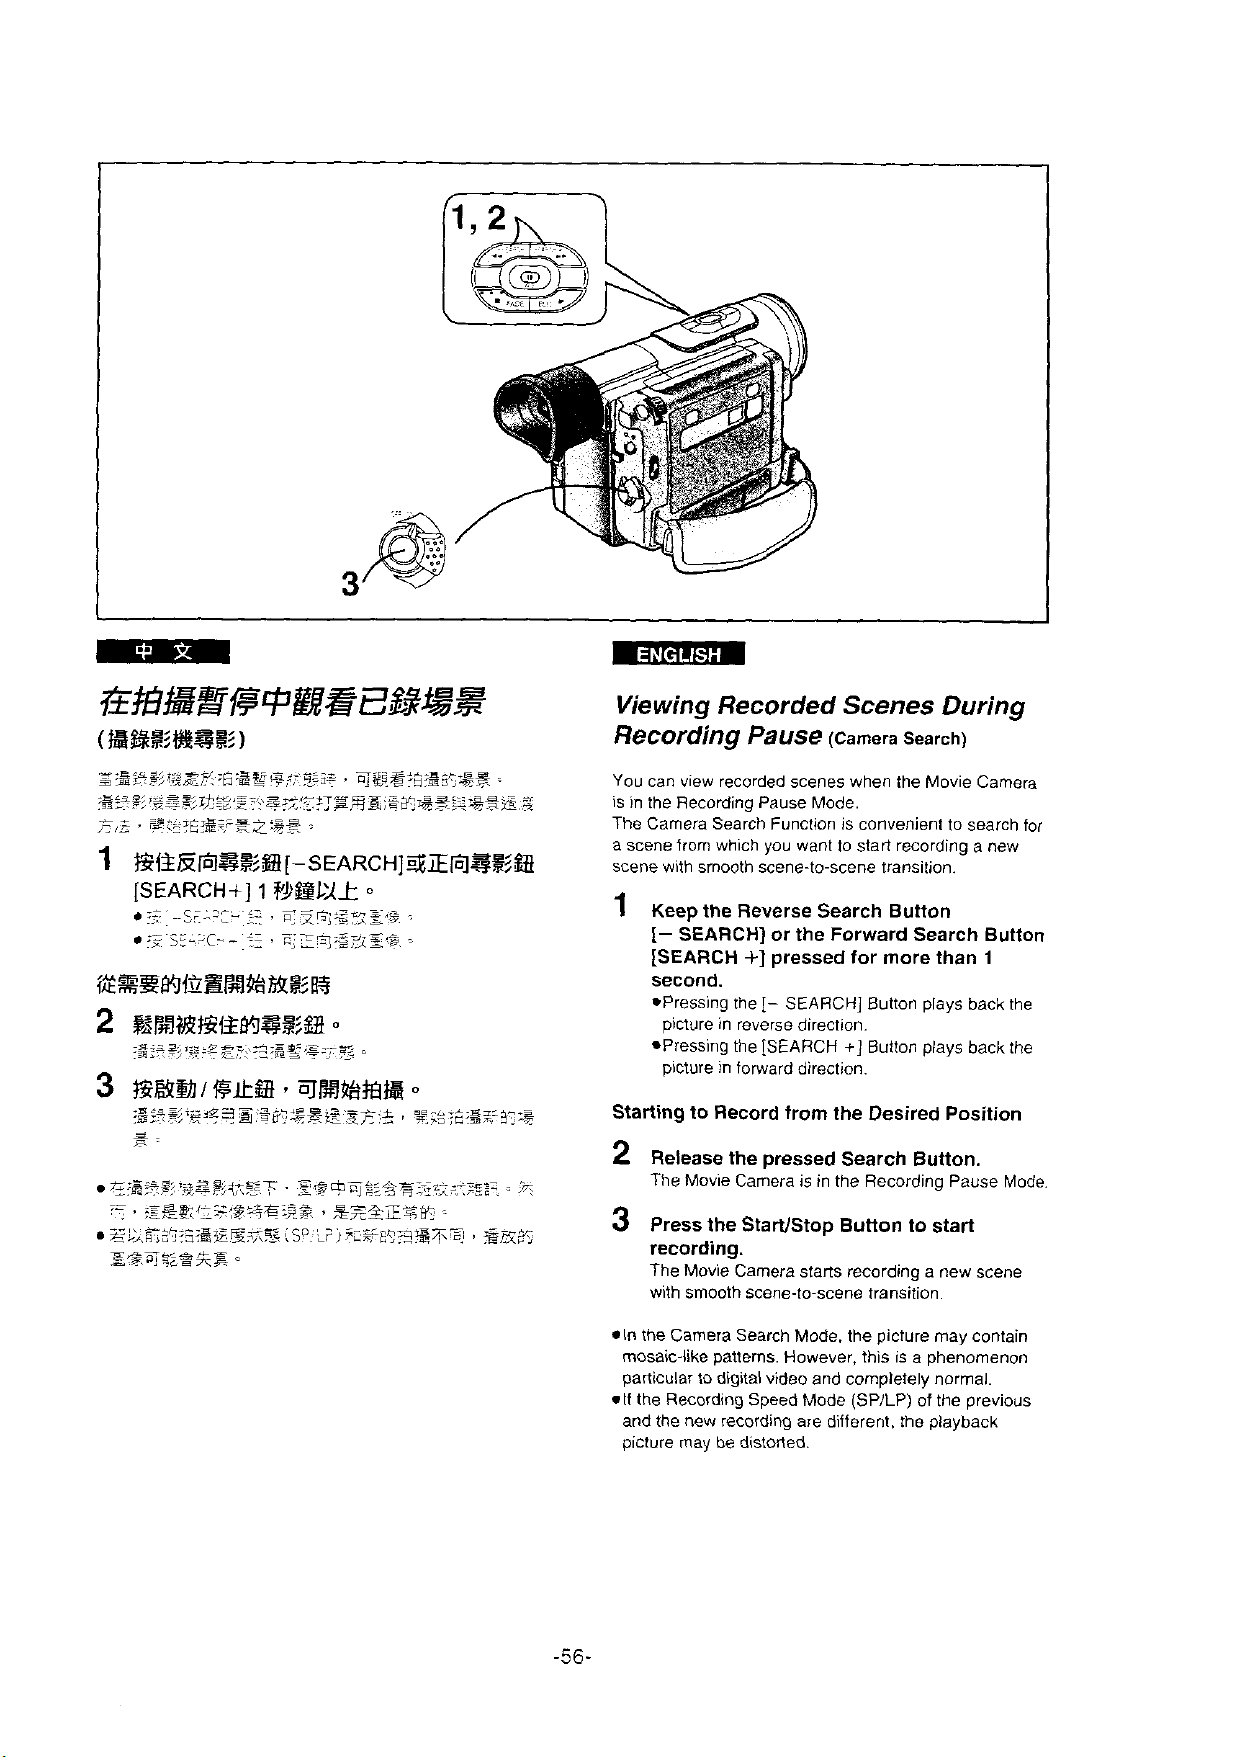
Viewing Recorded Scenes During
Recording Pause
5
You can view recorded scenes when the Movie Camera
is in the Recording Pause Mode.
The Carnera
a
scenefrorn which you want to start recording a new
scene with srnooth scene-to-scene
1
Keep the Reverse Search Button
[-
[SEARCH
Search Function is convenient to search for
SEARCH] or the Forward Search Button
i]
second.
epressing the
picture in
epressing the [SEARCH
picture in forward direction.
1-
reverse direction.
Stariing to Record from the Desired Position
2
Release the pressed Search Buiion.
The Movie Camera is in the Recording Pause Mode.
3
Press the StartlStop
recording.
The Movie Camera starts recording a new scene
smooth scene-to-scene transition.
with
(Camera Search)
transition.
pressed for more than
SEARCH] Button plays
t]
Button plays back the
Bution
to
start
1
back
the
*In
the Carnera Search Mode, the picture rnay contain
rnosaic-like patterns. However, this is a phenomenon
particular to digital video and
-If
the Recording Speed Mode (SPILP) of the previous
and the new recording
picture may he
distorted.
cornpletely normal.
are different. the playback
.i
ICi
O
CI.l'll
I
DIGITAL
1
DISPLI"
CFFECT
SETUP
(ZEm%5)
,=eG&.%$?7-=<,
7
,,-.A
~
~
~~~:~,~,::?;:g:E,~:*)
,,*.s<
1
E[VCRICAMERA](%&!%?&?
$3
,
~D/CR~~
2
f5i[MENU](Z%)B
.,'=
~,~.
.
,.
3
$i$m[PUSH]
FUNCTIONS]
4
$39
[PUSH]
q
*~~$~:$:&g~~<~*:*?~*$~
:
0
333
'
.i
*I===
i
is,
,
%@E
n,
'U
(T;E)fE
SEARCH](Z%ZB)
I
@%%&?)
o
-e
~B[OTHER
,-
5
[PUSH]
_'.
TF.=;
E
o
[BLANK
o
SEAIICH
REMOIE
REC
SPEED
RETURN
."UOTD
OFF
*VCF<I
bSP
,
----
.ON
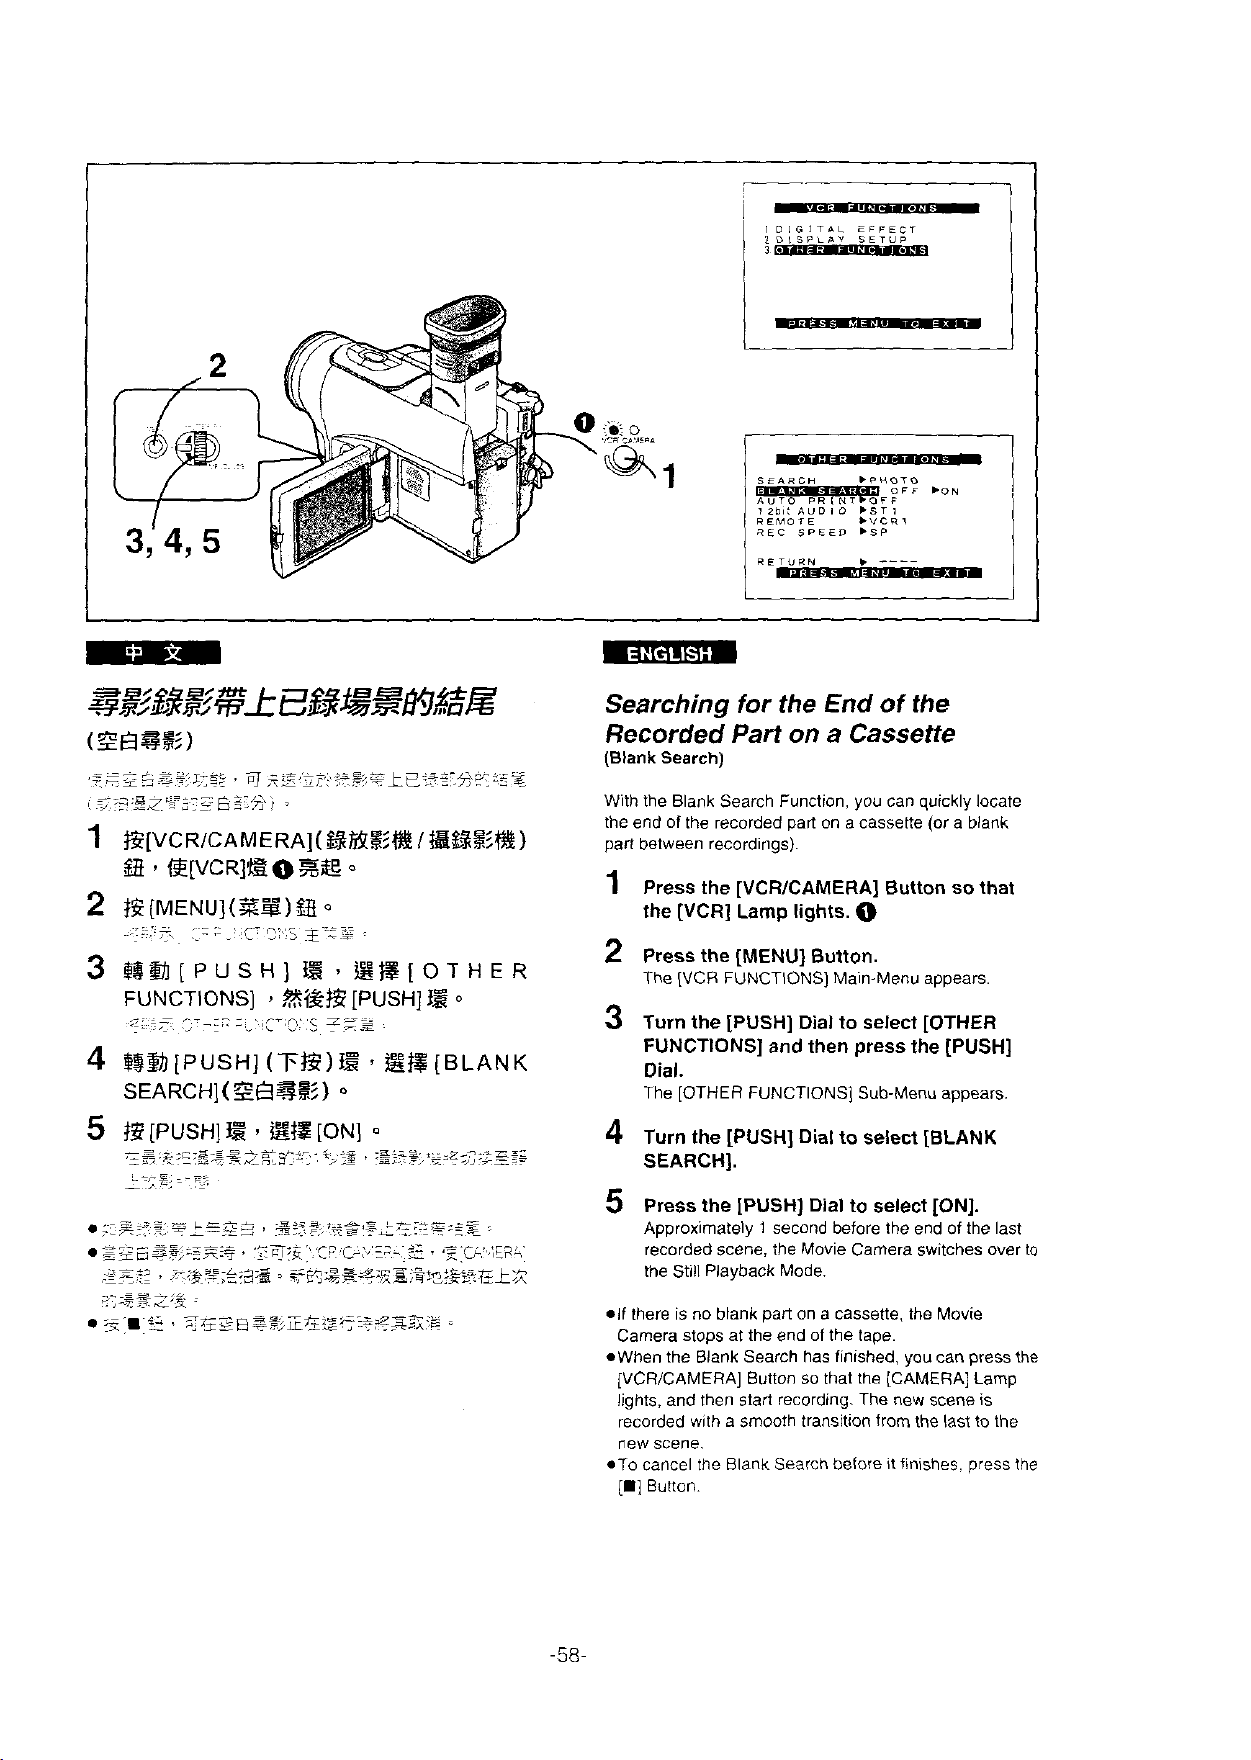
Searching for the End of the
a
lights.
Cassette
O
Recorded Part on
(Blank
Search)
With the Blank Search Function. you can quickly locate
the end of the recorded part on a cassetie (or a blank
between recordings).
pari
1
Press the [VCRICAMERA] Button so that
the [VCR]
2
Press the [MENU] Button.
The
3
Turn the [PUSH] Dial to select [OTHER
FUNCTIONS] and then press the [PUSH]
Dial.
The [OTHER FUNCTIONS] Sub-Menu appears.
Lamp
[VCR
FUNCTIONS] Main-Menu appears
5
$Z
[PUSH]
-.
,-r.,*;c;
-
z.zsA*3L*-,.
.
-,-<-z
S?
.~.d-m'.+.
E#
.
[ON]
o
,
;ek=%.
D~-;,:,
*:z.z-7..*~zz
5--.1J.+;'i
4
Turn the [PUSH] Dial to select [BLANK
SEARCH].
5
Press the [PUSH] Dial to select [ON].
Approximately 1 second before the end of the last
recorded scene, the Movie Carnera switches over to
the Still Playback Mode.
.If there is no blank part on a cassetie, the Movie
Camera stops at the end of the tape.
OWhen the Blank Search has finished,
[VCRICAMERA] Button so
lights, and then
recorded with
new scene.
*TO cancel the Blank Search before it finishes. press the
[i]
Button.
start recording. The new scene is
a
srnooth transition from the last to the
thai the [CAMERA] Lamp
you
can
press the

1-
i
BLANK
AUTO PRINTbOFF
1
2bit
REMOTE bVCRI
REC SPEED
.-
;
I
:
.
.
. , .
-
,
.
i
-
.
.
=
,
.=---
~.,ZE,
,
ï?'_~_
~s,
.-
-
...-.
..?i$
C.',E:-
-
.
.
,
. L . . .
.
~-
-
e;.-
z
.
,"
z-,
d.,-
-
<
.
_-I
.
SEARCHFOFF
AUD 1 0
~
~
_
_---=::==
,
-G
*
4
=.
-z
. , .
.~ -.
-
:;
..=.
~.
--
,-,\L.;=.
,...,,.~*=-,.~
s.<::
q.
F==-*:*
.
$
,
.
.
-
,
.-
-
>.
,-=E.;'-
g,
.z::&:sE,
-,
~Fa:..7;
.,
.J
<=
Z,-',C-',z,;,s
-
z=-=-=
=:
~.
:
:=*
,y,+,
-~.<
z
_-,,
.=,-
-:r;zs.+
.-
z
/>.,:=::=s=,.z:~~~,:~;$~;~~<$
=-
A~z
5
,=;=
ii_'
L
--+.x.
_r3zs,An::l~:,<~l~;~%:g
bPHOTO SCENE
,ST
1
WSP
Z-
.<
.,.-
*s2-2
:.<g3
-.
.
~
<r=
__.
~
.
~~,&~;:~~,,~
,=-<
G:
=i-
:
,9-,zz
xrEp5--;z
, ,
,-s~=
--=-=E
'
%55e,=:=.>:r
.
.'=--
.
.
, > .,-
-
,
.~.
.,.
ar-'
i
s=:
.-z-
,='..z.-
,..
,
k~~*$+~z~..~ee
r,.
._ .
~
,
1
1
REC SPEED bSP
AUDIO REC
WIND
-~ZHOUR
REMOTE bVCR1
REC LAMP POFF
/
BEEP
CUT
SOVNDIOFF
FtZblt
.OFF
DAY
i
Searching for the Beginning of
Recorded Scenes
Marked with
Index Signal
(Index
Search)
To ailow easy searching for desired scenes, this Movie
Camera automatically records index signals during
recording as follows:
O
Photoshot Index Signal
To
search for still pictures recorded in the Photoshot
(+
38)
Mode
(+
124).
A photoshot index signal is automatically recorded
every time you record a still picture in the Photoshot
Made.
However. in the Continuous Photoshot Mode
no photoshot index signals are recorded.
:T
Scene Index Signal
search for the beginning of recorded scenes.
To
A Scene index signal is automatically recorded in the
..
,
foliowing
*When you start recording after inserting a cassette.
,
G
However. if you switch the Movie
VCR
andlor time before you start recording. no index
signal is recorded.
OAccording to the setting of [SCENEINDEX] on the
[OTHER FUNCTIONS] Sub-Menu of the
FUNCTIONS] Main-Menu:
[ZHOUR]: An index signal is recorded when
[DAY]:
and to use for automatlc printing
(+
38).
cases:
Camera from the
Mode over to the Camera Mode or set the date
[CAMERA
recording is restaried
more
{han 2 hours.
after a lapse of
An index signal is recorded when
recording is restarted
changed since the
after the date has
last recordlng
(Vlhile an index signa!
Indication ilashes for a few ceconds.)
[OTHER FUNCTIONS] Sub-Menu
-
-60-
[OTHER
!.lode
FL'FICTIONS: S'Ab-Menu
is
being recorded the [INDEX)
tri
tne VCR ?.lode
!q
!h?
Carneiz
 Loading...