

Page 1
Operating Instructions
Bedienungsanleitung
Gebruiksaanwijzing
Mode d’emploi
Manuale di istruzioni
Instrucciones de funcionamiento
Manual de instruções
Instrukcja obsługi
Bruksanvisning
Brugsanvisning
Bruksanvisning
Käyttöohjeet
Návod k obsluze
Instrucţiuni de operare
Kezelési útmutató
English Deutsch
Nederlands
Français Italiano Español Svenska Dansk Norsk Suomi Polski Česky Magyar Românã
Microwave Oven
Mikrowellengerät
Magnetron
Four à Micro-ondes
Forno a Microonde
Horno Microondas
Forno Micro-Ondas
Kuchenka Mikrofalowa
Kombinationsugn med Mikrovågor
Mikrobølgeovn
Mikrobølge
Mikroaaltouuni
Mikrovlnná trouba
Cuptor cu microunde
mikrohullámú sütö
NN-SD271S
Page 2

IMPORTANT SAFETY INSTRUCTIONS: Before operating this oven, please read these instructions carefully and keep for future reference.
WICHTIGE SICHERHEITSANWEISUNGEN. Bitte sorgfältig durchlesen und zur weiteren Bezugnahme aufbewahren.
BELANGRIJKE VEILIGHEIDSINSTRUCTIES. Lees ze a.u.b. zorgvuldig door en bewaar ze zodat
u ze opnieuw kunt raadplegen wanneer nodig.
INSTRUCTIONS DE SÛRETÉ IMPORTANTES. Avant d’utiliser le four à micro-ondes, lisez attentivement les recommandations d’utilisation et
conservez-les soigneusement.
ISTRUZIONI IMPORTANTI PER LA SICUREZZA. Leggere attentamente queste istruzioni e
conservarle per consultazioni future..
INSTRUCCIONES SOBRE SEGURIDAD IMPORTANTES. Léalas detenidamente y guárdelas
para futura referencia.
INSTRUÇÕES DE SEGURANÇA IMPORTANTES. Leia atentamente as instruções de segurança
e guarde-as para futuras consultas.
WAŻNE INSTRUKCJE BEZPIECZEŃSTWA. Prosimy o dokładne zapoznanie się z instrukcją i
zachowanie jej.
VIGTIGE SIKKERHEDSFORSKRIFTER. Læses omhyggeligt, og opbevares til senere brug.
VIKTIGE SIKKERHETSINSTRUKSJONER. Les nøye, og oppbevar på et trygt sted slik at du kan
slå opp ved behov.
TÄRKEITÄ TURVALLISUUSTIETOJA. Lue nämä ohjeet huolellisesti ja säilytä ne myöhempää
tarvetta varten.
VIKTIGA SÄKERHETSANVISNINGAR. Läs igenom anvisningarna noga och spara dem för
framtida referens.
DŮLEŽITÉ BEZPEČNOSTNÍ POKYNY. Před uvedením trouby do provozu si laskavě pečlivě
přečtěte tyto pokyny a uschovejte je pro budoucí použití.
INSTRUCŢIUNI DE SIGURANŢĂ IMPORTANTE: Înainte de utilizarea a acestui cuptor, vă rugăm
să citiţi cu atenţie aceste instrucţiuni şi să le păstraţi pentru referinţe ulterioare.
DŮLEŽITÉ POKYNY K BEZPEČNOSTI. Pečlivě si je prosím přečtěte a uložte pro případné
použití.
Page 3

EN
English
Important safety instructions. Before
operating this oven, please read these
instructions carefully and keep for future
reference.
This appliance can be used by children
aged from 8 years and above and persons
with reduced physical, sensory and
mental capabilities or lack of experience
and knowledge if they have been given
supervision or instruction by a person
responsible for their safety concerning the
use of the appliance in a safe way and
understand the hazards involved. Children
shall not play with the appliance. Cleaning
and user maintenance shall not be made
by children without supervision. Keep the
appliance and its cord out of reach of children
less than 8 years.
When this oven is installed, it should
be easy to isolate the appliance from the
electricity supply by pulling out the plug or
operating a circuit breaker.
1
Page 4

EN
If the supply cord is damaged, it must be
replaced by the manufacturer or its service
agent or a similarly qualied person in order
to avoid a hazard.
Warning! The appliance should be
inspected for damage to the door seals
and door seal areas and if these areas
are damaged the appliance should not
be operated until it has been repaired
by a service technician trained by the
manufacturer.
Warning! Do not attempt to tamper with
or make any adjustments or repairs to the
door, control panel housing, safety interlock
switches or any other part of the oven. Do
not remove the outer panel from the oven
which gives protection against exposure to
microwave energy. Repairs should only be by
a qualied service person.
Warning! Do not place this oven near an
electric or gas cooker range.
2
Page 5

EN
English
Liquids and other foods must not be heated
in sealed containers since they are liable to
explode.
Warning! Only allow children to use the
oven without supervision when adequate
instructions have been given so that the child
is able to use the oven in a safe way and
understands the hazards of improper use.
This oven is intended for counter-top use
only. It is not intended for built-in use or use
inside a cupboard.
For countertop use:
Place the oven on a at and stable surface
more than 85 cm above the oor.
Allow 15 cm of space on the top of the
oven, 10 cm at the back, 5 cm on one side,
and the other side must be opened more
than 40 cm.
3
Page 6

EN
When heating food in plastic or paper
containers, check the oven frequently as
these types of containers ignite if overheated.
If smoke is emitted or a re occurs in the
oven, press Stop/Cancel button and leave
the door closed in order to stie any ames.
Disconnect the power cord, or shut off power
at fuse or circuit breaker panel.
When heating liquids, e.g. soup, sauces
and beverages in your oven, overheating the
liquid beyond boiling point can occur without
evidence of bubbling. This could result in a
sudden boil over of the hot liquid.
The contents of feeding bottles and baby
food jars are to be stirred or shaken. The
temperature has to be checked before
consumption to avoid burns.
Do not cook eggs in their shells and whole
4
Page 7

EN
English
hard-boiled eggs by MICROWAVE. Pressure
may build up and the eggs may explode,
even after the microwave heating has ended.
Clean the inside of the oven, door seals and
door seal areas regularly. When food splatters
or spilled liquids adhere to the oven walls,
door seals and door seal areas wipe off with
damp cloth. Mild detergent may be used if
a
they get very dirty.
The use of harsh detergent or abrasive
is not recommended. DO NOT USE
COMMERCIAL OVEN CLEANERS.
Failure to maintain the oven in a clean
condition could lead to deterioration of
surfaces that could affect the life of the
appliance and possibly result in a hazardous
situation.
Only use utensils that are suitable for use in
microwave ovens.
5
Page 8

EN
Contents
Installation and connection �����������������������������������������������������������������������������������������7
Placement of your oven ����������������������������������������������������������������������������������������������7
Important safety instructions����������������������������������������������������������������������������������8-11
Outline diagram ��������������������������������������������������������������������������������������������������������12
Control panel ������������������������������������������������������������������������������������������������������������13
Setting the clock �������������������������������������������������������������������������������������������������������14
Child safety lock �������������������������������������������������������������������������������������������������������14
Microwave cooking and defrosting ��������������������������������������������������������������������������15
Defrosting guidelines ������������������������������������������������������������������������������������������������16
Defrosting charts ������������������������������������������������������������������������������������������������������17
Using the timer ���������������������������������������������������������������������������������������������������������18
Multistage cooking ����������������������������������������������������������������������������������������������������19
Using the memory function ���������������������������������������������������������������������������������������20
Turbo defrost ������������������������������������������������������������������������������������������������������������21
Auto weight reheat / cook programs ��������������������������������������������������������������������22-23
Reheating & cooking charts���������������������������������������������������������������������������������24-25
Recipes���������������������������������������������������������������������������������������������������������������������26
Questions and answers ��������������������������������������������������������������������������������������������27
Care of your oven �����������������������������������������������������������������������������������������������������28
Technical specications �������������������������������������������������������������������������������������������� 29
Thank you for purchasing a Panasonic Microwave Oven.
6
Page 9
EN
English
Installation and connection
10 cm
Examine your microwave oven
Unpack the oven, remove all packing
material, and examine the oven for any
damage such as dents, broken door
latches or cracks in the door. If you nd any
damage, notify your dealer immediately� Do
not install a damaged microwave oven�
Earthing instructions
Important!
THIS UNIT HAS TO BE PROPERLY
EARTHED FOR PERSONAL SAFETY.
Placement of your oven
This oven is intended for counter-top use
only� It is not intended for built-in use or use
inside a cupboard�
Counter-top use:
1. Place the oven on a at and stable
surface more than 85 cm above the
oor.
2� When this oven is installed, it should
be easy to isolate the appliance from
the electricity supply by pulling out the
plug or operating a circuit breaker
3� For proper operation, ensure a
sufcient air circulation for the oven.
�
If your AC outlet is not grounded, it is the
personal responsibility of the customer to
have it replaced with a properly grounded
wall socket�
Operation voltage
The voltage has to be the same as specied
on the label on the oven� If a higher voltage
than specied is used, it may cause a re or
other damages�
5� Do not place this oven near an electric
or gas cooker range�
6� The feet should not be removed�
7� This oven is only for household usage�
Do not use outdoors�
8� Avoid using the oven in high humidity�
9� The power cord should not touch the
outside of the oven� Keep the cord
away from hot surfaces
cord hang over the edge of a table or
work top� Do not immerse the cord,
plug or oven in water�
� Do not let the
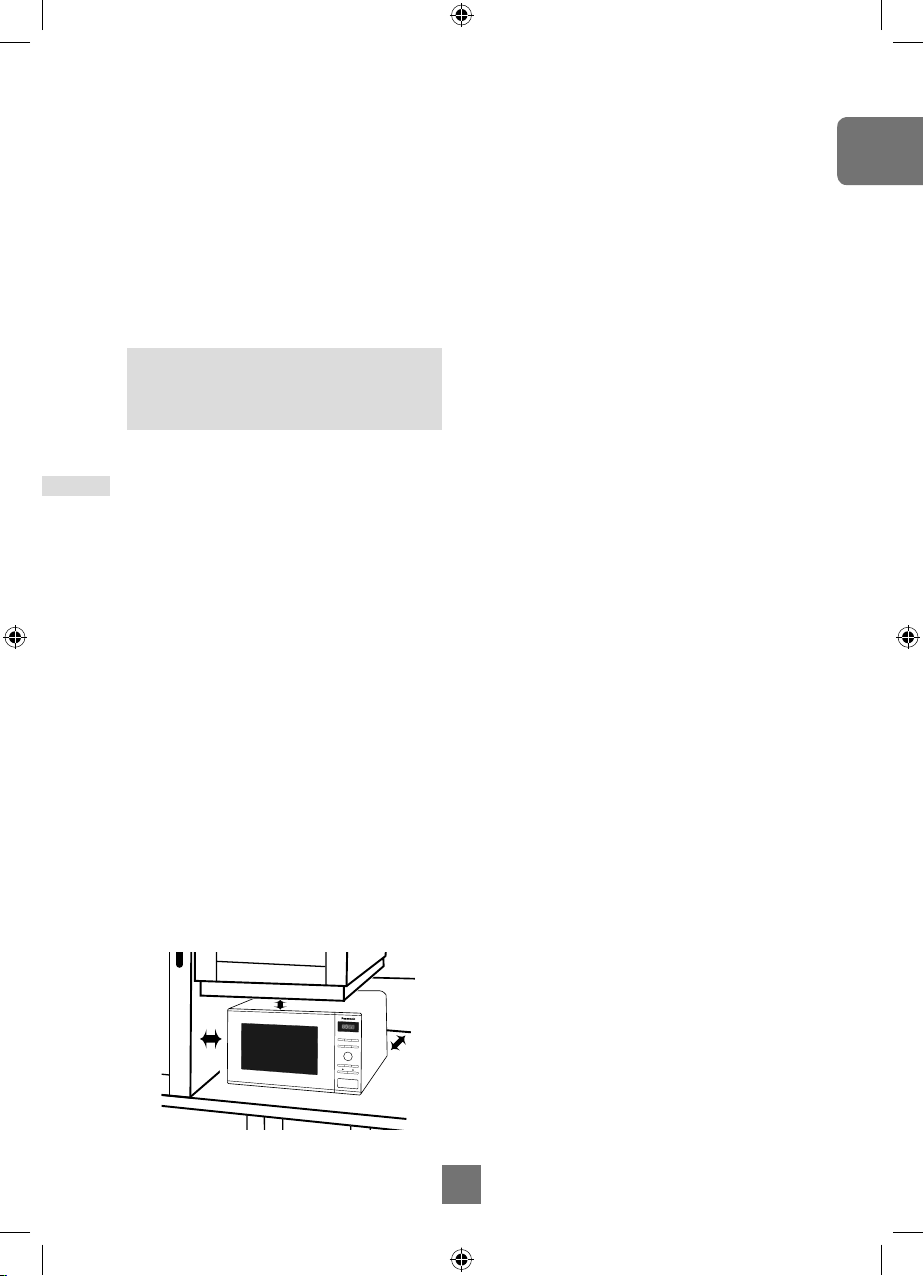
4� Allow 15 cm of space on the top of the
oven, 10 cm at the back, 5 cm on
one side, and the other side must be
opened more than 40 cm�
5 cm
counter top
15 cm
open
10� Do not block the air vents on the
sides and back of the oven� If these
openings are blocked during operation
the oven may overheat� In this case
the oven is protected by a thermal
safety device and resumes operation
only after cooling down�
11� This appliance is not intended to be
operated by means of an external
timer or separate remote-control
system�
7
Page 10

EN
Important safety instructions
WARNING!
Important safety instructions
1� The door seals and seal areas should
be cleaned with a damp cloth� The
appliance should be inspected for
damage to the door seals and door
seal areas and if these areas are
damaged the appliance should not
be operated until it has been repaired
by a service technician trained by the
manufacturer�
2� Do not attempt to tamper with or
make any adjustments or repairs
to the door, control panel housing,
safety interlock switches or any other
part of the oven� Do not remove the
outer panel from the oven which
gives protection against exposure to
microwave energy� Repairs should
only be carried out by a qualied
service person�
3� Do not operate this appliance if it has
a damaged CORD OR PLUG, if it is
not working properly, or if it has been
damaged or dropped� It is dangerous
for anyone other than a service
technician trained by the manufacturer
to perform repair service
4� If the supply cord is damaged,
be replaced by the manufacturer or its
service agent or a similarly qualied
person in order to avoid a hazard
�
it must
�
5� Only allow children to use the oven
6� Liquids and other foods must not be
7� Users are advised to avoid a
8� This appliance can be used by
without supervision when adequate
instructions have been given so that
the child is able to use the oven in a
safe way and understands the hazards
of improper use�
heated in sealed containers since they
are liable to explode�
downward pressure on the microwave
oven door when in the open position�
There is a safety risk that the oven will
tilt forward�
children aged from 8 years and above
and persons with reduced physical,
sensory and mental capabilities or
lack of experience and knowledge if
they have been given supervision or
instruction by a person responsible
for their safety concerning the use
of the appliance in a safe way and
understand the hazards involved
Children shall not play with the
appliance
maintenance shall not be made by
children without supervision
appliance and its cord out of reach of
children less than 8 years
� Cleaning and user
�
� Keep the
�
8
Page 11

EN
English
Important safety instructions
Use of your oven
1� Do not use the oven for any reason
other than the preparation of food�
This oven is specically designed to
heat or cook food
oven to heat chemicals or other nonfood products�
2� Before use, check that utensils
containers are suitable for use in
microwave ovens�
3� Do not attempt to use this microwave
oven to dry newspaper, clothing or
any other materials�
on re.
� When the oven is not being used,
4
do not store any objects inside the
oven in case it is accidentally turned
on�
5� The appliance must not be operated
by MICROW
THE OVEN
may damage the appliance�
6� If smoke is emitted or a re occurs in
the oven, press Stop/Cancel button
and leave the door closed in order
to stie any ames. Disconnect the
power cord, or shut of
or circuit breaker panel
� Do not use this
AVE WITHOUT FOOD IN
� Operation in this manner
They may catch
f power at fuse
�
Oven light
When it becomes necessary to replace the
oven light, please consult your dealer�
Accessories
The oven comes equipped with a variety of
accessories� Always follow the directions
given for use of the accessories�
Glass tray
1� Do not operate the oven without
the roller ring and the glass tray in
place�
2� Never use another type of glass tray
than the one specially designed for
this oven�
3� If the glass tray is hot, let it cool before
cleaning or placing in water�
4� The glass tray can turn in either
direction�
5� If the food or cooking vessel on the
glass tray touches the oven walls and
stops the tray rotating, the tray will
automatically rotate in the opposite
direction� This is normal�
6� Do not cook foods directly on the glass
tray, except when using the Auto
Weight Program for baked potatoes�
9
Page 12

EN
Important safety instructions
Roller ring
1. The roller ring and the oven oor
should be cleaned frequently to
prevent noise and build-up of
remaining food
2� The roller ring must always be used
for cooking together with the glass
tray�
�
Cooking times
The cooking time depends on the
condition, temperature, amount of food
and on the type of cookware�
Begin with the minimum cooking time
to help prevent overcooking� If the
food is not sufciently cooked you can
always cook it for a little longer�
Important!
If the recommended cooking times are
exceeded the food will be spoiled and
in extreme circumstances could catch
re and possibly damage the interior of
the oven.
Small quantities of foods
Small quantities of food or foods with
low moisture content can burn, dry
out or catch on re if cooked too long.
If materials inside the oven should
ignite, keep the oven door closed, turn
the oven off and remove the plug from
the socket
�
Eggs
Do not cook eggs in their shells and
whole hard-boiled eggs by
MICROWAVE� Pressure may build up
and the eggs may explode, even after
the microwave heating has ended�
Piercing Skin
Food with non porous skins, such as
potatoes, egg yolks and sausages
must be pierced before cooking by
MICROWAVE to prevent bursting�
Meat thermometer
Use a meat thermometer to check the
degree of cooking of roasts and
poultry only when the meat has been
removed from the oven� Do not use a
conventional meat thermometer in the
microwave oven because it may cause
sparking�
10
Page 13

EN
English
Important safety instructions
Liquids
When heating liquids, e�g� soup,
sauces and beverages in your
microwave oven, overheating the
liquid beyond boiling point can occur
without evidence of bubbling� This
could result in a sudden boil over of
the hot liquid
To prevent this possibility the following
steps should be taken:
a Avoid using straight-sided
b Do not overheat�
c Stir the liquid before placing the
container in the oven and again
halfway through the cooking time�
d After heating, allow it to stand
in the oven for a short time, stir
again before carefully removing
the container�
�
containers with narrow necks�
Paper/plastic
When heating food in plastic or paper
containers, check the oven frequently
as these types of containers ignite if
overheated�
Do not use recycled paper products
(e�g� Kitchen Roll) unless the paper
product is labelled as safe for
microwave oven use
products may contain impurities which
may cause sparks and/or res during
use�
� Recycled paper
Utensils/foil
Do not heat any closed cans or bottles
because they might explode�
Metal containers or dishes with
metallic trim should not be used during
microwave cooking� Sparking will
occur�
If you use any aluminium foil, meat
spikes or metalware the distance
between them and the oven walls
and door should be at least 2 cm to
prevent sparking�
Feeding bottles/baby food jars
The top and teat or lid must be
removed from feeding bottles or baby
food jars before placing in the oven�
The contents of feeding bottles and
baby food jars are to be stirred or
shaken�
The temperature has to be checked
before consumption to avoid burns�
Remove wire twist-ties from roasting
bags before placing the bags in the
oven�
11
Page 14

EN
Outline diagram
1. Door release
Press to open the door� When you
open the oven door during cooking,
the cooking is stopped temporarily
without clearing earlier made settings�
The cooking is resumed as soon
as the door is closed and Start button
pressed�
2. Oven window
3. Door safety lock system
4. Oven air vent
5. Microwave feed guide
(do not remove)
6. External oven air vents
7. Control panel
8. Power supply cord
9. Plug
10. Identication Label
11. Glass tray
12. Roller ring
13. Position your supplied auto
program menu label here
13
6
2
12
Note.
This illustration is for reference only�
12
11
3
5 6
4
7
8
9
1
10
Page 15

EN
English
Control panel NN-SD271S
3
6
1 Display window
2 Microwave power levels button
3 Turbo defrost programs button
4 Auto reheat programs button
1
2
5
4
5 Auto cook programs button
6 Time / Weight selection dial
7 Memory button
8 Timer button
9 Clock button
10 Stop /Cancel button:
Before Cooking:
One press clears your instructions
During Cooking:
One press temporarily stops the cooking
program
� Another press cancels all
your instructions and the time of day will
appear in the display
11 Start Button
12 Door Release
�
7
10
12
Note
If an operation is set and start button is not
pressed, after 6 minutes the oven will
automatically cancel the operation� The
display will revert back to clock mode�
9
8
11
This oven is equipped with an energy
saving function�
Please note
1� When in stand-by mode the brightness
of the display will be reduced�
2� The oven will enter stand-by mode,
when rst plugged in and immediately
after the last operation has completed�
Beep sound
When a button is pressed correctly a beep
will be heard� If a button is pressed and no
beep is heard, the unit has not or cannot
accept the instruction� At the end of any
complete program, the oven will beep 5
times�
13
Page 16

EN
Setting the clock
When the oven is rst plugged in “88:88” appears in display window.
Press Clock once
A colon starts to blink�
Turn Time/Weight Dial.
Enter the time by turning the Time/
Weight dial. The time appears in the
display and the colon blinks
�
Press Clock
The colon stops blinking�
Time of day is now locked
into the display
�
Notes
1� To reset time of day, repeat step 1 through to step 3, as above�
2� The clock will keep the time of day as long as the oven is plugged in and electricity is
supplied�
3� This is a 24 hour clock, ie 2pm = 14:00 not 2:00�
Child safety lock
Using this system will make the oven controls inoperable; however, the door can be opened.
Child Lock can be set when the display shows a colon or the time.
To Set: To Cancel:
Press Start three times
The time of day will disappear� Actual time will
not be lost� ‘----’ is indicated in the display�
Press Stop / Cancel three times
The time of day will reappear in the display
�
Note
1� To activate child lock, Start must be pressed 3 times within a 10 second period�
14
Page 17

EN
English
Microwave cooking and defrosting
The glass tray must always be in position when using the oven.
300
1 Press
2 Presses
1 Press
2 Presses
1 Press
2 Presses
950
Watts
600
Watts
440
Watts
300
Watts
270
Watts
100
Watts
Max
Medium
Low
Simmer
Defrost
Warm
Select the desired Microwave power
level.
Set the cooking time
using the Time/Weight dial
(HIGH power: up to 30
minutes other powers: up
to 90 minutes)
Press Start Button. The
cooking program will start
and the time in the display
will count down
�
CAUTION!
The oven will automatically work on MAX microwave power if a cooking time is entered
without the power level previously being selected�
Notes
1� For multi-stage cooking refer to page 19 EN�
2� Stand time can be programmed after microwave power and time setting� Refer to
using the timer page 18 EN�
3� You can change the cooking time during cooking if required�
to increase or decrease the cooking time�
minute increments, up to 10 minutes�
Time can be increased/decreased in 1
Turning the dial to zero will end cooking
Turn Time/Weight Dial
�
15
Page 18

EN
Defrosting guidelines
Tips for defrosting
Check the defrosting several times, even if
you use the auto programs� Observe the
standing times�
Standing times
Individual portions of food may be cooked
almost immediately after defrosting� It is
normal for large portions of food to be
frozen in the centre� Before cooking, allow
to stand for a minimum of one hour
During this standing time, the temperature
becomes evenly distributed and the food is
defrosted by conduction� N�B� If the food is
not going to be cooked immediately, store it
in the refrigerator� Never refreeze defrosted
food without rst cooking it.
Joints and poultry
It is preferable to place the joints on an
upturned plate or plastic rack so that they
are not resting in the juices� It is essential
to protect delicate or projecting parts
of this food with small pieces of foil to
prevent these parts from cooking� It is not
dangerous to use small pieces of foil in
your oven, provided they do not come
into contact with the oven walls.
Minced meat or cubes of meat
and seafood
Since the outside of these foods quickly
defrosts, it is necessary to separate them,
break the blocks into pieces frequently while
defrosting and remove them when they
have defrosted�
Beep Sounds
Beeps will sound during the Turbo Defrost
programs� The beeps are to remind you to
check, stir, separate the pieces, or shield
small parts
uneven defrosting�
� Failure to do this may result in
Small portions of food
Chops and chicken pieces must be
separated as soon as possible so that they
defrost evenly throughout� Fatty parts and
the ends defrost more quickly� Place them
near the centre of the glass tray or protect
them�
Bread
Loaves will require standing time to allow
the centre to thaw� Standing time can be
shortened if slices are separated and rolls
and loaves cut in half�
16
Page 19

EN
English
Defrosting charts
Food
Baguette (3) 150g MAX 30 s -
Bread rolls (3)
Bread - slice (3) 60g MAX 10 to 20 sec -
breakfast pastries (3)
Brioche (1) (3)
butter (1) 250g 270W 2 to 3 min 30s 15 mins
Cheese - Quark 250g 270W 6 to 8 mins 10 mins
Cream 600ml 270W 6 to 8 mins 10 mins
Fish whole (2) 500g 270W 12-14 mins 15 mins
Fish llets, thin (2) 500g (4 pce) 270W 10 to 12 mins 10 mins
Fish llets, thick (2) 380g 270W 12 to 14 mins 10 mins
Fish steaks without bone (2) 260g 270W 9 to 10 mins 15 mins
hamburger (1)
pork sausages 300g 270W 4 to 5 mins 10 mins
Pastry - puff 375g 270W 4 to 5 mins 10 mins
Pastry - shortcrust 500g 270W 6 to 8 mins 5 mins
red fruit (2)
Salami (thin) (2) 250g (12 slices) 270W 5 to 6 min 5 mins
shrimps/prawns (2) 200g 270W 7 to 9 min 10 mins
Desserts
Black Forest (3) 600g 270W 10 to 12 min 15 mins
Chocolate fondant (3) 1 pce 500g 440W 3 min 10 mins
Victoria sandwich cake (3) 400g 270W 7 to 8 mins 10 mins
Fruit Tart (3)
Wafes (3)
Weight/Quantity
1 piece (85g) MAX 30 to 40 s -
3 x 85g MAX 40s to 1 min -
2 x 50g
300g 270W 5 to 6 min 5 mins
500g 270W 6 to 8 mins 5 mins
200g 270W 6to 7 mins 10 mins
400g 270W 10 to 12 mins 10 mins
200g 270W 6 to 8 mins 15 mins
300g 270W 10 to 12 mins 15 mins
500g 270W 12 to 14 mins 15 mins
1 slice 270W 3 to 4 mins 10 mins
470g 270W 8 to 10 mins 10 mins
1 pce MAX 20 to 30 s 2 pce MAX 50s -
Defrosting time &
mode
MAX 30 to 40 s or
270W 3 mins
Standing Times
(minimum)
-
(1) turn or stir at half time� (2) Separate and turn several times (3) remove packaging and place on a heatresistant plate
�
17
Page 20

EN
Using the timer
Delay Start Cooking
By using the Timer, you are able to program Delay Start cooking.
example
Press Timer.
Set the delay time
by turning the Time/
Weight Dial (up to 9
�
hours)
Set the desired cooking
program and cooking time.
Press Start
Button.
Notes
1. Three stage cooking can be programmed including Delay Start cooking.
example
Delay Start: 1 hour
2
� If the programmed delay time exceeds one hour, the time will count down in units of
minutes� If less than one hour
3� Delay Start cannot be programmed before an auto program�
MAX Power: 10 min�
, the time will count down in units of seconds
Simmer Power 300W: 20 min
300
�
Stand Time
By using the Timer, you can program Stand Time after cooking is completed or use to
program the oven as a minute timer.
example
Set the desired
cooking program
and cooking time.
Notes
1. Three stage cooking can be programmed including stand time.
Press Timer
.
Set desired amount of
time by turning the Time/
Weight Dial (up to 9 hours)
Press Start.
�
example
MAX Power: 4min
2� If the oven door is opened during the Stand Time or Minute Timer, the time in the
display window will continue to count down�
3� This feature may also be used as a minute timer� In this case press the Timer, set
time and press Start�
4� Stand time cannot be programmed after an auto program�
Stand Time: 5min
MAX Power: 2min
18
Page 21

EN
English
Multistage cooking
2 or 3 stage cooking
Example:
Press a
Microwave Power
button. To select
desired power
level
Example: To cook at 950W for 2 minutes and cook food at 300W for 3 minutes.
Press Microwave
Power once to
select 950W.
Example: To cook at 600W for 5 minutes and cook food at 100W for 4 minutes.
Set the cooking
time using the
Time/Weight Dial.
Set the
cooking time
to 2 minutes
using the Time/
Weight Dial
Press a
Microwave
Power button.
To select desired
power level
Press
Microwave
Power twice to
select 300W
300
300
Set the cooking
time using the
Time/Weight Dial.
Set the
cooking time
to 3 minutes
using the Time/
Weight Dial
Press Start.
The cooking program
will start and the time
in the display will
count down
Press Start.
�
Press the
Microwave
Power twice to
select 600W.
Set the
cooking time
to 4 minutes
using the Time/
Weight Dial
Press the
Microwave
Power twice to
select 100W.
Set the
cooking time
to 5 minutes
using the Time/
Weight Dial
Press Start.
NOTE
1� For 3 stage cooking, enter another cooking program before pressing start�
2� During operation, pressing Stop/Cancel once will stop the operation� Pressing Start will
re-start the programmed operation� Pressing Stop/Cancel twice will stop and clear the
programmed operation�
3� Whilst not operating, pressing Stop/Cancel will clear the selected program�
4� Auto programs can not be used with multi-stage cooking�
19
Page 22

EN
Using the memory function
This feature allows you to pre-program your oven for a regular reheating or cooking task. You
are able to pre-program your oven for a specic power level and time that is convenient for
you. You can only pre-program one memory task with this oven.
To set a memory program
Program the desired
cooking program.
Press Memory.
The memory indicator
ashes in the display.
Press Memory to store
this task or press Start
Button to start cooking in
this sequence.
To use a memory program
Press Memory.
The memory indicator lights
and stored memory pogram
appears in the display
�
Notes
1� Auto programs cannot be programmed into memory�
2� Memory can only store 1 stage cooking� It is not possible to store 2 or 3 stage
cooking�
3� Setting a new cooking program into memory will cancel the cooking program
previously stored�
4� Memory program will be cancelled if the power supply is off or the plug is
disconnected�
Press Start to begin cooking
20
Page 23

EN
English
Turbo defrost
With this feature you can defrost frozen food according to the weight.
Select the desired Turbo Defrost
program
1 Press Small Pieces
2 Presses Big Piece
3 Presses Bread
Auto program number appears in
the display
and defrost indicators light
�
The microwave, auto
Program Weight
� SMALL PIECES
1
1 press
2� BIG PIECE
2 presses
3� BREAD
3 presses
�
Range
150 - 1000g
400 - 2000g
100 - 800g
Set the weight of the frozen
food by using the Time/Weight
Dial.
Turning the dial slowly will count
up in 10g steps� Turning the dial
quickly will count up in 100g steps
Small pieces of meat, escallop, sausages, minced meat, steak,
chops, sh llets (each 100g to 400g). Press turbo defrost
once� Turn/stir at beeps
Big pieces of meat, whole chickens, meat joints
defrost twice
shielding during defrosting
smooth pieces of aluminum foil secured with cocktail sticks� Do
not allow the foil to touch the walls of the oven
1 to 2 hours should be allowed before cooking�
at beeps
Small or large loaves of bread, white or wholewheat
loaf on a piece of kitchen roll
and turn at beep�
bread) to 30 min (dense rye bread)� Cut large loaves in half
during standing time
Important!
See page 16 EN for defrosting guidelines
Press Start
Remember to stir or
turn the food during
defrosting
�
Suitable Food
�
� Whole chickens and meat joints will require
� Protect wings, breast and fat with
� Standing time of
�
� Press turbo defrost three times
Allow bread to stand for 5 min (white light
�
�
�
� Press turbo
Turn and shield
� Place the
21
Page 24

EN
Auto weight reheat / cook programs
With this feature food can be cooked or reheated according to the weight. The weight has to be
entered in grams.
example
Select desired category
The microwave and auto
indicator lights, frozen indicator
also lights for frozen food auto
programs
appears in the display
The program number
�
�
Set Weight.
Set the weight of the food by using
the Time/Weight Dial� Turning the
dial slowly will count up in 10g steps�
Turning the dial quickly will count up
in 100g steps
�
Auto weight reheat programs
Program Weight Instructions
4
� CHILLED SOUP
150 - 1000g
1 press
5� CHILLED MEAL
200 - 1000g
2 presses
6� FROZEN MEAL
200 - 1000g
3 presses
For reheating chilled soup. Place soup into a suitable sized
� Foods should be at refrigerator temperature approx
container
� Cover, press auto cook once and stir at beeps� Stir again
+5°C
at end of program and allow a few minutes standing time
o reheat a fresh plated meal or casserole. All foods must
T
be pre-cooked
approx
Stir again at end of program and allow a few minutes standing
time. Large pieces of meat/sh in a thin sauce may require
longer cooking�
such as rice, noodles or potatoes
o reheat a frozen precooked meal or casserole; All foods
T
must be pre-cooked and frozen (-18°C); Cover
cook three times� Stir at beeps and cut the blocks into pieces�
Stir again at end of program and allow a few minutes standing
time� Check temperature and cook further minutes if necessary
before eating�
frozen foods
� Foods should be at refrigerator temperature
� + 5°C� Cover
, press auto cook twice and stir at beeps
This program is not suitable for starchy food
This program is not suitable for portionable
�
Press Start
�
�
�
� Press auto
22
Page 25

EN
English
Auto weight cook programs
Program Weight Instructions
7
� FRESH
VEGETABLES
1 press
8� FRESH FISH
2 presses
9� BAKED
ATOES
POT
3 presses
10� RICE
4 presses
200 - 800g
200 - 1400g
100 - 300g
200-800g
o cook fresh vegetables. Place prepared vegetables
T
into a suitable sized container
per 100g vegetables. Cover with pierced cling lm or a lid.
Press auto cook once
season to taste
o cook fresh llets or steaks of sh. Place in a suitable
T
sized container, add 2 tbsp (30ml) water
cling lm or a lid. Press auto cook twice.
For cooking baked potatoes. Choose medium sized
potatoes 200-250g for best results
and prick with a fork several times
tray around outer edge
cooking wrap in aluminium foil and stand for 5 minutes
For cooking rice for savoury dishes not rice puddings.
(Thai, Basmati, Jasmine, Suriname, Arborio or
Mediterranean rice).
cooking
boiling water to rice. Cover with a lid or pierced cling lm.
Press auto cook four times
for 5 minutes after cooking
�
� Use a large bowl�
� Sprinkle with 1 tbsp water
� Stir at beeps� Drain after cooking and
� Cover with pierced
ash and dry potatoes
� W
� Press auto cook three times�
� Place directly on glass
Rinse the rice thoroughly before
Add ½ tsp salt and 2 times
� Stir at the beep�
�
After
�
Allow to stand
Notes
1� The Auto Weight Programs must ONLY be used for foods described�
2� Only cook foods within the weight ranges described�
3� Always weigh the food rather than relying on the package information�
4. Most foods benet from a STANDING time, after cooking with an Auto Program, to
allow heat to continue conducting to the centre�
5� To allow for some variations that occur in food, check that food is thoroughly cooked
and piping hot before serving�
23
Page 26

EN
Reheating & cooking charts
Food Weight/Quantity Fresh Frozen
Drinks - Coffee - Milk
1 mug 240ml Max 1 min 30s 2 mugs 470ml Max 2 min 30s 1 jug 600ml Max 4 min 30s to 5 min -
Soup (chilled) (1,2)
Soup (ambient) (1,2)
Convenience Foods
Croque monsieur
unlled pancake (2) 1 piece Max 30 s
stuffed pancake (1,2)
small pizza (3) 1 piece (160g) Max 1 min Max 2 min 30s to 3 min
american pizza 1 piece (400g) Max 4 to 5 mins max 6 to 7 mins
small quiche (3) 1 piece (175g) 600W 1 min 40 s to 2 min Max 2 min 30s to 3 min
large quiche 1 piece (400g) 600W 3 to 4 mins 600W 7 to 8 mins
samosa (1) 2 pieces (150g) Max 1 to 1 min 30s Max 2 to 2 min 30s
Meat balls - frikadellen (1,2)
Plated Meals
Chilli con carne (1,2) 355g MAX 3 min 30 s MAX 7 to 8 min
Chicken korma with rice (1,2) 350g MAX 7 min MAX 6 to 7 min
Lasagne (meat gratin) (4)
Vegetable gratin (4)
sh gratin (4)
300ml Max 3 to 3 min 30s -
1000ml Max 10 min -
300ml Max 2 min 30s to 3 min -
1000ml Max 7 to 7 min 30s -
1 piece (170g) Max 30s to 50 s Max 2 min to 2min 30s
2 pieces (320g) Max 1 min 30s to 2 min Max 4 min 30s to 5 min
1 piece (150g) Max 1 min 30s Max 3 min to 3 min 30s
2 pieces (300g) Max 2 min 30s to 3 min Max 5 min to 5 min 30s
1 piece 100g 600W 1 min to 1 min 30 s -
2 pcs 200g 600W 2 to 3 mins 600W 5 mins
300 - 400g MAX 3 min MAX 10 to 12 mins
600g MAX 7 to 8 min MAX 14 to 15 mins
1 kg MAX 11 min MAX 20 to 22 mins
300 - 400g MAX 6 mins MAX 10 to 12 mins
1 kg MAX 12 mins -
400g MAX 4 min 30s to 5 mins 600W 13 to 15 mins
700 g MAX 8 mins
MAX 15 to 16 mins +
300W 4 mins
(1) turn or stir at half time� (2) cover� (3) remove packaging and place on a heat-resistant plate� (4) Remove
aluminium tray and put the gratin in a heat-resistant microwavable dish�
Points for checking
Always check that food is piping hot after reheating in the microwave� If unsure return to oven� Foods will still
require a STAND TIME, especially if they cannot be stirred� The denser the food the longer the stand time�
24
Page 27

EN
English
Reheating & cooking charts
Food Weight/Quantity Fresh Frozen
Fish in sauce (1,2) 225g - MAX 5 to 8 mins
Puree (1,2) of potato
of vegetables
Spaghetti in sauce (1,2) 450g MAX 3 min 30s to 4 mins MAX 8 min
Rice (2)
Baby food
(small pot at room temp)
Meat
Hamburger (raw) (2) 1 piece (150g) - MAX 2 min to 2 min 30s
Cocktail sausages (1,2) 120g 300W 2 to 2 min 30s -
Pieces of cooked meat
Pork 2 pieces (2) 130g 600W 1 min 30 s Lamb 2 pieces (2) 160g 600W 1 min Beef 2 pieces (2) 120g 600W 1 to 1 min 30s Chicken leg (2) 205g MAX 2 to 3 mins Chicken nuggets 10 pieces (200g) - MAX 2min 30 s
Cordon bleu 1 piece (100g) - MAX 2min to 2 min 30 s
(1) turn or stir at half time� (2) cover� (3) remove packaging and place on a heat-resistant plate� (4) Remove
aluminium tray and put the gratin in a heat-resistant microwavable dish�
200g MAX 2 min MAX 4 min 30s
200g MAX 2 min to 2 min 30 s Max 5 min to 5 min 30s
400g MAX 4 min MAX 8 min
150g MAX 1 to 1 min 30s MAX 2 min 30 s
300g Max 2 min 30s to 3 min MAX 4 min 30 s
120g 600W 30s TEST 200g 600W 40 to 50s TEST -
Points for checking
Always check that food is piping hot after reheating in the microwave� If unsure return to oven� Foods will still
require a STAND TIME, especially if they cannot be stirred� The denser the food the longer the stand time�
25
Page 28

EN
ingredients
4 bread rolls, day old
3 tbsp. chopped parsley
Recipes
Containers: 1 large bowl
SERVES 4
(approx 220g)
150 ml milk
40 g of butter
and 1 Pyrex plate
3 eggs
salt
Bread dumplings
Cut or tear the rolls into very small pieces and salt them lightly� Heat
milk with butter on MAX for 1 min and pour over bread
stand for 15 mins
parsley and mix well
Dip quickly into cold water
and cook on 600W for 5 to 6 mins
�
stew
Note: for variation add 50g of nely cut cooked smoked bacon to the
� Or
mixture
a more colorful result�
� Beat the eggs, add to the bread mixture with the
� With wet hands form 4 balls of the same size�
, take out and place onto the plate� Cover
� Serve immediately with a meat
, after cooking, fry the Meatballs in a skillet in hot butter for
� Cover and
ingredients
SERVES 4
150g large lentils
1 onion, diced
500 g turkey fillet, cubed
130 ml vegetable stock
25g of butter
1 tbsp flour
1 tbsp curry powder
juice of ½ lemon
1 tbsp sugar
130 ml cream.
Dish: 2 large bowls
ingredients
125 g short grain rice
cinnamon sugar to taste.
SERVES 4
500 ml milk
1 tsp butter
2 tbsp sugar
Dish: Large bowl
Turkey and lentil curry
Cover the lentils in cold water� Cover and cook on MAX for 8-10 mins�
to bring to the boil
the lentils are always covered in water)
In a separate bowl place the onion and butter and cook on MAX for 3
mins� Add the turkey, mix and cook on MAX for a further 4 to 5 mins
Add the curry powder mixed with the our
juice, sugar, lentils and cream
5-6 mins� Check the seasoning before serving�
� Continue cooking on 300W for 15 to 18 mins (check
� Drain and leave to stand�
, vegetable stock, lemon
� Mix well, cover
�
, and cook on MAX for
Rice pudding
Place rice, milk, butter and sugar into the bowl� Bring to the boil by
cooking on MAX for 6 to 7 mins� Cover and cook on 300W for 20 to 25
mins, stirring several times� Leave to stand for 5 mins before stirring
again and adding cinnamon sugar to taste�
Tip: you can add fruit compote instead of cinnamon sugar�
26
Page 29

EN
English
Questions and answers
Q: Why won’t my oven turn on?
A: When the oven does not turn on,
check the following:
1� Is the oven plugged in securely?
Remove the plug from the outlet, wait
10 seconds and reinsert�
2� Check the circuit breaker and the fuse�
Reset the circuit breaker or replace
the fuse if it is tripped or blown�
3� If the circuit breaker or fuse is all right,
plug another appliance into the outlet�
If the other appliance works, there
probably is a problem with the oven�
If the other appliance does not work,
there probably is a problem with the
outlet�
If it seems that there is a problem
with the oven, contact an authorized
Service Centre�
Q: My microwave oven causes
interference with my TV. Is this
normal?
Q: Sometimes warm air comes
from the oven vents. Why?
A: The heat given off from the cooking
food warms the air in the oven cavity�
This warmed air is carried out of the
oven by the air ow pattern in the
oven� There are no microwaves in the
air� The oven vents should never be
blocked during cooking�
Q: The oven stops cooking by
microwave and 'H97' or 'H98'
appears in the display. Why?
A: This display indicates a problem with
the microwave generation system�
Please contact an authorised Service
Centre�
A: Some radio and TV interference might
occur when you cook with the
microwave oven� This interference
is similar to the interference caused
by small appliances such as mixers,
vacuums, blow dryers, etc� It does not
indicate a problem with your oven�
Q: The oven won’t accept my
program. Why?
A: The oven is designed not to accept an
incorrect program� For example, the
oven will not accept a fourth stage,
and will not accept an Auto Weight
Program after Delay Start�
27
Page 30

EN
Care of your oven
1� Turn the oven off before cleaning�
2� Clean the inside of the oven, door
seals and door seal areas regularly�
When food splatters or spilled liquids
adhere to the oven walls, door seals
and door seal areas wipe off with a
damp cloth
used if they get very dirty�
of harsh detergent or abrasive is not
recommended
DO NOT USE COMMERCIAL
CLEANERS
� Mild detergent may be
The use
�
OVEN
�
7. The roller ring and oven cavity oor
should be cleaned regularly to avoid
excessive noise� Simply wipe the
bottom surface of the oven with mild
detergent and hot water then dry with
a clean cloth� The roller ring may be
washed in mild soapy water
vapours collect during repeated use
but in no way af
surface or roller ring wheels� After
removing the roller ring from the cavity
oor for cleaning, be sure to replace it
in the proper position
fects the bottom
� Cooking
�
3� The outside oven surface should
be cleaned with a damp cloth�
prevent damage to the operating parts
inside the oven, water should not be
allowed to seep into the ventilation
openings
4� If the Control
clean it with a soft, dry cloth
use harsh detergents or abrasives
on the Control Panel� When cleaning
the Control Panel leave the oven
door open to prevent the oven from
accidentally turning on�
touch STOP/CANCEL button to clear
display window
5� If steam accumulates inside or
around the outside of the oven door
wipe with a soft cloth� This may occur
when the microwave oven is operated
under high humidity conditions and in
no way indicates a malfunction of the
unit
6� It is occasionally necessary to r
the glass tray for cleaning
the tray in warm soapy water or in a
dishwasher
�
Panel becomes dirty,
�
�
�
� Do not
After cleaning
� W
ash
To
emove
8� A steam clea
cleaning�
9� This oven should only be serviced
by qualied personnel. For
maintenance and repair of the oven
contact the nearest authorized dealer�
10� Failure to maintain the oven in a
clean condition could lead to
deterioration of surfaces that could
af
fect the life of the appliance and
possibly result in a hazardous
situation
11� Keep air vents clean at all times�
Check that no dust or other material
is blocking any of the air vents on
,
the top, bottom or rear of the oven� If
air vents become blocked this could
cause overheating which would af
the operation of the oven and possibly
result in a hazardous situation
ner is not to be used for
�
fect
�
28
Page 31

EN
English
Technical specifications
Power Source: 230 V, 50 Hz
Power Consumption: Microwave; 1150 W
Output: Microwave; 950W (IEC-60705)
Outside Dimensions: 488 (W) x 395
(D) x 279 (H) mm
Oven Cavity Dimensions: 315 (W) x 353
(D) x 206 (H) mm
Uncrated Weight: 9.5 kg
Noise: 57dB
Specications subject to
change without notice.
This product is an equipment that fullls the
European standard for EMC disturbances
(EMC = Electromagnetic Compatibility)
EN 55011�
product is an equipment of
group 2, class B and is within required
limits
energy is intentionally generated in the form
of electromagnetic radiation for purpose of
warming or cooking food
that this product may be used in normal
household areas�
According to this standard this
� Group 2 means that radio-frequency
Information on Disposal for
Users of Waste Electrical
& Electronic Equipment
(private households)
This symbol on the products and/or
accompanying documents means that
usedelectrical and electronic products
should not be mixed with general household
waste
�
For proper treatment, recovery and
recycling, please take these products to
designated collection points, where they will
be accepted on a free of charge basis�
� Class B means
Alternatively, in some countries you may be
able to return your products to your local
retailer upon the purchase of an equivalent
new product�
Disposing of this product correctly will help
to save valuable resources and prevent
any potential negative effects on human
health and the environment which could
otherwise arise from inappropriate waste
handling� Please contact your local authority
for further details of your nearest designated
collection point�
Penalties may be applicable for incorrect
disposal of this waste, in accordance with
national legislation�
For business users in the
European Union
If you wish to discard electrical and
electronic equipment, please contact your
dealer or supplier for further information�
Information on Disposal in other
Countries outside the European
Union
This symbol is only valid in the European
Union�
If you wish to discard this product, please
contact your local authorities or dealer and
ask for the correct method of disposal�
Manufactured by: Panasonic Appliances
Microwave Oven (Shanghai) Co.,Ltd,
888, 898 Longdong Road, Pudong,
Shanghai, 201203, China.
Imported by: Panasonic Marketing
Europe GmbH
Contact: Panasonic Testing Centre
Winsbergring 15, 22525 Hamburg,
Germany.
29
Page 32

Panasonic Corporation
http://panasonic.net
© Panasonic Corporation 2013 F0003BA02EP
 Loading...