

Page 1
Please read these instructions completely before operating this oven.
Commercial Microwave Convection Oven
Operating Instructions and User Guide
Model: NE-C1358
NE C1358
8
7
6
5
4
3
2
1
AB
CONVECTION
START
PROG
LOCK BUZZ
MICROWAVE
GRILL
STOP
COOLING
LAMP
PREHEAT
4
B
2
1
3
A
B
Page 2

Page 3

1
Index
Safety Information . . . . . . . . . . . . . . . . . . . . . . . . . . . . . . . . . . . . . . .2
When you first unpack your Oven . . . . . . . . . . . . . . . . . . . . . . . . . . .3
Placement of Oven . . . . . . . . . . . . . . . . . . . . . . . . . . . . . . . . . . . . . .3
Caution . . . . . . . . . . . . . . . . . . . . . . . . . . . . . . . . . . . . . . . . . . . . . . .3
Important Information . . . . . . . . . . . . . . . . . . . . . . . . . . . . . . . . . . . .4
Your Oven Explained . . . . . . . . . . . . . . . . . . . . . . . . . . . . . . . . . . . . .5
Accessories Supplied . . . . . . . . . . . . . . . . . . . . . . . . . . . . . . . . . . . .5
Display Window . . . . . . . . . . . . . . . . . . . . . . . . . . . . . . . . . . . . . . . .6
Control Panel . . . . . . . . . . . . . . . . . . . . . . . . . . . . . . . . . . . . . . . . . .6
Types of Container to use . . . . . . . . . . . . . . . . . . . . . . . . . . . . . . . . .7
Operating Instructions
Operating your Oven as a Microwave . . . . . . . . . . . . . . . . . . . . . . . .8
Operating your Oven on Convection . . . . . . . . . . . . . . . . . . . . . . . .10
Operating your Oven on Grill . . . . . . . . . . . . . . . . . . . . . . . . . . . . . .12
Operating your Oven on Combination . . . . . . . . . . . . . . . . . . . . . . .14
Setting the Memory Programmes . . . . . . . . . . . . . . . . . . . . . . . . . .16
Using the Memory Programmes . . . . . . . . . . . . . . . . . . . . . . . . . . .17
How to activate Programme Lock . . . . . . . . . . . . . . . . . . . . . . . . . .18
How to release Programme Lock . . . . . . . . . . . . . . . . . . . . . . . . . . .19
How to read Programme List . . . . . . . . . . . . . . . . . . . . . . . . . . . . . .19
Keeping your Oven Hot . . . . . . . . . . . . . . . . . . . . . . . . . . . . . . . . . .20
Cooling your Oven quickly . . . . . . . . . . . . . . . . . . . . . . . . . . . . . . . .21
How to change the Beep Tone . . . . . . . . . . . . . . . . . . . . . . . . . . . . .21
Care of your Oven and Cleaning . . . . . . . . . . . . . . . . . . . . . . . . . . .22
What to do if an “F” appears in the Display . . . . . . . . . . . . . . . . . . .23
Cooking Guide
How a Microwave works . . . . . . . . . . . . . . . . . . . . . . . . . . . . . . . . .24
Standing Time . . . . . . . . . . . . . . . . . . . . . . . . . . . . . . . . . . . . . . . . .24
Defrosting by Microwave . . . . . . . . . . . . . . . . . . . . . . . . . . . . . . . . .25
Reheating by Microwave . . . . . . . . . . . . . . . . . . . . . . . . . . . . . . . . .26
Using the Combination Function . . . . . . . . . . . . . . . . . . . . . . . . . . .28
Using the Convection Function . . . . . . . . . . . . . . . . . . . . . . . . . . . .30
Using the Grill Function . . . . . . . . . . . . . . . . . . . . . . . . . . . . . . . . . .31
Technical Specifications . . . . . . . . . . . . . . . . . . . . . . . . . . . . . . . . .32
© Copyrighted by Matsushita Electric Industrial Co., Ltd. 1998
Page 4

2
Safety Information
1. Earthing
IMPORTANT: FOR PERSONAL SAFETY, THIS
APPLIANCE MUST BE PROPERLY EARTHED.
When an outlet is not earthed:
It is the personal responsibility and obligation of the
customer to have it replaced with a properly earthed
outlet.
2. Voltage and Power
The voltage used must be the same as specified on
the oven.Using a higher voltage than that which is
specified is dangerous, and may result in a fire or
other type of accident causing damage.
3. Service
It is dangerous for anyone other than a service
technician trained by the manufacturer to perform
repair service.
Do not remove the outer casing of the oven.
High voltages are present inside the cabinet.
Repairs and adjustments should be done only by
qualified service personnel.
4. Door Seals
The door seals and door seal areas should always
be kept clean-use a damp cloth. Do not attempt to
tamper with or make any adjustments or repairs to
door, control panel housing, safety interlock switches
or any other part of the oven. Do not remove outer
panel from the oven.
5. Operation when empty
The appliance must not be operated by microwave
or combination WITHOUT FOOD IN THE OVEN.
Operation when empty will damage the appliance.
6. Cord/Plug
If the supply cord of this appliance is damaged, it
must be replaced by the special cord available only
from manufacturer.
Do not immerse cord, plug or oven in water. Keep
cord away from heated surfaces.Do not let cord
hang over the edge of table or work top. Do not plug
your oven in via an extension cable as this can be
dangerous. It is important to plug the oven directly
into a wall socket.The back of the appliance heats
up during use. Do not allow the cord to be in contact
with the back of the appliance or cabinet surface.
7. Hot Surfaces
Exterior oven surfaces, including air vents on the
cabinet and the oven door will get hot during use.
(Grill, Convection and Combination) Take care when
opening or closing door and when inserting or
removing food and accessories.
The oven has heaters situated in the top and back
of the oven.After use, the roof, walls and floor will
be very hot.
8. Storage of Accessories
When the oven is not being used, do not store any
objects other than oven accessories inside the oven
in case it is accidentally turned on. In case of
electronic failure, oven can only be turned off at wall
socket.
WARNING
1. The appliance should be inspected for damage to the door seals and door seals areas and if
these areas are damaged the appliance should not be operated until it has been repaired by
service technician trained by the manufacturer.
2. It is dangerous for anyone other than a service technician trained by the manufacture to perform
repair service which involves the removal of any cover which gives protection against exposure to
microwave energy.
3. Liquids or other foods must not be heated in sealed containers since they are liable to explode.
Before use, the user should check that utensils are suitable for use in this oven. (See Page 7)
4. The accessible parts may become hot when Grill/Convection/Combination is in use. Children
should be kept away.
We certify that this microwave oven has been
inspected and complies with the safety
requirements of government notice 466 of
March 1981, and complies with the Radio
Regulation of government notice 587 of March
1986.
(This statement is applicable only for South Africa.)
Page 5

1. Examine your Oven
Unpack oven, retain all packing material, and
examine the oven for any damage such as dents,
broken door latches or cracks in the door. Notify
supplier immediately if unit is damaged. DO NOT
install if unit is damaged.
2. Removal of protective film
A protective film is used to prevent scratching of the
outer case during transportation. Peel this film off
before installation or use.
3
When you first unpack your Oven
1. Placement of Oven
Oven must be placed on a flat, stable surface. For
proper operation, the oven must have sufficient air
flow.
A minimum space of 20 cm must be left above the
oven and 10 cm free space at back wall. A gap of at
least 0 cm must be available on one side and the
other side must be opened.
Air vents
This oven requires free airflow at the back for
maximum cooling efficiency.
Do not block the air vents.
Maximum room temperature
Do not operate the oven when the room temperature
is higher than 40˚C and/or the humidity is more than
90%. Free airflow around the oven is important.
Outdoor use
Do not use this oven outdoors.
2. Shelves
Do not place the oven directly above or beside a
gas or electric hob.The oven may be damaged.It is
dangerous to position this oven on a shelf which is
so high that food and accessories cannot be safely
removed by the user.
3. Stacking
DO NOT attempt to stack these ovens.
Placement of Oven
1. Before Use
Before using CONVECTION, COMBINATION or
GRILL function for the first time, operate this oven
without food on Convection 250˚C for 20 minutes.
This will allow the oil that is used for rust protection
to be burned off. Remove all accessories from the
oven.
2. Usage
Use this microwave oven only for its intended use as
described in this manual.
Do not dry clothes, newspapers or other materials in
oven.They may catch on fire or be damaged.
Do not use this oven to heat chemicals or other nonfood products.
Do not store flammable materials next to, on top of,
or in the oven.It could be a fire hazard.
3. Smoke/Fire
If smoke or a fire occurs in the oven, press
Stop/Reset Pad, leave the oven door closed in order
to stifle any flames, and disconnect the power cord,
or shout off power at the fuse or circuit breaker
panel.
4. Interference
There is a possibility of a small amount of
interference with weak broadcast signals if the oven
is too close to a radio or TV.
5. Heater Operation during
Microwave Cooking
When using HIGH, MEDIUM, LOW and SIMMER
powers, the half of Grill elements operate to reduce
the build up of condensation.Take care NOT TO
TOUCH OVEN CEILING.
6. Fan Motor Operation
After using MICROWAVE, CONVECTION,
COMBINATION and GRILL fan motor always rotates
for approx.5 minutes to cool the electric
components.This is normal and you can take out
food even though fan motor operates.
7. Cleaning
Do not clean this appliance with a water jet.
(See page 22)
Caution
Page 6

4
Important Information––Read Carefully
1. Heating Times
As microwave heating times are much shorter than
other cooking methods, it is essential that
recommended heating times are not exceeded
without first checking the food.
Cooking times given in the charts and recipes are
approximate.Factors that may affect cooking times
are: star ting temperature, volume, size and shape of
foods and dishes used.
Fire!
If the recommended cooking times are exceeded the
food will be spoiled and in extreme circumstances
could catch fire and possibly damage the interior of
the oven.It is critical that the oven is cleaned
regularly and kept free of excess grease.See Care
of your Oven and Cleaning page 22.
2. Small Quantities of Foods
Particular attention should be paid to heating small
quantities of food and single items such as pastry
and bread items by Microwave.Small quantities of
food or foods with low moisture content can burn,
dry out or catch on fire if cooked too long.
Fire!
If materials inside the oven should ignite, keep the
oven door closed, turn the oven off, and switch off at
socket and remove plug from socket if possible or
shut off power at the fuse or circuit breaker panel.
3. Food Components
Foods high in sugar, salt, fats and moisture content
heat faster by Microwave because their properties
attract microwave energy.Denser foods high in
protein and fibre, absorb microwave energy slower
which means a longer heating time.
4. Food High in Fat/Sugar
It is important to correctly set the cooking time for
food with a high fat, alcohol and sugar content.If
these foods are heated by microwave for too long,
they can ignite.NEVER LEAVE UNATTENDED.eg.
Donuts, syrup sponge puddings, christmas puddings
and mince pies.
5. Eggs
Do not cook/heat eggs in their shells in your
Microwave oven, unless otherwise stated in the
Cooking Guide section. Pressure may build up and
eggs will explode causing serious injury.
Do not cook/heat eggs without shells also, before
piercing the membranes of the yolk and white.The
pierced membrane allows the steam to escape and
avoid exploding.
6. Piercing Skins
Potatoes, apples, egg yolks, whole vegetables and
sausages are examples of food with non-porous
skins.These must be pierced using a fork before
cooking by microwave to prevent bursting.
7. Deep fat frying
Do not attempt to deep fat fry in your oven.
8. Liquids
When heating liquids by Microwave, eg. soup,
sauces and beverages, overheating the liquid
beyond boiling point can occur without evidence of
bubbling.This could result in a sudden boil over of
the hot liquid.To prevent this possibility, the following
steps should be taken:
a. Avoid using straight-sided containers with narrow
necks.
b. Do not overheat.
c. Stir the liquid before placing the container in the
oven and again halfway through the heating time.
d. After heating, allow to stand in the oven for a
short time, stirring again before carefully
removing the container.
9. Paper, Plastic
When heating food in plastic or paper containers,
check the oven frequently as these types of
containers may ignite if overheated.(See page 7)
Do not use re-cycled paper products, as they may
contain impurities which may cause sparks and/or
fires when used, unless packaging states they are
specifically designed for microwave use.
10.
Reheating
It is essential reheated food is served “piping hot”
(72˚C). Always check before serving and if in doubt
return food to oven for further heating.
11.
Standing Times
Standing times are essential for foods cooked or
reheated by microwave or combination. During the
stand time, heat will continue to conduct to the
centre to cook the food completely.
The denser the food, the longer the stand time.
Reheated foods also require a standing time.
12.
Accessories
Follow specific instructions in this book for proper
use of oven accessories and cookware.Failure to do
so could damage the oven.
Take care when removing food and/or accessories
from the oven.The Wire Rack Shelf provided DOES
NOT have a non-tip lock––take care when you pull
out to remove food.
13.
Baby bottles, jars
When reheating babies bottles always remove top
and teat. Liquid at top of the bottle will be much
hotter than at the bottom and must be shaken
thoroughly before checking the temperature.The lid
must also be removed from babies food jars, the
contents must also be stirred or shaken before the
temperature is checked.
14.
Popcorn
Extreme care should be taken when cooking
popcorn in a microwave oven. NEVER leave oven
unattended when popping popcorn.
Page 7
Shelf Supports
Put the shelf supports on left side wall (shelf support mar ked L)
and right side (marked R) as follows.
Locate left-hand support marked “L” on left-hand back lug.
Slide forward to locate front hole over front lug and ensure it
drops into position. Check shelf support is securely in place.
Fit right-hand support in similar way.
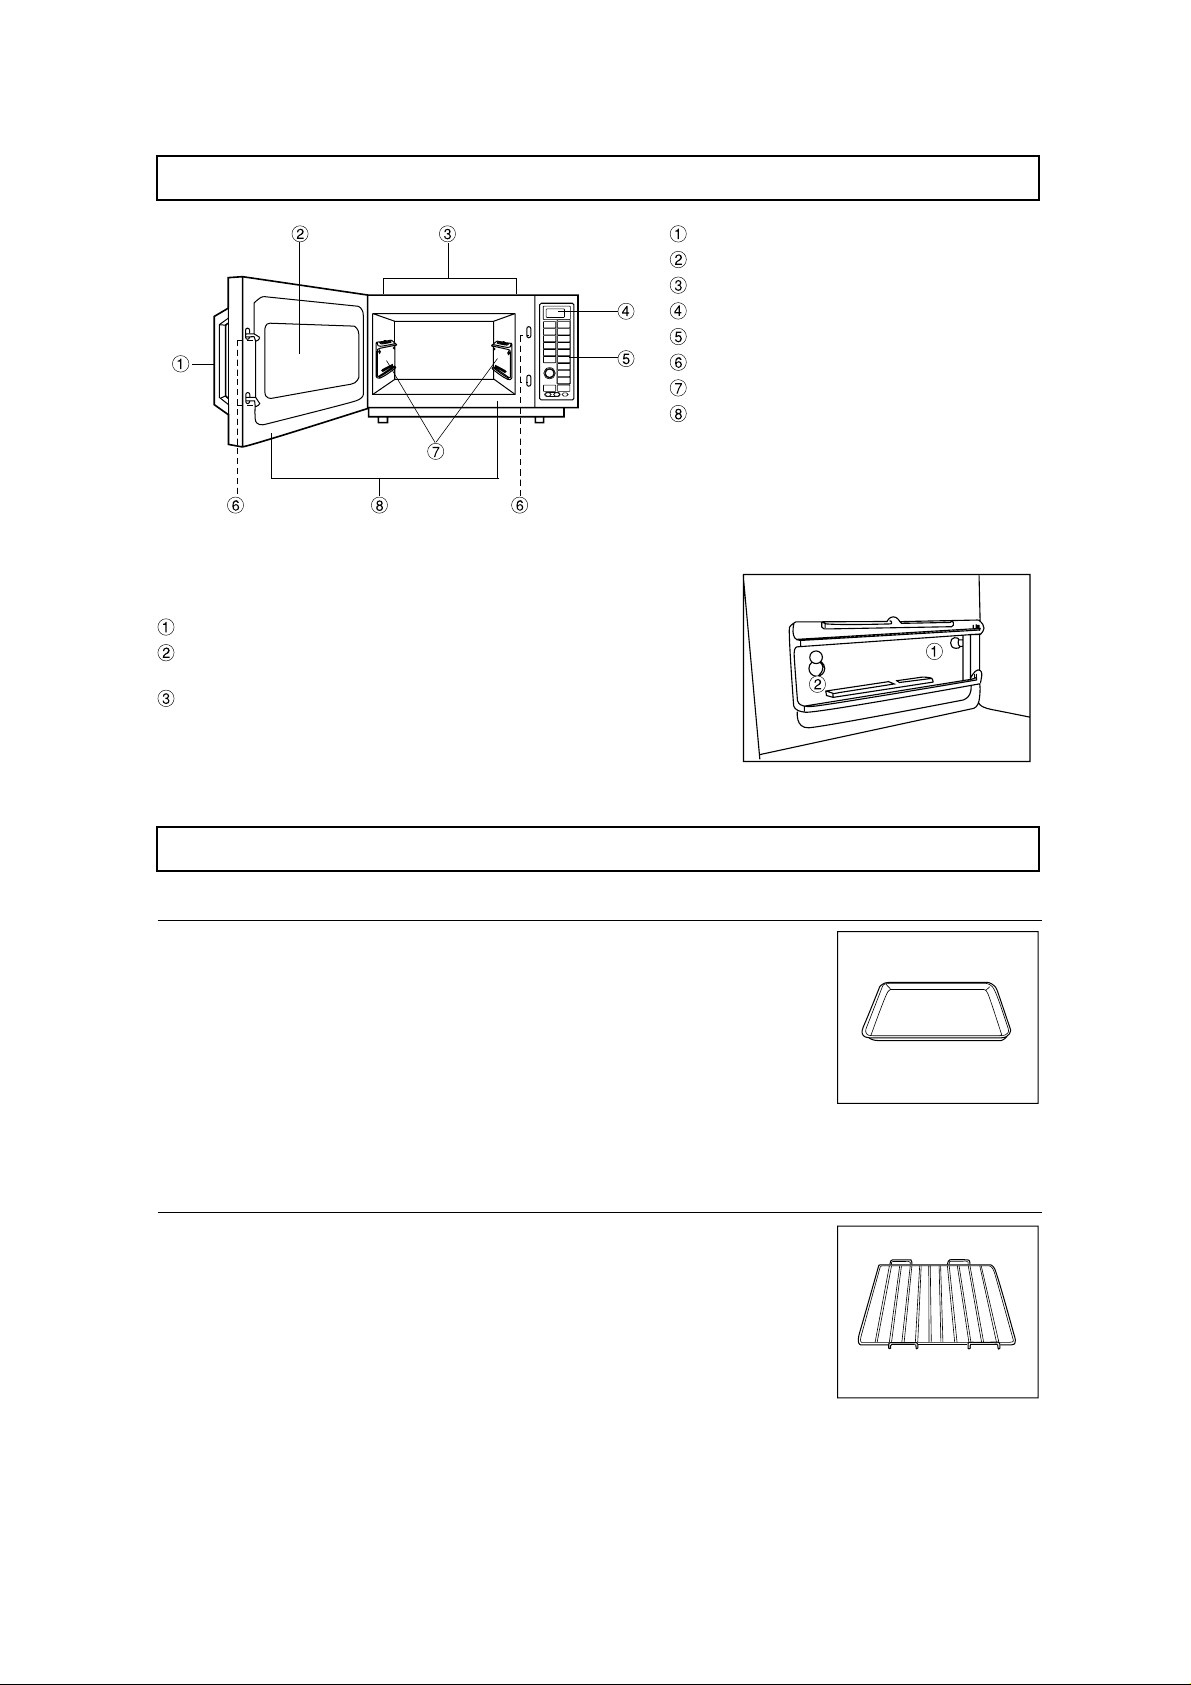
Accessories Supplied
Ceramic Insulating Tray Part No.A06033230GP
When using metal dishes on COMBINATION, place
the Ceramic Insulating Tray between the food container
and the Wire Rack Shelf.When Gr ill cooking, place the
Tray on the base of oven to catch the drip.
The Ceramic Insulating Tray should remain in the oven
during preheating on a combination programme.
DO NOT put it on Shelf Supports directly.
If placing food directly on the Ceramic Insulating Tray,
ensure it is clean and free of excess grease.
Cool the Ceramic Insulating Tray before cleaning to
avoid breakable.
Wire Rack Shelf Part No.A06023230BP
The shelf can be used on Convection, Combination
and Grill functions. DO NOT leave shelf in oven on
MICROWAVE ONLY function.
DO NOT PLACE METAL CONTAINERS DIRECTLY
ON WIRE RACK SHELF when using Combination
function. Use the Ceramic Insulation Tray.
There is no NON-TIP safety Lock on Shelf–– take care
when removing food.
5
Your Oven Explained
Door Handle
Oven Window
External Oven Air Vents (back of oven)
Display Window
Control Panel
Door Safety Lock System
Shelf Supports
Door Seal Area
L
Page 8
6
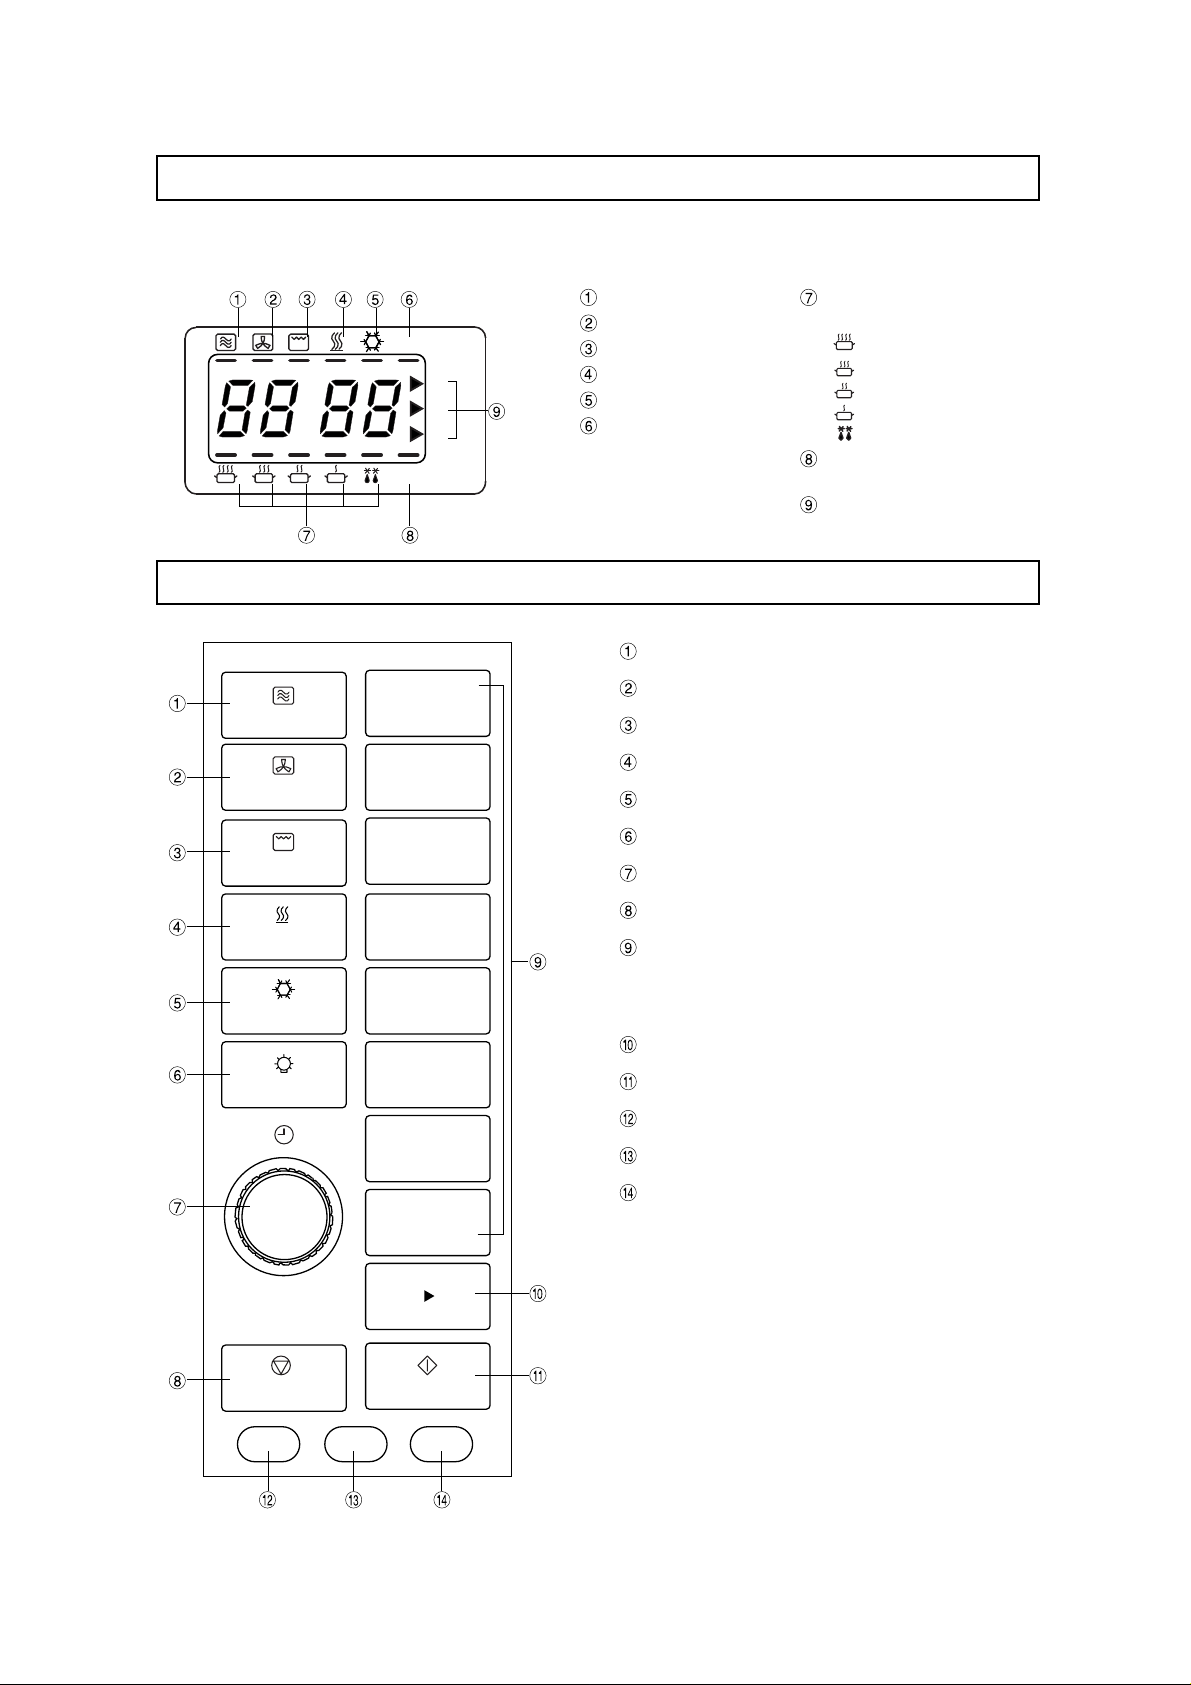
Display Window
The cursor will illuminate to indicate the programme set. Always check the cursor position before you
press Start Pad.
A
B
1
2
3
Control Panel
Microwave Power
Convection
Grill
Preheat
Cool
A select Programme
in use
Microwave Power
Level
HIGH
MEDIUM
LOW
SIMMER
DEFROST
B Select Programme
in use
Cooking Stage
Indicator
Microwave Pad
Convection Pad
Grill Pad
Preheat Pad
Cooling Pad
Lamp Pad
Timer Dial
Stop/Reset Pad
Programme Number Pads
These are blank for your own
programme.(A1-A8, B1-B8)
See page 16.
A-B Shift Pad
Start Pad
Programme Key
Programme Lock Key
Buzzer Key
MICROWAVE
CONVECTION
GRILL
1
2
3
PREHEAT
COOLING
LAMP
STOP
PROG
4
4
5
6
7
8
AB
START
LOCK BUZZ
Page 9

MICROWAVE
1. Glass
DO USE: Heat Resistant glass eg. Pyrex
DO NOT USE: Delicate glass, lead crystal which
may crack or arc.
2. China/Ceramics
DO USE: Glazed china dishes, porcelain
and ceramic dishes designed for
cooking.
DO NOT USE: Fine bone china dishes with metal
patterns. Jugs with glued handles.
3. Pottery/Earthenware/Stoneware
DO USE: If completely glazed.
DO NOT USE: If unglazed––these dishes can
absorb water which absorbs
energy.This makes the dish hot
and increase the heating time.
4. Foil/Metal
DO USE: For reheating only:
Individual portion, open topped foil
containers.Take care the
containers do not touch WALLS or
DOOR of oven.
Do not cook in foil containers.
Small amounts of Aluminium foil
can be used to shield joints of
meat during defrosting––take care
that foil does not touch sides or
door.
DO NOT USE: Metal platters, Wire Rack Shelf,
any dish with METAL PATTERN or
TRIM. METAL SKEWERS.
DO NOT REUSE FOIL
CONTAINERS––ARCING may
occur as they become
DENTED/DAMAGED. Do not use
Le Creuset style dishes (Cast iron
covered by enamel).These can be
used on convection or grill.
5. Plastics
DO USE: High temperature plastics like
Durable Polysulfon plastics rather
than soft flexible dishes, Roasting
bags. (Remove any metal twist
ties.)
DO NOT USE: Melamine, Polypropylene, Phenol
Urea, also do not use plastic food
storage bags and containers eg.
Margarine, Yoghurt and
Mayonnaise tubs.
6. Covering Films
DO USE: Non plasticiser cling film designed
for Microwave use.Do not allow
film to touch food.To prevent nasty
steam burns, pierce film to allow it
to escape and remove film from
dish carefully.
DO NOT USE:
Film designed only for covering food.
7. Wood/Wicker
DO USE: Wooden skewers designed for
food use.
DO NOT USE: Wicker baskets, wooden bowls
(with prolonged use these tend to
dry out and may ignite)
8. Paper
DO USE: Disposable, polyester coated
paper board dishes if designed for
microwave.
DO NOT USE: Paper napkins (these can ignite),
wax coated cups, recycled
products (unless stated suitable by
manufacture)
COMBINATION
Combination programs use microwaves and heat
(CONVECTION or GRILL) therefore you must
choose the container carefully.
DO USE: Metal containers check they do not
have jagged metal seams.
Ceramics that do not have a metal
pattern. Heat proof glass and
china.
DO NOT USE: Enamelled items (that may be
chipped). Dishes with gold/metal
pattern. Enamelled cast iron eg. Le
Creuset. Any dish that is not heat
proof eg. plastics, and cling film.
CONVECTION
DO USE: Any container suitable for
conventional ovens eg. metal,
ceramic, earthenware, enameled
cast iron etc.
DO NOT USE: Plastic containers, food films,
wood/wicker, glass, paper
GRILL
DO USE: Any container suitable for fierce
grilling eg. stainless steel, Le
Creuset, Ceramics, Baking Sheets
etc.
DO NOT USE: Plastic containers, fine ceramics,
cling film etc.
7
Types of Container to use
Before use, the user should check that utensils are suitable for use in your oven.
Do not use any closed jar for Microwave or Combination.Pressure will be build up and the jar may explode.
Page 10
8
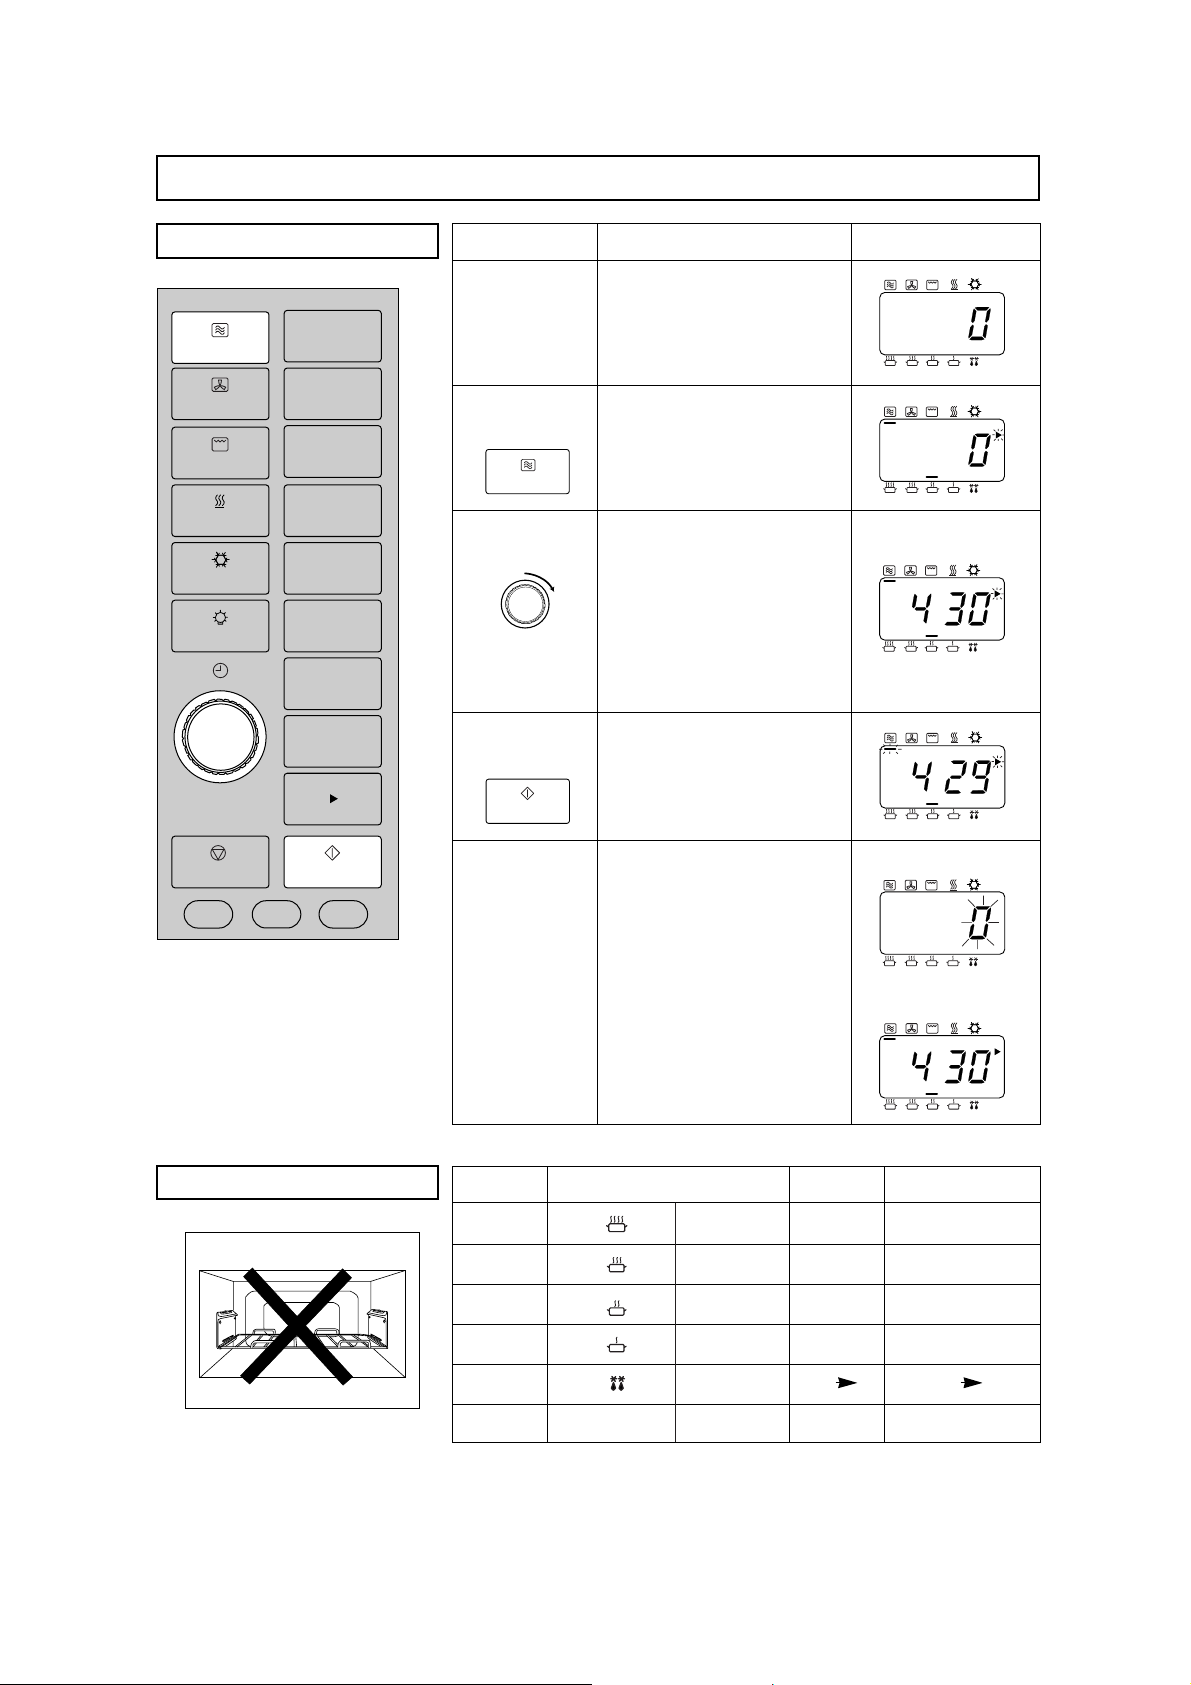
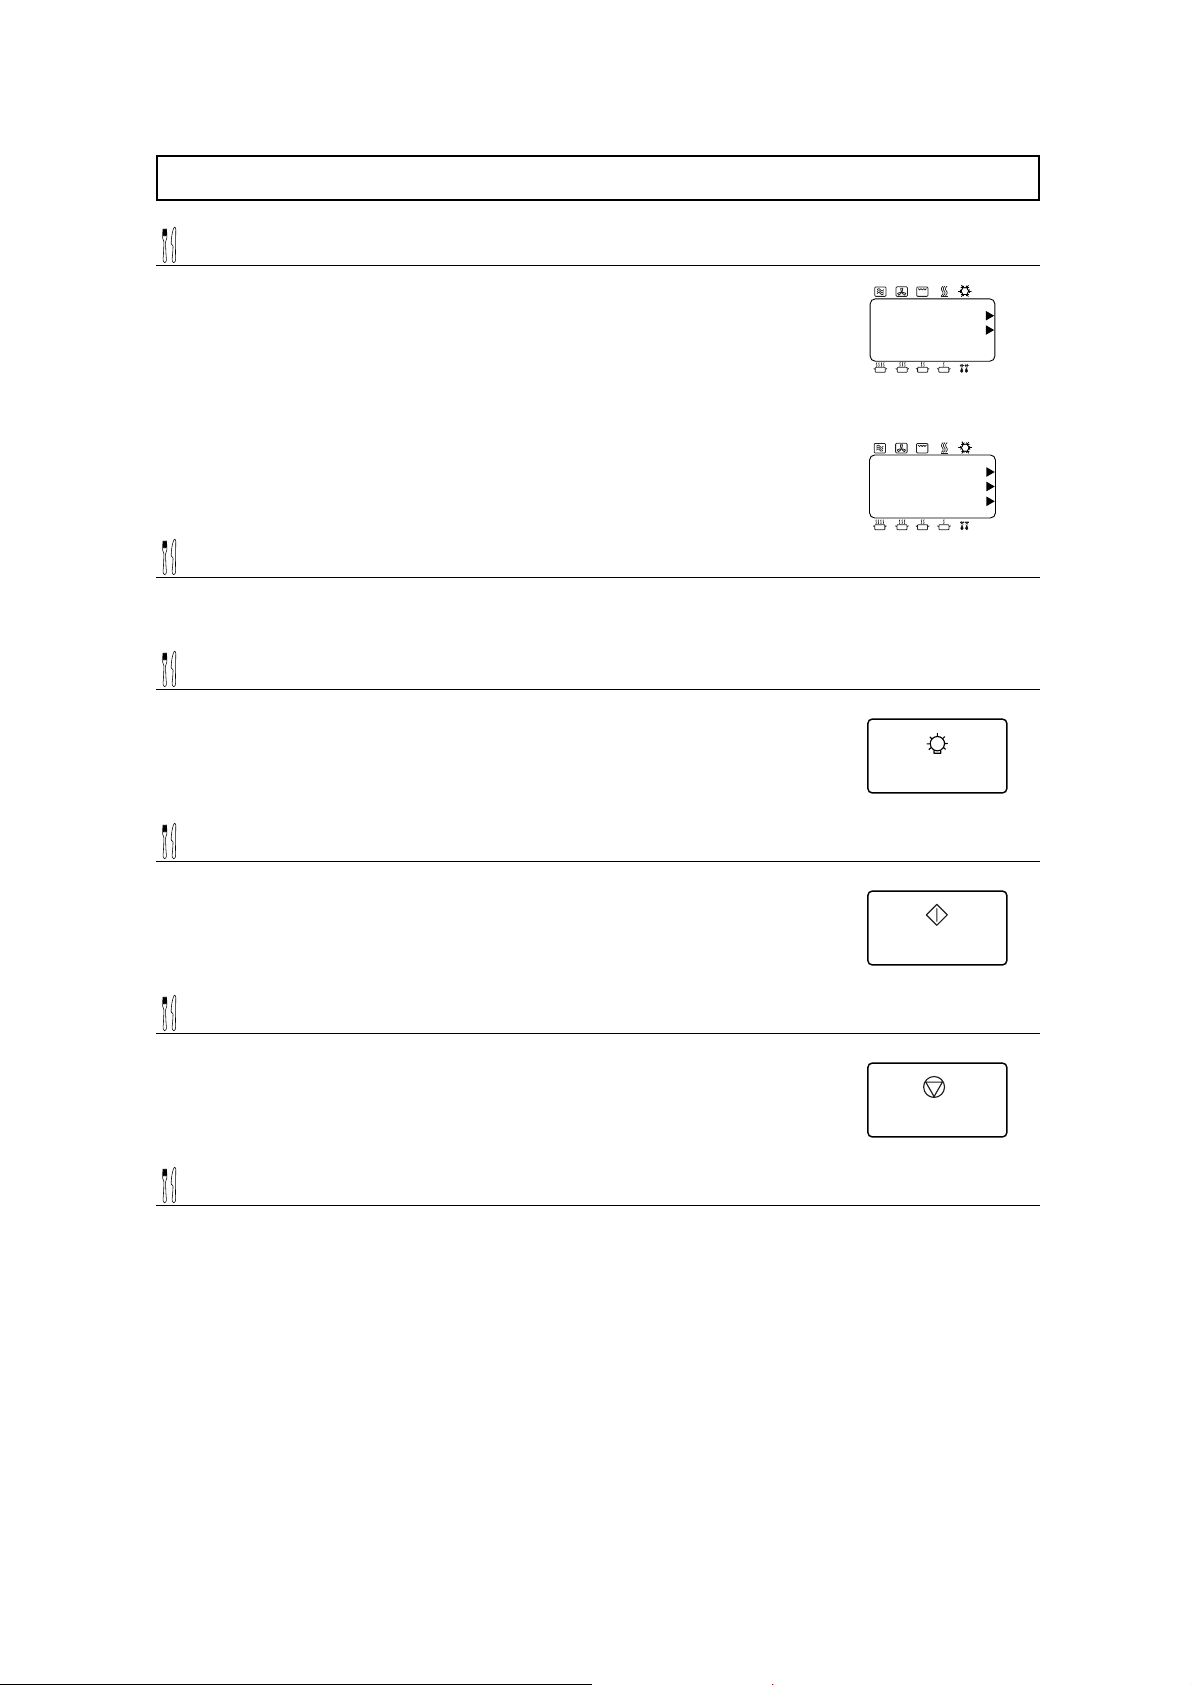
Operating your Oven as a Microwave
CONTROLS T O USE
INFORMATIONACTION DISPLAY
1 Open Door.
Put in Food.
Close Door.
The oven light will come on.
Oven light turns off.
2 Select
Power.
Press Microwave Pad to
select correct power.
eg. Low––press three times.
3 Select Time. Turn timer dial to set a
heating time.
eg. 4 min 30 s
Max time you can set:
High 15 min
Medium 15 min
Low, Simmer 60 min
Defrost, Stand 60 min
4 Press
Start Pad.
Display window will count
down time.
The fan will be turned on.
A
B
1
2
3
At end of cooking, oven
beeps 3 times, and “0”
flashes in window until door
is opened.
Remove food.
Display window repeats
programme previously set.
5 Open Door.
ACCESSORIES T O USE
Do not use the Wire Rack Shelf or
Ceramic Insulating Tray when
cooking by microwave.
PRESS
Once
Twice
3 Times
4 Times
5 Times
6 Times
POWER LEVEL
High
Medium
Low
Simmer
Defrost
* Stand
%
100
50
30
15
25 10
0
WATTS
1300
650
400
200
340 130
0
Note:
¥ The display window will go blank, one minute later after cooking or
during setting when the door is closed.
* See Page 24.
MICROWAVE
START
End of Programme
Open Door
A
B
1
2
3
A
B
1
2
3
A
B
1
2
3
A
B
1
2
3
A
B
1
2
3
––––
MICROWAVE
CONVECTION
GRILL
PREHEAT
COOLING
LAMP
1
2
3
4
4
5
6
7
8
AB
STOP
PROG
START
LOCK BUZZ
Page 11
9
Operating your Oven as a Microwave
Multi-Stage (Sequential) Heating
The oven can be programmed with up to 3 different
functions to operate in sequence.These can be
MICROWAVE, GRILL, CONVECTION or
COMBINATION programs. If a required heating time is
greater than 15 minutes on HIGH/MEDIUM power, use
2 stage programming.
For 2 stage programming:
Follow steps 1-3 before then enter the next heating
programme, then press Start Pad.
For 3 stage programming:
Follow 2 stage programming and enter a 3rd heating
programme before pressing Start Pad.
Changing the Heating Time
The heating time can be increased or decreased
during cooking by turning the timer dial.
Oven Lamp
The Oven Lamp switches off when the door is closed.
If you want to check the food, press Lamp Pad, it will
then illuminate for 10 seconds.
The Oven Lamp turns on whenever the door is
opened.
Repeat Feature
You can repeat the same heating programme if you
press Start Pad within 1 minute of the previous
programme finishing.
After 1 minute, if Start Pad is not pressed, the display
returns to “0”, or goes blank if the oven door is closed.
Stop Pad
Before heating: One tap clears the display.
During heating: One tap stops the heating cycle and
two taps clears the display.
N.B. see page 18 for operation while in Programme
Lock.
Heater Operation
When using HIGH, MEDIUM, LOW and SIMMER
powers, the half of GRILL elements and
CONVECTION fan operate to reduce the build up of
condensation.Take care NOT TO TOUCH OVEN
CEILING.
Please use the container suitable for Microwave and
Heat.
A
B
1
2
3
A
B
1
2
3
START
LAMP
STOP
Page 12

10
Operating your Oven on Convection
CONTROLS T O USE
INFORMATIONACTION DISPLAY
1 Open Door.
Put in Food.
Close Door.
The oven light will come on.
Oven light turns off.
2 Press
Convection
Pad.
Select required oven
temperature. eg. 180˚C
Continue to press Convection
Pad until temperature
required appears in display
window.
Temperature counts up in
10˚C from 100˚C-250˚C
3 Select Time.
Tur n timer dial to set a
heating time. eg. 18 min Max
heating time: 2 h
Timer counts up in:
30 s intervals 0-10 min
1 min intervals 10-60 min
10 min intervals 1 h-2 h
4 Press
Start Pad.
Display window will count
down time.
The Convection fan turns on.
At end of heating programme,
oven beeps 3 times, and “0”
flashes in window until door
is opened.
Remove food.
Display window repeats
programme previously set.
5 Open Door.
ACCESSORIES T O USE
For best results place food on Wire
Rack Shelf in the LOWER position.
Caution:
There is no NON-TIP Safety Lock on Wire Rack Shelf.Take care when
removing food.
End of Programme
Open Door
A
B
1
2
3
A
B
1
2
3
A
B
1
2
3
A
B
1
2
3
A
B
1
2
3
A
B
1
2
3
MICROWAVE
CONVECTION
GRILL
PREHEAT
COOLING
LAMP
1
2
3
4
4
5
6
7
8
AB
CONVECTION
START
STOP
PROG
START
LOCK BUZZ
Page 13

11
Operating your Oven on Convection
Hot Surfaces
Take great care when removing hot food. Use oven
gloves.
Multi-Stage (Sequential) Heating
The oven can be programmed with up to 3 different
functions to operate in sequence.These can be
MICROWAVE, GRILL, CONVECTION or
COMBINATION programs.
For 2 stage programming:
Follow steps 1-3 before then enter the next heating
programme, then press Start Pad.
For 3 stage programming:
Follow 2 stage programming and enter a 3rd heating
programme before pressing Start Pad.
Changing the Heating Time
The heating time can be increased or decreased
during cooking by turning the timer dial.
Recalling Set Temperature
The temperature selected can be checked during
operation by pressing Convection Pad. Temperature
will be displayed in window before returning to
remaining heating time during pressing pad.
The temperature cannot be altered during a
programme.
Oven Lamp
The Oven Lamp switches off when the door is closed.
If you want to check the food, press Lamp Pad, it will
then illuminate for 10 seconds.
The Oven Lamp turns on whenever the door is
opened.
Repeat Feature
You can repeat the same heating programme if you
press Start Pad within 1 minute of the previous
programme finishing.
After 1 minute, if Start Pad is not pressed, the display
returns to “0”, or goes blank if the oven door is closed.
Stop Pad
Before heating: One tap clears the display.
During heating: One tap stops the heating cycle and
two taps clears the display.
N.B. see page 18 for operation while in Programme
Lock.
Preheat
For best results on convection the oven should be
preheated. (See page 20)
It is useful to keep the oven condition fixed.
A
B
1
2
3
A
B
1
2
3
LAMP
CONVECTION
START
STOP
PREHEAT
Page 14

12
Operating your Oven on Grill
CONTROLS T O USE
INFORMATIONACTION DISPLAY
1 Open Door.
Put in Food.
Close Door.
The oven light will come on.
Oven light turns off.
2 Press
Grill Pad.
Select required Grill level.
eg. level 2
Display Output
1 press 1 1680 watts
2 presses 2 1380 watts
3 presses 3 1070 watts
3 Select Time.
Tur n timer dial to set a
heating time. eg.10 min
Max heating times is: 1 h
Timer counts up in:
30 s intervals 0-10 min
1 min intervals 10-60 min
4 Press
Start Pad.
Display window will count
down time.
The fan turns on.
At end of heating programme,
oven beeps 3 times, and “0”
flashes in window until door
is opened.
Remove food.
Display window repeats
programme previously set.
5 Open Door.
ACCESSORIES T O USE
For best results place food on Wire
Rack Shelf in the UPPER position
and place the Ceramic Insulating
Tray on the oven ground to receive
the drip.
Caution:
There is no NON-TIP Safety Lock on Wire Rack Shelf.Take care when
removing food.
End of Programme
Open Door
A
B
1
2
3
A
B
1
2
3
A
B
1
2
3
A
B
1
2
3
A
B
1
2
3
A
B
1
2
3
MICROWAVE
CONVECTION
GRILL
PREHEAT
COOLING
LAMP
1
2
3
4
4
5
6
7
8
AB
GRILL
START
STOP
PROG
START
LOCK BUZZ
Page 15

13
Operating your Oven on Grill
Hot Surfaces
Take great care when removing hot food. Use oven
gloves.
Multi-Stage (Sequential) Heating
The oven can be programmed with up to 3 different
functions to operate in sequence.These can be
MICROWAVE, GRILL, CONVECTION or
COMBINATION programs.
For 2 stage programming:
Follow steps 1-3 before then enter the next heating
programme, then press Start Pad.
For 3 stage programming:
Follow 2 stage programming and enter a 3rd heating
programme before pressing Start Pad.
Changing the Heating Time
The heating time can be increased or decreased
during cooking by turning the timer dial.
Recalling Grill Level Set
The grill level selected can be checked by pressing
Grill Pad.The level number will be displayed in the
window before returning to remaining heating time.
Oven Lamp
The Oven Lamp switches off when the door is closed.
If you want to check the food, press Lamp Pad, it will
then illuminate for 10 seconds.
The Oven Lamp turns on whenever the door is
opened.
Repeat Feature
You can repeat the same heating programme if you
press Start Pad within 1 minute of the previous
programme finishing.
After 1 minute, if Start Pad is not pressed, the display
returns to “0”, or goes blank if the oven door is closed.
Stop Pad
Before heating: One tap clears the display.
During heating: One tap stops the heating cycle and
two taps clears the display.
N.B. see page 18 for operation while in Programme
Lock.
A
B
1
2
3
A
B
1
2
3
LAMP
GRILL
START
STOP
Page 16

14
Operating your Oven on Combination
CONTROLS T O USE
INFORMATIONACTION DISPLAY
1 Open Door.
Put in Food.
Close Door.
The oven light will come on.
Oven light turns off.
2 Press
Convection
Pad.
OR
Grill Pad.
Press Convection Pad until
required temperature appears
in display. eg. 200˚C
OR
Select Grill Level.eg. Level 2
1 press 1680 watts
2 presses 1380 watts
3 presses 1070 watts
3 Select
Power.
Select Microwave power.
eg. LOW
1 press MED
2 presses LOW
3 presses SIMMER
4 presses DEFROST
N.B. It is NOT possible to
select HIGH power.
5 Press
Start Pad.
Display window will count
down time.
The fan turns on.
At end of heating programme,
oven beeps 3 times, and “0”
flashes in window until door
is opened.
Remove food.
Display window repeats
programme previously set.
6 Open Door.
ACCESSORIES T O USE
The Ceramic Insulating Tray MUST
be used if the cooking container is
metal, NEVER place a metal
container directly onto the Wire
Rack Shelf if cooking by
COMBINATION as arcing may
occur and damage the dish/oven.
CONVECTION
MICROWAVE
START
End of Programme
Open Door
A
B
1
2
3
A
B
1
2
3
A
B
1
2
3
A
B
1
2
3
A
B
1
2
3
A
B
1
2
3
GRILL
4 Select Time.
Tur n timer dial to set a
heating time. eg.12 min
Max heating times is: 1 h
Timer counts up in:
30 s intervals 0-10 min
1 min intervals 10-60 min
A
B
1
2
3
A
B
1
2
3
MICROWAVE
CONVECTION
GRILL
PREHEAT
COOLING
LAMP
STOP
PROG
LOCK BUZZ
1
2
3
4
4
5
6
7
8
AB
START
Page 17

15
Operating your Oven on Combination
Multi-Stage (Sequential) Heating
The oven can be programmed with up to 3 different
functions to operate in sequence.These can be
MICROWAVE, GRILL, CONVECTION or
COMBINATION programs.
For 2 stage programming:
Follow steps 1-3 before then enter the next heating
programme, then press Start Pad.
For 3 stage programming:
Follow 2 stage programming and enter a 3rd heating
programme before pressing Start Pad.
Changing the Heating Time
The heating time can be increased or decreased
during cooking by turning the timer dial.
Oven Lamp
The Oven Lamp switches off when the door is closed.
If you want to check the food, press Lamp Pad, it will
then illuminate for 10 seconds.
The Oven Lamp turns on whenever the door is
opened.
Repeat Feature
You can repeat the same heating programme if you
press Start Pad within 1 minute of the previous
programme finishing.
After 1 minute, if Start Pad is not pressed, the display
returns to “0”, or goes blank if the oven door is closed.
Stop Pad
Before heating: One tap clears the display.
During heating: One tap stops the heating cycle and
two taps clears the display.
N.B. see page 18 for operation while in Programme
Lock.
Preheat
For best results on combination the oven should be
preheated. (See page 20)
It is useful to keep the oven condition fixed.
For recalling set mode see pages 11 and 13.
A
B
1
2
3
A
B
1
2
3
START
LAMP
STOP
PREHEAT
Caution:
There is no NON-TIP Safety Lock on Wire Rack Shelf.Take care when
removing food.
Page 18

16
Setting the Memory Programs
Your oven has a 16 blank programs for your own heating requirement. (A1-A8, B1-B8)
CONTROLS T O USE
INFORMATIONACTION DISPLAY
1 Open Door. The oven light will come on.
2 Press
Programme
Key.
Keep key pressed for 2
seconds until “P” is display ed.
KEEP DOOR OPEN
3 Press
Programme
Number.
eg.To set Programme A2:
Low power 20 min
Press Programme Number
Pad 2.If programme has
been previously set, this will
appear in display.
If programme memory is
empty then programme
number will appear in display.
5 Select
Time.
Tur n Timer Dial until 20 min is
displayed.
After 3 seconds display
returns to “0”.
6 Press
Programme
Key.
PROG
2
A
B
1
2
3
A
B
1
2
3
A
B
1
2
3
A
B
1
2
3
4 Select
Power.
Press Microwave Pad 3
times.
MICROWAVE
A
B
1
2
3
To programme B side
Your oven has a further 8 blank programs on B select.
These can be used for your own heating requirements
or can be used for doubling portion etc. Press A-B
Shift Pad between steps 2 and 3 or 3 and 4 above.
Cursor will illuminate in B position.
Programme Lock
It is NOT possible to enter a programme when
Programme Lock is set.(See page 19)
AB
A
B
1
2
3
PROG
MICROWAVE
CONVECTION
GRILL
PREHEAT
COOLING
LAMP
1
2
3
4
4
5
6
7
8
AB
STOP
PROG
START
LOCK BUZZ
Page 19

17
Setting the Memory Programs
Multi-Stage (Sequential) Cooking
It is possible to programme into the memory 2 or 3
stage programme using MICROWAVE, CONVECTION,
GRILL or COMBINATION.
Changing a Memory Programme
To change a programme simply follow steps 1-6 as
before entering your new programme.
Using the Memory Programs
INFORMATIONACTION
1 Open Door.
Put in Food.
Close Door
The oven light will come on.
Oven light turns off.
2 Press
Programme Number Pad.
eg. For programme A2.
Press Programme Number Pad 2.
3 Press Start Pad.
Display Window will count down time.
DISPLAY
A
B
1
2
3
A
B
1
2
3
A
B
1
2
3
To use B Side Programs
Press A-B Shift Pad before pressing Programme
Number Pad.
Programme Lock
If programme lock is activated, cooking programme
starts immediately i.e. there is no need to press Star t
Pad.(See page 18)
AB
LOCKLOCK
2
START
Page 20

18
How to activate Programme Lock
CONTROLS T O USE
INFORMATIONACTION DISPLAY
1 Open Door. The oven light will come on.
2 Press
Programme
Lock Key
Keep key pressed for
2 seconds until “P” is
displayed.
KEEP DOOR OPEN.
After 2 seconds....
After 3 seconds.....
A
B
1
2
3
A
B
1
2
3
A
B
1
2
3
A
B
1
2
3
One Touch Operating Mode
When Programme Lock is activated, oven operates in “ONE TOUCH”
mode, i.e. press required memory programme number and oven
immediately starts.
No need to press Start Pad.
Interrupted Programme
If the door is opened during a Memory Programme,
the remaining heating time will be cancelled.
Setting New Programs
When the Programme Lock is activated it is not
possible to enter a Memory Programme and change
the Beep tone.
Stop Pad
During a Memory Programme, one tap stops the
heating cycle, the programme is cleared and the
display reverts to “0”.
LOCKLOCK
MICROWAVE
CONVECTION
GRILL
PREHEAT
COOLING
LAMP
STOP
PROG
LOCK BUZZ
1
2
3
4
4
5
6
7
8
AB
START
Page 21

19
How to release Programme Lock
INFORMATIONACTION
1 Open Door. The oven light will come on.
2 Press
Programme Lock Key.
Keep key pressed for 2 seconds until “P L” is
displayed.
KEEP DOOR OPEN.
After 2 seconds....
After 3 seconds...
LOCKLOCK
DISPLAY
A
B
1
2
3
A
B
1
2
3
Two Touch Operating Mode
The oven reverts to 2 Touch Operation mode.
Press required key number then press Start Pad.
Interrupted Programme
If the door is opened during a programme, once
programme lock is released, the remaining heating
time will stay in the display window until the door is
closed and Start Pad is pressed.
Setting New Programs
Once Programme Lock is released, you can again
enter new heating programs and change the Beep
tone.
A
B
1
2
3
A
B
1
2
3
How to read Programme List
It is possible to check the programs that have been entered into the 16 Programme Number Pads.With the
door open, press Start Pad and Programme Number Pad 1 simultaneously (the oven will make an
acknowledging beep).After 2 seconds the display window will show each individual stage of each memory
programme in the order A1, B1, A2 etc. Finally it will display the beep tone setting and the programme lock
symbol (P L) before clearing to “0”.
* If you want to know what mode is A5 programmed,
1. After starting to show in the display from A1 press Stop/Reset Pad.
2. Press Programme Number Pad 5.
3. Press Start Pad. (The display will show from A5 pad through the following Number Pads.)
Page 22

20
Keeping your Oven Hot
Notes on Preheat and Cooling:
¥ During PREHEAT or COOLING, if you have started from a blank display and want to select another function
pad, open the door first before selecting a function.
¥ You can select PREHEAT function during a COOLING function.
¥ AFTER a heating function has completed, oven will revert to preheat function automatically.
To assist in faster heating and browning results, the PREHEAT feature is designed to keep your oven at
170˚C, 200˚C or 220˚C for a hot start before using CONVECTION or COMBINATION function.
CONTROLS T O USE
INFORMATIONACTION DISPLAY
1 Press
Preheat Pad.
Select a required Preheat
temperature when display
has blank or “0”.
eg. 170˚C
1 press 170˚C
2 presses 200˚C
3 presses 220˚C
2 Press
Start Pad.
Reheat temperature will be
maintained at the selected
temperature.
If not used, oven will
automatically switch off after
1 hour.Door must remain
CLOSED.Once oven has
reached Preheat
temperature, “P” flashes.
3 Open Door.
Close Door
Press
Start Pad.
Place food in oven.
Select programme.
eg. Convection 200˚C 15 min
Display window will count
down time.
At end of heating programme,
“0” flashes in window until
door is opened.
START
A
B
1
2
3
A
B
1
2
3
4 Open Door.
Display window repeats
programme previously set.
If Start Pad is not pressed
within 1 minute, oven reverts
to PREHEAT.
PREHEAT
START
A
B
1
2
3
A
B
1
2
3
A
B
1
2
3
A
B
1
2
3
A
B
1
2
3
A
B
1
2
3
A
B
1
2
3
After 1 minute
Caution:
There is no NON-TIP Safety
Lock on Wire Rack Shelf.
Take care when removing food.
MICROWAVE
CONVECTION
GRILL
PREHEAT
COOLING
LAMP
1
2
3
4
4
5
6
7
8
AB
STOP
PROG
START
LOCK BUZZ
Page 23

21
Cooling your Oven quickly
To quickly cool the oven cavity, the oven has Cooling Pad. Cooling Pad can be used for defrosting or heating
by Microwave while on PREHEAT function.
INFORMATIONACTION
1 Press Cooling Pad. Select COOLING when the display is blank or “0”.
2 Press
Start Pad.
Once the oven has cooled.
¥ The COOLING fan and CONVECTION fan will
turn on.
¥ The oven door can be opened or closed.
But the oven can be cool faster when the door
is opened than closed.
¥ The oven will cool in 2-30 min depending on
temperature.
The cooling and convection fans switch off.
DISPLAY
A
B
1
2
3
A
B
1
2
3
A
B
1
2
3
How to change the Beep Tone
When the programme lock is activated, you can not change the beep tone.
Please release the programme lock.(See page 19)
INFORMATIONACTION
1 Open Door. The oven light will come on.
2 Press
Programme Key.
Keep key pressed for 2 seconds until “P” is
displayed.
KEEP DOOR OPEN.
PROG
DISPLAY
A
B
1
2
3
A
B
1
2
3
3 Press
Buzzer Key.
Press Buzzer Key to choose sound level required.
(eg. twice for Middle)
No. Presses Display Buzz level
1 b-3 Loudest
2 b-2 Middle
3 b-1 Quietist
4 b-0 Silent
BUZZ
A
B
1
2
3
A
B
1
2
3
A
B
1
2
3
After 3 seconds
4 Press
Programme Key.
After 3 seconds
Display returns to “0”.
PROG
START
COOLING
Page 24

22
Care of your Oven and Cleaning
It is essential that you follow these points to get the maximum use from your oven.Microwaves are attracted to
moisture and grease: therefore a dirty oven does not cook EFFICIENTLY.
Caution: Do not clean this oven with any product that is labeled as containing corrosive chemicals. The
heating of corrosive chemicals in this oven may cause microwave radiation leaks.
1. Before Cleaning
Unplug the oven at the socket.
2. Door Seals
Pay special attention to cleaning the door seals and
door seal areas.
Regularly wipe the Drip Ledge to avoid a build up of
moisture and grease.
3. Door
Keep the inside glass of the door clean by wiping
regularly with a soft damp cloth. Small amounts of
oven cleaner can be used––DO NOT SPRAY
DIRECTLY onto door––spray onto a cloth and wipe
oven.Do not use harsh detergents or abrasive.
4. Oven Walls
The walls should be wiped regularly with a soft damp
cloth. Small amounts of oven cleaner can be
used––DO NOT SPRAY DIRECTLY onto walls––spray
onto a cloth and wipe over.
DO NOT ALLOW OVEN CLEANER NEAR THE
HOLES IN THE WALL OF THE OVEN. If corrosive
cleaner gets behind the oven wall, your oven could be
damaged. Do not allow cleaning liquids to seep into
openings.
Excess grease can be softened for ease of cleaning by
placing 500 - 800 ml of hot water in a microwave-safe
bowl with a chopped fresh lemon. Heat on High Power
for 15 - 20 min.The moisture produced on the walls
should be wiped with a soapy cloth.
5. Floor
The wave guide is situated beneath the ceramic base
of the oven.Any spills must therefore be wiped to
ensure even heating.Do not use harsh detergents or
abrasives.
6. Roof
The roof contains the 4 Quarts elements. Before
cleaning ensure oven has cooled to avoid burns.Wipe
the roof regularly with a damp cloth to minimize build
up of grease and smoke.
7. Control Panel
If the Control Panel becomes dirty, clean with a soft,
dry cloth. Do not use harsh detergents or abrasives on
Control Panel.Do not use a saturated cloth as the
remaining moisture may damage the panel.When
cleaning the Control Panel, leave the oven door open
to prevent the oven from accidentally turning on. After
cleaning touch Stop/Reset Pad to clear display
window.
Page 25

23
8. Accessories
The accessories should be cleaned regularly to
maximize efficiency of the oven.
WARNING: DO NOT place hot Ceramic Insulating
Tray directly under a cold tap––the tray
will shatter.
Wire Rack Shelf––This should be cleaned after every
session.Take care not to use harsh abrasives.
9. Shelf Suppor ts
Remove the shelf supports and clean regularly. Do not
forget to clean oven walls behind supports.
If food splashes are not cleaned off from shelf
supports they will be carbonized during further heating
and may cause ARCING by Microwave.
What to do if an “F” appears in the Display
Your oven is equipped with a Self Diagnostic Failure Code System: this means the oven monitors its own
operation and will show a failure code in the display window in the unlikely event of a malfunction.
If a Failure Code appears in the display window (it will appear as an “F” then a two digit number) follow these
steps:
1. Close the door and unplug the oven at the mains socket.Ensure all air vents are clear.
2. Leave 1 minute and then reconnect the oven at the mains.
3. Open the door and place food or a jug of water in the cavity, close the door.
4. Try the same function that had been in operation prior to the appearance of the Failure Code in the display
window.
If the Failure Code appears again, then contact the dealer from which you purchased the oven.
Page 26

24
How a Microwave works
To get the most from your oven it is helpful to understand
how the oven works as a microwave.
Once plugged into a socket, the electricity flows along the
flex and is converted into microwave energy by the
MAGNETRON.Microwaves are ultra high frequency waves,
and belong to the same category as radio and television
waves.These are directed into the cavity through the WAVE
GUIDE.
When they reach the cavity, the microwaves will behave in
one of three ways:
1. Reflection
They will REFLECT off metal.The inner walls of your oven
are made of stainless steel, so that the microwave energy
can bounce evenly around the cavity. Of course, the
microwaves will also reflect off metal cooking containers and
accessories, such as saucepans and platters. For this
reason, NEVER use the Wire Rack Shelf on microwave only.
2. Transmission
The microwaves will TRANSMIT through paper, plastic,
glass and china, therefore, containers made of these
substances should be used in microwave cookery.
3. Absorption
The microwave energy is ABSORBED by the food.The
energy penetrates of the food causing the molecules of
vibrate over 2,450,000,000 times a second.This vibration
causes the water molecules to rub against each other
producing frictional heat which cooks this outer part of the
food; the heat is then conducted through the food to cook
the centre.
Standing Time
The heat that builds up on the outside of the food is still
being conducted to the centre, even after the microwave
oven has switched off.This period is known as the “Standing
Time”.The time it takes for the food to finish cooking will
vary depending on its shape, size and type.
For example, a jacket potato will need to stand for at least
5-10 minutes after the end of the cooking time and during
this time the temperature at the centre will increase. A pastry
pie that has been reheated will only need a standing time 12 minutes for the heat to distribute evenly.
1. Reflection
3. Absorption
2. Transmission
Page 27

25
Defrosting by Microwave
The ability to defrost foods quickly is another excellent benefit of your oven.The quality of the defrosted food
will depend a great deal on the care the food receives in freezing and defrosting, so always ensure that the
best food is frozen and that it is packaged correctly.
Ensure the freezer is running at the correct temperature (-18˚C or below) and that it is not overloaded with
food or ice.Always label and date foods so that they can be used in strict rotation.
Always defrost using the Defrost power setting.NEVER tr y to hurr y the defrosting by selecting a higher power
level as this will only over-defrost the food, causing it to become tough and inedible and leading to waste.
FOOD
Prawns
Fish fillets
Whole fish
Lamb Joints
Pork Joints
Beef Joints
Steaks
Minced/Cubed
Meats
Chicken
Chicken
Portions
Turkey
Chops
Gammon
Bacon
WEIGHT
500 g
500 g
approx.
500 g
500 g
500 g
500 g
500 g
500 g
500 g
500 g
500 g
500 g
INSTRUCTIONS
Stir halfway through
defrosting time.
Rearrange after half
defrosting time.
Shield head and tail after half
time.
Place on rack. After half time
stand for 15 min, shield and
continue.
As Lamb joints.
As Lamb joints.
Tur n and separate.
Break up and remove any
defrosted meat halfway
through time.
Place on rack. After half time,
shield, turn and remove
giblets.
Place on rack and arrange
correctly.
Place on rack, after half time.
Stand for 15 min, shield and
continue.
As Chicken Portions.
Separate rashers during time.
As Gammon
Remove any defrosted
rashers.
APPROX.
TIME PER
500 g
6 min
8 min
10 min
12 min
9 min
9 min
10 min
6 - 8 min
13 min
9 min
12 min
5 min
8 min
9 min
ST AND TIME
5 min.Wash under
cold water.
10 min.Wash
under cold water.
10 min.Wash
under cold water.
45 - 60 min
45 - 60 min
45 - 60 min
10 min
10 min
30 min.Wash
well.
10 min
45 - 60 min
10 min
10 min
10 min
Check food regularly during defrosting to ensure over defrosting does not occur.
Page 28

26
Reheating by Microwave
Affects of the food
1. Starting T emperature
The colder the food the longer it will take to heat to
a serving temperature. Extra time must be allowed if
food has been defrosted as the centre may still be
icy.
2. Head Space
When heating liquids, ensure they do not completely
fill their containers; a head space allows the liquids
to be stirred during and at the end of the heating
time without spillage.
3. Covering Foods
A container covered with either cling film, a plastic
plate cover or even the lid to the dish, will heat
fractionally faster than an uncovered dish. Do not
cover foods which require a drier texture, such as
pastries, as the steam that becomes trapped under
the cover will cause the food to go soggy.
4. Crisp Foods
Reheat pastry and bread items, such as sausage
rolls, pies and croissants, on a plastic rack to reduce
the chance of “sogginess”.The rack allows the air to
circulate beneath the food and remove steam which
causes moist, limp pastry. Your oven offers a
COMBINATION facility which will help crisp pastr y
items as they reheat.
5. Uneven Shapes
When heating uneven shaped pieces of food, place
the thick part of one piece against the thin part of
the second.This helps the food to heat more evenly.
6. Porous Foods/Dense Foods
Porous foods reheat more quickly than dense heavy
food.
7. Food with “Skins”
When reheating foods with a skin such as fish,
chicken or baked beans, reduce the power to a
lower setting to prevent the food from heating too
quickly and “exploding”
8. Doubling Quantities
A reheating time is based on weight and usually a
time is given for a particular quantity of food, i.e.
300 g lasagne take 3 minutes.When the number of
portions to be heated together doubles, then the
reheating time will need to be increased by
75 - 100 %.Two por tions will take 5 minutes 30
seconds to 6 minutes. Generally two lighter textured
products such as pastries will take the shorter time,
whilst two denser products such as lasagne will take
the longer time.
9. Frozen Foods
For speed, some foods can be reheated from frozen
but they must be foods that can be STIRRED eg.
meat sauce, chilli con carne. Set the total reheat
time but open the door to stir regularly.
Affects of the Dish
1. Shape
A round dish heats food more evenly than a square
dish.The corners of a square dish receive double
microwave energy and result in bubbling overcooked
whilst the centre of the food is cold. Oval dishes give
a better result but there may still be areas of hot
bubbling food at the two “ends”.
2. Depth
A shallow dish heats more quickly than a deep dish.
Food in a shallow dish heats evenly from all
directions. In a deep dish the centre food relies on
conduction and takes longer to heat.
3. Material
Heavy earthenware and china dishes will slow the
heating process by absorbing some of the heat from
the food itself.A thinner, lighter china is a better
choice as this will not impede the cooking time.
4. Glazed Finish
Always choose a glazed dish.An unglazed or
chipped container can absorb water when it is
washed. As microwave energy is attracted to
moisture the water molecules contained in the china
heat up, not only causing the dish to get hot but also
slowing down the reheating time.
5. Shape of Base
If possible, always choose a dish that has rounded
rather than sharp corners at the base to prevent
over cooking.
Page 29

27
Entrées
Snack/Bar Foods:
Burgers in Buns
Hotdogs in Rolls
Barbecue Half Racks Ribs
Cooked Chicken Drumsticks
Pizza
Quiche Slices
Baked Sausage Rolls
Baked Pies/Pasties
120 g
100 g
200 - 250 g
50 - 75 g
180 mm
120 g
140 g
170 g
-18˚C 1
1 min 10 s
1min 15 s
3 - 4 min
1 min 30 - 40 s
1 min 30 s
40 s
1 min 30 s
2 min 30 s
FOOD
Hungarian Goulash
Chicken Tikka Masala
Chilli Con Carne
Spicy Sausage Casserole
Irish Stew
Vienna Steaks with Gravy
Vegetable Chilli
Vegetable Curry
Spaghetti Bolognaise
Lasagne
Moussaka
Cauliflower Cheese
Tagliatelle Carbonara
WEIGHT
1.3 kg
300 g
1.3 kg
250 g
1.4 kg
1.7 kg
1.3 kg
1.4 kg
1.4 kg
300 g
300 g
300 g
300 g
300 g
300 g
ST ART TEMP
2˚C
-18˚C
2˚C
-18˚C
2˚C
-18˚C
2˚C
-18˚C
2˚C
-18˚C
2˚C
-18˚C
2˚C
-18˚C
2˚C
-18˚C
2˚C
-18˚C
2˚C
-18˚C
2˚C
-18˚C
2˚C
2˚C
2˚C
2˚C
-18˚C
QUANTITY
1
1
1
1
1
2
1
1
2
1
1
2
1
2
1
2
1
2
1
APPRO X.TIME
HIGH POWER
71/2- 81/2min
15 - 16 min
3 - 31/2min
5 - 51/2min
8 - 9 min
16 - 17 min
2 - 21/2min
41/2- 5 min
7 - 8 min
141/2- 151/2min
9 - 10 min
191/2- 21 min
71/2- 81/2min
141/2- 151/2min
9 - 10 min
17 - 18 min
7 - 71/2 min
14 - 15 min
11/2- 2 min
31/2- 4 min
4 - 41/2min
3 - 31/2min
41/2 - 5 min
5 - 51/2min
3 - 31/2min
41/2 - 5 min
31/2- 4 min
5 - 51/2min
31/2- 4 min
5 - 51/2min
31/2- 4 min
5 - 51/2min
4
1
/2 - 5 min
Page 30

28
Using the Combination Function
Choosing a Combination Function
Cooking by Combination allows you to obtain crisp
browned foods but in a shorter cooking time than
Conventional Cooking.
There are two types of Combination Setting:
1. Microwave and Grill together
2. Microwave and Convection together
Accessories to use
For best results, place cooking container on WIRE
RACK SHELF in lower position.Food can be placed
DIRECTLY on CERAMIC INSULATING TRAY if it is
thoroughly cleaned before use.The Ceramic
Insulating Tray must be used when food is placed in
a metal container.NEVER place a metal container
onto Wire Rack Shelf if cooking by Combination as
arcing may occur and damage the dish/oven.
Metal Container
Avoid using large or deep sided metal containers.
This will restrict the effectiveness of the Microwaves
and lengthen the heating time.
Containers to use
Combination programs use microwave and heat
(CONVECTION or GRILL) therefore you must
choose the container carefully.
DO USE: Metal containers check they do not
have jagged metal seams.
Ceramics that do not have a metal
pattern. Heat proof glass and
china.
DO NOT USE Enamelled items (that may be
chipped). Dishes with gold/metal
pattern. Enamelled cast iron eg. Le
Creuset. Any dish that is not heat
proof eg. plastics, and Cling Film.
Preheating
For best results, always place food in a preheated
oven.
If arcing occurs!
Stop oven immediately and continue to cook by
convection only and transfer food to a suitable
container.
Entrées
FOOD
Macaroni Cheese
Cottage Pie
Broccoli and Cream
Cheese Italienne
Lasagne Classico
Cannelloni
Vegetable Crumble
WEIGHT
1.3 kg
1.8 kg
320 g
1.3 kg
300 g
1.9 kg
1.5 kg
1.5 kg
ST ART TEMP
2˚C
2˚C
2˚C
-18˚C
2˚C
2˚C
-18˚C
2˚C
2˚C
2˚C
QUANTITY
1
2
1
1
2
1
SETTING
HIGH then
GRILL 1/MEDIUM
230˚C/MEDIUM
HIGH then
GRILL 1/MEDIUM
HIGH then
GRILL 1/MEDIUM
250˚C/MEDIUM
then HIGH
HIGH then
GRILL 1/MEDIUM
HIGH then
GRILL 1/MEDIUM
HIGH then
GRILL 1/MEDIUM
250˚C/MEDIUM
then HIGH
250˚C/MEDIUM
250˚C/MEDIUM
230˚C/MEDIUM
APPROX.
TIME
71/2min
7 min
22 min
31/2min
31/2min
6 min
31/2min
7 min
21/2min
6 min
7 min
3
1
/2min
31/2min
6 min
31/2min
7 min
31/2min
19 min
16 min
13 min
Page 31

Miscellaneous:
Meat and Poultry:
Battercrisp Fish
Burger
Rack of Lamb
Beef Wellington
Burgers
Sausages
Grill Steaks
Breaded Lamb
Cutlets
100 g
200 - 300 g
190 g
100 g
50 g
150 g
100 g
-18˚C
29
Pizza
Egg and Bacon Flan
Traditional Pasties
Bakewell Tart
Croissant
630 g
1.0 kg
170 g
790 g
50 g
-18˚C
Vegetables/Fish:
Vegetable Samosa
Roast Potatoes
Salmon En Croute
Battercrisp Cod
40 g
350 g
170 g
150 g
-18˚C
FOOD
Cauliflower Cheese
Moussaka
Fishermans Pie
WEIGHT
1.6 kg
2.0 kg
300 g
1.9 kg
ST ART TEMP
2˚C
2˚C
2˚C
-18˚C
2˚C
QUANTITY
1
2
1
4
8
1
2
1
4
2
4
1
2
1
2
2
4
8
16
2
4
2
4
1
1
6
1
6
250˚C/MEDIUM
GRILL 1/MEDIUM
250˚C/LOW
5 min
8 min
8 min
101/2min
7 min
81/2min
5 min.Turn
halfway
7 min.Turn
halfway
41/2 min
6 min
8 min
12 min
8 min
10 min
250˚C/DEF
190˚C/LOW
250˚C/LOW
220˚C/LOW
190˚C/LOW
220˚C/LOW
10 min
30 min
8 min
15 min
25 min
8 min
220˚C/LOW
220˚C/LOW
250˚C/MEDIUM
220˚C/LOW
220˚C/LOW
250˚C/MEDIUM
250˚C/MEDIUM
5 min
8 min
7 min
10 min
12 min
5 min
10
1
/2min
SETTING
HIGH then
GRILL 1/MEDIUM
HIGH then
GRILL 1/MEDIUM
HIGH then
GRILL 1/MEDIUM
HIGH then
GRILL 1/MEDIUM
250˚C/MEDIUM
then HIGH
250˚C/MEDIUM
APPROX.
TIME
11 min
8 min
13 min
5 min
2
1
/2min
31/2min
5 min
31/2min
7 min
31/2min
22 min
Page 32

30
Using the Convection Function
Accessories to use
For best results place the cooking containers on
WIRE RACK SHELF in lower position. Food can be
placed directly on Ceramic Insulating Tray if it is
thoroughly cleaned before use.
Positioning Food
Convection ovens rely on good circulation of air.For
best results ensure food/containers are placed in the
centre of the Wire Rack Shelf and avoid container
touching back wall or covering venting holes in front
of fan.
Containers to use
Use any container suitable for conventional ovens
eg. metal, ceramic, earthenware etc.
Do not use plastic containers, foods films,
wood/wicker.
Preheating
For best results, always place food into a preheated
oven.
Two Level Cooking
Do not attempt to use the Wire Rack Shelf to cook
on 2 levels.
MISC:
Yorkshire Puddings
Oven chips
12
900 g
Bun tin
Roasting tin
220˚C
200˚C
15 min
15 min
MEAT/POULTRY:
Beef––Topside
Chicken
Duck
Pork
Boned Lamb
2.5 kg
2.5 kg
2.5 kg
2.5 kg
1.3 kg
Roasting tin
Roasting tin
Roasting tin
Roasting tin
Roasting tin
180˚C
180˚C
190˚C
190˚C
180˚C
42 min/kg + 20 min
42 min/kg + 20 min
42 min/kg
77 min/kg + 35 min
42 min/kg + 20 min
PUDDINGS:
Bread Pudding
Bakewell Tart
12 portion
12 portion
12'' x 8''
12'' x 8''
180˚C
180˚C
50 min
35 min
PASTRY/BREADS:
Choux Buns
Vol au Vents
Sausage Rolls Frozen
Puff Pastry Ovals
Small Petit Pain
Samosas––uncooked
12
12
12
3 x (6'' x 4'')
8 x 40 g
8 x 50 g
Baking Sheet
Baking Sheet
Baking Sheet
Baking Sheet
Baking Sheet
Baking Sheet
200˚C
220˚C
220˚C
220˚C
220˚C
220˚C
20 - 30 min
12 min
30 min
15 min
15 min
15 min
CAKES:
Rich Fruit
Genoese
Victoria Sponge
36 slice
12 portion
12 portion
11'' Square tin
11'' Round tin
12 x 8'' Oblong tin
160˚C
180˚C
180˚C
11/2h
40 min
35 min
FOOD
QUANTITY
WEIGHT
DISH OVEN TEMP APPRO X.TIME
Page 33

MISC:
Brulee––finishing
Pizza––frozen
8 ramekins
1
1
3
6 min
12 min total
31
Using the Grill Function
Accessories to use
For best results place the cooking container on
WIRE RACK SHELF in upper position. Deep dishes
may be finished under the grill placed on Wire Rack
Shelf in the lower position or placed directly on
Ceramic Insulating Tray on the oven ground.
Caution T urning Food
Take great care when turning food––Wire Rack
Shelf and oven walls will be extremely hot.
Containers to use
Use any container suitable for fierce grilling eg.
stainless steel, Le Creuset, Ceramics etc.
Do not use plastic containers, fine ceramics etc.
Smoke
It is essential that the walls and particularly the roof
of the oven are kept free of grease to avoid
excessive smoking when the grill function is
operated.
MIXED GRILL:
Bacon
Tomatoes
Mushrooms
12 rashers
450 g
450 g
1
1
1
5 min
10 min
6 min
MEAT:
Burgers––fresh
Gammon Steaks
Sausages
Lamb Chops Loin
Pork Chops Loin
Steak Minute
Steak Rump––medium
Steak Sirloin––medium
4 x 100 g
2 x 250 g
16/900 g
8/750 g
8/1.1 kg
4/450 g
1.4 kg
900 g
1
1
1
1
1
1
1
1
8 min total
10 min total
15 min total
15 min total
15 min total
3 min total
10 min total
6 min total
FISH:
Whole Trout
Salmon Steaks
2 x 390 g
6/900 g
2
2
9 min total
8 min total
FOOD QUANTITY WEIGHT GRILL SETTING APPROX.TIME
Page 34

32
NE-C1358
220 V / 50 Hz
3100 W / 14.1 A
Microwave : 1300 W (IEC-705)
Convection Heater: 1640 W
Grill Heater: 1680 W
2450 MHz
600 mm x 484 mm x 383 mm
406 mm x 336 mm x 217 mm
41 kg
Microwave:(High) ,(MEDIUM) 15 minutes
(LOW) ,(SIMMER) ,(DEFROST) 60 minutes
(STAND) 60 minutes
Convection: 2 hours Grill: 1 hour Combination: 1 hour
16 Memory Programs
Specifications subject to change without notice.
As for the voltage requirement, the production year and month, country and serial number, please refer to the
identification plate on the Microwave Oven.
Technical Specifications
Model
Power Source
Required Power
Output
Frequency
Outer Dimensions (W x D x H)
Cavity Dimensions (W x D x H)
Net Weight
Timer
Maximum Setting Time
Memory Programme
2
600
383
25
626
11 11579
61
484
430 54
379
944
Page 35

Page 36

Matsushita Electric Industrial Co., Ltd.
Central P.O.Box 288, Osaka 530-91, Japan
A00033230VP
F0598-0
Printed in Japan
 Loading...