

Page 1

Version 7.00
Part No. NN46110-600
315897-F Rev 02
January 2008
Document status: Standard
600 Technology Park Drive
Billerica, MA 01821-4130
Nortel VPN Router Security —
Servers, Authentication, and
Certificates
Page 2

2
Copyright © 2008 Nortel Networks. All rights reserved.
The information in this document is subject to change without notice. The statements, configurations, technical data, and
recommendations in this document are believed to be accurate and reliable, but are presented without express or implied
warranty. Users must take full responsibility for their applications of any products specified in this document. The
information in this document is proprietary to Nortel Networks.
The software described in this document is furnished under a license agreement and may be used only in accordance
with the terms of that license. The software license agreement is included in this document.
Trademarks
Nortel Networks, the Nortel Networks logo, and Nortel VPN Router are trademarks of Nortel Networks.
Adobe and Acrobat Reader are trademarks of Adobe Systems Incorporated.
Java is a trademark of Sun Microsystems.
Microsoft, Windows, Windows NT, and MS-DOS are trademarks of Microsoft Corporation.
NETVIEW is a trademark of International Business Machines Corp (IBM).
OPENView is a trademark of Hewlett-Packard Company.
SPECTRUM is a trademark of Cabletron Systems, Inc.
All other trademarks and registered trademarks are the property of their respective owners.
Restricted rights legend
Use, duplication, or disclosure by the United States Government is subject to restrictions as set forth in subparagraph
(c)(1)(ii) of the Rights in Technical Data and Computer Software clause at DFARS 252.227-7013.
Notwithstanding any other license agreement that may pertain to, or accompany the delivery of, this computer software,
the rights of the United States Government regarding its use, reproduction, and disclosure are as set forth in the
Commercial Computer Software-Restricted Rights clause at FAR 52.227-19.
Statement of conditions
In the interest of improving internal design, operational function, and/or reliability, Nortel Networks Inc. reserves the
right to make changes to the products described in this document without notice.
Nortel Networks Inc. does not assume any liability that may occur due to the use or application of the product(s) or
circuit layout(s) described herein.
Portions of the code in this software product may be Copyright © 1988, Regents of the University of California. All
rights reserved. Redistribution and use in source and binary forms of such portions are permitted, provided that the above
copyright notice and this paragraph are duplicated in all such forms and that any documentation, advertising materials,
and other materials related to such distribution and use acknowledge that such portions of the software were developed
by the University of California, Berkeley. The name of the University may not be used to endorse or promote products
derived from such portions of the software without specific prior written permission.
SUCH PORTIONS OF THE SOFTWARE ARE PROVIDED “AS IS” AND WITHOUT ANY EXPRESS OR IMPLIED
WARRANTIES, INCLUDING, WITHOUT LIMITATION, THE IMPLIED WARRANTIES OF
MERCHANTABILITY AND FITNESS FOR A PARTICULAR PURPOSE.
In addition, the program and information contained herein are licensed only pursuant to a license agreement that contains
restrictions on use and disclosure (that may incorporate by reference certain limitations and notices imposed by third
parties).
NN46110-600
Page 3

Nortel Networks Inc. software license agreement
This Software License Agreement (“License Agreement”) is between you, the end-user (“Customer”) and Nortel
Networks Corporation and its subsidiaries and affiliates (“Nortel Networks”). PLEASE READ THE FOLLOWING
CAREFULLY. YOU MUST ACCEPT THESE LICENSE TERMS IN ORDER TO DOWNLOAD AND/OR USE THE
SOFTWARE. USE OF THE SOFTWARE CONSTITUTES YOUR ACCEPTANCE OF THIS LICENSE
AGREEMENT. If you do not accept these terms and conditions, return the Software, unused and in the original shipping
container, within 30 days of purchase to obtain a credit for the full purchase price.
“Software” is owned or licensed by Nortel Networks, its parent or one of its subsidiaries or affiliates, and is copyrighted
and licensed, not sold. Software consists of machine-readable instructions, its components, data, audio-visual content
(such as images, text, recordings or pictures) and related licensed materials including all whole or partial copies. Nortel
Networks grants you a license to use the Software only in the country where you acquired the Software. You obtain no
rights other than those granted to you under this License Agreement. You are responsible for the selection of the
Software and for the installation of, use of, and results obtained from the Software.
1. Licensed Use of Software. Nortel Networks grants Customer a nonexclusive license to use a copy of the Software on
only one machine at any one time or to the extent of the activation or authorized usage level, whichever is applicable. To
the extent Software is furnished for use with designated hardware or Customer furnished equipment (“CFE”), Customer
is granted a nonexclusive license to use Software only on such hardware or CFE, as applicable. Software contains trade
secrets and Customer agrees to treat Software as confidential information using the same care and discretion Customer
uses with its own similar information that it does not wish to disclose, publish or disseminate. Customer will ensure that
anyone who uses the Software does so only in compliance with the terms of this Agreement. Customer shall not a) use,
copy, modify, transfer or distribute the Software except as expressly authorized; b) reverse assemble, reverse compile,
reverse engineer or otherwise translate the Software; c) create derivative works or modifications unless expressly
authorized; or d) sublicense, rent or lease the Software. Licensors of intellectual property to Nortel Networks are
beneficiaries of this provision. Upon termination or breach of the license by Customer or in the event designated
hardware or CFE is no longer in use, Customer will promptly return the Software to Nortel Networks or certify its
destruction. Nortel Networks may audit by remote polling or other reasonable means to determine Customer’s Software
activation or usage levels. If suppliers of third party software included in Software require Nortel Networks to include
additional or different terms, Customer agrees to abide by such terms provided by Nortel Networks with respect to such
third party software.
2. Warranty. Except as may be otherwise expressly agreed to in writing between Nortel Networks and Customer,
Software is provided “AS IS” without any warranties (conditions) of any kind. NORTEL NETWORKS DISCLAIMS
ALL WARRANTIES (CONDITIONS) FOR THE SOFTWARE, EITHER EXPRESS OR IMPLIED, INCLUDING,
BUT NOT LIMITED TO THE IMPLIED WARRANTIES OF MERCHANTABILITY AND FITNESS FOR A
PARTICULAR PURPOSE AND ANY WARRANTY OF NON-INFRINGEMENT. Nortel Networks is not obligated to
provide support of any kind for the Software. Some jurisdictions do not allow exclusion of implied warranties, and, in
such event, the above exclusions may not apply.
3. Limitation of Remedies. IN NO EVENT SHALL NORTEL NETWORKS OR ITS AGENTS OR SUPPLIERS BE
LIABLE FOR ANY OF THE FOLLOWING: a) DAMAGES BASED ON ANY THIRD PARTY CLAIM; b) LOSS OF,
OR DAMAGE TO, CUSTOMER’S RECORDS, FILES OR DATA; OR c) DIRECT, INDIRECT, SPECIAL,
INCIDENTAL, PUNITIVE, OR CONSEQUENTIAL DAMAGES (INCLUDING LOST PROFITS OR SAVINGS),
WHETHER IN CONTRACT, TORT OR OTHERWISE (INCLUDING NEGLIGENCE) ARISING OUT OF YOUR
USE OF THE SOFTWARE, EVEN IF NORTEL NETWORKS, ITS AGENTS OR SUPPLIERS HAVE BEEN
ADVISED OF THEIR POSSIBILITY. The forgoing limitations of remedies also apply to any developer and/or supplier
of the Software. Such developer and/or supplier is an intended beneficiary of this Section. Some jurisdictions do not
allow these limitations or exclusions and, in such event, they may not apply.
4. General
a. If Customer is the United States Government, the following paragraph shall apply: All Nortel Networks
Software available under this License Agreement is commercial computer software and commercial computer
software documentation and, in the event Software is licensed for or on behalf of the United States
3
Nortel VPN Router Security — Servers, Authentication, and Certificates
Page 4

4
Government, the respective rights to the software and software documentation are governed by Nortel
Networks standard commercial license in accordance with U.S. Federal Regulations at 48 C.F.R. Sections
12.212 (for non-DoD entities) and 48 C.F.R. 227.7202 (for DoD entities).
b. Customer may te rminate the license at any time. Nortel Networks may terminate the license if Customer fail s
to comply with the terms and conditions of this license. In either event, upon termination, Customer must
either return the Software to Nortel Networks or certify its destruction.
c. Customer is responsible for payment of any taxes, including personal property taxes, resulting from
Customer’s use of the Software. Customer agrees to comply with all applicable laws including all applicable
export and import laws and regulations.
d. Neither party may bring an action, regardless of form, more than two years after the cause of the action arose.
e. The terms and conditions of this License Agreement form the complete and exclusiv e agreement between
Customer and Nortel Networks.
f. This License Agreement is governed by the laws of the country in which Customer acquires the Software. If
the Software is acquired in the United States, then this License Agreement is governed by the laws of the state
of New York.
NN46110-600
Page 5

Contents
Preface . . . . . . . . . . . . . . . . . . . . . . . . . . . . . . . . . . . . . . . . . . . . . . . . . . . . . . . 3
Before you begin . . . . . . . . . . . . . . . . . . . . . . . . . . . . . . . . . . . . . . . . . . . . . . . . . . . . . . 3
Text conventions . . . . . . . . . . . . . . . . . . . . . . . . . . . . . . . . . . . . . . . . . . . . . . . . . . . . . . . 3
Acronyms . . . . . . . . . . . . . . . . . . . . . . . . . . . . . . . . . . . . . . . . . . . . . . . . . . . . . . . . . . . .5
Related publications . . . . . . . . . . . . . . . . . . . . . . . . . . . . . . . . . . . . . . . . . . . . . . . . . . . . 6
Hard-copy technical manuals . . . . . . . . . . . . . . . . . . . . . . . . . . . . . . . . . . . . . . . . . . . . . 7
How to get help . . . . . . . . . . . . . . . . . . . . . . . . . . . . . . . . . . . . . . . . . . . . . . . . . . . . . . . 7
Finding the latest updates on the Nortel Web site . . . . . . . . . . . . . . . . . . . . . . . . . . 7
Getting help from the Nortel Web site . . . . . . . . . . . . . . . . . . . . . . . . . . . . . . . . . . . 8
Getting help over the phone from a Nortel Solutions Center . . . . . . . . . . . . . . . . . . 8
Getting help from a specialist by using an Express Routing Code . . . . . . . . . . . . . 9
Getting help through a Nortel distributor or reseller . . . . . . . . . . . . . . . . . . . . . . . . . 9
New in this release. . . . . . . . . . . . . . . . . . . . . . . . . . . . . . . . . . . . . . . . . . . . . 11
Features . . . . . . . . . . . . . . . . . . . . . . . . . . . . . . . . . . . . . . . . . . . . . . . . . . . . . . . . . . . .11
LDAP proxy password management support for Active Directory . . . . . . . . . . . . . 11
LDAP 3DES password encryption . . . . . . . . . . . . . . . . . . . . . . . . . . . . . . . . . . . . . 12
LDAP user configurable encryption key . . . . . . . . . . . . . . . . . . . . . . . . . . . . . . . . . 12
LDAP optimization scheduling . . . . . . . . . . . . . . . . . . . . . . . . . . . . . . . . . . . . . . . . 12
RADIUS dynamic filtering . . . . . . . . . . . . . . . . . . . . . . . . . . . . . . . . . . . . . . . . . . . 13
CRL Retrieval Scheduling . . . . . . . . . . . . . . . . . . . . . . . . . . . . . . . . . . . . . . . . . . . 13
Authentication services. . . . . . . . . . . . . . . . . . . . . . . . . . . . . . . . . . . . . . . . . 15
Contents 1
LDAP . . . . . . . . . . . . . . . . . . . . . . . . . . . . . . . . . . . . . . . . . . . . . . . . . . . . . . . . . . . . . .16
RADIUS . . . . . . . . . . . . . . . . . . . . . . . . . . . . . . . . . . . . . . . . . . . . . . . . . . . . . . . . . . . . 16
SSL and digital certificates . . . . . . . . . . . . . . . . . . . . . . . . . . . . . . . . . . . . . . . . . . . . . . 17
Tunnel certificates . . . . . . . . . . . . . . . . . . . . . . . . . . . . . . . . . . . . . . . . . . . . . . . . . . . . 17
Authentication servers . . . . . . . . . . . . . . . . . . . . . . . . . . . . . . . . . . . . . . . . . . . . . . . . . 18
Configuring servers. . . . . . . . . . . . . . . . . . . . . . . . . . . . . . . . . . . . . . . . . . . . 23
Using IPsec client . . . . . . . . . . . . . . . . . . . . . . . . . . . . . . . . . . . . . . . . . . . . . . . . . . . . . 23
LDAP database servers . . . . . . . . . . . . . . . . . . . . . . . . . . . . . . . . . . . . . . . . . . . . . . . . 24
LDAP encryption keys . . . . . . . . . . . . . . . . . . . . . . . . . . . . . . . . . . . . . . . . . . . . . . 25
Nortel VPN Router Security — Servers, Authentication, and Certificates
Page 6

2 Contents
RADIUS authentication service . . . . . . . . . . . . . . . . . . . . . . . . . . . . . . . . . . . . . . . . . . 41
Configuring DHCP servers . . . . . . . . . . . . . . . . . . . . . . . . . . . . . . . . . . . . . . . . . . . . . . 57
Configuring remote user IP address pool . . . . . . . . . . . . . . . . . . . . . . . . . . . . . . . . . . 59
Configuring DHCP relay . . . . . . . . . . . . . . . . . . . . . . . . . . . . . . . . . . . . . . . . . . . . . . . . 62
Configuring SSL administration . . . . . . . . . . . . . . . . . . . . . . . . . . . . . . . . . . . . . . . . . . 63
Configuring DNS servers . . . . . . . . . . . . . . . . . . . . . . . . . . . . . . . . . . . . . . . . . . . . . . . 68
Using certificates . . . . . . . . . . . . . . . . . . . . . . . . . . . . . . . . . . . . . . . . . . . . . . 71
Configuration information . . . . . . . . . . . . . . . . . . . . . . . . . . . . . . . . . . . . . . . . 25
External LDAP key information . . . . . . . . . . . . . . . . . . . . . . . . . . . . . . . . . 26
Changing from DES to 3DES . . . . . . . . . . . . . . . . . . . . . . . . . . . . . . . . . . . . . 26
3DES external LDAP information . . . . . . . . . . . . . . . . . . . . . . . . . . . . . . . 26
3DES external LDAP proxy information . . . . . . . . . . . . . . . . . . . . . . . . . . 27
Encrypting with 3DES password . . . . . . . . . . . . . . . . . . . . . . . . . . . . . . . . . . . . . . 27
Configuring LDAP user encryption key . . . . . . . . . . . . . . . . . . . . . . . . . . . . . . . . . 28
Optimizing LDAP scheduling . . . . . . . . . . . . . . . . . . . . . . . . . . . . . . . . . . . . . . . . . 29
Configuring internal LDAP server authentication . . . . . . . . . . . . . . . . . . . . . . . . . . 31
Configuring LDAP proxy server authentication . . . . . . . . . . . . . . . . . . . . . . . . . . . 33
LDAP proxy user authentication and password management . . . . . . . . . . . . . . . . 36
LDAP V3-compliant LDAP server . . . . . . . . . . . . . . . . . . . . . . . . . . . . . . . . . . 37
LDAP server without LDAP control support . . . . . . . . . . . . . . . . . . . . . . . . . . 38
Monitoring LDAP servers . . . . . . . . . . . . . . . . . . . . . . . . . . . . . . . . . . . . . . . . . . . . 40
Configuring RADIUS authentication . . . . . . . . . . . . . . . . . . . . . . . . . . . . . . . . . . . 42
RADIUS authentication class attribute values . . . . . . . . . . . . . . . . . . . . . . . . . . . . 44
RADIUS-Assigned Framed-IP-Address attribute . . . . . . . . . . . . . . . . . . . . . . . . . . 46
Configuring IPsec authentication . . . . . . . . . . . . . . . . . . . . . . . . . . . . . . . . . . . . . . 47
Configuring RADIUS dynamic filters . . . . . . . . . . . . . . . . . . . . . . . . . . . . . . . . . . . 51
Configuring PPTP and RADIUS . . . . . . . . . . . . . . . . . . . . . . . . . . . . . . . . . . . . . . 53
Configuring group-level RADIUS authentication . . . . . . . . . . . . . . . . . . . . . . . . . . 54
Vendor-specific RADIUS attribute . . . . . . . . . . . . . . . . . . . . . . . . . . . . . . . . . . . . . 55
Configuring RADIUS accounting . . . . . . . . . . . . . . . . . . . . . . . . . . . . . . . . . . . . . . 55
Browser security checks . . . . . . . . . . . . . . . . . . . . . . . . . . . . . . . . . . . . . . . . . . . . 65
Configuring SSL/TLS and configuring HTTP services . . . . . . . . . . . . . . . . . . . . . 66
LDAP server SSL encryption . . . . . . . . . . . . . . . . . . . . . . . . . . . . . . . . . . . . . . . . . . . . 71
Installing LDAP certificates . . . . . . . . . . . . . . . . . . . . . . . . . . . . . . . . . . . . . . . . . . 72
LDAP special characters . . . . . . . . . . . . . . . . . . . . . . . . . . . . . . . . . . . . . . . . . . . . 72
NN46110-600
Page 7

Contents 3
External LDAP proxy . . . . . . . . . . . . . . . . . . . . . . . . . . . . . . . . . . . . . . . . . . . . . . . 74
Configurable warning time for certificate expiration . . . . . . . . . . . . . . . . . . . . . . . . 74
VPN security using digital certificates . . . . . . . . . . . . . . . . . . . . . . . . . . . . . . . . . . . . . 75
Setting up public key infrastructure (PKI) . . . . . . . . . . . . . . . . . . . . . . . . . . . . . . . . . . . 75
CA and X.509 certificates . . . . . . . . . . . . . . . . . . . . . . . . . . . . . . . . . . . . . . . . . . . 75
Loading certificates . . . . . . . . . . . . . . . . . . . . . . . . . . . . . . . . . . . . . . . . . . . . . . . . 75
Generating a server certificate request . . . . . . . . . . . . . . . . . . . . . . . . . . . . . . . . . 76
Installing server certificates using cut and paste #7 and #10 . . . . . . . . . . . . . . . . 76
Installing server certificates using CMP . . . . . . . . . . . . . . . . . . . . . . . . . . . . . . . . . 77
Installing trusted CA certificates . . . . . . . . . . . . . . . . . . . . . . . . . . . . . . . . . . . . . . . . . . 79
Setting certificate parameters . . . . . . . . . . . . . . . . . . . . . . . . . . . . . . . . . . . . . . . . . . . 80
Trusted CA certificate settings . . . . . . . . . . . . . . . . . . . . . . . . . . . . . . . . . . . . . . . . . . . 82
Group assignment by user identification . . . . . . . . . . . . . . . . . . . . . . . . . . . . . . . . 82
Allow All policy . . . . . . . . . . . . . . . . . . . . . . . . . . . . . . . . . . . . . . . . . . . . . . . . . . . . 82
Access control by Subject DN . . . . . . . . . . . . . . . . . . . . . . . . . . . . . . . . . . . . . . . . 83
Group and certificate association configuration . . . . . . . . . . . . . . . . . . . . . . . . . . . 84
CA key update . . . . . . . . . . . . . . . . . . . . . . . . . . . . . . . . . . . . . . . . . . . . . . . . . . . . . . . 84
Configuring a certificate revocation list (CRL) . . . . . . . . . . . . . . . . . . . . . . . . . . . . . . . 86
Configuring CRL servers . . . . . . . . . . . . . . . . . . . . . . . . . . . . . . . . . . . . . . . . . . . . 87
Configuring CRL Retrieval Scheduling . . . . . . . . . . . . . . . . . . . . . . . . . . . . . . 88
CRL distribution points . . . . . . . . . . . . . . . . . . . . . . . . . . . . . . . . . . . . . . . . . . . . . . . . . 90
CRL retrieval . . . . . . . . . . . . . . . . . . . . . . . . . . . . . . . . . . . . . . . . . . . . . . . . . . . . . . . . 92
Enabling certificate use for tunnels . . . . . . . . . . . . . . . . . . . . . . . . . . . . . . . . . . . . 92
Identifying individual users with certificates . . . . . . . . . . . . . . . . . . . . . . . . . . . . . . 93
Identifying branch offices with certificates . . . . . . . . . . . . . . . . . . . . . . . . . . . . . . . 94
IPsec authentication . . . . . . . . . . . . . . . . . . . . . . . . . . . . . . . . . . . . . . . . . . . . . . . 94
L2TP/IPsec authentication . . . . . . . . . . . . . . . . . . . . . . . . . . . . . . . . . . . . . . . . . . . 96
Index . . . . . . . . . . . . . . . . . . . . . . . . . . . . . . . . . . . . . . . . . . . . . . . . . . . . . . . . 97
Nortel VPN Router Security — Servers, Authentication, and Certificates
Page 8

4 Contents
NN46110-600
Page 9

Figures
Figure 1 Authenticating users . . . . . . . . . . . . . . . . . . . . . . . . . . . . . . . . . . . . . . . . . 15
Figure 2 Authentication servers . . . . . . . . . . . . . . . . . . . . . . . . . . . . . . . . . . . . . . . 19
Figure 4 Enable 3DES window . . . . . . . . . . . . . . . . . . . . . . . . . . . . . . . . . . . . . . . . 28
Figure 5 LDAP proxy server . . . . . . . . . . . . . . . . . . . . . . . . . . . . . . . . . . . . . . . . . . 33
Figure 6 LDAP proxy user authentication . . . . . . . . . . . . . . . . . . . . . . . . . . . . . . . . 37
Figure 7 LDAP Proxy Server password management . . . . . . . . . . . . . . . . . . . . . . 39
Figure 8 RADIUS authentication class attribute values . . . . . . . . . . . . . . . . . . . . . 45
Figure 9 SSL administration . . . . . . . . . . . . . . . . . . . . . . . . . . . . . . . . . . . . . . . . . . 64
Figure 10 HTTPS services . . . . . . . . . . . . . . . . . . . . . . . . . . . . . . . . . . . . . . . . . . . . 67
Figure 11 Select ciphers . . . . . . . . . . . . . . . . . . . . . . . . . . . . . . . . . . . . . . . . . . . . . . 68
Figure 12 LDAP special characters . . . . . . . . . . . . . . . . . . . . . . . . . . . . . . . . . . . . . 73
Figure 13 Sample CMP environment . . . . . . . . . . . . . . . . . . . . . . . . . . . . . . . . . . . . 77
Figure 14 CA Key Update ready for authentication . . . . . . . . . . . . . . . . . . . . . . . . . . 85
Figure 15 CRL distribution points . . . . . . . . . . . . . . . . . . . . . . . . . . . . . . . . . . . . . . . 91
Figures 1
Nortel VPN Router Security — Servers, Authentication, and Certificates
Page 10

2 Figures
NN46110-600
Page 11

Tables
Table 1 RADIUS class attributes . . . . . . . . . . . . . . . . . . . . . . . . . . . . . . . . . . . . . . 45
Table 2 RADIUS example details . . . . . . . . . . . . . . . . . . . . . . . . . . . . . . . . . . . . . 46
Table 3 Syntax of attributes . . . . . . . . . . . . . . . . . . . . . . . . . . . . . . . . . . . . . . . . . . 52
Tables 1
Nortel VPN Router Security — Servers, Authentication, and Certificates
Page 12

2 Tables
NN46110-600
Page 13

Preface
This guide describes how to configure the Nortel VPN Router authentication
services and digital certificates.
Before you begin
This guide is for network managers who are responsible for setting up and
configuring the Nortel VPN Router. This guide assumes that you have experience
with windowing systems or graphical user interfaces (GUIs) and familiarity with
network management.
Text conventions
This guide uses the following text conventions:
3
angle brackets (< >) Indicate that you choose the text to enter based on the
description inside the brackets. Do not type the
brackets when entering the command.
Example: If the command syntax is
ping <ip_address>, you enter
ping 192.32.10.12
bold Courier text
Nortel VPN Router Security — Servers, Authentication, and Certificates
Indicates command names and options and text that
you need to enter.
Example: Use the
Example: Enter
show health command.
terminal paging {off | on}.
Page 14

4 Preface
braces ({}) Indicate required elements in syntax descriptions where
there is more than one option. You must choose only
one of the options. Do not type the braces when
entering the command.
Example: If the command syntax is
source {external | internal}
ldap-server source external or
either
ldap-server source internal
ldap-server
, you must enter
, but not both.
brackets ([ ]) Indicate optional elements in syntax descriptions. Do
not type the brackets when entering the command.
Example: If the command syntax is
show ntp [associations], you can enter
show ntp or show ntp associations.
either
Example: If the command syntax is default rsvp
[token-bucket
default rsvp, default rsvp token-bucket
depth, or default rsvp token-bucket rate.
{depth | rate}], you can enter
ellipsis points (. . . ) Indicate that you repeat the last element of the
command as needed.
Example: If the command syntax is
more diskn:<directory>/...<file_name>,
you enter
more and the fully qualified name of the file.
NN46110-600
italic text Indicates new terms, book titles, and variables in
command syntax descriptions. Where a variable is two
or more words, the words are connected by an
underscore.
Example: If the command syntax is
ping <ip_address>, ip_address is one variable
and you substitute one value for it.
plain Courier
text
Indicates system output, for example, prompts and
system messages.
Example:
File not found.
Page 15

separator ( > ) Shows menu paths.
Example: Choose Status > Health Check.
Preface 5
Acronyms
vertical line (
This guide uses the following acronyms:
AVPAIR Cisco's Vendor specific RADIUS Attribute Value Pair
CA Certification Authority
CDP CRL distribution points
CRL certificate revocation list
FTP File Transfer Protocol
IP Internet Protocol
IKE IPsec Key Exchange
| ) Separates choices for command keywords and
arguments. Enter only one of the choices. Do not type
the vertical line when entering the command.
Example: If the command syntax is
terminal paging {off | on}, you enter either
terminal paging off or terminal paging on,
but not both.
ISAKMP Internet Security Association and Key Management
Protocol
ISP Internet service provider
L2TP Layer2 Tunneling Protocol
LDAP Lightweight Directory Access Protocol
LAN local area network
PDN public data networks
POP point-of-presence
PPP Point-to-Point Protocol
PPTP Point-to-Point Tunneling Protocol
Nortel VPN Router Security — Servers, Authentication, and Certificates
Page 16

6 Preface
UDP User Datagram Protocol
VPN virtual private network
WAN wide area network
Related publications
For more information about the Nortel VPN Router, refer to the following
publications:
• Release notes provide the latest information, including brief descriptions of
the new features, problems fixed in this release, and known problems and
workarounds.
• Nortel VPN Router Configuration—Basic Features (NN46220-500)
introduces the product and provides information about initial setup and
configuration.
• Nortel VPN Router Configuration—SSL VPN Services (NN46110-501)
provides instructions for configuring services on the SSL VPN Module 1000,
including authentication, networks, user groups, and portal links.
• Nortel VPN Router Security—Servers, Authentication, and Certificates
(NN46110-600) provides instructions for configuring authentication services
and digital certificates.
• Nortel VPN Router Security—Firewalls, Filters, NAT, and QoS
(NN46110-601) provides instructions for configuring the Stateful Firewall
and interface and tunnel filters.
• Nortel VPN Router Configuration—Tunneling Protocols (NN46110-503)
provides configuration information for the tunneling protocols IPsec, L2TP,
PPTP, and L2F.
• Nortel VPN Router Configuration—Routing (NN46110-504) provides
instructions for configuring BGP, RIP, OSPF, and VRRP, as well as
instructions for configuring ECMP, routing policy services, and client address
redistribution (CAR).
• Nortel VPN Router Troubleshooting (NN46110-602) provides information
about system administrator tasks such as backup and recovery, file
management, and upgrading software, and instructions for monitoring VPN
Router status and performance. This book also provides troubleshooting
information and inter operability considerations.
NN46110-600
Page 17
• Nortel VPN Router Using the Command Line Interface (NN46110-507)
provides syntax, descriptions, and examples for the commands that you can
use from the command line interface.
• Nortel VPN Router Configuration—Client (NN46110-306) provides
information for setting up client software for the VPN Router.
• Nortel VPN Router Configuration—TunnelGuard (NN46110-307) provides
information about configuring and using the TunnelGuard feature.
Hard-copy technical manuals
You can print selected technical manuals and release notes free, directly from the
Internet. Go to www.nortel.com/documentation, find the product for which you
need documentation, then locate the specific category and model or version for
your hardware or software product. Use Adobe Reader to open the manuals and
release notes, search for the sections you need, and print them on most standard
printers. Go to Adobe Systems at www.adobe.com to download a free copy of the
Adobe Reader.
Preface 7
How to get help
This chapter explains how to get help for Nortel products and services.
Finding the latest updates on the Nortel Web site
The content of this documentation was current at the time the product was
released. To check for updates to the latest documentation and software for VPN
Router, click one of the following links:
Link to Takes you directly to the
Latest software Nortel page for VPN Router software located at:
www130.nortelnetworks.com/cgi-bin/eserv/cs/
main.jsp?cscat=SOFTWARE&resetFilter=1&poid
=12325
Nortel VPN Router Security — Servers, Authentication, and Certificates
Page 18
8 Preface
Getting help from the Nortel Web site
Link to Takes you directly to the
Latest documentation Nortel page for VPN Client documentation
located at:
www130.nortelnetworks.com/cgi-bin/eserv/cs/
main.jsp?cscat=DOCUMENTATION&resetFilter=
1&poid=12325
The best way to get technical support for Nortel products is from the Nortel
Technical Support Web site:
www.nortel.com/support
This site provides quick access to software, documentation, bulletins, and tools to
address issues with Nortel products. From this site, you can:
• download software, documentation, and product bulletins
• search the Technical Support Web site and the Nortel Knowledge Base for
answers to technical issues
• sign up for automatic notification of new software and documentation for
Nortel equipment
• open and manage technical support cases
Getting help over the phone from a Nortel Solutions Center
NN46110-600
If you do not find the information you require on the Nortel Technical Support
Web site, and you have a Nortel support contract, you can also get help over the
phone from a Nortel Solutions Center.
In North America, call 1-800-4NORTEL (1-800-466-7835).
Outside North America, go to the following web site to obtain the phone number
for your region:
www.nortel.com/callus
Page 19

Preface 9
Getting help from a specialist by using an Express Routing Code
To access some Nortel Technical Solutions Centers, you can use an Express
Routing Code (ERC) to quickly route your call to a specialist in your Nortel
product or service. To locate the ERC for your product or service, go to:
www.nortel.com/erc
Getting help through a Nortel distributor or reseller
If you purchased a service contract for your Nortel product from a distributor or
authorized reseller, contact the technical support staff for that distributor or
reseller.
Nortel VPN Router Security — Servers, Authentication, and Certificates
Page 20

10 Preface
NN46110-600
Page 21

New in this release
The following section details what is new in Nortel VPN Router Security —
Servers, Authentication, and Certificates for Release 7.0.
Features
See the following sections for information about feature changes:
• LDAP proxy password management support for Active Directory
• LDAP 3DES password encryption
• LDAP user configurable encryption key
• LDAP optimization scheduling
• RADIUS dynamic filtering
• CRL Retrieval Scheduling
11
LDAP proxy password management support for Active Directory
The Microsoft Active Directory is a server type that you select on the Servers >
LDAP Proxy window to manage passwords. With this option, if your password is
expired, a pop-up window appears, forcing you to change the password. You do
not receive a notification when the password is about to expire. To change the
password, you must have a Secure Sockets Layer (SSL) connection between the
VPN Router and Active Directory. This feature extends the Lightweight Directory
Access Protocol (LDAP) Proxy password management function to Active
Directory.
For more information about Microsoft Active Directory, see “LDAP server
without LDAP control support” on page 38.
Nortel VPN Router Security — Servers, Authentication, and Certificates
Page 22

12 New in this release
LDAP 3DES password encryption
The VPN Router can store shared secrets that are encrypted with 3DES, but you
must first enable the feature. You enable 3DES by selecting Servers > LDAP and
clicking TripleDES.
For more information about encryption of shared secrets, see “Encrypting with
3DES password” on page 27.
LDAP user configurable encryption key
In previous releases, passwords stored in LDAP were encrypted with the same
encryption key across all VPN Routers. This enhancement provides more security
on the VPN Router by allowing you to enter a desired encryption key for
passwords.
For more information about the user encryption key, see “Configuring LDAP user
encryption key” on page 28.
LDAP optimization scheduling
NN46110-600
With the LDAP optimization scheduling option, the VPN Router administrator
can configure the time and day that the LDAP database is optimized.
LDAP optimization is a process that frees all unused memory blocks and deletes
any deleted LDAP data structures, making the LDAP database lookups faster and
more efficient. The disadvantages of the LDAP optimization process are that it
runs at the LDAP priority and is very CPU intensive. In environments with heavy
traffic and very large LDAP databases, the optimization can cause timeouts and
data drops.
For more information about LDAP optimization scheduling, see “Optimizing
LDAP scheduling” on page 29.
Page 23

RADIUS dynamic filtering
You can set up and manage policy filters in the Remote Authentication Dial-In
User Service (RADIUS) server. If you use a RADIUS server to authenticate users,
the VPN Router can retrieve those policy filters from the server. IPsec user
tunnels are dynamically filtered based on attributes returned from the
authenticating RADIUS server. The returned dynamic filters are then prepended
to the groups filter to which the user is bound.
For more information about RADIUS dynamic filtering, see “Configuring
RADIUS dynamic filters” on page 51.
CRL Retrieval Scheduling
With CRL Retrieval Scheduling, the Nortel VPN Router administrator can
configure the time and day that a CRL request is sent to the CRL Server.
The CRL process has disadvantages because it is run at the LDAP priority and it is
very CPU intensive. In environments with heavy volume traffic and very large
LDAP CRLs, the CRL process can cause timeouts and data drops. The
administrator can use the CRL Update Specific Time to avoid these timeouts and
data drops.
New in this release 13
You can use the GUI or the CLI to configure CRL Retrieval Scheduling.
For more information about CRL Retrieval Scheduling, see “Configuring CRL
Retrieval Scheduling” on page 88.
Nortel VPN Router Security — Servers, Authentication, and Certificates
Page 24

14 New in this release
NN46110-600
Page 25

Chapter 1
Authentication services
The remote user attempting to dial in to the VPN Router must be authenticated
before gaining access to the corporate network. Authentication is one of the most
important functions that the VPN Router provides because it identifies users and
drives many other aspects of the user-centric functionality.
For authentication and access control, the VPN Router supports an internal or
external Lightweight Directory Access Protocol (LDAP) server and external
Remote Authentication Dial-In User Services (RADIUS) servers. External LDAP
proxy server support allows authentication of users against existing LDAP
databases.
Figure 1 shows how users are authenticated.
Figure 1 Authenticating users
15
The VPN Router uses a group profile mechanism to augment support for several
authentication services. When a remote user attempts to access the network, the
VPN Router references a particular group profile to determine encryption
strength, filtering profile, and quality of service attributes for that user.
Nortel VPN Router Security — Servers, Authentication, and Certificates
Page 26

16 Chapter 1 Authentication services
With user- and group-specific profiles, you can group common attributes while
preserving the flexibility to make exceptions for individual users. The product
features and network access that apply to a user are controlled by the user identity,
rather than by the source IP address or another mechanism. This is necessary to
support mobile users and users coming from other organizations.
LDAP
The Lightweight Directory Access Protocol (LDAP) emerged from the X.500
directory service. LDAP is gaining acceptance as the directory model for the
Internet. Microsoft*, Netscape*, and Novell* all support LDAP in their directory
service strategies. LDAP is based on directory entries; it has an Internet person
schema that defines standard attributes and you can extend it to include other
attributes. A directory service is a central repository of user information; for
example, the VPN Router supports the following elements using LDAP:
•groups
•users
• filters
• services
RADIUS
NN46110-600
Remote Authentication Dial-In User Services (RADIUS) is a distributed security
system that uses an authentication server to verify dial-up connection attributes
and authenticate connections. RADIUS is commonly used for remote access
authentication.
Many security systems are configured with a RADIUS front end to facilitate
remote access authentication. RADIUS is also the most common authentication
mechanism used by ISPs. Novell NDS*, Microsoft Windows NT* Domains, and
Security Dynamics ACE Server* all support RADIUS authentication. Windows
NT Domain authentication controls access to NT file servers and other resources
on NT networks. The RADIUS server provides a place to store user passwords,
because users generally remember their file server passwords.
Page 27

The X.509 digital certificates authentication mechanism works with public key
encryption to provide a level of assurance that users are who they say they are.
SSL and digital certificates
The Secure Socket Layer (SSL) protocol uses digital certificates to establish
secure, authenticated connections between SSL clients and servers.
The VPN Router uses a digital certificate sent from an SSL-capable LDAP server
to authenticate that server. In order for digital certificate authentication to succeed,
you must import a certificate from the authority certifying the LDAP server into
the VPN Router's certificate store. This type of certificate is often referred to as a
CA root certificate.
A single CA root certificate can certify the authenticity of multiple LDAP servers,
depending on the organization of your environment's certification hierarchy.
Chapter 1 Authentication services 17
Tunnel certificates
The VPN Router uses X.509 certificates for authentication to IPsec-based tunnel
connections. The VPN Router supports RSA* digital signature authentication in
the IPsec ISAKMP key management protocol. Remote users can authenticate
themselves to the VPN Router using a public key pair and a certificate as
credentials. In addition, the VPN Router uses its own key pair and certificate to
authenticate the VPN Router to the user. The VPN Router currently supports the
Entrust* product suite and Microsoft certificates.
The VPN Router supports retrieval of X.509v3 certificates from Microsoft
certificate storage through the Microsoft CryptoAPI (MS CAPI). Microsoft
certificate storage uses standard messages (PKCS #12) to import digital
certificates granted by third-party certificate authorities. This allows the VPN
Router and VPN Client to use CAs that are not tightly integrated with the client
and VPN Router.
Nortel VPN Router Security — Servers, Authentication, and Certificates
Page 28
18 Chapter 1 Authentication services
Certificate payload transports certificates or other certificate-related information
through ISAKMP and can appear in any ISAKMP message. Certificate payloads
are included in an exchange whenever an appropriate directory service (such as
Secure DNS) is not available to distribute certificates. The VPN Router supports
Microsoft native client (L2TP/IPsec) PKCS #7 termination in chained
environments.
Using certificates for tunnel connections requires the creation of a public key
infrastructure (PKI) to issue and manage certificates for remote users and VPN
Router servers.
Authentication servers
The VPN Router supports LDAP and RADIUS authentication servers. The VPN
Router always attempts to authenticate a remote user against the internal or
external LDAP profiles.
Note: If you authenticate using RADIUS or LDAP authentication, you
must use unique names for the Group ID and User ID.
NN46110-600
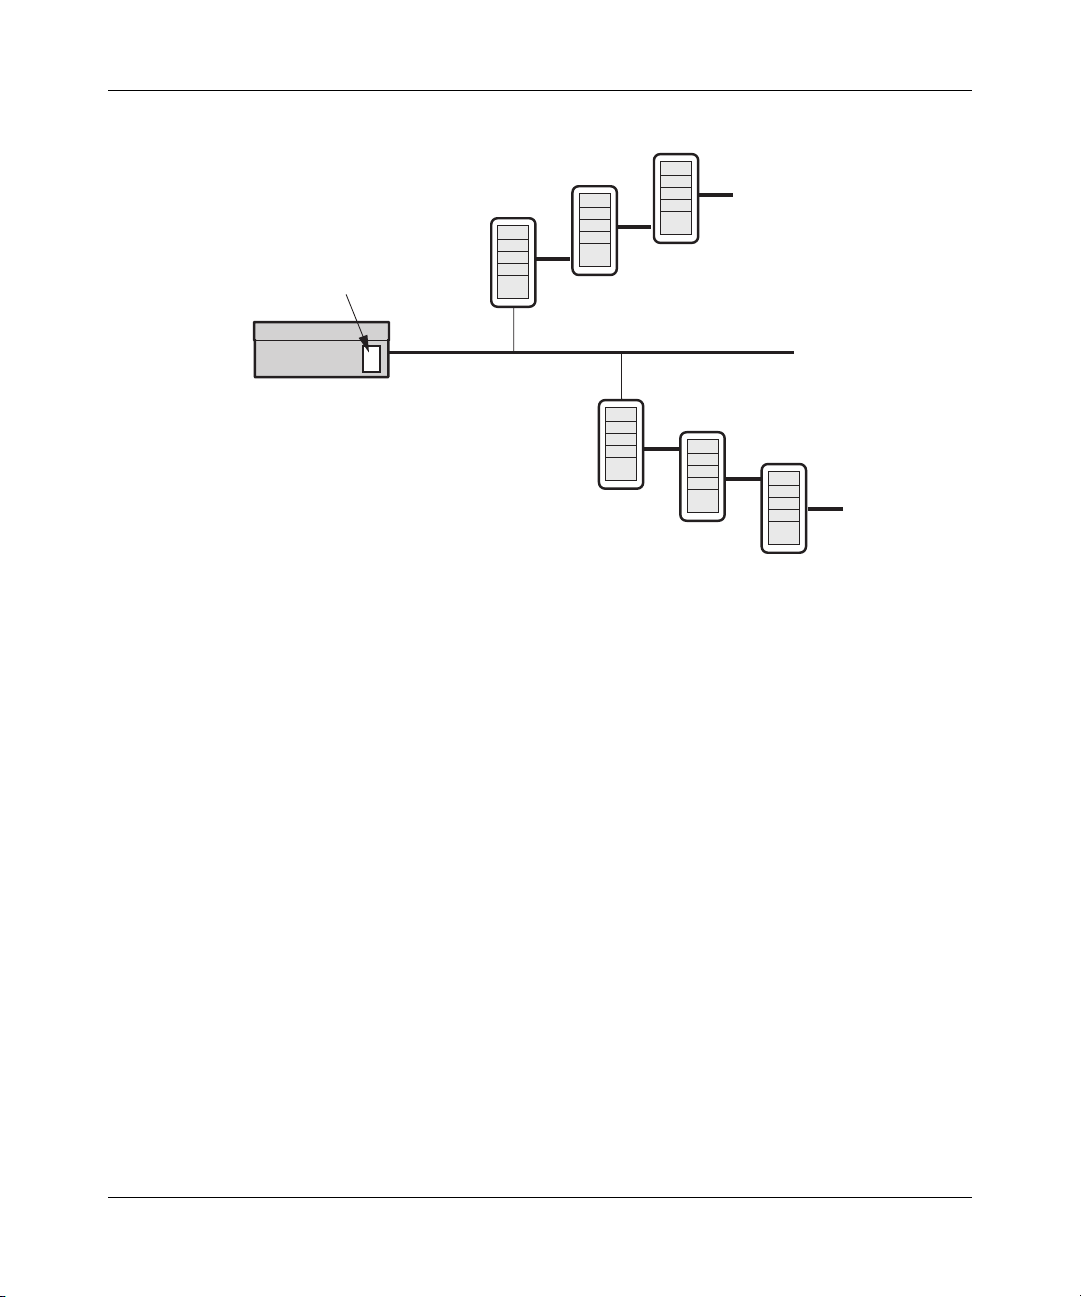
Figure 2 shows a VPN Router and authentication servers.
Page 29
Chapter 1 Authentication services 19
Figure 2 Authentication servers
RADIUS 3
Internal LDAP
10/100 LAN
VPN Router
RADIUS 2
RADIUS 1
External
LDAP 1
LDAP 2
LDAP 3
The user ID (UID) is checked against the LDAP profile database. If the UID is
found in the LDAP database, the user is assigned to a group and acquires that
group’s attributes. Next, the password is checked, and if it is correct, the VPN
Router forms a tunnel.
If the UID is not in the profile LDAP (internal or external) database, and if you
specified RADIUS as the next server to check, the UID and password is checked
against the RADIUS database. If the UID and password are correct, the VPN
Router checks to see if the RADIUS server returned a class attribute. The
RADIUS class attribute is treated as an LDAP group name. If a RADIUS class
attribute is returned, and it names an existing LDAP group, the VPN Router
applies the attributes of this group to this user’s session, and forms a tunnel. If the
group name does not exist, the user is given the RADIUS default group’s
attributes. If the UID and password are incorrect, the VPN Router rejects the user
request.
IPsec behaves the same as a PPTP session; the RADIUS server defines the group
for the user after authentication using the class attribute group identifier. The only
difference between IPsec and PPTP is that if the RADIUS server does not return a
class attribute, the group associated with the IPsec group ID is used instead of the
Nortel VPN Router Security — Servers, Authentication, and Certificates
Page 30
20 Chapter 1 Authentication services
RADIUS default group. You configure the IPsec Group ID in the Authentication
section of the Profiles > Groups > Edit > Configure IPsec window. You configure
the PPTP default group on the Servers > RADIUS Auth window, RADIUS Users
Obtain Default Settings from the Group option.
Note: The group that the user is bound to must allow the authentication
method that is used when the session is started.
If the UID is not in the profile LDAP (internal or external) database and if you
specified LDAP proxy as the next server to check, the UID and password is
checked against the LDAP proxy database.
Figure 3 illustrates the steps in user validation.
NN46110-600
Page 31

Figure 3 Authentication server validation flowchart
Authentication
UID
Group
ID
No
or
Certificate (Cert)
or
Group ID
LDAP Cert
Subject DN
or Alt Name
Found?
Yes
Assign Group
Attributes
(IPsec Only)
Certificate
Yes
UID
No
Reject Request
No
Valid ISAKMP
Signature
(see #1 and #2
below)
CA
Allow All
Enabled
No
LDAP UID
Found?
No
Yes
Yes
Yes
Yes
CRL
Enabled
for CA
Assign Group
Attributes
Assign
Attributes
from CA
Default
Group
No
Yes
Chapter 1 Authentication services 21
Reject R equest
Correct?
User Cert
Revoked?
No
Form Tunnel
Yes
No
No
No
Is CRL
Within
Lifetime
No
CRL Sig
Valid
Password
Yes
Yes
Form Tunnel
Yes
Client Side
Auth. of
Server
Successful
Send Server
Cert and
ISAKMP Sig
Yes
Group ID
Found in
LDAP?
Yes
No
RADIUS
UID Found?
No
Reject Reque s t
RADIUS
UID Found?
No
Reject Requ est
Yes
No
Yes
Password
Correct?
Pass wor d
Correct?
No
Yes
Yes
RADIUS
Class
Attribute
Returned?
RADIUS
Attribute
Returned?
No
Class
Yes
Use Default
RADIUS
No
RADIUS
Group ID
Found in
Group
Yes
Use Initial
Group ID for
Attributes
LDAP?
Form Tunnel
RADIUS
Group ID
Found in
LDAP?
Yes
RADIUS
Attributes
Yes
Form Tunnel
Assign
Group
Assign
RADIUS
Group
Attributes
Nortel VPN Router Security — Servers, Authentication, and Certificates
Page 32

22 Chapter 1 Authentication services
NN46110-600
Page 33

Chapter 2
Configuring servers
This chapter describes how to configure the following authentication servers for
users who tunnel into the VPN Router:
• Internal LDAP server stores group and user profiles on the internal server of
the VPN Router. External LDAP contains the contents of the internal LDAP
server exported to a separate external LDAP server.
• LDAP proxy server authenticates users against an existing LDAP database
separate from the VPN Router’s database.
• External RADIUS is a distributed security system that uses an authentication
server to verify dial-up connection attributes and authenticate connections.
• RADIUS accounting logs user sessions with RADIUS-style records
containing detailed connection statistics.
• The VPN Router can function as a simple RADIUS server.
This chapter also describes how to configure the VPN Router SSL administration
feature.
23
Using IPsec client
Authentication using the Nortel IPsec client provides the following options for
remote users connecting through a VPN Router:
• UID and password authentication against an LDAP database
• Group password authentication using a RADIUS server
• Token Security methods (RSA SecurID* )
Nortel VPN Router Security — Servers, Authentication, and Certificates
Page 34

24 Chapter 2 Configuring servers
All authentication options have the following:
• Diffie-Hellman key exchange (ISAKMP/Oakley Aggressive Mode) to build
the security association (SA).
• User name and the password are never transmitted in the clear; a
cryptographic hash function (SHA-1) is used to protect the user’s identity.
• Mutual authentication between the client and the VPN Router using a keyed
hash algorithm (HMAC).
• Protection against authentication replay attacks through the use of session
cookies.
LDAP database servers
LDAP is a standard protocol for Internet directory services based on directory
entries. A directory service is a central repository of user information, such as
groups, users, filters, and services.
An entry is a collection of attributes with a distinguished name (DN), which refers
to the entry unambiguously. Each entry attribute has a type and one or more
values. Types are typically mnemonic strings; for example, cn represents common
name and mail represents e-mail address. The values depend on the attribute type.
For example, a mail attribute value might resemble jchirac@elysee.france.gov.
NN46110-600
LDAP directory entries are arranged in a hierarchical tree-like structure that
reflects political, geographic, and organizational boundaries. Country entries
appear at the top of the tree. The next entries represent states or national
organizations. The third-branch entries represent people, organizations, servers,
files, or any other readable database entry. You can use LDAP to read, search, add,
and remove information from the centralized database.
Note: Nortel recommends that you back up your LDAP servers before
you make any changes so that you have a valid copy if the file becomes
corrupted.
Page 35

The VPN Router centrally stores remote access profiles and corporate networking
details such as the addressing mechanism in an LDAP server; for example, group
attributes including hours of access, filters, and authentication servers. The VPN
Router queries the LDAP server for access information when a user establishes a
tunnel connection. You can service the LDAP query locally by the internal LDAP
server or you can redirect it to an external LDAP server, such as the Netscape
Directory Server.
Note: Novell Directory Services and Novell eDirectory are not
supported.
LDAP encryption keys
You can use either a user-defined or a default Lightweight Directory Access
Protocol (LDAP) encryption key. This key can either be 8 bytes (DES) or 24 bytes
(3DES) in length.
By default, the VPN Router uses the Data Encryption Standard (DES), and
therefore an 8-byte key for LDAP-stored passwords. To use a 24-byte key, you
must first enable Triple DES (3DES) encryption. If you enable 3DES, a 24-byte
password is required.
Chapter 2 Configuring servers 25
Only passwords stored in the LDAP file are affected by this new feature. Any
passwords stored in the configuration file remain unchanged.
The first time that you enable 3DES and configure a 24-byte encryption key, the
VPN Router updates the LDAP. This can take some time, depending on the size of
the user base.
Configuration information
Internal and external LDAP keys are stored in flash memory. A hash is calculated
from the user-defined key and stored in the LDAP file.
To restore a VPN Router to the default internal key:
• the VPN Router must be set to factory default (this clears the key saved in
flash), and
Nortel VPN Router Security — Servers, Authentication, and Certificates
Page 36

26 Chapter 2 Configuring servers
• the configuration and LDAP files to be restored must be ones that were saved
before any user defined keys were applied.
External LDAP key information
For authentication to work between all VPN Routers using the shared LDAP, the
keys must match on all VPN Routers.
To change the key, the VPN Router must be configured with the last saved key.
Keys on all routers that use a shared LDAP must match before any router can
change the key; and if one router changes the key, all the others must have
matching keys configured. For example, if two routers, VPN Router1 and VPN
Router2, use the same external LDAP, and VPN Router1 sets a user-defined key,
then VPN Router2 cannot set any key except the one that matches the key of VPN
Router1. After VPN Router2 sets a key that matches, then VPN Router2 can
configure a new key. If VPN Router 2 sets a new key, then VPN Router1 must
configure a matching key before authentication is successful.
After VPN Router1 sets a key, the LDAP passwords are encrypted using the key.
When VPN Router2 sets the same key, there is no change to the LDAP passwords.
NN46110-600
Changing from DES to 3DES
For internal and external LDAP, 3DES uses the default internal key unless a user
key is defined. After 3DES is used, the VPN Router processes the entire LDAP,
field by field, and sets a flag for every password that is encrypted by 3DES.
For both internal and external LDAP, after 3DES is enabled, to return to DES, you
must restore a previously saved configuration and LDAP file.
3DES external LDAP information
All VPN Routers that use a shared LDAP must run a software version that
supports 3DES LDAP encryption. Even if a VPN Router is not configured to use
3DES LDAP encryption, it can decrypt 3DES passwords from an LDAP
encrypted by another VPN Router that uses 3DES.
After a VPN Router enables 3DES, the LDAP passwords are encrypted using
3DES. When another VPN Router that shared the LDAP enables 3DES, no
changes are made to the LDAP stored passwords.
Page 37

3DES external LDAP proxy information
If an external LDAP proxy is used, the VPN Router (which has its own internal
LDAP file) does not touch or modify the external LDAP database. However, the
VPN Router modifies the Bind Password that is attached to the Bind Name (under
LDAP Proxy Servers).
Encrypting with 3DES password
The Nortel VPN Router administrator can secure user and application passwords
with Triple Data Encryption Standard (3DES) encryption, which is a more secure
algorithm than the current DES.
If you use an external LDAP, you must upgrade all VPN Routers in the network to
utilize this capability. The first VPN Router to enable 3DES encryption of user
passwords first runs a script against the external LDAP to convert all user
passwords from DES to 3DES.
When you enable 3DES, the LDAP is automatically updated. Each VPN Router
that enables the feature checks the LDAP to ensure that all passwords are in 3DES
(external LDAP only).
Chapter 2 Configuring servers 27
Warning: Nortel recommends that you back up your LDAP and Config
before you enable 3DES.
You can use the GUI or the CLI to enable 3DES.
To enable 3DES:
1 Select Servers > LDAP.
The Servers > LDAP window appears. (Figure 4)
Nortel VPN Router Security — Servers, Authentication, and Certificates
Page 38

28 Chapter 2 Configuring servers
Figure 4 Enable 3DES window
2 Click Enable TripleDES.
The 3DES Confirmation window appears. When TripleDES is enabled, all
passwords within the box are encrypted with 3DES as well as any future
passwords that are entered.
3 To confirm the 3DES encryption, click OK.
To enable 3DES with the CLI, enter the following command:
Configuring LDAP user encryption key
NN46110-600
ldap-server tripledes-enable
With the LDAP user configurable encryption key, you can set your own
user-defined encryption key instead of the default encryption key that is present on
the VPN Router. If you use a user-defined encryption key with an external server,
all the VPN Routers that use that external LDAP server must have the same
configured encryption key..
Warning: To return to the default encryption key, after you set a
user-defined key, you must reset the VPN Router to factory defaults.
You can use the GUI or the CLI to configure the LDAP user configurable
encryption key.
To change the existing encryption key:
1 Select Servers > LDAP.
Page 39

Chapter 2 Configuring servers 29
2 From the Encryption Key options, select Text Encryption Key or Hex
Encryption Key.
3 In the Encryption Key dialog box, enter a character string or a hexadecimal
value.
Note: The following is applicable only for Nortel VPN Router release
7.05.300 and above.
When TripleDes LDAP Encryption is not enabled, the Encryption Key
value that you enter is 8 bytes—8 ASCII text characters or 16 hex
characters. When TripleDes LDAP Encryption is enabled, the
Encryption Key value that you enter is 24 bytes—24 ASCII text
characters or 48 hex characters.
4 In the Confirm Encryption Key dialog box, enter the same value from step 3.
5 Click OK.
Note: The default key is used to encrypt the passwords until a user
encryption key is entered. You can use DES or 3DES to encrypt
passwords stored in LDAP.
To change the existing encryption key for the 8 byte character string using the
CLI, enter the following command:
ldap-server encryptionkey-text <password>
To change the existing encryption key with the hexadecimal value, enter the
following command:
ldap-server encryptionkey-hex <password>
Optimizing LDAP scheduling
With the LDAP optimization scheduling option, the VPN Router administrator
can configure the time and day that the LDAP database is optimized.
Nortel VPN Router Security — Servers, Authentication, and Certificates
Page 40

30 Chapter 2 Configuring servers
LDAP optimization is a process that frees all unused memory blocks and deletes
any deleted LDAP data structures, making the LDAP database lookups faster and
more efficient. The disadvantages of the LDAP optimization process are that it
runs at the LDAP priority and is very CPU intensive. In environments with heavy
traffic and very large LDAP databases, the optimization can cause timeouts and
data drops.
You can use the GUI or the CLI to configure optimization LDAP scheduling.
To configure LDAP optimization scheduling:
1 Select Servers > LDAP.
The Servers > LDAP window appears.
2 Enable Automatic Optimization.
3 In the Automatic Optimization Time dialog box, type the desired time.
4 In the Automatic Optimization Days of the week options, select the desired
days.
NN46110-600
To enable LDAP Optimization Scheduling, enter the following command:
ldap-server internal optimize specific-time enable
To disable LDAP Optimization Scheduling, enter the following command:
no ldap-server internal optimize specific-time everyday
To enable LDAP Optimization Scheduling everyday at a specific time, enter the
following command:
ldap-server internal optimize specific-time everyday time <hh:mm>
where:
hh:mm is the hour (00-24) and the minutes of the specific time.
To disable LDAP Optimization Scheduling everyday at a specific time, enter the
following command:
no ldap-server internal optimize specific-time enable
Page 41

Chapter 2 Configuring servers 31
To enable LDAP Optimization Scheduling on specific days of the week at a
specific time, enter the following command:
ldap-server internal optimize specific-time <days of week> time
<hh:mm>
where:
• days of week are the specific days for enabling LDAP Optimization
Scheduling.
• hh:mm is the hour (00-24) and the minutes of the specific time.
To disable LDAP Optimization Scheduling on specific days of the week, enter the
following command:
no dap-server internal optimize specific-time <days of week>
where:
days of week are the specific days on which to disable optimization scheduling.
Configuring internal LDAP server authentication
Since the VPN Router’s internal LDAP server does not respond to external
queries, two or more VPN Routers cannot share the same internal LDAP database.
To allow sharing between VPN Routers, and to take full advantage of LDAP
-based directory service replication and centralization, use a dedicated directory
service.
The VPN Router synchronizes its cache every 15 minutes. For example, if you
delete a user from an external LDAP database, it can take up to 15 minutes before
all of the VPN Routers recognize the change. Additionally, the LDAP server’s
status is recorded in the event log every 15 minutes.
To configure internal LDAP:
1 Select Servers > LDAP. The internal LDAP server is internal to the VPN
Router. If you are using more than one VPN Router or if you are using LDAP
authentication for other network services, consider using an external LDAP
server.
Nortel VPN Router Security — Servers, Authentication, and Certificates
Page 42

32 Chapter 2 Configuring servers
2 To enable the internal LDAP server, click Switch to Internal Server. The
internal server is disabled if you enable an external LDAP server.
3 Under General Configuration, click to remove the user’s fully qualified ID
suffix from the UID before sending it to the RADIUS server. An example of a
user ID and suffix where Rcole is the UID and acme.com is the suffix, is
rcole@acme.com. Specify the character that separates the suffix from the
UID.
4 Click Stop Server or Start Server, as appropriate, when you intend to back
up or restore a configuration, or after you complete the restoration of a
configuration. You must stop the LDAP server before you can perform the
backup and restore procedures.
5 Under Internal Server Control, Directory shows the current directory path,
which begins at the root disk drive (ide0). Be sure to stop the LDAP before
performing a backup or restore procedure. To resume operation, you must
restart the LDAP server that you were running.
To backup to a file:
a Enter a filename (eight characters maximum) to back up the database.
b Click Backup Now to start the backup procedure. This procedure backs
up changes to the internal LDAP LDIF file only (it writes to the LDAP
Interchange Format file). The LDIF file is an intermediate databasefile
that you use to move data between LDAP servers.
NN46110-600
To restore from a file:
a Select a file from the Restore from File list with which to restore the
LDAP database.
b Click Restore Now.
Both the backup and restore processes can take extended periods of time,
based on the size of the database.
a The Installed LDAP (SSL) CA Certificates section shows whether any
certificates are installed. Click Import Secure LDAP (SSL) CA
Certificate to import a CA certificate
. This option takes you to an edit
dialog box where you can paste a PKCS#7 Base-64 certificate.
6 Select Optimize Database to optimize the internal LDAP database.
Page 43

Chapter 2 Configuring servers 33
Configuring LDAP proxy server authentication
The VPN Router supports authentication against an existing LDAP server rather
than creating a second user database for use with the VPN Router. The server can
reside on either a private or public network that is connected to the VPN Router.
Note: You must enable CSFW for the public interface to work with
LDAP proxy server authentication.
You can configure the type of authentication methods that can access the existing
LDAP server. The authentication options are:
• PAP (Bind authentication)
•PAP
• CHAP
• MS-CHAP
• MS-CHAP V2 (Bindname authentication)
The VPN Router supports LDAP V2 servers.
Figure 5 shows the authentication mechanism used between the VPN Router and
the external LDAP proxy configuration.
Figure 5 LDAP proxy server
Nortel VPN Router Security — Servers, Authentication, and Certificates
Page 44

34 Chapter 2 Configuring servers
General filter specification syntax:
• If no filter is specified, the resultant search is (uid=username).
• If a filter string is specified, the search is (&(uid=username)filterstring).
For example, a filter value of (|(ou=engineering)(ou=finance)) creates a search
that specifies UID=username and (ou= engineering or ou=finance)
(&(uid=username)(|(ou=engineering)(ou=finance)).
Certificate LDAP query syntax is (&(SubDn=<subject DN from
cert>)(CAAttribute=<issuer DN from cert>)myFilter) or
(&(SubAltName=<subject alt name from cert>)(CAAttribute=<issuer DN from
cert>)myFilter).
To determine the SubjectDN or Altname, check to see if the UID of the session is
the same as the subject DN of the certificate.
To configure LDAP proxy server authentication:
1 Select Servers > LDAP Proxy and click Enable Access to LDAP Proxy
Server.
NN46110-600
a In the Remove Suffix from User ID field, select to remove the fully
qualified ID suffix from the UID before sending it to the LDAP server.
b Specify the character that separates the suffix from the UID as the
delimiter value.
c In the LDAP Proxy Server Users Obtain Default Settings from the
Group field, select the default group to which users are assigned.
d Enter a number in the Response Timeout Interval dialog box.
2 Under LDAP Proxy Servers, enter a base distinguished name (DN) for the
server. This is usually in the form ou=organizational unit, o=organization,
c=country.
a For the remote LDAP server, enter the Master, Slave 1, and Slave 2
LDAP server host names or IP addresses. If the master server becomes
unavailable, the VPN Router attempts to initiate a connection with the
slave servers.
Page 45

Chapter 2 Configuring servers 35
b In the Connection section, enter the port number (default 389) and the
associated SSL port number (default 636) that your LDAP server listens
to queries on.
c Enter the bind distinguished name (DN), which is the LDAP equivalent
of a user ID and is required to access the base DN and its subentries.
Leave this field blank if your LDAP server allows anonymous access.
d Enter the bind password, which can consist of up to 32 characters. The
VPN Router uses this password to prove its identity (the bind DN) to the
LDAP server.
3 In the Username/Password Access section, you can use case-insensitive
character strings in LDAP search filters. The default value for each field is
blank. If you do not supply a value, the authentication fails. Enter the user
name and password. To enable additional policy checking, specify an LDAP
search filter, which can be a case-insensitive character string (default is
blank).
4 Use the User Certificate Access section to add digital certificates support for
authentication:
a Enter the Subject DN attribute, such as common name, organizational
unit, organization, and country.
b Enter the Subject Alternative Name attribute.
c Enter the Certificate Authority (CA) attribute.
d Enter the LDAP filter name.
5 In the User Policy Attributes section, specify attributes used to store the
VPN Router group, static IP address/netmask, and customized user filter.
6 Click the SSL Encryption link to go to the LDAP server SSL encryption
window. Select the encryption types the VPN Router uses during negotiation
with the external LDAP server.
7 To change the order in which the VPN Router applies authentication, select
Services > IPsec and click Swap Server Order 2 and 3. External LDAP
proxy is disabled by default and you must add it as an option before you can
swap it.
8 Select Profiles > Groups to add or select the group that you want as the
default group for LDAP users (this is the group a user is assigned to if the
LDAP server does not send back a class attribute).
Nortel VPN Router Security — Servers, Authentication, and Certificates
Page 46

36 Chapter 2 Configuring servers
9 Select Profiles > Groups Edit > Edit IPsec. In the Authentication area,
click Configure. Enter the Group ID, the Group Password, and confirm the
group password. You cannot have the same group ID and user ID. Consider
using the LDAP group name as the default group, because you must
remember a default name once you enter it.
Note: The Start/Stop option disappears when you restore the LDAP
database. If you need to refresh the window after the restore completes
and the restore status pop-up is not available, you can select it from the
menu.
To configure IPsec and LDAP on the client:
1 In the VPN Client UI, select Options > Authentication Options and click
Group Security Authentication.
2 Enter the group ID and group password.
3 Select one of the group authentication options.
4 Click OK.
LDAP proxy user authentication and password management
NN46110-600
User authentication and password management support the LDAP V3-compliant
servers, such as IBM RACF and Netscape/Novell directory server. LDAP controls
within the bind response from the LDAP server combined with the error message
within the bind response find the password status: expired, expiring, or valid
password. You can change the VPN Client password to the proxy server if the
password is expired.
Figure 6 shows the proxy server access fields.
Page 47

Chapter 2 Configuring servers 37
Figure 6 LDAP proxy user authentication
LDAP V3-compliant LDAP server
LDAP controls are an extension of the LDAP protocol in LDAP/V3. They pass
extended information with LDAP requests and responses. Netscape Directory
Server 3.0 and higher use LDAP controls to return password information within
bind responses. This information determines if the user's password is expiring or
already expired.
When you configure the VPN Router to use an external LDAP authentication
server, it informs users that their passwords are expired or expiring and allows the
client to change the password. If the RACF server password is expired, the VPN
Router sends the password in the form oldPw/newPw. For Netscape Directory, the
VPN Router sends the LDAP modify request to modify the password and
password time stamp attributes.
Note: The VPN Router currently supports MD4, MD5, SHA and clear
text methods. The VPN Router does not support the Unix CRYPT and
SSHA (Salted Secure Hashing Algorithm) encryption methods;
therefore, if passwords saved in LDAP proxy are encrypted using these
methods, the password change is not successful.
LDAP controls are only passed back when performing a user bind. An
administrative bind does not trigger password expiration controls. This means that
the password must be available in plain text to perform the bind, such as PAP
within IPsec authentication, as used by the VPN Client.
Nortel VPN Router Security — Servers, Authentication, and Certificates
Page 48

38 Chapter 2 Configuring servers
LDAP server without LDAP control support
LDAP V2 servers typically require clients to bind before any operations are
performed. This enhancement uses simple authentication when binding to an
LDAP server to authenticate the user. The server then returns a bind response to
the client indicating the status of the session setup request.
The bind response contains the result along with the string representation of the
error message. This indicates whether the password is invalid or has expired. For
IBM RACF server, the following are error messages under the standard result
code 0x49 (Invalid Credentials):
• R004128 = Password not Valid
• R004110 = User Revoked
• R004109 = Password Expired
The error message is used to determine whether the password is expired. If the
password is expired, the change password window appears on the client. The
LDAP user bind to the IBM RACF server implements the password change. IBM
RACF server returns the LDAP result of either success or invalid credentials.
NN46110-600
To configure LDAP proxy user authentication and password management:
1 Select Servers > LDAP Proxy.
2 Click Pwd Management.
The LDAP Proxy Server window appears. (Figure 7)
Page 49

Chapter 2 Configuring servers 39
Figure 7 LDAP Proxy Server password management
3 Select the server type from the list. The choices are:
• Not Specified
• IBM RACF Server
• Netscape Directory
• Novell eDirectory
• Microsoft Active Directory
4 Enter the password timestamp attribute. This field can hold case-insensitive
character strings. The default value for each field is blank. Authentication fails
if there is no specified value.
5 Enter the password life time in days.
6 Click OK.
When you log into the VPN Client, the Change VPN Password window appears
with a message that your VPN password has expired. To update your password:
1 Enter your old password in the Old Password dialog box.
2 Enter your new password in the New Password dialog box.
3 Enter your new password again in the Verify Password dialog box.
4 Click OK.
Nortel VPN Router Security — Servers, Authentication, and Certificates
Page 50

40 Chapter 2 Configuring servers
Monitoring LDAP servers
If the VPN Router cannot reach the LDAP proxy server, it still operates and passes
traffic. However, it does not authenticate users whose information exists in a third
party directory. The VPN Router simply pings the LDAP proxy servers every few
minutes to check for their status. If it receives an ICMP reply, an attempt is made
(considered available) to the LDAP proxy server. This is similar to the way the
VPN Router monitors RADIUS servers.
External LDAP servers behave differently because the server must reply to ICMP
echo requests and accept a directory bind before the VPN Router considers it
available. On initialization of the external LDAP server, the VPN Router monitors
the health of each external LDAP server to determine if the server is available. If it
cannot contact its directory, the VPN Router runs, but it does not terminate tunnels
or pass network traffic.
Note: If you configure an external LDAP proxy server that is
unavailable, you can experience delays in VPN Router provisioning
times.
NN46110-600
The VPN Router monitors the status of all configured external LDAP servers. If
the VPN Router has marked a server as up, it monitors the status of the server by
binding and conducting a search against the directory every 15 minutes. If the
VPN Router has marked a server as down, it does the following:
1 Monitors the status of the server by issuing an ICMP echo request to the
server every 15 minutes.
2 If an echo reply is received, the VPN Router attempts to bind and search the
server's directory.
3 If the bind and search is successful, the VPN Router changes the server's
status to up and returns the server back into the server list for operation.
If either the bind or search is unsuccessful, the server remains in the down state.
Note: When multiple systems share an external LDAP, any parameters
added or removed from the external database by one system are not
visible to the other system until the database caches are flushed. The
cache flush is a timed interval.
Page 51

Once the primary external LDAP server is initialized, the VPN Router issues an
ICMP echo request to all secondary server IP addresses and follows the previous
procedure for each secondary server.
Because the VPN Router assumes only read/write access to the primary external
LDAP server, it does not configure any secondary server directories for VPN
Router directory storage. Instead, the VPN Router relies on the LDAP replication
agreements between the primary LDAP server and secondary LDAP servers to
populate the secondary servers with the appropriate directory information.
During normal operations, the VPN Router utilizes the primary external LDAP
server. In the event of primary LDAP server failure, the VPN Router fails-over to
the next secondary LDAP server in succession. Only the servers marked up are
attempted. Once the VPN Router detects the return of the primary server, it returns
to normal operations and utilizes the primary server exclusively.
RADIUS authentication service
RADIUS is a distributed security system that verifies connection attributes and
authenticates connections. It is available on both public and private interfaces. You
enable RADIUS on the Services > RADIUS window. Packet flow is from external
clients to the VPN Router interface IP and port. You configure the port on the
Services > RADIUS window. To configure filters, go to the the Services >
Available window and in the Authentication Protocol section, click public or
private for RADIUS.
Chapter 2 Configuring servers 41
When you enable RADIUS client authentication, VPN Router acts as a RADIUS
authentication client to external RADIUS authentication servers. You enable
client authentication on the Servers > RADIUS Auth window. External
authentication servers are located on either public or private networks. You
determine the packet flow from the IP address/port that you configured on the
Servers > RADIUS auth > RADIUS Servers > interface window to external
servers and back. You control the filters from the Servers > RADIUS Auth >
Enable Access to RADIUS Authentication window. When you enable RADIUS,
public and private filters are put in place.
Nortel VPN Router Security — Servers, Authentication, and Certificates
Page 52

42 Chapter 2 Configuring servers
The VPN Router acts as a RADIUS accounting client to external RADIUS
accounting servers. You enable accounting on the Servers > RADIUS Acct
window. External accounting servers are located on either public or private
networks. The packet flow is from the IP address/port that you configure on the
Servers > RADIUS Acct > External RADIUS Accounting Server > Interface
window to external servers and back. You configure filters on the Services >
Available > RADIUS Accounting (public and private) window. You can use the
RADIUS Authentication Servers window to configure up to three servers for
remote authentication. It is imperative that the RADIUS servers contain the same
user data. The VPN Router uses the alternative RADIUS servers only when it
receives no response from the primary RADIUS server.
Most RADIUS servers support CHAP and PAP authentication, and some support
MS-CHAP (Funk, for example).
Note: If you require PPTP-encrypted tunnels and RADIUS
authentication, then you must use a RADIUS server that supports
MS-CHAP. The alternative is to use an LDAP server for PPTP
authentication.
Configuring RADIUS authentication
NN46110-600
The VPN Router supports authentication against a RADIUS server. This server
can reside on either a private or public network that is connected to the VPN
Router. To enable RADIUS authentication, you must configure the VPN Router
with the RADIUS server host name, port number (typically 1645, but port 1812 is
the RFC standard), and a shared secret. You access the VPN Router management
window from the Servers > RADIUS Authentication window.
You also use the RADIUS Authentication window to configure the type of
authentication methods that can access the RADIUS server. There are five
options, of which only four are IPsec-related:
• RESPONSE
• MS-CHAP-V2
• CHAP
•PAP
Page 53

Chapter 2 Configuring servers 43
• MS-CHAP is available for PPTP tunnel users only (it is not applicable to
IPsec tunneling applications).
If you are using token cards for authentication, you must select the appropriate
technologies (SecurID). For example, the SecurID passcode is the pin plus the
token code.
Note: The UID and password are never passed in the clear for an IPsec
client, either from the remote client or from the VPN Router
communicating with the RADIUS server. If you use PAP authentication
for a PPTP session, both the user name and the password are passed in
the clear to the VPN Router over the Internet.
There is no significant security benefit between using CHAP or PAP. A minor
consideration to take into account is that PAP authentication consumes fewer
instructions during the authentication process because the connection between the
VPN Router and the RADIUS server is protected by encryption.
When you use RADIUS-based authentication, the IPsec client and the VPN
Router require a second set of credentials for mutual authentication. These
credentials are referred to as the group ID and group password.
The remote access client information is documented in the VPN Client online
Help. On the IPsec client side, the remote user must:
1 Select Options > Authentication Options.
2 Click User Group Security Authentication.
3 Enter the group ID and group password.
4 Select one of the following options:
• Challenge Response Token
• Response Only Token
• Group Password Authentication
To complete the RADIUS setup, you must configure at least one group profile for
RADIUS users. In this profile, you must enter the group ID, password, and the
allowed group authentication options. You can configure the group profile from
the Profiles > Groups > Configure IPsec window.
Nortel VPN Router Security — Servers, Authentication, and Certificates
Page 54

44 Chapter 2 Configuring servers
1 Set up and test the operation of the RADIUS server with ACE and/or
Defender servers, depending on the type of token security you want. Do this
before attempting authentication by an IPsec client to verify that everything
on this side of the network is operating properly.
2 Identify and create the groups for authenticating token users, and supply the
group ID and password to all users using either token card or group password
authentication. SecurID users are created and maintained in their respective
servers, not in the VPN Router. Add the groups in the Profiles > Groups >
IPsec window.
3 Define the RADIUS server configuration settings for token security.
4 Define the Tunnels settings for IPsec. Add a RADIUS server, if necessary
(see
“Configuring IPsec authentication” on page 47).
RADIUS authentication class attribute values
Figure 8 shows the relationship between RADIUS authentication class attribute
values for VPN Router users. C is the class attribute for country, and OU is the
class attribute for organizational unit.
NN46110-600
Page 55

Chapter 2 Configuring servers 45
Figure 8 RADIUS authentication class attribute values
C=US
ou=My Company, c=US
Base Group
ou=Research and Development
ou=My Company, c=US
ou=Finance
ou=My Company
c=US
ou=New Products
ou=Research and
Development
ou=My Company
c=US
Research
and Development
New Products
Group
CAD Group
Support
Group
Accounts
Receivable
The VPN Router supports RADIUS-supplied attributes, such as IP address and
MPPE key and additional specific attributes, if they are returned from a RADIUS
server. All other returned attributes are ignored. The specific attributes are detailed
in Microsoft documentation and defined in RFC 2548. This data overrides the
corresponding data stored in LDAP, if any. Table 1 shows common examples of
class attributes.
Table 1 RADIUS class attributes
Name Value format Function
Class ou=groupname The user is assigned to the group
Framed-IP-Address dotted decimal If static addresses are allowed, this IP
groupname, if it exists.
address is used for the tunnel session.
Framed-IP-NetMask dotted decimal Subnet mask to be used with above IP
address.
Nortel VPN Router Security — Servers, Authentication, and Certificates
Page 56

46 Chapter 2 Configuring servers
Table 1 RADIUS class attributes (continued)
Name Value format Function
Filter-ID filter name If defined, this filter name is applied to the
DNS domain server name If used, the domain name system server
tunnel session.
name.
NBNS protocol name NetBIOS protocol; an internet naming
service. If used, translates the NetBIOS
Windows domain name to the IP address.
Table 2 shows sample details that you enter into your RADIUS server.
Table 2 RADIUS example details
User ID Class attribute value Assigned group
Lee Madison ou=New Products,
ou=Research and Development
Julie Lane None Default
Bill Sullivan ou=Staff Default (ou=Staff does not
New Products
exist)
The RADIUS server uses the class attribute value to associate the user ID with a
group in the LDAP database.
RADIUS-Assigned Framed-IP-Address attribute
You configure a RADIUS-Assigned Framed-IP-Address attribute on the RADIUS
server for the UID being authenticated by the VPN Router. If you enable Allow
Static Addresses (Profiles > Groups > Edit > Connectivity window) for the
assigned group, then the tunnel session uses the returned IP address. Otherwise, it
assigns an IP pool address.
NN46110-600
Note: The RADIUS server returns only a single IP address; therefore,
only one active tunnel connection is permitted per UID.
Page 57

Configuring IPsec authentication
The following procedures describe how to configure the VPN Router to
interoperate with a RADIUS server while using either IPsec or PPTP.
To configure IPsec and RADIUS:
1 Select Servers > Radius Auth and click Enable Access to RADIUS
Authentication.
a Click Remove Suffix from User ID to remove the fully-qualified ID
suffix from the UID before sending it to the RADIUS server. Specify the
character that separates the suffix from the UID as the delimiter value.
b Select Remove Prefix from User ID to remove the fully-qualified ID
prefix from the UID before sending it to the RADIUS server. Specify the
character that separates the suffix from the UID as the delimiter value.
c Select Error Code Pass Thru to allow an error message sent to the VPN
Router by the RADIUS server to pass through the VPN Router to the
originating client.
d In the RADIUS Users Obtain Default Settings from the Group field,
select the default group to which users are assigned.
Chapter 2 Configuring servers 47
2 Enable one of the following authentication methods from the Server
Supported Authentication Options:
• Response—Response Only Token Cards
• MS-CHAP-V2—Microsoft encrypted CHAP Version 2
• MSCHAP—Microsoft encrypted CHAP Version 1; check RFC-2548 to
enable the VPN Router to interoperate with a Microsoft RADIUS Server
Version 2.2 or later, or a Version 2.1 with the Microsoft Hotfix applied.
Leave this box empty if using a Microsoft RADIUS Server V2.1 (without
the Hotfix) or earlier.
• CHAP—Challenge Handshake Authentication Protocol
• PAP—Password Authentication Protocol
3 Under RADIUS Servers, click Enabled for the RADIUS servers that you
want to use for authentication (up to three servers). The primary server
receives all RADIUS authentication inquiries unless it is out of service. A
RADIUS server that fails to respond five times is temporarily taken off the
server list for 30 minutes. After 30 minutes, the server is tried again. In the
Nortel VPN Router Security — Servers, Authentication, and Certificates
Page 58

48 Chapter 2 Configuring servers
event that the primary server is unreachable, the VPN Router queries the first
and second alternate RADIUS servers.
a Enter either the Host Name or IP Address of the servers. For example,
finance.mycompany.com or 145.22.120.111. You can also use simple
names (for example, finance) if your VPN Router has a configured DNS
server. For Primary, enter the primary RADIUS server host name
(required if RADIUS is enabled). The primary server is normally used to
process incoming authentication requests. For Alternate 1, enter the first
alternate RADIUS Server host name (this server processes incoming
authentication requests if the primary RADIUS server is unavailable). For
Alternate 2, enter the second alternate RADIUS server host name (this
server processes incoming authentication requests if the primary
RADIUS Server and the first alternate server are unavailable).
b Under Interface, specify whether you want to access the RADIUS server
from the VPN Router’s private or public interface. You use the address of
the interface to configure the RADIUS client address information on the
remote RADIUS server. You must enable RADIUS authentication as an
allowed service on the Services > Available window. Select Private if the
RADIUS server is reached through the private interface. The management
address is used. Select Public if the RADIUS server is accessed through
the public interface. You must also specify the IP address for the public
interface. The public IP address list is dynamically built from the
information on the System > LAN window. Any change, such as
removing an interface card or changing an IP address, is automatically
reflected in the list.
NN46110-600
c In the Port field, enter the server port number that you want the RADIUS
authentication requests to use. Default is Port 1645.
d In the Secret field, enter the password to share with the VPN Router. To
enhance overall security, enter a different password for each server. The
shared secret encrypts the password between the VPN Router and the
server when the tunnel connection uses PAP or SecurID. It also verifies
the authenticity of each accounting request sent by the VPN Router to the
RADIUS server. Furthermore, it verifies the authenticity of each response
sent by the RADIUS server to the VPN Router.
Page 59

Chapter 2 Configuring servers 49
The VPN Router can store all passwords encrypted with 3DES, but you
must first enable the feature. To enable 3DES, select Servers > LDAP
and click Enable TripleDES. When you enable TripleDES, all passwords
within the box are encrypted with 3DES as well as any future passwords
that are entered.
You can also change the existing encryption key by enabling TripleDES
and, in the Encryption Key dialog box, enter an 8 byte character string or
hexadecimal value. For more information on 3DES, see
“Encrypting with
3DES password” on page 27.
e Confirm the password by reentering the server's Secret to verify that you
typed the password correctly.
f Use the reply-source-port option to configure the port that the RADIUS
server uses as a source in the RADIUS authentication reply. The default
value is 0 (only allow a reply packet with the source port of 1645). The
UDP port that is used is the port configured in the Port attribute of the
RADIUS server configuration on the server Servers > RADIUS
Authentication window. The default value is 1645.
Reply-source-port is only necessary if you have a RADIUS server that
sends a RADIUS authentication reply with a UDP port that differs from
the originating UDP port. For example. if a RADIUS authentication
packet is sent from the VPN Router using the UDP source port 1100 and
UDP destination port 1645, the RADIUS server responds with a UDP
source port of 8500 and a destination UDP port of 1100. The VPN Router
is expecting a reply with a source UDP port of 1645 and a destination
UDP port of 1100. Therefore, this packet is dropped because the UDP
port 8500 is not open (by default) and the packet is filtered.
g Click Suppress-service-type to remove the service type 8 attribute from
the radius access message and to return attributes to the VPN Router. This
is implemented to maintain forward compatibility with newer versions of
SBR.
4 In the Response Timeout Interval field, enter the frequency in seconds that
you want the VPN Router to wait before retrying to connect to the RADIUS
servers. By default, the VPN Router tries once every three seconds. The
minimum setting is 1.
Nortel VPN Router Security — Servers, Authentication, and Certificates
Page 60

50 Chapter 2 Configuring servers
5 In the Maximum Transmit Attempts, enter the number of times that you
want the VPN Router to try to connect to the RADIUS servers before failing.
By default, the VPN Router tries three times.
6 Click the RADIUS Diagnostic Report link to check that your RADIUS
Authentication configuration is correct. This report compares the settings on
the RADIUS Authentication window to the corresponding settings on other
VPN Router configuration windows. The title of each section of the
diagnostic report lists the name of the related window. For example, the IPsec
RADIUS Configuration section of the report contains information related to
the Services > IPsec window.
7 Enable a server and enter the server’s host name or IP address, the interface
type, port number (1645), and secret. Click OK.
8 Select Services > IPsec and click Add RADIUS to add a RADIUS server to
the Authentication Order table.
9 Select Profiles > Groups to add or select the default group for RADIUS users
(this is the group a user is assigned to if the RADIUS server does not send
back a class attribute).
10 Select Profiles > Groups > Edit > IPsec Configure.
NN46110-600
11 The Authentication section shows the Authentication method for the group
selected. Enter the group ID and group password. Consider using the LDAP
group name as the default group, because you must remember a default name
once you enter it. If your RADIUS server returns a class attribute, ensure that
the authentication method is enabled for that group. However, you do not need
a group ID and group password for the group that is being returned as a class
attribute.
Note: You must set the group ID and password in the Nortel VPN client
as well as in the group profile to use RADIUS authentication.
To configure IPsec and RADIUS on the client:
1 In the VPN Client GUI, select Options > Authentication Options and click
Group Security Authentication
2 Enter the group ID and group password.
Page 61

3 Select one of the group authentication options.
4 Click OK.
Configuring RADIUS dynamic filters
The Nortel VPN Router offers several methods to control network access for
authenticated users. One such mechanism is the tunnel filter. Tunnel filters are
applied at the group level and control access to network resources as well as
management access to the VPN Router. When a user is authenticated, they are
assigned to a group. Part of the group profile specifies that you apply a filter.
Dynamic filters provides a means of distributing filters for IPsec user tunnels via a
RADIUS return attribute. Depending on the configuration of the RADIUS server,
these filters can vary by individual user, or apply to an entire class of users.
Note: These filters apply only to IPsec user tunnels. They do not apply
to branch office tunnels or non-IPsec tunnels.
You must enable tunnel filters for the RADIUS dynamic filters to be effective.
You can set up and manage policy filters in the RADIUS server that the VPN
Router retrieves. RADIUS returns the Access Control List (ACL) to the VPN
Router. IPsec user tunnels are dynamically filtered based on attributes returned
from the authenticating RADIUS server. The returned dynamic filters are then
prepended to the groups filter to which the user is bound.
Chapter 2 Configuring servers 51
Dynamic filtering has minimal performance impact. Some performance
degradation can occur during user tunnel creation, depending on the number of
rules processed. Passing of traffic can degrade in a way similar to that which
occurs when you configure a large number of tunnel filters in a user group.
You configure all dynamic filters on the remote RADIUS server. Before you
configure dynamic RADIUS filters, you must first configure the RADIUS server.
There are many available RADIUS servers, each with different specifics for
configuring return attributes. Regardless of how you configure return attributes,
they always use the following AV-Pair to define and transmit attribute/value pairs:
• Vendor Specific Attribute (VSA)—26
• Vendor Code—9 (Cisco)
Nortel VPN Router Security — Servers, Authentication, and Certificates
Page 62

52 Chapter 2 Configuring servers
• Attribute—1 (AV Pair)
The supported syntax is:
[Prefix] [Action] [Protocol] [Source] [Source Wildcard Mask] [Destination]
[Destination Wildcard Mask] [Operator] [Port]
The following table describes the syntax of the attributes.
Table 3 Syntax of attributes
Section Description
Prefix ip:inacl#Num=
Action Deny or permit
Protocol IP, TCP, UDP, or ICMP
Source An IP Address, "any", or "host <host address>
Source wildcard mask This is not used if the source is "any" or "host". Note the
Destination An IP address, "any", or "host <host address>"
Destination wildcard mask This is not used if the source is "any" or "host". Note the
Operator LT - Less than, GT- Greater than, EQ - Equal, NEQ - Not
Port Port number. Must be provided if an operator is specified.
ip:outacl#Num=
Where "Num" is replaced with a number specifying the
order in the list. Inacl and outacl are the only two AV pair
types supported.
mask is NOT specified as a subnet mask. "0" indicates
exact match for an octet. "255" indicates a "don't care" for
all of the bits in the octet.
mask is NOT specified as a subnet mask. "0" indicates
exact match for an octet. "255" indicates a "don't care" for
all of the bits in the octet.
equal
Operator is not used unless the protocol is TCP or UDP.
NN46110-600
Do not specify an outacl that denies all traffic, such as ip:outacl#1=deny ip any
any, because this prevents the IPsec client from connecting to the banner server.
You must have at least one outacl entry specified. You can specify a "deny all"
filter in the group.
Page 63

Chapter 2 Configuring servers 53
The following example specifies that all IP traffic is allowed inbound from any
address to 10.10.1.2 and all ip traffic is allowed outbound.
ip:inacl#1=permit ip 0.0.0.0 255.255.255.255 host 10.10.1.2
ip:outacl#1=permit ip any any
To configure RADIUS dynamic filters with the CLI, enter the following
commands:
CES>enable
Password:
CES#config t
Enter configuration commands, one per line. End with Ctrl/z.
CES(config)#group add /Base/Radius
CES(config)#group connectivity /Base/Radius
CES(config-group/con)#filters "deny all"
CES(config-group/con)#exit
CES(config)#firewall tunnel-filter
CES(config)#aaa authentication ipsec radius
CES(config)#radius-server primary host 199.74.229.28 auth-port 1645
CES(config)#radius-server primary key secret
CES(config)#radius-server primary enabled
CES(config)#radius-server authentication pap
CES(config)#radius-server default-group /Base/Radius
CES(config)#aaa authorization network radius
CES(config)#exit
CES#
Configuring PPTP and RADIUS
To configure PPTP and RADIUS:
1 Select Servers > Radius Auth and click Enable Access to RADIUS
Authentication.
2 Enable an authentication method.
3 Click OK.
Nortel VPN Router Security — Servers, Authentication, and Certificates
Page 64

54 Chapter 2 Configuring servers
If a valid class attribute is not returned, then PPTP users are placed in the default
group as configured on the Servers > RADIUS Auth window.
Note: Everything about the authentication type must match; for
example, if you send an encrypted password, then MS-CHAP must be
enabled on the RADIUS authentication window and the RADIUS server
must support MS-CHAP.
Configuring group-level RADIUS authentication
In remote access deployments, if you want to partition users across several
different RADIUS servers, the VPN Router can connect to the appropriate server
when authenticating a specific user. This group-level authentication is particularly
useful for large installations with many different databases, and for carriers that
have a business need to keep customer authentication domains separate.
To configure the group-level RADIUS authentication server for each group:
1 Select Profiles > Groups > Edit > IPsec Configure.
NN46110-600
2 Click the Configure Group Level RADIUS Servers link in the
Authentication section. You can configure the following:
• A primary and two alternate RADIUS servers
• IP address, interface, port, and secret
• UserID suffix removal and delimiter value
• Response Time out and Maximum Transmission Attempts
• For user name/password authentication, the PAP/CHAP settings are
retrieved from the Servers > RADIUS Authentication Servers window.
Page 65

Group-level RADIUS authentication works only with clients that use a group ID
and password. This excludes all non-IPsec client implementations. You must use
the group ID and group password to configure each client in the group for group
authentication.
Note: There are no separate group levels of authentication on a
RADIUS configuration for the firewall user authentication (FWUA)
users. Because they are only members of the global group configuration,
if you have multiple RADIUS servers, you must add these users to the
group on the VPN Router global RADIUS configuration window. This
also applies to PPTP and L2TP user tunnels.
Vendor-specific RADIUS attribute
You can use the vendor-specific RADIUS attribute to store VPN Router group
membership information in a RADIUS vendor-specific attribute as well as to the
class attribute.
Configuring RADIUS accounting
Chapter 2 Configuring servers 55
You can use the RADIUS accounting configuration window to specify how your
VPN Router saves RADIUS accounting results. By default, the results are stored
locally. You can also save the RADIUS accounting information to a remote
RADIUS server.
Note: If you set the date ahead and then set it back, external RADIUS
accounting no longer works.
To configure RADIUS accounting:
1 Select Servers > Radius Acct.
2 Click Enable to enable internal RADIUS accounting. Internal RADIUS
accounting is enabled by default.
3 In Session Update Interval, enter an interval when a snapshot of the current
active tunnel sessions is recorded to a journal file. Use the format, hh:mm:ss,
for the interval. The journal file stores the session information until the user
logs out of the tunnel session, after which the session stop record is saved on
Nortel VPN Router Security — Servers, Authentication, and Certificates
Page 66

56 Chapter 2 Configuring servers
the local disk. In the event of a system crash, upon reinitialization the VPN
Router translates the journal file into a series of stop records on a per-session
basis. This minimizes accounting data loss. A low interval creates system
overhead and requires additional processing. The default interval is 00:10:00
(10 minutes).
4 In Remove Accounting Files, enter the number of days before the files are
removed.
5 Click Enable to enable the Interim RADIUS Accounting Record feature.
This selection is enabled by default.
6 In the Interim Update Interval, enter the interval at which time interim
RADIUS records are sent to the specified external RADIUS server. Use the
format hh:mm:ss for the interval. A short interval creates system overhead
which requires additional processing. The default interval is 00:10:00 (10
minutes).
7 Click Enable to send accounting records to the external RADIUS accounting
server.
8 Enter the external RADIUS server host name or IP address. If you enter a host
name, use a fully qualified domain name, such as Finance.mycompany.com.
NN46110-600
9 Click Private or Public for the Interface.
10 Enter the server port number that you want the RADIUS accounting requests
to use. The default is port 1646.
11 Enter the external RADIUS server’s required secret (password).
12 Reenter the remote server’s secret (password) to verify that you typed the
password correctly.
13 Click Test Server to verify the connectivity from your VPN Router to the
external RADIUS server. A message at the top of the window shows the
results of the test.
The VPN Router sends RADIUS accounting start and stop records to an external
RADIUS server. These interim records provide information about the currently
active sessions on the VPN Router. An administrator can use this information to
evaluate VPN Router usage, such as connection start and stop times.
Page 67

Configuring DHCP servers
Dynamic Host Configuration Protocol (DHCP) dynamically assigns IP addresses
to clients and provides centralized network administration. When a DHCP client
requests an IP address, a DHCP server grants the client exclusive use of an
assigned IP address for a specified period of time.
When you configure both the DHCP server and DHCP relay on the same
interface, the DHCP server takes precedence and the DHCP packets received by
the VPN Router are processed by the DHCP server. For DHCP relay to be
functional, you must disable the DHCP server for the interface on which the
DHCP relay is configured.
The DHCP server requires that either the Stateful Firewall or interface filter is
enabled. Incoming DHCP packets are discarded if the SFW or interface filter is
not enabled.
Note: The VPN Router includes a full implementation of a DHCP
server that is in compliance with RFC 2131 and RFC 2132.
Chapter 2 Configuring servers 57
The following restrictions apply to the DHCP server:
• DHCP server is enabled by default on the private (trusted) interface.
• DHCP Relay and the DHCP Server are mutually exclusive on a physical port.
Note: You can enter duplicate IP addresses for the DNS servers without
receiving error messages stating that there are duplicate addresses. This
applies to both the UI and CLI interfaces.
To configure the DHCP server:
1 Select Servers > DHCP.
2 Click DHCP Service Enabled to enable the DHCP server.
3 In the Default Options section, specify the lease time in the ddd:hh:mm:ss
format or select Infinite to indicate an unspecified period of time.
Nortel VPN Router Security — Servers, Authentication, and Certificates
Page 68

58 Chapter 2 Configuring servers
4 Click Add in the Standard Options section to access the Add Option
window. The standard options section shows the current status of any added
options and lets you add new options:
• Select the desired options from the list.
• Select the desired Type from the list.
• Enter the appropriate value.
5 In the Pool section, click Add to add a pool.
6 In the Add Pool window:
a Enter the base IP address for the pool.
b Enter the subnet mask for the pool.
c Enter a pool name. The pool name must match the group profile for
DHCP.
d Enter a description of the pool.
e Click OK.
7 Select Pool and click Configure to return to the Pool window.
8 Use the Inclusion Range section to add blocks of IP addresses that you can
then give out. Under Inclusion Range, click Add.
NN46110-600
9 In the Pool Inclusion window:
a Enter the base IP address for the Start Address.
b Enter the End IP address.
c Click OK.
10 Optionally, you can select an Exclusion Range for further control of the IP
addresses that you give out. Under Exclusion Range, click Add.
11 On the Pool Exclusion window:
a Enter the Start Address for the range.
b Enter the End Address for the range.
c Click OK.
12 Optionally, you can force the DHCP server to assign a fixed IP address to a
host every time it logs in. You can do this with host reservations under the
Host section. Click Add.
Page 69

Chapter 2 Configuring servers 59
13 On the Host window:
a Enter the host name that is registered with DNS.
b Enter the IP address that you always want to reserve.
c Enter the Ethernet (MAC) address.
d Click OK.
14 The server does not implement configuration changes until it is restarted.
Return to Server > DHCP and click Restart Server to restart the DHCP
server.
15 To verify the configuration changes, select Status > Health Check or click
DHCP Stats on the Status > Statistics window.
Configuring remote user IP address pool
Remote access users who use tunneling protocols require two IP addresses to form
packets. The addresses are normally referred to as outer and inner addresses. The
outer address, or public address, is visible when packets travel through the public
data networks (PDNs). This address is negotiated between the client and the ISP
to which it is connected. The VPN Router does not control this address.
The inner IP address is the address that eventually appears on the private network
when the outer layers of the packet are removed. Therefore, this address must lie
within the private network address space. The VPN Router provides the remote
user with the inner IP address during tunnel setup. This address can come from an
internal address pool, an external DHCP server,, a RADIUS server, or from an
external LDAP proxy server.
The VPN Router assigns the inner IP address from one of several sources, using
the following order:
1 user-specified (excluding IPsec)
2 static address, either the VPN Router’s LDAP database, the RADIUS server,
or the external LDAP proxy servers
3 local address pool, either the VPN Router’s internal address pool or the
DHCP-acquired address pool
Nortel VPN Router Security — Servers, Authentication, and Certificates
Page 70

60 Chapter 2 Configuring servers
Use the Remote User IP Address Pool window to select a method for users to
obtain IP addresses to access the private network. The VPN Router services these
addresses and they are available to remote users on demand. You can choose IP
addresses assigned from one of the following:
• external Dynamic Host Configuration Protocol (DHCP) pool
• internal address pool
A DHCP server on the private LAN segment dynamically assigns IP addresses on
behalf of remote users. You must have an existing DHCP server to choose this
option. The DHCP server is contacted by a broadcast or unicast (depending on the
option selected) DHCP request through the network adapter associated with the
management IP address.
The internal DHCP server option also provides the following:
• A cache of prenegotiated DHCP addresses so that the client does not wait to
acquire an address at logon.
• All DHCP controls (such as cache size, immediate release, blackout time,
blackout override) can fine tune the behavior of the DHCP client.
• Named pools are supported. The pool name from the user/group profile is
used to select which of the internal DHCP server pools a local address comes
from.
• A default pool can provide addresses when the preferred pool is exhausted or
unavailable. The default fail over control enables or disables the default pool.
NN46110-600
To configure a DHCP address pool:
1 Select Servers > User IP address.
2 Click DHCP.
3 Click Any External DHCP Server to allow any available external DHCP
server to provide the requested IP addresses. Any External DHCP Server is
the default selection.
4 Click Internal DHCP Server to allow a block of addresses. These addresses
must also be specified in the user’s group profile.
5 Click Specified DHCP Server to allow a specified DHCP server only to
provide IP addresses. Indicate the IP addresses of the servers that provide
DHCP service, including Primary, Secondary, and Tertiary. A status field
Page 71

Chapter 2 Configuring servers 61
provides information on the associated servers. Configuring a Secondary or
Tertiary server is optional.
6 Enter the DHCP Cache Size. This is the number of IP addresses that is held
in the VPN Router cache. The minimum number of IP addresses held is one
(1), and the maximum is derived from the maximum number of tunnel
sessions that the VPN Router supports.
7 Click Immediate Address Release if there are a limited number of available
IP addresses and you want the VPN Router to release the IP address back to
the DHCP server immediately. IP addresses from disconnected tunnel
sessions remain unavailable for the time you specify (300 to 7200 seconds).
This delay prohibits immediate reuse by another user that can represent a
security risk.
8 For DHCP Blackout Interval, enter the amount of time in seconds that a
DHCP address is held in a blackout state before it is returned to the DHCP
server or the DHCP cache.
9 Click Override Blackout Interval when no addresses are available to
enable this option.
To add a user IP address pool:
1 Select Servers > User IP address.
2 Click Add to add a new address pool.
3 Enter the starting IP address and ending IP address for this pool. Make sure
that none of the pool addresses are the same as those used for the LAN
interfaces or the management interface IP address. The VPN Router does not
check the IP address supplied by a PPTP client to see if it is assigned to a
LAN interface, management interface, or address pool.
The Use Client-Specified Address option is disabled by default. To avoid
potential conflicts, you can verify the current state of this option from the
Profiles > Groups > Edit > Configure PPTP window.
4 Enter the Subnet Mask for the pool that you are configuring. You can later
edit the Subnet Mask as necessary.
5 Beside Pool, click Default and enter the name of the pool. The name must
match the group profile for either DHCP or for a local address pool.
Nortel VPN Router Security — Servers, Authentication, and Certificates
Page 72

62 Chapter 2 Configuring servers
Select Profiles > Groups > Edit > Connectivity and click the Address Pool
Name list to select the address pools used by remote users to access the VPN
Router. The list shows all pools that are defined on the VPN Router.
Optionally, select New to define a new pool and enter the name of the pool.
The default for this option is Default.
6 Click OK to save the entries for the IP address pool and return to the Remote
User IP Address Pool window.
You can use internal address pools to select the block of addresses a particular
users local address comes from. You can name internal pools, but you must also
specify the pool name in the user’s group profile. For example, a profile for
software engineering and hardware engineering groups can select addresses from
the engineering address pool. You can also define a default internal address pool
to supply an address when the preferred pool is exhausted or otherwise
unavailable.
Configuring DHCP relay
NN46110-600
The DHCP relay agent on a VPN Router forwards DHCP and BOOTP messages
between a server and a client on different subnets. When a locally attached host
issues a DHCP or BOOTP request as a broadcast message, the VPN Router relays
the message to a specified DHCP or BOOTP server. The DHCP relay agent also
forwards DHCP replies from server to client.
Note: The DHCP relay agent can run only on all the private physical
interfaces and tunnels.
You can enable or disable DHCP relay for each interface and specify the DHCP
servers for each interface. When you enable DHCP relay on an interface, the VPN
Router forwards DHCP requests from the interface to the DHCP server configured
for the same interface.
The DHCP relay agent unicasts DHCP packets only to the specified Helper
servers (up to 3). Server 1 address is required. Server 2 and Server 3 addresses are
optional. Additionally, you can enable and disable each DHCP server by checking
or unchecking Enable.
Page 73

Chapter 2 Configuring servers 63
To add a DHCP relay interface:
1 Select Servers > DHCP Relay and click Add.
2 Select a Physical Interface from the list.
3 For the state, select either Enabled or Disabled.
4 For the DHCP Server, enter the IP address and then click Enabled for
Helper 1, Helper 2, and/or Helper 3.
5 Click OK.
To view DHCP Relay statistics:
1 Select DHCP Relay.
2 Click Statistics.
The DHCP Relay Statistics window provides the following details:
• In—total number of all of the incoming DHCP packets
• Out—total number of forwarded DHCP packets
• Discarded—total number of incoming packets that were ignored because of
bad content
• Relayed To Server—total number of packets forwarded to a DHCP server(s)
• Relayed To Client—total number of packets forwarded to DHCP client(s)
Configuring SSL administration
The SSL administration feature enables secure management of the VPN Router
over SSL-enabled HTTP (HTTPS) and is used over all tunnel and interface types.
Remote management of a VPN Router requires only an SSL-enabled Web
browser on the administrator's computer, which most operating systems include.
Figure 9 is an example of SSL administration.
Nortel VPN Router Security — Servers, Authentication, and Certificates
Page 74

64 Chapter 2 Configuring servers
Figure 9 SSL administration
SSL/TLS uses TCP port 443 for secure HTTP communication. Interface and
tunnel filters govern HTTPS packets destined for the management IP address. If
you enable tunnel filters, HTTPS must be allowed for SSL management through a
VPN tunnel.
NN46110-600
The Stateful Firewall applies only to HTTPS traffic routed through the device, not
to the management IP address.
The VPN Router uses HTTPS services for Firewall User Authentication (FWUA)
and SSL-enabled administration.
The following cipher combinations are available:
• (DHE_RSA_WITH_3DES_EDE_CBC_SHA, 0x16)
• (RSA_WITH_3DES_EDE_CBC_SHA, 0x0a)
• (RSA_WITH_RC4_128_SHA, 0x05)
• (RSA_WITH_RC4_128_MD5, 0x04)
• (RSA_EXPORT1024_WITH_RC4_56_SHA, 0x64)
• (RSA_EXPORT1024_WITH_DES_CBC_SHA, 0x62)
• (RSA_EXPORT1024_WITH_RC4_56_MD5, 0x60)
• (DHE_RSA_WITH_DES_CBC_SHA, 0x15)
• (RSA_WITH_DES_CBC_SHA, 0x09)
• (DHE_RSA_EXPORT_WITH_DES40_CBC_SHA, 0x14)
Page 75

• (RSA_EXPORT_WITH_DES40_CBC_SHA, 0x08)
To use SSL Administration, you must:
• Enable HTTPS services for the public and/or private interface on the Services
> Available window.
• Explicitly allow HTTPS if tunnel filters are enabled on the Profiles > Filters
window for management through a VPN tunnel.
• Install a valid server certificate on the VPN Router and applied to the SSL/
TLS services to authenticate and validate SSL connections.
• Select ciphers and apply the server certificate on the Services > SSL/TLS
window.
• Have an SSL-enabled Web browser.
• Have a valid administrator user name and password.
Browser security checks
When using certificates, Netscape Communicator and Internet Explorer perform
different security checks. The following configuration is recommended to obtain
the best performance when administering the VPN Router securely using SSL
administration.
Chapter 2 Configuring servers 65
1 Make an entry in the hosts file corresponding to your VPN Router
management IP address, such as 11.0.0.12 VPNRouter1.
2 Import the root certificate that issued your VPN Router server certificate into
the browser store as follows:
• For Netscape Communicator to accept the mime type application/
x-x509-ca-cert:
a Select Edit > Preferences.
b Click Applications.
c Click New Type.
A new window appears.
d Fill in the following information in the new window:
— Description of type—CAcert
Nortel VPN Router Security — Servers, Authentication, and Certificates
Page 76

66 Chapter 2 Configuring servers
— File extension—cacert
—MIME Type—application/x-x509-ca-cert
— Application to use—netscape.exe
e Click OK to complete the Netscape configuration.
f Save the base64 format root CA certificate onto a file with extension
.cacert.
g Select File > Open Page and open the file. Netscape Communicator
guides you to install the CA certificate.
• In Internet Explorer, select Tools > Internet options > content >
certificates > trusted root certification authority tab and select import.
3 Import the root certificate that issued your VPN Router server certificate into
the JRE certificate store.
Note: To satisfy a further name check by Netscape browsers, make the
VPN Router server certificate common name either a DNS name that
resolves to the management IP address or the management IP address.
Configuring SSL/TLS and configuring HTTP services
NN46110-600
To configure SSL/TLS and enable HTTP services:
1 Select Services > Available and check HTTPS services on the public and/or
private interfaces. This allows TCP port 443 through the system filter. If you
enable HTTPS on both the public and private interfaces, it allows port 443
through either interface.
selected for HTTPS.
Note: You can change the port from port 443 to run HTTPS. This allows
you to configure an SSL VPN server at the default 443 port while still
allowing HTTPS management.
Figure 10 shows the Services window with port 443
Page 77

Chapter 2 Configuring servers 67
Figure 10 HTTPS services
2 Select Services > SSLTLS, check the necessary ciphers, and select a digital
server certificate (for example, CN=ces1, O=MyOrg, C=US).
Figure 11 shows the SSLTLS window with select ciphers.
3 Click Advanced Options and check the box if you do not want empty
fragments for CBC ciphers inserted.
4 Click Apply.
Nortel VPN Router Security — Servers, Authentication, and Certificates
Page 78

68 Chapter 2 Configuring servers
Figure 11 Select ciphers
5 Verify SSL is enabled on the Web browser of the management PC.
To test the SSL administration feature, direct an SSL-enabled Web browser to the
private interface of the VPN Router. To use this service from the public side of the
VPN Router, you must direct your browser to the public IP address.
Configuring DNS servers
The Domain Name Service (DNS) maps host names to IP addresses. It allows the
Internet to provide an updated set of mappings for all Internet devices.
A DNS server holds the segment of the DNS database for which it has authority.
DNS clients are any TCP/IP applications that refer to hosts by host name. When
an application needs to convert a host name to its IP address, it uses the client
portion. This creates a DNS query specifying the host name and sends the query to
a server. The server looks for the host IP address by looking in its database or by
making queries to other servers. A DNS response is returned to the application
containing either the IP address or an error indicating that the host name is
unknown.
NN46110-600
Page 79

Chapter 2 Configuring servers 69
Companies often set up their own domain name system internally, and leave it to
the ISP to handle all external DNS. These companies have their own DNS servers,
but use the external DNS servers for non-company names. This splits the DNS
names into two separate systems: the private, company-controlled DNS names
and the Internet DNS names.
The VPN Router provides the following DNS services:
• DNS Proxy where the VPN Router caches information from corporate DNS
for faster address resolution. This eliminates the need for a separate branch
office server. See
“Configuring DHCP servers” on page 57 and “Configuring
DNS servers” on page 68.
• Split Proxy DNS occurs when a negative response from a DNS server
(private) prompts the VPN Router to try a second DNS server (Internet). Split
DNS supports private and Internet names without mixing the two and
eliminates the need to publish private names on public DNS. See
“Configuring DHCP servers” on page 57 and “Configuring DNS servers” on
page 68.
You can configure the VPN Router 1010, 1050, or 1100 as a DNS proxy, which
means that it can act like a DNS server for any PC on the private network. The
PCs are configured to send their DNS queries to the DNS proxy, which in turn
passes the query to its set of true DNS servers. Whether you configured DHCP
client or PPPoE determines which DNS servers respond. When the DNS proxy
receives a DNS query from a PC, it passes the query on to the DNS servers until it
receives a response, which is subsequently returned to the PC.
You can configure up to four DNS servers. The ISP can assign more than one
DNS server, which are displayed on the window, but cannot be changed. Enable
split DNS if your DNS name space is split into private names and public names; a
DNS server knows the private names while another server knows the public
Internet DNS names.
To configure a DNS server:
1 Select System > Identity.
2 Enable DNS Proxy if you want the DNS Proxy to act as a DNS server to the
private side. It resolves names for locally connected hosts and those from
other DNS zones. It it enabled by default.
Nortel VPN Router Security — Servers, Authentication, and Certificates
Page 80

70 Chapter 2 Configuring servers
3 Enable Split DNS if you have a split name space.
4 For Primary, enter the DNS server IP address that the DNS proxy tries to
contact first.
5 For Second Server, enter an IP address for the second DNS server. If the
Primary DNS server does not respond in a few seconds, service is requested of
the second DNS server.
6 For Third Server, enter an IP address for the third DNS server. If the Primary
and Secondary DNS servers do not respond, service is requested of the third
DNS server.
7 For Fourth Server, enter an IP address for the fourth DNS server. If the
preceding servers do not respond, service is requested of the fourth DNS
server.
8 Click OK. The VPN Router checks all of the DNS addresses to see if they
respond and then provides an operational or error status.
NN46110-600
Page 81

Chapter 3
Using certificates
Digital certificates bind an entity’s public encryption or signing key to its identity,
and verify that identity with a trusted third party (the certification authority). You
use digital certificates for authenticating both LDAP and VPN connections.
LDAP server SSL encryption
Secure socket layer (SSL) provides Internet security and privacy and ensures
privacy between the VPN Router and the external LDAP server. The SSL protocol
negotiates encryption keys and authenticates the server before any data is
exchanged. SSL maintains the transmission channels security and integrity
through encryption, authentication, and message authentication codes. The SSL
implementation supports the following encryption methods:
• RC4 128-bit MD5 encryption—most secure method. The longer the
encryption key, the more secure the encryption. US export law controls the
export of 128-bit encryption keys.
• DES 56-bit SHA encryption—mid-level encryption method, less secure than
RC4-128, but more secure than RC4-40.
• RC4 40-bit MD5 encryption—least secure method of encryption.
71
You can configure SSL parameters when you switch from internal to external
LDAP servers.
Nortel VPN Router Security — Servers, Authentication, and Certificates
Page 82

72 Chapter 3 Using certificates
Installing LDAP certificates
The LDAP connection between the VPN Router and the directory server is
authenticated asymmetrically. Initially a one-way authenticated SSL connection is
established when the directory server passes its certificate to the VPN Router.
After SSL authentication is established, the VPN Router authenticates itself to the
directory server by presenting its LDAP bind DN and password.
For the SSL connection to be successful, the VPN Router must trust the issuer of the certificate presented by the directory server during the initial SSL authentication.
To import an LDAP proxy SSL proxy certificate:
1 Select System > Certificates and select Import.
2 Paste the PKCS #7 formatted CA certificate into the input box.
3 Click OK.
To import an LDAP SSL certificate:
LDAP special characters
NN46110-600
1 Select Servers > LDAP.
2 Click Import Secure LDAP (SSL) CA certificate.
3 Paste the PKCS #7 formatted CA certificate into the input box.
4 Click OK.
You use the LDAP special character enhancement to create certificate subject DNs
containing previously unsupported special characters, such as the comma. This
enhancement is compliant with RFC 2253.
Page 83

Chapter 3 Using certificates 73
It is not necessary to enable the special character support if the certificate subject
DN does not contain special characters such as comma (,), quotes (") or backslash
(\) as valid characters.
Note: You may need to update the LDAP to use this feature if upgraded
from an older version and the cert subject DN already contains special
characters. Contact Nortel technical support for details to update of the
LDAP.
To configure LDAP special characters:
1 Select System > Certificates.
2 Select Enable Special Character Support for Subject DN. The default is
disabled.
Figure 12 shows the System > Certificates window with LDAP special
characters enabled.
Figure 12 LDAP special characters
Nortel VPN Router Security — Servers, Authentication, and Certificates
Page 84

74 Chapter 3 Using certificates
External LDAP proxy
External LDAP proxy supports the mapping of the following certificate subject
DN attributes to defined LDAP attributes:
• User cert Common Name attribute
• User cert e-mail address attribute
• User cert serial number attribute
• User cert uid attribute
• Subject Alternative Name attribute
The advanced setup includes flexible mapping. The basic setup is the default on
upgrade.
Configurable warning time for certificate expiration
You can configure the VPN Router so that Health Check Certificates Validity
sends a warning that a certificate is due to expire. You must enable SNMP traps,
and Server Trap Configuration must include Certificates Validity, with the Send
One parameter not checked.
NN46110-600
To configure certificate expiration warning:
1 Select System > Certificates.
2 In the Expiration Warning section, enter the number of days. The default is 7
days; the maximum is 365.
3 Click OK.
Figure 12 shows the default of 7.
Page 85

Chapter 3 Using certificates 75
VPN security using digital certificates
You can use X.509 certificates to authenticate IPsec tunnels and L2TP/IPsec
tunnels. The VPN Router supports RSA digital signature authentication for the
IPsec IKE key management protocol. Remote users can authenticate themselves
to the VPN Router using a public key pair and a certificate as credentials. The
VPN Router uses its own key pair and certificate to authenticate the VPN Router
to the user. The VPN Router must explicitly import and trust the CA certificate
that issued the certificate to the tunnel initiator.
Setting up public key infrastructure (PKI)
A PKI issues and manages certificates for both network hosts and end users. An
important decision about the design of a PKI is how to implement CA services.
You can use commercially available products from a vendor such as Entrust,
where the CA resides in your facility and is operated by you.
CA and X.509 certificates
The CA issues and revokes certificates within a PKI. The CA ensures certificates
are valid by signing each certificate with its own digital signature. A copy of all
signed certificates is stored in a publicly accessible certificate repository.
Certificate users use this repository to verify that other user’s certificates are valid.
Loading certificates
You must install two types of certificate in the VPN Router: server certificates and
trusted CA certificates. Server certificates are certificates that the VPN Router
requests for itself, and uses to prove its identity to connecting tunnels. Trusted CA
certificates are certificates that issue end user or branch office tunnel certificates,
and are imported by the VPN Router to establish a common trust.
You can request server certificates either manually (using cut and paste #7 and
#10) or automatically with Certificate Management Protocol (CMP) support.
Nortel VPN Router Security — Servers, Authentication, and Certificates
Page 86

76 Chapter 3 Using certificates
Generating a server certificate request
Consult the CA user documentation for instructions on generating reference
numbers and authorization codes, as well as general CA administration
information. When you use Entrust CA generated certificates with your VPN
Router:
• Both Entrust Web certificates and Entrust Enterprise certificates work
properly when you use HTTP-based cut and paste operations.
• Entrust does not support CMP renewal for Web certificates when you use
CMP automated lifecycle management for requesting and renewing
certificates.
Installing server certificates using cut and paste #7 and #10
To install server certificates using PKCS #7 and #10:
1 Select System > Certificates.
2 Click PKCS #10 (or PKCS #7) Certificate Request.
NN46110-600
3 If prompted, initialize the private key password to secure the certificate on the
VPN Router.
4 Fill out the required information for the certificate request.
5 Click OK.
6 Copy and paste or save your encoded certificate request (including certificate
request begin and certificate request end lines) to a file.
7 Follow the instructions from your CA provider on how to obtain a certificate.
8 Submit the request to the applicable CA by pasting the encoding into the CA's
request window, following the instructions provided by the CA for signing the
certificate request.
9 Click Server Certificate to indicate that you are importing a server
certificate. Import the signed certificate request and click OK.
Note: When you are using Entrust CA, this request must have a subject
distinguished name with a common name that is equal to the Entrust
reference number used to preauthorize the certificate issuance.
Page 87

Installing server certificates using CMP
You use the Certificate Management Protocol (CMP) to create a CMP compliant
certificate request. CMP targets management functions for the entire certificate or
key life for enrollment, renewal, recovery, and revocation. It defines message
formats and includes its own message protection. The CA is located on the private
network if it has a publicly accessible IP address.
Figure 13 shows a CMP environment.
Figure 13 Sample CMP environment
Chapter 3 Using certificates 77
To initialize the VPN Router for initial certificate enrollment with CMP, you need
the following:
• Issuer name—CA distinguished name
• Subject name—EE distinguished name (common name, organization,
organizational unit)
• Reference number—used to identify the secret value
• Transaction ID or authorization code—initial secret value
• Enrollment URL or destination (host name or IP address) and optional port
number
• Imported root CA certificate
Nortel VPN Router Security — Servers, Authentication, and Certificates
Page 88

78 Chapter 3 Using certificates
To enter this information:
1 Select System > Certificates.
2 Click Certificate Management Protocol (CMP). The Certificate Request—
CMP window displays the status of any outstanding requests and the fields to
fill in for a new request.
3 For a new request, enter the reference number provided by the CA.
4 Enter the Authorization code supplied by the CA.
5 Select one of the following keys (generally, larger keys are more secure):
•512
•768
• 1024
• 2048 (US only)
6 Enter the port number.
7 Enter the Registration address or URL.
8 Click Import Issuer CA Certificate if you want to automatically import the
CA Root certificate with this request.
NN46110-600
9 Under Subject Distinguished Name (optional), select Relative if you are
providing a relative name or Full if you are providing a full name. If you
select Relative, then enter the relative name details:
a Enter the common name associated with the VPN Router.
b Enter the organizational unit associated with the VPN Router.
c Enter the organization associated with the VPN Router.
d Enter the locality where the VPN Router resides.
e Enter the state or province where the VPN Router resides.
f Enter the country where the VPN Router resides.
10 Under Issuer Distinguished Name (optional), select Relative if you are
providing a relative name or Full if you are providing a full name. If you
select Relative, then enter the relative name details:
a Enter the common name associated with the VPN Router.
b Enter the organizational unit associated with the VPN Router.
Page 89

Chapter 3 Using certificates 79
c Enter the organization associated with the VPN Router.
d Enter the locality where the VPN Router resides.
e Enter the state or province where the VPN Router resides.
f Enter the country where the VPN Router resides.
11 Click Apply.
12 On the System > Certificates > Certificate Generation window, select
Details. This displays information from the certificate enrollment process. It
provides the address for the key update, key recovery, and revocation
purposes.
13 Enter the certificate enrollment configuration information:
a In the port field, enter the port number of the CA.
b In the Enrollment Address field, enter the IP address of the CA.
c Click Renew Certificate Now to renew the certificate now.
d In the Renew Days before expiration, select and enter the number of
days before the certificate expires.
e In the Recover Certificate field, enter the certificate reference number
and authentication code.
f Click Revoke Certificate Now to revoke the certificate.
Installing trusted CA certificates
The trusted CA certificate issues the certificate that the remote user or branch
office tunnel uses to authenticate, and it must be loaded and marked as trusted in
the VPN Router.
To import trusted CA certificates in PKCS #10 format:
1 Select System > Certificates.
2 Select Import Tunnel or Transport Certificate.
3 Select Trusted CA Certificate (default).
4 Paste the certificate into the box.
Nortel VPN Router Security — Servers, Authentication, and Certificates
Page 90

80 Chapter 3 Using certificates
5 Click OK. The Installed Tunnel Certificates table displays the certificate
entry.
6 Enable Allow All, if desired.
7 Click OK. You now have the CA certificate which remote users can
authenticate. Repeat this operation if multiple CAs are issuing user
certificates.
Optionally, you can configure a CRL distribution point to enable revocation
checking of client certificates. Click System > Certificates: Installed Tunnel
Certificates: CA Details, enter the appropriate CRL Information, and click
OK.
The Enabled check box enables CRL checking of certificates for a particular CA.
The Search Base, Host, Connection, and values must be set for proper access to
the CRL LDAP directory store.
Setting certificate parameters
You can set the following parameters from the System > Certificates > Certificate
Configuration window:
NN46110-600
1 Under Certificate Signature Requirements, select Key Usage Extension
Required if you want the Key Usage V3 extension present in all certificates
presented as part of a tunnel initiation (user and branch office).
2 Under Certificate Signature Requirements, select Validate Issuer if you do
not accept a subordinate CA without a parent CA. If the check is not set, a
subordinate CA is accepted even if it is not validated.
3 Under Installed Tunnel and Transport Certificates, enable Allow All to
allow in all tunnel requests authenticated by a particular CA, providing a
significant configuration savings because individual users do not have to be
provisioned into the VPN Router.
4 Select Trusted if the certificate is trusted. For CA certificates, this indicates
that tunnel requests presenting this issuer as the signer of their certificate are
trusted. For server certificates, this is a method of turning off the certificate
without deleting it.
Page 91

Chapter 3 Using certificates 81
The System > Certificate Details window provides the following certificate
details:
• This Certificate Belongs To shows the certificate owner’s X.500 distinguished
name.
• This Certificate Was Issued By shows the issuer of the certificate (the
Certificate Authority). In addition to the main attributes, this field also shows
the issuer’s certificate serial number.
• Validity Dates show the starting and ending dates during which the certificate
is valid (for example, 01/29/02 through 01/29/03).
• Certificate Fingerprint shows the unique identifier that is derived from MD5
hashing the certificates. Compare the identifier with the fingerprint supplied
directly by the certificate’s issuer (for example, a CA). If the fingerprints do
not match exactly, the certificate is forged or modified.
• CRL query optimization enables CRL performance improvement (LDAP
import only). Set this option to Disabled to disable CRL performance
improvements.
• Version provides information about the version.
• Signature Algorithm provides information about the signature algorithm.
• Public Key provides information about the public key.
• Extensions provides information about the extensions used.
You must configure a group that is using certificate-based authentication to
present a server certificate to remote parties that are initiating tunnel requests. The
Default Server Certificate is the Subject DN of the certificate that you want to use
as the identity of the VPN Router when initiating or responding to a connection
request associated with that group. Tunnel requests are bound to a particular group
by the CA certificate that the remote party is presenting as the signer of its
certificate. You can set up the local identity for the group on the Profiles > Groups
> Edit window.
Nortel VPN Router Security — Servers, Authentication, and Certificates
Page 92

82 Chapter 3 Using certificates
Trusted CA certificate settings
To authenticate incoming tunnel requests, you must associate every CA certificate
with a group. The group assignment of incoming tunnel requests is accomplished
by either finding the user provisioned in the VPN Router’s directory (internal or
external), or by allowing all users issued by a particular CA to gain access. If all
users issued by a particular CA are allowed, there are two ways to determine the
group that an initiator gets assigned to:
• direct assignment into the group assigned to that CA
• access control by subject DN
Group assignment by user identification
If the subject DN of the certificate presented by the remote initiator of the tunnel
is a user located on that VPN Router, then the group that the user is bound to is the
one indicated in that user’s configuration.
Allow All policy
NN46110-600
Using Allow All, the VPN Router trusts the CA to establish the true identity of a
user. If the user’s certificate is within the certificate validity period, the
certificate’s signature is verified using the CA certificate, and the user’s certificate
is not on the CA’s CRL, the tunnel connection is permitted. Using the Allow All
policy means that once users are certified by the CA, they can create a tunnel
connection as long as their certificate is in good standing.
You can allow all users with certificates issued by this CA to authenticate with the
VPN Router, regardless of whether they have a user entry in the VPN Router's
LDAP database. By default, the CA certificate does not allow all users
authentication. Only users with their subject distinguished names (DNs) entered
into the Profiles > Users window can authenticate using certificates issued by this
CA. If you enable Allow All users to authenticate, you must also select a group for
these users from the Default Group list. If you want only specific instances of
users to authenticate with the CA authority, you must configure each of these
users from the Profiles > Users > Edit window, and disable Allow All
authentication for this CA. Only these users can then perform IPsec RSA Digital
Signature Authentication using a certificate issued by this particular CA.
Page 93

You must enable the Allow All feature for each CA certificate against which you
want to permit authentication without an explicit user entry. This allows anyone
with a valid certificate from the particular CA to establish a tunnel connection.
Also, you must associate a default group with that certificate. The client
authenticating with the Allow All feature then uses the attributes associated with
that group. You can also assign Allow All users to specific groups by matching the
relative DN of a connecting certificate user. You are not limited to a single default
group.
Note: Branch Office connections do not support the CA Certificate
Allow All feature. Therefore, you must configure an explicit Branch
Office connection.
Access control by Subject DN
This form of mapping incoming requests to groups allows the subject DN of
incoming certificates to be parsed to a configured depth and associated with a
corresponding group. During the client authentication process, the VPN Router
tries to match the client’s certificate subject DN with all the associations of the
CA. The match can be a partial match or an exact match. In the case of a partial
match, the longest match from the root of DN is used. After a match is found, the
client is assigned to the corresponding group. If no match is found, the client is
assigned to the default group of the CA.
Chapter 3 Using certificates 83
A DN has multiple components (RDN). The most common ones are common
name (CN), country name (C), locality name (L), state/province name (S),
organization (O), and organizational unit (OU). The order of the RDN does not
matter unless multiple OUs are present, but ordering the DN in the following
sequence avoids ambiguity: C, S, L, O, OU, and CN.
The following examples show group mappings:
ou=VPNRouter, o=Nortel, c=US/base/vpnrouter
ou=Engineering, ou=VPNRouter, o=Nortel, c=US/base/vpnrouter/
Engineering
ou=Marketing, ou=VPNRouter, o=Nortel, c=US/base/vpnrouter/
Marketing
ou=Engineering, o=Bay Networks, L=Boston, S=MA, c=us/base/bay
Nortel VPN Router Security — Servers, Authentication, and Certificates
Page 94

84 Chapter 3 Using certificates
Group and certificate association configuration
This feature provides finer control for a user to associate a certificate with a group
for IPsec tunnel connections. Each Certificate Authority user can set up a lookup
table between the certificate subject DN and a VPN Router group. When a new
tunnel using the certificate is authenticated, the VPN Router uses the certificate's
subject DN to look up the group in the table. If there is a match (or partial match),
the new tunnel binds to the group specified in the table.
If no match is found in the lookup table, the new tunnel is bound to the default
group if it is configured and if the Allow All feature is turned on. Otherwise, the
tunnel is denied.
All the attributes (Lookup Table, Allow All, and default group) are CA-specific.
To configure the Group and Certificate Lookup Table:
1 Select the CA.
2 Click Details.
3 Click Add under Group Access Control. Use a partial Subject DN (omitting
one or more left most fields) to simplify the configuration. You can select
Relative or Full to specify the partial Subject DN. Relative automatically
generates the DN string. If it exists in the certificate's subject DN, do not omit
any field in the middle, such as o=Nortel or st=MA.
4 Click OK.
CA key update
The CA key update provides uninterrupted certificate authenticated user and
Branch Office tunnel connections before, during, and after the Entrust Key Update
function is performed by the CA in a given PKI environment. You can perform a
key update for security or other reasons. Figure 14 shows a CA Key Update ready
for authentication.
NN46110-600
Page 95

Chapter 3 Using certificates 85
Figure 14 CA Key Update ready for authentication
Prior to a key update, the original CA certificate (which is a self-signed root
certificate in the diagram above) is pushed out to the directory by the CA, along
with the CRL it produced (a list of revoked certificates, digitally signed by the CA
certificate). Both the VPN Router and the user’s PC have certificates signed by
that CA, as well as the self-signed CA certificate itself. The user authenticates the
VPN Router certificate because it has the original CA certificate that created the
VPN Router certificate stored locally. Likewise, the VPN Router authenticates the
user because it has the CA certificate that issued the user certificate. The VPN
Router can also verify that the user’s certificate is not revoked, because it was
configured to periodically retrieve the latest CRL from the directory. It can
authenticate that CRL because it has the CA certificate that signed it.
After a CA Key Update occurs, the directory contains four certificates:
• the original self-signed
• the new self-signed
• two cross certificates
From this point forward, all CRL’s issued by the CA are signed by the updated
CA.
Nortel VPN Router Security — Servers, Authentication, and Certificates
Page 96

86 Chapter 3 Using certificates
There are no user tunnel or VPN Router server authentication issues presented at
this point, because the certificates presented by the VPN Router and the user are
signed by the original CA, and both parties have that CA certificate stored locally
for authentication.
Authenticating the CRL presents a problem for the VPN Router at this point
because it is signed by the updated CA certificate, and the VPN Router does not
have that updated CA certificate locally to authenticate the CRL signature. The
solution is to import the updated CA certificate into the VPN Router.
Importing the updated CA certificate into the VPN Router must be done
immediately following the CA key update. All post key update CRL processing
and therefore tunnel authentication, fail until this action is taken.
Configuring a certificate revocation list (CRL)
A CA can revoke user and server certificates whenever the associated key pair is
no longer valid, the key pair has been compromised, the user has left the
organization, or a server is retired. When a certificate is revoked, the CA updates
an associated revocation list with the revoked certificate’s serial number. This list
is referred to as a certificate revocation list (CRL). A CA can have one or more
associated CRLs.
NN46110-600
Note: When you try to delete a certificate and that certificate is
referenced, you receive an error message. The certificate is not removed
until you remove all references to that certificate.
The CA publishes CRLs in an associated LDAP-accessible directory service. The
CA administrator sets the publication frequency. In an Entrust environment, a new
CRL is automatically published at a set time, at any time manually set by an
administrator, or whenever a certificate is revoked.
Note: When a certificate revocation list (CRL) directory is located on
the public side of the VPN Router, the VPN Router retrieves the CRLs
through the public interface. Reply packets are dropped if the size of the
CRL is large enough that the LDAP response includes 40 IP packets or
more. To correct this, enable the Stateful Firewall.
Page 97

The VPN Router can optionally use CRLs to verify the revocation status of user
certificates. If enabled on the VPN Router, CRLs are periodically retrieved from
the CA's LDAP directory store and cached in the VPN Router's associated LDAP
database. This allows for rapid verification of user certificates during IPsec tunnel
establishment. You can configure the frequency with which the VPN Router
checks for a new CRL.
Because a CRL is signed using the CA's private key, it is protected against
tampering. The VPN Router verifies the CRL signature each time it is used. You
must configure a CRL server for each trusted CA certificate that is imported into
the VPN Router.
Note: The LDAP server that contains CRLs for the CA certificates on
the VPN Router must be reachable from the public or private interface.
Configuring CRL servers
The following list provides explanations for CRL settings:
Chapter 3 Using certificates 87
• CRL Checking Enabled shows CRL usage enabled on the VPN Router on a
per-CA basis. To enable CRLs for a CA, click Details on the System >
Certificates window. You use the Certificate Revocation List Information
section to configure the necessary information. Click Enabled to turn on CRL
checking of certificates for the particular CA. You must set the Search Base,
Host, Connection, and Update frequency values for proper access to the CRL
LDAP directory store.
• CRL Retrieval Enabled determines whether the VPN Router tries to retrieve a
CRL from the configured directory. If the CRL retrieval is successful, the
VPN Router verifies the revocation status of the presented certificates. The
VPN Router sends out a trap to the SNMP management server on every
instance of CRL retrieval (success or failure). If this option is not selected, the
VPN Router does not attempt to retrieve a CRL, and does not verify
revocation status of presented certificates. Deselecting this option turns off
CRL checking. To enable CRL Retrieval, click Enable for CRL Retrieval on
the Servers > SNMP Traps > Trap Groups Server > Configure window. If the
VPN Router is rebooted or makes a failed CRL retrival, then the CRL retrival
option on the VPN Router becomes unchecked.
Nortel VPN Router Security — Servers, Authentication, and Certificates
Page 98

88 Chapter 3 Using certificates
• CRL Checking Mandatory determines if a CRL must be present when an
IPsec tunnel is established to a particular CA. If this is selected, the VPN
Router must have a CRL present for tunnel connections to be successful. If
this is not selected, the VPN Router allows certificate authenticated tunnels
when no CRL is present.
• CRL Update Frequency allows you to enter a value in minutes to represent the
frequency the VPN Router queries the CA’s LDAP server for a newly
published CRL. The default value of 0 indicates that this VPN Router does
not update any CRLs. This option is useful when more than one VPN Router
shares an LDAP database, but you want only one VPN Router to actually
perform the update operation. To minimize the load on an external LDAP
server, make sure that only one or two VPN Routers are updating a shared
CRL entry in a multiple-VPN Router, shared external LDAP environment.
• CRL System Status is read-only and is automatically updated by the VPN
Router to reflect the CRL updating activity.
• CRL Retrieval Scheduling allows you to configure the time and day that a
CRL request is sent to the CRL Server.
Configuring CRL Retrieval Scheduling
NN46110-600
To configure CRL Retrieval Scheduling:
1 Select System > Certificates.
The System > Certificates window appears.
2 In the desired certificate row, click details.
The Certificate Details window appears.
3 To apply the CRL Update Specific Time, select the option box. 4 To select the days to apply the CRL Update Specific T ime, select the desired
day options.
5 In the Time box, type the desired time. 6 To enable the CRL Update Specific Time, click Update CRL Now. 7 Click OK.
Page 99

Chapter 3 Using certificates 89
To configure the CRL Update Specific Time on specific days and a specific time
with the CLI, use the following command:
crl update specific-time time <hh:mm>
where:
hh:mm is the hour (0 to 24) and minutes of the time to apply the CRL Update.
This command has the following options:
crl update specific-time time <hh:mm>
followed by:
none | every | [monday]
[tuesday] [wednesday]
[thursday] [friday]
[saturday] [sunday]
Specifies the choices for the application of CRL
Update as none, everyday, or on specific days.
To configure the CRL Update so that it does not occur on specific days, use
the following command:
no crl update specific-time
This command has the following options:
no crl update specific-time
followed by:
[monday] [tuesday]
[wednesday] [thursday]
[friday] [saturday]
[sunday]
Specifies the days on which the CRL UPdate is not
applied.
To spontaneously apply a CRL update, use the following command:
crl update now
To configure CRL servers:
1 Select System > Certificates > CA Certificate: Details and click Manage
CRL Servers. The Manage CRL Servers window has a list of currently
Nortel VPN Router Security — Servers, Authentication, and Certificates
Page 100

90 Chapter 3 Using certificates
configured CRL servers for the CA that you can edit or delete. You can
configure and add a new CRL server in the New CRL Server section.
2 In the Search Base field, enter the portion of the X.500 directory where the
CA stores certificate revocation lists. The following is a sample search base
entry:
ou=Engineering, o=Nortel, c=US
3 In the host field, enter the host name or IP address of the LDAP-accessible
directory server that is storing the published CRLs. If you use a host name
instead of an IP address, then you must configure one or more DNS servers on
the System > Identity window.
4 In the Connection field, enter the port number associated with the LDAP
server. Optionally, enable Secure Socket Layer (SSL) to secure the
connection with the LDAP server. SSL is not required for handling CRLs
because a CRL is signed and is therefore protected against modification and
spoofing.
5 Select Enabled or Disabled to enable or disable the CRL server.
CRL distribution points
CRL distribution points (CDP) identifies how CRL vendor-specific information is
obtained. It is supported for Entrust CAs. When implemented, users authenticate
only against the CRL that is specified in the certificate CDP. This provides faster
tunnel establishment. Figure 15 is an example of CRL distribution points.
NN46110-600
 Loading...