

Page 1
Operating Instructions . . . . . . . . .Microwave Oven . . . . . . . . . . . . . . . .For Commercial Use
Bedienungsanleitung . . . . . . . . . .Mikrowellenherd . . . . . . . . . . . .Für gewerbliche Nutzung
Instructions d’utilisation . . . . . . .Four micro-ondes . . . . . .Pour une utilisation commerciale
Bedieningsinstructies . . . . . . . . . .Magnetronoven . . . . . . . . . .voor commercieel gebruiken
Instrucciones de uso . . . . . . . . . .Horno microondas . . . . . . . . . . . . . . . .Para uso comercial
Istruzioni per l’uso . . . . . . . . . . . .Forno a microonde . . . . . . . . . . . . . . . .Per uso domestico
Bruksanvisning . . . . . . . . . . . . . . . . .Mikrovågsugn . . . . . . . . . . .För kommersiell användning
Betjeningsinstruktioner . . . . . . . . .Mikrobølgeovn . . . . . . . . . . . . . . . . ..Til kommerciel brug
Bruksanvisning . . . . . . . . . . . . . . . . .Mikrobølgeovn . . . . . . . . . . . . . . ..For kommersielt bruk
Käyttöopas . . . . . . . . . . . . . . . . . . . . .Mikroaaltouuni . . . . . . .Tarkoitettu kaupalliseen käyttöön
English Deutsch
NE-C1475
Please read these instructions completely before operating this oven and keep for future reference.
Bitte lesen Sie diese Anweisungen sorgfältig durch, bevor Sie diesen Herd bedienen und bewahren Sie sie zum Nachschlagen auf.
Veuillez lire ces instructions dans leur intégralité avant d’utiliser le four et conservez-les pour référence.
Leest u s.v.p. eerst deze handleiding in zjin geheel door, voordat u de oven in gebruik neemt.
Lea las instrucciones detenidamente antes de empezar a usar el horno. Conserve este manual para futura referencia.
Leggere a fondo queste istruzioni prima di utilizzare il forno e conservarle per riferimento futuro.
Läs noggrant igenom denna bruksanvisning i sin helhet innan du använder denna ugn och behåll som en framtida referens.
Man skal læse disse instruktioner fuldstændigt igennem førend man betjener denne ovn, og gemme instruktionerne til fremtidig brug.
Les nøye igjennom disse instruksjonene før du tar i bruk denne ovnen, og ta vare på veiledningen for fremtidig referanse.
Lue nämä ohjeet kokonaan ennen uunin käyttöä ja säilytä ne myöhempää tarvetta varten.
Españoli
NorskDanskiFrançaisi SvenskaItalianoiNederlands
Suomi
Page 2

page
Safety Information . . . . . . . . . . . . . . . . . . . . . . . . . . . . . . . . . . . . . .1 - 4
Outline Diagram (Explanation) . . . . . . . . . . . . . . . . . . . . . . . . . . . .4 - 5
SD Memory Card . . . . . . . . . . . . . . . . . . . . . . . . . . . . . . . . . . . . . . . . .6
Types of Container to Use . . . . . . . . . . . . . . . . . . . . . . . . . . . . . . . . . .7
Operating your Oven as a Microwave . . . . . . . . . . . . . . . . . . . . . . . . .8
Operating your Oven on Convection . . . . . . . . . . . . . . . . . . . . . . . . . .9
Operating your Oven on Grill Convection . . . . . . . . . . . . . . . . . . . . . .10
Operating your Oven on Grill . . . . . . . . . . . . . . . . . . . . . . . . . . . . . . .11
Operating your Oven on Fan Grill . . . . . . . . . . . . . . . . . . . . . . . . . . . .12
Operating your Oven on Combination . . . . . . . . . . . . . . . . . . . . .13 - 16
Setting the Memory Programmes . . . . . . . . . . . . . . . . . . . . . . . . . . . .17
Using the Memory Programmes . . . . . . . . . . . . . . . . . . . . . . . . . . . . .18
How to Activate Programme Lock . . . . . . . . . . . . . . . . . . . . . . . . . . .19
How to Deactivate Programme Lock . . . . . . . . . . . . . . . . . . . . . . . . .20
Programme List . . . . . . . . . . . . . . . . . . . . . . . . . . . . . . . . . . . . . . . . .20
Keeping your Oven Hot . . . . . . . . . . . . . . . . . . . . . . . . . . . . . . . . . . .21
Cooling your Oven quickly . . . . . . . . . . . . . . . . . . . . . . . . . . . . . . . . .22
How to change the Beep Tone . . . . . . . . . . . . . . . . . . . . . . . . . . . . . .22
How to change Cleaning Interval of the Air Filter . . . . . . . . . . . . . . . .23
Care of your Oven and Cleaning . . . . . . . . . . . . . . . . . . . . . . . . .24 - 25
When to Call Service Engineer . . . . . . . . . . . . . . . . . . . . . . . . . . . . . .26
Technical Specifications . . . . . . . . . . . . . . . . . . . . . . . . . . . . . . . . . . .27
Information on Disposal for users of
Waste Electrical & Electronic Equipment . . . . . . .28
Contents
© 2005 Matsushita Electric Industrial Co., Ltd. All Right Reserved.
Page 3

- 1 -
English
1.Earthing instructions
IMPOTANT: FOR PERSONAL SAFETY, THIS
APPLIANCE MUST BE PROPERLY EARTHED.
When an outlet is not earthed, it is personal
responsibility and obligation of the customer to
have it replace with a properly earthed outlet.
VOLTAGE AND POWER WARNING
The voltage used must be the same as specified
on the oven. Using a higher voltage than that
which is specified is dangerous, and may result in
a fire or other type of accident causing damage.
PLACEMENT OF THE OVEN
Locate the oven on a surface which is flat and
stable. Do not place the oven in a hot or damp
place;
e.g. near a gas or electric range. Do not operate
the oven when the room temperature is higher
than 40˚C(104˚F) and/or the humidity is more than
85%. Free air flow around oven is important.
There is a possibility of a small amount of
interference with weak broadcast signals if the
oven is too close to a radio or TV.
For safe and efficient operation, the oven must
have sufficient air flow to the air vents
i.e. 5cm(2 inches) at the side and rear;
20cm(8 inches) at the top.
This oven must be positioned so that the plug is
accessible.
2.Voltage and Power
The voltage used must be the same as specified
on the oven. Using a higher voltage than that
which is specified is dangerous, and may result in
a fire or other type of accident causing damage.
3.Service
It is dangerous for anyone other than a service
technician trained by the manufacturer to perform
repair service.
Do not remove the outer casing of the oven.
High voltages are present inside the cabinet.
Repairs and adjustments should be done only by
qualified service personnel. Contact the
manufacturer.
Door Seals
Do not attempt to tamper with or make any
adjustments or repairs to door, control panel
housing, safety interlock switches or any other part
of the oven. Do not remove outer panel from the
oven.
The door seals and door seal areas should always
be kept clean-use a damp cloth.
4.Operation when empty
The appliance must not be operated by
MICROWAVE or COMBINATION WITHOUT
FOOD IN THE OVEN. Operation when empty will
damage the appliance.
5.Cord
If the supply cord is damaged, it must be replaced
by the manufacture or its service agent or a
similarly qualified person in order to avoid a
hazard.
Do not immerse oven in water. Keep cord away
from heated surfaces. Do not let cord hang over
the edge of table or work top. The back of the
appliance heats up during use. Do not allow the
cord to be in contact with the back of the appliance
or cabinet surface.
6.Hot Surfaces
Exterior oven surfaces, including air vents on the
cabinet and the oven door will get hot during use.
(Grill, Convection and Combination) Take care
when opening or closing door and when inserting
or removing food and accessories.
The oven has heaters situated in the top and back
of the oven. After use, the roof, walls and floor will
be very hot.
7.Switching off.
In case of electronic failure, oven can only be
turned off at outlet.
This product is an equipment that fulfills the European standard for EMC disturbances
(EMC = Electromagnetic Compatibility) EN 55011. According to this standard this product is an equipment
of group 2, class B and is within required limits. Group 2 means that radio-frequency energy is intentionally
generated in the form of electromagnetic radiation for warming and cooking of food. Class B means that this
product may be used in normal household areas.
Safety Information
Page 4

- 2 -
When you first unpack your Oven
Placement of Oven
1.Air vents
This oven requires free airflow at the back for
maximum cooling efficiency.
DO NOT BLOCK THE AIR VENTS.
2.Maximum room temperature
Do not operate the oven when the room
temperature is higher than 40˚C (104˚F) and/or the
humidity is more than 90%. Free airflow around
the oven is important.
3.Outdoor use
Do not use outdoors.
4.Storage of accessories
When the oven is not being used, do not store any
objects other than oven accessories inside the
oven in case it is accidentally turned on. In case of
electronic failure, oven can only be turned off at
outlet.
Operation
1.Examine your Oven
Unpack oven, retain all packing material, and
examine the oven for any damage such as dents,
broken door latches or cracks in the door. Notify
supplier immediately if unit is damaged. N.B DO
NOT install if unit is damaged.
2.Door Seals
The appliance should be inspected for damage to
the door seals and door seal areas and if these
areas are damaged the appliance should not be
operated until it has been repaired by a service
technician trained by the manufacturer.
3.Guarantee card
Fill out and post the pre-addressed guarantee
card.
4.Removal of protective film
A protective film is used to prevent scratching of
the outer case during transportation. Peel this film
off before installation or use.
1.Placement of Oven
Oven must be placed on a flat, stable surface. For
proper operation, the oven must have sufficient air
flow.
A gap of at least 5 cm (2 inches) must be available
at the right and left hand sides and back wall of the
oven. A minimum space of 20 cm (8 inches) must
be left above the oven and the 2 exhaust vents at
the rear.
2.Shelves
Do not place the oven on a shelf directly above or
beside a gas or electric hob, cooker or deep fat
fryer. The oven may be damaged. It is dangerous
to position this oven on a shelf which is so high
that food and accessories cannot be safely
removed by the user.
3.Stacking
DO NOT attempt to stack these ovens.
1.Before Use
Before using CONVECTION, COMBINATION,
GRILL, GRILL CONVECTION or FAN GRILL
function for the first time, operate this oven without
food on CONVECTION 250˚C for
20 minutes.This will allow the oil that is used for
rust protection to be burned off. Remove all
accessories from the oven.
2.Smoke/Fire
During cooking with MICROWAVE mode, if smoke
is observed, keep the Oven door closed, and
switch off or disconnect the oven from the supply.
If materials inside the oven should ignite, keep
oven door closed, press STOP/RESET pad.
Switch off at outlet. If possible, shut off power at
the fuse or circuit breaker panel.
3.Interference
There is a possibility of a small amount of
interference with weak broadcast signals if the
oven is too close to a radio or TV.
4.Heater Operation
When using HIGH, MEDIUM, LOW and SIMMER
powers, half the Grill elements and the
CONVECTION fan operate to reduce the build up
of condensation. Take care NOT TO TOUCH
OVEN CEILING.
5.Cleaning
Do not clean this appliance with a water jet.
Failure to maintain the oven in a clean condition
could lead to deterioration of the oven interior and
could adversely affect the life of the appliance and
possibly result in a hazardous situation.
Caution
Page 5

- 3 -
English
Important Information - Read Carefully
1.Heating Times
As MICROWAVE and COMBINATION heating
times are much shorter than other cooking
methods, it is essential that recommended heating
times are not exceeded without first checking the
food.
Cooking times given in the charts are approximate.
Factors that may affect cooking times are: starting
temperature, volume, size and shape of foods and
dishes used.
2.Small Quantities of Foods
Small quantities of food or foods with low moisture
content can burn, dry out or catch on fire if cooked
too long.
3.Food Components
Foods high in sugar, salt, fats and moisture
content heat faster by Microwave because their
properties attract microwave energy. Denser foods
high in protein and fibre, absorb microwave energy
slower which means a longer heating time.
4.Food High in Fat/Sugar
It is important to correctly set the heating time for
food with a high fat, alcohol and sugar content. If
these foods are heated by microwave for too long
they can ignite. NEVER LEAVE UNATTENDED.
eg. Doughnuts, syrup sponge puddings, Christmas
puddings and mince pies.
5.Eggs
Do not boil eggs in their shell by MICROWAVE.
Pressure may build up and the eggs will explode.
6.Piercing Skins
Potatoes, apples, egg yolks, whole vegetables and
sausages are examples of food with non-porous
skins. These must be pierced using a fork before
cooking by MICROWAVE to prevent bursting.
Fire!
If materials inside the oven should ignite, keep
the oven door closed, press STOP/RESET pad.
Switch off at outlet, if possible or shut off power at
the fuse or circuit breaker panel.
7.Deep fat frying
Do not attempt to deep fat fry in your oven.
8.Checking Internal Temperature
To ensure the complete destruction of food
poisoning bacteria such as Lysteria and
Salmonella, ensure the internal temperature of the
food reaches at least 72˚C when reheating. Use a
suitable thermometer with probe attachment to
check the temperature at the end of the heating
time. Heat for a longer time if the correct
temperatures are not reached. DO NOT use a
domestic meat thermometer - use only correctly
calibrated equipment.
9.Liquids
When heating liquids by MICROWAVE, eg. soup,
sauces and beverages, overheating the liquid
beyond boiling point can occur without evidence of
bubbling. This could result in a sudden boil over of
the hot liquid. To prevent this possibility, the
following steps should be taken:
a.Avoid using straight-sided containers with
narrow necks.
b.Do not overheat.
c. Stir the liquid before placing the container
in the oven and again halfway through the
heating time.
d.After heating, allow to stand in the oven for
a short time, stirring again before carefully
removing the container.
10.Paper, Plastic
When heating food in plastic or paper containers,
check the oven frequently as these types of
containers may ignite if overheated.
(See page 7.)
Do not use re-cycled paper products, as they may
contain impurities which may cause sparks and/or
fires when used, unless packaging states they are
specifically designed for microwave use.
11.
Reheating
It is essential reheated food is served
“piping hot” (72˚C). Always check before serving
and if in doubt return food to oven for further
heating.
12.
Standing Times
Standing times are essential for foods cooked or
reheated by MICROWAVE or COMBINATION.
During the stand time, heat will continue to
conduct to the centre to cook the food completely.
The denser the food, the longer the stand time.
Reheated foods also require a standing time.
Fire!
If the recommended heating times are exceeded
the food will be spoiled and in extreme
circumstances could catch fire and possibly
damage the interior of the oven. It is critical that
the Oven is cleaned regularly and kept free of
excess grease. See Care of your Oven and
Cleaning.
(See pages 24 - 25.)
Page 6
- 4 -
13.
Accessories
Follow specific instructions in this guide for proper
use of oven accessories and cookware. Failure to
do so could damage the oven.
Take care when removing food and/or accessories
from the oven. The Wire Rack Shelf provided
DOES NOT have a non-tip lock––take care if you
pull it out to remove food.
14.Cooking containers
Before use on MICROWAVE and COMBINATION,
always check that containers are suitable.
(See page 7.)
DO NOT MICROWAVE sealed containers as they
will explode.
Important Information - Read Carefully
15.Fan motor operation
After using MICROWAVE, CONVECTION,
COMBINATION, GRILL, FAN GRILL or GRILL
CONVECTION the fan motor always rotates for
approx. 5 minutes to cool the electric components.
This is normal and you can take out food even
though fan motor operates.
16.Baby bottles/jars
Feeding bottles and baby food jars shall be open
when heated and the contents are to be stirred or
shaken, and the temperature is to be checked
before consumption, in order to avoid burns.
17.When children use oven
Only allow children to use the oven without
supervision when adequate instructions have been
given so that the child is able to use the oven in a
safe way and understands the hazards of improper
use.
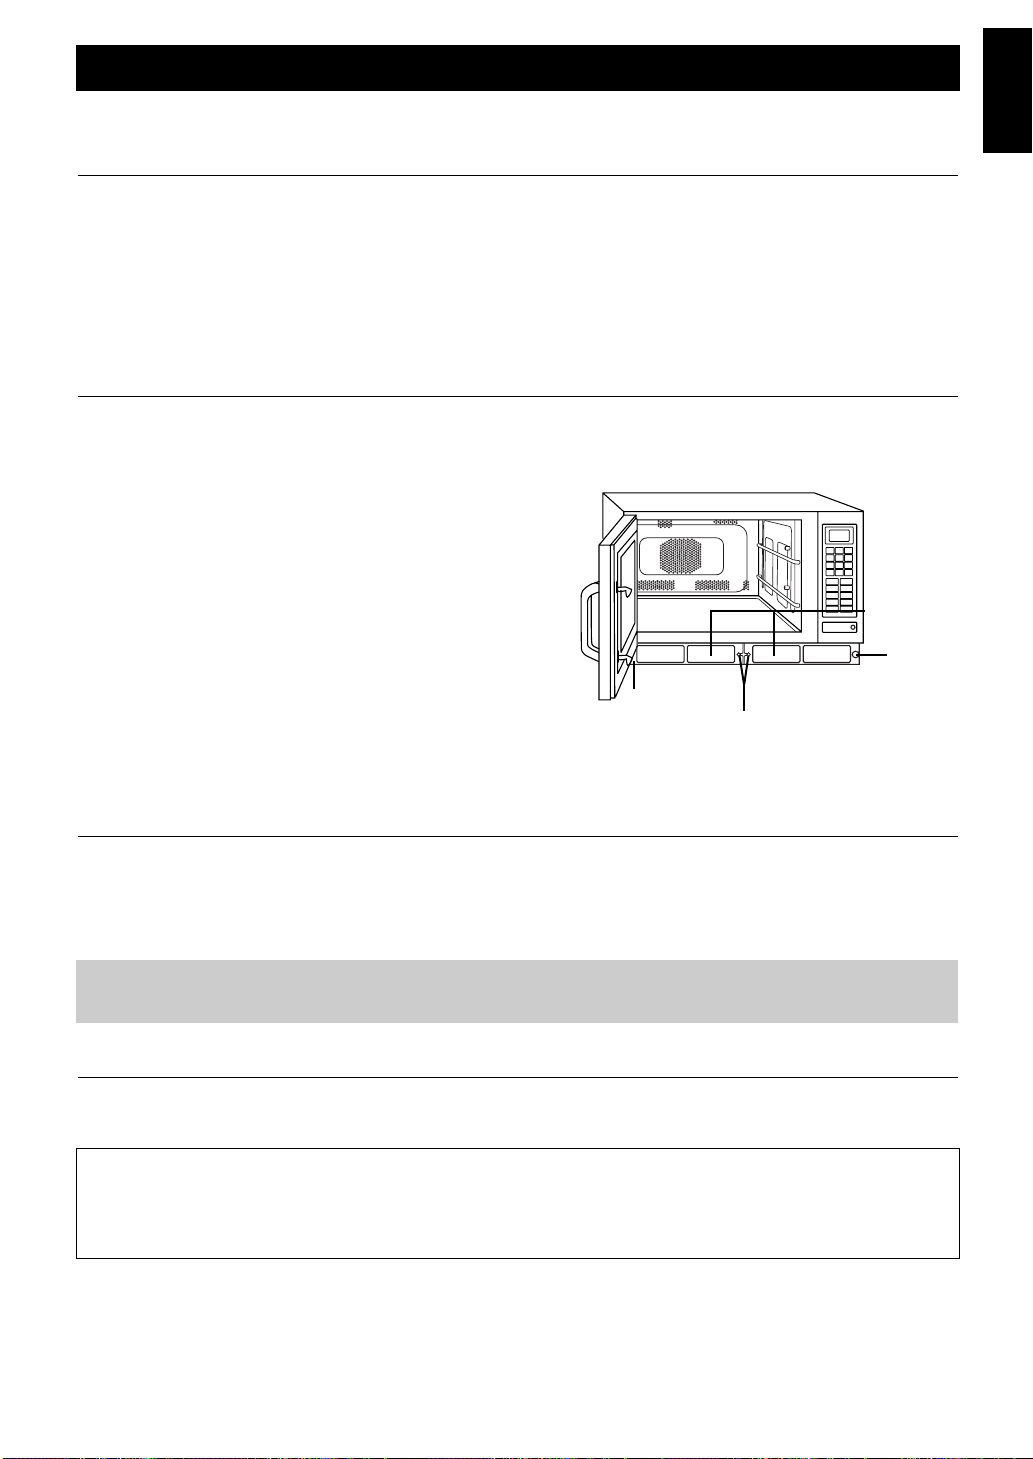
Outline Diagram
Accessories Supplied
(8) Air Filter
PLEASE ENSURE THAT AIR FILTERS ARE
INSTALLED BEFORE USING THE OVEN.
Operation without air filters will allow dirt and
grease to block air vents causing the oven to
overheat.
See page 25 for installation.
(
12) Ceramic Insulating Tray
Parts No.
A06033230BP
When using metal dishes on COMBINATION,
place the Ceramic Insulating Tray between the
food container and the Wire Rack Shelf.
The Ceramic Insulating Tray should remain in
the oven during preheating on a combination
programme.
If placing food directly on the Ceramic
Insulating Tray, ensure it is clean and free of
excess grease.
COOL the Ceramic Insulating Tray before
cleaning to avoid breakage. Ceramic Insulating
Tray should be placed on base of oven to catch
drips when grilling.
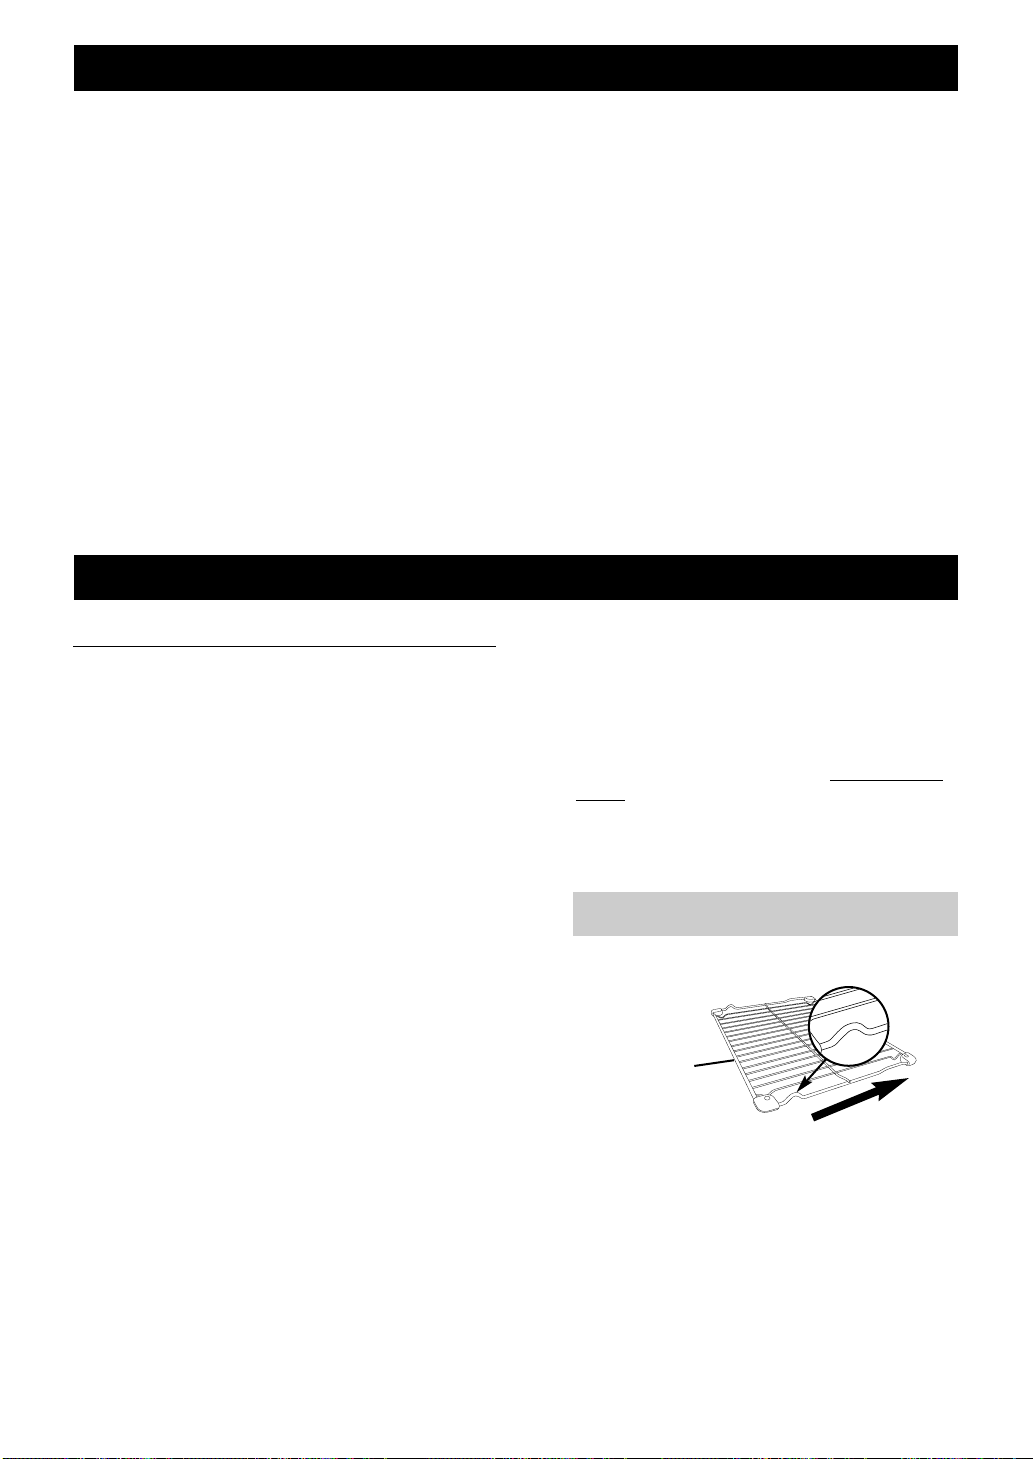
(13) Wire Rack Shelf
Parts No. A06023C50BP
The shelf can be used on CONVECTION,
COMBINATION, GRILL CONVECTION,
GRILL and FAN GRILL functions.
DO NOT leave shelf in oven on MICROWAVE
ONLY function.
DO NOT PLACE METAL CONTAINERS
DIRECTLY ON WIRE RACK SHELF when
using COMBINATION function.
Use the Ceramic Insulation Tray.
Installing Wire Rack Shelf
Insert direction to the cavity
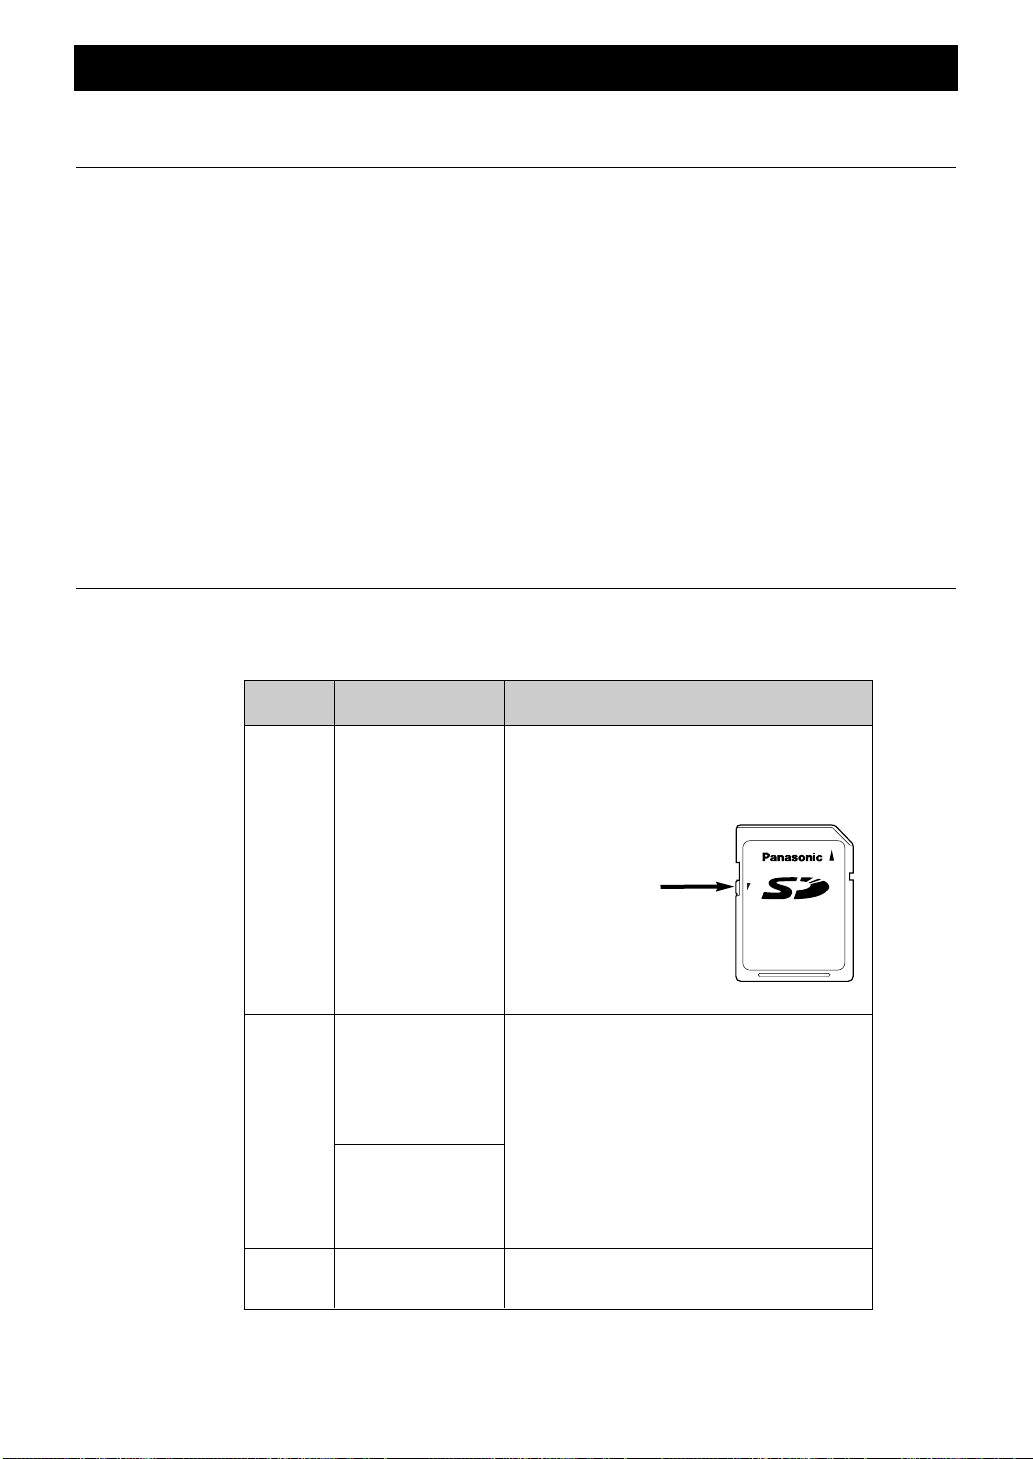
(14) SD Memory Card
Parts No. RP-SD016BCS0
An SD Memory Card is included with the oven
and carries excel files to enable programming
via your Personal Computer. Up to 99 of your
own cooking programmes can be stores via the
SD Memory Card. If the SD Card is lost or
develops a fault, please contact Service
Engineer.
See “Storing Programme Data on SD Memory
Card” for information on using the SD Card and
the memory programming software.
FRONT
There is NO NON-TIP Safety Lock on Shelf
–– take care when removing food.
Page 7

- 5 -
English
Outline Diagram
Your oven Explained
(1) Oven Lamp Cover
(2) Quartz Grill Elements
(3) Convection Fan and Heater
(4) Door handle
(5) Display Window
(6) Control panel
(7) SD Card Cover
(9) Oven Exhaust Vents
(10) Ceramic Base
(11) Shelf Supports (Upper, Lower)
Control Panel
(15) Number Pads
(16) Prog (Programme) pad
(17) Microwave Pad
(18) Grill pad
(19) Fan Grill Pad
(20) Convection Pad
(21) Stop/Reset Pad
Before heating: One press clears the display.
During heating: One press stops the heating
cycle and two presses clear the
display.
N.B. See page 19 for operation whilst in
Programme Lock.
(22) Prog Lock (Programme Lock) Pad
(23) Preheat Pad
(24) Combination pad
(25) Cooling Pad
(26) Oven Lamp Pad
The Oven Lamp switches off when the door is
closed. If you want to check the food, press
Lamp Pad, it will then illuminate for
10 seconds.The Oven Lamp turns on whenever
the door is opened.
(27) Start Pad
Repeat Feature:
You can repeat the same heating programme if
you press START Pad within 1 minute of the
previous programme finishing.
After 1 minutes, if START Pad is not pressed,
goes blank if the oven door is closed.
After 30 minutes returns to “0” if the oven door
is open.
Display Window
The cursor will illuminate to indicate the programme
set. Always check the cursor position before you
press START Pad.
(28) Microwave
(29) Grill
(30) Fan Grill
(31) Convection
(32) Preheat
(33) Cooling
(34) Microwave Power Level
(35) Cooking Stage Indicator
Page 8
- 6 -
SD Memory Card
●
An SD Memory Card is included in the unit purchased. It allows you to store up to 99 Memory
Programmes in the oven.
●
Use the card when storing or recalling Memory Programmes.
※You can record the Memory Programme data onto your SD Memory Card using your personal computer.
Refer to “Storing Programme Data on SD Memory Card”.
How to insert / remove the SD Memory Card
※Before you insert / remove an SD Memory Card, always disconnect the oven from the power supply.
Or it is possible, the display window should be blank, otherwise, the data on the SD Memory Card
may be damaged.
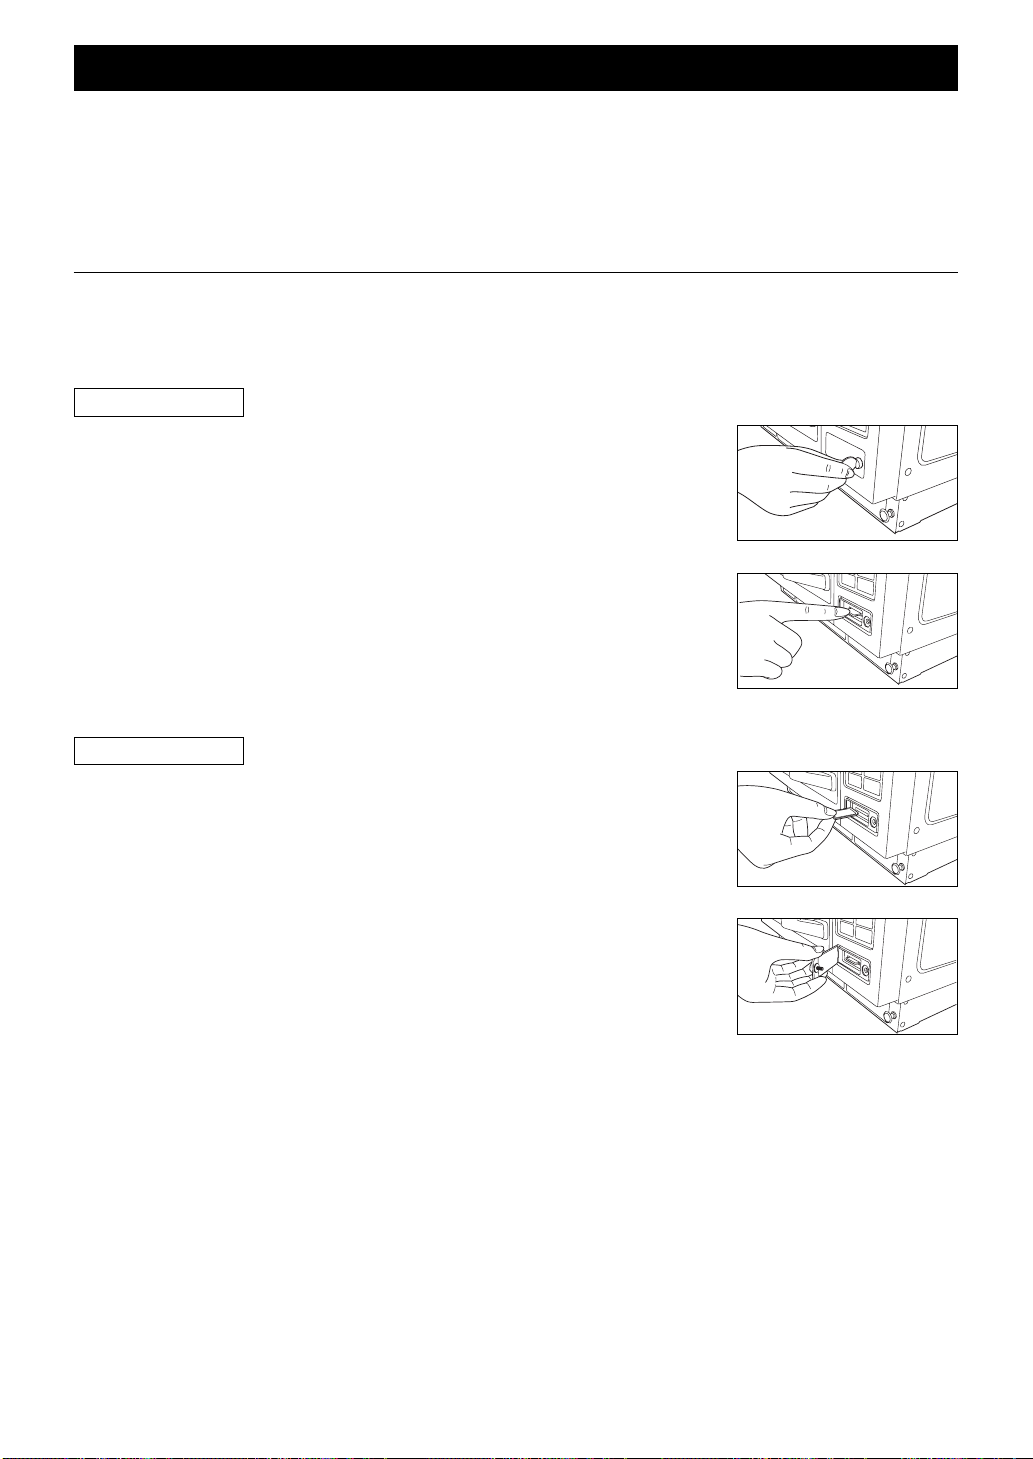
1. Unscrew the SD Card Cover and remove it.
2. Push the SD Memory Card with your finger to draw it out.
Then, remove it.
1. Insert an SD Memory Card with its label facing up as indicated
by ▲ mark until it snaps into place.
2. Fit the left edge of the SD Card Cover.
Screw to close at the right-hand side.
How to remove
How to insert
Caution:
1. Always close the SD Card Cover except when an SD Memory Card is inserted / removed in order to
prevent water or dust from entering.
2. Insert only an SD Memory Card specified for this oven. Do not use any other type or substitute SD Memory
Card.
3. Keep the removed SD Memory Card away from static electricity.
4. Do not disassemble or modify SD Memory Cards.
5. Do not apply a physical shock to SD Memory Cards. Do not bend, drop, or get them wet.
6. Do not touch the metal terminals of an SD Memory Card with your hand or metal.
7. Do not remove the label. Do not paste another label onto the SD Memory Card.
8. Do not leave SD Memory Cards in locations subject to high temperatures or direct sunlight.
9. Do not leave SD Memory Cards in locations subject to corrosive gases.
10. If the SD Memory Card is lost or becomes faulty, please contact a Service Engineer to obtain a
replacement.
Page 9

- 7 -
English
Types of container to use
MICROWAVE
1.Glass
DO USE: Heat Resistant glass eg. Pyrex
DO NOT USE:
Delicate glass, lead crystal which may
crack or arc.
2.China/Ceramics
DO USE: Glazed china dishes, porcelain and
ceramic dishes designed for cooking.
DO NOT USE:
Fine bone china dishes with metal
patterns. Jugs with glued handles.
3.Pottery/Earthenware/Stoneware
DO USE: If completely glazed.
DO NOT USE:
If unglazed - these dishes can absorb
water which absorbs energy.
This makes the dish hot and increases
the heating time.
4.Foil/Metal
DO USE: For reheating only:
Individual portion, open topped foil
containers. Take care the containers do
not touch WALLS or DOOR of oven. Do
not cook in foil containers.
Small amounts of Aluminium foil can be
used to shield joints of meat during
defrosting - take care that foil doesn’t
touch sides or door.
DO NOT USE:
Metal platters, Wire Rack Shelf, any
dish with METAL PATTERN or TRIM.
METAL SKEWERS. DO NOT RE-USE
FOILCONTAINERS - ARCING may
occur as they become DENTED/
DAMAGED. Do not use Le Cruesetstyle dishes (Cast iron covered by
enamel). These can be used on
convection or grill.
5.Plastic
DO USE: High temperature plastic like Durable
Polysulfon rather than soft flexible
dishes. (Remove any metal twist ties.)
DO NOT USE:
Melamine, Polypropilen, Phenol Urea,
also do not use plastic food storage
bags and containers eg. Margarine,
Yoghurt and Mayonnaise tubs.
6.Covering Films
DO USE: Non plasticiser cling film designed for
Microwave use. Do not allow film to
touch food. To prevent nasty steam
burns, pierce film to allow it to escape
and remove film from dish carefully.
DO NOT USE:
Film designed only for covering food.
7.Wood/Wicker
DO USE: Wooden skewers designed for food use.
DO NOT USE:
Wicker baskets, wooden bowls
(with prolonged use these tend to dry
out and may ignite)
8.Paper
DO USE: disposable, polyester coated paper
board dishes if designed for microwave.
DO NOT USE:
Paper napkins (these can ignite), wax
coated cups, recycled products (unless
stated suitable by manufacturer)
COMBINATION
Combination programmes use microwaves and
heat (CONVECTION or GRILL) therefore you must
choose the container carefully.
DO USE: Metal containers check they do not have
jagged metal seams. Ceramics that do
not have a metal pattern.
Heat proof glass and china.
DO NOT USE:
Enamelled items (that may be
gold/metal pattern. Enamelled castiron
eg Le Creuset. Any dish that’s not
heatproof eg plastics, and cling film.
CONVECTION / GRILL CONVECTION
DO USE: Any container suitable for conventional
ovens eg metal, ceramic, earthenwave,
enamelled cast iron etc.
DO NOT USE:
Plastic containers, food films,
wood/wicker, glass, paper.
GRILL / FAN GRILL
DO USE: Any container suitable for fierce griling
eg stainless steel, Le Creuset,
Ceramics, Baking Sheets etc.
DO NOT USE:
Plastic containers, fine ceramics, cling
film etc.
Page 10
- 8 -
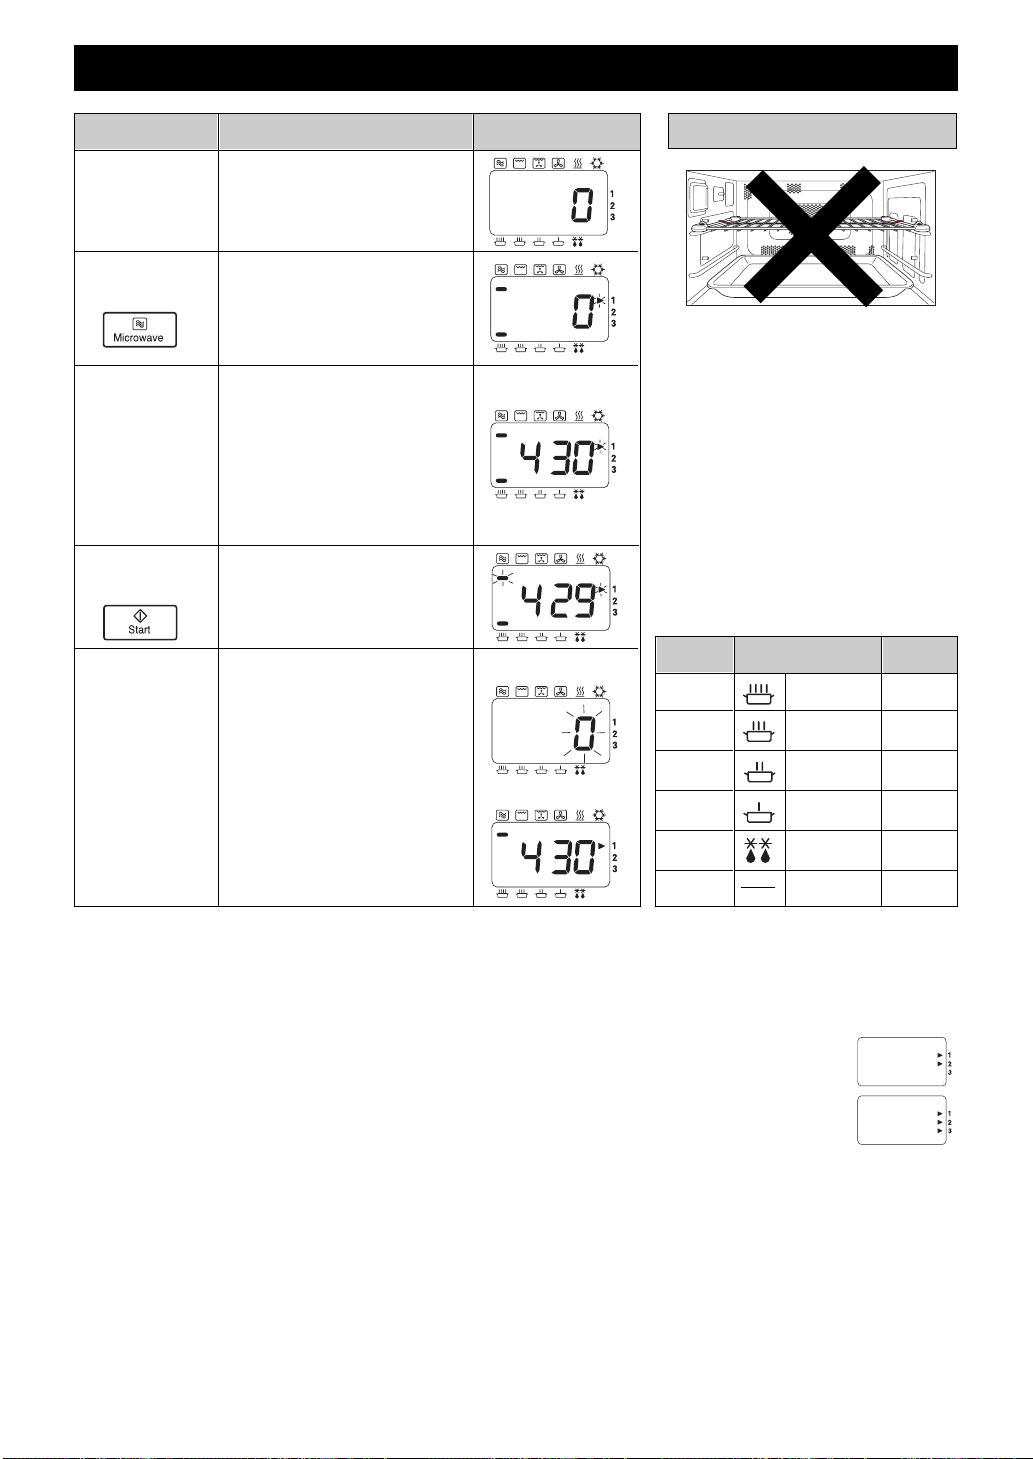
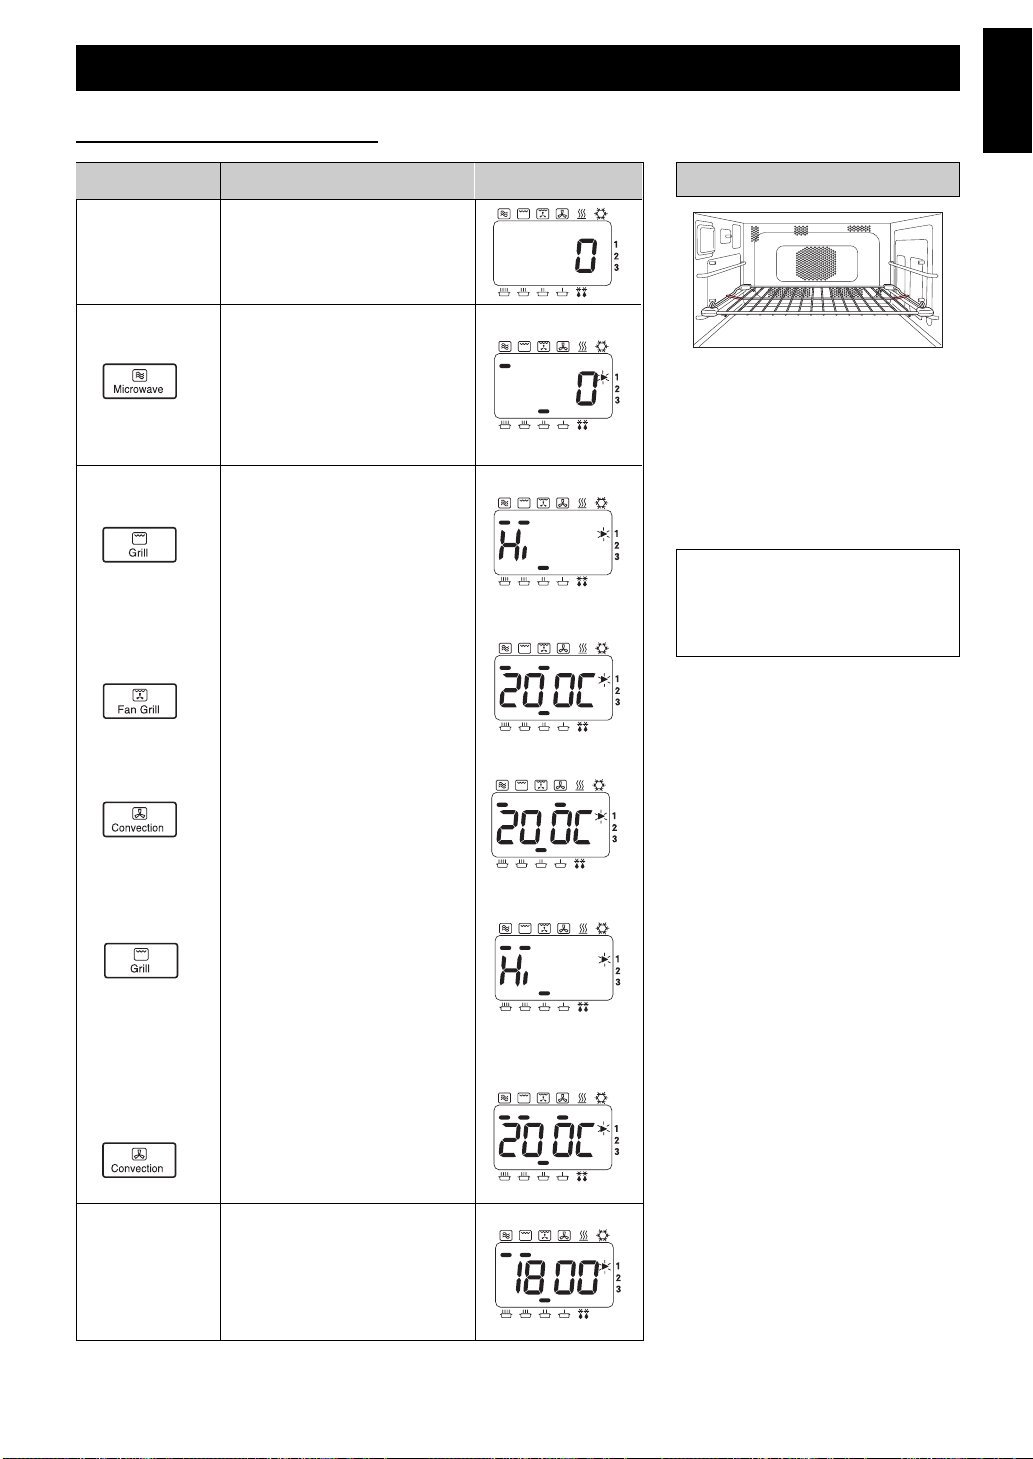
1 Open Door.
Put in Food.
Close Door.
The oven lamp will come on.
Oven lamp turns off.
2 Select
Power Level.
Press MICROWAVE Pad to
select correct power.
eg. HIGH––see below.
3 Select Time. Press NUMBER Pads to set a
heating time.
eg. 4 min. 30 secs.
Press Pads 4, 3 and 0.
Max time you can set:
HIGH 15 mins
Other 60 mins
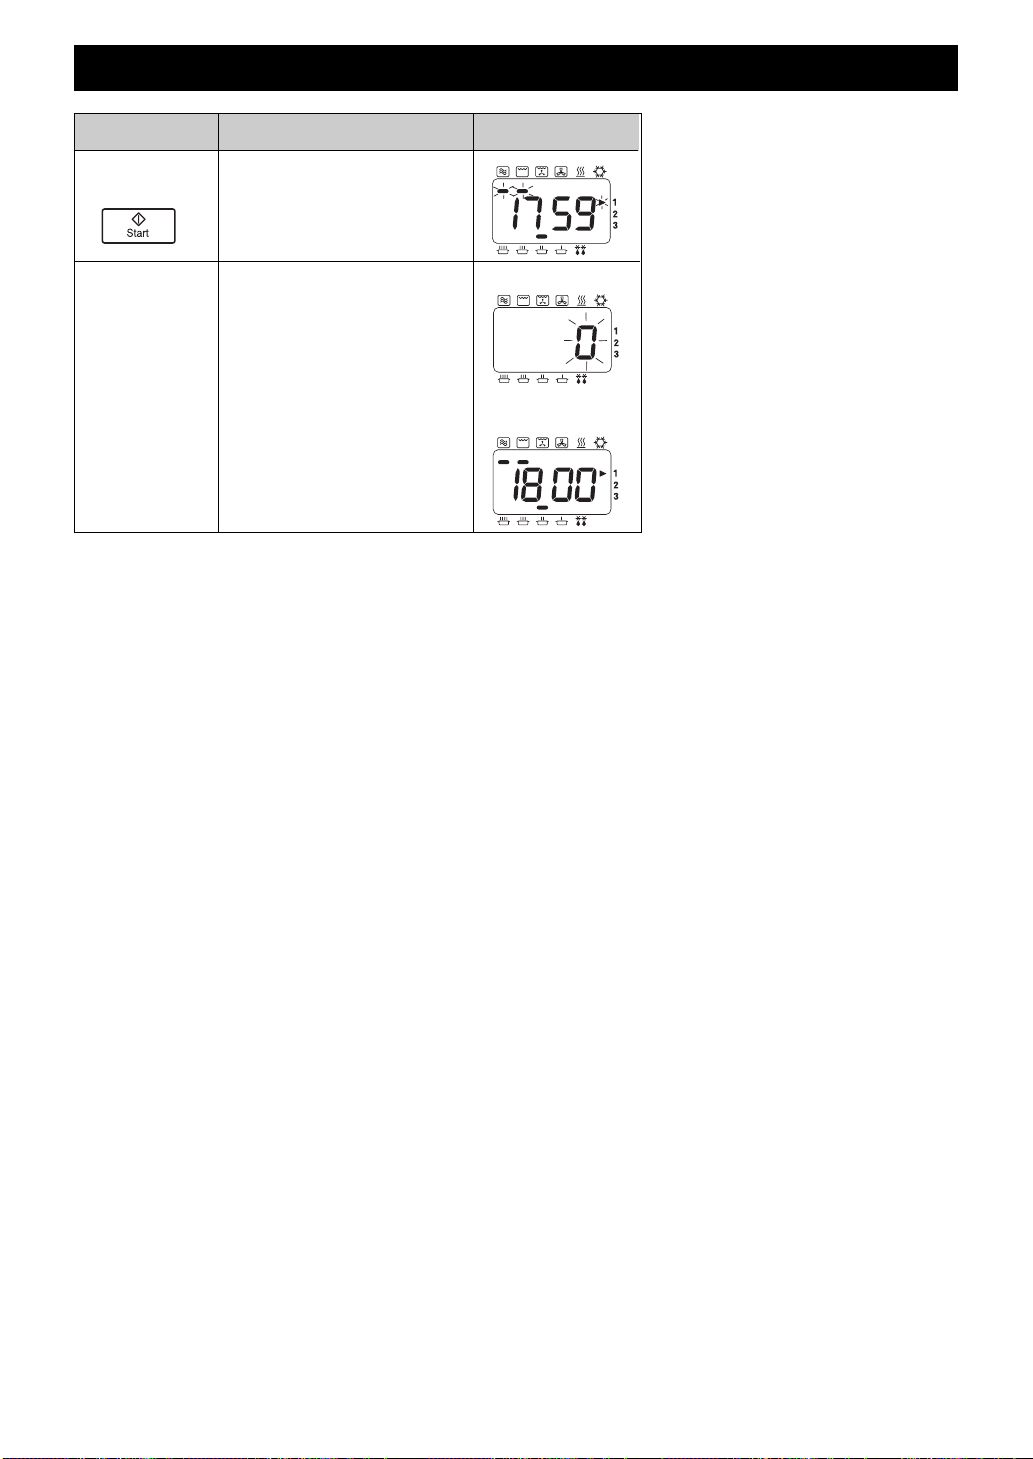
4 Press
START Pad.
Display window will count
down time.
The cooling fan will be turned
on.
At end of heating programme,
oven beeps
3 times, and “0” flashes in
window until door is opened.
Remove food.
Display window will indicate
the previous programme.
5 Open Door.
End of Programme
Open Door
INFORMATION
ACTION
DISPLAY
ACCESSORIES TO USE
Do not use the Wire Rack Shelf or
Ceramic Insulating Tray when
cooking by MICROWAVE.
Once
Twice
3 Times
4 Times
5 Times
6 Times
1350
650
420
240
180
0
PRESS
WATTS
Operating your Oven as a Microwave
HIGH
MEDIUM
LOW
SIMMER
DEFROST
STAND
POWER LEVEL
•
Multi-Stage (Sequential) Heating
The oven can be programmed with up to 3 different stages to operate in sequence.
These can be MICROWAVE, GRILL, CONVECTION, FAN GRILL , GRILL CONVECTION or
COMBINATION functions. If a required heating time is greater than 15 minutes on HIGH power, use
2 stage programming.
For 2 stage programming:
Follow steps 1-3 then enter the next heating programme, and press START Pad.
For 3 stage programming:
Follow 2 stage programming and enter a 3rd heating programme before
pressing START Pad.
•
Hot Surfaces
Take great care when removing hot food. Use oven gloves.
•
Repeat Feature
See page 5.
Page 11
- 9 -
English
•
Hot Surfaces
Take great care when removing hot food. Use oven gloves.
•
Multi-Stage (Sequential) Heating
See page 8.
•
Recalling Convection Temperature
The temperature selected can be checked for 3 seconds after pressing CONVECTION Pad.
Temperature will be displayed briefly in window before returning to remaining heating time.
The temperature cannot be altered during a programme.
•
Preheat
For best results on Convection the oven should be preheated.
(See page 21.)
•
Repeat Feature
See page 5.
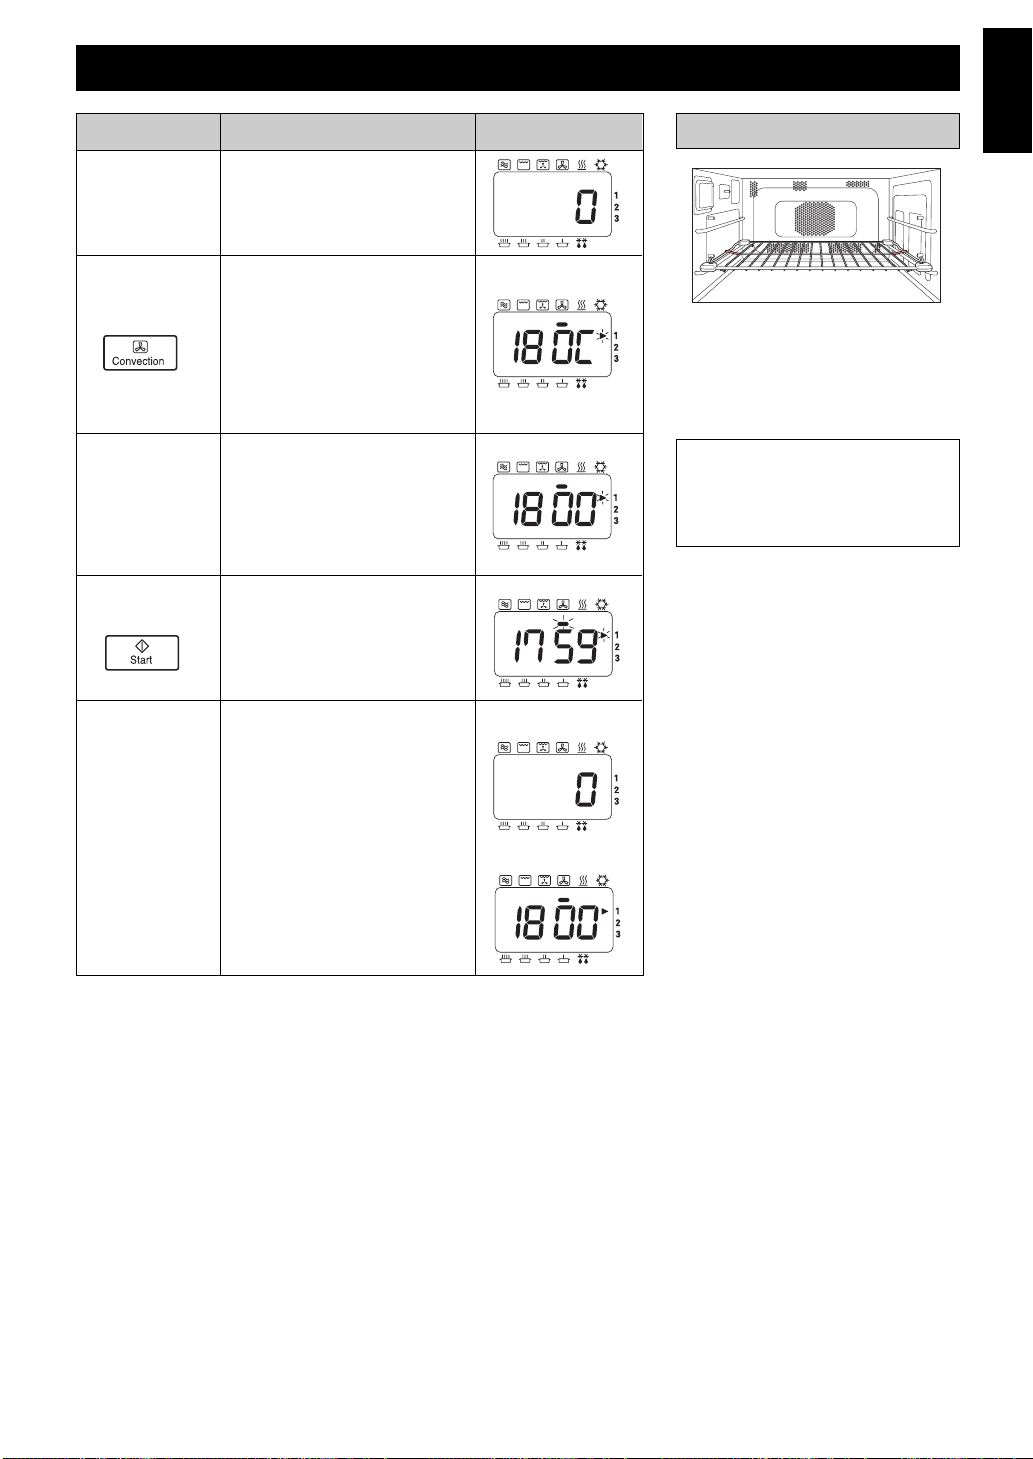
Operating your Oven on Convection
INFORMATION
ACTION
DISPLAY
1 Open Door.
Put in Food.
Close Door.
The oven lamp will come on.
Oven lamp turns off.
2 Press
CONVECTION
Pad.*
Select required oven
temperature. eg. 180˚C
Continue to press
CONVECTION Pad until
temperature required appears
in display window.
Temperature counts up in
10˚C from 100˚C-250˚C
3 Select Time.
Press NUMBER Pads to set
a heating time.
eg.18 mins.
Press Pads 1,8,0 and 0.
Max heating time is:
99 mins. 99 secs.
.
4 Press
START Pad.
Display window will count
down time.
The Convection fan turns on.
At end of heating programme,
oven beeps
3 times, and “0” flashes in
window until door is opened.
Remove food.
Display window will indicate
the previous programme.
5 Open Door.
End of Programme
Open Door
ACCESSORIES TO USE
For best results place the cooking
container on Wire Rack Shelf in the
LOWER position. Food can be
placed directly on the Wire Rack
Shelf if it is thoroughly cleaned
before use.
Caution:
There is NO NON-TIP Safety
Lock on Wire Rack Shelf.
Take care when removing food.
* The oven will memorise the last
CONVECTION temperature used
should you wish to use the same
one again.
Press the CONVECTION pad
when cooking is complete & the
last temperature used will be
displayed.
Page 12
- 10 -
Operating your Oven on Grill Convection
INFORMATION
ACTION
DISPLAY
1 Open Door.
Put in Food.
Close Door.
The oven lamp will come on.
Oven lamp turns off.
3 Press
CONVECTION
Pad.*
Select required oven
temperature. eg. 180˚C
Continue to press
CONVECTION Pad until
temperature required appears
in display window.
Temperature counts up in
10˚C from 100˚C-250˚C
4 Select Time.
Press NUMBER Pads to set a
heating time.
eg. 18 mins.
Press Pads 1,8,0 and 0.
Max heating time is:
99 mins. 99 secs.
5 Press
START Pad.
Display window will count
down time.
The Convection fan turns on.
At end of heating programme,
oven beeps
3 times, and “0” flashes in
window until door is opened.
Remove food.
Display window will indicate
the previous programme.
6 Open Door.
End of Programme
Open Door
2 Press
GRILL Pad.
High or low level can be
selected, but Grill level is
automatically fixed after
pressing CONVECTION Pad.
ACCESSORIES TO USE
For best results place the cooking
container on Wire Rack Shelf in the
LOWER position. Food can be
placed directly on the Wire Rack
Shelf if it is thoroughly cleaned
before use.
Caution:
There is NO NON-TIP Safety
Lock on Wire Rack Shelf.
Take care when removing food.
•
Hot Surfaces
Take great care when removing hot food. Use oven gloves.
•
Multi-Stage (Sequential) Heating
See page 8.
•
Recalling Convection Temperature
The temperature selected can be checked for 3 seconds after pressing CONVECTION Pad.
Temperature will be displayed briefly in window before returning to remaining heating time.
The temperature cannot be altered during a programme.
Recalling Grill level is not available.
•
Preheat
For best results on Convection the oven should be preheated. (See page 21.)
•
Repeat Feature
See page 5.
* The oven will memorise the last
GRILL CONVECTION
temperature used should you
wish to use the same one again.
Press the CONVECTION pad
when cooking is complete & the
last temperature used will be
displayed.
Page 13

- 11 -
English
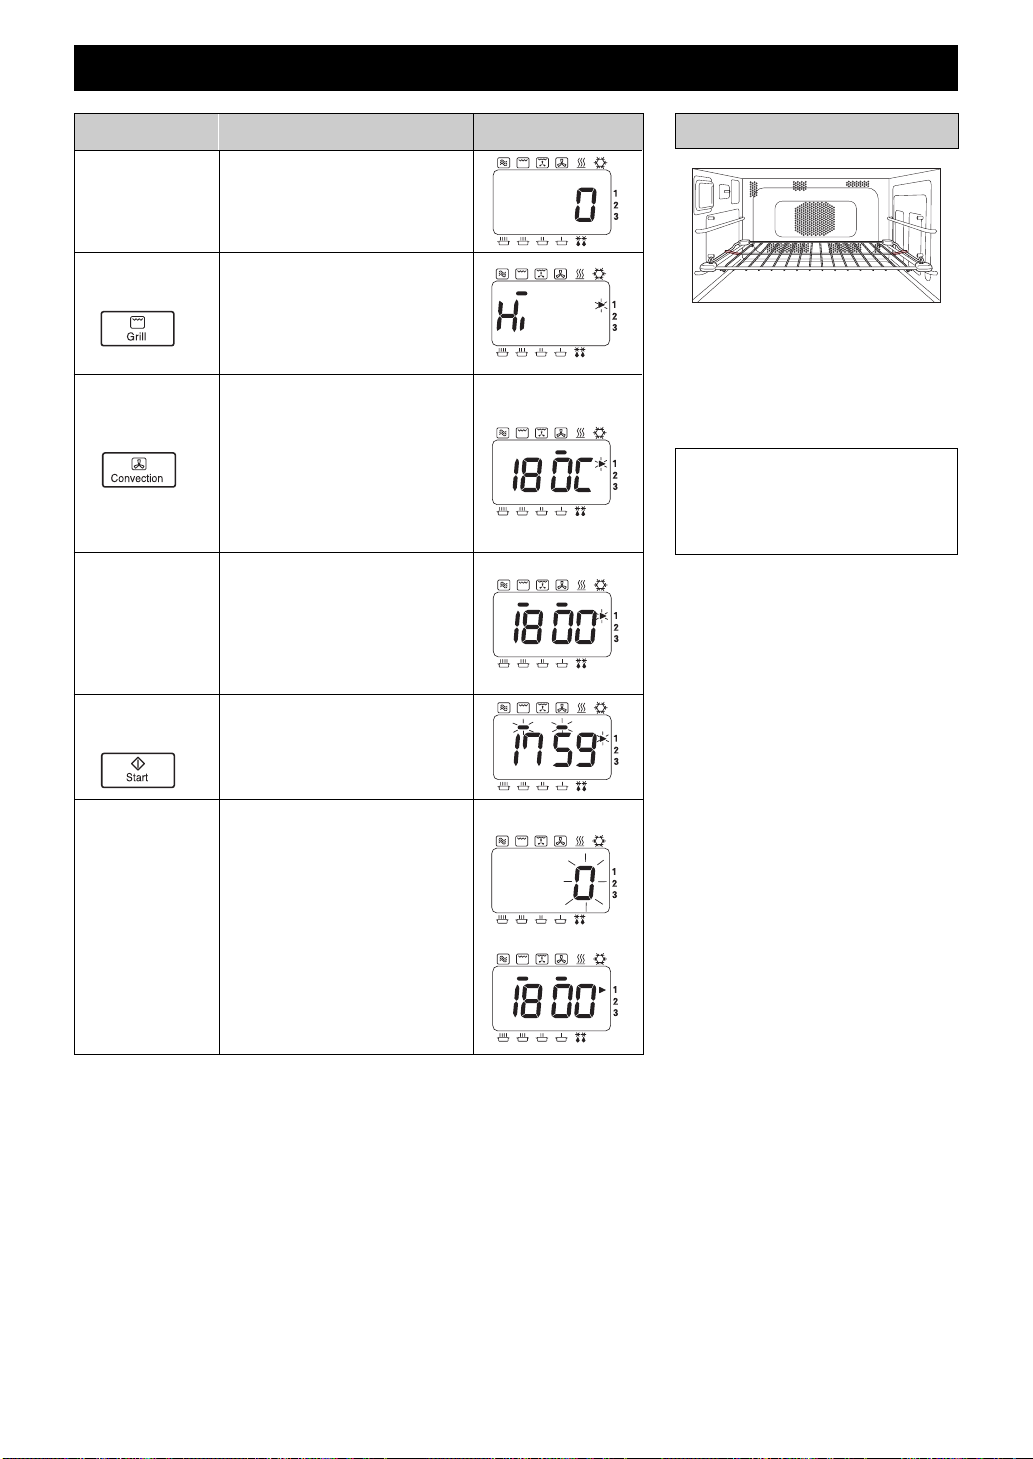
Operating your Oven on Grill
INFORMATION
ACTION
DISPLAY
1 Open Door.
Put in Food.
Close Door.
The oven lamp will come on.
Oven lamp turns off.
2 Press
GRILL Pad.
Select required Grill level.
eg. High
Display Output
1 press Hi 1840 W
2 presses Lo 1500 W
3 Select Time.
Press NUMBER Pads to set a
heating time.
eg.10 mins.
Press Pads 1,0,0 and 0.
Max heating time is:
60 mins.
4 Press
START Pad.
Display window will count
down time.
The convection fan turns on.
At end of heating programme,
oven beeps
3 times, and “0” flashes in
window until door is opened.
Remove food.
Display window will indicate
the previous programme.
(Less than 1 minute.)
5 Open Door.
ACCESSORIES TO USE
For best results place the food on
Wire Rack Shelf in UPPER
position.
Ceramic Insulating Tray may be
placed on base of oven to catch
splashes and drips. Small items of
food that might fall between Wire
Rack Shelf can be cooked directly
on ceramic Insulating Tray on Wire
Rack Shelf in UPPER position.
Drain frequently to avoid excessive
spitting. Deep dishes may be
finished under the grill placed on
the Wire Rack Shelf in the LOWER
position or placed directly on
ceramic base.
End of Programme
Open Door
Caution:
There is NO NON-TIP Safety
Lock on Wire Rack Shelf.
Take care when removing food.
•
Hot Surfaces
Take great care when removing hot food. Use oven gloves.
•
Multi-Stage (Sequential) Heating
See page 8.
•
Recalling Grill level
The Grill level selected can be checked for 3 seconds after pressing GRILL Pad.
The Grill level will be displayed in the window before returning to remaining heating time.
•
Preheat
For best results on Convection the oven should be preheated.
(See page 21.)
•
Repeat Feature
See page 5.
Page 14
- 12 -
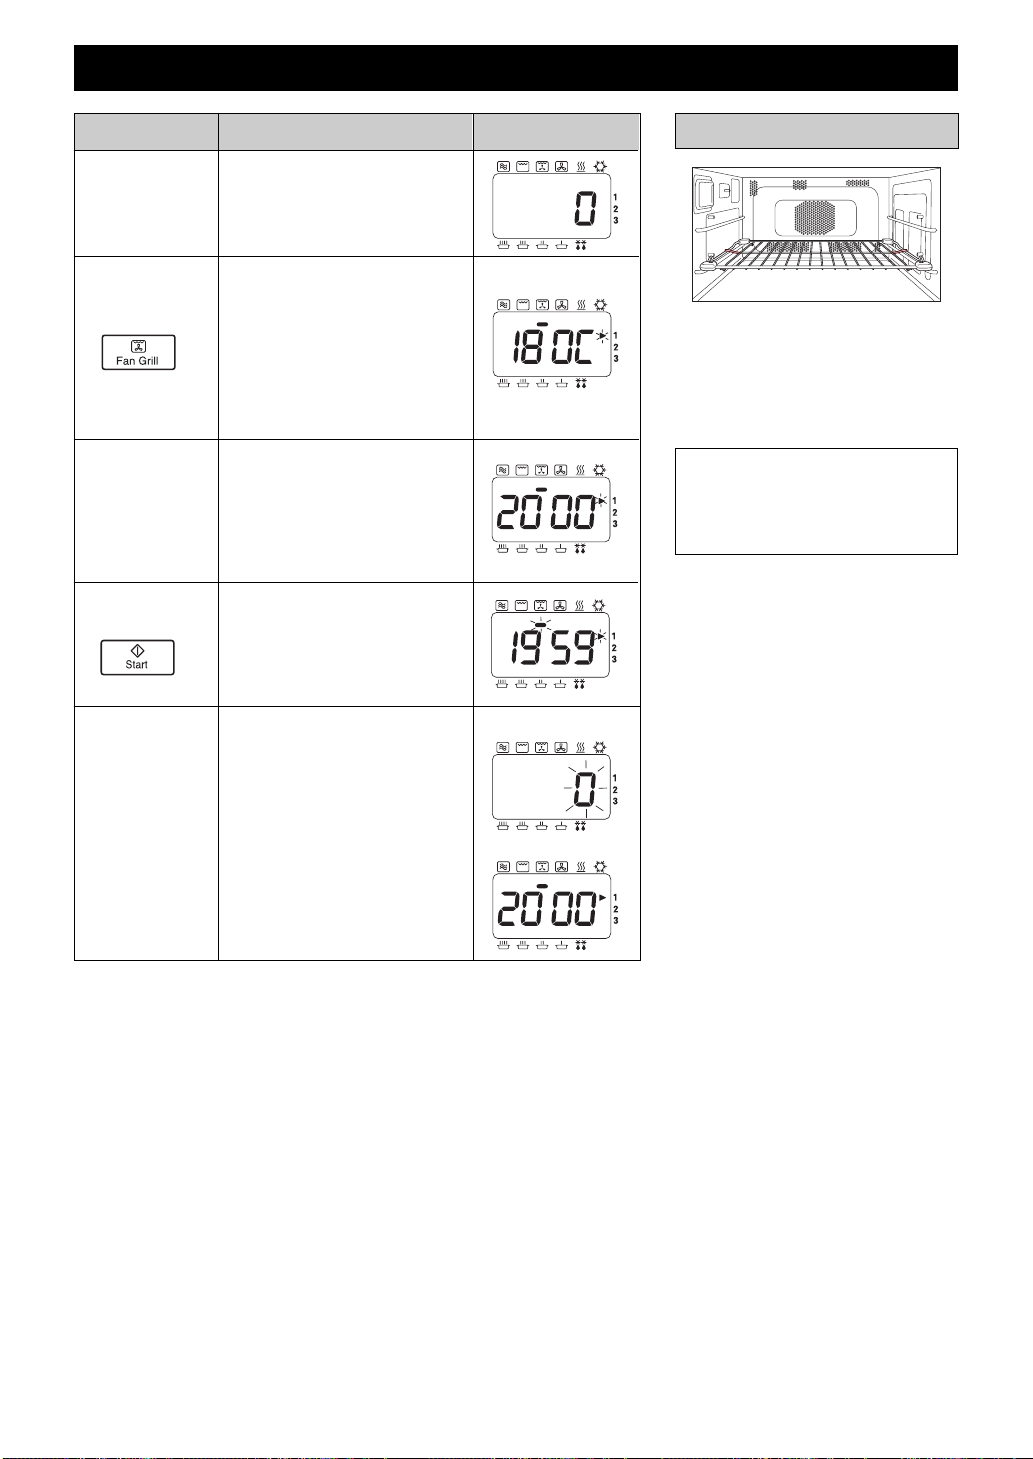
Operating your Oven on Fan Grill
INFORMATION
ACTION
DISPLAY
1 Open Door.
Put in Food.
Close Door.
The oven lamp will come on.
Oven lamp turns off.
2 Press
FAN GRILL
Pad.*
Select required Fan Grill
temperature. eg. 180˚C
Continue to press
FAN GRILL Pad until
temperature required
appears in display window.
Temperature counts up in
10˚C from 100˚C-250˚C
3 Select Time.
Press NUMBER Pads to set a
heating time.
eg. 20 mins.
Press Pads 2,0,0 and 0.
Max heating time is:
99 mins. 99 secs.
4 Press
START Pad.
Display window will count
down time.
The convection fan turns on.
At end of heating programme,
oven beeps
3 times, and “0” flashes in
window until door is opened.
Remove food.
Display window will indicate
the previous programme.
5 Open Door.
ACCESSORIES TO USE
End of Programme
Open Door
•
Hot Surfaces
Take great care when removing hot food. Use oven gloves.
•
Multi-Stage (Sequential) Heating
See page 8.
•
Recalling Fan Grill Temperature
The temperature selected can be checked for 3 seconds after pressing FAN GRILL Pad.
Temperature will be displayed briefly in window before returning to remaining heating time.
The temperature cannot be altered during a programme.
•
Preheat
For best results on Convection the oven should be preheated.
(See page 21.)
•
Repeat Feature
See page 5.
* The oven will memorise the last
FAN GRILL temperature used
should you wish to use the same
one again.
Press the FAN GRILL pad
when cooking is complete & the
last temperature used will be
displayed.
For best results place the cooking
container on Wire Rack Shelf in the
LOWER position. Food can be
placed directly on the Wire Rack
Shelf if it is thoroughly cleaned
before use.
Caution:
There is NO NON-TIP Safety
Lock on Wire Rack Shelf.
Take care when removing food.
Page 15
- 13 -
English
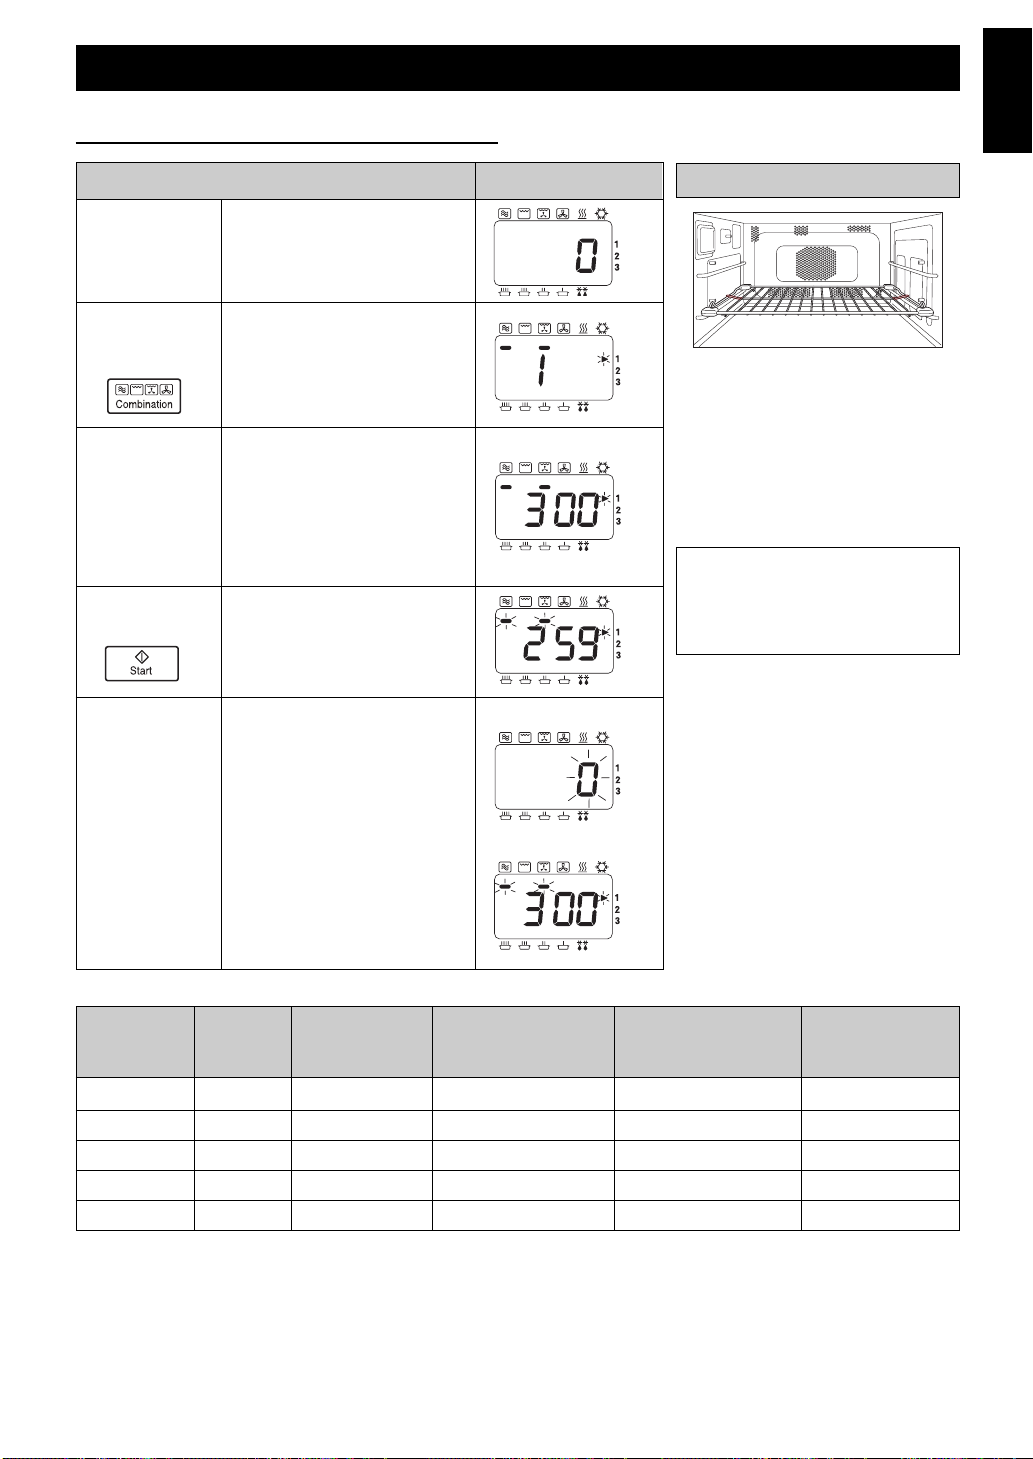
Operating your Oven on Combination
2 Press
COMBINATION
Pad.
INFORMATION
ACTION
DISPLAY
1 Open Door.
Put in Food.
Close Door.
The oven lamp will come on.
Oven lamp turns off.
3 Press
START Pad.
Display window will count
down time.
At end of heating programme,
oven beeps
3 times, and “0” flashes in
window until door is opened.
Remove food.
Display window will indicate
the previous programme.
4 Open Door.
ACCESSORIES TO USE
For best results place food on Wire
Rack Shelf in the LOWER position.
The Ceramic Insulating Tray MUST
be used if the cooking container is
metal, NEVER place a metal
container directly onto the WIRE
SHELF when cooking by
COMBINATION as arcing may
occur and damage the dish/oven.
End of Programme
Open Door
Select Preset COMBINATION
Number (1-5).
eg. 1––see below.
Preset Combination
3 Select Time.
Press NUMBER Pads to set a
heating time.
eg. 3 mins.
Press pad 3,0 and 0.
Max heating time is:
5 mins.
Caution:
There is NO NON-TIP Safety
Lock on Wire Rack Shelf.
Take care when removing food.
Once
Twice
3 Times
4 Times
5 Times
250˚C
250˚C
250˚C
250˚C
Hi
PRESS GRILL LEVEL OR
CONVECTION
TEMPERATURE
5 mins
60 mins
60 mins
60 mins
60 mins
MAXIMUM
HEATING
TIME
MICROWAVE
POWER
DISPLAY
1*
2
3
4
5
HIGH
LOW
DEFROST
LOW
LOW
Fan Grill
Fan Grill
Fan Grill
Grill Convection
Grill
GRILL OR
CONVECTION
SETTING
*Combi 1 may only be used as the first stage of a 2 or 3 stage cooking programme.
Page 16

•
Hot Surfaces
Take great care when removing hot food. Use oven gloves.
•
Multi-Stage (Sequential) Heating
See page 8.
•
Recalling Preset Combination Number
The Preset Combination Number (1-5) selected can be checked for 3 seconds after pressing
COMBINATION Pad.
The Preset Combination Number will be displayed in the window before returning to remaining heating
time.
•
Preheat
For best results on combination the oven should be preheated.
(See page 21.)
•
Repeat Feature
See page 5.
Operating your Oven on Combination
- 14 -
Page 17
English
Operating your Oven on Combination
2 Select Power
Level.**
INFORMATION
ACTION
DISPLAY
1 Open Door.
Put in Food.
Close Door.
The oven lamp will come on.
Oven lamp turns off.
Press MICROWAVE Pad to
select correct power.
eg. LOW.
Manual Combination
3 Press
GRILL Pad*
or
FAN GRILL
Pad***
or
CONVECTION
Pad* ***
or
GRILL Pad *
+
CONVECTION
Pad * ***
MWO + GRILL
Select Grill Level.
Display Output
1 press Hi 1840 W
2 presses Lo 1500 W
eg. Hi.
OR
MWO + FAN GRILL
Press Fan Grill Pad until
required temperature
appears in display.
eg. 200˚C.
OR
MWO + CONVECTION
Press Convection Pad until
required temperature
appears in display.
eg. 200˚C.
OR
MWO +
GRILL CONVECTION
Hi or Lo level can be selected
but Grill level is automatically
fixed after pressing
Convection Pad.
+
Press Convection Pad until
required temperature appears
in display.
eg. 200˚C.
ACCESSORIES TO USE
For best results place food on Wire
Rack Shelf in the LOWER position.
The Ceramic Insulating Tray MUST
be used if the cooking container is
metal, NEVER place a metal
container directly onto the WIRE
SHELF when cooking by
COMBINATION as arcing may
occur and damage the dish/oven.
Caution:
There is NO NON-TIP Safety
Lock on Wire Rack Shelf.
Take care when removing food.
(ACTION 5-6 continued on next page.)
* Combination of Microwave and
Grill and Convection is possible.
** Combination settings using
HIGH power may only be used
as 1 stage of a 2 or 3 stage
cooking programme and for a
maximum 5 mins heating time.
*** The oven will memorise the last
CONVECTION, GRILL
CONVECTION, or FAN GRILL
temperature used on
COMBINATION should you
wish to use the same one
again.
Press the CONVECTION or
FAN GRILL pad when cooking
is complate & the last
temperature used will be
displayed.
4 Select Time.
Press Number Pads to set a
heating time.
eg. MWO + GRILL 18 mins.
Press pads 1,8,0 and 0
Max heating time is:
60 mins.
- 15 -
Page 18
Operating your Oven on Combination
•
Hot Surfaces
Take great care when removing hot food. Use oven gloves.
•
Multi-Stage (Sequential) Heating
See page 8.
•
Recalling Grill level (Only Grill Combination)
The GRILL level selected can be checked for 3 seconds after pressing GRILL Pad.
The GRILL level will be displayed in the window before returning to remaining heating time.
•
Recalling Convection Temperature
The temperature selected can be checked for 3 seconds after pressing CONVECTION Pad.
Temperature will be displayed briefly in window before returning to remaining heating time.
The temperature cannot be altered during a programme.
•
Recalling Fan Grill Temperature
The temperature selected can be checked for 3 seconds after pressing FAN GRILL Pad.
Temperature will be displayed briefly in window before returning to remaining heating time.
The temperature cannot be altered during a programme.
•
Preheat
For best results on combination the oven should be preheated.
(See page 21.)
•
Repeat Feature
See page 5.
INFORMATION
ACTION
DISPLAY
At end of heating programme,
oven beeps 3 times, and “0”
flashes in window until door is
opened.
Remove food.
Display window will indicate
the previous programme.
6 Open Door.
End of Programme
Open Door
5 Press
START Pad.
Display window will count
down time.
- 16 -
Page 19
English
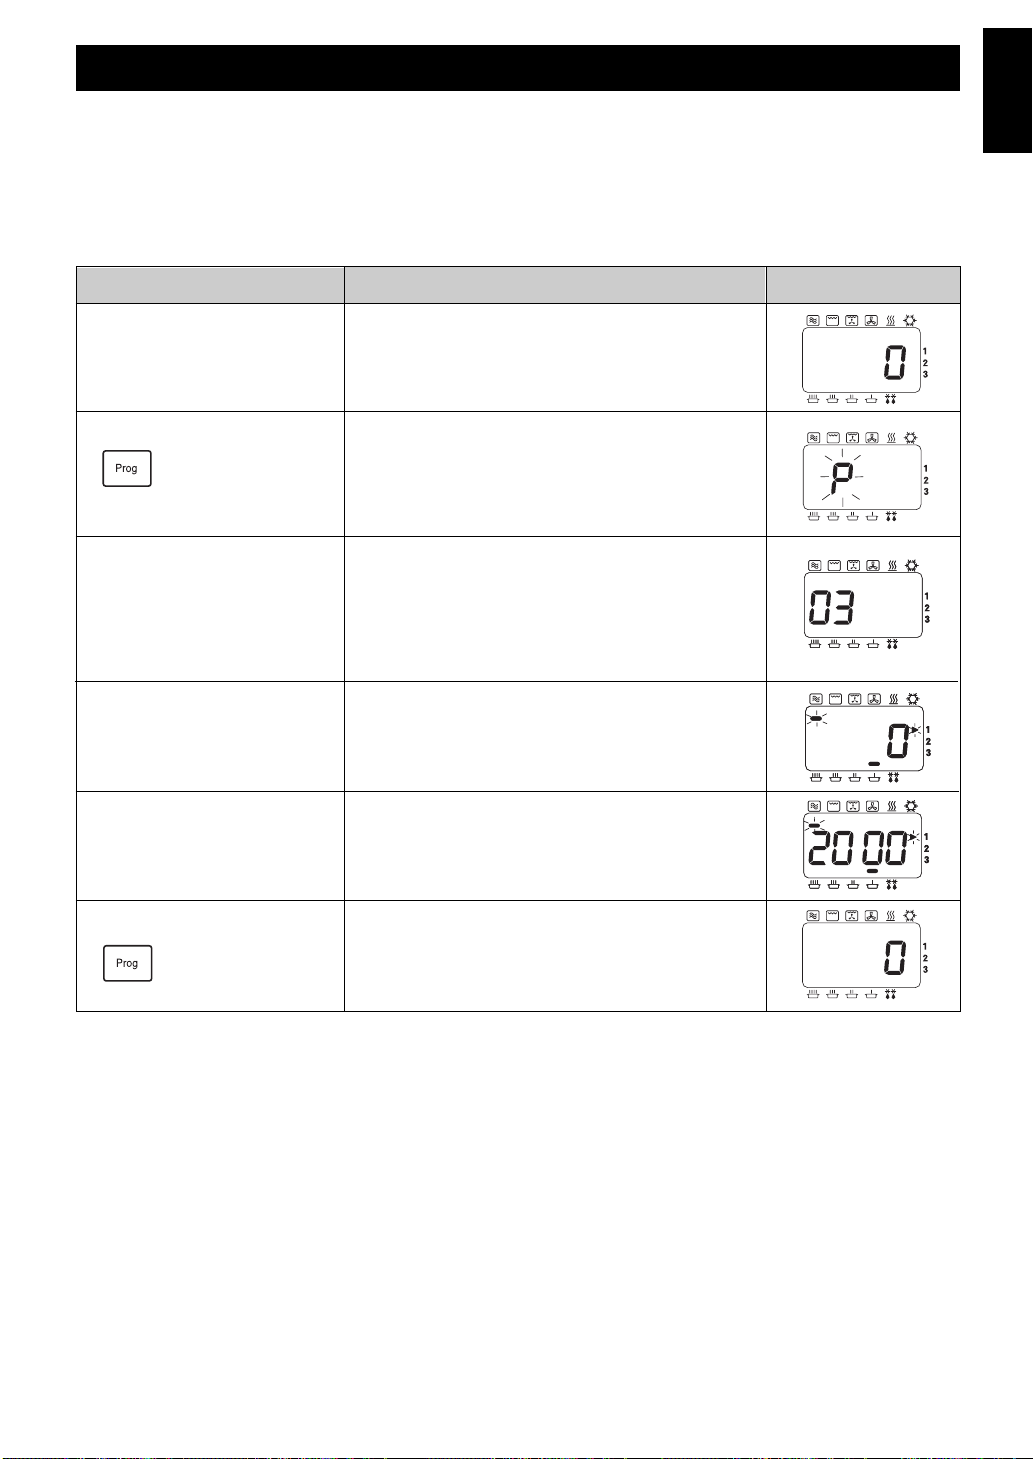
INFORMATION
ACTION
DISPLAY
1 Open Door. The oven lamp will come on.
2 Press PROG Pad.
Keep door open.
Keep pad pressed for 2 seconds until “P” is
displayed.
3 Press
Programme Number.
eg. To set Programme 03: SIMMER 20 mins.
Press NUMBER Pads 0 and 3.
If programme has been previously set, this will
appear in the display.
If the programme memory is empty then the
programme number will appear in the display.
5 Select Time. eg. Press NUMBER Pads 2, 0, 0, and 0.
After 3 seconds display returns to “0”.
6 Press PROG Pad.
4 Select Power. eg. Press MICROWAVE Pad 4 times.
•
Programme Lock
It is NOT possible to enter a programme when Programme Lock is set.
(See page 19.)
•
Multi-Stage (Sequential Cooking)
It is possible to programme into the memory a 2 or 3 stage programme using MICROWAVE,
CONVECTION, GRILL, FAN GRILL, GRILL CONVECTION or COMBINATION.
•
Changing a Memory Programme
To change a programme simply follow steps 1-6 on previous page entering your new programme.
Setting the Memory Programmes
Please ensure that the SD Memory Card is inserted in the Oven.
Your oven has 99 blank memory programmes for your own heating requirement.
All 99 Memory Programmes can be set manually using the Programme Pad on the control panel. However,
these programmes can be stored onto the SD Memory Card using your personal computer (see “Storing
Programme Data on SD Memory Card”).
Any programme information stored directly onto the SD Memory Card will override any manual programmes
previously set.
- 17 -
Page 20
Using the Memory Programmes
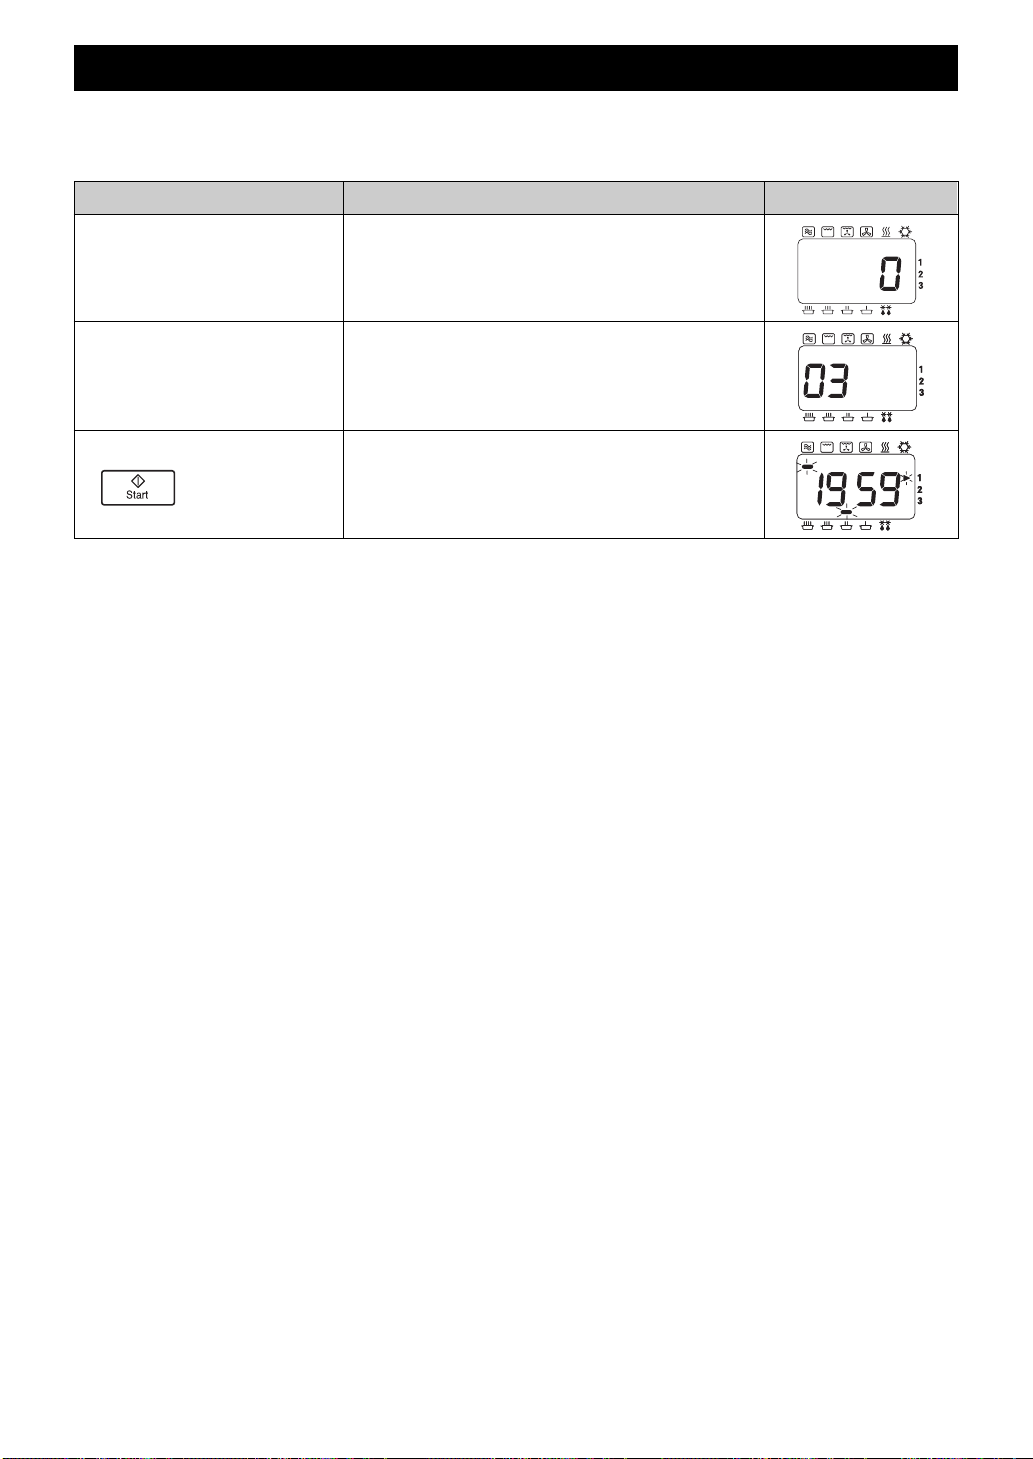
INFORMATION
ACTION
1 Open Door.
Put in Food.
Close Door.
The oven lamp will come on.
Oven lamp turns off.
2 Press
NUMBER Pads required.
eg. For programme 03.
Press NUMBER Pads 0 and 3. This example is
preset Memory Programme:
SIMMER power 20 mins.
3 Press START Pad.
Display window will count down time.
DISPLAY
•
Programme Lock
If programme lock is activated, programme starts immediately therefore there is no need to
press START Pad.
Please ensure SD Memory Card is inserted in the oven.
Using the 99 Memory Programmes.
- 18 -
Page 21
English
INFORMATION
ACTION
DISPLAY
1 Open Door. The oven lamp will come on.
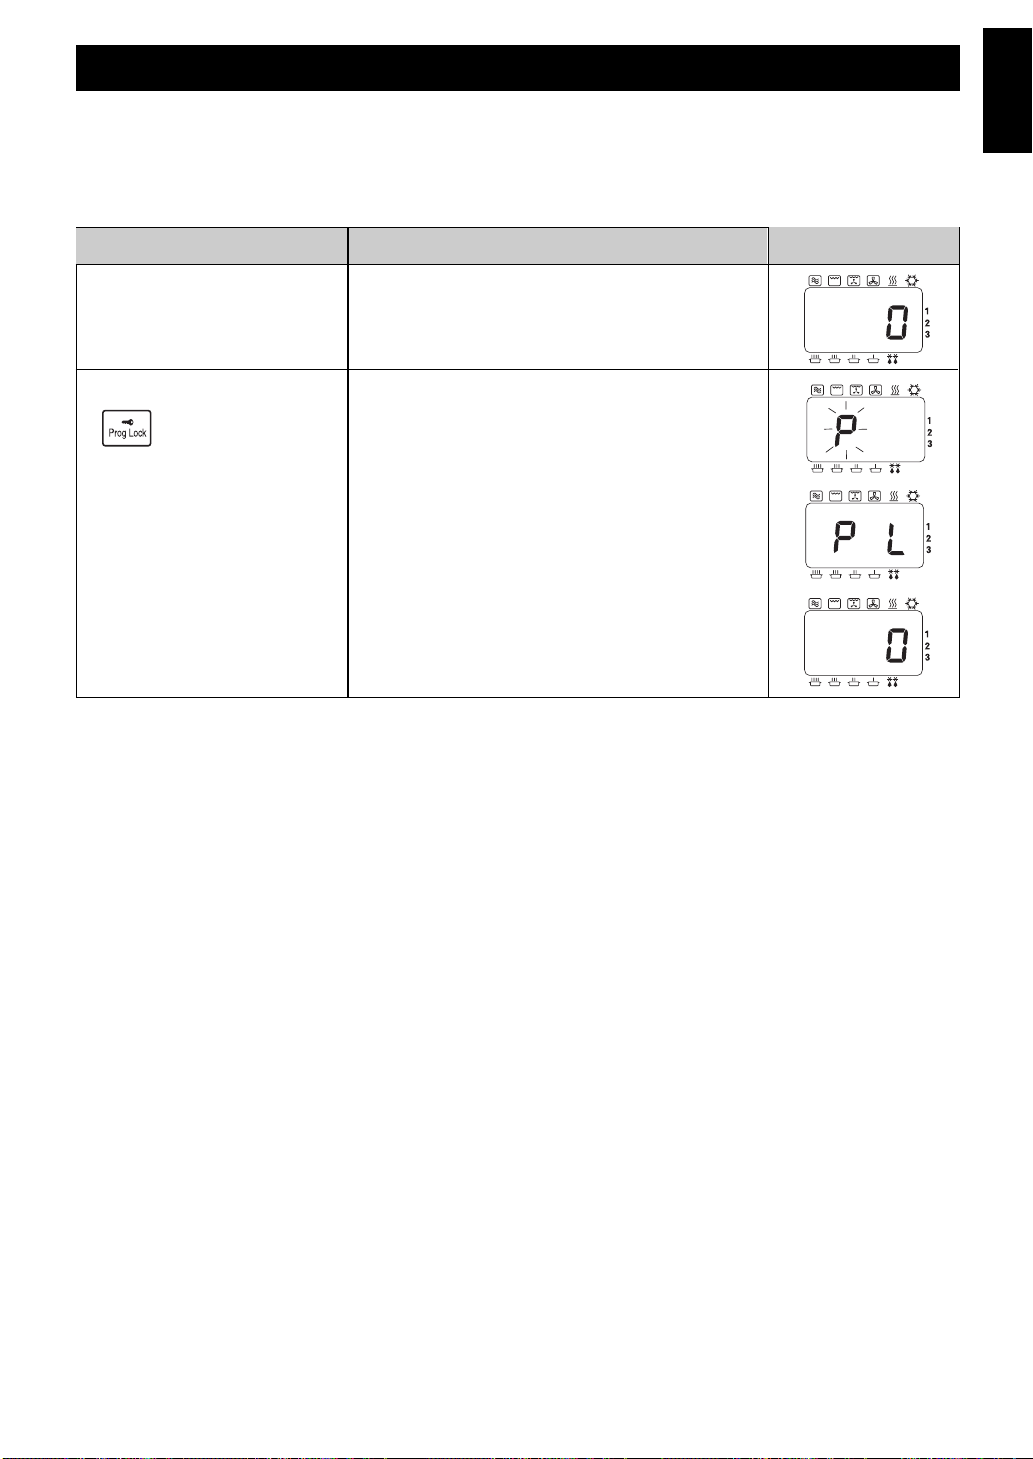
2 Press PROG LOCK Pad. “P” is displayed.
KEEP DOOR OPEN.
After 2 seconds....
After 3 seconds.....
One Touch Operating Mode
When Programme Lock is activated, oven operates in “ONE TOUCH” mode, i.e. press required
memory programme number and oven immediately starts.
No need to press START Pad.
•
Interrupted Programme
If the door is opened during a programme, the remaining heating time will be cancelled.
•
Repeat Feature
Once a manual heating programme has finished, the oven will automatically display the programme
again for a repeat programme even if the Programme Lock is activated.
•
Setting New Programs
When the Programme Lock is activated it is not possible to enter a Memory Programme or change
the Beep tone.
(See page 22.)
•
Stop/Reset Pad
During heating, one press stops the heating cycle, the programme is cleared and display returns to ”0”.
How to Activate Programme Lock
- 19 -
Page 22
INFORMATION
ACTION
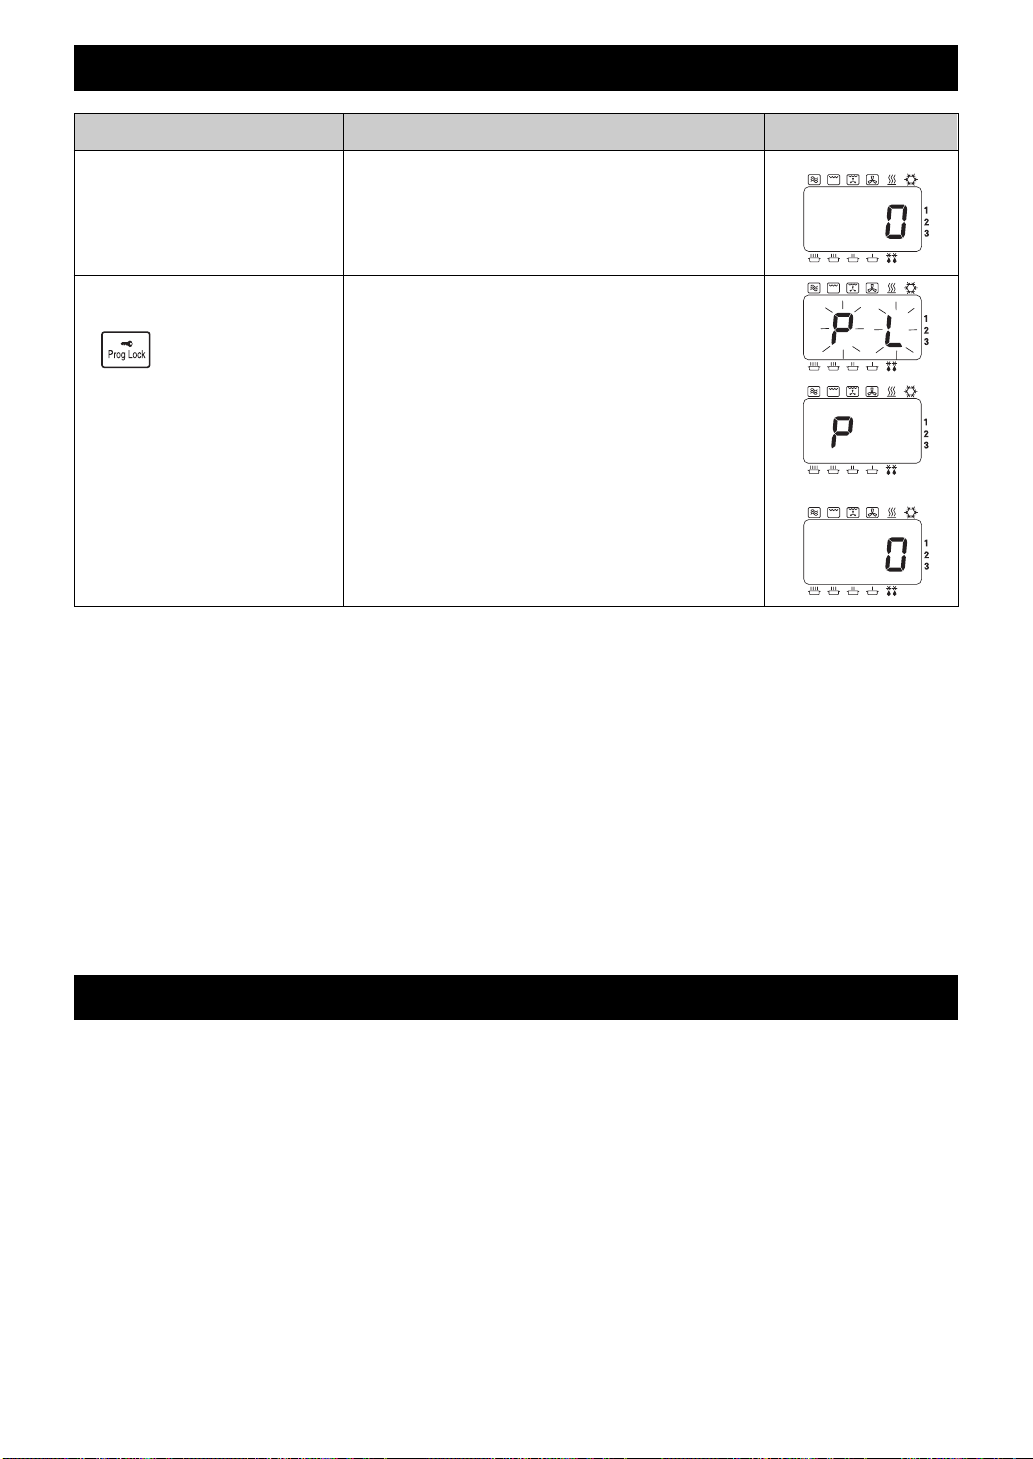
1 Open Door. The oven light will come on.
2 Press
PROG Pad.
Keep key pressed for 2 seconds until “P L” is
displayed.
KEEP DOOR OPEN.
After 2 seconds....
After 3 seconds...
DISPLAY
•
Two Touch Operating Mode
The oven reverts to 2 TOUCH OPERATION mode when you deactivate Programme Lock.
Press required key NUMBER Pads then press START Pad.
•
Interrupted Programme
If the door is opened during a programme, once programme lock is deactivated, the remaining heating
time will be retained in the display window until the door is closed and START Pad is pressed.
•
Repeat Feature
Once a manual heating programme has finished, the oven will automatically display the programme
again for a repeat programme with the Programme Lock deactivated.
•
Setting New Programs
Once Programme Lock is released, you can enter new heating programs.
Programme List
It is possible to check the programmes that have been entered into the SD Memory Card. With
the door open, press START pad and NUMBER pad 1 simultaneously. (The Oven will make an
acknowledging beep). After 2 seconds, the display window will show each individual stage of
each Memory Programme in the order 01, 02, 03 etc. Finally, it will display the Beep Tone
setting and the Programme Lock symbol (P.L), the time interval for cleaning of the Air Filter,
before clearing to “0”.
How to Deactivate Programme Lock
- 20 -
Page 23
English
Notes on Preheat and Cooling:
• Only PREHEAT and COOLING functions can be selected when the display is blank. All other programmes
must have “0” in display.
• You can select PREHEAT function during a COOLING function and vice versa.
• After a heating function has completed, oven will revert to PREHEAT function automatically.
• * The oven will memorise the last PREHEAT temperature used should you wish to use the same one again.
Press the PREHEAT Pad and the last temperature used will be displayed.
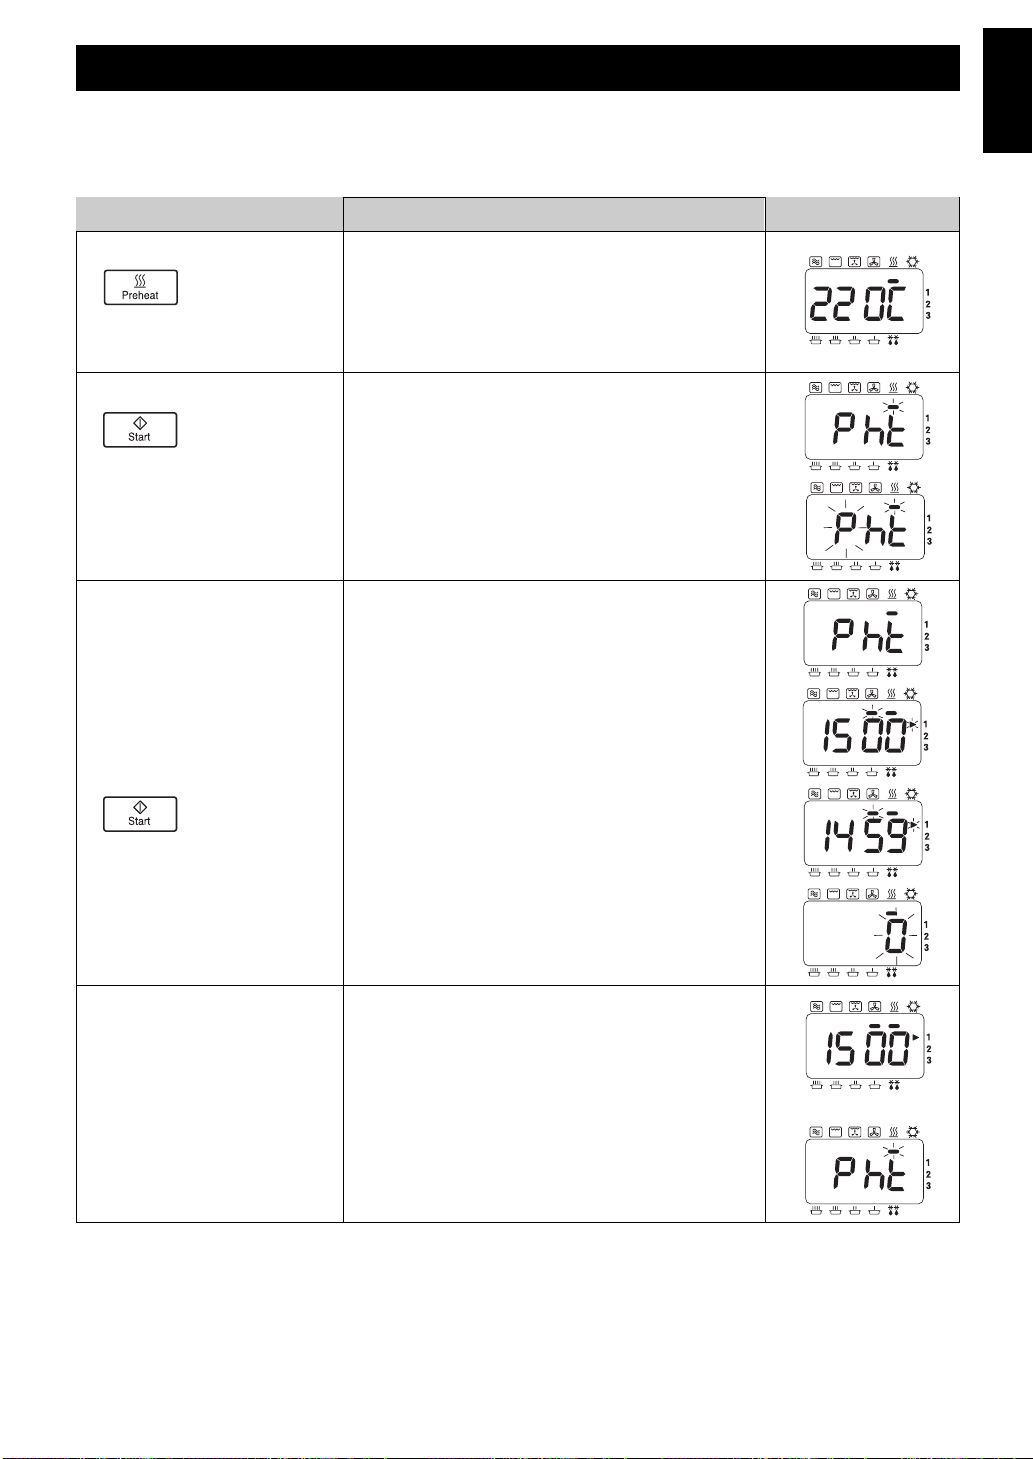
To assist in faster heating and browning results, the PREHEAT feature is designed to keep your oven at a
background temperature of 190˚C, 220˚C or 240˚C for a hot start before using a GRILL, CONVECTION,
FAN GRILL, GRILL CONVECTION or COMBINATION function.
INFORMATION
ACTION
DISPLAY
1 Press PREHEAT Pad.* Select a required Preheat temperature when
display is blank or “0”.
eg. 220˚C
1 press 190˚C
2 presses 220˚C
3 presses 240˚C
2 Press START Pad. Preheat temperature will be maintained at the
selected temperature. Preheat temperature is
reached when “P” flashes. The door must remain
closed. If oven is not used, preheat automatically
switches off after 4 hours.
3 Open Door.
Close Door
Press START Pad.
Place food in oven.
Select programme.
eg. Convection 220˚C 15 mins.
Display window will count down time.
At end of heating programme, beeps 3 times and
“0” flashes in window until door is opened.
4 Open Door.
Display window will indicate the previous
programme.
If START Pad is not pressed within 1 minute, oven
reverts to PREHEAT temperature previously
selected.
After 1 minute
Keeping your Oven Hot
- 21 -
Page 24
Cooling your Oven quickly
To quickly cool the oven cavity, the Panasonic Combi has a Cooling Pad. The Cooling Pad can be used
effectively at the end of a cooking session to cool the oven for cleaning or if it is required for defrosting or
heating by MICROWAVE whilst on PREHEAT function.
INFORMATION
ACTION
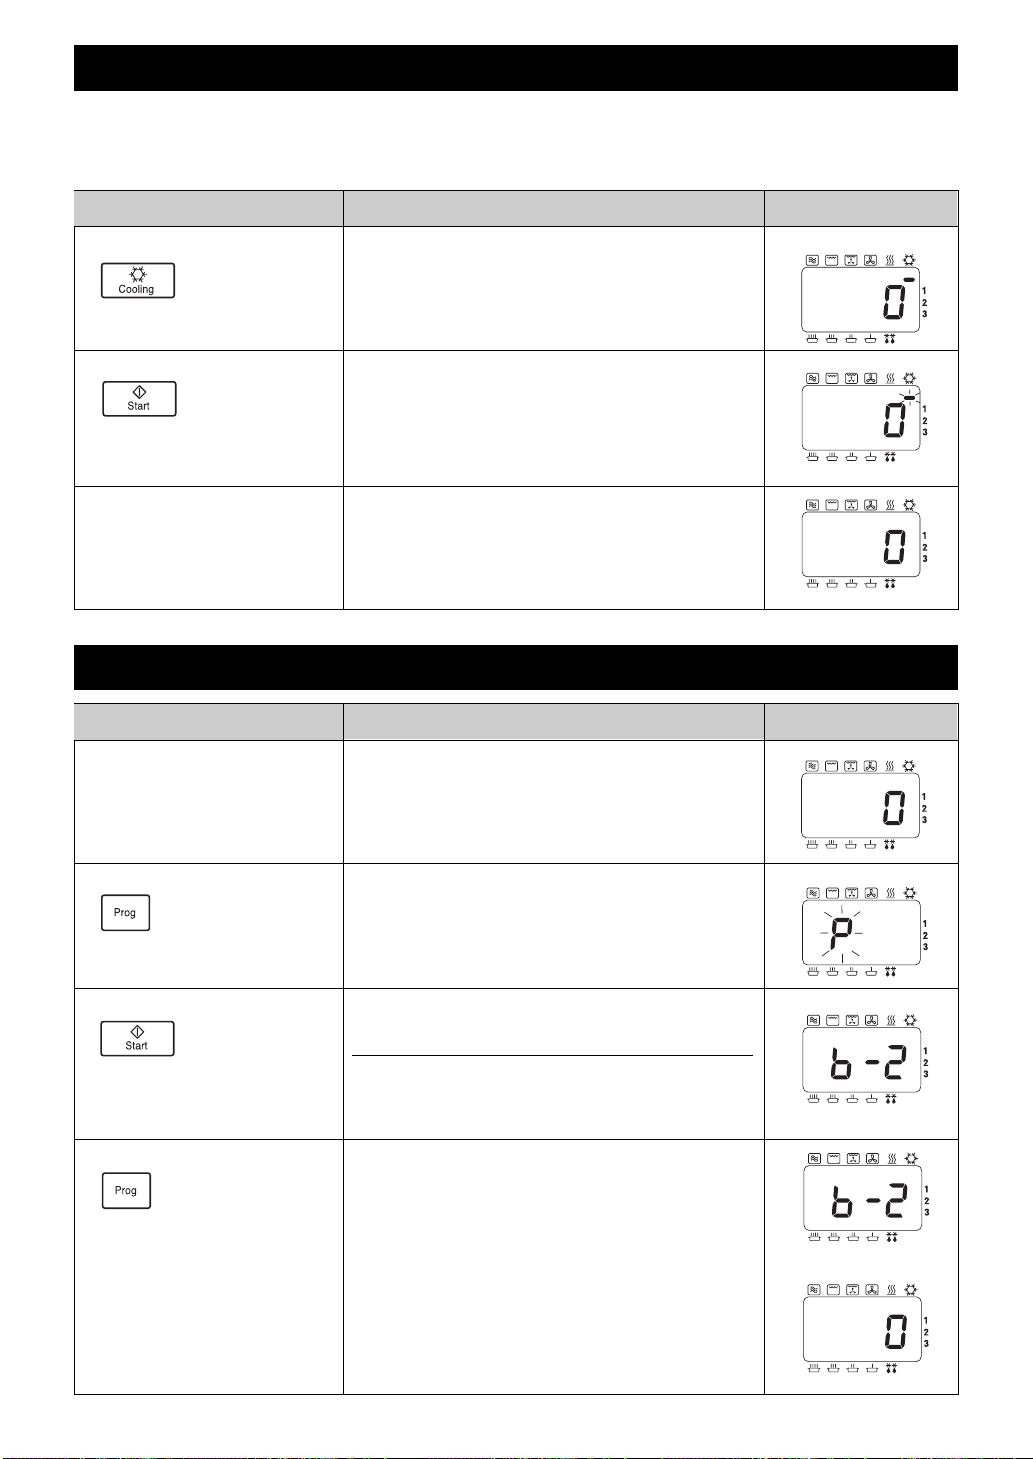
1 Press COOLING Pad. You can select cooling when the display is blank
(door closed), or when “0” is in the display (door
open).
2 Press START Pad.
3 Once the oven has cooled.
• The COOLING fan and CONVECTION fan will
turn on.
• The oven door can be opened or closed.
But cools fastest when the door is open.
• The oven will cool in 3-30 mins. depending on
temperature.
The cooling and convection fans switch off.
DISPLAY
How to change the Beep Tone
INFORMATION
ACTION
1 Open Door.
Keep door open.
The oven lamp will come on.
2 Press PROG Pad. Keep pressed Pad for 2 seconds.
DISPLAY
3 Press START Pad. Press START Pad to choose sound level
required. (eg. twice for Medium)
No. Presses Display Sound level
1 b-3 Loudest
2 b-2 Medium
3 b-1 Quietest
4 b-0 Silent
After 3 seconds
4 Press PROG Pad. After 3 seconds, display returns to “0”.
eg. Display has “0”
- 22 -
Page 25

English
- 23 -
INFORMATION
ACTION
1 Open Door. The oven lamp will come on.
2 Close a door while pushing
START Pad and open a
door.
Keep Door open.
After 3 seconds, display returns to “0”.
DISPLAY
3 Press NUMBER Pad 3.
The currently programmed interval will appear.
eg. 500 hours.
4 Select press NUMBER Pad. Up to 9999 hours.
eg. 600 hours.
Press NUMBER Pads 6, 0 and 0.
5 Press PROG Pad.
How to change Cleaning Interval of the Air Filter
A warning to clean the Air Filter will appear as “FILt” in the Display Window.
The oven is programmed to display the “FILt” warning after 500 hours of use.
When “FILt” appears in the Display Window, remove the Air Filter and clean it with hot soapy water.
Press STOP/RESET Pad to clear the display.
To check the total number of hours used,
1 Open the door. Keep door open.
2 Press Number Pad “3” while pressing START Pad.
3 The total number of hours used will appear in Display Window.
eg. If the oven has been used for 20 hours,
After 3 seconds, display returns to “0”.
Page 26
Care of your Oven and Cleaning
It is essential that you follow these points to get the maximum use from your oven. Microwaves are attracted to
moisture and grease: therefore a dirty oven does not cook EFFICIENTLY.
1. Before Cleaning
Switch off at the socket.
Cool the oven before cleaning. Use the COOLING programme.
(See page 22.)
The door may be left open to cool the oven quickly.
2. Door seals
Pay special attention to cleaning the door seals and door seal areas.
Regularly wipe the Drip Ledge to avoid a build up of moisture and grease.
3. Door
Keep the inside glass of the door clean by wiping regularly with a soft damp cloth. Small amounts of oven
cleaner can be used - DO NOT SPRAY DIRECTLY onto door - spray onto a cloth and wipe over.
Do not use harsh detergents or abrasives.
4. Oven walls
The walls should be wiped regularly with a soft damp cloth. Small amounts of oven cleaner can be used
- DO NOT SPRAY DIRECTLY onto walls - spray onto a cloth and wipe over.
DO NOT ALLOW OVEN CLEANER NEAR THE HOLES IN THE WALL OF THE OVEN.
If corrosive cleaner gets behind the wall, your oven could be damaged.
Do not allow cleaning liquids to seep into openings.
Keep the shelf runners free from grease and food debris.
The back wall of the oven has a heat resistant coating.
Clean this area oven cleaner applied onto a cloth and wipe over.
Do not use wire wool scourers to clean the oven interior.
5. Floor
The wave guide is situated beneath the ceramic base of the oven. Any spills must be wiped off to ensure even
heating. Do not use harsh detergents or abrasives.
6. Roof
The roof contains the 4 Quartz Grill elements. Before cleaning ensure oven has cooled to avoid burns.
Wipe the roof regularly with a damp cloth to minimise build up of grease.
7. Control Panel / SD Card Cover
If the Control Panel and SD Card Cover becomes dirty, clean with a soft, dry or well wrung cloth.
Do not use harsh detergents or abrasive on Control Panel. DO NOT use a saturated cloth as the remaining
moisture may damage the panel.
Excess grease can be softened for ease of cleaning by placing 1-1 1/2 pints of hot water in a microwavesafe bowl with a chopped, fresh lemon. Heat on HIGH Power for 10-15 minutes. The moisture produced on
the walls should then be wiped with a soapy cloth.
- 24 -
Page 27
English
Care of your Oven and Cleaning
8. Accessories
The accessories should be cleaned regularly to maximise efficiency of the oven.
Ceramic/Tray - Clean Ceramic Tray after every use but DO NOT PLACE HOT CERAMIC INSULATING TRAY
directly under a COLD tap - the tray may shatter. You can wash the ceramic tray in the dishwasher or by hand
in hot, soapy water.
Wire Rack Shelf - This should be cleaned after every session. Take care not to use harsh abrasive.
9. Air Filter
Clean the Air Filters occasionally according to the following instructions. Problems may occur with the oven if
the filters become clogged with dirt or grease. If the Air Filter becomes blocked this will cause an overheat
problem on the oven.
a. Remove the right Air Filter from the front bottom skirt
by pulling the Right Pop Pin straight out.
Then slide the filter to the right and lift it off the post
at the centre.
Remove the left Air Filter in the same way.
b. Wash the filters in hot, soapy water.
c. To replace, align the filter with the centre post,
and holding the front of the Pop Pin forward, locate,
the back of the pin into its hole. Press the front of the
pin and it will pop into place. Be sure to replace the
air filters before using the oven.
Note: When “FILt” sign appears in Display Window, remove Air Filter and clean it with hot soapy water.
Press STOP / RESET Pad to clear the display.
10. Replacing Oven Lamp
If the Oven lamp burns out you can replace it yourself by following these simple directions:
a. Unscrew the Oven Lamp cover, located on the left side of the cabinet.
b. Replace the old lamp with a new 240/220V 25W Max, E-14 lamp.
c. Close the Oven Lamp Cover and replace screw.
Damage
If the oven becomes damaged in any way, contact a Service Engineer before continuing use.
CAUTION:
Do not clean this appliance with a water jet.
Do not use any non-specified chemical cleaners or spray anything directry into the oven cavity.
CAUTION:
Switch off from electricity supply before replacing the Oven Lamp.
Air Filter
Pop Pin
Post
Pop Pin
- 25 -
Page 28
- 26 -
If an “F” Appears In The Display
Your Panasonic Combi Oven is equipped with a Self Diagnostic
Failure Code System; this means the oven monitors its own
operation and will show a failure code in the display window in the
unlikely event of a malfunction.
If a Failure Code appears in the display window (it will appear as an
“F” then a two digit number) follow these steps:
1. Close the door and switch off at socket. Ensure all air vents are
clear.
2. Leave 1 minute and then reconnect the oven at the mains.
3. Open the door and place food or a jug of water in the cavity,
close the door.
4. Try the same function that had been in operation prior to theb
appearance of the Failure Code in the display window.
If the Failure Code appears again, then contact the dealer from
which you purchased the oven, the manufacturer or a known
Approved Service Agent.
If a “U” Appears In The Display
A fault with the SD Memory Card will also show as a Failure Code
in the display window (it will appear as a “U” then a two digit
number). Follow the steps in the following chart.
When to Call a Service Engineer
CODE PROBREM
U16
U17
U19
SD Memory Card is
locked.
There is no
programme data
from this oven on
the SD Memory
Card.
Programme data of
a SD Memory Card
are damaged.
SD Memory Card is
not inserted.
WHAT TO DO
Take out the SD Memory Card & remove the
Lock. (see below).
Insert the SD Memory Card.
An SD Memory Card confirms that it is
attached to this oven. Please check whether
there is programme data from the oven on
the SD Memory Card in your personal
computer.
(See “Storing Programme Data on SD
Memory Card”)
When programme data is deleted, please
contact Service Engineer.
Remove the SD Card Cover & insert an
SD Memory Card.
Lock is removed
when this part is
pushed up wards.
LOCK
Recipe
Card
Page 29
English
NE-C1475
230 V / 50 Hz, Single phase
16 A
14.5A 3.3kW
2350 W
1950 W
1950 W
1350 W (IEC Test Procedure)
1840 W
1800 W
2450 MHz
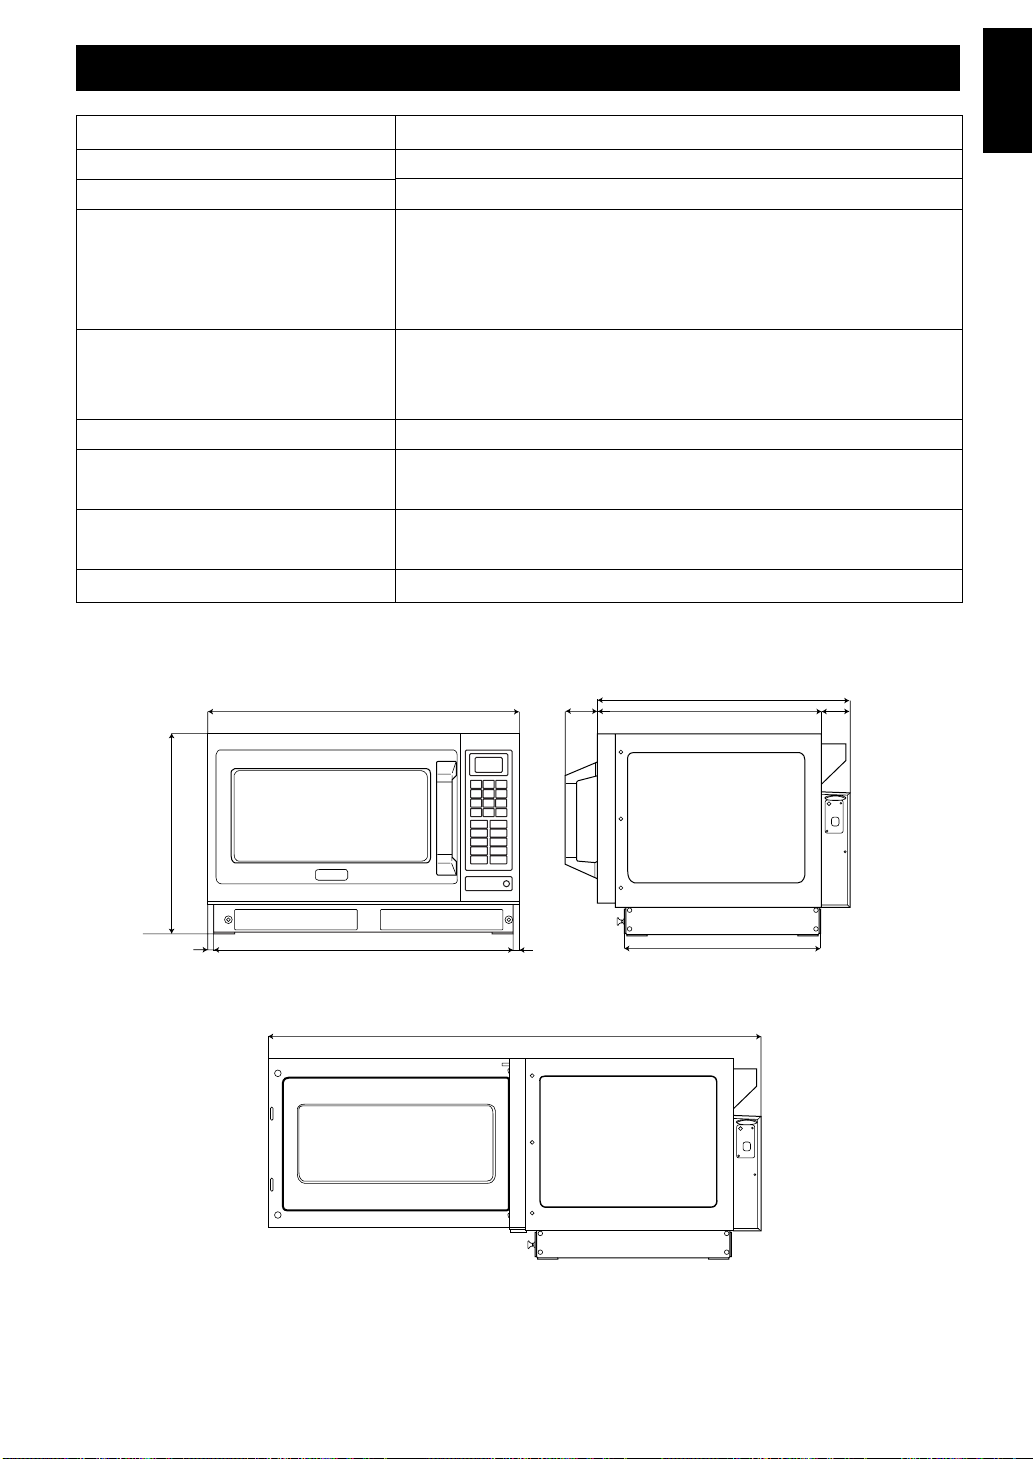
600 mm x 484 mm x 383 mm
406 mm x 336 mm x 217 mm
41 kgs (includes accessories)
22
Specifications subject to change without notice.
Technical Specifications
Model No.
Power Source
Outlet
Required Power - Max
- Microwave
- Grill
- Convection Heater
Output - Microwave
Grill
Convection Heater
Frequency
Outer Dimensions
(W x D x H)
Cavity Dimensions
(W x D x H)
Net Weight
- 27 -
600
61
484
430 54
383
10.5 10.5579
379
944
Page 30

Information on Disposal for Users of Waste Electrical & Electronic Equipment
(private households)
This symbol on the products and/or accompanying documents means that used electrical and
electronic products should not be mixed with general household waste.
For proper treatment, recovery and recycling, please take these products to designated
collection points, where they will be accepted on a free of charge basis. Alternatively, in some
countries you may be able to return your products to your local retailer upon the purchase of
an equivalent new product.
Disposing of this product correctly will help to save valuable resources and prevent any
potential negative effects on human health and the environment which could otherwise arise
from inappropriate waste handling. Please contact your local authority for further details of your nearest
designated collection point.
Penalties may be applicable for incorrect disposal of this waste, in accordance with national legislation.
For business users in the European Union
If you wish to discard electrical and electronic equipment, please contact your dealer or supplier for further
information.
Information on Disposal in other Countries outside the European Union
This symbol is only valid in the European Union.
If you wish to discard this product, please contact your local authorities or dealer and ask for the correct
method of disposal.
- 28 -
Page 31

- 29 -
Deutsch
1.Erdungsanweisungen
WICHTIG: FÜR IHRE PERSÖNLICHE
SICHERHEIT MUSS DIESES GERÄT KORREKT
GEERDET WERDEN.
Wenn eine Steckdose nicht geerdet ist, liegt es in
der persönlichen Verpflichtung des Kunden, diese
gegen eine entsprechend geerdete Steckdose
austauschen zu lassen.
SPANNUNGS- UND STROMWARNUNG
Die verwendete Spannung muss dieselbe sein,
wie die, die am Herd angegeben ist. Die
Verwendung einer höheren Spannung als der
angegebenen ist gefährlich und kann zu einem
Feuer oder anderen Unfällen mit Folgeschäden
führen.
AUFSTELLEN DES HERDES
Stellen Sie den Herd auf eine flache, stabile
Oberfläche. Stellen Sie den Herd nicht an einem
heißen oder feuchten Platz auf,
z.B. in der Nähe eines Gas- oder Elektroherdes.
Betreiben Sie den Herd nicht, wenn die
Zimmertemperatur höher als 40°C ist und/oder die
Luftfeuchtigkeit über 85% liegt. Eine freie
Luftzufuhr um den Herd herum ist wichtig.
Es besteht die Möglichkeit kleinerer Störungen
durch schwache Sendesignalen, wenn der Ofen
zu nah an einem Radio- oder Fernsehgerät
aufgestellt wird. Für einen sicheren und effizienten
Betrieb muss der Herd eine ausreichende
Luftzufuhr zu den Belüftungsgittern haben, d.h.
5 cm an den Seiten und hinten, 20 cm oberhalb.
Dieser Herd muss so aufgestellt werden, dass der
Stecker immer erreichbar ist.
2.Spannung und Strom
Die verwendete Spannung muss dieselbe sein,
wie die, die am Herd angegeben ist. Die
Verwendung einer höheren Spannung als der
angegebenen ist gefährlich und kann zu einem
Feuer oder anderen Unfällen mit Folgeschäden
führen.
3.Service
Es ist gefährlich für Personen, die nicht als
Servicetechniker vom Hersteller geschult wurden,
Reparaturarbeiten durchzuführen.
Entfernen Sie nie das äußere Gehäuse des
Ofens.
Hohe Spannungen liegen innerhalb des Gehäuses
an. Reparaturen und Anpassungen sollten nur von
geschultem Servicepersonal durchgeführt werden.
Wenden Sie sich an den Hersteller.
Türdichtungen
Versuchen Sie nicht, die Türdichtungen zu
verändern oder Türen zu reparieren, das
Steuergehäuse zu öffnen, die
Sicherheitssperrschalter oder einen anderen Teil
des Herdes zu verändern. Entfernen Sie nicht die
Umhüllung des Herdes.
Die Türdichtungen und Dichtungsbereiche sollten
immer mit einem feuchten Tuch gesäubert
werden.
4.Leerbetrieb
Das Gerät darf nicht im Modus MIKROWELLE
oder KOMBINATION betrieben werden, OHNE
DASS SICH NAHRUNGSMITTEL IM HERD
BEFINDEN. Ein Leerbetrieb beschädigt das Gerät.
5.Kabel
Wenn das Stromkabel beschädigt ist, muss es
vom Hersteller oder einem Serviceagenten oder
einer entsprechend qualifizierten Person
ausgetauscht werden, um Schaden zu vermeiden.
Tauchen Sie den Herd nicht in Wasser ein. Halten
Sie das Kabel von erwärmten Oberflächen
entfernt. Lassen Sie das Kabel nicht lose über die
Kante des Tisches oder der Arbeitsplatte
herabhängen. Die Rückseite des Gerätes wärmt
sich bei der Verwendung auf. Lassen Sie das
Kabel nicht mit der Rückseite des Gerätes oder
der Gehäuseoberfläche in Kontakt kommen.
6.Heiße Oberflächen
Die Außenflächen des Herdes, einschließlich der
Belüftungsgitter am Gehäuse und die Ofentür
werden bei der Benutzung heiß. (Grill, Heißluft und
Kombination) Passen Sie auf, wenn Sie die Türe
öffnen oder schließen und wenn Sie
Nahrungsmittel und Zubehör hineinstellen oder
herausnehmen.
Der Herd hat Heizkörper, die sich oben und im
hinteren Bereich befinden. Nach der Verwendung
sind der Himmel, die Seiten und der Boden sehr
heiß.
7.Ausschalten.
Im Falle eines elektronischen Fehlers kann der
Herd nur an der Steckdose ausgeschaltet werden.
Bei diesem Produkt handelt es sich um ein Gerät, das die europäische Norm für EMV-Funkstörungen
(EMV = Elektromagnetische Verträglichkeit), EN 55011, erfüllt. Gemäß dieser Norm ist dieses Produkt ein
Gerät der Gruppe 2, Klasse B und hält alle Grenzwerte ein. Gruppe 2 bedeutet, dass in diesem Gerät
Hochfrequenz-Energie für das Erwärmen oder Garen von Lebensmitteln absichtlich als elektromagnetische
Strahlung erzeugt wird. Klasse B sagt aus, dass dieses Produkt in einem normalen Wohnbereich betrieben
werden darf.
Sicherheitsinformationen
Page 32

- 30 -
Wenn Sie Ihren Herd zum ersten Mal auspacken
Aufstellen des Herdes
1.Lüftungsventile
Dieser Herd erfordert für eine maximale
Kühlwirkung eine freie Luftzufuhr auf der Rückseite.
BLOCKIEREN SIE NICHT DIESE
BELÜFTUNGSGITTER.
2.Maximale Zimmertemperatur
Betreiben Sie den Herd nicht, wenn die
Zimmertemperatur höher als 40°C ist und/oder die
Luftfeuchtigkeit über 90% liegt. Eine freie
Luftzufuhr um den Herd herum ist zwingend
erforderlich.
3.Verwendung im Freien
Verwenden Sie dieses Gerät nicht draußen.
4.Aufbewahrung des Zubehörs
Wenn der Herd nicht verwendet wird, lagern Sie
keine Objekte außer dem speziellen Ofenzubehör
in dem Herd, für den Fall, dass dieser
versehentlich eingeschaltet wird. Im Falle eines
elektronischen Fehlers kann der Herd nur an der
Steckdose ausgeschaltet werden.
Betrieb
1.Untersuchen Sie Ihren Herd
Packen Sie den Herd aus, verwahren Sie alle
Verpackungsmaterialien und untersuchen Sie den
Ofen auf Schäden wie Beulen, gebrochene
Türscharniere oder Risse in der Tür.
Benachrichtigen Sie unverzüglich den Lieferanten,
wenn das Gerät beschädigt ist. Installieren Sie das
Gerät NICHT, wenn es beschädigt ist.
2.Türdichtungen
Das Gerät sollte auf Schäden an den
Türdichtungen und Türdichtungsbereichen
untersucht werden, und für den Fall, dass diese
beschädigt sind, darf das Gerät nicht in Betrieb
genommen werden, bis es von einem durch den
Hersteller geschulten Servicetechniker repariert
wurde.
3.Garantiekarte
Füllen Sie die beiliegende vorbeschriftete
Garantierkarte vollständig aus und senden Sie sie
zurück.
4.Entfernen der Schutzfolie
Eine Schutzfolie wurde aufgebracht, um ein
Verkratzen der Außenflächen beim Transport zu
vermeiden. Ziehen Sie diese Folie vor der
Installation oder Benutzung ab.
1.Aufstellen des Herdes
Der Herd muss auf einer flachen, stabilen
Oberfläche aufgestellt werden. Für einen
ordnungsgemäßen Betrieb muss der Herd eine
ausreichende Luftzufuhr haben.
Ein Spalt von mindestens 5 cm muss rechts und
links vom Herd und an Rückwand vorhanden sein.
Ein Mindestabstand von 20 cm muss oberhalb des
Ofens und an den 2 Abluftventilen auf der
Rückseite vorhanden sein.
2.Regale
Stellen Sie den Herd nicht direkt auf einen
Regalboden über oder neben einem Gas- oder
Elektrokochfeld, Herd oder einer Friteuse. Der
Herd könnte beschädigt werden. Es ist gefährlich,
diesen Herd auf einen Regalboden zu stellen, der
so hoch ist, dass Nahrungsmittel und Zubehör
nicht sicher vom Benutzer herausgenommen
werden können.
3.Stapeln
Versuchen Sie NICHT, diese Herde zu stapeln.
1.Vor der Benutzung
Vor der ersten Verwendung der Funktionen
HEISSLUFT, KOMBINATION, GRILL, GRILL
HEISSLUFT oder UMLUFT-GRILL lassen Sie den
Herd ohne Nahrungsmittel für 20 Minuten im Modus
HEISSLUFT bei 250°C laufen. Hierbei verbrennt
das für den Rostschutz verwendete Öl. Entfernen
Sie dazu alle Zubehörteile aus dem Herd.
2.Rauch/Feuer
Wenn beim Kochen im Modus MIKROWELLE
Rauch gesichtet wird, lassen Sie die Herdtür
geschlossen und schalten Sie den Ofen aus oder
trennen Sie ihn vom Stromnetz. Wenn Materialien
im Herd beginnen sollten zu brennen, halten Sie
die Tür geschlossen und drücken Sie die
Schaltfläche STOPP/RESET.
Ziehen Sie den Stecker. Schalten Sie, wenn
möglich, den Strom an der Sicherung oder dem
Stromverteiler aus.
3.Störungen
Es besteht die Möglichkeit kleinerer Störungen
durch schwache Sendesignalen, wenn der Ofen
zu nah an einem Radio- oder Fernsehgerät
aufgestellt wird.
4.Betrieb der Herzkörper
Bei Verwendung der Stufen HOCH, MEDIUM,
NIEDRIG und KÖCHELN wird die Hälfte der
Grillelemente und der HEISSLUFTS-Lüfter
betrieben, um die Bildung von Kondenswasser zu
vermeiden. Achten Sie darauf, DIE OFENDECKE
NICHT ZU BERÜHREN.
5.Reinigung
Reinigen Sie dieses Gerät nicht mit einem
Wasserstrahl. Wenn Sie den Herd nicht in einem
sauberen Zustand halten, können Schädigungen im
Inneren des Herdes auftreten, die die Lebensdauer
des Gerätes verkürzen und möglicher Weise
gefährliche Situationen hervorrufen können.
Vorsicht
Page 33

- 31 -
Deutsch
Wichtige Informationen – Sorgfältig Lesen
1.Aufwärmzeiten
Da die Aufwärmzeiten bei MIKROWELLE und
KOMBINATION sehr viel kürzer sind, als bei
anderen Kochmethoden, ist es immens wichtig,
dass die Aufwärmzeiten nicht überschritten werden,
ohne zunächst die Nahrungsmittel zu prüfen.
Die in den Tabellen angegebenen Kochzeiten sind
nur Näherungswerte. Die Kochzeiten
beeinflussende Faktoren sind: Starttemperatur,
Menge, Größe und Form der verwendeten
Nahrungsmittel und Teller.
2.Kleine Mengen an Nahrungsmitteln
Kleine Mengen an Nahrungsmitteln oder Produkte
mit einem niedrigen Feuchtigkeitsgehalt können
brennen, austrocknen oder Feuer fangen, wenn
sie zu lange gekocht werden.
3.Nahrungsmittelbestandteile
Nahrungsmittel mit hohem Zucker-, Salz-, Fett- und
Feuchtigkeitsgehalt erwärmen sich schneller in der
Mikrowelle, da ihre physikalischen Eigenschaften
die Mikrowellenenergie anziehen. Dichtere
Nahrungsmittel mit hohem Protein- und Faserwert
absorbieren Mikrowellenenergie langsamer, was
eine längere Aufwärmdauer verursacht
.
4.Nahrungsmittel mit viel Fett/Zucker
Es ist wichtig, die Kochzeit für Nahrungsmittel mit
hohem Fett-, Alkohol- und Zuckergehalt richtig
einzustellen. Wenn diese Nahrungsmittel zu lange
von Mikrowellen erhitzt werden, können sie sich
entzünden. LASSEN SIE SIE DAHER NIEMALS
UNBEAUFSICHTIGT, z.B. Donuts, Sirup-/
Puddingnachspeisen, Christmas Puddings und
gefüllte Pasteten.
5. Eier
Kochen Sie mit Hilfe der MIKROWELLE keine Eier
in der Schale. Es kann sich Druck aufbauen und
die Eier können explodieren.
6.Häute anstechen
Kartoffeln, Äpfel, Eidotter, ganze Gemüse und
Würstchen sind Beispiele für Nahrungsmittel mit
nicht-poröser Haut. Diese müssen zuerst mit einer
Gabel angestochen werden, bevor Sie mit der
MIKROWELLE gekocht werden, damit sie nicht
platzen.
7.Frittieren
Versuchen Sie nicht, etwas in Ihrem Herd zu
frittieren.
8.Prüfen der Innentemperatur
Um sicherzustellen, dass alle für Nahrungsmittel
giftigen Bakterien wie Lysterien und Salmonellen
zerstört sind, prüfen Sie, ob die innere Temperatur
der Nahrungsmittel mindestens 72°C beim
Aufwärmen erreicht. Verwenden Sie ein
entsprechendes Thermometer mit Fühleraufsatz,
um die Temperatur zum Ende der Garzeit zu
kontrollieren. Wärmen Sie über einen längeren
Zeitraum auf, wenn die richtigen Temperaturen
nicht erreicht werden. Verwenden Sie KEIN
haushaltsübliches Fleischthermometer – nur
korrekt geeichtes Werkzeug.
9.Flüssigkeiten
Wenn Sie Flüssigkeiten mit Hilfe der
MIKROWELLE erwärmen, z.B. Suppen, Saucen
und Getränke, kann ein Erhitzen über den
Siedepunkt hinaus auftreten, ohne dass Blasen
erkennbar wären. Dies kann zu einem plötzlichen
Überkochen der heißen Flüssigkeit führen. Um
diese Möglichkeit zu verhindern, sollten die
folgenden Schritte unternommen werden:
a. Vermeiden Sie Behälter mit geraden Wänden
und engen Ausgüssen.
b. Nicht überhitzen.
c. Rühren Sie die Flüssigkeit durch, bevor Sie den
Behälter in den Herd stellen und wieder nach
Ablauf der halben Aufwärmzeit.
d. Lassen Sie nach dem Erhitzen die Flüssigkeit
für einen kurzen Zeitraum im Herd stehen,
rühren Sie dann erneut um, bevor Sie vorsichtig
den Behälter entnehmen.
10.Papier, Plastik
Wenn Sie Nahrungsmittel in Plastik- oder
Papierbehältern erwärmen, prüfen Sie häufig den
Herd, da sich diese Art von Behälter bei
Überhitzung entzünden kann. (Siehe Seite 35.)
Benutzen Sie keine Produkte aus Recyclingpapier,
da dieses Unreinheiten enthalten kann, die bei der
Verwendung Funken und/oder Feuer entstehen
lassen, wenn nicht ausdrücklich auf der
Verpackung auf die Mikrowellentauglichkeit
hingewiesen wird.
11.Aufwärmen
Es ist wichtig, dass das erhitzte Produkt
„kochendheiß“ (72°C) serviert wird. Überprüfen Sie
dies immer vor dem Servieren und falls Sie Zweifel
haben, stellen Sie es noch einmal in den Herd für
eine weitere Erwärmung.
12.Standzeiten
Standzeiten sind unverzichtbar für Nahrungsmittel,
die per MIKROWELLE oder KOMBINATION
gekocht oder erwärmt wurden. Während dieser
Standzeit durchdringt die Hitze die Nahrungsmittel
bis in den Kern, um es komplett durchzukochen.
Je dichter das Nahrungsmittel, je länger ist die
Standzeit. Aufgewärmte Nahrungsmittel erfordern
auch eine Standzeit.
Feuer!
Wenn Materialien im Herd beginnen sollten zu
brennen, halten Sie die Tür geschlossen und
drücken Sie die Schaltfläche STOPP/RESET
Schalten Sie, wenn möglich, den Strom an der
Steckdose aus oder trennen Sie die Sicherung
oder am Stromverteiler.
Feuer!
Wenn die empfohlenen Kochzeiten überschritten
werden, verdirbt das Essen und unter extremen
Umständen können diese Feuer fangen und
möglicher Weise das Innere des Herdes
beschädigen. Es ist unverzichtbar, dass der Herd
regelmäßig gereinigt und von überschüssigen
Schmierstoffen befreit wird. Siehe Pflege Ihres
Herdes und Reinigung. (Siehe Seiten 52 - 53.)
Page 34

- 32 -
Wichtige Informationen – Sorgfältig Lesen
Produktdiagramm
Mitgeliefertes Zubehör
(8) Luftfilter
BITTE ACHTEN SIE DARAUF, DASS DIE
LUFTFILTER VOR BENUTZUNG DES
HERDES INSTALLIERT WERDEN.
Betrieb ohne Luftfilter kann dazu führen, dass
Schmutz und Fett die Lüftung blockiert, so dass
der Herd überhitzt.
Siehe Seite 53 für die Installation.
(
12) Keramik-Isolierteller
Teilenr.
A06033230BP
Bei Verwendung von Metalltellern bei
KOMBINATION stellen Sie bitte den KeramikIsolierteller zwischen den
Nahrungsmittelbehälter und das Gitter.
Der Keramik-Isolierteller sollte während des
Aufwärmens bei einem Kombinationsprogramm
im Herd verbleiben.
Wenn Sie Nahrungsmittel direkt auf den
Keramik-Isolierteller legen, stellen Sie sicher,
dass er sauber und frei von Öl ist.
Lassen Sie den Keramik-Isolierteller vor der
Reinigung ABKÜHLEN, um Brüche zu
vermeiden. Der Keramik-Isolierteller sollte auf
dem Boden des Herdes platziert werden, um
Tropfen beim Grillen aufzufangen.
(13)Gitter
Teilenr. A06023C50BP
Das Gitter kann bei HEISSLUFT,
KOMBINATION, GRILL HEISSLUFT, GRILL
und UMLUFT-GRILL verwendet werden.
Lassen Sie das Gitter NICHT im Herd bei der
Funktion MIKROWELLE
. STELLEN SIE KEINE
METALLBEHÄLTER DIREKT AUF DAS
GITTER, wenn Sie die Funktion
KOMBINATION nutzen.
Verwenden Sie den Keramik-Isolierteller.
Installation des Gitters
Einlegerichtung in den Garraum
(14)SD Memory Card
Teilenr.
PR-SD016BCS0
Eine SD Memory Card wird mit dem Herd
geliefert und hat Excel-Dateien gespeichert,
damit Sie mit Hilfe Ihres PCs den Herd
programmieren können. Bis zu 99 Ihrer eigenen
Kochprogramme können mit Hilfe der SD
Memory Card gespeichert werden. Wenn Ihre
SD Card verloren geht oder Fehler zeigt,
wenden Sie sich bitte an einen
Servicetechniker. Siehe „Programmdaten auf
einer SD Memory Card speichern“ für
Informationen zur Verwendung der SD Card
und der Speicherprogrammierungssoftware.
VORNE
Es gibt keine Anti-Kipp Sicherheitsverriegelung
an dem Gitter – passen Sie also auf, wenn Sie
Nahrungsmittel entnehmen.
13.Zubehörteile
Befolgen Sie die speziellen Anweisungen in dieser
Anleitung für die korrekte Handhabung von
Herdzubehörteilen und Kochwerkzeugen. Ein
Nichtbeachten kann den Herd beschädigen.
Seien Sie vorsichtig, wenn Sie Nahrungsmittel
und/oder Zubehör aus dem Herd entnehmen. Die
Gitterablage verfügt über KEINE Anti-Kipp
Verriegelung – seien Sie vorsichtig, wenn Sie sie
herausziehen, um Nahrungsmittel zu entnehmen.
14. Kochbehältnisse
Bevor Sie die Funktion MIKROWELLE und
KOMBINATION verwenden, überprüfen Sie
immer, ob alle Behälter dafür geeignet sind.
(Siehe Seite 35.)
Nutzen Sie keinen verschlossenen Behälter in der
MIKROWELLE, da diese sonst explodieren.
15.Lüftungsmotorbetrieb
Nach Verwendung von MIKROWELLE,
HEISSLUFT, KOMBINATION, GRILL, UMLUFTGRILL oder GRILL HEISSLUFT läuft der
Lüftungsmotor für ca. 5 Minuten, um die
elektronischen Komponenten abzukühlen. Dies ist
normal und Sie können die Nahrungsmittel
herausnehmen, auch wenn der Lüfter in Betrieb
ist.
16.Babyfläschchen
Fütterfläschchen und Babyflaschen sollten beim
Erhitzen geöffnet werden und der Inhalt muss
gerührt oder geschüttelt werden, außerdem muss
die Temperatur vor dem Verbrauch geprüft
werden, damit keine Verbrennungen verursacht
werden.
17.Wenn Kinder den Ofen benutzen
Erlauben Sie Kindern die Benutzung des Herdes
ohne Aufsicht nur, wenn entsprechende
Anweisungen gegeben wurden, so dass das Kind
den Herd sicher verwenden kann und die
Gefahren einer unangemessenen Verwendung
versteht.
Page 35

- 33 -
Deutsch
Produktdiagramm
Ihr Herd Erläuterung
(1) Abdeckung der Herdlampe
(2) Quartz Grillelemente
(3) Heißluftslüfter und -heizer
(4) Türgriff
(5) Anzeige
(6) Bedienfeld
(7) SD Card Abdeckung
(9) Herdabluftgitter
(10)Keramikboden
(11)Regalstützer (oben, unten)
Bedienfeld
(15)Ziffernblock
(16)Prog Schaltfläche
(17)Mikrowelle Schaltfläche
(18)Grill Schaltfläche
(19)Umluft-Grill Schaltfläche
(20)Heißluft Schaltfläche
(21)Stopp/Reset Schaltfläche
Vor dem Aufwärmen:
Einmal drücken, um die Anzeige zu
leeren.
Während des Aufwärmens:
Einmaliges Drücken stoppt den
Aufwärmzyklus und zweimal Drücken
löscht die Anzeige.
N.B. Siehe Seite 47 für Betrieb bei
Programmsperre.
(22)Prog-Sperre Schaltfläche
(23)Vorwärmen Schaltfläche
(24)Kombination Schaltfläche
(25)Abkühlen Schaltfläche
(26)Herdbeleuchtung Schaltfläche
Die Herdbeleuchtung schaltet sich aus, wenn
die Türe geschlossen wird. Wenn Sie die
Nahrungsmittel prüfen wollen, drücken Sie die
Herdbeleuchtung Schaltfläche, sie wird sich
dann für 10 Sekunden einschalten. Die
Herdbeleuchtung schaltet sich immer ein, wenn
die Tür geöffnet wird.
(27)Start Schaltfläche
Wiederholungsfunktion:
Sie können dasselbe Aufwärmprogramm
wiederholen, wenn Sie die START Schaltfläche
innerhalb von 1 Minute nach Abschluss des
vorherigen Durchlaufs drücken.
Wenn die Schaltfläche START 1 Minute nicht
gedrückt wird, wird die Anzeige bei
geschlossener Herdtüre geleert.
Nach 30 Minuten schaltet sie zurück auf „0“,
wenn die Tür offen ist.
Anzeige
Der Positionszeiger leuchtet auf und zeigt die
Programmeinstellung an. Prüfen Sie immer die
Zeigerposition, bevor Sie die Schaltfläche START
betätigen.
(28)Mikrowelle
(29)Grill
(30)Umluft-Grill
(31)Heißluft
(32)Vorwärmen
(33)Abkühlen
(34)Mikrowellenstufe
(35)Kochstufenanzeige
Page 36

- 34 -
SD Memory Card
●
Eine SD Memory Card ist beim Kauf des Gerätes beigefügt. Diese ermöglicht Ihnen, bis zu 99 MemoryProgramme im Herd zu speichern.
●
Verwenden Sie die Karte zum Speichern oder Abrufen von Memory-Programmen.
※Sie können die Memory-Programmdaten auf Ihrer SD Memory Card mit Ihrem PC aufzeichnen. Siehe
„Programmdaten auf einer SD Memory Card speichern“.
SD Memory Card einlegen / entfernen
※Bevor Sie eine SD Memory Card einlegen/entfernen, trennen Sie immer den Stecker des Herdes vom
Stromnetz. Oder es ist möglich, dass das Anzeigefenster geleert ist, andernfalls können die Daten
auf der SD Memory Card beschädigt sein.
1. Schrauben Sie die SD Card Abdeckung los und entfernen Sie sie.
2. Drücken Sie mit dem Finger auf die SD Memory Card, um sie herauszuziehen.
Entnehmen Sie sie dann.
1. Legen Sie eine SD Memory Card mit dem Etikett nach oben, wie mit Hilfe von
▲, gezeigt, ein, bis diese einrastet.
2. Setzen Sie die linke Kante der SD Card Abdeckung ein.
Schrauben Sie rechts die Abdeckung fest.
Entfernen
Einlegen
Vorsicht:
1. Schließen Sie immer die SD Card Abdeckung, außer wenn eine SD Memory Card eingelegt / entfernt wird,
um das Eindringen von Wasser oder Staub zu verhindern.
2. Legen Sie nur eine für diesen Herd geeignete SD Memory Card ein. Verwenden Sie keine anderen
Memory Cards.
3. Heben Sie die entfernte SD Memory Card außer Reichweite von statischer Elektrizität auf.
4. Nehmen Sie SD Memory Cards nie auseinander oder verändern Sie diese.
5. Versuchen Sie nicht, SD Memory Cards einem physischen Schlag auszusetzen. Nicht biegen, fallen lassen
oder nass werden lassen.
6. Berühren Sie nie die Metallanschlüsse eine SD Memory Card mit Ihrer Hand oder Metall.
7. Entfernen Sie nie das Etikett. Kleben Sie kein anderes Etikett auf eine SD Memory Card.
8. Lassen Sie keine SD Memory Card an Orten liegen, an denen hohen Temperaturen oder direktes
Sonnenlicht auftreten.
9. Lassen Sie keine SD Memory Cards an Orten liegen, an denen korrosive Gase auftreten.
10. Wenn Ihre SD Card verloren geht oder Fehler zeigt, wenden Sie sich bitte an einen Servicetechniker, um
einen Ersatz zu erhalten.
Page 37

- 35 -
Deutsch
Zu verwendende Behältertypen
MIKROWELLE
1. Glas
VERWENDEN:
Hitzebeständiges Glas, z.B. Pyrex
NICHT VERWENDEN:
Dünnes Glas, Bleikristall, das brechen oder
platzen kann.
2. Porzellan/Keramik
VERWENDEN:
Glasierte Porzellanteller, Porzellan- und
Keramikteller, die zum Kochen geeignet sind.
NICHT VERWENDEN:
Feine Porzellanteller mit Metallmustern/rändern. Becher mit geklebten Griffen.
3. Töpferwaren/Tonwaren/Steingut
VERWENDEN:
Wenn vollständig glasiert.
NICHT VERWENDEN:
Wenn unglasiert – diese Teller können
Wasser aufnehmen, das die Energie
absorbiert. Dies macht die Teller heiß und
erhöht die Garzeit.
4. Folie/Metall
VERWENDEN:
Nur beim Aufwärmen:
Einzelteil, offene Folienbehälter. Achten Sie
darauf, dass die Behälter keine WÄNDE oder
die TÜRE des Herdes berühren. Nicht in
Folienbehältern kochen. Kleine Mengen von
Alufolie können verwendet werden, um
Metallteile beim Auftauen abzudecken –
achten Sie darauf, dass die Folie nicht die
Seiten oder die Türe berührt.
NICHT VERWENDEN:
Metallteller, Gitter, jeder Teller mit
METALLMUSTER oder RAND.
METALLSPIESSE. KEINE
FOLIENBEHÄLTER VERWENDEN – es
können FUNKEN auftreten und die Behälter
werden VERBEULT/BESCHÄDIGT.
Verwenden Sie keine Teller der Le CruesetArt (Gusseisen mit Emaille bedeckt). Diese
können nur bei Heißluft oder Grill verwendet
werden.
5. Plastik
VERWENDEN:
Hochtemperaturplastik wie
widerstandsfähiges Polysulfon Plastik,
weiche flexible Teller. (Entfernen Sie alle
Metallklammern.)
NICHT VERWENDEN:
Melamin, Polypropylen, Phenol Urea, auch
keine Plastikgefrierbeutel und Behälter, z.B.
Margarine, Joghurt und Mayonnaise-Tuben.
6. Frischhaltefolien
VERWENDEN:
Nicht-Plastik Frischhaltefolie, entwickelt für
die Verwendung in der Mikrowelle. Lassen
Sie die Folie nicht die Nahrungsmittel
berühren. Um Verbrennungen durch Dampf
zu verhindern, stechen Sie die Folie an, um
den Dampf entweichen zu lassen und
entfernen Sie vorsichtig die Folie von dem
Teller.
NICHT VERWENDEN:
Folie nur für Nahrungsmittel.
7. Holz/Korb
VERWENDEN:
Holzstäbchen für Nahrungsmittel.
NICHT VERWENDEN:
Körbe, Holzschalen (bei längerer
Verwendung trocknen diese aus und können
sich entzünden)
8. Papier
VERWENDEN:
Wegwerfbare, polyester-beschichtete
Pappteller, wenn für Mikrowellen geeignet.
NICHT VERWENDEN:
Papierservietten (diese können sich
entzünden), wachsbeschichtete Becher,
Recyclingprodukte (wenn nicht vom
Hersteller als geeignet gekennzeichnet)
KOMBINATION
Kombinationsprogramme verwenden Mikrowelle
und Hitze (HEISSLUFT oder GRILL), daher
müssen Sie die Behälter sorgfältig wählen.
VERWENDEN:
Prüfen Sie bei Metallbehältern, ob diese
keine scharfkantigen Metallränder haben.
Keramik, das kein Metall enthält.
Hitzebeständiges Glas und Porzellan.
NICHT VERWENDEN:
Emaillierte Teile (mit Gold-/
Metallmuster). Emailliertes Gusseisen, z.B.
Le Creuset. Alle Teller, die nicht
hitzebeständig sind, z.B. Plastik und
Frischhaltefolie.
HEISSLUFT / GRILL HEISSLUFT
VERWENDEN:
Alle Behälter, die für Heißluftsöfen geeignet
sind, z.B. Metall, Keramik, Tonware,
emailliertes Gusseisen, etc.
NICHT VERWENDEN:
Plastikbehälter, Nahrungsmittelfolie,
Holz/Korb, Glas, Papier.
GRILL / UMLUFT-GRILL
VERWENDEN:
Alle Behälter, die zum heißen Grillen
geeignet sind, z.B. Edelstahl, Le Creuset,
Keramik, Backpapier, etc.
NICHT VERWENDEN:
Plastikbehälter, Feinkeramik,
Frischhaltefolie, etc.
Page 38

- 36 -
1
Tür öffnen.
Nahrungsmittel
einlegen.
Tür schließen.
Die Herdlampe schaltet sich ein.
Die Herdlampe schaltet sich aus.
2
Leistungsstufe
wählen.
Drücken Sie die Schaltfläche
MIKROWELLE, um die
Leistungsstufe zu wählen,
z.B. HOCH – siehe unten.
3 Zeit wählen. Drücken Sie die ZIFFERN
Schaltflächen, um eine
Garzeit einzustellen, z.B.
4 Min 30 Sek. Drücken Sie
die Schaltflächen 4, 3 und 0.
Die maximal einstellbare Zeit:
HOCH/MITTEL 15 Min.
Andere 60 Min.
4 START
drücken.
Die Anzeige zählt die Zeit
herunter.
Der Kühllüfter schaltet sich
ein.
Zum Ende des
Garprogramms piept der
Herd 3 Mal und „0“ blinkt auf
der Anzeige, bis die Tür
geöffnet wird.
Nahrungsmittel entnehmen.
Die Anzeige zeigt das
vorherige Programm an.
5 Tür öffnen
Ende des Programms
Tür öffnen
INFORMATION
AKTION
ANZEIGE
VERWENDBARES ZUBEHÖR
Benutzen Sie nicht das Gitter oder
den Keramik-Isolierteller, wenn Sie
mit der MIKROWELLE kochen.
Einmal
Zweimal
3 Mal
4 Mal
5 Mal
6 Mal
1350
650
420
240
180
0
DRÜCKEN
WATT
Betrieb als Mikrowelle
HOCH
MITTEL
NIEDRIG
KÖCHELN
AUFTAUEN
WARTEN
LEISTUNGSSTUFE
• Mehrstufiges (sequentielles) Aufwärmen
Dieser Herd kann mit bis zu drei verschiedenen Stufen programmiert werden, die nacheinander
ablaufen.
Dies können die Funktionen MIKROWELLE, GRILL, HEISSLUFT, UMLUFT-GRILL, GRILL HEISSLUFT
oder KOMBINATION sein. Wenn eine erforderliche Garzeit bei HOHER Leistung größer als 15 Minuten
ist, verwenden Sie bitte eine 2-stufige Programmierung.
Für 2-stufige Programmierung:
Befolgen Sie die Schritte 1 – 3, geben Sie dann das nächste Garprogramm ein und
drücken Sie START.
Für 3-stufige Programmierung:
Führen Sie eine 2-stufige Programmierung durch und geben Sie ein drittes Garprogramm
ein, bevor Sie START drücken.
•
Heiße Oberflächen
Passen Sie auf, wenn Sie heiße Lebensmittel entnehmen. Benutzen Sie Ofenhandschuhe.
•
Wiederholungsfunktion
Siehe Seite 33.
Page 39

- 37 -
Deutsch
• Heiße Oberflächen
Passen Sie auf, wenn Sie heiße Lebensmittel entnehmen. Benutzen Sie Ofenhandschuhe.
•
Mehrstufiges (sequentielles) Aufwärmen
Siehe Seite 36.
•
Abrufen der Heißluftstemperatur
Die gewählte Temperatur kann nach Drücken der Schaltfläche HEISSLUFT 3 Sekunden überprüft
werden.
Die Temperatur wird kurz auf der Anzeige eingeblendet, bevor wieder zurück auf die verbleibende
Garzeit geschaltet wird.
Die Temperatur kann nicht während eines Programms geändert werden.
•
Vorheizen
Für beste Ergebnisse bei Heißluft sollte der Herd vorgeheizt werden.
(Siehe Seite 49.)
•
Wiederholungsfunktion
Siehe Seite 33.
Betrieb als Heißluftgerät
INFORMATION
AKTION
ANZEIGE
1
Tür öffnen.
Nahrungsmittel
einlegen.
Tür schließen.
Die Herdlampe schaltet sich ein.
Die Herdlampe schaltet sich aus.
2 HEISSLUFT
Schaltfläche
drücken.*
Wählen Sie die erforderliche
Herdtemperatur z.B. 180°C
Drücken Sie die HEISSLUFT
Schaltfläche so oft, bis die
gewünschte Temperatur auf
der Anzeige erscheint.
Die Temperatur erhöht sich in
Schritten von 10°C von 100°C-250°C
3 Zeit wählen.
Drücken Sie die ZIFFERN
Schaltflächen, um eine
Garzeit einzustellen,
z.B. 18 Min.
Drücken Sie die
Schaltflächen 1, 8, 0 und 0.
Die maximale Garzeit ist: 99 Min. 99 Sek.
4 START
drücken.
Die Anzeige zählt die Zeit
herunter.
Der Heißluftslüfter schaltet
sich ein.
Zum Ende des
Garprogramms piept der
Herd 3 Mal und „0“ blinkt auf
der Anzeige, bis die Tür
geöffnet wird.
Nahrungsmittel entnehmen.
Die Anzeige zeigt das
vorherige Programm an.
5 Tür öffnen.
Ende des Programms
Tür öffnen
VERWENDBARES ZUBEHÖR
Für beste Ergebnisse stellen Sie
den Kochbehälter auf das Gitter in
der UNTERSTEN Position. Die
Nahrungsmittel können auch direkt
auf das Gitter gestellt werden,
wenn dieses vor der Verwendung
sorgfältig gereinigt wurde.
Vorsicht:
Es gibt keine Anti-Kipp
Sicherheitsverriegelung an dem
Gitter.
Passen Sie also auf, wenn Sie
Nahrungsmittel entnehmen.
* Der Herd speichert die letzte
verwendete HEISSLUFTSTemperatur, sollten Sie diese
noch einmal verwenden wollen.
Drücken Sie die HEISSLUFT
Schaltfläche, wenn der
Kochvorgang abgeschlossen ist
& die letzte verwendete
Temperatur wird angezeigt.
Page 40

- 38 -
Betrieb als Grill-Heißluftgerät
INFORMATION
AKTION
ANZEIGE
1
Tür öffnen.
Nahrungsmittel
einlegen.
Tür schließen.
Die Herdlampe schaltet sich ein.
Die Herdlampe schaltet sich aus.
3
HEISSLUFT
Schaltfläche
drücken.
*
Wählen Sie die erforderliche
Herdtemperatur z.B. 180°C
Drücken Sie die HEISSLUFT
Schaltfläche so oft, bis die
gewünschte Temperatur auf
der Anzeige erscheint.
Die Temperatur erhöht sich in
Schritten von 10°C von 100°C-250°C
4 Zeit wählen.
Drücken Sie die ZIFFERN
Schaltflächen, um eine
Garzeit einzustellen,
z.B. 18 Min.
Drücken Sie die Schaltflächen 1, 8, 0 und 0.
Die maximale Garzeit ist: 99 Min. 99 Sek.
5 START
drücken.
Die Anzeige zählt die Zeit
herunter.
Der Heißluftslüfter schaltet
sich ein.
Zum Ende des
Garprogramms piept der
Herd 3 Mal und „0“ blinkt auf
der Anzeige, bis die Tür
geöffnet wird.
Nahrungsmittel entnehmen.
Die Anzeige zeigt das
vorherige Programm an.
6 Tür öffnen.
Ende des Programms
Tür öffnen
2 GRILL
Schaltfläche
drücken.
Es kann der hohe (High) oder
niedrige (Low) Modus gewählt
werden, die Grillleistung wird jedoch
nach Drücken der Schaltfläche
HEISSLUFT automatisch festgelegt.
VERWENDBARES ZUBEHÖR
Für beste Ergebnisse stellen Sie
den Kochbehälter auf das Gitter in
der UNTERSTEN Position. Die
Nahrungsmittel können auch direkt
auf das Gitter gestellt werden,
wenn dieses vor der Verwendung
sorgfältig gereinigt wurde.
Vorsicht:
Es gibt keine Anti-Kipp
Sicherheitsverriegelung an dem
Gitter.
Passen Sie also auf, wenn Sie
Nahrungsmittel entnehmen.
• Heiße Oberflächen
Passen Sie auf, wenn Sie heiße Lebensmittel entnehmen. Benutzen Sie Ofenhandschuhe.
•
Mehrstufiges (sequentielles) Aufwärmen
Siehe Seite 36.
•
Abrufen der Heißluftstemperatur
Die gewählte Temperatur kann nach Drücken der Schaltfläche HEISSLUFT 3 Sekunden überprüft
werden.
Die Temperatur wird kurz auf der Anzeige eingeblendet, bevor wieder zurück auf die verbleibende
Garzeit geschaltet wird.
Die Temperatur kann nicht während eines Programms geändert werden.
Abrufen der Grillstufe ist nicht möglich.
•
Vorheizen
Für beste Ergebnisse bei Heißluft sollte der Herd vorgeheizt werden. (Siehe Seite 49.)
•
Wiederholungsfunktion
Siehe Seite 33.
* Der Herd speichert die letzte
verwendete GRILL
HEISSLUFTS-Temperatur,
sollten Sie diese noch einmal
verwenden wollen. Drücken Sie
die HEISSLUFT Schaltfläche,
wenn der Kochvorgang
abgeschlossen ist & die letzte
verwendete Temperatur wird
angezeigt.
Page 41

- 39 -
Deutsch
Betrieb als Grill
INFORMATION
AKTION
ANZEIGE
1
Tür öffnen.
Nahrungsmittel
einlegen.
Tür schließen.
Die Herdlampe schaltet sich ein.
Die Herdlampe schaltet sich aus.
2 GRILL
Schaltfläche
drücken.
Wählen Sie die erforderliche
Grillstufe, z.B. High (hoch)
Anzeige Leistung
1x drücken
Hi 1840 W
2x drücken
Lo 1500 W
3 Zeit wählen.
Drücken Sie die ZIFFERN
Schaltflächen, um eine
Garzeit einzustellen,
z.B. 10 Min.
Drücken Sie die
Schaltflächen 1, 0, 0 und 0.
Die maximale Garzeit ist:
60 Min.
4 START
drücken.
Die Anzeige zählt die Zeit
herunter.
Der Heißluftlüfter schaltet
sich ein.
Zum Ende des
Garprogramms piept der
Herd 3 Mal und „0“ blinkt auf
der Anzeige, bis die Tür
geöffnet wird.
Nahrungsmittel entnehmen.
Die Anzeige zeigt das
vorherige Programm an.
(Weniger als 1 Minute lang.)
5 Tür öffnen.
VERWENDBARES ZUBEHÖR
Für beste Ergebnisse stellen Sie
die nahrungsmittel auf das Gitter in
der OBERSTEN Position.
Der Keramik-Isolierteller sollte auf
dem Boden des Herdes platziert
werden, um Tropfen beim Grillen
aufzufangen. Kleine Lebensmittel,
die zwischen dem Gitter
durchfallen können, sollten direkt
auf dem Keramik-Isolierteller auf
dem Gitter in der OBERSTEN
Position zubereitet werden.
Schütten Sie dies regelmäßig ab,
um übermäßige Spritzer zu
vermeiden. Tiefe Teller können
unter dem Grill platziert werden auf
dem Gitter in der NIEDRIGSTEN
Position oder auch direkt auf den
Keramikboden gestellt werden.
Ende des Programms
Tür öffnen
Vorsicht:
Es gibt keine Anti-Kipp
Sicherheitsverriegelung an dem
Gitter.
Passen Sie also auf, wenn Sie
Nahrungsmittel entnehmen.
• Heiße Oberflächen
Passen Sie auf, wenn Sie heiße Lebensmittel entnehmen. Benutzen Sie Ofenhandschuhe.
•
Mehrstufiges (sequentielles) Aufwärmen
Siehe Seite 36.
•
Abrufen der Grillstufe
Die gewählte Temperatur kann nach Drücken der Schaltfläche GRILL 3 Sekunden überprüft werden.
Die Grillstufe wird kurz auf der Anzeige eingeblendet, bevor wieder zurück auf die verbleibende Garzeit
geschaltet wird.
•
Vorheizen
Für beste Ergebnisse bei Heißluft sollte der Herd vorgeheizt werden.
(Siehe Seite 49.)
•
Wiederholungsfunktion
Siehe Seite 33.
Page 42

- 40 -
Betrieb als Umluft-Grill
INFORMATION
AKTION
ANZEIGE
1
Tür öffnen.
Nahrungsmittel
einlegen.
Tür schließen.
Die Herdlampe schaltet sich ein.
Die Herdlampe schaltet sich aus.
2 UMLUFT-
GRILL
Schaltfläche
drücken.*
Wählen Sie die erforderliche
Umluftgrilltemperatur, z.B. 180°C
Drücken Sie die UMLUFT-GRILL
Schaltfläche so oft, bis die
gewünschte Temperatur auf der
Anzeige erscheint.
Die Temperatur erhöht sich in
Schritten von 10°C von 100°C-250°C
3 Zeit wählen.
Drücken Sie die ZIFFERN
Schaltflächen, um eine
Garzeit einzustellen,
z.B. 20 Min.
Drücken Sie die
Schaltflächen 2, 0, 0 und 0.
Die maximale Garzeit ist:
99 Min. 99 Sek.
4 START
drücken.
Die Anzeige zählt die Zeit
herunter.
Der Heißluftlüfter schaltet
sich ein.
Zum Ende des
Garprogramms piept der
Herd 3 Mal und „0“ blinkt auf
der Anzeige, bis die Tür
geöffnet wird.
Nahrungsmittel entnehmen.
Die Anzeige zeigt das
vorherige Programm an.
5 Tür öffnen.
VERWENDBARES ZUBEHÖR
Ende des Programms
Tür öffnen
• Heiße Oberflächen
Passen Sie auf, wenn Sie heiße Lebensmittel entnehmen. Benutzen Sie Ofenhandschuhe.
•
Mehrstufiges (sequentielles) Aufwärmen
Siehe Seite 36.
•
Abrufen der Umluft-Grill Temperatur
Die gewählte Temperatur kann nach Drücken der Schaltfläche UMLUFTGRRILL 3 Sekunden überprüft
werden.
Die Temperatur wird kurz auf der Anzeige eingeblendet, bevor wieder zurück auf die verbleibende
Garzeit geschaltet wird.
Die Temperatur kann nicht während eines Programms geändert werden.
•
Vorheizen
Für beste Ergebnisse bei Heißluft sollte der Herd vorgeheizt werden.
(Siehe Seite 49.)
•
Wiederholungsfunktion
Siehe Seite 33.
* Der Herd speichert die letzte
verwendete UMLUFT-GRILL
Temperatur, sollten Sie diese
noch einmal verwenden wollen.
Drücken Sie die UMLUFT-GRILL
Schaltfläche, wenn der
Kochvorgang abgeschlossen ist
& die letzte verwendete
Temperatur wird angezeigt.
Für beste Ergebnisse stellen Sie
den Kochbehälter auf das Gitter in
der UNTERSTEN Position. Die
Nahrungsmittel können auch direkt
auf das Gitter gestellt werden,
wenn dieses vor der Verwendung
sorgfältig gereinigt wurde.
Vorsicht:
Es gibt keine Anti-Kipp
Sicherheitsverriegelung an dem
Gitter.
Passen Sie also auf, wenn Sie
Nahrungsmittel entnehmen.
Page 43

- 41 -
Deutsch
Betrieb in Kombination
2
KOMBINATION
Schaltfläche
drücken.
INFORMATION
AKTION
ANZEIGE
1
Tür öffnen.
Nahrungsmittel
einlegen.
Tür schließen.
Die Herdlampe schaltet sich ein.
Die Herdlampe schaltet sich aus.
4 START
drücken.
Die Anzeige zählt die Zeit
herunter.
Zum Ende des
Garprogramms piept der
Herd 3 Mal und „0“ blinkt auf
der Anzeige, bis die Tür
geöffnet wird.
Nahrungsmittel entnehmen.
Die Anzeige zeigt das
vorherige Programm an.
5 Tür öffnen.
VERWENDBARES ZUBEHÖR
Für beste Ergebnisse stellen Sie
die Nahrungsmittel auf das Gitter in
der UNTERSTEN Position. Der
Keramik-Isolierteller muss
verwendet werden, wenn der
Kochbehälter aus Metall ist, stellen
Sie NIEMALS einen Metallbehälter
direkt auf das GITTER, wenn Sie in
KOMBINATION kochen, da
Funkenschläge auftreten und den
Teller/Herd beschädigen können.
Ende des Programms
Tür öffnen
Wählen Sie die
Voreingestellte
KOMBINATIONSNUMMER
(1-5).
z.B. 1 – siehe unten.
Voreingestellte Kombination
3 Zeit wählen.
Drücken Sie die ZIFFERN
Schaltflächen, um eine Garzeit
einzustellen,
z.B. 3 Min.
Drücken Sie die Schaltflächen
3, 0 und 0. Die maximale
Garzeit ist: 5 Min.
Vorsicht:
Es gibt keine Anti-Kipp
Sicherheitsverriegelung an dem
Gitter.
Passen Sie also auf, wenn Sie
Nahrungsmittel entnehmen.
Einmal
Zweimal
3 Mal
4 Mal
5 Mal
250˚C
250˚C
250˚C
250˚C
Hi
DRÜCKEN GRILLSTUFE ODER
HEISSLUFTS-
TEMPERATUR
5 Min.
60 Min.
60 Min.
60 Min.
60 Min.
MAXIMALE
GARZEIT
MIKRO-
WELLEN-
LEISTUNG
ANZEIGE
1*
2
3
4
5
HOCH
NIEDRIG
AUFTAUEN
NIEDRIG
NIEDRIG
Umluft-Grill
Umluft-Grill
Umluft-Grill
Grill Heißluft
Grill
GRILLSTUFE ODER
HEISSLUFTS-
EINSTELLUNG
*Kombi 1 kann nur als erste Stufe eines 2- oder 3-stufigen Kochprogramms verwendet werden.
Page 44

- 42 -
•
Heiße Oberflächen
Passen Sie auf, wenn Sie heiße Lebensmittel entnehmen. Benutzen Sie Ofenhandschuhe.
•
Mehrstufiges (sequentielles) Aufwärmen
Siehe Seite 36.
•
Abrufen voreingestellter Kombinationsnummern
Die gewählte voreingestellte Kombinationsnummer (1-5) kann nach Drücken der Schaltfläche
KOMBINATION 3 Sekunden überprüft werden.
Die voreingestellte Kombinationsnummer wird kurz auf der Anzeige eingeblendet, bevor wieder zurück
auf die verbleibende Garzeit geschaltet wird.
•
Vorheizen
Für beste Ergebnisse bei Kombination sollte der Herd vorgeheizt werden.
(Siehe Seite 49.)
•
Wiederholungsfunktion
Siehe Seite 33.
Betrieb in Kombination
Page 45

- 43 -
Deutsch
Betrieb in Kombination
2
Leistungsstufe
wählen.
**
INFORMATION
AKTION
ANZEIGE
1
Tür öffnen.
Nahrungsmittel
einlegen.
Tür schließen.
Die Herdlampe schaltet sich ein.
Die Herdlampe schaltet sich aus.
Drücken Sie die Schaltfläche
MIKROWELLE, um die
richtige Leistung zu wählen,
z.B. NIEDRIG.
Manuelle Kombination
3 Drücken Sie
die GRILL
Schaltfläche*
oder
UMLUFT-GRILL
Schaltfläche
***
oder
HEISSLUFT
Schaltfläche
* ***
oder
GRILL
Schaltfläche *
+
HEISSLUFT
Schaltfläche
* ***
MWO + GRILL
GRILL-Stufe wählen.
Anzeige Leistung
1x drücken
Hi 1840 W
2x drücken
Lo 1500 W
z.B. Hi.
ODER
MWO + UMLUFTGRILL
Drücken Sie die Schaltfläche
Umluftgrill, bis die
erforderliche Temperatur auf
der Anzeige erscheint.
z.B. 200°C
ODER
MWO + HEISSLUFT
Drücken Sie die Schaltfläche
HEISSLUFT, bis die
erforderliche Temperatur auf
der Anzeige erscheint.
z.B. 200°C
ODER
MWO + GRILLHEISSLUFT
Es kann der hohe (High) oder
niedrige (Low) Modus
gewählt werden, aber die
Grillleistung wird automatisch
festgelegt, nachdem die
Schaltfläche Heißluft gedrückt
wurde.
+
Drücken Sie die Schaltfläche
Heißluft, bis die erforderliche
Temperatur auf der Anzeige
erscheint.
z.B. 200°C
VERWENDBARES ZUBEHÖR
Für beste Ergebnisse stellen Sie
die Nahrungsmittel auf das Gitter in
der UNTERSTEN Position. Der
Keramik-Isolierteller muss
verwendet werden, wenn der
Kochbehälter aus Metall ist, stellen
Sie NIEMALS einen Metallbehälter
direkt auf das GITTER, wenn Sie in
KOMBINATION kochen, da
Funkenschläge auftreten und den
Teller/Herd beschädigen können.
Vorsicht:
Es gibt keine Anti-Kipp
Sicherheitsverriegelung an dem
Gitter.
Passen Sie also auf, wenn Sie
Nahrungsmittel entnehmen.
(AKTION 5-6 Fortsetzung auf nächster Seite.)
* Eine Kombination von
Mikrowelle, Grill und Heißluft ist
möglich.
** Kombinationseinstellungen mit
HOHER Leistung können nur
als 1 Stufe eines 2- oder
3-stufigen Kochprogramms und
für maximal 5min Garzeit
verwendet werden.
*** Der Herd speichert die letzte
verwendete HEISSLUFT,
GRILL HEISSLUFT oder
UMLUFT-GRILL Temperatur
bei KOMBINATION, sollten Sie
diese noch einmal verwenden
wollen. Drücken Sie die
HEISSLUFT oder UMLUFTGRILL Schaltfläche, wenn der
Kochvorgang abgeschlossen
ist & die letzte verwendete
Temperatur wird angezeigt.
4 Zeit wählen.
Drücken Sie die Zifferntasten,
um eine Garzeit einzustellen.
z.B. MWO + GRILL 18 min.
Drücken Sie die Schaltflächen
1, 8, 0 und 0.
Die maximale Garzeit beträgt:
60 Min.
Page 46

- 44 -
Betrieb in Kombination
• Heiße Oberflächen
Passen Sie auf, wenn Sie heiße Lebensmittel entnehmen. Benutzen Sie Ofenhandschuhe.
•
Mehrstufiges (sequentielles) Aufwärmen
Siehe Seite 36.
•
Abrufen der Grillstufe (Nur Grill-Kombination)
Die gewählte Temperatur kann nach Drücken der Schaltfläche GRILL 3 Sekunden überprüft werden.
Die GRILL-Stufe wird kurz auf der Anzeige eingeblendet, bevor wieder zurück auf die verbleibende
Garzeit geschaltet wird.
•
Abrufen der Heißluftstemperatur
Die gewählte Temperatur kann nach Drücken der Schaltfläche HEISSLUFT 3 Sekunden überprüft
werden.
Die Temperatur wird kurz auf der Anzeige eingeblendet, bevor wieder zurück auf die verbleibende
Garzeit geschaltet wird.
Die Temperatur kann nicht während eines Programms geändert werden.
•
Abrufen der Umluft-Grill Temperatur
Die gewählte Temperatur kann nach Drücken der Schaltfläche UMLUFTGRRILL 3 Sekunden überprüft
werden.
Die Temperatur wird kurz auf der Anzeige eingeblendet, bevor wieder zurück auf die verbleibende
Garzeit geschaltet wird.
Die Temperatur kann nicht während eines Programms geändert werden.
•
Vorheizen
Für beste Ergebnisse bei Kombination sollte der Herd vorgeheizt werden.
(Siehe Seite 49.)
•
Wiederholungsfunktion
Siehe Seite 33.
INFORMATION
AKTION
ANZEIGE
Zum Ende des
Garprogramms piept der
Herd 3 Mal und „0“ blinkt auf
der Anzeige, bis die Tür
geöffnet wird.
Nahrungsmittel entnehmen.
Die Anzeige zeigt das
vorherige Programm an.
6 Tür öffnen
Ende des Programms
Tür öffnen
5 START
drücken.
Die Anzeige zählt die Zeit
herunter.
Page 47

- 45 -
Deutsch
INFORMATION
AKTION
ANZEIGE
1 Tür öffnen. Die Herdlampe schaltet sich ein.
2 PROG Schaltfläche drücken.
Halten Sie die Tür geöffnet.
Drücken Sie für 2 Sekunden die Schaltfläche
gedrückt, bis „P“ angezeigt wird.
3 Programmnummer drücken.
z.B. zum Einrichten von Programm 03: KÖCHELN
20 Min.
Drücken Sie die ZIFFERN Schaltflächen 0 und 3.
Wenn das Programm schon vorher eingerichtet
wurde, erscheint dieses auf der Anzeige.
Wenn der Programmspeicher leer ist, erscheint die
Programmnummer auf der Anzeige.
5 Zeit wählen. z.B. Drücken Sie die ZIFFERN Schaltflächen 2, 0,
0 und 0.
Nach 3 Sekunden schaltet die Anzeige auf „0“
zurück.
6 PROG Schaltfläche drücken.
4 Leistung wählen. z.B. Drücken Sie 4 Mal die MIKROWELLE
Schaltfläche
• Programmsperre
Es ist NICHT möglich, ein Programm einzugeben, wenn die Programmsperre gesetzt ist.
(Siehe Seite 47.)
•
Mehrstufig (sequentielles Kochen)
Es ist möglich ein 2- oder 3-stufiges Programm mit MIKROWELLE, HEISSLUFT, GRILL, UMLUFTGRILL, GRILL HEISSLUFT oder KOMBINATION im Speicher abzulegen.
•
Ändern eines Speicherprogramms
Um ein Programm zu ändern, folgen Sie einfach den Schritten 1 – 6 oben und geben Sie Ihr neues
Programm ein.
Einstellen der Speicherprogramme
Prüfen Sie, ob die SD Memory Card im Herd eingesetzt ist.
Ihr Herd hat 99 freie Speicherplätze für Programme, die Sie selbst einstellen können.
Alle 99 Programme können mit Hilfe der Schaltfläche Programm auf dem Bedienfeld manuell eingestellt
werden. Sie können die Programme auf Ihrer SD Memory Card mit Hilfe Ihres PCs speichern (siehe
„Programmdaten auf einer SD Memory Card speichern“).
Alle Programminformationen, die direkt auf Ihrer SD Memory Card gespeichert werden, überschreiben alle
zuvor gespeicherten manuellen Programme.
Page 48

- 46 -
Verwendung der Speicherprogramme
INFORMATION
AKTION
1 Tür öffnen.
Nahrungsmittel einlegen.
Tür schließen.
Die Herdlampe schaltet sich ein.
Die Herdlampe schaltet sich aus.
2 Drücken Sie die
erforderlichen ZIFFERN
Schaltflächen.
z.B. Für Programm 03.
Drücken Sie ZIFFERN Schaltflächen 0 und 3.
Dieses Beispiel ist ein voreingestelltes
Speicherprogramm.
KÖCHEL Leistung 20 Min.
3 START drücken.
Die Anzeige zählt die Zeit herunter.
ANZEIGE
•
Programmsperre
Wenn die Programmsperre aktiviert ist, beginnt das Programm sofort, daher müssen Sie nicht noch
einmal die START Schaltfläche bestätigen.
Prüfen Sie, ob die SD Memory Card im Herd eingesetzt ist.
Verwendung der 99 Speicherprogramme.
Page 49

- 47 -
Deutsch
INFORMATION
AKTION
ANZEIGE
1 Tür öffnen. Die Herdlampe schaltet sich ein.
2 PROG LOCK Schaltfläche
gedrückt halten.
„P“ wird angezeigt.
HALTEN SIE DIE TÜR GEÖFFNET.
Nach 2 Sekunden….
Nach 3 Sekunden….
One Touch Betriebsmodus
Wenn die Programmsperre aktiviert ist, kann der Herd im „ONE TOUCH“ Modus betrieben werden, d.h.
Sie drücken die gewünschte Speicherprogrammnummer und der Herd beginnt sofort. Sie müssen nicht
noch einmal die START Schaltfläche drücken.
•
Unterbrechen des Programms
Wenn die Tür während eines Programms geöffnet wird, bricht dieses ab und die verbleibende Garzeit
erlischt.
•
Wiederholungsfunktion
Sobald ein manuelles Garprogramm beendet ist, zeigt der Herd automatisch das Programm zur
Wiederholung an, wenn die Programmsperre aktiviert ist.
•
Einrichten neuer Programme
Wenn die Programmsperre aktiviert ist, ist es nicht möglich, ein Speicherprogramm einzugeben oder
den Signalton zu ändern.
(Siehe Seite 50.)
•
Stopp/Reset Schaltfläche
Währen des Heizens stoppt einmaliges Drücken den Heizzyklus, das Programm wird gelöscht und die
Anzeige schaltet zurück auf „0“.
Programmsperre aktivieren
Page 50

- 48 -
INFORMATION
AKTION
1 Tür öffnen. Das Herdlicht schaltet sich ein.
2 PROG LOCK Schaltfläche
gedrückt halten.
Halten Sie für 2 Sekunden die Schaltfläche
gedrückt, bis „P L“ angezeigt wird.
HALTEN SIE DIE TÜR GEÖFFNET.
Nach 2 Sekunden….
Nach 3 Sekunden…
ANZEIGE
• Two Touch Betriebsmodus
Der Herd schaltet auf den 2 TOUCH BETRIEB zurück, wenn Sie die Programmsperre deaktivieren.
Bitte drücken Sie die gewünschten ZIFFERN Schaltflächen und dann START.
•
Unterbrechen des Programms
Wird die Tür während eines Programms geöffnet, wenn die Programmsperre deaktiviert ist, bleibt die
restliche Garzeit auf der Anzeige stehen, bis die Tür wieder geschlossen und die Schaltfläche START
gedrückt wird.
•
Wiederholungsfunktion
Sobald ein manuelles Garprogramm beendet ist, zeigt der Herd automatisch das Programm zur
Wiederholung an, wenn die Programmsperre deaktiviert ist.
•
Einrichten neuer Programme
Wenn die Programmsperre freigegeben ist, können Sie neue Garprogramme eingeben.
Programmliste
Es ist möglich, die Programme zu überprüfen, die auf der SD Memory Card aufgezeichnet
wurden. Drücken Sie bei geöffneter Tür die START Schaltfläche und die ZIFFERN Taste 1
gleichzeitig. (Der Herd bestätigt mit einem Signalton). Nach 2 Sekunden zeigt die Anzeige jede
einzelne Stufe jedes Speicherprogramms in der Reihenfolge 01, 02, 03, etc. an. Schließlich wird
die Piepton-Einstellung und das Programmsperrsymbol (P.L) angezeigt, der Zeitintervall zur
Reinigung des Luftfilters, bevor „0“ angezeigt wird.
Programmsperre deaktivieren
Page 51

- 49 -
Deutsch
Bemerkungen zum Vorheizen und Abkühlen:
• Nur die Funktion VORHEIZEN und ABKÜHLEN können ausgewählt werden, wenn die Anzeige leer ist. Bei
allen anderen Programmen muss „0“ in der Anzeige erscheinen.
• Sie können die Funktion VORHEIZEN während einer ABKÜHLEN Funktion auswählen und umgekehrt.
• Nachdem eine Garfunktion abgeschlossen ist, schaltet der Herd automatisch zur Funktion VORHEIZEN
zurück.
• *
Der Herd speichert die letzte verwendete VORHEIZEN Temperatur, sollten Sie diese noch einmal verwenden
wollen. Drücken Sie die Schaltfläche VORHEIZEN und die letzte verwendete Temperatur wird angezeigt.
Um ein schnelleres Aufheizen und bessere Bräunungsergebnisse zu erzielen, wurde die VORHEIZEN
Funktion entwickelt, damit der Herd auf eine Temperatur von 190°C, 220°C oder 240°C gebracht wird und ein
heißer Start vor Benutzung der GRILL, HEISSLUFT, UMLUFT-GRILL, GRILL HEISSLUFT oder
KOMBINATION Funktion möglich ist.
INFORMATION
AKTION
ANZEIGE
1 VORHEIZEN Schaltfläche
drücken.*
Wählen Sie die erforderliche Vorheiztemperatur,
wenn die Anzeige leer ist oder „0“ anzeigt.
z.B. 220°C
1x drücken 190°C
2x drücken 220°C
3x drücken 240°C
2 START drücken. Die Vorheiztemperatur wird auf der gewählten
Temperatur gehalten. Die Vorheiztemperatur ist
erreicht, wenn „P“ blinkt. Die Tür muss dabei
geschlossen bleiben. Wenn der Herd nicht
verwendet wird, schaltet sich die Vorheiz-Funktion
automatisch nach 4 Stunden aus.
3 Tür öffnen.
Tür schließen
START drücken.
Nahrungsmittel in den Herd stellen.
Programm wählen.
z.B. Heißluft 220°C 15 Min.
Die Anzeige zählt die Zeit herunter.
Zum Ende des Garprogramms piept der Herd
3 Mal und „0“ blinkt auf der Anzeige, bis die Tür
geöffnet wird.
4 Tür öffnen.
Die Anzeige zeigt das vorherige Programm an.
Wenn die START Schaltfläche nicht innerhalb
1 Minute betätigt wird, schaltet der Herd zur vorher
gewählten VORHEIZEN Temperatur zurück.
Nach 1 Minute
Ihren Herd heiß halten
Page 52

- 50 -
Ihren Herd schnell abkühlen
Um den Garraum schnell abzukühlen, verfügt die Panasonic Combi über eine Abkühlschaltfläche. Die AbkühlenSchaltfläche kann effektiv am Ende eines Garzeitraum genutzt werden, um den Herd zur Reinigung abzukühlen oder
wenn es erforderlich ist, zum Auftauen oder Aufheizen per MIKROWELLE während der VORHEIZEN Funktion.
INFORMATION
AKTION
1 ABKÜHLEN Schaltfläche
drücken.
Sie können Abkühlen wählen, wenn die Anzeige
leer (bei geschlossener Tür) ist oder wenn „0“ auf
der Anzeige steht (Tür geöffnet).
2 START drücken.
3 Wenn der Herd abgekühlt
ist.
• Der ABKÜHL-Lüfter und der HEISSLUFTSLüfter schalten sich ein.
• Die Tür des Herdes kann geöffnet oder
geschlossen sein. Ein schnelleres Abkühlen
wird jedoch erreicht, wenn die Tür geöffnet ist.
• Der Herd wird sich in 3 – 30 Minuten abkühlen,
je nach vorheriger Temperatur.
Die Kühl- und Heißluftslüfter schalten sich aus.
ANZEIGE
Ändern des Signaltons
INFORMATION
AKTION
1 Tür öffnen.
Halten Sie die Tür geöffnet.
Die Herdlampe schaltet sich ein.
2 PROG Schaltfläche
drücken.
Halten Sie die Schaltfläche für 2 Sekunden
gedrückt.
ANZEIGE
3 START drücken.
Drücken Sie die Schaltfläche START, um die
gewünschte Lautstärke einzustellen. (z.B. 2x für Mittel)
Anz. Drücken Anzeige Lautstärke
1 b-3 Laut
2 b-2 Mittel
3 b-1 Leise
4 b-0 Stumm
Nach 3 Sekunden
4 PROG Schaltfläche
drücken.
Nach 3 Sekunden schaltet die Anzeige auf „0“
zurück.
z.B. Anzeige „0“
Page 53

- 51 -
Deutsch
INFORMATION
AKTION
1 Tür öffnen. Die Herdlampe schaltet sich ein.
Halten Sie die START Schaltfläche gedrückt,
während Sie die Tür schließen und wieder öffnen.
TÜR GEÖFFNET HALTEN.
2 Schließen Sie die Tür,
während Sie die
Schaltfläche START
drücken und öffnen Sie die
Türe.
Halten Sie die Tür geöffnet.
Nach 3 Sekunden schaltet die Anzeige auf „0“
zurück.
ANZEIGE
3 Drücken Sie die ZIFFERN
Schaltfläche 3.
Der momentan programmierte Zeitintervall
erscheint.
z.B. 500 Stunden.
4 Mit ZIFFERN Schaltflächen
wählen.
Bis zu 9999 Stunden.
z.B. 600 Stunden.
Drücken Sie die ZIFFERN Schaltflächen 6, 0 und
0.
5 PROG Schaltfläche
drücken.
Änderung des Reinigungsintervalls des Luftfilters
Eine Warnung zur Reinigung des Luftfilters wird mit „FILt“ auf der Anzeige angezeigt. Der Herd zeigt die
Warnung „FILt“ nach 500 Betriebsstunden an. Wenn „FILt“ auf der Anzeige erscheint, entnehmen Sie den
Luftfilter und reinigen Sie diesen mit Seifenwasser.
Drücken Sie die STOPP/RESET Schaltfläche, um die Anzeige zu löschen.
Um die gesamten Betriebsstunden zu prüfen,
1 Öffnen Sie die Tür. Halten Sie die Tür geöffnet.
2 Drücken Sie die Ziffernschaltfläche „3“ während Sie START gedrückt halten.
3 Die Gesamtanzahl in Stunden wird in der Anzeige eingeblendet.
z.B. Wenn der Herd für 20 Stunden im Einsatz war,
Nach 3 Sekunden schaltet die Anzeige auf „0“ zurück.
Page 54

- 52 -
Pflege Ihres Herdes und Reinigung
Es ist wichtig, dass Sie diese Punkte befolgen, um die maximale Leistung Ihres Herdes zu nutzen.
Mikrowellen werden von Feuchtigkeit und Öl angezogen: daher kocht ein verschmutzter Herd nicht
EFFIZIENT.
1. Vor der Reinigung
Ziehen Sie den Netzstecker vor der Reingung!
Lassen Sie den Herd vor der Reinigung abkühlen. Verwenden Sie das ABKÜHLEN Programm.
(Siehe Seite 50.)
Die Tür kann geöffnet bleiben, damit der Herd schneller abkühlt.
2. Türdichtungen
Achten Sie besonders auf die Reinigung der Türdichtungen und Dichtungsbereiche.
Wischen Sie die Tropfkante regelmäßig ab, um eine Ansammlung von Feuchtigkeit und Öl zu vermeiden.
3. Tür
Halten Sie die innere Glasseite der Tür sauber, indem Sie diese regelmäßig mit einem weichen
angefeuchteten Tuch abwischen. Kleine Mengen Ofenreiniger können verwendet werden – SPRÜHEN SIE
DIESEN NICHT DIREKT AUF die Tür – sprühen Sie diesen auf ein Tuch und wischen Sie den Herd ab.
Verwenden Sie keine scharfen Reiniger oder Scheuermittel.
4. Ofenwände
Die Wände sollten regelmäßig mit einem weichen angefeuchteten Tuch gereinigt werden. Kleine Mengen
Ofenreiniger können verwendet werden – SPRÜHEN SIE DIESEN NICHT DIREKT AUF die Tür – sprühen Sie
diesen auf ein Tuch und wischen Sie den Herd aus.
LASSEN SIE KEINE OFENREINIGER IN DER NÄHE DER LÖCHER AN DER RÜCKSEITE DES HERDES
KOMMEN.
Wenn ätzender Reiniger hinter die Wand gelangt, kann Ihr Herd beschädigt werden.
Lassen Sie keine Reinigungsflüssigkeiten in die Öffnungen kommen.
Halten Sie die Gitterlaufleisten frei von Öl und Nahrungsmittelresten.
Die Rückseite des Herdes hat eine hitzebeständige Beschichtung.
Reinigen Sie diesen Bereich mit einem Lappen mit Herdreiniger.
Verwenden Sie keine Stahlreiniger, um das Innere des Herdes zu reinigen.
5. Boden
Der Wellenleiter befindet sich unterhalb des Keramikbodens des Herdes. Alle Spitzer müssen abgewischt
werden, damit ein Aufheizen sichergestellt ist. Verwenden Sie keine scharfen Reiniger oder Scheuermittel.
6. Himmel
Der Himmel beinhaltet die 4 Quartz-Grillelemente. Stellen Sie vor der Reinigung sicher, dass sich der Herd
abgekühlt hat, um Verbrennungen zu vermeiden.
Wischen Sie den Himmel regelmäßig mit einem feuchten Tuch ab, um eine Ansammlung von Öl zu vermeiden.
7. Bedienfeld / SD Card Abdeckung
Wenn das Bedienfeld und die SD Card Abdeckung schmutzig werden, reinigen Sie diese mit einem weichen,
trockenen oder gut ausgewrungenen Tuch.
Verwenden Sie keine scharfen Reiniger oder Scheuermittel auf dem Bedienfeld. Verwenden Sie KEIN
getränktes Tuch, da die verbleibende Feuchtigkeit das Bedienfeld beschädigen kann.
Überschüssige Schmiermittel können zur leichteren Reinigung mit 0,5 – 0,75 l heißes Wasser in einer
mikrowellengeeigneten Schüssel mit einer aufgeschnittenen frischen Zitrone aufgeweicht werden. Wärmen
Sie dies bei HOHER Leistung für 10 – 15 Minuten auf. Die entstehende Feuchtigkeit an den Wänden sollte
dann mit einem Seifentuch abgewischt werden.
Page 55

- 53 -
Deutsch
Pflege Ihres Herdes und Reinigung
8. Zubehör
Die Zubehörteile müssen regelmäßig gereinigt werden, um die Effizienz des Herdes zu maximieren.
Keramikteller – Reinigen Sie den Keramikteller nach jeder Verwendung, aber STELLEN SIE DEN HEISSEN
KERAMIK-ISOLIERTELLER NICHT direkt unter einen KALTEN Wasserstrahl – dieser kann platzen. Sie
können den Keramikteller in der Geschirrspülmaschine oder per Hand in heißem Seifenwasser waschen.
Gitter – Dieses sollte nach jeder Benutzung gereinigt werden. Verwenden Sie keine scharfen Scheuermittel.
9. Luftfilter
Reinigen Sie die Luftfilter zwischenzeitlich entsprechend den Reinigungsanweisungen. Es können Probleme
mit dem Herd auftreten, wenn die Filter mit Dreck oder Fett verstopft werden. Wenn der Luftfilter verstopft ist,
verursacht dies ein Überhitzungsproblem im Herd.
a. Entfernen Sie den rechten Luftfilter aus der rechten
unteren Schürze, indem Sie den rechten Druckstift
herausziehen. Schieben Sie dann den Filter nach rechts
und heben Sie in an dem Loch in der Mitte heraus.
Entnehmen Sie den linken Luftfilter entsprechend.
b. Waschen Sie die Filter in heißem Seifenwasser.
c. Um sie wieder einzusetzen, legen Sie den Filter an dem
mittleren Pin an und setzen Sie den hinteren Teil des Pins
in sein Loch, während Sie die Vorderseite des Druckstiftes
halten. Drücken Sie die Vorderseite des Pins hinein und
dieser schnappt in seinen Platz ein. Stellen Sie sicher,
dass Sie die Luftfilter wieder eingesetzt haben, bevor Sie
den Herd wieder verwenden.
Hinweis: Wenn das „FILt“ Zeichen auf der Anzeige erscheint, entnehmen Sie den Luftfilter und reinigen Sie
diesen mit heißem Seifenwasser.
Drücken Sie die STOPP / RESET Schaltfläche, um die Anzeige zu löschen.
10. Ersetzen der Herdlampe
Wenn die Herdlampe durchbrennt, können Sie diese selbst ersetzen, indem Sie diese einfachen Anweisungen
befolgen:
a. Schrauben Sie die Abdeckung der Ofenlampe ab, die sich an der linken Seite des Garraums befindet.
b. Ersetzen Sie die alte Lampe mit einer neuen 240/220V 25W Max, E-14 Lampe.
c. Setzen Sie die Herdlampenabdeckung wieder auf und schrauben Sie diese fest.
Beschädigungen
Wenn der Herd auf irgendeine Weise beschädigt wird, kontaktieren Sie unverzüglich einen Servicetechniker,
bevor Sie ihn weiter verwenden.
VORSICHT:
Reinigen Sie dieses Gerät nicht mit einem Wasserstrahl.
Verwenden Sie keine nicht-spezifizierten chemischen Reiniger und sprühen Sie nichts direkt in den
Garraum.
Vorsicht:
Schalten Sie die Stromversorgung ab, bevor Sie die Herdlampe ersetzen.
Luftfilter
Druckstift
Stab
Druckstift
Page 56

- 54 -
Wenn ein „F“ auf der Anzeige erschient
Ihr Panasonic Combi Herd ist mit einem SelbstdiagnoseFehlercodesystem ausgestattet; dies bedeutet, dass der Herd
seinen eigenen Betrieb überwacht und für den unwahrscheinlichen
Fall einer Fehlfunktion einen Fehlercode auf dem Display anzeigt.
Wenn ein Fehlercode auf der Anzeige erscheint (dieser erscheint
als „F“ gefolgt von einer zweistelligen Nummer), befolgen Sie diese
Schritte:
1. Schließen Sie die Tür und trennen Sie den Herd am Stecker vom
Strom. Stellen Sie sicher, dass alle Belüftungsschlitze frei sind.
2. Lassen Sie den Herd 1 Minute stehen und schließen Sie den
Ofen wieder an der Steckdose an.
3. Öffnen Sie die Tür und stellen Sie ein Nahrungsmittel oder eine
Tasse Wasser in den Garraum, schließen Sie dann die Tür.
4. Versuchen Sie dieselbe Funktion, die vor dem Auftreten des
Fehlercodes auf der Anzeige in Betrieb war.
Falls der Fehlercode wieder erscheint, kontaktieren Sie den
Händler, bei dem Sie den Herd erworben haben, den Hersteller
oder einen autorisierten Servicetechniker.
Wenn ein „U“ auf der Anzeige erschient
Ein Fehler der SD Memory Card wird als Fehlercode in der Anzeige
angezeigt (es erscheint als „U“, dann eine zweistellige Nummer).
Folgen Sie den Schritten im Diagramm.
Wann muss man den Servicetechniker anrufen
CODE PROBLEM
U16
U17
U19
SD Memory Card
ist gesperrt.
Es gibt auf der SD
Memory Card keine
Programmdaten für
diesen Herd.
Die
Programmdaten
auf der SD Memory
Card sind
fehlerhaft.
Eine SD Memory
Card ist nicht
eingelegt.
WAS ZU TUN IST
Nehmen Sie die SD Memory Card heraus &
entfernen Sie die Sperre. (siehe unten).
Legen Sie die SD Memory Card wieder ein.
Eine SD Memory Card bestätigt, dass Sie in
den Herd eingesteckt ist. Bitte prüfen Sie mit
Ihrem PC, ob Programmdaten für den Herd
auf der SD Memory Card gespeichert sind.
(Siehe „Programmdaten auf einer SD
Memory Card speichern“)
Wenn Programmdaten gelöscht sind,
kontaktieren Sie bitte einen
Servicetechniker.
Entfernen Sie die SD Card Abdeckung &
legen Sie eine SD Memory Card ein.
Die Verriegelung
ist entfernt, wenn
dieser Teil nach
oben geschoben
ist.
LOCK
Recipe
Card
Page 57

- 55 -
Deutsch
NE-C1475
230 V / 50 Hz, einphasig
16 A
14,5A 3,3kW
2350 W
1950 W
1950 W
1350 W (IEC Testverfahren)
1840 W
1800 W
2450 MHz
600 mm x 484 mm x 383 mm
406 mm x 336 mm x 217 mm
41 kg (einschließlich Zubehör)
22
Spezifikationen können ohne weitere Benachrichtigung geändert werden.
Technische Spezifikationen
Modellnr.
Stromversorgung
Ausgabe
Erforderliche Leistung - Max.
- Mikrowelle-
- Grill
- Heißluftsheizer
Ausgabe - Mikrowelle
Grill
Heißluftsheizer
Frequenz
Abmessungen (außen)
(B x T x H)
Abmessungen (Garraum)
(B x T x H)
Nettogewicht
600
61
484
430 54
383
10.5 10.5579
379
944
Page 58

- 56 -
Benutzerinformationen zur Entsorgung von elektrischen und elektronischen
Geräten (private Haushalte)
Dieses Symbol auf Produkten und/oder begleitenden Dokumenten bedeutet, dass verbrauchte
elektrische und elektronische Produkte nicht mit gewöhnlichem Haushaltsabfall vermischt
werden sollen.
Bringen Sie zur ordnungsgemäßen Behandlung, Rückgewinnung und Recycling diese
Produkte zu den entsprechenden Sammelstellen, wo sie ohne Gebühren entgegengenommen
werden. In einigen Ländern kann es auch möglich sein, diese Produkte beim Kauf eines
entsprechenden neuen Produkts bei Ihrem örtlichen Einzelhändler abzugeben.
Die ordnungsgemäße Entsorgung dieses Produkts dient dem Umweltschutz und verhindert
mögliche schädliche Auswirkungen auf Mensch und Umgebung, die aus einer unsachgemäßen Handhabung
von Abfall entstehen können. Genauere Informationen zur nächstgelegenen Sammelstelle erhalten Sie bei
Ihrer Gemeindeverwaltung.
In Übereinstimmung mit der Landesgesetzgebung können für die unsachgemäße Entsorgung dieser Art von
Abfall Strafgebühren erhoben werden.
Für Geschäftskunden in der Europäischen Union
Bitte treten Sie mit Ihrem Händler oder Lieferanten in Kontakt, wenn Sie elektrische und elektronische Geräte
entsorgen möchten. Er hält weitere Informationen für sie bereit.
Informationen zur Entsorgung in anderen Ländern außerhalb der Europäischen
Union
Dieses Symbol ist nur in der Europäischen Union gültig.
Bitte treten Sie mit Ihrer Gemeindeverwaltung oder Ihrem Händler in Kontakt, wenn Sie dieses Produkt
entsorgen möchten, und fragen Sie nach einer Entsorgungsmöglichkeit.
Page 59

- 57 -
Deutsch
Jährliche Prüfung gewerblicher Mikrowellenherde
Schriftlicher Nachweis erforderlich
Jahr der Prüfung
(Datum)
Siehe Baujahr
geprüfte Details: Ergebnis
Tür-Leckstrahlung: <5 mW/cm
2
Öffnungen: <1 mW/cm
2
Sichtprüfung: O.K.
Sicherheitsbestätigung des geschulten
Fachpersonals der Firma (Stempel,
Unterschrift)
Matsushita Electric Industrial Co., Ltd.
Falls erforderlich, bitte weitere Seite hinzufügen!
Panasonic-Erzeugnisse sind Markenartikel von höchster Qualität, die mit größter Sorgfalt gefertigt werden.
Sie erhalten auf gewerbliche Panasonic-Mikrowellenherde.
24 Monate Material-Garantie
gerechnet vom Tage des Verkaufs durch den Fachhändler an den Endverbraucher. Die Garantie besteht darin,
daß während der Garantiezeit dem Fachhändler die Teile kostenlos geliefert werden, die zur Behebung eines
nachgewiesenen Fabrikations- oder Materialfehlers notwendig sind.
Ausgenommen von der Garantieleistung sind:
a) Schäden und Verluste, die durch das Gerät oder den Gebrauch desselben entstehen, sowie Schäden, die
auf lokale Verhältnisse, wie Fehler der Installation, Brand, Blitzschlag; Verschleißteile, Plastikteile und
Zubehör etc. zurückzuführen sind.
b) Schäden durch Nichtbeachtung der Bedienungsanleitung, z. B. Anschluß an eine falsche Netzspannung und
Schäden durch fahrlässige Behandlung oder Mißbrauch.
c) Schäden, die aufgrund äußerer Einflüsse entstanden sind.
Lohn-, Transport- und Verpackungskosten gehen zu Lasten des Käufers. Der Garantiedienst wird von
dem Fachhändler wahrgenommen, der das Gerät verkauft hat, es sei denn, er weist eine spezielle, für ihn
tätige Servicestelle nach.
Bitte beachten Sie:
Dieser Garantieschein hat nur Gültigkeit in Verbindung mit der Garantieerklärung, die ausgefüllt, mit HändlerStempel und Kaufdatum versehen, innerhalb von 14 Tagen an die Panasonic Deutschland GmbH
zurückgeschickt werden muß.
Bei Beanstandungen eines Gerätes bitten wir, diesen Garantieschein mit einzureichen.
Verkaufsdatum
Serien-Nr.
Modell-Nr.
✂
Page 60

- 58 -
1.Instructions de mise à la terre
IMPORTANT: POUR LA SECURITE DES
PERSONNES, CET APPAREIL DOIT ETRE
CORRECTEMENT MIS A LA TERRE.
Lorsqu’une prise de courant n’est pas mise à la
terre, le client a pour responsabilité personnelle et
obligation de la faire remplacer par une prise de
courant correctement mise à la terre.
AVERTISSEMENT: TENSION ET PUISSANCE
La tension utilisée doit être celle spécifiée sur le
four. Utiliser une tension supérieure à celle qui est
spécifiée est dangereux et peut entraîner un
incendie ou tout autre type d’accident
dommageable.
INSTALLATION DU FOUR
Posez le four sur une surface plane et stable. Il est
déconseillé d’installer le four dans un endroit
chaud ou humide; par ex. près d’une cuisinière à
gaz ou électrique. N’utilisez pas le four lorsque la
température de la pièce dépasse 40°C (104°F)
et/ou le taux d’humidité est supérieur à 85%. Il est
important que de l’air puisse circuler librement
autour du four.
Le four peut provoquer des interférences avec des
signaux de diffusion basse fréquence lorsqu’il est
placé trop près d’un poste de radio ou de
télévision.
Pour une utilisation efficace en toute sécurité, une
bonne circulation de l’air doit être assurée à
travers les grilles d’aération du four, c’est-à-dire
5cm (2 pouces) sur le côté et à l’arrière; 20cm
(8 pouces) sur le dessus.
Le four doit être positionné afin de permettre
l’accès à la prise.
2.Tension et puissance
La tension utilisée doit être celle spécifiée sur le
four. Utiliser une tension supérieure à celle qui est
spécifiée est dangereux et peut entraîner un
incendie ou tout autre type d’accident
dommageable.
3.Réparations
Il est dangereux pour toute personne autre qu’un
réparateur formé par le fabricant d’effectuer toute
réparation.
Il est interdit de déposer la carrosserie du four.
De hautes tensions se trouvent à l’intérieur de la
carrosserie.
Seul un personnel de maintenance qualifié est
autorisé à effectuer des réparations ou réglages.
Contactez le fabricant.
Joints d’étanchéité
N’essayez pas de forcer ou d’effectuer des
réglages ou réparations sur la porte, le boîtier du
tableau de commande, les interrupteurs de
verrouillage ou sur toute autre partie du four. Il est
interdit de déposer le panneau extérieur du four.
Les joints d’étanchéité et leurs zones alentour
doivent toujours être maintenus propres; pour
cela, utilisez un chiffon humide
4.Fonctionnement à vide
L’appareil ne doit pas être mis en marche en mode
MICROWAVE (micro-ondes) ou COMBINATION
(combiné) EN L’ABSENCE D’ALIMENTS DANS
LE FOUR. Le fonctionnement à vide provoque des
dommages à l’appareil.
5.Fil électrique
Lorsque le fil d’alimentation est endommagé, il doit
être remplacé par le fabricant, son service aprèsvente ou toute autre personne habilitée afin
d’éliminer tout danger.
Ne plongez pas le four dans l’eau. Maintenez le fil
électrique à l’écart des surfaces chaudes. Ne
laissez pas le fil pendre sur le bord d’une table ou
d’un plan de travail. L’arrière de l’appareil chauffe
pendant l’utilisation. Ne laissez pas le fil électrique
en contact avec l’arrière de l’appareil ou la surface
de la carrosserie.
6.Surfaces chaudes
Les surfaces extérieures du four, y compris les
grilles d’aération de la carrosserie et la porte du
four deviennent chaudes pendant l’utilisation.
(Gril, Chaleur tournante et Combiné) Procédez
avec précaution lors de l’ouverture et de la
fermeture des portes et lorsque vous insérez ou
retirez des aliments ou accessoires.
Le four est équipé d’éléments chauffants situés
sur le dessus et à l’arrière du four. Après
utilisation, les parois supérieure, latérales et
inférieure sont très chaudes.
7.Arrêt.
En cas de défaillance électrique, le four ne peut
être arrêté qu’au niveau de la prise.
Ce produit est un matériel qui répond aux normes européennes sur les perturbations électromagnétiques
EMC (EMC = compatibilité électromagnétique) EN 55011. Selon cette norme, ce produit est classé Groupe
2, classe B et reste dans les limites requises. La classification groupe 2 signifie que l’énergie à fréquence
radio est intentionnellement émise sous forme d’une radiation éléctromagnétique afin de réchauffer ou de
cuire des aliments. Classe B signifie que ce produit peut être utilisé dans un environnement domestique
usuel.
Informations de sécurité
Page 61

- 59 -
Françaisi
Lorsque vous déballez votre four
Installation du four
1.Grilles d’aération
Pour un refroidissement optimal du four, la
circulation de l’air doit se faire librement à l’arrière
du four.
IL EST INTERDIT D’OBSTRUER LES GRILLES
D’AERATION.
2.Température ambiante maximale
N’utilisez pas le four lorsque la température de la
pièce dépasse 40°C (104°F) et/ou le taux
d’humidité est supérieur à 90%. Il est important que
de l’air puisse circuler librement autour du four.
3.Utilisation en extérieur
N’utilisez pas le four en extérieur.
4.Rangement des accessoires
Lorsque vous n’utilisez pas le four, ne stockez
aucun objet autre que les accessoires du four à
l’intérieur de celui-ci au cas où il serait mis en
marche accidentellement. En cas de défaillance
électrique, le four ne peut être arrêté qu’au niveau
de la prise.
Fonctionnement
1.Examinez votre four
Déballez le four et conservez l’emballage.
Examinez ensuite le four et assurez-vous qu’il ne
présente aucune trace de choc, que les charnières
de la porte ne sont pas cassées et que la porte ne
présente aucune fissure. Si l’unité est
endommagée, avertissez immédiatement le
fournisseur. N.B. N’INSTALLEZ PAS l’unité si elle
est endommagée.
2.Joints d’étanchéité
Contrôlez l’état des joints d’étanchéité et des
zones alentour. En cas de dommages, l’appareil
ne doit pas être utilisé tant qu’il n’a pas été réparé
par un réparateur formé par le fabricant.
3.Carte de garantie
Complétez et envoyez la carte de garantie
prélibellée.
4.Retrait du film de protection
Un film de protection est utilisé pour protéger la
carrosserie des rayures pendant le transport.
Retirez ce film avant l’installation ou l’utilisation.
1.Installation du four
Le four doit être posé sur une surface plane et
stable. Pour un bon fonctionnement, la circulation
de l’air autour du four doit être suffisante.
Un écart d’au moins 5 cm (2 pouces) doit être
maintenu sur les côtés gauche et droit ainsi qu’à
l’arrière du four. Un espace minimum de 20 cm (8
pouces) doit être maintenu au-dessus du four et
au-dessus des 2 grilles d’évacuation à l’arrière.
2.Etagères
Ne posez pas le four sur une étagère directement
au-dessus ou à côté d’une plaque de gaz ou
électrique, d’une cuisinière ou bassine à friture.
Cela pourrait endommager le four. Il est
dangereux de poser le four sur une étagère aussi
haute que l’utilisateur ne peut pas retirer les
aliments et accessoires en toute sécurité.
3.Empilage
N’ESSAYEZ PAS d’empiler ces fours.
1.Avant l’utilisation
Avant d’utiliser la fonction CONVECTION,
COMBINAISON (combiné), GRILL (gril), GRILL
CONVECTION (chaleur tournante gril) ou FAN
GRILL (gril ventilateur) pour la première fois, faites
fonctionner ce four sans aliment sur
CONVECTION 250°C pendant 20 minutes. Cela
permet de brûler l’huile utilisée pour la protection
antirouille. Retirez tous les accessoires du four.
2.Fumée/Incendie
Si vous observez de la fumée alors que vous utilisez le
four en mode MICROWAVE (micro-ondes), maintenez
la porte du four fermée et arrêtez ou débranchez le
four au niveau de l’alimentation. Si des matériaux à
l’intérieur du four prennent feu, maintenez la porte du
four fermée et appuyez sur la touche STOP/RESET
(arrêt/annulation). Si possible, coupez l’alimentation au
niveau du boîtier à fusibles ou du disjoncteur.
3.Interférence
Le four peut provoquer quelques interférences
avec des signaux de diffusion basse fréquence
lorsqu’il est placé trop près d’un poste de radio ou
de télévision.
4.Eléments chauffants
Lorsque vous utilisez les puissances HIGH (haut),
MEDIUM (moyen), LOW (bas) et SIMMER (mijoter), la
moitié des éléments du Grill et le ventilateur de
CONVECTION fonctionnent pour réduire
l’accumulation de condensation. Veillez à NE PAS
TOUCHER LA PAROI SUPERIEURE DU FOUR.
5.Nettoyage
Ne nettoyez pas l’appareil avec un jet d’eau.
Si le four n’est pas nettoyé régulièrement,
l’intérieur du four pourrait se détériorer et cela
pourrait réduire la durée de vie de l’appareil et
éventuellement représenter un danger.
Précautions
Page 62

- 60 -
Informations importantes – Lire attentivement
1.Temps de chauffe
Etant donné que les temps de chauffe en mode
MICROWAVE (micro-ondes) et COMBINATION
(combiné) sont beaucoup plus courts que ceux
des autres méthodes de cuisson, veillez à ne pas
dépasser les temps de chauffe recommandés
sans d’abord vérifier les aliments.
Les temps de chauffe des tableaux sont
approximatifs. Les facteurs suivants peuvent
affecter les temps de cuisson: température de
départ, volume, taille et forme des aliments et
plats utilisés.
2.Petites quantités d’aliments
Les aliments en petites quantités avec une faible
teneur en humidité peuvent brûler, sécher ou
prendre feu s’ils sont cuits trop longtemps.
3.Eléments constitutifs d’une denrée
alimentaire
Les aliments avec une teneur en sucre, sel,
graisses et humidité élevée chauffent plus
rapidement dans un micro-ondes car leurs
propriétés attirent l’énergie micro-ondes. Les
aliments plus denses riches en protéines et fibres
absorbent l’énergie micro-ondes plus lentement et
nécessitent donc un temps de chauffe plus long.
4.Aliments riches en graisses/sucre
Il est important de régler correctement le temps de
chauffe des aliments présentant une teneur en
graisses, alcool et sucre élevée. Ces aliments
peuvent prendre feu s’ils sont chauffés trop
longtemps par micro-ondes. NE LAISSEZ JAMAIS
SANS SURVEILLANCE.
Par ex. beignets, baba au rhum, puddings et
tourtes à la viande.
5.Œufs
Ne faites pas d’œufs à la coque dans leur coquille
et d’œufs durs dans le MICRO-ONDES. La
pression peut s’accumuler et les œufs peuvent
exploser.
6.Percer la peau
Les pommes de terre, pommes, jaunes d’œuf,
légumes entiers et saucisses sont des exemples
d’aliments à la peau non poreuse. Leur peau doit
être percée à l’aide d’une fourchette avant la
cuisson par MICRO-ONDES pour éviter qu’ils
n’éclatent.
7.Friture
N’essayez pas de faire de la friture dans votre
four.
8.Vérification de la température interne
Pour s’assurer de la destruction complète des
bactéries pouvant entraîner une intoxication
alimentaire, comme la listéria et la salmonelle,
assurez-vous que la température interne de
l’aliment atteint au moins 72°C lorsque vous le
réchauffez. Utilisez un thermomètre approprié
avec une sonde pour contrôler la température à la
fin du temps de chauffe. Prolongez le temps de
chauffe si la température correcte n’est pas
atteinte. N’UTILISEZ PAS un thermomètre à
viande de cuisine – utilisez uniquement un
équipement correctement étalonné.
9.Liquides
Lorsque vous chauffez des liquides par MICROONDES, par ex. soupe, sauces et boissons, des
bulles de bouillonnement n’apparaissent pas
nécessairement si vous dépassez le point
d’ébullition du liquide. Cela peut entraîner un
débordement soudain du liquide chaud. Pour
éviter cela, suivez les consignes suivantes:
a. Evitez d’utiliser des contenants à flancs droits
au goulot étroit.
b. Ne surchauffez pas.
c. Remuez le liquide avant de placer le contenant
dans le four et de nouveau au milieu du temps
de chauffe.
d. Après la chauffe, laissez le contenant reposer
un court moment dans le four puis remuez de
nouveau avant de retirer le contenant avec
précaution.
10.Papier, plastique
Lorsque vous chauffez des aliments dans des
contenants en plastique ou carton, contrôlez
fréquemment le four car ce type de contenant peut
prendre feu en cas de surchauffe. (Voir page 64.)
N’utilisez pas de produits en papier recyclé, car ils
peuvent contenir des impuretés et provoquer des
étincelles et/ou un incendie à moins qu’il soit
stipulé sur l’emballage qu’ils ont été conçus pour
une utilisation au micro-ondes.
11.Réchauffage
Il est essentiel que les aliments réchauffés soient
servis très chauds (72°C). Vérifiez toujours avant
de servir et, en cas de doute, chauffez les aliments
plus longtemps.
12.Temps de repos
Le temps de repos est essentiel pour les aliments
cuits ou réchauffés en mode MICROWAVE (microondes) ou COMBINATION (combiné). Pendant le
temps de repos, la chaleur continue de se diffuser
vers le centre pour cuire entièrement l’aliment.
Plus l’aliment est dense, plus le temps de repos
est long. Un temps de repos est également
nécessaire pour les aliments réchauffés.
Incendie!
Si des matériaux à l’intérieur du four prennent
feu, maintenez la porte du four fermée et
appuyez sur la touche STOP/RESET
(arrêt/annulation). Coupez l’alimentation au
niveau du boîtier à fusibles ou du disjoncteur.
Incendie!
Dépasser les temps de chauffe recommandés
abîme les aliments qui, dans des cas extrêmes,
pourraient prendre feu et éventuellement
endommager l’intérieur du four. Il est essentiel
de nettoyer le four régulièrement et de retirer
tout excès de graisse. Voir Entretien et
nettoyage de votre four.
(Voir pages 81 - 82.)
Page 63

- 61 -
Françaisi
Informations importantes – Lire attentivement
Schéma général
Accessoires fournis
(8) Filtre à air
VEILLEZ A CE QUE LES FILTRES A AIR
SOIENT INSTALLES AVANT D’UTILISER LE
FOUR.
Si le four est utilisé sans filtres à air, la
poussière et la graisse bloquent l’aération et
provoquent une surchauffe.
Voir page 82 pour l’installation.
(
12) Plateau isolant en céramique
N° de pièce
A06033230BP
Lorsque vous utilisez des plats métalliques en
mode COMBINATION (combiné), placez le
plateau isolant en céramique entre le récipient
des aliments et la grille métallique.
Le plateau isolant en céramique doit rester
dans le four pendant le préchauffage du
programme combiné.
Assurez-vous que le plateau isolant en
céramique est propre et ne contient aucune
graisse avant d’y poser directement tout
aliment.
Laissez REFROIDIR le plateau isolant en
céramique avant de le nettoyer pour éviter qu’il
ne se brise. Le plateau isolant en céramique
doit être disposé sur la sole du four pour
recueillir les graisses de cuisson en mode gril.
(13)Grille métallique
N° de pièce A06023C50BP
La grille peut être utilisée avec les fonctions
CONVECTION (chaleur tournante),
COMBINATION (combiné), GRILL
CONVECTION (chaleur tournante gril), GRILL
(gril) et FAN GRILL (gril ventilateur).
NE laissez PAS la grille dans le four en mode
MICROWAVE ONLY
(micro-ondes uniquement).
NE PLACEZ PAS DE RÉCIPIENTS
MÉTALLIQUES DIRECTEMENT SUR LA
GRILLE lorsque vous utilisez le mode
COMBINATION (combiné).
Utilisez le plateau isolant en céramique.
Installation de la grille métallique
Sens d’insertion dans la cuve
(14)Carte mémoire SD
N° de pièce RP-SD016BCS0
Une Carte mémoire SD se trouve dans le four
et contient des fichiers Excel pour vous
permettre de programmer le four depuis votre
ordinateur. Vous pouvez mémoriser jusqu’à
99 programmes de cuisson sur la Carte
mémoire SD. Si vous perdez la Carte SD ou
qu’elle présente un dysfonctionnement,
contactez l’ingénieur de maintenance.
Voir “Enregistrement de données de
programmation sur la Carte mémoire SD” pour
plus d’informations sur l’utilisation de la Carte
mémoire SD et sur le logiciel de programmation
de la mémoire.
AVANT
La grille ne possède pas de dispositif ANTIBASCULEMENT – faites attention lorsque vous
retirez les aliments.
13.Accessoires
Suivez les instructions spécifiques de ce guide
pour utiliser les accessoires du four et ustensiles
de façon appropriée. Autrement, vous risquez
d’endommager le four.
Procédez avec précaution lorsque vous retirez les
aliments et/ou accessoires du four. La grille
métallique fournie N’A PAS de dispositif antibasculement –– faites donc attention lorsque vous
la tirez pour retirer les aliments.
14.Récipients de cuisson
Avant d’utiliser le four en mode MICROWAVE
(micro-ondes) et COMBINATION (combiné),
assurez-vous toujours d’utiliser le récipient
approprié. (Voir page 64.)
Ne mettez pas de récipients fermés
hermétiquement au MICRO-ONDES car ils
exploseraient.
15.Fonctionnement du moteur du
ventilateur
Après une utilisation en mode MICROWAVE
(micro-ondes), CONVECTION (chaleur tournante),
COMBINATION (combiné), GRILL (gril), FAN
GRILL (gril ventilateur) ou GRILL CONVECTION
(chaleur tournante gril), le moteur du ventilateur
tourne toujours pendant environ 5 minutes pour
refroidir les composants électriques.
Cela est normal et vous pouvez retirer les aliments
même si le moteur du ventilateur fonctionne.
16.Biberons/pots pour bébé
Les biberons et petits pots doivent être ouverts
pour être réchauffés et leur contenu doit être
remué ou secoué. En outre, vérifiez la température
des aliments avant de les donner à l’enfant pour
éviter les brûlures.
17.Les enfants utilisent le four
Il ne faut laisser les enfants utiliser le four qu’à la
seule condition qu’ils en connaissent le
fonctionnement et soient à même de comprendre
les dangers d’une utilisation inappropriée.
Page 64

- 62 -
Schéma général
Présentation de votre four
(1) Couvercle de protection de la lampe
(2) Eléments du gril en quartz
(3) Ventilateur de chaleur tournante et
résistance
(4) Poignée de porte
(5) Afficheur
(6) Tableau de commande
(7) Couvercle protecteur de carte SD
(9) Grilles d’évacuation du four
(10)Sole en céramique
(11)Supports de grille (supérieurs,
inférieurs)
Tableau de commande
(15)Touches numériques
(16)Touche de programmation
(17)Touche micro-ondes
(18)Touche gril
(19)Touche gril ventilateur
(20)Touche chaleur tournante
(21)Touche arrêt/annulation
Avant la chauffe:
Une pression efface l’afficheur.
Pendant la chauffe:
Une pression arrête le cycle de chauffe et
deux pressions effacent l’afficheur.
NB: voir page 76 pour le fonctionnement en
programme Verrouillage.
(22)Touche verrouillage programme
(23)Touche pré-chauffage
(24)Touche du mode combiné
(25)Touche refroidissement
(26)Touche de la lampe du four
La lampe du four s’éteint lorsque la porte est
fermée. Si vous voulez contrôler la nourriture,
appuyez sur la touche de la lampe pour
l’allumer pendant 10 secondes. La lampe du
four s’allume chaque fois que la porte est
ouverte.
(27)Touche de marche
Fonction de répétition:
Vous pouvez répéter le même programme de
chauffe si vous appuyez sur la touche START
(marche) pendant la minute suivant la fin du
programme précédent.
Après 1 minute, si vous n’avez pas appuyé sur
la touche START (marche), l’afficheur s’efface
si la porte du four est fermée.
Après 30 minutes, il revient à “0” si la porte du
four est ouverte.
Afficheur
L’illumination du curseur indique le programme
sélectionné. Vérifiez toujours la position du curseur
avant d’appuyer sur la touche START (marche).
(28)Micro-ondes
(29)Gril
(30)Gril ventilateur
(31)Chaleur tournante
(32)Pré-chauffage
(33)Refroidissement
(34)Niveau de puissance micro-ondes
(35)Indicateur d’étape de cuisson
Page 65

- 63 -
Françaisi
Carte mémoire SD
●
L’appareil est vendu avec une carte mémoire SD. Elle vous permet de mémoriser jusqu’à 99 Programmes
dans le four.
●
Utilisez la carte lorsque vous enregistrez ou rappelez des Programmes en mémoire.
※Vous pouvez enregistrer les données du Programme en mémoire sur votre Carte mémoire SD à l’aide de
votre ordinateur.
Reportez-vous à “Enregistrement de données de programmation sur la Carte mémoire SD”.
Comment insérer / retirer une Carte mémoire SD
※Avant d’insérer / retirer une Carte mémoire SD, débranchez toujours la prise d’alimentation du four.
Vous pouvez aussi insérer / retirer une Carte mémoire SD quand l’afficheur est vide, autrement les
données de la Carte mémoire SD pourraient se détériorer.
1. Dévissez le couvercle protecteur de carte SD et déposez-le.
2. Poussez la Carte mémoire SD avec votre doigt pour la faire sortir.
Ensuite, tirer pour la retirer.
1. Insérez une Carte mémoire SD en plaçant l’étiquette vers le haut comme
indiqué par le signe ▲ jusqu’à ce qu’elle s’emboîte dans son emplacement.
2. Posez l’extrémité gauche du couvercle protecteur de la carte SD.
Fermez en vissant sur le côté droit.
Retrait
Insertion
Attention:
1. Maintenez toujours le couvercle protecteur de la carte SD fermé sauf pour insérer / retirer la Carte mémoire
SD afin d’éviter toute pénétration d’eau ou de poussière.
2. Insérez uniquement la Carte mémoire SD spécifiée pour ce four. N’utilisez aucun autre type de Carte
mémoire SD.
3. Maintenez la Carte mémoire SD à l’écart de toute électricité statique.
4. Ne démontez et ne modifiez pas les Cartes mémoire SD.
5. N’exercez aucune force physique sur les Cartes mémoire SD. Ne les pliez pas, ne les laissez pas tomber
et ne les mouillez pas.
6. Evitez tout contact des bornes métalliques d’une Carte mémoire SD avec vos doigts ou du métal.
7. N’enlevez pas l’étiquette. Ne collez aucune autre étiquette sur la Carte mémoire SD.
8. Ne laissez pas les Cartes mémoire SD dans des endroits exposés à de hautes températures et à la lumière
directe du soleil.
9. Ne laissez pas les cartes mémoire SD dans des endroits exposés à des gaz corrosifs.
10. Si vous perdez la Carte mémoire SD ou qu’elle présente un dysfonctionnement, contactez l’ingénieur de
maintenance pour qu’il vous envoie une carte de remplacement.
Page 66

- 64 -
Types de récipients à utiliser
MICRO-ONDES
1. Verre
UTILISER: Verre résistant à la chaleur, par ex.
Pyrex.
NE PAS UTILISER:
Verre délicat, cristal au plomb qui peut
se fêler ou faire des étincelles.
2. Porcelaine/céramique
UTILISER: Plats en porcelaine vitrifiée, porcelaine
et céramique conçus pour la cuisson.
NE PAS UTILISER:
Plats en porcelaine tendre anglaise
avec décorations métalliques. Carafes
avec poignées collées.
3. Poterie/Terre cuite/Grès
UTILISER: Si entièrement vitrifié.
NE PAS UTILISER:
Si non vitrifiés – ces plats peuvent
absorber l’eau qui absorbe l’énergie.
Cela rend le plat chaud et augmente le
temps de chauffe.
4. Aluminium/métal
UTILISER: Pour réchauffer uniquement:
Contenants en aluminium ouverts sur
le dessus pour portion individuelle.
Veillez à ce que les contenants ne
touchent pas les PAROIS et la PORTE
du four. N’utilisez pas de récipients en
aluminium pour la cuisson.
De petits morceaux de papier
aluminium pour protéger des rôtis
pendant la décongélation – veillez à ce
que l’aluminium n’entre pas en contact
avec les parois ou la porte.
NE PAS UTILISER:
Plats en métal, grille métallique, tout
plat présentant des DECORATIONS
ou MOULURES METALLIQUES.
BROCHETTES EN METAL. NE
REUTILISEZ PAS DE CONTENANTS
EN ALUMINIUM – ils peuvent
provoquer des ETINCELLES et être
BOSSELES/ENDOMMAGES.
N’utilisez pas de plats de type Le
Creuset (en fonte émaillée). Ils
peuvent toutefois être utilisés en mode
chaleur tournante ou gril.
5. Plastique
UTILISER: Des récipients en plastique résistant
aux températures élevées comme
Polysulfone durable plutôt que des
récipients souples. (Enlevez les
attaches métalliques.)
NE PAS UTILISER:
Plastique de mélamine, polypropylène,
phénol urée, ne pas utiliser non plus
de sacs de conservation et de
contenants en plastique par ex. pots
de margarine, yoghourt et tubes de
mayonnaise.
6. Films de recouvrement
UTILISER: Film alimentaire non plastifiant conçu
pour le micro-ondes. Ne laissez pas le
film en contact avec la nourriture. Pour
éviter les brûlures à la vapeur, percez
le film pour laisser la vapeur
s’échapper et retirez le film du plat
avec précaution.
NE PAS UTILISER:
Film alimentaire uniquement.
7. Bois/Osier
UTILISER: Brochettes en bois alimentaires.
NE PAS UTILISER:
Paniers en osier, saladiers en bois
(une utilisation prolongée sèche le bois
et présente des risques d’incendie)
8. Papier
UTILISER: Barquettes en carton recouvert de
polyester conçues pour le microondes.
NE PAS UTILISER:
Serviettes en papier (qui peuvent
prendre feu), gobelets paraffinés,
produits recyclés (sauf indication
contraire du fabricant).
COMBINE
Les programmes combinés utilisent les microondes et la chaleur (CONVECTION ou GRIL);
vous devez donc faire attention dans le choix du
récipient.
UTILISER: Les récipients en métal ne doivent
présenter aucune soudure métallique
dentelée. Les récipients en céramique
ne doivent présenter aucun motif en
métal.
Verre et porcelaine résistants à la
chaleur.
NE PAS UTILISER:
Ustensiles émaillés (pouvant présenter
des dorures ou motifs en métal). Fonte
émaillée, par ex. Le Creuset. Tout plat
non résistant à la chaleur, par ex.
plastique, film alimentaire.
CONVECTION / CONVECTION GRIL
UTILISER: Tout récipient adapté pour les fours
conventionnels, par ex. métal,
céramique, poterie, fonte émaillée, etc.
NE PAS UTILISER:
Récipients en plastique, films
alimentaires, bois/osier, verre, papier.
GRIL / GRIL VENTILATEUR
UTILISER: Tout conteneur approprié pour une
cuisson au gril, par ex. inox, Le
Creuset, céramique, plaques à
pâtisserie.
NE PAS UTILISER:
Récipients en plastique, céramique
fine, film alimentaire, etc.
Page 67

- 65 -
Françaisi
1
Ouvrez la porte.
Disposez les
aliments.
Fermez la porte.
La lampe du four s’allume.
La lampe du four s’éteint.
2 Sélectionnez
la puissance.
Appuyez sur la touche
MICROWAVE (micro-ondes)
pour sélectionner la puissance
appropriée.
Par ex. HAUT – voir cidessous.
3 Sélectionnez
la durée.
Appuyez sur les touches
numériques pour régler le
temps de chauffe.
Par ex. 4 min. 30 sec.
Appuyez sur les touches 4, 3
et 0
Durées maximales:
HAUT 15 min
Autre 60 min
4
Appuyez sur la touche
START (marche).
La durée sera décomptée sur
l’afficheur.
Le ventilateur sera activé.
A la fin du programme de
chauffe, le four émet 3 bips,
et “0” clignote sur l’afficheur
jusqu’à l’ouverture de la
porte.
Retirez les aliments.
L’afficheur indiquera le
programme précédent.
5 Ouvrez la
porte.
Fin du programme
Ouvrir la porte
INFORMATIONS
ACTION
AFFICHAGE
ACCESSOIRES A UTILISER
N’utilisez pas la grille métallique ou
le plateau isolant en céramique en
mode MICRO-ONDES.
Une fois
Deux fois
3 fois
4 fois
5 fois
6 fois
1350
650
420
240
180
0
APPUYEZ
WATTS
Utilisation du four en mode micro-ondes
HAUT
MOYEN
BAS
MIJOTER
DÉGIVER
ARRÊT
NIVEAU DE PUISSANCE
• Chauffe à phases multiples (Séquentielle)
Jusqu’à 3 phases différentes peuvent être programmées, elles fonctionnent alors en séquences.
Il s’agit des fonctions MICROWAVE (micro-ondes), CONVECTION (chaleur tournante), FAN GRILL (gril
ventilateur), GRILL CONVECTION (chaleur tournante gril) ou COMBINATION (combiné). Si le temps
nécessaire à la chauffe est supérieur à 15 minutes sur la puissance HAUT, utilisez une programmation
à 2 phases.
Pour une programmation à 2 phases:
Suivez les étapes 1-3 puis entrez le programme de chauffe suivant et appuyez sur START
(marche)
Pour une programmation à 3 phases:
Procédez comme pour la programmation à 2 phases et entrez un 3
ème
programme de
chauffe avant d’appuyer sur START (marche).
•
Surfaces chaudes
Soyez prudent lorsque vous retirez des aliments chauds du four. Utilisez des gants isolants.
•
Fonction de répétition
Voir page 62.
Page 68

- 66 -
•
Surfaces chaudes
Soyez prudent lorsque vous retirez des aliments chauds du four. Utilisez des gants isolants.
•
Chauffe à phases multiples (Séquentielle)
Voir page 65.
•
Rappel de la température de chaleur tournante
Vous pouvez vérifier la température sélectionnée pendant 3 secondes après avoir appuyé sur la touche
CONVECTION.
La température s’affichera brièvement sur l’afficheur avant que le temps de chauffe restant ne
réapparaisse.
Il est impossible de changer la température en cours de programme.
•
Préchauffage
Pour de meilleurs résultats en mode Chaleur tournante, le four doit être préchauffé.
(Voir page 78.)
•
Fonction de répétition
Voir page 62.
Utilisation du four en mode chaleur tournante
INFORMATIONS
ACTION
AFFICHAGE
1
Ouvrez la porte.
Disposez les
aliments.
Fermez la porte.
La lampe du four s’allume.
La lampe du four s’éteint.
2
Appuyez sur la
touche
CONVECTION.
*
Sélectionnez la température du four
requise. Par ex. 180°C
Continuez d’appuyer sur la touche
CONVECTION jusqu’à ce que la
température requise n’apparaisse sur
l’afficheur.
La température se règle par incréments
de 10°C de 100°C à 250°C
3 Sélectionnez
la durée.
Appuyez sur les touches
numériques pour régler le temps de
chauffe.
Par ex. 18 min.
Appuyez sur les touches 1, 8, 0 et 0
Temps de chauffe maximum:
99 min. 99 sec.
4
Appuyez sur la
touche START
(marche).
La durée sera décomptée sur
l’afficheur.
Le ventilateur de chaleur
tournante est mis en marche.
A la fin du programme de
chauffe, le four émet 3 bips,
et “0” clignote sur l’afficheur
jusqu’à l’ouverture de la
porte.
Retirez les aliments.
L’afficheur indiquera le
programme précédent.
5 Ouvrez la
porte.
Fin du programme
Ouvrir la porte
ACCESSOIRES A UTILISER
Pour obtenir de meilleurs résultats,
mettez le récipient de cuisson sur
la grille métallique à la position la
plus basse. Les aliments peuvent
être placés directement sur la grille
métallique si elle a été bien
nettoyée avant l’utilisation.
Attention:
La grille métallique ne possède
pas de dispositif ANTIBASCULEMENT.
Soyez prudent lorsque vous
retirez les aliments du four.
* Le four mémorisera la dernière
température CONVECTION si
vous souhaitez utiliser la même
température à nouveau.
Appuyez sur la touche
CONVECTION à la fin de la
cuisson et la dernière
température utilisée s’affichera.
Page 69

- 67 -
Françaisi
Utilisation du four en mode chaleur tournante gril
INFORMATIONS
ACTION
AFFICHAGE
1
Ouvrez la porte.
Disposez les
aliments.
Fermez la porte.
La lampe du four s’allume.
La lampe du four s’éteint.
3
Appuyez sur la
touche
CONVECTION
.
*
Sélectionnez la température du four
requise. Par ex. 180°C
Continuez d’appuyer sur la touche
CONVECTION jusqu’à ce que la
température requise n’apparaisse sur
l’afficheur.
La température se règle par incréments
de 10°C de 100°C à 250°C
4 Sélectionnez
la durée.
Appuyez sur les touches numériques
pour régler le temps de chauffe.
Par ex. 18 min.
Appuyez sur les touches 1, 8, 0 et 0
Temps de chauffe maximum:
99 min. 99 sec.
5
Appuyez sur la touche
START (marche).
La durée sera décomptée sur
l’afficheur.
Le ventilateur de chaleur
tournante est mis en marche.
A la fin du programme de
chauffe, le four émet 3 bips,
et “0” clignote sur l’afficheur
jusqu’à l’ouverture de la
porte.
Retirez les aliments.
L’afficheur indiquera le
programme précédent.
6 Ouvrez la
porte.
Fin de programa
Ouvrir la porte
2 Appuyez sur
la touche
GRILL (gril).
Même si un niveau haut ou bas
est sélectionné, le niveau Gril
est réglé automatiquement
lorsque vous appuyez sur la
touche CONVECTION.
ACCESSOIRES A UTILISER
Pour obtenir de meilleurs résultats,
mettez le récipient de cuisson sur
la grille métallique à la position la
plus basse. Les aliments peuvent
être placés directement sur la grille
métallique si elle a été bien
nettoyée avant l’utilisation.
Attention:
La grille métallique ne possède
pas de dispositif ANTIBASCULEMENT.
Soyez prudent lorsque vous
retirez les aliments du four.
• Surfaces chaudes
Soyez prudent lorsque vous retirez des aliments chauds du four. Utilisez des gants isolants.
•
Chauffe à phases multiples (Séquentielle)
Voir page 65.
•
Rappel de la température de chaleur tournante
Vous pouvez vérifier la température sélectionnée pendant 3 secondes après avoir appuyé sur la touche
CONVECTION.
La température s’affichera brièvement sur l’afficheur avant que le temps de chauffe restant ne
réapparaisse.
Il est impossible de changer la température en cours de programme.
Le rappel du niveau du gril n’est pas disponible.
•
Préchauffage
Pour de meilleurs résultats en mode Chaleur tournante, le four doit être préchauffé. (Voir page 78.)
•
Fonction de répétition
Voir page 62.
* Le four mémorisera la dernière
température GRILL
CONVECTION (chaleur
tournante gril) si vous souhaitez
utiliser la même température à
nouveau. Appuyez sur la touche
CONVECTION à la fin de la
cuisson et la dernière
température utilisée s’affichera.
Page 70

- 68 -
Utilisation du four en mode gril
INFORMATIONS
ACTION
AFFICHAGE
1
Ouvrez la porte.
Disposez les
aliments.
Fermez la porte.
La lampe du four s’allume.
La lampe du four s’éteint.
2 Appuyez sur
la touche
GRILL (gril).
Sélectionnez le niveau de gril
requis.
Par ex. Haut
Afficheur
Puissance
1 pression
Hi (Haut) 1840 W
2 pressions
Lo (Bas) 1500 W
3 Sélectionnez
la durée.
Appuyez sur les touches
numériques pour régler le
temps de chauffe.
Par ex. 10 min.
Appuyez sur les touches 1, 0,
0 et 0
Temps de chauffe maximum:
60 min.
4
Appuyez sur la
touche START
(marche).
La durée sera décomptée sur
l’afficheur.
Le ventilateur de convection
tourne.
A la fin du programme de
chauffe, le four émet 3 bips,
et “0” clignote sur l’afficheur
jusqu’à l’ouverture de la
porte.
Retirez les aliments.
L’afficheur indiquera le
programme précédent.
(Moins d’une minute.)
5 Ouvrez la
porte.
ACCESSOIRES A UTILISER
Pour de meilleurs résultats, placez
les aliments sur la grille métallique
en position SUPERIEURE.
Le plateau isolant en céramique
peut être disposé sur la sole du
four pour recueillir les projections
et les graisses de cuisson. Les
petits morceaux qui peuvent
tomber entre la grille métallique
peuvent être cuits directement sur
le plateau isolant en céramique
avec la grille métallique en position
SUPERIEURE.
Egouttez fréquemment pour éviter
les projections excessives. Il est
possible de finir des plats creux
sous le gril en les plaçant sur la
grille métallique en position
inférieure ou directement sur la
sole en céramique.
Fin du programme
Ouvrir la porte
Attention:
La grille métallique ne possède
pas de dispositif ANTIBASCULEMENT.
Soyez prudent lorsque vous
retirez les aliments du four.
• Surfaces chaudes
Soyez prudent lorsque vous retirez des aliments chauds du four. Utilisez des gants isolants.
•
Chauffe à phases multiples (Séquentielle)
Voir page 65.
•
Rappel du niveau du gril
Vous pouvez vérifier le niveau du gril sélectionné pendant 3 secondes après avoir appuyé sur la touche
GRILL (gril).
Le niveau du gril s’affichera sur l’afficheur avant que le temps de chauffe restant ne réapparaisse.
•
Préchauffage
Pour de meilleurs résultats en mode Chaleur tournante, le four doit être préchauffé.
(Voir page 78.)
•
Fonction de répétition
Voir page 62.
Page 71

- 69 -
Françaisi
Utilisation du four en mode gril ventilateur
INFORMATIONS
ACTION
AFFICHAGE
1
Ouvrez la porte.
Disposez les
aliments.
Fermez la porte.
La lampe du four s’allume.
La lampe du four s’éteint.
2 Appuyez sur
la touche FAN
GRILL (gril
ventilateur).*
Sélectionnez la température FAN
GRIL (gril ventilateur).
Par exemple, 180°C
Continuez d’appuyer sur la touche
FAN GRILL (gril ventilateur) jusqu’à
ce que la température requise
n’apparaisse sur l’afficheur.
La température se règle par
incréments de 10°C de 100°C à
250°C
3 Sélectionnez
la durée.
Appuyez sur les touches numériques
pour régler le temps de chauffe.
Par ex. 20 min.
Appuyez sur les touches 2, 0, 0 et 0.
Temps de chauffe maximum:
99 min. 99 sec.
4
Appuyez sur la
touche START
(marche).
La durée sera décomptée sur
l’afficheur.
Le ventilateur de convection
tourne.
A la fin du programme de
chauffe, le four émet 3 bips,
et “0” clignote sur l’afficheur
jusqu’à l’ouverture de la
porte.
Retirez les aliments.
L’afficheur indiquera le
programme précédent.
5 Ouvrez la
porte.
ACCESSOIRES A UTILISER
Fin du programme
Ouvrir la porte
• Surfaces chaudes
Soyez prudent lorsque vous retirez des aliments chauds du four. Utilisez des gants isolants.
•
Chauffe à phases multiples (Séquentielle)
Voir page 65.
•
Rappel de la température du gril ventilateur
Vous pouvez vérifier la température sélectionnée pendant 3 secondes après avoir appuyé sur la touche
FAN GRILL (gril ventilateur).
La température s’affichera brièvement sur l’afficheur avant que le temps de chauffe restant ne
réapparaisse.
Il est impossible de changer la température en cours de programme.
•
Préchauffage
Pour de meilleurs résultats en mode Chaleur tournante, le four doit être préchauffé.
(Voir page 78.)
•
Fonction de répétition
Voir page 62.
* Le four mémorisera la dernière
température FAN GRILL (gril
ventilateur) si vous souhaitez
utiliser la même température à
nouveau.
Appuyez sur la touche FAN
GRILL (gril ventilateur) à la fin de
la cuisson et la dernière
température utilisée s’affichera.
Pour obtenir de meilleurs résultats,
mettez le récipient de cuisson sur
la grille métallique à la position la
plus basse. Les aliments peuvent
être placés directement sur la grille
métallique si elle a été bien
nettoyée avant l’utilisation.
Attention:
La grille métallique ne possède
pas de dispositif ANTIBASCULEMENT.
Soyez prudent lorsque vous
retirez les aliments du four.
Page 72

- 70 -
Utilisation du four en mode combiné
2
Appuyez sur la
touche
COMBINATION
(combiné).
INFORMATIONS
ACTION
AFFICHAGE
1
Ouvrez la porte.
Disposez les
aliments.
Fermez la porte.
La lampe du four s’allume.
La lampe du four s’éteint.
4
Appuyez sur la
touche START
(marche).
La durée sera décomptée sur
l’afficheur.
A la fin du programme de
chauffe, le four émet 3 bips,
et “0” clignote sur l’afficheur
jusqu’à l’ouverture de la
porte.
Retirez les aliments.
L’afficheur indiquera le
programme précédent.
5 Ouvrez la
porte.
ACCESSOIRES A UTILISER
Pour de meilleurs résultats, placez
les aliments sur la grille métallique
en position BASSE.
Le plateau isolant en céramique
DOIT être utilisé si le récipient de
cuisson est en métal, NE placez
JAMAIS un récipient métallique
directement sur la GRILLE
MÉTALLIQUE en mode COMBINÉ
car cela peut produire des
étincelles et endommager le
plat/four.
Fin du programme
Ouvrir la porte
Sélectionnez le numéro (1-5)
de COMBINATION (combiné)
pré-installé.
Par ex. 1 – voir ci-dessous.
Mode combiné prédéfini
3 Sélectionnez
la durée.
Appuyez sur les touches
numériques pour régler le
temps de chauffe.
Par ex. 3 min.
Appuyez sur les touches 3, 0
et 0.
Temps de chauffe maximum:
5 min.
Attention:
La grille métallique ne possède
pas de dispositif ANTIBASCULEMENT.
Soyez prudent lorsque vous
retirez les aliments du four.
Une fois
Deux fois
3 fois
4 fois
5 fois
250˚C
250˚C
250˚C
250˚C
Haut
APPUYEZ
NIVEAU DU GRIL OU
TEMPERATURE DE
CHALEUR TOURNANTE
5 min.
60 min.
60 min.
60 min.
60 min.
TEMPS DE
CHAUFFE
MAXIMUM
PUISSANCE
MICRO-ONDES
AFFICHAGE
1*
2
3
4
5
HAUT
BAS
DÉGIVER
BAS
BAS
Gril ventilateur
Gril ventilateur
Gril ventilateur
Chaleur tournante gril
Gril
REGLAGE GRIL OU
CHALEUR
TOURNANTE
*Combi 1 ne peut être utilisé que comme première phase d’un programme de cuisson à 2 ou 3 phases.
Page 73

- 71 -
Françaisi
• Surfaces chaudes
Soyez prudent lorsque vous retirez des aliments chauds du four. Utilisez des gants isolants.
•
Chauffe à phases multiples (Séquentielle)
Voir page 65.
•
Rappel du numéro de combiné pré-installé
Il est possible de vérifier le numéro de combiné pré-installé (1-5) sélectionné pendant 3 secondes après
avoir appuyé sur la touche COMBINATION (combiné).
Le numéro de combiné pré-installé s’affiche dans la fenêtre avant de revenir au temps de chauffe
restant.
•
Préchauffage
Pour de meilleurs résultats en mode combiné, le four doit être préchauffé.
(Voir page 78.)
•
Fonction de répétition
Voir page 62.
Utilisation du four en mode combiné
Page 74

- 72 -
Utilisation du four en mode combiné
2 Sélectionnez
la
puissance.**
INFORMATIONS
ACTION
AFFICHAGE
1
Ouvrez la porte.
Disposez les
aliments.
Fermez la porte.
La lampe du four s’allume.
La lampe du four s’éteint.
Appuyez sur la touche
MICROWAVE (micro-ondes)
pour sélectionner la puissance
appropriée.
Par ex. BAS
Mode combiné manuel
3 Appuyez sur
la touche
GRILL (gril)*
ou
la touche FAN
GRILL (gril
ventilateur)
***
ou
la touche
CONVECTION
* ***
ou
la touche
GRILL (gril)*
+
la touche
CONVECTION
* ***
MWO + GRILL
Sélectionnez le niveau du gril.
Afficheur
Puissance
1 pression
Hi (Haut) 1840 W
2 pressions
Lo (Bas) 1500 W
Ex. Hi (Haut).
OU
MWO + FAN GRIL
Appuyez sur la toucheGril
ventilateur jusqu’à ce que la
température requise
apparaisse sur l’afficheur.
Ex. 200°C.
OU
MWO + CONVECTION
Appuyez sur la touche
Chaleur tournante jusqu’à ce
que la température requise
apparaisse sur l’afficheur.
Ex. 200°C.
OU
MWO + GRIL CONVECTION
Vous pouvez sélectionner les
niveaux Hi (Haut) ou Lo
(Bas), mais le niveau de gril
est automatiquement réglé
lorsque vous appuyez sur la
touche Chaleur tournante.
+
Appuyez sur la touche
Chaleur tournante jusqu’à ce
que la température requise
apparaisse sur l’afficheur.
Ex. 200°C.
ACCESSOIRES A UTILISER
Pour de meilleurs résultats, placez
les aliments sur la grille métallique
en position BASSE. Le plateau
isolant en céramique DOIT être
utilisé si le récipient de cuisson est
en métal, NE placez JAMAIS un
récipient métallique directement
sur la GRILLE MÉTALLIQUE en
mode COMBINÉ car cela peut
produire des étincelles et
endommager le plat/four.
Attention:
La grille métallique ne possède
pas de dispositif ANTIBASCULEMENT.
Soyez prudent lorsque vous
retirez les aliments du four.
(ACTION 5-6 suite sur la page suivante.)
* Il est possible de combiner les
modes micro-ondes, gril et
chaleur tournante.
** Les paramètres de combiné
utilisant une puissance HIGH
(Haut) ne peuvent être utilisés
que comme phase 1 d’un
programme de cuisson à 2 ou
3 phases et pendant un
maximum de 5 min de chauffe.
*** Le four mémorisera la dernière
température de CONVECTION,
GRILL CONVECTION (chaleur
tournante gril) ou FAN GRILL
(gril ventilateur) utilisée en
mode COMBINE si vous
souhaitez utiliser la même
température à nouveau.
Appuyez sur la touche
CONVECTION ou FAN GRILL
(gril ventilateur) à la fin de la
cuisson et la dernière
température utilisée s’affichera.
4 Sélectionnez
la durée.
Appuyez sur la touche des
chiffres pour régler le temps
de chauffe.
Ex. MWO + GRIL 18 min.
Appuyez sur 1, 8, 0 et 0
Le temps de chauffe
maximum est de 60 min.
Page 75

- 73 -
Françaisi
Utilisation du four en mode combiné
• Surfaces chaudes
Soyez prudent lorsque vous retirez des aliments chauds du four. Utilisez des gants isolants.
•
Chauffe à phases multiples (Séquentielle)
Voir page 65.
•
Rappel du niveau du gril (Uniquement combiné gril)
Vous pouvez vérifier le niveau du gril sélectionné pendant 3 secondes après avoir appuyé sur la touche
GRILL (gril).
Le niveau du GRIL s’affichera sur l’afficheur avant que le temps de chauffe restant ne réapparaisse.
•
Rappel de la température de chaleur tournante
Vous pouvez vérifier la température sélectionnée pendant 3 secondes après avoir appuyé sur la touche
CONVECTION.
La température s’affichera brièvement sur l’afficheur avant que le temps de chauffe restant ne
réapparaisse.
Il est impossible de changer la température en cours de programme.
•
Rappel de la température du gril ventilateur
Vous pouvez vérifier la température sélectionnée pendant 3 secondes après avoir appuyé sur la touche
FAN GRILL (gril ventilateur).
La température s’affichera brièvement sur l’afficheur avant que le temps de chauffe restant ne
réapparaisse.
Il est impossible de changer la température en cours de programme.
•
Préchauffage
Pour de meilleurs résultats en mode combiné, le four doit être préchauffé.
(Voir page 78.)
•
Fonction de répétition
Voir page 62.
INFORMATIONS
ACTION
AFFICHAGE
A la fin du programme de
chauffe, le four émet 3 bips,
et “0” clignote sur l’afficheur
jusqu’à l’ouverture de la
porte.
Retirez les aliments.
L’afficheur indiquera le
programme précédent.
6 Ouvrez la
porte.
Fin de programa
Ouvrir la porte
5
Appuyez sur la
touche START
(marche).
La durée sera décomptée sur
l’afficheur.
Page 76

- 74 -
INFORMATIONS
ACTION
AFFICHAGE
1 Ouvrez la porte. La lampe du four s’allume.
2 Appuyez sur la touche
PROG.
Maintenez la porte ouverte.
Appuyez sur la touche pendant 2 secondes
jusqu’à ce que “P” s’affiche.
3 Appuyez sur le numéro du
programme.
Par ex. Pour régler le Programme 03: MIJOTER
20 min.
Appuyez sur les touches numériques 0 et 3.
Si le programme a été réglé précédemment, cela
apparaîtra sur l’afficheur.
Si la mémoire du programme est vide, le numéro
du programme apparaîtra alors sur l’afficheur.
5 Sélectionnez la durée. Par ex. Appuyez sur les touches numériques 2, 0,
0, et 0.
Après 3 secondes l’afficheur revient sur “0”.
6 Appuyez sur la touche
PROG.
4 Sélectionnez la puissance. Par ex. Appuyez sur la touche MICROWAVE
(micro-ondes) 4 fois.
• Programme Verrouillage
Il n’est PAS possible d’entrer un programme lorsque le Programme Verrouillage est activé.
(Voir page 76.)
•
Phases multiples (Cuisson séquentielle)
Il est possible de programmer en mémoire un programme à 2 ou 3 phases en utilisant MICROWAVE
(micro-ondes), CONVECTION, GRILL (gril), FAN GRILL (gril ventilateur), GRILL CONVECTION
(chaleur tournante gril) ou COMBINATION (combiné).
•
Changer un Programme en mémoire
Pour changer de programme, suivez les points 1-6 de la page précédente pour entrer le nouveau
programme.
Réglage des programmes en mémoire
Assurez-vous que la Carte mémoire SD est insérée dans le four.
Votre four dispose de 99 emplacements de mémorisation de programmes que vous pouvez utiliser en fonction
de vos besoins.
Les 99 programmes mémorisés peuvent être réglés manuellement à l’aide de la touche de programmation sur
le panneau de commande. Toutefois, ces programmes peuvent être mémorisés sur la Carte mémoire SD au
moyen de votre ordinateur (voir “Enregistrement de données de programmation sur la Carte mémoire SD”).
Toutes les informations de programme mémorisées directement sur la Carte mémoire SD remplaceront tout
programme manuel installé précédemment.
Page 77

- 75 -
Françaisi
Utilisation des programmes en mémoire
INFORMATIONS
ACTION
1 Ouvrez la porte.
Disposez les aliments.
Fermez la porte.
La lampe du four s’allume.
La lampe du four s’éteint.
2 Appuyez sur la touche
numérique souhaitée.
Par ex. pour le programme 03.
Appuyez sur les touches numériques 0 et 3. Cet
exemple est un Programme en mémoire
prédéfini:
puissance MIJOTER 20 min
3 Appuyez sur la touche
START (marche).
La durée sera décomptée sur l’afficheur.
AFFICHAGE
•
Programme Verrouillage
Si le programme Verrouillage est activé, le programme démarre immédiatement et il n’est donc pas
nécessaire d’appuyer sur la touche START (marche).
Assurez-vous que la Carte mémoire SD est insérée dans le four.
Utilisation des 99 programmes en mémoire.
Page 78

- 76 -
INFORMATIONS
ACTION
AFFICHAGE
1 Ouvrez la porte. La lampe du four s’allume.
2 Appuyez sur la touche PROG
LOCK (verrouillage
programme).
“P” s’affiche.
MAINTENEZ LA PORTE OUVERTE.
Après 2 secondes…..
Après 3 secondes…
Mode d’utilisation une touche
Lorsque le programme Verrouillage est activé, le four fonctionne en mode “ONE TOUCH” (une touche),
c’est-à-dire qu’il suffit d’appuyer sur le numéro du programme en mémoire pour que le four démarre
immédiatement.
Aucun besoin d’appuyer sur la touche START (marche).
•
Programme interrompu
Si la porte est ouverte pendant un programme, le temps de chauffe restant sera annulé.
•
Fonction de répétition
Lorsqu’un programme manuel de chauffe est terminé, le four affiche de nouveau automatiquement le
programme pour répéter le programme même si le verrouillage de programme est activé.
•
Définition de nouveaux programmes
Lorsque le Programme Verrouillage est activé, il n’est pas possible d’entrer un Programme en mémoire
ou de changer la tonalité de l’avertisseur sonore.
(Voir page 79.)
•
Touche arrêt/annulation
Pendant la chauffe, une pression arrête le cycle de chauffe, le programme est annulé et l’afficheur
revient sur “0”.
Activation du programme verrouillage
Page 79

- 77 -
Françaisi
INFORMATIONS
ACTION
1 Ouvrez la porte. La lampe du four s’allume.
2 Appuyez sur la touche
PROG.
Appuyez sur la touche pendant 2 secondes
jusqu’à ce que “P L” s’affiche.
MAINTENEZ LA PORTE OUVERTE.
Après 2 secondes…..
Après 3 secondes…
AFFICHAGE
• Mode d’utilisation deux touches
Le four repasse en mode 2 touches lorsque vous désactivez le programme Verrouillage.
Appuyez sur les touches numériques souhaitées puis appuyez sur la touche START (marche).
•
Programme interrompu
Si la porte est ouverte pendant un programme, une fois le programme Verrouillage désactivé, le temps
de chauffe restant restera affiché jusqu’à ce que vous ne fermiez la porte et que vous n’appuyiez sur la
touche START (marche).
•
Fonction de répétition
Lorsqu’un programme manuel de chauffe est terminé, le four affiche de nouveau automatiquement le
programme pour répéter le programme avec le verrouillage de programme désactivé.
•
Définition de nouveaux programmes
Une fois le Programme Verrouillage libéré, vous pouvez entrer de nouveau programmes de chauffe.
Liste des programmes
Il est possible de vérifier les programmes que vous avez entrés sur la Carte mémoire SD. Avec
la porte ouverte, appuyez simultanément sur START (marche) et la touche numérique 1. (Le
four émettra un bip de confirmation). Après 2 secondes, l’afficheur indiquera chaque phase
individuelle de chaque Programme en mémoire dans l’ordre 01, 02, 03 etc. Enfin, le paramètre
d’avertisseur sonore s’affiche ainsi que le symbole de verrouillage de programme (P.L) et le
temps préconisé avant le prochain nettoyage du filtre à air, avant de revenir sur “0”.
Désactivation du programme verrouillage
Page 80

- 78 -
Remarque sur le préchauffage et le refroidissement:
• Seules les fonctions PREHEAT (préchauffage) et COOLING (refroidissement) peuvent être sélectionnées
lorsque l’afficheur est vide. Pour tous les autres programmes, l’afficheur doit indiquer “0”.
• Vous pouvez sélectionner la fonction PREHEAT (préchauffage) pendant une fonction COOLING
(refroidissement) vice-versa.
• A la fin de la fonction de chauffe, le four revient automatiquement à la fonction PREHEAT (préchauffage).
• * Le four mémorisera la dernière température PREHEAT (préchauffage) si vous souhaitez utiliser la même
température à nouveau. Appuyez sur le touche PREHEAT (préchauffage) pour afficher la dernière
température appliquée.
Pour chauffer et brunir les aliments plus rapidement, la fonction PREHEAT (préchauffage) est conçue pour
maintenir votre four à une température de 190°C, 220°C ou 240°C pour démarrer la cuisson à chaud avant
d’utiliser la fonction GRILL (gril), CONVECTION, FAN GRILL (gril ventilateur), GRILL CONVECTION (chaleur
tournante gril) ou COMBINATION (combiné).
INFORMATIONS
ACTION
AFFICHAGE
1 Appuyez sur la touche
PREHEAT (préchauffage).*
Sélectionner une température de préchauffe
lorsque l’afficheur est vide ou sur “0”.
Par ex. 220°C
1 pression 190°C
2 pressions 220°C
3 pressions 240°C
2 Appuyez sur la touche
START (marche).
La température de préchauffage sera maintenue à
la température sélectionnée. La température de
préchauffage est atteinte lorsque “P” clignote. La
porte doit rester fermée. Si le four n’est pas utilisé,
le préchauffage s’éteint automatiquement après
4 heures.
3 Ouvrez la porte.
Fermez la porte
Appuyez sur la touche
START (marche).
Placez les aliments dans le four.
Sélectionnez un programme
Par ex. Chaleur tournante 220°C 15 min.
La durée sera décomptée sur l’afficheur.
A la fin du programme de chauffe, le four émet
3 bips, et “0” clignote sur l’afficheur jusqu’à
l’ouverture de la porte.
4 Ouvrez la porte.
L’afficheur indiquera le programme précédent.
Si vous n’appuyez pas sur la touche START
(marche) dans la minute qui suit, le four revient à
la température de préchauffage précédemment
sélectionnée.
Après 1 minute
Maintenir le four chaud
Page 81

- 79 -
Françaisi
Refroidissement rapide du four
Pour refroidir rapidement la cuve du four, la Panasonic Combi dispose d’une touche Cooling (refroidissement).
L’utilisation de la touche Cooling (refroidissement) est efficace à la fin de la cuisson pour refroidir le four pour le
nettoyer ou s’il est utilisé pour décongeler et chauffer par MICRO-ONDES en fonction PREHEAT (préchauffage).
INFORMATIONS
ACTION
1 Appuyez sur la touche
COOLING (refroidissement).
Vous pouvez sélectionner le refroidissement
lorsque l’afficheur est vide (porte fermée), ou
lorsque “0” est affiché (porte ouverte).
2 Appuyez sur la touche
START (marche).
3 Une fois le four refroidi.
•
Le ventilateur de REFROIDISSEMENT et le
ventilateur de CONVECTION se mettront en marche.
• La porte du four peut être ouverte ou fermée.
Toutefois, le four refroidit plus vide si la porte
est ouverte.
• Le four refroidira en 3-30 min. en fonction de la
température.
Les ventilateurs de refroidissement et de chaleur
tournante s’arrêtent.
AFFICHAGE
Réglage de l’avertisseur sonore
INFORMATIONS
ACTION
1 Ouvrez la porte.
Maintenez la porte ouverte.
La lampe du four s’allume.
2 Appuyez sur la touche
PROG.
Maintenez le doigt sur la touche pendant
2 secondes.
AFFICHAGE
3 Appuyez sur la touche
START (marche).
Appuyez sur la touche START (marche) pour choisir le
niveau sonore requis. (Par ex. deux fois pour Moyen)
Nb de pressions Affichage Niveau sonore
1 b-3 Le plus fort
2 b-2 Moyen
3 b-1 Le plus faible
4 b-0 Silencieux
Après 3 secondes
4 Appuyez sur la touche
PROG.
Après 3 secondes l’afficheur revient sur “0”.
“0” en affichage.
Page 82

- 80 -
INFORMATIONS
ACTION
1 Ouvrez la porte. La lampe du four s’allume.
2 Fermer une porte en
appuyant sur la touche
START( marche) et ouvrir
une porte.
Maintenez la porte ouverte.
Après 3 secondes l’afficheur revient sur “0”.
AFFICHAGE
3 Appuyez sur la touche
numérique 3.
L’intervalle programmé courant apparaît.
Par ex. 500 heures.
4 Sélectionnez à l’aide des
touches numériques.
Jusqu’à 9999 heures.
Par ex. 600 heures.
Appuyez sur les touches numériques 6, 0 et 0.
5 Appuyez sur la touche
PROG.
Comment changer le calendrier de nettoyage du filtre à air
Le symbole “FILt” apparaît sur l’afficheur lorsqu’il faut nettoyer le filtre à air.
Le four est programmé pour afficher le symbole “FILt” après 500 heures d’utilisation.
Lorsque le symbole “FILt” apparaît sur l’afficheur, déposez le filtre à air et nettoyez-le avec de l’eau chaude
savonneuse.
Appuyez sur la touche STOP/RESET (arrêt/annulation) pour effacer l’afficheur.
Pour vérifier le nombre total d’heures d’utilisation:
1 Ouvrez la porte. Maintenez la porte ouverte.
2 Appuyez sur la touche numérique “3” tout en appuyant sur la touche START (marche).
3 Le nombre total des heures d’utilisation apparaîtra sur l’afficheur.
Par ex. si le four a servi pendant 20 heures.
Après 3 secondes l’afficheur revient sur “0”.
Page 83

- 81 -
Françaisi
Entretien et nettoyage de votre four
Il est essentiel que vous suiviez les points suivants pour optimiser l’utilisation de votre four. Les micro-ondes
sont attirés par l’humidité et la graisse: pour une cuisson EFFICACE, le four doit par conséquent être propre.
1. Avant le nettoyage
Coupez l’alimentation au niveau de la prise.
Laissez refroidir le four avant de le nettoyer. Utilisez le programme de refroidissement pour cela.
(Voir page 79.)
Il est possible de laisser la porte du four ouverte pour le refroidir plus rapidement.
2. Joints d’étanchéité
Les joints d’étanchéité et les zones alentour doivent faire l’objet d’une attention particulière lors du nettoyage.
Essuyez régulièrement le rebord pour éviter que l’humidité ou la graisse ne s’accumulent.
3. Porte
Maintenez la vitre intérieure de la porte propre en l’essuyant régulièrement avec un chiffon doux mouillé. Vous
pouvez utiliser du nettoyant pour fours en petites quantités – NE PULVERISEZ PAS DIRECTEMENT sur la
porte – pulvérisez sur un chiffon que vous passerez ensuite sur la porte.
N’utilisez pas de détergents agressifs ou abrasifs.
4. Parois du four
Les parois doivent être essuyées régulièrement avec un chiffon doux mouillé. Vous pouvez utiliser du
nettoyant pour fours en petites quantités – NE PULVERISEZ PAS DIRECTEMENT sur les parois – pulvérisez
sur un chiffon que vous passerez ensuite sur les parois.
NE LAISSEZ PAS DE NETTOYANT POUR FOURS ENTRER DANS LES TROUS DES PAROIS DU FOUR.
Si un produit nettoyant corrosif passe derrière la paroi, cela peut endommager votre four.
Ne faites pas couler de liquides de nettoyage dans les ouvertures.
Veillez à nettoyer la graisse et les restes d’aliments sur les glissières de la grille.
La paroi postérieure du four présente un revêtement résistant à la chaleur.
Nettoyez cette partie avec un produit pour four appliqué sur un chiffon et essuyez.
N’utilisez pas de paille de fer métallique pour nettoyer l’intérieur du four.
5. Sole
Le guide d’ondes se trouve sous la sole en céramique du four. Veillez à essuyer tout déversement pour
assurer une chauffe homogène. N’utilisez pas de détergents agressifs ou abrasifs.
6. Paroi supérieure
La paroi supérieure contient les 4 éléments de gril en quartz. Avant de les nettoyer, assurez-vous que le four a
refroidi pour ne pas vous brûler.
Essuyez régulièrement la paroi supérieure avec un chiffon mouillé pour réduire l’accumulation de graisse.
7. Tableau de commande/Couvercle protecteur de carte SD
Si le tableau de commande et le Couvercle protecteur de carte SD deviennent sales, nettoyez-les avec un
chiffon doux sec ou bien essoré.
N’utilisez pas de détergents agressifs ou abrasifs sur le tableau de commande. N’utilisez PAS de chiffon
trempé car l’humidité restante peut endommager le tableau.
L’excès de graisse peut être ramolli pour faciliter le nettoyage en plaçant un demi-litre d’eau chaude dans
un bol transparent aux micro-ondes avec un citron frais coupé. Chauffez sur puissance HAUT pendant
10-15 minutes. L’humidité produite sur les parois doit ensuite être essuyée avec un chiffon savonneux.
Page 84

- 82 -
Entretien et nettoyage de votre four
8. Accessoires
Les accessoires doivent être nettoyés régulièrement pour optimiser l’efficacité du four.
Plateau en céramique – Nettoyez le plateau en céramique après chaque utilisation mais NE PLACEZ PAS
LE PLATEAU ISOLANT EN CÉRAMIQUE directement sous l’eau FROIDE – le plateau pourrait se briser.
Vous pouvez laver le plateau en céramique au lave-vaisselle ou à la main dans de l’eau chaude et
savonneuse.
Grille métallique – Elle doit être nettoyée après chaque utilisation. Veillez à ne pas utiliser d’abrasif agressif.
9. Filtre à air
Nettoyez de temps en temps les filtres à air en suivant les instructions suivantes. Le four pourrait présenter
des problèmes si les filtres sont encrassés par de la poussière ou de la graisse. Si les filtres à air sont
obstrués, cela provoquera des problèmes de surchauffe.
a. Déposez le filtre à air droit de l’avant de la paroi inférieure
en tirant sur le crochet à ressort droit.
Ensuite, faites glisser le filtre vers la droite et sortez-le du
montant au centre en le soulevant.
Déposez le filtre à air gauche de la même façon.
b. Lavez les filtres dans de l’eau chaude savonneuse.
c. Pour le remettre en place, aligner le filtre avec le montant
central et en maintenant l’avant du crochet à ressort vers
l’avant, placez l’arrière du crochet à ressort dans son trou.
Appuyez sur l’avant du crochet et il prendra sa place.
Assurez-vous de replacer les filtres à air avant d’utiliser le
four.
Remarque: Lorsque le message “FILt” apparaît sur l’afficheur, déposez le filtre à air et nettoyez-le avec de
l’eau chaude savonneuse.
Appuyez sur la touche STOP / RESET (arrêt/annulation) pour effacer l’afficheur.
10. Remplacement de la lampe du four
Si la lampe du four grille, vous pouvez la remplacer vous-même en suivant les consignes ci-dessous:
a. Dévissez le couvercle de protection de la lampe du four situé sur le côté gauche de la carrosserie.
b. Remplacez l’ancienne lampe par une lampe neuve 240/220V 25W Max, E-14.
c. Fermez le couvercle de protection de la lampe et revissez.
Dommages
Si le four subit des dommages, contactez un réparateur avant de continuer de l’utiliser.
ATTENTION:
Ne nettoyez pas l’appareil avec un jet d’eau.
N’utilisez aucun nettoyant chimique non spécifié et ne pulvérisez jamais directement dans la cuve du four.
ATTENTION:
Coupez l’alimentation avant de remplacer la lampe.
Filtre à air
Crochet
à ressort
Montant
Crochet
à ressort
Page 85

- 83 -
Françaisi
Si un “F” apparaît sur l’afficheur
Votre four Panasonic Combi est équipé d’un système
d’autodiagnostic à codes; cela signifie que le four contrôle son
propre fonctionnement et qu’il affichera un code de panne dans le
cas improbable d’un dysfonctionnement.
Si un code de panne apparaît sur l’afficheur (sous forme d’un “F”
suivi de deux chiffres), procédez comme suit:
1. Fermez la porte et coupez l’alimentation. Assurez-vous que les
grilles d’aération ne sont pas obstruées.
2. Attendez 1 minute puis rebranchez le four sur le secteur.
3. Ouvrez la porte, placez une carafe d’eau dans la cuve puis
refermez la porte.
4. Réessayez la fonction utilisée avant l’apparition du code de
panne.
Si le code de panne réapparaît, contactez alors le revendeur de
votre four, le fabricant ou bien un réparateur agréé.
Si un “U” apparaît sur l’afficheur
Une erreur de la Carte mémoire SD apparaît également avec un
code de panne sur l’afficheur (sous forme de “U” suivi de deux
chiffres). Suivez les points du tableau ci-dessous.
Quand appeler un réparateur
CODE PROBLEME
U16
U17
U19
La carte mémoire
SD est verrouillée.
Il n’y a pas de
données de
programmation de
ce four sur la Carte
mémoire SD.
Les données de
programmation de
la Carte mémoire
SD sont
endommagées.
La carte mémoire
SD n’est pas
insérée.
MESURE A PRENDRE
Retirez la Carte mémoire SD et enlevez le
verrouillage. (Voir ci-dessous.)
Insérez la Carte mémoire SD.
Une Carte Mémoire SD confirme qu’elle est
liée à ce four. Vérifiez s’il y a des données de
programmation de ce four sur la Carte
mémoire SD sur votre ordinateur.
(Voir “Enregistrement de données de
programmation sur la Carte mémoire SD”)
Lorsque les données de programmation sont
supprimées, contactez le réparateur.
Retirez le couvercle protecteur de la carte SD
et insérez la carte mémoire SD.
Le verrou est
débloqué lorsque
cette partie est
poussée vers le
haut.
LOCK
Recipe
Card
Page 86

- 84 -
NE-C1475
230 V / 50 Hz, monophasé
16 A
14,5A 3,3kW
2350 W
1950 W
1950 W
1350 W (Procédure de test IEC)
1840 W
1800 W
2450 MHz
600 mm x 484 mm x 383 mm
406 mm x 336 mm x 217 mm
41 kg (accessoires compris)
22
Les spécifications peuvent être modifiées sans préavis.
Spécifications techniques
N° de modèle
Source d’alimentation
Prise
Puissance requise - Max
- Micro-ondes
- Gril
- Convecteur
Puissance - Micro-ondes
Gril
Convecteur
Fréquence
Dimensions extérieures
(L x P x H)
Dimensions de la cuve
(L x P x H)
Poids net
600
61
484
430 54
383
10.5 10.5579
379
944
Page 87

- 85 -
Françaisi
Informations relatives à l’évacuation des déchets, destinées aux utilisateurs
d’appareils électriques et électroniques (appareils ménagers domestiques)
Lorsque ce symbole figure sur les produits et/ou les documents qui les accompagnent, cela
signifie que les appareils électriques et électroniques ne doivent pas être jetés avec les
ordures ménagères.
Pour que ces produits subissent un traitement, une récupération et un recyclage appropriés,
envoyez-les dans les points de pré-collecte désignés, où ils peuvent être déposés
gratuitement. Dans certains pays, il est possible de renvoyer les produits au revendeur local en
cas d’achat d’un produit équivalent.
En éliminant correctement ce produit, vous contriburez à la conservation des ressources
vitales et à la prévention des éventuels effets négatifs sur l’environnement et la santé humaine, pouvant être
dus à la manipulation inappropriée des déchets. Veuillez contacter les autorités locales pour connaître le point
de pré-collecte le plus proche.
Des sanctions peuvent être appliquées en cas d’élimination incorrecte de ces déchets, conformément à la
législation nationale.
Utilisateurs professionnels de l’Union européenne
Pour en savoir plus sur l’élimination des appareils électriques et électroniques, contactez votre revendeur ou
fournisseur.
Informations sur l’évacuation des déchets dans les pays ne faisant pas partie de
l’Union européenne
Ce symbole n’est reconnu que dans l’Union européenne.
Pour supprimer ce produit, contactez les autorités locales ou votre revendeur afin de connaître la procédure
d’élimination à suivre.
Page 88

- 86 -
1.Instructies voor aarden
BELANGRIJK: VOOR UW PERSOONLIJKE
VEILIGHEID MOET DIT APPARAAT GOED
GEAARD WORDEN.
Wanneer een stopcontact niet geaard is, is het uw
persoonlijke verantwoordelijkheid en de
verplichting van de klant om dit te laten vervangen
door een goed geaard stopcontact.
WAARSCHUWING OVER VOLTAGE EN
STROOM
Het gebruikte voltage moet hetzelfde zijn als dat
opgegeven op de oven. Gebruik geen andere
netspanning dan 220-230 V; 50 Hz. Dit kan uw
magnetron beschadigen of er kan brand ontstaan.
INSTALLATIE VAN DE MAGNETRON
Zet de oven op een oppervlak dat plat en stabiel
is. Zet de oven niet op een hete of vochtige plaats,
bijvoorbeeld vlakbij een gasfornuis of elektrisch
fornuis. Werk niet met de oven wanneer de
temperatuur hoger is dan 40 graden Celcius en/of
de vochtigheid meer is dan 85%. Vrije luchtstroom
rond de oven is belangrijk.
De mogeljkheid bestaat dat er enigszins
interferentie plaatsvindt met zwakke zendsignalen
als de oven te dicht bij een radio of TV staat.
Voor veilig en effïciënt werken moet de oven
voldoende luchtstroom naar de luchtopeningen
bezitten, 5 centimeter aan de zij- en achterkant en
20 centimeter aan de bovenkant.
Deze oven moet geplaatst worden, zodat de
stekker vrij is.
2.Voltage en stroom
Het gebruikte voltage moet hetzelfde zijn als
opgegeven op de oven. Als men een hoger
voltage dan dat wat opgegeven is gebruikt, kan
dat gevaarlijk zijn en dit kan brand tot gevolg
hebben of een ander ongeluk dat schade
veroorzaakt.
3.Service
Het is gevaarlijk als iemand anders dan een
service-technicus die door de fabrikant getraind is,
reparatie werkzaamheden uitvoert.
Verwijder de buitenomhulling van de oven niet.
Hoge voltages heersen binnen de kast.
Reparaties en aanpassingen dienen alleen
uitgevoerd te worden door gekwalificeerd
servicepersoneel. Neem contact op met de
fabrikant.
Deurafdichtingen
Probeer de deur niet te wrikken of aanpassingen
of reparaties aan de deur uit te voeren, de
behuizing van het bedieningspaneel, schakelaars
voor vergrendeling voor de veiligheid of een ander
deel van de oven. Verwijder geen buitenpaneel
van de oven.
De deurafdichtingen en de gebieden waar de deur
wordt afgesloten, dient altijd schoon gehouden te
worden – gebruik een vochtige doek.
4.Bediening indien leeg
Het apparaat moet niet bediend worden door
ZONDER VOEDSEL IN DE OVEN. Als men het
apparaat gebruikt en dit is leeg, zal het apparaat
beschadigd worden.
5.Het snoer
Als het stroomsnoer beschadigd is, moet dit
vervangen worden door de fabrikant of de serviceagent of een soortgelijk gekwalificeerd persoon om
gevaar te vermijden.
Dompel de oven niet onder in water. Houd snoer
weg van verhitte oppervlakten. Laat snoer niet
over de rand van tafel of werkblad hangen. De
achterkant van het apparaat wordt warm tijdens
gebruik. Laat het snoer niet in contact komen me
de achterkant van het apparaat of het oppervlak
van de kast.
6.Hete oppervlakten
Buitenwanden, waaronder luchtopeningen op de
kast en de ovendeur zullen tijdens gebruik heet
worden. (Grill, convectie en combinatie) Wees
voorzichtig wanneer u de deur opent of sluit en
wanneer u voedsel en accessoires insteekt of
verwijdert.
De oven heeft verhitters die zich in de bovenkant
en de achterkant van de oven bevinden. Na
gebruik, zullen de bovenkant, de wanden en de
onderkant zeer heet zijn.
7.Uitschakelen
Wanneer er een stroomstoring optreedt, kan de
oven alleen uitgeschakeld worden door de stekker
uit het stopcontact te trekkun.
Dit produkt voldoet aan de Europese standaard (EN 55011) voor EMC interferentie ’s
(EMC = Elektromagnetische Compabiliteit) Overeenkomstig deze standaard behoord dit produkt tot de
groep 2 apparatuur, klasse B en voldoet deze aan alle normeringseisen. Groep 2 houdt in dat de Frequentie
energie wordt opgewekt in de vorm van elektromagnetische straling bedoeld voor het verwarmen en koken
van voedsel. Groep B informeerd dat dit produkt toegepast kan worden voor normaal huishoudelijk gebruik.
Informatie over veiligheid
Page 89

- 87 -
Nederlands
Wanneer u voor de eerste keer de oven uitpakt
Plaatsing van oven
1.Luchtopeningen
Deze oven heeft voldoende ventilatie nodig aan de
achterkant om maximale koelefficiency te
bereiken.
BLOKKEER DE VENTILATIEROOSTERS IN
GEEN GEVAL.
2.Maximale kamertemperatuur
Werk niet met de oven, als de kamertemperatuur
hoger ligt dan 40 graden Celsius en/of de
vochtigheid hoger is dan 90%. Voldoende
ventilatie rond de oven is belangrijk.
3.Gebruiken buitenshuis
Niet buitenshuis gebruiken.
4.Accessoires bewaren
Wanneer de oven niet wordt gebruikt, bewaar dan
geen objecten anders dan ovenaccessoires
binnen de oven in geval deze per ongeluk wordt
ingeschakeld. Wanneer er een elektrische storing
optreedt, kan de oven alleen bij het stopcontact
worden uitgeschakeld.
Bediening
1.Controleer uw oven
Pak de oven uit, bewaar al het
verpakkingsmateriaal en controleer de oven op
beschadiging zoals deuken, gebroken deurklinken
of barsten in de deur. Stel de leverancier
onmiddellijk op de hoogte hiervan als de eenheid
beschadigd is. NB Installeer de eenheid NIET
wanneer deze beschadigd is.
2.Deurafdichtingen
Men dient het apparaat te inspecteren op schade
aan de deurafdichtingen en de gebieden van de
deurafdichtingen en als deze gebieden
beschadigd zijn, dient u het apparaat niet te
gebruiken totdat het gerepareerd is door een
servicetechnicus die door de fabrikant getraind is.
3.Garantiekaart
Vul de al gefrankeerde garantiekaart in en doe
hem op de bus.
4.Verwijderen van beschermingsfolie
Een beschermende folie wordt gebruikt om te
voorkomen dat de buitenkast tijdens transport
beschadigd zal worden. Trek deze folie af voor
installatie of gebruik.
1.Plaatsing van oven
Oven moet geplaatst worden op een plat, stabiel
oppervlak. Voor juiste bediening moet de oven
voldoende ventilatie hebben.
Een tussenruimte van op zijn minst 5 centimeter
moet aan de rechterkant en linkerkant en aan de
achterkant van de oven beschikbaar zijn. Een
minimale ruimte van 20 centimeter moet links
boven de oven vrij zijn en de twee
uitlaatopeningen aan de acherkant.
2.Planken
Zet de oven niet op een plank direct boven of
naast een gaskookplaat of een elektrische
kookplaat, een kooktoestel of frituurpan. Mogelijk
kan de oven dan beschadigd worden. Het is
gevaarlijk om deze oven op een plank te zetten die
zo hoog is dat voedsel en accessoires niet veilig
door de gebruiker kunnen worden verwijderd.
3.Stapelen
PROBEER IN GEEN GEVAL deze ovens te
stapelen.
1.Alvorens te gebruiken
Voordat u de functie CONVECTIE, COMBINATIE,
GRILL, GRILL CONVECTIE of VENTILATORGRILL
voor de eerste keer gebruikt, moet u werken met
deze oven zonder voedsel op CONVECTIE
250 graden Celcius gedurende twintig minuten. Dit
stelt de olie die gebruikt wordt om tegen roest te
beschermen in staat om verbrand te worden.
Verwijder alle accessoires uit de oven.
2.Rook/brand
Tijdens koken in de modus MAGNETRON, als u
rook ziet, houd dan de deur van de oven gesloten
en trek de stekker van de oven uit het stopcontact
of schakel de stroom uit. Als materialen binnen de
oven zouden ontvlammen, houd dan de ovendeur
gesloten en druk op de knop STOP/RESET. Indien
nodig, schakel de stroom uit bij de zekering of het
stopcontact.
3.Interferentie
Er bestaat een mogelijkheid dat er lichtelijke
interferentie optreedt bij zwakke zendsignalen, als
de oven te dicht bij een radio of TV staat.
4.Werken met de verhitter
Wanneer u de stroom HOOG, MEDIUM, LAAG en
SUDDEREN gebruikt, halveer dan de werking van
de grill-elementen en de CONVECTIE-ventilator
om de opbouw van condens te verminderen. Zorg
ervoor dat u de BOVENKANT VAN DE OVEN
NIET AANRAAKT.
5.Schoonmaken
Maak dit apparaat niet schoon met een waterstraal.
Als de oven niet goed schoon gehouden wordt, kan
de binnenzijde van de oven aangetast worden. Dit
kan de levensduur van het apparaat beperken en
kan leiden tot gevaarlijke situaties.
Voorzichtig
Page 90

- 88 -
Belangrijke informatie – aandachtig lezen
1.Hoe lang verhitten
Aangezien de verhittingstijd van MAGNETRON en
COMBINATIE veel korter is dan bij andere
kookmethoden, is het van cruciaal belang dat de
aanbevolen tijden voor verhitting in acht genomen
worden wanneer men voor het eerst het voedsel
controleert.
De kooktijden die u in de grafiek vindt, zijn juist.
Factoren die van invloed kunnen zijn op de
kooktijden zijn de begintemperatuur, het volume,
de omvang en de vorm van het voedsel en de
schalen die gebruikt worden.
2.Kleine hoeveelheden voedsel
Kleine hoeveelheden voedsel of voedsel met een
lage vochtigheidsgraad kunnen branden, uitdrogen
of ook vlam vatten, als men ze te lang kookt.
3.Voedselcomponenten
Voedsel met veel suiker, vetten en vocht wordt
sneller heet met de magnetron, omdat hun
eigenschappen magnetron-energie aantrekken.
Dichter voedsel, rijk aan eiwit en vezel, absorbeert
magnetronenergie langzamer en dit betekent in de
praktijk dat deze langer verhit moeten worden.
4.Voedsel rijk aan vet/suiker
Het is belangrijk om de verhittingstijd correct in te
stellen voor voedsel met veel vet, alcohol en
suiker. Als dit voedsel te lang met de magnetron
wordt verhit, kan het vlam vatten. LOOP NOOIT
WEG ALS HET APPARAAT WERKT. Het gaat
hier om donuts, lichte cake met siroop,
kerstpuddingen en pasteitjes.
5.Eieren
Kook geen eieren in de schaal in de
MAGNETRON. De druk kan zich namelijk
opbouwen en dan kunnen de eieren exploderen.
6.Huid doorprikken
Aardappelen, appels, eierdooiers, groente in zijn
geheel en worsten zijn voorbeelden van voedsel
met met een poreuze omhulling. Deze moeten met
een vork worden doorgeprikt voordat ze met de
MAGNETRON worden gekookt om te voorkomen
dat ze barsten.
7.Frituren
Probeer niet in uw oven te frituren.
8.De interne temperatuur controleren
Om er zeker van te zijn dat bacterieën die voedsel
vergiftigen zoals Lysteria en Salmonella volledig
vernietigd worden, moet u ervoor zorgen dat de
interne temperatuur van het voedsel op zijn minst
72 graden Celsius bedraagt, wanneer u dit
opnieuw verhit. Gebruik een goede thermometer
met een sonde om de temperatuur aan het einde
van de verhittingstijd te controleren. Verhit langere
tijd als de juiste temperatuur niet bereikt wordt.
GEBRUIK GEEN huishoudthermometer – gebruik
alleen goed gekalibreerde apparatuur.
9.Vloeistoffen
Wanneer u vloeistoffen met de MAGNETRON
verhit (bijvoorbeeld soep, sauzen en dranken), kan
oververhitting tot het kookpunt optreden zonder
dat u bellen ziet. Dit zou tot gevolg kunnen hebben
dat de hete vloeistof overkookt. Om deze
mogelijkheid te voorkomen moet u de volgende
stappen nemen:
a. Vermijd om bakjes met rechte hoeken met
nauwe halzen te gebruiken.
b. Verhit het voedsel niet over.
c. Roer de vloeistof voordat u het bakje in de oven
zet en herhaal dit halverwege de verhittingstijd.
d. Na verhitting laat u het voedsel korte tijd in de
oven staan en roert voorzichtig opnieuw voordat
u het bakje verwijdert.
10.Papier, plastic
Wanneer u voedsel in plastic of papieren bakjes
verhit, controleer dan de oven vaak, aangezien
deze soorten doosjes mogelijk vlam vatten,
wanneer ze oververhit worden.
(Zie pagina 92.)
Gebruik geen gerecyclede papieren producten,
deze kunnen onzuiverheden bevatten, die voor
vonken zorgen of kunnen branden wanneer deze
gebruikt worden, tenzij de verpakking vermeld dat
ze specifiek ontworpen zijn voor gebruik met een
magnetron.
11.Opnieuw verhitten
Het is cruciaal dat opnieuw verhit voedsel echt
heet (72 graden Celcius) wordt opgediend.
Controleer altijd voordat u het opdient en als u
twijfelt, zet het voedsel dan terug in de oven om
nog langer te verhitten.
12.Tijd dat men het voedsel moet laten
staan
Tijd dat men het voedsel moet laten staan voor
voedsel; dat gekookt of opnieuw verhit wordt door
MAGNETRON of COMBINATIE. Tijdens de tijd dat
het voedsel blijft staan, zal hitte door blijven
stromen om het voedsel volledig te koken. Hoe
dichter het voedsel, des te langer de tijd dat het
voedsel moet blijven staan. Opnieuw verhit
voedsel moet een tijd blijven staan.
Brand!
Als materialen binnen de oven vlam vatten, houd
dan de deur van de oven gesloten, druk op de
knop STOP/RESET. Schakel uit bij het
stopcontact, als dat mogelijk is of schakel de
stroom uit bij de zekering of het stopcontact.
Brand!
Als men het voedsel te lang verhit, zal het
oneetbaar worden en in extreme
omstandigheden zou dit brand kunnen opleveren
en zou mogelijk de binnenkant van de oven
beschadigd kunnen worden. Het is cruciaal dat
de oven regelmatig wordt schoongemaakt en vrij
blijft van te veel vet. Zie “Uw oven goed
onderhouden en schoonmaken”.
(Zie pagina 109 – 110.)
Page 91

- 89 -
Nederlands
Belangrijke informatie – aandachtig lezen
Overzicht magnetron functions
Bijgeleverde accessoires
(8) Luchtfilter
INSTALLEER EERST LUCHTFILTERS
ALVORENS U DE OVEN IN GEBRUIK
NEEMT.
Als u geen luchtfilters gebruikt, kunnen de
luchtgaten verstopt raken door vuil en vet
waardoor de oven oververhit kan raken.
Zie pagina 110 voor installatie.
(
12) Keramische plaat
Onderdelen
A06033230BP
Wanneer men metalen schalen op
COMBINATIE gebruikt, zet u de keramische
plaat tussen het voedselbakje en het
spijlenrooster.
De keramische plaat dient in de oven te blijven
tijdens het voorverhitten op een
combinatieprogramma.
Als u voedsel direct op de keramische plaat zet,
zorg er dan voor dat deze schoon en vrij van
overmatig vet is.
KOEL de keramische plaat voordat u deze
schoonmaakt, zodat u een breuk voorkomt. De
keramische plaat dient gezet te worden op de
basis van de oven om druppels op te vangen
wanneer men grillt.
(13)Spijlenrooster
Onderdelen A06023C50BP
Het rooster kan gebruikt worden voor de
functies CONVECTIE, COMBINATIE, GRILL
CONVECTIE, GRILL en VENTILATORGRILL.
LAAT IN GEEN GEVAL het rooster in de oven
met de functie ALLEEN MAGNETRON
.
ZET METALEN SCHALEN NIET DIRECT OP
het spijlenrooster wanneer men de functie
COMBINATIE gebruikt.
Gebruik de kermaische plaat.
Rooster installeren
Insteekrichting in de holte
(14)SD Memory Card
Onderdelen
PR-SD016BCS0
De oven wordt geleverd met een SD Memory
Card. Deze kaart bevat Excel-bestanden
waarmee u de oven kunt programmeren met
behulp van uw pc. U kunt maximaal 99
persoonlijke verhittingsprogramma’s opslaan op
de SD Memory Card. Raadpleeg een
onderhoudsmonteur bij verlies of schade van
de SD Card.
Ga naar “Programmagegevens op een SDgeheugenkaart opslaan” voor informatie over
het gebruik van de SD Card en de software
voor het programmeren van het geheugen.
VOORKANT
Gebruik de keramische plaat.
Het rooster ligt niet vast – wees voorzichtig
wanneer u voedsel verwijdert.
13.Accessoires
Volg de specifieke instructies in deze gids voor het
juist gebruik van ovenaccessoires en kookgerei.
Wanneer u dit niet doet, kunt u de oven
beschadigen.
Wees voorzichtig wanneer u voedsel en/of
accessoires verwijdert. Het spijlenrooster dat
bijgeleverd wordt IS GEHEEL LOS - wees
voorzichtig als u deze uittrekt om voedsel te
verwijderen.
14. Kookdoosjes
Voordat u MAGNETRON of COMBINATIE
gebruikt, moet u controleren dat de bakjes
geschikt zijn.
(Zie pagina 92.)
GEBRUIK DE MAGNETRON NIET bij afgedichte
bakjes, want deze zullen ontploffen.
15.Werken met de motor van de ventilator
Nadat u MAGNETRON, CONVECTIE,
COMBINATIE, GRILL, VENTILATORGRILL of
GRILL CONVECTIE hebt gebruikt, draait de motor
van de ventilator gedurende ongeveer 5 minuten
om de elektrische componenten te koelen. Dit is
normaal en u kunt voedsel uit de oven halen, zelfs
als de motor van de ventilator nog draait.
16.Zuigflessen/potten
Zuigflessen en potten met babyvoedsel dienen
open te zijn wanneer ze verhit worden en de
inhoud moet geroerd of door elkaar geschud
worden en de temperatuur moet gecontroleerd
worden voordat men deze consumeert om er
zeker van te zijn dat men zich niet verbrandt.
17.Gebruik van de oven door kinderen
Laat kinderen alleen gebruik maken van de
magnetronoven nadat ze zorgvuldig geïnstrueerd
zijn.
Page 92

- 90 -
Overzicht magnetron functions
Uitleg van uw oven
(1) Deksel ovenlamp
(2) Kwarts-grill elementen
(3) Convectieventilator en verhitter
(4) Deurhendel
(5) Displayvenster
(6) Bedieningspaneel
(7) SD-card slot
(9) Ventilatieopeningen
(10)Keramische plaat
(11)Plankondersteuningen (boven,
beneden)
Bedieningspaneel
(15)Nummerblok
(16)Programmablok
(17)Magnetronblok
(18)Grillblok
(19)Ventilatorgrilltoets
(20)Convectietoets
(21)Stop/Reset-toets
Voor te verhitten:
Een keer drukken display wissen.
Tijdens verhitten:
Een keer drukken stopt verhittingscyclus
en twee keer drukken wist de display.
NB Zie pagina 104 voor bediening wanneer in
programmavergrendeling.
(22)Programma vergrendeltoets
(23)Voorverwarm-toets
(24)Combinatietoets
(25)Afkoeltoets
(26)Lamptoets
De ovenlamp wordt uitgeschakeld wanneer de
deur wordt gesloten. Als u het voedsel wilt
controleren, druk dan op het lampknop. Dit zal
dan gedurende 10 seconde verlicht worden. De
ovenlamp gaat aan, telkens wanner de oven
geopend wordt.
(27)Starttoets
Herhaalfunctie:
U kunt hetzelfde verhittingsprogramma
herhalen als u op de START-knop drukt binnen
1 minuut nadat het laatste programma is
beëindigd.
Als de START-toets niet wordt ingedrukt, wordt
het displayvenster 1 minuut nadat de ovendeur
is gesloten leeg.
Na dertig minuten keert u terug na “0”, als de
ovendeur open is.
Displayvenster
De cursor zal oplichten om het pogramma aan te
duiden dat ingesteld is. Controleer altijd de
cursorpositie voordat u op de knop START drukt.
(28)Magnetron
(29)Grill
(30)Ventilatorgrill
(31)Convectie
(32)Voorverwarmen
(33)Koeling
(34)Stroomniveau magnetron
(35)Indicator kookfase
Page 93

- 91 -
Nederlands
SD-geheugenkaart
●
Een SD-geheugenkaart is in het SD-card slot ingebracht. Het maakt het u mogelijk maximaal
99 geheugenprogramma’s in de oven op te slaan.
●
Gebruik de kaart wanneer u geheugenprogramma’s opslaat of opnieuw oproept.
※U kunt de geheugenprogrammagegevens op uw SD-geheugenkaart met behulp van uw personal computer
opslaan.
Zie “Programmagegevens op een SD-geheugenkaart opslaan”.
Hoe een SD-geheugenkaart in te steken / te verwijderen
※Als u een SD Memory Card wilt invoeren / verwijderen, haal dan eerst de stekker uit het stopcontact.
Het displayvenster moet leeg zijn, anders kunnen de gegevens op de SD Memory Card beschadigd
raken.
1. Schroef de SD-card slot los en verwijder deze.
2. Duw de SD-geheugenkaart met uw vinger om deze uit te trekken.
Verwijder deze vervolgens.
1. Plaats een SD Memory Card in het toestel met het etiket naar boven zoals
aangegeven met behulp van het ▲-symbool.
2. Lijn de linker kant van de SD-card slot uit.
Schroef om aan de rechterkant te sluiten.
Hoe te verwijderen
Hoe in te steken
Voorzichtig:
1. Sluit de SD-card slot oltyd behalve wanneer er een SD-geheugenkaart wordt ingestoken / verwijderd om te
voorkomen dat water of stof de oven binnenkomt.
2. Plaats uitsluitend een SD Memory Card in het apparaat die geschikt is voor deze oven. Gebruik geen
andere soort kaart of een vervangende SD Memory Card.
3. Houd de verwijderde SD-geheugenkaart weg van statische elektriciteit.
4. Haal SD-geheugenkaarten niet uit elkaar en verander deze niet.
5. Pas nooit een elektrische schok op SD-geheugenkaarten toe. Buig deze niet, laat deze niet vallen en zorg
dat ze niet vochtig worden.
6. Raak de metalen eindpunten van een SD-geheugenkaart niet aan met uw hand of met metaal.
7. Verwijder het label niet. Plak geen ander label op de SD-geheugenkaart.
8. Laat geen SD-geheugenkaarten op plaatsen waar een hoge temperatuur heerst of direct zonlicht op staat.
9. Laat geen SD-geheugenkaarten op plaatsen waar roest veroorzakende gassen zijn.
10. Neem bij verlies of schade van de SD Memory Card contact op met een onderhoudsmonteur voor
vervanging van de kaart.
Page 94

- 92 -
Soorten schalen die men kan gebruiken
MAGNETRON
1. Glas
WEL GEBRUIKEN:
Hittebestendig glas bijvoorbeeld Pyrex
NIET GEBRUIKEN:
Gevoelig glas, loodkristal dat kan barsten of
breken.
2. Porselein/keramiek
WEL GEBRUIKEN:
Geglazuurde porseleinen schalen, porselein
en keramische schalen ontworpen om te
koken.
NIET GEBRUIKEN:
Fijne porseleinen schalen met metalen
patronen. Kruiken met geplakte hendels.
3. Potten/aardewerk/steengoed
WEL GEBRUIKEN:
Als volledig geglazuurd.
NIET GEBRUIKEN:
Als ongeglazuurd – deze schalen kunnen
water dat energie absorbeert absorberen.
Dit heeft tot gevolg dat de schaal heet wordt
en verhoogt de verhittingstijd.
4. Folie/metaal
WEL GEBRUIKEN:
Alleen voor opnieuw verhitten:
Aparte portie, foliebakjes met open deksel.
Zorg ervoor dat de bakjes niet de WANDEN
of de DEUR van de oven raken. Kook niet in
foliebakjes. Kleine hoeveelheden alumunium
folie kunnen gebruikt worden om gewrichten
in vlees te beschermen tijdens het ontdooien
- zorg ervoor dat de folie niet de zijkanten van
de oven raakt.
NIET GEBRUIKEN:
Metalen schalen, spijlenrooster, elk schaal
met METALEN PATRONEN of
BIJGESNEDEN METALEN SPIEZEN,
GEBRUIK DE FOLIEBAKJES NIET
OPNIEUW – vonken kunnen hiervan het
gevolg zijn als ze
INGEKEEPT/BESCHADIGD zijn. Gebruik
geen Le Cureset-stijl schalen. (Gietijzer
bedekt met emaille.) Deze kunnen gebruikt
worden voor convectie of grill.
5. Plastic
WEL GEBRUIKEN:
Schalen van hittebestendig kunststof zoals
Durable Polysulfon in plaats van zachte
kunststof schalen. (Verwijder een metalen
dwarsbalk.)
NIET GEBRUIKEN:
Melamine, polypropileen, fenolureüm, gebruik
ook geen plastic zakken voor voedselopslag
en bakjes zoals bijvoorbeeld
margarinekuipjes yoghurtflacons en
mayonaisetubes.
6. Dekfolie
WEL GEBRUIKEN:
Niet geplastificeerde folie ontworpen voor
gebruik bij magnetrons. Laat de folie het
voedsel niet raken. Om te voorkomen dat
stoom het voedsel verbrandt, prikt u de folie
om dit te laten ontsnappen en verwijdert
zorgvuldig de folie van de schaal.
NIET GEBRUIKEN:
Transparante vershoudfolie alleen ontworpen
voor het bedekken voor voedsel.
7. Hout/riet
WEL GEBRUIKEN:
Houten satéstokjes ontworpen voor
voedselgebruik.
NIET GEBRUIKEN:
Rieten manden, houten schalen (als ze lang
gebruikt worden drogen deze uit en kunnen
ze vlamvatten.)
8. Papier
WEL GEBRUIKEN:
Wegwerpbaar, polyester gecoate kartonnen
schalen indien ontworpen voor magnetron
NIET GEBRUIKEN:
Papieren servetten (deze kunnen
ontvlammen), koppen met een coating,
gerecyclede producten (tenzij de fabrikant
stelt dat ze geschikt zijn).
COMBINATIE
Combinatieprogramma’s gebruiken microgolven
en hitte (CONVECTIE of GRILL) daarom moet u
het bakje zorgvuldig kiezen.
WEL GEBRUIKEN:
Metalen bakjes controleer dat ze geen
gekartelde metalen randen hebben. Keramiek
dat geen metalen rand heeft. Hittebestendig
glas en porselein.
NIET GEBRUIKEN:
Geëmailleerde items (met mogelijke
gouden/metalen rand. Geëmailleerd gietijzer
bijvoorbeeld Le Creusel. Elke schaal dat niet
hittebestendig is bijvoorbeeld plastic en folie.
CONVECTIE / GRILL CONVECTIE
WEL GEBRUIKEN:
Alle bakjes geschikt voor conventionele
ovens bijvoorbeeld metaal, keramiek,
aardewerk, geëmailleerd gietijzer etcetera.
NIET GEBRUIKEN:
Plastic bakjes, huishoudfolie, hout/riet, glas,
papier.
GRILL / VENTILATORGRILL
NIET GEBRUIKEN:
Elk bakje geschikt voor hevig grillen
bijvoorbeeld roestvrij staal, Le Creusel,
keramiek, bakbladen etcetera.
NIET GEBRUIKEN:
Plastic bakjes, fijn keramiek, folie etcetera.
Page 95

- 93 -
Nederlands
1 Open deur.
Schuif
voedsel in.
Sluit deur.
De ovenlamp zal aan gaan.
De ovenlamp zal uitgaan.
2 Selecteer
niveau
sterkte.
Druk op MAGNETRON-blok
om het juiste vermogen te
selecteren,
bijvoorbeeld HOOG – zie
hieronder.
3 Selecteer de
tijd.
Druk op NUMMER-blok om
een verhittingstijd in te stellen
bijvoorbeeld 4 minuten
30 seconden.
Druk op knop 4, 3 en 0.
Max. tijd kunt u instellen:
HOOG 15 minuten
Anders 60 minuten
4
Druk op de
START-toets.
Displayvenster zal de tijd
aftellen.
De ventilator zal aan gaan.
Op het einde van het
verhittingsprogramma piept
de oven.driemaal en ‘0’
flikkert in het venster totdat
de deur open gaat.
Verwijder voedsel.
Displayvenster duidt het
vorige programma aan.
5 Open deur.
Einde programma
Open deur
INFORMATIE
ACTIE
DISPLAY
TE GEBRUIKEN ACCESSOIRES
Gebruik het rooster of de
keramische plaat niet wanneer
men kookt met de MAGNETRON.
Eenmaal
Tweemaal
Driemaal
Viermaal
Vijfmaal
Zesmaal
1350
650
420
240
180
0
DRUK
WATT
Uw oven als een magnetron gebruiken
HOOG
MIDDEN
LAAG
SUDDEREN
ONTDOOIEN
PAUZE
STERKTENIVEAU
• Verhitten in meerdere fasen (sequentieel)
De oven kan geprogrammeerd worden met maximaal drie verschillende fasen om opeenvolgend te
werken.
Dat kunnen de functies MAGNETRON, GRILL, CONVECTIE, VENTILATORGRILL, GRILL
CONVECTIE of COMBINATIE zijn. Als een product langer dan 15 minuten op HOOG vermogen moet
worden verhit, maak dan gebruik van de programmering in twee fasen.
Voor programmeren in twee fasen:
Volg de stappen 1 tot 3 en voer dan het volgende verhittingsprogamma in en druk op
START.
Voor programmeren in drie fasen:
Volg programmeren in drie fasen en voer een derde verhittingsprogramma in voordat u op
START drukt.
•
Hete oppervlakken
Wees zeer voorzichtig wanneer u heet voedsel verwijdert. Gebruik hiervoor keukenhandschoenen.
•
Herhaalfunctie
Zie pagina 90.
Page 96

- 94 -
•
Hete oppervlakken
Wees zeer voorzichtig wanneer u heet voedsel verwijdert. Gebruik hiervoor keukenhandschoenen.
•
Verhitten in meerdere fasen (sequentieel)
Zie pagina 93.
•
Convectietemperatuur opnieuw oproepen
De gekozen temperatuur kan nog 3 seconden worden gecontroleerd nadat de CONVECTIE-toets is
ingedrukt.
Temperatuur zal kort weergegeven worden in venster voordat u terugkeert naar de resterende
verhittingstijd.
De temperatuur kan niet tijdens een programma veranderd worden.
•
Voorverhitten
Voor de beste resultaten voor convectie dient de oven voorverhit te worden.
(Zie pagina 106.)
•
Herhaalfunctie
Zie pagina 90.
Uw oven gebruiken voor convectie
INFORMATIE
ACTIE
DISPLAY
1 Open deur.
Schuif
voedsel in.
Sluit deur.
De ovenlamp zal aan gaan.
De ovenlamp zal uitgaan.
2 Druk op
CONVECTIEtoets.*
Selecteer vereiste
oventemperatuur, bijvoorbeeld
180 graden Celsius. Ga door met
CONVECTIE indrukken, totdat de
temperatuur die u nodig hebt in het
displayvenster staat. Temperatuur
gaat omhoog in stappen van tien
graden van 100 graden Celsius tot
250 graden Celcius.
3 Selecteer de
tijd.
Druk op de NUMMER-blok om
een verhittingstijd in te stellen,
bijvoorbeeld 18 minuten.
Druk op de knop 1, 8, 0 en 0
in.
Maximale verhittingstijd is
99 minuten 99 seconden.
4 Druk op de
STARTtoets.
Displayvenster zal aftellen.
De convectieventilator gaat
aan.
Aan het einde van het
verhittingsprogramma laat de
oven driemaal een pieptoon
horen en “0” flikkert in het
venster totdat de deur open
is.
Verwijder voedsel.
Displayvenster duidt het
vorige programma aan.
5 Open deur.
Einde programma
Open deur
TE GEBRUIKEN ACCESSOIRES
U krijgt de beste resultaten als u de
schaal op het rooster in de
LAAGSTE stand plaatst. Het
voedsel kan ook direct op het
rooster worden geplaatst mits het
rooster voor gebruik goed schoon
is gemaakt.
Voorzichtig:
Het spijlenrooster ligt los.
Wees voorzichtig wanneer u
voedsel verwijdert.
* De oven zal de meest recente
CONVECTIE-temperatuur die
gebruikt is onthouden, indien u
dezelfde opnieuw wilt gebruiken.
Druk op het CONVECTIE-knop,
wanneer het koken klaar is en
vervolgens zal de meest recent
gebruikte temperatuur
weergegeven worden.
Page 97

- 95 -
Nederlands
Uw oven gebruiken voor grillconvectie
INFORMATIE
ACTIE
DISPLAY
1 Open deur.
Schuif
voedsel in.
Sluit deur.
De ovenlamp zal aan gaan.
De ovenlamp zal uitgaan.
3 Druk op
CONVECTIEtoets.*
Selecteer vereiste oventemperatuur,
bijvoorbeeld 180 graden Celsius.
Ga door met CONVECTIE indrukken,
totdat de temperatuur die u nodig
hebt in het displayvenster staat.
Temperatuur gaat omhoog in stappen
van tien graden van 100 graden
Celsius tot 250 graden Celcius
.
4 Selecteer de
tijd.
Druk op de NUMMER-blok om
een verhittingstijd in te stellen,
bijvoorbeeld 18 minuten.
Druk op de knop 1, 8, 0 en 0 in.
Maximale verhittingstijd is
99 minuten 99 seconden.
5 Druk op de
START-toets.
Displayvenster zal aftellen.
De convectieventilator gaat
aan.
Aan het einde van het
verhittingsprogramma laat de
oven driemaal een pieptoon
horen en “0” flikkert in het
venster totdat de deur open
is.
Verwijder voedsel.
Displayvenster duidt het
vorige programma aan.
6 Open deur.
Einde programma
Open deur
2 Druk op
GRILL-blok.
U kunt niveau hoog of laag
selecteren, maar als de
CONVECTIE-toets is
ingedrukt wordt de grillstand
automatisch ingesteld.
TE GEBRUIKEN ACCESSOIRES
U krijgt de beste resultaten als u de
schaal op het rooster in de
LAAGSTE stand plaatst. Het
voedsel kan ook direct op het
rooster worden geplaatst mits het
rooster voor gebruik goed schoon
is gemaakt.
Voorzichtig:
Het spijlenrooster ligt los.
Wees voorzichtig wanneer u
voedsel verwijdert.
• Hete oppervlakken
Wees zeer voorzichtig wanneer u heet voedsel verwijdert. Gebruik hiervoor keukenhandschoenen.
•
Verhitten in meerdere fasen (sequentieel)
Zie pagina 93.
•
Convectietemperatuur opnieuw oproepen
De gekozen temperatuur kan nog 3 seconden worden gecontroleerd nadat de CONVECTIE-toets is
ingedrukt.
Temperatuur zal kort weergegeven worden in venster voordat u terugkeert naar de resterende
verhittingstijd.
De temperatuur kan niet tijdens een programma veranderd worden.
De grillstand kan niet worden herroepen.
•
Voorverhitten
Voor de beste resultaten voor convectie dient de oven voorverhit te worden. (Zie pagina 106.)
•
Herhaalfunctie
Zie pagina 90.
* De oven zal de meest recente
GRILL CONVECTIE-temperatuur
die gebruikt is onthouden, indien
u dezelfde opnieuw wilt
gebruiken. Druk op het
CONVECTIE-knop, wanneer het
koken klaar is en vervolgens zal
de meest recent gebruikte
temperatuur weergegeven
worden.
Page 98

- 96 -
Uw oven op de stand GRILL gebruiken
INFORMATIE
ACTIE
DISPLAY
1 Open deur.
Schuif
voedsel in.
Sluit deur.
De ovenlamp zal aan gaan.
De ovenlamp zal uitgaan.
2 Druk op
GRILL-blok.
Selecteer vereist Grillstand,
bijvoorbeeld HOOG.
Display Uitvoer
1 druk op Hi 1840 W
2 druk op Lo 1500 W
3 Selecteer de
tijd.
Druk op de NUMMER-blok om
een verhittingstijd in te stellen,
bijvoorbeeld 10 minuten.
Druk op de knop 1, 0, 0 in en
0.
De maximale verhittingstijd is
60 minuten.
4 Druk op de
START-toets.
Displayvenster zal aftellen.
De convectieventilator gaat
aan.
Aan het einde van het
verhittingsprogamma laat de
oven driemaal een pieptoon
horen en “0” flikkert in het
venster, totdat de deur
geopend wordt.
Verwijder voedsel.
Displayvenster zal het vorige
programma aanduiden
(minder dan 1 minuut).
5 Open deur.
TE GEBRUIKEN ACCESSOIRES
Om de beste resultaten te behalen
zet u het voedsel op het
spijlenrooster in de positie boven.
De keramische plaat kan op de
basis van de oven worden
geplaatst om spetters en druppels
op te vangen. Kleine stukken
voedsel die mogelijk vallen tussen
het spijlenrooster kunnen direct op
de keramische plaat gekookt
worden op het spijlenrooster in de
positie boven. Vaak laten afvloeien
om excessief spatten te
voorkomen. Die schalen kunnen
mogelijk voltooid worden onder de
grill op het spijlenrooster in de
positie onder of direct op de
keramische plaat geplaatst worden.
Einde programma
Open deur
Voorzichtig:
Het spijlenrooster ligt los.
Wees voorzichtig als u voedsel
verwijdert.
• Hete oppervlakken
Wees zeer voorzichtig wanneer u heet voedsel verwijdert. Gebruik hiervoor keukenhandschoenen.
•
Verhitten in meerdere fasen (sequentieel)
Zie pagina 93.
•
Convectietemperatuur opnieuw oproepen
De geselecteerde grillstand kan nog 3 seconden worden gecontroleerd nadat de GRILL-blok is
ingedrukt.
Het grillstand zal worden weergegeven in het venster voordat men terugkeert naar de resterende
verhittingstijd.
•
Voorverhitten
Voor de beste resultaten voor convectie dient de oven voorverhit te worden.
(Zie pagina 106.)
•
Herhaalfunctie
Zie pagina 90.
Page 99

- 97 -
Nederlands
Uw oven gebruiken als een ventilatorgrill
INFORMATIE
ACTIE
DISPLAY
1 Open deur.
Schuif
voedsel in.
Sluit deur.
De ovenlamp zal aan gaan.
De ovenlamp zal uitgaan.
2
Druk op
VENTILATORGRILLtoets.
*
Stel de temperatuur in die de
ventilatorgrill moet aannemen,
bijv. 180°C.
Ga door met de
VENTILATORGRILL-toets in te
drukken totdat de vereiste
temperatuur in het displayvenster
wordt weergegeven.
Temperatuur gaat omhoog in
stappen van 10 graden Celcius
van 100 tot 250 graden Celcius.
3 Selecteer de
tijd.
Druk op de NUMMER-blok om
een verhittingstijd in te stellen,
bijvoorbeeld 20 minuten.
Druk op de knop 2, 0, 0 en 0.
De maximale verhittingstijd is
99 minuten en 99 seconden.
4 Druk op de
STARTtoets.
Displayvenster zal tijd
aftellen.
De convectieventilator gaat
aan.
Aan het einde van het
verhittingsprogramma maakt
de oven driemaal een
piepgeluid en “0” flikkert in
het venster, totdat de deur
geopend wordt.
Verwijder voedsel.
Displayvenster zal het
eerdere programma
aanduiden.
5 Open deur.
TE GEBRUIKEN ACCESSOIRES
Einde programma
Open deur
• Hete oppervlakken
Wees zeer voorzichtig wanneer u heet voedsel verwijdert. Gebruik hiervoor keukenhandschoenen.
•
Verhitten in meerdere fasen (sequentieel)
Zie pagina 93.
•
De VENTILATORGRILL-temperatuur opnieuw oproepen
De geselecteerde temperatuur kan nog 3 seconden worden gecontroleerd nadat de toets
VENTILATORGRILL is ingedrukt.
Temperatuur zal kort weergegeven worden in venster voordat u terugkeert naar het resterende
verhittingstijd.
De temperatuur kan niet tijdens een programma veranderd worden.
•
Voorverhitten
Voor de beste resultaten voor convectie dient de oven voorverhit te worden.
(Zie pagina 106.)
•
Herhaalfunctie
Zie pagina 90.
* De oven zal de meest recente
VENTILATORGRILL-temperatuur
die gebruikt wordt onthouden,
mocht u dezelfde temperatuur
opnieuw wilt gebruiken.
Druk op het VENTILATORGRILLtoets als het kookproces voltooid
is en de meest recente
temperatuur zal worden
weergegeven.
U krijgt de beste resultaten als u de
schaal op het rooster in de
LAAGSTE stand plaatst. Het
voedsel kan ook direct op het
rooster worden geplaatst mits het
rooster voor gebruik goed schoon
is gemaakt.
Voorzichtig:
Het spijlenrooster ligt los.
Wees voorzichtig wanneer u
voedsel verwijdert.
Page 100

- 98 -
Uw oven gebruiken met COMBINATIE
2
Druk op de
COMBINATIEtoets.
INFORMATIE
ACTIE
DISPLAY
1 Open deur.
Schuif
voedsel in.
Sluit deur.
De ovenlamp zal aan gaan.
De ovenlamp zal uitgaan.
4 Druk op de
START-toets.
Displayvenster zal tijd aftellen.
Aan het einde van het
verhittingsprogramma maakt
de oven driemaal een
piepgeluid en “0” flikkert in
het venster, totdat de deur
geopend wordt.
Verwijder voedsel.
Displayvenster zal het
eerdere programma
aanduiden.
5 Open deur.
TE GEBRUIKEN ACCESSOIRES
Voor de beste resultaten zet u het
voedsel op het spijlenrooster in de
positie onder. De keramische plaat
MOET gebruikt worden als het
kookbakje van metaal is. Zet
NOOIT een metalen bakje direct op
het spijlenrooster, wanneer u met
een COMBINATIE kookt,
aangezien vonken dan kunnen
worden opgewekt en de schaal
oven kunnen beschadigen.
Einde programma
Open deur
Selecteer het nummer van de
COMBINATIE die u vooraf
wilt instellen (1-5),
bijvoorbeeld 1. Zie hieronder.
Combinatie die u vooraf wilt instellen
3 Selecteer de
tijd.
Druk op de NUMMER-bloken
om een verhittingstijd in te
stellen, bijvoorbeeld
3 minuten.
Druk op de knop 3, 0 en 0.
De maximale verhittingstijd is
5 minuten.
Voorzichtig:
Het spijlenrooster ligt los. Wees
voorzichtig wanneer u voedsel
verwijdert.
Eenmaal
Tweemaal
Driemaal
Viermaal
Vijfmaal
250˚C
250˚C
250˚C
250˚C
Hoog
DRUK OP NIVEAU GRILL OF
CONVECTIE-
TEMPERATUUR
5 minuten
60 minuten
60 minuten
60 minuten
60 minuten
MAXIMALE
VERHITTINGS-
TIJD
HOOGTE
MAGNETRON
DISPLAY
1*
2
3
4
5
HOOG
LAAG
ONTDOOIEN
LAAG
LAAG
Ventilatorgrill
Ventilatorgrill
Ventilatorgrill
Grill convectie
Grill
INSTELLING GRILL
OF CONVECTIE
*Combi 1 mag alleen worden gebruikt als eerste fase van een verhittingsprogramma met twee of drie fasen.
 Loading...