

Page 1
Operating Instructions
Bedienungsanleitung
Gebruiksaanwijzing
Mode d’emploi
Istruzioni operative
Instrucciones de funcionamiento
Automatic Espresso Machine (Household Use)
Kaffevollautomat (Hausgebrauch)
Automatische espressomachine (voor huishoudelijk gebruik)
Machine expresso automatique (usage domestique)
Macchina per caffè espresso automatica (utilizzo domestico)
Máquina de café espresso automática (uso doméstico)
Model No.
NC-ZA1
English
Deutsch
Nederlands
Français
Italiano
Español
Page 2

Contents Page
Safety Precautions GB3
Important Information GB9
Electrical Requirement (For UK market only) GB10
Parts Names and Handling Instructions GB11
Display GB13
Flavour setting GB15
Before Use GB16
Espresso/Coffee GB19
Cappuccino/Latte Macchiato/Hot milk GB21
Powder coffee preparation GB24
Hot water GB26
Turn off the power GB27
Changing the setting GB29
Memory setting GB33
How to Clean GB35
Troubleshooting GB44
Error display GB46
Replacement parts GB47
Specifications GB47
Thank you for purchasing the Panasonic product.
• This product is intended for household use only.
• Please read these instructions carefully to use the product correctly and safely.
• Before using this product please give your special attention to “Safety Precautions” (Page GB3–GB8).
• Please keep this Operating Instructions for future use.
GB2
Page 3
Please make sure to follow these
Safety Precautions
In order to prevent accidents or injuries to the user, other people, and
damage to property, please follow the instructions below.
Q The following charts indicate the degree of damage caused by
wrong operation.
instructions.
WARNING:
CAUTION:
Q The symbols are classified and explained as follows.
This symbol indicates prohibition.
This symbol indicates requirement that must be followed.
Indicates serious injury or death.
Indicates risk of injury or property damage.
WARNING
O
Do not damage the mains lead or mains
plug.
Following actions are strictly prohibited.
Modifying, touching on or placing near
heating elements, bending, twisting, pulling,
pulled over sharp edges, putting heavy
objects on top, bundling the mains lead and
Mains lead
Mains plug
carrying the appliance by the mains lead.
(It may cause electric shock, or fire due to short circuit.)
ODo not use the appliance if the mains lead or mains plug is
damaged or the mains plug is loosely connected to the
household mains socket.
(It may cause electric shock, or fire due to short circuit.)
« If the supply cord is damaged, it must be replaced by the
manufacturer, its service agent or similarly qualified persons in
order to avoid a hazard.
ODo not plug or unplug the mains plug with wet hands.
(It may cause electric shock.)
• Always ensure that hands are dry before handling the mains plug
or switching on the appliance.
GB3
Page 4

Safety Precautions
WARNING
OMake sure the voltage indicated on the label of the appliance
is the same as your local supply.
(It may cause electric shock or fire.)
Also avoid plugging other devices into the same household mains
socket to prevent electrical over heating. However, if you are
connecting a number of mains plugs, make sure the total wattage
does not exceed the rated wattage of the household mains socket.
The use of extension cords is not recommended.
OInsert the mains plug firmly.
Otherwise it may cause electric shock and fire due to heat that
(
may be generated around the mains plug.
Please make sure to follow these
instructions.
)
• Place the appliance where the mains plug can be easily pulled
out.
OClean the mains plug regularly.
Dust and moisture build-up on the mains plug may cause
(
insufficient insulation, which may cause a fire.
« Unplug the mains plug, and wipe with a dry cloth.
OKeep the mains lead out of reach of children. Do not let the
mains lead hang over the edge of the table or worktop.
(It may cause burns, injury or electric shock.)
ODo not immerse the appliance in water or splash it with water.
(It may cause electric shock, or fire due to short circuit.)
ODo not disassemble, repair or modify this appliance.
)
GB4
(It may cause fire, electric shock or injury.)
« Consult the place of purchase or a Panasonic service centre.
ODo not touch or get your face close to places where steam is
coming out.
(It may cause burns or injury.)
• Especially keep the appliance out of reach of infants and children.
Page 5
WARNING
OThis appliance can be used by children aged from 8 years and
above if they have been given supervision or instruction
concerning use of the appliance in a safe way and if they
understand the hazards involved. Cleaning and user
maintenance shall not be made by children unless they are
older than 8 and supervised. Keep the appliance and its cord
out of reach of children aged less than 8 years.
(It may cause burns, injury or electric shock.)
OAlways keep the children away from the appliance and
cleaning agent.
(It may cause burns or injury.)
• Children do not realise dangers that are likely to occur because of
improper use of appliances.
ODiscontinue using the appliance immediately and unplug in
the unlikely event that this appliance stops working properly.
(It may cause smoking, fire, electric shock or burns.)
e.g. for abnormal operation or break down
• The mains plug and the mains lead become abnormally hot.
• The mains lead is damaged or the appliance power fails.
• The main body is deformed, has visible damage or is abnormally
hot.
• Water is leaking from the inside of main body.
• There is another abnormality or failure.
« Unplug the appliance immediately and consult the place of
purchase or a Panasonic service centre for inspection or repair.
ODo not allow infants and children to play with packaging
material.
(It may cause suffocation.)
ODo not open the water tank, dispenser or tray while the coffee
is brewing.
(It may cause burns.)
GB5
Page 6

Safety Precautions
CAUTION
ODo not use the appliance for any purpose other than those
described in these instructions.
(It may cause burns or injury.)
• Panasonic will not accept any liability if the appliance is subject to
improper use, or failure to comply with these instructions.
ODo not insert any object in the gaps.
(It may cause electric shock.)
• Especially metal objects such as pins or wires.
ODo not touch the hot surface such as coffee spouts while
appliance is in use or immediately after use.
Please make sure to follow these
instructions.
(It may cause burns.)
• Never touch the appliance with wet hands.
ODo not use the appliance on following places.
• On uneven surfaces, on carpet, non-water-resistant surface or
table cloths etc.
(It may cause fire or injury.)
• Places where it may be splashed with water or near a heat
source.
(It may cause electric shock or electrical leakage.)
• Near any open water such as bathtubs, sinks, or other containers.
(It may cause electric shock or electrical leakage.)
• Near a wall or furniture.
(It may cause discolouration or deformation.)
• Places that could be damaged even by moderate heat.
(It may cause discolouration or deformation.)
GB6
• Places where it is not strong enough to hold the appliance.
(It may cause damage or injury.)
• In enclosed spaces such as a built-in cupboard.
(It may cause discolouration or deformation.)
Page 7
CAUTION
ODo not remove the cup or pot while brewing.
(It may cause burns.)
ODo not move the appliance by holding dispenser or drip tray.
(It may cause injury.)
ODo not reach into the grinding unit.
(It may cause injury.)
ODo not hold the espresso machine with the mains lead.
(It may cause fire or electric shock.)
OMake sure to hold the mains plug when unplugging the mains
plug. Never pull on the mains lead.
(Otherwise it may cause electric shock, or fire due to short circuit.)
OAlways ensure the appliance is switched off and unplug the
mains plug when the appliance is not in use, before moving
and before cleaning (except cleaning function).
Otherwise it may cause electric shock, or fire due to electric
(
leakage.
OPlace the appliance (including the drip tray and Latte
Macchiato plate) on a firm, dry, clean flat heatproof worktop.
(Otherwise it may cause burns or injury.)
OBeware not to be tripped over or get caught in the mains lead
while in use.
(Otherwise it may cause burns or injury.)
)
ODo not touch, block or cover the steam vent holes during use.
(It may cause discolouration.)
• Especially pay attention when supervising children.
GB7
Page 8

Safety Precautions
CAUTION
OUnplug and allow the appliance to cool down fully before
cleaning and storing away.
(It may cause burns.)
OMake sure to clean the appliance after every use.
Otherwise it may cause burns due to overflow by clogging the
(
filter holder.
OAvoid getting contact with the skin or eyes while handling
cleaning agent.
(It may cause injury.)
« In case of contact with skin or eyes, rinse immediately with
Please make sure to follow these
instructions.
)
plenty of water and consult a doctor.
OIf the cleaning agent comes into contact with sensitive
surfaces, clean up any splashes immediately.
(It may cause discolouration damage.)
GB8
Page 9

Important Information
• Do not fill the water tank with milk (including soy and rice milk), mineral
water, sparkling water or hot water etc. Only use tap water.
(It may cause a malfunction.)
• Do not use the appliance outdoors.
• Do not place coffee powder in the powder coffee shaft when the
appliance is not turned on.
• Adjust the grinding level only while coffee beans are ground. (P. GB12)
• Do not fill the coffee bean container with freeze-dry, candied or
caramelised or oily coffee beans or water.
• Do not use any attachment and cleaning agent other than those
provided or recommended by the manufacturer. (P. GB47)
• If leaving the appliance unattended for long time, turn the power off.
• Place the temperature could drop below freezing point.
(It may cause a malfunction.)
GB9
Page 10
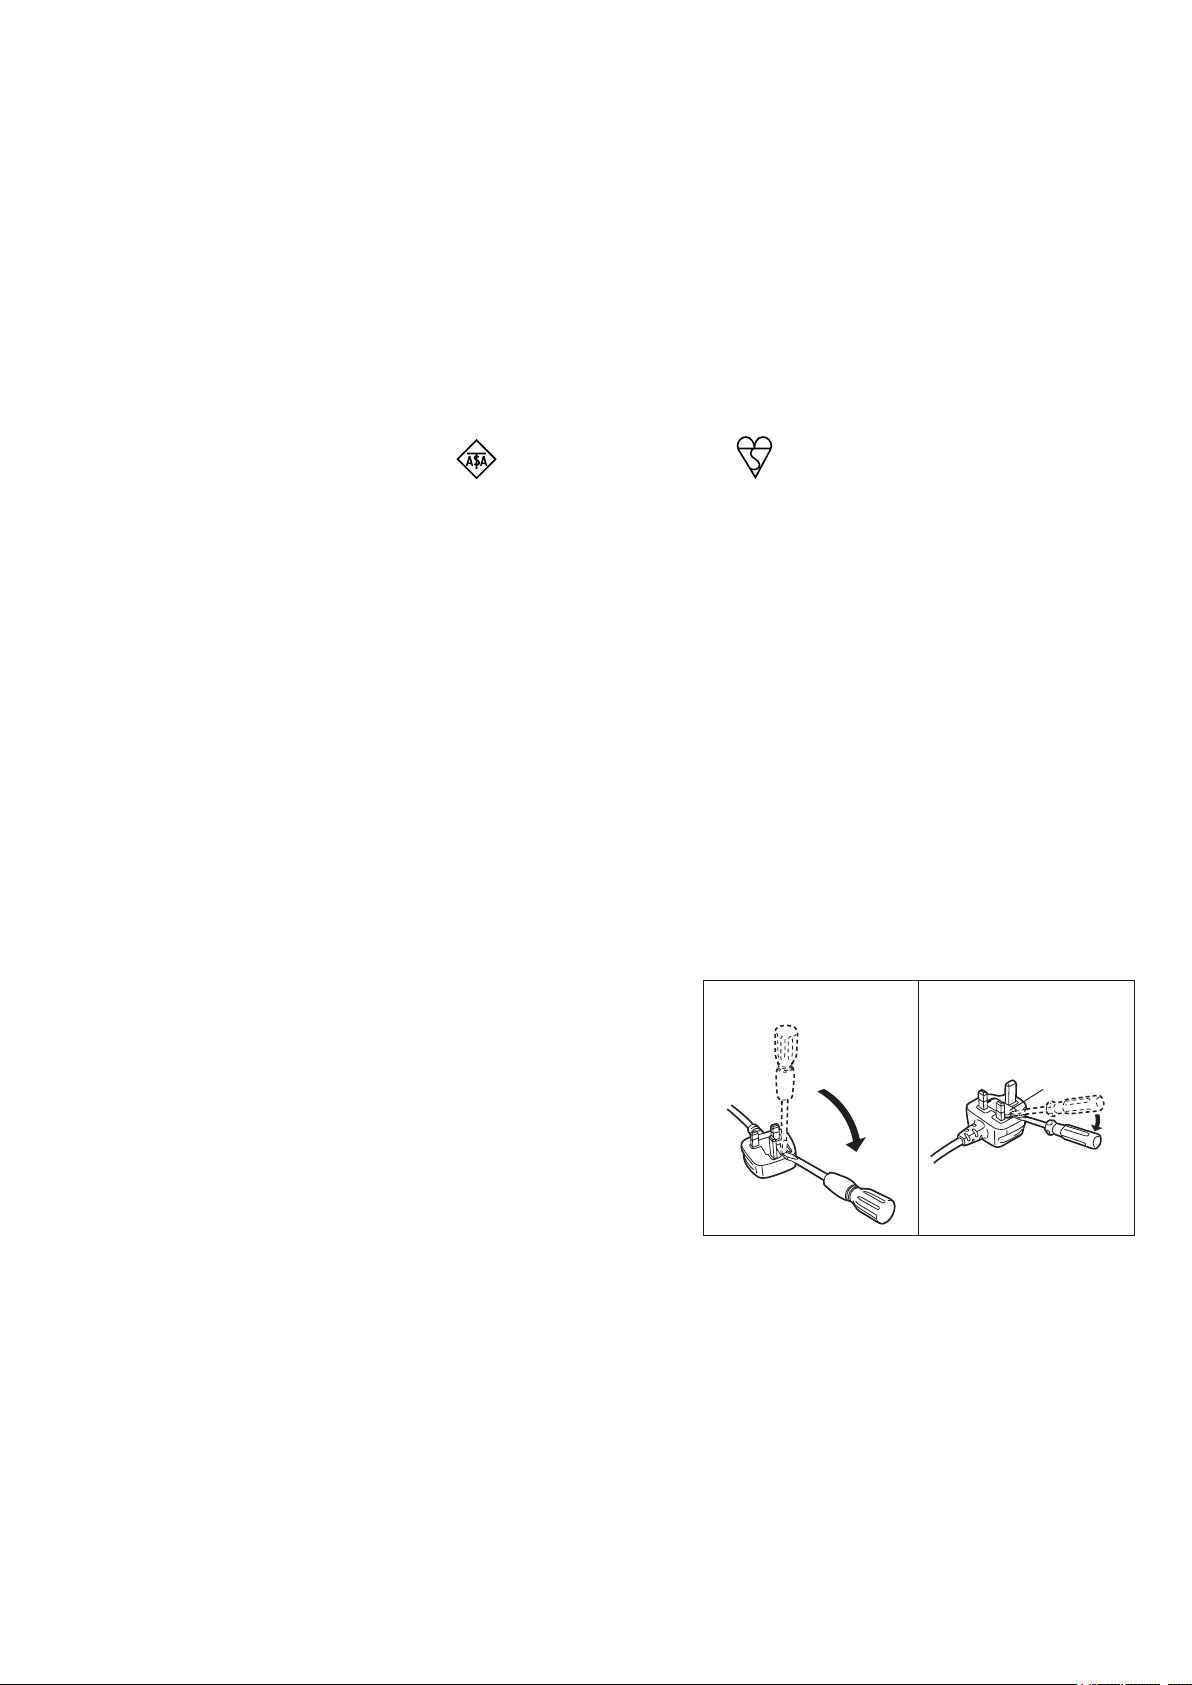
Electrical Requirement (For UK market only)
Fuse cover
FOR YOUR SAFETY PLEASE READ THE FOLLOWING TEXT
CAREFULLY.
This appliance is supplied with a moulded three pin mains plug for your
safety and convenience. A 13-amp fuse is fitted in this plug.
Should the fuse need to be replaced please ensure that the replacement
fuse has a rating of 13-amp and that it is approved by ASTA or BSI to
BS1362.
Check for the ASTA mark or the BSI mark on the body of the fuse.
If the plug contains a removable fuse cover, you must ensure that it is
refitted when the fuse is replaced.
If you lose the fuse cover, the plug must not be used until a replacement
cover is obtained.
A replacement fuse cover can be purchased from your local Panasonic
Dealer.
If the fitted moulded plug is unsuitable for the socket outlet in your home,
then the fuse should be removed and the plug cut off and disposed of
safely. There is a danger of severe electrical shock if the cut off plug is
inserted into any 13-amp socket.
How to replace the fuse
The location of the fuse differs according
to the type of AC mains plug (figures A
and B). Confirm the AC mains plug fitted
and follow the instructions below.
Illustrations may differ from actual AC
mains plug.
Open the fuse cover with a screwdriver
and replace the fuse and close or attach
the fuse cover.
Figure A Figure B
GB10
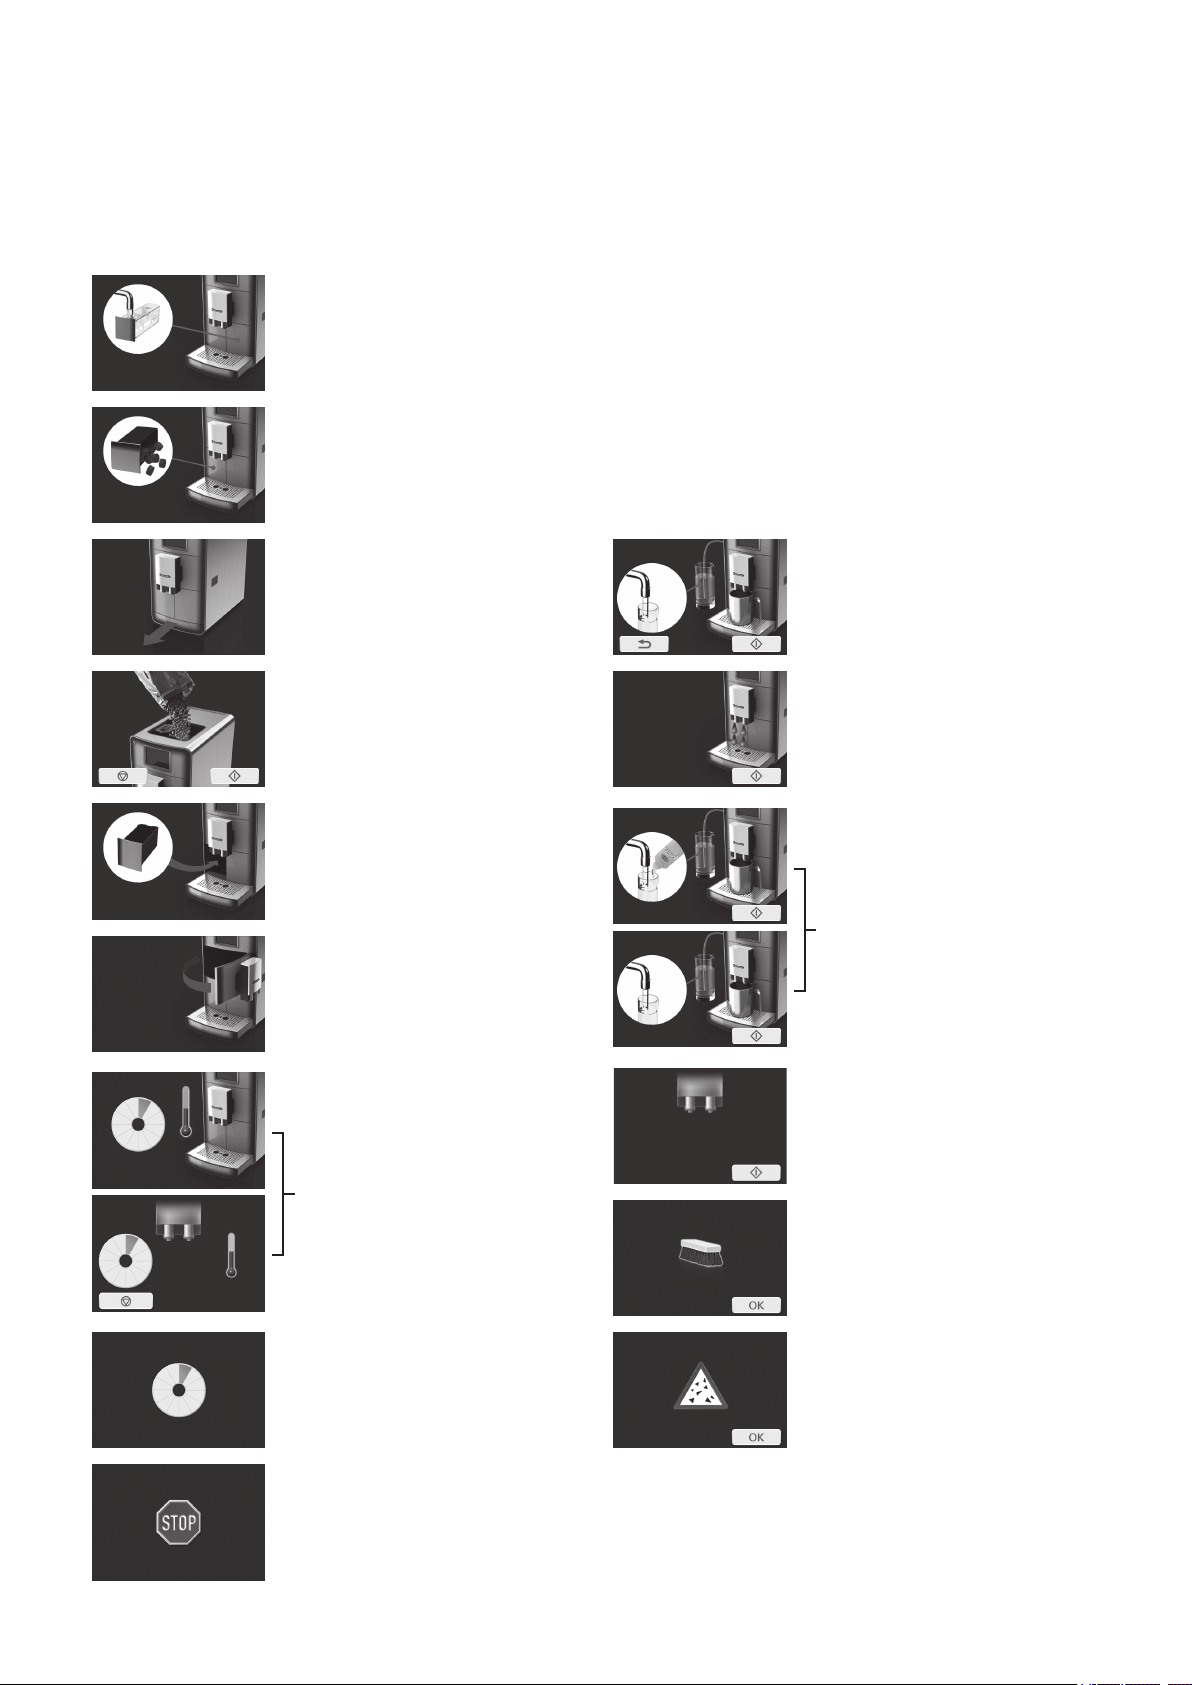
Page 11
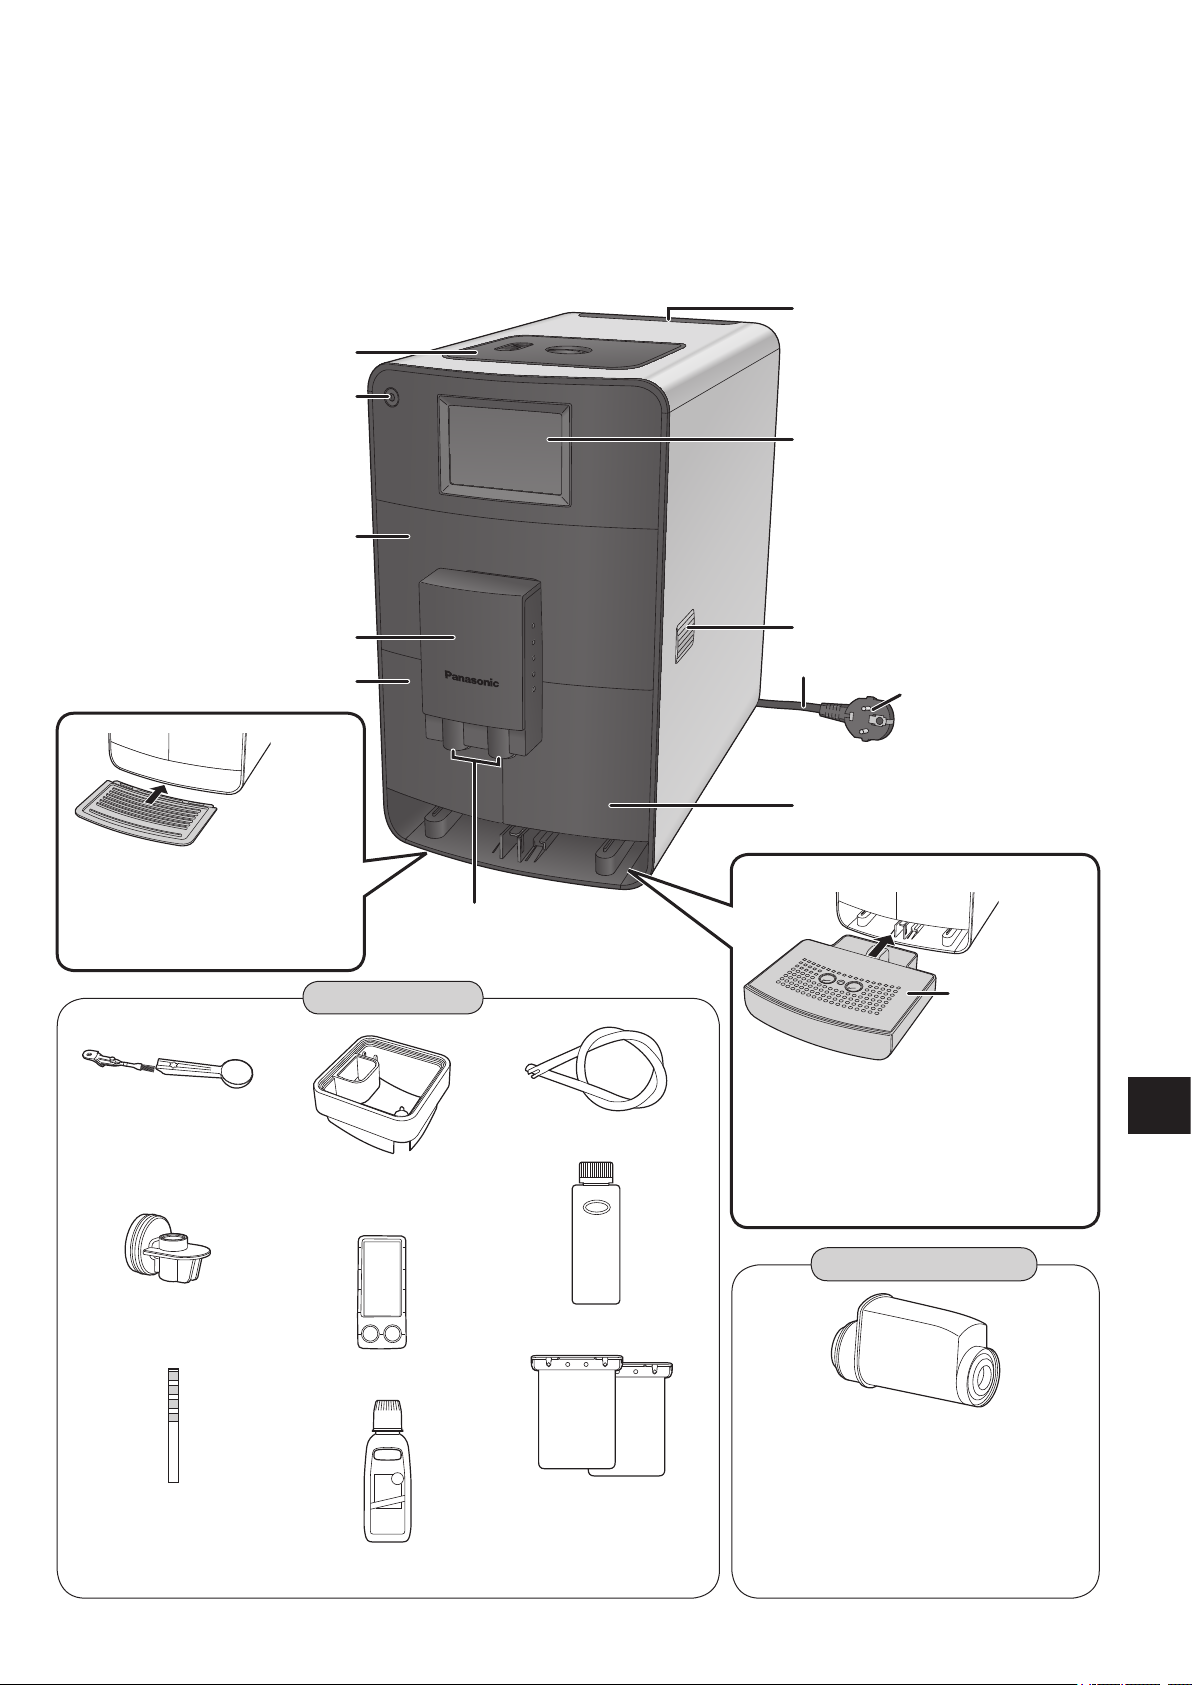
Filter cartridge
It may only be used together with the
BRITA INTENZA water filter cartridge;
cartridge is not supplied by default.
Cartridges are available from your local
BRITA customer service: www.brita.net
(Availability varies by country.)
Parts Names and Handling
Measuring spoon
(
with cleaning brush
and setting function
Adapter
(for filter cartridge)
Test strip
(
for determining the
water hardness
Bean container
extension (P. GB12)
Cleaning tablets
Descaling agent
Milk hose
Milk system cleaner
Quick reference
)
)
Instructions
Q Wash the all detachable parts before using the appliance for the first time or when you have not used it for a while. (P. GB35)
For parts names inside the door, refer to “How to Clean” on pages GB36–GB38.
Quick reference (Inserted)
Coffee bean container (P. GB12)
Power button
Display (P. GB13, GB14)
Door
Dispenser
Waste container
Latte Macchiato plate
• Close the drip tray by pressing it
and place the Latte Macchiato
plate until it snaps into place.
Accessories
Steam vent
Mains lead
Mains plug
* The shape of plug may
be different from
illustration.
Water tank (P. GB12)
Drip tray
Spout
Stainless steel
plate
Place the stainless steel plate (rounded
edge is facing up) on the drip tray.
Push them into the espresso machine until
they snap into place.
Open the drip tray by pressing it.
Sold separately
GB11
Page 12
Parts Names and Handling
Coffee bean container
Powder coffee
shaft
Grinding setting
lever
Coffee bean
container lid
Powder coffee
shaft lid
Setting the grinding fineness
Turn the grinding setting lever to the desired level of fineness.
Only set the grinding fineness when the grinder is running.
During grinding, do not touch coffee beans or put fingers into
the grinder. Close the coffee bean container lid after adjusting
the lever.
Fine ground for “Intensive taste”.
Use this setting for light roasted coffee beans.
Medium ground for “normal taste”.
Use this setting for medium roasted coffee
beans.
Coarse ground for “mild taste”.
Use this setting for dark roasted coffee beans.
• Taste does not meet at your desire right away.
Wait for a few times brewing to get desire taste.
To attach the bean container extension
O If you desire to increase the capacity of the standard coffee bean container from 125 g to 250 g, proceed
as follows.
1
Remove the coffee bean container lid from its holder.
2
Remove the powder coffee shaft lid by opening it to an upright position and pulling it out of its
holder.
3
Put the bean container extension onto the coffee bean container.
Make sure that the grinding setting levers are at the same position each other.
4
Attach the powder coffee shaft lid and close the coffee bean container lid.
Water tank
Helps to keep in mind changing time of the filter
cartridge.
IN: Time the filter cartridge was attached.
OUT: Time to change the filter cartridge.
1
Attach the adapter to the filter
cartridge.
2
Insert the filter cartridge with the
adapter into the guides as the
illustration.
* sold separately
Note
• The cartridge must be from BRITA INTENZA.
Similar INTENZA from different manufacture will not fit to this
espresso machine.
Filter time control
Water tank lid Filter cartridge*
Adapter
Lift up the lid to
open.
Instructions
(Continued)
GB12
Page 13
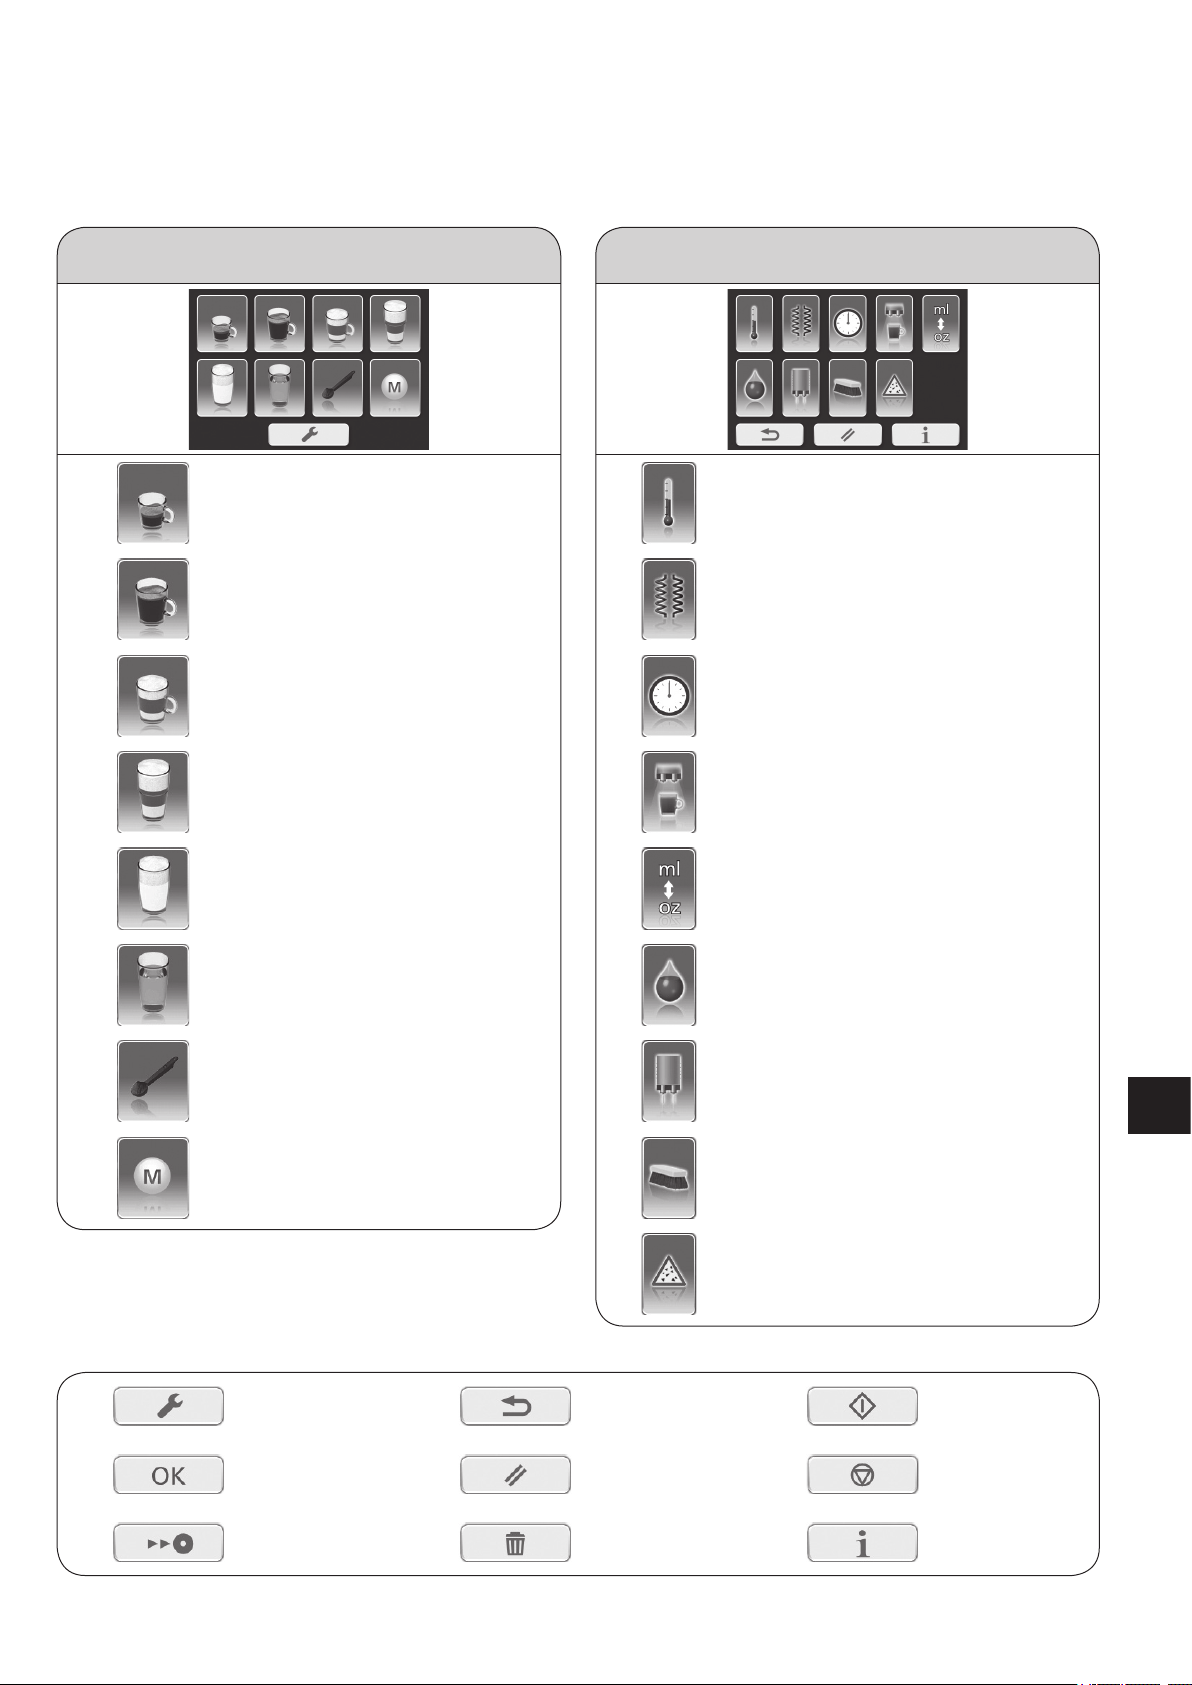
Display
Main menu
Espresso (P. GB19)
Coffee (P. GB19)
Cappuccino* (P. GB21)
Latte Macchiato* (P. GB21)
Hot milk/foam* (P. GB21)
Hot water (P. GB26)
Powder coffee preparation (P. GB24)
Memory menu (P. GB33)
User menu
Coffee temperature (P. GB29)
Heating mode (P. GB29)
Auto off timer (P. GB30)
Cup illumination (P. GB30)
ml / oz selection (P. GB31)
Water hardness level (P. GB31)
Milk system cleaning programme (P. GB41)
Cleaning programme (P. GB39)
Descaling programme (P. GB42)
Setting Return Start
OK Reset (P. GB32) Stop
Save Delete
Information
(P. GB32)
Menu display
• If no action for 1 minute, display turns dark.
*Milk menu
Operation icon
GB13
Page 14
Display (Continued)
Information display
Following displays appear during operations.
Refill with water
After the water tank is replaced, it takes approx. 5 seconds to detect it.
To ensure there is sufficient water for one dispensing, this display shows even when there may be water
remaining in the water tank.
Empty the waste container
Only empty it when the espresso machine is turned on.
Otherwise, it shows again next time power is turned on.
Open the drip tray Simple rinsing (P. GB23)
Refill with coffee beans Rinsing cycle
Attach the waste container
Cleaning the milk system
Close the door
Restart brewing
Heating up
Cleaning programme
GB14
In process
It shows after the brewing and rinsing
etc.
Stop the process
Descaling programme
Page 15
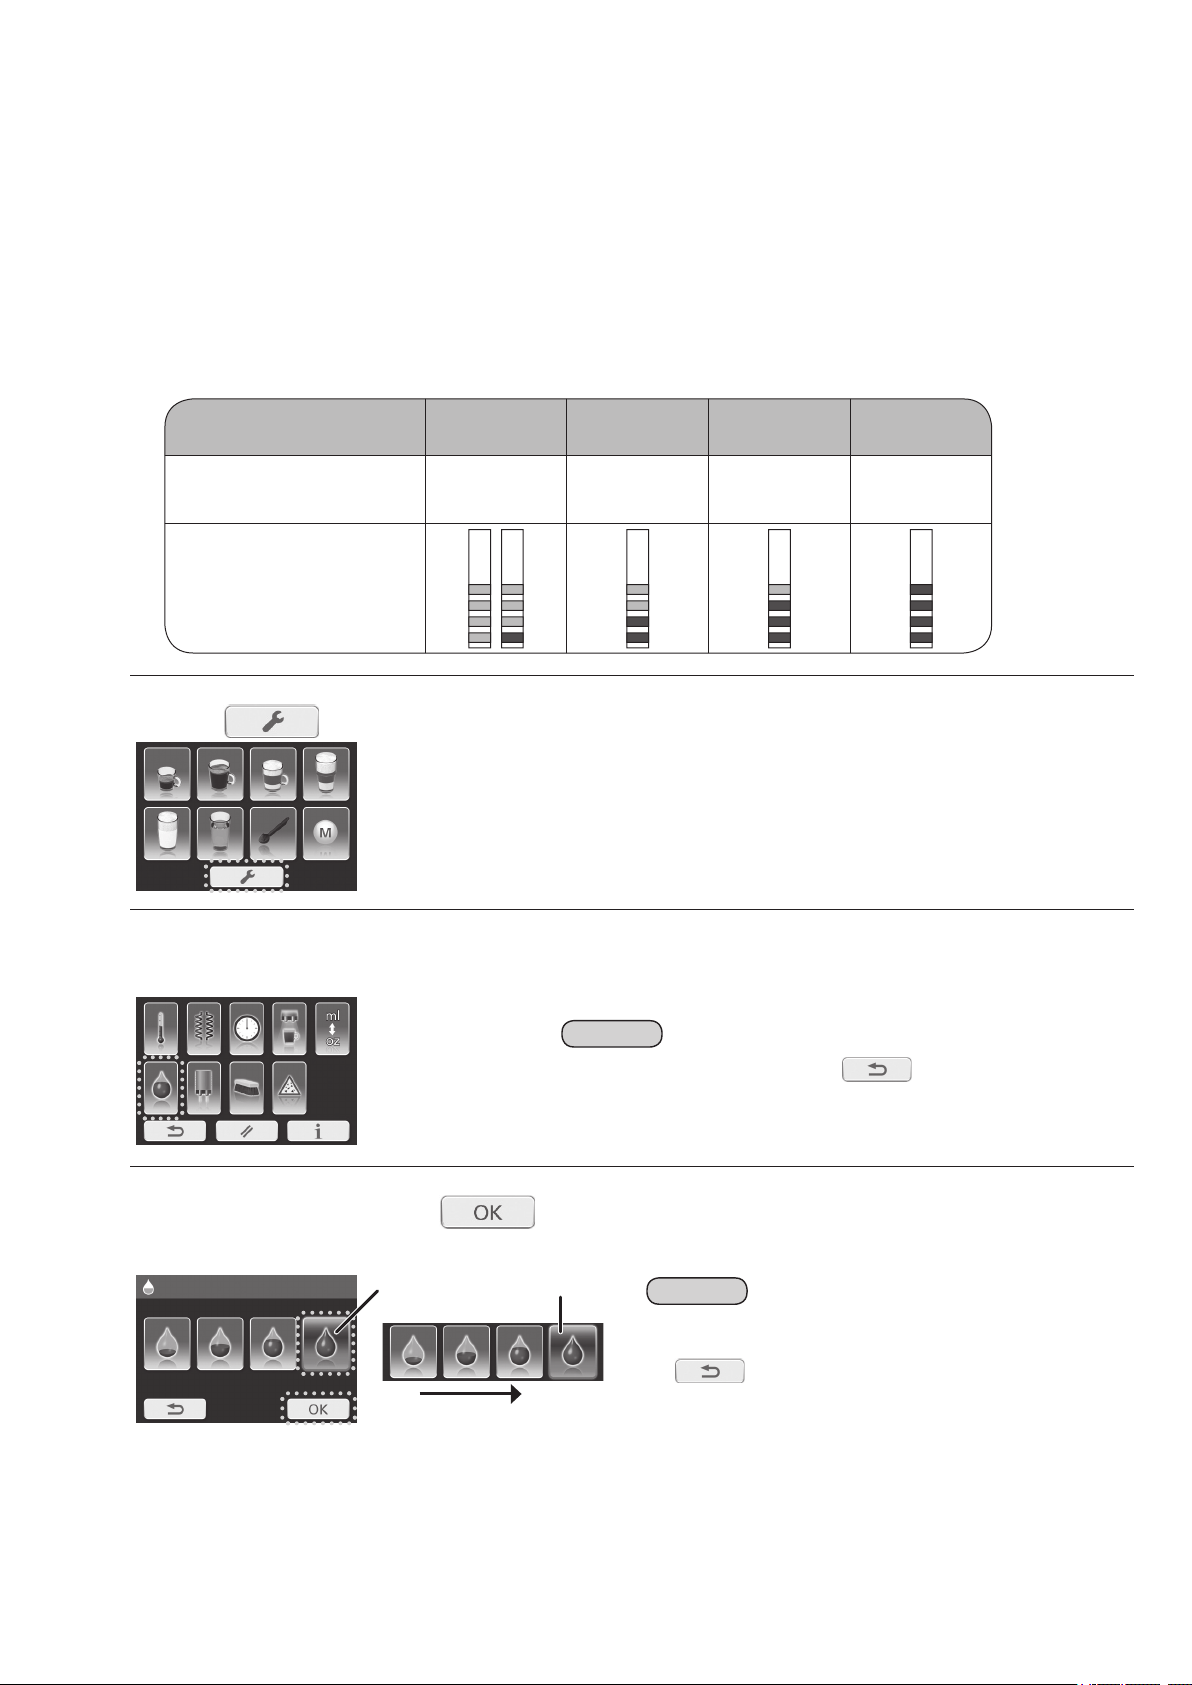
Flavour setting
Espresso Coffee
Setting range Default Setting range Default
Coffee amount
< mL>
20–100 mL (change by 5 mL)
< oz>
0.7–3.5 oz (change by 0.1 or 0.2 oz)
35 mL
1.2 oz
< mL>
60–300 mL (change by 10 mL)
< oz>
2.1–10.6 oz (change by 0.3 or 0.4 oz)
120 mL
4.2 oz
Bean level
extra light
normal
extra light
normal
light light
normal normal
strong strong
extra strong extra strong
Number of cups for
a pot
— —
3–6 cups
each: 120 mL/4.2 oz
3 cups
Setting range
Default
Cappuccino Latte Macchiato Hot milk
Coffee amount
< mL>
60–300 mL (change by 10 mL)
< oz>
2.1–10.6 oz (change by 0.3 or 0.4 oz)
120 mL
4.2 oz
180 mL
6.3 oz
120 mL
4.2 oz
Bean level
extra light
normal normal —
light
normal
strong
extra strong
Milk foam
no foam
extra rich extra rich extra rich
normal
rich
extra rich
Milk and coffee ratio
Milk : Coffee
80 : 20–20 : 80
Milk : Coffee
60 : 40
Milk : Coffee
80 : 20
—
Espresso/Coffee
Milk menu
• Select your flavour by pressing the or icon repeatedly.
Note
• First time of use or change the type of coffee beans, taste does not meet at your desire right away.
Wait for a few times brewing to get desire taste.
GB15
Page 16
Before Use
<Preparations>
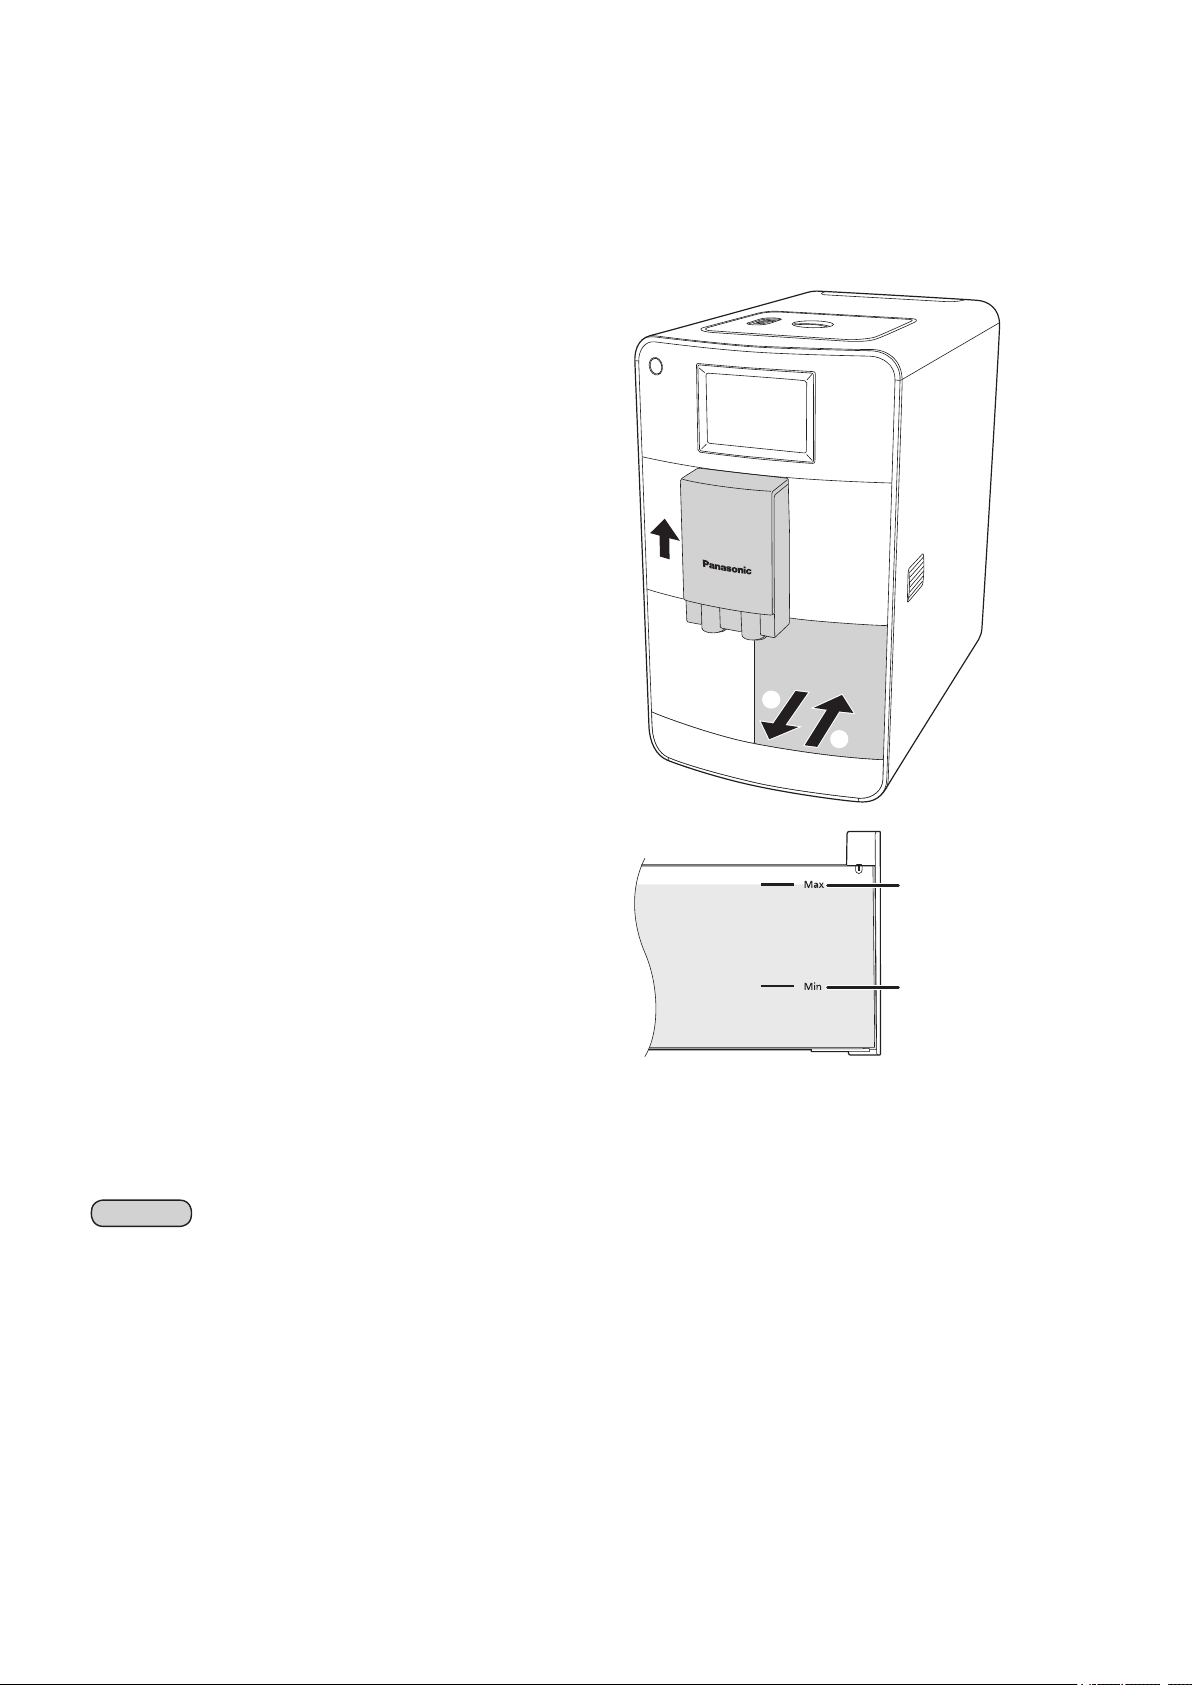
Fill the water tank with fresh cold water.
1
Push the dispenser up into the upper position.
1
Push the water tank and pull it out.
2
Fill the water tank with tap water up to “Max”
3
(maximum) line.
Dry off the out side of water tank.
Replace the water tank.
4
Push it until it snaps in.
Note
• Do not fill the water tank with milk (including soy and rice milk), mineral water, sparkling water or hot water etc. Only use tap
water.
• When filling the water tank with water, hold the bottom of the water tank with both hands.
“Max” (maximum) line
“Min” (minimum) line
GB16
Page 17
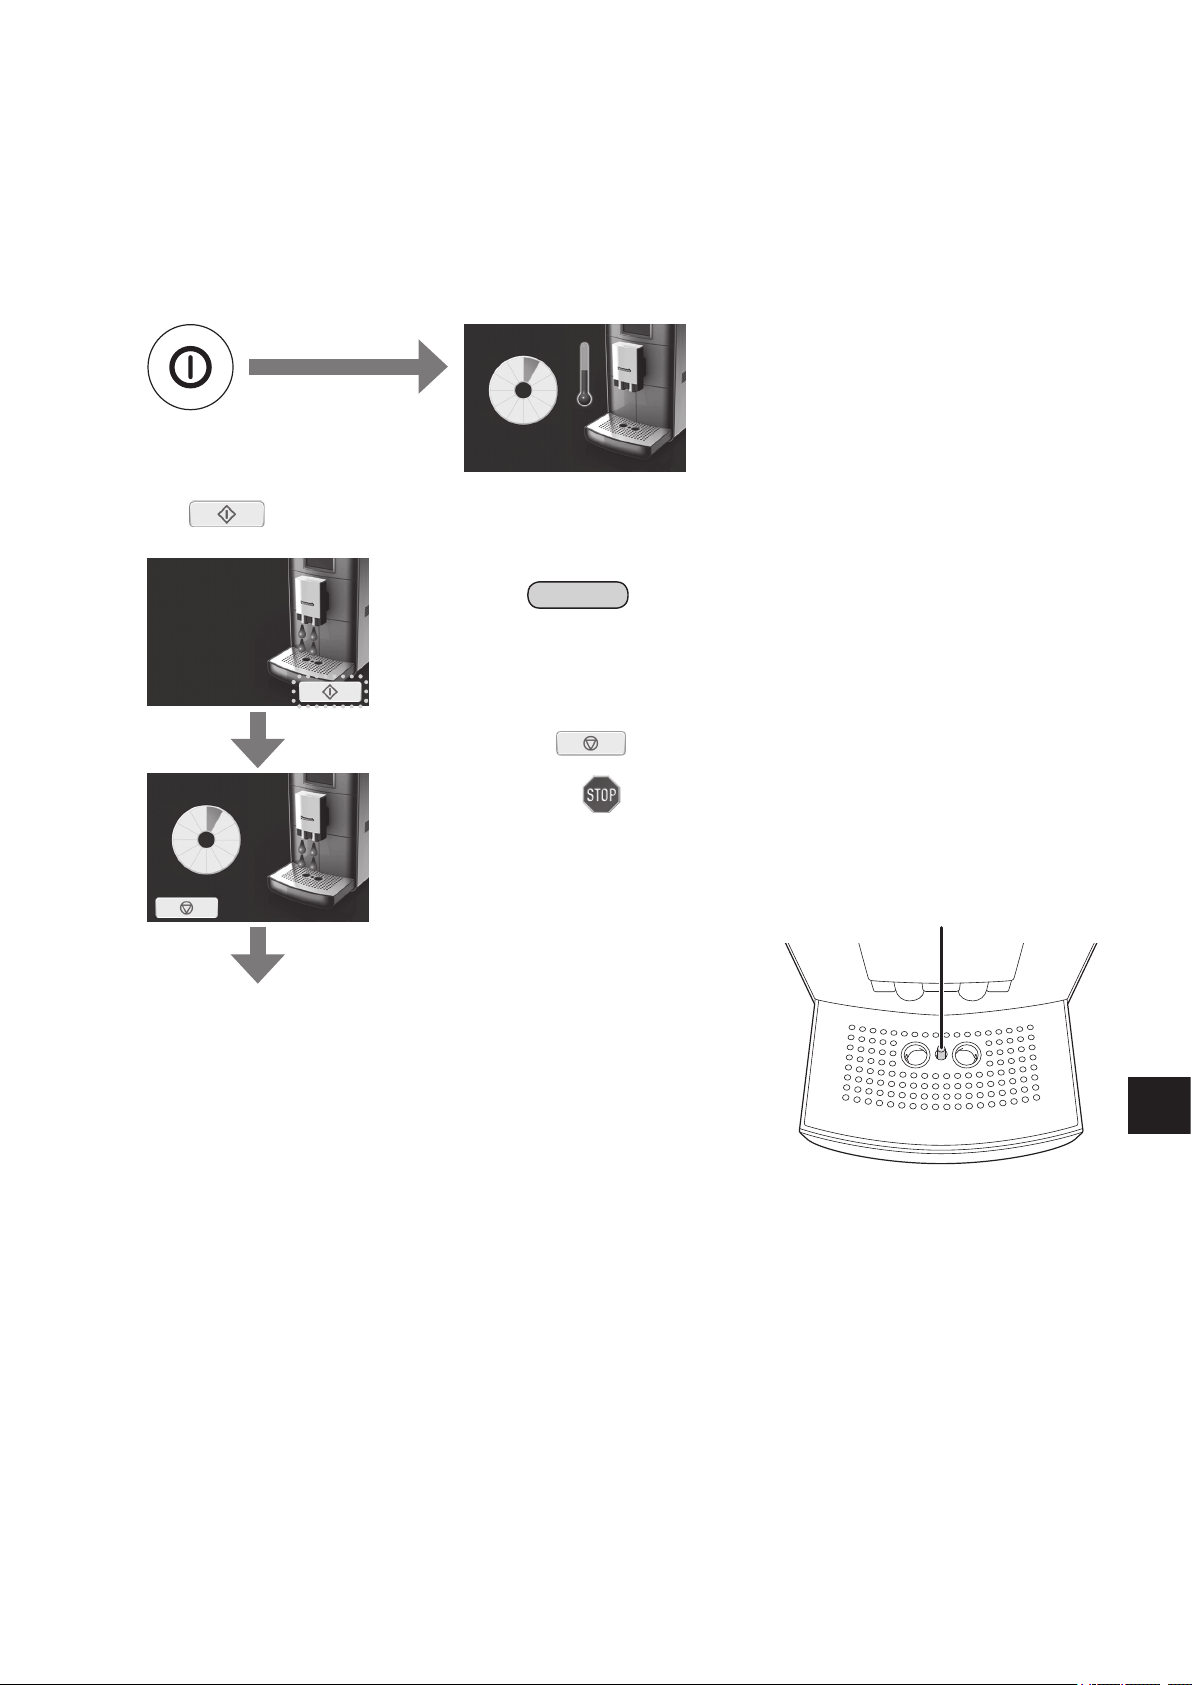
Turn the power on.
2
Plug in and press the power button.
1
• Make sure the waste container, water tank, drip tray and stainless steel plate are fitted.
• Open the drip tray by pressing it. (Attention for drip tray display will show for 3 seconds after the espresso machine is
heated up.)
Press to start rinsing.
2
• Make sure the drip tray is opened. Otherwise hot water will dispense onto the countertop.
Heats up the machine
automatically.
Note
• When starting up for the first time or when the water tank was
completely emptied, water suction may take a little longer dispensing
hot water for rinsing cycle.
• A small amount of water can get into the waste container during each
rinsing cycle. This is system-related and not a fault.
• If
the process.
After
• When dispensing hot water into the drip tray during rinsing cycle, you
may place the container under the dispenser.
• During the rinsing, water is to collect in the drip tray.
When water is full in the drip tray, the red float will be float up.
is pressed during the rinsing cycle, it immediately stops
flashes, the display will return to the previous display.
Float
When rinsing is complete (dispense hot
water 4 times), the display will return to
the main menu. Wait until the display
shows the main menu.
GB17
Page 18
Water hardness level
1
soft
2
medium-hard
3
hard
4
very hard
Water hardness mol/m
3
German hardness
French hardness
up to 1.24
up to 7°
up to 12.6°
up to 2.5
up to 14°
up to 25.2°
up to 3.7
up to 21°
up to 37.8°
over 3.7
over 21°
over 38°
Test strip
Before Use (Continued)
<Setting water hardness>
Before using the espresso machine for the first time, it should be set to the appropriate water hardness for your area.
Determine the water hardness.
1
Dip the test strip into cold water for 1 second and shake off the excess water.
1
Read the water hardness from the pink-coloured areas on test strip after approximately 1 minute.
2
Press .
2
Select “water hardness level”.
3
Note
• If the no action for 30 seconds or is pressed, the display will
return to the main menu.
Select level and press to save the setting.
4
(e.g. for very hard)
The selected setting will light up
in blue.
Soft
Very hard
Note
• If the no action for 30 seconds, the display will return to the
main menu without saving the settings.
• If
display without saving the setting.
is pressed, the display will return to the previous
GB18
Page 19
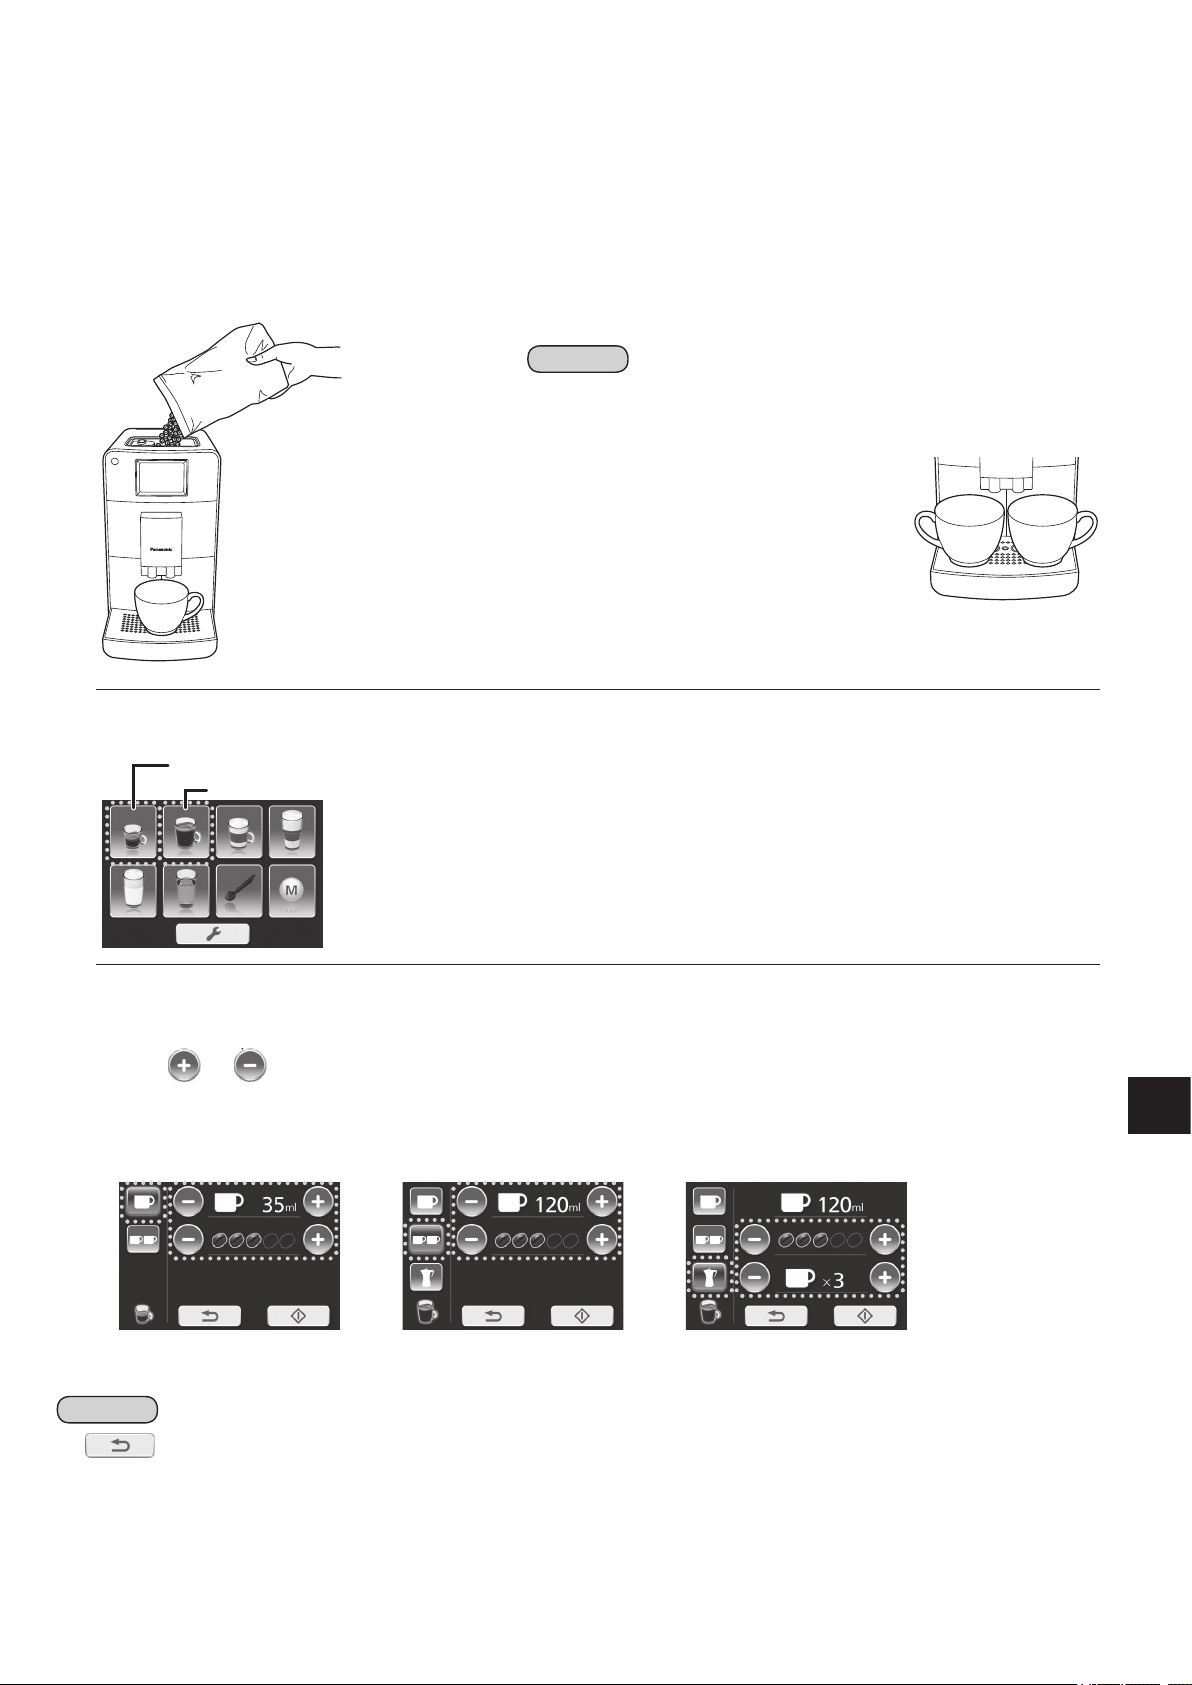
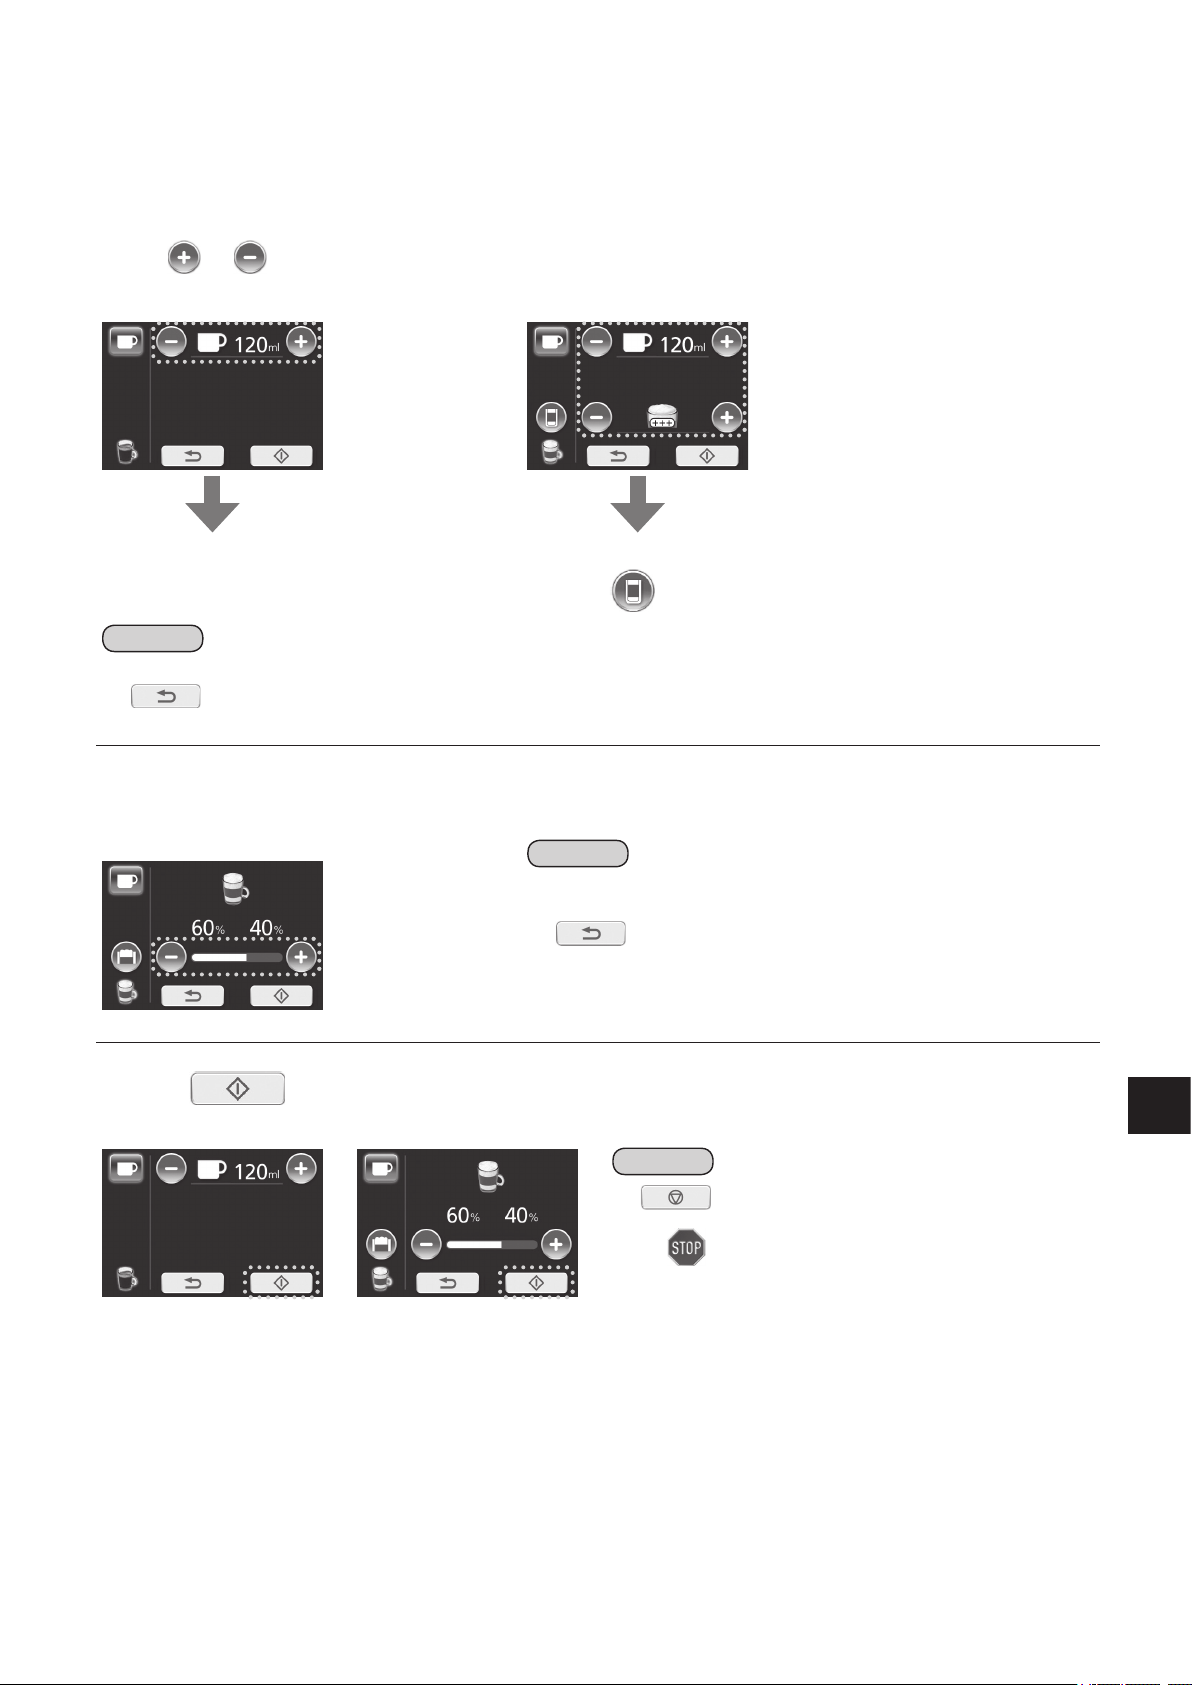
Espresso/Coffee
Fill the coffee bean container with whole coffee beans and close the lid.
1
Then place a cup(s) or pot under the spout.
• When preparing drink for a pot, use the Latte Macchiato plate. (Height between the dispenser and Latte Macchiato plate:
approx. 14 cm)
• Make sure the door is closed firmly.
Note
• In order to reduce heat and splashing, adjust the dispenser height to
suit your cup size by moving it up and down.
If the dispenser is difficult to move, clean it. (P. GB36)
• When preparing 2 cups of drink, place the
cups under the spout side by side.
• Preheat a cup(s) or pot by pouring hot water or use the hot water
menu (P. GB26) to have hot and tasty coffee.
After preheating a cup(s) or pot, throw the hot water away.
Select “Espresso” or “Coffee” on the main menu.
2
Espresso
Coffee
Select the number of cups or pot and adjust the taste to your desire.
3
• The selected cup will light up in blue.
• Press
• If adjustment is unnecessary, move on to step 4.
e.g.: When 1 cup is selected
(
or
on espresso menu
repeatedly to adjust quantity for coffee and coffee beans. (P. GB15)
e.g.: When 2 cups are
(
) ) )
selected on coffee menu
e.g.: When pot is selected
(
on coffee menu
(Not available for espresso)
Note
• If is pressed, the display will return to the previous display.
• Fill the water tank with water up to “Max” (maximum) line when preparing 6 cups of drink for a pot.
• If you wish to memorise your settings, see P. GB33.
GB19
Page 20
Espresso/Coffee (Continued)
If following display shows;
refill with beans. refill with water.
empty the waste
container.
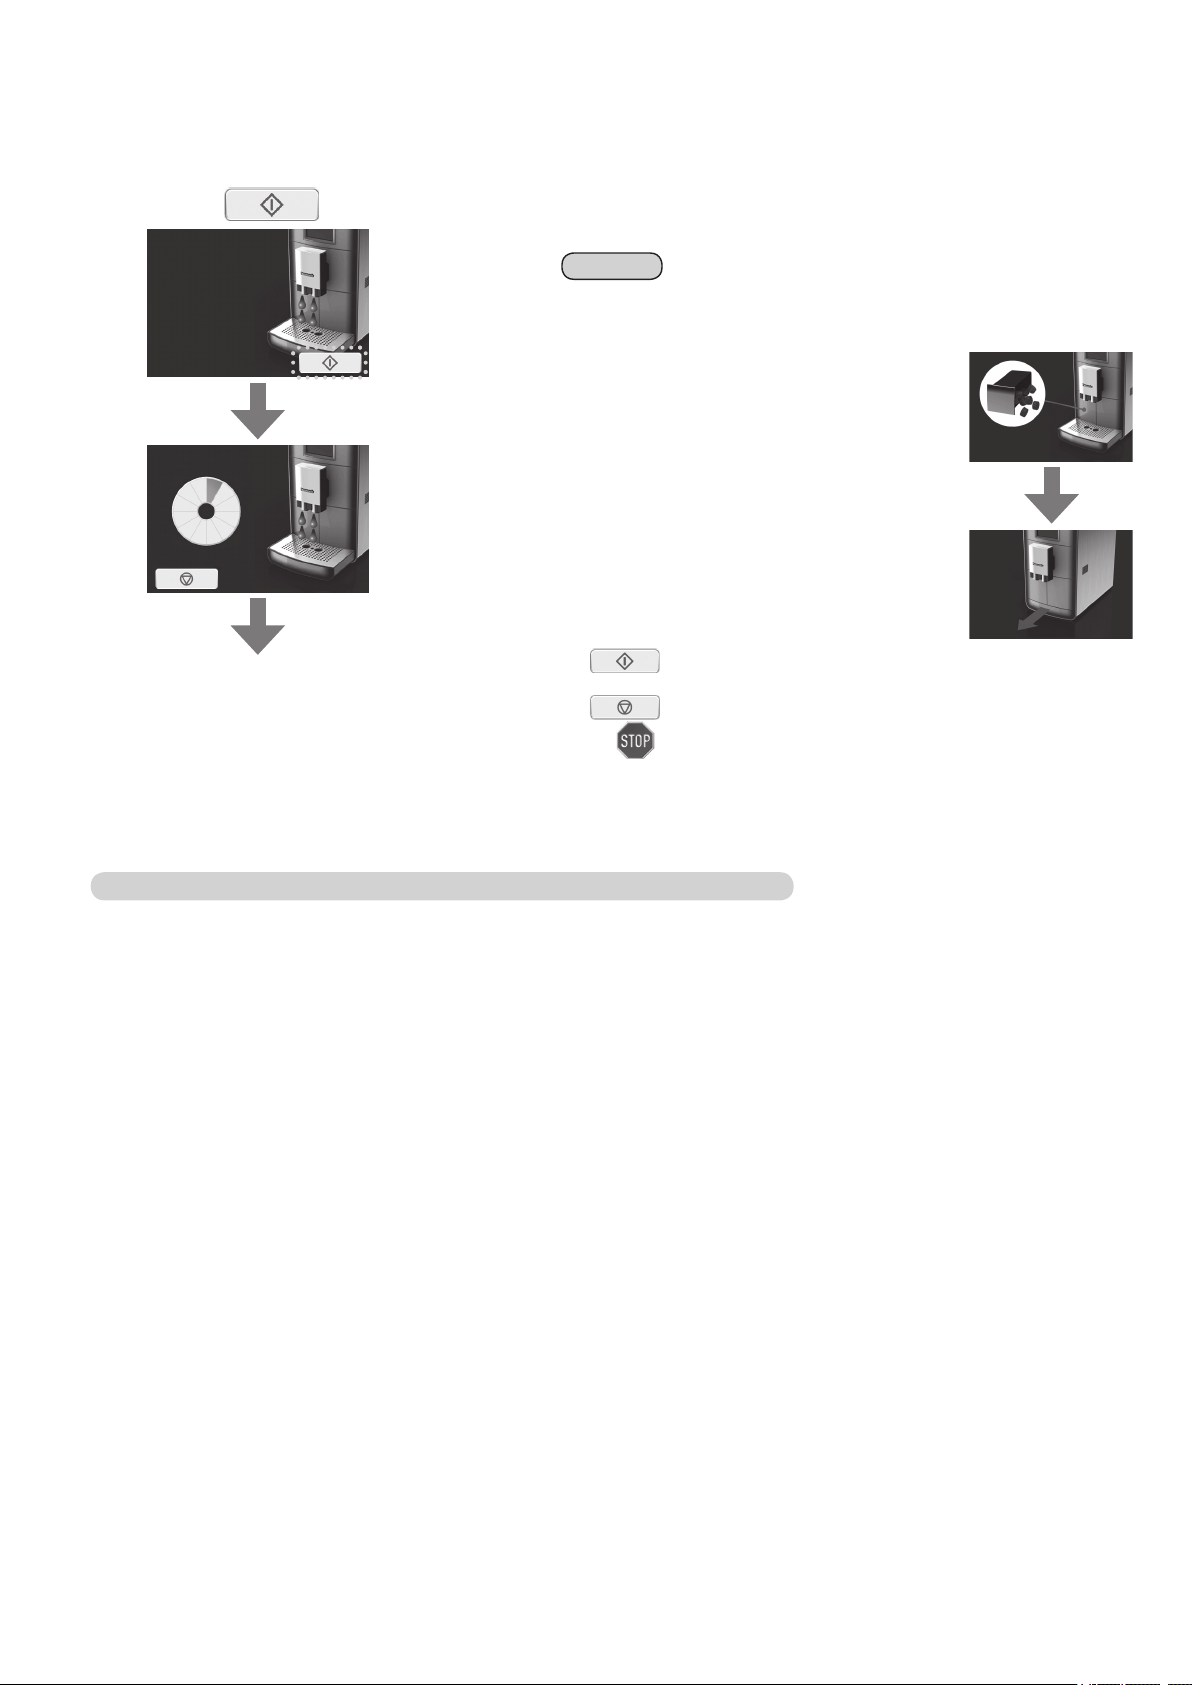
Press to start brewing.
4
(e.g.: When 1 cup is selected on coffee menu)
Note
• If is pressed during the brewing process, it immediately
stops the process.
After
• If
• If the temperature of the water is not sufficient to
brew coffee, the heating up process will be used
prior to the brewing process.
Time bar is increasing
according to process.
When the brewing is complete,
the display will return to the main
menu. Wait until the display
shows the main menu before
removing the cup(s) or pot.
flashes, the display will return to the main menu.
is pressed, the display will return to the previous display.
Q To turn off the power after use « P. GB27
GB20
Page 21

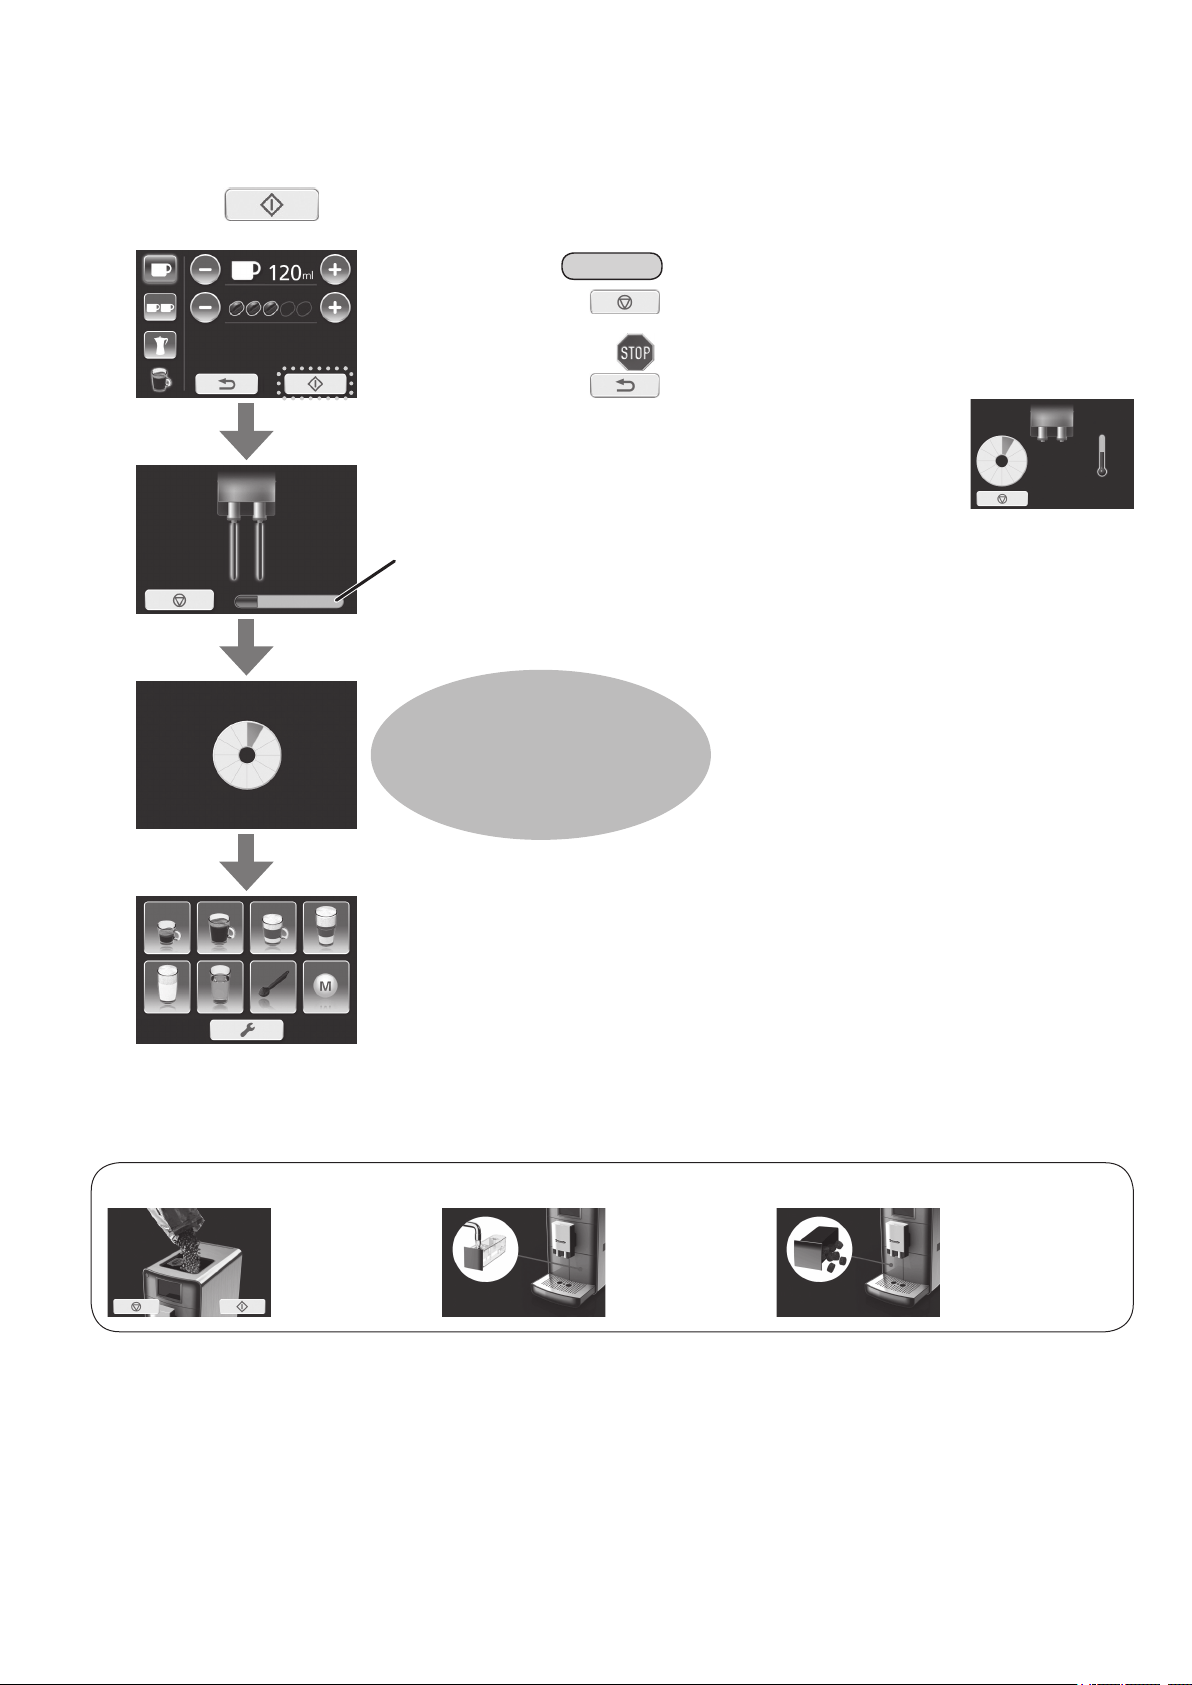
Cappuccino/Latte Macchiato/Hot
milk
Preparations:
(P. GB16)
Fill the water tank with water.
1
Operate rinsing cycle.
2
Attach the milk hose.
1
Insert the straight cut end of the milk hose through
1
the side opening of the espresso machine.
Insert the end of the milk hose into the opening on
2
the side of the milk foamer until it stops.
Press the milk hose into the guide, then close the
3
door.
Insert the milk hose into the milk package.
4
Do not use soy or rice milk otherwise it may
influence the milk foam quality.
Fill the coffee bean container with whole coffee beans (except hot milk
2
preparation). Then place a cup(s) under the spout.
• When using a tall cup, use the Latte Macchiato
plate instead of the drip tray.
• Preparing hot milk, move on to step 3.
Note
• In order to reduce heat and splashing, adjust the dispenser height to
suit your cup size by moving it up and down.
If the dispenser is difficult to move, clean it. (P. GB36)
• When preparing 2 cups of drink, place the
cups under the spout side by side.
• Preheat a cup(s) or pot by pouring hot water or use the hot water
menu (P. GB26) to have hot and tasty coffee.
After preheating a cup(s) or pot, throw the hot water away.
• Result of the Latte Macchiato may vary by the shape of glass.
Select “Cappuccino”, “Latte Macchiato” or “Hot milk” on the main menu.
3
Hot milk
Cappuccino
Latte Macchiato
GB21
Page 22
Cappuccino/Latte Macchiato/Hot
milk
(Continued)
Select the number of cups and adjust the taste as desired.
4
• The selected cup will light up in blue.
• If adjustment is unnecessary, move on to step 6.
• Press
e.g.: When cappuccino or Latte Macchiato
(
To adjust coffee and milk
ratio, press
or repeatedly to adjust quantity of coffee, coffee beans and milk foam. (P. GB15)
(e.g.: When hot milk is selected for 1 cup)
is selected for 1 cup
)
To start, move on to step 6.
and move on
to step 5.
Adjust the coffee and milk ratio to your desire.
5
• If adjustment is unnecessary, move on to the step 6.
• Press
e.g.: When cappuccino is selected
(
or repeatedly to adjust the coffee and milk ratio. (P. GB15)
Note
• When “Latte Macchiato” is selected, the coffee and milk ratio will be
displayed as 80% and 20%.
• If
• If you wish to memorise your settings, see P. GB33.
is pressed, return to step 4.
• If
60% : 40% = milk : coffee
)
is pressed, the display will return to the main menu.
GB22
Page 23
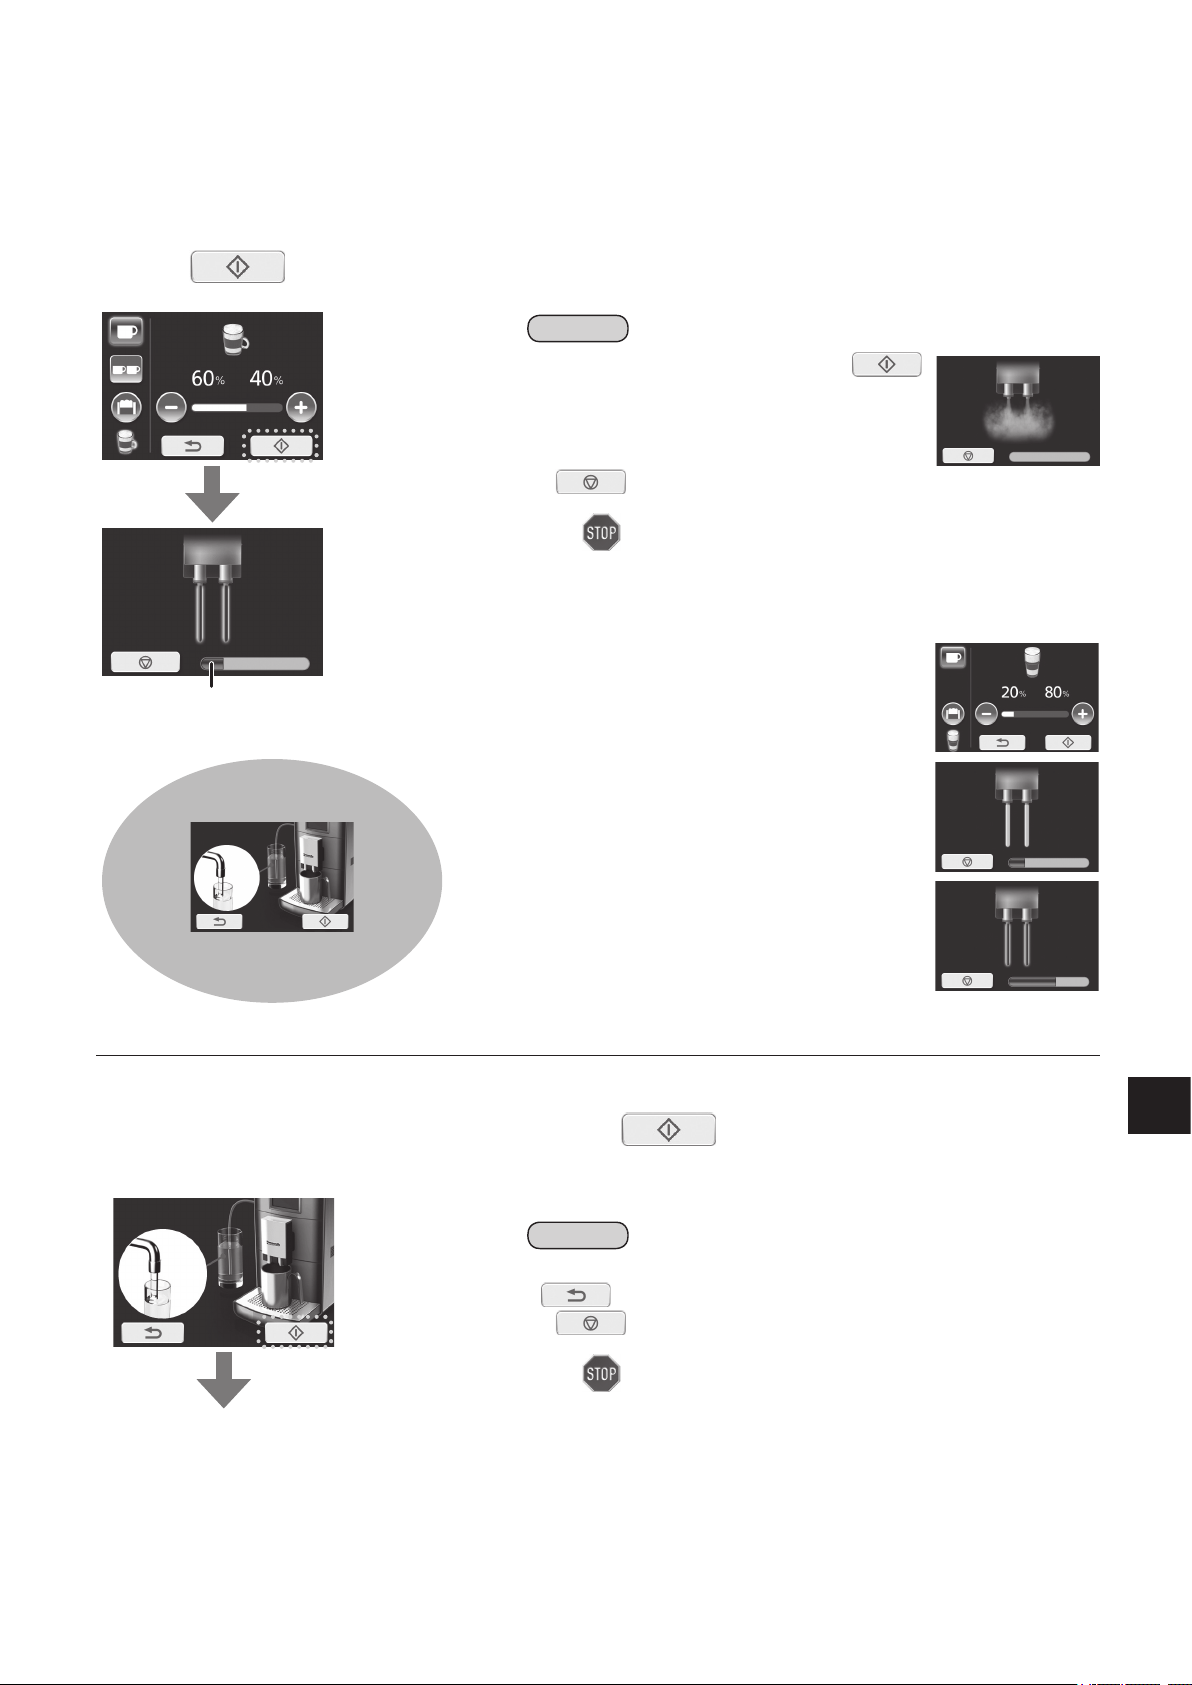
Press to start brewing.
6
(e.g.: When cappuccino is selected)
Time bar is increasing according to process.
Wait until display shows
Note
• Be careful with steam coming out after
is pressed.
• If is pressed during the brewing process, it immediately
stops the process.
After
• If the temperature of the water is not sufficient to brew coffee, the
heating up process will be performed first.
• When brewing cappuccino or Latte Macchiato, the display shows as
follows.
Between brewing milk and coffee, brewing will
be paused.
flashes, the display will move on to step 7.
to remove the cup(s).
• If surface of milk is higher than the spouts position, it may cause milk
to drip from the dispenser. In that case pull out the milk hose.
(simple rinsing)
Fill a glass with clean water and press to start rinsing.
7
• This cleaning cycle is for next drink preparation without milk residue.
• Switch the milk hose from milk package to the glass and set the empty cup under the dispenser. (Cup size > 250 mL)
Note
• If you prepare milk menu continuously, skip this cycle by pressing
.
• If
the process.
After
The display will return to the main menu
when the rinsing cycle is completed.
is pressed during the rinsing cycle, it immediately stops
flashes, the display will return to the previous display.
Q To turn off the power after use « P. GB27
GB23
Page 24

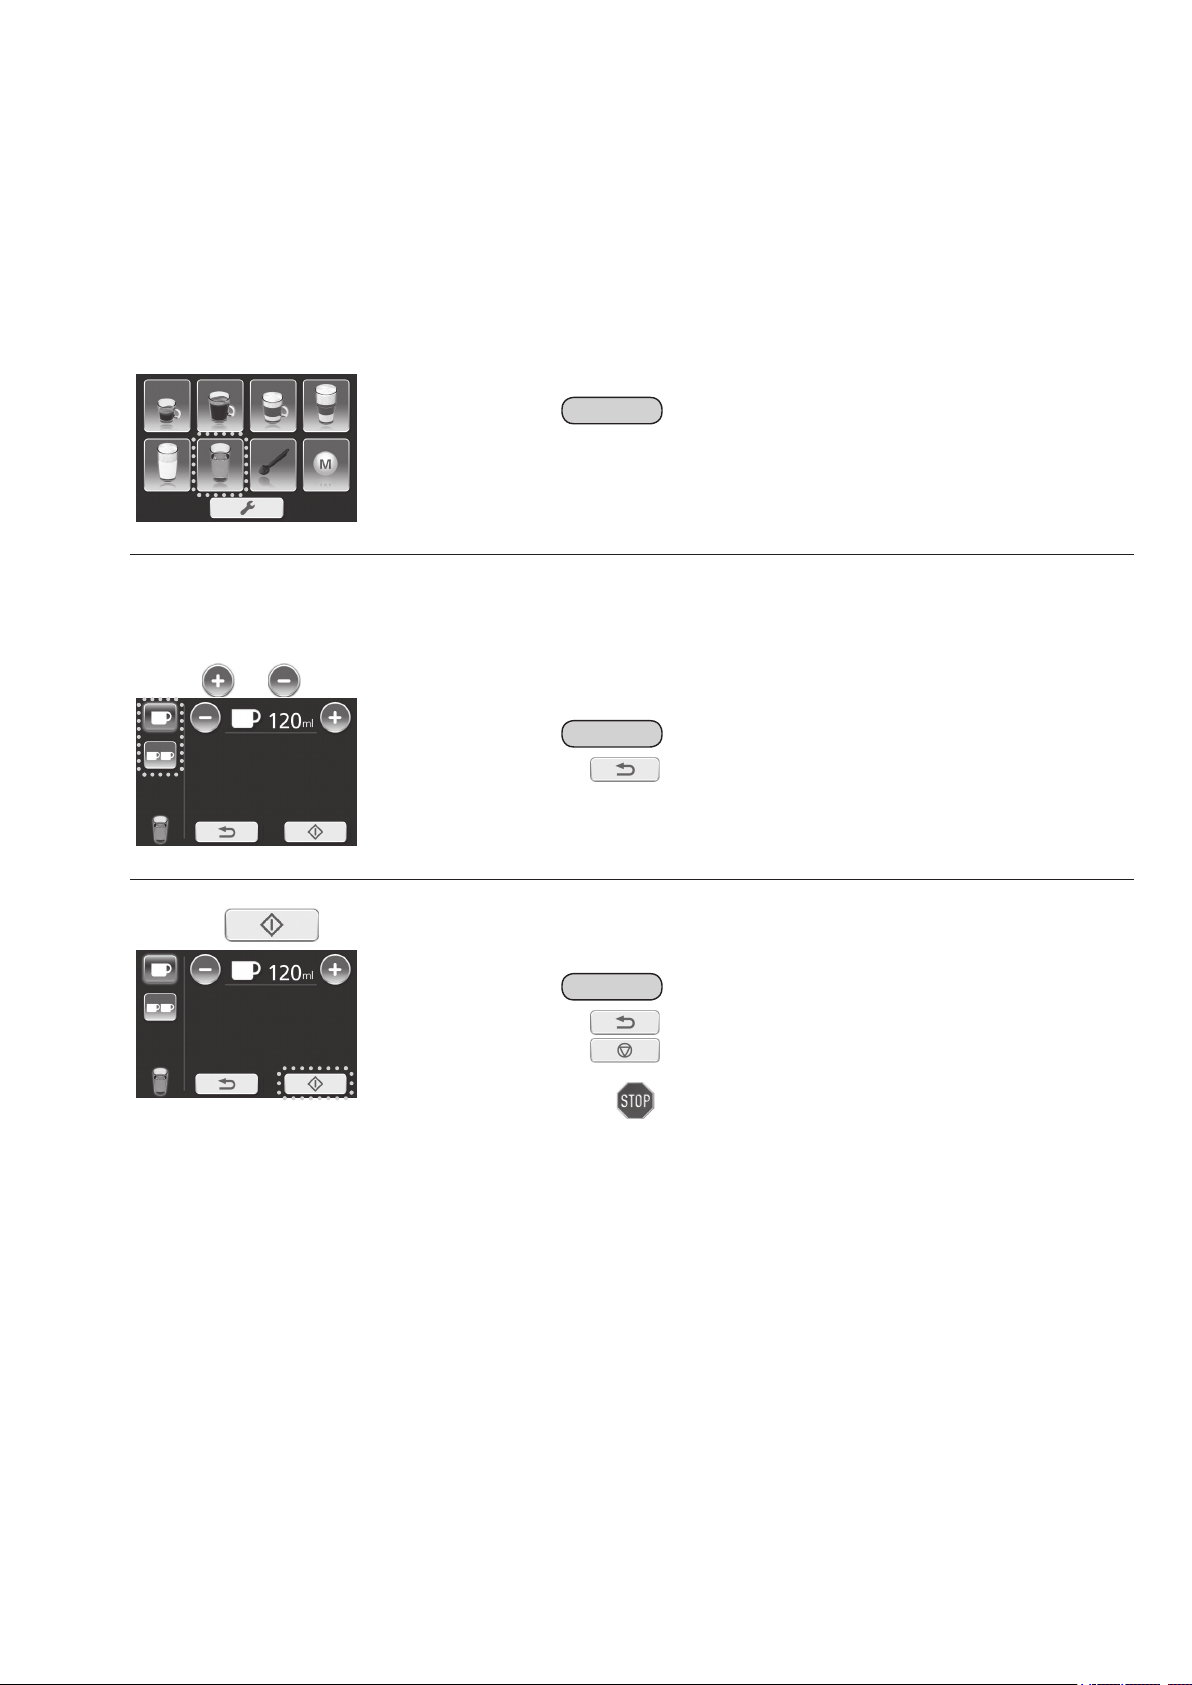
Powder coffee preparation
Preparations:
(P. GB16)
Fill the water tank with water.
1
Operate rinsing cycle.
2
Select “powder coffee preparation” on the main menu.
1
Select drink menu.
2
• If you select speciality coffee or milk menu, attach the milk hose to the espresso machine. (P. GB21)
Espresso
Coffee
Latte Macchiato
Cappuccino
Note
• If is pressed, the display will return to the main menu.
Fill the powder coffee shaft with one level measuring spoon of fresh coffee
3
powder and close the lids. Place a cup(s) under the spout. Then press
.
• Make sure the powder coffee shaft is dry before filling with coffee powder. Continuous usage may cause condensation in
the powder coffee shaft.
• Make sure the door is closed firmly.
Note
• In order to reduce heat and splashing, adjust the dispenser height to
suit your cup size by moving it up and down. If the dispenser is difficult
to move, clean it. (P. GB36)
• Ensure that you only use the measuring spoon provided.
• Do not fill more than one level measuring spoon (max. 10 g) of coffee
powder.
• Do not fill the powder coffee shaft with water-soluble, freeze-dried,
instant products or other drink powders.
• Too finely ground coffee powder may clog the brewing unit.
• Preheat a cup(s) or pot by pouring hot water or use hot water menu
(P. GB26) to have hot and tasty coffee.
After preheating a cup(s) or pot, throw the hot water away.
• If
is pressed, the display will return to the previous display.
GB24
Page 25
Adjust cup filling quantity and/or milk foam as desired.
4
• If adjustment is unnecessary, move on to the step 6.
• Press
(e.g.: Espresso/Coffee) (e.g.: Cappuccino/Latte Macchiato)
or repeatedly to adjust quantity for coffee and/or milk foam. (P. GB15)
To start, move on to step 6. To adjust coffee and milk ratio,
press
Note
• Only one cup can be prepared with this function.
• If
the coffee powder into the waste container. Refill the powder coffee at step 3.
is pressed, the display will return to the select drink menu (step 2). At same time the Espresso machine release
and move on to step 5.
Adjust coffee and milk ratio.
5
e.g.: Cappuccino
(
60% : 40% = milk : coffee
)
Note
• When “Latte Macchiato” is selected, the cup filling quantity will be
displayed as 80% and 20%.
• If
Press to start brewing.
6
(e.g.: Espresso/Coffee) (e.g.: Cappuccino)
O When brewing is completed, display will return to the main menu.
Wait until display shows the main menu to remove the cup(s) or pot.
is pressed, the display will return to the select drink menu.
Note
• If is pressed during the brewing process, it
immediately stops the process.
After
flashes, the display will return to the main menu.
Q To turn off the power after use « P. GB27
GB25
Page 26
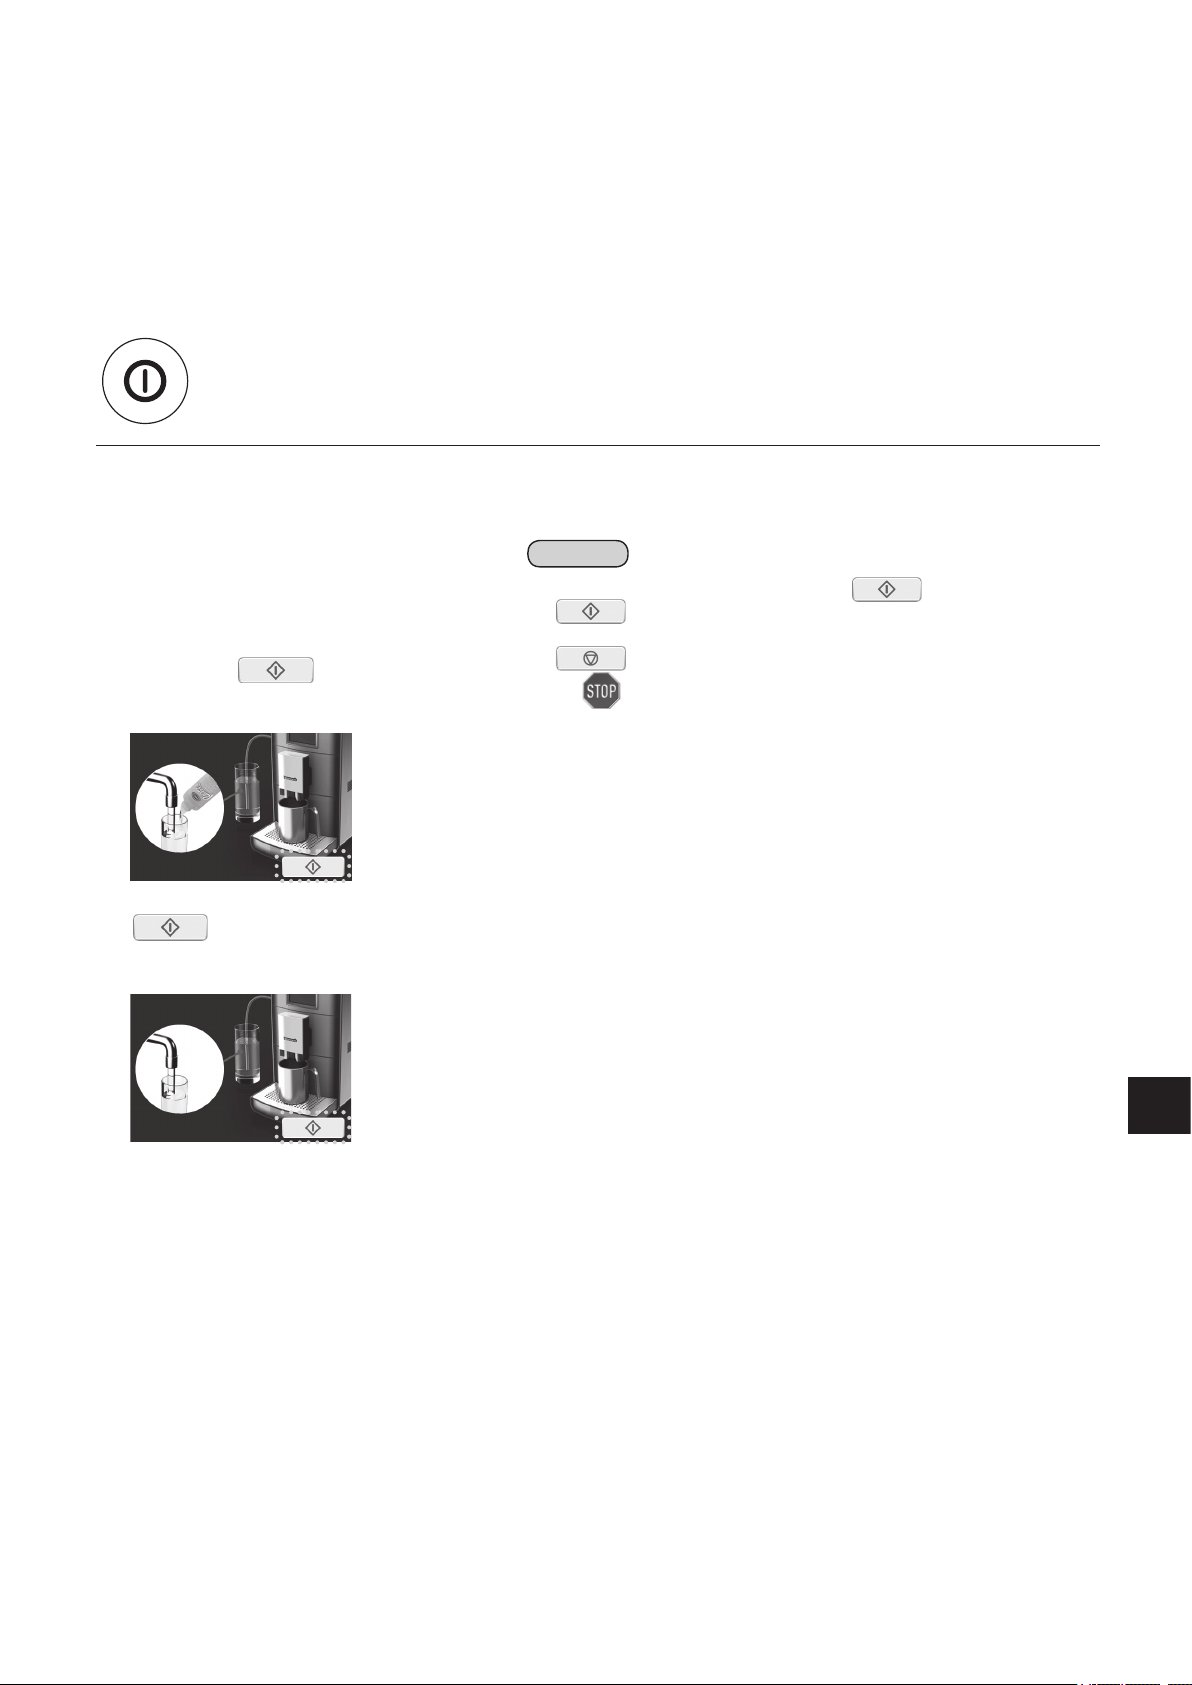
Hot water
Preparations:
(P. GB16)
Fill the water tank with water.
1
Operate rinsing cycle.
2
• Make sure the milk hose is not attached.
Select “hot water” on the main menu.
1
Then place a cup(s) under the spout.
Note
• If simple rinsing is skipped after milk menu, milk residue may mix into
the hot water. (Step 7 on P. GB23)
In that case dispense the hot water a few times.
Select the number of cups and adjust quantity.
2
• The selected cup will light up in blue.
• If adjustment is unnecessary, move on to the step 3.
• Press
or repeatedly to adjust quantity for hot water.
Note
• If is pressed, the display will return to the previous menu.
Press to start brewing.
3
Note
• If is pressed, the display will return to the main menu.
• If
stops the process.
After
O When brewing is completed, display will return to the main menu.
Wait until display shows the main menu to remove the cup(s).
Q To turn off the power after use « P. GB27
is pressed during the brewing process, it immediately
flashes, the display will return to the main menu.
GB26
Page 27
Turn off the power
After the power is turned off, the cleaning cycle starts. The cleaning cycle will vary depending on which menus have been used
whilst the espresso machine is turned on. If milk menus were used, milk system cleaning will be included.
Turn off the power.
1
• If milk system cleaning is not necessary, cleaning will start from step 3.
• If the coffee or milk menus are not prepared, it will turn off without cleaning.
Clean the milk system. (Only for milk menu)
2
Fill a glass with 250 mL of water and
1
appropriate quantity of milk system cleaner.
(Convert into the quantity per 250 mL of
water.)
Place an empty cup under the dispenser.
(Cup size > 250 mL)
Then press .
• If the milk hose is not attached, attach it to
espresso machine. (P. GB21)
Note
• Be careful with steam coming out after is pressed.
• If
turn off without running the rinsing cycle.
• If
After
• Clean the milk foamer nozzle every day that a milk menu drink is
prepared. (P. GB38)
is not pressed for 15 minutes, the espresso machine will
is pressed, it immediately stops the rinsing process.
flashes, the display will return to the previous display.
Fill the glass with clean water and press
2
to start the rinsing cycle again.
Place an empty cup under the dispenser
before starting. (Cup size > 250 mL)
GB27
Page 28
Turn off the power (Continued)
Press to start the rinsing cycle.
3
Note
• Before starting, following display shows to make actions. (Shows
30 seconds each)
empty the waste
container.
open the drip tray.
When the rinsing cycle has finished, the
power turns off. Then unplug the espresso
machine.
Espresso machine will turn off automatically in the following conditions.
• When the time set in auto shut off is reached. (P. GB30)
• No action for 15 minutes on step 2 or step 3. « Shut off without rinsing process.
In that case, the machine starts with the cleaning cycle the next time power is turned on.
• If is not pressed for 15 minutes, the espresso machine will
turn off without running the rinsing cycle.
• If
After
is pressed, it immediately stops the rinsing process.
flashes, the display will return to the previous display.
GB28
Page 29
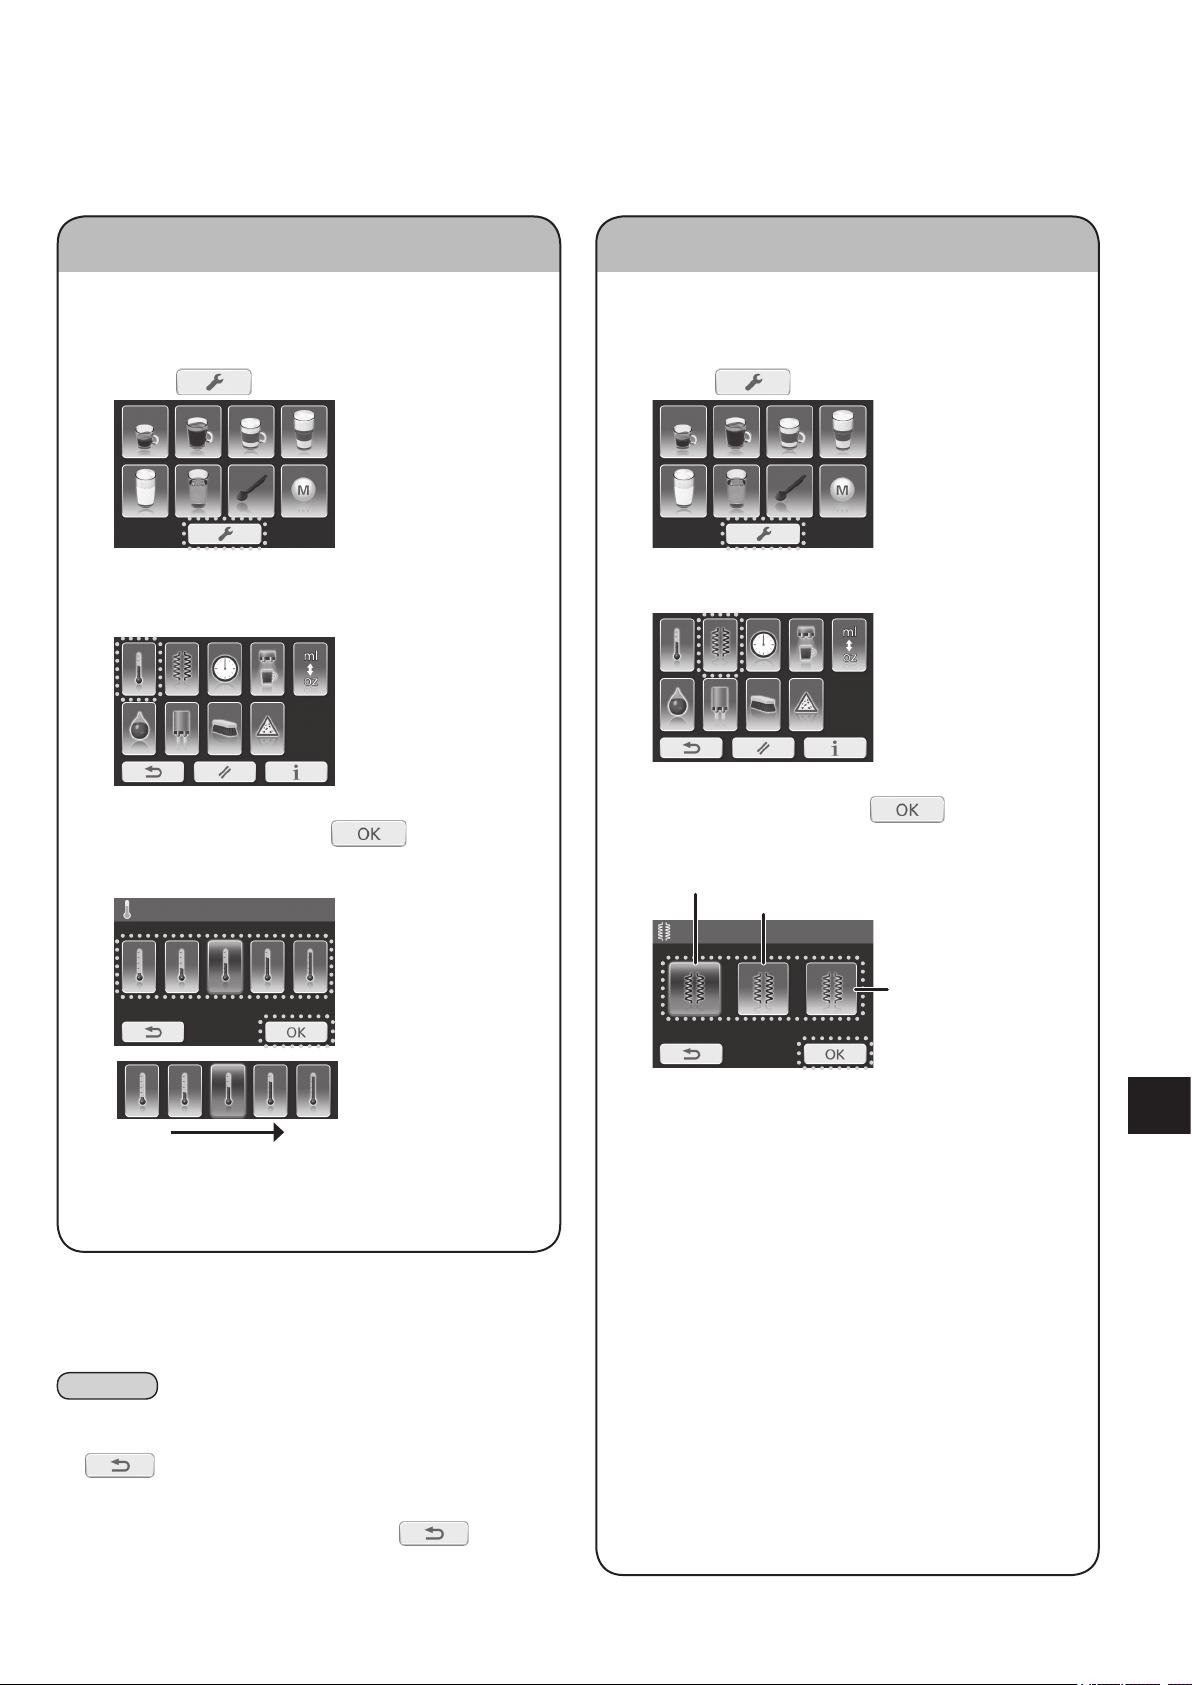
Changing the setting
Coffee temperature
Select temperature from 5 levels on your drink.
(Default setting: middle)
1
Press on the main menu.
2
Select “coffee temperature” on the user
menu.
3
Select level and press to save the
setting.
• The selected setting will light up in blue.
Low High
Heating mode
Select heater condition from 3 modes. (Default
setting: Eco mode)
1
Press on the main menu.
2
Select “heating mode” on the user menu.
3
Select level and press to save the
setting.
• The selected setting will light up in blue.
Standby
mode
Standard mode
Eco mode
(Eco mode)
There is a short wait as the heating system is only
switched on when a drink is to be brewed.
Recommended when the machine is used
occasionally.
(Standard mode)
The heating system is turned on, only for coffee and
espresso with a short waiting time. Recommended for
frequent preparation of coffee and espresso.
(Standby mode)
The heating system and additional heating are
activated permanently. Recommended for frequent
preparation of speciality coffees.
O Changing settings from the default.
Note
• If there is no action for 30 seconds, the display will return to
the main menu without saving the setting.
• If
display without saving the setting.
• When setting is completed, the display will return to the user
menu. To return to the main menu, press
is pressed, the display will return to the previous
.
GB29
Page 30

Changing the setting (Continued)
Auto off timer
Select auto off timing from 5 auto off times (1–5 hours).
(Default setting: 1 hour)
1
Press on the main menu.
2
Select “auto off timer” on the user menu.
3
Select time and press to save the
setting.
• The selected setting will light up in blue.
• The shut-off time begins after brewing the last
operation.
1 hr 5 hr
Cup illumination
Select cup illumination on the dispenser from
3 modes. (Default setting: auto)
1
Press on the main menu.
2
Select “cup illumination” on the user menu.
3
Select desired operating mode and press
to save the setting.
• The selected setting will light up in blue.
OnOff
(Off)
Cup illumination is off.
(On)
Cup illumination is always on.
(Auto)
Cup illumination is turned on and off by operation of
the espresso machine.
GB30
Page 31

ml / oz selection
1
Press on the main menu.
2
Select “ml / oz selection” on the user menu.
3
Select “ml” or “oz” and press to
save the setting.
• The selected setting will light up in blue.
*1 oz is approx. 28.41 mL
Water hardness level
1
Press on the main menu.
2
Select “water hardness level” on the user
menu.
3
Select level and press to save the
setting.
• The selected setting will light up in blue.
(e.g. for very hard)
Soft Very hard
Q To check water hardness « P. GB18
Q To purchase a new test strip « P. GB47
Note
• If there is no action for 30 seconds, the display will return to the main menu without saving the setting.
• If
• When setting is completed, the display will return to the user menu. To return to the main menu, press
is pressed, the display will return to the previous display without saving the setting.
.
GB31
Page 32

Reset
You can reset all settings to factory settings by this
mode.
1
Press on the main menu.
2
Press on the user menu.
3
Press .
Information
This displays the total cups made and setting
information for this espresso machine.
If there is a problem with the espresso machine,
the setting information will be helpful for service.
1
Press on the main menu.
2
Press on the user menu.
3
Press .
Changing the setting (Continued)
Note
GB32
• If there is no action for 30 seconds, the display will return to
the main menu without saving the setting.
• If
display without saving the setting.
• When setting is completed, the display will return to the user
menu. To return to the main menu, press
is pressed, the display will return to the previous
.
Page 33

Memory setting
Memory setting
1
Select “memory menu” in the main menu.
2
Select an available memory from the memory
menu.
• Greyed-out icons are yet to be used.
3
Select desired drink.
(e.g. for coffee)
4
Adjust the quantity and taste.
Then press to save the setting.
(e.g. for coffee)
Returns to the memory menu
Using memory setting
1
Display the memory menu as step 1 on
“Memory setting”. Then select “memory” you
wish to use.
• Blue icons can be selected.
2
Press to start brewing.
Returns to the main menu after brewing
Note
• If is pressed, the display will return to the previous
display.
GB33
Page 34

Changing memory setting
1
Display the memory menu as step 1 on
“Memory setting”. Then press .
2
Select “memory” you wish to change.
• Greyed-out icons cannot be selected.
3
Adjust the quantity and press to
save the setting.
(e.g. for coffee)
Returns to the memory menu
Deleting memory setting
1
Display the memory menu as step 1 on
“Memory setting”. Then press “delete”.
2
Select “memory” to delete and press .
• The selected setting will light up in blue.
Returns to the memory menu
Memory setting (Continued)
Note
• If is pressed, the display will return to the previous display.
GB34
Page 35

How to Clean
Main body
Wipe with a well-wrung
cloth.
Waste container/water tank
After removing the parts, wash with
diluted dish soap (neutral) and a soft
sponge.
Drip tray/Latte Macchiato plate
After removing the parts,
wash with diluted dish
soap (neutral) and a soft
sponge.
Coffee bean container/powder coffee shaft
Wipe them off with a lint-free cloth.
<Lid>
After removing the parts, wash with diluted dish soap (neutral) and a soft
sponge. Then dry them well.
Q Clean the appliance after every use.
Q Unplug and make sure that the appliance has cooled down before cleaning.
Note
• Do not use benzine, thinner, alcohol, bleach, polishing powder, metal brush or nylon brush, otherwise the surface will be
damaged.
• Do not wash in a dishwasher.
• Do not clean the appliance with pointed object such as a toothpick or pin.
To clean the inside of the door,
see pages GB36–GB38.
Dispenser (P. GB36)
Spout (P. GB36)
GB35
Page 36

Dispenser:
Clean the dispensing spouts weekly or if used intensively, clean it frequently.
Clean the dispenser from the inside and outside with warm water and a suitable
brush to remove any residue and prevent mould from forming.
<To remove>
1
Press the left side of the door
with the dispenser to open.
(P. GB11)
2
Press the dispenser upwards.
Pull the distribution hose
lightly from the inner side of
the door and pressing to the
left so that it clicks out of the
fastener. Then remove the
dispenser.
<To attach>
1
Place the dispenser in the upper position
back into the door and push it slightly
and slide it down until top of door high.
2
Pull the hose from inner side of the door opening and press it to
the right into the holder and push the funnel-shaped part of the
hose back into the collar until it fits perfectly.
Holder
Dispenser
Collar
3
Make sure top of the door and dispenser are same high, and
close the door firmly.
Cleaning when spout is clogged
1
Disassemble the dispenser. Grip and pull the loose hose end near to the
spring and pull both hose ends with the sleeve ends out of the spout.
2
Pull the sleeves out of hoses and disconnect the hoses from the
connecting piece . Pull the hose and spring together from connecting
piece .
3
Leave the parts immersed in a milk system cleaner for several hours.
Refer to the instructions on the milk system cleaner for the exact
quantity. Then rinse them thoroughly with clean water.
4
To assemble, insert both sleeve ends and hoses back together. Insert
both sleeve ends into the small spouts 1 and press them in until they
snap in properly. Push the connecting piece into the fixing slot 2. Then
push the hoses to the right and left under the frame 3.
Note
• If sleeves are inserted into large spouts, coffee is not dispensed
straight.
Correct Incorrect
How to Clean (Continued)
GB36
Page 37

Brewing unit:
Clean the brewing unit weekly or if used intensively, clean it frequently.
1
Press the left side of the door with the dispenser to open.
2
Remove the waste container by pressing the container and pulling it out of
the espresso machine.
3
Grip the lower front part of the brewing unit and pull it out to the front. Use
your other hand to stop it from falling out.
4
Turn the brewing unit upside down and clean the opened brewing unit
under warm running water with a brush, then shake it lightly. In particular,
the stainless steel filter must be rinsed out well to remove any coffee
residue.
• To clean the two stainless steel filters, open the brewing unit, turn it upside down and fold
down the ejector. If the brewing unit cannot be opened because it is blocked, refer to
page GB46 (U10) on how to open it.
Stainless
steel filter
Recommendation:
Soak the brewing unit for approximately 30 minutes in lukewarm water containing
a diluted dish soap (neutral) and rinse well.
5
After the brewing unit is dried off well, insert it into the guide grooves and
push it completely into the espresso machine.
6
Place the waste container into the espresso machine and close the door.
GB37
Page 38

Milk foamer nozzle:
Clean the milk foamer nozzle every day that a milk menu drink is prepared.
1
Press the left side of the door with the dispenser to open.
• When opening and closing the door, the dispenser should be located at the
upper position, otherwise the milk hose on the inside will be jammed.
2
Pull the milk hose out of the milk foamer. Then fold the lever on
the milk foamer upwards and pull the milk foamer out towards
you.
Lever
3
Open the cap from the milk foamer. Then remove the milk foamer
nozzle from the milk foamer by inserting the rounded end of the
measuring spoon into the slot of the milk foamer nozzle and
turning 45° to pull it out. The nozzle is lifted up slightly during
turning, so that it can be removed more easily.
Cap
Milk foamer nozzle
4
Clean the milk foamer nozzle with a thin needle.
• Do not use a metal brush or nylon brush.
5
Mix 250 mL of water with 7.5–15 mL of milk system cleaner.
6
Leave all parts of the milk foamer in the cleaner solution for
5 hours or over night and rinse well.
7
Use the brush of the measuring spoon to clean all parts of the
milk foamer nozzle. Make sure that all vents of the milk foamer
and its nozzle are cleaned with brush and rinse well.
8
Put all parts back together by reversing steps 1–3.
How to Clean (Continued)
GB38
Page 39

Cleaning Cycle:
Use this cycle occasionally and/or when the display shows .
This cleaning programme enables intensive cleaning of inaccessible areas. This programme takes approx. 8 minutes and should
not be interrupted. When display shows
, press and follow steps from 3.
Press on the main menu.
1
Select “cleaning programme”.
2
Note
• If is pressed, the display will return to the previous display.
Fill the water tank with water, then press .
3
Note
• If is pressed, the display will return to the main menu.
Place the cleaning tablet into the powder coffee shaft and close the lids,
4
then press
.
GB39
Page 40

How to Clean (Continued)
Press to start cleaning cycle.
5
• Empty the drip tray before starting cleaning cycle.
• The cleaning water is collected in the drip tray. Alternatively, you can
place a container (> 250 mL) under the spout.
• In the event of power failure during the cleaning programme, the
programme has to be restarted.
• If
continue the cleaning cycle, press
• Information clock is turning during cleaning.
Note
is pressed during cleaning, the process will be paused. To
.
Empty the drip tray or container
when the display indicates that
the drip tray must be emptied.
• When cleaning is completed, information clock will
be full bars, then return to the main menu.
GB40
Page 41

Milk system cleaning:
Use this programme when quality of foam is low and when milk residue gets into coffee, espresso or hot water
during espresso machine use.
Press on the main menu.
1
Select “Milk system cleaning programme”.
2
Note
• If is pressed, the display will return to the main menu.
Fill a glass with 250 mL of water and 7.5–15 mL of milk system cleaner.
3
Place an empty cup under the dispenser. (Cup size > 250 mL) Then press
to start rinsing cycle for milk system.
• If the milk hose is not attached, attach it to espresso machine. (P. GB21)
Note
• If is pressed , it immediately stops the
rinsing process.
After flashes, the display will show the
following display.
Fill the glass with clean water and press to start the rinsing cycle
4
again. Place an empty cup under the dispenser before starting. (Cup size >
250 mL)
Note
• If is pressed, it immediately stops the rinsing process.
After
Display will return to the main menu when
the rinsing cycle is completed.
flashes, the display will return to the previous display.
GB41
Page 42

Decalcification cycle:
Use this cycle occasionally and/or when the display shows .
How to Clean (Continued)
This decalcification cycle enables simple and effective descaling. This programme runs in 2 phases and it takes approximately
11 minutes and should not be interrupted. When display shows
, press and follow steps from 3.
Press on the main menu.
1
Select “descaling programme”.
2
Note
• If is pressed, the display will return to the previous display.
(First phase)
Fill the water tank with 250 mL of water and add 125 mL of descaling
3
agent, then press
.
Note
• If is pressed, the display will return to the previous display.
Press to start decalcification cycle. (Approx. 9 min.)
4
• Empty the drip tray before starting the cleaning cycle.
Note
• If is pressed during descaling, the
display indicates to empty the drip tray. To
continue the descaling cycle, press
.
GB42
Page 43

Empty the drip tray and press .
5
(Second phase)
Dispose of the water in the water tank and rinse it thoroughly. Press
6
process. (Approx. 2 min.)
. Then fill it with clean water and press to continue the
Note
• If is pressed during descaling, the
display indicates to empty the drip tray. To
continue the descaling cycle, press
.
Press .
7
Note
• If is pressed during descaling, the
display indicates to empty the drip tray. To
continue the descaling cycle, press
Press to return the main menu.
8
• Empty the drip tray.
Note
• The cleaning water is collected in the drip tray. Empty the drip tray or container when the display indicates that the drip tray must
be emptied.
• In the event of power failure during the descaling cycle, the programme has to be restarted.
• If
is pressed during descaling, the process will be paused. To continue the descaling cycle, press .
.
GB43
Page 44

Troubleshooting
Problem Cause and Action
O Temperature setting is low. (P. GB29)
Drinks are not hot
enough.
Drinks are too weak or
strong.
O Cups are too cold.
«Warm up cups with hot water.
O Room temperature is too cold.
O It is first time use of the espresso machine or shortly after changing coffee beans.
«Wait for a few times brewing to get desire taste.
[Powder coffee]
O Not enough or too much coffee powder is being used.
«Measure coffee properly with measuring spoon provided. (Max: 1 level of
measuring spoon)
«Try different kinds of coffee powder.
[Coffee beans]
O The settings are not properly adjusted.
«Try to change setting of ground coffee quantity. (P. GB19, GB22)
«Change grinding fineness. (P. GB12)
«Try different kinds of coffee beans.
O Coffee bean type or grinding fineness setting is changed.
«As there are remaining ground coffee beans in the espresso machine, it will take
a few cups for the new beans to come through.
Abnormal loud noise
during grinding.
No milk foam or milk is
not dispensed.
Low quality foam.
Latte Macchiato is not
three layers.
O The grinding mechanism is clogged with foreign matter.
«Contact an authorised service centre to have the espresso machine inspected.
O The distribution hose or milk hose is not connected correctly.
«Check the distribution hose or milk hose connection. (P. GB21, GB36)
O The milk foamer is not inserted correctly.
«Fit the milk foamer correctly. (P. GB38)
O The milk foamer cap is open.
«Check the milk foamer cap. (P. GB38)
O The milk hose bent.
«Reinstall the milk hose. (P. GB21)
O The milk foamer is clogged.
«Clean the milk foamer nozzle by soaking. (Step 6 on P. GB38)
O The steam outlet of the espresso machine is blocked.
«Descale the espresso machine. (P. GB42)
O Milk is too warm, too old or too high or low in fat.
«Use fresh cold milk and/or try use different ratio in fat.
O The milk foam nozzle is clogged.
«Clean the milk foamer nozzle. (P. GB38)
O The milk foamer is not clean.
«Clean the milk foamer. (P. GB38)
O The steam outlet of the espresso machine is blocked.
«Descale the espresso machine. (P. GB42)
Display shows “Refill
with water” even
though the water tank
is full.
“Refill with water”
does not appear in the
display despite an
empty water tank.
GB44
O There is air in the water system.
«Dispense a little hot water. (P. GB26)
O The water flow system is clogged.
«Descale the espresso machine. (P. GB42)
O Too much moisture on the water tank.
«Remove the water tank and dry it off thoroughly.
Page 45

Problem Cause and Action
“Empty the waste
container” displayed
after empty the waste
container.
Coffee dispensing too
slow.
Water in the waste
container.
The espresso machine
turns off after rinsing
or dispensing coffee.
O Waste container was emptied while the espresso machine was switched off.
«Empty the waste container only when the espresso machine is switched on.
O When confirmation display is shown for “Empty the waste container”,
was pressed.
«Press
container”.
O Grinding fineness set too fine.
«Set coarser grinding fineness.
O Grinding quantity set too high.
«Set ground coffee quantity lower.
O The water flow system is clogged.
«Run the descaling programme. (P. GB42)
O Coffee powder is too fine or too much has been used.
«Use coarser coffee powder or use less coffee powder. (Max: 1 level of
measuring spoon)
O Water leaks into the waste container during each rinsing process.
«No remedy necessary. (Technical reasons.)
O Brewing unit is blocked or maladjusted.
«Adjust the brewing unit. (P. GB46)
O The pressure in the brewing unit is too high.
«Remove and clean the brewing unit. If the brewing unit is closed, open before
cleaning. Unscrew the brewing unit at the black tooth pin. (P. GB46)
when confirmation display is shown for “Empty the waste
The espresso machine
cannot be turned on.
The coffee dispensing
is very uneven or only
one-sided.
Only hot water is
dispensing on coffee
menu.
Hot water is not
dispensing.
The appliance is not
working well.
O The mains plug is not plugged in.
«Plug in the mains plug.
O The brewing unit is not set.
«Set the brewing unit properly. (P. GB37)
O Brewing unit was not pushed in completely.
«Push the brewing unit in until it stops. (P. GB37)
O The spout is clogged or blocked by foreign matter (e.g.: coffee bean or similar).
«Pull the coffee spout upwards and clean the inside or remove the foreign matter
(e.g.: coffee bean).
O The sleeve with distribution hose inside of dispenser is inserted into the coffee
outlet.
«Insert the sleeve with distribution hose correctly. (P. GB36)
O Coffee powder is clogging the powder coffee shaft.
«Turn the power off and push any coffee powder down into the powder coffee
shaft using a stick.
O The milk foamer is not set.
«Set the milk foamer. (P. GB38)
O Turn off the appliance and wait approx. 5 minutes. Turn the appliance back on and
if problem remains, contact the authorised Panasonic service centre for inspection.
Milk is dripping from
spouts.
O The surface of milk is higher than the spouts position.
«Pull out the milk hose from the milk package.
GB45
Page 46

Troubleshooting (Continued)
Problem Cause and Action
Display shows “Descaling
programme” or “Cleaning
the milk system” when
power is turned on.
Display shows “Refill
with coffee beans”
even though there are
sufficient coffee beans.
O The espresso machine is turned off without cleaning last time of use.
«Clean the espresso machine before use. (P. GB41, GB42)
O If oily coffee beans are used, it may be difficult for them to flow into the grinder.
«Feed them towards the grinder or try other types of coffee beans.
Coffee crema overflows
O Depending on the type of beans, there may be a lot of crema. (It is not a
from the rear of the spouts.
Error display
Display Cause and Action
If this message appears on the display,
1
Turn off the espresso machine.
2
H01–H08
U10
Wait until the espresso machine has cooled down completely then turn the power on again.
3
If the message is displayed again, an error has occurred. Contact an authorised service
centre for inspection.
O Brewing unit is blocked. (Technical reason)
«Pull out the brewing unit then, using the setting function of the measuring spoon, loosen
it at the rear. To loosen, push the toothed opening on the measuring spoon onto the pin
and turn the pin completely at least 3 times. Then thoroughly rinse out the brewing unit.
malfunction.)
U11
U12
U13
U14
GB46
O Over filled coffee powder.
«Clean the brewing unit. (P. GB37)
O The adapter without filter cartridge is still in the water tank.
«Remove the adapter from the water tank.
O The water tank has overflowed or is too wet.
«Dry the water tank and the water tank compartment thoroughly.
O Grinding fineness set too fine or coffee powder used is too fine.
«Clean the brewing unit.
«Set grinding fineness coarser or use a different, coarser coffee powder.
O The room temperature is too low or the espresso machine is too cold.
«Use the espresso machine in the place above 10 °C and wait until it warms up to room
temperature.
O The temperature inside of the espresso machine is high with continued use.
1
Wait until the espresso machine has cooled down completely then turn the power on again.
2
If the message is displayed again, an error has occurred. Contact an authorised service
centre for inspection.
Page 47

Replacement parts
Part name Part number
Bean container extension ACK05-155U
Latte Macchiato plate ACK06-155
Measuring spoon ACK10-155U
Milk hose ACK08-155
Adapter for filter cartridge ACK07-155U
Test strip ACK11-155
Cleaning tablets ACK12-155U
Descaling agent ACK13-155U
Milk system cleaner ACK14-155
Quick reference ACZ78-155U
Milk foamer unit ACW33-155U
Specifications
NC-ZA1
Power supply
Power consumption 1550 W
Max. amount of water 1.4 L (49.3 oz)
Dimensions (W × D × H) (approx.) 19.5 × 41.0 × 33.5 cm (7.7 × 16.1 × 13.2 inches)
Mass (approx.) 10.3 kg (22.7 lb)
Length of the mains lead (approx.) 115 cm (45.3 inches)
Information on Disposal for Users of Waste Electrical & Electronic Equipment
(private households)
This symbol on the products and/or accompanying documents means that used electrical and electronic
products should not be mixed with general household waste.
For proper treatment, recovery and recycling, please take these products to designated collection points, where they
will be accepted on a free of charge basis. Alternatively, in some countries you may be able to return your products
to your local retailer upon the purchase of an equivalent new product.
Disposing of this product correctly will help to save valuable resources and prevent any potential
negative effects on human health and the environment which could otherwise arise from inappropriate waste
handling. Please contact your local authority for further details of your nearest designated collection point.
Penalties may be applicable for incorrect disposal of this waste, in accordance with national legislation.
220 – 240 V
50 – 60 Hz
For business users in the European Union
If you wish to discard electrical and electronic equipment, please contact your dealer or supplier for further
information.
Information on Disposal in other Countries outside the European Union
This symbol is only valid in the European Union.
If you wish to discard this product, please contact your local authorities or dealer and ask for the correct method of
disposal.
GB47
Page 48

Inhaltsverzeichnis Seite
Sicherheitsvorkehrungen DE3
Wichtige Informationen DE8
Teilenamen und Bedienungsanleitung DE9
Display DE11
Geschmackseinstellung DE13
Vor dem Gebrauch DE14
Espresso/Kaffee DE17
Cappuccino/Latte Macchiato/Heißmilch DE19
Kaffeepulverzubereitung DE22
Heißwasser DE24
Schalten Sie den Strom aus DE25
Änderung der Einstellung DE27
Speichereinstellung DE31
Reinigung DE33
Fehlerbehebung DE42
Fehler-Display DE44
Austauschteile DE45
Technische Daten DE45
Wir danken Ihnen für den Kauf des Panasonic-Produkts.
• Dieses Produkt ist nur für den Haushaltsgebrauch vorgesehen.
• Bitte lesen Sie sorgfältig diese Anleitung, um einen korrekten und sicheren Betrieb der Maschine zu gewährleisten.
• Bevor Sie dieses Produkt verwenden, lesen Sie sich bitte aufmerksam die “Sicherheitsvorkehrungen” (Seite
DE3–DE8) durch.
• Bitte bewahren Sie diese Bedienungsanleitung für eine spätere Verwendung auf.
DE2
Page 49

Bitte befolgen Sie diese
Sicherheitsvorkehrungen
Um Unfälle oder Verletzungen des Benutzers und anderer Personen
sowie Sachschäden zu vermeiden, befolgen Sie bitte die folgenden
Anweisungen.
Q Die folgenden Symbole weisen auf das mögliche Ausmaß der
Folgen unsachgemäßer Bedienung hin.
Anweisungen.
WARNUNG:
ACHTUNG:
Q Die Symbole werden wie folgt kategorisiert und erläutert:
Dieses Symbol weist auf ein Verbot hin.
Dieses Symbol weist auf eine erforderliche Anweisung hin, die befolgt werden muss.
Weist auf die Möglichkeit schwerer Verletzungen oder Tod hin.
Weist auf die Möglichkeit von Verletzungen oder Sachschäden hin.
WARNUNG
O
Beschädigen Sie nicht das Netzkabel
oder den Netzstecker.
Sie dürfen auf keinen Fall das Netzkabel bzw.
den Netzstecker modifizieren, auf oder an
Heizkörper legen, knicken, verdrehen, über
scharfe Kanten ziehen, durch schwere
Gegenstände quetschen oder das Gerät am
Netzkabel
Netzstecker
Netzkabel transportieren.
(Es besteht Brand- und Stromschlaggefahr durch Kurzschluss.)
OVerwenden Sie das Gerät nicht, wenn das Netzkabel oder der
Netzstecker beschädigt ist bzw. der Netzstecker nur lose in
der Steckdose steckt.
(Es besteht Brand- und Stromschlaggefahr durch Kurzschluss.)
« Wenn das Netzkabel beschädigt ist, muss es durch den
Hersteller, seinen Kundendienst oder ähnlich qualifizierte
Personen ausgetauscht werden, um ein Risiko zu vermeiden.
OLösen und befestigen Sie den Netzstecker nicht mit nassen
Händen.
(Es besteht Stromschlaggefahr.)
• Achten Sie stets darauf, dass Ihre Hände trocken sind, bevor Sie
den Netzstecker anfassen oder das Gerät einschalten.
DE3
Page 50

Sicherheitsvorkehrungen
WARNUNG
OPrüfen Sie vor Inbetriebnahme, ob die Spannungsangabe auf
dem Gerät mit der örtlichen Netzspannung übereinstimmt.
(Es besteht Brand- und Stromschlaggefahr.)
Stecken Sie auch keine anderen Geräte in dieselbe Steckdose, um
Überhitzung der Leitungen zu vermeiden. Überprüfen Sie auf alle Fälle,
wenn Sie mehrere Netzstecker anschließen, dass die Gesamtleistung
die Nennleistung der Netzsteckdose nicht überschreitet. Der Gebrauch
von Verlängerungskabeln wird nicht empfohlen.
OStecken Sie den Netzstecker fest in die Steckdose.
Andernfalls könnte es aufgrund der Hitze rund um den Netzstecker
(
zum elektrischen Stromschlag oder sogar zu einem Brand kommen.
• Stellen Sie das Gerät so auf, dass der Netzstecker leicht
Bitte befolgen Sie diese
Anweisungen.
)
herausgezogen werden kann.
OReinigen Sie den Netzstecker regelmäßig.
Staub und/oder Feuchtigkeit auf dem Netzstecker können zu
verminderter Isolation führen, was wiederum einen Brand zur
(
Folge haben kann.
« Ziehen Sie den Netzstecker aus der Steckdose und reinigen Sie
ihn mit einem trockenen Tuch.
O Machen Sie das Netzkabel für Kinder unzugänglich. Lassen Sie das
Netzkabel nicht über die Tischkante oder Arbeitsfläche hängen.
(Es besteht Verbrennungs-, Verletzungs- und Stromschlaggefahr.)
OTauchen Sie das Gerät nicht in Wasser und bespritzen Sie es
auch nicht damit.
(Es besteht Stromschlag- und Brandgefahr durch Kurzschluss.)
OSie dürfen das Gerät weder auseinanderbauen, noch
reparieren oder modifizieren.
)
DE4
(Es besteht Brand-, Stromschlag- und Verletzungsgefahr.)
« Wenden Sie sich an den Verkäufer oder an ein Panasonic-
Servicecenter.
OBerühren Sie keine Flächen, wo heißer Dampf austreten kann
und halten Sie Abstand zu ihrem Gesicht.
(Es besteht Verbrennungs- und Verletzungsgefahr.)
• Machen Sie das Gerät insbesondere für Kinder und Kleinkinder
unzugänglich.
Page 51

WARNUNG
ODieses Gerät darf von Kindern, die das achte Lebensjahr erreicht
haben, unter Aufsicht bedient werden, vorausgesetzt es wurde
für eine angemessene Anleitung zum sicheren Gebrauch und
Aufklärung über die möglichen Gefahren bei der Benutzung des
Geräts gesorgt. Die Reinigung und Wartung des Geräts darf nicht
von Kindern unter 8 Jahren und ohne Aufsicht durchgeführt
werden. Bewahren Sie das Gerät und das dazugehörige Netzkabel
außer Reichweite von Kindern unter 8 Jahren auf.
(Es besteht Verbrennungs-, Verletzungs- und Stromschlaggefahr.)
OMachen Sie das Gerät und das Reinigungsmittel für Kinder
stets unzugänglich.
(Es besteht Verbrennungs- und Verletzungsgefahr.)
• Kindern sind die Gefahren, die vom falschen Gebrauch eines
Gerätes ausgehen, nicht bewusst.
OSollte das Gerät nicht mehr ordnungsgemäß funktionieren,
verwenden Sie es nicht mehr und ziehen Sie den Netzstecker
aus der Steckdose.
Es besteht die Gefahr von Rauchentwicklung, sowie Brand-,
(
Stromschlag- und Verbrennungsgefahr.
z.B. bei Fehlfunktionen oder Ausfall
• Der Netzstecker und das Netzkabel werden ungewöhnlich heiß.
• Das Netzkabel ist beschädigt oder die Stromversorgung ist
ausgefallen.
• Das Gehäuse ist deformiert, hat sichtbare Schäden oder wird
ungewöhnlich heiß.
• Wasser läuft von innen aus dem Gehäuse heraus.
• Das Gerät verhält sich in irgendeiner Weise abnormal.
« Trennen Sie sofort das Gerät vom Netz und wenden Sie sich an
den Verkäufer des Gerätes oder an ein PanasonicServicecenter, um es überprüfen oder reparieren zu lassen.
OLassen Sie Kleinkinder und Kinder nicht mit dem
Verpackungsmaterial spielen.
)
(Dies kann zu Erstickungen führen.)
OÖffnen Sie während der Kaffeezubereitung nicht den
Wassertank, Kaffeeauslauf oder Schale.
(Es besteht Verbrennungsgefahr.)
DE5
Page 52

Sicherheitsvorkehrungen
ACHTUNG
OVerwenden Sie das Gerät ausschließlich zu den in dieser
Anleitung beschriebenen Zwecken.
(Es besteht Verbrennungs- und Verletzungsgefahr.)
• Panasonic übernimmt keine Verantwortung, wenn das Gerät
falsch verwendet oder diese Anleitung nicht befolgt wird.
OStecken Sie keine Gegenstände in die Schlitze des Geräts.
(Es besteht Stromschlaggefahr.)
• Insbesondere keine Metallgegenstände wie z.B. Stecknadeln oder
Drähte.
OBerühren Sie nicht die heiße Oberfläche wie Kaffeetüllen
während der Apparat in Betrieb ist bzw. kurz danach.
Bitte befolgen Sie diese
Anweisungen.
(Es besteht Verbrennungsgefahr.)
• Fassen Sie das Gerät niemals mit nassen Händen an.
ODas Gerät darf an den folgenden Orten nicht verwendet werde.
• Auf unebenen Oberflächen, auf Teppichen, nicht wasserfesten
Oberflächen oder Tischtüchern etc.
(Es besteht Brand- und Verletzungsgefahr.)
• In Umgebungen, an denen es nass werden kann bzw. in der Nähe
von Wärmequellen.
(Dies könnte zu Stromschlag oder elektrischen Leckströmen führen.)
• In Umgebungen, die mit Wasser gefüllt werden, wie z.B.
Badewannen, Spülen oder anderen Behältern.
(Dies könnte zu Stromschlag oder elektrischen Leckströmen führen.)
• In der Nähe einer Wand oder von Möbeln.
(Es besteht Verfärbungs- und Verformungsgefahr.)
• An Stellen, die schon durch leichte Hitze beschädigt werden
können.
(Es besteht Verfärbungs- und Verformungsgefahr.)
• Orte, die nicht stark genug sind, das Gerät zu halten.
(Es kann Schäden oder Verletzungen verursachen.)
• In geschlossenen Räumen wie zum Beispiel ein eingebauter
Schrank.
(Es besteht Verfärbungs- und Verformungsgefahr.)
DE6
Page 53

ACHTUNG
OEntfernen Sie die Tasse oder Kanne nicht während der
Kaffeezubereitung.
(Es besteht Verbrennungsgefahr.)
OTransportieren Sie das Gerät nicht am Kaffeeauslauf oder der
Tropfschale.
(Dies kann zu Verletzungen führen.)
OFassen Sie nicht in das Mahlgerät.
(Dies kann zu Verletzungen führen.)
OHalten Sie die Kaffevollautomat nicht am Netzkabel fest.
(Dies kann zu einem Brand oder elektrischem Schlag führen.)
OStellen Sie sicher, dass Sie beim Herausziehen des
Netzsteckers den Netzstecker festhalten. Ziehen Sie niemals
am Netzkabel selbst.
Andernfalls besteht Stromschlag- und Brandgefahr durch
(
Kurzschluss.
OSchalten Sie das Gerät immer aus und ziehen Sie den
Netzstecker aus der Steckdose, wenn Sie es nicht verwenden
bzw. bevor Sie es bewegen oder reinigen (außer
Reinigungsfunktion).
Andernfalls besteht Stromschlag- und Brandgefahr durch
(
Kriechstrom.
OStellen Sie das Gerät (einschließlich Tropfschale und Latte-
Macchiato-Platte) auf eine feste, trockene, saubere, ebene und
hitzebeständige Oberfläche.
(Andernfalls kann dies zu Brand oder Verletzung führen.)
OGeben Sie während des Betriebs darauf Acht, nicht über das
Netzkabel zu stolpern oder sich darin zu verfangen.
(Andernfalls kann dies zu Brand oder Verletzung führen.)
)
)
ODie Dampfabzugsöffungen dürfen während der Verwendung
nicht berührt, blockiert oder abgedeckt werden.
(Es kann sonst zu einer Verfärbung.)
• Achten Sie insbesondere auf Kinder.
DE7
Page 54

Sicherheitsvorkehrungen
ACHTUNG
OBevor Sie das Gerät reinigen oder verstauen, ziehen Sie den
Netzstecker aus der Steckdose und lassen Sie es vollständig
abkühlen.
(Es besteht Verbrennungsgefahr.)
OReinigen Sie das Gerät nach jedem Gebrauch.
Ansonsten kann es zu Verbrennungen durch Überlaufen kommen,
(
indem der Filterhalter verstopft wird.
OVermeiden Sie den Kontakt auf der Haut oder den Augen
während Sie das Reinigungsmittel verwenden.
(Dies kann zu Verletzungen führen.)
« Falls es in Kontakt mit der Haut oder den Augen kommt, spülen
Bitte befolgen Sie diese
Anweisungen.
)
Sie es gründlich mit Wasser aus und suchen Sie einen Arzt auf.
OWenn das Reinigungsmittel in Kontakt mit sensiblen
Oberflächen kommt, säubern Sie sofort alle Spritzer.
(Es kann sonst zu einer Verfärbung kommen.)
Wichtige Informationen
• Füllen Sie den Wassertank nicht mit Milch (einschließlich Soja- und
Reismilch), Mineralwasser, Sprudelwasser oder Heißwasser usw.
Verwenden Sie nur Leitungswasser.
(Dies kann zu einer Funktionsstörung führen.)
• Verwenden Sie die Maschine nicht im Freien.
• Füllen Sie keinen Kaffee in den Kaffeepulverschacht, wenn das Gerät
nicht eingeschaltet ist.
• Stellen Sie die Mahlstufe nur ein, während die Kaffeebohnen gemahlen
werden. (S. DE10)
• Füllen Sie den Kaffeebohnenbehälter nicht mit gefriergetrockneten,
kandierten, karamellisierten oder öligen Kaffeebohnen oder Wasser.
• Verwenden Sie kein anderes Zubehör und Reinigungsmittel als das was
mitgeliefert wurde oder vom Hersteller empfohlen wurde. (S. DE45)
• Wenn Sie das Gerät längere Zeit unbeaufsichtigt lassen, stellen Sie den
Strom aus.
• Ort, an dem die Temperatur unter den Gefrierpunkt absinken kann.
(Dies kann zu einer Funktionsstörung führen.)
DE8
Page 55

Teilenamen und
Filterkartusche
Sie sollte nur zusammen mit der BRITA
INTENZA Wasserfilterkartusche verwendet
werden; Kartusche wird nicht standardmäßig
mitgeliefert. Kartuschen erhalten Sie bei
Ihrem BRITA Kundendienst: www.brita.net
(Verfügbarkeit variiert je nach Land.)
Messlöffel
(
mit Reinigungsbürste
und Einstellungsfunktion
Adapter
(für Filterkartusche)
Teststreifen
(
zur Feststellung der
Wasserhärte
Bohnenbehälter-
Erweiterung (S. DE10)
Reinigungstabletten
Entkalkungsmittel
Milchschlauch
Milchsystemreiniger
Schnellübersicht
)
)
Bedienungsanleitung
Q Waschen Sie alle abnehmbaren Teile, bevor Sie das Gerät zum ersten Mal verwenden oder wenn Sie es eine Weile nicht
benutzt haben. (S. DE33)
Bezüglich der Teilenamen innen an der Zugangsklappe schauen Sie sich “Reinigung” auf den Seiten DE34–DE36 an.
Schnellübersicht (Eingefügt)
Kaffeebohnenbehälter (S. DE10)
An-/Aus-Taste
Display (S. DE11, DE12)
Zugangsklappe
Latte-Macchiato-Platte
•
Schließen Sie die Tropfschale,
indem Sie auf sie drücken und
platzieren Sie die Latte-MacchiatoPlatte so, dass sie einrastet.
Kaffeeauslauf
Tresterbehälter
Zubehör
Tülle
Dampfentlüftung
Netzkabel
Netzstecker
* Steckerform kann von
der Abbildung
abweichen.
Wassertank (S. DE10)
Tropfschale
Edelstahlplatte
Stellen Sie die Edelstahlplatte
(abgerundete Kante nach oben) auf die
Tropfschale.
Drücken Sie sie in die Kaffevollautomat,
bis sie einrasten.
Öffnen Sie die Tropfschale, indem Sie
darauf drücken.
Wird separat verkauft
DE9
Page 56

Teilenamen und
Kaffeebohnenbehälter
Kaffeepulverschacht
Mahlgradeinstellungshebel
Kaffeebohnenbehälterdeckel
Kaffeepulverschachtdeckel
Einstellung des Mahlgrades
Stellen Sie den Mahlgradeinstellungshebel auf die Feinheit ein, die Sie
wünschen. Stellen Sie die Mahlstärke nur ein, wenn das Mahlwerk läuft.
Berühren Sie während des Mahlvorgangs nicht die Kaffeebohnen und
stecken Sie nicht Ihre Finger in das Mahlwerk. Schließen Sie den
Kaffeebohnenbehälterdeckel, nachdem Sie den Hebel eingestellt haben.
Fein gemahlen für einen “intensiven Geschmack”.
Verwenden Sie diese Einstellung für leicht
geröstete Kaffeebohnen.
Mittelstark gemahlen für einen “normalen Geschmack”.
Verwenden Sie diese Einstellung für mittelstark
geröstete Kaffeebohnen.
Grob gemahlen für einen “milden Geschmack”.
Verwenden Sie diese Einstellung für dunkel
geröstete Kaffeebohnen.
• Der gewünschte Geschmack wird nicht sofort erreicht.
Der gewünschte Geschmack wird nach wiederholtem Brühen
erreicht.
Anbringen der Bohnenbehälter-Erweiterung
O Wenn Sie die Kapazität des Standardkaffeebohnenbehälters von 125 g auf 250 g erhöhen möchten, gehen
Sie wie folgt vor.
1
Entfernen Sie den Kaffeebohnenbehälterdeckel aus der Halterung.
2
Entfernen Sie des Deckel des Kaffeepulverschachts, indem Sie ihn aufrecht stellen und dann
aus seiner Halterung ziehen.
3
Stellen Sie die Bohnenbehälter-Erweiterung auf den Kaffeebohnenbehälter.
Achten Sie darauf, dass die Mahlgradeinstellungshebel jeweils alle auf der gleichen Position
stehen.
4
Bringen Sie den Kaffeepulverschachtdeckel an und schließen Sie den Kaffeebohnenbehälterdeckel.
Wassertank
Hilft dabei, sich an die Austauschzeit der
Filterkartusche zu erinnern.
IN (EIN): Zeit, in der die Filterkartusche
eingesetzt wurde.
OUT (AUS): Zeit, die Filterkartusche
auszutauschen.
1
Bringen Sie den Adapter an der
Filterkartusche an.
2
Setzen Sie die Filterkartusche mit
dem Adapter in die Führungen ein,
wie abgebildet.
* Wird separat verkauft
Hinweis
• Bitte verwenden Sie ausschließlich Filterkartuschen von BRITA
INTENZA.
Generische Filterkartuschen, ähnlich wie INTENZA, anderer
Hersteller, sind für diesen Kaffeevollautomat ungeeignet.
Filterzeitsteuerung
Wassertankdeckel Filterkartusche*
Adapter
Klappen Sie zum Öffnen
den Deckel hoch.
Bedienungsanleitung
(Fortsetzung)
DE10
Page 57

Display
Hauptmenü
Espresso (S. DE17)
Kaffee (S. DE17)
Cappuccino* (S. DE19)
Latte Macchiato* (S. DE19)
Heißmilch/Schaum* (S. DE19)
Heißwasser (S. DE24)
Kaffeepulverzubereitung (S. DE22)
Speichermenü (S. DE31)
Benutzermenü
Kaffeetemperatur (S. DE27)
Heizmodus (S. DE27)
Auto-Aus-Timer (S. DE28)
Tassenbeleuchtung (S. DE28)
ml/oz-Auswahl (S. DE29)
Wasserhärtestufe (S. DE29)
Milchsystem Reinigungsprogramm (S. DE39)
Reinigungsprogramm (S. DE37)
Entkalkungsprogramm (S. DE40)
Einstellung Zurückkehren Starten
OK
Zurücksetzen
(S. DE30)
Stopp
Speichern Löschen
Informationen
(S. DE30)
Menü-Display
• Wenn 1 Minute lang nichts passiert, wird das Display dunkel.
*Milchmenü
Betriebssymbol
DE11
Page 58

Display (Fortsetzung)
Informations-Display
Folgende Anzeigen erscheinen während des Betriebs.
Mit Wasser auffüllen
Nachdem der Wassertank ausgetauscht wurde dauert es etwa 5 Sekunden, um dies zu erkennen.
Um abzusichern, dass Wasser für eine Zubereitung vorhanden ist, zeigt das Display an, ob noch Wasser
vorhanden ist.
Tresterbehälter entleeren
Entleeren Sie ihn nur, wenn die Kaffevollautomat eingeschaltet ist.
Ansonsten wird es wieder angezeigt, wenn das nächste Mal der Strom eingeschaltet wird.
Öffnen Sie die Tropfschale Einfaches Spülen (S. DE21)
Mit Kaffeebohnen auffüllen Spülkreislauf
Den Tresterbehälter
anbringen
Reinigung des
Milchsystems
Schließen Sie die
Zugangsklappe
Brühen erneut starten
Aufheizen
Reinigungsprogramm
DE12
In Zubereitung
Es wird nach dem Brühen, Spülen etc.
angezeigt
Stoppen Sie die Zubereitung
Entkalkungsprogramm
Page 59

Geschmackseinstellung
Espresso Kaffee
Einstellungsbereich
Standard
Einstellungsbereich
Standard
Kaffeemenge
< mL>
20–100 mL (Änderung pro 5 mL)
< oz>
0,7–3,5 oz (Änderung pro 0,1 oder 0,2 oz)
35 mL
1,2 oz
< mL>
60–300 mL (Änderung pro 10 mL)
< oz>
2,1–10,6 oz (Änderung pro 0,3 oder 0,4 oz)
120 mL
4,2 oz
Bohnenpegel
extra leicht
normal
extra leicht
normal
leicht leicht
normal normal
stark stark
extra stark extra stark
Anzahl der Tassen
für eine Kanne
— —
3–6 Tassen
jeweils: 120 mL/4,2 oz
3 Tassen
Einstellungsbereich
Standard
Cappuccino
Latte Macchiato
Heißmilch
Kaffeemenge
< mL>
60–300 mL (Änderung pro 10 mL)
< oz>
2,1–10,6 oz (Änderung pro 0,3 oder 0,4 oz)
120 mL
4,2 oz
180 mL
6,3 oz
120 mL
4,2 oz
Bohnenpegel
extra leicht
normal normal —
leicht
normal
stark
extra stark
Milchschaum
kein Schaum
extra fetthaltig extra fetthaltig extra fetthaltig
normal
fetthaltig
extra fetthaltig
Milch-/ Kaffeeverhältnis
Milch : Kaffee
80 : 20–20 : 80
Milch : Kaffee
60 : 40
Milch : Kaffee
80 : 20
—
Espresso/Kaffee
Milchmenü
• Wählen Sie ihren Geschmack aus, indem Sie wiederholt auf oder drücken.
Hinweis
• Beim erstmaligen Gebrauch oder nach dem Wechsel zu einer anderen Kaffebohnensorte wird der gewünschte Geschmack nicht
sofort erreicht.
Der gewünschte Geschmack wird nach wiederholtem Brühen erreicht.
DE13
Page 60

Vor dem Gebrauch
<Vorbereitungen>
Füllen Sie den Wassertank mit frischem, kalten Wasser.
1
Drücken Sie den Kaffeeauslauf hoch auf die obere
1
Position.
Drücken Sie auf den Wassertank und ziehen Sie
2
ihn heraus.
Füllen Sie den Wassertank bis zur “Max”-
3
(Maximum-)Linie mit Kranwasser.
Trocken Sie die Außenseite des Wassertanks.
Tauschen Sie den Wassertank aus.
4
Drücken Sie ihn, bis er einrastet.
Hinweis
• Füllen Sie den Wassertank nicht mit Milch (einschließlich Soja- und Reismilch), Mineralwasser, Sprudelwasser oder Heißwasser
usw. Verwenden Sie nur Leitungswasser.
• Wenn Sie den Wassertank mit Wasser füllen, halten Sie den Boden des Wassertanks mit beiden Händen fest.
“Max”- (Maximum-)Linie
“Min”- (Minimum-)Linie
DE14
Page 61

Stellen Sie den Strom an.
2
Stecken Sie den Stecker hinein und drücken Sie die An-/Aus-Taste.
1
• Achten Sie darauf, dass Tresterbehälter, Wassertank, Tropfschale und Edelstahlplatte angebracht sind.
• Öffnen Sie die Tropfschale, indem Sie darauf drücken. (Achten Sie darauf, dass das Display der Tropfschale
3 Sekunden, nachdem der Kaffevollautomat aufgeheizt ist, aufleuchtet.)
Heizt die Maschine
automatisch auf.
Drücken Sie , um das Spülen zu starten.
2
• Stellen Sie sicher, dass die Tropfschale geöffnet wurde. Ansonsten wird das heiße Wasser auf die Arbeitsplatte laufen.
Sobald das Spülen abgeschlossen ist
(füllen Sie 4 Mal heißes Wasser nach),
kehrt das Display zum Hauptmenü
zurück. Warten Sie, bis das Display das
Hauptmenü anzeigt.
Hinweis
• Wenn Sie das Gerät zum ersten Mal in Betrieb nehmen oder wenn der
Wassertank vollständig leer ist, kann es sein, dass das
Wasseransaugen etwas länger dauert, um Heißwasser für den
Spülzyklus abzugeben.
• Während jedes Spülzyklus kann eine kleine Menge Wasser in den
Tresterbehälter gelangen. Dies hat mit dem System zu tun und ist kein
Fehler.
• Wenn während des Spülzyklus
Vorgang sofort angehalten.
Nachdem
zurück.
• Wenn während des Spülzyklus Heißwasser in die Tropfschale läuft,
können Sie den Behälter unter den Kaffeeauslauf stellen.
• Während des Spülens wird das Wasser in der Tropfschale gesammelt.
Wenn die Tropfschale voll ist, schwimmt der rote Schwimmer nach
oben.
blinkt, kehrt das Display zum vorherigen Display
gedrückt wird, wird der
Der Schwimmer
DE15
Page 62

Wasserhärtestufe
1
weich
2
mittelhart
3
hart
4
sehr hart
Wasserhärte mol/m
3
Deutsche Härte
Französische Härte
bis zu 1,24
bis zu 7°
bis zu 12,6°
bis zu 2,5
bis zu 14°
bis zu 25,2°
bis zu 3,7
bis zu 21°
bis zu 37,8°
über 3,7
über 21°
über 38°
Teststreifen
Vor dem Gebrauch (Fortsetzung)
<Einstellung der Wasserhärte>
Bevor Sie den Kaffevollautomaten zum ersten Mal verwenden, muss sie auf die entsprechende Wasserhärte Ihrer Gegend eingestellt
werden.
Bestimmen Sie die Wasserhärte.
1
Tunken Sie den Teststreifen 1 Sekunde lang in kaltes Wasser und schütteln Sie das überschüssige Wasser ab.
1
Lesen Sie nach etwa 1 Minute die Wasserhärte von den rosa gefärbten Bereichen auf dem Teststreifen ab.
2
Drücken Sie .
2
Wählen Sie “Wasserhärtestufe”.
3
Wählen Sie die Stufe aus und drücken Sie , um die Einstellung zu
4
speichern.
(z.B. für sehr hart)
Hinweis
• Wenn 30 Sekunden lang nichts passiert oder gedrückt wird,
kehrt das Display zum Hauptmenü zurück.
Die ausgewählte Einstellung
leuchtet blau.
Weich
Sehr hart
Hinweis
• Wenn 30 Sekunden lang nichts passiert, kehrt das Display
zum Hauptmenü zurück, ohne die Einstellungen zu
speichern.
• Wenn
vorherigen Display zurück, ohne die Einstellung zu
speichern.
gedrückt wird, kehrt das Display zum
DE16
Page 63

Espresso/Kaffee
Füllen Sie den Kaffeebohnenbehälter mit ganzen Kaffeebohnen und schließen
1
Sie den Deckel. Dann stellen Sie eine Tasse(n) oder Kanne unter die Tülle.
•
Wenn Sie Kaffee für eine Kanne zubereiten, verwenden Sie die Latte-Macchiato-Platte. (Abstand zwischen der Latte MacchiatoPlatte und Kaffeeauslauf: ca. 14 cm)
• Vergewissern Sie sich, dass die Zugangsklappe gut verschlossen ist.
Hinweis
•
Um Hitze und Spritzen zu reduzieren, stellen Sie die Kaffeeauslauf-Höhe so ein,
dass sie zur Höhe Ihrer Tasse passt, indem Sie ihn hoch und runter bewegen.
Wenn sich der Kaffeeauslauf schwer bewegen lässt, reinigen Sie ihn. (S. DE34)
•
Wenn 2 Tassen des Getränks vorbereitet werden,
stellen Sie die Tassen Seite an Seite unter die Tülle.
•
Wärmen Sie die Tasse(n) oder Kanne mit heißem Wasser vor oder verwenden
Sie das Heißwassermenü (S. DE24), um heißen, leckeren Kaffee zu erhalten.
Nachdem Sie die Tasse(n) oder Kanne vorgewärmt haben, gießen Sie das
heiße Wasser weg.
Wählen Sie “Espresso” oder “Kaffee” aus dem Hauptmenü.
2
Espresso
Kaffee
Wählen Sie die Anzahl der Tassen bzw. Kanne aus und stellen Sie den
3
Geschmack nach Ihren Wünschen ein.
• Die ausgewählte Tasse leuchtet blau.
• Drücken Sie wiederholt
• Wenn die Einstellung nicht nötig ist, gehen Sie weiter zu Schritt 4.
z.B.: Wenn im Espresso-Menü
(
1 Tasse ausgewählt wurde
oder , um die Menge des Kaffees und der Kaffeebohnen einzustellen. (S. DE13)
z.B.: Wenn im Kaffee-Menü
)
(
2 Tassen ausgewählt wurden
z.B.: Wenn Kanne im Kaffee-Menü
) )
(
ausgewählt wurde
Steht für Espresso nicht zur
(
Verfügung
Hinweis
• Wenn gedrückt wird, kehrt das Display zum vorherigen Display zurück.
• Füllen Sie den Wassertank mit Wasser bis zur “Max”- (Maximum-)Linie, wenn Sie 6 Tassen Getränk für eine Kanne vorbereiten.
• Wenn Sie Ihre Einstellungen speichern möchten, siehe Seite DE31.
)
DE17
Page 64

Espresso/Kaffee (Fortsetzung)
Wenn folgendes Display angezeigt wird;
Mit Bohnen
auffüllen.
Mit Wasser
auffüllen.
Tresterbehälter
entleeren.
Drücken Sie , um das Brühen zu starten.
4
z.B.: Wenn im Kaffee-Menü 1 Tasse
(
ausgewählt wurde
)
• Wenn während des Brühvorgangs gedrückt wird, wird der
• Wenn
• Wenn die Temperatur des Wassers nicht erreicht
Zeitleiste wird während
der Zubereitung erhöht.
Hinweis
Vorgang sofort angehalten.
Nachdem
Display zurück.
wird, um Kaffee zu brühen, wird der
Aufheizvorgang während des Brühvorgangs
ausgeführt.
blinkt, kehrt das Display zum Hauptmenü zurück.
gedrückt wird, kehrt das Display zum vorherigen
Sobald das Brühen abgeschlossen
ist, kehrt das Display zum Hauptmenü
zurück. Warten Sie bis das Display
das Hauptmenü anzeigt, um die
Tasse(n) oder Kanne zu entfernen.
Q Ausschalten des Stroms nach dem Gebrauch « S. DE25
DE18
Page 65

Cappuccino/Latte Macchiato/
Heißmilch
Vorbereitungen:
(S. DE14)
Füllen Sie den Wassertank mit Wasser auf.
1
Spülzyklus betreiben.
2
Bringen Sie den Milchschlauch an.
1
Stecken Sie das gerade geschnittene Ende des
1
Milchschlauchs durch die Seitenöffnung des
Kaffevollautomaten.
Stecken Sie das Ende des Milchschlauchs in die
2
Öffnung an der Seite des Milchschäumers, bis es stoppt.
Drücken Sie den Milchschlauch in die Führung,
3
dann schließen Sie die Zugangsklappe.
Stecken Sie den Milchschlauch in die
4
Milchpackung.
Verwenden Sie keine Soja- oder Reismilch, sonst
kann es Einfluss auf die Milchschaumqualität
haben.
Füllen Sie den Kaffeebohnenbehälter mit ganzen Kaffeebohnen (außer
2
Heißmilchzubereitung). Dann stellen Sie die Tasse(n) unter die Tülle.
• Wenn Sie eine hohe Tasse verwenden,
verwenden Sie eine Latte-Macchiato-Platte anstatt
der Tropfschale.
• Heißmilchzubereitung, gehen Sie zu Schritt 3.
Hinweis
• Um Hitze und Spritzen zu reduzieren, stellen Sie die KaffeeauslaufHöhe so ein, dass sie zur Höhe Ihrer Tasse passt, indem Sie ihn hoch
und runter bewegen.
Wenn sich der Kaffeeauslauf schwer bewegen lässt, reinigen Sie ihn.
(S. DE34)
• Wenn 2 Tassen des Getränks vorbereitet
werden, stellen Sie die Tassen Seite an Seite
unter die Tülle.
• Wärmen Sie die Tasse(n) oder Kanne mit heißem Wasser vor oder
verwenden Sie das Heißwassermenü (S. DE24), um heißen, leckeren
Kaffee zu erhalten.
Nachdem Sie die Tasse(n) oder Kanne vorgewärmt haben, gießen Sie
das heiße Wasser weg.
•
Das Endergebnis des Latte Macchiato kann je nach Glasform variieren.
Wählen Sie “Cappuccino”, “Latte Macchiato” oder “Heißmilch” am Hauptmenü.
3
Heißmilch
Cappuccino
Latte Macchiato
DE19
Page 66

Cappuccino/Latte Macchiato/
Heißmilch
(Fortsetzung)
Wählen Sie die Anzahl der Tassen aus und stellen Sie den Geschmack
4
nach Ihren Wünschen ein.
• Die ausgewählte Tasse leuchtet blau.
• Wenn die Einstellung nicht nötig ist, gehen Sie weiter zu Schritt 6.
• Drücken Sie wiederholt
(S. DE13)
z.B.: Wenn Cappuccino oder Latte Macchiato
(
für 1 Tasse ausgewählt wird
Um das Kaffee- und
Milchverhältnis einzustellen,
drücken Sie
oder , um die Quantität des Kaffees, Kaffeebohnen einzustellen und der Milchschaum.
) )
z.B.: Wenn Heißmilch für 1 Tasse
(
ausgewählt wird
Um zu starten, gehen Sie zu
Schritt 6.
und gehen Sie
über zu Schritt 5.
Stellen Sie das Milch-/ Kaffeeverhältnis nach Ihren Wünschen ein.
5
• Wenn die Einstellung nicht nötig ist, gehen Sie weiter zu Schritt 6.
• Drücken Sie wiederholt
z.B.: Wenn Cappuccino ausgewählt wurde
(
60% : 40% = Milch : Kaffee
oder , um das Milch-/ Kaffeeverhältnis einzustellen. (S. DE13)
Hinweis
• Wenn “Latte Macchiato” ausgewählt wird, zeigt das Milch-/
Kaffeeverhältnis 80% und 20% an.
• Wenn
zurück.
)
• Wenn Sie Ihre Einstellungen speichern möchten, siehe Seite DE31.
• Wenn
gedrückt wird, kehrt das Display zum Hauptmenü
gedrückt wird, kehrt das Display zum Schritt 4 zurück.
DE20
Page 67

Drücken Sie um das Brühen zu starten.
6
(z.B.: Wenn Cappuccino ausgewählt wurde)
Hinweis
•
Seien Sie vorsichtig, wenn der Dampf
herauskommt, nachdem
• Wenn während des Brühvorgangs gedrückt wird, wird der
Vorgang sofort angehalten.
Nachdem
• Wenn die Temperatur des Wassers nicht erreicht wird, um Kaffee zu
brühen, wird der Aufheizvorgang zuerst ausgeführt.
• Wenn Cappuccino oder Latte Macchiato gebrüht wird, zeigt das
Display Folgendes an.
Zwischen dem Aufbrühen von Milch und Kaffee,
wird der Brühvorgang unterbrochen.
Zeitleiste wird während der Zubereitung erhöht.
Warten Sie bis das Display das
gedrückt wurde.
blinkt, geht das Display zu Schritt 7 weiter.
anzeigt, um die Tasse(n) zu
entfernen.
• Wird die Tülle über dem Milchpegel angebracht, dann kann es dazu
führen, dass die Milch aus dem Kaffeeauslauf tropft. Ziehen Sie in
diesem Fall den Milchschlauch heraus.
(Einfaches Spülen)
Füllen Sie ein Glas mit sauberem Wasser und drücken Sie , um das
7
Spülen zu beginnen.
• Dieser Reinigungszyklus ist für die nächste Getränkezubereitung ohne Milchrückstände gedacht.
• Legen Sie den Milchschlauch aus der Milchpackung in das Glas und stellen Sie eine leere Tasse unter den Kaffeeauslauf.
(Tassengröße > 250 mL)
Hinweis
• Wenn Sie das Milchmenü stetig vorbereiten, überspringen Sie den
Das Display kehrt zum Hauptmenü zurück,
wenn der Spülzyklus abgeschlossen ist.
Zyklus, indem Sie
• Wenn während des Spülzyklus
Vorgang sofort angehalten.
Nachdem
zurück.
blinkt, kehrt das Display zum vorherigen Display
drücken.
gedrückt wird, wird der
Q Ausschalten des Stroms nach dem Gebrauch « S. DE25
DE21
Page 68

Kaffeepulverzubereitung
Vorbereitungen:
(S. DE14)
Füllen Sie den Wassertank mit Wasser auf.
1
Spülzyklus betreiben.
2
Wählen Sie “Kaffeepulverzubereitung” aus dem Hauptmenü.
1
Wählen Sie das Getränkemenü.
2
• Wenn Sie das Spezialkaffee- oder Milchmenü auswählen, bringen Sie den Milchschlauch an den Kaffevollautomaten an.
(S. DE19)
Espresso
Kaffee
Latte Macchiato
Hinweis
• Wenn gedrückt wird, kehrt das Display zum Hauptmenü
zurück.
Cappuccino
Füllen Sie den Kaffeepulverschacht mit einem Messlöffel frischen
3
Kaffeepulvers und schließen Sie die Deckel. Stellen Sie die Tasse(n) unter
die Tülle. Drücken Sie
• Achten Sie darauf, dass der Kaffeepulverschacht trocken ist, bevor Sie ihn mit Kaffeepulver füllen. Ein stetiger Gebrauch
kann Kondenswasserbildung im Kaffeepulverschacht verursachen.
• Vergewissern Sie sich, dass die Zugangsklappe gut verschlossen ist.
.
Hinweis
• Um Hitze und Spritzen zu reduzieren, stellen Sie die KaffeeauslaufHöhe so ein, dass sie zur Höhe Ihrer Tasse passt, indem Sie ihn hoch
und runter bewegen. Wenn sich der Kaffeeauslauf schwer bewegen
lässt, reinigen Sie ihn. (S. DE34)
• Stellen Sie sicher, dass Sie nur den mitgelieferten Messlöffel
verwenden.
• Füllen Sie nicht mehr als einen Messlöffel (max. 10 g) des
Kaffeepulvers ein.
• Füllen Sie nicht den Kaffeepulverschacht mit wasserlöslichen,
gefriergetrockneten Fertigprodukten oder anderen Trinkpulvern.
• Zu fein gemahlenes Kaffepulver kann dazu führen, dass die
Brüheinheit verstopft.
• Wärmen Sie die Tasse(n) oder Kanne mit heißem Wasser vor oder
verwenden Sie das Heißwassermenü (S. DE24), um heißen, leckeren
Kaffee zu erhalten.
Nachdem Sie die Tasse(n) oder Kanne vorgewärmt haben, gießen Sie
das heiße Wasser weg.
• Wenn
Display zurück.
gedrückt wird, kehrt das Display zum vorherigen
DE22
Page 69

Stellen Sie die Menge einer Tassenfüllung und/oder Milchschaum nach
4
Wunsch ein.
• Wenn die Einstellung nicht nötig ist, gehen Sie weiter zu Schritt 6.
• Drücken Sie wiederholt
(z.B.: Espresso/Kaffee) (z.B.: Cappuccino/Latte Macchiato)
oder , um die Menge des Kaffees und/oder Milchschaum. (S. DE13)
Um zu starten, gehen Sie zu
Schritt 6.
Um das Kaffee- und Milchverhältnis
einzustellen, drücken Sie
gehen Sie über zu Schritt 5.
Hinweis
• Mit dieser Funktion kann nur eine Tasse zubereitet werden.
• Wenn
Kaffeevollautomat das Kaffeepulver in den Tresterbehälter. Füllen Sie in Schritt 3 das Kaffeepulver nach.
gedrückt wird, kehrt das Display zum ausgewählten Getränkemenü zurück (Schritt 2). Gleichzeitig wirft der
Stellen Sie das Kaffee-Milch-Verhältnis ein.
5
z.B.: Cappuccino
(
60% : 40% = Milch : Kaffee
)
Hinweis
• Wenn “Latte Macchiato” ausgewählt wird, zeigt die Tassenfüllmenge
80% und 20% an.
• Wenn
Getränkemenü zurück.
gedrückt wird, kehrt das Display zum ausgewählten
Drücken Sie , um das Brühen zu starten.
6
(z.B.: Espresso/Kaffee) (z.B.: Cappuccino)
Hinweis
und
• Wenn während des Brühvorgangs gedrückt wird,
wird der Vorgang sofort angehalten.
Nachdem
zurück.
O Sobald das Brühen abgeschlossen ist, kehrt das Display zum Hauptmenü zurück.
Warten Sie bis das Display das Hauptmenü anzeigt, um die Tasse(n) oder Kanne zu entfernen.
blinkt, kehrt das Display zum Hauptmenü
Q Ausschalten des Stroms nach dem Gebrauch « S. DE25
DE23
Page 70

Heißwasser
Vorbereitungen:
(S. DE14)
Füllen Sie den Wassertank mit Wasser auf.
1
Spülzyklus betreiben.
2
• Stellen Sie sicher, dass der Milchschlauch nicht an der Maschine befestigt ist.
Wählen Sie “Heißwasser” aus dem Hauptmenü.
1
Dann stellen Sie die Tasse(n) unter die Tülle.
Hinweis
• Wenn das einfache Spülen nach dem Milchmenü übersprungen wird,
können Milchrückstände im Heißwasser zurückbleiben. (Schritt 7 auf
S. DE21)
Lassen Sie dann für ein paar Mal heißes Wasser aus dem Dispenser
laufen.
Wählen Sie die Anzahl der Tassen aus und stellen Sie die Menge ein.
2
• Die ausgewählte Tasse leuchtet blau.
• Wenn die Einstellung nicht nötig ist, gehen Sie weiter zu Schritt 3.
• Drücken Sie wiederholt
oder , um die Menge für Heißwasser einzustellen.
Hinweis
• Wenn gedrückt wird, kehrt das Display zum vorherigen
Menü zurück.
Drücken Sie , um das Brühen zu starten.
3
Hinweis
• Wenn gedrückt wird, kehrt das Display zum Hauptmenü
zurück.
• Wenn während des Brühvorgangs
Vorgang sofort angehalten.
Nachdem
O Sobald das Brühen abgeschlossen ist, kehrt das Display zum Hauptmenü zurück.
Warten Sie bis das Display das Hauptmenü anzeigt, um die Tasse(n) zu entfernen.
Q Ausschalten des Stroms nach dem Gebrauch « S. DE25
blinkt, kehrt das Display zum Hauptmenü zurück.
gedrückt wird, wird der
DE24
Page 71

Schalten Sie den Strom aus
Nachdem der Strom ausgeschaltet wurde, beginnt der Reinigungszyklus. Der Reinigungszyklus variiert je nach den Menüs, die
vorbereitet werden, während der Kaffevollautomat eingeschaltet ist. Wenn die Milchmenüs während des Gebrauchs vorbereitet
werden, beinhaltet die Reinigung auch die Milchsystemreinigung.
Schalten Sie den Strom aus.
1
• Falls die Milchsystemreinigung nicht erforderlich sein sollte, startet die Reinigung bei Schritt 3.
• Sind die Kaffee- und Milchmenüs nicht vorbereitet, dann schaltet das Gerät ohne Reinigung ab.
Reinigen Sie das Milchsystem. (Nur für das Milchmenü)
2
Füllen Sie ein Glas mit 250 mL Wasser und
1
der entsprechenden Menge des
Milchsystemreinigers. (Wandeln Sie sie um
in die Menge pro 250 mL Wasser.)
Stellen Sie eine leere Tasse unter den
Kaffeeauslauf. (Tassengröße > 250 mL)
Dann drücken Sie .
• Wenn der Milchschlauch nicht angebracht ist,
bringen Sie ihn an den Kaffevollautomaten an.
(S. DE19)
Hinweis
• Seien Sie vorsichtig, wenn der Dampf herauskommt, nachdem
gedrückt wurde.
• Wenn
Kaffevollautomat ohne Spülkreislauf aus.
• Wenn das
angehalten.
Nachdem
zurück.
• Reinigen Sie jedes Tag die Milchschäumerdüse, wenn Sie ein
Milchmenü zubereitet haben. (S. DE36)
15 Minuten lang nicht gedrückt wird, schaltet sich die
gedrückt wird, wird der Spülvorgang sofort
blinkt, kehrt das Display zum vorherigen Display
Füllen Sie das Glas mit sauberem Wasser
2
und drücken Sie erneut , um den
Spülzyklus zu starten. Stellen Sie eine
leere Tasse unter den Kaffeeauslauf, bevor
Sie beginnen. (Tassengröße > 250 mL)
DE25
Page 72

Schalten Sie den Strom aus (Fortsetzung)
Drücken Sie , um den Spülzyklus zu starten.
3
Hinweis
• Vor dem Starten zeigt das Display die folgenden Aktionen an. (Jede
Aktion wird für 30 Sekunden angezeigt)
Tresterbehälter
entleeren.
Öffnen Sie die
Tropfschale.
Wenn der Spülkreislauf abgeschlossen ist,
schaltet sich der Strom aus. Ziehen Sie
danach den Stecker.
Unter folgenden Umständen schaltet sich der Kaffevollautomat automatisch aus.
• Wenn der Zeitpunkt der automatischen Ausschaltzeit erreicht wurde. (S. DE28)
• Keine Aktion für 15 Minuten bei Schritt 2 oder Schritt 3. « Abschaltung ohne Spülvorgang.
In diesem Fall beginnt der Reinigungszyklus , wenn der Strom das nächste Mal eingeschaltet wird.
• Wenn 15 Minuten lang nicht gedrückt wird, schaltet sich die
Kaffevollautomat ohne Spülkreislauf aus.
• Wenn das
angehalten.
Nachdem
zurück.
gedrückt wird, wird der Spülvorgang sofort
blinkt, kehrt das Display zum vorherigen Display
DE26
Page 73

Änderung der Einstellung
Kaffeetemperatur
Wählen Sie die Temperatur aus 5 Stufen an Ihrem
Getränk aus. (Standardeinstellung: mittel)
1
Drücken Sie im Hauptmenü.
2
Wählen Sie “Kaffeetemperatur” im
Benutzermenü.
3
Wählen Sie die Stufe aus und drücken Sie
, um die Einstellung zu speichern.
• Die ausgewählte Einstellung leuchtet blau.
Niedrig Hoch
Heizmodus
Wählen Sie aus 3 Modi den Heizzustand aus.
(Standardeinstellung: Öko-Modus)
1
Drücken Sie im Hauptmenü.
2
Wählen Sie “Heizmodus” im Benutzermenü.
3
Wählen Sie die Stufe aus und drücken Sie
, um die Einstellung zu speichern.
• Die ausgewählte Einstellung leuchtet blau.
Standby-Modus
Standardmodus
Öko-Modus
(Öko-Modus)
Das Heizsystem wird nur nach einer kurzen Wartezeit
umgeschaltet, wenn ein Getränk gebrüht werden soll.
Empfehlung für gelegentlichen Gebrauch.
(Standardmodus)
Das Heizsystem wird nur für Kaffee und Espresso
nach einer kurzen Wartezeit eingeschaltet.
Empfehlung für regelmäßigen Gebrauch zur
Zubereitung von Kaffee und Espresso.
(Standby-Modus)
Das Heizsystem und die zusätzliche Heizung werden
permanent aktiviert. Empfehlung für die regelmäßige
Zubereitung von Kaffeespezialitäten.
O Sie können die Einstellungen der Standardeinstellung ändern.
Hinweis
• Wenn 30 Sekunden lang nichts passiert, kehrt das Display
zum Hauptmenü zurück, ohne die Einstellung zu speichern.
• Wenn
vorherigen Display zurück, ohne die Einstellung zu speichern.
• Sobald die Einstellung abgeschlossen ist, kehrt das Display
zum Benutzermenü zurück. Um zum Hauptmenü
zurückzukehren, drücken Sie
gedrückt wird, kehrt das Display zum
.
DE27
Page 74

Änderung der Einstellung (Fortsetzung)
Auto-Aus-Timer
Wählen Sie das Auto-Aus-Timing aus 5 Auto-Aus-Zeiten
(1–5 Stunden). (Standardeinstellung: 1 Stunde)
1
Drücken Sie im Hauptmenü.
2
Wählen Sie “Auto-Aus-Timer” im
Benutzermenü.
3
Wählen Sie die Zeit aus und drücken Sie
um die Einstellung zu speichern.
• Die ausgewählte Einstellung leuchtet blau.
• Die Abschaltzeit beginnt, nach der letzten
Inbetriebnahme.
1 Std. 5 Std.
Tassenbeleuchtung
Wählen Sie die Tassenbeleuchtung am
Kaffeeauslauf aus 3 Modi. (Standardeinstellung:
Auto)
1
Drücken Sie im Hauptmenü.
2
Wählen Sie “Tassenbeleuchtung” im
Benutzermenü.
3
Wählen Sie den gewünschten Betriebsmodus
aus und drücken Sie , um die
Einstellung zu speichern.
• Die ausgewählte Einstellung leuchtet blau.
Ein
Aus
(Aus)
Tassenbeleuchtung ist aus.
(Ein)
Tassenbeleuchtung ist immer an.
(Auto)
Tassenbeleuchtung wird durch Inbetriebnahme des
Kaffeevollautomaten ein- und ausgeschaltet.
DE28
Page 75

ml/oz-Auswahl
1
Drücken Sie im Hauptmenü.
2
Wählen Sie “ml/oz-Auswahl” im
Benutzermenü.
3
Wählen Sie “ml” oder “oz” aus und drücken
Sie , um die Einstellung zu
speichern.
• Die ausgewählte Einstellung leuchtet blau.
*1 oz ist etwa 28,41 mL
Wasserhärtestufe
1
Drücken Sie im Hauptmenü.
2
Wählen Sie “Wasserhärtestufe” im
Benutzermenü.
3
Wählen Sie die Stufe aus und drücken Sie
, um die Einstellung zu speichern.
• Die ausgewählte Einstellung leuchtet blau.
(z.B. für sehr hart)
Weich Sehr hart
Q Prüfen der Wasserhärte « S. DE16
Q Kaufen eines neuen Teststreifens « S. DE45
Hinweis
• Wenn 30 Sekunden lang nichts passiert, kehrt das Display zum Hauptmenü zurück, ohne die Einstellung zu speichern.
• Wenn
• Sobald die Einstellung abgeschlossen ist, kehrt das Display zum Benutzermenü zurück. Um zum Hauptmenü zurückzukehren,
drücken Sie
gedrückt wird, kehrt das Display zum vorherigen Display zurück, ohne die Einstellung zu speichern.
.
DE29
Page 76

Zurücksetzen
Über diesen Modus können Sie alle Einstellungen auf
die Werkseinstellungen zurücksetzen.
1
Drücken Sie im Hauptmenü.
2
Drücken Sie im Benutzermenü.
3
Drücken Sie .
Informationen
Sie können sehen, wie viele Tassen insgesamt
zubereitet wurden, sowie die Einstellungsversion
dieses Kaffeevollautomaten.
Wenn es ein Problem mit Ihrem
Kaffeevollautomaten gibt, kann die
Einstellungsversion bei der Wartung hilfreich
sein.
1
Drücken Sie im Hauptmenü.
2
Drücken Sie im Benutzermenü.
3
Drücken Sie .
Änderung der Einstellung (Fortsetzung)
Hinweis
DE30
• Wenn 30 Sekunden lang nichts passiert, kehrt das Display
zum Hauptmenü zurück, ohne die Einstellung zu speichern.
• Wenn
vorherigen Display zurück, ohne die Einstellung zu speichern.
• Sobald die Einstellung abgeschlossen ist, kehrt das Display
zum Benutzermenü zurück. Um zum Hauptmenü
zurückzukehren, drücken Sie
gedrückt wird, kehrt das Display zum
.
Page 77

Speichereinstellung
Speichereinstellung
1
Wählen Sie “Speichermenü” im Hauptmenü.
2
Wählen Sie den zur Verfügung stehenden
Speicher im Speichermenü aus.
• Grau unterlegter Speicher ist verfügbar.
3
Wählen Sie das gewünschte Getränk.
(z.B. für Kaffee)
4
Stellen Sie die Qualität und den Geschmack ein.
Dann drücken Sie , um die Einstellung
zu speichern.
(z.B. für Kaffee)
Kehrt zum Speichermenü zurück
Verwendung der
Speichereinstellung
1
Zeigt das Speichermenü als Schritt 1 in der
“Speichereinstellung” an. Dann wählen Sie
den “Speicher”, den Sie verwenden möchten.
• Sie können die blauen Symbole auswählen.
2
Drücken Sie , um das Brühen zu
starten.
Kehrt nach dem Brühen zum Hauptmenü
Hinweis
• Wenn gedrückt wird, kehrt das Display zum
vorherigen Display zurück.
DE31
Page 78

Änderung der Speichereinstellung
1
Zeigt das Speichermenü als Schritt 1 in der
“Speichereinstellung” an. Dann drücken Sie
.
2
Wählen Sie den “Speicher”, den Sie ändern
möchten.
• Grau unterlegter Speicher kann nicht ausgewählt
werden.
3
Wählen Sie die Menge aus und drücken Sie
, um die Einstellung zu speichern.
(z.B. für Kaffee)
Kehrt zum Speichermenü zurück
Löschen der Speichereinstellung
1
Zeigt das Speichermenü als Schritt 1 in der
“Speichereinstellung” an. Dann drücken Sie
“Löschen”.
2
Wählen Sie den zu löschenden “Speicher”
und drücken Sie .
• Die ausgewählte Einstellung leuchtet blau.
Kehrt zum Speichermenü zurück
Speichereinstellung (Fortsetzung)
Hinweis
• Wenn gedrückt wird, kehrt das Display zum vorherigen Display zurück.
DE32
Page 79

Reinigung
Gerät
Wischen Sie es mit einem
gut ausgewrungenen
Tuch ab.
Tresterbehälter/Wassertank
Nach dem Herausnehmen der Teile
waschen Sie sie mit verdünnter
(neutraler) Seifenlösung und einem
weichen Schwamm.
Tropfschale/Latte-Macchiato-Platte
Nach dem Herausnehmen
der Teile waschen Sie sie
mit verdünnter (neutraler)
Seifenlösung und einem
weichen Schwamm.
Kaffeebohnenbehälter/Kaffeepulverschacht
Wischen Sie es mit einem fusselfreien Tuch ab.
<Deckel>
Nach dem Herausnehmen der Teile waschen Sie sie mit verdünnter
(neutraler) Seifenlösung und einem weichen Schwamm. Dann trocknen
Sie sie gut ab.
Q Reinigen Sie das Gerät nach jedem Gebrauch.
Q Ziehen Sie den Stecker heraus und vergewissern Sie sich, dass das Gerät vollständig abgekühlt ist, bevor Sie es reinigen.
Hinweis
• Verwenden Sie kein Benzin, Verdünnungsmittel, Bleichmittel, Scheuerpulver, keinen Alkohol, sowie keine Metall- oder
Nylonbürsten, da diese die Oberfläche beschädigen.
• Waschen Sie es nicht in der Geschirrspülmaschine.
• Reinigen Sie das Gerät nicht mit spitzen Gegenständen, wie z.B. Stecknadeln oder Zahnstochern.
Um die Innenseite der Zugangsklappe
zu reinigen, siehe Seiten DE34–DE36.
Kaffeeauslauf (S. DE34)
Tülle (S. DE34)
DE33
Page 80

Kaffeeauslauf:
Reinigen Sie wöchentlich die Ausgießtülle bzw. säubern Sie sie gründlich, wenn sie häufig verwendet wurde.
Säubern Sie den Kaffeeauslauf innen und außen mit warmem Wasser und einer passenden
Bürste, um alle Rückstände zu entfernen und um zu verhindern, dass sich Schimmel bildet.
<Um zu entfernen>
1
Drücken Sie die linke Seite
der Zugangsklappe mit dem
Kaffeeauslauf, um sie zu
öffnen. (S. DE9)
2
Drücken Sie den Kaffeeauslauf
nach oben. Ziehen Sie den
Verteilerschlauch leicht aus der
Innenseite der Zugangsklappe
und drücken Sie ihn nach links,
sodass man aus der
Befestigung ein Klicken hören
kann. Dann entfernen Sie den
Kaffeeauslauf.
<Um anzubringen>
1
Stellen Sie den Kaffeeauslauf zurück in
die obere Position in der
Zugangsklappe, drücken Sie leicht
darauf und schieben Sie ihn herunter,
bis oben zur Zugangsklappe.
2
Ziehen Sie am Schlauch von der Innenseite der Türöffnung und drücken Sie
ihn nach rechts in die Halterung und drücken Sie den trichterförmigen Teil des
Schlauchs zurück in die Manschette, bis er perfekt passt.
Halterung
Kaffeeauslauf
Manschette
3
Stellen Sie sicher, dass sich Oberkante der Zugangsklappe und
Kaffeeauslauf auf derselben Höhe befinden und schließen Sie die
Zugangsklappe fest.
Säuberung, wenn die Tülle verstopft ist
1
Zerlegen Sie den Kaffeeauslauf. Greifen und ziehen Sie den losen
Schlauch in der Nähe der Feder und ziehen Sie danach beide
Schlauchenden mit den Hülsenenden aus der Tülle heraus.
2
Ziehen Sie die Hülsen aus den Schläuchen heraus und trennen Sie
die Schläuche vom Verbindungsstück . Ziehen Sie Schlauch und
Feder zugleich aus dem Verbindungsstück .
3
Lassen Sie die Teile für mehrere Stunden im Milchsystemreiniger liegen.
Für die genaue Menge des Milchsystemreinigers schauen Sie in der
Anleitung nach. Dann spülen Sie sie sorgfältig mit sauberem Wasser ab.
4
Um sie zusammenzusetzen, stecken Sie beide Hülsenenden und
Schläuche wieder zusammen. Stecken Sie beide Hülsenenden in die
kleinen Tüllen 1 und drücken Sie sie, bis sie richtig einrasten. Drücken
Sie das Verbindungsstück in den Fixierschlitz 2. Dann drücken Sie die
Schläuche nach rechts und links unter den Rahmen 3.
Hinweis
•
Wenn die Hülsen in große Tüllen gesteckt werden, wird der Kaffee nicht
gerade ausgegeben.
Richtig Falsch
Reinigung (Fortsetzung)
DE34
Page 81

Brüheinheit:
Reinigen Sie wöchentlich die Brüheinheit oder, wenn sie häufig verwendet wurde, säubern Sie sie regelmäßig.
1
Drücken Sie die linke Seite der Zugangsklappe mit dem Kaffeeauslauf, um
sie zu öffnen.
2
Entfernen Sie den Tresterbehälter, indem Sie auf den Behälter drücken und
ihn aus dem Kaffeevollautomaten herausziehen.
3
Greifen Sie den unteren vorderen Teil der Brüheinheit und ziehen Sie sie
nach vorn heraus. Verwenden Sie Ihre andere Hand, um zu verhindern, dass
sie herausfällt.
4
Drehen Sie die Brüheinheit herum und reinigen Sie die geöffnete
Brüheinheit unter laufendem warmem Wasser mit einer Bürste, dann
schütteln Sie sie leicht. Insbesondere der Edelstahlfilter muss gut
ausgespült werden, um Kaffeerückstände zu entfernen.
• Wenn die Brüheinheit herumgedreht wird, ist sie geöffnet und der Auswerfer ist
heruntergeklappt. Die zwei Edelstahlfilter können frei zugänglich gereinigt werden. Wenn
die Brüheinheit nicht geöffnet ist, weil sie blockiert ist, siehe Seite DE44 (U10), um sie zu
öffnen.
Edelstahlfilter
Empfehlung:
Weichen Sie die Brüheinheit etwa 30 Minuten in lauwarmen Wasser ein, in dem
aufgelöstes Spülmittel ist (neutral), und spülen Sie sie gut ab.
5
Nachdem die Brüheinheit gut getrocknet ist, stecken Sie sie in die
Führungsrillen und drücken Sie sie vollständig in den Kaffeevollautomaten.
6
Stellen Sie den Tresterbehälter in den Kaffeevollautomaten und schließen
Sie die Zugangsklappe.
DE35
Page 82

Milchschäumerdüse:
Reinigen Sie jedes Tag die Milchschäumerdüse, wenn Sie ein Milchmenü zubereitet haben.
1
Drücken Sie die linke Seite die Zugangsklappe mit dem
Kaffeeauslauf, um sie zu öffnen.
• Wenn Sie die Zugangsklappe öffnen und schließen, sollte der Kaffeeauslauf
auf der oberen Position stehen, ansonsten wird der Milchschlauch an der
Innenseite eingeklemmt.
2
Ziehen Sie den Milchschlauch aus dem Milchschäumer. Dann
kippen Sie den Hebel am Milchschäumer nach oben und ziehen
Sie den Milchschäumer zu sich heran.
Hebel
3
Öffnen Sie die Kappe des Milchschäumers. Dann entfernen Sie
die Milchschäumerdüse aus dem Milchschäumer, indem Sie das
abgerundete Ende des Messlöffels in den Schlitz der
Milchschäumerdüse stecken und um 45° drehen, um sie
herauszuziehen. Während des Drehens wird die Düse leicht
angehoben, sodass sie einfacher entfernt werden kann.
Kappe
Milchschäumerdüse
4
Reinigen Sie die Milchschäumerdüse mit einer dünnen Nadel.
• Verwenden Sie eine Metallbürste oder Nylonbürste.
5
Mischen Sie 250 mL Wasser mit 7,5–15 mL Milchsystemreiniger.
6
Lassen Sie alle Teile des Milchschäumers 5 Stunden oder über
Nacht in der Reinigungslösung liegen und spülen Sie sie dann
gut ab.
7
Verwenden Sie die Bürste des Messlöffels, um alle Teile der
Milchschäumerdüse zu reinigen. Achten Sie darauf, dass alle
Öffnungen des Milchschäumers und seiner Düse mit der Bürste
gereinigt und gut abgespült wurden.
8
Stellen Sie alle Teile zurück, indem Sie die Schritte 1–3
umgekehrt wiederholen.
Reinigung (Fortsetzung)
DE36
Page 83

Reinigungszyklus:
Verwenden Sie diesen Zyklus gelegentlich und/oder wenn das Display anzeigt.
Dieses Reinigungsprogramm ermöglicht die intensive Reinigung unzugänglicher Bereiche. Dieses Programm dauert etwa
8 Minuten und sollte nicht unterbrochen werden. Wenn das Display das
Schritten ab 3.
anzeigt, drücken Sie und folgen Sie den
Drücken Sie im Hauptmenü.
1
Wählen Sie “Reinigungsprogramm”.
2
Hinweis
• Wenn gedrückt wird, kehrt das Display zum vorherigen
Display zurück.
Füllen Sie den Wassertank mit Wasser auf, dann drücken Sie .
3
Hinweis
• Wenn gedrückt wird, kehrt das Display zum Hauptmenü
zurück.
Geben Sie eine Reinigungstablette in den Kaffeepulverschacht und
4
schließen Sie die Deckel, dann drücken Sie
.
DE37
Page 84

Reinigung (Fortsetzung)
Drücken Sie , um den Reinigungszyklus zu starten.
5
• Leeren Sie die Tropfschale, bevor Sie den Reinigungszyklus starten.
Hinweis
• Das Reinigungswasser wird in der Tropfschale aufgefangen. Alternativ
dazu können Sie einen Behälter (> 250 mL) unter die Tülle stellen.
• Im Falle eines Stromausfalls während des Reinigungsprogramms
muss das Programm neu gestartet werden.
• Wenn während der Reinigung
Vorgang angehalten. Um den Reinigungszyklus fortzusetzen, drücken
Sie
• Informationsuhr dreht sich während der Reinigung.
.
gedrückt wird, wird der
Leeren Sie die Tropfschale oder
den Behälter, wenn das Display
anzeigt, dass die Tropfschale
geleert werden muss.
• Wenn die Reinigung abgeschlossen ist, hat die
Informationsuhr volle Balken, dann kehren Sie zum
Hauptmenü zurück.
DE38
Page 85

Milchsystemreinigung:
Verwenden Sie dieses Programm, wenn die Schaumqualität nachlässt und wenn Milchrückstände in den Kaffee,
Espresso oder Heißwasser gelangen, wenn der Kaffeevollautomat verwendet wird.
Drücken Sie im Hauptmenü.
1
Wählen Sie “Milchsystem Reinigungsprogramm”.
2
Hinweis
• Wenn gedrückt wird, kehrt das Display zum Hauptmenü
zurück.
Füllen Sie ein Glas mit 250 mL Wasser und 7,5–15 mL Milchsystemreiniger.
3
Stellen Sie eine leere Tasse unter den Kaffeeauslauf. (Tassengröße
> 250 mL) Dann drücken Sie
Milchsystem zu starten.
• Wenn der Milchschlauch nicht angebracht ist, bringen Sie ihn an den Kaffeevollautomaten an. (S. DE19)
, um den Spülzyklus für das
Hinweis
• Wenn das gedrückt wird, wird der
Spülvorgang sofort angehalten.
Nachdem
folgendes Display an.
blinkt, zeigt das Display
Füllen Sie das Glas mit sauberem Wasser und drücken Sie erneut ,
4
um den Spülzyklus zu starten. Stellen Sie eine leere Tasse unter den
Kaffeeauslauf, bevor Sie beginnen. (Tassengröße > 250 mL)
Hinweis
• Wenn das gedrückt wird, wird der Spülvorgang sofort
angehalten.
Nachdem
zurück.
Das Display kehrt zum Hauptmenü zurück,
wenn der Spülzyklus abgeschlossen ist.
blinkt, kehrt das Display zum vorherigen Display
DE39
Page 86

Entkalkungszyklus:
Verwenden Sie diesen Zyklus gelegentlich und/oder wenn das Display anzeigt.
Reinigung (Fortsetzung)
Dieser Entkalkungszyklus ermöglicht eine einfache und effektive Entkalkung. Dieses Programm läuft in 2 Phasen, dauert etwa
11 Minuten und sollte nicht unterbrochen werden. Wenn das Display das
Schritten ab 3.
anzeigt, drücken Sie und folgen Sie den
Drücken Sie im Hauptmenü.
1
Wählen Sie “Entkalkungsprogramm”.
2
Hinweis
• Wenn gedrückt wird, kehrt das Display zum vorherigen
Display zurück.
(Erste Phase)
Füllen Sie den Wassertank mit 250 mL Wasser und geben Sie 125 mL
3
Entkalkungsmittel hinzu, dann drücken Sie
Hinweis
• Wenn gedrückt wird, kehrt das Display zum vorherigen
Display zurück.
.
Drücken Sie , um den Entkalkungszyklus zu starten. (ca. 9 Min.)
4
• Leeren Sie die Tropfschale, bevor Sie den Reinigungszyklus starten.
Hinweis
• Wenn während der Entkalkung
gedrückt wird, zeigt das Display an, dass die
Tropfschale geleert werden muss. Um den
Entkalkungszyklus fortzusetzen, drücken Sie
.
DE40
Page 87

Leeren Sie die Tropfschale und drücken Sie .
5
(Zweite Phase)
Leeren Sie das Wasser aus dem Wassertank und spülen Sie ihn sorgfältig
6
aus. Drücken Sie
drücken Sie
, um den Vorgang fortzuführen. (ca. 2 Min.)
. Dann füllen Sie ihn mit sauberem Wasser und
Hinweis
• Wenn während der Entkalkung
gedrückt wird, zeigt das Display an, dass die
Tropfschale geleert werden muss. Um den
Entkalkungszyklus fortzusetzen, drücken Sie
.
Drücken Sie .
7
Hinweis
• Wenn während der Entkalkung
gedrückt wird, zeigt das Display an, dass die
Tropfschale geleert werden muss. Um den
Entkalkungszyklus fortzusetzen, drücken Sie
.
Drücken Sie , um zum Hauptmenü zurückzukehren.
8
• Leeren Sie die Tropfschale.
Hinweis
• Das Reinigungswasser wird in der Tropfschale aufgefangen. Leeren Sie die Tropfschale oder den Behälter, wenn das Display
anzeigt, dass die Tropfschale geleert werden muss.
• Im Falle eines Stromausfalls während des Entkalkungszyklus muss das Programm neu gestartet werden.
• Wenn während der Entkalkung
drücken Sie
.
gedrückt wird, wird der Vorgang angehalten. Um den Entkalkungszyklus fortzusetzen,
DE41
Page 88

Fehlerbehebung
Problem Ursache und Maßnahme
O Die Temperatureinstellung ist niedrig. (S. DE27)
Getränke sind nicht
heiß genug.
Getränke sind zu
schwach oder stark.
O Tassen sind zu kalt.
«Wärmen Sie die Tassen mit heißem Wasser vor.
O Raumtemperatur ist zu kalt.
O Erste Inbetriebnahme des Kaffeevollautomaten oder Wechsel zu einer neuen
Kaffebohnensorte.
«Der gewünschte Geschmack wird nach wiederholtem Brühen erreicht.
[Pulverkaffee]
O Es wurde nicht genug oder zu viel Kaffeepulver verwendet.
«
Messen Sie den Kaffee richtig mit dem mitgelieferten Messlöffel ab. (Max: 1 Messlöffel voll)
«Probieren Sie verschiedene Arten Kaffeepulver.
[Kaffeebohnen]
O Einstellung ist nicht richtig.
«Versuchen Sie die Einstellung der Qualität des gemahlenen Kaffees zu ändern.
(S. DE17, DE20)
«Ändern Sie den Mahlgrad. (S. DE10)
«Probieren Sie verschiedene Arten Kaffeebohnen.
O Der Kaffeebohnentyp oder die Mahlgradeinstellung wurde geändert.
«
Warten Sie ein paar Tassen ab, es sind noch Kaffeebohnen in dem Kaffeevollautomaten.
Anormales lautes Geräusch
während des Mahlens.
Kein Milchschaum
oder Milch wird nicht
ausgegeben.
Schlechte Qualität des
Schaums.
Latte Macchiato
besteht nicht aus drei
Schichten.
O Mahlmechanismus ist durch Fremdmaterial verstopft.
«Senden Sie den Kaffeevollautomaten zur Inspektion an den Servicecenter.
O Der Verteilerschlauch oder der Milchschlauch sind nicht richtig angeschlossen.
«Überprüfen Sie den Verteilerschlauch oder die Milchschlauchverbindung.
(S. DE19, DE34)
O Der Milchschäumer wurde nicht korrekt eingesetzt.
«Stellen Sie den Milchschäumer richtig ein. (S. DE36)
O Die Milchschäumerkappe ist geöffnet.
«Überprüfen Sie die Milchschäumerkappe. (S. DE36)
O Der Milchschlauch ist verbogen.
«Bringen Sie den Milchschlauch erneut an. (S. DE19)
O Der Milchschäumer ist verstopft.
«
Reinigen Sie die Milchschäumerdüse, indem Sie sie einweichen. (Schritt 6 auf S. DE36)
O Der Dampfausgang des Kaffevollautomaten ist blockiert.
«Entkalken Sie den Kaffeevollautomaten. (S. DE40)
O Milch ist zu warm, zu alt oder hat einen zu hohen oder zu niedrigen Fettanteil.
«Verwenden Sie frische kalte Milch und/oder Milch mit einem anderen Fettanteil.
O Die Milchschäumerdüse ist verstopft.
«Reinigen Sie die Milchschäumerdüse. (S. DE36)
O Der Milchschäumer ist nicht sauber.
«Reinigen Sie den Milchschäumer. (S. DE36)
O Der Dampfausgang des Kaffevollautomaten ist blockiert.
«Entkalken Sie den Kaffeevollautomaten. (S. DE40)
Display zeigt an “Mit
Wasser auffüllen”,
auch wenn der
Wassertank voll ist.
“Mit Wasser auffüllen”
erscheint nicht, trotz
leeren Wassertanks.
DE42
O Luft im Wasserdurchgang.
«Lassen Sie ein wenig heißes Wasser ab. (S. DE24)
O Wasserdurchgang ist verstopft.
«Entkalken Sie den Kaffeevollautomaten. (S. DE40)
O Zu viel Feuchtigkeit auf dem Wassertank.
«Entfernen Sie den Wassertank und trocknen Sie ihn sorgfältig.
Page 89

Problem Ursache und Maßnahme
“Tresterbehälter
entleeren” wird
angezeigt, nachdem
der Tresterbehälter
geleert wurde.
Kaffeeausgabe zu
langsam.
Wasser im
Tresterbehälter.
Der Kaffevollautomat
schaltet sich aus,
nachdem gespült oder
Kaffee ausgegeben wurde.
O Tresterbehälter wurde geleert, während der Kaffevollautomat ausgeschaltet war.
«
Leeren Sie den Tresterbehälter nur, wenn der Kaffevollautomat eingeschaltet ist.
O Wenn im Bestätigungs-Display “Tresterbehälter entleeren” angezeigt wird, wurde
gedrückt.
«Drücken Sie
entleeren” anzeigt.
O Mahlstärke ist zu fein eingestellt.
«Stellen Sie einen gröberen Mahlgrad ein.
O Mahlquantität ist zu hoch eingestellt.
«Stellen Sie die Menge des gemahlenen Kaffees niedriger ein.
O Wasserdurchgang ist verstopft.
«Lassen Sie das Entkalkungsprogramm durchlaufen. (S. DE40)
O Kaffeepulver ist zu fein oder zu hohe Menge.
«Verwenden Sie gröberes Kaffeepulver oder eine geringere Menge des
Kaffeepulvers. (Max: 1 Messlöffel voll)
O Wasser läuft während jeden Spülvorgangs in den Tresterbehälter.
«Keine Abhilfe notwendig. (Technische Gründe.)
O Brüheinheit ist blockiert oder falsch eingestellt.
«Stellen Sie die Brüheinheit ein. (S. DE44)
O Der Druck in der Brüheinheit ist zu hoch.
«Entfernen Sie und reinigen Sie die Brüheinheit. Wenn die Brüheinheit
geschlossen ist, öffnen Sie sie vor der Reinigung. Schrauben Sie die
Brüheinheit am schwarzen Zahnstift auf. (S. DE44)
, wenn das Bestätigungs-Display “Tresterbehälter
Der Kaffevollautomat
kann nicht
eingeschaltet werden.
Die Kaffeeausgabe ist
sehr uneinheitlich oder
nur auf einer Seite.
Es wird nur Heißwasser am
Kaffeemenü ausgegeben.
Es wird kein Heißwasser
ausgegeben.
Das Gerät funktioniert
nicht richtig.
O Der Netzstecker ist nicht angesteckt.
«Stecken Sie den Netzstecker ein.
O Die Brüheinheit ist nicht eingestellt.
«Stellen Sie die Brüheinheit richtig ein. (S. DE35)
O Die Brüheinheit wurde nicht vollständig hineingedrückt.
«Drücken Sie die Brüheinheit hinein, bis Sie stoppt. (S. DE35)
O
Die Tülle ist durch Fremdkörper verstopft oder blockiert (z.B.: Kaffeebohne oder Ähnliches).
«Ziehen Sie die Kaffeetülle nach oben und reinigen Sie das Innere oder entfernen
Sie den Fremdkörper (z.B.: Kaffeebohne).
O Die Hülse mit dem Verteilerschlauch innen im Kaffeeauslauf wurde in den
Kaffeeausgang eingesetzt.
«Stecken Sie die Hülse mit dem Verteilerschlauch richtig hinein. (S. DE34)
O Kaffeepulver verstopft den Kaffeepulverschacht.
«Schalten Sie den Strom aus und drücken Sie das Kaffeepulver mit einem Stab
hinunter in den Kaffeepulverschacht.
O Der Milchschäumer ist nicht eingestellt.
«Stellen Sie den Milchschäumer ein. (S. DE36)
O Schalten Sie das Gerät aus und warten Sie etwa 5 Minuten. Schalten Sie das
Gerät erneut ein und wenn das Gerät immer noch das Gleiche macht, kontaktieren
Sie den Panasonic-Servicecenter zur Inspektion.
Milch tropft aus der
Tülle.
O Der Milchpegel ist höher als die Tüllenposition.
«Ziehen Sie den Milchschlauch aus der Milchpackung.
DE43
Page 90

Fehlerbehebung (Fortsetzung)
Problem Ursache und Maßnahme
Das Display zeigt
“Entkalkungsprogramm”
oder “Reinigung des
Milchsystems”, wenn das
Gerät eingeschaltet ist.
O Der Kaffeevollautomat wurde ohne vorhergehende Reinigung abgeschaltet.
«Reinigen Sie den Kaffeevollautomaten vor jeder Verwendung. (S. DE39, DE40)
Das Display zeigt “Mit
Kaffeebohnen auffüllen”,
obwohl noch ausreichend
Kaffeebohnen vorhanden
O Wenn ölige Kaffebohnen verwendet werden, können sie nur erschwert vom
Mahlwerk erfasst werden.
«Schütten Sie sie direkt in die Mahlwerk oder verwenden Sie eine andere
Bohnenart.
sind.
Caffe Crema fließt an
der Tüllenrückseite über.
O Je nach Bohnenart kann sich eine größere Menge Crema bilden. (Dies ist keine
Funktionsstörung.)
Fehler-Display
Display Ursache und Maßnahme
Wenn diese Nachricht auf dem Display erscheint,
1
Schalten Sie den Kaffeevollautomaten aus.
2
H01–H08
U10
Warten Sie, bis der Kaffevollautomat vollkommen abgekühlt ist und schalten Sie den Strom wieder ein.
3
Wenn die Nachricht erneut angezeigt wird, ist ein Fehler aufgetreten – setzen Sie sich mit
dem Servicecenter in Verbindung, um eine Inspektion oder Reparatur durchführen zu lassen.
O Brüheinheit ist blockiert. (Technische Gründe)
«
Ziehen Sie die Brüheinheit heraus und lösen Sie sie auf der Rückseite, indem Sie die Einstellungsfunktion
des Messlöffels verwenden. Drücken Sie die verzahnte Öffnung am Messlöffel auf den Stift und lösen Sie
ihn, indem Sie ihn vollständig mindestens 3 Mal drehen. Dann spülen Sie die Brüheinheit gründlich aus.
U11
U12
U13
U14
DE44
O Überfülltes Kaffeepulver.
«Reinigen Sie die Brüheinheit. (S. DE35)
O Der Adapter ohne Filterkartusche ist immer noch im Wassertank.
«Entfernen Sie den Adapter aus dem Wassertank.
O Der Wassertank ist übergelaufen oder zu nass.
«Trocknen Sie den Wassertank und das Wassertankfach sorgfältig.
O Mahlgrade ist zu fein eingestellt, oder es wird ein zu feines Kaffeepulver verwendet.
«Reinigen Sie die Brüheinheit.
«Stellen Sie die Mahlgrade gröber ein, oder verwenden Sie ein gröberes Kaffeepulver.
O Die Raumtemperatur ist zu niedrig oder der Kaffeevollautomat ist zu kalt.
«Stellen Sie den Kaffeevollautomaten in einem Raum mit einer Temperatur über 10 °C
auf und warten Sie, bis sie Raumtemperatur erreicht hat.
O
Die Innentemperatur des Kaffeevollautomats bleibt bei regelmäßigem Gebrauch konstant hoch.
1
Warten Sie, bis der Kaffevollautomat vollkommen abgekühlt ist und schalten Sie den Strom wieder ein.
2
Wenn die Nachricht erneut angezeigt wird, ist ein Fehler aufgetreten – setzen Sie sich mit
dem Servicecenter in Verbindung, um eine Inspektion oder Reparatur durchführen zu lassen.
Page 91

Austauschteile
Teilename Teilenummer
Bohnenbehälter-Erweiterung ACK05-155U
Latte-Macchiato-Platte ACK06-155
Messlöffel ACK10-155U
Milchschlauch ACK08-155
Adapter für Filterkartusche ACK07-155U
Teststreifen ACK11-155
Reinigungstabletten ACK12-155U
Entkalkungsmittel ACK13-155U
Milchsystemreiniger ACK14-155
Schnellübersicht ACZ78-155U
Milchschäumer ACW33-155U
Technische Daten
NC-ZA1
Netzspannung
Leistungsaufnahme 1550 W
Max. Wassermenge 1,4 L (49.3 oz)
Abmessungen (B × T × H) (ca.) 19,5 × 41,0 × 33,5 cm (7,7 × 16,1 × 13,2 Zoll)
Masse (ca.) 10,3 kg (22,7 Pfund)
Länge des Netzkabels (ca.) 115 cm (45,3 Zoll)
Benutzerinformationen zur Entsorgung von elektrischen und elektronischen Geräten (private
Haushalte)
Entsprechend der grundlegenden Firmengrundsätze der Panasonic-Gruppe, wurde ihr Produkt aus
hochwertigen Materialien und Komponenten entwickelt und hergestellt, die recycelbar und
wiederverwendbar sind.
Dieses Symbol auf Produkten und/oder begleitenden Dokumenten bedeutet, dass elektrische und
elektronische Produkte am Ende ihrer Lebensdauer vom Hausmüll getrennt entsorgt werden müssen.
Bringen Sie bitte diese Produkte für die Behandlung, Rohstoffrückgewinnung und das Recycling zu den
eingerichteten kommunalen Sammelstellen bzw. Wertstoffsammelhöfen, die diese Geräte kostenlos entgegennehmen.
Die ordnungsgemäße Entsorgung dieses Produkts dient dem Umweltschutz und verhindert mögliche schädliche
Auswirkungen auf Mensch und Umwelt, die sich aus einer unsachgemäßen Handhabung der Geräte am Ende Ihrer
Lebensdauer ergeben könnten.
Genauere Informationen zur nächstgelegenen Sammelstelle bzw. Recyclinghof erhalten Sie bei Ihrer
Gemeindeverwaltung.
220 – 240 V
50 – 60 Hz
Für Geschäftskunden in der Europäischen Union
Bitte treten Sie mit Ihrem Händler oder Lieferanten in Kontakt, wenn Sie elektrische und elektronische Geräte
entsorgen möchten. Er hält weitere Informationen für sie bereit.
Informationen zur Entsorgung in Ländern außerhalb der Europäischen Union
Dieses Symbol ist nur in der Europäischen Union gültig.
DE45
Page 92

Inhoud Pagina
Veiligheidsmaatregelen NL3
Belangrijke informatie NL8
Onderdeelnamen en bedieningsinstructies NL9
Scherm NL11
Smaakinstelling NL13
Voor gebruik NL14
Espresso/Koffie NL17
Cappuccino/Latte macchiato/Warme melk NL19
Oploskoffie bereiden NL22
Heet water NL24
Uitzetten NL25
De instelling wijzigen NL27
Geheugen instellen NL31
De machine schoonmaken NL33
Problemen oplossen NL42
Foutmeldingsscherm NL44
Reserveonderdelen NL45
Specificaties NL45
Hartelijk dank voor uw aankoop van dit Panasonic product.
• Dit product is alleen bestemd voor huishoudelijk gebruik.
• Lees deze handleiding zorgvuldig door om het apparaat juist en veilig te gebruiken.
• Voordat u dit product gebruikt, lees aandachtig de “Veiligheidsmaatregelen” (Pagina NL3–NL8).
• Bewaar deze gebruiksaanwijzing voor toekomstig gebruik.
NL2
Page 93

Houdt u zich aan de
Veiligheidsmaatregelen
Volg de onderstaande instructies om ongelukken of verwondingen aan
gebruikers en andere mensen, evenals beschadigingen aan uw
eigendom te voorkomen.
Q De volgende tabellen laten zien hoeveel schade verkeerd gebruik
kan veroorzaken.
volgende instructies.
WAARSCHUWING:
LET OP:
Q De symbolen worden als volgt ingedeeld en omschreven.
Dit symbool geeft een verbod aan.
Dit symbool geeft een vereiste aan dat moet worden nageleefd.
Geeft ernstig letsel of de dood aan.
Geeft risico op letselschade of eigendommen aan.
WAARSCHUWING
O
Beschadig het netsnoer of de stekker niet.
De volgende handelingen zijn streng verboden.
Wijzigen, aanraken van of in de buurt plaatsen
van verwarmingselementen, buigen, draaien,
trekken, trekken over scherpe randen, zware
voorwerpen er op zetten, het netsnoer bundelen
en het apparaat dragen aan het netsnoer.
Netsnoer
Stekker
Dit kan een elektrische schok veroorzaken, of
(
brand, door kortsluiting.
OGebruik het apparaat niet als het netsnoer of de stekker is
beschadigd of de stekker losjes in het stopcontact zit.
(Dit kan een elektrische schok veroorzaken, of brand, door kortsluiting.)
« Als het netsnoer beschadigd raakt, moet dit worden vervangen
door de fabrikant of het servicecentrum of door iemand met
dezelfde kwalificaties om gevaren uit te sluiten.
OSteek de stekker niet in of trek hem niet uit het stopcontact
met natte handen.
(Dit kan een elektrische schok veroorzaken.)
• Zorg er altijd voor dat uw handen droog zijn voordat u de stekker
aanraakt of het apparaat inschakelt.
)
NL3
Page 94

Veiligheidsmaatregelen
WAARSCHUWING
OZorg ervoor dat het voltage aangegeven op het etiket van het
apparaat dezelfde is als uw lokale voltage.
Indien dit niet het geval is, kan dit een elektrische schok of brand
(
veroorzaken.
Vermijd ook het aansluiten van andere apparaten op hetzelfde
stopcontact om elektrische oververhitting te voorkomen. Maar als u
een aantal stekkers aansluit, zorg ervoor dat de totale wattage het
nominale vermogen van het stopcontact niet overschrijdt. Het
gebruik van verlengsnoeren is niet aan te raden.
OSteek de stekker stevig in het stopcontact.
De warmte die kan worden gegenereerd rond de stekker kan een
(
elektrische schok en/of brand veroorzaken.
• Plaats het apparaat op een plaats waar de stekker gemakkelijk
kan worden verwijderd.
Houdt u zich aan de
volgende instructies.
)
)
OMaak de stekker regelmatig schoon.
Stof- en vochtopbouw op de stekker kunnen onvoldoende isolatie
(
veroorzaken, wat brand kan veroorzaken etc.
« Trek de stekker uit het contact en veeg deze schoon met een
droge doek.
OHoud het netsnoer buiten het bereik van kinderen. Laat het
netsnoer niet over de rand van de tafel of het aanrecht hangen.
(Dit kan brandwonden, letsel of elektrische schokken veroorzaken.)
OZet het apparaat niet in water en zorg dat er geen water op komt.
(Dit kan een elektrische schok veroorzaken, of brand, door kortsluiting.)
ODit apparaat niet repareren, demonteren of wijzigen.
(Dit kan brand, elektrische schokken of letsel veroorzaken.)
« Neem contact op met de verkoper of een servicecentrum van
Panasonic.
)
NL4
OVermijd aanraking of uw gezicht in de buurt brengen van
plaatsen waar stoom uit komt.
(Dit kan brandwonden of letsel veroorzaken.)
•
Houd het apparaat vooral buiten het bereik van baby’s en kinderen.
Page 95

WAARSCHUWING
ODit apparaat kan gebruikt worden door kinderen vanaf 8 jaar en
ouder, wanneer dit onder toezicht gebeurt of na instructie over
het veilige gebruik van het apparaat en als ze de mogelijke
gevaren begrijpen. Het reinigen en gebruikersonderhoud mag
niet door kinderen worden uitgevoerd, tenzij ze ouder zijn dan
8 jaar en onder toezicht. Houd het apparaat en het netsnoer
buiten het bereik van kinderen jonger dan 8 jaar.
(Dit kan brandwonden, letsel of elektrische schokken veroorzaken.)
OHoud de kinderen altijd uit de buurt van het apparaat en het
reinigingsproduct.
(Dit kan brandwonden of letsel veroorzaken.)
• Kinderen realiseren zich niet de gevaren die kunnen optreden als
gevolg van onjuist gebruik van apparaten.
OGebruik het apparaat niet meer en haal de stekker uit het
stopcontact in het onwaarschijnlijke geval dat dit apparaat
niet naar behoren functioneert.
Dit kan rook, brand, elektrische schokken of brandwonden
(
veroorzaken.
bijvoorbeeld bij abnormale werking of demontage.
• De stekker en het netsnoer worden abnormaal heet.
• Het netsnoer is beschadigd of er is een stroomstoring.
• De behuizing is vervormd, vertoont zichtbare schade of is
abnormaal heet.
• Er lekt water uit de behuizing.
• Er is een andere abnormaliteit of storing.
« Ontkoppel het apparaat direct en neem contact op met de
verkoper of een servicecentrum van Panasonic om het te laten
controleren of repareren.
)
O Laat peuters en kinderen niet met het verpakkingsmateriaal spelen.
(Dit kan verstikking veroorzaken.)
OOpen het waterreservoir, de dispenser of lekbak niet terwijl de
koffie wordt gemaakt.
(Dit kan brandwonden veroorzaken.)
NL5
Page 96

Veiligheidsmaatregelen
LET OP
OGebruik het apparaat niet voor andere doeleinden dan die
beschreven zijn in deze handleiding.
(Dit kan brandwonden of letsel veroorzaken.)
• Panasonic aanvaardt geen aansprakelijkheid indien het apparaat
onderworpen wordt aan onjuist gebruik, of niet naleving van deze
instructies.
OSteek geen voorwerpen in de gaten.
(Dit kan een elektrische schok veroorzaken.)
• Vooral geen metalen voorwerpen, zoals pennen of draden.
ORaak hete oppervlakken zoals koffieschenktuiten niet aan
Houdt u zich aan de
volgende instructies.
tijdens of direct na gebruik.
(Dit kan brandwonden veroorzaken.)
• Het apparaat nooit met natte handen aanraken.
OGebruik het apparaat niet op de volgende plaatsen:
• Op oneffen oppervlakken, tapijt, niet waterbestendige
oppervlakken of tafelkleed, enzovoort.
(Het kan een brand of letsel veroorzaken.)
• Plaatsen waar het apparaat kan worden bespat met water of in de
buurt van een warmtebron.
(Het kan elektrische schokken of elektrische lekkage veroorzaken.)
• Plaatsen waar met water wordt gevuld, zoals een bad, wastafel of
in andere containers.
(Het kan elektrische schokken of elektrische lekkage veroorzaken.)
• In de buurt van een muur of meubels.
(Dit kan verkleuring of misvorming veroorzaken.)
NL6
•
De plaats die zelfs kan worden beschadigd door een lichte verwarming.
(Dit kan verkleuring of misvorming veroorzaken.)
• Plaatsen die niet sterk genoeg zijn om het apparaat te dragen.
(Dit kan schade of letsel veroorzaken.)
• In gesloten ruimtes zoals een ingebouwde kast.
(Dit kan verkleuring of misvorming veroorzaken.)
Page 97

LET OP
O Het kopje of koffiepot niet verwijderen terwijl de koffie wordt gemaakt.
(Dit kan brandwonden veroorzaken.)
OVerplaats het apparaat niet terwijl u de dispenser of de lekbak
vasthoudt.
(Dit kan letsel veroorzaken.)
OSteek uw handen niet in het maalgedeelte.
(Dit kan letsel veroorzaken.)
OHoud de espressomachine niet vast bij het netsnoer.
(Dit kan brand of elektrische schok veroorzaken.)
OHoud de stekker vast als u het uit het stopcontact trekt.
Trek nooit aan het netsnoer.
Anders kan er een elektrische schok of brand ontstaan, vanwege
(
kortsluiting.
OVerwijder altijd de stekker uit het stopcontact wanneer het
apparaat wordt uitgeschakeld, voordat u het verplaatst en voor
het schoonmaken (met uitzondering van de reinigingsfunctie).
(Anders kan er een elektrische schok of brand ontstaan, vanwege lekstroom.)
O Plaats het apparaat (inclusief de lekbak en de Latte Macchiato
plaat) op een stevig, droog, schoon, vlak, hittebestendig aanrecht.
(Anders kan het brandwonden of letsel veroorzaken.)
OPas op niet te struikelen over of vast komen te zitten in het
netsnoer tijdens het gebruik.
(Anders kan het brandwonden of letsel veroorzaken.)
)
ORaak de luchtgaten voor stoom niet aan en blokkeer of bedek
deze niet tijdens het gebruik.
(Dit kan verkleuring veroorzaken.)
• Let vooral op kinderen.
NL7
Page 98

Veiligheidsmaatregelen
LET OP
OTrek de stekker uit het stopcontact en laat het apparaat
volledig afkoelen alvorens het te reinigen en op te bergen.
(Dit kan brandwonden veroorzaken.)
OZorg ervoor dat u het apparaat na elk gebruik reinigt.
Anders kan dit brandwonden veroorzaken door overlopen
(
vanwege een verstopte filterhouder.
OVermijd contact met de huid of de ogen wanneer u het
reinigingsproduct gebruikt.
(Dit kan letsel veroorzaken.)
« Bij contact met de huid of de ogen, onmiddellijk spoelen met
Houdt u zich aan de
volgende instructies.
)
ruim water en uw huisarts raadplegen.
OAls het reinigingsproduct in aanraking komt met kwetsbare
oppervlakken, de spatten onmiddellijk afnemen.
(Het kan verkleuring veroorzaken.)
Belangrijke informatie
•
Vul het waterreservoir niet met melk (soja- en rijstmelk inbegrepen),
mineraal water, spuitwater of heet water enz. Gebruik alleen leidingwater.
(Dit kan een storing veroorzaken.)
• Gebruik het apparaat niet buitenshuis.
• Doe geen gemalen koffie in de schacht voor gemalen koffie als het
apparaat niet aan staat.
• Pas de maalsterkte alleen aan terwijl koffiebonen worden gemalen.
(P. NL10)
• Vul het koffiebonenreservoir niet met gevriesdroogde, gekonfijte of
gekarameliseerde of vette koffiebonen of water.
• Gebruik geen andere accessoires en reinigingsmiddellen dan die door
de fabrikant worden geleverd of aanbevolen. (P. NL45)
• Zet het apparaat uit als u het langere tijd niet gebruikt.
• Op een plaats waar de temperatuur onder het vriespunt kan dalen.
(Dit kan een storing veroorzaken.)
NL8
Page 99

Onderdeelnamen en
Filterpatroon
Mag alleen worden gebruikt met een BRITA
INTENZA waterfilterpatroon; patroon niet
standaard meegeleverd. Patronen zijn
beschikbaar bij uw plaatselijke BRITA
klantendienst: www.brita.net
(Beschikbaarheid verschilt per land.)
Maatlepel
(
met reinigingsborstel
en instelfunctie
Adapter
(voor filterpatroon)
Teststrip
(
voor het bepalen van
de hardheid van het
water
Uitbreiding koffiebo-
nenreservoir (P. NL10)
Reinigingstabletten
Ontkalker
Melkslang
Melksysteem reiniger
Snelzoekgids
)
)
bedieningsinstructies
Q Reinig alle verwijderbare onderdelen voordat u het apparaat voor de eerste keer gebruikt of als u het langere tijd niet hebt
gebruikt. (P. NL33)
Voor de namen van de interne onderdelen, zie “De machine schoonmaken” op pagina’s NL34–NL36.
Snelzoekgids (Invoegsel)
Koffiebonenreservoir (P. NL10)
Aan-/uitschakelaar
Scherm (P. NL11, NL12)
Deur
Latte Macchiato plaat
•
Sluit de lekbak door erop te duwen en
breng de Latte Macchiato plaat aan
totdat deze op zijn plaats vastklikt.
Dispenser
Afvalreservoir
Accessoires
Stoomuitlaat
Netsnoer
Stekker
* De vorm van de
stekker kan verschillen
van de illustratie.
Waterreservoir (P. NL10)
Lekbak
Schenktuit
Roestvrijstalen
plaat
Plaats de roestvrijstalen plaat (met de
afgeronde rand naar boven gericht) op
de lekbak.
Duw deze in de espressomachine totdat
ze op hun plaats vastklikken.
Open de lekbak door erop te drukken.
Apart verkocht
NL9
Page 100

Onderdeelnamen en
Kofebonenreservoir
Schacht voor
gemalen koffie
Hendel voor
instellen van
maalsterkte
Deksel voor
koffiebonenreservoir
Deksel voor
schacht met
gemalen koffie
Instellen van de fijnheid van het malen
Draai de hendel voor het instellen van de maalsterkte naar u
toe om de gewenste fijnheid in te stellen. Stel de fijnheid van
het malen alleen in als de koffiemolen werkt.
Raak tijdens het malen de koffiebonen niet aan of steek uw
vingers niet in de koffiemolen. Sluit het deksel van het
koffiebonenreservoir nadat u de hendel hebt aangepast.
Fijn malen voor een “intense smaak”.
Gebruik deze instelling voor licht gebrande
koffiebonen.
Gemiddeld malen voor een “normale smaak”.
Gebruik deze instelling voor gemiddeld
gebrande koffiebonen.
Grof malen voor een “zachte smaak”.
Gebruik deze instelling voor donker gebrande
koffiebonen.
• Zal de gewenste smaak niet meteen proefbaar zijn.
Pas na een aantal keer zal de gewenste smaak proefbaar zijn.
De uitbreiding van het uitbreiding kofebonenreservoir aanbrengen
O Ga als volgt te werk als u de capaciteit van het standaard koffiebonenreservoir wilt uitbreiden van 125 gr
tot 250 gr.
1
Verwijder het deksel van het koffiebonenreservoir uit de houder.
2
Verwijder het deksel van de schacht voor gemalen koffie door het rechtop te openen en uit de
houder te trekken.
3
Plaats de uitbreiding van het uitbreiding koffiebonenreservoir op het koffiebonenreservoir.
Zorg ervoor dat de hendels voor het instellen van de maalsterkte allebei op dezelfde positie staan.
4
Breng het deksel van de schacht voor gemalen koffie aan en sluit het deksel van het
koffiebonenreservoir.
Waterreservoir
Helpt eraan herinneren wanneer het
filterpatroon moet worden vervangen.
IN (IN): Tijd dat het filterpatroon is aangebracht.
OUT (UIT): Tijd waarop het nodig is het
filterpatroon te vervangen.
1
De adapter aan het filterpatroon
aanbrengen.
2
Steek het filterpatroon met de adapter
in de geleiders, zoals getoond in de
afbeelding.
* Apart verkocht
Opmerking
• Het patroon moet van BRITA INTENZA zijn.
Vergelijkbare INTENZA van een ander merk past niet in deze
espressomachine.
Controle van de leeftijd van de filter
Deksel van het
waterreservoir
Filterpatroon*
Adapter
Til het deksel omhoog
om te openen.
bedieningsinstructies
(vervolg)
NL10
 Loading...