

Page 1

Operating Instructions / Bedienungsanleitung /
Instructions de fonctionnement / Istruzioni per l’uso
Instrucciones de funcionamiento / Gebruiksaanwijzing
Food Processor (Household Use)
Universal-Küchenmaschine (Hausgebrauch)
Robot de cuisine multifonction (Utilisation domestique)
Robot da cucina (Per uso domestico)
Procesador de alimentos (Uso hogareño)
Keukenmachine (Huishoudelijk Gebruik)
Model No.
MK-F800
Thank you for purchasing the Panasonic product.
• This product is intended for household use only.
• Please read these instructions carefully in order to use this product correctly and safely.
• Before using this product please give your special attention to the section “SAFETY PRECAUTIONS” (Page GB3-GB5).
• Please keep this Operating Instructions for future use.
Wir danken lhnen für den Kauf des Panasonic-Produkts.
• Dieses Produkt ist nur für den Haushaltsgebrauch vorgesehen.
• Bitte lesen Sie sorgfältig diese Anleitung, um einen korrekten und sicheren Betrielo der Maschine zu gewährleisten.
• Bevor Sie dieses Produkt verwenden, lesen Sie sich bitte aufmerksam die “SICHERHEITSVORKEHRUNGEN” (Seite DE3-
DE5) durch.
• Bitte bewahren Sie diese Bedienungsanleitung für eien spätere Verwendung auf.
Nous vous remercions d’avoir choisi le produit Panasonic.
• Ce produit est destiné aux particuliers uniquement.
• Veuillez lire attentivement ces consignes an d’utiliser la machine à café de manière correcte et sécurisée.
• Avant d’utiliser ce produit, veuillez porter une attention toute particulière à la section intitulée “CONSIGNES DE
SÉCURITÉ” (Page FR3-FR5).
• Veuillez conserver ce mode d’emploi pour référence ultérieure.
Grazie per aver acquistato il prodotto Panasonic.
• Questo prodotto è destinato esclusivamente a un uso domestico.
• Leggere attentamente queste istruzioni per utilizzare I’apparecchio in modo corretto e sicuro.
• Prima di utilizzare questo prodotto prestare particolare attenzione alle “PRECAUZIONI DI SICUREZZA” (Pagine IT3-IT5).
• Conservare queste istruzioni operative per la consultazione in futuro.
Gracias por comprar el producto de Panasonic.
• Este producto se ha diseñado exclusivamente para un uso doméstico.
• Lea atentamente estas instrucciones para utilizar el aparato de forma correcta y segura.
• Antes de utilizar este producto, preste especial atención a las “PRECAUCIONES DE SEGURIDAD” (Páginas SP3-SP5).
• Conserve estas instrucciones de funcionamiento para su uso en el futuro.
Hartelijk dank voor uw aankoop van de Panasonic product.
• Dit product is alleen bestemd voor huishoudelijk gebruik.
• Lees deze handleiding zorgvuldig door om het apparaat juist en veiling te gebruiken.
• Voordat u dit product gebruikt, schenk speciaal aandacht aan de “VEILIGHEIDSMAATREGELEN” (Pagina NL3-NL5).
• Bewaar deze gebruiksaanwijzing voor toekomstig gebruik.
100_160419_MK-F800_Second_EU(UZ50E153).indb 1 2016/04/19 16:56:43
Page 2

TABLE OF CONTENTS
Page
SAFETY PRECAUTIONS ........................................................................................................................... GB3 - GB5
IMPORTANT INFORMATION ................................................................................................................................. GB6
ELECTRICAL REQUIREMENT ..............................................................................................................................GB7
PART NAMES...............................................................................................................................................GB8 - GB9
SAFETY LOCK ..................................................................................................................................................... GB10
CIRCUIT BREAKER AND TEMPERATURE SENSOR PROTECTION ................................................................ GB10
DISASSEMBLY & ASSEMBLY
(i) DISASSEMBLY FROM PACKAGED CONDITION ..................................................................................... GB11
(ii) KNIFE BLADE • KNEADING BLADE • WHIPPING BLADE • GRATING BLADE ....................................... GB11
(iii) SLICING BLADES • SHREDDING BLADES • JULIENNE BLADE ............................................................ GB12
(iv) CITRUS PRESS .........................................................................................................................................GB12
(v) SALAD DRAINER ......................................................................................................................................GB13
FOOD PROCESSOR
(i) KNIFE BLADE ................................................................................................................................GB14 - GB16
- Preparation of Ingredients
- How to Use
(ii) SLICING BLADES • SHREDDING BLADES • JULIENNE BLADE ................................................GB17 - GB18
- Preparation of Ingredients
- How to Use
(iii) KNEADING BLADE .................................................................................................................................... GB19
- Preparation of Ingredients
- How to Use
(iv) WHIPPING BLADE ....................................................................................................................................GB20
- Preparation of Ingredients
- How to Use
(v) GRATING BLADE ......................................................................................................................................GB21
- Preparation of Ingredients
- How to Use
(vi) SALAD DRAINER ......................................................................................................................................GB22
- Preparation of Ingredients
- How to Use
(vii) CITRUS PRESS ......................................................................................................................................... GB23
- Preparation of Ingredients
- How to Use
BLENDER
(i) BLENDER ......................................................................................................................................GB24 - GB25
- Disassembly & Assembly
- Preparation of Ingredients
- How to Use
DRY MILL
(ii) DRY MILL .......................................................................................................................................GB26 - GB27
- Disassembly & Assembly
- Preparation of Ingredients
- How to Use
AFTER USE .............................................................................................................................................GB28 - GB29
TROUBLESHOOTING .............................................................................................................................GB30 - GB31
SPECIFICATIONS ................................................................................................................................................ GB33
GB2
100_160419_MK-F800_Second_EU(UZ50E153).indb 2 2016/04/19 16:56:43
Page 3
English
SAFETY PRECAUTIONS (Make sure to follow these instructions)
In order to prevent accidents or injuries to the user, other people and damage to
property, please follow the instructions below.
The following indication indicates the degree of damage caused by incorrect
operation.
WARNING
CAUTION
The symbols are classied and explained as follows.
This symbol indicates prohibition.
Indicates serious injury or death.
Indicates risk of injury or property damage.
This symbol indicates requirement
that must be followed.
WARNING
Do not damage the Cord or the Plug.
(It may cause electric shock, or re caused by short circuit.)
Do not use the appliance if the Cord or the Plug is damaged or the Plug is
loosely connected to the outlet.
(It may cause electric shock, or re caused by short circuit.)
If the Cord is damaged, it must be replaced by the manufacturer, its service
center or similarly qualied persons in order to avoid a hazard.
Do not plug or unplug the Plug with wet hands.
(It may cause electric shock.)
Do not exceed outlet voltage or use an alternate current other than that
specied on the appliance.
(It may cause electric shock or re.)
• Make sure the voltage supplied to the appliance is the same as your local
supply.
• Plugging other devices into the same outlet may cause over-heating.
Do not immerse the Motor Housing in water or splash it with water.
(It may cause electric shock, or re caused by short circuit.)
Do not dismantle, repair or modify the appliance.
(It may cause re, electric shock or injury.)
Please contact your service center for repairing.
Do not insert any objects into the vent or the gap.
(It may cause electric shock or malfunction.)
• Especially metal objects such as pins or wires.
Do not replace any parts of appliance with non-genuine spare parts.
(It may cause injury, electric shock or re.)
Do not try to remove the Lid when the appliance is still operating.
(It may cause injury.)
Do not use hot water (over 60 °C) for cleaning purpose or re to dry the
appliance.
(It may cause burning or malfunction.)
GB3
100_160419_MK-F800_Second_EU(UZ50E153).indb 3 2016/04/19 16:56:43
Page 4
WARNING
Do not place hot ingredients (over 60 °C) into the Bowl or the Blender Jug.
(It may cause injury or malfunction.)
Do not operate without the Blender Lid in place correctly for the Blender
Jug.
(It may cause injury.)
Do not put your nger or utensils such as spoon, fork etc. into the Bowl or
the Blender Jug during operation.
(It may cause injury, electric shock, or re caused by short circuit.)
Do not push the Safety Pin and Safety Lever with any instruments, stick etc.
as the appliance might be on.
(It may cause injury.)
This appliance shall not be used by children.
Keep the appliance and its cord out of reach of children. Appliances can
be used by persons with reduced physical, sensory or mental capabilities
or lack of experience and knowledge if they have been given supervision
or instruction concerning use of the appliance in a safe way and if they
understand the hazards involved.
Children shall not play with the appliance.
(It may cause burning, injury or electric shock.)
Insert the Plug rmly.
(Otherwise it may cause electric shock and re caused by the heat that may
generate around the Plug.)
Clean the Plug regularly.
(A soiled Plug may cause insufcient insulation due to moisture, and may cause
re.)
When abnormal operation or breaking down occurs, discontinue the
appliance operation immediately and unplug.
(It may cause smoke, re or electric shock.)
e.g. during abnormal operation or breaking down.
• The Plug and the Cord becomes abnormally hot.
• The Cord is damaged or there has been a power failure.
• The Motor Housing is deformed or abnormally hot.
Please unplug the appliance immediately and contact the service centre for
advice or a repair.
Make sure to hold the Plug when unplugging the Plug, i.e. never pull on the
Cord.
(Otherwise it may cause electric shock, or re caused by short circuit.)
Be careful if hot liquid is poured into the Bowl or Blender Jug as it can be
ejected out of the appliance due to a sudden steaming.
(It may cause burning.)
GB4
100_160419_MK-F800_Second_EU(UZ50E153).indb 4 2016/04/19 16:56:44
Page 5

English
CAUTION
QO Do not leave the appliance unattended when it is in operation.
(It may cause re or burns.)
• When leaving the appliance unattended, turn the power off.
QO Do not use the appliance in the following places:
• Any uneven surface, on non-heat resistant carpet or table cloth etc.
(It may cause re or injury.)
• In a location where there is risk of the appliance being splashed with water, or
near a heat source.
(It may cause electric shock or current leakage.)
QO Do not process more than the maximum capacity marked on each container
respectively. Follow the recommended ingredient amount for processing.
(It may cause injury.)
QO Do not continue operation for a long time. It is recommended to rest the
appliance after a certain operating time.
(It may cause burns.)
Function
Food Processor 2 4
Blender 2 2
Dry Mill 1 2
* With exception for the stated ”Ingredient Preparations” in this Operating Instruction.
QO Always disconnect the appliance from the supply if it is left unattended and
before assembling, disassembling or cleaning.
(Otherwise it may cause electric shock, or re caused by current leakage.)
QO Remove the Bowl, the Blender Jug and the Mill Container before lift up the
Motor Housing from the table.
(It may cause injury.)
QO Switch off the appliance and disconnect it from power supply before
changing accessories or approaching parts that are moving during
operation.
(It may cause injury.)
QO When carrying the appliance, be sure to hold the Motor Housing with both
hands. Do not carry it by holding only the Bowl or Blender Jug or Mill
Container.
(It may cause injury.)
QO If the Blender Cutting Blade gets stuck, switch off the Blender, then unplug.
Do not insert your nger into the Blender Jug. Use a rubber spatula to
remove the ingredients that are blocking the Blender Cutting Blade.
(It may cause injury.)
QO Care should be taken when handling the sharp cutting blades, emptying the
Bowl or Blender Jug and cleaning. (e.g. Knife Blade, Slicing Blades and etc.)
(It may cause injury.)
Operating Time
(minutes)
Rest Time
(minutes)
GB5
101_800-2_English - コピー.indd 5 2016/04/19 21:11:20
Page 6

IMPORTANT INFORMATION
Do not place the appliance in the following places.
• In a location where the appliance being expose to excessive moisture, temperature or
direct sunlight.
(It may cause malfunction.)
• Any high or low temperature location such as fridge, freezer, microwave or oven.
(It may cause malfunction or breakage.)
Do not process hard ingredients (e.g. hard meat, meat with bones) or viscous
material.
(It may cause malfunction.)
Prohibited Ingredients:
Attachments Description
Knife Blade Hard ingredients, viscous ingredients, e.g. coffee beans, dried
soyabeans, frozen food, dried squid, and etc.
Slicing Blades,
Shredding Blades
and Julienne
Blade
Kneading Blade Ingredients not suited for dough making, e.g. meat, vegetables,
Whipping Blade Any other ingredients aside from egg whites and fresh cream.
Grating Blade Viscous ingredients, ingredients with high hard ber concentrations,
Salad Drainer Large chunky ingredients, ingredients that are soft and fragile, e.g.
Citrus Press Any other ingredients aside from citrus fruits, e.g. apple, kiwi and
Blender Hard ingredients, highly sticky ingredients, ingredients with low
Dry Mill Hard nuts, dried fruit, ingredients with high hard ber concentration,
Ingredients with high hard ber concentrations, viscous ingredients,
ingredients that are too soft, e.g. hard vegetables, frozen food, ham,
turmeric, ginger, lettuce, tomato, peach, chocolate and etc.
nuts, sauces, spreads.
ingredients that are too small and thin, e.g. yam, celery, leek, pine
nuts, and etc.
large carrot or potato chunks, tomato, tofu, pasta, noodle, and etc.
etc.
water content, e.g. turmeric, dried soyabeans, frozen food, meat,
sh, boiled potatoes, or just ice cubes.
moist ingredients, liquids, e.g. various nuts, raisins, meat,
vegetables, boiled egg, turmeric, and etc.
Before Use:
Always operate the appliance on a clean, dry, at, hard and smooth surface, and clean
the Rubber Foot (P.GB8) before use to ensure that the Rubber Foot suction is at optimum
performance.
GB6
100_160419_MK-F800_Second_EU(UZ50E153).indb 6 2016/04/19 16:56:44
Page 7
English
Electrical Requirement (For UK market only)
FOR YOUR SAFETY PLEASE READ THE FOLLOWING TEXT CAREFULLY.
This appliance is supplied with a moulded three pin mains plug for your safety and
convenience. A 13-amp fuse is tted in this plug. Should the fuse need to be replaced
please ensure that the replacement fuse has a rating of 13-amp and that it is approved by
ASTA or BSI to BS1362.
Check for the ASTA mark
or the BSI mark on the body of the fuse. If the plug
contains a removable fuse cover, you must ensure that it is retted when the fuse is
replaced. If you lose the fuse cover, the plug must not be used until a replacement cover
is obtained.
A replacement fuse cover can be purchased from your local Panasonic Dealer.
If the tted moulded plug is unsuitable for the socket outlet in your home, then the fuse
should be removed and the plug cut off and disposed of safety.
There is a danger of severe electrical shock if the cut off plug is inserted into any 13-amp
socket.
How to replace the fuse
The location of the fuse differs according to the
type of AC mains plug (gures A and B).
Conrm the AC mains plug tted and follow the
instructions below.
Illustrations may differ from actual AC mains plug.
Open the fuse cover with a screwdriver and
replace the fuse and close or attach the fuse cover.
Figure A
Figure B
Fuse cover
GB7
100_160419_MK-F800_Second_EU(UZ50E153).indb 7 2016/04/19 16:56:44
Page 8
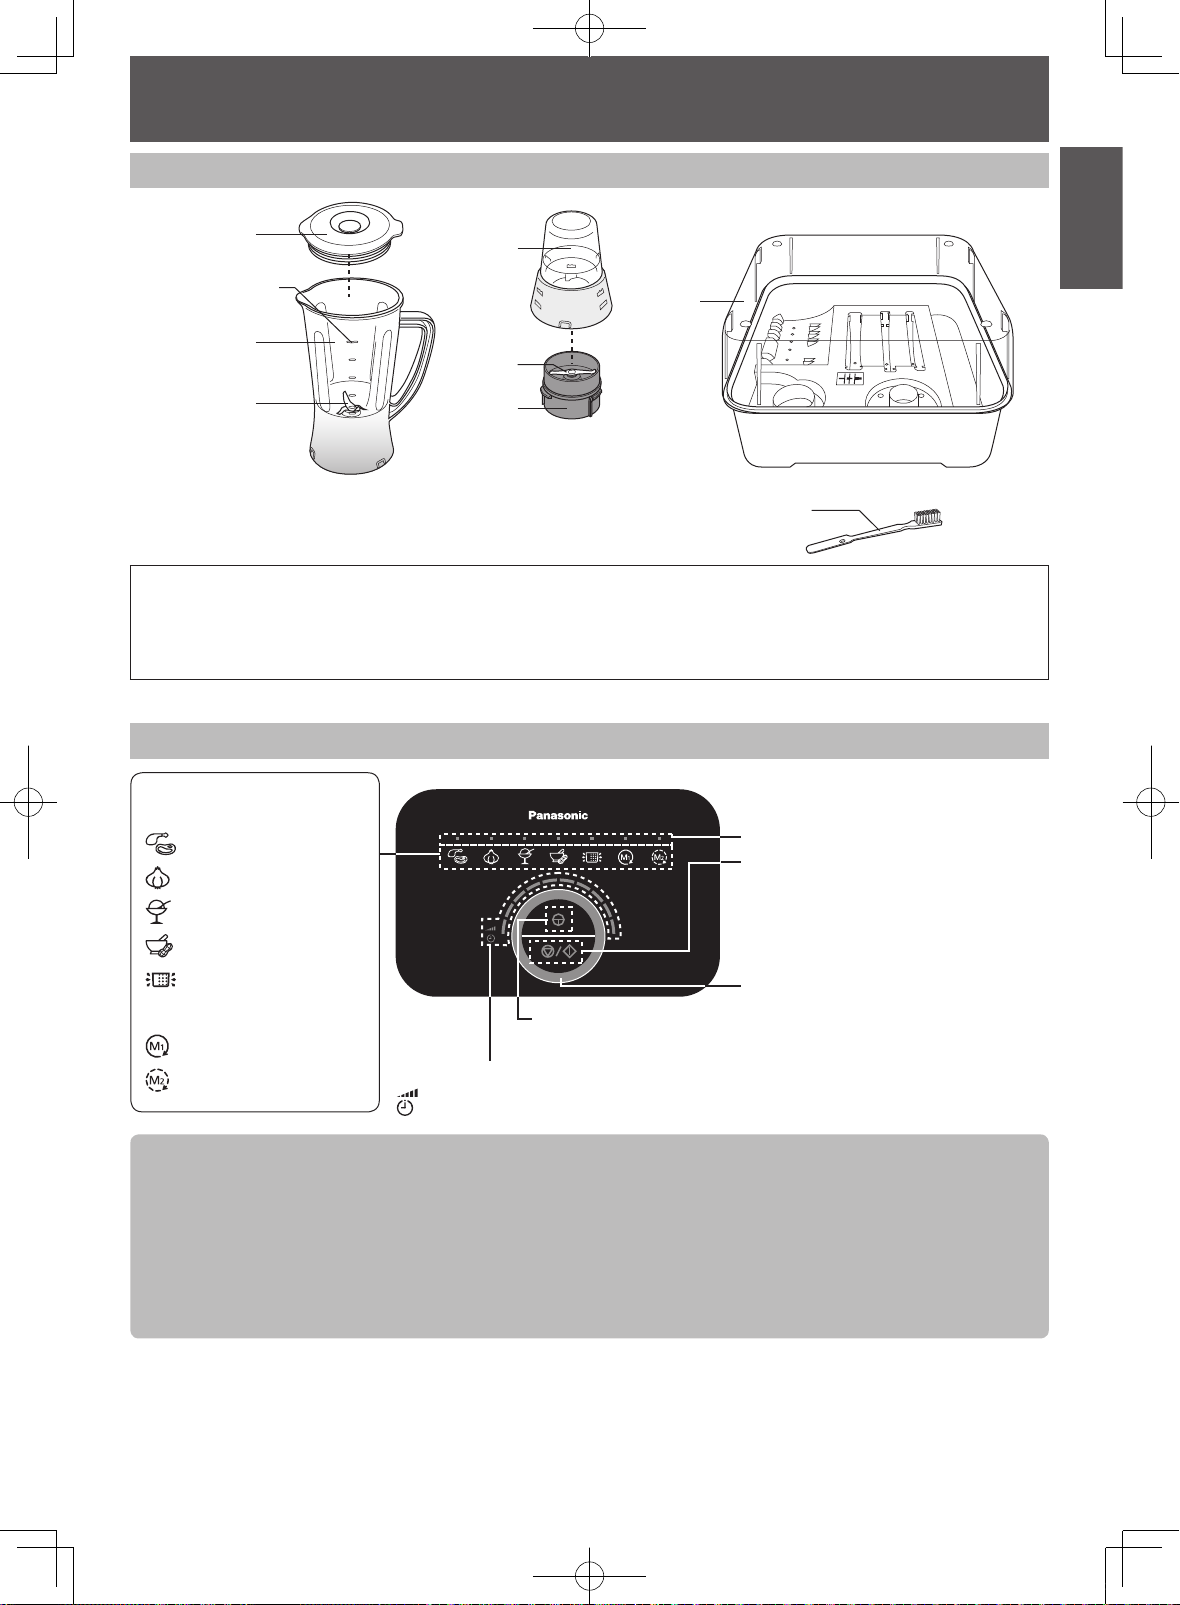
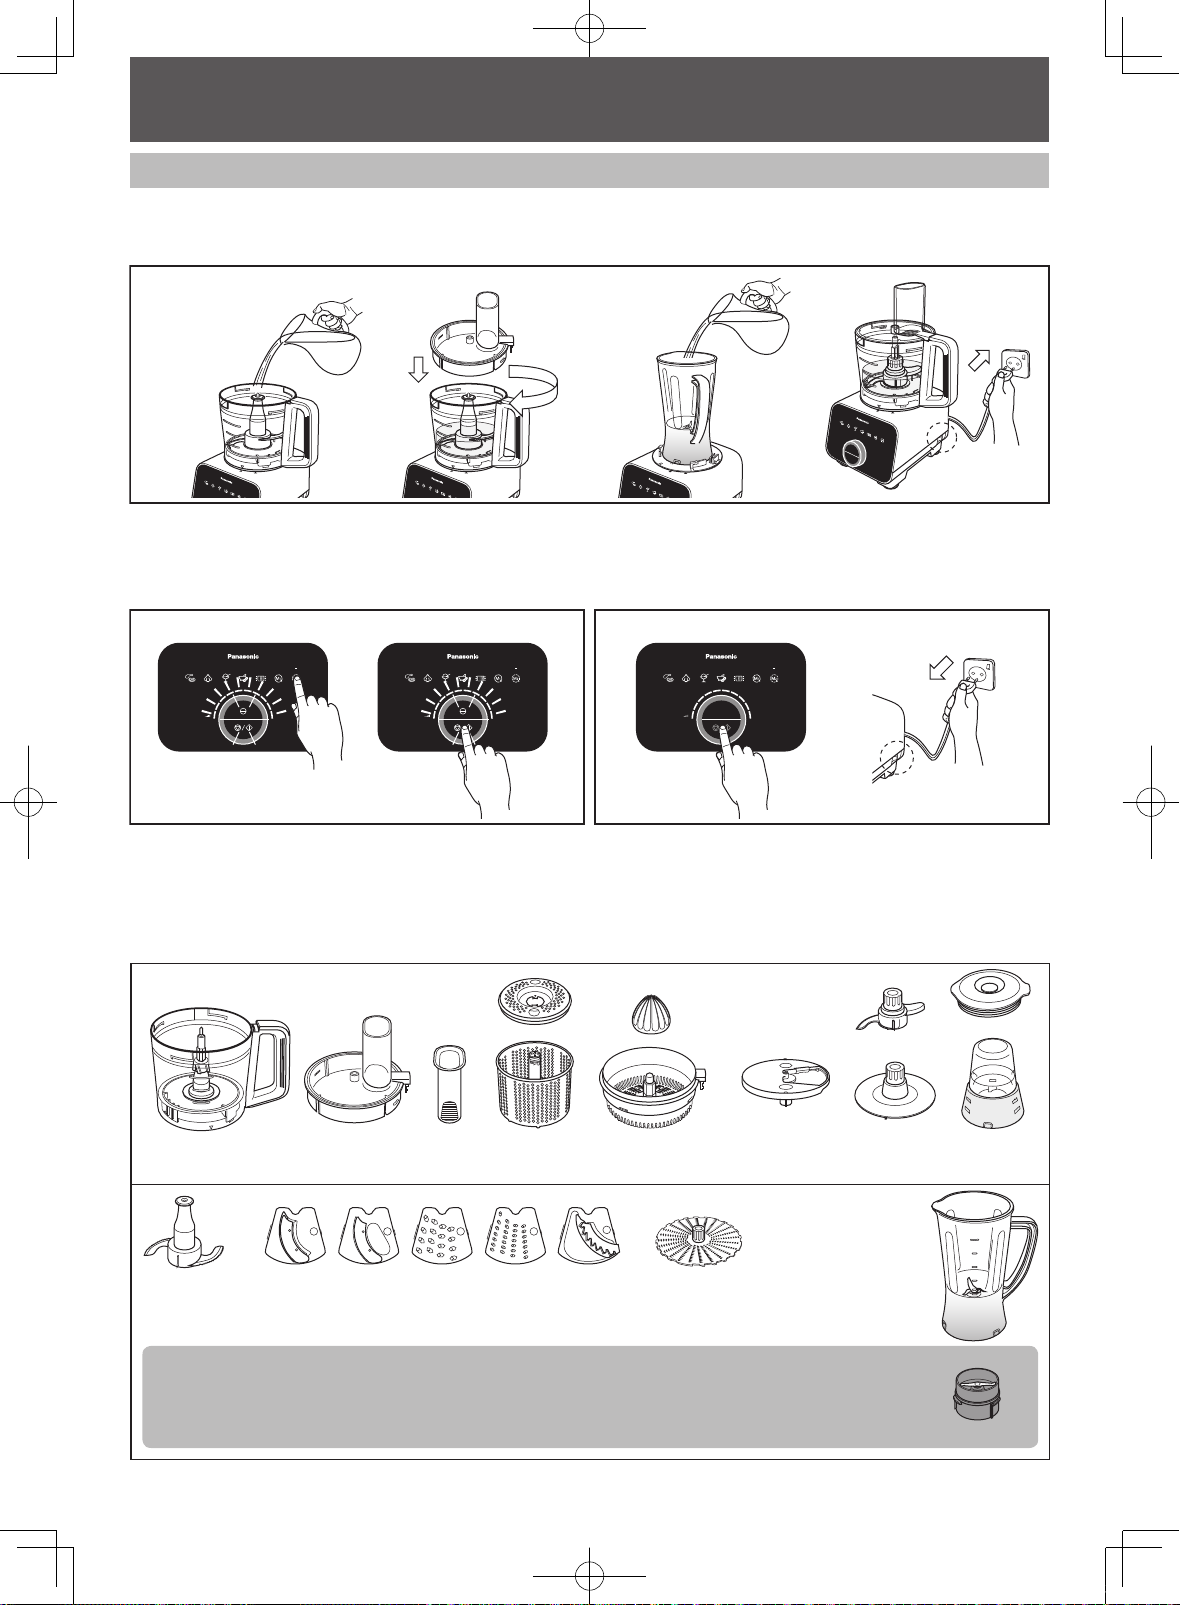
PART NAMES
Food Processor
Working capacity: 1.5 L
1. Food Pusher
2. Feeding Tube
3. Bowl Lid
4. Knife Blade
5. Grating Blade
6. Kneading Blade
7. Whipping Blade
8. Drainer Cover
9. Salad Drainer
10. Blade Stand
11. Fine Shredding Blade
12. Coarse Shredding Blade
*The shape of the Plug may vary from illustration.
GB8
13. Thin Slicing Blade
14. Thick Slicing Blade
15. Julienne Blade
16. Citrus Cone
17. Citrus Strainer
18. Bowl
19. Drive Shaft
20. Motor Housing
21. Power Switch
22. Rubber Foot
23. Cord
24. *Plug
100_160419_MK-F800_Second_EU(UZ50E153).indb 8 2016/04/19 16:56:44
Page 9
English
PART NAMES
Blender, Dry Mill & Accessories
Working
capacity: 1 L
1. Blender Lid
2. Blender Jug
3. Blender Cutting Blade
6. Mill Container Base
7. Storage Case Unit
8. Brush
4. Mill Container
5. Mill Cutting Blade
Control Panel
Mode Selection
- Auto Menu -
Mince Mode
Chop Mode
Frozen Mode
Mode Indication L.E.D.
Stop/Start Switch
For Auto Menu: to Pause/Start process
For Manual Menu: to Stop/Start process
Paste Mode
Drainer Mode
- Manual Menu -
PULSE Switch
Rotary Dial
Adjusst Speed and Timer/Driving Time
Continuous Mode
Intermittent Mode
Speed and Timer/Driving Time indication L.E.D.
: Light up when Manual Menu is operating and indicate speed level by bars.
: Light up when Auto Menu is processing and indicate Timer/Driving time by bars.
Note:
• The program will time-out and reset itself after 10 seconds if no further action is done after a function is
selected.
• Turning the Rotary Dial clockwise will increase the number of lighted bars and vice versa.
• The default speed for the Continuous and Intermittent modes are at maximum, (level 10).
• The program will time-out and reset itself after 20 seconds if the program is paused during processing and no
further action is done.
• Continuous Mode will stop automatically approximately 19 minutes and Intermittent Mode will stop
automatically approximately 7 minutes after processing is started.
GB9
100_160419_MK-F800_Second_EU(UZ50E153).indb 9 2016/04/19 16:56:45
Page 10

SAFETY LOCK
The Safety Pin is designed to prevent the appliance from switching on when
- The Bowl Lid or Citrus Strainer and the Bowl are not fully locked to each other.
- The Bowl, Blender Jug or Dry Mill are not fully locked to the Motor Housing.
Fully locking steps:
For Bowl and Blender Jug, align the
triangle mark with the Motor Housing as
shown in position . Turn it clockwise
until a ‘click’ sound is heard and the
triangular mark now aligns to position .
For Dry Mill, place onto Motor Housing
and turn clockwise until a ‘click’ sound is
heard. To unlock, follow the locking steps
Safety Pins
in reverse.
The Safety Lever only
activates the Safety Pin if the
Bowl Lid or Citrus Strainer is
secured on the Bowl.
Position A : Unlock
Position B : Lock
Note:
• Do not push the Safety Pin and Safety Lever with any instrument, stick etc.
• Do not pour liquids or ingredient at the Safety Pin and Safety Lever area.
• Keep the Safety Pin and Safety Lever area clean to avoid foreign particles accumulate on the area.
Actions above will ensure the Safety Pin and Safety Lever function properly. If not followed, it will
damage the parts related to the Safety Pin and Safety Lever.
CIRCUIT BREAKER AND TEMPERATURE SENSOR PROTECTION
This appliance has the Circuit Breaker and Temperature sensor functions to stop the motor when motor is
overloaded.
(refer to page GB32)
GB10
100_160419_MK-F800_Second_EU(UZ50E153).indb 10 2016/04/19 16:56:45
Page 11
English
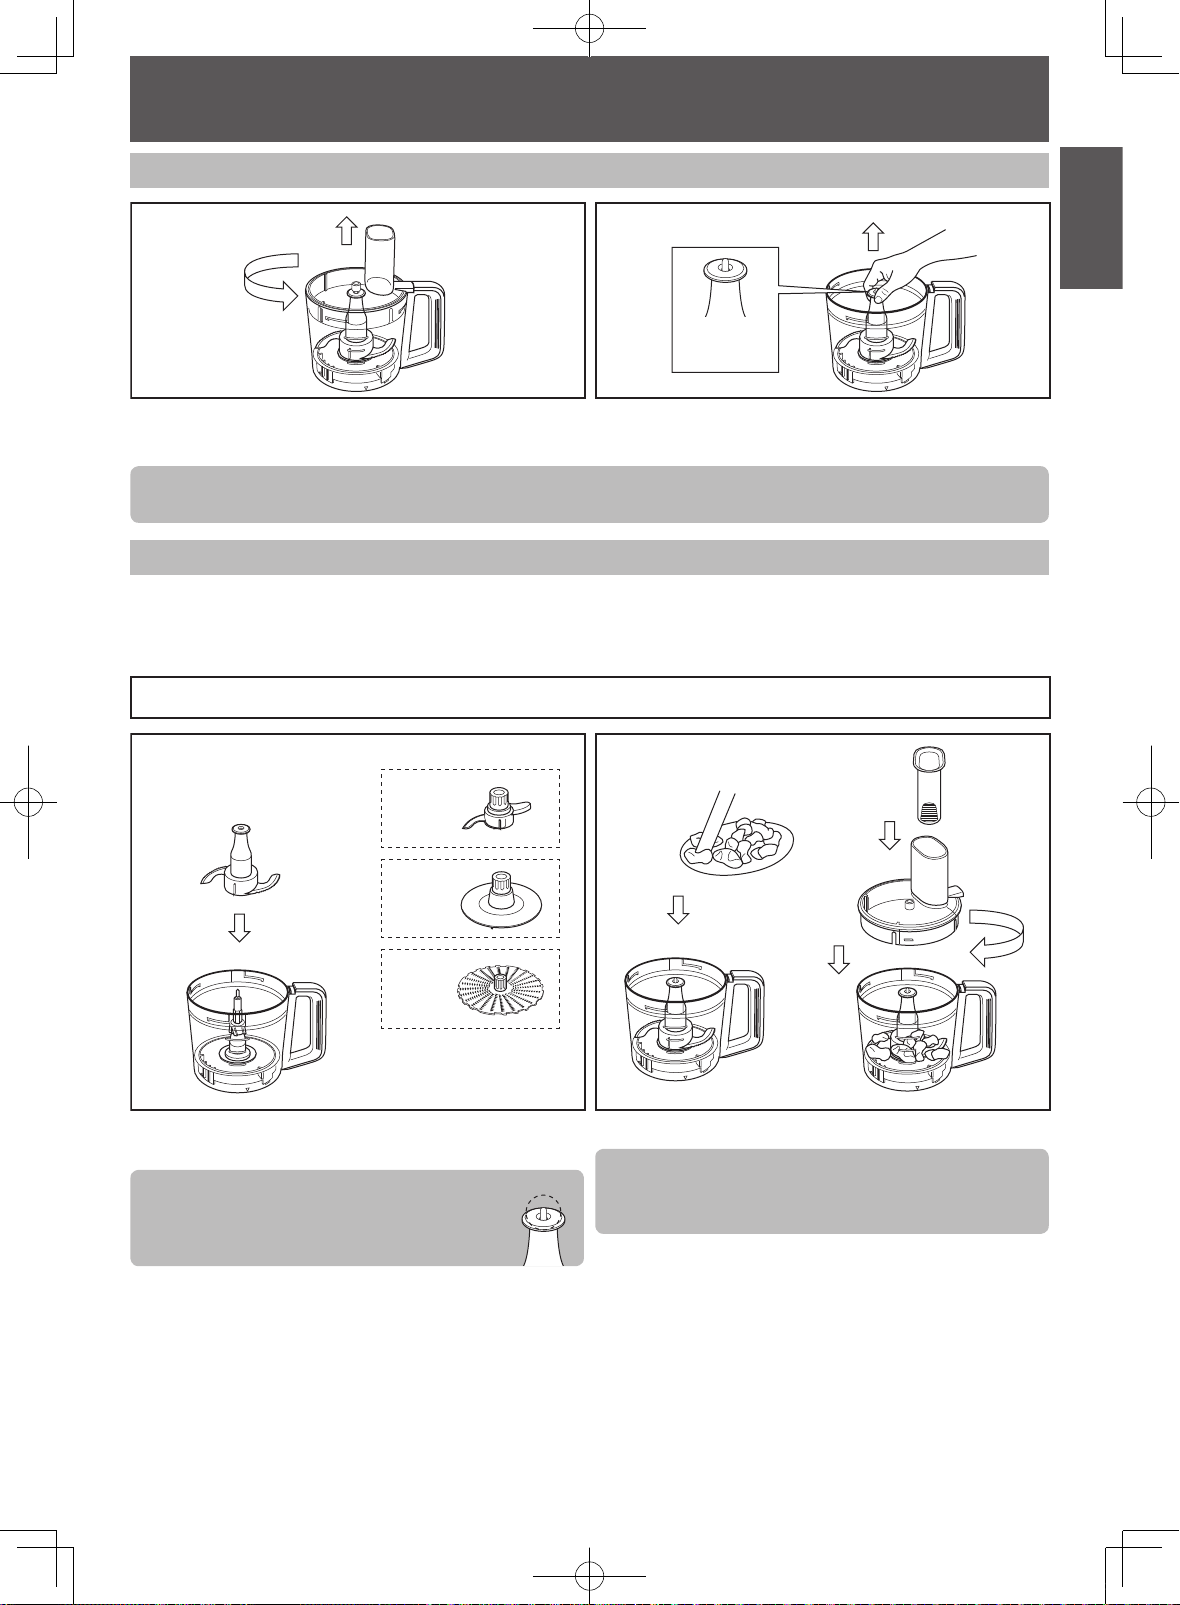
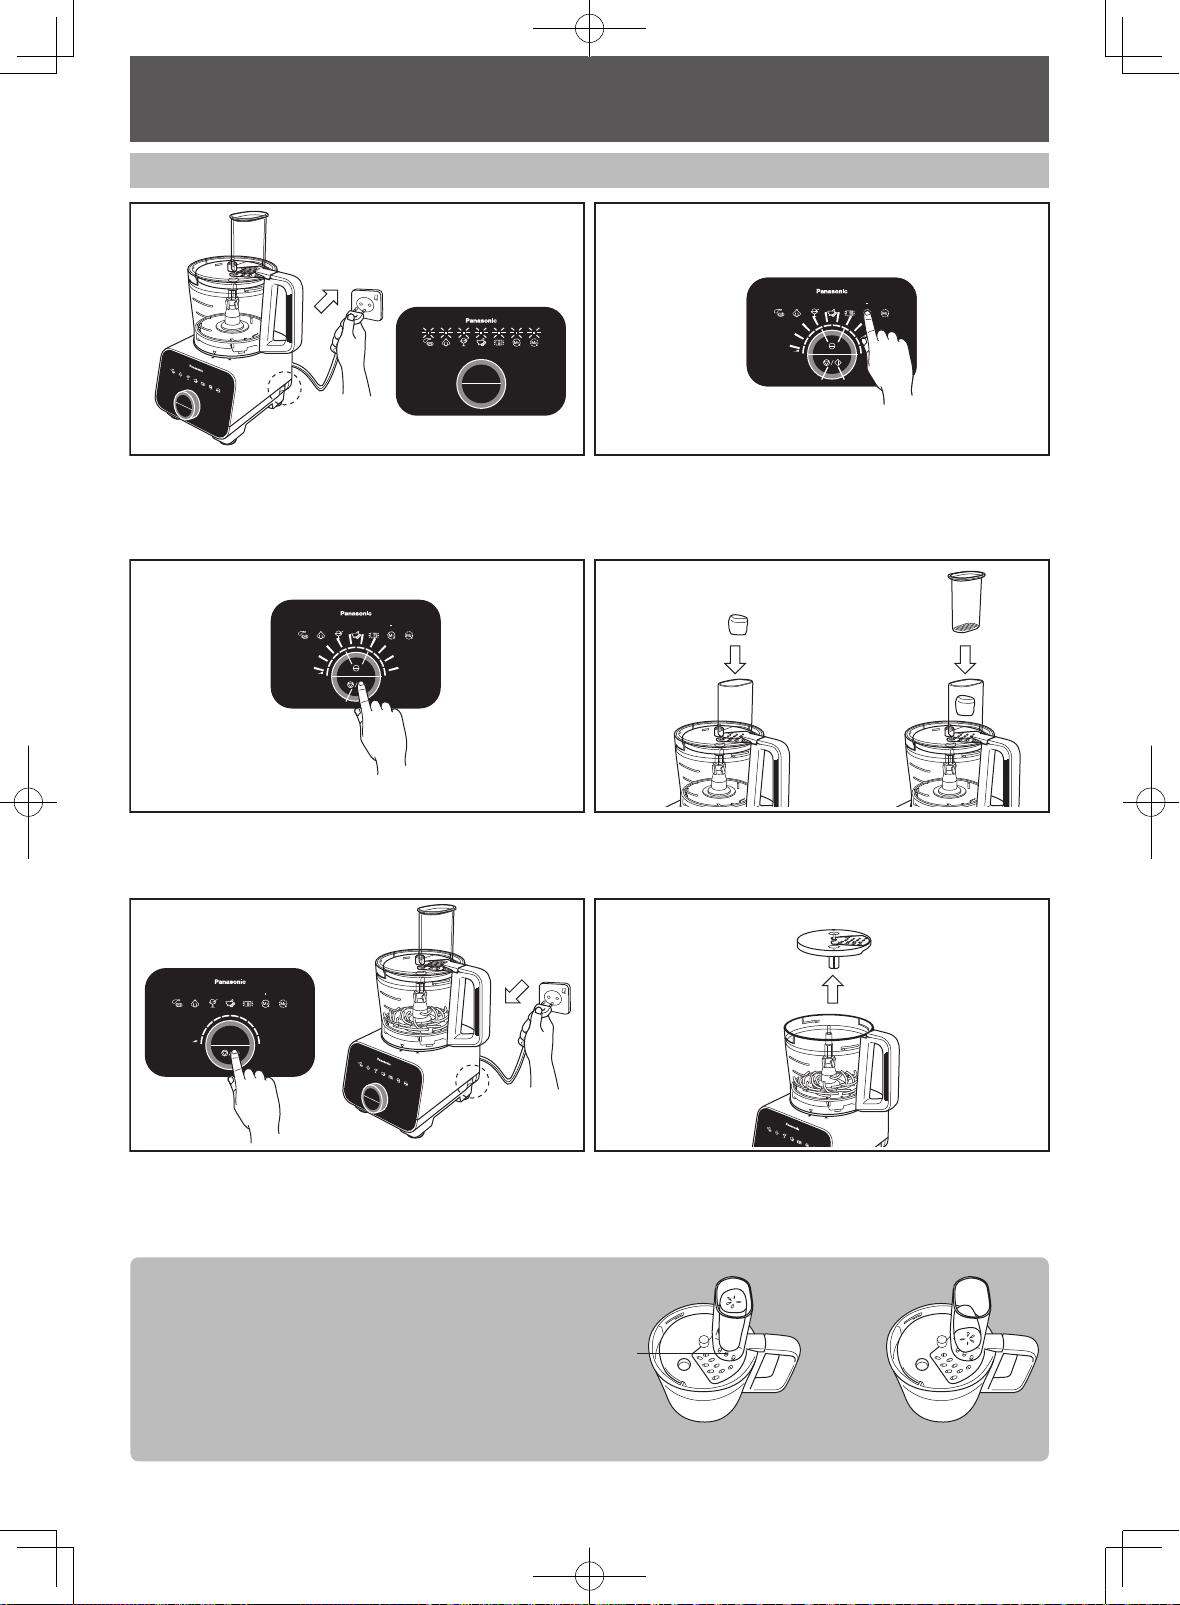
FOOD PROCESSOR -DISASSEMBLY & ASSEMBLY-
Disassembly from Packaged Condition
1
Rotate the Bowl Lid anticlockwise and lift up from the
Bowl.
Note:
Beware of the sharp edges of the Knife Blade when removing it from the Bowl.
Assembly of Food Processor Attachments
It is highly recommended to clean all attachments and accessories and dry well before using the appliance for the
rst time, refer to page GB28 and GB29 for the cleaning method. Unplug when assembling the unit. Before plugging
in, ensure that the Power Switch is switched off. Please refer to page GB29 under ‘Storing’ on how to re-position the
Motor Housing.
Knife Blade · Kneading Blade · Whipping Blade · Grating Blade
1 2
2
Top of the
Knife Blade
Hold the top of the Knife Blade and lift up to remove
from Bowl.
or
or
or
Place the Knife Blade (Kneading Blade or Whipping
Blade or Grating Blade) into the Bowl.
Note:
For the Knife Blade, ensure that the Drive
Shaft is protruding from the Knife Blade
after insertion.
Put the ingredients into the Bowl.
Note:
For the Grating Blade, place the ingredients on top of
the blade and spread them out evenly.
Place the Bowl Lid on top of the Bowl and turn it
clockwise until a ‘click’ sound is heard. Insert the Food
Pusher into the Feeding Tube.
GB11
100_160419_MK-F800_Second_EU(UZ50E153).indb 11 2016/04/19 16:56:45
Page 12

FOOD PROCESSOR -DISASSEMBLY & ASSEMBLY-
Assembly of Food Processor Attachments
Slicing Blades (Thick / Thin) · Shredding Blades (Coarse / Fine) · Julienne Blade
1 2
Projected Detent
Fit the projected detent of the desired blade onto the
Blade Stand and ensure it is seated properly.
Note:
• Beware of the sharp edges on the blades while inserting into the Blade Stand.
• To remove the blade, turn over the Blade Stand and push down on the reverse side of the dimple on the blade.
3 4
Push down on the dimple on the blade as seen above
until a ‘snap’ sound is heard.
Finger Holes
Insert nger and thumb into the nger holes to grip the
Blade Stand. Place the assembled Blade Stand into the
Bowl.
Note:
Ensure that the Drive Shaft is
protruding from the Blade Stand after
insertion.
Citrus Press
1 2
Place the Citrus Strainer onto the Bowl. Turn it
clockwise until a ‘click’ sound is heard.
Place the Bowl Lid on top of the Bowl and turn it
clockwise until a ‘click’ sound is heard.
Attach the Citrus Cone onto the Drive Shaft.
GB12
100_160419_MK-F800_Second_EU(UZ50E153).indb 12 2016/04/19 16:56:45
Page 13

English
FOOD PROCESSOR -DISASSEMBLY & ASSEMBLY-
Assembly of Food Processor Attachments
Salad Drainer
1 2
Place the Salad Drainer into the Bowl. Insert the
ingredients into the Salad Drainer.
3 4
PP
A
B
PP
Place Drainer Cover on top of the Salad Drainer until
the mark aligns as shown in A. Turn the Drainer Cover
anticlockwise until the mark aligns as shown in B.
Ensure that the Drive Shaft is protruding out of the
Salad Drainer after insertion.
Attaching the assembled units to the Motor Housing
To disassemble, follow the assembly steps in reverse.
Place the Bowl Lid on top of the Bowl and turn it
clockwise until a ‘click’ sound is heard.
1. Place the Bowl on top of the Motor Housing until the
mark aligns as shown in .
2. Turn the Bowl clockwise until a ‘click’ sound is heard.
Ensure that the triangle mark on the Bowl is aligned
with the rectangle mark on the Motor Housing as
seen in .
GB13
100_160419_MK-F800_Second_EU(UZ50E153).indb 13 2016/04/19 16:56:46
Page 14

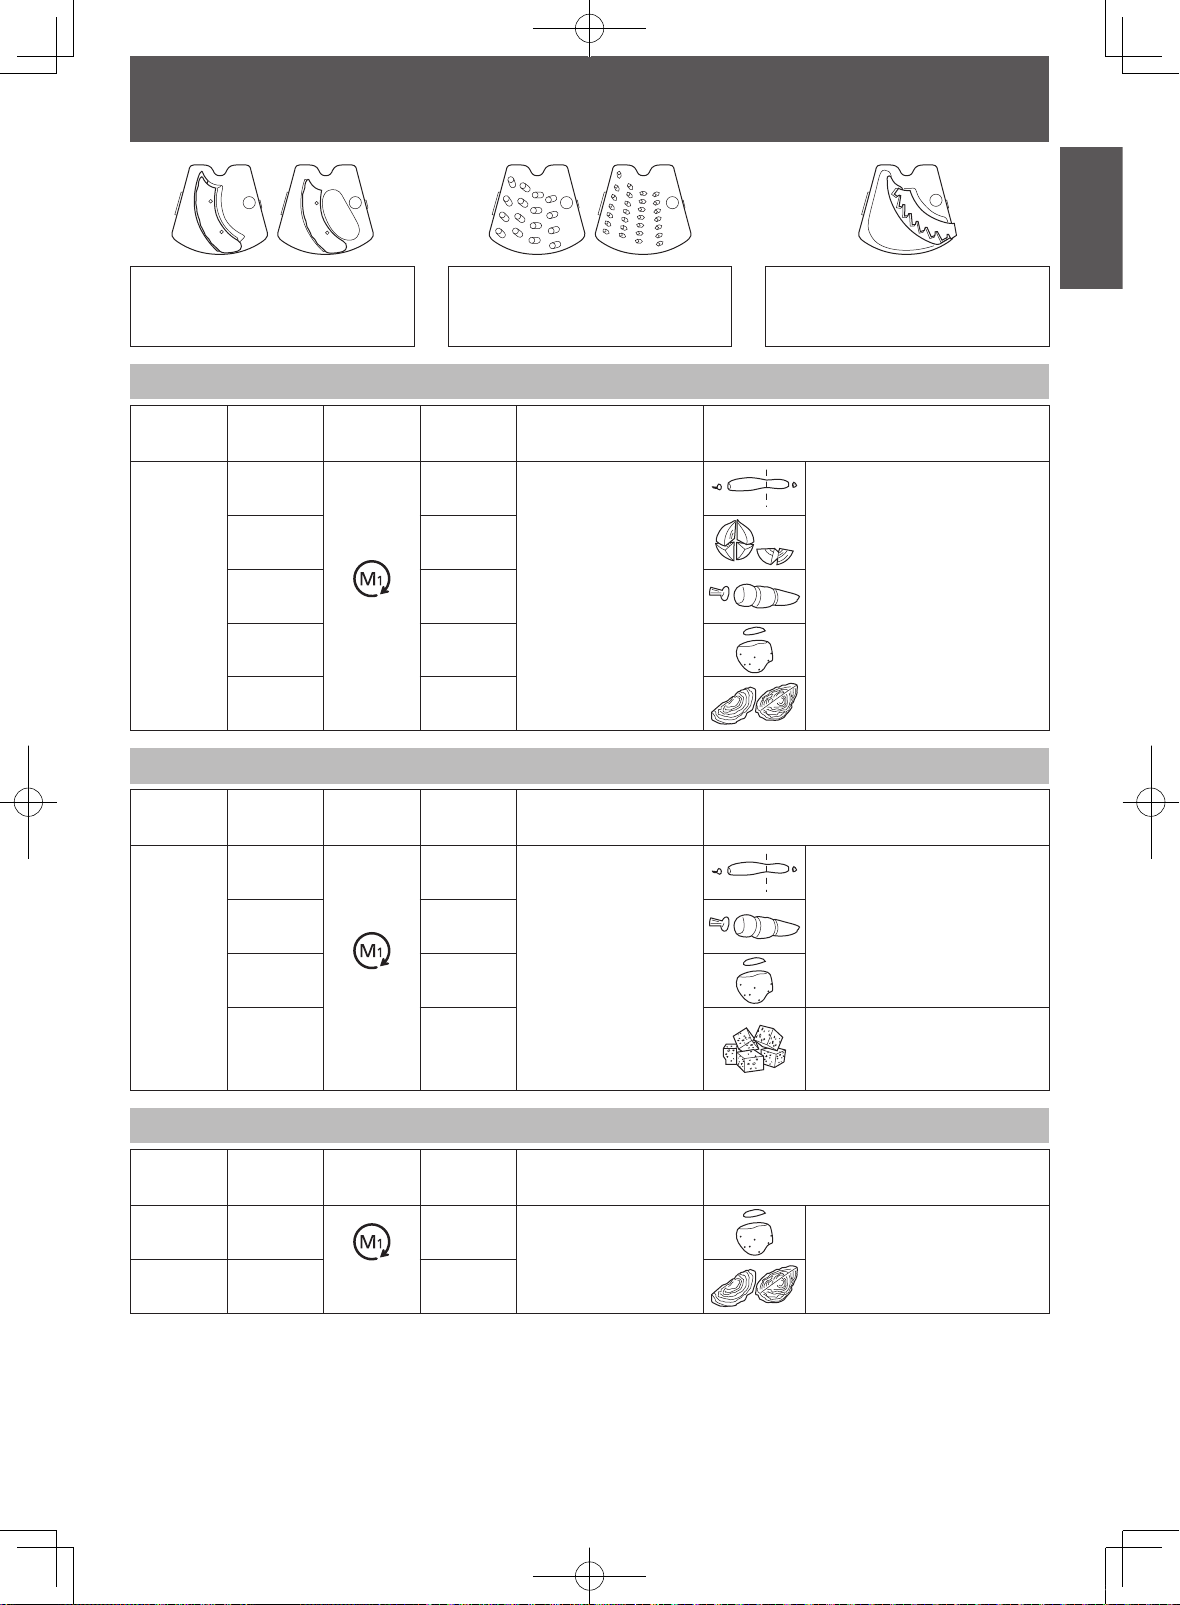
FOOD PROCESSOR -KNIFE BLADE-
Ingredient Preparations
Function Ingredient Mode Quantity Operating Time (approx.) Preparation Method
50 ~ 400 g 5 ~ 40 sec
Initial setting is for 200 g (10 sec)
Remove all skin, bones, and
tendons, cut into 2 ~ 3 cm cubes.
Mince
Meat
Fish 50 ~ 500 g 3 ~ 30 sec
Auto
Onion
Garlic
Chop
Crush
Mash
Frozen
Ice Crush Ice Cubes
Carrot 50 ~ 450 g 10 ~ 30 sec
Italian
Parsley
Mushroom 30 ~ 250 g 3 ~ 15 sec
Parmesan
Cheese
Boiled
Potato
Frozen
Banana
Auto
Continuous
Speed: Max
Continuous
Speed: Max
Intermittent
Speed: Max
Auto
Continuous
Speed: Max
150 ~ 500 g 10 ~ 50 sec
Initial setting is for 300 g (20 sec)
5 ~ 500 g 10 ~ 30 sec
5 ~ 70 g 10 ~ 40 sec
10 ~ 200 g 10 ~ 60 sec
100 ~ 400 g 10 ~ 40 sec
250 ~ 450 g 40 ~ 120 sec
Initial setting is for 350 g (60 sec)
~ 10 pcs ~ 20 sec
Peel skin, cut into 2 ~ 3 cm
cubes.
Peel skin.
Peel skin, cut into 2 ~ 3 cm
cubes.
Remove stalk.
Cut into 2 ~ 3 cm cubes.
Cut into 2 ~ 3 cm cubes.
Cut into 2 ~ 3 cm cubes.
Do not over process.
1 ~ 2 cm width, half frozen
condition, i.e. toothpick can
pierce.
2 ~ 3 cm ice cubes.
Grind Peanuts
Paste
Crumb
Knead
(for
confectionary)
Juice Make
Soup Make
GB14
Roasted
Peanuts
Soft White
Bread
Flour
Fruit, Liquid
etc.
Boiled
Vegetable,
Liquid etc.
Continuous
Speed: Max
Auto
Continuous
Speed: Max
Continuous
Speed: Max
Continuous
Speed: Max
Continuous
Speed: Max
10 ~ 200 g 15 ~ 30 sec
100 ~ 400 g 4 ~ 10 min
Initial setting is for 300 g (7 min)
10 ~ 200 g 15 ~ 60 sec
~ 300 g ~ 120 sec
~ 1,500 mL ~ 120 sec
~ 1,500 mL ~ 120 sec
Remove peanut shell and skin.
Remove peanut shell and skin.
Slice soft bread into 6 to 8
pieces.
Use for making confectionery
such as sweets and cakes.
Cut into 2 ~ 3 cm cubes. Process
solids rst. Fill liquid till total not
exceeding 1,500 mL. Do not add
more than 10 pcs of ice cubes
during processing.
Cut into 2 ~ 3 cm cubes. Process
solids rst. Fill liquid till total not
exceeding 1,500 mL.
100_160419_MK-F800_Second_EU(UZ50E153).indb 14 2016/04/19 16:56:47
Page 15

English
FOOD PROCESSOR -KNIFE BLADE-
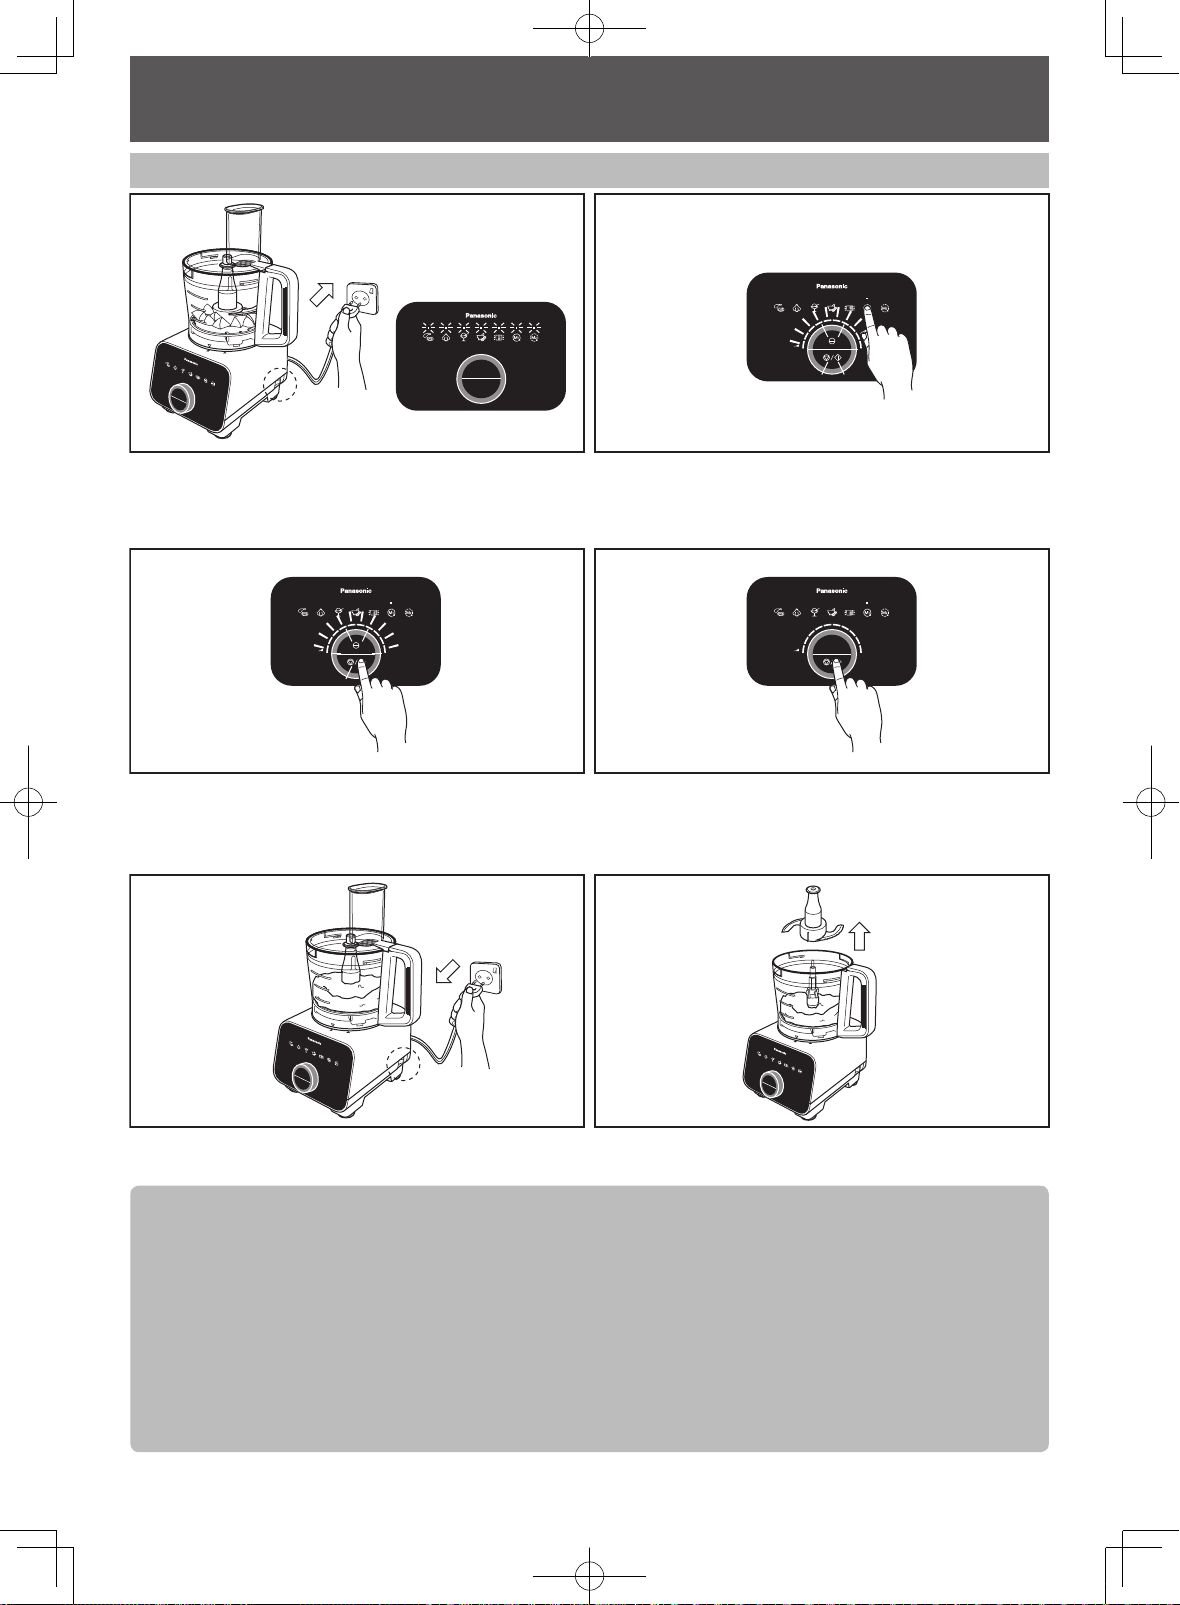
Operating with Auto Menu
21
After completing the assembly steps, plug-in the plug
into the socket and turn on the Power Switch. The Mode
Indication L.E.D.s will light up and blink.
3 4
Each Auto Menu has a pre-programmed driving time.
Each lighted bar represents 10 seconds* of driving time.
Push the Stop/Start Switch to start the operation.
Select the required Auto Menu mode (except the
Drainer Mode). The selected Mode Indication L.E.D. will
light up and a beep sound will be heard. The Driving
Time and Stop/Start Switch Indication L.E.D. will light up
and blink.
During operation, the Driving Time L.E.D. will turn off
one by one after every 10 second intervals until the set
duration is completed and 4 beep sounds will be heard.
The Mode Indication L.E.D.s will light up and blink.
5 6
After the processing is completed, switch off the Power
Switch and unplug from the socket.
* For Paste Auto Menu, each lighted bar represents 1 minute. The lighted bar will decrease at every 1 minute
interval.
Note:
• Always ensure that the Knife Blade is inserted before adding ingredients into the Bowl.
• The Driving Time of the Auto Menu can be increased or decreased by adjusting the Rotary Dial if necessary.
• The operation of the Auto Menu can be stopped prematurely by pushing the Stop/Start Switch before the set
duration ends.
• Depending on the speed and amount of ingredients used, there will be signicant vibrations present. In that
case, hold down the Bowl Lid with both hands to support it during its operation.
Remove the Knife Blade from the Bowl before removing
the processed ingredients.
GB15
100_160419_MK-F800_Second_EU(UZ50E153).indb 15 2016/04/19 16:56:47
Page 16
FOOD PROCESSOR -KNIFE BLADE-
Operating with Manual Menu
1 2
After completing the assembly steps, plug-in the plug
into the socket and turn on the Power Switch. The Mode
Indication L.E.D.s will light up and blink.
3 4
Adjust the desired speed with the Rotary Dial. The more
bars are lighted, the higher the speed. Push the Stop/
Start or PULSE Switch to start the operation.
5 6
Select the Continuous or Intermittent mode. The
selected Mode Indication L.E.D. will light up and a beep
sound will be heard. The Speed, Stop/Start Switch and
PULSE Switch Indication L.E.D. will light up and blink.
During the driving operation, the Stop/Start Indication
L.E.D. will remain lit. The speed can be adjusted during
operation. Push the Stop/Start Switch to stop the driving
operation.
After the processing is completed, switch off the Power
Switch and unplug from the socket.
Note:
• Always ensure that the Knife Blade is inserted before adding ingredients into the Bowl.
• Do not exceed the stated amount of ingredients for kneading as abnormal vibration may occur.
• Do not insert hot ingredients into the Bowl for processing. Always ensure that the ingredients are sufciently
cooled before inserting, e.g. boiled potato.
• For Juice Make, ll in the solid ingredients rst into the Bowl, followed by the liquid ingredients until the total
volume does not exceed 1,500 mL.
• Depending on the speed and amount of ingredients used, there will be signicant vibrations present. In that
case, hold down on the Bowl Lid to support it during its operation.
• For kneading, do not reprocess after the dough has formed the rst time.
• When process the liquid ingredients together with ice cubes, put the ice cubes not more than 10 pcs (approx.
170 g).
GB16
100_160419_MK-F800_Second_EU(UZ50E153).indb 16 2016/04/19 16:56:47
Remove the Knife Blade from the Bowl before removing
the processed ingredients.
Page 17
English
FOOD PROCESSOR
-SLICING BLADES • SHREDDING BLADES • JULIENNE BLADE-
Slicing Blades (Thick / Thin)
- used for slicing ingredients
Shredding Blades (Coarse / Fine)
- used for shredding and grating
ingredients.
Ingredient Preparations for Slicing Blades (Thick / Thin)
Function Ingredient Mode
Cucumber
Onion
Slice
Carrot 600 g
Potato 600 g
Cabbage 400 g
Continuous
Speed: Max
Max
Single Use
700 g
700 g
Operating Time (approx.) Preparation Method
-
Ingredient Preparations for Shredding Blades (Coarse / Fine)
Function Ingredient Mode
Max
Single Use
Operating Time (approx.) Preparation Method
Julienne Blade
- used for making french fries and
shredding ingredients.
Cut ingredient till it is small
enough to t into the Feeding
Tube.
Shred
Cucumber
Carrot 500 g
Potato 650 g
Cheese 500 g
Continuous
Speed: Max
500 g
Ingredient Preparations for Julienne Blade
Function Ingredient Mode
French Fry Potato
Shred Cabbage 500 g
Continuous
Speed: Max
Max
Single Use
800 g
Cut ingredient till it is small
enough to t into the Feeding
Tube.
-
Cut ingredient till it is small
enough to t into the Feeding
Tube. Do not use hard
ingredients such as Parmesan.
Operating Time (approx.) Preparation Method
Cut ingredient till it is small
-
enough to t into the Feeding
Tube.
GB17
100_160419_MK-F800_Second_EU(UZ50E153).indb 17 2016/04/19 16:56:48
Page 18
FOOD PROCESSOR
Operating with Manual Menu
1 2
-SLICING BLADES • SHREDDING BLADES • JULIENNE BLADE-
After completing the assembly steps, plug-in the plug
into the socket and turn on the Power Switch. The Mode
Indication L.E.D.s will light up and blink.
3
Adjust the speed with the Rotary Dial. The more bars
are lighted, the higher the speed. Push the Stop/Start
Switch or PULSE Switch to start the operation.
5 6
Select the Continuous mode. The selected Mode
Indication L.E.D. will light up and a beep sound will
be heard. The Speed, Stop/Start and PULSE Switch
Indication L.E.D. will light up and blink.
4
Insert the ingredients into the Feeding Tube and push
down with the Food Pusher.
During the driving operation, the Stop/Start Indication
L.E.D. will remain lit. Push the Stop/Start Switch to stop
the driving operation. After the processing is completed,
switch off the Power Switch and unplug from the socket.
Note:
• When using long and narrow ingredients, place
it against the front wall of the Feeding Tube as
indicated in Figure 1, for support while in operation
to avoid uneven processing.
• Dispose of any remaining lumps of unprocessed
ingredients.
• Align high bre ingredients as indicated in Figure 2
for a consistent processing result.
GB18
100_160419_MK-F800_Second_EU(UZ50E153).indb 18 2016/04/19 16:56:48
Remove the Blade Stand from the Bowl before
removing the processed ingredients.
Front
Wall
Figure 1 Figure 2
Page 19
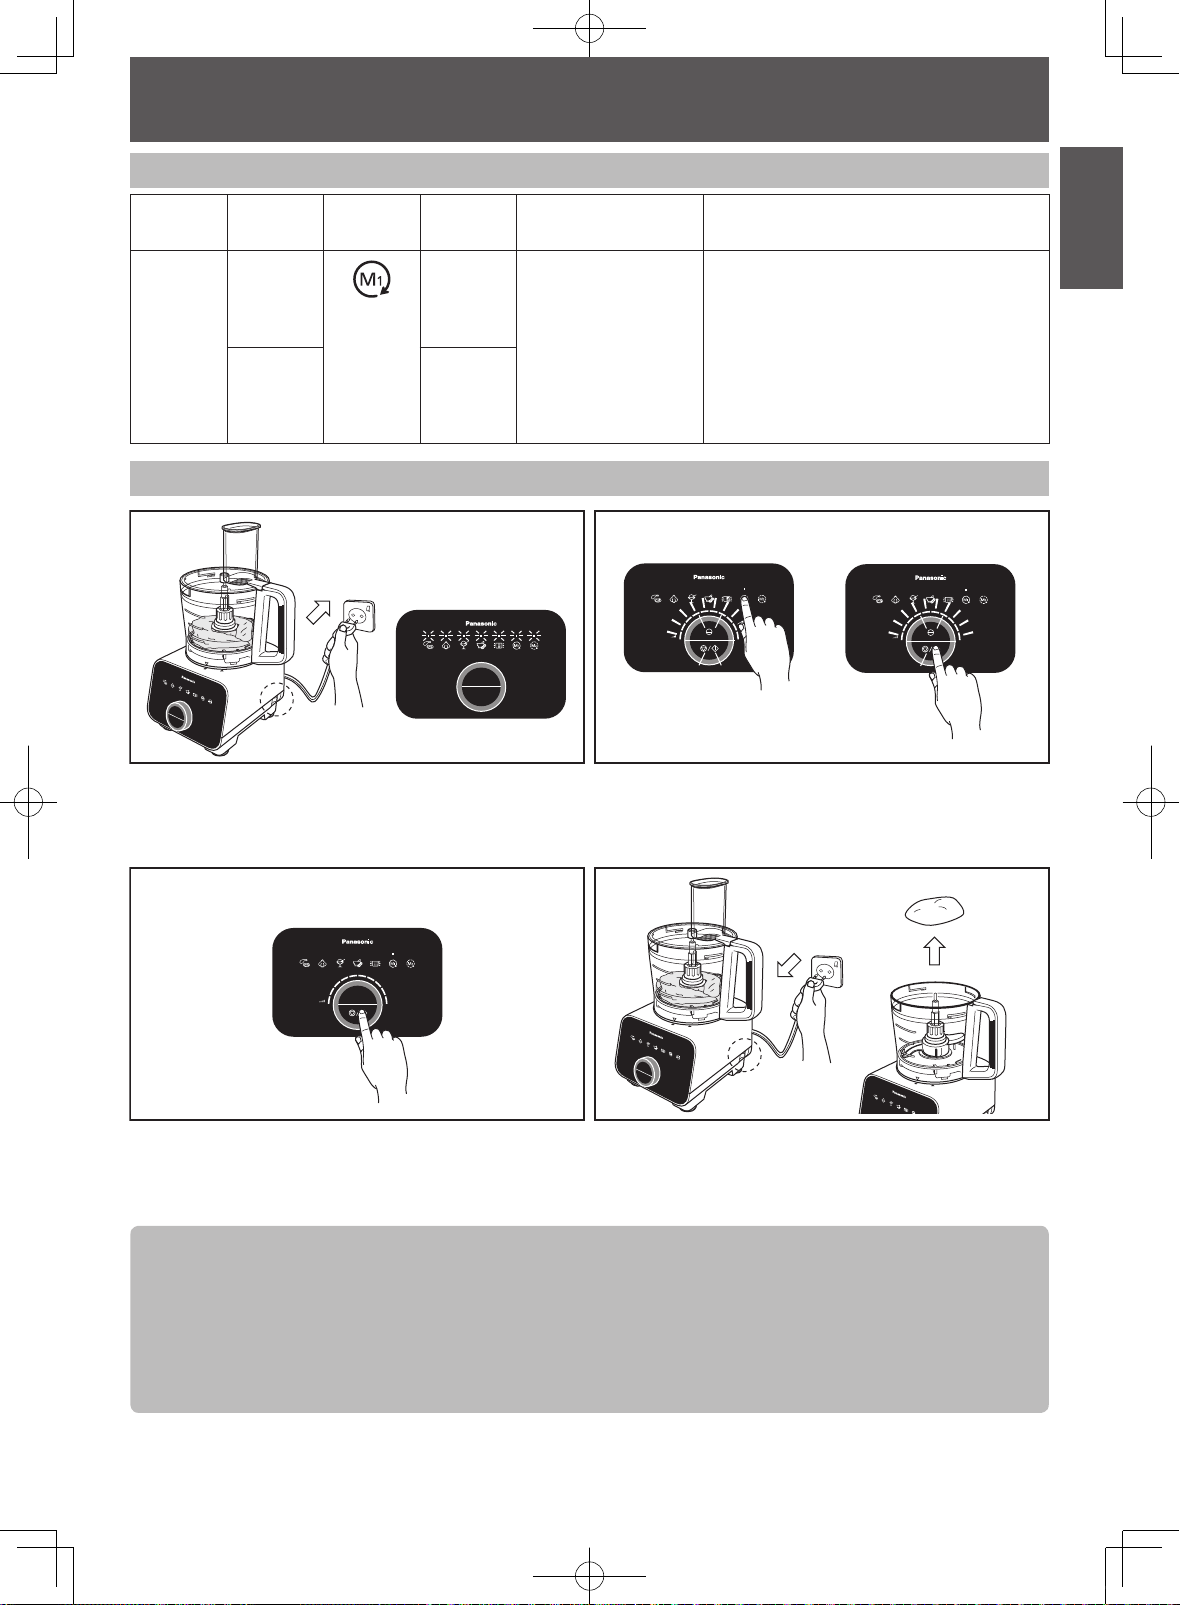
FOOD PROCESSOR -KNEADING BLADE-
Ingredient Preparations for Kneading Blade
Function Ingredient Mode
Bread Flour
Knead
(for bread)
Liquid
Continuous
Speed: Start
with level 1,
increase
every 1
second till
Max.
Max
Single Use
300 g
160 ~ 200 mL
Operating Time (approx.) Preparation Method
Operating with Manual Menu
After completing the assembly steps, plug-in the plug
into the socket and turn on the Power Switch. The Mode
Indication L.E.D.s will light up and blink.
Mix yeast with water and add during the
processing of dough (adding yeast directly
before processing may result in aking and
premature rising). If dough mix still appears
~ 120 sec
aky after initial processing, add 1 tsp of water
into the mix. When large vibrations occur due
to dough mix wrapping around the Drive Shaft,
add 1 tbsp of our. Do not reprocess the dough
after the process is complete, if the dough is
not satisfactory, knead by hand.
21
Select the Continuous mode and adjust to the
appropriate speed with the Rotary Dial. The more bars
are lighted, the higher the speed. Push the Stop/Start
Switch to start the operation.
English
43
During the driving operation, the Stop/Start Indication
L.E.D. will remain lit. Observe the formation of the
dough ball. Push the Stop/Start Switch to stop the
After the processing is completed, switch off the Power
Switch and unplug from the socket. Remove the dough
ball from the Bowl before removing the Kneading Blade.
driving operation once a rm dough ball is formed.
Note:
• Do not exceed the stated amount of ingredients for the Kneading Blade as abnormal vibration may occur.
• Depending on the speed and amount of ingredients used, there will be signi cant vibrations present. In that
case, hold down the Bowl Lid with both hands to support it during its operation.
• For kneading, do not reprocess after the dough has formed the rst time.
• High amounts of butter and sugar in the dough may cause abnormal vibration when using the Kneading Blade.
• Using our other than bread our may cause abnormal vibration. Before processing, remove 1 ~ 2 tbsp of
water from the total amount stated and add the water little by little during processing if necessary.
GB19
100_160419_MK-F800_Second_EU(UZ50E153).indb 19 2016/04/19 16:56:49
Page 20
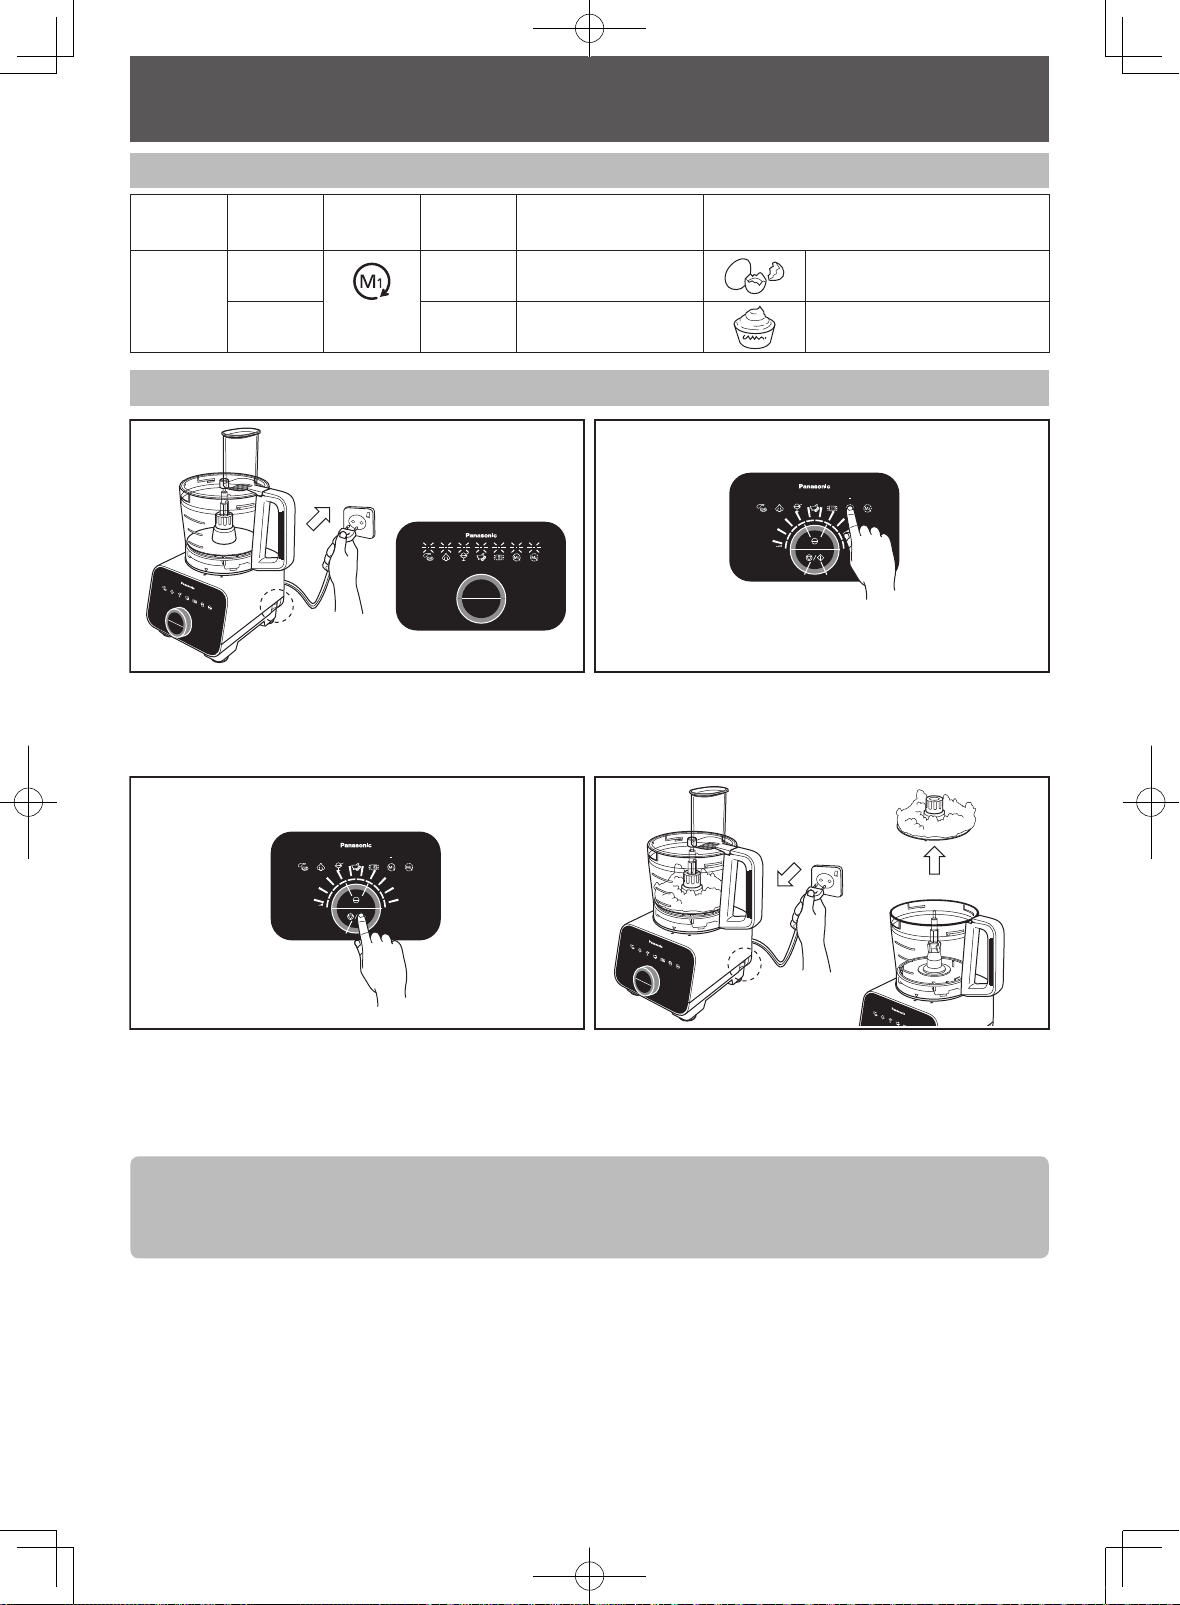
FOOD PROCESSOR -WHIPPING BLADE-
Ingredient Preparations for Whipping Blade
Function Ingredient Mode
Egg White
Whip
Cream
Continuous
Speed: Max
Max
Single Use
2 ~ 6 pcs 50 ~ 90 sec
100 ~ 300 mL
Operating Time (approx.) Preparation Method
15 sec ~ 2 min
Operating with Manual Menu
After completing the assembly steps, plug-in the plug
into the socket and turn on the Power Switch. The Mode
Indication L.E.D.s will light up and blink.
Separate the egg white from the
yolk for a smooth meringue.
Use fresh cream of fat content
35% or higher at 5 °C.
21
Select the Continuous mode and adjust the speed with
the Rotary Dial. The more bars are lighted, the higher
the speed. Push the Stop/Start Switch to start the
operation.
43
During the driving operation, the Stop/Start Indication
L.E.D. will remain lit. Observe the rising and formation
of the whipped ingredients. Push the Stop/Start Switch
to stop the driving operation once a desired texture is
After the processing is completed, switch off the Power
Switch and unplug from the socket. Carefully remove
the Whipping Blade together with the processed
ingredients from the Bowl.
formed.
Note:
• Do not over process the whipping cream, it may break down to form clumps of butter.
• Using different brands of whipping cream will have varying results. It is recommended to process until the
cream is sufciently whipped.
GB20
100_160419_MK-F800_Second_EU(UZ50E153).indb 20 2016/04/19 16:56:49
Page 21
English
FOOD PROCESSOR -GRATING BLADE-
Ingredient Preparations for Grating Blade
Function Ingredient Mode
Carrot
Grate
Apple
Cucumber
Continuous
Speed: Max
Max
Single Use
200 g
200 g
200 g
Operating Time (approx.) Preparation Method
Operating with Manual Menu
1
After completing the assembly steps, plug-in the plug
into the socket and turn on the Power Switch. The Mode
Indication L.E.D.s will light up and blink.
-
Cut into 2 ~ 3 cm cubes.
2
Select the Continuous mode and adjust the speed with
the Rotary Dial. The more bars are lighted, the higher
the speed. Push the Stop/Start Switch to start the
operation.
43
During the driving operation, the Stop/Start Indication
L.E.D. will remain lit. Push the Stop/Start Switch to stop
the driving operation.
After the processing is completed, switch off the Power
Switch and unplug from the socket. Remove the Grating
Blade from the Bowl before removing the ingredients.
Note:
• Do not insert the ingredients through the Feeding Tube during operation of the Grating Blade.
GB21
100_160419_MK-F800_Second_EU(UZ50E153).indb 21 2016/04/19 16:56:49
Page 22

FOOD PROCESSOR -SALAD DRAINER-
Ingredient Preparations for Salad Drainer
Function Ingredient Mode
Lettuce
Drainer
Leaves
Auto
Cabbage
Max
Single Use
100 g 20 ~ 60 sec
Initial setting is for 50 g (20 sec)
200 g 20 ~ 70 sec
Operating Time (approx.) Preparation Method
Operating with Auto Menu
After completing the assembly steps, plug-in the plug
into the socket and turn on the Power Switch. The Mode
Indication L.E.D.s will light up and blink.
Cut into 3 ~ 5 cm slices.
Shredded into 1 ~ 3 mm.
21
Select the Drainer mode. The selected Mode Indication
L.E.D. will light up and a beep sound will be heard. The
Driving Time and Stop/Start Switch Indication L.E.D. will
light up and blink.
43
Each Auto Menu has a pre-programmed driving time.
Each lighted bar represents 10 seconds of driving time.
Push the Stop/Start Switch to start the operation.During
After the processing is completed, switch off the Power
Switch and unplug from the socket. Remove the Salad
Drainer from the Bowl.
operation, the Driving Time L.E.D. will turn off one by
one after every 10 second intervals until the set duration
is completed and 4 beep sounds will be heard. The
Mode Indication L.E.D.s will light up and blink.
Note:
• Maximum working capacity of the Salad Drainer: 200 g or till maximum height of Salad Drainer, whichever
comes rst.
• Prohibited ingredients: refer to page GB6.
• Ensure that the ingredients are spread evenly around the Salad Drainer before processing.
• Do not operate the Salad Drainer in any other mode except Drainer mode.
• Always ensure that the Drainer Cover is attached onto the Salad Drainer before operation, otherwise the
ingredients might come out and tear around the Bowl.
• Depending on the amount of ingredients used, there will be signicant vibrations present. In that case, hold
down the Bowl Lid with both hands to support it during its operation.
GB22
100_160419_MK-F800_Second_EU(UZ50E153).indb 22 2016/04/19 16:56:50
Page 23
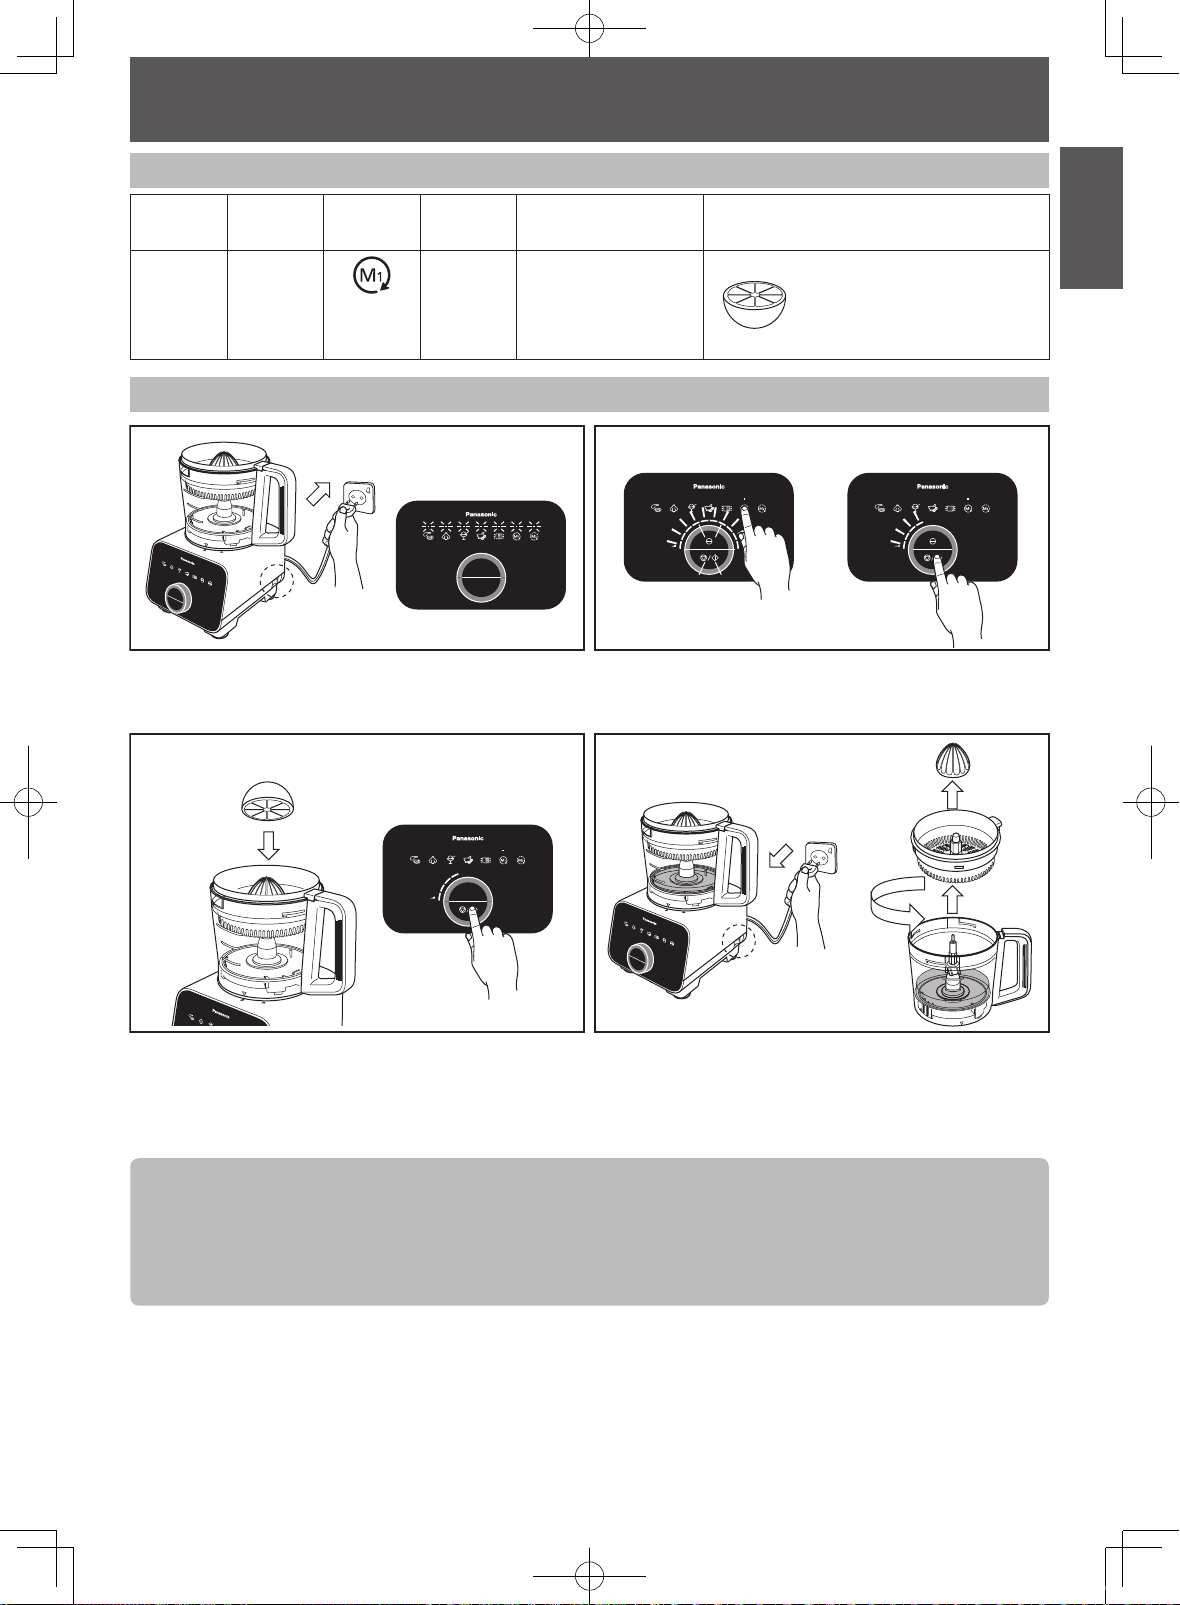
FOOD PROCESSOR -CITRUS PRESS-
Ingredient Preparations for Citrus Press
Function Ingredient Mode
Squeeze Citrus Fruit
Continuous
Speed:
Level 4
Max
Single Use
1000 mL -
Operating Time (approx.) Preparation Method
Operating with Manual Menu
After completing the assembly steps, plug-in the plug
into the socket and turn on the Power Switch. The Mode
Indication L.E.D.s will light up and blink.
3
English
Cut fruit into halves.
21
Select the Continuous mode and adjust to level 4 with
the Rotary Dial. Push the Stop/Start Switch to start the
operation.
4
Place the half cut fruit with the cut side on top of the
Citrus Cone and press down rmly to extract juice.
During the driving operation, the Stop/Start Indication
L.E.D. will remain lit. Push the Stop/Start Switch to stop
After the processing is completed, switch off the Power
Switch and unplug from the socket. Remove the Citrus
Press attachment from the Bowl before pouring the
extracted juice out.
the driving operation.
Note:
• Always ensure that the Citrus Cone is placed onto the Citrus Strainer before usage.
• Stop the processing periodically to remove the pulp remaining on the Citrus Strainer to ease the juice
extraction process.
• It is not recommended to operate the Citrus Press at speed levels higher than level 4.
• Avoid touching the Citrus Cone while it is turning.
GB23
100_160419_MK-F800_Second_EU(UZ50E153).indb 23 2016/04/19 16:56:50
Page 24

BLENDER
Assembly and Disassembly of Blender Attachment
1 2
Insert ingredients into the Blender Jug and close with
the Blender Lid.
Place the Blender Jug on top of the Motor Housing until
the mark aligns as shown in .
Turn the Blender Jug clockwise until a ‘click’ sound is
heard. Ensure that the triangle mark on the Blender Jug
is aligned with the rectangle mark on the Motor Housing
as seen in .
To disassemble, simply follow the assembly steps in reverse.
Ingredient Preparations for Blender
Function Ingredient Mode
Liquidize
Fruit,
Vegetable
Continuous
Speed: Max
Max
Single Use
1,000 mL ~ 2 min
Operating Time (approx.) Preparation Method
Cut into 1 cm cubes.
Note:
• Maximum working capacity: 1 L.
• Prohibited ingredients for Blender Jug: refer to page GB6.
• It is not recommended to blend hard and viscous ingredients. However, if necessary, cut the hard ingredients
into small pieces (eg. cut carrot into 1 cm³ cubes) and ll the Blender Jug with the ingredients not exceeding
half its rated capacity.
• Do not ll exceeding the maximum level and reduce ingredients when appliance makes abnormal sound or
vibration during operation.
• Add in soft ingredients (fruits, vegetables) into the Blender Jug before adding in other ingredients.
GB24
100_160419_MK-F800_Second_EU(UZ50E153).indb 24 2016/04/19 16:56:51
Page 25
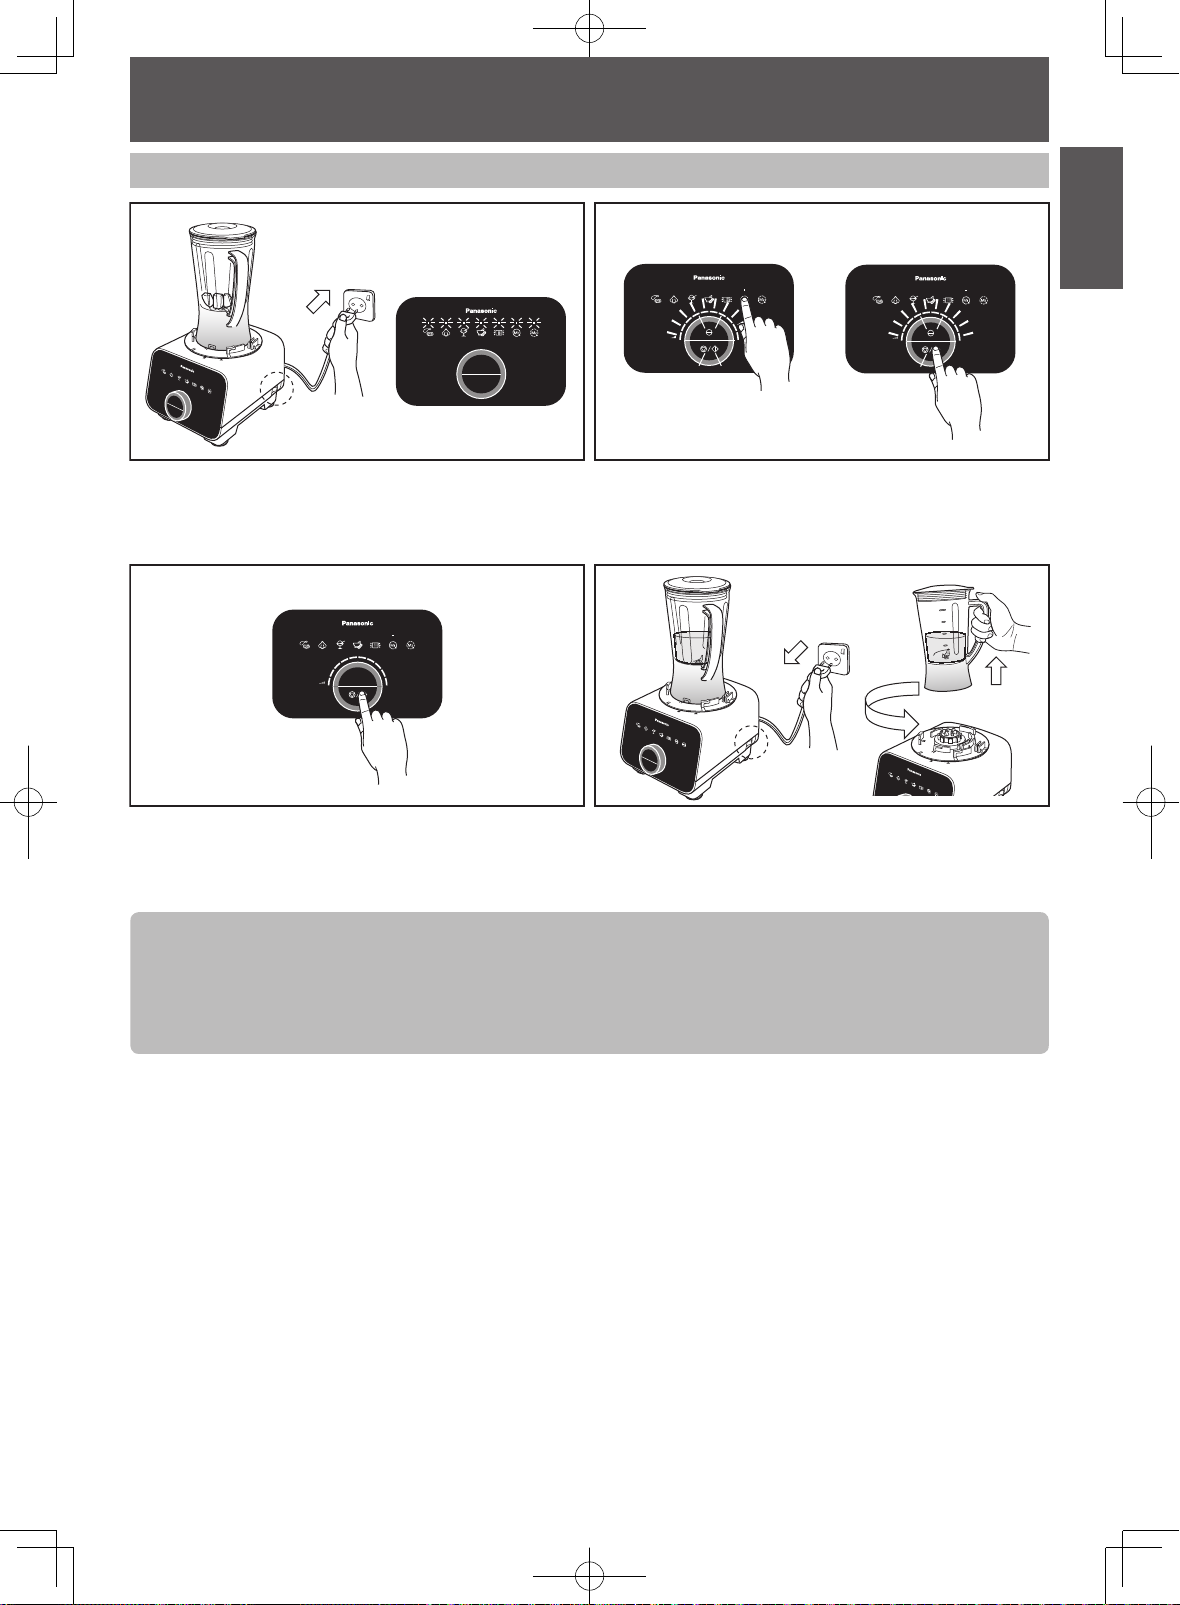
BLENDER
Operating with Manual Menu
1 2
English
After completing the assembly steps, plug-in the plug
into the socket and turn on the Power Switch. The Mode
Indication L.E.D.s will light up and blink.
3 4
3
During the driving operation, the Stop/Start Indication
L.E.D. will remain lit. Push the Stop/Start Switch to stop
the driving operation.
Note:
• If the Cutting Blade gets stuck, switch off immediately and unplug. Do not attempt to proceed to unstuck the
ingredients with your ngers, use an object like a rubber spatula instead.
• During blending, there is a possibility that the ingredients will splash out of the Blender Lid hole. In the event
that it splashes out, wipe it off with a dry cloth.
• Do not operate exceeding the rated operation duration (2 min ON, 2 min OFF).
Select the Continuous mode and adjust the speed with
the Rotary Dial. The more bars are lighted, the higher
the speed. Push the Stop/Start Switch to start the
operation.
After the processing is completed, switch off the Power
Switch and unplug from the socket. Remove the
Blender Unit from the Motor Housing and proceed to
remove the ingredients.
GB25
100_160419_MK-F800_Second_EU(UZ50E153).indb 25 2016/04/19 16:56:51
Page 26
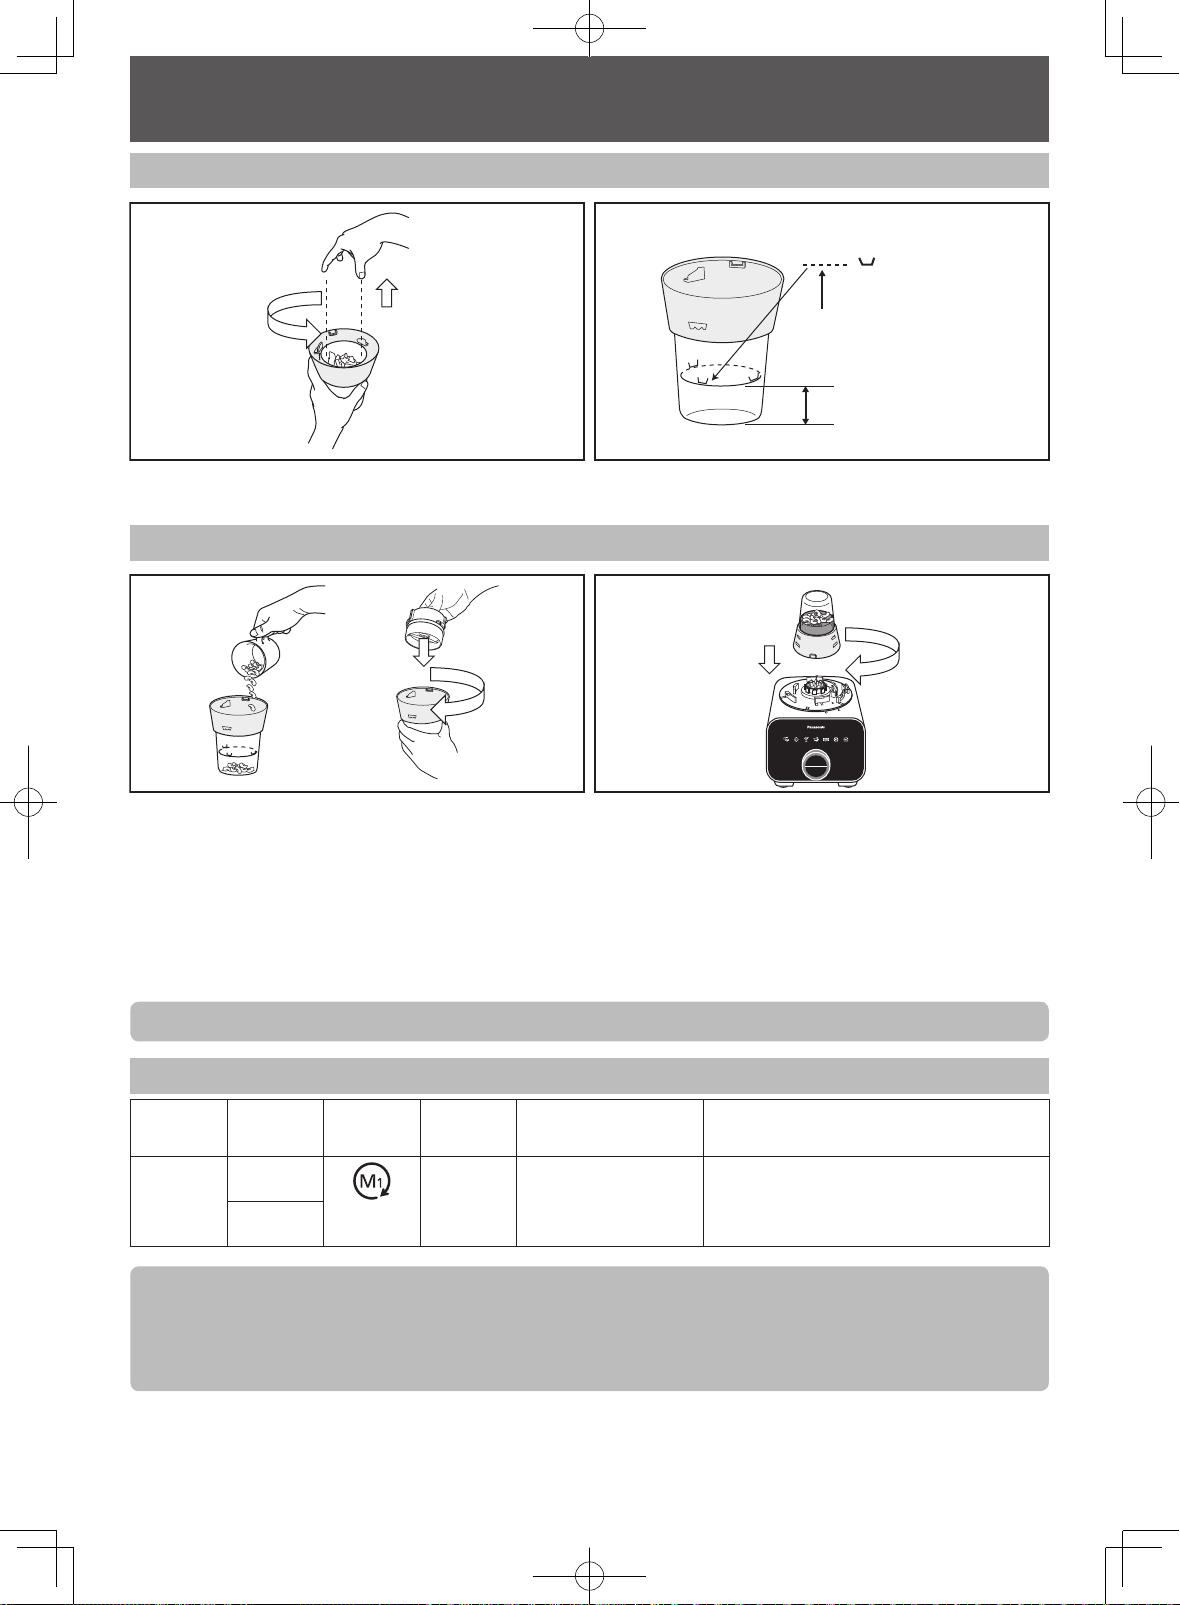
DRY MILL
Disassembly from Packaged Condition
1 2
Maximum Level
Maximum Level for
Dry Ingredients
Turn the Mill Container Base anticlockwise to unlock
and lift up from the Mill Container.
A maximum level for dry ingredients is indicated on the
Mill Container. Do not ll exceeding this level.
Assembly and Disassembly of Dry Mill Attachment
1 2
Turn the Mill Container upside down and ll in the
ingredients without exceeding the maximum level
indicated.
Place the Dry Mill Unit on top of the Motor Housing.
Turn the Dry Mill Unit clockwise until a ‘click’ sound is
heard.
Place the Mill Container Base into the Mill Container
and turn it clockwise until a ‘click’ sound is heard.
Make sure the ribs on outer surface of the Mill container
base and inner surface of the Mill container are hooked
rmly.
To disassemble, simply follow the assembly steps in reverse.
Ingredient Preparations for Dry Mill
Function Ingredient Mode
Coffee Bean
Grind
Pepper
Continuous
Speed: Max
Max
Single Use
Till
Max Level
Operating Time (approx.) Preparation Method
~ 60 sec
-
Note:
• Prohibited ingredients: refer to page GB6.
• Do not operate the unit with empty Dry Mill.
• Do not ll exceeding the maximum level and reduce ingredients when the appliance makes an abnormal sound
or vibrates during operation.
GB26
100_160419_MK-F800_Second_EU(UZ50E153).indb 26 2016/04/19 16:56:51
Page 27

English
DRY MILL
Operating with Manual Menu
1 2
After completing the assembly steps, plug-in the plug
into the socket and turn on the Power Switch. The Mode
Indication L.E.D.s will light up and blink.
3 4
3
During the driving operation, the Stop/Start Indication
L.E.D. will remain lit. Push the Stop/Start Switch to stop
the driving operation.
Note:
• While removing the ingredients, be careful of the Cutting Blade.
• Do not operate exceeding the rated operation duration (1 min ON, 2 min OFF).
Select the Continuous mode and adjust the speed with
the Rotary Dial. The more bars are lighted, the higher
the speed. Push the Stop/Start Switch to start the
operation.
After the processing is completed, switch off the Power
Switch and unplug from the socket. Remove the Dry Mill
Unit from the Motor Housing and proceed to remove the
ingredients.
GB27
100_160419_MK-F800_Second_EU(UZ50E153).indb 27 2016/04/19 16:56:51
Page 28
AFTER USE
Cleaning
Pre-wash
The pre-wash enables easier cleaning. It can be used for the Knife Blade and Blender Unit. To pre-wash, simply
follow the steps below.
1
Put the used attachment inside the Bowl, ll the Bowl
with water until the attachment is submerged in water
(max. 500 mL). Place the Bowl Lid on top of the Bowl
and turn it clockwise until a ‘click’ sound is heard.
2 3
Food Processor: Select the Intermittent mode, push the
Stop/Start Switch and operate for 10 ~ 20 seconds at
level 10.
Blender: Select the Continuous mode, push the Stop/
Start Switch and operate for 10 ~ 20 seconds at level
10.
BlenderFood Processor
For the Blender Unit, ll 500 mL of water into the
Blender Jug and cover with the Blender Lid. Plug-in the
plug into the socket and turn on the Power Switch.
Push the Stop/Start Switch to stop the driving operation.
Switch off the Power Switch and unplug from the
socket.
Remove the attachments and proceed for cleaning.
Wash these items by rinsing them under running water. Use neutral kitchen detergent if necessary. Proceed to
wipe them dry with a clean cloth.
Wash these items by rinsing them under running water, and clean carefully with Brush.
Use neutral kitchen detergent if necessary.
Note:
• These items are extremely sharp and should be handled with extra care while cleaning.
Avoid hitting these items on hard objects during the cleaning process.
• The Mill Container Base must not be washed, use Brush to clean.
GB28
100_160419_MK-F800_Second_EU(UZ50E153).indb 28 2016/04/19 16:56:52
Page 29

English
AFTER USE
Motor Housing / Rubber Foot
Wipe off any dirt or stains with a clean damp cloth.
Note:
• Ensure that the power cord is unplugged before cleaning the Motor Housing.
• Do not wash the Motor Housing under running water.
• Never use corrosive liquids (e.g. alcohol, thinner, etc) to clean the Motor Housing.
Cleaning with a Dishwasher
The Bowl and Bowl Lid of this appliance are dishwasher safe.
Note:
• Do not place these items near the dishwasher heater area as high temperatures may damage the parts.
Storing
Ensure all attachments and the Bowl are removed from the Motor Housing prior to storage.
1 2
To release the Rubber Foot suction of the Motor
Housing, press on the release lever located at the
bottom side of the Motor Housing at the same time as
seen in the above picture and lift up.
3
(i)
Release Lever
(ii) (iii)
Tilt the Motor Housing on its side, and proceed to wind
up the Power Cord around the Cord Winding Area
partially, leaving the Plug at the sides.
(i) Store the Knife Blade inside
the Bowl. The Storage Case
Unit is included to store the
other attachments. Store the
attachments in place as per
packaging condition.
100_160419_MK-F800_Second_EU(UZ50E153).indb 29 2016/04/19 16:56:52
(ii) List of attachments in Storage
Case Unit: Kneading Blade,
Citrus Cone, Thick Slicing
Blade, Thin Slicing Blade,
Fine Shredding Blade, Coarse
Shredding Blade, Julienne Blade,
Blade Stand, Grating Blade,
Whipping Blade and Brush.
(iii) Place the Storage Case Lid
beneath the Storage Case to
collect the drained water from
the washed attachments
Note:
• Dispose of the exible plastic
cover after opening the Storage
Case.
GB29
Page 30

TROUBLESHOOTING
Please check the following points before arranging for service.
Problem Cause and Action
The plug is loose in the outlet.
The appliance does not turn on.
None of the Control Panel
Functions can be selected.
The appliance does not start even
the Stop/Start Switch is pressed.
(Error Mode is indicated)
Plug in rmly into the outlet.
The Power Switch has not been
Turn on the Power Switch.
Gloves may cause insensitivity of the Control Panel.
Select the functions with bare ngers.
Pressing the function at the wrong position.
Press rmly on the illustration on the Control Panel.
The appliance is already operating.
The functions cannot be changed when the appliance is
operating. Stop the previous function before selecting a new
one.
The Bowl, Blender Unit or Dry Mill Unit is not properly locked
onto the Motor Housing.
Ensure that the triangle mark on the attachments are
aligned with the rectangular mark on the Motor Housing as
seen in page GB10.
The Bowl Lid or Citrus Strainer is not fully locked onto the
Bowl.
Fully secure the Bowl Lid or Citrus Strainer onto the Bowl.
The appliance does not operate
even when the function is started.
(No Error Mode)
The selected function is canceled.
(The Mode Indication L.E.D. starts
blinking).
The appliance suddenly stops
during operation.
The ingredients are jammed.
Remove the ingredients carefully and ensure that the
amount used is as stated.
The appliance was left idle for more than 10 seconds after
selecting the function.
Ensure that action is done after selecting the function within
10 seconds.
The circuit breaker protection is activated. (Refer to page GB10)
• Too much ingredients were inserted.
Remove the excess ingredients and ensure that the amount
used is as stated.
• Large chunks or hard ingredients were used.
Ensure that the ingredients are cut into the stated sizes.
Do not use hard ingredients such as frozen foods or highly
dense solids.
The safety lock was triggered. (Refer to page GB10)
• Abnormal vibration during operation may offset the safety
lock engagement.
Ensure that the ingredients used and the amount are as
stated.
Lock the Bowl Lid or Citrus Strainer onto the Bowl rmly,
and ensure that the Bowl, Blender Unit, or Dry Mill Unit is
locked rmly onto the Motor Housing.
GB30
100_160419_MK-F800_Second_EU(UZ50E153).indb 30 2016/04/19 16:56:52
Page 31

English
TROUBLESHOOTING
Problem Cause and Action
There is abnormal vibration and
noise during operation.
The texture and consistency of
the processed ingredients did not
turn out well.
The Rubber Feet and/or the work top are not clean.
Wipe off any dirt or stains with a clean damp cloth. The
Rubber Foot is only effective when placed on a clean,
smooth and at surface.
The ingredients used for processing is either too much or too
hard.
Ensure that the ingredients used are as stated, reduce the
ingredients if it is over the stated amount.
Some ingredients might be too difcult to process raw,
e.g.pumpkin.
Precook might be necessary to soften the ingredients
before processing, i.e. until a fork can easily pierce.
Ingredient size is not according to the preparation method.
Prepare accordingly to follow the size stated.
Processing certain ingredients at the same time may result in
lumps remaining for Frozen mode.
Auto Menu
The Auto Menu’s default processing duration is meant for
the stated ingredient amounts. Any other ingredient amounts
processed will affect the performance.
Increase the processing duration by adjusting the Rotary
Dial and process till the desired texture and consistency.
Manual Menu
The maximum ingredient amount and processing duration are
meant to serve as a guideline, lesser ingredient amount and
different ingredients will affect the performance.
Process the ingredients with a suitable duration till the
desired texture and consistency.
GB31
100_160419_MK-F800_Second_EU(UZ50E153).indb 31 2016/04/19 16:56:52
Page 32

Error Mode Indication
Circuit Breaker Protection, High Voltage Detection and High Current Detection
i) Circuit Breaker Protection
ii) High Voltage Detection
iii) High Current Detection
No L.E.D.s light up.
Alternate blinking of Chop and
Intermittent L.E.D.s.
Alternate blinking of Mince+Chop
and Continuous+Intermittent
L.E.D.s.
Action:
For scenario i) and iii), turn off the Power Switch at the side of Motor Housing, reduce the amount of ingredients
into half and resume operation. If it still does not start, turn off the Power Switch again at the side of Motor Housing
and resume operation.
For scenario ii), the Error Mode Indication is shown due to exceed voltage rating. Use 220-240 V.
Motor Overheat The Bowl, Blender Unit or Dry Mill Unit is not
properly locked onto the Motor Housing.
Alternate blinking of Mince and Intermittent
L.E.D.s.
Action:
Turn off the Power Switch, and let the appliance to
cool down (approx. 30 min). Reduce the amount of
ingredients into half and resume operation.
Electronic component malfunction
or or
Alternate blinking of Mince or Chop or Frozen and Continuous L.E.D.s.
Action:
Please contact your nearest service center for repairing.
GB32
Alternate blinking of Mince+Chop+Frozen
and Paste+Drainer+Continuous L.E.D.s.
Action:
Reattach the part onto the Motor Housing in proper
position. (Refer to page GB10).
100_160419_MK-F800_Second_EU(UZ50E153).indb 32 2016/04/19 16:56:53
Page 33

English
SPECIFICATIONS
Model No. MK-F800
Function Food Processor Blender & Dry Mill
Power Supply 220 - 240 V ~ 50 - 60 Hz
Rated Consumption 180 - 200 W
Switch Rotary Dial with Soft Touch Panel Switch
Operation Rating
Dimension (Approx.)(HxWxD) 435 x 264 x 265 mm
Mass (Approx.) 4.3 kg
Capacity (Approx.)
Attachment & Accessories
Common Accessories Brush with Spatula
Dishwasher Safe Items Bowl and Bowl Lid
Airborne Acoustical Noise 86 (dB (A) re. 1 pW) 87 (dB (A) re. 1 pW)
2 minutes ON, 4 minutes OFF
With exception for the stated on “Ingredient Preparations” page.
Container Capacity: 2.5 L
Maximum working capacity:
Liquids only = 1.5 L
Solids only = 600 g
With exception for the stated on “Ingredient Preparations” page.
Knife Blade, Grating Blade, Kneading
Blade, Whipping Blade, Salad Drainer,
Blade Stand, Shredding Blades (Coarse
& Fine), Slicing Blades (Thick & Thin),
Julienne Blade, Citrus Press and
Storage Case Unit
Blender: 2 minutes ON, 2 minutes OFF
Dry Mill: 1 minute ON, 2 minutes OFF
Blender : 406 x 264 x 265 mm
Dry Mill : 298 x 264 x 265 mm
Blender : 4.0 kg
Dry Mill : 3.8 kg
Blender : 1 L
Dry Mill : 50 g (Coffee Beans)
Blender Unit, Dry Mill Unit
Disposal of Old Equipment
Only for European Union and countries with recycling systems
This symbol on the products, packaging, and/or accompanying documents means that used
electrical and electronic products must not be mixed with general household waste.
For proper treatment, recovery and recycling of old products, please take them to applicable
collection points in accordance with your national legislation.
By disposing of them correctly, you will help to save valuable resources and prevent any
potential negative effects on human health and the environment.
For more information about collection and recycling, please contact your local municipality.
Penalties may be applicable for incorrect disposal of this waste, in accordance with national
legislation.
GB33
100_160419_MK-F800_Second_EU(UZ50E153).indb 33 2016/04/19 16:56:53
Page 34

INHALTSVERZEICHNIS
Seite
SICHERHEITSVORKEHRUNGEN ..............................................................................................................DE3 - DE5
WICHTIGE HINWEISE ........................................................................................................................................... DE6
TEILE-NAMEN .............................................................................................................................................DE7 - DE8
VERRIEGELUNG ................................................................................................................................................... DE9
SCHUTZSCHALTER UND TEMPERATURSENSOR-SCHUTZ ............................................................................. DE9
DEMONTAGE + MONTAGE
(i) AUSPACKEN ............................................................................................................................................. DE10
(ii) MESSERKLINGE • KNETHAKEN • SCHLAGSAHNE-AUFSATZ • RASPELSCHEIBE .............................DE10
(iii) SCHNEIDEEINSÄTZE • REIBEEINSÄTZE • MESSERKLINGE ................................................................ DE11
(iv) ZITRUSPRESSE ........................................................................................................................................ DE11
(v) SALATSCHLEUDER .................................................................................................................................. DE12
KÜCHENMASCHINE
(i) MESSERKLINGE ........................................................................................................................... DE13 - DE15
- Vorbereitung der Zutaten
- Bedienung
(ii) SCHNEIDEEINSÄTZE • REIBEEINSÄTZE • MESSERKLINGE .................................................... DE16 - DE17
- Vorbereitung der Zutaten
- Bedienung
(iii) KNETHAKEN ............................................................................................................................................. DE18
- Vorbereitung der Zutaten
- Bedienung
(iv) SCHLAGSAHNE-AUFSATZ ....................................................................................................................... DE19
- Vorbereitung der Zutaten
- Bedienung
(v) RASPELSCHEIBE ..................................................................................................................................... DE20
- Vorbereitung der Zutaten
- Bedienung
(vi) SALATSCHLEUDER .................................................................................................................................. DE21
- Vorbereitung der Zutaten
- Bedienung
(vii) ZITRUSPRESSE ........................................................................................................................................ DE22
- Vorbereitung der Zutaten
- Bedienung
MIXER
(i) MIXER ............................................................................................................................................ DE23 - DE24
- Demontage & Montage
- Vorbereitung der Zutaten
- Bedienung
TROCKENMAHLWERK
(ii) TROCKENMAHLWERK .................................................................................................................DE25 - DE26
- Demontage & Montage
- Vorbereitung der Zutaten
- Bedienung
NACH GEBRAUCH .................................................................................................................................. DE27 - DE28
FEHLERBEHEBUNG ............................................................................................................................... DE29 - DE30
TECHNISCHE DATEN .........................................................................................................................................DE32
DE2
100_160419_MK-F800_Second_EU(UZ50E153).indb 2 2016/04/19 16:56:53
Page 35

Deutsch
SICHERHEITSVORKEHRUNGEN (Bitte befolgen Sie diese Anweisungen.)
Befolgen Sie bitte die nachstehenden Anweisungen, um Unfälle oder Verletzungen des
Benutzers oder Dritter sowie Sachschäden zu vermeiden.
Die nachfolgenden Hinweise zeigen das durch unsachgemäßen Gebrauch
entstehende Schadensausmaß auf.
Weist auf die Möglichkeit schwerer Verletzungen
WARNUNG
ACHTUNG
Die Zeichen sind klassiziert und wie folgt erläutert:
Dieses Symbol weist auf ein Verbot
hin.
oder Tod hin.
Weist auf die Möglichkeit von Verletzungen oder
Sachschäden hin.
Dieses Symbol weist auf eine erforderliche
Anweisung hin, die befolgt werden muss.
WARNUNG
Vermeiden Sie Beschädigungen des Kabels und des Steckers.
(Diese können zu Stromschlag oder Feuer durch Kurzschluss führen.)
Verwenden Sie das Gerät nicht, wenn das Kabel oder der Stecker beschädigt
sind oder der Stecker nur lose mit der Steckdose verbunden ist.
(Dies kann zu Stromschlag oder Feuer durch Kurzschluss führen.)
Sofern das Kabel beschädigt ist, muss es zur Vermeidung von Gefahren durch
den Hersteller, dessen Kundendienst oder eine gleichermaßen qualizierte
Person ausgewechselt werden.
Den Stecker nicht mit nassen Händen einstecken oder abziehen.
(Dies kann einen Stromschlag verursachen.)
Überschreiten Sie nicht die zulässige Steckdosenspannung und verwenden
Sie keine andere als die auf dem Gerät angegebene Stromstärke.
(Dies kann zu Stromschlag oder Feuer führen.)
• Stellen Sie sicher, dass die dem Gerät zugeführte Stromspannung ihrer
Ortsversorgung entspricht.
• Das Einstecken anderer Geräte in die gleiche Steckdose kann zu elektrischer
Überhitzung führen.
Das Motorengehäuse nicht in Wasser eintauchen oder mit Wasser bespritzen.
(Dies kann zu Stromschlag oder Feuer durch Kurzschluss führen.)
Bauen Sie das Gerät nicht auseinander und nehmen Sie am Gerät keine
Reparaturen oder Änderungen vor.
(Dies kann zu Feuer, Stromschlag oder Verletzungen führen.)
Wenden Sie sich bei Reparaturbedarf bitte an Ihren Kundendienst.
Stecken Sie keine Gegenstände in die Lüftungsöffnung oder in die
Zwischenräume.
(Dies kann zu Stromschlag oder Fehlfunktionen führen.)
• Insbesondere keine Gegenstände aus Metall wie Nadeln oder Drähte.
Ersetzen Sie Geräteteile nur mit für dieses Produkt zugelassenen Ersatzteilen.
(Anderenfalls kann es zu Verletzungen, Stromschlag oder Feuer kommen.)
Versuchen Sie nicht, die Abdeckung zu entfernen, wenn das Gerät noch in
Betrieb ist.
(Andernfalls können Verletzungen verursacht werden.)
Verwenden Sie kein heißes Wasser (über 60 °C) zu Reinigungszwecken oder
Feuer, um das Gerät zu trocknen.
(Dies kann zu Verbrennungen oder Fehlfunktionen führen.)
DE3
100_160419_MK-F800_Second_EU(UZ50E153).indb 3 2016/04/19 16:56:53
Page 36

WARNUNG
Geben Sie keine heißen Zutaten (über 60 °C) in den Behälter oder den Mixer.
(Es kann zu Verletzungen oder Fehlfunktionen führen.)
Das Gerät nicht ohne die ordnungsgemäß angebrachte Mixerabdeckung des
Mixbehälters bedienen.
(Andernfalls können Verletzungen verursacht werden.)
Halten Sie nicht Ihren Finger oder Gebrauchsgegenstände wie Löffel, Gabel
etc. in den Behälter oder den Mixbehälter während des Betriebes.
(Es kann zu Verletzungen, Stromschlag oder einem Brand durch Kurzschluss
führen.)
Drücken Sie den Sicherheitsbolzen und Sicherheitsstift nicht mit einem
Gerät, Stift etc. herunter, solange das Gerät eingeschaltet ist.
(Andernfalls können Verletzungen verursacht werden.)
Dieses Gerät ist nicht zum Gebrauch durch Kinder geeignet. Halten Sie das
Gerät und das zugehörige Kabel aus der Reichweite von Kindern fern. Das
Gerät kann von Personen mit eingeschränkten körperlichen, sensorischen
oder psychischen Fähigkeiten oder Mangel an Erfahrung oder Kenntnissen
benutzt werden, sofern diese Personen beaufsichtigt werden oder
Anweisungen hinsichtlich der sicheren Verwendung des Produkts erhalten
haben und die damit verbundenen Gefahren verstehen. Lassen Sie Kinder
nicht mit dem Gerät spielen.
(Es besteht Verbrennungs-, Verletzungs- und Stromschlaggefahr.)
Stecken Sie den Stecker fest ein.
(Anderenfalls kann die möglicherweise um den Stecker herum entstehende Hitze
zu Stromschlag und Feuer führen.)
Der Stecker sollte regelmäßig gereinigt werden.
(Ein verunreinigter Stecker kann aufgrund von Feuchtigkeit zu unzureichender
Isolierung führen und eine Brandgefahr darstellen.)
Sofern abnormale Vorkommnisse oder Störungen auftreten, stellen Sie den
Betrieb des Geräts unverzüglich ein und ziehen Sie den Stecker ab.
(Es besteht die Gefahr von Rauchbildung, Feuer oder Stromschlag.)
Beispiele für abnormale Vorkomnisse oder Störungen:
• Stecker und Kabel erhitzen sich über das normale Maß hinaus.
• Das Kabel ist beschädigt oder es liegt ein Stromausfall vor.
• Das Motorengehäuse ist verformt oder ungewöhnlich heiß.
Ziehen Sie den Gerätestecker unverzüglich ab und wenden Sie sich an den
Kundendienst, um das Gerät überprüfen oder reparieren zu lassen.
Vergewissern Sie sich, dass Sie am Stecker ziehen, wenn Sie diesen
ausstecken, d. h. ziehen Sie niemals direkt am Kabel.
(Anderenfalls kann es zu Stromschlag oder Feuer durch Kurzschluss kommen.)
Seien Sie vorsichtig, wenn heiße Flüssigkeit in den Behälter oder
Mixbehälter gelangt, die aufgrund einer plötzlichen Dampfentwicklung aus
dem Gerät austreten kann.
(Es kann zu Verbrennungen führen.)
DE4
100_160419_MK-F800_Second_EU(UZ50E153).indb 4 2016/04/19 16:56:53
Page 37

Deutsch
ACHTUNG
Lassen Sie das Gerät während des Betriebs nicht unbeaufsichtigt.
(Es besteht Feuer- oder Verbrennungsgefahr.)
• Schalten Sie das Gerät ab, wenn Sie es unbeaufsichtigt zurücklassen.
Folgende Stellen sind zum Betrieb des Geräts nicht geeignet:
• Unebene Oberächen, nicht-hitzebeständige Teppiche oder Tischdecken, usw.
(Es besteht Feuer- oder Verletzungsgefahr.)
• Stellen, an denen die Gefahr von Spritzwasser besteht oder die sich in der
Nähe einer Wärmequelle benden.
(Es besteht Stromschlag- oder Leckstromgefahr.)
Verarbeiten Sie nicht mehr als die auf jedem Behälter angegebene maximale
Menge. Beachten Sie die empfohlene Dosierung der Zutaten für die
Verarbeitung.
(Es kann zu Vibrationen und Fehlfunktionen führen.)
Schalten Sie das Gerät nicht für längere Zeit ein. Es wird empfohlen, das
Gerät nach einer bestimmten Betriebszeit ruhen zu lassen.
(Es kann Verbrennungen verursachen.)
Funktionsweise
Küchenmaschine 2 4
Mixer 2 2
Trockenmahlwerk 1 2
* Ausgenommen der genannten „Zubereitung der Zutaten“ in dieser
Betriebsanleitung.
Betriebszeit
(Minuten)
Ruhezeit
(Minuten)
Ziehen Sie stets den Gerätestecker aus der Steckdose ab, wenn das
Gerät unbeaufsichtigt zurückgelassen wird und bevor Sie das Gerät
zusammensetzen, demontieren oder reinigen.
(Es bestent Verbrennugs - und Verletzungsgefahr.)
Entfernen Sie Behälter und Mixbehälter bevor Sie das Motorengehäuse vom
Tisch nehmen.
(Andernfalls können Verletzungen verursacht werden.)
Schalten Sie das Gerät aus und ziehen Sie den Stecker ab, bevor Sie
Zubehörteile auswechseln oder sich Teilen nähern, die sich während des
Betriebs in Bewegung benden.
(Anderenfalls kann es zu Verletzungen kommen.)
Achten Sie beim Tragen des Gerätes darauf, das Motorgehäuse mit beiden
Händen zu halten. Tragen Sie es nicht, indem Sie nur den Behälter, den
Mixbehälter oder den Mahlbehälter festhalten.
(Andernfalls können Verletzungen verursacht werden.)
Falls sich die Mixerklinge verklemmt, schalten Sie den Mixer aus und ziehen
Sie den Stecker raus. Halten Sie Ihren Finger nicht in den Mixbehälter.
Verwenden Sie eine Spachtel, um die Zutaten, die die Mixerklinge blockieren
zu entfernen.
(Andernfalls können Verletzungen verursacht werden.)
Vorsicht beim Umgang mit den scharfen Schneidklingen beim Entleeren
des Behälters oder Mixbehälters und beim Reinigen. (z.B. Messerklinge,
Schneideeinsätze etc.)
(Dies kann zu Verletzungen führen.)
DE5
100_160419_MK-F800_Second_EU(UZ50E153).indb 5 2016/04/19 16:56:53
Page 38

WICHTIGE HINWEISE
Stellen Sie das Gerät nicht an den folgenden Orten auf.
• Orte, an denen das Gerät übermäßiger Feuchtigkeit, überhöhten Temperaturen oder
direkter Sonneneinstrahlung ausgesetzt ist.
(Es kann zu Fehlfunktionen führen.)
• Jegliche Orte mit übermäßig hohen oder niedrigen Temperaturen wie Kühlschrank,
Gefrierschrank, Mikrowelle oder Backofen.
(Es kann zu Funktionsstörungen oder Ausfall führen.)
Verarbeiten Sie keine harten Zutaten (z.B. zähes Fleisch, Fleisch mit Knochen)
oder zähüssige Materialien.
(Es kann zu Fehlfunktionen führen.)
Verbotene Zutaten:
Anhänge Beschreibung
Messerklinge Harte und zähüssige Zutaten, z.B. Kaffeebohnen, getrocknete
Sojabohnen, gefrorene Lebensmittel, getrockneter Tintensch etc.
Schneideeinsätze
Reibeeinsätze und
Pommes-Frites-
Schneider
Knethaken Zutaten, die sich nicht zur Zubereitung von Teig eignen sind z.B.
Schlagsahne-
Aufsatz
Raspelscheibe Zähüssige Zutaten, Zutaten mit hoher Festfaserkonzentrationen,
Salatschleuder Große klobige Zutaten, Zutaten, die weich und zerbrechlich, z.B.
Zitruspresse Alle anderen Zutaten abgesehen von Zitrusfrüchten, wie z.B.
Mixer Harte Zutaten, äußerst klebrige Zutaten, Zutaten mit niedrigem
Trockenmahlwerk Harte Nüsse, getrocknete Früchte, Zutaten mit hoher
Zutaten mit hoher Festfaserkonzentrationen, zähüssige Zutaten,
Zutaten, die zu weich sind, z.B. hartes Gemüse, Schinken,
Kurkuma, Ingwer, Kopfsalat, Tomaten, Prsiche, Schokolade etc.
Fleisch, Gemüse, Nüsse, Soßen, Aufstriche.
Alle anderen Zutaten, abgesehen von Eiweiß und frischer Sahne.
Zutaten, die zu klein und dünn sind, z.B. Süßkartoffeln, Kartoffeln,
Sellerie, Lauch, Pinienkerne etc.
große Karotten oder Kartoffelstücke, Tomaten, Tofu, Pasta etc.
Apfel, Kiwi etc.
Wassergehalt z.B. Kurkuma, getrocknete Sojabohnen, Tiefkühlkost,
Fleisch, Fisch, gekochte Kartoffeln, oder bloße Eiswürfel etc.
Festfaserkonzentration, feuchte Zutaten, Flüssigkeiten, z.B.
verschiedene Nüsse, Rosinen, Fleisch, Gemüse, gekochte Eier,
Kurkuma usw..
Vor Gebrauch:
Bedienen Sie das Gerät nur auf einer sauberen, trockenen, achen, harten und glatten
Oberäche und säubern Sie den Gummisaugfuß (S. DE7) vor der Bedienung um
sicherzustellen, dass der Gummifuß Absaugung an eine optimale Leistung ist.
DE6
100_160419_MK-F800_Second_EU(UZ50E153).indb 6 2016/04/19 16:56:53
Page 39

Deutsch
TEILE-NAMEN
Küchenmaschine
Verarbeitungskapazität: 1,5 L
1. Schieber
2. Fülltrichter
3. Behälterabdeckung
4. Messerklinge
5. Raspelscheibe
6. Knethaken
7. Schlagsahne-Aufsatz
8. Salatschleuder-Deckel
9. Salatschleuder
10. Universaleinsatz
11. Reibeeinsatz fein
12. Reibeeinsatz grob
*Die Form des Steckers kann sich von der Abbildung unterscheiden.
13. Schneideeinsatz dünn
14. Schneideeinsatz dick
15. Pommes-Frites-Schneider
16. Zitruspresse
17. Filtersieb
18. Universalschüssel
19. Antriebswelle
20. Motorengehäuse
21. Ein/Ausschalter
22. Gummifuß
23. Kabel
24. *Stecker
DE7
100_160419_MK-F800_Second_EU(UZ50E153).indb 7 2016/04/19 16:56:54
Page 40

TEILE-NAMEN
Mixer, Trockenmahlwerk & Zubehör
Verarbeitungskapazität:
1 L
1. Mixerabdeckung
2. Mixbehälter
3. Mixerklinge
4. Mahlbehälter
5. Mahlklinge
Bedienpult
Modus-Wahl
- Auto-Menü -
Modus Zerkleinern
Modus Zerhacken
Modus Tiefgefroren
Modus Paste
6. Mahlwerkunterteil
7. Aufbewahrungsbox
8. Bürste
Modus-Anzeige LED
Stopp/Start-Schalter
Für Auto-Menü: zum Pausieren/Starten der
Verarbeitung
Für Manuelles Menü: zum Stoppen/Starten
der Verarbeitung
Modus Abtropfen
- Manuelles Menü -
Impulsschalter
Drehschalter
Stellen Sie die Geschwindigkeit und
Zeitgeber/Einschaltdauer ein
Dauerbetrieb
Intervallbetrieb
Anzeige Geschwindigkeit und Zeitgeber/Einschaltdauer LED.
: Leuchtet auf, wenn das Manuelle Menü aktiv ist und zeigt den Geschwindigkeitspegel
in Balken an.
: Leuchtet auf, wenn das Auto Menü ausgeführt wird und zeigt die Timer/Antriebszeit in
Balken an.
Hinweis:
• Das Programm wird unterbrochen und nach 10 Sekunden zurückgesetzt, falls keine weiteren Handlungen
unternommen werden, nachdem eine Funktionsweise ausgewählt wurde.
• Dreht man den Drehschalter im Uhrzeigersinn, werden mehr Kästchen beleuchtet und andersherum.
• Die Standardgeschwindigkeit für Dauer- und Intervallbetrieb ist auf maximalem Niveau (Stufe 10).
• Das Programm wird unterbrochen und nach 20 Sekunden zurückgesetzt, falls das Programm während der
Verarbeitung pausiert wurde und keine weiteren Handlungen unternommen wurden.
• Der Dauerbetrieb stoppt automatisch nach ca. 19 Minuten, und der Intervallbetrieb stoppt automatisch ca.
7 Minuten nach dem Beginn der Verarbeitung.
DE8
100_160419_MK-F800_Second_EU(UZ50E153).indb 8 2016/04/19 16:56:54
Page 41

Deutsch
VERRIEGELUNG
Der Sicherheitsbolzen wurde entworfen, um das Gerät vor dem Einschalten zu schützen, wenn
- die Behälterabdeckung oder die Zitruspresse und die Universalschüssel nicht vollständig miteinander verriegelt
sind.
- Der Behälter, der Mixer oder der Mahlwerkbehälter nicht vollständig mit dem Motorengehäuse verriegelt sind.
Der Sicherheitshebel
aktiviert den
Sicherheitsbolzen nur dann,
wenn die Behälterabdeckung
oder die Zitruspresse
vollständig mit dem Behälter
verriegelt sind.
Position A : Entriegeln
Position B : Verriegeln
Volle Verriegelung Schritte :
Richten Sie für Behälter oder Mixbehälter
die Dreiecksmarkierung mit dem
Motorengehäuse aus, wie in Position
dargestellt. Drehen Sie diesen im
Uhrzeigersinn bis das Geräusch der
Verriegelung zu hören ist und sich die
Dreiecksmarkierung mit Position in einer
Linie bendet. Für das Trockenmahlwerk
drehen Sie diesen auf dem Motorengehäuse
im Uhrzeigersinn bis Sie ein Klicken hören.
Sicherheitsbolzen
Zum Entriegeln gehen Sie die einzelnen
Schritte in umgekehrter Reihenfolge durch.
Hinweis:
• Drücken Sie den Sicherheitsbolzen und Sicherheitshebel nicht mit einem Gerät, Stift etc. herunter.
• Geben Sie keine Flüssigkeiten oder Zutaten über den Bereich des Sicherheitsbolzens und des
Sicherheitshebels hinzu.
• Halten Sie den Bereich um den Sicherheitsbolzen und den Sicherheitshebel sauber, um zu vermeiden, dass
sich Fremdkörper dort ansammeln.
Die o.g. Maßnahmen gewährleisten die korrekte Funktion des Sicherheitsbolzens und des
Sicherheitshebels. Werden diese nicht befolgt, werden die mit dem Sicherheitsbolzen und dem
Sicherheitshebel in Verbindung stehenden Teile beschädigt.
SCHUTZSCHALTER UND TEMPERATURSENSOR-SCHUTZ
Das Gerät hat einen Schutzschalter und Temperatursensor-Funktionen, um den Motor bei Überlastung
auszuschalten.
(siehe Seite DE31)
DE9
100_160419_MK-F800_Second_EU(UZ50E153).indb 9 2016/04/19 16:56:54
Page 42

KÜCHENMASCHINE - DEMONTAGE & MONTAGE -
AUSPACKEN
1
Drehen Sie die Behälterabdeckung gegen den
Uhrzeigersinn und heben Sie diese vom Behälter ab.
Hinweis:
Seien Sie vorsichtig mit den scharfen Kanten der Messerklinge, wenn Sie diese aus dem Behälter herausnehmen.
Montage des Zubehörs der Küchenmaschine
Es wird dringend empfohlen, jegliches Gerätezubehör und Zusatzteile vor dem ersten Gebrauch der Maschine zu
reinigen und gut zu trocknen. Für das Reinigungsverfahren siehe S. DE27 und DE28. Ziehen Sie bei der Montage
den Stecker heraus. Vergewissern Sie sich vor dem Einstecken des Steckers, dass der Netzschalter ausgeschaltet
ist. Bitte sehen Sie auf S. DE28 unter „Aufstellort“ nach, wie Sie das Motorengehäuse neu positionieren.
Messerklinge • Knethaken • Schlagsahne-Aufsatz • Raspelscheibe
1 2
2
Oberes Ende
der Messerklinge
Halten Sie das obere Ende der Messerklinge und heben
Sie diese an, um sie aus dem Behälter zu entfernen.
oder
oder
oder
Setzen Sie die Messerklinge (den Knethaken, den
Schlagsahne-Aufsatz oder die Raspelscheibe) in den
Behälter.
Hinweis:
Bei der Messerklinge stellen Sie sicher,
dass der Metallschaft nach dem Einsetzen
aus der Messerklinge herausragt.
Geben Sie die Zutaten in die Universalschüssel.
Hinweis:
Legen Sie die Zutaten bei der Raspelscheibe darüber
und verteilen Sie sie regelmäßig darauf.
Setzen Sie die Behälterabdeckung auf die
Universalschüssel und drehen Sie diesen im
Uhrzeigersinn bis Sie ein „Klicken“ hören. Stecken Sie
den Schieber in den Fülltrichter.
DE10
100_160419_MK-F800_Second_EU(UZ50E153).indb 10 2016/04/19 16:56:55
Page 43

Deutsch
KÜCHENMASCHINE - DEMONTAGE & MONTAGE -
Montage des Gerätezubehörs
Schneideeinsätze (dick/dünn) · Reibeeinsatz (Grob/Fein) · Pommes-Frites-Schneider
1 2
Arretierung
Stecken Sie die Arretierung der gewünschten Klinge auf
den Universaleinsatz und stellen Sie sicher, dass sie
ordnungsgemäß eingepasst ist.
Hinweis:
• Seien Sie vorsichtig mit den scharfen Kanten von Schneideinsätzen, wenn Sie diese auf den Universaleinsatz stecken.
• Zum Entfernen der Klinge, legen Sie den Universaleinsatz um und drücken Sie auf die Vertiefung auf der Klinge.
3 4
Drücken Sie auf die Vertiefung auf der Klinge, wie oben
dargestellt, bis es einrasten hören.
Fingerlöcher
Führen Sie Ihren Finger und Ihren Daumen in die
Fingerlöcher ein, um den Universaleinsatz zu greifen.
Platzieren Sie den zusammengebauten
Universaleinsatz in den Behälter.
Hinweis:
Vergewissern Sie sich, dass die
Antriebswelle nach dem Einführen aus
dem Universaleinsatz herausragt.
Zitruspresse
1 2
Setzen Sie das Filtersieb auf den Behälter. Drehen Sie
es im Uhrzeigersinn bis Sie ein „Klicken“ hören.
Setzen Sie die Behälterabdeckung auf die
Universalschüssel und drehen Sie diesen im
Uhrzeigersinn bis Sie ein „Klicken“ hören.
Setzen Sie die Zitruspresse auf die Antriebswelle.
DE11
100_160419_MK-F800_Second_EU(UZ50E153).indb 11 2016/04/19 16:56:55
Page 44

KÜCHENMASCHINE - DEMONTAGE & MONTAGE -
Montage des Gerätezubehörs
Salatschleuder
1 2
Platzien Sie die Salatschleuder in den Behälter. Fügen
Sie die Zutaten in die Salatschleuder.
3 4
PP
A
B
PP
Platzieren Sie den Deckel der Salatschleuder auf die
Salatschleuder bis die Markierungen übereinstimmen,
wie unter A dargestellt. Drehen Sie den Deckel der
Schleuder gegen den Uhrzeigersinn bis die
Markierungen übereinstimmen, wie unter B dargestellt.
Vergewissern Sie sich, dass der Metallschaft nach dem
Einführen aus der Salatschleuder herausragt.
Setzen Sie die Behälterabdeckung auf die
Universalschüssel und drehen Sie diesen im
Uhrzeigersinn bis Sie ein „Klicken“ hören.
Bringen Sie die zusammengebauten Zusatzteile am Motorengehäuse an.
1. Platzieren Sie den Behälter oben auf das
Motorengehäuse bis die Markierungen
übereinstimmen, wie unter dargestellt.
2. Drehen Sie den Behälter im Uhrzeigersinn bis
Sie ein „Klicken“ hören. Stellen Sie sicher, dass
die Dreiecksmarkierung auf dem Behälter mit der
rechteckigen Markierung auf dem Motorengehäuse
in einer Linie ist, wie unter dargestellt.
Für eine Demontage gehen Sie die einzelnen Schritte in umgekehrter Reihenfolge durch.
DE12
100_160419_MK-F800_Second_EU(UZ50E153).indb 12 2016/04/19 16:56:55
Page 45

Deutsch
KÜCHENMASCHINE -MESSERKLINGE-
Vorbereitung der Zutaten
Funktionsweise
Zerkleinern
Zerhacken
Zerquetschen
Zerdrücken
Tiefkühl
Zutaten Modus Menge Betriebszeit (ca.). Zubereitungsart
Fleisch
Fisch 50 ~ 500 gr 3 ~ 30 Sek.
Zwiebel
Knoblauch
Karotten 50 ~ 450 gr 10 ~ 30 Sek.
Glatte
Petersilie
Pilze 30 ~ 250 gr 3 ~ 15 Sek.
Parmesankäse
Salzkartoffeln
Gefrorene
Bananen
Auto
Auto
Dauerbetrieb
Geschwindigkeit: Max
Dauerbetrieb
Geschwindigkeit:
Max
Intervallbetrieb
Geschwindigkeit: Max
Auto
50 ~ 400 gr 5 ~ 40 Sek.
Grundeinstellung ist für 200 gr (10 Sek.)
150 ~ 500 gr 10 ~ 50 Sek.
Grundeinstellung ist für 300 gr (20 Sek.)
5 ~ 500 gr 10 ~ 30 Sek. Die Haut abziehen.
5 ~ 70 gr 10 ~ 40 Sek.
10 ~ 200 gr 10 ~ 60 Sek.
100 ~ 400 gr 10 ~ 40 Sek.
250 ~ 450 gr 40 ~ 120 Sek.
Grundeinstellung ist für 350 gr (60 Sek.)
Entfernen Sie Haut, Knochen
und Sehnen und schneiden Sie
es in 2 ~ 3 cm große Würfel.
Die Haut abziehen und in
2 ~ 3 cm große Würfel schneiden.
Die Haut abziehen und in
2 ~ 3 cm große Würfel schneiden.
Stiel entfernen.
In 2
~
3 cm große Würfel
schneiden.
In 2 ~ 3 cm große Würfel
schneiden.
In 2 ~ 3 cm große Würfel
schneiden. Verarbeiten Sie nicht
übermäßig.
1 ~ 2 cm Breite, halbgefrorener
Zustand, d.h. man kann sie mit
einem Zahnstocher durchstechen.
Eiszerkleinerer
Mahlen von Erdnüsse
Paste
Krumen
Kneten von
(für
Süßwaren)
Entsafter
Suppenzubereiter
Eiswürfel
Geröstete
Erdnüsse
Weiches
Weißbrot
Mehl
Obst,
Flüssigkeiten
etc.
Gekochtes
Gemüse,
Flüssigkeiten,
etc.
Dauerbetrieb
Geschwindigkeit: Max
Dauerbetrieb
Geschwindigkeit: Max
Auto
Dauerbetrieb
Geschwindigkeit: Max
Dauerbetrieb
Geschwindigkeit: Max
Dauerbetrieb
Geschwindigkeit: Max
Dauerbetrieb
Geschwindigkeit: Max
~ 10 Stk. ~ 20 Sek. 2 ~ 3 cm große Eiswürfel.
10 ~ 200 gr 15 ~ 30 Sek.
100 ~ 400 gr 4 ~ 10 Min.
Grundeinstellung ist für 300 gr (7 Min.)
10 ~ 200 gr 15 ~ 60 Sek.
~ 300 gr ~ 120 Sek.
~ 1.500 mL ~ 120 Sek.
~ 1.500 mL ~ 120 Sek.
Von den Erdnüssen Schale und
Haut entfernen.
Von den Erdnüssen Schale und
Haut entfernen.
Schneiden Sie weiches Brot in
6 ~ 8 Stücke.
Zu verwenden für die Herstellung
von Süßwaren wie Konfekt und
Kuchen.
In 2 ~ 3 cm große Würfel
schneiden. Feste Stoffe zuerst
verarbeiten. Füllen Sie maximal
1.500 mL Flüssigkeit ein. Fügen
Sie nicht mehr als 10 Eiswürfel
während der Verarbeitung hinzu.
In 2 ~ 3 cm große Würfel
schneiden. Feste Stoffe zuerst
verarbeiten. Füllen Sie maximal
1.500 mL Flüssigkeit ein.
DE13
100_160419_MK-F800_Second_EU(UZ50E153).indb 13 2016/04/19 16:56:56
Page 46

KÜCHENMASCHINE -MESSERKLINGE-
Betrieb im Auto-Menü
21
Nach Abschluss der Montageschritte, stecken Sie
den Stecker in die Steckdose und schalten Sie den
Netzschalter ein. Die Modus-Anzeige LED leuchtet und
blinkt.
3 4
Jedes Auto-Menü hat eine vorprogrammierte
Einschaltdauer. Jeder beleuchtete Balken stellt
10 Sekunden* Einschaltdauer dar. Drücken Sie den
Stopp/Start-Schalter, um die Verarbeitung zu starten.
5 6
Wählen Sie den gewünschten automatischen Modus
(außer im Modus Sieben). Die Modus-Anzeige LED
leuchtet auf und es ist ein Piepton zu hören. Die LEDAnzeige für die Einschaltdauer und der Stopp/StartSchalter leuchten und blinken.
Während des Betriebs, schalten sich die LEDLeuchten für die Einschaltdauer in 10 Sek.-Intervallen
einzeln aus, bis 4 Pieptöne zu hören sind. Die LEDModusanzeige leuchtet und blinkt.
Nachdem die Verarbeitung abgeschlossen ist, schalten
Sie den Netzschalter aus und ziehen Sie den Stecker
aus der Steckdose.
* Beim Betrieb im Auto-Menü für Paste stellt jeder beleuchtete Balken 1 Minute dar. Der beleuchtete Balken wird im
Intervall von 1 Minute immer kleiner.
Hinweis:
• Stellen Sie sicher, dass die Messerklinge eingelegt ist, bevor Sie Zutaten in den Behälter geben.
• Die Einschaltdauer des automatischen Modus kann, falls erforderlich, mit dem Drehschalter erhöht oder verringert werden.
• Der Betrieb des Auto-Menüs kann vorzeitig beendet werden, indem der Stopp/Start-Schalter betätigt wird,
bevor die eingestellte Einschaltdauer endet.
• Entsprechend der Geschwindigkeit, aber auch der verwendeten Zutaten kommt es zu starken Vibrationen.
Halten Sie in diesem Fall die Behälterabdeckung mit beiden Händen fest, um sie während des Betriebs zu stützen.
DE14
100_160419_MK-F800_Second_EU(UZ50E153).indb 14 2016/04/19 16:56:57
Entfernen Sie die Messerklinge aus der
Universalschüssel, bevor Sie die verarbeiteten Zutaten
entnehmen.
Page 47

Deutsch
KÜCHENMASCHINE -MESSERKLINGE-
Betrieb im Manuellen Menü
1 2
Nach Abschluss der Montageschritte, stecken Sie den
Stecker in die Steckdose und schalten Sie den
Netzschalter ein. Die LED-Modusanzeige leuchtet und
blinkt.
3 4
Wählen Sie zwischen Dauer- und Intervallmodus Die
LED für die gewählte Modus-Anzeige leuchtet auf und
es ist ein Piepton zu hören. Die LED-Anzeige für die
Geschwindigkeit, der Stopp/Start-Schalter und der
Impulsschalter leuchten und blinken.
Stellen Sie mit dem Drehschalter die gewünschte
Geschwindigkeit ein. Je mehr Balken leuchten, desto höher
die Geschwindigkeit. Betätigen Sie den Stopp/Start-Schalter
oder den Impulsschalter (PULSE), um den Betrieb zu starten.
5 6
Nachdem die Verarbeitung abgeschlossen ist, schalten
Sie den Netzschalter aus und ziehen Sie den Stecker
aus der Steckdose.
Hinweis:
• Stellen Sie sicher, dass die Messerklinge eingelegt ist, bevor Sie Zutaten in den Behälter geben.
• Überschreiten Sie die angegebene Höchstmenge beim Kneten nicht, da übermäßige Vibrationen auftreten können.
• Geben Sie keine heißen Zutaten zur Verarbeitung in den Behälter. Achten Sie immer darauf, dass die Zutaten
abkühlen, bevor Sie sie hinzugeben, z.B. bei Salzkartoffeln.
• Um Saft zu machen, fügen Sie die festen Zutaten zuerst hinzu und daraufhin die üssigen, so dass das
Gesamtvolumen 1.500 ml nicht überschreitet.
• Entsprechend der Geschwindigkeit und Menge der verwendeten Zutaten kommt es zu starken Vibrationen.
Halten Sie in diesem Fall die Behälterabdeckung fest, so dass sie während des Vorgangs gesichert ist.
• Beim Kneten, verarbeiten Sie den Teig nicht erneut, wenn dieser schon geformt wurde.
Geben Sie bei der Verarbeitung von Flüssigkeiten mit Eiswürfeln nicht mehr als 10 St. Eiswürfel hinzu (ca. 170 g).
•
Wenn das Gerät eingeschaltet ist, bleibt die LED-Anzeige
Stopp/Start beleuchtet. Die Geschwindigkeit kann
während des Betriebs angepasst werden kann. Drücken
Sie den Stopp/Start-Schalter, um den Betrieb zu stoppen.
Entfernen Sie die Messerklinge aus der
Universalschüssel, bevor Sie die verarbeiteten Zutaten
entnehmen.
DE15
100_160419_MK-F800_Second_EU(UZ50E153).indb 15 2016/04/19 16:56:57
Page 48

KÜCHENMASCHINE - SCHNEIDEEINSÄTZE • REIBEEINSÄTZE • MESSERKLINGE -
Schneideeinsätze (dick/dünn)
- werden zum Schneiden der
Zutaten verwendet
Reibeeinsätze (Grob/Fein)
- werden zum Reiben und Raspeln
von Zutaten verwendet.
Vorbereitung der Zutaten für die Schneideeinsätze (dick/dünn)
Max
700 gr
700 gr
Betriebszeit (ca.). Zubereitungsart
-
Funktionsweise
Schneiden
von
Zutaten Modus
Gurken
Zwiebel
Karotten 600 gr
Kartoffeln 600 gr
Kohl 400 gr
Dauerbetrieb
Geschwindigkeit:
Max
Einmalgebrauch
Vorbereitung der Zutaten für die Reibeeinsätze (Grob/Fein)
Max
Funktionsweise
Zutaten Modus
Einmalgebrauch
Betriebszeit (ca.). Zubereitungsart
Pommes-Frites-Schneider
- wird zur Herstellung von Pommes
Frites und zum Schroten von
Zutaten verwendet.
Schneiden Sie die Zutaten bis
sie klein genug sind, um in den
Fülltrichter zu passen.
Reiben von
Gurken
Karotten 500 gr
Kartoffeln 650 gr
Käse 500 gr
Dauerbetrieb
Geschwindigkeit:
Max
500 gr
-
Vorbereitung der Zutaten für den Pommes-Frites-Schneider.
Funktionsweise
Pommes
frites
Reiben von Kohl 500 gr
Zutaten Modus
Kartoffeln
Dauerbetrieb
Geschwindigkeit:
Max
Max
Einmalgebrauch
800 gr
Betriebszeit (ca.). Zubereitungsart
-
Schneiden Sie die Zutaten bis
sie klein genug sind, um in den
Fülltrichter zu passen.
Schneiden Sie die Zutaten bis
sie klein genug sind, um in den
Fülltrichter zu passen.
Verwenden Sie keine harten
Zutaten, wie Parmesan.
Schneiden Sie die Zutaten bis
sie klein genug sind, um in den
Fülltrichter zu passen.
DE16
100_160419_MK-F800_Second_EU(UZ50E153).indb 16 2016/04/19 16:56:58
Page 49

Deutsch
KÜCHENMASCHINE - SCHNEIDEEINSÄTZE • REIBEEINSÄTZE • MESSERKLINGE -
Betrieb im manuellen Menü
1 2
Nach Abschluss der Montageschritte, stecken Sie
den Stecker in die Steckdose und schalten Sie den
Netzschalter ein. Die LED-Modusanzeige leuchtet und
blinkt.
Wählen Sie den Dauerbetrieb. Die LED für die gewählte
Modus-Anzeige leuchtet auf und es ist ein Piepton zu
hören. Die LED-Anzeige für die Stopp/Start-Schalter
und die für den Impulsschalter leuchten und blinken.
3
Stellen Sie mit dem Drehschalter die gewünschte
Geschwindigkeit ein. Je mehr Balken leuchten, desto höher
die Geschwindigkeit. Betätigen Sie den Stopp/Start-Schalter
oder den Impulsschalter (PULSE), um den Betrieb zu starten.
5 6
Fügen Sie die Zutaten in den Fülltrichter und drücken
Sie sie mit dem Schieber herunter.
4
Wenn das Gerät eingeschaltet ist, bleibt die LEDAnzeige Stopp/Start beleuchtet. Drücken Sie den Stopp/
Start-Schalter, um den Betrieb zu stoppen. Nachdem
die Verarbeitung abgeschlossen ist, schalten Sie den
Netzschalter aus und ziehen Sie den Stecker aus der
Steckdose.
Hinweis:
• Bei der Verarbeitung von lang und schmal Zutaten,
legen sie diese an die Vorderwand des Fülltrichters,
wie in Abb. 1 dargestellt, so dass die Zutaten
festgehalten werden und eine ungleichmäßige
Verarbeitung vermieden werden kann.
• Entfernen Sie Klumpen von unverarbeiteten Zutaten.
• Platzieren Sie Zutaten mit hohen Faserbestandteilen für ein
gleichmäßiges Verarbeitungsergebnis wie in Abb. 2 dargestellt.
100_160419_MK-F800_Second_EU(UZ50E153).indb 17 2016/04/19 16:56:58
Entfernen Sie den Universaleinsatz vom Behälter, bevor
Sie die verarbeiteten Zutaten entnehmen.
Vordere
Wand
Abb. 1. Abb. 2.
DE17
Page 50

KÜCHENMASCHINE - KNETHAKEN -
Vorbereitung der Zutaten für den Knethaken.
Funktionsweise
Kneten von
(für Brot)
Zutaten Modus
Brotmehl
Dauerbetrieb
Geschwindigkeit:
Sie mit Stufe
Flüssigkeiten
erhöhen Sie
jede Sekunde
Beginnen
bis zum
Maximum.
Betrieb im manuellen Modus
1 und
Max
Einmalgebrauch
300 gr
160 ~ 200 mL
Betriebszeit (ca.). Zubereitungsart
Lösen Sie die Hefe in Wasser auf und fügen Sie
die Lösung bei Verarbeitung der Masse hinzu
(das direkte Hinzufügen von Hefe, ohne diese
zu verarbeiten, kann dazu führen, dass der Teig
zu früh aufgeht oder diese bröckelig wird). Ist die
Teigmischung nach der ersten Verarbeitung immer
~ 120 Sek.
noch ockig, fügen Sie einen Teelöffel Wasser
hinzu. Wenn starke Vibrationen entstehen, weil
sich die Teigmischung um die Antriebswelle wickelt,
fügen Sie 1 Esslöffel Mehl hinzu. Verarbeiten Sie
den Teig nicht ein weiteres Mal, wenn der Vorgang
beendet ist. Sind Sie mit dem Teig nicht zufrieden,
kneten Sie diesen mit der Hand.
21
Nach Abschluss der Montageschritte, stecken Sie
den Stecker in die Steckdose und schalten Sie den
Netzschalter ein. Die LED-Modusanzeige leuchtet und
blinkt.
Wählen Sie den Dauerbetrieb und stellen Sie mit dem
Drehschalter die geeignete Geschwindigkeit ein. Je mehr
Balken leuchten, desto höher die Geschwindigkeit. Drücken
Sie den Stopp/Start-Schalter, um das Gerät zu starten.
43
Wenn das Gerät eingeschaltet ist, bleibt die LED-Anzeige
Stopp/Start beleuchtet. Beachten Sie die Bildung der
Teigkugel. Drücken Sie den Stopp/Start-Schalter, um den
Betrieb zu stoppen, sobald sich eine feste Teigkugel gebildet
Nachdem die Verarbeitung abgeschlossen ist, schalten
Sie den Netzschalter aus und ziehen Sie den Stecker
aus der Steckdose. Entfernen Sie die Teigkugel vom
Behälter bevor Sie den Knethaken entfernen.
hat.
Hinweis:
• Überschreiten Sie die angegebene Höchstmenge beim Kneten nicht, da übermäßige Vibrationen auftreten können.
• Entsprechend der Geschwindigkeit, aber auch der verwendeten Zutaten kommt es zu starken Vibrationen.
Halten Sie in diesem Fall die Behälterabdeckung mit beiden Händen fest, so dass sie während des Vorgangs gesichert ist.
• Führen Sie beim Kneten nicht weiter die Verarbeitung aus, nachdem sich der Teig zum ersten Mal gebildet hat.
• Große Mengen von Butter und Zucker im Teig können bei der Benutzung der Nutzung des Knethakens zu
außergewöhnlichen Vibrationen führen.
• Die Nutzung von anderen Mehlsorten als Brotmehl kann zu außergewöhnlichen Vibrationen führen. Entfernen
Sie vor der Verarbeitung 1 ~ 2 Esslöffel Wasser. Wasser der gesamten Angabe und fügen Sie diese nach und
nach während der Verarbeitung, wenn nötig, hinzu.
DE18
100_160419_MK-F800_Second_EU(UZ50E153).indb 18 2016/04/19 16:56:58
Page 51

Deutsch
KÜCHENMASCHINE -SCHLAGSAHNE-AUFSATZ-
Vorbereitung der Zutaten für den Schlagsahne-Aufsatz
Funktionsweise
Schlagen
von
Zutaten Modus
Eiweiß
Dauerbetrieb
Sahne
Geschwindigkeit:
Max
Max
Einmalgebrauch
2 ~ 6 Eier 50 ~ 90 Sek.
100 ~ 300 mL
Betriebszeit (ca.). Zubereitungsart
15 Sek. ~ 2 Min.
Betrieb im manuellen Modus
Nach Abschluss der Montageschritte, stecken Sie den
Stecker in die Steckdose und schalten Sie den
Netzschalter ein. Die LED-Modusanzeige leuchtet und
blinkt.
Trennen Sie das Eiweiß vom
Eigelb für einen glatten Schaum.
Verwenden Sie frische Sahne
mit einem Fettgehalt von 35 %
oder höher bei 5 °C.
21
Wählen Sie den Dauerbetrieb und stellen Sie mit dem
Drehschalter die Geschwindigkeit ein. Je mehr Balken
leuchten, desto höher die Geschwindigkeit. Drücken Sie
den Stopp/Start-Schalter, um die Verarbeitung starten.
43
Wenn das Gerät eingeschaltet ist, bleibt die LEDAnzeige Stopp/Start beleuchtet. Beobachten Sie das
Aufgehen und die Veränderung der geschlagenen
Zutaten. Drücken Sie den Stopp/Start-Schalter, um den
Betrieb zu stoppen, sobald sich die gewünschte
Nachdem die Verarbeitung abgeschlossen ist, schalten
Sie den Netzschalter aus und ziehen Sie den Stecker
aus der Steckdose. Entfernen Sie denn SchlagsahneAufsatz vorsichtig vom Behälter, zusammen mit den
verarbeiteten Zutaten.
Konsistenz gebildet hat.
Hinweis:
• Schlagen Sie die Schlagsahne nicht zu lange, es können sich Butterklumpen bilden.
• Mit verschiedenen Marken Schlagsahne, werden unterschiedliche Ergebnisse erzielt. Es wird empfohlen, das
Gerät so lange einzuschalten bis die Sahne ausreichend geschlagen ist.
DE19
100_160419_MK-F800_Second_EU(UZ50E153).indb 19 2016/04/19 16:56:59
Page 52

KÜCHENMASCHINE - RASPELSCHEIBE -
Vorbereitung der Zutaten für die Raspelscheibe.
Max
Funktionsweise
Zutaten Modus
Einmalgebrauch
Betriebszeit (ca.). Zubereitungsart
Raspeln von
Karotten
Äpfeln
Gurken
Dauerbetrieb
Geschwindigkeit:
Max
200 gr
200 gr
200 gr
Betrieb im manuellen Modus
1
Nach Abschluss der Montageschritte, stecken Sie den
Stecker in die Steckdose und schalten Sie den
Netzschalter ein. Die LED-Modusanzeige leuchtet und
blinkt.
-
In 2 ~ 3 cm große Würfel
schneiden.
2
Wählen Sie den Dauerbetrieb und stellen Sie mit dem
Drehschalter die Geschwindigkeit ein. Je mehr Balken
leuchten, desto höher die Geschwindigkeit. Drücken Sie
den Stopp/Start-Schalter, um die Verarbeitung starten.
43
Wenn das Gerät eingeschaltet ist, bleibt die LEDAnzeige Stopp/Start beleuchtet. Drücken Sie den Stopp/
Start-Schalter, um den Betrieb zu stoppen.
Nachdem die Verarbeitung abgeschlossen ist, schalten
Sie den Netzschalter aus und ziehen Sie den Stecker
aus der Steckdose. Entfernen Sie die Raspelscheibe
vom Behälter, bevor Sie die verarbeiteten Zutaten
entnehmen.
Hinweis:
• Fügen Sie die Zutaten nicht durch den Fülltrichter während der Nutzung der Raspelscheibe.
DE20
100_160419_MK-F800_Second_EU(UZ50E153).indb 20 2016/04/19 16:56:59
Page 53

Deutsch
KÜCHENMASCHINE - SALATSCHLEUDER -
Vorbereitung der Zutaten für Salatschleuder
Funktionsweise
Schleudern
von
Zutaten Modus
Salatblättern
Auto
Kohl
Max
Einmalgebrauch
100 gr 20 ~ 60 Sek.
Grundeinstellung ist für 50 gr (20 Sek.)
200 gr 20 ~ 70 Sek.
Betriebszeit (ca.). Zubereitungsart
Betrieb im automatischen Modus
Nach Abschluss der Montageschritte, stecken Sie den
Stecker in die Steckdose und schalten Sie den
Netzschalter ein. Die LED-Modusanzeige leuchtet und
blinkt.
In 3 ~ 5 cm große Scheiben
schneiden.
Zerkleinert zu 1 ~ 3 mm.
21
Wählen Sie den Modus Abtropfen. Die LED für die
gewählte Modus-Anzeige leuchtet auf und es ist ein
Piepton zu hören. Die LED-Anzeige für die Einschaltdauer
und der Stopp/Start-Schalter leuchten und blinken.
43
Jedes Auto-Menü hat eine vorprogrammierte
Einschaltdauer. Jeder beleuchtete Balken bedeutet 10
Sekunden Einschaltdauer. Drücken Sie den Stopp/StartSchalter, um das Gerät zu starten. Während des Betriebs,
Nachdem die Verarbeitung abgeschlossen ist, schalten
Sie den Netzschalter aus und ziehen Sie den Stecker
aus der Steckdose. Entfernen Sie die Salatschleuder
vom Behälter.
schalten sich die LED-Leuchten für die Einschaltdauer in
10 Sek.-Intervallen einzeln aus, bis 4 Pieptöne zu hören
sind. Die LED-Modusanzeige leuchtet und blinkt.
Hinweis:
• Maximale Verarbeitungskapazität der Salatschleuder: 200 g oder bis zur maximalen Höhe der Salatschleuder,
je nachdem was zuerst eintritt.
• Verbotene Zutaten: siehe Seite DE6.
• Vergewissern Sie sich, dass die Zutaten vor dem Einschalten des Gerätes gleichmäßig in der Salatschleuder
verteilt sind.
• Betreiben Sie die Salatschleuder in keinem anderen Modus als im Schleudermodus.
• Vergewissern Sie sich vor dem Betrieb, dass der Salatschleuder-Deckel an der Salatschleuder angebracht ist,
andernfalls kommen die Zutaten heraus und verteilen sich im Behälter.
• Entsprechend der Menge der verwendeten Zutaten kommt es zu starken Vibrationen. Halten Sie in diesem Fall
die Behälterabdeckung mit beiden Händen fest, so dass sie während des Vorgangs gesichert ist.
DE21
100_160419_MK-F800_Second_EU(UZ50E153).indb 21 2016/04/19 16:57:00
Page 54

KÜCHENMASCHINE -ZITRUSPRESSE-
Vorbereitung der Zutaten für die Zitruspresse
Funktionsweise
Pressen von Zitrusfrüchte
Zutaten Modus
Dauerbetrieb
Geschwindigkeit:
Stufe 4
Max
Einmalgebrauch
1000 mL -
Betriebszeit (ca.). Zubereitungsart
Betrieb im manuellen Modus
Nach Abschluss der Montageschritte, stecken Sie den
Stecker in die Steckdose und schalten Sie den
Netzschalter ein. Die LED-Modusanzeige leuchtet und
blinkt.
3
Schneiden Sie das Obst in
Hälften.
21
Wählen Sie den Dauerbetrieb und stellen Sie mit dem
Drehschalter Stufe 4 ein. Drücken Sie den Stopp/StartSchalter, um das Gerät zu starten.
4
Positionieren Sie die Hälfte der geschnittenen Frucht
mit der Seite der Schale nach oben auf die Zitruspresse
und drücken Sie diese fest nach unten, um den Saft
daraus zu gewinnen. Wenn das Gerät eingeschaltet ist,
bleibt die LED-Anzeige Stopp/Start beleuchtet. Drücken
Nachdem die Verarbeitung abgeschlossen ist, schalten
Sie den Netzschalter aus und ziehen Sie den Stecker
aus der Steckdose. Entfernen Sie das Zubehör der
Zitruspresse vom Behälter bevor, sie den gewonnenen
Saft abschütten.
Sie den Stopp/Start-Schalter, um den Betrieb zu
stoppen.
Hinweis:
• Vergewissern Sie sich stets vor dem Gebrauch, dass die Zitruspresse sich auf dem Filtersieb be ndet.
• Unterbrechen Sie das Pressen regelmäßig, um das sich auf dem Filtersieb be ndliche Frucht eisch zu
entfernen, so dass die Saftgewinnung besser vorangeht.
• Es wird nicht empfohlen, die Zitruspresse auf Geschwindigkeiten über 4 zu nutzen.
• Berühren Sie nicht die Zitruspresse, während sie sich dreht.
DE22
100_160419_MK-F800_Second_EU(UZ50E153).indb 22 2016/04/19 16:57:00
Page 55

Deutsch
MIXER
Montage und Demontage des Gerätezubehörs
1 2
Geben Sie die Zutaten in den Mixbehälter und
schließen Sie diesen mit der Mixerabdeckung.
Platzieren Sie den Mixbehälter oben auf das
Motorengehäuse bis die Markierungen übereinstimmen,
wie unter dargestellt.
Drehen Sie den Mixbehälter im Uhrzeigersinn bis Sie
ein „Klicken“ hören. Stellen Sie sicher, dass die
Dreiecksmarkierung auf dem Mixbehälter mit der
rechteckigen Markierung auf dem Motorengehäuse in
einer Linie ist, wie unter dargestellt.
Für eine Demontage gehen Sie die einzelnen Schritte einfach in umgekehrter Reihenfolge durch.
Vorbereitung der Zutaten für den Mixer.
Max
Funktionsweise
Zutaten Modus
Einmalgebrauch
Betriebszeit (ca.). Zubereitungsart
Verüssigen
von
Obst,
Gemüse
Dauerbetrieb
Geschwindigkeit:
Max
1.000 mL ~ 2 Min.
In 1 cm große Würfel schneiden.
Hinweis:
• Verarbeitungskapazität: 1 L
• Für den Mixer verbotene Zutaten: siehe Seite DE6.
• Es wird nicht empfohlen, harte und zähüssige Zutaten zu mixen. Falls erforderlich schneiden Sie die harten
Zutaten in kleine Stücke (z.B. Karotten in 1 cm³ große Würfel schneiden) und füllen Sie den Mixbehälter mit
den Zutaten, überschreiten Sie dabei jedoch nicht die Hälfte der angegebenen Kapazität.
• Überschreiten Sie beim Befüllen die Höchstkapazität nicht und verringern Sie die Zutaten, wenn das Gerät
während des Betriebs unnormale Geräusche macht oder stark vibriert.
• Geben Sie zuerst die weichen Zutaten (Obst, Gemüse) in den Mixbehälter, bevor Sie sonstige Zutaten
hinzufügen.
DE23
100_160419_MK-F800_Second_EU(UZ50E153).indb 23 2016/04/19 16:57:00
Page 56

MIXER
Betrieb im manuellen Modus
1 2
Nach Abschluss der Montageschritte, stecken Sie
den Stecker in die Steckdose und schalten Sie den
Netzschalter ein. Die LED-Modusanzeige leuchtet und
blinkt.
3 4
3
Wenn das Gerät eingeschaltet ist, bleibt die LEDAnzeige Stopp/Start beleuchtet. Drücken Sie den Stopp/
Start-Schalter, um den Betrieb zu stoppen.
Hinweis:
• Falls sich die Mixerklinge verklemmt, schalten Sie den Mixer sofort aus und ziehen den Stecker raus.
Versuchen Sie nicht, Zutaten mit Ihren Fingern zu lösen, verwenden Sie stattdessen etwas, wie einen
Gummispatel.
• Beim Mixen besteht die Möglichkeit, dass die Zutaten aus dem Loch in der Mixerabdeckung heraus iegen.
Falls die Zutaten heraus iegen, wischen Sie diese mit einem trockenen Lappen auf.
• Betreiben Sie das Gerät nicht länger als die angegebene Betriebsdauer (2 Min EIN, 2 Min AUS).
Wählen Sie den Dauerbetrieb und stellen Sie mit dem
Drehschalter die Geschwindigkeit ein. Je mehr Balken
leuchten, desto höher die Geschwindigkeit.
Drücken Sie den Stopp/Start-Schalter, um das Gerät zu
starten.
Nachdem die Verarbeitung abgeschlossen ist, schalten
Sie den Netzschalter aus und ziehen Sie den Stecker
aus der Steckdose. Entfernen Sie den Mixbehälter vom
Motorengehäuse und daraufhin entnehmen Sie den
Inhalt.
DE24
100_160419_MK-F800_Second_EU(UZ50E153).indb 24 2016/04/19 16:57:01
Page 57

Deutsch
TROCKENMAHLWERK
Auspacken
1 2
Drehen Sie das Mahlwerkunterteil gegen den
Uhrzeigersinn und heben Sie es vom Mahlbehälter ab.
Montage und Demontage des Gerätezubehörs des Trockenmahlwerks
1 2
Die maximale Höhe für trockene Zutaten ist auf dem
Mahlbehälter angegeben. Überschreiten Sie diese
Höhe nicht.
Maximale Höhe
Maximale Höhe für
trockene Zutaten
Drehen Sie den Mahlbehälter nach unten und geben
Sie die Zutaten hinein.
Platzieren Sie das Trockenmahlwerk auf dem
Motorengehäuse. Drehen Sie das Trockenmahlwerk im
Uhrzeigersinn bis Sie ein „Klicken“ hören.
Platzieren Sie das Mahlwerkunterteil in den
Mahlbehälter und drehen Sie es im Uhrzeigersinn bis
Sie ein „Klicken“ hören.
Stellen Sie sicher, dass die Rippen an der Außenäche
der Mahlbehälterbasis und der Innenäche des
Mahlbehälters fest eingreifen.
Für eine Demontage gehen Sie die einzelnen Schritte einfach in umgekehrter Reihenfolge durch.
Vorbereitung der Zutaten für Trockenmahlwerk
Max
Bis zum
max.
Füllstand
Betriebszeit (ca.). Zubereitungsart
~ 60 Sek.
-
Funktionsweise
Mahlen von
Zutaten Modus
Kaffeebohnen
Pfeffer
Dauerbetrieb
Geschwindigkeit:
Einmalgebrauch
Max
Hinweis:
• Verbotene Zutaten: siehe Seite DE6.
• Betreiben Sie das Gerät nicht mit leerem Trockenmahlwerk.
• Überschreiten Sie beim Befüllen die Höchstkapazität nicht und verringern Sie die Zutaten, wenn das Gerät
während des Betriebs unnormale Geräusche macht oder stark vibriert.
DE25
100_160419_MK-F800_Second_EU(UZ50E153).indb 25 2016/04/19 16:57:01
Page 58

TROCKENMAHLWERK
Betrieb im manuellen Modus
1 2
Nach Abschluss der Montageschritte, stecken Sie den
Stecker in die Steckdose und schalten Sie den
Netzschalter ein. Die LED-Modusanzeige leuchtet und
blinkt.
3 4
3
Wenn das Gerät eingeschaltet ist, bleibt die LEDAnzeige Stopp/Start beleuchtet. Drücken Sie den Stopp/
Start-Schalter, um den Betrieb zu stoppen.
Hinweis:
• Beim Entfernen der Zutaten, seien Sie vorsichtig mit der Mahlklinge.
• Betreiben Sie das Gerät nicht länger als die angegebene Betriebsdauer (1 Min EIN, 2 Min AUS).
Wählen Sie den Dauerbetrieb und stellen Sie mit dem
Drehschalter die Geschwindigkeit ein. Je mehr Balken
leuchten, desto höher die Geschwindigkeit.
Drücken Sie den Stopp/Start-Schalter, um das Gerät zu
starten.
Nachdem die Verarbeitung abgeschlossen ist, schalten
Sie den Netzschalter aus und ziehen Sie den Stecker
aus der Steckdose. Entfernen Sie das Trockenmahlwerk
vom Motorengehäuse und daraufhin entnehmen Sie
den Inhalt.
DE26
100_160419_MK-F800_Second_EU(UZ50E153).indb 26 2016/04/19 16:57:01
Page 59

NACH GEBRAUCH
Reinigung
Vorwäsche
Das Vorwaschen ermöglicht eine einfachere Reinigung. Es kann für die Messerklinge und den Mixer benutzt werden. Folgen
Sie den unteren Schritten für die Vorwäsche.
1
Legen Sie das verwendete Gerätezubehör in den
Behälter und füllen Sie den Behälter mit Wasser, bis
das Zubehör vom Wasser bedeckt ist (max. 500 ml).
Legen Sie die Behälterabdeckung auf den Behälter und
drehen Sie diesen im Uhrzeigersinn bis Sie ein „Klicken“
hören.
2 3
MixerKüchenmaschine
Deutsch
Füllen Sie für den Mixer 500 ml Wasser in
den Mixbehälter und decken Sie ihn mit der
Behälterabdeckung zu. Stecken Sie den Stecker in die
Steckdose und schalten Sie den Netzschalter ein.
Küchenmaschine: Wählen Sie den Intervallbetrieb aus,
betätigen Sie den Stopp/Start-Schalter und nehmen Sie
das Gerät für 10 ~ 20 Sekunden auf Stufe 10 in Betrieb.
Mixer: Wählen Sie den Dauerbetrieb aus, betätigen Sie
den Stopp/Start-Schalter und nehmen Sie das Gerät für
10 ~ 20 Sekunden auf Stufe 10 in Betrieb.
Waschen Sie diese Artikel, indem Sie sie unter ießendes Wasser halten. Verwenden Sie neutrale Reinigungsmittel, falls
erforderlich. Trocknen Sie diese mit einem sauberen Tuch.
Waschen Sie diese Artikel, indem Sie sie unter ießendes Wasser halten und säubern Sie
sie vorsichtig mit einer Bürste. Verwenden Sie neutrale Reinigungsmittel, falls erforderlich.
Hinweis:
• Diese Elemente sind extrem scharf und sollten während der Reinigung mit besonderer Sorgfalt behandelt
werden. Vermeiden Sie es, mit diesen Elementen während der Reinigung an harte Gegenstände zu stoßen.
• Das Mahlwerkunterteil darf nicht gewaschen werden, verwenden Sie die Bürste, um es zu säubern.
Drücken Sie den Stopp/Start-Schalter, um den Betrieb
zu
stoppen. Schalten Sie den Netzschalter aus und ziehen
Sie den Stecker aus der Steckdose. Entfernen Sie das
Gerätezubehör und fahren Sie mit der Reinigung fort.
DE27
100_160419_MK-F800_Second_EU(UZ50E153).indb 27 2016/04/19 16:57:02
Page 60

NACH GEBRAUCH
Motorengehäuse / Gummifuß
Wischen Sie Schmutz oder Flecken mit einem sauberen, feuchten Tuch ab.
Hinweis:
• Vergewissern Sie sich, dass das Netzkabel ausgesteckt ist, bevor Sie das Motorengehäuse reinigen.
• Waschen Sie das Motorengehäuse nicht unter ießendem Wasser.
• Verwenden Sie niemals ätzende Flüssigkeiten (z.B. Alkohol, Verdünner etc.), um das Motorengehäuse zu reinigen.
Reinigung mit Geschirrspüler
Behälter und Behälterabdeckung sind spülmaschinengeeignet.
Hinweis:
• Stellen Sie diese Artikel nicht in die Nähe der Spülmaschinen-Heizung, da hohe Temperaturen die Teile
beschädigen könnten.
Aufstellort
Vergewissern Sie sich, dass jegliches Gerätezubehör und der Behälter vom Motorengehäuse vor dem Verstauen
entfernt wurden.
1 2
Um den Gummifuß des Motorengehäuses zu entriegeln,
drücken Sie gleichzeitig den Entriegelungshebel auf der
unteren Seite des Motorengehäuses und heben Sie es
ab, wie im Bild oben dargestellt.
3
(i)
Entriegelungshebel
(ii) (iii)
Kippen Sie das Motorengehäuse auf eine Seite
und wickeln Sie daraufhin das Stromkabel im
Wicklungsbereich fast gänzlich auf und lassen Sie den
Stecker an der Seite.
(i) Bewahren Sie die Messerklinge
im Behälter auf. Zur Lagerung
des übrigen Gerätezubehörs
wurde eine Aufbewahrungsbox
mitgeliefert. Verstauen Sie
das Zubehör, so wie es die
Verpackung erlaubt.
DE28
100_160419_MK-F800_Second_EU(UZ50E153).indb 28 2016/04/19 16:57:02
(ii) Liste des Zubehörs in
der Aufbewahrungsbox:
Knethaken, Zitruspresse,
Dicker Schneideeinsatz,
Dünner Schneideeinsatz,
Feiner Reibeeinsatz, grober
Reibeeinsatz, Pommes-FritesSchneider, Universaleinsatz,
Raspelscheibe, SchlagsahneAufsatz und Bürste.
(iii) Setzen Sie den Speicher-Fall Deckel unter dem Speicher-Fall
die abgelassene Wasser aus
den gewaschenen Anhänge zu
sammeln.
Hinweis:
• Entsorgen Sie das exible
Kunststoffabdeckung nach dem
Aufbewahrungsbehälter zu
öffnen.
Page 61

Deutsch
FEHLERBEHEBUNG
Bitte überprüfen Sie folgende Punkte, bevor Sie den Service aufsuchen.
Problem Ursache und Maßnahme
Der Stecker ist lose in der Steckdose.
Das Gerät lässt sich nicht
einschalten.
Keine der Funktionen des
Bedienpults kann ausgewählt
werden.
Das Gerät startet nicht, auch
wenn der Stopp/Start-Schalter
gedrückt wird.
(Fehlermodus wird angezeigt)
Fest in die Steckdose einstecken.
Der Netzschalter ist nicht eingeschaltet.
Schalten Sie den Netzschalter ein.
Handschuhe können zu Unempndlichkeit bei der Bedienung
des Bedienfeldes führen.
Wählen Sie die Funktionen mit bloßen Fingern aus.
Drücken der Funktion an der falschen Stelle.
Die Abbildung auf dem Bedienfeld fest andrücken.
Das Gerät ist bereits in Betrieb.
Die Funktionen können nicht geändert werden, wenn das
Gerät in Betrieb ist. Stoppen Sie die vorherige Funktion
bevor sie eine neue auswählen.
Der Behälter, der Mixer oder das Trockenmahlwerk sind nicht
richtig mit dem Motorengehäuse verriegelt.
Stellen Sie sicher, dass die Dreiecksmarkierung auf dem
Gerätezubehör mit der rechteckigen Markierung auf
dem Motorengehäuse in einer Linie ist, wie auf S. DE9
dargestellt.
Die Behälterabdeckung oder die Zitruspresse sind nicht
vollständig miteinander verriegelt.
Sichern Sie die Behälterabdeckung oder das Filtersieb
vollständig auf den Behälter.
Das Gerät kann nicht benutzt
werden, auch wenn die Funktion
aktiviert wurde.
(Kein Fehlermodus)
Die ausgewählte Funktion wird
abgebrochen. (Die LED-ModusAnzeige beginnt zu blinken).
Das Gerät stoppt plötzlich
während des Betriebs.
Die Zutaten haben sich verklemmt.
Entfernen Sie die Zutaten vorsichtig und stellen Sie sicher,
dass Sie die angegeben Mengen verwendet haben.
Das Gerät lief mehr als 10 Sekunden im Leerlauf, nachdem
die Funktion ausgewählt wurde.
Stellen Sie sicher, dass innerhalb von 10 Sek. die richtigen
Maßnahmen ergriffen werden, nachdem die entsprechende
Funktion ausgewählt wurde.
Der Schutzschalter ist aktiviert. (siehe Seite DE9)
• Es wurden zu viele Zutaten hinzugefügt.
Entfernen Sie die überschüssigen Zutaten und stellen Sie
sicher, dass Sie die angegeben Mengen verwendet haben.
• Große Stücke oder harte Zutaten wurden verwendet.
Stellen Sie sicher, dass die Zutaten in die angegebenen
Größen geschnitten werden. Verwenden Sie keine harte
Zutaten oder hochdichte Feststoffe.
Das Sicherheitsschloss wurde ausgelöst. (siehe Seite DE9)
• Unnormale Vibrationen während des Betriebes kann das
Sicherheitsschloss außer Kraft setzen.
Stellen Sie sicher, dass Sie die angegeben Mengen
verwendet haben.
Schließen Sie die Behälterabdeckung oder das Filtersieb
fest auf dem Behälter und vergewissern Sie sich, dass der
Behälter, der Mixer oder das Trockenmahlwerk fest mit dem
Motorengehäuse verriegelt ist.
DE29
100_160419_MK-F800_Second_EU(UZ50E153).indb 29 2016/04/19 16:57:02
Page 62

FEHLERBEHEBUNG
Problem Ursache und Maßnahme
Beim Betrieb gibt es unnormale
Vibrationen und Geräusche.
Textur und Konsistenz der
verarbeiteten Zutaten sind nicht
zufriedenstellend.
Die Gummifüße und/oder die Arbeitsplatte sind nicht sauber.
Wischen Sie Schmutz oder Flecken mit einem sauberen,
feuchten Tuch ab. Der Gummisaugfuß ist nur dann effektiv,
wenn er auf einer sauberen, glatten und achen Oberäche
angebracht wird.
Zur Verarbeitung wurden entweder zu viele Zutaten oder zu
harte verwendet.
Stellen Sie sicher, dass Sie die angegeben Mengen
verwendet haben, andernfalls verringern Sie die Menge.
Manche Zutaten können roh schwer zu verarbeiten sein, z.B.
Kürbis.
Es kann erforderlich sein, manche Zutaten vor der
Verarbeitung vorzukochen, bis sie so weich sind, dass man
sie z.B. mit einer Gabel leicht durchstechen kann.
Größe der Zutat entspricht nicht der Zubereitungsart.
Bereiten Sie sie bitte nach der angegebenen Größe zu.
Die gleichzeitige Verarbeitung von manchen Zutaten kann zu
Klumpen für die Tiefkühlfunktion führen.
Auto-Menü
Die Standardverarbeitungsdauer im Auto-Menü gilt für die
angegebene Menge an Zutaten. Zusätzliche Zutatenmengen
würden die Leistung beeinträchtigen.
Erhöhen Sie die Dauer der Verarbeitung, indem Sie
den Drehschalter betätigen. Verarbeiten Sie die Zutaten
daraufhin, bis Sie die gewünschte Konsistenz und
Beschaffenheit erreicht haben.
Manuelles Menü
Die Höchstmenge Zutaten sowie die Verarbeitungsdauer sind
Richtwerte, weniger und unterschiedliche Zutaten ergeben
andere Resultate.
Verarbeiten Sie die Zutaten so lange, bis Sie die
gewünschte Konsistenz erreicht haben.
DE30
100_160419_MK-F800_Second_EU(UZ50E153).indb 30 2016/04/19 16:57:02
Page 63

Deutsch
Anzeige Fehlermodus
Schutzschalter, Überspannungserkennung und Hochsstromerkennung.
i) Schutzschalter
ii) Überspannungserkennung
iii) Hochsstromerkennung
Es leuchtet keine LED.
Abwechselndes Blinken
für Zerhacken und LED für
Intervallbetrieb.
Abwechselndes Blinken für Zerkleinern
+Zerhacken und LED für Dauerbetrieb
+Intervallbetrieb.
Maßnahme:
Für die Fälle i) und iii), schalten Sie den Netzschalter an der Seite des Motorengehäuses aus, verringern Sie die
Mengen von Zutaten auf die Hälfte und setzen Sie die Verarbeitung fort. Wenn sich das Gerät weiterhin nicht
einschaltet, schalten Sie den Ein/Ausschalter an der Seite des Motorengehäuses aus und beginnen Sie erneut mit
der Verarbeitung.
Im Fall ii) wird die Fehlermodus-Anzeige aufgrund der zu hohen Spannung angezeigt. Verwenden Sie 220-240 V.
Motorüberhitzung Der Behälter, der Mixer oder das
Trockenmahlwerk sind nicht richtig mit dem
Motorengehäuse verriegelt.
Abwechselndes Blinken für Zerkleinern und LED für
Intervallbetrieb.
Abwechselndes Blinken für Zerkleinern+Zerhacken+
Tiefkühlkost und LED für Passieren+Sieb+
Dauerbetrieb.
Maßnahme:
Schalten Sie den Netzschalter aus und lassen Sie das
Gerät etwas abkühlen (ca. 30 Min). Verringern Sie die
Maßnahme:
Rasten Sie das Zubehörteil erneut am Motorengehäuse
in der richtigen Position ein. (siehe Seite DE9).
Zutaten auf die Hälfte und fahren Sie mit der
Verarbeitung fort.
Fehlfunktion elektronischer Komponenten
oder oder
Abwechselndes Blinken für Zerkleiner oder Zerhacken oder Tiefkühlkost und LED für Dauerbetrieb.
Maßnahme:
Bitte kontaktieren Sie den nächsten Kundendienst für Reparaturen.
DE31
100_160419_MK-F800_Second_EU(UZ50E153).indb 31 2016/04/19 16:57:03
Page 64

TECHNISCHE DATEN
Modellname MK-F800
Netzspannung Küchenmaschine Mixer & Trockenmahlwerk
Leistungsaufnahme 220 - 240 V ~ 50 - 60 Hz
Nennverbrauch 180 - 200 W
Schalter Drehschalter mit Soft-Touch-Panel-Schalter
Anschlusswert
Abmessungen (HxBxT) (ca.): 435 x 264 x 265 mm
Artikelgewicht (ca.) 4,3 kg
Kapazität (ca.)
Gerätezubehör & Zusatzteile
Gemeinsames Zubehör Bürste mit Spatel
Spülmaschinengeeignete Teile Behälter und Behälterabdeckung
Luftschallemission 86 (dB (A) bei 1 pW) 87 (dB (A) bei 1 pW))
2 Minuten EIN, 4 Minuten AUS
Mit Ausnahme der Angaben auf der Seite „Vorbereitung der Zutaten“.
Behälterkapazität: 2,5 L
Maximale Verarbeitungskapazität:
Nur Flüssigkeiten= 1,5 L
Nur Feststoffe = 600 g
Mit Ausnahme der Angaben auf der Seite „Vorbereitung der Zutaten“.
Messerklinge, Raspelscheibe,
Knethaken, Schlagsahne-Aufsatz,
Salatschleuder, Universalaufsatz,
Reibeeinsätze (grob & fein),
Schneideeinsätzen (dick & dünn),
Pommes-Frites-Schneider, Zitrusspresse
und Aufbewahrungsbox
Mixer: 2 Min. EIN, 2 Min AUS
Trockenmahlwerk: 1 Min. EIN, 2 Min. AUS
Mixer: 406 x 264 x 265 mm
Trockenmahlwerk: 298 x 264 x 265 mm
Mixer: 4,0 kg
Trockenmahlwerk: 3,8 kg
Mixer: 1 L
Trockenmahlwerk: 50 g (Kaffebohnen)
Mixer, Trockenmahlwerk
DE32
Entsorgung von Altgeräten
Nur für die Europäische Union und Länder mit Recyclingsystemen
Dieses Symbol, auf den Produkten, der Verpackung und/oder den Begleitdokumenten,
bedeutet, dass gebrauchte elektrische und elektronische Produkte nicht in den allgemeinen
Hausmüll gegeben werden dürfen.
Bitte führen Sie alte Produkte zur Behandlung, Aufarbeitung bzw. zum Recycling gemäß den
gesetzlichen Bestimmungen den zuständigen Sammelpunkten zu.
Indem Sie diese Produkte ordnungsgemäß entsorgen, helfen Sie dabei, wertvolle Ressourcen
zu schützen und eventuelle negative Auswirkungen auf die menschliche Gesundheit und die
Umwelt zu vermeiden.
Für mehr Informationen zu Sammlung und Recycling, wenden Sie sich bitte an Ihren örtlichen
Abfallentsorgungsdienstleister.
Gemäß Landesvorschriften können wegen nicht ordnungsgemäßer Entsorgung dieses Abfalls
Strafgelder verhängt werden.
100_160419_MK-F800_Second_EU(UZ50E153).indb 32 2016/04/19 16:57:03
Page 65

Françis
TABLE DES MATIÈRES
Page
CONSIGNES DE SÉCURITÉ ....................................................................................................................... FR3 - FR5
INFORMATION IMPORTANTE .............................................................................................................................. FR6
NOMS DES PIÈCES .................................................................................................................................... FR7 - FR8
VERROUILLAGE DE SÉCURITÉ .......................................................................................................................... FR9
PROTECTION DU DISJONCTEUR ET DU CAPTEUR DE TEMPÉRATURE ....................................................... FR9
DÉMONTAGE ET ASSEMBLAGE
(i) DÉMONTAGE DE L’EMBALLAGE ............................................................................................................. FR10
(ii) LAME DU COUTEAU • LAME POUR PÉTRIR • LAME POUR FOUETTER • LAME POUR RÂPER ....... FR10
(iii) LAMES DE TRANCHAGE • LAMES DE BROYAGE • LAME À JULIENNE ..............................................FR11
(iv) PRESSE AGRUMES ...................................................................................................................................FR11
(v) ÉGOUTTOIR À SALADE ........................................................................................................................... FR12
ROBOT DE CUISINE MULTIFONCTION
(i) LAME DU COUTEAU ..................................................................................................................... FR13 - FR15
- Préparation des Ingrédients
- Mode d’emploi
(ii) LAMES DE TRANCHAGE • LAMES DE BROYAGE • LAME À JULIENNE ................................... FR16 - FR17
- Préparation des Ingrédients
- Mode d’emploi
(iii) LAME POUR PÉTRIR ................................................................................................................................ FR18
- Préparation des Ingrédients
- Mode d’emploi
(iv) LAME POUR FOUETTER .......................................................................................................................... FR19
- Préparation des Ingrédients
- Mode d’emploi
(v) LAME POUR RÂPER ................................................................................................................................. FR20
- Préparation des Ingrédients
- Mode d’emploi
(vi) ÉGOUTTOIR À SALADE ........................................................................................................................... FR21
- Préparation des Ingrédients
- Mode d’emploi
(vii) PRESSE-AGRUMES ................................................................................................................................. FR22
- Préparation des Ingrédients
- Mode d’emploi
MIXEUR
(i) MIXEUR ......................................................................................................................................... FR23 - FR24
- Démontage et assemblage
- Préparation des Ingrédients
- Mode d’emploi
ACCESSOIRE DE BROYAGE À SEC
(ii) ACCESSOIRE DE BROYAGE À SEC ........................................................................................... FR25 - FR26
- Démontage et assemblage
- Préparation des Ingrédients
- Mode d’emploi
APRÈS UTILISATION .............................................................................................................................. FR27 - FR28
DÉPANNAGE ........................................................................................................................................... FR29 - FR30
SPÉCIFICATIONS ................................................................................................................................................ FR32
FR2
100_160419_MK-F800_Second_EU(UZ50E153).indb 2 2016/04/19 16:57:03
Page 66

CONSIGNES DE SÉCURITÉ
Suivez les consignes ci-dessous an de prévenir les accidents ou blessures à la
personne, et les dommages matériels.
Les graphiques suivants indiquent le degré des dommages causés par une
mauvaise utilisation.
(Veuillez vous assurer de suivre ces instructions.)
AVERTISSEMENT:
ATTENTION:
Les symboles sont classés et expliqués comme suit.
Ce symbole indique une interdiction.
Indique de sérieuses blessures ou la mort.
Indique un risque de blessure ou de dommages
matériels.
Ce symbole indique les conditions
préalables à suivre.
AVERTISSEMENT
Ne pas endommager le Câble ou la prise.
(Cela pourrait provoquer un choc électrique ou un incendie dû à un court-circuit.)
Ne pas utiliser l’appareil si le Câble ou la che est endommagée ou si la
che est mal branchée à la prise.
(Cela pourrait provoquer une électrocution ou un incendie dû à court-circuit.)
Si le Câble est endommagé, il doit être remplacé par le fabricant, son service après
vente ou une personne ayant une qualication similaire an d’éviter tout risque.
Ne pas brancher ou débrancher la prise avec des mains mouillées.
(Cela pourrait provoquer une électrocution.)
Ne pas dépasser la tension mentionnée sur la prise et ne pas utiliser un
courant alternatif autre que ceux énumérés sur l’appareil.
(Cela pourrait provoquer une électrocution ou un incendie.)
• S’assurer que la tension fournie à l’appareil est la même que celle de
l’alimentation locale.
• Brancher d’autres appareils dans la même prise électrique peut provoquer une
surchauffe.
Ne pas plonger l’appareil dans l’eau ou l’asperger avec de l’eau.
(Cela pourrait provoquer une électrocution ou un incendie dû à un court-circuit.)
Ne pas démonter, réparer ou modier l’appareil.
(Cela pourrait provoquer un incendie, une électrocution ou des blessures.)
Contacter le service client pour la réparation.
Ne pas insérer d’objets dans la fente ou l’interstice, en particulier les objets
métalliques tels que les broches ou les câbles.
(Cela pourrait provoquer une électrocution ou un dysfonctionnement.)
• Notamment des objets métalliques tels que des broches ou des ls.
Ne pas remplacer les pièces de l’appareil avec des pièces de rechange
autres que les pièces authentiques de ce produit.
(Cela pourrait provoquer des blessures, une électrocution ou un incendie.)
N’essayez pas d’enlever le couvercle lorsque l’appareil fonctionne.
(Cela peut causer des blessures.)
N’utilisez pas d’eau chaude (plus de 60 °C) pour nettoyer l’appareil ou le feu
pour le sécher.
(Cela peut provoquer des brûlures ou un dysfonctionnement.)
FR3
100_160419_MK-F800_Second_EU(UZ50E153).indb 3 2016/04/19 16:57:03
Page 67

Françis
AVERTISSEMENT
Ne placez pas des ingrédients très chauds (plus de 60 °C) dans le Bol ou le
Récipient du mixeur.
(Cela peut causer des blessures ou un dysfonctionnement.)
Ne faites pas fonctionner sans le Couvercle du mixeur correctement en
place sur le Récipient du mixeur.
(Cela peut causer des blessures.)
Ne mettez pas votre doigt ou des ustensiles comme une cuillère, une
fourchette, etc., dans le Bol ou le Récipient du mixeur pendant le
fonctionnement.
(Cela peut causer des blessures, un choc électrique ou un incendie causé par un
court-circuit.)
Ne poussez pas la Goupille de sécurité ni le Levier de sécurité avec des
instruments, bâtons, etc. car l’appareil pourrait être activé.
(Cela peut causer des blessures.)
Cet appareil n’est pas destiné à être utilisé par des enfants. Garder
le produit et son câble hors de la portée des enfants. Les appareils
peuvent être utilisés par des personnes dont les capacités physiques,
sensorielles ou mentales sont réduites ou qui manquent d’expérience et
de connaissances si elles sont surveillées ou instruites sur l’utilisation de
l’appareil d’une manière sûre et si elles comprennent les dangers impliqués.
Les enfants ne doivent pas jouer avec l’appareil.
(Cela pourrait provoquer une brûlure, des blessures ou une électrocution.)
Insérer fermement la Fiche dans la prise.
(Sinon, cela pourrait provoquer une électrocution et un incendie dû à la chaleur
qui peut se générer autour de la prise.)
Nettoyer régulièrement la Fiche.
(Une Fiche sale peut causer une isolation insufsante en raison de l’humidité, et
peut provoquer un incendie.)
Lorsqu’un fonctionnement anormal ou une dégradation se produit, stopper
immédiatement l’utilisation de l’appareil et le débrancher.
(Cela pourrait provoquer de la fumée, un incendie ou une électrocution.)
Exemples d’événement anormal ou de dégradation.
• La Fiche et le Câble deviennent anormalement chauds.
• Le Câble est endommagé ou ne conduit plus le courant.
• Le Boîtier du moteur est déformé ou anormalement chaud.
Débrancher immédiatement l’appareil et contacter le service client pour la
vérication ou la réparation.
Tenir la prise pour la débrancher. Ne jamais tirer sur le Câble.
(Sinon, cela pourrait provoquer une électrocution ou un incendie dû à un court-
circuit.)
Soyez prudent si un liquide chaud est versé dans le Bol ou le Récipient du
mixeur car il peut être éjecté de l’appareil en raison d’un coup de vapeur.
(Cela peut provoquer des brûlures.)
FR4
100_160419_MK-F800_Second_EU(UZ50E153).indb 4 2016/04/19 16:57:03
Page 68

ATTENTION
Ne pas laisser l’appareil sans surveillance lorsqu’il est en cours d’utilisation.
(Cela pourrait provoquer un incendie ou des brûlures.)
• L’éteindre une fois l’utilisation nie.
Ne pas utiliser l’appareil dans les lieux suivants.
• Un lieu où se trouve une surface inégale, un tapis ou linge de table non
résistant à la chaleur, etc.
(Cela pourrait provoquer un incendie ou des blessures.)
• Un lieu où il peut être éclaboussé avec de l’eau ou situé près d’une source de chaleur.
(Cela pourrait provoquer une électrocution ou une fuite de courant.)
Ne traitez pas plus que la capacité maximale indiquée sur chaque conteneur,
respectivement. Suivez la quantité d’ingrédient recommandée pour le
traitement.
(Cela peut provoquer des blessures.)
Ne faites pas fonctionner en continu pendant une trop longue période. Il
est recommandé de laisser l’appareil reposer un certain temps après le
fonctionnement.
(Cela peut provoquer des brûlures.)
Temps de
Fonction
Robot de cuisine
multifonction
Mixeur 2 2
Accessoire de
broyage à sec
* À l’exception des « Préparatifs ingrédient » énoncés dans ce Mode d’emploi.
Toujours enlever l’appareil de l’alimentation s’il est laissé sans surveillance
et avant le montage, le démontage ou le nettoyage.
(Cela peut causet une brûlure ou blessure.)
Retirez le Bol, le récipient du mixeur et le récipient du Broyeur avant de
soulever le Boîtier du moteur de la table.
(Cela peut provoquer des blessures.)
Eteindre l’appareil et débrancher l’alimentation électrique avant de changer
les pièces individuelles qui se déplacent pendant l’utilisation.
(Cela pourrait provoquer des blessures.)
Lorsque vous transportez l’appareil, veillez à tenir le Boîtier du moteur
avec les deux mains. Ne transportez pas en tenant seulement le Bol ou le
récipient du mixeur ou le récipient du broyeur.
(Cela peut causer des blessures.)
Si la lame de coupe du mixeur se coince, arrêter le Mixeur, puis débranchez.
N’insérez pas votre doigt dans le récipient du mixeur. Utilisez une spatule en
caoutchouc pour enlever les ingrédients qui bloquent la lame de coupe du mixeur.
(Cela peut causer des blessures.)
Il faut faire attention lors de la manipulation des lames tranchantes, lorsque
vous videz le Bol ou le Récipient du mixeur et lors du nettoyage. (par
exemple, Lame du couteau, Lames pour tranche, etc.)
(Cela peut provoquer des blessures.)
FR5
fonctionnement
(minutes)
2 4
1 2
Temps de repos
(minutes)
100_160419_MK-F800_Second_EU(UZ50E153).indb 5 2016/04/19 16:57:03
Page 69

Françis
Information importante
Ne placez pas l’appareil dans les endroits suivants :
• Dans un endroit où l’appareil est exposé à une humidité ou une température
excessive, ou à lumière directe du soleil.
(Cela peut provoquer des dysfonctionnements.)
• Tout emplacement à forte ou basse température comme le réfrigérateur, le
congélateur, les micro-ondes ou le four.
(Cela peut entraîner un dysfonctionnement ou une rupture.)
Ne traitez pas d’ingrédients durs (par exemple, la viande dure, la viande avec des
os) ou visqueux.
(Cela peut provoquer des dysfonctionnements.)
Ingrédients interdits :
Accessoires Description
Lame du couteau Ingrédients durs, ingrédients visqueux, p. ex. grains de café, fèves
de soja séchées, aliments surgelés, poulpe séché, etc.
Lames pour
couper
lames pour
déchiqueter
lames à julienne
Lame pour pétrir Ingrédients qui ne conviennent pas à fabrication de pâte, par
Lame pour
fouetter
Lame pour râper Ingrédients visqueux, ingrédients avec concentrations de bres
Égouttoir à salade Grands ingrédients en morceaux, ingrédients mous et fragiles, par
Presse-agrumes Tous les autres ingrédients à part les agrumes, par exemple
Mixeur Ingrédients durs, ingrédients très collants, ingrédients à faible
Accessoire de
broyage à sec
Ingrédients avec des concentrations élevées de bres dures,
ingrédients visqueux, ingrédients trop mous, par exemple, légumes
durs, surgelés, jambon, curcuma, gingembre, laitue, tomate, pêche,
chocolat etc.
exemple viande, légumes, noix, sauces, pâtes à tartiner.
Tous les ingrédients à part les blancs d’œufs et la crème fraîche.
dures élevées, ingrédients trop petits et minces, par exemple,
igname, pomme de terre, céleri, poireau, noix de pin, etc.
exemple, grosse carotte ou pomme de terre en morceaux, tomate,
tofu, pâtes, nouilles, etc.
pomme, kiwi, etc.
teneur en eau, par exemple curcuma, soja sec, surgelés, viandes,
poissons, pommes de terre bouillies, ou des glaçons, etc.
Noix dures, noix séchées, ingrédients avec concentration élevée
de bres dures, ingrédients humides, liquides, par exemple, noix
diverses, raisins secs, viande, légumes, oeufs durs, curcuma, etc.
Avant l’utilisation :
Toujours faire fonctionner l’appareil sur une surface propre et sèche, plane, rigide et
lisse, et nettoyer le pied en caoutchouc (p.FR7) avant de l’utiliser pour faire en sorte que
l’aspiration des pieds en caoutchouc est à une performance optimale.
FR6
100_160419_MK-F800_Second_EU(UZ50E153).indb 6 2016/04/19 16:57:03
Page 70

NOMS DES PIÈCES
Robot de cuisine multifonction
Capacité opérationnelle : 1,5 L
1. Poussoir à aliments
2. Tube d’alimentation
3. Couvercle du bol
4. Lame du couteau
5. Lame pour râper
6. Lame pour pétrir
7. Lame pour fouetter
8. Couvercle de l’égouttoir
9. Égouttoir à salade
10. Socle de lame
11. Lame pour broyage n
12. Lame pour broyage épais
*La forme de la prise peut être différente de l’illustration.
FR7
13. Lame pour tranches nes
14. Lame pour tranches épais
15. Lame à julienne
16. Cône pour agrumes
17. Presse-agrumes
18. Bol
19. Axe d’entraînement
20. Boîtier du moteur
21. Interrupteur
22. Pied en caoutchouc
23. Cordon
24. *Prise
100_160419_MK-F800_Second_EU(UZ50E153).indb 7 2016/04/19 16:57:03
Page 71

Françis
NOMS DES PIÈCES
Mixeur, accessoire de broyage à sec et Accessoires
Capacité
opérationnelle :
1 L
1. Couvercle du mixeur
2. Récipient du mixeur
3. Lame de coupe du mixeur
4. Récipient du broyeur
5. Lame de coupe du moulin
Panneau de contrôle
Sélection de mode
- Menu Auto -
Mode hacher
Mode émincer
Mode congeler
Mode pâte
Mode égouttoir
- Menu Manuel -
Mode Continu
Mode Intermittent
6. Base du récipient de broyage
7. Boîte de rangement
8. Brosse
LED indicateur de mode
Interrupteur Arrêt/Démarrage
Pour le menu Auto : pour mettre en Pause/
Démarrage le processus
Pour le menu Manuel : pour mettre en
Pause/Démarrage le processus
Cadran rotatif
Interrupteur de pulsation
DEL Vitesse et Minuterie/Indication temps de conduite
: S’allument quand le menu Manuel fonctionne et indiquent le niveau de vitesse avec
des barres.
: S’allument quand le menu Auto est en fonction et indiquent Minuterie/Temps de
conduite avec des barres.
Ajuster Vitesse et Minuterie/Temps de
conduite
Note :
• Le programme s’arrête et se réinitialise après 10 secondes si aucune autre action n’est faite une fois qu’une
fonction est sélectionnée.
• Tourner le cadran rotatif dans le sens horaire augmente le nombre de barres allumées et vice versa.
• Les vitesses par défaut pour les modes continu et intermittent sont maximales, (niveau 10).
• Le programme s’arrête et se réinitialise après 20 secondes si le programme est en pause pendant le
traitement et qu’aucune autre action n’est donnée.
• Le mode continu cessera automatiquement d’environ 19 minutes, et le mode intermittent arrêtera
automatiquement environ 7 minutes après le traitement est démarré.
FR8
100_160419_MK-F800_Second_EU(UZ50E153).indb 8 2016/04/19 16:57:04
Page 72

VERROUILLAGE DE SÉCURITÉ
La goupille de sécurité est conçue pour empêcher l’appareil de s’allumer lorsque
- Le Couvercle du bol ou le presse-agrumes et le Bol ne sont pas complètement verrouillés les uns aux autres.
- Les Bol, Récipient du mixeur ou Récipient du broyeur ne sont pas complètement verrouillés au Boîtier du moteur.
Le levier de sécurité active
la goupille de sécurité
uniquement si le Couvercle
du bol ou la passoire à
agrumes est entièrement
xé(e) sur le Bol.
Position A : Déverrouillage
Position B : Verrouillage
Fully locking steps :
Pour le bol et le récipient du mixeur, alignez la
marque triangulaire avec le Boîtier du moteur
comme indiqué en position . Tournez
vers la droite jusqu’à entendre un ‘clic’ et la
marque triangulaire s’aligne désormais en
position . Pour le Broyeur sec, placez sur
le Boîtier du moteur et tournez vers la droite
jusqu’à ce qu’un ‘clic’ se fasse entendre.
Goupilles de
sécurité
Pour déverrouiller, suivez les étapes de
verrouillage dans le sens inverse.
Note :
• Ne poussez pas les goupilles de sécurité et le levier de sécurité avec un instrument, bâton, etc.
• Ne versez pas de liquides ou d’ingrédients dans la zone des goupilles de sécurité et du levier de sécurité.
• Gardez la zone des goupilles de sécurité et du levier de sécurité propre pour éviter que des particules
étrangères ne s’y accumulent.
Les actions ci-dessus assureront le bon fonctionnement des goupilles de sécurité et du Levier de
sécurité.
Si elles ne sont pas suivies, cela endommagera les pièces liées aux goupilles de sécurité et au levier de
sécurité.
PROTECTION DU DISJONCTEUR ET DU CAPTEUR DE
TEMPÉRATURE
Cet appareil dispose des fonctions Disjoncteur et Capteur de température pour arrêter le moteur quand ce dernier
est en surcharge.
(voir page FR31)
FR9
100_160419_MK-F800_Second_EU(UZ50E153).indb 9 2016/04/19 16:57:04
Page 73

Françis
ROBOT DE CUISINE MULTIFONCTION - DÉMONTAGE ET ASSEMBLAGE -
Démontage de l’emballage
1
2
Dessus de la
Lame du
couteau
Tournez le Couvercle du bol vers la gauche et soulevez
du Bol.
Tenez le haut de la Lame du couteau et soulevez pour
la retirer du Bol.
Note :
Méez-vous des arêtes vives de la Lame du couteau lors de son retrait du Bol.
Assemblage des accessoires du Robot de cuisine multifonction
Il est fortement recommandé de nettoyer toutes les pièces et accessoires joints et de bien les sécher avant
d’utiliser l’appareil pour la première fois, voir la méthode de nettoyage pages FR27 - FR28. Débranchez l’unité lors
de l’assemblage. Avant de brancher l’appareil, vériez que l’interrupteur est éteint. Veuillez vous référer à la page
FR28 dans ‘Stockage’ sur la manière de repositionner le Boîtier du moteur.
Lame du couteau • Lame pour pétrir • Lame pour fouetter • Lame pour râper
1 2
ou
ou
ou
Placez la Lame du couteau (Lame pour pétrir ou Lame
pour fouetter ou Lame pour râper) dans le Bol.
Note :
Pour la Lame du couteau, assurez-vous
que l’axe d’entraînement est en saillie à
partir de Lame du couteau après insertion.
Placez les ingrédients dans le bol.
Note :
Pour la Lame à râper, mettez les ingrédients sur le
dessus de la lame et répartissez-les uniformément.
Placez le Couvercle du bol sur le dessus du Bol et
tournez vers la droite jusqu’à ce qu’un « clic » se fasse
entendre. Insérez le Poussoir à aliments dans le tube
d’alimentation.
FR10
100_160419_MK-F800_Second_EU(UZ50E153).indb 10 2016/04/19 16:57:04
Page 74

ROBOT DE CUISINE MULTIFONCTION - DÉMONTAGE ET ASSEMBLAGE -
Assemblage des accessoires du Robot de cuisine multifonction
Lames pour trancher (épais/n), Lames pour broyage (gros/n), Lame à julienne
1 2
Cran d’arrêt projetée
Montez la lame souhaitée sur le socle de lame et
assurez-vous qu’elle est correctement installée.
Note :
• Méez-vous des arêtes vives sur les lames lorsque vous l’insérez dans le Socle de lame.
• Pour retirer la lame, retournez le Socle de lame et poussez vers le bas sur le côté inverse du creux de la lame.
3 4
Trous pour les doigts
Poussez vers le bas sur le creux de la lame comme
montré ci-dessus jusqu’à ce qu’un ‘déclic’ se fasse
entendre.
Insérez votre doigt et le pouce dans les trous pour les
doigts pour saisir le Socle de lame. Placez le Socle de
lame assemblé dans le Bol.
Note:
Assurez-vous que l’axe d’entraînement
est en saillie du Socle de lame après
l’insertion.
Presse-agrumes
1 2
Placez la passoire à agrumes sur le Bol. Tournez
dans le sens horaire jusqu’à ce qu’un « clic » se fasse
entendre.
FR11
Placez le Couvercle du bol sur le dessus du Bol et
tournez vers la droite jusqu’à ce qu’un « clic » se fasse
entendre.
Fixez le cône pour agrumes sur l’Axe d’entraînement.
100_160419_MK-F800_Second_EU(UZ50E153).indb 11 2016/04/19 16:57:05
Page 75

Françis
ROBOT DE CUISINE MULTIFONCTION - DÉMONTAGE ET ASSEMBLAGE -
Assemblage des accessoires du Robot de cuisine multifonction
Égouttoir à salade
1 2
Placez l’Égouttoir à salade dans le Bol. Insérez les
ingrédients dans l’Égouttoir à salade.
3 4
PP
A
B
PP
Placez le Couvercle de l’égouttoir au dessus de
l’Égouttoir à salade jusqu’à ce que la marque s’aligne
comme montré en A. Tournez le Couvercle de l’égouttoir
vers la gauche jusqu’à ce que la marque s’aligne
comme indiqué dans B.
Assurez-vous que la tige de métal est en saillie de
l’Égouttoir à salade après insertion.
Placez le Couvercle du bol sur le dessus du Bol et
tournez vers la droite jusqu’à ce qu’un « clic » se fasse
entendre.
En xant l’unité assemblée au Boîtier du moteur
1. Placez le Bol sur le Boîtier du moteur jusqu’à ce que
la marque s’aligne comme montré en .
2. Tournez le Bol dans le sens horaire jusqu’à ce qu’un
« clic » se fasse entendre. Assurez-vous que la
marque en triangle sur le Bol est alignée avec la
marque de rectangle sur le Boîtier du moteur comme
on le voit dans la position .
Pour démonter, suivez les étapes d’assemblage dans le sens inverse.
FR12
100_160419_MK-F800_Second_EU(UZ50E153).indb 12 2016/04/19 16:57:05
Page 76

ROBOT DE CUISINE MULTIFONCTION - LAME DU COUTEAU -
Ingrédient Préparations
Fonction Ingrédient Mode Quantité
Viande
Hacher
Poisson 50 ~ 500 g 3 ~ 30 sec
Oignon
Ail
Émincer
Écraser Parmesan
Purée
Congeler
Carotte 50 ~ 450 g 10 ~ 30 sec
Persil plat 5 ~ 70 g 10 ~ 40 sec
Champignon
Patates
bouillies
Banane
congelée
Auto
Auto
Continu
Vitesse: Max
Continu
Vitesse: Max
Intermittent
Vitesse: Max
Auto
50 ~ 400 g 5 ~ 40 sec
Le réglage initial est pour 200 g (10 sec)
150 ~ 500 g 10 ~ 50 sec
Le réglage initial est pour 300 g (20 sec)
5 ~ 500 g 10 ~ 30 sec Pelez la peau.
30 ~ 250 g 3 ~ 15 sec Coupez en cubes de 2 à 3 cm.
10 ~ 200 g 10 ~ 60 sec Coupez en cubes de 2 à 3 cm.
100 ~ 400 g 10 ~ 40 sec
250 ~ 450 g 40 ~ 120 sec
Le réglage initial est pour 350 g (60 sec)
Temps de
fonctionnement (env.)
Méthode de préparation
Retirez toute la peau, les os et
les tendons, coupez en cubes de
2 à 3 cm.
Pelez la peau, coupez les en
cubes de 2 à 3 cm.
Pelez la peau, coupez les en
cubes de 2 à 3 cm.
Retirez la tige.
Coupez en cubes de 2 à 3 cm.
Ne surtraitez pas.
1 à 2 cm de largeur, à moitié
congelé, qu’un cure-dents peut
percer.
Concassage
de glaçons
Moudre Cacahuètes
Pâtes
Miette Pain blanc
Pétrir
(pour des
pâtisseries)
Centrifugeuse
Mixeur à
soupes
Cubes de
glace
Cacahuètes
grillées
Farine
Fruit,
Liquide etc.
Légumes
bouillis,
Liquide, etc.
Continu
Vitesse: Max
Continu
Vitesse: Max
Auto
Continu
Vitesse: Max
Continu
Vitesse: Max
Continu
Vitesse: Max
Continu
Vitesse: Max
~ 10 pièces ~ 20 sec Cubes de glace de 2 à 3 cm.
10 ~ 200 g 15 ~ 30 sec
100 ~ 400 g 4 ~ 10 min
Le réglage initial est pour 300 g (7 min)
10 ~ 200 g 15 ~ 60 sec
~ 300 g ~ 120 sec
~ 1 500 mL ~ 120 sec
~ 1 500 mL ~ 120 sec
Retirer la coquille et la peau des
cacahuètes.
Retirer la coquille et la peau des
cacahuètes.
Coupez du pain frais en 6 à 8
morceaux.
Utilisez pour faire des conseries
comme des bonbons et des
gâteaux.
Coupez en cubes de 2 à 3 cm.
Traitez les solides en premier.
Remplissez le liquide jusqu’au
total ne dépassant pas 1 500 mL.
N’ajoutez pas plus de 10 glaçons
pendant le traitement.
Coupez en cubes de 2 à 3 cm.
Traitez les solides en premier.
Remplissez le liquide jusqu’au
total ne dépassant pas 1 500 mL.
FR13
100_160419_MK-F800_Second_EU(UZ50E153).indb 13 2016/04/19 16:57:06
Page 77

Françis
ROBOT DE CUISINE MULTIFONCTION - LAME DU COUTEAU -
Fonctionnant avec le Menu Auto
21
Après avoir terminé les étapes de montage, branchez
la che dans la prise et tournez l’Interrupteur. Les LED
d’Indication de mode s’allument et clignotent.
3 4
Chaque menu Auto a un temps d’entraînement
préprogrammé. Chaque barre lumineuse représente
10 secondes* de temps de d’entraînement. Poussez
l’interrupteur Arrêt/Démarrage pour commencer le
fonctionnement.
5 6
Sélectionnez le mode Menu Auto requis (sauf le Mode
égouttoir). La LED d’indication du mode sélectionné
s’allume et un bip sonore retentit. La LED d’indication de
temps de conduite et Arrêt/Démarrage s’allume et clignote.
En fonctionnement, la LED de temps d’entraînement
s’éteignent une par une à 10 secondes d’intervalle
jusqu’à ce que la durée de soit terminée et que 4 bips
sonores retentissent. Les LED d’Indication de mode
s’allument et clignotent.
Une fois que le traitement est terminé, éteignez
l’interrupteur et débranchez de la prise.
* Pour le Menu Auto pâte, chaque barre lumineuse représente 1 minute. La barre lumineuse diminue à chaque
intervalle de 1 minute.
Note :
• Assurez-vous toujours que la Lame du couteau est insérée avant d’ajouter les ingrédients dans le Bol.
• Le temps d’entrainement du Menu Auto peut être augmenté ou diminué en ajustant le cadran rotatif si nécessaire.
• Le fonctionnement du menu Auto peut être arrêté prématurément en appuyant sur l’interrupteur Arrêt/
Démarrage avant la n de la durée réglée.
• Selon la vitesse et la quantité des ingrédients utilisées, il y aura d’importantes vibrations. Dans ce cas,
maintenez le Couvercle du bol avec les deux mains pour le soutenir lors de son fonctionnement.
100_160419_MK-F800_Second_EU(UZ50E153).indb 14 2016/04/19 16:57:06
Retirez la Lame du couteau du Bol avant de retirer les
ingrédients transformés.
FR14
Page 78

ROBOT DE CUISINE MULTIFONCTION - LAME DU COUTEAU -
Fonctionnement avec le Menu manuel
1 2
Après avoir terminé les étapes de montage, branchez
la che dans la prise et tournez l’Interrupteur. Les LED
d’Indication de mode s’allument et clignotent.
3 4
Réglez la vitesse désirée avec le cadran rotatif. Plus
les barres sont allumées plus la vitesse est élevée.
Poussez l’interrupteur Arrêt/Démarrage ou PULSE pour
commencer le fonctionnement.
5 6
Sélectionnez le mode continu ou intermittent. La LED
d’indication du mode sélectionné s’allume et un bip
sonore retentit. La LED de la vitesse, de l’interrupteur
Arrêt/Démarrage
clignote.
Pendant l’entrainement, la LED indicateur Arrêt/
Démarrage reste allumée. La vitesse peut être réglée
pendant le fonctionnement. Poussez l’interrupteur Arrêt/
Démarrage pour arrêter l’entrainement.
et du commutateur PULSE s’allume et
Une fois que le traitement est terminé, éteignez
l’interrupteur et débranchez de la prise.
Note :
• Assurez-vous toujours que la Lame du couteau est insérée avant d’ajouter les ingrédients dans le Bol.
• Ne dépassez pas la quantité indiquée d’ingrédients pour pétrir car une vibration anormale pourrait se produire.
• N’insérez pas d’ingrédients très chauds à traiter dans le Bol. Assurez-vous toujours que les ingrédients sont
sufsamment refroidis avant de les insérer, comme des pommes de terre bouillies.
• Pour faire un jus, remplissez d’abord le Bol d’ingrédients solides, suivis par des ingrédients liquides jusqu’à ce
que le volume total ne dépasse pas 1 500 mL.
• Selon la vitesse et la quantité des ingrédients utilisées, il y aura d’importantes vibrations. Dans ce cas,
maintenez le Couvercle du bol pour le soutenir lors de son fonctionnement.
• Pour le pétrissage, ne retraitez pas une fois que la pâte s’est formée la première fois.
• Lorsque vous transformez des ingrédients en liquides avec des glaçons, ne mettez pas plus de 10 cubes de
glace (env. 170 g).
FR15
100_160419_MK-F800_Second_EU(UZ50E153).indb 15 2016/04/19 16:57:07
Retirez la Lame du couteau du Bol avant de retirer les
ingrédients transformés.
Page 79

Françis
ROBOT DE CUISINE MULTIFONCTION - LAMES DE TRANCHAGE • LAMES DE BROYAGE •
LAME À JULIENNE. -
Lames pour trancher (épais/n)
- utilisée pour trancher les
ingrédients
Lames pour broyage (gros/n)
- utilisée pour broyer et gratter les
ingrédients
Préparations des Ingrédients pour les lames pour trancher (épais/n)
Fonction Ingrédient Mode
Concombre
Oignon
Tranche
Carotte 600 g
Pomme
de terre
Chou 400 g
Continu
Vitesse: Max
Max
Utilisation
unique
700 g
700 g
600 g
Temps de
fonctionnement (env.)
-
Préparations des Ingrédients pour les lames pour broyage (gros/n)
Fonction Ingrédient Mode
Max
Utilisation
unique
Temps de
fonctionnement (env.)
Lame à julienne
- utilisée pour faire des frites et
broyer les ingrédients en cubes.
Méthode de préparation
Coupez les ingrédients jusqu’à
ce qu’ils soient assez petits pour
tenir dans le tube d’alimentation.
Méthode de préparation
Broyage
Concombre
Carotte 500 g
Pomme
de terre
Cheese 500 g
Continu
Vitesse: Max
500 g
650 g
Préparations des Ingrédients pour la Lame à julienne
Fonction Ingrédient Mode
Frites
Broyage Chou 500 g
Pomme
de terre
Continu
Vitesse: Max
Max
Utilisation
unique
800 g
Temps de
fonctionnement (env.)
Coupez les ingrédients jusqu’à
ce qu’ils soient assez petits pour
tenir dans le tube d’alimentation.
-
Coupez les ingrédients jusqu’à
ce qu’ils soient assez petits pour
tenir dans le tube d’alimentation.
Ne pas utiliser des ingrédients
durs comme le parmesan.
Méthode de préparation
Coupez les ingrédients jusqu’à
-
ce qu’ils soient assez petits pour
tenir dans le tube d’alimentation.
FR16
100_160419_MK-F800_Second_EU(UZ50E153).indb 16 2016/04/19 16:57:07
Page 80

ROBOT DE CUISINE MULTIFONCTION - LAMES DE TRANCHAGE • LAMES DE BROYAGE •
LAME À JULIENNE. -
Fonctionnement avec le Menu manuel
1 2
Après avoir terminé les étapes de montage, branchez
la che dans la prise et tournez l’Interrupteur. Les LED
d’Indication de mode s’allument et clignotent.
3
Réglez la vitesse désirée avec le cadran rotatif. Plus les
barres sont allumées plus la vitesse est élevée.
Poussez l’interrupteur Arrêt/Démarrage ou PULSE pour
commencer le fonctionnement.
5 6
Sélectionnez le mode Continu. La LED d’indication du
mode sélectionné s’allume et un bip sonore retentit. La
LED de vitesse, de l’interrupteur Arrêt/Démarrage et du
commutateur PULSE s’allume et clignote.
4
Insérez les ingrédients dans le tube d’alimentation et
poussez vers le bas avec le Poussoir à aliments.
Pendant l’entrainement, la LED indicateur Arrêt/
Démarrage reste allumée. Poussez l’interrupteur Arrêt/
Démarrage pour arrêter l’entrainement. Une fois que
le traitement est terminé, éteignez l’interrupteur et
débranchez de la prise.
Note :
• Lorsque vous utilisez des ingrédients longs et minces,
placez-les contre la paroi avant du tube d’alimentation,
comme indiqué sur la gure 1, pour le soutien pendant
le fonctionnement an d’éviter un traitement inégal.
• Débarrassez-vous des morceaux restants
d’ingrédients non transformés.
• Alignez les ingrédients riches en bres, comme indiqué
sur la gure 2 pour un résultat de traitement cohérent.
FR17
100_160419_MK-F800_Second_EU(UZ50E153).indb 17 2016/04/19 16:57:08
Retirez le Socle de lame du Bol avant de retirer les
ingrédients transformés.
Paroi
avant
Figure 1 Figure 2
Page 81

ROBOT DE CUISINE MULTIFONCTION - LAME POUR PÉTRIR -
Préparations des Ingrédients pour la Lame pour pétrir
Fonction Ingrédient Mode
Farine à
pain
Pétrir
(pour du
pain)
Liquide
Continu
Vitesse :
Commencez
par le
niveau 1,
augmentez
toutes les
1 seconde
jusqu’à Max.
Utilisation
unique
300 g
160 ~ 200 mL
Fonctionnement avec le Menu manuel
Max
Temps de
fonctionnement (env.)
~ 120 sec
21
Méthode de préparation
Mélangez de l’eau avec de la levure et
ajoutez-la au cours du traitement de la
pâte (l’ajout de levure directement avant le
traitement peut entraîner un effritement et le
levage prématuré). Si un mélange de pâte
paraît toujours friable après le traitement
initial, ajoutez 1 cuillère à café d’eau dans le
mélange. Lorsque de trop grandes vibrations
se produisent parce que le mélange de pâte
s’enroule autour de l’axe d’entraînement,
ajoutez 1 cuillère de farine. Ne retraitez pas la
pâte une fois le processus terminé, si la pâte
n’est pas satisfaisante, pétrissez à la main.
Françis
Après avoir terminé les étapes de montage, branchez
la che dans la prise et tournez l’Interrupteur. Les LED
d’Indication de mode s’allument et clignotent.
Sélectionnez le mode continu et ajustez la vitesse
appropriée avec le cadran rotatif. Plus les barres sont
allumées plus la vitesse est élevée. Poussez
l’interrupteur
Arrêt/Démarrage pour commencer le fonctionnement.
43
Pendant l’entrainement, la LED indicateur Arrêt/Démarrage
reste allumée. Observez la formation de boule de pâte.
Poussez l’interrupteur Arrêt/Démarrage pour arrêter l’opération
Une fois que le traitement est terminé, éteignez
l’interrupteur et débranchez de la prise. Retirez la boule
de pâte du Bol avant de retirer la Lame pour pétrir.
d’entrainement une fois qu’une boule de pâte ferme est formée.
Note:
• Ne dépassez pas la quantité indiquée d’ingrédients pour la Lame à pétrir car une vibration anormale pourrait
se produire.
• Selon la vitesse et la quantité des ingrédients utilisées, il y aura d’importantes vibrations. Dans ce cas,
maintenez le Couvercle du bol avec les deux mains pour le soutenir lors de son fonctionnement.
• Pour le pétrissage, ne retraitez pas une fois que la pâte s’est formée la première fois.
• De grandes quantités de beurre et de sucre dans la pâte peuvent provoquer des vibrations anormales lors de
l’utilisation de la lame pour pétrir.
• Utiliser de la farine autre que la farine à pain peut provoquer des vibrations anormales. Avant traitement, retirez 1
~ 2 c. à soupe d’eau de la quantité totale xée et rajoutez l’eau petit à petit au cours du traitement si nécessaire.
FR18
100_160419_MK-F800_Second_EU(UZ50E153).indb 18 2016/04/19 16:57:08
Page 82

ROBOT DE CUISINE MULTIFONCTION - LAME POUR FOUETTER -
Préparations des Ingrédients pour la Lame pour fouetter
Fonction Ingrédient Mode
Blanc d’œuf
Fouet
Cream
Continu
Vitesse: Max
Max
Utilisation
unique
2 ~ 6 pièces 50 ~ 90 sec
100 ~ 300 mL
fonctionnement (env.)
Fonctionnement avec le Menu manuel
Après avoir terminé les étapes de montage, branchez
la che dans la prise et tournez l’Interrupteur. Les LED
d’Indication de mode s’allument et clignotent.
Temps de
15 sec ~ 2 min
Méthode de préparation
Séparer le blanc du jaune pour
une meringue lisse.
Utilisez la crème fraîche à 35%
de teneur en matières grasses
ou plus à 5 °C
21
Sélectionnez le mode continu et ajustez la vitesse
avec le cadran rotatif. Plus les barres sont
plus la vitesse est élevée. Poussez l’interrupteur Arrêt/
Démarrage pour commencer le fonctionnement.
allumées
43
Pendant l’entrainement, la LED indicateur Arrêt/
Démarrage reste allumée. Observez la formation et la
hausse des ingrédients fouettés. Poussez l’interrupteur
Arrêt/Démarrage pour arrêter l’opération d’entrainement
Une fois que le traitement est terminé, éteignez
l’interrupteur et débranchez de la prise. Retirez
délicatement la lame pour fouetter et les ingrédients
transformés du Bol.
une fois la texture désirée formée.
Note :
• Ne mélangez pas trop la crème à fouetter, elle peut se décomposer et former des paquets de beurre.
• Utiliser différentes marques de crème à fouetter aura des résultats variables. Il est recommandé de traiter
jusqu’à ce que la crème soit sufsamment fouettée.
FR19
100_160419_MK-F800_Second_EU(UZ50E153).indb 19 2016/04/19 16:57:08
Page 83

Françis
ROBOT DE CUISINE MULTIFONCTION - LAME POUR RÂPER -
Préparations d’ingrédients pour la lame pour râper
Fonction Ingrédient Mode
Carotte
Grille
Pomme
Concombre
Continu
Vitesse: Max
Max
Utilisation
unique
200 g
200 g
200 g
fonctionnement (env.)
Fonctionnement avec le Menu manuel
1
Après avoir terminé les étapes de montage, branchez
la che dans la prise et tournez l’Interrupteur. Les LED
d’Indication de mode s’allument et clignotent.
Temps de
-
Méthode de préparation
Coupez en cubes de 2 à 3 cm.
2
Sélectionnez le mode continu et ajustez la vitesse
maximale avec le cadran rotatif. Plus les barres sont
allumées plus la vitesse est élevée. Poussez l’interrupteur
Arrêt/Démarrage pour commencer le fonctionnement.
43
Pendant l’entrainement, la LED indicateur Arrêt/
Démarrage reste allumée. Poussez l’interrupteur Arrêt/
Démarrage pour arrêter l’entrainement.
Une fois que le traitement est terminé, éteignez
l’interrupteur et débranchez de la prise. Retirez la
Lame pour râper du Bol avant de retirer les ingrédients
transformés.
Note:
• N’insérez pas les ingrédients par le tube d’alimentation pendant le fonctionnement de la lame pour râper.
FR20
100_160419_MK-F800_Second_EU(UZ50E153).indb 20 2016/04/19 16:57:09
Page 84

ROBOT DE CUISINE MULTIFONCTION - ÉGOUTTOIR À SALADE -
Préparations des Ingrédients pour l’Égouttoir à salade
Fonction Ingrédient Mode
Feuilles
Égouttoir
de laitue
Auto
Chou
Max
Utilisation
unique
100 g 20 ~ 60 sec
Le réglage initial est pour 50 g (20 sec)
200 g 20 ~ 70 sec
fonctionnement (env.)
Fonctionnant avec le Menu Auto
Après avoir terminé les étapes de montage, branchez
la che dans la prise et tournez l’Interrupteur. Les LED
d’Indication de mode s’allument et clignotent.
Temps de
Méthode de préparation
Broyage en tranches de 3 à 5
cm.
Coupé en 1 à 3 mm.
21
Sélectionnez le mode égouttoir. La LED d’indication
du mode sélectionné s’allume et un bip sonore retentit.
La LED d’indication de temps de conduite et de
l’interrupteur Arrêt/Démarrage s’allument et clignotent
s’allume et clignote.
43
Chaque menu Auto a un temps d’entraînement
préprogrammé. Chaque barre lumineuse représente 10
secondes de temps de d’entraînement. Poussez l’interrupteur
Une fois que le traitement est terminé, éteignez
l’interrupteur et débranchez de la prise. Retirez
l’Égouttoir à salade du Bol.
Arrêt/Démarrage pour commencer le fonctionnement. En
fonctionnement, la LED de temps d’entraînement s’éteignent
une par une à 10 secondes d’intervalle jusqu’à ce que la
durée de soit terminée et que 4 bips sonores retentissent.
Les LED d’Indication de mode s’allument et clignotent.
Note:
• Capacité opérationnelle maximale de l’égouttoir à salade : 200 g ou jusqu’à hauteur maximum de l’Égouttoir à
salade, quelque soit le premier.
• Ingrédients interdits : Reportez-vous à la page FR6.
• Veiller à ce que les ingrédients soient répartis uniformément autour de l’égouttoir à salade avant de traiter.
• Ne pas faire fonctionner l’égouttoir à salade dans un mode autre que le Mode égouttoir.
• Assurez-vous toujours que le Couvercle de l’égouttoir est xé sur l’égouttoir à salade avant toute opération,
sinon les ingrédients pourraient sortir et se répandre autour du Bol.
• Selon la quantité d’ngrédients utilisés, il y aura d’importantes vibrations. Dans ce cas, maintenez le Couvercle
du bol avec les deux mains pour le soutenir lors de son fonctionnement.
FR21
100_160419_MK-F800_Second_EU(UZ50E153).indb 21 2016/04/19 16:57:09
Page 85

ROBOT DE CUISINE MULTIFONCTION - PRESSE AGRUMES -
Préparations des Ingrédients pour le presse agrumes
Fonction Ingrédient Mode
Presse-
agrumes
Fruit type
agrume
Continu
Vitesse :
Niveau 4
Max
Utilisation
unique
1000 mL -
fonctionnement (env.)
Fonctionnement avec le Menu manuel
Après avoir terminé les étapes de montage, branchez
la che dans la prise et tournez l’Interrupteur. Les LED
d’Indication de mode s’allument et clignotent.
3
Temps de
Méthode de préparation
Coupez le fruit en moitiés
21
Sélectionnez le mode continu et ajustez la vitesse au
niveau 4 avec le cadran rotatif. Poussez l’interrupteur
Arrêt/Démarrage pour commencer le fonctionnement.
4
Françis
Placez les fruits coupés à moitié côté tasse sur le
dessus du cône pour agrumes et appuyez fermement
pour en extraire le jus. Pendant l’entrainement, la
Une fois que le traitement est terminé, éteignez
l’interrupteur et débranchez de la prise. Retirez le
Presse agrumes du Bol avant de verser le jus extrait.
LED indicateur Arrêt/Démarrage reste allumée.
Poussez l’interrupteur Arrêt/Démarrage pour arrêter
l’entrainement.
Note :
• Assurez-vous toujours que le cône pour agrumes soit placé sur la passoire à agrumes avant l’utilisation.
• Arrêtez le traitement périodiquement pour enlever la pulpe restant sur la passoire à agrumes pour faciliter
l’extraction du jus.
Il n’est pas recommandé de faire fonctionner le presse-agrumes à des niveaux de vitesse supérieurs au
•
niveau 4.
• Évitez de toucher le cône pour agrumes pendant qu’il tourne.
FR22
100_160419_MK-F800_Second_EU(UZ50E153).indb 22 2016/04/19 16:57:10
Page 86

MIXEUR
Montage et démontage des accessoires du mixeur
1 2
Insérez les ingrédients dans le Récipient du mixeur et
fermez avec le Couvercle du mixeur.
Placez le Récipient du Mixeur sur le Boîtier du moteur
jusqu’à ce que la marque s’aligne comme montré en .
Tournez le Récipient du mixeur dans le sens horaire
jusqu’à ce qu’un « clic » se fasse entendre. Assurez-
vous que la marque en triangle sur le Récipient du
mixeur est alignée avec la marque de rectangle sur le
Boîtier du moteur comme on le voit dans la position .
Pour démonter, suivez simplement les étapes d’assemblage dans le sens inverse.
Préparations des Ingrédients pour le Mixeur
Fonction Ingrédient Mode
Max
Utilisation
unique
Temps de
fonctionnement (env.)
Méthode de préparation
Mixeur
Fruit,
légume
Continu
Vitesse: Max
1 000 mL ~ 2 min
Coupez en cubes de 1 cm.
Note:
• Capacité opérationnelle maximale : 1 L.
• Ingrédients interdits pour le Récipient du mixeur : Reportez-vous à la page FR6.
• Il est recommandé de ne pas mixer les ingrédients durs et visqueux. Cependant, si nécessaire, coupez les
ingrédients durs en petits morceaux (par exemple des carottes coupées en cubes de 1 cm³) et remplissez le
Récipient du mixeur avec des ingrédients en ne dépassant pas la moitié de sa capacité nominale.
• Ne remplissez pas jusqu’au niveau maximal et réduisez les ingrédients lorsque l’appareil fait du bruit ou émet
des vibrations anormales pendant le fonctionnement.
• Ajoutez des ingrédients mous (Fruit, légumes) dans le récipient du mixeur avant d’ajouter d’autres ingrédients.
FR23
100_160419_MK-F800_Second_EU(UZ50E153).indb 23 2016/04/19 16:57:10
Page 87

MIXEUR
Fonctionnement avec le Menu manuel
1 2
Après avoir terminé les étapes de montage, branchez
la che dans la prise et tournez l’Interrupteur. Les LED
d’Indication de mode s’allument et clignotent.
3 4
3
Pendant l’entrainement, la LED indicateur Arrêt/
Démarrage reste allumée. Poussez l’interrupteur Arrêt/
Démarrage pour arrêter l’entrainement.
Note :
• Si la lame de coupe se coince, éteignez et débranchez immédiatement. Ne tentez pas de décoller les
ingrédients avec les doigts, utilisez un objet comme une spatule en caoutchouc à la place.
• Pendant le mixage, il est possible que les ingrédients rejaillissent par le trou du Couvercle du mixeur. En cas
d’éclaboussures, essuyez-les avec un chiffon sec.
• Ne pas faire fonctionner en dépassant la durée nominale de fonctionnement (2 min ON, 2 min OFF).
Sélectionnez le mode continu et ajustez la vitesse
avec le cadran rotatif. Plus les barres sont allumées
plus la vitesse est élevée. Poussez
Démarrage pour commencer le fonctionnement.
Une fois que le traitement est terminé, éteignez
l’interrupteur et débranchez de la prise. Retirez l’Unité
de mixeur du Boîtier du moteur et retirez les ingrédients.
l’interrupteur Arrêt/
Françis
FR24
100_160419_MK-F800_Second_EU(UZ50E153).indb 24 2016/04/19 16:57:10
Page 88

ACCESSOIRE DE BROYAGE À SEC
Démontage De L’emballage
1 2
Niveau maximum
Niveau maximum
pour ingrédients secs
Tournez la base du récipient de broyage vers la gauche
pour déverrouiller et levez le du Récipient du broyeur.
Un niveau maximal pour les ingrédients secs est
indiqué sur le Récipient du broyeur. ne remplissez pas
au delà de ce niveau.
Montage et démontage des accessoires de l’accessoire de broyage à sec
1 2
Retournez le Récipient du broyeur à l’envers et
remplissez-le des ingrédients sans dépasser le niveau
maximum indiqué.
Placez l’Unité de broyage à sec sur le Boîtier du moteur.
Tournez l’Unité de broyage à sec vers la droite jusqu’à
ce qu’un « clic » se fasse entendre.
Placez la Base du récipient de broyage dans le
Récipient du broyeur et tournez vers la droite jusqu’à ce
qu’un « clic » se fasse entendre.
Assurez-vous que les nervures sur la surface externe
de la base du récipient de broyage et la surface
intérieure du récipient du broyeur sont fermement
accrochées.
Pour démonter, suivez simplement les étapes d’assemblage dans le sens inverse.
Préparations des ingrédients pour l’accessoire de broyage à sec
Fonction Ingrédient Mode
Grains de
Moudre
café
Poivre
Continu
Vitesse: Max
Max
Utilisation
unique
Jusqu’au
niveau
maximum
Temps de
fonctionnement (env.)
~ 60 sec
Méthode de préparation
-
Note :
• Ingrédients interdits : Reportez-vous à la page FR6.
• Ne pas faire fonctionner l’appareil avec l’accessoire de broyage à sec vide.
• Ne remplissez pas jusqu’au niveau maximal et réduisez les ingrédients lorsque l’appareil fait du bruit ou émet
des vibrations anormales pendant le fonctionnement.
FR25
100_160419_MK-F800_Second_EU(UZ50E153).indb 25 2016/04/19 16:57:11
Page 89

Françis
ACCESSOIRE DE BROYAGE À SEC
Fonctionnement avec le Menu manuel
1 2
Après avoir terminé les étapes de montage, branchez
la che dans la prise et tournez l’Interrupteur. Les LED
d’Indication de mode s’allument et clignotent.
3 4
3
Pendant l’entrainement, la LED indicateur Arrêt/
Démarrage reste allumée. Poussez l’interrupteur Arrêt/
Démarrage pour arrêter l’entrainement.
Note :
• Tout en retirant les ingrédients, faites attention à la lame de coupe.
• Ne pas faire fonctionner en dépassant la durée nominale de fonctionnement (1 min ON, 2 min OFF).
Sélectionnez le mode continu et ajustez la vitesse
avec le cadran rotatif. Plus les barres sont allumées
plus la vitesse est élevée. Poussez
Démarrage pour commencer le fonctionnement.
Une fois que le traitement est terminé, éteignez
l’interrupteur et débranchez de la prise. Retirez l’Unité
de broyage à sec du Boîtier du moteur et retirez les
ingrédients.
l’interrupteur Arrêt/
FR26
100_160419_MK-F800_Second_EU(UZ50E153).indb 26 2016/04/19 16:57:11
Page 90

APRÈS UTILISATION
Nettoyage
Prélavage
Le prélavage permet un nettoyage plus facile. Il peut être utilisé pour le mélangeur et la lame de couteaux. Pour
faire un prélavage, suivez les étapes ci-dessous.
1
Placez l’appareil utilisé à l’intérieur du Bol, remplissez le
Bol avec de l’eau jusqu’à ce que l’appareil soit immergé
dans l’eau (max. 500 ml). Placez le Couvercle du bol
sur le dessus du Bol et tournez vers la droite jusqu’à ce
qu’un ‘clic’ se fasse entendre.
2 3
Robot de cuisine multifonction : Sélectionnez le mode
intermittent, appuyez sur l’interrupteur Arrêt/Démarrage et
faites fonctionner pendant 10 à 20 secondes au niveau 10.
Mixeur : Sélectionnez le mode continu, appuyez sur
l’interrupteur Arrêt/Démarrage et faites fonctionner
pendant 10 à 20 secondes au niveau 10.
MixeurRobot de cuisine multifonction
Pour l’unité du mixeur, remplissez avec 500 ml d’eau
le récipient du mixeur et couvrez avec le couvercle
du mixeur. Branchez la che dans la prise et tournez
l’Interrupteur.
Poussez l’interrupteur Arrêt/Démarrage pour arrêter
l’entrainement. Éteignez l’interrupteur et débranchez de
la prise. Retirez les accessoires et nettoyez.
Lavez ces éléments en les rinçant à l’eau courante. Utilisez un détergent neutre de cuisine si nécessaire.
Essuyez-les avec un chiffon propre.
Laver ces éléments en les rinçant sous l’eau courante, et nettoyez soigneusement avec la
Brosse. Utilisez un détergent neutre de cuisine si nécessaire.
Note :
• Ces éléments sont extrêmement tranchants et doivent être manipulés avec un soin particulier
lors du nettoyage. Évitez de cogner ces éléments sur des objets durs pendant le nettoyage.
• La Base du récipient de broyage ne doit pas être lavée, utilisez la Brosse pour la nettoyer.
FR27
100_160419_MK-F800_Second_EU(UZ50E153).indb 27 2016/04/19 16:57:11
Page 91

Françis
APRÈS UTILISATION
Boîtier du moteur/Pied en caoutchouc
Essuyez toutes les traces de saleté ou les taches avec un linge propre et humide.
Note :
• Assurez-vous que le cordon d’alimentation est débranché avant de nettoyer le Boîtier du moteur.
• Ne lavez pas le Boîtier du moteur à l’eau courante.
• N’utilisez jamais de liquides corrosifs (par exemple, de l’alcool, des diluants, etc.) pour nettoyer le Boîtier du
moteur.
Nettoyage au lave-vaisselle
Le Bol et le Couvercle du bol de cet appareil sont adaptés pour le lave-vaisselle.
Note :
• Ne placez pas ces éléments près de la zone de chauffage du lave-vaisselle car des températures élevées
peuvent endommager les pièces.
Stockage
Assurez-vous que tous les accessoires et le Bol sont retirés du Boîtier du moteur avant le stockage.
1 2
Pour libérer l’aspiration du Pied en caoutchouc du
Boîtier du moteur, appuyez sur le levier de déblocage
situé sur le côté bas du Boîtier du moteur en même
temps comme on le voit dans l’image ci-dessus et
soulevez.
3
(i)
Levier de déblocage
(ii) (iii)
Inclinez le Boîtier du moteur sur le côté, et enroulez le
Cordon d’alimentation autour de la zone d’enroulage du
Cordon, en laissant la che sur les côtés.
(i) Rangez la Lame du couteau
à l’intérieur du Bol. Une boîte
de rangement est incluse pour
stocker les autres accessoires.
Rangez les accessoires
conformément à la condition de
l’emballage.
100_160419_MK-F800_Second_EU(UZ50E153).indb 28 2016/04/19 16:57:12
(ii) Liste des accessoires dans la
Boîte de rangement : Lame
pour pétrir, Cône pour agrumes,
Lame pour tranches épais, Lame
pour tranches nes, Lame pour
broyage n, Lame pour broyage
épais, Lame pour frites, Socle
de lame, Lame pour râper, Lame
pour fouetter, Brosse.
(iii) Placez le couvercle de l’étui de
rangement sous la boîte pour
recueillir l’eau drainée des pièces
jointes lavées.
Note:
• Jetez le plastique souple
après l’ouverture de l’étui de
rangement.
FR28
Page 92

DÉPANNAGE
Veuillez vérier les points suivants avant d’arranger une maintenance.
Problème Cause et Action
La che est lâche dans la prise.
L’appareil ne s’allume pas.
Aucune des fonctions du
panneau de contrôle ne peut être
sélectionnée.
L’appareil ne démarre pas
même en cas de pression sur
l’interrupteur Arrêt/Marche.
(Le mode Erreur est indiqué)
Branchez-la fermement dans la prise.
L’Interrupteur n’a pas été activé.
Activez l’Interrupteur.
Des gants peuvent causer une insensibilité du panneau de contrôle.
Sélectionnez les fonctions avec les doigts nus.
Presse de la fonction sur la mauvaise position.
Pressez fermement sur l’illustration sur le panneau de contrôle.
L’appareil est déjà en fonctionnement.
Les fonctions ne peuvent pas être modiées lorsque
l’appareil est en marche. Arrêtez la fonction précédente
avant d’en choisir une nouvelle.
Le Bol, l’Unité de mixeur ou l’Unité de broyage à sec ne sont
pas correctement verrouillés sur le Boîtier du moteur.
Assurez-vous que la marque triangulaire sur les
accessoires est alignée avec la marque rectangulaire sur le
Boîtier du moteur comme vu page FR9.
Le Couvercle du bol ou la passoire à agrumes ne sont pas
complètement verrouillés sur le Bol.
Sécurisez totalement le couvercle du bol ou le presse-
agrumes sur le bol.
L’appareil ne fonctionne pas
même lorsque la fonction est
activée.
(Pas de mode Erreur)
La fonction sélectionnée est
annulée. (La LED d’Indication de
Mode commence à clignoter).
L’appareil s’arrête soudainement
pendant le fonctionnement.
Les ingrédients sont coincés.
Retirez soigneusement les ingrédients et veillez à ce que la
quantité utilisée soit comme indiquée.
L’appareil est resté inactif plus de 10 secondes après la
sélection de la fonction.
Assurez-vous que l’action est faite après avoir sélectionné
la fonction dans les 10 secondes.
Le disjoncteur de protection est activé. (Reportez-vous à la
page FR9)
• Trop d’ingrédients ont été insérés.
Retirez les ingrédients en excès et veillez à ce que la
quantité utilisée soit comme indiqué.
• De gros morceaux ou des ingrédients durs ont été utilisés.
Veillez à ce que les ingrédients soient coupés dans les
tailles indiquées. N’utilisez pas d’ingrédients durs comme
les aliments congelés ou solides très denses.
Le verrou de sécurité a été déclenché. (Reportez-vous à la
page FR9)
• Une vibration anormale pendant le fonctionnement peut
déclencher le verrouillage de sécurité.
Veillez à ce que les ingrédients utilisés et leur quantité
soient tels que décrits.
Verrouillez fermement le Couvercle du bol ou de la passoire
à agrumes sur le Bol, et veillez à ce que le Bol, l’Unité de
mixeur, ou l’Unité de broyage à sec soient bien verrouillés
sur le Boîtier du moteur.
FR29
100_160419_MK-F800_Second_EU(UZ50E153).indb 29 2016/04/19 16:57:12
Page 93

Françis
DÉPANNAGE
Problème Cause et Action
Il y a une vibration et un bruit
anormaux pendant le
fonctionnement.
La texture et la consistance des
ingrédients transformés ne se
présentent pas bien.
L’appareil n’a pas été placé sur une surface propre et lisse.
Le Pied en caoutchouc est efcace lorsqu’il est placé sur
une surface propre, lisse et plane.
Les ingrédients utilisés pour le traitement sont en trop grande
quantité ou trop durs.
Veillez à ce que les ingrédients utilisés soient comme
indiqué, réduisez la quantité d’ingrédients si elle est
supérieure à la quantité indiquée.
Certains ingrédients pourraient être trop difciles à traiter à
l’état brut, ex. citrouille.
Une pré-cuisson pourrait être nécessaire pour attendrir les
ingrédients avant le traitement, c.-à-d. lorsqu’une fourchette
peut facilement percer.
La quantité d’ingrédients n’est pas conforme à la méthode de
préparation.
Préparez en conséquence pour respecter la quantité indiquée.
Le traitement simultané de certains ingrédients peut résulter
en morceaux restants en fonction Frozen.
Menu Auto
La durée du traitement par défaut du menu Auto est conçue
pour les quantités d’ingrédients indiquées. Toute autre quantité
d’ingrédients transformés affectera les performances.
Augmentez la durée de traitement en ajustant le cadran
rotatif et le processus jusqu’à obtention de la texture et de
la consistance souhaitées.
Menu Manuel
La quantité d’ingrédients maximale et la durée maximale de
traitement sont destinées à servir de ligne directrice, une
quantité d’ingrédient moindre et des ingrédients différents
auront une incidence sur la performance.
Traitez les ingrédients pendant une durée appropriée
jusqu’à ce que la texture et la consistance souhaitées
soient obtenues.
FR30
100_160419_MK-F800_Second_EU(UZ50E153).indb 30 2016/04/19 16:57:12
Page 94

Indication d’erreur de mode
Protection par disjoncteur, Détection haute tension et Détection courant élevé
i) Protection par disjoncteur
ii) Détection haute tension
iii) Détection courant élevé
Aucun LED ne s’allume.
Clignotement alterné des LED
émincer et intermittent.
Clignotement alterné des
LED hachoir n +émincer et
continu+intermittent.
Action:
Pour les scénarios i) et iii), éteindre l’interrupteur d’alimentation sur le côté du boîtier du moteur, réduire la quantité
d’ingrédients par deux et reprendre l’opération. S’il ne démarre toujours pas, éteignez l’interrupteur sur le côté du
Boîtier du moteur et reprenez l’opération.
Pour le scénario ii), l’indication du mode Erreur s’afche à cause d’un dépassement de la tension nominale. Utilisez
une tension de 220-240 V.
Surchauffe du moteur. Le Bol, l’Unité de mixeur ou l’Unité de broyage à sec
ne sont pas correctement verrouillés sur le Boîtier
du moteur.
Clignotement alterné des LED hachoir n et
intermittent.and Intermittent L.E.D.s.
Clignotement alterné des LED
hachoir n+émincer+congelé et
pâte+égouttoir+continu.
Action :
Éteignez l’Interrupteur et laissez l’appareil refroidir
(env. 30 min). Réduire la quantité d’ingrédients de
Action :
Remettez la pièce sur le Boîtier du moteur en position
correcte. (Reportez-vous à la page FR9)
moitié et reprenez l’opération.
Dysfonctionnement d’un composant électronique
ou ou
Clignotement alterné des LED hachoir n ou émincer ou congelé et continu.
Action :
Veuillez contactez votre centre de service le plus proche pour réparation.
FR31
100_160419_MK-F800_Second_EU(UZ50E153).indb 31 2016/04/19 16:57:12
Page 95

Françis
SPÉCIFICATIONS
Nom du modèle MK-F800
Fonction Robot de cuisine multifonction Mixeur & Accessoire de broyage à sec
Alimentation électrique 220 - 240 V ~ 50 - 60 Hz
Consommation électrique 180 - 200 W
Interrupteur Cadran rotatif avec interrupteur de panneau à toucher doux
Mixeur : 2 minutes ON, 2 minutes OFF
Note fonctionnement
Dimensions (Env.) (HxLxP) 435 x 264 x 265 mm
Poids (Env.) 4,3 kg
Capacité (Env.)
Accessoires
Accessoires communs Brosse avec Spatule
Éléments passant au
lave-vaisselle
Bruit acoustique aérien 86 (dB (A) référence 1 pW) 87 (dB (A) référence 1 pW)
2 minutes ON, 4 minutes OFF
À l’exception des indications sur la page « Préparatiions des ingrédients ».
Capacité du récipient : 2,5 L
Capacité opérationnelle maximale :
Uniquement les liquides = 1,5 L
Uniquement les solides = 600 g
À l’exception des indications sur la page « Préparatiions des ingrédients ».
Lame de métal, Lame à râper, Lame de
malaxage, Fouet, Égouttoir à salade,
Socle de lame, couteaux-hachoirs (Gros
& Fin), Lames pour trancher (épais/n),
Éplucheur à Julienne, Presse-agrumes,
et Boîte de rangement
Bol et Couvercle du bol
Accessoire de broyage à sec :
1 minute ON, 2 minutes OFF
Mixeur : 406 x 264 x 265 mm
Accessoire de broyage à sec :
298 x 264 x 265 mm
Mixeur : 4,0 kg
Accessoire de broyage à sec : 3,8 kg
Mixeur : 1 L
Accessoire de broyage à sec :
50 g (grains de café)
Unité de mixeur, Unité de broyage à sec
L’élimination des équipements usagés
Applicable uniquement dans les pays membres de l’Union européenne et les
pays disposant de systèmes de recyclage.
Apposé sur le produit lui-même, sur son emballage, ou gurant dans la documentation qui
l’accompagne, ce pictogramme indique que appareils électriques et électroniques usagés,
doivent être séparées des ordures ménagères.
An de permettre le traitement, la valorisation et le recyclage adéquats des appareils usagés,
veuillez les porter à l’un des points de collecte prévus, conformément à la législation nationale
en vigueur.
En les éliminant conformément à la réglementation en vigueur, vous contribuez à éviter le
gaspillage de ressources précieuses ainsi qu’à protéger la santé humaine et l’environnement.
Pour de plus amples renseignements sur la collecte et le recyclage, veuillez vous renseigner
auprès des collectivités locales.
Le non-respect de la réglementation relative à l’élimination des dé chets est passible d’une
peine d’amende.
FR32
100_160419_MK-F800_Second_EU(UZ50E153).indb 32 2016/04/19 16:57:12
Page 96

INDICE
Pagina
PRECAUZIONI DI SICUREZZA .......................................................................................................................IT3 - IT5
INFORMAZIONI IMPORTANTI ................................................................................................................................IT6
NOMI DEI COMPONENTI ................................................................................................................................IT7 - IT8
BLOCCO DI SICUREZZA .........................................................................................................................................IT9
INTERRUTTORE E PROTEZIONE SENSORE DI TEMPERATURA ....................................................................... IT9
SMONTAGGIO & MONTAGGIO
(i) ESTRARRE DAGLI IMBALLAGGI ............................................................................................................... IT10
LAMA DA TAGLIO • DISCO PANNA MONTATA •LAMA PER IMPASTARE • LAMA PER GRATTUGIARE
(ii)
(iii) LAME PER AFFETTARE • LAME PER SMINUZZARE• LAMA PER PATATINE ....................................... IT11
(iv) SPREMIAGRUMI ......................................................................................................................................... IT11
(v) SCOLAINSALATA ........................................................................................................................................IT12
ROBOT DA CUCINA
(i) LAMA DA TAGLIO ..............................................................................................................................IT13 - IT15
- Preparazione degli ingredienti
- Modalità dʼuso
(ii) LAME PER AFFETTARE • LAME PER SMINUZZARE• LAMA PER PATATINE ..............................IT16 - IT17
- Preparazione degli ingredienti
- Modalità dʼuso
(iii) LAMA PER IMPASTARE .............................................................................................................................. IT18
- Preparazione degli ingredienti
- Modalità dʼuso
(iv) DISCO PANNA MONTATA ...........................................................................................................................IT19
- Preparazione degli ingredienti
- Modalità dʼuso
(v) LAMA PER GRATTUGIARE ......................................................................................................................... IT20
- Preparation of Ingredients
- Modalità dʼuso
(vi) SCOLAINSALATA ....................................................................................................................................... IT21
- Preparazione degli ingredienti
- Modalità dʼuso
(vii) SPREMIAGRUMI ......................................................................................................................................... IT22
- Preparazione degli ingredienti
- Modalità dʼuso
FRULLATORE
(i) FRULLATORE ....................................................................................................................................IT23 - IT24
- Smontaggio & Montaggio
- Preparazione degli ingredienti
- Modalità dʼuso
TRITATUTTO
(ii) TRITATUTTO ......................................................................................................................................IT25 - IT26
- Smontaggio & Montaggio
- Preparazione degli ingredienti
- Modalità dʼuso
DOPO L’USO................................................................................................................................................IT27 - IT28
LOCALIZZAZIONE DEI GUASTI ..................................................................................................................IT29 - IT30
SPECIFICHE .......................................................................................................................................................... IT32
.... IT10
IT2
100_160419_MK-F800_Second_EU(UZ50E153).indb 2 2016/04/19 16:57:12
Page 97

Italiano
PRECAUZIONI DI SICUREZZA (Attenersi alle presenti istruzioni.)
Al ne di evitare incidenti o lesioni per l’utente, altre persone, e danni materiali, seguire le
istruzioni riportate di seguito.
I graci seguenti indicano il grado di danni causati da un uso sbagliato.
AVVERTENZA
ATTENZIONE
I simboli sono classicati e spiegati come segue.
Questo simbolo indica divieto.
Indica infortuni gravi o mortali.
Indica il rischio di infortuni o danni
agli oggetti.
Questo simbolo indica la necessità di
adottare determinati accorgimenti.
AVVERTENZA
Non danneggiare il Cavo o la Spina.
(Ciò potrebbe provocare scosse elettriche o incendi causati da corto circuito.)
Non utilizzare l’apparecchio se il Cavo o la Spina sono danneggiati o la
Spina non è collegata saldamente alla presa.
(Ciò potrebbe provocare scosse elettriche o incendi causati da corto circuito.)
Se il Cavo è danneggiato, deve essere sostituito dal costruttore, dal
responsabile per l’assistenza o da una persona similarmente qualicata, in
modo da prevenire ogni rischio.
Non collegare o scollegare la Spina con le mani bagnate.
(Ciò potrebbe provocare scosse elettriche.)
Non superare la tensione in uscita e non utilizzare una corrente alternata
diversa da quanto indicato sull’apparecchio.
(Ciò potrebbe provocare scosse elettriche o incendi.)
• Assicurarsi che la tensione fornita all’apparecchio sia la stessa della propria rete
locale.
• Collegare altri dispositivi nella stessa presa elettrica potrebbe provocare
surriscaldamento.
Non immergere l’apparecchio in acqua o a contatto con spruzzi d’acqua.
(Ciò potrebbe provocare scosse elettriche o incendi causati da corto circuito.)
Non smontare, riparare o modicare l’apparecchio.
(Ciò potrebbe causare incendi, scosse elettriche o lesioni.)
Contattare il centro di assistenza per le riparazioni.
Non inserire oggetti nella ventola o nello spazio libero.
(Ciò potrebbe provocare scosse elettriche o malfunzionamenti.)
• In particolare oggetti metallici quali puntine o li.
Non sostituire le parti del prodotto con pezzi di ricambio diversi dai prodotti
originali.
(Ciò può causare lesioni, scosse elettriche o incendi.)
Non cercare di togliere il Coperchio quando l’apparecchio è ancora in
funzione.
(Può provocare lesioni.)
Non utilizzare acqua calda (oltre 60 °C) per pulire né calore per asciugare
l’apparecchio.
(Potrebbe causare bruciore o un funzionamento scorretto.)
IT3
100_160419_MK-F800_Second_EU(UZ50E153).indb 3 2016/04/19 16:57:13
Page 98

AVVERTENZA
Non posizionare ingredienti caldi (oltre i 60 °C) nella Ciotola o nel Contenitore
del Frullatore.
(Potrebbe causare lesioni o un funzionamento scorretto.)
Non utilizzare senza aver posizionato correttamente il Coperchio del
Frullatore sopra il Contenitore del Frullatore.
(Può provocare lesioni.)
Non inserire le dita o utensili come cucchiai, forchette, ecc nella Ciotola o
nel Contenitore del Frullatore durante l’utilizzo.
(Può provocare lesioni, scosse elettriche, o incendi per corto circuito.)
Non spingere il Perno di Sicurezza e la Leva di Sicurezza con nessun
strumento, bastone ecc, in quanto l’apparecchio potrebbe essere acceso.
(Può provocare lesioni.)
Questo apparecchio non deve essere utilizzato dai bambini.
Tenere l’apparecchio e il cavo fuori dalla portata dei bambini. Gli apparecchi
possono essere utilizzati da persone con ridotte capacità siche, sensoriali
o mentali, o con scarsa esperienza e conoscenza, a condizione che siano
controllate o istruite all’uso dell’apparecchio in modo sicuro e se non
siano informati sui rischi del caso. I bambini non devono giocare con
l’apparecchio.
(Può causare bruciature, lesioni o scosse elettriche.)
Inserire saldamente la Spina.
(In caso contrario si possono vericare delle scosse elettriche e incendi causati
dal calore generato intorno alla Spina.)
Pulire regolarmente la Spina.
(Una Spina sporca può causare isolamento insufciente a causa dell’umidità, e
può causare un incendio.)
In caso di anomalie o di rottura, non utilizzare l’apparecchio e scollegare
immediatamente.
(Possono vericarsi fumo, incendi o scosse elettriche.)
ad esempio per le anomalie o rottura.
• La Spina e il Cavo diventano eccessivamente caldi.
• Il Cavo è danneggiato o vi è interruzione di corrente.
• L’alloggiamento del Motore è deformato o eccessivamente caldo.
Scollegare l’apparecchio e rivolgersi immediatamente al centro di assistenza
per i controllo o la riparazione.
Assicurarsi di tenere la Spina quando la si stacca. Non tirare mai il Cavo.
(In caso contrario possono vericarsi scosse elettriche o incendi causati da corto
circuito.)
Fare attenzione se il liquido caldo si versa nella Ciotola o nel Contenitore del
Frullatore in quanto può essere espulso fuori dall’apparecchio a causa di un
improvviso vapore.
(Può causare bruciore).
IT4
100_160419_MK-F800_Second_EU(UZ50E153).indb 4 2016/04/19 16:57:13
Page 99

Italiano
ATTENZIONE
Non lasciare l’apparecchio incustodito quando è in uso.
(Ciò potrebbe provocare incendi o bruciare.)
• Quando non è in uso, staccare la corrente.
Non utilizzare l’apparecchio nei seguenti posti.
• Una supercie irregolare, un tappeto non resistente al calore o una tovaglia,
ecc.
(Ciò potrebbe causare incendi o lesioni.)
• Un luogo a contatto con acqua o vicino ad una fonte di calore.
(Ciò potrebbe provocare scosse elettriche o dispersione di corrente.)
Non lavorare superando la capacità massima indicata rispettivamente su
ogni contenitore. Rispettare la quantità raccomandata degli ingredienti per
l’elaborazione.
(Può provocare lesioni.)
Non continuare l’utilizzo per molto tempo. Si raccomanda di lasciare
riposare l’apparecchio dopo un certo tempo di utilizzo.
(Può provocare ustioni.)
Funzione
Robot da cucina 2 4
Frullatore 2 2
Tritatutto 1 2
* Con eccezione per “Preparazioni ingrediente” citate in queste Istruzioni d’Uso.
Staccare sempre la spina dell’apparecchio quando non viene utilizzato e
prima di montare, smontare o pulire.
(La mancata osservanza di questo accorgimento potrebbe provocare ustioni o
infortuni.)
Rimuovere la Ciotola e la Caraffa del Frullatore e il Contenitore del Tritatutto
prima di sollevare l’Alloggiamento del Motore dal tavolo.
(Può provocare lesioni.)
Spegnere l’apparecchio e scollegare la corrente prima di cambiare gli
accessori o di avvicinarsi alle parti che servono per l’uso.
(Ciò può causare lesioni.)
Quando si trasporta l’apparecchio, assicurarsi di tenere l’Alloggiamento del
Motore con entrambe le mani. Non trasportarlo tenendo solo la Ciotola o il
Contenitore del Frullatore o il Contenitore del Tritatutto.
(Può provocare lesioni.)
Se la Lama da Taglio del Frullatore si blocca, spegnere il Frullatore, poi
staccare la spina. Non inserire le dita nella Caraffa del Frullatore. Utilizzare
una spatola di gomma per rimuovere gli ingredienti che bloccano la Lama da
Taglio del Frullatore.
(Può provocare lesioni.)
Usare cautela quando si maneggiano le lame taglienti, nel svuotare la ciotola
o il Contenitore del Frullatore e nella pulizia. (es: Lama da taglio, lame per
affettare ecc.)
(Può provocare lesioni.)
Durata
(minuti)
Tempo di riposo
(minuti)
IT5
100_160419_MK-F800_Second_EU(UZ50E153).indb 5 2016/04/19 16:57:13
Page 100

Informazioni importanti
Non posizionare l’apparecchio nei seguenti luoghi.
• In un luogo in cui l’apparecchio sia esposto a eccessiva umidità, calore o luce solare
diretta.
(Potrebbe causare un funzionamento scorretto.)
• Luogo con alta o bassa temperatura come il frigorifero, il congelatore, microonde o
forno.
(Può causare un funzionamento scorretto o una rottura.)
Non lavorare ingredienti difcili (ad esempio carne dura, carne con le ossa) o
materiale viscoso.
(Può causare un funzionamento scorretto.)
Ingredienti vietati:
Accessori Descrizione
Lama da taglio Ingredienti duri, ingredienti viscosi, ad esempio chicchi di caffè,
semi di soia secchi, surgelati, calamari secchi, ecc.
Lame per
affettare, lame per
sminuzzare e lama
per patatine
Lama per
impastare
Disco panna
montata
Lama per
grattugiare
Scolainsalata Ingredienti grossi, ingredienti morbidi e fragili, ad esempio, la carota
Spremiagrumi Eventuali altri ingredienti a parte gli agrumi, ad esempio, mela, kiwi
Frullatore Ingredienti duri, ingredienti altamente appiccicosi, ingredienti a
Tritatutto Noci dure, frutta secca, ingredienti con alta concentrazione di bre
Ingredienti con alta concentrazione di bre dure, ingredienti viscosi,
ingredienti troppo morbidi, ad esempio, verdure dure, surgelati,
prosciutto, curcuma, zenzero, lattuga, pomodoro, pesca, cioccolato,
ecc.
Ingredienti non adatti a fare impasti, ad esempio carne, verdura,
noci, salse, creme spalmabili.
Eventuali altri ingredienti a parte bianchi d’uovo e panna fresca.
Ingredienti viscosi, ingredienti con alta concentrazione di bre dure,
ingredienti troppo piccoli e sottili, ad esempio, patata dolce, patate,
sedano, porro, pinoli, ecc.
grande o pezzi di patata, pomodoro, tofu, pasta, pasta, noodle, ecc.
ecc.
basso contenuto di acqua, ad esempio curcuma, semi di soia
essiccati, alimenti surgelati, carne, pesce, patate lesse, o solo
cubetti di ghiaccio, ecc.
dure, ingredienti umidi, liquidi, ad es. noci varie, uva passa, carne,
verdure, uova sode, curcuma, ecc.
Prima dell’uso:
Utilizzare sempre l’apparecchio su una supercie pulita, asciutta, piana, dura e liscia e
pulire il Piedino in Gomma (p. IT7) prima dell’uso per garantire che l’aspirazione in gomma
del piede è a prestazioni ottimali.
IT6
100_160419_MK-F800_Second_EU(UZ50E153).indb 6 2016/04/19 16:57:13
 Loading...