


Deutsch
Nederlands
FrançaisEnglish PolskiDansk SuomiČeský MagyarItaliano Español Svenska
Operating Instructions / Bedienungsanleitung /
Instructions de fonctionnement / Istruzioni per l’uso /
Instrucciones de funcionamiento / Gebruiksaanwijzing /
Návod k použití / Használati útmutató /
Betjeningsvejledning / Instrukcja obsługi /
Käyttöohjeet / Bruksanvisningar
Food Processor (Household Use)
Universal-Küchenmaschine (Hausgebrauch)
Robot de cuisine multifonction (Utilisation domestique)
Robot da cucina (Per uso domestico)
Procesador de alimentos (Para uso doméstico)
Keukenmachine (Huishoudelijk Gebruik)
Kuchyňský robot (Pro domácí použití)
Konyhai robotgép (Háztartási használatra)
Foodprocessor (til husholdningsbrug)
Robot kuchenny (Do użytku domowego)
Monitoimikone (Kotitalouskäyttöön)
Matberedare (Hushållsbruk)
Model No.
MK-F500
Reset
100_160715_MK-F500_Second_EU(UZ50G1551).indb 1 2016/07/20 17:29:26

TABLE OF CONTENTS
Page
SAFETY PRECAUTIONS ........................................................................................................................... GB3 - GB5
IMPORTANT INFORMATION .................................................................................................................................GB6
ELECTRICAL REQUIREMENT ..............................................................................................................................GB7
PART NAMES...............................................................................................................................................GB8 - GB9
CIRCUIT BREAKER PROTECTION ......................................................................................................................GB9
SAFETY LOCK ..................................................................................................................................................... GB10
DISASSEMBLY ....................................................................................................................................................GB10
FOOD PROCESSOR
(i) INTRODUCTION ........................................................................................................................................ GB11
(ii) KNIFE BLADE • KNEADING BLADE • WHIPPING BLADE • GRATING BLADE ...........................GB11 - GB13
‒ Preparation of Ingredients
‒ How to Use
(iii) SLICING BLADES • SHREDDING BLADES • JULIENNE BLADE ................................................GB14 - GB15
‒ Preparation of Ingredients
‒ How to Use
(iv) SALAD DRAINER ......................................................................................................................................GB16
‒ Preparation of Ingredients
‒ How to Use
(v) CITRUS PRESS .........................................................................................................................................GB17
‒ Preparation of Ingredients
‒ How to Use
BLENDER
(i) INTRODUCTION ........................................................................................................................................ GB18
(ii) BLENDER ..................................................................................................................................................GB18
‒ Preparation of Ingredients
‒ How to Use
DRY MILL
(i) DRY MILL ...................................................................................................................................................GB19
‒ Preparation of Ingredients
‒ How to Use
AFTER USE .............................................................................................................................................GB20 - GB21
TROUBLESHOOTING .........................................................................................................................................GB22
SPECIFICATIONS ................................................................................................................................................ GB23
Thank you for purchasing the Panasonic product.
• This product is intended for household use only.
• Please read these instructions carefully in order to use this product correctly and safely.
• Before using this product please give your special attention to the section “SAFETY PRECAUTIONS” (Page
GB3-GB5).
• Please keep this Operating Instructions for future use.
This symbol on the product indicates “Make sure you read the Operating Instruction carefully before
using”.
GB2
100_160715_MK-F500_Second_EU(UZ50G1551).indb 2 2016/07/20 17:29:27
English
SAFETY PRECAUTIONS (Make sure to follow these instructions)
In order to prevent accidents or injuries to the user, other people and damage to
property, please follow the instructions below.
The following indication indicates the degree of damage caused by incorrect
operation.
WARNING
CAUTION
The symbols are classied and explained as follows.
This symbol indicates prohibition.
Indicates serious injury or death.
Indicates risk of injury or property damage.
This symbol indicates requirement
that must be followed.
WARNING
Do not damage the Cord or the Plug.
(It may cause electric shock, or re caused by short circuit.)
Do not use the appliance if the Cord or the Plug is damaged or the Plug is
loosely connected to the outlet.
(It may cause electric shock, or re caused by short circuit.)
If the Cord is damaged, it must be replaced by the manufacturer, its service
center or similarly qualied persons in order to avoid a hazard.
Do not plug or unplug the Plug with wet hands.
(It may cause electric shock.)
Do not exceed outlet voltage or use an alternate current other than that
specied on the appliance.
(It may cause electric shock or re.)
• Make sure the voltage supplied to the appliance is the same as your local
supply.
• Plugging other devices into the same outlet may cause over-heating.
Do not immerse the Motor Housing in water or splash it with water.
(It may cause electric shock, or re caused by short circuit.)
Do not dismantle, repair or modify the appliance.
(It may cause re, electric shock or injury.)
Please contact your service center for repairing.
Do not insert any objects into the vent or the gap.
(It may cause electric shock or malfunction.)
• Especially metal objects such as pins or wires.
Do not replace any parts of appliance with non-genuine spare parts.
(It may cause injury, electric shock or re.)
Do not try to remove the Lid when the appliance is still operating.
(It may cause injury.)
Do not use hot water (over 60 °C) for cleaning purpose or re to dry the
appliance.
(It may cause burning or malfunction.)
GB3
100_160715_MK-F500_Second_EU(UZ50G1551).indb 3 2016/07/20 17:29:27

WARNING
Do not place hot ingredients (over 60 °C) into the Bowl or the Blender Jug.
(It may cause injury or malfunction.)
Do not operate without the Blender Lid in place correctly for the Blender
Jug.
(It may cause injury.)
Do not put your nger or utensils such as spoon, fork etc. into the Bowl or
the Blender Jug during operation.
(It may cause injury, electric shock, or re caused by short circuit.)
Do not push the Safety Pin and Safety Lever with any instruments, stick etc.
as the appliance might be on.
(It may cause injury.)
This appliance shall not be used by children.
Keep the appliance and its cord out of reach of children. Appliances can
be used by persons with reduced physical, sensory or mental capabilities
or lack of experience and knowledge if they have been given supervision
or instruction concerning use of the appliance in a safe way and if they
understand the hazards involved.
Children shall not play with the appliance.
(It may cause burning, injury or electric shock.)
Insert the Plug rmly.
(Otherwise it may cause electric shock and re caused by the heat that may
generate around the Plug.)
Clean the Plug regularly.
(A soiled Plug may cause insufcient insulation due to moisture, and may cause
re.)
When abnormal operation or breaking down occurs, discontinue the
appliance operation immediately and unplug.
(It may cause smoke, re or electric shock.)
e.g. during abnormal operation or breaking down.
• The Plug and the Cord becomes abnormally hot.
• The Cord is damaged or there has been a power failure.
• The Motor Housing is deformed or abnormally hot.
Please unplug the appliance immediately and contact the service centre for
advice or a repair.
Make sure to hold the Plug when unplugging the Plug, i.e. never pull on the
Cord.
(Otherwise it may cause electric shock, or re caused by short circuit.)
Be careful if hot liquid is poured into the Bowl or Blender Jug as it can be
ejected out of the appliance due to a sudden steaming.
(It may cause burning.)
GB4
100_160715_MK-F500_Second_EU(UZ50G1551).indb 4 2016/07/20 17:29:27

English
CAUTION
Do not leave the appliance unattended when it is in operation.
(It may cause re or burns.)
• When leaving the appliance unattended, turn the power off.
Do not use the appliance in the following places:
• Any uneven surface, on non-heat resistant carpet or table cloth etc.
(It may cause re or injury.)
• In a location where there is risk of the appliance being splashed with water, or
near a heat source.
(It may cause electric shock or current leakage.)
Do not process more than the maximum capacity marked on each container
respectively. Follow the recommended ingredient amount for processing.
(It may cause injury.)
Do not continue operation for a long time. It is recommended to rest the
appliance after a certain operating time.
(It may cause burns.)
Function
Food Processor 2 4
Blender 2 2
Dry Mill 1 2
* With exception for the stated ”Ingredient Preparations” in this Operating Instruction.
Always disconnect the appliance from the supply if it is left unattended and
before assembling, disassembling or cleaning.
(Otherwise it may cause electric shock, or re caused by current leakage.)
Remove the Bowl, the Blender Jug and the Mill Container before lift up the
Motor Housing from the table.
(It may cause injury.)
Switch off the appliance and disconnect it from power supply before
changing accessories or approaching parts that are moving during
operation.
(It may cause injury.)
When carrying the appliance, be sure to hold the Motor Housing with both
hands. Do not carry it by holding only the Bowl or Blender Jug or Mill
Container.
(It may cause injury.)
If the Blender Cutting Blade gets stuck, switch off the Blender, then unplug.
Do not insert your nger into the Blender Jug. Use a rubber spatula to
remove the ingredients that are blocking the Blender Cutting Blade.
(It may cause injury.)
Care should be taken when handling the sharp cutting blades, emptying the
Bowl or Blender Jug and cleaning. (e.g. Knife Blade, Slicing Blades and etc.)
(It may cause injury.)
Operating Time
(minutes)
Rest Time
(minutes)
GB5
100_160715_MK-F500_Second_EU(UZ50G1551).indb 5 2016/07/20 17:29:27

IMPORTANT INFORMATION
Do not place the appliance in the following places.
• In a location where the appliance being expose to excessive moisture, temperature or
direct sunlight.
(It may cause malfunction.)
• Any high or low temperature location such as fridge, freezer, microwave or oven.
(It may cause malfunction or breakage.)
Do not process hard ingredients (e.g. hard meat, meat with bones) or viscous
material.
(It may cause malfunction.)
Prohibited Ingredients:
Attachments Description
Knife Blade Hard ingredients, viscous ingredients, e.g. coffee beans, dried
soyabeans, frozen food, dried squid, and etc.
Slicing Blades,
Shredding Blades
and Julienne
Blade
Kneading Blade Ingredients not suited for dough making, e.g. meat, vegetables,
Whipping Blade Any other ingredients aside from egg whites and fresh cream.
Grating Blade Viscous ingredients, ingredients with high hard ber concentrations,
Salad Drainer Large chunky ingredients, ingredients that are soft and fragile, e.g.
Citrus Press Any other ingredients aside from citrus fruits, e.g. apple, kiwi and
Blender Hard ingredients, highly sticky ingredients, ingredients with low
Dry Mill Hard nuts, dried fruit, ingredients with high hard ber concentration,
Ingredients with high hard ber concentrations, viscous ingredients,
ingredients that are too soft, e.g. hard vegetables, frozen food, ham,
turmeric, ginger, lettuce, tomato, peach, chocolate and etc.
nuts, sauces, spreads.
ingredients that are too small and thin, e.g. yam, celery, leek, pine
nuts, and etc.
large carrot or potato chunks, tomato, tofu, pasta, noodle, and etc.
etc.
water content, e.g. turmeric, dried soyabeans, frozen food, meat,
sh, boiled potatoes, or just ice cubes.
moist ingredients, liquids, e.g. various nuts, raisins, meat,
vegetables, boiled egg, turmeric, and etc.
Before Use:
Always operate the appliance on a clean, dry, at, hard and smooth surface, and clean
the Rubber Foot (P.GB8) before use to ensure that the Rubber Foot suction is at optimum
performance.
GB6
100_160715_MK-F500_Second_EU(UZ50G1551).indb 6 2016/07/20 17:29:27
English
Electrical Requirement (For UK market only)
FOR YOUR SAFETY PLEASE READ THE FOLLOWING TEXT CAREFULLY.
This appliance is supplied with a moulded three pin mains plug for your safety and
convenience. A 13-amp fuse is tted in this plug. Should the fuse need to be replaced
please ensure that the replacement fuse has a rating of 13-amp and that it is approved by
ASTA or BSI to BS1362.
Check for the ASTA mark
or the BSI mark on the body of the fuse. If the plug
contains a removable fuse cover, you must ensure that it is retted when the fuse is
replaced. If you lose the fuse cover, the plug must not be used until a replacement cover
is obtained.
A replacement fuse cover can be purchased from your local Panasonic Dealer.
If the tted moulded plug is unsuitable for the socket outlet in your home, then the fuse
should be removed and the plug cut off and disposed of safety.
There is a danger of severe electrical shock if the cut off plug is inserted into any 13-amp
socket.
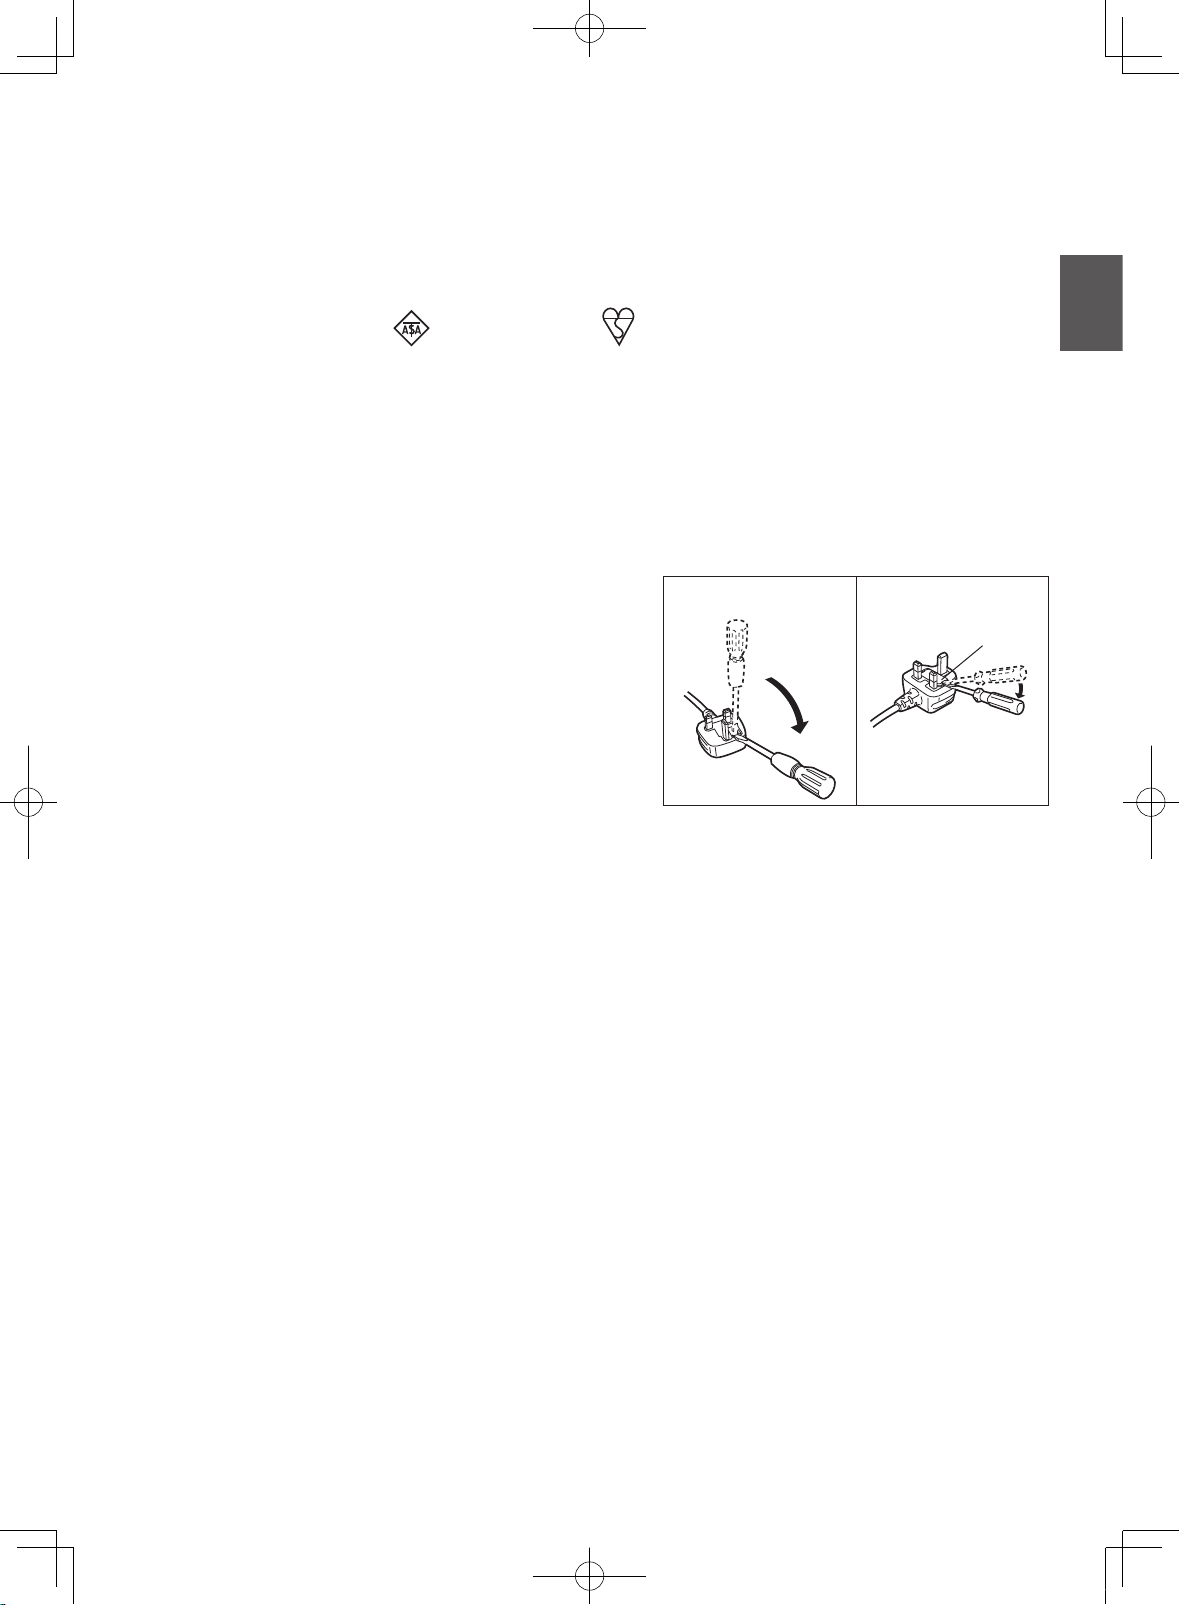
How to replace the fuse
The location of the fuse differs according to the
type of AC mains plug (gures A and B).
Conrm the AC mains plug tted and follow the
instructions below.
Illustrations may differ from actual AC mains plug.
Open the fuse cover with a screwdriver and
replace the fuse and close or attach the fuse cover.
Figure A
Figure B
Fuse cover
GB7
100_160715_MK-F500_Second_EU(UZ50G1551).indb 7 2016/07/20 17:29:28
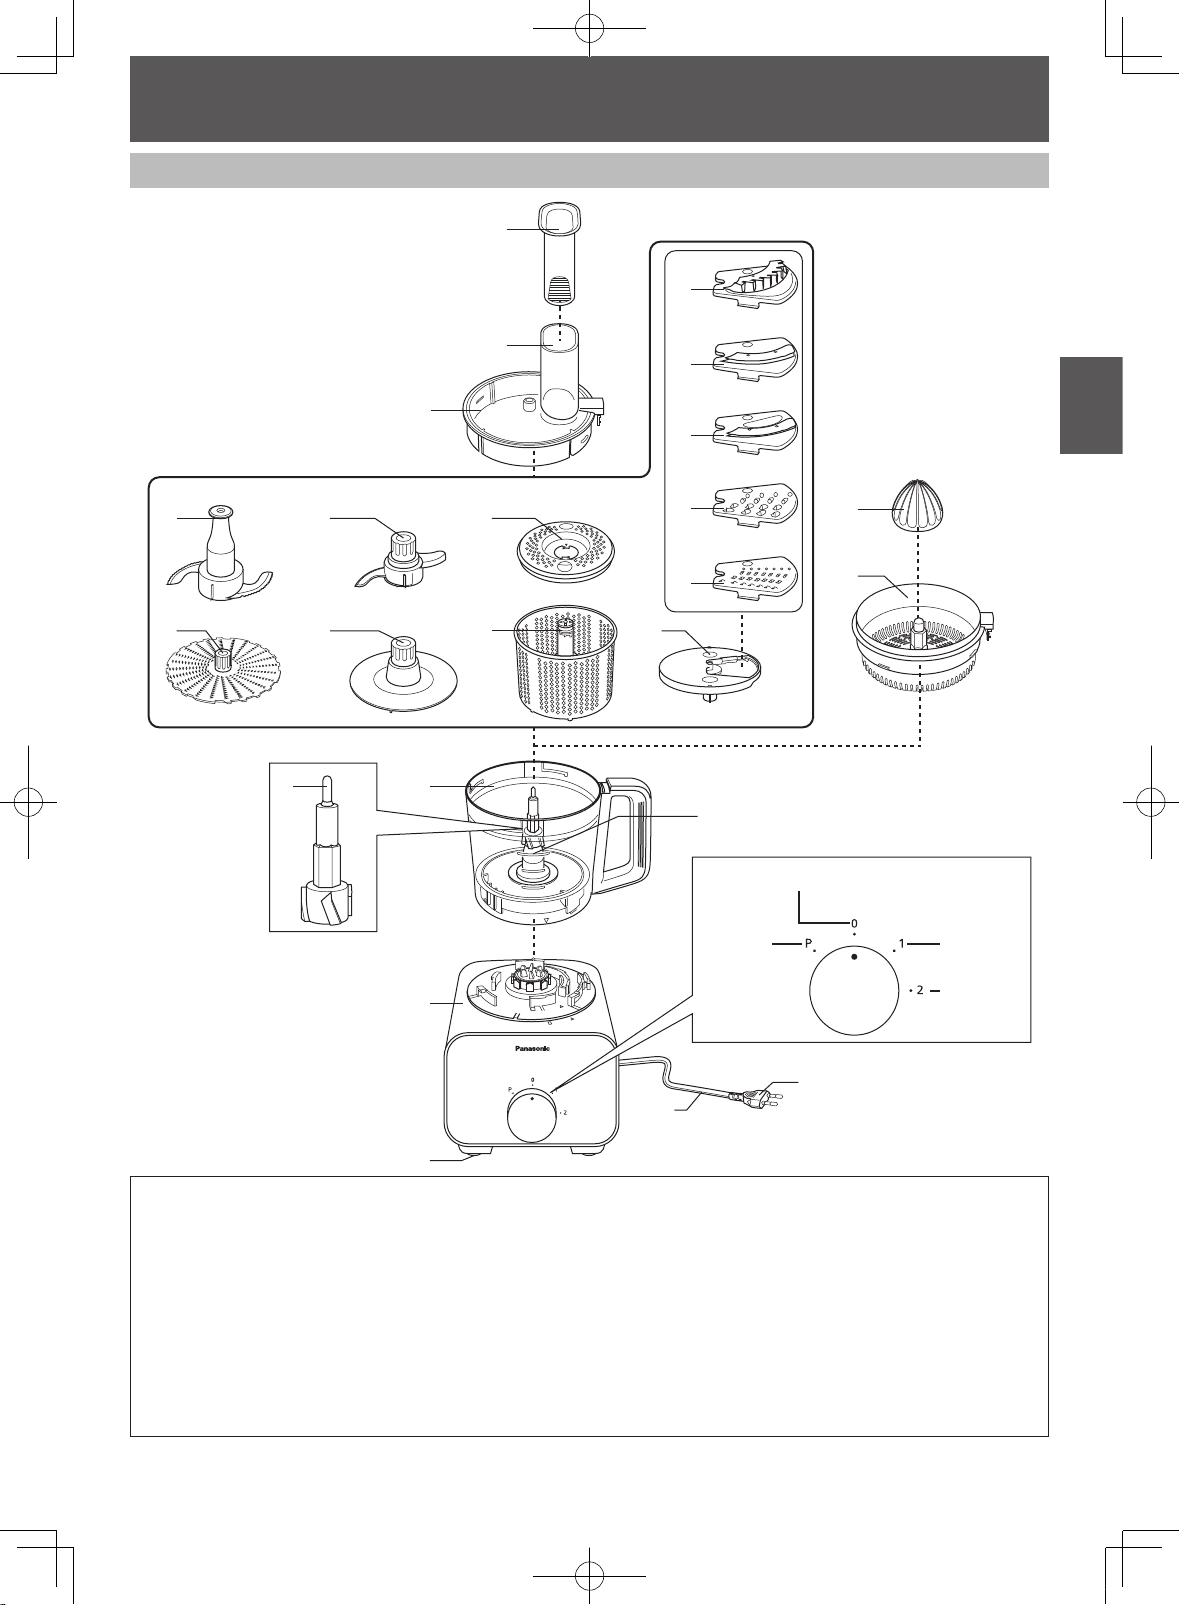
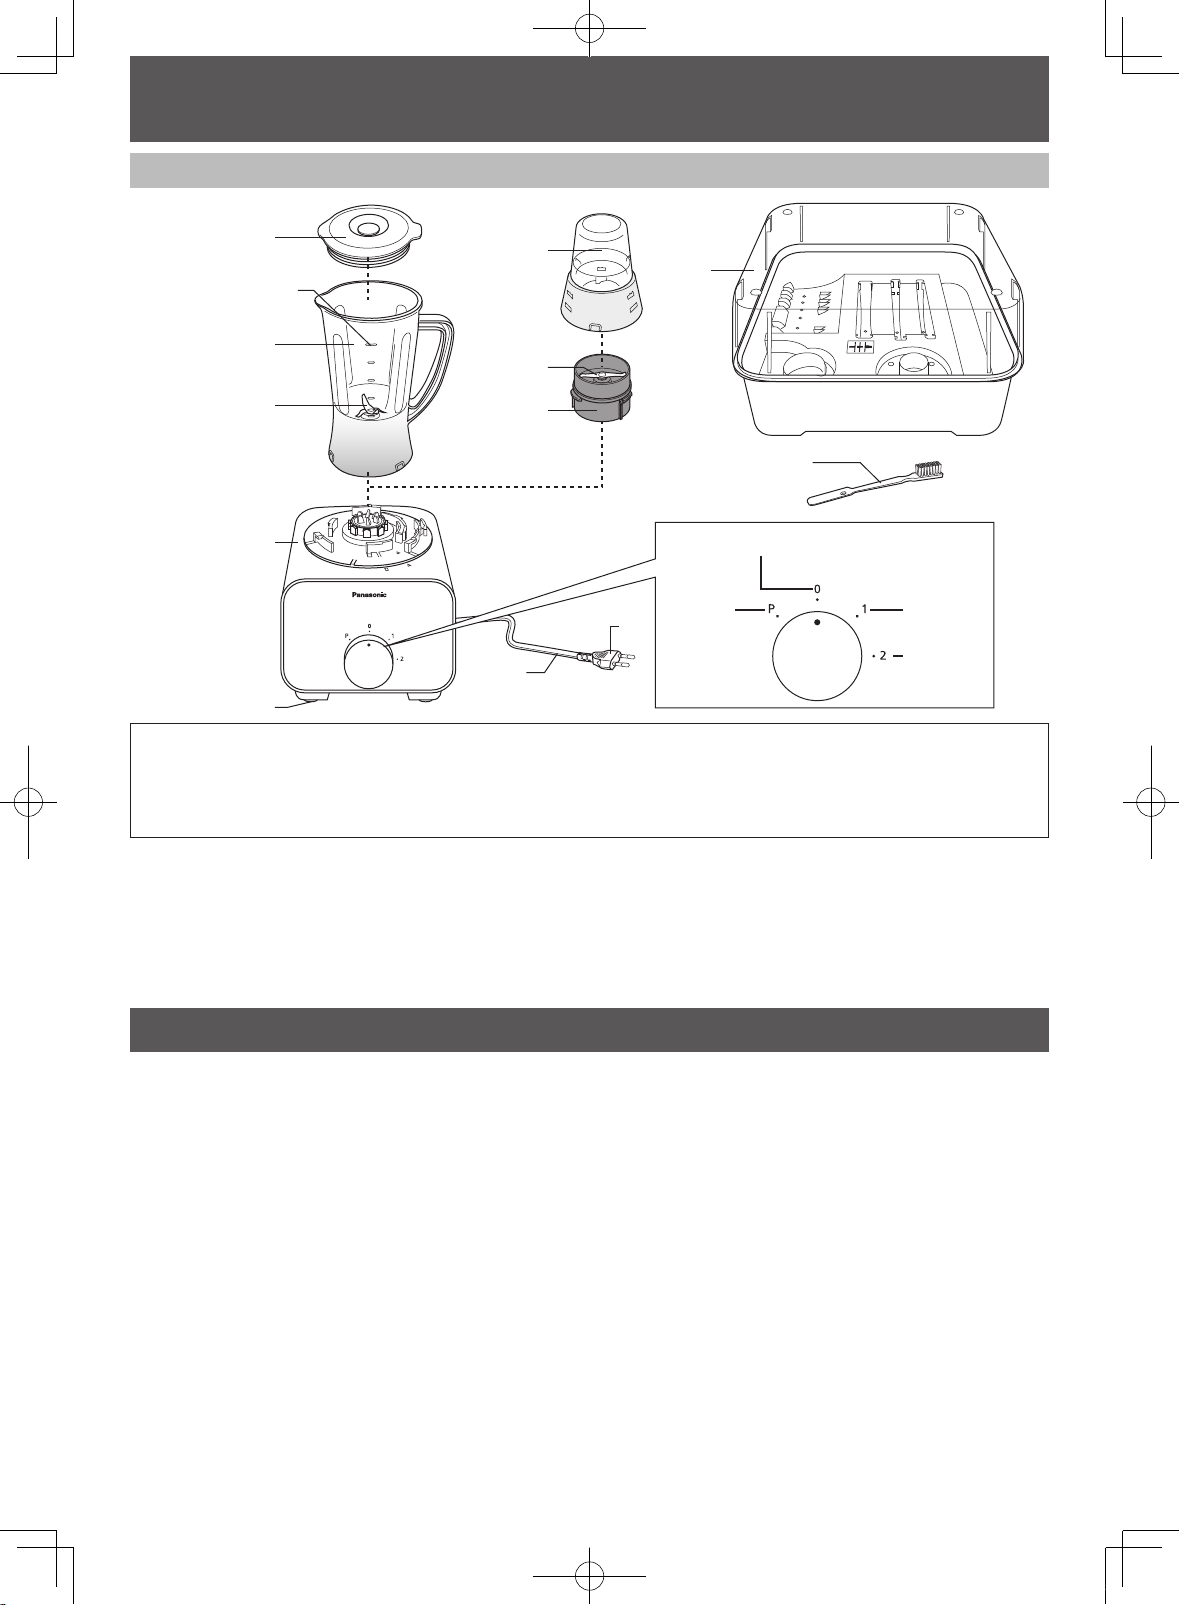
PART NAMES
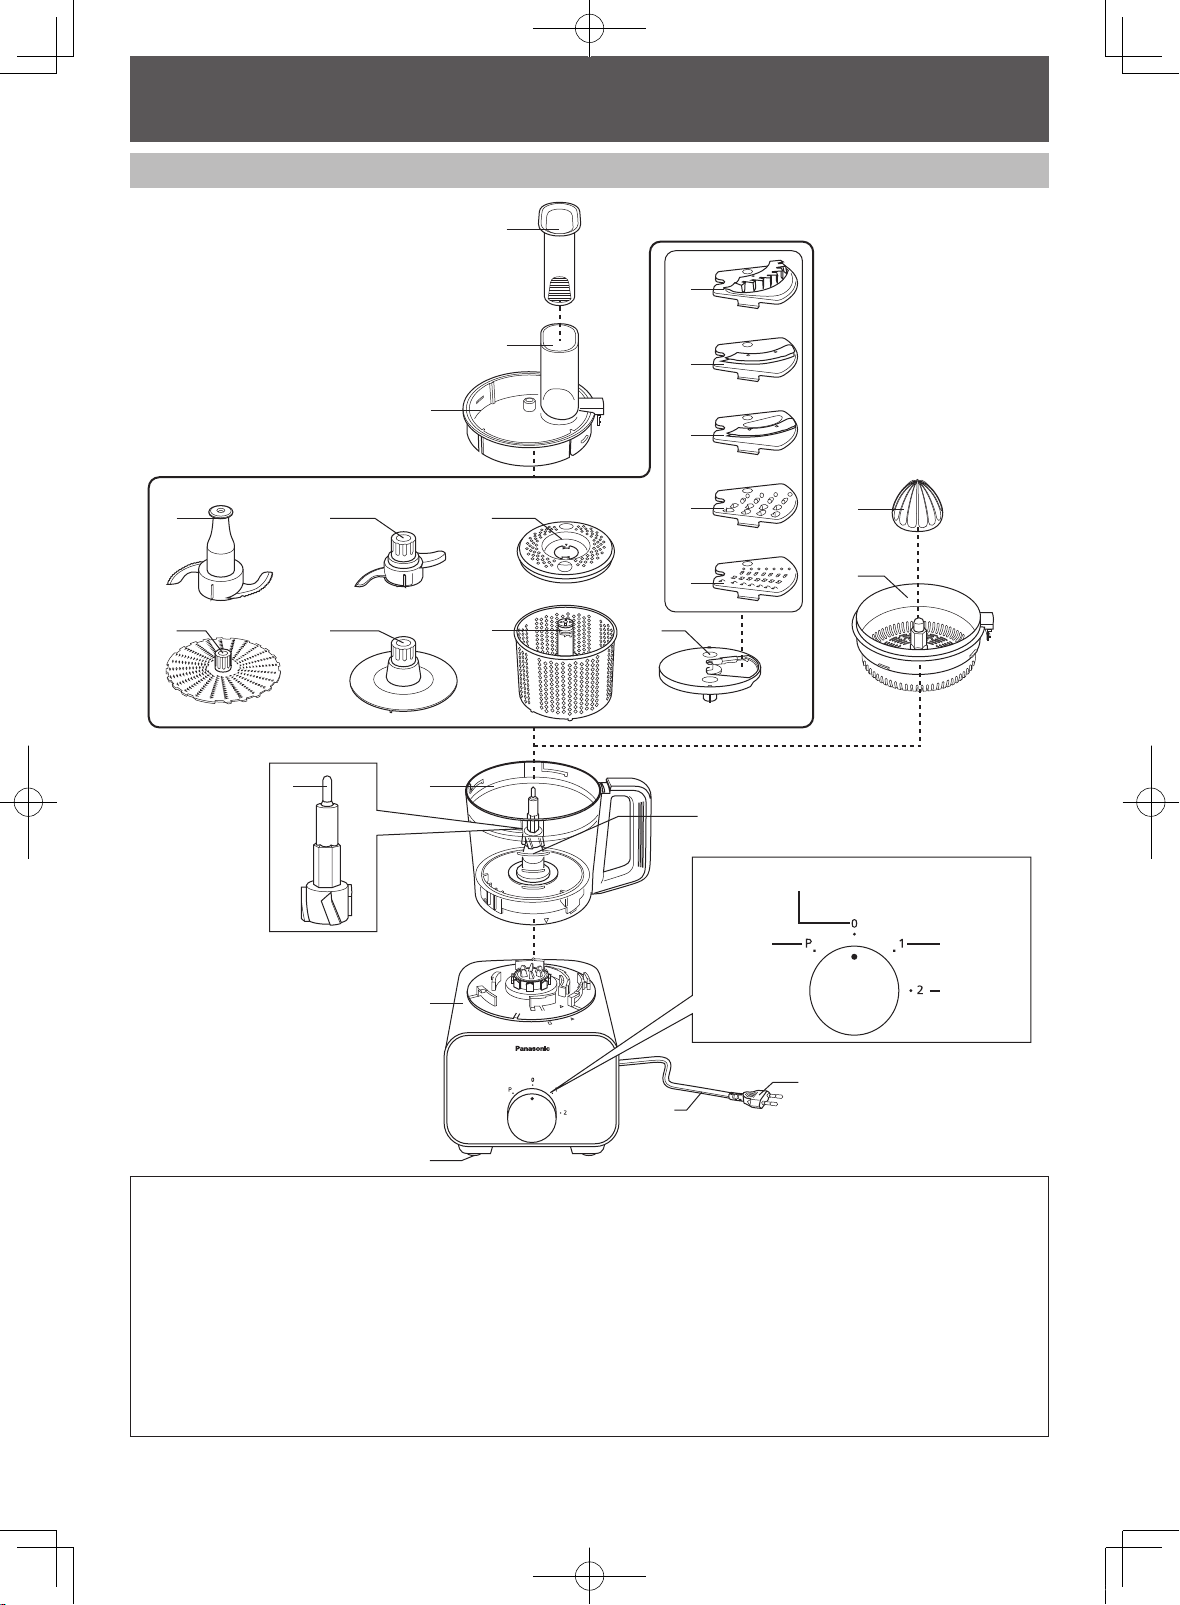
Food Processor
Working capacity: 1.5 L
OFF/RESET CIRCUIT BREAKER
Reset
1. Food Pusher
2. Feeding Tube
3. Bowl Lid
4. Knife Blade
5. Grating Blade
6. Kneading Blade
7. Whipping Blade
8. Drainer Cover
9. Salad Drainer
10. Blade Stand
11. Fine Shredding Blade
12. Coarse Shredding Blade
*The shape of the Plug may vary from illustration.
GB8
PULSE
13. Thin Slicing Blade
14. Thick Slicing Blade
15. Julienne Blade
16. Citrus Cone
17. Citrus Strainer
18. Bowl
19. Drive Shaft
20. Motor Housing
21. Rubber Foot
22. Rotary Switch
23. Cord
24. *Plug
SPEED 1
SPEED 2
100_160715_MK-F500_Second_EU(UZ50G1551).indb 8 2016/07/20 17:29:28
English
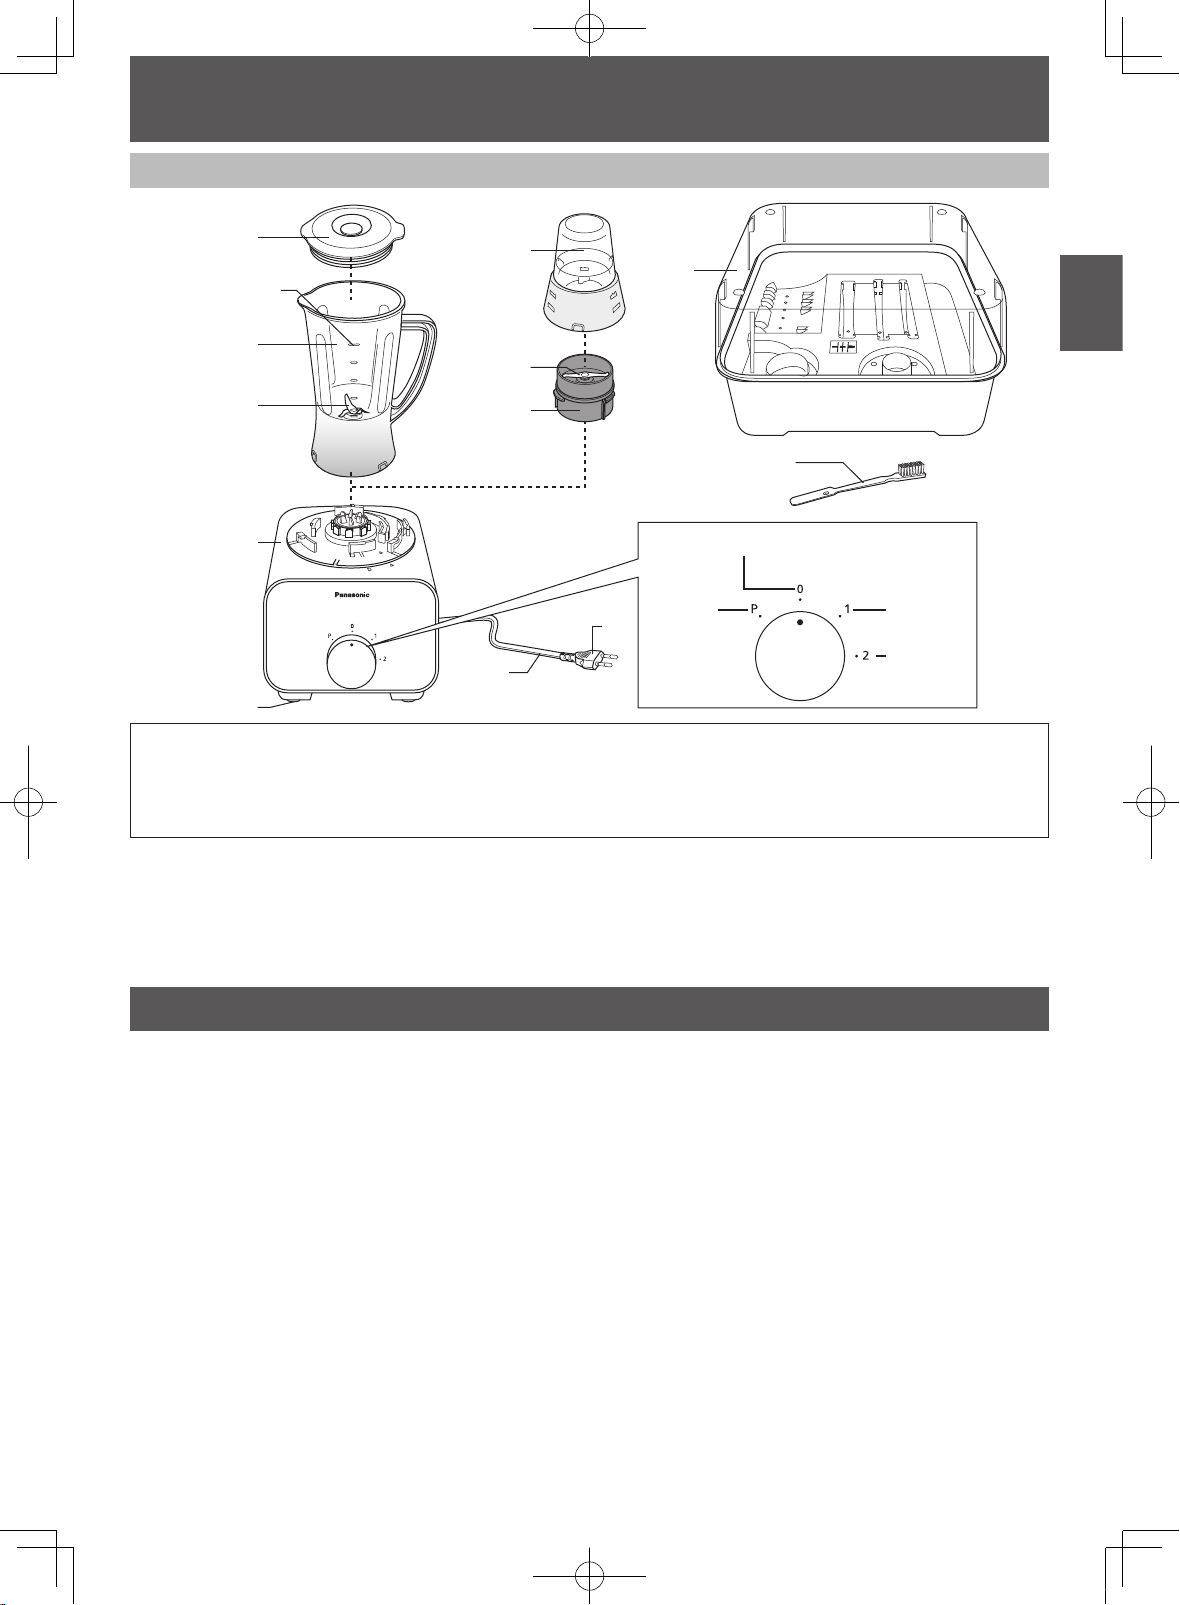
PART NAMES
Blender, Dry Mill & Accessories
Working
capacity: 1 L
1. Blender Lid
2. Blender Jug
3. Blender Cutting Blade
4. Mill Container
5. Mill Cutting Blade
6. Mill Container Base
7. Motor Housing
8. Rubber Foot
9. Rotary Switch
10. Cord
⑨
OFF/RESET CIRCUIT BREAKER
Reset
PULSE
11. *Plug
12. Storage Case Unit
13. Brush
SPEED 1
SPEED 2
*The shape of the Plug may vary from illustration.
CIRCUIT BREAKER PROTECTION
This appliance has the Circuit Breaker function to stop the motor when motor is overloaded.
When the Circuit Breaker stops the motor due to overloading, turn off the Rotary Switch to OFF position “0” and
follow the instruction below:
1. Reduce the ingredients to less than half and resume operation.
2. If it still does not start, turn off the Rotary Switch to OFF position “0” again and resume operation.
3. If all else fails, please contact your nearest service centre.
GB9
100_160715_MK-F500_Second_EU(UZ50G1551).indb 9 2016/07/20 17:29:28
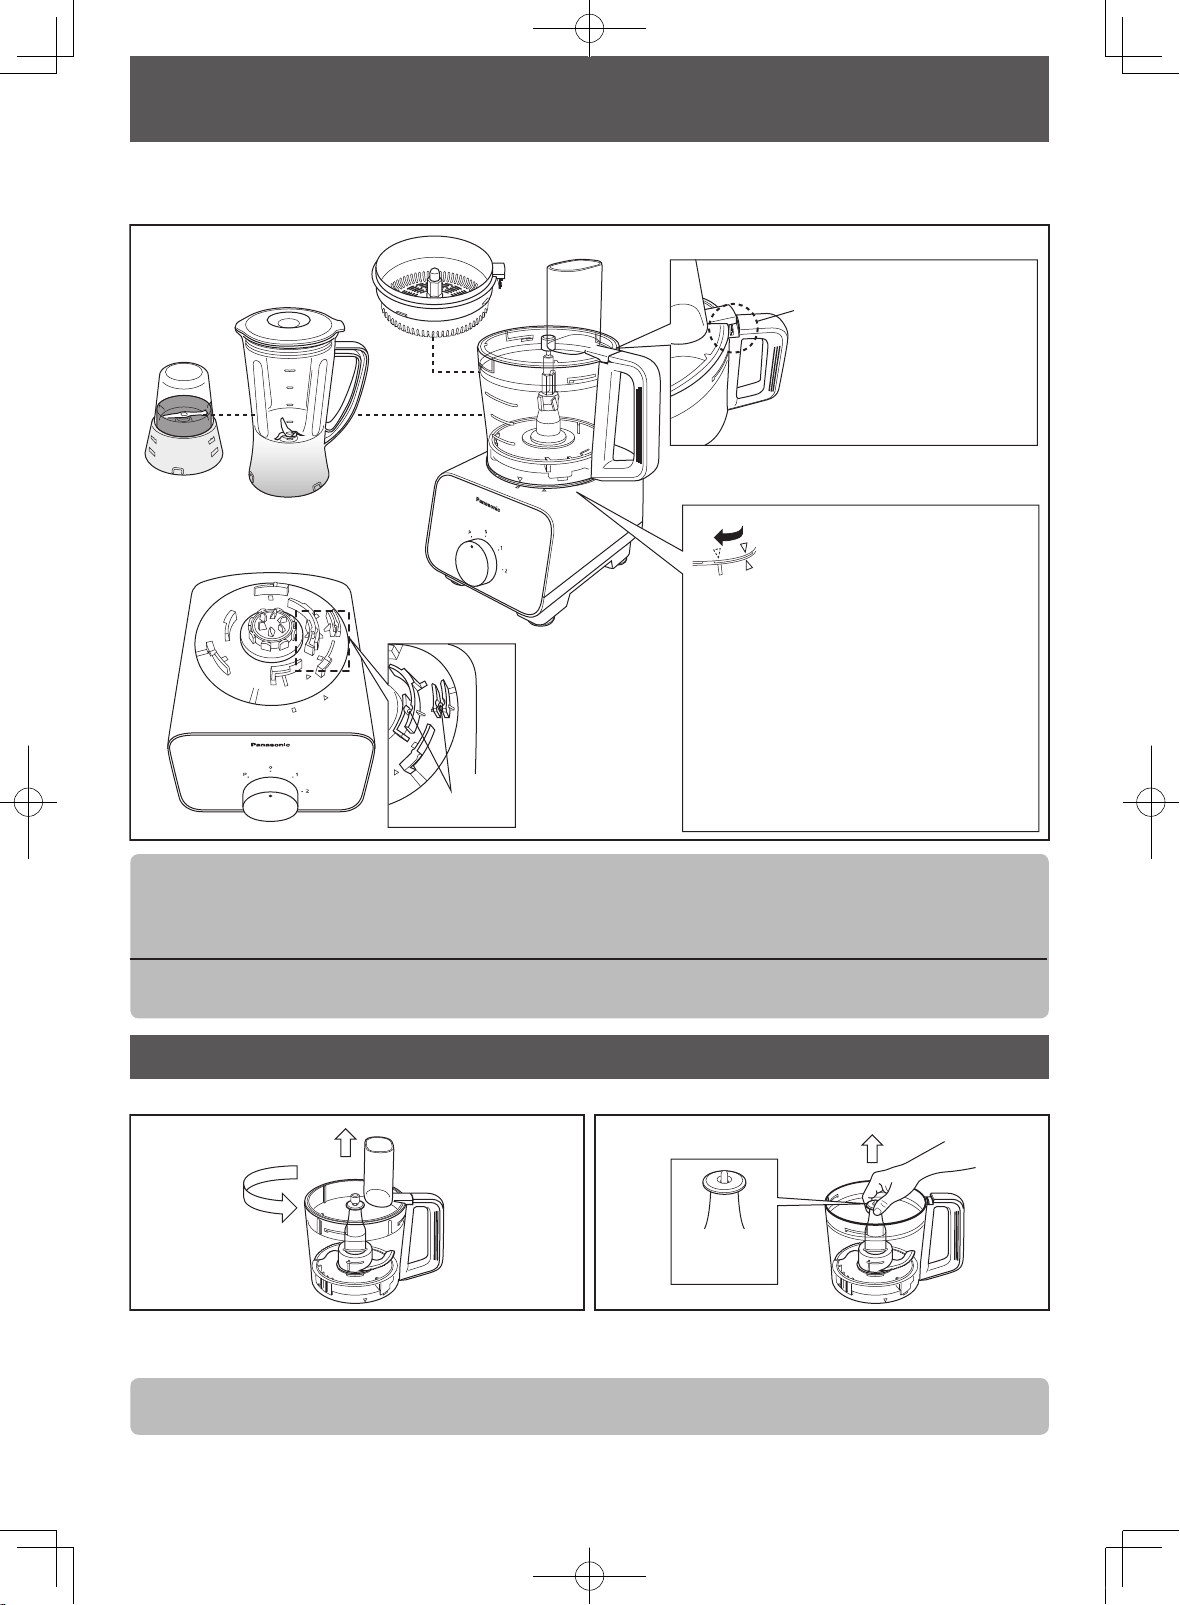
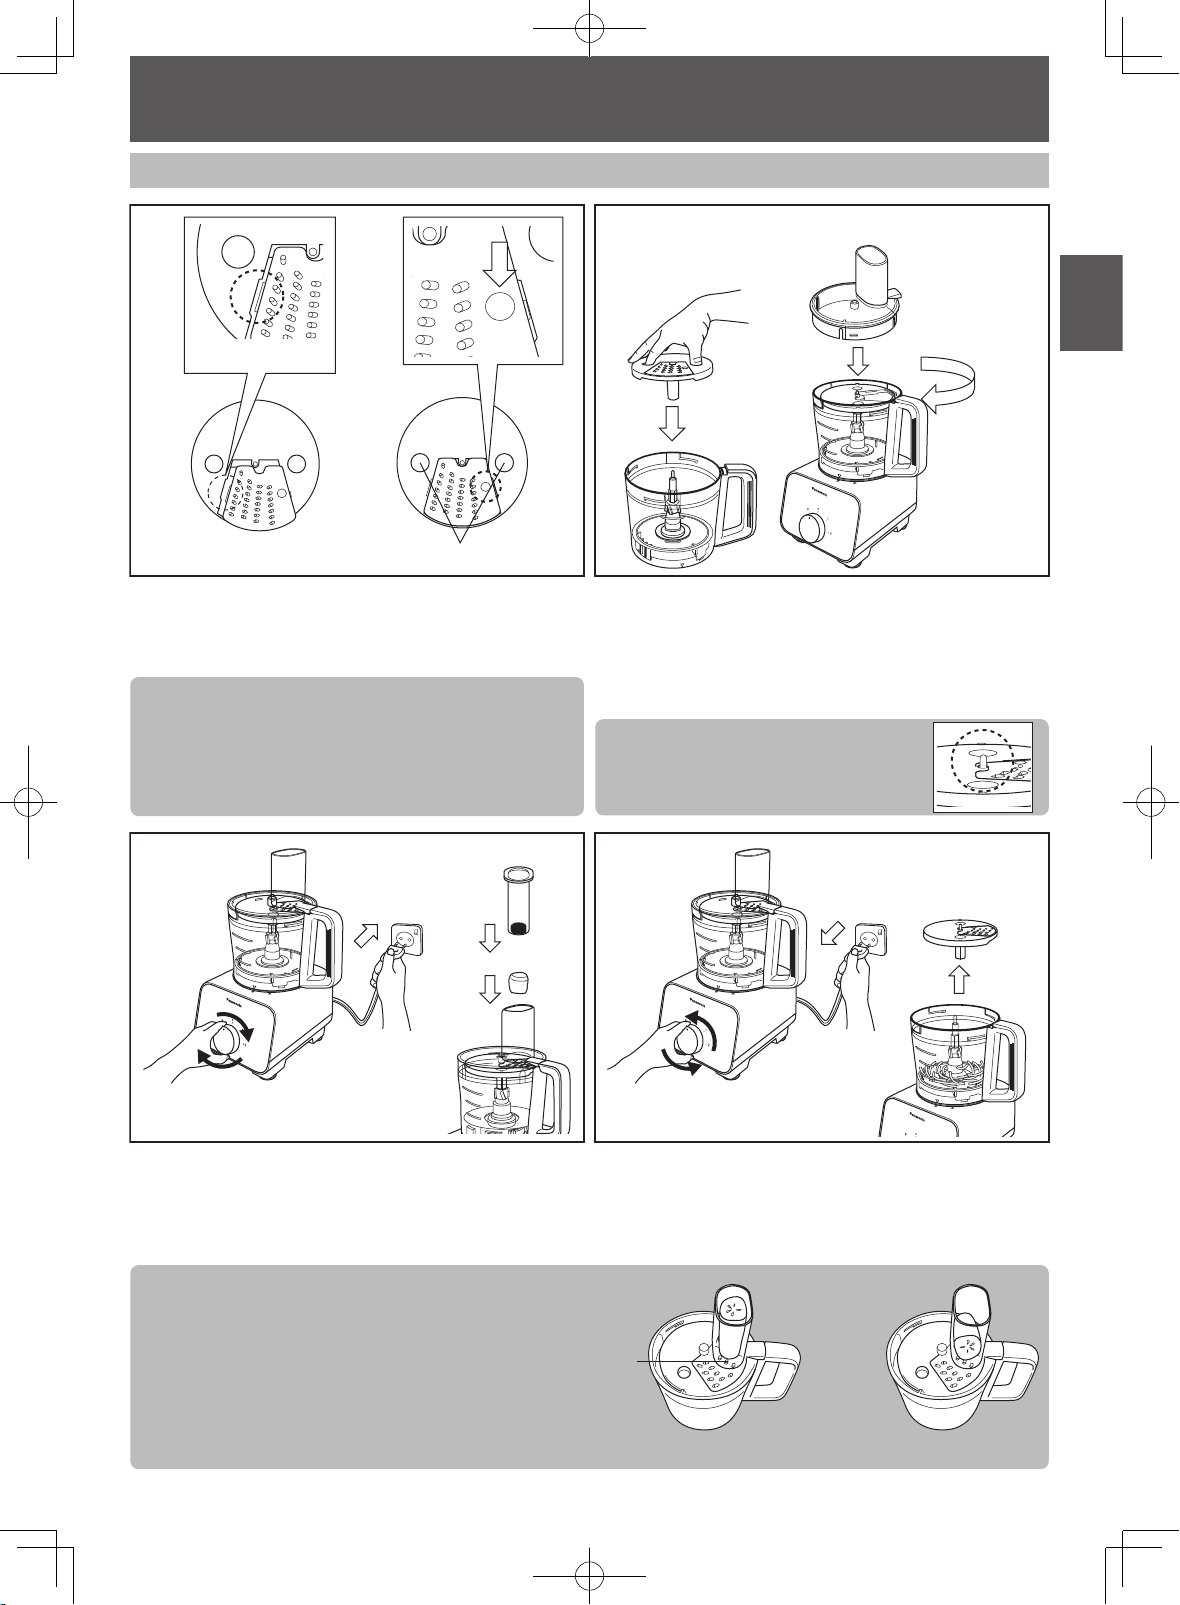
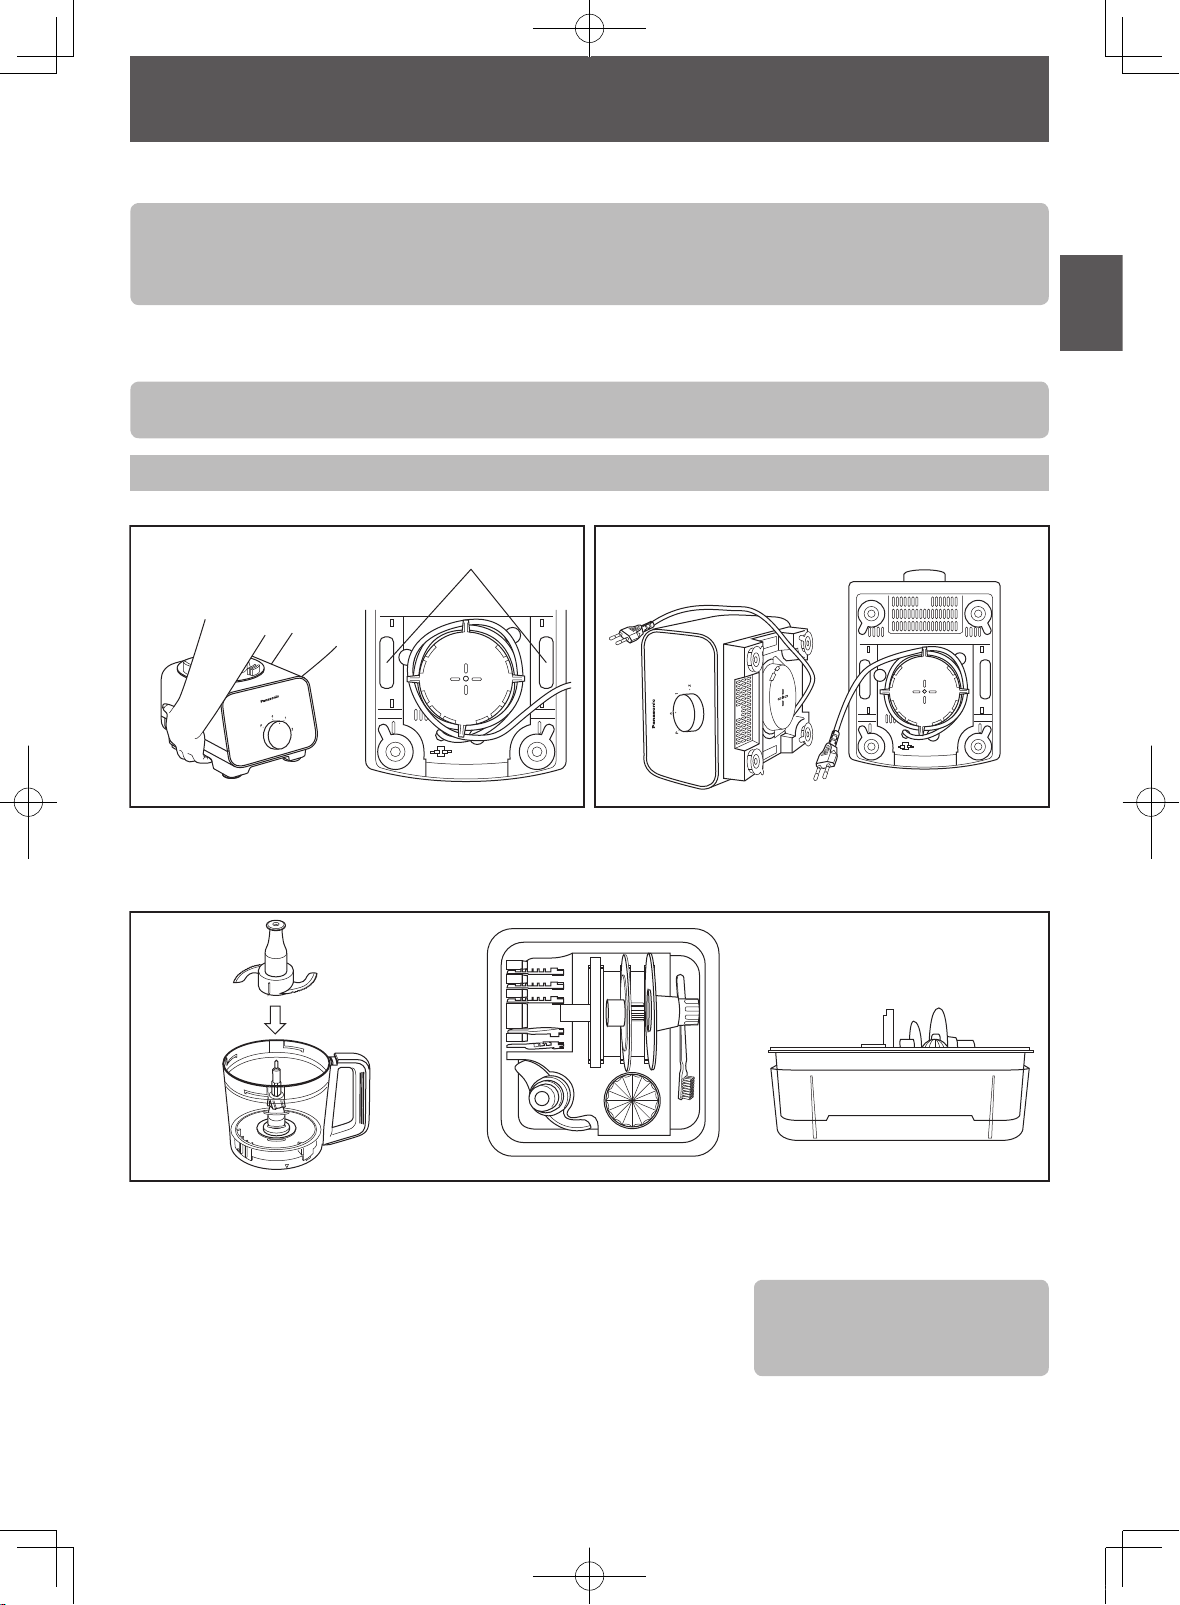
SAFETY LOCK
The Safety Pin is designed to prevent the appliance from switching on when
- The Bowl Lid or Citrus Strainer and the Bowl are not fully locked to each other.
- The Bowl, Blender Jug or Mill Container are not fully locked to the Motor Housing.
Position A : Unlock
Position B : Lock
Fully locking steps :
For Bowl and Blender Jug, align the
triangle mark with the Motor Housing as
shown in position A. Turn it clockwise
until a ‘click’ sound is heard and the
triangular mark now aligns to position .
For Dry Mill, place onto Motor Housing
and turn clockwise until a ‘click’ sound is
Safety Pins
heard. To unlock, follow the locking steps
in reverse.
The Safety Lever only
activates the Safety Pin
if the Bowl Lid or Citrus
Strainer is secured on the
Bowl.
Note:
• Do not push the Safety Pin and Safety Lever with any instrument, stick etc.
• Do not pour liquids or ingredient at the Safety Pin and Safety Lever area.
• Keep the Safety Pin and Safety Lever area clean to avoid foreign particles accumulate on the area.
Actions above will ensure the Safety Pin and Safety Lever function properly. If not followed, it will
damage the parts related to the Safety Pin and Safety Lever.
DISASSEMBLY
Disassembly from Packaged Condition
1
Rotate the Bowl Lid anticlockwise and lift up from the
Bowl.
Note:
Beware of the sharp edges of the Knife Blade when removing it from the Bowl.
2
Top of the
Knife Blade
Hold the top of the Knife Blade and lift up to remove
from Bowl.
GB10
100_160715_MK-F500_Second_EU(UZ50G1551).indb 10 2016/07/20 17:29:29
English
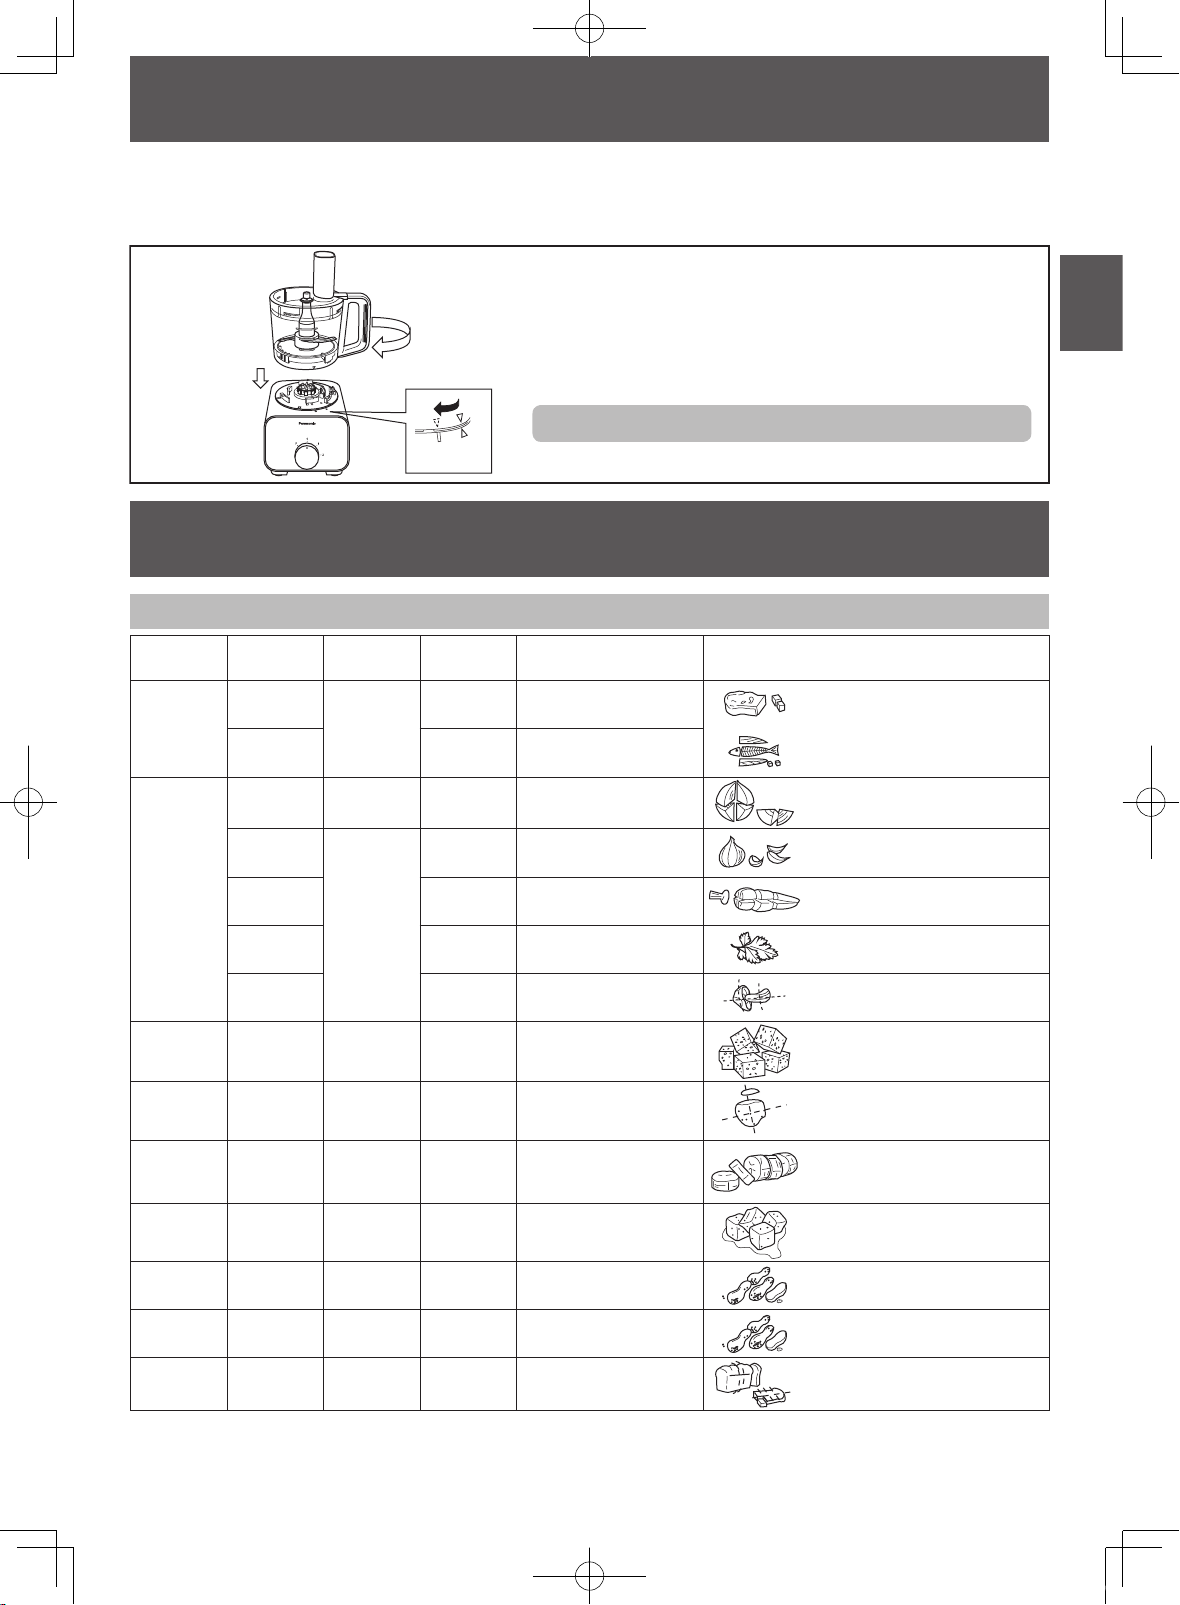
FOOD PROCESSOR -INTRODUCTION-
It is highly recommended to clean all attachments and accessories and dry well before using the appliance for the
rst time, refer to page GB20 - GB21 for the cleaning method. Unplug when assembling the unit. Before plugging in,
ensure that the Rotary Switch is in the OFF position “0”. Please refer to page GB21 under ‘Storing’ on how to
re-position the Motor Housing.
1. Place the Bowl on top of the Motor Housing until the mark
aligns as shown in A.
2. Turn the Bowl clockwise until a ‘click’ sound is heard.
Ensure that the triangle mark on the Bowl is aligned with
the rectangle mark on the Motor Housing as seen in .
To disassemble, follow the assembly steps in reverse.
FOOD PROCESSOR - KNIFE BLADE • KNEADING BLADE
• WHIPPING BLADE • GRATING BLADE-
Ingredient Preparations for Knife Blade
Function
Mince
Chop
Crush
Mash
Frozen
Ice Crush Ice Cubes 2 ~ 10 pcs ~ 20 sec
Ingredient
Meat
Fish 50 ~ 500 g 3 ~ 20 sec
Onion
Garlic
Carrot 50 ~ 450 g 10 ~ 30 sec
Italian
Parsley
Mushroom 30 ~ 250 g 3 ~ 15 sec
Parmesan
Cheese
Boiled
Potato
Frozen
Banana
Speed Quantity Operating Time (approx.) Preparation Method
50 ~ 400 g 5 ~ 50 sec
2
1
(Intermittent)
PULSE 100 ~ 400 g 3 ~ 15 times
150 ~ 500 g 4 ~ 15 times
5 ~ 500 g 10 ~ 30 sec
2
5 ~ 70 g 10 ~ 40 sec
2 10 ~ 200 g 10 ~ 60 sec
2
250 ~ 450 g 30 ~ 180 sec
Remove all skin, bones, and
tendons, cut into 2 ~ 3 cm cubes.
Peel skin, cut into 2 ~ 3 cm
cubes.
Peel skin.
Peel skin, cut into 2 ~ 3 cm
cubes.
Remove stalk.
Cut into 2 ~ 3 cm cubes.
Cut into 2 ~ 3 cm cubes.
Cut into 2 ~ 3 cm cubes.
Do not over process.
1 ~ 2 cm width, half frozen
condition, i.e. toothpick can
pierce.
2 ~ 3 cm ice cubes.
Grind Peanuts 2 10 ~ 200 g 15 ~ 30 sec
Paste
Crumb
100_160715_MK-F500_Second_EU(UZ50G1551).indb 11 2016/07/20 17:29:30
Roasted
Peanuts
Soft White
Bread
2
100 ~ 400 g 5 ~ 10 min
2 10 ~ 200 g 15 ~ 60 sec
Remove peanut shell and skin.
Remove peanut shell and skin.
Slice soft bread into 6 to 8
pieces.
GB11

FOOD PROCESSOR - KNIFE BLADE • KNEADING BLADE
• WHIPPING BLADE • GRATING BLADE-
Ingredient Preparations for Knife Blade
Function
Knead
(for
confectionary)
Juice Make
Soup Make
Ingredient
Flour 2 ~ 300 g ~ 120 sec
Fruit, Liquid
etc.
Boiled
Vegetable,
Liquid etc.
Speed
2 ~ 1,500 mL ~ 120 sec
2 ~ 1,500 mL ~ 120 sec
Max
Single Use
Ingredient Preparations for Kneading Blade
Function
Knead
(for bread)
Ingredient
Bread Flour
Liquid
Speed
2
Max
Single Use
300 g
160 ~ 200 mL
Operating Time (approx.) Preparation Method
Use for making confectionery
such as sweets and cakes.
Cut into 2 ~ 3 cm cubes. Process
solids rst. Fill liquid till total not
exceeding 1,500 mL. Do not add
more than 10 pcs of ice cubes
during processing.
Cut into 2 ~ 3 cm cubes. Process
solids rst. Fill liquid till total not
exceeding 1,500 mL.
Operating Time (approx.) Preparation Method
Mix yeast with water and add during the
processing of dough (adding yeast directly
before processing may result in aking and
premature rising). If dough mix still appears
~ 120 sec
aky after initial processing, add 1 tsp of water
into the mix. When large vibrations occur due
to dough mix wrapping around the Drive Shaft,
add 1 tbsp of our. Do not reprocess the dough
after the process is complete, if the dough is
not satisfactory, knead by hand.
Ingredient Preparations for Whipping Blade
Function Ingredient Speed
Egg White
Whip
Cream
2
Max
Single Use
2 ~ 6 pcs 50 sec ~ 90 sec
100 ~ 300 mL
Ingredient Preparations for Grating Blade
Function Ingredient Speed
Carrot
Grate
Apple
Cucumber
2
Max
Single Use
200 g
200 g
200 g
Operating Time (approx.) Preparation Method
Separate the egg white from the
yolk for a smooth meringue.
15 sec ~ 2 min
Operating Time (approx.) Preparation Method
-
Use fresh cream of fat content
35% or higher at 5 °C.
Cut into 2 ~ 3 cm cubes.
GB12
100_160715_MK-F500_Second_EU(UZ50G1551).indb 12 2016/07/20 17:29:31
English
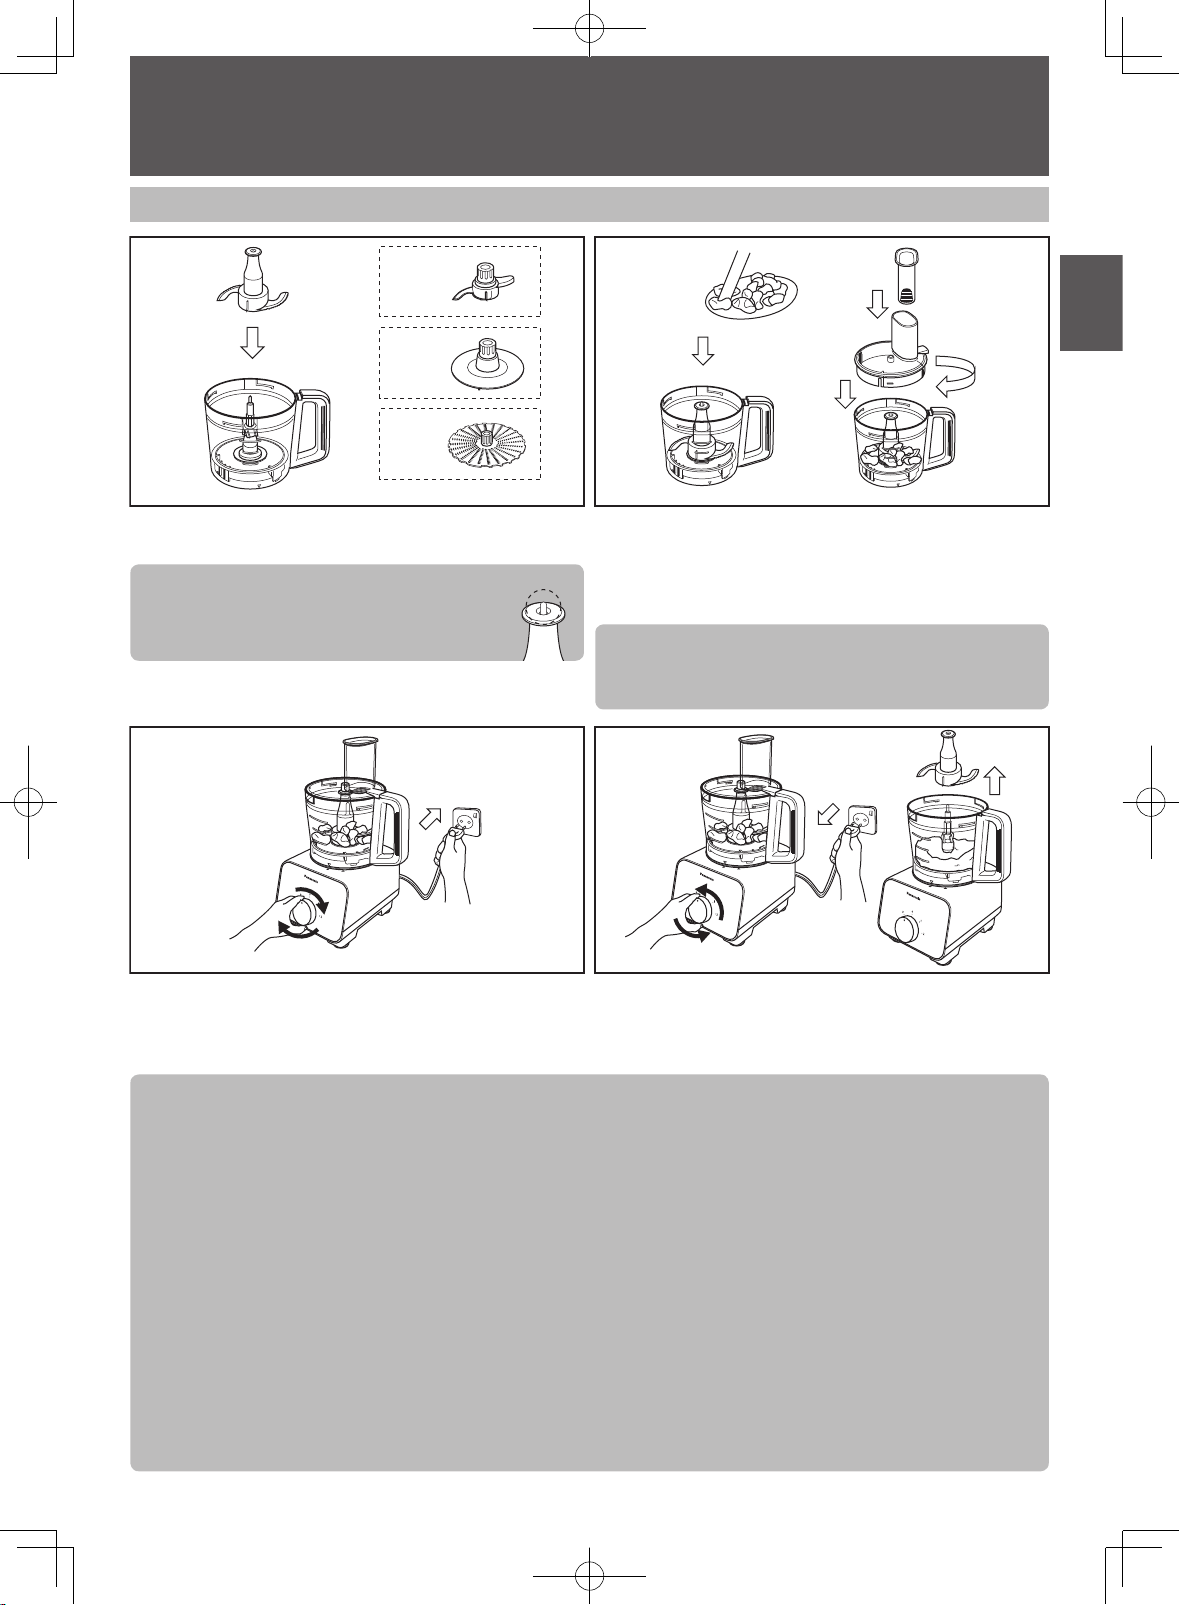
FOOD PROCESSOR - KNIFE BLADE • KNEADING BLADE
• WHIPPING BLADE • GRATING BLADE-
How to Use : Knife Blade • Kneading Blade • Whipping Blade • Grating Blade
1 2
or
or
or
Place the Knife Blade (Kneading Blade or Whipping
Blade or Grating Blade) into the Bowl.
Note:
For the Knife Blade, ensure that the Drive
Shaft is protruding from the Knife Blade
after insertion.
3 4
Plug-in the plug into the socket and turn the Rotary
Switch to select the speed required (refer to
“Preparation of Ingredients” at page GB11-GB12).
Note:
• Always ensure that the Knife Blade is inserted before adding ingredients into the Bowl.
• Do not exceed the stated amount of ingredients for kneading as abnormal vibration may occur.
• Do not insert hot ingredients into the Bowl for processing. Always ensure that the ingredients are sufciently
cooled before inserting, i.e. boiled potato.
• For Juice Make, ll in the solid ingredients rst into the Bowl, followed by the liquid ingredients until the total
volume does not exceed 1,500 mL.
• When process the liquid ingredients together with ice cubes, put the ice cubes not more than 10 pcs (approx.
170 g).
• Do not exceed the stated amount of ingredients for the Kneading Blade as abnormal vibration may occur.
• Do not over process the whipping cream, it may break down to form clumps of butter.
• Using different brands of whipping cream will have varying results. It is recommended to process until the
cream is sufciently whipped.
• Depending on the speed and amount of ingredients used, there will be signicant vibrations present. In that
case, hold down the Bowl Lid with both hands to support it during its operation.
• For kneading, do not reprocess after the dough has formed the rst time.
• High amounts of butter and sugar in the dough may cause abnormal vibration when using the Kneading Blade.
• Using our other than bread our on the Kneading Blade may cause abnormal vibration. Before processing,
remove 1 ~ 2 tbsp of water from the total amount stated and add the water little by little during processing if
necessary.
Put the ingredients into the Bowl. Place the Bowl Lid on
top of the Bowl and turn it clockwise until a ‘click’ sound
is heard. Insert the Food Pusher into the Feeding Tube.
Attach the Bowl assembly onto the Motor Housing as
seen in page GB11.
Note:
For the Grating Blade, place the ingredients on top of
the blade and spread them out evenly.
After the processing is completed, return the Rotary
Switch to OFF position “0” and unplug from the socket.
Remove the Knife Blade from the Bowl before removing
the processed ingredients.
GB13
100_160715_MK-F500_Second_EU(UZ50G1551).indb 13 2016/07/20 17:29:31
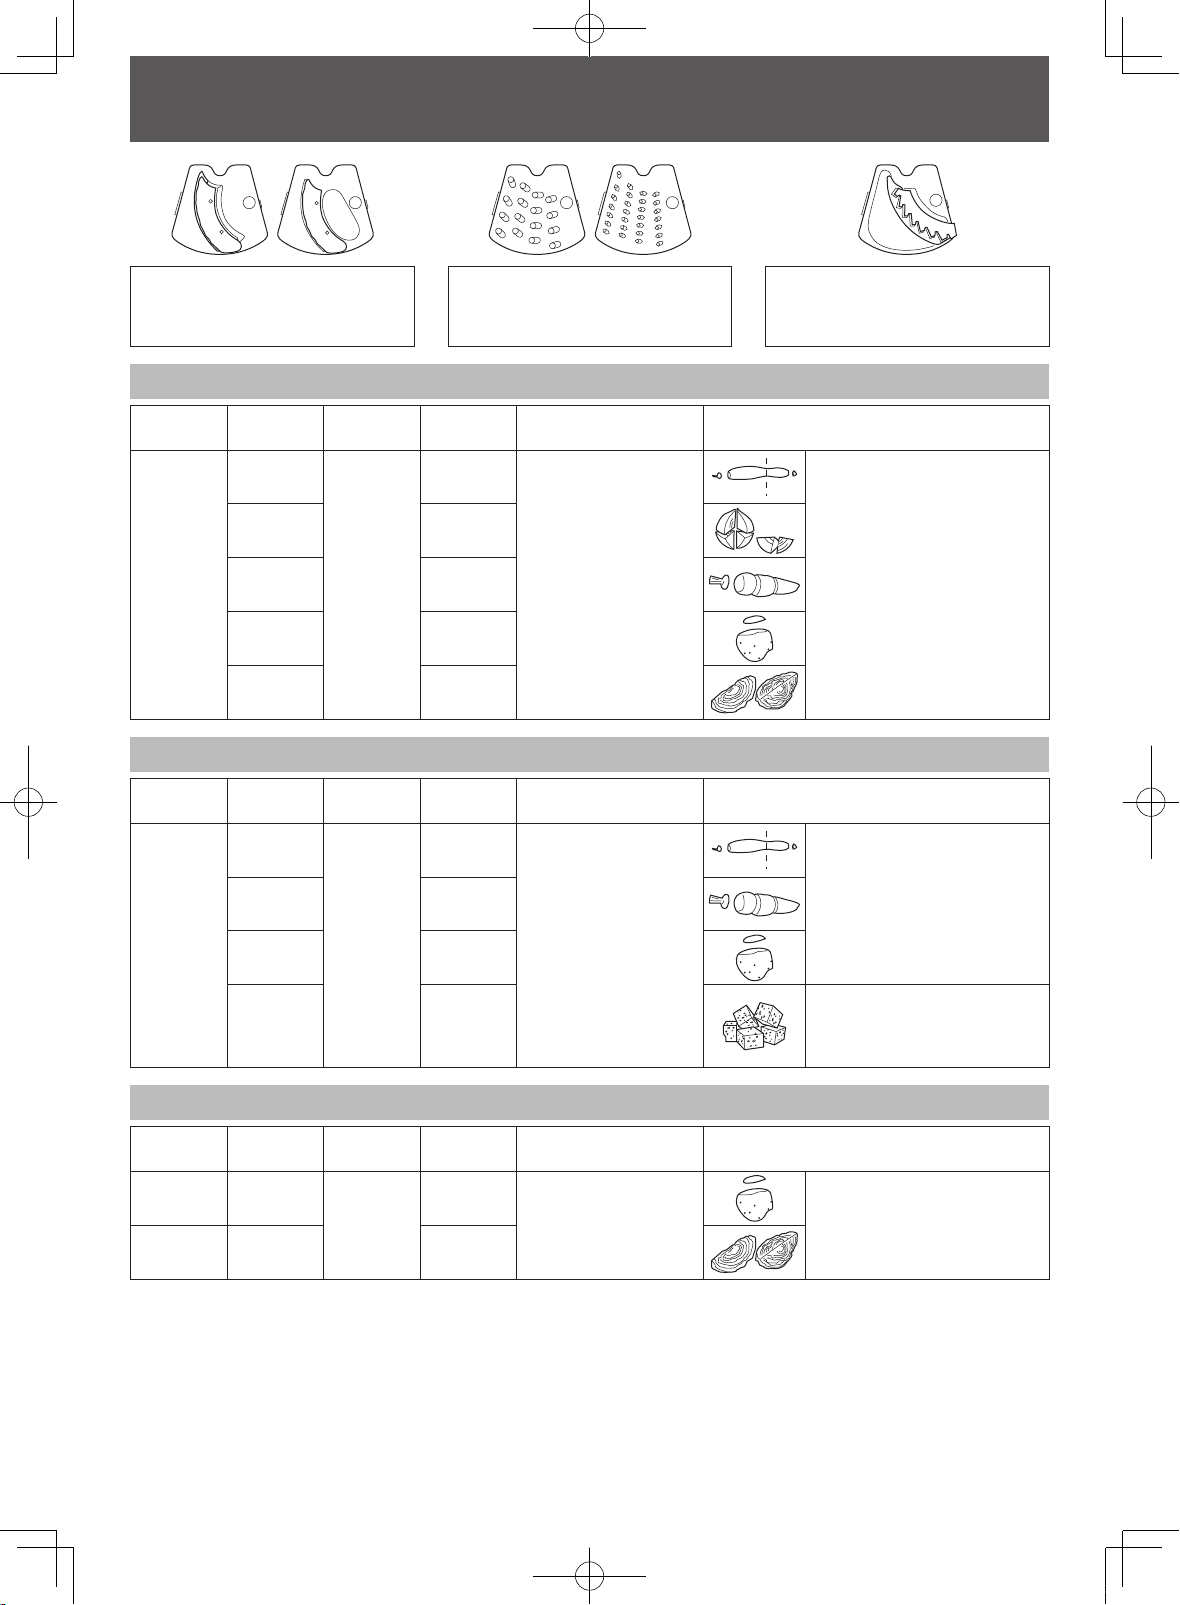
FOOD PROCESSOR
-SLICING BLADES • SHREDDING BLADES • JULIENNE BLADE-
Slicing Blades (Thick / Thin)
- used for slicing ingredients
Shredding Blades (Coarse / Fine)
- used for shredding and grating
ingredients.
Ingredient Preparations for Slicing Blades (Thick / Thin)
Function Ingredient Speed
Cucumber
Onion
Slice
Carrot 600 g
Potato 600 g
Cabbage 400 g
2
Max
Single Use
700 g
700 g
Operating Time (approx.) Preparation Method
-
Ingredient Preparations for Shredding Blades (Coarse / Fine)
Function Ingredient Speed
Cucumber
Carrot 500 g
Shred
Potato 650 g
2
Max
Single Use
500 g
Operating Time (approx.) Preparation Method
-
Julienne Blade
- used for making french fries and
shredding ingredients.
Cut ingredient till it is small
enough to t into the Feeding
Tube.
Cut ingredient till it is small
enough to t into the Feeding
Tube.
Cheese 500 g
Ingredient Preparations for Julienne Blade
Function Ingredient Speed
French Fry Potato
2
Shred Cabbage 500 g
GB14
Max
Single Use
800 g
Cut ingredient till it is small
enough to t into the Feeding
Tube. Do not use hard
ingredients such as Parmesan.
Operating Time (approx.) Preparation Method
Cut ingredient till it is small
-
enough to t into the Feeding
Tube.
100_160715_MK-F500_Second_EU(UZ50G1551).indb 14 2016/07/20 17:29:32
English
PUSH
FOOD PROCESSOR
-SLICING BLADES • SHREDDING BLADES • JULIENNE BLADE-
How to Use: Slicing Blades (Thick / Thin), Shredding Blades (Coarse / Fine), Julienne Blade
1 2
Projected Detent
Finger Holes
Fit the projected detent of the desired blade onto the
Blade Stand and ensure it is seated properly. Push
down on the dimple on the blade as seen above until a
‘snap’ sound is heard.
Note:
• Beware of the sharp edges on the blades while
inserting into the Blade Stand.
• To remove the blade, turn over the Blade Stand and
push down on the reverse side of the dimple on the
blade.
3 4
Insert nger and thumb into the nger holes to grip
the Blade Stand. Place the assembled Blade Stand
into the Bowl. Attach the Bowl to the Motor Housing as
seen in page GB10, then place the Blade Stand into the
Bowl. Place the Bowl Lid on top of the Bowl and turn it
clockwise until a ‘click’ sound is heard.
Note:
Ensure that the Drive Shaft is
protruding from the Blade Stand after
insertion.
Plug-in the plug into the socket and turn the Rotary
Switch to select the speed required (refer to the
“Preparation of Ingredients” at page GB14). Insert the
ingredients into the Feeding Tube and push down with
After the processing is completed, return the Rotary
Switch to OFF position “0” and unplug from the socket.
Remove the Blade Stand from the Bowl before
removing the processed ingredients.
the Food Pusher.
Note:
• When using long and narrow ingredients, place
it against the front wall of the feeding tube as
indicated in Figure 1, for support while in operation
to avoid uneven processing.
• Dispose of any remaining lumps of unprocessed
Front
Wall
ingredients.
• Align high bre ingredients as indicated in Figure 2
for a consistent processing result.
100_160715_MK-F500_Second_EU(UZ50G1551).indb 15 2016/07/20 17:29:33
Figure 1 Figure 2
GB15

FOOD PROCESSOR -SALAD DRAINER-
Ingredient Preparations for Salad Drainer
Function Ingredient Speed
Lettuce
Drainer
Leaves
Cabbage
1
Max
Single Use
100 g 20 ~ 40 sec
200 g 20 ~ 50 sec
Operating Time (approx.) Preparation Method
How to Use: Salad Drainer
1 2
A
PP
B
PP
After inserting the Salad Drainer into the Bowl, insert
the ingredients into the Salad Drainer. Place the Drainer
Cover on top of the Salad Drainer until the mark aligns
as shown in A. Turn the Drainer Cover anticlockwise
until the mark aligns as shown in B.
Cut into 3 ~ 5 cm slices.
Shredded into 1 ~ 3 mm.
Place the Bowl Lid on top of the Bowl and turn it
clockwise until a ‘click’ sound is heard. Attach the Bowl
assembly onto the Motor Housing as seen in page GB11.
Note:
Ensure that the Drive Shaft is protruding from the
Salad Drainer after insertion.
3 4
Plug-in the plug into the socket and turn the Rotary
Switch to select the speed required.
After the processing is completed, return the Rotary
Switch to OFF position “0” and unplug from the socket.
Remove the Salad Drainer from the Bowl.
Note:
• Maximum working capacity of the Salad Drainer: 200 g or till maximum height of Salad Drainer, whichever
comes rst.
• Prohibited ingredients: refer to page GB6.
• Ensure that the ingredients are spread evenly around the Salad Drainer before processing.
• Always ensure that the Drainer Cover is attached onto the Salad Drainer before operation, otherwise the
ingredients might come out and tear around the Bowl.
• Depending on the speed and amount of ingredients used, there will be signicant vibrations present. In that
case, hold down on the Bowl Lid to support it during its operation.
GB16
100_160715_MK-F500_Second_EU(UZ50G1551).indb 16 2016/07/20 17:29:33
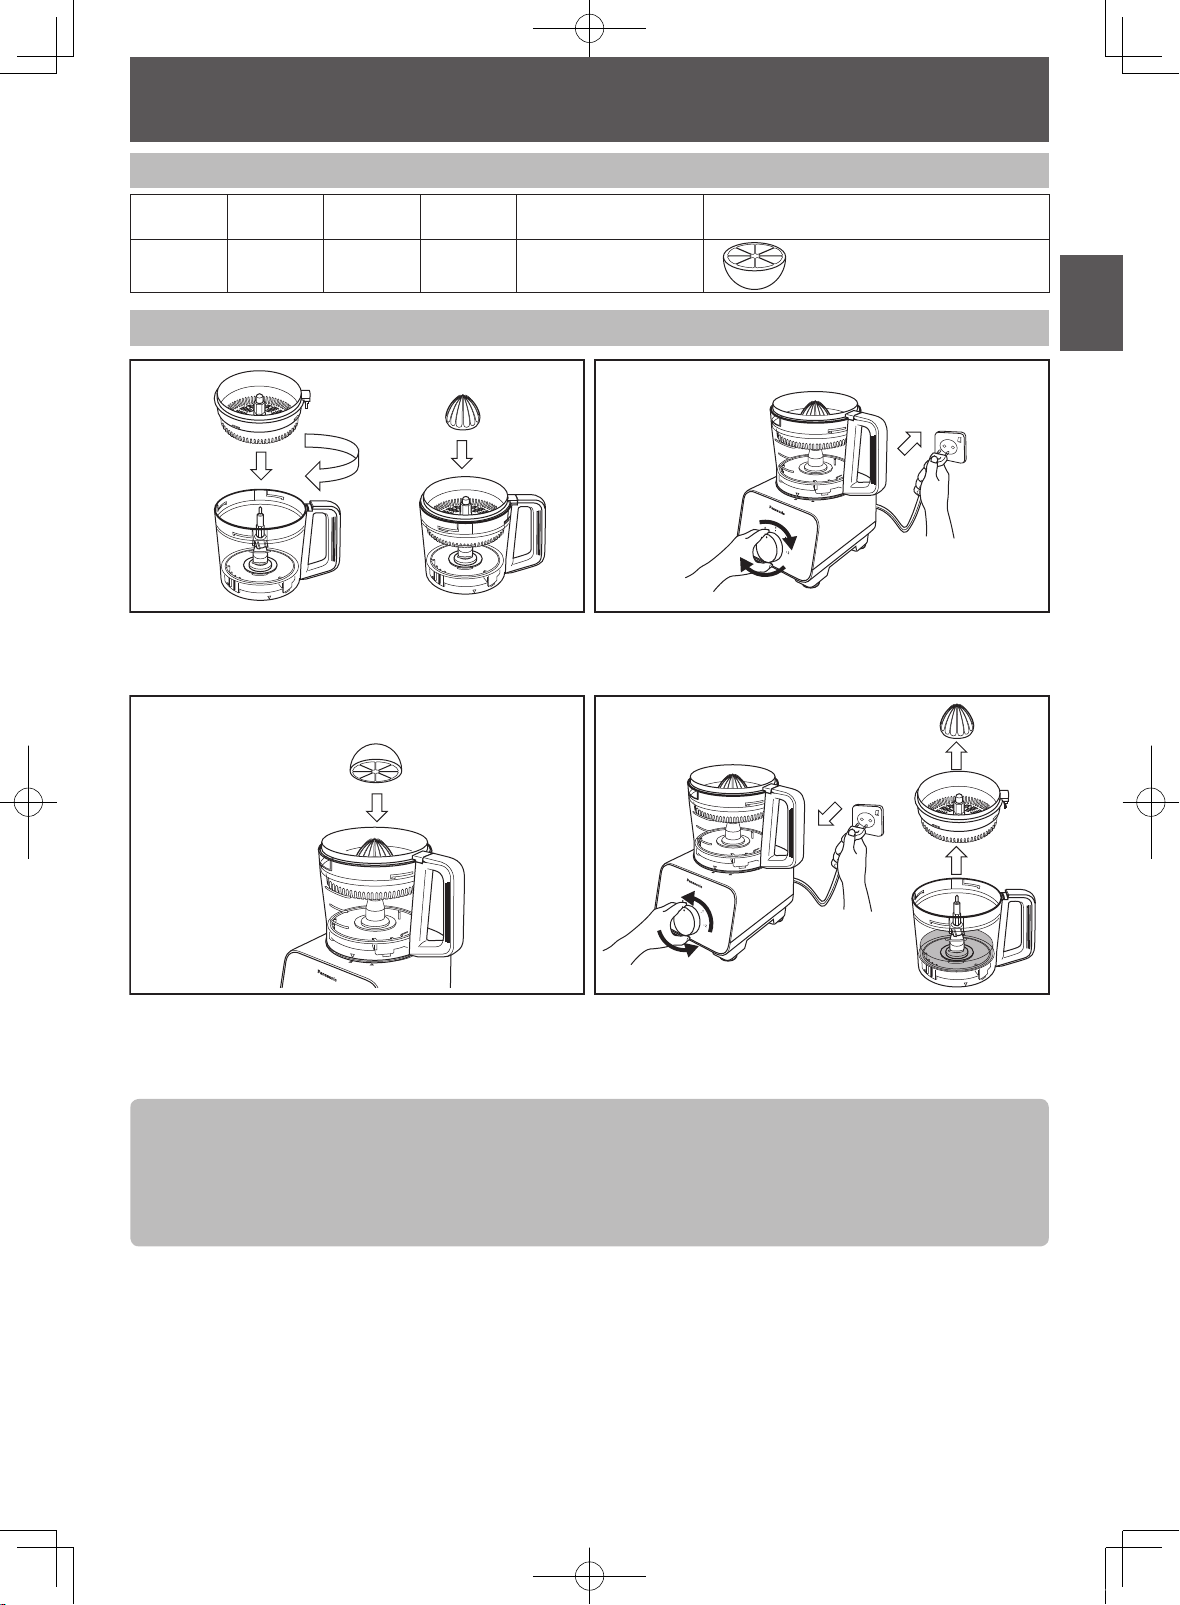
FOOD PROCESSOR -CITRUS PRESS-
Ingredient Preparations for Citrus Press
Function Ingredient Speed
Squeeze Citrus Fruit 1
Max
Single Use
1000 mL -
Operating Time (approx.) Preparation Method
How to Use: Citrus Press
Place the Citrus Strainer onto the Bowl. Turn it
clockwise until a ‘click’ sound is heard. Attach the Citrus
Cone onto the Drive Shaft.
Cut fruit into halves.
21
Attach the Bowl assembly onto the Motor Housing as
seen in page GB11. Plug-in the plug into the socket and
turn the Rotary Switch to select the speed required.
43
English
Place the half cut fruit with the cut side on top of the
Citrus Cone and press down rmly to extract juice.
After the processing is completed, return the Rotary
Switch to OFF position “0” and unplug from the socket.
Remove the Citrus Press attachment from the Bowl
before pouring the extracted juice out.
Note:
• Always ensure that the Citrus Cone is placed onto the Citrus Strainer before usage.
• Stop the processing periodically to remove the pulp remaining on the Citrus Strainer to ease the juice
extraction process.
• It is not recommended to operate the Citrus Press at speed 2.
• Avoid touching the Citrus Cone while it is turning.
GB17
100_160715_MK-F500_Second_EU(UZ50G1551).indb 17 2016/07/20 17:29:34

BLENDER
Introduction
1. Place the Blender Jug on top of the Motor Housing.
Ensure that the triangle mark on the Blender Jug is
aligned with the triangle mark on the Motor Housing
as seen in Position A.
Ingredient Preparations for Blender
Function Ingredient Speed
Liquidize
Fruit,
Vegetable
2
How to Use : Blender
1
2. Turn the Blender Jug clockwise until a ‘click’ sound is
heard. Ensure that the triangle mark on the Blender
Jug is aligned with the rectangle mark on the Motor
Housing as seen in .
To disassemble, follow the assembly steps in
reverse.
Max
Single Use
1,000 mL ~ 2 min
Operating Time (approx.) Preparation Method
2
Cut into 1 cm cubes.
Insert ingredients into the Blender Jug and close with
the Blender Lid. Attach the Blender Unit onto the Motor
Housing as seen above. Plug-in the plug into the socket
and turn the Rotary Switch to select the speed required.
After the processing is completed, return the Rotary
Switch to OFF position “0” and unplug from the socket.
Remove the Blender Unit from the Motor Housing and
proceed to remove the ingredients.
Note:
• Maximum working capacity: 1 L.
• Prohibited ingredients for Blender Jug: refer to page GB6.
• It is not recommended to blend hard and viscous ingredients. However, if necessary, cut the hard ingredients
into small pieces (e.g. cut carrot into 1 cm³ cubes) and ll the Blender Jug with the ingredients not exceeding
half its rated capacity.
• Do not ll exceeding the maximum level and reduce ingredients when appliance makes abnormal sound or
vibration during operation.
• Add in soft ingredients (fruits, vegetables) into the Blender Jug before adding in other ingredients.
• If the Cutting Blade gets stuck, switch off immediately and unplug. Do not attempt to proceed to unstuck the
ingredients with your ngers, use an object like a rubber spatula instead.
• During blending, there is a possibility that the ingredients will splash out of the Blender Lid hole. In the event
that it splashes out, wipe it off with a dry cloth.
• Do not operate exceeding the rated operation duration (2 min ON, 2 min OFF).
GB18
100_160715_MK-F500_Second_EU(UZ50G1551).indb 18 2016/07/20 17:29:34
English
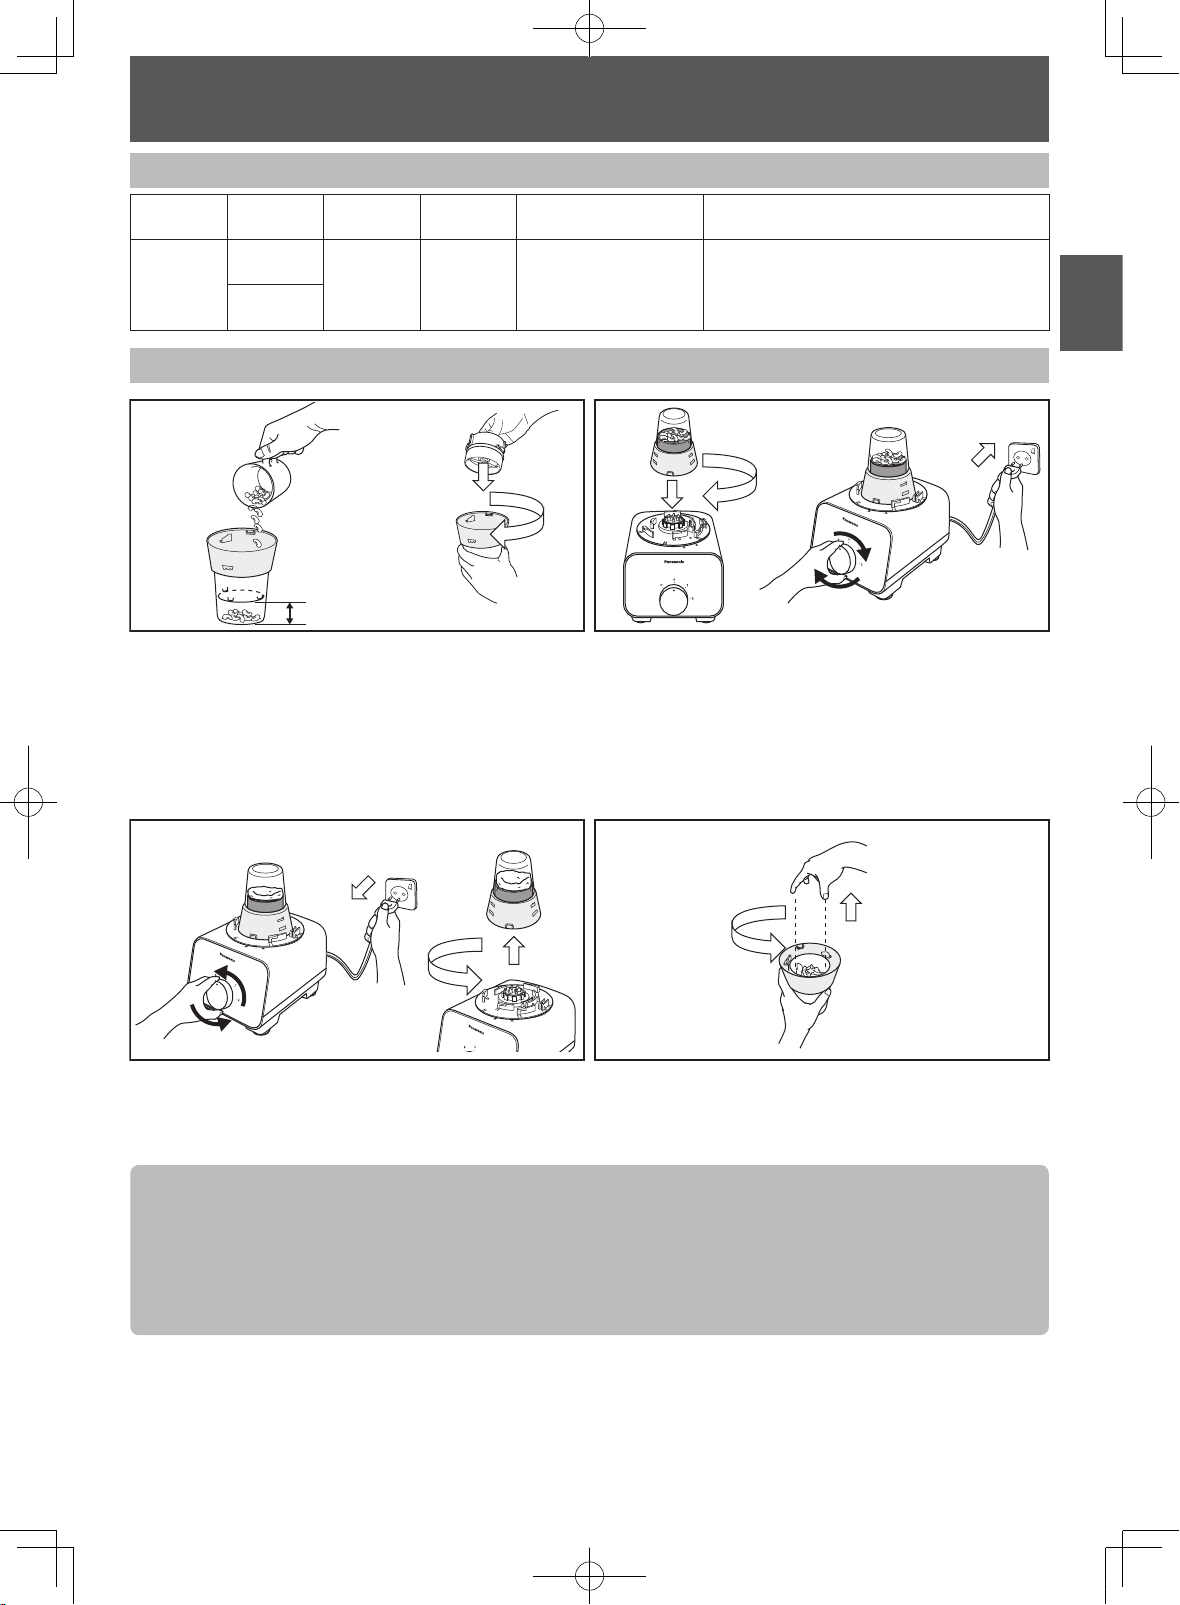
DRY MILL
Ingredient Preparations for Dry Mill
Function Ingredient Speed
Coffee Bean
Grind
Pepper
2
Max
Single Use
Till
Max Level
Operating Time (approx.) Preparation Method
~ 60 sec
How to Use: Dry Mill
1 2
Maximum
Level for Dry
Ingredients
Turn the Mill Container upside down and ll in the
ingredients without exceeding the maximum level
indicated. Place the Mill Container Base into the Mill
Container and turn it clockwise until a ‘click’ sound is
heard.
Make sure the ribs on outer surface of the Mill container
base and inner surface of the Mill container are hooked
rmly.
-
Attach the Dry Mill Unit onto the Motor Housing. Turn
the Dry Mill Unit clockwise until a ‘click’ sound is heard.
Plug-in the plug into the socket and turn the Rotary
Switch to select the speed required.
3 4
After the processing is completed, return the Rotary
Switch to OFF position “0” and unplug from the socket.
Turn the Mill Container Base anticlockwise to unlock
and lift up from the Mill Container.
Remove the Dry Mill Unit from the Motor Housing and
proceed to remove the ingredients.
Note:
• While removing the ingredients, be careful of the Cutting Blade.
• Do not operate exceeding the rated operation duration (1 min ON, 2 min OFF).
• Prohibited ingredients: refer to page GB6.
• Do not operate the unit with empty Dry Mill.
• Do not ll exceeding the maximum level and reduce ingredients when the appliance makes an abnormal sound
or vibrates during operation.
GB19
100_160715_MK-F500_Second_EU(UZ50G1551).indb 19 2016/07/20 17:29:35
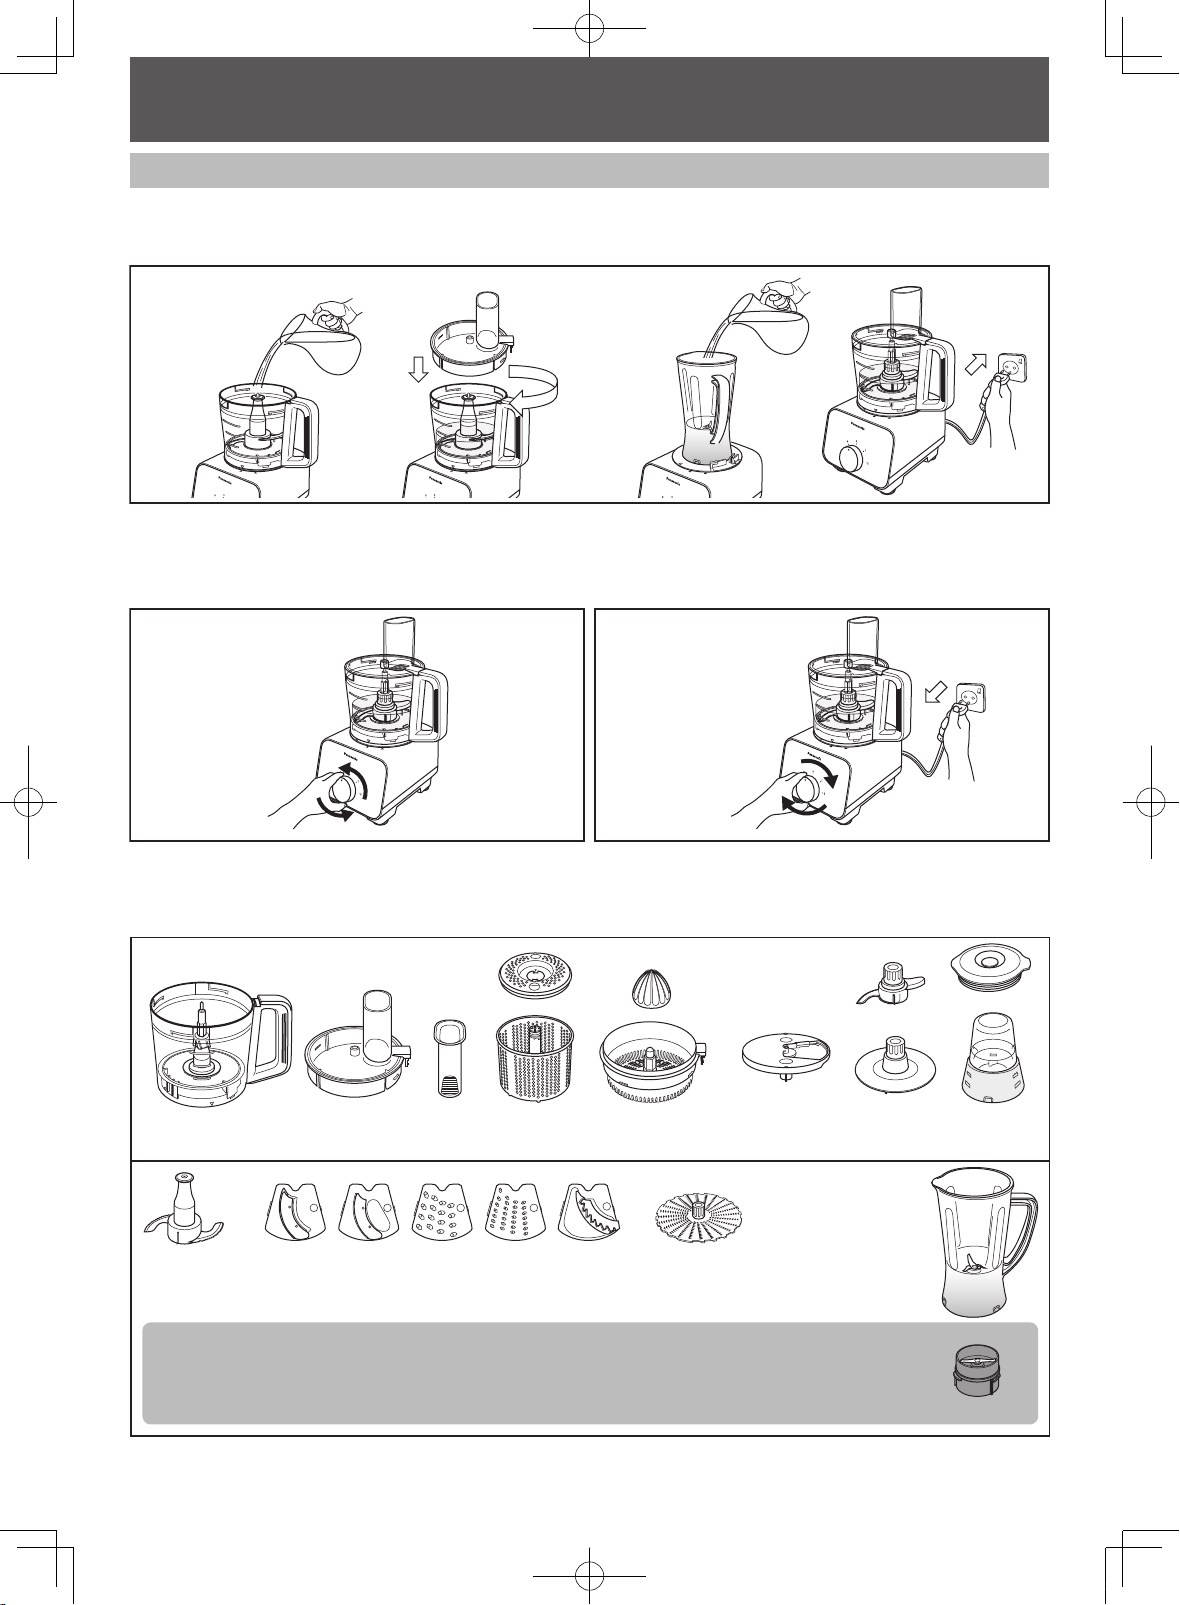
AFTER USE
Cleaning
Pre-wash
The pre-wash enables easier cleaning. It can be used for the Knife Blade and Blender Unit. To pre-wash, simply
follow the steps below.
1
Put the used attachment inside the Bowl, ll the Bowl
with water until the attachment is submerged in water
(max. 500 mL). Place the Bowl Cover on top of the Bowl
and turn it clockwise until a ‘click’ sound is heard.
2 3
Food Processor: Turn the Rotary Switch to “PULSE” 5 ~
10 times.
Blender: Turn the Rotary Switch to select speed 2 and
operate for 10 ~ 20 seconds.
BlenderFood Processor
For the Blender Unit, ll 500mL of water into the Blender
Jug and cover with the Blender Lid. Plug-in the plug into
the socket.
Return the Rotary Switch to OFF position “0” and
unplug from the socket. Remove the attachments and
proceed for cleaning.
Wash these items by rinsing them under running water. Use neutral kitchen detergent if necessary. Proceed to
wipe them dry with a clean cloth.
Wash these items by rinsing them under running water, and clean carefully with a brush.
Use neutral kitchen detergent if necessary.
Note:
• These items are extremely sharp and should be handled with extra care while cleaning.
Avoid hitting these items on hard objects during the cleaning process.
• The Mill Container Base must not be washed, use Brush to clean.
GB20
100_160715_MK-F500_Second_EU(UZ50G1551).indb 20 2016/07/20 17:29:35
English
AFTER USE
Motor Housing / Rubber Foot
Wipe off any dirt or stains with a clean damp cloth.
Note:
• Ensure that the power cord is unplugged before cleaning the Motor Housing.
• Do not wash the Motor Housing under running water.
• Never use corrosive liquids (e.g. alcohol, thinner, etc) to clean the Motor Housing.
Cleaning with a Dishwasher
The Bowl and Bowl Lid of this appliance are dishwasher safe.
Note:
• Do not place these items near the dishwasher heater area as high temperatures may damage the parts.
Storing
Ensure all attachments and the Bowl are removed from the Motor Housing prior to storage.
1 2
To release the Rubber Foot suction of the Motor
Housing, press on the release lever located at the
bottom side of the Motor Housing at the same time as
seen in the above picture and lift up.
3
(i)
Release Lever
(ii) (iii)
Tilt the Motor Housing on its side, and proceed to wind
up the Power Cord around the Cord Winding Area
partially, leaving the Plug at the sides.
(i) Store the Knife Blade inside
the Bowl. The Storage Case
Unit is included to store the
other attachments. Store the
attachments in place as per
packaging condition.
100_160715_MK-F500_Second_EU(UZ50G1551).indb 21 2016/07/20 17:29:36
(ii) List of attachments in Storage
Case Unit: Kneading Blade,
Citrus Cone, Thick Slicing
Blade, Thin Slicing Blade,
Fine Shredding Blade, Coarse
Shredding Blade, Julienne Blade,
Blade Stand, Grating Blade,
Whipping Blade and Brush.
(iii) Place the Storage Case Lid
beneath the Storage Case to
collect the drained water from
the washed attachments
Note:
• Dispose of the exible plastic
cover after opening the Storage
Case.
GB21

TROUBLESHOOTING
Please check the following points before arranging for service.
Problem Cause and Action
The appliance does not turn on.
The appliance does not operate
even when the Rotary Switch is
activated.
The appliance suddenly stops
during operation.
The plug is loose in the outlet.
Plug in rmly into the outlet.
The Bowl, Blender Unit or Dry Mill Unit is not properly locked
onto the Motor Housing.
Ensure that the triangle mark on the attachments are
aligned with the rectangular mark on the Motor Housing as
seen in page GB10.
The Bowl Lid or Citrus Strainer is not fully locked onto the
Bowl.
Fully secure the Bowl Lid or Citrus Strainer onto the Bowl.
The ingredients are jammed.
Remove the ingredients carefully and ensure that the
amount used is as stated.
The circuit breaker protection is activated. (Refer to page GB9)
• Too much ingredients were inserted.
Remove the excess ingredients and ensure that the amount
used is as stated.
• Large chunks or hard ingredients were used.
Ensure that the ingredients are cut into the stated sizes.
Do not use hard ingredients such as frozen foods or highly
dense solids.
The safety lock was triggered. (Refer to page GB10)
• Abnormal vibration during operation may offset the safety
lock engagement.
Ensure that the ingredients used and the amount are as
stated.
Lock the Bowl Lid or Citrus Strainer onto the Bowl rmly,
and ensure that the Bowl, Blender Unit, or Dry Mill Unit is
locked rmly onto the Motor Housing.
There is abnormal vibration and
noise during operation.
The texture and consistency of
the processed ingredients did not
turn out well.
GB22
The Rubber Feet and/or the work top are not clean.
Wipe off any dirt or stains with a clean damp cloth. The
Rubber Foot is only effective when placed on a clean,
smooth and at surface.
The ingredients used for processing is either too much or too
hard.
Ensure that the ingredients used are as stated, reduce the
ingredients if it is over the stated amount.
Some ingredients might be too difcult to process raw,
e.g.pumpkin.
Precook might be necessary to soften the ingredients
before processing, i.e. until a fork can easily pierce.
Ingredient size is not according to the preparation method.
Prepare accordingly to follow the size stated.
Processing certain ingredients at the same time may result in
lumps remaining for Frozen function.
The maximum ingredient amount and processing duration are
meant to serve as a guideline, lesser ingredient amount and
different ingredients will affect the performance.
Process the ingredients with a suitable duration till the
desired texture and consistency.
100_160715_MK-F500_Second_EU(UZ50G1551).indb 22 2016/07/20 17:29:36

English
SPECIFICATIONS
Model No. MK-F500
Function Food Processor Blender & Dry Mill
Power Supply 220 - 240 V ~ 50 - 60 Hz
Rated Consumption 180 - 200 W
Switch Rotary Switch
Operation Rating
Dimension (Approx.)(HxWxD) 435 x 264 x 265 mm
Mass (Approx.) 3.1 kg
Capacity (Approx.)
Attachment & Accessories
Common Accessories Brush with Spatula
Dishwasher Safe Items Bowl and Bowl Lid
Airborne Acoustical Noise 88 (dB (A) re. 1 pW) 88 (dB (A) re. 1 pW)
2 minutes ON, 4 minutes OFF
With exception for the stated on “Ingredient Preparations” page.
Container Capacity: 2.5 L
Maximum working capacity:
Liquids only = 1.5 L
Solids only = 600 g
With exception for the stated on “Ingredient Preparations” page.
Knife Blade, Grating Blade, Kneading
Blade, Whipping Blade, Salad Drainer,
Blade Stand, Shredding Blades (Coarse
& Fine), Slicing Blades (Thick & Thin),
Julienne Blade, Citrus Press, and
Storage Case Unit
Blender: 2 minutes ON, 2 minutes OFF
Dry Mill: 1 minute ON, 2 minutes OFF
Blender : 406 x 264 x 265 mm
Dry Mill : 298 x 264 x 265 mm
Blender : 2.8 kg
Dry Mill : 2.6 kg
Blender : 1 L
Dry Mill : 50 g (Coffee Beans)
Blender Unit, Dry Mill Unit
Disposal of Old Equipment
Only for European Union and countries with recycling systems
This symbol on the products, packaging, and/or accompanying documents means that used
electrical and electronic products must not be mixed with general household waste.
For proper treatment, recovery and recycling of old products, please take them to applicable
collection points in accordance with your national legislation.
By disposing of them correctly, you will help to save valuable resources and prevent any
potential negative effects on human health and the environment.
For more information about collection and recycling, please contact your local municipality.
Penalties may be applicable for incorrect disposal of this waste, in accordance with national
legislation.
GB23
100_160715_MK-F500_Second_EU(UZ50G1551).indb 23 2016/07/20 17:29:36

INHALTSVERZEICHNIS
Seite
SICHERHEITSVORKEHRUNGEN ..............................................................................................................DE3 - DE5
WICHTIGE HINWEISE ........................................................................................................................................... DE6
TEILENAMEN...............................................................................................................................................DE7 - DE8
SCHUTZSCHALTER .............................................................................................................................................. DE8
VERRIEGELUNG ................................................................................................................................................... DE9
DEMONTAGE ......................................................................................................................................................... DE9
KÜCHENMASCHINE
(i) EINFÜHRUNG ........................................................................................................................................... DE10
(ii) MESSERKLINGE • KNETHAKEN • SCHLAGSAHNE-AUFSATZ • RASPELSCHEIBE .................DE10 - DE12
‒ Vorbereitung der Zutaten
‒ Bedienung
(iii) SCHNEIDEEINSÄTZE • REIBEEINSÄTZE • MESSERKLINGE .................................................... DE13 - DE14
‒ Vorbereitung der Zutaten
‒ Bedienung
(iv) SALATSCHLEUDER .................................................................................................................................. DE15
‒ Vorbereitung der Zutaten
‒ Bedienung
(v) ZITRUSPRESSE ........................................................................................................................................ DE16
‒ Vorbereitung der Zutaten
‒ Bedienung
MIXER
(i) EINFÜHRUNG ........................................................................................................................................... DE17
(ii) MIXER ....................................................................................................................................................... DE17
‒ Vorbereitung der Zutaten
‒ Bedienung
TROCKENMAHLWERK
(i) TROCKENMAHLWERK .............................................................................................................................DE18
‒ Vorbereitung der Zutaten
‒ Bedienung
NACH GEBRAUCH .................................................................................................................................. DE19 - DE20
FEHLERBEHEBUNG ........................................................................................................................................... DE21
TECHNISCHE DATEN .........................................................................................................................................DE22
Wir danken lhnen für den Kauf des Panasonic-Produkts.
• Dieses Produkt ist nur für den Haushaltsgebrauch vorgesehen.
• Bitte lesen Sie sorgfältig diese Anleitung, um einen korrekten und sicheren Betrieb der Maschine zu gewährleisten.
• Bevor Sie dieses Produkt verwenden, lesen Sie sich bitte aufmerksam die “SICHERHEITSVORKEHRUNGEN” (Seite
DE3-DE5) durch.
• Bitte bewahren Sie diese Bedienungsanleitung für eine spätere Verwendung auf.
Dieses Symbol auf dem Produkt bedeutet „Vor Gebrauch unbedingt die Bedienungsanleitung lesen“.
DE2
100_160715_MK-F500_Second_EU(UZ50G1551).indb 2 2016/07/20 17:29:36
Deutsch
SICHERHEITSVORKEHRUNGEN (Bitte befolgen Sie diese Anweisungen.)
Befolgen Sie bitte die nachstehenden Anweisungen, um Unfälle oder Verletzungen des
Benutzers oder Dritter sowie Sachschäden zu vermeiden.
Die nachfolgenden Hinweise zeigen das durch unsachgemäßen Gebrauch
entstehende Schadensausmaß auf.
Weist auf die Möglichkeit schwerer Verletzungen
WARNUNG
ACHTUNG
oder Tod hin.
Weist auf die Möglichkeit von Verletzungen oder
Sachschäden hin.
Die Zeichen sind klassiziert und wie folgt erläutert:
Dieses Symbol weist auf ein Verbot
hin.
Dieses Symbol weist auf eine erforderliche
Anweisung hin, die befolgt werden muss.
WARNUNG
Vermeiden Sie Beschädigungen des Kabels und des Steckers.
(Diese können zu Stromschlag oder Feuer durch Kurzschluss führen.)
Verwenden Sie das Gerät nicht, wenn das Kabel oder der Stecker beschädigt
sind oder der Stecker nur lose mit der Steckdose verbunden ist.
(Dies kann zu Stromschlag oder Feuer durch Kurzschluss führen.)
Sofern das Kabel beschädigt ist, muss es zur Vermeidung von Gefahren durch
den Hersteller, dessen Kundendienst oder eine gleichermaßen qualizierte
Person ausgewechselt werden.
Den Stecker nicht mit nassen Händen einstecken oder abziehen.
(Dies kann einen Stromschlag verursachen.)
Überschreiten Sie nicht die zulässige Steckdosenspannung und verwenden
Sie keine andere als die auf dem Gerät angegebene Stromstärke.
(Dies kann zu Stromschlag oder Feuer führen.)
• Stellen Sie sicher, dass die dem Gerät zugeführte Stromspannung ihrer
Ortsversorgung entspricht.
• Das Einstecken anderer Geräte in die gleiche Steckdose kann zu elektrischer
Überhitzung führen.
Das Motorengehäuse nicht in Wasser eintauchen oder mit Wasser bespritzen.
(Dies kann zu Stromschlag oder Feuer durch Kurzschluss führen.)
Bauen Sie das Gerät nicht auseinander und nehmen Sie am Gerät keine
Reparaturen oder Änderungen vor.
(Dies kann zu Feuer, Stromschlag oder Verletzungen führen.)
Wenden Sie sich bei Reparaturbedarf bitte an Ihren Kundendienst.
Stecken Sie keine Gegenstände in die Lüftungsöffnung oder in die
Zwischenräume.
(Dies kann zu Stromschlag oder Fehlfunktionen führen.)
• Insbesondere keine Gegenstände aus Metall wie Nadeln oder Drähte.
Ersetzen Sie Geräteteile nur mit für dieses Produkt zugelassenen Ersatzteilen.
(Anderenfalls kann es zu Verletzungen, Stromschlag oder Feuer kommen.)
Versuchen Sie nicht, die Abdeckung zu entfernen, wenn das Gerät noch in
Betrieb ist.
(Andernfalls können Verletzungen verursacht werden.)
Verwenden Sie kein heißes Wasser (über 60 °C) zu Reinigungszwecken oder
Feuer, um das Gerät zu trocknen.
(Dies kann zu Verbrennungen oder Fehlfunktionen führen.)
DE3
100_160715_MK-F500_Second_EU(UZ50G1551).indb 3 2016/07/20 17:29:36

WARNUNG
Geben Sie keine heißen Zutaten (über 60 °C) in den Behälter oder den Mixer.
(Es kann zu Verletzungen oder Fehlfunktionen führen.)
Das Gerät nicht ohne die ordnungsgemäß angebrachte Mixerabdeckung des
Mixbehälters bedienen.
(Andernfalls können Verletzungen verursacht werden.)
Halten Sie nicht Ihren Finger oder Gebrauchsgegenstände wie Löffel, Gabel
etc. in den Behälter oder den Mixbehälter während des Betriebes.
(Es kann zu Verletzungen, Stromschlag oder einem Brand durch Kurzschluss
führen.)
Drücken Sie den Sicherheitsbolzen und Sicherheitsstift nicht mit einem
Gerät, Stift etc. herunter, solange das Gerät eingeschaltet ist.
(Andernfalls können Verletzungen verursacht werden.)
Dieses Gerät ist nicht zum Gebrauch durch Kinder geeignet. Halten Sie das
Gerät und das zugehörige Kabel aus der Reichweite von Kindern fern. Das
Gerät kann von Personen mit eingeschränkten körperlichen, sensorischen
oder psychischen Fähigkeiten oder Mangel an Erfahrung oder Kenntnissen
benutzt werden, sofern diese Personen beaufsichtigt werden oder
Anweisungen hinsichtlich der sicheren Verwendung des Produkts erhalten
haben und die damit verbundenen Gefahren verstehen. Lassen Sie Kinder
nicht mit dem Gerät spielen.
(Es besteht Verbrennungs-, Verletzungs- und Stromschlaggefahr.)
Stecken Sie den Stecker fest ein.
(Anderenfalls kann die möglicherweise um den Stecker herum entstehende Hitze
zu Stromschlag und Feuer führen.)
Der Stecker sollte regelmäßig gereinigt werden.
(Ein verunreinigter Stecker kann aufgrund von Feuchtigkeit zu unzureichender
Isolierung führen und eine Brandgefahr darstellen.)
Sofern abnormale Vorkommnisse oder Störungen auftreten, stellen Sie den
Betrieb des Geräts unverzüglich ein und ziehen Sie den Stecker ab.
(Es besteht die Gefahr von Rauchbildung, Feuer oder Stromschlag.)
Beispiele für abnormale Vorkomnisse oder Störungen:
• Stecker und Kabel erhitzen sich über das normale Maß hinaus.
• Das Kabel ist beschädigt oder es liegt ein Stromausfall vor.
• Das Motorengehäuse ist verformt oder ungewöhnlich heiß.
Ziehen Sie den Gerätestecker unverzüglich ab und wenden Sie sich an den
Kundendienst, um das Gerät überprüfen oder reparieren zu lassen.
Vergewissern Sie sich, dass Sie am Stecker ziehen, wenn Sie diesen
ausstecken, d. h. ziehen Sie niemals direkt am Kabel.
(Anderenfalls kann es zu Stromschlag oder Feuer durch Kurzschluss kommen.)
Seien Sie vorsichtig, wenn heiße Flüssigkeit in den Behälter oder
Mixbehälter gelangt, die aufgrund einer plötzlichen Dampfentwicklung aus
dem Gerät austreten kann.
(Es kann zu Verbrennungen führen.)
DE4
100_160715_MK-F500_Second_EU(UZ50G1551).indb 4 2016/07/20 17:29:36
Deutsch
ACHTUNG
Lassen Sie das Gerät während des Betriebs nicht unbeaufsichtigt.
(Es besteht Feuer- oder Verbrennungsgefahr.)
• Schalten Sie das Gerät ab, wenn Sie es unbeaufsichtigt zurücklassen.
Folgende Stellen sind zum Betrieb des Geräts nicht geeignet:
• Unebene Oberächen, nicht-hitzebeständige Teppiche oder Tischdecken, usw.
(Es besteht Feuer- oder Verletzungsgefahr.)
• Stellen, an denen die Gefahr von Spritzwasser besteht oder die sich in der
Nähe einer Wärmequelle benden.
(Es besteht Stromschlag- oder Leckstromgefahr.)
Verarbeiten Sie nicht mehr als die auf jedem Behälter angegebene maximale
Menge. Beachten Sie die empfohlene Dosierung der Zutaten für die
Verarbeitung.
(Es kann zu Vibrationen und Fehlfunktionen führen.)
Schalten Sie das Gerät nicht für längere Zeit ein. Es wird empfohlen, das
Gerät nach einer bestimmten Betriebszeit ruhen zu lassen.
(Es kann Verbrennungen verursachen.)
Funktionsweise Betriebszeit (Minuten) Ruhezeit (Minuten)
Küchenmaschine 2 4
Mixer 2 2
Trockenmahlwerk 1 2
* Ausgenommen der genannten „Zubereitung der Zutaten“ in dieser
Betriebsanleitung.
Ziehen Sie stets den Gerätestecker aus der Steckdose ab, wenn das
Gerät unbeaufsichtigt zurückgelassen wird und bevor Sie das Gerät
zusammensetzen, demontieren oder reinigen.
(Es besteht Verbrennungs- und Verletzungsgefahr.)
Entfernen Sie Behälter und Mixbehälter bevor Sie das Motorengehäuse vom
Tisch nehmen.
(Andernfalls können Verletzungen verursacht werden.)
Schalten Sie das Gerät aus und ziehen Sie den Stecker ab, bevor Sie
Zubehörteile auswechseln oder sich Teilen nähern, die sich während des
Betriebs in Bewegung benden.
(Anderenfalls kann es zu Verletzungen kommen.)
Achten Sie beim Tragen des Gerätes darauf, das Motorgehäuse mit beiden
Händen zu halten. Tragen Sie es nicht, indem Sie nur den Behälter, den
Mixbehälter oder den Mahlbehälter festhalten.
(Andernfalls können Verletzungen verursacht werden.)
Falls sich die Mixerklinge verklemmt, schalten Sie den Mixer aus und ziehen
Sie den Stecker raus. Halten Sie Ihren Finger nicht in den Mixbehälter.
Verwenden Sie eine Spachtel, um die Zutaten, die die Mixerklinge blockieren
zu entfernen.
(Andernfalls können Verletzungen verursacht werden.)
Vorsicht beim Umgang mit den scharfen Schneidklingen beim Entleeren
des Behälters oder Mixbehälters und beim Reinigen. (z. B. Messerklinge,
Schneideeinsätze etc.)
(Dies kann zu Verletzungen führen.)
DE5
100_160715_MK-F500_Second_EU(UZ50G1551).indb 5 2016/07/20 17:29:36

WICHTIGE HINWEISE
Stellen Sie das Gerät nicht an den folgenden Orten auf.
• Orte, an denen das Gerät übermäßiger Feuchtigkeit, überhöhten Temperaturen oder
direkter Sonneneinstrahlung ausgesetzt ist.
(Es kann zu Fehlfunktionen führen.)
• Jegliche Orte mit übermäßig hohen oder niedrigen Temperaturen wie Kühlschrank,
Gefrierschrank, Mikrowelle oder Backofen.
(Es kann zu Funktionsstörungen oder Ausfall führen.)
Verarbeiten Sie keine harten Zutaten (z. B. zähes Fleisch, Fleisch mit Knochen)
oder zähüssige Materialien.
(Es kann zu Fehlfunktionen führen.)
Verbotene Zutaten:
Anhänge Beschreibung
Messerklinge Harte und zähüssige Zutaten, z. B. Kaffeebohnen, getrocknete
Sojabohnen, gefrorene Lebensmittel, getrockneter Tintensch etc.
Schneideeinsätze
Reibeeinsätze und
Pommes-Frites-
Schneider
Knethaken Zutaten, die sich nicht zur Zubereitung von Teig eignen sind z. B.
Schlagsahne-
Aufsatz
Raspelscheibe Zähüssige Zutaten, Zutaten mit hoher Festfaserkonzentration,
Salatschleuder Große klobige Zutaten, Zutaten, die weich und zerbrechlich sind,
Zitruspresse Alle anderen Zutaten abgesehen von Zitrusfrüchten, wie z. B. Apfel,
Mixer Harte Zutaten, äußerst klebrige Zutaten, Zutaten mit niedrigem
Trockenmahlwerk Harte Nüsse, getrocknete Früchte, Zutaten mit hoher
Zutaten mit hoher Festfaserkonzentration, zähüssige Zutaten,
Zutaten, die zu weich sind, z. B. hartes Gemüse, Schinken,
Kurkuma, Ingwer, Kopfsalat, Tomaten, Prsiche, Schokolade etc.
Fleisch, Gemüse, Nüsse, Soßen, Aufstriche.
Alle anderen Zutaten, abgesehen von Eiweiß und frischer Sahne.
Zutaten, die zu klein und dünn sind, z. B. Süßkartoffeln, Kartoffeln,
Sellerie, Lauch, Pinienkerne etc.
z. B. große Karotten oder Kartoffelstücke, Tomaten, Tofu, Pasta etc.
Kiwi etc.
Wassergehalt z. B. Kurkuma, getrocknete Sojabohnen, Tiefkühlkost,
Fleisch, Fisch, gekochte Kartoffeln, oder bloße Eiswürfel etc.
Festfaserkonzentration, feuchte Zutaten, Flüssigkeiten, z. B.
verschiedene Nüsse, Rosinen, Fleisch, Gemüse, gekochte Eier,
Kurkuma usw..
Vor Gebrauch:
Bedienen Sie das Gerät nur auf einer sauberen, trockenen, achen, harten und glatten
Oberäche und säubern Sie die Gummisaugfüße (S. DE7) vor der Bedienung um
sicherzustellen, dass die Gummisaugfüße optimal auf der Abstelläche haften.
DE6
100_160715_MK-F500_Second_EU(UZ50G1551).indb 6 2016/07/20 17:29:36
Deutsch
TEILENAMEN
Küchenmaschine
Verarbeitungskapazität: 1,5 L
AUS/RÜCKSETZEN SCHUTZSCHALTER
Reset
1. Stößel
2. Fülltrichter
3. Behälterabdeckung
4. Messerklinge
5. Raspelscheibe
6. Knethaken
7. Schlagsahne-Aufsatz
8. Salatschleuder-Deckel
9. Salatschleuder
10. Universaleinsatz
11. Reibeeinsatz fein
12. Reibeeinsatz grob
13. Schneideeinsatz dünn
14. Schneideeinsatz dick
15. Pommes-Frites-Schneider
16. Zitruspresse
17. Filtersieb
18. Universalbehälter
19. Antriebswelle
20. Motorengehäuse
21. Gummisaugfüße
22. Drehschalter
23. Kabel
24. *Stecker
*Die Form des Steckers kann sich von der Abbildung unterscheiden.
IMPULS
GESCHWINDIGKEIT 1
GESCHWINDIGKEIT 2
DE7
100_160715_MK-F500_Second_EU(UZ50G1551).indb 7 2016/07/20 17:29:36
TEILENAMEN
Mixer , Trockenmahlwerk & Zubehör
Verarbeitungskapazität
:
1 L
1. Mixerabdeckung
2. Mixbehälter
3. Mixerklinge
4. Mahlbehälter
5. Mahlklinge
6. Mahlwerkunterteil
7. Motorblock
8. Gummisaugfüße
9. Drehschalter
10. Kabel
⑨
AUS/RÜCKSETZEN SCHUTZSCHALTER
Reset
IMPULS
11. *Stecker
12. Aufbewahrungsbox
13. Bürste
GESCHWINDIGKEIT 1
GESCHWINDIGKEIT 2
*Die Form des Steckers kann sich von der Abbildung unterscheiden.
SCHUTZSCHALTER
Das Gerät hat eine Schutzschalter-Funktion, um den Motor bei Überlastung auszuschalten.
Wenn der Schutzschalter den Motor wegen Überlastung automatisch stoppt, schalten Sie den Drehschalter auf
AUS „0“ und folgen Sie den Anweisungen unten:
1. Verringern Sie die Zutaten auf weniger als die Hälfte und fahren Sie mit der Verarbeitung fort.
2. Wenn das Gerät immer noch nicht startet, schalten Sie den Drehschalter erneut auf AUS „0“ und fahren Sie mit
der Verarbeitung fort.
3. Wenn das Problem weiterhin besteht, wenden Sie sich an den nächsten Kundendienst in Ihrer Nähe.
DE8
100_160715_MK-F500_Second_EU(UZ50G1551).indb 8 2016/07/20 17:29:36
 Loading...