

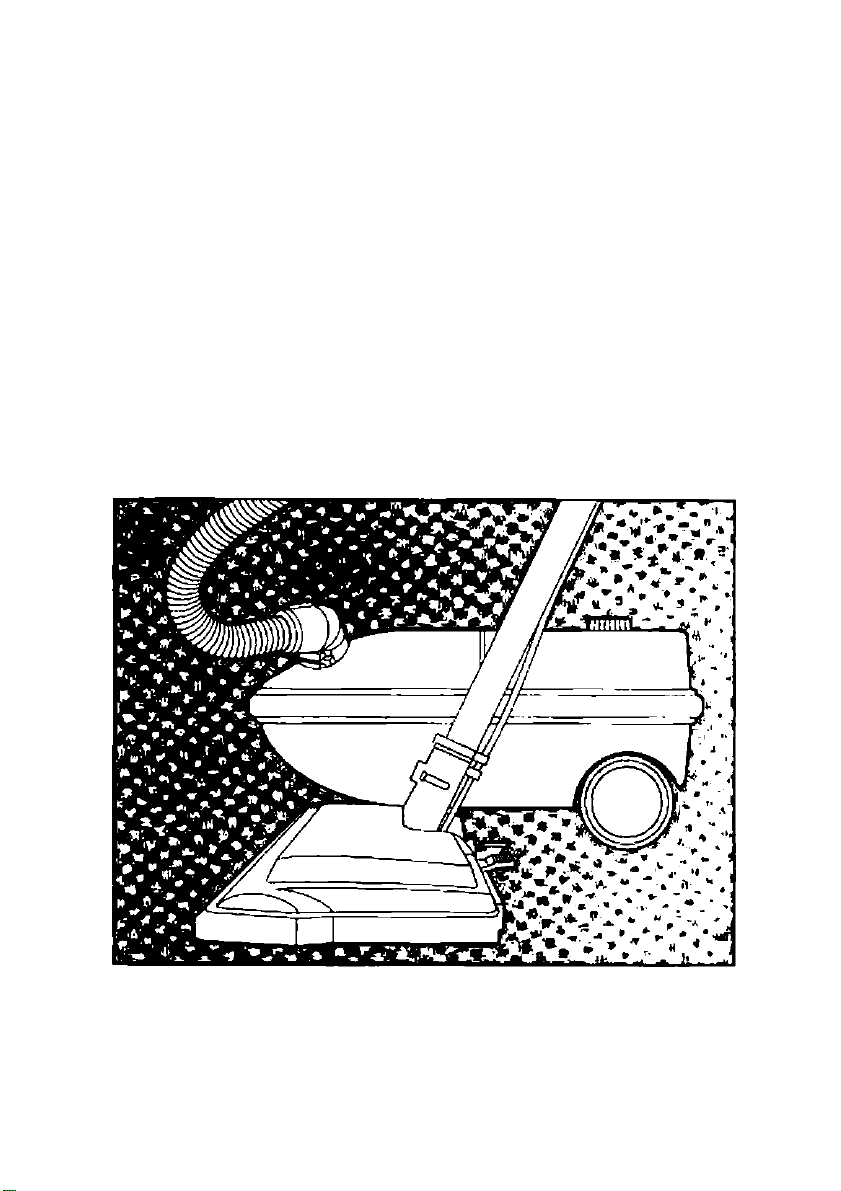
Page 1
Operating
Instructions
VACUUM CLEANER
MC-V9620
Panasonic,
Before operating this unit please read these instructions completely.
Page 2

TABLE OF CONTENTS
Safety Instructions........................................................................................................................................1
Parts Identification and Features Chart........................................................................................................2
Vacuum Cleaner Assembly.......................................................................................................................3-4
How Your Vacuum Works.............................................................................................................................4
Use - How To Start.......................................................................................................................................5
Suggested Pile Height Settings.................................................................................................................. 5
Handle Switch...............................................................................................................................................5
Attachments and Use....................................................................................................................................6
Performance Features - Overload Protector, Suction Control,
Hose Swivel, and Performance Indicator.....................................................................................................7
Vacuuming Tips............................................................................................................................................7
Bag Changing and Motor Safety Fitter Cleaning......................................................................................... 8
Cleaning Exterior and Attachments..............................................................................................................9
POWER NOZZLE Care - Light Bulb Changing, Belt Changing and Agitator Cleaning
Brush Servicing and Agitator Exploded View............................................................................................11
Troubleshooting..........................................................................................................................................12
Warranty......................................................................................................................................................17
Service Information........................................................................................................................Back Cover
.........................
9-10
CONSUMER INFORMATION
VCMA Vacuum Cleaner Manufacturer’s Association
Service to the Industry since 1913 (Panasonic - An Association Member)
This information has been compiled by the Vacuum Cleaner Manufacturer’s Association from
Government and Private Sources concerned with product safety. These basic guidelines are for
your protection and convenience.
Proper assembly and safe use of your vacuum cleaner are your responsibilities. Your
cleaner is intended only for household use. The cleaner should be stored in a dry, indoor
area. Read the Operating Instructions carefully for important use and safety information.
A
WARNING
TO AVOID ELECTRIC SHOCK
Never vacuum damp or wet surfaces or liquids.
Do not store machine outdoors.
Replace worn or frayed power cord immediately.
TO AVOID ACCIDENTS
Except for hand-held cleaners, keep machine on floor - not on chairs, tables, etc.
Store machine promptly after each use to prevent accidents from tripping over power cord or machine.
Use machine and accessories only in manner intended by manufacturers.
The use of an extension cord is not recommended.
Page 3

IMPORTANT SAFETY INSTRUCTIONS
When using vacuum cleaner, basic precautions should always
be followed, including the following;
READ ALL INSTRUCTIONS BEFORE
___________________
USING THIS VACUUM CLEANER______________________
WARNING
To reduce the risk of fire, electric shock, or injury;
1. Do not leave vacuum cleaner when plugged in. Unplug from outlet when not in
use and before servicing.
2. To reduce the risk of electric shock - DO NOT use outdoors or on wet surfaces.
3. Do not allow to be used as a toy. Close attention is necessary when used by
or near children.
4. Use only as described in this manual. Use only manufacturer's recom
mended attachments.
5. Do not use with damaged cord or plug. If vacuum cleaner is not working as
it should, has been dropped, damaged, left outdoors, or dropped into water,
return it to an authorized Panasonic Service Center.
6. Do not pull or carry by cord, use cord as a handle, close a door on cord, or
pull cord around sharp edaes or corners. Do not run vacuum cleaner over
cord. Keep cord away from heated surfaces.
7. Do not unplug by pulling on cord. To unplug, grasp the plug, not the cord.
8. Do not handle plug or vacuum cleaner with wet hands.
9. Do not put any object into openings. Do not use with any opening blocked;
keep free of dust, lint, hair and anything that may reduce air flow.
10. Keep hair, loose clothing, fingers, and all parts of body away from openings
and moving parts.
11. Do not pick up anything that is burning or smoking, such as cigarettes,
matches or hot ashes.
12. Do not use without dust bag and/or filters in place.
13. Turn off all controls before unplugging.
14. Use extra care when cleaning on stairs.
15. Do not use to pick up fiammabte or combustible liquids such as gasoline or
use in areas where they may be present.
16. Always turn cleaner off before connecting or disconnecting the hose or
Power Nozzie.
SAVE THESE INSTRUCTIONS
THIS VACUUM CLEANER IS INTENDED FOR HOUSEHOLD USE ONLY
Notice: Before you plug in your Panasonic Vacuum Cleaner, make sure that the voltage indicated on the
rating plate located on the bottom of the vacuum cleaner is the same as your local supply.
-1-
Page 4
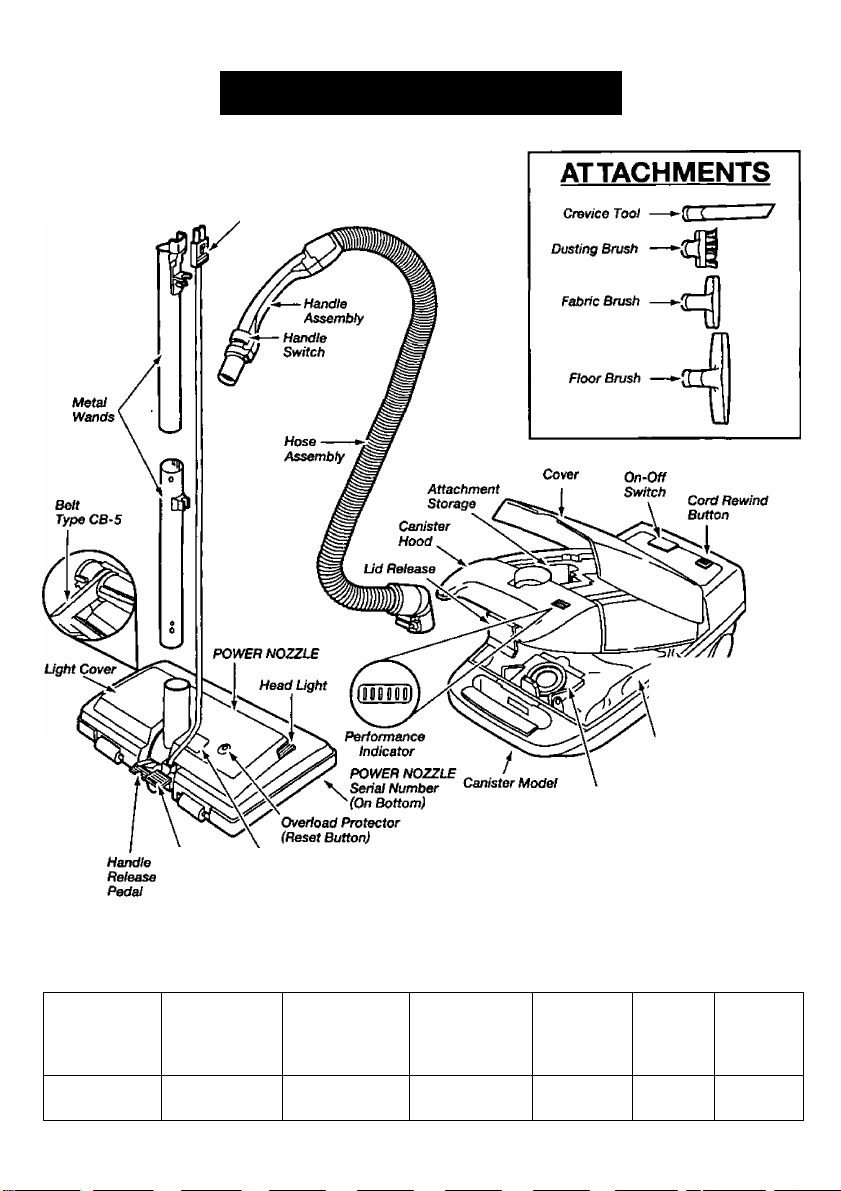
PARTS IDENTIFICATION
Power Nozzle
Power Cord
\
Power
Cord
S/jownJ
\/^Motor Safety Eitter
(Behind Dust Bag)
/
POWER
NOZZLE
Model/Serìal
Numbers
(On Bottom)
Pile Height pile Height
Pedal Indicator
Sena/ Numbers Bag Holder
(On SofiomJ
FEATURE CHART
(PANASONIC CANISTER TYPE VACUUM CLEANER)
FEATURES
Model
MC-V9620
POWER
120V AC(60Hz)
11.0 Amps
OVERLOAD
PROTECTOR
Yes
HEADLIGHT
Yes
-2-
CORD
LENGTH
(feet)
20 Yes
Dust Bag
Type C-5
Micron Bag
TOOLS
POWER
NOZZLE
Yes
Page 5

VACUUMCLEANER ASSEMBLY
A WARNING Electrical Shock Hazard.
• Do not plug into electrical supply until assembly is complete. Doing so
could result in electrical shock or injury.
• Do not get the power cord caught under the agitator when using the
cleaning tools. Keep cord out from under POWER NOZZLE when
vacuuming.
Before assembling your vacuum cleaner, be sure you have all parts shown on page 2.
WANDS
POWER NOZZLE
Slide wands
together until
wand button
snaps into
place.
POWER NOZZLE
1. Insert wands into POWER
NOZZLE until the wand button
snaps into the grooved slot.
Connect POWER NOZZLE plug and cord as
shown. Do not force. If hard to install, turn the
plug over and try again.
Slot
CANISTER
I.Open the canister
hood by gripping
the lid release. Pull
out and up to open
hood. See page 2
for location of lid
release.
2. Check the dust
bag. See page 8 for installation instructions.
3. Check motor safety filter.
See page 8 for installation instructions.
-3-
1
m
Motor
Fitter
m
•afety^
Page 6
ASSEMBLY (continued)
HOOD-TOOL STORAGE
It is normal for the canister hood to come off
when opened further than needed. Line up the
hinges, insert them, and close the hood to
repiace it.
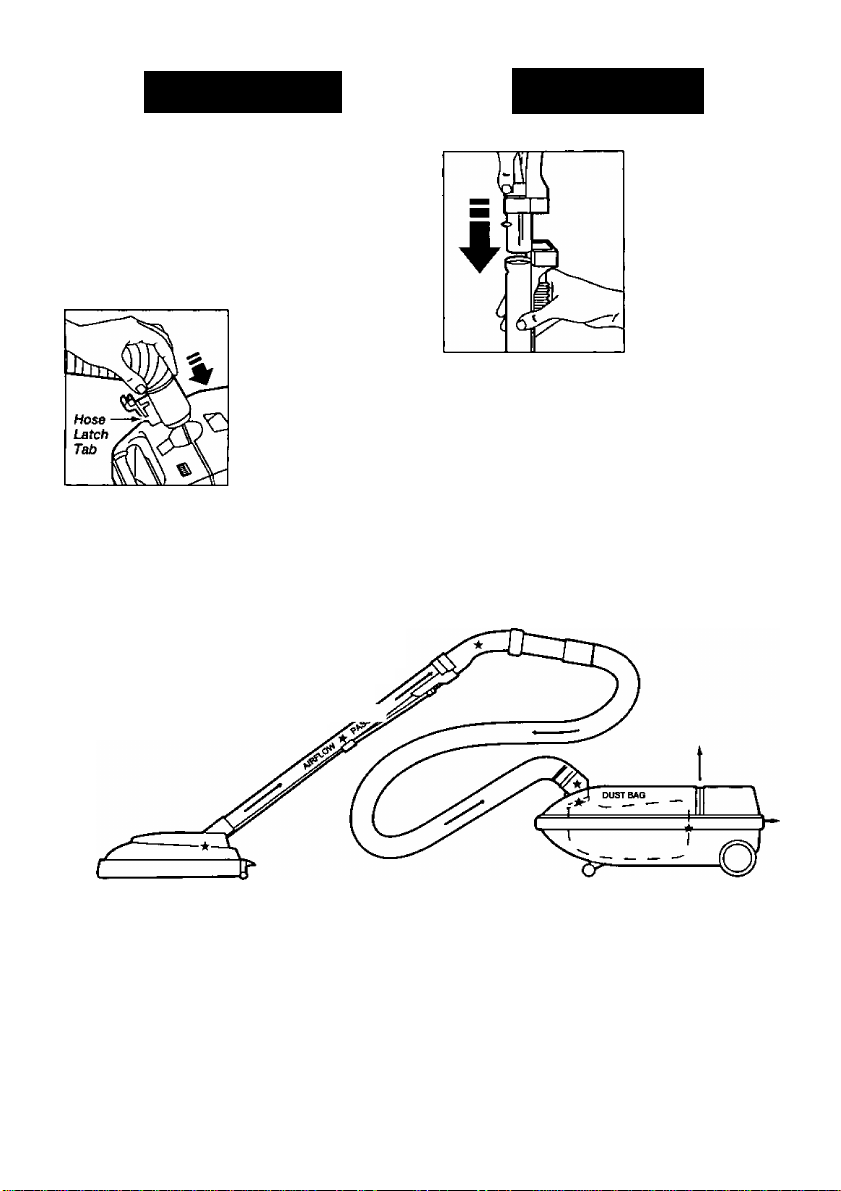
HOSE
1. Insert hose into
canister until it snaps
in place.
TO REMOVE: Uft
hose latch tab upward
and pull up on hose.
HOW YOUR VACUUM WORKS
The vacuum cleaner creates suction that picks up
dirt. Rapidly moving air carries the dirt to the dust
bag through the airflow passage. The dust bag
lets the air pass through, while it traps the dirt.
For best cleaning results, keep the airflow
passage open. Check the starred
areas occasionally for clogs.
2. Insert handle into
wand until lock
button snaps in
place. Be sure
hose is not
twisted.
TO REMOVE: Press
handle release
button and pull up
on handle.
-4-
Page 7

USE - HOW TO START
WARNING Personal Injury and Product Damage Hazard
• DO NOT plug in if switch is in ON position. Personal injury or damage could result.
• The cord moves rapidly when rewinding. Keep children away and provide a clear
path when rewinding the cord to prevent personal injury.
• DO NOT use outlets above counters. Damage to items in surrounding area could occur.
NOTE: To reduce the risk of electric shock, this vacuum cleaner has a polarized plug, (one blade is wider
than the other). This plug will fit in a polarized outlet only one way. If the plug does not fit fully in the
outlet, reverse the plug. If it still does not fit, contact a qualified eiectrician to instali the proper outlet.
DO NOT CHANGE THE PLUG IN ANY WAY.
TO REWIND: Remove the cord from the cord grip.
Unplug the cleaner. Hold the plug white rewinding
to prevent damage or injury from the moving cord.
Push cord rewind button. The cord will not rewind
until the cord rewind button is pushed.
4. Lower wand
from upright
position by
pressing on the
2. Snap
cord into
grip to
prevent
accidental
rewinding.
3. Plug cord into 120-volt outlet located near the
floor.
handle release
pedal.
5. Select a pile
height setting by
pressing the small
pedal on the rear.
The pile height
setting is shown in
the window.
SUGGESTED PILE HEIGHT SETTINGS
For best deep down cleaning, use the XLO setting. However, you may need to raise the height to make
some jobs easier, (such as scatter rugs and some deep pile carpets) and to prevent the vacuum cleaner
from shutting off. Suggested settings are: XLO- most carpets and bare floors. LO-low to medium pile.
MED-medium to deep pile. Hl-shag; deep pile; scatter mgs.
HANDLE SWITCH 2. There are two
used on uncarpeted floors. The Canister motor
only will run. Carpet position turns on both the
Canister motor and the Power Nozzle motor for
normal carpet cleaning.
-5-
positions on the handle.
Bare Floor/Off and
Carpet. Bare Floor/Off
position turns the
power bmsh off on the
Power Nozzle to be
Page 8

ATTACHMENTS AND USE
A
CAUTION
DO NOT attach or remove handle or wands while cleaner is ON. This could cause
sparking and damage the electrical contacts.
ATTACHMENTS ON HANDLE
NOTE: If the POWER
NOZZLE is attached, turn
cleaner off before removing
handle from wands.
1. Press lock button, then
pull to remove handle from
wand.
2. Slide attachments
firmly on handle as
needed (See chart on
this page.)
2. Remove POWER
NOZZLE plug and cord
from holders.
ATTACHMENTS
ON WANDS
NOTE: If the POWER NOZZLE is attached, turn
cleaner off before removing plug from wands.
1. To remove
wands from
POWER
NOZZLE, lock
wands in
straight-up
position.
4. Put attachments
on wands as
needed. (See chart
on this page.)
A
WARNING
Personal Injury Hazard
Use care if canister is placed on
stairs. If it falls, personal injury or
property damage could result.
ATTACHMENT USE
ATTACHMENT
DUSTING
BRUSH
CREVICE
TOOL
FABRIC
BRUSH
FLOOR
BRUSH
POWER
NOZZLE
&
FumlturQ*
Between
Cushions'* Drapes* Stairs
X X
X X
X X
CLEANING AREA
Bare
Floors
■
X X X
Carpeted
Floors
X
'Afways dean attachmenta before using on fabrics.
3. Steady POWER
NOZZLE with foot
and turn wands
counterclockwise
until lock button
disappears, then
pull wands out of
POWER NOZZLE.
Rugs Walls
X
X
-6-
Page 9

PERFORMANCE FEATURES
OVERLOAD PROTECTORPOWER NOZZLE
The overload protector stops the motor when the
brush jams and prevents belt breakage.
TO CORRECT PROBLEM;
1. Unplug electrical cord.
2. Check brush and brush support areas for
excessive lint build-up or jamming.
3. Clean jammed area. (See pages 9-10).
TO RESET; Press reset button on top of the
POWER NOZZLE. Plug In and turn on cleaner.
SUCTION
CONTROL
The suction
control Increases
or decreases the
suction for dif
ferent fabric and
carpet weights.
Opening the
control decreases suction for draperies and
lightweight rugs. Closing the control increases
suction for furniture and carpets.
HOSE SWIVEL
The hose swivel allows
the hose to turn without
moving the canister.
This is helpful for
cleaning in small areas.
Check hose for twisting
before pulling canister.
PERFORMANCE INDICATOR
When the unit is running
the tines in the indicator
windows will be clear If
there are no clogs. When
the lines turn completely
red there is a need to check the dust bag for
being full or the other areas that may be clogged.
See page 4.
NOTE: Red lines may appear when using
attachments or when cleaning new carpet, due to
reduced air flow by the attachments themselves
or new carpet fuzz filling the bag quickly.
VACUUMING TIPS
Suggested sweeping pattern.
For best cleaning action, the POWER NOZZLE should be pushed straight away from you and pulled
straight back. At the end of each pull stroke, the direction of the POWER NOZZLE should be changed to
point into the next section to be cleaned. This pattern should be continued across the rug with slow,
gliding motions.
Small areas can be
cleaned without moving
NOTE: Fast,
jerky strokes
do not
provide
complete
cleaning.
the canister. The hose
swivel allows the hose to
turn from side to side
while the canister stays
in place. Check hose for
twisting before pulling
canister.
Carpeted stairs
need to be
vacuumed
regularly. For
best cleaning
results, fully
close the
suction control.
-7-
Page 10

BAG CHANGING
For best cleaning results, the dust bag should
be changed often. Use Panasonic micron dust
bag type C-5
1, Unplug cord from
wall outlet.
2. Pull lid release
out and up, then lift
canister hood.
3. Remove cardboard
tab from red bag mount
by pressing away and
lifting up.
4. Pull bag out of the
red bag mount.
A
powder, fine dust, plaster, soot, new carpet lint, etc. can clog the bag and cause it
CAUTION
NEVER REUSE A DUST BAG. Very fine materials, such as carpet fresheners, face
to burst before it is full. Change bag more often when vacuuming these materials.
5. The red bag
mount will flip
forward after
removing bag. This
will prevent the lid
from closing until a
new bag Is Installed.
6. Raise red bag mount up.
7. Install bag into slots
pushing down until
the cardboard tab
locks into position and
the holes align.
8. Close and latch
canister hood.
9. Plug cord into wall outlet.
10. Bags are available at Panasonic Dealers and
Distributors.
MOTOR SAFETY FILTER CLEANING
Check motor safety filter occasionally and clean when dirty.
A
Do not operate the cleaner without the motor safety filter. Be sure the filter is dry
and properly installed to prevent motor failure and/or electrical shock.
WARNING
1. Unplug cord from
wall outlet and
remove bag.
2. Pull out safety
filter as shown.
3. Wash filter in
warm soapy water,
rinse, then air dry.
Electrical Shock Hazard
Do not clean in
dishwasher or
install while damp.
4. Snap filter back
into canister.
5. Install bag.
-8-
Page 11

CLEANING EXTERIOR AND ATTACHMENTS
1. Unplug cord from wall outlet. DO NOT drip water on cleaner.
2. Clean exterior using a clean, soft cloth that has been dipped in a solution of mild liquid detergent and
water, then wrung dry. Wipe dry after cleaning.
3. To reduce static electricity and dust build-up, wipe outer surface of canister and attachments.
4. Wash attachments in warm soapy water, rinse and air dry. Do not clean in dishwasher.
DO NOT USE ATTACHMENTS IF THEY ARE WET.
A
CAUTION
Attachments used in dirty areas (under a refrigerator) should not be used on other
surfaces until they are washed. They could leave marks.
POWER NOZZLE CARE
Always follow all safety precautions when cleaning and servicing the POWER NOZZLE.
A
Disconnect electrical supply before servicing or cleaning the unit. Failure to do so
could result in electrical shock or personal injury from cleaner suddenly starting.
WARNING
LIGHT BULB CHANGING
side of the light cover up. After freeing one side,
lift up to remove.
Electrical Shock Or Personal Injury Hazard
1.To remove
light cover
use a flat
blade screw
driver, gently
prying one
To replace cover, fit the rear tabs into the rear of
the housing and press the sides down until it
snaps in place.
2. Push in and turn
bulb to remove.
3. Replace the bulb
with a standard
bayonet type appliance
bulb rated 120V/15W.
A
CAUTION
Do not use a bulb rated over 15W. During extended use, heat from the bulb could
overheat the surrounding plastic parts.
BELT CHANGING AND AGITATOR CLEANING
Disconnect cleaner from electrical outlet. Check and remove hair, string and lint build-up frequently in
the POWER NOZZLE brush and agitator support areas. If build-up becomes excessive, disconnect POWER
NOZZLE from wand and follow the steps on page 10.
-9-
Page 12

TO REMOVE BELT
□
M
3. Turn POWER
NOZZLE over. To
remove cover, insert
screwdriver at cover
tabs on both sides and
twist to release tabs.
1. Remove light cover
and light bulb as
shown under “LIGHT
BULB CHANGiNG.”
2. Unscrew the two
(2) POWER NOZZLE
cover screws.
4. Turn POWER
NOZZLE right side up.
Press handle release
pedal and lower the
swivel. Tilt cover for
ward from back until
front snaps free.
TO REPLACE BELT
1. Slide washers
and agitator
supports onto
agitator assembly.
5. Carefully
insert and twist
screwdriver at
each agitator
support to free
brush from
base.
A
supports, a small metal washer on
each end may come off. DO NOT
lose these two metal washers.
CAUTION
When you remove the agitator
6. Remove worn belt.
7. Slide agitator
supports off to check
and clean agitator
support areas. See page
11 for picture of com
plete agitator assembly.
4. Line up front of
cover and base.
Rest cover on front
edge of base as
shown.
2. Install new
belt in belt
groove on the
agitator
assembly, then
over the motor
shaft. Be sure
belt is under
the belt guard.
3. Insert both front
support tabs into
the base slots. Then
snap agitator
supports into place.
See page 11.
5. Tilt cover to back.
Press cover firmly
until rear tabs snap
into place. Turn
POWER NOZZLE
over. Replace the
cover screws and
lower the pile height
adjustment rollers
Into place. Replace
light bulb and cover.
-10-
Page 13

BRUSH SERVICING
A
Disconnect electrical supply before servicing or cleaning the unit. Failure to do so
can result in electrical shock or personal injury from cleaner suddenly starting.
WARNING
Electrical Shock Or Personal Injury Hazard
TO CHECK
BRUSHES:
When brushes
are worn to
the level of the
base support
bars, replace
the brushes.
TO REPLACE BRUSH AGITATOR UNIT:
1. Remove POWER NOZZLE cover, belt and
agitator assembly. (See “TO REMOVE BELT" in
“BELT CHANGING AND AGITATOR CLEANING”
on pages 9-10).
2. Remove agitator supports, washers, screws,
end brush, brush sprocket, and brush sprocket
flange from ends oil agitator assembly.
3. Replace belt, agitator assembly and POWER
NOZZLE cover screws. (See “TO REMOVE
BELT" in “BELT CHANGING AND AGITATOR
CLEANING” on page 10).
-11-
Page 14

TROUBLESHOOTING
Review this chart to find do-it-yourself solutions for minor performance problems.
A
WARNING
Electrical Shock Hazard
Disconnect electrical supply before servicing or cleaning the unit. Failure to do so
could result in electrical shock or personal injury.
PROBLEM
Cleaner won’t start
Poor job of dirt pick-up.
Cleaner starts but
cuts off.
POWER NOZZLE will not
run when attached.
Cleaner picks up movable
rugs -OR- POWER
NOZZLE pushes to hard.
Light won’t work.
Cord won’t rewind.
Cleaner leaves marks
on carpet.
POSSIBLE CAUSE
1. Unplugged at wall outlet.
2. Tripped circuit breaker/blown
fuse at household service panel.
3. Loose hose electrical connections.
4. Tripped Overioad Protector
in POWER NOZZLE.
5. On-Off switch not turned ON.
1. Full or clogged dust bag
or airflow blockage.
2. Dirty motor safety filter.
3. Wrong pile height setting.
4. Open suction control,
5. Hole in hose.
6. Worn POWER NOZZLE brushes.
7. Clogged POWER NOZZLE nozzle.
8. Clogged handle or hose.
9. Canister hood open.
10. POWER NOZZLE not running.
1. Hose or hood electrical
connections.
2. Tripped Overload Protector
in POWER NOZZLE.
3. Motor too hot.
4. Full or clogged dust bag
orí '
1. POWER NOZZLE connections
unplugged.
2. Worn or broken belt,
3. Dirty brush or brush supports,
4. Tripped Overload Protector
in POWER NOZZLE.
1. Wrong pile height setting.
2. Suction too strong.
1. Burned out bulb. 1. Change bulb, (page 9).
1. Dirty power cord.
2. Cord locked in cord grip.
3. Cord jammed.
1. Wrong vacuuming pattern. 1. See “VACUUMING TIPS," (page 7).
POSSIBLE SOLUTION
1. Plug in firmly, push On/Off switch to ON.
2. Reset circuit breaker or replace fuse.
3. Reconnect hose ends, (page 4).
4. Clean bmsh and brush supports,
then reset, (pages 9,10,11).
5. Push On-Off switch to ON.
1. Change bag, (page 8} Clean
airflow passage, (page 4).
2. Clean filter, (page 8).
3. Adjust setting, (page 5).
4. Adjust control, (page 7).
5. Replace hose.
6. Change agitator unit, (page 11).
7. Clean POWER NOZZLE air passage.
6. Clean air passage.
9. Close and latch hood,
10. Check overioad protector button.
Reset POWER NOZZLE, (page 7).
1. Check connections, reconnect
hose ends, (page 4).
2. Remove any items that may be
caught or jammed, then reset,
If the cleaner starts and stops
again, clean brush and brush
supports, then reset, (pages 9,10,11),
3. Wait 20 minutes for motor to cool.
4. Change dust bag, (page 8) Clear
airflow blockage, (page 4). Walt
20 minutes for motor to cool.
1. Plug in firmly, (page 5).
2.&3. See “BELT CHANGING AND
BRUSH CLEANING.” (pages 9,10,11).
4. Check brush area for excessive
lint build-up or jamming. Clean
brush and brush supports, then
reset, (pages 9,10,11),
1. Adjust setting, (page 5).
2. Open suction control, (page 7),
1. Clean the power cord.
2. Remove cord from grip.
3. Pull out cord and rewind.
-12-
Page 15

NOTES
-13-
Page 16

NOTES
-14-
Page 17

NOTES
-15-
Page 18

NOTES
-16-
Page 19

WARRANTY
Panasonic Vacuum Cleaner
Limited Warranty
MATSUSHITA CONSUMER ELECTRONICS COMPANY OR PANASONIC SALES
COMPANY (collectively referred to as the warrantor) will repair this product with new or
refurbished parts free of charge, in the U.SA or Puerto Rico one (1) year from the date of
original purchase in the event of a defect in materials or workmanship. Excluded are the
following items which require normal replacement: Disposable Dust Bag, Filters, Belts,
Light Bulb, Agitator Brushes and Battery (if supplied).
Carry-in service in the continental U.S.A. can be obtained during the warranty period
from a Matsushita Services Company (MSC) Factory Servicenter. To locate an authorized
MSC Servicenter call 1 -800-545-2672 toll free. Service in Puerto Rico can be obtained
during the warranty period by calling the telephone numbers listed in the Servicenter
Directory. This warranty is extended only to the original purchaser. A purchase receipt or
other proof of date of original purchase will be required before warranty performance is
rendered.
This warranty only covers failures due to defects in materials or workmanship which
occur during normal use and does not cover damage which occurs in shipment or
failures which are caused by products not supplied by the warrantor, or failures which
result from accident, misuse, abuse, neglect, mishandling, misapplication, alteration,
modification of the product, or commercial use such as hotel, office, restaurant or rental
use of the product, or service by anyone other than an authorized Servicenter, or damage
that is attributable to acts of God.
LIMITS AND EXCLUSIONS: There are no express warranties except as listed above.
The warrantor SHALL NOT BE LIABLE FOR INCIDENTAL OR CONSEQUENTIAL
DAMAGES RESULTING FROM THE USE OF THIS PRODUCT, OR ARISING OUT OF ANY
BREACH OF THIS WARRANTY. ALL EXPRESS AND IMPLIED WARRANTIES,
INCLUDING THE WARRANTIES OF MERCHANTABILITY AND FITNESS FOR A
PARTICULAR PURPOSE, ARE LIMITED TO THE APPLICABLE WARRANTY PERIOD SET
FORTH ABOVE. Some states do not allow the exclusion or limitation of incidental or
consequential damages or limitations on how long an implied warranty lasts, so the
above exclusions or limitations may not apply to you.
This warranty gives you specific legal rights and you may also have other rights which
vary from state to state.
If a problem with this product develops during or after the warranty period, you may
contact your dealer or Servicenter. If the problem is not handled to your satisfaction, then
write to the Customer Satisfaction Center at the address listed on the back cover.
-17-
Page 20

WHAT TO DO WHEN SERVICE IS NEEDED
If your Panasonic Vacuum Cleaner needs service, look in the yellow pages of the
telephone book under “Home Appliance Service’’ for your nearest Matsushita
Service Company (“MSC”) Factory Servicenter, or MSC authorized Servicenter,
or call 1-800-545-2672, toll free to find a convenient servicenter. Do NOT send
the product to the Executive of Regional Sales offices. They are NOT equipped
to make repairs.
If you ship the product
Carefully pack and send it prepaid, adequately insured and preferably in thé original carton. Attach a postage-
paid letter to the outside of the carton, which contains a description of your complaint. DO NOT send the
product to the Executive or regional Sates office. They are NOT equipped to maire repairs.
Customer’s Record
Model No.
Serial No.
Dealer's Address
Date of Purchase
Consumers requiring product information
or operating assistance with a consumer
product should contact:
CUSTOMER SATISFACTION
CENTER
DEPARTMENT 2F-3
50 Meadowlands Parkway
Secaucus, N.J. 07094
(201) 348-9090
MATSUSHITA CONSUMER ELECTRONICS
COMPANY, DIVISION OF MATSUSHITA ELECTRIC
CORPORATION OF AMERICA
One Panasonic Way
Secaucus, New Jersey 07094
C01ZGE00U00
Dealer’s Name
Matsushita Services Co.
DIAL TOLL FREE
1-800-545-2672
24 hours a day,
7 days a week
PANASONIC SALES COMPANY, DIVISION OF
MATSUSHITA ELECTRIC OF PUERTO RICO INC.
AVE. 65 de Infantería, Km. 9.5
San Gabriel Industrial Park
Tel. (809) 750-4300 Fax. (809) 768-2910
Carolina, Puerto Rico 00985
Printed in U.S.A.
(“PSC”)
 Loading...