

Panasonic MC-V5715 User Manual [en, es]

m—
Operating
Instructions
VACUUM CLEANER
MC-V5715
Panasonic
B4fcr9 operating your vacuum claanar, plaaaa raad thaaa Instructions eompiatety:

CONSUMER INFORMATION
Please read IMPORTANT SAFETY INSTRUCTIONS on page 4 before
use. Read and understand all instructions.
TO OUR VALUED CUSTOMER
We are very pleased to welcome you to the Panasonic family of products. Thank you for
purchasing this product. Our intent is that you become one of our many satisfied customers.
Proper assembly and safe use of your vacuum cleaner are your responsibilities.
Your cleaner is intended only for household use. The cleaner should be stored in a dry,
indoor area. Read the Operating Instructions carefully for important use and safety infor
mation.
Special care Is required when vacuuming certain types of carpet or floor covering. Always
check the caroet or floor covering manufacturer's recommended cleaning Instructions
before vacuuming.
PLEASE PAY CLOSE ATTENTION TO THE
WARNING AND CAUTION STATEMENTS THAT
ARE FOUND THROUGHOUT THIS MANUAL.
WARNING statements are designed to aiert you
to the possibility of personal injury, loss of human
A
WARNING
life, and/or damage to the vacuum cieaner and/or
personal property if the instructions given are not
foiiowed.
CAUTION statements are designed to alert you
A
A
TO AVOID ELECTRICAL SHOCK
Never vacuum damp or wet surfaces or liquids.
DO NOT store machine outdoors.
Replace worn or frayed power cord immediately.
TO AVOID ACCIDENTS
Except for hand-held cleaners, keep machine on floor - not chairs, tables, steps, stairs, etc.
Store machine promptly after each use to prevent accidents stx:h as tripping over power cord or machine.
Use machine and accessories only in a manner intended by the manufacturer.
The use of an extension cord Is not recommended.
<91997 Matsushita Electric Industrial Co., Ltd. All rights reserved.
CAUTION
WARNING
to the possibility of damage to the vacuum clean
er and/or personal property if the instructions
given are not foiiowed.
-2-

TABLE OF CONTENTS
CONSUMER INFORMATION...................................................................................... 2
IMPORTANT SAFETY INSTRUCTIONS
PARTS IDENTIFICATION ............................................................................................ 5
Feature Chart ......................................................................................................... 5
TO ASSEMBLE CLEANER ............................................................................................ 6
Attaching Handle to Vacuum Cleaner .............................................................. 6
Using the Cord Hook............................................................................................. 6
Attachment Assembly, Tools-on-Board............................................................ 7
SPECIAL FEATURES OF CLEANER ............................................................................. 8
Automatic Self Adjusting Nozzle........................................................................ 8
Edge Cleaning Feature.......................................................................................... 8
Motor Protector..................................................................................................... 8
TO OPERATE CLEANER................................................................................................ 9
Power Cord ............................................................................................................. 9
On/Off Switch......................................................................................................... 9
Handle Adjustments ............................................................................................. 9
Attachments.......................................................................................................... 10
ROUTINE CARE OF CLEANER ................................................................................ 11
Changing the Dust Bag ................................................................................ 11-12
Cleaning Secondary Foam Filter ...................................................................... 12
Replacing Electrostatic Exhaust Filter............................................................. 12
Removing/lnstalling the Lower Plate.............................................................. 13
Replacing the Headlight Bulb .......................................................................... 13
Replacing the Belt................................................................................................ 14
Cleaning the Agitator
L Replacing the Agitator............................................................................................ 15
Cleaning Exterior and Attachments
Removing Clogs................................................................................................... 16
........................................................................................
....................................................................
...............................................................
4
14
16
BEFORE REQUESTING SERVICE............................................................................... 17
NOTES ......................................................................................................................... 18
WARRANTY................................................................................................................. 19
WHAT TO DO WHEN SERVICE IS NEEDED
..........................................................
20
- 3-

IMPORTANT SAFETY INSTRUCTIONS
When using vacuum cleaner, basic precautions should always
be followed, including the following:
READ ALL INSTRUCTIONS BEFORE
USING THIS VACUUM CLEANER
WARNING
To reduce the risk of fire, electrical shock, Injury:
1. DO NOT leave vacuum cleaner when plugged in. Unplug from outlet when
not in use and before servicing.
2. To reduce the risk of fire, electric shock - DO NOT use outdoors or on wet
surfaces.
3. DO NOT allow to be used as a toy. Close attention is necessary when
used by or near children.
4. Use only as described in this manual. Use only manufacturer's recom
mended attachments.
5. DO NOT use with damaged cord or plua. If vacuum cleaner is not working
as it should, has been dropped, damaged, left outdoors, or dropped into water,
return it to an authorized Panasonic Servicenter.
6. DO NOT pull or carry by cord, use cord as a handle, close door on cord, or
pull cord around sharp edges or corners. DO NOT run vacuum cleaner over
cord. Keep cord away from heated surfaces.
7. DO NOT unplug by pulling on cord. To unplug, grasp the plug, not the
cord.
8. DO NOT handle plug or vacuum cleaner with wet hands.
9. DO NOT put any objects into openings. DO NOT use with any opening
blocked; keep free of dust, lint, hair, and anything that may reduce air flow.
10. Keep hair, loose clothing, fingers, and all parts of body away from openings
and moving parts.
11. DO NOT pick up anything that is burning or smoking, such as cigarettes,
matches, or hot ashes.
12. DO NOT use without dust bag and/or filters in place. ,
13. Turn off all controls before unplugging.
14. Use extra care when cleaning on stairs.
15. DO NOT use cleaner to pick up flammable or combustible liquids such as
gasoline or use in areas where they may be present.
SAVE THESE INSTRUCTIONS
THIS VACUUM CLEANER IS lIVTENDED
FOR HOUSEHOLD USE ONLY
Note: Before you plug in your Panasonic vacuum cleaner, make sure that the voltage
indicated on the rating plate located at the back of the vacuum cleaner is the same as
your local supply.
-4-
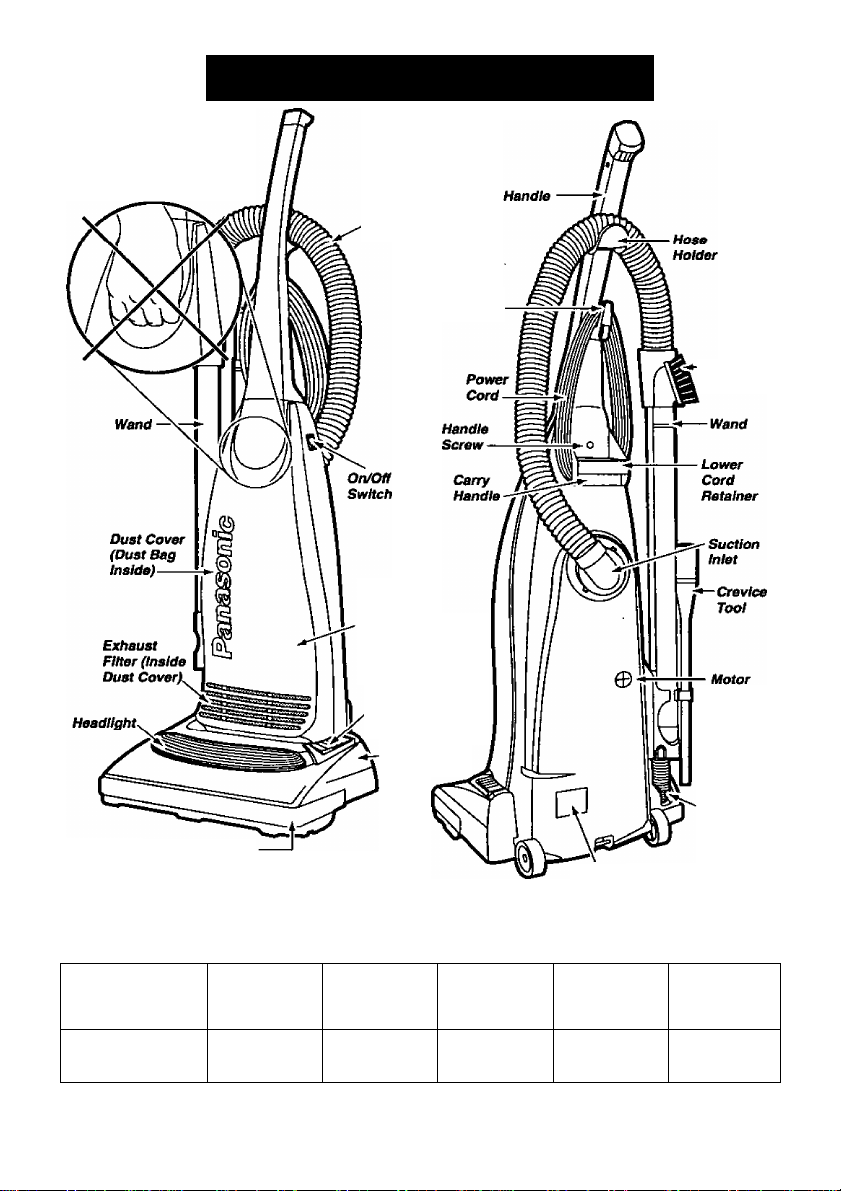
PARTS IDENTIFICATION
Do Not Carry Unit
By the Dust Cover
(see illustration)
Hose
Secondary
Filter (Inside
Dust Cover)
Quick
Release
Cord Hook
■ Dusting
Brush
Foot Rest For
Handle Release
Nozzle
Furniture Guard
FEATURE CHART
(PANASONIC UPRIGHT VACUUM CLEANER)
\™rURES
Model
MC-V5715
POWER DIRT
120V.ACÍ60HZ)
12.0 Amps
SENSOR
No
HEADUGHT CORD
Yes 25 Ft. Yes
- 5
Rating
Plata
LENGTH
Protector
Short
Hose
TOOLS
-ON-
BOARD
TO ASSEMBLE CLEANER
A
DO NOT plug Into electrical supply until assembly Is complete. Failure to do so could
result In electrical shock or injury.
WARNiNG
Electrical Shock Hazarti.
ni^6H№m0fEi10iA^^
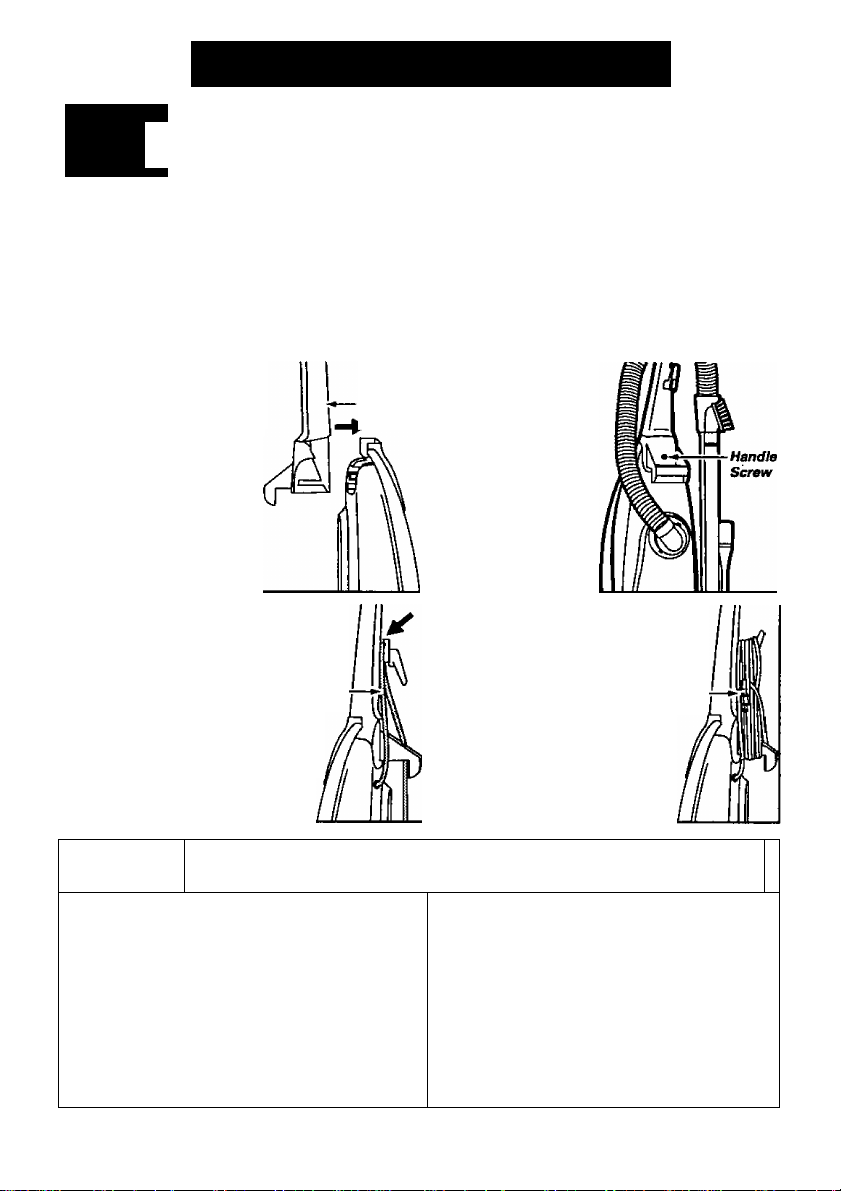
The vacuum cleaner main body and handle are packed separately.
1. The handle screw has
been installed for shipping
purposes. Please remove
the screw before inserting
the handle. Insert the
handle as shown in the
Illustration.
3. There is a recessed area
between the upper cord hook base
and the handle that is designed
to secure the power cord dur- po,rer
ing vacuuming. cord -
Always push the power cord down
into this recessed area to help
keep the power cord from hang
ing near the nozzle and being
damaged by the agitator.
Handle
2. Insert the screw
that you have
removed. Be sure
the screw is tight
ened, but not overtightened.
4. Loosely wrap the power cord
around the quick release cord
hook and the lower
cord retainer. Secure Ratalner
the plug head to the (Plug Head)
cord by pushing the
power cord into the retainer
on the plug head.
USINGTHE CORD HOOK
1. The upper cord hook has a ^
quick-release action. To
release the power cord, rotate 1
the hook downward and the j^t—cord
complete power cord will jmt&^Hook
drop off the hook for immedi- m
ate use.
;
2. DO NOT unplug the
power cord by pulling on /
the cord. Grasp the plug
head and pull to unplug the |V[jM
vacuum cleaner. j
Return the hook to the 'am
upright position before //7-J
attempting to rewind the //
cord. I j
-6-
Ml
1
?AWáCHMEI«ASSEMBLY.T(^ls-on-Board
■ . u .
A
DO NOT get the power cord caught under the nozzle when using the vacuum or
attachments as it can be damaged by the agitator as it revolves.
CAUTION
ATTACHMEt^
Jjj*
---------
Wands (2)
Dusting
Brush —
Crevice
Wand ^ Tab
L
■^-rVia'
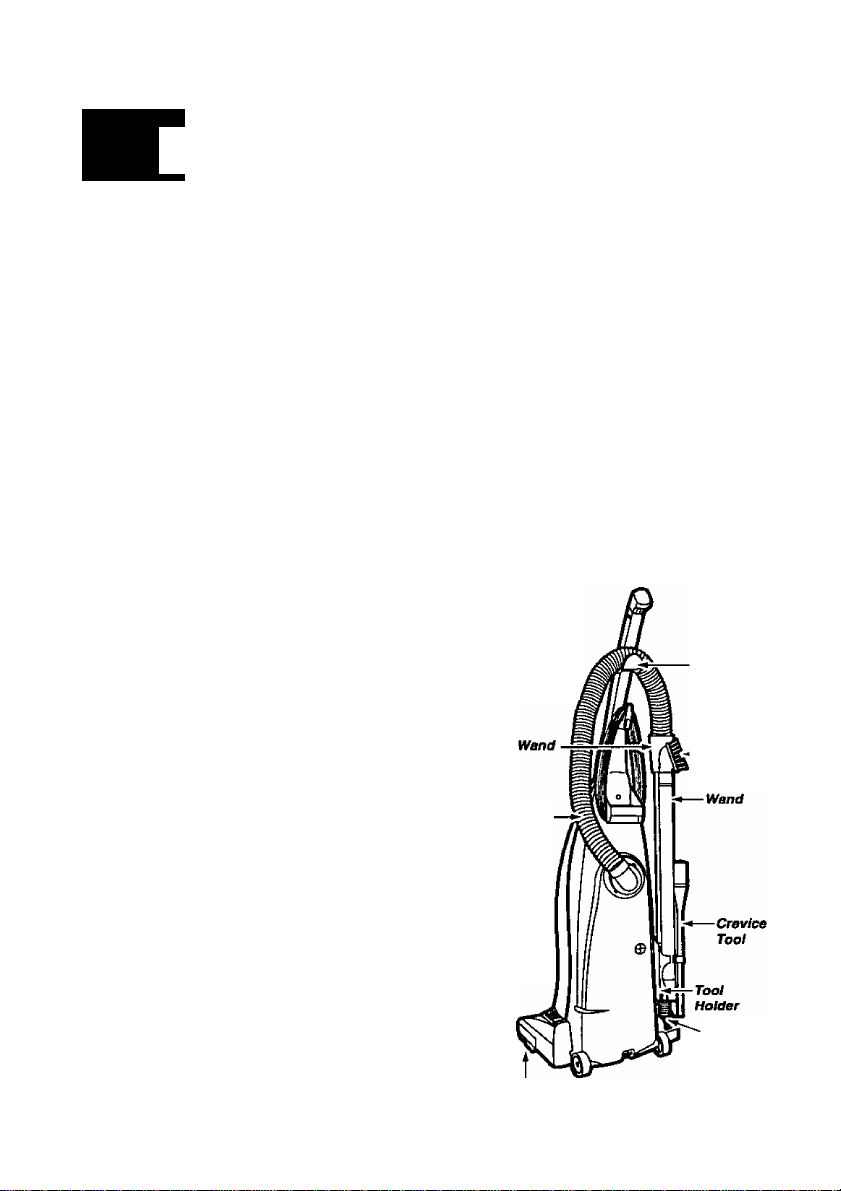
The attachments should be conveniently positioned on the side of the
cleaner for easy access. Assemble the hose arid attachments to the
cleaner as follows:
Place the hose in back of the handle on the hose holder. Attach the
wand to the hose by aligning the two (2) raised tabs on the wand
with the “J" slots in the hose. After guiding the tabs along the
grooves, twist to lock in place.
Place the wand in the front slot of the tool holder, twisting
and pushing down over the short hose to assure a good
connection.
Store the other wand in the round rear slot of №e tool
holder. Insert the dusting brush Into the top of the wand
as shown.
Place the crevice tool into the rectangular rear slot of the tool
holder.
Refer to the illustration in the PARTS IDENTIFICATION section
for correct attachment storage.
Raised
MJ.
Tool
Hose
Hose
Holder
Dusting
Brush
- 7 -
-----
Agitator
(Underneath)
Short
Hose
SPECIAL FEATURES OF CLEANER
№DIMAW3EII^^
Your Panasonic upright vacuum cleaner is
designed with an automatic self adjusting
nozzle. No manual adjustments are
required. The height of the nozzle is
instantiy and automatically adjusted to any
carpet pile height. This self adjusting
feature allows the nozzle to float evenly
over all carpet pile sur^ces.
Yi':-/'■'^ .¿Í»:. Í ■:
Nozzle
Deep Pile Carpet
Shallow Pile Carpet
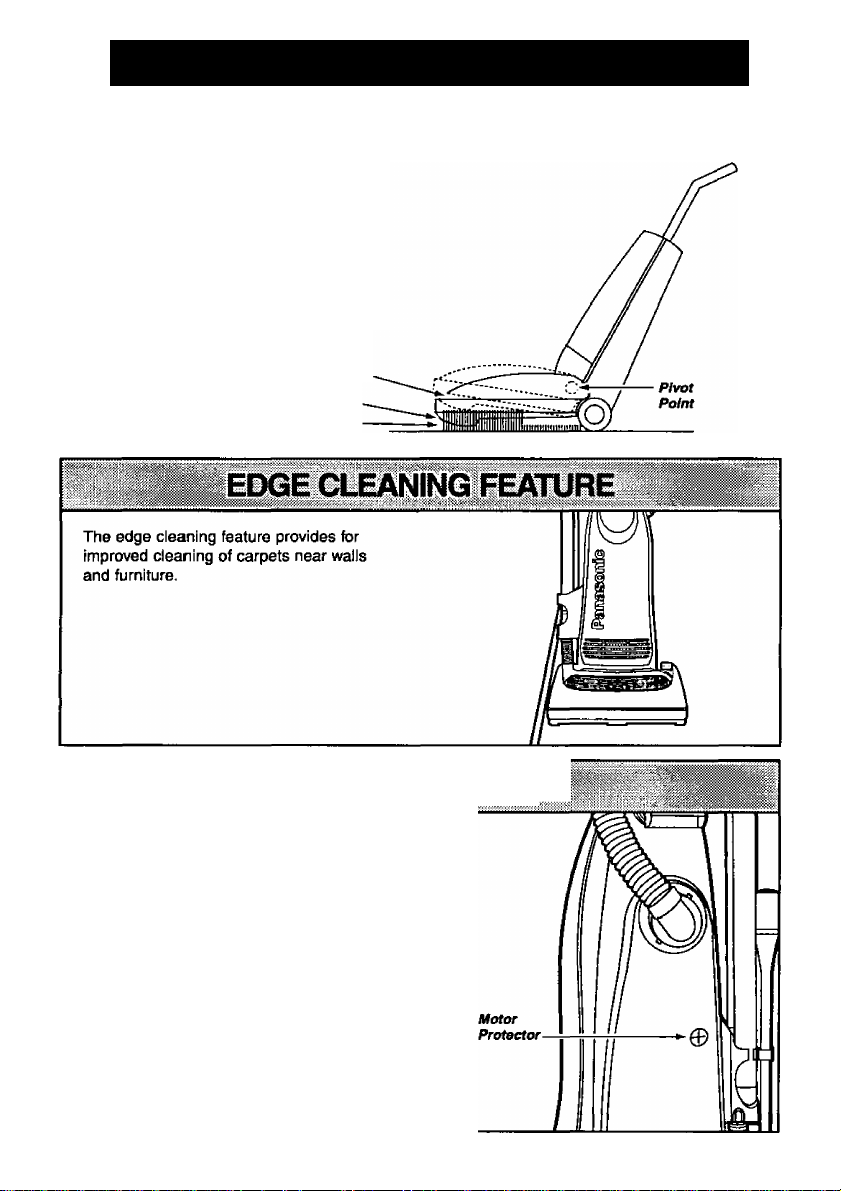
MOTOR PROTECTOR
This vacuum has a motor protector by-pass valve
which automatically opens to provide cooling air to
the motor when a dog prevents the normal flow of air
to the motor. The by-pass valve opens to prevent üie
motor from overheating and possibly causing
damage to the vacuum. When open, a change of
sound will be noticed as air rushes through the valve
opening. If this occurs, turn the vacuum off and
unplug the power cord from the outlet. Check for
clogs as described in the REMOVING CLOGS
section.
The motor protector by-pass valve may open when
using attachments or when cleaning new carpet, due
to reduced air flow by the attachments themselves or
by new carpet fuzz filling the bag quickly.
8-
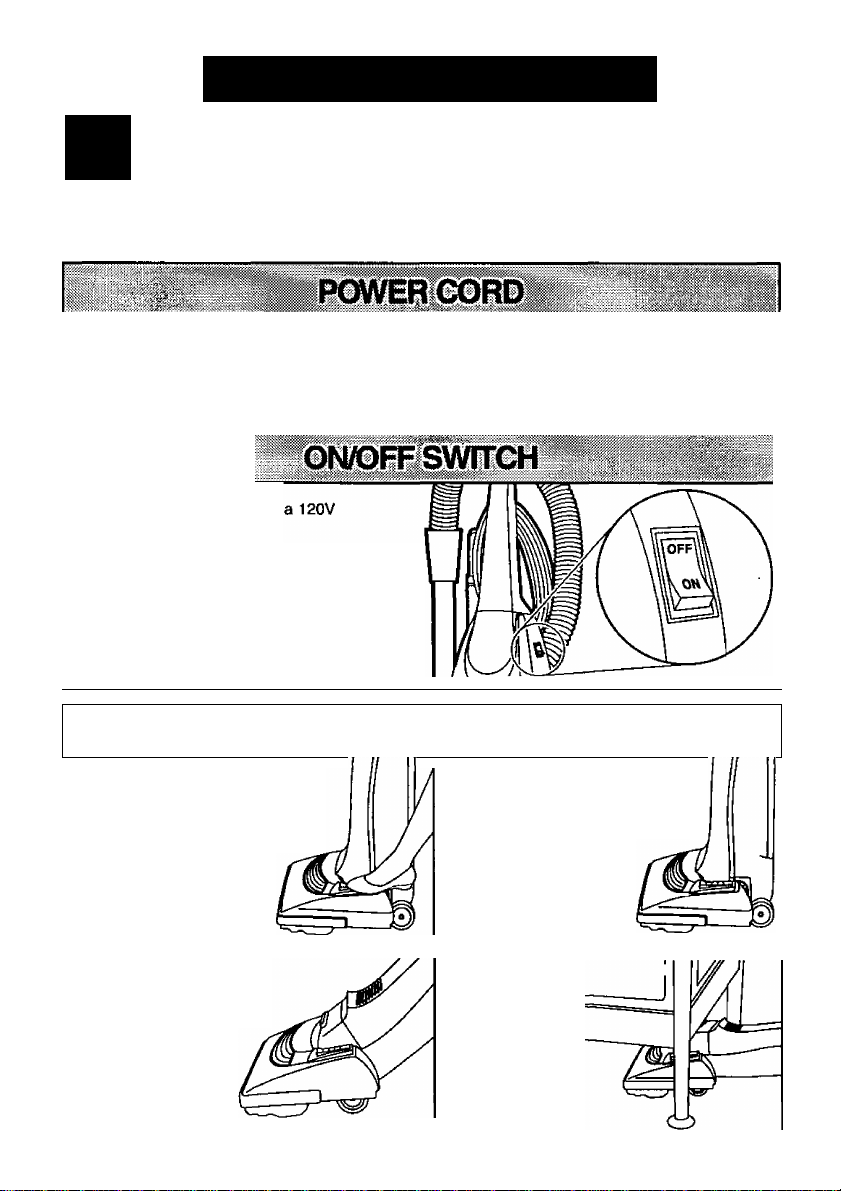
TO OPERATE CLEANER
A
DO NOT use outlets above counters. Damage to items in the surrounding areas could
occur. Be sure the switch is in the off position while plugging the cord in.
NOTE: To reduce the risk of electrical shock, this vacuum has a polarized plug, one blade is wider
than the other. This plug will fit in a polarized outlet only one way. If the plug does not fit fully in
the outlet, reverse the plug. If it still does not fit, contact a qualified electrician to install the proper
outlet. DO NOT CHANGE THE PLUG IN ANY WAY.
1. Plug the power cord into
outlet.
2. To Start the vacuum cleaner, push
the switch to the ON position.
3. To stop the vacuum cleaner, push
the switch to the OFF position.
The handle may be lowered
to any position required. Just
step on the area as indicated by
the illustration and lower
the handle as desired.
CAUTION
HANDLE ADJ
màmimm-ii'A
lUSTMENTS
1. Upright position
The handle locks in this position
for storage. The handle
should always be in an
upright position when
the attachments are
used.
2. Middle position
This position is for normal
cleaning.
3. Low position
This position
is used for
cleaning under
furniture.
- 9 -

A
DO NOT place hands or feet underneath the unit when using the attachment toois. The
agitator begins to revolve rapidly when using attachments.
WARNING
Personal Infury Hazard when Using Attachments.
A
When using the attachments, the agitator begins rotating. DO NOT aiiow the deaner to
remain in Just one place for a period of time, as the agitator may damage the floor sur
face. Avoid piacing the cleaner on furniture, the fringed area of rugs, deep pile caipetIng, or carpeted stairs. The ideal position for the deaner when using attachments is
for the unit to be on a level area with tite handle in the full uoriaht position. See the
HANDLE ADJUSTMENTS section.
To remove the wand from the short hose, grasp the top part of the wand, see
illustration, and twist as you pull up. Once the wand has been removed it
can be used as is or the extension wand can be used for further reach.
The crevice tooi or dusting brush can be attached to the hose or the end
of the wand. When connecting the crevice tool or dusting brush, always
twist as you push down. If additional reach is required, the dusting
brush can be attached to the end of the crevice tool by simply slid
ing it over the narrow end of the crevice tool.
When using the attachments DO NOT overextend your reach
with the hose as it could tip the cleaner over.
To store attachments place the hose in back of the handle on the
hose holder. Return the wand to the tool holder, twisting as you push
down to connect it to the short hose. Place the extension wand in the
tool holder. Store the remaining tools in their proper positions.
CAUTION
HO30'
-Agitator
(Underneath)
Hose
Holder
Dustirtg
Brush
Tool
Holder
Short
Hose
ATTACHMENT USE
CLEANING AREA
ATTACHMENT Furniture*
CREVICE TOOL X X X
DUSTING BRUSH ^ X
*Always dean attachments before using on fabrics. Attachments used in dirty areas, such as
under a refrigerator, should not be used on other surfaces until they are washed. They could leave
marks. See the CLEANING EXTERIOR AND ATTACHMENTS section.
Between
Cushions*
Drapes* Stairs Walls
X X
X X
X
- 10 -
ROUTINE CARE OF CLEANER
Performing the following tasks will keep your new Panasonic vacuum cleaner operating at peak
performance levels and will insure these high levels for years to come. Check the BEFORE
REQUESTING SERVICE section in this manual for recommendations on performing some of
these tasks to help solve various problems that may occur.
A
WARNING
Electrical Shock or Personal Injury Hazard.
Always disconnect electrical supply before performing any service and/or cleaning of the
vacuum cleaner. Failure to do so could result in electrical shock or persona/ injury from
cleaner suddenly starting. DO NOT operate the cleaner without the dust bag and secondary
filter. Be sure the dust bag and secondary filter are properly installed. Failure to do so
could result In motor failure.
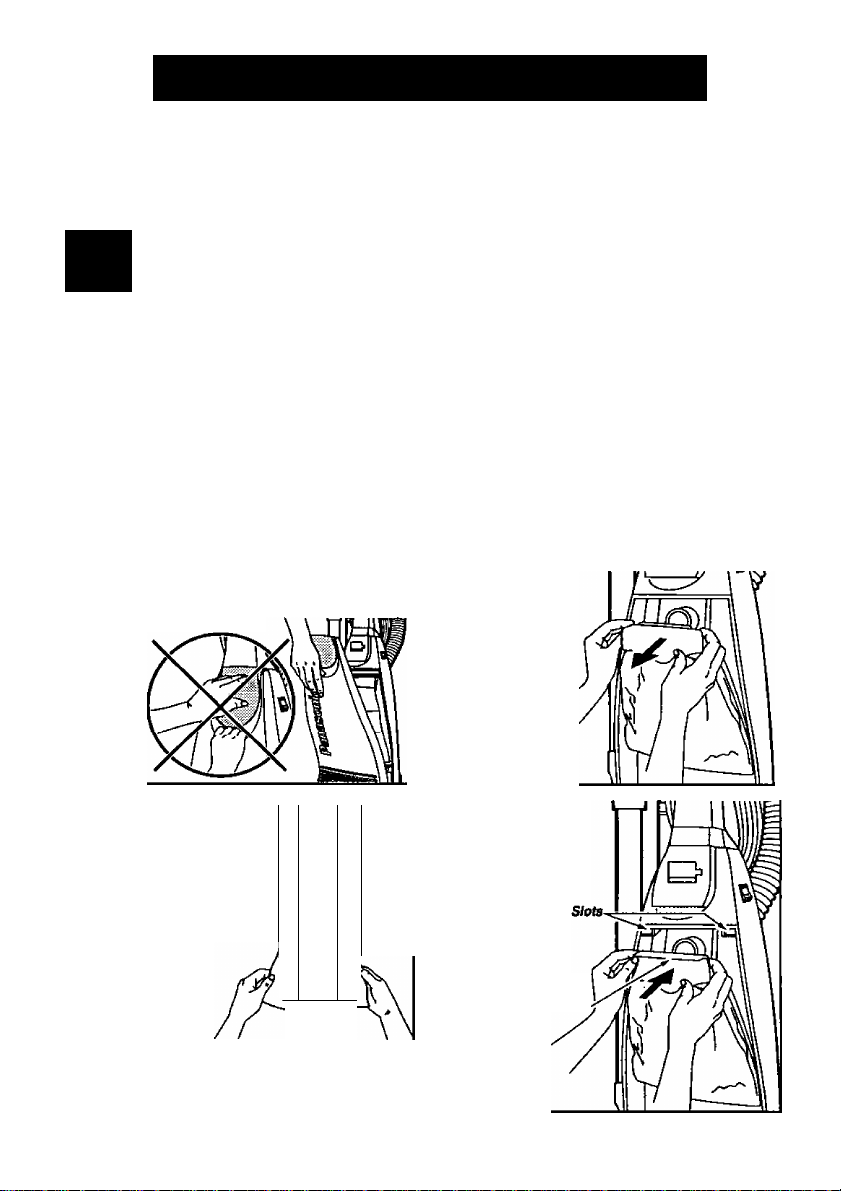
CHANGING THE DUST BAG
Always operate the vacuum with a genuine Panasonic Type U3 Standard or U6
Electrostatic dust bag installed. Panasonic dust bags may be ordered through any
authorized Panasonic dealer.
1. Pull outward on the dust cover grip,
located near the top of the dust cover and
remove the cover.
3. Spread out the end
of the new dust bag.
NOTE: Pull carefully so
as not to tear the bag at
the folds.
r ■
-
■
CX)
□ 0
m
CD
■
2. To remove the
dust bag, grasp the
cardboard portion of
the dust bag and
pull It out.
4. Fold the new dust
bag back to clear the
slots as shown.
Failure to do so will
prevent the dust
cover from clos
ing properly.
Attach the new
dust bag onto the
bag holder by
holding the
cardboard por
tion and pushing
back as
illustrated.
- 11 -
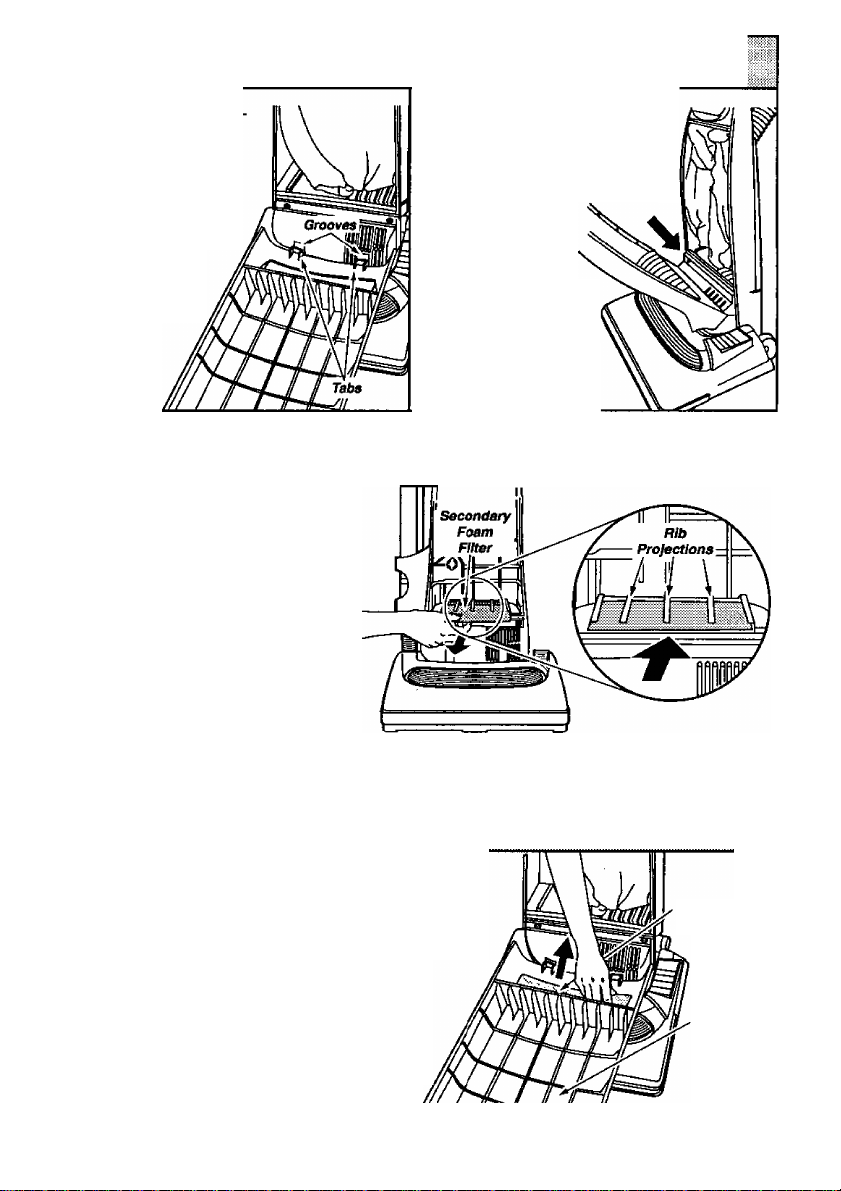
5. Reinsert the tab pro
vided on the end of the
dust cover into the
grooves on the dust
compartment to allow
the cover to rotate
ciosed.
NOTE: The dust
cover must be
completely and
correctly
installed for
proper
operation.
CLEANII
A secondary foam filter protects the
motor from dirt. When installing a new
dust bag, check this filter. Accumulated
dirt in the dust compartment will collect
on the filter and may restrict motor per
formance. When the filter becomes
dirty, pull it from the bottom of the dust
compartment and clean by rinsing with
water. When dry, slide the filter back
into place, insert the secondary foam
filter with a ruler or something flat, it
should be fully inserted under the plas
tic rib projections all the way to the
rear.
6. Rotate the dust cover up into
the closed position and press
into place.
NOTE: The dust
bag should not
be caught
between the
lower edge of
the dust cover and
the gasket as indicat
ed by the arrow in
the illustration.
.
:CX)NDARY FOAM RLTER
^ S:«*: * X
REPLAaNQ ELECTROSTATIC EXHAUST RLTER
The Electrostatic exhaust filter is located inside the dust
cover. The purpose of this filter is to remove dust and dirt
from the recirculated air. When installing a new dust bag,
check ttiis filter. When the filter becomes dirty, remove it
from the bottom of the dust cover by pulling it straight
up. Replace the filter. DO NOT CLEAN WITH
■
£jr/)austF/№r
(Electrostatic)
WATER*. Place the new filter back into the dust
cover with the six (6) slots in the filter aligned with
the six tabs on the dust cover, and making sure
the rough side is facing up.
Dust Cover
*This filter cannot be cleaned and should
be replaced at least once each year if the
cleaner is used at least one hour each week.
- 12 -
 Loading...