

Page 1
Operating Instructions
Vacuum Cleaner
MC-E7001, MC-E7002
For Accessories and Consumables visit our web site at
www.panasonic.co.uk
(for customers in the UK only)
Customers Care Tel. No. 0870 900 9043
Table of contents Page
• Part location and how to use (diagrams) . . . . . . . . . . . . . . . . . . . . . . . . . . . . . . . . . . . . . . . . . . . . . . . . . . . . 2 / 3
• Information for your safety . . . . . . . . . . . . . . . . . . . . . . . . . . . . . . . . . . . . . . . . . . . . . . . . . . . . . . . . . . . . . . . . . . . . . . . . . 4
• Important for users in the UK. . . . . . . . . . . . . . . . . . . . . . . . . . . . . . . . . . . . . . . . . . . . . . . . . . . . . . . . . . . . . . . . . . . . . 4
• How to use . . . . . . . . . . . . . . . . . . . . . . . . . . . . . . . . . . . . . . . . . . . . . . . . . . . . . . . . . . . . . . . . . . . . . . . . . . . . . . . . . . . . . . . . . . . . 5
• Maintenance . . . . . . . . . . . . . . . . . . . . . . . . . . . . . . . . . . . . . . . . . . . . . . . . . . . . . . . . . . . . . . . . . . . . . . . . . . . . . . . . . . . . . . . . . . 6
• What to do if your appliance does not work . . . . . . . . . . . . . . . . . . . . . . . . . . . . . . . . . . . . . . . . . . . . . . . . . . . 6
• What to do when the suction performance reduces? . . . . . . . . . . . . . . . . . . . . . . . . . . . . . . . . . . . . . . .6
• Vacuum Cleaner Consumables /Accessories . . . . . . . . . . . . . . . . . . . . . . . . . . . . . . . . . . . . . . . . . . . . . . . . 7
• Specifications . . . . . . . . . . . . . . . . . . . . . . . . . . . . . . . . . . . . . . . . . . . . . . . . . . . . . . . . . . . . . . . . . . . . . . . . . . . . . . . . . . . . . . . . . 8
Page 2
– 2 –
8
1
2
10
3
13
12
11
8
9
9
Carpet
Hard floor
7
6
2
3
1
7
7
MC-E7001 MC-E7002
14 15
MC-E7002 MC-E7001
11
12
10
13
16
17
18
22
24
25
23
19
26
21
20
Part location and how to use (diagram)
Page 3
– 3 –
14 15
MC-E7002 MC-E7001
11
12
10
13
16
17
18
22
24
25
23
19
26
21
20
Page 4

– 4 –
Please read all the following information,
which contains important instructions for
the safety, the use and the maintenance
of the appliance.
This appliance complies with the following EC
Directives: 73/23/EEC and 89/336EEC.
■ This appliance is not intended for use by
young children or infirm person without
supervision.
■ Do not use the appliance if the mains lead is
damaged or faulty.
■ This appliance is provided with a mains lead
and if this becomes damaged, it must be
repaired by an Authorised Service Centre or
a qualified person in order to avoid any
hazard.
■ Unplug from the socket when not in use and
before cleaning the appliance or
undertaking maintenance operations.
■ If no dust bag is inserted, the cover
cannot be closed. Please do not close it
by force!
■ Do not vacuum flammable or explosive
substances(liquids or gases).
■ Do not vacuum hot ash, embers or sharp
objects.
■ Do not vacuum water or other liquids.
■ This cleaner includes an automatic thermal
safety device which automatically turns off
the power if the suction inlet, hose or
extension wand becomes clogged. If this
occurs, disconnect from the mains outlet,
remove the material responsible for the
clogging and then wait about 10 minutes,
before operating your cleaner again.
The wires in the mains lead of this appliance
are coloured in accordance with the following
code:
BLUE-neutral BROWN - live
As the colours of the wires in the mains lead of
this appliance may not correspond with the
coloured markings identifying the terminals in
your plug,
PROCEED AS FOLLOWS:
The wire which is coloured BROWN must be
connected to the terminal which is marked L
or coloured RED.
The wire which is coloured BLUE must be
connected to the terminal which is marked N
or coloured BLACK
VERY IMPORTANT:
Neither wire is to be connected to the earth
terminal of a 3 pin plug.
If a 13 amp plug is fitted, fit a 13 amp BS 1362
fuse.
If any other type of plug is used, protect with a
15 amp fuse at the distribution board.
For appliances which come with mains lead
and plug moulded on : the plug moulded on to
the cord incorporates a fuse.
For replacement use a 13 amp BS 1362 fuse.
Only ASTA approved or certified fuses should
be used.
The fuse cover/carrier must be replaced in the
event of changing the fuse.
The plug must not be used if the fuse
cover/carrier is lost. A replacement cover/
carrier must be obtained from authorised
electrical goods retailers.
WARNING!
Should it become necessary to replace the
moulded on plug then the detective plug
should be destroyed to avoid any possible
shock hazard that could occur should such a
plug be inserted into a 13 amp socket
elsewhere in the house.
Information for your
safety
Important for users in
the UK
Page 5

– 5 –
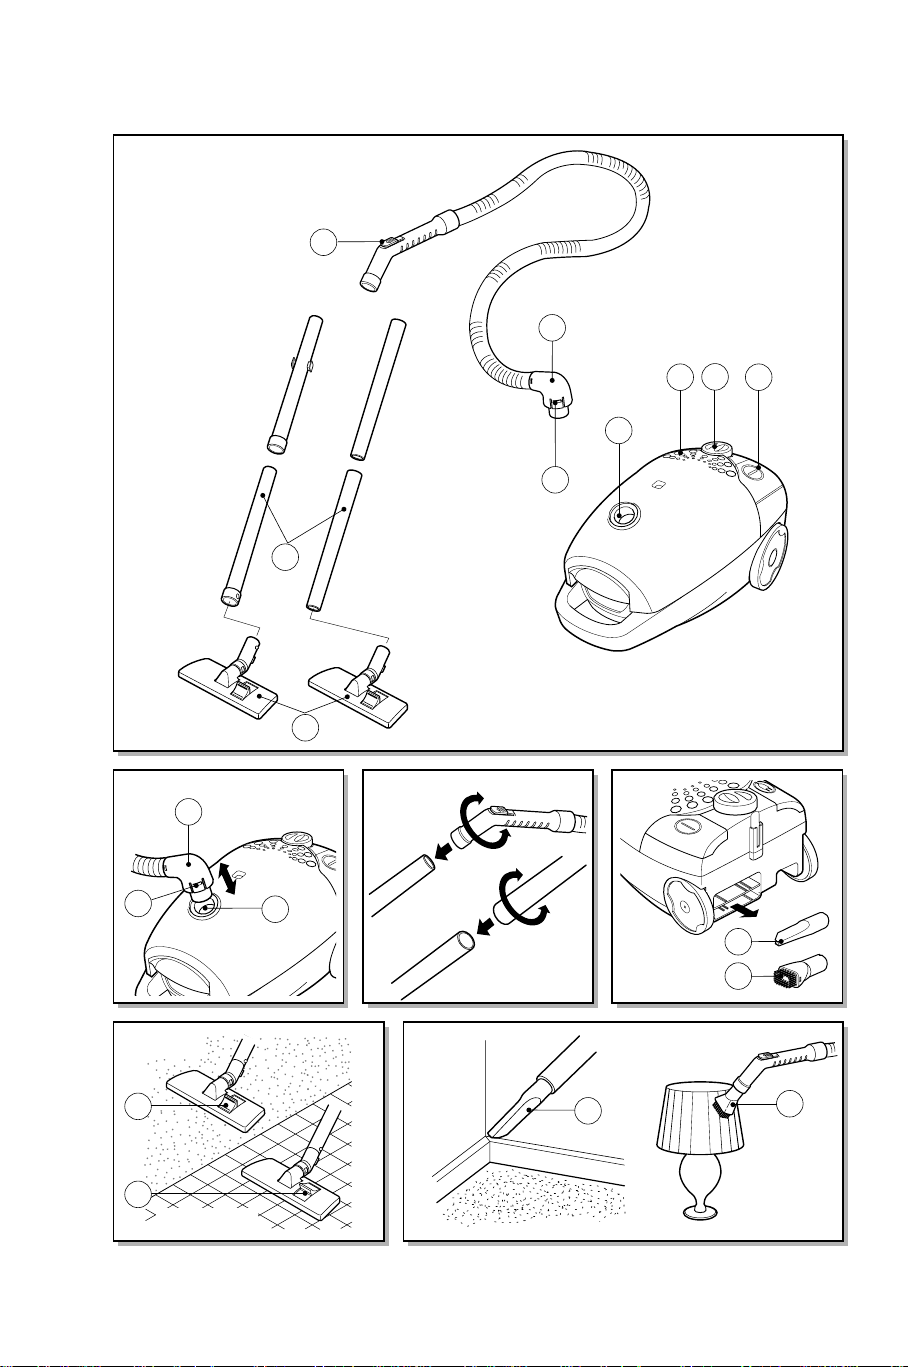
Connecting the flexible hose
Push the end of the head (1) on the flexible
hose into the attachment point (2) on the
vacuum cleaner.
To remove the flexible hose from the vacuum
cleaner, press on the button (3) situated on
the head, then pull upwards.
Assembling the tubes
(depending on model)
• Metal or plastic tube (6)
-
Fit together the two tubes by twisting slightly.
Using the cleaning head and Accessory
Nozzles
Fit the large cleaning head onto the
end of the tube.
• The 2 position head is equipped with a
pedal (7) which allows you to alter its position
according to the type of floor to be cleaned.
Hard floor position (tiles, parquet floors...)
Press on the pedal to lower the brush.
Carpet or rug position. Press on the pedal
to lift the brush up.
• Crevice Tool (8)
For vacuuming in those normally inaccessible
places like a window frame or a crevice in the
wall.
• Dusting brush (9)
For vacuuming picture frames, furniture
outlines, books and other uneven objects.
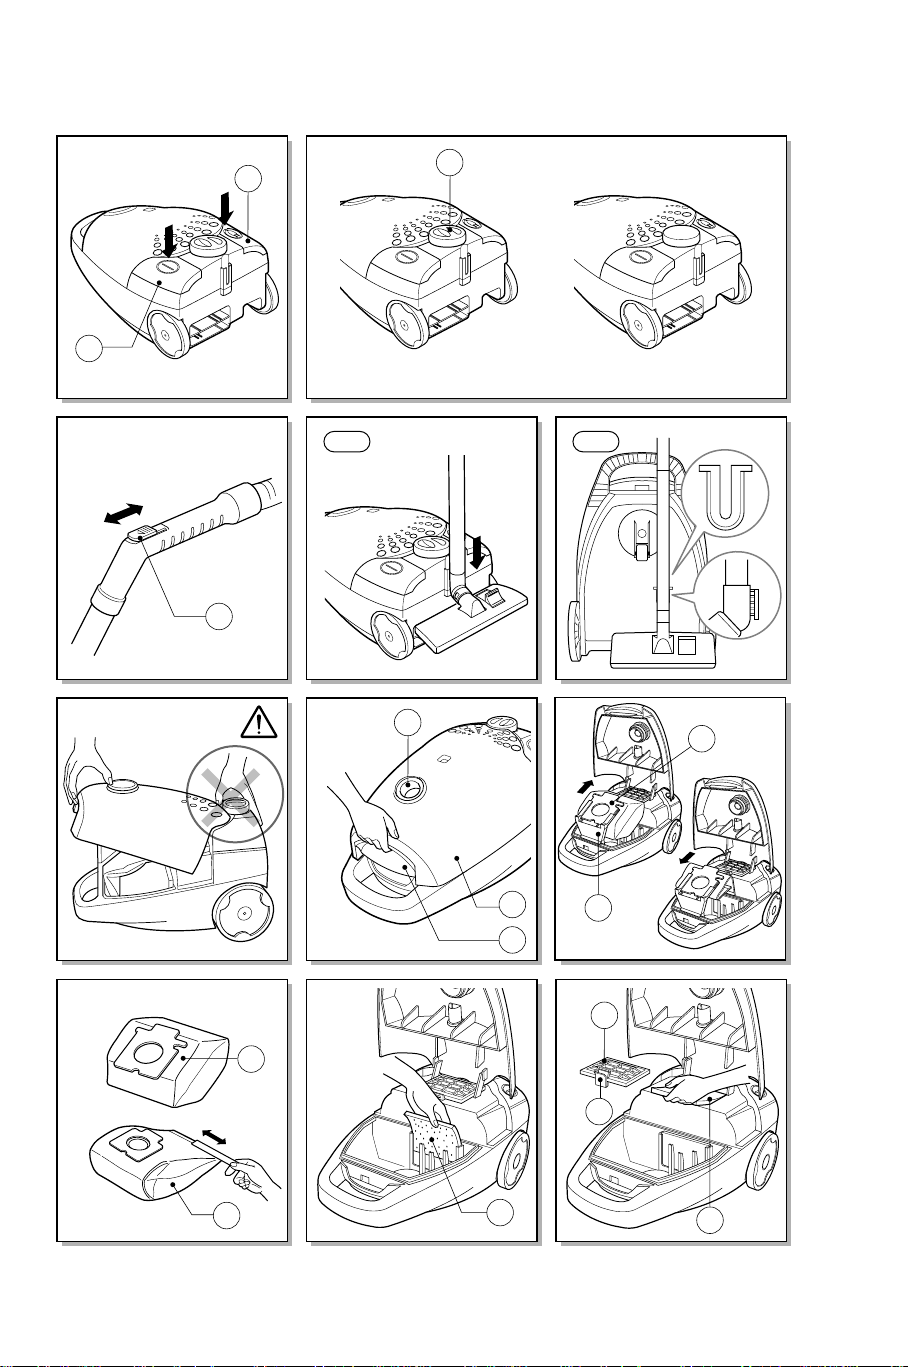
How to plug in and use
Pull out the mains lead to the desired length
and plug into the socket.
Press the button (10) to start the vacuum
cleaner.
To stop it press the button (10) again.
Press the button (11) to rewind the power
cord.
Adjusting the power level
• If your appliance is equipped with an
electronic variable rotary button (12), you can
choose the power appropriated for the task.
The more you rotate the rotary button (12)
towards the right, the greater the suction
power.
• The flexible hose handle has a manual air
flow regulator (13) which allows you to briefly
reduce the suction level.
Park-System (14)
For short breaks during vacuuming, for
example to move a small piece of furniture or
a rug, use the [Park system] to support the
flexible hose and cleaning head.
• Slide the hook attached to the large cleaning
tool into the slot on the rear of the appliance.
Carrying and storage (15)
When you have switched off and unplugged
the appliance, press the button (11) to
automatically rewind the cord.
You can move or store your appliance in a
vertical position by sliding the hook on the
large cleaning head into the clip on the
underside of the appliance.
How to Use
Page 6

Changing the dust bag
The dust bag needs changing when the cleaner
is set to maximum power and the cleaner head is
off the floor but the “bag full” indicator window
(16) is completely coloured red.
Even if the dust bag does not appear to be full
at this stage, it should be changed. It could be
that a great deal of fine dust has clogged up
the pores of the dust bag.
• Turn off the appliance and unplug it.
• Open the filter cover (17) by pulling the latch
(18) and lifting it up.
Your appliance is equipped with either a paper
dust bag (19) or a fabric dust bag (20)
(depending on model)
• To remove the dust bag, pull the cardboard
(21) of the dust bag from the bag mouth (22).
• To refit a new bag, push the cardboard
support of a new bag into the bag mount (22)
until it will go no further.
Use only original Panasonic dust bags
Type C-20E
If your appliance is fitted with a fabric
dust bag
follow the same instructions as above.
Empty it and replace it (20). Do not wash it.
Cleaning the motor safety filter
The motor safety filter is situated inside the
appliance between the dust bag and the
motor. When if becomes dirty, we advise you
to remove the motor safety filter (23) and to
clean it by tapping to remove the dirt and then
replacing it in the vacuum cleaner.
Changing the air outlet filter
• To change the air outlet filter, open the filter
cover (17) by pulling the latch (18), take out
the air outlet cover (24) by pushing the lever
(25) and then change the filter (26).
• The foam filter, should be cleaned regularly
by tapping it to remove the dirt.
What to do if your appliance
does not work?
Check that the appliance is correctly plugged
in and that the electrical socket is working.
What to do when the suction
performance reduces?
• Stop the appliance and unplug it.
• Check that the tubes, flexible hose and
cleaning tool are blocked or not.
If they are blocked, remove the obstruction.
• Check that the dust bag is full or not.
Replace if necessary.
•
Check that the air outlet filter is blocked or not.
Replace if necessary.
Maintenance
Page 7

– 7 –– 6 –
Vacuum Cleaner Consumables / Accessories
(for customers in the UK only)
Hose unit
Floor nozzle NZ- 27
Extension tube (2/ pcs. Plastic)
Extension tube (2/ pcs. Metallic)
Telescopic tube (Optional)
Clean air outlet filter
Central filter
Crevice nozzle
Dusting brush
Dust bag (pack of 5/ u.)
Type C- 20E
•
Order accessory and consumables items for all Vacuum Cleaner with ease and confidence
either by telephoning our Customers Care Centre on 0870 900 9043
Mon – Fri 9: 00 am 5: 30 (except public holidays).
•
Or go online through our Internet Accessory ordering application at www. panasonic. co. uk
•
Most major credit and debit cards accepted.
•
All enquiries, transactions and distribution facilities are provided directly by Panasonic
UK Ltd.
•
It couldn’t be simpler!
Note: Specifications are subject to change without notice.
Product code
AMC8A92V9034
Product Code
AMC8A99V8034
(for plastic tube)
Product code
AMC8A85V8034
Product code
AMC8A12V8000
(Alternative type)
Product Code
.......
Product Code
AMC8F28V8000
Product Code
AMC8F03V8000
Product Code
AMC8A13V8034
Product code
AMC8F97V8034
Product Code
AMC8F96T0000
Product code
AMC8A92V9034
Product Code
AMC8A99V9034
(for metallic tube)
Product code
AMC8A85V8034
(Alternative type)
Product code
AMC8A12V8000
Product Code
AMC8A85V9000
Product Code
AMC8F28V8000
Product Code
AMC8F03V8000
Product Code
AMC8A13V8034
Product code
AMC8F97V8034
Product Code
AMC8F96T0000
DESCRIPTION MC- E7001 MC- E7002
1
7
6
6
26
23
8
9
19
Page 8

Power sourde 230- 240V ~ 50Hz 230- 240V ~ 50Hz
Max. Output 1400W 1500W
Nominal Output 1200W 1300W
Dimensions (LxWxH) 419x285x247 419x285x247
Net weight (kg) 7.0 7.2
Floor nozzle NZ- 27 (for plastic tube) Floor nozzle NZ- 27 (for metallic tube) Dusting brush
Crevice nozzle
Extension tube (plastic) Extension tube (metallic) -
SPECIFICATIONS MC- E7001 MC- E7002
Design and specifications may be changed without notice.
Weight and dimensions shown are aproximate.
REMINDER FOR CUSTOMER
The model and serial number of this product may be
found on the name plate located at the back of your
cleaner. You should note the model and serial
number in the spaces provided and retain this book
as a permanet record of your purchase.
Model Number : . . . . . . . . . . . . . . . . . . . . . . . . . . . . . . . . . . . . . . . . . . . . . . . .
Serial Number : . . . . . . . . . . . . . . . . . . . . . . . . . . . . . . . . . . . . . . . . . . . . . . . . .
Date Purchased : . . . . . . . . . . . . . . . . . . . . . . . . . . . . . . . . . . . . . . . . . . . . . .
Where Purchased : . . . . . . . . . . . . . . . . . . . . . . . . . . . . . . . . . . . . . . . . . . . .
Matsushita Electric España, S. A.
Vacuum Cleaner Division
Zona Industrial del Polígono de CELRÀ
17460 CELRÀ (Girona) SPAIN
Z07V80I0 (P/No.:3828Fi2837A) Printed in P. R. C.
 Loading...