

Panasonic LUMIX DMC-FZ2B Operating Instructions Manual

Digital Camera
Operating Instructions
Model No.DMC-FZ2B
Web Site: http://www.panasonic-europe.com
Before use, please read these
instructions completely and
retain for future reference.
VQT0E71
Safety
Dear Customer,
We would like to take this opportunity to
thank you for purchasing this Panasonic
Digital Camera. Please read these
Operating Instructions carefully and
keep them handy for future reference.
Information for Your
Safety
Safety
• Please note that the actual controls
and components, menu items, etc. of
your Digital Camera may look
somewhat different from those shown
in the illustrations in these Operating
Instructions.
• SD Logo is a trademark.
• Other names, company names, and
product names printed in these
instructions are trademarks or
registered trademarks of the
companies concerned.
WARNING
TO REDUCE THE RISK OF FIRE
OR SHOCK HAZARD AND
ANNOYING INTERFERENCE, USE
ONLY THE RECOMMENDED
ACCESSORIES AND DO NOT
EXPOSE THIS EQUIPMENT TO
RAIN OR MOISTURE. DO NOT
REMOVE THE COVER (OR BACK);
THERE ARE NO USER
SERVICEABLE PARTS INSIDE.
REFER SERVICING TO QUALIFIED
SERVICE PERSONNEL.
Carefully observe copyright laws.
Recording of pre-recorded tapes or
discs or other published or
broadcast material for purposes
other than your own private use may
infringe copyright laws. Even for the
purpose of private use, recording of
certain material may be restricted.
IF THE MAINS LEAD OF THIS
EQUIPMENT IS DAMAGED, IT MUST
BE REPLACED WITH AN
ELECTRICALLY APPROVED MAINS
LEAD.
THE SOCKET OUTLET SHALL BE
INSTALLED NEAR THE
EQUIPMENT AND SHALL BE
EASILY ACCESSIBLE.
CAUTION
Danger of explosion if battery is
incorrectly replaced. Replace only
with the same or equivalent type
recommended by the manufacturer.
Dispose of used batteries according
to the manufacturer’s instructions.
2
Safety
Digital Camera
The rating plate is on the underside of the
Digital Camera.
AC Adapter
• The rating plate is on the underside of
the AC Adapter.
• As this equipment gets hot during use,
operate it in well ventilated place; do not
install this equipment in a confined
space such as a bookcase or similar
unit.
Caution for AC mains lead
For your safety, please read the following
text carefully.
This appliance is supplied with a moulded
three-pin mains plug for your safety and
convenience. A 5-ampere fuse is fitted in
this plug.
Should the fuse need to be replaced,
please ensure that the replacement fuse
has a rating of 5-amperes and it is
approved by ASTA or BSI to BS1362.
Ï
Check for the ASTA mark
Ì
mark
If the plug contains a removable fuse
cover you must ensure that it is refitted
when the fuse is replaced. If you lose the
fuse cover, the plug must not be used until
a replacement cover is obtained. A
replacement fuse cover can be purchased
from your local Panasonic Dealer.
IF THE FITTED MOULDED PLUG IS
UNSUITABLE FOR THE SOCKET
OUTLET IN YOUR HOME THEN THE
FUSE SHOULD BE REMOVED AND THE
PLUG CUT OFF AND DISPOSED OF
SAFELY.
THERE IS A DANGER OF SEVERE
ELECTRICAL SHOCK IF THE CUT OFF
PLUG IS INSERTED INTO ANY 13AMPERE SOCKET.
on the body of the fuse.
or the BSI
ª
IMPORTANT
The wires in this mains lead are coloured
in accordance with the following code:
Blue: Neutral
Brown: Live
As the colours of the wires in the mains
lead of this appliance may not correspond
with the coloured markings identifying the
terminals in your plug, proceed as follows:
The wire which is coloured BLUE must be
connected to the terminal in the plug
which is marked with the letter N or
coloured BLACK.
The wire which is coloured BROWN must
be connected to the terminal in the plug
which is marked with the letter L or
coloured RED.
Under no circumstances should either of
these wires be connected to the earth
terminal of the three-pin plug, marked with
Ó
the letter E or the Earth Symbol
.
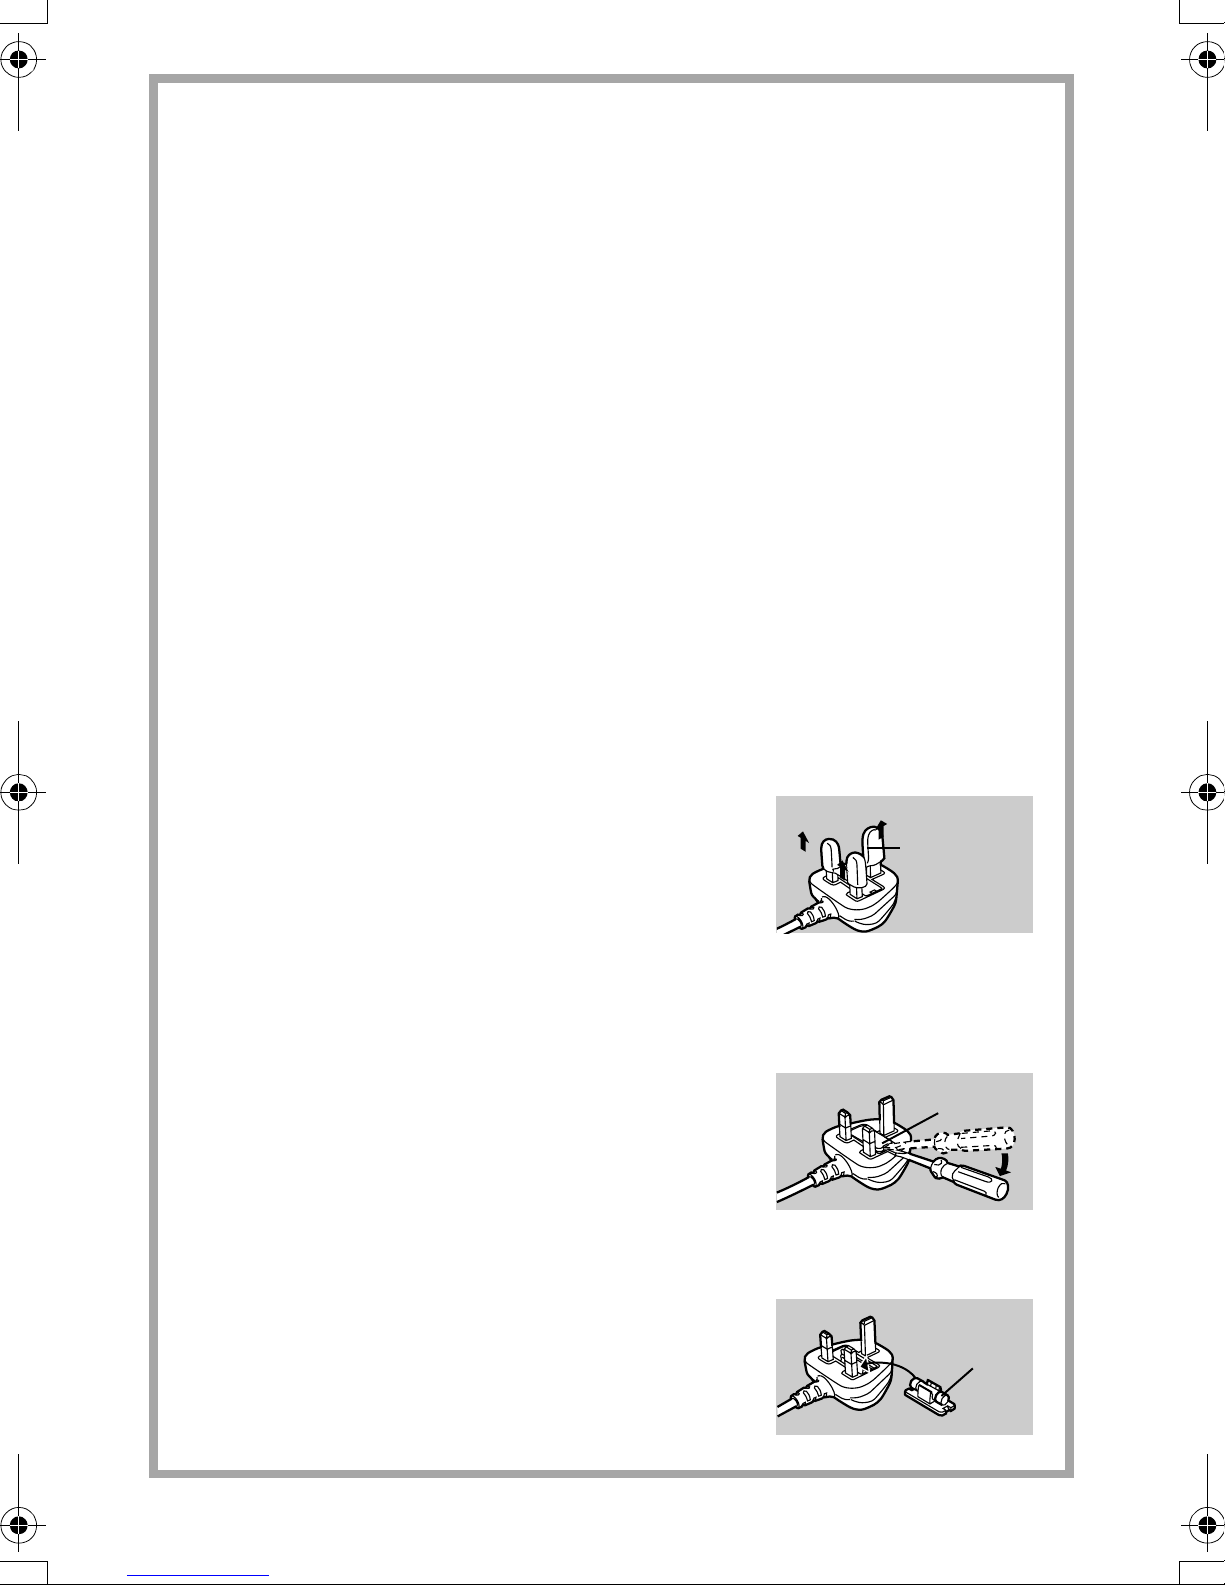
ª Before Use
Remove the Connector Cover as follows.
Connector
Cover
ª How to replace the Fuse
1
Remove the Fuse Cover with a
screwdriver.
Fuse
Cover
2
Replace the fuse and attach the
Fuse Cover.
If a new plug is to be fitted, please
observe the wiring code as shown below.
If in any doubt, please consult a qualified
electrician.
Fuse
3

Contents
Safety
Information for Your Safety..................2
Preparation
Standard Accessories ..........................7
Controls Layout....................................8
LCD Monitor Display/Viewfinder
Display ...........................................10
Quick Guide .......................................12
Charging the Battery ..........................13
Inserting the Battery...........................14
Using the AC Adapter ........................16
Inserting the Card ..............................17
Turning Camera on/off .......................19
Adjusting the Viewfinder
(Diopter Adjustment) ......................20
Attaching the Lens Hood....................21
Attaching the Strap ............................23
Attaching the Lens Cap......................24
Using the LCD Monitor/Viewfinder.....25
The Shutter Button
(Pressing halfway/Pressing fully) ...26
The Mode Dial....................................27
Operating the Menu ...........................29
Setting the Date/Time (Clock Set) .....30
Recording images (basic)
Taking Pictures ..................................31
Taking Pictures in Simple Mode ........33
Checking the Captured Picture
(Review) .........................................34
Recording Motion Images ..................35
Using the Optical Zoom .....................36
Using the Digital Zoom.......................37
Taking Pictures with the Built-in
Flash ..............................................38
Using the Optical Image Stabilizer.....40
Using the AF Trigger..........................41
Using the Continuous AF ...................42
Taking Pictures with the Self-timer ....43
Recording images (advanced)
Taking Pictures with Audio ................ 44
Changing the Picture Size................. 45
Changing the Quality
(Data Compression Ratio) ............. 46
Taking Pictures with
Aperture-priority AE....................... 47
Taking Pictures with
Shutter-priority AE ......................... 48
Taking Pictures with Macro Mode ..... 49
Taking Pictures with the Portrait
Mode ............................................. 50
Taking Pictures with the Sports
Mode ............................................. 51
Taking Pictures with the Panning
Mode ............................................. 52
Taking Pictures with the Night
Portrait Mode................................. 53
Taking Pictures with the Spot
Mode ............................................. 54
Compensating the Exposure ............. 55
Taking Pictures with Auto (AE)
Bracket .......................................... 56
Using the AF/AE Lock....................... 57
Using the Colour Effect ..................... 58
Adjusting the Colour Tone or the
Contrast (Picture Adjustment) ....... 59
Setting the White Balance................. 60
Finely Adjusting the White
Balance ......................................... 62
Setting ISO Sensitivity....................... 63
Taking Pictures with Burst Mode....... 64
Using the MC Protector/ND Filter...... 65
Playback
Playing Back Still Pictures................. 66
Playing Back Still Pictures with
Audio ............................................. 67
9 Images Multi Playback ................... 68
Using the Playback Zoom ................. 69
Playing Back Motion Images............. 70
4

Editing
Deleting Images .................................71
Writing the Print Information in the
Card (DPOF Setting)......................73
Protecting Images on the Card ..........76
Technical use
Playing Back with Slide Show
(Automatic Playback) .....................77
Adding Audio to Recorded Pictures
(Audio Dubbing) .............................79
Resizing Recorded Pictures...............80
Trimming Recorded Pictures .............81
Formatting the Card ...........................82
Adjusting the LCD Monitor/Viewfinder
Brightness ......................................83
Using the Auto Review.......................84
Setting up the Beep Sound ................85
Setting up the Power Save Mode ......86
Resetting the File Number .................87
Reset the Settings..............................88
Playing Back Images with a TV
Monitor ...........................................89
Connecting to a PC............................90
USB DIRECT-PRINT .........................91
USB DIRECT-PRINT
(Single Picture)...............................92
USB DIRECT-PRINT
(DPOF Picture)...............................93
After Use............................................94
Others
The Menu Items .................................95
Cautions for Use ................................97
Warning Indications .........................101
Troubleshooting ...............................102
Specifications ...................................104
5

Sales and Support Information
Customer Care Centre
• For UK customers: 08705 357357
• For Republic of Ireland customers:
01 289 8333
• Visit our website for product
information
• E-mail:
customer.care@panasonic.co.uk
Technical Support for AV Software
• For callers in UK: 08701 505610
• For callers in ROI: 0044 8701 505610
Direct Sales at Panasonic UK
• Order accessory and consumable
items for your product with ease and
confidence by phoning our Customer
Care Centre Monday–Friday 9:00am–
5:30pm. (Excluding public holidays).
• Or go on line through our Internet
Accessory ordering application at
www.panasonic.co.uk.
• Most major credit and debit cards
accepted.
• All enquiries transactions and
distribution facilities are provided
directly by Panasonic UK Ltd.
• It couldn’t be simpler!
• Also available through our Internet is
direct shopping for a wide range of
finished products, take a browse on
our website for further details.
6
Preparation
Preparation
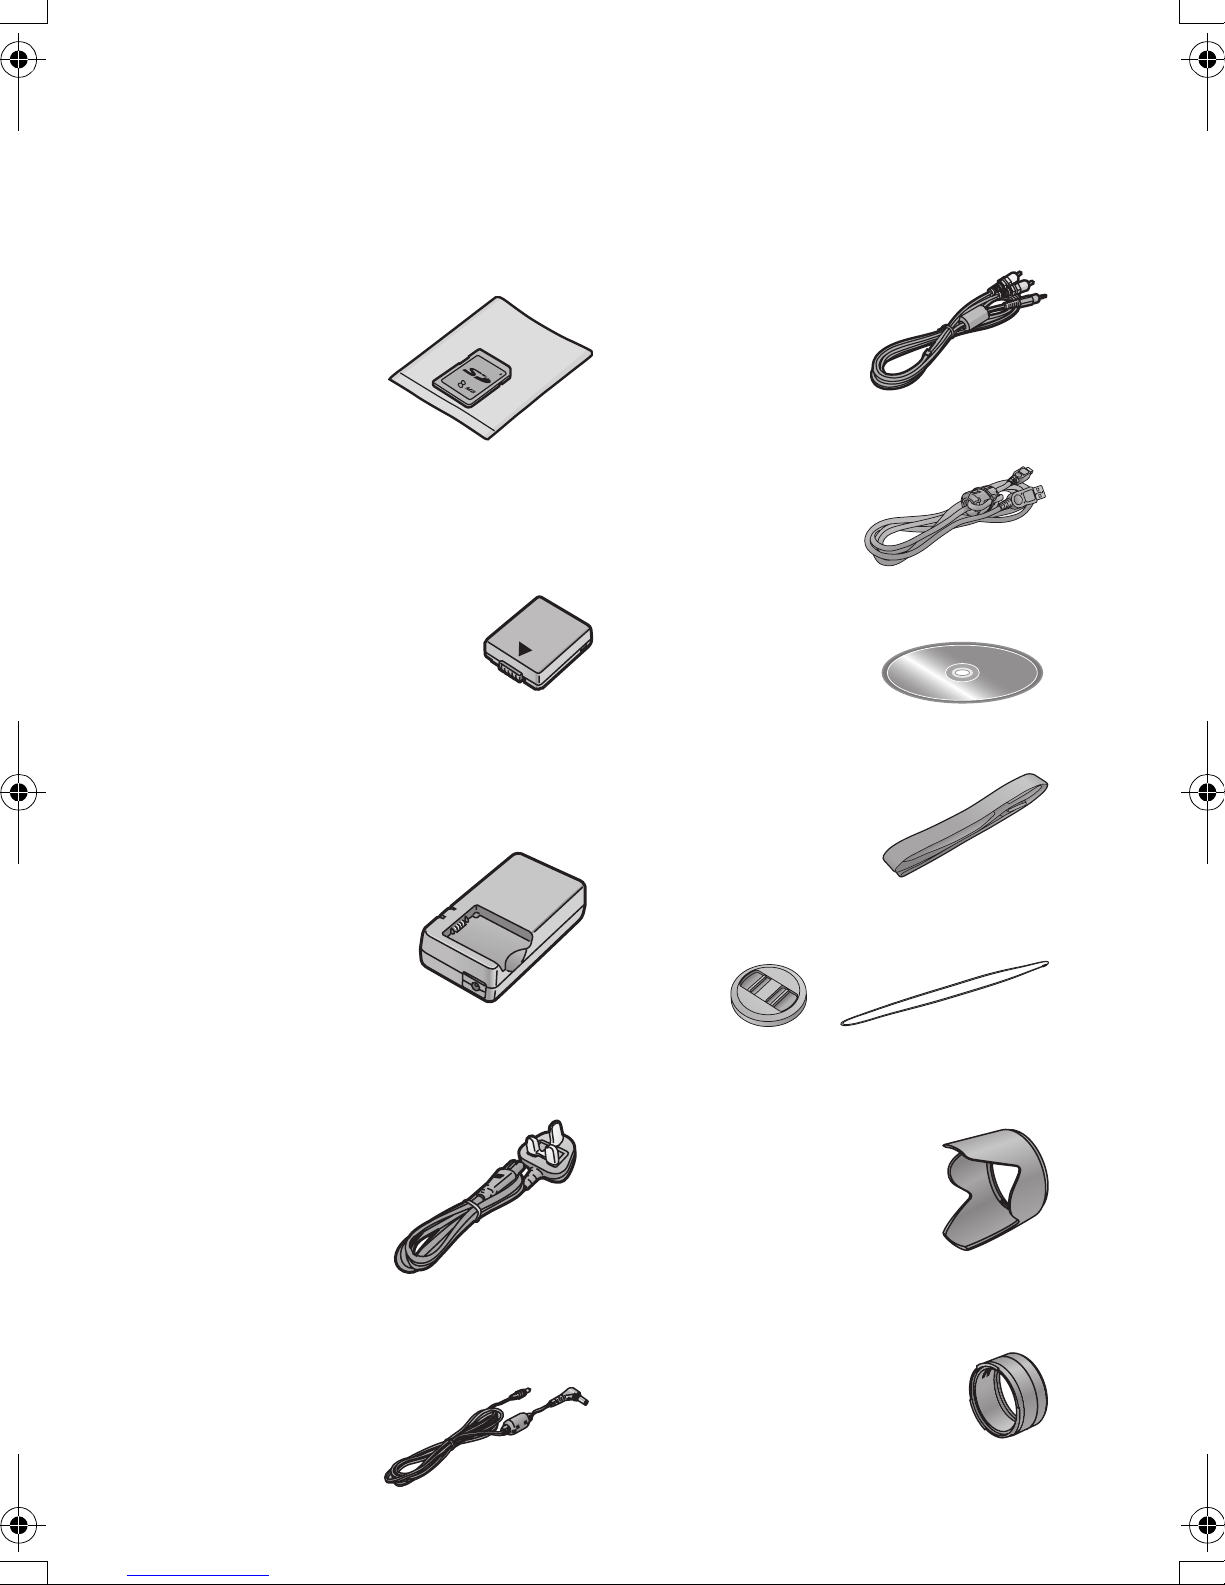
Standard Accessories
Before using your camera, check the contents.
1 SD Memory Card (8 MB)
RP-SD008B
(In the text, it is indicated as “Card”)
2 Battery Pack
CGA-S002E
(In the text, it is indicated as
“Battery”)
3 Battery Charger/AC Adapter
DE-928B
(In the text, it is indicated as
“AC Adapter”)
6 A/V Cable
K1V204C10001
7 USB Connection Cable
K1HA05CD0004
8 CD-ROM
VFF0184
9Strap
VFC4002
4 AC Mains lead
K2CT3DA00003
5 DC Cable
K2GH2DB00003
10 Lens Cap/Lens Cap String
VYK0W73
11 Lens Hood
VYQ2677 (Black)
VYQ2787 (Silver)
12 Lens Hood Adapter
VYQ2583 (Black)
VYQ2782 (Silver)
7
Preparation
Controls Layout
2 3 41 5
6
7
Preparation
11
[Front View]
1 Flash Sensor (P39)
2 Lens
3Flash
4 Microphone (P35, P44, P79)
5 Self-timer Indicator (P43)
[Top View]
6 Lens Barrel
7 Lens Ring (P21, P65)
8 Mode Dial (P27)
9 Shutter Button (P26)
10 Single/Burst Mode Button
(P64)
11 Zoom Lever (P36, P37)
9810
15
20
19 21 22 24 25 26
17
161213 14
18
23
[Rear View]
12 Viewfinder (P20, P25)
13 Diopter Adjustment Dial (P20)
14 Flash Open Button (P38)
15 DISPLAY Button (P25)
16 FOCUS Button (P41)
17 Power Indicator (P19)
18 Camera Switch (P19)
19 LCD Monitor (P10)
20 MENU Button (P29)
21 Delete Button (P34, P71)
22 2/Self-timer Button (P43)
23 4/REVIEW/SET Button (P34)
24 1/Flash Mode Button (P38)
25 3/Exposure Compensation
(P55)/Auto Bracket (P56)/
White Balance Fine
Adjustment (P62) Button
26 Speaker (P67)
8

7
8
9
30
31
32
Preparation
[Left View]
27 A/V OUT Socket (P89)
28 USB Socket (5pin) (P90)
29 Terminal Door
2
2
2
[Right View]
30 Strap Eyelet (P23)
31 DC IN Socket (P16)
32 DC IN Terminal Door (P16)
2
3
4
3433 35
1
[Bottom View]
33 Memory Card/Battery Door
(P14, P17)
34 Memory Card/Battery Door
Open Lever (P14, P17)
35 Tripod Receptacle
[Battery Charger/AC Adapter]
1 AC Input Terminal
2 [POWER] Indicator
3 [CHARGE] Indicator
4 Battery Charging Slot
5 DC Output Terminal
5
9

Preparation
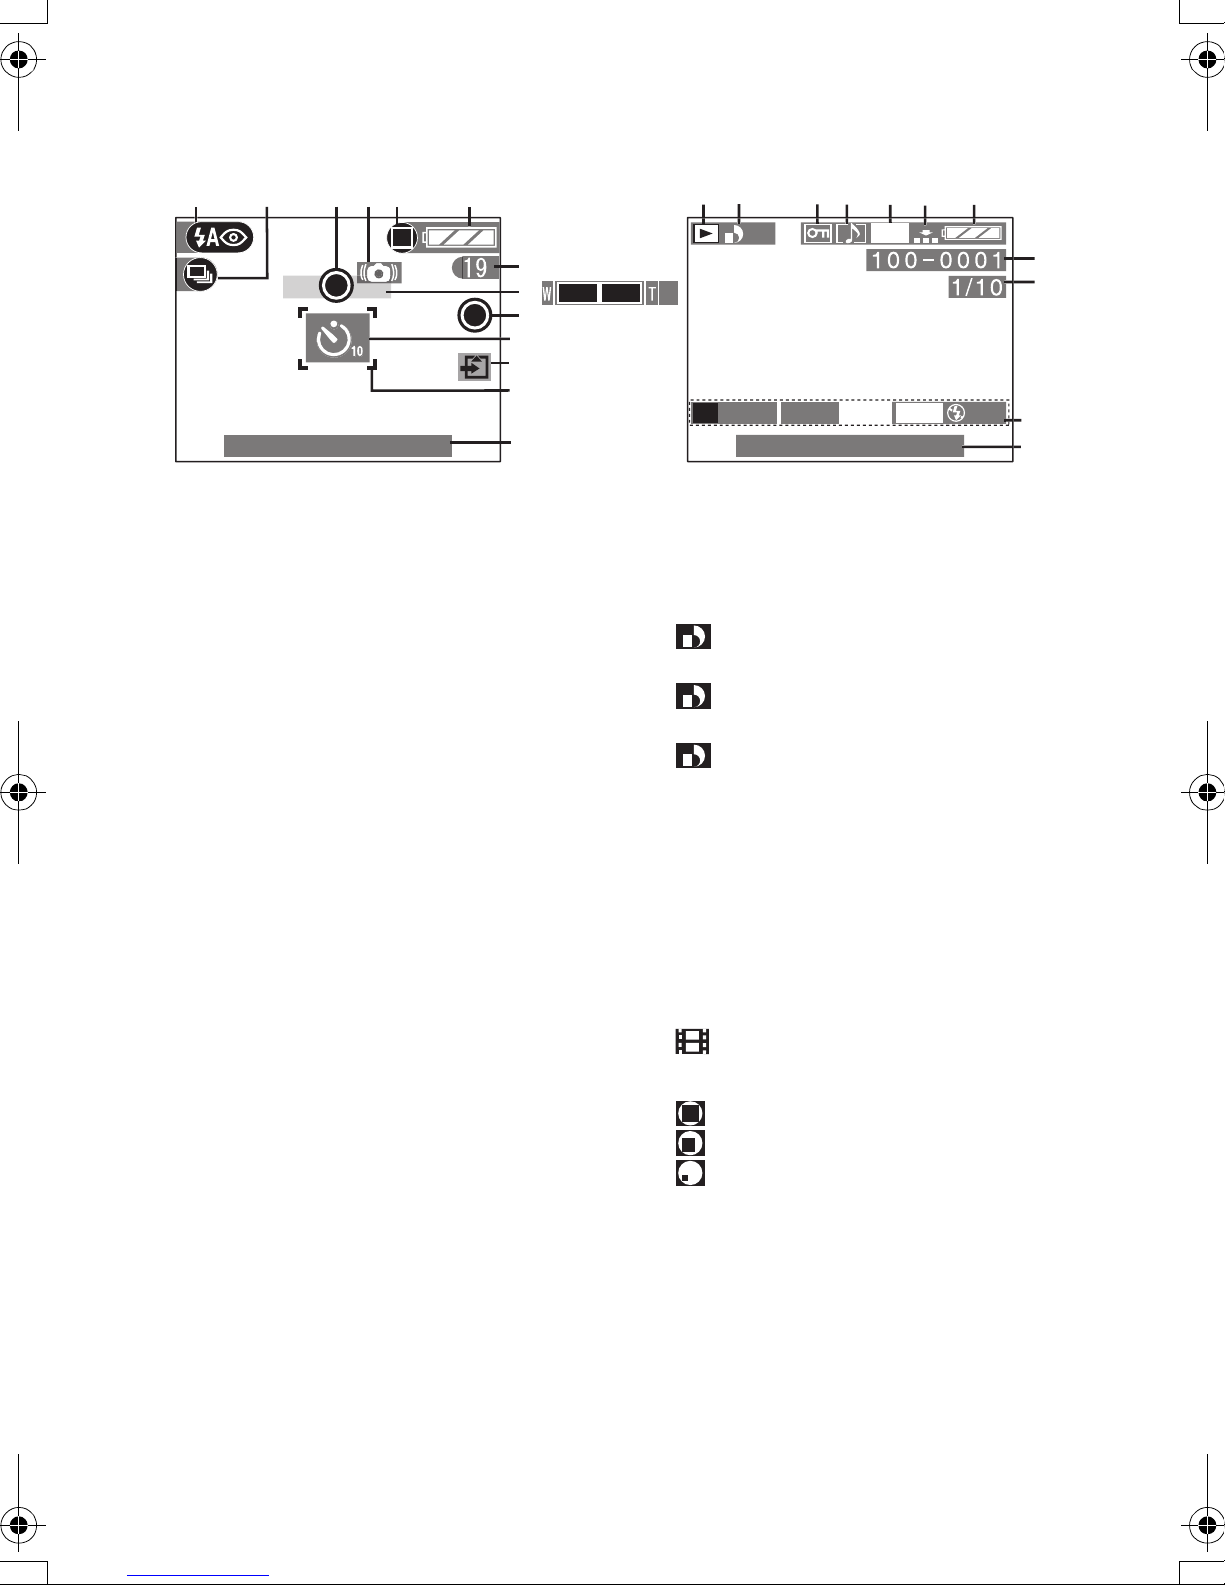
LCD Monitor Display/Viewfinder Display
12 34 56 7
ISO100
27
26
25
24
23
22
21
20
19
P
COOL
C-AF
H
10:00
1
+
/
3
F2.8 1/25
OFF
1600
1.AUG.2003
AF
161718
19
FOCUS
10
11
12
13
14
15
8
9
6X
[In recording]
1 REC mode
2 Flash mode (P38)
3 White balance (P60)
4 ISO sensitivity (P63)
5 Picture size (P45)
6 Quality (data compression ratio)
(P46)
7 Battery indicator (P15)
(When using AC adapter this is not
displayed)
8 Frame/Time remain
In motion image mode: XXXS
9 Camera Shake alert (P32)
10 Recording indication
11 Audio REC (P44)
19 Auto Bracket (P56)
20 Current date and time (P30)
• It is displayed for about 5 seconds
after turning on the camera or
setting the clock.
21 : Spot AF area (P54)
22 : Spot metering target (P54)
23 Focus indication (P31)
24 Burst mode (P64)
25 Continuous AF (P42)
26 Colour Effect mode (P58)
27 Optical Image Stabilizer (OIS)
(OFF) (P40)
12 Zoom (P36, P37)
13 Self-timer mode (P43)
14 Card access indication (P18)
15 AF area (P31)
16 AF Trigger (P41)
17 Aperture indication/Shutter speed
indication (P31)
18 Exposure Compensation (P55)
10
Preparation
2
1
2
3
5
4
6
1
10
3
7
8
6X
9
10
11
12
P
F2.8
10:00 11.AUG.2003 10:00 11.AUG.2003
[In recording in Simple mode]
1 Flash mode (P38)
2 Burst mode (P64)
3 Focus indication (P33)
4 Camera Shake alert (P32)
5 Picture mode (P33)
6 Battery indicator (P15)
7 Frame remain
13
[In playback]
1 Playback mode
2DPOF (P73)
(White):
DPOF setting for printing
(Green):
DPOF setting for Slide Show
(Green with DPOF number):
DPOF setting for printing and
Slide Show
1/25
4
6
57
1600
ISO100
AUTO
8
9
10
11
8 Zoom (P36)
9 Recording indication
10 Self-timer mode (P43)
11 Card access indication (P18)
12 AF area (P31)
13 Current date and time (P30)
• It is displayed for about 5 seconds
after turning on the camera or
setting the clock.
3 Protected image (P76)
4 Image with audio (P67)
5 Picture size (P45)
6 Quality (data compression ratio)
(P46)
: In motion image mode
In simple mode:
:ENLARGE
:4qa6q/10a15cm
: INTERNET
7 Battery indicator (P15)
8 Folder/File number
9 Page/Total images
10 REC data
• It will be displayed when the
[DISPLAY] button is pressed.
11 Recorded date and time
11
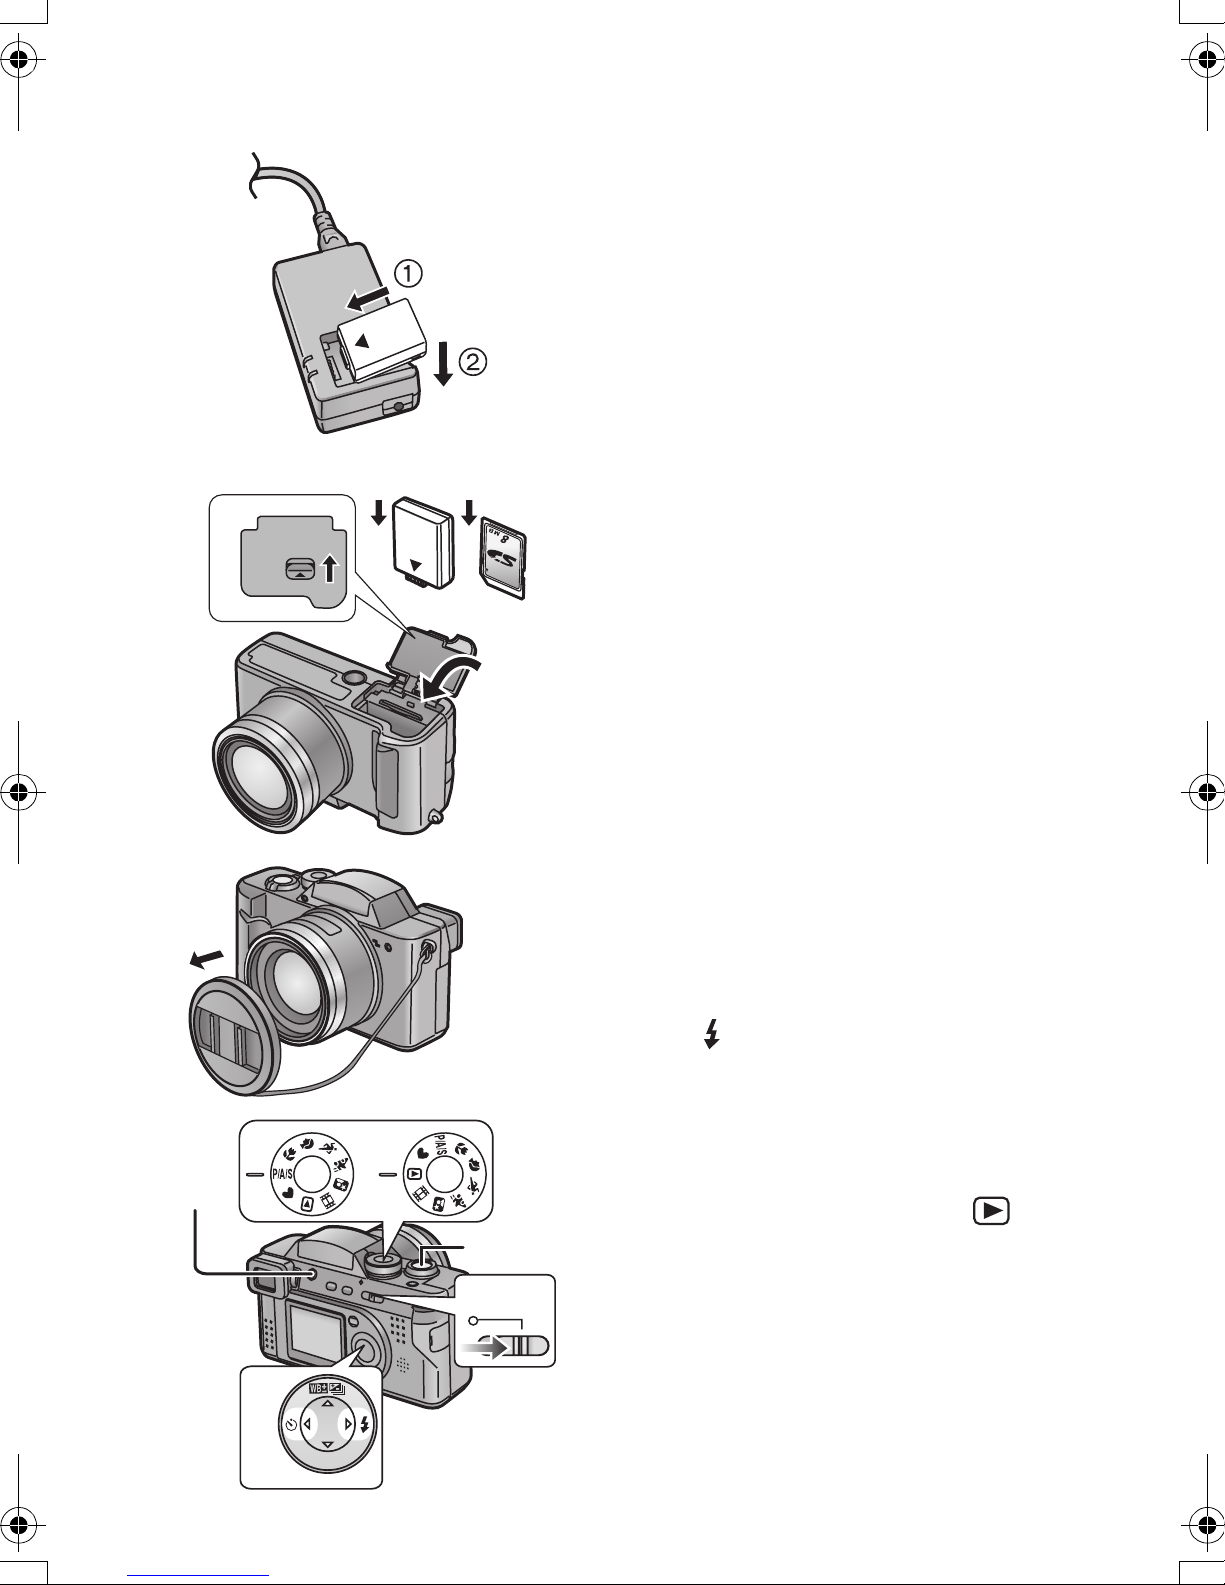
Quick Guide
1
Preparation
Prepare following items.
• Camera
•Battery
•Card
• AC adapter
• AC mains lead
[Preparation]
1 Charge the battery. (1 # 2) (P13)
• Charging will take about 90 minutes.
6
2
OPEN
34
5
2 Slide the lever in the direction of the
arrow to open the Memory Card/
Battery door.
3 Insert the battery into the camera.
(P14)
4 Insert the Card into the camera. (P17)
5 Close the Memory Card/Battery door.
[Recording]
6 Remove the lens cap.
7 Set the camera switch to [ON]. (P19)
8 Set date/time. (P30)
9 Set the mode dial to [P/A/S]. (P27)
10 (When you want to take a picture with
the flash)
Press [ OPEN] button to open the
Flash. (P38)
912
10
13
R
W
E
E
I
V
SET
11
7
OFF≥≥ON
11 Take a picture. (P26, P31)
[Playback]
12 Set the mode dial to playback [ ].
(P27)
13 Press 2/1 to select the picture you
want to view. (P66)
12
Preparation
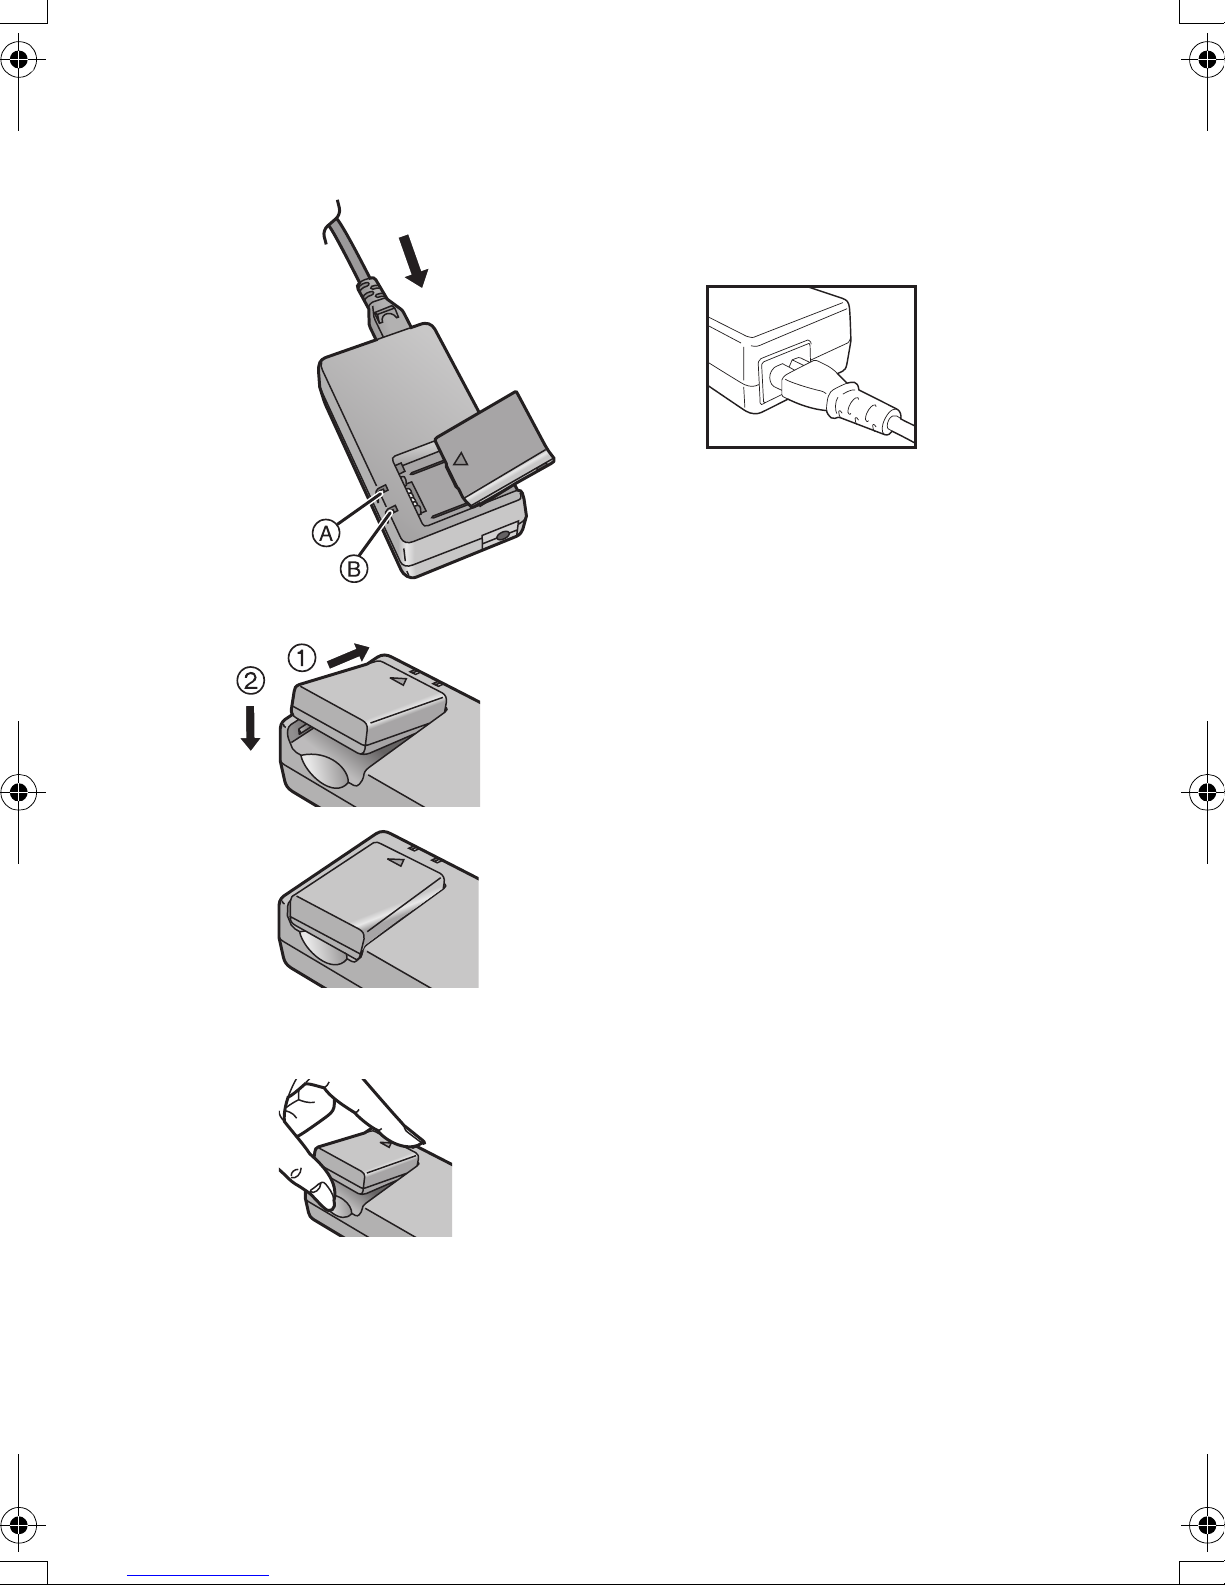
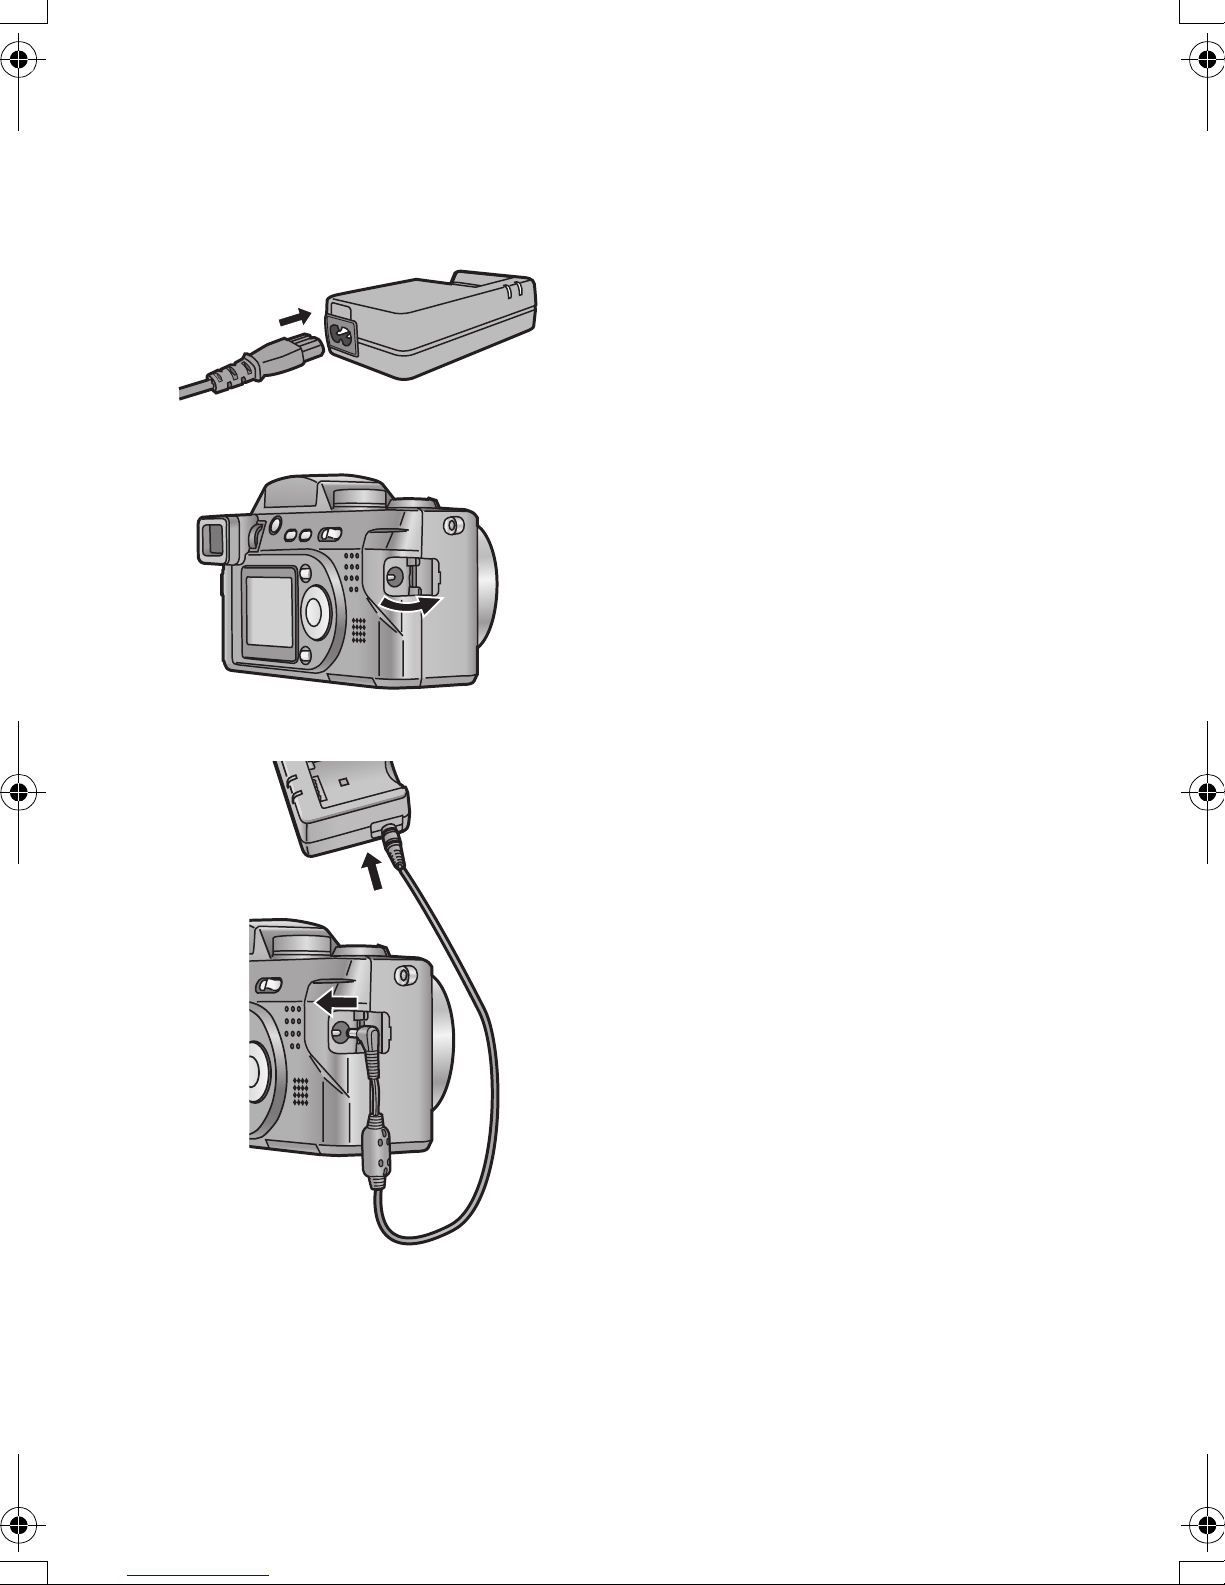
Charging the Battery
1 Connect the AC mains lead.
1
2
• Push the AC plug as far in to the AC in
terminal as it can go. A gap will remain
as shown below.
• The [POWER] indicator A lights up.
2 Attach the battery to the AC adapter.
(1 # 2)
• The [CHARGE] indicator B lights up
and charging starts.
3 When the [CHARGE] indicator B
turns off, charging is finished.
• Charging takes about 90 minutes.
4
4 Remove the battery from the AC
adapter.
• The battery cannot be charged when the
DC cable is connected to the AC adapter.
• After use, be sure to disconnect the AC
mains lead.
• During normal use or charging, the camera/
battery becomes warm. This is normal and
is not a fault with the camera/battery.
• The battery/AC adapter supplied with this
camera is exclusively designed for this
camera. Do not use with any other
equipment.
13
Preparation
OPEN
OPEN
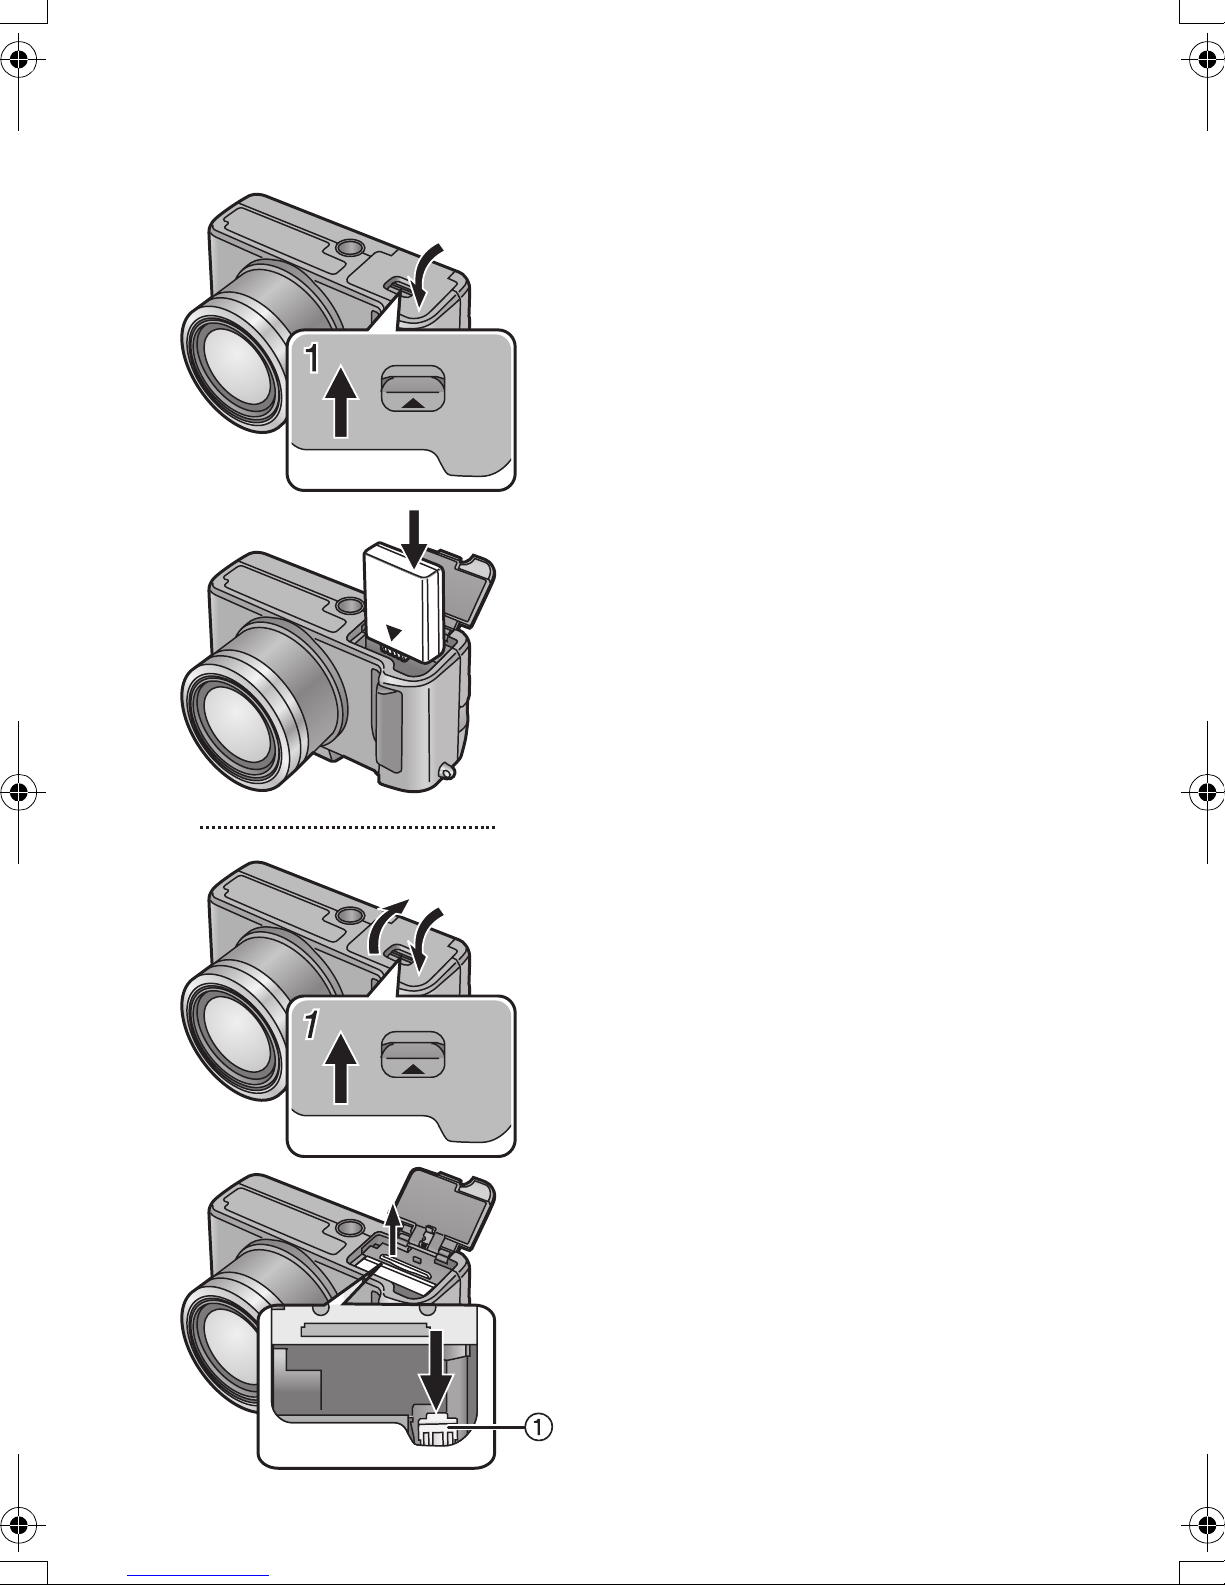
Inserting the Battery
[Preparation]
• Check that the camera switch is set to [OFF]
and the lens is fully retracted.
3
• Close the flash. (P39)
1 Slide the lever in the direction of the
2 Insert the charged battery all the way
3 Close the Memory Card/battery door.
arrow to open the Memory Card/
battery door.
in, until it is locked.
2
3
[Removing the battery]
1
Open the Memory Card/battery door.
2
Slide the lock 1 to the direction of the
arrow to remove the battery.
3
Close the Memory Card/battery door.
• If you will not be using the camera for a long
time, remove the battery.
• A fully charged battery needs to be left in
the camera for at least one hour for the
clock settings to be retained for about
24 hours after the battery has been
removed. (The time may be shorter if the
battery is not charged sufficiently)
When the clock setting is cancelled, please
set the date/time again. (P30)
• When the card is being read, do not open
the Memory Card/battery door.
• The battery supplied with this camera is
exclusively designed for this camera. Do not
use with any other equipment.
2
14
Preparation
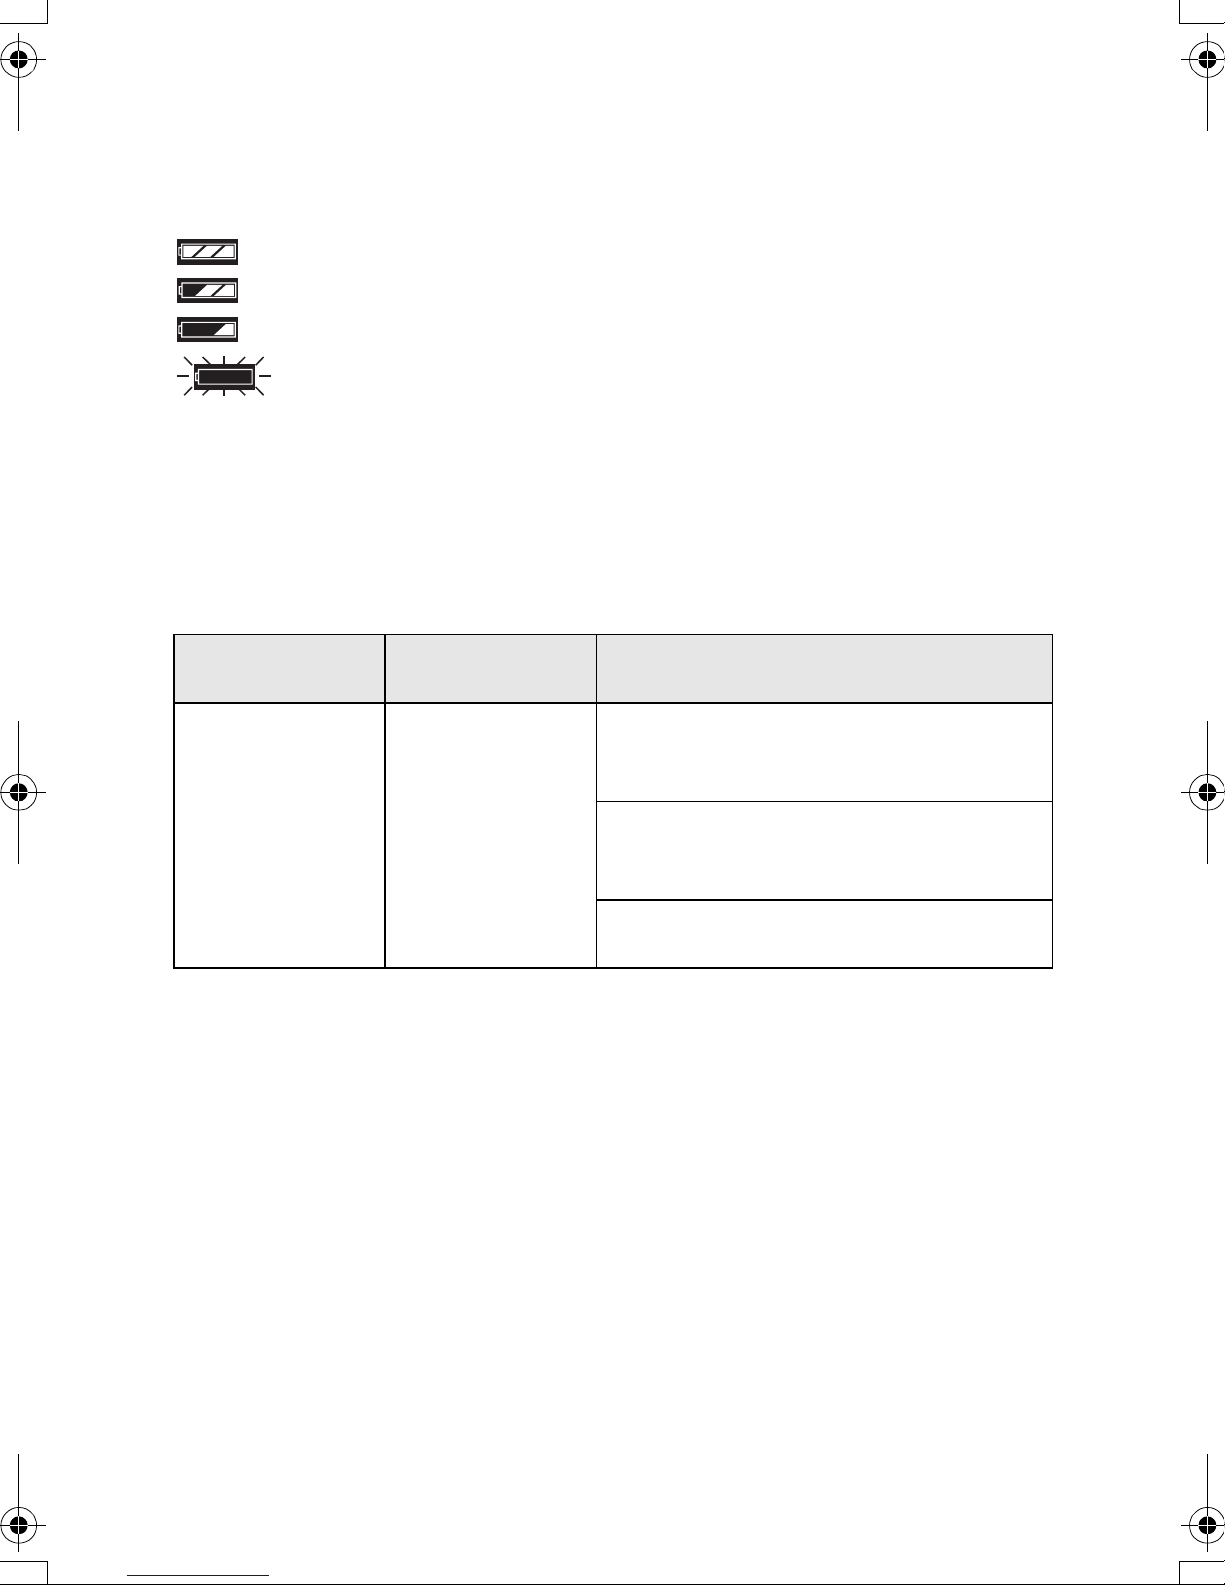
ª Battery indicator
The remaining battery power is displayed on the LCD monitor/Viewfinder. (This is
not displayed when using AC adapter)
: Battery is fully charged.
: Battery power is partially reduced.
: Battery power is low.
: Recharge the battery.
ª Charging time and available recording time
(Recording condition)
• Temperature: 25oC/Humidity: 60%
• Shooting once every 30 seconds, flash every other shot.
• Using the supplied SD Memory Card (Recording size: 1600k1200/Quality: Fine/
When deleting all pictures after full use)
Charging time
(recordable number)
Recording with LCD monitor
Approx. 100 min.
(equal to 200 still pictures)
Recording with Viewfinder
Continuous recording/playback time
Supplied battery Approx. 90 min.
Approx. 120 min.
(equal to 240 still pictures)
Playback with LCD monitor
Approx. 120 min.
The times shown in the table are approximate guides. The times may vary
depending on the condition.
ª Charging environment and charging error
• Charge the battery in a place with a temperature of 10 – 35oC. (The battery should
also be the same temperature)
• When charging starts, the [CHARGE] indicator lights. If, after charging starts, the
[CHARGE] indicator blinks at about 1 second cycles, this indicates a charging
error.
In this case, remove the AC adapter from the electrical outlet, remove the battery
and check if both room and battery temperature is too low or high and then charge
it again. If the problem persists, consult the dealer or your nearest servicentre.
15
Preparation
Using the AC Adapter
You can connect the camera via the DC cable
to the AC adapter, without any concerns of
battery discharge.
1
2
3
[Preparation]
• Check that the camera switch is set to [OFF]
and the lens is fully retracted.
1 Connect the AC mains lead.
2 Open the DC IN terminal door.
3 Connect the DC cable (supplied) to
the camera.
• During normal use the camera becomes
warm, this is not a fault.
• When not in use always disconnect the AC
adapter and DC cable.
• The battery cannot be charged in the
camera with the AC adapter connected.
• Use the supplied DC cable.
16
Inserting the Card
OPEN
OPEN
3
2
Preparation
[Preparation]
• Check that the camera switch is set to [OFF]
and the lens is fully retracted.
• Close the flash. (P39)
1 Slide the lever in the direction of the
arrow to open the Memory Card/
battery door.
2 Insert the card with the label facing
the front of the camera.
• Insert the card, pressing gently until it
locks in place. If the card will not insert
freely, it may be reversed. Do not force
the card.
• Do not touch the connection terminals
on the back side of the card.
2
4
3 Close the Memory Card
/battery
door.
[Removing the card]
1
Open the Memory Card/battery door.
2
Press the card to release.
3
Pull the card out.
4
Close the
• If the Memory Card door cannot be
completely closed, take the card out and
insert it again.
• If the card cannot be fully inserted, verify
whether the direction of the card is correct.
• We recommend that you use a Panasonic
branded SD Memory Card. (Use only the
genuine card)
• If the card is not fully inserted, the card may
be damaged.
Memory Card/battery
door.
17
Preparation
ª Access to the card
When the card is being accessed, the
card access indication 1 lights.
P
When the card access indication 1 is
lit, do not:
• turn the camera [OFF].
• remove the battery or the card.
• pull the DC cable out if you use the AC
adapter.
The card and the card contents may be
destroyed and the camera may not
operate normally.
1600
ª SD Memory Card (supplied)
and MultiMediaCard (optional)
The SD Memory Card and
MultiMediaCard are small, lightweight,
removable external cards. The reading/
writing speed of SD Memory Card is
fast. The SD Memory Card is equipped
with a write protection switch that can
inhibit writing and formatting. (When the
switch is moved towards the [LOCK]
side, it is not possible to write or delete
data on the card and format it. When the
switch is unlocked, these functions
become available)
SD Memory Card
It is possible that images stored on the
card can be damaged due to accidental
erasure, static electricity, electrical noise
or a defective card. We strongly suggest
copying the images to your PC’s hard
drive using the USB connection
explained on P90.
MultiMediaCard
• The reading/writing
speed of
MultiMediaCards is
slower than SD cards.
When MultiMediaCards
are used, the performance of certain
features may be slightly slower than
advertised.
• After recording motion images using
the MultiMediaCard, the card access
indication may appear for a while, but
this is not a malfunction.
• Keep the Memory Card out of reach of
children to prevent swallowing.
18

Preparation
Turning Camera on/off
1 Set the camera switch to [ON].
• The power indicator 1 lights.
• The lens will extend out.
2 Set the camera switch to [OFF].
• The lens will retract.
1,2
OFF≥≥ON
ª Power indicator
Lit:
OFF≥≥ON
• When turning the camera switch to
[ON]
Blinking:
• When the Memory Card/battery door is
opened
• When the card is not inserted
• When no space is left in the card
• When the card is protected during
recording
• When setting the mode dial from the
playback mode to recording mode with
the lens cap attached
• When the remaining battery power is
low (blink slowly)
• When the camera switch is turned on, do not hold the lens cap. If the lens cap is
not removed, [SYSTEM ERROR] will be displayed. Turn the camera switch off,
remove lens cap, then switch the camera on again.
• When turning on the camera in the recording mode, do not put any obstacle in
front of the lens.
• Please be sure to remove the lens cap before you switch on the camera in
recording mode. If not, the message “REMOVE LENS CAP AND PRESS
BUTTON” appears on the LCD monitor/Viewfinder. Please remove the lens
cap and press 4/[REVIEW/SET] button 2.
• Do not put pressure on the lens when the lens barrel comes out. Ensure that the
lens has fully retracted before wiping it.
19
Preparation
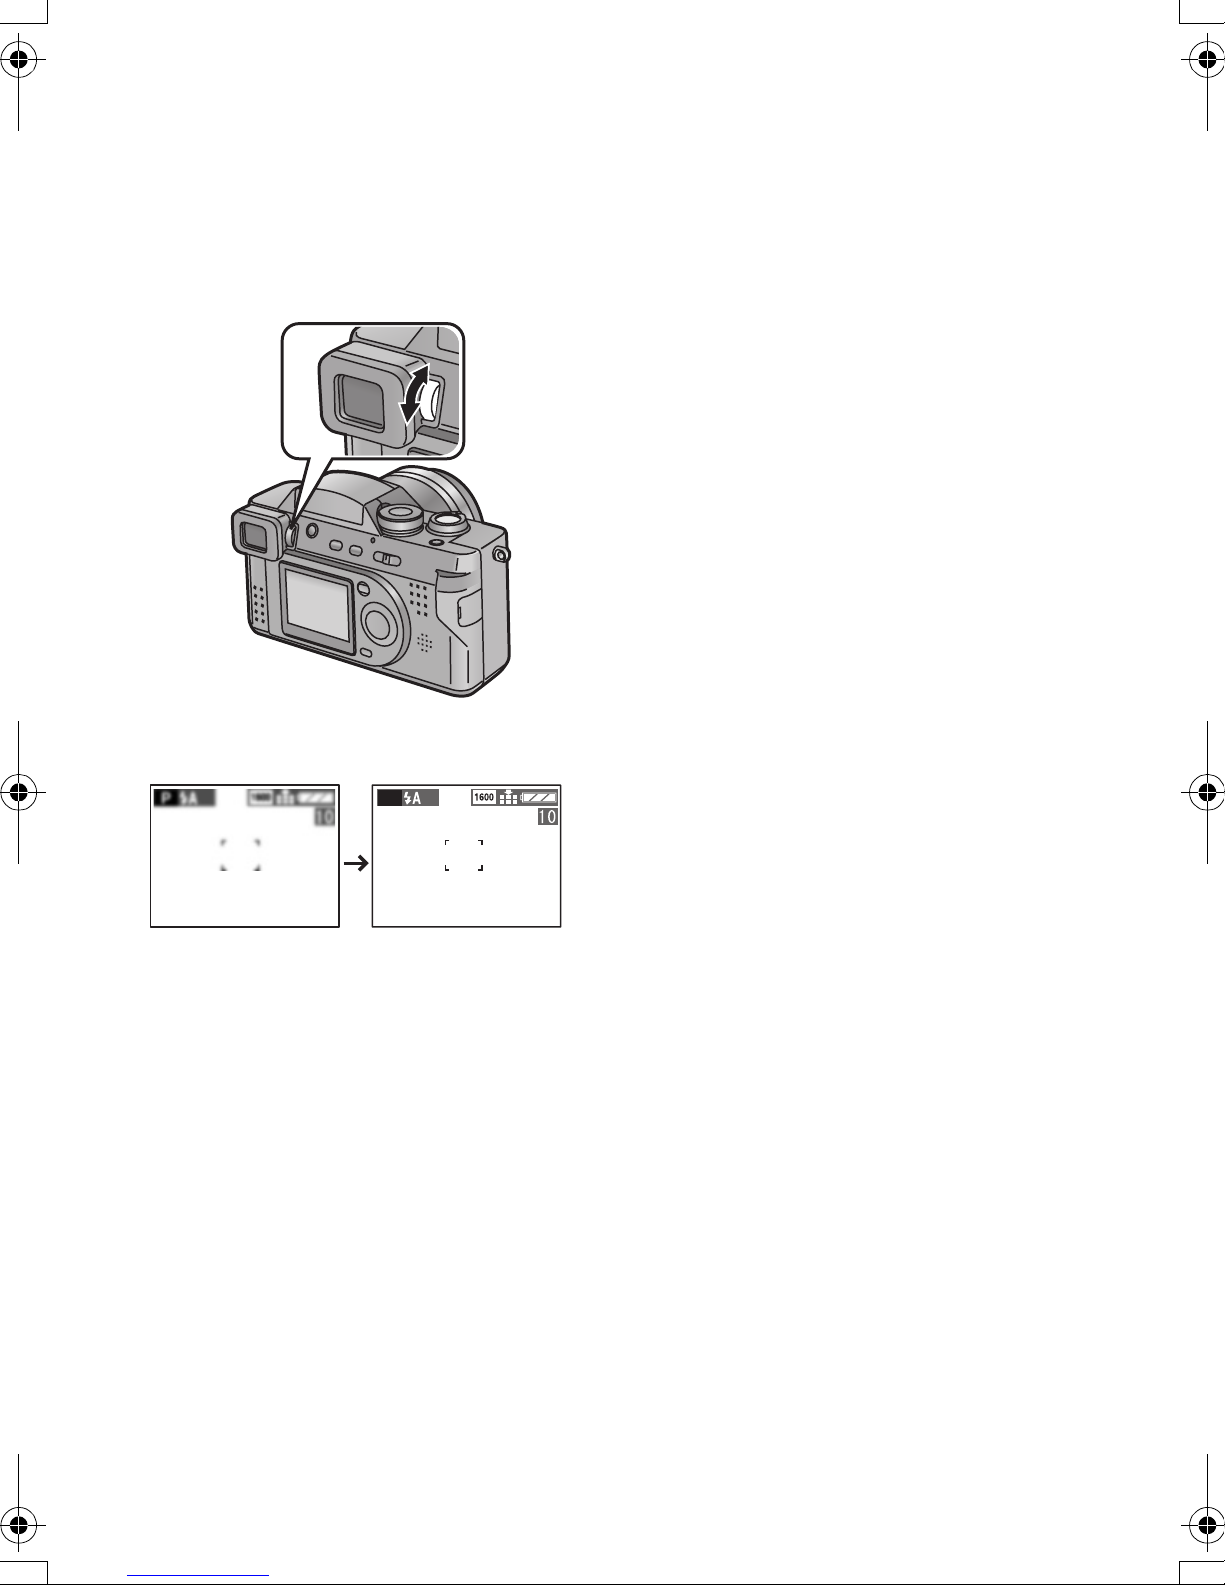
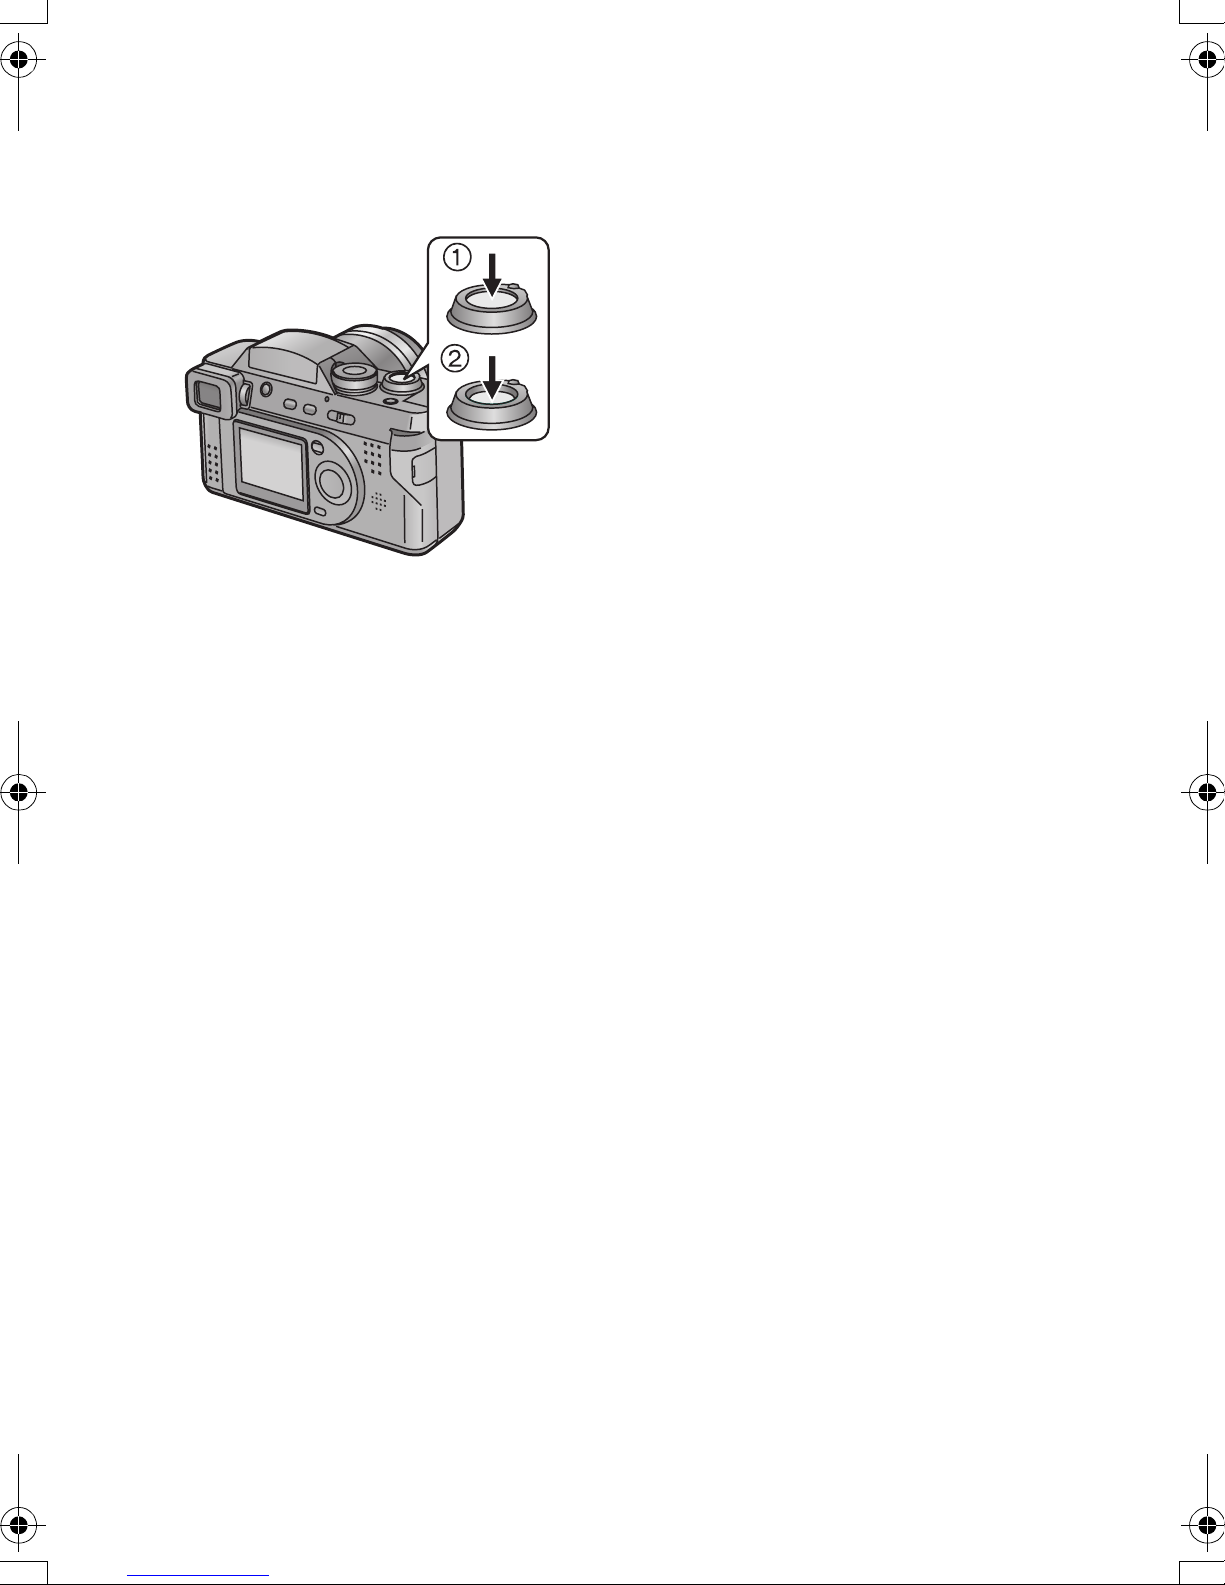
Adjusting the Viewfinder
(Diopter Adjustment)
This camera’s Viewfinder has a diopter
adjustment. It allows the user to make
adjustments related to each users individual
vision characteristics. Please adjust this
feature before using the camera.
1
This feature is especially useful for the user
who wears corrective lens because the lens is
not needed.
[Preparation]
• Press [DISPLAY] button a few times until
picture appears on the Viewfinder.
1 Adjust the diopter by rotating the dial
until the picture is in focus.
1
P
20
Preparation
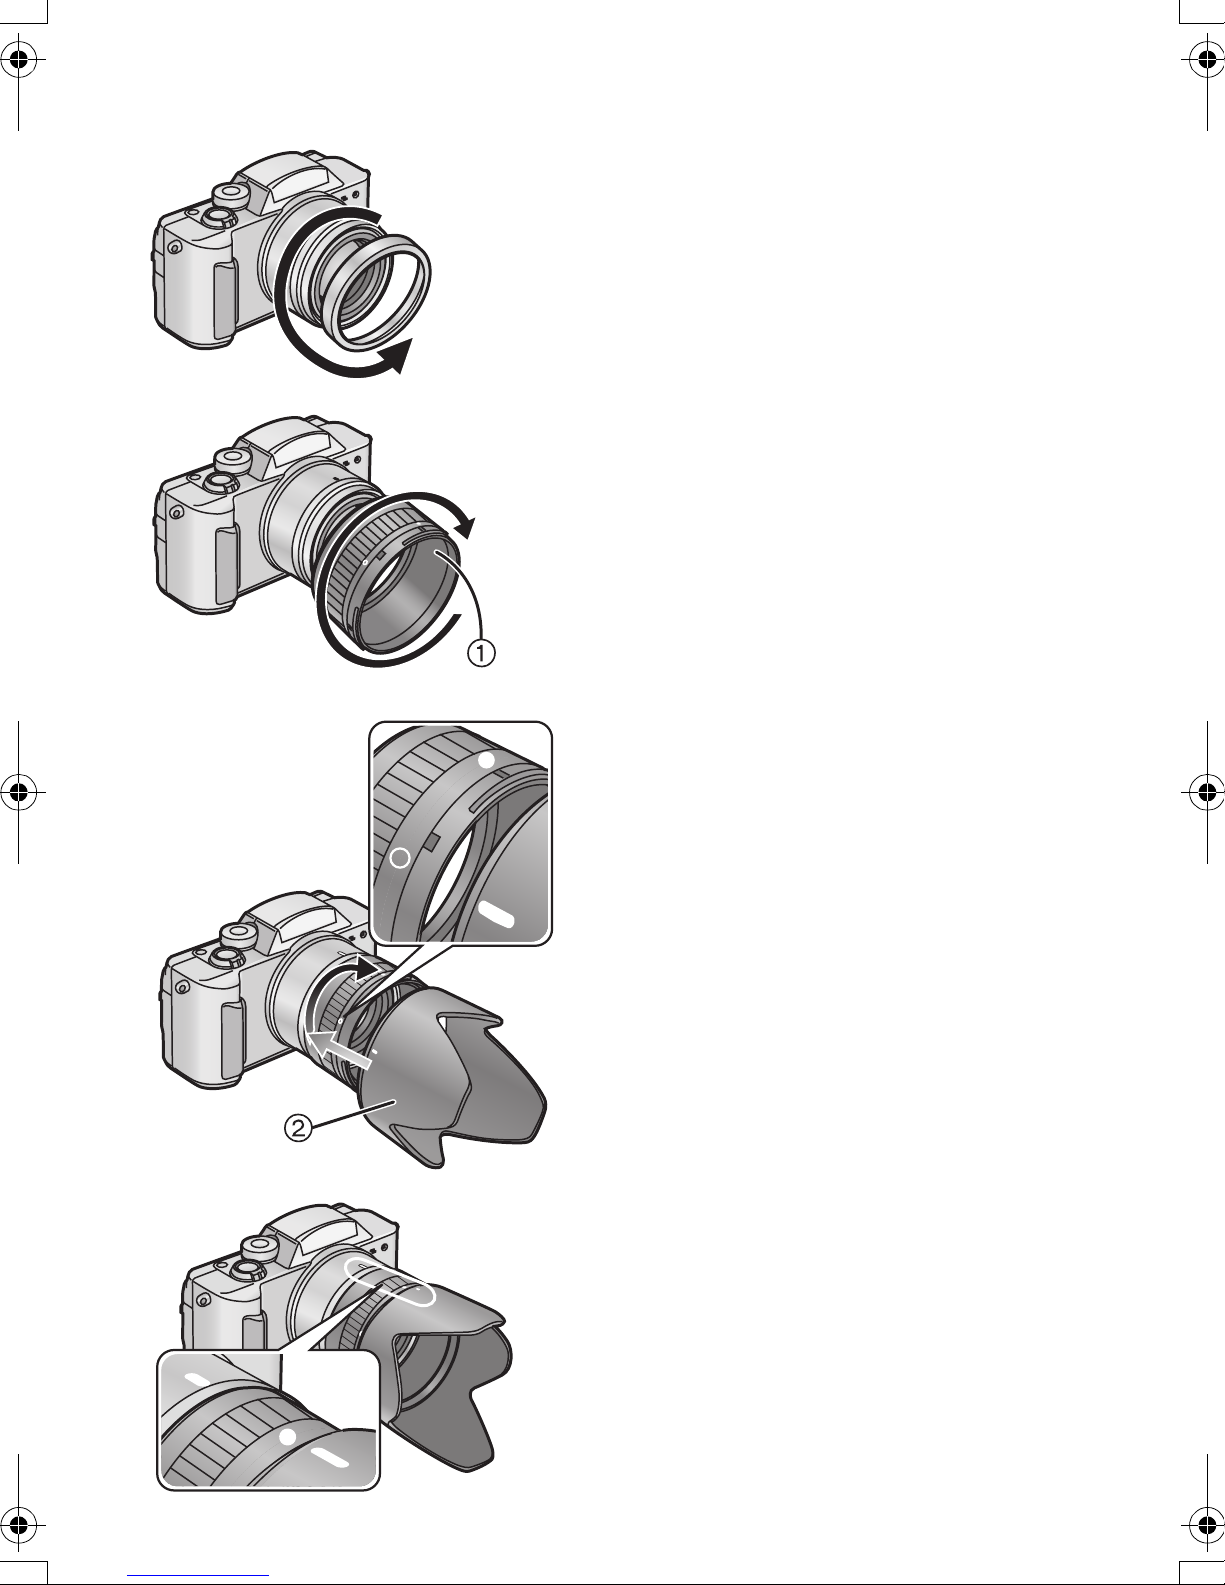
Attaching the Lens Hood
1
2
When shooting in very sunny condition, use
the supplied lens hood to avoid reflection and
flare on pictures.
[Preparation]
• Check that the camera switch is set to [OFF]
and the lens barrel is fully retracted.
• Close the flash. (P39)
1 Remove the lens ring.
2 Attach the lens hood adapter 1
(supplied).
• The mark ±, ¥ will be the opposite
side of the camera.
3 Attach the lens hood 2 (supplied).
• Adjust the mark of the lens hood to the
mark ± of the lens hood adapter.
Then, rotate the lens hood to the
mark ¥ and fix it.
• Be careful not to rotate the lens hood
adapter.
3
4
4 Rotate the lens hood and the lens
hood adapter until the mark of the
lens hood is fitted to the mark of the
camera.
• If the marks are not fitted, edges of the
screen may become dark. (vignetting
effect)
• When taking pictures with flash, flash light is
interrupted by the lens hood and the bottom
of the screen becomes dark. (vignetting
effect)
We recommend to remove the lens hood/
lens hood adapter.
• Even when the lens hood is attached, you
can attach the lens cap without the string.
21
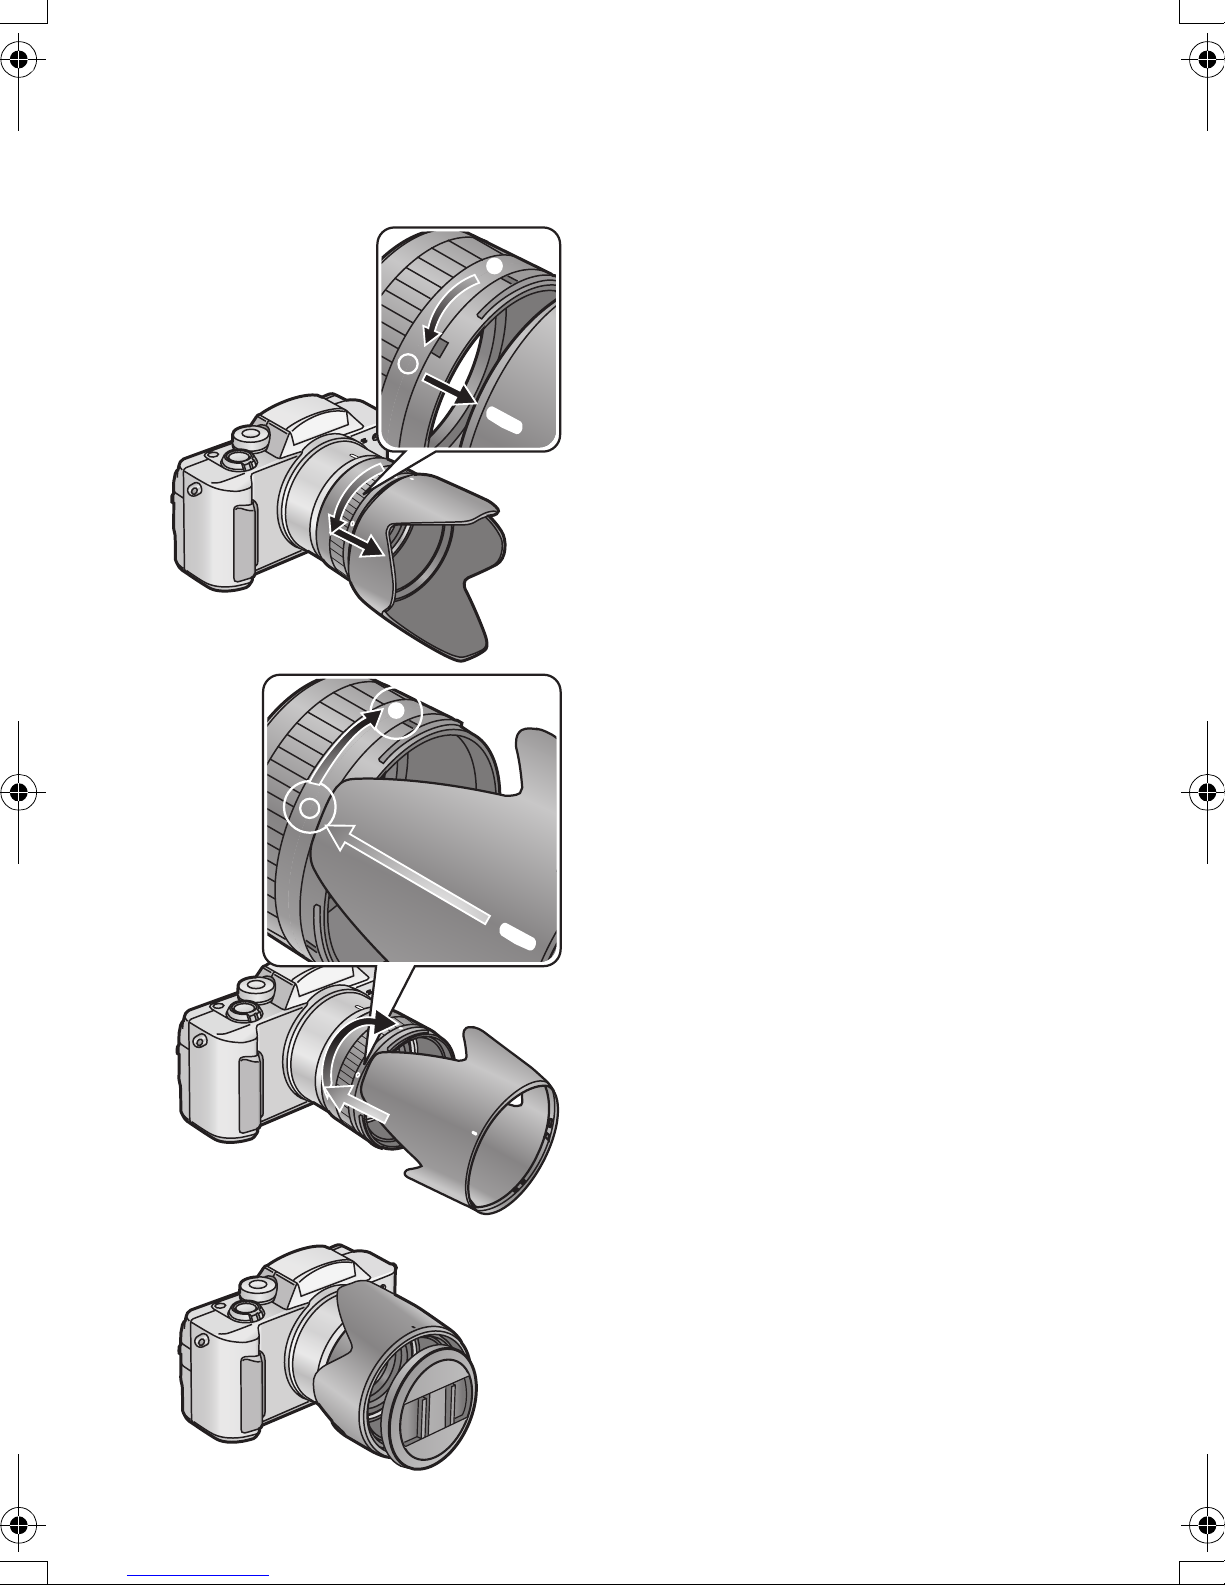
1
Preparation
ª Temporarily storing the lens hood
You can store the lens hood in the camera
temporarily. Please do not take a picture with
the lens hood stored.
[Preparation]
• Check that the camera switch is set to [OFF]
and the lens barrel is fully retracted.
• Close the flash. (P39)
1 Remove the lens hood.
2 Reverse the lens hood and attach it.
• Attach the lens hood adjusting the
mark ± of the lens hood adapter to the
mark of the lens hood, and rotate the
lens hood to the right.
2
3
3 Attach the lens cap.
• When taking pictures with flash, flash light is
interrupted by the lens hood and the bottom
of the screen becomes dark. (vignetting
effect)
We recommend you to remove the lens
hood/lens hood adapter.
• Even when the lens hood is attached, you
can attach the lens cap without the string.
22
Preparation
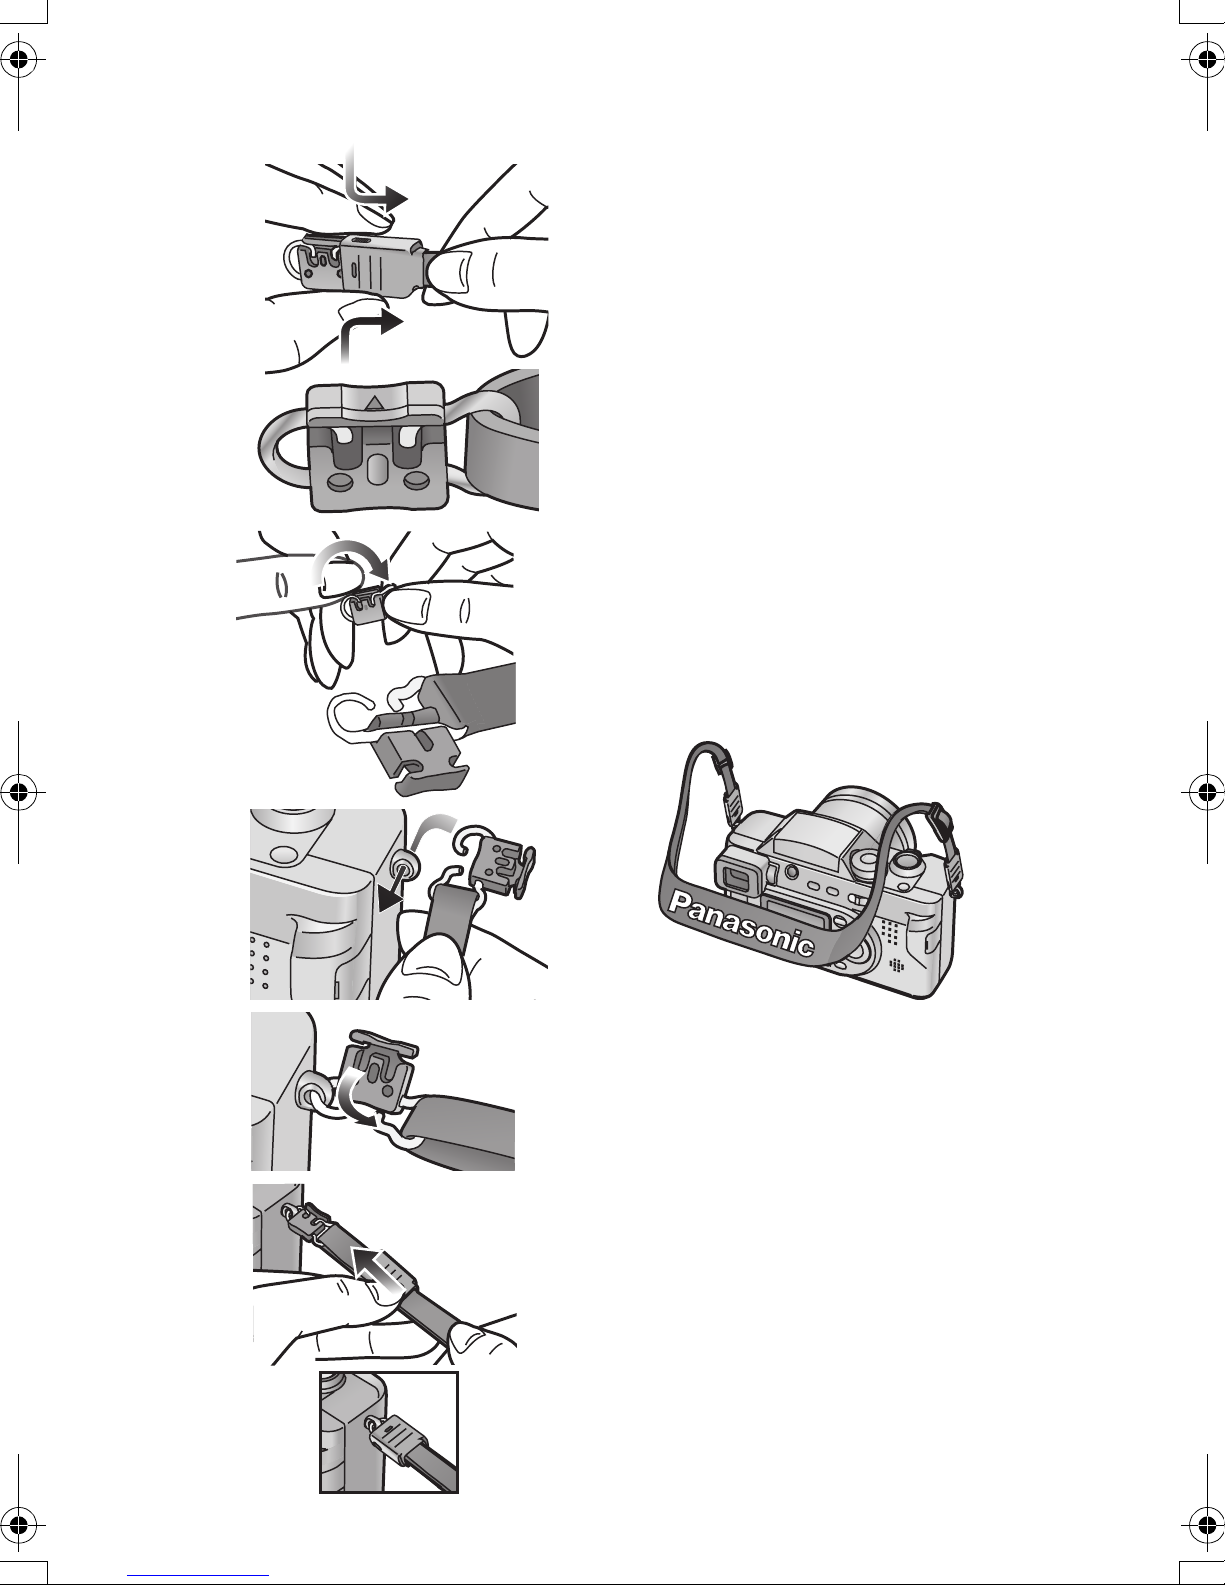
Attaching the Strap
1 Press both sides of the cover to put
the metal fitting out of the cover.
1
2
2 Rotate the plastic part of the metal
fitting to the direction of the arrow.
• Please attach the plastic part to the
metal fitting again if it detached.
3 Let the metal fitting pass through the
eyelet of the camera.
4 Rotate the plastic part of the metal
fitting to the opposite direction until it
is locked.
5 Move the cover to the direction of the
arrow, and attach it firmly.
• Be sure to move the cover entirely until
it is attached firmly.
6 Attach the strap to the other side of
the camera in the same way.
3
4
5
23
Preparation
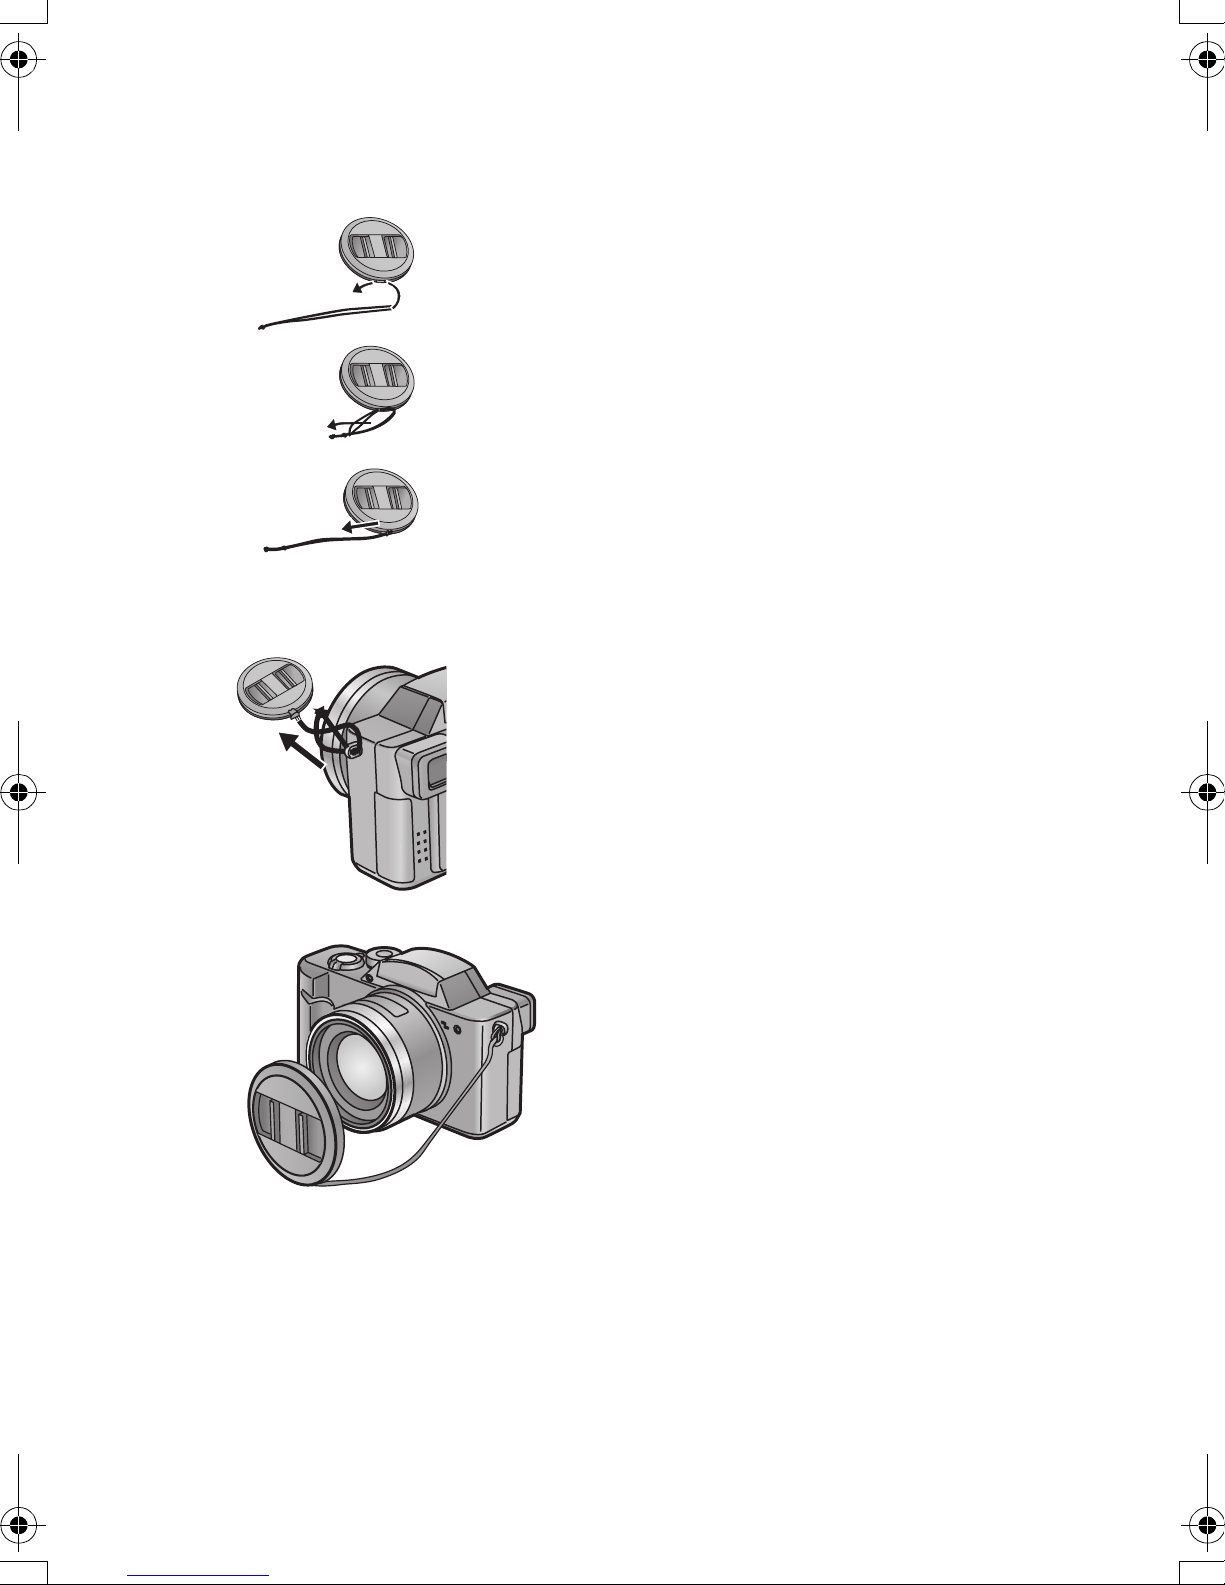
Attaching the Lens Cap
When you turn the camera [OFF] or draw
back the lens, attach the supplied lens cap to
protect the surface of the lens.
1
2
1 Let the top of the string pass through
the lens cap.
2 Let the opposite side of the string
pass through the circular part of the
string.
3 Pull to the direction of the arrow.
3
4
5
4 Let the top of the lens cap string pass
through the strap eyelet as shown in
the picture.
5 Attach the lens cap.
• Remove the lens cap before turning on the
camera in the recording mode.
• Even when the lens hood is attached, you
can attach the lens cap without the string.
24
Preparation
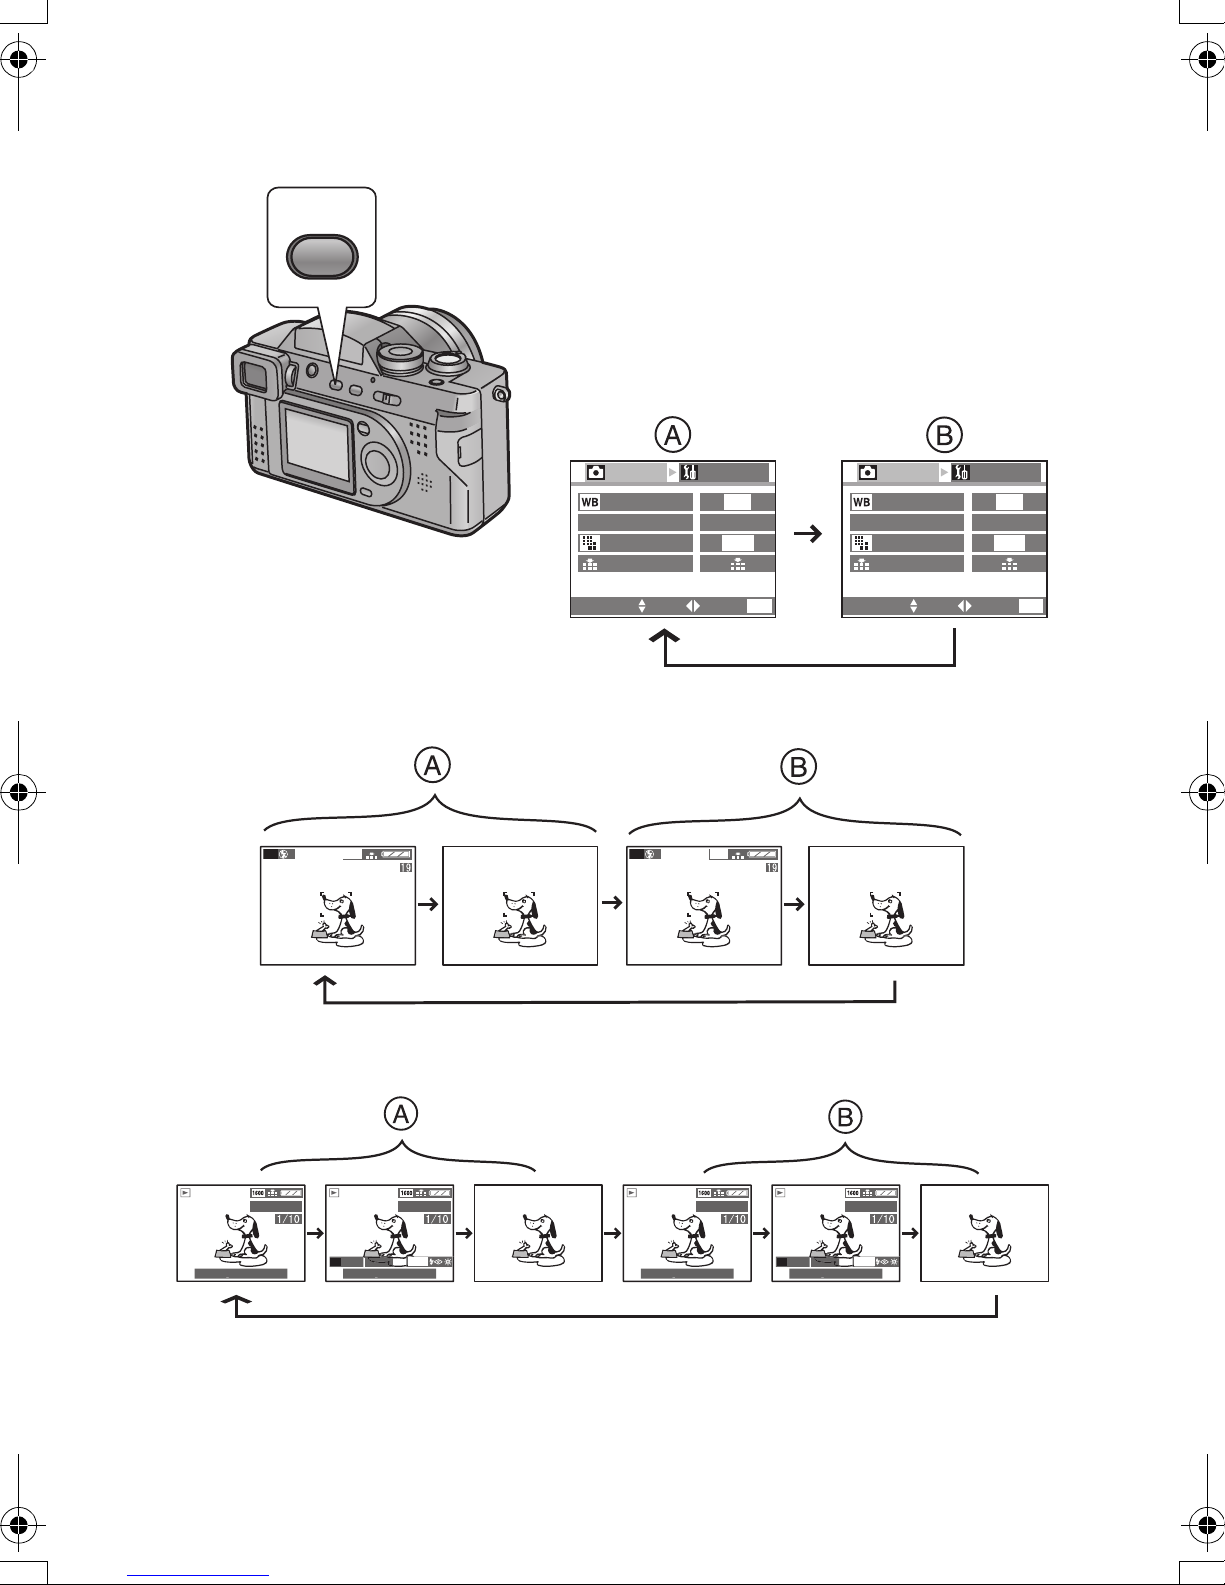
Using the LCD Monitor/Viewfinder
Every time you press the [DISPLAY] button,
the display of the LCD monitor/Viewfinder
DISPLAY
changes as shown below.
[Menu display]
[In multi/zoom playback]
A LCD monitor
B Viewfinder
[In recording]
P
1600
1
REC
/
4
W.BALANCE
AE
AE MODE
PICT.SIZE
QUALITY
SELECT SET
P
SETUP
AUTO
P
1600
EXIT
1600
MENU
1
REC
/
4
W.BALANCE
AE
AE MODE
PICT.SIZE
QUALITY
SELECT SET
SETUP
AUTO
P
1600
EXIT
MENU
[In playback]
100-0001
10:00 11.
AUG
.2003
P
• When the LCD monitor is displayed, the Viewfinder turns off. (vice versa)
100-0001 100-0001
AUG
ISO100
.2003
F2.8 1/200
10:00 11.
25
10:00 11.
AUG
.2003
P
F2.8 1/200
10:00 11.
100-0001
AUG
ISO100
.2003
Preparation
The Shutter Button
(Pressing halfway/Pressing fully)
The shutter button is pressed in 2 steps:
“pressing halfway” and “pressing fully”.
Pressing halfway 1
• Focus and exposure are locked.
Pressing fully 2
• The picture is captured. In motion image
mode, the recording starts.
• You can adjust volume of the beep sound in the menu. (P85)
• If you press the shutter button fully in a single stroke, the captured picture may
appear shaken or unfocused. (The camera may be moved during capturing)
26
Preparation
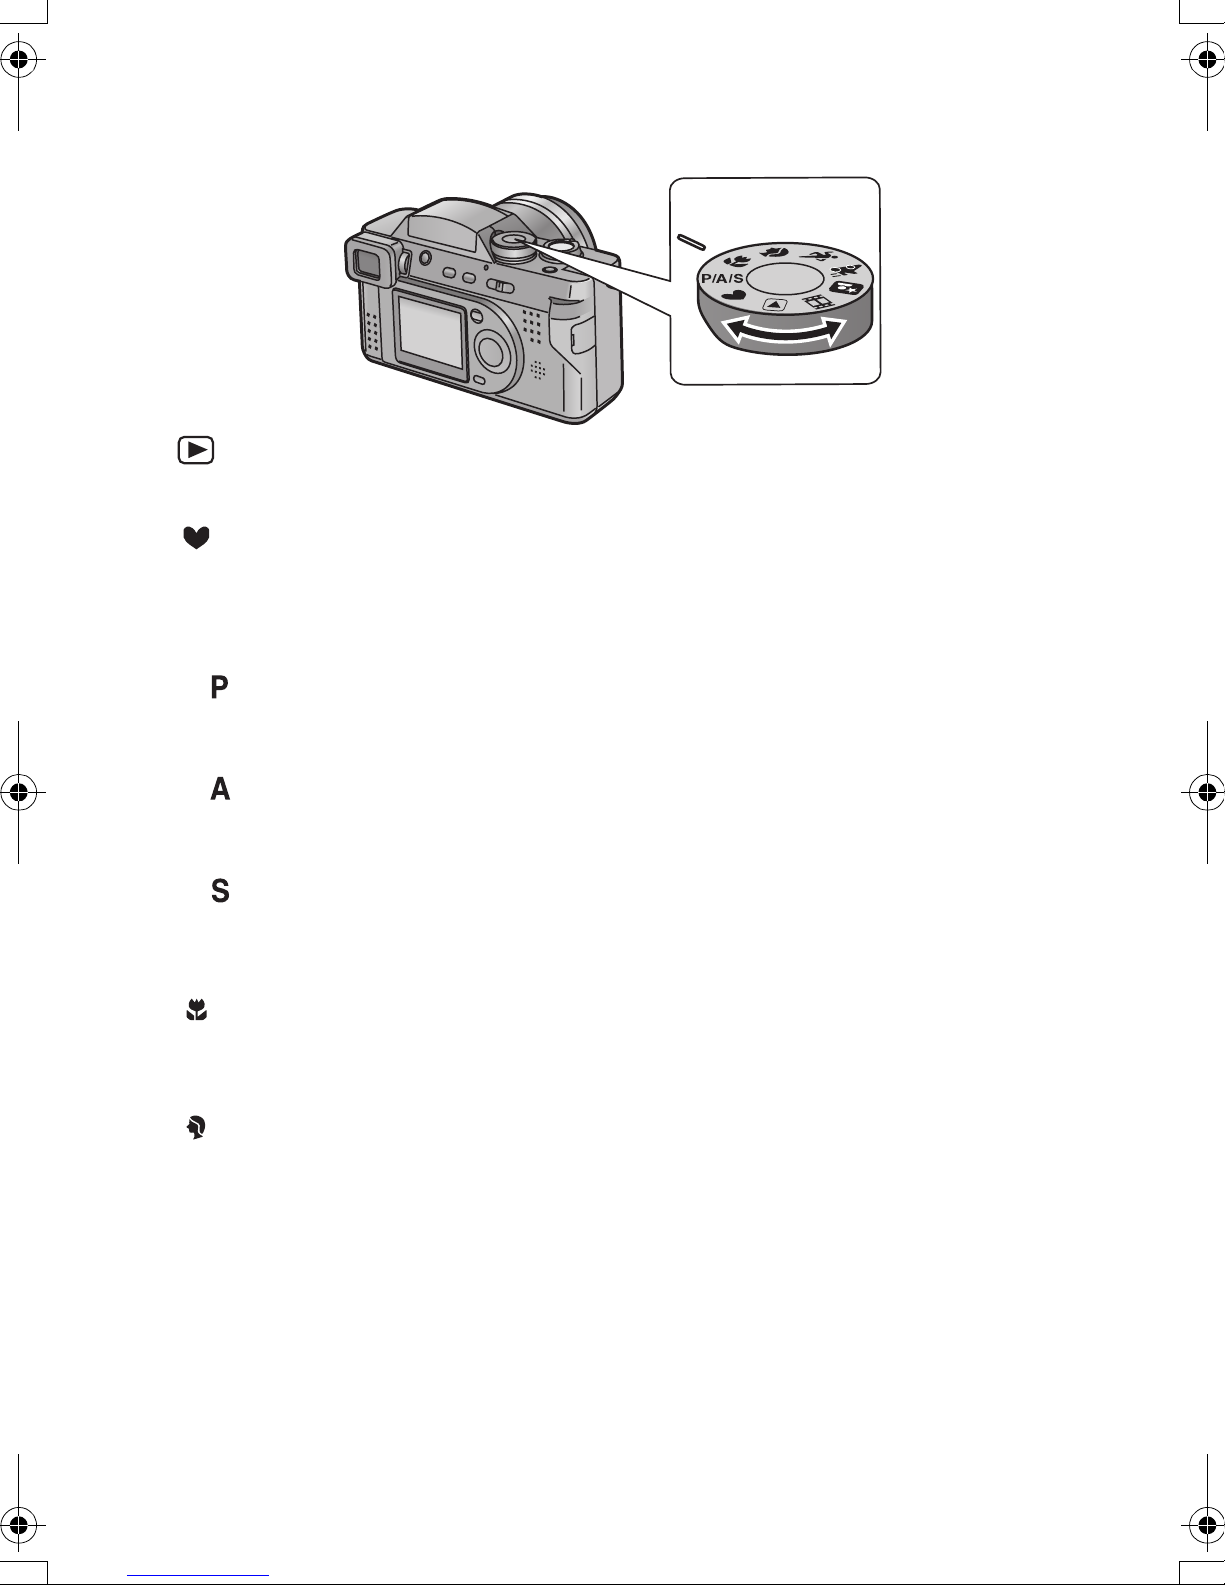
The Mode Dial
You can choose a desired mode by the mode dial.
: Playback (P66)
Playback recorded images.
: Simple mode (P33)
You can take pictures easily because the necessary setting menus are minimized.
This mode is for beginners.
P/A/S
: Programme AE (P31)
The shutter speed and the aperture value are automatically adjusted. In addition,
more settings can be adjusted.
: Aperture-priority AE (P47)
The shutter speed is adjusted automatically, according to the aperture value you
set.
: Shutter-priority AE (P48)
The aperture value is adjusted automatically, according to the shutter speed you
set.
: Macro mode (P49)
When you take pictures from a distance closer than 120 cm (Tele), set the camera in
macro mode. This allows you to get closer to the subject up to 5 cm (Wide).
: Portrait mode (P50)
Portrait mode is the position for taking portrait shot and let the subject outstanding
out of background.
27

Preparation
: Sports mode (P51)
When you take pictures of outdoor sports, this mode let you capture the still action
photo easily.
: Panning mode (P52)
Panning is a technique of moving the camera tracking a subject in motion.
Using a slower shutter speed when tracking a subject, you can sharply photograph
a subject in motion while blurring the background.
: Night portrait mode (P53)
When you take pictures of, for example, your friends in front of beautiful night
illumination scenery, this mode let you get the appropriate exposure for your subject
as well as the background, using flash and slow shutter.
: Motion images (P35)
Use this mode when recording motion images.
28
Preparation
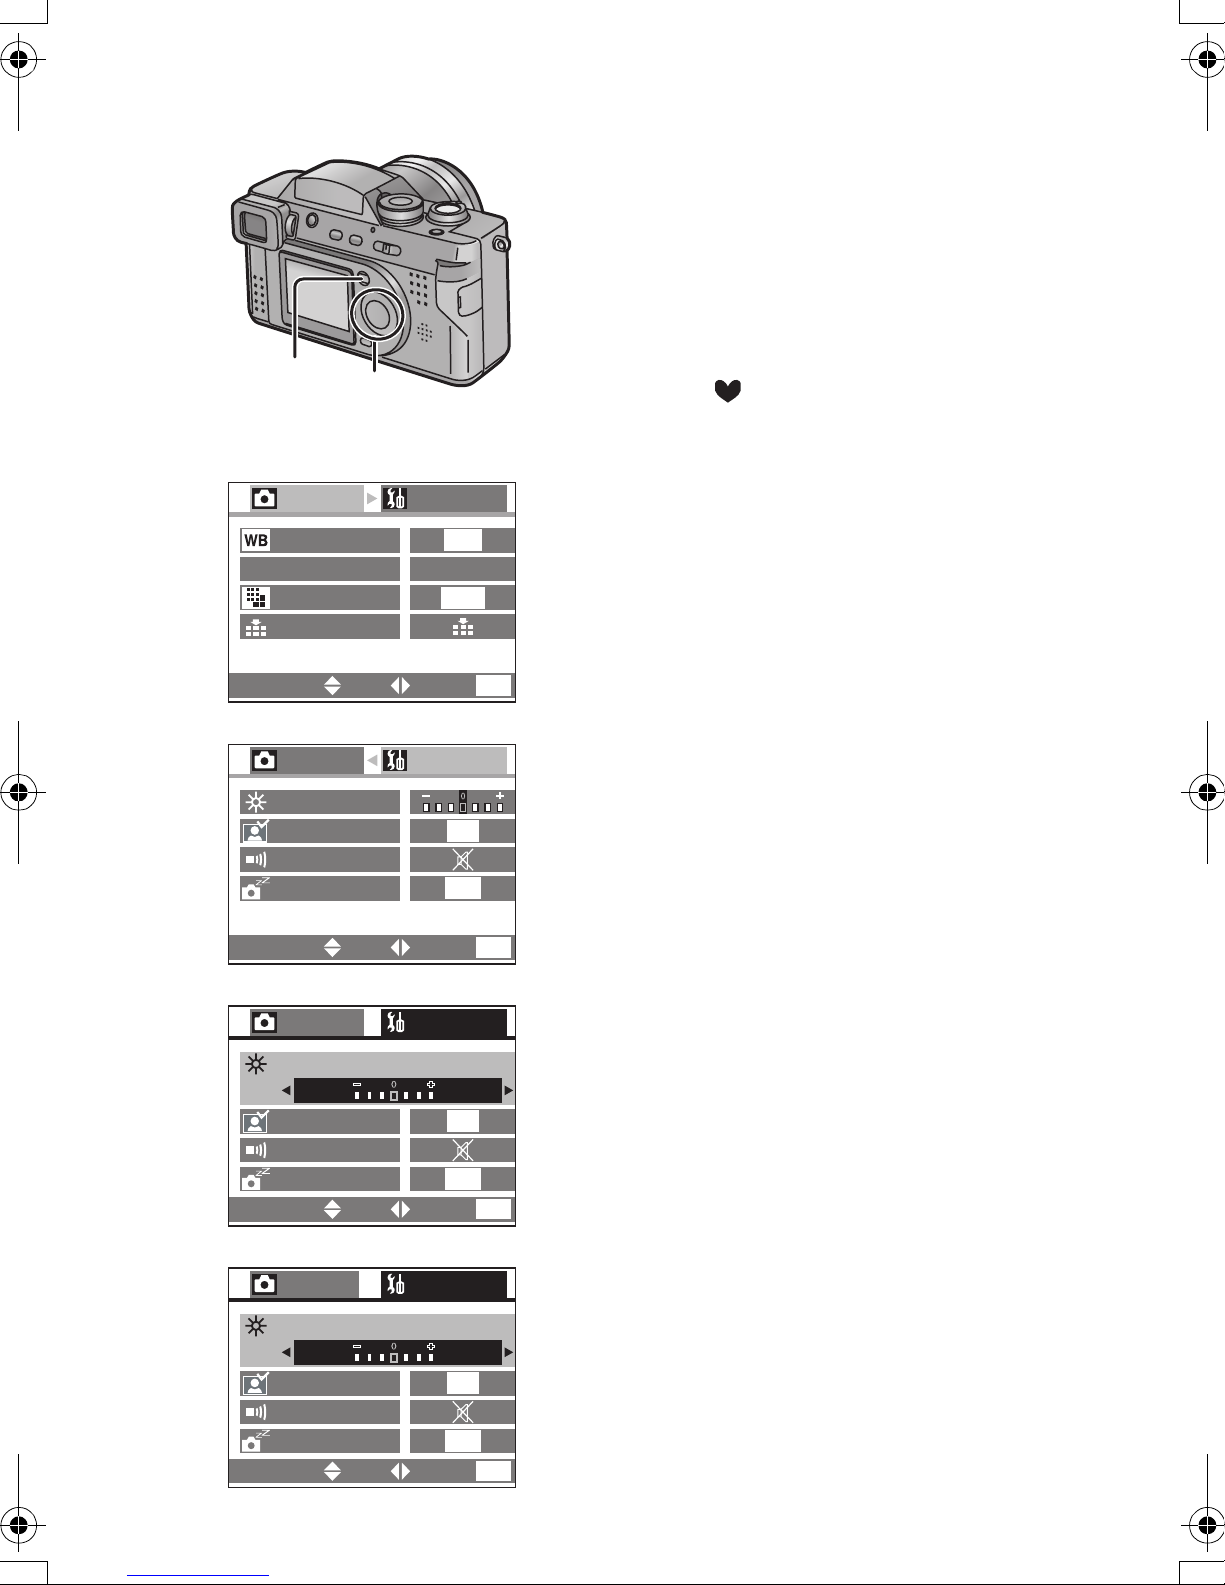
Operating the Menu
By operating the menu, you can set the
settings of REC or playback mode. You can
also set the date and time, the beep sound
and various other settings. Follow these
instructions.
[Preparation]
1,5
2,3,4
• Set the mode dial to the recording mode
(except for [ ]) or the playback mode.
1
1
REC
W.BALANCE
AE
AE MODE
PICT.SIZE
QUALITY
SELECT SET
/
2
REC
MONITOR
AUTO REVIEW
BEEP
POWER SAVE
SELECT SET
3
REC
1 Press the [MENU] button.
SETUP
4
AUTO
P
1600
• If you set the mode dial to the recording
mode, the REC menu is displayed; if
you set it to the playback mode, the
playback menu is displayed.
2 Press 1.
3 Press 3/4 to choose the item.
MENU
EXIT
4 Press 2/1 to set the item.
SETUP
OFF
2MIN.
EXIT
SETUP
1
/
2
MENU
1
/
2
5 Press the [MENU] button.
• The menu will disappear.
MONITOR
AUTO REVIEW
BEEP
POWER SAVE
SELECT SET
4
REC
MONITOR
AUTO REVIEW
BEEP
POWER SAVE
SELECT SET
SETUP
OFF
2MIN.
EXIT
OFF
2MIN.
EXIT
MENU
1
/
2
MENU
29
Preparation
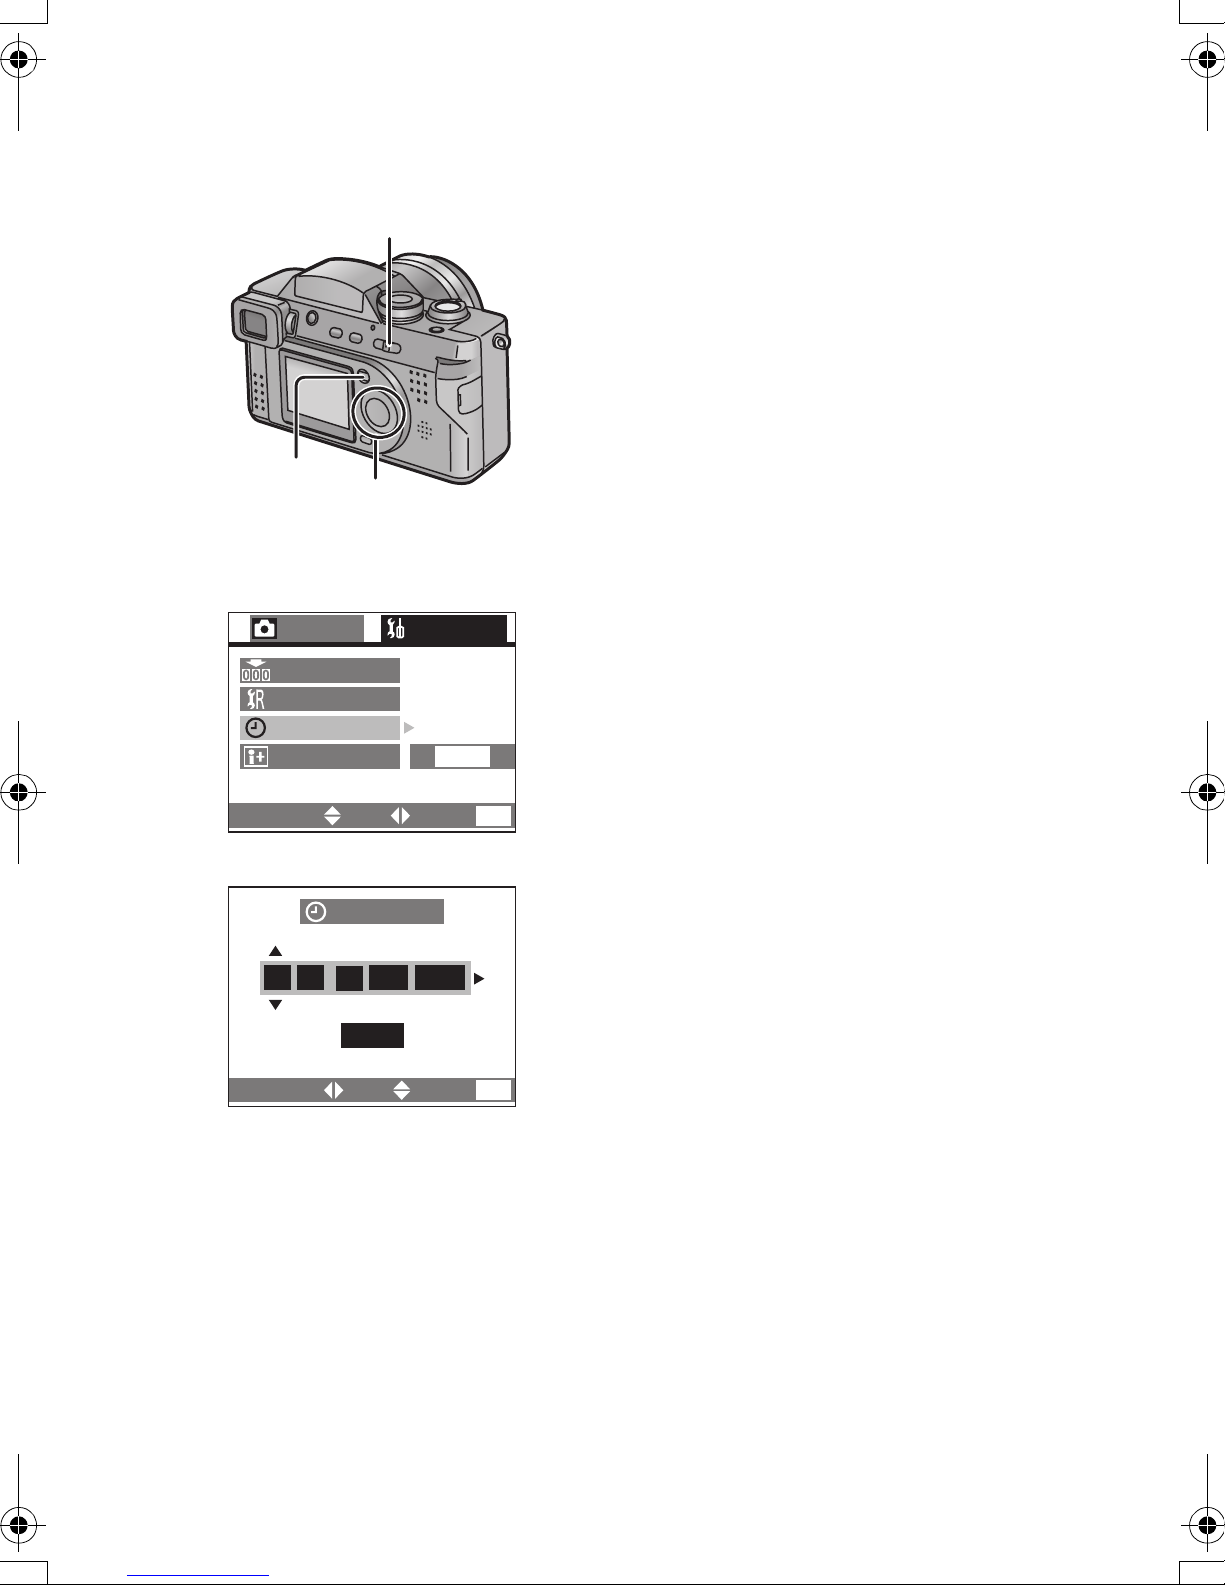
Setting the Date/Time (Clock Set)
If the message [PLEASE SET THE CLOCK]
appears, set the date and time.
You can go to the setup menu by pressing the
[MENU] button during the message is
displayed.
You can set the year from 2003 to 2099. The
24-hour system is used.
1 Press the [MENU] button.
2 Press 1 to make the [SETUP] menu
appear.
• In simple mode, skip this step.
3 Press 3/4 to select [CLOCK SET],
and then press 1.
4 Press 3/4/2/1 to set date and time,
and then press 1.
5 Press 3/4 to select [M/D/Y], [D/M/Y]
or [Y/M/D].
6 Press the [MENU] button twice.
1,6
3
REC
NO.RESET
RESET
CLOCK SET
LANGUAGE
7
2,3,4,5
SETUP
ENG
2
/
2
SELECT SET
EXIT
MENU
• The menu will disappear.
7 Check if the date/time setting is
4,5
CLOCK SET
10:00
SELECT SET
• It is possible to print the recording date.
When using the [SD Viewer for DSC] in the supplied CD-ROM, you can print with
the recording date by setting its position on the picture. For further information
(software installation), read the supplied operating instructions for PC connection.
• When you want digital printings with the recording date, be sure to order the
printing of the date. For further information, ask a photo studio, a store, etc.
Depending on the store, it may not be printed.
• When the fully charged battery is inserted to the camera more than one hour, the
clock setting is memorized by the camera for about 24 hours even after the battery
is removed. (The time may be shorter if the battery is not charged sufficiently)
When the clock setting is cancelled, please set the date and time again.
1
D/M/Y
AUG
.
2003
.
EXIT
MENU
displayed correctly, after turning the
camera [OFF] and [ON].
30
 Loading...