

Panasonic Lumix DMC-FX78, Lumix DMC-FX78P Owner's Manual

Pa.aso.ic
Owner's Manual
for advanced features
Digital Camera
Mode,NoDMC-FX78
Before connecting, operating or adjusting this product,
please read the instructions completely.
,S',_ T_
VQT3G35-1
Recording
For details on [Motion Picture] Mode menu settings, refer to P3&
This sets up the data format of motion pictures.
Applicable modes: [_'_r_[]_
[_ [AVCHD]]
• Select this format to record HD (high definition) video for playback on your HDTV using an
HDMI connection,
• it can be played back as is by inserting the card into a device compatible with AVCHD. Refer to
the instructions of the device used for details on compatibility.
• Use a card with SD Speed Class with "Class 4" or higher.
[E_ [Motion JPEG]]
• Select this format to record standard definition video for playback on your PC. It can be
recorded using less storage when there is not much space left on the memory card or when
you want to attach the motion picture to an e-mail.
• Use a card with SD Speed Class with "Class 6" or higher.
- 90-
Recording
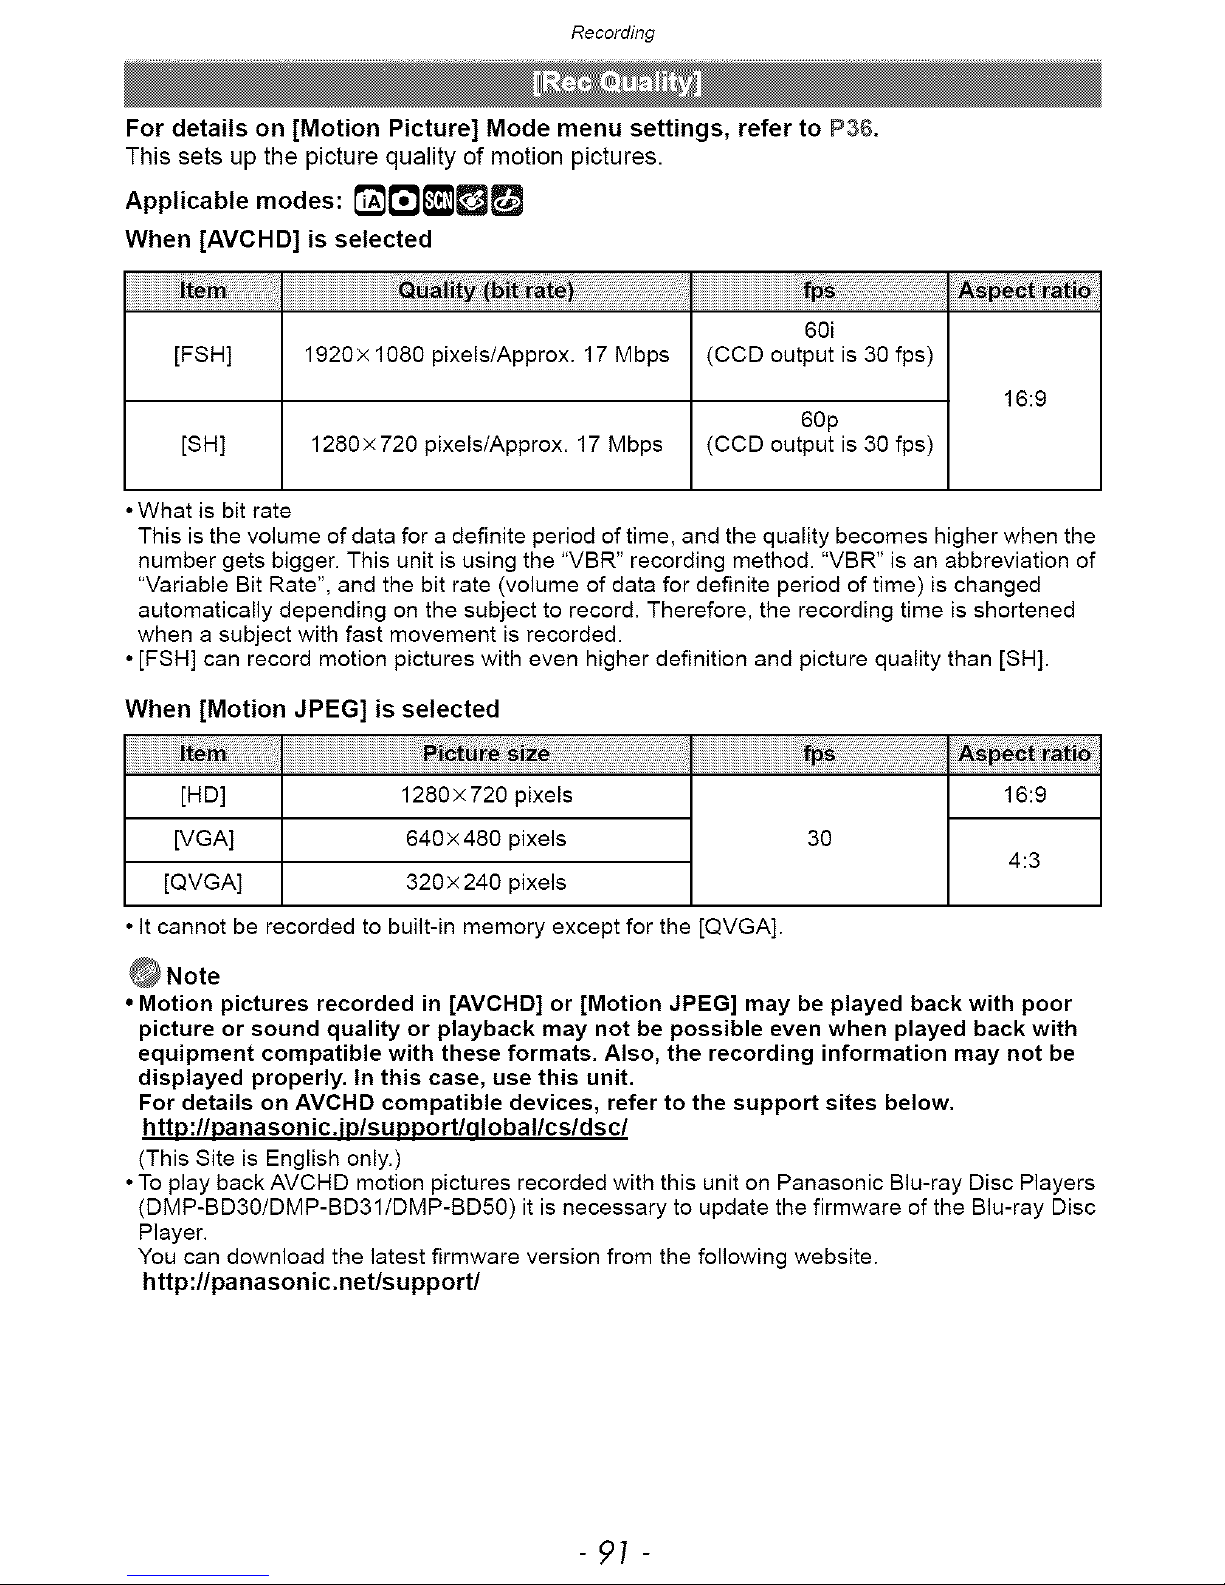
For details on [Motion Picture] Mode menu settings, refer to P3&
This sets up the picture quality of motion pictures.
Applicablemodes:
When [AVCHD] is selected
60i
[FSH] 1920x 1080 pixels/Approx. 17 Mbps (CCD output is 30 fps)
16:9
60p
[SH] 1280×720 pixels/Approx. 17 Mbps (CCD output is 30 fps)
• What is bit rate
This is the volume of data for a definite period of time, and the quality becomes higher when the
number gets bigger. This unit is using the "VBR" recording method. "VBR" is an abbreviation of
"Variable Bit Rate", and the bit rate (volume of data for definite period of time) is changed
automatically depending on the subject to record. Therefore, the recording time is shortened
when a subject with fast movement is recorded.
• [FSH] can record motion pictures with even higher definition and picture quality than [SH].
When [Motion JPEG] is selected
_ict_re
[H D] 1280 × 720 pixels 16:9
[VGA] 640 × 480 pixels 30
4:3
[QVGA] 320× 240 pixels
It cannot be recorded to built-in memory except for the [QVGA].
• Motion pictures recorded in [AVCHD] or [Motion JPEG] may be played back with poor
picture or sound quality or playback may not be possible even when played back with
equipment compatible with these formats. Also, the recording information may not be
displayed properly. In this case, use this unit.
For details on AVCHD compatible devices, refer to the support sites below.
http://panasonic.ip/supportlqlobal/cs/dsc/
(This Site is English only.)
• To play back AVCHD motion pictures recorded with this unit on Panasonic Blu-ray Disc Players
(DMP-BD30/DMP-BD31/DMP-BD50) it is necessary to update the firmware of the Blu-ray Disc
Player.
You can download the latest firmware version from the following website.
http:flpanasonic.netlsupportl
-91 -
Recording
For details on [Motion Picture] Mode menu settings, refer to P36.
In addition to the optical image stabilizer, the electronic image stabilizer is used, further
decreasing the jitter of the image when recording motion picture while walking, etc.
Applicable modes: r__
[ON]/[OFF]
• While recording motion pictures, the angle of view narrows.
• Stronger effect of the correction can be achieved at the wide end.
• image stabilizer may not be as effective when recording in rooms or dark places.
• The setting is fixed to [OFF] in the following cases.
- In [Pin Hole] or [Film Grain] in My Color Mode
-In [Motion JPEG]
For details on [Motion Picture] Mode menu settings, refer to P3&
It will continually keep on focusing on the subject that the focus was once set for.
Applicable modes: r__
[ON]/[OFF]
• Set this function to [OFF] if you wish to fix the focus on the position where you started the
motion picture recording.
• In [Starry Sky] and [Fireworks] in Scene Mode, this setting is fixed to [OFF].
For details on [Motion Picture] Mode menu settings, refer to P3&
This reduces the wind noise in the audio recording.
Applicable modes: r__
[ON]/[OFF]
• Sound quality will be different than usual when [Wind Cut] is set.
- 92-
Recording
It is possible to enter babies' and pets' names and the names of travel destinations when
recording. (Only alphabetical characters and symbols can be entered.)
You can use the stylus pen (supplied) if it is hard to operate with your fingers.
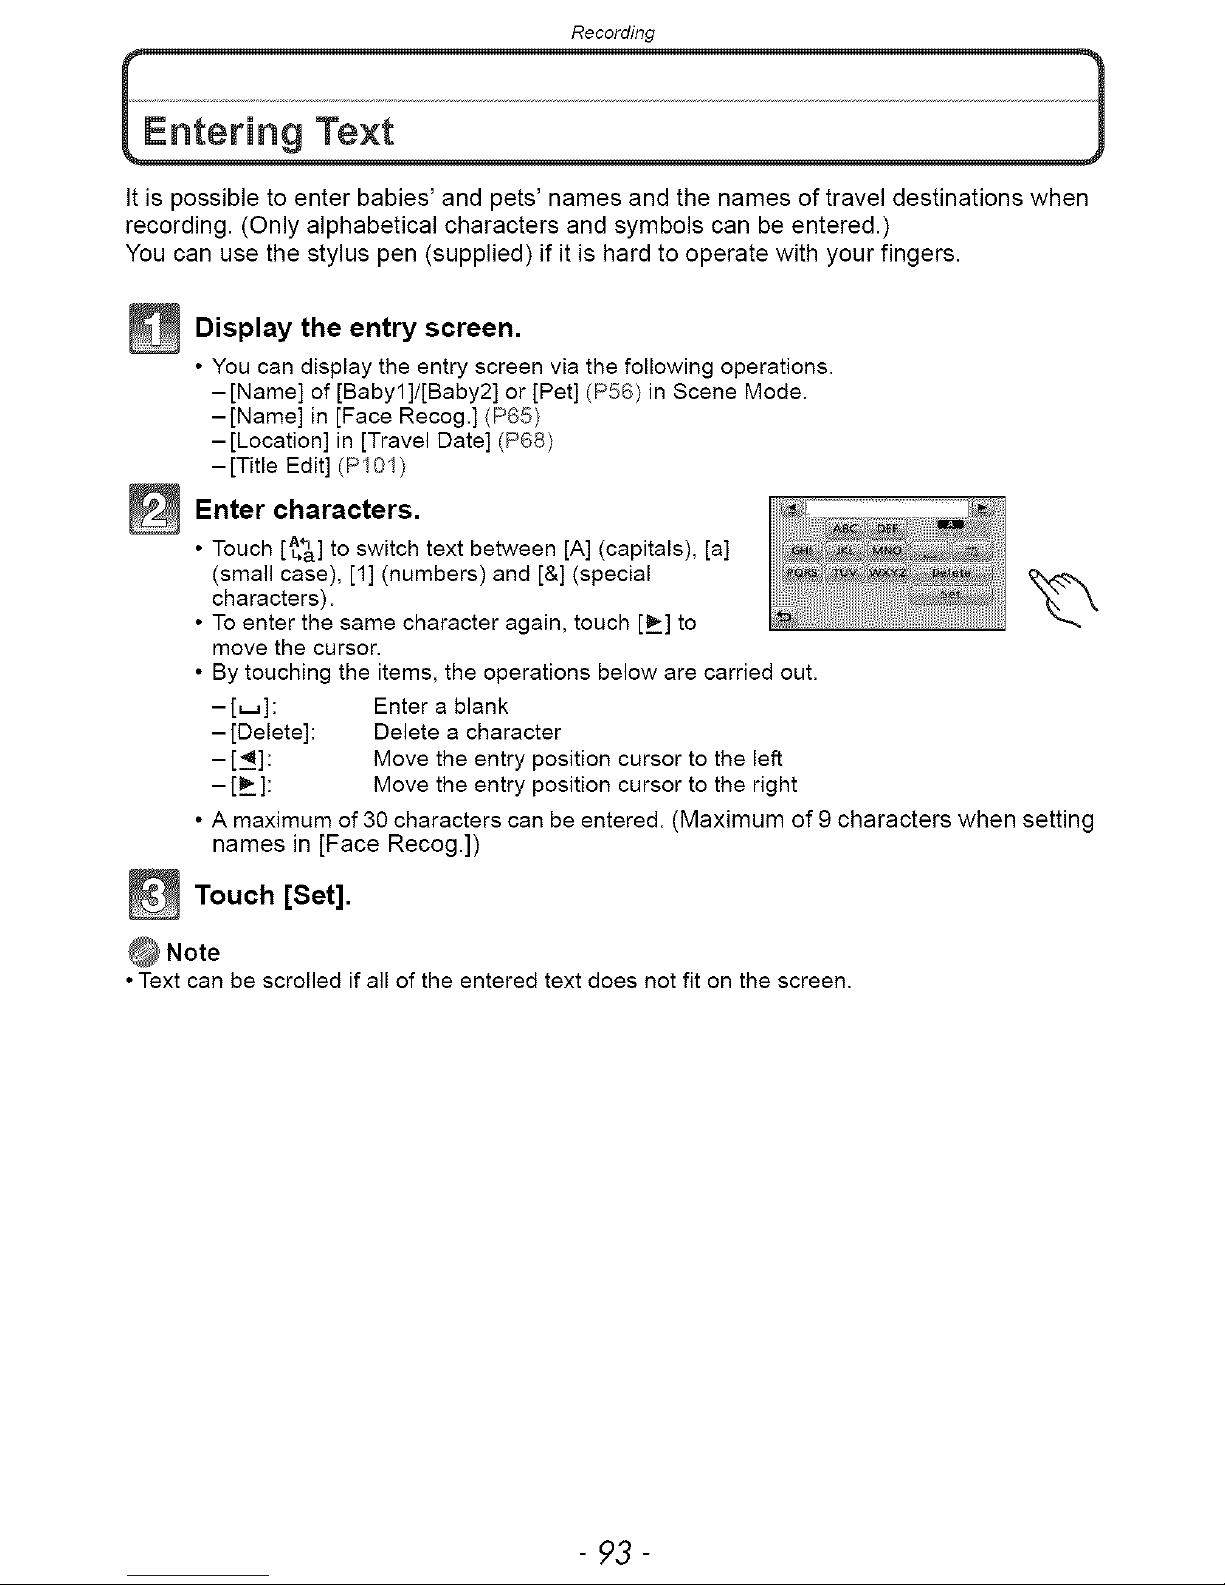
_ Display entry screen.
the
• You can display the entry screen via the following operations.
-[Name] of [Babyl]/[Baby2] or [Pet] (P56) in Scene Mode.
-[Name] in [Face Recog.] (P65)
-[Location] in [Travel Date] (P68)
-[Title Edit] (P101)
_ Enter characters.
• Touch [_a] to switch text between [A] (capitals), [a]
(small case), [1] (numbers) and [&] (special
characters).
\\
• To enter the same character again, touch [_] to
move the cursor.
• By touching the items, the operations below are carried out.
-[_]: Enter a blank
-[Delete]: Delete a character
-[_]: Move the entry position cursor to the left
-[_ ]: Move the entry position cursor to the right
• A maximum of 30 characters can be entered. (Maximum of 9 characters when setting
names in [Face Recog.])
_ Touch [Set].
• Text can be scrolled if all of the entered text does not fit on the screen.
- 93 -
Playback/Editing
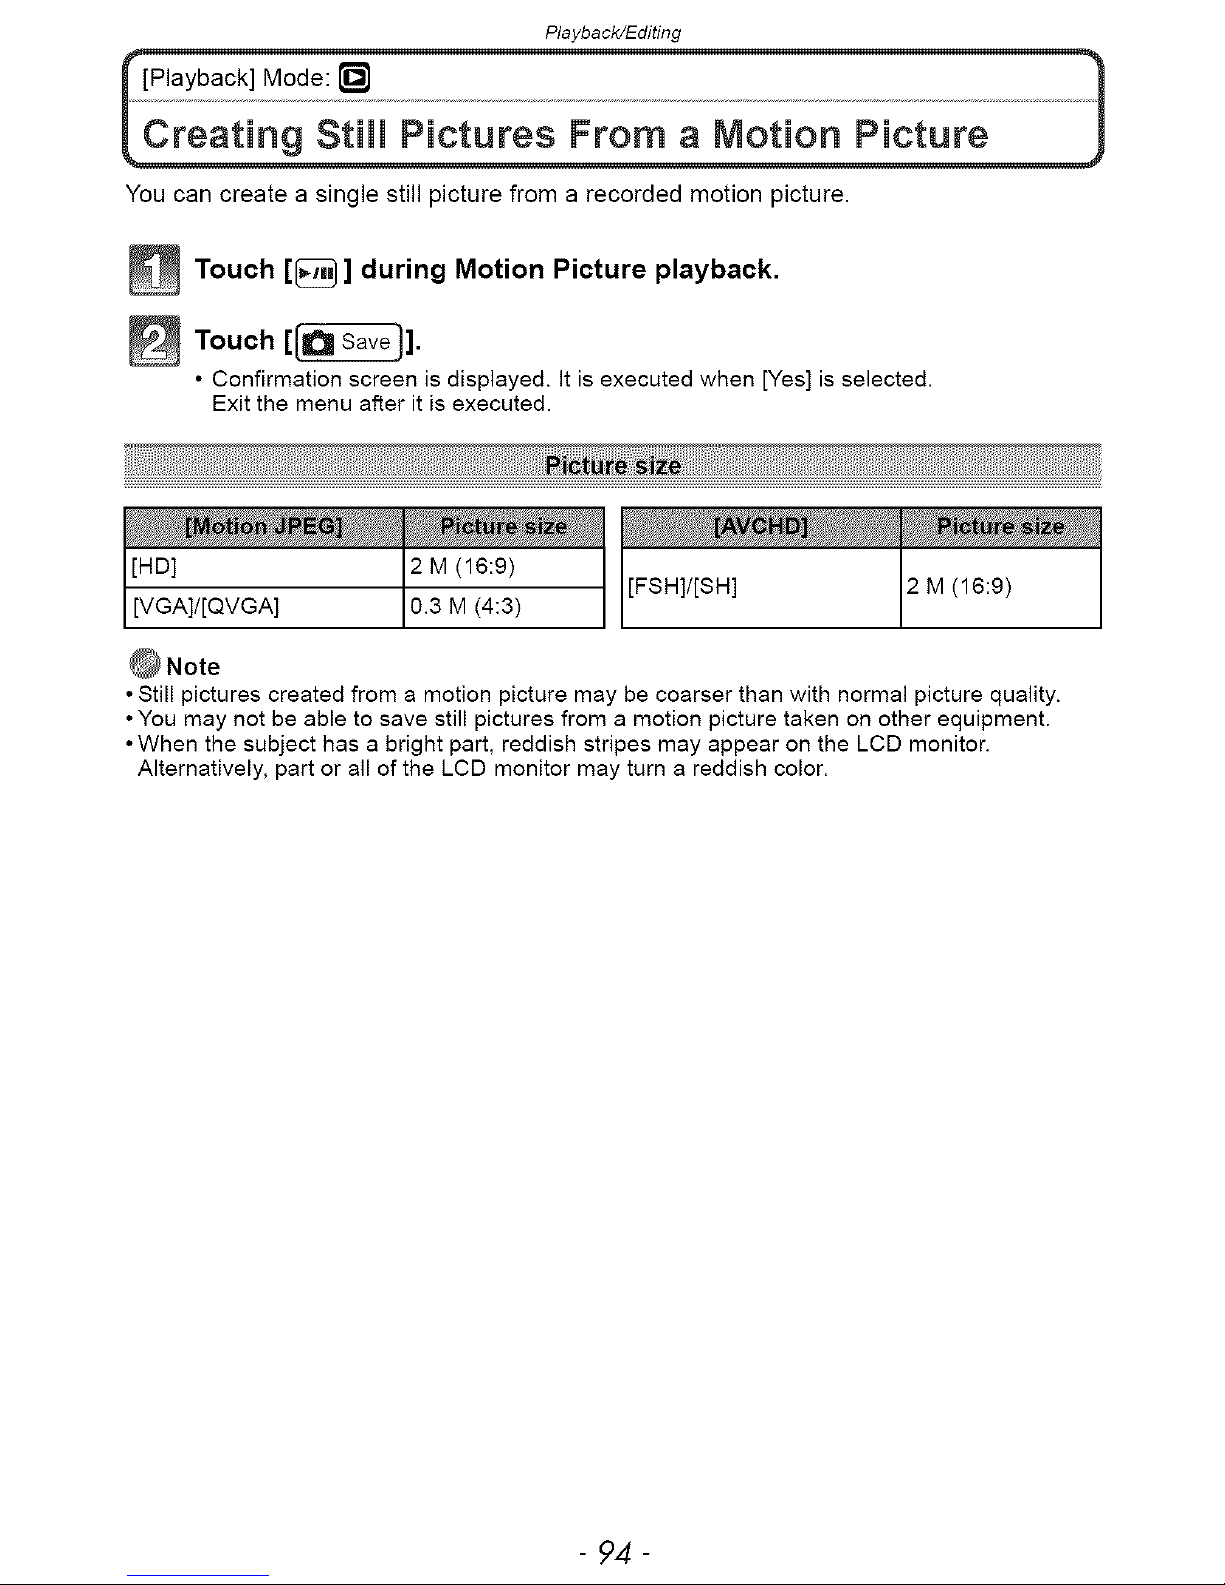
You can create a single still picture from a recorded motion picture.
_ Touch [_ ] during Motion Picture playback.
_ Touch [_].
• Confirmation screen is displayed. It is executed when [Yes] is selected.
Exit the menu after it is executed.
2 M (16:9)
0.3 M (4:3)
• Still pictures created from a motion picture may be coarser than with normal picture quality.
• You may not be able to save still pictures from a motion picture taken on other equipment.
• When the subject has a bright part, reddish stripes may appear on the LCD monitor.
Alternatively, part or all of the LCD monitor may turn a reddish color.
- 9,4-

Playback/Editing
You can play back the recorded pictures in various methods.
_ Touch [_].
_ Touch the mode icon.
I _tti_
i_q [Normal Play] (P24) All the pictures are played back.
[Slide Show] (P96) images are played back in sequence.
[Filtering Play] (P98) images are sorted into categories and played back.
Playback pictures registered in albums with
I_ [Playback Album] (P99} [My Photo Album],
R_ [Dual Play] (P99} Playing Back Pictures on the Dual Display.
images are played back by the date the picture was
[Calendar] (P99} taken.
- 95-
Playback/Editing
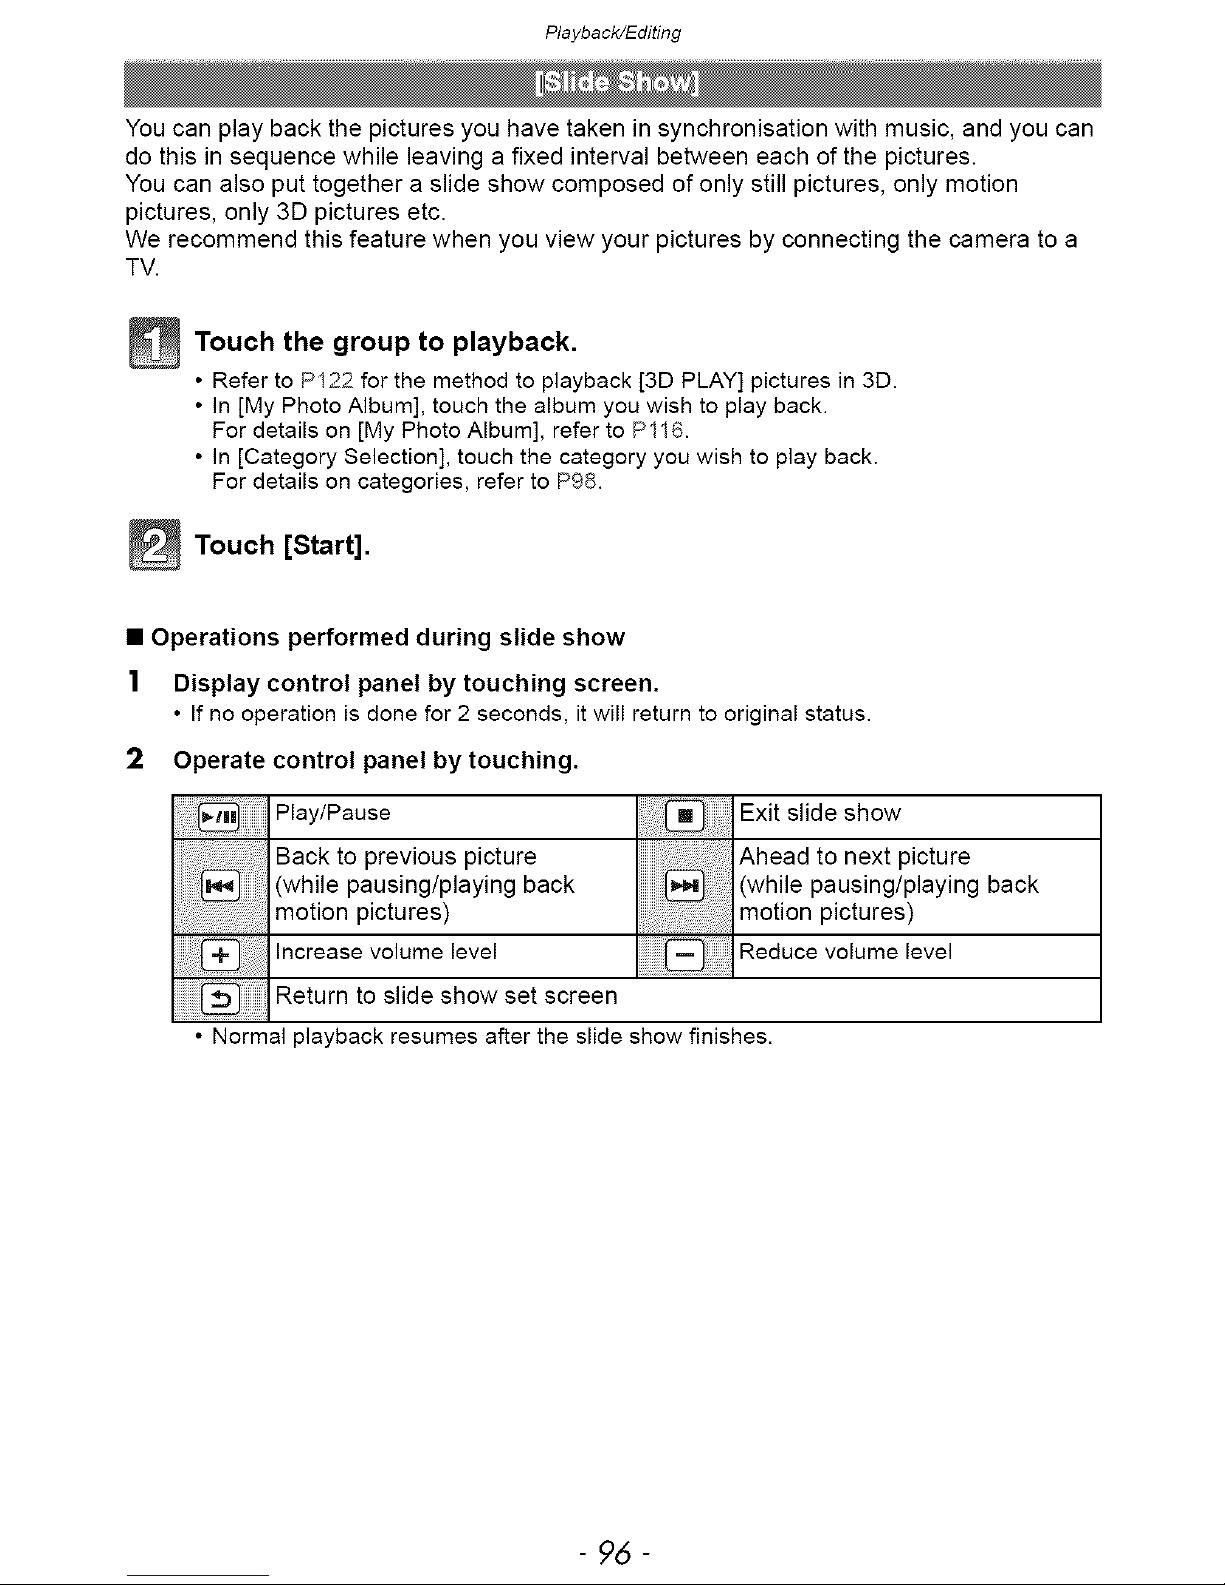
You can play back the pictures you have taken in synchronisation with music, and you can
do this in sequence while leaving a fixed interval between each of the pictures.
You can also put together a slide show composed of only still pictures, only motion
pictures, only 3D pictures etc.
We recommend this feature when you view your pictures by connecting the camera to a
TV.
_ Touch group playback.
the to
• Refer to P122 for the method to playback [3D PLAY] pictures in 3D.
• In [My Photo Album], touch the album you wish to play back.
For details on [My Photo Album], refer to P116.
• In [Category Selection], touch the category you wish to play back.
For details on categories, refer to P98.
_ Touch [Start].
• Operations performed during slide show
1 Display control panel by touching screen.
• If no operation is done for 2 seconds, it will return to original status.
2 Operate control panel by touching.
Play/Pause Exit slide show
Back to previous picture Ahead to next picture
(while pausing/playing back (while pausing/playing back
motion pictures) motion pictures)
Increase volume level Reduce volume level
Return to slide show set screen
• Normal playback resumes after the slide show finishes.
- 96 -
Playback/Editing
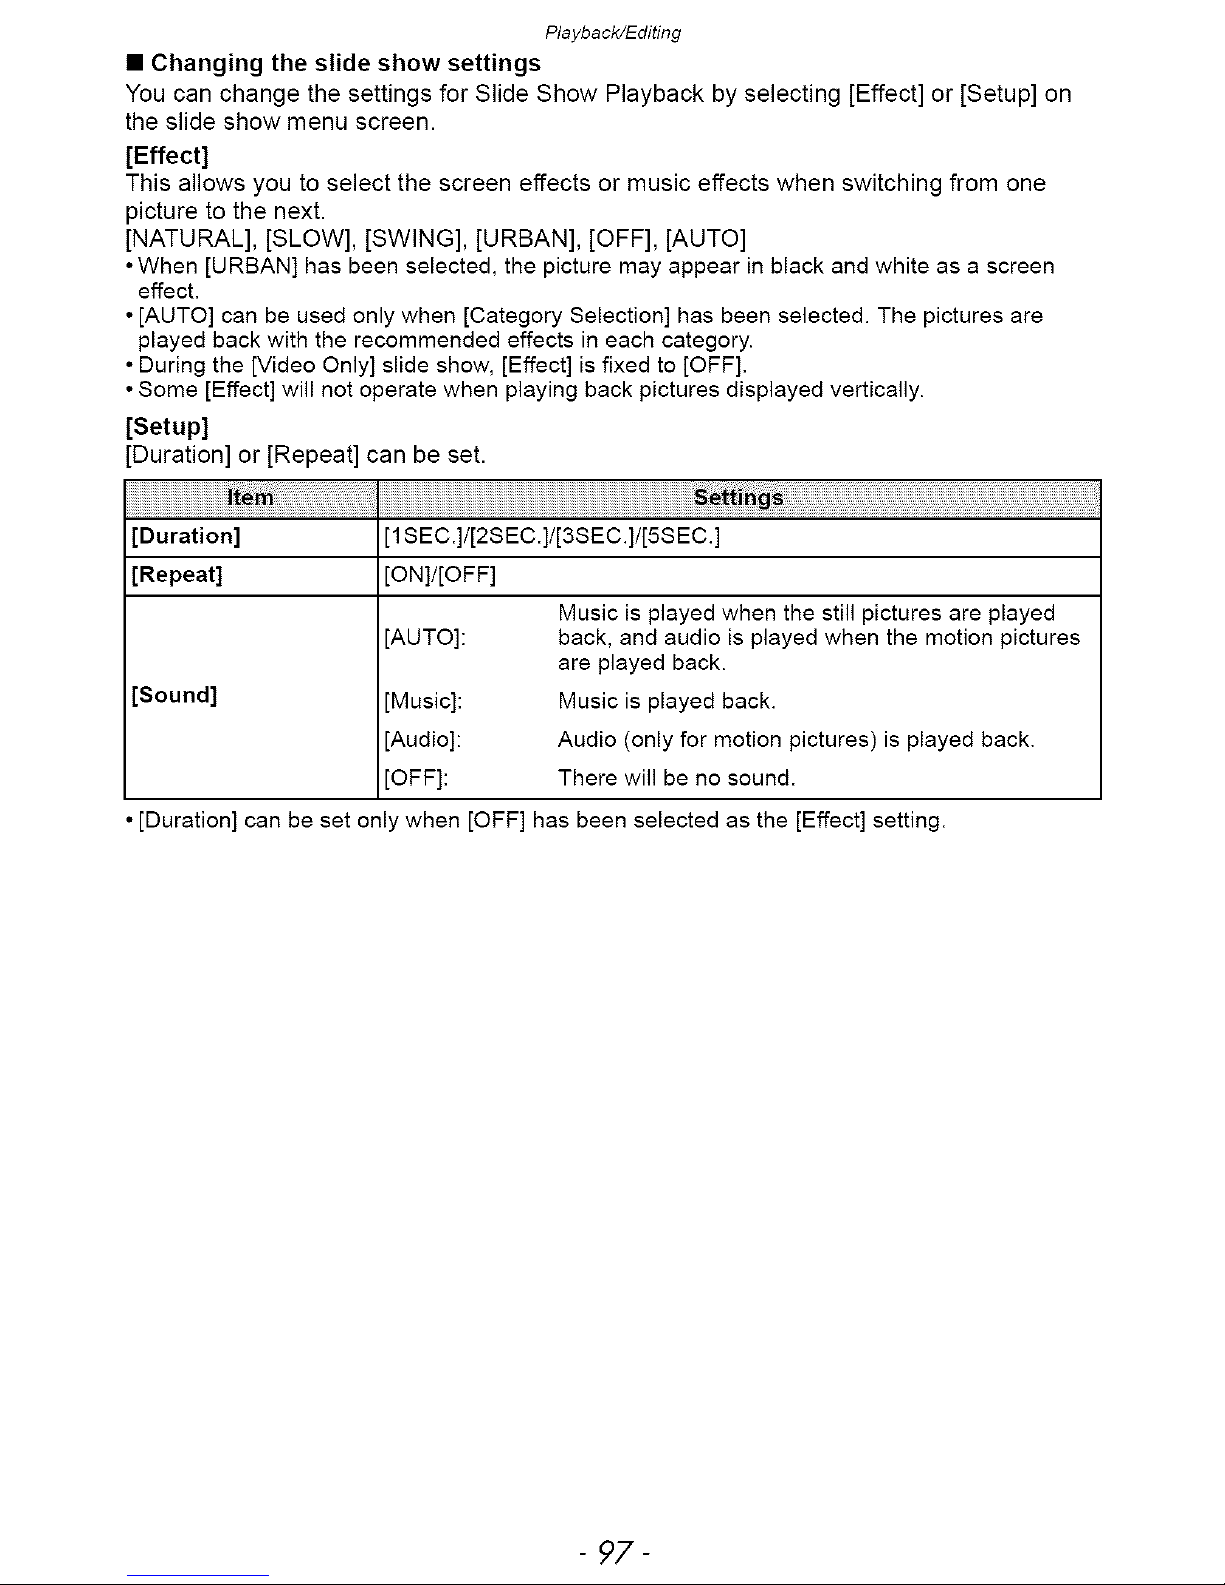
• Changing the slide show settings
You can change the settings for Slide Show Playback by selecting [Effect] or [Setup] on
the slide show menu screen.
[Effect]
This allows you to select the screen effects or music effects when switching from one
picture to the next.
[NATURAL], [SLOW], [SWING], [URBAN], [OFF], [AUTO]
• When [URBAN] has been selected, the picture may appear in black and white as a screen
effect.
• [AUTO] can be used only when [Category Selection] has been selected. The pictures are
played back with the recommended effects in each category.
• During the [Video Only] slide show, [Effect] is fixed to [OFF].
• Some [Effect] will not operate when playing back pictures displayed vertically.
[Setup]
[Duration] or [Repeat] can be set.
[Duration] [1SEC.]/[2SEC.]/[3SEC.]/[5S EC.]
[Repeat] [ON]/[OFF]
[Sound]
[AUTO]:
[Music]:
[Audio]:
[OFF]:
Music is played when the still pictures are played
back, and audio is played when the motion pictures
are played back.
Music is played back.
Audio (only for motion pictures) is played back.
There will be no sound.
[Duration] can be set only when [OFF] has been selected as the [Effect] setting.
- 97-
Playback/Editing
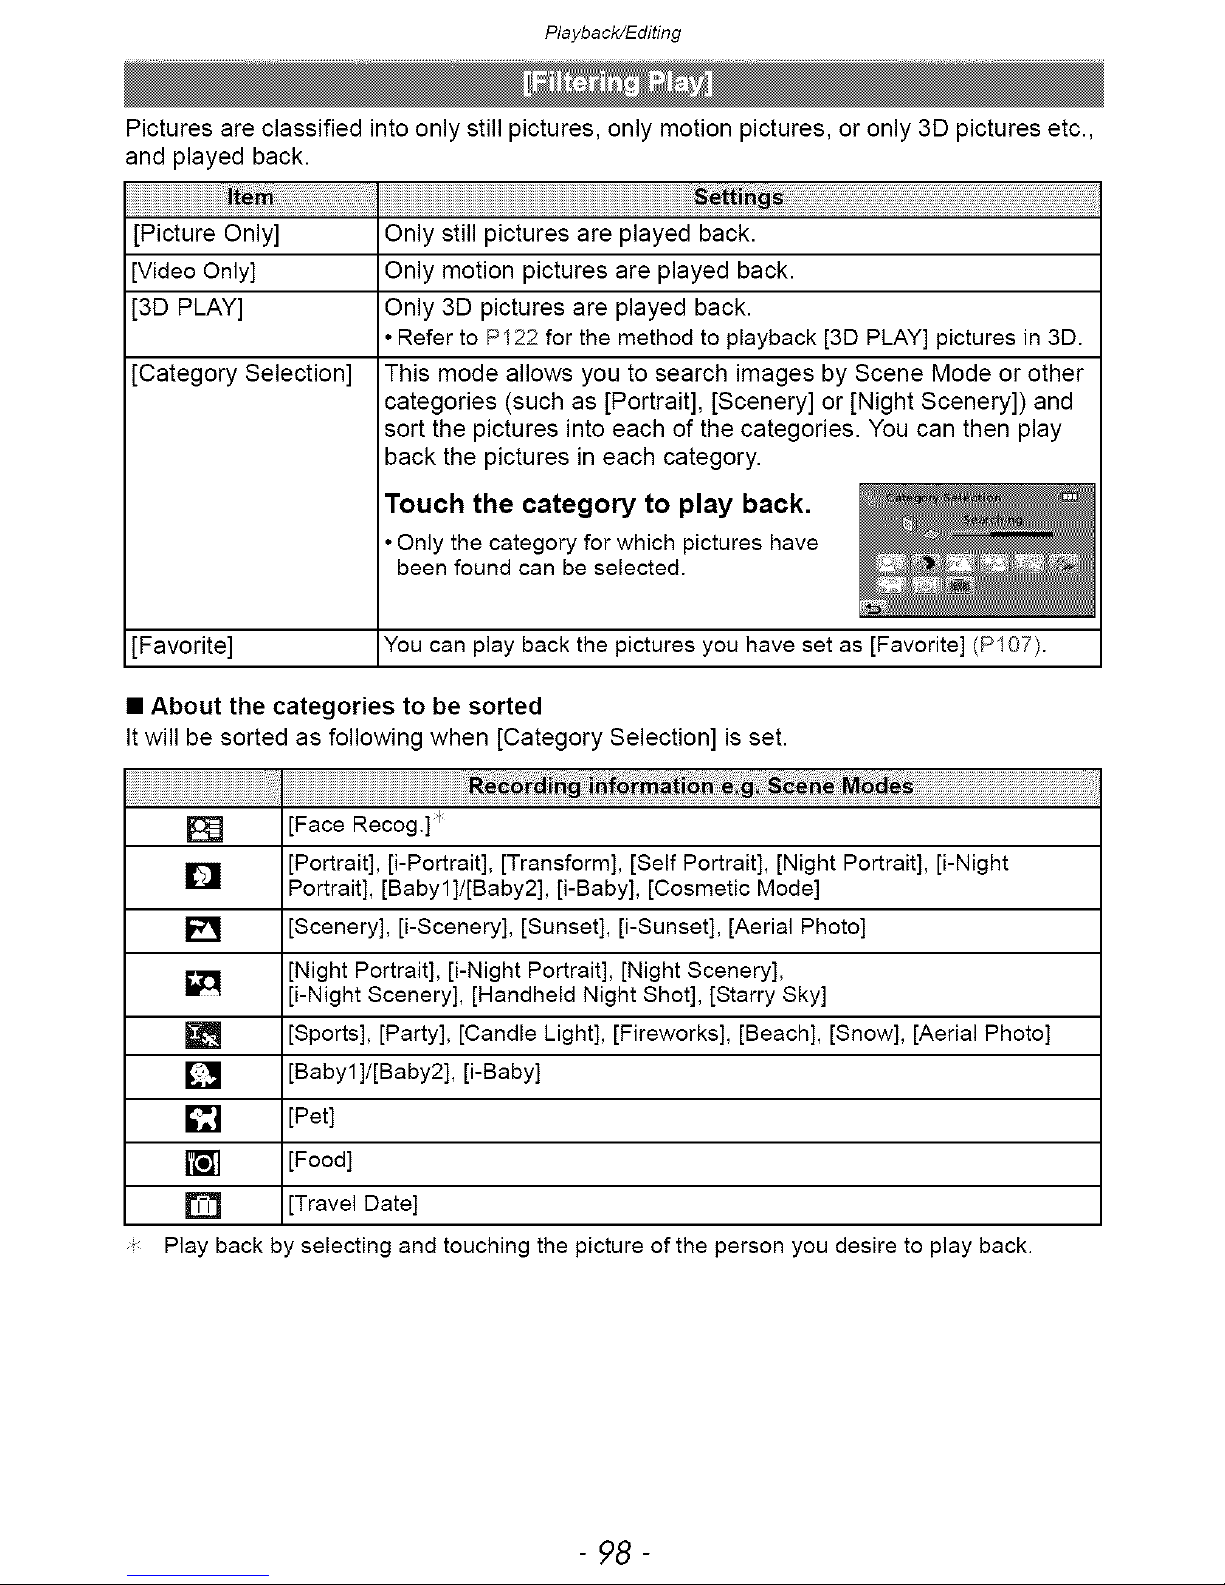
Pictures are classified into only still pictures, only motion pictures, or only 3D pictures etc.,
and played back.
[Picture Only] Only still pictures are played back.
[Video Only] Only motion pictures are played back.
[3D PLAY] Only 3D pictures are played back.
• Refer to PI22 for the method to playback [3D PLAY] pictures in 3D.
[Category Selection] This mode allows you to search images by Scene Mode or other
categories (such as [Portrait], [Scenery] or [Night Scenery]) and
sort the pictures into each of the categories. You can then play
back the pictures in each category.
Touch the category to play back.
• Only the category for which pictures have
been found can be selected.
[Favorite] You can play back the pictures you have set as [Favorite] (P107).
• About the categories to be sorted
Itwill be sorted as following when [Category Selection] is set.
_fo_
F_
[]
E_
W
[]
[]
[]
D
[Face Recog.] I
[Portrait], [i-Portrait], [Transform], [Self Portrait], [Night Portrait], [i-Night
Portrait], [Babyl]/[Baby2], [i-Baby], [Cosmetic Mode]
[Scenery], [i-Scenery], [Sunset], [i-Sunset], [Aerial Photo]
[Night Portrait], [i-Night Portrait], [Night Scenery],
[i-Night Scenery], [Handheld Night Shot], [Starry Sky]
[Sports], [Party], [Candle Light], [Fireworks], [Beach], [Snow], [Aerial Photo]
[Babyl]/[Baby2], [i-Baby]
[Pet]
[Food]
[Travel Date]
Play back by selecting and touching the picture of the person you desire to play back.
- 98-
Playback/Editing
Pictures registered to an album can be played back by the albums with [My Photo Album].
• For details on [My Photo Album], refer to Pl16.
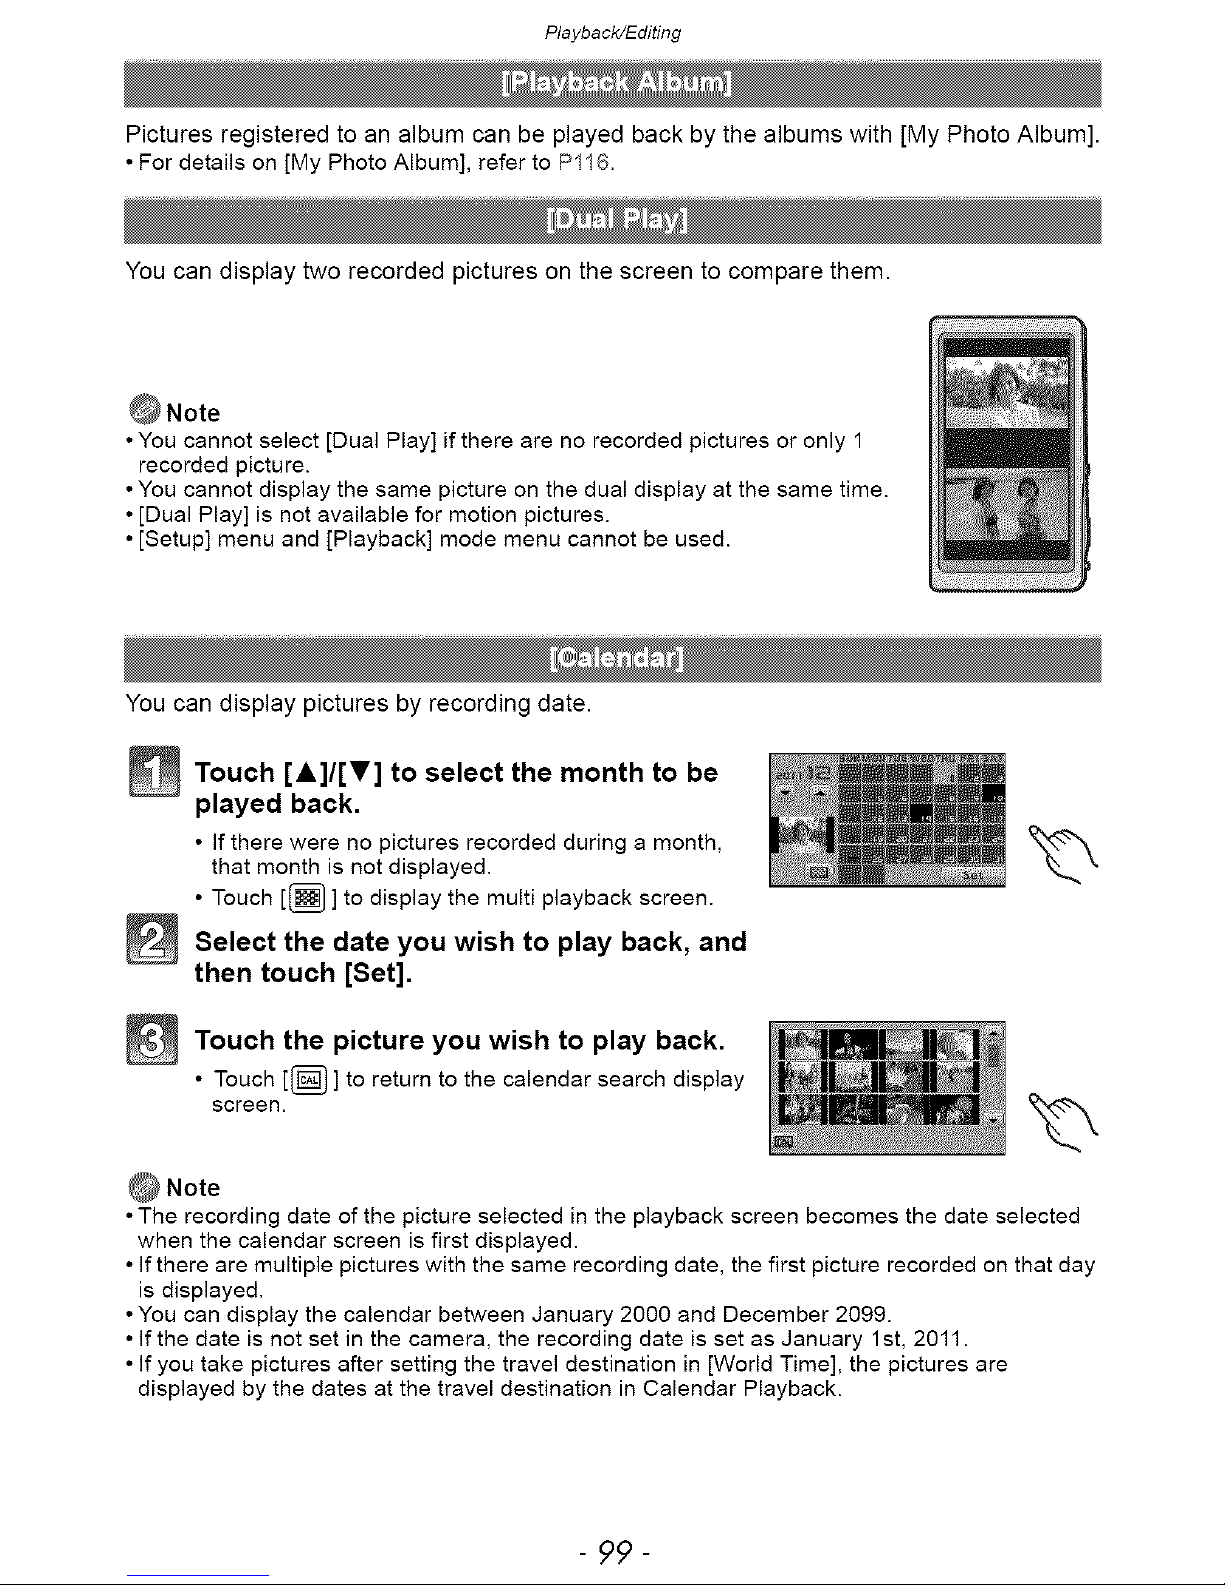
You can display two recorded pictures on the screen to compare them.
• You cannot select [Dual Play] if there are no recorded pictures or only 1
recorded picture.
• You cannot display the same picture on the dual display at the same time.
• [Dual Play] is not available for motion pictures.
• [Setup] menu and [Playback] mode menu cannot be used.
You can display pictures by recording date.
_ ouch [A]/[I'] to select the month to be
played back.
• If there were no pictures recorded during a month,
that month is not displayed.
• Touch [(_ ] to display the multi playback screen.
_ elect the date you wish to play back, and
then touch [Set].
_ Touch the picture you wish to play back.
• Touch [_ ] to return to the calendar search display
screen.
• The recording date of the picture selected in the playback screen becomes the date selected
when the calendar screen is first displayed.
• If there are multiple pictures with the same recording date, the first picture recorded on that day
is displayed.
• You can display the calendar between January 2000 and December 2099.
• If the date is not set in the camera, the recording date is set as January 1st, 2011.
• If you take pictures after setting the travel destination in [World Time], the pictures are
displayed by the dates at the travel destination in Calendar Playback.
- 99-
Playback/Editing
You can setup pictures to be uploaded to image sharing sites and perform editing like
cropping recorded pictures, as well as set up the protection of recorded images, etc.
• With [Text Stamp], [Resize] or [Cropping], a new edited picture is created. A new picture cannot
be created if there is no free space on the built-in memory or the card so we recommend
checking that there is free space and then editing the picture.
It is possible to setup the images to be uploaded to the image sharing sites (Facebook/
YouTube) on this unit.
• You can only upload still pictures to Facebook, and only motion pictures to YouTube.
• This cannot be done to the images in the built-in memory. Copy the images to a card
(P112}, and then perform the [Upload Set].
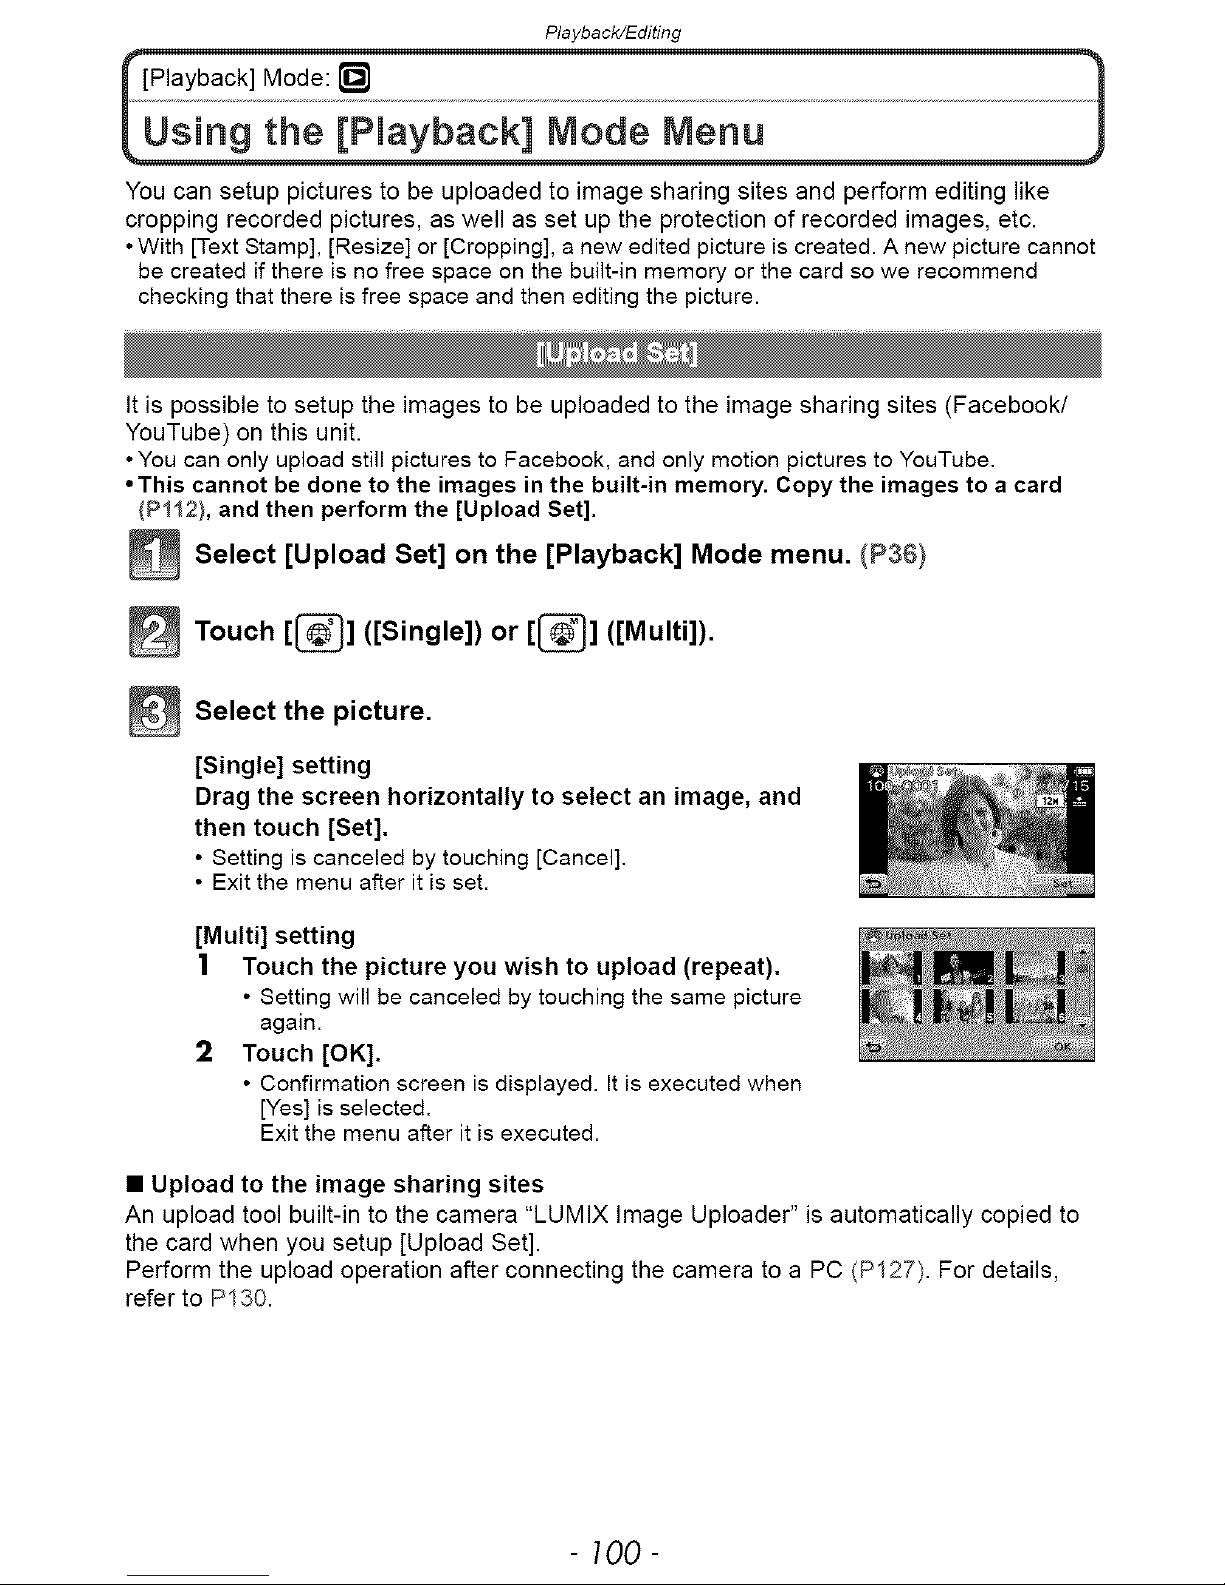
_ Select [Upload Set] on [Playback] menu. (P36}
the Mode
Touch [_] ([Single]) or [_] ([Multi]).
Select the picture.
[Single] setting
Drag the screen horizontally to select an image, and
then touch [Set].
• Setting is canceled by touching [Cancel].
• Exit the menu after it is set.
[Multi] setting
| Touch the picture you wish to upload (repeat).
• Setting will be canceled by touching the same picture
again.
2 Touch [OK].
• Confirmation screen is displayed. It is executed when
[Yes] is selected.
Exit the menu after it is executed.
• Upload to the image sharing sites
An upload tool built-in to the camera "LUMIX Image Uploader" is automatically copied to
the card when you setup [Upload Set].
Perform the upload operation after connecting the camera to a PC (P127). For details,
refer to P130.
- 100-
Playback/Editing
• Canceling all the [Upload Set] settings
1 Select [Upload Set] on the [Playback] Mode menu.
2 Touch [CANCEL].
• Confirmation screen is displayed. It is executed when [Yes] is selected.
Exit the menu after it is executed.
• Setting may not be possible for pictures recorded with other cameras.
• It cannot be set with the card less than 512 MB.
You can add text (comments) to pictures. After text has been registered, it can be stamped
in prints using [Text Stamp] (P1021.
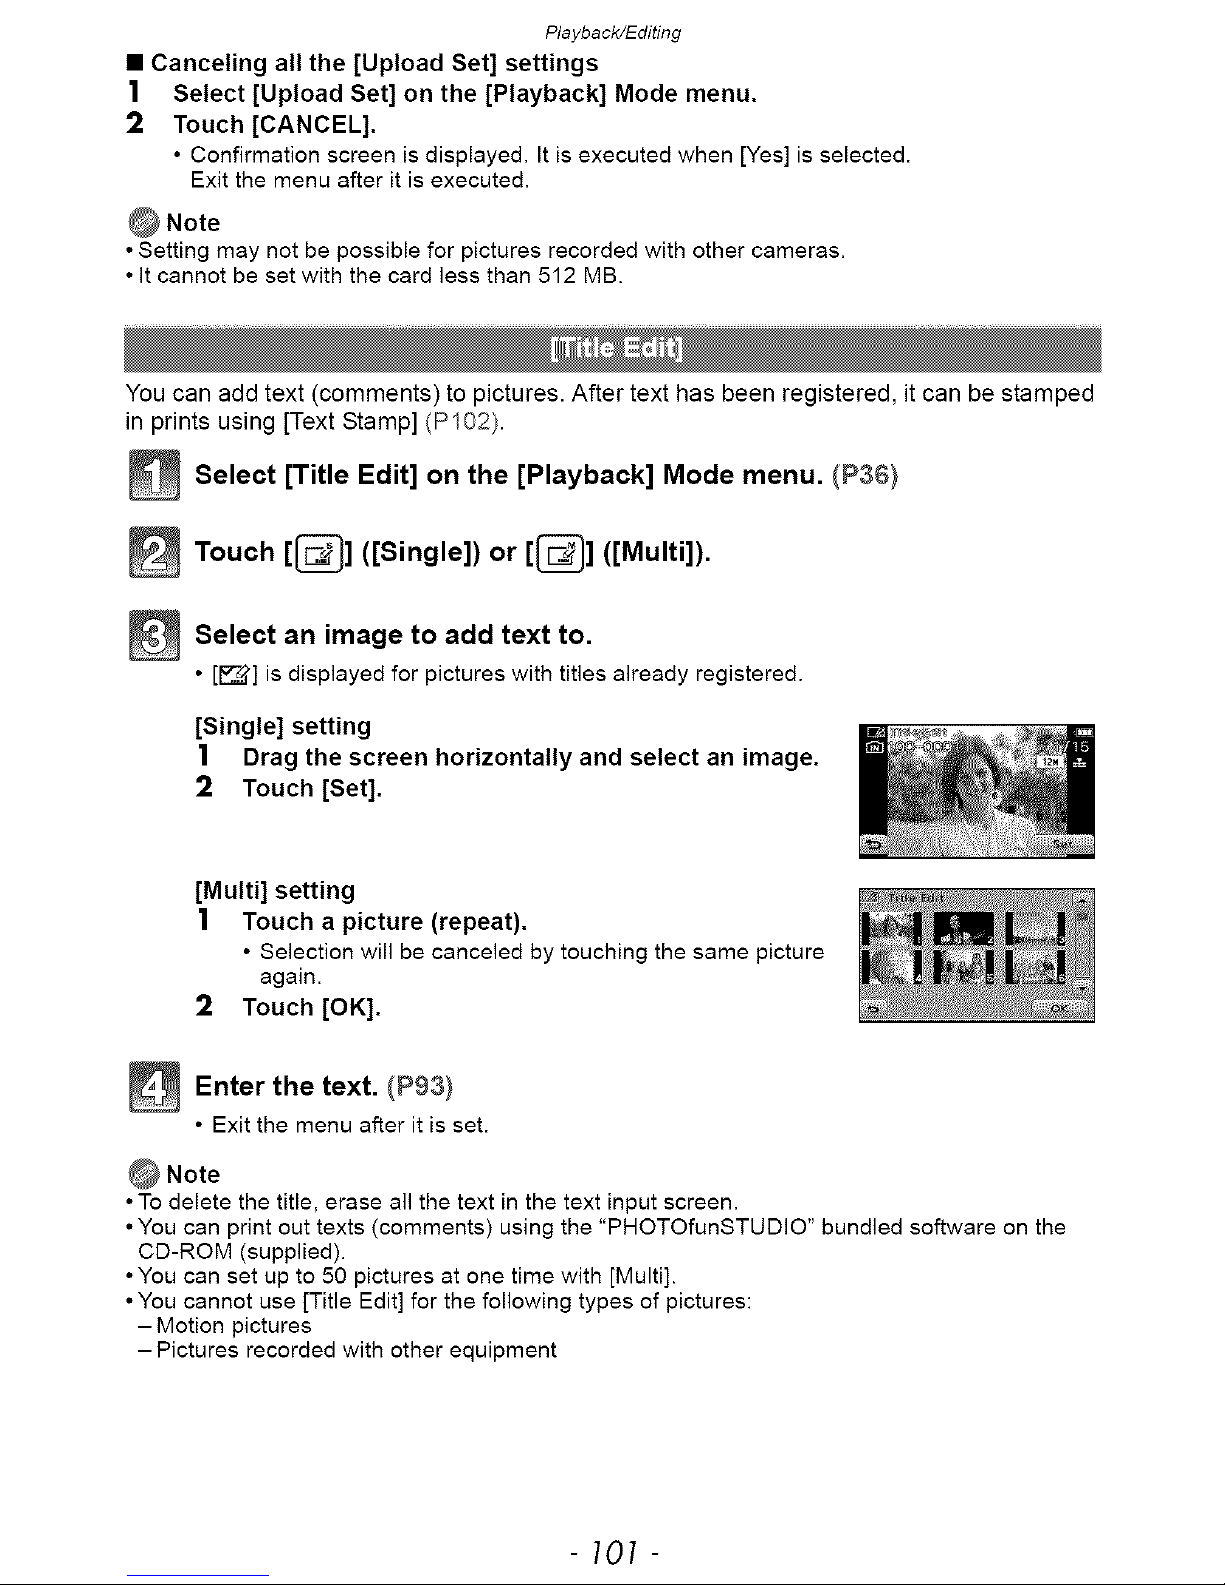
_ Select [Title Edit] on [Playback] menu. (P36}
the Mode
Touch [@] ([Single]) or [@] ([Multi]).
Select to add text to.
an
image
• [_] is displayed for pictures with titles already registered.
[Single] setting
1 Drag the screen horizontally and select an image.
2 Touch [Set].
[Multi] setting
1 Touch a picture (repeat).
• Selection will be canceled by touching the same picture
again.
2 Touch [OK].
_ Enter the text. (P93)
• Exit the menu after it is set.
• To delete the title, erase all the text in the text input screen.
• You can print out texts (comments) using the "PHOTOfunSTUDIO" bundled software on the
CD-ROM (supplied).
• You can set up to 50 pictures at one time with [Multi].
• You cannot use [Title Edit] for the following types of pictures:
- Motion pictures
-Pictures recorded with other equipment
- 707 -
Playback/Editing
You can stamp the recording date/time, name, location, travel date or title onto the
recorded pictures.
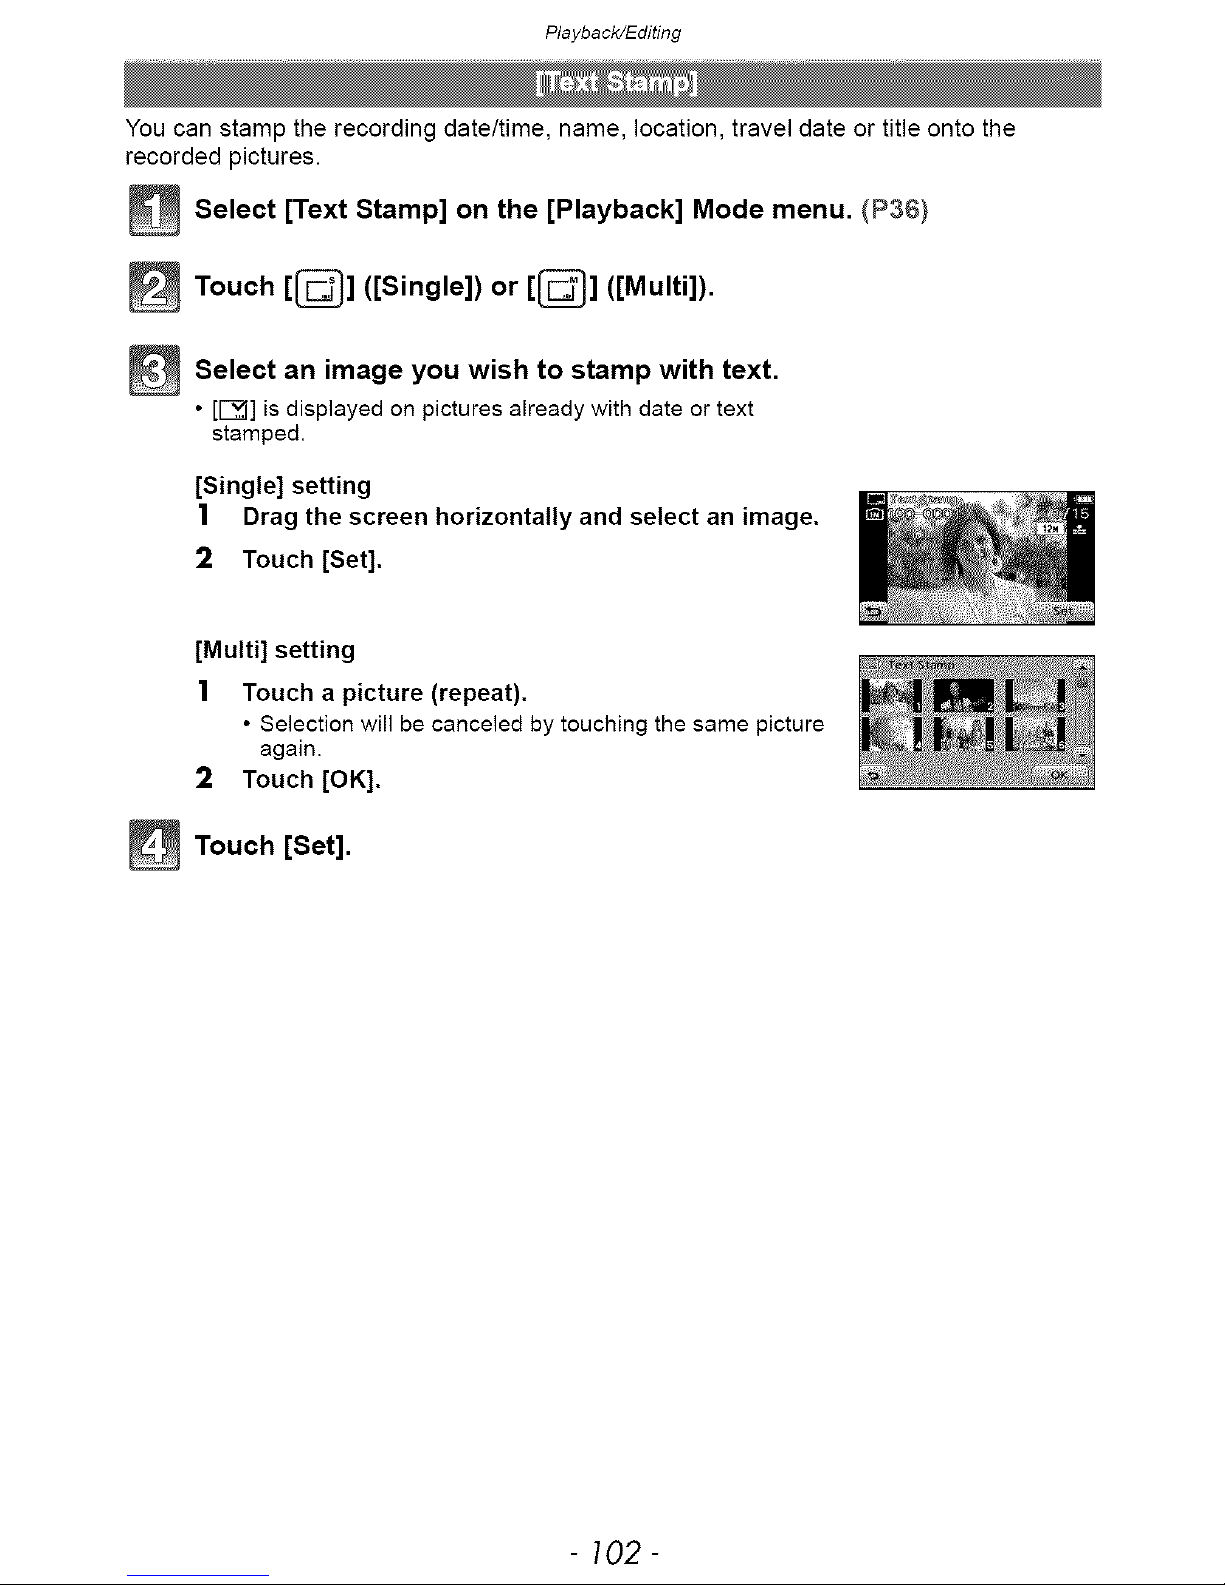
_ Select [Text Stamp] on [Playback] menu. (P36}
the Mode
Touch [_] ([Single]) or [_] ([Multi]).
_ Select an image you stamp
wish to with text.
• [I-_] is displayed on pictures already with date or text
stamped.
[Single] setting
1 Drag the screen horizontally and select an image.
2 Touch [Set].
[Multi] setting
1 Touch a picture (repeat).
• Selection will be canceled by touching the same picture
again.
2 Touch [OK].
_ Touch [Set].
- 102-
Playback/Editing
_ Select the item to stamp.
[W/O TIME]: Stamp the year, month and date.
[Shooting Date] [WITH TIME]: Stamp the year, month, day, hour and minutes.
[OFF]
[_:i]: Stamps names registered in name settings for
[Face Recog.].
[Name] [_,/'_]: Stamps names registered in name settings for
[Babyl]/[Baby2] or [Pet] in Scene Mode.
[OFF]
[ON]: Stamps the travel destination name set under
[Location] [Location].
[OFF]
[ON]: Stamps the travel date set under [Travel Date].
[Travel Date]
[OFF]
[ON]: Title input in the [Title Edit] will be stamped.
[Title]
[OFF]
_ Touch [_].
_ Touch [OK].
• Confirmation screen is displayed. It is executed when [Yes] is selected.
Exit the menu after it is executed.
• When you print pictures stamped with text, the date will be printed over the stamped text if you
specify printing of the date at the photo shop or on the printer.
• You can set up to 50 pictures at one time in [Multi].
• The picture quality may deteriorate when text stamping is carried out.
• Depending on the printer being used, some characters may be cut at printing. Check before
printing.
• When text is stamped onto the images smaller than 0.3 M, it is difficult to read it.
• Text and dates cannot be stamped on the pictures in the following cases.
- Motion pictures
-Pictures recorded without setting the clock and title
-Pictures with date or text stamped
-Pictures recorded with other equipment
- 103-
Playback/Editing
Recorded motion picture can be divided in two. It is recommended for when you want to
divide a part you need with a part you do not need.
It cannot be restored once divided.
_ Select [Video Divide] on [Playback] menu. (P36}
the Mode
_Drag the to select motion to and
screen
horizontally
a
picture divide,
touch [Set].
_ Touch [_] at the location to divide.
• Motion picture is played back from the same location when [_ ] is touched again.
Touch
• Confirmation screen is displayed. It is executed when [Yes] is selected.
Exit the menu after it is executed.
• Motion picture may be lost if the card or battery is removed while processing the
dividing.
• [Video Divide] may not be performed on motion pictures recorded with other equipment.
• Motion pictures cannot be divided at a location close to the start or end of the motion picture.
• With [Motion JPEG] motion pictures, the order of pictures will change if divided.
It is recommended to display these motion pictures by using [Calendar] or [Video Only] in the
[Filtering Play].
• With [AVCHD] motion pictures, the order of pictures will not change.
• Motion pictures with a short recording time cannot be divided.
- 104 -
Playback/Editing
TO allow easy posting to web pages, attachment to e-mail etc., picture size (number of
pixels) is reduced.
_ Select [Resize] on [Playback] menu. _P36}
the Mode
Touch [[_] ([Single]) or [[_] ([Multi]).
_ Select the picture and size.
[Single] setting
1 Drag the screen horizontally to select an image, and
then touch [Set].
2 Touch the size you wish to change, and then touch
[Set].
• Confirmation screen is displayed. It is executed when
[Yes] is selected.
Exit the menu after it is executed.
[Multi] setting
1 Touch the size you wish to change.
2 Touch a picture (repeat).
• Selection will be canceled by touching the same picture
again.
3 Touch [OK].
• Confirmation screen is displayed. It is executed when
[Yes] is selected.
Exit the menu after it is executed.
• You can set up to 50 pictures at one time in [Multi].
• The picture quality of the resized picture will deteriorate.
• It may not be possible to resize pictures recorded with other equipment.
• Motion pictures or still pictures with date or text stamped cannot be resized.
- 105-
Playback/Editing
YOU can enlarge and then crop the important part of the recorded picture.
_ Select [Cropping] on [Playback] menu. (P36}
the Mode
_Drag the to select and then touch
horizontally image, [Set].
screen an
_ elect the parts to be cropped.
Touch [[_]: Enlarge
Touch [[_]: Reduce
Drag: Move
_ Touch [Set].
• Confirmation screen is displayed, it is executed when [Yes] is selected.
Exit the menu after it is executed.
• The picture quality of the cropped picture will deteriorate.
• it may not be possible to crop pictures recorded with other equipment.
• Motion pictures or still pictures with date or text stamped cannot be cropped.
• information regarding the Face Recognition in the original picture will not be copied to images
having undergone [Cropping].
- 106 -
Playback/Editing
YOU can do the following if a mark has been added to pictures and they have been set as
favorites.
• Play back only the pictures set as favorites. ([Favorite] in [Filtering Play])
• Play back the pictures set as favorites only as a slide show.
• Delete all the pictures not set as favorites. ([All Delete Except-k])
Select [Favorite] on the [Playback] Mode menu. (P36)
Touch [[_] ([Single]) or [[_] ([Multi]).
Select the picture.
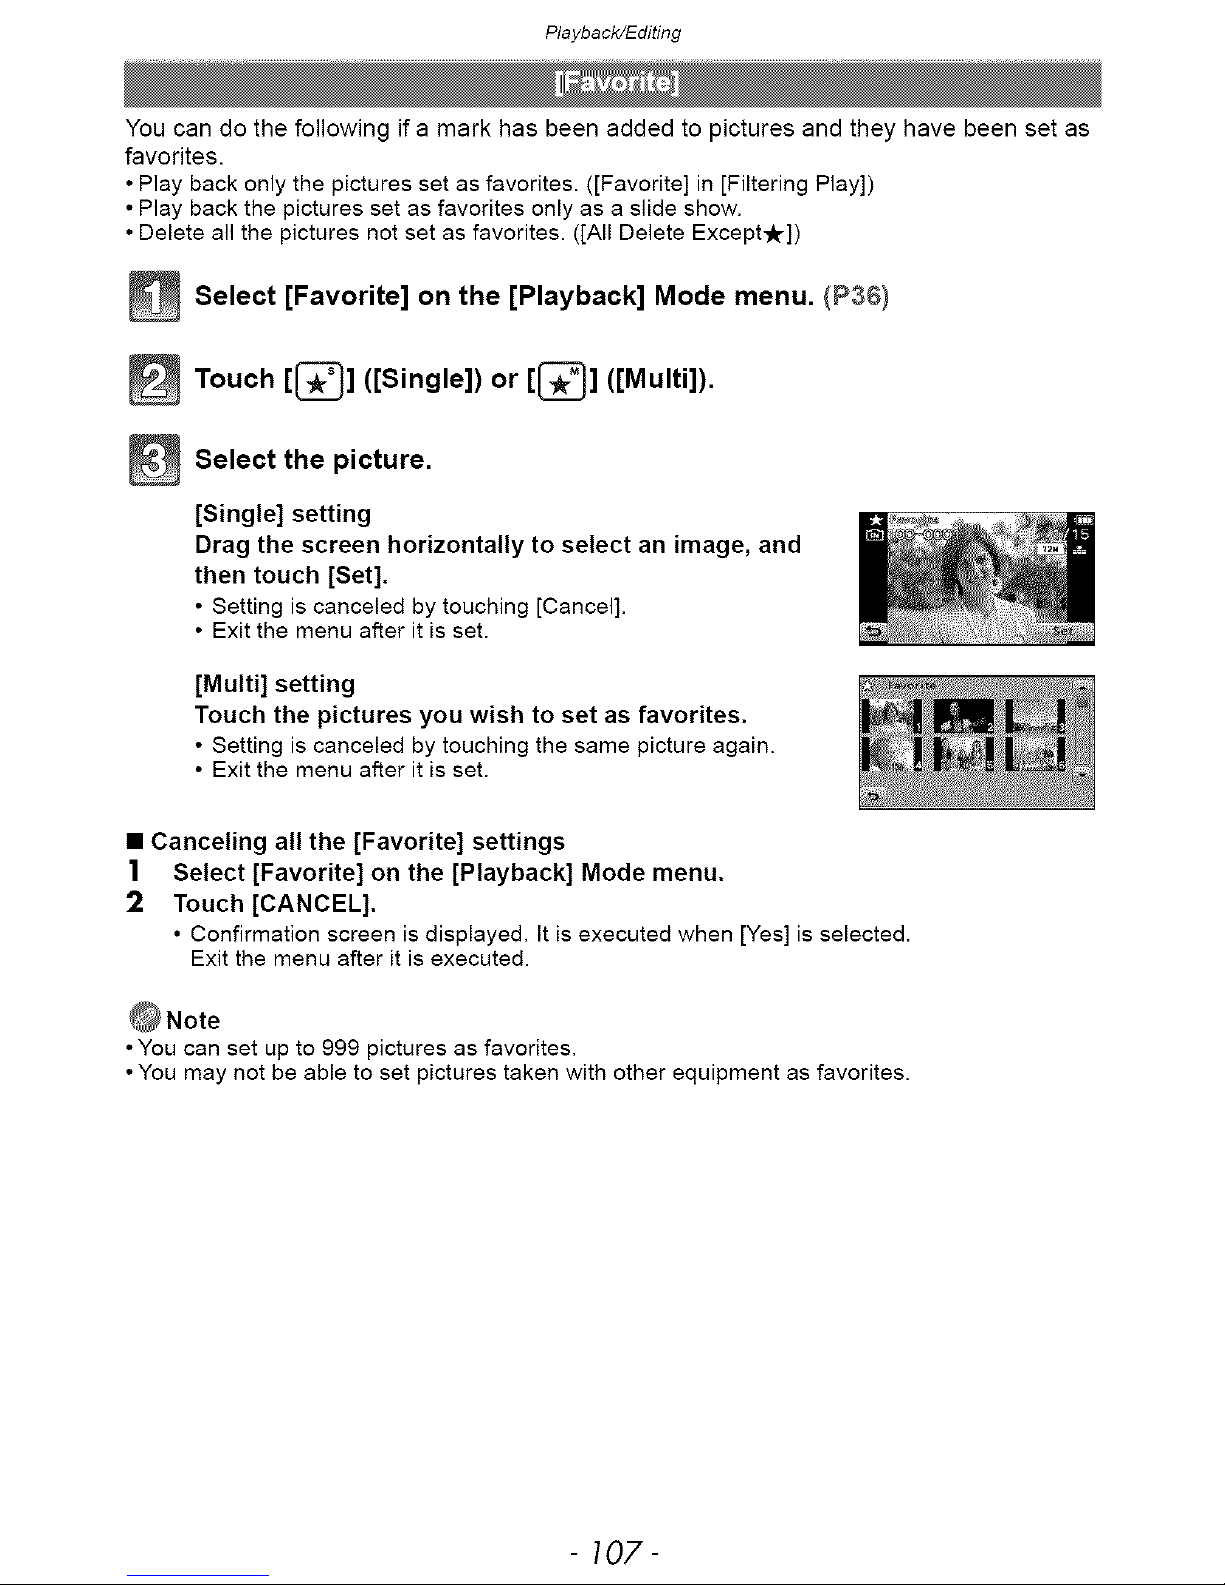
[Single] setting
Drag the screen horizontally to select an image, and
then touch [Set].
• Setting is canceled by touching [Cancel].
• Exit the menu after it is set.
[Multi] setting
Touch the pictures you wish to set as favorites.
• Setting is canceled by touching the same picture again.
• Exit the menu after it is set.
• Canceling all the [Favorite] settings
| Select [Favorite] on the [Playback] Mode menu.
2 Touch [CANCEL].
• Confirmation screen is displayed. It is executed when [Yes] is selected.
Exit the menu after it is executed.
• You can set up to 999 pictures as favorites.
• You may not be able to set pictures taken with other equipment as favorites.
- I07-
Playback/Editing
DPOF "Digital Print Order Format" is a system that allows the user to select which pictures
to print, how many copies of each picture to print and whether or not to print the recording
date on the pictures when using a DPOF compatible photo printer or photo printing store.
For details, ask at your photo printing store.
When you want to use a photo printing store to print pictures recorded on the built-in
memory, copy them to a card (Pl12) and then set the print setting.
For more information visit:
http://panasonic.jp/dc/dpof_l 10/white_e. htm
_ Select [Print Set] on the [Playback] Mode menu. (P36}
Touch [_] ([Single]) or [_] ([Multi]).
_ elect the picture.
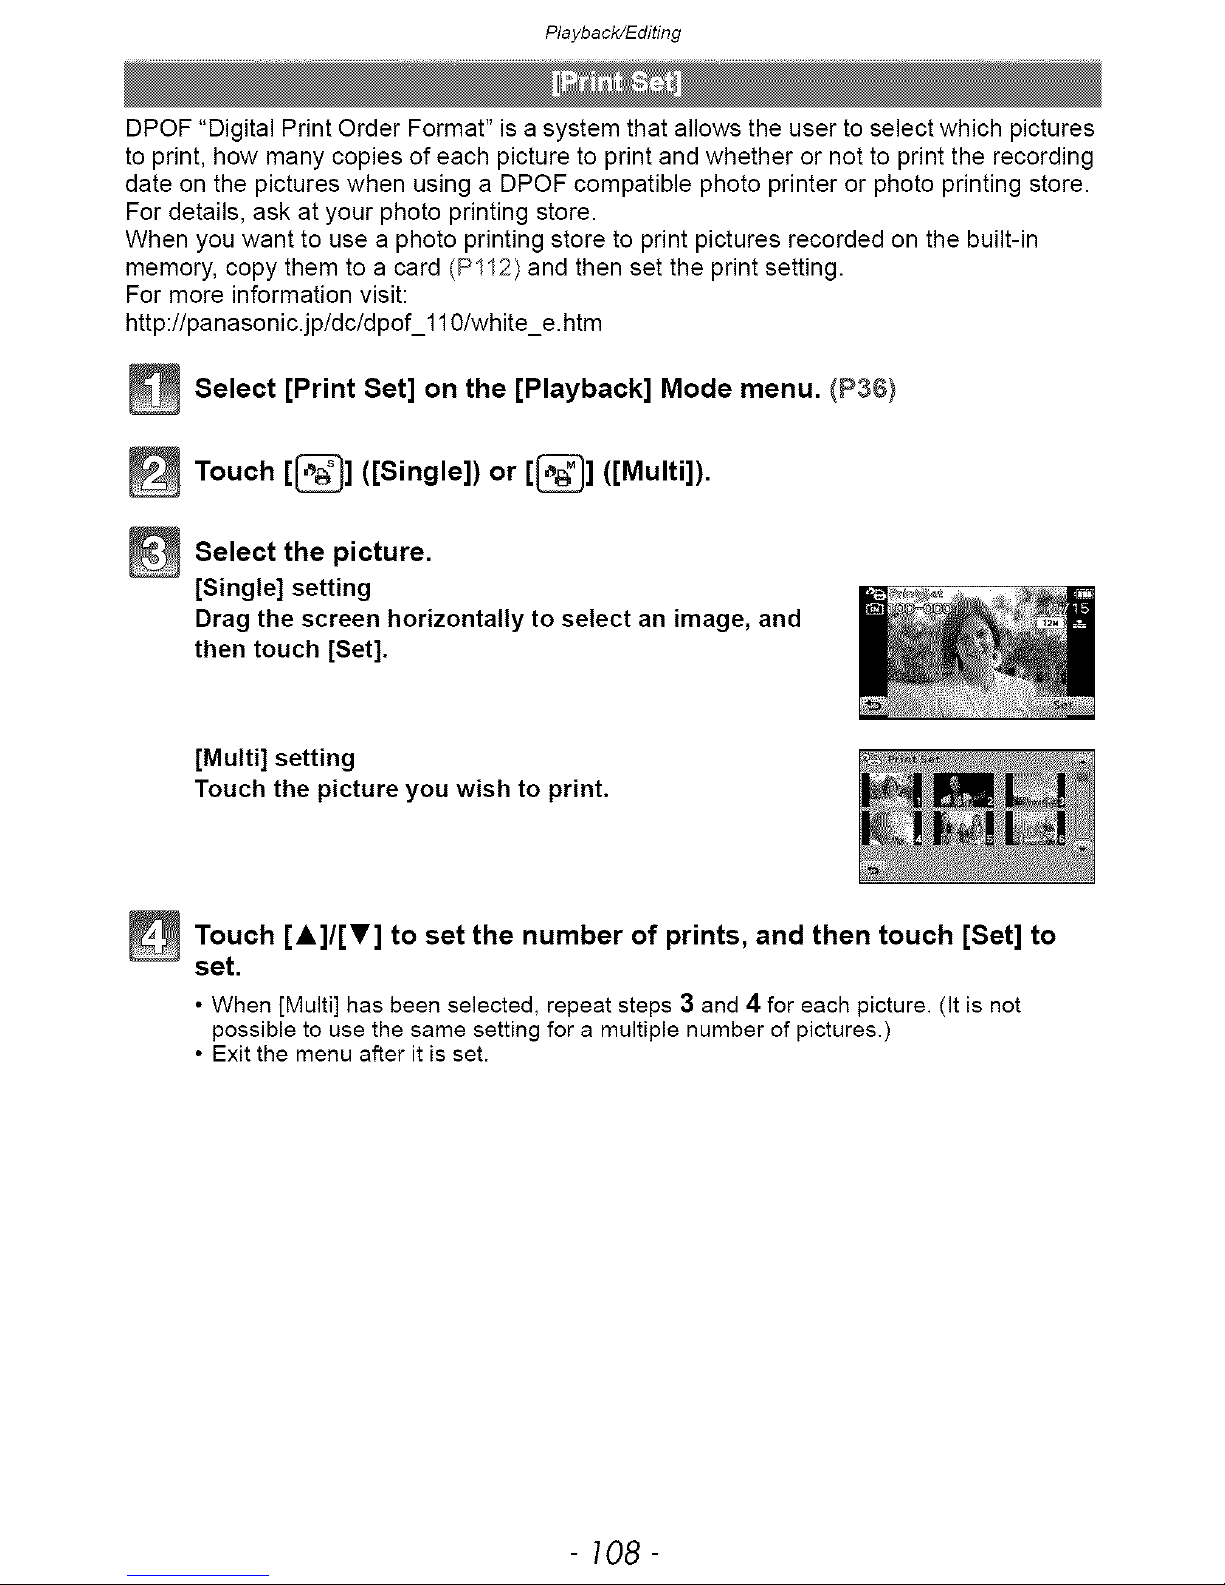
[Single] setting
Drag the screen horizontally to select an image, and
then touch [Set].
[Multi] setting
Touch the picture you wish to print.
_ Touch to set the number of and then touch to
[A]/[v] prints, [Set]
set.
• When [Multi] has been selected, repeat steps 3 and 4 for each picture. (It is not
possible to use the same setting for a multiple number of pictures.)
• Exit the menu after it is set.
- 108-

Playback/Editing
• Canceling all the [Print Set] settings
] Select [Print Set] on the [Playback] Mode menu.
2 Touch [CANCEL].
• Confirmation screen is displayed. It is executed when [Yes] is selected.
Exit the menu after it is executed.
• To print the date
After setting the number of prints, set/cancel printing with the recording date by touching
[Date].
• Depending on the photo printing store or the printer, the date may not be printed even if you set
to print the date. For further information, ask at your photo printing store or refer to the
operating instructions for the printer.
• The date cannot be printed on pictures with date or text stamped.
• The number of prints can be set from 0 to 999.
• Depending on the printer, the date print settings of the printer may take precedence so check if
this is the case.
• it may not be possible to use the print settings with other equipment, in this case, cancel all the
settings, and reset the settings.
• [Print Set] cannot be set for motion pictures.
• If the file is not based on the DCF standard, the print setting cannot be set.
- 109-
 Loading...