

Panasonic Lumix DMC-FX65, Lumix DMC-FX60 Basic Operating Instructions Manual

Basic
GC SGGH
Operating Instructions
Digital Camera
Model No. DMC-FX65/DMC-FX60
Before use, please read these instructions completely.
Please also refer to Operating
Instructions (PDF format)
recorded on the CD-ROM
containing the Operating Instructions (supplied).
You can learn about advanced operation methods
and check the Troubleshooting.
VQT2E36
Dear Customer,
We would like to take this opportunity to thank you for purchasing this Panasonic Digital
Camera. Please read these Operating Instructions carefully and keep them handy for
future reference. Please note that the actual controls and components, menu items, etc. of
your Digital Camera may look somewhat different from those shown in the illustrations in
these Operating Instructions.
Carefully observe copyright laws.
Recording of pre-recorded tapes or discs or other published or broadcast material for purposes
•
other than your own private use may infringe copyright laws. Even for the purpose of private
use, recording of certain material may be restricted.
Information for Your Safety
WARNING:
TO REDUCE THE RISK OF FIRE, ELECTRIC SHOCK OR PRODUCT DAMAGE,
•
DO NOT EXPOSE THIS APPARATUS TO RAIN, MOISTURE, DRIPPING OR SPLASHING
AND THAT NO OBJECTS FILLED WITH LIQUIDS, SUCH AS VASES, SHALL BE
PLACED ON THE APPARATUS.
• USE ONLY THE RECOMMENDED ACCESSORIES.
• DO NOT REMOVE THE COVER (OR BACK); THERE ARE NO USER SERVICEABLE
PARTS INSIDE. REFER SERVICING TO QUALIFIED SERVICE PERSONNEL.
THE SOCKET OUTLET SHALL BE INSTALLED NEAR THE EQUIPMENT AND SHALL
BE EASILY ACCESSIBLE.
Product Identification Marking is located on the bottom of units.
∫ About the battery pack
CAUTION
Danger of explosion if battery is incorrectly replaced. Replace only with the same or
equivalent type recommended by the manufacturer. Dispose of used batteries
according to the manufacturer’s instructions.
Do not heat or expose to flame.
•
• Do not leave the battery(ies) in an automobile exposed to direct sunlight for a long period of
time with doors and windows closed.
Warning
Risk of fire, explosion and burns. Do not disassemble, heat above 60 xC or incinerate.
VQT2E36 (ENG)
2
∫ About the battery charger
Figure A Figure B
Fuse
(5 ampere)
Fuse
(5 ampere)
CAUTION!
•
DO NOT INSTALL OR PLACE THIS UNIT IN A BOOKCASE, BUILT-IN CABINET OR IN
ANOTHER CONFINED SPACE. ENSURE THE UNIT IS WELL VENTILATED. TO PREVENT
RISK OF ELECTRIC SHOCK OR FIRE HAZARD DUE TO OVERHEATING, ENSURE THAT
CURTAINS AND ANY OTHER MATERIALS DO NOT OBSTRUCT THE VENTILATION VENTS.
• DO NOT OBSTRUCT THE UNIT’S VENTILATION OPENINGS WITH NEWSPAPERS,
TABLECLOTHS, CURTAINS, AND SIMILAR ITEMS.
•
DO NOT PLACE SOURCES OF NAKED FLAMES, SUCH AS LIGHTED CANDLES, ON THE UNIT.
• DISPOSE OF BATTERIES IN AN ENVIRONMENTALLY FRIENDLY MANNER.
•
The battery charger is in the standby condition when the AC power supply cord is connected.
The primary circuit is always “live” as long as the power cord is connected to an electrical outlet.
∫ Cautions for Use
Always use a genuine Panasonic AC adaptor (DMW-AC5G; optional).
•
• When using an AC adaptor, use the AC cable supplied with the AC adaptor.
• Do not use any other AV cables except the supplied one.
•
Do not use any other cables except a genuine Panasonic component cable (DMW-HDC2; optional).
• Do not use any other USB connection cables except the supplied one.
Keep the camera as far away as possible from electromagnetic equipment (such as
microwave ovens, TVs, video games etc.).
If you use the camera on top of or near a TV, the pictures and sound on the camera may be
•
disrupted by electromagnetic wave radiation.
• Do not use the camera near cell phones because doing so may result in noise adversely
affecting the pictures and sound.
• Recorded data may be damaged, or pictures may be distorted, by strong magnetic fields
created by speakers or large motors.
• Electromagnetic wave radiation generated by microprocessors may adversely affect the
camera, disturbing the pictures and sound.
• If the camera is adversely affected by electromagnetic equipment and stops functioning
properly, turn the camera off and remove the battery or disconnect AC adaptor (DMW-AC5G;
optional). Then reinsert the battery or reconnect AC adaptor and turn the camera on.
Do not use the camera near radio transmitters or high-voltage lines.
•
If you record near radio transmitters or high-voltage lines, the recorded pictures and sound may
be adversely affected.
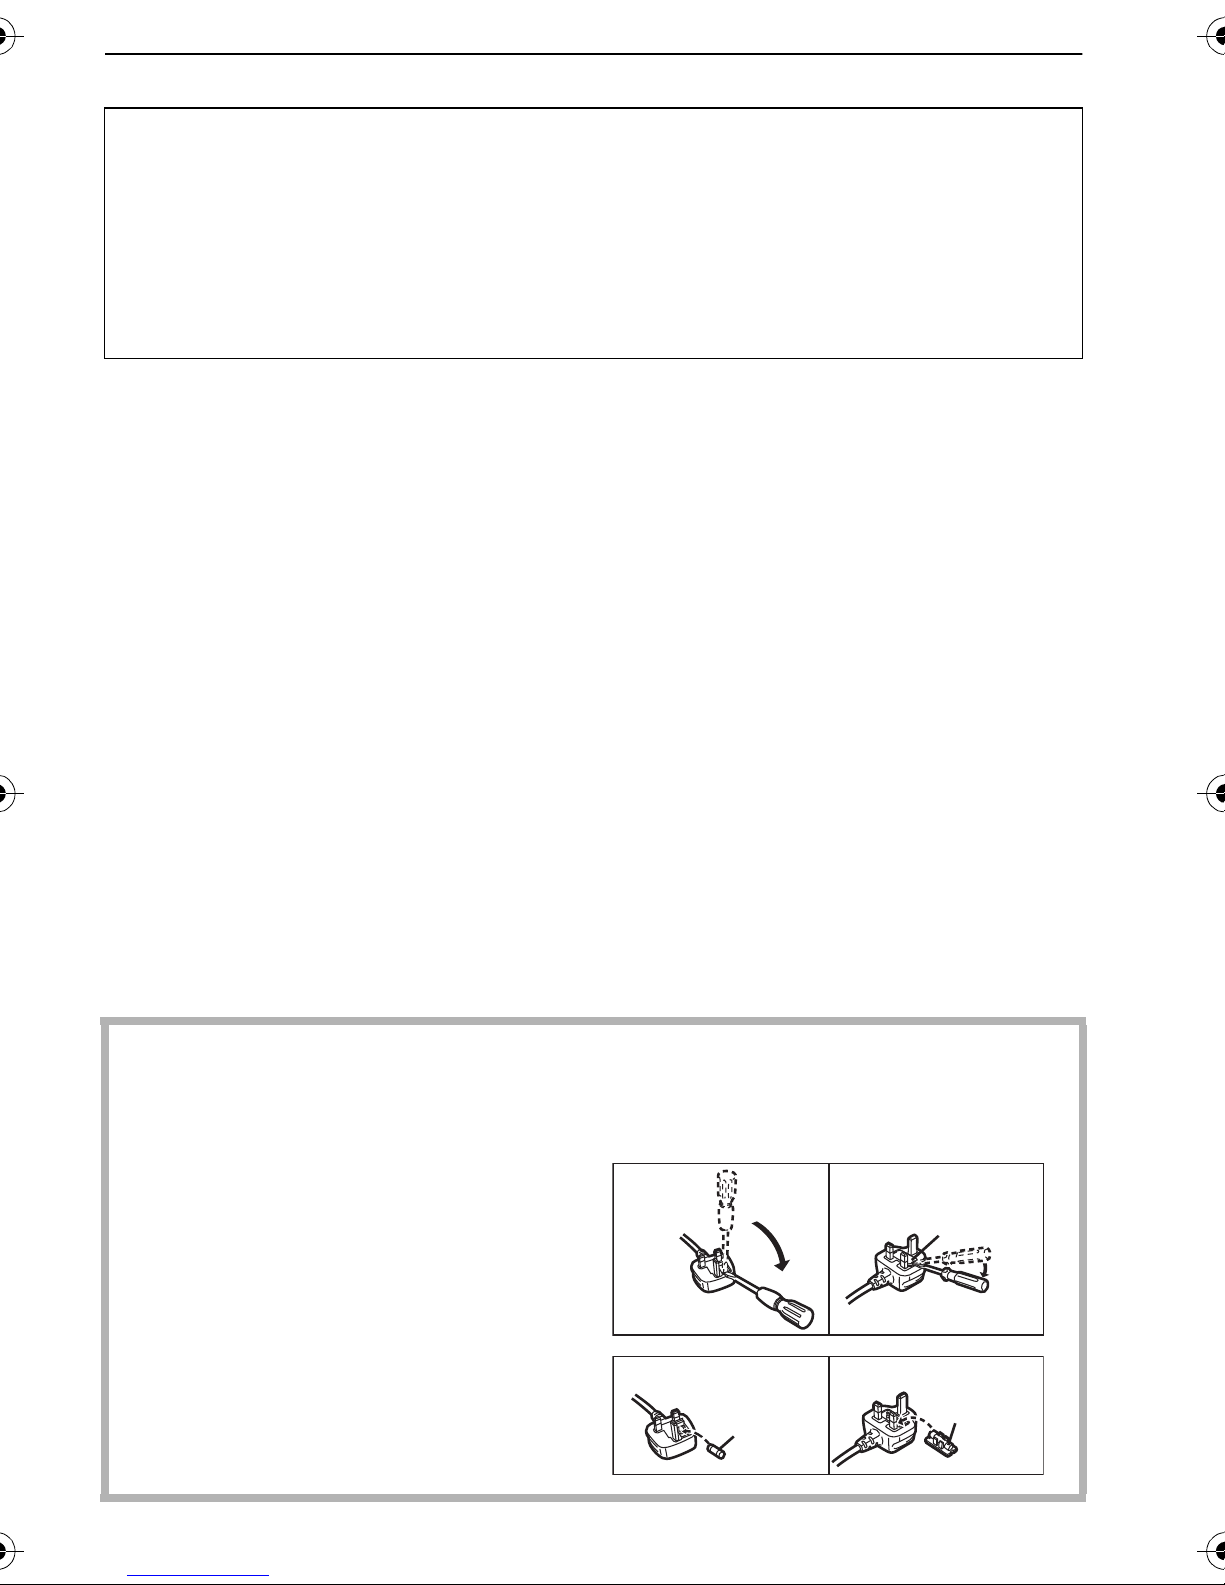
∫ How to replace the Fuse
The location of the fuse differ according to the type of AC cable (figures A and B).
Confirm the AC cable fitted and follow the instructions below.
Illustrations may differ from actual AC cable.
1 Open the fuse cover with a
screwdriver.
2 Replace the fuse and close or attach
the fuse cover.
Figure A Figure B
Fuse cover
(ENG) VQT2E36
3

∫ Care of the camera
Do not touch the lens or the sockets with dirty hands. Also, be careful not to allow
•
liquids, sand and other foreign matter to get into the space around the lens, buttons etc.
• Do not strongly shake or bump the camera by dropping or hitting it. Do not subject to
strong pressure.
The camera may malfunction, recording pictures may become impossible, or the lens, the LCD
monitor or the external case may be damaged.
• We strongly recommend you do not leave the camera in your trousers pocket
when you sit down or forcefully insert it into a full or tight bag etc.
Damage to the LCD monitor or personal injury may result.
• Do not attach any other items to the hand strap that’s included with your
camera. While being stored, that item can rest against the LCD monitor and
damage it.
• Be particularly careful in the following places as they may cause this
unit to malfunction.
– Places with a lot of sand or dust.
– Places where water can come into contact with this unit such as when using
it on a rainy day or on a beach.
• This camera is not waterproof. If water or seawater splashes on the camera, use a dry
cloth to wipe the camera body carefully.
If the unit does not operate normally, please contact the dealer where you purchased the
camera or the repair service centre.
∫ About Condensation (When the lens is fogged up)
Condensation occurs when the ambient temperature or humidity changes. Be careful of
•
condensation since it causes lens stains, fungus and camera malfunction.
• If condensation occurs, turn the camera off and leave it for about 2 hours. The fog will
disappear naturally when the temperature of the camera becomes close to the ambient
temperature.
VQT2E36 (ENG)
4

∫ About cards that can be used in this unit
44
OK
You can use an SD Memory Card and SDHC Memory Card.
When the term card is used in these operating instructions this refers to the following types of
•
Memory Cards.
– SD Memory Card (8 MB to 2 GB)
– SDHC Memory Card (4 GB to 32 GB)
More specific information about memory cards that can be used with this unit.
You can only use an SDHC Memory Card if using cards with 4 GB or
•
more capacity.
• A 4 GB (or more) Memory Card without an SDHC logo is not based on
the SD Standard and will not work in this product.
Please confirm the latest information on the following website.
http://panasonic.jp/support/global/cs/dsc/
(This Site is English only.)
•
Keep the Memory Card out of reach of children to prevent swallowing.
-If you see this symbol-
Information on Disposal in other Countries outside the European Union
This symbol is only valid in the European
Union.
If you wish to discard this product, please
contact your local authorities or dealer
and ask for the correct method of
disposal.
(ENG) VQT2E36
5

Contents
Information for Your Safety................................................................................................. 2
Before Use
Standard Accessories......................................................................................................... 7
Names of the Components ................................................................................................. 8
Preparation
Charging the Battery.........................................................................................................10
Inserting and Removing the Card (optional)/the Battery................................................... 12
Setting Date/Time (Clock Set) .......................................................................................... 13
• Changing the clock setting ......................................................................................... 13
Setting the Menu............................................................................................................... 14
• Setting menu items..................................................................................................... 14
Selecting the [REC] Mode ................................................................................................ 16
Basic
Taking pictures using the automatic function
(ñ: Intelligent Auto Mode) ................................................................................................ 17
• Scene detection.......................................................................................................... 18
• AF Tracking Function ................................................................................................. 18
Taking pictures with your favourite settings
(·: Normal Picture Mode)................................................................................................ 19
• Focusing..................................................................................................................... 19
Playing back Pictures ([NORMAL PLAY]) ........................................................................20
Deleting Pictures...............................................................................................................21
• To delete a single picture ........................................................................................... 21
• To delete multiple pictures (up to 50) or all the pictures............................................. 21
Others
Reading the Operating Instructions (PDF format) ............................................................ 22
Specifications.................................................................................................................... 23
VQT2E36 (ENG)
6
Before Use
3
1
2
45
6
7
DE-A60E
(DMC-FX60SG)
DE-A60B
(DMC-FX65GC/
DMC-FX65GH)
K1HA08AD0003
K1HA08CD0020
8
VFC4297
: K2CT39A00002
(DMC-FX65GC/
DMC-FX65GH)
: K2CQ29A00002
(DMC-FX65GC)
DMW-BCF10E
K2CA29A00023
(DMC-FX60SG)
9
VGQ0D56
VFF0532
(DMC-FX60SG)
VFF0519
(DMC-FX65GC/
DMC-FX65GH)
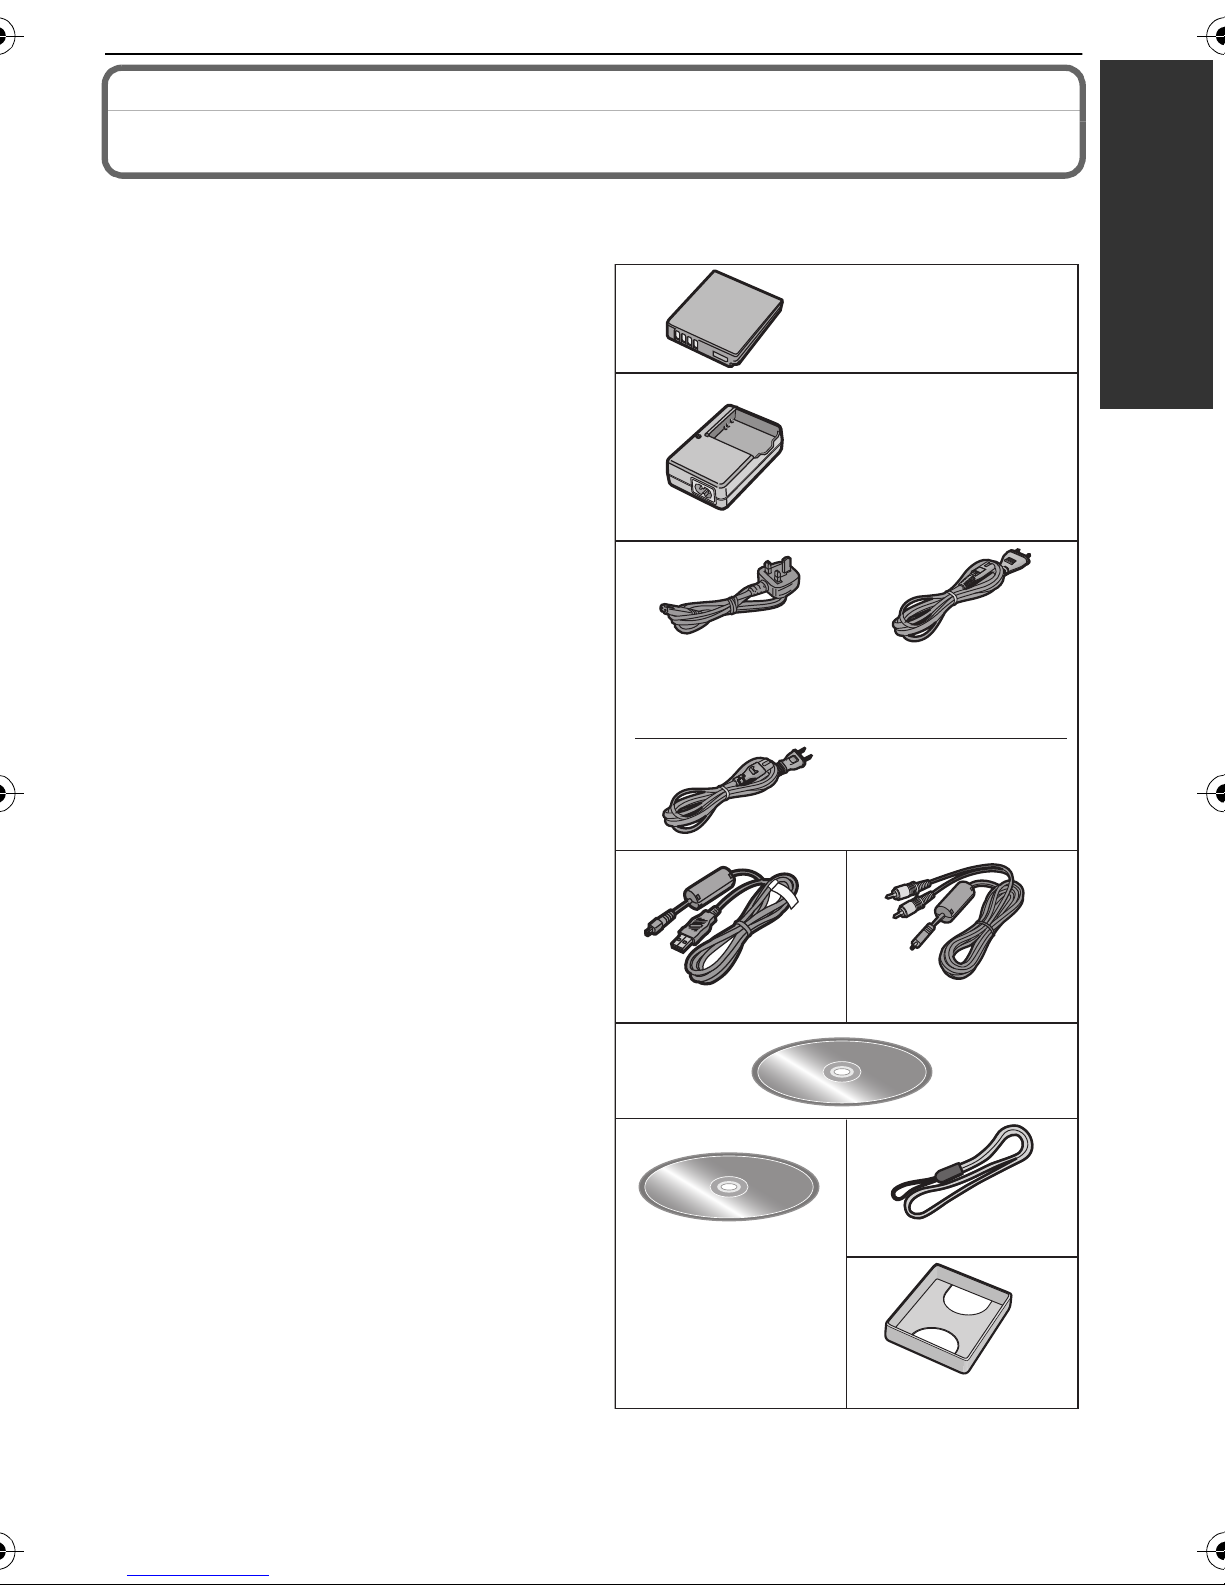
Standard Accessories
Check that all the accessories are included before using the camera.
Product numbers correct as of July 2009. These may be subject to change.
1Battery Pack
(Indicated as battery pack or battery in
the text)
Charge the battery before use.
2 Battery Charger
(Indicated as battery charger or
charger in the text)
3 AC Cable
A: Hong Kong Special Administrative
B: Areas Other than Hong Kong Special
4 USB Connection Cable
5 AV Cable
6 CD-ROM
Software:
•
Use it to install the software to your PC.
7 CD-ROM
•
Operating Instructions
8 Hand Strap
9Battery Case
Region of China and Saudi Arabia
Administrative Region of China and
Saudi Arabia
SD Memory Card and SDHC Memory Card
•
are indicated as card in the text.
• The card is optional.
You can record or play back pictures on the
built-in memory when you are not using a
card.
• Consult the dealer or your nearest Service
Centre if you lose the supplied accessories.
(You can purchase the accessories
separately.)
Before Use
(ENG) VQT2E36
7
Before Use
104 9
5786
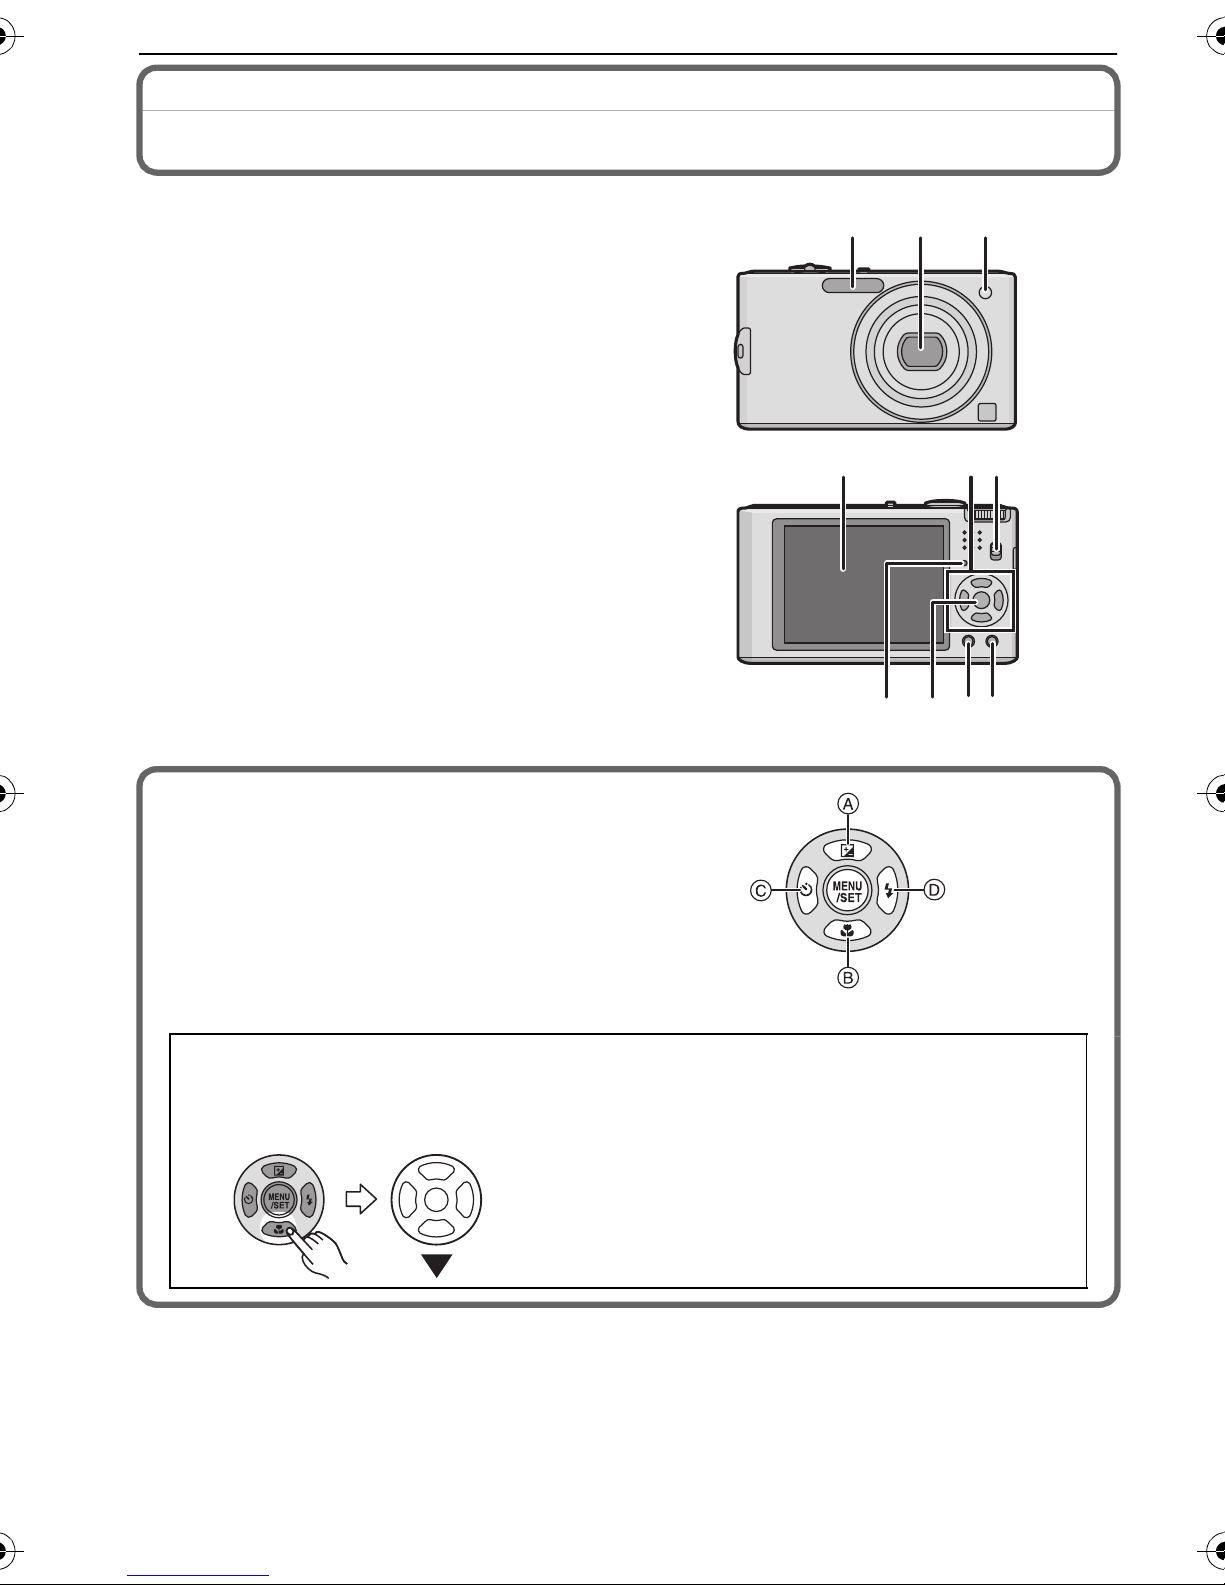
Names of the Components
1Flash
2 Lens
3 Self-timer indicator
AF assist lamp
4 LCD monitor
5 Status indicator
6 [MENU/SET] button
7 [DISPLAY] button
8 [Q.MENU]/Delete button
9 [REC]/[PLAYBACK] selector switch
123
10 Cursor buttons
A: 3/Exposure compensation/Auto
Bracket/White balance fine
adjustment
B: 4/Macro Mode
AF Tracking
C: 2/Self-timer button
D: 1/Flash setting button
In these operating instructions, the cursor buttons are described as shown in the
figure below or described with 3/4/2/1.
e.g.: When you press the 4 (down) button
or Press 4
VQT2E36 (ENG)
8
 Loading...