

PANASONIC KYT936SL User Manual
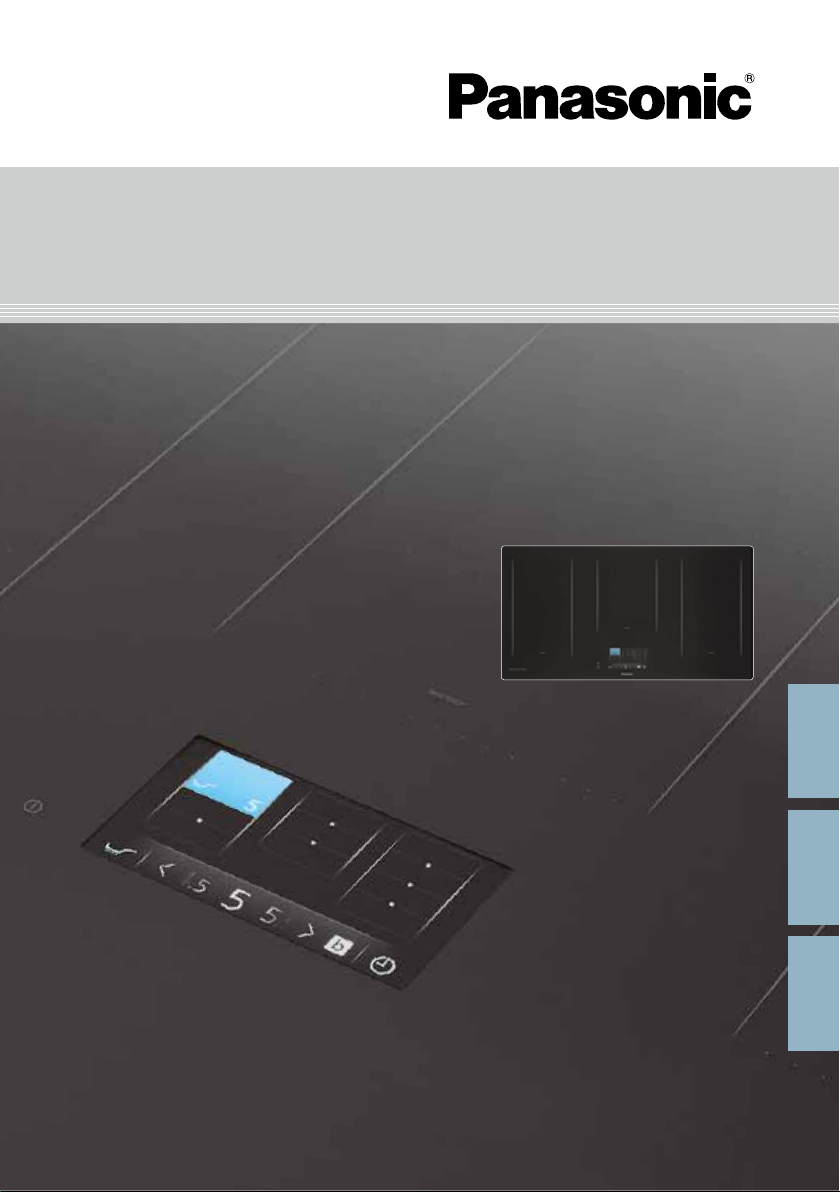
Operating / Installation Instructions
Bedienungs / Installationsanleitung
Mode d’emploi / Instructions d’installation
Induction Hob
Induktionskochfeld
Plaque à induction
FOR DOMESTIC USE ONLY
NUR FÜR HAUSHALTSÜBLICHEN GEBRAUCH
POUR UN USAGE DOMESTIQUE
Model No.
KY-T936SL
KY-T935XL
KY-T935XL
ZY02-F19
English Deutsch Français
Thank you for purchasing this Panasonic appliance.
KY-T935XL
60101EH00001
KY-T935XL
60101EH00001
Contents
IMPORTANT SAFETY INSTRUCTIONS: Before operating this appliance, please
read these instructions carefully and keep for future reference.
Vielen Dank, dass Sie dieses Gerät von Panasonic
gekauft haben.
WICHTIGE SICHERHEITSANWEISUNGEN: Bevor Sie dieses Gerät in Betrieb
nehmen, bitte sorgfältig durchlesen und zur weiteren Bezugnahme aufbewahren.
Merci d’avoir fait l’achat d’un appareil Panasonic.
CONSIGNES DE SÉCURITÉ : Avant d’utiliser l’appareil, lisez attentivement les
recommandations d’utilisation et conservez-les soigneusement.
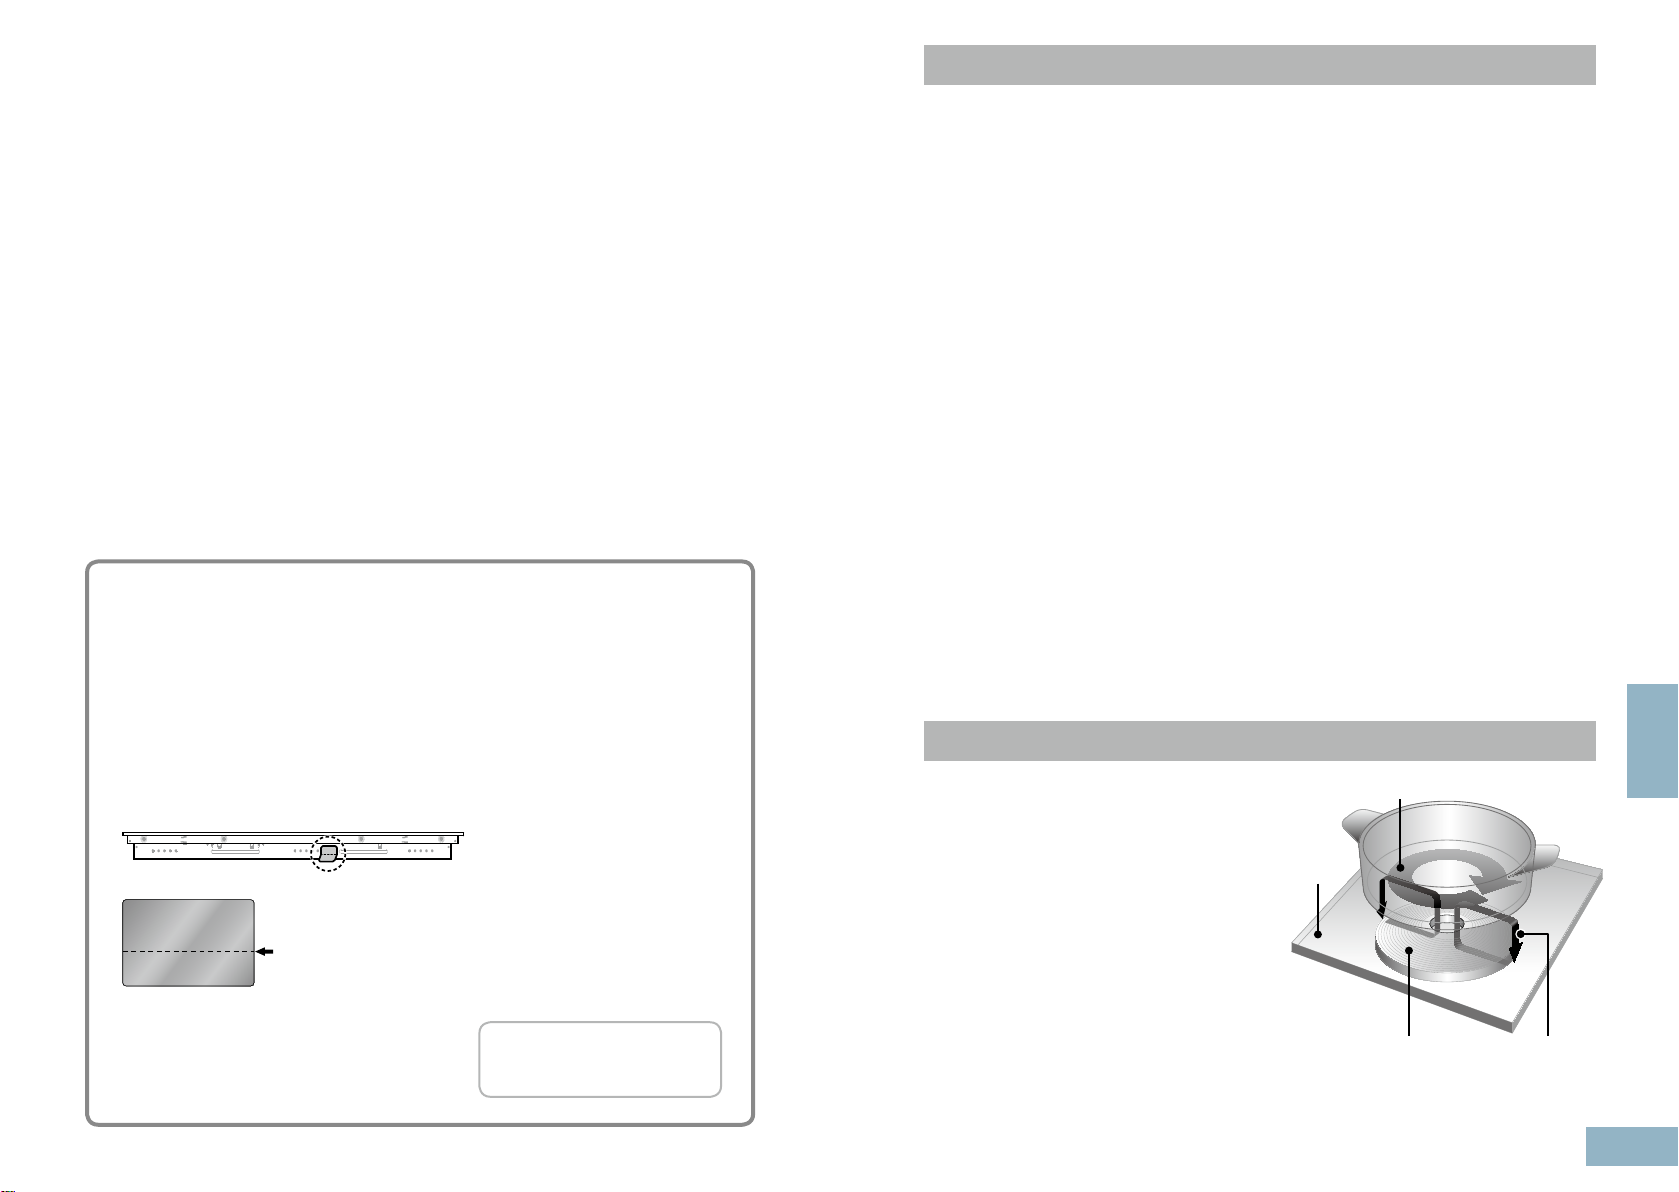
Before the installation: Locate the serial number sticker on the rear side of the
appliance. Tear off along the perforation and attach below for future reference.
Vor dem Einbau: Auf der Rückseite des Gerätes bendet sich der
Seriennummer-Aufkleber. Bitte trennen Sie den unteren Teil ab und kleben Sie
ihn unten auf das vorgegebene Feld.
Avant l’installation : Trouvez le numéro de série autocollant sur la face
arrière de l’appareil. Détachez l’étiquette pré-découpée et collez la ci-dessous.
IH Cooking Mechanism .......................1
Operating Instructions .............. 2-37
Safety Instructions ......................... 2-6
General Precautions .......................... 7
Disposal of Waste Products .............. 8
Genius Sensor Technology ..................9
Energy Saving Tips..............................9
General Controls ..........................10 -12
Cooking Zones .............................13 -14
Suitable Cookware .......................... 15
IH Cooking ................................. 16 -26
- Operation Overview..................16-17
- Safety Features ........................... 18
- Heating Mode ................................ 19
- Autoboil Mode................................20
-
Low Temperature Cooking Mode ...
- Pan Frying Mode ...........................22
- Deep/Shallow Frying Mode ..... 23-24
- Timer ....................................... 25-26
21
IH Cooking Mechanism
IH (Induction Heating) refers to
electromagnetic induction heating.
Power Level Guidelines ................... 27
Genius Sensor Cooking Chart ... 28-29
Cleaning .......................................... 30
Troubleshooting .......................... 31-35
Error Codes ............................... 36-37
Installation Instructions ............ 38-49
Installation and Connection ...............38
Safety Instructions ....................... 38-40
Installation Location ...........................41
Accessories .......................................41
Dimensions ................................. 42-44
Electrical Work .............................45-46
Installing the Appliance ..................... 47
Flush-tting .......................................48
Post-installation Checklist .................49
Specications ............................ 50 -51
English
Eddy current
When electricity ows in the magnetic
coils underneath the top plate, magnetic
lines of force are produced.
1) Detach here.
Trennen Sie hier.
Détachez ici.
2) Attach the sticker here.
Feld für den Aufkleber.
Collez l’étiquette ici.
The magnetic lines of force pass through
metallic cookware when an eddy current
is induced. The heat that is generated by
the electrical resistance of the cookware
is used for heating.
Top plate
Magnetic force
generating coil
Magnetic lines
of force
EN-1

Operating Instructions
Safety Instructions
Safety Instructions
■ This appliance can be used by children aged
from 8 years and above and persons with
reduced physical, sensory or mental capabilities
or lack of experience and knowledge if they
have been given supervision or instruction
concerning use of the appliance in a safe way
and understand the hazards involved. Children
shall not play with the appliance. Cleaning
and user maintenance shall not be made by
children without supervision.
■ Do not place combustible materials near the
appliance. They may cause a re.
■ Do not overheat the pan when preheating for
stir frying and pan frying.
■ If the power cord is damaged, it must be
replaced by a service technician authorised by
the manufacturer in order to avoid a hazard.
■ Stir liquids before heating. Otherwise, liquids
may splatter and cause burns or injuries.
■ Do not apply excessive pressure or drop
objects on the top plate. This may crack or
damage the top plate.
■ Do not place portable gas burners, steel
cylinders and canned goods on or near
the appliance. If they are heated, they may
explode.
■ Metal objects such as knives, forks, spoons and
lids should not be placed on the hob surface as
they can become hot.
English
■ WARNING: In case of malfunction or
breakdown, immediately stop using the
■ After use, switch off the hob element by its
control and do not rely on the pan detector.
appliance. Turn off the main power switch and
the circuit breaker, and then contact the service
centre. Failure to do this may cause smoke,
burns, and electric shock.
EN-2 EN-3
■ Do not disassemble, repair, or modify the
appliance. For repairs, contact the dealer where
you purchased the appliance.

Safety Instructions Safety Instructions
■ WARNING: This appliance must be earthed to
prevent electric shock or re.
■ WARNING: The appliance and its accessible
parts may become hot during use. Care should
be taken to avoid touching heating elements.
Children less than 8 years of age shall be kept
away unless continuously supervised.
■ WARNING: Unattended cooking on a hob with
fat or oil can be dangerous and may result in
re. NEVER try to extinguish a re with water,
but switch off the appliance and then cover
ame with a lid or a re blanket.
■ WARNING: Danger of re: do not store items
on the cooking surfaces.
■ WARNING: If the surface is cracked, switch off
the appliance to avoid the possibility of electric
■ If the oil smokes, immediately turn off the main
power switch. Otherwise, it may catch re.
■ Take care with hot oil as it may cause burns.
■ Take care when preheating the pan with small
amounts of oil. The pan may overheat and
cause damage.
■ Do not heat empty cookware or overheat
ingredients. The ingredients may burn and the
cookware may be damaged.
■ Do not use the appliance for purposes other
than cooking. This may cause overheating or
malfunction resulting in a re.
■ If you are wearing a medical device (such as a
pacemaker), consult your doctor. The operation
of the appliance may affect a medical device.
English
shock.
■ WARNING: Hob guards have not been
■ Do not use a steam cleaner. Water may get into
the electrical components and cause damage.
designed for use with this appliance and should
not be tted under any circumstances.
EN-4 EN-5

Safety Instructions
General Precautions
■ The appliance is not intended to be operated
by means of an external timer or separate
remote control system.
■
Do not place paper or dishcloths under the
cookware. They may get scorched due to the
heat of the cookware.
■
WARNING: The manufacturer cannot be held
liable for damage to persons or items caused
by failure to observe the above instructions, by
interference with any part of the appliance or by
the use of non-original spare parts.
■ The appliance emits magnetic lines of force. Do not place anything
affected by magnetism close to the appliance.
- Radios, TVs, hearing aids may be liable to noise interference.
- Cards with magnetic strips such as store or bank cards, may be
erased or damaged.
■ Do not use other IH cooking appliances, such as IH rice cooker
or portable IH cooktop, on the top plate. Electromagnetic waves
generated by these may damage the appliance.
■ Do not place foods in the cabinet below the appliance. They may
be spoiled by the exhaust heat.
■ If acidic foods such as vinegar, jam, or lemon juice are spilt on the
top plate, wipe off immediately. Otherwise, the top plate may become
discoloured.
■ Do not pour water on or place anything on the control panel. The
control panel keys may malfunction.
■ Do not place hot cookware on the control panel. The control panel
may get damaged.
■ Do not block the intake or exhaust vent. The appliance may become
hot and automatically switch off the main power.
English
EN-6 EN-7
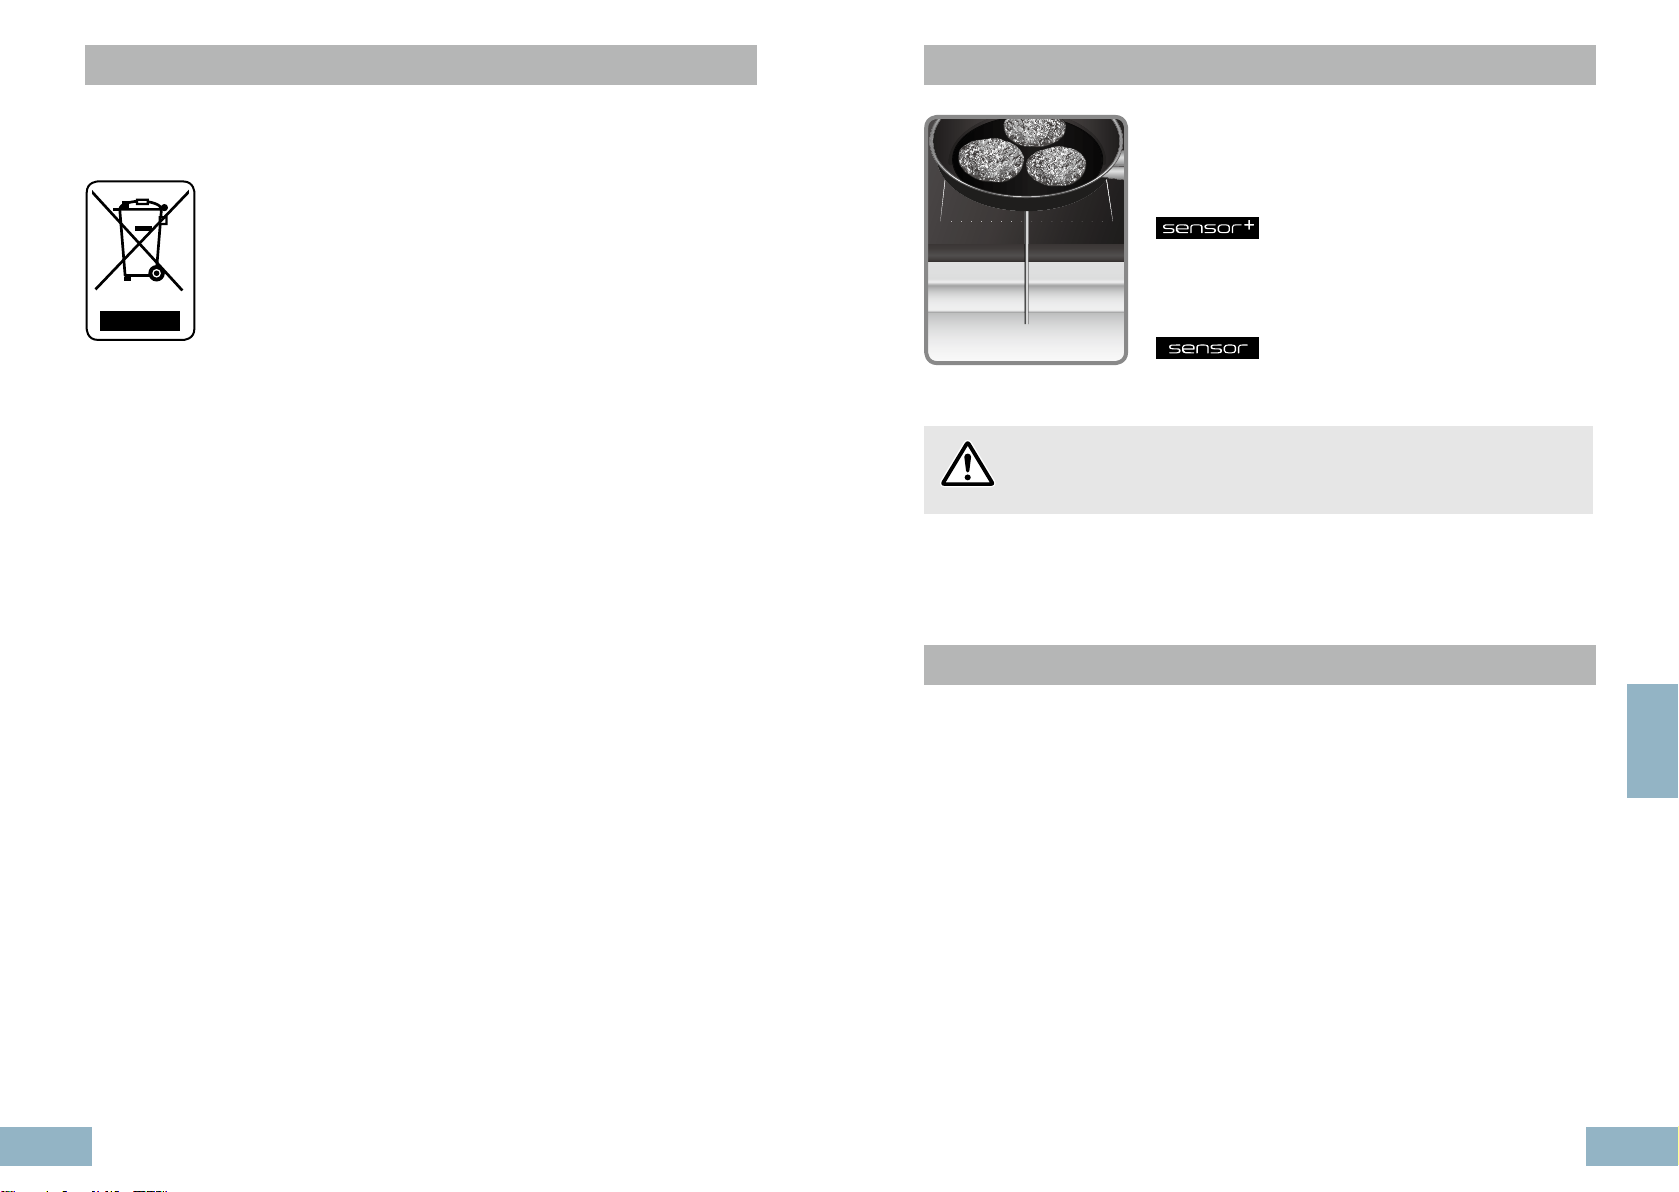
Disposal of Waste Products
Genius Sensor Technology
Information on Disposal for Users of Waste Electrical &
Electronic Equipment (private households)
This symbol on the products and/or accompanying
documents means that used electrical and electronic
products should not be mixed with general household waste.
For proper treatment, recovery and recycling, please take
these products to designated collection points, where they
will be accepted on a free of charge basis.
Alternatively, in some countries you may be able to return
your products to your local retailer upon the purchase of an
equivalent new product.
Disposing of this product correctly will help to save valuable
resources and prevent any potential negative effects on
human health and the environment which could otherwise
arise from inappropriate waste handling. Please contact
your local authority for further details of your nearest
designated collection point.
Penalties may be applicable for incorrect disposal of this
waste, in accordance with national legislation.
Information on Disposal in other Countries outside
the European Union
This symbol is only valid in the European Union.
If you wish to discard this product, please contact your
local authorities or dealer and ask for the correct method of
disposal.
Genius Sensor regulates the set temperature by
quickly detecting the temperature on the base of the
cookware. This is suitable for the following cooking
modes:
(Left cooking zone)
■ Autoboil Mode
■ Low Temperature Cooking Mode
■ Pan Frying Mode
■ Deep/Shallow Frying Mode
Genius Sensor
CAUTION
Do not use oil preheated by other appliances. Genius Sensor will
not work efciently and the oil could ignite.
(Middle and Right cooking zones)
■ Pan Frying Mode
■ Deep/Shallow Frying Mode
Energy Saving Tips
■ Always place the correct lids on
pans to keep the heat in.
■ Use the correct size of pan for the
amount of food you are cooking.
■ Use the right size of pan for the
diameter of the cooking zone. If the
diameter of the pan is not the same
as the cooking zone it is preferable
to use a pan with a base that is
larger in diameter than the cooking
zone.
■ Put just enough water in the pan
to cover vegetables. This will save
energy.
■ Turn down the power level of the
English
cooking zone once the cooking
temperature is reached; simmer
food rather than boiling it.
■ Use a steamer to cook vegetables,
that way you can layer a number
of vegetables on top of each other
and still use one cooking zone.
Alternatively, a pan with a divider
can be used.
EN-8 EN-9
General Controls
General Controls
Top plateCooking zone Cooking zone
Right rear Left rear
Middle
Right front Left front
Control PanelMain Power
Switching on the appliance for the rst time
1. Touch and hold the main power
key to turn on the power.
■ The main power light illuminates
when the main power is turned on.
■ If 1 minute has elapsed without
any operation, the main power
automatically turns off.
2. Select the desired language, and
touch
to the main menu.
to conrm and continue
Main Menu
* While cooking zone is in operation
Child Lock
■ Lock the control panel to prevent misuse of the
appliance.
■ Touch and hold for 3 seconds while cooking zones
are not in operation. To deactivate, touch and hold
again for 3 seconds.
Information
■ Show important additional information on the
function currently being used.
■ Touch
Kitchen Timer
■ Counts down from a set time and sounds an alarm
when it reaches zero. Kitchen Timer does not turn
off the cooking zones.
■ For more details on how to set the timer, see page
26.
Settings
■ The appliance has various default settings that can
be adapted to your requirements while cooking
zones are not in operation.
- Display Brightness
- Languages
- Silent Mode
-
Power Management *
1
*
For cooking zone groups and its effects, see page 13.
*2 During Easy Mode, Autoboil Mode and
Temperature Cooking Mode
■ Touch
key again to back to the main menu.
- Power Levels
- Easy Mode *
- Default Settings
1
- Menu Display Time
cannot be used.
key again to back to the main menu.
2
Low
English
EN-10 EN-11
General Controls Cooking Zones
Control Panel Lock
■ Lock the control panel while cooking zones are in
operation enabling cleaning of small spills in that
area.
■ This will disable the control panel for 20 seconds
while cooking zones are in operation.
■ To deactivate within 20 seconds, touch
again.
Pause key
■ Touch and hold for 1 second to reduce all active
cooking zones to level 1 for 30 minutes (after 30
minutes the appliance will switch off). Timer is
paused.
■ Touch and hold again to revert the cooking zones
to their original settings. Timer will continue
countdown.
■ Pause function cannot be used if Genius Sensor
cooking modes are being used on any of the
cooking zones.
Hot Surface Warning
■ Illuminates when any area of the top plate is hot.
Take care not to touch cooking zones when this is
displayed.
key
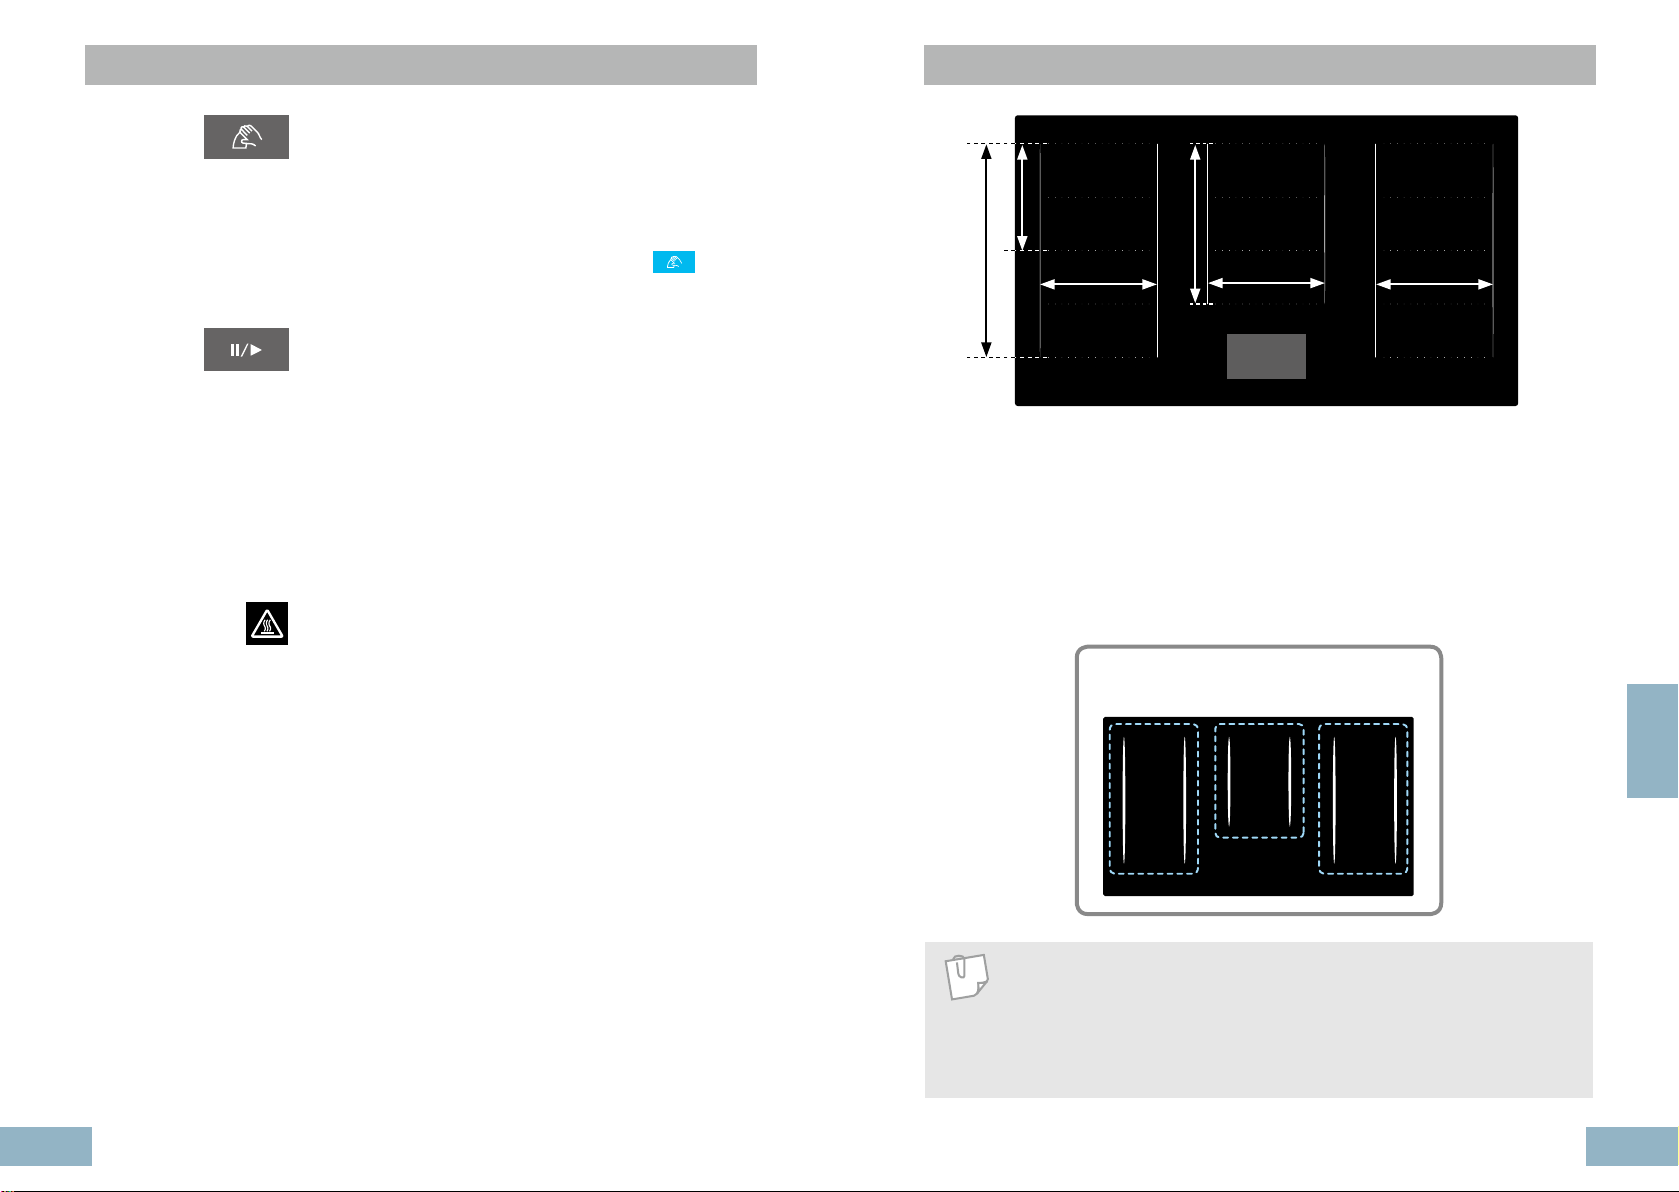
Cooking zone groups
The cooking zones are grouped into three, e.g. front and rear on the left and front
and rear on the right. When the two cooking zones within the same group are
used simultaneously, the heating power is regulated so that the overall power
consumption does not exceed the limit.
e.g. When Power Level 9 is selected for left front cooking zone, the maximum
power available for left rear cooking zone is power level 8.
19.1 cm
38.2 cm
21 cm 21 cm21 cm
zone group
Left
cooking
28.6 cm
300 mm200 mm 200 mm300 mm200 mm 200 mm
Middle
cooking
zone group
Right
cooking
zone group
English
NOTE
When the overall power consumption has been set to 7200 W under
“Power Management”, the heating power are regulated as follows.
- Very large cookware may affect the maximum power level.
- When using two or more cooking zones within the same group, only
“Heating Mode” can be used.
EN-12 EN-13
Cooking Zones
Suitable Cookware
Flex Cooking Zone
The ex cooking zone consists of several independently-controlled inductors. When
cookware is detected, only sections that are in contact with the cookware will be
activated, all others will remain switched off.
To ensure that the cookware is detected and heat is distributed evenly, centre the
cookware as shown below:
Pans with a diameter less than 13 cm
( Heating Mode only, not for Genius Sensor cooking
modes)
For smaller pans, place the cookware in one of the
four positions shown.
Pans with a diameter of 13 cm or more
For larger pans, place the cookware in one of the three
positions shown.
Larger cookware
Place it at the top or bottom edge of the ex cooking
zone.
Two independent cooking zones
The front and rear areas of a ex cooking zone can
be used independently of each other by selecting the
necessary power for each one.
Material
Compatible cookware
■ Iron / Cast iron
■ Enamelled iron
■ Magnetic stainless steel
( The heating power may not be as strong for some stainless steel cookware.)
Incompatible cookware
■ Aluminium / Copper
■ Heat-resistant glass
■ Ceramic and earthenware
Shape of the Base
Compatible cookware
The base needs to be at and sit evenly on the top plate.
(Failure to ensure this could result in injuries or burns.)
Incompatible cookware
■ Round-based cookware
■ Cookware with feet
■ Thin-based cookware
Round-based With feet
Thin-based Curved-based
■ Curved-based cookware
Do not use curved-based cookware with a 3 mm
or over curve, as the safety features may not be
activated, heating power may be diminished, or the
cookware may not be heated.
English
Do not place the cookware over multiple ex cooking
zones.
CAUTION
■ The cooking zone and base of the pan must be kept dry.
If there is liquid between them, it can cause steam pressure and
the pan may move.
Do not place the cookware in an off-centre position.
The sensor may not function properly and could cause
a re.
WARNING
Failure to follow these instructions may cause serious injury.
EN-14 EN-15
■ Do not heat up empty enamel cookware. Do not allow enamel
cookware to scorch during cooking. Enamel coating may melt
and damage the top plate.
■ Do not use ceramic and earthenware cookware even if it is
made for induction heating.
■ If the cookware is incompatible,
the display. (See page 36)
will appear and ash in
IH Cooking
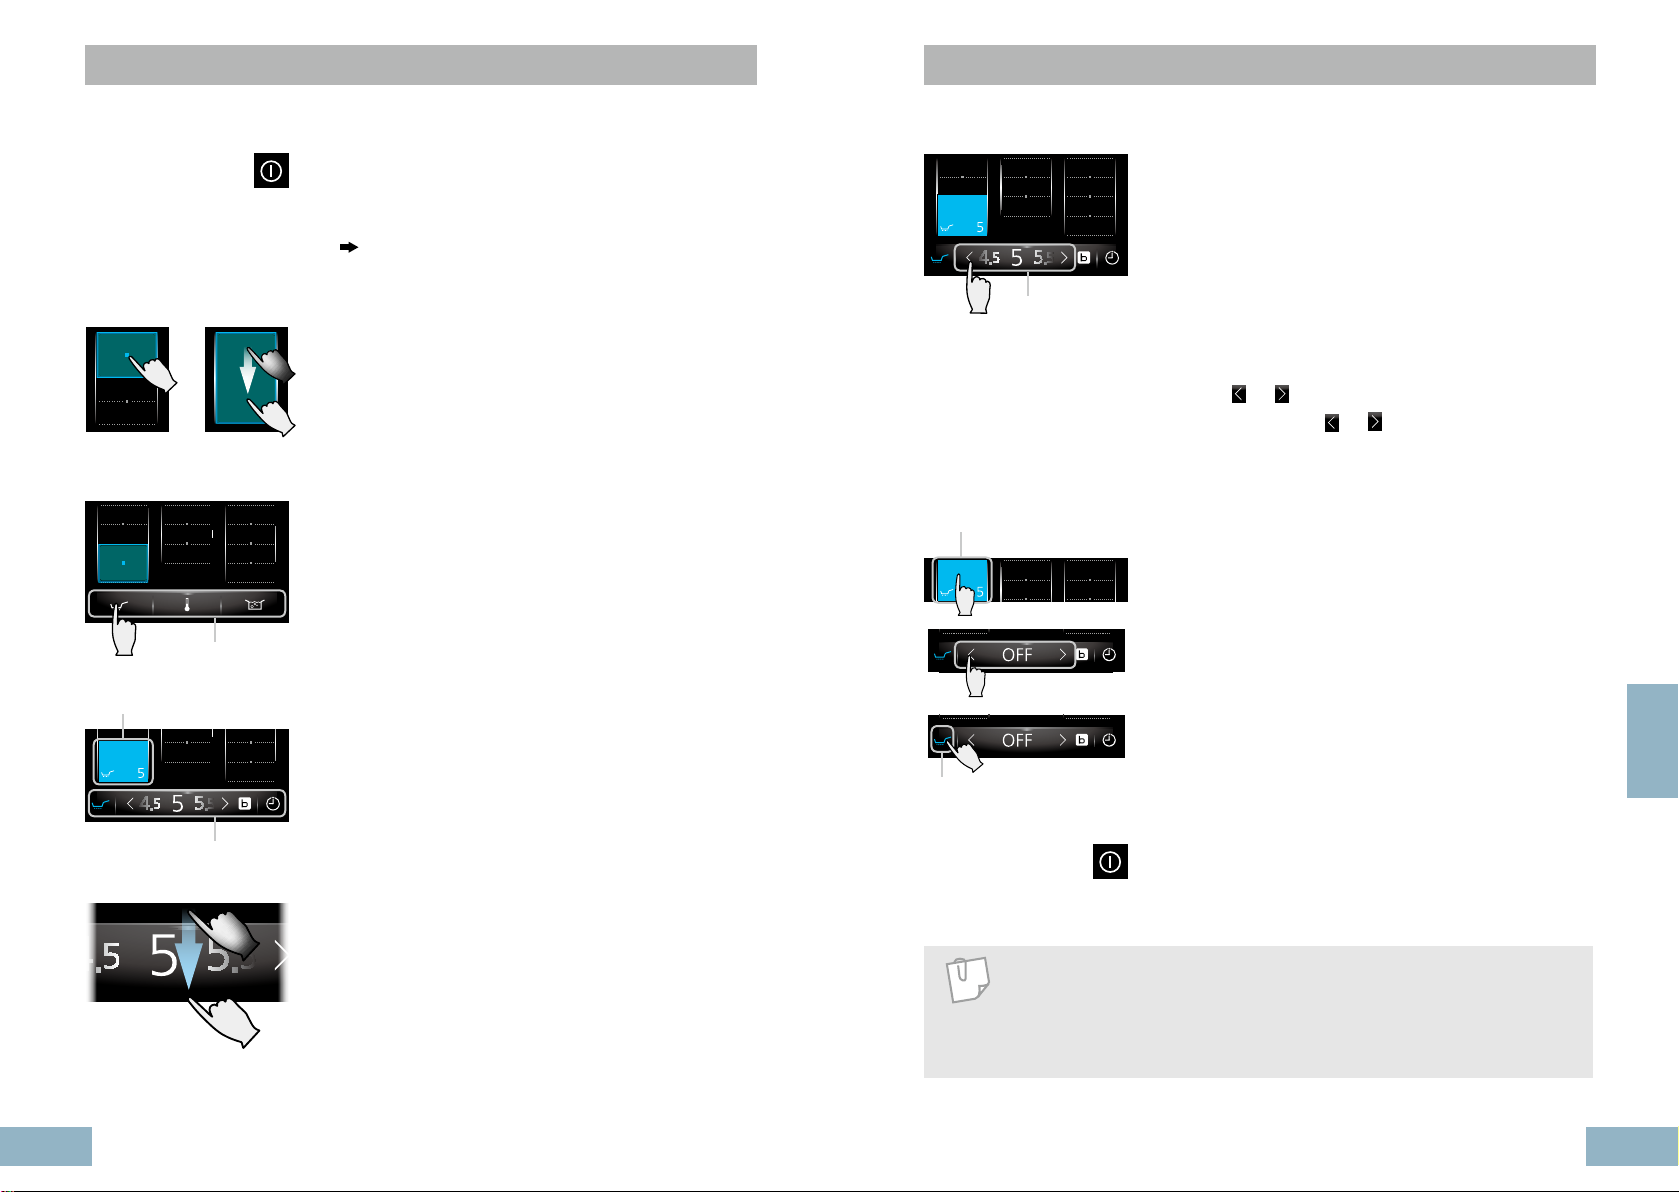
Operation Overview
IH Cooking
Touch a ■.
Cooking zone selector
Drag.
Menu bar
Menu bar
1. Touch and hold the main power key to turn on
the power.
If 1 minute has elapsed without any operation, the
main power automatically turns off.
If this happens, turn on the main power again.
2. Select the cooking zone by touching a square
mark (
■) or dragging.
If 5 seconds has elapsed without any operation, or
touched twice, selected area will be cancelled.
3. Perform the desired operation with the menu bar.
■ Heating Mode (See page 19)
■ Autoboil Mode (See page 20)
■ Low Temperature Cooking Mode (See page 21)
■ Pan Frying Mode (See page 22)
■ Deep/Shallow Frying Mode (See pages 23-24)
Cooking zone selector will stay illuminated when
the corresponding cooking zone is in operation.
Menu bar
■ Menu bar will appear from bottom of the control
panel after selecting the cooking zone.
■ Menu bar will close downward if 5 seconds has
elapsed without any operation.
Menu bar operation
■ Touch the cooking zone selector to show the menu
bar.
■ Touch around the top centre of the menu bar and
slide your nger downward to close it immediately.
Slider
Cooking zone selector
Cooking mode key
NOTE
■ For the recommended cookware sizes and placement, see page 14.
■ Illuminated area of the cooking zone selector may not match with
the cooking zone covered by cookware depending on the size or
material of the pan used.
4. Touch slider in the menu bar to set the power
level or the required temperature.
Slider
■ Change the power level for Heating Mode.
■ Set the temperature for Genius Sensor cooking
modes.
Slider operation
There are three ways of using the Slider.
■ Slide to the desired setting quickly.
to adjust the setting precisely.
■ Tap
■ Touch and hold
5. Turn off the cooking zone.
There are three ways as follows.
■ Touch and hold the cooking zone selector.
■ Touch the cooking zone selector once, and set
■ Touch the cooking zone selector once, and touch
6. Touch and hold the main power key to turn off
the main power.
or
to change the setting in
or
succession.
the slider to “OFF”.
the cooking mode key in the menu bar.
English
EN-16 EN-17
IH Cooking
IH Cooking
Safety Features
NOTE
The appliance may not switch off automatically when an abnormality
is present. Low power level and the type of cookware can impact
detection.
Auto Switch Off
■ The appliance is automatically turned off when an
abnormality is detected:
- Cookware not detected (See page 36)
- Small object on the cooking zone (See page 36)
- Empty pan on the cooking zone (See page 36)
- Long cooking time (See page 31)
■ The main power is automatically turned off if 1
minute has elapsed without any operation.
Overheating Prevention Function
■ The heating power is automatically reduced to
prevent the pan overheating. (See page 33)
Hot Surface Warning
■ illuminates when the top plate is hot.
(See page 12)
Child Lock
■ The control panel can be locked to prevent misuse
of the appliance. (See page 11)
Heating Mode
WARNING
■ Stir liquids before heating. Otherwise, ingredients may suddenly
splatter or cookware may move, and you may get burned or injured.
■ Do not overheat the pan when preheating for stir frying and
pan frying.
CAUTION
Take care when preheating the pan with a small amount of oil.
The pan may overheat and become damaged.
1. Select the cooking zone required.
2. Touch Heating Mode key ( ).
3. Touch slider to set the power level.
Power level adjustable range: 1 For slider operation, see page 17.
See Power Level Guidelines on page 27.
Boost Function
Touch this to heat even more quickly than with the
power level 9.
After 10 minutes, the power level will return to 9.
4. Turn off the cooking zone. (See page 17)
.
English
NOTE
■ If no key is touched for a xed period of time when a cooking zone
is in operation, a beep will sound and the cooking zone is turned off
automatically. See Auto switch off time table on page 31.
■ When the front and rear cooking zones are used simultaneously, the
heating power is regulated so that the overall power consumption
does not exceed the limit. For cooking zone groups and its effects,
see page 13.
■ Cooking Timer can be used with Heating Mode. (See page 25)
EN-18 EN-19

IH Cooking
IH Cooking
Autoboil Mode
NOTE
NOTE
■ The cookware size and material (e.g. non-stick coating) and the
volume of water may affect the sensor detection. If the water has not
boiled after beeping or it has boiled but the appliance does not beep,
select a power level as required.
■ Cooking Timer can be used with Autoboil Mode. (See page 25)
Min. 3 cm
Min. 0.5 L / 1 L
Brings a pan of water to the boil.
Available on the cooking zone with
1. Select the cooking zone required.
2. Touch Autoboil Mode key (
The appliance beeps 5 times when the water
reaches boiling point and maintains a rolling boil.
After beeping add ingredients and adjust the
heating power with the slider as required.
Temperature ‘100’ will ash in the display until the
boiling temperature is reached. After the water is
boiled, the appliance automatically sets the power
level to “7”. Increase or decrease the power level as
required.
3. Turn off the cooking zone. (See page 17)
Autoboil Mode is developed for boiling water only.
To achieve the optimum performance, the following is
recommended.
■ Use a lid until boiling.
■ Use a minimum of 0.5 L of water. If a larger pan that
covers 3 or more areas of ex cooking zone, use a
minimum of 1 L of water.
■ Minimum 1 cm of depth when ex cooking zone is
used.
In order to prevent water boiling over from the pan, the
following is recommended.
■ No more than 70% pan capacity should be used.
■ There should be a minimum gap of 3 cm between
the lid and the water surface.
).
Low Temperature Cooking Mode
Available on the cooking zone with
.
1. Select the cooking zone required.
2. Touch Sensor Option key (
Low Temperature Cooking.
3. Touch Low Temperature Cooking Mode key (
4. Touch slider to set the required temperature.
Temperature adjustable range: 65
See Genius Sensor Cooking Chart on page 28.
5. When the set temperature is reached, the
temperature display stops ashing and the
appliance beeps 5 times.
- When Low Temperature Cooking Mode is used
after cooking with high power, the temperature
display stops ashing when the set temperature is
reached but the appliance does not beep.
6. Turn off the cooking zone. (See page 17)
NOTE
■ Due to the variety of food types and pans, the actual temperature of
food may be different from the set temperature. Increase or decrease
the setting until the required food temperature is achieved.
■ Cookware with a non-stick coating may affect the sensor detection.
Adjust the set temperature until the required temperature is achieved.
■ To achieve the optimum performance, it is recommended that the
following minimum amount is heated at any one time with Low
Temperature Cooking Mode.
■ Minimum 1 cm of depth when ex cooking zone is used.
■ Due to the consistency of milk it is recommended to stir continuously
when heating, to prevent the milk from sticking to the bottom of the
pan and burning.
■ Cooking Timer can be used with Low Temperature Cooking Mode.
(See page 25)
- Water / milk: 200 g
- Any other food
types: 400 g
) once to select
o
C to 120 oC.
- All liquid and food
types: 400 g
.
).
English
EN-20 EN-21

IH Cooking
IH Cooking
Pan Frying Mode
Available on the cooking zones with
and
1. Place the pan with the required amount of oil on
the cooking zone.
2. Select the cooking zone required.
3. Touch Pan Frying Mode key (
For the cooking zone with
Sensor Option key (
Mode.
4. Touch slider to set the required temperature.
Temperature adjustable range: 140
See Genius Sensor Cooking Chart on page 29.
5. When the set temperature is reached, the
temperature display stops ashing and the
appliance beeps 5 times. Add ingredients.
6. Turn off the cooking zone. (See page 17)
.
) once to select Pan Frying
).
, touch
o
C to 230 oC.
Deep/Shallow Frying Mode
Available on the cooking zones with
and
WARNING
When deep/shallow frying, use Deep/Shallow Frying Mode (
minimum 200 g oil at least 1 cm deep.
Failure to observe this warning may cause oil to overheat resulting in
a re.
1. Place the pan with the required amount of oil on
the cooking zone.
2. Select the cooking zone required.
3. Touch Deep/Shallow Frying Mode key (
For the cooking zone with
Sensor Option key (
Deep/Shallow Frying Mode.
4. Touch slider to set the required temperature.
Temperature adjustable range: 140
See Genius Sensor Cooking Chart on page 29.
.
) once to select
, touch
o
C to 200 oC.
) with
).
English
5. When the set temperature is reached, the
temperature display stops ashing and the
appliance beeps 5 times. Add ingredients.
NOTE
■ The actual temperature at the base of the pan may vary from the
set temperature depending on the type of cookware. Adjust the
temperature if required.
■ Ensure that the cookware is dry inside and out before heating up.
■ Cooking Timer can be used with Pan Frying Mode. (See page 25)
EN-22 EN-23
NOTE
■ The whole ex cooking zone cannot be used with Deep/Shallow
Frying Mode.
■ The actual oil temperature may vary from the set temperature
depending on the cookware. Adjust the temperature if required.
■ Cooking Timer cannot be used with Deep/Shallow Frying Mode.
Only Kitchen Timer can be used. (See page 26)
6. Turn off the cooking zone. (See page 17)
IH Cooking
IH Cooking
Deep/Shallow Frying Mode
Observe the following to keep Genius Sensor
functioning efciently.
■ Follow instructions for quantity of oil.
Amount: 200 g to 800 g (0.22 L to 0.9 L)
Depth: minimum 1 cm
■ Place the pan in the centre of the cooking zone.
■ Do not use hot oil, brown-coloured oil, cloudy oil, or
oil with food sediment.
■ Observe the recommendations for suitable
cookware. (See page 15)
■ Ensure the top plate and bottom of the pan are dry
and clean.
■ Do not add ingredients before the temperature
display stops ashing. Heating may stop due to an
abnormality detected.
■ Once preheating has started, do not add oil or
move the pan to another cooking zone.
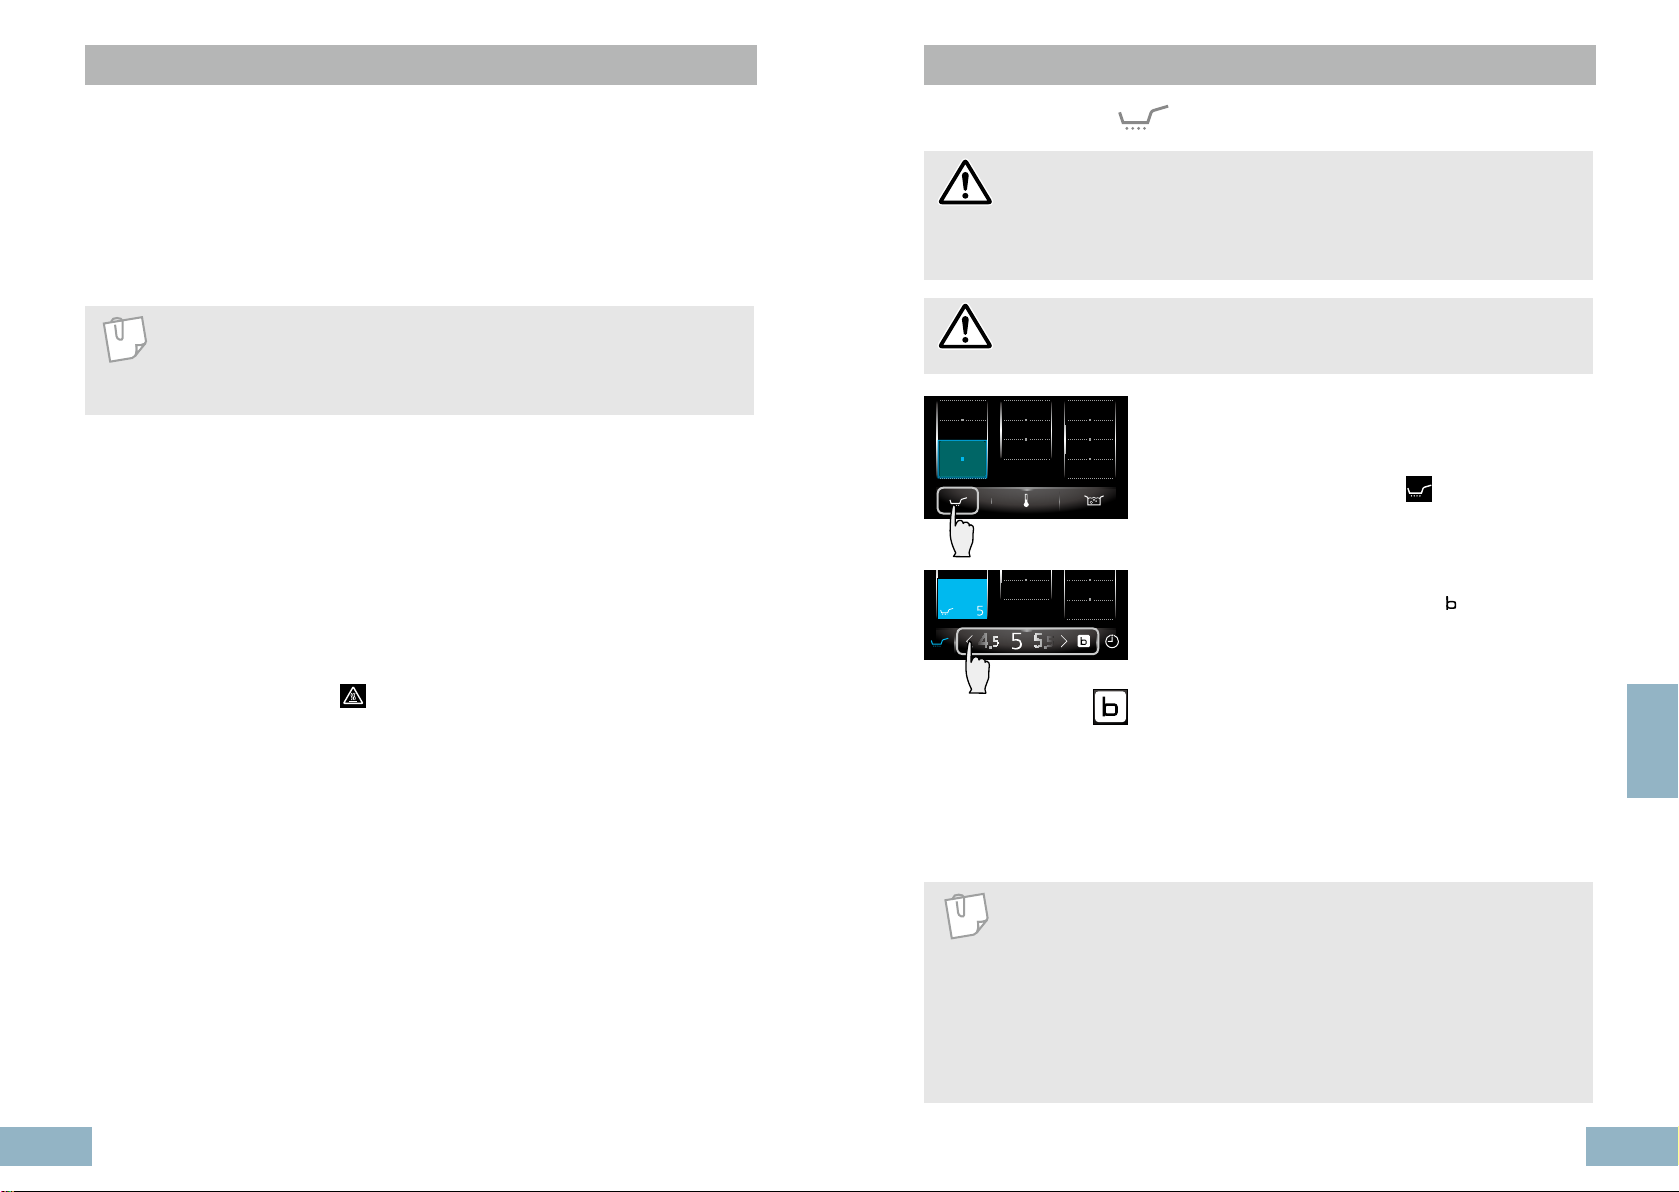
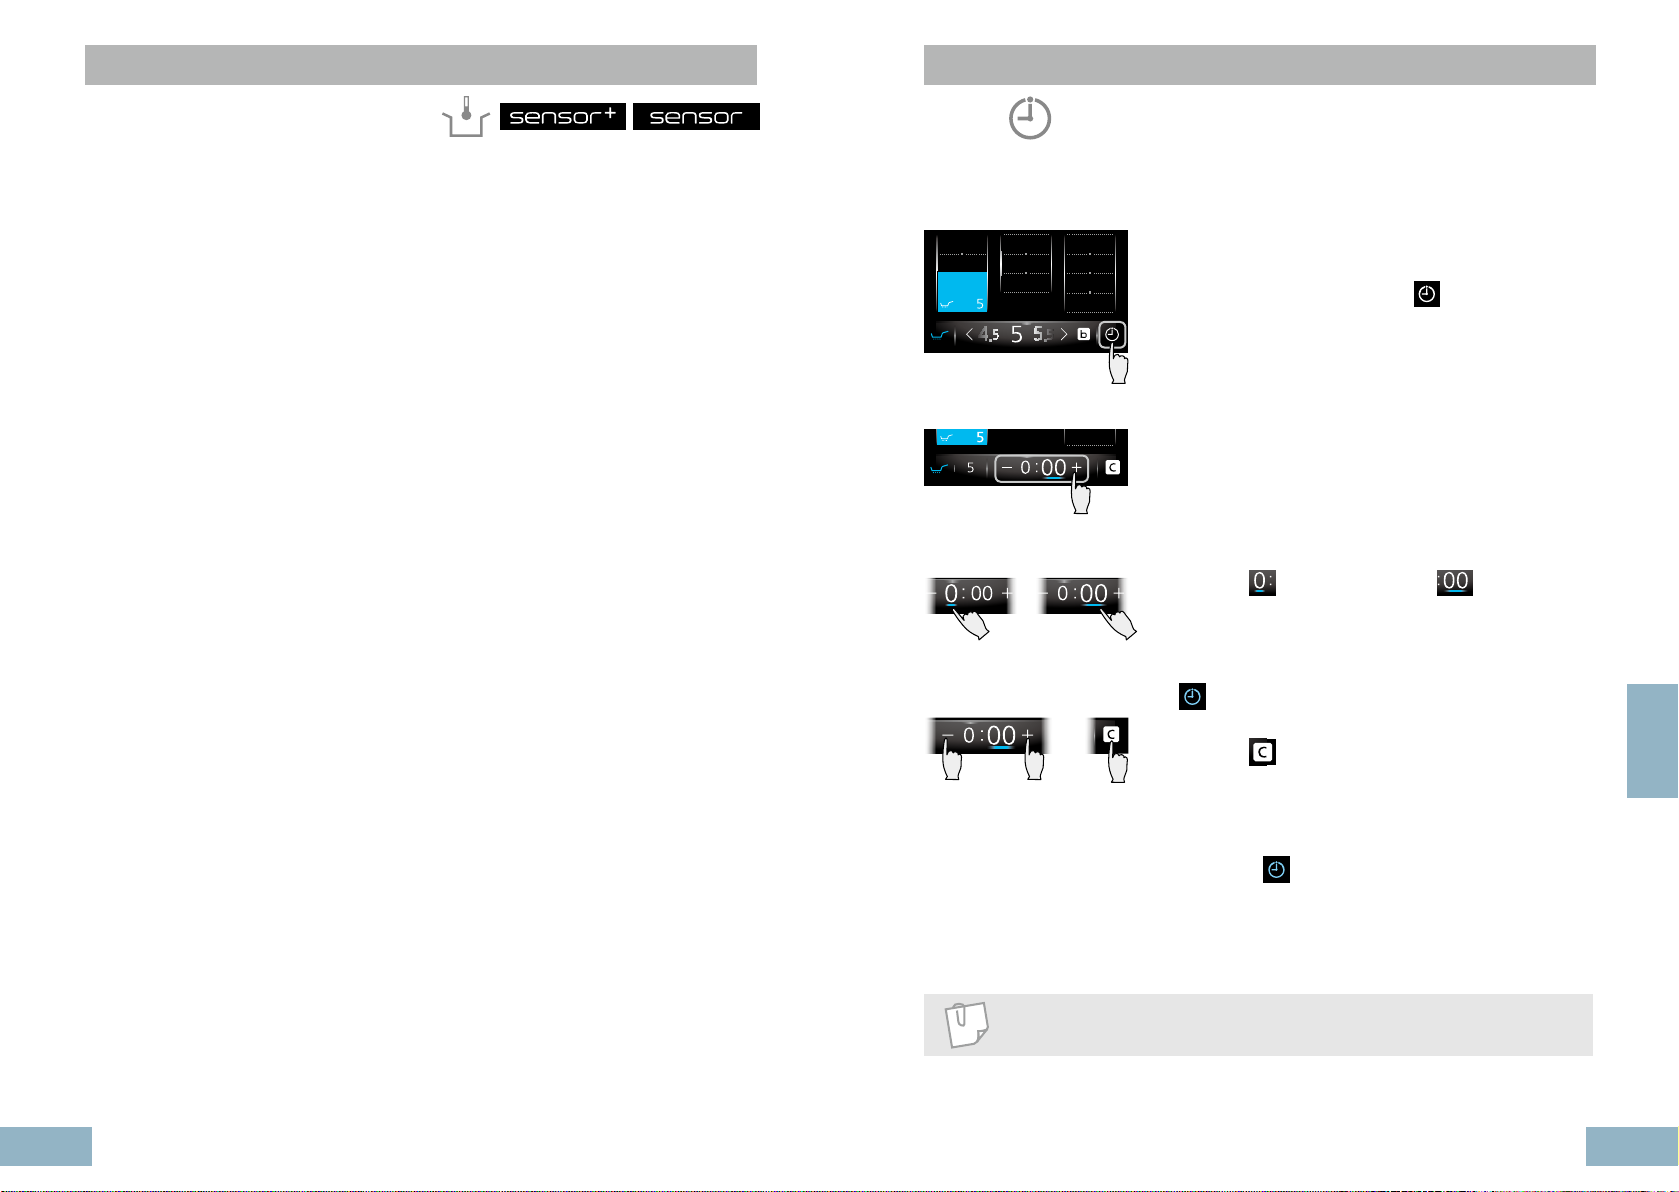
Timer
or
Using Cooking Timer
Used to switch a cooking zone off automatically.
Cooking Timer can be set for multiple cooking zones.
1. Perform the desired operation. (See pages 19-22)
2. Touch Cooking Timer key (
■ Menu bar will appear from bottom of the control
panel after selecting the cooking zone.
■ Menu bar will close downward if 5 seconds has
elapsed without any operation.
3. Set the desired cooking time.
Cooking Timer setting range: 1 minute to 9 hours
59 minutes.
■ Tap ‘+’ or ‘-’ to adjust the setting precisely.
■ Touch and hold ‘+’ or ‘-’ to change the setting in
succession.
■ Touch
settings to minutes.
Cancelling Cooking Timer
Touch the cooking zone selector once, and touch
key, then;
■ Set the timer to “0:00”.
■ Touch
to set hours. Touch to revert
key.
) in the menu bar.
English
Adjusting countdown time
Once countdown has started, the timer can be
adjusted. Touch the cooking zone selector once,
and touch
4. When the timer reaches “0:00”, the appliance
beeps 5 times and turns off the cooking zone.
NOTE
Cooking Timer can not be set for Deep/Shallow Frying Mode.
EN-24 EN-25
to adjust the time.

IH Cooking
Power Level Guidelines
Timer
or
Using Kitchen Timer
Used independently from all other cooking
functions. It counts down from a set time.
1. Touch and hold the main power key to turn on
the power.
2. Touch Kitchen Timer key (
menu.
■ Menu bar for timer setting will appear from bottom
of the control panel.
■ Menu bar will close downward if 5 seconds has
elapsed without any operation.
3. Set the time.
Kitchen Timer setting range: 1 minute to 9 hours
59 minutes.
■ Tap ‘+’ or ‘-’ to adjust the setting precisely.
■ Touch and hold ‘+’ or ‘-’ to change the setting in
succession.
■ Touch
settings to minutes.
Cancelling Kitchen Timer
Touch Kitchen Timer key (
■ Set the timer to “0:00”.
■ Touch
to set hours. Touch to revert
key.
) in the main
) again, then;
Low Medium High
Power level 1 1. 2 2. 3 3. 4 4. 5 5. 6 6. 7 7. 8 8. 9
Chocolate
Butter
Melting
Soup (e.g. lentil)
Heating
Simmering
Pan-frying
Bacon, Chops
Honey
Milk
Frankfurters
Stew
Pasta sauce
Rice pudding
Fish llets
White sauce
Pre-heat pan
Stir-fry
Fried eggs
Pancakes
Omelette
Steak,
Fish llets
English
Adjusting countdown time
Once countdown has started, the timer can be
adjusted. Touch Kitchen Timer key (
to adjust the time.
4. When the timer reaches “0:00”, the appliance
beeps 5 times.
NOTE
■ Kitchen Timer does not switch off the cooking zone.
■ Cooking Timer and Kitchen Timer can be set together.
EN-26 EN-27
) again
Boiling
Power level 1 1. 2 2. 3 3. 4 4. 5 5. 6 6. 7 7. 8 8. 9
Meatballs
Pasta, Water
Vegetables
Rice
NOTE
The heat values may vary depending on cookware used.
Check and adjust the power levels as required.

Genius Sensor Cooking Chart
Genius Sensor Cooking Chart
Low Temperature Cooking Mode (12 levels)
Menus 65 70 75 80 85 90 95
Heating
Poaching
Boiling
Steaming
Bain-
marie
Sauce (e.g. Hollandaise)
Simmering *
Canned foods
Chicken breast
Boiled egg
Fish and Shell sh
Vegetables
Chicken breast
Melting chocolate
Pot roast
Casserole
Meat sauce
Irish Stew
Milk
Egg
Fish
Rice
Potato
Potato
Curry
Soup
Jam
100 105 110 115 120
Pan Frying Mode (5 levels)
°C 140 160 180 200 230
Lamb chops, Fish llets
Steak, Pork, Chicken llets
Schnitzel,
Breaded escalope
Sautéed potato
Suggested
menus
Omelette
Croque monsieurs
American pancakes
Burgers
Deep/Shallow Frying Mode
°C 140 150 160 170 180 190 200
Croutons
Frozen food items
Suggested
menus
Fried chicken
Mushrooms
Homemade chips
Bacon,
Sausages
Fried eggs
French
toast
(7 levels)
Battered sh
Doughnuts
Battered
vegetables
Pancakes
Stir fry
English
Compote
* Simmering
The temperatures recommended are for simmering only. Some recipes may require
to cook food items (e.g. meat, vegetables etc.) with high power before moving onto
simmering stage. In such cases, cook the food items by selecting the appropriate power
level and set Low Temperature Cooking Mode. (See page 21)
If Low Temperature Cooking Mode is used after cooking with a high power, the
appliance stops ashing but does not beep when the set temperature is reached.
EN-28 EN-29
NOTE
The heat values may vary depending on cookware used.
Check and adjust the Genius Sensor level as required.

Cleaning
Troubleshooting
CAUTION
■ Before cleaning, turn off the main power switch. Allow to cool
before cleaning the top plate.
■ Do not use a steam cleaner. Water may get into the electrical
components and cause damage.
Always keep the appliance in a clean condition.
Spilled food or oil scorched on the appliance may
become difcult to clean.
Top Plate and Control Panel
Light stains
Wipe off with a damp cloth.
Oil stains
■ Wipe off with a cloth dampened in mild detergent.
■ Do not use strong acidic or alkaline detergents, such
as bleach or synthetic detergents. They may cause
discolouration.
Heavy stains
Apply non-abrasive cream cleaner to the top plate or
control panel and wipe with a cloth.
Check the following for some advice on rectifying some common problems before
calling the service centre.
Power Source
Symptom Possible cause
The appliance cannot
be turned ON.
The cooking zone
turned itself off while in
operation.
Auto switch off time
(hours)
■ The main power switch has not been turned ON.
Touch the main power switch a little longer.
■ Child Lock has been activated. (See page 11)
Auto switch off
If 1 minute has elapsed without any operation after
switching on, the main power automatically turns off.
Turn on the main power switch again.
Long cooking time
If no key is touched for a set time (see table below)
when a cooking zone is in operation, a beep will sound
and the cooking zone is turned off automatically.
Set the appliance again as required.
It is recommended to use the Cooking Timer when
simmering for a long period of time. (See page 25)
Power Level
Low Medium High
1 1. 2 2. 3 3. 4 4. 5 5. 6 6. 7 7. 8 8. 9
9 8 7 6 5 4 3 2 1
English
NOTE
Ensure there are no stains on the base of the cookware.
EN-30 EN-31
Control Panel
Symptom Possible cause
Key operation is
disabled.
Keys react when the
surrounding area is
touched.
■ Your ngertips are covered. Touch with bare nger.
■ Control Panel Lock is activated. (See page 12)
■ You performed the operation while holding the
cookware handle.
■ The control panel is dirty.
Turn off the main power switch and ensure the area
is clean and dry. Turn on the main power switch
again.
Water or other liquids may be on or around the control
panel.
Ensure the area is clean and dry.
Troubleshooting
Troubleshooting
Sounds and Noises
Symptom Possible cause
Noise is heard during
heating.
The level of the noise
from the appliance
increases and
decreases.
After the main power
switch is turned off,
sound from the fan can
still be heard.
Clicking noise is heard
at the start of ex
cooking operation.
Various sounds may be heard depending on the type of
cookware. You may feel a small vibration when you hold
the handle and the cookware may move slightly.
This is not a malfunction. Moving the cookware
slightly or replacing it may eliminate the sound.
If the cookware is removed during heating, a short
metallic sound may be heard.
It is the sound of the cooling fan inside the appliance.
The level of noise changes according to the power level
and the material of the cookware. When the power level
is increased, the fan will operate at high speed and
generate more noise.
While the inside of the appliance is still hot, the cooling
fan operates. When the appliance cools down, it will
automatically stop.
This is not a malfunction. This is a part of induction
heating technology. The noise is eliminated during
operation.
Heat Power
Symptom Possible cause
The heating power is
weaker.
When multiple cooking
zones are used together,
■ The heating power
decreases.
■ The power indicator
automatically
decreases.
■ The power level can
not be increased.
Overheating Prevention Function
If the base of the cookware overheats, the heating
power will automatically reduce. The power indication
will remain the same. The power returns to normal after
the cookware cools down.
Unsuitable cookware, e.g. ceramic and earthenware
pans, are used.
Do not use ceramic and earthenware pans even
if they are for induction heating as they are not
efcient. (See page 15)
The power level is automatically regulated so that
overall power consumption does not exceed the limit.
(See page 13)
The power indicator for a cooking zone may decrease
on its own.
Even after touching the
power level, it may not increase the power level and the
appliance will beep.
slider to adjust
English
EN-32 EN-33

Troubleshooting
Troubleshooting
Autoboil Mode
Symptom Possible cause
Heating time takes too
long.
■ Water has not boiled
after beeping.
■ Water has boiled but
does not beep.
No power - heating
does not start.
■ The base of the pan or top plate is dirty.
■ A lid has not been used.
■ Water was added to the pan during Autoboil Mode.
■ The lid is removed or the pan is moved during Autoboil
Mode.
The cookware size and material (e.g. non-stick coating)
and the volume of water may affect the sensor detection.
Select a power level as required.
The top plate is too hot for Autoboil Mode. Autoboil Mode
will start automatically when the top plate has cooled
down.
Low Temperature Cooking Mode
Symptom Possible cause
■ Preheating time
takes too long.
■ The actual
temperature is
different from the set
temperature.
■ Food is not achieving
set temperature.
■ The pan is not in the correct position. (See page 14)
■ The base of the pan or top plate is dirty.
■ Water, oil, or food was added during preheating.
■ The temperature on the base of the pan may vary
from the set temperature depending on the type of
cookware.
■ Due to the variety of food types and pans, the actual
temperature of food may be different from the set
temperature.
■ Cookware with a non-stick coating may affect the
sensor detection.
Adjust the temperature as required with
slider.
Pan Frying Mode
Symptom Possible cause
■ Preheating time
takes too long.
■ The actual
temperature is
different from the set
temperature.
■ The pan is not in the correct position. (See page 14)
■ The base of the pan or top plate is dirty.
■ Water, oil, or food was added during preheating.
■ The temperature on the base of the pan may vary
from the set temperature depending on the type of
cookware.
Adjust the temperature as required with
Deep/Shallow Frying Mode
Symptom Possible cause
■ Preheating time
takes too long.
■ The actual
temperature is
different from the set
temperature.
■ The pan is not in the correct position. (See page 14)
■ The base of the pan or top plate is dirty.
■ More than 800 g of oil has been added.
■ Hot oil, brown-coloured oil, cloudy oil, or oil with food
sediment is used.
■ The oil temperature may vary from the set temperature
or the preheating time may take longer depending on
the type, material, shape and size of the base of the
pan.
Adjust the temperature as required with
slider.
English
slider.
No power - heating
does not start.
EN-34 EN-35
The top plate is too hot for the temperature set. Heating
will start automatically when the top plate has cooled
down.
NOTE
If you cannot resolve the problems, turn off the main power switch and
the circuit breaker. Turn them on again.

Error Codes
Error Codes
Heating automatically resumes if the causes of the following error are eliminated
within 1 minute.
Indication Possible cause
Cookware not detected
■ No pan placed on the cooking zone.
■ The pan has been removed.
■ The pan is not in the correct position. (See page 14)
■ An incompatible pan is used. (See page 15)
Small object on the cooking zone
■ Small metal objects (e.g. cutlery, utensils) are placed
on the cooking zone.
If the above conditions are not rectied, the display and
the main power will turn off.
The following errors can be cleared by turning off the corresponding cooking zone.
Indication Possible cause
The intake or exhaust vent are blocked. (See page 42)
Remove any blockages.
If you cannot resolve the problems, or any error appears, contact the service
centre.
Turn off the main power switch and the circuit breaker. Contact the dealer you
purchased the appliance from or the service centre for assistance.
NOTE
■ During the warranty period, any repairs may only be performed by
service technicians authorised by the appliance manufacturer.
■ Unauthorised repairs may cause electric shock and short circuit; do
not attempt this yourself. Consult an authorised service technician.
■ Warranty claims that resulted from improper connection or use of the
appliance is not covered by the warranty. In such cases, the costs of
repair are borne by the user.
■ For the list of service centres, refer to the guarantee booklet.
English
Empty pan on the cooking zone
■ An empty pan has been heated.
■ When deep/shallow frying, oil was preheated by
Heating Mode instead of Deep/Shallow Frying Mode.
Use Deep/Shallow Frying Mode for heating up
a large amount of oil.
■ Incompatible cookware is used for Deep/Shallow
Frying Mode. (See page 15)
■ The pan is not in the correct position. (See page 14)
■ More than 800 g of oil has been heated up.
■ Ingredients were added while preheating.
EN-36 EN-37

Installation Instructions
Safety Instructions
Installation and Connection
Please fully observe the following safety precautions.
IMPORTANT
■ Unpack the appliance, remove all packing material, and examine for
any damage. If the appliance is damaged DO NOT install and notify
your dealer immediately.
■ Install the appliance in accordance with the Installation Instructions.
Otherwise, the performance of the appliance may be affected.
■ After installation, perform a test run and explain to the customer
how to operate the appliance.
■ Correct installation is the responsibility of the installer. Any
malfunction or accident resulting from the failure to follow
Installation Instructions is not covered by the warranty.
Safety Instructions
■ When performing the installation, follow these
instructions completely. Improper installation
may cause an electric leakage or re.
■ Electrical work must be performed by a legally
qualied electrician. Improper wire connections
may cause electric leakages or res.
■ This appliance must be properly earthed
following the electric laws. Earth line must not
be connected to gas pipe, water pipe, earth
of a lightning rod or telephone. Otherwise, it
may cause electric shock in case of appliance
breakdown or insulation breakdown.
■ Have a qualied electrician earth the appliance.
Improper earthing may cause an electric shock.
■ Before performing the installation, turn off the
circuit breaker. This can prevent electric shock.
■ If the power cord is damaged, it must be
replaced by a service technician authorised by
English
■ Install 220-240 V dedicated single-phase (or
the appliance manufacturer in order to avoid a
hazard.
three-phase at 380-415 V 3N) circuit with the
earth leakage circuit breaker for the power
supply. The electrical wiring may abnormally
overheat if the dedicated circuit is not properly
connected.
EN-38 EN-39
■ Do not disassemble, repair or modify the
appliance (e.g. the top plate). Doing so may
cause the appliance to operate abnormally and
may be dangerous.

Safety Instructions
Installation Location
■ Do not step on the appliance, or drop heavy
items on top of it. Cracks in the top plate may
cause overheating, malfunctions or electric
shocks.
■ Do not touch high temperature parts, such as
the top plate after use.
■ The power cord must be accurately connected
to ensure the integrity of the connection.
Improper wire connections may cause electric
leakages or res.
■ Use heat resistant materials for the countertop.
However, do not use varnished materials as
they may become discoloured. The material
of the countertop should have heat resistance
Installation of the Appliance
Max. 330 mm
depth of cabinets
Min. 762 mm clearance
from the top of the cooktop
to the bottom of the cabinets
Min. 51 mm clearance
from cutout to rear wall
Min. 51 mm clearance
from cutout to side wall
Cutout
equal to or exceeding that of laminated
thermosetting high-pressure decorative sheets.
For more details on cutout, see page 44.
If the materials are not heat resistant, they may
get deformed or cause a re.
■ WARNING: The manufacturer cannot be held
Accessories
Clamp
liable for damage to persons or items caused
by failure to observe the safety instructions, by
interference with any part of the appliance or by
the use of non-original spare parts.
(2 pieces)
See page 47.
EN-40 EN-41
English

900
520
Dimensions
Dimensions
Top View
520
Front View
52
900
(measurement: mm)
Side View
(measurement: mm)
CAUTION
Minimum 30
for flat part
+ 3
490
- 0
Min. 20
Partition
Flow of intake and exhaust
When Installing a Partition Inside the Cabinet
6
■ Allow for a minimum of 20 mm extra space underneath the bottom of the
appliance for air circulation.
■ Allow for a minimum of 40 mm extra space in rear of the partition.
If this condition is not met,
do not install the appliance.
Min. 40
Rear sideFront side
English
Top view of the partition
Side View
70
6
Min. 20
52
Rear sideFront side
Power cord length: approx. 1.2 m (Sheath length: approx. 1.1 m)
EN-42 EN-43
Intake ventExhaust vent
490
Min. 40
265
870
Building rear wall
Countertop cutout
Countertop front
Partition

Min. 60
Min. 5 Min. 40
Dimensions
Electrical Work
When Installing Above an Oven
■ The appliance may only be installed over a Panasonic oven.
■ Allow for extra spaces for air circulation as shown below.
Side View with an Oven
Min. 60
Oven
Min. 5 Min. 40
(measurement: mm)
Oven
Flow of intake
and exhaust
WARNING
Electrical work must be performed by a legally qualied electrician.
Electrical Requirements
■ This appliance must be supplied with the proper voltage and frequency, and
connected to an individual, properly earthed branch circuit, protected by a
circuit breaker or fuse. (The rating plate is on the bottom of the appliance.)
■ This appliance is not tted with other means for disconnection from the supply
mains having a contact separation in all poles that provide full disconnection
under overvoltage category III conditions. Means for disconnection must be
incorporated in the xed wiring in accordance with the wiring rules.
■ Single-phase A.C. 220-240 V, 50 Hz electrical system must be used. (It is also
possible to use a three-phase electrical system.) If connecting to aluminium
wiring, use connectors approved for use with aluminium wiring.
■ Check with the local utilities for electrical codes applied in the area. Failure to
wire the appliance according to governing codes may result in a hazardous
condition.
■ After installation, show the customer where the breaker for the appliance is
located.
Dimensions of Countertop Cutout
Installation of the Earth Leakage Circuit Breaker
Building rear wall
0
Min.51
Building side wall
EN-44 EN-45
3
490
Min. 59
Min.51
R3 1
3
870
0
Countertop front
Min.51
Building side wall
Min.600
■ In accordance with the electrical wiring rules, incorporate the earth leakage
circuit breaker in the home electrical wire.
■ Follow the specication of the earth leakage circuit breaker as follows.
Rated current: 50 A*, rated sensitivity current: 30 mA
* If rated current is 40 A, please change to 7200 W under “Power Management”
in settings. (See page 11)
English
 Loading...