

Page 1
Operating Instructions
Commercial Induction Cooktop
Model No.
KY-MK3500
Contents
Safety Precautions
General Precautions
Installation
Part Names
Types of Usable Cookware
Basics
Power Level Mode
Temperature Mode
Timer
Memory Mode
Customizing Settings
...............................
..............................
......................................
........................................
.................
...............
..................
..................
.........................
.............
....
10
12
14
15
16
17
18
20
2
7
8
Preparation
Usage Care
Two Riverfront Plaza,
Newark, NJ 07102-5490
© Panasonic Corporation 2016
ofNorthAmerica
ZY02AC93
F0916K0
Printed in Japan
Cleaning
Troubleshooting
Error Indications
Specifi cations
Thank you for purchasing
this Panasonic appliance.
Before operating this appliance,
please read these instructions
carefully and keep them
for future reference.
..................................
.....................
.....................
.........................
ZY02AC93
24
26
28
29
Page 2

Safety Precautions
WARNING
IMPORTANT SAFEGUARDS
When using electrical appliances, basic safety precautions should
always be followed, including the following:
Read all instructions.
1.
Do not touch hot surfaces.
2.
To protect against electrical shock, do not immerse cord, plugs,
3.
or appliance in water or other liquid.
Close supervision is necessary when any appliance is used by
4.
or near children.
Unplug from outlet when not in use and before cleaning. Allow
5.
to cool before putting on or taking off parts.
Do not operate any appliance with a damaged cord or plug or
6.
after the appliance malfunctions or has been damaged in any
manner. Return appliance to the nearest authorized service
facility for examination, repair, or adjustment.
The use of accessory attachments not recommended by the
7.
appliance manufacturer may cause injuries.
Do not use outdoors.
8.
Do not let cord hang over edge of table or counter, or touch hot
9.
surfaces.
Do not place on or near a hot gas or electric burner, or in a
10.
heated oven.
To disconnect, turn any control to “off”, then remove plug from
11.
wall outlet.
Do not use appliance for other than intended use.
12.
Denotes a potential hazard that could result in fire or electric shock.
TO REDUCE THE RISK OF FIRE OR ELECTRIC SHOCK,
DO NOT REMOVE COVER AND BOTTOM COVER.
NO USER-SERVICEABLE PARTS INSIDE. REPAIR SHOULD
BE DONE BY AUTHORIZED SERVICE PERSONNEL ONLY.
WARNING
Denotes a potential hazard that could result in serious injury or death.
This appliance is not intended for use by persons (including
children) with reduced physical, sensory or mental
capabilities, or lack of experience and knowledge, unless
they have been given supervision or instruction concerning
use of the appliance by a person responsible for their safety.
Children should be supervised to make sure that they do not
play with the appliance. Keep infants away from the appliance.
Do not place combustible materials near the appliance.
They may cause fire.
Observe the following to keep the IR sensor functioning
properly.
- Make sure that the cookware completely covers the IR sensor.
- For stir-frying and pan-frying, wipe water off the top plate and the pan both
inside and out.
Failure to observe these warnings may cause an operation error of the IR
sensor, leading to oil overheating and resulting in fire.
Preparation
SAVE THESE INSTRUCTIONS.
Set the power level to the default power level or below
for preheating to prevent the pan from overheating.
Oil temperature may rise too high, resulting in fire.
2 3
Page 3

Safety Precautions
WARNING
Do not leave the appliance unattended while cooking.
Oil temperature may rise too high, resulting in fire.
Stir liquids, such as soup and stewed food, before heating.
Otherwise, liquids may splatter and cause burns or injuries, or cookware may
jump and damage the top plate.
Do not touch the top plate during or after use.
Special attention is required when the Hot surface warning
is illuminating or flashing.
Note an aluminum or copper pan in particular causes high temperature.
Do not place explosive objects, such as portable gas burners,
steel cylinders and canned goods, on or near the appliance.
If they are mistakenly heated, they may explode.
Do not let metallic objects, such as knives, forks, spoons,
lids, aluminum foil/tray, watches or accessories, be placed
on or near the top plate, or touch the cookware while the
cooking zone is operating.
They may get hot, causing burns or injuries.
Do not insert metallic objects into the intake and exhaust
vents
Doing so may cause electric shock.
.
Do not apply high pressure to or drop things on the top plate.
The top plate may crack, causing overheating, malfunctions or electric shock.
Do not disassemble, repair, or modify the appliance (e.g. top
plate).
Doing so may cause abnormal operation of the appliance and may result in
danger. For repairs, contact the dealer where you purchased the appliance.
After use, turn off the appliance by its control and do not rely
on the pan detector (safety features).
When the appliance will not be used for a long period of time,
turn off the circuit breaker.
In case of malfunction or breakdown, immediately stop using
the appliance.
Turn off the main power switch and circuit breaker, and then contact the
service center. Failure to do this may cause smoke, burns, and electric shock.
Breakdown examples:
- Smells of something burning come from the appliance.
- You feel electricity when touching the top plate.
- The top plate is cracked.
- The power cord is extremely hot.
- The electricity shuts off when the power cord is moved.
ĺ,IWKHSRZHUFRUGLVGDPDJHGLWPXVWEHUHSODFHGE\WKHPDQXIDFWXUHURU
its service center or a similar qualified person in order to avoid a hazard.
Be sure to install a 20 A dedicated single-phase circuit with
an earth leakage circuit breaker for the power supply.
The electrical wiring may abnormally overheat if the dedicated circuit is not
properly connected.
Preparation
The manufacturer cannot be held liable for damage to
WARNING: If the top plate is cracked, do not touch it and
turn off the main power switch to avoid the possibility of
electric shock.
persons or items caused by failure to observe the above
instructions, by interference with any part of the appliance
or by the use of non-original spare parts.
4 5
Page 4

Safety Precautions General Precautions
CAUTION
Denotes a hazard that could result in minor injury or property damage.
Do not use high power level for preheating in the following
cases to prevent pans from turning red-hot or deforming.
- When a small amount of oil is used
- When small, light, thin-based or curved-based pans are used
If you are wearing a medical device (such as a pacemaker),
consult your doctor.
The operation of the appliance may affect the medical device.
Ensure the cookware is stable.
Dropped cookware may cause injuries or burns.
Do not place paper or dishcloths under the cookware.
They may get scorched due to the heated cookware.
Do not heat empty cookware or overheat ingredients.
The ingredients may burn and the cookware may be damaged.
Do not use the appliance for purposes other than cooking.
This may cause overheating or malfunction, resulting in fire.
NOTICE
Denotes a hazard that could result in property damage.
The appliance is not intended to be operated by means of an
external timer or separate remote-control system.
This appliance may emit magnetic field lines, which could
cause interference to such devices as radio, TV, hearing aid
etc.
This can be checked by turning this appliance off and on. If interference is
present, it is recommended that the user take one or more measures as shown
below:
- Increase the space between the appliance and the device receiving the
interference.
- If possible, use a properly installed receiver antenna and/or reorient the
antenna of the device receiving the interference.
- Plug the appliance into a different outlet from that of the product receiving the
interference.
Do not use other induction cooking appliances, such as
rice cooker or portable cooktop, on the top plate.
Electro-magnetic waves generated by such appliances may damage this
appliance.
If the top plate is stained by acidic foods, such as vinegar,
jam, or lemon juice, immediately wipe it off.
Otherwise, the top plate may be discolored.
Preparation
Do not block the intake or exhaust vent.
The appliance may become hot, and heating may stop automatically.
6 7
Page 5
Installation
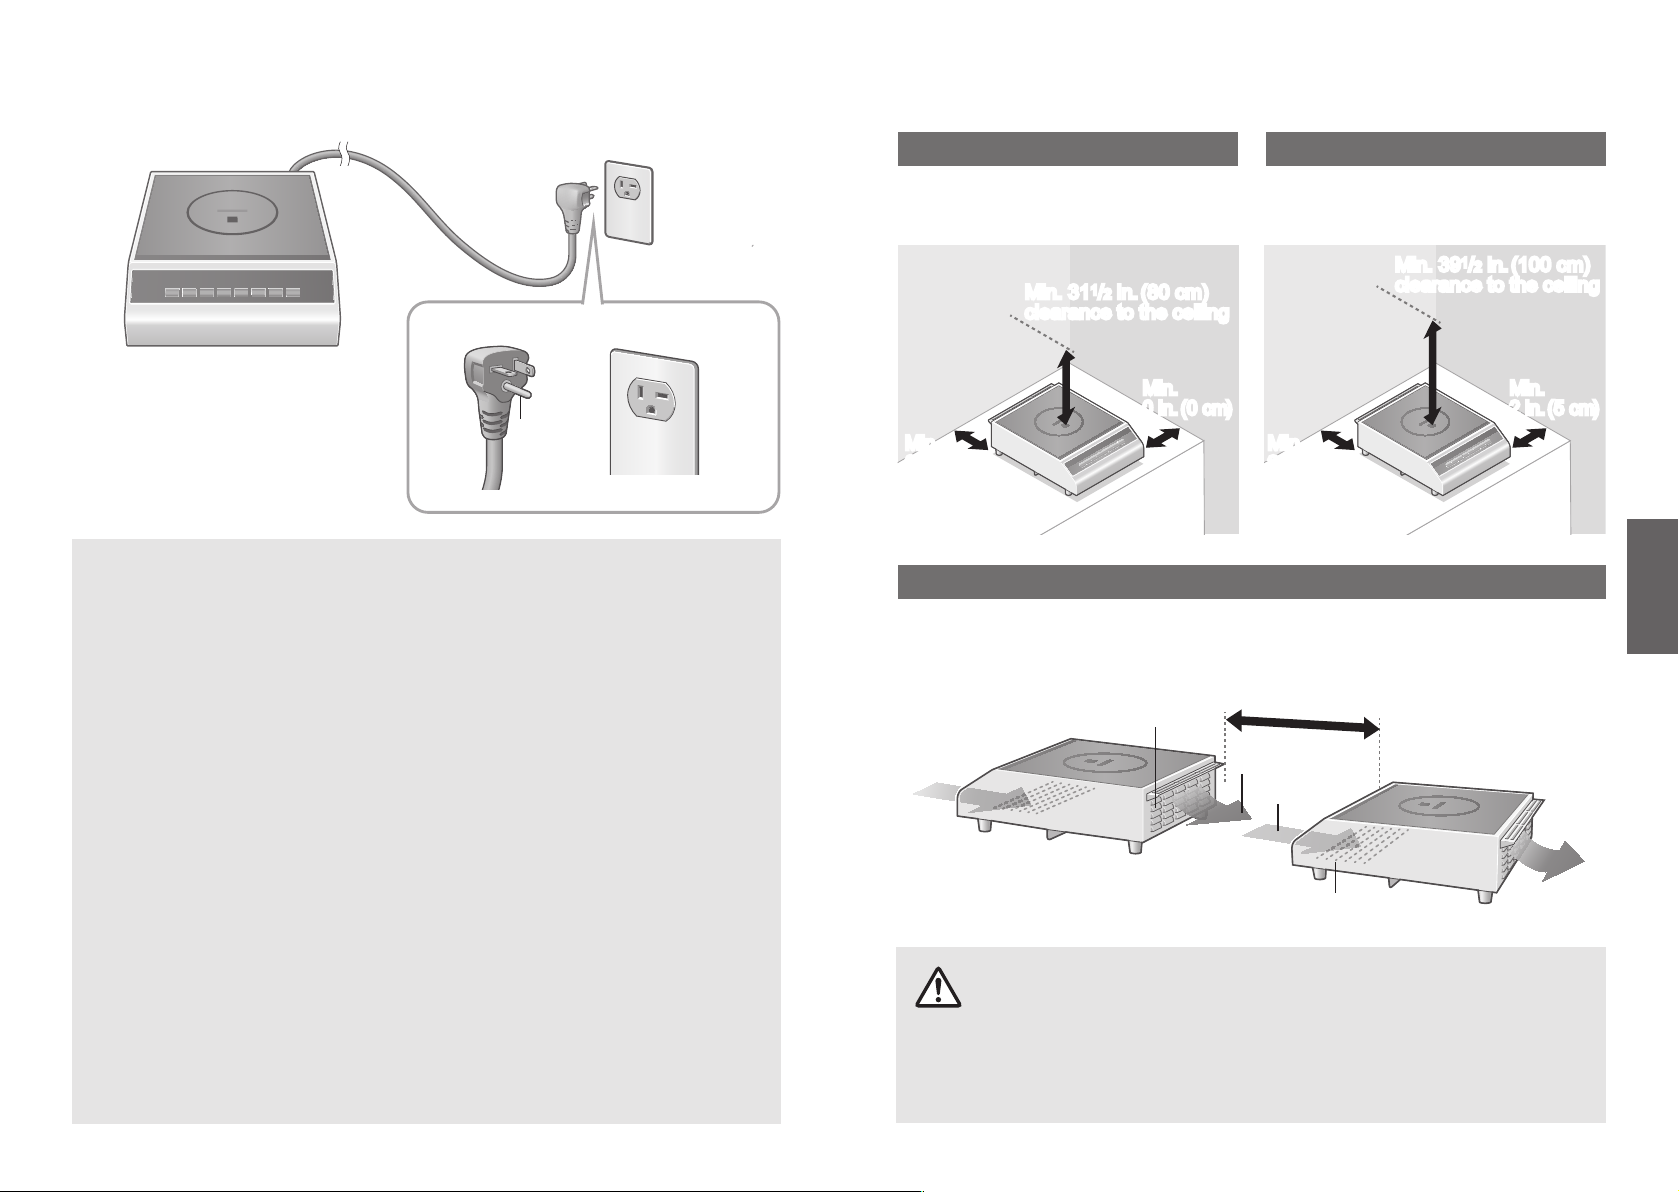
3-prong plug 3-prong receptacle
Ground
plug
Warning
IMPROPER USE OF THE GROUNDING PLUG CAN RESULT IN A
RISK OF ELECTRIC SHOCK.
Consult a qualified electrician or service person if the grounding
instructions are not completely understood, or if doubt exists as to
whether the appliance is properly grounded. If it is necessary to use an
extension cord, use only a three-wire extension cord that has a threeprong polarized grounding plug, and a three-slot receptacle that will
accept the plug of the appliance. The marked rating of the extension
cord should be equal to or greater than the electrical rating of the
appliance.
For incombustible wall and ceiling
Metal, tile, brick, etc. (Including heatinsulating board made of metal, tile,
brick, etc.)
Min. 311/2 in. (80 cm)
Min. 311/2 in. (80 cm)
clearance to the ceiling
clearance to the ceiling
Min.
Min.
0 in. (0 cm)
0 in. (0 cm)
Min.
Min.
0 in. (0 cm)
0 in. (0 cm)
For combustible wall and ceiling
Min. 391/2 in. (100 cm)
Min. 391/2 in. (100 cm)
clearance to the ceiling
clearance to the ceiling
Min.
Min.
2 in. (5 cm)
2 in. (5 cm)
Min.
Min.
2 in. (5 cm)
2 in. (5 cm)
When installing the appliances lengthwise next to each other
Keep a distance of 311/2 in. (80 cm) or more from the back of the other appliance.
Inhaling the exhaust air of the other appliance may generate heat, resulting in
malfunction.
Exhaust vent
Min.
1
31
/2 in. (80 cm)
Exhaust air
Intake air
Preparation
Grounding Instructions
THIS APPLIANCE MUST BE GROUNDED.
In the event of an electrical short circuit, grounding reduces the risk of
electric shock by providing an escape wire for the electric current. This
appliance is equipped with a cord having a grounding wire with a
grounding plug.
The plug must be plugged into an outlet that is properly installed and
grounded.
Plug into properly installed and grounded three-prong outlet.
DO NOT remove ground prong.
DO NOT use an adapter.
Warning
Be careful of the power plug's direction, avoiding twist of or
load on the power cord.
Be careful not to damage the power cord.
Do not install the outlet at a location subject to splashing water.
Doing so may cause overheating, fire or electric shock.
Intake vent
8 9
Page 6

Part Names
Top plate
IR sensor
Hot surface warning
Illuminates when the top plate
becomes hot.
Even after heating is stopped or
the power is turned off,
it keeps flashing as long as
the top plate is hot.
Operation panel
Cooking zone
Use the area circled with this line as a guideline.
Luminous circle
Illuminates while heating, and changes the brightness
according to the power level.
Even after heating is stopped or the power is turned off,
it keeps flashing as long as the top plate is hot.
Preparation
Main power switch
Timer (P.17)
Mode
Memory
(P.18)
Using with
registered settings
Register the power level or temperature
and timer in combination, and select
the memory number for cooking.
Temperature
Power Level
Basic cooking
For simmering, boiling,
heating, steaming,
stir-frying and pan-frying
(P.16)
Mode
Mode (P.15)
Pan-frying with
the temperature set
For hamburger, pancake, etc.
Desired temperature is maintained
automatically.
10 11
Page 7

Types of Usable Cookware
Material
Usable
Iron/Cast iron
Enameled iron
Stainless steel
Aluminum/Copper*
*Aluminum and copper cookware may move if they are light.
*Use an aluminum casting pan with a thick base. A pan with a thin base may
deform.
Not usable
Heat-resistant glass
Ceramic and earthenware
Shape of the base
Usable
Make sure the base is flat and sits evenly on the top plate.
(Otherwise, injury or burn may occur.)
Not usable
Note
The heating power slightly varies depending on the material of cookware.
Do not heat and scorch empty enamelware.
Enamel coating may melt and the top plate may be damaged.
The surface of the cookware may be abraded depending on the material.
Note that some materials are softer than the glass of the top plate.
For cleaning, see page 25.
Do not use ceramic ware and earthenware even if they are made for
induction heating.
This appliance may malfunction, heating power may be reduced automatically,
or heating may be stopped by the safety features.
How to check usable cookware
Power level
Lighting
Place the cookware filled with about 1 cup of
1.
water on the cooking zone.
Lighting
Preparation
Press the main power switch.
2.
Round-based With feet Thin-based Curved-based*
3.
*
Do not use curved-based cookware. The safety features may not work, heating
power may be reduced, or the cookware may not be heated.
Size (Base diameter)
Usable
Iron/Stainless steel: 5 in. (12.7 cm) or more
Aluminum/Copper: 6 in. (15.2 cm) or more
Press the Power Level button.
Press and check the power level indication.
4.
Lighting : Usable.
Flashing : Not usable.
Press the main power switch to turn the
5.
power off.
12 13
Page 8

Basics Power Level Mode
How to set cookware
Place the cookware in the center of the cooking zone so that the IR sensor
is completely covered.
Otherwise, the IR sensor does not operate properly.
For stir-frying and pan-frying,
wipe water off the top plate and
the pan both inside and out.
Otherwise, the IR sensor does not
detect the temperature of the base
of the pan correctly.
IR sensor
Detects the temperature of the base
of cookware and adjusts the power
level. Prevents overheating, or
restores the temperature to the
original level after the temperature
drops by adding ingredients.
Top plate
Cooking
zone
IR sensor
How to turn the power on
Press the main power switch.
The mode used last between the
Power Level Mode and Temperature
Mode is selected at power-on.
Main power
switch
Power level
Lighting
1.
Press the Power Level button.
2.
Press the “ޕ” or “ޔ” button to start and adjust
the power level.
Default power level:
Power level range:
To change the level rapidly:
To use the timer: See page 17.
3.
Press the main power switch to turn the power
(Or set the power level to .)
off.
to ( to for Aluminum/Copper)
Press and hold the “ޕ” or “ޔ” button.
Usage
Safety features
The following functions are equipped.
Auto switch off
Heating stops when an abnormality is
detected. For example:
Cookware not detected (P.28)
Small object on the cooking zone (P.28)
Empty pan on the cooking zone (P.28)
Unsuitable aluminum/copper pan on
the cooking zone (P.28)
Long cooking time auto shutoff* (P.26)
Heating stops if 2 hours have elapsed
without any operation.
Main power auto shutoff* (P.26)
The main power is turned off if 3
minutes have elapsed without any
operation.
Overheating prevention function
Heating power is reduced to prevent
the pan from overheating. (P.27)
Hot surface warning
illuminates when the top plate is
hot. (P.10)
*Factory default: OFF
14 15
Warning
Stir liquids, such as soup and stewed food, before heating.
Otherwise, liquids may splatter and cause burns or injuries, or
cookware may jump and damage the top plate.
Set the power level to the default power level or below for
preheating to preventthe pan from overheating.
Oil temperature may rise too high, resulting in fire.
Caution
When preheating the pan with a small amount of oil, do not use
high power level.
The pan may become red-hot or deform.
Page 9

Temperature Mode Timer
Flashing while preheating
1.
Press the Temp. button.
Press the “ޕ” or “ޔ” button to start and adjust
2.
the temperature.
Default temperature: 400 °F
Temperature range: See the table below.
To change the temperature rapidly: Press and hold the “ޕ” or “ޔ” button.
When preheating is complete, disappears,
3.
and a beep will sound. Put in the ingredients.
To use the timer: See page 17.
(The timer cannot be set while preheating.)
4.
Press the main power switch to turn the power
(Or set the temperature to .)
off.
Temperature
Lighting
Remaining timeLighting
1.
Start cooking with the Power Level Mode or
Temperature Mode.
2.
Press the “
Setting range: 30 seconds to 9 hours 30 minutes.
Setting unit: - to 10 minutes: by 30 seconds
To change the time rapidly: Press and hold the “-” or “+” button.
When the “
starting from
To cancel: Press both the “-” and “+” buttons simultaneously.
” or “+” button to set the time.
-
- to 30 minutes: by 1 minute
- to 1 hour: by 5 minutes
- to 3 hours: by 10 minutes
- to 9 hours 30 minutes: by 30 minutes
” button is pressed first, the timer can be set
-
(the maximum time) to shorter time.
(Or set the time to .)
Usage
3.
When the set time has elapsed, the appliance
Temperature range
Fahrenheit
display (°F)
Celsius
display (°C)*
*Can be changed to the Celsius display. (P.20)
285 300 310 320 330 340 350 360 370 380 390
400 410 420
140 149 154 160 166 171 177 182 188 193 199
204 210 216 221 227 232 238 243 249 254 260
430 440 450 460 470 480 490 500
beeps and heating stops automatically.
16 17
Page 10

Memory Mode
How to register
Press and hold the Memory button
1.
for 3 seconds.
2.
Press the “
memory number.
Setting range:
When setting the power level:
3.
Press the Power Level button.
Press the “
level.
When setting the temperature:
Press the Temp. button.
Press the “
temperature.
Memory number
” or “ޔ” button to select the
ޕ
to
” or “ޔ” button to adjust the power
ޕ
(P.15)
” or “ޔ” button to adjust the
ޕ
(P.16)
Cooking with the registered memory number
Press the Memory button.1.
2.
Press the “ޕ” or “ޔ” button to select the
memory number.
Heating starts with the registered setting in 3 seconds.
When cooking with the set temperature, disappears
at the end of preheating, and a beep will sound. Put in the
ingredients.
3.
When the set time has elapsed, the appliance
beeps and heating stops automatically.
Checking the registered contents
Press and hold the Memory button for 3 seconds, and press the “+” button.
The settings are displayed in order of to .
Usage
Deleting the registered contents
4.
Press the “
Default setting time:
If the temperature is set, time count starts when preheating is
complete.
5.
Press and hold the Memory button for 3 seconds
” or “+” button to set the time. (P.17)
-
According to “How to register” (P.18), select the memory number to delete.
Set the power level or temperature to . Press and hold the Memory
button for 3 seconds to complete the registration.
to complete the registration.
The memory number followed by the setting contents is
displayed.
18 19
Page 11

Customizing Settings
This appliance is equipped with the functions to allow users to customize them.
The customized items are shown below.
Within 5 seconds after power-on, press
Power level
(20 steps* or
10 steps)
1.
and holdthe “
button simultaneously for 3 seconds.
” button and Power Level
+
*Factory default
Main power
auto shutoff
(OFF* or ON)
*Factory default
1.
Within 5 seconds after power-on, press
and hold the “
simultaneously for 3 seconds.
2.
Press the “
” and “ޔ” buttons
-
” button to select .
+
Temperature
display
(°F* or °C)
Long cooking
time auto
shutoff
(OFF* or ON)
Press the “
2.
or .
3.
Press the main power switch to turn the
power off.
The changed setting is registered.
Within 5 seconds after power-on, press
1.
and hold the “+” button and Temp.
button simultaneously for 3 seconds.
Press the “
2.
or .
3.
Press the main power switch to turn the
power off.
The changed setting is registered.
Within 5 seconds after power-on, press
1.
and hold the “
simultaneously for 3 seconds.
Press the “
2.
or .
” or “ޔ” button to select
ޕ
” or “ޔ” button to select
ޕ
” and “ޔ” buttons
-
” or “ޔ” button to select
ޕ
Luminous
circle
(Always ON*/
OFF while stopped/
Always OFF)
Press the “
3.
or .
Press the main power switch to turn the
4.
power off.
The changed setting is registered.
1.
Within 5 seconds after power-on, press
and hold the “
simultaneously for 3 seconds.
2.
Press the “-” button to select .
Press the “
3.
the setting from among , and .
: Always ON
: OFF while stopped
: Always OFF
4. Press the main power switch to turn
the power off.
The changed setting is registered.
” or “ޔ” button to select
ޕ
” and “ޔ” buttons
-
” or “ޔ” button to select
ޕ
Usage
3.
Press the main power switch to turn the
power off.
The changed setting is registered.
20 21
Page 12

Customizing Settings
*Factory default*Factory default
Beep volume
(Large*/OFF/
Small/ Medium)
Timer finish
beep
(Pattern 1*/2/3)
Within 5 seconds after power-on, press
1.
and hold the “
simultaneously for 3 seconds.
Press the “ޕ” or “ޔ” button to select
2.
the setting from among , , and .
: OFF
: Small
: Medium
: Large
Press the main power switch to turn the
3.
power off.
The changed setting is registered.
1. Within 5 seconds after power-on, press
and hold the “
simultaneously for 3 seconds.
Press the “
2.
” and “ޕ” buttons
-
” and “ޕ” buttons
-
” button to select .
+
Preheating
finish beep
(Pattern 1*/2/3)
Time to filter
cleaning
(0* to 900 hours)
1. Within 5 seconds after power-on, press
and hold the “
simultaneously for 3 seconds.
Press the “-” button to select .
2.
Press the “ޕ” or “ޔ” button to select
3.
the setting from among , and .
: Short beep repeats 5 times.
: Short beep repeats for 1 minute.
: Long beep continues for 5 seconds,
and then Short beep repeats 3 times
after 30 seconds and 60 seconds.
Press the main power switch to turn
4.
the power off.
The changed setting is registered.
Within 5 seconds after power-on, press
1.
and hold the Memory button and Temp.
button simultaneously for 3 seconds.
” and “ޕ” buttons
-
Usage
Press the “
3.
the setting from among , and .
: Short beep repeats 5 times.
: Short beep repeats for 1 minute.
: Long beep continues for 5 seconds,
and then Short beep repeats 3 times
after 30 seconds and 60 seconds.
Press the main power switch to turn the
4.
power off.
The changed setting is registered.
” or “ޔ” button to select
ޕ
2.
Press the “
time.
(on a 100-hour basis)
3.
Press the main power switch to turn
the power off.
The changed setting is registered.
After this appliance is used for the set period,
is displayed. Press both the “
buttons simultaneously to delete the display.
The count is reset.
” or “ޔ” button to set the
ޕ
” and “ޔ”
ޕ
22 23
Page 13

Cleaning
Always keep the appliance clean.
If splattered food or oil become scorched to the appliance, it will be difficult to
remove.
Caution
Before cleaning, turn off the main power switch, wait for the top
plate to cool down, and then, remove the power plug.
Do not use a steam cleaner. Also, do not splash water on the
appliance.
Water may enter the electrical components, and malfunction may occur.
Note
Do not use strong acidic or alkaline detergents (bleach, synthetic housing
detergents, etc.).
They may cause discoloration.
Do not use a hard scrub brush or powder type cleanser.
They may damage the appliance.
Be sure to remove stains from the base of cookware.
Otherwise, the stains will be scorched and stuck on the
top plate.
Wipe off oil stains attached both on the front and side of the appliance.
Be sure to clean the filter once a week.
A clogged filter may cause malfunction.
The setting to inform the “Time to filter cleaning” is recommended. (P.23)
Main unit
Light stains:
Wipe off with a damp cloth.
Oil stains:
Wipe off with a cloth dampened in mild detergent.
Stubborn stains:
Apply non-abrasive cream cleanser to the top
plate and scrape off stains with crumpled plastic
wrap or aluminum foil.
Filter
Remove the filter from the appliance, and wash it
with a soft sponge soaked in mild detergent.
Dry it completely before attaching.
A damp filter may cause malfunction.
Handle
Filter
When attaching the filter, insert it to the end along the
groove at the bottom of the appliance.
Groove
24 25
Care
Page 14

Troubleshooting
Check the following before making inquiries or requesting service.
Symptom Probable cause
Ŷ
Power source
The appliance
The main power switch has not been turned on.
cannot be
turned on.
The cooking zone
automatically
turns off while
in operation.
Ŷ
Sound and noise
Noise is heard
while heating.
Even after the
main power
switch is turned
Main power auto shutoff (Factory default: OFF)
If 3 minutes have elapsed without any operation after
power-on, the main power automatically turns off.
ĺ7XUQRQWKHPDLQSRZHUVZLWFKDJDLQ
Long cooking time auto shutoff
If no button is pressed for 2 hours while the cooking
zone is in operation, a beep will sound and the cooking
zone automatically turns off.
ĺ7XUQRQWKHPDLQSRZHUVZLWFKDJDLQDQGUHVWDUWWKH
operation.
*Using the timer is recommended for simmering more
than 2 hours. (P.17)
Various resonant sounds may be heard depending on
the type of cookware. You may feel small vibration when
you hold the handle, or the cookware may slightly move.
ĺ7KLVLVQRWDPDOIXQFWLRQ0RYLQJWKHFRRNZDUHVOLJKWO\
or replacing it may stop the sound.
If the cookware is removed while heating, a short
metallic sound may be heard.
The cooling fan is operating because the inside of the
appliance is still hot.
(As the appliance cools down, it will automatically stop.)
off, noise from
the fan is still
heard.
(Factory default: OFF)
Symptom Probable cause
Ŷ
Heating power
The heating
power is weak.
Overheating prevention function
If the base of the cookware overheats, for example, by
preheating too long, the heating power will be reduced
automatically without changing the power level indication.
(The heating power returns to normal after the cookware
cools down.)
Aluminum or copper cookware is used.
The heating power for such cookware is weak,
compared to iron cookware, etc.
ĺIncrease the heating time, and cook while checking
the state.
The aluminum or copper cookware was moved from
the cooking zone.
Unsuitable cookware, e.g. ceramic and earthenware
pans, are used.
ĺDo not use ceramic and earthenware pans even if
they are for induction heating as they are not efficient.
The power level
automatically
decreases.
Ŷ
Temperature Mode
Preheating time
is too long.
The actual
temperature is
different from
The cookware that easily moves (because it is small, or
light and thin, or the base is deformed) is used. If it
moves, the power level may automatically decrease by 1
to several steps.
The pan has been moved away from the IR sensor.
(P.14)
The base of the pan or top plate is stained.
Water, oil, or food was added while preheating.
the set
temperature.
The temperature on the base of the pan may vary from
the set temperature depending on the type of pan.
ĺ3UHVV to adjust the temperature as required.
Care
26 27
Page 15

Error Indications Specifi cations
If any of the following error indications appears, check the cause and deal with it.
After the cause is eliminated, press the main power switch to turn the
power off. Then, turn the power on again to start over the operation.
Indication Probable cause
The intake or exhaust vent is blocked with dust, etc.
ĺ5HPRYHDQ\EORFNDJH
Empty pan on the cooking zone
An empty pan has been heated.
*This function may not operate properly depending on the
type of pan, or if the power level is low.
Unsuitable aluminum/copper pan on the cooking zone
An unsuitable aluminum/copper pan is used as below.
The base diameter is less than 6 in. (15.2 cm).
The base is curved or deformed.
Foreign objects or stains are stuck on the base.
The cookware is not centered on the cooking zone.
If the error indication shown below appears, check the cause and deal with it.
After the cause is eliminated, heating resumes automatically.
Indication Probable cause
Cookware not detected
No pan is placed on the cooking zone.
The pan has been removed while heating.
The pan is not centered on the cooking zone.
An incompatible pan is used. (P.12)
(Flashing)
Small object on the cooking zone
Small metal objects (e.g. cutlery, utensils) are placed on
the cooking zone.
*If the above conditions are not remedied, the display and
the main power will turn off.
Power supply
(single phase)
Receptacle required
Maximum
power consumption
(approx.)
Dimensions
(approx.)
Weight (approx.)
Power level
adjustment(approx.)
Temperature
adjustment (approx.)
Cooking timer
KY-MK3500
230-240 V ~ 60 Hz
20 AMP NEMA #6-20R
3500 W
(Aluminum/Copper:
2500 W)
5
/64 × D 205/32 × H 529/32 in.
W 15
(W 383 × D 512 × H 150 mm)
13
/64 lb. (13.7 kg)
30
20-level adjustment: 50 to 3500/3000 W
(Aluminum/Copper: 18-level adjustment:
60 to 2500 W)
10-level adjustment: 90 to 3500/3000 W
(Aluminum/Copper: 9-level adjustment:
110 to 2500 W)
22-level adjustment
285 to 500 °F (140 to 260 °C)
30 seconds to 9 hours 30 minutes
208 V ~ 60 Hz
3000 W
(Aluminum/Copper:
2500 W)
Care
If you cannot resolve the above problems,
Ŷ
or any error appears, contact the service center.
ĺ7XUQRIIWKHPDLQSRZHUVZLWFKDQGEUHDNHU&RQWDFWWKHGHDOHU\RXKDYH
purchased the appliance from or service center for assistance.
Note
For the service center, refer to the limited warranty.
28 29
Page 16

 Loading...