

Page 1
Operating / Installation Instructions
Bedienungs / Installationsanleitung
Mode d’emploi / Instructions d’installation
Induction Hob
Induktionskochfeld
Plaque à induction
FOR DOMESTIC USE ONLY
NUR FÜR HAUSHALTSÜBLICHEN GEBRAUCH
POUR UN USAGE DOMESTIQUE
Model No.
KY-B925GL
KY-B915AL
KY-B915AB
KY-B925GL
ZY02-D84
English Deutsch Français
Page 2

Thank you for purchasing this Panasonic appliance.
IMPORTANT SAFETY INSTRUCTIONS: Before operating this appliance, please
read these instructions carefully and keep for future reference.
Vielen Dank, dass Sie dieses Gerät von Panasonic
gekauft haben.
WICHTIGE SICHERHEITSANWEISUNGEN: Bitte sorgfältig durchlesen und zur
weiteren Bezugnahme aufbewahren.
Merci d’avoir fait l’achat de cet appareil Panasonic.
INSTRUCTIONS DE SÛRETÉ IMPORTANTES: Avant d’utiliser l’appareil, lisez
attentivement les recommandations d’utilisation et conservez-les soigneusement.
Page 3
Contents
IH Cooking Mechanism .......................1
Operating Instructions .............. 2-41
Safety Instructions ......................... 2-6
General Precautions .......................... 7
Disposal of Waste Products .............. 8
Genius Sensor Technology ..................9
Energy Saving Tips..............................9
Features and Functions
- KY-B925GL
-
KY-B915AL / KY-B915AB
General Controls ..........................12-14
Cooking Zones .............................15-17
Suitable Cookware ..................... 18 -19
IH Cooking ................................. 20-30
- Operation Overview.......................20
- Safety Features ........................... 21
- Selecting the Power Level ....... 22-23
- Autoboil Mode................................24
-
Low Temperature Cooking Mode ...
.......................................10
................... 11
25
- Pan Frying Mode ...........................26
- Deep/Shallow Frying Mode ......27-28
- Timer .......................................29-30
Power Level Guidelines ................... 31
Genius Sensor Cooking Chart ... 32-33
Cleaning .......................................... 34
Troubleshooting ......................... 35-39
Error Codes ............................... 40-41
Installation Instructions ............ 42-53
Installation and Connection ...............42
Safety Instructions ....................... 42- 44
Installation Location ...........................45
Accessories .......................................45
Dimensions ................................. 46-48
Electrical Work .............................49-50
Installing the Appliance .....................51
Flush-tting .......................................52
Post-installation Checklist .................53
Specications .................................. 54
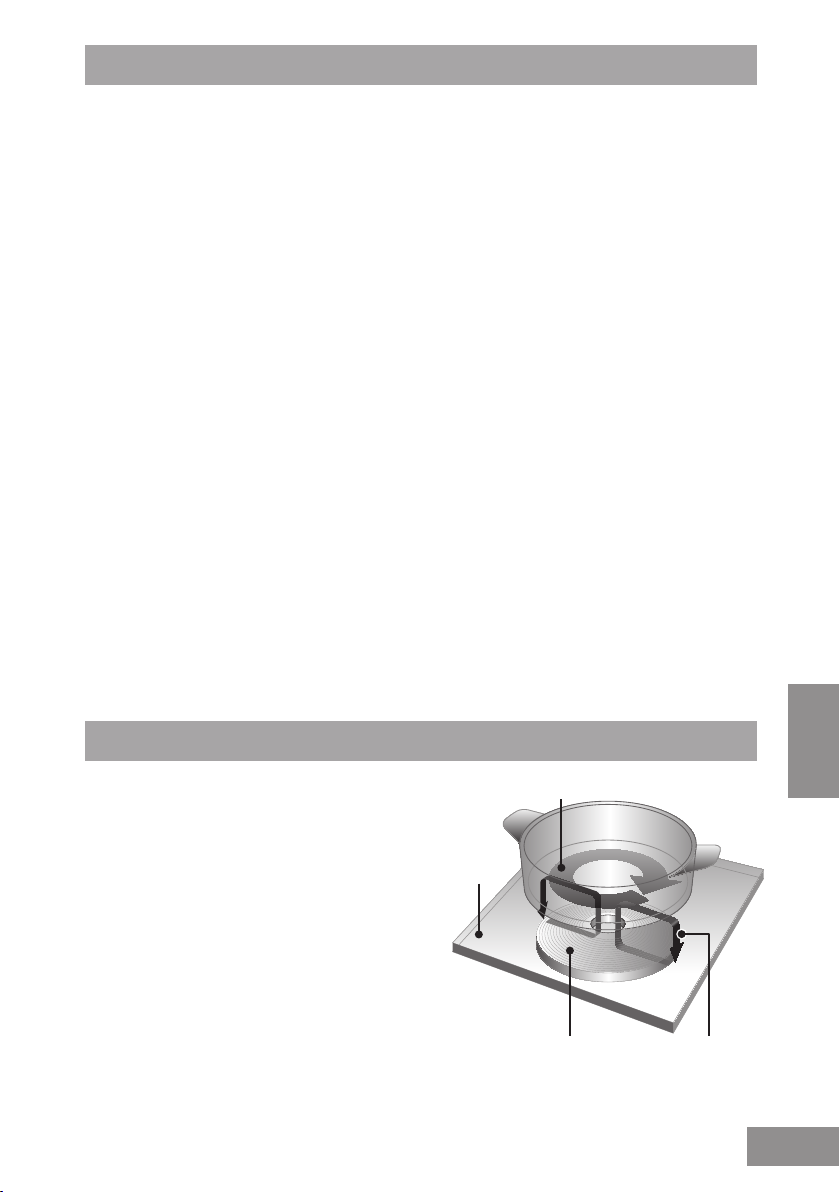
IH Cooking Mechanism
IH (Induction Heating) refers to
electromagnetic induction heating.
When electricity ows in the magnetic
coils underneath the top plate, magnetic
lines of force are produced.
The magnetic lines of force pass through
metallic cookware when an eddy current
is induced. The heat that is generated by
the electrical resistance of the cookware
is used for heating.
Eddy current
Top plate
Magnetic force
generating coil
English
Magnetic lines
of force
EN-1
Page 4

Operating Instructions
Safety Instructions
■ This appliance can be used by children aged
from 8 years and above and persons with
reduced physical, sensory or mental capabilities
or lack of experience and knowledge if they
have been given supervision or instruction
concerning use of the appliance in a safe way
and understand the hazards involved. Children
shall not play with the appliance. Cleaning
and user maintenance shall not be made by
children without supervision.
■ Do not place combustible materials near the
appliance. They may cause a re.
EN-2
■ Do not overheat the pan when preheating for
stir frying and pan frying.
■ WARNING: In case of malfunction or
breakdown, immediately stop using the
appliance. Turn off the main power switch and
the circuit breaker, and then contact the service
centre. Failure to do this may cause smoke,
burns, and electric shock.
Page 5

Safety Instructions
■ If the power cord is damaged, it must be
replaced by a service technician authorised by
the manufacturer in order to avoid a hazard.
■ Stir liquids before heating. Otherwise, liquids
may splatter and cause burns or injuries.
■ Do not apply excessive pressure or drop
objects on the top plate. This may crack or
damage the top plate.
■ Do not place portable gas burners, steel
cylinders and canned goods on or near
the appliance. If they are heated, they may
explode.
■ Metal objects such as knives, forks, spoons and
lids should not be placed on the hob surface as
they can become hot.
■ After use, switch off the hob element by its
control and do not rely on the pan detector.
■ Do not disassemble, repair, or modify the
appliance. For repairs, contact the dealer where
you purchased the appliance.
English
EN-3
Page 6

Safety Instructions
■ WARNING: This appliance must be earthed to
prevent electric shock or re.
■ WARNING: The appliance and its accessible
parts may become hot during use. Care should
be taken to avoid touching heating elements.
Children less than 8 years of age shall be kept
away unless continuously supervised.
■ WARNING: Unattended cooking on a hob with
fat or oil can be dangerous and may result in
re. NEVER try to extinguish a re with water,
but switch off the appliance and then cover
ame with a lid or a re blanket.
■ WARNING: Danger of re: do not store items
EN-4
on the cooking surfaces.
■ WARNING: If the surface is cracked, switch off
the appliance to avoid the possibility of electric
shock.
■ WARNING: Hob guards have not been
designed for use with this appliance and should
not be tted under any circumstances.
Page 7

Safety Instructions
■ If the oil smokes, immediately turn off the main
power switch. Otherwise, it may catch re.
■ Take care with hot oil as it may cause burns.
■ Take care when preheating the pan with small
amounts of oil. The pan may overheat and
cause damage.
■ Do not heat empty cookware or overheat
ingredients. The ingredients may burn and the
cookware may be damaged.
■ Do not use the appliance for purposes other
than cooking. This may cause overheating or
malfunction resulting in a re.
■ If you are wearing a medical device (such as a
pacemaker), consult your doctor. The operation
of the appliance may affect a medical device.
■ Do not use a steam cleaner. Water may get into
the electrical components and cause damage.
English
EN-5
Page 8

Safety Instructions
■ The appliance is not intended to be operated
by means of an external timer or separate
remote control system.
■
Do not place paper or dishcloths under the
cookware. They may get scorched due to the
heat of the cookware.
■
WARNING: The manufacturer cannot be held
liable for damage to persons or items caused
by failure to observe the above instructions, by
interference with any part of the appliance or by
the use of non-original spare parts.
EN-6
Page 9

General Precautions
■ The appliance emits magnetic lines of force. Do not place anything
affected by magnetism close to the appliance.
- Radios, TVs, hearing aids may be liable to noise interference.
- Cards with magnetic strips such as store or bank cards, may be
erased or damaged.
■ Do not use other IH cooking appliances, such as IH rice cooker
or portable IH cooktop, on the top plate. Electromagnetic waves
generated by these may damage the appliance.
■ Do not place foods in the cabinet below the appliance. They may
be spoiled by the exhaust heat.
■ If acidic foods such as vinegar, jam, or lemon juice are spilt on the
top plate, wipe off immediately. Otherwise, the top plate may become
discoloured.
■ Do not pour water on or place anything on the control panel. The
control panel keys may malfunction.
■ Do not block the intake or exhaust vent. The appliance may become
hot and automatically switch off the main power.
EN-7
English
Page 10

Disposal of Waste Products
Information on Disposal for Users of Waste Electrical &
Electronic Equipment (private households)
This symbol on the products and/or accompanying
documents means that used electrical and electronic
products should not be mixed with general household waste.
For proper treatment, recovery and recycling, please take
these products to designated collection points, where they
will be accepted on a free of charge basis.
Alternatively, in some countries you may be able to return
your products to your local retailer upon the purchase of an
equivalent new product.
Disposing of this product correctly will help to save valuable
resources and prevent any potential negative effects on
human health and the environment which could otherwise
arise from inappropriate waste handling. Please contact
your local authority for further details of your nearest
designated collection point.
Penalties may be applicable for incorrect disposal of this
waste, in accordance with national legislation.
Information on Disposal in other Countries outside
the European Union
This symbol is only valid in the European Union.
If you wish to discard this product, please contact your
local authorities or dealer and ask for the correct method of
disposal.
EN-8
Page 11
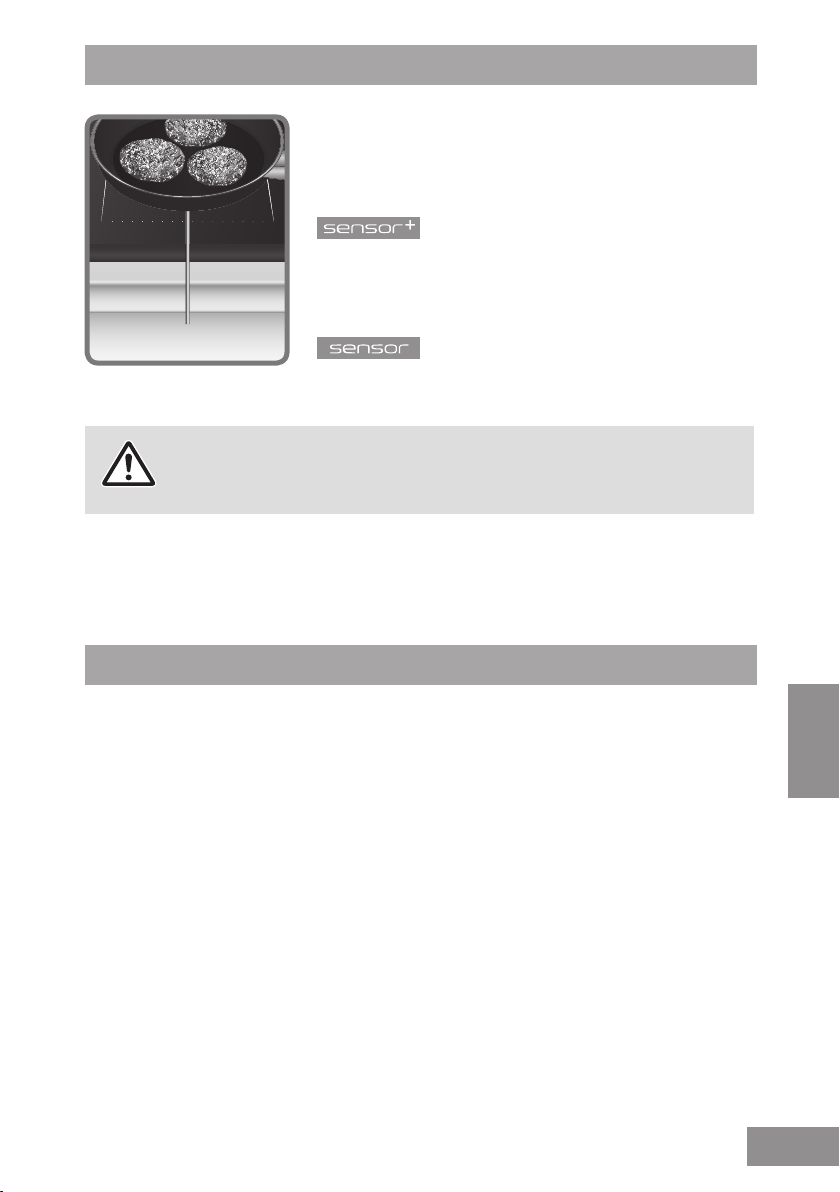
Genius Sensor Technology
Genius Sensor regulates the set temperature by
quickly detecting the temperature on the base of the
cookware. This is suitable for the following cooking
modes:
■ Autoboil Mode
■ Low Temperature Cooking Mode
■ Pan Frying Mode
■ Deep/Shallow Frying Mode
Genius Sensor
■ Pan Frying Mode
■ Deep/Shallow Frying Mode
CAUTION
Do not use oil preheated by other appliances. Genius Sensor will
not work efciently and the oil could ignite.
Energy Saving Tips
■ Always place the correct lids on
pans to keep the heat in.
■ Use the correct size of pan for the
amount of food you are cooking.
■ Use the right size of pan for the
diameter of the cooking zone.
If the diameter of the pan is not
the same as the cooking zone it
is preferable to use a pan with a
base that is larger in diameter than
the cooking zone.
■ Put just enough water in the pan
to cover vegetables. This will save
energy.
■ Turn down the power level of the
English
cooking zone once the cooking
temperature is reached; simmer
food rather than boiling it.
■ Use a steamer to cook vegetables,
that way you can layer a number
of vegetables on top of each other
and still use one cooking zone.
Alternatively, a pan with a divider
can be used.
EN-9
Page 12
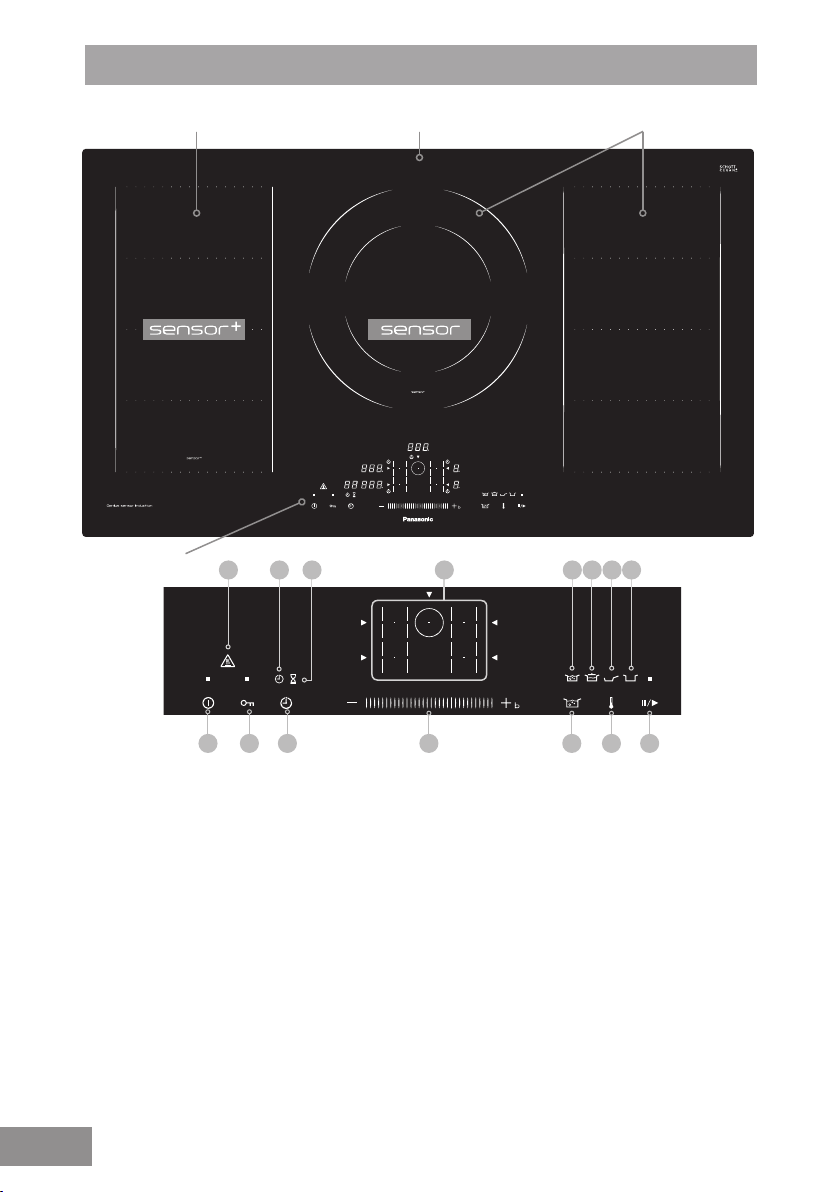
Features and Functions
Top plateCooking zone Cooking zone
Right rear Left rear
Middle
Right front Left front
KY-B925GL
Control Panel
54
2 3
1. Main Power (See page 12)
2. Child Lock /
Control Panel Lock key
(See page 12)
3. Timer key (See pages 12, 29-30)
4. Hot Surface Warning
(See page 14)
5. Cooking Timer display
(See page 29)
6. Kitchen Timer display
(See page 30)
7. Cooking Zone selectors
7
8
1211 13 146
9
1511
10
8. Slider Bar and Boost
Function (See page 13)
9. Autoboil key (See page 13)
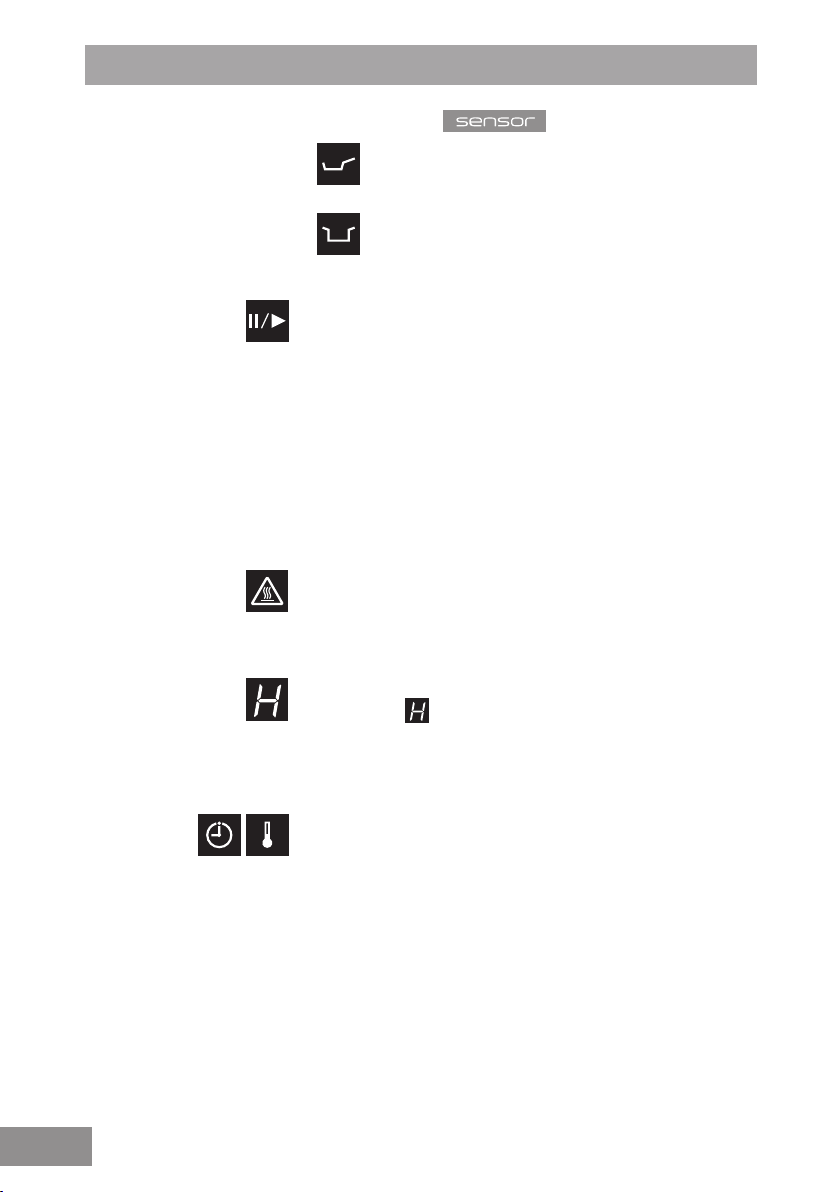
10. Sensor Option key (See page 13)
11. Autoboil display (See page 24)
12. Low Temperature Cooking
Mode display (See page 25)
13. Pan Frying Mode display
(See page 26)
14. Deep/Shallow Frying Mode
display (See pages 27-28)
15. Pause key (See page 14)
EN-10
Page 13

Features and Functions
Top plateCooking zone Cooking zone
Left rear
Middle
KY-B915AL
/
KY-B915AB
Left front
Control Panel
1. Main Power (See page 12)
2. Child Lock /
Control Panel Lock key
(See page 12)
3. Timer key (See pages 12, 29-30)
4. Hot Surface Warning
(See page 14)
5. Cooking Timer display
(See page 29)
6. Kitchen Timer display
(See page 30)
7. Cooking Zone selectors
54 7 11 12 13 146
2 3 8 9 10 151
Right front
English
8. Slider Bar and Boost
Function (See page 13)
9. Autoboil key (See page 13)
10. Sensor Option key (See page 13)
11. Autoboil display (See page 24)
12. Low Temperature Cooking
Mode display (See page 25)
13. Pan Frying Mode display
(See page 26)
14. Deep/Shallow Frying Mode
display (See pages 27-28)
15. Pause key (See page 14)
EN-11
Page 14

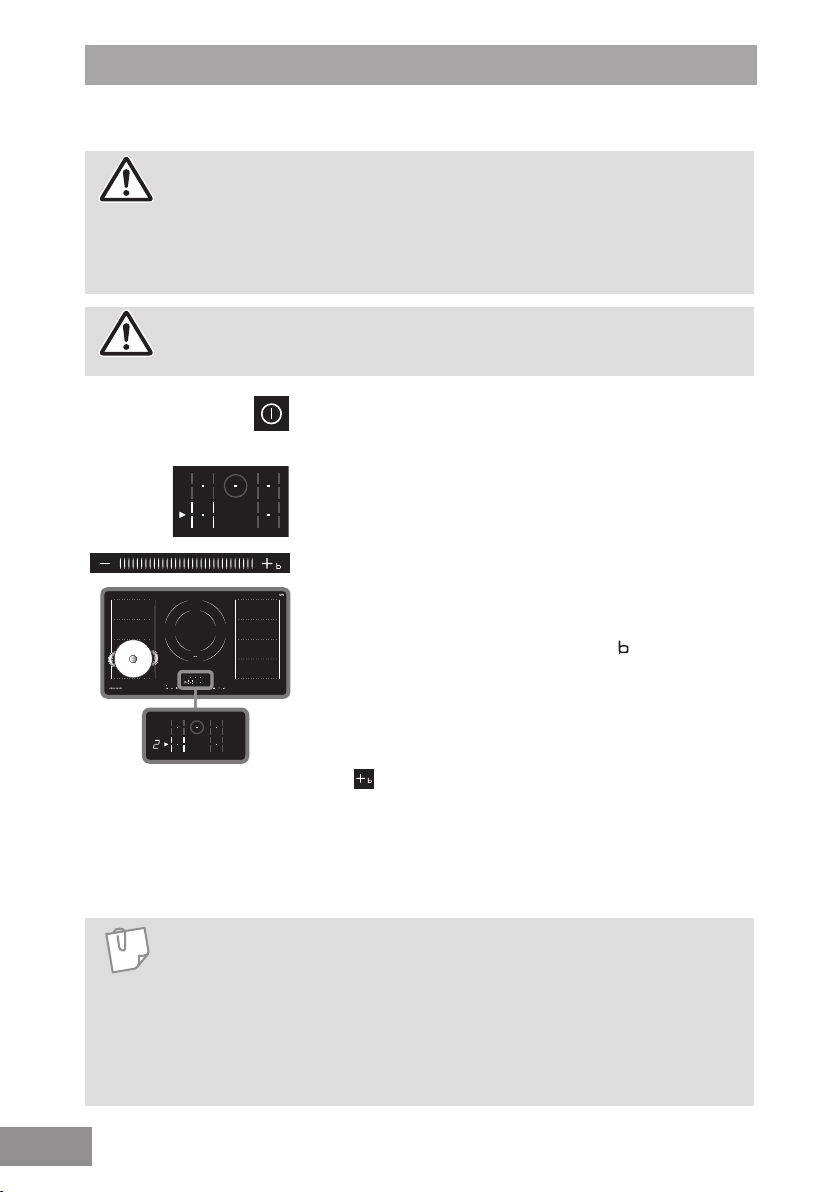
General Controls
Main Power
■ The main power light illuminates when the main
power is turned on.
■ If 1 minute has elapsed without any operation, the
main power automatically turns off.
Child Lock
■ Lock the control panel to prevent misuse of the
appliance.
■ With the main power off, touch and hold for 3
seconds. A light will indicate that Child Lock is
on. This will turn off after 10 seconds and will
reactivate to show light when any key is touched.
■ To deactivate, touch and hold again for 3 seconds.
Control Panel Lock
■ Lock the control panel while cooking zones are in
operation enabling cleaning of small spills in that
area.
■ Touch with the main power on. This will disable
the control panel for 20 seconds while cooking
zones are in operation.
■ To deactivate within 20 seconds, touch again.
EN-12
Timer
■ There are two types of timers:
Cooking Timer which counts down from a set
time and switches off the zone when it reaches
zero. Available for all cooking zones.
Kitchen Timer which counts down from a set
time and sounds an alarm when it reaches zero.
Kitchen Timer does not turn off the cooking zones.
■ For more details on how to set the timers, see
pages 29-30.
Page 15

General Controls
Slider Bar
■ Change the power level and time by using the
slider for all cooking zones.
■ Set the temperature for the cooking zones with
Genius Sensor.
Slider Bar operation
There are three ways of using the Slider Bar.
■ Slide to the desired setting quickly.
■ Tap the +/- keys to adjust the setting precisely.
■ Touch and hold the +/- keys to change the setting
in succession.
Boost Function
■ With a cooking zone power level set to 9, touching
boosts the power of the selected zone. After
10 minutes the power level will return to 9.
Autoboil key
■ Brings a pan of water to the boil. (See page 24)
Sensor Option key
Select Genius Sensor cooking modes listed below.
(See pages 25-28)
Low Pan Deep/Shallow
Temperature Frying Mode Frying Mode
Cooking Mode
Option key for
Low Temperature Cooking Mode
keeps a low, stable temperature ranging from
65 °C -120 °C in 5 °C steps. (See page 25)
Pan Frying Mode maintains an optimum
temperature with ve settings 140 °C / 160 °C
/ 180 °C / 200 °C and 230 °C. (See page 26)
Deep/Shallow Frying Mode controls the
temperature of the oil ranging from 140 °C 200 °C in 10 °C steps. (See pages 27-28)
English
EN-13
Page 16
General Controls
Option key for
Pan Frying Mode maintains an optimum
temperature with ve settings 140 °C / 160 °C
/ 180 °C / 200 °C and 230 °C. (See page 26)
Deep/Shallow Frying Mode controls the
temperature of the oil ranging from 140 °C 200 °C in 10 °C steps. (See pages 27-28)
Pause key
■ Touch and hold for 1 second to reduce all active
cooking zones to level 1 for 30 minutes (after 30
minutes the appliance will switch off). Timer is
paused.
■ Touch and hold again to revert the cooking zones
to their original settings. Timer will continue
countdown.
■ Pause function cannot be used if Genius Sensor
cooking modes are being used on any of the
cooking zones.
Hot Surface Warning
■ Illuminates when any area of the top plate is hot
along with Residual Heat Indicator (see below)
which will illuminate a specic area.
EN-14
Residual Heat Indicator
■ When
corresponding cooking zones are hot. Take care
not to touch cooking zones that are indicated to
be hot.
Silent Mode
■ Turn on the main power, touch and hold both
simultaneously for 3 seconds to turn off the key
sound.
1 is displayed to show Silent Mode is ON.
0 is displayed to show Silent Mode is OFF.
■ The beep sound for the main power switch, Child
Lock, timer and error notication remain ON.
All other key touch sounds are eliminated.
ashes on the display, the
Page 17

Cooking Zones
38.2 cm
21 cm 21 cm
19.1 cm
21 cm
38.2 cm
19.1 cm
ø 20 cm
300 mm200 mm 200 mm300 mm200 mm 200 mm
(Min. pan size)
ø 30 cm
KY-B925GL
ø 20 cm
(Min. pan size)
ø 21 cm
ø 30 cm
KY-B915AL /
KY-B915AB
Cooking zone groups
The cooking zones are grouped into two or three, i.e. front and rear on the left and
front and rear on the right. When the two cooking zones within the same group
are used simultaneously, the heating power is regulated so that the overall power
consumption does not exceed the limit.
e.g. When Power Level 9 is selected for left front cooking zone, the maximum
power available for left rear cooking zone is power level 8.
English
Left
cooking
zone group
Middle
cooking
zone group
Right
cooking
zone group
KY-B925GL KY-B915AL /
Left
cooking
zone group
Right
cooking
zone group
KY-B915AB
EN-15
Page 18
Cooking Zones
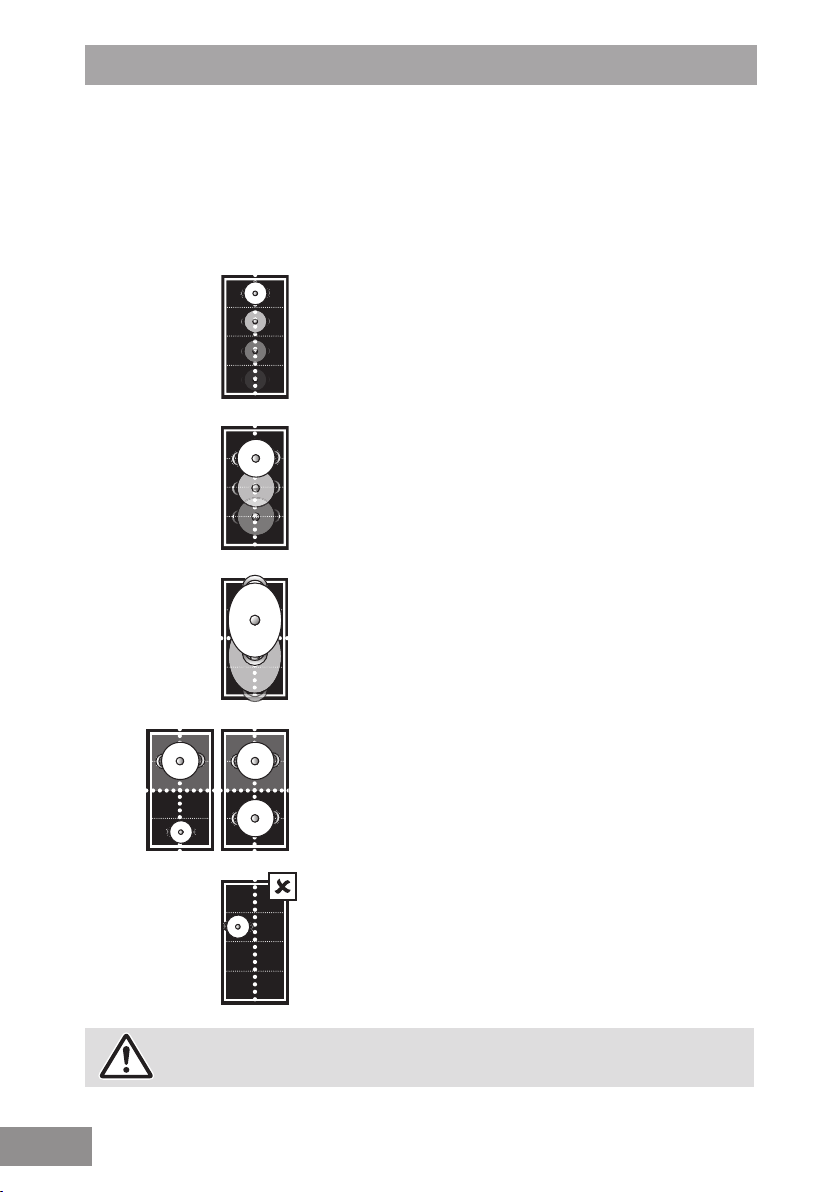
Flex Cooking Zone
The ex cooking zone consists of several independently-controlled inductors. When
cookware is detected, only sections that are in contact with the cookware will be
activated, all others will remain switched off.
To ensure that the cookware is detected and heat is distributed evenly, centre the
cookware as shown below:
Pans with a diameter less than 13 cm
For smaller pans, place the cookware in one of the
four positions shown.
Pans with a diameter of 13 cm or more
For larger pans, place the cookware in one of the three
positions shown.
Larger cookware
Place it at the top or bottom edge of the ex cooking
zone.
EN-16
Two independent cooking zones
The front and rear areas of a ex cooking zone can
be used independently of each other by selecting the
necessary power for each one.
Do not place the cookware in an off-centre position.
The sensor may not function properly and could cause
a re.
WARNING
Failure to follow these instructions may cause serious injury.
Page 19

Cooking Zones
Genius Sensor Cooking
Pans with a diameter of 13 cm or more
For Genius Sensor cooking, use either the upper or
lower two sections of the ex cooking zone.
Larger cookware
Place it at the top or bottom edge of the ex cooking
zone.
Whilst cooking with the Genius Sensor, do not place
the pan on the middle two sections of the ex cooking
zone.
EN-17
English
Page 20

Suitable Cookware
Material
Compatible cookware
■ Iron / Cast iron
■ Enamelled iron
■ Magnetic stainless steel
( The heating power may not be as strong for some stainless steel cookware.)
Incompatible cookware
■ Aluminium / Copper
■ Heat-resistant glass
■ Ceramic and earthenware
Shape of the Base
Compatible cookware
The base needs to be at and sit evenly on the top plate.
(Failure to ensure this could result in injuries or burns.)
Incompatible cookware
■ Round-based cookware
■ Cookware with feet
■ Thin-based cookware
Round-based With feet
Thin-based Curved-based
■ Curved-based cookware
Do not use curved-based cookware with a 3 mm
or over curve, as the safety features may not be
activated, heating power may be diminished, or the
cookware may not be heated.
EN-18
Size (base diameter)
Compatible cookware
The minimum size of pans to be used on each cooking
zone are:
Cooking zone Minimum size pan
ø 30 cm 20 cm
ø 21 cm 14.5 cm
Ensure the cookware ts the cooking zone.
For the ex cooking zone, see pages 16-17 for the
recommended cookware sizes and placement.
Page 21

Suitable Cookware
CAUTION
■ The cooking zone and base of the pan must be kept dry.
If there is liquid between them, it can cause steam pressure and
the pan may move.
■ Do not heat up empty enamel cookware. Do not allow enamel
cookware to scorch during cooking. Enamel coating may melt
and damage the top plate.
■ Do not use ceramic and earthenware cookware even if it is
made for induction heating.
Checking Cookware Compatibility
1. Fill cookware with some water and place on a
cooking zone.
2. Touch and hold the main power key to turn on
the power.
Touch the key of the cooking zone to be used
3.
and set the power level using the slider.
■ If the cookware is compatible,
power indicator and the cooking
zone selector will stay illuminated.
■ If the cookware is incompatible,
will appear and the cooking
zone selector will ash.
Touch and hold the key of the cooking zone or
4.
set the power level to “0” to turn off.
English
EN-19
Page 22

IH Cooking
Operation Overview
1. Touch and hold the main power key to turn on
If 1 minute has elapsed without any operation, the
If this happens, turn on the main power again.
2. Perform the desired operation.
3. Touch and hold the key of the cooking zone or
the power.
main power automatically turns off.
■ Selecting the Power Level 1 -
(See pages 22-23)
■ Autoboil Mode (See page 24)
■ Low Temperature Cooking Mode
(See page 25)
■ Pan Frying Mode (See page 26)
■ Deep/Shallow Frying Mode (See pages 27-28)
■ Pan Frying Mode (See page 26)
■ Deep/Shallow Frying Mode (See pages 27-28)
set the power level to “0” or “OFF” to turn off.
EN-20
Page 23

IH Cooking
Safety Features
NOTE
The appliance may not switch off automatically when an abnormality
is present. Low power level and the type of cookware can impact
detection.
Auto Switch Off
■ The appliance is automatically turned off when an
abnormality is detected:
- Cookware not detected (See page 40)
- Small object on the cooking zone (See page 40)
- Empty pan on the cooking zone (See page 41)
- Long cooking time (See page 35)
■ The main power is automatically turned off if
1 minute has elapsed without any operation.
Overheating Prevention Function
■ The heating power is automatically reduced to
prevent the pan overheating. (See page 37)
Hot Surface Warning
■ illuminates when the top plate is hot.
(See page 14)
Residual Heat Indicator
■ ashes when the top plate is hot.
(See page 14)
Child Lock
■ The control panel can be locked to prevent
misuse of the appliance. (See page 12)
English
EN-21
Page 24
IH Cooking
Selecting the Power Level
WARNING
■ Stir liquids before heating. Otherwise, ingredients may suddenly
splatter or cookware may move, and you may get burned or
injured.
■ Do not overheat the pan when preheating for stir frying and
pan frying.
CAUTION
Take care when preheating the pan with a small amount of oil.
The pan may overheat and become damaged.
1. Touch and hold the main power key to turn on
the power.
2. Select a cooking zone e.g. left front.
3. Touch slider to set the power level.
Cooking zone selector will stay illuminated when
the corresponding cooking zone is in operation.
Power level adjustable range: 1 -
For slider bar operation, see page 13.
See Power Level Guidelines on page 31.
Boost Function
With a cooking zone power level set to 9, touching
boosts the power to the selected zone.
After 10 minutes, the power level will return to 9.
(18 levels).
EN-22
4. Touch and hold the key of the cooking zone or
set the power level to “0” to turn off.
NOTE
■ If no key is touched for a xed period of time when a cooking zone
is in operation, a beep will sound and the cooking zone is turned off
automatically. See Auto switch off time table on page 35.
■ When the front and rear cooking zones are used simultaneously,
the heating power is regulated so that the overall power
consumption does not exceed the limit. For cooking zone groups
and its effects, see page 15.
Page 25

IH Cooking
Selecting the Power Level
Using the ex cooking zones as one
1. Touch and hold the main power key to turn on
the power.
2. Select the cooking zones by touching the
cooking zone selector twice to choose the
whole ex cooking zone e.g. left ex cooking
zone.
The whole ex cooking zone can be selected by
touching either front or rear cooking zone selector
twice.
3. Touch slider to set the power level.
Cooking zone selector will stay illuminated when
the corresponding cooking zone is in operation.
Power level adjustable range: 1 -
For slider bar operation, see page 13.
See Power Level Guidelines on page 31.
Boost Function
With a cooking zone power level set to 9, touching
boosts the power to the selected zone.
After 10 minutes, the power level will return to 9.
(18 levels).
English
4. Touch and hold the key of the cooking zone or
set the power level to “0” to turn off.
NOTE
■ For the recommended cookware sizes and placement, see pages
16-17.
■ Illumination of the cooking zone selector bars may not match with
the cooking zone covered by cookware depending on the size or
material of the pan used.
EN-23
Page 26
IH Cooking
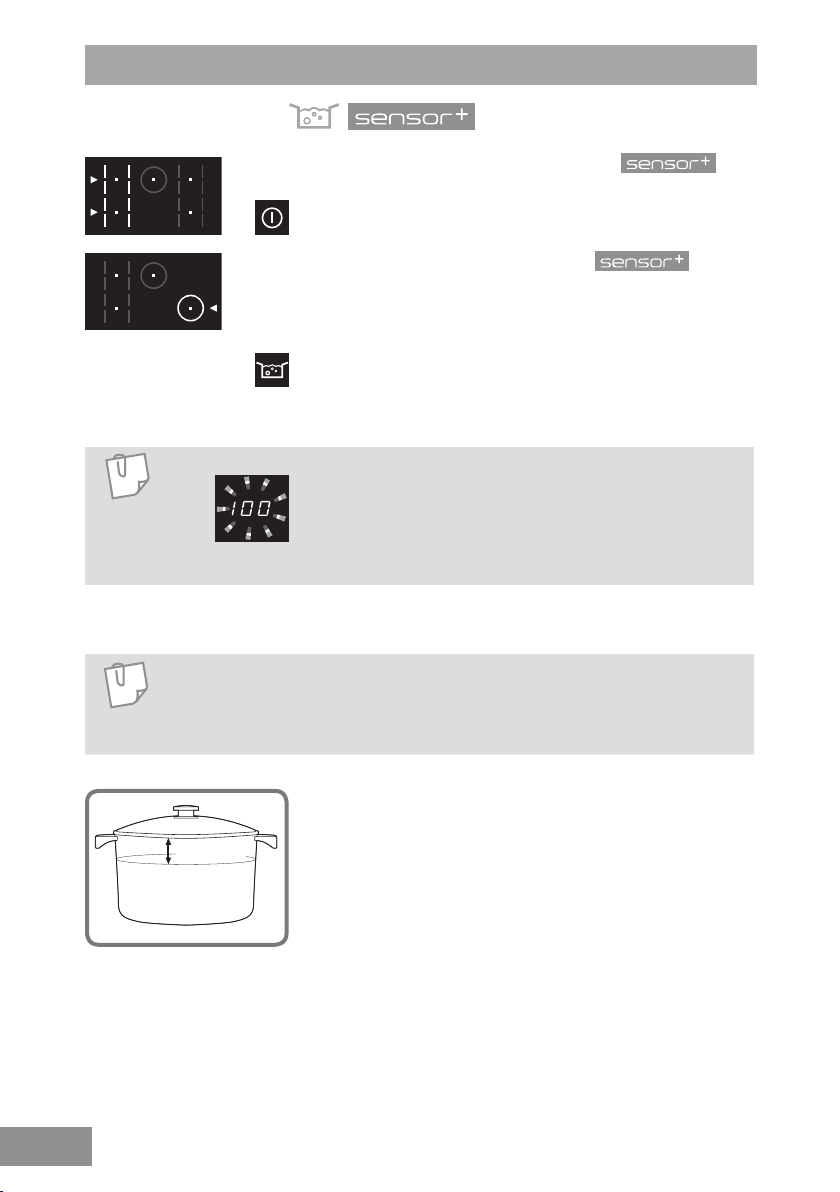
Autoboil Mode
KY-B925GL
KY-B915AL
KY-B915AB
NOTE
NOTE
■ Cookware with a non-stick coating may affect the sensor detection.
After beeping, adjust the power level as required.
■ Cooking Timer can be used with Autoboil Mode. (See page 29)
Available on the cooking zone with
1. Touch and hold the main power key to turn on
the power.
2. Select the cooking zone with
For large cookware, the whole ex cooking zone
can also be selected by touching either front or rear
cooking zone selector twice.
3. Touch Autoboil key. The appliance beeps 5 times
when the water reaches boiling point and maintains
a rolling boil. After beeping add ingredients and
adjust the heating power with the slider as required.
Temperature ‘100’ will ash in the display until the
boiling temperature is reached. After the water is
boiled, the appliance automatically sets the power
level to “7”. Increase or decrease the power level as
required.
4. Touch and hold the key of the cooking zone or
set the power level to “OFF” to turn off.
.
.
EN-24
Min. 3 cm
Min. 0.5 L / 1 L
Autoboil Mode is developed for boiling water only.
To achieve the optimum performance, the following is
recommended.
■ Use a lid until boiling.
■ Use a minimum of 0.5 L of water. If a larger pan
that covers 3 or more areas of ex cooking zone,
use a minimum of 1 L of water.
■ Minimum 1 cm of depth when ex cooking zone is
used.
In order to prevent water boiling over from the pan, the
following is recommended.
■ No more than 70% pan capacity should be used.
■ There should be a minimum gap of 3 cm between
the lid and the water surface.
Page 27

IH Cooking
Low Temperature Cooking Mode
Available on the cooking zone with .
1. Touch and hold the main power key to turn on
KY-B925GL
KY-B915AL
KY-B915AB
the power.
2. Select the cooking zone with
For large cookware, the whole ex cooking zone
can also be selected by touching either front or rear
cooking zone selector twice.
3. Touch Sensor Option key once to select Low
Temperature Cooking.
4. Touch slider to set the required temperature.
Temperature adjustable range: 65
See Genius Sensor Cooking Chart on page 32.
5. When the set temperature is reached, the
temperature display stops ashing and the
appliance beeps 5 times.
- When Low Temperature Cooking Mode is used
after cooking with high power, the temperature
display stops ashing when the set temperature
is reached but the appliance does not beep.
6. Touch and hold the key of the cooking zone or
set the temperature to “OFF” to turn off.
o
C to 120 oC.
.
NOTE
■ Due to the variety of food types and pans, the actual temperature of
food may be different from the set temperature. Increase or decrease
the setting until the required food temperature is achieved.
■ Cookware with a non-stick coating may affect the sensor detection.
Adjust the set temperature until the required temperature is achieved.
■ To achieve the optimum performance, it is recommended that the
following minimum amount is heated at any one time with Low
Temperature Cooking Mode.
■ Minimum 1 cm of depth when ex cooking zone is used.
■ Due to the consistency of milk it is recommended to stir continuously
when heating, to prevent the milk from sticking to the bottom of the
pan and burning.
■ Cooking Timer can be used with Low Temperature Cooking Mode.
(See page 29)
- Water / milk: 200 g
- Any other food
types: 400 g
- All liquid and food
types: 400 g
English
EN-25
Page 28

IH Cooking
Pan Frying Mode
KY-B925GL
KY-B915AL
KY-B915AB
Available on the cooking zones with
and
1. Touch and hold the main power key to turn on
the power.
2. Place the pan with the required amount of oil
on the cooking zone.
3. Select the cooking zone required. For large
cookware, the whole ex cooking zone can also
be selected by touching either front or rear cooking
zone selector twice.
4. Touch Sensor Option key until
5. Touch slider to set the required temperature.
Temperature adjustable range: 140
See Genius Sensor Cooking Chart on page 33.
6. When the set temperature is reached, the
temperature display stops ashing and the
appliance beeps 5 times. Add ingredients.
7. Touch and hold the key of the cooking zone or
set the temperature to “OFF” to turn off.
.
is shown.
o
C to 230 oC.
EN-26
NOTE
■ Cooking Timer can be used with Pan Frying Mode. (See page 29)
■ The actual temperature at the base of the pan may vary from the
set temperature depending on the type of cookware. Adjust the
temperature if required.
■ Ensure that the cookware is dry inside and out before heating up.
Page 29

IH Cooking
Deep/Shallow Frying Mode
KY-B925GL
KY-B915AL
KY-B915AB
Available on the cooking zones with
and
WARNING
When deep/shallow frying, use Deep/Shallow Frying Mode (
minimum 200 g oil at least 1 cm deep.
Failure to observe this warning may cause oil to overheat resulting in
a re.
1. Touch and hold the main power key to turn on
the power.
2. Place the pan with the required amount of oil
on the cooking zone.
3. Select the cooking zone required.
4. Touch the sensor option key until
shown.
5. Touch slider to set the required temperature.
Temperature adjustable range: 140
See Genius Sensor Cooking Chart on page 33.
6. When the set temperature is reached, the
temperature display stops ashing and the
appliance beeps 5 times. Add ingredients.
.
) with
is
o
C to 200 oC.
English
7. Touch and hold the key of the cooking zone
or set the temperature to “OFF” to turn off the
cooking zone.
NOTE
■ Cooking Timer cannot be used with Deep/Shallow Frying Mode.
Only Kitchen Timer can be used. (See page 30)
■ The whole ex cooking zone cannot be used with Deep/Shallow
Frying Mode.
■ The actual oil temperature may vary from the set temperature
depending on the cookware. Adjust the temperature if required.
EN-27
Page 30

IH Cooking
Deep/Shallow Frying Mode
Observe the following to keep Genius Sensor
functioning efciently.
■ Follow instructions for quantity of oil.
Amount: 200 g to 800 g (0.22 L to 0.9 L)
Depth: minimum 1 cm
■ Place the pan in the centre of the cooking zone.
■ Do not use hot oil, brown-coloured oil, cloudy oil,
or oil with food sediment.
■ Observe the recommendations for suitable
cookware. (See page 18)
■ Ensure the top plate and bottom of the pan are
dry and clean.
■ Do not add ingredients before the temperature
display stops ashing. Heating may stop due to
an abnormality detected.
■ Once preheating has started, do not add oil or
move the pan to another cooking zone.
EN-28
Page 31

IH Cooking
Timer
Using Cooking Timer
Used to switch a cooking zone off automatically.
Cooking Timer can be set for multiple cooking zones.
1. Touch and hold the main power key to turn on
the power.
2. Perform the desired operation.
(See pages 22-26)
3. Touch Timer key once to select Cooking
Timer.
Cooking Timer symbol ashes when the
corresponding cooking zone is selected and until
the timer is set.
4. Touch slider to set the desired cooking time.
■ Timer can be set while the timer display is
ashing.
Cooking Timer setting range: 1 minute to
9 hours.
■ Slide to 90 minutes. Then touch ‘+’ to increase
in hours.
■ Keep holding either ‘+’ or ‘-’ will increase or
decrease hours or minutes rapidly.
English
Cancelling Cooking Timer:
■ Set the timer to “0”.
Adjusting countdown time
■ Once countdown has started, the timer can be
adjusted. Select cooking zone, press timer and
adjust with the slider.
When the timer reaches “0”, the appliance
5.
beeps 5 times and turns off the cooking zone.
NOTE
Cooking Timer can not be set for Deep/Shallow Frying Mode.
EN-29
Page 32

IH Cooking
Timer
Using Kitchen Timer
Used independently from all other cooking
functions. It counts down from a set time.
1. Touch and hold the main power key to turn on
the power.
2. Touch Timer key to select Kitchen Timer.
Kitchen Timer is selected automatically if the
appliance is not in operation. Touch Timer key
twice if the appliance is in operation.
Kitchen Timer symbol ashes until the time is
set.
3. Touch slider to set time.
Kitchen Timer setting range: 1 minute to
9 hours.
■ Slide to 90 minutes. Then touch ‘+’ to increase
in hours.
■ Keep holding either ‘+’ or ‘-’ will increase or
decrease hours or minutes rapidly.
EN-30
Cancelling Kitchen Timer:
■ Set the timer to “0”.
Adjusting countdown time:
■ Once countdown has started, the timer can be
adjusted. Select Kitchen Timer and adjust with
the slider.
4. When the timer reaches “0”, the appliance
beeps 5 times.
NOTE
■ Kitchen Timer does not switch off the cooking zone.
■ Cooking Timer and Kitchen Timer can be set together.
Page 33

Power Level Guidelines
Low Medium High
Power level 1 1. 2 2. 3 3. 4 4. 5 5. 6 6. 7 7. 8 8. 9
Chocolate
Butter
Melting
Soup (e.g. lentil)
Heating
Honey
Milk
Frankfurters
Stew
Pasta sauce
Rice pudding
Simmering
Pan-frying
Boiling
* These power levels are based on when using the left and right cooking zones.
Please set the power level lower than these guidelines when using the middle
cooking zone.
Fish llets
White sauce
Pre-heat pan
Stir-fry
Fried eggs
Pancakes
Omelette
Steak,
Bacon, Chops
Fish llets
Meatballs
Pasta, Water
Vegetables
Rice
Power level 1 1. 2 2. 3 3. 4 4. 5 5. 6 6. 7 7. 8 8. 9
NOTE
The heat values may vary depending on cookware used.
Check and adjust the power levels as required.
English
EN-31
Page 34

Genius Sensor Cooking Chart
Low Temperature Cooking Mode (12 levels)
Menus 65 70 75 80 85 90 95
Heating
Poaching
Boiling
Steaming
Bain-
marie
Sauce (e.g. Hollandaise)
Canned foods
Chicken breast
Boiled egg
Fish and Shell sh
Vegetables
Chicken breast
Melting chocolate
100 105 110 115 120
Milk
Egg
Fish
Rice
Potato
Potato
Curry
EN-32
Pot roast
Soup
Casserole
Meat sauce
Simmering *
* Simmering
The temperatures recommended are for simmering only. Some recipes may require
to cook food items (e.g. meat, vegetables etc.) with high power before moving onto
simmering stage. In such cases, cook the food items by selecting the appropriate power
level and set Low Temperature Cooking Mode. (See page 25)
If Low Temperature Cooking Mode is used after cooking with a high power, the
appliance stops ashing but does not beep when the set temperature is reached.
Irish Stew
Jam
Compote
Page 35

Genius Sensor Cooking Chart
Pan Frying Mode (5 levels)
°C 140 160 180 200 230
Lamb chops, Fish llets
Steak, Pork, Chicken llets
Schnitzel,
Breaded escalope
Sautéed potato
Suggested
menus
Omelette
Croque monsieurs
American pancakes
Burgers
Bacon,
Sausages
Fried eggs
French
toast
Pancakes
Stir fry
Deep/Shallow Frying Mode
°C 140 150 160 170 180 190 200
Croutons
Frozen food items
Suggested
menus
Mushrooms
Homemade chips
NOTE
The heat values may vary depending on cookware used.
Check and adjust the Genius Sensor level as required.
(7 levels)
Battered sh
Doughnuts
Battered
vegetables
Fried chicken
English
EN-33
Page 36

Cleaning
CAUTION
■ Before cleaning, turn off the main power switch. Allow to cool
before cleaning the top plate.
■ Do not use a steam cleaner. Water may get into the electrical
components and cause damage.
Always keep the appliance in a clean condition.
Spilled food or oil scorched on the appliance may
become dif cult to clean.
Top Plate and Control Panel
Light stains
Wipe off with a damp cloth.
Oil stains
■ Wipe off with a cloth dampened in mild detergent.
■ Do not use strong acidic or alkaline detergents, such
as bleach or synthetic detergents. They may cause
discolouration.
Heavy stains
Apply non-abrasive cream cleaner to the top plate or
control panel and wipe with a cloth.
EN-34
NOTE
Ensure there are no stains on the base of the cookware.
Page 37

Troubleshooting
Check the following for some advice on rectifying some common problems before
calling the service centre.
Power Source
Symptom Possible cause
The appliance cannot
be turned ON.
■ The main power switch has not been turned ON.
Touch the main power switch a little longer.
■ Child Lock has been activated. (See page 12)
Auto switch off
If 1 minute has elapsed without any operation after
switching on, the main power automatically turns off.
Turn on the main power switch again.
The cooking zone
turned itself off while in
operation.
Auto switch off time
(hours)
Long cooking time
If no key is touched for a set time (see table below)
when a cooking zone is in operation, a beep will sound
and the cooking zone is turned off automatically.
Set the appliance again as required.
It is recommended to use the cooking timer when
simmering for a long period of time. (See page 29)
Low Medium High
1 1. 2 2. 3 3. 4 4. 5 5. 6 6. 7 7. 8 8. 9
9 8 7 6 5 4 3 2 1
Control Panel
Symptom Possible cause
Key operation is
disabled.
Keys react when the
surrounding area is
touched.
■ Your ngertips are covered. Touch with bare nger.
■ Control Panel Lock is activated. (See page 12)
■ You performed the operation while holding the
cookware handle.
■ The control panel is dirty.
Turn off the main power switch and ensure the area
is clean and dry. Turn on the main power switch
again.
Water or other liquids may be on or around the keys.
Ensure the area is clean and dry.
Power Level
English
EN-35
Page 38

Troubleshooting
Sounds and Noises
Symptom Possible cause
Noise is heard during
heating.
Various sounds may be heard depending on the type of
cookware. You may feel a small vibration when you hold
the handle and the cookware may move slightly.
This is not a malfunction. Moving the cookware
slightly or replacing it may eliminate the sound.
If the cookware is removed during heating, a short
metallic sound may be heard.
The level of the noise
from the appliance
increases and
decreases.
After the main power
switch is turned off,
sound from the fan can
still be heard.
Clicking noise is heard
at the start of ex
cooking operation.
It is the sound of the cooling fan inside the appliance.
The level of noise changes according to the power level
and the material of the cookware. When the power level
is increased, the fan will operate at high speed and
generate more noise.
While the inside of the appliance is still hot, the cooling
fan operates. When the appliance cools down, it will
automatically stop.
This is not a malfunction. This is a part of induction
heating technology. The noise is eliminated during
operation.
EN-36
Page 39

Troubleshooting
Heat Power
Symptom Possible cause
The heating power is
weaker.
When multiple cooking
zones are used together,
■ The heating power
decreases.
■ The power indicator
automatically
decreases.
■ The power level can
not be increased.
Overheating Prevention Function
If the base of the cookware overheats, the heating
power will automatically reduce. The power indication
will remain the same. The power returns to normal after
the cookware cools down.
Unsuitable cookware, e.g. ceramic and earthenware
pans, are used.
Do not use ceramic and earthenware pans even
if they are for induction heating as they are not
efcient. (See pages 18-19)
The power level is automatically regulated so that
overall power consumption does not exceed the limit.
(See page 15)
The power indicator for a cooking zone may decrease
on its own.
Even after touching the slider to
adjust power level, it may not increase the power level
and the appliance will beep.
EN-37
English
Page 40

Troubleshooting
Autoboil Mode
Symptom Possible cause
Heating time takes too
long.
■ The base of the pan or top plate is dirty.
■ A lid has not been used.
■ Water was added to the pan during Autoboil Mode.
■ The lid is removed or the pan is moved during Autoboil
Mode.
■ Cookware with a non-stick coating may affect the
sensor detection. If the water is not boiled after the
beep, continue heating up as required.
No power - heating
does not start.
The top plate is too hot for Autoboil Mode. Autoboil Mode
will start automatically when the top plate has cooled
down.
Low Temperature Cooking Mode
Symptom Possible cause
■ Preheating time
takes too long.
■ The actual
temperature is
different from the set
temperature.
■ Food is not achieving
set temperature.
No power - heating
does not start.
■ The pan has been moved away from Genius Sensor.
■ The base of the pan or top plate is dirty.
■ Water, oil, or food was added during preheating.
■ The temperature on the base of the pan may vary
from the set temperature depending on the type of
cookware.
■ Due to the variety of food types and pans, the actual
temperature of food may be different from the set
temperature.
■ Cookware with a non-stick coating may affect the
sensor detection.
Adjust the temperature as required with
The top plate is too hot for the temperature set. Heating
will start automatically when the top plate has cooled
down.
slider.
EN-38
Page 41

Troubleshooting
Pan Frying Mode
Symptom Possible cause
■ Preheating time
takes too long.
■ The actual
temperature is
different from the set
temperature.
■ The pan has been moved away from Genius Sensor.
■ The base of the pan or top plate is dirty.
■ Water, oil, or food was added during preheating.
■ The temperature on the base of the pan may vary
from the set temperature depending on the type of
cookware.
Adjust the temperature as required with
Deep/Shallow Frying Mode
Symptom Possible cause
■ Preheating time
takes too long.
■ The actual
temperature is
different from the set
temperature.
■ The pan has been moved away from Genius Sensor.
■ The base of the pan or top plate is dirty.
■ More than 800 g of oil has been added.
■ Hot oil, brown-coloured oil, cloudy oil, or oil with food
sediment is used.
■ The oil temperature may vary from the set temperature
or the preheating time may take longer depending on
the type, material, shape and size of the base of the
pan.
Adjust the temperature as required with
slider.
slider.
English
EN-39
Page 42

Error Codes
Heating can be resumed after the causes of the following errors are eliminated.
Indication Possible cause
■ There is water or objects on or around the control
panel.
■ Key is held longer than required.
Cookware not detected
■ No pan placed on the cooking zone.
■ The pan has been removed.
■ The pan is not in the correct position.
(See pages 16-17)
■ An incompatible pan is used. (See pages 18-19)
Small object on the cooking zone
■ Small metal objects (e.g. cutlery, utensils) are placed
on the cooking zone.
If the above conditions are not rectied,
the display and the main power will turn off.
EN-40
Page 43

Error Codes
The following errors can be cleared by pressing the key of the applicable cooking
zone.
Indication Possible cause
The intake or exhaust vent are blocked. (See page 46)
Remove any blockages.
Empty pan on the cooking zone
■ An empty pan has been heated.
■ When deep/shallow frying, oil was preheated by
selecting the power level instead of Deep/Shallow
Frying Mode.
Use Deep/Shallow Frying Mode for heating up
a large amount of oil.
■ Incompatible cookware is used for Deep/Shallow
Frying Mode. (See pages 18-19)
■ The pan is not in the correct position. (See page 17)
■ More than 800 g of oil has been heated up.
■ Ingredients were added while preheating.
If you cannot resolve the above problems, or any error appears, contact
the service centre.
Turn off the main power switch and the circuit breaker. Contact the dealer you
purchased the appliance from or the service centre for assistance.
English
NOTE
■ During the warranty period, any repairs may only be performed by
service technicians authorised by the appliance manufacturer.
■ Unauthorised repairs may cause electric shock and short circuit; do
not attempt this yourself. Consult an authorised service technician.
■ Warranty claims that resulted from improper connection or use of
the appliance is not covered by the warranty. In such cases, the
costs of repair are borne by the user.
■ For the list of service centres, refer to the guarantee booklet.
EN-41
Page 44

Installation Instructions
Installation and Connection
Please fully observe the following safety precautions.
IMPORTANT
■ Unpack the appliance, remove all packing material, and examine
for any damage. If the appliance is damaged DO NOT install and
notify your dealer immediately.
■ Install the appliance in accordance with the Installation
Instructions. Otherwise, the performance of the appliance may be
affected.
■ After installation, perform a test run and explain to the customer
how to operate the appliance.
■ Correct installation is the responsibility of the installer. Any
malfunction or accident resulting from the failure to follow
Installation Instructions is not covered by the warranty.
Safety Instructions
EN-42
■ When performing the installation, follow these
instructions completely. Improper installation
may cause an electric leakage or re.
■ Install 220-240 V dedicated single-phase (or
three-phase at 380-415 V 3N / 380-415 V 2N)
circuit with the earth leakage circuit breaker
for the power supply. The electrical wiring may
abnormally overheat if the dedicated circuit is
not properly connected.
Page 45

Safety Instructions
■ Electrical work must be performed by a legally
qualied electrician. Improper wire connections
may cause electric leakages or res.
■ This appliance must be properly earthed
following the electric laws. Earth line must not
be connected to gas pipe, water pipe, earth
of a lightning rod or telephone. Otherwise, it
may cause electric shock in case of appliance
breakdown or insulation breakdown.
■ Have a qualied electrician earth the appliance.
Improper earthing may cause an electric shock.
■ Before performing the installation, turn off the
circuit breaker. This can prevent electric shock.
■ If the power cord is damaged, it must be
replaced by a service technician authorised by
the appliance manufacturer in order to avoid a
hazard.
■ Do not disassemble, repair or modify the
appliance (e.g. the top plate). Doing so may
cause the appliance to operate abnormally and
may be dangerous.
English
EN-43
Page 46

Safety Instructions
■ Do not step on the appliance, or drop heavy
items on top of it. Cracks in the top plate may
cause overheating, malfunctions or electric
shocks.
■ Do not touch high temperature parts, such as
the top plate after use.
■ The power cord must be accurately connected
to ensure the integrity of the connection.
Improper wire connections may cause electric
leakages or res.
■ Use heat resistant materials for the countertop.
However, do not use varnished materials as
they may become discoloured. The material
EN-44
of the countertop should have heat resistance
equal to or exceeding that of laminated
thermosetting high-pressure decorative sheets.
If the materials are not heat resistant, they may
get deformed or cause a re.
■ WARNING: The manufacturer cannot be held
liable for damage to persons or items caused
by failure to observe the safety instructions, by
interference with any part of the appliance or by
the use of non-original spare parts.
Page 47

Installation Location
Installation of the Appliance
Max. 330 mm
depth of cabinets
Min. 762 mm clearance
from the top of the cooktop
to the bottom of the cabinets
Min. 51 mm clearance
from cutout to rear wall
Accessories
Clamp
Min. 51 mm clearance
from cutout to side wall
Cutout
English
For more details on cutout, see page 48.
(2 pieces)
See page 51.
EN-45
Page 48

900
520
Dimensions
Top View
520
Front View
52
900
(measurement: mm)
900
520
KY-B925GL KY-B915AL /
KY-B915AB
6
EN-46
Side View
52
Power cord length: approx. 1.2 m (Sheath length: approx. 1.1 m)
Intake ventExhaust vent
6
Rear sideFront side
Page 49

Dimensions
Side View
(measurement: mm)
CAUTION
Minimum 30
for flat part
+ 3
490
- 0
Min. 20
Partition
Flow of intake and exhaust
When Installing a Partition Inside the Cabinet
■ Allow for a minimum of 20 mm extra space underneath the bottom of the
appliance for air circulation.
■ Allow for a minimum of 40 mm extra space in rear of the partition.
If this condition is not met,
do not install the appliance.
Min. 40
Rear sideFront side
English
Top view of the partition
Min. 20
490
Min. 40
70
870
Partition
Building rear wall
265
Countertop cutout
Countertop front
EN-47
Page 50

Min. 60
Min. 5 Min. 40
Dimensions
When Installing Above an Oven
■ The appliance may only be installed over a Panasonic oven.
■ Allow for extra spaces for air circulation as shown below.
Side View with an Oven
Min. 60
Oven
Min. 5 Min. 40
(measurement: mm)
Oven
Flow of intake
and exhaust
EN-48
Dimensions of Countertop Cutout
Building rear wall
Min.51
Building side wall
3
Min. 59
0
490
Min.51
R3 1
3
870
0
Countertop front
Min.51
Building side wall
Min.600
Page 51

Electrical Work
WARNING
Electrical work must be performed by a legally qualied electrician.
Electrical Requirements
■ This appliance must be supplied with the proper voltage and frequency, and
connected to an individual, properly earthed branch circuit, protected by a
circuit breaker or fuse. (The rating plate is on the bottom of the appliance.)
■ This appliance is not tted with other means for disconnection from the supply
mains having a contact separation in all poles that provide full disconnection
under overvoltage category III conditions. Means for disconnection must be
incorporated in the xed wiring in accordance with the wiring rules.
■ Single-phase A.C. 220-240 V, 50 Hz electrical system must be used. (It is also
possible to use a three-phase electrical system.) If connecting to aluminium
wiring, use connectors approved for use with aluminium wiring.
■ Check with the local utilities for electrical codes applied in the area. Failure to
wire the appliance according to governing codes may result in a hazardous
condition.
■ After installation, show the customer where the breaker for the appliance is
located.
Installation of the Earth Leakage Circuit Breaker
■ In accordance with the electrical wiring rules, incorporate the earth leakage
circuit breaker in the home electrical wire.
■ Follow the specication of the earth leakage circuit breaker as follows.
Rated current: 50 A (KY-B925GL), 40 A (KY-B915AL / KY-B915AB)
Rated sensitivity current: 30 mA
English
EN-49
Page 52

Electrical Work
Electrical Connections
1. Turn off power.
Turn off power at the circuit breaker or remove fuses to the appliance branch circuit.
2. Connect the power cord.
Connect the power cord in accordance with all governing codes and ordinances.
■ Single-phase connection (220-240 V ~ 50 Hz)
Connect the wires in accordance with the instructions given in the following
table and diagram:
Electrical cable Wire connection
KY-B925GL
N
L
KY-B915AL / KY-B915AB
N
L
: Yellow / Green
(Connect to the earth terminal)
N: Black, Cord No. 2 / 4 / 6
L: Black, Cord No. 1 / 3 / 5
(Connect to the live terminal)
: Yellow / Green
(Connect to the earth terminal)
N: Grey and Blue together
L: Black and Brown together
(Connect to the live terminal)
■ Three-phase connection (380-415 V 3N~ 50 Hz / 380-415 V 2N~ 50 Hz)
Separate the L wires and connect them in accordance with the instructions
given in the following table and diagram:
Electrical cable Wire connection
KY-B925GL
N
L1
L2
L3
: Yellow / Green
(Connect to the earth terminal)
N: Black, Cord No. 2 / 4 / 6
L1: Black, Cord No. 1
L2: Black, Cord No. 3
L3: Black, Cord No. 5
(Connect to the live terminal)
EN-50
KY-B915AL / KY-B915AB
L1
L2
: Yellow / Green
(Connect to the earth terminal)
N
N: Grey and Blue together
L1: Black
L2: Brown
(Connect to the live terminal)
Page 53

Installing the Appliance
WARNING
Do not disassemble the top plate. Connected wire may become loose
and cause a malfunction.
1. Fasten the clamps to the appliance. (2 places at
rear)
■ Place the appliance on the packaging upper
ller when tting clamps to prevent damage to
the countertop.
■ Match the clamp grips with the holes on the
sides of the appliance, then slide the clamp
from the right to the left to fasten them to the
Upper ller
Correct
Incorrect
appliance.
2. Embed the appliance in the countertop cutout
while keeping it is as level as possible.
■ Do not drop the appliance on the countertop.
■ Press down on top of the appliance to make
sure that it rests on the countertop.
■ Make sure that the spaces between the
countertop and the under surface of the
appliance are even in the front, rear, left and
right.
English
3. Connect the power cord.
■ See page 50.
CAUTION
If the cabinet does not have an opening in the front, the wiring needs
to be connected before the appliance is embedded into the countertop.
EN-51
Page 54

Flush-tting
R3
29
(measurement: mm)
KY-B925GL and KY-B915AL can be tted ush when installing.
Installing the appliance as ush-tting
■ Only suitable for installation on heat and water resistant worktops such as
marble, natural stone, solid wood (if cut out edges are sealed).
■ Mount onto other types of worktops only with the recommendation of the
worktop manufacturer.
■ Remove the cushion from the underside of the appliance before ush tting.
■ The internal width of the base unit must be at least as wide as the internal
cut-out width for the hob. This is to ensure that the casing can be easily
removed for maintenance.
■ Before sealing in, test that the appliance works. Grout the perimeter using a
heat resistant silicone. Smooth the seal with a suitable nishing product.
Follow the silicone instructions and do not turn on the appliance until the
silicone is completely dry.
R3
EN-52
870
490
904
524
CAUTION
■ Please observe the diagrams for the cut-out dimensions in granite
and marble worktops.
■ Using unsuitable silicone may cause permanent colour changes
to marble worktops.
5.5
Uninstalling the appliance as ush-tting
■ Disconnect the appliance from the mains.
■ Remove the silicone seal from the perimeter with a suitable tool.
■ Push the appliance upwards from below to remove it.
CAUTION
Do not try to remove the appliance by prying it out from above.
17
Page 55

Post-installation Checklist
Upon completing installation, check and mark off the following items.
Checklist
Appearance ■ Ensure that the appliance is not tilted.
■ Is the top plate clean?
Electrical
work
Electrical
testing
■ Is the power supply a single-phase (220-240 V ~), or a
three-phase (380-415 V 3N~/ 380-415 V 2N~)?
■ Has the earth been installed?
■ Has the earth leakage circuit breaker been installed?
1. Touch
■ Does the main power light illuminate?
2. Touch the following keys to check function of each
cooking zone:
■ Left front
■ Left rear
■ Middle
■ Right front
■ Right rear
to turn on the main power.
KY-B925GL KY-B915AL
Do each cooking zone selector and
Checked
KY-B915AB
English
ash?
■ Make sure to turn off each cooking zone and the main power switch after
performing electrical testing.
■ Hand the Operating / Installation Instructions to the customer.
I hereby certify that installation has been completed.
Signature of installer
EN-53
Page 56

Specications
Manufacturer Panasonic
Model identication KY-B925GL
Type of hob Electric
Number of cooking zones and/
or areas
Heating technology Induction
Diameter of useful surface area
(circular)
Length and width of useful
surface area (non-circular)
Left front 226.8 Wh / kg 226.2 Wh / kg
Energy
consumption per
cooking zone or
area calculated
per kg
electric cooking)
(EC
Energy consumption for the hob
calculated per kg (EC
Power supply
Power consumption 10800 W 7200 W
Dimensions (approx.) 900 mm (W) 520 mm (D) 58 mm (H)
Frame design Flush
Maximum power
consumption by
cooking zone
(approx.)
Uncrated weight (approx.) 20.5 kg 18 kg
Left middle 191.0 Wh / kg 193.7 Wh / kg
Left rear 207.7 Wh / kg 210.7 Wh / kg
Middle 175.4 Wh / kg 174.5 Wh / kg
Right front 223.2 Wh / kg 189.2 Wh / kg
Right middle 186.6 Wh / kg -
Right rear 207.7 Wh / kg -
electric hob)
Single-phase 220-240 V ~ 50 Hz
Three-phase
Left front 2800 W 2800 W
Left rear 2800 W 2800 W
Middle 3600 W 3600 W
Right front 2800 W 3300 W
Right rear 2800 W -
Flex cooking
zone
380-415 V 3N~ 50 Hz 380-415 V 2N~ 50 Hz
5 4
1 x ø 30.0 cm
4 x
L 19.1 cm
W 21.0 cm
202.6 Wh / kg 198.9 Wh / kg
3600 W 3600 W
KY-B915AL
KY-B915AB
1 x ø 30.0 cm
1 x ø 21.0 cm
2 x
L 19.1 cm
W 21.0 cm
(KY-B915AL)
Flush
Bevelled (KY-B915AB)
EN-54
Page 57

Equipment complying with IEC 61000-3-12
This product complies with the requirements of EN 60350-2:2013
(Methods for Measuring Performance - Hobs)
REP. EU: Panasonic Testing Centre
Winsbergring 15, 22525 Hamburg, Germany
English
EN-55
Page 58

Page 59

Inhalt
Funktionsweise des Induktionsherdes
Bedienungsanleitung ................ 2-41
Sicherheitsanweisungen ................ 2-6
Allgemeine Vorkehrungen ................. 7
Entsorgung von Abfallprodukten ........ 8
Genius Sensor Technologie .................9
Energiespartipps..................................9
Eigenschaften und Funktionen
- KY-B925GL ......................................10
- KY-B915AL / KY-B915AB ................. 11
Allgemeine Bedienelemente .........12-14
Kochzonen....................................15-17
Geeignetes Kochgeschirr ........... 18 -19
Kochen mit Induktion ................. 20-30
- Übersicht Bedienung .....................20
- Sicherheitsfunktionen .................. 21
- Leistungsstufe wählen ............. 22-23
- Autoboil Modus .............................. 24
- Niedrigtemperaturkochmodus .......25
...1
- Bratmodus .....................................26
- Frittiermodus ............................27-28
- Zeitschaltuhr ............................ 29-30
Richtlinien für Leistungsstufen ......... 31
Kochtabelle für Genius Sensor ...
Reinigung ........................................ 34
Fehlersuche und Behebung ...... 35-39
Fehler-Codes ............................. 40 - 41
Installationsanleitung ................ 42-53
Installation und Anschluss ................. 42
Sicherheitsanweisungen.............. 42- 44
Installationsort ...................................45
Zubehör .............................................45
Abmessungen .............................46-48
Elektroarbeiten ............................ 49-50
Installation des Gerätes ....................51
Bündig abschließend ........................52
Checkliste nach der Installation ........53
Spezikationen ................................ 54
32-33
Funktionsweise des Induktionsherdes
Induktion bezieht sich auf das Aufheizen
durch die elektromagnetische Induktion.
Wenn Strom in die magnetische Spule
unter der Deckplatte ießt, dann entsteht
ein magnetisches Kraftfeld.
Das magnetische Kraftfeld geht auf
das metallische Kochgeschirr über,
wodurch ein Wirbelstrom entsteht. Die
Wärme zum Kochen entsteht dann
durch den elektrischen Widerstand des
Kochgeschirrs.
Wirbelstrom
Deckplatte
Spule, mit der das
magnetische Kraftfeld
erzeugt wird
Deutsch
Magnetisches
Kraftfeld
DE-1
Page 60

Bedienungsanleitung
Sicherheitsanweisungen
■ Dieses Gerät kann von Kindern ab 8 Jahren und
Personen mit eingeschränkten körperlichen,
sensorischen oder geistigen Fähigkeiten oder
mangelnder Erfahrung und Kenntnis verwendet
werden, wenn sie beaufsichtigt werden oder
Anleitung für die sichere Verwendung des
Gerätes erhalten haben und die diesbezüglichen
Risiken verstehen. Kinder sollten mit dem Gerät
nicht spielen. Reinigung und Wartung sollte nicht
von Kindern durchgeführt werden, die dabei
ohne Aufsicht sind.
■ Brennbare Materialien dürfen nicht in der Nähe
DE-2
des Gerätes gelagert werden. Dies kann zu
einem Brand führen.
■ Überhitzen Sie die Pfanne beim Vorheizen vor
dem Braten nicht.
■ WARNUNG: Im Falle einer Fehlfunktion oder
eines Ausfalls müssen Sie die Verwendung
des Gerätes sofort einstellen. Schalten Sie den
Hauptschalter und den Schutzschalter aus und
wenden sich an das Kundendienstzentrum.
Wenn Sie dies nicht tun, kann dies zu Rauch,
Verbrennungen und einem Stromschlag führen.
Page 61

Sicherheitsanweisungen
■ Wenn das Stromkabel beschädigt ist, muss
es von einem Kundendienstmonteur ersetzt
werden, der vom Hersteller zugelassen ist, um
Risiken zu vermeiden.
■ Flüssigkeiten müssen vor dem Aufwärmen
umgerührt werden. Sonst können Flüssigkeiten
spritzen und zu Verbrennungen oder
Verletzungen führen.
■ Üben Sie keinen übermäßigen Druck auf
die Deckplatte aus und lassen sie keine
Gegenstände darauf fallen. Dies kann zu
Rissen oder Schäden an der Deckplatte führen.
■ Stellen Sie keine tragbaren Gasbrenner,
Stahlzylinder und Dosenprodukte auf oder
in die Nähe des Gerätes. Wenn sich diese
erhitzen, können Sie explodieren.
■ Metallische Gegenstände wie Messer, Gabeln,
Löffel und Deckel sollten nicht auf das Kochfeld
gelegt werden, da sich diese erhitzen können.
■ Schalten Sie das Kochfeld nach dem Gebrauch
über das Bedienelement aus und verlassen Sie
sich nicht auf die Pfannenerkennung.
■ Sie sollten das Gerät nicht demontieren,
reparieren oder modizieren. Wenden Sie sich
bezüglich Reparaturen an den Händler, bei
dem Sie das Gerät gekauft haben.
Deutsch
DE-3
Page 62

Sicherheitsanweisungen
■ WARNUNG: Dieses Gerät muss geerdet werden,
um Stromschlag oder einen Brand zu vermeiden.
■ WARNUNG: Das Gerät und die zugänglichen
Teile können bei Betrieb heiß werden. Deshalb
gilt besondere Vorsicht, um das Berühren der
Heizelemente zu vermeiden. Kinder unter 8
Jahren sollen vom Gerät fern gehalten werden,
wenn sie nicht unter ständiger Aufsicht stehen.
■ WARNUNG: Wenn Sie beim Kochen auf einem
Kochfeld mit Fett oder Öl arbeiten und nicht
dabei bleiben, so kann dies gefährlich werden
und zu einem Brand führen. Versuchen Sie
NIEMALS einen Brand mit Wasser zu löschen,
sondern schalten Sie das Gerät ab und decken
DE-4
Sie dann die Flamme mit einem Deckel oder
einer Feuerlöschdecke ab.
■ WARNUNG: Brandgefahr: Lagern Sie keine
Gegenstände auf der Kochäche.
■ WARNUNG: Wenn die Oberäche einen Riss
hat, schalten Sie das Gerät aus, um die Gefahr
eines Stromschlags zu vermeiden.
■ WARNUNG: Herdschutzgitter sind nicht für den
Gebrauch mit diesem Gerät gedacht und sollten
unter keinen Umständen angebracht werden.
Page 63

Sicherheitsanweisungen
■ Wenn das Öl raucht, sofort Hauptschalter
ausschalten. Ansonsten besteht Brandgefahr.
■ Gehen Sie vorsichtig mit heißem Öl um, da es
zu Verbrennungen führen kann.
■ Seien Sie vorsichtig, wenn Sie die Pfanne mit
einer kleinen Menge Öl vorheizen. Die Pfanne
kann sich überhitzen und zu Schäden führen.
■ Heizen Sie kein leeres Kochgeschirr auf und
überhitzen Sie keine Zutaten. Die Zutaten
können Feuer fangen und das Kochgeschirr
beschädigen.
■ Verwenden Sie das Gerät nicht zu anderen
Zwecken als zum Kochen. Dies kann zu einer
Überhitzung oder Fehlfunktion und zu einem
Brand führen.
■ Wenn Sie ein medizintechnisches Gerät (z.B.
einen Herzschrittmacher) tragen, dann wenden
Sie sich an Ihren Arzt. Der Betrieb des Gerätes
kann sich auf das medizintechnische Gerät
auswirken.
■ Verwenden Sie keinen Dampfreiniger. Dabei
könnte Wasser in die elektrischen Bauteile
eindringen und zu Schäden führen.
Deutsch
DE-5
Page 64

Sicherheitsanweisungen
■ Das Gerät ist nicht für den Betrieb mittels einer
externen Zeitschaltuhr oder eines getrennten
Fernbedienungssystems ausgelegt.
■ Legen Sie kein Papier oder Geschirrtuch unter
das Kochgeschirr. Dies könnte aufgrund der
Hitze des Kochgeschirrs versengt werden.
■ WARNUNG: Der Hersteller haftet nicht für
Schäden an Personen oder Sachen, die durch
die Nichtbeachtung obiger Anweisungen
verursacht worden sind, durch Eingriffe in Teile
des Gerätes oder durch die Verwendung von
Ersatzteilen, die keine Originalersatzteile sind.
DE-6
Page 65

Allgemeine Vorkehrungen
■ Diese Gerät erzeugt ein magnetisches Kraftfeld. Bringen Sie keine
Dinge in die Nähe des Gerätes, die auf Magnetfelder reagieren.
- Radio- und Fernsehgeräte oder Hörgeräte können gestört werden.
- Karten mit Magnetstreifen, z.B. von Geschäften oder Banken,
können gelöscht oder beschädigt werden.
■ Verwenden Sie keine anderen Induktionskochgeräte wie
Induktionsreiskocher oder tragbare Induktionskochplatten auf der
Deckplatte. Die von diesen Geräten erzeugten elektromagnetischen
Wellen können das Gerät beschädigen.
■ Lagern Sie im Schrank unter dem Gerät keine Lebensmittel. Diese
könnten durch die Abwärme verderben.
■ Falls säurehaltige Lebensmittel wie Essig, Marmelade oder
Zitronensaft auf der Deckplatte verschüttet werden, wischen Sie
dies bitte sofort ab. Dies könnte sonst zu Verfärbungen der Deckplatte
führen.
■ Verschütten Sie kein Wasser auf dem Bedienfeld und stellen Sie
nichts darauf. Dies könnte zu Fehlfunktionen der Bedienfeldtasten
führen.
■ Versperren Sie nicht die Zu- und Abluftschlitze. Das Gerät könnte
sonst überhitzen und zu einer automatischen Abschaltung des
Hauptschalters führen.
Deutsch
DE-7
Page 66

Entsorgung von Abfallprodukten
Information für Benutzer zur Entsorgung von Elektro- und
Elektronikschrott (Privathaushalte)
Dieses Symbol auf den Produkten und/oder den
Begleitdokumenten bedeutet, dass benutzte elektrische
und elektronische Produkte nicht mit dem allgemeinen
Haushaltsmüll zusammen entsorgt werden sollen.
Zur ordnungsgemäßen Behandlung, Rückgewinnung und
Recyclingverarbeitung müssen diese Produkte an die hierfür
vorgesehenen Sammelpunkte gebracht werden, wo sie
kostenfrei angenommen werden.
In einigen Ländern ist es auch möglich, Ihrem Einzelhändler
das Produkt beim Kauf eines entsprechenden neuen
Produkts zur Entsorgung zurückzugeben.
Die ordnungsgemäße Entsorgung dieses Produkts trägt
dazu bei, wertvolle Ressourcen einzusparen und potenzielle
negative Auswirkung auf die menschliche Gesundheit und
die Umwelt, die anderweitig durch eine unangemessene
Entsorgung bedingt werden könnten, zu vermeiden. Ihre
Ortsbehörde wird Sie auf Anfrage über einen Sammelpunkt
in Ihrer Nähe informieren.
Für eine unsachgemäße Entsorgung dieses Abfalls gelten u.
U. Strafen entsprechend der national geltenden Gesetze.
DE-8
Informationen über die Entsorgung in anderen Ländern
außerhalb der Europäischen Union
Dieses Symbol ist nur in der Europäischen Union gültig.
Wenn Sie dieses Produkt entsorgen möchten, kontaktieren
Sie Ihre Ortsbehörde oder Ihren Händler und fragen Sie
nach der korrekten Entsorgungsmethode.
Page 67

Genius Sensor Technologie
Der Genius Sensor reguliert die eingestellte
Temperatur durch schnelle Erkennung der Temperatur
am Boden des Kochgeschirrs. Dies ist für folgende
Kochmethoden geeignet:
■ Autoboil Modus
■ Niedrigtemperaturkochmodus
■ Bratmodus
■ Frittiermodus
Genius Sensor
■ Bratmodus
■ Frittiermodus
VORSICHT
Verwenden Sie kein Öl, das Sie in anderen Geräten vorgewärmt
haben. Der Genius Sensor funktioniert dann nicht optimal und
das Öl könnte sich entzünden.
Energiespartipps
■ Setzen Sie immer den passenden
Deckel auf die Pfanne oder den
Topf, um die Wärme darin zu
halten.
■ Verwenden Sie eine Pfanne oder
einen Topf in der richtigen Größe
für die Menge an Lebensmitteln,
die Sie kochen.
■ Verwenden Sie eine Pfanne
oder einen Topf in der richtigen
Größe für den Durchmesser des
Kochfeldes. Wenn Durchmesser
von Pfanne/Topf und Kochfeld
nicht übereinstimmen, dann sollten
Sie das Kochgeschirr wählen, das
einen größeren Durchmesser als
das Kochfeld hat.
■ Fügen Sie nur so viel Wasser
hinzu, dass Gemüse abgedeckt ist.
Dadurch sparen Sie Energie.
■ Drehen Sie Leistungsstufe des
Kochfeldes herunter, sobald die
Kochtemperatur erreicht ist; Sie
sollten Lebensmittel eher sieden
lassen als sprudelnd kochen.
■ Verwenden Sie einen
Dampfkochtopf zum Garen von
Gemüse. Darin können Sie
mehrere Lagen verschiedener
Gemüse übereinander kochen
und brauchen dennoch nur ein
Kochfeld. Ansonsten können Sie
eine Pfanne/einen Topf mit Teilung
verwenden.
Deutsch
DE-9
Page 68

Eigenschaften und Funktionen KY-B925GL
DeckplatteKochzone Kochzone
Rechts hinten Links hinten
Mitte
Rechts vorne Links vorne
DE-10
Bedienfeld
54
2 3
1. Hauptschalter (Siehe Seite 12)
2. Kindersicherung /
Bedienfeldsperre Taste
(Siehe Seite 12)
3. Zeitschaltuhr Taste
(Siehe Seiten 12, 29-30)
4. WarnungvorheißenOberächen
(Siehe Seite 14)
5. Garzeituhranzeige
(Siehe Seite 29)
6. Kurzzeitweckeranzeige
(Siehe Seite 30)
7. Kochzonenauswahl
8. Schieberegler und BoostFunktion (Siehe Seite 13)
7
8
1211 13 146
9
1511
10
9. Autoboil Modus Taste
(Siehe Seite 13)
10. Sensor-Option Taste
(Siehe Seite 13)
11. Anzeige für Autoboil Modus
(Siehe Seite 24)
12. Anzeige für
Niedrigtemperaturkochmodus
(Siehe Seite 25)
13. Anzeige für Bratmodus
(Siehe Seite 26)
14. Anzeige für Frittiermodus
(Siehe Seiten 27-28)
15. Pause Taste (Siehe Seite 14)
Page 69

Eigenschaften und Funktionen KY-B915AL / KY-B915AB
DeckplatteKochzone Kochzone
Links hinten
Mitte
Links vorne
Bedienfeld
1. Hauptschalter (Siehe Seite 12)
2. Kindersicherung /
Bedienfeldsperre Taste
(Siehe Seite 12)
3. Zeitschaltuhr Taste
(Siehe Seiten 12, 29-30)
4. WarnungvorheißenOberächen
(Siehe Seite 14)
5. Garzeituhranzeige
(Siehe Seite 29)
6. Kurzzeitweckeranzeige
(Siehe Seite 30)
7. Kochzonenauswahl
8. Schieberegler und BoostFunktion (Siehe Seite 13)
54 7 11 12 13 146
2 3 8 9 10 151
Rechts vorne
9. Autoboil Modus Taste
(Siehe Seite 13)
10. Sensor-Option Taste
(Siehe Seite 13)
11. Anzeige für Autoboil Modus
(Siehe Seite 24)
12. Anzeige für
Niedrigtemperaturkochmodus
(Siehe Seite 25)
13. Anzeige für Bratmodus
(Siehe Seite 26)
14. Anzeige für Frittiermodus
(Siehe Seiten 27-28)
15. Pause Taste (Siehe Seite 14)
Deutsch
DE-11
Page 70

Allgemeine Bedienelemente
Hauptschalter
■ Das Licht am Hauptschalter geht an, wenn dieser
eingeschaltet wird.
■ Wenn das Kochfeld nach 1 Minute nicht
verwendet wird, schaltet sich das Gerät
automatisch wieder aus.
Kindersicherung
■ Sperren Sie das Bedienfeld, um Missbrauch des
Geräte zu verhindern.
■ Halten Sie die Taste 3 Sekunden lang bei
ausgeschaltetem Hauptschalter gedrückt. Ein
Licht zeigt an, dass die Kindersicherung aktiviert
ist. Dieses Licht erlischt nach 10 Sekunden und
geht wieder an, wenn ein Taste berührt wird.
■ Zur Deaktivierung halten Sie sie wieder 3
Sekunden lang gedrückt.
Bedienfeldsperre
■ Sperren Sie das Bedienfeld, wenn die Kochzonen
in Betrieb sind, um kleine Spritzer in diesem
Bereich abwischen zu können.
■ Dies erfolgt bei eingeschaltetem Hauptschalter.
Damit deaktivieren Sie das Bedienfeld für 20
Sekunden, während die Kochzonen in Betrieb
sind.
■ Um die Sperre innerhalb der 20 Sekunden zu
deaktivieren, berühren Sie die Taste erneut.
DE-12
Zeitschaltuhr
■ Es gibt zwei Arten von Zeitschaltuhren:
Die Garzeituhr, die ab einer bestimmten
eingestellten Zeit anfängt abzulaufen und die
Zone abschaltet, wenn sie bei Null angelangt ist.
Sie steht für alle Kochzonen zur Verfügung.
Der Kurzzeitwecker, der ab einer eingestellten
Zeit anfängt abzulaufen und einen Alarm auslöst,
wenn er bei Null angelangt ist. Der Kurzzeitwecker
schaltet die Kochzonen nicht ab.
■ Weitere Einzelheiten zum Einstellen der
Zeitschaltuhren nden Sie auf den Seiten 29-30.
Page 71

Allgemeine Bedienelemente
Schieberegler
■ Zum Ändern der Leistungsstufe und Zeit mithilfe
des Schiebers, für alle Kochzonen.
■ Stellen Sie die Temperatur für die Kochzonen
mithilfe des Genius Sensors ein.
Bedienung des Schiebereglers
Es gibt drei Möglichkeiten, den Schieberegler zu
bedienen.
■ Schnell zur gewünschten Einstellung schieben.
■ Über die "+/-"-Tasten eine genaue Einstellung
vornehmen.
■ Die "+/-"-Tasten gedrückt halten, um die
Einstellung vorzunehmen.
Boost-Funktion
■ Wenn die Leistungsstufe einer Kochzone auf 9
eingestellt ist, wird die Leistung der ausgewählten
Zone durch die Taste
Nach 10 Minuten wird die Leistungsstufe
automatisch auf 9 zurückgesetzt.
Autoboil Modus Taste
■ Bringt einen Topf Wasser zum Kochen.
(Siehe Seite 24)
schnell hochgefahren.
Sensor-Option Taste
Wählen Sie die Genius Sensor Programme aus, die
unten aufgeführt sind. (Siehe Seiten 25-28)
Niedrigtemperaturkochmodus
Optionstaste für
Niedrigtemperaturkochmodus
hält die Temperatur stabil auf niedrigem
Niveau im Bereich von 65 °C -120 °C in
Stufen von 5 °C. (Siehe Seite 25)
Bratmodus hält eine optimale Temperatur bei
fünf Einstellungsstufen von 140 °C / 160 °C /
180 °C / 200 °C und 230 °C. (Siehe Seite 26)
Frittiermodus regelt die Temperatur des Öls
im Bereich zwischen 140 °C - 200 °C in Stufen
von 10 °C. (Siehe Seiten 27-28)
Bratmodus Frittiermodus
Deutsch
DE-13
Page 72

Allgemeine Bedienelemente
Optionstaste für
Bratmodus hält eine optimale Temperatur bei
fünf Einstellungsstufen von 140 °C / 160 °C /
180 °C / 200 °C und 230 °C. (Siehe Seite 26)
Frittiermodus regelt die Temperatur des
Öls im Bereich zwischen 140 °C - 200 °C in
Stufen von 10 °C. (Siehe Seiten 27-28)
Pause Taste
■ Halten Sie die Taste 1 Sekunde lang gedrückt, um
alle aktiven Kochzonen 30 Minuten lang auf die
Stufe 1 zu senken (nach 30 Minuten schaltet das
Gerät ab). Die Zeitschaltuhr setzt aus.
■ Halten Sie die Taste noch einmal gedrückt, um
die ursprüngliche Einstellung der Kochzonen
wiederherzustellen. Die Zeitschaltuhr läuft dann
weiter.
■ Die Pause-Funktion kann nicht verwendet
werden, wenn das Genius Sensor- Programm in
einer der Kochzonen läuft.
WarnungvorheißenOberächen
■ Geht an, wenn ein Bereich der Deckplatte heiß
ist, zusammen mit der Restwärmeanzeige (siehe
unten), die für einen bestimmten Bereich leuchtet.
DE-14
Restwärmeanzeige
■ Wenn
entsprechende Kochzone heiß. Achten Sie
darauf, keine Kochzonen zu berühren, die als
heiß angezeigt werden.
Geräuschloser Modus
■ Schalten Sie den Hauptschalter ein, halten
sie beide Tasten gleichzeitig 3 Sekunden lang
gedrückt, um die Tastentöne abzuschalten.
1 wird angezeigt, wenn der geräuschlose Modus
EIN ist.
0 wird angezeigt, wenn der geräuschlose Modus
AUS ist.
■ Der Piepton für den Hauptschalter, die
Kindersicherung, die Zeitschaltuhr und für
Fehlermeldungen bleibt AN. Alle anderen
Tastentöne werden deaktiviert.
in der Anzeige blinkt, dann ist die
Page 73

Kochzonen
38,2 cm
21 cm 21 cm
19,1 cm
21 cm
38,2 cm
19,1 cm
ø 20 cm
300 mm200 mm 200 mm300 mm200 mm 200 mm
(Min. Pfannengröße)
ø 30 cm
KY-B925GL
ø 20 cm
(Min. Pfannengröße)
ø 21 cm
ø 30 cm
KY-B915AL / KY-B915AB
Kochzonengruppen
Die Kochzonen sind in zwei oder drei Gruppen zusammengefasst, d. h. die
vordere und hintere Zone auf der linken Seite und die vordere und hintere Zone
auf der rechten Seite. Wenn die beiden Kochzonen innerhalb derselben Gruppe
gleichzeitig genutzt werden, dann wird die Wärmeerzeugung so reguliert, dass der
gesamte Stromverbrauch den Grenzwert nicht übersteigt.
D. h., dass wenn die Leistungsstufe 9 für die linke vordere Kochzone eingestellt ist,
dann ist die maximal verfügbare Leistung für die linke hintere Kochzone die Stufe 8.
Deutsch
Linke
Kochzonen-
gruppe
Mittlere
Kochzonen-
gruppe
Rechte
Kochzonen-
gruppe
KY-B925GL KY-B915AL / KY-B915AB
Linke
Kochzonen-
gruppe
Rechte
Kochzonen-
gruppe
DE-15
Page 74

Kochzonen
Flex-Kochzone
Die Flex-Kochzone besteht aus verschiedenen individuell steuerbaren
Induktionsspulen. Wenn Kochgeschirr erkannt wird, dann werden nur die Bereiche
aktiviert, die im Kontakt mit dem Kochgeschirr sind. Alle anderen Bereiche bleiben aus.
Um die Erkennung des Kochgeschirrs und eine gleichmäßige Wärmeverteilung
sicherzustellen, platzieren Sie das Kochgeschirr mittig wie unten gezeigt:
Töpfe und Pfannen mit einem Durchmesser von
unter 13 cm
Kleinere Töpfe und Pfannen sollten in einer der vier
gezeigten Positionen platziert werden.
Töpfe und Pfannen mit einem Durchmesser ab
13 cm und darüber
Größere Töpfe und Pfannen sollten in einer der drei
gezeigten Positionen platziert werden.
Größeres Kochgeschirr
Platzieren Sie dieses am oberen oder unteren Rand
der Flex-Kochzone.
DE-16
Zwei unabhängige Kochzonen
Die vorderen und hinteren Bereiche einer Flex-
Kochzone können unabhängig voneinander genutzt
werden, indem für jede die erforderliche Leistung
ausgewählt wird.
Stellen Sie kein Kochgeschirr außerhalb der Mitte
auf. Es kann sein, dass der Sensor dann nicht
ordnungsgemäß funktioniert und ein Brand verursacht
wird.
WARNUNG
Die Missachtung dieser Anweisungen kann zu schweren
Verletzungen führen.
Page 75

Kochzonen
Kochen mit Genius Sensor
Töpfe und Pfannen mit einem Durchmesser ab
13 cm und darüber
Wenn Sie mit dem Genius Sensor kochen, dann
verwenden Sie entweder die beiden oberen oder
unteren Bereiche der Flex-Kochzone.
Größeres Kochgeschirr
Platzieren Sie dieses am oberen oder unteren Rand
der Flex-Kochzone.
Während Sie mit dem Genius Sensor kochen, stellen
Sie den Topf oder die Pfanne nicht in die mittleren
beiden Bereiche der Flex-Kochzone.
DE-17
Deutsch
Page 76

Geeignetes Kochgeschirr
Material
Kompatibles Kochgeschirr
■ Eisen/Gusseisen
■ Emailliertes Eisen
■ Magnetischer Edelstahl
( Bei manchem Kochgeschirr aus Edelstahl kann es sein, dass die
Wärmeleistung nicht so stark ist.)
Nicht kompatibles Kochgeschirr
■ Aluminium/Kupfer
■ Hitzebeständiges Glas
■ Keramik und Steingut
Form der Aufstelläche
Kompatibles Kochgeschirr
Der Boden muss ach sein und eben auf der Deckplatte auiegen.
(Wenn dies nicht der Fall ist, kann dies zu Verletzungen und Verbrennungen führen.)
Nicht kompatibles Kochgeschirr
■ Kochgeschirr mit gerundetem Boden
■ Kochgeschirr mit Füßen
■ Kochgeschirr mit dünnem Boden
Gerundeter
Boden
Dünner Boden Unebener
Mit Füßen
Boden
■ Kochgeschirr mit unebenem Boden
Verwenden Sie kein Kochgeschirr mit unebenem
Boden, wenn die Rundung 3 mm oder mehr beträgt,
weil es dann möglich ist, dass die Sicherheitsfunktionen
nicht aktiviert werden, die Wärmeleistung vermindert ist
oder das Kochgeschirr nicht heiß wird.
DE-18
Größe (Bodendurchmesser)
Kompatibles Kochgeschirr
Die Mindestgrößen der Pfannen und Töpfe, die in den
einzelnen Kochzonen verwendet werden können, sind:
Kochzone Mindestdurchmesser
ø 30 cm 20 cm
ø 21 cm 14,5 cm
Vergewissern Sie sich, dass das Kochgeschirr zur
Kochzone passt.
Bezüglich der empfohlenen Größen und Positionierung
des Kochgeschirrs in der Flex-Kochzone lesen Sie
bitte die Seiten 16-17.
Page 77

Geeignetes Kochgeschirr
VORSICHT
■ Kochzone und Topf- oder Pfannenboden müssen immer
trocken sein. Wenn sich Flüssigkeit dazwischen be ndet, kann
dies Wasserdampf erzeugen und Topf oder Pfanne können sich
bewegen.
■ Heizen Sie kein leeres Email-Kochgeschirr auf. Email-
Kochgeschirr darf beim Kochen nicht angesengt werden. Die
Emailbeschichtung könnte dadurch schmelzen und die Deckplatte
beschädigen.
■ Verwenden Sie kein Keramik- oder Steingutgeschirr, auch
wenn es für Induktionsherde geeignet ist.
Eignung von Kochgeschirr prüfen
1. Füllen Sie ein Kochgefäß mit etwas Wasser
und stellen Sie es auf die Kochzone.
2. Halten Sie den Hauptschalter gedrückt, um die
Stromzufuhr einzuschalten.
3. Berühren Sie die Taste der Kochzone, die
Sie verwenden möchten, und stellen Sie die
Leistungsstufe mithilfe des Schiebers ein.
■ Wenn das Kochgeschirr
geeignet ist, bleibt das Licht
der Leistungsanzeige und der
Kochzonenauswahl an.
■ Wenn das Kochgeschirr nicht
geeignet ist, erscheint
Kochzonenauswahl blinkt.
4. Halten Sie die Taste der Kochzone gedrückt
oder stellen Sie die Leistungsstufe auf "0" ein,
um auszuschalten.
und die
Deutsch
DE-19
Page 78

Kochen mit Induktion
Übersicht Bedienung
1. Halten Sie den Hauptschalter gedrückt, um die
Wenn das Kochfeld nach 1 Minute nicht verwendet
Wenn das passiert, schalten Sie den
2. Gewünschten Vorgang ausführen.
3. Halten Sie die Taste der Kochzone gedrückt
Stromzufuhr einzuschalten.
wird, schaltet sich das Gerät automatisch wieder aus.
Hauptschalter erneut ein.
■ Leistungsstufe wählen 1 -
(Siehe Seiten 22-23)
■ Autoboil Modus (Siehe Seite 24)
■ Niedrigtemperaturkochmodus
(Siehe Seite 25)
■ Bratmodus (Siehe Seite 26)
■ Frittiermodus (Siehe Seiten 27-28)
■ Bratmodus (Siehe Seite 26)
■ Frittiermodus (Siehe Seiten 27-28)
oder stellen Sie die Leistungsstufe auf "0" oder
"OFF", um auszuschalten.
DE-20
Page 79

Kochen mit Induktion
Sicherheitsfunktionen
Automatische Abschaltung
■ Das Gerät wird automatisch abgeschaltet, wenn
eine Unregelmäßigkeit erkannt wird:
- Kochgeschirr nicht erkannt (Siehe Seite 40)
- Kleiner Gegenstand in der Kochzone
- Leere/r Pfanne/Topf in der Kochzone
- Lange Kochzeit (Siehe Seite 35)
HINWEIS
Wenn eine Unregelmäßigkeit vorliegt, kann es sein, dass das Gerät
nicht automatisch abschaltet. Eine niedrige Leistungsstufe und die Art
des Kochgeschirrs können die Erkennung beeinussen.
■ Der Hauptschalter wird automatisch
ausgeschaltet, wenn 1 Minute ohne Betrieb
verstreicht.
Überhitzungsschutzfunktion
■ Die Heizleistung wird automatisch reduziert, um
ein Überhitzen von Kochgeschirr zu vermeiden.
(Siehe Seite 37)
(Siehe Seite 40)
(Siehe Seite 41)
WarnungvorheißenOberächen
■
leuchtet auf, wenn die Deckplatte heiß ist.
(Siehe Seite 14)
Restwärmeanzeige
■ blinkt, wenn die Deckplatte heiß ist.
(Siehe Seite 14)
Kindersicherung
■ Das Bedienfeld kann gesperrt werden, um
Missbrauch des Gerätes zu verhindern.
(Siehe Seite 12)
Deutsch
DE-21
Page 80

Kochen mit Induktion
Leistungsstufe wählen
WARNUNG
■ Flüssigkeiten müssen vor dem Aufwärmen umgerührt werden.
Andernfalls können die Zutaten plötzlich spritzen oder das
Kochgeschirr kann sich bewegen und Sie können Verbrennungen
oder Verletzungen erleiden.
■ Überhitzen Sie die Pfanne beim Vorheizen vor dem Braten nicht.
VORSICHT
Seien Sie vorsichtig, wenn Sie die Pfanne mit einer kleinen Menge Öl
vorheizen. Die Pfanne kann sich überhitzen und beschädigt werden.
1. Halten Sie den Hauptschalter gedrückt, um die
Stromzufuhr einzuschalten.
2. Wählen Sie eine Kochzone aus, z.B. vorne
links.
3. Berühren Sie den Schieber, um die
Leistungsstufe einzustellen.
Das Licht der Kochzonenauswahl bleibt an,
solange die entsprechende Kochzone in Betrieb ist.
Einstellbereich der Leistungsstufen: 1 – (18 Stufen).
Mehr zum Bedienungs des Schiebereglers nden
Sie auf Seite 13.
Richtlinien zu den Leistungsstufen nden Sie auf
Seite 31.
Boost-Funktion
Wenn die Leistungsstufe einer Kochzone auf 9
eingestellt ist, wird die Leistung der ausgewählten
Zone durch die Taste
Nach 10 Minuten wird die Leistungsstufe
automatisch auf 9 zurückgesetzt.
4. Halten Sie die Taste der Kochzone gedrückt
oder stellen Sie die Leistungsstufe auf "0" ein,
um auszuschalten.
HINWEIS
■ Wenn für einen bestimmten Zeitraum während des Betriebs einer
Kochzone keine Taste berührt wird, dann ertönt ein Piepton und die
Kochzone wird automatisch abgeschaltet. Eine Tabelle der Zeiten
der automatischen Abschaltung nden Sie auf Seite 35.
■ Wenn die vorderen und hinteren Kochzonen gleichzeitig genutzt werden,
wird die Wärmezufuhr so reguliert, dass der Gesamtstromverbrauch den
Grenzwert nicht übersteigt. Informationen über die Kochzonengruppen
und deren Auswirkungen nden Sie auf Seite 15.
schnell hochgefahren.
DE-22
Page 81

Kochen mit Induktion
Leistungsstufe wählen
Die Flex-Kochzonen als eine Zone verwenden
1. Halten Sie den Hauptschalter gedrückt, um die
Stromzufuhr einzuschalten.
2. Wählen Sie die Kochzonen durch zweimaliges
Berühren der Kochzonenauswahl aus, um die
gesamte Flex-Kochzone auszuwählen, z.B. die
linke Flex-Kochzone.
Die gesamte Flex-Kochzone kann durch
zweimaliges Berühren entweder der vorderen
oder hinteren Kochzonenauswahl ausgewählt
werden.
3. Berühren Sie den Schieber, um die
Leistungsstufe einzustellen.
Das Licht der Kochzonenauswahl bleibt an,
solange die entsprechende Kochzone in Betrieb ist.
Einstellbereich der Leistungsstufen: 1 – (18 Stufen).
Mehr zum Bedienungs des Schiebereglers nden
Sie auf Seite 13.
Richtlinien zu den Leistungsstufen nden Sie auf
Seite 31.
Boost-Funktion
Wenn die Leistungsstufe einer Kochzone auf 9
eingestellt ist, wird die Leistung der ausgewählten
Zone durch die Taste
Nach 10 Minuten wird die Leistungsstufe
automatisch auf 9 zurückgesetzt.
4. Halten Sie die Taste der Kochzone gedrückt
oder stellen Sie die Leistungsstufe auf "0" ein,
um auszuschalten.
schnell hochgefahren.
Deutsch
HINWEIS
■ Informationen zu den empfohlenen Kochgeschirrgrößen und deren
Positionierung nden Sie auf den Seiten 16-17.
■ Die Leuchtanzeige der Kochzonenauswahl stimmt möglicherweise
nicht mit den vom Kochgeschirr abgedeckten Kochzonen überein.
Dies hängt von der Größe und dem Material der verwendeten
Pfanne oder des Topfes ab.
DE-23
Page 82

Kochen mit Induktion
Autoboil Modus
KY-B925GL
KY-B915AL
KY-B915AB
HINWEIS
In der Anzeige blinkt solange die Temperatur "100" bis der
Siedepunkt erreicht ist. Nachdem das Wasser gekocht hat, stellt
das Gerät die Leistungsstufe automatisch auf "7" zurück. Sie
können die Leistungsstufe nach Bedarf erhöhen oder senken.
HINWEIS
■ Kochgeschirr mit Antihaftbeschichtung kann sich auf die
Sensorerkennung auswirken. Wenn das Gerät gepiepst hat, stellen
Sie die Leistungsstufe nach Bedarf ein.
■ Die Garzeituhr kann zusammen mit dem automatischen Aufkochen
verwendet werden. (Siehe Seite 29)
Ist auf der Kochzone mit dem möglich.
1. Halten Sie den Hauptschalter gedrückt, um die
Stromzufuhr einzuschalten.
2. Wählen Sie die Kochzone mit
Wenn Sie mit großem Kochgeschirr kochen,
kann auch die gesamte Flex-Kochzone durch
zweimaliges Berühren entweder der vorderen oder
hinteren Kochzonenauswahl ausgewählt werden.
3. Berühren Sie die Taste des Autoboil Modus.
Das
Gerät piepst 5 mal, wenn das Wasser den Siedepunkt
erreicht hat und lässt das Wasser weiter sprudelnd kochen.
Wenn das Gerät gepiepst hat, fügen Sie die Zutaten hinzu
und regeln die Wärmezufuhr mit dem Schieber nach Bedarf.
4. Halten Sie die Taste der Kochzone gedrückt
oder stellen Sie die Leistungsstufe auf "OFF"
ein, um auszuschalten.
aus.
DE-24
Min. 3 cm
Min. 0,5 L / 1 L
Autoboil Modus ist ausschließlich zum Aufkochen
von Wasser vorgesehen.
Um die optimale Leistung zu erreichen, wird Folgendes empfohlen.
■ Verwenden Sie einen Deckel, bis das Wasser kocht.
■ Verwenden Sie mindestens 0,5 L Wasser. Wenn
Sie einen größeren Topf verwenden, der über drei
oder mehr Bereiche der Flex-Kochzone reicht,
sollten Sie mindestens 1 L Wasser verwenden.
■ Der Topf oder die Pfanne sollte mindestens 1 cm
gefüllt sein, wenn die Flex-Kochzone genutzt wird.
Um zu verhindern, dass das kochende Wasser über
den Topfrand überkocht, wird Folgendes empfohlen.
■ Der Topf sollte maximal zu 70 % gefüllt sein.
■ Der Abstand zwischen der Wasseroberäche und
dem Deckel sollte mindestens 3 cm betragen.
Page 83

Kochen mit Induktion
Niedrigtemperaturkochmodus
Ist auf der Kochzone mit dem möglich.
1. Halten Sie den Hauptschalter gedrückt, um die
Stromzufuhr einzuschalten.
KY-B925GL
KY-B915AL
KY-B915AB
HINWEIS
■ Aufgrund der Vielfalt an Lebensmitteln und Topf- und Pfannenarten
kann die tatsächliche Temperatur der Lebensmittel von der
eingestellten Temperatur abweichen. Erhöhen oder senken Sie die
Einstellung bis die gewünschte Lebensmitteltemperatur erreicht ist.
■ Kochgeschirr mit Antihaftbeschichtung kann sich auf die
Sensorerkennung auswirken. Passen Sie die eingestellte Temperatur
an, bis die gewünschte Temperatur erreicht ist.
■ Um die optimale Leistung zu erreichen empfehlen wir, dass jeweils die
folgenden Mindestmengen im Niedrigtemperaturkochmodus erhitzt werden.
■ Der Topf oder die Pfanne sollte mindestens 1 cm gefüllt sein, wenn die
Flex-Kochzone genutzt wird.
■ Aufgrund der Konsistenz von Milch wird empfohlen, diese unter ständigem
Rühren aufzuwärmen, um ein Anlegen oder Anbrennen am Boden zu verhindern.
■ Die Garzeituhr kann zusammen mit dem Niedrigtemperaturkochmodus
verwendet werden. (Siehe Seite 29)
2. Wählen Sie die Kochzone mit
Wenn Sie mit großem Kochgeschirr kochen,
kann auch die gesamte Flex-Kochzone durch
zweimaliges Berühren entweder der vorderen oder
hinteren Kochzonenauswahl ausgewählt werden.
3. Berühren Sie die Taste der Sensor-Option
einmal, um Niedrigtemperaturkochmodus auszuwählen.
4.
Berühren Sie den Schieber, um die erforderliche
Temperatur einzustellen. Temperatureinstellbereich:
65 °C bis 120 °C. Die Kochtabelle für den Genius
Sensor nden Sie auf Seite 32.
5.
Wenn die eingestellte Temperatur erreicht ist, hört die
Temperaturanzeige auf zu blinken und das Gerät piepst 5 mal.
-
Wenn Niedrigtemperaturkochmodus ausgewählt wird,
nachdem zuvor mit hoher Temperatur gekocht worden
war, hört die Temperaturanzeige auf zu blinken, wenn
die eingestellte Temperatur erreicht ist, aber das Gerät
piepst nicht.
6. Halten Sie die Taste der Kochzone gedrückt oder stellen
Sie bei der Temperatur "OFF" ein, um auszuschalten.
- Wasser/Milch: 200 g
- Alle anderen Arten von
Lebensmitteln: 400
g
- Alle Arten von
Flüssigkeiten und
Lebensmitteln: 400
aus.
Deutsch
g
DE-25
Page 84

Kochen mit Induktion
Bratmodus
KY-B925GL
KY-B915AL
KY-B915AB
Ist auf den Kochzonen mit und
möglich.
1. Halten Sie den Hauptschalter gedrückt, um die
Stromzufuhr einzuschalten.
2. Stellen Sie die Pfanne/den Topf mit der
erforderlichen Menge an Öl auf die Kochzone.
3. Wählen Sie die gewünschte Kochzone aus.
Wenn Sie mit großem Kochgeschirr kochen,
kann auch die gesamte Flex-Kochzone durch
zweimaliges Berühren entweder der vorderen oder
hinteren Kochzonenauswahl ausgewählt werden.
4. Berühren Sie die Taste der Sensor-Option bis
angezeigt wird.
Berühren Sie den Schieber, um die erforderliche
5.
Temperatur einzustellen.
140 °C bis 230 °C. Die Kochtabelle für den Genius
Sensor nden Sie auf Seite 33.
6. Wenn die eingestellte Temperatur erreicht ist,
hört die Temperaturanzeige auf zu blinken und
das Gerät piepst 5 mal. Fügen Sie die Zutaten hinzu.
7. Halten Sie die Taste der Kochzone gedrückt
oder stellen Sie bei der Temperatur "OFF" ein,
um auszuschalten.
Temperatureinstellbereich:
DE-26
HINWEIS
■ Die Garzeituhr kann zusammen mit dem Bratmodus verwendet
werden. (Siehe Seite 29)
■ Die tatsächliche Temperatur am Boden der Pfanne oder des
Topfes kann von der eingestellten Temperatur abweichen, je nach
Art des Kochgeschirrs. Passen Sie die Temperatur nach Bedarf an.
■ Vergewissern Sie sich, dass das Kochgeschirr innen und außen
trocken ist, bevor Sie es aufheizen.
Page 85

Kochen mit Induktion
Frittiermodus
Ist auf den Kochzonen mit und
WARNUNG
Wenn Sie frittieren möchten, sollten Sie den Frittiermodus (
mindestens 200 g Öl oder mindestens 1 cm Füllhöhe verwenden.
Wenn Sie diese Sicherheitswarnung nicht beachten, dann kann dies
zum Überhitzen des Öls führen und einen Brand verursachen.
1. Halten Sie den Hauptschalter gedrückt, um die
möglich.
) mit
Stromzufuhr einzuschalten.
KY-B925GL
KY-B915AL
KY-B915AB
2. Stellen Sie die Pfanne/den Topf mit der
erforderlichen Menge an Öl auf die Kochzone.
3. Wählen Sie die gewünschte Kochzone aus.
4. Berühren Sie die Taste der Sensor-Option bis
angezeigt wird.
5.
Berühren Sie den Schieber, um die erforderliche
Temperatur einzustellen.
140 °C bis 200 °C. Die Kochtabelle für den Genius
Sensor nden Sie auf Seite 33.
6. Wenn die eingestellte Temperatur erreicht ist,
hört die Temperaturanzeige auf zu blinken und
das Gerät piepst 5 mal. Fügen Sie die Zutaten hinzu.
7. Halten Sie die Taste der Kochzone gedrückt
oder stellen Sie bei der Temperatur "OFF" ein,
um die Kochzone auszuschalten.
HINWEIS
■ Die Garzeituhr kann nicht zusammen mit dem Frittiermodus
verwendet werden. Nur der Kurzzeitwecker kann verwendet
werden. (Siehe Seite 30)
■ Mit dem Frittiermodus kann die gesamte Flex-Kochzone nicht
verwendet werden.
■ Die tatsächliche Öltemperatur kann von der eingestellten
Temperatur abweichen, je nach Art des Kochgeschirrs. Passen Sie
die Temperatur nach Bedarf an.
Temperatureinstellbereich:
Deutsch
DE-27
Page 86

Kochen mit Induktion
Frittiermodus
Achten Sie auf Folgendes, damit der Genius
Sensor ordnungsgemäß funktioniert.
■ Halten Sie sich an die Anweisung bezüglich der
■ Stellen Sie die Pfanne/den Topf in die Mitte der
■ Verwenden Sie kein heißes, bräunlich
■ Beachten Sie die Empfehlungen zum geeigneten
■ Vergewissern Sie sich, dass Deckplatte und Topf-/
■ Fügen Sie keine Zutaten hinzu, bevor die
■ Fügen Sie kein Öl hinzu oder stellen die Pfanne/
Ölmenge.
Menge: 200 g bis 800 g (0,22 L bis 0,9 L)
Füllhöhe: mindestens 1 cm
Kochzone.
verfärbtes oder ockiges Öl oder Öl mit
Lebensmittelrückständen.
Kochgeschirr. (Siehe Seite 18)
Pfannenunterseite trocken und sauber sind.
Temperaturanzeige nicht aufgehört hat zu blinken.
Wenn eine Unregelmäßigkeit erkannt wird, kann
es sein, dass nicht mehr weiter aufgeheizt wird.
den Topf auf eine andere Kochzone, sobald das
Vorheizen begonnen hat.
DE-28
Page 87

Kochen mit Induktion
Zeitschaltuhr
Verwendung der Garzeituhr
Dient zum automatischen Abschalten einer
Kochzone. Die Garzeituhr kann für mehrere
Kochzonen eingestellt werden.
1. Halten Sie den Hauptschalter gedrückt, um die
2. Gewünschten Vorgang ausführen.
(Siehe Seiten 22-26)
3. Berühren Sie die Taste der Zeitschaltuhr
Das Symbol der Garzeituhr blinkt, wenn die
4. Berühren Sie den Schieber, um die gewünschte
Kochzeit einzustellen.
Einstellbereich der Garzeituhr: 1 Minute bis 9
Stunden.
Stromzufuhr einzuschalten.
einmal, um die Garzeituhr auszuwählen.
entsprechende Kochzone ausgewählt ist bis die
Uhr eingestellt ist.
■ Die Garzeituhr kann eingestellt werden,
solange die Anzeige blinkt.
■ Schieben Sie den Regler auf 90 Minuten.
Durch Berühren der "+"-Taste erhöhen Sie die
Zeit.
■ Wenn Sie die "+" oder "-"-Taste länger halten,
erhöhen oder verringern Sie die Zeit schnell.
Garzeituhr ausschalten:
■ Stellen Sie die Zeitanzeige auf "0".
Anpassen der Countdown-Zeit
■ Sobald der Countdown begonnen hat, kann
die Zeit eingestellt werden. Wählen Sie die
Kochzone aus, drücken Sie auf die Zeituhr und
passen Sie die Zeit mit dem Schieber an.
5. Wenn die Zeituhr "0" erreicht, piepst das Gerät
5 mal und schaltet die Kochzone ab.
HINWEIS
Die Garzeituhr kann nicht im Frittiermodus eingestellt werden.
Deutsch
DE-29
Page 88

Kochen mit Induktion
Zeitschaltuhr
Verwendung des Kurzzeitweckers
Dieser wird unabhängig von allen sonstigen
Kochfunktionen verwendet. Er zählt von einer
eingestellten Zeit herunter.
1. Halten Sie den Hauptschalter gedrückt, um die
Stromzufuhr einzuschalten.
2. Berühren Sie die Taste des Kurzzeitweckers,
um diesen auszuwählen. Der Kurzzeitwecker
wird automatisch ausgewählt, wenn das Gerät
nicht in Betrieb ist. Berühren Sie die Taste des
Kurzzeitweckers zweimal, wenn das Gerät in
Betrieb ist.
Das Symbol des Kurzzeitweckers blinkt, bis die
Zeit eingestellt ist.
3. Berühren Sie den Schieber, um die Zeit
einzustellen.
Einstellbereich des Kurzzeitweckers: 1 Minute
bis 9 Stunden.
■ Schieben Sie den Regler auf 90 Minuten. Durch
Berühren der "+"-Taste erhöhen Sie die Zeit.
■ Wenn Sie die "+" oder "-"-Taste länger halten,
erhöhen oder verringern Sie die Zeit schnell.
DE-30
Kurzzeitwecker ausschalten:
■ Stellen Sie die Zeitanzeige auf "0".
Anpassen der Countdown-Zeit:
■ Sobald der Countdown begonnen hat, kann
die Zeit eingestellt werden. Wählen Sie den
Kurzzeitwecker aus und passen Sie die Zeit mit
dem Schieber an.
4. Wenn der Wecker "0" erreicht, piepst das Gerät
5 mal.
HINWEIS
■ Der Kurzzeitwecker schaltet die Kochzonen nicht ab.
■ Garzeituhr und Kurzzeitwecker können zusammen eingestellt
werden.
Page 89

Richtlinien für Leistungsstufen
Niedrig Mittel Hoch
Leistungsstufe 1 1. 2 2. 3 3. 4 4. 5 5. 6 6. 7 7. 8 8. 9
Schokolade
Butter
Schmelzen
Suppe (z.B. Linsen)
Wiener Würstchen
Erwärmen
Nudelsauce
Milchreis
Köcheln
Braten
Fischlets
Weiße Sauce
Pfanne vorheizen
Anbraten
Spiegeleier
Pfannkuchen
Omelett
Steak, Speck,
Kotelett
Fischlets
Frikadellen
Nudeln, Wasser
Honig
Milch
Eintopf
Deutsch
Gemüse
Kochen
Leistungsstufe 1 1. 2 2. 3 3. 4 4. 5 5. 6 6. 7 7. 8 8. 9
* Diese Leistungsstufen beziehen sich auf die Verwendung der linken und rechten
Kochzonen.
Bitten stellen Sie die Leistungsstufe niedriger ein, wenn Sie die mittlere Kochzone
verwenden.
HINWEIS
Die Hitzewerte sind möglicherweise abhängig vom verwendeten Kochgeschirr.
Prüfen und passen Sie die Leistungsstufen nach Bedarf an.
Reis
DE-31
Page 90

Kochtabelle für Genius Sensor
Niedrigtemperaturkochmodus (12 Stufen)
Gerichte 65 70 75 80 85 90 95
Lebensmittel in Dosen
Erwärmen
Hähnchenbrust
Pochieren
Gekochtes Ei
Kochen
Fisch und Schalentiere
Dünsten
Schokolade schmelzen
Sauce (z.B. Hollandaise)
Wasserbad
Kartoffeln
Gemüse
Kartoffeln
Hähnchenbrust
Schmoreisch
100 105 110 115 120
Milch
Ei
Fisch
Reis
Curry
Suppe
DE-32
Schmorgericht
Köcheln *
Ragout nach irischer Art
* Köcheln
Die empfohlenen Temperaturen gelten nur für Köcheln. Bei einigen Rezepten kann
es notwendig sein, Zutaten (z.B. Fleisch, Gemüse, usw.) zuerst mit hoher Temperatur
zu kochen, bevor dann langsam weiter gekocht wird. In diesem Fall sollten Sie
die Zutaten mit den entsprechenden Leistungsstufen kochen und dann erst den
Niedrigtemperaturkochmodus einstellen. (Siehe Seite 25)
Wenn der Niedrigtemperaturkochmodus nach dem Kochen mit hoher Leistung
verwendet wird, hört das Gerät auf zu blinken, piepst aber nicht, wenn die eingestellte
Temperatur erreicht ist.
Fleischsauce
Marmelade
Kompott
Page 91

Kochtabelle für Genius Sensor
Bratmodus (5 Stufen)
°C 140 160 180 200 230
Lammkotelett,Fischllet
Steak,Schwein,Hähnchenllet
Schnitzel,
Paniertes Schnitzel
Vorgeschlagene
Gerichte
Omelett
Schinkentoast mit Käse
Amerikanische Pancakes
Burger
Bratkartoffeln
Speck,
Würstchen
Spiegeleier
Arme Ritter
Pfannkuchen
Anbraten
Frittiermodus (7 Stufen)
°C 140 150 160 170 180 190 200
Croutons
Tiefgefrorenes
Fisch im Ausbackteig
Donuts
Vorgeschlagene
Gerichte
Frittiertes
Hähnchen
Pilze
Selbstgemachte
Pommes Frites
HINWEIS
Die Hitzewerte sind möglicherweise abhängig vom verwendeten Kochgeschirr.
Prüfen und passen Sie die Genius Sensor-Stufen nach Bedarf an.
Gemüse im
Ausbackteig
Deutsch
DE-33
Page 92

Reinigung
VORSICHT
■ Bevor Sie mit der Reinigung beginnen, schalten Sie den
Hauptschalter aus. Lassen Sie das Gerät abkühlen, bevor Sie
die Deckplatte reinigen.
■ Verwenden Sie keinen Dampfreiniger. Dabei könnte Wasser in
die elektrischen Bauteile eindringen und zu Schäden führen.
Halten Sie das Gerät immer sauber.
Verschüttete Lebensmittel oder verbranntes Fett auf
dem Gerät lassen sich möglicherweise nur schwer
entfernen.
Deckplatte und Bedienfeld
Leichte Verschmutzungen
Wischen Sie diese mit einem feuchten Tuch ab.
Fettecken
■ Wischen Sie diese mit einem feuchten Tuch und
einem milden Reinigungsmittel ab.
■ Verwenden Sie keine starken säure- oder
laugenhaltigen Reinigungsmittel wie Bleiche oder
synthetische Reinigungsmittel. Dies kann zu
Verfärbungen führen.
DE-34
Starke Verschmutzungen
Tragen Sie nicht scheuernde Reinigungsmilch auf die
Deckplatte oder das Bedienfeld auf und reinigen Sie
mit einem Tuch.
HINWEIS
Stellen Sie sicher, dass der Boden des Kochgeschirrs nicht
verschmutzt ist.
Page 93

Fehlersuche und Behebung
Prüfen Sie die folgenden Punkte, wenn Sie Rat bezüglich einigen der üblichen
Probleme suchen, bevor Sie sich an das Kundendienstzentrum wenden.
Stromversorgung
Symptom Mögliche Ursache
Das Gerät lässt sich
nicht einschalten.
Die Kochzone hat sich
während des Betriebs
selbst abgeschaltet.
Automatische
Abschaltung (Stunden)
■ Der Hauptschalter wurde nicht eingeschaltet.
Berühren Sie den Hauptschalter etwas länger.
■ Kindersicherung ist eingeschaltet. (Siehe Seite 12)
Automatische Abschaltung
Wenn das Gerät nach 1 Minute ab dem Einschalten nicht
verwendet wird, schaltet sich das Gerät automatisch wieder aus.
Schalten Sie den Hauptschalter wieder ein.
Lange Kochzeit
Wenn für einen bestimmten Zeitraum (siehe Tabelle
unten) während des Betriebs einer Kochzone keine
Taste berührt wird, dann ertönt ein Piepston und die
Kochzone wird automatisch abgeschaltet.
Stellen Sie das Gerät erneut wie gewünscht ein.
Wir empfehlen, die Garzeituhr einzustellen, wenn über einen
längeren Zeitraum langsam gekocht wird. (Siehe Seite 29)
Leistungsstufe
Niedrig Mittel Hoch
1 1. 2 2. 3 3. 4 4. 5 5. 6 6. 7 7. 8 8. 9
9 8 7 6 5 4 3 2 1
Bedienfeld
Symptom Mögliche Ursache
Tasten können nicht
bedient werden.
Die Tasten reagieren,
wenn benachbarte
Bereiche berührt werden.
■ Ihre Fingerspitzen sind bedeckt. Berühren Sie die
Tasten mit dem nackten Finger.
■ Bedienfeldsperre ist aktiviert. (Siehe Seite 12)
■ Sie haben den Vorgang ausgeführt, während Sie einen
Pfannen-/Topfgriff halten.
■ Das Bedienfeld ist verschmutzt.
Schalten Sie den Hauptschalter aus und stellen Sie
sicher, dass der Bereich sauber und trocken ist.
Schalten Sie den Hauptschalter wieder ein.
Möglicherweise benden sich Wasser oder andere
Flüssigkeiten an oder um die Tasten.
Stellen Sie sicher, dass der Bereich sauber und trocken ist.
Deutsch
DE-35
Page 94

Fehlersuche und Behebung
Töne und Geräusche
Symptom Mögliche Ursache
Während des
Aufheizens ist ein
Geräusch zu hören.
Je nach verwendetem Kochgeschirr können
verschiedene Geräusche zu hören sein. Es kann sein,
dass Sie geringe Vibrationen spüren, wenn Sie den Griff
halten und das Kochgeschirr kann sich leicht bewegen.
Dies ist keine Fehlfunktion. Wenn Sie das
Kochgeschirr leicht bewegen oder erneut aufstellen,
kann dies das Geräusch zu beheben.
Wenn das Kochgeschirr währen des Aufheizens entfernt
wird, kann es sein, dass ein kurzes metallisches
Geräusch zu hören ist.
Der Geräuschpegel des
Gerätes ändert sich
nach oben oder unten.
Nachdem der
Hauptschalter
abgeschaltet ist, ist das
Geräusch des Ventilators
noch zu hören.
Beim Beginn des Flex-
Kochens ist ein klickendes
Geräusch zu hören.
Dies ist das Geräusch des Ventilators im Gerät. Der
Geräuschpegel ändert sich je nach Leistungsstufe
und dem Material des Kochgeschirrs. Wenn die
Leistungsstufe erhöht wird, läuft der Ventilator schneller
und wird lauter.
Solange das Gerät im Inneren noch heiß ist, läuft der
Ventilator weiter. Wenn das Gerät abkühlt, stoppt der
Ventilator automatisch.
Dies ist keine Fehlfunktion. Dies ist Teil der
Induktionstechnologie. Das Geräusch verstummt
während des Betriebs.
DE-36
Page 95

Fehlersuche und Behebung
Aufheizleistung
Symptom Mögliche Ursache
Die Aufheizleistung ist
schwächer.
Wenn mehrere
Kochzonen zusammen
verwendet werden
■ wird die
Aufheizleistung
schwächer.
■ nimmt die
Leistungsanzeige
automatisch ab.
■ kann die
Leistungsstufe nicht
erhöht werden.
Überhitzungsschutzfunktion
Wenn der Boden des Kochgeschirrs überhitzt, dann
wird die Aufheizleistung automatisch reduziert. Die
Leistungsanzeige bleibt dieselbe. Die Leistung kehrt
zum Normalwert zurück, wenn das Kochgeschirr
abgekühlt ist.
Es wird ungeeignetes Kochgeschirr verwendet, z.B. aus
Keramik und Steingut.
Verwenden Sie keine Pfannen und Töpfe aus
Keramik oder Steingut, selbst wenn diese für
Induktion geeignet sind, da diese nicht so effektiv
sind. (Siehe Seiten 18-19)
Die Leistungsstufe wir automatisch so reguliert, dass der
Gesamtstromverbrauch nicht den Grenzwert übersteigt.
(Siehe Seite 15)
Die Leistungsanzeige für eine Kochzone kann sich
selbst absenken.
Es kann sein, dass auch nach Berühren des
Leistungsstufe diese nicht erhöht wird und das Gerät
piepst.
Schiebers zur Anpassung der
DE-37
Deutsch
Page 96

Fehlersuche und Behebung
Autoboil Modus
Symptom Mögliche Ursache
Aufheizen dauert zu
lange.
Keine Leistung - beginnt
nicht aufzuheizen.
■ Der Boden der Pfanne/des Topfes oder die Deckplatte
ist verschmutzt.
■ Es wurde kein Deckel verwendet.
■ Während des automatischen Aufkochens wurde mehr
Wasser hinzugefügt.
■ Der Deckel wurde während des automatischen
Aufkochens entfernt oder die Pfanne/der Topf bewegt.
■ Kochgeschirr mit Antihaftbeschichtung kann sich auf
die Sensorerkennung auswirken. Wenn das Wasser
nach dem Piepston nicht kocht, heizen Sie nach
Bedarf weiter auf.
Die Deckplatte ist zu heiß für den Autoboil Modus. Das
automatische Aufheizen beginnt dann automatisch,
wenn die Deckplatte abgekühlt ist.
Niedrigtemperaturkochmodus
Symptom Mögliche Ursache
■ Vorheizen dauert zu
lange.
■ Die tatsächliche
Temperatur
unterscheidet sich
von der eingestellten
Temperatur.
■ Die Lebensmittel
erreichen nicht
die eingestellte
Temperatur.
■ Die Pfanne/der Topf wurde vom Genius Sensor weg
bewegt.
■ Der Boden der Pfanne/des Topfes oder die Deckplatte
ist verschmutzt.
■ Während des Vorheizens wurden Wasser, Öl oder
Lebensmittel hinzugefügt.
■ Die Temperatur am Boden der Pfanne oder des Topfes
kann von der eingestellten Temperatur abweichen, je
nach Art des Kochgeschirrs.
■ Aufgrund der Vielfalt an Lebensmitteln und Topf- und
Pfannenarten kann die tatsächliche Temperatur der
Lebensmittel von der eingestellten Temperatur abweichen.
■ Kochgeschirr mit Antihaftbeschichtung kann sich auf
die Sensorerkennung auswirken.
Passen Sie die Temperatur nach Bedarf über
Schieber an.
DE-38
Keine Leistung - beginnt
nicht aufzuheizen.
Die Deckplatte ist zu heiß für die eingestellte Temperatur.
Das Aufheizen beginnt automatisch, wenn die Deckplatte
abgekühlt ist.
Page 97

Fehlersuche und Behebung
Bratmodus
Symptom Mögliche Ursache
■ Vorheizen dauert zu
lange.
■ Die tatsächliche
Temperatur
unterscheidet sich
von der eingestellten
Temperatur.
■ Die Pfanne/der Topf wurde vom Genius Sensor weg
bewegt.
■ Der Boden der Pfanne/des Topfes oder die Deckplatte
ist verschmutzt.
■ Während des Vorheizens wurden Wasser, Öl oder
Lebensmittel hinzugefügt.
■ Die Temperatur am Boden der Pfanne oder des Topfes
kann von der eingestellten Temperatur abweichen, je
nach Art des Kochgeschirrs.
Passen Sie die Temperatur nach Bedarf über
Frittiermodus
Symptom Mögliche Ursache
■ Vorheizen dauert zu
lange.
■ Die tatsächliche
Temperatur
unterscheidet sich
von der eingestellten
Temperatur.
■ Die Pfanne/der Topf wurde vom Genius Sensor weg
bewegt.
■ Der Boden der Pfanne/des Topfes oder die Deckplatte
ist verschmutzt.
■ Es wurden mehr als 800 g Öl hinzugefügt.
■ Es wurde heißes, bräunlich verfärbtes oder ockiges
Öl oder Öl mit Lebensmittelrückständen verwendet.
■ Die Öltemperatur kann sich von der eingestellten
Temperatur unterscheiden oder die Vorheizzeit kann
sich verlängern, je nach Art, Material, Form und Größe
des Bodens der Pfanne/des Topfes.
Passen Sie die Temperatur nach Bedarf über
Schieber an.
Schieber an.
Deutsch
DE-39
Page 98

Fehler-Codes
Das Aufheizen kann wieder aufgenommen werden, nachdem die Ursachen der
folgenden Fehler behoben sind.
Anzeige Mögliche Ursache
■ Es bendet sich Wasser oder etwas anderes auf dem
oder um das Bedienfeld.
■ Taste wird länger gehalten als erforderlich.
Kochgeschirr nicht erkannt
■ Kein/e Pfanne/Topf auf der Kochzone.
■ Pfanne/Topf wurde entfernt.
■ Pfanne/Topf nicht an der richtigen Position.
(Siehe Seiten 16-17)
■ Es wird ein/e nicht geeignete/r Pfanne/Topf verwendet.
(Siehe Seiten 18-19)
Kleiner Gegenstand in der Kochzone
■ Es wurden kleine metallische Gegenstände (z.B.
Besteck, Kochgerät) auf der Kochzone abgelegt.
Wenn obige Zustände nicht behoben werden, schalten
die Anzeige und der Hauptschalter ab.
DE-40
Page 99

Fehler-Codes
Die folgenden Fehler können durch Drücken der Taste der entsprechenden
Kochzone gelöscht werden.
Anzeige Mögliche Ursache
Die Ansaug- oder Abluftöffnungen sind blockiert.
(Siehe Seite 46)
Entfernen Sie alle Hindernisse.
Leere/r Pfanne/Topf in der Kochzone
■ Es wurde ein/e leere/r Pfanne/Topf aufgeheizt.
■ Beim Frittiermodus wurde das Öl überhitzt, weil die
Leistungsstufe anstelle von Frittiermodus ausgewählt
worden ist.
Verwenden Sie zum Aufheizen von großen Mengen
Öl den Frittiermodus.
■ Es wurde ungeeignetes Kochgeschirr zum
Frittiermodus verwendet. (Siehe Seiten 18-19)
■ Pfanne/Topf nicht an der richtigen Position.
(Siehe Seite 17)
■ Es wurden mehr als 800 g Öl aufgeheizt.
■ Beim Vorheizen wurden Zutaten hinzugefügt.
Wenn Sie die obigen Probleme nicht lösen können oder ein Fehler auftritt,
wenden Sie sich bitte an den Kundendienst.
Schalten Sie den Hauptschalter und den Schutzschalter aus. Wenden Sie sich
bezüglich Hilfestellung an den Händler, bei dem Sie das Gerät gekauft haben,
oder an das Kundendienstzentrum.
HINWEIS
■ Während der Garantiefrist dürfen Reparaturen nur durch
Kundendiensttechniker durchgeführt werden, die vom
Gerätehersteller zugelassen sind.
■ Unautorisierte Reparaturen können zu Stromschlägen und
Kurzschlüssen führen; versuchen Sie nicht, das Gerät selbst
zu reparieren. Wenden Sie sich an einen zugelassenen
Kundendiensttechniker.
■ Garantieansprüche infolge eines unsachgemäßen Anschlusses
oder Gebrauchs des Gerätes sind nicht von der Garantie
abgedeckt. In diesem Fall müssen die Kosten der Reparatur vom
Benutzer getragen werden.
■ Eine Liste der Kundendienstzentren nden Sie im Garantieheft.
Deutsch
DE-41
Page 100

Installationsanleitung
Installation und Anschluss
Bitte halten Sie sich strikt an die folgenden Sicherheitsvorkehrungen.
WICHTIG
■ Packen Sie das Gerät aus, entfernen Sie sämtliches
Verpackungsmaterial und prüfen Sie auf etwaige Schäden. Wenn
das Gerät Schäden aufweist, DÜRFEN SIE es NICHT einbauen.
Benachrichtigen Sie dann sofort Ihren Händler.
■ Bauen Sie das Gerät gemäß den Installationsanleitung ein.
Andernfalls kann es sein, dass die Leistung des Gerätes leidet.
■ Führen Sie nach dem Einbau einen Probelauf durch und erklären
Sie dem Kunden, wie das Gerät zu bedienen ist.
■ Der korrekte Einbau liegt in der Verantwortung des Monteurs. Eine
Fehlfunktion oder ein Unfall, der die Folge der Nichteinhaltung der
Installationsanleitung ist, ist nicht von der Garantie abgedeckt.
Sicherheitsanweisungen
DE-42
■ Befolgen Sie beim Einbau diese Anweisungen
voll und ganz. Ein unsachgemäßer Einbau
kann zu elektrischen Kriechströmen oder einem
Brand führen.
■ Schließen Sie das Gerät zwecks
Stromversorgung an einen dafür geeigneten
220-240
V Einphasenanschluss (oder
Dreiphasenanschluss 380-415 V 3N /
380-415 V 2N) an, mit FI-Schutzschalter.
Die elektrische Verkabelung kann sich
außergewöhnlich erhitzen, wenn der Anschluss
nicht korrekt ausgeführt ist.
 Loading...