

Panasonic KX-TS108W User Manual

Integrated Telephone System
Preparation Basic Operation
Model No.
KX-TS108W
Pulse-or-tone dialing capability
Operating Instructions
Advanced Operation
PLEASE READ BEFORE USE AND SAVE.
Panasonic World Wide Web address: http://www.panasonic.com
for customers in the USA or Puerto Rico
Useful Information

Before Initial Use
Please read IMPORTANT SAFETY
INSTRUCTIONS on page 34 before use.
Read and understand all instructions.
Thank you for purchasing your new Panasonic integrated
telephone.
Attach your purchase receipt here.
For your future reference
Serial No. Date of purchase
(found on the bottom of the unit)
Name and address of dealer
2
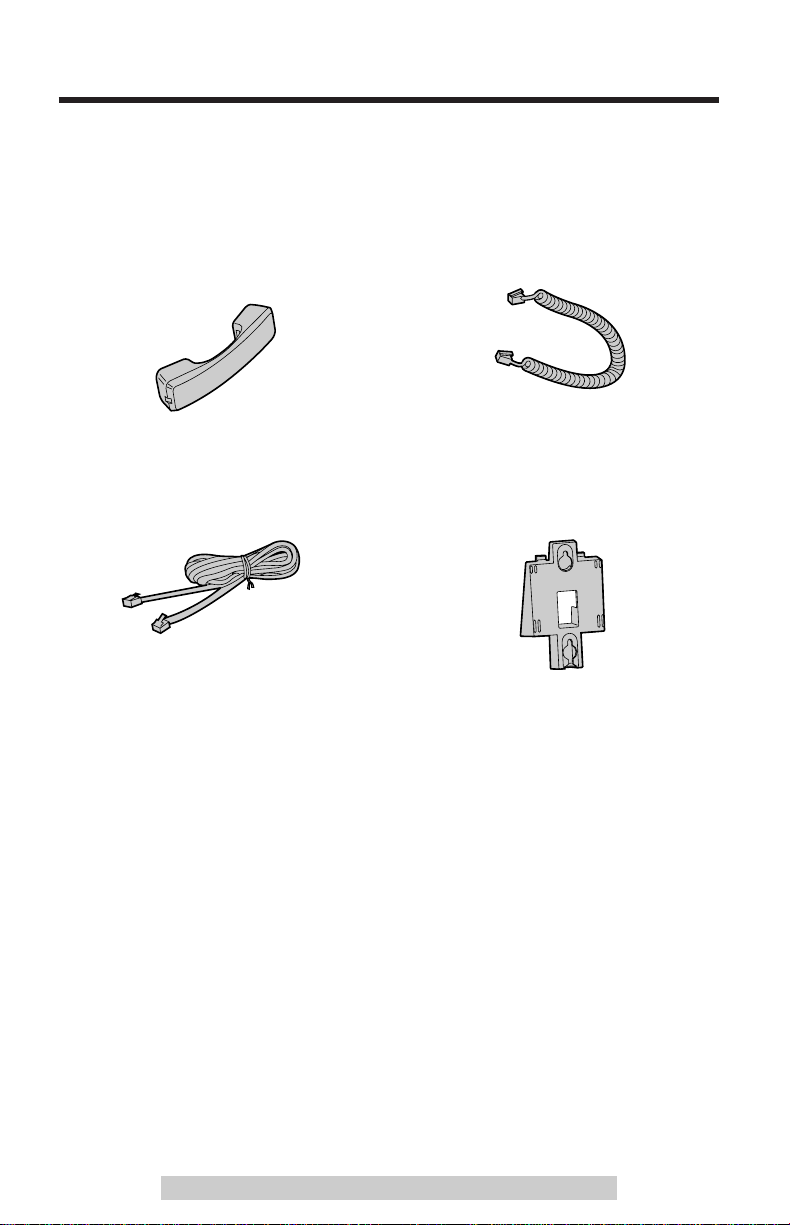
Accessories (included)
For extra orders, call 1-800-332-5368.
∑ Handset (p. 8)
Order No. PQJXC0102Z
one
∑ Telephone Line Cord (p. 8)
one
∑ Handset Cord (p. 8)
Order No. PQJA212M
one
∑ Wall Mounting Adaptor (p. 14)
Order No. PQKL10038Y1
one
For assistance, please call: 1-800-211-PANA(7262)
3

Contents
Preparation
Location of Controls . . . . . . . . . . . . . . . . . . . . . . . . . . . . . . . . . 16
Display . . . . . . . . . . . . . . . . . . . . . . . . . . . . . . . . . . . . . . . . . . . . 17
Settings. . . . . . . . . . . . . . . . . . . . . . . . . . . . . . . . . . . . . . . . . . . . 18
Installing the Batteries. . . . . . . . . . . . . . . . . . . . . . . . . . . . . . . . 18
Connecting the Handset/Telephone Line Cord . . . . . . . . . . . . . 18
Connecting a Communication Device . . . . . . . . . . . . . . . . . . . . . 9
Programming Summary . . . . . . . . . . . . . . . . . . . . . . . . . . . . . . 10
Dialing Mode. . . . . . . . . . . . . . . . . . . . . . . . . . . . . . . . . . . . . . . 11
Time Adjustment . . . . . . . . . . . . . . . . . . . . . . . . . . . . . . . . . . . . 12
LCD Contrast . . . . . . . . . . . . . . . . . . . . . . . . . . . . . . . . . . . . . . 13
Ringer Volume . . . . . . . . . . . . . . . . . . . . . . . . . . . . . . . . . . . . . 13
Wall Mounting . . . . . . . . . . . . . . . . . . . . . . . . . . . . . . . . . . . . . . 14
Basic Operation
Making Calls . . . . . . . . . . . . . . . . . . . . . . . . . . . . . . . . . . . . . . . . 15
Answering Calls . . . . . . . . . . . . . . . . . . . . . . . . . . . . . . . . . . . . . 17
Advanced Operation
Speed Dialer . . . . . . . . . . . . . . . . . . . . . . . . . . . . . . . . . . . . . . . . 18
Storing Phone Numbers . . . . . . . . . . . . . . . . . . . . . . . . . . . . . . 18
Dialing a Stored Number . . . . . . . . . . . . . . . . . . . . . . . . . . . . . . 19
One-Touch Dialer . . . . . . . . . . . . . . . . . . . . . . . . . . . . . . . . . . . . 20
Storing Phone Numbers . . . . . . . . . . . . . . . . . . . . . . . . . . . . . . 20
Dialing a Stored Number . . . . . . . . . . . . . . . . . . . . . . . . . . . . . . 22
4

Special Features. . . . . . . . . . . . . . . . . . . . . . . . . . . . . . . . . . . . . 23
For Call Waiting Service Users . . . . . . . . . . . . . . . . . . . . . . . . . 23
Temporary Tone Dialing
(For Rotary or Pulse Service Users) . . . . . . . . . . . . . . . . . . . 23
How to Use the PAUSE Button
(For Analog PBX Line/Long Distance Service Users) . . . . . . . 24
Muting Your Conversation. . . . . . . . . . . . . . . . . . . . . . . . . . . . . 24
FLASH Button . . . . . . . . . . . . . . . . . . . . . . . . . . . . . . . . . . . . . . 25
PIN Code . . . . . . . . . . . . . . . . . . . . . . . . . . . . . . . . . . . . . . . . . 26
Dial Lock. . . . . . . . . . . . . . . . . . . . . . . . . . . . . . . . . . . . . . . . . . 27
Call Restriction . . . . . . . . . . . . . . . . . . . . . . . . . . . . . . . . . . . . . 28
Useful Information
Optional Headset . . . . . . . . . . . . . . . . . . . . . . . . . . . . . . . . . . . . 29
Battery Replacement . . . . . . . . . . . . . . . . . . . . . . . . . . . . . . . . . 31
Troubleshooting . . . . . . . . . . . . . . . . . . . . . . . . . . . . . . . . . . . . . 32
Important Safety Instructions . . . . . . . . . . . . . . . . . . . . . . . . . . 34
FCC and Other Information . . . . . . . . . . . . . . . . . . . . . . . . . . . . 36
Index . . . . . . . . . . . . . . . . . . . . . . . . . . . . . . . . . . . . . . . . . . . . . . 38
Preparation Basic Operation
Advanced Operation
For assistance, please call: 1-800-211-PANA(7262)
Useful Information
5

Location of Controls
ABC
DEF
JKL
MNO
GHI
TUV
WXYZ
PQRS
PAUSE
REDIALREDIAL
FLASH
HOLD
VOLUMEVOLUME
MUTEMUTE
PROGRAM
MIC
S
P
-
P
H
O
N
E
DIAL LOCKDIAL LOCK
DIAL LOCK
MUTUTE
PRPROG.OG.
LOWER TIME
AUTO/AUTO/
LOWERLOWER
(TONE) Button (p. 23)
(FLASH) Button (p. 23, 25)
VOLUME
(_) (^)
Buttons (p. 16)
RINGER
Selector (p. 13)
(PROGRAM) Button (p. 10, 18)
(PAUSE) Button (p. 24)
(REDIAL) Button (p. 15)
Display (p. 7)
One-Touch Auto
Dial Buttons (p. 20)
(DIAL\LOCK) Button (p. 27)
(AUTO/LOWER)
Button (p. 18, 21)
(HOLD) Button (p. 16)
MIC (Microphone)
(p. 15, 17)
(MUTE) Button (p. 10, 24)
(SP-PHONE/HEADSET) Button and Indicator (p. 15, 17, 30)
Headset Jack (p. 29)
Ringer Indicator (p. 17)
EMERGENCYEMERGENCY
TONE
HEADSETHEADSET
PAUSE
IT
IT
S
OPER
6
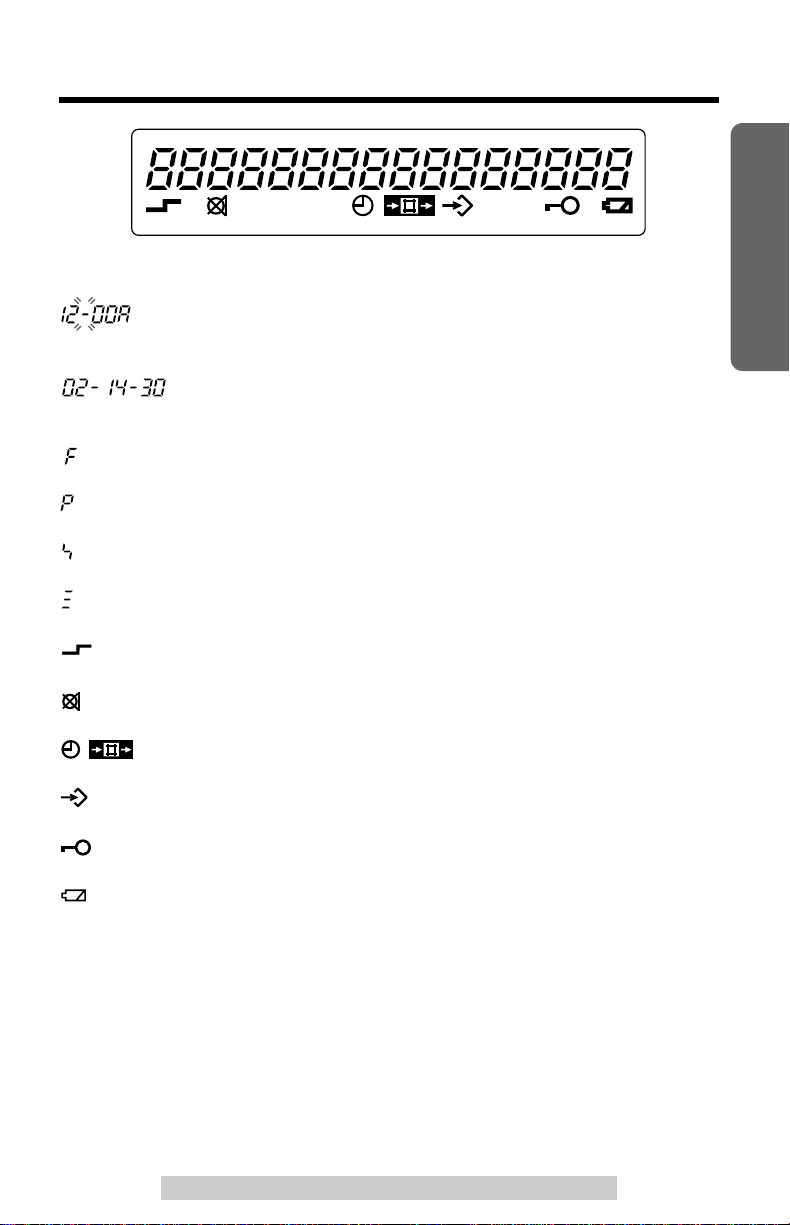
Display
(This display shows all of the possible configurations.)
: In the standby mode, the display shows the current time.
(Ex. 12:00AM)
: During a conversation, the call duration is displayed.
(Ex. 2 hours, 14 minutes, 30 seconds)
: (FLASH) was pressed.
: (PAUSE) was pressed while storing phone numbers.
: ($) was pressed while dialing.
: (#) was pressed while dialing.
Preparation
: (AUTO/LOWER) was pressed (p. 18, 21).
: (MUTE) was pressed during a conversation (p. 24).
: The unit is in the clock setting mode (p. 12).
: The unit is in the programming mode (p. 10).
: The dial lock mode is set. To cancel the mode, see page 27.
: This display flashes, when the battery power is low. To replace
the batteries, see page 31.
For assistance, please call: 1-800-211-PANA(7262)
7
Settings
Single-Line
Telephone Jack
(RJ11C)
Handset Cord
Handset
Telephone Line
Cord
LINE
+
-
-
+
+
-
1
2
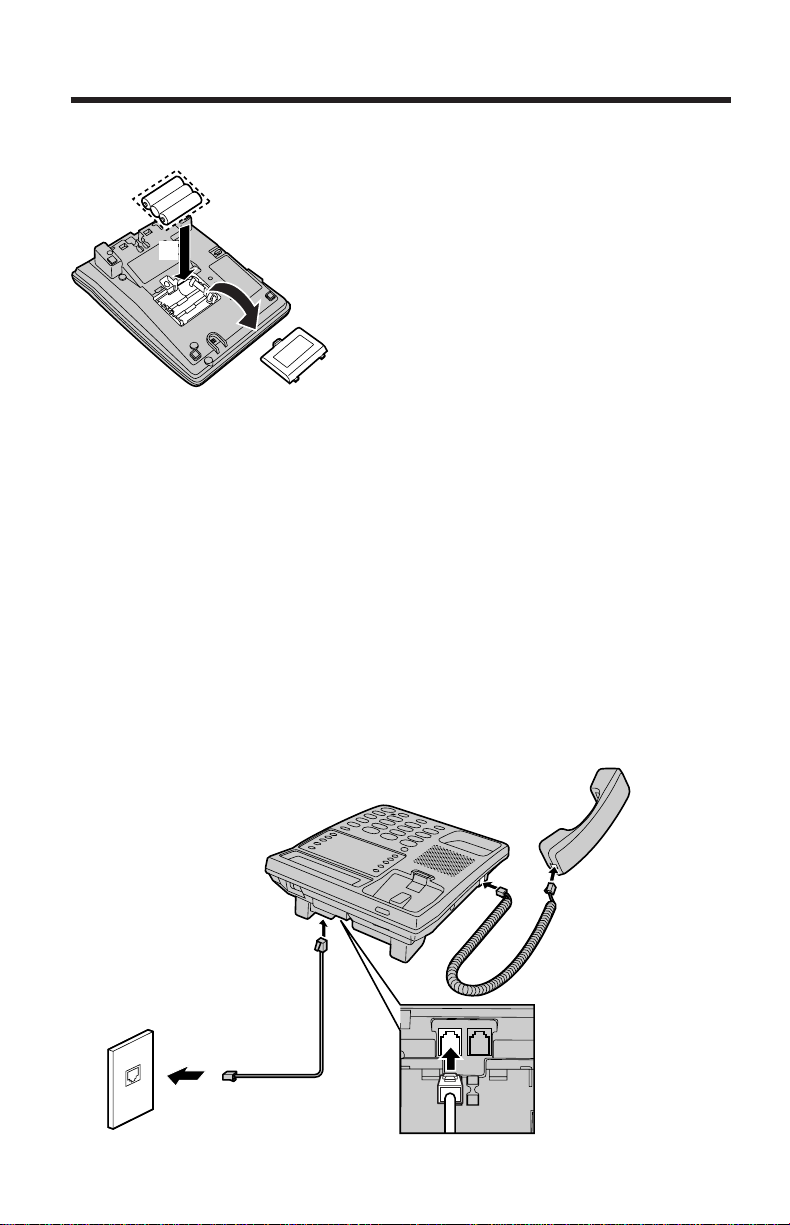
Installing the Batteries
1. Press down in the direction of the
arrow and remove the cover.
2. Install the batteries in the proper
order as shown, matching the
correct polarity.
3. Close the battery cover.
≥Batteries are not included in the unit.
≥Install three high quality “AA” Alkaline or Manganese batteries. We recommend
to use Alkaline batteries.
Battery life is: —about six months in use of Alkaline batteries.
≥Battery life may depend on usage conditions and ambient temperature.
≥Make sure to install the batteries for the following features to operate properly:
—Display (p. 7)
≥—Buttons’ function when the handset is on the cradle
≥—Speakerphone (p. 15, 17)
≥—Programming (p. 10)
—about three months in use of Manganese batteries.
Connecting the Handset/Telephone Line
Cord
After connection, lift the handset to check for a dial tone.
≥Use only a Panasonic Handset for the KX-TS108W.
8
LINE
DADATA
“
≥Computer
≥Modem
≥Fax
≥Answering machine
Single-Line
Telephone Jack
(RJ11C)
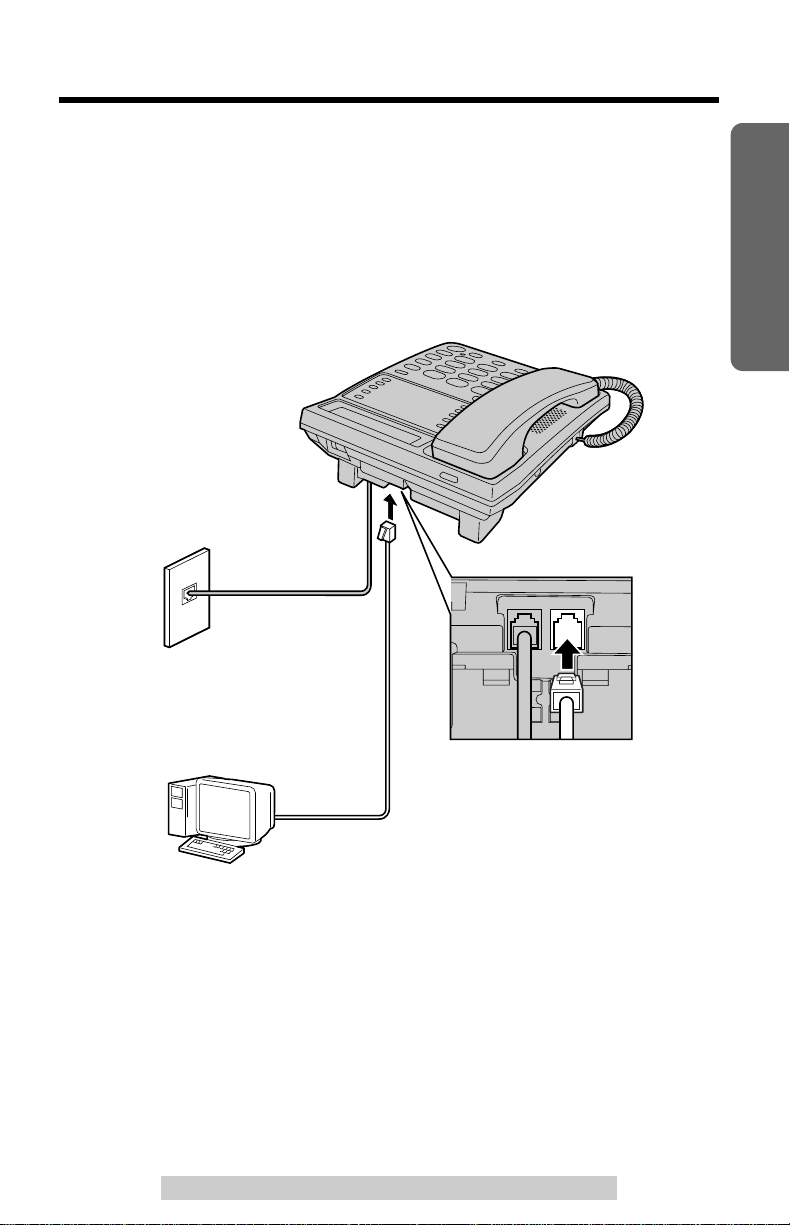
Connecting a Communication Device
If you connect a communication device (computer, modem, fax,
answering machine, etc.) to the telephone line, you can connect it through
this unit using the DATA jack.
After connecting the handset and telephone line cord (p. 8), connect the
communication device telephone line cord to the DATA jack.
LINE
DATA
Preparation
≥Make sure the communication device is not in use before using this unit (making
calls, storing phone numbers in memory etc.) or the communication device may
not operate properly.
For assistance, please call: 1-800-211-PANA(7262)
9
“
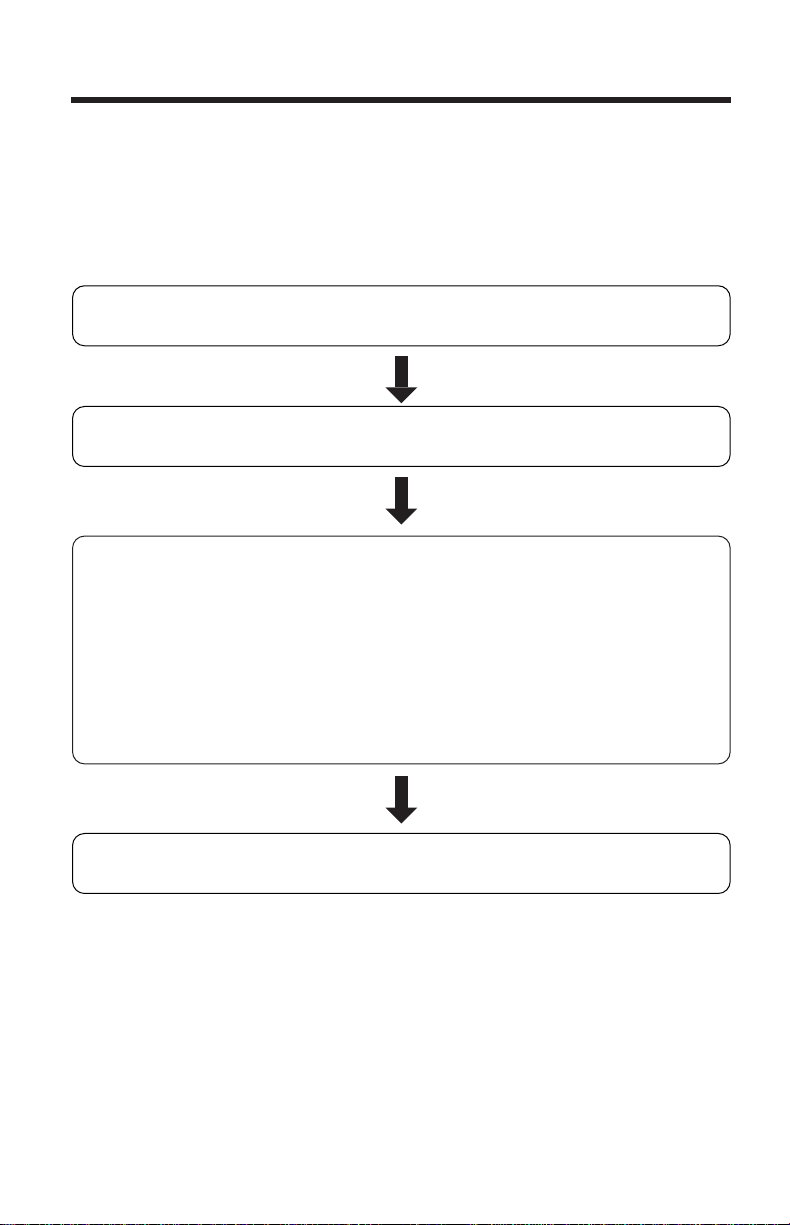
Press (MUTE).
Press (PROGRAM) to store the setting.
Press (PROGRAM).
≥To set the call restriction, press (1). (page 28)
≥To change the flash time, press (2). (page 25)
≥To select the dialing mode, press (3). (page 11)
≥To change the PIN code for the dial lock and call restriction,
press (5). (page 26)
≥To adjust the time, press (6). (page 12)
≥To change the LCD contrast setting, press (7). (page 13)
Settings
Programming Summary
You can program the following functions. The display shows the
programming instructions. See the corresponding pages for function
details.
Make sure that a call is not put on hold.
≥You can exit the programming mode any time by pressing (PROGRAM).
≥If you do not press any buttons for 60 seconds, the unit will return to the standby
mode.
10

“
Dialing Mode
You can select the dialing mode by programming. If you have touch tone
service, set to “Tone”. If rotary or pulse service is used, set to “Pulse”.
Your phone comes from the factory set to “Tone”.
Make sure that a call is not put on hold.
Press (PROGRAM).
1
Press (MUTE).
2
Press (3).
3
≥The current setting is displayed.
To select “Pulse”, press (2).
4
OR
To select “Tone”, press (1).
Preparation
Press (PROGRAM).
5
≥A long beep sounds.
≥The unit will return to the standby mode.
For assistance, please call: 1-800-211-PANA(7262)
11
“
Display
AM
PM
Military time
A
(Blank display)
P
Option
Settings
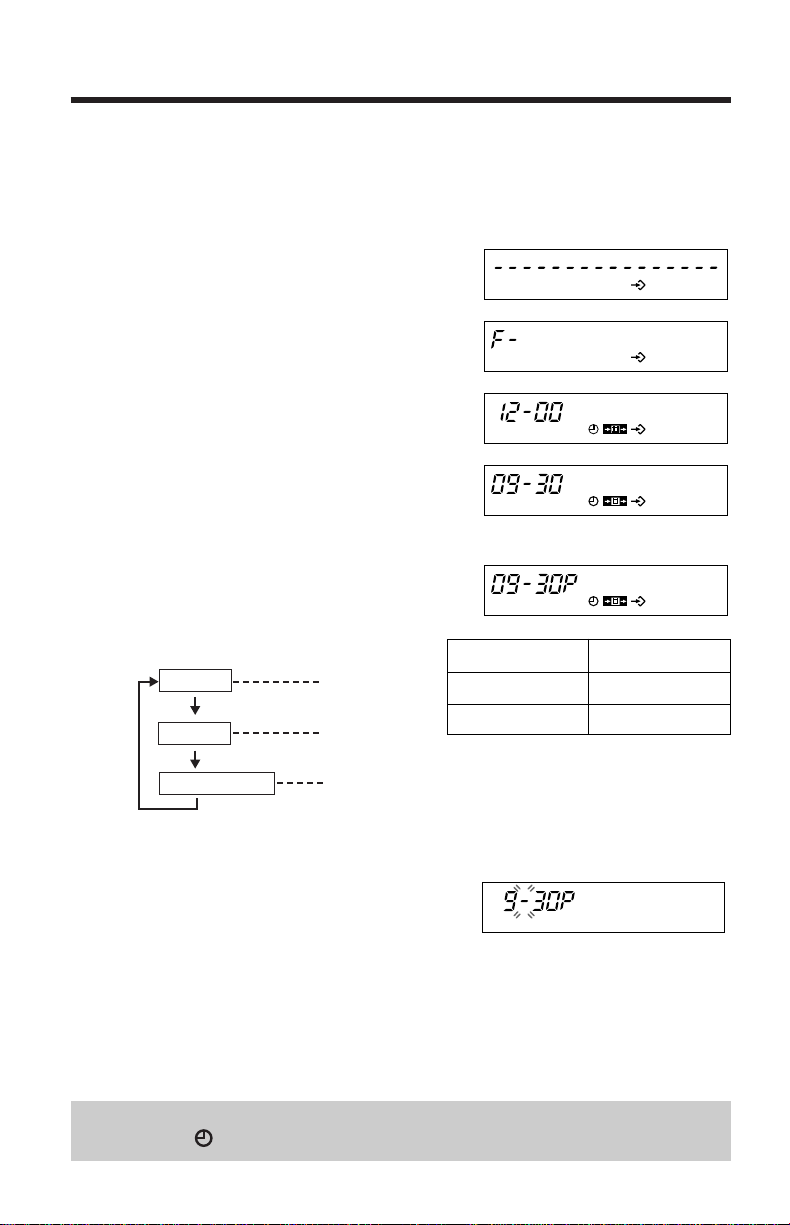
Time Adjustment
You can select AM/PM or military time by programming.
Make sure that a call is not put on hold.
Press (PROGRAM).
1
Press (MUTE).
2
Press (6).
3
Enter the current time (hour and
4
minute) using a 4-digit number.
(Ex. To set 9:30, enter “0930”.)
Press (#) to select AM, PM or military
5
time.
(Ex. You select PM.)
AM/PM Military Time
12:00AM–11:59
12:00PM–11:59
≥Each time you press (#), the selection will change on the display.
Press (PROGRAM).
6
≥A long beep sounds.
≥The clock starts working. “-” flashes on
the display.
≥If an alarm sound is heard when entering
the time and pressing (PROGRAM), the
12
time entered are not correct. Enter the
correct time and press (PROGRAM).
≥The unit will return to the standby mode.
If the batteries installed in the unit have expired, the time will be shown as
“12 -00 ” and “ ” will flash. Readjust the time.
AM
PM
0:00–11:59
12:00–23:59
 Loading...