

Panasonic KX-TGA915EX User Manual
TGA915EX(e).book Page 1 Tuesday, August 8, 2006 11:14 AM
Operating Instructions
USB Adaptor
Model No.
KX-TGA915EX
Contents/Inhalt/Table des matières Page/Seite/Page
English instructions 1 – 20
Deutsche Anleitung (1) – (20)
Instructions en français <1> – <20>
This unit is an accessory unit for use with the Panasonic KX-TG9120/KX-TG9140
Digital Cordless Phone. You must install the Skype software to your computer and
register this unit with your base unit before Skype feature can be used on your
handset.
What is Skype?
Skype is a programme for making free calls over the Internet to anyone else who also has
Skype. It is free and easy to download and use, and works with most computers.
You can get the Skype software and detailed information from the following website:
http://www.skype.com/
Important:
L To use Skype, the USB adaptor must be connected to a computer which is active and
connected to the Internet using broadband connection.
L Installation, configuration, and operation explanations for Skype software are not included
in these operating instructions. For more information, refer to the online manual for Skype
software.
L Skype is not a replacement for your ordinary telephone and cannot be used for emergency
calling.
L For information about Skype, please visit the Skype homepage:
http://www.skype.com/
Please read these Operating Instructions before using the unit and save for future
reference.

TGA915EX(e).book Page 2 Tuesday, August 8, 2006 11:14 AM
Table of Contents
Introduction
Introduction . . . . . . . . . . . . . . . . . . . . . . . . . . . . . . . . . . . . . . . . . . . . . . . . . . . . . . . . . . . . . .3
Feature highlights. . . . . . . . . . . . . . . . . . . . . . . . . . . . . . . . . . . . . . . . . . . . . . . . . . . . . . . . . .4
Accessory information . . . . . . . . . . . . . . . . . . . . . . . . . . . . . . . . . . . . . . . . . . . . . . . . . . . . . .4
Important information . . . . . . . . . . . . . . . . . . . . . . . . . . . . . . . . . . . . . . . . . . . . . . . . . . . . . . .5
Preparation
Controls . . . . . . . . . . . . . . . . . . . . . . . . . . . . . . . . . . . . . . . . . . . . . . . . . . . . . . . . . . . . . . . . .6
System requirements for your computer . . . . . . . . . . . . . . . . . . . . . . . . . . . . . . . . . . . . . . . .7
Connecting to a computer . . . . . . . . . . . . . . . . . . . . . . . . . . . . . . . . . . . . . . . . . . . . . . . . . . .7
Symbols and screen shots used in these operating instructions . . . . . . . . . . . . . . . . . . . . . .8
Installing and setting up the USB Adaptor Utility . . . . . . . . . . . . . . . . . . . . . . . . . . . . . . . . . .9
Confirming the USB adaptor works properly . . . . . . . . . . . . . . . . . . . . . . . . . . . . . . . . . . . .10
Soft key and display menus . . . . . . . . . . . . . . . . . . . . . . . . . . . . . . . . . . . . . . . . . . . . . . . . .10
Deregistering the USB adaptor . . . . . . . . . . . . . . . . . . . . . . . . . . . . . . . . . . . . . . . . . . . . . .11
Uninstalling the USB Adaptor Utility. . . . . . . . . . . . . . . . . . . . . . . . . . . . . . . . . . . . . . . . . . .11
Using the USB Adaptor
Entering the IP phone mode . . . . . . . . . . . . . . . . . . . . . . . . . . . . . . . . . . . . . . . . . . . . . . . .12
Making internet calls . . . . . . . . . . . . . . . . . . . . . . . . . . . . . . . . . . . . . . . . . . . . . . . . . . . . . .12
Answering internet calls . . . . . . . . . . . . . . . . . . . . . . . . . . . . . . . . . . . . . . . . . . . . . . . . . . . .13
Useful features during an internet call . . . . . . . . . . . . . . . . . . . . . . . . . . . . . . . . . . . . . . . . .14
Using the history . . . . . . . . . . . . . . . . . . . . . . . . . . . . . . . . . . . . . . . . . . . . . . . . . . . . . . . . .14
Selecting the IP ringtone . . . . . . . . . . . . . . . . . . . . . . . . . . . . . . . . . . . . . . . . . . . . . . . . . . .15
Useful Information
Troubleshooting . . . . . . . . . . . . . . . . . . . . . . . . . . . . . . . . . . . . . . . . . . . . . . . . . . . . . . . . . .16
Specifications . . . . . . . . . . . . . . . . . . . . . . . . . . . . . . . . . . . . . . . . . . . . . . . . . . . . . . . . . . . .18
2
TGA915EX(e).book Page 3 Tuesday, August 8, 2006 11:14 AM
Introduction
Thank you for purchasing the USB Adaptor.
For your future reference
Attach or keep original receipt to assist with any repair under warranty.
Serial No. (found on the bottom of the unit)
Date of purchase
Name and address of dealer
Introduction
3
TGA915EX(e).book Page 4 Tuesday, August 8, 2006 11:14 AM
Introduction
Feature highlights
Internet telephone
By connecting the USB adaptor to your computer installed with Skype software and USB
Adaptor Utility, you can make and answer internet telephone calls using the handset.
If you do not have the Skype software, please visit http://www.skype.com/ to download and
install the Skype software to your computer.
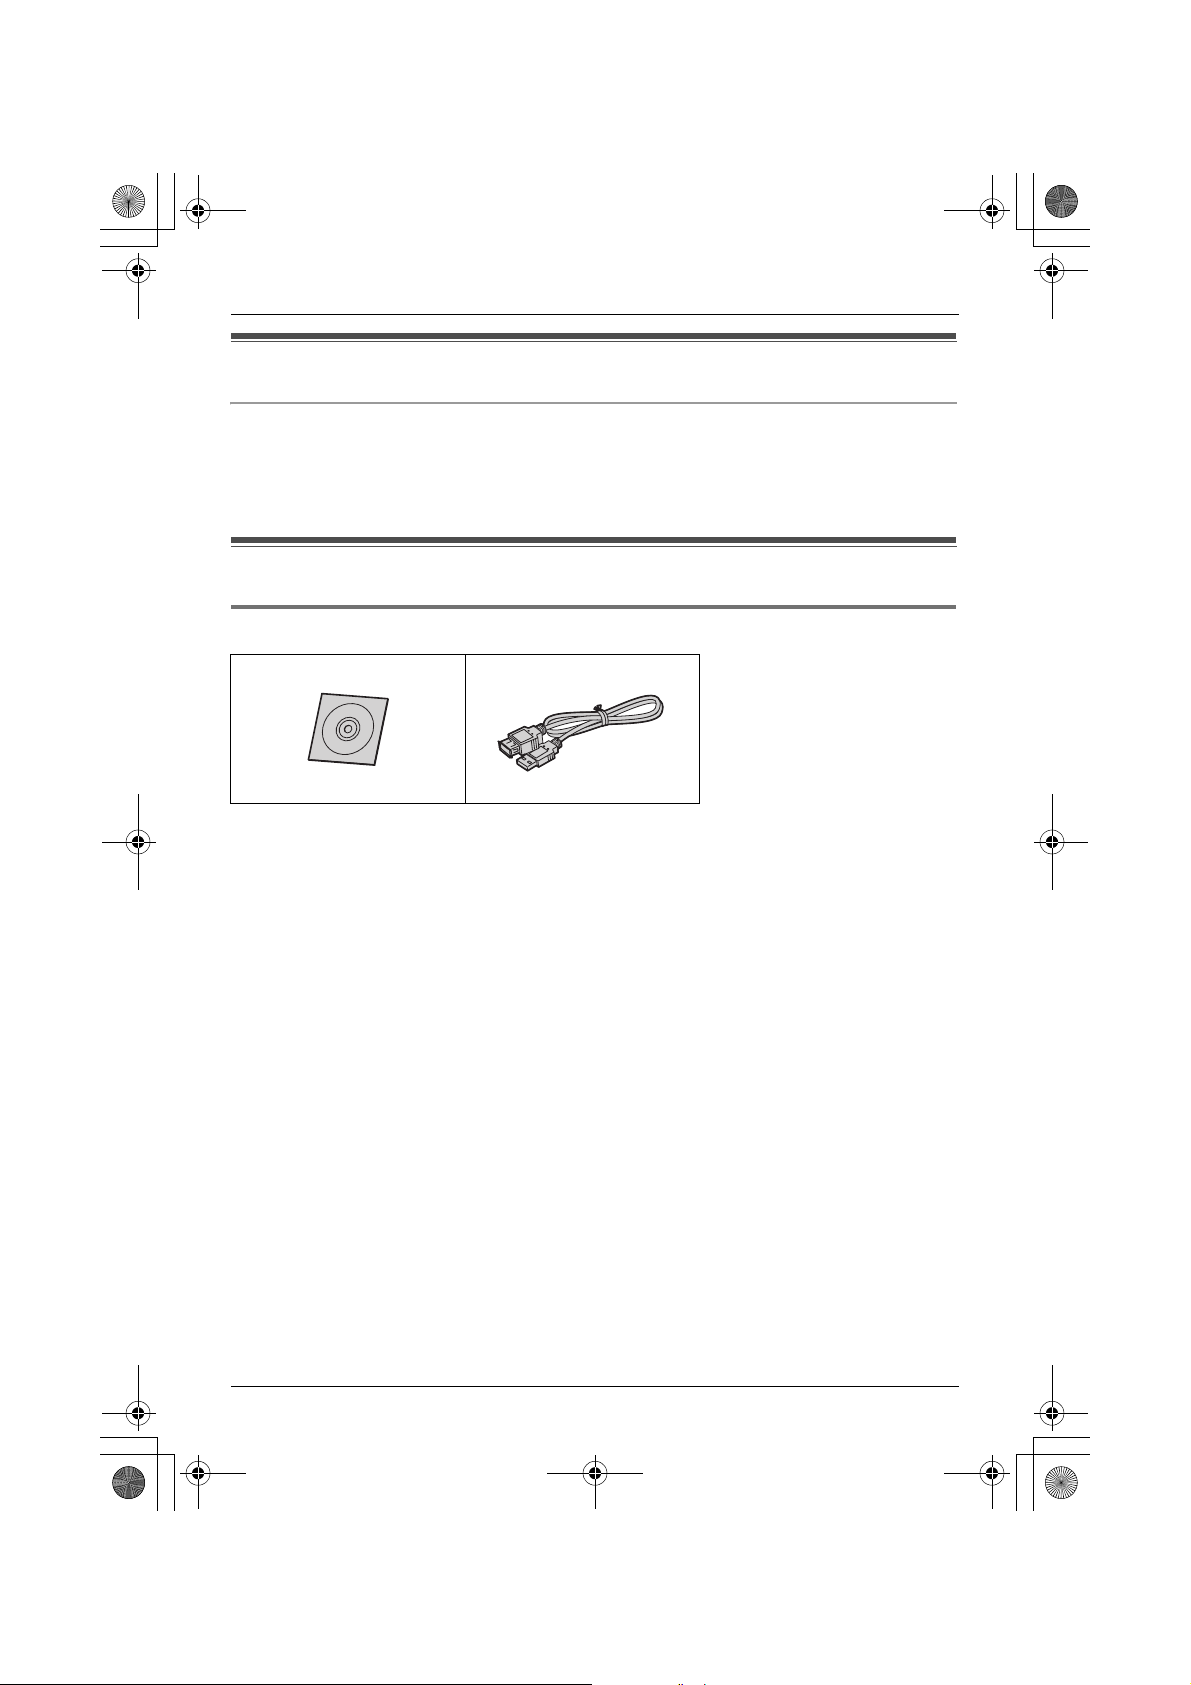
Accessory information
Included accessories
A CD-ROM A Extension cable
Part No. PQJKTGA915Z Part No. PQJA10173Z
4
TGA915EX(e).book Page 5 Tuesday, August 8, 2006 11:14 AM
Important information
General
L This product should not be used near
emergency/intensive care medical
equipment and should not be used by
people with pacemakers.
L Care should be taken that objects do not
fall onto, and liquids are not spilled into,
the unit. Do not subject this product to
excessive smoke, dust, mechanical
vibration or shock.
Environment
L Do not use this product near water.
L This product should be kept away from
heat sources such as radiators, cookers,
etc. It should also not be placed in rooms
where the temperature is less than 5 °C or
greater than 40 °C.
L When you leave the product unused for a
long period of time, disconnect the
product from the computer.
L The maximum data transferring distance
may be shortened when the product is
used in the following places: Near
obstacles such as hills, tunnels,
underground, near metal objects such as
wire fences, etc.
Warning:
L To prevent the risk of electrical shock, do
not expose this product to rain or any
other type of moisture.
Introduction
sleep mode. By connecting/disconnecting
the USB adaptor from an active computer,
the USB adaptor will turn on/off. We
recommend when you are not using the
internet telephony, that you disconnect the
USB adaptor from your computer.
Important security notice
L Panasonic cannot accept any liability or
provide warranty for security problems
occurring in the following cases:
– when the internet security settings were
not set during use,
– when VoIP (Voice over Internet
Protocol) communication software was
used,
– when software not provided by
Panasonic was used.
Important
L Panasonic cannot accept any liability or
provide warranty for the Skype software.
Connections
L Connect the USB adaptor to a USB port
on your computer. For optimum
performance, do not connect more than
one USB adaptor to a single computer or
the USB adaptor to your computer via a
hub.
L The USB adaptor may not turn off and
may consume electricity regardless of
whether your computer is turned off or in
5
TGA915EX(e).book Page 6 Tuesday, August 8, 2006 11:14 AM
Preparation
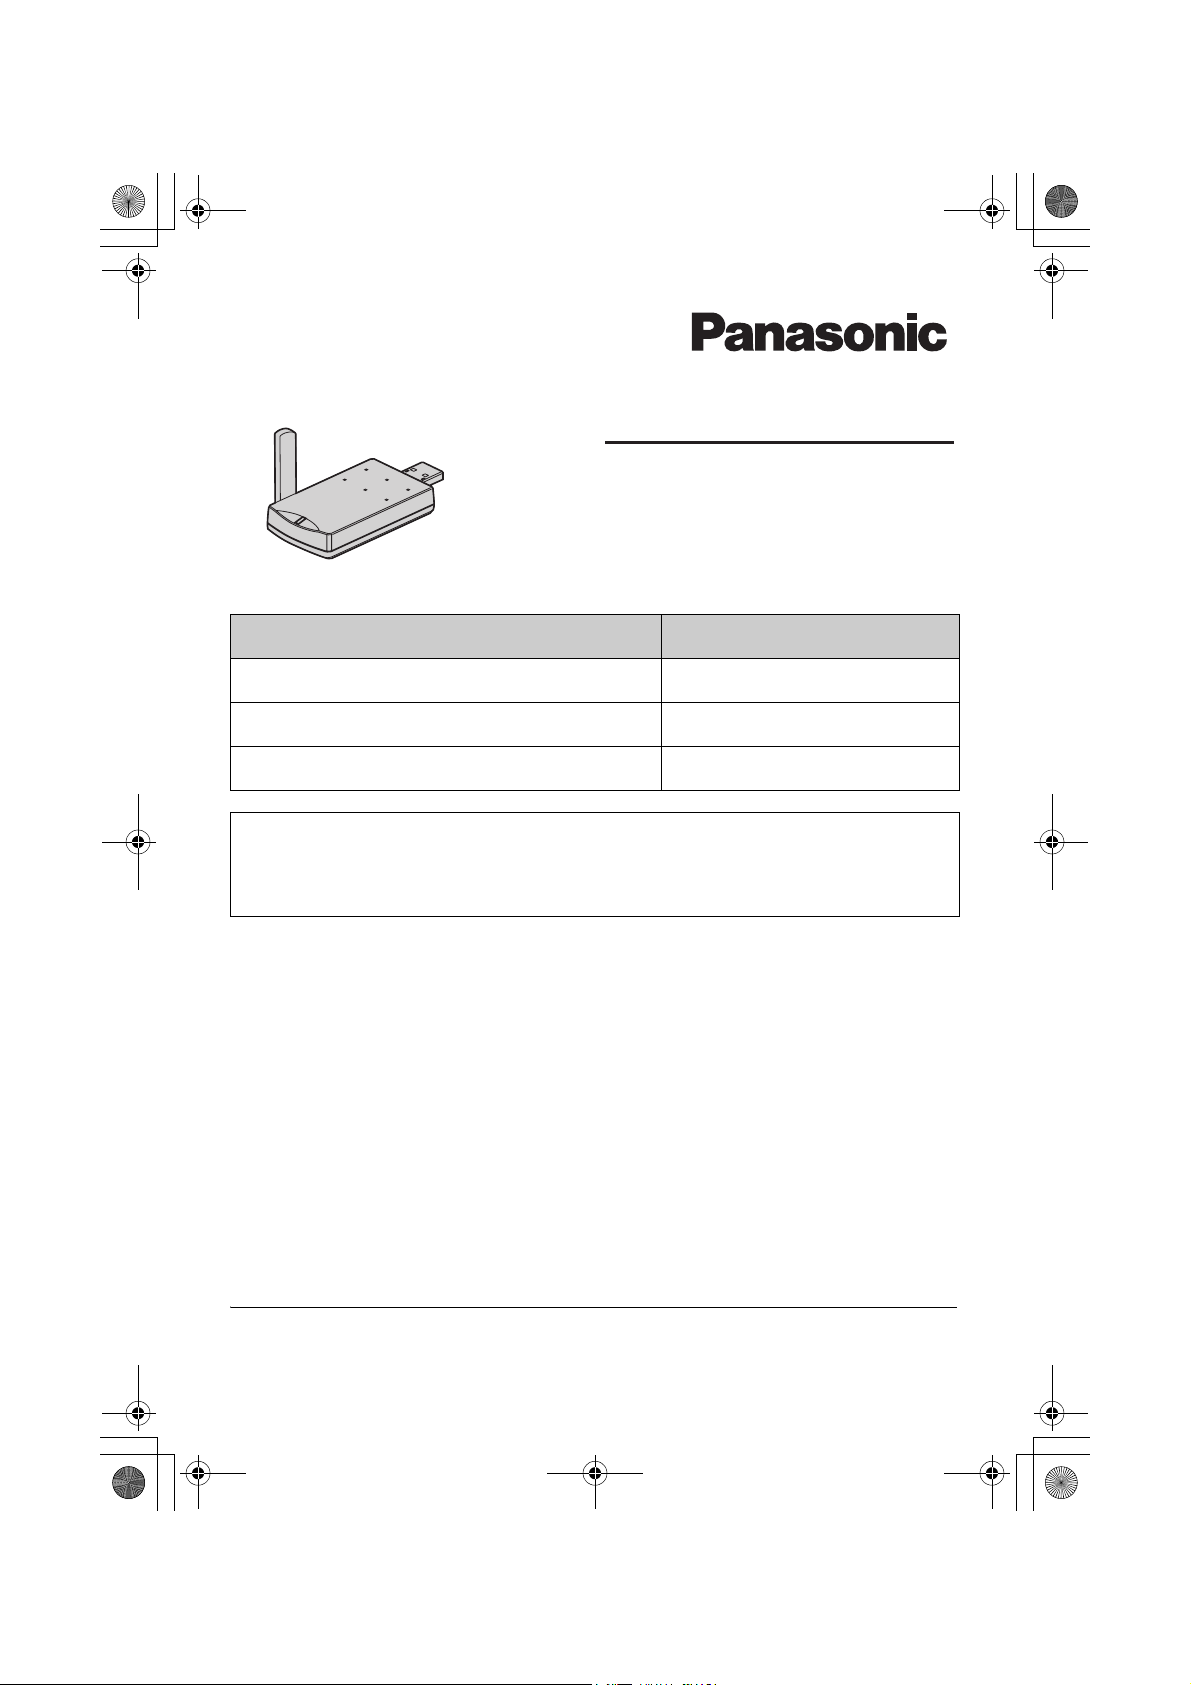
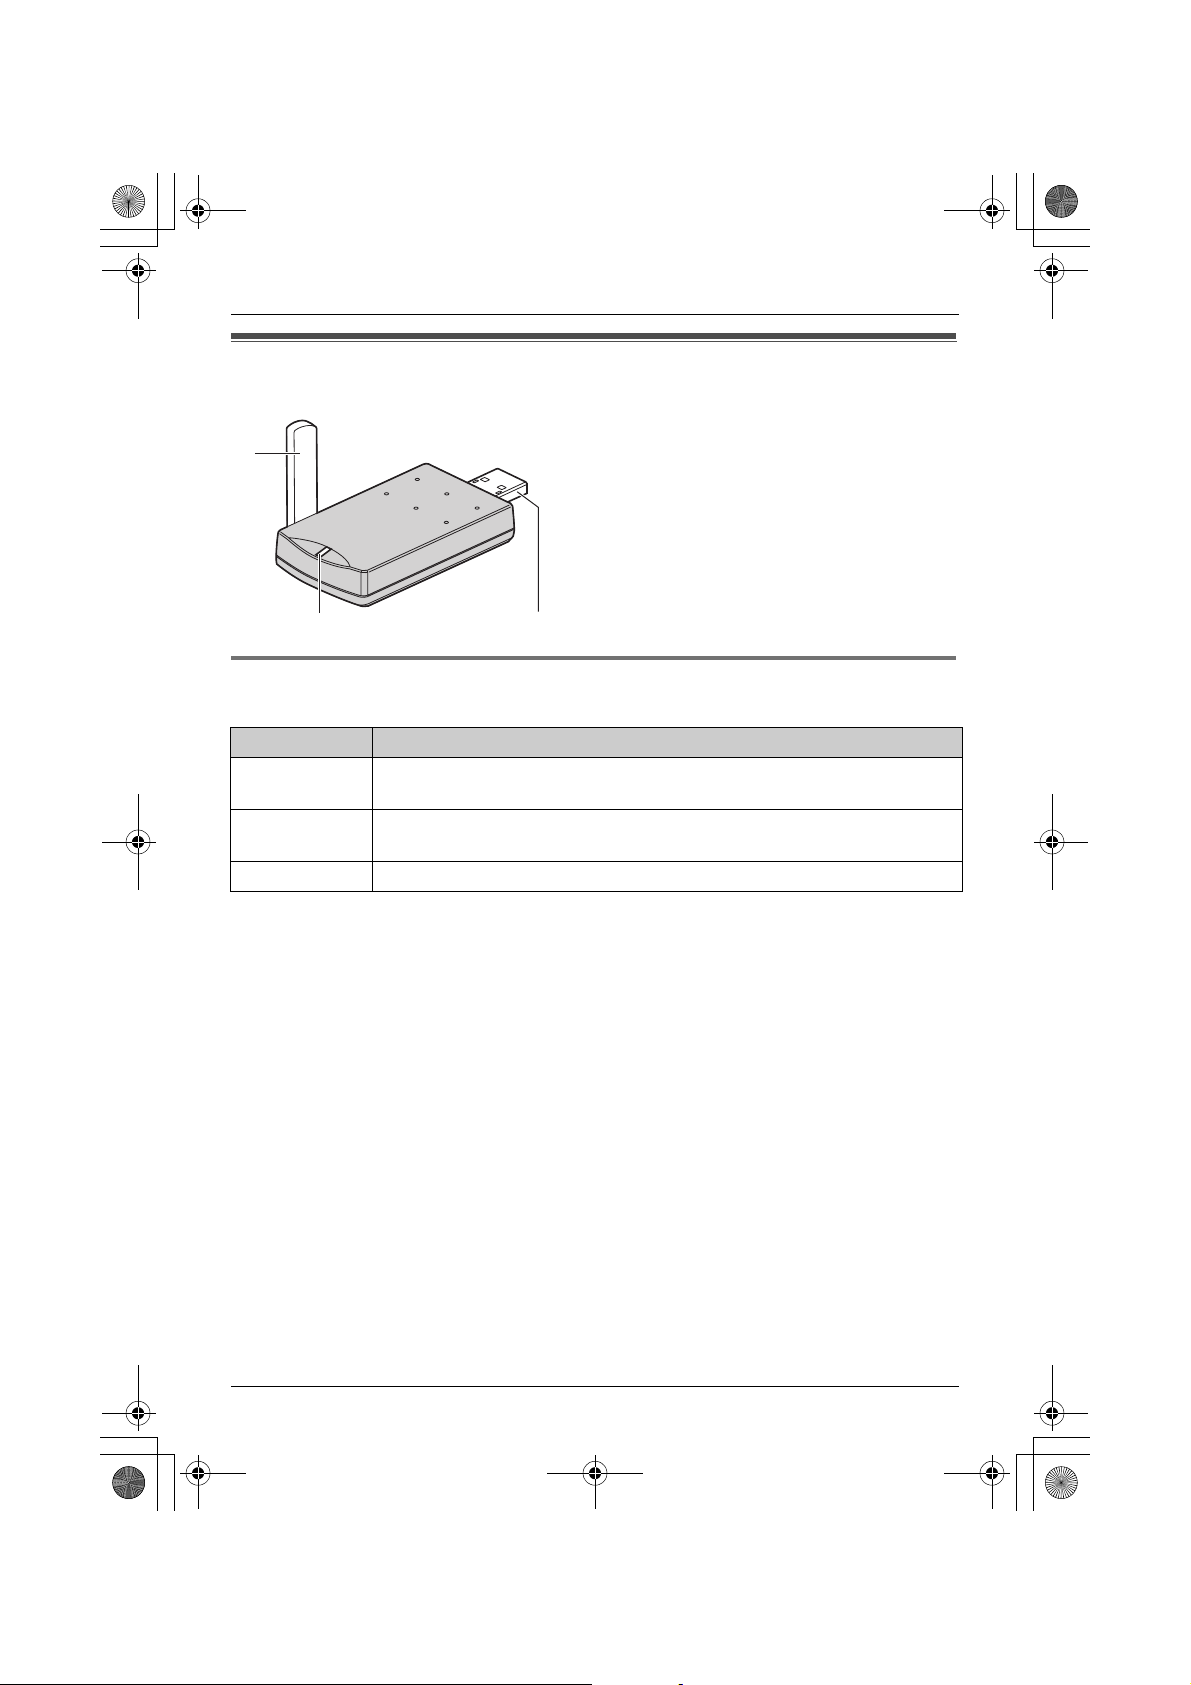
Controls
A
A Antenna
B Status indicator
C USB plug
B
C
Status indicator
The status indicator indicates the USB adaptor status.
Indicator Status
Flashing USB adaptor is receiving power from the computer but link to the base
unit, Skype software or USB Adaptor Utility has not been established.
Light on USB adaptor is receiving power from the computer and has link with your
base unit, ready to use.
Light off USB adaptor is off (not receiving power from the computer).
6
TGA915EX(e).book Page 7 Tuesday, August 8, 2006 11:14 AM
Preparation
System requirements for your computer
The following system requirements must be met in order to use the USB Adaptor Utility.
Item Description
®
Operating System Microsoft
CPU Intel
RAM 256 MB or more
HDD 50 MB available disk space
Resolution 800 x 600 or higher resolution display
Others USB interface (1.1)
CD-ROM drive
Video adaptor with High Colour (16 bit) or higher
Panasonic KX-TG9120/KX-TG9140 Digital Cordless Phone
Skype software (Skype 2.0 or later)
Internet connection: Broadband, e.g. DSL
Windows® 2000 or Microsoft Windows XP
®
Pentium®III 1 GHz or faster
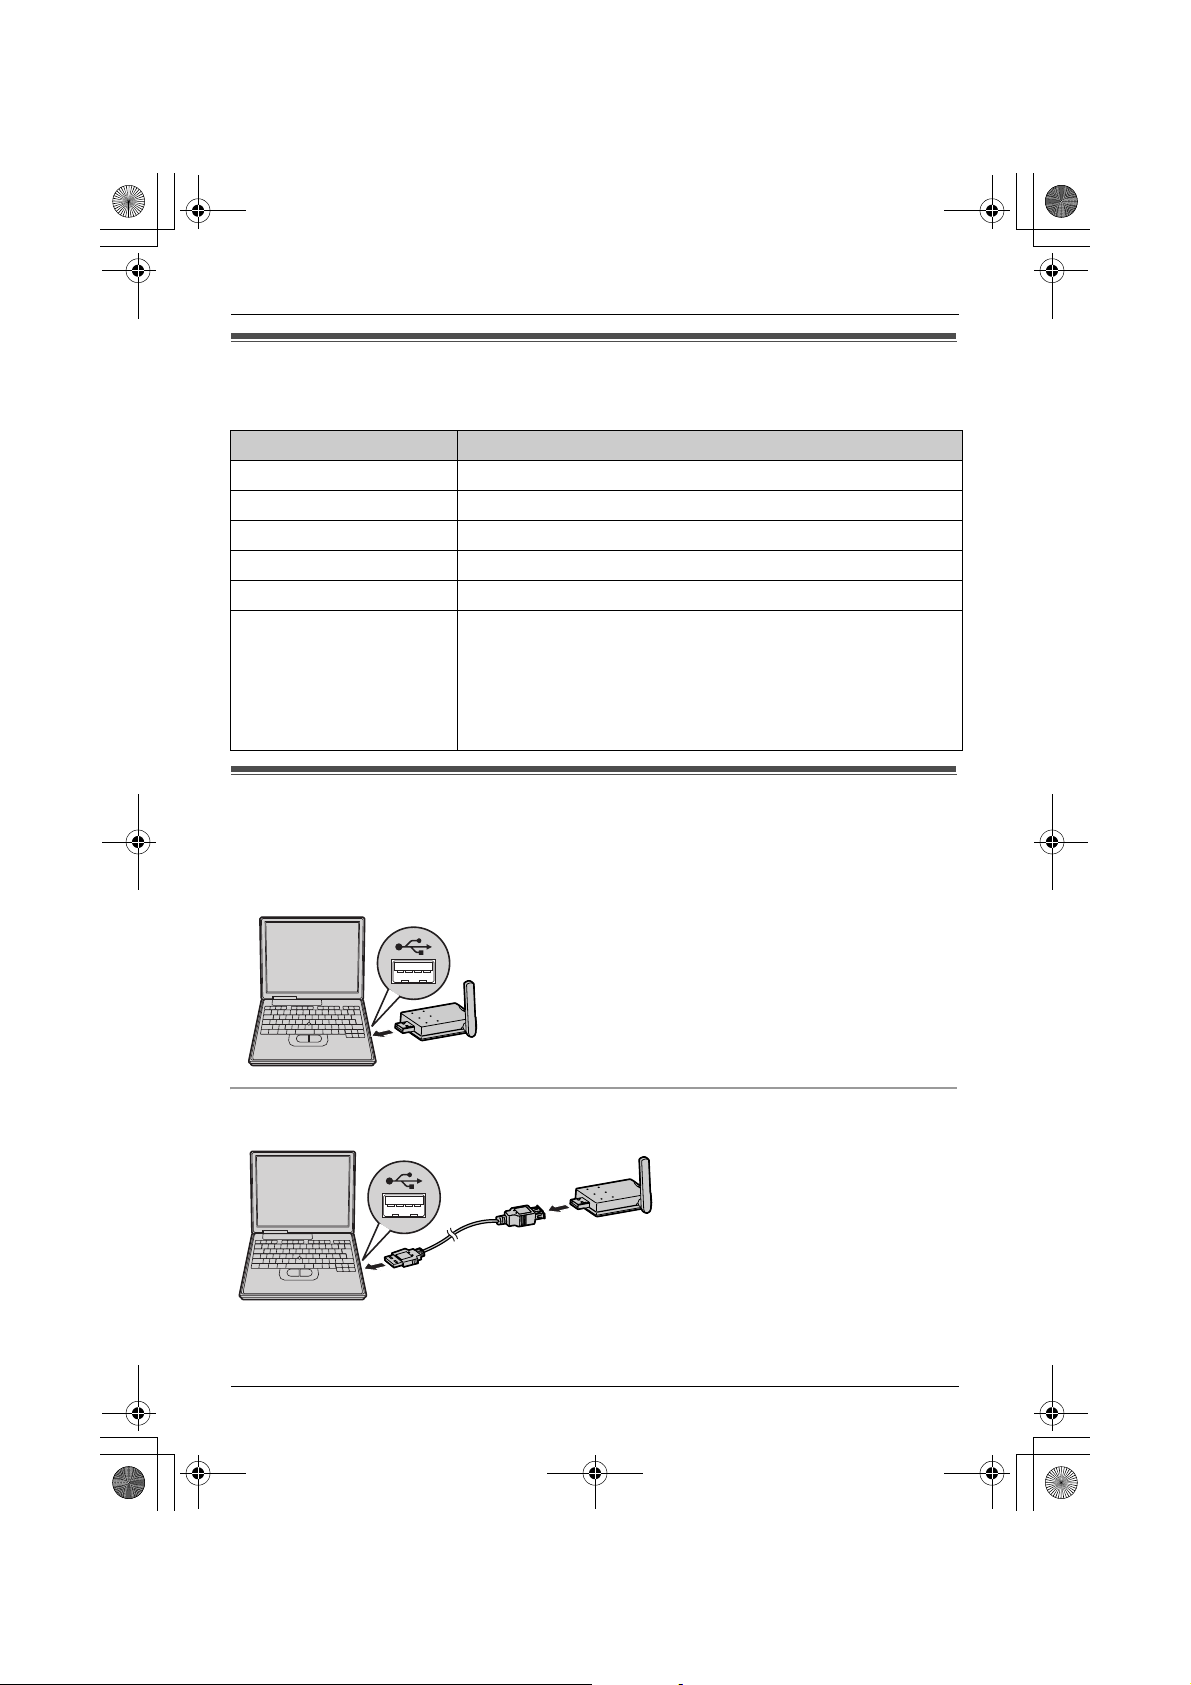
Connecting to a computer
Connect the USB adaptor to the USB port of your computer.
L The USB adaptor receives power from the USB port.
Raise the antenna.
Using the included USB extension
Raise the antenna.
7
TGA915EX(e).book Page 8 Tuesday, August 8, 2006 11:14 AM
Preparation
Symbols and screen shots used in these operating
instructions
Symbols used for operations
Symbol Meaning
Example: “Contacts” Push the joystick up or down to select the words in quotations
shown on the display.
Example: D The symbols indicate soft key names on your handset.
Example: {C} The symbols in the brackets indicate buttons on your handset.
Example: [OK] The words in the brackets indicate button names on your
computer.
i Proceed to the next operation.
Screen shots used for operations
L The screen shots in these instructions are for Microsoft Windows XP and are included for
reference only.
L The screen shots in these instructions may differ slightly from the screen shown on your
computer.
8
TGA915EX(e).book Page 9 Tuesday, August 8, 2006 11:14 AM
Installing and setting up
the USB Adaptor Utility
Before you use the USB adaptor, you must
install the USB Adaptor Utility from the
included CD-ROM to a computer installed
with the Skype software, and register the
USB adaptor to the base unit. The USB
adaptor is registered as an extension device
of the base unit. Only one USB adaptor can
be registered to the base unit.
Before you start to install the USB
Adaptor Utility, make sure that:
– Skype software has been already installed
in your computer. If the Skype software is
not installed to your computer, please visit
http://www.skype.com/ to download and
install the Skype software.
– Your computer is being connected to the
Internet correctly and active Skype icon
( ) is displayed in the system tray (page
10).
– The base unit and handset are powered
up nearby and are not being used.
– The USB adaptor is being connected to
the USB port on your computer and the
status indicator is flashing.
These preparation will make your
installation simple and smooth.
Preparation
2 Connect the USB adaptor to your
computer (page 7).
3 Insert the included CD-ROM into your
CD-ROM drive.
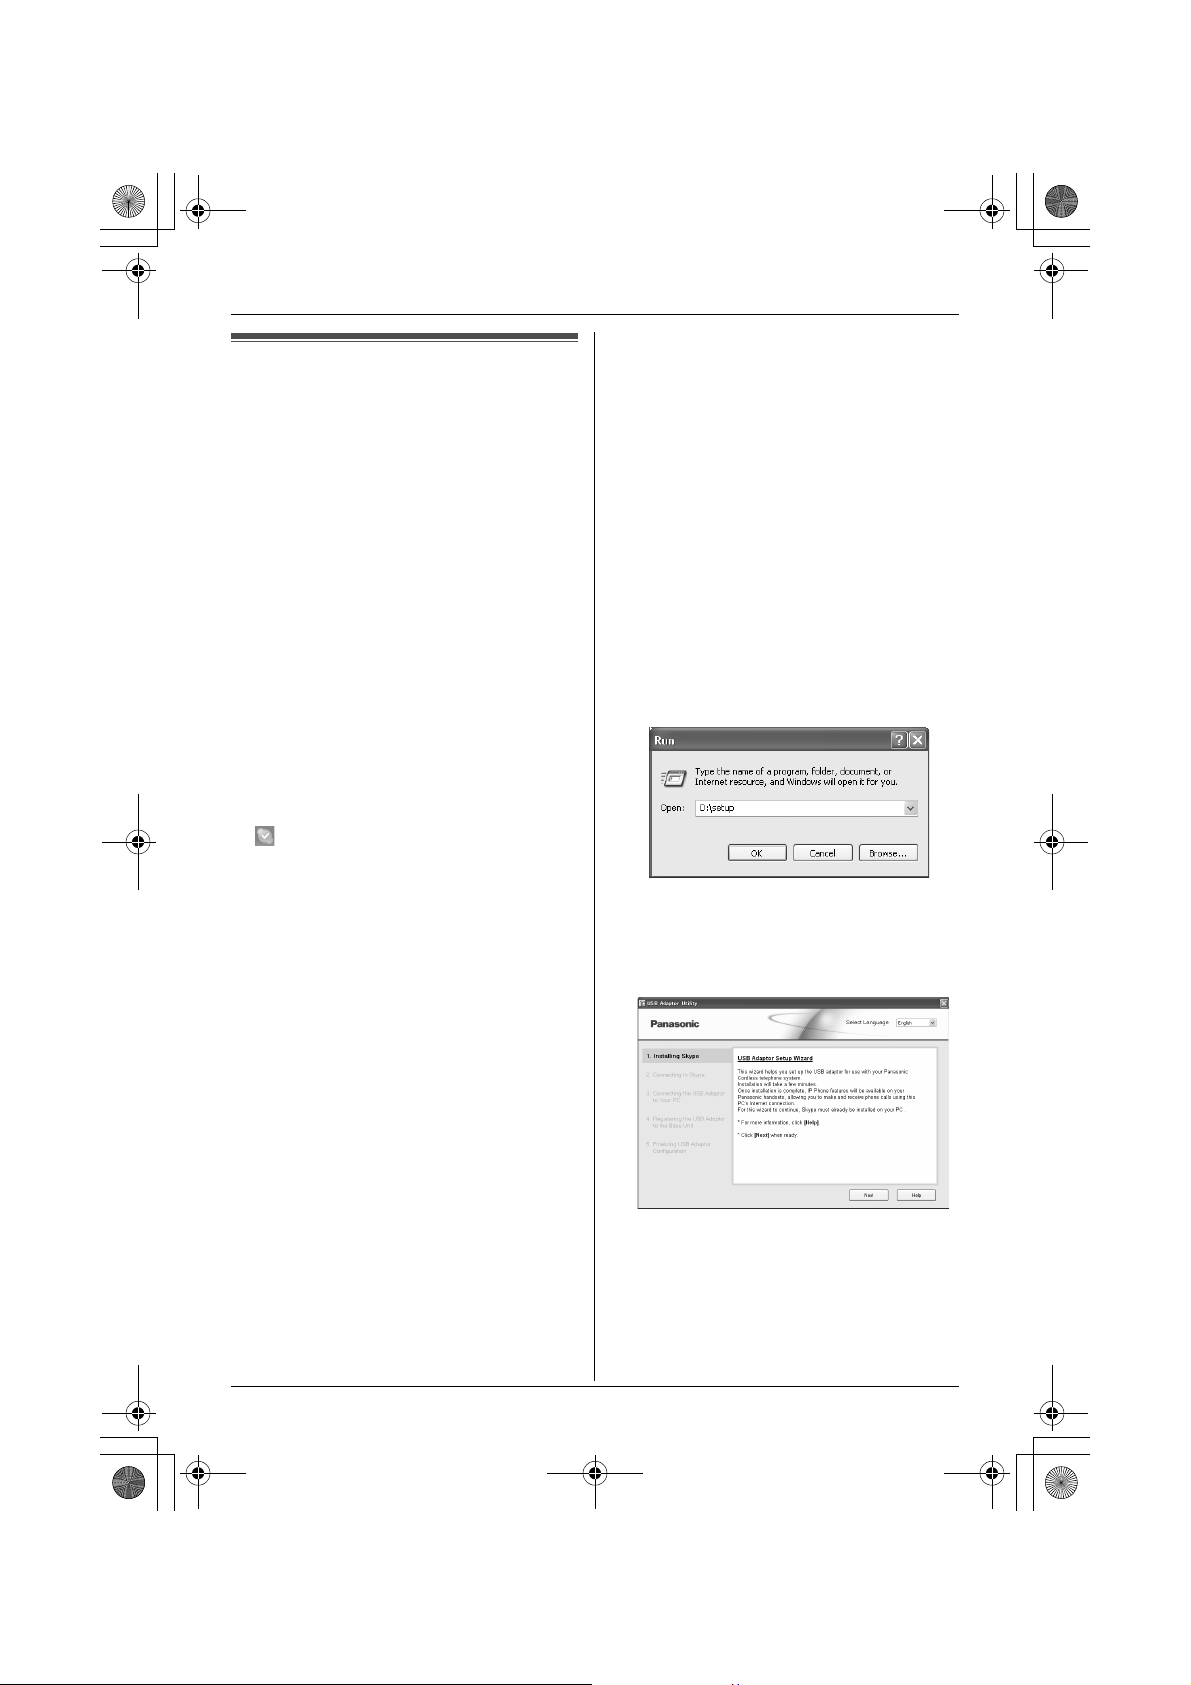
4 After the installer has started, follow the
on-screen instructions until all files have
been installed.
L If the installer does not start
automatically:
Click [Start], then choose [Run...].
Type “D:\setup” (where “D” is the drive
letter of your CD-ROM drive). Click
[OK]. (If you are not sure what the drive
letter is for your CD-ROM drive, use
Windows Explorer and look for the CDROM drive.)
5 When installation is complete, the USB
adaptor setup window is opened.
Remove the included CD-ROM from your
CD-ROM drive.
Important:
L Before installing the USB Adaptor Utility,
please be sure to back up the system
settings of your computer.
L At the end of installation, you may perform
a Skype test call on your handset (page
10).
1 Start Windows and the Skype software,
and exit all other applications.
L You must be logged in as an
administrator in order to install the USB
Adaptor Utility.
L Confirm that the Skype status is online.
L To change the display language for the
USB Adaptor Utility, select the desired
language from the pull-down menu on
the upper right of the setup window.
(Available languages: English,
German, French, Italian, Spanish,
Greek, Russian, Turkish, and Dutch)
9
TGA915EX(e).book Page 10 Tuesday, August 8, 2006 11:14 AM
Preparation
L The display language chosen for this
utility also becomes the handset
display language in IP phone mode
(page 12).
6 Follow the on-screen instructions to set
up the USB adaptor.
L When the setting up is complete, you
are ready to use the internet telephone.
Note:
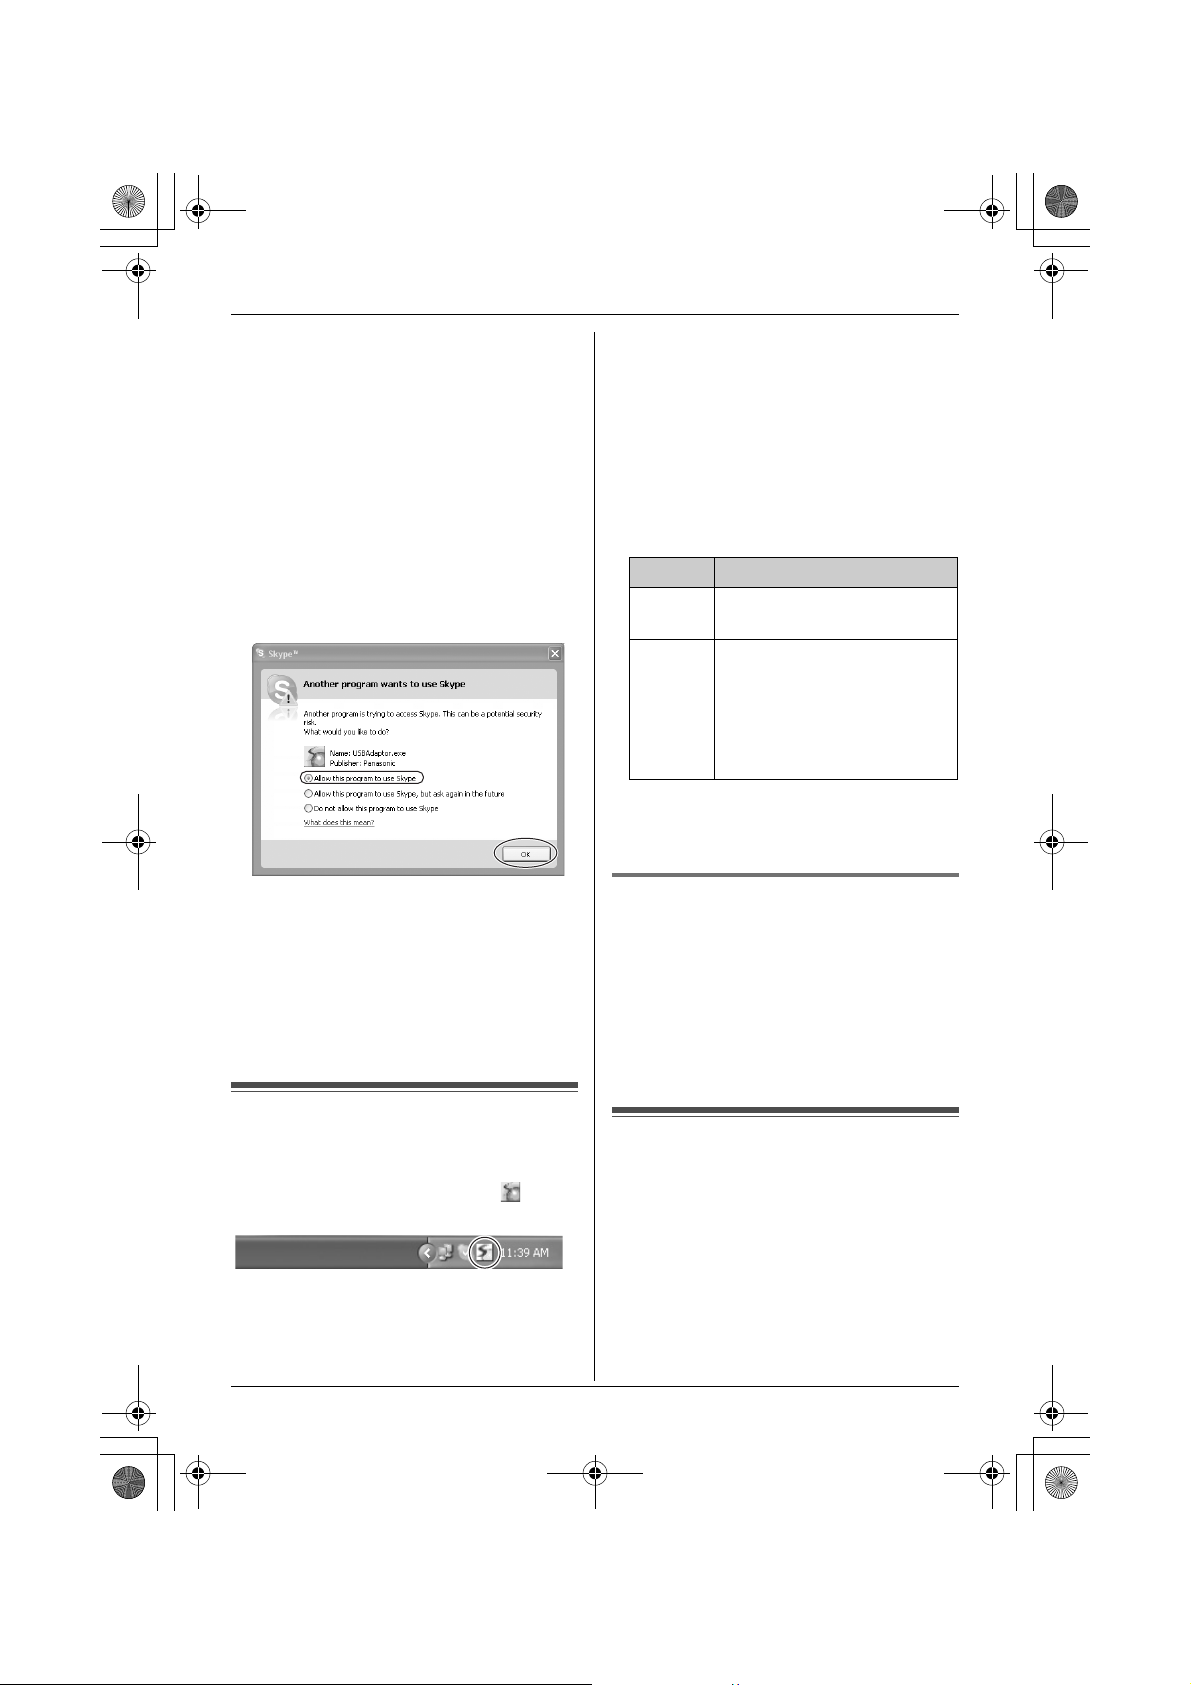
L If the following window appears, check
[Allow this program to use Skype], then
click [OK].
L To perform a Skype test call:
1. D (left soft key)
2. Push the joystick up or down to select
“Contacts”. i M
3. Push the joystick up or down to select
“Echo/Sound Te”.
*1 The selection name for Skype test call
may vary.
*1
i {C}/s/P
instructions. When the configuration is
complete, you are ready to use the internet
telephone.
In case you encounter any difficulty, please
refer to “Troubleshooting” on page 16.
Note:
L Colour of the USB Adaptor Utility icon in
the system tray indicates the status of the
USB adaptor configuration.
Colour Status
Blue Internet telephone is
available.
Gray Internet telephone is not
available.
(Refer to “Troubleshooting”
on page 16 or click [Help] to
view “Troubleshooting” on
your web browser.)
L If the USB Adaptor Utility icon does not
appear, refer to the troubleshooting
section (page 16).
To quit the USB Adaptor Utility
Right-click the USB Adaptor Utility icon in
the system tray, then select [Exit].
L To restart the USB Adaptor Utility, click
[Start], then select [All Programs] –
[Panasonic] – [USB Adaptor Utility
(KX-TGA915)] – [USB Adaptor Utility].
(For Windows 2000, click [Programs]
instead of [All Programs].)
Confirming the USB
adaptor works properly
Click the USB Adaptor Utility icon ( ) in the
system tray.
The setup programme starts checking the
configuration of the USB adaptor. If the
setup programme finds errors in the
configuration, follow the on-screen
10
Soft key and display
menus
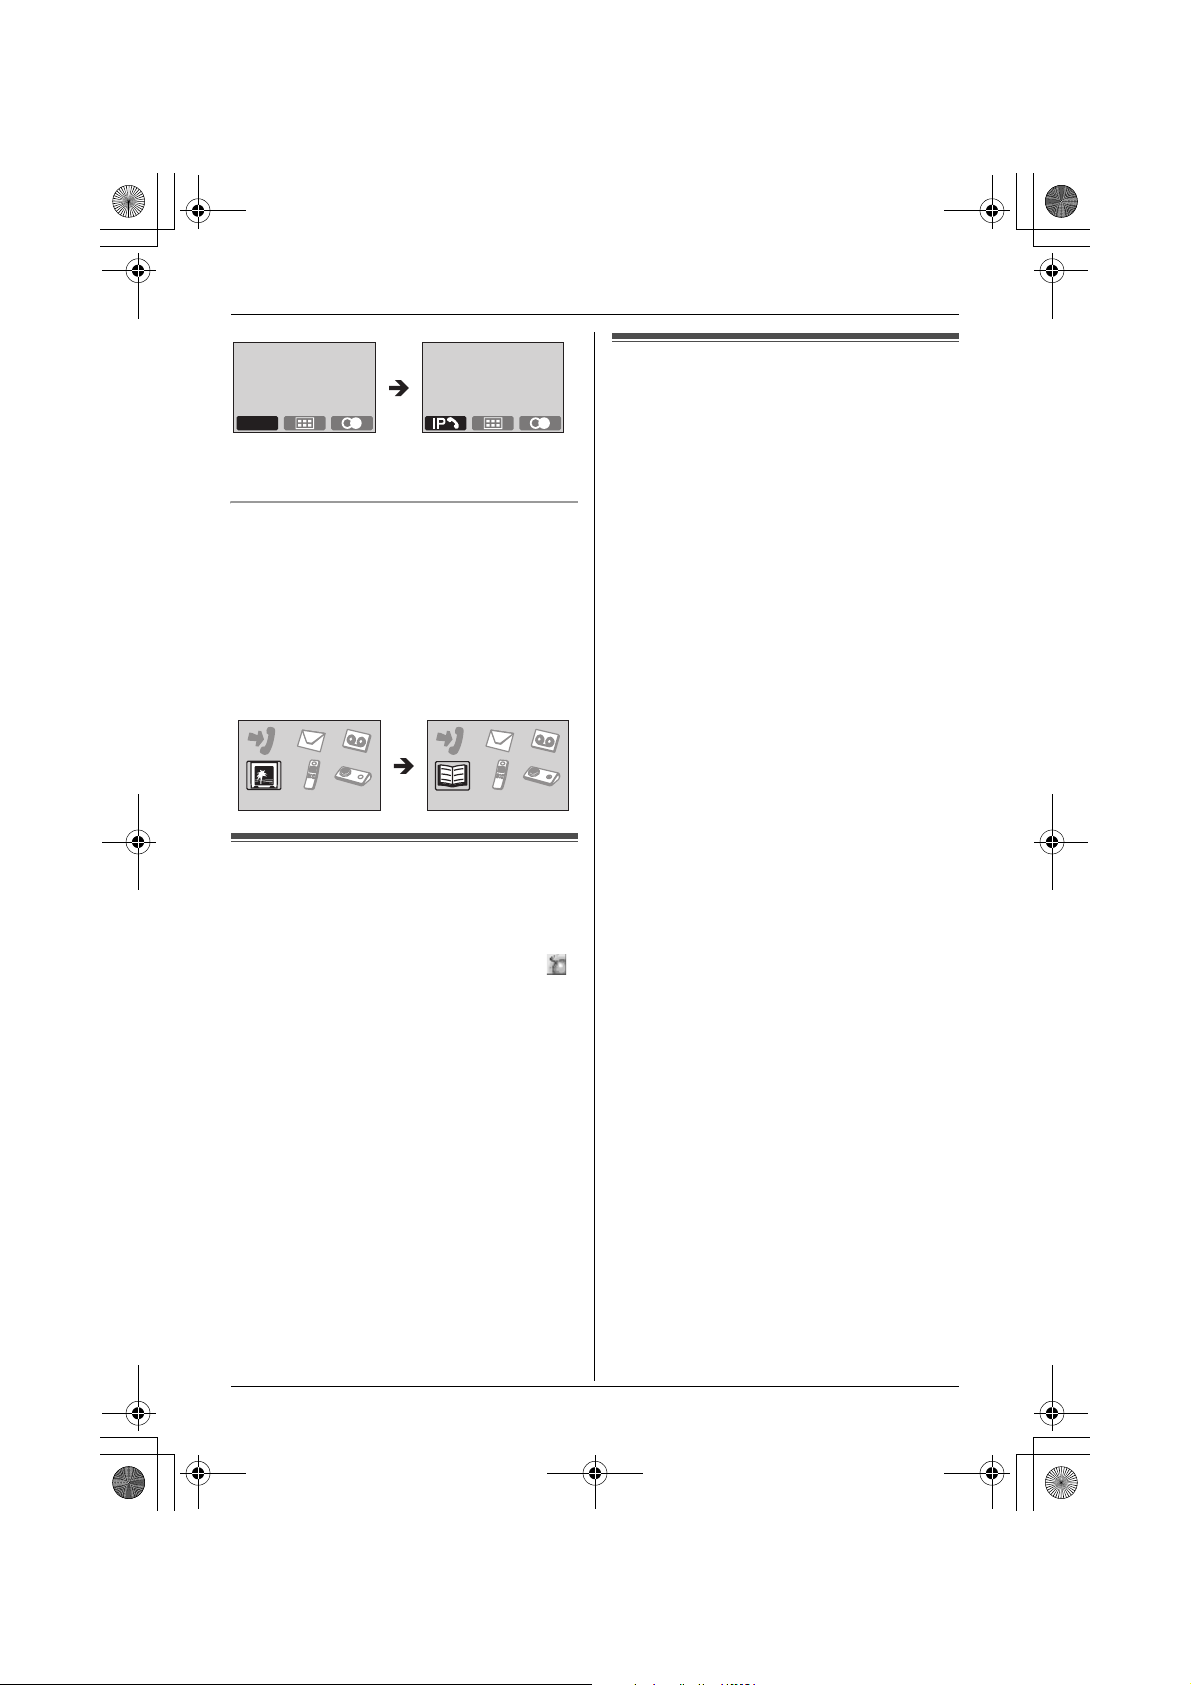
After setting up the USB adaptor, n
(Phonebook) on the left soft key on the
handset is changed to D.
TGA915EX(e).book Page 11 Tuesday, August 8, 2006 11:14 AM
C
To enter the phonebook, press K (centre
of joystick) then select “Ph.Book Setup”.
Preparation
Uninstalling the USB
Adaptor Utility
N For Windows XP users:
1 Click [Start], then click [Control Panel].
Display menus
After setting up the USB adaptor, the display
menus will be changed as follows:
–“Display Setup” is replaced with
“Ph.Book Setup”.
–“Display Setup” is in the sub-menu of
“Handset Setup”.
Example:
Display Setup Ph.Book Setup
Deregistering the USB
adaptor
You can cancel a registered USB adaptor.
Right-click the USB Adaptor Utility icon ( )
in the system tray, then select [Tool] –
[Deregistration].
Note:
L You can cancel registration by using a
handset that is registered to the same
base unit.
1. K (centre of joystick) i L i
M
2. Enter “335”.
3. “Cancel Handset” i M
4. Select the USB adaptor. i t
LA Q is displayed with the selected
item.
LTo cancel a selected item, select it
again. i t
5. M i “Yes” i M
6. {ih}
2 Click [Add or Remove Programs].
3 Select [Panasonic USB Adaptor Utility]
from the list.
4 Click [Remove], then follow the on-
screen instructions.
N For Windows 2000 users:
1 Click [Start], point to [Settings], then
click [Control Panel].
2 Double-click [Add/Remove Programs].
3 Select [Panasonic USB Adaptor Utility]
from the list.
4 Click [Change/Remove], then follow the
on-screen instructions.
11
TGA915EX(e).book Page 12 Tuesday, August 8, 2006 11:14 AM
Using the USB Adaptor
Entering the IP phone
mode
Press D (left soft key) on the handset to
enter the IP phone mode.
L D appears in the upper left of the
handset display in IP phone mode.
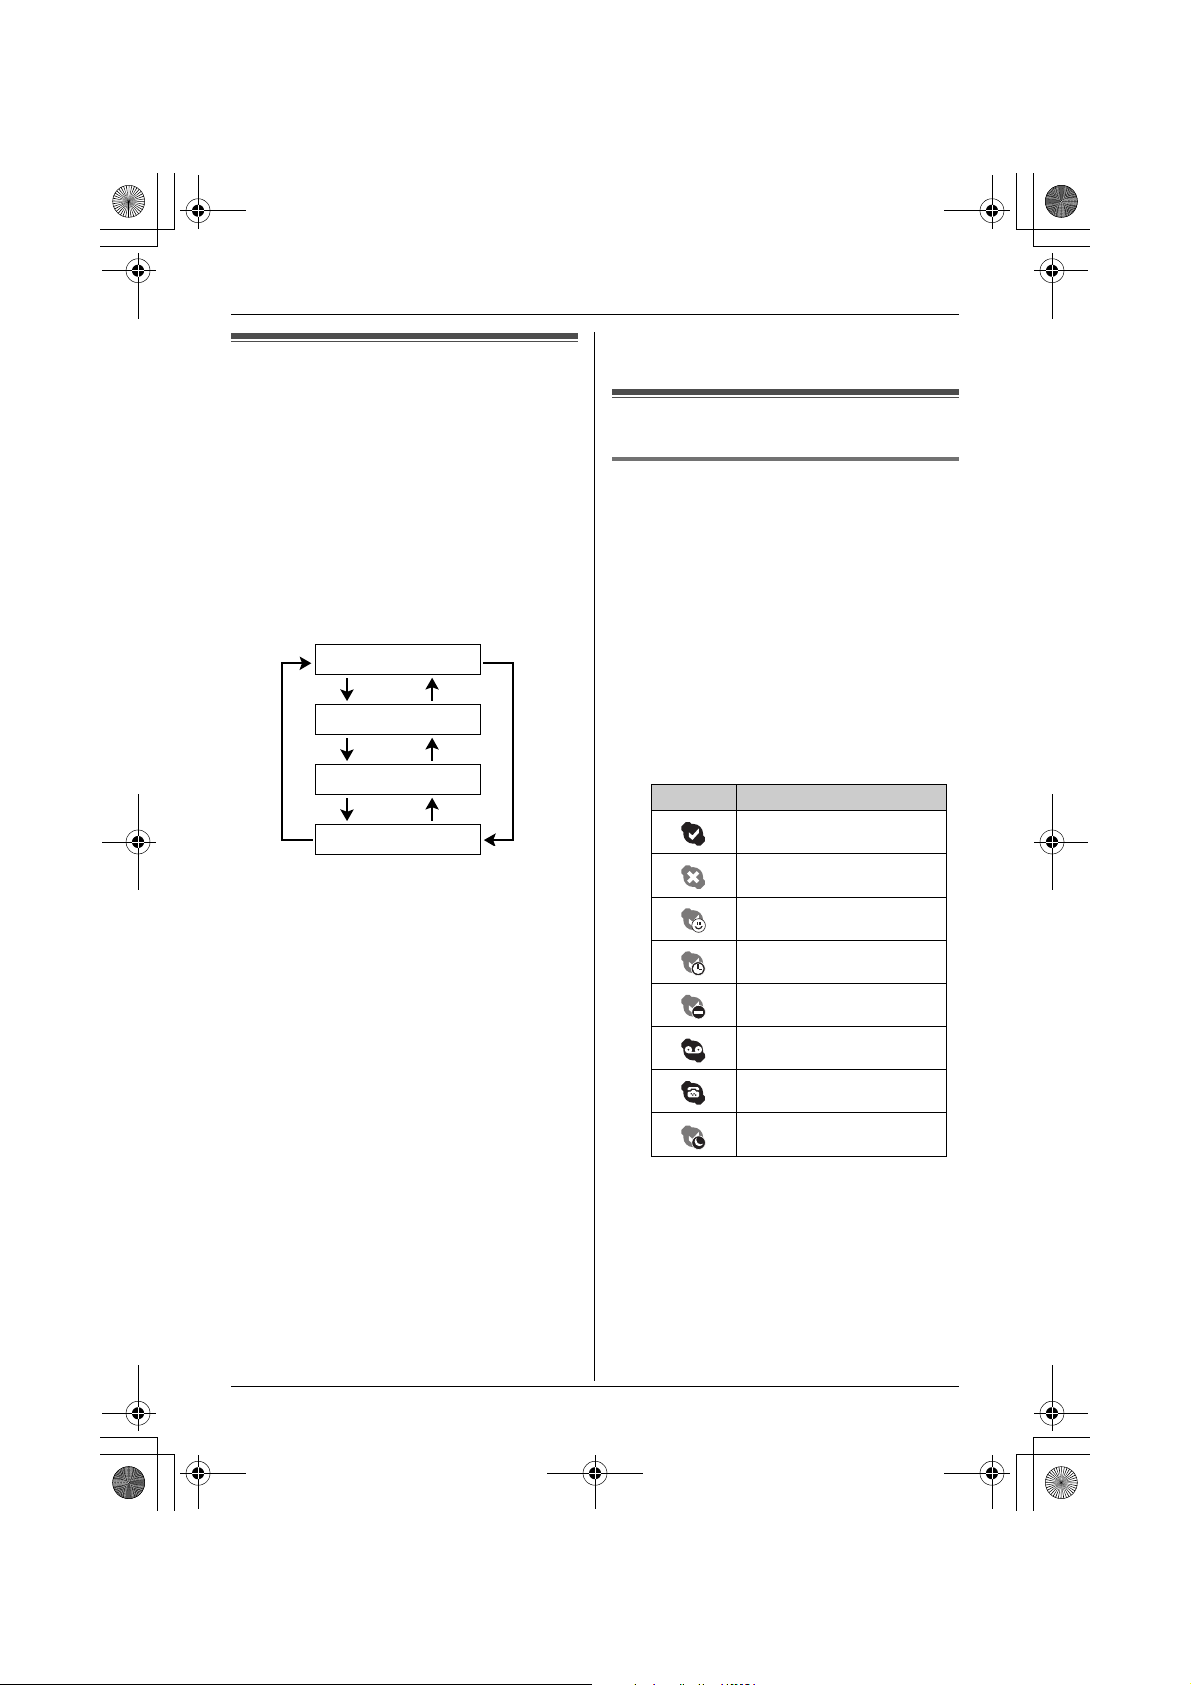
The IP phone mode consists of the following
menus.
Push the joystick up or down to scroll
through the menus.
Missed call
Contacts
History
Dial
*1 This menu will appear only when internet
calls are not answered.
“Missed call”:
You can view call information of the missed
calls.
“Contacts”:
You can view the Skype Contact list, or
make internet calls from it.
“History”:
You can view the Skype History in which call
information of incoming and outgoing
internet calls is logged.
“Dial”:
You can make regular phone calls using
SkypeOut.
To exit the IP phone mode, press {ih}.
Important:
L Do not change any Skype settings using
the computer while the handset is in IP
phone mode. If you have changed the
*1
settings, quit the USB Adaptor Utility and
restart it (page 10).
Making internet calls
Calling from the Contact list
You can make an internet call by selecting a
Skype name from the Skype Contact list.
You must add Skype names in the
Contact list beforehand by using your
computer.
1 D (left soft key) i “Contacts” i
M
2 Push the joystick up or down to select the
desired Skype name.
L Skype name and its current status icon
are displayed.
Icon Status
Online
Offline
Skype Me
Away
Do Not Disturb
Voicemail
SkypeOut
Not Available
L You can search the desired Skype
name by pressing the dialling button
that corresponding to the first letter.
3 {C}/P
4 When you finish talking, press {ih} or
place the handset on the base unit or
charger.
12

TGA915EX(e).book Page 13 Tuesday, August 8, 2006 11:14 AM
Using the USB Adaptor
Note:
L You cannot select items from the handset
phonebook, redial list and caller list.
L If you receive a land line call during an
internet call, you will hear an incoming call
tone. To answer the 2nd call, press
{ih} to end the first call, then press
{C} or {s}.
Using the speakerphone
1 During a conversation, press {s} to turn
on the speakerphone.
L Speak alternately with the other party.
2 When you finish talking, press {ih}.
Note:
L Use the speakerphone in a quiet
environment.
L To switch back to the receiver, press
{C}.
Adjusting the receiver or speaker volume
Push the joystick up or down repeatedly
while talking.
Making regular phone calls
(SkypeOut)
SkypeOut is a way to make calls from Skype
to persons who use telephone lines or
mobile phones. Making SkypeOut calls is
not free of charge. Before using the
SkypeOut, purchase the Skype credit on
your Skype account page. For more
information about SkypeOut, see the Skype
website (http://www.skype.com/).
1 D (left soft key) i “Dial” i M
2 Enter the phone number in the following
way (even for local calls):
“country code” + “area code” +
“local phone number”
L In case of some countries, delete “0” at
the first digit of the area code.
L To correct a digit, press {C/T}.
3 {C}/{s}/P
4 When you finish talking, press {ih} or
place the handset on the base unit or
charger.
Note:
L You do not need to enter the international
prefix (such as “+”) because “+” is
automatically added to the phone number
when dialling. For this reason, “+” is
displayed in the dialled phone number
when you view the history (page 14).
Answering internet calls
If you receive an internet call, you will hear
an IP ringtone from the handset and D will
flash in the upper left of the handset display.
1 Lift the handset and press {C} or {s}.
L You can also answer a call by pressing
any dial key from {0} to {9}, {*}, {#},
or {INT}. (Any key answer feature)
2 When you finish talking, press {ih} or
place the handset on the base unit or
charger.
Note:
L You can change the IP ringtone (page 15).
L When an internet call is received, the base
unit does not ring.
L When an internet call is received while
you are in the “Do Not Disturb” mode of
the online status, the handset does not
ring.
L The answering system does not answer
internet calls.
L Caller ID feature does not work for internet
calls.
L If you receive an internet call during a land
line call, you will hear an incoming call
tone. To answer the 2nd call, press
13

TGA915EX(e).book Page 14 Tuesday, August 8, 2006 11:14 AM
Using the USB Adaptor
{ih} to end the first call, then press
{C} or {s}.
Auto talk feature
You can answer calls simply by lifting the
handset off the base unit or charger. You do
not need to press {C}. To turn this feature
on, see the operating instructions included
with the base unit.
Missed calls
If an internet call is not answered, 9 is
shown on the handset display. To see who
called while you were out:
1 D (left soft key) i “Missed call”
i M
2 Push the joystick down to search from the
most recent missed call. Push the
joystick up to search from the oldest
missed call.
L Skype name and its current status icon
are displayed (page 12).
L To call the displayed item, press {C},
{s}, or P.
L To play the displayed Voicemail
message, press m.
Note:
L Once you have viewed a missed call or
played a Voicemail message, it will not be
displayed the next time you enter the
missed call list.
L If you press {ih} in step 2 without
viewing all missed internet calls, 9
disappears from the handset display.
When you receive another internet call, it
is displayed.
Answering another internet call
This feature allows you to receive or reject
another internet call while you are already
talking on the IP phone.
If you receive an internet call while on the IP
phone, you will hear an incoming call tone.
Press D to end the first call and answer
the 2nd call.
L To reject the 2nd call, press E.
Useful features during an
internet call
HOLD button
This feature allows you to put an internet call
on hold.
Press H during an internet call.
L To release the hold, press {C} or {s}.
Mute
While mute is turned on, you can hear the
other party, but the other party cannot hear
you.
To mute your voice, press {C/T}.
L To return to the conversation, press {C/
T}.
Using the history
Call information of incoming and outgoing
internet calls is logged in the Skype History
by the most recent internet call to the oldest.
If you receive the Skype Voicemail, it will be
recorded in the history along with call
information. You can view the history by
using the handset, and you can call or play
the Voicemail by selecting the item in the
history.
1 D (left soft key) i “History” i
M
2 Push the joystick down to search in the
incoming call history from the most recent
call. Push the joystick up to search from
the oldest call.
L Skype name and its current status icon
are displayed (page 12).
L You can change the history by pressing
the right soft key as follows;
14
TGA915EX(e).book Page 15 Tuesday, August 8, 2006 11:14 AM
Incoming call history F
G
Outgoing call history
u
Voicemail history
3 To call to the displayed item, press {C},
{s}, or P.
To play the displayed Voicemail
message, press m. To stop playing the
message, press O.
4 When you finish talking or playing, press
{ih} or place the handset on the base
unit or charger.
Note:
L You cannot edit or erase call information
in the history by using the handset.
Using the USB Adaptor
Selecting the IP ringtone
You can change the IP ringtone heard when
an internet call is received. The default
setting is “Ringtone 6”.
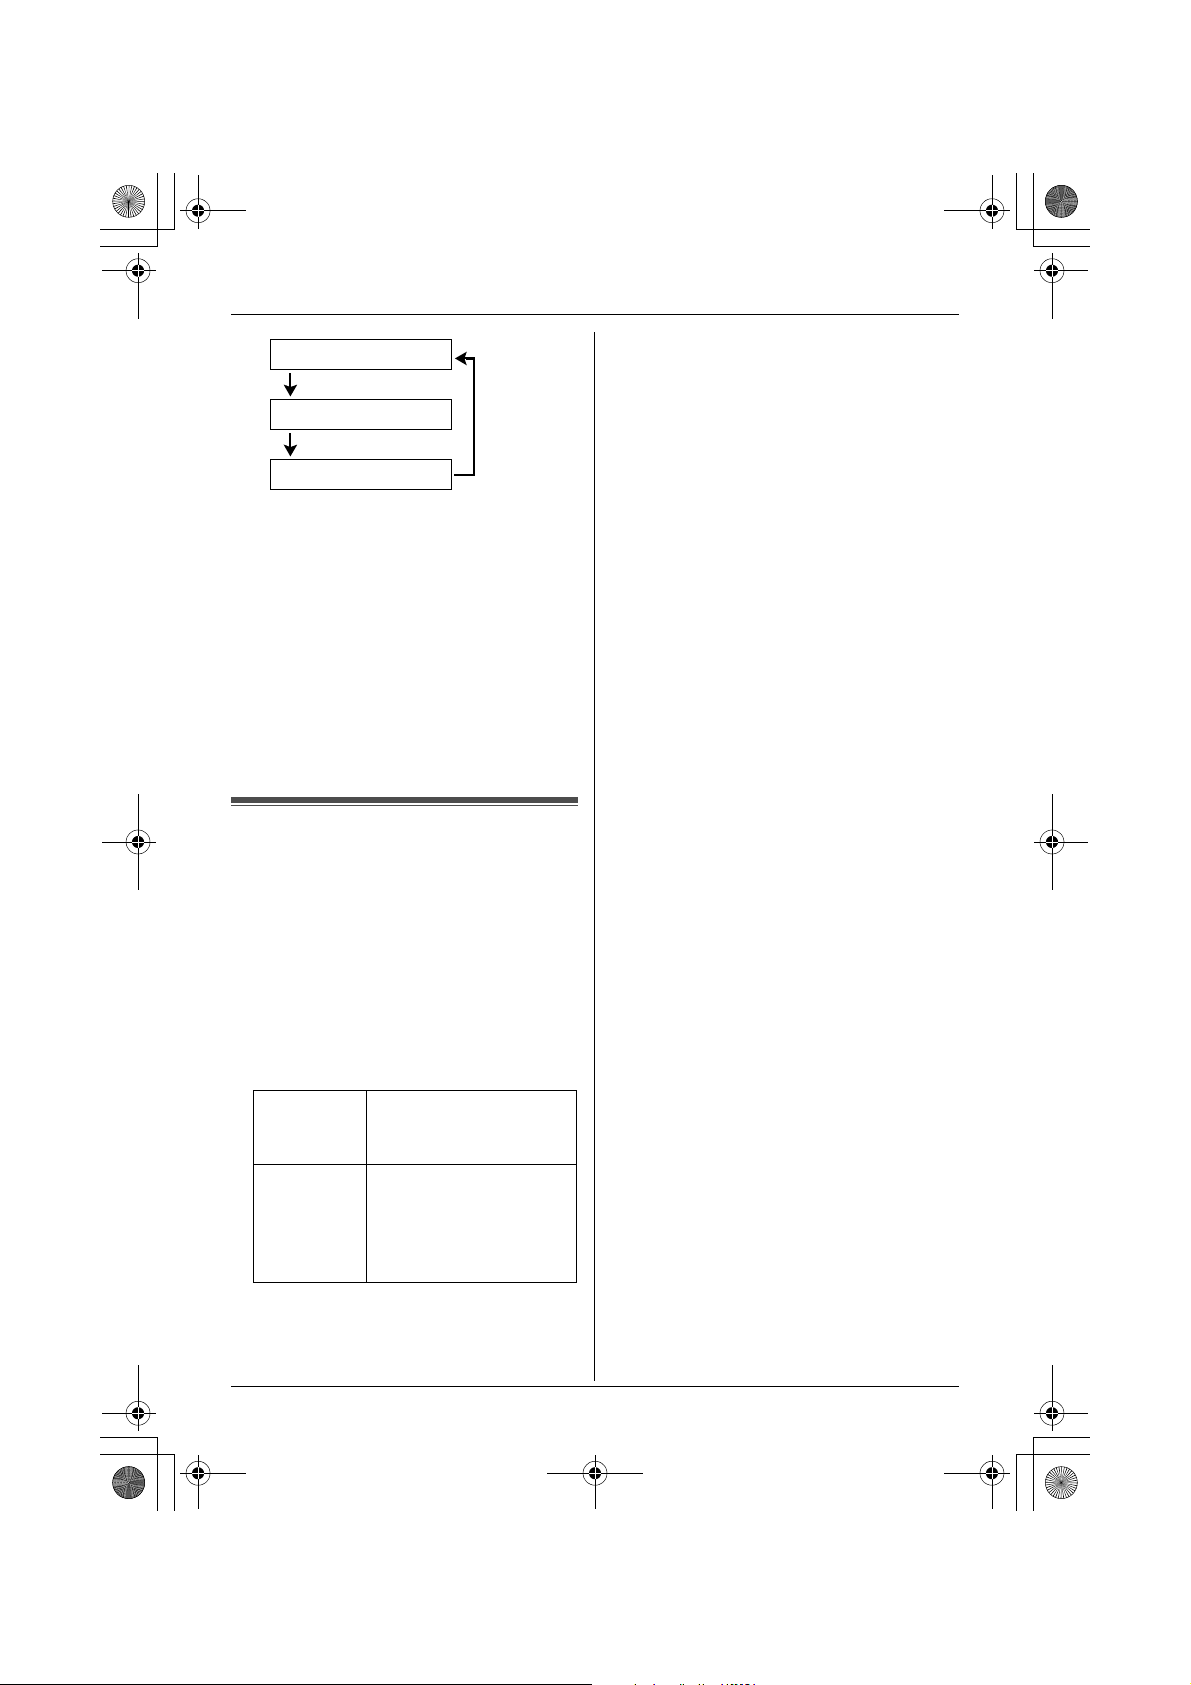
1 K (centre of joystick) i m i M
2 “Ringer Setup” i M
3 “IP Ringtone” i M
4 Select the desired item. i M
Preset
Ringtones
User
Ringtones
5 Select the desired ringtone. i Mi
{ih}
Ringtones stored in the
handset at the time of
purchase.
Ringtones you stored in
the handset. To store,
see the operating
instructions included
with the base unit.
15
TGA915EX(e).book Page 16 Tuesday, August 8, 2006 11:14 AM
Useful Information
Troubleshooting
Problem Cause & solution
The USB adaptor does
not work. (The USB
Adaptor Utility icon ( ) is
indicated in gray.)
The USB Adaptor Utility
does not start when my
computer is started up.
(The USB Adaptor Utility
icon ( ) does not appear
in the system tray.)
I cannot read the
language displayed by
the USB Adaptor Utility.
I cannot make or receive
internet calls.
I cannot register the USB
adaptor.
L Make sure the USB plug is connected properly to your
computer.
L The USB adaptor may not work properly depending on the
power supply of your computer’s USB port. If this is the
case and your computer has multiple USB ports, we
recommend that you try other USB ports.
L The USB adaptor is too far from the base unit. Move closer
to the base unit.
L Skype software is not activated. Start the software.
L Your base unit is turned off. Confirm the connection.
L The registration may be cancelled from the base unit. Set
up and register the USB adaptor to the base unit again
(“Confirming the USB adaptor works properly” on page 10).
L If you are still having problems, deregister the USB adaptor
(page 11) and uninstall the USB Adaptor Utility (page 11)
then reinstall it (page 9).
L Start the Utility manually. Click [Start], then select [All
Programs] – [Panasonic] – [USB Adaptor Utility (KXTGA915)] – [USB Adaptor Utility].
(For Windows 2000, click [Programs] instead of [All
Programs].)
L After you have started the USB Adaptor Utility, you can
enable the Auto Startup feature to make sure the USB
Adaptor Utility starts each time your computer is started up.
To enable Auto Startup, right-click on the USB Adaptor
Utility icon in the system tray and insert a check mark next
to [Auto Startup].
L You can change the display language. Select the desired
language from the pull-down menu on the upper right of the
USB adaptor setup window.
L While the cordless camera is in use, you cannot make
internet calls.
L If other handsets are in use, you may not be able to make
or receive internet calls.
L The maximum number of extensions (6) are already
registered to the base unit. Cancel unused handset or
cordless camera registrations from the base unit. See the
base unit operating instructions.
16
TGA915EX(e).book Page 17 Tuesday, August 8, 2006 11:14 AM
Useful Information
Problem Cause & solution
Some names displayed in
the Contact list or history
on the handset are
different from ones on
your computer.
L For other troubleshooting, refer to the base unit operating instructions or visit:
http://panasonic.co.jp/pcc/cs/en/telecom/tel/download.htm
L The handset does not display characters that you cannot
enter using the handset. Refer to the character tables for
character entry mode (excluding the ones for SMS
messages) in the base unit operating instructions.
17

TGA915EX(e).book Page 18 Tuesday, August 8, 2006 11:14 AM
Useful Information
Specifications
N Standard:
DECT (Digital Enhanced Cordless
Telecommunications)
N Number of channels:
120 Duplex Channels
N Frequency range:
1.88 GHz to 1.9 GHz
N Duplex procedure:
TDMA (Time Division Multiple Access)
N Channel spacing:
1,728 kHz
N Bit rate:
1,152 kbit/s
N Modulation:
GFSK (Gaussian Frequency Shift Keying)
N RF transmission power:
Approx. 250 mW
N Power source:
5 V DC (USB powered)
N Power consumption:
Standby: Approx. 0.2 W
Maximum: Approx. 0.3 W
N Interface:
USB: 1.1
N Operating conditions:
5 °C–40 °C, 20 %–80 % relative air humidity
(dry)
N Dimensions:
Approx. 15 mm × 42 mm × 74 mm
N Mass (weight):
Approx. 30 g
Trademarks
L Microsoft and Windows are either
registered trademarks or trademarks of
Microsoft Corporation in the United States
and/or other countries.
L Intel and Pentium are either trademarks or
registered trademarks of Intel Corporation
or its subsidiaries in the United States and
other countries.
L Microsoft product screen shots reprinted
with permission from Microsoft
Corporation.
L Skype, SkypeIn, SkypeOut and the S logo
are trademarks of Skype Limited.
L All other trademarks identified herein are
the property of their respective owners.
Note:
L Specifications are subject to change.
L The illustrations used in these operating
instructions may differ slightly from the
actual product.
L Software features and appearance are
subject to change without notice.
18
 Loading...