

Page 1
X
TGA914FX(e).book Page 1 Wednesday, August 23, 2006 9:51 AM
Operating Instructions
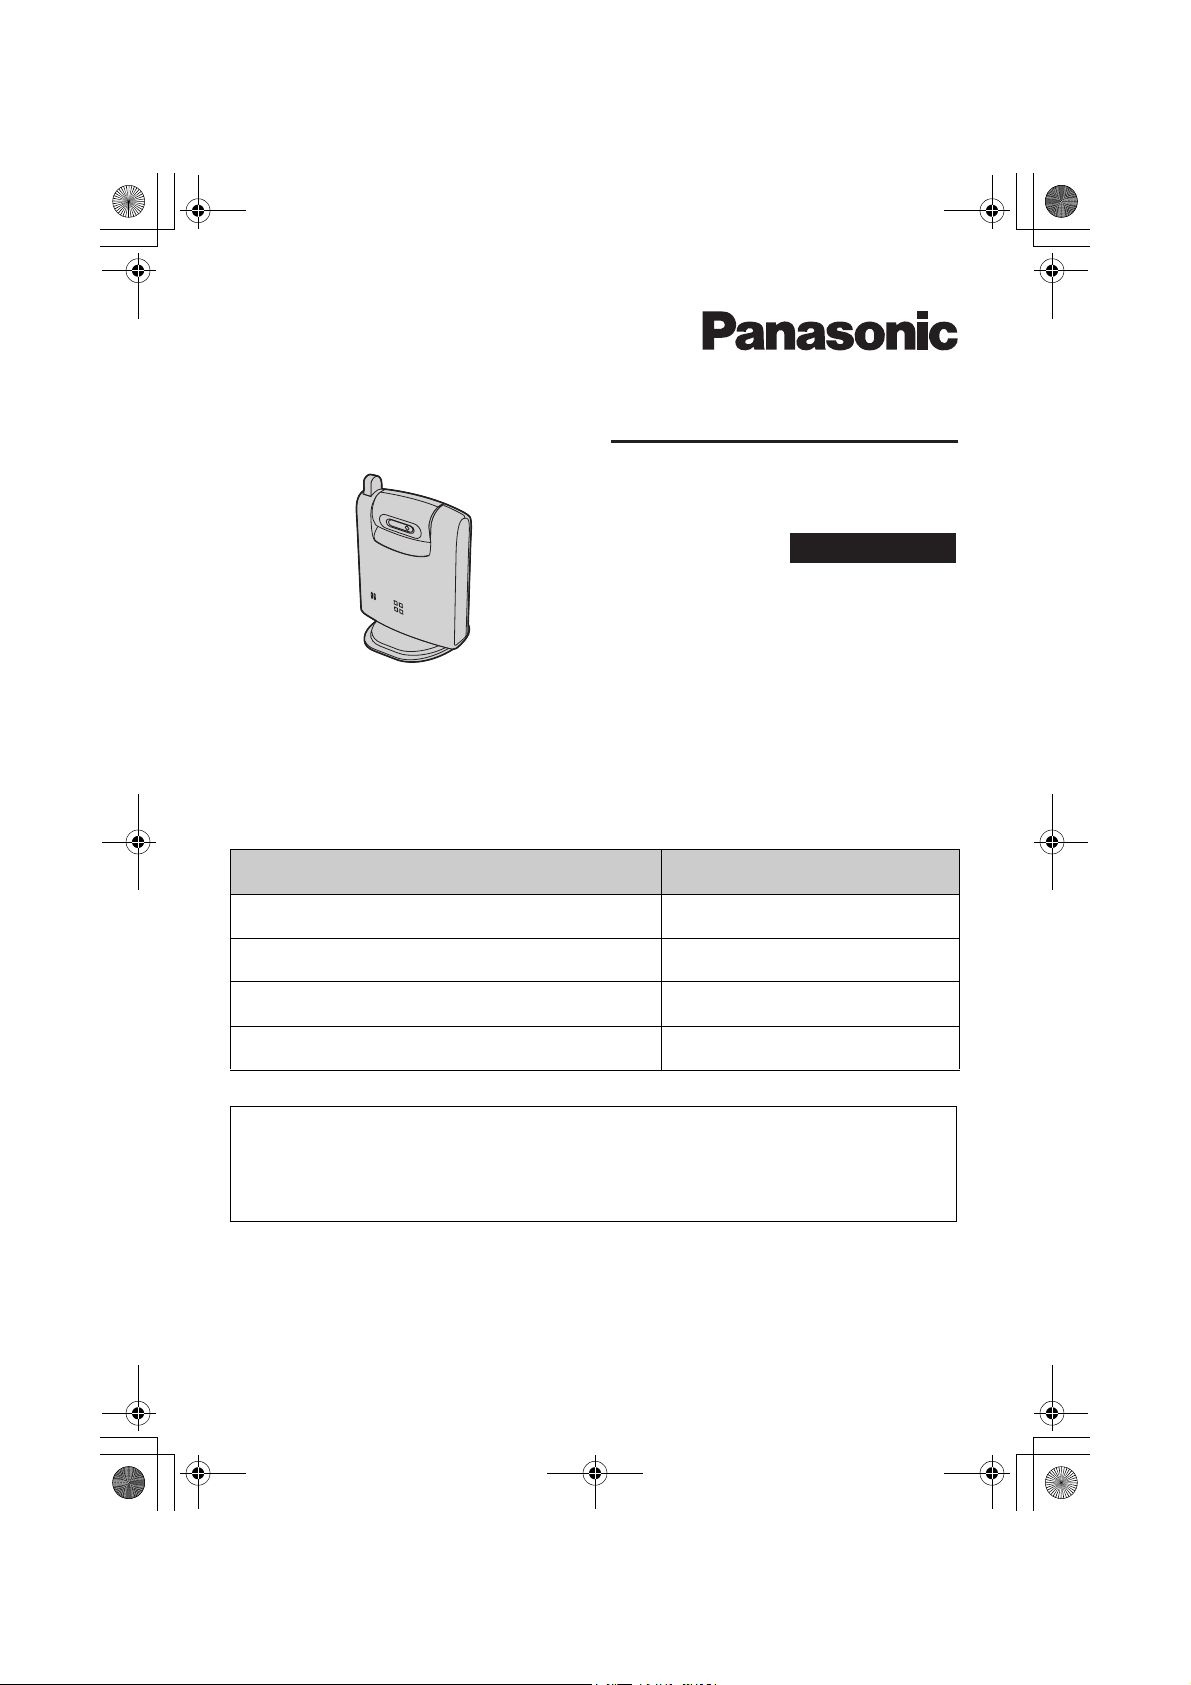
Cordless Camera
Model No.
KX-TGA914F
Indoor Use Only
Contents/Obsah/İçindekiler Page/Strana/Str./Sayfa
English instructions 1 - 24
Pokyny v češtině (1) - (24)
Pokyny v slovenčine <1> - <24>
Türkçe talimatlar ((1)) - ((24))
This cordless camera is an accessory unit for use with Panasonic Digital
Cordless Phone: KX-TG9120
You must register this cordless camera with your base unit before it can
be used.
Please read these Operating Instructions before using the unit and save for
future reference.
Page 2
TGA914FX(e).book Page 2 Wednesday, August 23, 2006 9:51 AM
Table of Contents
Introduction
Introduction . . . . . . . . . . . . . . . . . . . . . . . . . . . . . . . . . . . . . . . . . . . . . . . . . . . . . . . . . . . . . 3
Accessory information . . . . . . . . . . . . . . . . . . . . . . . . . . . . . . . . . . . . . . . . . . . . . . . . . . . . . 5
Important information . . . . . . . . . . . . . . . . . . . . . . . . . . . . . . . . . . . . . . . . . . . . . . . . . . . . . . 6
Preparation
Controls . . . . . . . . . . . . . . . . . . . . . . . . . . . . . . . . . . . . . . . . . . . . . . . . . . . . . . . . . . . . . . . . 8
Setting up the cordless camera . . . . . . . . . . . . . . . . . . . . . . . . . . . . . . . . . . . . . . . . . . . . . . 9
Symbols used in these operating instructions . . . . . . . . . . . . . . . . . . . . . . . . . . . . . . . . . . 12
Registering the cordless camera . . . . . . . . . . . . . . . . . . . . . . . . . . . . . . . . . . . . . . . . . . . . 12
Camera Monitoring
Camera monitoring using a handset . . . . . . . . . . . . . . . . . . . . . . . . . . . . . . . . . . . . . . . . . 13
Useful Information
Wall mounting . . . . . . . . . . . . . . . . . . . . . . . . . . . . . . . . . . . . . . . . . . . . . . . . . . . . . . . . . . 16
Troubleshooting . . . . . . . . . . . . . . . . . . . . . . . . . . . . . . . . . . . . . . . . . . . . . . . . . . . . . . . . . 19
Specifications . . . . . . . . . . . . . . . . . . . . . . . . . . . . . . . . . . . . . . . . . . . . . . . . . . . . . . . . . . . 21
Sales department. . . . . . . . . . . . . . . . . . . . . . . . . . . . . . . . . . . . . . . . . . . . . . . . . . . . . . . . 22
2
Page 3
TGA914FX(e).book Page 3 Wednesday, August 23, 2006 9:51 AM
Introduction
Introduction
Thank you for purchasing the cordless camera.
For your future reference
Attach or keep original receipt to assist with any repair under warranty.
Serial No. (found on the bottom of the unit)
Date of purchase
Name and address of dealer
Note:
L In the event of problems, you should contact your equipment supplier in the first instance.
Declaration of Conformity:
L Panasonic Communications Co., Ltd. declares that this equipment is in compliance with the
essential requirements and other relevant provisions of Radio & Telecommunications
Terminal Equipment (R&TTE) Directive 1999/5/EC.
Declarations of Conformity for the relevant Panasonic products described in this manual
are available for download by visiting:
http://www.doc.panasonic.de
Contact:
Panasonic Services Europe
a Division of Panasonic Marketing Europe GmbH
Panasonic Testing Centre
Winsbergring 15, 22525 Hamburg, Germany
3
Page 4

TGA914FX(e).book Page 4 Wednesday, August 23, 2006 9:51 AM
Introduction
Feature highlight
Camera monitoring using the handset
Important:
L In these operating instructions, the term “handset” is used to refer to the KX-TGA910FX.
You can monitor the room where the cordless camera is located when:
– you access the cordless camera using the handset (page 13).
– the cordless camera pages the handset when it detects sound (page 14).
– the cordless camera user pages the handset using the call button (page 14).
4
Page 5
TGA914FX(e).book Page 5 Wednesday, August 23, 2006 9:51 AM
Introduction
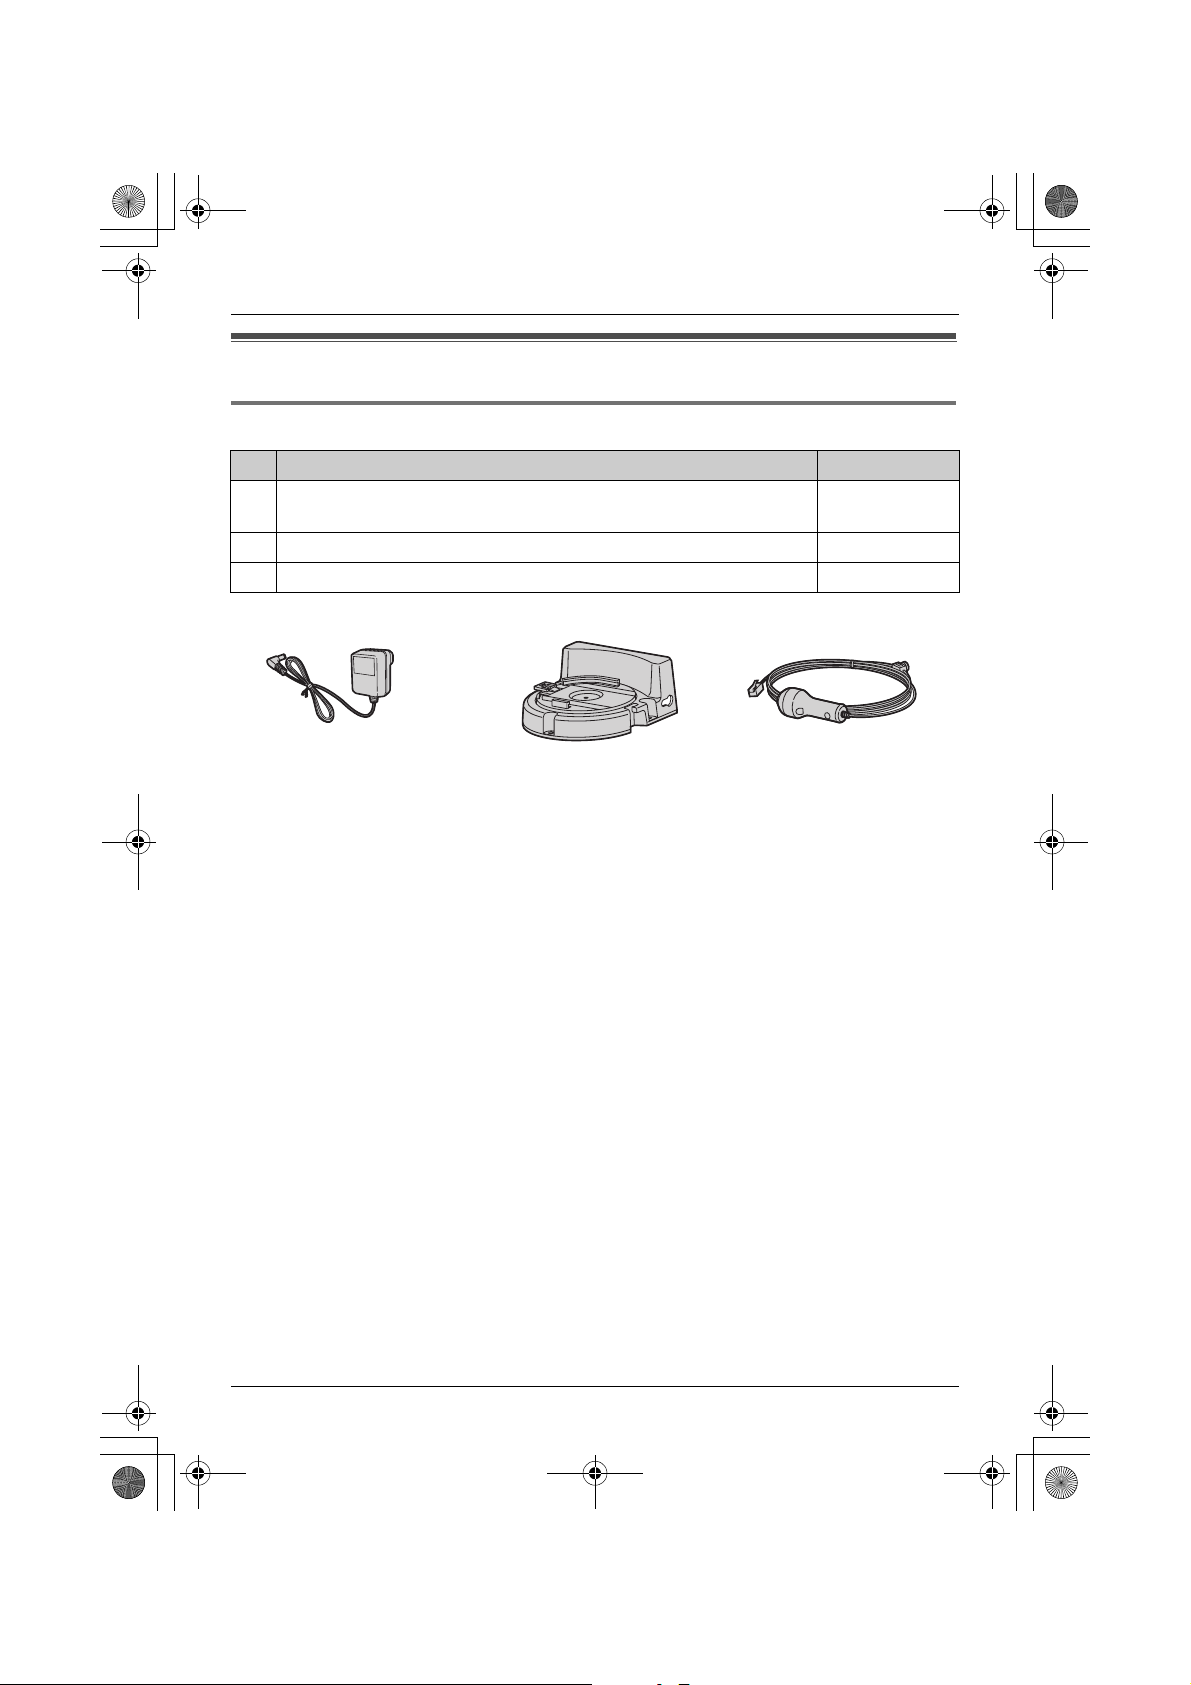
Accessory information
Included accessories
No. Accessory item Quantity
1 AC adaptor
(Part No. PQLV209CE)
2 Wall-mounting adaptor 1
3 Call button 1
123
1
5
Page 6
TGA914FX(e).book Page 6 Wednesday, August 23, 2006 9:51 AM
Introduction
Important information
General
L Use only the AC adaptor included with this
product, noted on page 5.
L Do not connect the AC adaptor to any AC
outlet other than a standard 220–240 V
AC outlet.
L This product should not be used near
emergency/intensive care medical
equipment and should not be used by
people with pacemakers.
L Care should be taken that objects do not
fall onto, and liquids are not spilled into,
the unit. Do not subject this product to
excessive smoke, dust, mechanical
vibration or shock.
Environment
L Do not use this product near water.
L This product should be kept away from
heat sources such as radiators, cookers,
etc. It should also not be placed in rooms
where the temperature is less than 5 °C or
greater than 40 °C.
L The AC adaptor is used as the main
disconnect device. Ensure that the AC
outlet is installed near the product and is
easily accessible.
Warning:
L To prevent the risk of electrical shock, do
not expose this product to rain or any
other type of moisture.
L Unplug this product from power outlets if it
emits smoke, an abnormal smell, or
makes unusual noise. These conditions
can cause fire or electric shock. Confirm
that smoke has stopped emitting and
contact an authorised service centre.
Routine care
L After cleaning away the dust on the lens,
wipe the lens with a cotton bud.
Conditions for using the cordless
camera
L The cordless camera is intended for
indoor use only. Prolonged exposure to
direct sunlight or halogen light may
damage the camera lens.
L Use the cordless camera in a bright place
such as under daylight or a well-lit room.
L Do not use the cordless camera in the
following places:
– near incandescent lamps.
– near any electrical appliance that emits
a strong radio signal.
– where the subject of the picture is
against a light source or in front of a
mirror.
– in places where temperature varies
greatly, such as near an air conditioner
or heater.
– any place exposed to oil or steam such
as a kitchen.
– where an object such as glass can
cause temperature change due to
reflection.
L When using the cordless camera, please
take into consideration the rights of others
with regard to privacy.
Information on Disposal for
Users of Waste Electrical &
Electronic Equipment (private
households)
This symbol on the products and/or
accompanying documents means that used
electrical and electronic products should not
be mixed with general household waste. For
proper treatment, recovery and recycling,
6
Page 7
TGA914FX(e).book Page 7 Wednesday, August 23, 2006 9:51 AM
please take these products to designated
collection points, where they will be
accepted on a free of charge basis.
Alternatively, in some countries you may be
able to return your products to your local
retailer upon the purchase of an equivalent
new product.
Disposing of this product correctly will help
to save valuable resources and prevent any
potential negative effects on human health
and the environment which could otherwise
arise from inappropriate waste handling.
Please contact your local authority for
further details of your nearest designated
collection point.
Penalties may be applicable for incorrect
disposal of this waste, in accordance with
national legislation.
For business users in the European
Union
If you wish to discard electrical and
electronic equipment, please contact your
dealer or supplier for further information.
Introduction
Information on Disposal in other
Countries outside the European Union
This symbol is only valid in the European
Union.
If you wish to discard this product, please
contact your local authorities or dealer and
ask for the correct method of disposal.
7
Page 8
TGA914FX(e).book Page 8 Wednesday, August 23, 2006 9:51 AM
Preparation
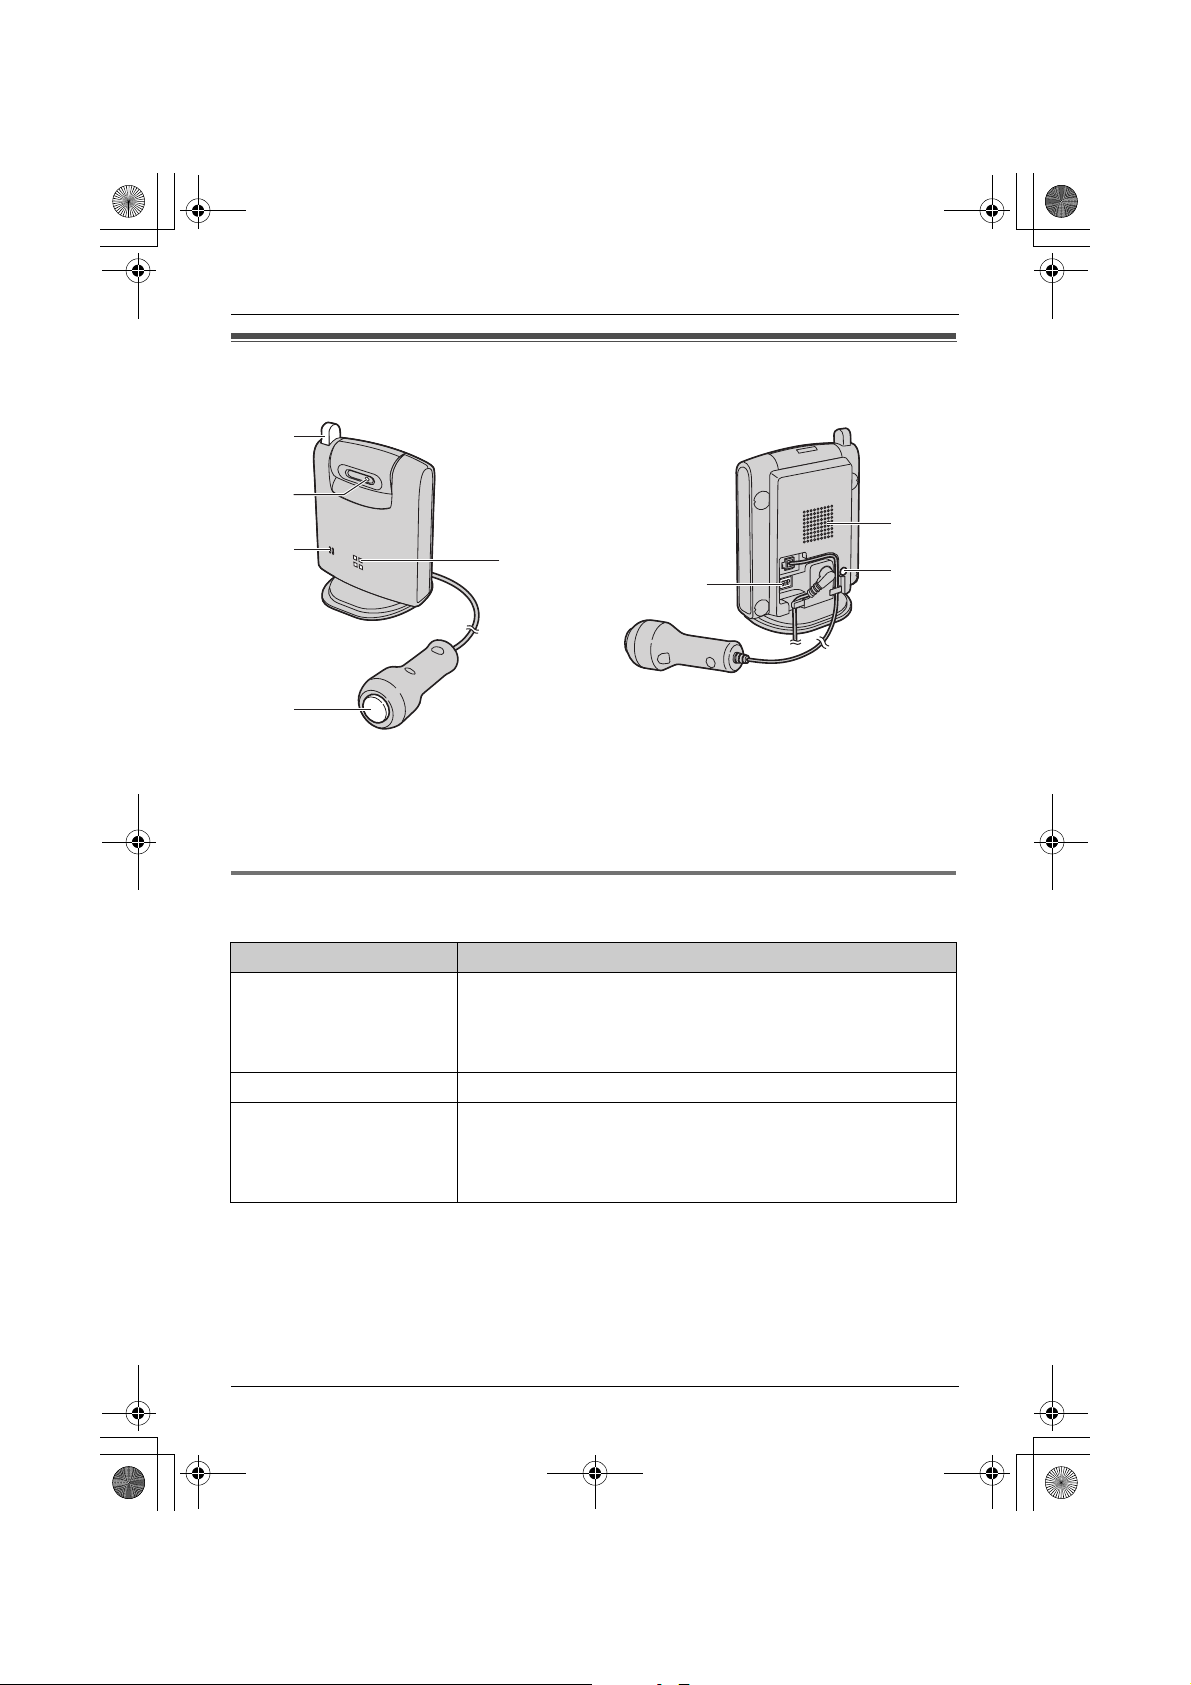
Controls
A
B
C
D
E
F
G
H
A Antenna
B Camera lens
C MIC (Microphone)
D Call button
E Indicator
F DIP switches
G Speaker
H PROG. (Program)
Understanding the cordless camera indicator
The cordless camera indicator shows the status as follows.
Status Description
Red (flashing rapidly) L The cordless camera is not registered. Register the
cordless camera (page 12).
L The cordless camera is out of range. Locate the cordless
camera near the base unit.
Yellow-green L The cordless camera is registered and in standby mode.
Yellow-green (flashing) L The camera sensor is responding and the cordless camera
is paging the handset.
L The cordless camera is connected and sending live images
to the handset.
8
Page 9

TGA914FX(e).book Page 9 Wednesday, August 23, 2006 9:51 AM
Preparation
Setting up the cordless camera
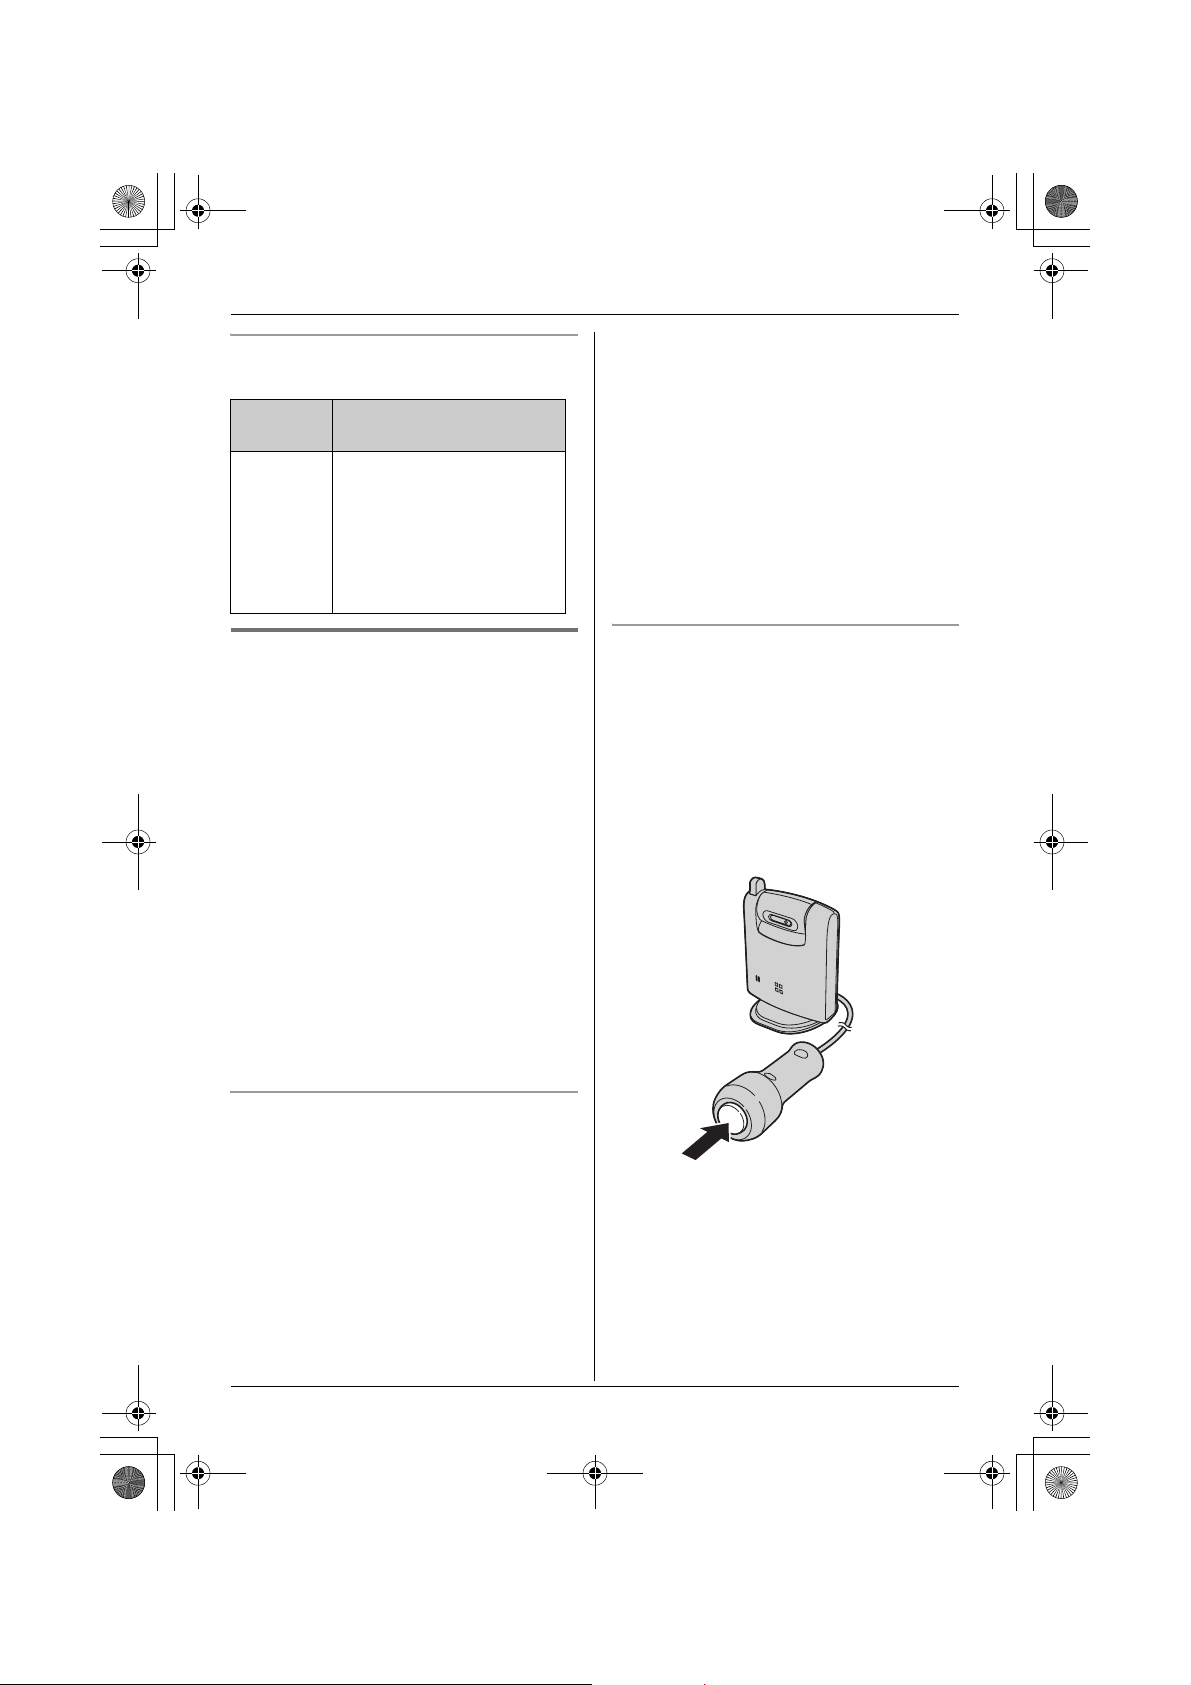
Connecting the AC adaptor and the call button
Connect the AC adaptor cord by pressing the plug firmly (A). Connect the call button cord
until it clicks into the unit (B).
L Use only the included AC adaptor.
B
A
Note:
L When the AC adaptor is connected, the indicator lights in red then starts flashing.
L The AC adaptor must remain connected at all times. (It is normal for the adaptor to feel
warm during use.)
L The AC adaptor should be connected to a vertically oriented or floor-mounted AC outlet. Do
not connect the AC adaptor to a ceiling-mounted AC outlet, as the weight of the adaptor
may cause it to become disconnected.
Hooks
(220–240 V, 50 Hz)
9
Page 10

TGA914FX(e).book Page 10 Wednesday, August 23, 2006 9:51 AM
Preparation
Adjusting the cordless camera lens angle
Aim the camera lens by pushing the tab (A) and rotating the lens up or down.
L Using the handset, confirm that the area you want to monitor from the cordless camera is
displayed (page 13).
Approx.
40°
Approx.
40°
Note:
L Do not touch the camera lens (page 8).
A
10
Page 11
TGA914FX(e).book Page 11 Wednesday, August 23, 2006 9:51 AM
Preparation
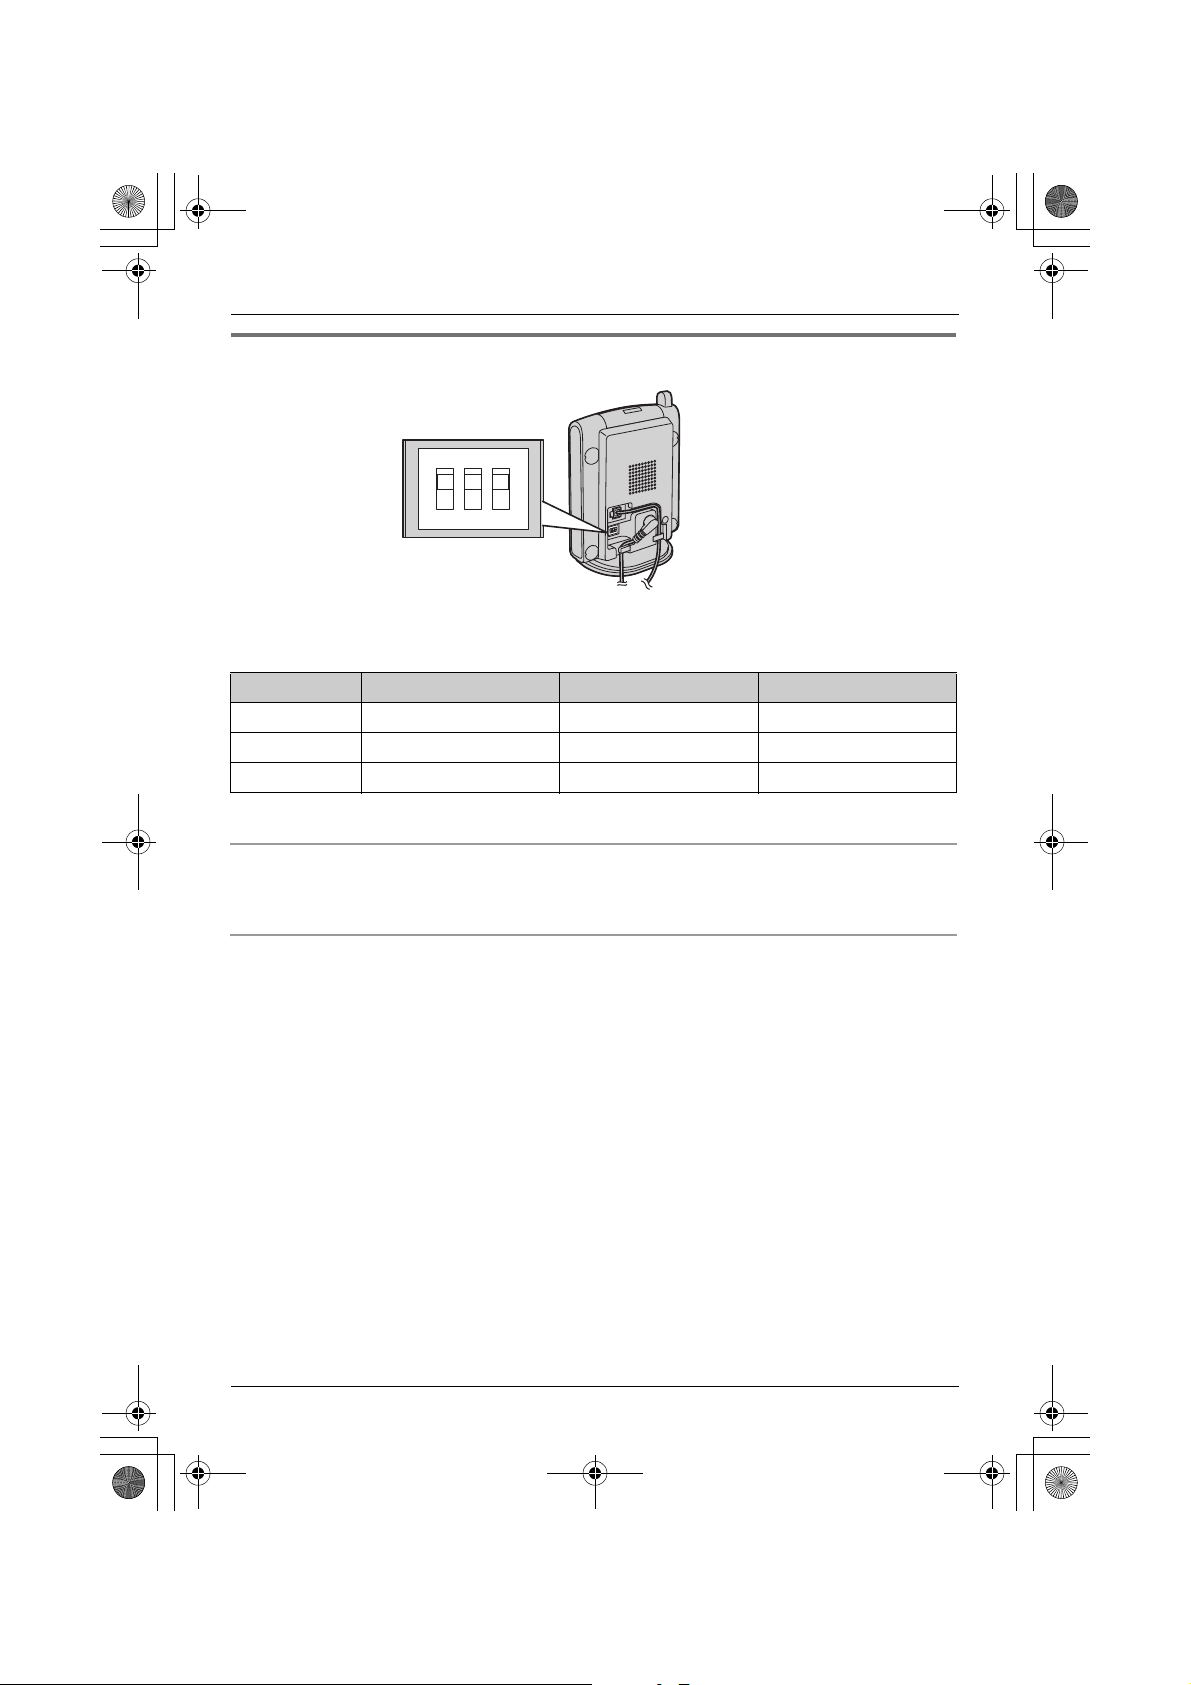
Setting the DIP switches
DIP switches
(Default position: ON)
1ON23
OFF*1
You can set the following functions by using DIP switches 2 and 3.
DIP switch 1 is not used for any settings.
Slide each switch with a pointed object such as a pen as necessary.
DIP switch Function ON (default) OFF
1–––
2 Image orientation Normal Upside down
3 Speaker volume Normal Low
*1
*1 Slide the switch down.
Displaying the image upside down (DIP switch 2)
To turn the camera image upside down, set to OFF. This feature is useful when you mount the
cordless camera upside down (page 17).
Selecting the cordless camera speaker volume (DIP switch 3)
If you want to lower the speaker volume, set to OFF (LOW).
11
Page 12
TGA914FX(e).book Page 12 Wednesday, August 23, 2006 9:51 AM
Preparation
Symbols used in these
operating instructions
Symbol Meaning
J Press J (centre of joystick).
i Proceed to the next operation.
L Press L (centre of joystick).
“ ” Select the words in quotations
shown on the display (e.g.,
“Cancel Handset”) by
pushing the joystick up or
down.
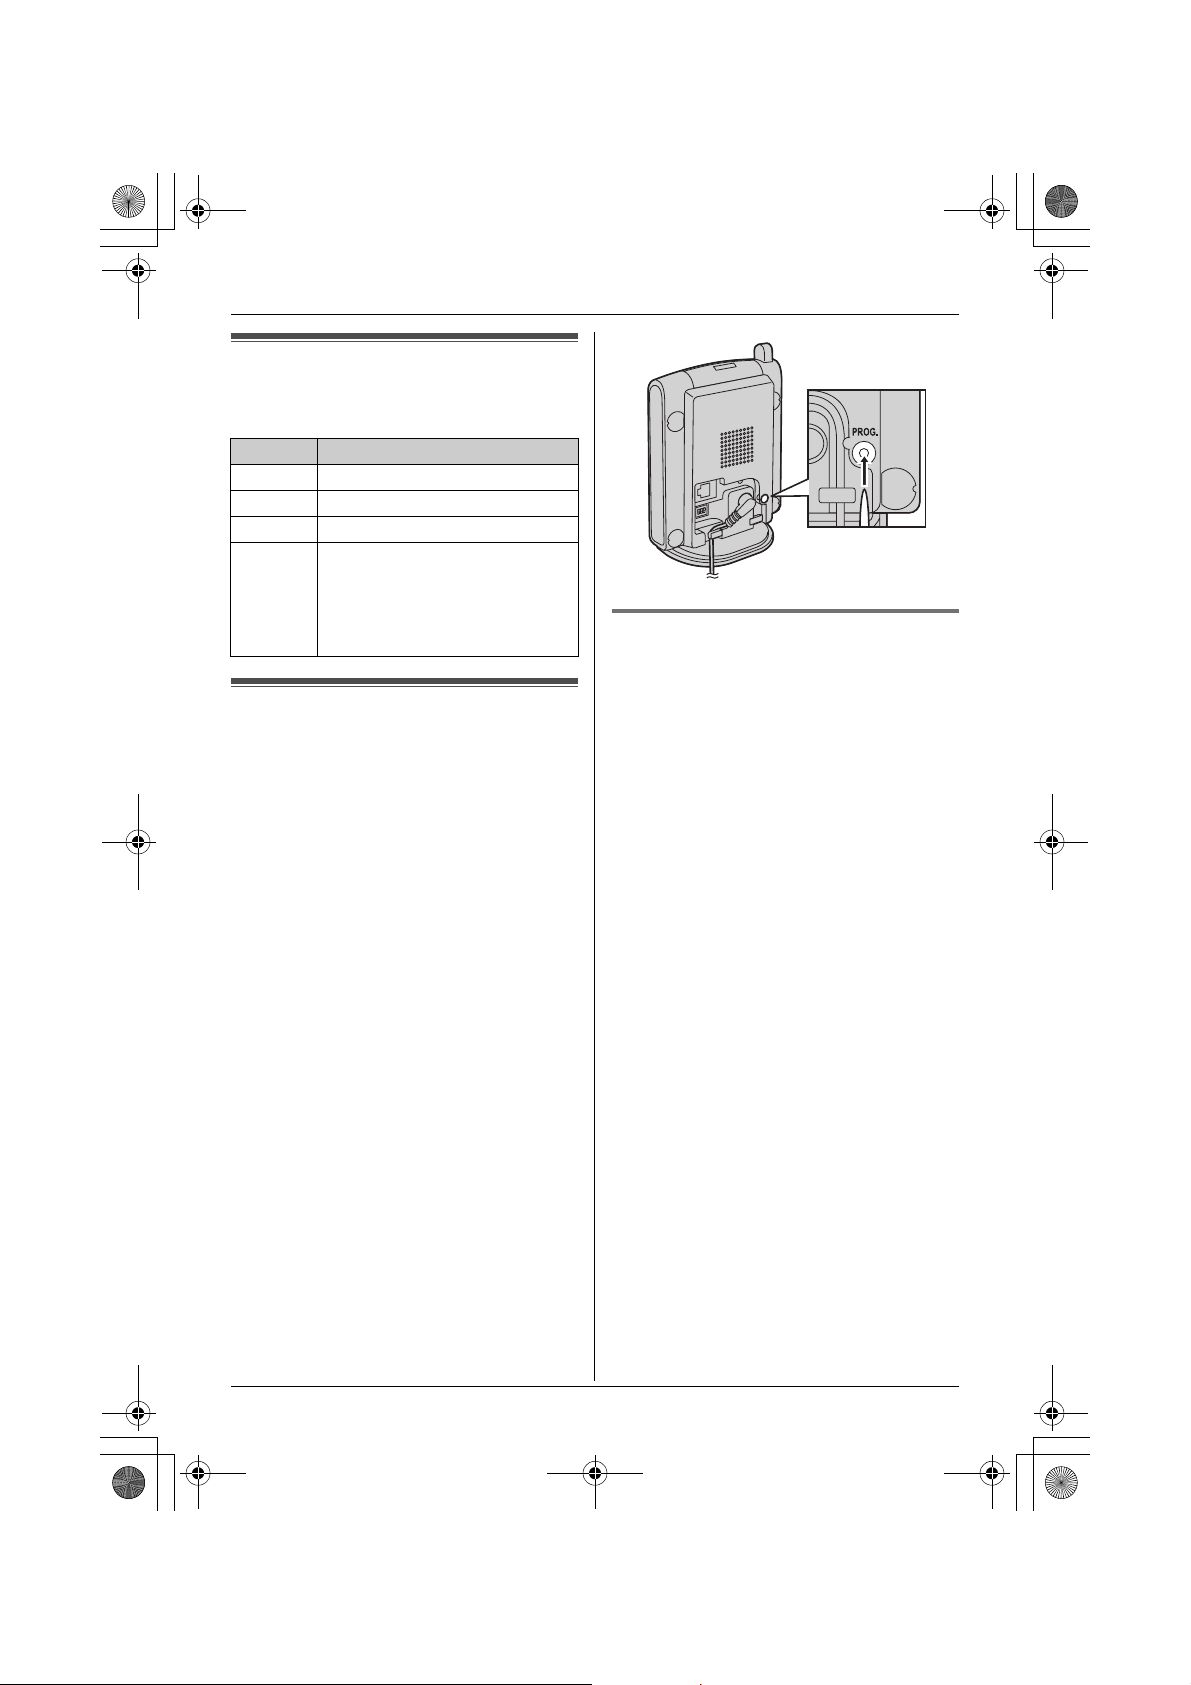
Registering the cordless
camera
Register the cordless camera to a KXTG9120 base unit.
1 Base unit:
Press and hold {x} on the base unit for
about 3 seconds, until the registration
tone sounds.
2 Camera:
Press PROG. (program) on the back side
of the cordless camera with a pointed
object such as a pen until a beep sounds.
L When registration is completed
successfully, the cordless camera
beeps and the indicator stops flashing
red but remains lit in yellow-green
(page 8).
L If all registered handset start ringing in
step 2, press {x} to stop. Start again
from step 1.
Cancelling the cordless camera
Using a handset registered to the same
base unit, you can cancel the registration of
a registered cordless camera.
1 J (centre of joystick) i L i L
2 Enter “335”.
3 “Cancel Handset” i L
4 Select the cordless camera you want to
cancel. i t
L A Q is displayed with the selected item.
L To cancel a selected item, select it
again. i t
5 L i “Yes” i L
L “Please Wait...” will be displayed
and a long beep will sound.
6 {ih}
12
Page 13
TGA914FX(e).book Page 13 Wednesday, August 23, 2006 9:51 AM
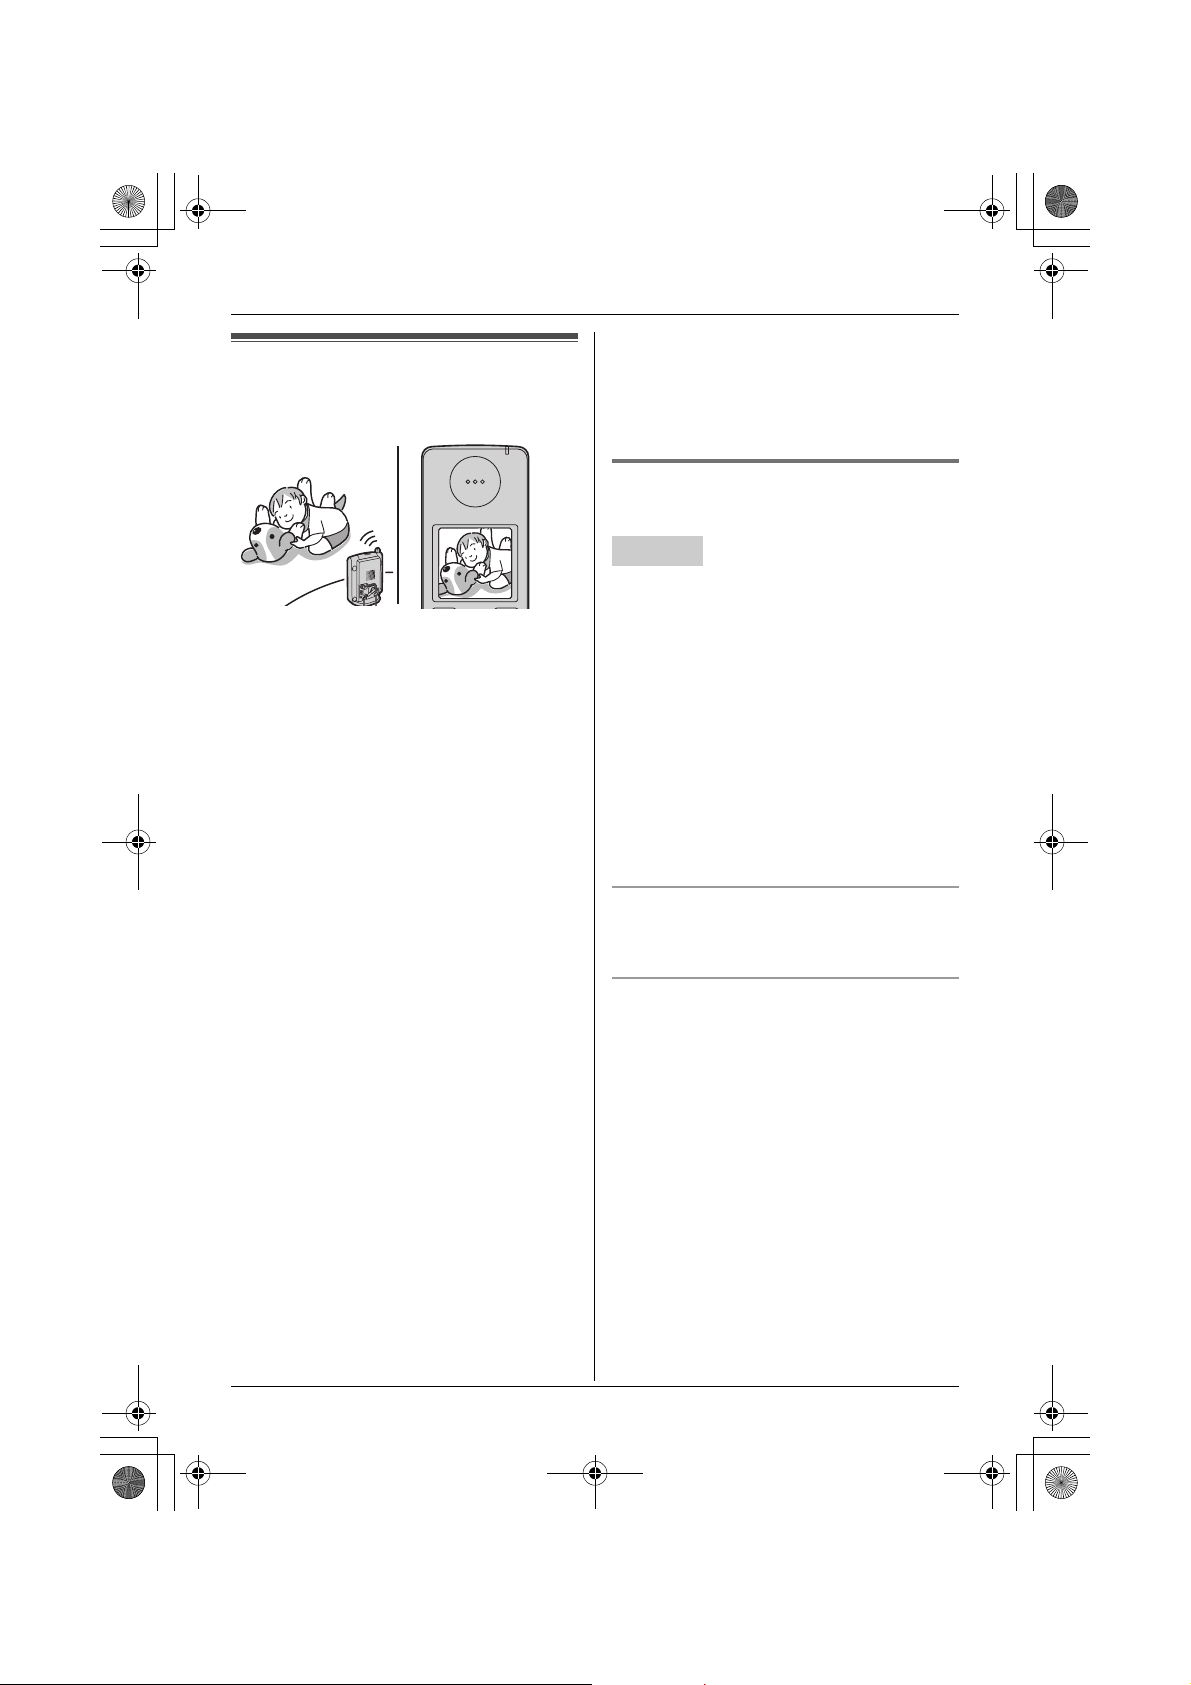
Camera monitoring using
a handset
With a handset, you can monitor the image
and sound of the room where the cordless
camera is located. The monitored camera
does not ring, allowing you to easily monitor
a baby’s room, for example, from different
areas of the house.
Important:
L Before you start monitoring, confirm that
the camera lens of the cordless camera
has been adjusted to the correct angle.
L Only 1 person can access the cordless
camera at a time.
L A refreshed image taken by the cordless
camera is displayed every few seconds.
The displayed image is not a moving
picture.
L While monitoring a cordless camera,
other users cannot make an intercom call
or transfer a call.
L The monitoring connection is
automatically cancelled after 10 minutes.
L While monitoring you cannot place the
handset on the base unit or charger. The
monitoring connection will be cancelled.
L The cordless camera may not page
handsets in the following conditions:
– when other users are on an intercom or
conference call.
– when electrical interference is emitted
from electrical devices.
Camera Monitoring
– while you are on a call with the handset.
(In this case you will hear 2 tones and
z will flash on the handset.)
L You cannot make a monitoring connection
via a DECT repeater.
Monitoring the cordless camera
from a handset
Handset
1 {INT}
2 Select the desired cordless camera. i
P/{C}/{s}
3 Speak to the cordless camera user if
necessary.
OR
To mute your sound output, press {C/T}
if necessary.
4 When you finish monitoring, press
{ih} or place the handset on the base
unit or charger.
Adjusting receiver/speaker volume
Push the joystick up or down while
monitoring.
Talking to the paged party using the
cordless camera
When the cordless camera is paged from a
handset, the cordless camera does not ring
and the speakerphone is turned on. You can
talk to the handset user. Speak clearly into
the MIC.
13
Page 14
TGA914FX(e).book Page 14 Wednesday, August 23, 2006 9:51 AM
Camera Monitoring
Handset display item for camera
monitoring
Displayed
item
Example:
8
Meaning
The handset is connected
to the cordless camera.
When flashing:
The cordless camera is
paging the handset. (It
detects sound or its call
button is pressed.)
Paging the handsets from the
cordless camera
The cordless camera can page handsets
when it detects sound or by pressing its call
button. Then the answering handset user
can monitor live images from the cordless
camera.
Important:
L Only registered handsets can be paged
from the cordless camera. The base unit
cannot be paged.
L If a handset is paged by the cordless
camera during a call, 2 tones sound and
z flashes on the handset. To monitor the
cordless camera from the handset, press
{ih}, then press {s}.
L Auto intercom feature cannot be used
when paged by a cordless camera.
2 Handset:
Press {s} to answer the page.
L You can monitor the room where the
camera is located.
3 Handset:
To mute your sound output, press {C/T}
if necessary.
4 Handset:
When you finish monitoring, press
{ih} or place the handset on the base
unit or charger.
Paging using the cordless camera call
button
1 Cordless camera:
Press the call button.
L The cordless camera produces a
camera tone and pages the handsets
for 1 minute.
L To stop paging, press the call button
again.
Paging using the camera audio sensor
Important:
L To use the audio detection feature of the
cordless camera, turn the audio detection
sensitivity to on (page 15).
1 Camera:
The camera detects sound.
L The camera produces a camera tone
and pages the handsets for 1 minute.
14
2 Handset:
Press {s} to answer the page.
L You can monitor the room where the
cordless camera is located.
3 Cordless camera:
When the handset user answers, speak
clearly into the MIC.
Page 15

TGA914FX(e).book Page 15 Wednesday, August 23, 2006 9:51 AM
Camera Monitoring
4 Handset:
When you finish monitoring, press
{ih} or place the handset on the base
unit or charger.
Useful settings while camera
monitoring
With a handset, you can set the camera
settings while monitoring.
Adjusting the display brightness
There are 6 levels.
1 Start monitoring (page 13).
2 Press B repeatedly to adjust the
brightness.
Note:
L When you finish monitoring, the setting is
reset to the default.
Selecting image zoom
1 Start monitoring (page 13).
2 Press A to zoom in on the image.
L To return to the original view, press
A again.
Setting the audio detection sensitivity
The cordless camera features a sensor that
detects human voices such as a baby cry.
Sounds other than human voices may be
difficult to detect. To use this feature, confirm
that the cordless camera is located in a
place where it can easily detect voices.
Once the sensor has detected sound, the
cordless camera pages the handset.
There are 3 levels. The default setting is
“off”.
1 Start monitoring (page 13).
2 v
3 To turn the feature on, push the joystick
up.
Push the joystick up or down to select the
desired sensitivity.
L To turn this feature off, push down the
joystick repeatedly.
4 L
Note:
L When you turn this feature off, the
cordless camera cannot detect sound
(page 14).
L To set the appropriate level, test the
sensor of the camera from the handset
beforehand.
15
Page 16
TGA914FX(e).book Page 16 Wednesday, August 23, 2006 9:51 AM
Useful Information
Wall mounting
The cordless camera can be mounted by the standard mounting or upside down mounting.
CAUTION:
L Mount the cordless camera on the stable location where the unit can be adequately
supported when installing.
L The AC adaptor should be connected to a vertically oriented or floor-mounted AC outlet. Do
not connect the AC adaptor to a ceiling-mounted AC outlet, as the weight of the adaptor
may cause it to become disconnected.
L Do not mount the cordless camera on a soft material. It may fall down, break or cause
injury.
L Do not mount the cordless camera on the following places: plaster board, ALC (autoclaved
lightweight cellular concrete), concrete block, plywood less than 25 mm thick, and etc.
L Do not pull the call button wire after you mount the cordless camera on the wall.
L After mounting the cordless camera on the wall, speak loudly and clearly into the MIC when
talking with the handset user.
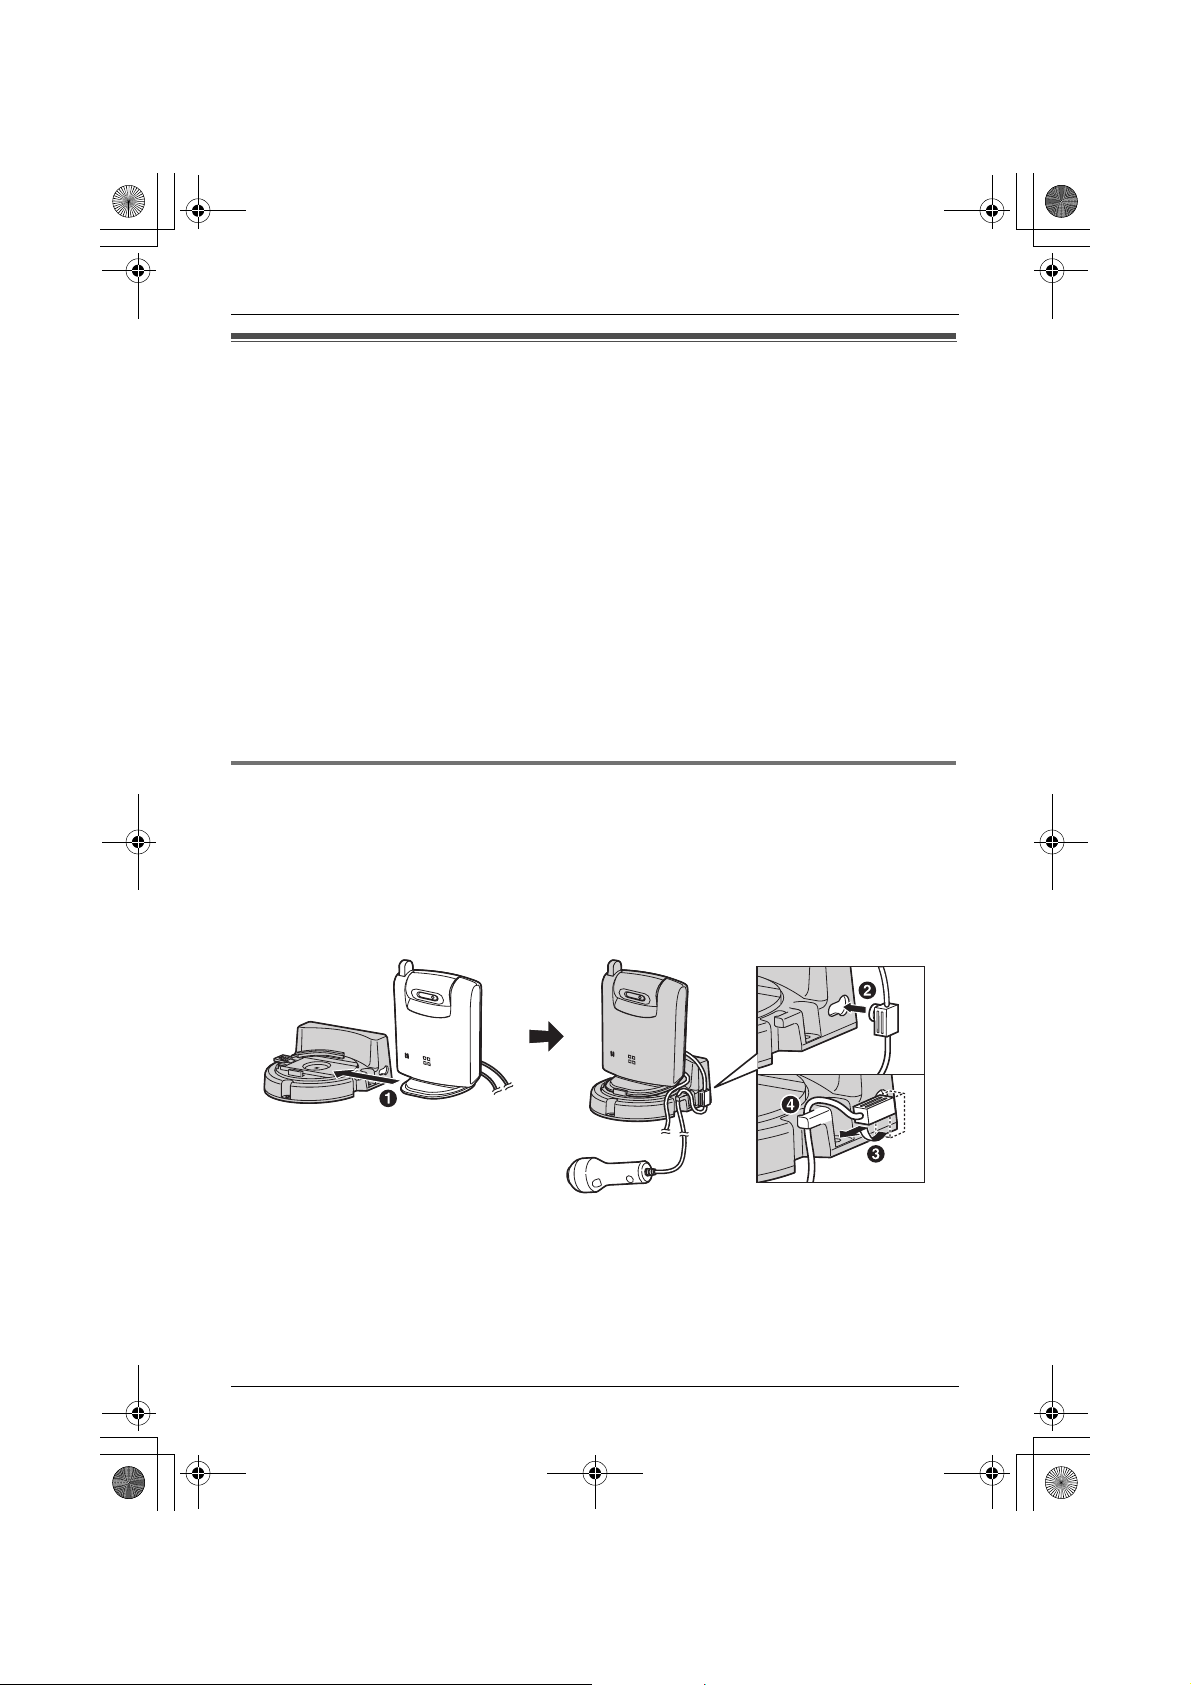
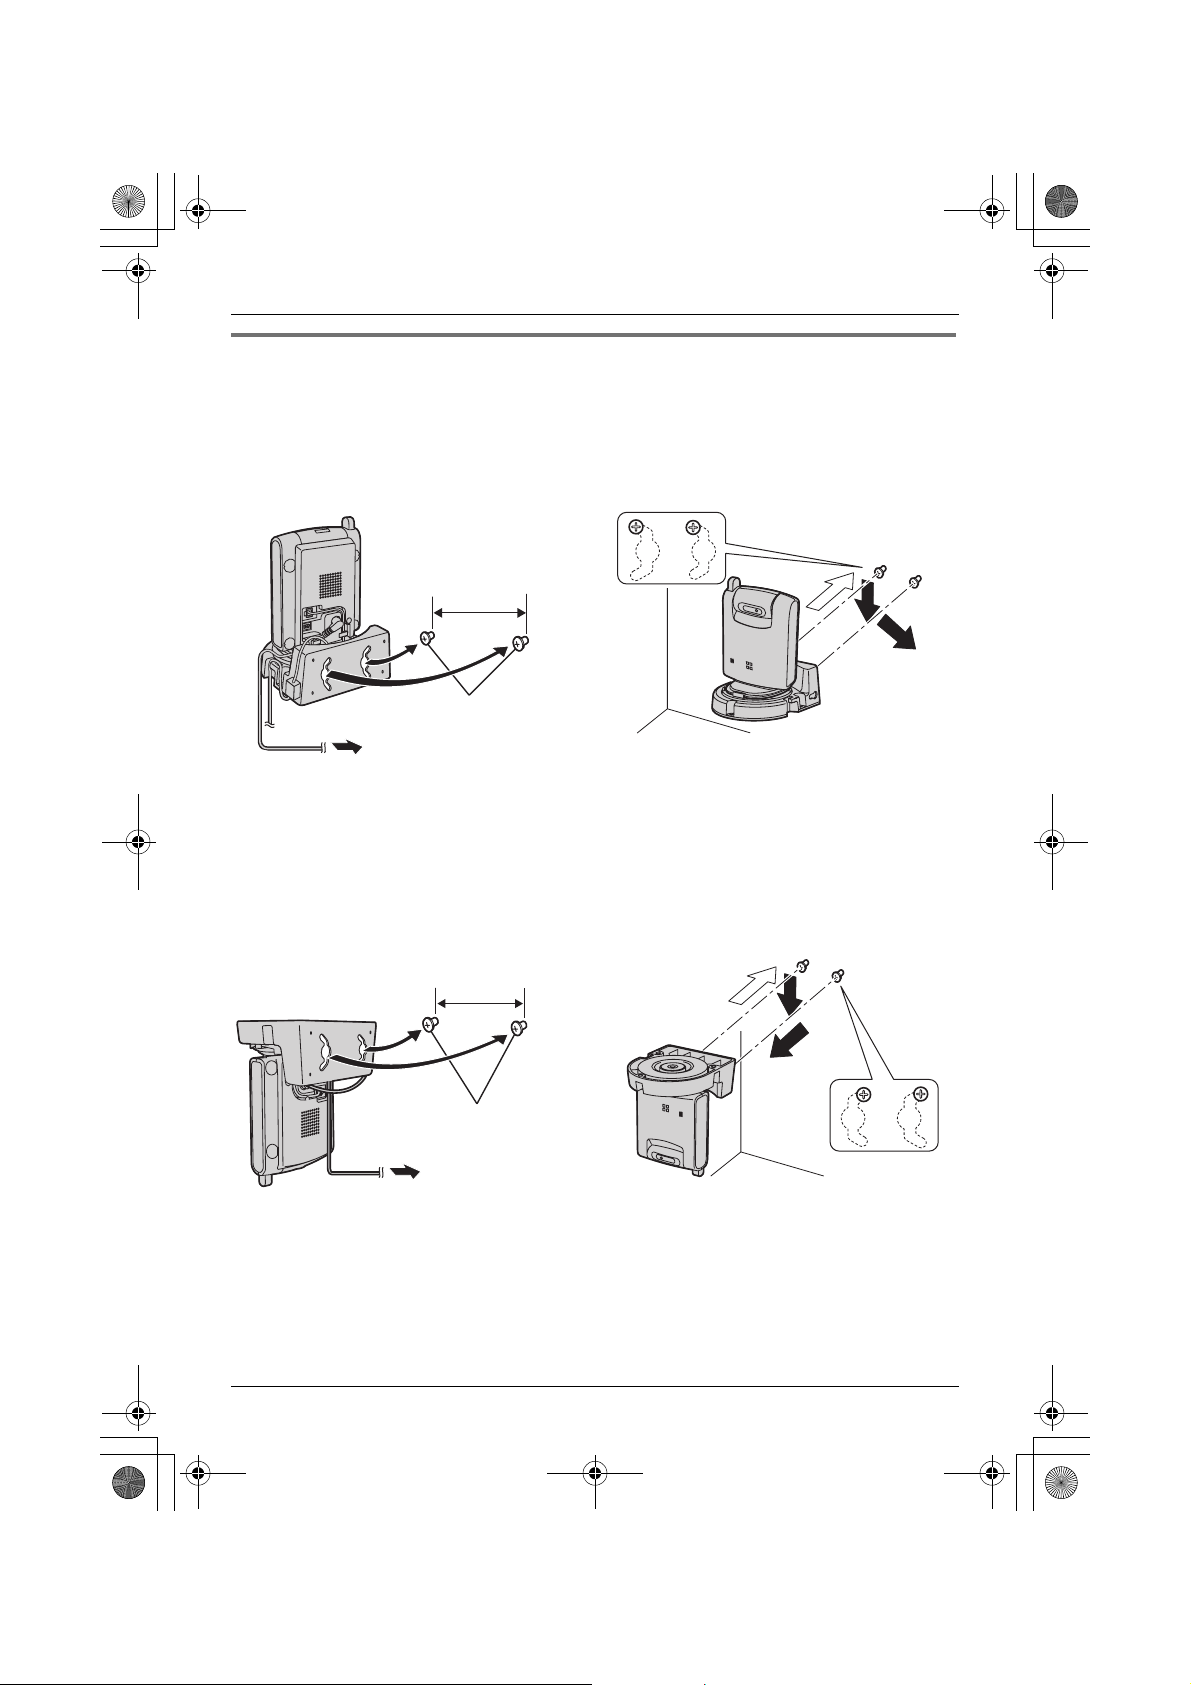
Connecting the wall-mounting adaptor
A Slide the cordless camera into the wall-mounting adaptor in the direction of the arrow until
it clicks into the place.
B Tuck the call button wire into the hole on the side of the wall-mounting adaptor by plugging
the small wire fixture into the hole.
C Turning it slightly and sliding it in place.
D Fasten the call button wire to the hook of the wall-mounting adaptor.
16
Page 17
TGA914FX(e).book Page 17 Wednesday, August 23, 2006 9:51 AM
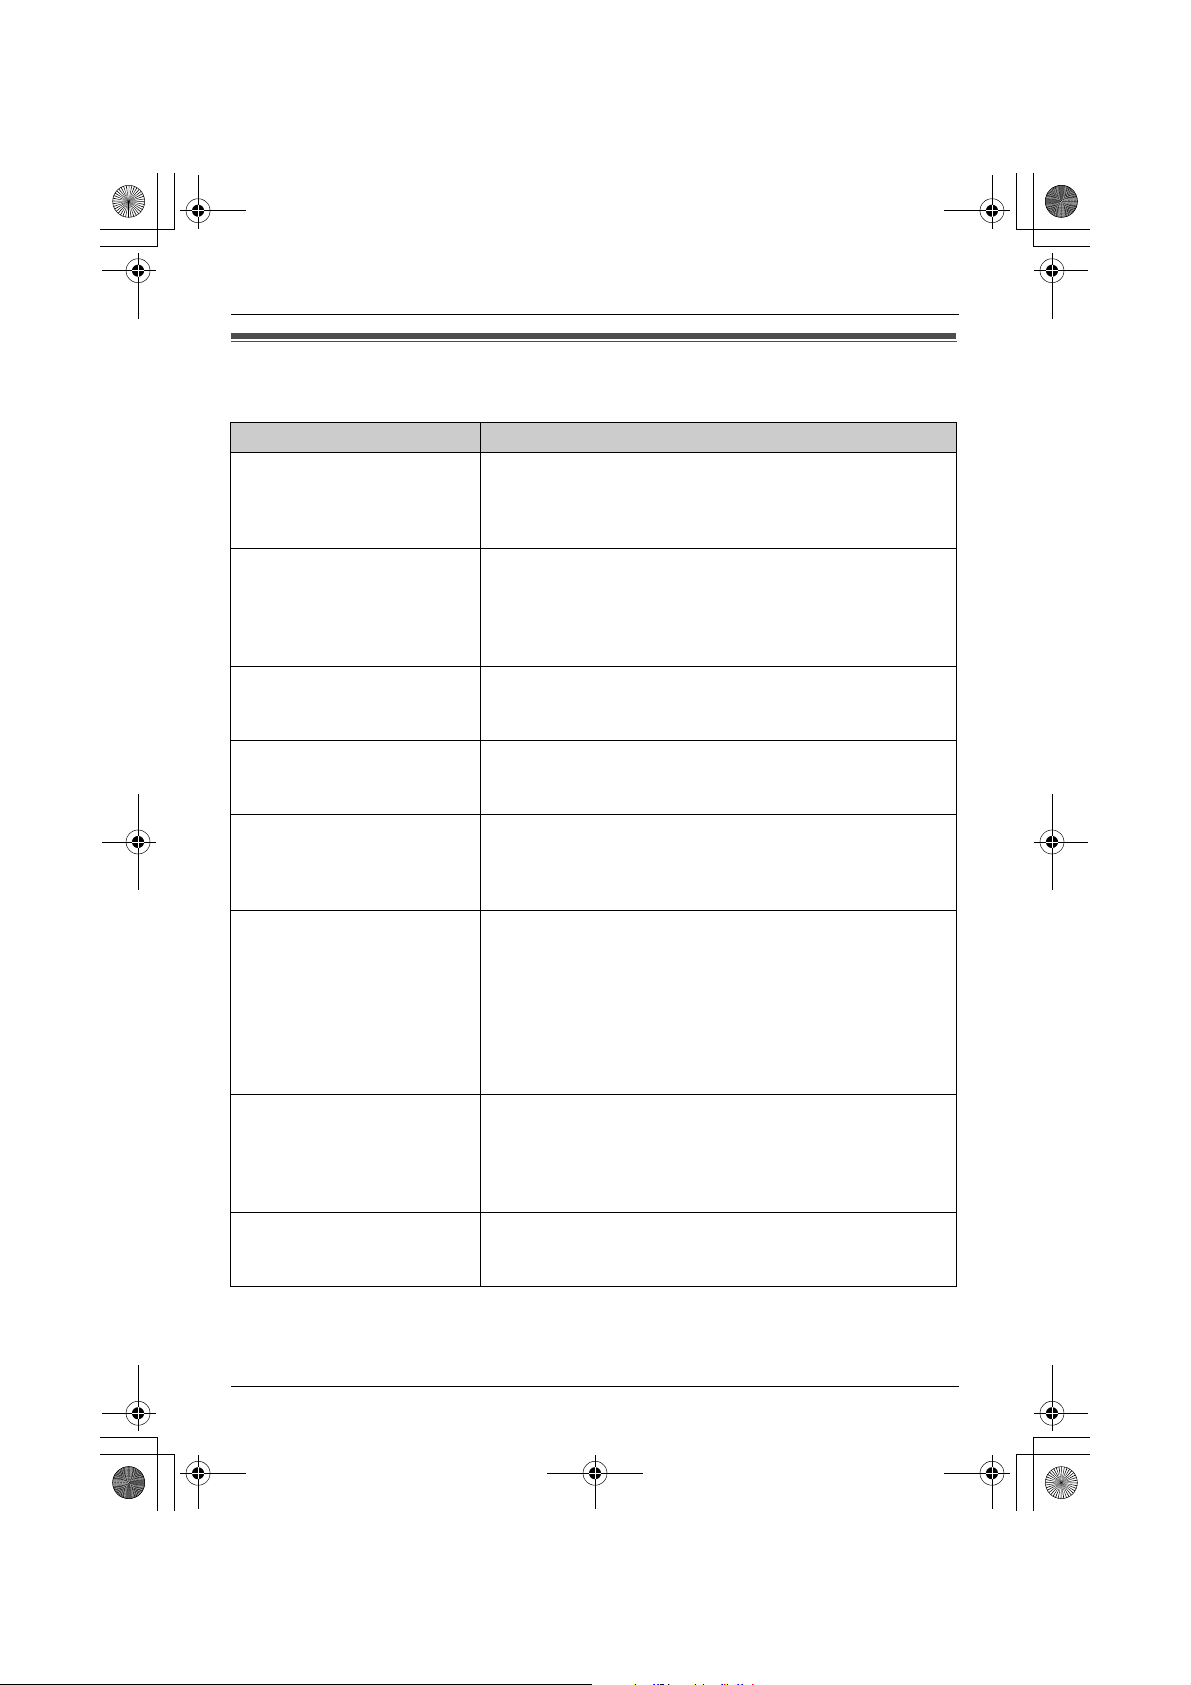
Mounting the cordless camera on the wall
Standard mounting
1 Drive the screws (not included) into the
wall at a recommended height of 1.8 m
or below using the wall mount template
as a guide (page 18).
2 Mount the cordless camera (A), then
slide it down (B) and to the right (C) until
it is secure.
L To aim the camera lens, see page 10.
Useful Information
51 mm
Screws
(220–240 V, 50 Hz)
Upside down mounting
L The image may be seen upside down when mounting upside down. To compensate for this,
change the cordless camera setting to display images upside down (page 11).
1 Drive the screws (not included) into the
wall at a recommended height of 1.8 m
or below using the wall mount template
as a guide (page 18).
51 mm
Screws
2 Mount the cordless camera (A), then
slide it down (B) and to the left (C) until
it is secure.
A
A
B
C
B
C
(220–240 V,
50 Hz)
17
Page 18

TGA914FX(e).book Page 18 Wednesday, August 23, 2006 9:51 AM
Useful Information
About the screws for wall mounting
L Use the recommended screw size below.
L Drive the mounting screws leaving enough length from the wall to hook the cordless
camera.
Space
Max. 9.3 mm
Max. 4.5 mm
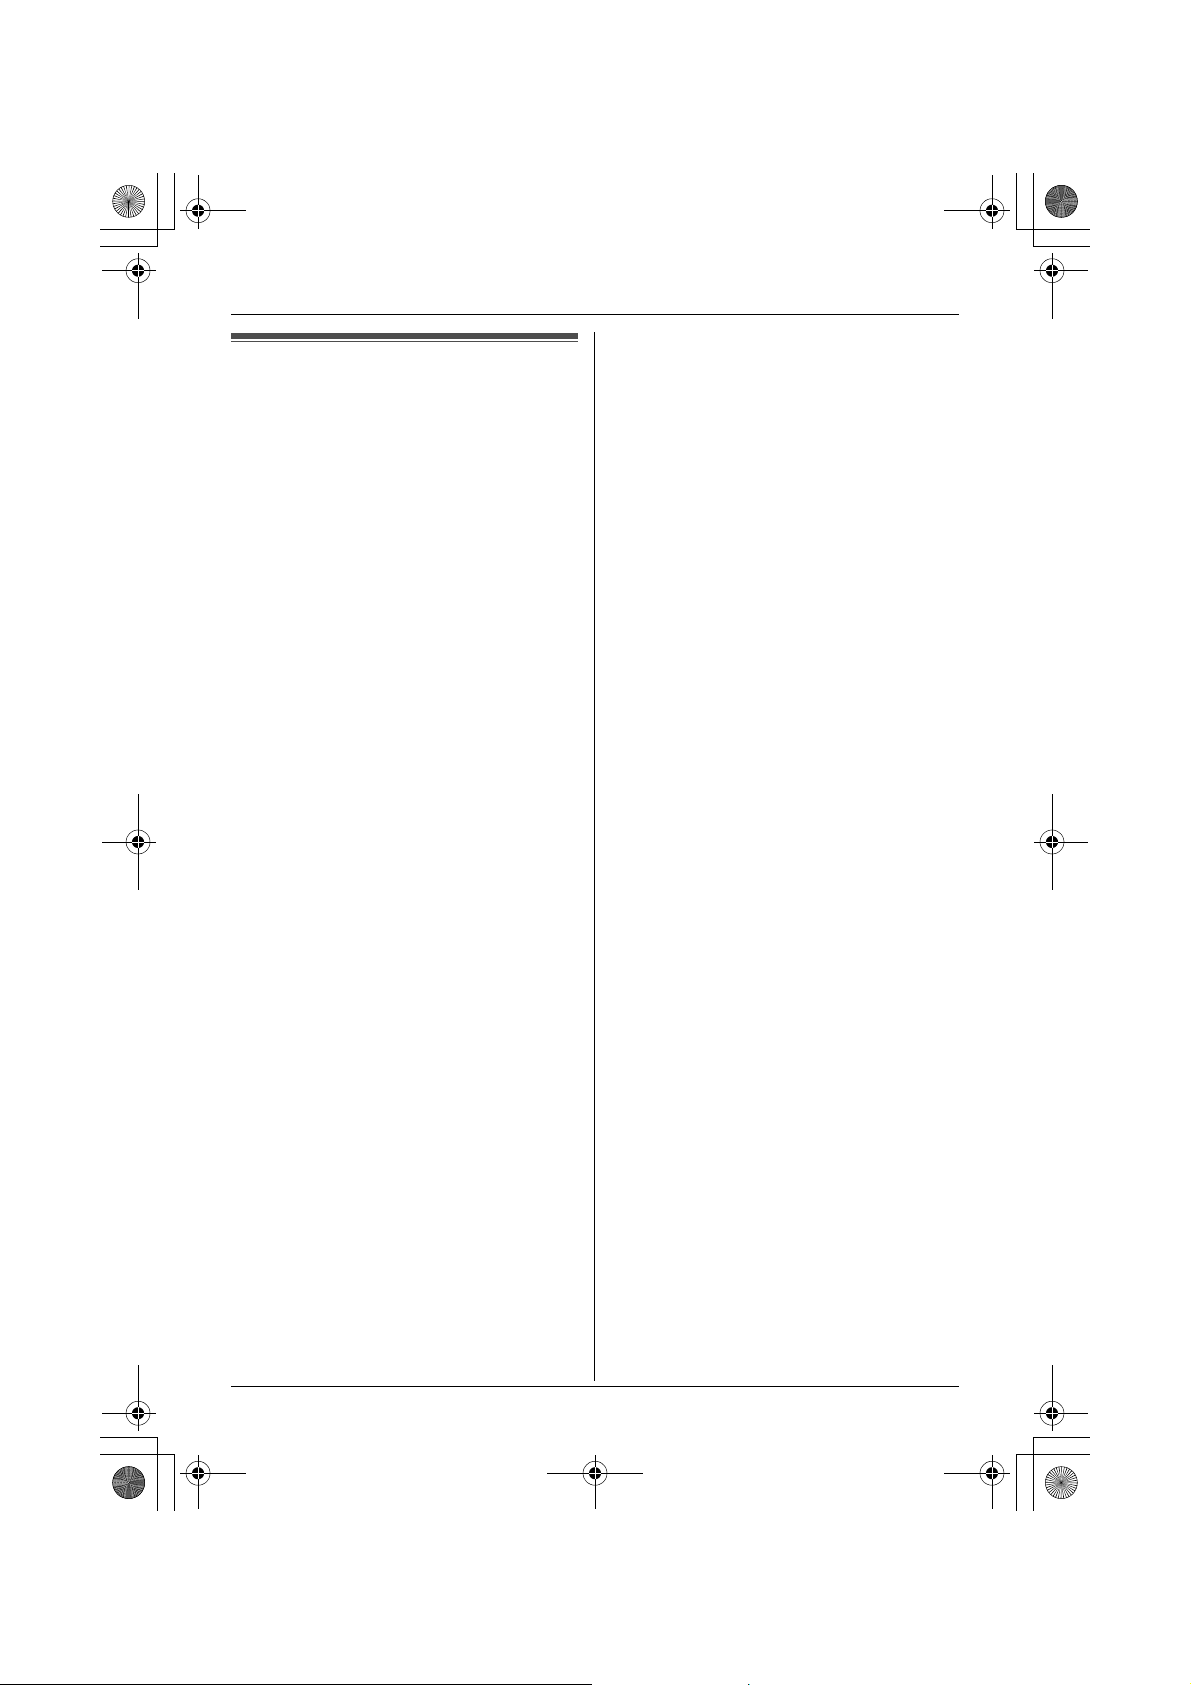
Removing the wall-mounting adaptor
Press and hold the hold button (A) on the left side of the wall-mounting plate. Slide the
cordless camera to the right (B).
A
B
18
Wall mount template for the cordless camera
51 mm
Page 19
TGA914FX(e).book Page 19 Wednesday, August 23, 2006 9:51 AM
Useful Information
Troubleshooting
Problem Cause & solution
The cordless camera does
not work.
The cordless camera’s
indicator is flashing red.
The image is faint. L The camera lens is dirty. Clean it with a soft dry cloth.
The image sent from the
cordless camera is poor on
the handset display.
The image sent from the
cordless camera is dark and
difficult to see on the
handset display.
I cannot connect to the
cordless camera, the image
distorts, or the image is
slow.
The camera sensor does not
respond.
I pressed the call button but
the cordless camera does
not page the handsets.
L Check the connections (page 9).
L The cordless camera is not registered to the base unit.
Register the cordless camera to the base unit (page
12).
L The cordless camera is not registered to the base unit.
Register the cordless camera to the base unit (page
12).
L The cordless camera is out of range. Locate the
cordless camera near the base unit.
L Do not touch the lens directly. Fingerprint may cause an
unclear image.
L Adjust the display brightness setting (page 15).
L The place where the cordless camera is located is dark.
Improve lighting.
L Adjust the display brightness setting (page 15).
L There is a strong sunlight or a backlight in the place
where the cordless camera is located. Try shading the
camera’s location.
L The cordless camera has lost communications with the
base unit. Move the cordless camera closer to the base
unit, and try again.
L There is an obstacle such as concrete wall. Move the
cordless camera to the place without an obstacle.
L A microwave appliance is in use. Move the cordless
camera closer to the base unit or use the cordless
camera away from that appliance, and try again.
L If you set the audio detection sensitivity to off, the
camera sensor does not respond. Turn this feature on
(page 15).
L While a handset is monitoring the cordless camera, the
cordless camera stops detecting sound.
L While the image of the cordless camera is being
monitored by a handset, the call button will not have
response.
19
Page 20
TGA914FX(e).book Page 20 Wednesday, August 23, 2006 9:51 AM
Useful Information
Problem Cause & solution
The handset speaker and/or
the cordless camera emit a
howling noise while
monitoring.
When using the handset
speakerphone to have an
intercom call with the
cordless camera, sound cuts
in and out and you have
difficulty hearing the other
party.
L Move the handset away from the cordless camera.
L Lower the speaker volume by pushing the joystick
down.
20
Page 21
TGA914FX(e).book Page 21 Wednesday, August 23, 2006 9:51 AM
Specifications
N Standard:
DECT (Digital Enhanced Cordless
Telecommunications)
N Number of channels:
120 Duplex Channels
N Frequency range:
1.88 GHz to 1.9 GHz
N Duplex procedure:
TDMA (Time Division Multiple Access)
N Channel spacing:
1,728 kHz
N Bit rate:
1,152 kbit/s
N Modulation:
GFSK (Gaussian Frequency Shift Keying)
N RF transmission power:
Approx. 250 mW
N Power source:
220–240 V, 50 Hz
N Power consumption:
Standby: Approx. 2.1 W
Maximum: Approx. 3.9 W
N Operating conditions:
5 °C–40 °C, 20 %–80 % relative air humidity
(dry)
N Dimensions:
Approx. 124 mm × 86 mm × 68 mm
N Mass (weight):
Approx. 140 g
N Number of pixels:
12,288 pixels
N Illuminance:
10 lux (min.)
N Focus:
Fixed 0.4 m–Infinity
N Photograph angle:
Vertical angle: Approx. 35°
Horizontal angle: Approx. 45°
Useful Information
L The illustrations used in these operating
instructions may differ slightly from the
actual product.
Note:
L Specifications are subject to change.
21
Page 22
TGA914FX(e).book Page 22 Wednesday, August 23, 2006 9:51 AM
Sales department
N Czech
Panasonic Czech Republic, s.r.o.
Křižíkova 237/36A (Palác Karlín) 186 00 Praha 8
telefon: +420-236 032 511
centrální fax: +420-236 032 411
e-mail:info@panasonic.cz
e-mail:pcsserv@panasonic.cz
aktuální info na www.panasonic.cz
N Slovakia
Panasonic Slovakia, spol. s.r.o.
Štúrova 11, 811 02 BRATISLAVA, Slovenská republika
Tel. číslo: +421-2-5292-1423
Fax: +421-2-5292-1411
e-mail:sales@panasonic.sk
web: www.panasonic.sk
N Turkey
Tekofaks Elektronik Sanayi Mümessillik ve Tic. A.Ş.
Kağıthane Cad. Sevilen Sok. No: 65
Çağlayan İstanbul (Türkiye)
Tel: (0212) 210 69 00
Fax: (0212) 222 77 26
N Poland
Panasonic Polska Sp. z o. o.
Al.Krakowska 4/6
02-284 Warszawa, Polska
Tel: (22) 338 11 00
Fax: (22) 228 12 00
Infolinia: 0801 351 903
22
Page 23
TGA914FX(e).book Page 23 Wednesday, August 23, 2006 9:51 AM
Notes
23
Page 24
TGA914FX(e).book Page 24 Wednesday, August 23, 2006 9:51 AM
Copyright:
This material is copyrighted by Panasonic Communications Co., Ltd., and may be reproduced
for internal use only. All other reproduction, in whole or in part, is prohibited without the written
consent of Panasonic Communications Co., Ltd.
© 2006 Panasonic Communications Co., Ltd. All Rights Reserved.
24
Page 25

TGA914FX_1(cz).book Page 1 Wednesday, August 23, 2006 10:27 AM
Návod k obsluze
Bezdrátová kamera
Model č.
Pouze pro použití ve vnitřních prostorách
Tato bezdrátová kamera je příslušenství pro použití s digitálním bezdrátovým
telefonem Panasonic: KX-TG9120
Bezdrátovou kameru je před použitím nutné zaregistrovat ve vaší základně.
KX-TGA914FX
Před použitím zařízení si přečtěte tento návod k obsluze a uschovejte jej pro budoucí
použití.
Page 26
TGA914FX_1(cz).book Page 2 Wednesday, August 23, 2006 10:27 AM
Obsah
Úvod
Úvod . . . . . . . . . . . . . . . . . . . . . . . . . . . . . . . . . . . . . . . . . . . . . . . . . . . . . . . . . . . . . . . . . . . . . . . . . . . 3
Informace o příslušenství . . . . . . . . . . . . . . . . . . . . . . . . . . . . . . . . . . . . . . . . . . . . . . . . . . . . . . . . . . . 5
Důležité informace . . . . . . . . . . . . . . . . . . . . . . . . . . . . . . . . . . . . . . . . . . . . . . . . . . . . . . . . . . . . . . . . 6
Příprava
Ovládací prvky . . . . . . . . . . . . . . . . . . . . . . . . . . . . . . . . . . . . . . . . . . . . . . . . . . . . . . . . . . . . . . . . . . . 8
Nastavení bezdrátové kamery . . . . . . . . . . . . . . . . . . . . . . . . . . . . . . . . . . . . . . . . . . . . . . . . . . . . . . . 9
Symboly použité v tomto návodu k obsluze . . . . . . . . . . . . . . . . . . . . . . . . . . . . . . . . . . . . . . . . . . . . 12
Registrace bezdrátové kamery . . . . . . . . . . . . . . . . . . . . . . . . . . . . . . . . . . . . . . . . . . . . . . . . . . . . . . 12
Monitorování kamerou
Monitorování kamerou za použití mikrotelefonu . . . . . . . . . . . . . . . . . . . . . . . . . . . . . . . . . . . . . . . . . 13
Užitečné informace
Montáž na stěnu . . . . . . . . . . . . . . . . . . . . . . . . . . . . . . . . . . . . . . . . . . . . . . . . . . . . . . . . . . . . . . . . . 16
Řešení potíží. . . . . . . . . . . . . . . . . . . . . . . . . . . . . . . . . . . . . . . . . . . . . . . . . . . . . . . . . . . . . . . . . . . . 19
Technické údaje . . . . . . . . . . . . . . . . . . . . . . . . . . . . . . . . . . . . . . . . . . . . . . . . . . . . . . . . . . . . . . . . . 21
Obchodní oddělení . . . . . . . . . . . . . . . . . . . . . . . . . . . . . . . . . . . . . . . . . . . . . . . . . . . . . . . . . . . . . . . 22
(2)
Page 27

TGA914FX_1(cz).book Page 3 Wednesday, August 23, 2006 10:27 AM
Úvod
Jsme rádi, že jste si zakoupili bezdrátovou kameru Panasonic.
Pro budoucí použití
Přiložte nebo uschovejte originální doklad – je důležitý při záručních opravách.
Výrobní číslo (je uvedeno na spodní části přístroje)
Datum nákupu
Jméno a adresa prodejce
Poznámka:
L
V případě jakýchkoliv problémů byste měli nejdříve kontaktovat dodavatele zařízení.
Prohlášení o shodě:
L
Společnost Panasonic Communications Co., Ltd. tímto prohlašuje, že toto zařízení je v souladu
sklíčovými požadavky a dalšími platnými opatřeními směrnice Radio & Telecommunications
Terminal Equipment (R&TTE – směrnice pro rádiové a telekomunikační stanice) 1999/5/EC.
Prohlášení o shodě pro příslušné produkty Panasonic popsané v této příručce jsou k dispozici ke
stažení na stránkách:
http://www.doc.panasonic.de
Úvod
Kontakt:
Panasonic Services Europe
a Division of Panasonic Marketing Europe GmbH
Panasonic Testing Centre
Winsbergring 15, 22525 Hamburg, Germany
(3)
Page 28

TGA914FX_1(cz).book Page 4 Wednesday, August 23, 2006 10:27 AM
Úvod
Popis hlavních funkcí
Monitorování kamerou za použití mikrotelefonu
Důležité:
L
V tomto návodu k obsluze je pojem „mikrotelefon“ používán pro produkt KX-TGA910FX.
Místnost, v níž je kamera umístěna, můžete monitorovat pokud:
– máte přístup k bezdrátové kameře pomocí mikrotelefonu (strana 13),
– bezdrátová kamera se v případě zaznamenání zvuku ohlásí mikrotelefonu (strana 14),
– uživatel bezdrátové kamery zavolá na mikrotelefon pomocí tlačítka volání (strana 14).
(4)
Page 29

TGA914FX_1(cz).book Page 5 Wednesday, August 23, 2006 10:27 AM
Úvod
Informace o příslušenství
Dodávané příslušenství
Č. Položka příslušenství Množství
1
Sítový adaptér
(Číslo dílu PQLV209CE)
2
Adaptér pro montáž na stěnu 1
3
Tlačítko volání 1
123
1
(5)
Page 30

TGA914FX_1(cz).book Page 6 Wednesday, August 23, 2006 10:27 AM
Úvod
Důležité informace
Obecné informace
L
Používejte pouze sítový adaptér dodávaný
s tímto produktem (informace viz strana 5).
L
Sítový adaptér nezapojujte do jiné než
standardní zásuvky s napájením 220–240 V.
L
Tot o z ařízení by se nemělo používat v blízkosti
záchranných lékařských přístrojů a neměly by
ho používat osoby s kardiostimulátorem.
L
Dbejte také na to, aby do zařízení nezapadly
žádné předměty a aby se do něj nevylila
tekutina. Tento přístroj nevystavujte
nadměrnému kouři, prachu, mechanickým
otřesům ani nárazům.
Prostředí
L
Nepoužívejte tento produkt v blízkosti vody.
L
Neponechávejte tento produkt v blízkosti
zdrojů tepla, například topných těles, sporáků
atd. Umístujte jej v místnostech s teplotou
v rozmezí 5 °C až 40 °C.
L
Jako hlavní připojovací zařízení je použit
sítový adaptér. Poblíž výrobku musí být
umístěna snadno přístupná zásuvka.
Výstraha:
L
Abyste zamezili nebezpečí úrazu elektrickým
proudem, nevystavujte zařízení dešti ani
vlhkosti.
L
Výrobek odpojte od zásuvky napájení, pokud
zněj vychází kouř, neobvyklý zápach nebo
pokud vydává neobvyklé zvuky. Mohlo by dojít
k požáru nebo úrazu elektrickým proudem.
Ověřte, že se z výrobku již nekouří,
a kontaktujte autorizované servisní středisko.
Pravidelná péče
L
Po odstranění prachu z objektivu otřete
objektiv vatovou tyčinkou.
Podmínky pro použití bezdrátové kamery
L
Bezdrátová kamera není určena pro venkovní
použití. Dlouhodobé vystavení přímému
slunečnímu záření nebo halogenovému světlu
může poškodit objektiv.
L
Bezdrátovou kameru používejte na jasném
místě, např. za denního světla nebo v dobře
osvětlené místnosti.
L
Bezdrátovou kameru nepoužívejte na
následujících místech:
– v blízkosti žárovek,
– v blízkosti elektrických zařízení, která
vysílají silné rádiové signály,
– v místech, kde je předmět obrazu umístěn
proti zdroji světla nebo před zrcadlem,
– v místech, kde se výrazně mění teplota,
např. v blízkosti klimatizace nebo topení,
– v místech, kde by byla kamera vystavena
oleji nebo páře, např. v kuchyni,
– v místech, kde předměty, jako např. sklo,
mohou odrazem způsobit změnu teploty.
L
Při používání bezdrátové kamery respektujte
práva ostatních na vlastní soukromí.
Informace pro uživatele k likvidaci
elektrických a elektronických
zařízení (domácnosti)
Tento symbol na produktech anebo v průvodních
dokumentech znamená, že použité elektrické
a elektronické výrobky nesmí být přidány do
běžného komunálního odpadu. Ke správné
likvidaci, obnově a recyklaci doručte tyto výrobky
na určená sběrná místa, kde budou přijata
zdarma. Alternativně vněkterých zemích můžete
vrátit své výrobky místnímu prodejci při koupi
ekvivalentního nového produktu.
Správnou likvidací tohoto produktu pomůžete
zachovat cenné přírodní zdroje a napomáháte
(6)
Page 31

TGA914FX_1(cz).book Page 7 Wednesday, August 23, 2006 10:27 AM
prevenci potenciálních negativních dopadů na
životní prostředí a lidské zdraví, což by mohly být
důsledky nesprávné likvidace odpadů. Další
podrobnosti si vyžádejte od místního úřadu nebo
nejbližšího sběrného místa.
Při nesprávné likvidaci tohoto druhu odpadu
mohou být v souladu s národními předpisy
uděleny pokuty.
Pro podnikové uživatele v zemích Evropské
unie
Chcete-li likvidovat elektrická a elektronická
zařízení, vyžádejte si potřebné informace od
svého prodejce nebo dodavatele.
Informace k likvidaci v ostatních zemích
mimo Evropskou unii
Tento symbol je platný jen v Evropské unii.
Chcete-li tento výrobek zlikvidovat, vyžádejte si
potřebné informace o správném způsobu
likvidace od místních úřadů nebo od svého
prodejce.
Úvod
(7)
Page 32

TGA914FX_1(cz).book Page 8 Wednesday, August 23, 2006 10:27 AM
Příprava
Ovládací prvky
A
B
C
D
A
Anténa
B
Objektiv kamery
C
MIC (Mikrofon)
D
Tlačítko volání
E
E
F
G
H
F
Indikátor
Přepínače DIP
Reproduktor
PROG. (Program)
G
H
Význam indikace bezdrátové kamery
Stav bezdrátové kamery poznáte podle chování indikátoru.
Stav Popis
Červený (rychle bliká)
Žlutozelený
Žlutozelený (bliká)
(8)
L
Bezdrátová kamera není zaregistrována. Zaregistrujte
bezdrátovou kameru (strana 12).
L
Bezdrátová kamera je mimo dosah. Umístěte bezdrátovou
kameru do blízkosti základny.
L
Bezdrátová kamera je zaregistrována a je v pohotovostním
režimu.
L
Senzor kamery odpovídá a bezdrátová kamera volá mikrotelefon.
L
Bezdrátová kamera je připojena a odesílá na mikrotelefon živý
obraz.
Page 33

TGA914FX_1(cz).book Page 9 Wednesday, August 23, 2006 10:27 AM
Příprava
Nastavení bezdrátové kamery
Připojení sítového adaptéru a tlačítka volání
Pevným stlačením zástrčky připojte sítový adaptér (A). Kabel tlačítka volání připojte tak, aby zacvakl
do jednotky (B).
L
Používejte pouze dodaný sítový adaptér.
B
A
Poznámka:
L
Když je sítový adaptér připojen, indikátor se rozsvítí červeně a poté začne blikat.
L
Sítový adaptér musí být vždy zapojen. (Při používání je adaptér obvykle teplý.)
L
Sítový adaptér musí být připojen do zásuvky na stěně nebo v podlaze. Nezapojujte sítový adaptér do
stropní zásuvky, protože by hmotností adaptéru mohlo dojít k odpojení.
Háčky
(220–240 V, 50 Hz)
(9)
Page 34

TGA914FX_1(cz).book Page 10 Wednesday, August 23, 2006 10:27 AM
Příprava
Úprava úhlu objektivu bezdrátové kamery
Objektiv kamery zaměřte stlačením výstupku (A) a otočením objektivu nahoru nebo dolů.
L
Pomocí mikrotelefonu potvrďte, zda je oblast, kterou chcete bezdrátovou kamerou monitorovat,
zobrazena (strana 13).
Cca 40°
Cca 40°
Poznámka:
L
Objektivu kamery se nedotýkejte (strana 8).
A
(10)
Page 35

TGA914FX_1(cz).book Page 11 Wednesday, August 23, 2006 10:27 AM
Příprava
Nastavení přepínačů DIP
Přepínače DIP
(Výchozí nastavení: ON (ZAPNUTO))
1ON23
VYPNUTO*1
Pomocí přepínačů DIP 2 a 3 můžete nastavit následující funkce.
Přepínač DIP 1 se pro nastavení nepoužívá.
Každý přepínač posuňte dle potřeby pomocí špičatého předmětu, např. tužky.
Přepínač DIP Funkce ON (ZAPNUTO)
(výchozí)
1–––
2 Orientace obrazu Normální Obrácená
3 Hlasitost reproduktoru Normální Nízká
VYPNUTO
*1
*1 Přesuňte přepínač dolů.
Zobrazení obráceného obrazu (přepínač DIP 2)
Chcete-li obraz kamery otočit, nastavte možnost VYPNUTO. Tato funkce je praktická v případě, že
bezdrátovou kameru nainstalujete obráceně (strana 17).
Volba hlasitosti reproduktoru bezdrátové kamery (přepínač DIP 3)
Chcete-li snížit hlasitost reproduktoru, nastavte možnost VYPNUTO (NÍZKÁ).
(11)
Page 36

TGA914FX_1(cz).book Page 12 Wednesday, August 23, 2006 10:27 AM
Příprava
Symboly použité v tomto
návodu k obsluze
Symbol Význam
J
i
L
“ ” Stisknutím joysticku směrem dolů
Stiskněte tlačítko J (uprostřed
navigačního tlačítka).
Přejděte k další činnosti.
Stiskněte tlačítko L (uprostřed
navigačního tlačítka).
nebo nahoru vyberte slova
v uvozovkách zobrazená na
displeji (například “
sluch.
”).
ZruŠit
Zrušení bezdrátové kamery
Pomocí mikrotelefonu zaregistrovaného na
stejné základně můžete zrušit registraci
zaregistrované bezdrátové kamery.
1
Registrace bezdrátové
kamery
Bezdrátovou kameru zaregistrujte k základně
KX-TG9120.
1
Základna:
Stiskněte a po tři sekundy přidržte tlačítko
{x}
na základně, dokud nezazní registrační
tón.
2
Kamera:
Pomocí špičatého předmětu, např. tužky,
stiskněte tlačítko PROG. (Program) na zadní
straně bezdrátovéh kamery, dokud neuslyšíte
pípnutí.
L
Jakmile je registrace úspěšně dokončena,
bezdrátová kamera pípne, indikátor
přestane červeně blikat a rozsvítí se
žlutozeleně (strana 8).
L
Pokud všechny zaregistrované
mikrotelefony začnou v kroku 2 vyzvánět,
zvonění vypněte tlačítkem
znovu od kroku 1.
{x}
. Začněte
2
3
4
5
6
J
(střed navigačního tlačítka) i L i
L
Zadejte “
“
Vyberte bezdrátovou kameru, kterou chcete
zrušit.
LQ se zobrazuje s vybranou položkou.
L
L i “Ano” i L
L
{ih}
335
”.
ZruŠit sluch.” i L
i t
Chcete-li zrušit vybranou položku, vyberte ji
znovu. i
Zobrazí se “
pípnutí.
t
Čekejte...
” a zazní dlouhé
(12)
Page 37

TGA914FX_1(cz).book Page 13 Wednesday, August 23, 2006 10:27 AM
L
Monitorování nelze provést ve spojení s
Monitorování kamerou za
použití mikrotelefonu
opakovačem signálu DECT.
Monitorování bezdrátové kamery
z mikrotelefonu
Mikrotelefon
1
2
3
S mikrotelefonem můžete monitorovat obraz
a zvuk v pokoji, kde je bezdrátová kamera
umístěna. Monitorovací kamera nezvoní, proto ji
lze snadno použít pro monitorování pokoje
miminka, např. z jiné části domu.
Důležité:
L
Před zahájením monitorování se ujistěte, že
objektiv bezdrátové kamery byl nastaven do
správného úhlu.
L
Ke kameře může mít přístup vždy pouze 1
osoba.
L
Aktualizovaný obraz pořízený bezdrátovou
kamerou se zobrazí vždy po několika
sekundách. Zobrazovaný obraz není film.
L
Během monitorování pomocí bezdrátové
kamery nemohou jiní uživatele zahájit hovor
intercom ani hovor přesměrovat.
L
Monitorovací připojení se po 10 minutách
automaticky zruší.
L
Během monitorování nemůžete mikrotelefon
umístit do základny ani nabíječky.
Monitorovací připojení by bylo zrušeno.
L
Bezdrátová kamera nemůže zavolat na
mikrotelefon v následujících případech:
– když jiní uživatelé provádějí hovor intercom
nebo konferenční hovor,
– když elektrická zařízení vysílají elektrické
rušení,
–během telefonování pomocí mikrotelefonu.
(V tomto případě uslyšíte 2 tóny a na
z
mikrotelefonu začne blikat
.)
4
Úprava hlasitosti sluchátka/reproduktoru
Během monitorování stiskněte joystick nahoru
nebo dolů.
Hovor s volaným účastníkem pomocí
bezdrátové kamery
Pokud voláte na bezdrátovou kameru
z mikrotelefonu, bezdrátová kamera nezazvoní,
ale zapne se hlasitý telefon. Nyní můžete hovořit
s uživatelem mikrotelefonu. Do mikrofonu mluvte
jasně.
Zobrazovaná položka na mikrotelefonu
během monitorování kamery
Zobrazená
položka
Příklad:
8
Monitorování kamerou
{
INT
}
Vyberte požadovanou bezdrátovou kameru
i P/{C}/{s}
Je-li to nutné, mluvte na uživatele bezdrátové
kamery.
NEBO
V případě potřeby ztlumte svůj zvukový
{C/T}
výstup stisknutím tlačítka
Po skončení monitorování stiskněte tlačítko
{ih}
nebo vložte mikrotelefon do základny
či nabíječky.
Význam
Mikrotelefon je připojen
k bezdrátové kameře.
Když bliká:
Bezdrátová kamera volá na
mikrotelefon. (Zaznamenala
zvuk nebo bylo stisknuto
tlačítko volání.)
.
(13)
Page 38

TGA914FX_1(cz).book Page 14 Wednesday, August 23, 2006 10:27 AM
Monitorování kamerou
Volání na mikrotelefon z bezdrátové
kamery
Bezdrátová kamera může volat na mikrotelefon
při zaznamenání zvuku nebo po stisknutí tlačítka
volání. Poté může uživatel mikrotelefonu, který
odpoví, sledovat živý obraz z bezdrátové
kamery.
Důležité:
L
Bezdrátová kamera může volat pouze na
zaregistrované mikrotelefony. Na základnu
nelze volat.
L
Zavolá-li bezdrátová kamera na mikrotelefon
během hovoru, zazní 2 tóny a na
z
mikrotelefonu začne blikat
monitorovat bezdrátovou kameru
z mikrotelefonu, stiskněte tlačítko
a poté
{s}
.
L
Při volání bezdrátové kamery nelze použít
automatickou funkci interkom.
Volání pomocí zvukového senzoru kamery
Důležité:
L
Chcete-li funkci detekce zvuku na bezdrátové
kameře používat, zapněte citlivost detekce
zvuků (strana 15).
1
Kamera:
Kamera detekuje zvuk.
L
Z kamery zazní tón a po dobu 1 minuty volá
kamera na mikrotelefony.
2
Mikrotelefon:
Stisknutím tlačítka
L
Místnost, kde je kamera umístěna, můžete
monitorovat.
3
Mikrotelefon:
V případě potřeby ztlumte svůj zvukový
výstup stisknutím tlačítka {C/T}.
4
Mikrotelefon:
Po skončení monitorování stiskněte tlačítko
{ih}
nebo vložte mikrotelefon do základny
či nabíječky.
{s}
. Chcete-li
{ih}
přijměte výzvu.
Volání pomocí tlačítka volání na bezdrátové
kameře
1
Bezdrátová kamera:
Stiskněte tlačítko volání.
L
Z bezdrátové kamery zazní tón a po dobu 1
minuty volá kamera na mikrotelefony.
L
Chcete-li volání ukončit, stiskněte znovu
tlačítko volání.
2
Mikrotelefon:
Stisknutím tlačítka
L
Místnost, kde je bezdrátová kamera
umístěna, můžete monitorovat.
3
Bezdrátová kamera:
Když uživatel mikrotelefonu odpoví, mluvte
jasně do mikrofonu.
4
Mikrotelefon:
Po skončení monitorování stiskněte tlačítko
{ih}
nebo vložte mikrotelefon do základny
či nabíječky.
{s}
přijměte výzvu.
Užitečná nastavení během
monitorování kamery
Pomocí mikrotelefonu můžete během
monitorování provést nastavení kamery.
Úprava jasu obrazu
Můžete si vybrat z 6 úrovní.
(14)
Page 39

TGA914FX_1(cz).book Page 15 Wednesday, August 23, 2006 10:27 AM
1
Spustte monitorování (strana 13).
2
Opakovaným stisknutím tlačítka B upravte
jas.
Poznámka:
L
Po ukončení monitorování se obnoví výchozí
nastavení.
Vol b a přiblížení obrazu
1
Spustte monitorování (strana 13).
2
Stisknutím tlačítka A obraz přibližte.
L
Chcete-li se vrátit k původnímu zobrazení,
znovu stiskněte tlačítko A.
Nastavení citlivosti detekce zvuků
Bezdrátová kamera je vybavena senzorem, který
detekuje lidské hlasy, např. dětský pláč. Jiné
zvuky než lidské hlasy detekuje obtížně. Chceteli tuto funkci používat, ujistěte se, že je
bezdrátová kamera umístěna tam, kde může
snadno detekovat hlasy. Jakmile senzor detekuje
zvuk, bezdrátová kamera zavolá na mikrotelefon.
Můžete si vybrat ze 3 úrovní. Výchozí nastavení
je „vypnuto“.
1
2
3
Monitorování kamerou
Spustte monitorování (strana 13).
v
Funkci zapnete stisknutím joysticku směrem
nahoru.
Stisknutím joysticku nahoru nebo dolů vyberte
požadovanou citlivost.
L
Stisknutím joysticku opakovaně směrem
dolů funkci vypnete.
4
L
Poznámka:
L
Když tuto funkci vypnete, bezdrátová kamera
nemůže detekovat zvuk (strana 14).
L
Abyste nastavili vhodnou úroveň, nejprve
z mikrotelefonu senzor kamery vyzkoušejte.
(15)
Page 40

TGA914FX_1(cz).book Page 16 Wednesday, August 23, 2006 10:27 AM
Užitečné informace
Montáž na stěnu
Bezdrátovou kameru lze namontovat standardním způsobem nebo obráceně.
UPOZORNĚNÍ:
L
Bezdrátovou kameru namontujte na stabilním místě, kde lze zařízení odpovídajícím způsobem při
instalaci podepřít.
L
Sítový adaptér musí být připojen do zásuvky na stěně nebo v podlaze. Nezapojujte sítový adaptér do
stropní zásuvky, protože by hmotností adaptéru mohlo dojít k odpojení.
L
Bezdrátovou kameru nemontujte na měkký materiál. Mohla by upadnout, rozbít se nebo
způsobit zranění
L
Bezdrátovou kameru nemontuje na následujících místech: na sádrokartonovou desku, ALC
(antibakteriální odlehčený pěnový beton), betonové tvárnice, překližku tenčí než 25 mm atd.
L
Po namontování bezdrátové kamery na stěnu netahejte za kabel tlačítka volání.
L
Po namontování bezdrátové kamery na stěnu mluvte při komunikaci s uživatelem mikrotelefonu
hlasitě ajasně do mikrofonu.
Připojení adaptéru pro montáž na stěnu
A
Zasuňte bezdrátovou kameru do adaptéru pro montáž na stěnu ve směru šipky, dokud kamera
nezacvakne na své místo.
B
Zastrčte kabel tlačítka volání do otvoru na straně adaptéru pro montáž na stěnu – zastrčte malý
upínač kabelu do otvoru.
C
Mírně jej pootočte a zasuňte na místo.
D
Utáhněte kabel tlačítka volání do háčku adaptéru pro montáž na stěnu.
.
<16>
Page 41

TGA914FX_1(cz).book Page 17 Wednesday, August 23, 2006 10:27 AM
Montáž bezdrátové kamery na stěnu
Standardní montáž
1
Vruty (nejsou součástí) zašroubujte do
stěny v doporučené výšce 1,8 m nebo níže
pomocí šablony pro připevnění na stěnu
(strana 18).
2
Namontujte bezdrátovou kameru (A), poté ji
posuňte dolů (
dokud nebude bezpečně upevněna.
L
Užitečné informace
B
) a směrem vpravo (C),
Pokyny pro zaměření objektivu kamery
naleznete zde: strana 10.
51 mm
Šrouby
(220–240 V, 50 Hz)
Obrácená montáž
L
Při obrácené montáži se může i obraz zobrazit obráceně. V takovém případě změňte nastavení
bezdrátové kamery na obrácené zobrazení obrazu (strana 11).
1
Vruty (nejsou součástí) zašroubujte do
stěny v doporučené výšce 1,8 m nebo níže
pomocí šablony pro připevnění na stěnu
(strana 18).
51 mm
Šrouby
2
Namontujte bezdrátovou kameru (A), poté ji
posuňte dolů (B) a směrem vlevo (C), dokud
nebude bezpečně upevněna.
A
A
B
B
C
C
(220–240 V,
50 Hz)
<17>
Page 42

TGA914FX_1(cz).book Page 18 Wednesday, August 23, 2006 10:27 AM
Užitečné informace
Informace o vrutech pro montáž na stěnu
L
Použijte níže doporučené velikosti vrutů.
L
Vruty zašroubujte pouze tak hluboko do zdi, aby zbyl dostatek místa pro zavěšení bezdrátové
kamery.
Mezera
Max. 9,3 mm
Max. 4,5 mm
Odstranění adaptéru pro montáž na stěnu
Stiskněte a podržte tlačítko přidržení (A) na levé straně desky pro montáž na stěnu. Posuňte
bezdrátovou kameru směrem vpravo (B).
A
B
<18>
Šablona pro připevnění bezdrátové kamery na stěnu
51 mm
Page 43

TGA914FX_1(cz).book Page 19 Wednesday, August 23, 2006 10:27 AM
Řešení potíží
Problém Příčina a řešení
Bezdrátová kamera nefunguje.
Indikátor bezdrátové kamery
bliká červeně.
Obraz je nejasný.
Obraz odeslaný bezdrátovou
kamerou je na mikrotelefonu
nekvalitní.
Obraz odeslaný bezdrátovou
kamerou je na mikrotelefonu
tmavý a špatně viditelný.
Nemohu se připojit
k bezdrátové kameře, obraz je
deformovaný nebo pomalý.
Senzor kamery neodpovídá.
Stiskl(a) jsem tlačítko volání,
ale bezdrátová kamera
mikrotelefony nevolá.
Reproduktor mikrotelefonu
nebo bezdrátová kamera
vydávají během monitorování
nepříjemný zvuk.
L
Zkontrolujte připojení (strana 9).
L
Bezdrátová kamera není zaregistrována k základně.
Zaregistrujte bezdrátovou kameru k základně (strana 12).
L
Bezdrátová kamera není zaregistrována k základně.
Zaregistrujte bezdrátovou kameru k základně (strana 12).
L
Bezdrátová kamera je mimo dosah. Umístěte bezdrátovou
kameru do blízkosti základny.
L
Objektiv kamery je špinavý. Očistěte jej pomocí jemného
suchého hadříku.
L
Objektivu se přímo nedotýkejte. Otisk prstu může mít za
následek nejasný obraz.
L
Upravte nastavení jasu obrazu (strana 14).
L
Místo, kde je bezdrátová kamera umístěna, je příliš tmavé.
Zlepšete osvětlení.
L
Upravte nastavení jasu obrazu (strana 14).
L
Na místě, kde je kamera umístěna, je silné sluneční záření
nebo osvětlení v pozadí. Zkuste kameru zastínit.
L
Došlo k přerušení komunikace mezi bezdrátovou kamerou
a základnou. Přesuňte bezdrátovou kameru blíže k základně
a zkuste to znovu.
L
V cestě je překážka, např. betonová zeď. Přesuňte
bezdrátovou kameru do místa bez překážek.
L
Používá se mikrovlnné zařízení. Přesuňte bezdrátovou
kameru blíže k základně nebo mimo dosah tohoto zařízení
a zkuste to znovu.
L
Vypnete-li citlivost detekce zvuků, nebude senzor kamery
odpovídat. Funkci zapněte (strana 15).
L
Když mikrotelefon monitoruje bezdrátovou kameru,
bezdrátová kamera přestane detekovat zvuk.
L
Když je obraz bezdrátové kamery monitorován
mikrotelefonem, tlačítko volání nereaguje.
L
Přesuňte mikrotelefon dále od bezdrátové kamery.
Užitečné informace
<19>
Page 44

TGA914FX_1(cz).book Page 20 Wednesday, August 23, 2006 10:27 AM
Užitečné informace
Problém Příčina a řešení
Pokud používáte hlasitý telefon
mikrotelefonu pro hovor
interkom s bezdrátovou
kamerou, zvuk přeskakuje
a druhou stranu slyšíte jen
obtížně.
L
Snižte hlasitost reproduktoru stisknutím joysticku směrem
dolů.
<20>
Page 45

TGA914FX_1(cz).book Page 21 Wednesday, August 23, 2006 10:27 AM
Poznámka:
L
Technické údaje
N
Standard:
Technologie DECT (Digital Enhanced Cordless
Telecommunications: pro bezdrátové telefonní
přístroje)
N
Počet kanálů:
120 duplexních kanálů
N
Frekvenční rozsah:
1,88 GHz až 1,9 GHz
N
Duplexní provoz:
TDMA (Time Division Multiple Access:
multiplexní přístup s časovým dělením)
N
Rozestup kanálů:
1 728 kHz
N
Rychlost přenosu:
1 152 kbit/s
N
Modulace:
GFSK (Gaussian Frequency Shift Keying)
N
Vysokofrekvenční výkon přenosu:
Cca 250 mW
N
Zdroj napájení:
220–240 V, 50 Hz
N
Spotřeba energie:
Pohotovostní režim: Cca 2,1 W
Maximum: Cca 3,9 W
N
Provozní podmínky:
5 °C–40 °C, 20 %–80 % relativní vlhkost
vzduchu (suchý)
N
Rozměry:
Cca 124 mm × 86 mm × 68 mm
N
Hmotnost:
Cca 140
N
12 288 pixelů
N
10 lux (min.)
N
Pevné 0,4 m–Nekonečno
N
Vertikální úhel: Cca 35 °
Horizontální úhel: Cca 45 °
g
Počet pixelů:
Osvětlenost:
Ohnisko:
Úhel záběru:
Technické údaje mohou být změněny.
L
Ilustrace v tomto návodu k obsluze se mohou
nepatrně lišit od skutečného produktu.
Užitečné informace
<21>
Page 46

TGA914FX_1(cz).book Page 22 Wednesday, August 23, 2006 10:27 AM
Užitečné informace
Obchodní oddělení
N Česká republika
Panasonic Czech Republic, s.r.o.
Křižíkova 237/36A (Palác Karlín) 186 00 Praha 8
telefon: +420-236 032 511
centrální fax: +420-236 032 411
e-mail:info@panasonic.cz
e-mail:pcsserv@panasonic.cz
aktuální info na www.panasonic.cz
N Slovensko
Panasonic Slovakia, spol. s.r.o.
Štúrova 11, 811 02 BRATISLAVA, Slovenská republika
Tel. číslo: +421-2-5292-1423
Fax: +421-2-5292-1411
e-mail:sales@panasonic.sk
web: www.panasonic.sk
N Turecko
Tekofaks Elektronik Sanayi Mümessillik ve Tic. A.Ş.
Kağıthane Cad. Sevilen Sok. No: 65
Çağlayan İstanbul (Türkiye)
Tel: (0212) 210 69 00
Fax: (0212) 222 77 26
N Polsko
Panasonic Polska Sp. z o. o.
Al.Krakowska 4/6
02-284 Warszawa, Polska
Tel: (22) 338 11 00
Fax: (22) 228 12 00
Infolinia: 0801 351 903
<22>
Page 47

TGA914FX_1(cz).book Page 23 Wednesday, August 23, 2006 10:27 AM
Poznámky
<23>
Page 48

TGA914FX_1(cz).book Page 24 Wednesday, August 23, 2006 10:27 AM
Autorské právo:
Autorská práva k tomuto materiálu vlastní společnost Panasonic Communications Co., Ltd. a lze jej
reprodukovat pouze pro interní použití. Všechny jiné reprodukce, at celku nebo části, jsou bez
písemného souhlasu společnosti Panasonic Communications Co., Ltd. zakázány.
© 2006 Panasonic Communications Co., Ltd. Všechna práva vyhrazena.
(24)
Page 49

a
X
TGA914FX(sk).book Page 1 Tuesday, August 22, 2006 4:16 PM
Návod na obsluhu
Bezšnúrová kamer
Model KX-TGA914F
Len do interiéru
Táto bezšnúrová kamera je doplnkovým príslušenstvom pre digitálne
bezšnúrové telefóny Panasonic: KX-TG9120
Pred uvedením do činnosti je potrebné túto bezšnúrovú kameru zaregistrovat k
základni.
Pred uvedením zariadenia do činnosti si prečítajte tento návod. Návod si odložte pre
prípad potreby v budúcnosti.
Page 50

TGA914FX(sk).book Page 2 Tuesday, August 22, 2006 4:16 PM
Obsah
Úvod
Úvod . . . . . . . . . . . . . . . . . . . . . . . . . . . . . . . . . . . . . . . . . . . . . . . . . . . . . . . . . . . . . . . . . . . . . . . . . . . 3
Informácie o príslušenstve . . . . . . . . . . . . . . . . . . . . . . . . . . . . . . . . . . . . . . . . . . . . . . . . . . . . . . . . . . 5
Dôležité informácie . . . . . . . . . . . . . . . . . . . . . . . . . . . . . . . . . . . . . . . . . . . . . . . . . . . . . . . . . . . . . . . . 6
Príprava
Ovládacie prvky . . . . . . . . . . . . . . . . . . . . . . . . . . . . . . . . . . . . . . . . . . . . . . . . . . . . . . . . . . . . . . . . . . 8
Nastavenie bezšnúrovej kamery. . . . . . . . . . . . . . . . . . . . . . . . . . . . . . . . . . . . . . . . . . . . . . . . . . . . . . 9
Symboly použité v tomto návode na obsluhu . . . . . . . . . . . . . . . . . . . . . . . . . . . . . . . . . . . . . . . . . . . 12
Registrácia bezšnúrovej kamery. . . . . . . . . . . . . . . . . . . . . . . . . . . . . . . . . . . . . . . . . . . . . . . . . . . . . 12
Monitorovanie kamerou
Monitorovanie kamerou prostredníctvom prenosnej jednotky . . . . . . . . . . . . . . . . . . . . . . . . . . . . . . 13
Užitočné informácie
Montáž na stenu . . . . . . . . . . . . . . . . . . . . . . . . . . . . . . . . . . . . . . . . . . . . . . . . . . . . . . . . . . . . . . . . . 16
Riešenie problémov . . . . . . . . . . . . . . . . . . . . . . . . . . . . . . . . . . . . . . . . . . . . . . . . . . . . . . . . . . . . . . 19
Technické údaje . . . . . . . . . . . . . . . . . . . . . . . . . . . . . . . . . . . . . . . . . . . . . . . . . . . . . . . . . . . . . . . . . 21
Obchodné zastúpenie. . . . . . . . . . . . . . . . . . . . . . . . . . . . . . . . . . . . . . . . . . . . . . . . . . . . . . . . . . . . . 22
<2>
Page 51

TGA914FX(sk).book Page 3 Tuesday, August 22, 2006 4:16 PM
Úvod
Ďakujeme Vám, že ste si kúpili bezšnúrovú kameru.
Záznamy pre Vás
Pre prípad záručnej opravy si sem priložte alebo inak uschovajte pôvodný doklad o kúpe.
Sériové číslo (uvedené na spodnej strane zariadenia)
Dátum kúpy
Obchodný názov a adresa predajcu
Pre Vašu informáciu:
L
V prípade problémov sa obrátte v prvom rade na svojho predajcu.
Vyhlásenie o zhode:
L
Spoločnost Panasonic Communications Co., Ltd. týmto vyhlasuje, že toto zariadenie vyhovuje
základným požiadavkám ako aj ďalším relevantným ustanoveniam smernice 1999/5/EC o rádiovom
zariadení a koncových telekomunikačných zariadeniach (R&TTE).
Vyhlásenia o zhode pre relevantné zariadenia Panasonic uvádzané v tomto návode na obsluhu
môžete nájst na internetovej adrese:
http://www.doc.panasonic.de
Úvod
Kontakt:
Panasonic Services Europe
a Division of Panasonic Marketing Europe GmbH
Panasonic Testing Centre
Winsbergring 15, 22525 Hamburg, Germany
<3>
Page 52

TGA914FX(sk).book Page 4 Tuesday, August 22, 2006 4:16 PM
Úvod
Charakteristika
Monitorovanie kamerou prostredníctvom prenosnej jednotky
Dôležitá informácia:
L
V tomto návode sa výraz „prenosná jednotka” vztahuje na model KX-TGA910FX.
Miestnost, v ktorej je bezšnúrová kamera, možno monitorovat nasledujúcimi spôsobmi:
–keď nadviaže prenosná jednotka spojenie s bezšnúrovou kamerou (str. 13),
–keď bezšnúrová kamera pri detekcii zvuku prezvoní prenosnú jednotku (str. 14),
–keď osoba pri bezšnúrovej kamere prezvoní prenosnú jednotku tlačidlom voľby (str. 14).
<4>
Page 53

TGA914FX(sk).book Page 5 Tuesday, August 22, 2006 4:16 PM
Úvod
Informácie o príslušenstve
Štandardná výbava
Číslo Súčast príslušenstva Počet kusov
1
2
3
123
Sietový adaptér
(Objedn. č. PQLV209CE)
Adaptér nástenného upevnenia 1
Tlačidlo voľby 1
1
<5>
Page 54

TGA914FX(sk).book Page 6 Tuesday, August 22, 2006 4:16 PM
Úvod
Dôležité informácie
Všeobecné informácie
L
Používajte len dodaný sietový adaptér
uvedený na str. 5.
L
Sietový adaptér zapájajte iba do štandardnej
sietovej zásuvky so striedavým napätím 220 –
240 V.
L
Toto zariadenie nie je vhodné pre prevádzku
v blízkosti zdravotníckych zariadení
intenzívnej starostlivosti a pre osoby
s kardiostimulátorom.
L
Dbajte na to, aby na zariadenie nič nespadlo
a aby sa na neho nič nevylialo. Zariadenie
nevystavujte nadmernému prachu, dymu,
mechanickým vibráciám a otrasom.
Prevádzkové prostredie
L
Zariadenie nepoužívajte v blízkosti vody.
L
Zariadenie neumiestňujte do blízkosti zdrojov
tepla ako sú napríklad radiátory, sporáky atď.
Ďalej ho neumiestňujte do priestorov, kde je
teplota nižšia ako 5 °C a vyššia ako 40 °C.
L
Sietový adaptér sa používa na odpojenie
zariadenia od elektrickej siete. Zariadenie
preto umiestnite do blízkosti ľahko prístupnej
sietovej zásuvky.
Upozornenie:
L
Zariadenie nevystavujte vplyvu dažďa alebo
vlhkosti, aby nedošlo k zasiahnutiu osôb
elektrickým prúdom.
L
Ak sa zo zariadenia šíri dym, pach alebo
neobvyklý zvuk, odpojte ho od zdroja
napájania. Takéto príznaky vedú k vzniku
požiaru alebo zasiahnutiu osôb elektrickým
prúdom. Dohliadnite na to, aby zariadenie
prestalo dymit, a obrátte sa na autorizované
servisné stredisko.
Bežná starostlivost
L
Najprv odstráňte z objektívu prach a potom
poutierajte objektív vatovým tampónom.
Podmienky používania bezšnúrovej kamery
L
Bezšnúrová kamera je určená len na použitie
v interiéri. Dlhodobé pôsobenie priameho
slnka alebo halogénového osvetlenia môže
poškodit objektív kamery.
L
Bezšnúrovú kameru používajte v miestnosti pri
dennom svetle alebo s dobrým osvetlením.
L
Bezšnúrovú kameru nepoužívajte na
nasledujúcich miestach:
– v blízkosti žiarovkového osvetlenia,
– v blízkosti elektrospotrebičov, ktoré vyžarujú
silné rádiové signály,
– na snímanie objektu osvetleného zozadu
protisvetlom alebo pred zrkadlom,
– na miestach s výraznými zmenami teplôt,
ako napríklad pri klimatizačnom zariadení
alebo ohrievači,
– v prostredí s parami a mastnotou, ako
napríklad v kuchyni,
– tam, kde nejaký objekt, ako napríklad sklo,
môže spôsobovat zmeny teplôt v dôsledku
odrazov.
L
Pri použití bezšnúrovej kamery je nutné
zachovávat právo snímaných osôb na
súkromie.
Informácie o likvidácii
opotrebovaného elektrického
a elektronického zariadenia
(súkromné domácnosti)
Tento symbol na produktoch a/alebo na
priložených dokumentoch znamená, že sa pri
likvidácii nesmú elektrické a elektronické
zariadenia miešat so všeobecným domácim
odpadom. V záujme správneho
obhospodarovania, obnovy a recyklácie odvezte,
prosím, tieto produkty na určené zberné miesta,
<6>
Page 55

TGA914FX(sk).book Page 7 Tuesday, August 22, 2006 4:16 PM
kde budú prijaté bez poplatku. V niektorých
krajinách je možné tieto produkty vrátit priamo
miestnemu maloobchodu v prípade, ak si
objednáte podobný nový výrobok.
Správna likvidácia týchto produktov pomôže
ušetrit hodnotné zdroje a zabránit možným
negatívnym vplyvom na ľudské zdravie
a prostredie, ktoré môžu inak vzniknút
v dôsledku nesprávneho zaobchádzania
s odpadom. Bližšie informácie o najbližšom
zbernom mieste získate na miestnom úrade.
V prípade nesprávnej likvidácie odpadu môžu byt
uplatnené pokuty v súlade s platnou legislatívou.
Pre právnické osoby v Európskej únii
Ak potrebujete zlikvidovat opotrebované
elektrické a elektronické zariadenia, bližšie
informácie získate od svojho miestneho predajcu
alebo dodávateľa.
Informácie o likvidácii v krajinách mimo
Európskej únie
Tento symbol je platný len v Európskej únii.
Ak si želáte zlikvidovat toto zariadenie, obrátte
sa na miestny úrad alebo predajcu
a poinformujte sa o správnom spôsobe likvidácie
tohto typu odpadu.
Úvod
<7>
Page 56

TGA914FX(sk).book Page 8 Tuesday, August 22, 2006 4:16 PM
Príprava
Ovládacie prvky
A
B
C
D
A
Anténa
B
Objektív kamery
C
MIC (mikrofón)
D
Tlačidlo vol’by
E
F
E
Indikátor
F
DIP prepínače
G
Reproduktor
H
PROG. (Program)
G
H
Objasnenie indikácií bezšnúrovej kamery
Indikátor bezšnúrovej kamery signalizuje stav nasledujúcimi indikáciami.
Stav Opis
Červená farba (rýchle bliká)LBezšnúrová kamera nie je zaregistrovaná. Bezšnúrovú kameru
zaregistrujte (str. 12).
L
Bezšnúrová kamera je mimo dosahu. Bezšnúrovú kameru
umiestnite v dosahu základne.
L
Žltozelená farba
Žltozelená farba (bliká)
<8>
Bezšnúrová kamera je zaregistrovaná a je v pohotovostnom
režime.
L
Senzor kamery je aktívny a bezšnúrová kamera prezváňa
prenosnú jednotku.
L
Bezšnúrová kamera je v spojení a prenáša živé zábery do
prenosnej jednotky.
Page 57

TGA914FX(sk).book Page 9 Tuesday, August 22, 2006 4:16 PM
Príprava
Nastavenie bezšnúrovej kamery
Pripojenie sietového adaptéra a tlačidlo voľby
Sietový adaptér pripojte dôkladným zasunutím koncovky (A). Šnúru tlačidla voľby pripojte tak, že
s kliknutím zapadne na svoje miesto do konektora (B).
L
Používajte výhradne dodaný sietový adaptér.
B
A
Pre Vašu informáciu:
L
Keď je sietový adaptér pripojený, indikátor sa rozsvieti červeným svetlom a následne začne blikat.
L
Sietový adaptér musí byt neustále zapojený v zásuvke. (Sietový adaptér sa počas prevádzky
zahrieva. Je to normálny jav.)
L
Sietový adaptér zapojte do sietovej zásuvky osadenej v stene alebo na podlahe. Nezapájajte ho do
sietovej zásuvky na strope. Sietový adaptér by sa mohol pôsobením vlastnej tiaže odpojit.
Háčiky
(220–240 V, 50 Hz)
<9>
Page 58

TGA914FX(sk).book Page 10 Tuesday, August 22, 2006 4:16 PM
Príprava
Napolohovanie objektívu bezšnúrovej kamery
Stlačte jazýček (A) a natáčaním objektívu nahor alebo nadol napolohujte kameru.
L
Prostredníctvom prenosnej jednotky skontrolujte, či sa záber, ktorý si želáte monitorovat
bezšnúrovou kamerou, zobrazuje (str. 13).
Približne
40°
Približne
40°
Pre Vašu informáciu:
L
Nedotýkajte sa objektívu kamery (str. 8).
A
<10>
Page 59

TGA914FX(sk).book Page 11 Tuesday, August 22, 2006 4:16 PM
Príprava
Nastavenie DIP prepínačov
DIP prepínače
(Štandardná poloha: ON)
1ON23
OFF–vypnutý stav*1
Prostredníctvom DIP prepínačov č. 2 a 3 možno nastavit nasledujúce funkcie.
DIP prepínač 1 sa nevyužíva na žiadne nastavenie.
Prepínače sa podľa potreby nastavujú zahroteným predmetom, ako je napríklad pero.
DIP prepínač Funkcia ON – zapnutý
(štandardné nastavenie)
1–––
2 Orientácia záberu Normálna Naopak
3Hlasitost reproduktora Normálna Nízka
OFF – vypnutý
*1
*1 Posunutie prepínača nadol
Zobrazovanie záberov naopak (DIP prepínač 2)
Ak sa majú zábery kamery zobrazovat naopak, nastavte OFF – vypnutý stav. Táto funkcia je užitočná,
ak sa bezšnúrová kamera upevní naopak (str. 17).
Nastavenie hlasitosti reproduktora bezšnúrovej kamery (DIP prepínač 3)
Ak si želáte znížit hlasitost reproduktora, nastavte prepínač do polohy OFF (nízka úroveň).
<11>
Page 60

TGA914FX(sk).book Page 12 Tuesday, August 22, 2006 4:16 PM
Príprava
Symboly použité v tomto
návode na obsluhu
Symbol Význam
J
i
L
“ ” Naklápaním krížového ovládača
Stlačte J (stred krížového
ovládača).
Pristúpte k ďalšiemu úkonu.
Stlačte L (stred krížového
ovládača).
nadol alebo nahor si zvoľte
možnost uvedenú na displeji
v úvodzovkách (napr.
ZruŠ.reg. PJ
“
”).
Registrácia bezšnúrovej
kamery
Zrušenie registrácie bezšnúrovej
kamery
Registráciu bezšnúrovej kamery možno zrušit
prostredníctvom prenosnej jednotky
zaregistrovanej k tej istej základni.
1
J
(stred krížového ovládača) i L i
L
Bezšnúrovú kameru je potrebné zaregistrovat
k základni KX-TG9120.
1
Základňa:
Na základni stlačte a asi 3 sekundy podržte
tlačidlo
{x}
, až kým nezaznie registračný tón.
2
Kamera:
Zahroteným predmetom, akým je pero, tlačte
tlačidlo PROG. (program) na zadnej strane
bezšnúrovej kamery až do zaznenia pípnutia.
L
Keď sa registrácia úspešne ukončí,
bezšnúrová kamera zapípa, indikátor
prestane blikat červeným svetlom
a zostane rozsvietený v žltozelenej farbe
(str. 8).
L
Ak v kroku 2 začnú vyzváňat všetky
zaregistrované prenosné jednotky,
{x}
stlačením
opät od kroku 1.
vyzváňanie zrušte. Začnite
<12>
2
Zadajte “
3
“
4
Zvoľte bezšnúrovú kameru, ktorej registráciu
si želáte zrušit. i
L
L
5
L i “ÁNO” i L
L
6
{ih}
335
”.
ZruŠ.reg. PJ” i L
t
Pri zvolenom prvku sa zobrazuje Q.
Ak si zvolený prvok želáte zrušit, zvoľte si
ho znova.
Zobrazí sa “
dlhé pípnutie.
i t
Čakajte,prosím..
” a zaznie
Page 61

TGA914FX(sk).book Page 13 Tuesday, August 22, 2006 4:16 PM
Monitorovanie kamerou
prostredníctvom prenosnej
jednotky
Prostredníctvom prenosnej jednotky možno
monitorovat obraz i zvuk z miestnosti, v ktorej je
umiestnená bezšnúrová kamera. Kamera, ktorou
sa monitoruje, nevyzváňa, takže je vhodná
napríklad na sledovanie detskej izby z rôznych
častí domu.
Dôležitá informácia:
L
Pred začatím monitorovania skontrolujte, či je
objektív bezšnúrovej kamery napolohovaný do
správneho smeru.
L
K bezšnúrovej kamere má prístup vždy len 1
osoba.
L
Z bezšnúrovej kamery sa každých niekoľko
sekúnd prenáša aktualizovaný obraz.
Zobrazovaný záber nie je dynamickým
obrazom.
L
Počas monitorovania bezšnúrovou kamerou
nemôžu ostatní účastníci nadviazat vnútornú
komunikáciu (interkom) a prepojit spojenie.
L
Spojenie s monitorovanou kamerou sa
automaticky zruší po 10 minútach.
L
Počas monitorovania sa nemôže prenosná
jednotka vložit do základne alebo nabíjačky.
Spojenie s monitorovanou kamerou by sa
zrušilo.
L
Bezšnúrová kamera neprezváňa prenosné
jednotky v nasledujúcich situáciách:
–keď ostatní účastníci komunikujú medzi
sebou (interkom) alebo v konferenčnom
spojení,
Monitorovanie kamerou
–keď z elektrických zariadení vyžaruje
elektrické rušenie,
–keď sa cez prenosnú jednotku komunikuje.
(V takomto prípade zaznejú 2 tóny a na
z
prenosnej jednotke začne blikat ikona
L
Cez regeneračný zosilňovač DECT
komunikácie sa nedá monitorovat.
.)
Monitorovanie bezšnúrovou
kamerou prostredníctvom prenosnej
jednotky
Prenosná jednotka
1
{
INT
}
2
Zvoľte si želanú bezšnúrovú kameru. i
P/{C}/{s}
3
Ak je potrebné, môžete cez bezšnúrovú
kameru komunikovat.
ALEBO
Ak je potrebné, môžete stlačením tlačidla
T} vyradit reprodukciu zvuku.
4
Po ukončení monitorovania stlačte tlačidlo
{ih}
alebo prenosnú jednotku vložte do
základne alebo nabíjačky.
Nastavenie hlasitosti slúchadla
a reproduktora
Počas monitorovania potlačte krížový ovládač
smerom nahor alebo nadol.
Komunikácia s účastníkom prezváňajúcej
jednotky cez bezšnúrovú kameru
Keď sa bezšnúrová kamera prezvoní z prenosnej
jednotky, bezšnúrová kamera nevyzváňa, ale
hlasitá komunikácia je aktívna. Môžete hovorit
súčastníkom s prenosnou jednotkou. Hovorte
zreteľne do mikrofónu (MIC).
{C/
<13>
Page 62

TGA914FX(sk).book Page 14 Tuesday, August 22, 2006 4:16 PM
Monitorovanie kamerou
Indikácia na displeji prenosnej jednotky pri
monitorovaní kamerou
Zobrazovaná
ikona
Príklad:
8
Význam
Prenosná jednotka je
v spojení s bezšnúrovou
kamerou.
Keď bliká:
Bezšnúrová kamera
prezváňa prenosnú
jednotku. (Identifikovala zvuk
alebo sa stlačilo tlačidlo
voľby.)
Prezváňanie prenosných jednotiek
z bezšnúrovej kamery
Bezšnúrová kamera prezváňa prenosné jednotky
pri detekcii zvuku alebo po stlačení tlačidla voľby
na kamere. Následne môže príjemca
prezváňania cez svoju prenosnú jednotku
monitorovat živý obraz snímaný bezšnúrovou
kamerou.
Dôležitá informácia:
L
Z bezšnúrovej kamery možno prezváňat len
zaregistrované prenosné jednotky. Základňa
sa nedá prezvonit.
L
Ak sa počas komunikácie prezvoní prenosná
jednotka z bezšnúrovej kamery, zaznejú 2 tóny
a na prenosnej jednotke začne blikat ikona z.
Ak si z prenosnej jednotky želáte monitorovat
{ih}
bezšnúrovou kamerou, stlačte tlačidlo
a potom
L
Pri prezváňaní bezšnúrovou kamerou sa nedá
použit funkcia automatickej vnútornej
komunikácie.
{s}
.
1
Kamera:
Kamera zachytí zvuk.
L
Kamera vyšle kamerový signál a v dĺžke 1
minúty prezvoní prenosné jednotky.
2
Prenosná jednotka:
Stlačením tlačidla
volanie.
L
Môžete monitorovat miestnost, v ktorej je
kamera.
3
Prenosná jednotka:
Ak je potrebné, môžete stlačením tlačidla {C
T} vyradit reprodukciu zvuku.
4
Prenosná jednotka:
Po ukončení monitorovania stlačte tlačidlo
{ih}
alebo prenosnú jednotku vložte do
základne alebo nabíjačky.
Prezváňanie z bezšnúrovej kamery tlačidlom
voľby
1
Bezšnúrová kamera:
Stlačte tlačidlo voľby.
L
Bezšnúrová kamera vyšle kamerový signál
avdĺžke 1 minúty prezvoní prenosné
jednotky.
L
Ak si želáte prezváňanie zastavit, znova
stlačte tlačidlo voľby.
{s}
prijmite prezváňajúce
/
Prezváňanie na základe detekcie zvuku
kamerou
Dôležitá informácia:
L
Ak sa má funkcia detekcie zvuku bezšnúrovej
kamery využívat, je potrebné nastavit citlivost
detekcie zvuku do aktívneho režimu (str. 15).
<14>
2
Prenosná jednotka:
Stlačením tlačidla
volanie.
{s}
prijmite prezváňajúce
Page 63

TGA914FX(sk).book Page 15 Tuesday, August 22, 2006 4:16 PM
L
Môžete monitorovat miestnost, v ktorej je
bezšnúrová kamera.
3
Bezšnúrová kamera:
Keď používateľ prenosnej jednotky prijme
prezváňanie, hovorte zreteľne do mikrofónu
(MIC).
4
Prenosná jednotka:
Po ukončení monitorovania stlačte tlačidlo
{ih}
alebo prenosnú jednotku vložte do
základne alebo nabíjačky.
Užitočné nastavenia počas
monitorovania kamerou
Počas monitorovania možno zadat z prenosnej
jednotky nastavenia kamery.
Nastavenie jasu displeja
Na výber je 6 úrovní.
1
Spustite monitorovanie (str. 13).
2
Jas sa nastavuje stláčaním tlačidla B.
Monitorovanie kamerou
Nastavenie citlivosti detekcie zvuku
Bezšnúrová kamera je vybavená senzorom,
ktorý slúži na detekciu ľudského hlasu, ako
napríklad detského plaču. Iné zvuky než ľudský
hlas môže byt problematické detekovat. Aby sa
dala táto funkcia využívat, je potrebné overit, či
je bezšnúrová kamera umiestnená tak, aby bolo
možné spoľahlivo detekovat hlas. Keď senzor
detekuje zvuk, bezšnúrová kamera prezvoní
prenosnú jednotku.
Na výber sú 3 úrovne. Štandardným nastavením
je “vyradený stav”.
1
Spustite monitorovanie (str. 13).
2
v
3
Ak si želáte túto funkciu aktivovat, potlačte
krížový ovládač nahor.
Stláčaním krížového ovládača smerom nahor
alebo nadol zvoľte želanú citlivost.
L
Ak si želáte túto funkciu vyradit, opakovane
stláčajte krížový ovládač nadol.
Pre Vašu informáciu:
L
Po skončení monitorovania sa nastavenie vráti
na pôvodnú úroveň.
Nastavenie zoomu záberu
1
Spustite monitorovanie (str. 13).
2
Nájazd zoomom sa ovláda stlačením tlačidla
A
.
L
Po ďalšom stlačení tlačidla A sa obnoví
pôvodné zobrazenie.
4
L
Pre Vašu informáciu:
L
Ak sa táto funkcia vyradí, bezšnúrová kamera
nedetekuje zvuk (str. 14).
L
V záujme nastavenia optimálnej úrovne si
z prenosnej jednotky vopred otestujte citlivost
senzora kamery.
<15>
Page 64

TGA914FX(sk).book Page 16 Tuesday, August 22, 2006 4:16 PM
Užitočné informácie
Montáž na stenu
Bezšnúrovú kameru možno namontovat na stenu štandardným spôsobom alebo obrátene.
UPOZORNENIE:
L
Bezšnúrovú kameru je nutné upevnit na stabilné miesto, na ktorom môže byt kamera pri inštalácii
adekvátne zaistená.
L
Sietový adaptér zapojte do sietovej zásuvky osadenej v stene alebo na podlahe. Nezapájajte ho do
sietovej zásuvky na strope. Sietový adaptér by sa mohol pôsobením vlastnej tiaže odpojit.
L
Bezšnúrovú kameru neupevňujte na mäkký materiál. Mohla by spadnút, poškodit sa alebo
spôsobit zranenie
L
Bezšnúrovú kameru neupevňujte na nasledujúce miesta: na sadrokartón, ALC (autoklávovaný ľahký
pórobetón), tvárnice, preglejku s hrúbkou menšou než 25 mm a podobné materiály.
L
Po namontovaní bezšnúrovej kamery na stenu už netahajte šnúru tlačidla voľby.
L
Po namontovaní bezšnúrovej kamery na stenu pri komunikácii s používateľom prenosnej jednotky
hovorte nahlas a zreteľne priamo do mikrofónu (MIC).
Pripojenie k adaptéru nástenného upevnenia
A
Bezšnúrovú kameru zasuňte do adaptéra nástenného upevnenia v smere šípky tak, aby
s cvaknutím zapadla na svoje miesto.
B
Zasunutím malého výčnelku na šnúre uchytte šnúru tlačidla voľby do otvoru na boku adaptéra
nástenného upevnenia.
C
Pootočte ho a zasuňte na miesto.
D
Šnúru tlačidla voľby upevnite za háčik adaptéra nástenného upevnenia.
.
<16>
Page 65

TGA914FX(sk).book Page 17 Tuesday, August 22, 2006 4:16 PM
Upevnenie bezšnúrovej kamery na stenu
Štandardné upevnenie
1
Prostredníctvom šablóny zaskrutkujte do
steny v odporúčanej výške 1,8 m alebo
nižšie skrutky (nie sú súčastou
príslušenstva) (str. 18).
Užitočné informácie
2
Nasaďte bezšnúrovú kameru (A) a posuňte
B
ju nadol (
zaistená na svojom mieste.
L
Nasmerovanie objektívu je opísané na str.
str. 10.
) a doprava (C) tak, aby bola
51 mm
Skrutky
(220–240 V, 50 Hz)
Obrátené upevnenie
L
Ak upevníte kameru obrátene, záber kamery sa bude zobrazovat obrátene. Aby sa obraz
nezobrazoval obrátene, dá sa nastavenie zobrazovania bezšnúrovej kamery zmenit na opačné (str.
11) .
1
Prostredníctvom šablóny zaskrutkujte do
steny v odporúčanej výške 1,8 m alebo
nižšie skrutky (nie sú súčastou
príslušenstva) (str. 18).
51 mm
Skrutky
2
Nasaďte bezšnúrovú kameru (A) a posuňte
B
ju nadol (
zaistená na svojom mieste.
) a doľava (C) tak, aby bola
A
A
B
C
B
C
(220–240 V,
50 Hz)
<17>
Page 66

TGA914FX(sk).book Page 18 Tuesday, August 22, 2006 4:16 PM
Užitočné informácie
Informácie o skrutkách pre nástenné upevnenie
L
Použite odporúčanú veľkost skrutiek uvedenú nižšie.
L
Po zaskrutkovaní skrutky nechajte trochu vyčnievat, aby sa na ne dala upevnit bezšnúrová
kamera.
Medzera
Max. 9,3 mm
Max. 4,5 mm
Zloženie adaptéra nástenného upevnenia
Stlačte a podržte stlačené tlačidlo (A) na ľavej strane stojana na upevnenie na stenu. Bezšnúrovú
kameru posuňte doprava (B).
A
B
<18>
Šablóna na upevnenie bezšnúrovej kamery na stenu
51 mm
Page 67

TGA914FX(sk).book Page 19 Tuesday, August 22, 2006 4:16 PM
Riešenie problémov
Problém Príčina a riešenie
Bezšnúrová kamera nefunguje.LSkontrolujte zapojenia (str. 9).
L
Bezšnúrová kamera nie je zaregistrovaná k základni.
Bezšnúrovú kameru zaregistrujte k základni (str. 12).
L
Indikátor bezšnúrovej kamery
bliká červeným svetlom.
Obraz je slabý.
Obraz prenášaný
z bezšnúrovej kamery na
prenosnú jednotku je slabý.
Obraz prenášaný
z bezšnúrovej kamery na
prenosnú jednotku je tmavý
anie je zreteľný.
Nedá sa nadviazat spojenie
s bezšnúrovou kamerou, obraz
je skreslený alebo oneskorený.
Senzor kamery nereaguje.
Po stlačení tlačidla voľby
bezšnúrová kamera
neprezváňa prenosné jednotky.
Počas monitorovania sa cez
reproduktor prenosnej jednotky
a/alebo bezšnúrovej kamery šíri
nepríjemný zvuk.
Bezšnúrová kamera nie je zaregistrovaná k základni.
Bezšnúrovú kameru zaregistrujte k základni (str. 12).
L
Bezšnúrová kamera je mimo dosahu. Bezšnúrovú kameru
umiestnite v dosahu základne.
L
Objektív kamery je znečistený. Vyčistite ho mäkkou suchou
handričkou.
L
Nedotýkajte sa priamo objektívu. Odtlačky prstov spôsobujú
nejasné zobrazovanie.
L
Nastavte jas displeja (str. 15).
L
Miesto, na ktorom je umiestnená bezšnúrová kamera, je
tmavé. Zlepšite osvetlenie.
L
Nastavte jas displeja (str. 15).
L
Na mieste, kde je bezšnúrová kamera, pôsobí silné slnečné
svetlo alebo protisvetlo. Skúste zatienit miesto, na ktorom je
kamera.
L
Bezšnúrová kamera stratila spojenie so základňou. Presuňte
bezšnúrovú kameru bližšie k základni a skúste znova.
L
V prenose bráni prekážka - napríklad betónová stena.
Presuňte bezšnúrovú kameru na miesto bez prekážok.
L
Práve je v činnosti mikrovlnné zariadenie. Bezšnúrovú
kameru presuňte bližšie k základni alebo mimo dosahu
rušenia mikrovlnným zariadením a skúste znova.
L
Ak sa pre citlivost detekcie zvuku nastaví vyradený stav,
senzor nereaguje. Zapnite túto funkciu (str. 15).
L
Pokiaľ prenosná jednotka monitoruje bezšnúrovou kamerou,
bezšnúrová kamera nedetekuje zvuk.
L
Pokiaľ sa cez prenosnú jednotku monitoruje obraz snímaný
bezšnúrovou kamerou, tlačidlo voľby je nefunkčné.
L
Zväčšite vzdialenost prenosnej jednotky od bezšnúrovej
kamery.
Užitočné informácie
<19>
Page 68

TGA914FX(sk).book Page 20 Tuesday, August 22, 2006 4:16 PM
Užitočné informácie
Problém Príčina a riešenie
Pri použití hlasitej komunikácie
cez prenosnú jednotku v režime
interkomu s bezšnúrovou
kamerou dochádza k únikom
a nastávajú tažkosti so zvukom
z druhej strany.
L
Potlačením krížového ovládača smerom nadol znížte
hlasitost reproduktora.
<20>
Page 69

TGA914FX(sk).book Page 21 Tuesday, August 22, 2006 4:16 PM
Užitočné informácie
Technické údaje
N
Norma:
DECT (Digital Enhanced Cordless
Telecommunications: zdokonalené digitálne
bezdrôtové telekomunikácie)
N
Počet kanálov:
120 duplexných kanálov
N
Frekvenčný rozsah:
1,88 GHz až 1,9 GHz
N
Obojsmerný prenos:
TDMA (Time Division Multiple Access:
viacnásobný prístup s časovým delením)
N
Odstup kanálov:
1 728 kHz
N
Prenosová rýchlost:
1 152 kbit/s
N
Modulácia:
GFSK (Gaussian Frequency Shift Keying:
gausovo kľúčovanie frekvenčným posuvom)
N
Výkon RF prenosu:
Približne 250 mW
N
Napájanie:
220–240 V, 50 Hz
N
Príkon:
Pohotovostný režim: približne 2,1 W
Maximálny príkon: približne 3,9 W
N
Prevádzkové podmienky:
5 °C – 40 °C, 20 % – 80 % relatívna vlhkost
vzduchu (sucho)
N
Rozmery:
približne 124 mm × 86 mm × 68 mm
N
Hmotnost:
približne 140
N
Počet obrazových bodov:
12 288 pixelov
N
Osvetlenie:
10 luxov (min.)
N
Zaostrenie:
nemenné 0,4 m – nekonečno
N
Rozsah snímania:
vertikálny uhol: približne 35°
horizontálny uhol: približne 45°
g
Pre Vašu informáciu:
L
Technické údaje podliehajú zmenám.
L
Ilustrácie použité v tomto návode na obsluhu
sa môžu od skutočného zariadenia mierne
líšit.
<21>
Page 70

TGA914FX(sk).book Page 22 Tuesday, August 22, 2006 4:16 PM
Užitočné informácie
Obchodné zastúpenie
N Česká republika
Panasonic Czech Republic, s.r.o.
Křižíkova 237/36A (Palác Karlín) 186 00 Praha 8
telefon: +420-236 032 511
centrální fax: +420-236 032 411
e-mail:info@panasonic.cz
e-mail:pcsserv@panasonic.cz
aktuální info na www.panasonic.cz
N Slovensko
Panasonic Slovakia, spol. s.r.o.
Štúrova 11, 811 02 BRATISLAVA, Slovenská republika
Tel. číslo: +421-2-5292-1423
Fax: +421-2-5292-1411
e-mail:sales@panasonic.sk
web: www.panasonic.sk
N Turecko
Tekofaks Elektronik Sanayi Mümessillik ve Tic. A.Ş.
Kağıthane Cad. Sevilen Sok. No: 65
Çağlayan İstanbul (Türkiye)
Tel: (0212) 210 69 00
Fax: (0212) 222 77 26
N Poljska
Panasonic Polska Sp. z o. o.
Al.Krakowska 4/6
02-284 Warszawa, Polska
Tel: (22) 338 11 00
Fax: (22) 228 12 00
Infolinia: 0801 351 903
<22>
Page 71

TGA914FX(sk).book Page 23 Tuesday, August 22, 2006 4:16 PM
Poznámky
<23>
Page 72

TGA914FX(sk).book Page 24 Tuesday, August 22, 2006 4:16 PM
Copyright:
Autorské práva na tento materiál vlastní spoločnost Panasonic Communications Co., Ltd. Tento
materiál sa smie reprodukovat len pre interné účely a akákoľvek iná reprodukcia po častiach alebo
vcelku je bez písomného súhlasu spoločnosti Panasonic Communications Co., Ltd., zakázaná.
© 2006 Panasonic Communications Co., Ltd. Všetky práva vyhradené.
<24>
Page 73

a
X
TGA914FX(tr).book Page 1 Wednesday, August 23, 2006 5:45 PM
İşletme Talimatları
Kablosuz Kamer
Model No. KX-TGA914F
Yalnızca İç Mekanlarda Kullanım
Bu kablosuz kamera, Panasonic Dijital Kablosuz Telefon KX-TG9120 ile
kullanılmak üzere geliştirilmiş bir aksesuar birimidir.
Bu kablosuz kamerayı, kullanılabilmesi için önce ana birime kaydetmeniz
gerekir.
Lütfen bu birimi kullanmadan önce bu İşletme Talimatlarını okuyunuz ve gerektiğinde
başvurmak üzere saklayınız.
Page 74

TGA914FX(tr).book Page 2 Wednesday, August 23, 2006 5:45 PM
İçindekiler
Giriş
Giriş . . . . . . . . . . . . . . . . . . . . . . . . . . . . . . . . . . . . . . . . . . . . . . . . . . . . . . . . . . . . . . . . . . . . . . . . . . . 3
Aksesuar bilgileri. . . . . . . . . . . . . . . . . . . . . . . . . . . . . . . . . . . . . . . . . . . . . . . . . . . . . . . . . . . . . . . . . . 5
Önemli bilgiler . . . . . . . . . . . . . . . . . . . . . . . . . . . . . . . . . . . . . . . . . . . . . . . . . . . . . . . . . . . . . . . . . . . . 6
Hazırlık
Kumanda düğmeleri . . . . . . . . . . . . . . . . . . . . . . . . . . . . . . . . . . . . . . . . . . . . . . . . . . . . . . . . . . . . . . . 8
Kablosuz kameranın ayarlanması. . . . . . . . . . . . . . . . . . . . . . . . . . . . . . . . . . . . . . . . . . . . . . . . . . . . . 9
Bu işletme talimatlarında kullanılan simgeler . . . . . . . . . . . . . . . . . . . . . . . . . . . . . . . . . . . . . . . . . . . 12
Kablosuz kameranın kaydedilmesi . . . . . . . . . . . . . . . . . . . . . . . . . . . . . . . . . . . . . . . . . . . . . . . . . . . 12
Kameranın İzlenmesi
Kameranın bir mobil cihaz kullanılarak izlenmesi. . . . . . . . . . . . . . . . . . . . . . . . . . . . . . . . . . . . . . . . 13
Yararlı Bilgiler
Duvara montaj. . . . . . . . . . . . . . . . . . . . . . . . . . . . . . . . . . . . . . . . . . . . . . . . . . . . . . . . . . . . . . . . . . . 16
Sorun giderme . . . . . . . . . . . . . . . . . . . . . . . . . . . . . . . . . . . . . . . . . . . . . . . . . . . . . . . . . . . . . . . . . . 19
Özellikler . . . . . . . . . . . . . . . . . . . . . . . . . . . . . . . . . . . . . . . . . . . . . . . . . . . . . . . . . . . . . . . . . . . . . . . 21
Satış bölümü. . . . . . . . . . . . . . . . . . . . . . . . . . . . . . . . . . . . . . . . . . . . . . . . . . . . . . . . . . . . . . . . . . . . 22
((2))
Page 75

TGA914FX(tr).book Page 3 Wednesday, August 23, 2006 5:45 PM
Giriş
Bu kablosuz kamerayı satın aldığınız için teşekkür ederiz.
Gerektiğinde başvurmanız için
Garanti kapsamında onarım olasılığı için orijinal faturayı iliştiriniz veya saklayınız.
Seri No. (ünitenin altındadır)
Satın alındığı tarih
Satıcının adı ve adresi
Not:
L
Herhangi bir sorun çıktığında, öncelikle donanımı satın aldığınız yere başvurmalısınız.
Uyumluluk Beyanı:
L
Panasonic Communications Co., Ltd., bu donanımın Radyo ve Telekomünikasyon Terminal
Donanımları (R&TTE) Direktifinin 1999/5/EC temel şartlarına ve diğer ilgili hükümlerine uygun
olduğunu beyan eder.
Bu kılavuzda açıklanan ilgili Panasonic ürünleri için Uyumluluk Beyanını aşağıdaki siteden
indirebilirsiniz:
http://www.doc.panasonic.de
Giriş
İletişim Adresi:
Panasonic Services Europe
a Division of Panasonic Marketing Europe GmbH
Panasonic Testing Centre
Winsbergring 15, 22525 Hamburg, Germany
((3))
Page 76

TGA914FX(tr).book Page 4 Wednesday, August 23, 2006 5:45 PM
Giriş
Özellik tanıtımı
Mobil cihaz kullanılarak kameranın izlenmesi
Önemli:
L
Bu işletme talimatlarında, “mobil cihaz” terimi KX-TGA910FX'i belirtmek için kullanılmaktadır.
Kablosuz kameranın yerleştirildiği odayı aşağıdaki durumlarda izleyebilirsiniz:
– kablosuz kameraya mobil cihazı kullanarak eriştiğinizde (sayfa 13).
– kablosuz kamera ses tespit ettiği zaman mobil cihaza çağrı yaptığında (sayfa 14).
– kablosuz kamera kullanıcısı arama tuşunu kullanarak mobil cihazı aradığında (sayfa 14).
((4))
Page 77

TGA914FX(tr).book Page 5 Wednesday, August 23, 2006 5:45 PM
Giriş
Aksesuar bilgileri
Birlikte verilen aksesuarlar
No. Aksesuar parça Miktar
1
AC Adaptörü
(Parça No. PQLV209CE)
2
Duvara montaj adaptörü 1
3
Arama düğmesi 1
123
1
((5))
Page 78

TGA914FX(tr).book Page 6 Wednesday, August 23, 2006 5:45 PM
Giriş
Önemli bilgiler
Genel
L
Yal nızca bu ürünle birlikte gelen, sayfa 5’de
belirtilen AC adaptörünü kullanınız.
L
AC adaptörünü standart 220–240 V AC priz
dışında hiçbir AC prize takmayınız.
L
Bu ürün acil yardım/yoğun bakım tıbbi
cihazlarının yakınında veya kalp pili takanlar
tarafından kullanılmamalıdır.
L
Ünitenin üzerine bir şey düşmemesine ve içine
sıvı dökülmemesine dikkat edilmelidir. Bu
ürünü aşırı duman, toz, mekanik titreşim ve
çarpmaya maruz bırakmayınız.
Ortam
L
Bu ürünü su yakınında kullanmayınız.
L
Bu ürün radyatör ve ocak gibi ısı
kaynaklarından uzak tutulmalıdır. Ayrıca,
sıcaklığı 5 °C’den düşük veya 40 °C’den
yüksek olan odalara da konulmamalıdır.
L
AC Adaptörü ana kesinti cihazı olarak
kullanılmaktadır. AC prizinin ürünün yakınına
takılmasını ve kolayca erişilebilir olmasını
sağlayınız.
Uyarı:
L
Elektrik çarpması riski ile karşı karşıya
kalmamak için, cihazı yağmura veya herhangi
bir aşırı neme maruz bırakmayınız.
L
Üründen duman, anormal koku veya ses
çıkması durumunda ürünün fişini prizden
çekiniz. Bu tür durumlar yangın veya elektrik
çarpmasına yol açabilir. Artık duman
çıkmadığından emin olduktan sonra, yetkili
servis merkezini arayınız.
Rutin bakım
L
Mercekteki tozu temizledikten sonra merceği
pamuklu bir çubukla siliniz.
Kablosuz kamerayı kullanma şartları
L
Kablosuz kamera yalnızca iç mekanlarda
kullanım için tasarlanmıştır. Kameranın
merceği, doğrudan güneş ışığına ya da
halojen ışığa uzun süre maruz kalırsa zarar
görebilir.
L
Kablosuz kamerayı gün ışığı alan ya da iyi
aydınlatılmış bir oda gibi aydınlık bir alanda
kullanınız.
L
Kablosuz kamerayı aşağıda belirtilen
ortamlarda kullanmayınız:
– elektrik ampülü yakınında.
– güçlü radyo sinyalleri yayan elektrikli
aygıtların yakınında.
– görüntüsü alınacak nesne bir ışık kaynağına
karşı ya da bir aynanın önünde dururken.
–bir klimanın ya da kaloriferin yanı gibi
sıcaklığın çok fazla değiştiği yerlerde.
– mutfak gibi yağ veya buhara maruz kalınan
yerlerde.
– yansıma nedeniyle cam gibi nesnelerin
sıcaklık değişikliğine neden olabileceği
yerlerde.
L
Kablosuz kamerayı kullanırken, lütfen diğer
kişilerin kişisel gizlilikle ilgili haklarını göz
önünde bulundurunuz.
Kullanılmayan Elektrikli ve Elektronik
Aletlerin Elden Çıkarılmasına İlişkin
Bilgi (bireysel kullanıcılar)
Ürünlerde ve/veya ürünle birlikte gelen
dokümanlarda yer alan bu simge, ömrü sona
ermiş elektrikli ve elektronik ürünlerin genel ev
çöpüne karıştırılmaması gerektiğini ifade eder.
Uygun biçimde toplanmaları, işlenmeleri ve geri
dönüştürülmeleri için lütfen bu tür ürünleri, bunlar
için öngörülen ve ücretsiz olarak kabul edilen
toplama noktalarına götürün. Ayrıca bazı
((6))
Page 79

TGA914FX(tr).book Page 7 Wednesday, August 23, 2006 5:45 PM
ülkelerde eski ürününüzü, yeni eşdeğer bir ürün
satın aldığınız yerel satıcınıza teslim
edebilirsiniz.
Ürünün doğru bir şekilde elden çıkarılması,
değerli kaynakları korumaya yardımcı olacak ve
yanlış biçimde atık gidermenin insan sağlığına ve
çevreye verebileceği olası negatif etkileri
önleyecektir. Çevrenizdeki en yakın toplama
noktasına ilişkin daha ayrıntılı bilgi almak için
lütfen yerel yetkililere başvurun.
Ürünlerin uygun biçimde elden çıkarılmaması
durumunda, ilgili ülkenin yasal düzenlemelerine
bağlı olarak cezalar uygulanabilir.
Avrupa Birliği dahilindeki kurumsal
kullanıcılar için
Elektrikli ve elektronik aletlerinizi elden çıkarmak
istiyorsanız, ayrıntılı bilgi için lütfen satıcınıza
veya tedarikçinize başvurun.
Avrupa Birliği dışındaki ülkelerde atık
gidermeye ilişkin bilgi
Bu simge yalnızca Avrupa Birliği sınırları
içerisinde geçerlidir.
Bu ürünü elden çıkarmak istiyorsanız, lütfen yerel
yetkililere veya satıcınıza başvurun ve uygun atık
giderme yöntemi konusunda bilgi alın.
Giriş
((7))
Page 80

TGA914FX(tr).book Page 8 Wednesday, August 23, 2006 5:45 PM
Hazırlık
Kumanda düğmeleri
A
B
C
D
A
Anten
B
Kamera merceği
C
MIC (Mikrofon)
D
Arama Düğmesi
E
F
E
Gösterge
F
DIP anahtarları
G
Hoparlör
H
PROG. (Program)
G
H
Kablosuz kamera göstergesini anlama
Kablosuz kamera göstergesi durumu aşağıdaki gibi gösterir.
Durum Açıklaması
Kırmızı (hızlı şekilde yanıp
sönüyor)
Sarı-yeşil
Sarı-yeşil (yanıp sönüyor)
((8))
L
Kablosuz kamera kaydedilmemiş. Kablosuz kamerayı kaydediniz
(sayfa 12).
L
Kablosuz kamera kapsama alanı dışında. Kablosuz kamerayı ana
birimin yakınına yerleştiriniz.
L
Kablosuz kamera kaydedilmiş ve bekleme modunda.
L
Kamera algılayıcısı cevap veriyor ve kablosuz kamera mobil
cihaza çağrı yapıyor.
L
Kablosuz kamera bağlı ve mobil cihaza canlı görüntüler
gönderiyor.
Page 81

TGA914FX(tr).book Page 9 Wednesday, August 23, 2006 5:45 PM
Hazırlık
Kablosuz kameranın ayarlanması
AC adaptörünün ve arama düğmesinin bağlanması
AC adaptörü kablosunu, fişe iyice bastırarak takınız (A). Arama düğmesi kablosunu birimdeki yerine,
tık sesi çıkartarak oturacak şekilde bağlayınız (B).
L
Yal nızca verilen AC adaptörünü kullanınız.
B
A
Not:
L
AC adaptörü bağlandığında, gösterge kırmızı renk yanar ve ardından yanıp sönmeye başlar.
L
AC adaptörü daima prizde tutulmalıdır. (Kullanım sırasında adaptörün ısınması normaldir.)
L
AC adaptörü, dikey duran veya zemine monte edilmiş bir AC prizine takılmalıdır. AC adaptörünü
tavana monte edilmiş AC prizine takmayınız, aksi taktirde adaptörün ağırlığı prizden çıkmasına
neden olabilir.
Çengel
(220–240 V, 50 Hz)
((9))
Page 82

TGA914FX(tr).book Page 10 Wednesday, August 23, 2006 5:45 PM
Hazırlık
Kablosuz kamera merceğinin açısının ayarlanması
Kamera merceğini yönlendirmek için, tırnağı (A) itiniz ve merceği yukarı veya aşağı doğru döndürünüz.
L
Mobil cihazı kullanarak, kablosuz kameradan izlemek istediğiniz alanın görüntülendiğine emin olunuz
(sayfa 13).
Yaklaşık
40°
Yaklaşık
40°
Not:
L
Kameranın merceğine dokunmayınız (sayfa 8).
A
((10))
Page 83

TGA914FX(tr).book Page 11 Wednesday, August 23, 2006 5:45 PM
Hazırlık
DIP anahtarlarının ayarlanması
DIP anahtarları
(Varsayılan konum: ON (AÇIK))
1ON23
KAPALI*1
2. ve 3. DIP anahtarlarını kullanarak aşağıdaki işlevleri ayarlayabilirsiniz.
1. DIP anahtarı herhangi bir ayar için kullanılmaz.
Gereken anahtarları, kalem gibi sivri uçlu bir nesneyle kaydırınız.
DIP anahtarı İşlev ON (AÇIK) (varsayılan) KAPALI
1–––
2 Görüntünün yönünü
belirleme
3 Hoparlör ses seviyesi Normal Düşük
Normal Baş aşağı
*1
*1 Anahtarı aşağıya doğru kaydırınız.
Görüntünün baş aşağı görüntülenmesi (2. DIP anahtarı)
Kamera görüntüsünü baş aşağı çevirmek için KAPALI olarak ayarlayınız. Bu özellik, kablosuz kamerayı
baş aşağı konumda monte ettiğiniz zaman gereklidir (sayfa 17).
Kablosuz kamera hoparlör ses seviyesinin seçilmesi (3. DIP anahtarı)
Hoparlörün sesini azaltmak isterseniz KAPALI (DÜŞÜK) olarak ayarlayınız.
((11))
Page 84

TGA914FX(tr).book Page 12 Wednesday, August 23, 2006 5:45 PM
Hazırlık
Bu işletme talimatlarında
kullanılan simgeler
Simge Anlamı
JJ
i
LL
“ ” Kumanda kolunu aşağı ya da
tuşuna (kumanda tuşunun
orta kısmı) basınız.
Bir sonraki işleme devam edin.
tuşuna (kumanda tuşunun
orta kısmı) basınız.
yukarı doğru iterek ekranda tırnak
işareti içinde gösterilen kelimeleri
El ünit. İptali
(örn. “
seçiniz.
”)
Kablosuz kameranın
kaydedilmesi
Kablosuz kamerayı KX-TG9120 ana birimine
kaydediniz.
1
Ana birim:
Ana birimdeki
kadar, kayıt sinyali duyulana dek basılı
durumda tutunuz.
2
Kamera:
Kablosuz kameranın arka tarafında bulunan
PROG. (program) düğmesine kalem gibi sivri
uçlu bir nesneyle bastırınız ve bir sinyal sesi
duyulana kadar bastırmaya devam ediniz.
L
Kayıt başarılı bir şekilde tamamlandığında,
kablosuz kameradan bir sinyal sesi duyulur
ve gösterge kırmızı renkte yanıp sönmeyi
durdurur ve sarı-yeşil renkte yanık kalır
(sayfa 8).
L
2 adımda tüm kayıtlı mobil cihazların zili
çalmaya başlarsa, durdurmak için
tuşuna basınız. Tekrar 1. adımdan
başlayınız.
{x}
tuşuna basınız ve 3 saniye
{x}
Kablosuz kameranın iptal edilmesi
Aynı ana birime kayıtlı bir mobil cihazı kullanarak,
kayıtlı bir kablosuz kameranın kaydını iptal
edebilirsiniz.
1
J
(kumanda tuşunun merkezi) i L i
L
2
“
335
” giriniz.
3
“
El ünit. İptali” i L
4
İptal etmek istediğiniz kablosuz kamerayı
i t
seçiniz.
L
Seçilen madde ile birlikte Q görüntülenir.
L
Seçilmiş bir maddeyi iptal etmek için, onu
yeniden seçin. i
5
L i “EVET” i L
L“Lüt. Bekleyin...
uzun bir bip sesi duyulur.
6
{ih}
t
”görüntülenir ve
((12))
Page 85

TGA914FX(tr).book Page 13 Wednesday, August 23, 2006 5:45 PM
Kameranın bir mobil cihaz
kullanılarak izlenmesi
Bir mobil cihaz ile, kablosuz kameranın
yerleştirildiği odadaki görüntü ve sesi
izleyebilirsiniz. İzlenen kameranın zili çalmaz,
böylece örneğin bebek odasını, evin farklı
bölümlerinden kolayca izleyebilirsiniz.
Önemli:
L
İzleme işlemine başlamadan önce kablosuz
kamera merceğinin doğru açıya ayarlanmış
olduğunu kontrol ediniz.
L
Kablosuz kameraya belirli bir anda yalnızca 1
kişi erişebilir.
L
Kablosuz kamera tarafından çekilen yeni
görüntü birkaç saniyede bir görüntülenir.
Görüntülenen görüntü hareketli bir resim
değildir.
L
Bir kablosuz kamera izlenirken, diğer
kullanıcılar dahili çağrı yapamaz ya da bir
çağrıyı transfer edemezler.
L
İzleme bağlantısı 10 dakika sonunda otomatik
olarak iptal edilir.
L
İzleme sırasında mobil cihazı ana birime ya da
şarj cihazına yerleştiremezsiniz. Bu durumda,
izleme bağlantısı iptal edilir.
L
Kablosuz kamera aşağıdaki koşullarda mobil
cihazlara çağrı yapamayabilir:
–diğer kullanıcılar dahili bir çağrı ya da
konferans arama yaptığında.
– elektrikli cihazlar elektriksel parazitler
yaydığında.
Kameranın İzlenmesi
– mobil cihazla görüşme yaparken. (Bu
z
durumda 2 ton duyarsınız ve
üzerinde yanıp söner.)
L
Bir DECT tekrarlayıcı vasıtasıyla izleme
bağlantısı yapamazsınız.
mobil cihaz
Kablosuz kameranın bir mobil
cihazdan izlenmesi
Mobil cihaz
1
{
INT
}
2
İstediğiniz kablosuz kamerayı seçiniz. i
P/{C}/{s}
3
Gerekirse, kablosuz kamera kullanıcısıyla
konuşunuz.
VEYA
Ses çıkışınızı sessize almak için gerekirse
T} tuşuna basınız.
4
İzleme bittiğinde
mobil cihazı ana birim ya da şarj cihazı
üzerine yerleştiriniz.
Alıcı/hoparlör ses seviyesinin ayarlanması
İzlerken kumanda tuşunu yukarı ya da aşağı
doğru itiniz.
Kablosuz kamerayı kullanarak aranan kişiyle
konuşma
Kablosuz kamera bir mobil cihaz tarafından
aranırsa, kablosuz kamera çalmaz ve hoparlör
açılır. Mobil cihaz kullanıcısıyla konuşabilirsiniz.
Mikrofona doğru net bir şekilde konuşunuz.
{ih}
tuşuna basınız veya
{C/
((13))
Page 86

TGA914FX(tr).book Page 14 Wednesday, August 23, 2006 5:45 PM
Kameranın İzlenmesi
Kamera izlemesi için mobil cihaz ekran öğesi
Görüntülenen
öğe
Örnek:
8
Anlamı
Mobil cihaz kablosuz
kameraya bağlı.
Yanıp söndüğünde:
Kablosuz kamera mobil
cihaza çağrı yapıyor. (Ses
tespit etmiştir ya da arama
düğmesine basılmıştır.)
Mobil cihazlara kablosuz kameradan
çağrı yapılması
Kablosuz kamera ses algıladığında ya da arama
düğmesine basıldığı zaman mobil cihazlara çağrı
yapabilir. Cevap veren mobil cihaz kullanıcısı,
kablosuz kameradan canlı görüntüleri izleyebilir.
Önemli:
L
Kablosuz kamera tarafından yalnızca kayıtlı
mobil cihazlara çağrı yapılabilir. Ana birime
çağrı yapılamaz.
L
Bir çağrı sırasında bir mobil cihaza kablosuz
kamera tarafından çağrı yapılırsa, 2 ton
z
duyulur ve mobil cihazda
Kablosuz kamerayı mobil cihazdan izlemek
{ih}
için
L
Kablosuz bir kamera tarafından çağrı
yapıldığında otomatik dahili çağrı özelliği
kullanılamaz.
ve ardından
yanıp söner.
{s}
tuşuna basınız.
2
Mobil cihaz:
Dahili çağrıya cevap vermek için
basınız.
L
Kameranın yerleştirildiği odayı
izleyebilirsiniz.
3
Mobil cihaz:
Ses çıkışınızı sessize almak için gerekirse
{C/T}
tuşuna basınız.
4
Mobil cihaz:
İzleme bittiğinde
mobil cihazı ana birim ya da şarj cihazı
üzerine yerleştiriniz.
Kablosuz kamera arama düğmesini
kullanarak çağrı yapma
1
Kablosuz kamera:
Arama düğmesine basınız.
L
Kablosuz kamera bir kamera tonu çıkarır ve
1 dakika süresince mobil cihazlara çağrı
yapar.
L
Çağrı işlemini durdurmak için arama
düğmesine tekrar basınız.
{ih}
tuşuna basınız veya
{s}
tuşuna
Kamera ses algılayıcısını kullanarak çağrı
alma
Önemli:
L
Kablosuz kameranın ses algılama özelliğini
kullanmak için ses algılama hassasiyetini açık
konuma getiriniz (sayfa 15).
1
Kamera:
Kamera sesi algılar.
L
Kamera bir kamera tonu çıkarır ve 1 dakika
süresince mobil cihazlara çağrı yapar.
((14))
2
Mobil cihaz:
Dahili çağrıya cevap vermek için
basınız.
L
Kablosuz kameranın yerleştirildiği odayı
izleyebilirsiniz.
{s}
tuşuna
Page 87

TGA914FX(tr).book Page 15 Wednesday, August 23, 2006 5:45 PM
3
Kablosuz kamera:
Mobil cihaz kullanıcısı cevap verdiğinde
mikrofona doğru net bir şekilde konuşunuz.
4
Mobil cihaz:
İzleme bittiğinde
mobil cihazı ana birim ya da şarj cihazı
üzerine yerleştiriniz.
{ih}
tuşuna basınız veya
Kamerayla izleme yaparken gerekli
ayarlar
İzleme sırasında bir mobil cihazla kamera
ayarlarını yapabilirsiniz.
Ekran parlaklığının ayarlanması
6 seviye bulunur.
1
İzleme işlemini başlatınız (sayfa 13).
2
Parlaklığı ayarlamak için B tuşuna ard arda
basınız.
Not:
L
İzlemeyi sona erdirdiğinizde, ayar varsayılan
ayara geri döner.
Görüntü yakınlaştırmanın seçilmesi
1
İzleme işlemini başlatınız (sayfa 13).
2
Görüntüyü yakınlaştırmak için A tuşuna
basınız.
L
Orijinal görünüme dönmek için tekrar A
tuşuna basınız.
Kameranın İzlenmesi
Ses algılama hassasiyetinin ayarlanması
Kablosuz kamerada, bebek ağlaması gibi insan
seslerini algılama özelliğine sahip bir algılayıcı
bulunur. İnsan sesleri dışındaki seslerin
algılanması zor olabilir. Bu özelliği kullanmak için,
kablosuz kameranın sesleri kolay bir şekilde
algılayabileceği bir yere yerleştirildiğini kontrol
ediniz. Algılayıcı sesi algıladığında, kablosuz
kamera mobil cihaza çağrı yapar.
3 seviye bulunur. Varsayılan ayar “kapalı” dır.
1
İzleme işlemini başlatınız (sayfa 13).
2
v
3
Özelliği açmak için kumanda tuşunu yukarı
doğru itiniz.
İstenen hassasiyet seviyesini seçmek için
kumanda tuşunu yukarı ya da aşağı doğru
itiniz.
L
Bu özelliği kapatmak için kumanda tuşunu
ard arda aşağıya doğru itiniz.
4
L
Not:
L
Bu özelliği kapattığınızda, kablosuz kamera
sesi algılayamaz (sayfa 14).
L
Uygun seviyeyi ayarlamak için, kameranın
algılayıcısını önceden mobil cihazla test
ediniz.
((15))
Page 88

TGA914FX(tr).book Page 16 Wednesday, August 23, 2006 5:45 PM
Yararlı Bilgiler
Duvara montaj
Kablosuz kamera, standart olarak ya da baş aşağı monte edilebilir.
DİKKAT:
L
Kablosuz kamerayı, birimin takma işlemi sırasında uygun şekilde desteklenebileceği sabit bir yere
monte ediniz.
L
AC adaptörü, dikey duran veya zemine monte edilmiş bir AC prizine takılmalıdır. AC adaptörünü
tavana monte edilmiş AC prizine takmayınız, aksi taktirde adaptörün ağırlığı prizden çıkmasına
neden olabilir.
L
Kablosuz kamerayı yumuşak bir malzeme üzerine monte etmeyiniz. Düşebilir, kırılabilir ya da
yaralanmaya neden olabilir
L
Kablosuz kamerayı belirtilen yerlere monte etmeyiniz: Alçı kaplama, ALC (otoklavlanmış hafif hücreli
beton), beton blok, kalınlığı 25 mm'den az olan kontrplak, vb.
L
Kablosuz kamerayı duvara monte ettikten sonra arama düğmesi kablosunu çekmeyiniz.
L
Kablosuz kamerayı duvara monte ettikten sonra, mobil cihaz kullanıcısıyla konuşurken mikrofona
doğru yüksek sesle ve anlaşılır şekilde konuşunuz.
Duvar montaj adaptörünün bağlanması
A
Kablosuz kamerayı, duvar montaj adaptörü içinde ok yönünde, yerine oturana kadar kaydırınız.
B
Küçük kablo bağlantı parçasını deliğe yerleştirerek arama düğmesini duvar montaj adaptörünün
yan tarafındaki deliğe yerleştiriniz.
C
Hafifçe döndürerek yerine yerleştiriniz.
D
Arama düğmesi kablosunu duvar montaj adaptörü kancasına tutturunuz.
.
((16))
Page 89

TGA914FX(tr).book Page 17 Wednesday, August 23, 2006 5:45 PM
Kablosuz kameranın duvara monte edilmesi
Standart montaj
1
Duvar montaj taslağını (sayfa 18) kılavuz
olarak kullanarak, vidaları (verilmez)
önerilen 1,8 m veya daha az yükseklikte
duvara sabitleyiniz.
2
Yararlı Bilgiler
Kablosuz kamerayı (A) monte ediniz, sonra
B
sağlamlaşana kadar aşağıya (
doğru kaydırınız.
L
Kamera merceğini yönlendirmek için, bkz.
sayfa 10.
) ve sağa (C)
51 mm
Vidalar
(220–240 V, 50 Hz)
Baş aşağı montaj
L
Baş aşağı montaj yapıldığında görüntü baş aşağı görünebilir. Bunu gidermek için, kablosuz kamera
ayarını görüntüleri baş aşağı gösterecek şekilde yapınız (sayfa 11).
1
Duvar montaj taslağını (sayfa 18) kılavuz
olarak kullanarak, vidaları (verilmez)
önerilen 1,8 m veya daha az yükseklikte
duvara sabitleyiniz.
51 mm
Vidalar
2
Kablosuz kamerayı (A) monte ediniz, sonra
sağlamlaşana kadar aşağıya (B) ve sola (C)
doğru kaydırınız.
A
A
B
C
B
C
(220–240 V,
50 Hz)
((17))
Page 90

TGA914FX(tr).book Page 18 Wednesday, August 23, 2006 5:45 PM
Yararlı Bilgiler
Duvar montajında kullanılan vidalar hakkında
L
Aşağıda önerilen boydaki vidaları kullanınız.
L
Montaj vidalarını duvara takarken, kablosuz kameranın asılmasını sağlamaya yetecek kadar
mesafe bırakınız.
Boşluk
Maks. 9,3 mm
Maks. 4,5 mm
Duvar montaj adaptörünün çıkarılması
Duvar montaj plakasının sol tarafındaki düğmeye (A) basınız ve basılı tutunuz. Kablosuz kamerayı
sağa (B) doğru kaydırınız.
A
B
((18))
Kablosuz kamera için duvar montaj taslağı
51 mm
Page 91

TGA914FX(tr).book Page 19 Wednesday, August 23, 2006 5:45 PM
Sorun giderme
Sorun Neden & çözüm
Kamera çalışmıyor.
Kablosuz kamera göstergesi
kırmızı renkte yanıp sönüyor.
Görüntü soluk.
Kablosuz kamera tarafından
gönderilen görüntü mobil cihaz
ekranında zayıf görüntüleniyor.
Kablosuz kamera tarafından
gönderilen görüntü koyu ve
mobil cihaz ekranında zor
görünüyor.
Kablosuz kameraya
bağlanamıyorum, görüntü
bozuluyor ya da görüntü yavaş.
Kamera algılayıcısı cevap
vermiyor.
Arama düğmesine bastım
ancak kablosuz kamera mobil
cihazlara çağrı yapmıyor.
Mobil cihaz hoparlörü ve/veya
kablosuz kameradan izleme
sırasında bir uğultu çıkıyor.
L
Bağlantıları kontrol ediniz (sayfa 9).
L
Kablosuz kamera ana birime kaydedilmemiş. Kablosuz
kamerayı ana birime kaydediniz (sayfa 12).
L
Kablosuz kamera ana birime kaydedilmemiş. Kablosuz
kamerayı ana birime kaydediniz (sayfa 12).
L
Kablosuz kamera kapsama alanı dışında. Kablosuz kamerayı
ana birimin yakınına yerleştiriniz.
L
Kamera merceği kirlidir. Yumuşak, kuru bir bezle temizleyiniz.
L
Merceğe doğrudan dokunmayınız. Parmak izi net olmayan bir
görüntüye neden olabilir.
L
Ekran parlaklık ayarını ayarlayınız (sayfa 15).
L
Kablosuz kameranın yerleştirildiği yer karanlık. Aydınlatmayı
artırınız.
L
Ekran parlaklık ayarını ayarlayınız (sayfa 15).
L
Kablosuz kameranın yerleştirildiği yerde kuvvetli güneş ışığı
ya da arka ışık var. Kameranın bulunduğu yeri
gölgelendirmeyi deneyiniz.
L
Kablosuz kameranın ana birimle iletişimi kopmuş durumda.
Kablosuz kamerayı ana birime yaklaştırınız ve tekrar
deneyiniz.
L
Beton duvar gibi bir engel var. Kablosuz kamerayı engel
bulunmayan bir yere götürünüz.
L
Bir mikrodalga cihazı kullanılıyor. Kablosuz kamerayı ana
birimin yakınına getiriniz ya da kablosuz kamerayı
mikrodalgadan uzakta kullanınız ve tekrar deneyiniz.
L
Ses algılama hassasiyetini kapalı olarak ayarlarsanız kamera
algılayıcısı cevap vermez. Bu özelliği açınız (sayfa 15).
L
Bir mobil cihaz kablosuz kamerayı izlerken kablosuz kamera
ses algılamayı durdurur.
L
Kablosuz kamera görüntüsü bir mobil cihazla izlenirken,
arama düğmesi cevap alamaz.
L
Mobil cihazı kablosuz kameradan uzaklaştırınız.
Yararlı Bilgiler
((19))
Page 92

TGA914FX(tr).book Page 20 Wednesday, August 23, 2006 5:45 PM
Yararlı Bilgiler
Sorun Neden & çözüm
Mobil cihaz hoparlörünü
kablosuz kamerayla dahili çağrı
yapmak için kullandığınızda,
ses gidip geliyor ve karşı tarafı
duymakta zorlanıyorsunuz.
L
Kumanda düğmesini aşağıya doğru iterek hoparlörün ses
seviyesini düşürünüz.
((20))
Page 93

TGA914FX(tr).book Page 21 Wednesday, August 23, 2006 5:45 PM
Özellikler
N
Standart:
DECT (Digital Enhanced Cordless
Telecommunications: Dijital Geliştirilmiş
Kablosuz İletişim)
N
Kanalların sayısı:
120 Çift kanal
N
Frekans aralığı:
1,88 GHz ile 1,9 GHz
N
Çift prosedür:
TDMA (Time Division Multiple Access: Zaman
Dilimli Çoklu Erişim)
N
Kanal aralığı:
1.728 kHz
N
Bit oranı:
1.152 kbit/s
N
Modülasyon:
GFSK (Gaussian Frequency Shift Keying: Gauss
Tipi Frekans Kaydırma)
N
RF iletim gücü:
Yak laşık 250 mW
N
Güç kaynağı:
220–240 V, 50 Hz
N
Güç tüketimi:
Bekleme: Yaklaşık 2,1 W
Maksimum: Yaklaşık 3,9 W
N
İşletme şartları:
5 °C–40 °C, 20 %–80 % bağıl hava nemi (kuru)
N
Boyutlar:
Yak laşık 124 mm × 86 mm × 68 mm
N
Kütle (ağırlık):
Yak laşık 140
N
Piksel sayısı:
12.288 piksel
N
Aydınlık:
10 lüks (dak.)
N
Odak:
Sabit 0,4 m – Sonsuz
N
Fotoğraf açısı:
Dikey açı: Yaklaşık 35°
Yat ay açı: Yaklaşık 45°
g
Yararlı Bilgiler
Not:
L
Teknik özellikler değiştirilebilir.
L
Bu işletme talimatlarında kullanılan resimler
gerçek üründen belli ölçüde farklı olabilir.
((21))
Page 94

TGA914FX(tr).book Page 22 Wednesday, August 23, 2006 5:45 PM
Yararlı Bilgiler
Satış bölümü
N Chech.
Panasonic Czech Republic, s.r.o.
Křižíkova 237/36A (Palác Karlín) 186 00 Praha 8
telefon: +420-236 032 511
centrální fax: +420-236 032 411
e-mail:info@panasonic.cz
e-mail:pcsserv@panasonic.cz
aktuální info na www.panasonic.cz
N Slovakya.
Panasonic Slovakia, spol. s.r.o.
Štúrova 11, 811 02 BRATISLAVA, Slovenská republika
Tel. číslo: +421-2-5292-1423
Fax: +421-2-5292-1411
e-mail:sales@panasonic.sk
web: www.panasonic.sk
N Turkey.
Tekofaks Elektronik Sanayi Mümessillik ve Tic. A.Ş.
Kağıthane Cad. Sevilen Sok. No: 65
Çağlayan İstanbul (Türkiye)
Tel: (0212) 210 69 00
Fax: (0212) 222 77 26
N Polonya.
Panasonic Polska Sp. z o. o.
Al.Krakowska 4/6
02-284 Warszawa, Polska
Tel: (22) 338 11 00
Fax: (22) 228 12 00
Infolinia: 0801 351 903
((22))
Page 95

TGA914FX(tr).book Page 23 Wednesday, August 23, 2006 5:45 PM
Notlar
((23))
Page 96

TGA914FX(tr).book Page 24 Wednesday, August 23, 2006 5:45 PM
1999/5/EC
Panasonic Communications Zhuhai Co., Ltd.
3 Ping Xi 8 Lu, Nanping Keji Gongye Yuan, Zhuhai, Guangdong, China 519060
Telif Hakkı:
Bu materyalin telif hakkı Panasonic Communications Co., Ltd.’ye aittir ve sadece dahili kullanım için
çoğaltılabilir. Panasonic Communications Co., Ltd.’nin yazılı izni olmadan başka herhangi bir şekilde
kısmen veya tamamen çoğaltılması yasaktır.
© 2006 Panasonic Communications Co., Ltd. Tüm hakları saklıdır.
PQQX15637ZA DC0806SH0
FX-1/2
 Loading...