

Page 1

Operating Instructions
5.8 GHz Digital Cordless Phone
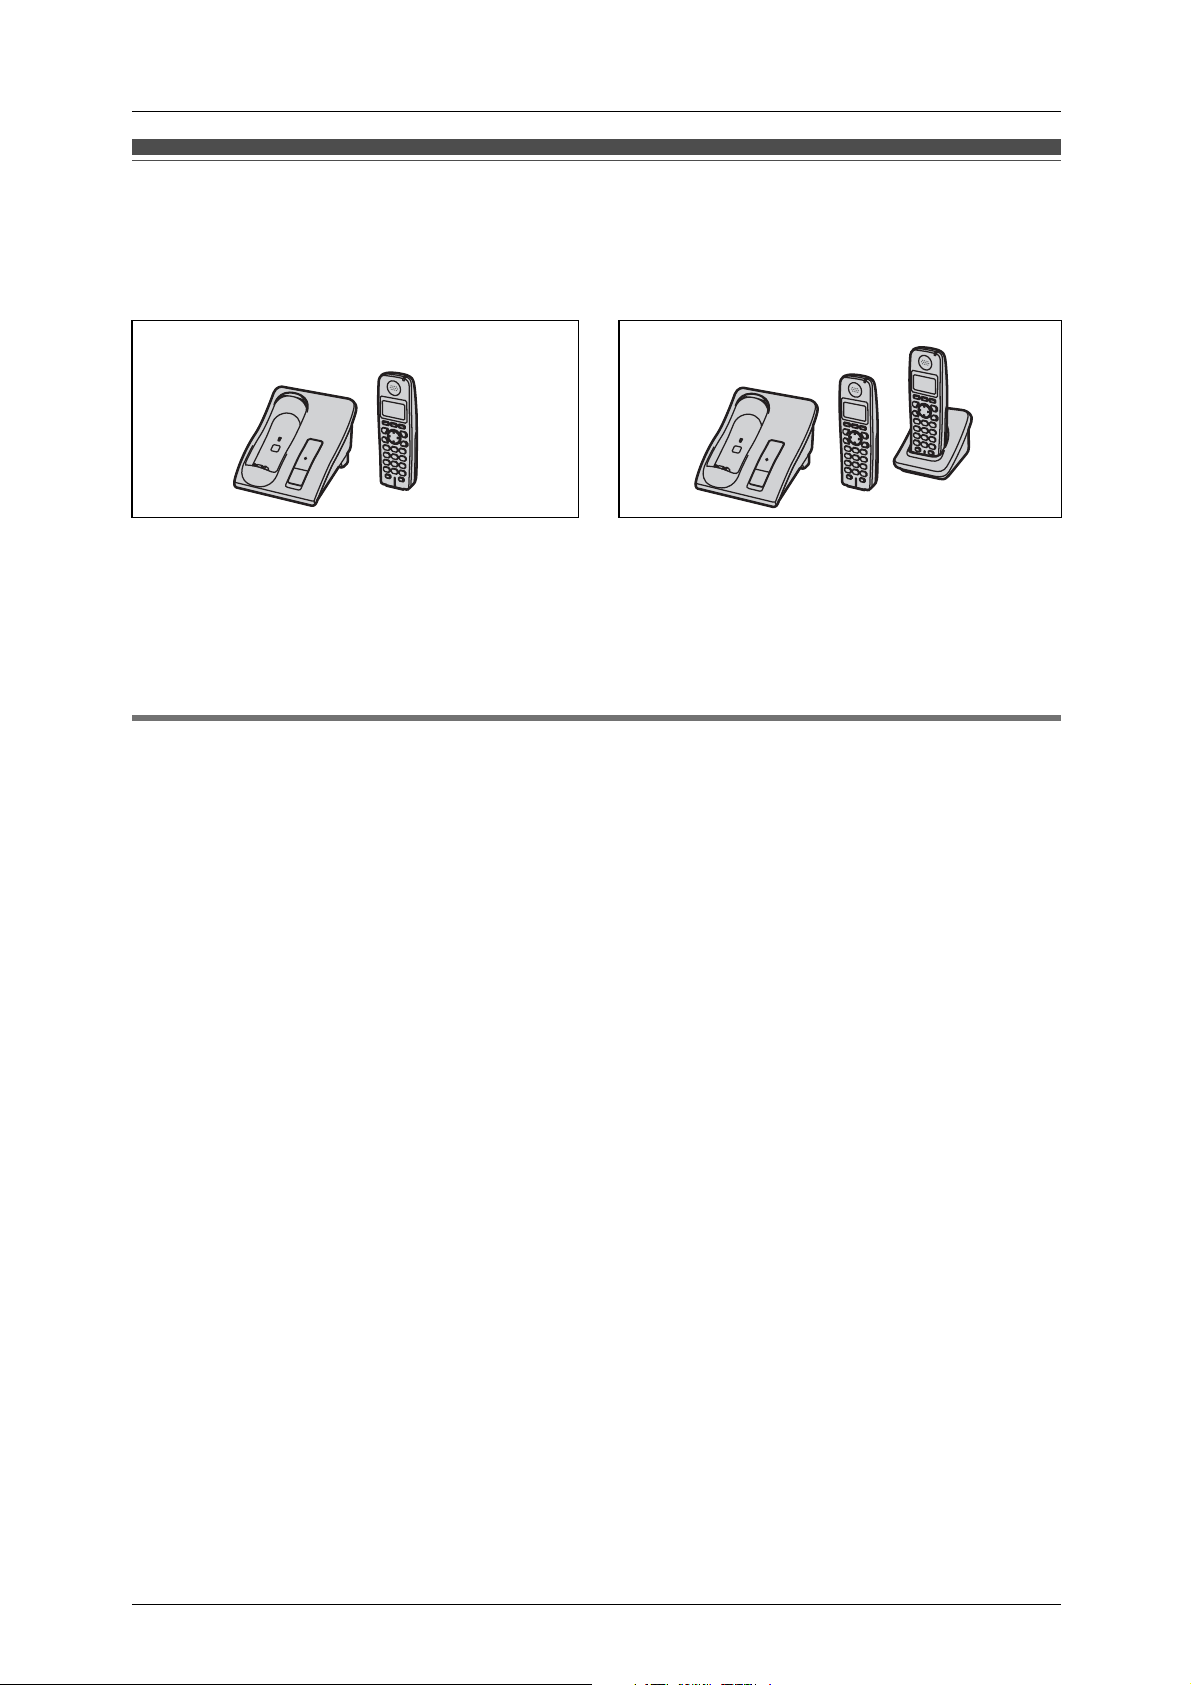
Model No. KX-TG6021NZ
with 2 Handsets
Model No.
KX-TG6022NZ
Model shown is KX-TG6021NZ.
This unit is compatible with Caller ID. To use this feature, you must
subscribe to the appropriate service offered by your service provider/
telephone company.
Charge the handset battery for 7 hours before initial use.
Please read these Operating Instructions before using the unit and save for
future reference.
Page 2

Table of Contents
Introduction
Product information . . . . . . . . . . . . . . 3
Accessory information . . . . . . . . . . . . 4
Important safety instructions . . . . . . . 5
For best performance . . . . . . . . . . . . 7
Preparation
Setting up the base unit. . . . . . . . . . . 9
Setting up the handset . . . . . . . . . . . 9
Controls. . . . . . . . . . . . . . . . . . . . . . 12
Display. . . . . . . . . . . . . . . . . . . . . . . 13
Setting the unit before use . . . . . . . 14
Making/Answering Calls
Making calls. . . . . . . . . . . . . . . . . . . 15
Answering calls . . . . . . . . . . . . . . . . 16
Useful features during a call . . . . . . 16
Phonebook
Index
Index . . . . . . . . . . . . . . . . . . . . . . . . 39
Handset phonebook . . . . . . . . . . . . 18
Copying handset phonebook
items . . . . . . . . . . . . . . . . . . . . . . . . 19
Caller ID Service
Using Caller ID service . . . . . . . . . . 20
Caller list . . . . . . . . . . . . . . . . . . . . . 21
Programming
Programmable settings . . . . . . . . . . 23
Voice Mail Service
Using Voice Mail service . . . . . . . . . 28
Multi-unit Operation
Intercom . . . . . . . . . . . . . . . . . . . . . 30
Handset locator . . . . . . . . . . . . . . . . 30
Transferring calls between handsets,
conference calls . . . . . . . . . . . . . . . 30
Useful Information
Wall mounting . . . . . . . . . . . . . . . . . 31
Headset (optional) . . . . . . . . . . . . . . 32
Lanyard/strap eyelet . . . . . . . . . . . . 32
Error messages. . . . . . . . . . . . . . . . 33
Troubleshooting. . . . . . . . . . . . . . . . 34
Specifications . . . . . . . . . . . . . . . . . 38
2
Page 3
Introduction
Product information
Thank you for purchasing a Panasonic cordless telephone.
These operating instructions can be used for the following models:
KX-TG6021 KX-TG6022
Important:
LThe suffix (NZ) in the following model numbers will be omitted in these instructions:
KX-TG6021NZ/KX-TG6022NZ
LReferences in these operating instructions to the charger and multiple handsets
are for KX-TG6022 only.
Special feature
NHandset voice enhancer
This feature clarifies the voice of the person you are talking to, reproducing a more
natural-sounding voice that is easier to hear and understand (page 17).
3
Page 4
Introduction
Accessory information
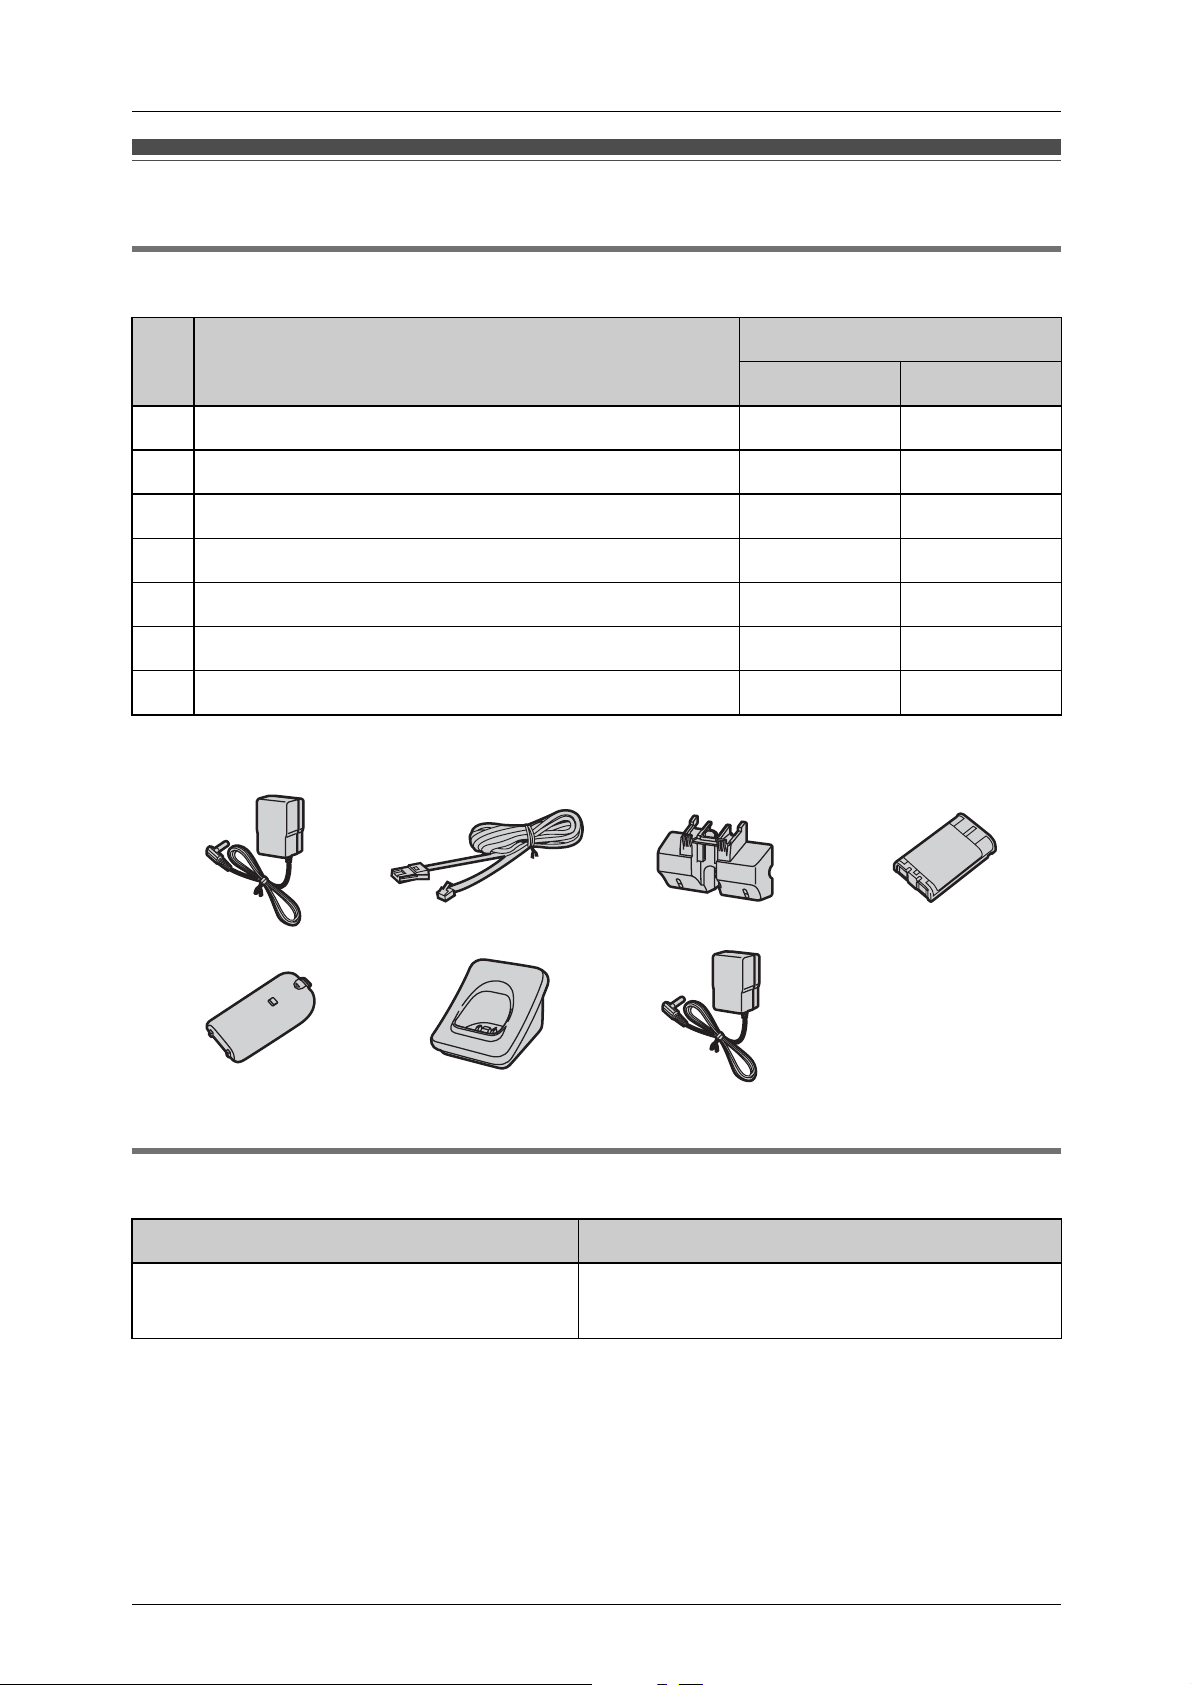
Included accessories
Quantity
No. Accessory item
KX-TG6021 KX-TG6022
1 AC adaptor for base unit 1 1
2 Telephone line cord 1 1
3 Wall mounting adaptor 1 1
4 Battery 1 2
5 Handset cover
6 Charger – 1
7 AC adaptor for charger – 1
*1 The handset cover comes attached to the handset.
1234
567
*1
12
Additional/replacement accessories
Accessory item Order number
Rechargeable nickel metal hydride
(Ni-MH) battery
4
HHR-P107
Page 5

Important safety
instructions
When using the product, basic safety
precautions should always be followed
to reduce the risk of fire, electric shock,
or personal injury.
1. Read all instructions carefully.
2. Follow all warnings and instructions
marked on the product.
3. Unplug the product from power
outlets before cleaning. Do not use
liquid or aerosol cleaners. Use a
moist cloth for cleaning.
4. Do not use the product near water,
for example near a bathtub, wash
bowl, kitchen sink, etc.
5. Place the product securely on a
stable surface. Serious damage
and/or injury may result if the
product falls.
6. Do not cover slots and openings on
the product. They are provided for
ventilation and protection against
overheating. Never place the
product near radiators, or in a place
where proper ventilation is not
provided.
7. Use only the power source marked
on the product. If you are not sure of
the type of power supplied to your
home, consult your dealer or local
power company.
8. Do not place objects on the power
cord. Install the product where no
one can step or trip on the cord.
9. Do not overload power outlets and
extension cords. This can result in
the risk of fire or electric shock.
10. Never push any objects through
slots in the product. This may result
in the risk of fire or electric shock.
Never spill any liquid on the product.
Introduction
11. To reduce the risk of electric shock,
do not disassemble the product.
Take the product to an authorised
service centre when service is
required. Opening or removing
covers may expose you to
dangerous voltages or other risks.
Incorrect reassembly can cause
electric shock when the product is
subsequently used.
12. Unplug the product from power
outlets and take to an authorised
service centre when the following
conditions occur:
A. When the power cord is
damaged or frayed.
B. If liquid has been spilled into the
product.
C. If the product has been exposed
to rain or water.
D. If the product does not work
normally by following the
operating instructions. Adjust
only controls covered by the
operating instructions. Improper
adjustment may require
extensive work by an authorised
service centre.
E. If the product has been dropped
or physically damaged.
F. If the product exhibits a distinct
change in performance.
13. During thunderstorms, avoid using
telephones including cordless
phones. There is a risk of an electric
shock from lightning.
14. Do not use the product to report a
gas leak, when in the vicinity of the
leak.
SAVE THESE
INSTRUCTIONS
5
Page 6

Introduction
WARNING:
LTo prevent the risk of fire or electrical
shock, do not expose the product to
rain or any type of moisture.
LUnplug the product from power
outlets if it emits smoke, an abnormal
smell, or makes an unusual noise.
These conditions can cause fire or
electric shock. Confirm that smoke
has stopped emitting and contact an
authorised service centre.
LDo not spill liquids (detergents,
cleansers, etc.) onto the telephone
line cord plug, or allow it to become
wet at all. This may cause a fire. If the
telephone line cord plug becomes
wet, immediately pull it from the
telephone wall socket, and do not
use.
LDo not place or use this product near
automatically controlled devices such
as automatic doors and fire alarms.
Radio waves emitted from this
product may cause such devices to
malfunction resulting in an accident.
LCompletely insert the AC adaptor/
power plug into the power outlet.
Failure to do so may cause electric
shock and/or excessive heat resulting
in a fire.
LRegularly remove any dust, etc. from
the AC adaptor/power plug by pulling
it from the power outlet, then wiping
with a dry cloth. Accumulated dust
may cause an insulation defect from
moisture, etc. resulting in a fire.
CAUTION:
Installation
LNever touch uninsulated telephone
wires or terminals unless the
telephone line has been
disconnected at the network
interface.
LUse caution when installing or
modifying telephone lines.
LDo not touch the plug with wet hands.
LThe AC adaptor is used as the main
disconnect device. Ensure that the
AC outlet is installed near the product
and is easily accessible.
Battery
To reduce the risk of fire or injury to
persons, read and follow these
instructions.
LUse only the battery(ies) specified.
LDo not dispose of the battery(ies) in a
fire. They may explode. Check with
local waste management codes for
special disposal instructions.
LDo not open or mutilate the
battery(ies). Released electrolyte is
corrosive and may cause burns or
injury to the eyes or skin. The
electrolyte may be toxic if swallowed.
LExercise care when handling the
battery(ies). Do not allow conductive
materials such as rings, bracelets or
keys to touch the battery(ies),
otherwise a short circuit may cause
the battery(ies) and/or the conductive
material to overheat and cause burns.
LCharge the battery(ies) provided, or
identified for use with the product
only, in accordance with the
instructions and limitations specified
in this manual.
LNever install telephone wiring during
a lightning storm.
LNever install telephone line sockets in
wet locations unless the socket is
specifically designed for wet
locations.
6
Medical
LConsult the manufacturer of any
personal medical devices, such as
pacemakers or hearing aids, to
determine if they are adequately
Page 7

Introduction
shielded from external RF (radio
frequency) energy. (The product
operates in the frequency range of
5.76 GHz to 5.84 GHz, and the power
output is 200 mW (max.).) Do not use
the product in health care facilities if
any regulations posted in the area
instruct you not to do so. Hospitals or
health care facilities may be using
equipment that could be sensitive to
external RF energy.
General warnings
LThis equipment will be inoperable
when mains power fails.
LWhen a failure occurs which results in
the internal parts becoming
accessible, disconnect the power
supply cord immediately and return
the product to an authorised service
centre.
LDisconnect the telecom connection
before disconnecting the power
connection prior to relocating the
equipment, and reconnect the power
first.
LNo “111” or other calls can be made
from this device during a mains power
failure. This equipment shall not be
set to make automatic calls to the
Telecom “111” Emergency Service.
LTo minimise the possibility of lightning
damage, when you know that a
thunderstorm is coming, we
recommend that you:
– Unplug the telephone line cord from
the phone socket.
– Unplug the power supply cord from
the AC power outlet.
LThe earpiece on the handset is
magnetised and may retain small
metallic objects.
LThis equipment has been tested and
found to comply with AS/NZS
CISPR22: 2004 limits for
electromagnetic interference. Any
modifications to any part of the
system or to any peripherals may void
the EMC compliance of the system or
the peripherals.
LNot all telephones will respond to
incoming ringing when connected to
the extension socket.
LThis equipment may not provide for
the effective hand-over of a call to
another device connected to the
same line.
LThe grant of a Telepermit for any item
of terminal equipment indicates only
that Telecom has accepted that the
item complies with minimum
conditions for connection to its
network. It indicates no endorsement
of the product by Telecom, nor does it
provide any sort of warranty. Above
all, it provides no assurance that any
item will work correctly in all respects
with another item of Telepermitted
equipment of a different make or
model, nor does it imply that any
product is compatible with all of
Telecom’s network services.
Important notice
LUnder power failure conditions, this
telephone may not operate. Please
ensure that a separate telephone, not
dependent on local power, is
available for emergency use.
For best performance
Base unit location/avoiding noise
The base unit and other compatible
Panasonic units use radio waves to
communicate with each other.
LFor maximum coverage and noise-
free communications, place your
base unit:
7
Page 8

Introduction
– at a convenient, high, and central
location with no obstructions
between the handset and base unit
in an indoor environment.
– away from electronic appliances
such as TVs, radios, personal
computers, wireless devices or
other phones.
– avoid facing radio frequency
transmitters, such as external
antennas of mobile phone cell
stations (avoid putting the base unit
on a bay window or near a window).
LCoverage and voice quality depends
on the local environmental conditions.
LIf the reception for a base unit location
is not satisfactory, move the base unit
to another location for better
reception.
underground, near metal objects such
as wire fences, etc.
LOperating the product near electrical
appliances may cause interference.
Move away from the electrical
appliances.
Routine care
LWipe the outer surface of the product
with a soft moist cloth. Do not use
benzine, thinner, or any abrasive
powder.
Environment
LKeep the product away from electrical
noise generating devices, such as
fluorescent lamps and motors.
LThe product should be kept free from
excessive smoke, dust, high
temperature, and vibration.
LThe product should not be exposed to
direct sunlight.
LDo not place heavy objects on top of
the product.
LWhen you leave the product unused
for a long period of time, unplug the
product from the power outlet.
LThe product should be kept away
from heat sources such as heaters,
kitchen stoves, etc. It should not be
placed in rooms where the
temperature is less than 5 °C or
greater than 40 °C. Damp basements
should also be avoided.
LThe maximum calling distance may
be shortened when the product is
used in the following places: Near
obstacles such as hills, tunnels,
8
Page 9

Setting up the base
Preparation
LThe unit is not designed to be used
with rotary (pulse dialling) services.
unit
Connecting the AC adaptor
and telephone line cord
Connect the telephone line cord until it
clicks into the base unit and telephone
line socket (A). Connect the AC
adaptor cord (B) by pressing the plug
firmly (C).
LUse only the included Panasonic AC
adaptor PQLV203AL.
A
To single-line
telephone socket
B
If you subscribe to an ADSL service
Please attach a noise filter (contact your
ADSL provider) to the telephone line
between the base unit and the
telephone line socket in the event of the
following:
– Noise is heard during conversations.
– Caller ID features do not function
properly.
To single-line
telephone socket
Noise filter
Setting up the handset
C
Hooks
Note:
LThe AC adaptor must remain
connected at all times. (It is normal for
the adaptor to feel warm during use.)
LThe AC adaptor should be connected
to a vertically oriented or floormounted AC outlet. Do not connect
the AC adaptor to a ceiling-mounted
AC outlet, as the weight of the
adaptor may cause it to become
disconnected.
LThe unit will not work during a power
failure. We recommend connecting a
corded telephone to the same
telephone line or to the same
telephone socket using a BT double
adaptor.
(230–240 V AC,
50/60 Hz)
Connecting the AC adaptor
Available model:
KX-TG6022
LUse only the included Panasonic AC
adaptor PQLV208AL.
(230–240 V AC,
50/60 Hz)
Bottom of the charger
Hooks
Hooks
Fasten the AC adaptor cord to
prevent it from being disconnected.
9
Page 10
Preparation
Battery installation/
replacement
1
Press the notch of the handset cover
firmly, and slide it in the direction of
the arrow.
LIf necessary, remove the old
battery.
2 Insert the battery (A), and press it
down until it snaps into position (B).
Then close the handset cover (C,
D).
Battery charge
Place the handset on the base unit or
charger for 7 hours before initial use.
LWhile charging, “Charging” is
displayed and the charge indicator on
the handset lights in amber. When the
battery is fully charged, “Charge
completed” is displayed and the
indicator lights in green.
Base unit:
Charge
contacts
B
A
Important:
LUse only the rechargeable Panasonic
battery noted on page 4.
C
D
Charger:
Available model:
KX-TG6022
Charge
contacts
Note:
LIf you want to use the handset
immediately, charge the battery for at
least 15 minutes.
10
LTo ensure that the battery charges
properly, clean the charge contacts of
Page 11

Preparation
the handset, base unit, and charger
with a soft, dry cloth once a month.
Clean more often if the unit is subject
to the exposure of grease, dust, or
high humidity.
LWhen the battery is empty, “Charge
for 7h” is displayed and the charge
indicator does not light for about 5
minutes to concentrate on charging.
Battery level
Battery icon Battery level
5 Fully charged
6 Medium
7 Low
Flashing: needs to
be recharged.
8 Empty
Note:
LWhen the battery needs to be
charged, the handset beeps
intermittently during use.
Panasonic battery performance
Operation Operating time
While in use
(talking)
While not in use
(standby)
While using the
clarity booster
feature (page 17)
Note:
LBattery operating time may be
shortened over time depending on
usage conditions and surrounding
temperature.
Up to 5 hours
Up to 11 days
Up to 3 hours
charger, even when the handset is not
in use.
LAfter the handset is fully charged,
displaying “Charge completed”, it
may be left on the base unit or
charger without any ill effect on the
battery.
LThe battery level may not be
displayed correctly after you replace
the battery. In this case, place the
handset on the base unit or charger
and let it charge for 7 hours.
Symbols used in these
operating instructions
Symbol Meaning
{}
Button name/
soft key name
i Proceed to the next
“ ”
Example:
“Alarm”
Example:
{V}/{^}: “Off”
The words in the
brackets indicate
button names/soft
key names on the
handset and base
unit.
Example:
Unit keys:
{C}, {OFF}
Soft keys:
{View CID},
{Phonebook}
operation.
The words in
quotations indicate
the menu on the
display.
Press {V} or {^} to
select “Off”.
LBattery power is consumed whenever
the handset is off the base unit or
11
Page 12
Preparation
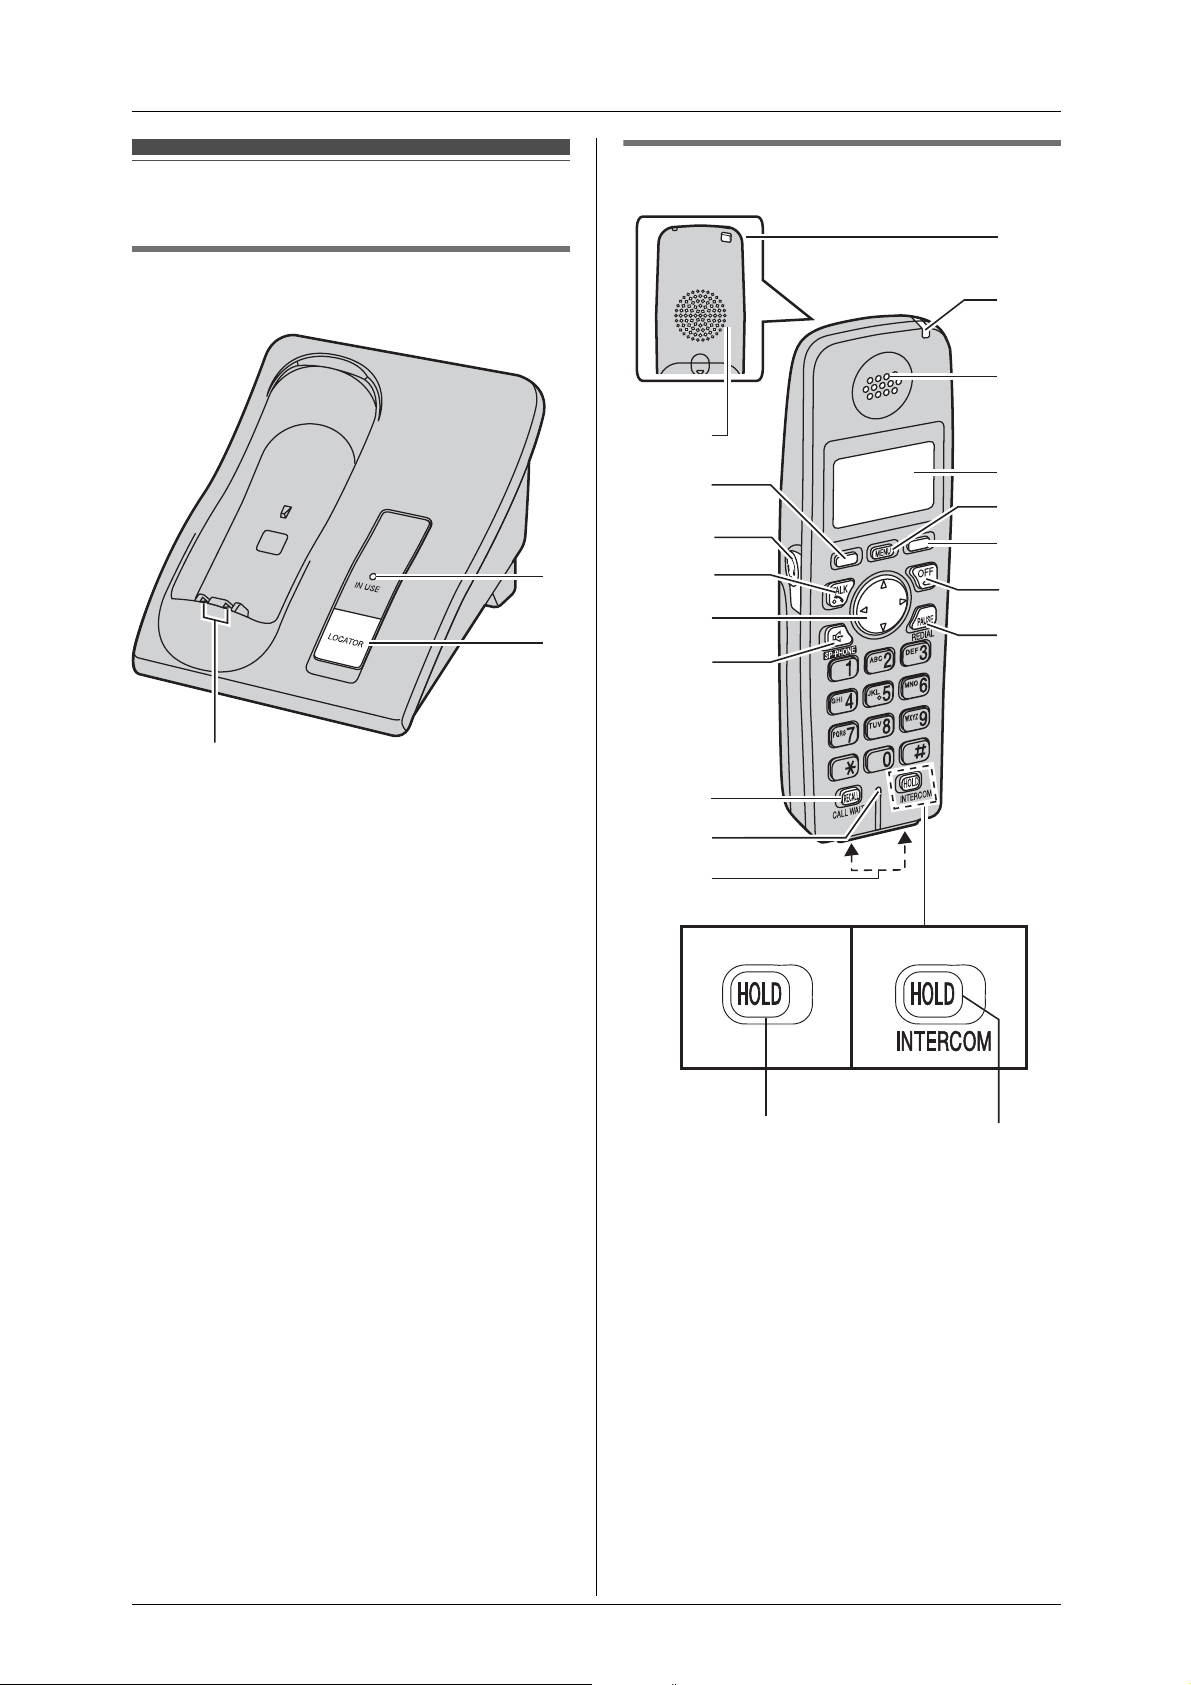
Controls
Handset
J
Base unit
C
A IN USE indicator
B {LOCATOR}
C Charge contacts
A
B
A
B
C
D
E
F
G
H
I
K
L
M
N
B
O
P
KX-TG6021 KX-TG6022
RQ
A Speaker
B Soft keys
C Headset socket
D {C} (TALK)
E Navigator key ({^} {V} {<}{>})
F {s} (SP-PHONE)
G {RECALL}{CALL WAIT}
H Microphone
I Charge contacts
J Lanyard/strap eyelet
K Charge indicator
Ringer indicator
Message indicator
12
Page 13

L Receiver
Preparation
M Display
N {MENU}
O {OFF}
P {PAUSE}{REDIAL}
Q {HOLD}
R {HOLD}{INTERCOM}
Using the navigator key
The handset navigator key can be used
to navigate through menus and to select
items shown on the display by pressing
{^}, {V}, {<}, or {>}.
Adjusting audio volume
Press {^} or {V} repeatedly while
talking.
{^}
Display
Handset display items
Displayed
item
J Voice enhancer is on.
5 Battery level
Example:
[1]
*1 KX-TG6022
Meaning
The handset’s
extension number
(example shown here:
handset 1)
*1
{<}{>}
{V}
Using the soft keys
The handset features 2 soft keys. By
pressing a soft key, you can select the
feature shown directly above it on the
display.
5
10:30AM [1]
View Phone
K
CID book
L
13
Page 14

Preparation
Setting the unit before
use
Important:
LTo program features by scrolling
through the display menus, see page
23.
Date and time
Set the correct date and time.
– To display the date and time when the
calls were received in the caller list.
– To use the available alarm function
(page 27).
1 {MENU} i {4}{1}
2 Enter the current day, month, and
year by selecting 2 digits for each.
Example: 15 August, 2007
{1}{5}{0}{8}{0}{7}
3 Enter the current hour and minute
(12-hour clock format) by selecting 2
digits for each.
Example: 9:30
{0}{9}{3}{0}
4 {AM/PM}: Select “AM” or “PM”.
5 {Save} i {OFF}
Note:
LIf you make a mistake when entering
the date and time, press {<}, {>},
{^}, or {V} to move the cursor, then
make the correction.
LThe date and time may be incorrect
after a power failure. In this case, set
the date and time again.
14
Page 15

Making calls
Making/Answering Calls
Erasing a number in the redial list
1 {REDIAL}
1 Dial the phone number.
LTo correct a digit, press {Clear}.
2 Press {C} or {Call}.
3 When you finish talking, press {OFF}
or place the handset on the base unit
or charger.
Note:
L“Line in use” is displayed when
someone is talking on the handset or
another phone.
Using the speakerphone
1 Dial the phone number, and press
{s}.
LSpeak alternately with the other
party.
2 When you finish talking, press
{OFF}.
Note:
LUse the speakerphone in a quiet
environment.
LTo switch to the receiver, press {C}.
2 {V}/{^}: Select the desired phone
number.
3 {Erase} i {Yes} i {OFF}
PAUSE button (for PBX/long
distance service users)
A pause is sometimes required when
making calls using a PBX or long
distance service. When storing a calling
card access number and/or PIN in the
phonebook, a pause is also needed
(page 19).
For example, if you need to dial the line
access number “9” when making
outside calls with a PBX:
1 {9} i {PAUSE} i Dial the
phone number.
2 {C}
Note:
LA 3.5 second pause is inserted each
time {PAUSE } is pressed. Press
repeatedly to insert longer pauses.
Adjusting the receiver/speaker
volume
Press {^} or {V} repeatedly while
talking.
Making a call using the redial list
The last 5 phone numbers dialled are
stored in the redial list (each 48 digits
max.).
1 {REDIAL}
2 {V}/{^}: Select the desired phone
number.
3 {C}
15
Page 16

Making/Answering Calls
Answering calls
When a call is being received, the ringer
indicator flashes rapidly.
1 Press {C} or {s}.
LYou can also answer the call by
pressing any dial key from {0} to
{9}, {*}, or {#}. (Any key talk
feature)
2 When you finish talking, press
{OFF}.
Note:
LYou can change the ringer indicator
colour and the ringer tone (page 25).
You can also adjust the handset
ringer volume (page 25).
Auto talk
This feature allows you to answer a call
by simply lifting the handset off the base
unit or charger. You do not need to
press {C}. To activate this feature, see
page 25.
Temporary ringer off
While the handset is ringing for an
outside call, you can turn the ringer off
temporarily by pressing {OFF}.
Useful features during
a call
HOLD button
This feature allows you to put an
outside call on hold.
KX-TG6021
Press {HOLD} during an outside call.
KX-TG6022
Press {HOLD} 2 times during an
outside call.
LTo release the hold, press {C}.
LAnother handset user can take the
call by pressing {C}.
Note:
LIf another phone is connected to the
same line (page 9), you can also take
the call by lifting its handset.
LIf a call is kept on hold for more than 6
minutes, an alarm tone starts to
sound and the ringer indicator flashes
rapidly. After 4 additional minutes on
hold, the call is disconnected.
Mute button
While mute is turned on, you can hear
the other party, but the other party
cannot hear you.
To mute your voice, press {Mute}.
16
LTo return to the conversation, press
{Mute} or {C}.
Note:
LWhen this feature is turned on,
{Mute} flashes.
L{Mute} is a soft key visible on the
handset display during a call.
Page 17

RECALL button
Pressing {RECALL} allows you to use
special features of your host PBX such
as transferring an extension call, or
accessing optional telephone services
such as Call Waiting.
Making/Answering Calls
LWhen this feature is turned off
manually during a call, it does not turn
on automatically during the same call.
LWhile this feature is turned on the
battery operating time is shortened
(page 11).
Note:
LTo change the recall time, see page
26.
For Call Waiting service
users
To use Call Waiting, you must subscribe
to your service provider/telephone
company’s Call Waiting service.
This feature allows you to receive calls
while you are already talking on the
phone. If you receive a call while on the
phone, you will hear a Call Waiting tone.
Please contact your service provider/
telephone company for details and
availability of this service in your area.
Press {CALL WAIT} to answer the 2nd
call.
L
To switch between calls, press
CALL WAIT}.
{
Handset voice enhancer
This feature can simulate a band signal
above the normal bandwidth limitations,
achieving a sound which is close to the
actual voice. You can turn this feature
on or off depending on the
circumstance.
Press {(VE)} during an outside call to
turn on or off this feature.
Note:
LWhen this feature is turned on, J
is displayed.
LDepending on the condition and
quality of your telephone line, this
feature may emphasise existing line
noise. If it becomes difficult to hear,
turn this feature off.
Call share
Handset clarity booster
This feature can improve sound clarity
when the handset is used in an area
where there may be interference.
During an outside call, this feature is
turned on automatically when
necessary. You can also turn this
feature on or off manually.
1 Press {MENU} during an outside
call.
2 {V}/{^}: Select “Booster on” or
“Booster off”. i {Select}
Note:
LWhen this feature is turned on,
“BOOST” flashes.
Available model:
KX-TG6022
This feature allows the handset to join
an existing outside call.
To join the conversation, press {C}
when the other handset is on an outside
call.
17
Page 18

Phonebook
Key Character
Handset phonebook
You can add up to 50 items to the
handset phonebook and search for
phonebook items by name.
Adding items to the
phonebook
1
{Phonebook}
2 {Add}
3 Enter the name (max. 16
characters). i {Next}
4 Enter the phone number (max. 32
digits). i {Next} i {Save}
LTo add other items, repeat from
step 2.
5 {OFF}
{9} wxyzWXYZ9
{0} 0Space
{*} ;
{#} #
LTo enter another character that is
located on the same dial key, first
press {>} to move the cursor to the
next space.
Editing/correcting a mistake
Press {<} or {>} to move the cursor to
the character or number you want to
erase, then press {Clear}. Enter the
appropriate character or number.
LPress and hold {Clear} to erase all
characters or numbers.
Note:
LYour service provider/telephone
company may charge you for a local
call if the number dialled has the area
code prefix included. If this is
unacceptable, dial only the 7-digit
local number. Do not dial the “0” prefix
or the area code.
LCaller ID subscribers can use ringer
ID and light-up ID features (page 20).
Character table for entering names
Key Character
{1} &’(),–./1
{2} abcABC2
{3} def DEF3
{4} ghi GHI 4
{5} jklJKL5
{6} mnoMNO6
Finding and calling a
phonebook item
Searching for a name alphabetically
by scrolling through all items
1 {Phonebook} i {Search}
2 {V}/{^}: Select the desired item.
3 Press {C} to dial the phone
number.
Searching for a name by initial
1 {Phonebook} i {Search}
2 Press the dial key ({0} – {9}, {#}, or
{*}) that corresponds to the first
letter you are searching for (see the
character table, page 18).
Example: “LISA”
Press {5} repeatedly to display the
first phonebook entry starting with
the initial “L” and go to step 3.
{7} pqr sPQRS7
{8} tuvTUV8
18
Page 19

Phonebook
LIf there is no item corresponding to
the letter you selected, the next
item is displayed.
3 Press {V} to select the desired item.
4 Press {C} to dial the phone
number.
Editing items in the
phonebook
1 Find the desired item (page 18). i
{Option}
2 {V}/{^}: “Edit” i {Select}
3 Edit the name if necessary (see the
character table, page 18). i
{Next}
4 Edit the phone number if necessary.
i {Next} i {Save} i {OFF}
phonebook as one phonebook item,
press {PAUS E} to add pauses after
the number and PIN as necessary
(page 15).
Copying handset
phonebook items
Available model:
KX-TG6022
You can copy one or all of the
phonebook items from one handset to
another.
Important:
LRinger ID and light-up ID for
phonebook items are not copied.
Erasing items in the
phonebook
1
Find the desired item (page 18).
2 {Erase} i {Yes} i {OFF}
Chain dial
This feature allows you to dial phone
numbers in the handset phonebook
while you are on a call. This feature can
be used, for example, to dial a calling
card access number or bank account
PIN that you have stored in the handset
phonebook, without having to dial
manually.
1 During an outside call, press
{MENU}.
2 {V}/{^}: “Phonebook” i {Select}
Copying an item
{MENU} i {#}{1}
1
2 {V}/{^}: Select the desired item. i
{Send}
3 Press {OFF} after the long beep.
Copying all items
{MENU} i {#}{2}
1
2 Press {OFF} after the long beep.
3 Find the desired item (page 18). i
{Call}
Note:
LWhen storing a calling card access
number and your PIN in the
19
Page 20

Caller ID Service
Using Caller ID service
Caller information for the last 50 callers
is logged in the caller list by the most
recent call to the oldest.
Important:
LThis unit is Caller ID compatible. To
use Caller ID features, you must
subscribe to your service provider/
telephone company’s Caller ID
service.
For all local and national incoming calls,
your display will show the area code
(e.g. 09 for Auckland) or the cellular
prefix (e.g. 0274 for Telecom Cellular)
followed by the caller’s phone number.
An Auckland caller’s number will be
displayed as 09XXXXXXX. The 7 X’s
represent the 7 digits of the caller’s
phone number. A caller from a 6-digit
Telecom Cellular number will be
displayed as 0274XXXXXX. For
incoming international calls, your
display may only show “0000”. For
business users on a Centrex line, your
display will show Centrex extension
numbers in the shorter extension
number format used within your
company.
LIf the unit cannot receive caller
information, the following is
displayed:
–“Out of area”: The caller dialled
from an area which does not
provide Caller ID service.
–“Private caller”: The caller
requested not to send caller
information.
LIf the unit is connected to a PBX
system, caller information may not be
received properly. Consult your PBX
supplier.
LIf the name display service is
available in your area, the display
shows caller names. For further
information, please contact your
service provider/telephone company.
Missed calls
If a call is not answered, the unit treats
the call as a missed call. You can view
the number of missed calls by pressing
{View CID}.
LThe Caller ID information is not
presented on incoming fax calls if
Telecom FaxAbility is used.
Using toll services from Telecom or
another company
Your service provider/telephone
company may charge you for a local call
if the number dialled has the area code
prefix included. If this is unacceptable,
dial only the 7-digit local number. Do not
dial the “0” prefix or the area code.
Caller ID features
When an outside call is being received,
the calling party’s phone number is
displayed.
Custom name display
When the Caller ID number is received
and it matches a phone number stored
in the phonebook, the stored name from
the phonebook is displayed and logged
in the caller list.
Ringer ID/Light-up ID
This feature can help you identify who is
calling by using different ringers and
ringer indicator colours for different
callers stored in the phonebook. You
can assign a different ringer and
indicator colour to each phonebook
item. When a call is received from a
caller stored in the phonebook, the
assigned ringer rings and the assigned
20
Page 21

ringer indicator colour flashes after
Caller ID information is displayed.
If you select “No Ringer ID” (default)
or “No Light-up ID” (default), the
handset uses the ringer tone or ringer
indicator colour you selected on page
25 when a call is received from that
caller.
LThe ringer and indicator colour may
be changed after the 2nd ring.
1 Find the desired item (page 18). i
{Option}
2 To assign a ringer:
{V}/{^}: Select “Ringer ID”. i
{Select}
To assign a ringer indicator colour:
{V}/{^}: Select “Light-up ID”. i
{Select}
3 {V}/{^}: Select the desired setting.
Caller ID Service
Caller list
Viewing the caller list and
calling back
1
{View CID}
2 Press {V} to search from the most
recent call, or {^} to search from the
oldest call.
3 To call back, press {C}.
To exit, press {OFF}.
Note:
LIf you do not want to dial the area
codes when making calls from the
Caller ID list, you can store the area
codes which you want the unit to
delete automatically (page 21).
4 {Save} i {OFF}
LKX-TG6022:
Each handset has its own caller list.
The number of missed calls may differ
between handsets. Even if you
viewed the caller list or answered a
call on one handset, the same
information is still recognised as a
missed call in the other handset.
LA Q is displayed in caller information
which has already been viewed or
answered.
LIf an arrow (→ ) is displayed after the
number, the whole phone number is
not shown. Press {>} to see the
remaining numbers. To return to the
previous display, press {<}.
Storing your area code
We recommend storing your area code
before using Caller ID (page 20). Calls
from the same area will be recorded in
the caller list without the area code. You
do not have to remove it before calling
back the caller or storing in the
phonebook.
21
Page 22

Caller ID Service
1 {MENU} i {0}{4}
2 Enter your area code (max. 8 digits).
LTo correct a digit, press {<} or {>}
to move the cursor, then press
{Clear}. Enter the correct number.
3 {Save} i {OFF}
Note:
LThe use of this feature can prevent a
National Call from being dialled.
For example, the “03” for South Island
callers will be omitted and will
therefore prevent a National Call to
other areas of the South Island.
To erase your area code
Press and hold {Clear} in step 2, press
{Save}, then press {OFF}.
LTo edit the number, press {Edit},
then edit the number (see step 3
on page 22, “Editing a caller’s
phone number before calling
back”).
3 {Save}
LIf there is name information for the
caller, skip to step 5.
4 Enter the name (see the character
table, page 18). i {Next} i
{Save}
5 {OFF}
Erasing selected caller
information
1
{View CID}
2 {V}/{^}: Select the desired item.
Editing a caller’s phone
number before calling back
You can edit a phone number in the
caller list.
1 {View CID}
2 {V}/{^}: Select the desired item. i
{Select} i {Edit}
3 Add or erase digits to the beginning
of the number as necessary.
LTo add a digit, press the desired
dial key.
LTo erase a digit, press {Clear} or
{#}.
4 {C}
Note:
LThe edited phone number is not
saved in the caller list.
3 {Erase} i {Yes} i {OFF}
Erasing all caller information
1 {View CID}
2 {All erase} i {Yes}
Storing caller information
into the phonebook
1
{View CID}
2 {V}/{^}: Select the desired item. i
{Select}
22
Page 23

Programming
Programmable settings
You can customise the unit by programming the following features using the handset.
To access the features, there are 2 methods:
– scrolling through the display menus (page 23)
– using the direct commands (page 25)
LMainly the direct command method is used in these operating instructions.
Programming by scrolling through the display menus
{MENU}
1
2 Press {V} or {^} to select the desired menu. i {Select}
LIf there is a sub-menu(s), press {V} or {^} to select the desired item. i
{Select}
3 Press {V} or {^} to select the desired setting. i {Save}
LThis step may vary depending on the feature being programmed.
4 {OFF}
Main menu Sub-menu 1 Sub-menu 2 Page
V.M. access ––29
Alarm ––27
Ringer setting Ringer volume ––
Ringer tone ––
Ring colour ––
Set date & time Date and time
Time adjustment
Voice enhancer ––17
Copy phonebook
(KX-TG6022)
Copy 1 item –19
Copy all items –19
*1
*1
–14
–26
23
Page 24

Programming
Main menu Sub-menu 1 Sub-menu 2 Page
Initial setting
Voice Mail Store VM access#
*1
28
Message alert –29
LCD contrast ––
Key tone ––
Auto talk –16
Set area code –21
Set tel line Set dial mode
Set recall time
Set line mode
*1
*1
*1
35
17
Registration HS registration 37
Deregistration 37
*1 If you program these settings using one of the handsets, you do not need to
program the same item using another handset (KX-TG6022).
–
24
Page 25

Programming
Programming using the direct commands
{MENU}
1
2 Enter the desired feature code.
3 Enter the desired setting code. i {Save}
LThis step may vary depending on the feature being programmed.
4 {OFF}
Note:
LIn the following table, < > indicates the default setting.
LIf you make a mistake or enter the wrong code, press {OFF}, then start again from
step 1.
Feature Feature
code
Alarm {8}{1}: Once {0}: <Off>–27
*3
*3
*4
*2
{0}{3}{1}: On {0}: <Off>–16
{#}{1} ––19
{#}{2} ––19
{0}{0}{1} ––37
{0}{2}{1}: <On> {0}: Off ––
{0}{1}{1}–{6}: Level 1–6 <3> – –
Auto talk
Copy phonebook
(1 item)
Copy phonebook
(all items)
Date and time {4}{1} – r 14
Deregistration {0}{0}{2} ––37
HS
registration
Key tone
LCD contrast
(Display contrast)
Setting code System
setting
Page
*1
Message alert {0}{#} {1}: On {0}: <Off>–29
Ring colour
(Ringer indicator
colour)
Ringer tone {1}{2}{1}–{3}: Tone <1>–3
Ringer volume {1}{1}{1}: Low {2}: Medium
Set area code {0}{4} ––21
Set dial mode {0}{5}{1} – r 35
{1}{4}{1}: <Colour1>=Amber
{2}: Colour2=Green
{3}: Colour3=Red
{4}: Multicolour
{4}–{7}:
{3}: <High> {0}: Off
Melody 1–4
––
––
––
25
Page 26

Programming
Feature Feature
code
Set recall
time
*5
{0}{5}{2}{1}: 700ms {2}: <600ms>
Setting code System
setting
r 17
{3}: 400ms {4}: 300ms
Page
*1
{5}: 250ms {6}: 110ms
{7}: 100ms {8}: 90ms
Set line mode
Store VM
*6
{0}{5}{3}{1}: A {2}: <B> r –
{0}{7}{1} – r 28
access#
Time
adjustment
*7
{4}{2}{1}:
{0}: Manual
<
Caller ID[auto]
>
r –
(Caller ID
subscribers only)
V.M. access {3} ––29
Voice enhancer {5}{1}: On {0}: <Off>–17
*1 If “System setting” column is checked, you do not need to program the same item
using another handset (KX-TG6022).
*2 If you subscribe to Caller ID service and want to view the caller’s information after
lifting up the handset to answer a call, turn off this feature.
*3 KX-TG6022 only
*4 Turn this feature off if you prefer not to hear key tones while you are dialling or
pressing any keys, including confirmation tones and error tones.
*5 The recall time depends on your telephone exchange or host PBX. Consult your
PBX supplier if necessary.
The setting should stay at 600 ms unless pressing {RECALL} fails to pick up the
Call Waiting call.
*6 Generally, the line mode setting should not be adjusted. If “Line in use” is not
displayed when another phone connected to the same line is in use, you need to
change the line mode to “A”.
*7 This feature allows the unit to automatically adjust the date and time setting when
caller information is received. To use this feature, set the date and time first.
26
Page 27

Programming
Alarm
An alarm will sound once for 3 minutes at the set time.
Set the date and time beforehand (page 14).
1 {MENU} i {8}
2 {V}/{^}: “Once” i {Select}
L To turn off the alarm, select “Off”. i {Select} i {OFF}
3 Set the desired date and time. i {Save}
4 {V}/{^}: Select the desired ringer tone. i {Save}
L We recommend selecting a different ringer tone from outside call.
5 {OFF}
Note:
LTo stop the alarm, press any dial key or place the handset on the base unit or
charger.
LWhen the handset is in use, the alarm will not sound until the handset is in standby
mode.
27
Page 28

Voice Mail Service
Note:
Using Voice Mail
service
For Telecom Call Minder or
TelstraClear Message Mailbox
service subscribers
To receive Call Minder or Message
Mailbox messages, please note the
following:
“Call Minder” and “Message Mailbox” is
an automatic answering service offered
by your service provider/telephone
company. After you subscribe to this
service, your service provider/
telephone company’s Voice Mail
system will answer calls for you when
you are unavailable to answer the
phone or when your line is busy.
Messages are recorded by your service
provider/telephone company, not your
telephone. Your service provider/
telephone company uses a “Stutter” dial
tone (special dial tone) to indicate that
you have new messages.
LWhen storing your Voice Mail access
number and your mailbox password,
press {PAUSE} to add pauses (page
15) between the access number and
the password as necessary. Consult
your service provider/telephone
company for the required pause time.
Example:
083210
VM access
number
To erase the Voice Mail access
number
Repeat step 1, then press and hold
{Clear} until all digits are erased. Press
{Save}, then press {OFF}.
PPPP 8888
Pauses Password
Important:
LPlease contact your service provider/
telephone company for details and
availability of this service in your area.
Storing the Voice Mail (VM)
access number
In order to listen to your Voice Mail
messages, you must dial your service
provider/telephone company’s Voice
Mail access number. Once you have
stored your Voice Mail access number,
you can dial it automatically (page 29).
1 {MENU} i {0}{7}{1}
2 Enter your access number (max. 32
digits). i {Save} i {OFF}
28
Page 29

Voice Mail Service
Listening to Voice Mail
messages
If compatible with message indication
signals provided by your service
provider/telephone company, the unit
lets you know that you have new Voice
Mail messages in the following ways:
–“New Voice Mail” is displayed on
the handset.
– The message indicator on the
handset flashes slowly if message
alert feature is turned on (page 29).
1 Press {C}, then press {VM} within
15 seconds.
OR
{MENU} i{V}/{^}: “V.M.
access” i {Select}
LThe speakerphone turns on.
Message alert
You can select whether or not the
message indicator on the handset
flashes slowly when there are new
recorded messages in the Voice Mail
system.
The default setting is “Off”.
1 {MENU} i {0}{#}
2 {V}/{^}: Select the desired setting.
3 {Save} i {OFF}
Note:
LWhile message alert is on, battery
operating time is shortened (page 11).
2 Follow the prerecorded instructions.
3 When finished, press {OFF}.
Note:
LIf {VM} is not displayed, the Voice
Mail access number has not been
stored. Store the number (page 28).
LIf the handset still indicates there are
new messages even after you have
listened to all new messages, turn it
off by pressing and holding {OFF}
until the handset beeps.
29
Page 30

Multi-unit Operation
Intercom
Available model:
KX-TG6022
2 To stop paging:
Base unit:
Press {LOCATOR}.
Handset:
Press {OFF}.
Intercom calls can be made between
handsets.
Note:
LIf you receive an outside call while
talking on the intercom, you hear 2
tones. To answer the call, press
{OFF}, then press {C}.
LWhen paging a unit for an intercom
call, the paged unit beeps for 1
minute.
Making an intercom call
{INTERCOM}
1
LTo stop paging, press {OFF}.
2 When you finish talking, press
{OFF}.
Answering an intercom call
Transferring calls
between handsets,
conference calls
Available model:
KX-TG6022
Outside calls can be transferred
between 2 handsets. 2 handsets can
have a conference call with an outside
party.
1 During an outside call, press
{INTERCOM} to put the call on hold.
2 Press the right soft key.
3 Wait for the paged party to answer.
LIf the paged party does not answer,
press {C} to return to the outside
call.
Press {C} or {s} to answer the
1
page.
2 When you finish talking, press
{OFF}.
Note:
LWhen the ringer volume is set to off,
the handset rings at a low level for
intercom calls.
Handset locator
You can locate a misplaced handset by
paging it.
1 Base unit:
{LOCATOR}
LThe handset beeps for 1 minute.
4 To complete the transfer:
Press {OFF}.
LThe outside call is being routed to
the handset.
To establish a conference call:
Press {Conf}.
LTo leave the conference, press
{OFF}. The other parties can
continue the conversation.
LTo put the outside call on hold,
press {HOLD}. To resume the
conference, press {Conf}.
Answering transferred calls
Press {C} to answer the page.
LAfter the paging party disconnects,
you can talk to the outside caller.
30
Page 31

Wall mounting
Base unit
Insert the hooks on the wall
1
mounting adaptor into the holes 1
and 2 on the base unit.
2
Useful Information
3 Tuck the telephone line cord inside
the wall mounting adaptor and
connect the cord. Drive the screws
(not included) into the wall. Mount
the unit, and then slide it down.
Connect the AC adaptor to power
outlet (page 9).
AC adaptor cord
1
2
1
2 While pressing down the lever (A),
press it in the direction of the arrow
(B) until it is secure.
A
Screws
83 mm
To single-line
telephone socket
(230–240 V AC,
50/60 Hz)
To remove the wall mounting adaptor
While pushing down the release lever
(A), remove the adaptor (B).
A
B
Wall mount template for the base unit
83 mm
B
31
Page 32

Useful Information
Charger
Available model:
KX-TG6022
1
Drive the screws (not included) into
the wall.
25.4 mm
Screws
(230–240 V AC,
50/60 Hz)
2 Mount the charger (A), then slide it
down (B) and to the right (C) until it
is secure.
A
Headset (optional)
Connecting a headset to the handset
allows hands-free phone
conversations.
Note:
LOnly telecommunications compliance
labelled headsets should be plugged
into the headset socket on the
handset.
B
C
Wall mount template for the charger
Switching a call between the headset
and handset speakerphone
To switch to the handset speakerphone,
press {s}.
To return to the headset, press {C}.
Lanyard/strap eyelet
If you have a lanyard/strap (not
included), you can hang your handset
from your neck or wrist. Thread it
through the eyelet as shown and pull to
tighten it.
32
25.4 mm
Page 33

Useful Information
Error messages
If the unit detects a problem, one of the following messages is shown on the display.
Display message Cause/solution
Busy LThe called unit is in use.
*1
LThe handset you tried to copy phonebook items to
is in use. Try again later.
*1
LThe handset you are calling is too far from the
base unit.
*1
Error!! LThe handset’s registration has failed. Move the
handset and base unit away from all electrical
appliances and try again.
LAnother handset user tried to send phonebook
items to you but there was an error. Have the other
handset user re-send the items to you (page 19).
---Incomplete--Phonebook full
LThe destination handset’s phonebook memory is
full. Erase unnecessary items from the destination
handset’s phonebook (page 19).
*1
Invalid LAnother handset’s registration may have been
cancelled. Re-register the handset (page 37).
*1
No items stored LYour phonebook or redial list is empty.
*1
No link to base.
Move closer to
base, try again.
LThe handset has lost communication with the base
unit. Move closer to the base unit, and try again.
LConfirm that the base unit’s AC adaptor is plugged
in.
LThe handset’s registration may have been
cancelled. Re-register the handset (page 37).
Phonebook full LThere is no space to store new items in the
phonebook. Erase unnecessary items (page 19).
Please lift up and
try again.
LA handset button was pressed while the handset
was on the base unit or charger. Lift the handset
and press the button again.
System is busy.
Please try again
later.
LOther units are in use and the system is busy. Try
again later.
LThe handset’s registration may have been
cancelled. Re-register the handset (page 37).
Store VM access# L You have not stored the Voice Mail access
number. Store the number (page 28).
*1
*1 KX-TG6022
33
Page 34

Useful Information
Troubleshooting
General use
Problem Cause/solution
The unit does not work. LMake sure the battery is installed correctly and
fully charged (page 10).
LCheck the connections (page 9).
LUnplug the base unit’s AC adaptor to reset the
unit. Reconnect the adaptor and try again.
LThe handset has not been registered to the
base unit. Register the handset (page 37).
I cannot hear a dial tone. LConfirm the telephone line cord is properly
connected (page 9).
LDisconnect the unit from the telephone line and
connect a known working telephone. If the
working telephone operates properly, contact
our service personnel to have the unit repaired.
If the working telephone does not operate
properly, contact your service provider/
telephone company.
The communication
between the base unit and
the handset is unstable.
The indicator on the top
right of the handset flashes
slowly.
Programmable settings
Problem Cause/solution
I cannot program items. L Programming is not possible while either the
I cannot set the alarm. LIn order to set the alarm, you must first set the
LThe handset may not be properly registered. Try
to re-register the handset (page 37).
LNew Voice Mail messages have been recorded.
Listen to the new Voice Mail messages (page
29).
base unit or another handset is being used. Try
again later.
date and time (page 14).
LThe handset has lost communication with the
base unit. Move closer to the base unit, and try
again.
While programming, the
handset starts to ring.
34
LA call is being received. Answer the call and
start again after hanging up.
Page 35

Battery recharge
Problem Cause/solution
Useful Information
I fully charged the battery,
but 7 continues to flash,
or 8 is displayed.
The handset display is
blank.
While charging, the charge
indicator does not light and
“Charge for 7h” is
displayed.
Making/answering calls, intercom
Problem Cause/solution
Static is heard, sound cuts
in and out. Interference
from other electrical units.
LClean the charge contacts and charge again
(page 10).
LThe battery may need to be replaced with a new
one (page 10).
LConfirm that the battery is properly installed.
LFully charge the battery (page 10).
LThe battery is empty. The charge indicator does
not light in order to concentrate on charging.
After about 5 minutes, the charge indicator lights
and “Charging” is displayed.
LMove the handset and base unit away from
other electrical appliances.
LMove closer to the base unit.
LTurn on the clarity booster feature (page 17).
LYour unit is connected to a telephone line with
ADSL (JetStream) service. We recommend that
you contact your ADSL service provider to have
an ADSL Splitter installed. We do not
recommend the use of generic ADSL filters.
Contact your ADSL provider for details.
The handset does not ring. LThe ringer volume is turned off. Adjust it (page
25).
I cannot make a call. LAnother handset is in use. Try again later.
LIf the above remedy does not solve the problem,
set the dialling mode. Press {MENU}{0}{5}
{1}{Save}{OFF}.
LThe unit is not designed to be used with rotary
(pulse dialling) services.
I cannot have a
conversation using the
headset.
I cannot page the handset. LThe called handset is too far from the base unit.
*1 KX-TG6022
LMake sure that an optional headset is
connected properly (page 32).
LIf “SP-phone” is displayed on the handset,
press {C} to switch to the headset.
LThe called handset is in use. Try again later.
*1
35
Page 36

Useful Information
Caller ID
Problem Cause/solution
The handset does not
display the caller’s phone
number.
LYou have not subscribed to Caller ID service.
Contact your service provider/telephone
company to subscribe.
LIf your unit is connected to any additional
telephone equipment such as a Caller ID box or
cordless telephone line socket, disconnect the
unit from the equipment and plug the unit
directly into the wall socket.
LYour unit is connected to a telephone line with
ADSL (JetStream) service. We recommend that
you contact your ADSL service provider to have
an ADSL Splitter installed. We do not
recommend the use of generic ADSL filters.
Contact your ADSL provider for details.
LOther telephone equipment such as a monitored
Burglar Alarm or the modem in the SKY Digital
decoder may be interfering with this unit.
Disconnect the other equipment and try again.
LThe caller requested not to send caller
information (page 20).
36
Page 37

Registration
Problem Cause/solution
Useful Information
The handset registration
may have been cancelled
or the communication
between the base unit and
the handset is unstable.
LRe-register the handset.
1 Handset: {MENU} i {0}{0}{1}
2 Base unit: Press and hold {LOCATOR} until
the IN USE indicator flashes.
3 Handset: Press {OK}, then wait until a beep
sounds. i {OFF}
If the registration fails, try to deregister the
handset first:
KX-TG6021
Press {MENU} i {0}{0}{2} i {3}{3}{5}
i {OK} i {1}, then re-register it again.
KX-TG6022
Use another handset to deregister the unstable
handset. Press {MENU} i {0}{0}{2} i
{3}{3}{5} i {OK} i {1} or {2} (The
handset number which you want to cancel). Try
to re-register it again.
LIf the above remedy does not solve the problem,
consult your nearest Panasonic service centre.
37
Page 38

Useful Information
Specifications
General
Operating
environment
Frequency 5.76 GHz – 5.84 GHz
Base unit
Dimensions Approx. height 97 mm × width 120 mm × depth 144 mm
Mass (Weight) Approx. 220 g
Power consumption Standby: Approx. 1.4 W
Power output 200 mW (max.)
Power supply AC adaptor (230–240 V AC, 50/60 Hz)
Handset
Dimensions Approx. height 156 mm × width 48 mm × depth 33 mm
Mass (Weight) Approx. 160 g
5 °C – 40 °C
Maximum: Approx. 4.4 W
Power output 200 mW (max.)
Power supply Ni-MH battery (3.6 V, 650 mAh)
Charger (KX-TG6022)
Dimensions Approx. height 68 mm × width 82 mm × depth 87 mm
Mass (Weight) Approx. 80 g
Power consumption Standby: Approx. 0.8 W
Maximum: Approx. 3.2 W
Power supply AC adaptor (230–240 V AC, 50/60 Hz)
Note:
LDesign and specifications are subject to change without notice.
LThe illustrations in these instructions may vary slightly from the actual product.
38
Page 39

Index
Index
A Alarm: 27
Answering calls
Area code
Auto talk
B Battery
Booster (Clarity booster)
C Call share
Call Waiting service
Caller ID edit
Caller ID service
Caller list
Chain dial
CID (Caller ID)
Conference calls
Connections
: 21
: 16
: 10, 11
: 17
: 22
: 21, 22
: 19
: 21
: 9
: 16
: 20
: 30
: 17
: 17
SP-phone
T Time adjustment
Transferring calls
Troubleshooting
V VE (Voice Enhancer)
VM (Voice Mail)
Voice Mail access number
Volume
Handset ringer
Receiver
Speaker
W Wall mounting
: 15
: 26
: 30
: 34
: 28
: 25
: 15
: 15
: 31, 32
: 17
: 28
D Date and time
Display contrast
E Error messages
H Handset locator
Headset, optional
Hold
: 16
I Intercom
K Key tone
L Light-up ID
Line mode
M Making calls
Message alert
Missed calls
Mute
: 16
N Navigator key
P Pause
Phonebook
Phonebook copy
Power failure
: 15
: 14
: 30
: 25
: 20
: 26
: 15
: 29
: 20
: 13
: 18
: 9
: 25
: 33
: 30
: 32
: 19
R Recall
Redial list
Ring colour
Ringer ID
Ringer off
Ringer tone
S Soft keys
: 17, 26
: 15
: 25
: 20
: 16, 25
: 25
: 13
39
Page 40

We recommend keeping a record of the following information for future reference.
Serial No. Date of purchase
(found on the bottom of the base unit)
Name and address of dealer
Attach your purchase receipt here.
Customer Support Centre Tel.No.: (09) 272 0178 or website
www.panasonic.co.nz
Sales Department:
Panasonic New Zealand Limited
350 Te Irirangi Drive, East Tamaki, Private Bag 14911 Panmure, Auckland, New
Zealand
Panasonic Communications Co., Ltd.
1-62, 4-chome, Minoshima, Hakata-ku, Fukuoka 812-8531, Japan
Copyright:
This material is copyrighted by Panasonic Communications Co., Ltd., and may be
reproduced for internal use only. All other reproduction, in whole or in part, is
prohibited without the written consent of Panasonic Communications Co., Ltd.
© 2007 Panasonic Communications Co., Ltd. All Rights Reserved.
PQQX15821ZB DC0207PF1037
 Loading...