

Page 1

PQQX14670ZA.book 1 ページ 2005年2月22日 火曜日 午後12時0分
Digital Cordless Phone
Operating Instructions
Model No. KX-TG2340JX
Pulse-or-tone dialing capability
The unit is Caller ID compatible. To display the caller’s phone number, you must
subscribe to Caller ID service.
PLEASE READ BEFORE USE AND SAVE.
Charge the battery for 6 hours before initial use.
Page 2
PQQX14670ZA.book 2 ページ 2005年2月22日 火曜日 午後12時0分
Thank you for purchasing your new Panasonic cordless
telephone.
Caller ID Service, where available, is a telephone company service. After
subscribing to Caller ID, this phone will display a caller’s phone number.
For your future reference
Serial No. Date of purchase
(found on the bottom of the unit)
Name and address of dealer
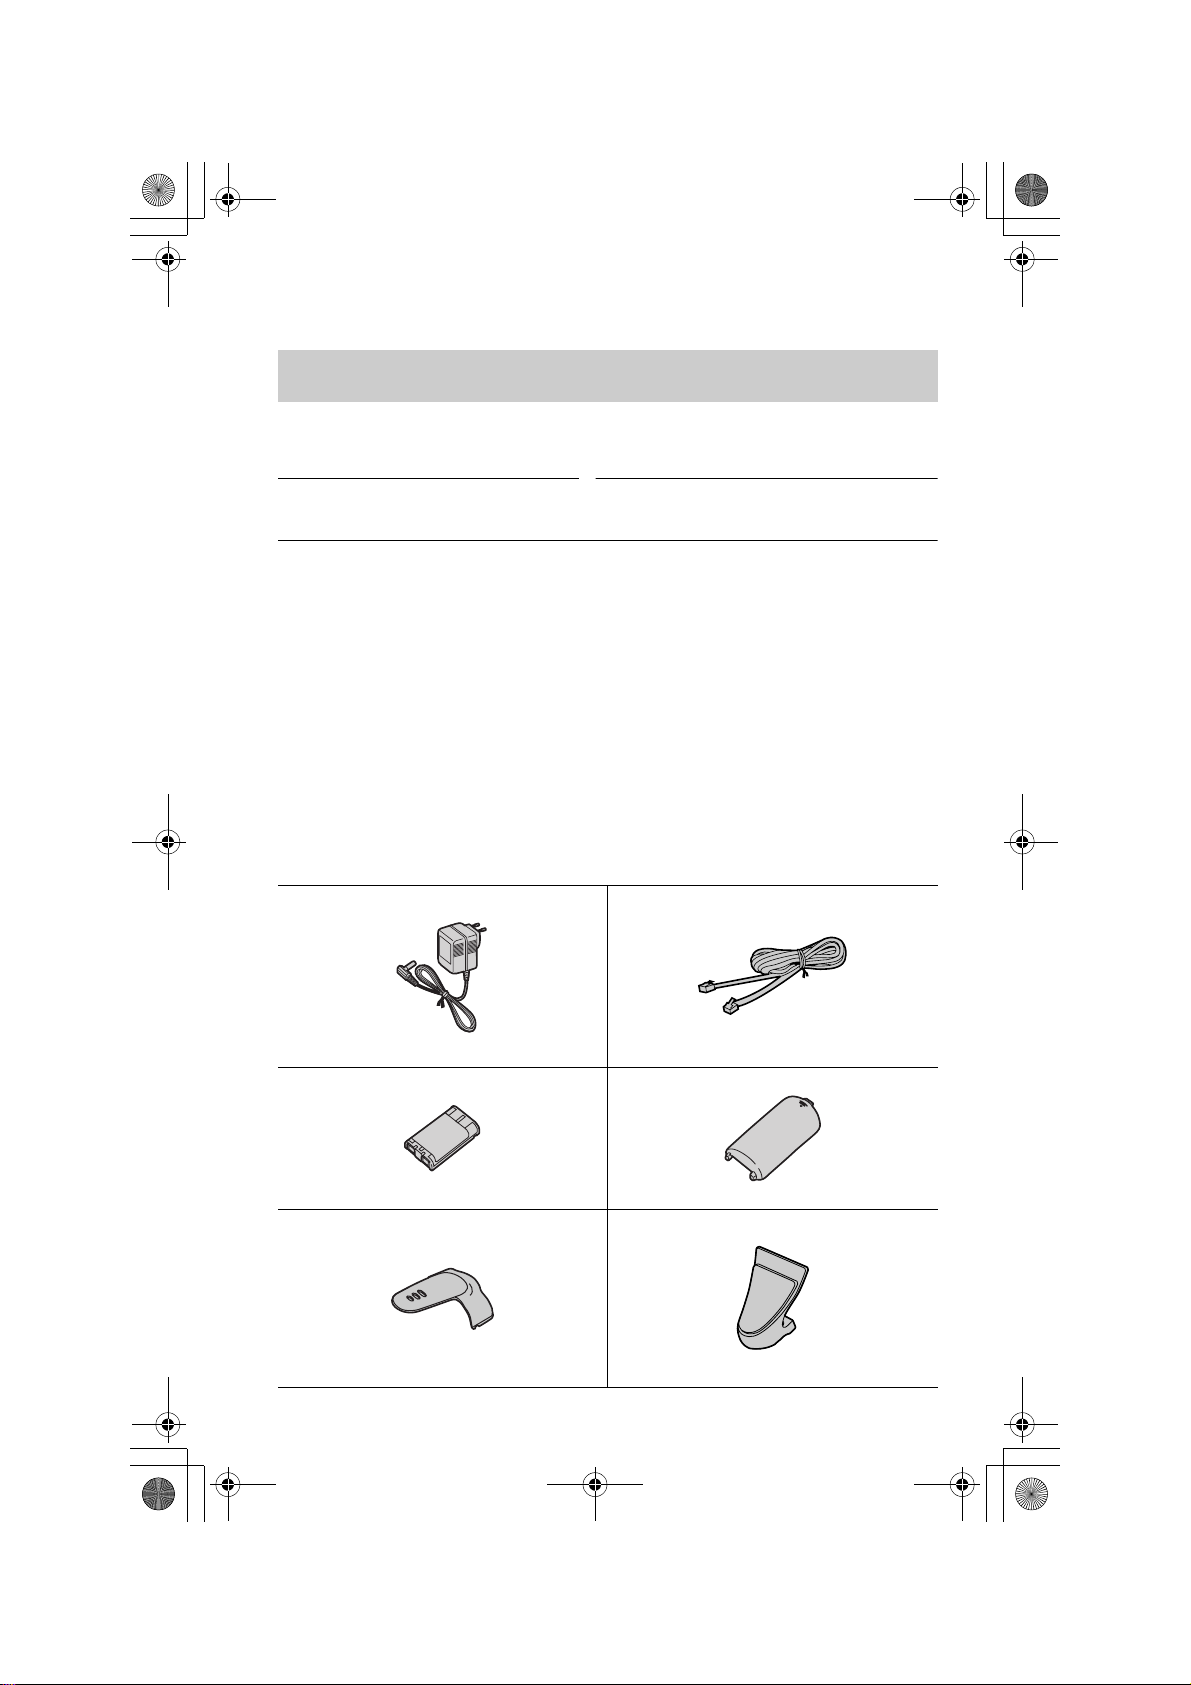
Accessories (included)
AAC Adaptor (p. 8)
one
ABattery (p. 9)
one
ABelt Clip (p. 50)
one
2
ATelephone Line Cord (p. 8)
one
AHandset Cover (p. 9)
one
AShoulder Rest Attachment (p. 50)
one
Page 3

PQQX14670ZA.book 3 ページ 2005年2月22日 火曜日 午後12時0分
For Best Performance
Battery Charge
The handset is powered by a rechargeable NickelMetal Hydride (Ni-MH) battery. Charge the battery
for 6hours before initial use (p. 9).
Base Unit Location/Noise
Calls are transmitted between the base unit and handset using wireless radio
waves. For maximum distance and noise-free operation, the recommended
base unit location is:
Away from electrical appliances such
as a TV, personal computer or another
cordless phone.
Raise the antenna.
Note:
• If you use the handset near a microwave oven which is being used, noise may be
heard from the receiver or the speaker. Move away from the microwave oven and
closer to the base unit.
• If you use the handset near another cordless phone’s base unit, noise may be
heard. Move away from the other cordless phone’s base unit and closer to your
base unit.
In a HIGH and CENTRAL location
with no obstructions such as walls.
3
Page 4
PQQX14670ZA.book 4 ページ 2005年2月22日 火曜日 午後12時0分
Contents
Preparation
Location of Controls . . . . . . . 6
Installation . . . . . . . . . . . . . . . 8
Connections . . . . . . . . . . . . . 8
Installing the Battery in the
Handset . . . . . . . . . . . . . . . 9
Battery Charge . . . . . . . . . . . 9
Programmable Settings . . . . 11
Programming Guidelines . 11
Function Menu Table . . . . 12
Date and Time . . . . . . . . . 13
Dialing Mode . . . . . . . . . . . 14
Line Mode . . . . . . . . . . . . . 14
Auto Talk . . . . . . . . . . . . . . 15
Ringer Volume . . . . . . . . . . 16
Ringer Tone . . . . . . . . . . . . 18
LCD Contrast . . . . . . . . . . 19
Basic Operation
Making Calls . . . . . . . . . . . . . 20
Using the Handset . . . . . . 20
Using the Base Unit . . . . . 23
Answering Calls . . . . . . . . . . 24
Caller ID Service . . . . . . . . . . 25
Using Talking Caller ID . . . 26
Using the Caller List . . . . . . 28
Viewing the Caller List . . . 28
Calling Back from the Caller
List . . . . . . . . . . . . . . . . . 29
Editing the Caller’s Phone
Number . . . . . . . . . . . . . . 30
Storing Caller Information in the
Phone Book . . . . . . . . . . 31
Erasing Caller
Information . . . . . . . . . . . . 32
Advanced Operation
Phone Book . . . . . . . . . . . . . . 33
Storing Names and
Numbers . . . . . . . . . . . . . 33
Dialing from the Phone
Book . . . . . . . . . . . . . . . . 35
Chain Dial . . . . . . . . . . . . . 36
Editing an Item in the Phone
Book . . . . . . . . . . . . . . . . 37
Erasing an Item in the Phone
Book . . . . . . . . . . . . . . . . 37
Intercom . . . . . . . . . . . . . . . . 38
Making Intercom Calls . . . . 38
Answering Intercom Calls . 39
Transferring a Call . . . . . . . . 40
Conference Calls . . . . . . . . . 42
Call Share . . . . . . . . . . . . . . 42
Special Features . . . . . . . . . . 43
Temporary Tone Dialing
(For Rotary or Pulse Service
Users) . . . . . . . . . . . . . . . 43
Muting Your Conversation . 43
For Call Waiting Service
Users . . . . . . . . . . . . . . . 43
Using the PAUSE Key
(For PBX Line/Long Distance
Calls) . . . . . . . . . . . . . . . . 44
FLASH Button . . . . . . . . . 44
Incoming Call Tone . . . . . 45
Key Tone . . . . . . . . . . . . . . 46
Dial Lock . . . . . . . . . . . . . . 47
Re-registering the
Handset . . . . . . . . . . . . . . 49
4
Page 5

PQQX14670ZA.book 5 ページ 2005年2月22日 火曜日 午後12時0分
Useful Information
Contents
Belt Clip . . . . . . . . . . . . . . . . . 50
Shoulder Rest Attachment . . 50
Wall Mounting . . . . . . . . . . . . 51
Optional Headset . . . . . . . . . 52
Direct Commands . . . . . . . . . 53
If the Following Appear on Your
Display... . . . . . . . . . . . . . . . 54
Troubleshooting . . . . . . . . . . 55
Safety Instructions . . . . . . . . 58
Specifications . . . . . . . . . . . . 59
Preparation Useful InformationAdvanced OperationBasic Operation
Important:
Throughout these Operating Instructions, and
are used to indicate with which unit an operation can be performed.
Handset
Base Unit
Handset Base Unit
Handset & Base Unit
: Perform with the handset.
: Perform with the base unit.
: Perform with the handset and base unit
separately.
: Perform with the handset and base unit
together.
Handset Base Unit
5
Page 6
PQQX14670ZA.book 6 ページ 2005年2月22日 火曜日 午後12時0分
Location of Controls
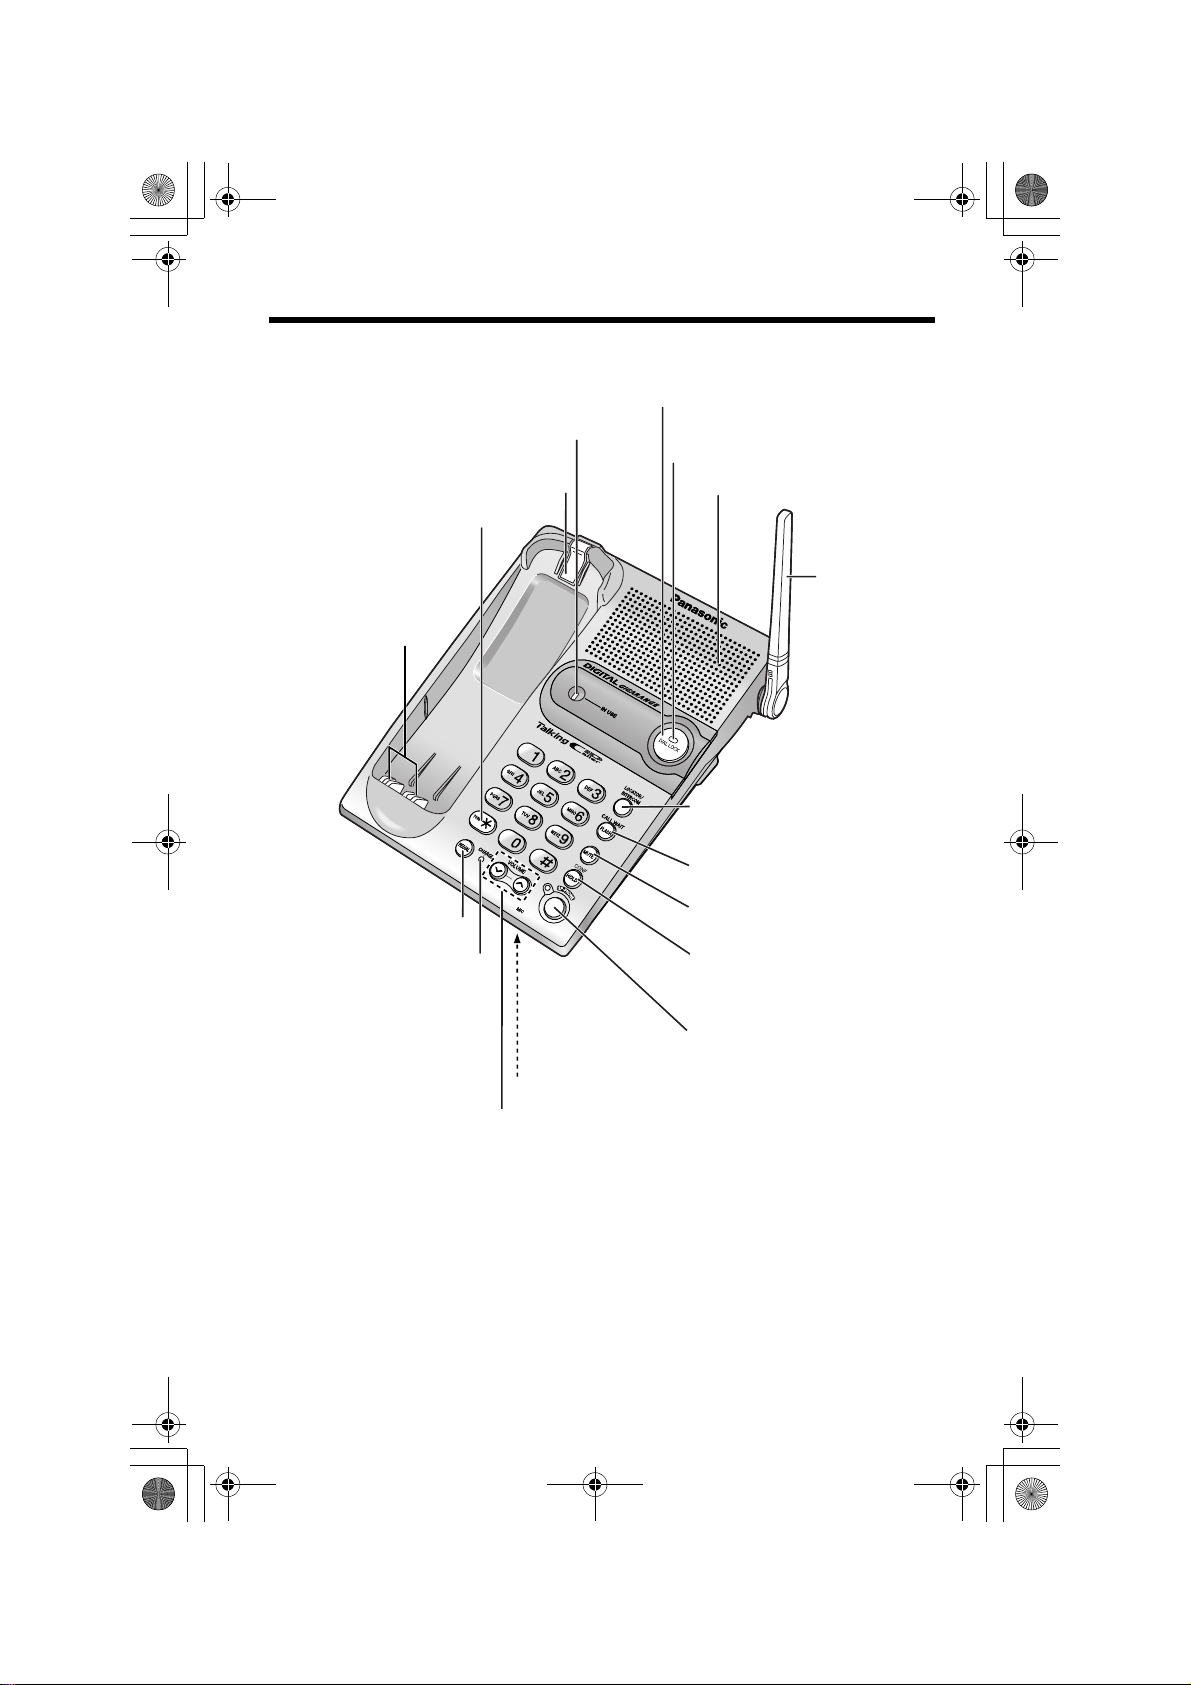
Base unit
[DIAL LOCK] Button (p. 47)
IN USE Indicator (p. 24)
DIAL LOCK Indicator (p. 47)
Hook (p. 51)
[*] (TONE) Button
(p. 43)
Charge Contacts
(p. 10)
Speaker
Antenna
(p. 3)
[REDIAL] Button (p. 23)
CHARGE Indicator (p. 9)
VOLUME Button [<], [>] (p. 17, 23)
[LOCATOR/INTERCOM]
Button (p. 38)
[FLASH/CALL WAIT]
Button (p. 43, 44)
[MUTE] Button (p. 43)
[HOLD/CONF]
(Conference) Button
(p. 23, 42)
[SP-PHONE] (Speakerphone)
Button and Indicator (p. 23)
MIC (Microphone) (p. 23)
6
Page 7

)
PQQX14670ZA.book 7 ページ 2005年2月22日 火曜日 午後12時0分
Location of Controls
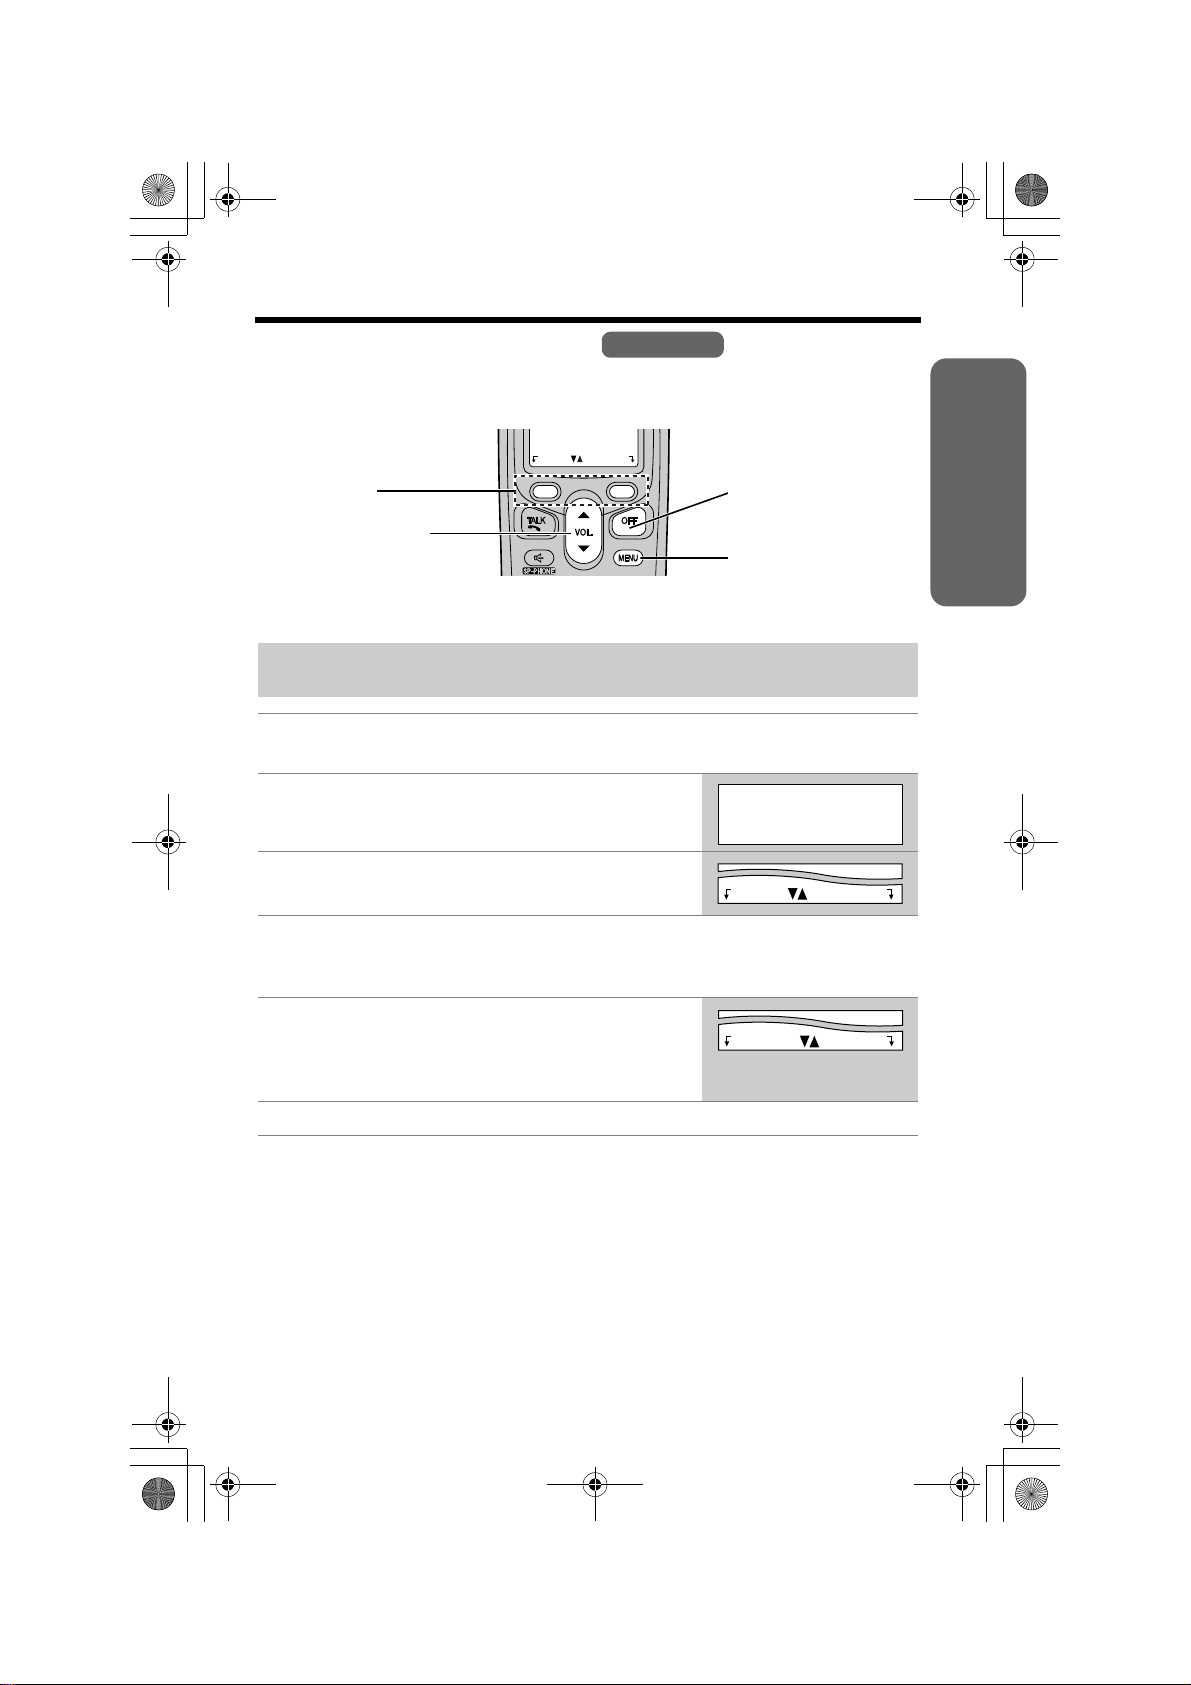
Handset
Back side
Speaker
Display
Headset Jack (p. 52)
[C] (TALK) Button (p. 20)
[s] (Speakerphone) Button (p. 20)
Ringer Indicator (p. 24)
Antenna
Receiver
Soft Keys (see below)
[OFF] Button
(p. 11, 20)
[MENU] Button (p. 11)
Navigator Key
([
d
Preparation
], [B]) (see below)
[*] (TONE) Button (p. 43)
[HOLD/INTERCOM] Button
(p. 22, 38)
Charge Contacts (p. 10)
[REDIAL] Button (p. 21
[FLASH/CALL WAIT]
Button (p. 43, 44)
Microphone (p. 20)
Handset soft keys
J 5
Talk
00-00-32
KL
(VE) Mute
Pressing the right soft key selects mute “Mute
Pressing the left soft key selects Voice Enhancer “ (VE)
• When a function name does not appear above a soft key, the soft key has no
function.
Two soft keys are used to select functions displayed
directly above each key. Functions displayed above the
keys will change depending on the state of use.
On this sample display, “ (VE)” and “Mute ” are
displayed above soft keys.
KL
L
”.
K
”.
Handset navigator key
B
Scrolls up [
Caller List and the phone book.
Increases [
receiver/speaker volumes.
Throughout these Operating Instructions:
• The soft keys are indicated by what is displayed above the keys.
Ex. “Press Mute.” indicates “Press the soft key below Mute ”.
• The navigator key is indicated by the arrows [
] and down [d] the function menu, the
B
] or decreases [d] the handset ringer and
L
d
] or [B].
7
Page 8
PQQX14670ZA.book 8 ページ 2005年2月22日 火曜日 午後12時0分
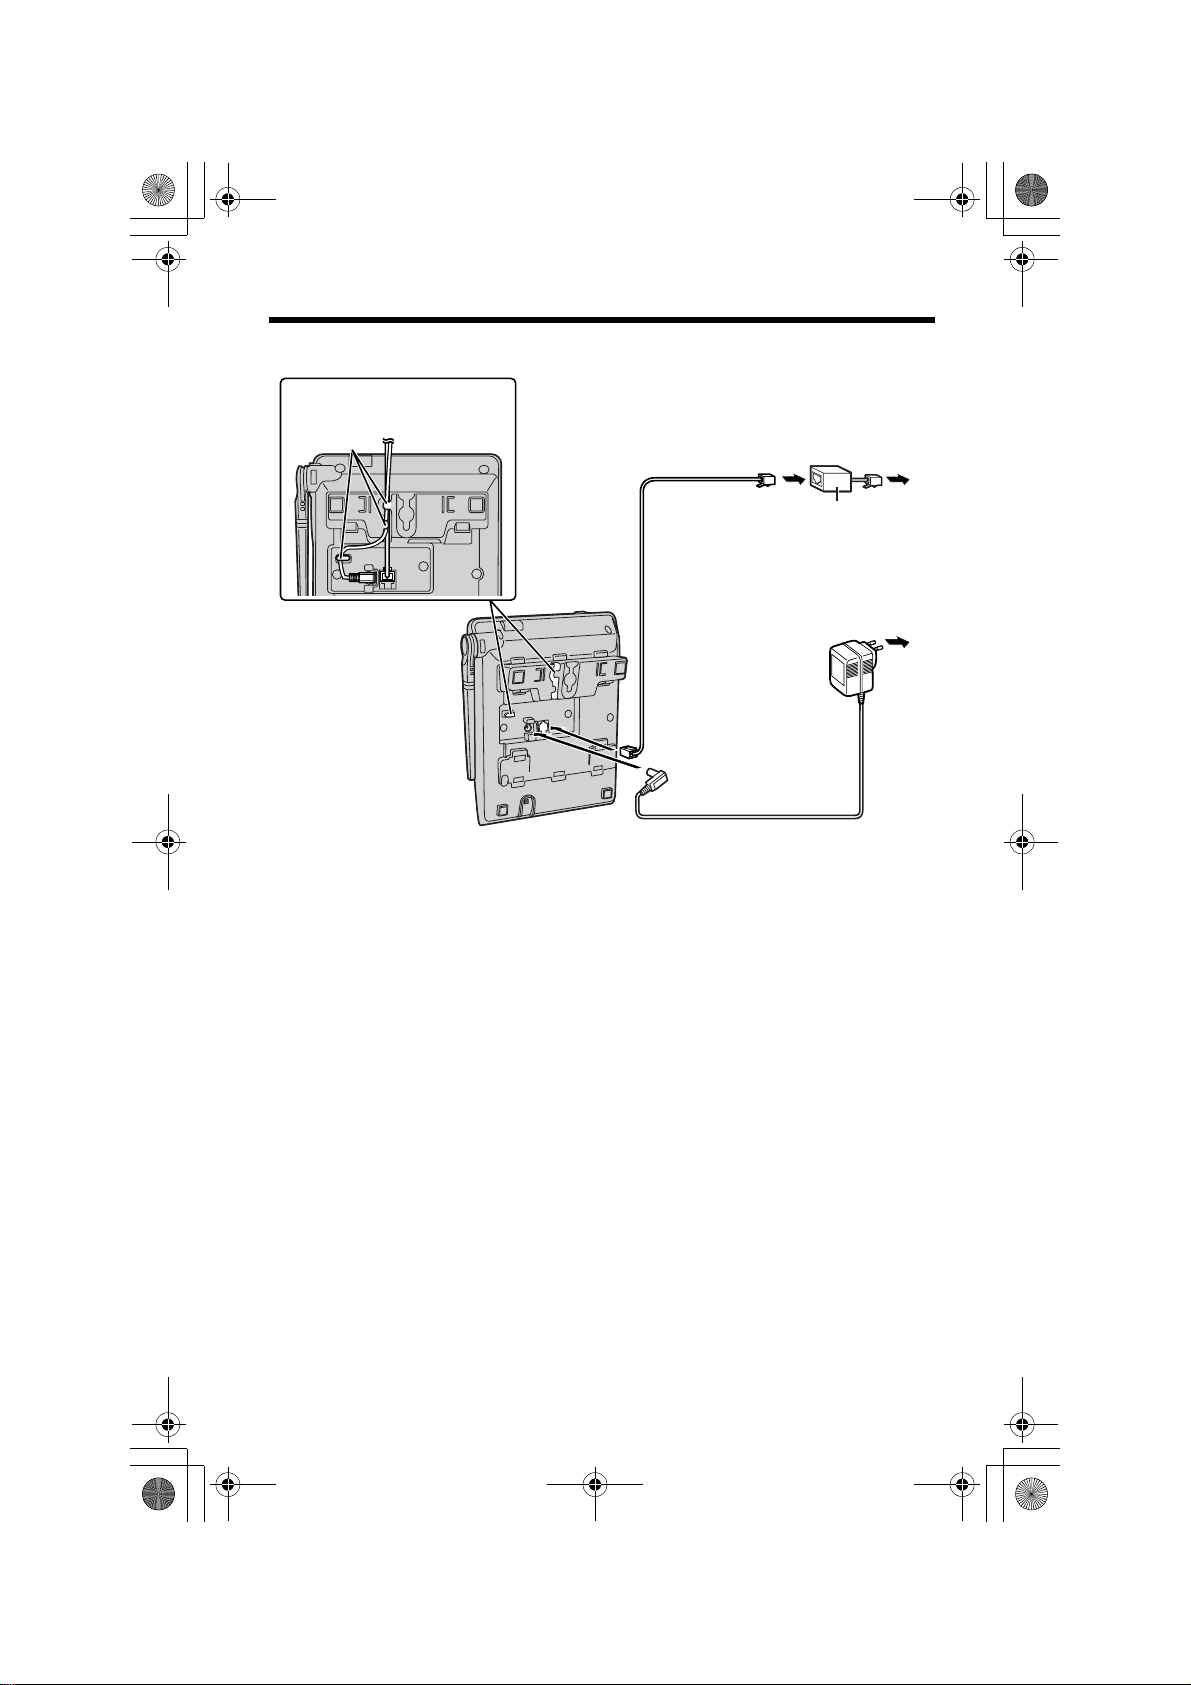
Installation
Connections
Fasten the cords.
Hooks
To Single-Line Telephone Jack
Telephone
Line Cord
• USE ONLY WITH Panasonic AC ADAPTOR PQLV1BX.
• The AC adaptor must remain connected at all times. (It is normal for the adaptor to
feel warm during use.)
• If your unit is connected to a PBX which does not support Caller ID, you cannot
access Caller ID services.
• The unit will not work during a power failure. We recommend connecting a
standard telephone to the same telephone line or to the same telephone jack
using a T-adaptor.
• When more than one unit is used, the units may interfere with each other. To
prevent or reduce interference, please keep ample space between the base units.
* If the unit is connected to a telephone line with DSL service, you may hear noise
from the receiver or speaker during conversations or the unit may not display
caller’s phone number properly. We recommend connecting a noise filter (contact
your DSL service provider) to the telephone line between the unit and the
telephone line jack.
* Noise Filter
(For DSL users)
To Power Outlet
(AC 220–240 V,
50/60 Hz)
AC Adaptor
8
Page 9

PQQX14670ZA.book 9 ページ 2005年2月22日 火曜日 午後12時0分
Installation
Installing the Battery in the Handset
Insert the battery (1), and press it down until it snaps into the compartment (2).
Close the cover.
2
1
To replace the battery:
Press the notch on the cover firmly and slide it as indicated
by the arrow. Replace the old battery with a new one
(p. 10). Close the cover and charge the battery for 6 hours.
Preparation
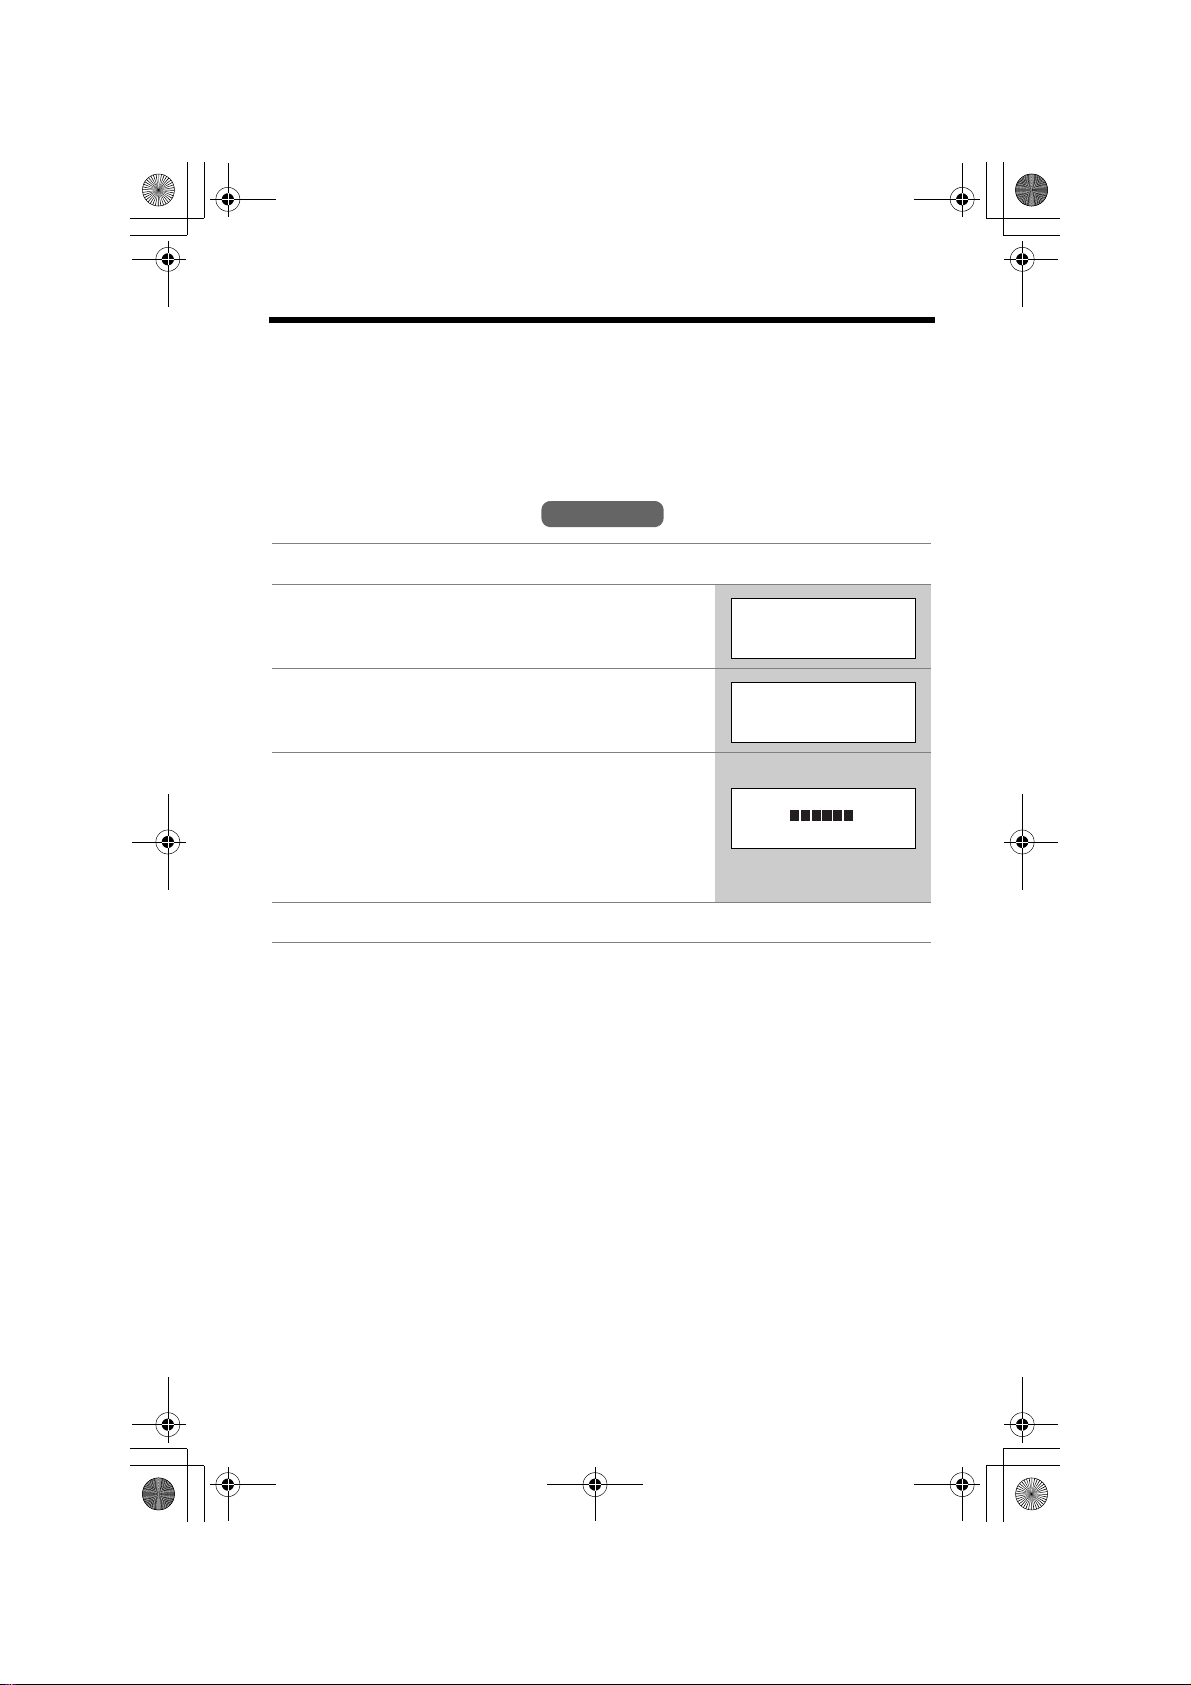
Battery Charge
Place the handset on the base unit.
Charge for 6 hours before initial use.
• The unit beeps once, the CHARGE indicator
lights, and “Charging” is displayed.
• When the battery is fully charged, “Charge
completed” is displayed.
Battery strength
You can confirm battery strength
on the handset display.
Battery strength is indicated by
the icons shown in the chart to
the right.
Display prompt Battery strength
5 Fully charged
6 Medium
7 Low
074 (flashing) Needs to be recharged.
8 Discharged
OR
CHARGE
Indicator
9
Page 10

PQQX14670ZA.book 10 ページ 2005年2月22日 火曜日 午後12時0分
Installation
Recharge
Recharge the battery when:
—“Recharge battery” is displayed on the handset,
—“7” flashes, or
—the handset beeps intermittently while it is in use.
• The display will continually indicate “Recharge battery” and/or “7” will
flash when the handset battery is charged for less than 15 minutes and the
handset is lifted off the base unit.
• If the battery has been discharged, the handset will display “Charge for 6h”
and “8” when you place the handset on the base unit. The handset will not
work unless the battery is charged. Continue charging.
Battery replacement:
If you cleaned the charge contacts and fully charged the battery, but after a few
telephone calls, “Recharge battery” is displayed and/or “7” continues to
flash, or “Charge for 6h” and “8” are displayed, the battery may need to
be replaced. Please replace with a new Panasonic HHR-P104 battery. To
replace the battery, see page 9.
Recharge battery
Battery information
After your Panasonic battery
is fully charged, you can
expect the following
performance:
• A fully charged battery will give you up to 5 hours of continuous talk time, or keep
your handset in Standby mode to receive incoming calls for up to 11 days (if no
phone calls are made). Battery power is consumed whenever the handset is off of
the base unit, even when the handset is not in use. The longer you leave the
handset off of the base unit, the time you can actually talk on the handset will be
shortened. Actual battery performance depends on a combination of how often
the handset is in TALK mode and how often it is in Standby mode.
• Clean the charge contacts of the handset and the base unit with a soft, dry
cloth once a month. Clean more often if the unit is subject to grease, dust or
high humidity. Otherwise the battery may not charge properly.
• If the battery is fully charged, you do not have to place the handset on the base
unit until “Recharge battery” is displayed and/or “7” flashes. This will
maximize the battery life.
• If you want to keep the battery fully charged at all times, place the handset on the
base unit when the handset is not used. The battery cannot be overcharged.
While in use (TALK)
While not in use (Standby) Up to 11 days
Operation Operating time
Up to 5 hours
10
Page 11
PQQX14670ZA.book 11 ページ 2005年2月22日 火曜日 午後12時0分
Programmable Settings
Programming Guidelines
This unit has several programmable functions which can be selected from the
function menu on the display (p. 12).
The soft keys selects the
functions displayed above
each soft key.
When “
d
” or “B” is
displayed, navigator key
scrolls through the menu.
Back Select
Handset
[OFF] exits
programming.
[MENU] enters the
function menu.
How to select a function item from the menu
Make sure the handset and base unit are not being used. The handset
must be operated near the base unit and while off the base unit.
1 Press [MENU].
• The main menu is displayed (p. 12).
2 Scroll to the desired item by pressing [
[
B
].
d
] or
Initial setting
K
d
Back Select
BL
3 Press Select to select the desired item.
Back Select
Preparation
4 If the item has a sub-menu, select the menu item (p. 12). Repeat
steps 2 and 3 until the desired item is displayed. If the item has no
sub-menu, go to step 5.
5 Select the desired setting by pressing [
[
B
], then press Save to save your setting.
• A confirmation tone will be heard and the setting
will be saved.
d
] or
Back Save
6 Press [OFF] to exit programming mode.
• To go back to the previous menu, press Back, or press Select while
“---(Go back)----” is displayed. If you press this key in the main menu, the
unit will exit programming mode.
• After programming is complete, the display will return to the main menu or the
sub-menu depending on which menu the selected item is located. (See the menu
table on page 12.)
• You can exit programming mode at any time by pressing [OFF].
• If you do not press any buttons for 60 seconds, the handset will exit programming
mode.
• If the unit detects a problem, an error message will be displayed (p. 54) and/or
error beeps will sound.
11
Page 12

PQQX14670ZA.book 12 ページ 2005年2月22日 火曜日 午後12時0分
Programmable Settings
Function Menu Table
Handset
You can use the following functions to customize your unit. See the corresponding
pages for function details.
• After pressing [MENU], you can also program menu items directly by pressing [0]
to [9], and [*] instead of using the soft keys (p. 53).
Main menu Sub-menu I Sub-menu II
(p. 16)
(p. 18)
(p. 45)
(p. 19)
(p. 46)
Date and time
Voice enhancer
Dial lock
Talk Caller ID
Initial setting
Ringer volumeRinger setting
Ringer tone
Incoming call.
(p. 13)
(p. 22)
(p. 47)
(p. 27)
LCD contrast
Key tone
12
Auto talk
Set tel line
Set base unit
(p. 15)
Set dial mode
Set flash time
Set line mode
Ringer tone
Incoming call.
Talk Caller ID
(p. 14)
(p. 44)
(p. 14)
(p. 19)
(p. 45)
(p. 27)
Page 13

PQQX14670ZA.book 13 ページ 2005年2月22日 火曜日 午後12時0分
Programmable Settings
Date and Time
You need to set the date and time to display the time and date the calls were
received in the Caller List.
Handset
1 Press [MENU].
2 Scroll to “Date and time” by pressing [
[
B
], then press Select.
3 1 Enter 2 digits each for the day, month, and
year.
(Ex. To set June 15, 2005, enter “15 06
05”.)
2 Enter 4 digits for the time (hour and minute).
(Ex. To set 9:30, enter “0930”.)
• If you enter a wrong number, press [d] or [B] to
move the cursor to the incorrect number. Enter the
correct number.
4 Select “AM” or “PM” by pressing AM/PM.
d
] or
Date and time
d
Back Select
K
Date:|31.12.2004
Time:12:00 AM
AM/PM Save
K
Example
Date:|15.06.2005
Time:09:30 AM
AM/PM Save
K
Date:|15.06.2005
Time:09:30 AM
AM/PM Save
K
BL
5 Press Save.
• If the handset beeps 3 times, the date and time
were not set correctly. Start again from step 3.
Preparation
L
L
L
6 Press [OFF].
• When entering the time in step 3, you cannot enter numbers greater than 12. Do
not use military time. (To set 13:00 hours, enter “0100”, then select “PM” in
step 4.)
The date and time may be incorrect after a power failure. When “E Press
MENU.” flashes on the handset display, adjust the date and time.
To adjust the date and time when “E Press MENU.” flashes on the
handset display:
Press [MENU], then go to step 3 above.
To confirm the date and time, repeat steps 1 and 2 above.
• The current date and time are displayed. When finished, press [OFF].
13
Page 14

PQQX14670ZA.book 14 ページ 2005年2月22日 火曜日 午後12時0分
Programmable Settings
Dialing Mode
If you have touch tone service, set the dialing mode to “Tone”. For rotary or pulse
service, set to “Pulse”. The factory preset is “Tone”.
Handset
1 Press [MENU].
2 Scroll to “Initial setting” by pressing [
or [
B
], then press Select.
3 Scroll to “Set tel line” by pressing [
[
B
], then press Select.
d
d
] or
]
Initial setting
d
Back Select
K
BL
Set tel line
d
Back Select
K
BL
4 Press Select at “Set dial mode”.
Set dial mode
d
Back Select
K
5 Select “Pulse” or “Tone” by pressing [
[
B
].
d
] or
Set dial mode
:Tone
Back Save
K
6 Press Save, then press [OFF].
Line Mode
The line mode is preset to “B” and generally should not be adjusted. If “Line in
use” on the handset is not displayed properly or the IN USE indicator on the base
unit does not light properly, the line mode selection is incorrect. Set line mode to
“A”.
Handset
BL
d
BL
1 Press [MENU].
2 Scroll to “Initial setting” by pressing [
or [
B
], then press Select.
3 Scroll to “Set tel line” by pressing [
[
B
], then press Select.
4 Scroll to “Set line mode” by pressing [
[
B
], then press Select.
5 Select “A” or “B” by pressing [
d
] or [B].
6 Press Save, then press [OFF].
14
d
] or
d
d
] or
]
Initial setting
d
Back Select
K
BL
Set tel line
d
Back Select
K
BL
Set line mode
d
Back Select
K
Set line mode
:B
Back Save
K
BL
d
BL
Page 15

PQQX14670ZA.book 15 ページ 2005年2月22日 火曜日 午後12時0分
Programmable Settings
Auto Talk
The Auto Talk feature allows you to answer calls by simply lifting the handset off the
base unit. You do not need to press [C] or [s]. The factory preset is OFF.
Handset
1 Press [MENU].
2 Scroll to “Initial setting” by pressing [
or [
B
], then press Select.
3 Scroll to “Auto talk” by pressing [
then press Select.
4 Select “On” or “Off” by pressing [
d
d
] or [B].
d
] or [B],
]
Initial setting
d
Back Select
K
BL
Auto talk
d
Back Select
K
Auto talk
:Off
Back Save
K
BL
d
BL
5 Press Save, then press [OFF].
• In order to view Caller ID information after you lift the handset to answer a call,
leave the Auto Talk feature turned off.
Preparation
15
Page 16
PQQX14670ZA.book 16 ページ 2005年2月22日 火曜日 午後12時0分
Programmable Settings
Ringer Volume
You can select the handset or base unit ringer volumes to high, medium, low, or off.
The factory preset is HIGH. If the handset and base unit ringer is turned off, the
handset or base unit will ring at the low level for intercom calls, and will not ring for
outside calls. Caller names will not be announced even if the Talking Caller ID
feature is turned on (p. 27).
Handset ringer volume
Handset
1 Press [MENU].
2 Press Select at “Ringer setting”.
Ringer setting
d
Back Select
K
BL
3 Press Select at “Ringer volume”.
Ringer volume
d
Back Select
K
4 Select the desired volume level by pressing
[
d
] or [B].
• The volume will change and ring.
• The number of steps indicates the volume level.
• To turn the ringer off, press [
“Off ?” is displayed.
d
] repeatedly until
Ex. High
Ringer volume
Low High
Back Save
K
5 Press Save.
• If the handset ringer is turned off, “Ringer off” will be displayed while not in
use.
“Ringer off” is not displayed, if the handset is off the base unit when there are
missed calls (p. 28) or the Dial Lock is turned on (p. 47).
• You can adjust the ringer volume while an outside call is ringing. Press [
while the handset is ringing.
BL
d
BL
d
] or [B]
Temporary ringer off
While the handset is ringing for an outside call, you can turn the ringer off
temporarily by pressing [OFF]. The handset will ring again as normal the next time
a call is received.
16
Page 17
PQQX14670ZA.book 17 ページ 2005年2月22日 火曜日 午後12時0分
Programmable Settings
Base unit ringer volume
Make sure the base unit is not being used.
To set the ringer volume to high (preset), medium, or low, press
VOLUME [<] or [>].
• To increase volume, press VOLUME [>].
To decrease volume, press VOLUME [<].
• To stop ringing, press [0].
To turn the ringer off, press and hold VOLUME [<] until 2 beeps sound.
To turn the ringer on, press VOLUME [<] or [>].
• The base unit will ring at the low level.
• You can adjust the ringer volume while an outside call is ringing. Press VOLUME
[<] or [>] while the base unit is ringing.
To turn the ringer off, press and hold VOLUME [<] until 2 beeps sound.
Base Unit
Preparation
17
Page 18
PQQX14670ZA.book 18 ページ 2005年2月22日 火曜日 午後12時0分
Programmable Settings
Ringer Tone
You can set the handset and base unit ringers to use one of 7 ringer patterns for
outside calls. “Tone 1” to “Tone 3” are bell ringer patterns. “Melody 1” to “Melody 4”
are melody patterns. The factory preset is “Tone 1”.
• You cannot change the ringer tone for intercom calls.
• If you select one of the melody ringer patterns, the ringer will continue to sound for
several seconds if:
— the caller hangs up before you answer the call, or
— another person answers the call using another phone connected on the same
line.
Handset ringer tone
Handset
1 Press [MENU].
2 Press Select at “Ringer setting”.
3 Scroll to “Ringer tone” by pressing [
[
B
], then press Select.
4 Select the desired ringer tone by pressing [
or [
B
].
• The handset will ring and the ringer tone will
change. If the ringer volume has been turned off,
the handset will not ring (p. 16).
• You can also select the ringer tone by pressing [1]
to [7].
d
] or
d
]
5 Press Save, then press [OFF].
Base unit ringer tone
(use either the handset or the base unit)
Base Unit
Ringer setting
d
Back Select
K
BL
Ringer tone
d
Back Select
K
Ringer tone
1:Tone 1
Back Save
K
BL
d
BL
Make sure the base unit is not being used.
Press VOLUME [<] or [>], then select the desired ringer tone by pressing
[1] to [7].
[1] to [3] : Bell ringer patterns [4] to [7] : Melody patterns
• After pressing VOLUME [<] or [>], the base unit will ring using the current ringer
tone.
• The base unit will ring and the ringer tone will change.
• To stop ringing, press [0].
18
Page 19

PQQX14670ZA.book 19 ページ 2005年2月22日 火曜日 午後12時0分
Programmable Settings
Setting the base unit ringer tone by using the
1 Press [MENU].
2 Scroll to “Initial setting” by pressing [
or [
B
], then press Select.
3 Scroll to “Set base unit” by pressing [
[
B
], then press Select.
d
d
] or
4 Press Select at “Ringer tone”.
5 Select the desired ringer tone by pressing [
or [
B
].
• The base unit will ring and the ringer tone will
change. If the base unit ringer volume has been
turned off, the base unit will not ring (p. 17).
• You can also select the ringer tone by pressing [1]
to [7].
d
6 Press Save, then press [OFF].
Handset
]
Initial setting
d
Back Select
K
BL
Set base unit
d
Back Select
K
BL
Ringer tone
d
Back Select
K
]
Ringer tone
1:Tone 1
Back Save
K
BL
d
BL
Preparation
LCD Contrast
There are 6 levels of LCD contrast. The factory preset is “level 3”.
Handset
1 Press [MENU].
2 Scroll to “Initial setting” by pressing [
or [
B
], then press Select.
d
]
Initial setting
Back Select
K
3 Press Select at “LCD contrast”.
LCD contrast
Back Select
K
4 Select the desired contrast by pressing [
[
B
].
• The contrast will change.
5 Press Save, then press [OFF].
d
] or
Ex. Level 3
LCD contrast
Low High
Back Save
K
d
BL
d
BL
d
BL
19
Page 20

PQQX14670ZA.book 20 ページ 2005年2月22日 火曜日 午後12時0分
Making Calls
Using the Handset
Handset
1 Press [C].
•“Talk” is displayed.
2 Dial a phone number.
• The dialed number is displayed.
• After a few seconds, the display
will show the length of the call.
Display
Soft Keys
[C]
[s]
3 To hang up, press [OFF] or
place the handset on the base
unit.
[HOLD/INTERCOM]
To have a hands-free phone conversation
1 Press [s].
•“SP-phone” is displayed.
[OFF]
[d], [B]
[REDIAL]
Microphone
2 Dial a phone number.
• The dialed number is displayed.
• After a few seconds, the display will show the length of the call.
3 When the other party answers, talk into the microphone.
4 To hang up, press [OFF] or place the handset on the base unit.
Hands-free Digital Duplex Speakerphone
For best performance, please note the following:
• Talk alternately with the other party in a quiet room.
• If you or the other party has difficulty hearing, press [d] to decrease the
speaker volume.
• While talking using [C], you can switch to a hands-free phone conversation
by pressing [s]. To switch back to the receiver, press [C].
20
Page 21

PQQX14670ZA.book 21 ページ 2005年2月22日 火曜日 午後12時0分
To dial after confirming the entered number
Making Calls
1 Enter a phone number.
• If you misdial, press Clear. Enter the correct
number.
• If a pause is required when dialing, press Pause
where needed (p. 44).
• To cancel, press [OFF].
3334444
Clear Pause
K
|
2 Press [C] or [s].
3 To hang up, press [OFF] or place the handset
on the base unit
To adjust the receiver/speaker volume during a
conversation
There are 3 volume levels for the receiver and 6 volume levels for the speaker.
To increase volume, press [B].
To decrease volume, press [
• The display shows the current volume setting.
• If you try to increase/decrease volume when it is at
the maximum/minimum level, the handset will
beep 3 times.
d
].
Ex. Receiver volume: High
Speaker volume: Level 6
Volume
Low High
(VE) Mute
K
L
To redial the last number dialed
Press [C] or [s], then press [REDIAL].
L
Basic Operation
To redial using the redial list (Memory Redial)
The last 5 phone numbers dialed are stored in the redial list.
1 Press [REDIAL].
• The last number dialed is displayed.
2 Scroll to the desired number by pressing [
[
B
].
• You can also scroll down through the list by
pressing [REDIAL].
• To exit the list, press [OFF].
d
] or
3334444
K
Erase
3 Press [C] or [s].
• To erase an item, scroll to the item then press Erase.
•If “No items stored” is displayed, the list is empty.
d
B
21
Page 22

PQQX14670ZA.book 22 ページ 2005年2月22日 火曜日 午後12時0分
Making Calls
To put a call on hold
1 Press [HOLD/INTERCOM] during a conversation.
•“Line on hold.” is displayed.
• To transfer the call to the base unit, see page 40.
2 Press [HOLD/INTERCOM] again.
•“Hold” is displayed.
• You can search the Caller List or phone book while a call is on hold. To exit the
list, press [OFF]. The call will remain on hold.
To return to the call, press [C] or [s].
• The base unit user can also take the call by pressing [SP-PHONE].
• If another phone is connected on the same line (p. 8), you can also take the call
by lifting its handset.
• If a call is kept on hold for 6 minutes, an alarm tone will start to sound and the
Ringer indicator will start to flash rapidly. After 4 additional minutes on hold, the
call will be disconnected.
Voice Enhancer Technology
Panasonic’s Voice Enhancer Technology clarifies the voice of the person you are
talking to, reproducing a more natural-sounding voice that is easier to hear and
understand.
Voice Enhancer Technology can be turned on or off. The factory preset is OFF.
• Depending on the condition and quality of your telephone line, this feature may
emphasize existing line noise. If it becomes difficult to hear, turn this feature off.
To turn this feature on, press (VE) during a
conversation.
•“J” is displayed.
• To turn this feature off, press (VE)
“J” disappears from the display.
• After hanging up a call, the on/off setting will be retained.
When the handset is not in use, you can also turn this feature on or off by
programming as follows:
1. Press [MENU].
2. Scroll to “Voice enhancer” by pressing [
3. Select “On” or “Off” by pressing [d] or [B].
4. Press Save, then press [OFF].
again.
d
] or [B], then press Select.
J 5
Talk
00-00-32
(VE) Mute
K
Backlit LCD display/Lighted handset keypad
The handset display and dialing buttons will light for a few seconds after pressing a
button or lifting the handset off the base unit. They will also light when an intercom/
outside call is being received.
22
L
Page 23

PQQX14670ZA.book 23 ページ 2005年2月22日 火曜日 午後12時0分
Making Calls
Using the Base Unit
Base Unit
1 Press [SP-PHONE].
• The SP-PHONE indicator lights.
2 Dial a phone number.
3 When the other party answers, talk
into the MIC (microphone).
4 To hang up, press [SP-PHONE].
• The indicator light goes out.
• To switch to the handset while using the base unit speakerphone:
— If the handset is off the base unit, press [C] or [s] on the handset, then press
[SP-PHONE] on the base unit.
— If the handset is on the base unit, just lift up.
Hands-free Digital Duplex Speakerphone
For best performance, please note the following:
• Talk alternately with the other party in a quiet room.
• If you or the other party has difficulty hearing, press VOLUME [<] to decrease
the speaker volume.
[REDIAL]
MIC
VOLUME [<], [>]
[HOLD/CONF]
[SP-PHONE]
and Indicator
To adjust the speaker volume during a conversation
To increase volume, press VOLUME [>].
To decrease volume, press VOLUME [<].
• There are 8 volume levels. If you try to increase/decrease volume when it is at the
maximum/minimum level, the base unit will beep 3 times.
Basic Operation
To redial the last number dialed
Press [SP-PHONE], then press [REDIAL].
To put a call on hold
Press [HOLD/CONF] during a conversation.
• The SP-PHONE indicator flashes.
To return to the call, press [SP-PHONE].
• The handset user can also take the call by pressing [C] or [s].
• If another phone is connected on the same line (p. 8), you can also take the call
by lifting its handset.
• If a call is kept on hold for 6 minutes, an alarm tone will start to sound. After
4 additional minutes on hold, the call will be disconnected.
23
Page 24

PQQX14670ZA.book 24 ページ 2005年2月22日 火曜日 午後12時0分
Answering Calls
When a call is received, the unit rings, “Incoming call” is displayed, and the
Ringer indicator on the handset and the IN USE indicator on the base unit flash
rapidly. If you subscribe to Caller ID, see page 25.
Handset
1 Press [C] or [s].
• You can also answer a call by
pressing any button except [
or [OFF].
d
], [B]
2 To hang up, press [OFF] or place
the handset on the base unit.
Ringer Indicator
[C]
[s]
Auto Talk
If the Auto Talk feature is turned on (p. 15), you can answer a call by simply lifting
the handset off the base unit.
Temporary ringer off
You can turn the ringer off temporarily by pressing [OFF], while the handset is
ringing for an outside call. The handset will ring again as normal the next time a call
is received.
[OFF]
Base Unit
1 Press [SP-PHONE].
2 Talk into the MIC.
3 To hang up, press [SP-PHONE].
[SP-PHONE]
and Indicator
MIC
• To transfer the call to another person, see page 40.
• If the ringer volume is turned off, the unit will not ring (p. 16, 17).
24
Page 25

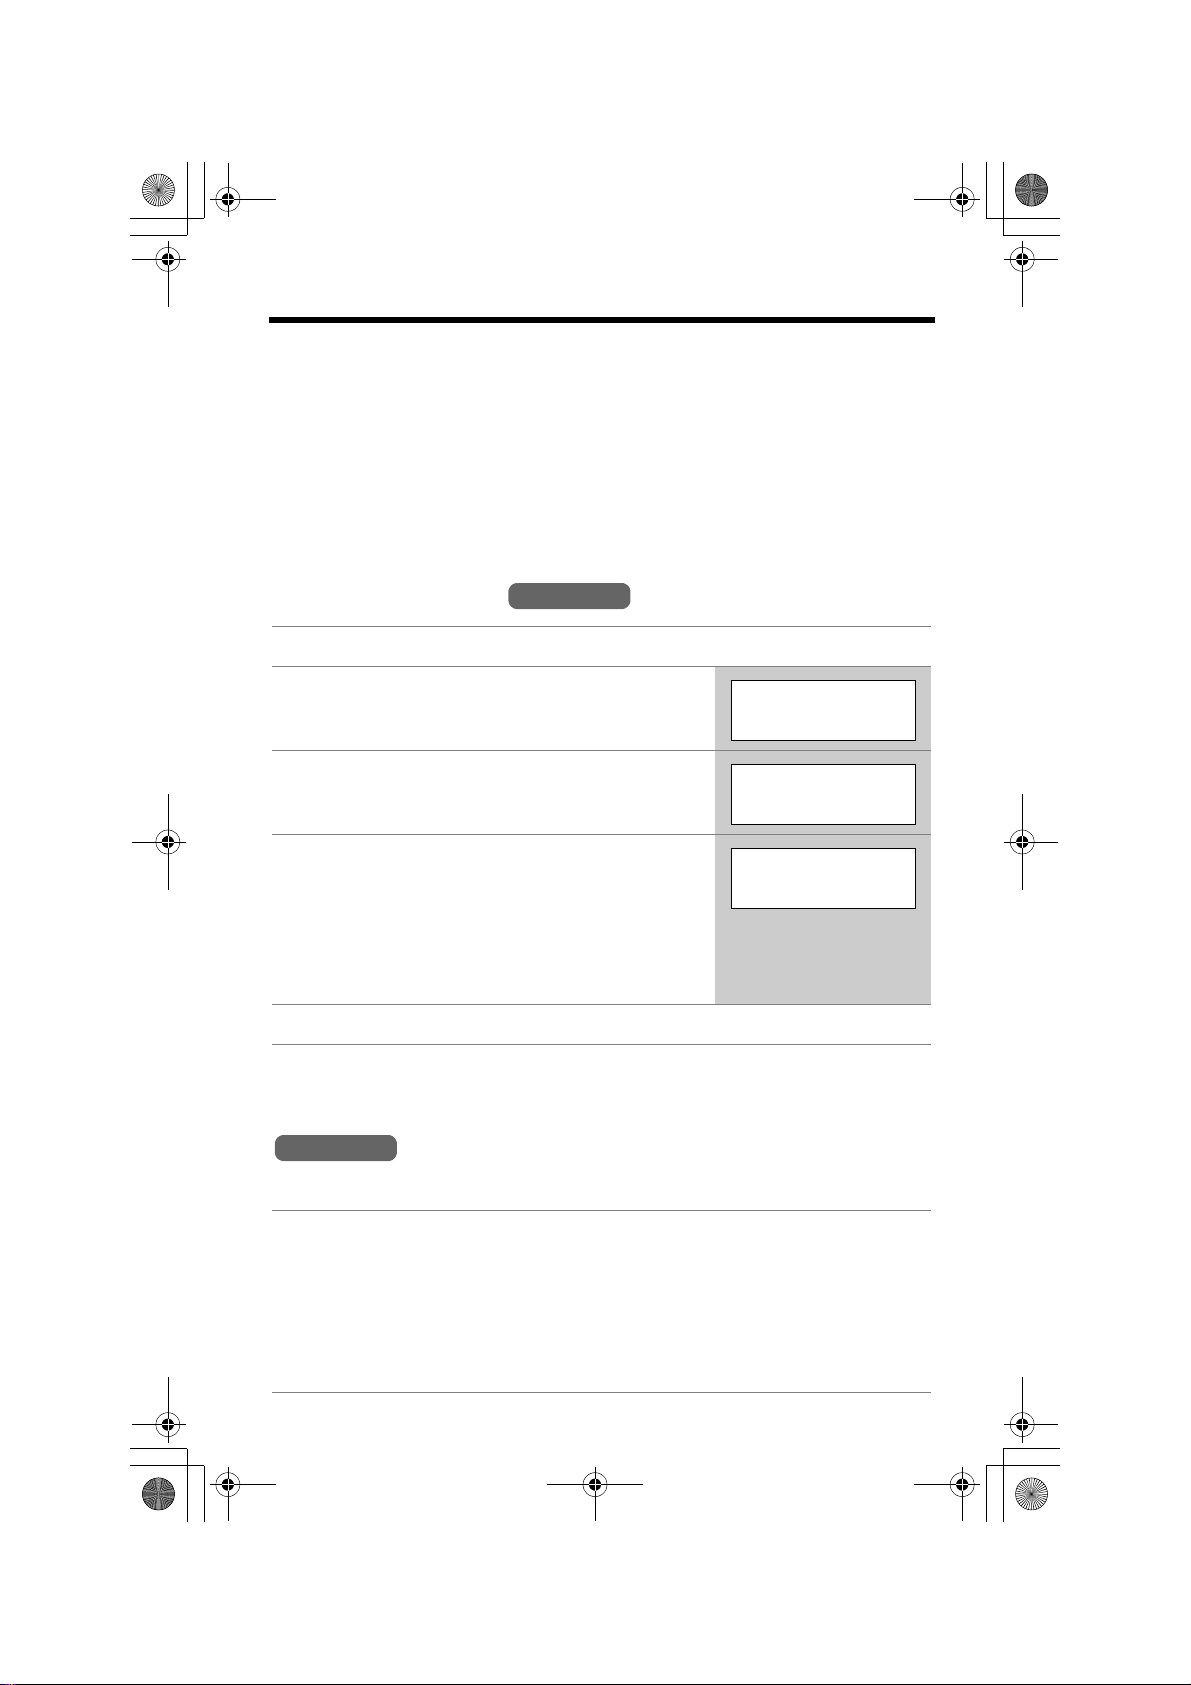
PQQX14670ZA.book 25 ページ 2005年2月22日 火曜日 午後12時0分
Caller ID Service
This unit is compatible with Caller ID services offered by your telephone company. If
you subscribe to Caller ID, caller’s information will be displayed and recorded in the
Caller List.
How Caller ID information is displayed
When a call comes in, the unit will ring and the caller
information will be received. Once the caller information is
received, the handset display shows the caller’s phone
number after the ring.*
• After you answer the call, the display will show the
length of the call.
*Private name display
If you receive a call from one of the phone numbers
stored in the phone book, the handset will show the
caller’s name stored in the phone book.
• To use this function, names and phone numbers must be stored in the phone book
(p. 33).
Example
15552223333
Example
TINA ROBINSON
15552223333
Basic Operation
• If the unit does not receive Caller ID information, one of the following will be
displayed:
Display Meaning
Out of area The caller dialed from an area which does not provide
Caller ID service.
Private caller The caller requested not to send his/her information.
• Depending on the radio communications with the base unit, the handset may not
display Caller ID information immediately after the ring.
• If your unit is connected to a PBX which does not support Caller ID, you cannot
access Caller ID service.
• If the name and the time/date display service is available in your area, the display
will show callers’ names and the time/date the calls were received. For further
information, please contact your telephone company.
• You need to adjust the date and time to show the time and date the calls were
received in the Caller List (p. 13).
25
Page 26

PQQX14670ZA.book 26 ページ 2005年2月22日 火曜日 午後12時0分
Caller ID Service
Using Talking Caller ID
To use this feature, you need to subscribe to Caller ID. For further information,
please contact your telephone company.
To activate this feature, you must turn this feature on (p. 27).
When a call is received, the unit will ring and receive
caller information.
If you receive a call from one of the same phone
numbers stored in the phone book or if the name
display service is available in your area, the caller’s
name will be displayed.
Example
TINA ROBINSON
15552223333
Announcing caller information (Talking Caller ID)
If the caller’s phone number is stored in the phone book, the handset and base unit
will announce the name stored in that phone book (Ex. “Call from TINA
ROBINSON”) following every ring.
• If the caller’s phone number is not stored in the phone book, “Number available” is
announced, indicating you should look at the display to see who is calling.
• Depending on your telephone company, the unit may announce “Number available”
before announcing the caller’s name stored in the phone book.
• If the unit does not receive Caller ID information, the unit will announce “Call from
out of area” or “Call from private caller”.
• If the ringer volume of the handset and base unit is off, caller names will not be
announced. The announcement is heard at the handset or base unit ringer
volume (p. 16, 17).
• If this feature is turned off, caller names will not be announced (p. 27).
• Name pronunciation may vary.
• The unit will announce each letter of abbreviations, such as “Co.” and “Inc.”.
• Caller ID supports names of up to 15 letters. If the caller’s name has more than
15 letters, the name will not be displayed or announced correctly.
• Your unit may mute one or more rings in order to announce the name of the caller.
Talking Caller ID takes precedence over ringing.
26
Page 27

PQQX14670ZA.book 27 ページ 2005年2月22日 火曜日 午後12時0分
Caller ID Service
To turn Talking Caller ID on or off
You can turn Talking Caller ID on or off for the handset and base unit separately. If
this feature is off, the unit will not announce caller names. The factory preset is
OFF.
Handset Talking Caller ID feature
1 Press [MENU].
Handset
2 Scroll to “Talk Caller ID” by pressing [
or [
B
], then press Select.
3 Select “On” or “Off” by pressing [
d
] or [B].
d
]
Talk Caller ID
d
Back Select
K
Talk Caller ID
:Off
Back Save
K
BL
d
BL
4 Press Save, then press [OFF].
Base unit Talking Caller ID feature
This feature must be turned on or off for the base unit by using the handset.
Handset
1 Press [MENU].
2 Scroll to “Initial setting” by pressing [
or [
B
], then press Select.
3 Scroll to “Set base unit” by pressing [
[
B
], then press Select.
4 Scroll to “Talk Caller ID” by pressing [
or [
B
], then press Select.
d
d
] or
d
]
]
Initial setting
d
Back Select
K
BL
Set base unit
d
Back Select
K
BL
Talk Caller ID
d
Back Select
K
BL
Basic Operation
5 Select “On” or “Off” by pressing [
6 Press Save, then press [OFF].
d
] or [B].
Talk Caller ID
:Off
Back Save
K
d
BL
27
Page 28

PQQX14670ZA.book 28 ページ 2005年2月22日 火曜日 午後12時0分
Using the Caller List
The unit can record information up to 50 different callers and store this information
in the Caller List. Caller information is sorted by the most recent call to the oldest.
When the 51
The unit will also tell you how many calls you missed while you were out or
unavailable to answer the phone.
2 missed calls
Charging
1 The display will show the number of calls you missed.
2 Press Rcvd calls to review other calls logged in the Caller List.
• If there are no items in the Caller List, “Rcvd calls” will not be displayed.
• After viewing the missed call entries, “missed calls” will disappear from the
display.
st
call is received, the information from the 1st call is deleted.
Handset off the base unitHandset on the base unit
1
2
2 missed calls
Rcvd Phone
calls book
K
L
1
Viewing the Caller List
1 Press Rcvd calls, [
Caller List.
2 To search from the most recent call, press [
To search from the oldest call, press [
d
], or [B] to enter the
Handset
B
].
Ex. 2 calls missed.
2 missed calls
Rcvd Phone
calls book
K
2 missed calls
d
B
=Scroll list
All erase
K
d
].
Example
15553334444
3:10P 29JUN.
Erase Select
K
3 Press [OFF] to exit the list.
• If you do not press any buttons for 60 seconds, the unit will exit the Caller List.
L
L
28
Page 29

PQQX14670ZA.book 29 ページ 2005年2月22日 火曜日 午後12時0分
Using the Caller List
• If a call has name information, the caller’s name and
phone number are alternately displayed in step 2 on
page 28 as shown on the right.
→
• If an arrow (
in step 2 on page 28, the whole phone number will not
be shown. Press [*] to see the remaining numbers or
to return to the previous display. Each time you press
[*], the display will change alternately.
) is displayed after the number
What “,” means
“,” indicates you have already viewed this calling
information or answered the call. If the same caller calls
again, the call entry with the “,” will be replaced with the
new call entry.
If a caller calls more than once
The number of times the same caller called is displayed
(“×2” to “×9”). The date and time of the most recent call will
be recorded. After viewing a caller’s information, “×2” to
“×9” will be replaced with “,”.
JACK SMITH
3:10P 29JUN.
Erase Select
K
15553334444
3:10P 29JUN.
Erase Select
K
122233344445555
3:10P 29JUN.
Erase Select
K
[*]
1222333444455556
666
Erase Select
K
15553334444
3:10P 29JUN. ,
Ex. Called 2 times.
15553215555
11:20A 12JUN. ×2
L
L
→
L
L
Basic Operation
Calling Back from the Caller List
1 Press Rcvd calls, [
2 Scroll to the desired caller by pressing [
d
], or [B] to enter the Caller List.
d
] or [B].
Handset
3 Press [C] or [s].
• The phone number is dialed.
• In some cases, you may have to edit the number before dialing (p. 30).
• If a phone number is not displayed in the caller information, you cannot call that
caller back from the Caller List.
29
Page 30

PQQX14670ZA.book 30 ページ 2005年2月22日 火曜日 午後12時0分
Using the Caller List
Editing the Caller’s Phone Number
You can edit a phone number in the Caller List to call it back or store it in the phone
book.
1 Press Rcvd calls, [
Caller List.
2 Scroll to the desired caller by pressing [
[
B
].
d
], or [B] to enter the
d
] or
Handset
2 missed calls
Rcvd Phone
calls book
K
2 missed calls
d
B
=Scroll list
All erase
K
15553215555
11:20A 12JAN.
Erase Select
K
L
L
3 Press Select.
4 Press Edit.
5 Add or erase digits to the beginning of the
number as desired.
• To add a digit, enter a number.
f
• To erase a digit, press
or [#].
15553215555
Edit Save
K
|
15553215555
f
MENU=Save P
K
0|15553215555
f
MENU=Save P
K
L
L
L
6 To make a call to the edited number, press [C] or [s].
To store the edited number in the phone book, press [MENU].
• If the phone number has no name information when it is stored, continue from
(a) under step 4 of “Storing Caller Information in the Phone Book” on page 31.
• The number edited in step 5 will not be maintained in the Caller List.
• You cannot edit a phone number, if the Dial Lock is turned on (p. 47).
To quickly add or erase a digit at the beginning of a phone number in
the Caller List
1. Follow steps 1 and 2 above.
2. Add or erase digits to the beginning of the number as desired.
• To add a digit, enter a number.
• To erase a digit, press [#].
3. To make a call to the edited number, press [C] or [s].
To store the edited number in the phone book, press [MENU].
30
Page 31

PQQX14670ZA.book 31 ページ 2005年2月22日 火曜日 午後12時0分
Using the Caller List
Storing Caller Information in the Phone Book
Handset
Caller’s phone numbers that are in the Caller List can be stored in the phone book.
1 Press Rcvd calls, [
d
], or [B] to enter the
Caller List.
2 Scroll to the desired caller by pressing [
[
B
].
d
3 Press Select.
• If the number requires editing, see page 30.
4 Press Save.
(a) If there is no name information for the caller,
“Enter name” will be displayed.
—You can enter a name by performing the
following steps:
(1) enter the name (p. 34),
d
(2) press [
(3) press Save.
—If a name is not required, press [
press Save.
(b) If there is already name information for the
caller, the item will be stored.
• To continue storing other items, repeat from
step 2.
• To exit programming mode, press [OFF].
], and
d
], then
] or
2 missed calls
Rcvd Phone
calls book
K
2 missed calls
d
B
=Scroll list
All erase
K
15553215555
11:00A 12JAN. ×3
Erase Select
K
15553215555
Edit Save
K
Enter name
|
dg
=Next
L
L
L
L
CINDY TURNE|R
fd g
=Next
K
L
Basic Operation
• You cannot store Caller List item in the phone book if a phone number is not
displayed or the Dial Lock is turned on (p. 47).
31
Page 32

PQQX14670ZA.book 32 ページ 2005年2月22日 火曜日 午後12時0分
Using the Caller List
Erasing Caller Information
Handset
To erase a specific caller
1 Press Rcvd calls, [
Caller List.
2 Scroll to the desired caller by pressing [
[
B
], then press Erase.
• To erase other items, repeat step 2.
• To exit the Caller List, press [OFF].
d
], or [B] to enter the
d
] or
2 missed calls
Rcvd Phone
calls book
K
2 missed calls
d
B
=Scroll list
All erase
K
18887776666
12:20A 12JAN.
Erase Select
K
Erased
To erase all entries
Before erasing all entries, make sure that you have viewed all missed calls.
1 Press Rcvd calls, [
Caller List.
d
], or [B] to enter the
Rcvd Phone
calls book
K
L
L
L
2 Press All erase.
3 Press Yes.
• All entries in your Caller List are erased.
• To cancel erasing, press No after step 2.
32
0 missed call
d
B
=Scroll list
All erase
K
All erase?
No Yes
K
All erased
L
Page 33

PQQX14670ZA.book 33 ページ 2005年2月22日 火曜日 午後12時0分
Phone Book
The handset can store up to 50 names and phone numbers in its phone book. You
can make a call by selecting a name or number from the phone book.
Storing Names and Numbers
1 Press Phone book.
2 Press Add.
• The display will show the number of stored items.
3 Enter a name of up to 16 characters with the
dialing buttons ([0] to [9]) (p. 34), then press
[
d
].
• If a name is not required, press [d] then go to
step 4.
4 Enter a phone number of up to 32 digits.
• Each time you press f, a digit is erased. To erase
all of the digits, press and hold f.
• If a pause is required when dialing, press
A pause is stored in a phone number as one digit
(p. 44).
P.
Handset
Rcvd Phone
calls book
K
Phone book
7 items
Add Search
K
Enter name
|
=Next
Example
To|m
fd g
=Next
K
Enter phone no.
P
Example
5557654321
fd
=Next P
K
L
L
dg
L
L
L
Advanced Operation
|
L
5 Press [
• If you want to change the name, press Edit.
• If you want to change the number, press [
d
].
The display returns to step 3. Change the name.
B
].
The display returns to step 4. Change the number.
Tom
5557654321
Edit Save
K
6 Press Save.
• To continue storing other items, repeat from
step 2.
7 Press [OFF].
When the Dial Lock is turned on (p. 47), only numbers stored in the phone book
as emergency numbers can be dialed.
To store an emergency number:
When storing a name in step 3, press [1] to enter # at the beginning of the name
(p. 34).
L
33
Page 34

PQQX14670ZA.book 34 ページ 2005年2月22日 火曜日 午後12時0分
Phone Book
• To store numbers for calling card access (see “Chain Dial” on page 36), we
recommend you add pauses after each item. Storing pauses with numbers will
prevent misdialing (p. 44). The delay time necessary will depend on your
telephone company.
• You cannot store a name and phone number in the phone book if the Dial Lock is
turned on (p. 47).
Selecting characters to enter names
Enter names using the dialing buttons. Press each button until the desired
character is displayed.
• Pressing each button selects a character in the order shown below.
Keys
[1]
[2]
[3]
[4]
[5]
f
g
For example, to enter “Tom”:
Characters
# & ’ ( ) ; , – . / 1
a b c A B C 2
d e f D E F 3
g h i G H I 4
j k l J K L 5
Erases the character to the left.
Moves the cursor to the right.
(To enter another character using the same number key,
move the cursor to the next space.)
Keys
[6]
[7]
[8]
[9]
[0]
1 Press [8] four times.
2 Press [6] three times, then press
the cursor.
3 Press [6] once.
Characters
m n o M N O 6
p q r s P Q R S 7
t u v T U V 8
w x y z W X Y Z 9
0 Space
|
T
g
to move
To
To|m
|
If you make a mistake when entering a name or number
Use f to erase the incorrect character. Each time you press f, a character is
erased. Re-enter the correct character. To erase all characters, press and hold f.
34
Page 35

PQQX14670ZA.book 35 ページ 2005年2月22日 火曜日 午後12時0分
Phone Book
Dialing from the Phone Book
Handset
1 Press Phone book.
2 Press Search.
3 Scroll to the desired item. To scroll down,
press [
d
]. To scroll up, press [B].
Phone book items are sorted in the following order:
1
2
3
4
5
Alphabet letters (Alphabetical)
Space & ’ ( ) , – . /
Numbers 0 to 9
# ;
Telephone numbers (If no name is stored)
4 Press [C] or [s].
• The displayed phone number is dialed.
•If “No items stored” is displayed in step 1, the phone book is empty.
• To exit the phone book, press [OFF].
• To view a phone number over 16 digits long, repeat steps 1 to 3, then press Edit
d
and then [
• To quickly search the desired item, press [d] or [B] after step 1.
]. When finished, press [OFF].
Phone book
7 items
Add Search
K
0-9=Name search
d
B
=Scroll list
Frank
4445555
Erase Edit
K
L
L
Advanced Operation
To search for a name by initial
1. Press Phone book.
2. Press Search.
3. Press the dialing button for the first letter of the desired name until any
name with the same initial is displayed (see the Index on page 36).
Ex. To find “Frank”, press [3] repeatedly until the first item under “F” is displayed.
• If there are no items beginning with the character you selected, the first item in
the next alphabetical index will be displayed.
4. Press [d] repeatedly until the desired name is displayed.
35
Page 36

PQQX14670ZA.book 36 ページ 2005年2月22日 火曜日 午後12時0分
Phone Book
Index table
Keys
[1]
[2]
[3]
[4]
[5]
Symbols, 1
A, B, C, 2
D, E, F, 3
G, H, I, 4
J, K, L, 5
Chain Dial
You can dial a combination of phone book or manual key pad entries while making
a call. This feature can be used, for example, to first automatically dial a calling card
access number that you have stored in the phone book, then manually or
automatically dial your PIN and then automatically dial the destination number from
the phone book.
Ex. Using a long distance calling card
• To prevent misdialing, we recommend you add pauses where needed when
storing numbers. For example, add pauses after a calling card access number
and your PIN when storing in the phone book (p. 33).
1. Search and dial from phone book: 18000123456 (Calling card access number)
• The voice guidance may be announced.
2. Search and dial from phone book: 1234 (Calling card PIN)
3. Search and dial from phone book: 15550123456 (Destination number)
Index Keys Index
[6]
[7]
[8]
[9]
[0]
M, N, O, 6
P, Q, R, S, 7
T, U, V, 8
W, X, Y, Z, 9
0, Space
Handset
1 While you are on a call;
Press [MENU].
2 Search for the desired item by pressing [
[
B
].
• To search for an item by initial, see page 35.
3 Press Call.
• The phone number is dialed.
• If required, repeat steps 1 to 3 for any remaining
numbers.
• If you have rotary or pulse service, you need to press [*] before pressing
[MENU] in step 1 to change the dialing mode temporarily to tone.
d
] or
Phone book
d
B
=Scroll list
Back Search
K
Alan
15550123456
Back Call
K
36
L
L
Page 37

PQQX14670ZA.book 37 ページ 2005年2月22日 火曜日 午後12時0分
Phone Book
Editing an Item in the Phone Book
1 Press Phone book.
2 Press Search.
3 Scroll to the desired item by pressing [
[
B
], then press Edit.
• To search for the item by initial, see page 35.
4 Edit the name (p. 34), then press [
• If you do not need to change the name, press [d]
then go to step 5.
5 Edit the phone number, then press [
• If you do not need to change the number, press
[d] then go to step 6.
f
• Each time you press
all of the digits, press and hold f.
, a digit is erased. To erase
6 Press Save.
• To continue editing other items, repeat from step 3.
7 Press [OFF].
• You cannot edit an item, if the Dial Lock is turned on (p. 47).
d
d
] or
].
Jane
3456789
K
Jane Walke
K
d
].
5553456789
K
Handset
|
r
|
L
L
L
Erase Edit
fd g
=Next
fd
=Next P
Advanced Operation
Erasing an Item in the Phone Book
Handset
1 Press Phone book.
2 Press Search.
3 Scroll to the desired item by pressing [
[
B
], then press Erase.
• To search for the item by initial, see page 35.
4 Press Yes.
• To erase other items, repeat from step 3.
d
] or
Helen
5557778888
Erase Edit
K
Erase?
No Yes
K
5 Press [OFF].
• To cancel erasing, press No after step 3.
• You cannot erase an item, if the Dial Lock is turned on (p. 47).
L
L
37
Page 38

PQQX14670ZA.book 38 ページ 2005年2月22日 火曜日 午後12時0分
Intercom
Intercom calls can be made between the handset and the base unit.
Making Intercom Calls
From
1 Press [HOLD/INTERCOM].
2 When the paged party answers, start talking.
Handset
• The base unit will ring for 1 minute.
• To stop paging, press [OFF].
• You can switch to the speaker by pressing [s]. To
switch back to the receiver, press [C].
Calling Base
Intercom
00-00-05
Mute
3 To disconnect the intercom, press [OFF].
From
Using this feature, you can also locate a misplaced handset.
Base Unit
1 Press [LOCATOR/INTERCOM].
• The SP-PHONE indicator lights.
• The handset will ring for 1 minute.
• To stop paging, press [SP-PHONE] or [LOCATOR/INTERCOM].
2 When the paged party answers, talk into the MIC.
3 To disconnect the intercom, press [SP-PHONE] or
[LOCATOR/INTERCOM].
• The indicator light goes out.
L
During an intercom call:
• If you have difficulty hearing while using the handset speakerphone and base
unit speaker, decrease the speaker volume by pressing VOLUME [<] on the
base unit or [d] on the handset.
• If an incoming call is being received, you will hear two tones (incoming call
tone, page 45) and the IN USE indicator will flash rapidly on the base unit.
To answer the call;
— if using the handset, press [OFF], then [C] or [s].
— if using the base unit, press [SP-PHONE] twice.
38
Page 39

PQQX14670ZA.book 39 ページ 2005年2月22日 火曜日 午後12時0分
Intercom
Answering Intercom Calls
Handset
When the handset is paged, it rings and the Ringer indicator flashes rapidly.
1 Press [C], [s] or [HOLD/INTERCOM].
• You can also answer a call by pressing any button
d
except [
], [B] or [OFF].
Call from Base
2 To disconnect the intercom, press [OFF].
• If the Auto Talk feature is turned on (p. 15), you can also answer a page by simply
lifting the handset off the base unit.
Base Unit
When the base unit is being paged, it rings.
1 Press [SP-PHONE] or [LOCATOR/INTERCOM].
2 To disconnect the intercom, press [SP-PHONE] or
[LOCATOR/INTERCOM].
• When the ringer volume is turned off (p. 16, 17), the handset and the base unit
will ring at the low level for intercom calls.
• You cannot change the ringer tone for intercom calls.
Advanced Operation
39
Page 40

PQQX14670ZA.book 40 ページ 2005年2月22日 火曜日 午後12時0分
Transferring a Call
You can transfer an outside call to the base unit or the handset.
From the to the
1 Handset:
(1)
During a call, press
• The call is put on hold.
(2) Press Base.
(3) Wait for the paged party to answer, then
you can announce the transfer.
• After the paged party answers, “Intercom
• If the paged party does not answer, press [C]
2 Base unit:
Press [SP-PHONE] or [LOCATOR/INTERCOM] to answer the page.
3 Handset: To complete the transfer, press [OFF].
Handset Base Unit
[HOLD/INTERCOM]
hold” is displayed.
or [s] to return to the outside call.
.
Line on hold.
Transfer to
K
Hold
Calling Base
Base
From the to the
1 Base unit:
• The call is put on hold.
• If the paged party does not answer, press [LOCATOR/INTERCOM] to return
to the outside call.
Base Unit Handset
During a call, press
[LOCATOR/INTERCOM]
.
2 Handset: Press [C], [s] or [HOLD/INTERCOM] to answer the page.
• You can also answer a call by pressing any button except [d], [B] or [OFF].
3 Base unit: To complete the transfer, press [SP-PHONE].
40
Page 41

PQQX14670ZA.book 41 ページ 2005年2月22日 火曜日 午後12時0分
Transferring a Call
Quick call transfer
You can transfer a call without waiting for the paged party to answer.
Handset
1 During a call, press [HOLD/INTERCOM], then press Base.
2 Press [OFF] to hang up.
Base Unit
1 During a call, press [LOCATOR/INTERCOM].
2 Press [SP-PHONE] to hang up.
• The call will be transferred directly.
• The paged party can answer the transferred call by pressing [C], [s] or
[SP-PHONE].
• After the paged party answers, the transfer is complete.
• If the paged party does not answer:
—for the handset, press [C] or [s] to return to the outside call.
—for the base unit, press [SP-PHONE] to return to the outside call.
• If the paged party does not answer within 60 seconds after you hang up, your
phone will ring and the call will be returned to your phone. You may speak to the
caller again by pressing [C], [s] or [SP-PHONE].
If you do not answer the call within 4 minutes, the call will be disconnected.
Advanced Operation
41
Page 42

PQQX14670ZA.book 42 ページ 2005年2月22日 火曜日 午後12時0分
Conference Calls
While you are talking with an outside caller, the base unit user or the handset user
can join the conversation and establish a conference call.
Handset
1 During a call, press
[HOLD/INTERCOM].
• The call is put on hold.
2 Press Base.
3 When the paged party answers,
press Conf on your unit to
make a conference call.
•“Conference” is displayed
during a conference call.
• To leave the conference, press [OFF] on the handset or press [SP-PHONE] on
the base unit. The two other parties can continue the conversation.
• During a conference, the outside call can be placed on hold by pressing
[HOLD/INTERCOM] on the handset or [HOLD/CONF] on the base unit. Internal
communications are not suspended. Only the person who placed the call on hold
can resume the full conference by pressing Conf on the handset or [HOLD/
CONF] on the base unit.
Base Unit
1 During a call, press
[LOCATOR/INTERCOM].
• The call is put on hold.
2 When the paged party answers,
press [HOLD/CONF] on your
unit to make a conference call.
Call Share
This feature allows the base unit or the handset to join an existing outside call.
To join a conversation (Call Share)
Handset
Press [C] or [s].
•“Conference” is displayed.
Base Unit
Press [SP-PHONE].
42
Page 43

PQQX14670ZA.book 43 ページ 2005年2月22日 火曜日 午後12時0分
Special Features
Temporary Tone Dialing
(For Rotary or Pulse Service Users)
Handset Base Unit
[*] (TONE) before entering access numbers which require tone dialing.
Press
• The dialing mode changes to tone. You can enter numbers to access an
answering service, electronic banking service, etc. When you hang up, the dialing
mode will return to pulse.
Muting Your Conversation
During a call, you can mute your phone so the other party cannot listen to you.
When muting your conversation, you can hear the other party.
Handset
•“Mute” will flash.
• To release the mute, press Mute again.
• If you press [C] or [s] to switch between the receiver
and speaker, the mute will be released.
Base Unit
• The SP-PHONE indicator flashes.
• To release the mute, press [MUTE] again.
Press Mute.
Press [MUTE].
Talk
00-00-30
(VE) Mute
K
For Call Waiting Service Users
Handset Base Unit
L
40
Advanced Operation
Press [FLASH/CALL WAIT] if you hear a call waiting tone during a conversation.
• The first call is put on hold and you can answer the second call.
• To return to the first caller, press [FLASH/CALL WAIT] again.
• Call Waiting service cannot be used when the first call is put on hold.
• If this function does not operate properly, consult your telephone company for
details.
43
Page 44

l
PQQX14670ZA.book 44 ページ 2005年2月22日 火曜日 午後12時0分
Special Features
Using the PAUSE Key
(For PBX Line/Long Distance Calls)
We recommend you press Pause or P if a pause is
required for dial with a PBX or to make a long distance call.
Ex. Line access number [9] (PBX)
[9] N Pause or P N
• Pressing Pause or P once creates a 3.5 second pause.
This prevents misdialing when you dial after confirming
the entered number (p. 21) or dial a stored number
(p. 35, 36).
• Pressing Pause or P more than once increases the length of the pause between
numbers.
Phone number
Handset
Examp
e
9P15556667777
Clear Pause
K
OR
9P15551234567
fd
=Next P
K
|
L
|
L
FLASH Button
Pressing [FLASH/CALL WAIT] allows you to use special features of your host PBX
such as transferring an extension call, or accessing optional telephone services
such as call waiting.
• Pressing [FLASH/CALL WAIT] cancels Temporary Tone Dialing mode or the
mute (p. 43).
Selecting the flash time
The flash time required depends on your telephone exchange or host PBX.
You can select the following flash times: “700, 600, 400, 300, 250, 110, 100 or
90 ms (milliseconds)”. The factory preset is “700 ms”.
• If PBX functions do not work correctly, consult your PBX supplier for the correct
settings.
Handset Base Unit
Handset
1 Press [MENU].
2 Scroll to “Initial setting” by pressing [
or [
B
], then press Select.
3 Scroll to “Set tel line” by pressing [
[
B
], then press Select.
4 Scroll to “Set flash time” by pressing [
or [
B
], then press Select.
d
d
] or
d
]
Initial setting
d
Back Select
K
BL
Set tel line
d
Back Select
K
BL
]
Set flash time
d
Back Select
K
BL
5 Select the desired time by pressing [
d
] or [B].
Set flash time
:700ms
Back Save
K
d
BL
6 Press Save, then press [OFF].
44
Page 45

PQQX14670ZA.book 45 ページ 2005年2月22日 火曜日 午後12時0分
Special Features
Incoming Call Tone
During an intercom call (p. 38), you can be informed of incoming calls by two tones.
If this feature is turned on, incoming call tones will be heard for as long as the line is
ringing. If this feature is set to “2”, incoming call tones will be heard only 2 times.
If this feature is turned off, no tones will be heard. The factory preset is “2”. Using
the handset, this feature can be set separately for the handset and base unit.
Handset incoming call tone
Handset Base Unit
Handset
1 Press [MENU].
2 Press Select at “Ringer setting”.
Ringer setting
d
BL
d
BL
d
BL
3 Scroll to “Incoming call.” by pressing [
or [
B
], then press Select.
4 Select “On”, “Off” or “2” by pressing [
d
] or [B].
5 Press Save, then press [OFF].
Base unit incoming call tone
Handset
d
Back Select
K
]
Incoming call.
Back Select
K
Incoming call
tone :2
Back Save
K
Advanced Operation
1 Press [MENU].
2 Scroll to “Initial setting” by pressing [
or [
B
], then press Select.
3 Scroll to “Set base unit” by pressing [
[
B
], then press Select.
d
4 Scroll to “Incoming call.” by pressing [
or [
B
], then press Select.
5 Select “On”, “Off” or “2” by pressing [
d
] or [B].
6 Press Save, then press [OFF].
d
] or
d
]
]
Initial setting
d
Back Select
K
BL
Set base unit
d
Back Select
K
BL
Incoming call.
d
Back Select
K
Incoming call
tone :2
Back Save
K
BL
d
BL
45
Page 46

PQQX14670ZA.book 46 ページ 2005年2月22日 火曜日 午後12時0分
Special Features
Key Tone
You can select whether or not the handset keys will sound tones (key tone,
confirmation tone, error tone). The factory preset is ON.
Handset
1 Press [MENU].
2 Scroll to “Initial setting” by pressing [
or [
B
], then press Select.
3 Scroll to “Key tone” by pressing [
then press Select.
4 Select “Off” or “On” by pressing [
d
] or [B],
d
] or [B].
d
]
Initial setting
d
Back Select
K
BL
Key tone
d
Back Select
K
Key tone
:On
Back Save
K
BL
d
BL
5 Press Save, then press [OFF].
46
Page 47

PQQX14670ZA.book 47 ページ 2005年2月22日 火曜日 午後12時0分
Special Features
Dial Lock
The Dial Lock feature allows you to prevent others from making calls with the
handset and base unit. You can turn the Dial Lock on for both the handset and base
unit using the handset or the base unit. To use this feature, turn the feature on. The
factory preset is OFF.
When the Dial Lock is turned on, only numbers stored in the phone book as
emergency numbers (numbers stored with a # at the beginning of the name) can
be dialed (p. 33). We recommend storing emergency numbers in the phone
book before using this feature.
Handset Base Unit
To turn the Dial Lock on (use either the handset or the base unit)
Handset
1 Press [MENU].
2 Scroll to “Dial lock” by pressing [
then press Select.
3 Enter a 4-digit password.
• This password is required when canceling the Dial
Lock.
• If more than 4 digits are entered, the last 4 digits
are the password.
4 Press Save.
d
] or [B],
Dial lock
d
Back Select
K
Enter password
:_ _ _
Back
K
Example
Enter password
:1234
Back Save
K
BL
_
L
Advanced Operation
5 Press Yes, then press [OFF].
•“Dial lock on” is displayed.
Base Unit
Turn Dial lock
on?
Back Yes
K
1 Press [DIAL LOCK].
• The DIAL LOCK indicator flashes.
2 Enter a 4-digit password.
• If more than 4 digits are entered, the last 4 digits are the password.
3 Press [#].
4 Enter the password again.
5 Press [DIAL LOCK].
• A long beep sounds and the indicator lights.
• If the base unit beeps 3 times, the wrong password was entered in step 4.
Start again from step 1.
L
47
Page 48

PQQX14670ZA.book 48 ページ 2005年2月22日 火曜日 午後12時0分
Special Features
• If the Dial Lock is turned on, the handset displays “Dial lock” while not in use
and the DIAL LOCK indicator on the base unit lights. “Dial lock” is not
displayed, if the handset is off the base unit when there are missed calls (p. 28).
• If you make a call while the Dial Lock is turned on:
— using the handset, the handset beeps 3 times and “Dial locked” is
displayed.
— using the base unit, the base unit beeps 3 times.
• Please write down your password. If you forget your password, consult your
nearest Panasonic service center.
To cancel the Dial Lock (use either the handset or the base unit)
Handset
1 Press [MENU].
2 Scroll to “Dial lock” by pressing [
then press Select.
3 Enter the password set when the Dial Lock
was turned on.
4 Press Save.
5 Press Yes, then press [OFF].
•“Dial lock off” is displayed.
• If you entered the wrong password, the handset
beeps 3 times and “Save error” is displayed.
Enter the correct password.
Base Unit
d
] or [B],
Dial lock
d
Back Select
K
Enter password
:_ _ _
Back
K
Enter password
:
@@@@
Back Save
K
Turn Dial lock
off?
Back Yes
K
BL
_
1 Press [DIAL LOCK].
•The DIAL LOCK indicator flashes.
2 Enter the password set when the Dial Lock was turned on.
3 Press [DIAL LOCK].
• A long beep sounds and the indicator light goes out.
• If you entered the wrong password, the base unit beeps 3 times. Start again
from step 1.
L
L
48
Page 49

PQQX14670ZA.book 49 ページ 2005年2月22日 火曜日 午後12時0分
Special Features
Re-registering the Handset
If “No link to base. Move closer to base, try again.” is displayed
even when using the handset near the base unit, the handset may have lost
communication with the base unit. You need to re-register the handset to the base
unit.
• Have both the handset and base unit nearby during registration.
• Follow steps 1 and 2 listed below. You have about 1 minute to complete
them.
Handset & Base Unit
1 Base unit:
Press and hold [LOCATOR/INTERCOM] until a beep sounds.
• The CHARGE indicator flashes.
2 Handset:
Press and hold [FLASH/CALL WAIT] until
“Handset Registering” is displayed.
• When registration is complete, a beep sounds
from the handset.
• Wait for 20 seconds after registration is
complete while the handset establishes
communication with the base unit.
• If the handset beeps 3 times and “Error!!” is displayed, an error occurred. Try
again from step 1.
• You can stop registration by pressing [OFF] on the handset, and pressing
[LOCATOR/INTERCOM] on the base unit.
Handset
Registering
Handset [1]
Registered
Advanced Operation
49
Page 50

PQQX14670ZA.book 50 ページ 2005年2月22日 火曜日 午後12時0分
Belt Clip
You can hang the handset on your belt or pocket using the included belt clip.
To attach the belt clip To remove the belt clip
Shoulder Rest Attachment
Use the shoulder rest attachment if you need to keep your hands free during a
phone conversation.
To attach the shoulder rest
attachment
Attach the included belt clip to the
handset (see above), then attach the
shoulder rest attachment to the belt clip
as shown below. You will hear a click
when the shoulder rest attachment is in
place.
To remove the shoulder
rest attachment
Slide the base of the attachment in the
direction of the arrow as shown below.
50
Page 51

PQQX14670ZA.book 51 ページ 2005年2月22日 火曜日 午後12時0分
Wall Mounting
This unit can be mounted on a wall.
1 Push the hook and turn it
upward. Turn the hook until a
click is heard.
2 Press the tabs in the direction
of the arrows (1), then remove
the wall mounting adaptor (2).
2
4 Install screws using the wall
template below. Connect the
telephone line cord. Mount the
unit, then slide it down.
• Raise the antenna.
Screws
(not included)
8.3 cm
To Single-Line
Telephone Jack
1 1
3 Connect the AC adaptor. Tuck
the telephone line cord inside
the wall mounting adaptor, then
push the adaptor in the direction
of the arrows (1 and 2).
• The word “UP WALL” should face
upward.
• Fasten the AC adaptor cord to
prevent it from being disconnected.
Hook
2
1
To Power Outlet
Wall Template
5 To charge the handset battery:
Rest the handset on the
charge contacts (1), then
push the top of the handset so
the hook snaps into the slot at
the top of the handset (2).
• The unit beeps once and the
CHARGE indicator lights.
Hook
Slot
2
OR
1
Useful Information
8.3 cm
51
Page 52

PQQX14670ZA.book 52 ページ 2005年2月22日 火曜日 午後12時0分
Optional Headset
Connecting the optional headset to the handset allows hands-free phone
conversation. Please use only the Panasonic KX-TCA89BX headset.
Connecting the optional headset
Open the headset jack cover, and insert the headset plug into the headset jack as
shown below.
Headset Jack
To switch to the speakerphone while using the headset:
Press [s]. To return to the headset, press [C].
52
Page 53

PQQX14670ZA.book 53 ページ 2005年2月22日 火曜日 午後12時0分
Direct Commands
Handset
After pressing [MENU], you can also program menu items directly by pressing [0]
to [9], and [*] instead of using the soft keys.
Menu item Command Selection items Page
Ringer volume [1] [1] [0] : Off [1] : Low [2] : Medium
[3] : High
Ringer tone
(for handset)
Incoming call tone
(for handset)
Date and time [4] Go to Step 3 on page 13. —
Voice enhancer [5] [1] : On [0] : Off p. 22
Dial lock [6] Go to Step 3 on page 47. —
Talking Caller ID
(for handset)
LCD contrast [0] [1] [1]–[6] : Level 1–6 p. 19
Key tone [0] [2] [1] : On [0] : Off p. 46
Auto talk [0] [3] [1] : On [0] : Off p. 15
Dial mode [0] [5] [1] [1] : Pulse [2] : Tone p. 14
Flash time [0] [5] [2] [1] : 700 ms [2] : 600 ms
Line mode [0] [5] [3] [1] : A [2] : B p. 14
[1] [2] [1]–[3] : Tone pattern 1– 3
[4]–[7] : Melody pattern 1–4
[1] [3] [1] : On [2] : Twice [0] : Off p. 45
[9] [1] : On [0] : Off p. 27
[3] : 400 ms [4] : 300 ms
[5] : 250 ms [6] : 110 ms
[7] : 100 ms [8] : 90 ms
p. 16
p. 18
p. 44
Ringer tone
(for base unit)
Incoming call tone
(for base unit)
Talking Caller ID
(for base unit)
During programming:
When “Save” is displayed, press the right soft key to save the new settings.
To exit programming, press [OFF].
• If you press the direct command incorrectly, press [OFF], then re-enter
programming mode by pressing [MENU].
• For function details, see the corresponding pages.
[0] [*] [1] [1]–[3] : Tone pattern 1–3
[4]–[7] : Melody pattern 1–4
[0] [*] [2] [1] : On [2] : Twice [0] : Off p. 45
[0] [*] [4] [1] : On [0] : Off p. 27
p. 19
Useful Information
53
Page 54

PQQX14670ZA.book 54 ページ 2005年2月22日 火曜日 午後12時0分
If the Following Appear on Your Display...
The following will be displayed when the unit needs your attention.
Display message Cause & Remedy
Recharge battery • The battery needs to be charged. Recharge the
battery (p. 9).
Charge for 6h • The battery has been discharged. The handset will
not work. Fully charge the battery (p. 9).
No link to base.
Move closer to
base, try again.
Please lift up
and try again.
Busy • The base unit is in use. Try again later.
Error!! • When you tried to re-register the handset, the
Phone book full • When you tried to store an item in the phone book,
System is busy.
Please try again
later.
Save error • The entered password was wrong in programming
• The handset has lost communication with the base
unit. Walk closer to the base unit and try again or
re-register the handset (p. 49).
• Confirm the base unit’s AC adaptor is plugged in.
• Raise the base unit antenna.
• A handset button was pressed while the handset
was on the base unit. Lift the handset and press the
button again.
handset and base unit could not link for some
reason, such as interference from electrical
appliances. Move the handset and base unit away
from any electrical appliances and try again.
the phone book memory was full. Press [OFF] to exit
the programming mode. To erase other items from
the phone book, see page 37.
• The handset has lost communication with the base
unit. Walk closer to the base unit and try again.
the Dial Lock. Enter the correct password.
Dial locked • The Dial Lock is turned on. If necessary, cancel the
Dial Lock (p. 48).
Line in use • The base unit is conducting an outside call or a
parallel connected telephone is in use.
Line on hold • The base unit is on hold for an outside call.
54
Page 55

PQQX14670ZA.book 55 ページ 2005年2月22日 火曜日 午後12時0分
Troubleshooting
If the handset display shows error messages, see “If the Following Appear on
Your Display...” (p. 54) for the Cause & Remedy.
Problem Cause & Remedy
“No link to base. Move
closer to base, try
again.” is displayed and an
alarm tone sounds.
The handset and/or base unit
does not work.
Static, sound cuts in/out,
fades. Interference from other
electrical units.
• You are too far from the base unit. Walk
closer to the base unit.
• Confirm the base unit’s AC adaptor is
plugged in.
• Raise the base unit antenna.
• If the above remedies do not solve the
problem, the handset may have lost
communication with the base unit. Register
the handset again (p. 49).
• Check the settings (p. 8 – 10).
• Check whether the dialing mode setting is
correct (p. 14).
• Fully charge the battery (p. 9).
• Clean the charge contacts and charge again
(p. 10).
• Check battery Installation (p. 9).
• Unplug the base unit’s AC adaptor to reset it.
Plug in, and try again.
• Re-install the battery (p. 9) and fully charge it.
• Move the handset and base unit away from
other electrical appliances (p. 3).
• Walk closer to the base unit.
• Raise the base unit antenna.
• If the unit is connected to a telephone line
with DSL service, you may hear noise from
the receiver or speaker during conversations.
We recommend connecting a noise filter
(contact your DSL service provider) to the
telephone line between the unit and the
telephone line jack.
The handset and/or base unit
does not ring.
The handset display is blank. • If the handset display is blank, fully charge
You cannot program any
function items.
• The ringer volume is turned off. Set to high,
medium, or low (p. 16, 17).
the battery (p. 9).
• Programming is not possible while the
handset and/or base unit is being used.
• Do not pause for over 60 seconds while
programming.
• Walk closer to the base unit.
• When the Dial Lock is turned on (p. 47), you
cannot store the phone number in the phone
book.
Useful Information
55
Page 56

PQQX14670ZA.book 56 ページ 2005年2月22日 火曜日 午後12時0分
Troubleshooting
Problem Cause & Remedy
While programming or
searching, the handset starts
to ring and the program/
search stops.
You cannot make an intercom/
outside call.
You cannot redial. • If the last number dialed was more than
The handset does not display
the caller’s phone number.
• A call is coming in. To answer the call, press
[C], [s] or [SP-PHONE]. Start again from
the beginning after hanging up.
• If the handset or base unit is in use, you may
not be able to make a call. Try again later.
• You cannot make an outside call when the
Dial Lock is turned on. To cancel the mode,
see page 48.
48 digits long, the number will not be redialed
correctly.
• You cannot redial when the Dial Lock is
turned on. To cancel the mode, see page 48.
• You need to subscribe to Caller ID.
• Other telephone equipment may be interfering
with your phone. Disconnect it and try again.
• Other electrical appliances connected to the
same outlet may be interfering with Caller ID.
• Telephone line noise may be affecting Caller ID.
• The caller requested not to send his/her
Caller ID information (p. 25).
• If a call is being transferred to you, the Caller
ID information will not be displayed.
• If a (separate) Caller ID box is connected
between the base unit and the telephone wall
jack, disconnect the Caller ID box or plug the
unit directly into the wall jack.
• If the unit is connected to a telephone line
with DSL service, the unit may not display
caller’s phone number properly. We
recommend connecting a noise filter (contact
your DSL service provider) to the telephone
line between the unit and the telephone line
jack.
The handset and/or base unit
does not announce the
displayed caller’s name.
56
• The handset and/or base unit ringer volumes
are turned off. Set to high, medium, or low
(p. 16, 17).
• The Talking Caller ID feature is turned off.
Turn it on (p. 27).
Page 57

PQQX14670ZA.book 57 ページ 2005年2月22日 火曜日 午後12時0分
Troubleshooting
Problem Cause & Remedy
The handset and/or base unit
does not announce the
displayed caller’s name
properly.
The handset display exits the
Caller List or phone book.
“Recharge battery” is
displayed, “7” flashes, or
the handset beeps
intermittently.
“Charge for 6h” and “8”
are displayed and the handset
does not work.
You charged the battery fully,
but “Recharge battery” is
still displayed and/or “7”
continues to flash, or “Charge
for 6h” and “8” are
displayed.
Time setting is erased, and “E
Press MENU.” flashes on the
handset display.
• Name pronunciation may vary.
• The handset and/or base unit will announce
each letter of abbreviations, such as “Co.”
and “Inc.”.
• Caller ID supports names of up to 15 letters.
If the caller’s name has more than 15 letters,
the name will not be announced correctly.
• Do not pause for over 60 seconds while
searching.
• Fully charge the battery (p. 9).
• The battery has been discharged. Fully
charge the battery (p. 9).
• Check battery installation (p. 9).
• Clean the charge contacts and charge again
(p. 10).
• The battery may need to be replaced. If you
install a new battery, fully charge it (p. 9).
• If a power failure occurs, time setting may be
erased. Set the date and time again (p. 13).
The CHARGE indicator does
not go out after the battery has
been charged.
You cannot have a
conversation using the
headset.
• This is normal.
• Make sure the optional headset is connected
properly (p. 52).
• If “SP-phone” is displayed on the handset,
press [C] to switch to the headset.
Useful Information
57
Page 58

PQQX14670ZA.book 58 ページ 2005年2月22日 火曜日 午後12時0分
Safety Instructions
Take special care to follow the safety suggestions listed below.
Safety
1) The unit should be connected to a power supply only of the type described in the
operating instructions or as marked on the unit.
2) When left unused for a long period of time, the base unit should be unplugged
from the household AC outlet.
Installations
Environment
1) Do not use this unit near water—for example, near a bathtub, washbowl, sink,
etc. Damp basements should also be avoided.
2) The unit should be kept away from heat sources such as radiators, kitchen
range, etc. It also should not be placed in rooms where the temperature is less
than 5°C or greater than 40°C.
3) The AC adaptor is used as the main disconnect device, ensure that the AC outlet
is located/installed near the unit and is easily accessible.
Placement
1) Do not place heavy objects on top of this unit.
2) Care should be taken so that objects do not fall onto, and liquids are not spilled
into, the unit. Do not subject this unit to excessive smoke, dust, mechanical
vibration or shock.
3) Place the unit on a flat surface.
For best performance
1) If noise prevents the conversation from being understood at the handset,
approach the base unit to lessen the noise.
2) The handset should be used at the HIGH volume setting when the reception tone
is difficult to hear.
3) The handset should be fully recharged on the base unit when “Recharge
battery” is displayed and/or “7” flashes.
4) The handset antenna should not be touched during use because of its high
sensitivity.
5) The maximum calling distance may be shortened when the unit is used in the
following places: Near obstacles such as hills, tunnels, undergrounds, near metal
objects such as wire fences, etc.
Medical
Consult the manufacturer of any personal medical devices, such as pacemakers or
hearing aids, to determine if they are adequately shielded from external RF (radio
frequency) energy. (The unit operates in the frequency range of 2400 MHz to
2481 MHz, and the power output level can range from 0.04 to 0.1 watts.) Do not
use the unit in health care facilities if any regulations posted in the area instruct you
not to do so. Hospitals or health care facilities may be using equipment that could
be sensitive to external RF (radio frequency) energy.
Operating near 2.4 GHz electrical appliances may cause interference. Move away
from the electrical appliances.
58
Page 59

PQQX14670ZA.book 59 ページ 2005年2月22日 火曜日 午後12時0分
Safety Instructions
WARNING:
TO PREVENT FIRE OR SHOCK HAZARD, DO NOT EXPOSE THIS PRODUCT
TO RAIN OR ANY TYPE OF MOISTURE.
If there is any trouble, disconnect the unit from the telephone line and connect a
known working phone. If the known working phone operates properly, do not
reconnect the unit to the telephone line until the trouble has been repaired. If the
known working phone does not operate properly, consult your telephone company.
Specifications
n Base Unit
Power Supply: AC Adaptor (220– 240 V AC, 50/60 Hz)
Power Consumption: Standby: Approx. 2.0 W
Maximum: Approx. 5.4 W
Frequency: 2.4 GHz – 2.48 GHz
Dimensions (H x W x D): Approx. 85 mm x 175 mm x 200 mm
Mass (Weight): Approx. 460 g
n Handset
Power Supply: Ni-MH battery (3.6 V, 830 mAh)
Frequency: 2.4 GHz – 2.48 GHz
Dimensions (H x W x D): Approx. 208 mm x 52 mm x 39 mm
Mass (Weight): Approx. 190 g
Security Codes: 1,000,000
n Dialing Mode: Tone (DTMF)/Pulse
n Operating Environment: 5 °C – 40 °C
Specifications are subject to change without notice.
Useful Information
59
Page 60

PQQX14670ZA.book 60 ページ 2005年2月22日 火曜日 午後12時0分
Panasonic Communications Co., Ltd.
1-62, 4-chome, Minoshima, Hakata-ku, Fukuoka 812-8531, Japan
PQQX14670ZA
F0205-0 D
 Loading...