

Page 1

Operating Instructions
Digital Cordless Phone
Charge the batteries for about
10 hours before initial use.
KX-TG1701
Model No.
KX-TG1701NZ
KX-TG1702NZ
Table of Contents
Introduction ................................................. 2
Preparation .................................................. 4
Useful Telephone Settings ....................... 10
Making / Answering Calls ......................... 12
Phonebook ................................................. 14
Caller ID Service ........................................ 15
Multi-unit Operation ................................... 16
Useful Information ..................................... 17
You must subscribe to Caller ID service to use this feature.
Caller ID
Please read these operating instructions before using the unit and save them for future
reference.
1
Page 2
Introduction
Thank you for purchasing a new Panasonic digital cordless phone.
For your future reference
Attach or keep original receipt to assist with any repair under warranty.
Serial No. (found on the bottom of the unit)
Date of purchase
Name and address of dealer
Note:
• In the event of problems, you should contact your equipment supplier in the first
instance.
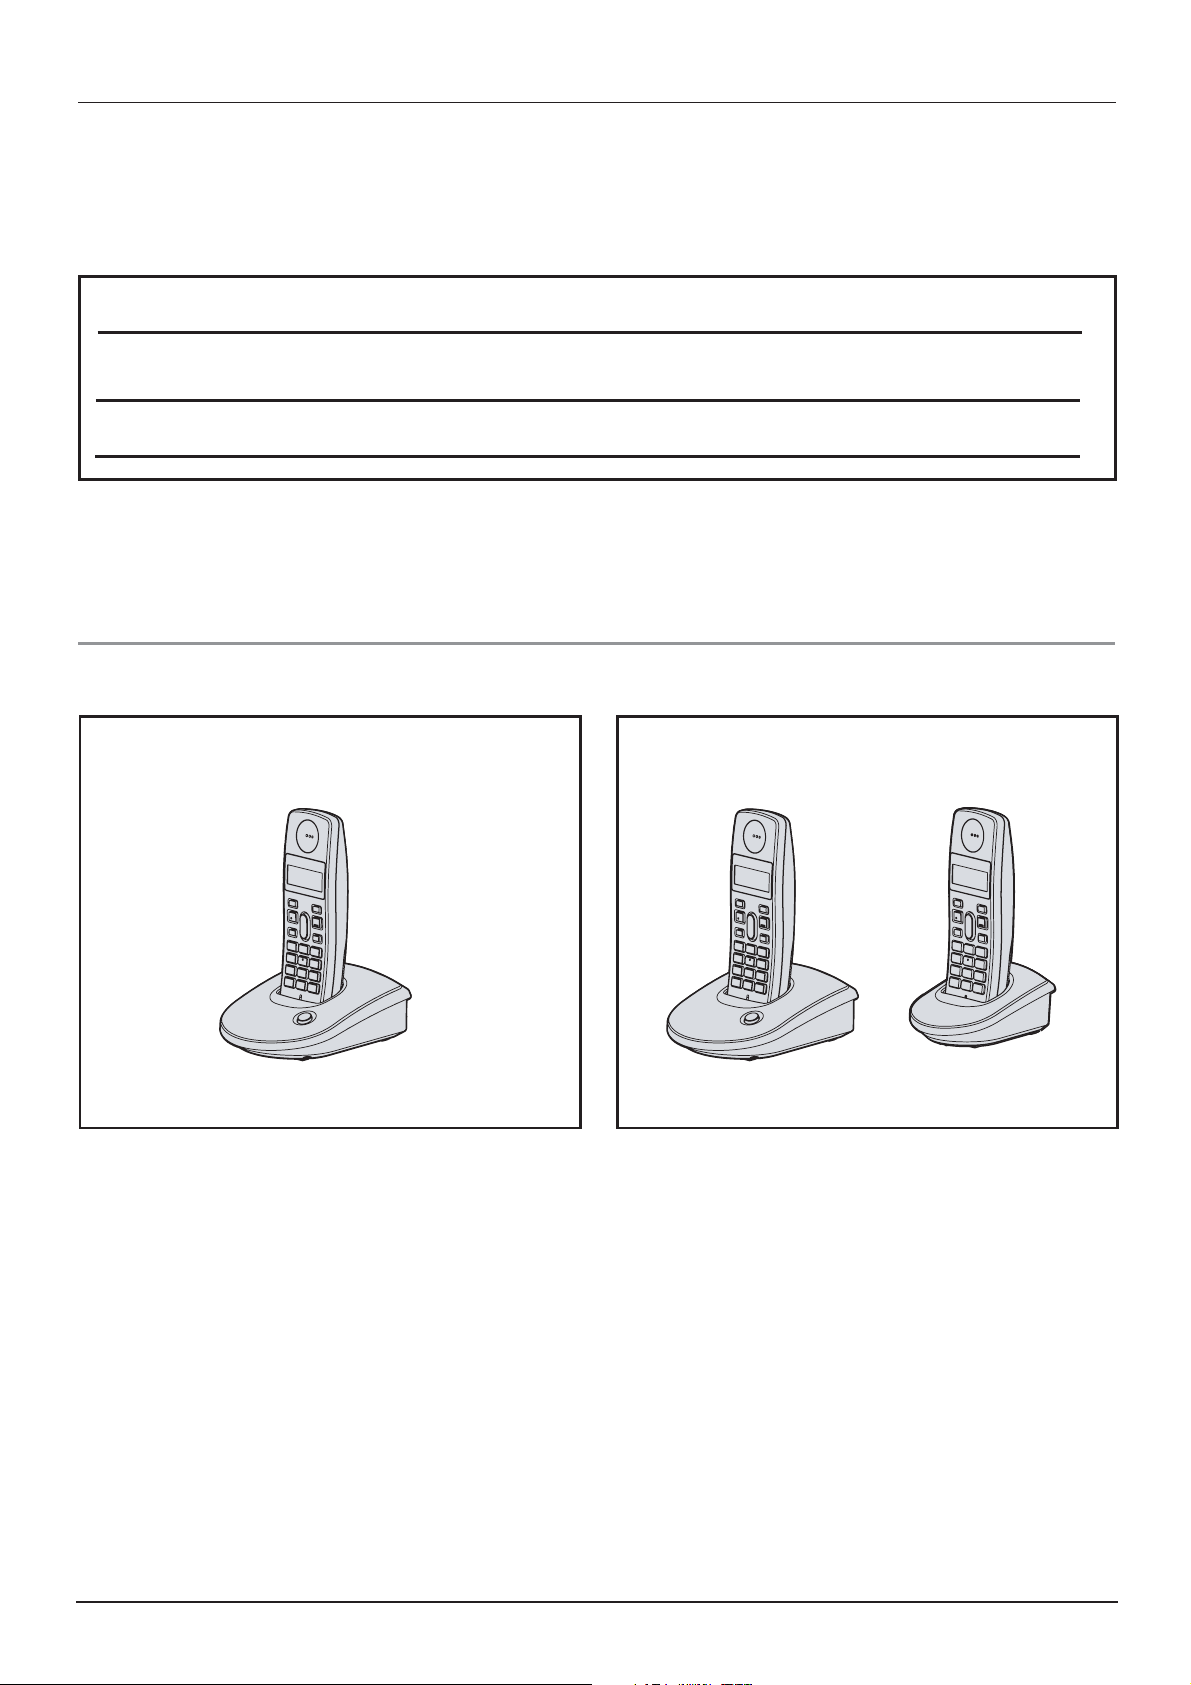
Your phone
KX-TG1701
KX-TG1702
2
Page 3
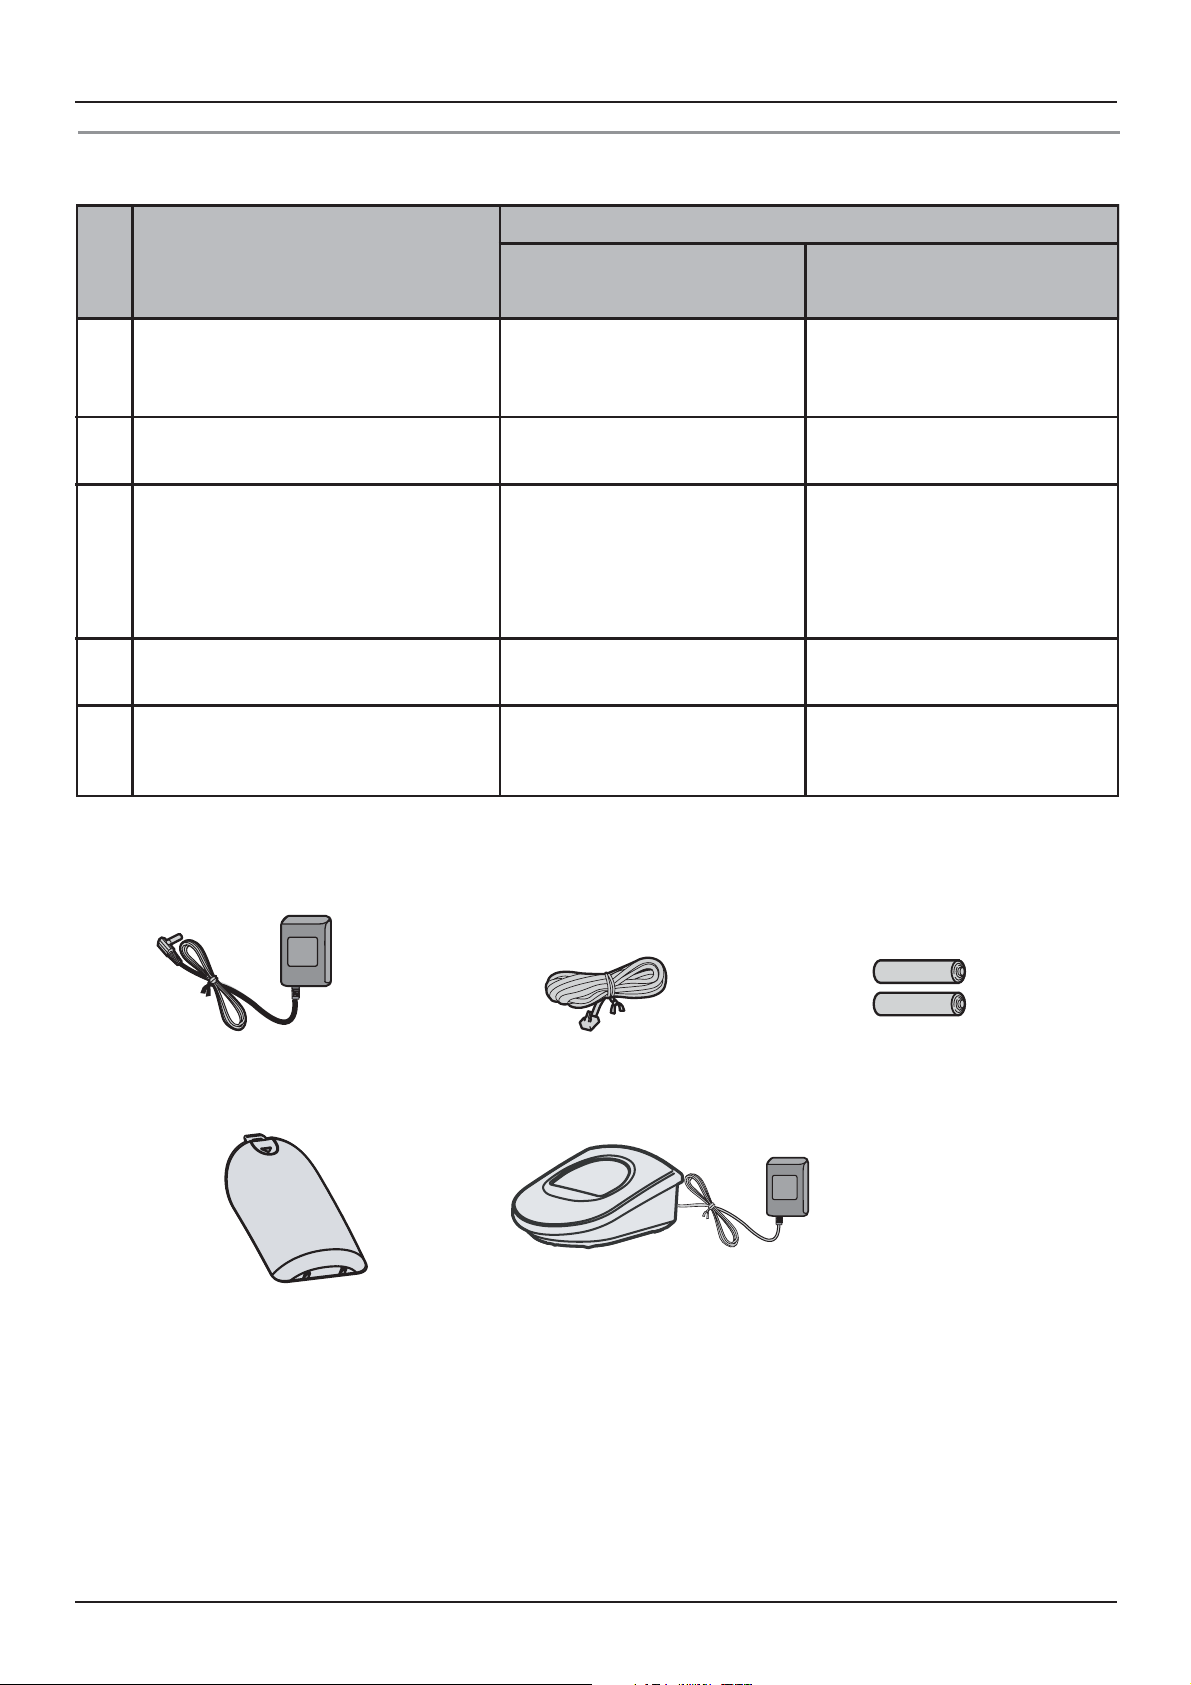
Included accessories
Introduction
Quantity
No.
1.
2.
4.
* The handset cover comes attached to the handset.
Accessory items
AC adaptor for base unit
Part No. PQWATG1070AL
Telephone line cord
Rechargeable batteries
AAA size
3.
Part No. HHR-55AAAB or
HHR-4EPT
Handset cover*
Charger
5.
Part No. PQWETGA107AL
KX-TG1701 KX-TG1702
11
11
24
12
–1
1. 2. 3.
4. 5.
Note:
• When replacing the batteries, use only 2 rechargeable AAA size nickel metal hydride
(Ni-MH) batteries of capacity up to 750 mAh. We recommend using Panasonic
rechargeable batteries (Model No. HHR-4EPT).
• We cannot be responsible for any damage to the unit or degradation of performance
which may occur from using non-Panasonic rechargeable batteries.
3
Page 4

Preparation
Important information
General
• Use only the AC adaptor included with
this product, noted on page 3.
• Do not connect the AC adaptor to any
AC outlet other than a standard 220240 V AC outlet.
• This product is unable to make calls
when:
- The portable handset battery(ies)
need recharging or have failed.
- There is a power failure.
- The key lock feature is turned on.
• Do not open the base unit, charger or
handset other than to replace the
battery(ies).
• This product should not be used near
emergency/intensive care medical
equipment and should not be used by
people with pacemakers.
• Care should be taken that objects do
not fall onto, and liquids are not
spilled into, the unit. Do not subject
this product to excessive smoke, dust,
mechanical vibration or shock.
• Only the included handset can be
used with the base unit. No other
handsets can be registered or used.
Environment
• Do not use this product near water.
• This product should be kept away
from heat sources such as radiators,
cookers, etc. It should also not be
placed in rooms where the
temperature is less than 5 °C or
greater than 40 °C.
• The AC adaptor is used as the main
disconnect device. Ensure that the AC
outlet is installed near the unit and is
easily accessible.
Warning:
• To prevent the risk of electrical shock,
do not expose this product to rain or
any other type of moisture.
• Unplug this unit from power outlets if it
emits smoke, an abnormal smell or
makes unusual noise. These
conditions can cause fire or electric
shock. Confirm that smoke has
stopped and contact an authorised
service centre.
Battery caution
• We recommend using the battery(ies)
noted on page 3. Use only
rechargeable battery(ies).
• Do not mix old and new batteries.
• Do not dispose of the battery(ies) in a
fire, as they may explode. Check local
waste management codes for special
disposal instructions.
• Do not open or mutilate the
battery(ies). Released electrolyte from
the battery(ies) is corrosive and may
cause burns or injury to the eyes or
skin. The electrolyte may be toxic if
swallowed.
• Exercise care when handling the
battery(ies). Do not allow conductive
materials such as rings, bracelets or
keys to touch the battery(ies),
otherwise a short circuit may cause
the battery(ies) and/or the conductive
material to overheat and cause burns.
• Charge the battery(ies) in accordance
with the information provided in these
operating instructions.
• Only use the included base unit (or
charger) to charge the battery(ies). Do
not tamper with the base unit (or
charger). Failure to follow these
instructions may cause the
battery(ies) to swell or explode.
4
Page 5

Preparation
General warnings:
• This equipment will be inoperable
when mains power fails.
• When a failure occurs which results in
the internal parts becoming
accessible, disconnect the power
supply cord immediately and return
this unit to an authorised service
centre.
• Disconnect the telecom connection
before disconnecting the power
connection prior to relocating the
equipment, and reconnect the power
first.
• No “111” or other calls can be made
from this device during a mains power
failure.
• This equipment shall not be set to
make automatic calls to the Telecom
“111” Emergency Service.
• To minimise the possibility of lightning
damage, when you know that a
thunderstorm is coming, we
recommend that you:
- Unplug the telephone line cord from
the phone jack.
- Unplug the AC adaptor from the AC
power outlet.
• The earpiece on the handset is
magnetised and may retain small
metallic objects.
• This equipment has been tested and
found to comply with AS/NZS 3548:
1995 limits for electromagnetic
interference.
Any modifications to any part of the
system or to any peripherals may void
the EMC compliance of the system or
the peripherals.
• Not all telephones will respond to
incoming ringing when connected to
the extension socket.
• This equipment may not provide for the
effective hand-over of a call to another
device connected to the same line.
• The grant of a Telepermit for any item
of terminal equipment indicates only
that Telecom has accepted that the
item complies with minimum
conditions for connection to its
network. It indicates no endorsement
of the product by Telecom, nor does it
provide any sort of warranty. Above all,
it provides no assurance that any item
will work correctly in all respects with
another item of Telepermitted
equipment of a different make or
model, nor does it imply that any
product is compatible with all of
Telecom’s network services.
Important notice:
• Under power failure conditions, this
telephone may not operate. Please
ensure that a separate telephone, not
dependent on local power, is available
for emergency use.
Information on Disposal in other
Countries outside the European
Union
This symbol is only valid in the European
Union.
If you wish to discard this product, please
contact your local authorities or dealer and
ask for the correct method of disposal.
5
Page 6
6
reparation
ections
it
220-240 V, 50 Hz
:
leph
d.
C
.
ll,
e
2
z
k
ADS
base unit and the
e
.
f
e
p
r
high
:
.
g
e
e
sconnected.
g a
e
a
.
.
nn
ase un
oo
. To telephone network
.
• The unit will not work during a power
failure. We recommend connectin
standard telephone to the same telephon
line or to the same telephone jack using
double adaptor
• The unit is not designed to be used with
rotary (pulse dialling) services
f you subscribe to an ADSL service
• Please attach a noise filter (contact your
L service provider) to the telephone
ne between the
elephone line jack in the event of th
ollowing:
Noise is heard during conversations
Caller ID features (page 15) do not
unction properly.
Note
Use only the included AC adaptor and
te
page 19.
one line cor
onnect the AC adaptor securely to the A
tlet
o mount the base unit to the wa
harger
X-TG170
. 220-240 V, 50 H
ote
ever install telephone wiring during a
ightning storm
Do not connect the AC adaptor to a ceilingmounted AC outlet, as the wei
adaptor may cause it to becom
i
ht of th
se
Telephone
line cord
Noise filter
(For ADSL users)
Location
For maximum distance and noise-fre
operation, place your base unit:
Away from electrical appliances such as
TVs, radios,
hones.
n a convenient,
ersonal computers or othe
and central location.
Page 7

Preparation
Battery installation
Important:
• Wipe the battery ends (+,–) with a dry
cloth.
• Install the batteries without touching the
battery ends (+,–) or the unit contacts.
1 Press the notch of the handset cover firmly
and slide it in the direction of the arrow.
2 Insert the batteries negative (–) terminal
first. Close the handset cover.
Panasonic Ni-MH battery
performance
When you charge the batteries for 10
hours from the battery empty status, the
following performance is available.
Operation
In continuous use
In continuous
standby mode
* When operation temperature is 25
Note:
• It takes 10 hours to fully charge the
batteries, however, you can use the
handset if
remains on the display
Operation time
10 hours max.*
120 hours max.*
o
C.
Note:
• Use only the included rechargeable
batteries.
Battery charge
Place the handset on the base unit or
charger for about 10 hours before initial use.
When charging,
shown on the display. When the batteries are
highly charged,
Battery strength
and are alternately
remains on the display.
while charging.
• It is normal for batteries not to reach
full capacity at the initial charge.
Maximum battery performance is
reached after a few complete cycles of
charge/discharge (use).
• Actual battery performance depends
on a combination of how often the
handset is in use and how often it is
not in use (standby).
• Even after the handset is fully
charged, the handset can be left on
the base unit or charger without any ill
effect on the batteries.
• The battery strength may not be
displayed correctly after you replace
the batteries. In this case, place the
handset on the base unit or charger
and charge for at least 10 hours.
Battery icon
Meaning
The handset can be used.
Needs to be charged.
7
Page 8

Preparation
Controls
Handset
Base unit
1
2
1. Charge contacts
2. [ ] Page
Charger
KX-TG1702
1. Receiver
2. Display
3. [ /C] Mute / Clear
4. [ ] Talk
5. [ /INT] Phonebook / Intercom
6. [ / ] Volume down / Redial list
7. Charge contacts
8. [
9. [
/OK] Setting / OK
/CID] Volume up / Call log
10. [ ] Off
11. [R] Recall
12. Microphone
1
1. Charge contacts
8
Page 9

Preparation
Displays
Icons
Meaning
Handset within range of base
unit
• When this icon is not
Setting mode
Making or answering a call
Incoming call
Intercom call in progress
Ringer volume is off
displayed: out of range, no
registration or no power on
base unit
Icons
[ ]
Meaning
Displayed when you press
[
]
Displayed when you press
]
[
Displayed when you press
[R]
Displayed when you long
press [0]
If the current handset number
is 2, “[2]” is displayed
Displayed when you press
and hold [INT].
Key lock is on
Microphone is muted
Phonebook
The handset can be used.
Needs to be charged.
Symbols used in these
operating instructions
Symbol
/OK]
[
>
Meaning
Press [
Proceed to the next
operation
/OK]
9
Page 10

Useful Telephone Settings
Guide to telephone settings
For your reference, a chart of all items which can be customized for the telephone is
printed below.
Items
Date and time
12 and 24-hour display format
Handset ringer tone
Handset ringer volume
Handset key tone
Auto talk
Recall time *
PIN *
* You do not need to program the same item using another handset (for models with 2
or more handsets included).
Default setting
-
24-hour
1
5
On
Off
600ms
0000
Page
Page 10
Page 10
Page 10
Page 11
Page 11
Page 11
Page 11
Page 11
Date and time
1 [ /OK] > [1]
2 Enter the current hour and minute (in
the 24-hour format).
3 [
4 Enter the current day, month, and year
5 [
Note:
• (KX-TG1702 only) If you set the date
• The date and time may be incorrect
/OK]
(dd-mm-yy).
/OK] to save the setting.
and time with handset 1, press [
and [
the time on that handset.
after a power failure. In this case, set
the date and time again.
] on another handset to show
]
12 and 24-hour display format
1 [ /OK] > [2]
2 Press [ ] or [ ] to select between
“12” and “24”-hour display format.
3 [
Note:
• When 12-hour format is selected, “A”
/OK] to save the setting.
or “P” shows next to the current time to
indicate AM or PM time.
Handset ringer tone
1 [ /OK] > [4]
2 Press [ ] or [ ] to select a tone.
• 6 tones are available.
3 [
/OK] to save the setting.
10
Page 11

Useful Telephone Settings
Handset ringer volume
1 [ /OK] > [5]
2 Press [ ] or [ ] to select handset
ringer volume.
• 5 levels are available.
• The handset plays the selected tone
at that volume while selecting.
3 [
/OK] to save the setting.
Handset key tone (On/Off)
1 [ /OK] > [6]
2 Press [ ] or [ ] to select handset
key tone “On” or “OFF”.
3 [
/OK] to save the setting.
Auto talk
Auto talk feature allows you to answer
calls simply by lifting the handset off the
base unit or charger. You do not need to
press [
] key.
Setting PIN
Set the PIN to prevent others from
accidentally resetting the telephone
settings.
• Factory setting is “0000”.
Changing to a new PIN
If you change the PIN, please write down
your new PIN as the unit will not reveal the
PIN to you.
1 [
2 Enter the current 4 digit PIN > [
• If a wrong PIN is entered, a long beep
3 Create a PIN (4 digits).
4 [
5 Enter the newly created PIN again for
6 [
• If a wrong PIN is entered, a long beep
/OK] > [ ]
/OK]
will be heard.
/OK]
confirmation.
/OK] to save PIN.
will be heard.
1 [
2 Press [
3 [
/OK] > [8]
] or [ ] to select between
“On” and “OFF”.
/OK] to save the setting.
Recall time
8 recall time values are available for
selection.
1 [
2 Press [ ] or [ ] to select a value
3 [
Note:
• Consult your service provider/
/OK] > [R]
(options: 80, 100, 120, 180, 250, 300, 600
and 800ms) (factory setting: 600ms).
/OK] to save the setting.
telephone company for details of this
setting.
Resetting to default settings
Telephone settings (page 10) are reset to
default settings.
1 [ /OK] > [9]
2 Enter the PIN (4 digits).
3 Press [
settings.
/OK] again to reset to default
Note:
• If a wrong PIN is entered, a long beep
will be heard.
• Date and time will not be reset.
• The following items will be deleted:
-Redial list
-Phonebook entries
-Call log
11
Page 12

Making / Answering Calls
Making calls
1 Predial the phone number > [ ]
• If you make a mistake while
predialling a phone number, press [C]
to clear it. Press and hold [C] to clear
all inputs.
2 When finished talking, press [
place the handset on the base unit or
charger.
Adjusting the receiver volume
Press [
are available.
] or [ ] while on a call. 5 levels
] or
Answering calls
1 Press [ ] to answer the call.
2 When finished talking, press [
place the handset on the base unit or
charger.
Note:
• With Auto Talk function switched on,
you can talk directly when the handset
is picked up from the base unit or
charger during incoming call (page
10).
Handset locator
1 Press [ ] on the base unit.
• While paging the handset, the time
and handset number displays will
temporarily disappear from the
handset screen.
2 To stop paging, press [
] on the
] or
base unit again or press [ ] on each
handset.
• The handset beeps for 1 minute.
Pause button (for PBX/long distance
service users)
A pause is sometimes required when
making calls using a PBX or long
distance service. Press and hold [0] for
about 2 seconds to create one pause.
12
Page 13

aking / Answering Calls
lling
/
[
[
[
ote:
t
y
g
/
[
[
k
/
[
/
/
k
s
s
.
[
2
.
.
hile k
s
.
“
y.
y “
o
ll.
[
“
.
e
g
[
dset.
“
e
[
)
/
).
r
y
be
.
/
.
edia
he last 4 numbers dialled (each 20
igits max.) are stored in the redial list.
> Press
ired number.
ress
N
• If the number is more than 12-digi
long, only the last 11 digits will be
displa
Deletin
e numbers.
to delete the selected number.
eleting the whole redial list
] to start redialling.
ed preceded by a “_”.
a number in the redial list
> Press
> [ >
or
or
to select a
to chec
ilent mode
o switch off ringer, press and hold [
ntil
• When an incoming call is received,
o switch on ringer, press and hold
ntil
ote:
” shows on the displa
onl
ndicate an incoming ca
Even if the silent mode is set, the
andset will ring for paging at th
aximum volume.
” flashes on the display t
disappears from the display
utin
uring a call, press
n
The other party cannot hear you.
When muting is on,
to mute
shows on th
to confirm deletion.
ey loc
he handset can be locked to prevent
ccidental key activation. Incoming call
an be answered, but all other function
except making emergency calls) are
isabled while key lock is on
o turn key lock on, press
econds
To turn key lock off, press [
bout 2 seconds again
ote:
shows on the display w
ock is on.
mergency numbers are prestored as
111”, “911” and “999”. The user
annot program them
for about
for
ey
splay.
ress
o cancel muting.
R button (to use the recall feature
is used to access optional telephone
ervices. Contact your service provider
elephone company for details.
ote:
ou can change the recall time
page 11
Call waiting
all waiting is a service offered by you
ervice provider/telephone compan
whereby a second caller can
nswered while online with the first caller.
o answer the second caller, press [. To
eturn to the first caller, press [
lease consult your service provider
elephone company for details of this
ervice
again
Page 14

Phonebook
Adding entries to the
phonebook
The phonebook allows you to make calls
without having to dial manually. You can
add 10 phone numbers to the
phonebook.
1 [
2 Press [
3 Enter the party’s phone number (20
4 [
/OK] > [ ]
] or [ ] to select a
phonebook location (0-9).
digits max.).
/OK] to save the phone number in
the phonebook.
Making calls
1 [ ] > Press [ ] or [ ] to display the
desired entry.
2 [ ]
Editing numbers
1 [ /OK] > [ ]
2 Press [ ] or [ ] to select a
phonebook location (0-9).
3 Press [C] to erase a digit backward, or
press and hold [C] to erase all digits.
4 Enter new phone number.
5 [
/OK] to save the edited phone
number in the phonebook.
Deleting the whole phonebook
1 [ /OK] > [0] > [ ]
2 [
14
/OK] to confirm deletion.
Page 15

e
Using Caller ID servic
e
.
/
.
d
e
m
s
n
r
f
Abili
d.
y
Y
u
s
s
l
features
w
e
y.
e
r
/CID
[
[
umbers.
er
udes
d
e
ote:
[
d
.
.
.
g
/C
[
[
k
.
g
/
[
/CID
/
.
mportant:
This unit is Caller ID compatible. To
se Caller ID features (such as
isplaying caller phone numbers), you
must subscribe to Caller ID service
onsult your service provider
elephone company for details.
or all local and national incoming calls,
our display will show the area code (e.g.
9 for Auckland) or the cellular prefix (e.g
274 for Telecom Cellular) followed by the
aller’s telephone number. An Aucklan
aller’s number will be displayed as
9XXXXXXX. The seven X’s represent th
even digits of the caller’s telephone
umber. A caller from a 6-digit Teleco
ellular number will be displayed a
74XXXXXX. For incoming international
alls, your display may only show “0000”.
or business users on a Centrex line,
our display will show Centrex extensio
umbers in the shorter extension numbe
ormat used within your company.
The Caller ID information will not be
resented on incoming fax calls i
elecom Fax
ty is use
aller ID Servic
The following will not be left in the call
og:
-O-” (Out of area): The caller dialled
rom an area which does not provid
aller ID service.
-P-” (Private caller): The calle
equested not to send caller
nformation.
aller information for the answered
alls.
hecking call log
> Press
n
• If the date and time is set or call
information incl
time, you can display it by pressing [
If you want to return to the phon
number, press [] again.
N
• Press
mber
If a call number in the log has never
een read, “n
mber
If the number is more than 10-digit
ong, only the last 10 digits will be
isplayed preceded by a “_”
to start calling the selecte
or
shows prior to the
to check the
the date an
.
sing toll services from Telecom or
nother compan
our telephone company may charge yo
or a local call if the number dialled ha
he area code prefix included. If this i
nacceptable, dial only the 7-digit loca
umber. Do not dial the [ prefix or the
rea code.
ller ID
hen new calls have been received, the
isplay will show the number of ne
alls. If a call is not answered, phon
umbers of the last 10 different callers
will be listed in the call log and “-CALL-” is
hown on the displa
eleting a number in the call lo
ID
> Press
e numbers
to delete the selected number.
eleting the whole call lo
> [ >
to confirm deletion
or
to chec
5
Page 16

Multi-unit Operation (KX-TG1702)
Intercom between
handsets
Intercom calls can be made between
handsets.
Example: When handset 1 calls handset 2
1 Handset 1:
Press and hold [INT] until “
on the display. Press [2] (desired
handset number).
2 Handset 2:
Press [
3 When finished talking, press [
Note:
• If phonebook is shown when you
press [INT], press [C], then press and
hold [INT].
] to answer.
” shows
].
Switching calls between
outside call and intercom
with a handset
Example: When handset 1 switches
between an outside call and handset 2
1 Handset 1:
During an outside call, press and hold
[INT] until “
Press [2] (desired handset number).
• The outside call will be put on hold. If
there is no answer, press [
return to the outside call.
2 Handset 2:
Press [
• Handset 2 can talk with handset 1.
3 Handset 1:
Press and hold [INT] to return to the
outside call.
Handset 2:
Press [
” shows on the display.
] to
] to answer the call.
] to end the call.
Transferring an outside call
to handsets
Example: When handset 1 transfers an
outside call to handset 2
1 Handset 1:
During an outside call, press and hold
[INT] until “ ” shows on the display.
Press [2] (desired handset number).
• The outside call will be put on hold. If
there is no answer, press [
return to the outside call.
2 Handset 2:
Press [
• Handset 2 can talk with handset 1.
3 Handset 1:
Press [
to handset 2.
Note:
• The external call can only be
transferred when the intercom is
established successfully.
] to answer the call.
] to transfer the outside call
] to
Conference call with an
outside call and a handset
Example: When handset 1 talks with an
outside call and handset 2
1 Handset 1:
During an outside call, press and hold
[INT] until “ ” shows on the display.
Press [2] (desired handset number).
• The outside call will be put on hold. If
there is no answer, press [
return to the outside call.
2 Handset 2:
Press [
• Handset 2 can talk with handset 1.
3 Handset 1:
Press [
call with the outside call and handset
2.
] to answer the call.
] to establish a conference
] to
16
Page 17

Useful Information
e
C
m
.
.
.
.
,
.
dse
base u
oser.
.
h
ace
dset and base unit
p
.
(
).
o
a
,
ll
e
.
).
e
).
r
.
L
r
ADS
y
roubleshooting
you still have difficulities after following the instructions in this section, disconnect th
ase unit’s AC adaptor and remove the handset batteries. Then reconnect the A
aptor and install the batteries.
roble
disappears
flashes.
I cannot make or receive calls
ause & Solution
The han
The AC adaptor is not connected. Check the connections
You are using the handset or base unit in an area with hig
lectrical interference. Pl
way from interference sources, such as antennas and
mobile
e handset registration is cancelled. Register the handset
to the base unit
ou pressed [ ] when your handset was not linked t
the base unit ( is not displayed). Refer to the solutions
or disappears.
ou pressed [ ] when another handset was on
telephone call. Wait for the other user to finish.
The AC adaptor or telephone line cord is not connected.
heck the connections.
If you are using a BT double adaptor to connect the unit
remove the adaptor and connect the unit to the phone wa
socket directly. If the unit operates properly, check or
replace the adaptor.
The key lock feature is turned on. Turn it off (page 13).
The unit is not designed to be used with rotary (puls
dialling) services
t is too far from the
hones
page 19
nit. Move cl
the han
The unit does not ring
The handset will not turn on
tatic, sound cuts in/out
ades. Interference from other
electrical units
The ringer volume is turned off. Adjust the ringer volume
page 11
Make sure that the batteries are installed correctly (pag
7).
Charge the batteries for 10 hours (page 7
Place the handset and the base unit away from othe
ectrical appliances.
Move closer to the base unit
Your unit is connected to a telephone line with ADS
JetStream) service. We recommend that you contact you
We do not recommend the use of generic ADSL filters.
Contact
L service provider to have an ADSL Splitter installed.
our ADSL service provider for details.
7
Page 18

Useful Information
Problem
Noise is heard during a call.
Pressing [ ] does not display/ dial
the last number dialled.
I tried to charge the batteries, but they
do not charge at all.
I charged the batteries for 10 hours, but
still flashes.
I charged the batteries for 10 hours, but
the operating time seems to be short.
Cause & Solution
• You are using the handset or base unit in an area
with high electrical interference. Place the handset
and base unit away from interference sources,
such as antennas and mobile phones.
• The redialled number was more than 20 digits long.
Redial the number manually.
• Make sure the charge contacts are not dirty and the
AC adaptor is connected properly, then try again.
• Clean the charge contacts and charge again (page
7,8).
• It is time to replace the batteries (page 7).
• Wipe the battery ends (+, –) and the unit contacts
with a dry cloth.
Caller information is not displayed.
I reset the handset but a long beep is
heard and the display returns to
telephone setting mode.
I found the numbers stored in the
phonebook and in the redial list are
cleared.
• You must subscribe to Caller ID service.
• Your unit is connected to a telephone line with
ADSL (JetStream) service. We recommend that you
contact your ADSL service provider to have an
ADSL Splitter installed. We do not recommend the
use of generic ADSL filters. Contact your ADSL
service provider for details.
• When you answer the calls, the caller information
will not be left in the call log.
• Other telephone equipment such as a monitored
Burglar Alarm or the modem in the SKY Digital
decoder may be interfering with this unit.
Disconnect the other equipment and try again.
• Reset has failed. Please try again (page 11).
• If you reset to default, the numbers in the
phonebook and redial list are cleared.
I cannot enter the PIN.
-CALL- is displayed.
18
• If you have changed PIN but forgot it, please
contact your nearest Panasonic Service Centre
for help.
• Caller information has been received (page 15).
Page 19

Handset registration
The included handset and base unit are
preregistered. If
handset display when the unit is turned
on, the handset is not registered to the
base unit. Register the handset.
1 Base unit:
Press and hold page button [
about 10 seconds to go to registration
mode.
• If all registered handsets start ringing
in step 1, press [ ] to stop and try
again.
2 Handset:
[
/OK] > [ ] > Input PIN (factory
setting “0000”, page 11) > [
• “-Sub-” flashes on the display.
• Handset will search base unit for
registration.
• When the registration is completed,
lights and a beep sounds.
is not shown on the
] for
/OK]
Useful Information
• Operating conditions: 5 °C–40 °C,
20%–80 % relative air humidity (dry)
• Dimensions:
Base unit: Approx. 47 mm × 116 mm ×
107 mm
Handset: Approx. 142 mm × 34 mm ×
47 mm
Charger*1: Approx. 45 mm × 88 mm ×
79 mm
• Mass (weight):
Base unit: Approx. 120 g
Handset: Approx. 120 g
Charger
*1 KX-TG1702
*2 Includes the AC adaptor.
Note:
• Specifications are subject to change.
• The illustrations used in these
operating instructions may differ
slightly from the actual product.
Wall mounting
*1*2
: Approx. 300 g
Specifications
• Number of channels: 120 Duplex
Channels
• Frequency range: 1.88 GHz to 1.9 GHz
• Duplex procedure: TDMA (Time
Division Multiple Access)
• Channel spacing: 1,728 kHz
• Bit rate: 1,152 kbit/s
• Modulation: GFSK (Gaussian
Frequency Shift Keying)
• RF transmission power: Approx. 250mW
• Power source: 220–240 V, 50 Hz
• Voice coding: ADPCM 32 kbit/s
• Power consumption:
Base unit:
Standby: Approx. 3.5 W
Maximum: Approx. 9.2 W
Charger
Standby: Approx. 0.6 W
Maximum: Approx. 5.0 W
*1
:
Base unit
70 mm
Screws
19
Page 20

Customer Support Centre Tel. No.: (09) 272 0178
Website: http://www.panasonic.co.nz
Sales Department:
Panasonic New Zealand Ltd.
350 Te Irirangi Drive
East Tamaki
Private Bag 14911
Panmure
Auckland
NEW ZEALAND
Panasonic Communications Zhuhai Co., Ltd.
3 Ping Xi 8 Lu, Nanping Keji Gongye Yuan, Zhuhai, Guangdong, China 519060
Copyright:
This material is copyrighted by Panasonic Communications Co., Ltd., and may be
reproduced for internal use only. All other reproduction, in whole or in part, is prohibited
without the written consent of Panasonic Communications Co., Ltd.
© 2006 Panasonic Communications Co., Ltd. All Rights Reserved.
20
PQQX15485ZA
 Loading...