

Page 1
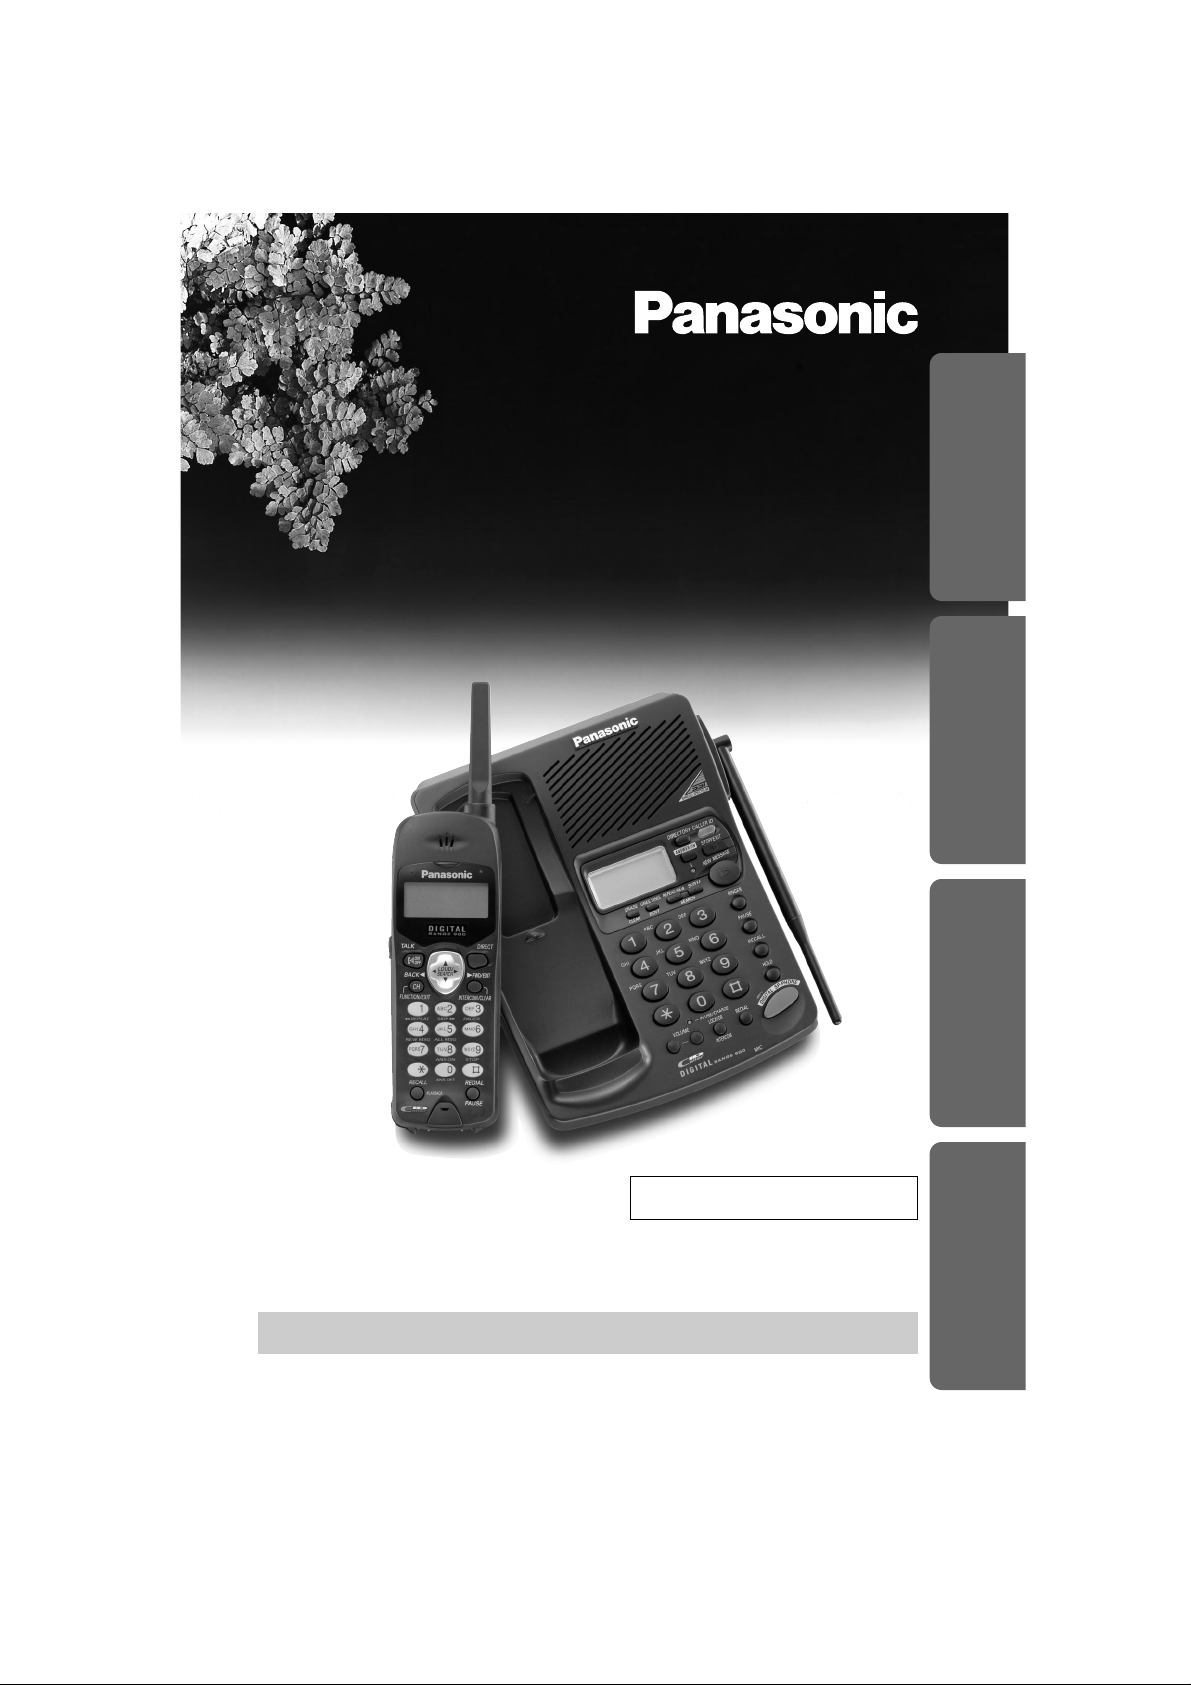
900MHz Cordless Answering System
Model No.
KX-TC1871ALB
KX-TC1871NZB
Operating Instructions
PLEASE READ BEFORE USE AND SAVE.
Charge the battery for about 6 hours before initial use.
Preparation Cordless Telephone Answering System Useful Information
Caller ID Compatible
KX-TC1871ALB
Page 2
Before Initial Use
2
Thank you for purchasing your new Panasonic cordless
telephone.
For your future reference
Serial No. Date of purchase
(found on the bottom of the unit)
Name and address of dealer
For Australia
When you subscribe to Caller ID services from your telephone
operator, this telephone will display the caller’s phone number. When
available from your telephone operator, this telephone will also display
the number of the second call or call waiting.
For New Zealand
Caller ID, where available, is telephone company service. After
subscribing to Caller ID, this phone will display a caller’s phone number.
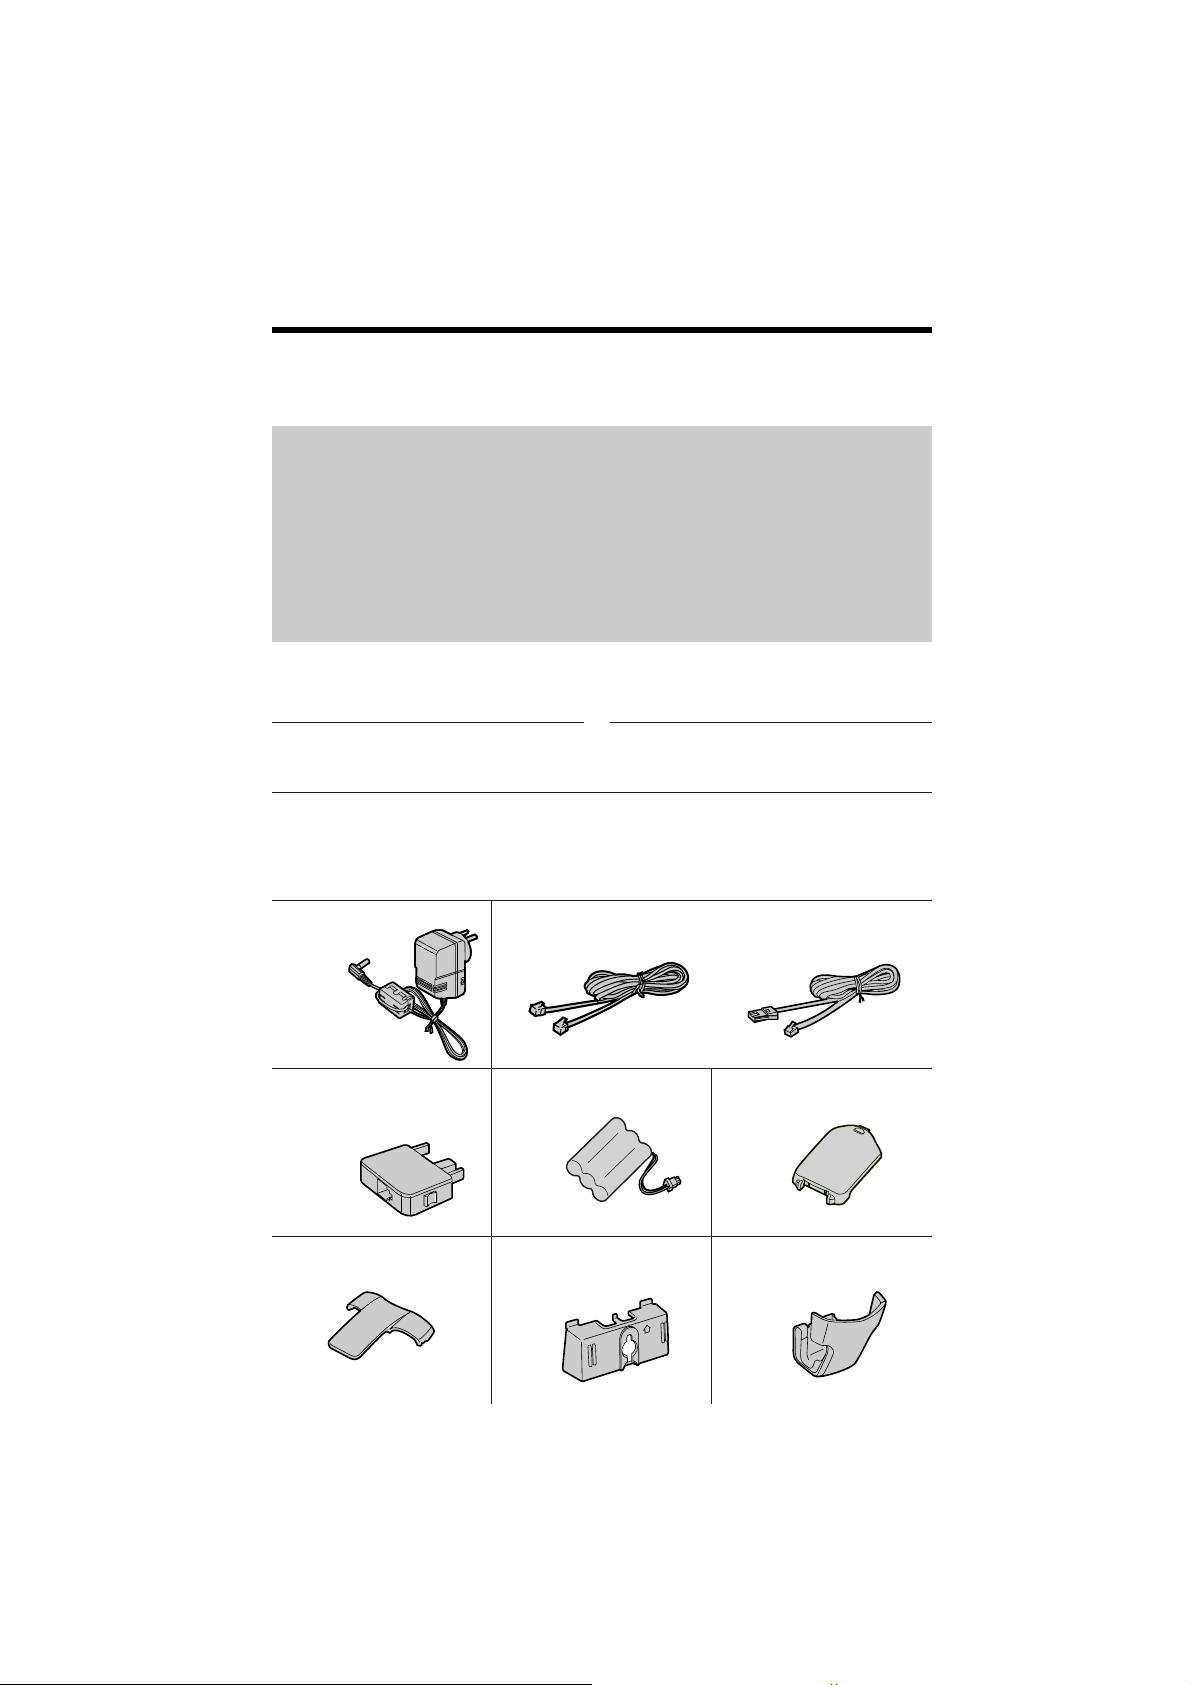
Accessories (included)
∑ AC Adaptor
(p. 14)
one
∑ Telephone Line Cord (p. 14)
For Australia For New Zealand
one
∑ Wall Mounting
Adaptor (p. 82)
one
∑ Handset Holder
(p. 82)
one
∑ Belt Clip (p. 17)
one
∑ Battery (p. 15)
one
∑ Handset Cover
(p. 15)
one
For Australia only
∑ Telephone Plug
(p. 14)
one
Attach or keep original receipt to assist with any repair under warranty.
Page 3
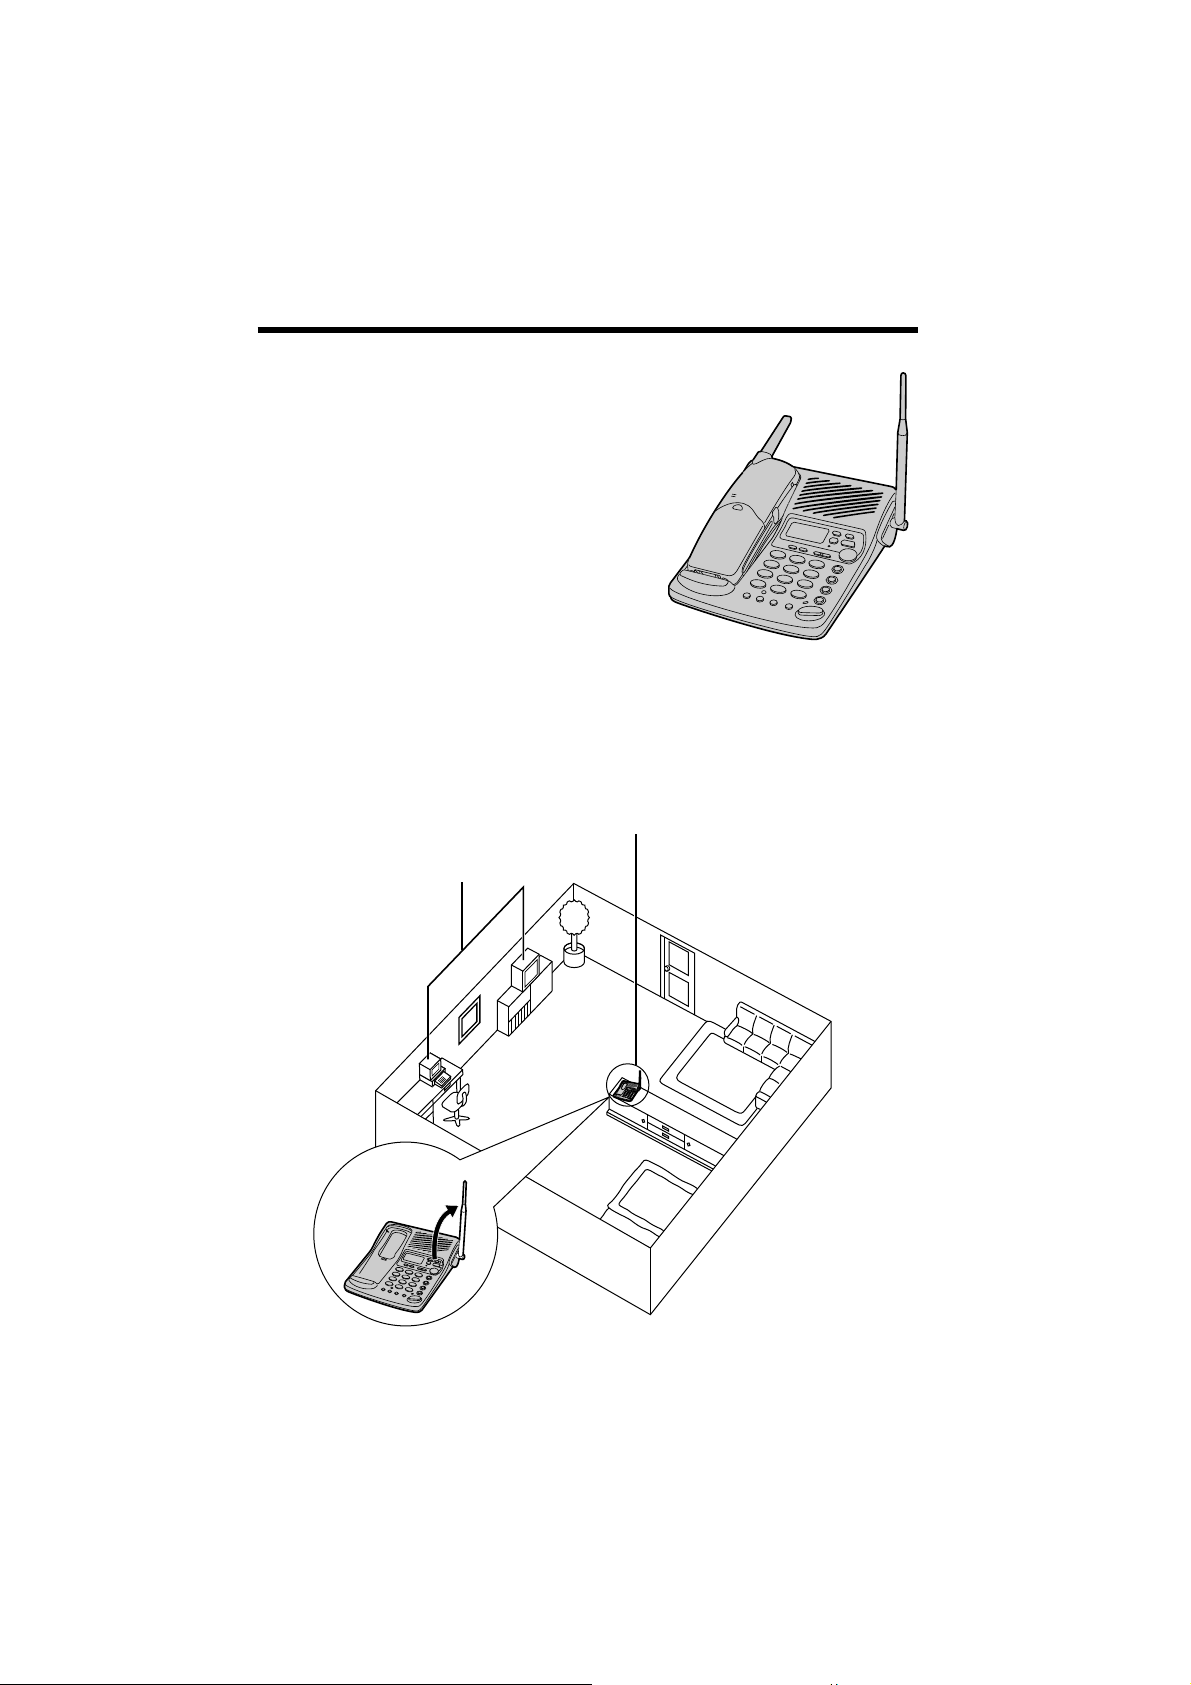
For Best Performance
3
Battery Charge
A rechargeable Ni-Cd battery powers
the handset. Charge the battery for about
6 hours before initial use (p. 15).
Clean the handset and the base unit
charge contacts with a soft, dry cloth
once a month. Clean more often if the unit
is subject to grease, dust or high
humidity. Otherwise the battery may not
charge properly.
Base Unit Location/Noise
Calls are transmitted between the base unit and the handset using
wireless radio waves. For maximum distance and noise-free
operation, the recommended base unit location is:
In a HIGH and CENTRAL location
with no obstructions such as walls.
Raise the
antenna.
≥If more than one cordless phone is being used and your handset is near another
cordless phone’s base unit, noise may be heard. Move away from the other
cordless phone’s base unit and closer to your base unit.
Away from electrical appliances
such as a TV, personal computer,
cellular phone charging units or
another cordless phone.
Page 4

Preparation
Location of Controls . . . . . . . . . . . . . . . . . . . . . . . . . . . . . . . . . 6
Displays . . . . . . . . . . . . . . . . . . . . . . . . . . . . . . . . . . . . . . . . . . . 9
Settings. . . . . . . . . . . . . . . . . . . . . . . . . . . . . . . . . . . . . . . . . . . . 14
Connections . . . . . . . . . . . . . . . . . . . . . . . . . . . . . . . . . . . . . . . 14
Installing the Battery in the Handset . . . . . . . . . . . . . . . . . . . . . 15
Battery Charge . . . . . . . . . . . . . . . . . . . . . . . . . . . . . . . . . . . . . 15
Standby Mode . . . . . . . . . . . . . . . . . . . . . . . . . . . . . . . . . . . . . . 16
Using the Belt Clip . . . . . . . . . . . . . . . . . . . . . . . . . . . . . . . . . . 17
Using the Optional Headset. . . . . . . . . . . . . . . . . . . . . . . . . . . . 17
Selecting the Line Mode . . . . . . . . . . . . . . . . . . . . . . . . . . . . . . 18
Programmable Functions . . . . . . . . . . . . . . . . . . . . . . . . . . . . . 19
Setting the Auto Talk Feature . . . . . . . . . . . . . . . . . . . . . . . . . . 20
Selecting the Ringer Volume. . . . . . . . . . . . . . . . . . . . . . . . . . . 21
Preparing the Answering System . . . . . . . . . . . . . . . . . . . . . . . 23
Greeting Message . . . . . . . . . . . . . . . . . . . . . . . . . . . . . . . . . . . 23
Programming Summary for the Answering System . . . . . . . . . . 25
Day and Time Adjustment. . . . . . . . . . . . . . . . . . . . . . . . . . . . . 26
Selecting the Caller’s Recording Time . . . . . . . . . . . . . . . . . . . . 28
Selecting the Number of Rings . . . . . . . . . . . . . . . . . . . . . . . . . 29
Cordless Telephone
Making Calls. . . . . . . . . . . . . . . . . . . . . . . . . . . . . . . . . . . . . . . . 30
With the Handset . . . . . . . . . . . . . . . . . . . . . . . . . . . . . . . . . . . 30
With the Base Unit (Digital Duplex Speakerphone) . . . . . . . . . . 32
Simultaneous Keypad Dialling. . . . . . . . . . . . . . . . . . . . . . . . . . 34
Answering Calls . . . . . . . . . . . . . . . . . . . . . . . . . . . . . . . . . . . . . 35
With the Handset . . . . . . . . . . . . . . . . . . . . . . . . . . . . . . . . . . . 35
With the Base Unit . . . . . . . . . . . . . . . . . . . . . . . . . . . . . . . . . . 35
Caller ID Service . . . . . . . . . . . . . . . . . . . . . . . . . . . . . . . . . . . . . 36
Using the Caller List. . . . . . . . . . . . . . . . . . . . . . . . . . . . . . . . . . 38
Viewing the Caller List. . . . . . . . . . . . . . . . . . . . . . . . . . . . . . . . 38
Calling Back from the Caller List . . . . . . . . . . . . . . . . . . . . . . . . 39
Editing the Caller’s Phone Number . . . . . . . . . . . . . . . . . . . . . . 40
Storing Caller List Information in the Directory. . . . . . . . . . . . . . 43
Erasing Caller List Information . . . . . . . . . . . . . . . . . . . . . . . . . 45
One-Touch Dialler . . . . . . . . . . . . . . . . . . . . . . . . . . . . . . . . . . . 47
Storing a Phone Number in the DIRECT Button . . . . . . . . . . . . 47
Dialling the Stored Number in the DIRECT Button. . . . . . . . . . . 48
Contents
4
Page 5

5
Preparation Cordless Telephone Answering System Useful Information
Using the Directory . . . . . . . . . . . . . . . . . . . . . . . . . . . . . . . . . . 49
Storing Names and Numbers in the Directory . . . . . . . . . . . . . . 49
Steps for Entering Names and Symbols . . . . . . . . . . . . . . . . . . 52
Finding Items in the Directory . . . . . . . . . . . . . . . . . . . . . . . . . . 54
Dialling from the Directory . . . . . . . . . . . . . . . . . . . . . . . . . . . . 56
Editing an Item in the Directory . . . . . . . . . . . . . . . . . . . . . . . . 57
Erasing an Item from the Directory . . . . . . . . . . . . . . . . . . . . . . 58
Intercom . . . . . . . . . . . . . . . . . . . . . . . . . . . . . . . . . . . . . . . . . . . 59
Transferring a Call Using the Intercom . . . . . . . . . . . . . . . . . . . 60
Special Features. . . . . . . . . . . . . . . . . . . . . . . . . . . . . . . . . . . . . 61
Automatic Security Code Setting. . . . . . . . . . . . . . . . . . . . . . . . 61
How to Use the PAUSE Button
(For Analog PBX Line/Long Distance Service Users) . . . . . . . 62
Call Waiting and Caller ID Compatible. . . . . . . . . . . . . . . . . . . . 62
RECALL Button. . . . . . . . . . . . . . . . . . . . . . . . . . . . . . . . . . . . . 63
Answering System
Automatic Answering Operation. . . . . . . . . . . . . . . . . . . . . . . . 65
Setting the Unit to Answer Calls . . . . . . . . . . . . . . . . . . . . . . . . 65
Listening to Messages. . . . . . . . . . . . . . . . . . . . . . . . . . . . . . . . 66
From the Handset . . . . . . . . . . . . . . . . . . . . . . . . . . . . . . . . . . . 68
Erasing Messages . . . . . . . . . . . . . . . . . . . . . . . . . . . . . . . . . . . 69
Pager Call . . . . . . . . . . . . . . . . . . . . . . . . . . . . . . . . . . . . . . . . . . 70
Storing a Pager Number . . . . . . . . . . . . . . . . . . . . . . . . . . . . . . 70
Setting the Unit to Call a Pager. . . . . . . . . . . . . . . . . . . . . . . . . 73
Remote Operation from a Touch Tone Phone . . . . . . . . . . . . . 74
Setting the Remote Code . . . . . . . . . . . . . . . . . . . . . . . . . . . . . 75
Voice Menu . . . . . . . . . . . . . . . . . . . . . . . . . . . . . . . . . . . . . . . . 76
Direct Remote Operation. . . . . . . . . . . . . . . . . . . . . . . . . . . . . . 78
Remote Operation with the Handset. . . . . . . . . . . . . . . . . . . . . 80
Useful Information
Wall Mounting. . . . . . . . . . . . . . . . . . . . . . . . . . . . . . . . . . . . . . . 82
Battery Replacement . . . . . . . . . . . . . . . . . . . . . . . . . . . . . . . . . 84
Adding Another Phone . . . . . . . . . . . . . . . . . . . . . . . . . . . . . . . 85
Before Requesting Help. . . . . . . . . . . . . . . . . . . . . . . . . . . . . . . 86
Safety Instructions. . . . . . . . . . . . . . . . . . . . . . . . . . . . . . . . . . . 91
Important Information (For Australia only). . . . . . . . . . . . . . . . 94
Page 6
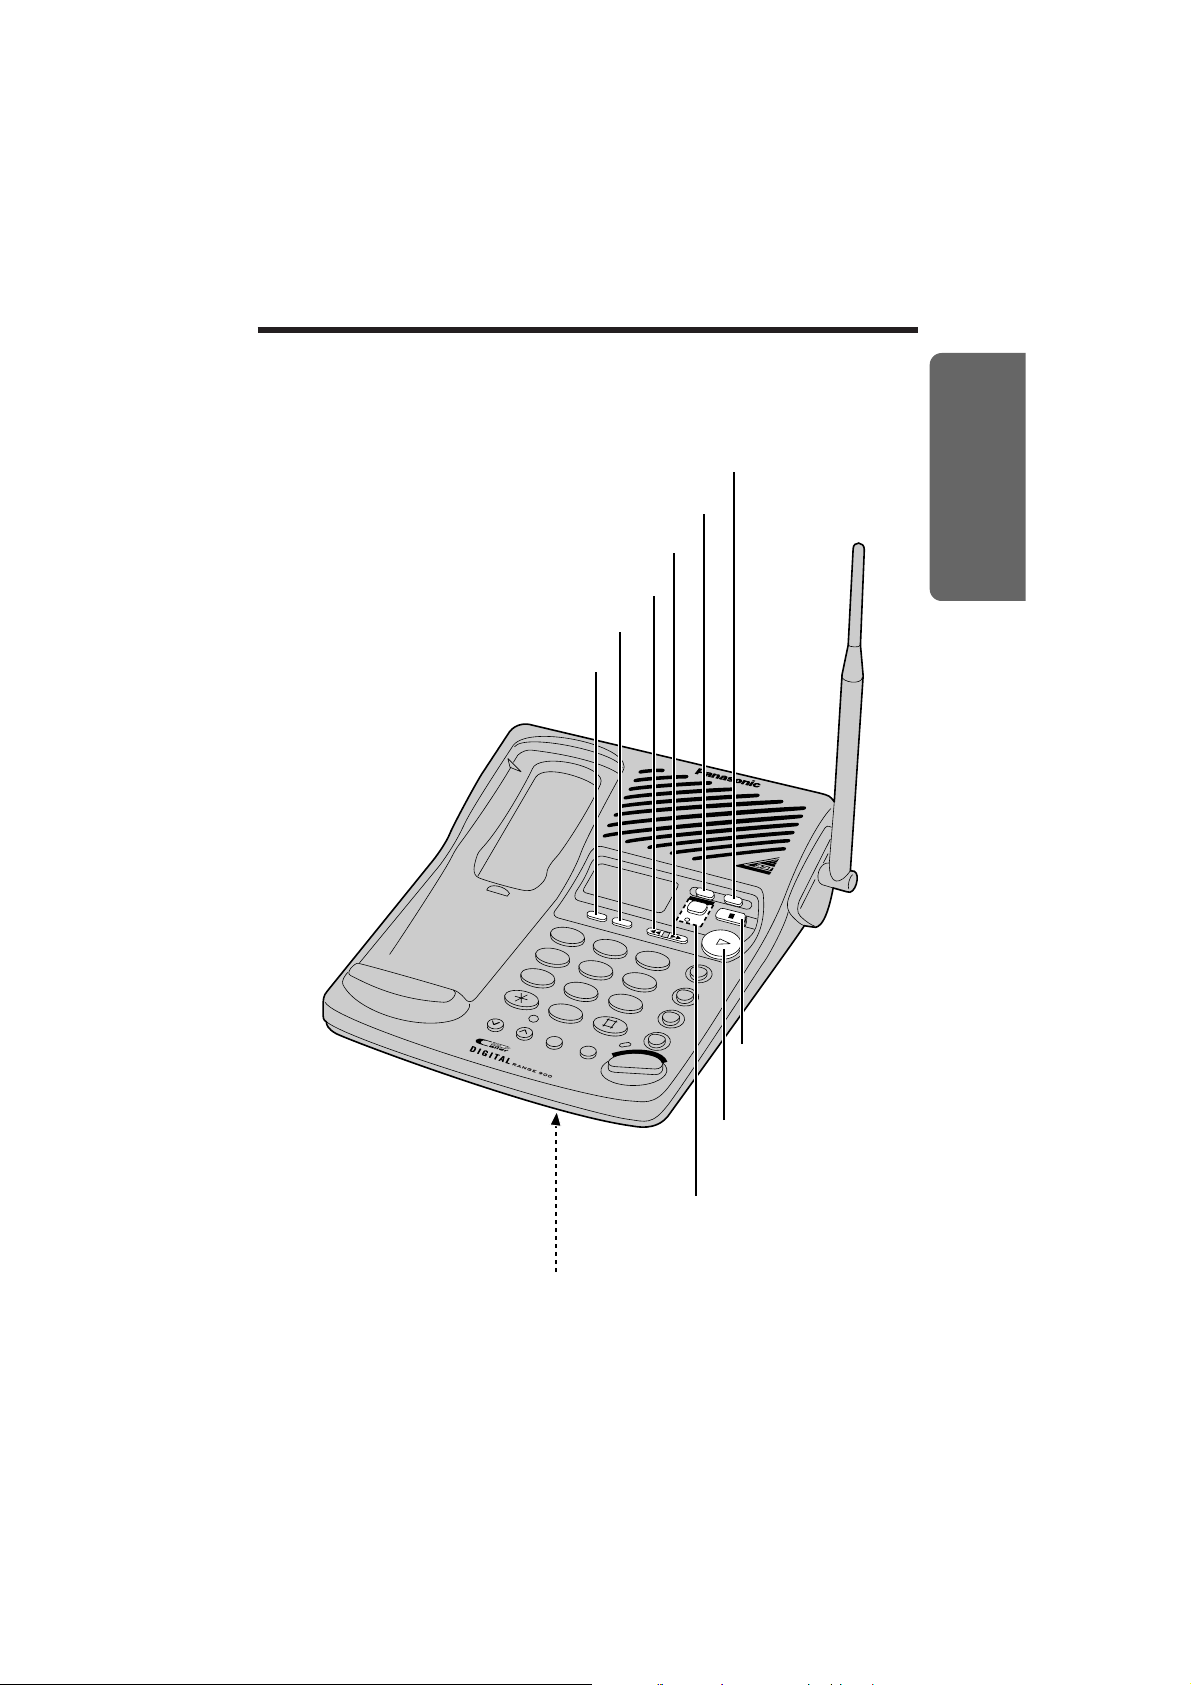
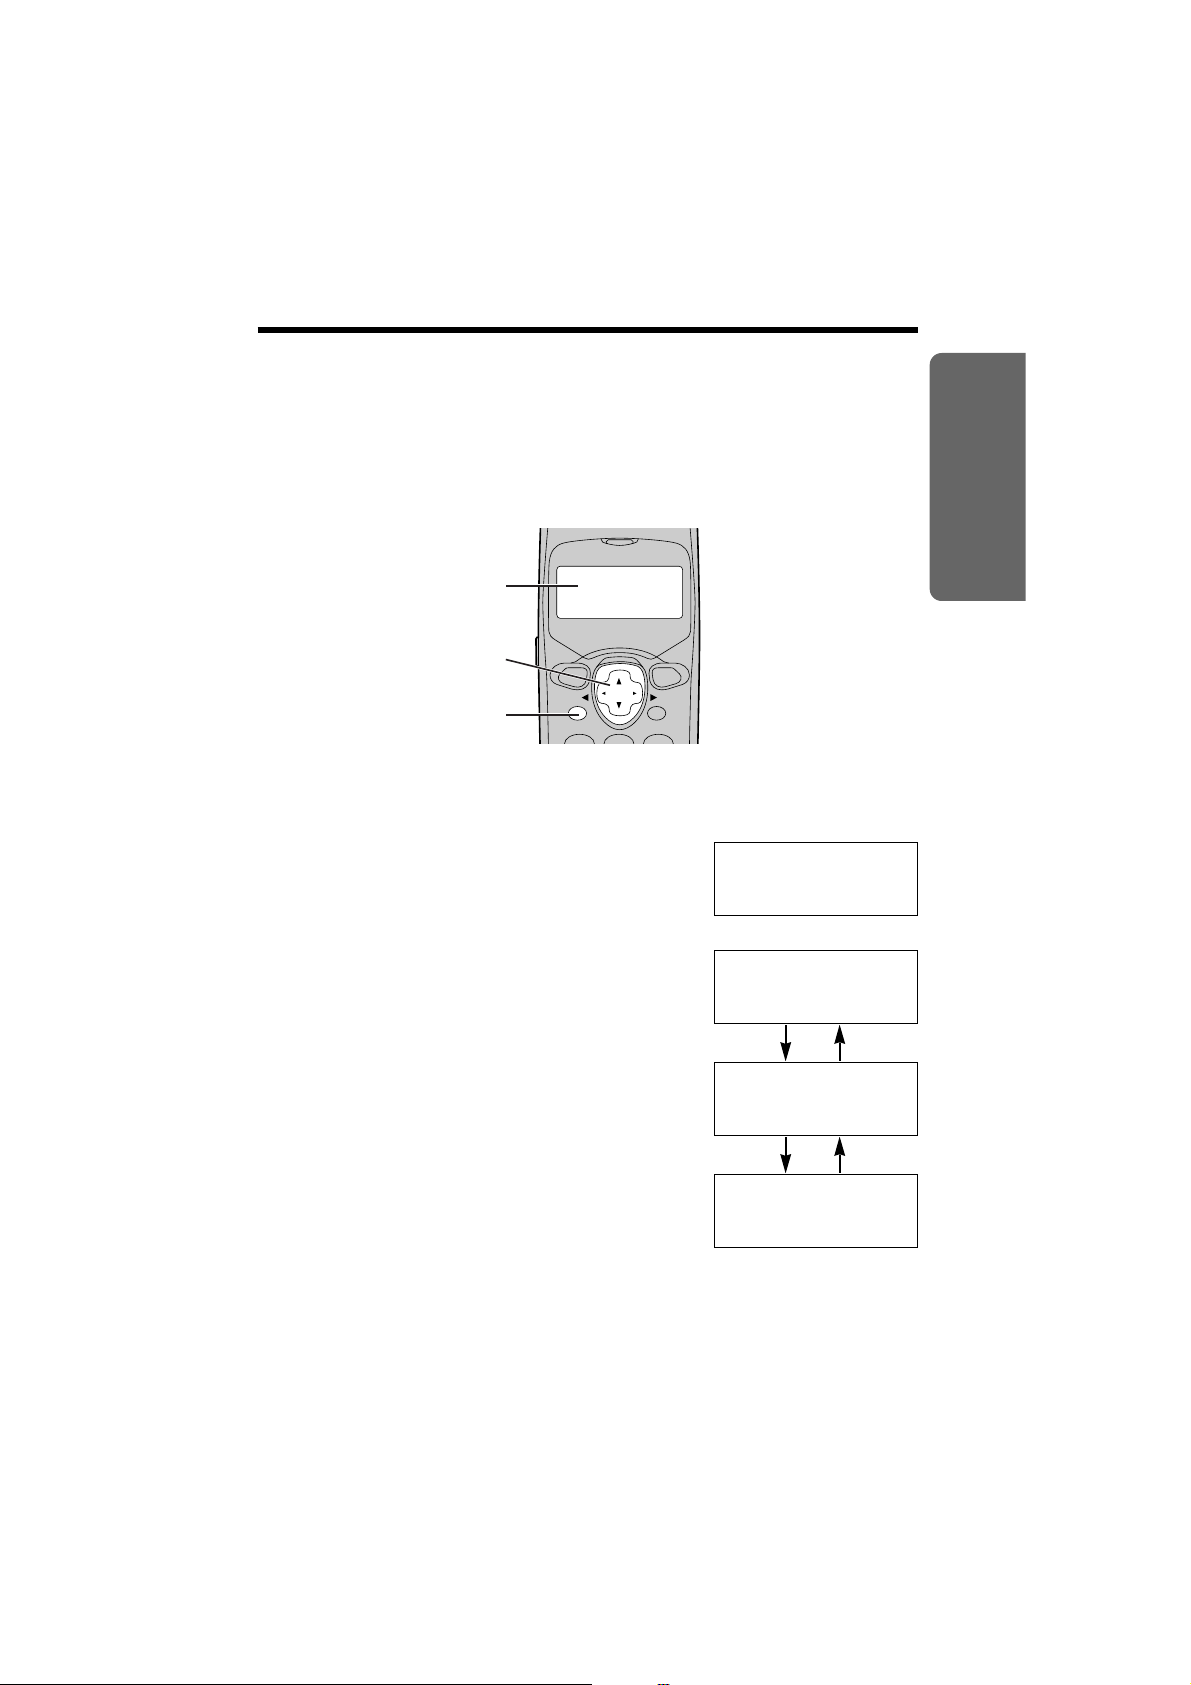
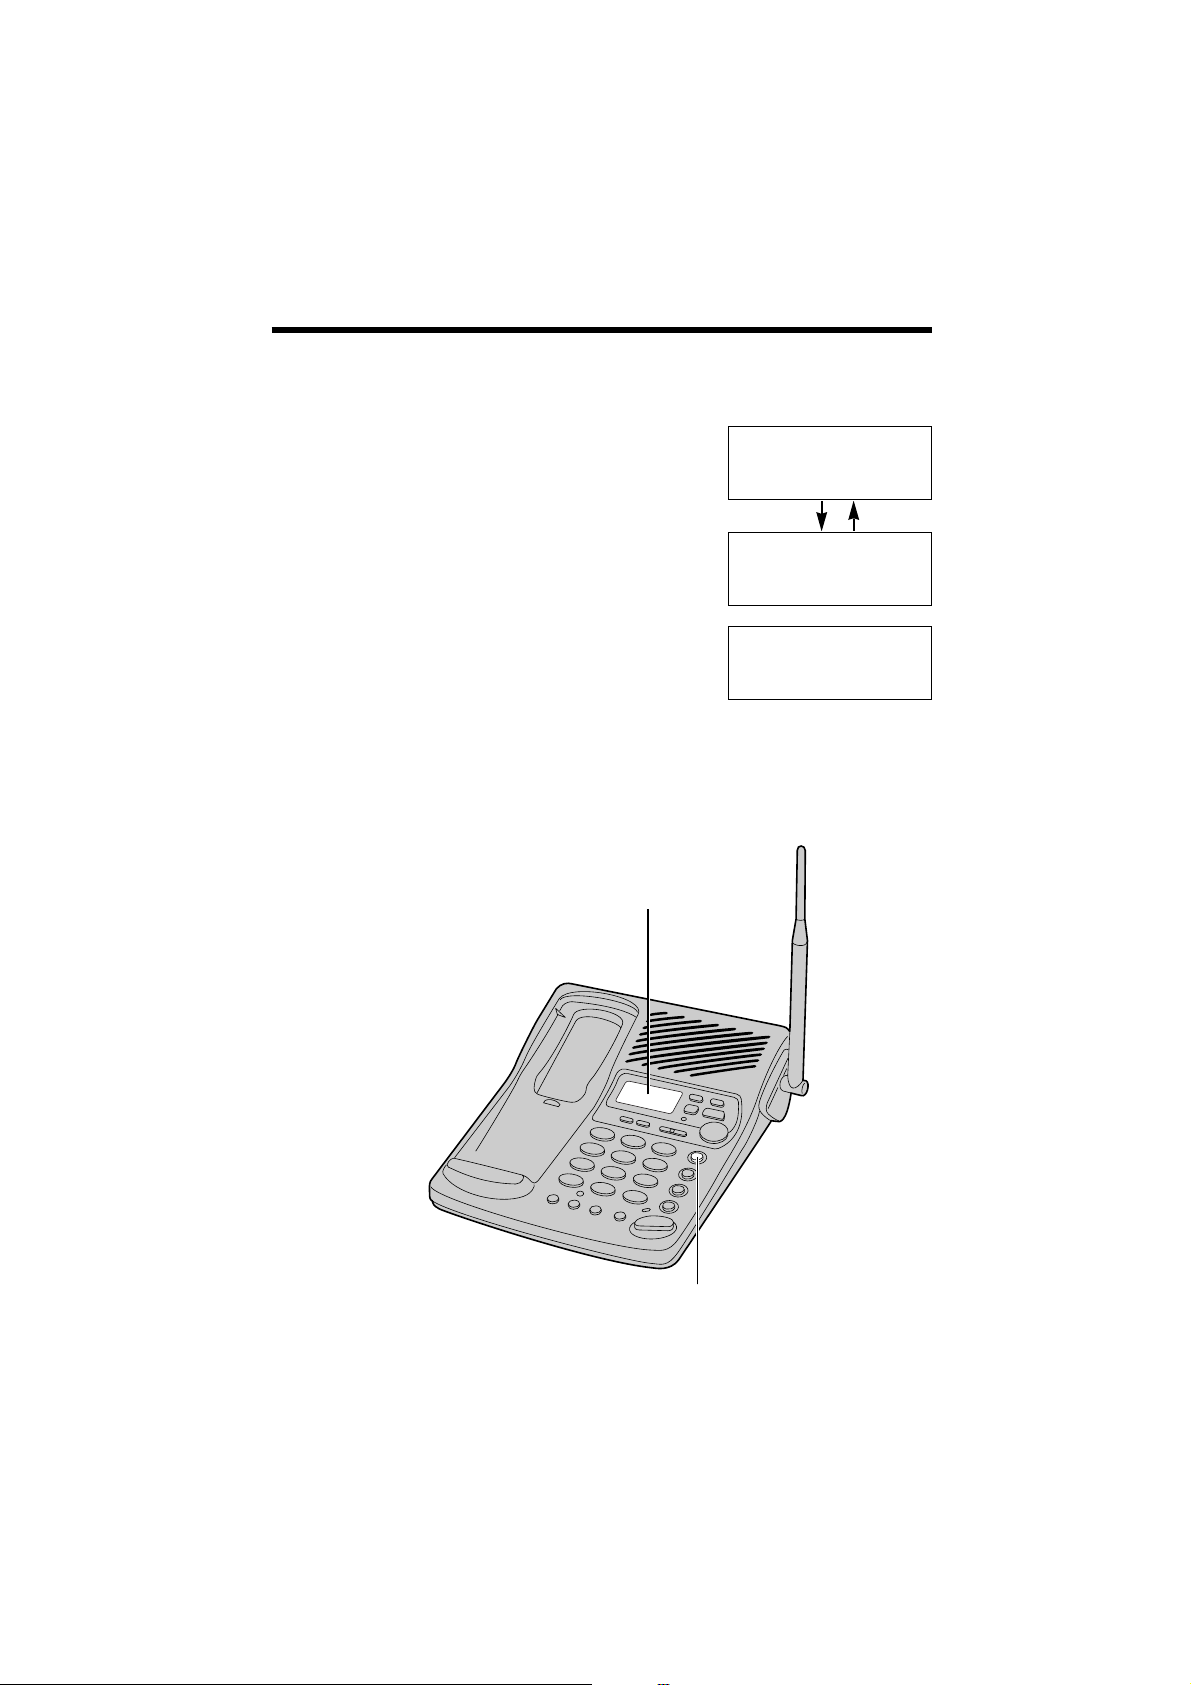
Location of Controls
6
Base unit
CALLER ID
STOP/EXIT
NEW MESSAGE
ERASE
CLEAR
EDIT
SKIP/FF
SEARCH
REPEAT/REW
GREETING
DIRECTORY
ABC
DEF
MNO
JKL
GHI
1
2
3
4
5
6
7
8
9
0
PQRS
VOLUME
LOCATOR
REDIAL
INTERCOM
MIC
HOLD
RECALL
PAUSE
RINGER
IN USE/CHARGE
TUV
WXYZ
D
I
G
I
T
A
L
S
P
-
P
H
O
N
E
ANSWER ON
(RINGER) Button (p. 22)
(PAUSE) Button (p. 62)
(LOCATOR/INTERCOM)
Button (p. 59)
(RECALL) Button (p. 62, 63)
(HOLD) Button (p. 33)
VOLUME (_), (^) Buttons
(p. 23, 33)
(REDIAL) Button (p. 33)
(DIGITAL\SP-PHONE) (Speakerphone) Button and Indicator (p. 32, 35)
Antenna (p. 3, 14)
IN USE/CHARGE Indicator
(p. 15)
Display (p. 9, 12)
Charge Contacts (p. 16)
SPREAD SPECTRUM
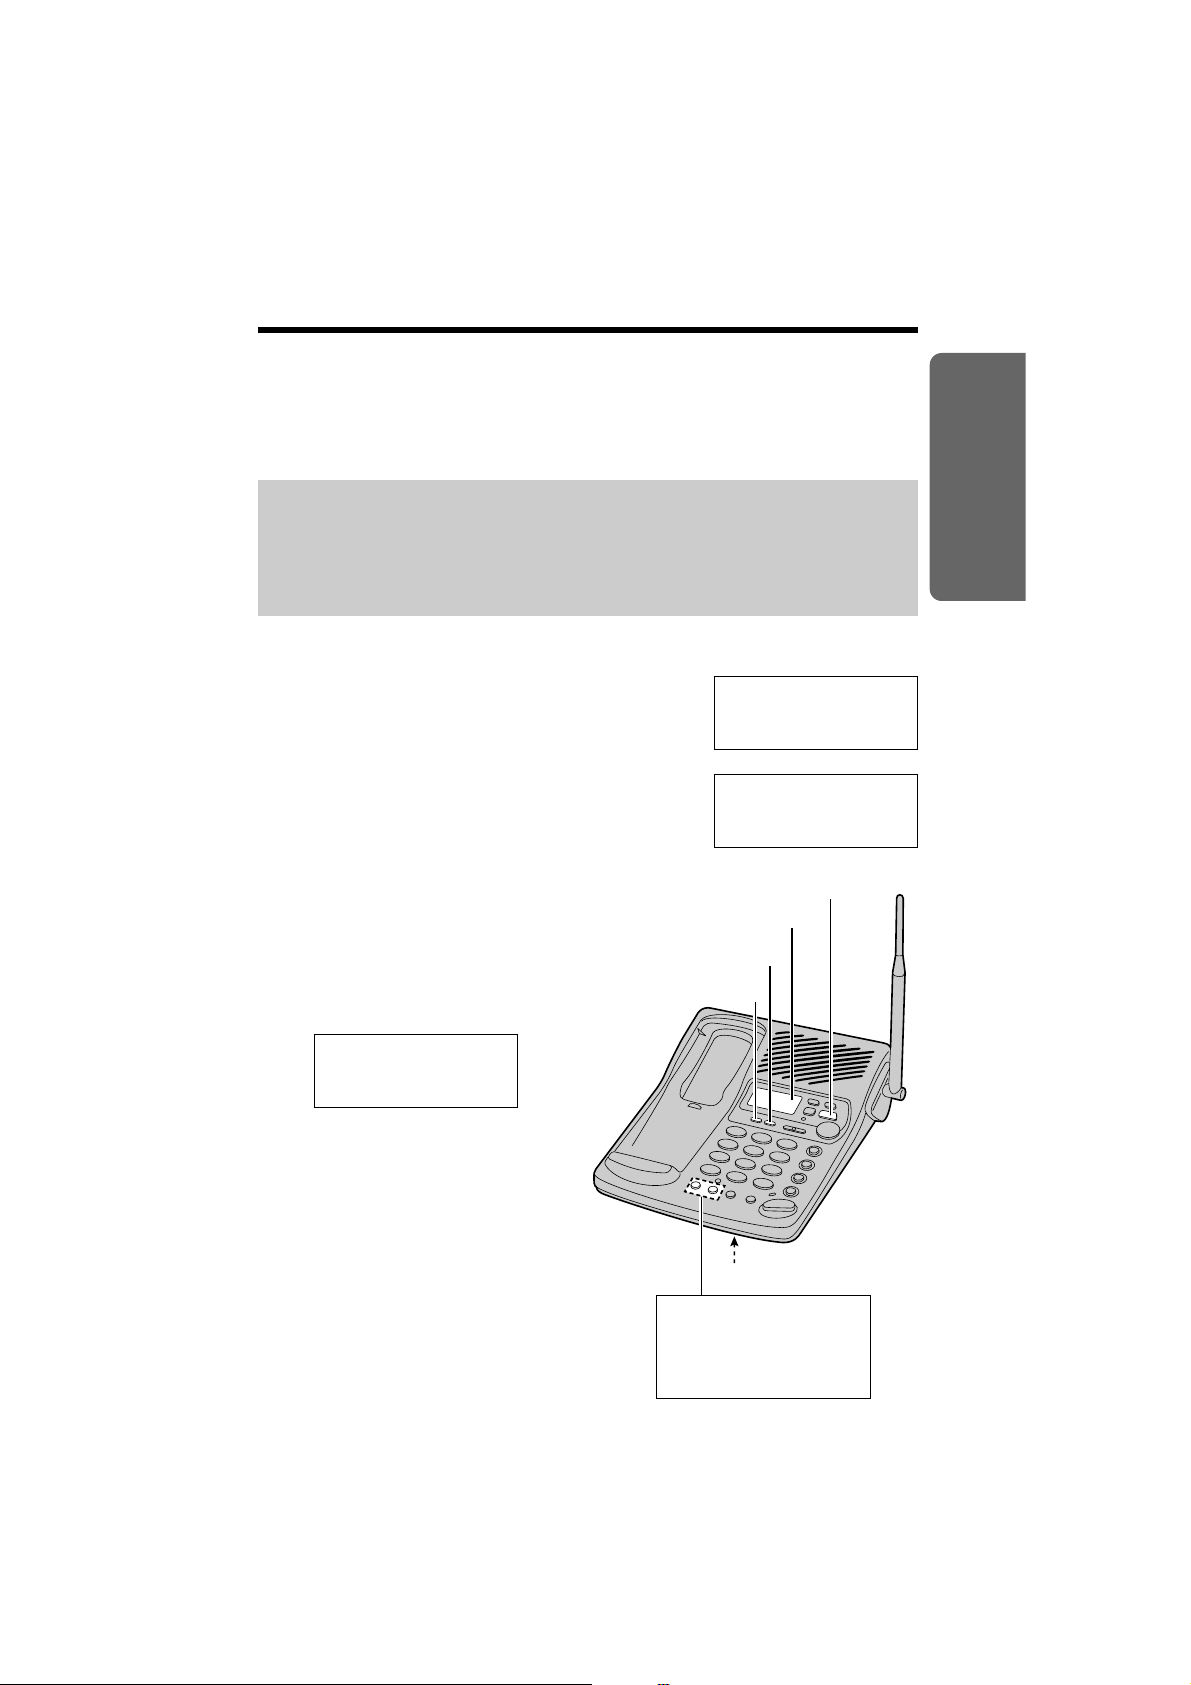
Page 7
“
7
Preparation
SPREAD SPECTRUM
CALLER ID
STOP/EXIT
NEW MESSAGE
ERASE
CLEAR
EDIT
SKIP/FF
SEARCH
REPEA
T/REW
GREETING
DIRECTORY
ABC
DEF
MNO
JKL
GHI
1
2
3
4
5
6
7
8
9
0
PQRS
VOLUME
LOCATOR
REDIAL
INTERCOM
MIC
HOLD
RECALL
PAUSE
RINGER
IN USE/CHARGE
TUV
WXYZ
D
I
G
I
T
A
L
S
P
-
P
H
O
N
E
ANSWER ON
(NEW\MESSAGE)
Button (p. 66)
(STOP/EXIT) Button
(p. 23, 38, 67)
(SKIP/FF) Button (p. 38, 55, 67)
(REPEAT/REW) Button (p. 38, 55, 67)
(GREETING/EDIT) Button (p. 23, 42)
(ERASE/CLEAR) Button (p. 24, 45, 69)
(ANSWER\ON) Button and Indicator
(p. 65, 66, 69)
MIC (Microphone) (p. 23, 32, 59)
(DIRECTORY) Button (p. 55)
(CALLER\ID) Button (p. 38)
Page 8
“
Location of Controls
8
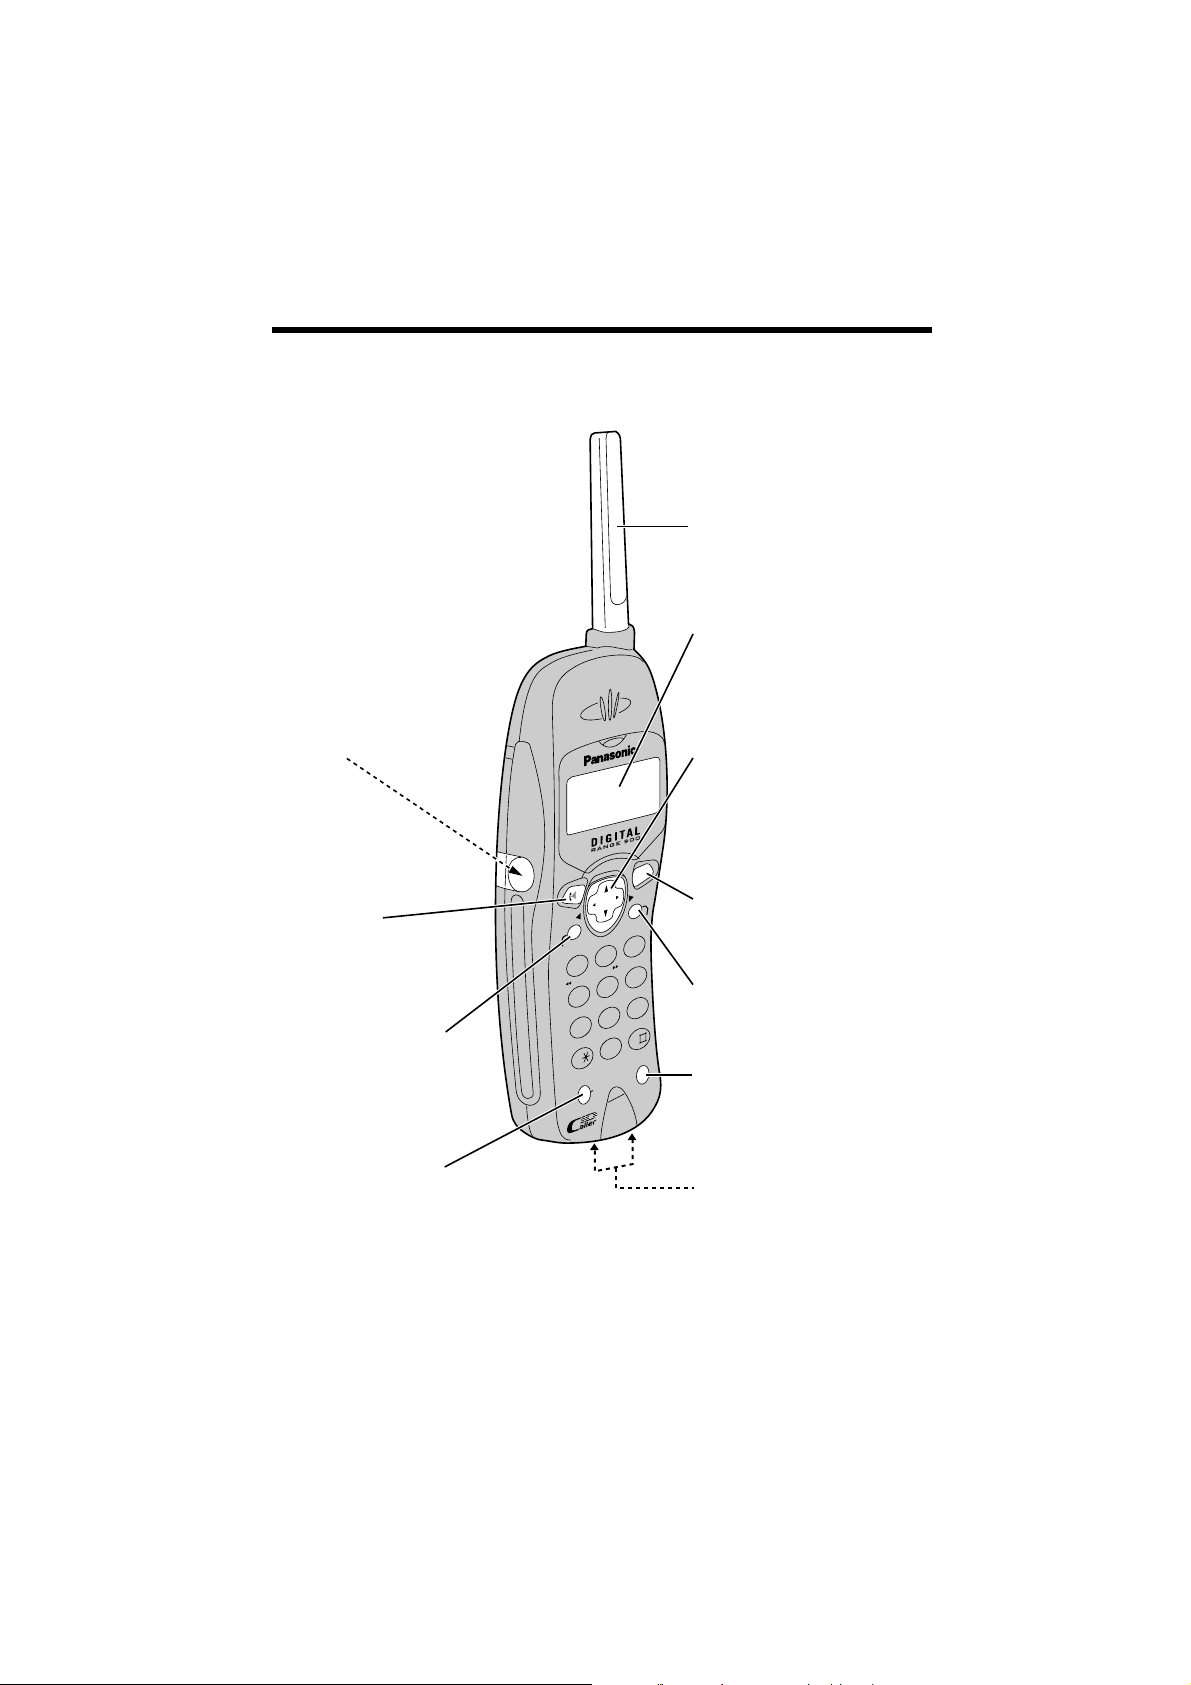
Handset
TALK
DIRECT
FWD/EDIT
BACK
FUNCTION/EXIT
1
2
ABC
3
DEF
5
JKL
6
MNO
4
GHI
8
TUV
0
9
WXYZ
7
PQRS
RECALL
REDIAL
PAUSE
INTERCOM/CLEAR
ON
OFF
LOUD/
SEARCH
CH
PLAYBACK
REPEAT
SKIP
PAGER
NEW MSG
ALL MSG
ANS ON
STOP
ANS OFF
Antenna
(TALK) Button
(p. 30, 35)
(INTERCOM/CLEAR)
Button
(p. 31, 45, 58, 59)
Navigator Key
(
(‹), (›), BACK (fi),
FWD/EDIT (fl))
(p. 19, 25, 31, 38, 50, 52)
(DIRECT) Button
(p. 47, 48)
(REDIAL/PAUSE) Button
(p. 30, 31, 62)
Display (p. 9, 10)
(RECALL/PLAYBACK)
Button (p. 62, 63, 68, 80)
(FUNCTION/EXIT/CH)
(Channel) Button
(p. 19, 25, 30, 38)
Charge Contacts (p. 16)
Headset Jack
(p. 17)
Page 9

Displays
“
9
Preparation
Both the handset and the base unit show you instructions and information
on the displays. These display prompts are shown below.
Common prompts for the handset and the base unit
No items stored
The Caller List is empty or there are no stored
items in the directory.
This is a phone number from the Caller List.
The display shows:
—the caller’s phone number,
—the time and date of the last call
(ex. Jan. 12, 11:20 AM), and
—the number of times called (ex. 3 times).
This is a name from the directory. The stored
name and phone number are displayed.
A second call is received during a conversation
(p. 62).
0222333444
11:20A JAN.12 a3
Ann
0312345678
0266667777
----Waiting-----
Page 10
“
Displays
10
Please lift up
and try again
Talk
01-06-35
No link to base.
Place on cradle
and try again.
12 new calls
12 new calls
43
1
=Directory
Handset only
Recharge battery
The battery needs to be charged. Place the
handset on the base unit to charge the battery
(p. 15).
The display shows the number of new calls and
the battery strength (p. 15) while the handset is
on the base unit.
The display shows the number of new calls when
(›) or (‹) is pressed while the handset is off
the base unit.
To search from the most recent call, press (›).
To search from the oldest call, press (‹) (p. 38).
To go to the directory list, press FWD/EDIT (fl)
(Directory key).
During a conversation, the display shows
the length of the call (ex. 1 hour, 6 minutes and
35 seconds). The battery strength is also
displayed (p. 15).
The handset has lost communication with
the base unit. Place the handset on the base unit
and try again.
(›), (‹), BACK (fi) or FWD/EDIT (fl) was
pressed while the handset was on the base unit.
Lift the handset and press the button again.
Page 11

“
11
Preparation
Remote
operation
Answering
system setting.
See base unit.
When the ringer volume is set to OFF (p. 21),
“Ringer off” will flash for about 45 seconds
before the unit returns to the standby mode
(p. 16).
When trying to store an item or Caller List
information in the directory, the directory memory
is full (p. 44, 51).
(›), (‹), BACK (fi) or FWD/EDIT (fl) was
pressed while the base unit was not in
the standby mode.
The unit is in answering system programming
mode (p. 25).
The handset is operating the answering system
remotely (p. 80).
During a programming procedure, the handset
has lost communication with the base unit. Move
closer to the base unit.
Not available
Save error
Ringer off
Directory full
Page 12
“
Displays
12
Base unit only
In the standby mode, the display shows
the current day and time, the number of new
calls and recorded messages. (Ex. 5 new calls
have been received and 10 messages have
been recorded.)
When the clock needs adjusting, the day and
time flash (p. 26, 27).
This display will be shown when (CALLER\ID) is
pressed.
To search from the most recent call, press
(SKIP/FF) (New key).
To search from the oldest call, press
(REPEAT/REW) (Old key) (p. 38).
Your greeting message was not recorded
correctly. Record it again (p. 23).
A greeting message is being played (p. 23).
The display shows the elapsed time.
SUN 12:00AM
5 new calls
10 messages
SUN 12:00AM
0 message
5 new calls
<<=Old >>=New
Greeting record
Recording error
Greeting check
00-12
Page 13

13
Preparation
0222333444
- Answering -
SUN 12:00AM
5 new calls
Message full
SUN 12:00AM
5 new calls
10 messages
SUN 12:00AM
Ringer off
10 messages
Handset in use
The answering system is recording a message
(p. 65). (“– Answering –” flashes.)
Message memory is full. (“Message full”
flashes.) Erase some or all of the messages
(p. 69).
The pager call mode is set to ON (p. 73).
The ringer volume is set to OFF (p. 22).
This display will be shown when the handset is
used (making/answering a call, viewing the
Caller List or directory list, etc.).
PAGER
Page 14
Settings
14
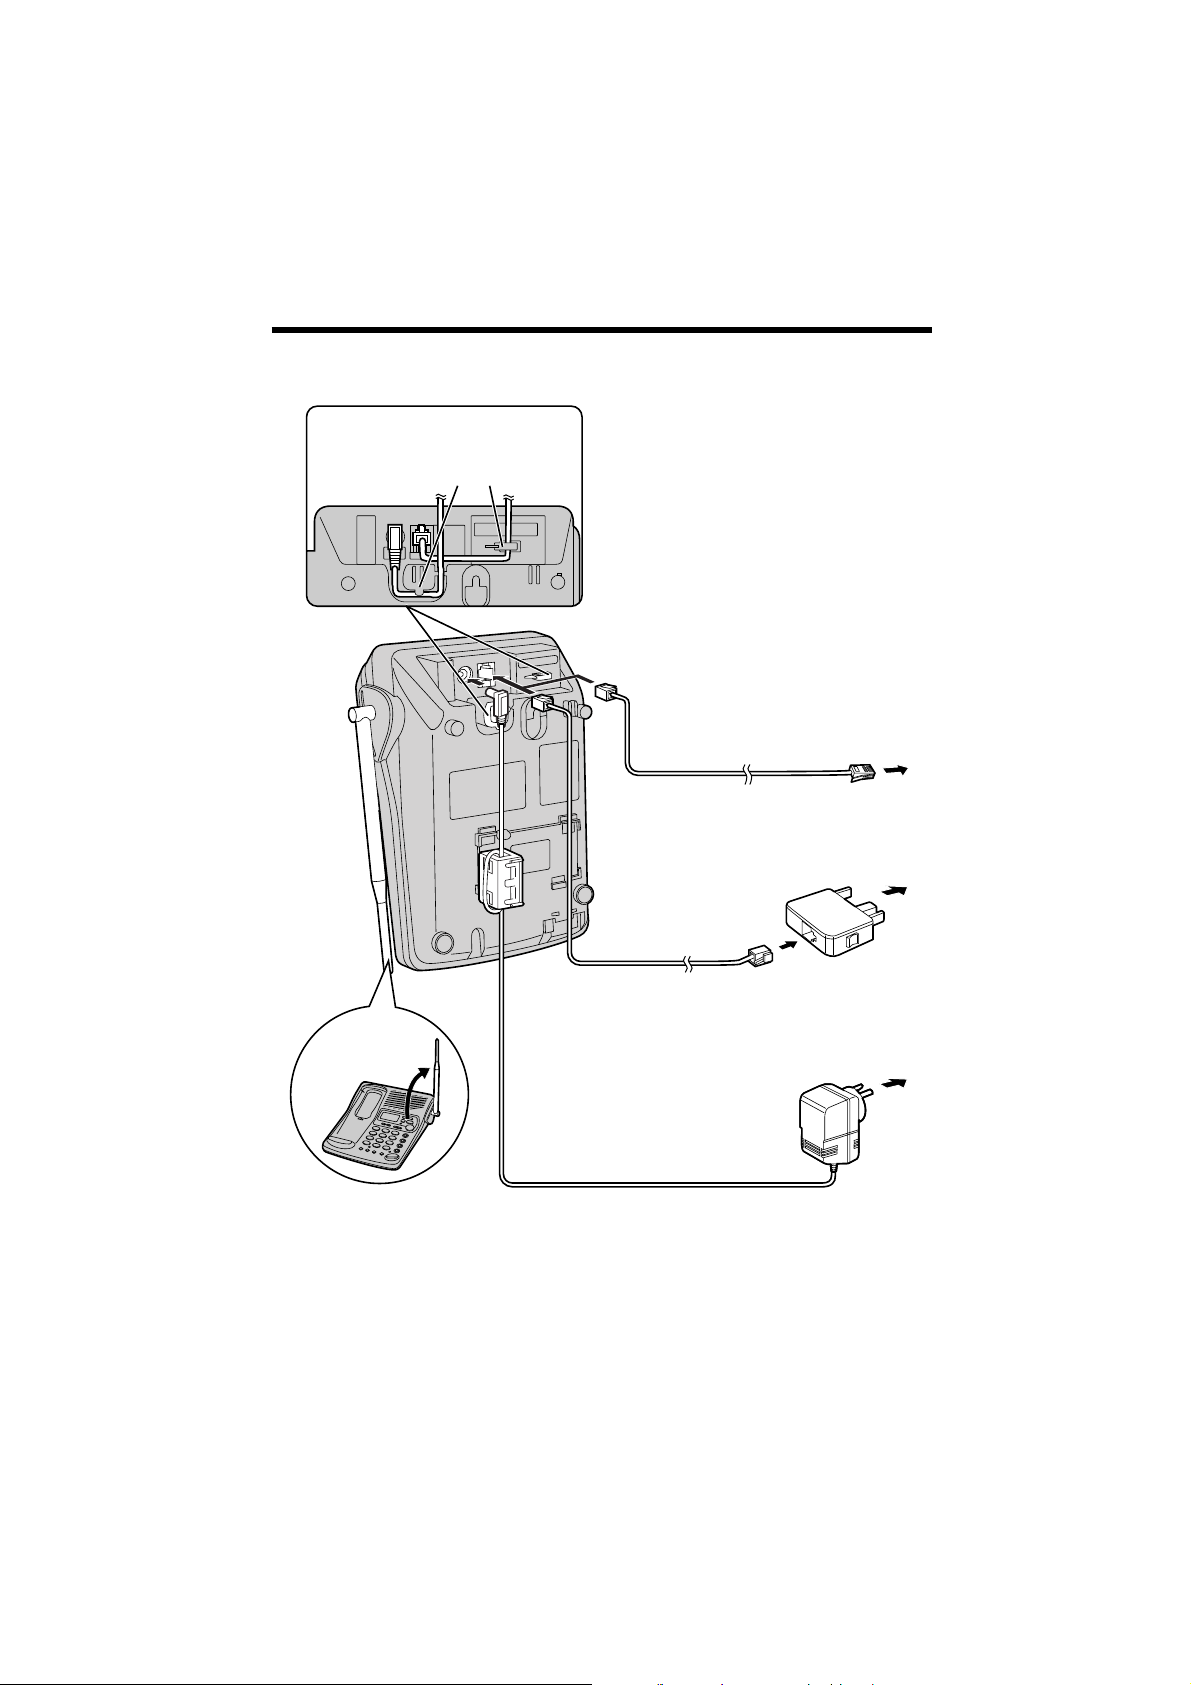
Connections
Fasten the cords to prevent
them from being disconnected.
Hooks
Raise the
antenna.
To Power Outlet
(AC 230 V–240 V, 50 Hz)
AC Adaptor
Telephone
Line Cord
To Socket
Telephone Plug
OR
For New Zealand
To Single-Line
Telephone Jack
For Australia
Telephone
Line Cord
≥USE ONLY WITH Panasonic AC ADAPTOR PQLV1AL.
≥The AC adaptor must remain connected at all times. (It is normal for the adaptor
to feel warm during use.)
≥To connect a standard telephone on the same line, see page 85.
≥If your unit is connected to a PBX which does not support Caller ID services, you
cannot access those services.
≥KX-TC1871ALB and KX-TC1871NZB are not designed to be used with rotary
(pulse dialling) services.
≥KX-TC1871NZB will not answer incoming calls on your FaxAbility number.
Page 15
15
Preparation
Installing the Battery in the Handset
Install the battery and close the handset cover, locking it into place.
IN USE/CHARGE Indicator
OR
Battery strength
You can check the battery strength on the display while the handset is on
the base unit, while it is in use (making/answering a call etc.), or after
viewing the Caller List or directory items, programming etc.
The battery strength will remain for 5 seconds after using the handset,
then the display will return to the standby mode (see next page).
The battery strength is as shown in the chart below.
Display prompt Battery strength
Fully charged
Medium
Low
(flashing) Needs to be recharged.
“
Battery Charge
Place the handset on the base unit and charge for about 6 hours before
initial use.
≥The IN USE/CHARGE indicator
lights.
Page 16
16
Recharge
Recharge the battery when:
—“Recharge battery” is displayed,
—“ ” flashes on the display, or
—the handset beeps intermittently while it is in use.
≥If you DO NOT recharge the handset battery for more than 15 minutes, the
display will keep indicating “Recharge battery” and/or “ ” will continue
to flash.
≥To fully recharge the battery, the handset should be left on the base unit for
about 6 hours.
Battery information
After your Panasonic battery is fully charged (p. 15):
*Within about 3 m
≥Battery life may be shortened depending on usage conditions, such as viewing
the Caller ID Caller List or directory list, and ambient temperature.
≥Clean the handset and the base unit charge contacts with a soft, dry cloth
once a month. Clean more often if the unit is subject to grease, dust or
high humidity. Otherwise the battery may not charge properly.
≥If the battery is fully charged, you do not have to place the handset on the base
unit until “Recharge battery” is displayed and/or “ ” flashes. This will
maximize the battery life.
≥The battery cannot be overcharged.
Standby Mode
Handset (While off the base unit)
The handset goes into the standby mode after you finish using the
handset (making/answering a call, viewing the Caller List or directory list
etc.). The display is blank, but the handset can receive calls.
The battery life is conserved in this mode.
Base Unit
The base unit goes into the standby mode after you finish using the base
unit (making/answering a call, using the intercom, using the answering
system etc.). Programming and storing phone numbers are possible only
when the base unit is in the standby mode.
Operation Approx. battery life
While in use
(TALK)
Up to about 6 hours
Up to about 4 hours
Up to about 14 daysWhile not in use (Standby)
near the base unit*
away from the base unit
Recharge battery
“
Settings
Page 17

17
Preparation
“
Using the Belt Clip
You can hang the handset on your belt or pocket using the belt clip.
To attach the belt clip To remove the belt clip
Headset Jack
When the optional headset is connected to the handset, make sure
to use the headset to talk with the caller. If you want to have a
normal cordless phone conversation, disconnect the headset.
Using the Optional Headset
Plugging an optional headset into the handset allows a hands-free phone
conversation. Please use only the Panasonic KX-TCA87AL headset.
Connecting the optional headset to the handset
Open the headset jack cover, and connect the optional headset to the
headset jack as shown below.
Page 18

“
Settings
18
Selecting the Line Mode
If the line is connected to a low voltage system such as a PBX, set to “B”.
Otherwise a second caller’s information may not be displayed (p. 62), and
the unit may not alert your pager (p. 70). Your phone comes from the
factory set to “A”.
Make sure the unit is in the standby mode.
1
Press (FUNCTION/EXIT/CH).
2
Press (›) or (‹) repeatedly until the arrow
points to “Program”.
3
Press FWD/EDIT (fl) (Yes key).
4
Press (›) or (‹) repeatedly until the arrow
points to “Set line mode”.
5
Press FWD/EDIT (fl) (Yes key).
6
Press (›) or (‹) to select “B” or “A”.
Press FWD/EDIT (fl) (Save key).
≥A beep sounds.
≥To return to the standby mode, press
(FUNCTION/EXIT/CH).
≥You can exit the programming mode any time by pressing (FUNCTION/EXIT/CH).
1
Save directory
Calling pager
43
1
=Yes
Ringer volume
1
Program
43
1
=Yes
1
Save DIRECT#
Set recall time
43
1
=Yes
1
Set line mode
Talk switching
43
1
=Yes
Line mode
:A
43
1
=Save
Line mode
:B
Page 19
Programmable Functions
“
19
Preparation
1
Save DIRECT#
Set recall time
Set line mode
Talk switching
TAD program
You can program the following function items using the handset near
the base unit. The display shows the programming instructions.
See the corresponding pages for function details.
Make sure the unit is in the standby mode.
During programming
*To select a desired function item, press (›) or (‹) repeatedly until the
arrow points to the item. Then press FWD/EDIT (fl) to go to the next step.
≥If the handset displays “No link to base. Place on cradle and try
again.” and an alarm tone sounds, move closer to the base unit and try again.
≥You can exit the programming mode any time by pressing (FUNCTION/EXIT/CH).
≥If you do not press any buttons for 60 seconds, the unit will return to the standby
mode.
Press (FUNCTION/EXIT/CH).
<Function menu>*
To store an item in the directory (p. 50).
To dial the stored pager number (p. 72).
To select the ringer volume (p. 21).
Press FWD/EDIT (fl).
To store a phone number in the DIRECT button
(p. 47).
To select the recall time (p. 64).
To select the line mode (p. 18).
To set the auto talk feature (p. 20).
To program answering system functions (p. 25).
1
Save directory
Calling pager
Ringer volume
Program
<Function menu>*
Page 20

20
Setting the Auto Talk Feature
The Auto Talk feature allows you to answer a call by lifting the handset off
the base unit without pressing (TALK). If you want to use this feature, turn
the feature ON by programming. Your phone comes from the factory set
to OFF.
Make sure the unit is in the standby mode.
1
Press (FUNCTION/EXIT/CH).
2
Press (›) or (‹) repeatedly until the arrow
points to “Program”.
3
Press FWD/EDIT (fl) (Yes key).
4
Press (›) or (‹) repeatedly until the arrow
points to “Talk switching”.
5
Press FWD/EDIT (fl) (Yes key).
6
Press (›) or (‹) to select “On” or “Off”.
Press FWD/EDIT (fl) (Save key).
≥A beep sounds.
≥To return to the standby mode, press
(FUNCTION/EXIT/CH).
≥You can exit the programming mode any time by pressing (FUNCTION/EXIT/CH).
≥To answer a call when the Auto Talk feature is OFF, lift the handset off the base
unit and press (TALK).
Ringer volume
1
Program
43
1
=Yes
Set line mode
1
Talk switching
43
1
=Yes
Auto talk
:Off
43
1
=Save
Auto talk
:On
“
Programmable Functions
Page 21
21
Preparation
“
1
Press (FUNCTION/EXIT/CH).
2
Press (›) or (‹) repeatedly until
the arrow points to “Ringer
volume”, and press FWD/EDIT (fl)
(Yes key).
3
Press (›) or (‹) to select
the desired volume.
≥The selected volume is displayed and
rings.
≥To turn the ringer OFF, press and hold
(›) until 2 beeps sound.
≥The handset will return to the standby
mode.
To turn the ringer ON, press (‹) or (›)
in step 3.
≥The ringer will sound at the LOW level.
≥When you replace the battery, the selected ringer volume setting will return to
the factory set (HIGH). Reprogram if necessary.
Selecting the Ringer Volume
With the handset
You can program the ringer volume to HIGH, LOW or OFF. If set to OFF,
the unit will not ring. Your phone comes from the factory set to HIGH.
Make sure the unit is in the standby mode.
Ringer
Low ❚ ❚ ❚ ❚ ❚ ❚ High
43
Ringer
Low ❚ ❚ ❚ ❚ ❚ ❚ High
43
HIGH
LOW
1
Ringer volume
Program
43
1
=Yes
Ringer off
OFF
(›)
(›)
(‹)
(‹)
Display
(‹), (›),
FWD/EDIT (fl)
(FUNCTION/EXIT/CH)
Page 22
22
“
Programmable Functions
With the base unit
Make sure the unit is in the standby mode.
≥To select HIGH (preset) or LOW,
press (RINGER).
Each time you press the button,
the ringer volume will change and
the selected volume will ring.
≥To turn the ringer OFF, press and hold
(RINGER) until 2 beeps sound. “Ringer
off” will be displayed.
≥To turn the ringer ON, press (RINGER).
The ringer will sound at the HIGH level.
Ringer
Low ❚ ❚ ❚ ❚ ❚ ❚ High
Ringer
Low ❚ ❚ ❚ ❚ ❚ ❚ High
HIGH
LOW
Ringer off
OFF
(RINGER)
(RINGER)
Display
Page 23
23
Preparation
Preparing the Answering System
“
Greeting Message
You can record a personal greeting message of up to 2 minutes. If a
greeting message is not recorded, one of two pre-recorded greetings will
be played when a call is received (p. 24).
All messages (greeting, incoming, etc.) are stored in digital memory
(p. 24). The total recording time is about 15 minutes.
We recommend you record a brief greeting message (see sample
on next page) in order to leave more time for recording new
messages.
To record a greeting message
1
Press and hold (GREETING/EDIT) until
a long beep is heard.
2
Talk clearly, about 20 cm away from
the MIC (microphone).
≥The base unit display shows the elapsed
recording time.
≥If you record for over 2 minutes, the unit will
automatically stop recording.
3
When finished, press (STOP/EXIT).
≥To check the recorded greeting,
press (GREETING/EDIT) briefly.
≥To change the message,
start again from step 1.
MIC
To increase the volume,
press VOLUME (^).
To decrease, press
VOLUME (_).
(STOP/EXIT)
(GREETING/EDIT)
(ERASE/CLEAR)
Display
Greeting record
00-00
Greeting record
00-12
Greeting check
00-12
Page 24

“
Preparing the Answering System
24
To erase the recorded greeting message
Press (GREETING/EDIT) briefly ¤ Press (ERASE/CLEAR) while
the message is being played.
≥The unit will answer a call with a pre-recorded greeting.
Pre-recorded greeting message
If you do not record a greeting message (p. 23), one of two messages will
be played when a call is received, depending on the caller’s recording
time (p. 28).
To check the pre-recorded greeting, press (GREETING/EDIT) briefly.
≥A pre-recorded greeting will be played as follows:
∫When the recording time is set to “1 minute” or “3 minutes”:
“Hello, we are not available now. Please leave your name and phone number
after the beep. We will return your call.”
∫When the recording time is set to “Greeting only”:
“Hello, we are not available now. Please call again. Thank you for your call.”
Flash Memory Message Backup
Messages are stored on a “ flash memory” IC chip and will not be
affected by power failures. All messages are saved until you erase
them.
Greeting message sample
“Hello, this is (your name and/or number). Sorry I cannot take your
call. Please leave a message after the beep. Thank you.”
Page 25
“
25
Preparation
Programming Summary for the Answering
System
You can program the following functions using the handset near the
base unit. See the page numbers below for details.
The unit must be in the standby mode before programming.
≥To cancel during programming, press (FUNCTION/EXIT/CH). Start again from
the beginning.
≥If 6 beeps sound during programming, a wrong key was pressed. Enter
the correct number.
Lift the handset, and press (FUNCTION/EXIT/CH).
Press (›) or (‹) to select “Program”, and press FWD/EDIT (fl)
(Yes key).
To adjust the day and time, press (0). (page 26)
To set the remote code, press (1). (page 75)
To select the number of rings, press (2). (page 29)
To select the caller’s recording time, press (5). (page 28)
To store a pager number, press (#). (page 71)
≥The base unit display shows the setting of the selected adjustment or
function.
Press FWD/EDIT (fl) (Save key).
≥A beep sounds.
≥To return to the standby mode, press (FUNCTION/EXIT/CH).
≥If the handset displays “No link to base. Place on
cradle and try again.” and an alarm tone sounds,
move closer to the base unit and try again.
Press (›) or (‹) to select “TAD program”, and press FWD/EDIT (fl)
(Yes key).
≥“Answering system setting. See base unit.” is displayed on
the handset.
Base unit display
5=Recording time
6=Pager mode
7=Home number
≥Do not change the settings of
“Pager mode” ((6)) and “Home
number” ((7)). If you have changed
these settings, reset to the default.
(Pager mode: Recorded MSG,
Home number: No items)
PAGER
Page 26

26
“
Preparing the Answering System
Day and Time Adjustment
Voice Day/Time Stamp: During playback, a synthesized voice will
announce the day and time that each message was recorded.
1
Press (FUNCTION/EXIT/CH).
2
Press (›) or (‹) repeatedly until the arrow
points to “Program”.
3
Press FWD/EDIT (fl) (Yes key).
4
Press (›) or (‹) repeatedly until the arrow
points to “TAD program”.
5
Press FWD/EDIT (fl) (Yes key).
≥The base unit display shows the answering
system function menu.
6
Press (0).
≥“Set time” is announced.
If previously adjusted, the day/time will be
heard.
7
Enter the current time (hour and minute) using a 4-digit number.
(Ex. To set 9:30, enter “0930”.)
8
Press ($) to select “AM” or “PM”.
Press (#) repeatedly to set the day.
9
Press FWD/EDIT (fl) (Save key).
≥The unit announces the day/time. The clock starts working.
≥To return to the standby mode, press (FUNCTION/EXIT/CH).
Ringer volume
1
Program
43
1
=Yes
1
Save DIRECT#
Set recall time
43
1
=Yes
1
TAD program
43
1
=Yes
Answering
system setting.
See base unit.
1
Save directory
Calling pager
43
1
=Yes
MON 12:00 AM
¢
=AM/PM #=Day
Base unit display
Page 27

27
Preparation
“
To check the day/time
Repeat steps 1 to 6 on page 26.
≥The current day/time is heard. When finished, press (FUNCTION/EXIT/CH).
For Caller ID service users (p. 36)
≥The Caller ID information will re-set the clock after the first ring if the
adjusted time is incorrect. However, the day will not be re-set by the Caller
ID information. Adjust the correct day by following the steps on page 26.
≥If the time has not previously been set, the Caller ID information will not
adjust the clock.
≥The Caller ID information will automatically adjust the clock for daylight
saving time.
If a power failure occurs, “ ” will flash or the incorrect day/time will
be shown on the base unit display. Reprogram the current day/time.
≥In step 7, you cannot enter numbers greater than 12. Do not use military time.
(To set 13:00 hours, enter “0100” and select “PM” by pressing ($).)
Page 28
28
“
Preparing the Answering System
Selecting the Caller’s Recording Time
You can select “1 minute”, “3 minutes” or “Greeting only” for the caller’s
recording time. Your phone comes from the factory set to “3 minutes”.
1
Press (FUNCTION/EXIT/CH).
2
Press (›) or (‹) repeatedly until the arrow
points to “Program”.
3
Press FWD/EDIT (fl) (Yes key).
4
Press (›) or (‹) repeatedly until the arrow
points to “TAD program”.
5
Press FWD/EDIT (fl) (Yes key).
≥The base unit display shows the answering
system function menu.
6
Press (5).
≥The current setting is displayed on the base
unit.
7
Press (1), (2) or (3) to select the recording time.
1: 1 minute
2: 3 minutes (factory preset)
3: Greeting only
8
Press FWD/EDIT (fl) (Save key).
≥A beep sounds.
≥To return to the standby mode, press (FUNCTION/EXIT/CH).
If you select “Greeting only”, the unit will answer a call with the
greeting message, and then hang up. The unit will not record any
incoming messages.
Ringer volume
1
Program
43
1
=Yes
1
Save DIRECT#
Set recall time
43
1
=Yes
1
TAD program
43
1
=Yes
Answering
system setting.
See base unit.
1
Save directory
Calling pager
43
1
=Yes
Recording time
:3min
Base unit display
Page 29
29
Preparation
Selecting the Number of Rings
You can select the number of times the unit rings before the answering
system answers a call, from “2” to “7” or “Toll saver”*.
Your phone comes from the factory set to “Toll saver”.
1
Press (FUNCTION/EXIT/CH).
2
Press (›) or (‹) repeatedly until the arrow
points to “Program”.
3
Press FWD/EDIT (fl) (Yes key).
4
Press (›) or (‹) repeatedly until the arrow
points to “TAD program”.
5
Press FWD/EDIT (fl) (Yes key).
≥The base unit display shows the answering
system function menu.
6
Press (2).
≥The current setting is displayed on the base
unit.
7
Press (0), or (2) to (7) to set the number of rings.
0: Selects “Toll saver”.
2–7: The unit will answer after the selected number of rings.
8
Press FWD/EDIT (fl) (Save key).
≥A beep sounds.
≥To return to the standby mode, press (FUNCTION/EXIT/CH).
*Toll saver
When you call the unit from a touch tone telephone:
If the unit answers on the 2nd ring, there is at least one new message.
If the unit answers on the 4th ring, there are no new messages.
Hang up when you hear the 3rd ring. This will save you the toll
charge for the call.
Ringer volume
1
Program
43
1
=Yes
1
Save DIRECT#
Set recall time
43
1
=Yes
1
TAD program
43
1
=Yes
Answering
system setting.
See base unit.
1
Save directory
Calling pager
43
1
=Yes
Number of rings
:Toll saver
Base unit display
Page 30

Making Calls
30
1
Press (TALK).
2
Dial a phone number.
≥The dialled number is displayed.
≥After a few seconds, the display will show
the length of the call and the battery strength.
3
To hang up, press (TALK) or place
the handset on the base unit.
If noise interferes with the conversation
Press (FUNCTION/EXIT/CH) to select a clearer channel or move closer to
the base unit.
To redial the last number dialled on the handset
Press (TALK) ¤ (REDIAL/PAUSE).
Talk
0111112222
Talk
00-00-00
Talk
With the Handset
To have a hand-free conversation, connect the headset to the handset
(p. 17).
Display
(TALK)
(‹), (›)
(FUNCTION/EXIT/CH)
(INTERCOM/CLEAR)
(REDIAL/PAUSE)
Page 31

“
31
Cordless Telephone
To dial after confirming the entered number
1
Dial a phone number.
≥If you misdial, press (INTERCOM/CLEAR). All
digits are erased. Dial the correct phone number.
2
Press (TALK).
≥After a few seconds, the display will show
the length of the call and the battery strength.
3
To hang up, press (TALK) or place
the handset on the base unit.
To redial after confirming the last number dialled
Press (REDIAL/PAUSE) ¤ (TALK).
To select the receiver volume
Press (‹) or (›) while talking.
≥Each time you press (‹) or (›),
the volume level will change.
≥The display will return to the length of
the call.
≥Your phone comes from the factory
set to MEDIUM.
≥When you replace the battery,
the selected receiver volume setting will
return to the factory set (MEDIUM).
Reprogram if necessary.
Backlit LCD display
The backlit handset display will stay on for about 10 seconds after
pressing a handset button or lifting the handset off the base unit.
Backlit handset keypad
The handset dialling buttons will light when you press a button or lift the
handset off the base unit, and flash when a call is received. The lights will
go out about 10 seconds after pressing a button, lifting the handset or
answering a call.
Talk
0233334444
Talk
00-00-00
0233334444
Loud
Low ❚ ❚ ❚ ❚ ❚ ❚ High
Loud
Low ❚ ❚ ❚ ❚ ❚ ❚ High
HIGH
MEDIUM
Loud
Low ❚ ❚ ❚ ❚ ❚ ❚ High
LOW
(‹)
(‹)
(›)
(›)
Page 32

32
“
Making calls
With the Base Unit (Digital Duplex Speakerphone)
(DIGITAL\SP-PHONE)
and Indicator
(HOLD)
VOLUME (_), (^)
(REDIAL)
MIC
Display
1
Press (DIGITAL\SP-PHONE).
≥The DIGITAL SP-PHONE indicator
lights.
2
Dial a telephone number.
3
When the other party answers,
talk into the MIC (microphone).
4
To hang up, press
(DIGITAL\SP-PHONE).
≥The indicator light goes out.
≥To switch to the handset while using the speakerphone:
—If the handset is off the base unit, press (TALK).
—If on the base unit, just lift up.
≥During a call using the handset, the call can be switched to the speakerphone by
pressing (DIGITAL\SP-PHONE) on the base unit.
Talk
0111112222
Talk
00-00-00
Talk
Page 33

33
Cordless Telephone
“
Hands-free Digital Speakerphone
For best performance, please note the following:
≥Talk alternately with the caller in a quiet room.
≥If the other party has difficulty hearing you, press VOLUME (_) to decrease
the speaker volume.
≥If the other party’s voice from the speaker cuts in/out during a conversation,
press VOLUME (_) to decrease the speaker volume.
To adjust the speaker volume (8 levels) while talking
To increase, press VOLUME (^).
To decrease, press VOLUME (_).
To redial the last number dialled on the base unit
Press (DIGITAL\SP-PHONE) ¤ (REDIAL).
To put a call on hold
Press (HOLD).
≥The DIGITAL SP-PHONE indicator flashes.
To release the hold
From the base unit, press (DIGITAL\SP-PHONE).
From the handset, press (TALK) or lift the handset off the base unit.
≥If another phone is connected on the same line (p. 85), you can also release
the hold by lifting its handset.
Loud
Low ❚❚❚❚❚❚❚❚High
Hold
Page 34

“
Making calls
34
Simultaneous Keypad Dialling
You can use the base unit like a standard telephone. After pressing
(TALK) to make a call with the handset near the base unit, you can also
dial using the base unit keypad.
1
Handset:
Press (TALK).
2
Base unit:
Dial a telephone number while
hearing a dial tone on
the handset.
≥When the other party answers, talk
using the handset.
3
Handset:
To hang up, press (TALK) or
place the handset on the base
unit.
Useful information
You can enter numbers using the base unit keypad during a call with the
handset. For example, to access an answering service, electronic banking
service, etc.
1. Handset:
Press (TALK).
2. Handset:
Dial a telephone number.
≥You can also dial with base unit keypad.
3. Base unit:
Enter the required numbers while listening to the pre-recorded
instructions.
4. Handset:
To hang up, press (TALK) or place the handset on the base unit.
Simultaneous Keypad Dialling is only possible after pressing (TALK).
(TALK)
Page 35

Answering Calls
35
Cordless Telephone
When a call is received, the unit rings and the (CALLER–ID) button on
the base unit flashes quickly. If you subscribe to a Caller ID service,
the calling party information will be displayed after the first ring (p. 36).
In order to view the Caller ID information, please wait until the second ring
to answer a call.
With the Handset
Lift the handset off the base unit and press
(TALK).
≥You can also answer a call by pressing any
dialling button (0) to (9), ($) or (#)
(—Any Key Talk).
Auto Talk
If you set the Auto Talk feature to ON (p. 20),
you can answer a call by lifting the handset off
the base unit without pressing (TALK).
(CALLER–ID)
(TALK)
When the headset is connected (p. 17), make sure to use the
headset to talk with the caller. If you want to have a normal cordless
phone conversation, disconnect the headset.
With the Base Unit
1
Press (DIGITAL\SP-PHONE).
≥The DIGITAL SP-PHONE
indicator lights.
2
Talk into the MIC.
3
To hang up, press
(DIGITAL\SP-PHONE).
≥The indicator light goes out.
(DIGITAL\SP-PHONE)
and Indicator
MIC
Page 36

Caller ID Service
36
This unit is compatible with a Caller ID service offered by your telephone
company. If you subscribe to a Caller ID service, the calling party’s
information will be displayed on the handset and the base unit after
the first ring.
The unit can record information of up to 50 different callers, including
the time and date received and the number of times called, in the Caller
List. The Caller List information is sorted by the most recent to the oldest
call. When the 51st call is received, the first call is deleted.
Using the list, you can automatically call back a caller. You can store
the callers’ numbers from the Caller List into the directory.
When a second call is received while talking, the new caller’s phone
number will be displayed (p. 62).
How caller information is displayed when a call is
received
The handset and the base unit displays show the caller’s phone number
after the first ring.*
≥For Australia users, the caller’s phone number will be displayed as 10 digits.
For New Zealand users, the caller’s phone number will be displayed as 9 digits.
≥If the handset is on the base unit, the caller’s information will be displayed on
the base unit only.
≥After you answer the call, the display will show the length of the call.
0244448888
The (CALLER–ID)
button will flash
quickly when a call
is being received.
TINA ROBINSON
0244448888
*Private name display
If you receive a call from one of the phone
numbers stored in the directory (p. 50),
the caller’s name will also be displayed.
Page 37

37
Cordless Telephone
To check the number of new calls
When new calls have been received, the (CALLER–ID) button flashes
slowly on the base unit.
Ex. You have received 10 new calls.
(›), (‹)
While the handset is off the base unit:
Press (›) or (‹) to turn the display on.
10 new calls
43
1
=Directory
10 new calls
≥Caller information cannot be displayed in the following cases:
≥—If the caller dialled from an area which does not provide a Caller ID service,
the display will show “Out of area”.
≥—If the caller has requested not to display his/her information, the display will
show “Private caller”.
≥If your unit is connected to a PBX which does not support Caller ID services, you
cannot access those services.
SUN 12:00AM
10 new calls
0 message
While the handset is on the base unit:
Base unit display
Handset display
(CALLER–ID)
Page 38

38
Using the Caller List
With the handset
1
Lift the handset off the base
unit and press (›) or (‹) to
enter the Caller List.
≥The display will show, for
example, the following:
≥You can go to the directory list
by pressing FWD/EDIT (fl)
(p. 54).
2
To search from the most
recent call, press (›).
To search from the oldest
call, press (‹).
≥To scroll between callers,
press (›) or (‹).
3
To exit the list, press
(FUNCTION/EXIT/CH).
≥The handset will return to
the standby mode.
With the base unit
1
Press (CALLER\ID) to enter
the Caller List.
≥The display will show, for
example, the following:
2
To search from the most
recent call, press (SKIP/FF).
To search from the oldest
call, press (REPEAT/REW).
≥To scroll between callers,
press (SKIP/FF) or
(REPEAT/REW).
3
To exit the list, press
(STOP/EXIT).
≥The base unit will return to
the standby mode.
2 new calls
43
1
=Directory
≥Once new calls have been checked, “√” will be added.
≥If “No items stored” is displayed in step 1, the Caller List is empty. After
5 seconds, the unit will return to the standby mode.
≥If more than one call is received from the same caller, the date and time of the
most recent call will be recorded. If the same caller calls again, the call entry
with “√” will be deleted.
Viewing the Caller List
To check who has called, follow the steps below.
Make sure the unit is in the standby mode.
JACK SMITH
0112233445
3:10P JUN.10
2 new calls
<<=Old >>=New
JACK SMITH
0112233445
3:10P JUN.10
*
*
*Caller’s name and phone number are stored in the directory
(—Private name display).
Page 39

39
Cordless Telephone
“
√ : You have checked this caller information, answered the call
or called back the caller.
k2–k9: The number of times the same caller called (up to 9). After
checking, “a2”–“a9” will be replaced with “√”.
With the handset
1
Lift the handset off the base
unit and press (›) or (‹) to
enter the Caller List.
2
Press (›) or (‹) repeatedly
to find the desired caller.
3
Press (TALK).
≥The displayed phone number
is dialled automatically.
With the base unit
1
Press (CALLER\ID) to enter
the Caller List.
2
Press (SKIP/FF) or
(REPEAT/REW) repeatedly to
find the desired caller.
3
Press (DIGITAL\SP-PHONE).
≥The displayed phone number
is dialled automatically.
0355566677
11:20A JAN.12 a3
Talk
0355566677
3 new calls
43
1
=Directory
Calling Back from the Caller List
≥If a phone number is not displayed in the caller information, you cannot call back
that caller.
3 new calls
<<=Old >>=New
0355566677
11:20A JAN.12 a3
Talk
0355566677
Display meaning
For New Zealand Users:
Your telephone service provider may charge you for a local call when
it is dialled with an area code prefix. If the charge for local call is
unacceptable, only the 7-digits of the local number should be dialled
from your telephone. Do not dial the “0” prefix or the area code digit.
Page 40

“
Using the Caller List
40
Editing the Caller’s Phone Number
The unit can edit a phone number into one of 3 patterns.
Make sure the unit is in the standby mode.
With the handset
1
Lift the handset off the base unit and
press (›) or (‹) to enter the Caller List.
2
Press (›) or (‹) repeatedly to find
the desired caller. Press FWD/EDIT (fl).
3
While the arrow points to “Edit”,
press FWD/EDIT (fl) (Yes key).
4
Press FWD/EDIT (fl) (Edit key) to
select a pattern.
≥Each time you press FWD/EDIT (fl),
the number is rearranged into one of
3 different patterns.
a
b Free editing
≥You can add digits to the front of
the number, up to a total of 20 digits
including the original number.
≥Each time you press
(INTERCOM/CLEAR),
—after you add a number, the digit
to the left of the cursor is erased.
—when the cursor is at the front,
the digit on the cursor is erased.
c –
≥The order in which patterns a–c are
displayed depends on how the telephone
number is displayed in step 2.
≥You should complete editing a number
within 60 seconds.
Phone no.
Area code
Phone no.
5 new calls
43
1
=Directory
0276543210
11:20A JAN.12 √
1
Edit
Save directory
43
1
=Yes
76543210
4
=Next 1=Edit
0276543210
4
=Next 1=Edit
0276543210
4
=Next 1=Edit
a
b
c
00276543210
4
=Next 1=Edit
Ex. “0” is added.
Page 41

“
41
Cordless Telephone
5
After editing the number, you can continue with calling back or
storing procedures.
To call back, press (TALK) (p. 39).
To store the number in the directory,
press (›) (Next key). Follow the
instructions on the display (p. 43).
≥The number edited in step 4 will not be maintained in the Caller List.
76543210
3
=Edit 1=Save
For New Zealand Users:
Your telephone service provider may charge you for a local call when
it is dialled with an area code prefix. If the charge for local call is
unacceptable, only the 7-digits of the local number should be dialled
from your telephone. Do not dial the “0” prefix or the area code digit.
Page 42

“
Using the Caller List
42
With the base unit
1
Press (CALLER\ID) to enter the Caller
List.
2
Press (SKIP/FF) or (REPEAT/REW)
repeatedly to find the desired caller.
3
Press (GREETING/EDIT) to select
a pattern.
≥Each time you press (GREETING/EDIT),
the number is rearranged into one of
3 different patterns.
a
b Free editing
≥You can add digits to the front of
the number, up to a total of 20 digits
including the original number.
≥Each time you press
(ERASE/CLEAR),
—after you add a number, the digit
to the left of the cursor is erased.
—when the cursor is at the front,
the digit on the cursor is erased.
c –
≥The order in which patterns a–c are
displayed depends on how the telephone
number is displayed in step 2.
4
After editing the number, you can continue with calling back.
To call back, press (DIGITAL\SP-PHONE) (p. 39).
≥The number edited in step 3 will not be maintained in the Caller List.
Phone no.Area code
Phone no.
5 new calls
<<=Old >>=New
0276543210
11:20A JAN.12 √
76543210
11:20A JAN.12 √
0276543210
11:20A JAN.12 √
0276543210
11:20A JAN.12 √
a
b
c
00276543210
11:20A JAN.12 √
Ex. “0” is added.
For New Zealand Users:
Your telephone service provider may charge you for a local call when
it is dialled with an area code prefix. If the charge for local call is
unacceptable, only the 7-digits of the local number should be dialled
from your telephone. Do not dial the “0” prefix or the area code digit.
Page 43

“
43
Cordless Telephone
Storing Caller List Information in the
Directory
You can store numbers that are in the Caller List in the directory.
This feature can operate only with the handset.
Make sure the unit is in the standby mode.
1
Lift the handset off the base unit and
press (›) or (‹) to enter the Caller List.
2
Press (›) or (‹) repeatedly to find
the caller you want to store in the
directory. Press FWD/EDIT (fl) (Yes key).
≥If the number requires editing, see page 40.
3
Press (›) or (‹) to select “Save
directory”. Press FWD/EDIT (fl)
(Yes key).
If there is no name information for
the caller, “Enter name” will be
displayed.
a) If a name is not required, press (›)
(Next key) and FWD/EDIT (fl)
(Save key).
b) If a name is required, enter the name
(p. 52). When finished, press (›)
(Next key) and FWD/EDIT (fl)
(Save key).
≥A beep sounds.
≥The display will return to step 2. You can
continue storing other items.
To return to the standby mode, press
(FUNCTION/EXIT/CH).
0355566677
11:20A JAN.12 a3
Edit
1
Save directory
43
1
=Yes
10 new calls
43
1
=Directory
Enter name
21
4
=Next
Enter name
CINDY TURNER
21
4
=Next
CINDY TURNER
0355566677
1
=Save
1
Edit
Save directory
43
1
=Yes
Page 44

“
Using the Caller List
44
≥You can exit the programming mode any time by pressing (FUNCTION/EXIT/CH).
≥If the display shows “Directory full” in step 3, the display will return to
step 2. Press (FUNCTION/EXIT/CH) to exit the list. To erase other stored items
from the directory, see page 58.
≥You cannot store caller information in the directory if a phone number is not
displayed.
≥If the display shows “Save error” or “No link to base. Place on
cradle and try again.” in step 3, the item cannot be stored in the directory.
Try again from step 1.
For New Zealand Users:
Your telephone service provider may charge you for a local call when
it is dialled with an area code prefix. If the charge for local call is
unacceptable, only the 7-digits of the local number should be dialled
from your telephone. Do not dial the “0” prefix or the area code digit.
Page 45

With the handset
1
Lift the handset off the base
unit and press (›) or (‹) to
enter the Caller List.
2
Press (›) or (‹) repeatedly
to find the caller you want to
erase from the Caller List.
3
Press (INTERCOM/CLEAR).
≥A beep sounds and
the information is erased.
≥To erase other items, repeat
from step 2.
≥To return to the standby mode,
press (FUNCTION/EXIT/CH).
With the base unit
1
Press (CALLER\ID) to enter
the Caller List.
2
Press (SKIP/FF) or
(REPEAT/REW) repeatedly to
find the caller you want to
erase from the Caller List.
3
Press (ERASE/CLEAR).
≥A beep sounds and
the information is erased.
≥To erase other items, repeat
from step 2.
≥To return to the standby mode,
press (STOP/EXIT).
“
45
Cordless Telephone
Erasing Caller List Information
After checking the Caller List, you can erase some or all of the entries.
Make sure the unit is in the standby mode.
To erase a specific caller from the Caller List
0246813579
12:20A JAN.12 √
Clear
10 new calls
43
1
=Directory
10 new calls
<<=Old >>=New
0246813579
12:20A JAN.12 √
Clear
Page 46

With the handset
1
Lift the handset off the base
unit and press (›) or (‹) to
enter the Caller List.
2
Press (INTERCOM/CLEAR).
3
Press (›) or (‹) to select
“All clear”.
4
Press FWD/EDIT (fl) (Yes
key) or (INTERCOM/CLEAR).
≥A beep sounds and all entries
are erased.
≥The handset will return to
the standby mode.
With the base unit
1
Press (CALLER\ID) to enter
the Caller List.
2
Press (ERASE/CLEAR).
3
Press (ERASE/CLEAR) again.
≥A beep sounds and all entries
are erased.
≥The base unit will return to
the standby mode.
“
Using the Caller List
46
Exit
1
All clear
43
1
=Yes
All clear
0 new call
43
1
=Directory
To erase all entries in the Caller List
Before erasing all entries, make sure that “0 new call” is displayed.
0 new call
<<=Old >>=New
Press CLEAR for
all clear
All clear
1
Exit
All clear
43
1
=Yes
Page 47

47
Cordless Telephone
One-Touch Dialler
“
A phone number stored in the (DIRECT) button can be dialled with
a one-touch operation.
Storing a Phone Number in the DIRECT
Button
Make sure the unit is in the standby mode.
1
Press (FUNCTION/EXIT/CH).
2
Press (›) or (‹) repeatedly until the arrow
points to “Program”.
3
Press FWD/EDIT (fl) (Yes key).
4
While the arrow points to “Save
DIRECT#”, press FWD/EDIT (fl) (Yes key).
5
Enter a phone number, up to 22 digits.
≥Each time you press (INTERCOM/CLEAR)
the digit to the left of the cursor is erased.
To erase all of the digits, press and hold
(INTERCOM/CLEAR).
6
Press (›) (Next key).
≥If you want to edit the entered number, press
(‹) (Edit key) and return to step 5.
7
Press FWD/EDIT (fl) (Save key).
≥A beep sounds.
≥To return to the standby mode, press
(FUNCTION/EXIT/CH).
≥You can exit the programming mode any time by pressing (FUNCTION/EXIT/CH).
≥If a pause is required for dialling, (REDIAL/PAUSE) can be stored in a phone
number counting as one digit (p. 62) in step 5.
Ringer volume
1
Program
43
1
=Yes
1
Save DIRECT#
Set recall time
43
1
=Yes
21
4
=Next
1234567890123456
789012
21
4
=Next
1234567890123456
789012
3
=Edit 1=Save
1234567890123456
789012
Save DIRECT#
Page 48

48
“
One-Touch Dialler
Dialling the Stored Number in the DIRECT
Button
1
Press (TALK).
2
Press (DIRECT).
≥After a few seconds, the display will show
the length of the call and the battery strength.
To dial after confirming the entered number
Press (DIRECT) ¤ (TALK).
Talk
1234567890123456
789012
Talk
00-00-00
Page 49

Using the Directory
“
49
Cordless Telephone
You can store up to 50 names and phone numbers in the directory.
All directory items are sorted by the first word in alphabetical order.
Using the directory, you can make a call by selecting a name on the
handset or base unit display.
When you receive a Caller ID call from a caller stored in the directory,
the display will show the caller’s name with the phone number
(—Private name display).
Storing Names and Numbers in the
Directory
Make sure the unit is in the standby mode.
(FUNCTION/EXIT/CH)
(INTERCOM/CLEAR)
(REDIAL/PAUSE)
The dialling buttons
can be used to enter
letters and symbols.
(›), (‹),
BACK (fi),
FWD/EDIT (fl)
Display
≥While storing or finding items in the directory,
“ ” will be shown on the display.
Ann
0312345678
(Continued “)
Page 50

“
Using the Directory
50
1
Press (FUNCTION/EXIT/CH).
2
While the arrow points to “Save
directory”, press FWD/EDIT (fl)
(Yes key).
≥The display shows the number of stored items
in the directory.
3
Enter a name, up to 15 characters, with
the dialling buttons, BACK (fi) or
FWD/EDIT (fl).
≥See the steps for entering names and symbols
(p. 52).
≥If a name is not required, press (›)
(Next key) and go to step 5.
4
Press (›) (Next key).
5
Enter a phone number, up to 22 digits.
≥Each time you press (INTERCOM/CLEAR),
a character is erased from the right. To erase
all of the digits, press and hold
(INTERCOM/CLEAR).
6
Press (›) (Next key).
7
Press FWD/EDIT (fl) (Save key).
≥A beep sounds.
≥To continue storing other items, repeat from step 2.
≥To return to the standby mode, press (FUNCTION/EXIT/CH).
Directory=
20 items
Enter name
21
4
=Next
Enter name
Tom Jones
21
4
=Next
Enter phone no.
1
Save directory
Calling pager
43
1
=Yes
0398765432
21
4
=Next
Tom Jones
0398765432
1
=Save
Page 51

“
51
Cordless Telephone
≥If a pause is required for dialling, (REDIAL/PAUSE) can be stored in a phone
number counting as one digit (p. 62) in step 5.
≥You can exit the programming mode any time by pressing (FUNCTION/EXIT/CH).
≥If the display shows “Directory full” in step 2, the display will return to
step 1. Press (FUNCTION/EXIT/CH) to exit the list. To erase other stored items
from the directory, see page 58.
≥If the display shows “Save error” in step 7, the item cannot be stored in the
directory. Try again from step 1.
For New Zealand Users:
Your telephone service provider may charge you for a local call when
it is dialled with an area code prefix. If the charge for local call is
unacceptable, only the 7-digits of the local number should be dialled
from your telephone. Do not dial the “0” prefix or the area code digit.
Page 52

“
Using the Directory
52
(1)
(2)
(3)
(4)
(5)
(6)
(7)
(8)
(9)
(0)
BACK
(fi)
FWD/EDIT
(fl)
1 2 3 4 5 6 7 8 9 10 11
Number of times key is pressed
Steps for Entering Names and Symbols
The handset dialling buttons ((0) to (9)),
BACK (fi) and FWD/EDIT (fl) can be used to enter
letters and symbols.
Each button selects a character as shown below.
≥To enter another character using the same dialling button, press FWD/EDIT (fl)
to move the cursor to the next space.
If you make a mistake while entering a name
Use BACK (fi) or FWD/EDIT (fl) to move the cursor to the incorrect
character, press (INTERCOM/CLEAR) to delete and enter the correct
character. Each time you press (INTERCOM/CLEAR), a character is erased
from the right.
To erase all characters, press and hold (INTERCOM/CLEAR).
Keys
# & ’ ( ) ¢ , – . / 1
A B C a b c 2
D E F d e f 3
G H I g h i 4
J K L j k l 5
M N O m n o 6
P Q R S p q r s 7
T U V t u v 8
W X Y Z w x y z 9
0 Blank
To move the cursor to the left
To move the cursor to the right
TALK
DIRECT
FWD/EDIT
BACK
FUNCTION/EXIT
1 2
ABC3DEF
5
JKL
6
MNO
4
GHI
8
TUV
0
9
WXYZ
7
PQRS
ON
OFF
CH
INTERCOM/CLEAR
LOUD/
SEARCH
Page 53

“
53
Cordless Telephone
For example, to enter “Tom Jones”:
1
Press (FUNCTION/EXIT/CH).
2
While the arrow points to “Save
directory”, press FWD/EDIT (fl)
(Yes key).
3
Press (8).
4
Press (6) six times, then press FWD/EDIT
(fl)
to move the cursor to the right.
5
Press (6) four times.
6
Press FWD/EDIT (fl) twice to enter a
blank.
7
Press (5).
8
Press (6) six times, then press FWD/EDIT
(fl)
to move the cursor to the right.
9
Press (6) five times.
10
Press (3) five times.
11
Press (7) eight times.
12
When finished, press (›) (Next key).
≥Follow steps 5 to 7 on page 50 to complete
the operation.
≥While entering names, the cursor will flash on the display.
Enter name
Tom Jones
21
4
=Next
T
To
Tom
Tom
Tom J
Tom Jo
Tom Jon
Tom Jone
Directory=
20 items
Enter name
21
4
=Next
Enter phone no.
Page 54

Finding Items in the Directory
With the handset
Make sure the unit is in the standby mode.
1
Press BACK (fi) or FWD/EDIT (fl) to
enter the directory list.
2
Press (›) or (‹).
≥The first item is displayed.
3
Press (›) or (‹) repeatedly until
the desired item is displayed.
≥All directory items are stored in
the order shown on the right.
To search for a name by the initial:
1 Press the dialling button for the first
letter of the desired name until any
name with the same initial is
displayed (see the Index table on
page 56).
Ex. To find “Frank”, press (3)
repeatedly until the first item
under “F” is displayed.
2 Press (›) until the name is displayed.
≥You can exit the directory list any time by pressing (FUNCTION/EXIT/CH).
≥If “No items stored” is displayed in step 2, the directory is empty. To return
to the standby mode, press (FUNCTION/EXIT/CH).
≥In step 1, you can go to the Caller List by pressing FWD/EDIT (fl) (p. 38).
“
Using the Directory
54
Press (›). Press (‹).
Alphabet
Symbol
Number
Telephone number
(When a name is not stored)
Ann
0312345678
Directory list
43
1
=Caller’s list
(›), (‹), BACK (fi),
FWD/EDIT (fl)
(FUNCTION/EXIT/CH)
Page 55

“
55
Cordless Telephone
With the base unit
Make sure the unit is in the standby mode.
1
Press (DIRECTORY) to enter
the directory list.
≥The first item is displayed.
2
Press (SKIP/FF) or (REPEAT/REW)
repeatedly until the desired item is
displayed.
≥All directory items are stored in
the order shown on the right.
To search for a name by the initial:
1 Press the dialling button for the first
letter of the desired name until any
name with the same initial is
displayed (see the Index table on
page 56).
Ex. To find “Frank”, press (3)
repeatedly until the first item
under “F” is displayed.
2 Press (SKIP/FF) until the name is
displayed.
≥You can exit the directory list any time by pressing (STOP/EXIT).
≥If “No items stored” is displayed in step 2, the directory is empty. To return
to the standby mode, press (STOP/EXIT).
Press
(SKIP/FF).
Press
(REPEAT/REW).
Alphabet
Symbol
Number
Telephone number
(When a name is not stored)
Ann
0312345678
(REPEAT/REW)
(DIRECTORY)
(SKIP/FF)
Display
(STOP/EXIT)
Page 56

“
Using the Directory
56
With the handset
1
Press BACK (fi) or FWD/EDIT
(fl)
to enter the directory list.
2
Press (›) or (‹).
≥The first item is displayed.
3
Press (›) or (‹) repeatedly
to find the directory item that
you want to dial (p. 54).
4
Press (TALK).
≥The number is dialled
automatically.
5
To hang up, press (TALK) or
place the handset on
the base unit.
≥You can exit the directory list any
time by pressing
(FUNCTION/EXIT/CH).
With the base unit
1
Press (DIRECTORY) to enter
the directory list.
≥The first item is displayed.
2
Press (SKIP/FF) or
(REPEAT/REW) repeatedly to
find the directory item that
you want to dial (p. 55).
3
Press (DIGITAL\SP-PHONE).
≥The number is dialled
automatically.
4
To hang up, press
(DIGITAL\SP-PHONE).
≥You can exit the directory list any
time by pressing (STOP/EXIT).
Frank
0234567890
Talk
0234567890
(1)
(2)
(3)
(4)
(5)
(6)
(7)
(8)
(9)
(0)
IndexKeys IndexKeys
Other symbols, 1
A, B, C, 2
D, E, F, 3
G, H, I, 4
J, K, L, 5
M, N, O, 6
P, Q, R, S, 7
T, U, V, 8
W, X, Y, Z, 9
0
Dialling from the Directory
Frank
0234567890
Talk
0234567890
Index table
Page 57

“
57
Cordless Telephone
Editing an Item in the Directory
This feature can operate only with the handset.
Make sure the unit is in the standby mode.
1
Press BACK (fi) or FWD/EDIT (fl) to enter
the directory list.
2
Press (›) or (‹).
≥The first item is displayed.
3
Press (›) or (‹) repeatedly to find
the directory item you want to change
(p. 54). Press FWD/EDIT (fl).
4
Edit the name using the dialling buttons,
BACK (fi) or FWD/EDIT (fl) (p. 52), up to
15 characters.
5
Press (›) (Next key).
≥If you do not need to change the number,
press (›) (Next key) twice and go to step 8.
6
Add a number to the current number.
≥Each time you press (INTERCOM/CLEAR),
a character is erased from the right. To erase
all of the digits, press and hold
(INTERCOM/CLEAR).
7
Press (›) (Next key).
8
When finished, press FWD/EDIT (fl)
(Save key).
≥To continue editing other items, repeat steps 3
through 8.
≥To return to the standby mode, press (FUNCTION/EXIT/CH).
≥You can exit the directory list any time by pressing (FUNCTION/EXIT/CH).
0233444555
21
4
=Next
Jane
0233444555
Enter name
Jane Walker
21
4
=Next
0233444555
21
4
=Next
Jane Walker
0333444555
Jane Walker
0333444555
1
=Save
Enter name
Jane
21
4
=Next
0333444555
21
4
=Next
Page 58

“
Using the Directory
58
With the handset
1
Press BACK (fi) or FWD/EDIT
(fl)
to enter the directory list.
2
Press (›) or (‹).
≥The first item is displayed.
3
Press (›) or (‹) repeatedly
to find the directory item you
want to erase (p. 54).
4
Press (INTERCOM/CLEAR).
5
Press FWD/EDIT (fl) (Yes
key) or (INTERCOM/CLEAR).
≥The display will show the next
item.
≥To return to the standby mode,
press (FUNCTION/EXIT/CH).
≥You can exit the directory list any
time by pressing
(FUNCTION/EXIT/CH).
With the base unit
1
Press (DIRECTORY) to enter
the directory list.
≥The first item is displayed.
2
Press (SKIP/FF) or
(REPEAT/REW) repeatedly to
find the directory item you
want to erase (p. 55).
3
Press (ERASE/CLEAR).
4
Press (SKIP/FF) (Yes key) or
(ERASE/CLEAR).
≥The display will show the next
item.
≥To return to the standby mode,
press (STOP/EXIT).
≥You can exit the directory list any
time by pressing (STOP/EXIT).
Erasing an Item from the Directory
Make sure the unit is in the standby mode.
Helen
0357924680
Clear?
2
=No 1=Yes
Clear
Helen
0357924680
Clear?
<<=No >>=Yes
Clear
Page 59

Intercom
“
59
Cordless Telephone
A 2-way intercom is possible between the handset and the base unit.
Paging the base unit from the handset
1
Handset:
Press (INTERCOM/CLEAR). Talk
to the paged party after
the beeps.
≥“Intercom” is displayed.
2
Base unit:
When the other party’s voice is
heard, answer using the MIC.
3
Handset:
To end the intercom, press
(INTERCOM/CLEAR).
Paging the handset from the base unit (Handset locator)
Using this feature, you can locate a misplaced handset.
1
Base unit:
Press (LOCATOR/INTERCOM).
≥“Paging” is displayed on the base
unit.
≥The handset beeps for 1 minute
and displays “Paging Press
INTERCOM”.
≥To stop paging, press
(LOCATOR/INTERCOM) again.
2
Handset:
Press (INTERCOM/CLEAR) to
answer.
≥“Intercom” is displayed.
3
Base unit:
Talk into the MIC.
4
Handset:
To end the intercom, press
(INTERCOM/CLEAR).
MIC
(INTERCOM/CLEAR)
(LOCATOR/INTERCOM)
MIC
(INTERCOM/CLEAR)
Page 60

“
Intercom
60
During an intercom call:
≥Intercom calls can only be ended with the handset.
≥If the handset user has difficulty hearing the base unit user, decrease the
base unit speaker volume by pressing VOLUME (_).
≥If an incoming call is received, the intercom call stops and the unit starts to
ring. To answer, press (TALK) or (DIGITAL\SP-PHONE).
Transferring a Call Using the Intercom
The intercom can be used during a call. This feature enables you to
transfer a call between the handset and the base unit.
From the handset to
the base unit
1
Handset:
During a call, press
(INTERCOM/CLEAR). Talk to
the paged party after the
beeps.
≥The call is put on hold and
“Intercom hold” is
displayed.
≥If the base unit user does not
answer, press (TALK).
2
Base unit:
When the paging party’s
voice is heard, answer using
the MIC.
3
Base unit:
To answer the call, press
(DIGITAL\SP-PHONE).
≥The transfer is complete.
From the base unit to
the handset
1
Base unit:
During a call, press
(LOCATOR/INTERCOM).
≥The call is put on hold and
“Paging” is displayed.
≥If the handset user does not
answer, press
(DIGITAL\SP-PHONE).
2
Handset:
Press (INTERCOM/CLEAR) to
answer the page.
3
Handset:
To answer the call, press
(TALK).
≥The transfer is complete.
Page 61

Special Features
“
61
Cordless Telephone
Automatic Security Code Setting
Each time you place the handset on the base unit, the unit automatically
selects one of more than a million security codes. These codes help
prevent the unauthorized use of your telephone line by another cordless
telephone user.
(›), (‹),
FWD/EDIT (fl)
(FUNCTION/EXIT/CH)
(RECALL/PLAYBACK)
(REDIAL/PAUSE)
Display
(RECALL)
(PAUSE)
Page 62

62
“
Special Features
How to Use the PAUSE Button
(For Analog PBX Line/Long Distance Service Users)
We recommend you press (REDIAL/PAUSE) or (PAUSE) if a pause is
required for dialling with a PBX or to access a long distance service.
Ex. Line access number (9) (PBX)
(9) ¤ (REDIAL/PAUSE) or (PAUSE) ¤
≥Pressing (REDIAL/PAUSE) or (PAUSE) once creates a 3.5 second pause.
This prevents misdialling when you redial or dial a stored number.
≥Pressing (REDIAL/PAUSE)
or (PAUSE) more than once increases the length of
the pause between numbers.
Call Waiting and Caller ID Compatible
If you subscribe to Caller ID services, your
handset displays a second caller’s information
while talking. After you hear a call-waiting tone,
the caller’s phone number and
“----Waiting-----” will be displayed.
You can answer the second call, keeping the first call on hold.
Follow Telstra’s instructions using (RECALL/PLAYBACK) or (RECALL).
≥If the phone number is stored in the directory, the caller’s name will be displayed
(p. 36).
≥Please contact Telstra for details and availability in your area.
Phone number
For Call Waiting Service Users in New Zealand
Make sure the recall time is set to 600 msec for use with Telecom’s
Call Waiting Service. Press (RECALL/PLAYBACK) or (RECALL) if you
hear a call-waiting tone while talking.
≥The first call is put on hold and you can answer the second call.
≥To return to the first caller, press (RECALL/PLAYBACK) or (RECALL)
again.
≥Your telephone company may not support the second caller display
feature.
0266667777
----Waiting-----
Page 63

63
Cordless Telephone
“
RECALL Button
Pressing (RECALL/PLAYBACK) or (RECALL) allows you to use special
features of your host PBX such as transferring an extension call or
accessing special telephone services (optional) such as call waiting.
Selecting the recall time
The recall time depends on your telephone exchange or host PBX.
You can select the following recall times: “700, 600, 400, 300, 250, 110,
100 or 90 msec (milliseconds)”. KX-TC1871ALB comes from the factory
set to “100 msec” and KX-TC1871NZB comes set to “600 msec”.
Make sure the unit is in the standby mode.
(Continued “)
(›), (‹),
FWD/EDIT (fl)
(FUNCTION/EXIT/CH)
(RECALL/PLAYBACK)
Display
(RECALL)
Page 64

64
“
Special Features
1
Press (FUNCTION/EXIT/CH).
2
Press (›) or (‹) repeatedly until the arrow
points to “Program”.
3
Press FWD/EDIT (fl) (Yes key).
4
Press (›) or (‹) repeatedly until the arrow
points to “Set recall time”.
5
Press FWD/EDIT (fl) (Yes key).
6
Press (›) or (‹) repeatedly until
the desired time is displayed.
7
Press FWD/EDIT (fl) (Save key).
≥A beep sounds.
≥To return to the standby mode, press (FUNCTION/EXIT/CH).
≥You can exit the programming mode any time by pressing (FUNCTION/EXIT/CH).
≥Users in Australia can access Telstra’s “EASY CALL” service by having
the recall time set at 100 msec (this is the factory default setting), and then
follow Telstra’s “EASY CALL” instructions to operate this service.
≥If you are connected via a PBX, a longer or shorter recall time may be necessary
to use PBX functions (transferring a call etc.). Consult your PBX supplier for
the correct setting.
Ringer volume
1
Program
43
1
=Yes
Save DIRECT#
1
Set recall time
43
1
=Yes
Recall time
:100ms
43
1
=Save
For Call Waiting Service Users in New Zealand
Make sure the recall time is set to 600 msec for use with Telecom’s
Call Waiting Service. Press (RECALL/PLAYBACK) or (RECALL) if you
hear a call-waiting tone while talking.
≥The first call is put on hold and you can answer the second call.
≥To return to the first caller, press (RECALL/PLAYBACK) or (RECALL)
again.
≥Your telephone company may not support the second caller display
feature.
Page 65

65
Answering System
Automatic Answering Operation
When the unit answers a call, a greeting message is played and
the caller’s message is recorded. While recording, “- Answering -” will
be displayed.
≥The total recording time (including greeting message) is about
15 minutes. If messages are recorded in noisy rooms, the time
may be shortened by up to 3 minutes.
≥A maximum of 64 messages (including greeting message) can be
recorded.
Setting the Unit to Answer Calls
Press (ANSWER\ON) to turn on the answering system.
≥The indicator lights and “Answer set” is
heard.
≥The unit will announce the remaining
recording time if it is less than 5 minutes.
≥If you hear “Memory full”, “Message
full” is displayed on the base unit and
the ANSWER ON indicator flashes
rapidly, erase some, or all, of
the messages (p. 69).
≥If you do not want the unit to answer calls, press (ANSWER\ON) again to turn
off the answering system. The indicator light goes out and “Answer off ” is heard.
≥You can also turn on the answering system remotely using any other phone
(p. 79).
Monitoring incoming calls
While a call is being recorded, you can monitor it through the speaker.
To answer the call with the speakerphone, press (DIGITAL\SP-PHONE).
For the handset, lift the handset off the base unit and press (TALK).
The unit stops recording.
≥KX-TC1871NZB will not answer incoming calls on your FaxAbility number.
(ANSWER\ON)
and Indicator
Page 66

66
Listening to Messages
You can see the total number of recorded messages on the base unit
display. If the ANSWER ON indicator flashes, new messages have been
recorded.
Listening to only new
messages
Press (NEW\MESSAGE) briefly.
≥The unit announces the number of
new messages and plays them back.
Listening to all recorded
messages
Press and hold (NEW\MESSAGE)
until playback starts.
(NEW\MESSAGE)
(SKIP/FF)
(REPEAT/REW)
To increase the volume, press
VOLUME (^).
To decrease, press VOLUME (_).
(STOP/EXIT)
ANSWER ON
Indicator
≥During playback, the display shows which message is being played.
(Ex. While the first message is being played back, “Message 1” is
displayed.)
≥At the end of the last message, “End of final message” is heard. The unit will
announce the remaining recording time if it is less than 5 minutes.
Page 67

To repeat from the beginning of the message
Press (REPEAT/REW) briefly.
≥If you press within 5 seconds of playback, the previous
message will be played.
To rewind part of the message
Press and hold (REPEAT/REW) until you reach the desired
place.
≥At the beginning of the message, 3 beeps will sound.
To skip to the next message
Press (SKIP/FF) briefly.
To cue to part of the message
Press and hold (SKIP/FF) until you reach the desired
place.
≥The message will be heard at twice the normal speed.
≥At the end of the message, 3 beeps will sound.
Press (STOP/EXIT).
≥To resume playback, press (NEW\MESSAGE).
≥If you do not press any button for 60 seconds or if you press
(STOP/EXIT) again, the unit will return to the standby mode.
67
Answering System
“
During playback
To repeat/
rewind
message
For Caller ID service users (p. 36)
≥During playback, the base unit display will show the phone number of
the caller whose message is being played.
To call back the displayed number:
During playback, lift the handset and press (TALK) within 10 seconds,
or press (DIGITAL\SP-PHONE).
—The unit stops playback and automatically dials the displayed
phone number.
≥After listening to new incoming messages, “√” will be added to the call
entries in the Caller ID Caller List (p. 39).
To skip/cue
message
To stop
operation
Page 68

68
“
Listening to Messages
From the Handset
If someone else is in the room and you want to listen to the recorded
messages privately, you can use the handset.
1
Handset:
Press (RECALL/PLAYBACK).
≥The number of new messages is heard on the handset.
2
Base unit:
To listen to new messages, press
(NEW\MESSAGE) briefly.
To listen to all messages, press
and hold (NEW\MESSAGE) until
playback starts.
≥The messages will be heard on
the handset.
≥(REPEAT/REW), (SKIP/FF) and
(STOP/EXIT) can also be used during
playback (p. 67).
3
When finished, press
(RECALL/PLAYBACK) or place
the handset on the base unit.
≥You can also listen to messages without using the base unit. See page 80.
Page 69

69
Answering System
Erasing Messages
The unit will announce the remaining recording time after playback, if it is
less than 5 minutes. New messages cannot be recorded when:
—“Memory full” is heard.
—“Message full” is displayed on the base unit.
—the ANSWER ON indicator flashes rapidly.
Erase some, or all, of the messages. We recommend you erase
unnecessary messages after each playback.
Erasing a specific message
Press (ERASE/CLEAR) while the message you want to erase is being
played.
≥The unit erases the message.
≥A short beep will sound and the unit will continue to play the next message.
Erasing all messages
All recorded messages, except the greeting message, can be erased at
one time.
1
Press (ERASE/CLEAR).
≥“Press ERASE again to erase all
messages” is heard.
2
Within 5 seconds, press
(ERASE/CLEAR) again.
≥A beep sounds and “No messages” is
heard.
≥The base unit display shows
“0 message”.
≥The information in the Caller List will not be erased. To erase Caller List
information, see page 45.
(ERASE/CLEAR)
ANSWER ON Indicator
Page 70

70
Pager Call
This feature allows you to alert your pager when the unit records an
incoming message. You can retrieve the message from a touch tone
telephone (p. 74). First program the pager number, then set the unit to
call the pager.
≥Consult your pager company to check whether the service alerts your pager
automatically or via an operator. If an operator is used, this feature cannot be
used.
Make sure that the unit is in the standby mode.
Storing a Pager Number
(RECALL/PLAYBACK)
(FUNCTION/EXIT/CH)
Display
(›), (‹),
FWD/EDIT (fl)
(REDIAL/PAUSE)
(INTERCOM/CLEAR)
Display
Page 71

71
Answering System
“
* Pager companies require a delay after the pager number and/or
the access code is dialled. Contact your pager company regarding
the required pause time. Pressing (REDIAL/PAUSE) once creates a
3.5 second delay and counts as one digit.
1
Press (FUNCTION/EXIT/CH).
2
Press (›) or (‹) repeatedly until the arrow
points to “Program”.
3
Press FWD/EDIT (fl) (Yes key).
4
Press (›) or (‹) repeatedly until the arrow
points to “TAD program”.
5
Press FWD/EDIT (fl) (Yes key).
≥The base unit display shows the answering
system function menu.
6
Press (#).
7
Enter your pager number, and press (REDIAL/PAUSE) twice.* Enter
the access code, if required by your pager company, and press
(REDIAL/PAUSE) twice again.*
≥The entered number is displayed on the base unit.
≥If you misdial, press (INTERCOM/CLEAR) and enter the correct number.
≥You can enter a total of 44 digits.
8
Press FWD/EDIT (fl) (Save key).
≥A beep sounds.
≥To return to the standby mode, press (FUNCTION/EXIT/CH).
Ringer volume
1
Program
43
1
=Yes
1
Save DIRECT#
Set recall time
43
1
=Yes
1
TAD program
43
1
=Yes
Answering
system setting.
See base unit.
Enter pager no.
Base unit display
Page 72

72
To confirm the stored pager number
1. Press (FUNCTION/EXIT/CH).
2. Press (›) or (‹) to select “Calling pager”.
3. Press FWD/EDIT (fl) (Yes key).
4. Press (TALK).
≥The unit dials the stored pager number.
≥If the pager does not beep, check your pager by calling it manually to ensure it
works. Start again from step 1 to store the pager number (p. 71).
To erase the stored pager number
Repeat steps 1 through 6 on page 71. ¤ (INTERCOM/CLEAR) ¤
¤ FWD/EDIT (fl) (Save key) ¤ (FUNCTION/EXIT/CH).
≥The pager call mode will automatically return to OFF (p. 73).
“
Pager Call
≥After step 5 on page 71, do not press (6) (“Pager mode”) and (7) (“Home
number”), moreover do not change these settings. If you have changed these
settings, reset to the default.
(Pager mode: Recorded MSG, Home number: No items)
Page 73

73
Answering System
Setting the Unit to Call a Pager
1
Press (RECALL/PLAYBACK).
≥The number of new messages is heard on
the handset.
2
Press (3).
≥“ ” is displayed on the base unit.
≥If “ ” is not displayed, the pager
number has not been stored. Store the
number (p. 71), and try again.
3
Press (RECALL/PLAYBACK).
To turn off the pager call mode, repeat
steps 1 through 3.
≥“ ” will disappear.
≥Each time you press (3) in step 2, the mode will
turn on or off.
PAGER
PAGER
PAGER
(RECALL/PLAYBACK)
≥If someone else makes or answers another call with the unit or a parallel
connected phone before the unit alerts your pager for a previous message, the
unit will stop alerting your pager for that message.
Page 74

74
Remote Operation from a Touch Tone Phone
You can operate the answering system from any touch tone phone.
A synthesized voice menu will guide you on how to operate the unit
(p. 76).
≥To skip the voice menu and operate
the unit directly, see page 78.
Summary of remote operation
Call your unit from a touch tone phone.
Enter your remote code (p. 75) during or after the greeting message.
≥The number of new messages is heard.
After 3 seconds, the voice menu will start (p. 76).
Follow the menu or enter the direct commands (p. 78).
To end remote operation, hang up.
≥The messages are saved.
≥The unit will announce the remaining recording time after playback, if it is less
than 5 minutes.
Page 75

75
Answering System
“
Setting the Remote Code
The remote code prevents unauthorized people from accessing your unit
and listening to your messages. Choose any 2-digit number (00–99).
The factory preset remote code is “11”. If you do not program your own
remote code, you can use “11”.
Make sure that the unit is in the standby mode.
1
Press (FUNCTION/EXIT/CH).
2
Press (›) or (‹) repeatedly until the arrow
points to “Program”.
3
Press FWD/EDIT (fl) (Yes key).
4
Press (›) or (‹) repeatedly until the arrow
points to “TAD program”.
5
Press FWD/EDIT (fl) (Yes key).
≥The base unit display shows the function menu
for the answering system.
6
Press (1).
≥The current remote code is displayed on the
base unit.
7
Enter a remote code using a 2-digit
number (00–99).
8
Press FWD/EDIT (fl) (Save key).
≥A beep sounds.
≥To return to the standby mode, press (FUNCTION/EXIT/CH).
≥If 6 beeps sound during programming, a wrong key was pressed. Enter
the correct number.
To check the remote code
Repeat steps 1 to 6.
≥The current remote code is displayed on the base unit. When finished, press
(FUNCTION/EXIT/CH).
Ringer volume
1
Program
43
1
=Yes
1
Save DIRECT#
Set recall time
43
1
=Yes
1
TAD program
43
1
=Yes
Answering
system setting.
See base unit.
Remote code
:11
Base unit display
Page 76

76
“
Remote Operation from a Touch Tone Phone
Voice Menu
The shaded boxes are voice prompts.
Press 1 to play back all messages.
Press 2 for other functions.
Press 1 to play back new messages.
Press 2 for other functions.
Press 1 to record your message.
Press 2 for other functions.
Press 1 to erase all messages.
Press 2 for other functions.
Press 1 to record your greeting.
Press 2 for other functions.
All message
playback.
New message
playback.
Please leave
your message.
Press 7 to record
your greeting.
Press 9 to end
recording.
Press (2).
Press (2).
Press (2).
Press (2).
Press (2).
Press (1).
Press (1).
Press (1).
Press (1).
Press (1).
Page 77

77
Answering System
“
All Message Playback
All recorded messages are played back. At the end of the last
message, “End of final message” is heard. The unit will
announce the remaining recording time if it is less than
5 minutes.
New Message Playback
Only new messages are played back. At the end of the last
message, “End of final message” is heard. The unit will
announce the remaining recording time if it is less than
5 minutes.
Recording a Memo Message
You can leave a personal message.
1. Talk after you hear “Please leave your message”.
2. When you finish recording, hang up.
Erasing All Messages
All recorded messages (except greeting message) are
erased.
Recording a Greeting Message
You can re-record your greeting message.
1. Press (7).
You will hear a voice prompt followed by a long beep.
2. After the beep, talk for up to 2 minutes.
3. When you finish recording, press (9).
4. Your greeting will be played back for confirmation.
≥3 seconds after playback, the voice menu will start again from the beginning.
≥If you hear “Memory full” after playback, erase some, or all, of the messages
(p. 78).
Page 78

78
“
Remote Operation from a Touch Tone Phone
Direct Remote Operation
Once you have entered the remote code, you can also control your unit
by direct commands instead of using the voice menu. To end the remote
operation, hang up anytime.
Direct commands
NEW MESSAGE
PLAYBACK
ALL MESSAGE
PLAYBACK
REPEAT
(During playback)
SKIP
(During playback)
STOP
GREETING
MESSAGE
RECORDING
ERASING A
SPECIFIC
MESSAGE
(During playback)
ERASING ALL
MESSAGES
(4)
(5)
(1)
(2)
(9)
(7)
(9)
($) (4)
($) (5)
≥Only new messages are played back.
≥All messages are played back.
≥The current message is repeated.
≥The current message is skipped.
The next message is played.
≥Operation is stopped temporarily.
≥To resume operation, enter a direct
command within 15 seconds, or the
voice menu will start.
≥A long beep sounds.
≥After the beep, talk immediately for up
to 2 minutes.
≥The recording is stopped.
≥The recorded message is played.
≥The current message is erased.
≥A short beep will sound and the next
message will be played.
≥All recorded messages are erased.
≥A long beep sounds and “No messages”
is heard.
RECORD
¤ ¤
Page 79

79
Answering System
PAGER CALL
ON/OFF
ANSWERING
SYSTEM OFF
(3)
(0)
≥Each time you press (3), “On/Off” is
heard and the mode will turn on or off.
≥If you have not stored a pager number,
6 beeps will sound and the mode will
not turn on.
≥The unit hangs up and will not answer
calls until turned on again.
Turning on the answering system
Call your unit and wait for 15 rings.
≥The unit will answer and the greeting message will be played.
≥The answering system will turn on. Hang up or enter the remote code for other
options.
≥When turning on the answering system using a rotary or pulse service
telephone, you cannot enter the remote code for other options.
Skipping the greeting message
After calling your unit, press ($) during the greeting message.
≥The unit skips the rest of the greeting message and you can start recording your
message after the long beep.
Page 80

80
Remote Operation with the Handset
Voice menu
If no commands are entered after you press (RECALL/PLAYBACK),
the unit will start the following voice menu.
“Press 4 to play back new messages. Press 5 to play back all messages.”
≥You can enter direct commands even if the voice menu has started.
You can operate your answering system
with the handset.
The announcements and recorded
messages can only be heard with
the handset.
Summary of remote operation
Press (RECALL/PLAYBACK).
≥The number of new messages is heard.
≥“Remote operation” is displayed on the handset.
Enter the desired direct commands (p. 81).
≥If you do not enter a command, the voice menu will start (see below).
≥After the voice menu, all message playback will start.
To end remote operation, press (RECALL/PLAYBACK).
≥The messages are saved.
≥The unit will announce the remaining recording time after playback, if it is less
than 5 minutes.
≥If the unit starts to ring during the remote operation, press (TALK) to answer
the call. The remote operation is ended.
≥If you hear “Memory full” after playback, erase some, or all, of the messages
(p. 81).
(RECALL/PLAYBACK)
Page 81

81
Answering System
Direct commands
NEW MESSAGE
PLAYBACK
ALL MESSAGE
PLAYBACK
REPEAT
(During playback)
SKIP
(During playback)
STOP
ERASING A
SPECIFIC
MESSAGE
(During playback)
ERASING ALL
MESSAGES
PAGER CALL
ON/OFF
ANSWERING
SYSTEM OFF
ANSWERING
SYSTEM ON
(4)
(5)
(1)
(2)
(9)
($) (4)
($) (5)
≥Only new messages are played back.
≥All messages are played back.
≥The current message is repeated.
≥The current message is skipped.
The next message is played.
≥Operation is stopped temporarily.
≥To resume operation, enter a direct
command within 15 seconds, or
the voice menu will start (p. 80).
≥The current message is erased.
≥A short beep will sound and the next
message will be played.
≥All recorded messages are erased.
≥A long beep sounds and “No messages”
is heard.
≥Each time you press (3), the mode will
turn on or off.
≥If you have not stored a pager number,
“ ” will not be displayed on the
base unit, and the mode will not turn on.
≥“Answer off” is heard and the answering
system is turned off.
≥“Answer set” is heard and the answering
system is turned on.
PAGER
(3)
(0)
(8)
Page 82

82
Wall Mounting
This unit can be mounted on a wall.
1
Set the handset holder as shown.
2
Connect the AC adaptor.
3
Tuck the telephone line cord inside
the wall mounting adaptor, then
push it in the direction of the arrow.
≥The word “UP” should face upward.
To Power
Outlet
Wall Template
8.5 cm
Page 83

83
Useful Information
2
1
OR
Screws
8.5 cm
To Telephone Plug
and Socket
For Australia
To Single-Line
Telephone Jack
For New Zealand
OR
4
Install screws using the wall
template (see p. 82).
Connect the telephone line
cord.
Mount the unit, then slide
down.
≥Raise the antenna.
5
To charge the battery:
Place the handset on
the handset holder as
shown.
≥The IN USE/CHARGE
indicator lights.
To remove the handset holder
While pressing the arrow (1) and opposite side (2) of the holder, pull out
the handset holder.
Page 84

Battery Replacement
84
If “Recharge battery” is displayed and/or “ ” flashes after being
fully charged, replace the battery with a new Panasonic P-P508 battery.
To prevent memory loss, replace within 3 minutes.
1
Press the notch on the battery
cover firmly and slide it as
indicated by the arrow.
2
Replace the battery and close
the cover.
3
Make sure you charge the new
battery for about 6 hours in order
to display the battery strength
prompt correctly (p. 15).
Page 85

Adding Another Phone
85
Useful Information
Standard
Telephone
Telephone
Line Cord
To Socket
(Optional)
Telephone
Double Adaptor
This unit will not function during a power failure. To connect a standard
telephone on the same line, use a telephone double adaptor.
Standard
Telephone
Telephone Line Cord
T-Adaptor (Optional)
To Single-Line
Telephone Jack
For Australia
For New Zealand
Page 86

Before Requesting Help
86
Problem
“No link to base.
Place on cradle and
try again.” is displayed
and an alarm tone sounds.
Static, sound cuts in/out,
fades. Interference from
other electrical units.
The handset and/or the base
unit do not ring.
The handset display is
blank.
The handset display is still
blank after pressing (›),
(‹), BACK (fi) or
FWD/EDIT (fl).
You cannot store a name
and phone number in the
directory.
While programming or
searching, the unit starts to
ring and stops the program/
search.
Cause and Remedy
≥You are too far from the base unit.
Move closer and try again.
≥Place the handset on the base unit and
try again.
≥Plug in the AC adaptor.
≥Raise the base unit antenna.
≥Locate the handset and the base unit
away from other electrical appliances
(p. 3).
≥Move closer to the base unit.
≥Raise the base unit antenna.
≥Press (FUNCTION/EXIT/CH) to select
a clearer channel.
≥The ringer volume is set to OFF. Set to
HIGH or LOW (p. 21, 22).
≥If the line is connected to a low voltage
system such as a PBX, the unit may not
ring. Set the line mode to “B” (p. 18).
≥The handset is in the standby mode
(p. 16). Press (›), (‹), BACK (fi) or
FWD/EDIT (fl) to turn the display on.
≥Charge the battery fully (p. 15).
≥You cannot store an item in the
directory while the unit is in the talk,
speakerphone or intercom mode, or
while the answering system is in use.
≥Do not pause for over 60 seconds while
storing.
≥To answer the call, press (TALK) or
(DIGITAL\SP-PHONE). Start again from
the beginning after hanging up.
Cordless Telephone
Page 87

“
87
Useful Information
Problem
The unit does not display the
caller’s phone number.
The handset display goes to
the standby mode while
viewing the Caller List.
When a second call is
received during a
conversation, the unit does
not display the new caller’s
phone number.
(LOCATOR/INTERCOM) does
not function.
You cannot redial by
pressing (REDIAL/PAUSE) or
(REDIAL).
You cannot have a
conversation using
the handset.
You cannot have a
conversation using
the headset.
Cause and Remedy
≥
You do not subscribe to a Caller ID service.
≥Other telephone equipment may be
interfering with your phone. Disconnect
it and try again.
≥Other electrical appliances connected to
the same outlet may be interfering with
the Caller ID information.
≥Telephone line noise may be affecting
the Caller ID information.
≥Some PABX units do not support Caller
Display.
≥Do not pause for over 60 seconds while
searching.
≥(DIGITAL\SP-PHONE) was pressed.
≥The line mode selection is incorrect.
See page 18.
≥Your Caller ID service provider does not
support this feature.
≥
The handset is too far from the base unit.
≥The handset is engaged in an outside
call or is viewing the Caller List/directory
list. Wait until the IN USE/CHARGE
indicator light goes out.
≥If the last number dialled was more than
32 digits long, the number will not be
redialled correctly.
≥Access numbers entered after pressing
(TONE) will not be included when
redialling.
≥When the optional headset is connected
(p. 17), you must use the headset to
talk with the caller. To have a normal
cordless phone conversation,
disconnect the headset.
≥Make sure that the optional headset is
connected properly (p. 17).
Page 88

“
Before Requesting Help
88
Problem
The answering system is on,
but incoming messages are
not recorded.
You cannot listen to the
recorded messages.
“Message full” is
displayed and the ANSWER
ON indicator flashes rapidly,
and no new messages are
recorded.
You cannot operate the
answering system at the
base unit.
You cannot operate the
answering system from a
touch tone phone.
You cannot operate
the answering system with
the handset.
Cause and Remedy
≥The recording time is set to “Greeting
only”. Select “1 minute” or “3 minutes”
(p. 28).
≥Memory is full. Erase some, or all, of
the messages (p. 69).
≥Make sure that the unit is in the standby
mode.
≥Memory is full. Erase some, or all, of
the messages (p. 69).
≥The handset user is operating the
answering system. Wait until the
IN USE/CHARGE indicator light goes
out.
≥Make sure you enter the correct remote
code.
≥The answering system may not respond
if the tones are too short to activate the
unit. Press each button firmly.
≥The answering system is off. Turn it on
(p. 79).
≥Someone is operating the answering
system.
≥You are too far from the base unit.
Move closer to the base unit.
≥The unit is recording a message.
To answer the call, press (TALK).
Answering System
Page 89

“
89
Useful Information
Problem
While recording a greeting
message, the unit starts to
ring and stops recording.
During playback, the unit
starts to ring and stops
playback.
The unit does not alert your
pager.
Cause and Remedy
≥To answer the call, press
(DIGITAL\SP-PHONE), or lift the handset
off the base unit or press (TALK). Start
again from the beginning after hanging
up.
≥To answer the call, press
(DIGITAL\SP-PHONE), or lift the handset
off the base unit or press (TALK). To
resume playback, press
(NEW\MESSAGE) after hanging up.
≥The line mode selection is incorrect.
See page 18.
General
Problem
The unit does not work.
Cause and Remedy
≥Check the settings (p. 14–18).
≥Charge the battery fully (p. 15).
≥Clean the charge contacts and charge
again (p. 16).
≥Install the battery properly (p. 15, 84).
≥Place the handset on the base unit and
unplug the AC adaptor to reset. Plug in,
and try again.
≥KX-TC1871ALB and KX-TC1871NZB
are not designed to be used with rotary
(pulse dialling) services.
Page 90

“
Before Requesting Help
90
Problem
You cannot program items,
such as the line mode.
Previously programmed
information is erased.
“Recharge battery” is
displayed, “ ” flashes or
the unit beeps intermittently.
You charged the battery
fully, but “Recharge
battery” is still displayed
and/or “ ” continues to
flash.
The IN USE/CHARGE
indicator light does not go
out while charging.
Cause and Remedy
≥Programming is not possible while the
unit is in the talk or speakerphone
mode, when viewing the Caller
List/directory list, or while the answering
system is in use.
≥Do not pause for over 60 seconds while
programming.
≥Move closer to the base unit.
≥(›), (‹), BACK (fi) or FWD/EDIT (fl)
may have been pressed when you
picked up the handset. Press
(FUNCTION/EXIT/CH) and try again.
≥If a power failure occurs, programmed
information may be erased. Reprogram
if necessary.
≥Charge the battery fully (p. 15).
≥Clean the charge contacts and charge
again (p. 16).
≥Install a new battery (p. 84).
≥This is normal.
For New Zealand Customers
Panasonic New Zealand operates a toll free Customer Support
Centre.
Please phone 0800 Panasonic (0800 726276) for assistance.
Page 91

91
Useful Information
Safety Instructions
“
Take special care to follow the safety suggestions listed below.
Safety
1) The unit should be connected to a power supply only of the type
described in the operating instructions or as marked on the unit.
2) When left unused for a long period of time, the base unit should be
unplugged from the household AC outlet.
3) To minimize the possibility of lighting damage when you know that a
thunderstorm is coming, we recommend that you:
a) Unplug the telephone line cord from the phone jack.
b) Unplug the power supply cord from the AC power outlet.
Installations
Environment
1) Do not use this unit near water—for example, near a bathtub,
washbowl, sink, etc. Damp basements should also be avoided.
2) The unit should be kept away from heat sources such as radiators,
kitchen range, etc. It also should not be placed in rooms where the
temperature is less than 5oC or greater than 40oC.
3) The AC adaptor is used as the main disconnect device, ensure that
the AC outlet is located/installed near the unit and is easily accessible.
Placement
1) Do not place heavy objects on top of this unit.
2) Care should be taken so that objects do not fall onto and liquids are
not spilled into the unit. Do not subject this unit to excessive smoke,
dust, mechanical vibration, or shock.
3) Place the unit on a flat surface.
For best performance
1) If noise prevents the conversation from being understood at the
handset, approach the base unit to lessen the noise.
2) The handset should be used at the HIGH volume setting when the
reception tone is difficult to hear.
3) The handset should be fully recharged on the base unit when
“Recharge battery” is displayed and/or “ ” flashes on the
display.
4) The handset antenna should not be touched during use because of its
high sensitivity.
5) The maximum calling distance may be shortened when the unit is used
in the following places: Near obstacles such as hills, tunnels,
undergrounds, near metal objects such as wire fences, etc.
Page 92

92
“
Safety Instructions
WARNING:
TO PREVENT FIRE OR SHOCK HAZARD, DO NOT EXPOSE THIS
PRODUCT TO RAIN OR ANY TYPE OF MOISTURE.
Medical
Consult the manufacture of any personal medical device, such as
pacemakers, to determine if they are adequately shielded from external
RF (radio frequency) energy. (The unit operates in the frequency range of
917MHz to 927MHz for Australia and 923MHz to 927MHz for New
Zealand, and the power output level can range from 0.001 watts to
0.1 watts.) Do not use the unit in health care facilities if any regulations
posted in the area instruct you not to do so. Hospitals or health care
facilities may be using equipment that could be sensitive to external RF
(radio frequency) energy.
When a failure occurs which results in the internal parts becoming
accessible, disconnect AC adaptor immediately and return this unit to the
place of purchase or service centre.
If there is any trouble, disconnect the unit from the telephone line and
connect a known working phone. If the known working phone operates
properly, do not reconnect the unit to the telephone line until the trouble
has been repaired. If the known working phone does not operate properly,
consult with your telephone company.
This equipment has been tested and found to comply with AS/NZS
3548:1995 limits for electromagnetic interference. Any modifications to
any part of the system or to any peripherals may void the EMC
compliance of the system or the peripherals.
WARNING:
This equipment will be inoperable if mains power fails.
WARNING:
The earcap on the handset is magnetised and may retain metallic objects.
Page 93

93
Useful Information
For New Zealand Users Only
The grant of a Telepermit for any item of terminal equipment
indicates only that Telecom has accepted that the item complies
with minimum conditions for connection to its network. It indicates
no endorsement of the product by Telecom, nor does it provide any
sort of warranty. Above all, it provides no assurance that any item
will work correctly in all respects with another item of Telepermitted
equipment of a different make or model, nor does it imply that any
product is compatible with all of Telecom’s network services.
This equipment may not provide for the effective hand-over of a call
to another device connected to the same line.
This device only responds to Distinctive Alert cadence(s) DA1 &
DA3.
WARNING NOTICE:
No “111” or other calls can be made from this device during a mains
power failure.
This equipment shall not be set to make automatic calls to the
Telecom “111” Emergency Service.
≥
We recommend that a standard phone which can be used in the case
of a power failure be connected to the telephone line at all times.
≥This cordless telephone system does not incorporate provision for
secrecy of conversations. Appropriately tuned radio equipment and
other cordless telephone systems in close proximity may be used
by a third party to monitor and possibly interrupt conversations in
progress when this system is on radio operation.
Page 94

94
Important Information (For Australia only)
Instructions to customer
Installation
Attached to this apparatus is an approval label. This label is evidence that
it is a “Permitted Attachment” which has been authorised to be connected
to your telephone service.
Conditions relating to connection and operation of this Permitted
Attachment are contained in Telecommunications General By-Law
220 (5).
You are authorised to install this Permitted Attachment yourself by
plugging it into the line socket of any regular telephone. You may connect
it in place of your existing telephone or to any spare telephone socket
installed in your premises.
To disconnect your existing telephone you must first remove its plug from
the line socket. You can then insert the plug of your Permitted Attachment
into the socket and use your equipment.
If the plug of your existing telephone cannot be readily removed, you will
have to remove the screw securing it. To do this proceed as follows:
1. Loosen screw “A” sufficiently to remove the socket cover. (See Fig. 1.)
2. Remove screw “B” and withdraw the plug. (See Fig. 2.)
3. Replace screw “B”. (See Fig. 3.) Ensure that it screws completely into
the socket recess. (If the screw is too long, increase the hole depth or
replace the screw with one 5 mm shorter.)
4. Replace socket cover and tighten screw “A”. (See Fig. 4.)
SOCKET
SCREW “A”
PLUG
Fig. 1
TELEPHONE CORD
Connect to the
PLUG as shown
in Fig. 1.
SCREW
“B”
Fig. 3
SOCKET
SCREW “A”
Fig. 4
SCREW
“B”
Fig. 2
Page 95

95
Useful Information
If you are satisfied with the operation of your telephone service after
plugging in your Permitted Attachment, your installation is completed.
You will be unable to connect this Permitted Attachment if your telephone
service consists only of a wall phone or an old style telephone which is
not connected by means of a modern plug and socket. In such cases a
new socket will need to be installed.
Should the Permitted Attachment not operate when plugged into a socket,
it is either faulty or unsuitable for operation with your telephone service. It
should be returned to the store where purchased.
Service difficulties
If at any time a fault occurs on your telephone service carry out the
following checks before you call for service:
≥Disconnect the Permitted Attachment and try using the service with the
normal telephone.
≥If the telephone service then operates satisfactorily, the fault is in your
Permitted Attachment. Leave the Permitted Attachment disconnected
and report the fault to its supplier or agent to arrange for repair.
≥If when using the telephone the service is still faulty, report the fault to
“Service Difficulties and Faults” for attention.
You are required to keep this Permitted Attachment in good working order
while it is connected to your telephone service. Its construction or internal
circuit must not be modified in any way without permission.
WARNING
This cordless telephone system does not incorporate provision for
secrecy of conversations. Appropriately tuned radio equipment and other
cordless telephone systems in close proximity may be used by a third
party to monitor and possibly interrupt conversations in progress when
this system is on radio operation.
Page 96

Printed in Japan PQQX12877ZA FF0900HK0 D
Kyushu Matsushita Electric Co., Ltd.
1-62, 4-chome, Minoshima, Hakata-ku, Fukuoka 812-8531, Japan
 Loading...